韦东山-数码相框之freetype
矢量字体文件的优点,不会变形,放大放小都会不模糊。
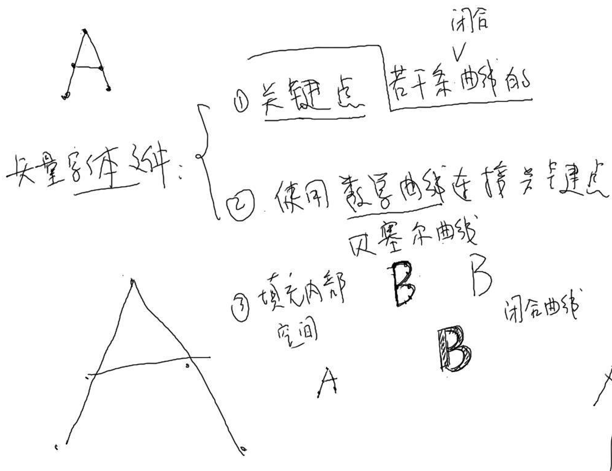
矢量字体文件的实现方式:
- 取若干条闭合曲线的关键点
- 使用贝塞尔曲线连接关键点
- 填充内部空间
Freetype 的函数说明

-
FT_Init_FreeType初始化 -
FT_New_Face加载字体文件 -
FT_Set_Char_Size设置字体大小 -
FT_Set_Transform设置转化参数 -
FT_Load_Char会将位图存在 slot 里面
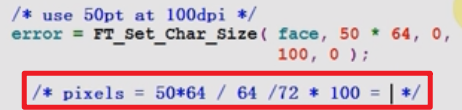
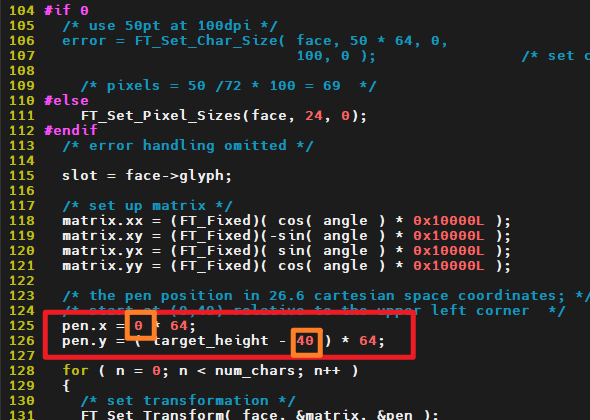
set_char_size 函数说明
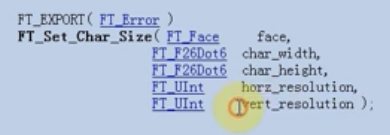


在 Freetype 中,char_width 和 char_height 这两个参数用于设置字符的宽度和高度。它们的单位是(1/64)个点(point)。例如,如果我们字符的单位是 100,那么在 Freetype 中为 100*(1/64) 点。这里的点(point)是一个印刷和排版中常用的单位,是一个物理尺寸。而 1 英寸等于 72 点,所以最后算出来是 100*(1/64)*(1/72) 英寸,计算出了实际物理尺寸。
horz_resolution 和 vert_resolution 这两个参数表示的是水平分辨率和垂直分辨率,单位是每英寸点数(dpi,dots per inch)。它们描述了输出设备上每英寸有多少个像素点。
假设分辨率是 200 的话,那么这个字符像素为 100*(1/64)*(1/72)*200=43。
也可以通过 FT_Set_Pixel_Sizes() 函数设置字体大小:
为 24*24 的点阵

FT_Set_Transform 函数说明
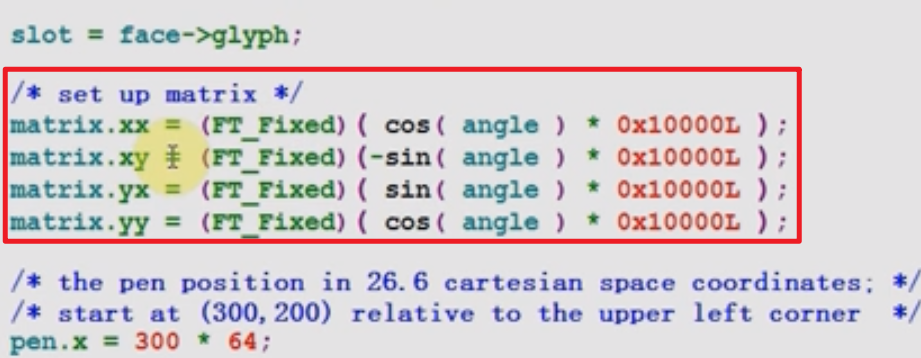
字体文件中的字体函数用的是笛卡尔坐标系,而 LCD 屏幕用的是平面直角坐标系。
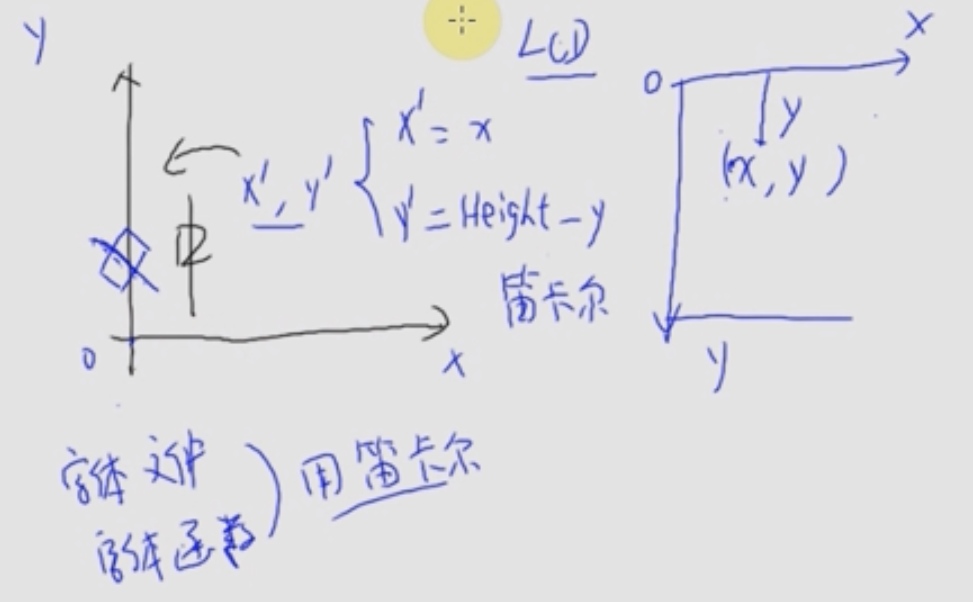
在字体文件中的 (x,y) 映射到 LCD 屏幕就是 (x,Height-y)。


Freetype 的使用(PC)
从网上下载 Index of /releases/freetype/ (gnu.org) freetype-2.13.2 版本,解压,并生成配置文件:
bleaaach@bleaaach-virtual-machine:~/linux/IMX6ULL/frame/03_freetype$ tar -xjf freetype-2.13.3.tar.gz
bleaaach@bleaaach-virtual-machine:~/linux/IMX6ULL/frame/03_freetype/freetype-2.13.2$ cd freetype-2.13.2/
bleaaach@bleaaach-virtual-machine:~/linux/IMX6ULL/frame/03_freetype$ cd freetype-2.13.2/bleaaach@bleaaach-virtual-machine:~/linux/IMX6ULL/frame/03_freetype/freetype-2.13.2$ ./configure
编译 freetype:
bleaaach@bleaaach-virtual-machine:~/linux/IMX6ULL/frame/03_freetype/freetype-2.13.2$ cd freetype-2.13.2
bleaaach@bleaaach-virtual-machine:/usr/local/include/freetype2/freetype$ sudo make install
编译 exmaple.c 文件:
bleaaach@bleaaach-virtual-machine:~/linux/IMX6ULL/frame/03_freetype/01th_pc/01th_english$ gcc -o example1 example1.c -I /usr/local/include/freetype2/ -lfreetype -lm
运行 example,指定一个字体:
bleaaach@bleaaach-virtual-machine:~/linux/IMX6ULL/frame/03_freetype/01th_pc/01th_english$ ./example1 ../../simsun.ttc agf
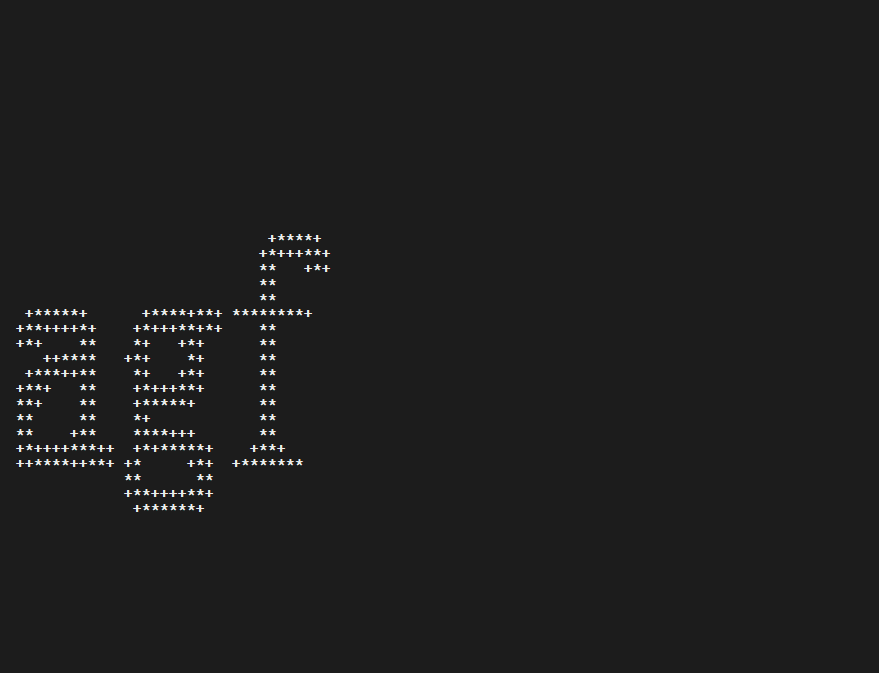
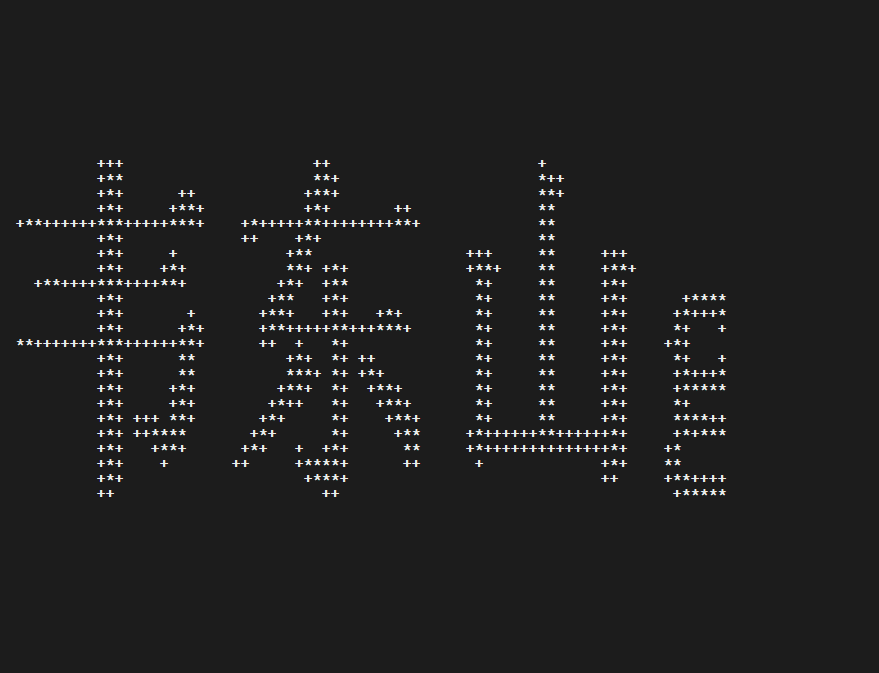
可以看到我们的运行结果为:
我们可以修改 LCD 屏幕大小:

修改字体显示位置:
继续测试我们的中文:
输出中文字符可以使用两种方法:
-
找到它的 unicode 码

-
使用宽字符直接输出

编译的时候要指定字符集:

测试宽字符:
bleaaach@bleaaach-virtual-machine:~/linux/IMX6ULL/frame/03_freetype/01th_pc/03th_wchar$ gcc -finput-charset=GBK -fexec-charset=UTF-8 -o example1 example1.c -I /usr/local/include/freetype2/ -lfreetype -lm
bleaaach@bleaaach-virtual-machine:~/linux/IMX6ULL/frame/03_freetype/01th_pc/03th_wchar$ ./example1
Uniocde:
0x97e6 0x4e1c 0x5c71 0x67
usage: ./example1 font
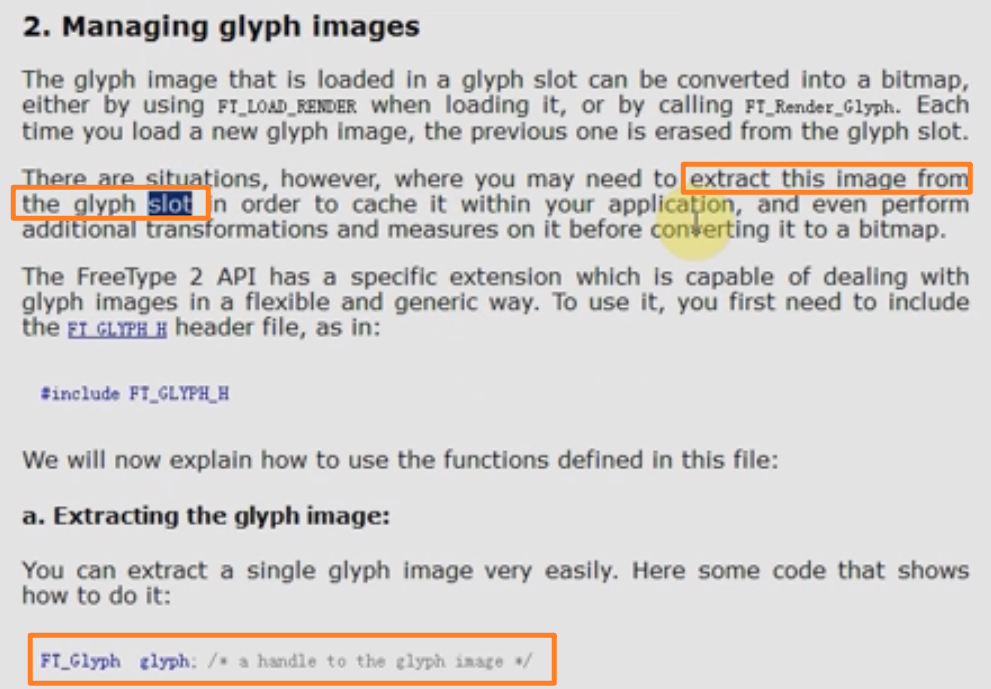
从象形文字提取图像(PC)
/* load glyph image into the slot (erase previous one) */
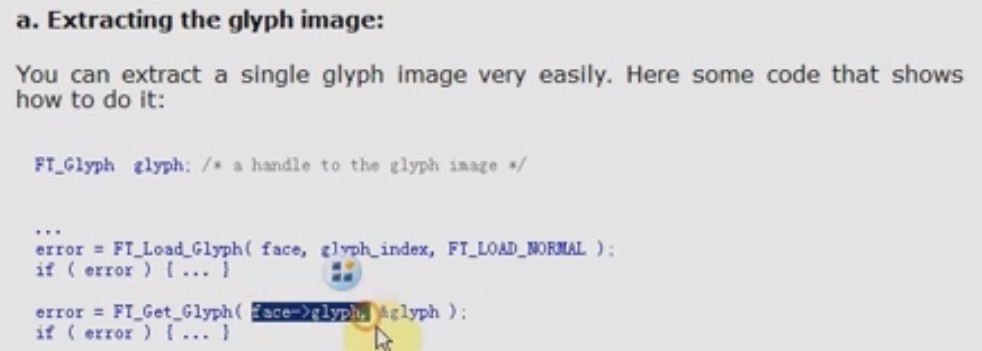
error = FT_Load_Char( face, chinese_str[n], FT_LOAD_RENDER );
if ( error )
continue; /* ignore errors */
error = FT_Get_Glyph( face->glyph, &glyph );
if (error)
{
printf("FT_Get_Glyph error!\n");
return -1;
}
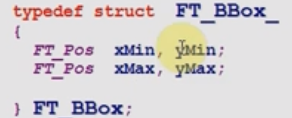
FT_Glyph_Get_CBox(glyph, FT_GLYPH_BBOX_TRUNCATE, &bbox );
/* now, draw to our target surface (convert position) */
draw_bitmap( &slot->bitmap,
slot->bitmap_left,
target_height - slot->bitmap_top );
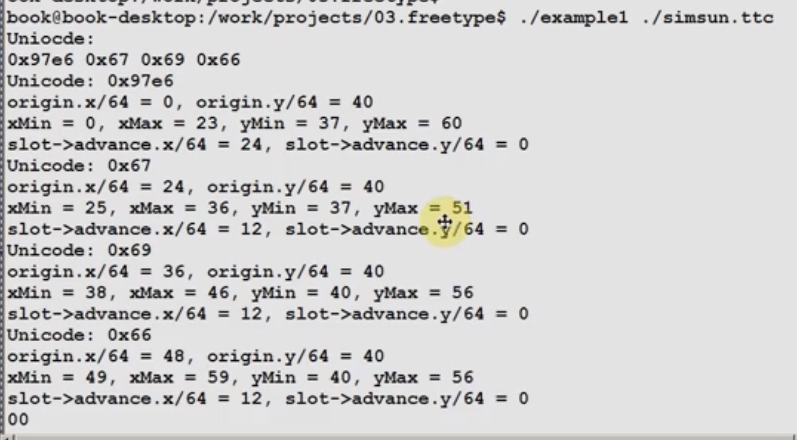
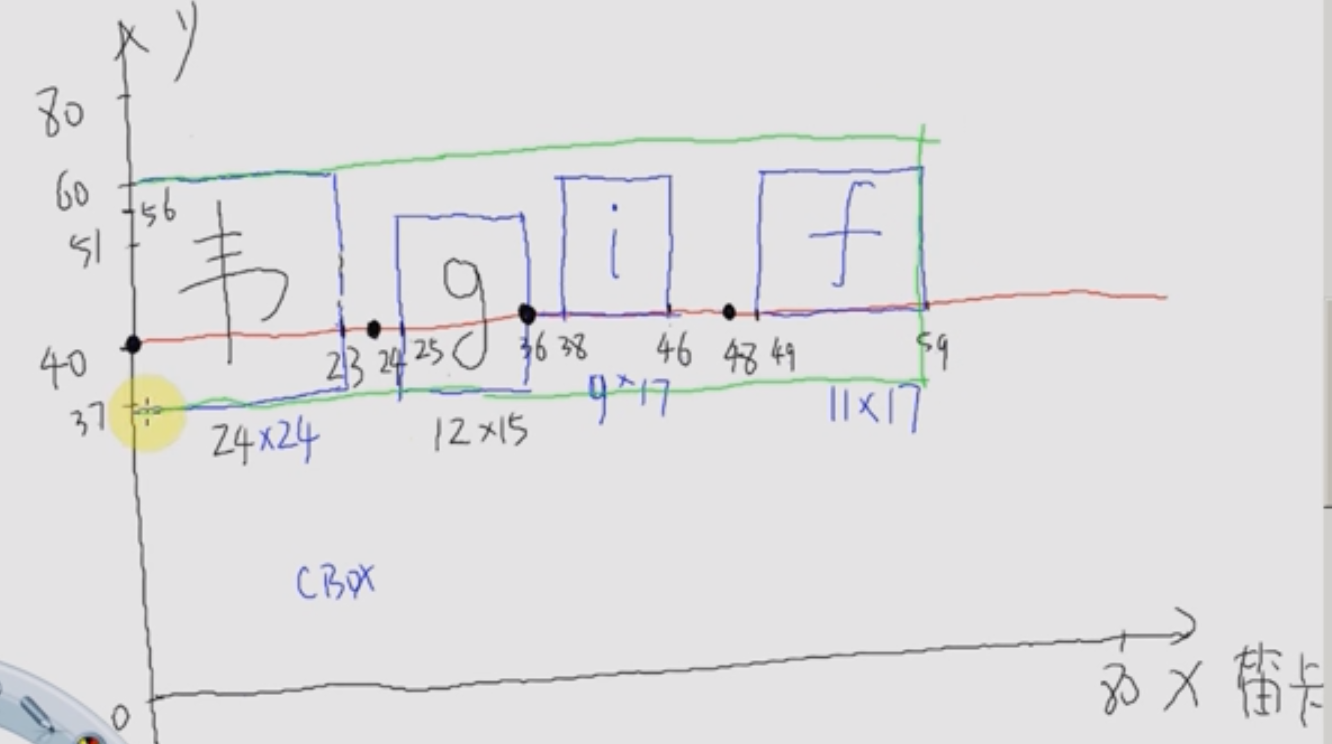
printf("Unicode: 0x%x\n", chinese_str[n]);
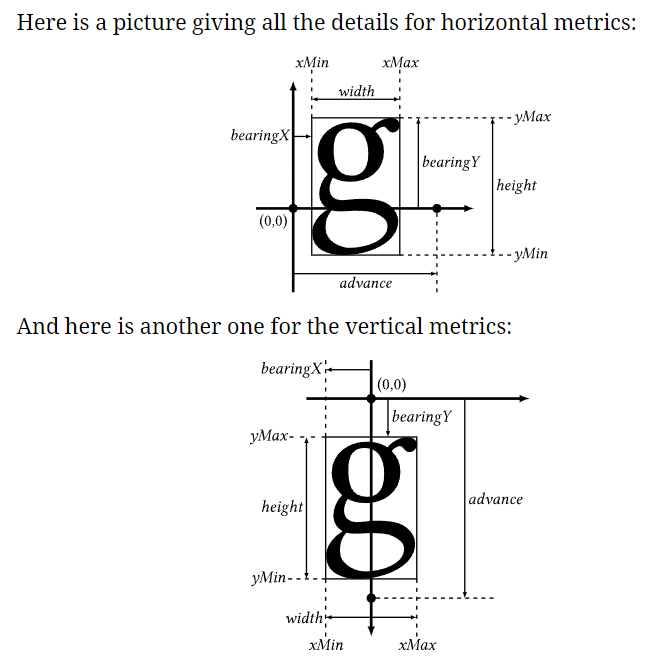
printf("origin.x/64 = %d, origin.y/64 = %d\n", pen.x/64, pen.y/64);
printf("xMin = %d, xMax = %d, yMin = %d, yMax = %d\n", bbox.xMin, bbox.xMax, bbox.yMin, bbox.yMax);
printf("slot->advance.x/64 = %d, slot->advance.y/64 = %d\n", slot->advance.x/64, slot->advance.y/64);
/* increment pen position */
从哪里提取的象形文字?
face 是一个 FreeType 字体面对象,FT_LOAD_RENDER 是一个标志,表示在加载字符的同时进行渲染。
-
error = FT_Load_Char( face, chinese_str[n], FT_LOAD_RENDER );- 这行代码尝试加载并渲染
chinese_str[n] 这个中文字符。face 是一个 FreeType 字体面对象,FT_LOAD_RENDER 是一个标志,表示在加载字符的同时进行渲染。
- 这行代码尝试加载并渲染
-
if ( error ) continue;- 如果在加载字符时发生错误,则跳过当前循环迭代,继续处理下一个字符。
-
error = FT_Get_Glyph( face->glyph, &glyph );-
从当前字体面的槽中获取字形对象,并将其存储在
glyph 变量中。 -
Load_Char 函数会把 glyph 加载到 face 结构体里面的
FT_GlyphSlot glyph变量里。

-
-
if (error) { printf("FT_Get_Glyph error!\n"); return -1; }- 如果在获取字形对象时发生错误,则打印错误消息并返回 -1。
-
FT_Glyph_Get_CBox(glyph, FT_GLYPH_BBOX_TRUNCATE, &bbox );-
获取字形的边界框(bounding box),即字形在屏幕上的最小和最大 x 和 y 坐标。
-

会从 glyphslot 插槽里面取出 glyph 放入到 bbox 里面,可以得到象形文字的相关属性。
-
-
draw_bitmap( &slot->bitmap, slot->bitmap_left, target_height - slot->bitmap_top );- 调用
draw_bitmap 函数来绘制字形。这里假设draw_bitmap 是一个自定义函数,用于将字形位图绘制到目标表面上。slot->bitmap 是字形的位图数据,slot->bitmap_left 和slot->bitmap_top 是字形位图在槽中的位置。
- 调用
-
接下来的几行
printf 语句用于输出一些调试信息,包括:- 当前处理的 Unicode 字符
- 当前画笔位置(除以 64 是为了单位转换为点)
- 字形的边界框坐标
- 字形的推进向量(advance vector),它表示在绘制完当前字符后,画笔应该移动的距离
测试可以知道:
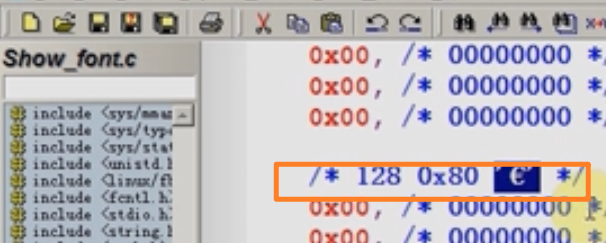
可以得出象形文字框,得出点阵大小:
void draw_bitmap( FT_Bitmap*  bitmap,FT_Int x,FT_Int y){
  FT_Int  i, j, p, q;
  FT_Int  x_max = x + bitmap->width;
  FT_Int  y_max = y + bitmap->rows;
//printf("x = %d, y = %d\n", x, y);
  for ( i = x, p = 0; i < x_max; i++, p++ )
  {
    for ( j = y, q = 0; j < y_max; j++, q++ )
    {
      if ( i < 0      || j < 0       ||
           i >= WIDTH || j >= HEIGHT )
        continue;

      image[j][i] |= bitmap->buffer[q * bitmap->width + p];
    }
  }
}
这段 draw_bitmap 函数用于将 FreeType 渲染的位图(FT_Bitmap)绘制到一个二维数组 image 上。
Freetype(ARM)
获得交叉编译器的头文件目录:
bleaaach@bleaaach-virtual-machine:~/linux/IMX6ULL/frame/03_freetype/freetype-2.13.2$ echo $PATH
/usr/local/sbin:/usr/local/bin:/usr/sbin:/usr/bin:/sbin:/bin:/usr/games:/usr/local/games:/snap/bin:/home/bleaaach/linux/jdk-11.0.2/bin:/usr/local/arm/gcc-linaro-4.9.4-2017.01-x86_64_arm-linux-gnueabihf/bin:/home/bleaaach/Linux_4412/toolchain/gcc-4.6.4/bin/
bleaaach@bleaaach-virtual-machine:~/linux/IMX6ULL/frame/03_freetype/freetype-2.13.2$ cd /usr/local/arm/gcc-linaro-4.9.4-2017.01-x86_64_arm-linux-gnueabihf/
bleaaach@bleaaach-virtual-machine:/usr/local/arm/gcc-linaro-4.9.4-2017.01-x86_64_arm-linux-gnueabihf$ find -name include
./lib/gcc/arm-linux-gnueabihf/4.9.4/plugin/include
./lib/gcc/arm-linux-gnueabihf/4.9.4/include
./lib/gcc/arm-linux-gnueabihf/4.9.4/install-tools/include
./include
./arm-linux-gnueabihf/libc/usr/include
./arm-linux-gnueabihf/include
bleaaach@bleaaach-virtual-machine:/usr/local/arm/gcc-linaro-4.9.4-2017.01-x86_64_arm-linux-gnueabihf$ cd ./arm-linux-gnueabihf/libc/usr/include
bleaaach@bleaaach-virtual-machine:/usr/local/arm/gcc-linaro-4.9.4-2017.01-x86_64_arm-linux-gnueabihf/arm-linux-gnueabihf/libc/usr/include$ pwd
/usr/local/arm/gcc-linaro-4.9.4-2017.01-x86_64_arm-linux-gnueabihf/arm-linux-gnueabihf/libc/usr/include
/usr/local/arm/gcc-linaro-4.9.4-2017.01-x86_64_arm-linux-gnueabihf/arm-linux-gnueabihf/libc/usr/include
编译出来的库文件:

我这里放入到 /usr/local/arm/gcc-linaro-4.9.4-2017.01-x86_64_arm-linux-gnueabihf/arm-linux-gnueabihf/libc/usr/lib
解压 freetype,生成配置:
bleaaach@bleaaach-virtual-machine:~/linux/IMX6ULL/frame/03_freetype/freetype-2.13.2$ ./configure --host=arm-linux-gnueabihf
bleaaach@bleaaach-virtual-machine:~/linux/IMX6ULL/frame/03_freetype/freetype-2.13.2$ sudo make
要用自己的交叉编译工具:我用的是 arm-linux-gnueabihf。
编译生成的静态库到指定目录:

root@bleaaach-virtual-machine:/home/bleaaach/linux/IMX6ULL/frame/03_freetype/freetype-2.13.2/# make DESTDIR=/home/bleaaach/linux/IMX6ULL/frame/03_freetype/freetype-2.13.2/tmp install
我执行这个一直报错,显示未找到 gcc,明明安装了也可以在 PATH 环境变量下看到。最后通过 su 登录到 root 账户下就可以编译了。但是我用 pwd 变量还是没有生成到当前目录下。

拷贝 lib 下的文件:

root@bleaaach-virtual-machine:/home/bleaaach/linux/IMX6ULL/frame/03_freetype/freetype-2.13.2/tmp/usr/local# cp lib /usr/local/arm/gcc-linaro-4.9.4-2017.01-x86_64_arm-linux-gnueabihf/arm-linux-gnueabihf/libc/usr/lib -d -rf
root@bleaaach-virtual-machine:/home/bleaaach/linux/IMX6ULL/frame/03_freetype/freetype-2.13.2/tmp/usr/local# cp include /usr/local/arm/gcc-linaro-4.9.4-2017.01-x86_64_arm-linux-gnueabihf/arm-linux-gnueabihf/libc/usr/include -rf
为了防止在编译 c 文件的时候指定库文件地址,所以把 freetype2 下面的 freetype 直接移动:
bleaaach@bleaaach-virtual-machine:/usr/local/arm/gcc-linaro-4.9.4-2017.01-x86_64_arm-linux-gnueabihf/arm-linux-gnueabihf/libc/usr/include$ sudo mv freetype2/* .
因为还是找不到 gcc 的库编译路径,所以我只能选择手动指定路径了。
root@bleaaach-virtual-machine:/home/bleaaach/linux/IMX6ULL/frame/03_freetype/01th_pc/01th_english# arm-linux-gnueabihf-gcc -o example2 example1.c -I /usr/local/arm/gcc-linaro-4.9.4-2017.01-x86_64_arm-linux-gnueabihf/arm-linux-gnueabihf/libc/usr/include/freetype -lm
将测试文件和字体文件以及库文件都拷贝到开发板上面:


在开发板上测试:

这个文件是将文字显示在命令上上面,但是没有在 LCD 屏幕上显示,所以我们这里还需要再修改一下。
编写.c 文件:
int fd_fb;
struct fb_var_screeninfo var; /* Current var */
struct fb_fix_screeninfo fix; /* Current fix */
int screen_size;
unsigned char *fbmem;
unsigned int line_width;
unsigned int pixel_width;
int fd_hzk16;
struct stat hzk_stat;
unsigned char *hzkmem;
/* color : 0x00RRGGBB */
void lcd_put_pixel(int x, int y, unsigned int color)
{
unsigned char *pen_8 = fbmem+y*line_width+x*pixel_width;
unsigned short *pen_16;
unsigned int *pen_32;
unsigned int red, green, blue;
pen_16 = (unsigned short *)pen_8;
pen_32 = (unsigned int *)pen_8;
switch (var.bits_per_pixel)
{
case 8:
{
*pen_8 = color;
break;
}
case 16:
{
/* 565 */
red = (color >> 16) & 0xff;
green = (color >> 8) & 0xff;
blue = (color >> 0) & 0xff;
color = ((red >> 3) << 11) | ((green >> 2) << 5) | (blue >> 3);
*pen_16 = color;
break;
}
case 32:
{
*pen_32 = color;
break;
}
default:
{
printf("can't surport %dbpp\n", var.bits_per_pixel);
break;
}
}
}
void lcd_put_ascii(int x, int y, unsigned char c)
{
unsigned char *dots = (unsigned char *)&fontdata_8x16[c*16];
int i, b;
unsigned char byte;
for (i = 0; i < 16; i++)
{
byte = dots[i];
for (b = 7; b >= 0; b--)
{
if (byte & (1<<b))
{
/* show */
lcd_put_pixel(x+7-b, y+i, 0xffffff); /* 白 */
}
else
{
/* hide */
lcd_put_pixel(x+7-b, y+i, 0); /* 黑 */
}
}
}
}
void lcd_put_chinese(int x, int y, unsigned char *str)
{
unsigned int area = str[0] - 0xA1;
unsigned int where = str[1] - 0xA1;
unsigned char *dots = hzkmem + (area * 94 + where)*32;
unsigned char byte;
int i, j, b;
for (i = 0; i < 16; i++)
for (j = 0; j < 2; j++)
{
byte = dots[i*2 + j];
for (b = 7; b >=0; b--)
{
if (byte & (1<<b))
{
/* show */
lcd_put_pixel(x+j*8+7-b, y+i, 0xffffff); /* 白 */
}
else
{
/* hide */
lcd_put_pixel(x+j*8+7-b, y+i, 0); /* 黑 */
}
}
}
}
/* Replace this function with something useful. */
void
draw_bitmap( FT_Bitmap* bitmap,
FT_Int x,
FT_Int y)
{
FT_Int i, j, p, q;
FT_Int x_max = x + bitmap->width;
FT_Int y_max = y + bitmap->rows;
//printf("x = %d, y = %d\n", x, y);
for ( i = x, p = 0; i < x_max; i++, p++ )
{
for ( j = y, q = 0; j < y_max; j++, q++ )
{
if ( i < 0 || j < 0 ||
i >= var.xres || j >= var.yres )
continue;
//image[j][i] |= bitmap->buffer[q * bitmap->width + p];
lcd_put_pixel(i, j, bitmap->buffer[q * bitmap->width + p]);
}
}
}
int main(int argc, char **argv)
{
unsigned char str[] = "中";
wchar_t *chinese_str = L"繁";
FT_Library library;
FT_Face face;
int error;
FT_Vector pen;
FT_GlyphSlot slot;
if (argc != 2)
{
printf("Usage : %s <font_file>\n", argv[0]);
return -1;
}
fd_fb = open("/dev/fb0", O_RDWR);
if (fd_fb < 0)
{
printf("can't open /dev/fb0\n");
return -1;
}
if (ioctl(fd_fb, FBIOGET_VSCREENINFO, &var))
{
printf("can't get var\n");
return -1;
}
if (ioctl(fd_fb, FBIOGET_FSCREENINFO, &fix))
{
printf("can't get fix\n");
return -1;
}
line_width = var.xres * var.bits_per_pixel / 8;
pixel_width = var.bits_per_pixel / 8;
screen_size = var.xres * var.yres * var.bits_per_pixel / 8;
fbmem = (unsigned char *)mmap(NULL , screen_size, PROT_READ | PROT_WRITE, MAP_SHARED, fd_fb, 0);
if (fbmem == (unsigned char *)-1)
{
printf("can't mmap\n");
return -1;
}
fd_hzk16 = open("HZK16", O_RDONLY);
if (fd_hzk16 < 0)
{
printf("can't open HZK16\n");
return -1;
}
if(fstat(fd_hzk16, &hzk_stat))
{
printf("can't get fstat\n");
return -1;
}
hzkmem = (unsigned char *)mmap(NULL , hzk_stat.st_size, PROT_READ, MAP_SHARED, fd_hzk16, 0);
if (hzkmem == (unsigned char *)-1)
{
printf("can't mmap for hzk16\n");
return -1;
}
/* 清屏: 全部设为黑色 */
memset(fbmem, 0, screen_size);
lcd_put_ascii(var.xres/2, var.yres/2, 'A');
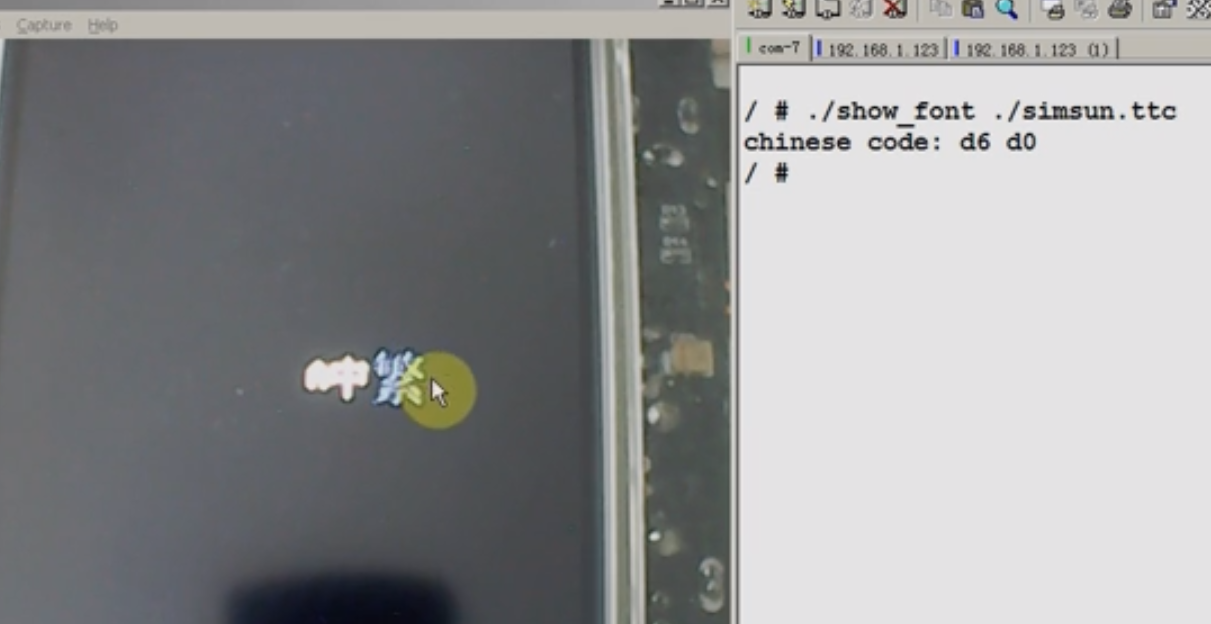
printf("chinese code: %02x %02x\n", str[0], str[1]);
lcd_put_chinese(var.xres/2 + 8, var.yres/2, str);
/* 显示矢量字体 */
error = FT_Init_FreeType( &library ); /* initialize library */
/* error handling omitted */
error = FT_New_Face( library, argv[1], 0, &face ); /* create face object */
/* error handling omitted */
slot = face->glyph;
FT_Set_Pixel_Sizes(face, 24, 0);
/* 确定座标:
* lcd_x = var.xres/2 + 8 + 16
* lcd_y = var.yres/2 + 16
* 笛卡尔座标系:
* x = lcd_x = var.xres/2 + 8 + 16
* y = var.yres - lcd_y = var.yres/2 - 16
*/
pen.x = (var.xres/2 + 8 + 16) * 64;
pen.y = (var.yres/2 - 16) * 64;
/* set transformation */
FT_Set_Transform( face, 0, &pen);
/* load glyph image into the slot (erase previous one) */
error = FT_Load_Char( face, chinese_str[0], FT_LOAD_RENDER );
if (error)
{
printf("FT_Load_Char error\n");
return -1;
}
draw_bitmap( &slot->bitmap,
slot->bitmap_left,
var.yres - slot->bitmap_top);
return 0;
}
修改一下 show_font.c 文件的编码,不然不可以把编码输出 GBK 格式,不能正常执行程序,将下面这一行的特殊字符给删除掉:
重新编译文件,传输给开发板:
测试:


【推荐】编程新体验,更懂你的AI,立即体验豆包MarsCode编程助手
【推荐】凌霞软件回馈社区,博客园 & 1Panel & Halo 联合会员上线
【推荐】抖音旗下AI助手豆包,你的智能百科全书,全免费不限次数
【推荐】博客园社区专享云产品让利特惠,阿里云新客6.5折上折
【推荐】轻量又高性能的 SSH 工具 IShell:AI 加持,快人一步
· 微软正式发布.NET 10 Preview 1:开启下一代开发框架新篇章
· 没有源码,如何修改代码逻辑?
· PowerShell开发游戏 · 打蜜蜂
· 在鹅厂做java开发是什么体验
· WPF到Web的无缝过渡:英雄联盟客户端的OpenSilver迁移实战