import 'package:flutter/material.dart';

void main() => runApp(MyApp());

class MyApp extends StatelessWidget {
  @override
  Widget build(BuildContext context) {
    return MaterialApp(
      debugShowCheckedModeBanner: false,
      theme: ThemeData(
        primarySwatch: Colors.green,
      ),
      home: MyHomePage(),
    );
  }
}

class MyHomePage extends StatelessWidget {
  @override
  Widget build(BuildContext context) {
    return Scaffold(
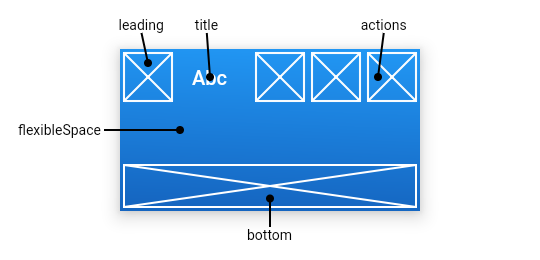
      appBar: AppBar(
        // 左上角的控件,一般放一个icon
        leading: IconButton(
          icon: Icon(
            Icons.apps,
            color: Colors.white,
          ),
          // 点击事件
          onPressed: () {
            print('点击了');
          },
        ),
        // 标题
        title: Text(
          'LOL战绩查询',
        ),
        // 一系列的组件
        actions: <Widget>[
          IconButton(
            icon: Icon(
              Icons.search,
              color: Colors.white,
            ),
            // 点击事件
            onPressed: () {
              print('点击了');
            },
          ),
        ],
        // 此小组件堆叠在工具栏和标签栏后面。它的高度与应用栏的整体高度相同
        flexibleSpace: Container(
          color: Colors.red,
        ),
        bottom: PreferredSize(
          child: Container(
            height: 50,
            width: double.infinity,
            color: Colors.grey,
            child: Text('bottom'),
          ),
          preferredSize: Size(30, 50),
        ),
        // 最下方阴影部分辐射范围
        elevation: 4.0,
        // 背景颜色
        backgroundColor: Colors.teal,
        // 应用栏材质的亮度
        brightness: Brightness.dark,
        // 设置图标样式
        iconTheme: IconThemeData(
            //设置图标样式
            color: Colors.white,
            opacity: 1,
            size: 20.0),
        // 标题栏字体样式
        textTheme: TextTheme(title: TextStyle(fontSize: 20.0)),
        // title是否显示在中间
        centerTitle: true,
        // 配合leading使用,取决于automaticallyImplyLeading == true && leading ==null
        automaticallyImplyLeading: true,
        // 应用栏的工具栏部分透明度
        toolbarOpacity: 1,
        // 应用栏底部的不透明程度
        bottomOpacity: 1,
        // 此应用栏是否显示在屏幕顶部。
        // 如果为true,则appbar的工具栏元素和底部窗口小部件将在系统状态栏的高度上填充。 flexibleSpace的布局不受主要属性的影响。
        primary: true,
        // 横轴上标题内容 周围的间距。即使没有前导内容或操作,也会应用此间距。如果希望 title占用所有可用空间,请将此值设置为0.0
        titleSpacing: 0.0,
      ),
      body: HomeContent(),
    );
  }
}

class HomeContent extends StatelessWidget {
  @override
  Widget build(BuildContext context) {
    return Center(
      child: Column(
        mainAxisAlignment: MainAxisAlignment.center,
        children: <Widget>[
          Text('',
              style: TextStyle(
                  fontSize: 40.0,
                  fontWeight: FontWeight.bold,
                  color: Colors.green)),
        ],
      ),
    );
  }
}


 浙公网安备 33010602011771号