WSL安装以及建立ssh连接
WSL安装以及建立ssh连接
简介:
WSL,全称Windows Subsystem for Linux,是一种由Microsoft开发的功能,允许在Windows操作系统上运行本机Linux应用程序。通过WSL,用户可以在Windows环境中使用Linux命令行工具和实用程序,而无需虚拟机或双重启动系统。
WSL安装以及使用步骤
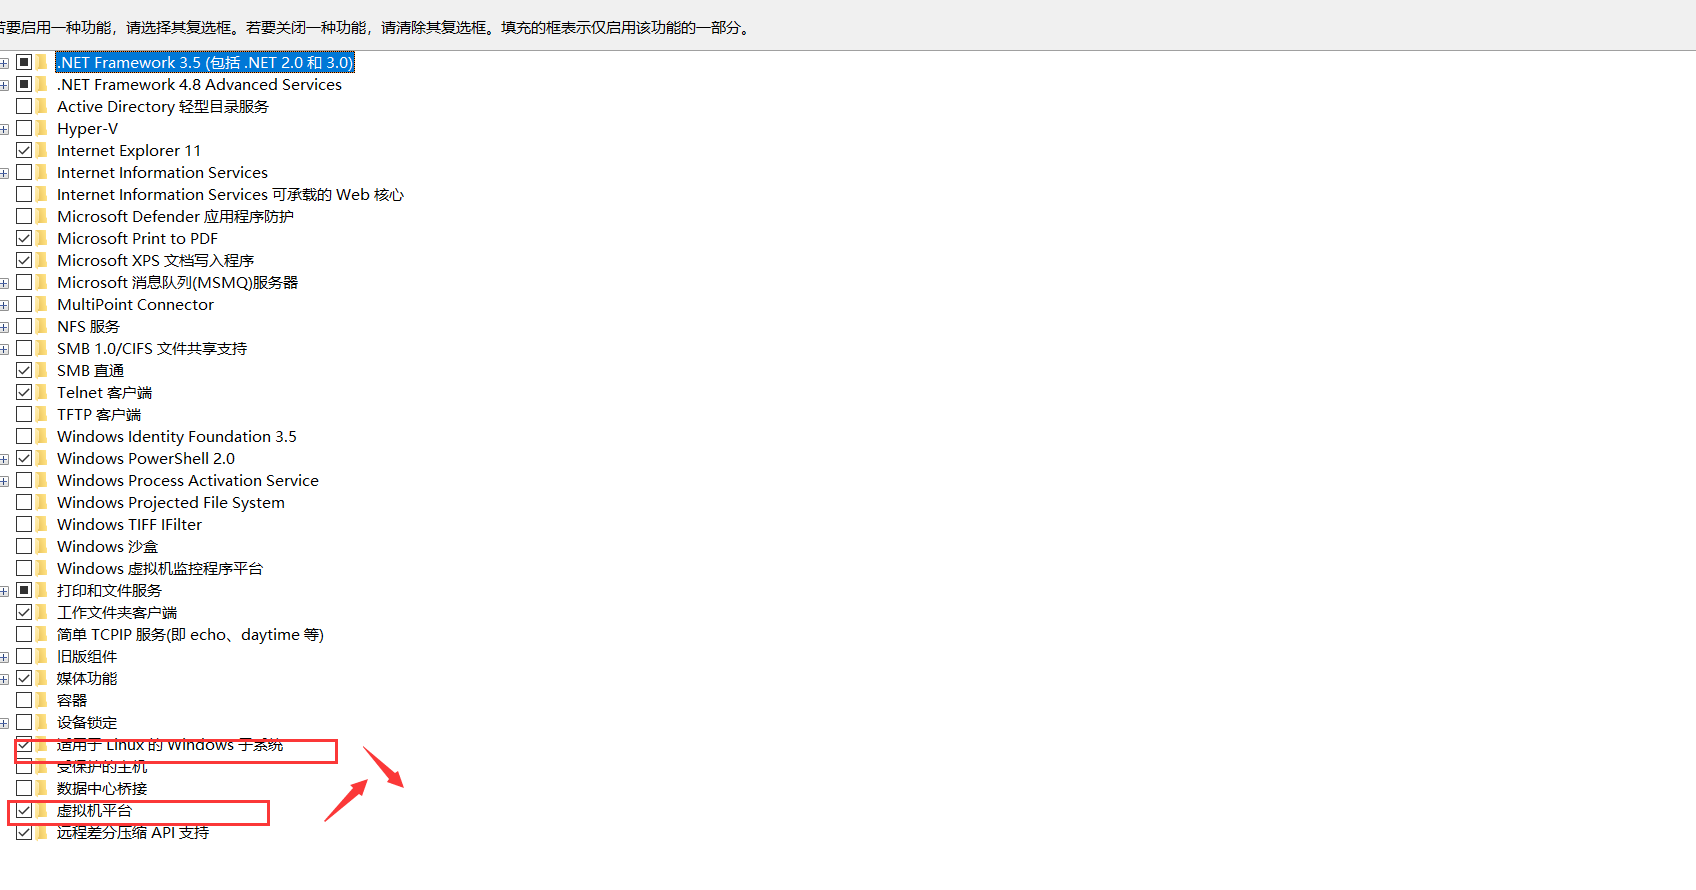
第一步:启用如下两种功能(需要重启电脑)

第2步:在微软应用商店搜索ubuntu,选择相应的版本进行下载即可
下载完成,输入密码就可以使用了,ubuntu24自带vim,推荐使用插件安装:Neovim,htop,net-tools,neofetch
第3步:已经实现window文件系统自动挂载到/mnt目录下,可以运行windows系统下的相应文件(重要)

OpenSSH Server Setup in WSL
第1步:安装ufw(Uncomplicated Firewal)
sudo apt install ufw
第2步:开放22端口
sudo ufw allow 22
遇到报错:
xurong@DESKTOP-SOE9MG1:~$ sudo ufw allow 22
ERROR: Couldn't determine iptables version
解决:
By default it uses iptables-nft. When changes to iptables-legacy
xurong@DESKTOP-SOE9MG1:~$ update-alternatives --list iptables
/usr/sbin/iptables-legacy
/usr/sbin/iptables-nft
xurong@DESKTOP-SOE9MG1:~$ update-alternatives --list iptables
/usr/sbin/iptables-legacy
/usr/sbin/iptables-nft
xurong@DESKTOP-SOE9MG1:~$ sudo update-alternatives --set iptables /usr/sbin/iptables-legacy
update-alternatives: using /usr/sbin/iptables-legacy to provide /usr/sbin/iptables (iptables) in manual mode
xurong@DESKTOP-SOE9MG1:~$ sudo ufw allow 22
Rules updated
第3步:安装 openssh-server从而安装 SSH 服务器守护程序
sudo apt install openssh-server
第4步:开启ssh
xurong@DESKTOP-SOE9MG1:~$ sudo service ssh start
[sudo] password for xurong:
Starting OpenBSD Secure Shell server: sshd.
第4步:生成密钥
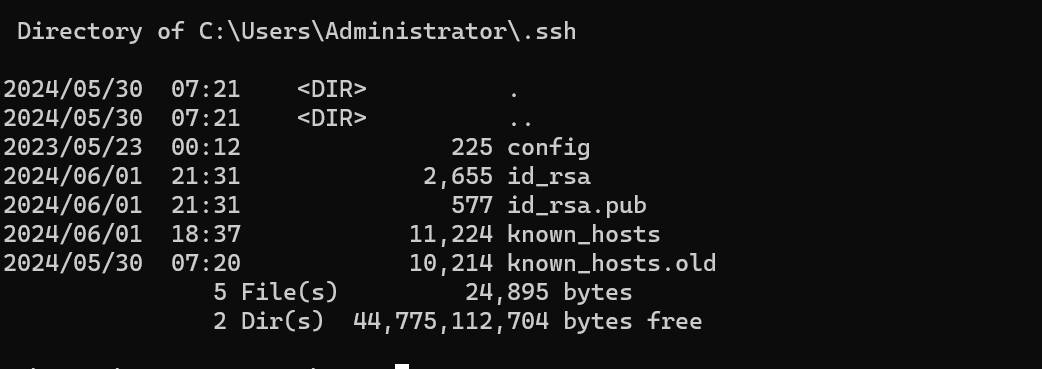
C:\Users\Administrator\.ssh>ssh-keygen -t rsa

第5步:将cmd中生成的id_rsa.pub复制一份到linux
5-1:需要到/home/username中创建.ssh目录,然后创建要给文件夹(文件随便命名)
xurong@DESKTOP-SOE9MG1:~$ pwd
/home/xurong
xurong@DESKTOP-SOE9MG1:~$ mkdir .ssh
xurong@DESKTOP-SOE9MG1:~$ cd .ssh/
xurong@DESKTOP-SOE9MG1:~/.ssh$ touch authorized_keys
5-2:将刚刚windows生成的公共密钥(id_rsa.pub)复制到authorization_key中
xurong@DESKTOP-SOE9MG1:~/.ssh$ sudo cp /mnt/c/Users/Administrator/.ssh/id_rsa.pub /home/xurong/.ssh/authorized_keys
xurong@DESKTOP-SOE9MG1:~/.ssh$ sudo service ssh restart
Restarting OpenBSD Secure Shell server: sshd.
此处注意:WSL(Windows Subsystem for Linux)会自动将硬盘挂载到mnt目录下,所以上面我直接将C盘中id_rsa.pub密钥复制到/home/xurong/.ssh/authorized_keys中:

第6步:ssh测试连接成功
C:\Users\Administrator>ssh xurong@192.168.xx.xx
The authenticity of host '192.168.xx.xx (192.168.xx.xx)' can't be established.
ECDSA key fingerprint is SHA256:nQNRHxQrOLq0DqneTENxyiVFaNW085Bf0YiBozk2e7E.
Are you sure you want to continue connecting (yes/no/[fingerprint])? yes
Warning: Permanently added '192.168.xx.xx' (ECDSA) to the list of known hosts.
Enter passphrase for key 'C:\Users\Administrator/.ssh/id_rsa':
Linux DESKTOP-SOE9MG1 4.4.0-19041-Microsoft #4355-Microsoft Thu Apr 12 17:37:00 PST 2024 x86_64

The programs included with the Debian GNU/Linux system are free software;
the exact distribution terms for each program are described in the
individual files in /usr/share/doc/*/copyright.

Debian GNU/Linux comes with ABSOLUTELY NO WARRANTY, to the extent
permitted by applicable law.
xurong@DESKTOP-SOE9MG1:~$
补充:
出现如下错误:
@@@@@@@@@@@@@@@@@@@@@@@@@@@@@@@@@@@@@@@@@@@@@@@@@@@@@@@@@@@
@    WARNING: REMOTE HOST IDENTIFICATION HAS CHANGED!     @
@@@@@@@@@@@@@@@@@@@@@@@@@@@@@@@@@@@@@@@@@@@@@@@@@@@@@@@@@@@
IT IS POSSIBLE THAT SOMEONE IS DOING SOMETHING NASTY!
Someone could be eavesdropping on you right now (man-in-the-middle attack)!
It is also possible that a host key has just been changed.
The fingerprint for the ECDSA key sent by the remote host is
85:82:b1:58:20:21:a5:da:be:24:e8:14:9a:12:b2:d2.
Please contact your system administrator.
Add correct host key in /root/.ssh/known_hosts to get rid of this message.
Offending ECDSA key in /root/.ssh/known_hosts:5
ECDSA host key for 192.168.xx.xx has changed and you have requested strict checking.
Host key verification failed.
解决办法:
1.删除192.168.xx.xx相关IP信息

2.然后重新执行第4,第5步操作即可ssh连接成功
升级为wsl2参考文档
https://learn.microsoft.com/zh-cn/windows/wsl/tutorials/gui-apps
参考:
Linux Terminal & GUI Inside of Windows 10 (WSL) - YouTube
OpenSSH Server Setup in WSL - YouTube
(13)flask搭建服务器关闭防火墙 - MKT-porter - 博客园 (cnblogs.com)
SSH连接时出现Host key verification failed的原因及解决方法以及ssh-keygen命令的用法 - 553490191 - 博客园 (cnblogs.com)
本文作者:远道而重任
本文链接:https://www.cnblogs.com/rong-xu-drum/p/18226635
版权声明:本作品采用知识共享署名-非商业性使用-禁止演绎 2.5 中国大陆许可协议进行许可。


【推荐】国内首个AI IDE,深度理解中文开发场景,立即下载体验Trae
【推荐】编程新体验,更懂你的AI,立即体验豆包MarsCode编程助手
【推荐】抖音旗下AI助手豆包,你的智能百科全书,全免费不限次数
【推荐】轻量又高性能的 SSH 工具 IShell:AI 加持,快人一步