springboot入门
SpringBoot入门
参考资料:
1.资源:笔记:https://www.yuque.com/atguigu/springboot
2.源码地址:https://gitee.com/leifengyang/springboot2?_from=gitee_search
3.微服务概念中文版:https://blog.cuicc.com/blog/2015/07/22/microservices/
4.springboot文档:https://docs.spring.io/spring-boot/docs/current-SNAPSHOT/reference/html/
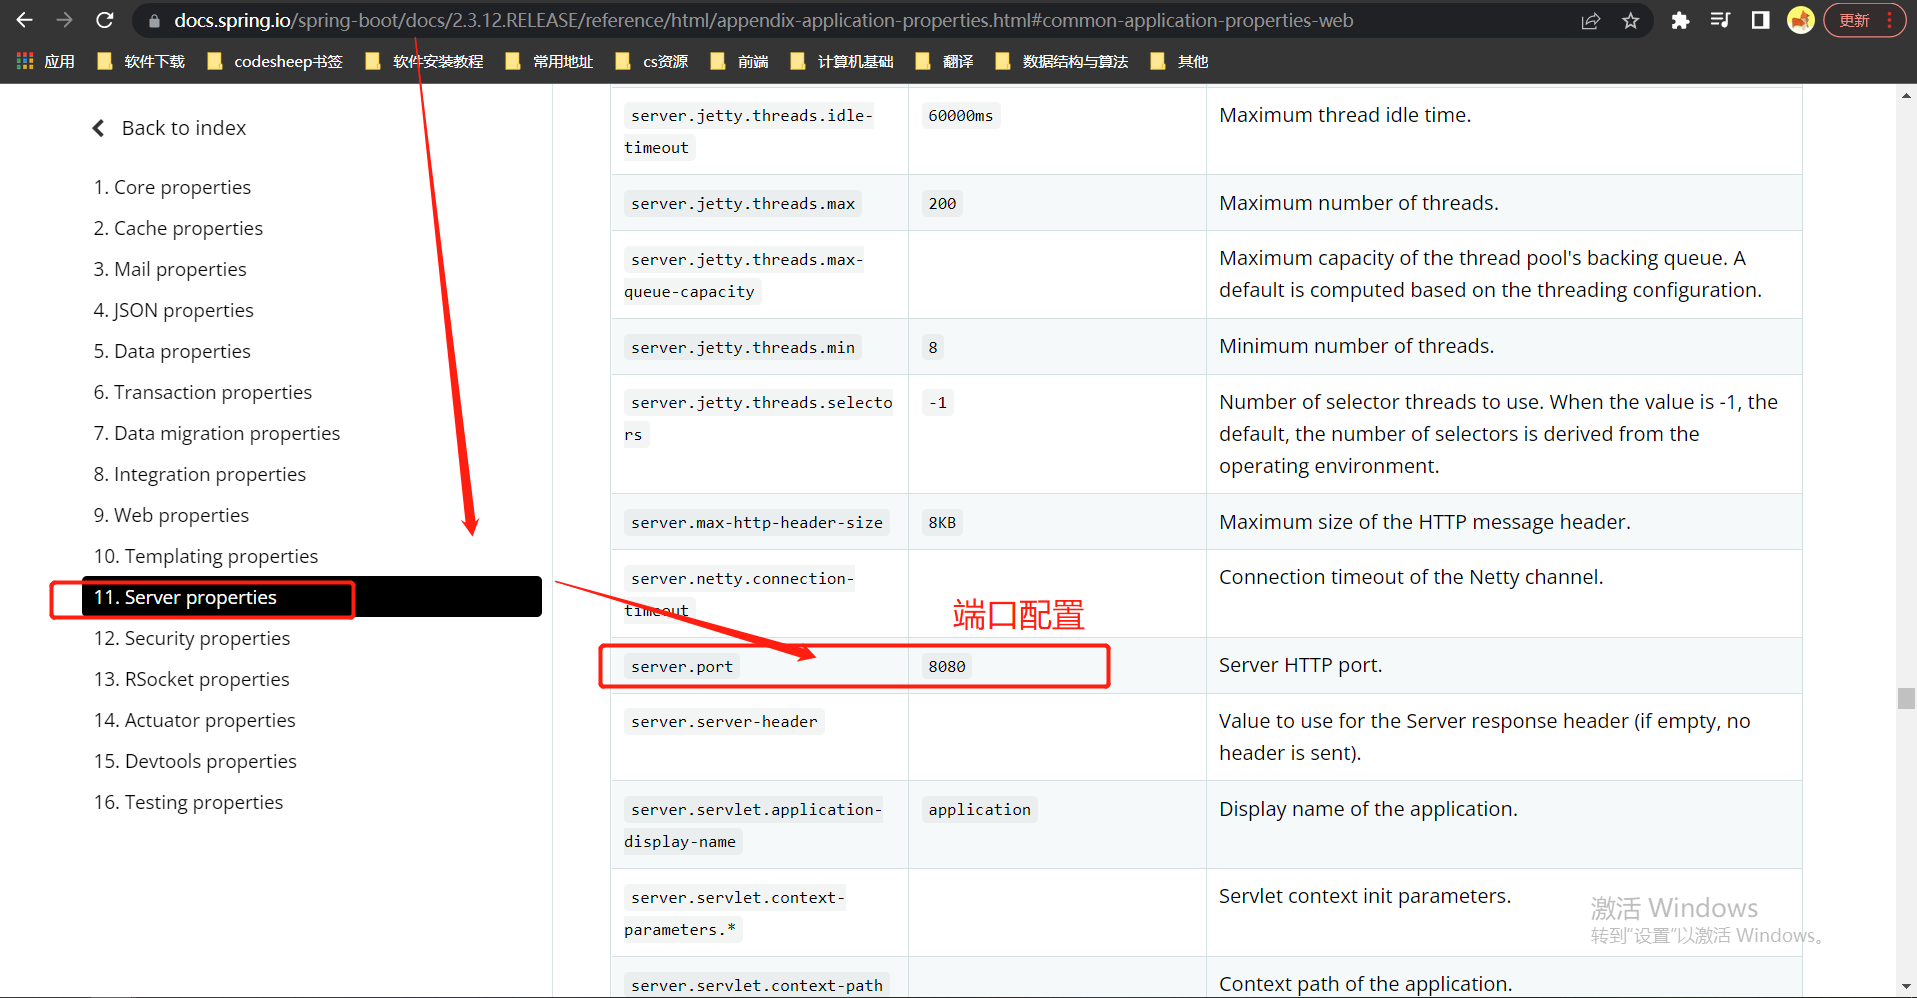
5.配置书写参考:https://docs.spring.io/spring-boot/docs/2.3.12.RELEASE/reference/html/appendix-application-properties.html#common-application-properties-web
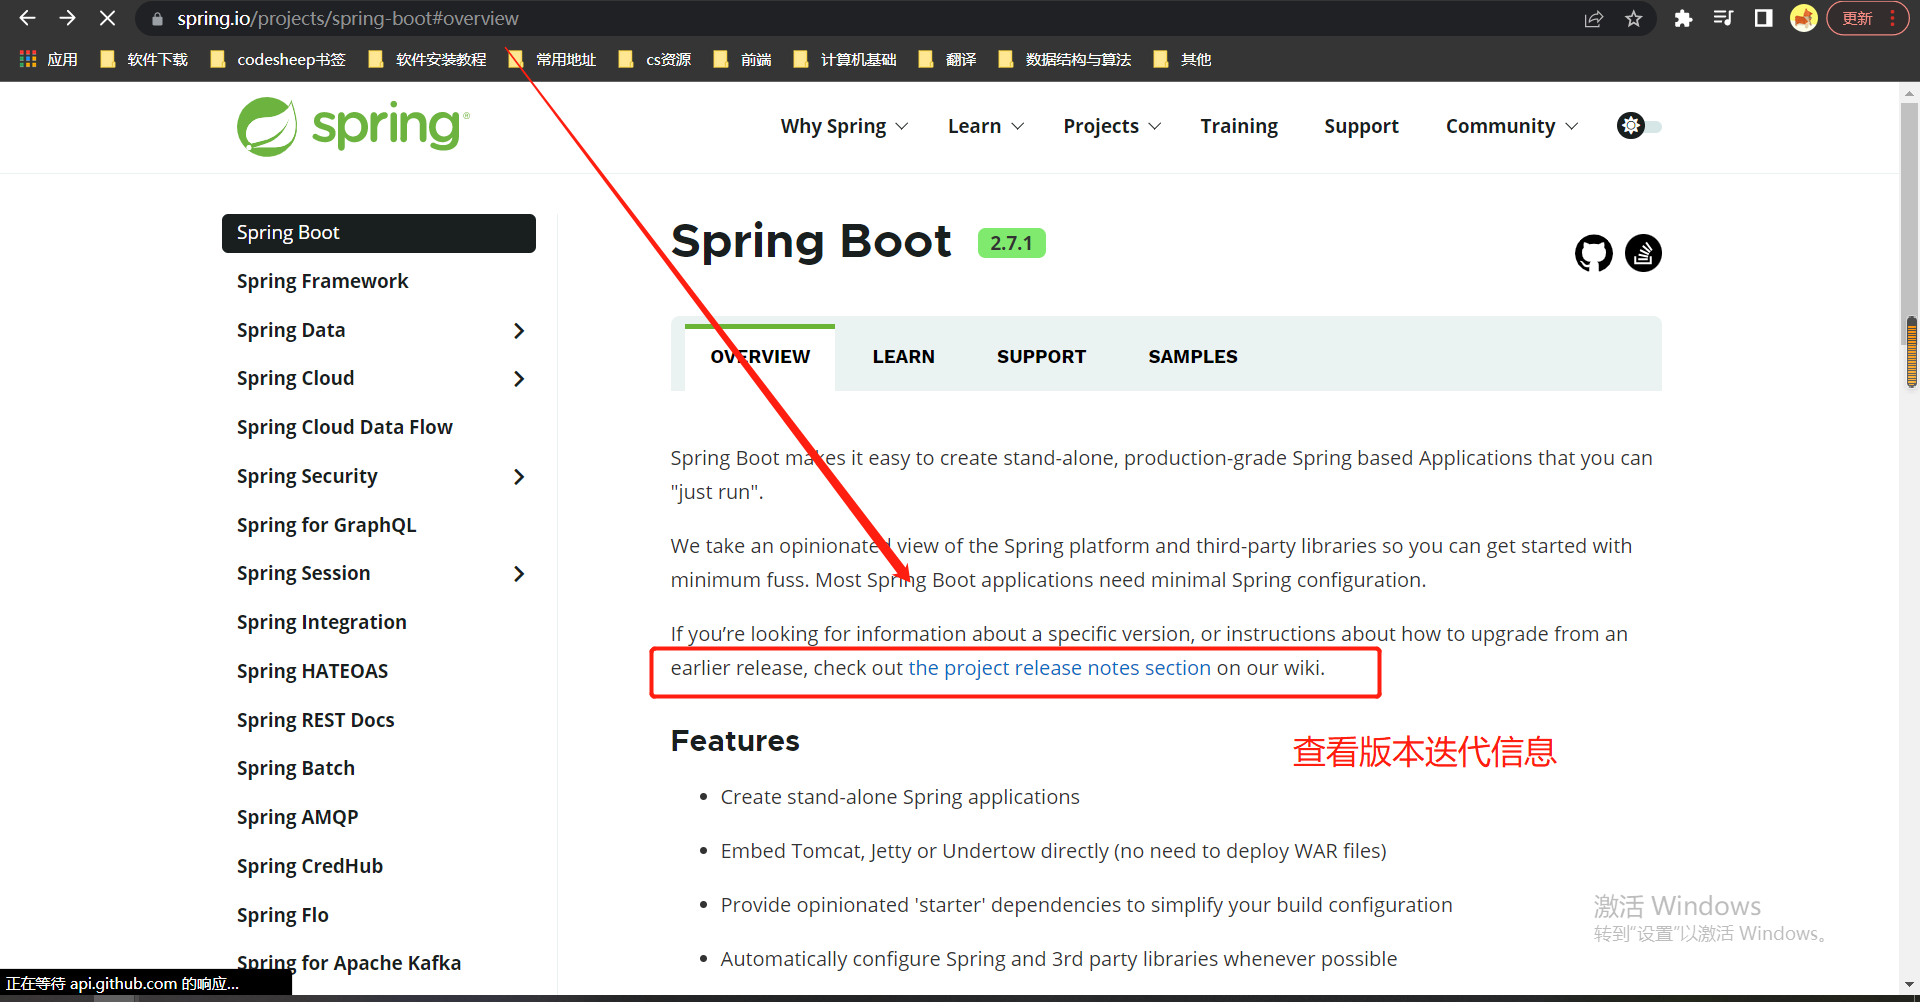
6.查看版本迭代信息:
7.tomcat是如何启动的源码分析
https://blog.csdn.net/qq_29551611/article/details/119268637
8.史上最全的Jackson框架使用教程
https://blog.csdn.net/weixin_44747933/article/details/108301626
第1章--getting-start
1-1 基础入门
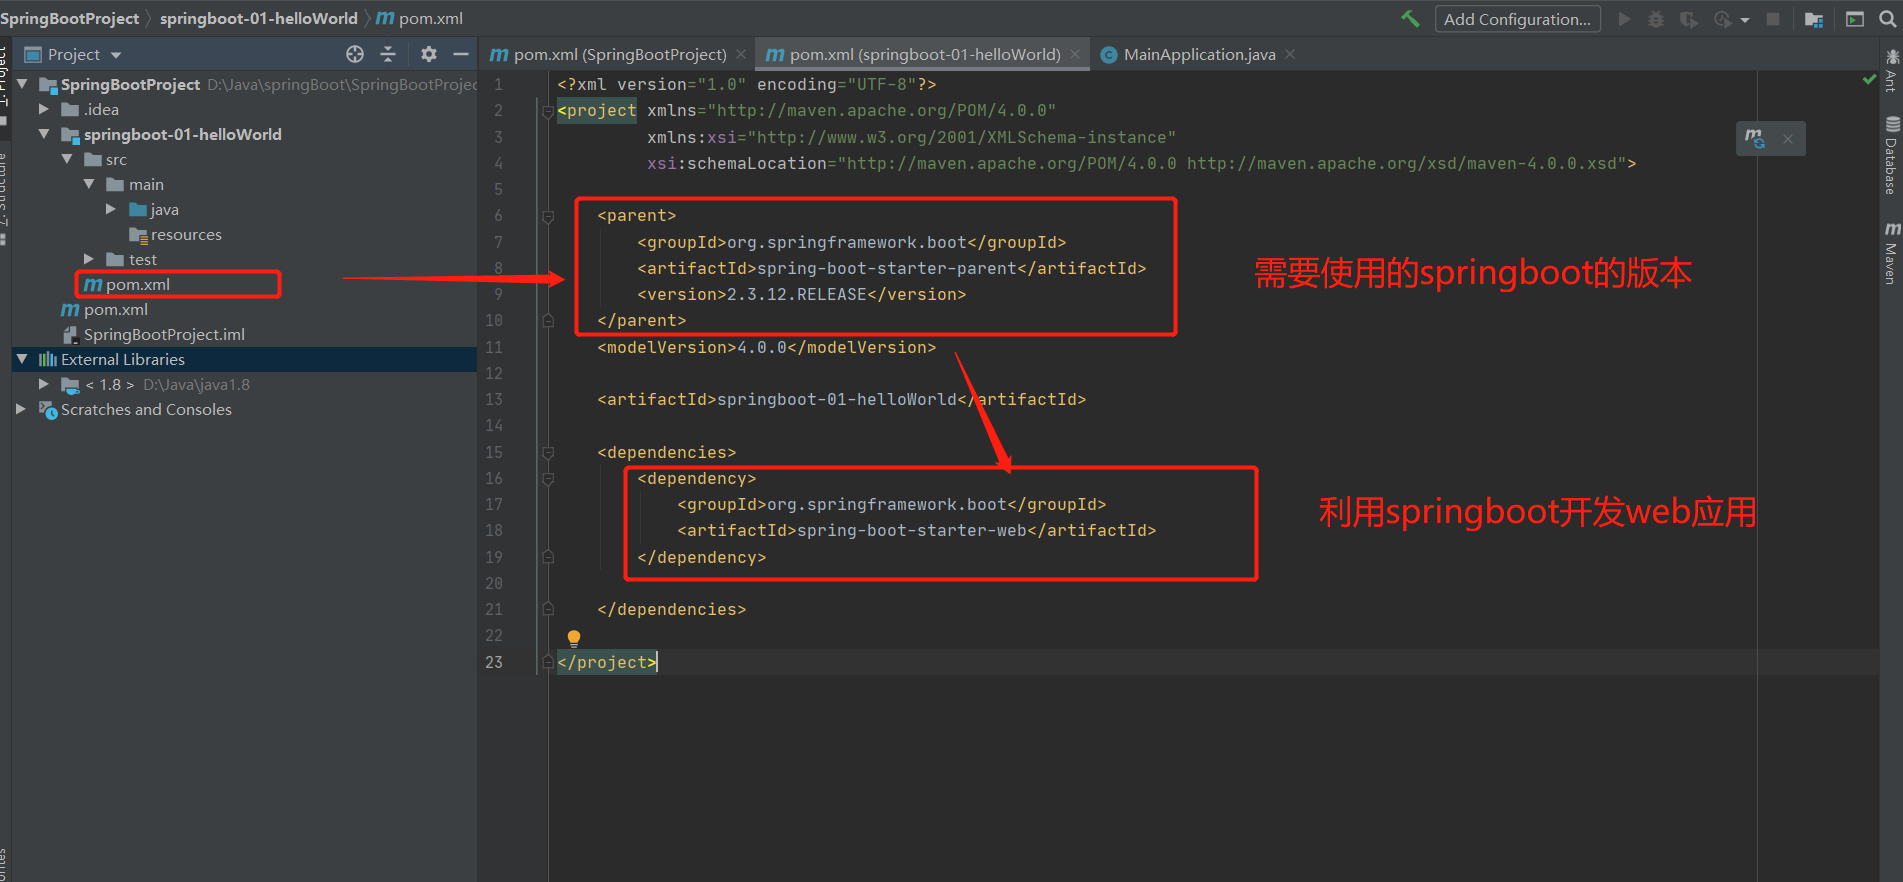
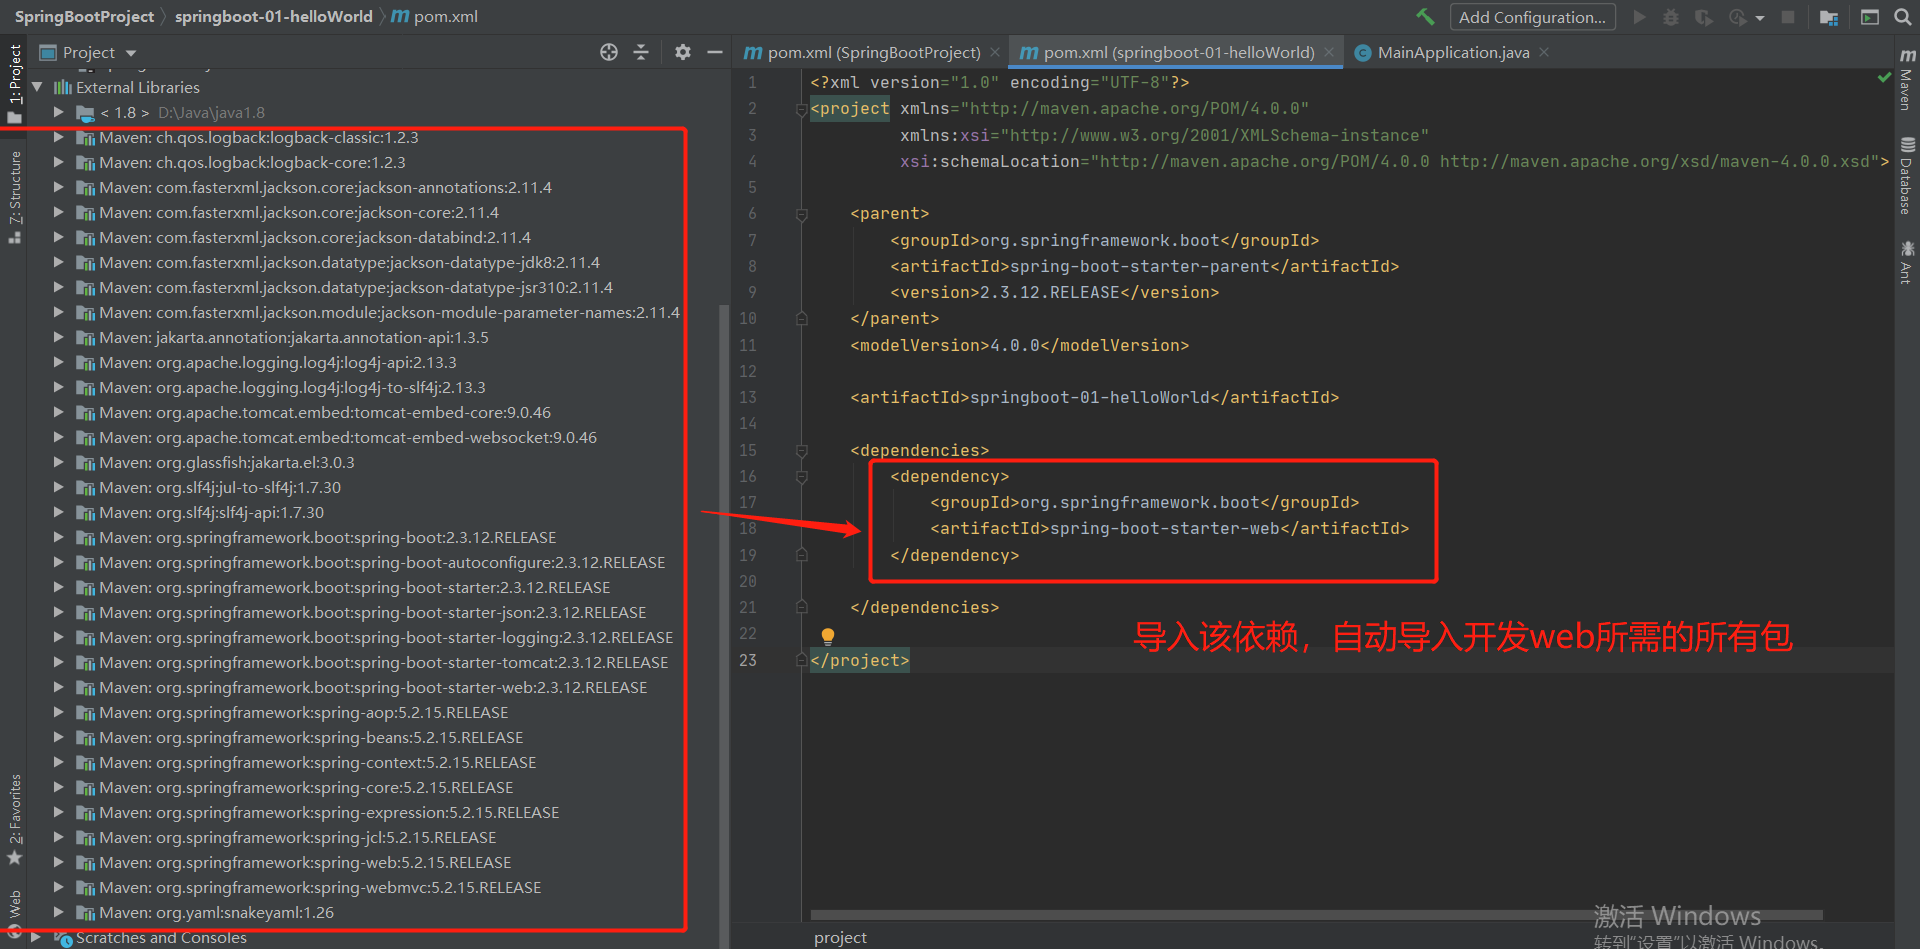
1-2 写一个helloWorld
@ResponseBody作用:
@ResponseBody:标注在类上,代表该类的所有方法返回值直接传给浏览器,而非某一个页面的跳转
@ResponseBody : 标注在方法上,代表该方法的返回值是直接写给浏览器的,而不是某一个页面的跳转
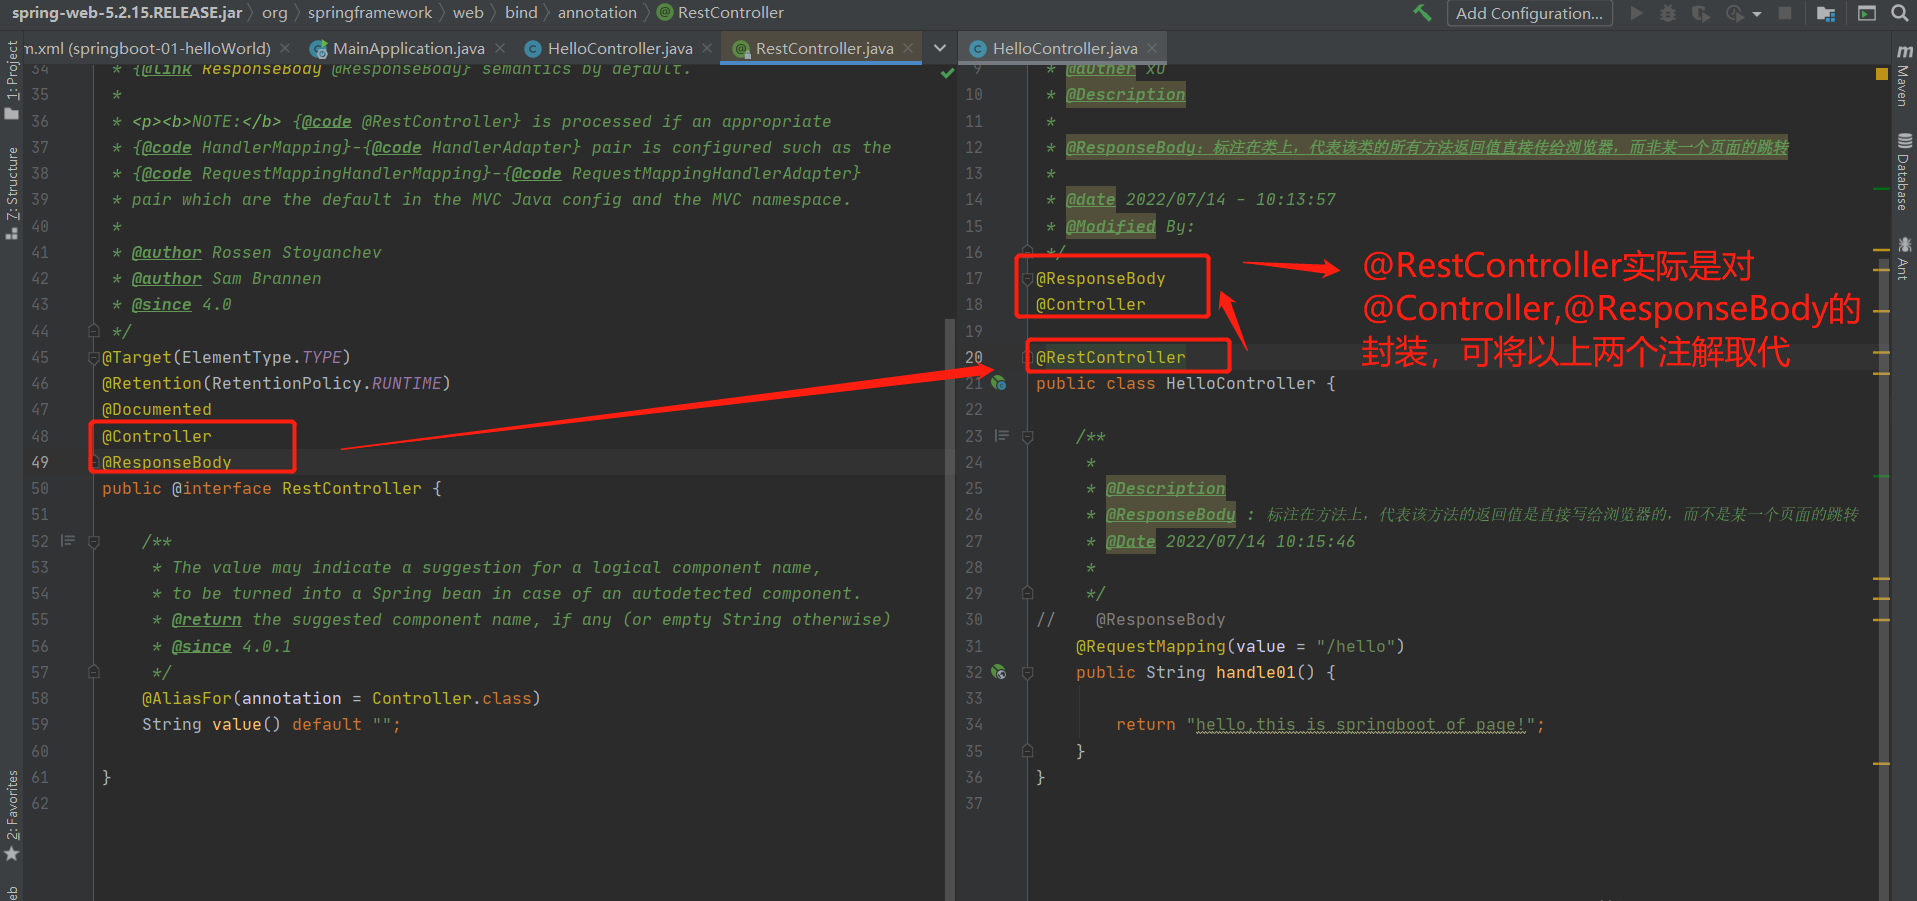
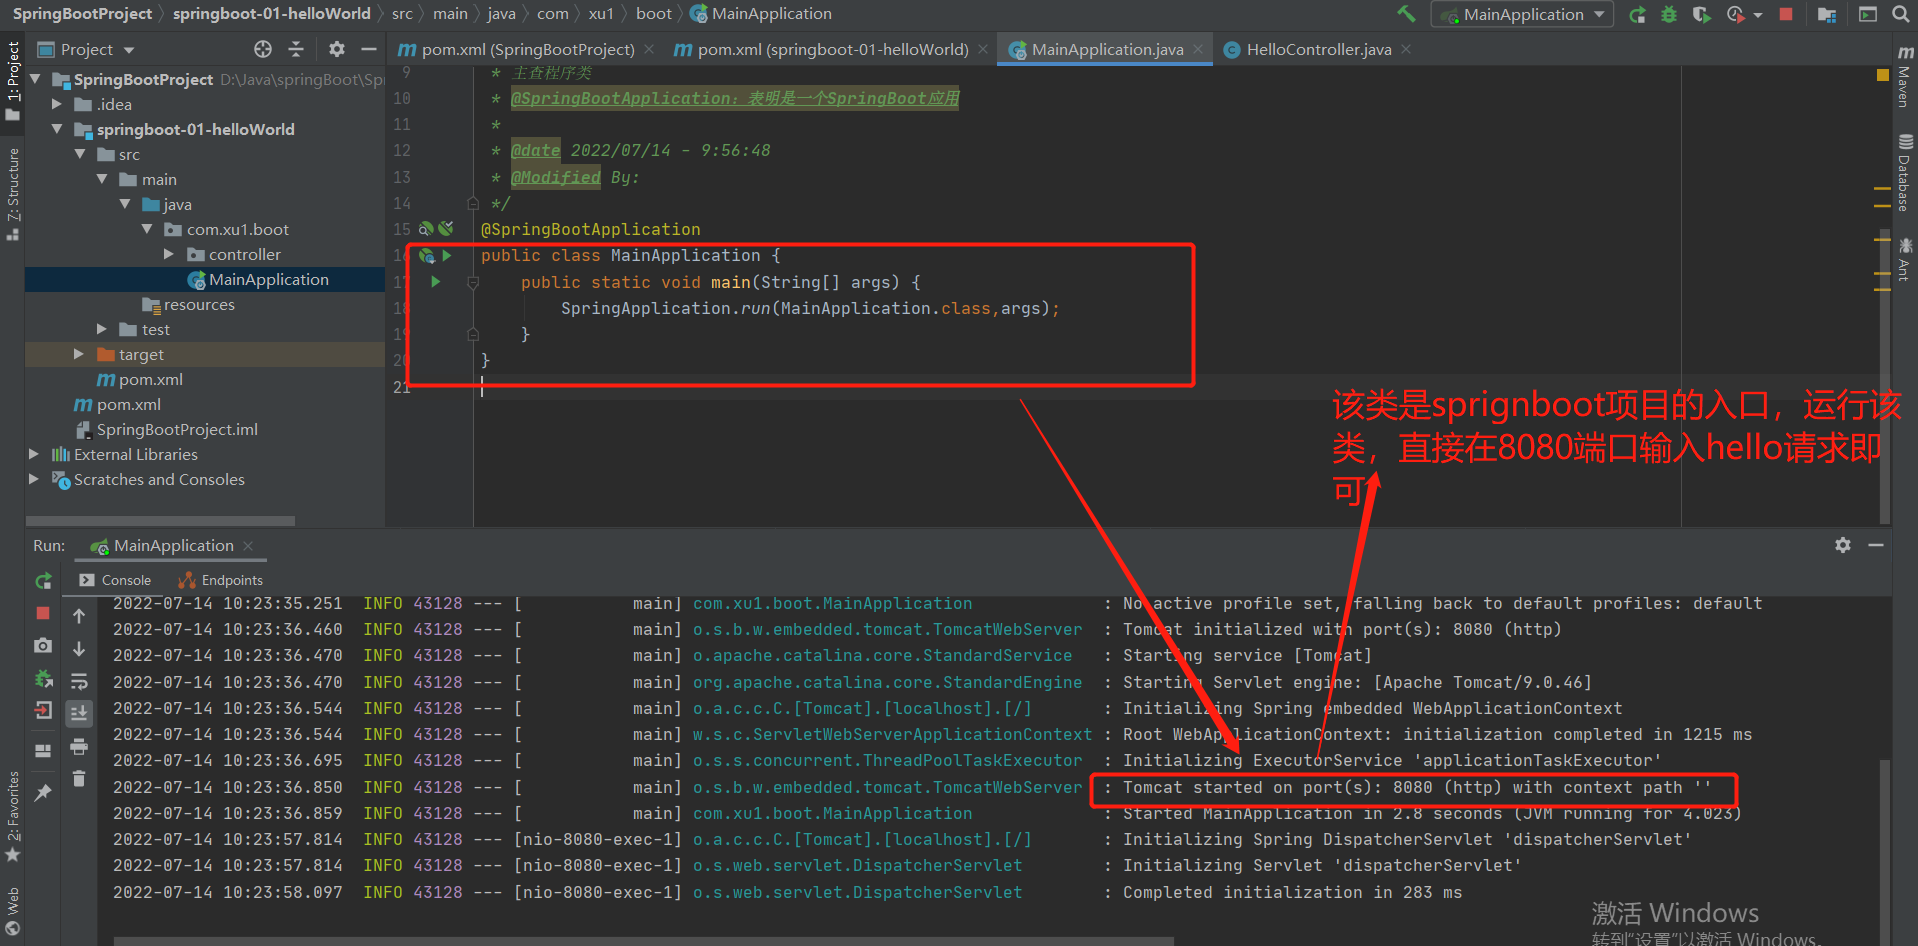
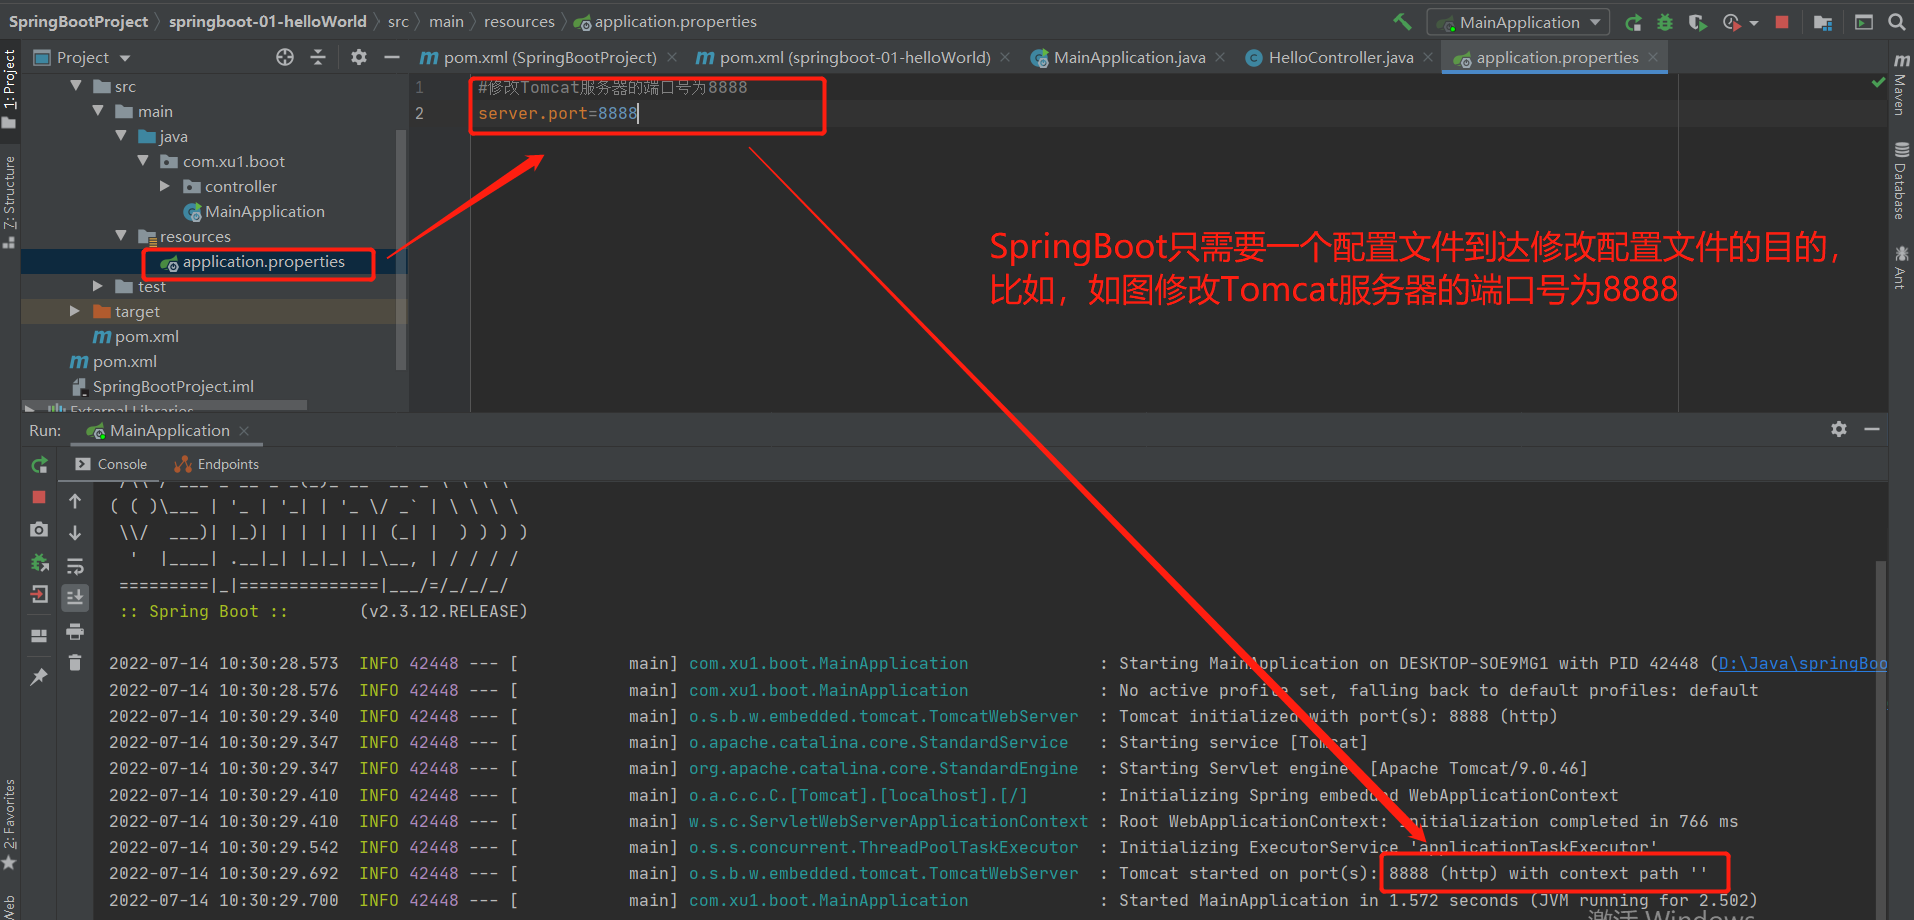
输出结果:(测试的时候直接运行main方法即可)
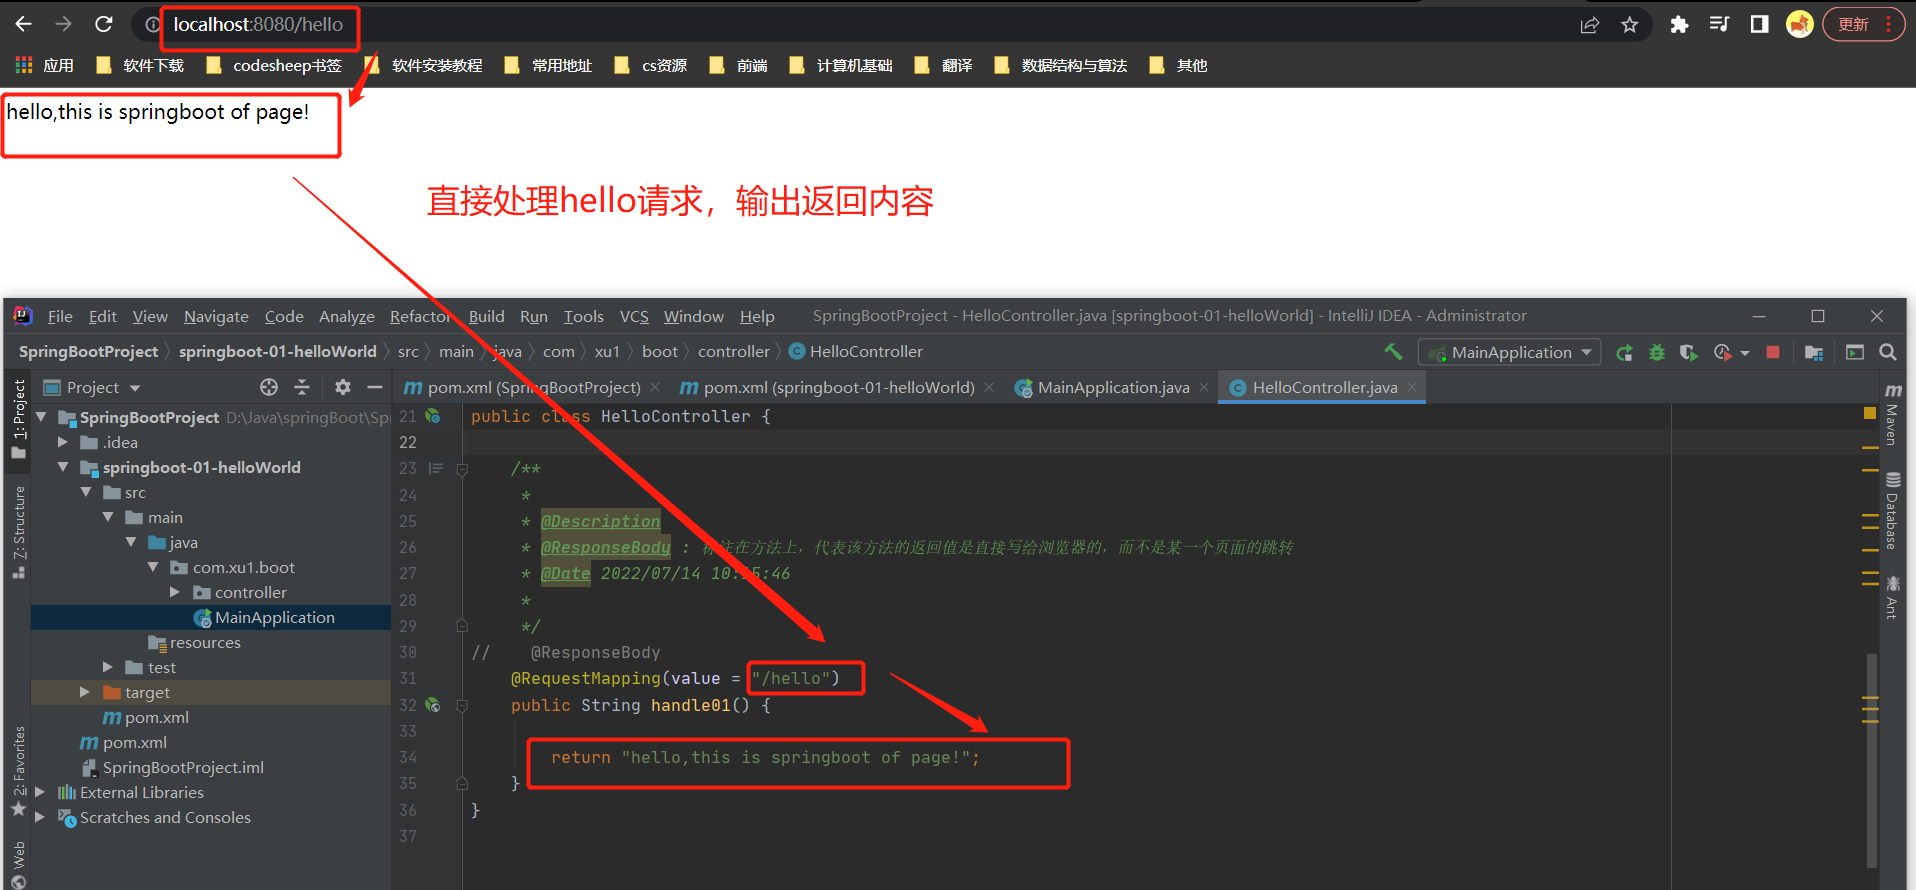
SpringBoot只为我们准备了一个配置文件:

代码参考:
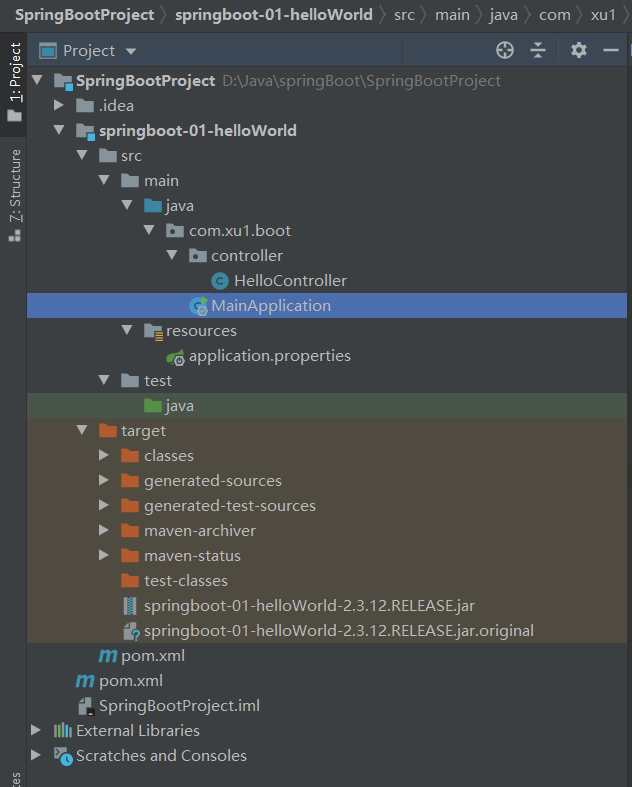
pom.xml:
<?xml version="1.0" encoding="UTF-8"?>
<project xmlns="http://maven.apache.org/POM/4.0.0"
         xmlns:xsi="http://www.w3.org/2001/XMLSchema-instance"
         xsi:schemaLocation="http://maven.apache.org/POM/4.0.0 http://maven.apache.org/xsd/maven-4.0.0.xsd">

    <parent>
        <groupId>org.springframework.boot</groupId>
        <artifactId>spring-boot-starter-parent</artifactId>
        <version>2.3.12.RELEASE</version>
    </parent>
    <modelVersion>4.0.0</modelVersion>

    <artifactId>springboot-01-helloWorld</artifactId>

    <dependencies>
        <dependency>
            <groupId>org.springframework.boot</groupId>
            <artifactId>spring-boot-starter-web</artifactId>
        </dependency>
    </dependencies>
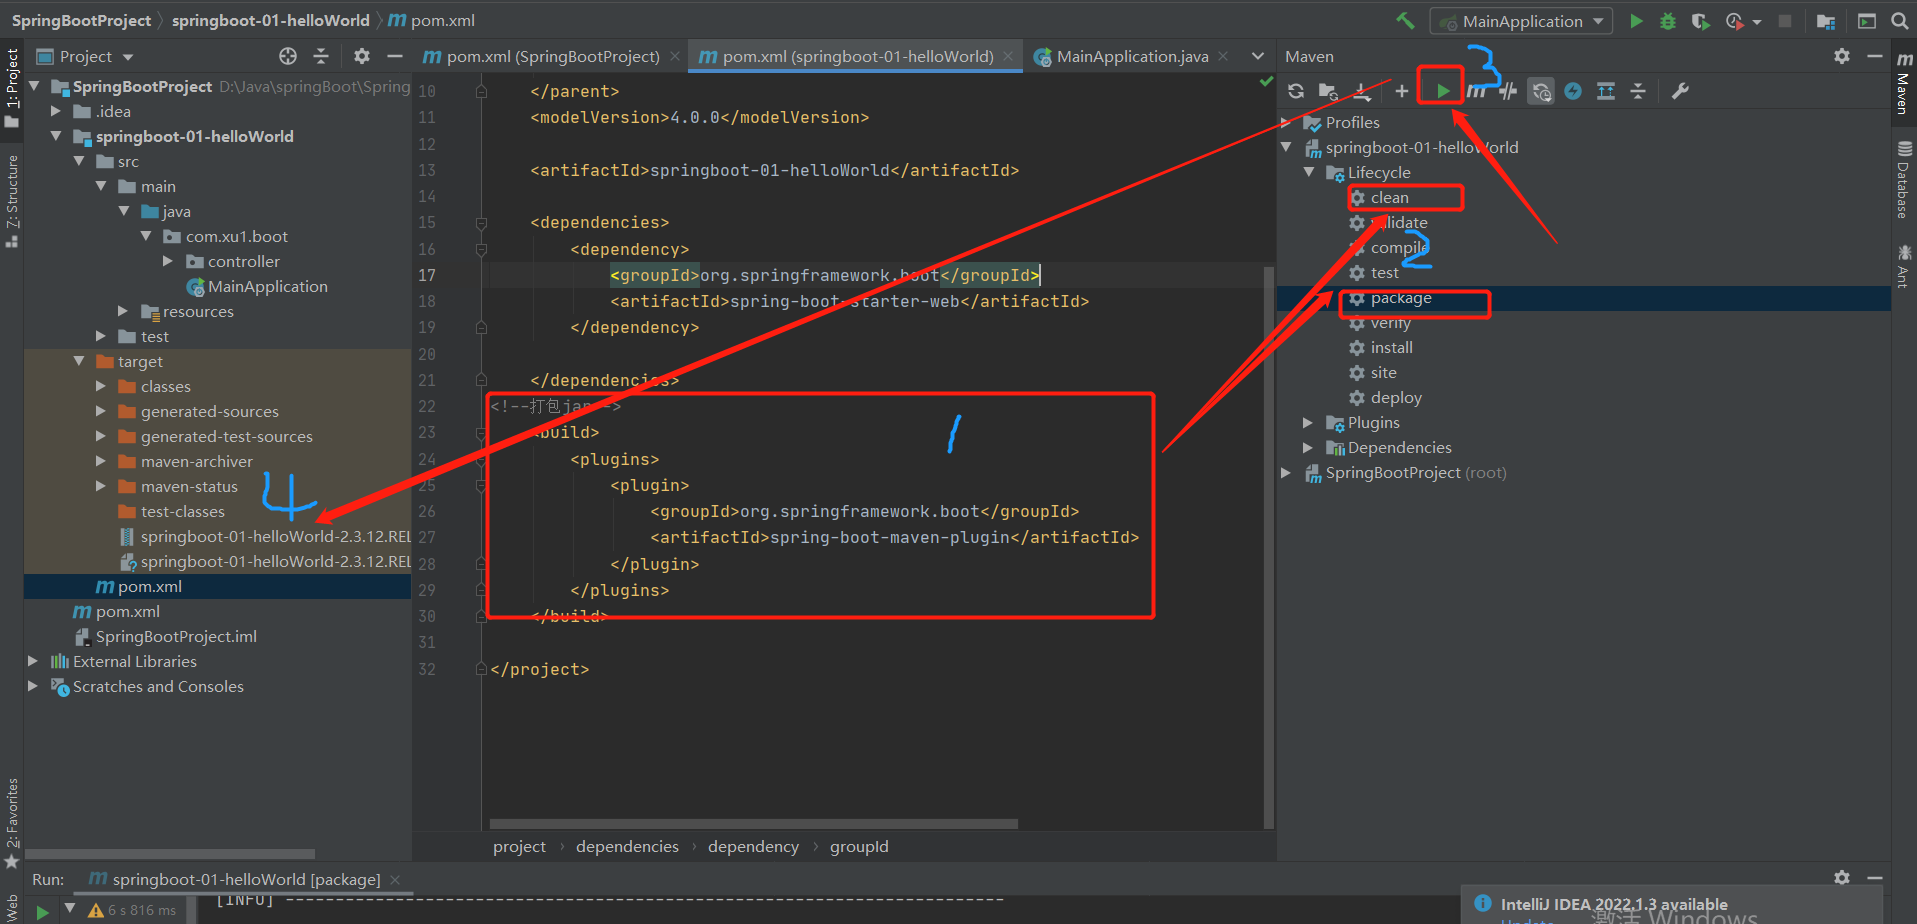
<!--打包jar-->
    <build>
        <plugins>
            <plugin>
                <groupId>org.springframework.boot</groupId>
                <artifactId>spring-boot-maven-plugin</artifactId>
            </plugin>
        </plugins>
    </build>

</project>
application.properties:
#修改Tomcat服务器的端口号为8888
#server.port=8888
MainApplication.java:
package com.xu1.boot;

import org.springframework.boot.SpringApplication;
import org.springframework.boot.autoconfigure.SpringBootApplication;

/**
 * @auther xu
 * @Description
 * 主查程序类
 * @SpringBootApplication:表明是一个SpringBoot应用
 *
 * @date 2022/07/14 - 9:56:48
 * @Modified By:
 */
@SpringBootApplication
public class MainApplication {
    public static void main(String[] args) {
        SpringApplication.run(MainApplication.class,args);
    }
}
HelloController.java:
package com.xu1.boot.controller;

import org.springframework.stereotype.Controller;
import org.springframework.web.bind.annotation.RequestMapping;
import org.springframework.web.bind.annotation.ResponseBody;
import org.springframework.web.bind.annotation.RestController;

/**
 * @auther xu
 * @Description
 *
 * @ResponseBody:标注在类上,代表该类的所有方法返回值直接传给浏览器,而非某一个页面的跳转
 *
 * @date 2022/07/14 - 10:13:57
 * @Modified By:
 */
//@ResponseBody
//@Controller

@RestController
public class HelloController {

    /**
     *
     * @Description
     * @ResponseBody : 标注在方法上,代表该方法的返回值是直接写给浏览器的,而不是某一个页面的跳转
     * @Date 2022/07/14 10:15:46
     *
     */
//    @ResponseBody
    @RequestMapping(value = "/hello")
    public String handle01() {

        return "hello,this is springboot of page!";
    }
}
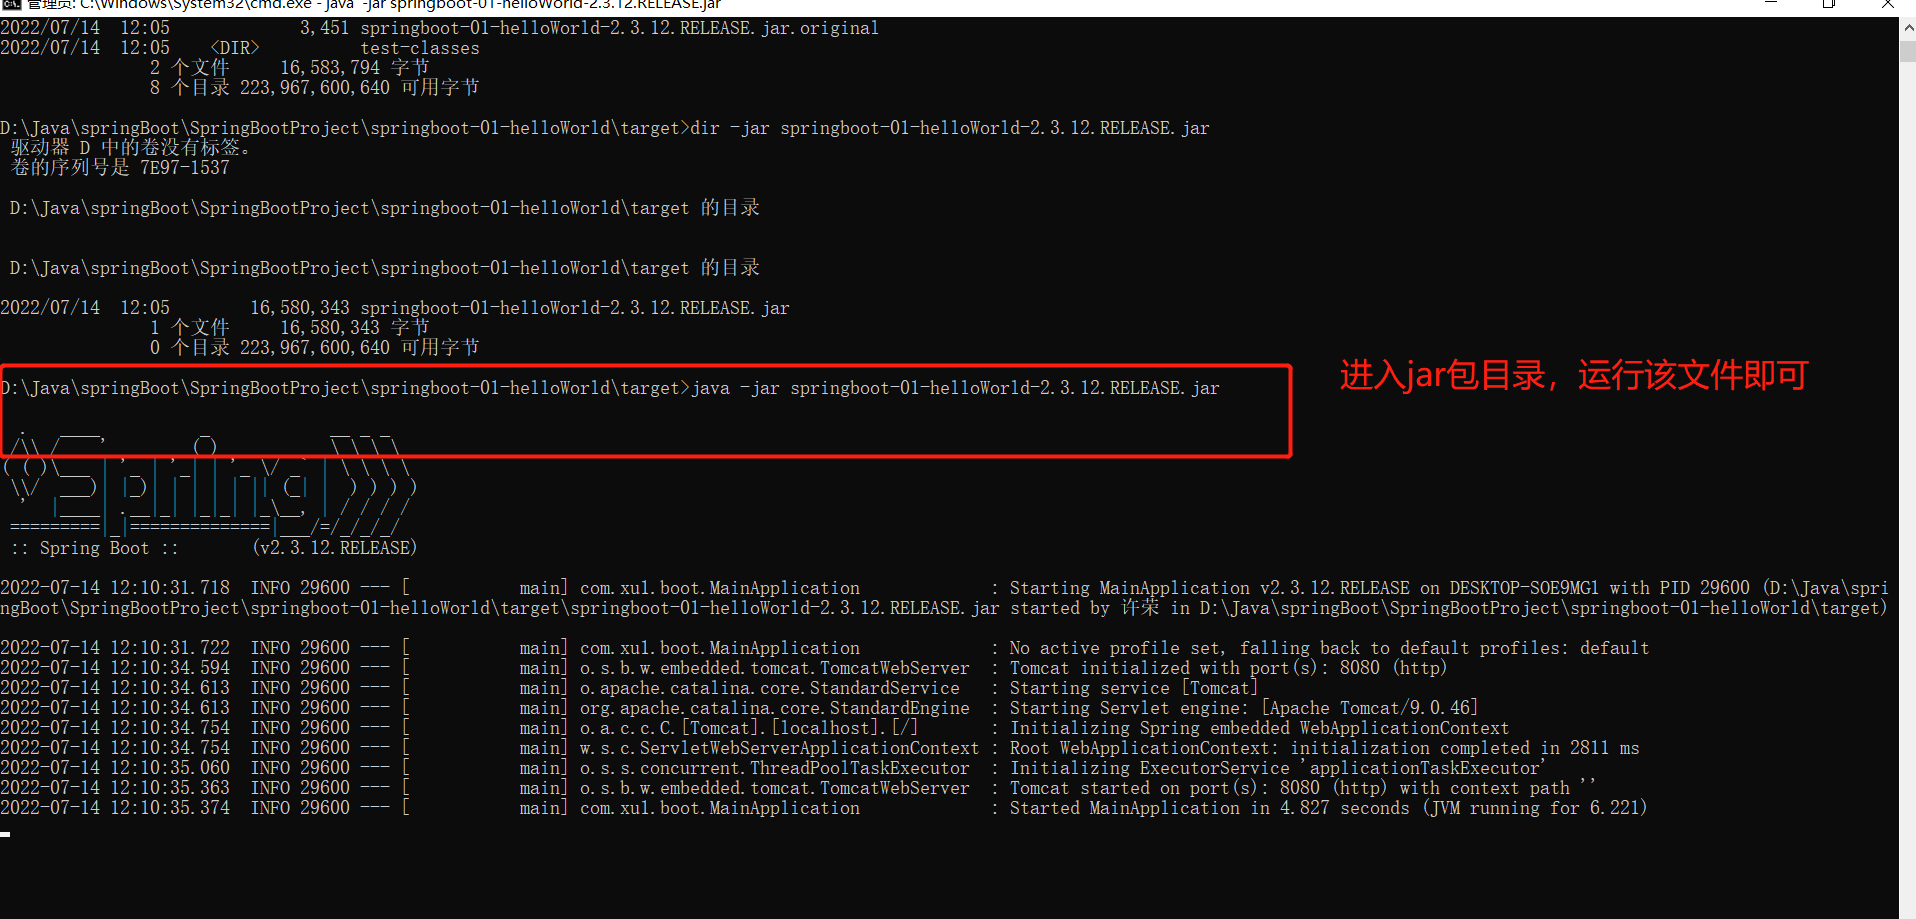
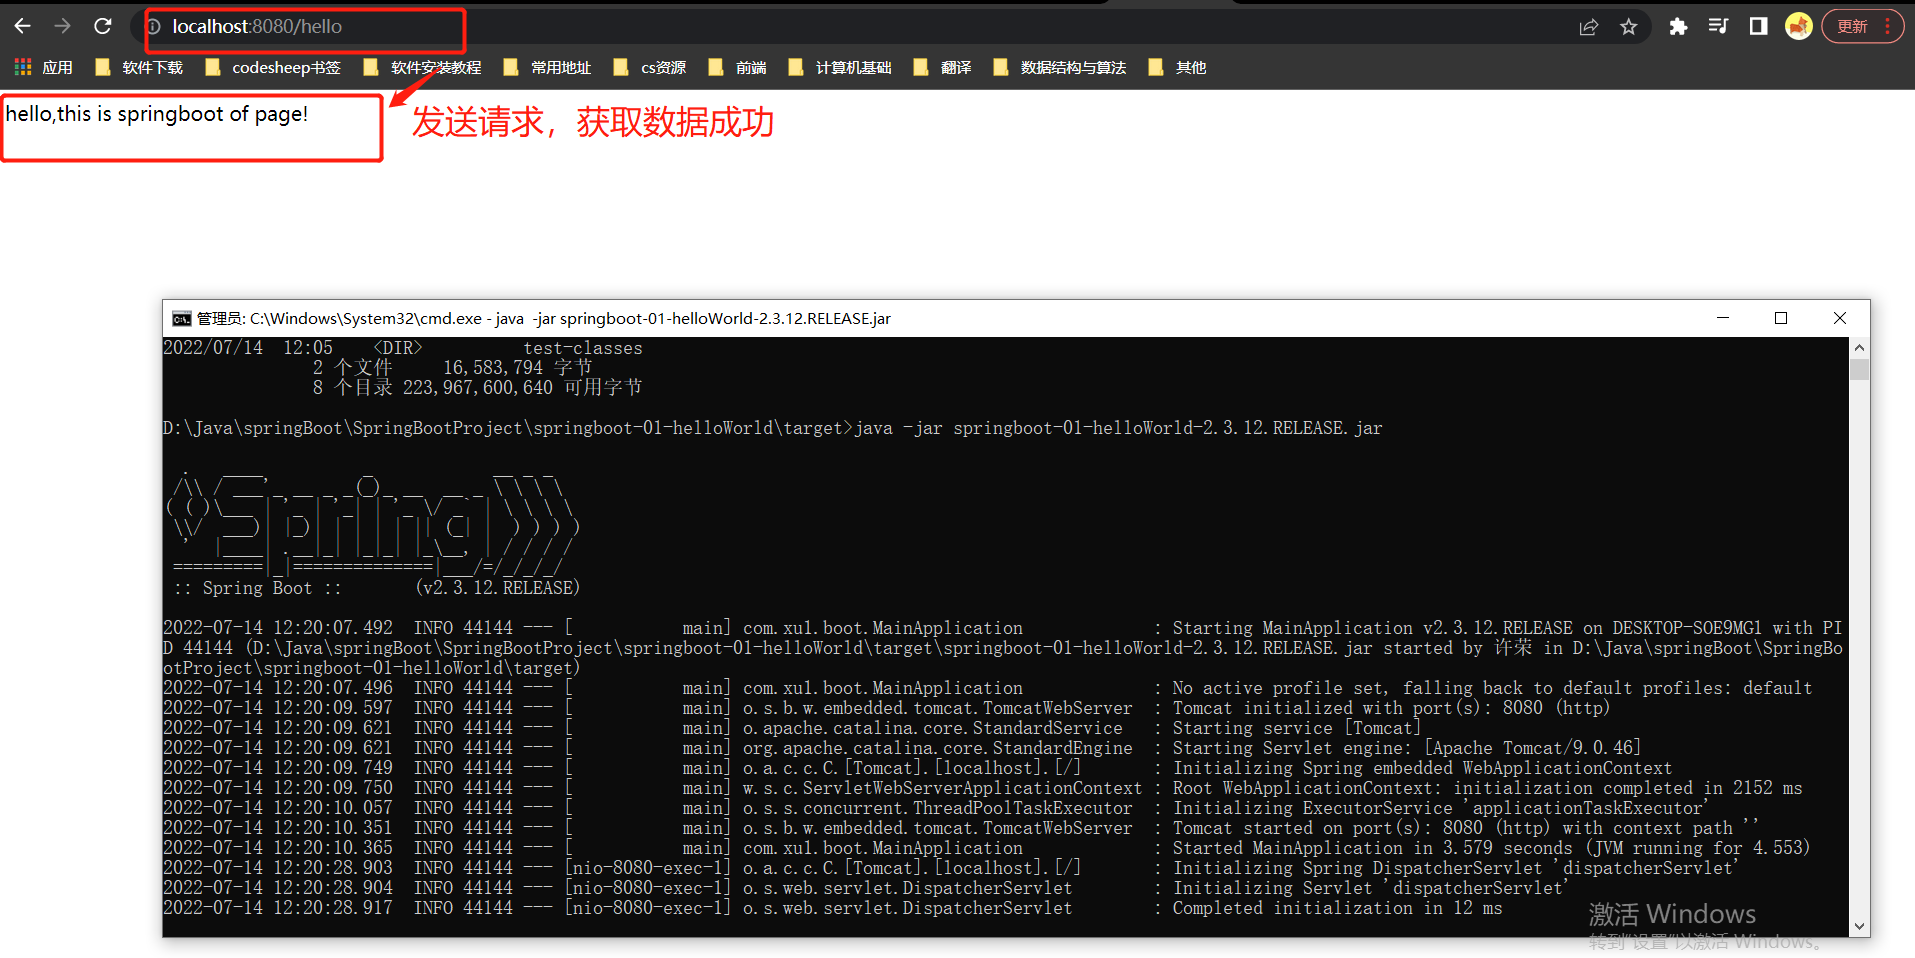
1-3 项目部署---详解java -jar命令及SpringBoot通过java -java启动的过程
参考网址:https://www.w3cschool.cn/article/49843893.html
操作步骤:
结果:
1-4 maven就近优先原则用于修改版本号
<dependency>
    <groupId>org.springframework.boot</groupId>
    <artifactId>spring-boot-starter-web</artifactId>
</dependency>
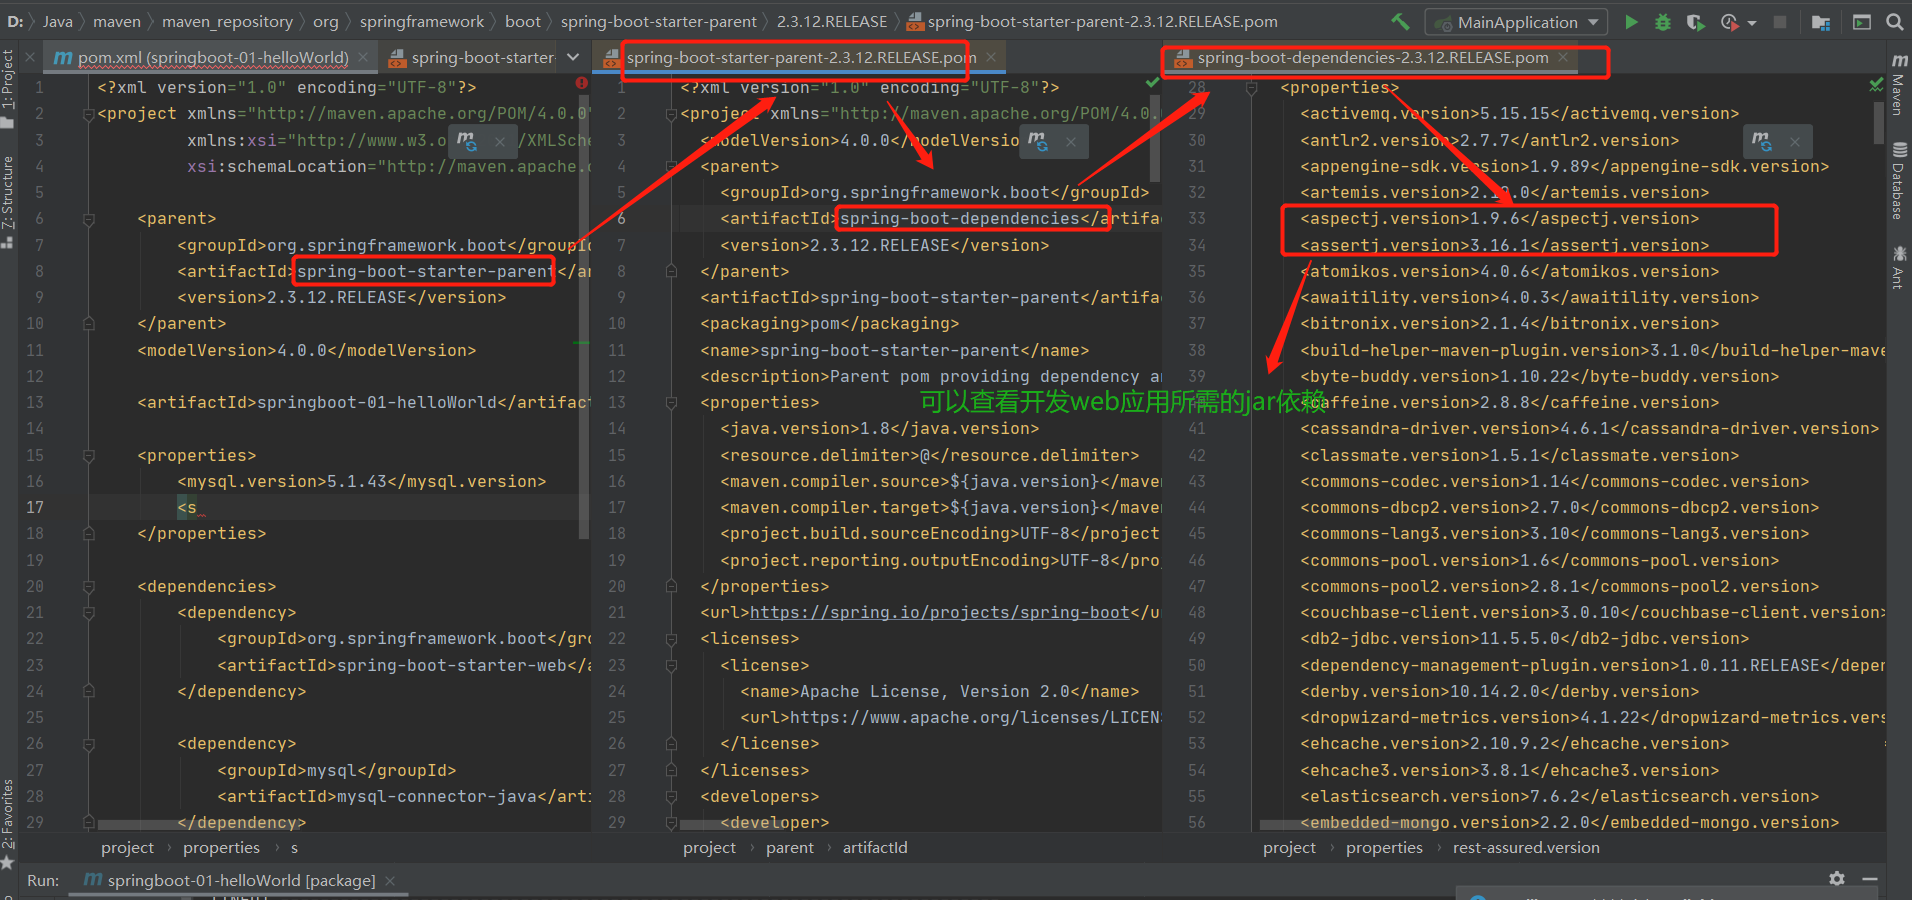
解决问题:
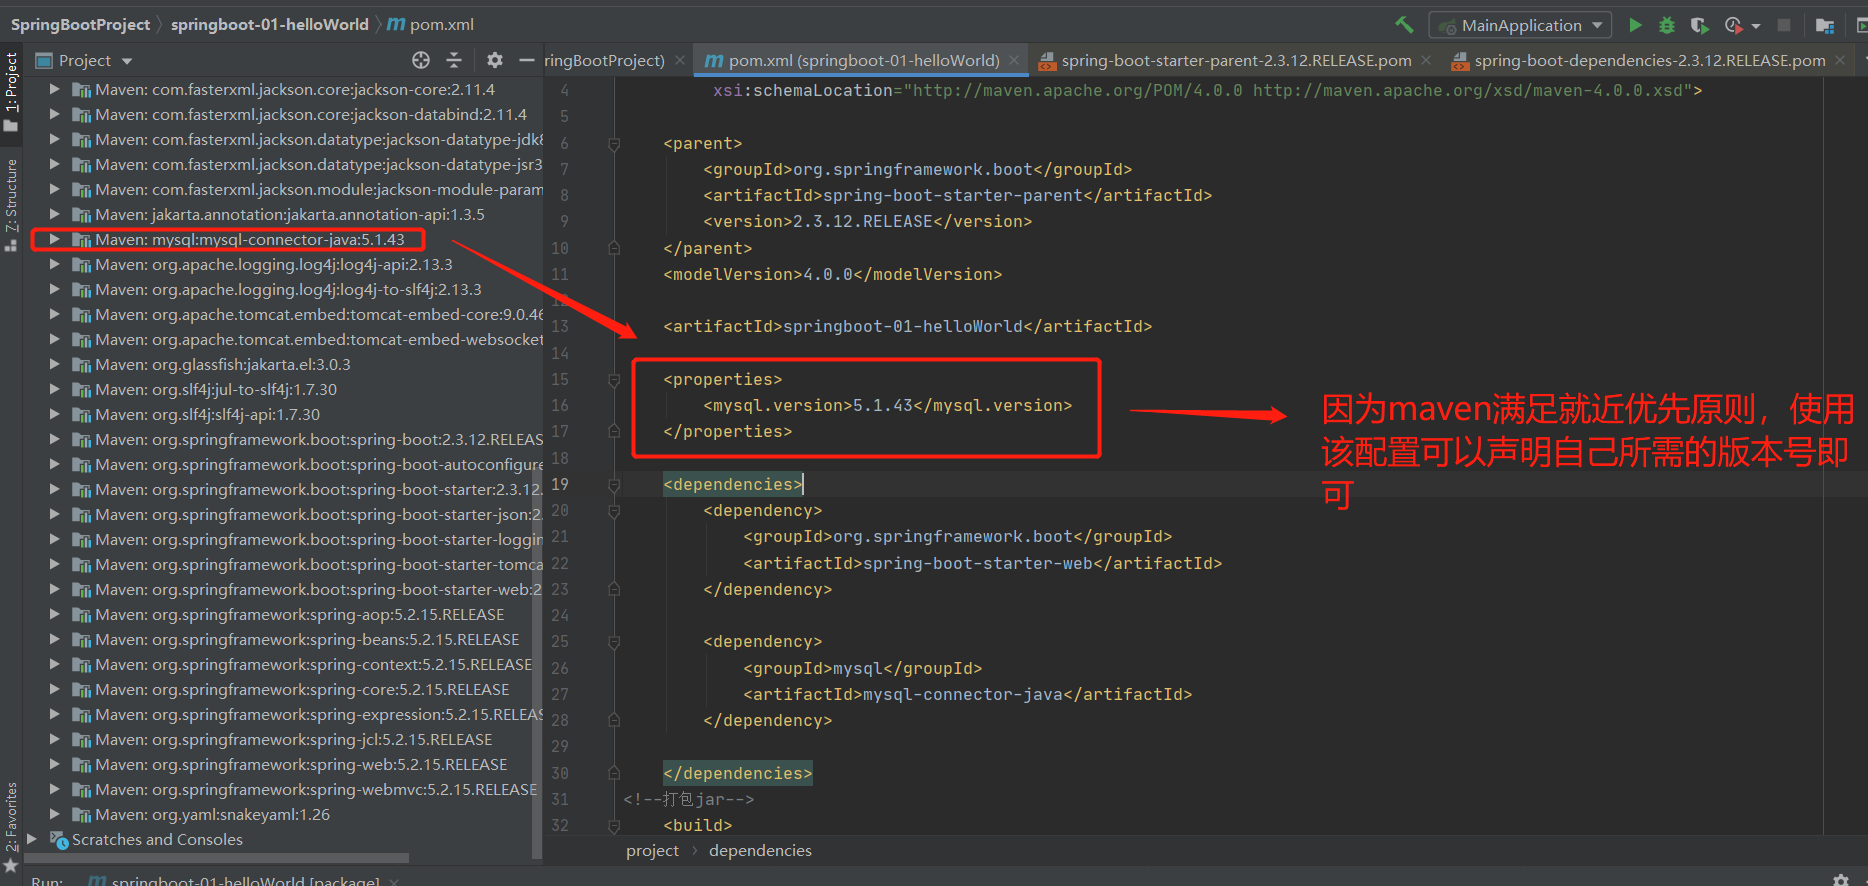
对于以上的springboot依赖,spring-boot-starter-web为我们自动导入web开发所需的jar包,但是有可能我们项目开发中需要更改jar包的版本号。
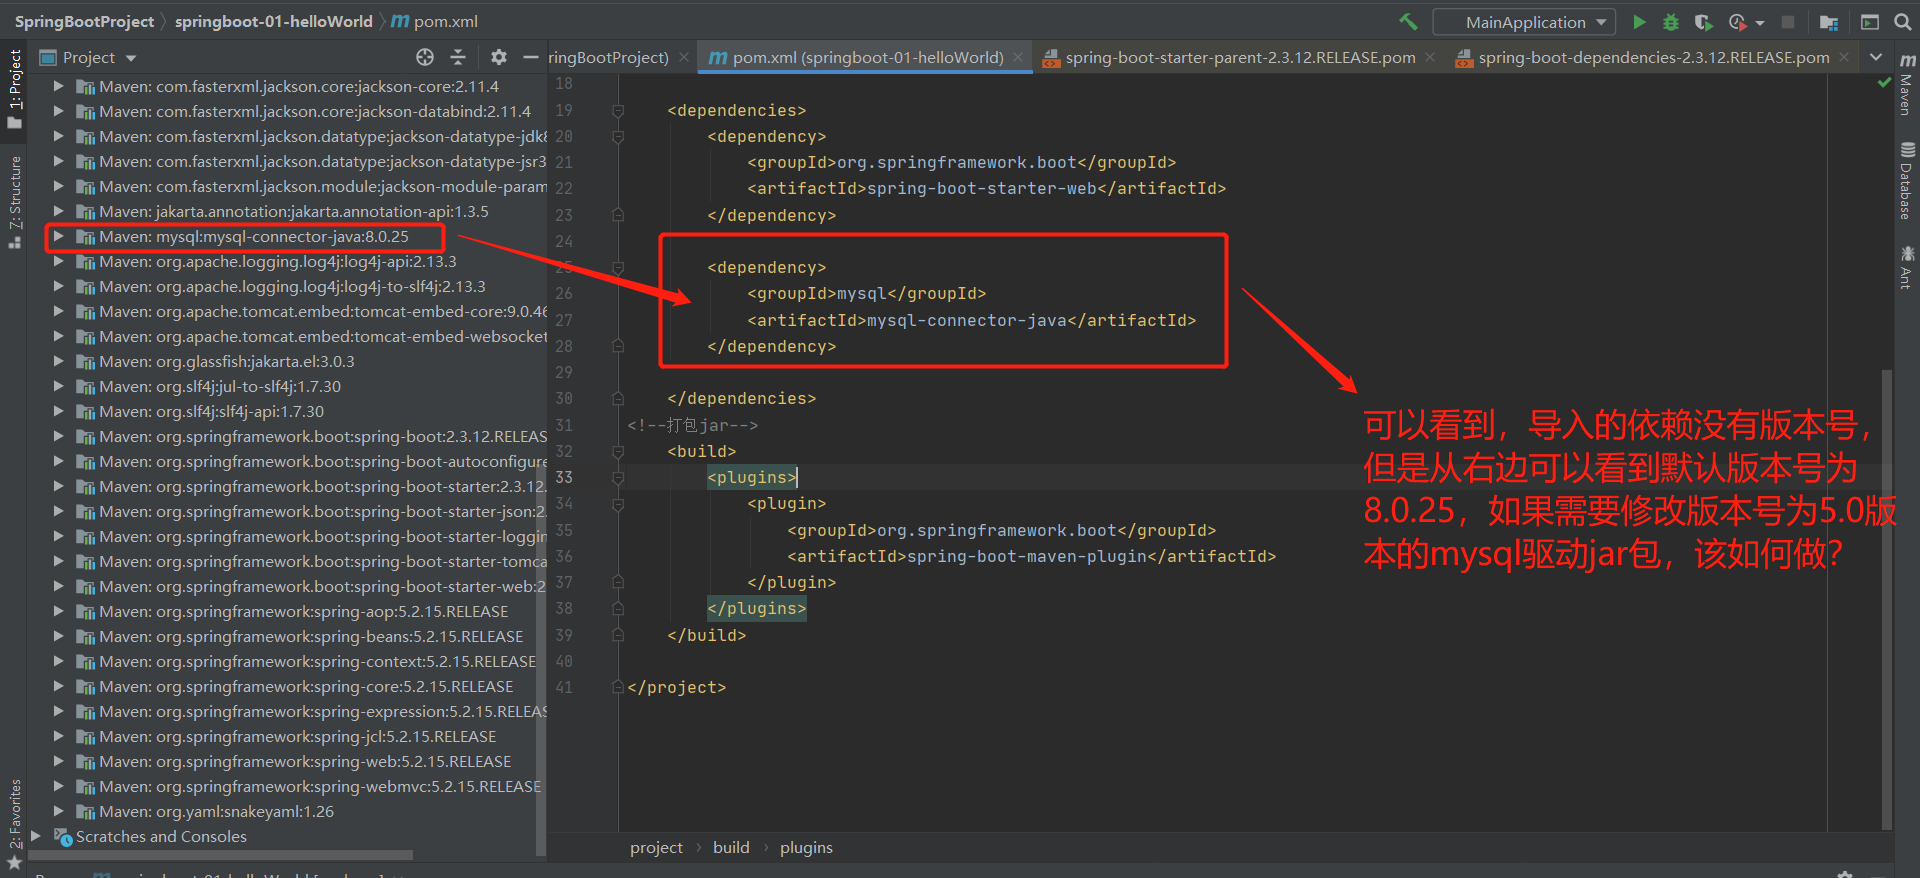
补充:该8.0版本的就是父项目依赖管理的依赖版本。
1-5 开发导入starter场景启动器
官网:https://docs.spring.io/spring-boot/docs/2.3.12.RELEASE/reference/html/using-spring-boot.html#using-boot-starter
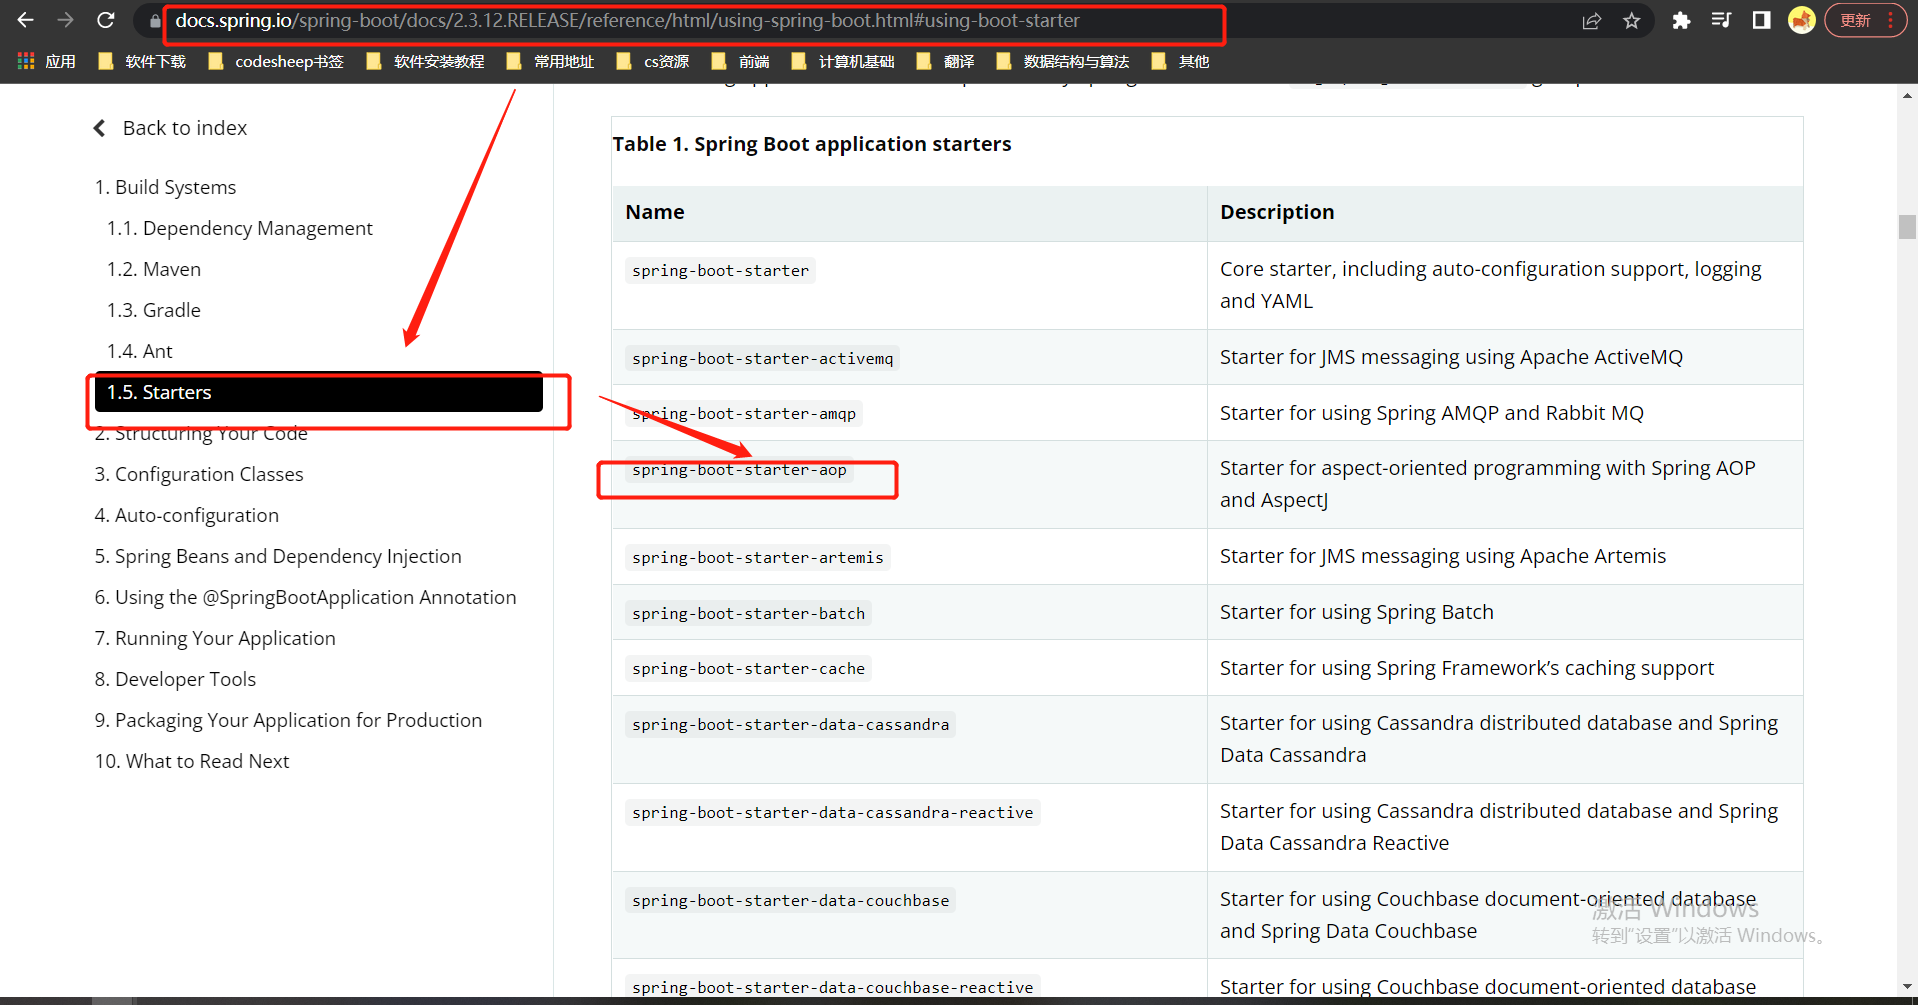
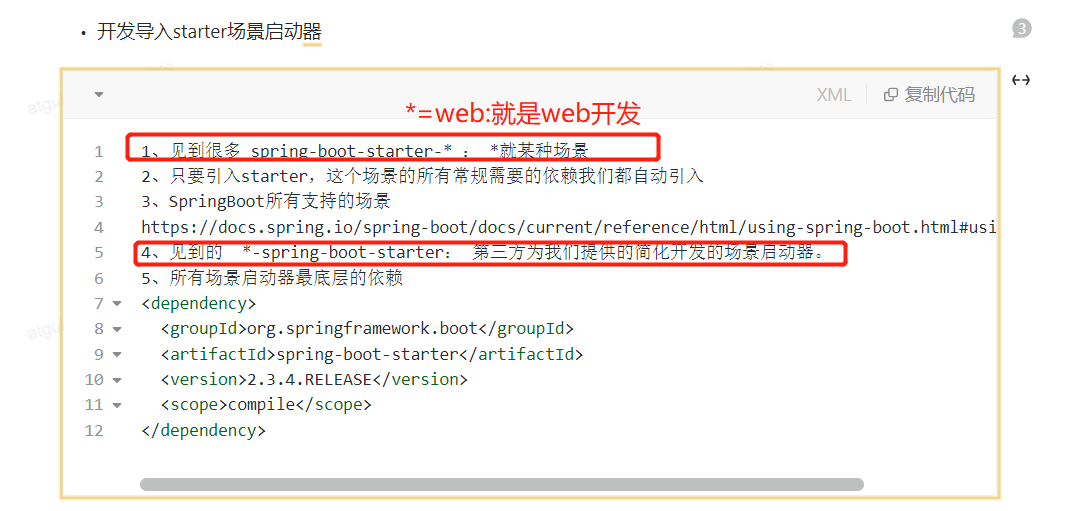
说明:对于某一种场景所需要导入的所有jar包
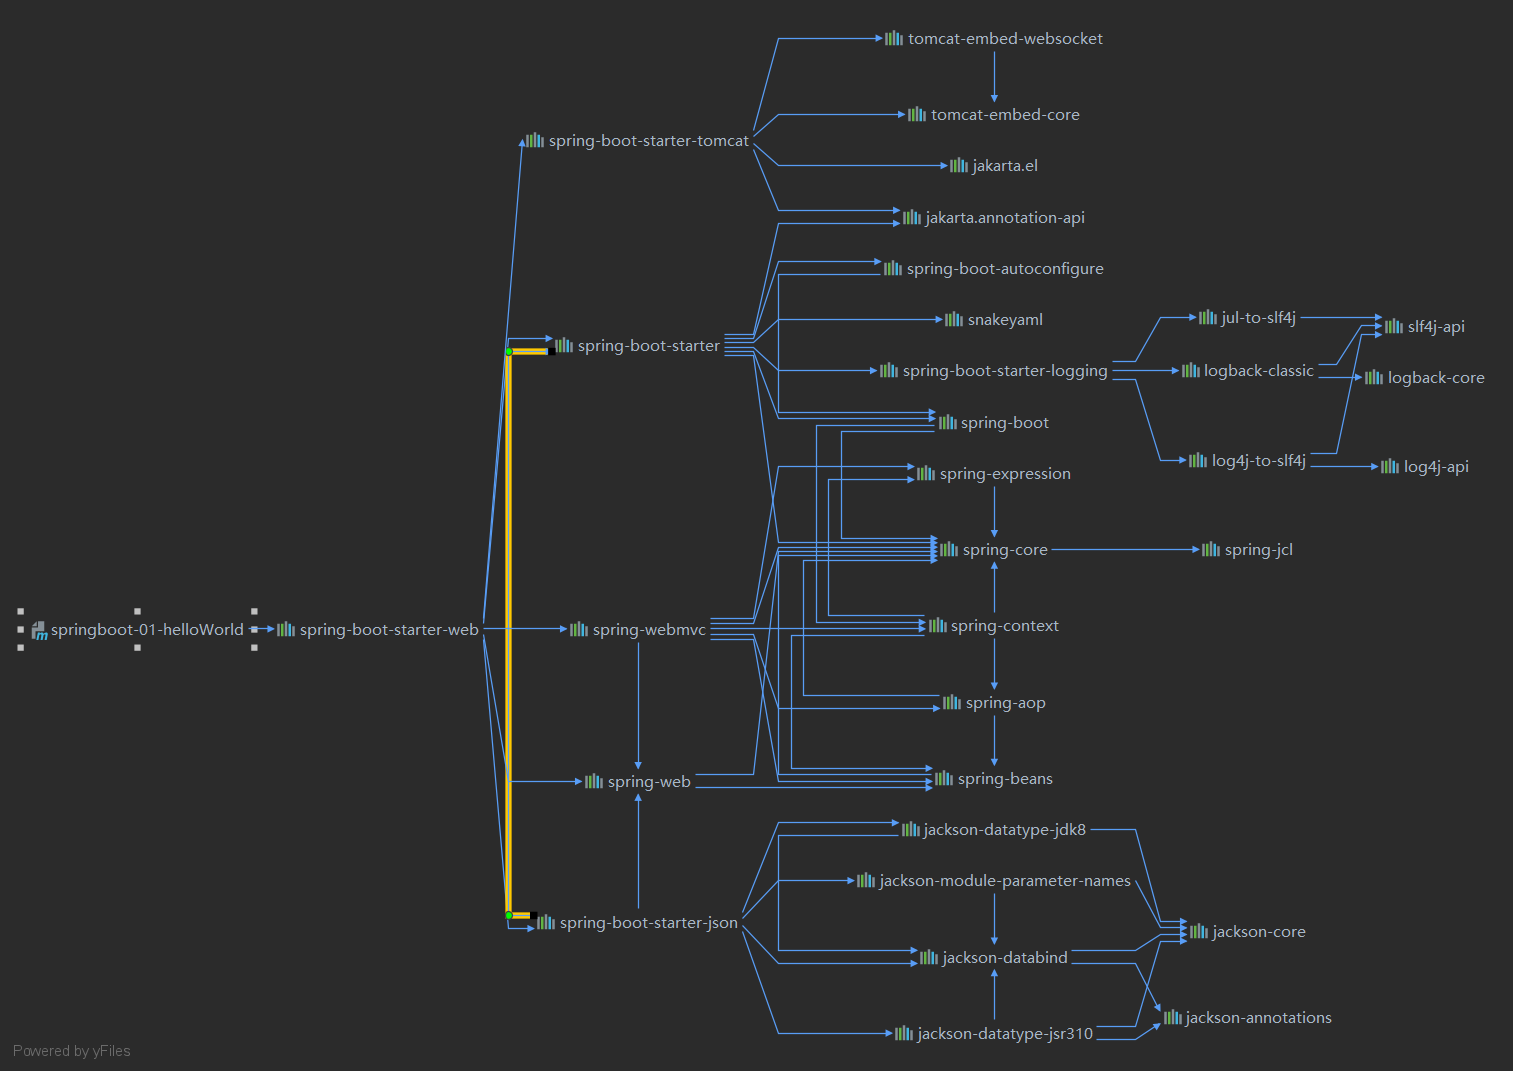
以下是spring-boot-starter-web所导入的依赖图示:
注意:

所谓非版本仲裁:eg:spring-boot-starter-web依赖中,没有开发所需的jar包,在导入外部jar包时,需要写明版本号。(比如:mysql依赖的导入)
1-6 基础入门---自动配置特性
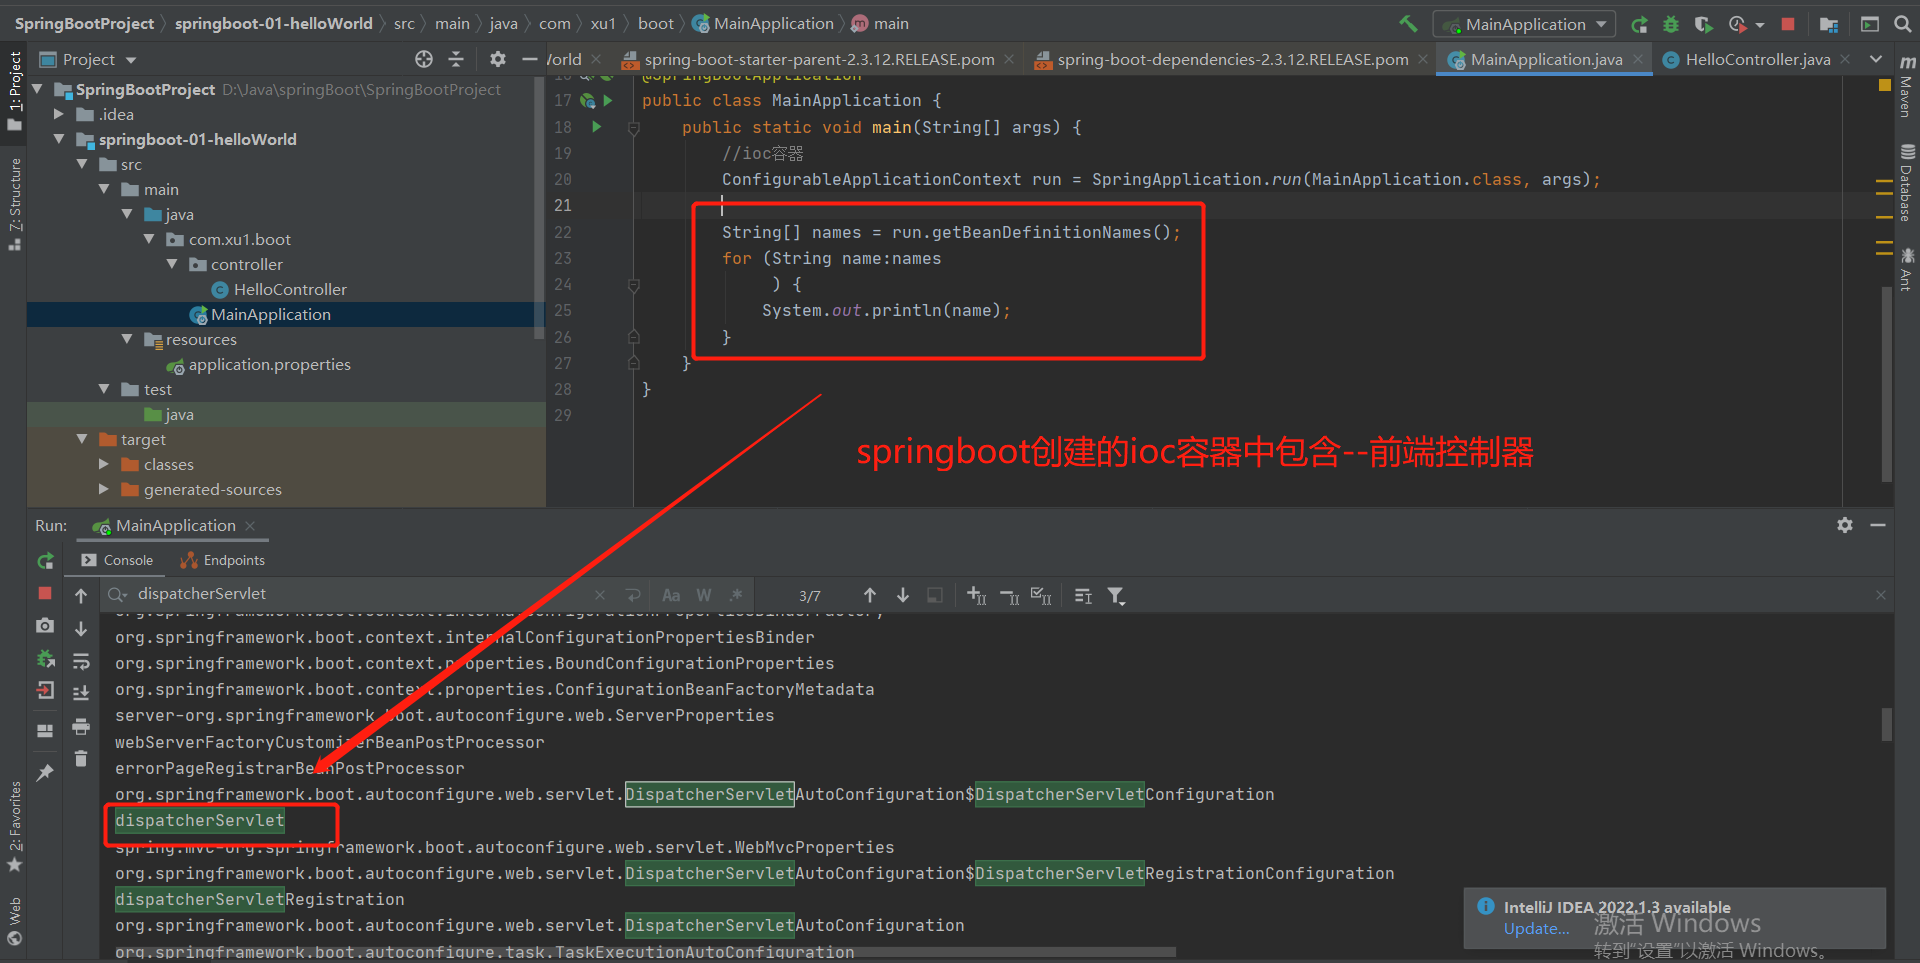
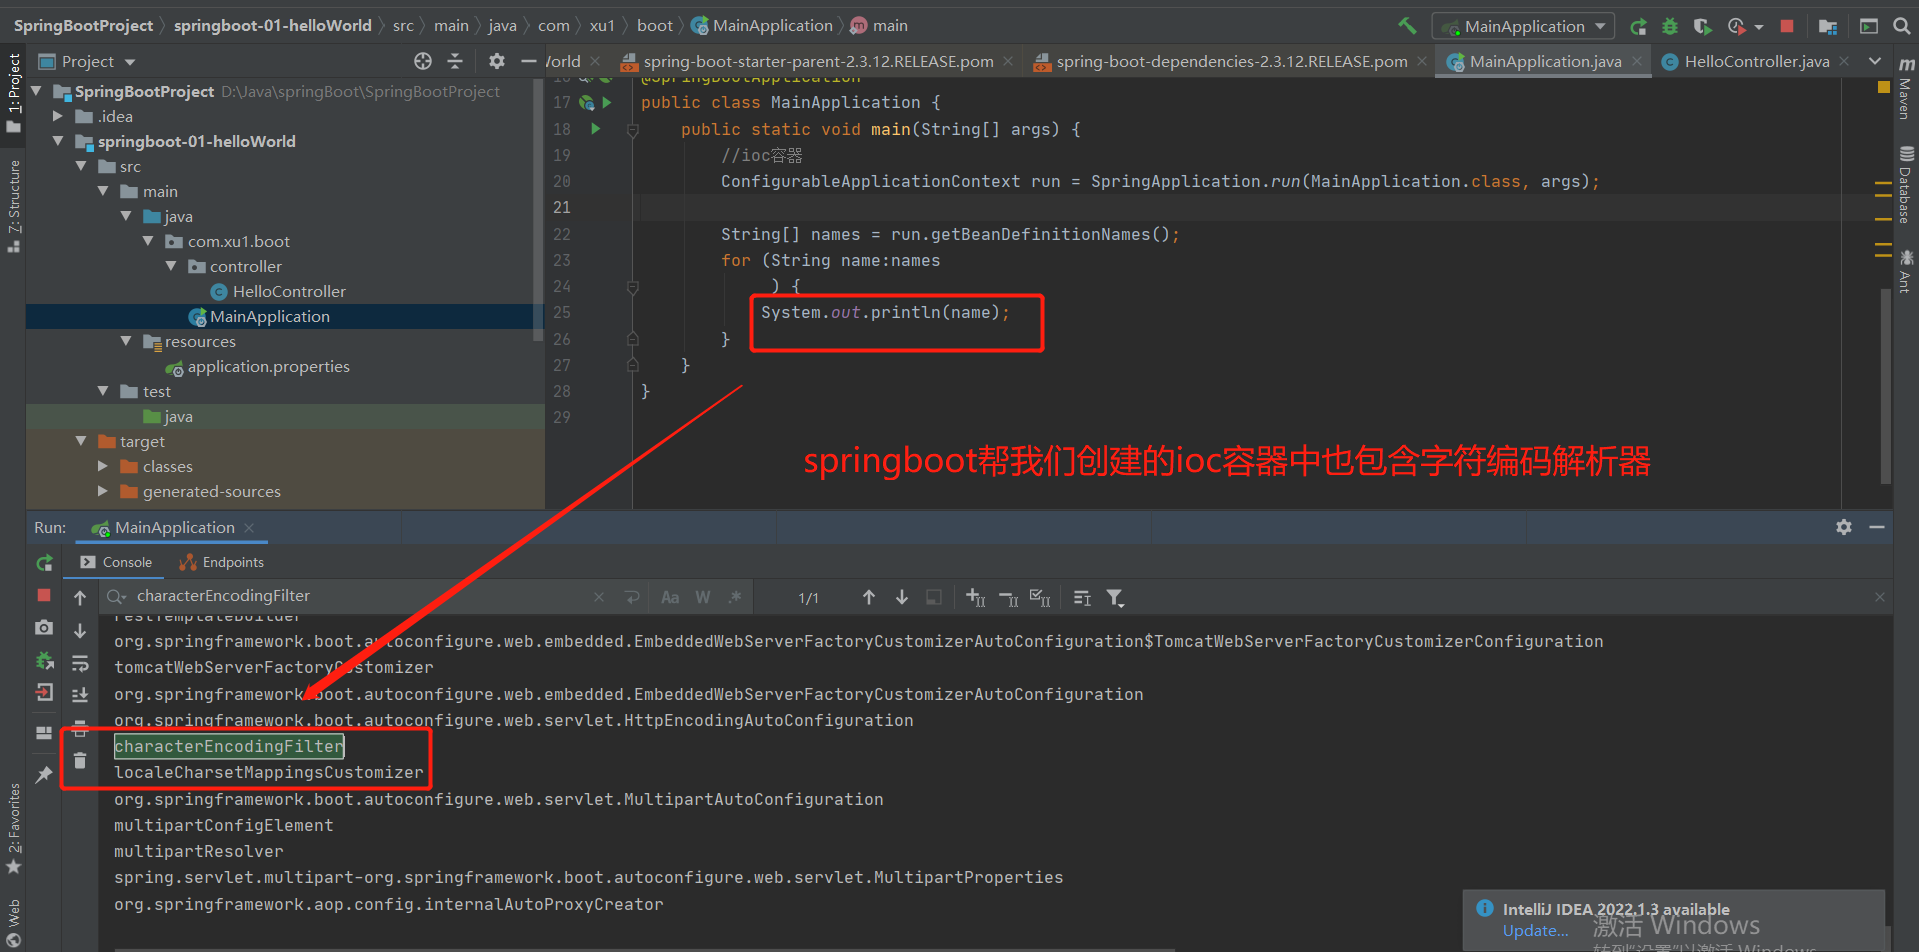
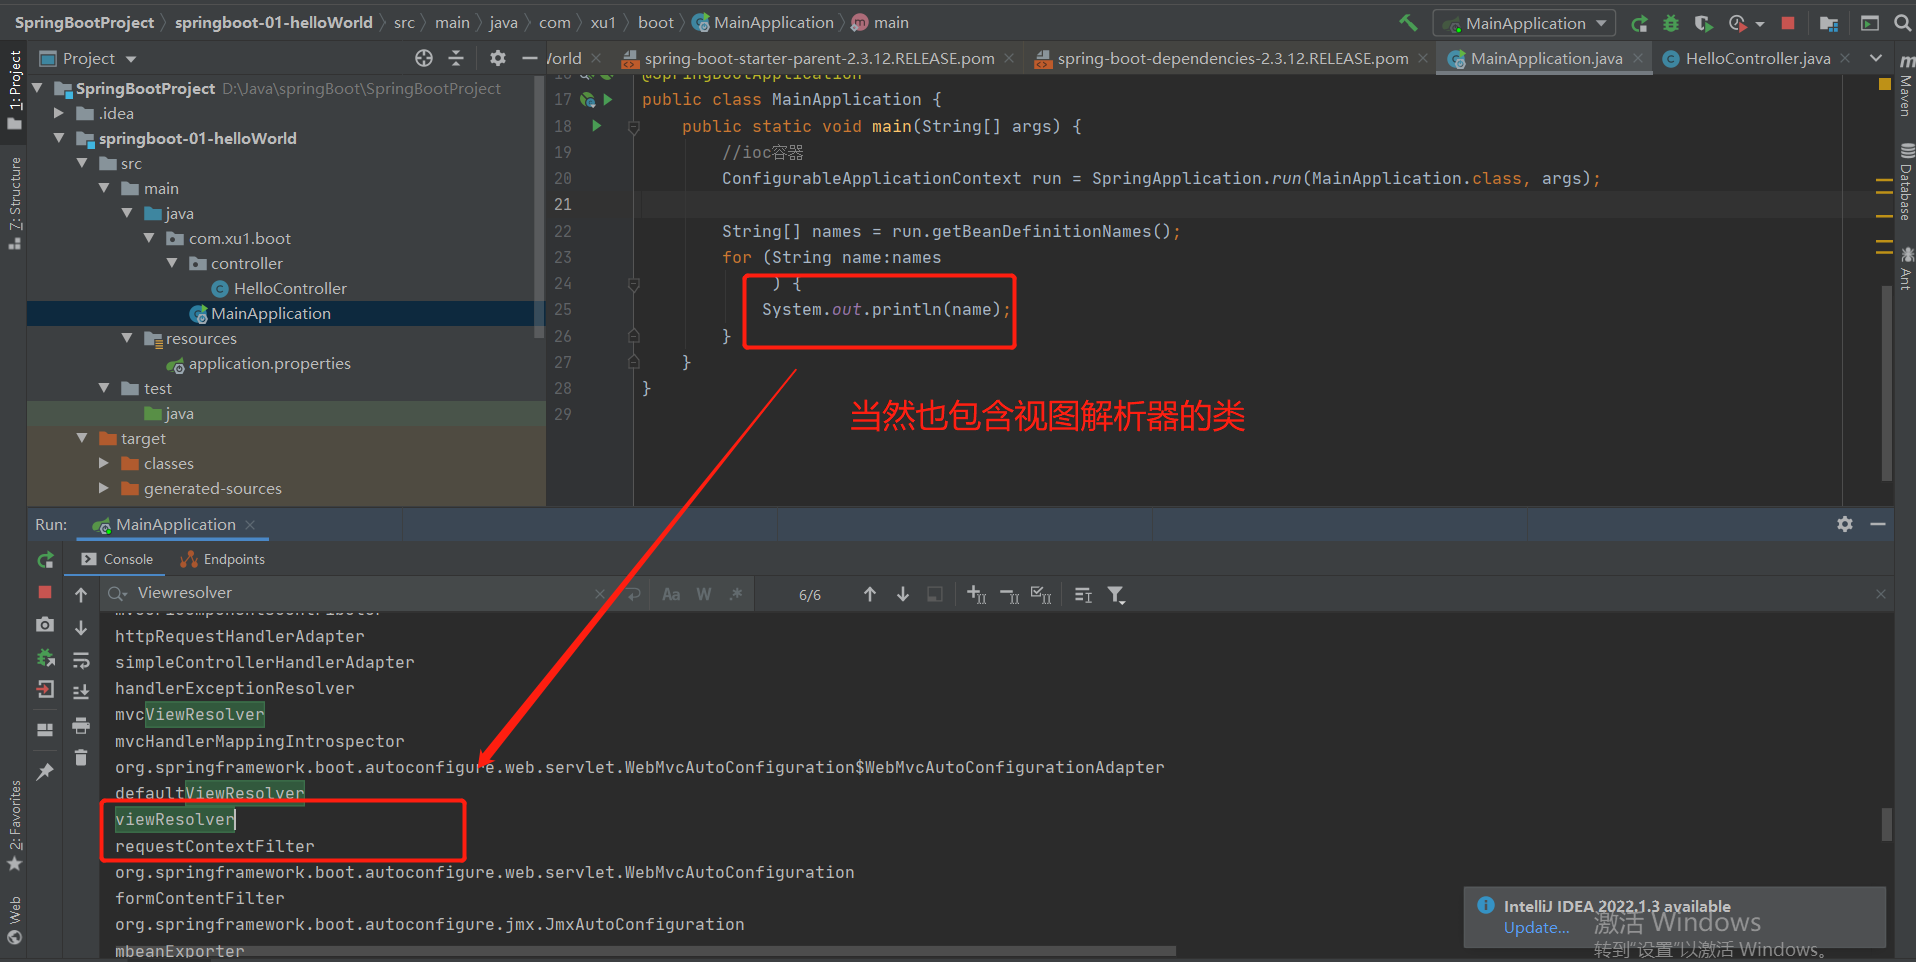
1.默认扫描的包
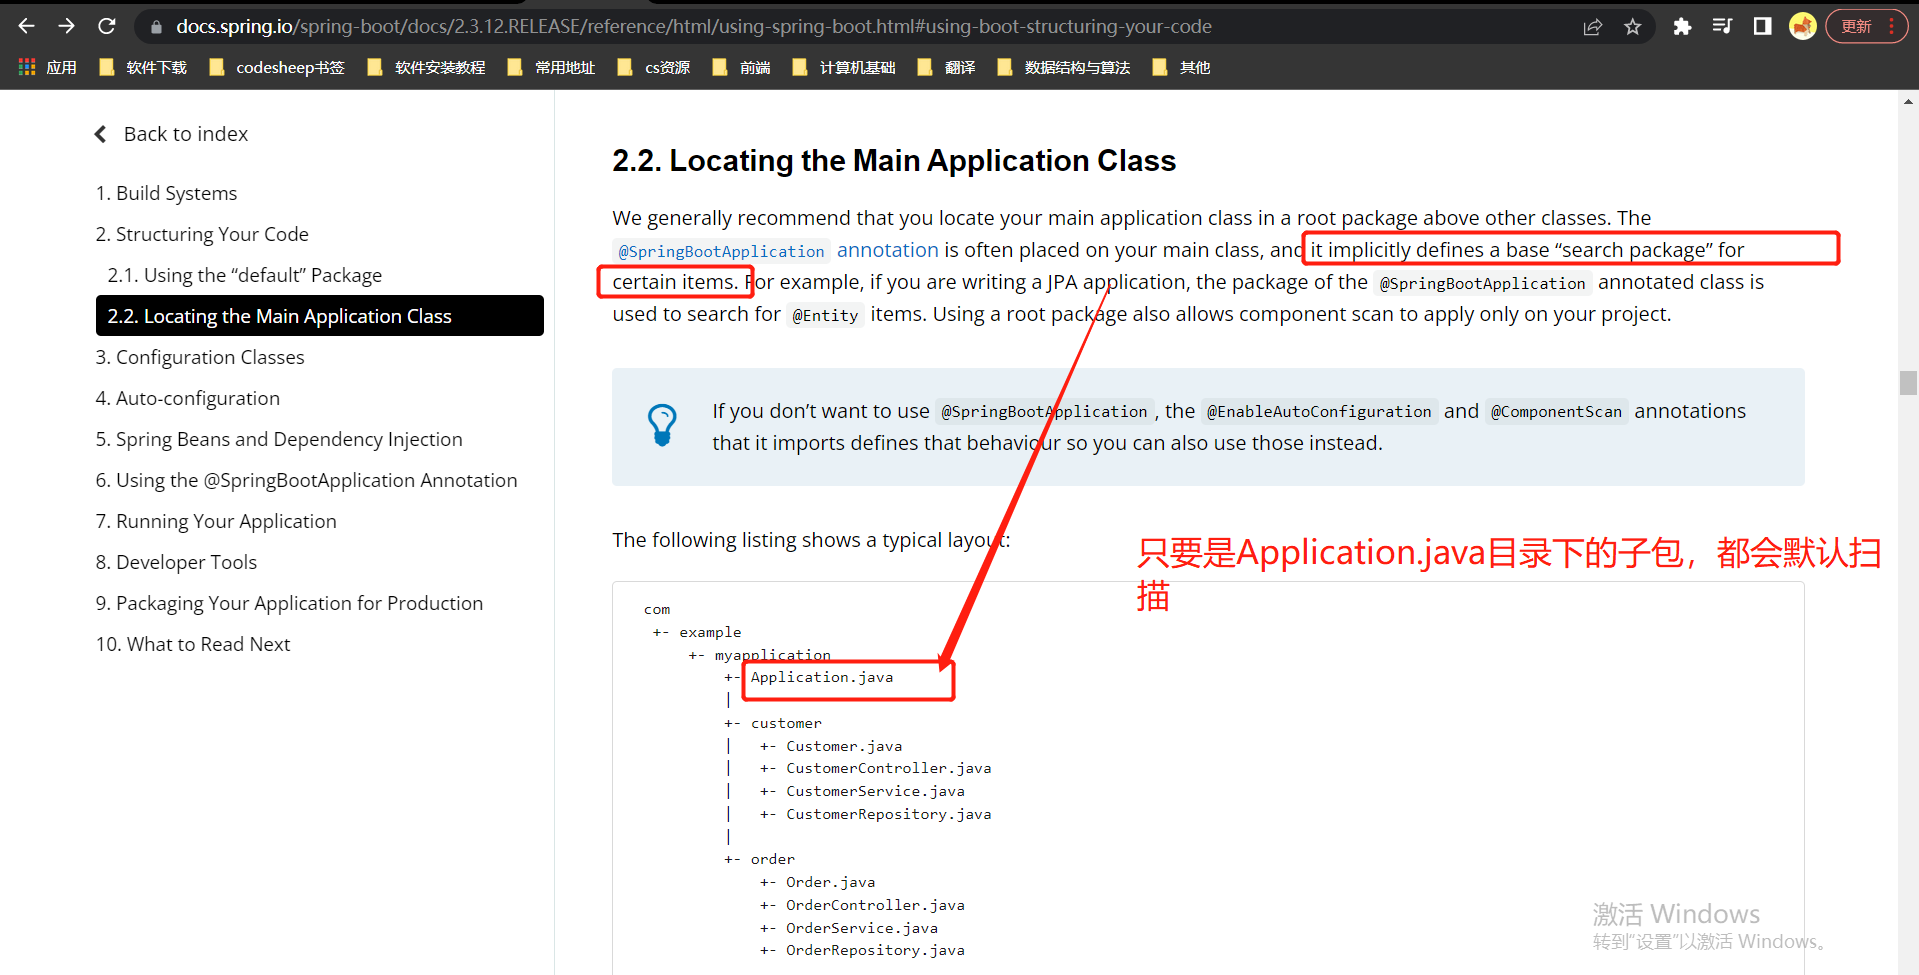
更正:只要是与Application.java是同一个目录,或者是其子包中的类,都会自动扫描
验证:如果不是与Application.java是同一个目录,或者是其子包中的类,那么就不会自动扫描
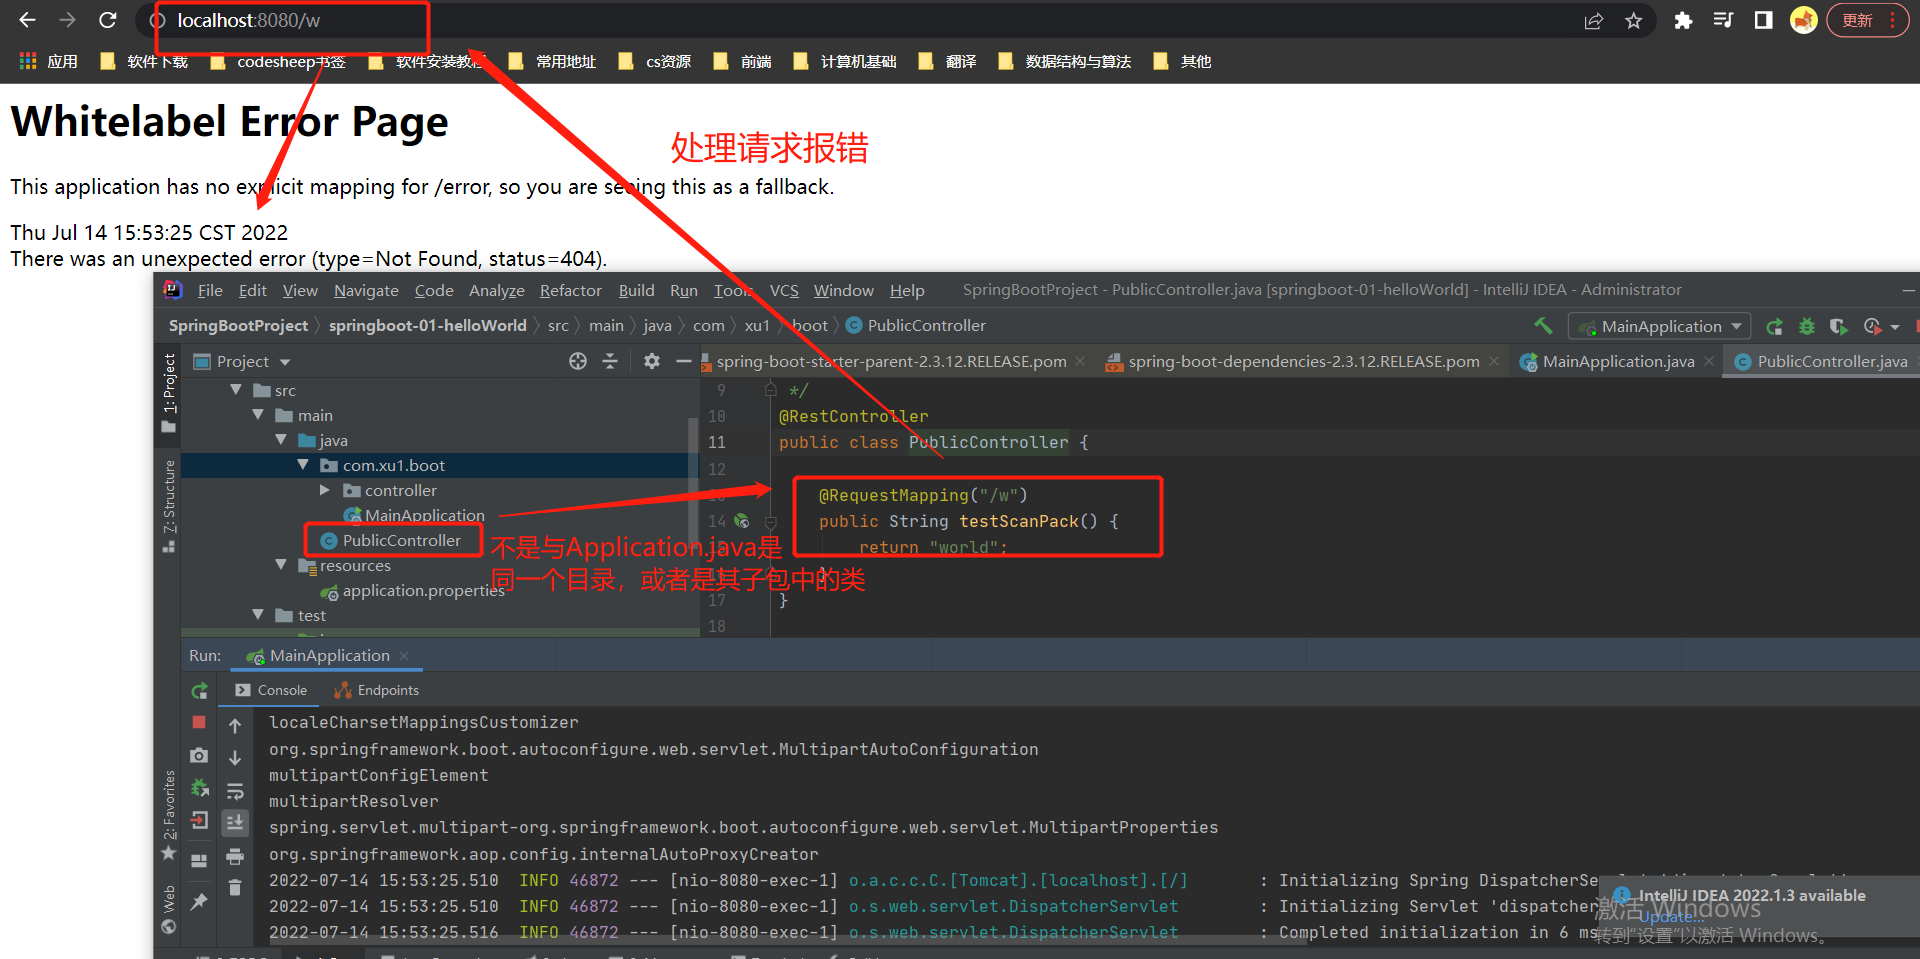
得证.
1.对于默认包扫描不到的类,解决办法如下:
法1:将包扫描层级扩大
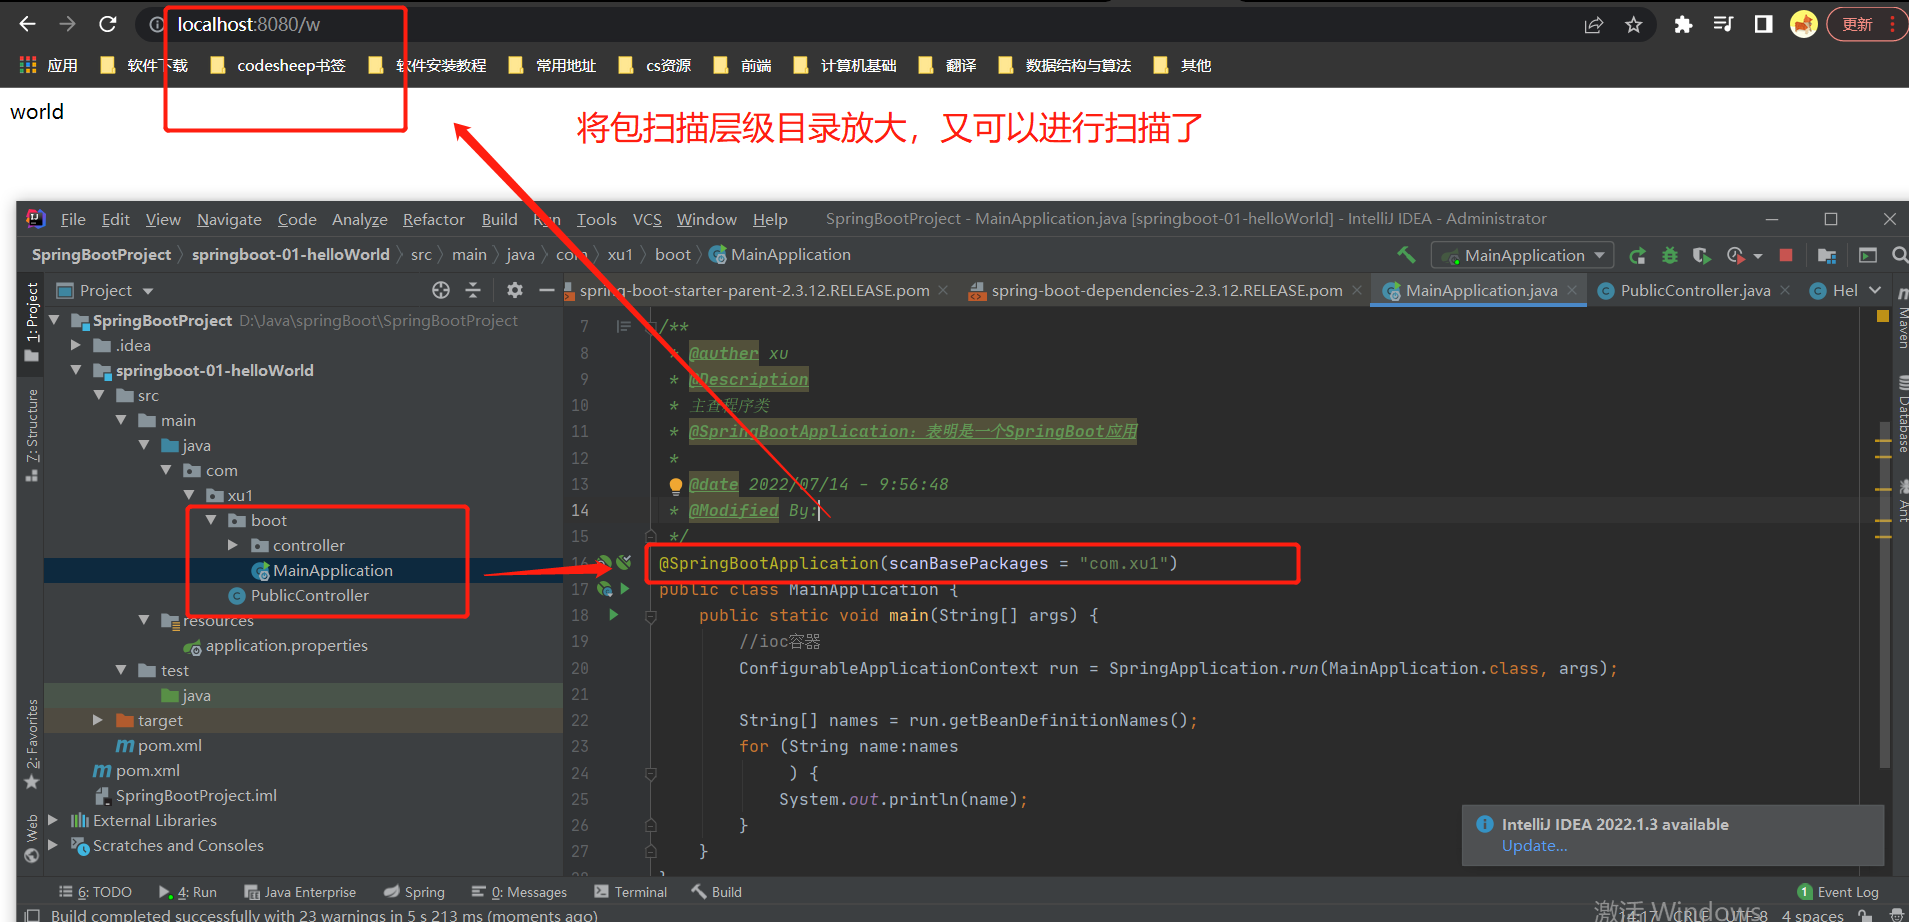
法2:将包扫描层级扩大(使用注解不同)
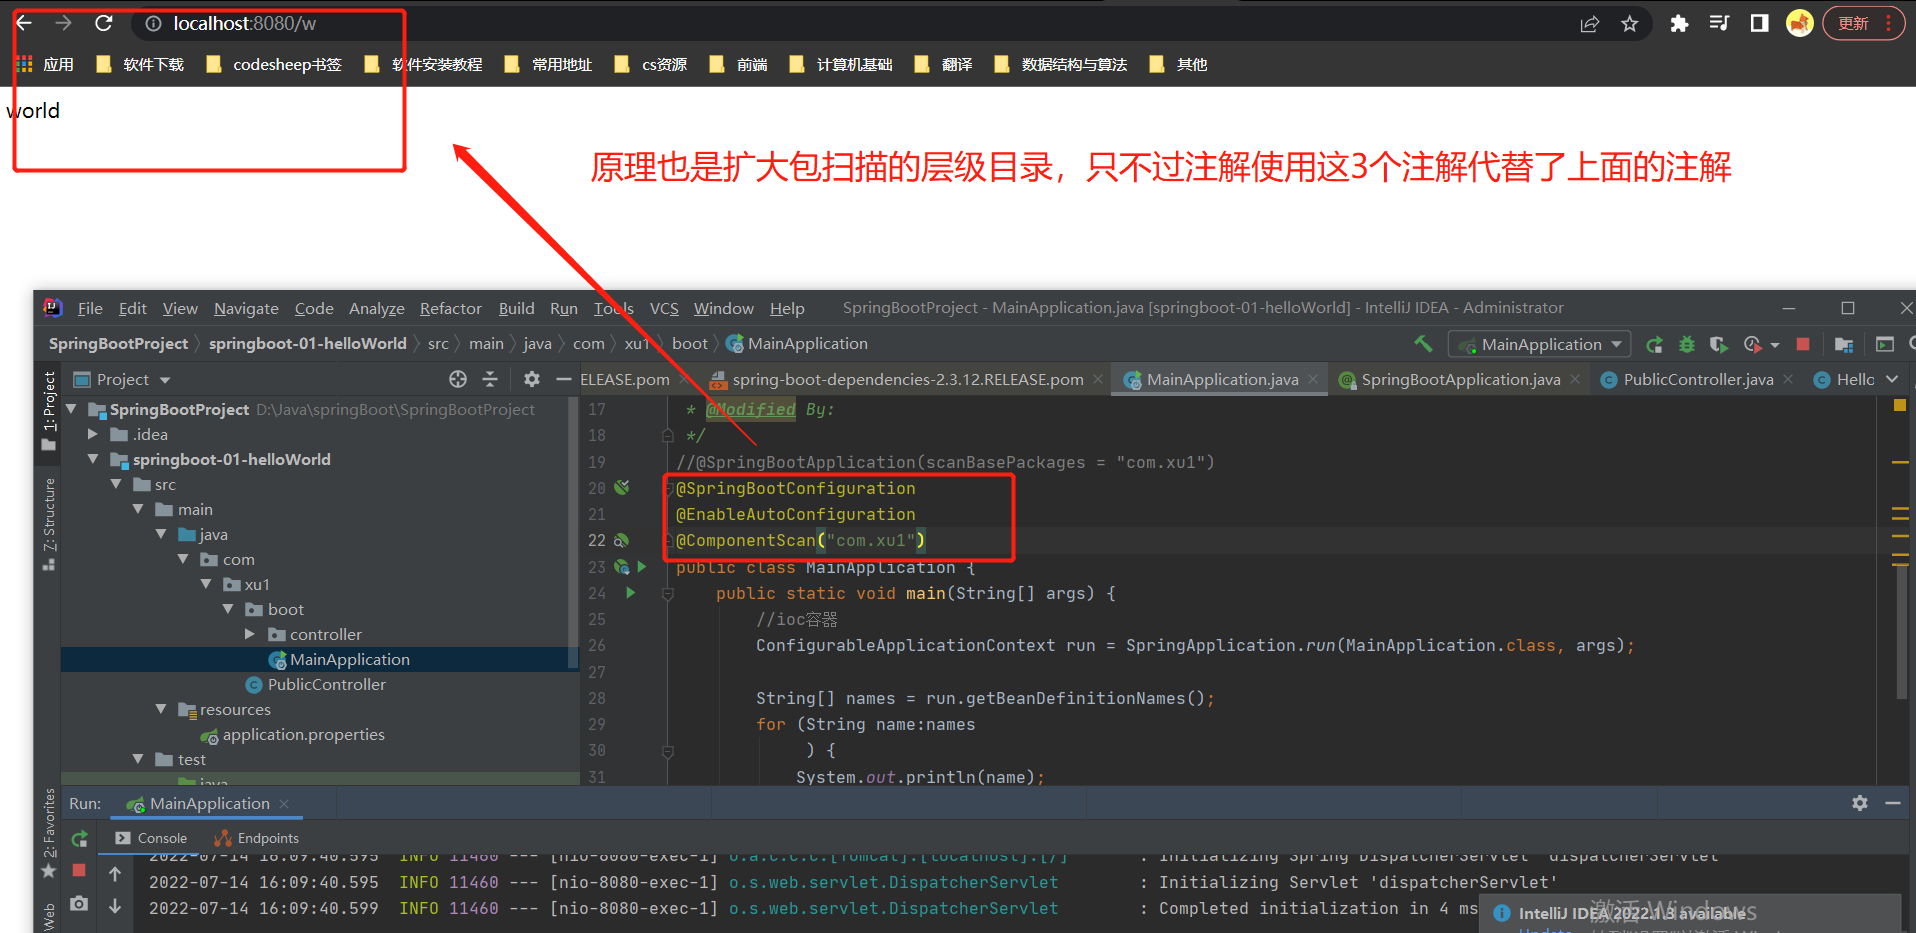
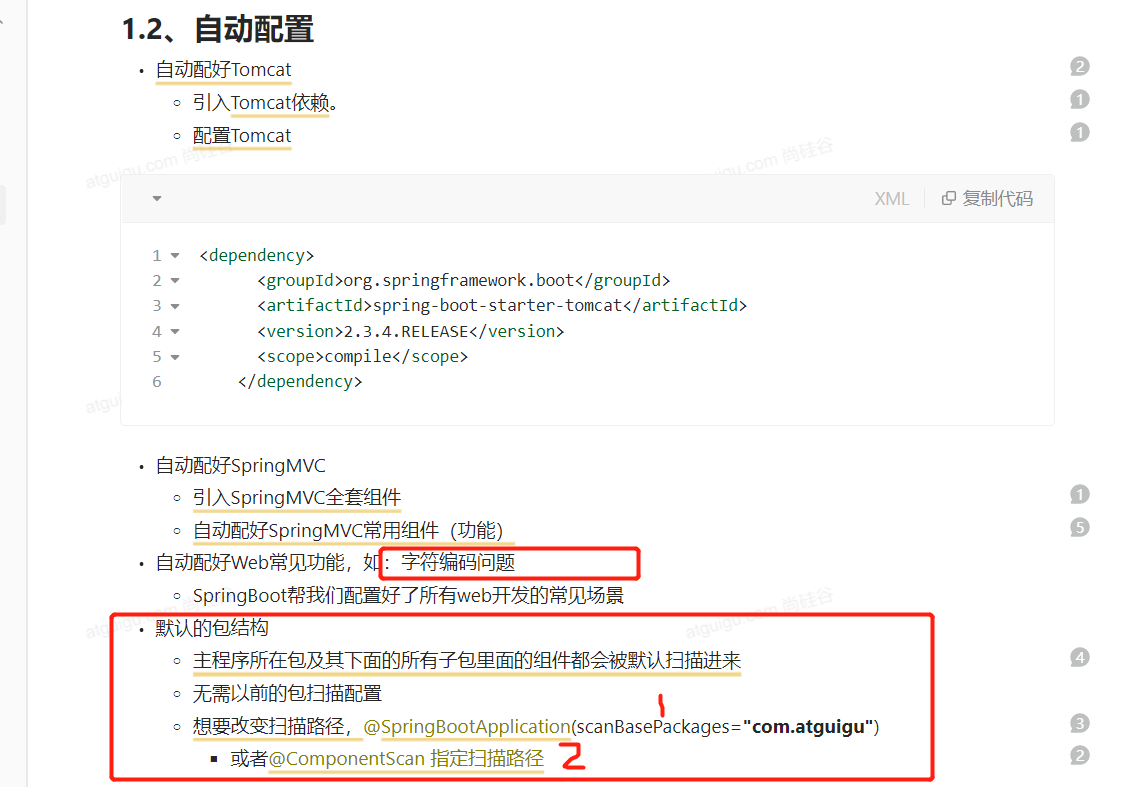
总结:(自动配置按需加载,没有使用的类不加载)

第2章 底层注解
2-1 底层注解之@Configuration
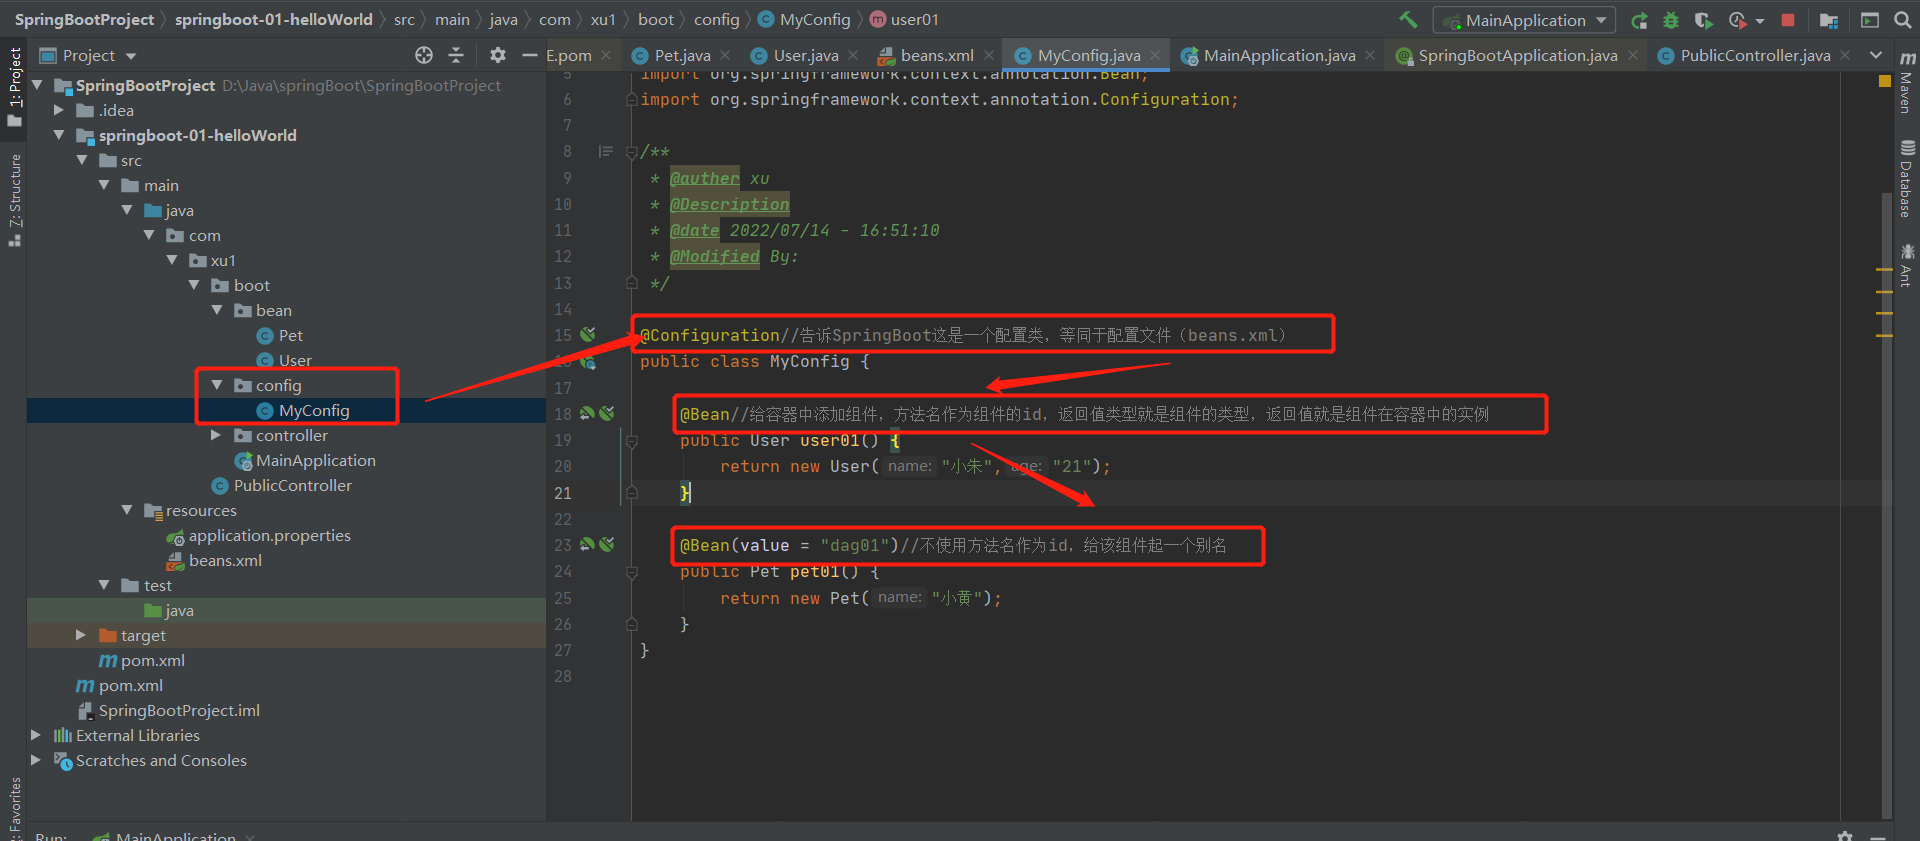
1.验证加入容器中的组件是否是单实例:
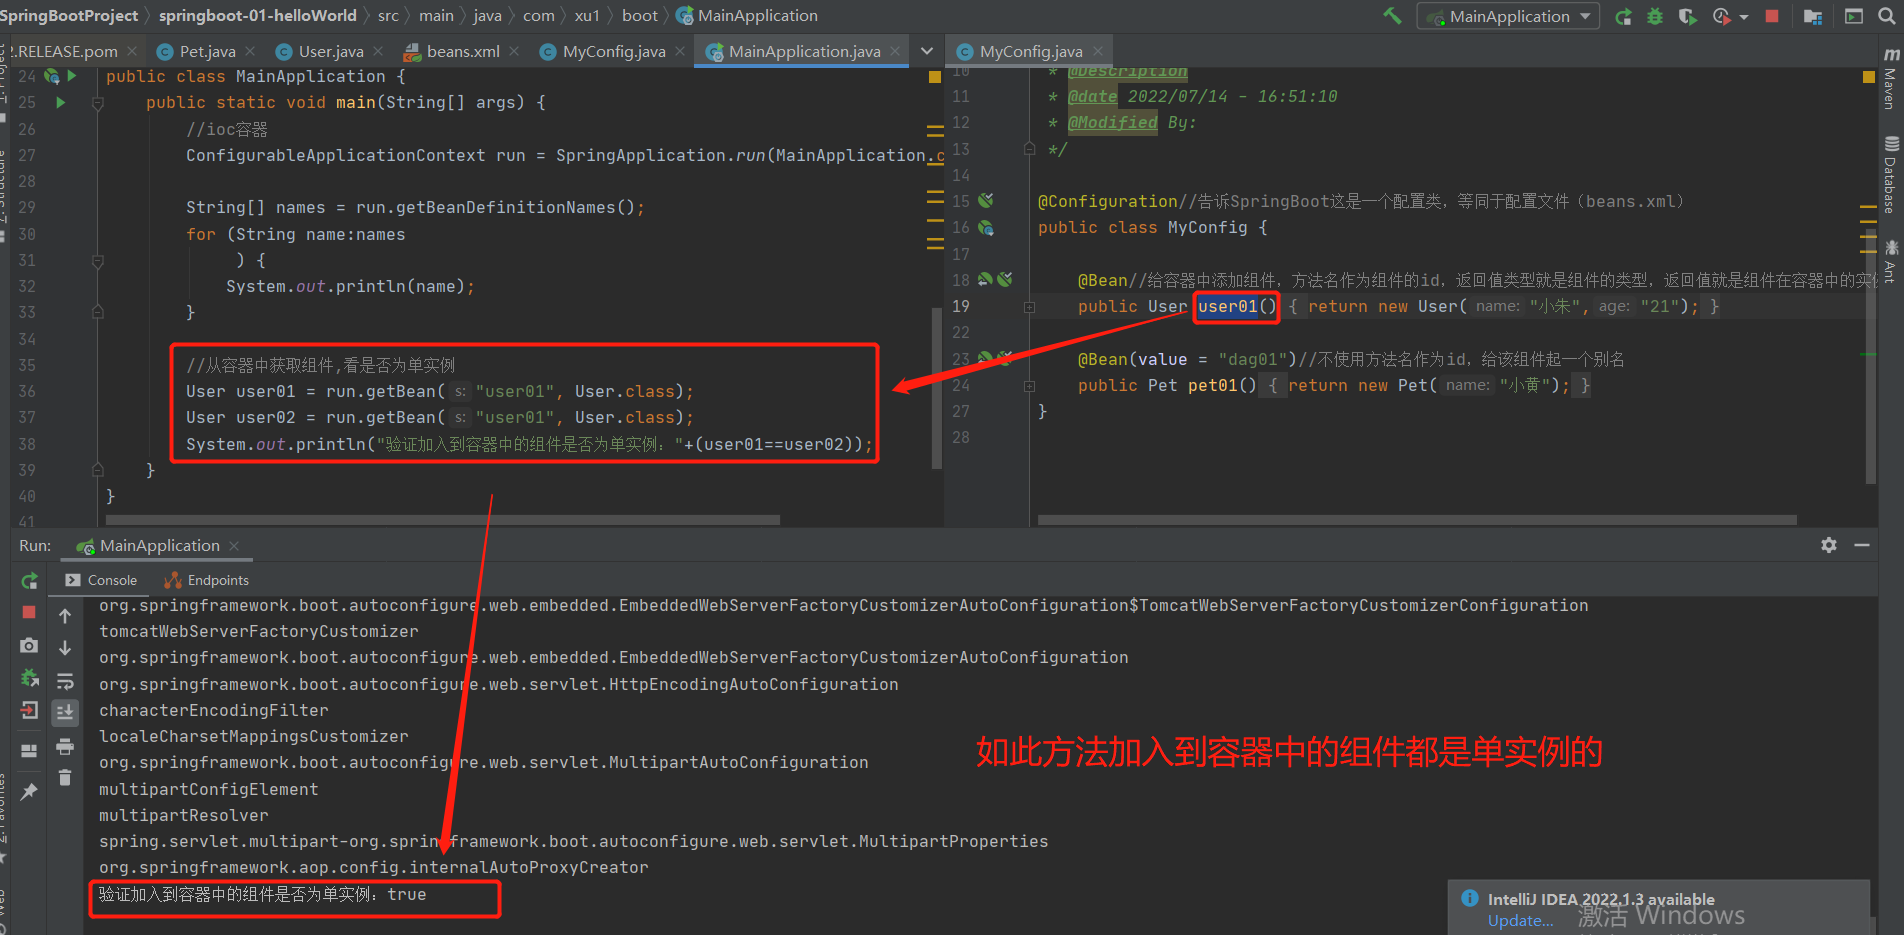
2.验证:配置类本身也是一个组件
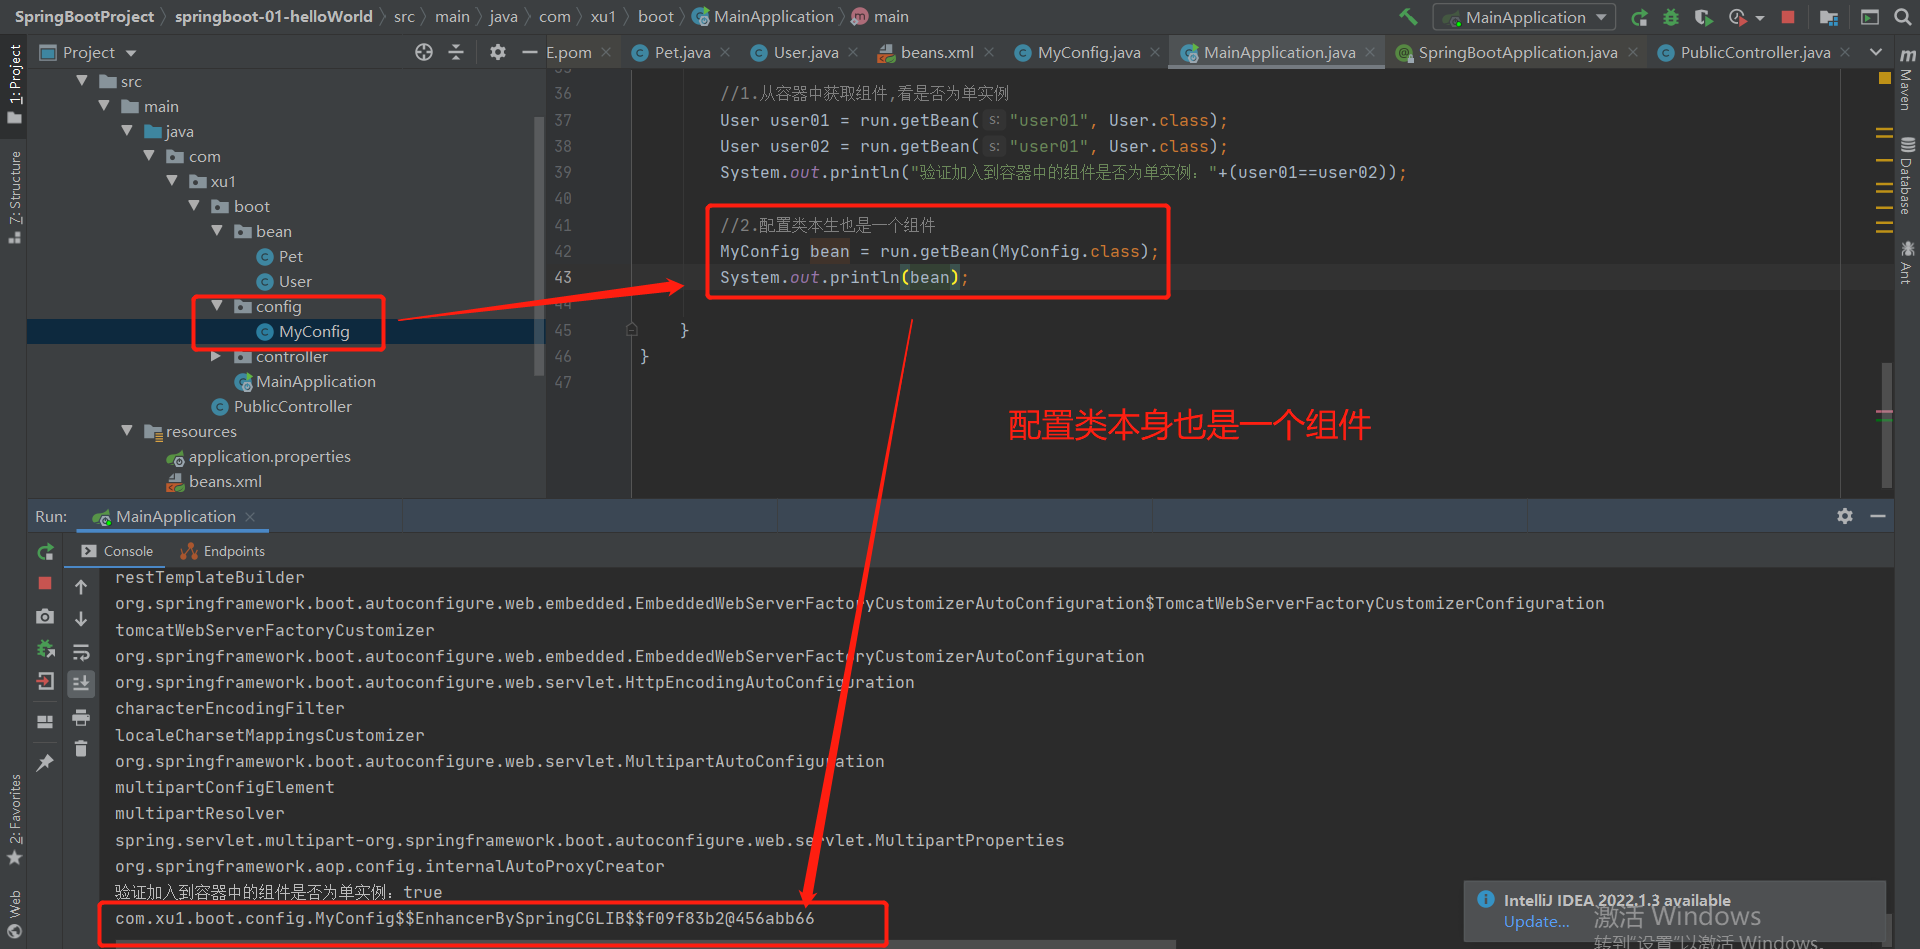
3.bean是一个组件类,调用其中的user01()方法,可以验证返回值都是加载进容器的单实例组件
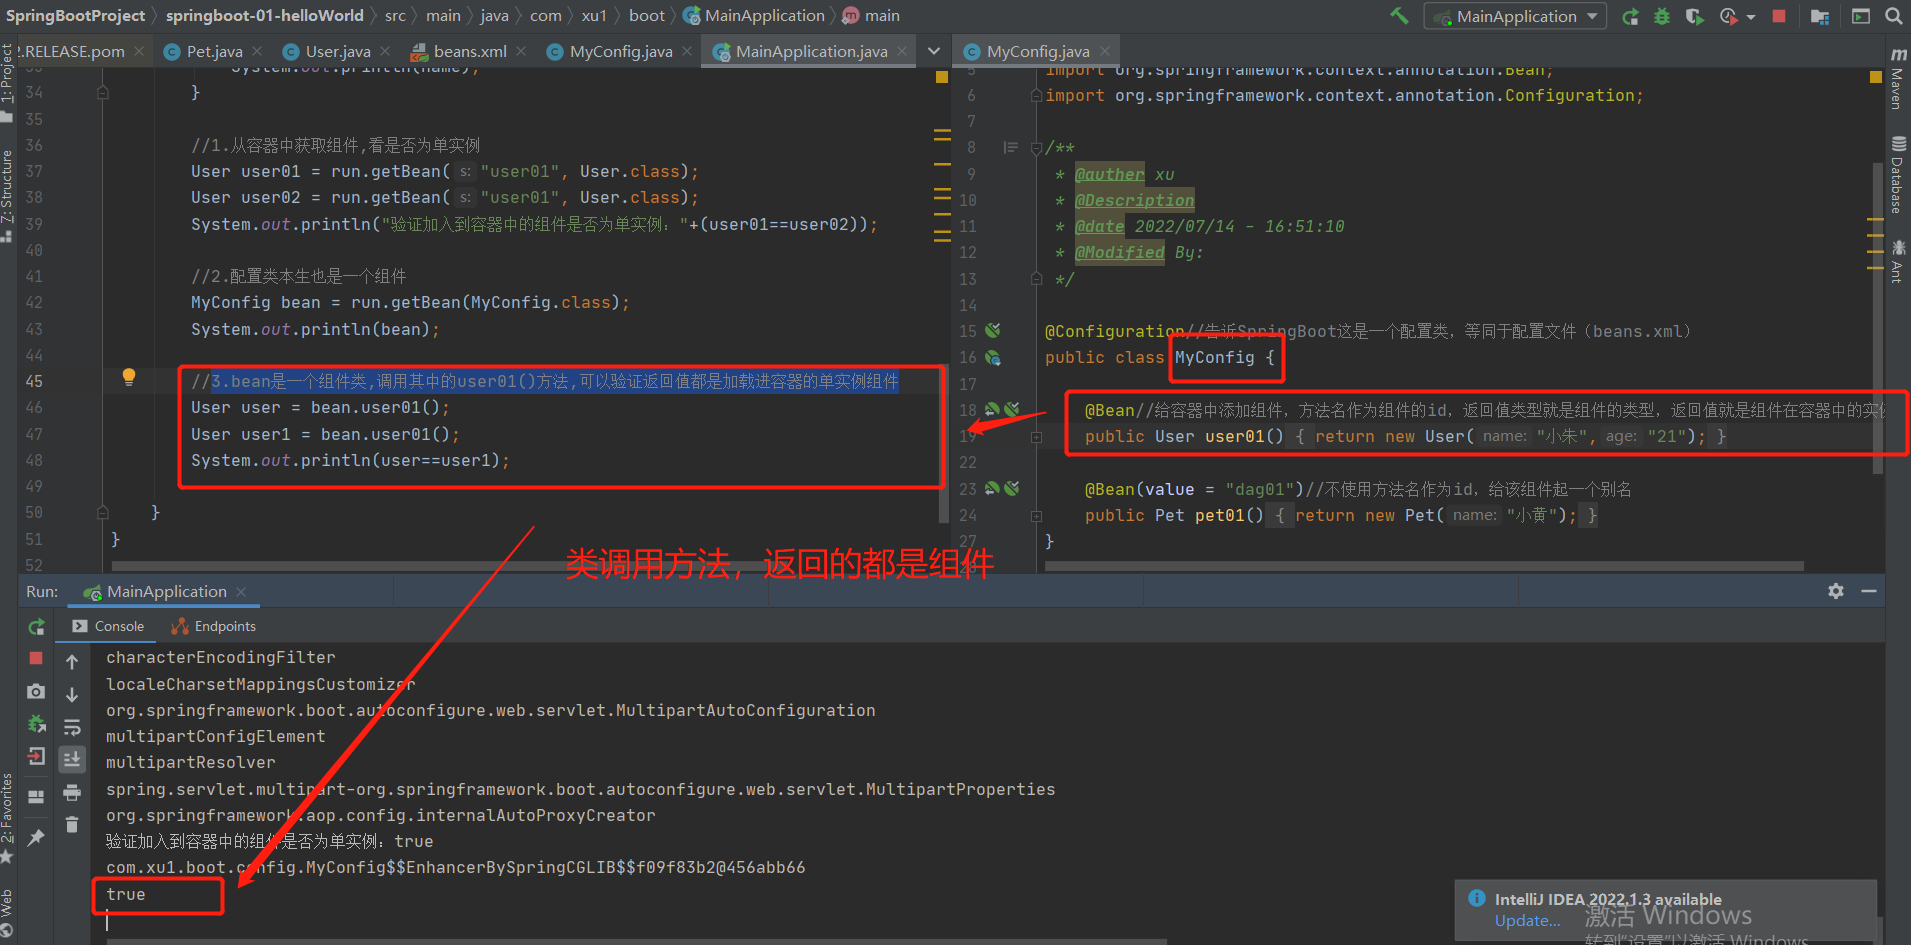
得证。
4.组件依赖的程度---proxyBeanMethods表明:
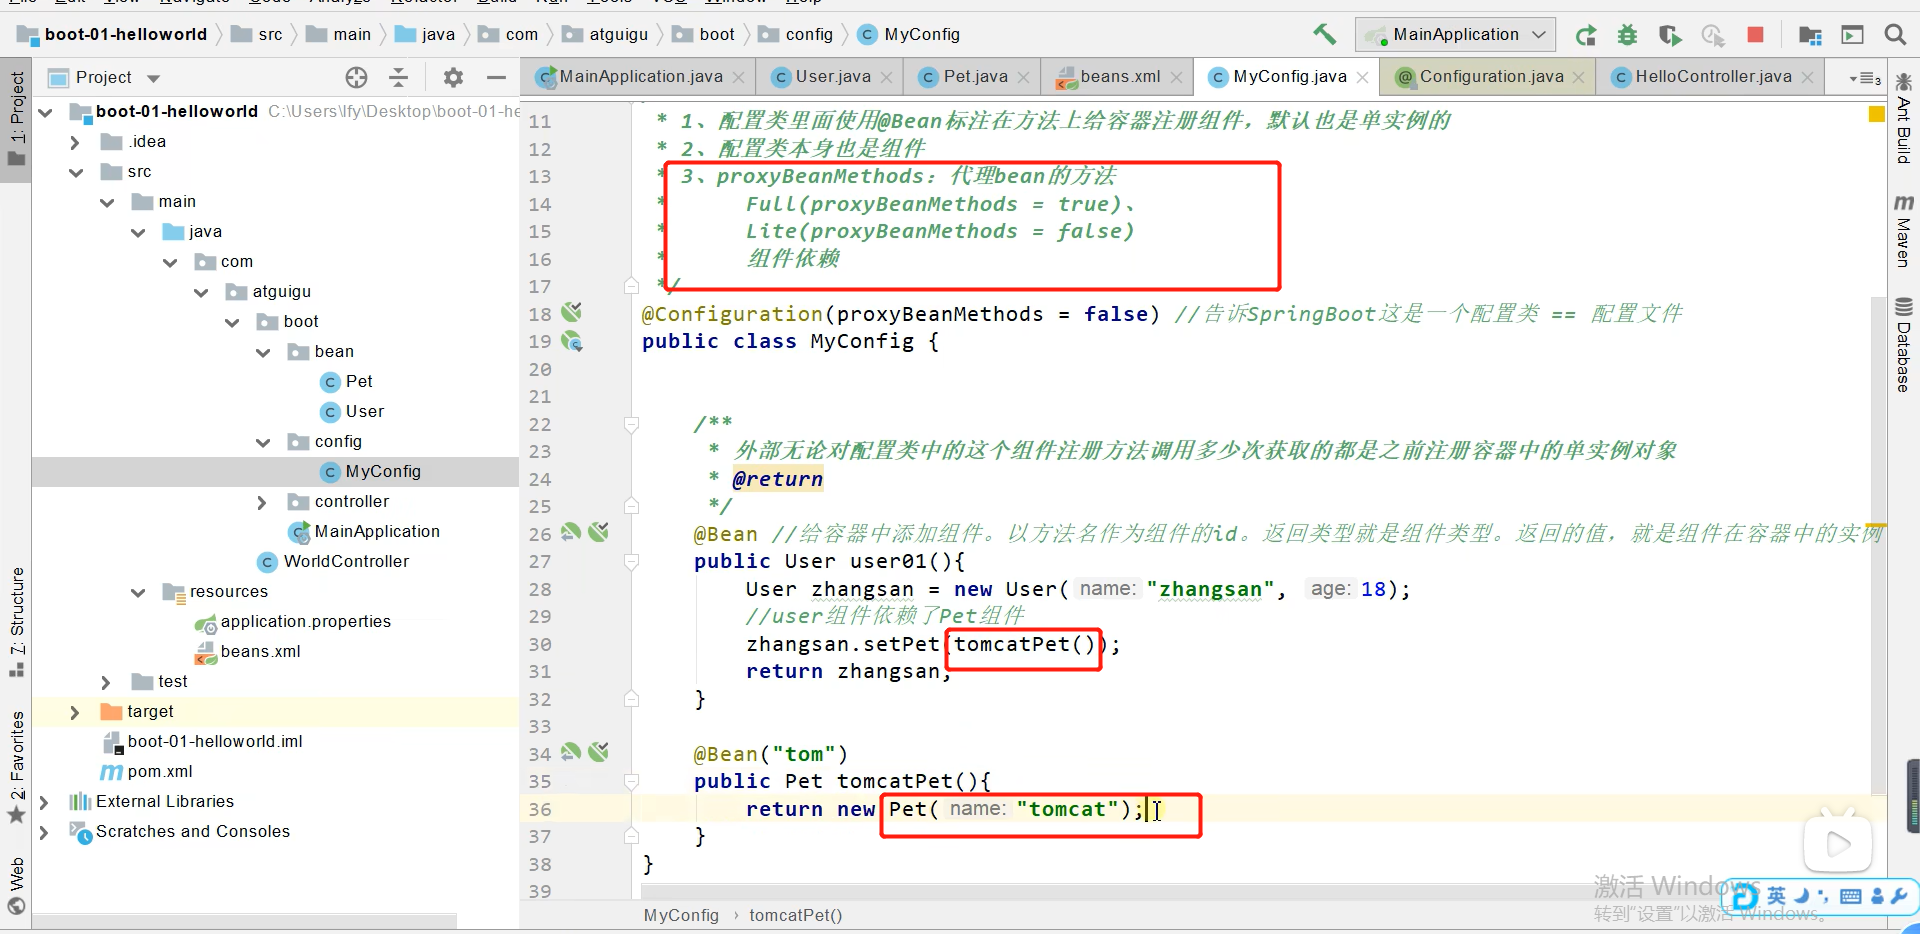
1.条件准备:
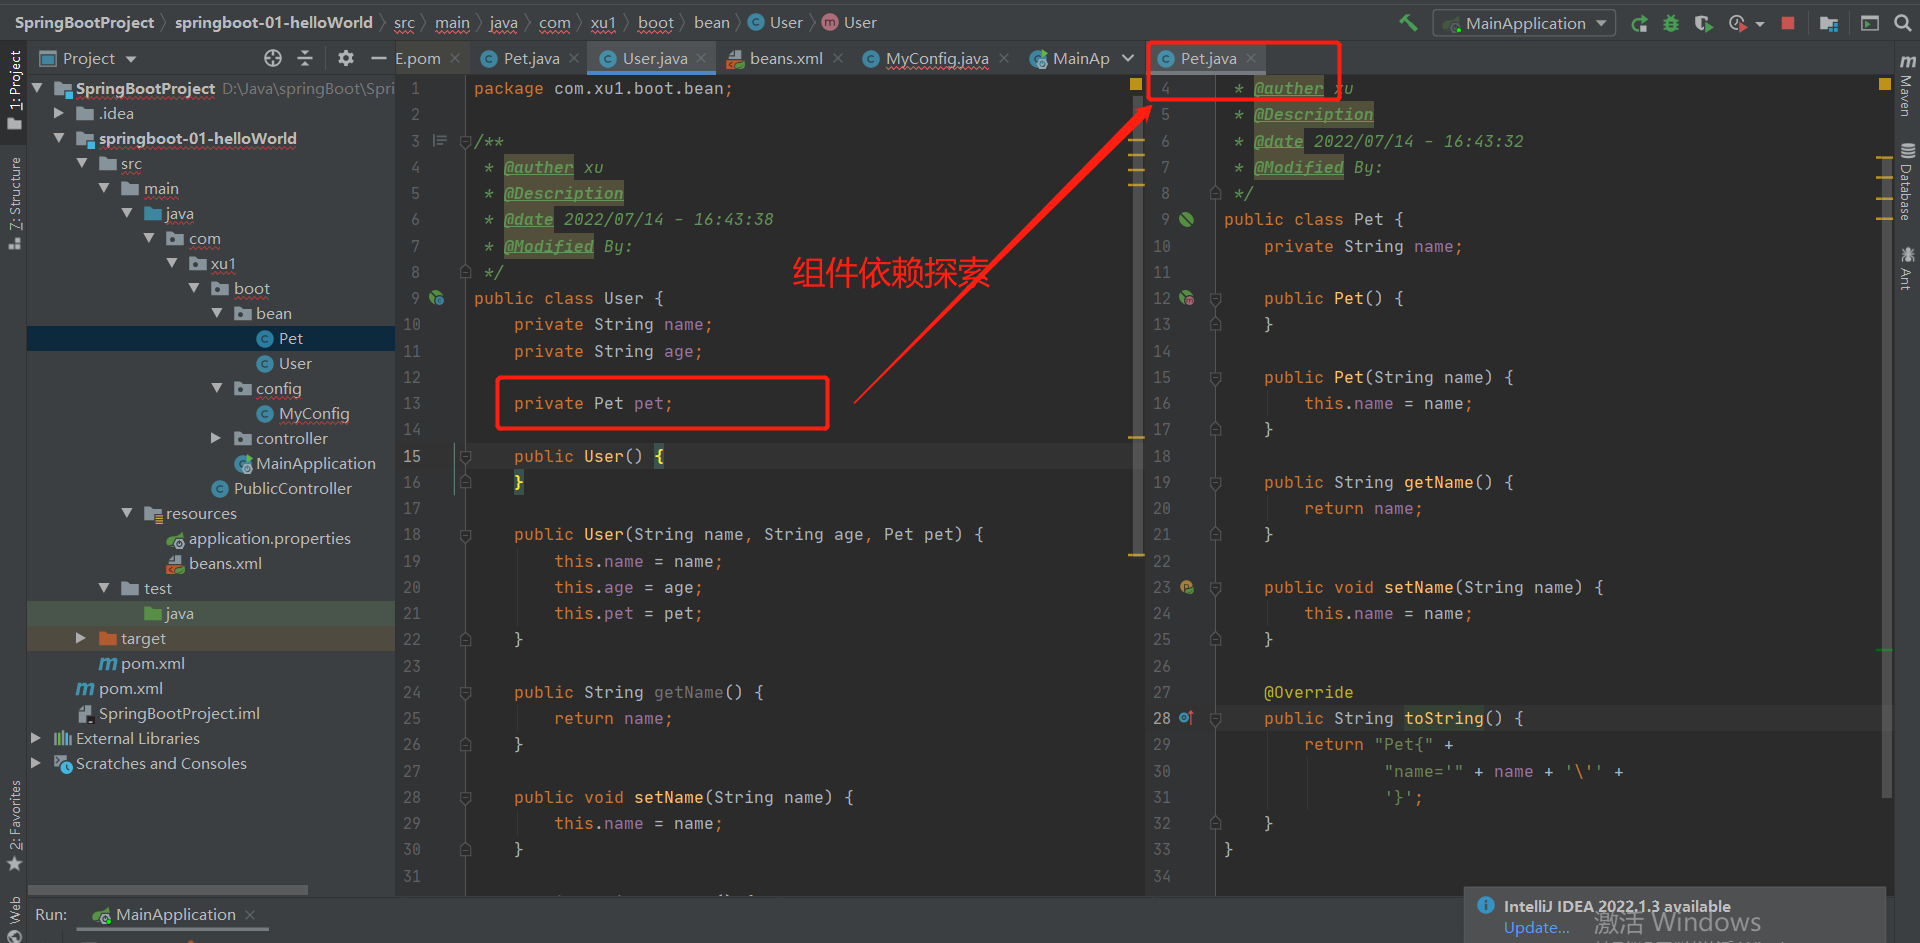
2.验证User组件中Pet类型的属性与Pet组件依赖性是否很强
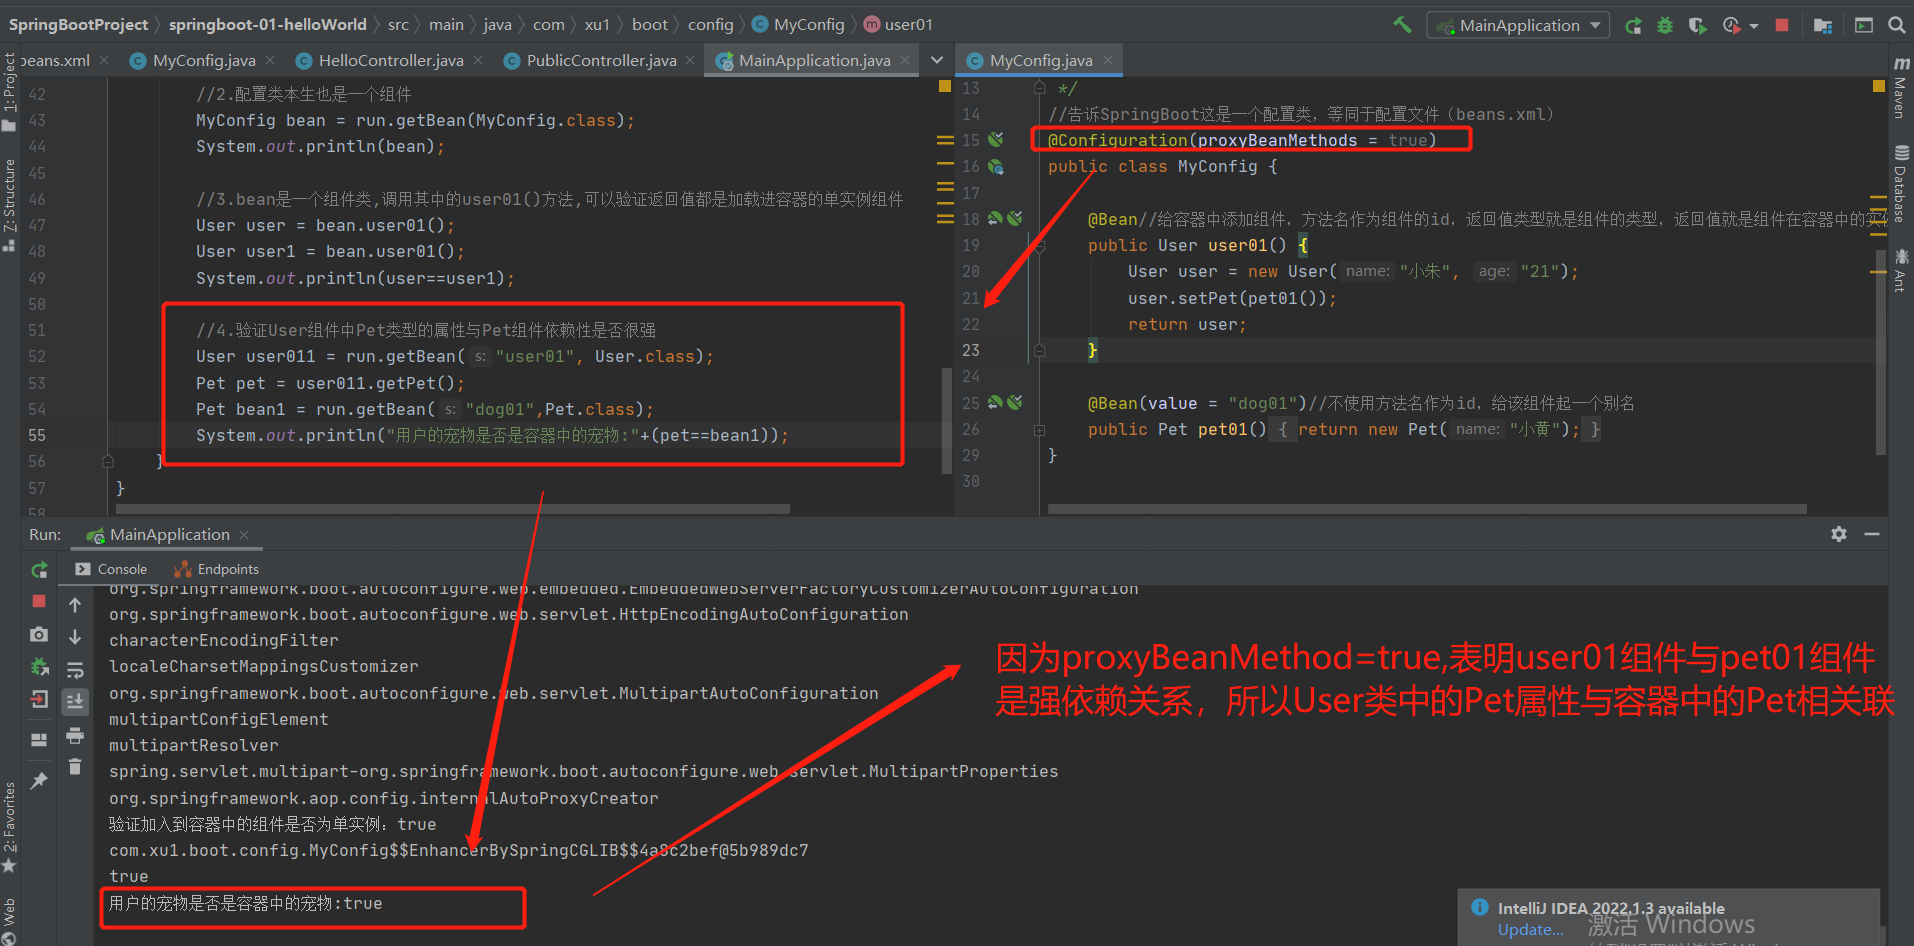
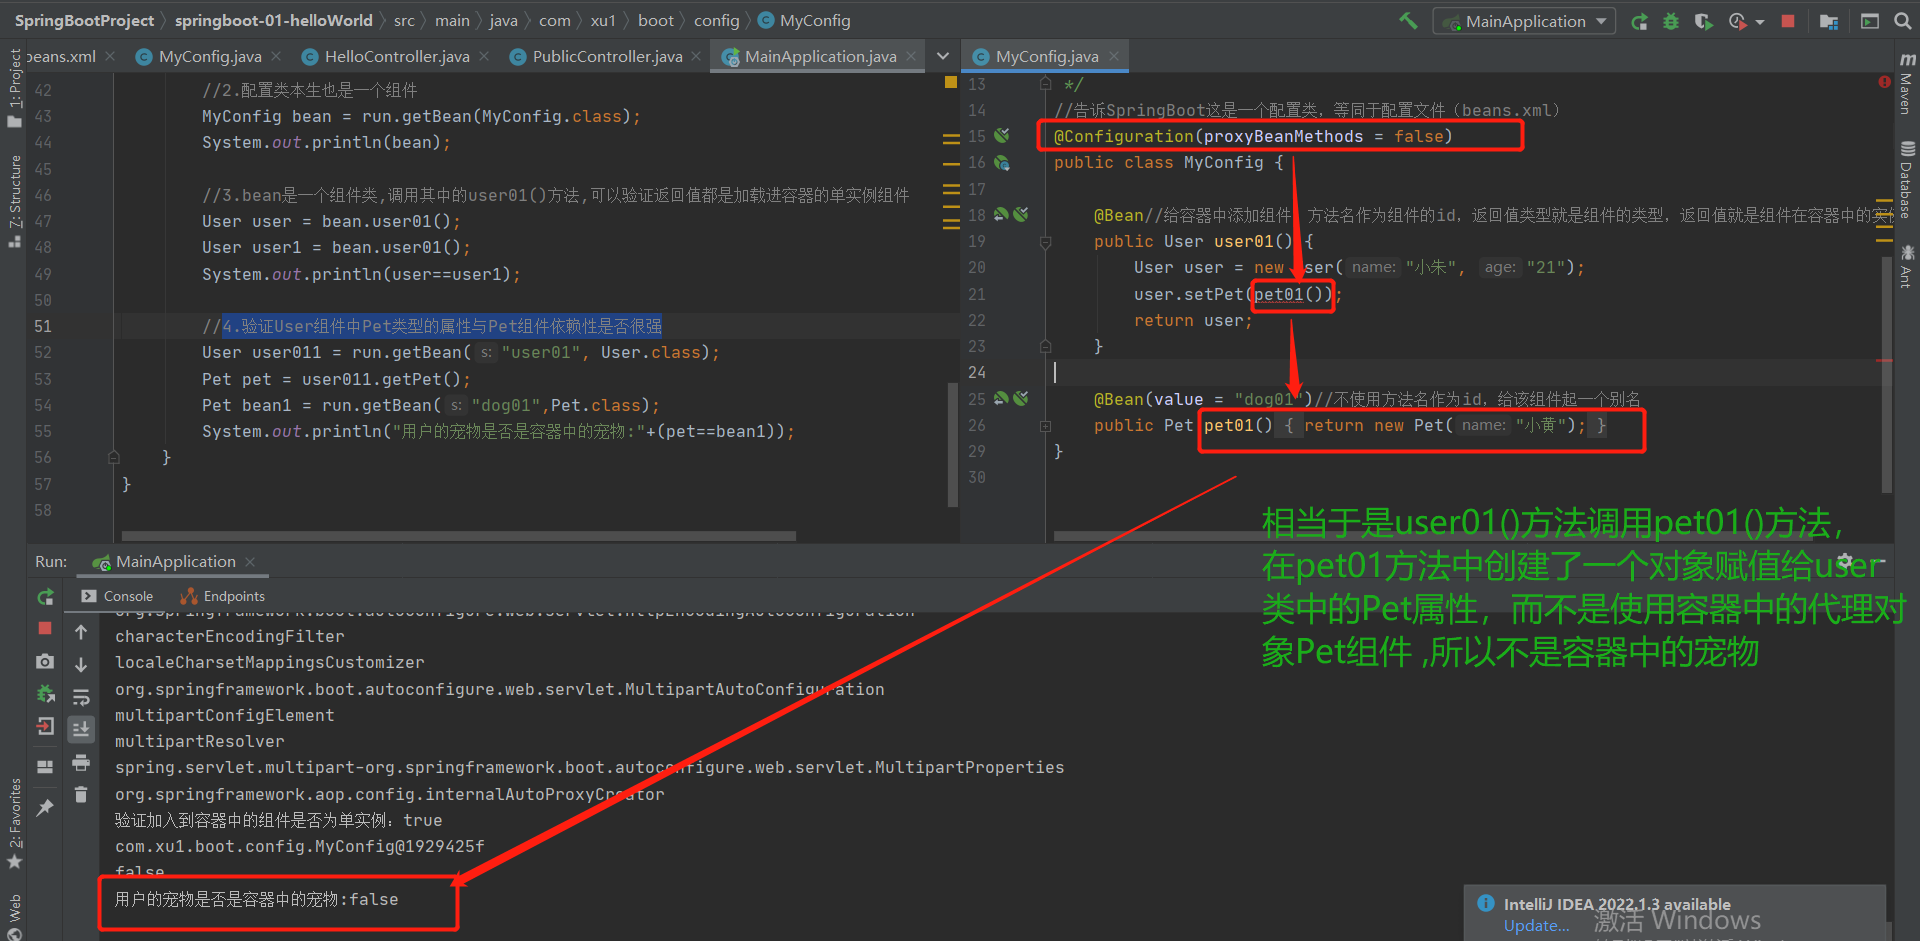
总结:
proxyBeanMethods默认值是true,一般将proxyBeanMethods设置为false,如果只是单单给容器中注册组件,各组件之间也不依赖,设置为false时,这样SpringBoot启动也非常快,加载也非常快。反之设置为true.

2-2 底层注解之@Import注解导入组件
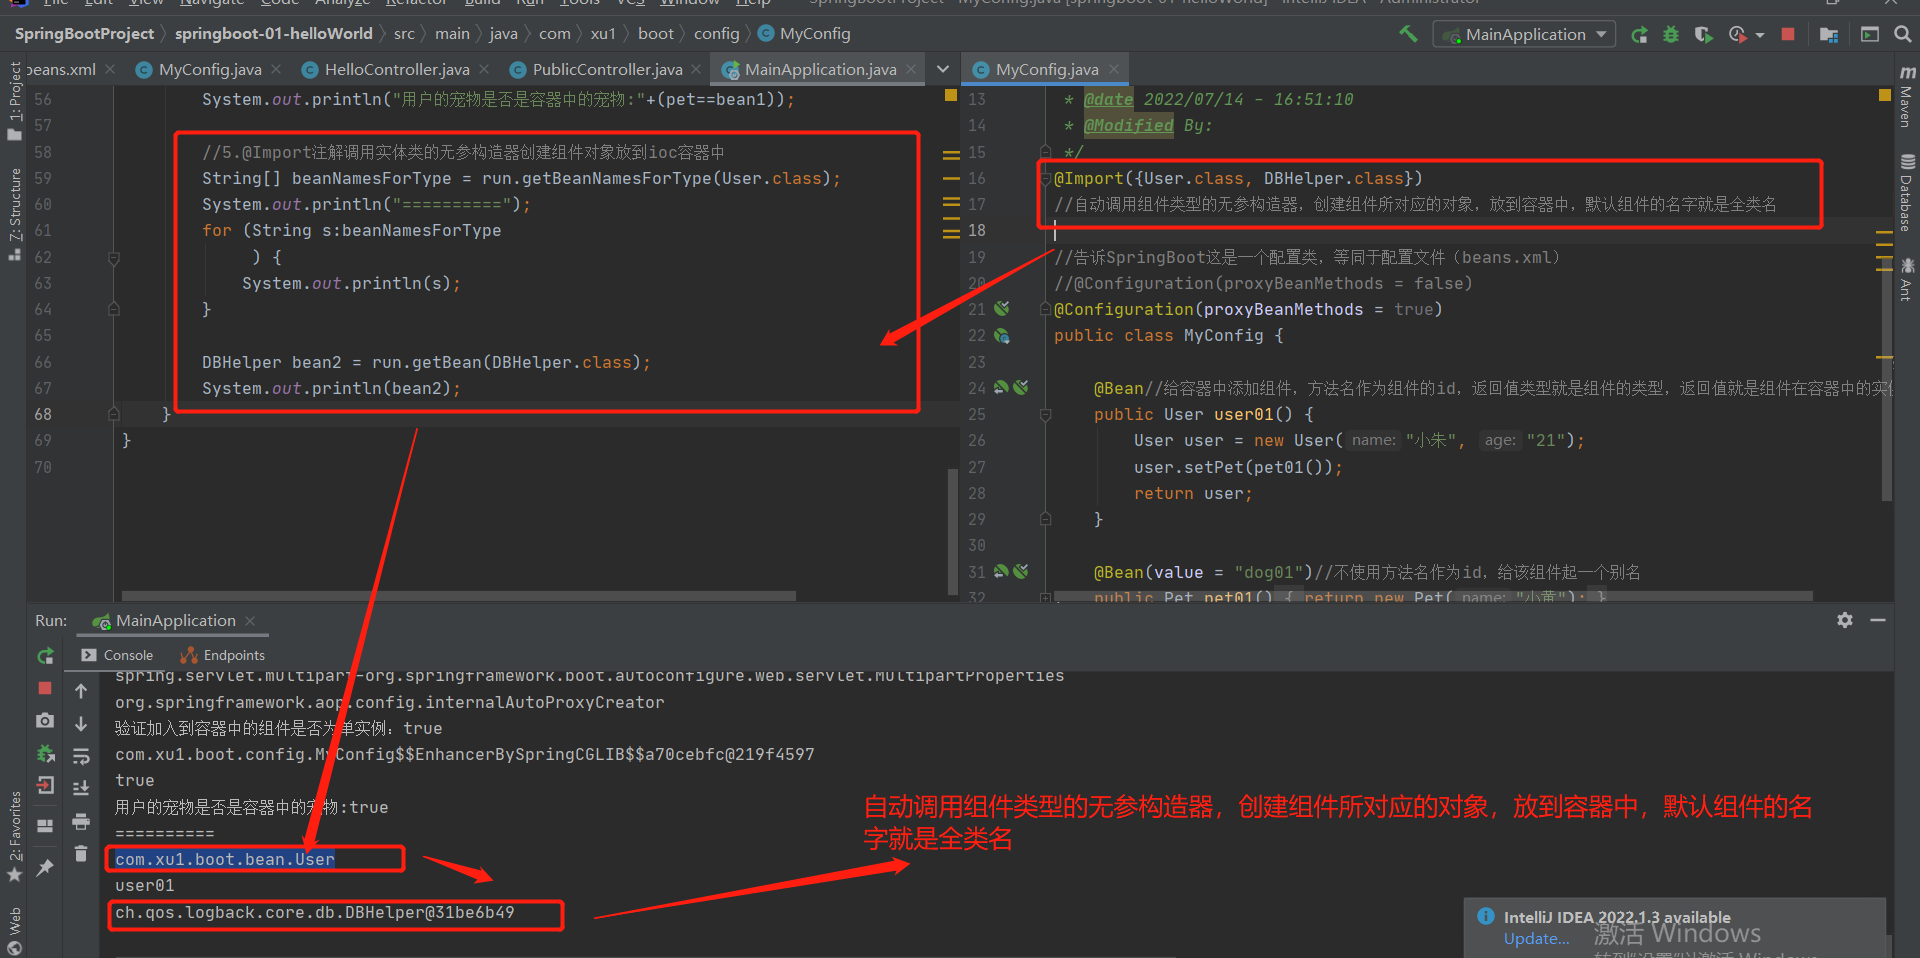
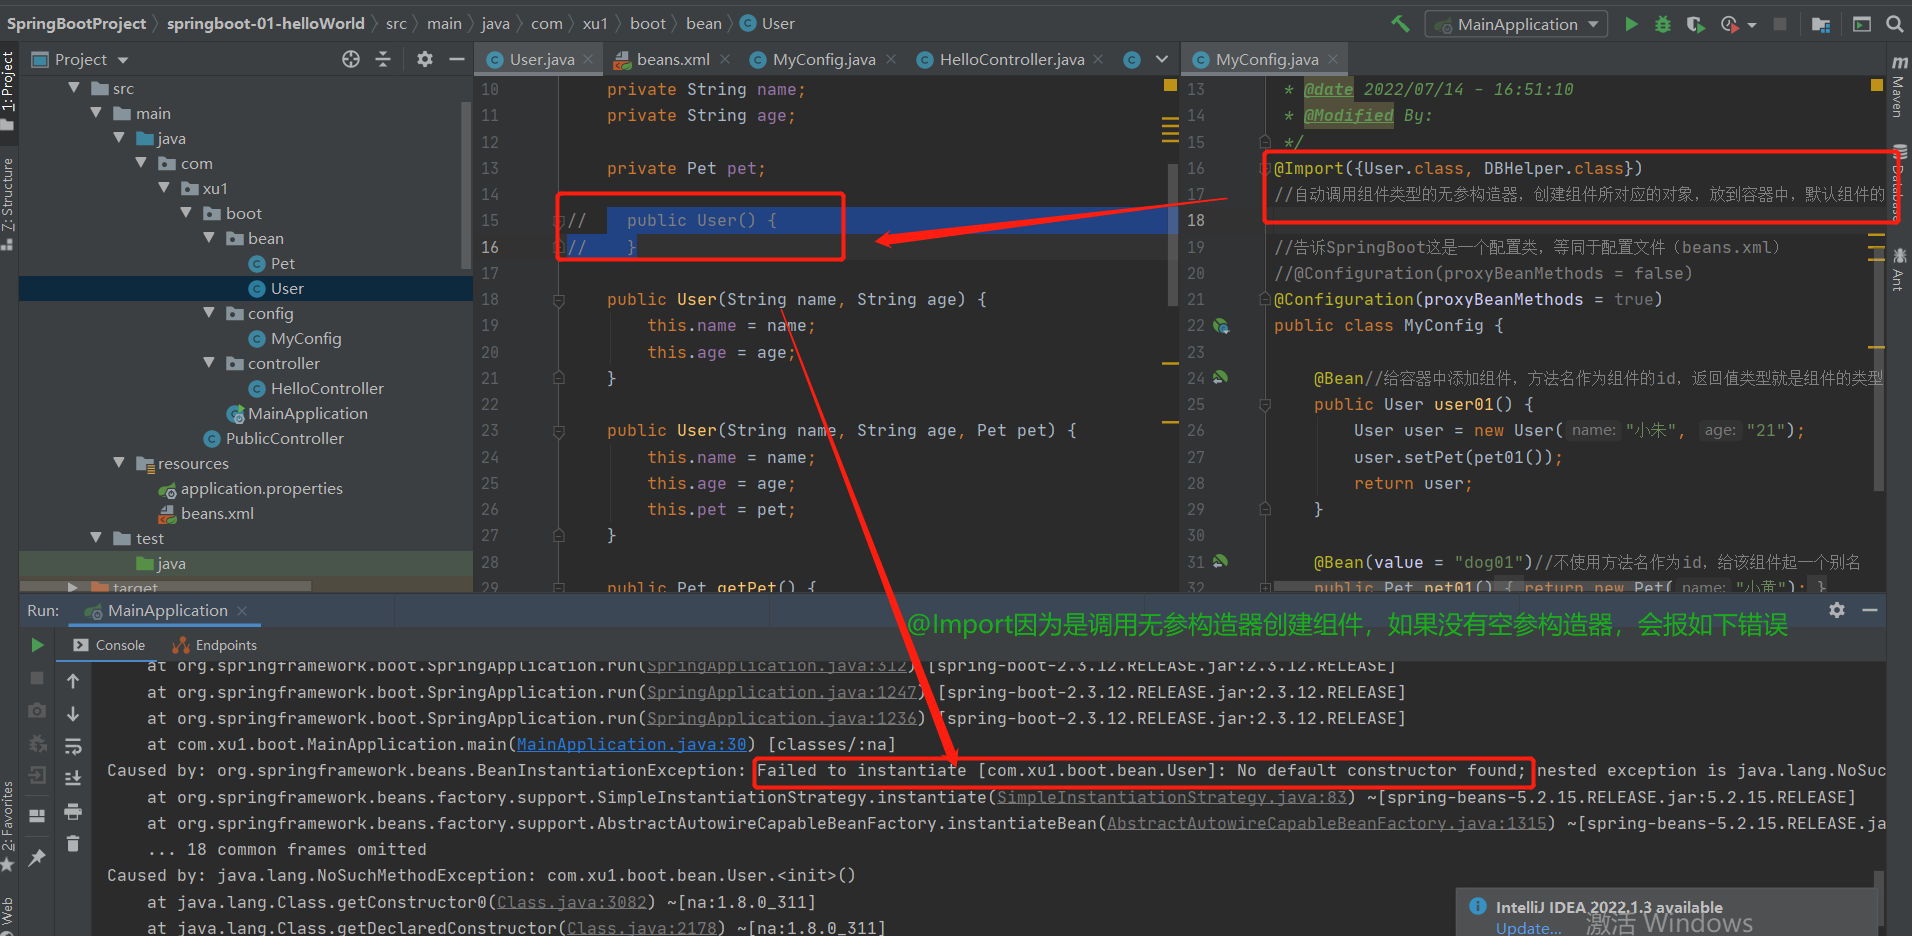
代码参考:
package com.xu1.boot.config;

import ch.qos.logback.core.db.DBHelper;
import com.xu1.boot.bean.Pet;
import com.xu1.boot.bean.User;
import org.springframework.context.annotation.Bean;
import org.springframework.context.annotation.Configuration;
import org.springframework.context.annotation.Import;

/**
 * @auther xu
 * @Description
 * @date 2022/07/14 - 16:51:10
 * @Modified By:
 */
@Import({User.class, DBHelper.class})
//自动调用组件类型的无参构造器,创建组件所对应的对象,放到容器中,默认组件的名字就是全类名

//告诉SpringBoot这是一个配置类,等同于配置文件(beans.xml)
//@Configuration(proxyBeanMethods = false)
@Configuration(proxyBeanMethods = true)
public class MyConfig {

    @Bean//给容器中添加组件,方法名作为组件的id,返回值类型就是组件的类型,返回值就是组件在容器中的实例
    public User user01() {
        User user = new User("小朱", "21");
        user.setPet(pet01());
        return user;
    }

//    @Bean(value = "dog01")//不使用方法名作为id,给该组件起一个别名
    public Pet pet01() {
        return new Pet("小黄");
    }
}
2-3 底层注解之@Conditional(满足该注解指定的条件,才进行组件注入)
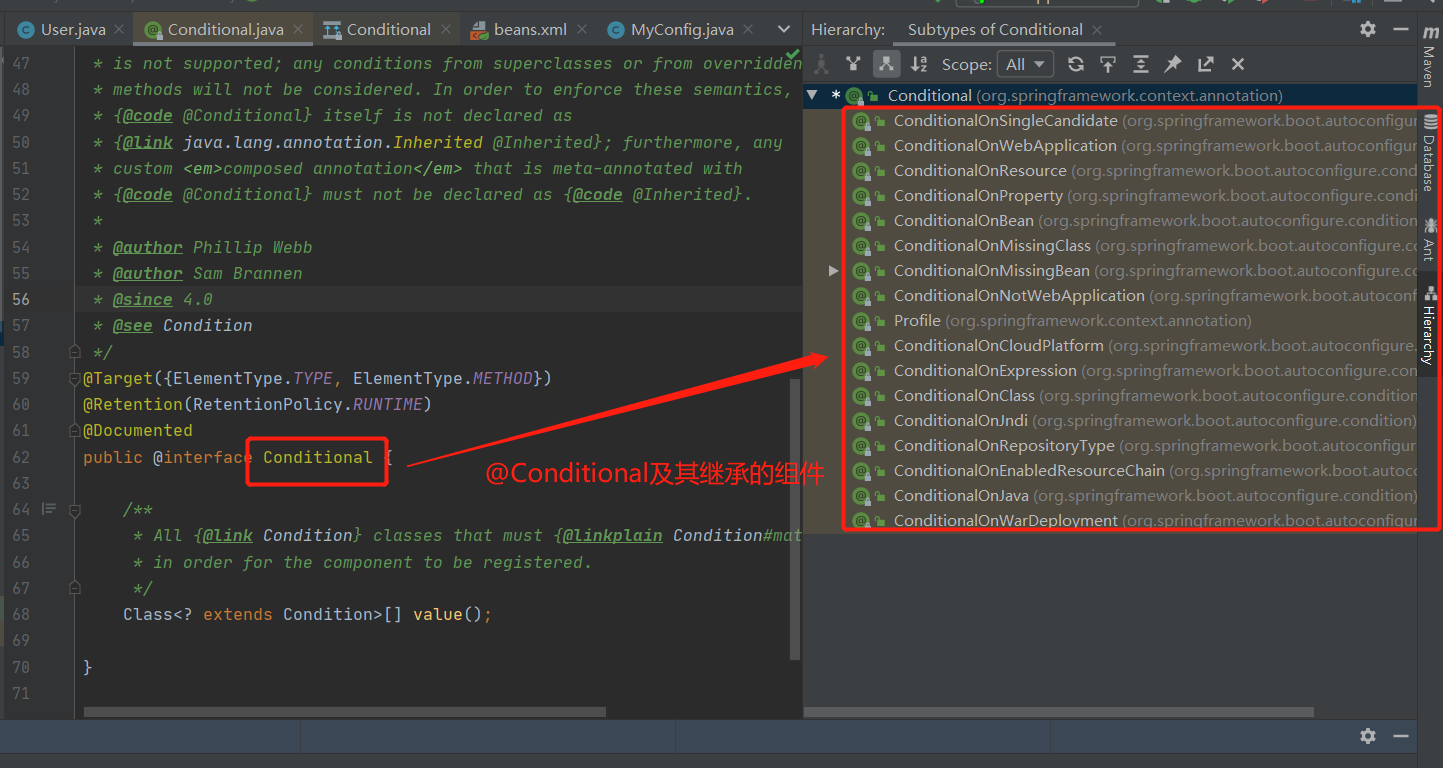
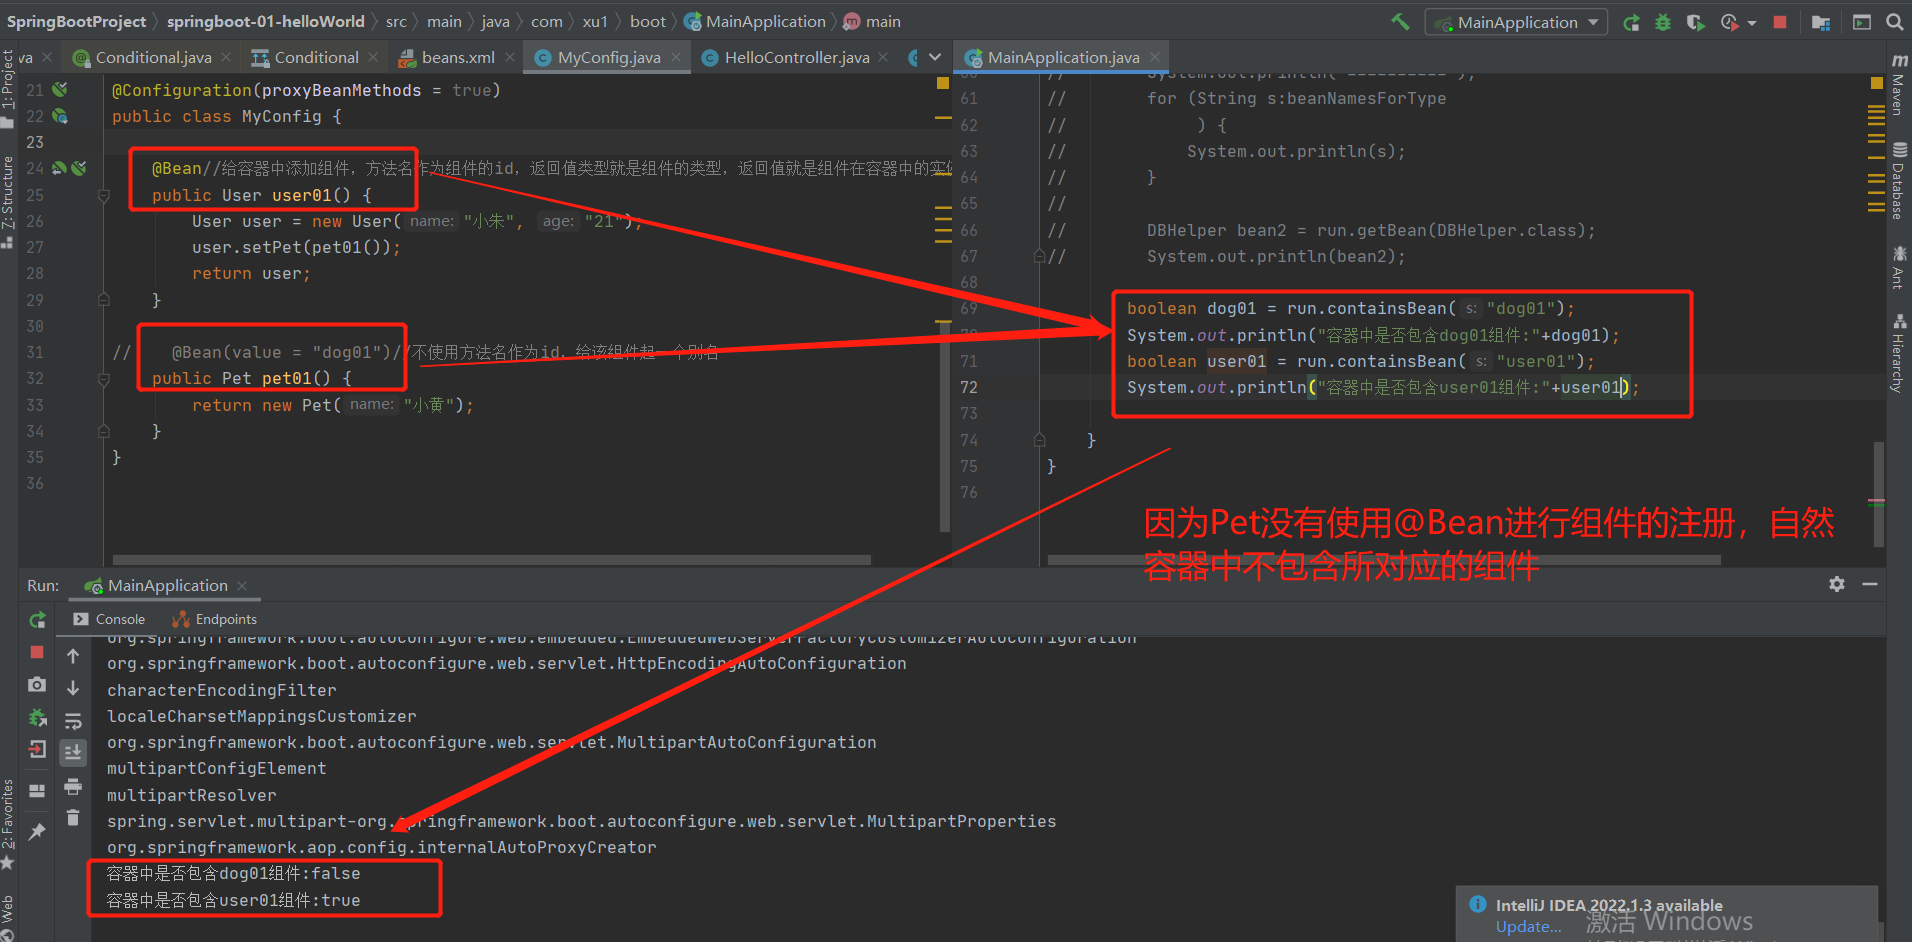
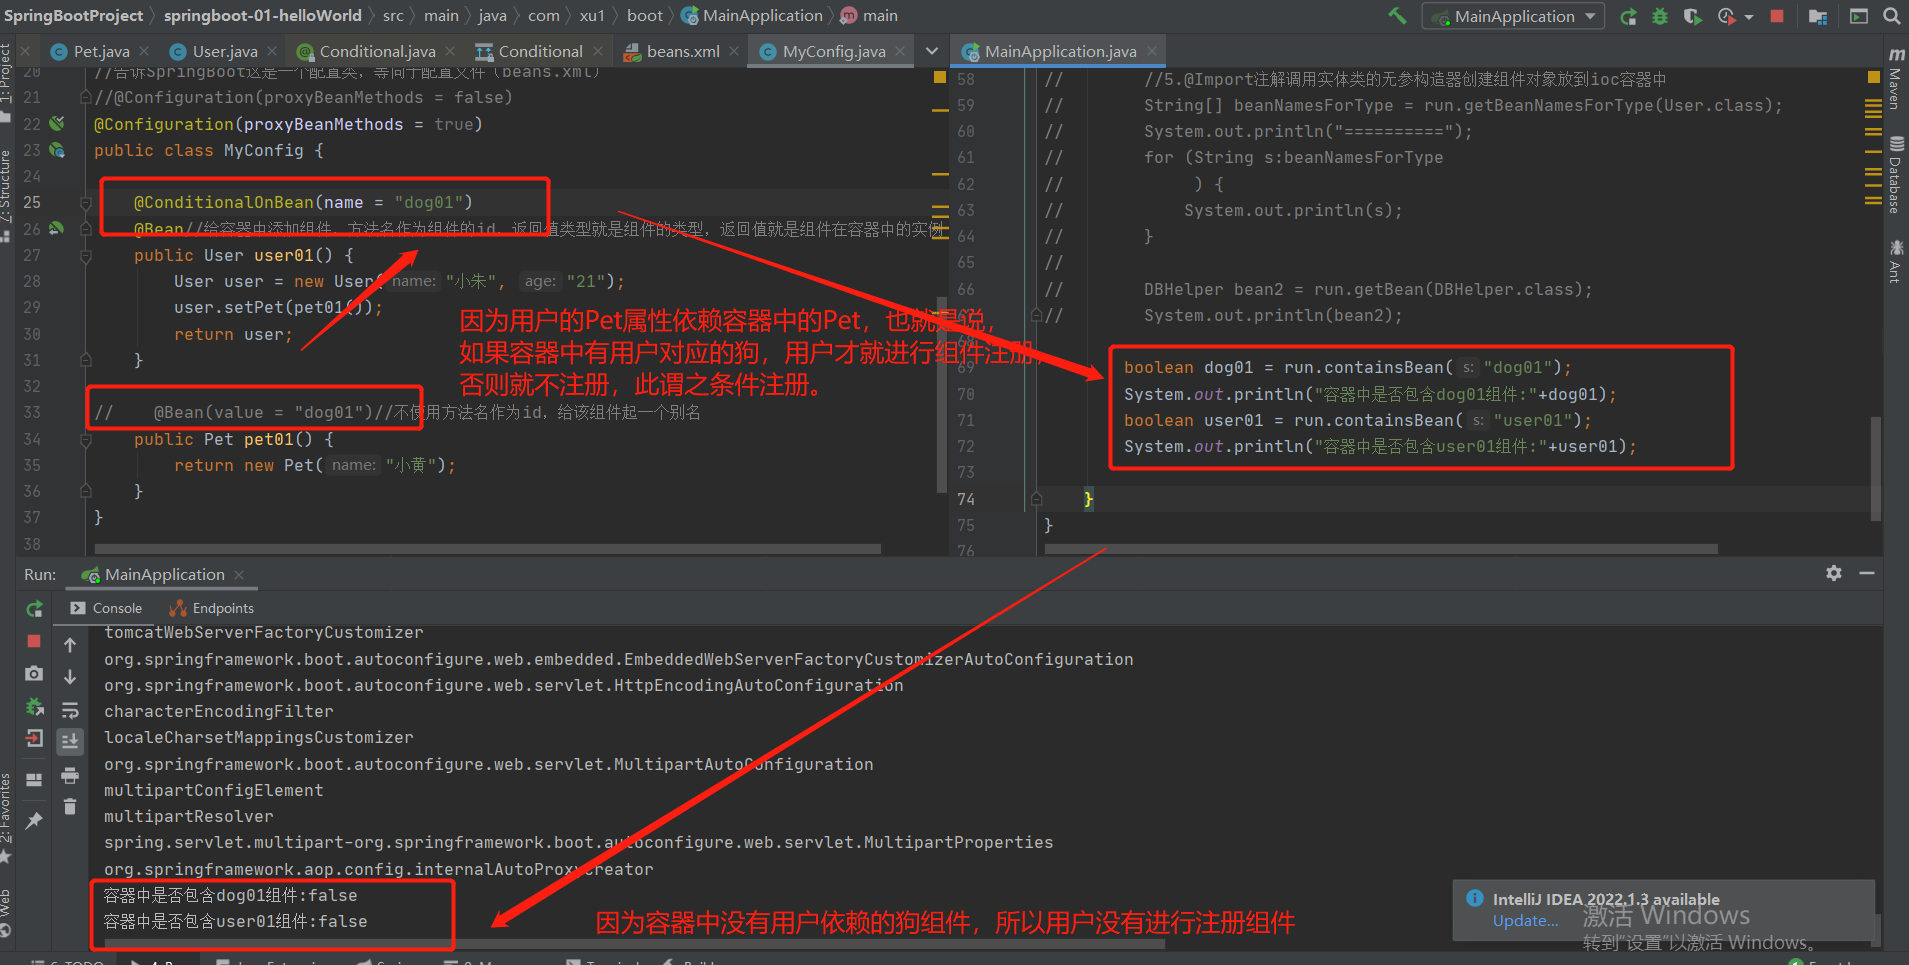
1.@ConditionalOnBean(name = "dog01")标注在方法上
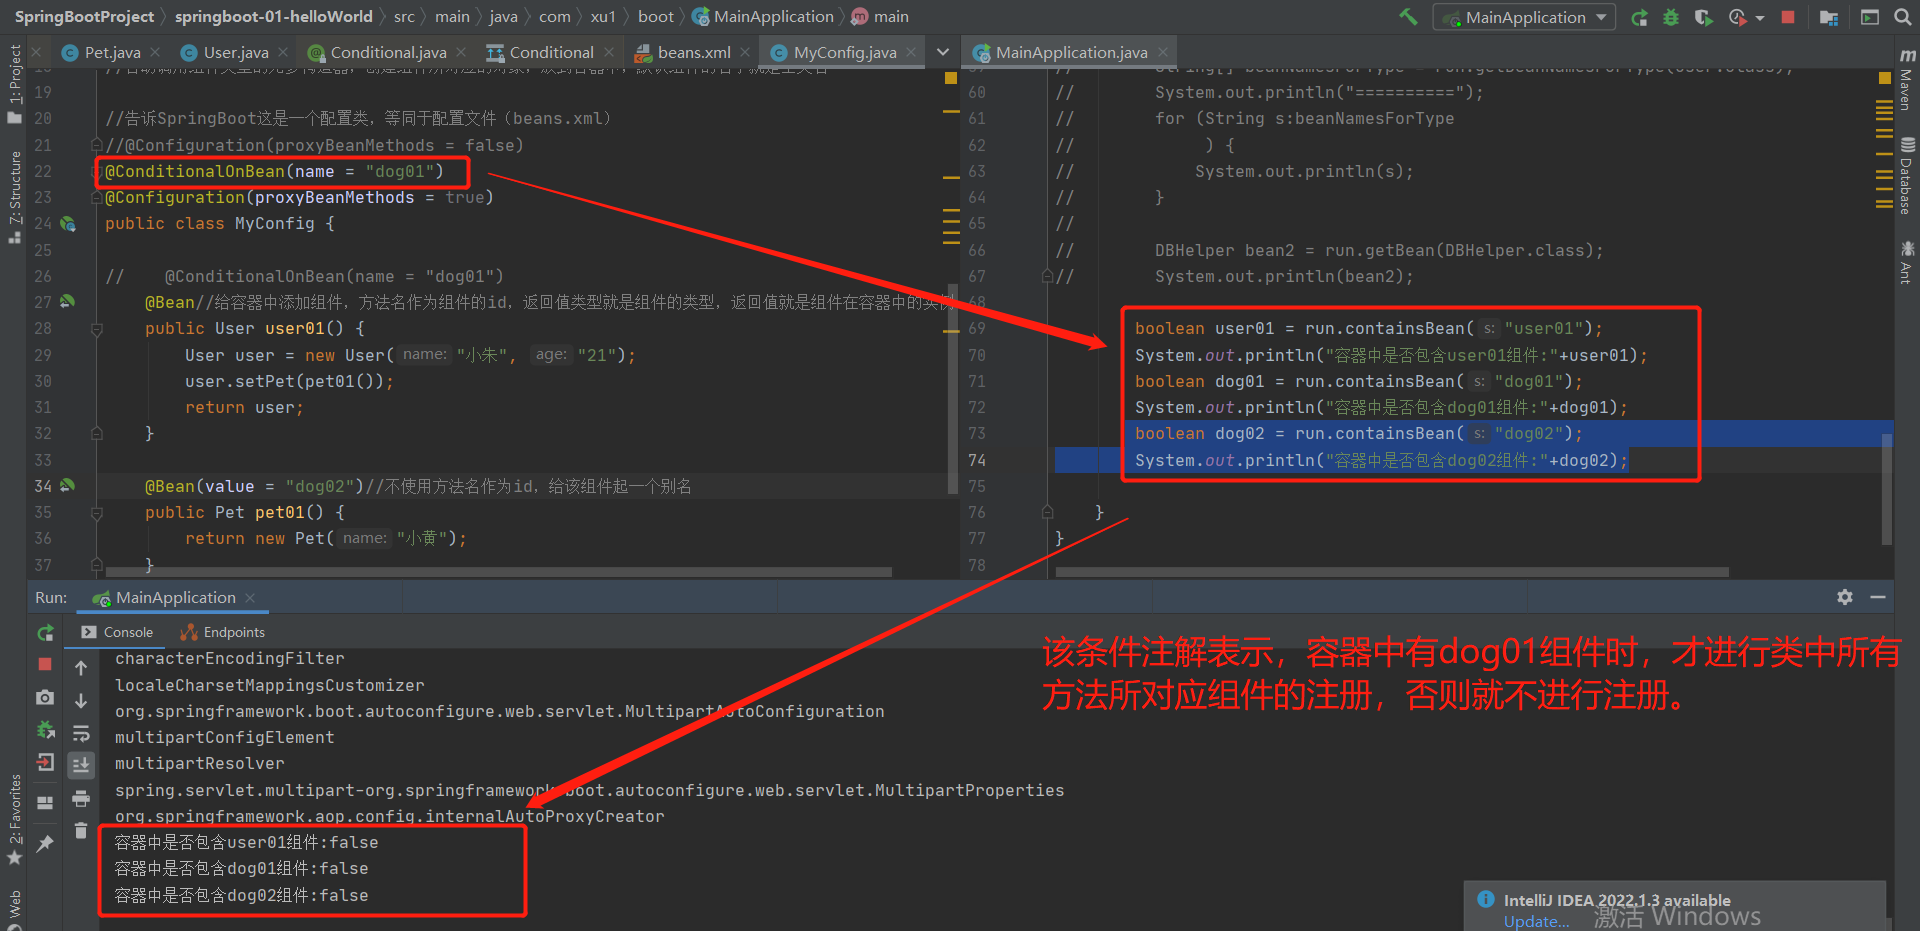
2.@ConditionalOnBean(name = "dog01")标注在类上
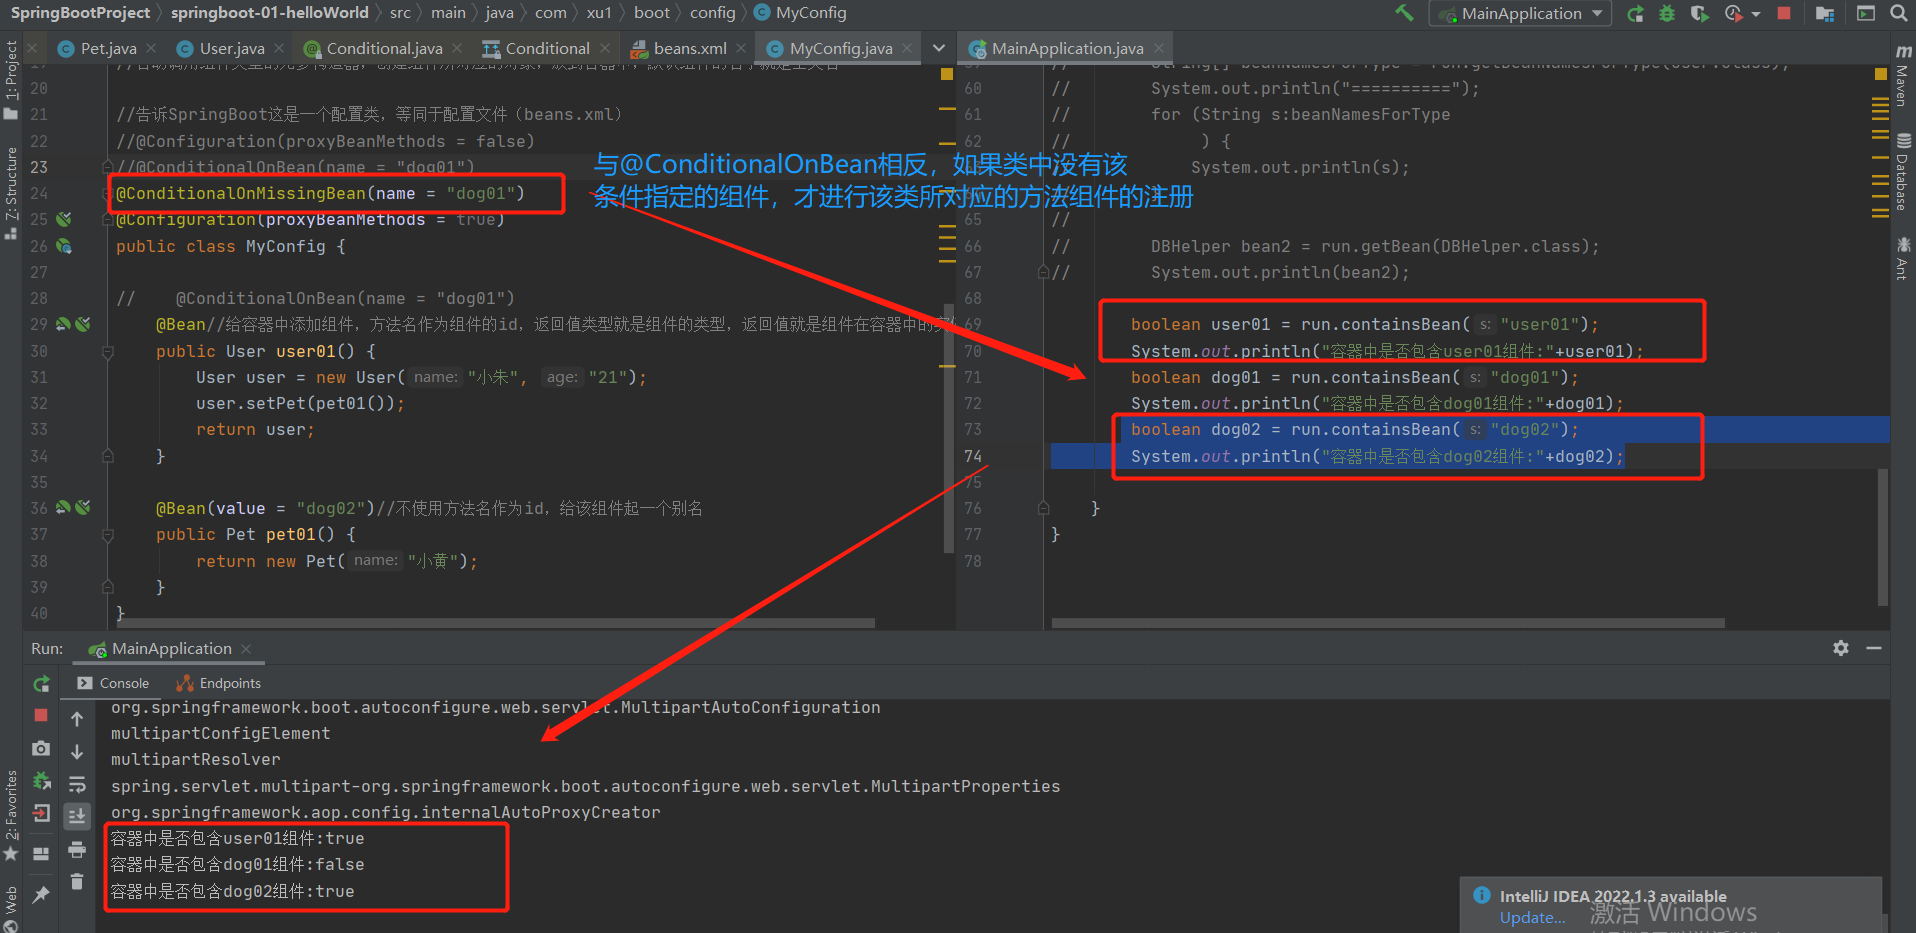
3.@ConditionalOnMissingBean(name = "dog01")标注在类上
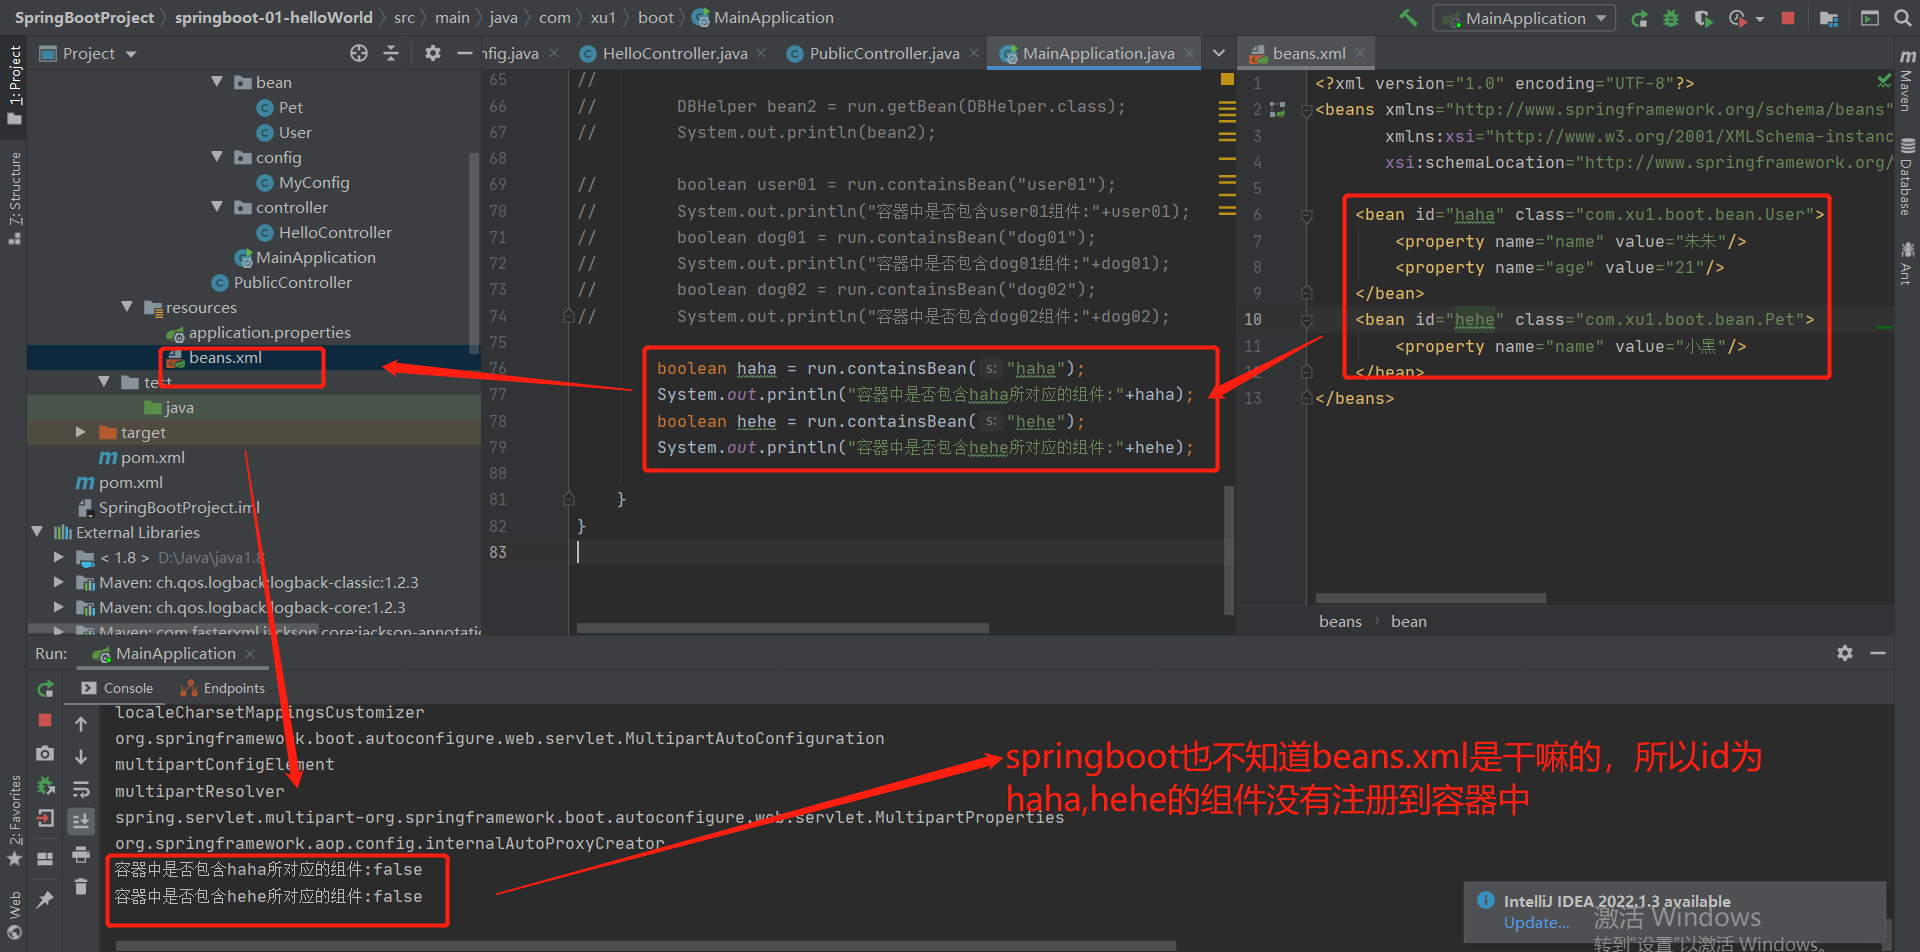
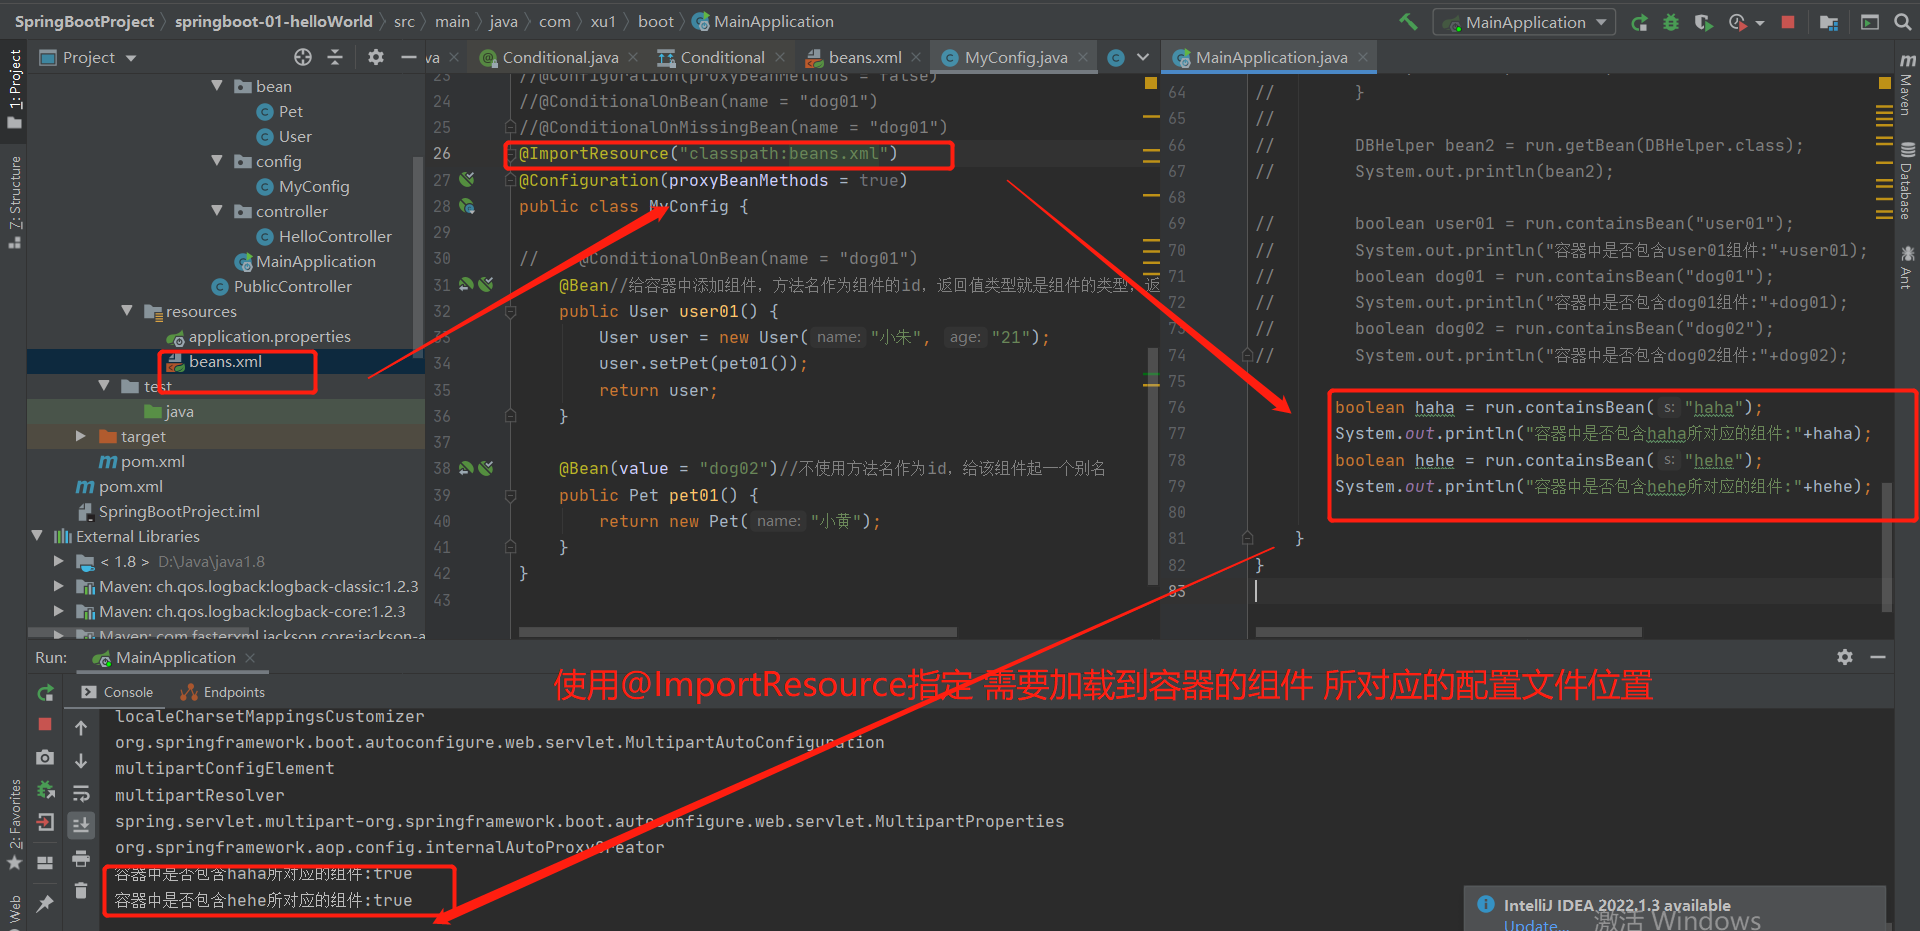
2-4 底层注解之-@ImportResource
2-5 底层注解之@ConfigurationProperties
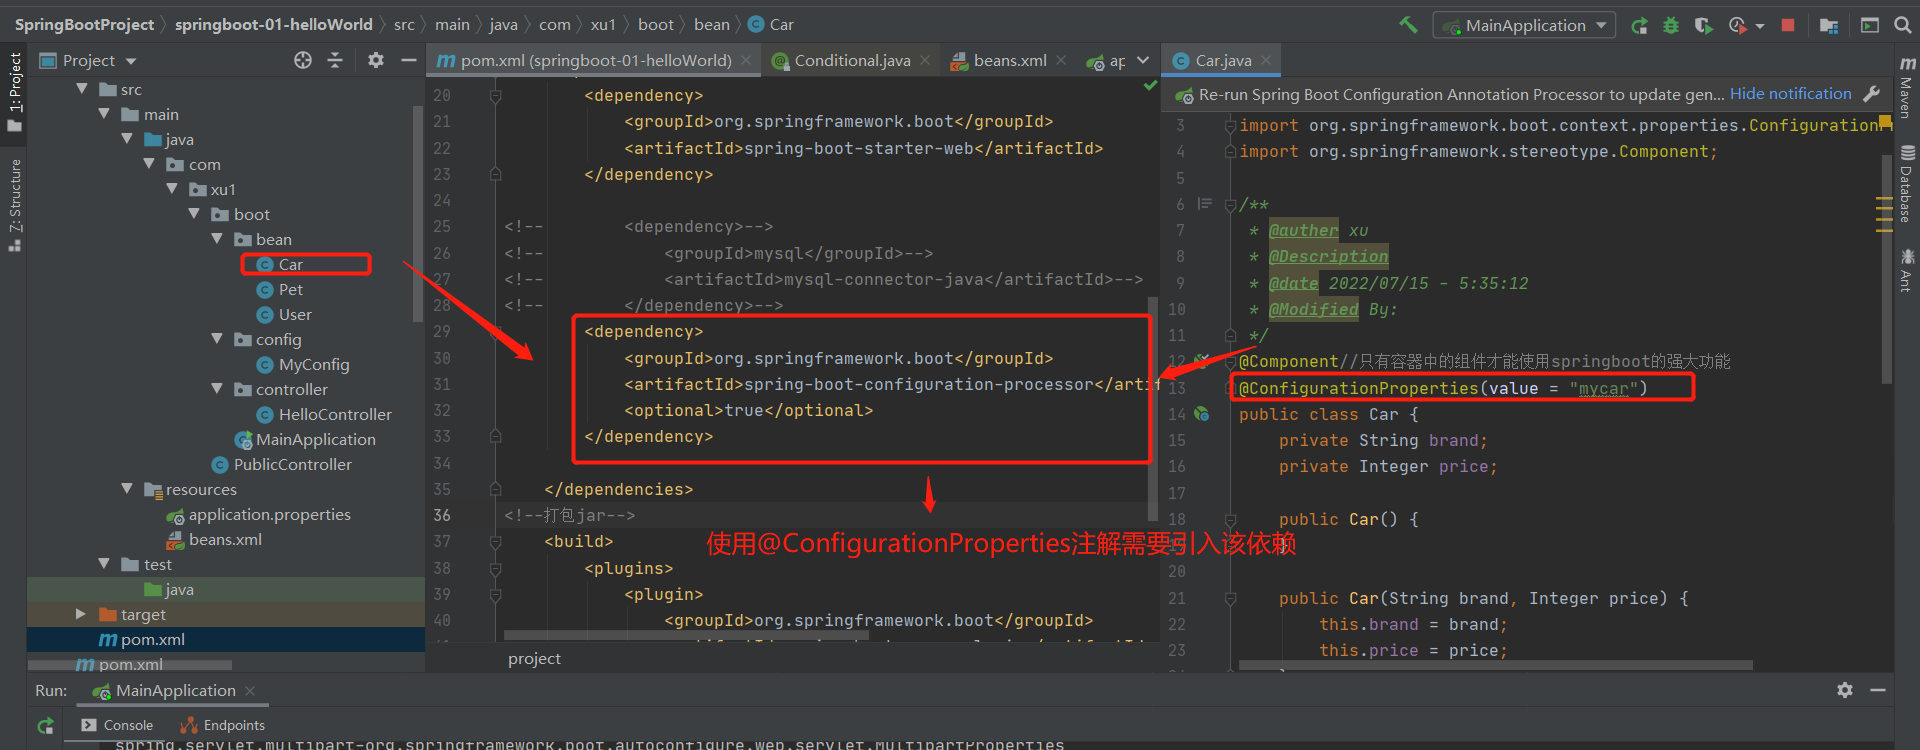
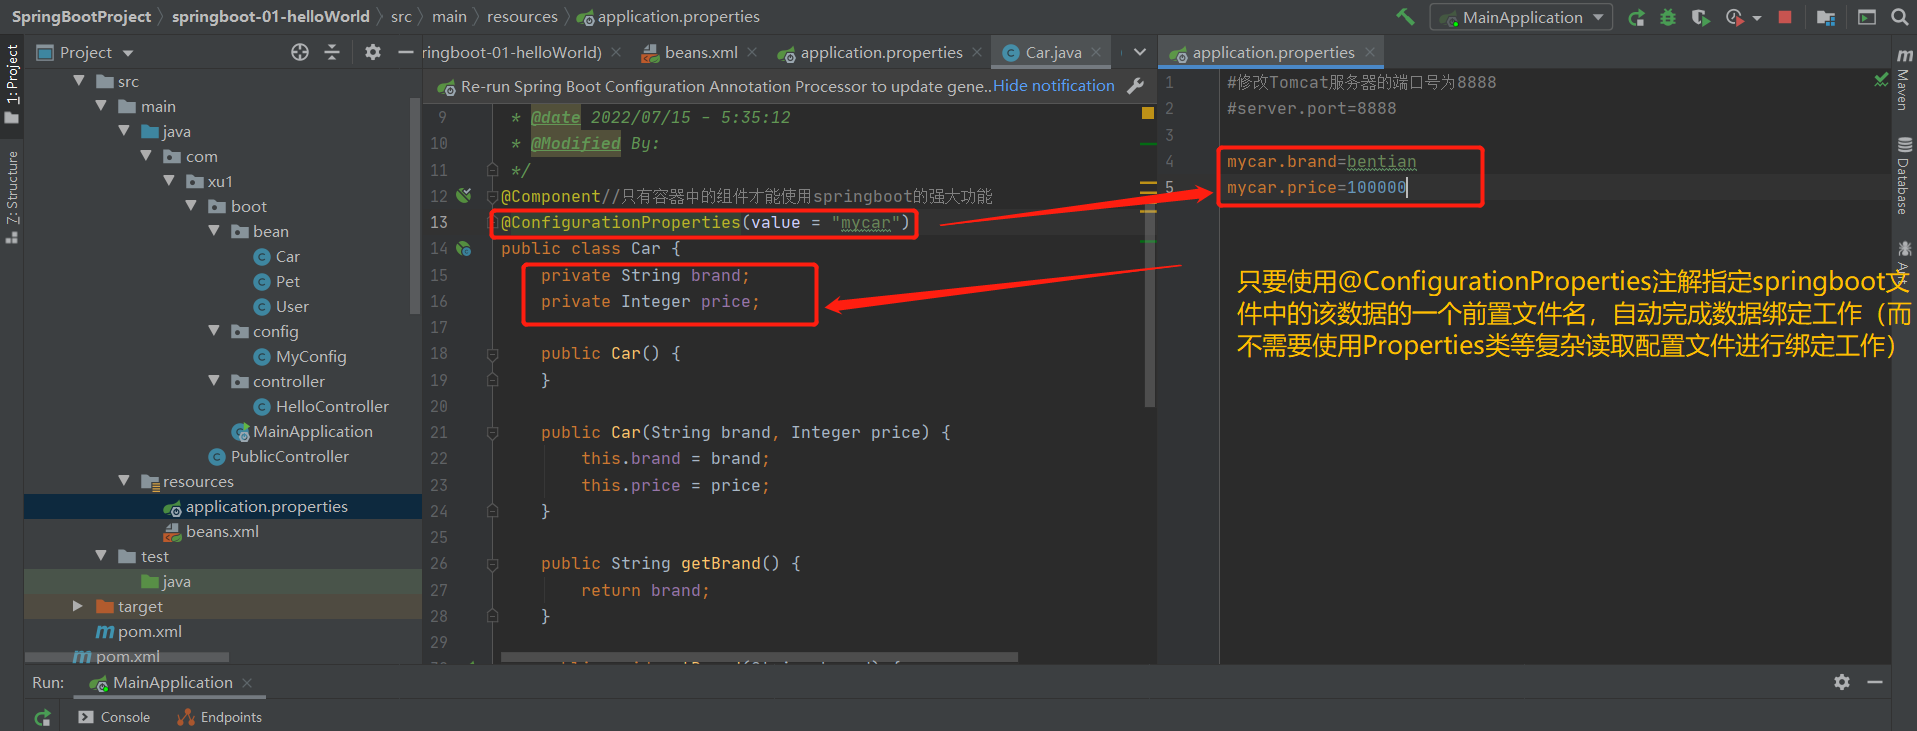
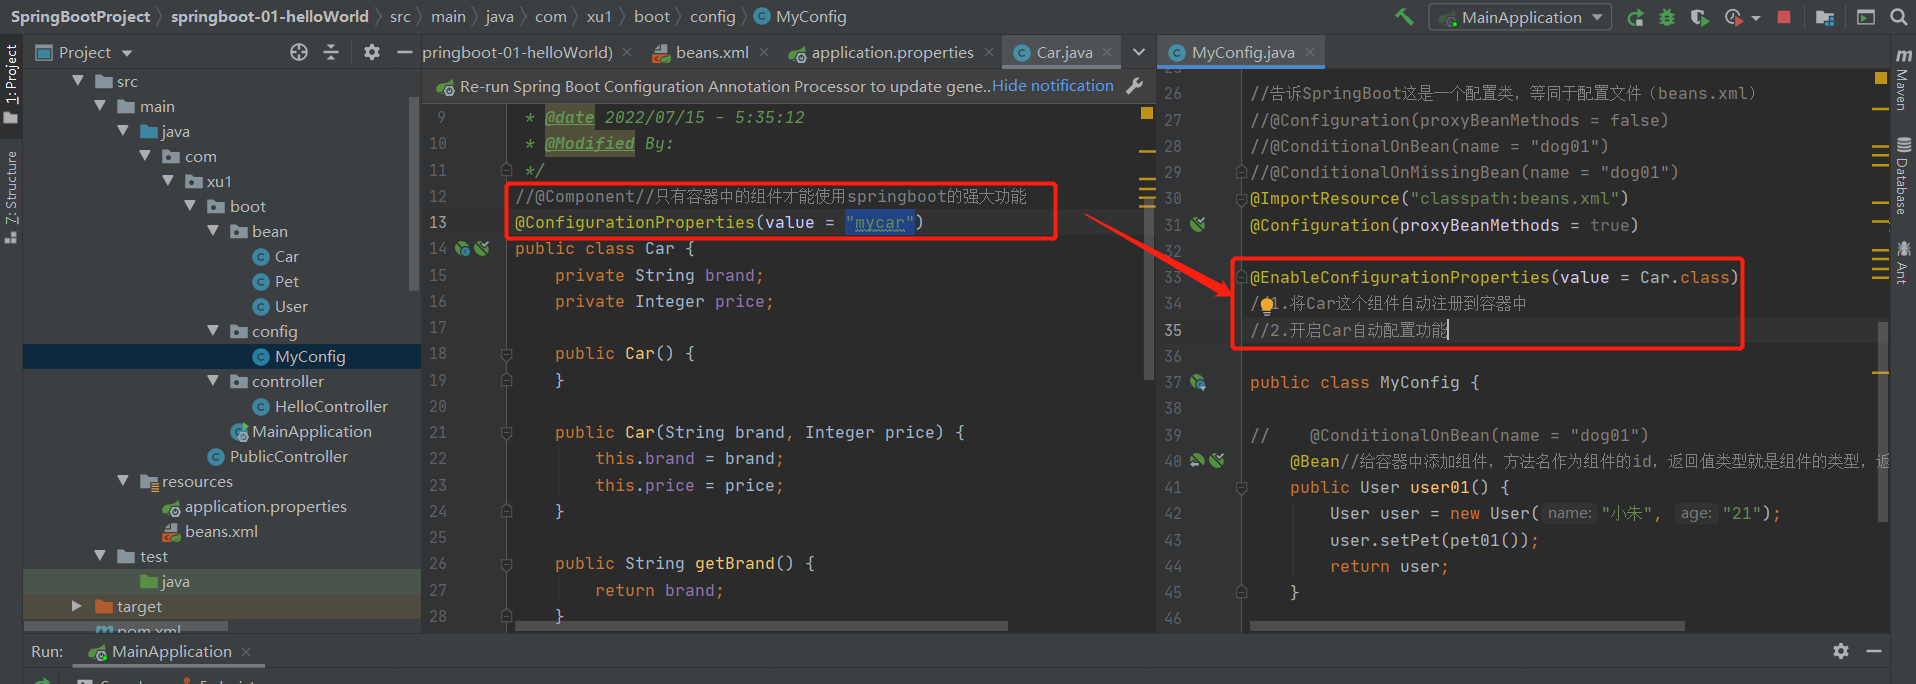
数据绑定方式1:@Component+@ConfigurationProperties
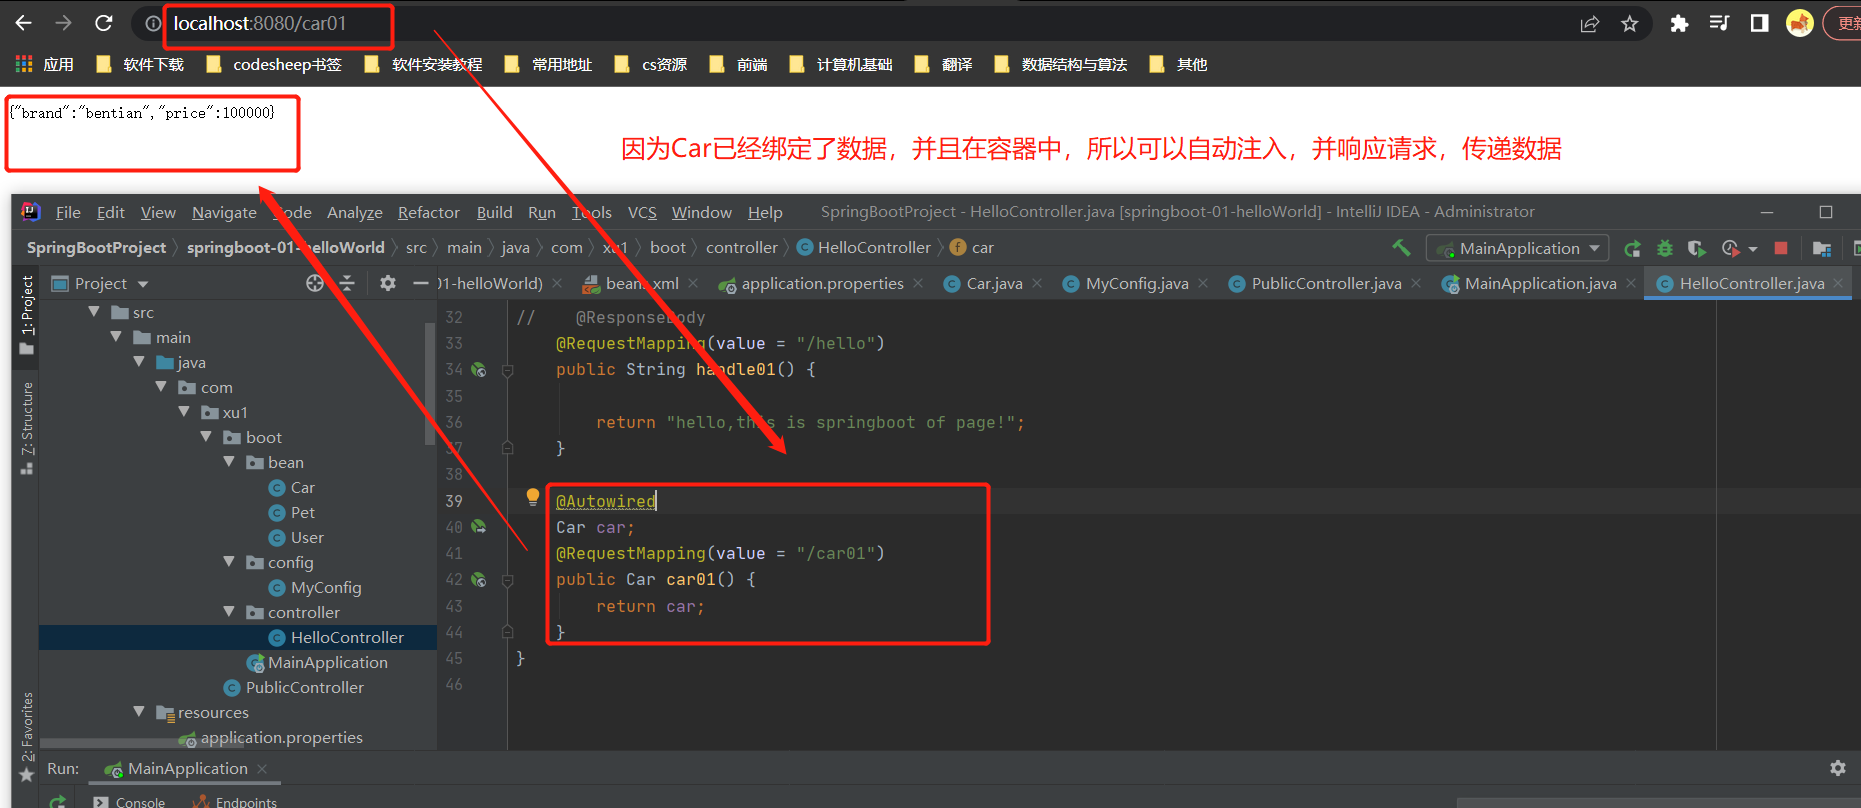
数据绑定方式2:@ConfigurationProperties+@EnableConfigurationProperties
1.功能:
1.将Car这个组件自动注册到容器中
2.开启Car自动配置功能
2.解决的问题:
如果Car类引用的是第3方包里面的类,但是没有标@Component,导致该类没有在容器中,没有在容器中,就无法使用@ConfigurationProperties进行数据绑定,该方式解决此问题。
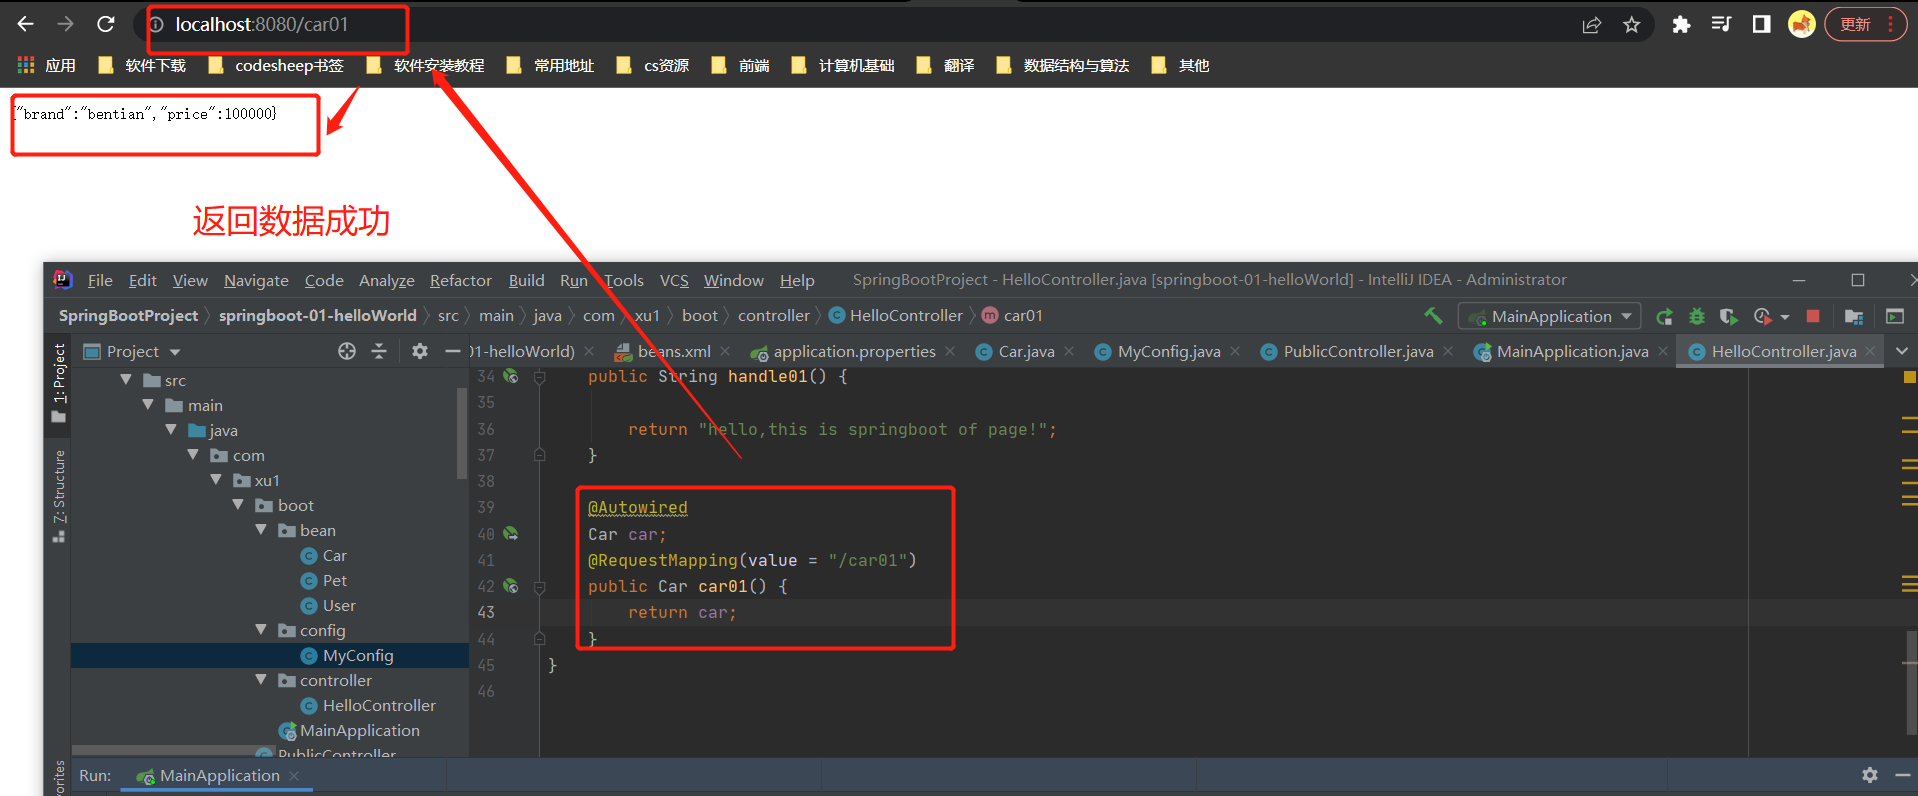
3.结果参考:
注意:没有使用@Component将类注册到容器中,而是@EnableConfigurationProperties(value = Car.class)也具有组件注册功能
4.源码参考:
/*
 * Copyright 2012-2021 the original author or authors.
 *
 * Licensed under the Apache License, Version 2.0 (the "License");
 * you may not use this file except in compliance with the License.
 * You may obtain a copy of the License at
 *
 *      https://www.apache.org/licenses/LICENSE-2.0
 *
 * Unless required by applicable law or agreed to in writing, software
 * distributed under the License is distributed on an "AS IS" BASIS,
 * WITHOUT WARRANTIES OR CONDITIONS OF ANY KIND, either express or implied.
 * See the License for the specific language governing permissions and
 * limitations under the License.
 */

package org.springframework.boot.context.properties;

import java.lang.annotation.Documented;
import java.lang.annotation.ElementType;
import java.lang.annotation.Retention;
import java.lang.annotation.RetentionPolicy;
import java.lang.annotation.Target;

import org.springframework.core.annotation.AliasFor;
import org.springframework.stereotype.Indexed;

/**
 * Annotation for externalized configuration. Add this to a class definition or a
 * {@code @Bean} method in a {@code @Configuration} class if you want to bind and validate
 * some external Properties (e.g. from a .properties file).
 * <p>
 * Binding is either performed by calling setters on the annotated class or, if
 * {@link ConstructorBinding @ConstructorBinding} is in use, by binding to the constructor
 * parameters.
 * <p>
 * Note that contrary to {@code @Value}, SpEL expressions are not evaluated since property
 * values are externalized.
 *
 * @author Dave Syer
 * @since 1.0.0
 * @see ConfigurationPropertiesScan
 * @see ConstructorBinding
 * @see ConfigurationPropertiesBindingPostProcessor
 * @see EnableConfigurationProperties
 */
@Target({ ElementType.TYPE, ElementType.METHOD })
@Retention(RetentionPolicy.RUNTIME)
@Documented
@Indexed
public @interface ConfigurationProperties {

   /**
    * The prefix of the properties that are valid to bind to this object. Synonym for
    * {@link #prefix()}. A valid prefix is defined by one or more words separated with
    * dots (e.g. {@code "acme.system.feature"}).
    * @return the prefix of the properties to bind
    */
   @AliasFor("prefix")
   String value() default "";

   /**
    * The prefix of the properties that are valid to bind to this object. Synonym for
    * {@link #value()}. A valid prefix is defined by one or more words separated with
    * dots (e.g. {@code "acme.system.feature"}).
    * @return the prefix of the properties to bind
    */
   @AliasFor("value")
   String prefix() default "";

   /**
    * Flag to indicate that when binding to this object invalid fields should be ignored.
    * Invalid means invalid according to the binder that is used, and usually this means
    * fields of the wrong type (or that cannot be coerced into the correct type).
    * @return the flag value (default false)
    */
   boolean ignoreInvalidFields() default false;

   /**
    * Flag to indicate that when binding to this object unknown fields should be ignored.
    * An unknown field could be a sign of a mistake in the Properties.
    * @return the flag value (default true)
    */
   boolean ignoreUnknownFields() default true;

}
第3章 自动配置原理入门
3-1 自动扫描包规则的原理
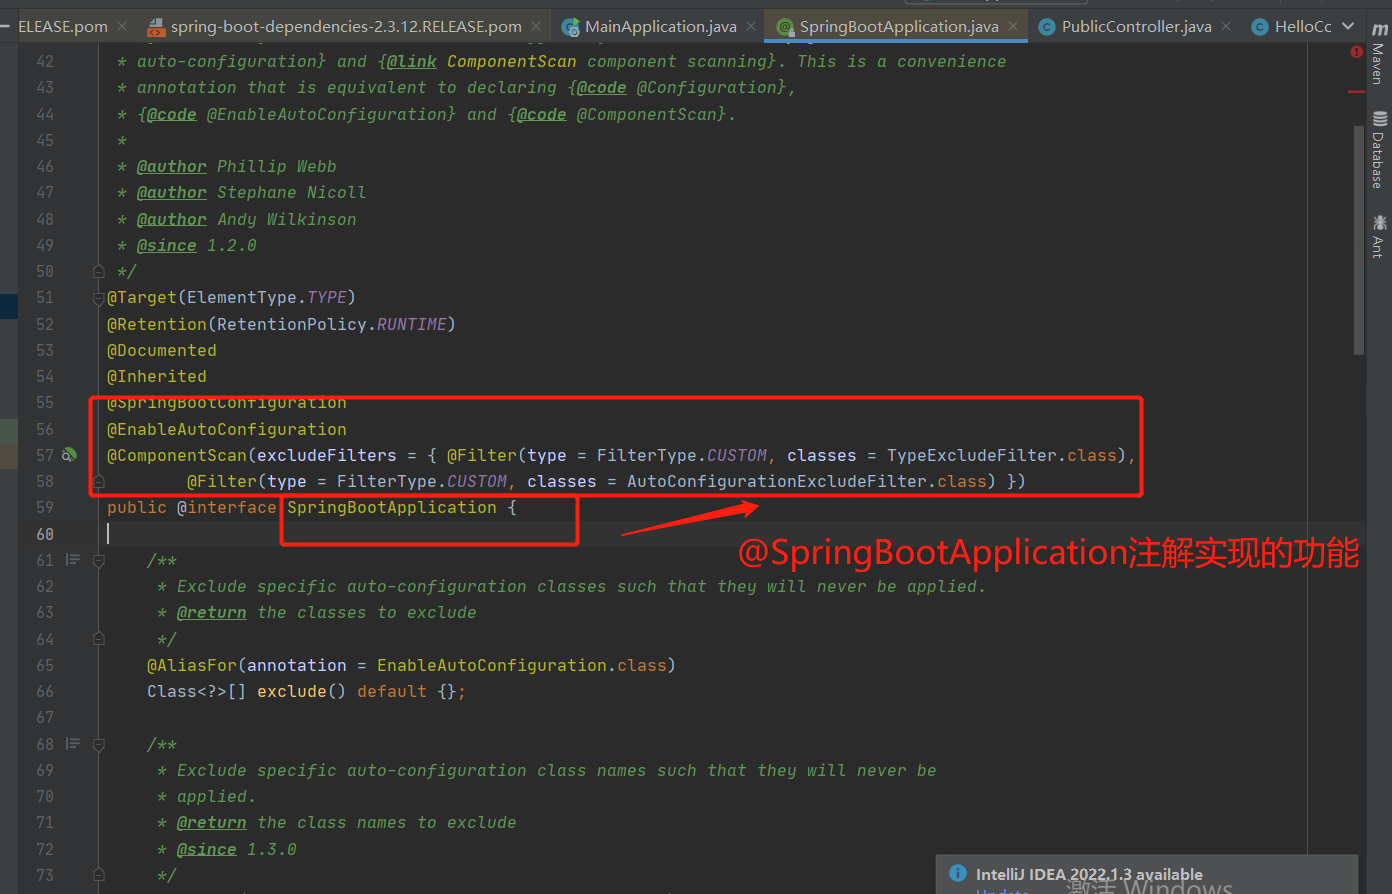
@SpringBootApplication
@SpringBootConfiguration
@EnableAutoConfiguration
@ComponentScan(excludeFilters = { @Filter(type = FilterType.CUSTOM, classes = TypeExcludeFilter.class),
      @Filter(type = FilterType.CUSTOM, classes = AutoConfigurationExcludeFilter.class) })
public @interface SpringBootApplication{}
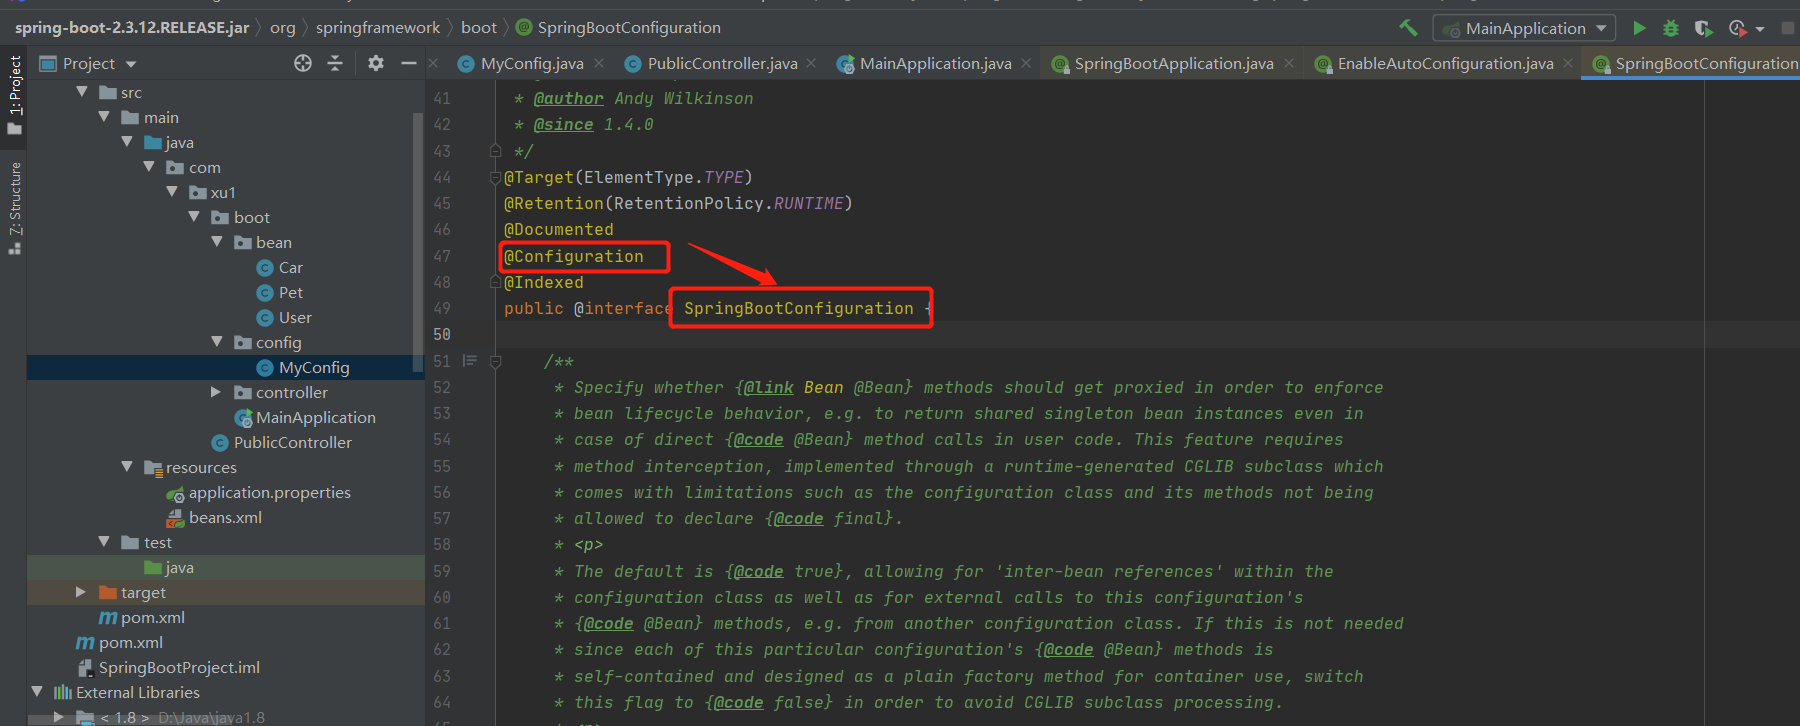
1.@SpringBootConfiguration---代表当前是一个配置类
@Configuration:代表当前是一个配置类
2.@ComponentScan--指定扫描那些,spring注解
3.@EnableAutoConfiguration(重点)
@AutoConfigurationPackage
@Import(AutoConfigurationImportSelector.class)
public @interface EnableAutoConfiguration {
3-1 @AutoConfigurationPackage:
@Import(AutoConfigurationPackages.Registrar.class)
public @interface AutoConfigurationPackage {}
@AutoConfigurationPackage注解利用Registrar类给容器中导入一系列组件
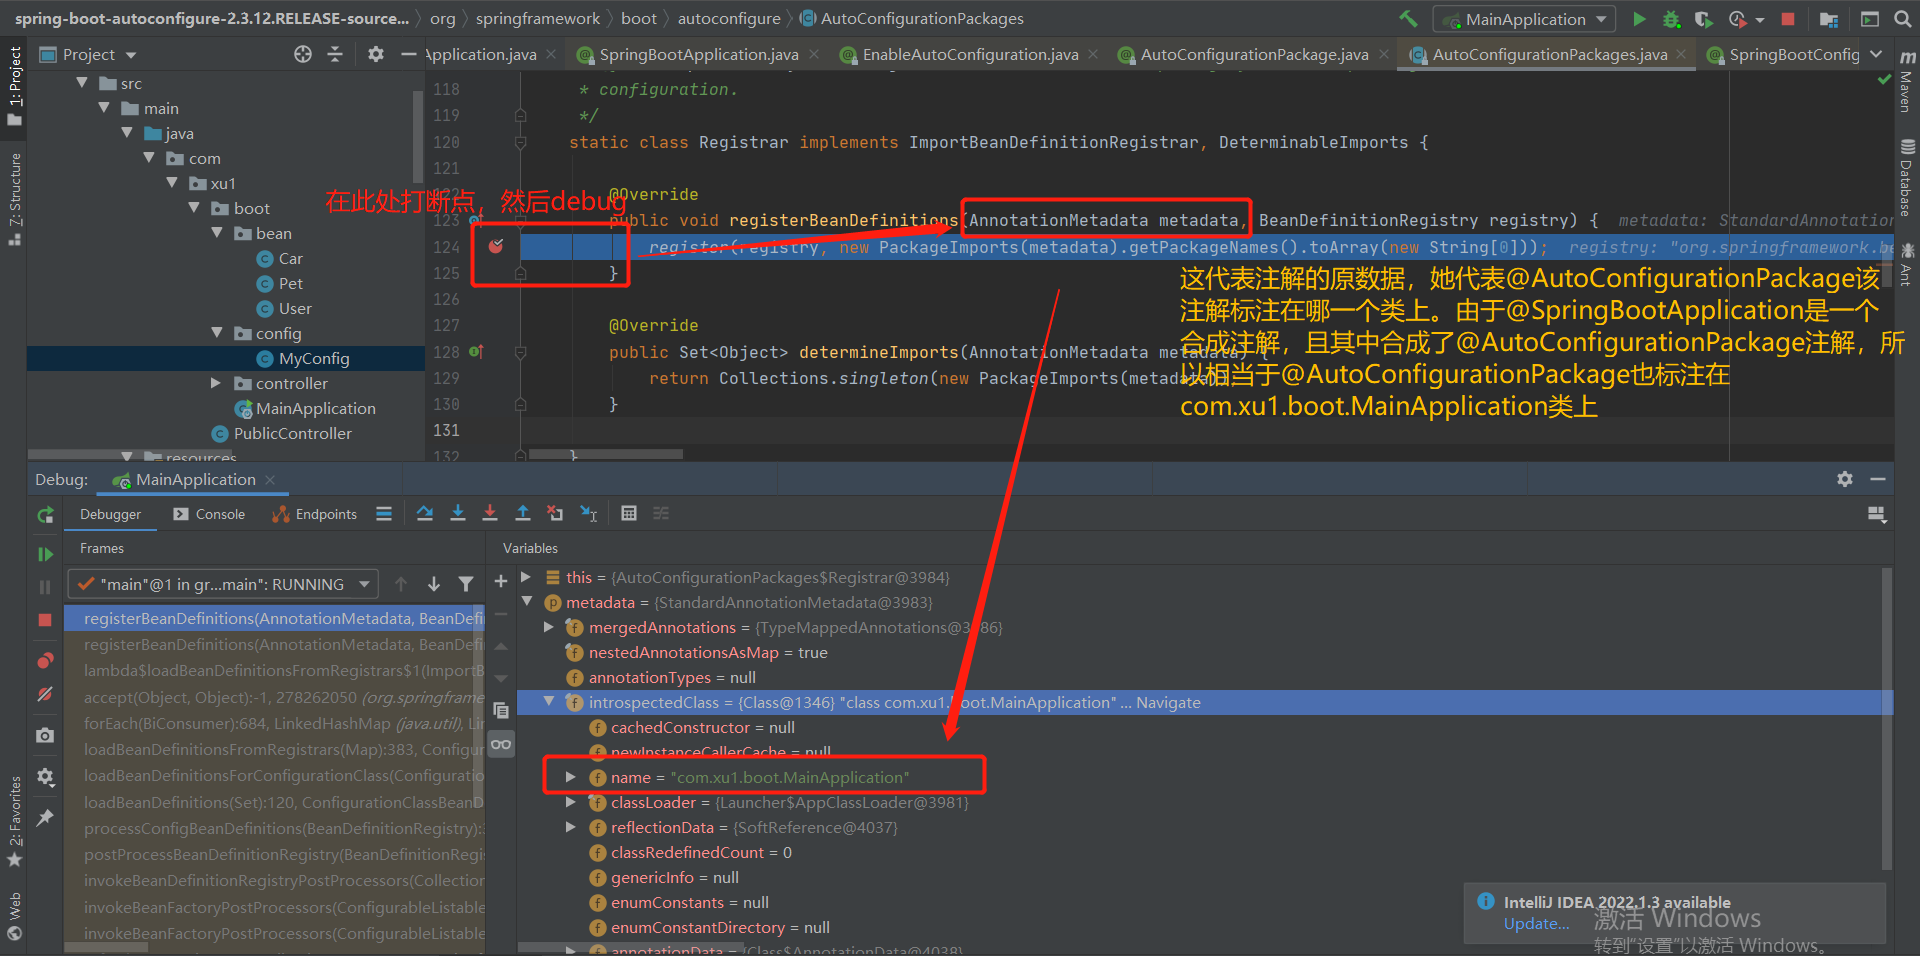
补充:注解指的是@AutoConfigurationPackage这一个注解
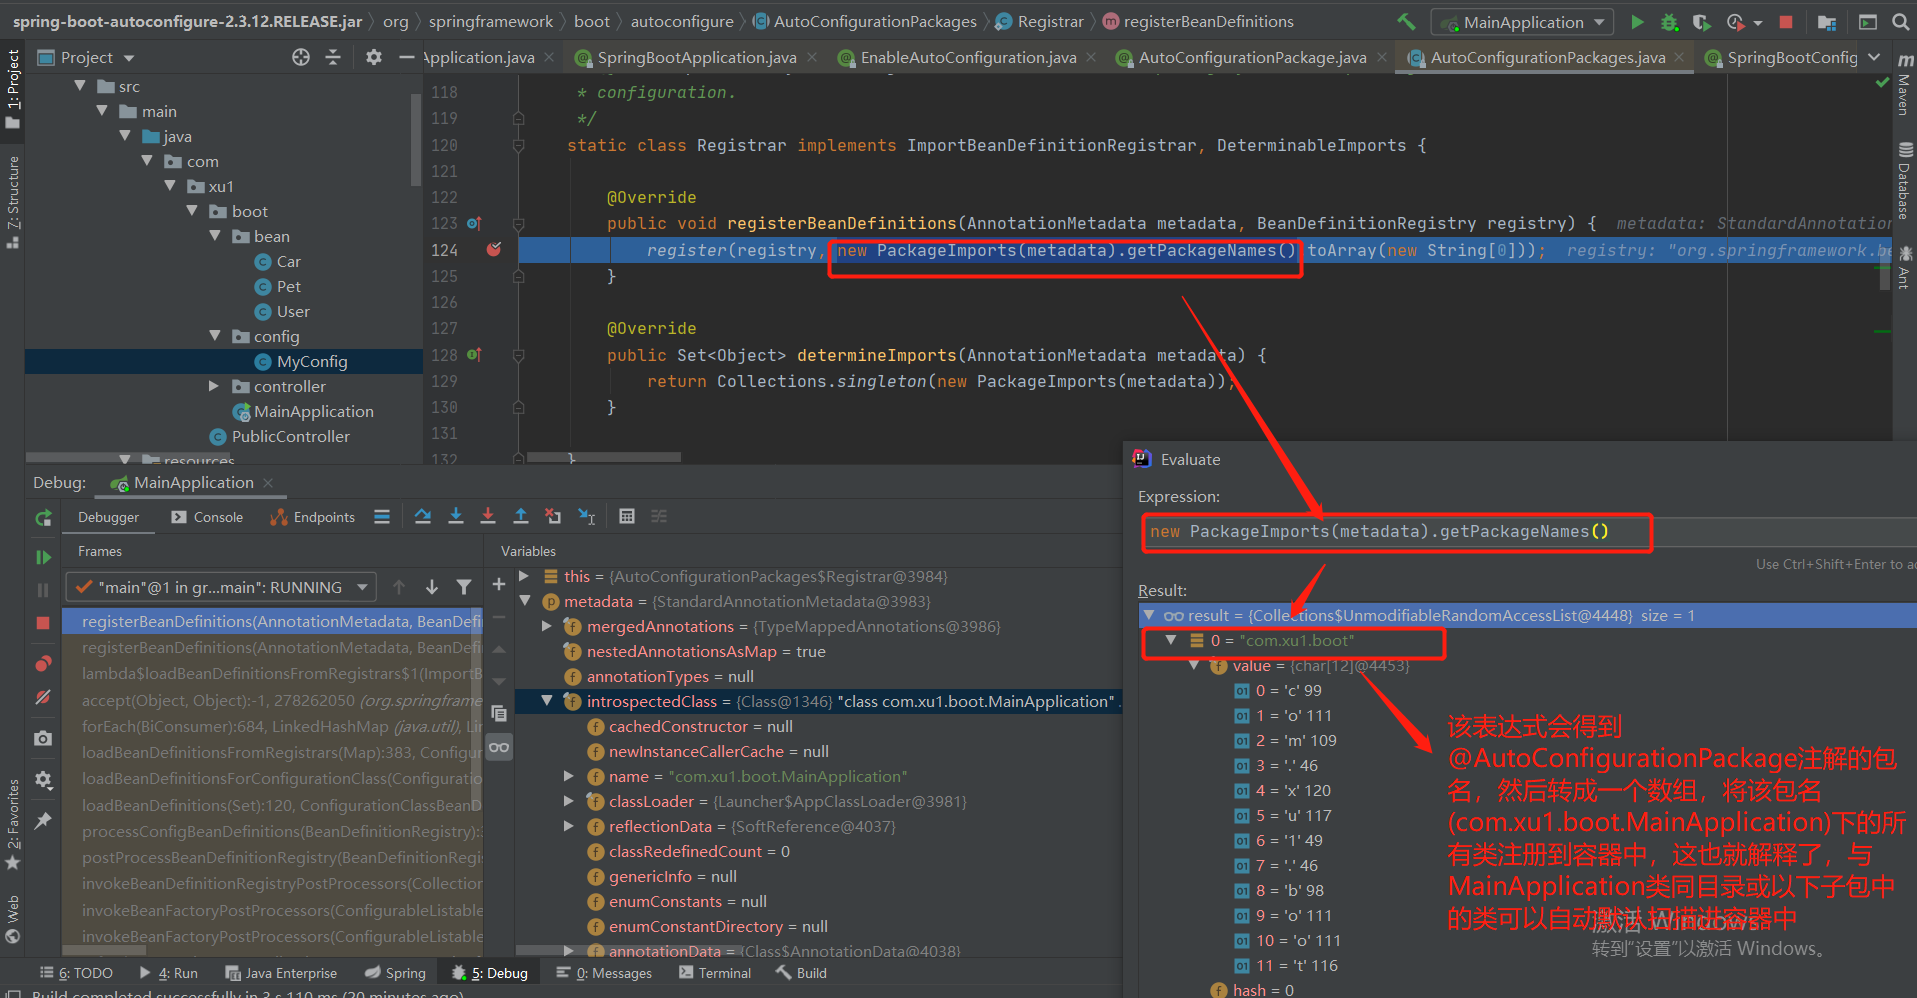
源码参考:
static class Registrar implements ImportBeanDefinitionRegistrar, DeterminableImports {

   @Override
   public void registerBeanDefinitions(AnnotationMetadata metadata, BeanDefinitionRegistry registry) {
      register(registry, new PackageImports(metadata).getPackageNames().toArray(new String[0]));
   }

   @Override
   public Set<Object> determineImports(AnnotationMetadata metadata) {
      return Collections.singleton(new PackageImports(metadata));
   }

}
3-2 初始加载自动配置类
@AutoConfigurationPackage
@Import(AutoConfigurationImportSelector.class)
public @interface EnableAutoConfiguration {
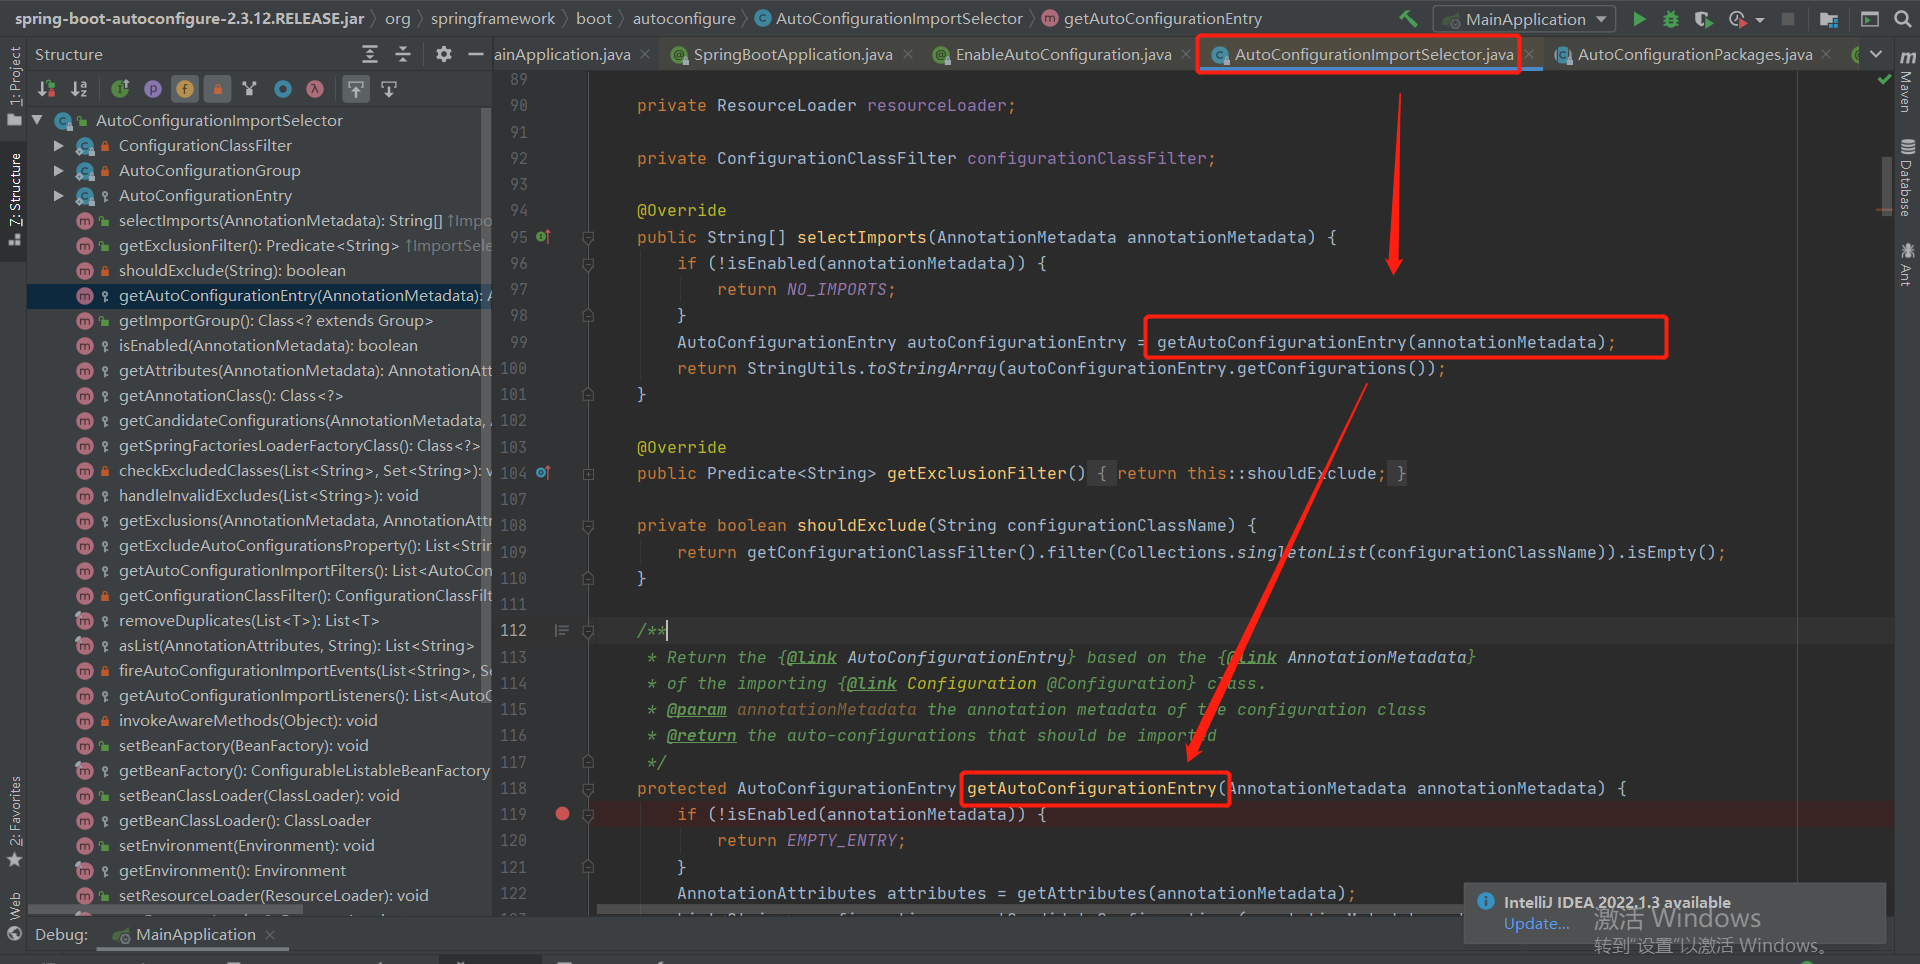
1.@Import(AutoConfigurationImportSelector.class)
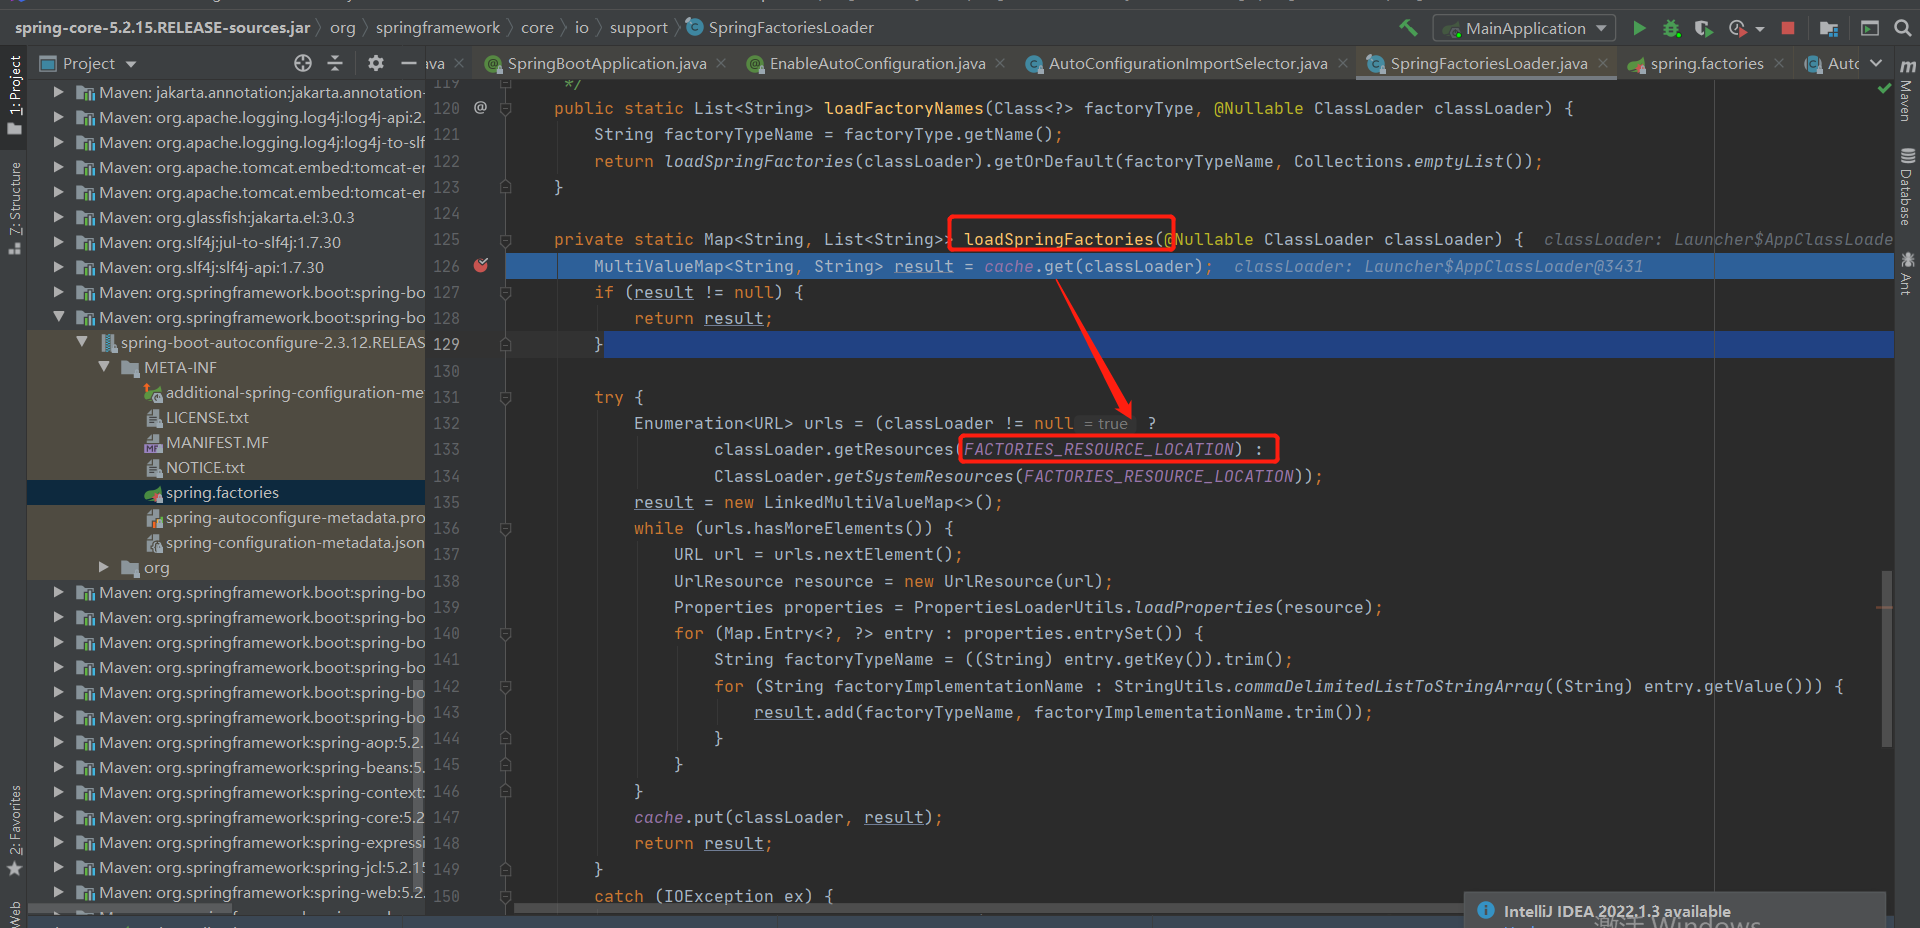
第2步:分析getCandidateConfigurations()方法
protected List<String> getCandidateConfigurations(AnnotationMetadata metadata, AnnotationAttributes attributes) {
   List<String> configurations = SpringFactoriesLoader.loadFactoryNames(getSpringFactoriesLoaderFactoryClass(),
         getBeanClassLoader());
   Assert.notEmpty(configurations, "No auto configuration classes found in META-INF/spring.factories. If you "
         + "are using a custom packaging, make sure that file is correct.");
   return configurations;
}
Spring.factories():
# Initializers
org.springframework.context.ApplicationContextInitializer=\
org.springframework.boot.autoconfigure.SharedMetadataReaderFactoryContextInitializer,\
org.springframework.boot.autoconfigure.logging.ConditionEvaluationReportLoggingListener

# Application Listeners
org.springframework.context.ApplicationListener=\
org.springframework.boot.autoconfigure.BackgroundPreinitializer

# Auto Configuration Import Listeners
org.springframework.boot.autoconfigure.AutoConfigurationImportListener=\
org.springframework.boot.autoconfigure.condition.ConditionEvaluationReportAutoConfigurationImportListener

# Auto Configuration Import Filters
org.springframework.boot.autoconfigure.AutoConfigurationImportFilter=\
org.springframework.boot.autoconfigure.condition.OnBeanCondition,\
org.springframework.boot.autoconfigure.condition.OnClassCondition,\
org.springframework.boot.autoconfigure.condition.OnWebApplicationCondition

# Auto Configure
org.springframework.boot.autoconfigure.EnableAutoConfiguration=\
org.springframework.boot.autoconfigure.admin.SpringApplicationAdminJmxAutoConfiguration,\
org.springframework.boot.autoconfigure.aop.AopAutoConfiguration,\
org.springframework.boot.autoconfigure.amqp.RabbitAutoConfiguration,\
org.springframework.boot.autoconfigure.batch.BatchAutoConfiguration,\
org.springframework.boot.autoconfigure.cache.CacheAutoConfiguration,\
org.springframework.boot.autoconfigure.cassandra.CassandraAutoConfiguration,\
org.springframework.boot.autoconfigure.context.ConfigurationPropertiesAutoConfiguration,\
org.springframework.boot.autoconfigure.context.LifecycleAutoConfiguration,\
org.springframework.boot.autoconfigure.context.MessageSourceAutoConfiguration,\
org.springframework.boot.autoconfigure.context.PropertyPlaceholderAutoConfiguration,\
org.springframework.boot.autoconfigure.couchbase.CouchbaseAutoConfiguration,\
org.springframework.boot.autoconfigure.dao.PersistenceExceptionTranslationAutoConfiguration,\
org.springframework.boot.autoconfigure.data.cassandra.CassandraDataAutoConfiguration,\
org.springframework.boot.autoconfigure.data.cassandra.CassandraReactiveDataAutoConfiguration,\
org.springframework.boot.autoconfigure.data.cassandra.CassandraReactiveRepositoriesAutoConfiguration,\
org.springframework.boot.autoconfigure.data.cassandra.CassandraRepositoriesAutoConfiguration,\
org.springframework.boot.autoconfigure.data.couchbase.CouchbaseDataAutoConfiguration,\
org.springframework.boot.autoconfigure.data.couchbase.CouchbaseReactiveDataAutoConfiguration,\
org.springframework.boot.autoconfigure.data.couchbase.CouchbaseReactiveRepositoriesAutoConfiguration,\
org.springframework.boot.autoconfigure.data.couchbase.CouchbaseRepositoriesAutoConfiguration,\
org.springframework.boot.autoconfigure.data.elasticsearch.ElasticsearchDataAutoConfiguration,\
org.springframework.boot.autoconfigure.data.elasticsearch.ElasticsearchRepositoriesAutoConfiguration,\
org.springframework.boot.autoconfigure.data.elasticsearch.ReactiveElasticsearchRepositoriesAutoConfiguration,\
org.springframework.boot.autoconfigure.data.elasticsearch.ReactiveElasticsearchRestClientAutoConfiguration,\
org.springframework.boot.autoconfigure.data.jdbc.JdbcRepositoriesAutoConfiguration,\
org.springframework.boot.autoconfigure.data.jpa.JpaRepositoriesAutoConfiguration,\
org.springframework.boot.autoconfigure.data.ldap.LdapRepositoriesAutoConfiguration,\
org.springframework.boot.autoconfigure.data.mongo.MongoDataAutoConfiguration,\
org.springframework.boot.autoconfigure.data.mongo.MongoReactiveDataAutoConfiguration,\
org.springframework.boot.autoconfigure.data.mongo.MongoReactiveRepositoriesAutoConfiguration,\
org.springframework.boot.autoconfigure.data.mongo.MongoRepositoriesAutoConfiguration,\
org.springframework.boot.autoconfigure.data.neo4j.Neo4jDataAutoConfiguration,\
org.springframework.boot.autoconfigure.data.neo4j.Neo4jRepositoriesAutoConfiguration,\
org.springframework.boot.autoconfigure.data.solr.SolrRepositoriesAutoConfiguration,\
org.springframework.boot.autoconfigure.data.r2dbc.R2dbcDataAutoConfiguration,\
org.springframework.boot.autoconfigure.data.r2dbc.R2dbcRepositoriesAutoConfiguration,\
org.springframework.boot.autoconfigure.data.r2dbc.R2dbcTransactionManagerAutoConfiguration,\
org.springframework.boot.autoconfigure.data.redis.RedisAutoConfiguration,\
org.springframework.boot.autoconfigure.data.redis.RedisReactiveAutoConfiguration,\
org.springframework.boot.autoconfigure.data.redis.RedisRepositoriesAutoConfiguration,\
org.springframework.boot.autoconfigure.data.rest.RepositoryRestMvcAutoConfiguration,\
org.springframework.boot.autoconfigure.data.web.SpringDataWebAutoConfiguration,\
org.springframework.boot.autoconfigure.elasticsearch.ElasticsearchRestClientAutoConfiguration,\
org.springframework.boot.autoconfigure.flyway.FlywayAutoConfiguration,\
org.springframework.boot.autoconfigure.freemarker.FreeMarkerAutoConfiguration,\
org.springframework.boot.autoconfigure.groovy.template.GroovyTemplateAutoConfiguration,\
org.springframework.boot.autoconfigure.gson.GsonAutoConfiguration,\
org.springframework.boot.autoconfigure.h2.H2ConsoleAutoConfiguration,\
org.springframework.boot.autoconfigure.hateoas.HypermediaAutoConfiguration,\
org.springframework.boot.autoconfigure.hazelcast.HazelcastAutoConfiguration,\
org.springframework.boot.autoconfigure.hazelcast.HazelcastJpaDependencyAutoConfiguration,\
org.springframework.boot.autoconfigure.http.HttpMessageConvertersAutoConfiguration,\
org.springframework.boot.autoconfigure.http.codec.CodecsAutoConfiguration,\
org.springframework.boot.autoconfigure.influx.InfluxDbAutoConfiguration,\
org.springframework.boot.autoconfigure.info.ProjectInfoAutoConfiguration,\
org.springframework.boot.autoconfigure.integration.IntegrationAutoConfiguration,\
org.springframework.boot.autoconfigure.jackson.JacksonAutoConfiguration,\
org.springframework.boot.autoconfigure.jdbc.DataSourceAutoConfiguration,\
org.springframework.boot.autoconfigure.jdbc.JdbcTemplateAutoConfiguration,\
org.springframework.boot.autoconfigure.jdbc.JndiDataSourceAutoConfiguration,\
org.springframework.boot.autoconfigure.jdbc.XADataSourceAutoConfiguration,\
org.springframework.boot.autoconfigure.jdbc.DataSourceTransactionManagerAutoConfiguration,\
org.springframework.boot.autoconfigure.jms.JmsAutoConfiguration,\
org.springframework.boot.autoconfigure.jmx.JmxAutoConfiguration,\
org.springframework.boot.autoconfigure.jms.JndiConnectionFactoryAutoConfiguration,\
org.springframework.boot.autoconfigure.jms.activemq.ActiveMQAutoConfiguration,\
org.springframework.boot.autoconfigure.jms.artemis.ArtemisAutoConfiguration,\
org.springframework.boot.autoconfigure.jersey.JerseyAutoConfiguration,\
org.springframework.boot.autoconfigure.jooq.JooqAutoConfiguration,\
org.springframework.boot.autoconfigure.jsonb.JsonbAutoConfiguration,\
org.springframework.boot.autoconfigure.kafka.KafkaAutoConfiguration,\
org.springframework.boot.autoconfigure.availability.ApplicationAvailabilityAutoConfiguration,\
org.springframework.boot.autoconfigure.ldap.embedded.EmbeddedLdapAutoConfiguration,\
org.springframework.boot.autoconfigure.ldap.LdapAutoConfiguration,\
org.springframework.boot.autoconfigure.liquibase.LiquibaseAutoConfiguration,\
org.springframework.boot.autoconfigure.mail.MailSenderAutoConfiguration,\
org.springframework.boot.autoconfigure.mail.MailSenderValidatorAutoConfiguration,\
org.springframework.boot.autoconfigure.mongo.embedded.EmbeddedMongoAutoConfiguration,\
org.springframework.boot.autoconfigure.mongo.MongoAutoConfiguration,\
org.springframework.boot.autoconfigure.mongo.MongoReactiveAutoConfiguration,\
org.springframework.boot.autoconfigure.mustache.MustacheAutoConfiguration,\
org.springframework.boot.autoconfigure.orm.jpa.HibernateJpaAutoConfiguration,\
org.springframework.boot.autoconfigure.quartz.QuartzAutoConfiguration,\
org.springframework.boot.autoconfigure.r2dbc.R2dbcAutoConfiguration,\
org.springframework.boot.autoconfigure.rsocket.RSocketMessagingAutoConfiguration,\
org.springframework.boot.autoconfigure.rsocket.RSocketRequesterAutoConfiguration,\
org.springframework.boot.autoconfigure.rsocket.RSocketServerAutoConfiguration,\
org.springframework.boot.autoconfigure.rsocket.RSocketStrategiesAutoConfiguration,\
org.springframework.boot.autoconfigure.security.servlet.SecurityAutoConfiguration,\
org.springframework.boot.autoconfigure.security.servlet.UserDetailsServiceAutoConfiguration,\
org.springframework.boot.autoconfigure.security.servlet.SecurityFilterAutoConfiguration,\
org.springframework.boot.autoconfigure.security.reactive.ReactiveSecurityAutoConfiguration,\
org.springframework.boot.autoconfigure.security.reactive.ReactiveUserDetailsServiceAutoConfiguration,\
org.springframework.boot.autoconfigure.security.rsocket.RSocketSecurityAutoConfiguration,\
org.springframework.boot.autoconfigure.security.saml2.Saml2RelyingPartyAutoConfiguration,\
org.springframework.boot.autoconfigure.sendgrid.SendGridAutoConfiguration,\
org.springframework.boot.autoconfigure.session.SessionAutoConfiguration,\
org.springframework.boot.autoconfigure.security.oauth2.client.servlet.OAuth2ClientAutoConfiguration,\
org.springframework.boot.autoconfigure.security.oauth2.client.reactive.ReactiveOAuth2ClientAutoConfiguration,\
org.springframework.boot.autoconfigure.security.oauth2.resource.servlet.OAuth2ResourceServerAutoConfiguration,\
org.springframework.boot.autoconfigure.security.oauth2.resource.reactive.ReactiveOAuth2ResourceServerAutoConfiguration,\
org.springframework.boot.autoconfigure.solr.SolrAutoConfiguration,\
org.springframework.boot.autoconfigure.task.TaskExecutionAutoConfiguration,\
org.springframework.boot.autoconfigure.task.TaskSchedulingAutoConfiguration,\
org.springframework.boot.autoconfigure.thymeleaf.ThymeleafAutoConfiguration,\
org.springframework.boot.autoconfigure.transaction.TransactionAutoConfiguration,\
org.springframework.boot.autoconfigure.transaction.jta.JtaAutoConfiguration,\
org.springframework.boot.autoconfigure.validation.ValidationAutoConfiguration,\
org.springframework.boot.autoconfigure.web.client.RestTemplateAutoConfiguration,\
org.springframework.boot.autoconfigure.web.embedded.EmbeddedWebServerFactoryCustomizerAutoConfiguration,\
org.springframework.boot.autoconfigure.web.reactive.HttpHandlerAutoConfiguration,\
org.springframework.boot.autoconfigure.web.reactive.ReactiveWebServerFactoryAutoConfiguration,\
org.springframework.boot.autoconfigure.web.reactive.WebFluxAutoConfiguration,\
org.springframework.boot.autoconfigure.web.reactive.error.ErrorWebFluxAutoConfiguration,\
org.springframework.boot.autoconfigure.web.reactive.function.client.ClientHttpConnectorAutoConfiguration,\
org.springframework.boot.autoconfigure.web.reactive.function.client.WebClientAutoConfiguration,\
org.springframework.boot.autoconfigure.web.servlet.DispatcherServletAutoConfiguration,\
org.springframework.boot.autoconfigure.web.servlet.ServletWebServerFactoryAutoConfiguration,\
org.springframework.boot.autoconfigure.web.servlet.error.ErrorMvcAutoConfiguration,\
org.springframework.boot.autoconfigure.web.servlet.HttpEncodingAutoConfiguration,\
org.springframework.boot.autoconfigure.web.servlet.MultipartAutoConfiguration,\
org.springframework.boot.autoconfigure.web.servlet.WebMvcAutoConfiguration,\
org.springframework.boot.autoconfigure.websocket.reactive.WebSocketReactiveAutoConfiguration,\
org.springframework.boot.autoconfigure.websocket.servlet.WebSocketServletAutoConfiguration,\
org.springframework.boot.autoconfigure.websocket.servlet.WebSocketMessagingAutoConfiguration,\
org.springframework.boot.autoconfigure.webservices.WebServicesAutoConfiguration,\
org.springframework.boot.autoconfigure.webservices.client.WebServiceTemplateAutoConfiguration

# Failure analyzers
org.springframework.boot.diagnostics.FailureAnalyzer=\
org.springframework.boot.autoconfigure.data.redis.RedisUrlSyntaxFailureAnalyzer,\
org.springframework.boot.autoconfigure.diagnostics.analyzer.NoSuchBeanDefinitionFailureAnalyzer,\
org.springframework.boot.autoconfigure.flyway.FlywayMigrationScriptMissingFailureAnalyzer,\
org.springframework.boot.autoconfigure.jdbc.DataSourceBeanCreationFailureAnalyzer,\
org.springframework.boot.autoconfigure.jdbc.HikariDriverConfigurationFailureAnalyzer,\
org.springframework.boot.autoconfigure.r2dbc.ConnectionFactoryBeanCreationFailureAnalyzer,\
org.springframework.boot.autoconfigure.session.NonUniqueSessionRepositoryFailureAnalyzer

# Template availability providers
org.springframework.boot.autoconfigure.template.TemplateAvailabilityProvider=\
org.springframework.boot.autoconfigure.freemarker.FreeMarkerTemplateAvailabilityProvider,\
org.springframework.boot.autoconfigure.mustache.MustacheTemplateAvailabilityProvider,\
org.springframework.boot.autoconfigure.groovy.template.GroovyTemplateAvailabilityProvider,\
org.springframework.boot.autoconfigure.thymeleaf.ThymeleafTemplateAvailabilityProvider,\
org.springframework.boot.autoconfigure.web.servlet.JspTemplateAvailabilityProvider
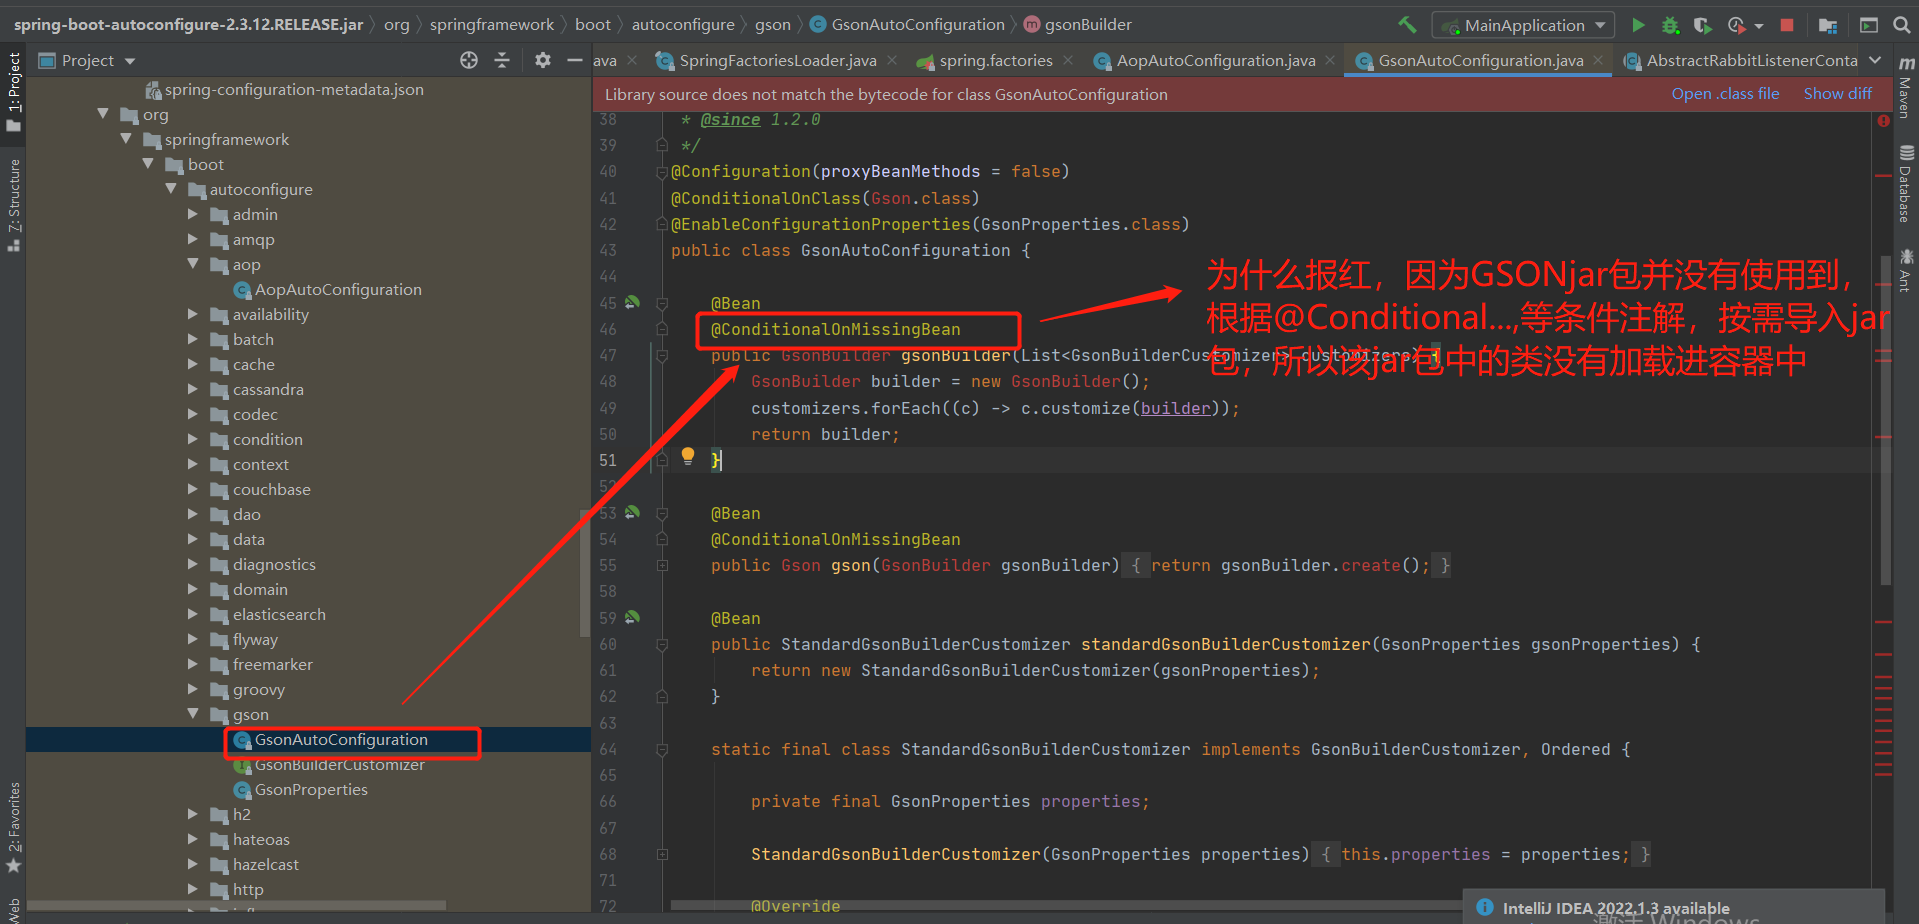
第3步:@Conditional...条件注解
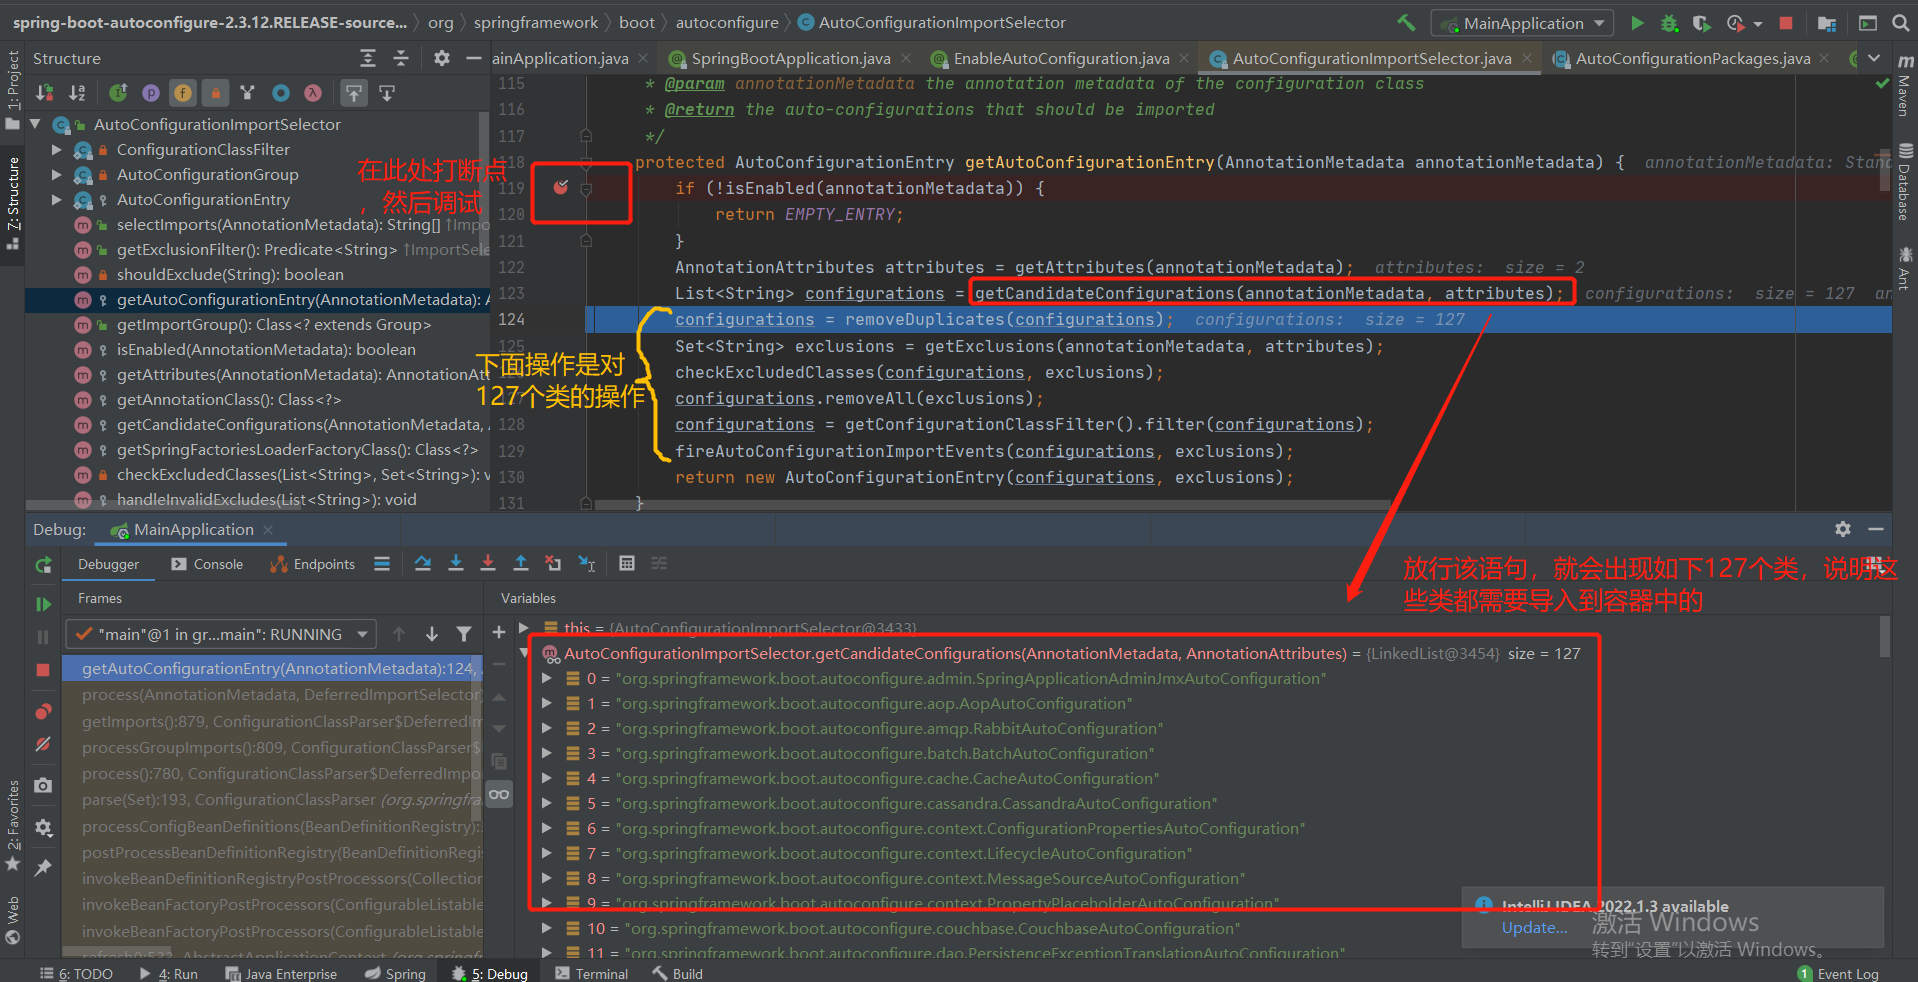
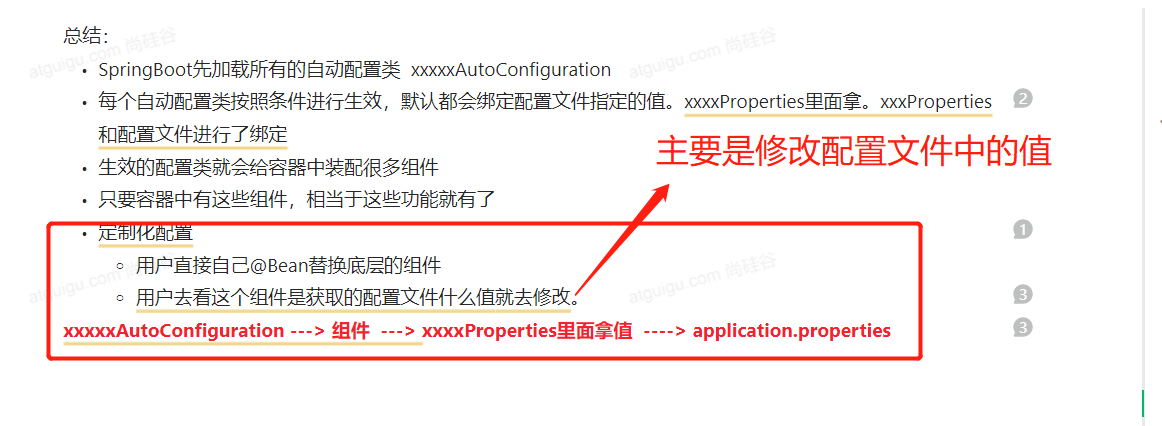
虽然我们127个场景的所有自动配置启动的时候默认全部加载。xxxxAutoConfiguration
按照条件装配规则(@Conditional),最终会按需配置,也就是说,使用哪一个场景,就会按需配置哪一个jar包。
总结:
1、利用getAutoConfigurationEntry(annotationMetadata);给容器中批量导入一些组件
2、调用List<String> configurations = getCandidateConfigurations(annotationMetadata, attributes)获取到所有需要导入到容器中的配置类d
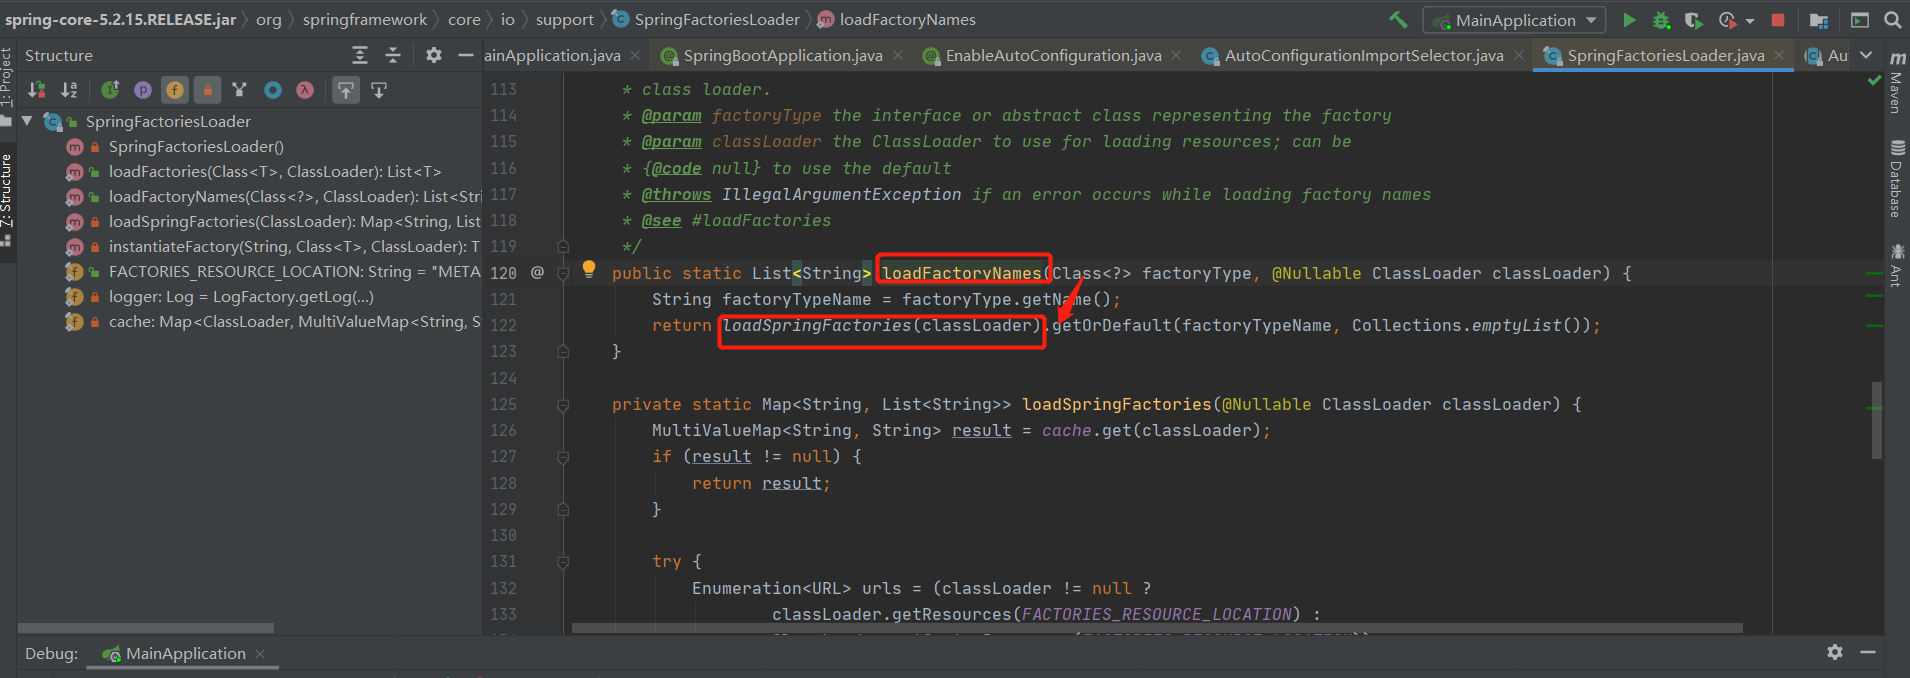
3、利用工厂加载 Map<String, List<String>> loadSpringFactories(@Nullable ClassLoader classLoader);得到所有的组件
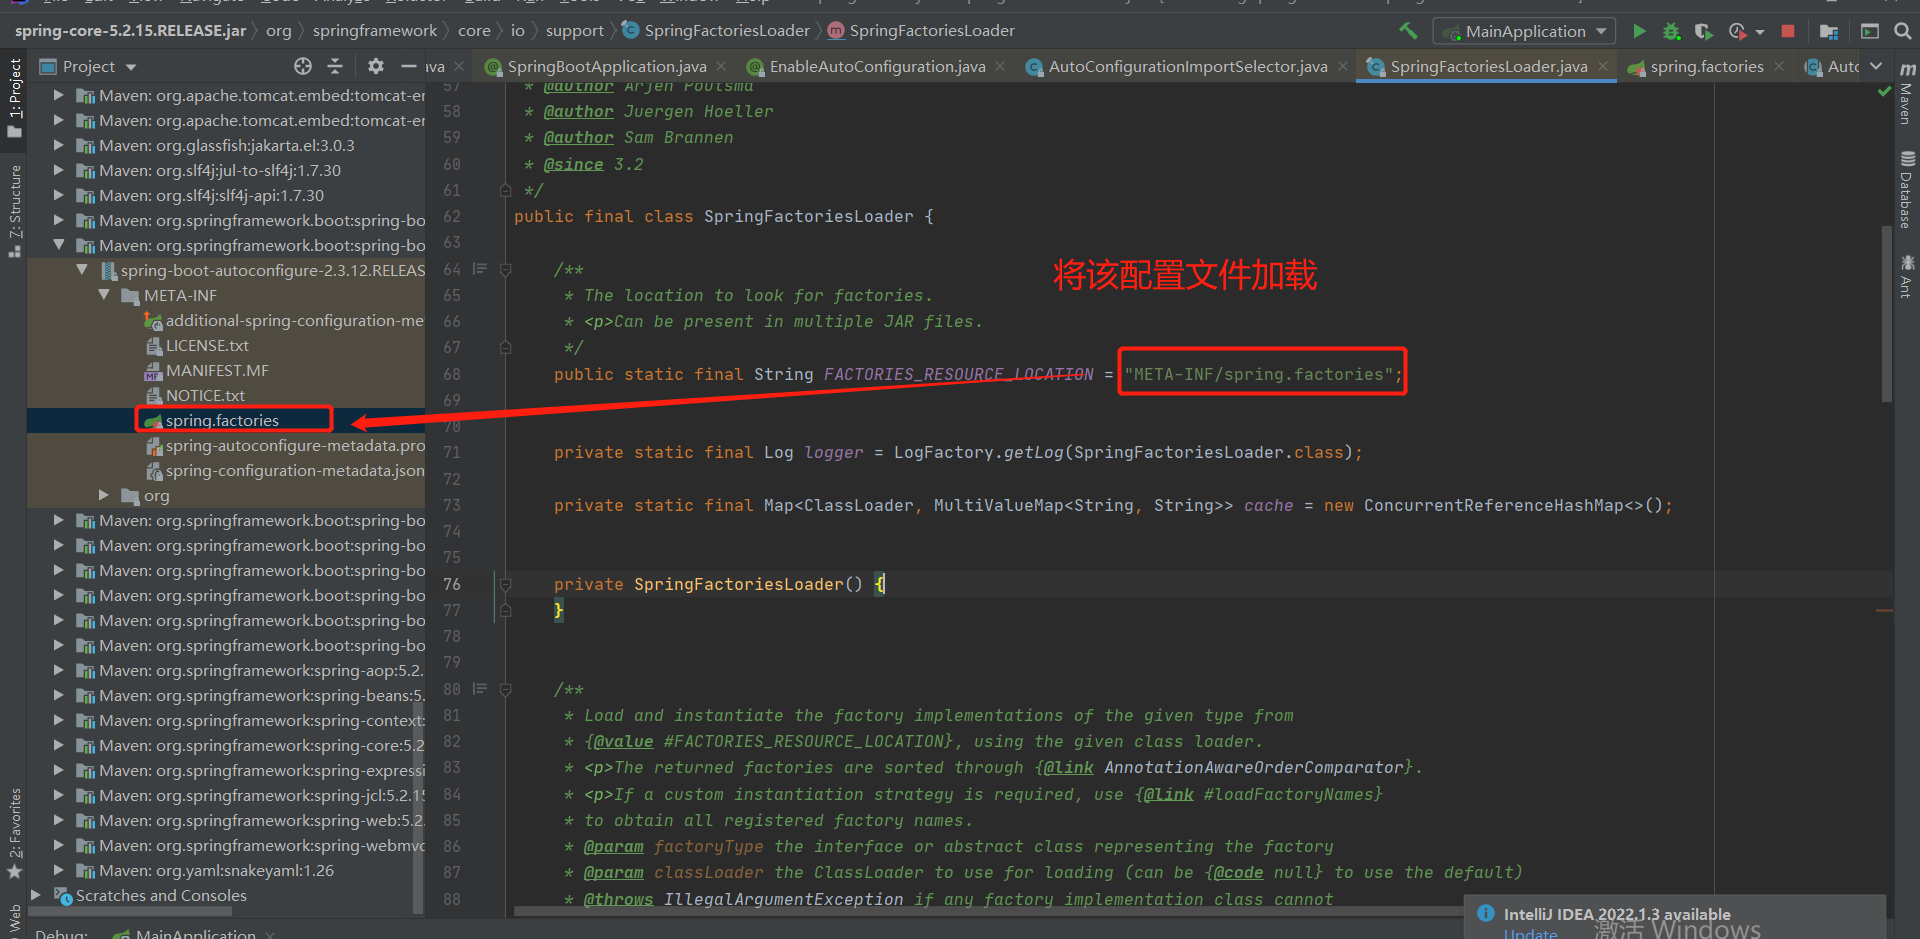
4、从META-INF/spring.factories位置来加载一个文件。
	默认扫描我们当前系统里面所有META-INF/spring.factories位置的文件
    spring-boot-autoconfigure-2.3.4.RELEASE.jar包里面也有META-INF/spring.factories
3-3 修改默认配置(需要仔细看(学完spring注解开发):https://www.bilibili.com/video/BV19K4y1L7MT?p=15&spm_id_from=pageDriver&vd_source=7d15f545f2dd3742f9567eefbadf3aaa)
1.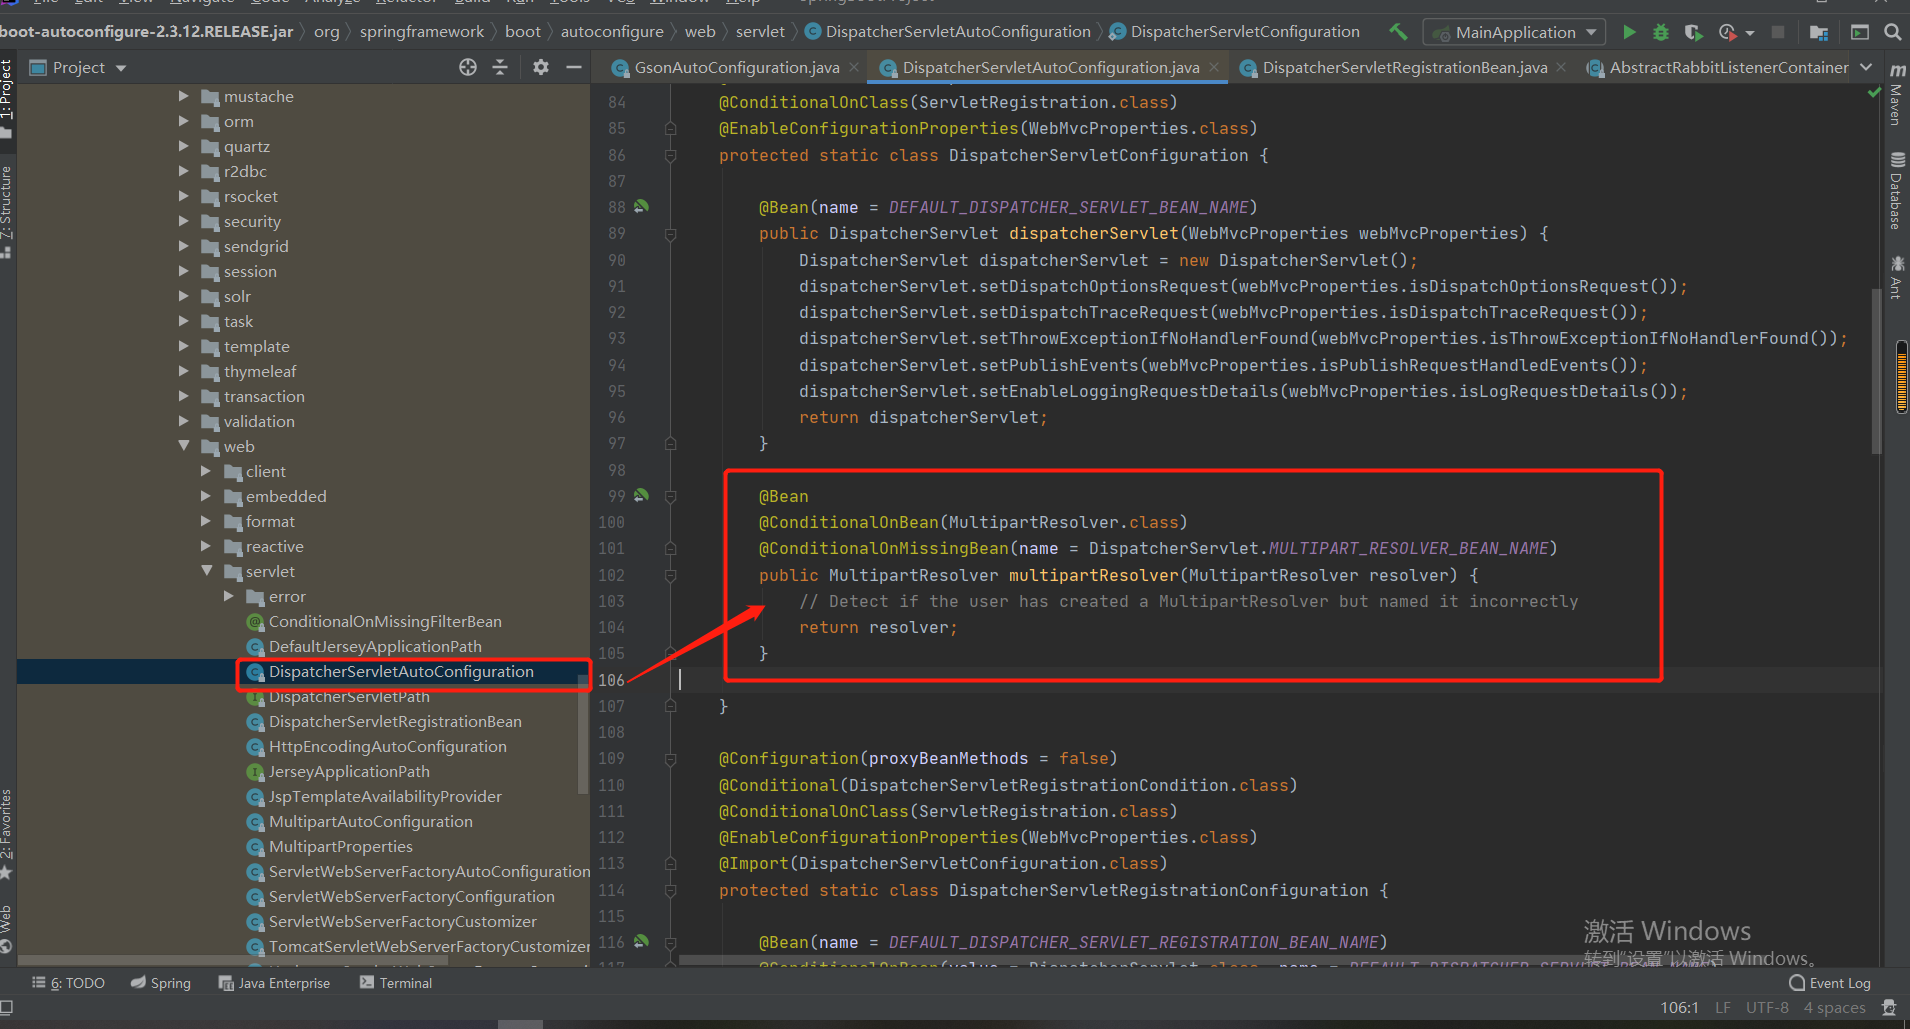
    @Bean
	@ConditionalOnBean(MultipartResolver.class)  //容器中有这个类型组件
	@ConditionalOnMissingBean(name = DispatcherServlet.MULTIPART_RESOLVER_BEAN_NAME) //容器中没有这个名字 multipartResolver 的组件
	public MultipartResolver multipartResolver(MultipartResolver resolver) {
        //给@Bean标注的方法传入了对象参数,这个参数的值就会从容器中找。
        //SpringMVC multipartResolver。防止有些用户配置的文件上传解析器名字不符合规范
		// Detect if the user has created a MultipartResolver but named it incorrectly
		return resolver;
	}
//给容器中加入了文件上传解析器;
SpringBoot默认会在底层配好所有的组件。但是如果用户自己配置了以用户的优先
	@Bean
	@ConditionalOnMissingBean
	public CharacterEncodingFilter characterEncodingFilter() {
    }
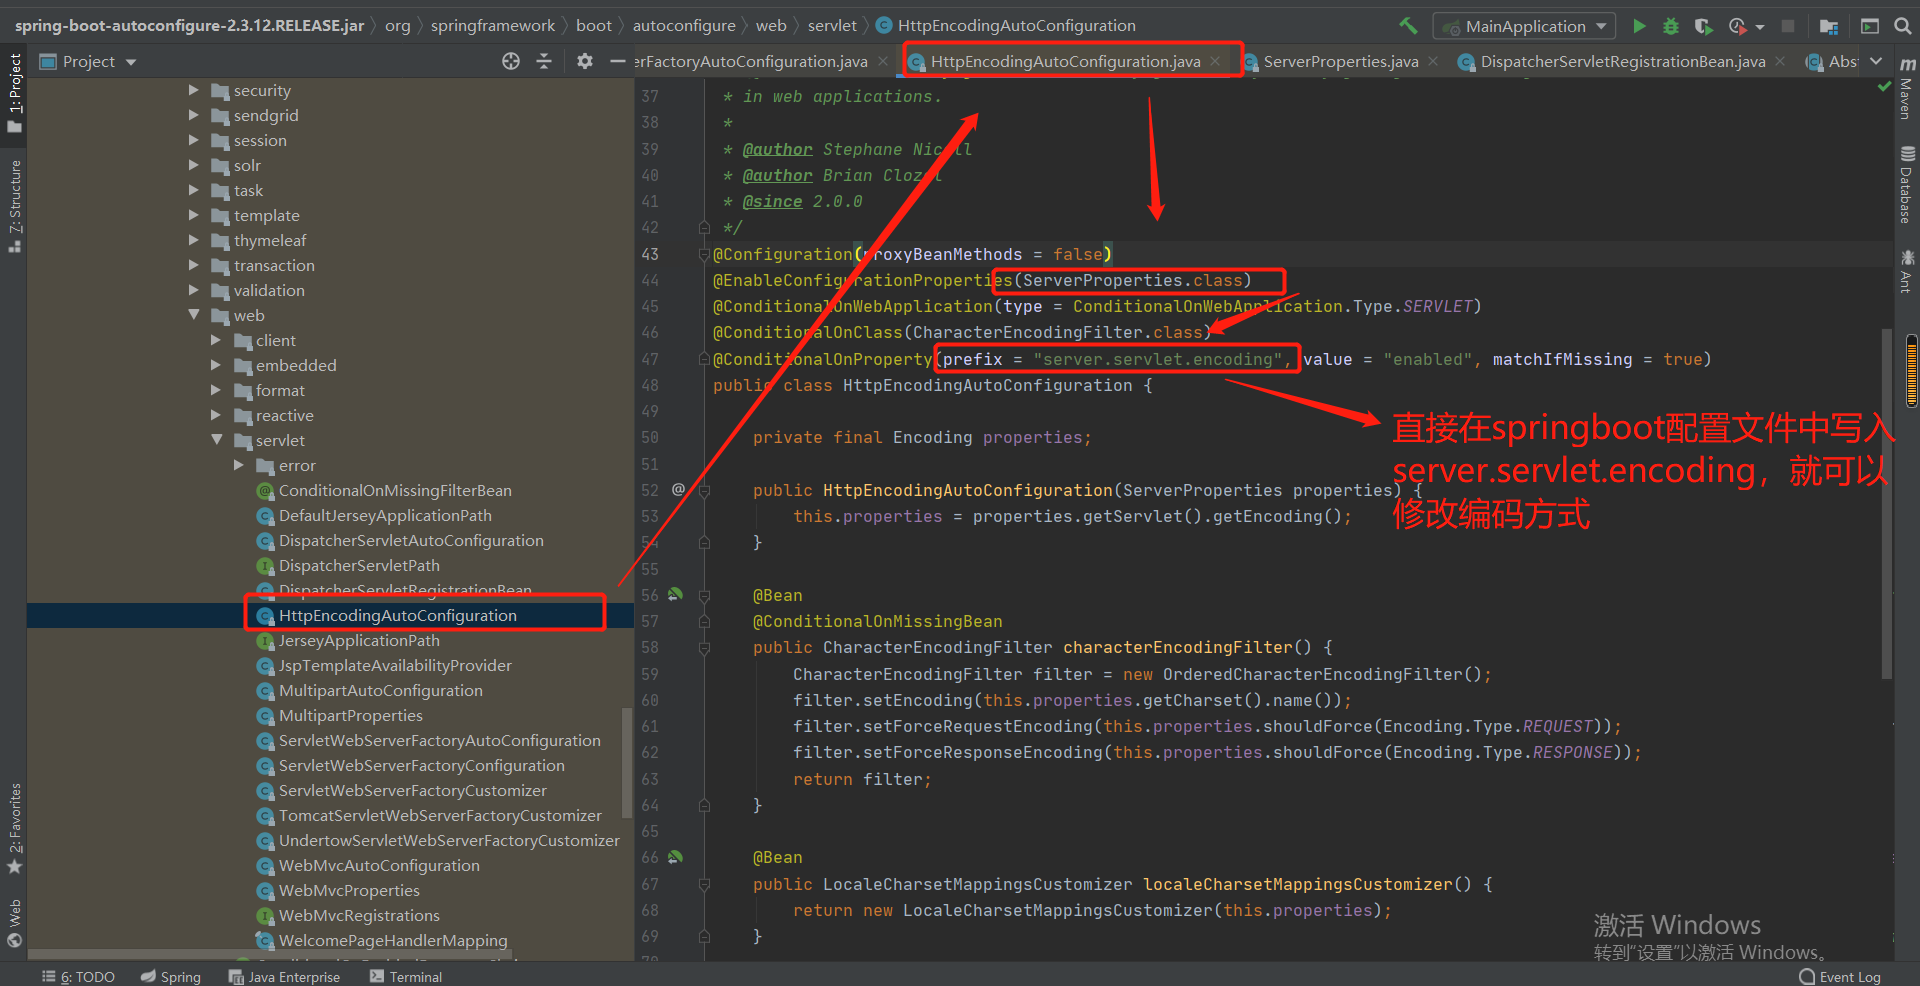
3.总结(方式1:查看文档有那些配置文件;方式2:直接查底层)
eg:采用方式2(直接查底层)---修改编码方式
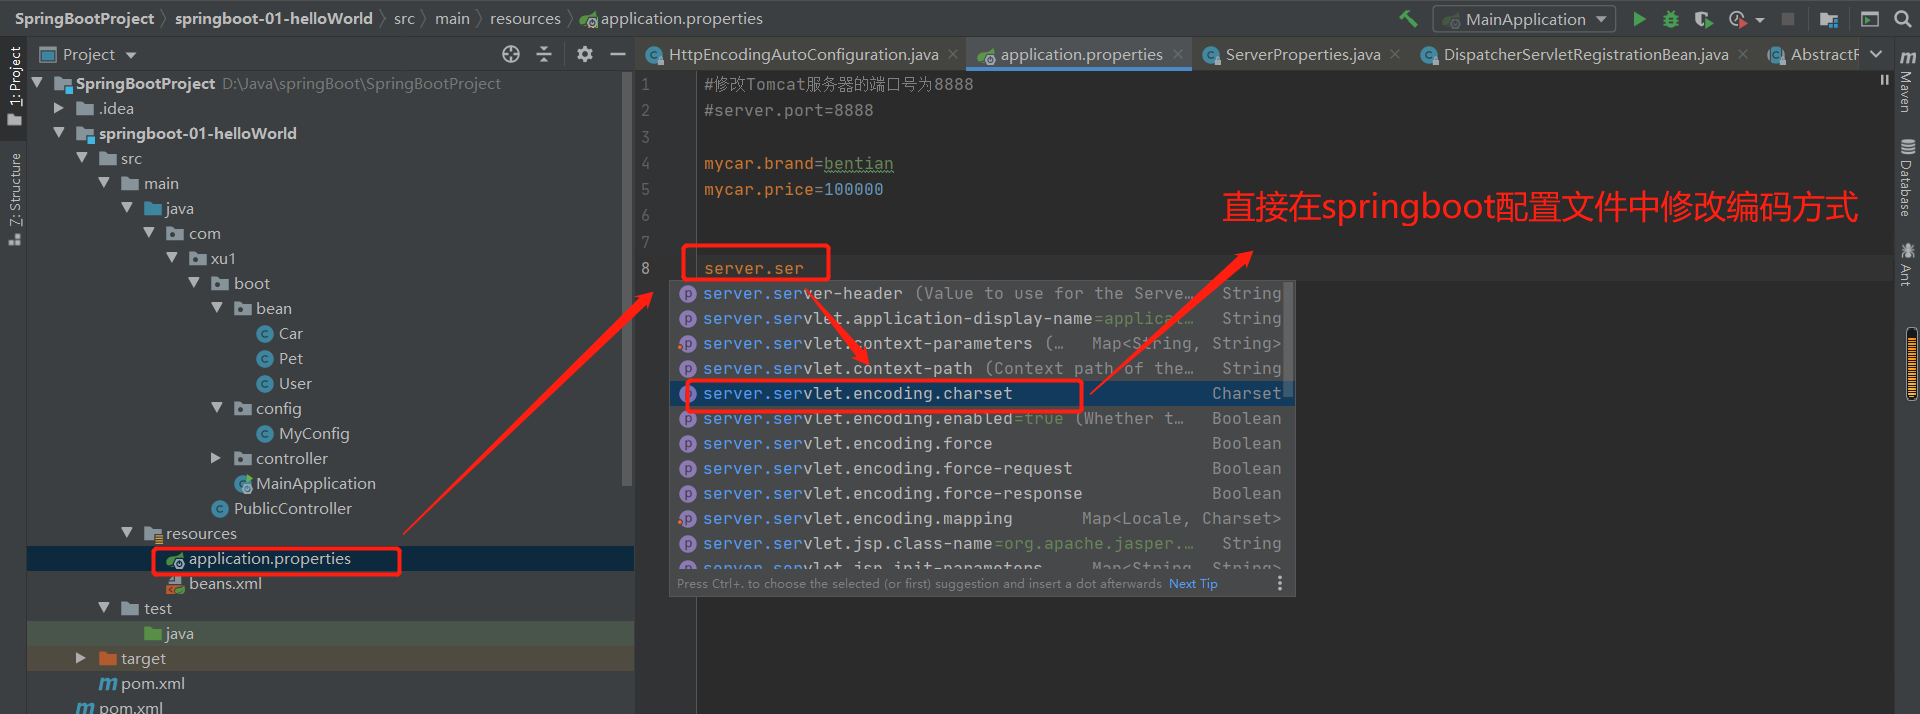
第4章 最佳实践
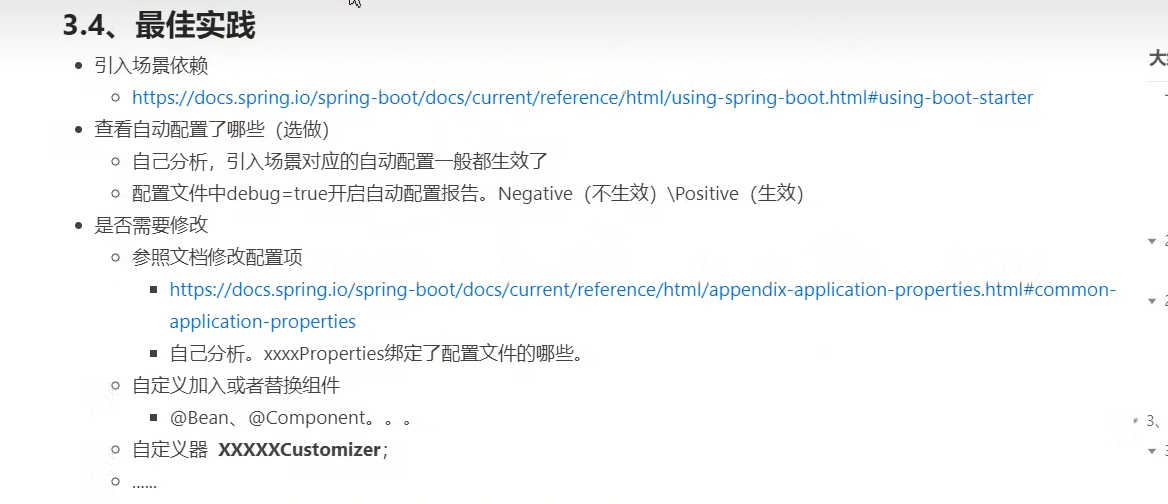
4-1 springboot应用如何编写
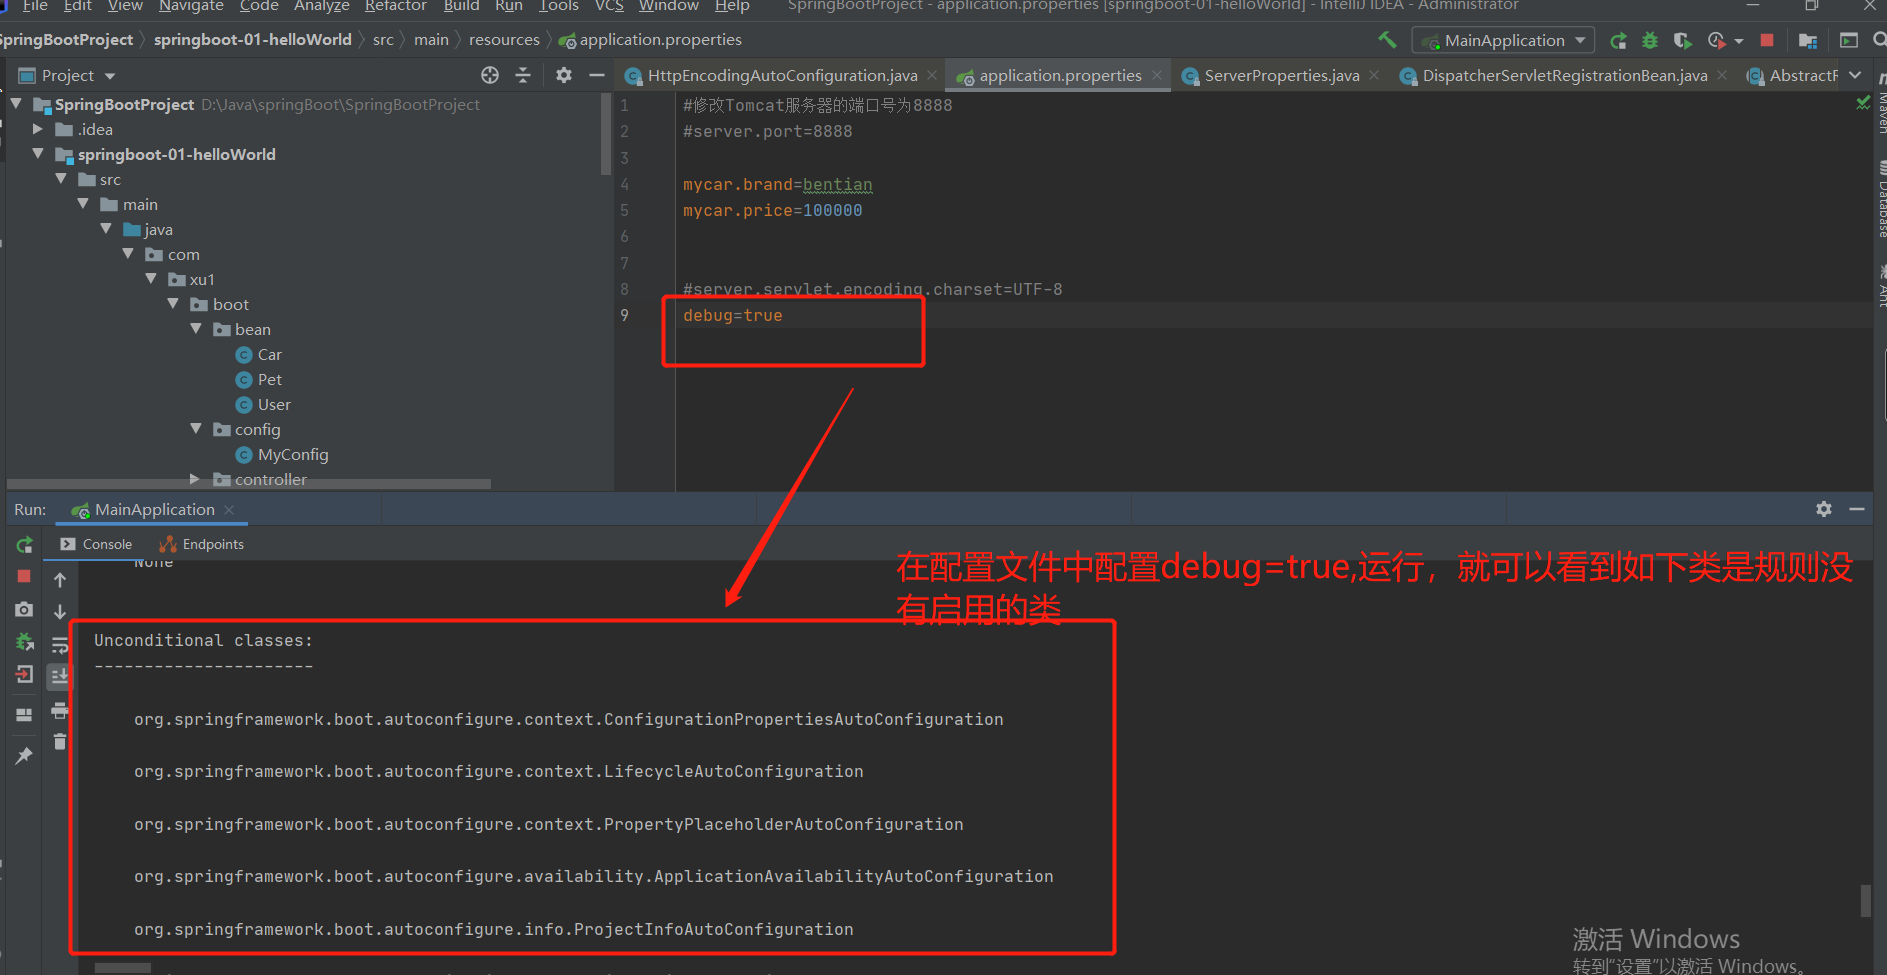
1.debug=true---查看自动配置报告
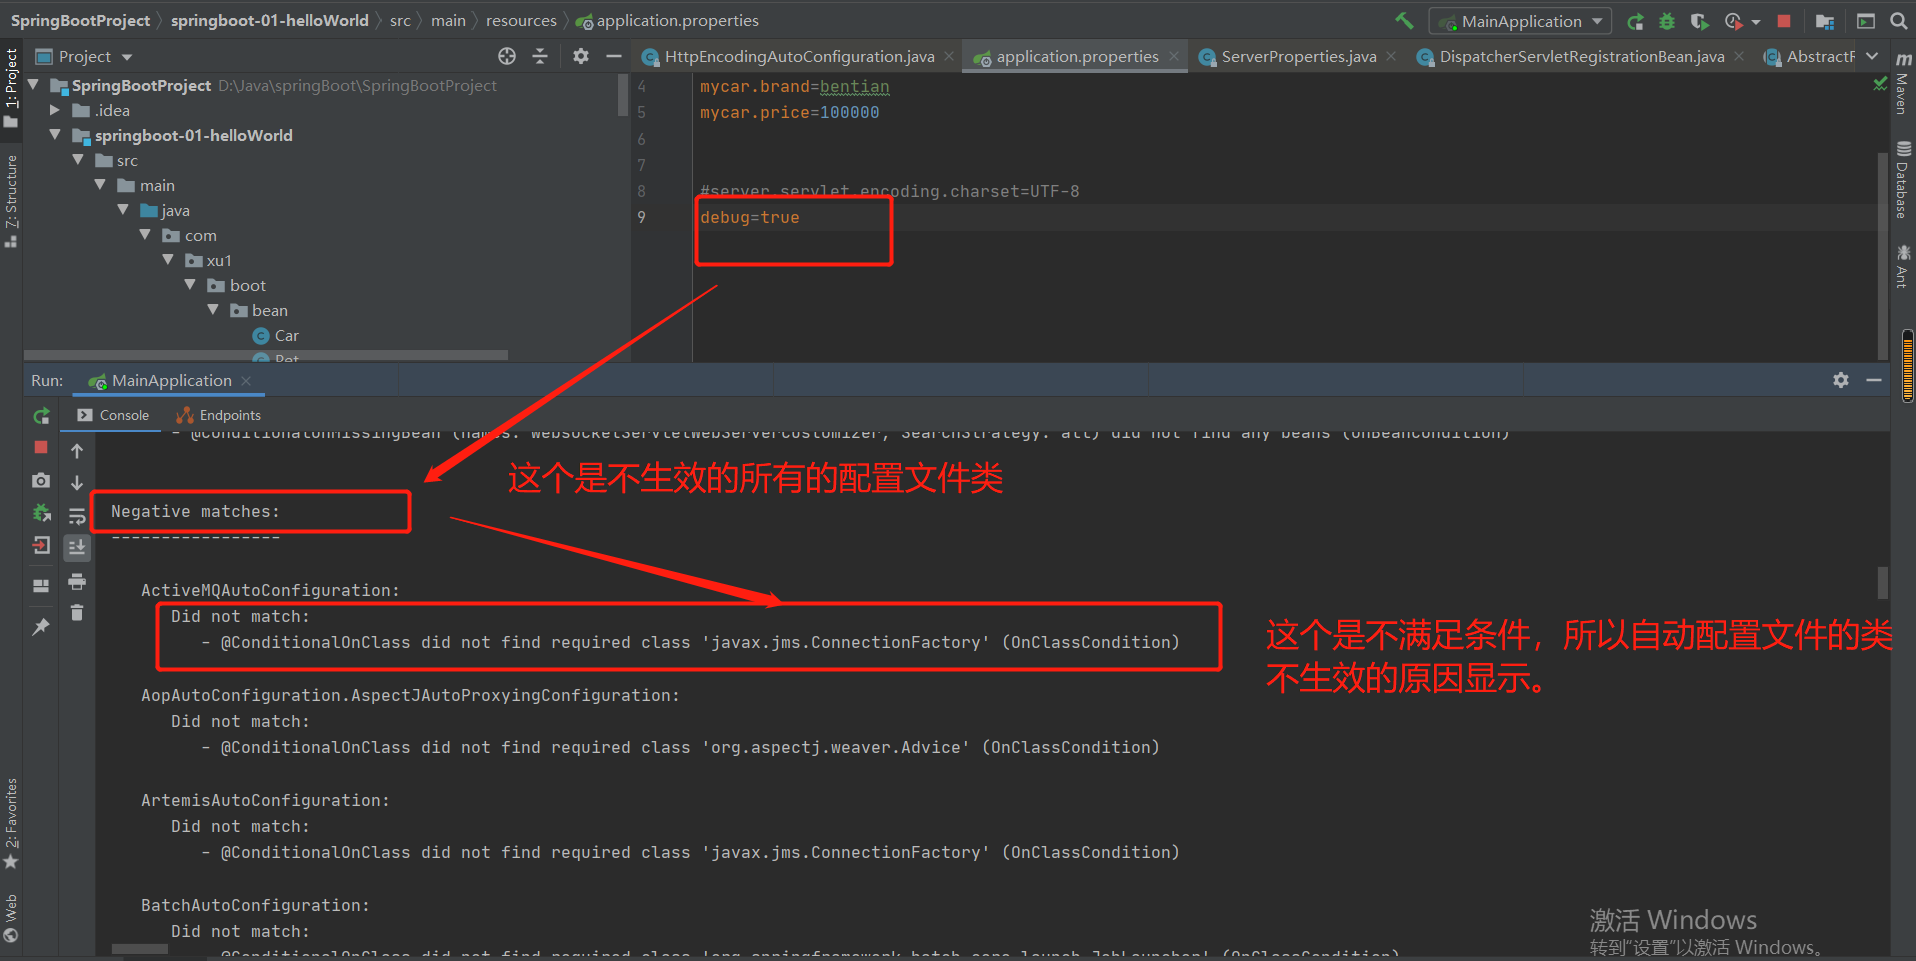
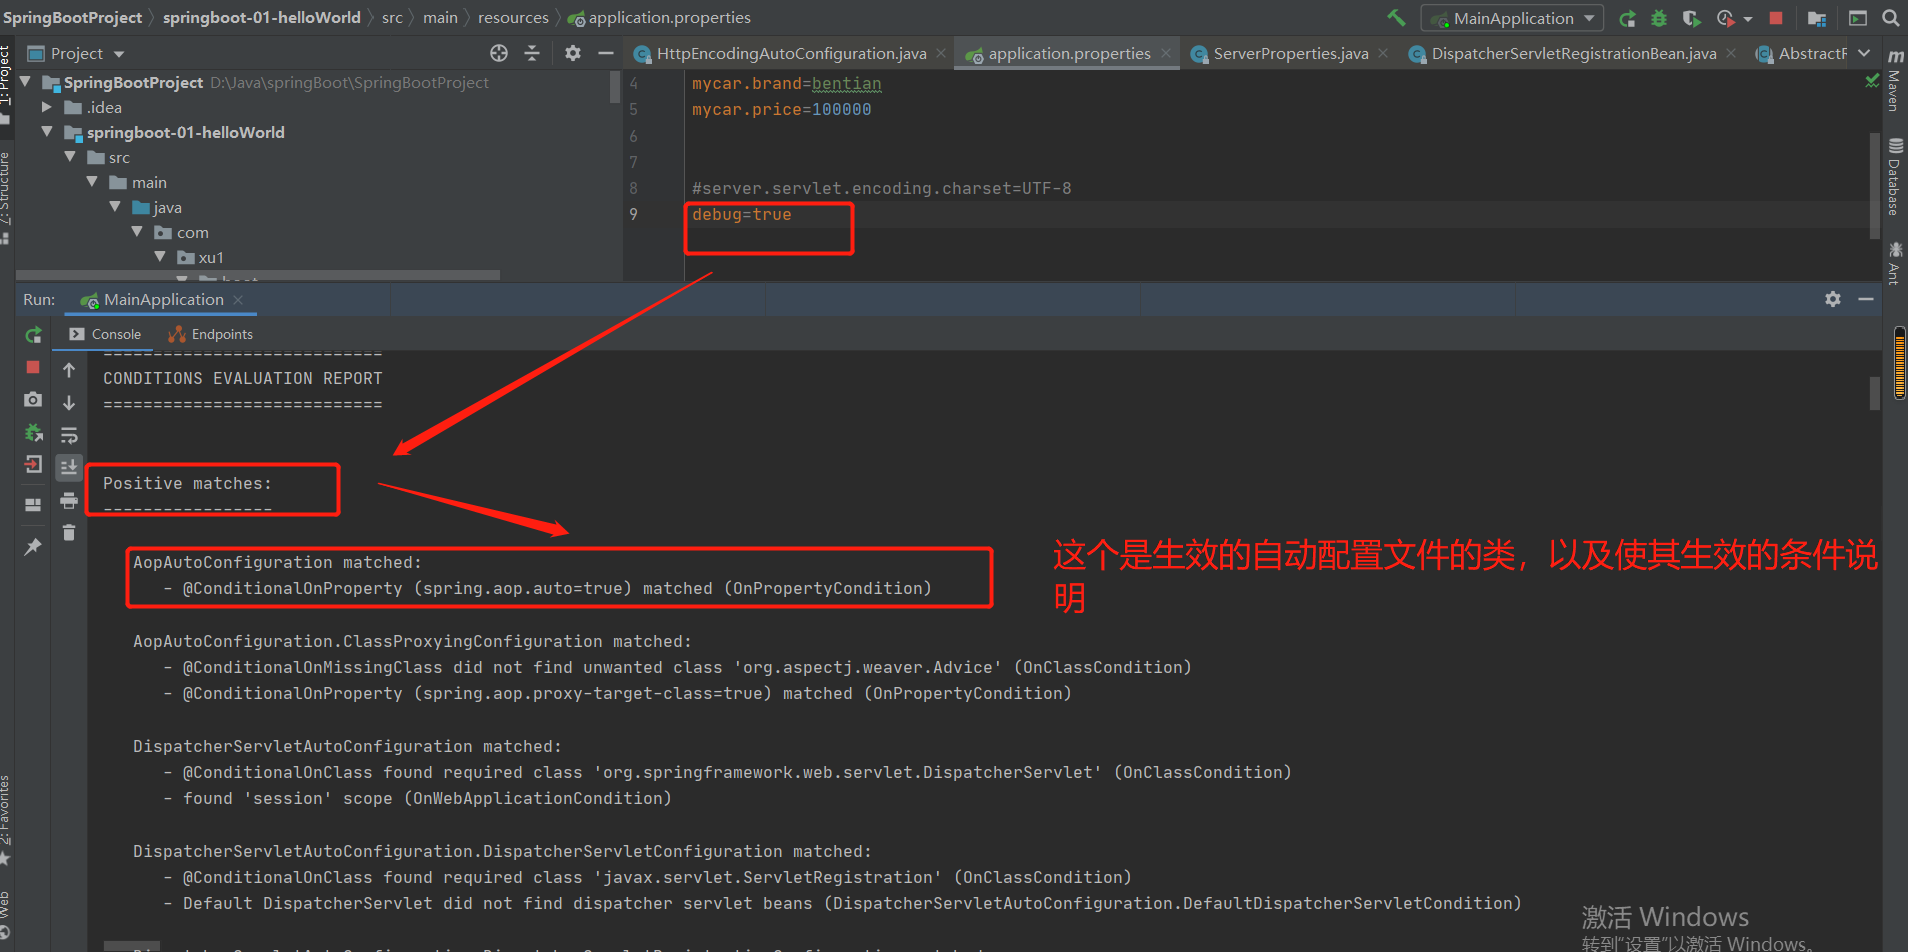
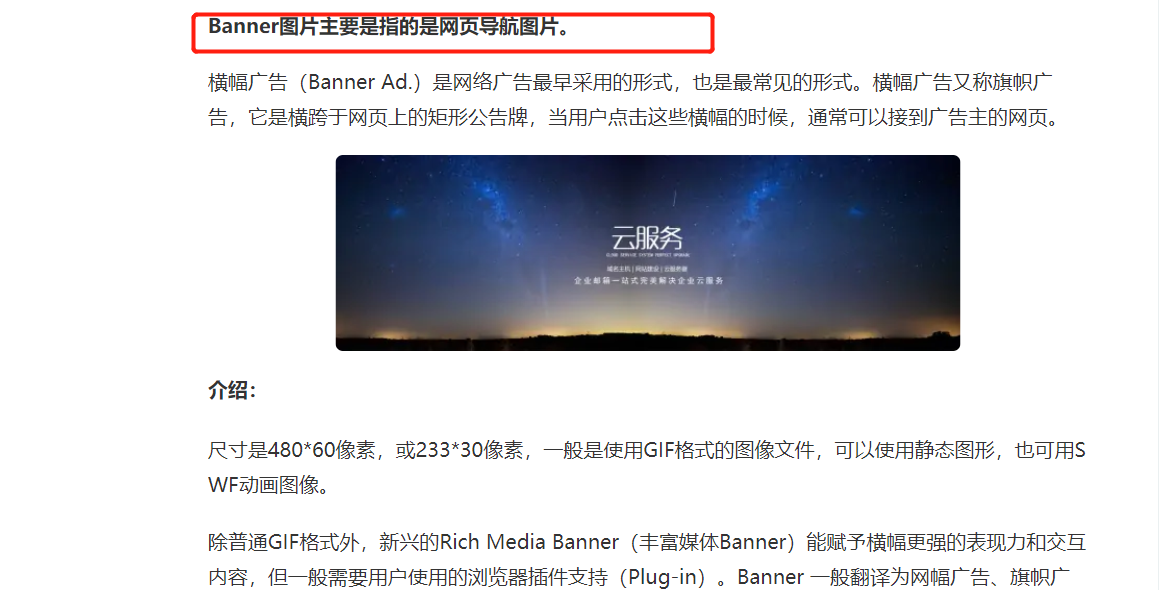
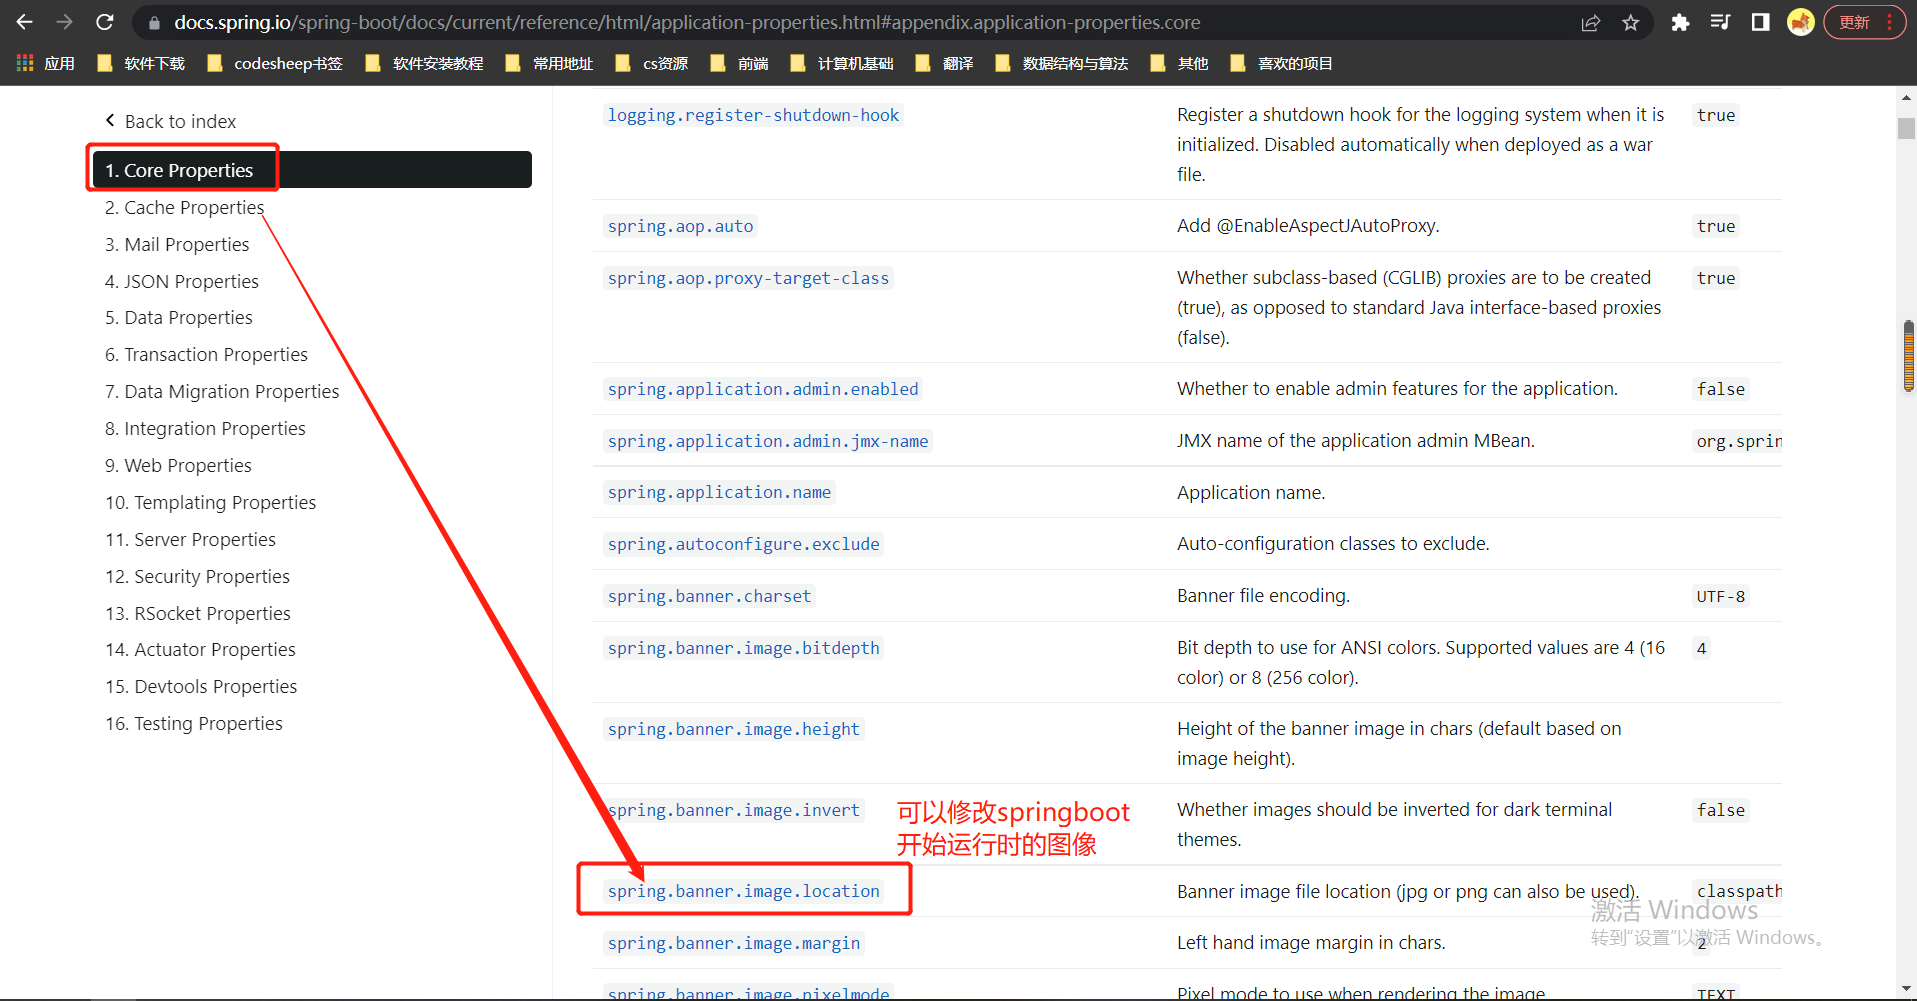
2.实践---修改banner图像:
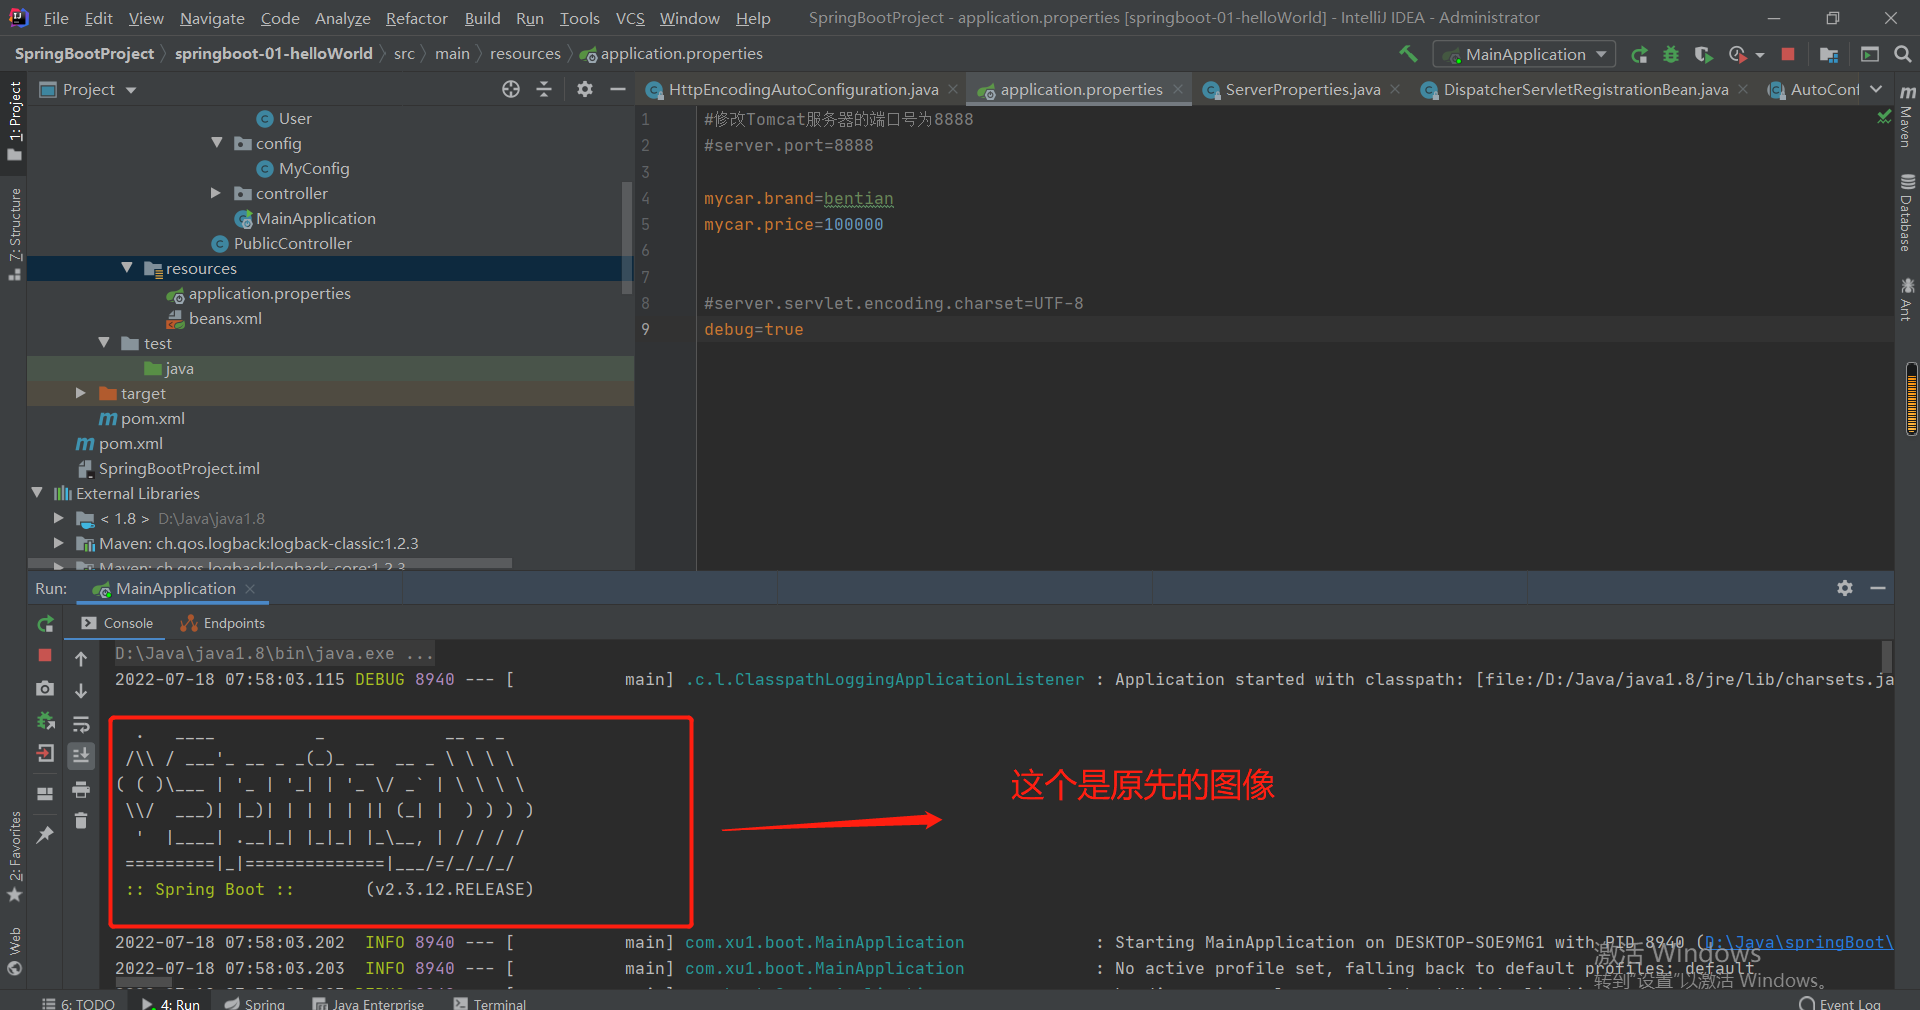
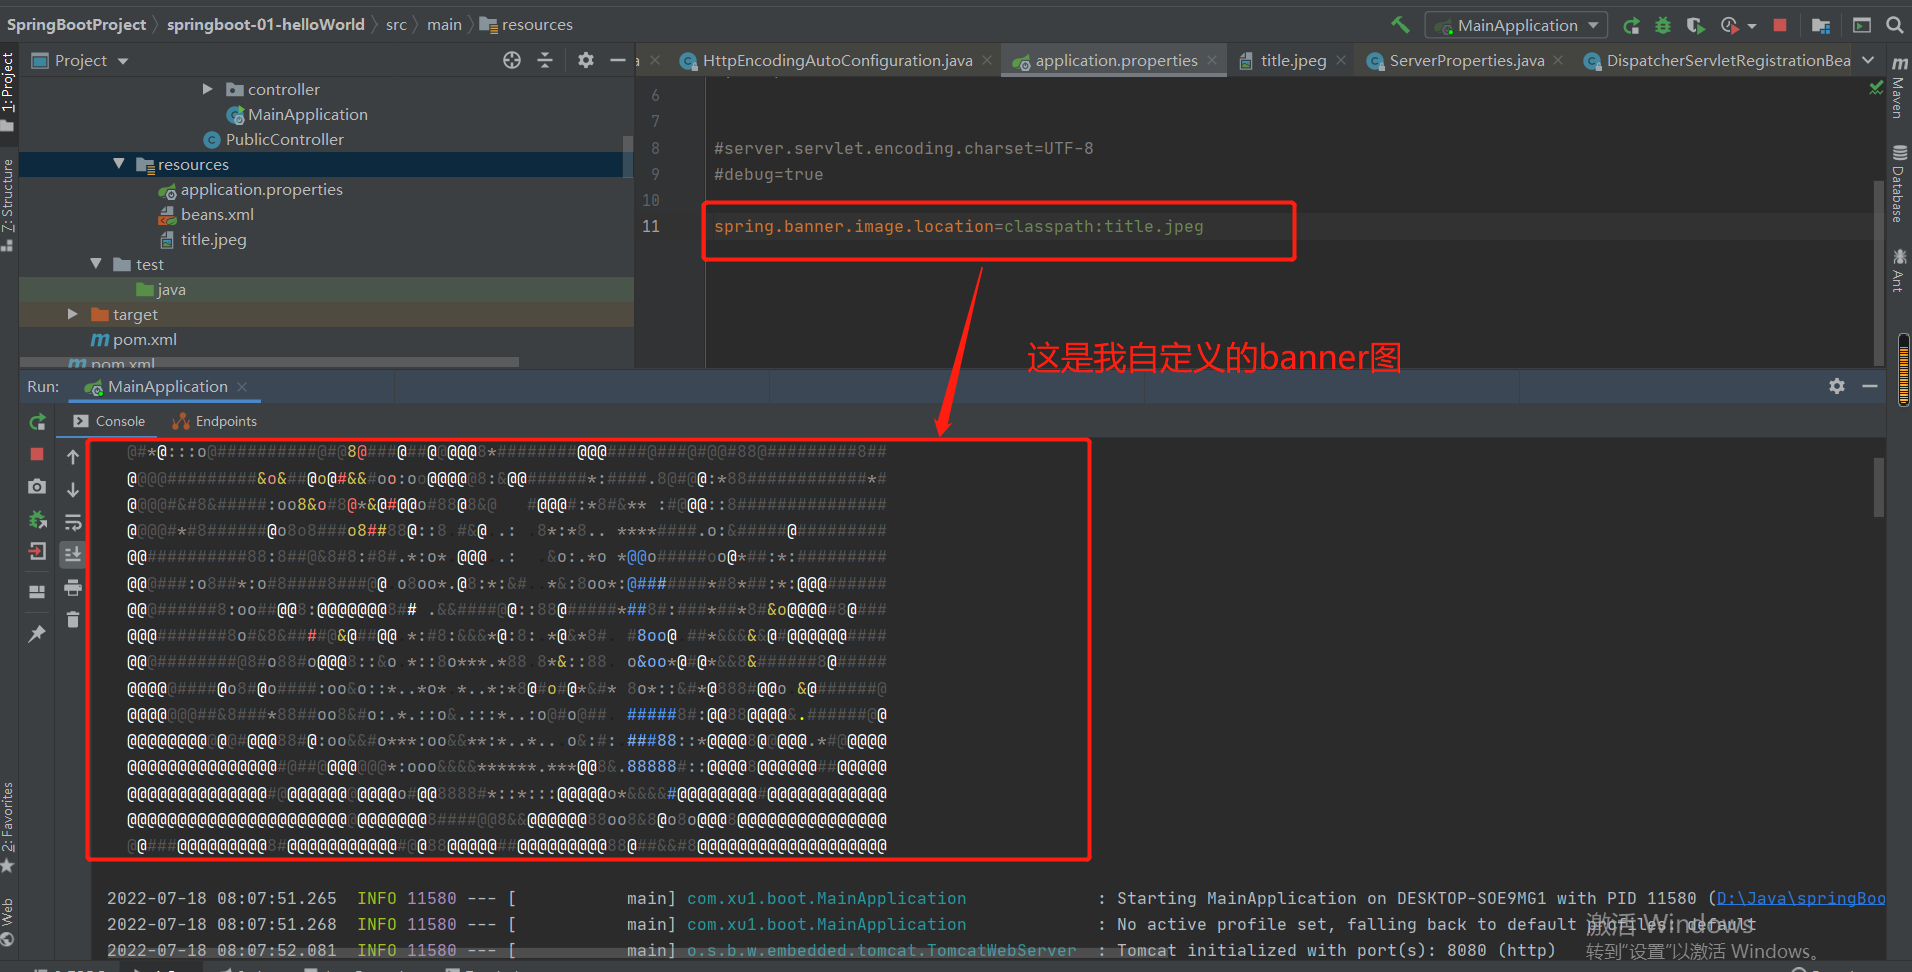
3.总结:
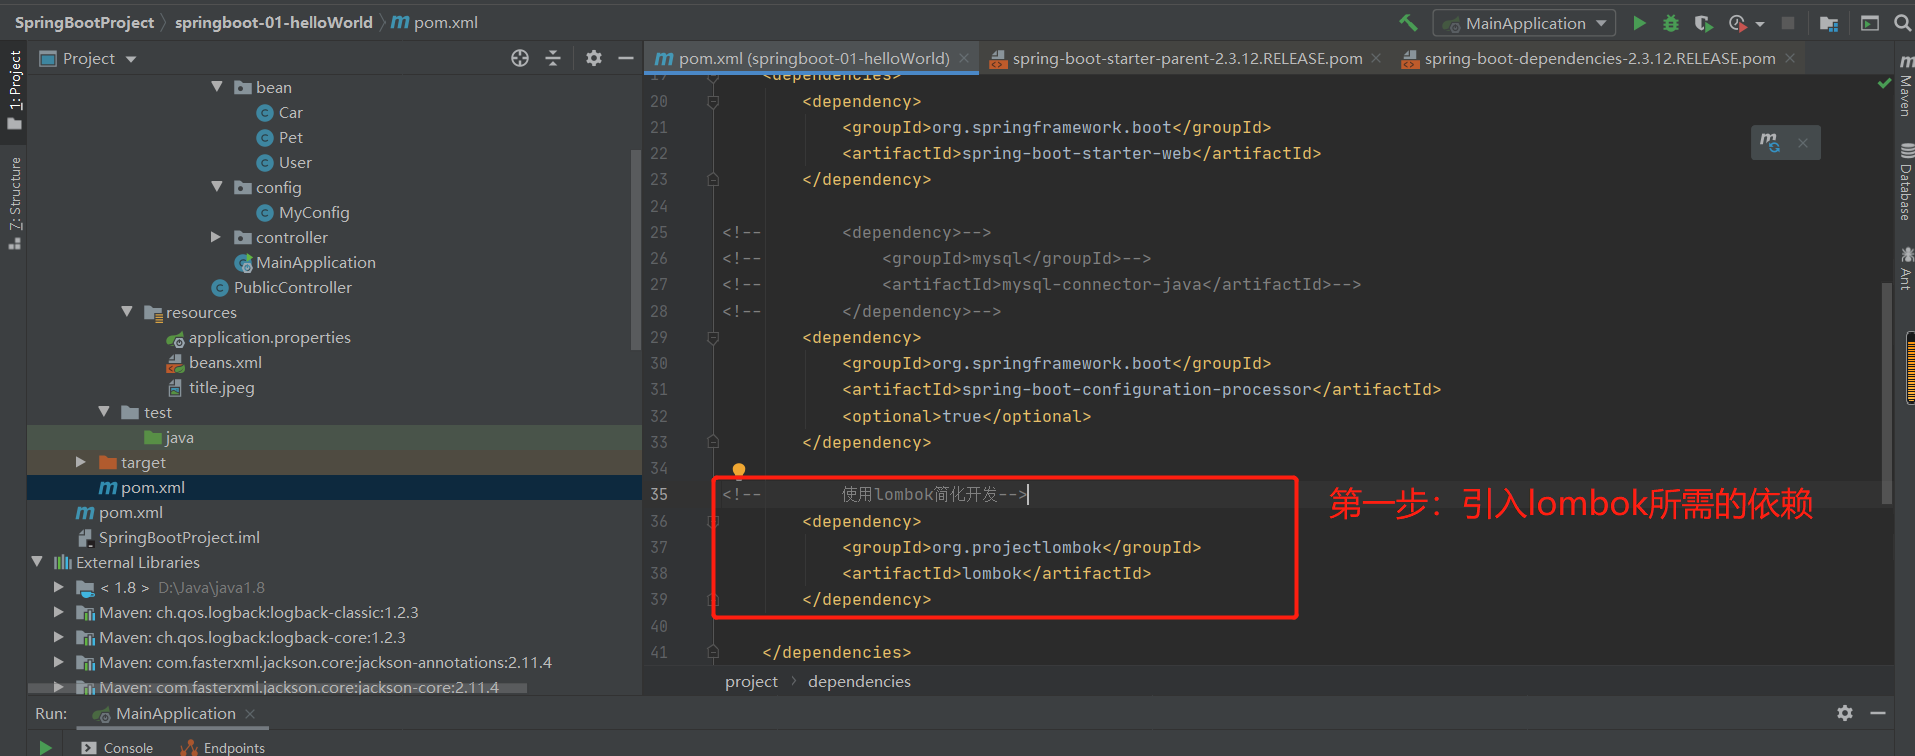
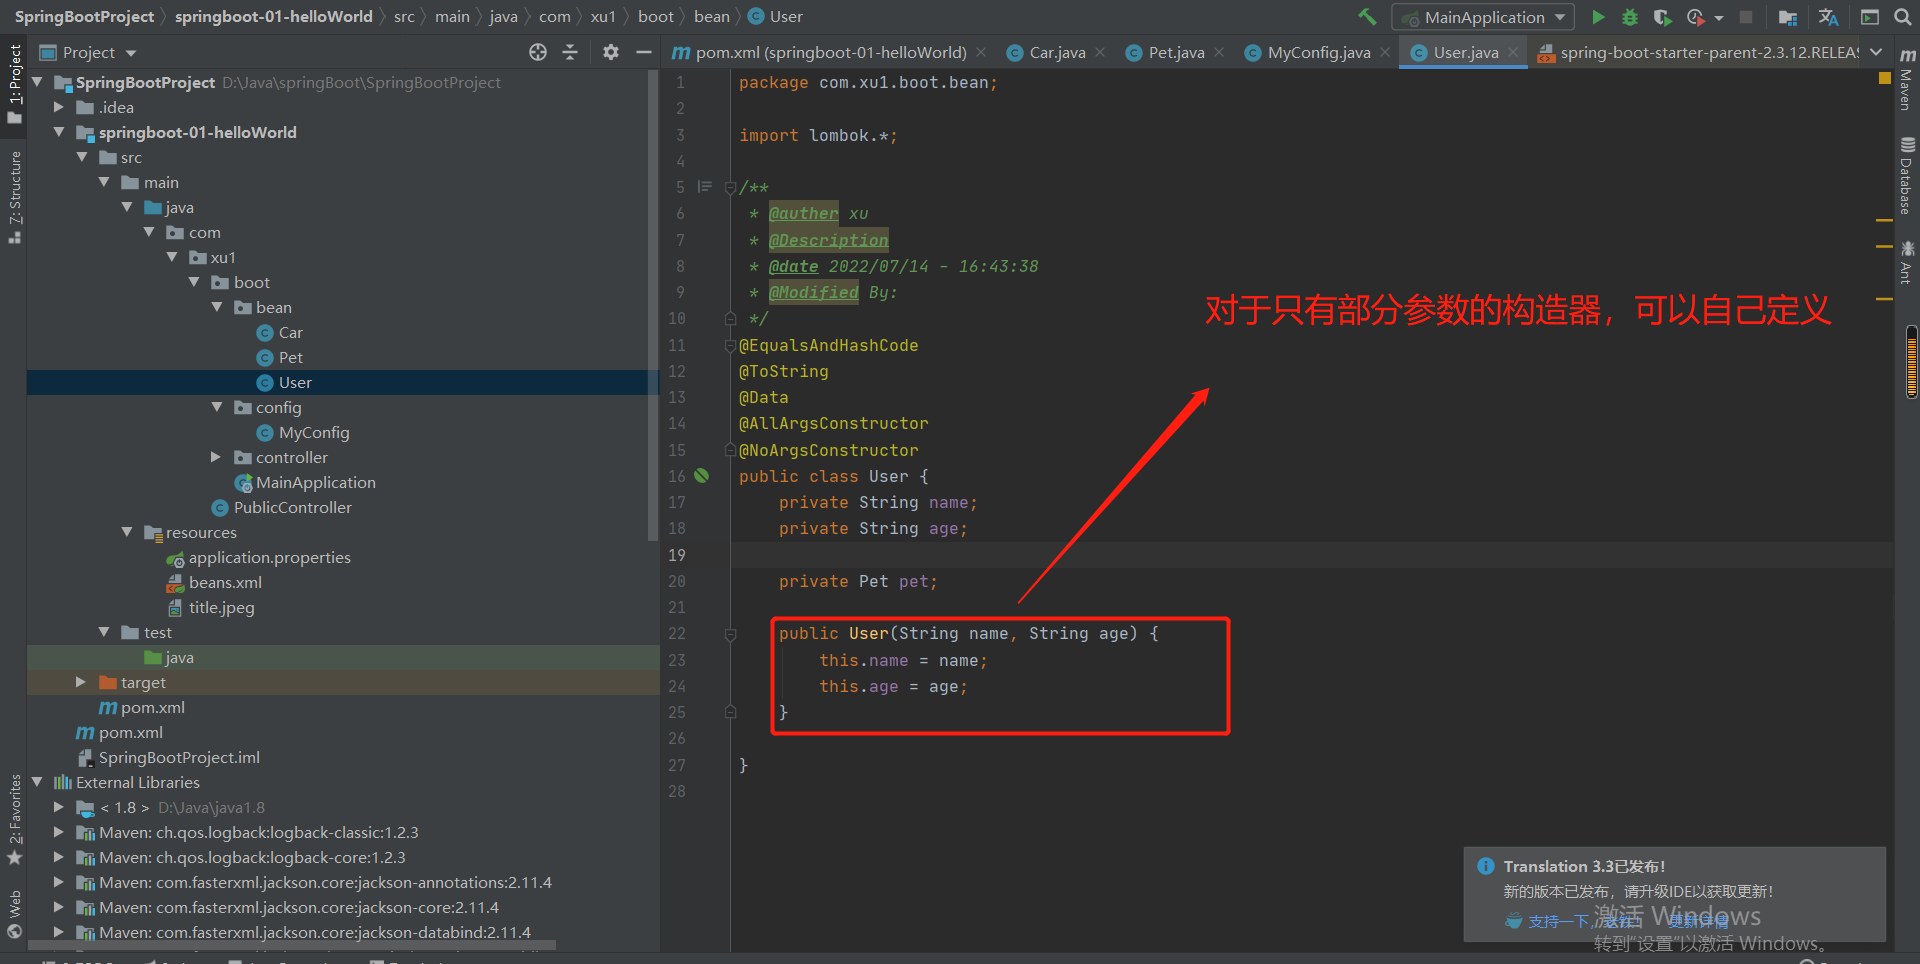
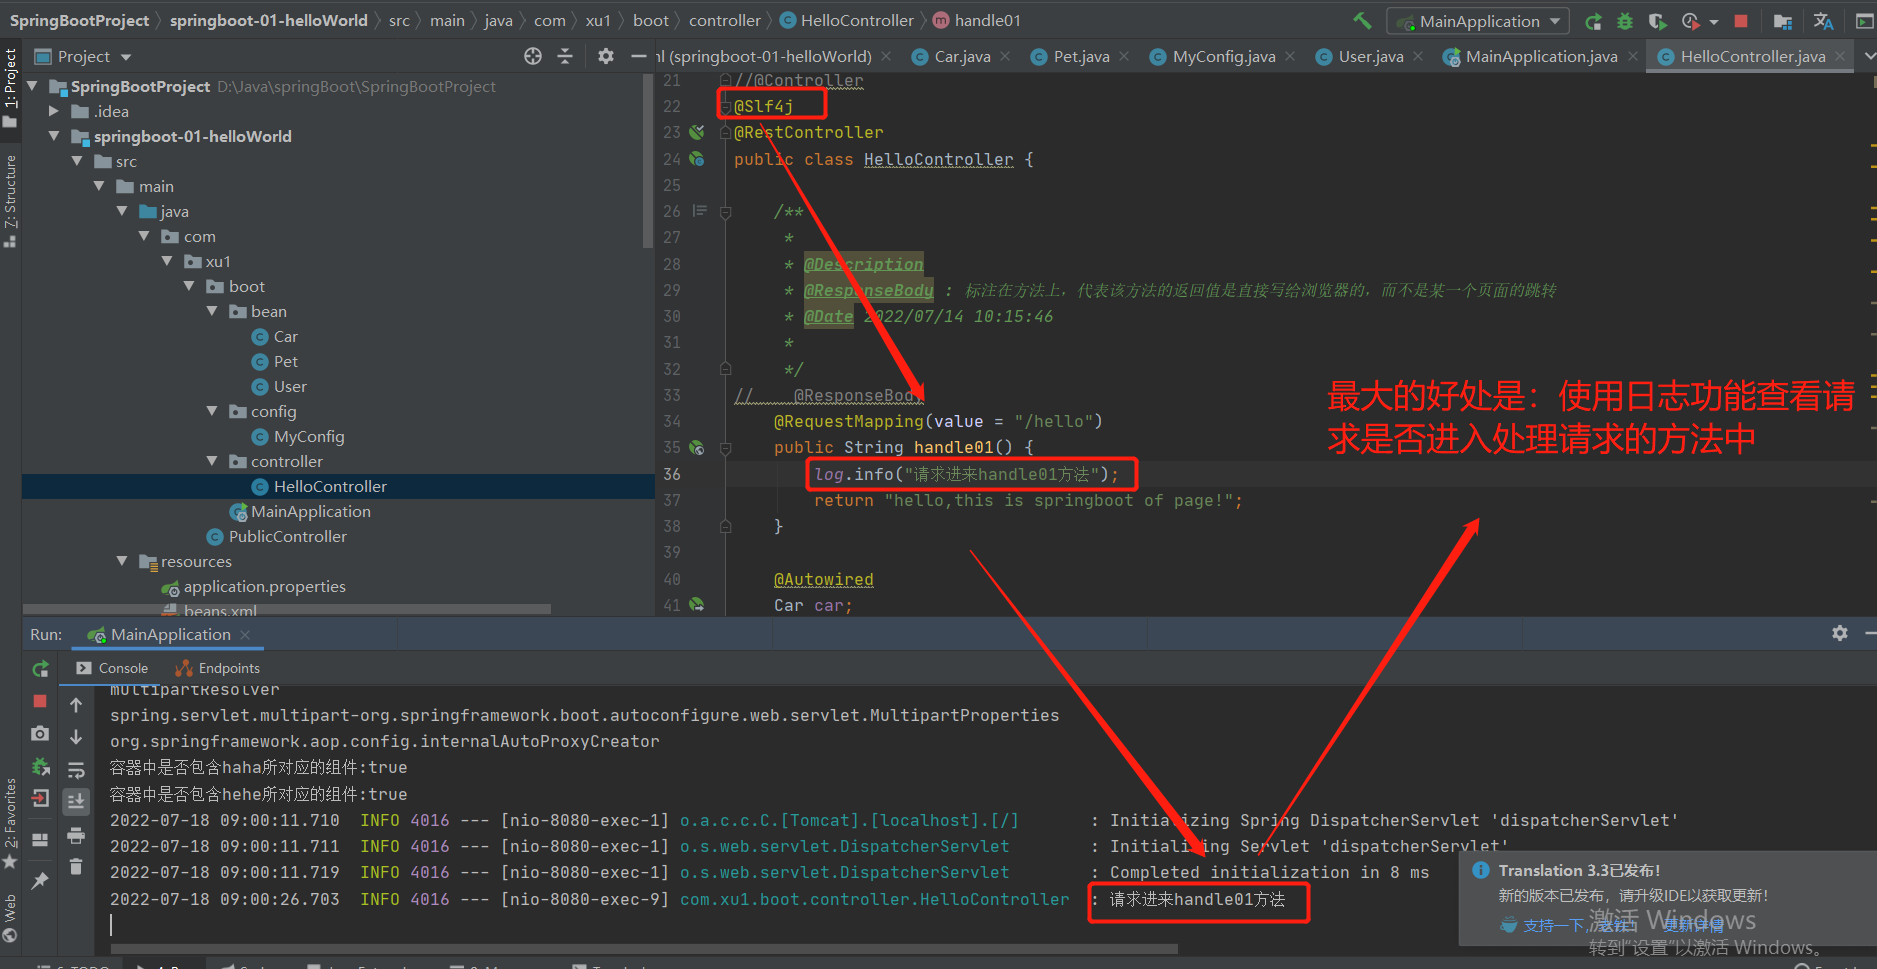
4-2 Lombok简化开发
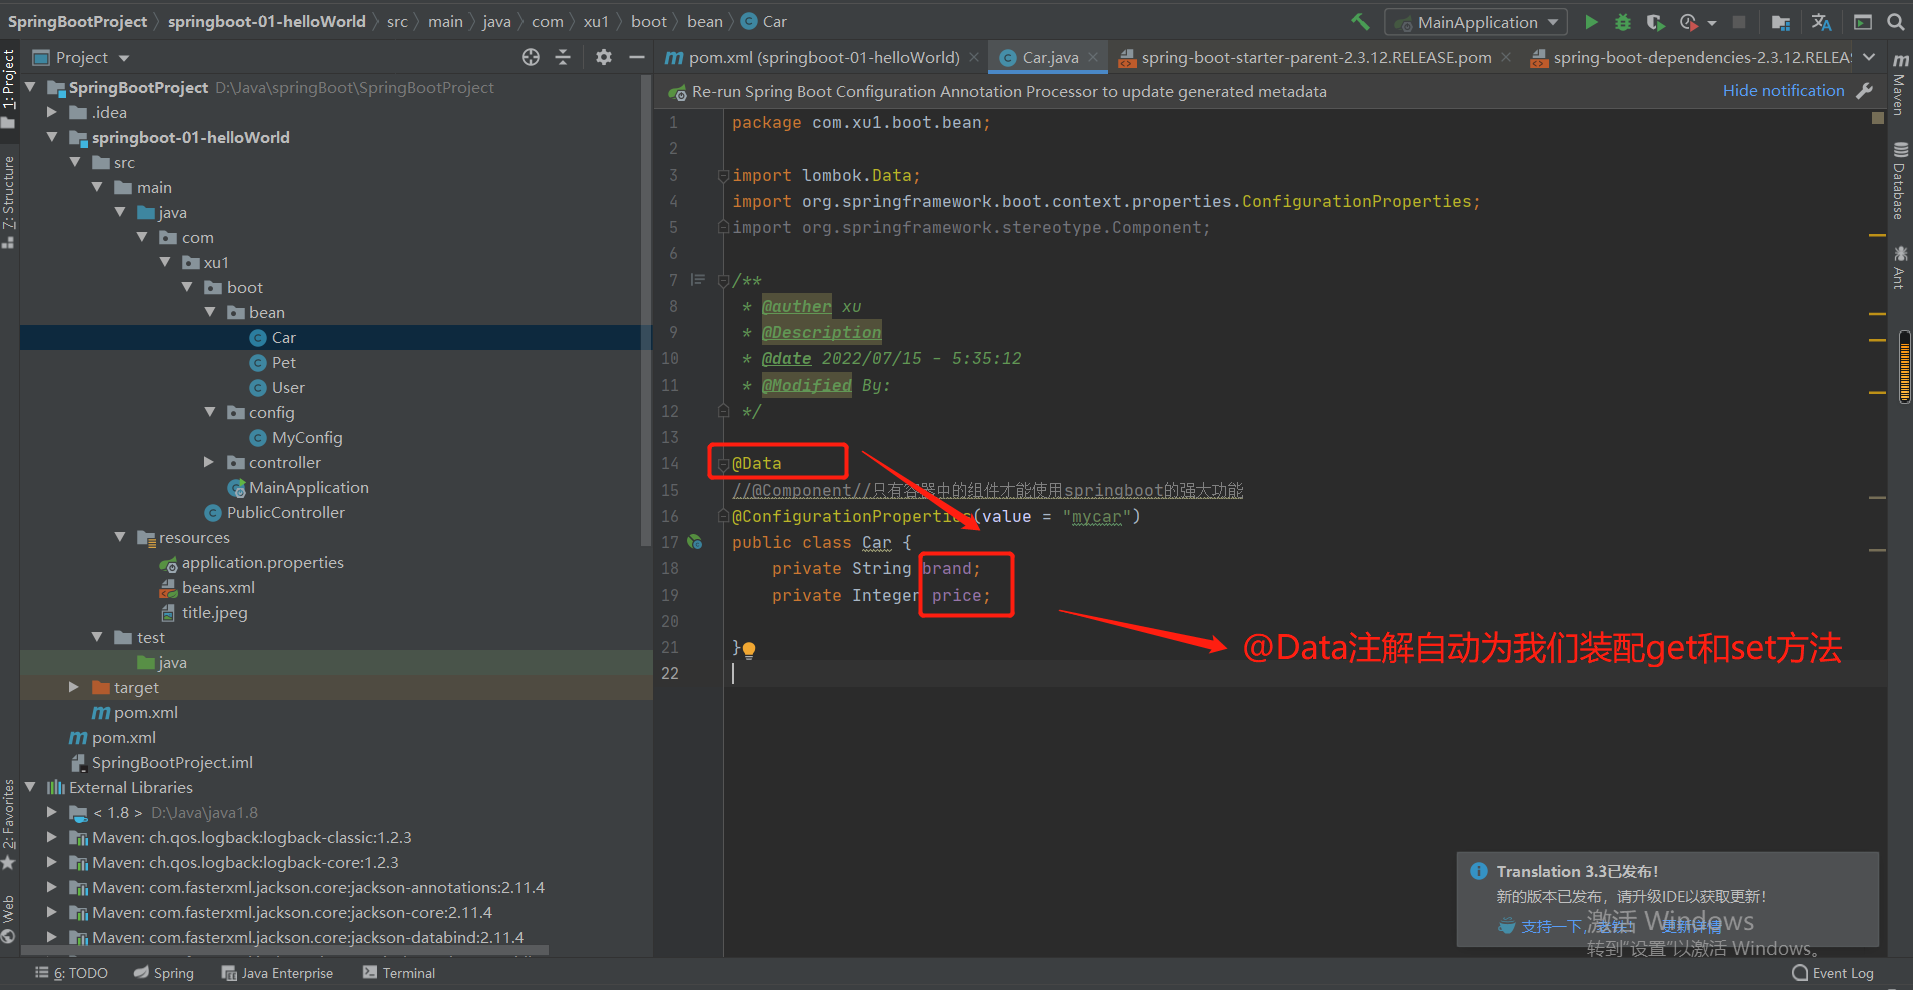
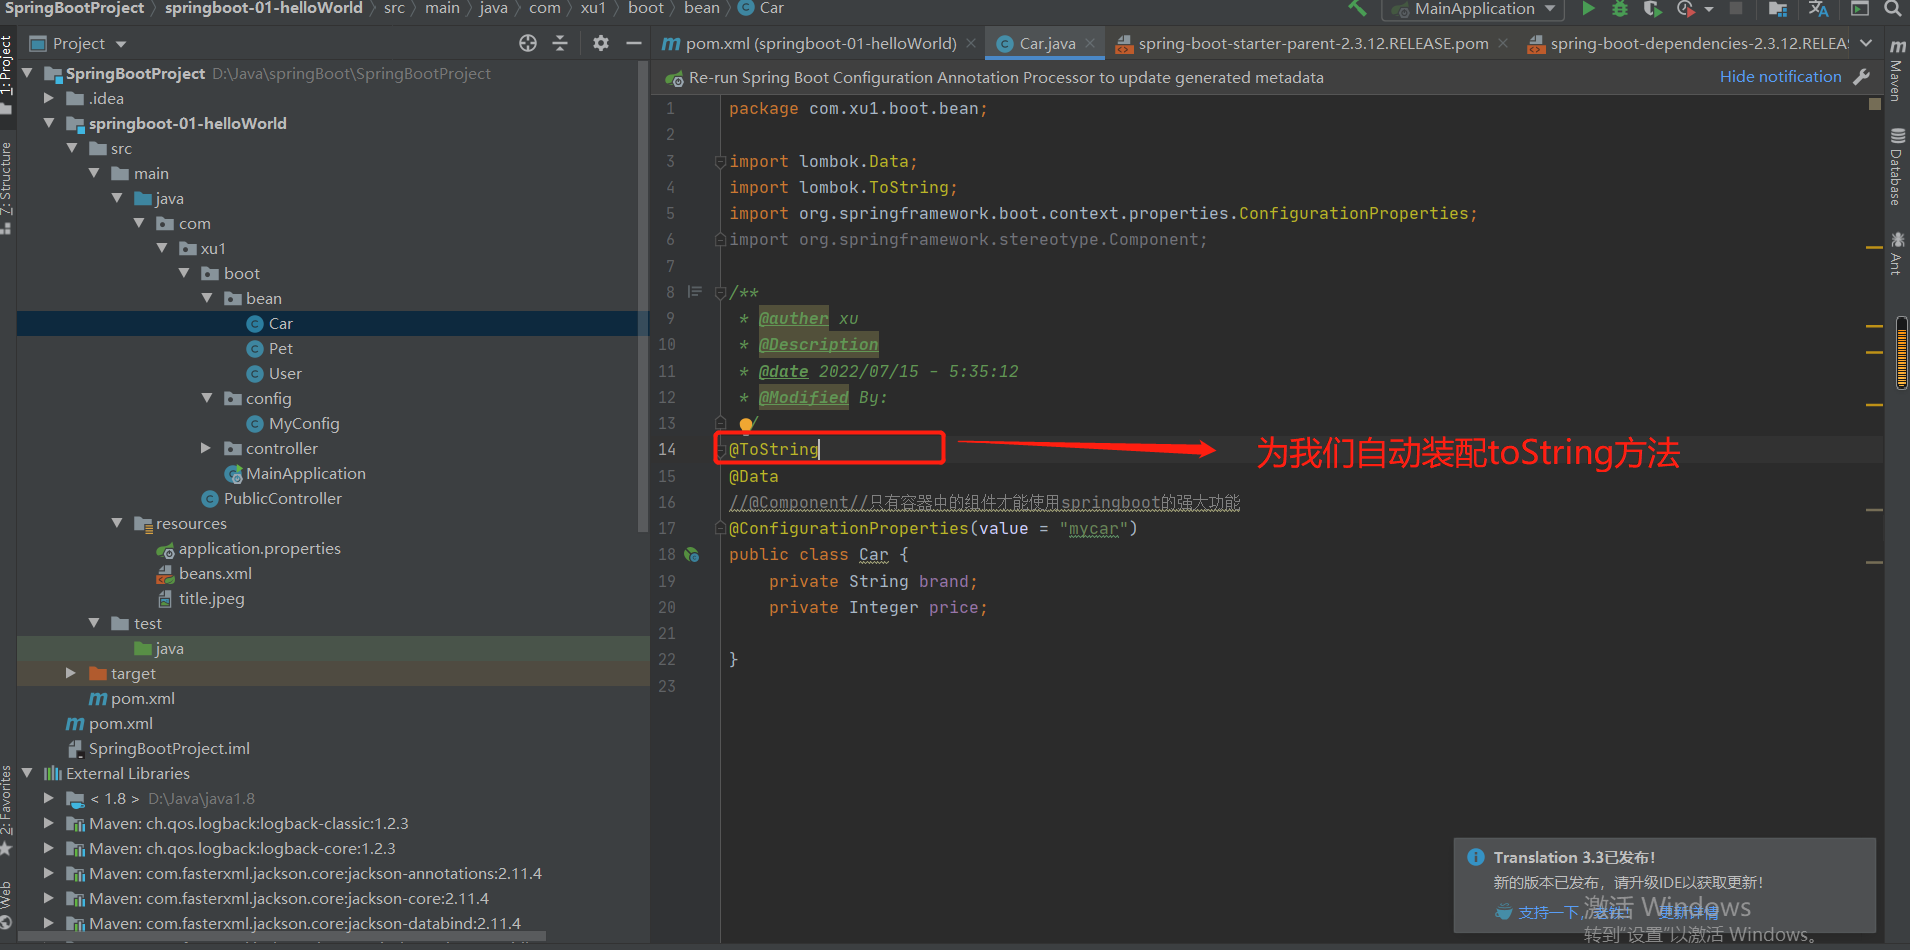
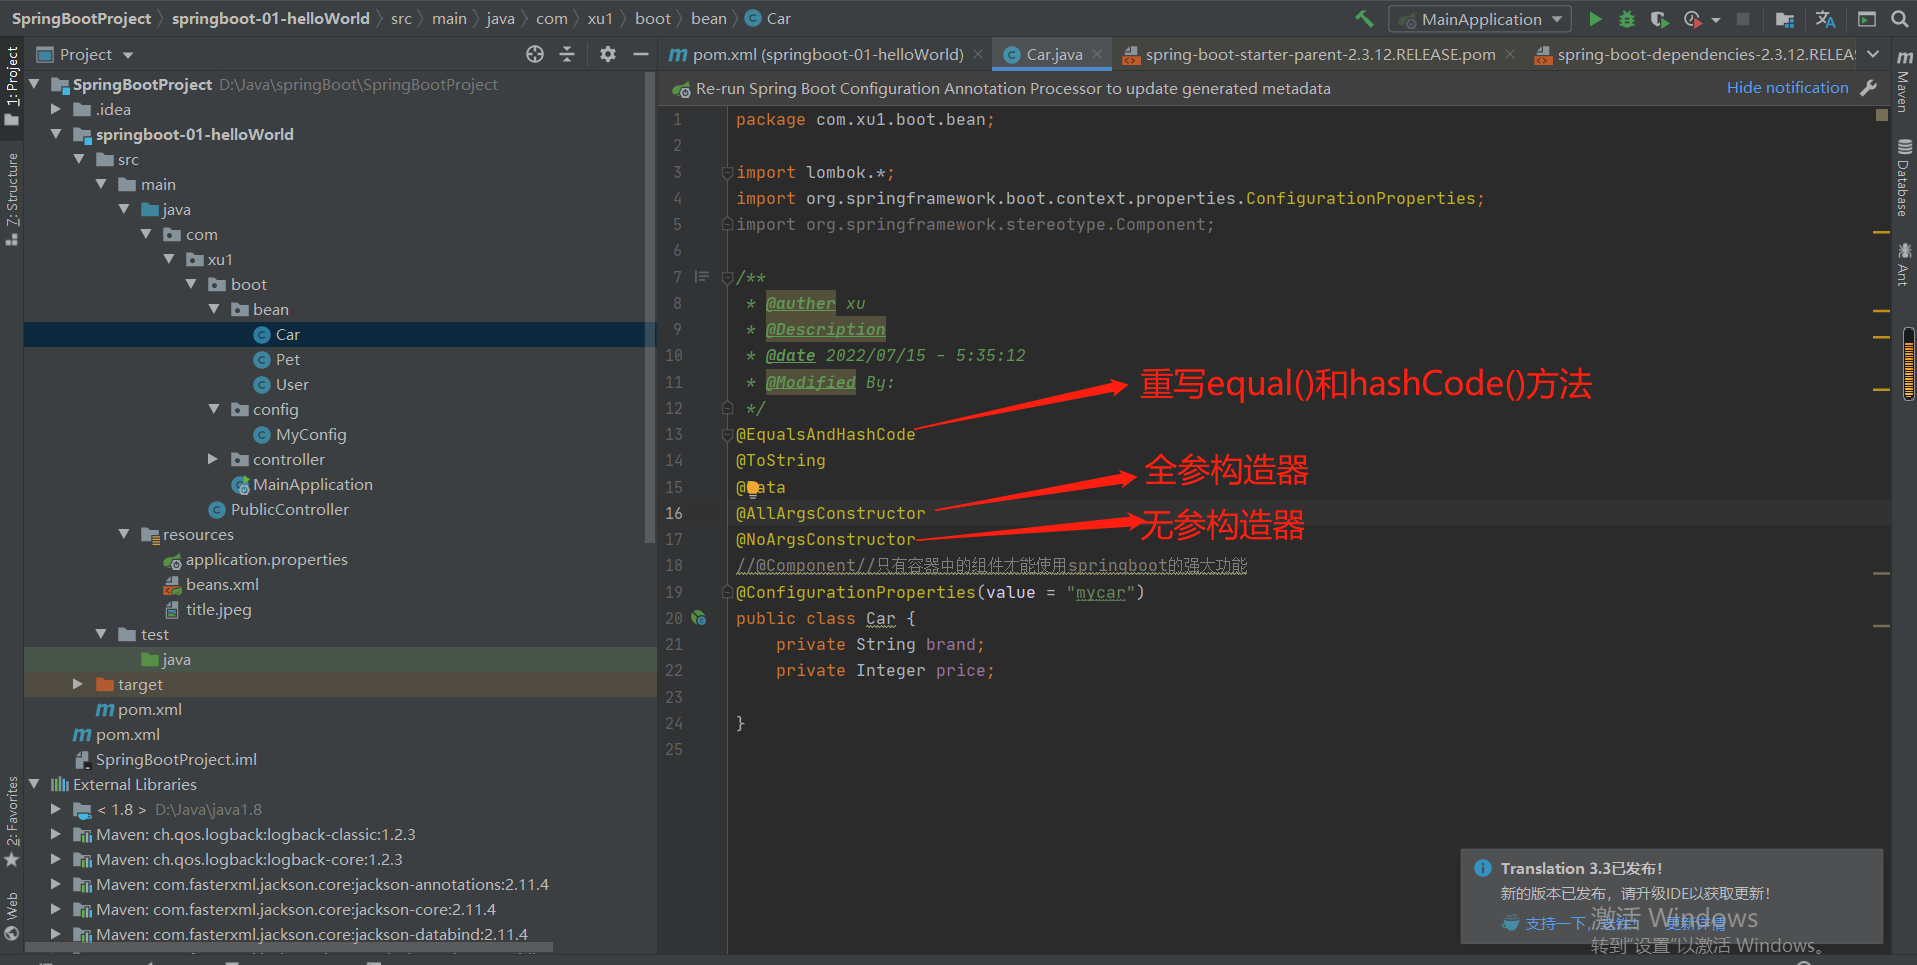
解决的问题:在编译时,自动帮我们生成get和set方法,达到简化开发的目的
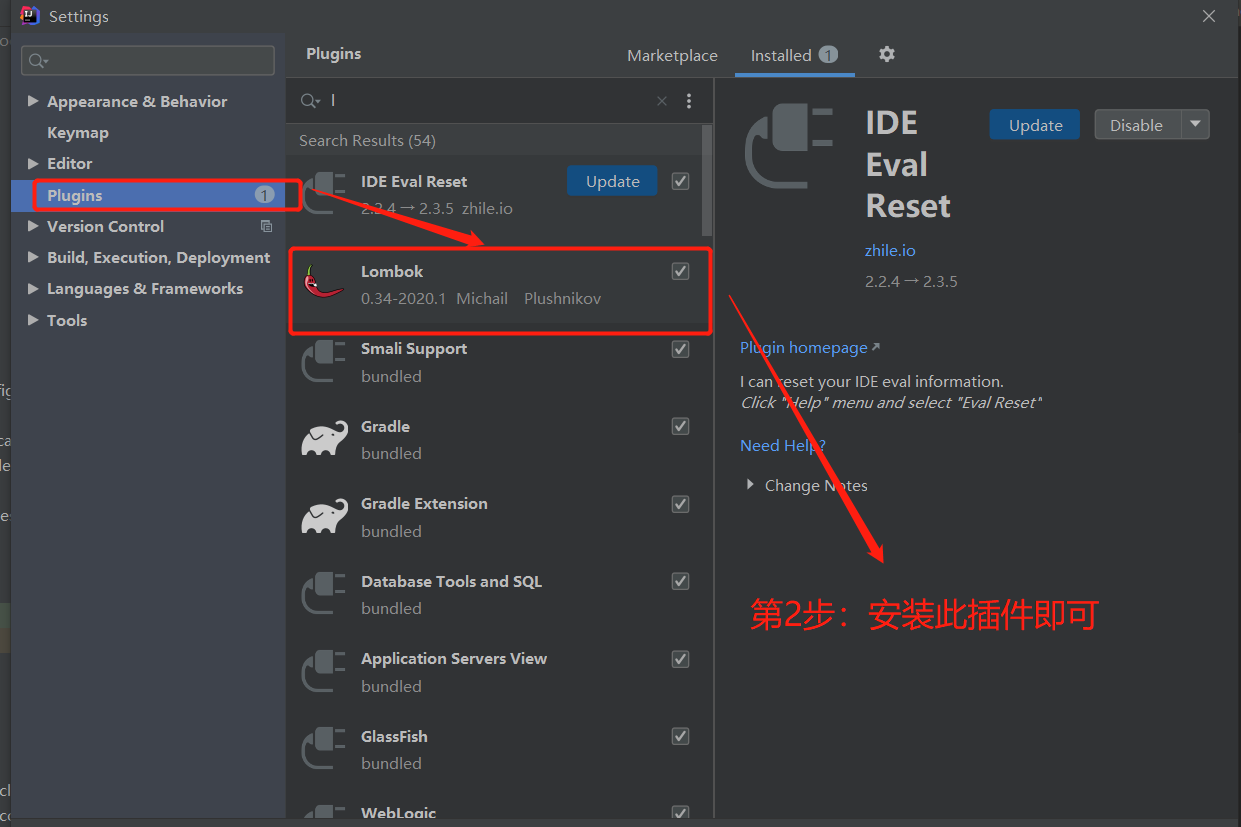
第三步:自动装配
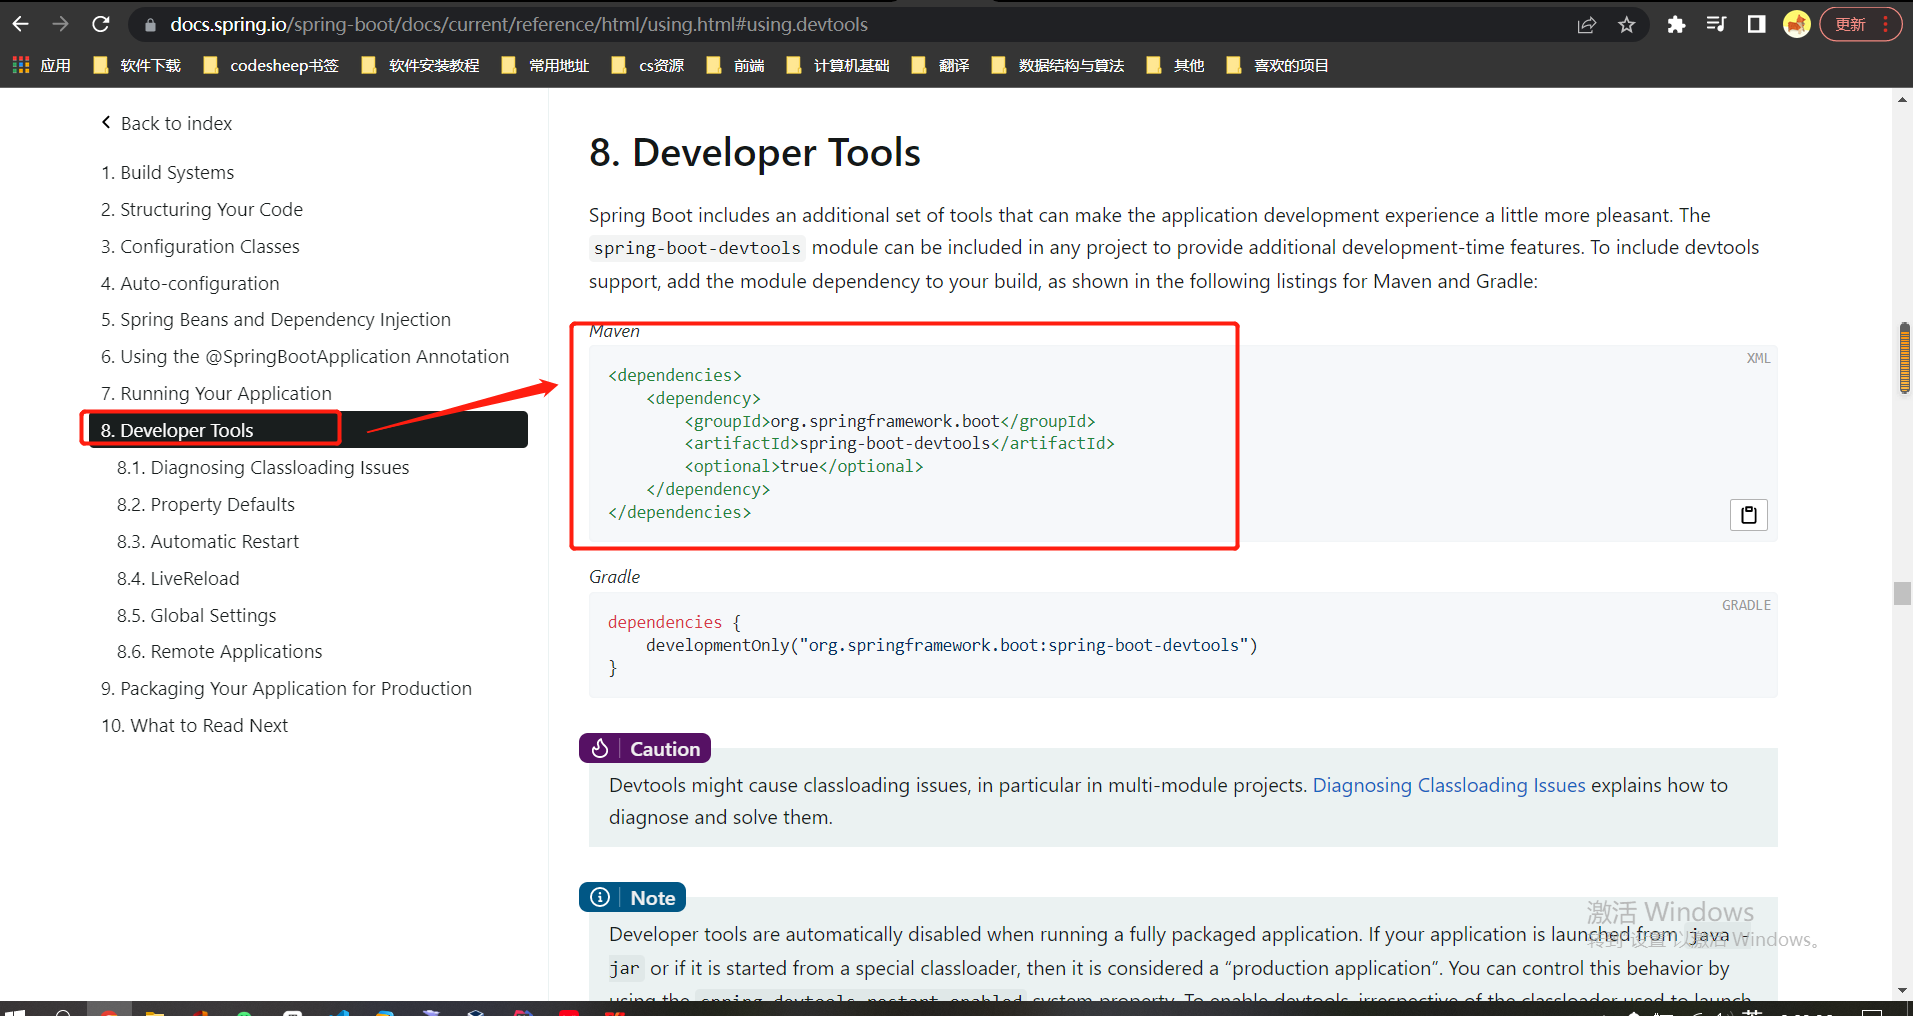
4-3 Developer Tools
<dependency>
    <groupId>org.springframework.boot</groupId>
    <artifactId>spring-boot-devtools</artifactId>
    <scope>runtime</scope>
    <optional>true</optional>
</dependency>
解决问题:
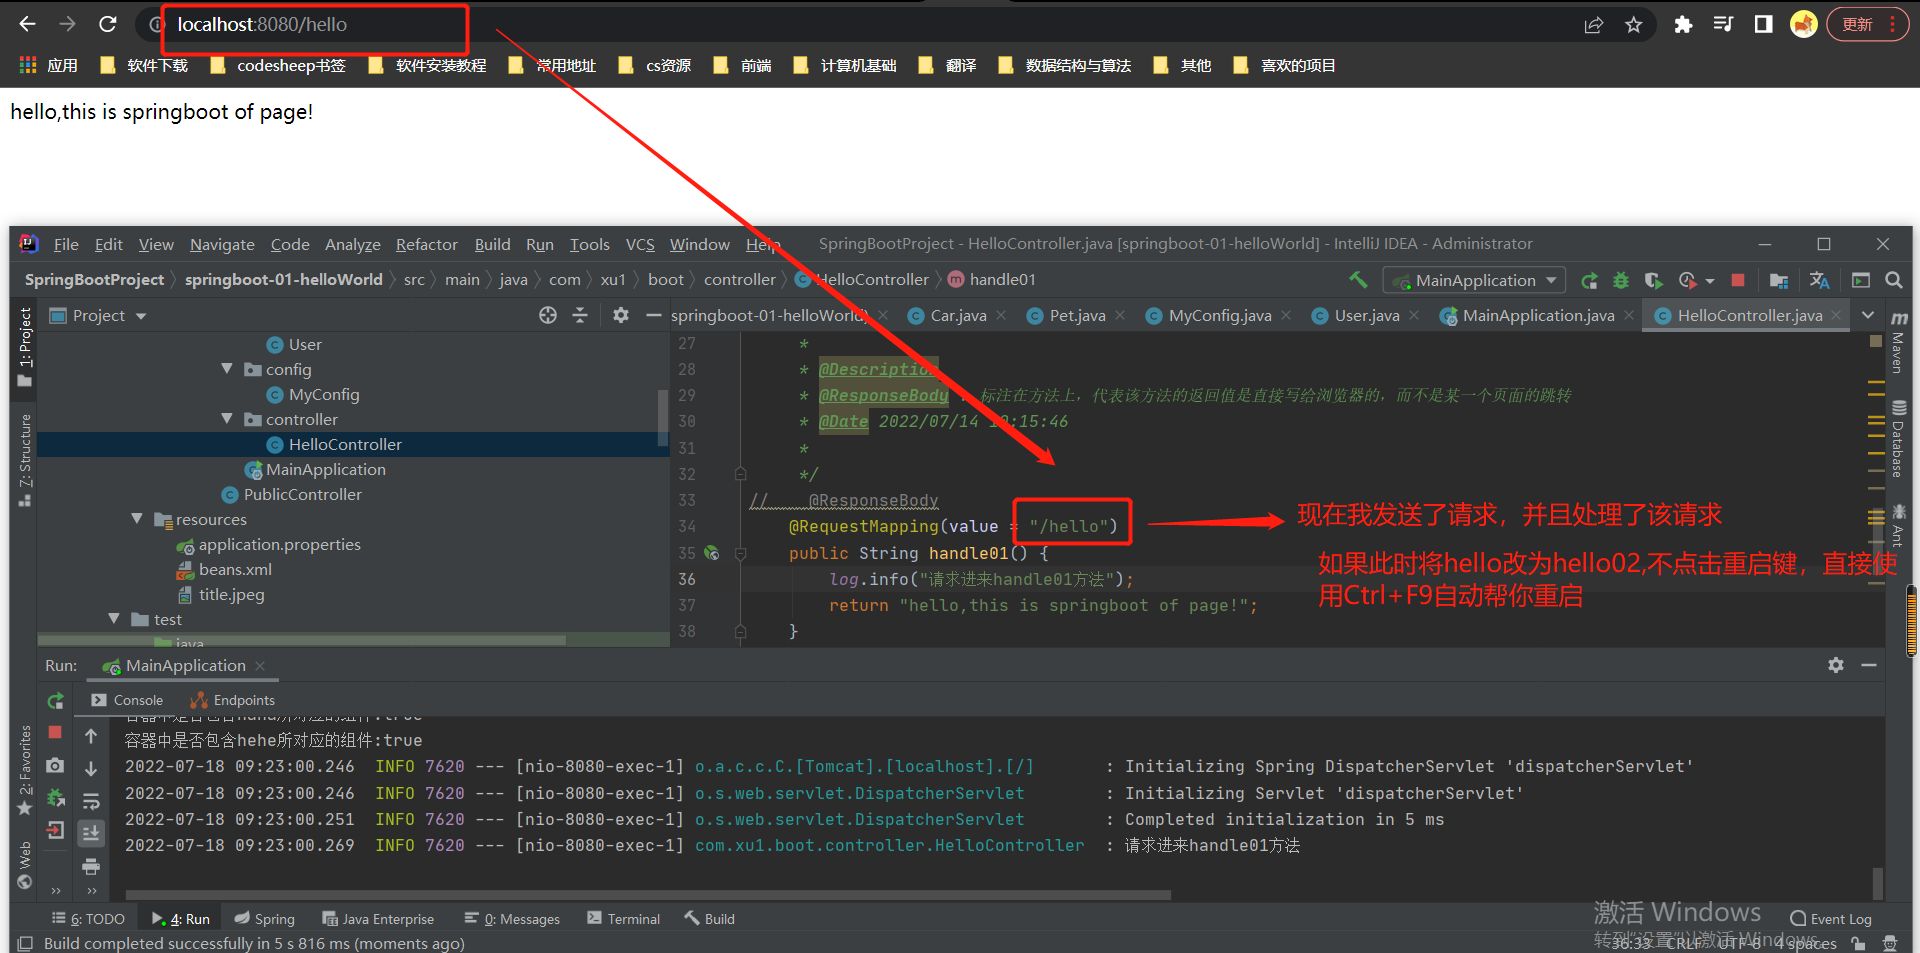
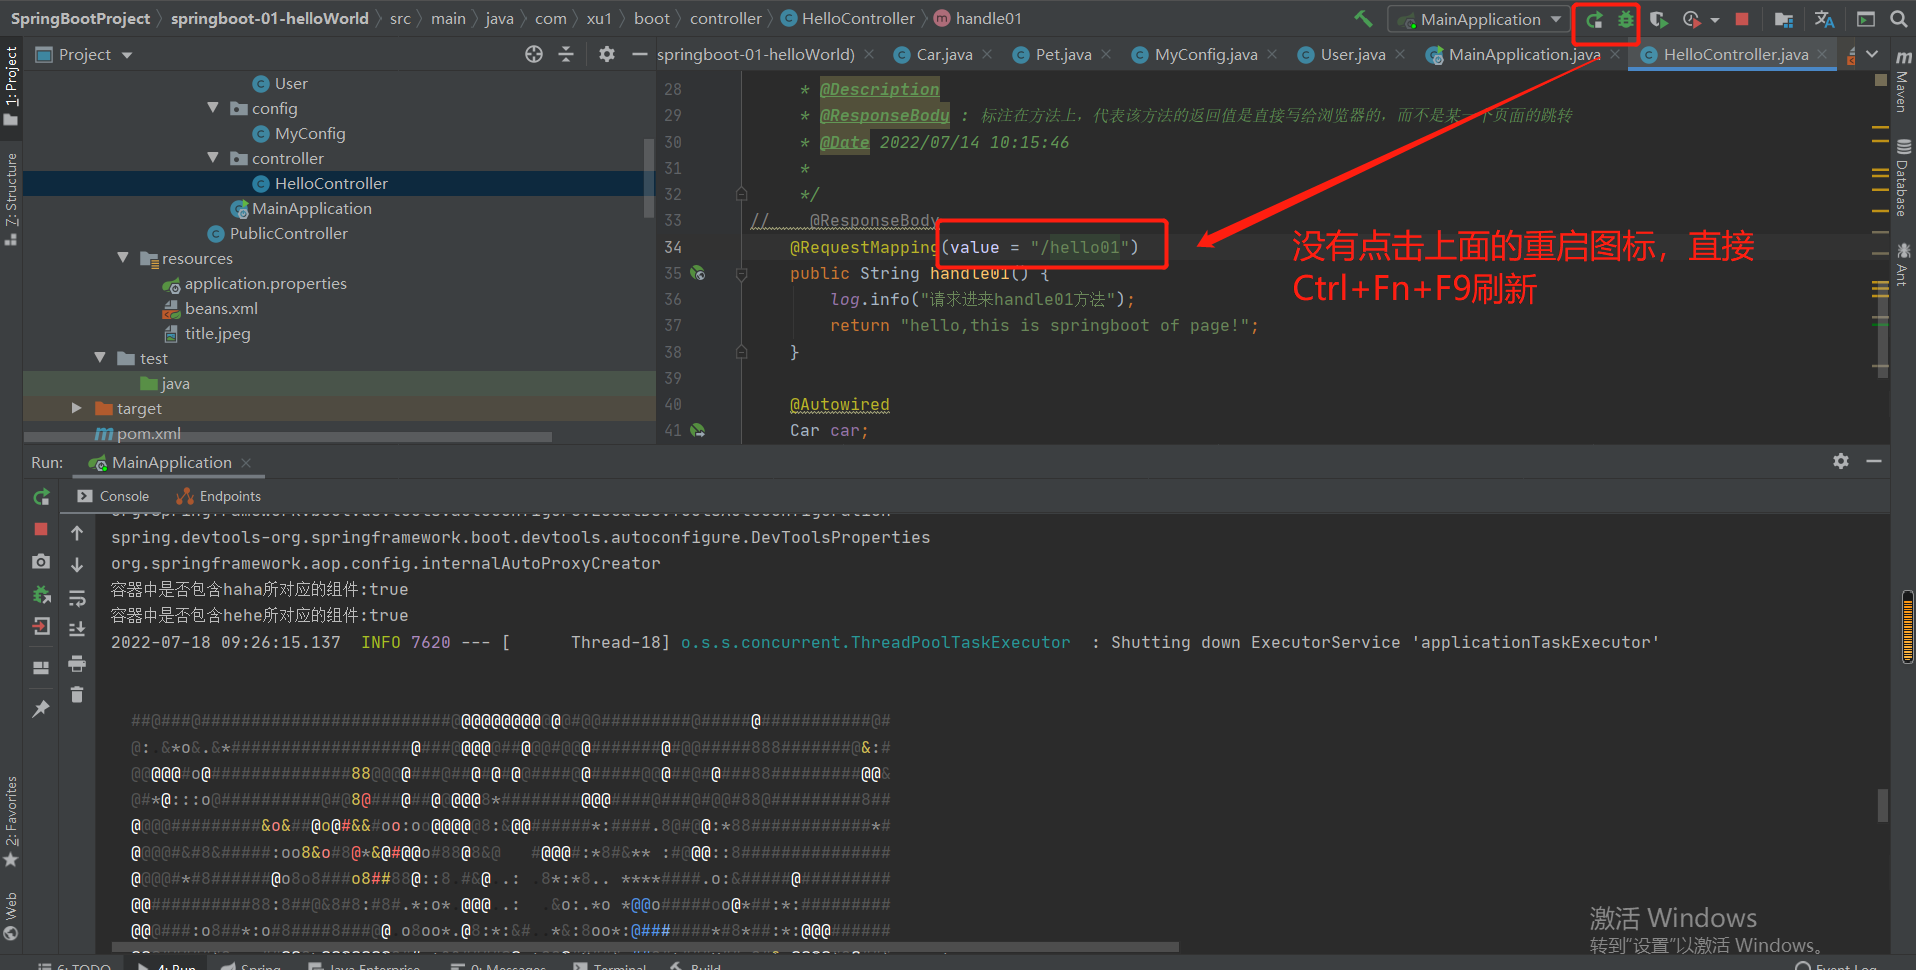
就是当前项目在运行期间进行了代码修改,可以使用(Ctrl+F9)帮你重新加载该项目,还有一个好处是,如果是静态页面修改,不需要重启,只是将页面替换了。
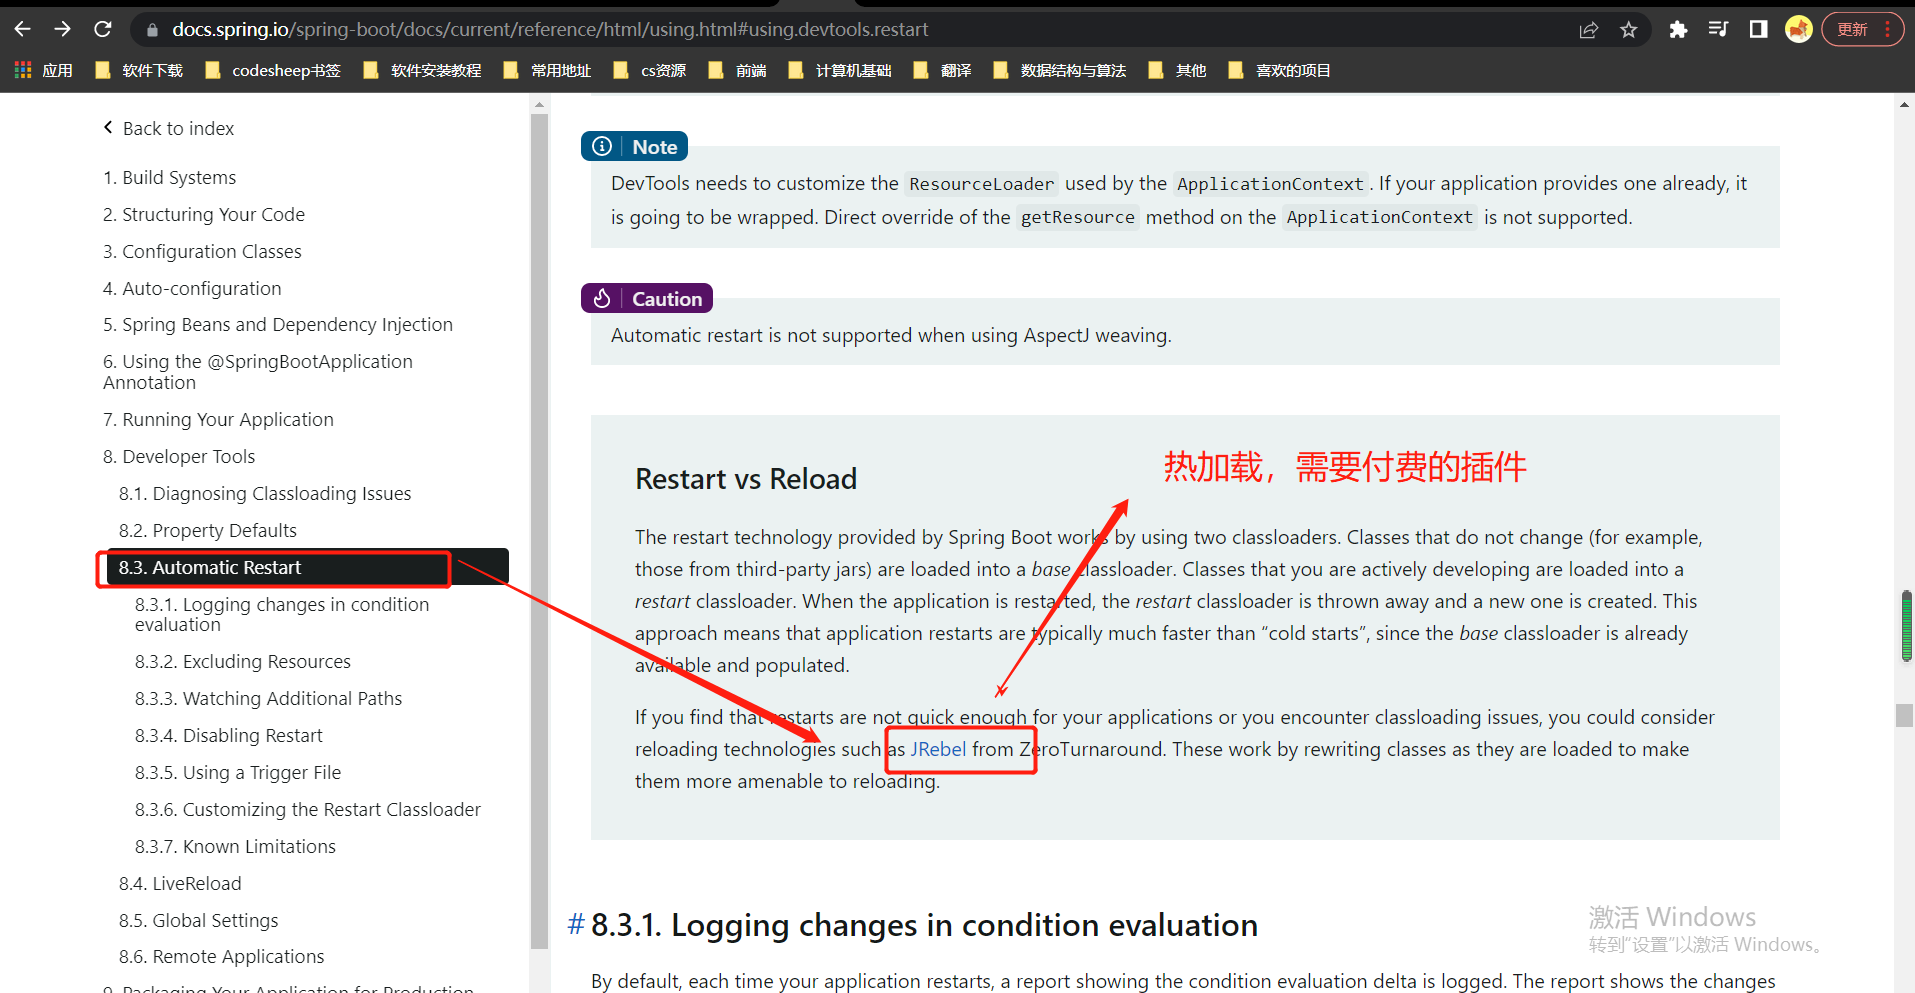
如果想使用热加载(eg:JRebel),需要付费购买该插件。( 什么是热加载:热加载是指可以在不重启服务的情况下让更改的代码生效,热加载可以显著的提升开发以及调试的效率,它是基于 Java 的类加载器实现的,但是由于热加载的不安全性,一般不会用于正式的生产环境。)
eg:
4-4 Spring Initializr简化开发
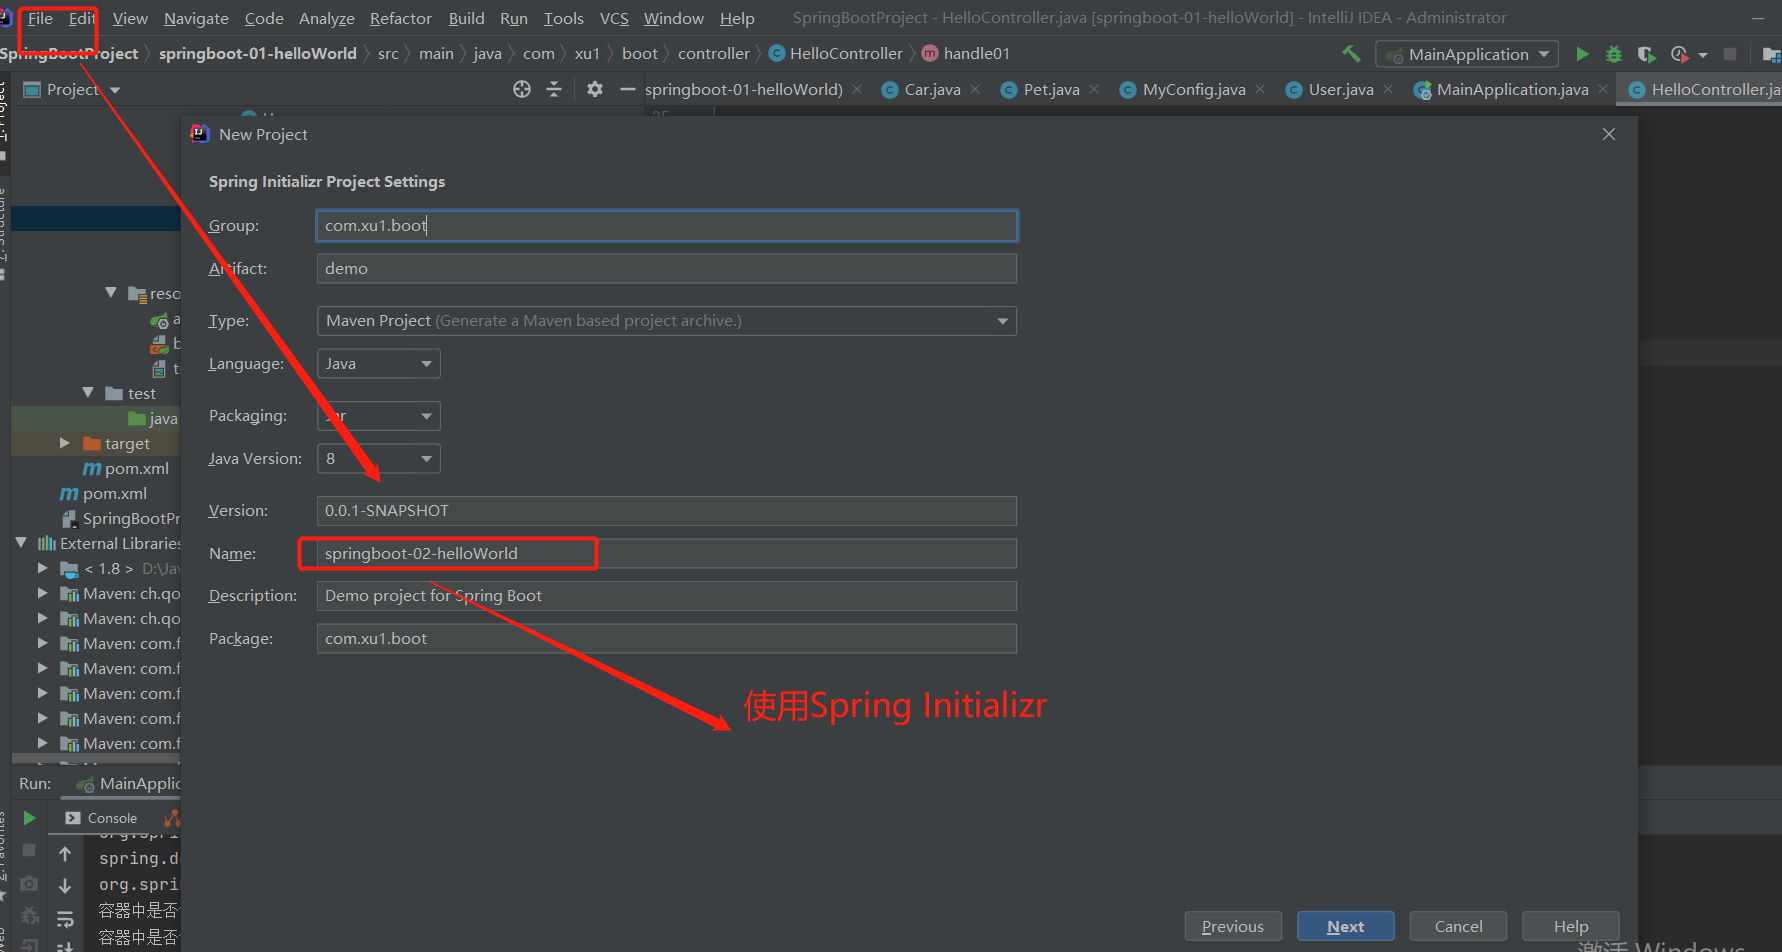
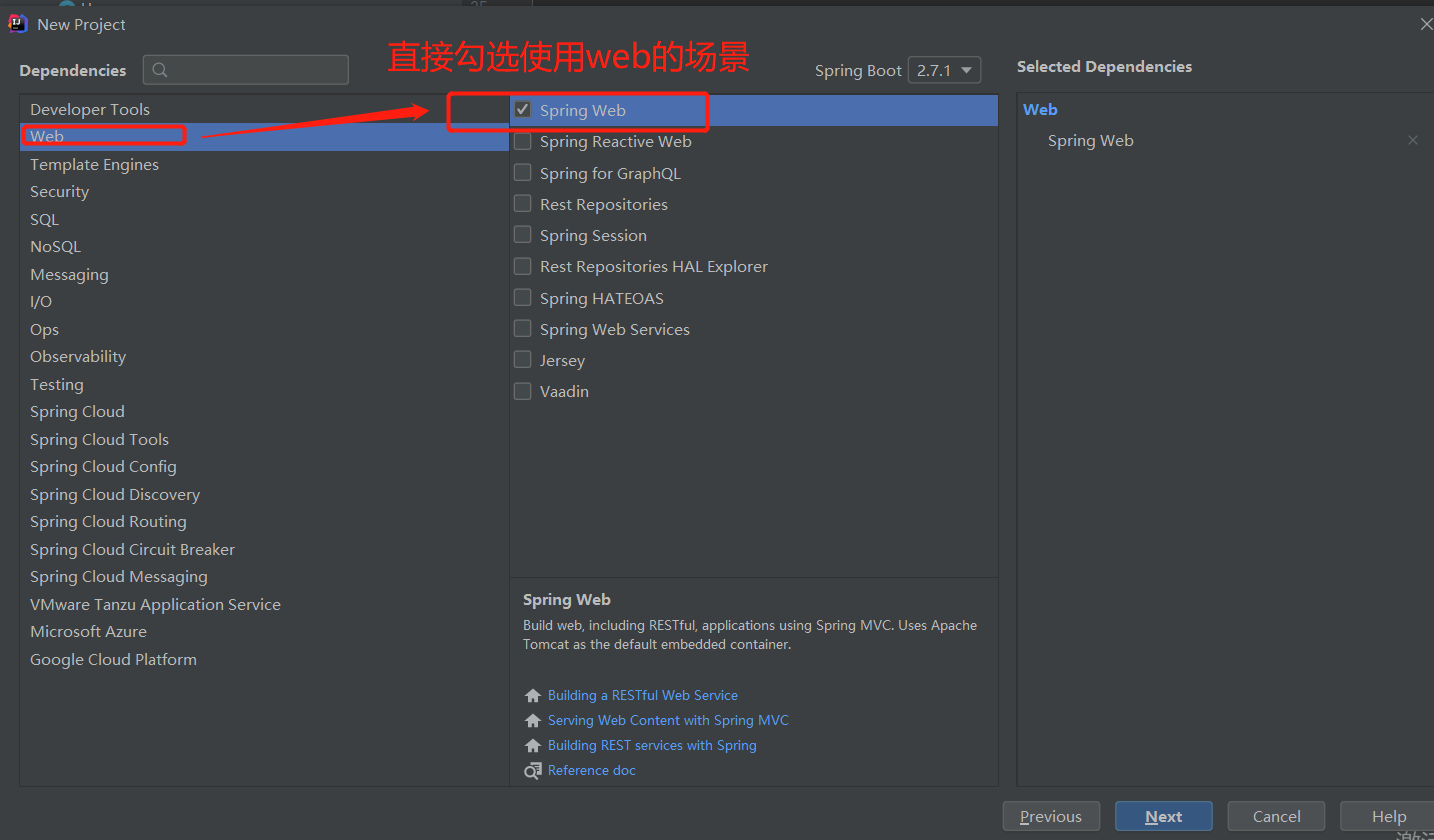
解决的问题:不需要再看springboot--starter--xx官方文档,使用场景直接勾选即可。
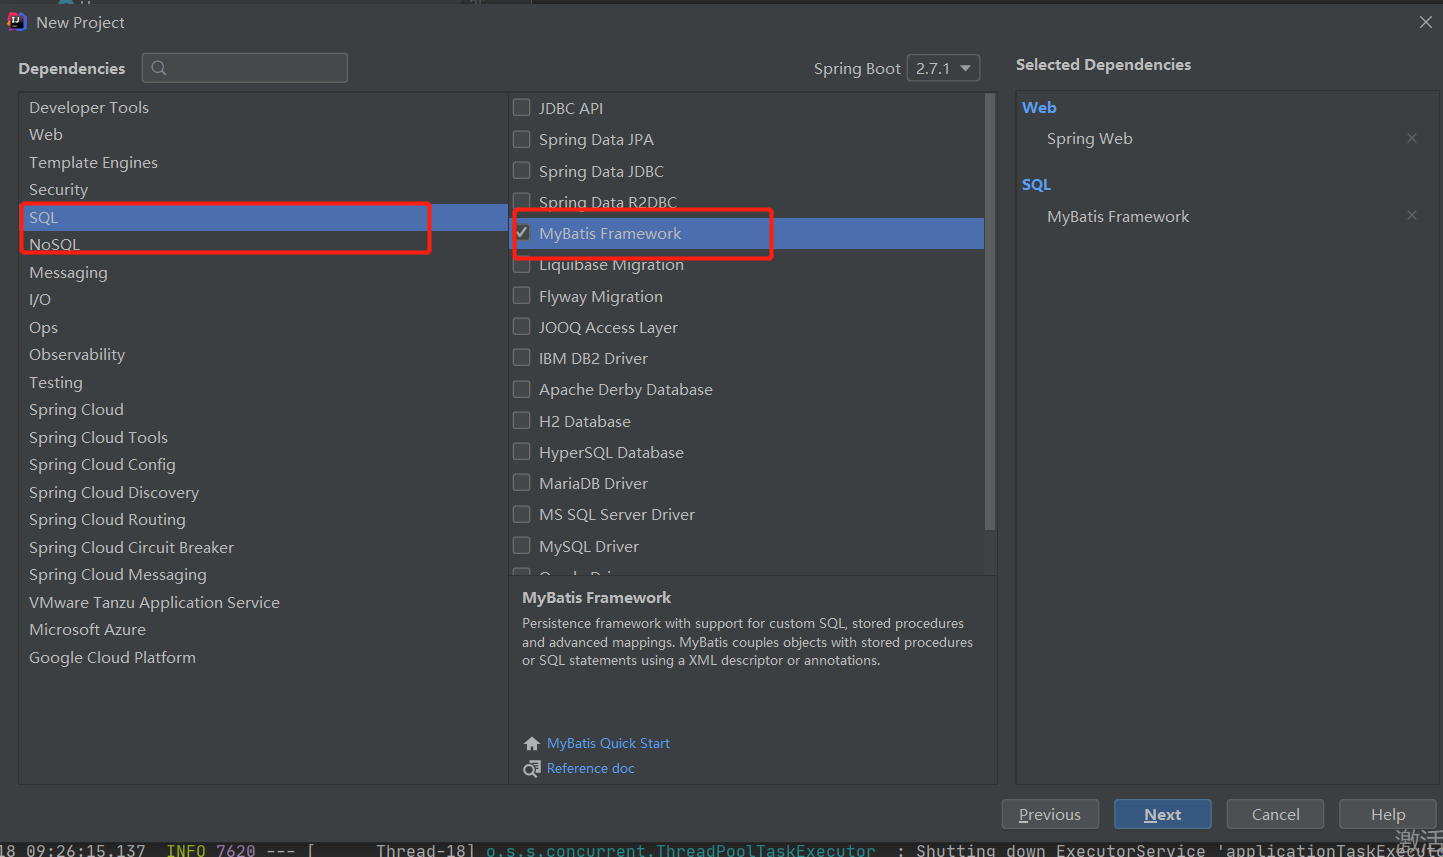
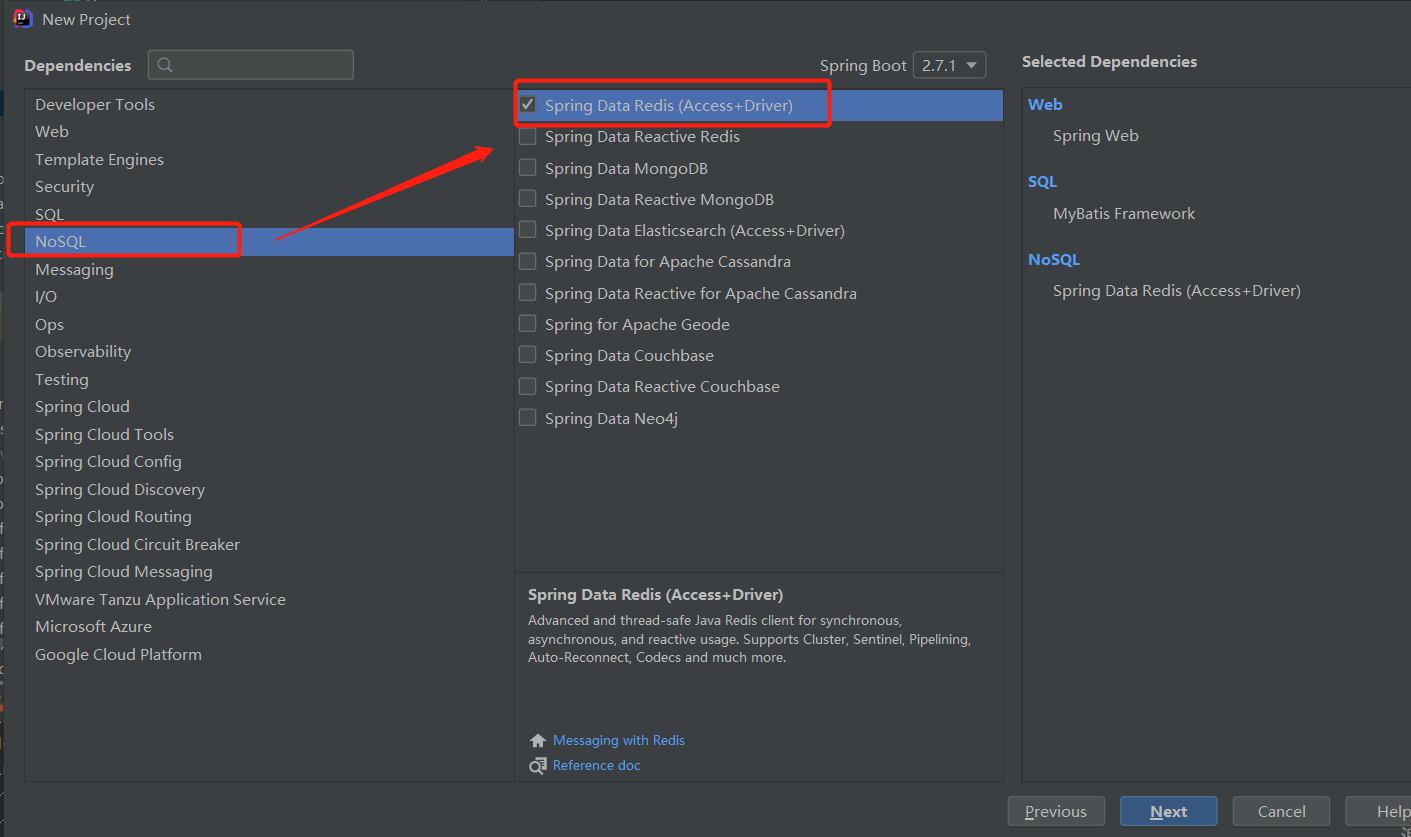
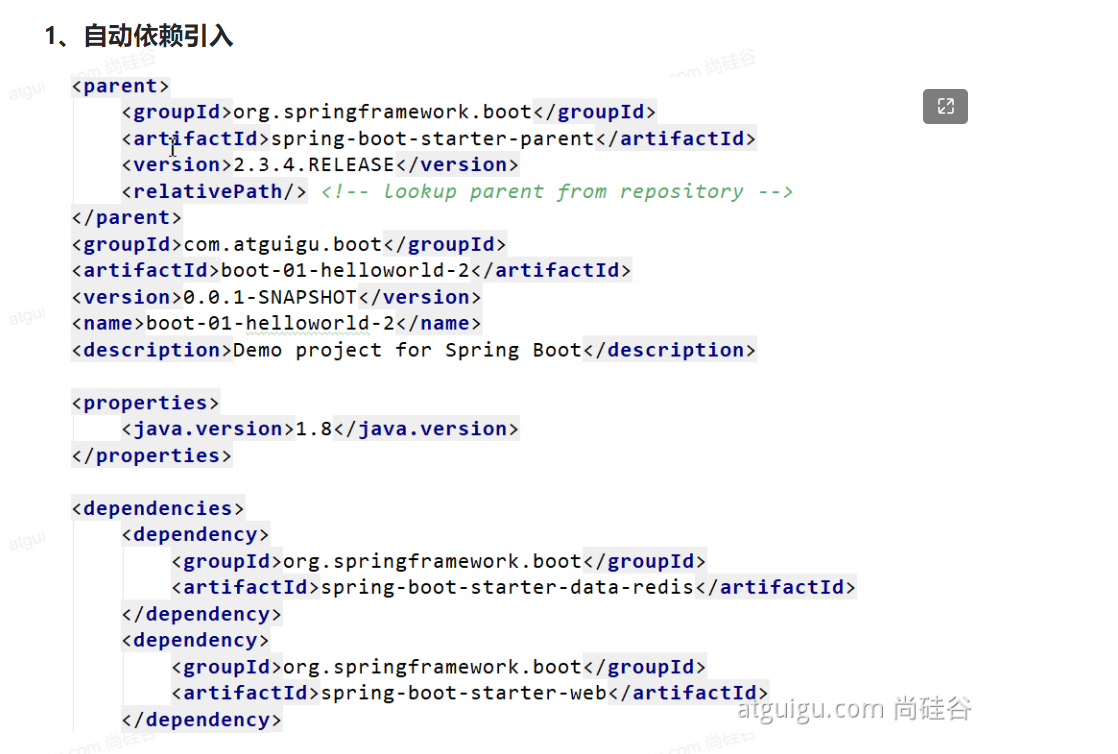
创建好的视图如下:
1.帮我们自动导入了依赖
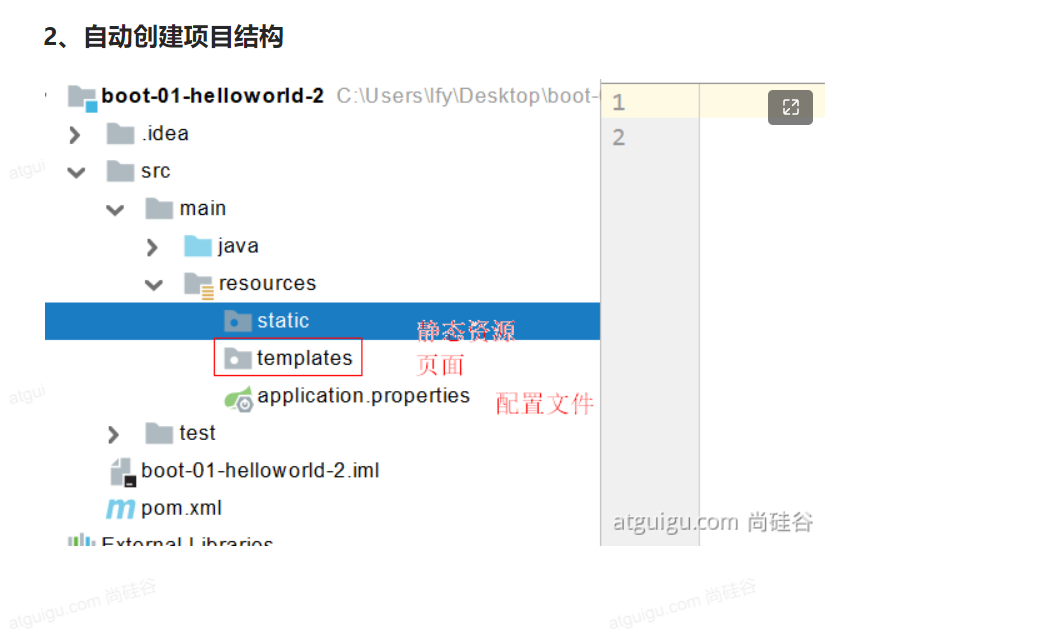
2.帮我们自动创建了项目结构
3.帮我们自动编写好了主配置类
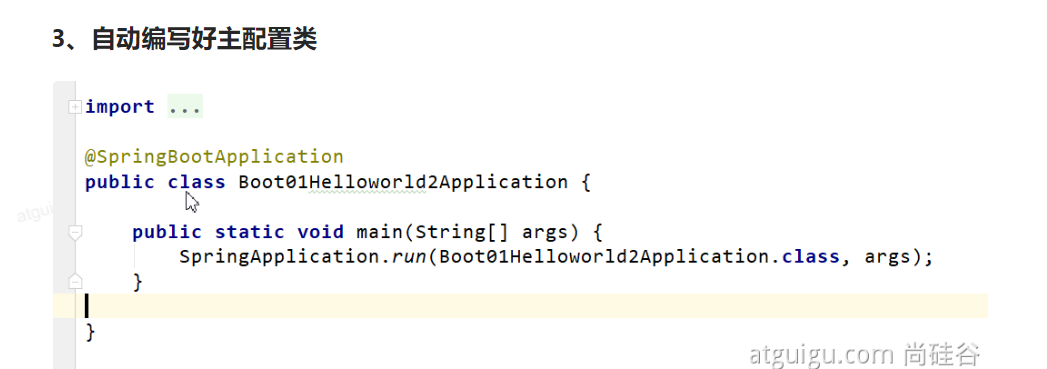
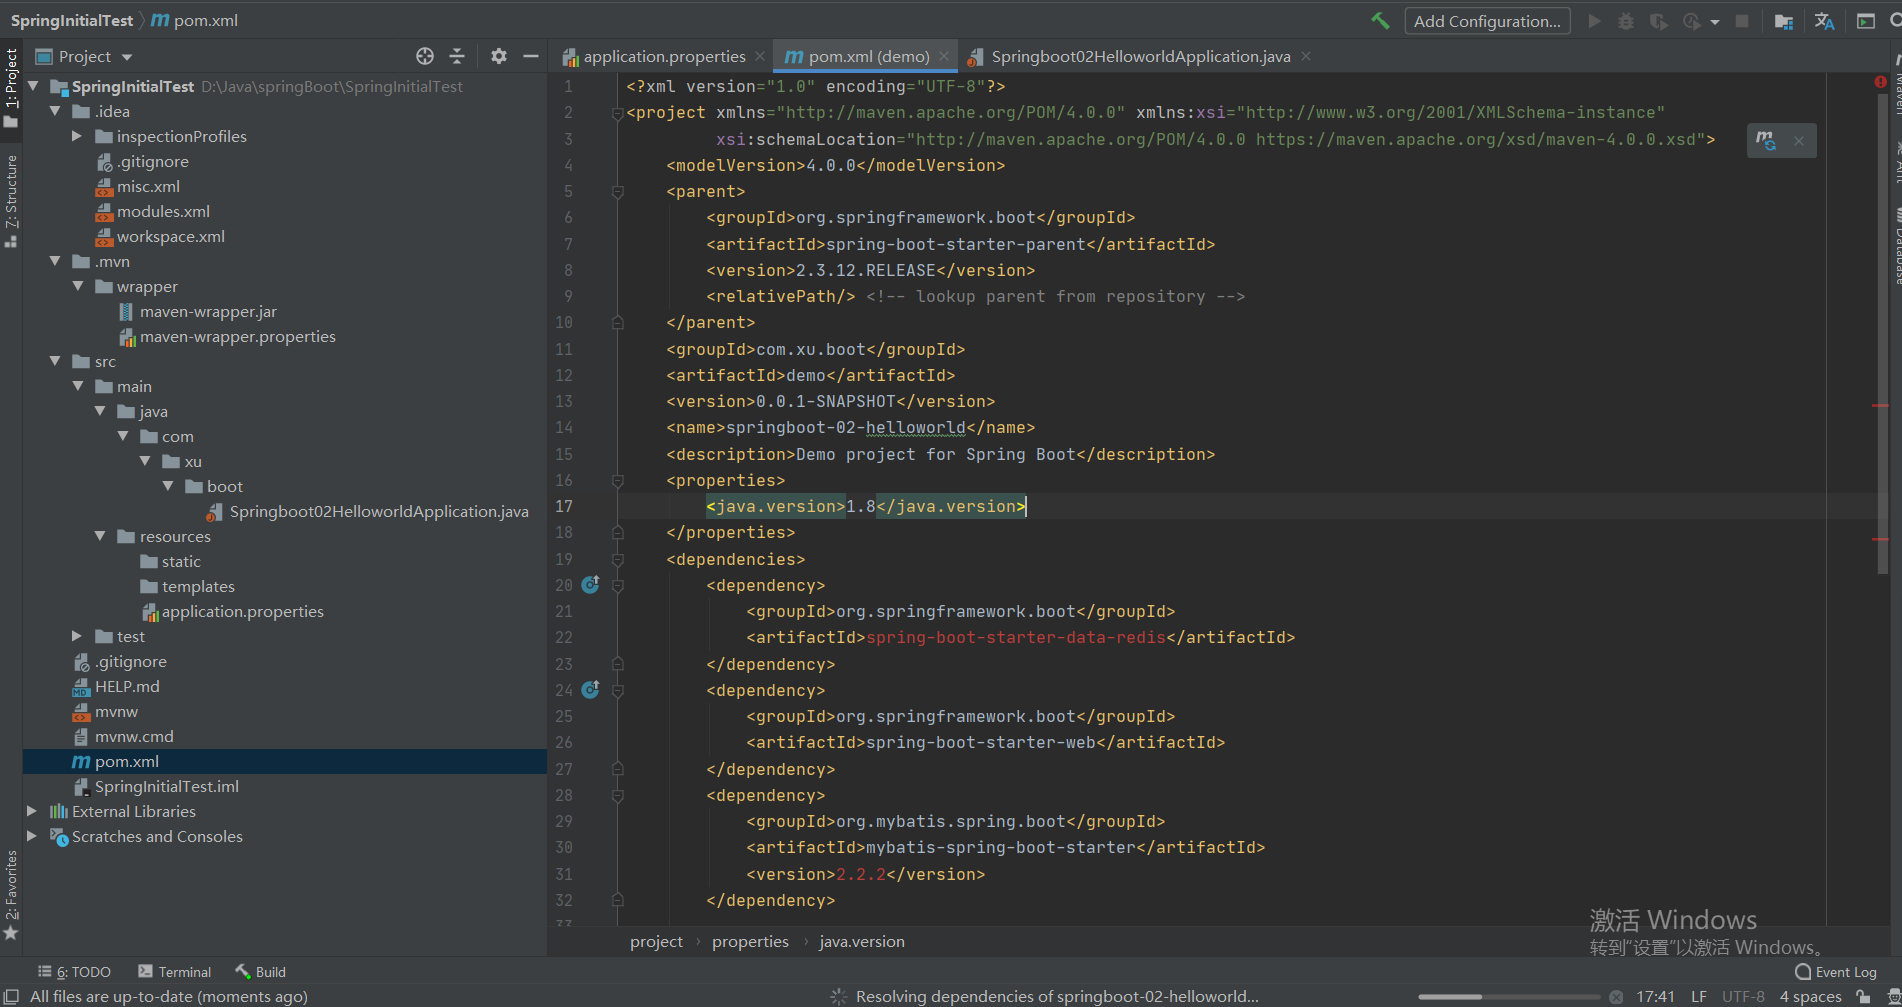
Spring Initializr初始化慢解决办法:见https://www.cnblogs.com/rong-xu-drum/p/16492769.html
-----------------------------------------以上是springboot入门,接下来为核心功能片的学习-----------------------------------
第5章 (springboot核心1)配置文件
5-1 properties
同以前的properties用法
5-2 yaml
5-2-1 简介
YAML 是 "YAML Ain't Markup Language"(YAML 不是一种标记语言)的递归缩写。在开发的这种语言时,YAML 的意思其实是:"Yet Another Markup Language"(仍是一种标记语言)。
非常适合用来做以数据为中心的配置文件
5-2-2 基本语法
-
key: value;kv之间有空格
-
大小写敏感
-
使用缩进表示层级关系
-
缩进不允许使用tab,只允许空格
-
缩进的空格数不重要,只要相同层级的元素左对齐即可
-
'#'表示注释
-
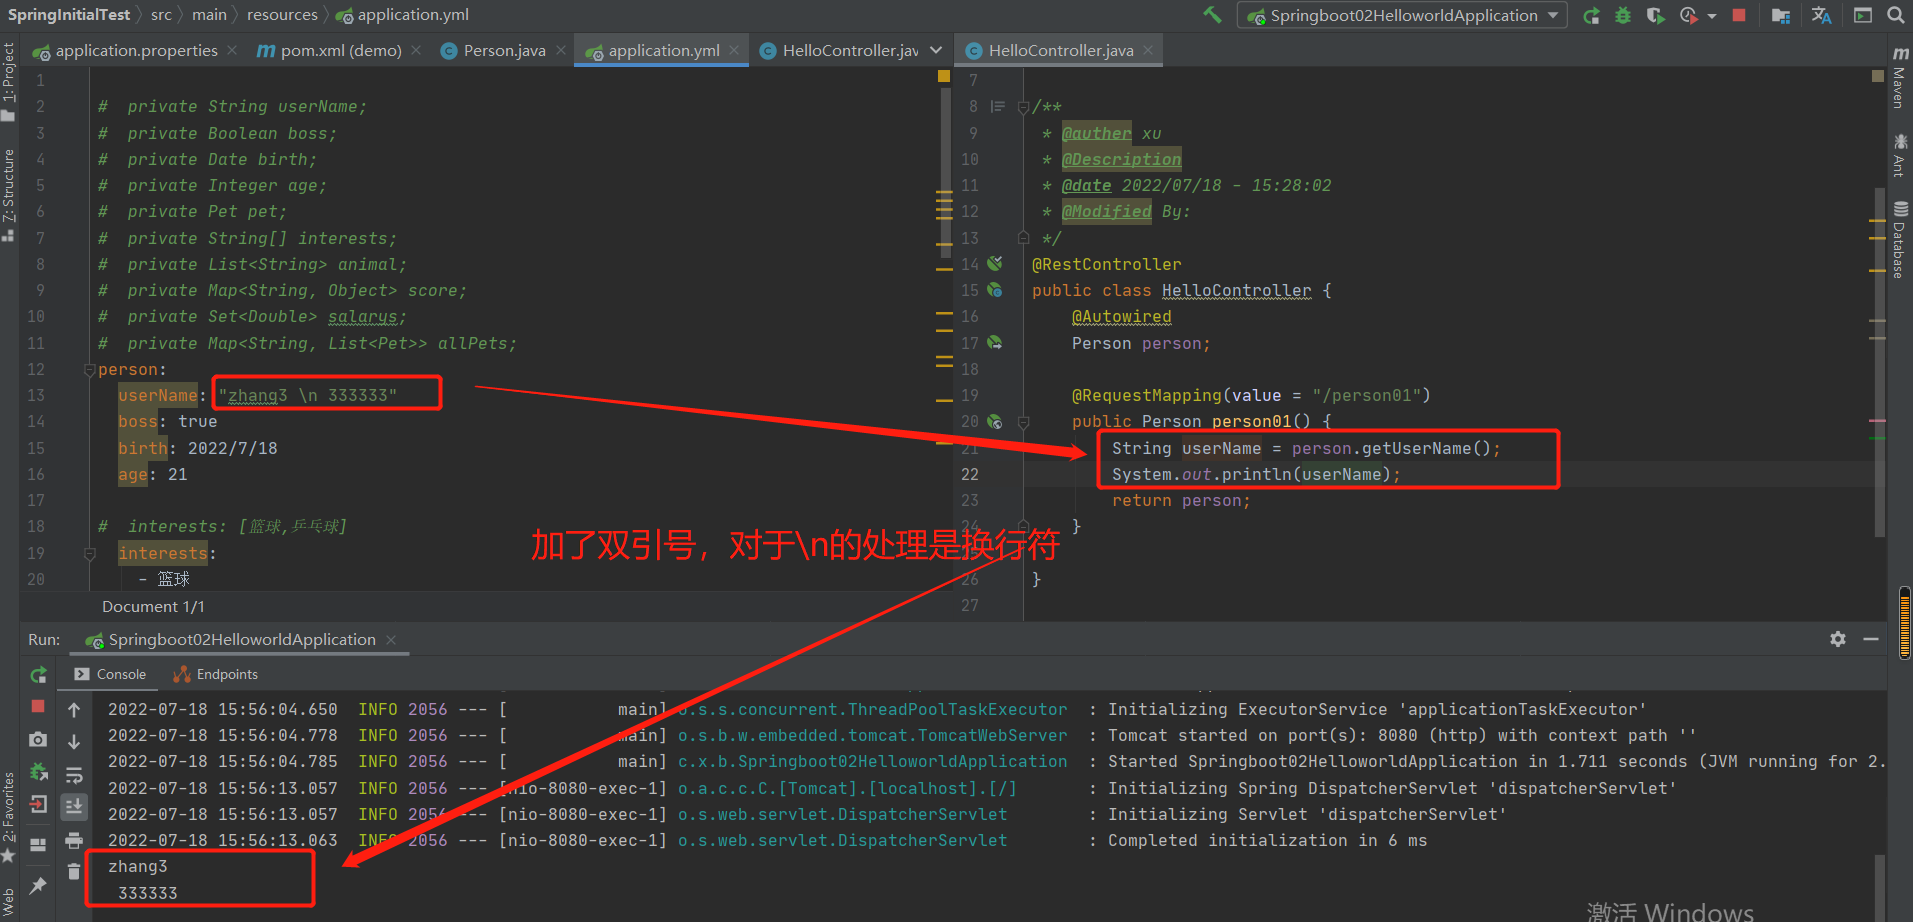
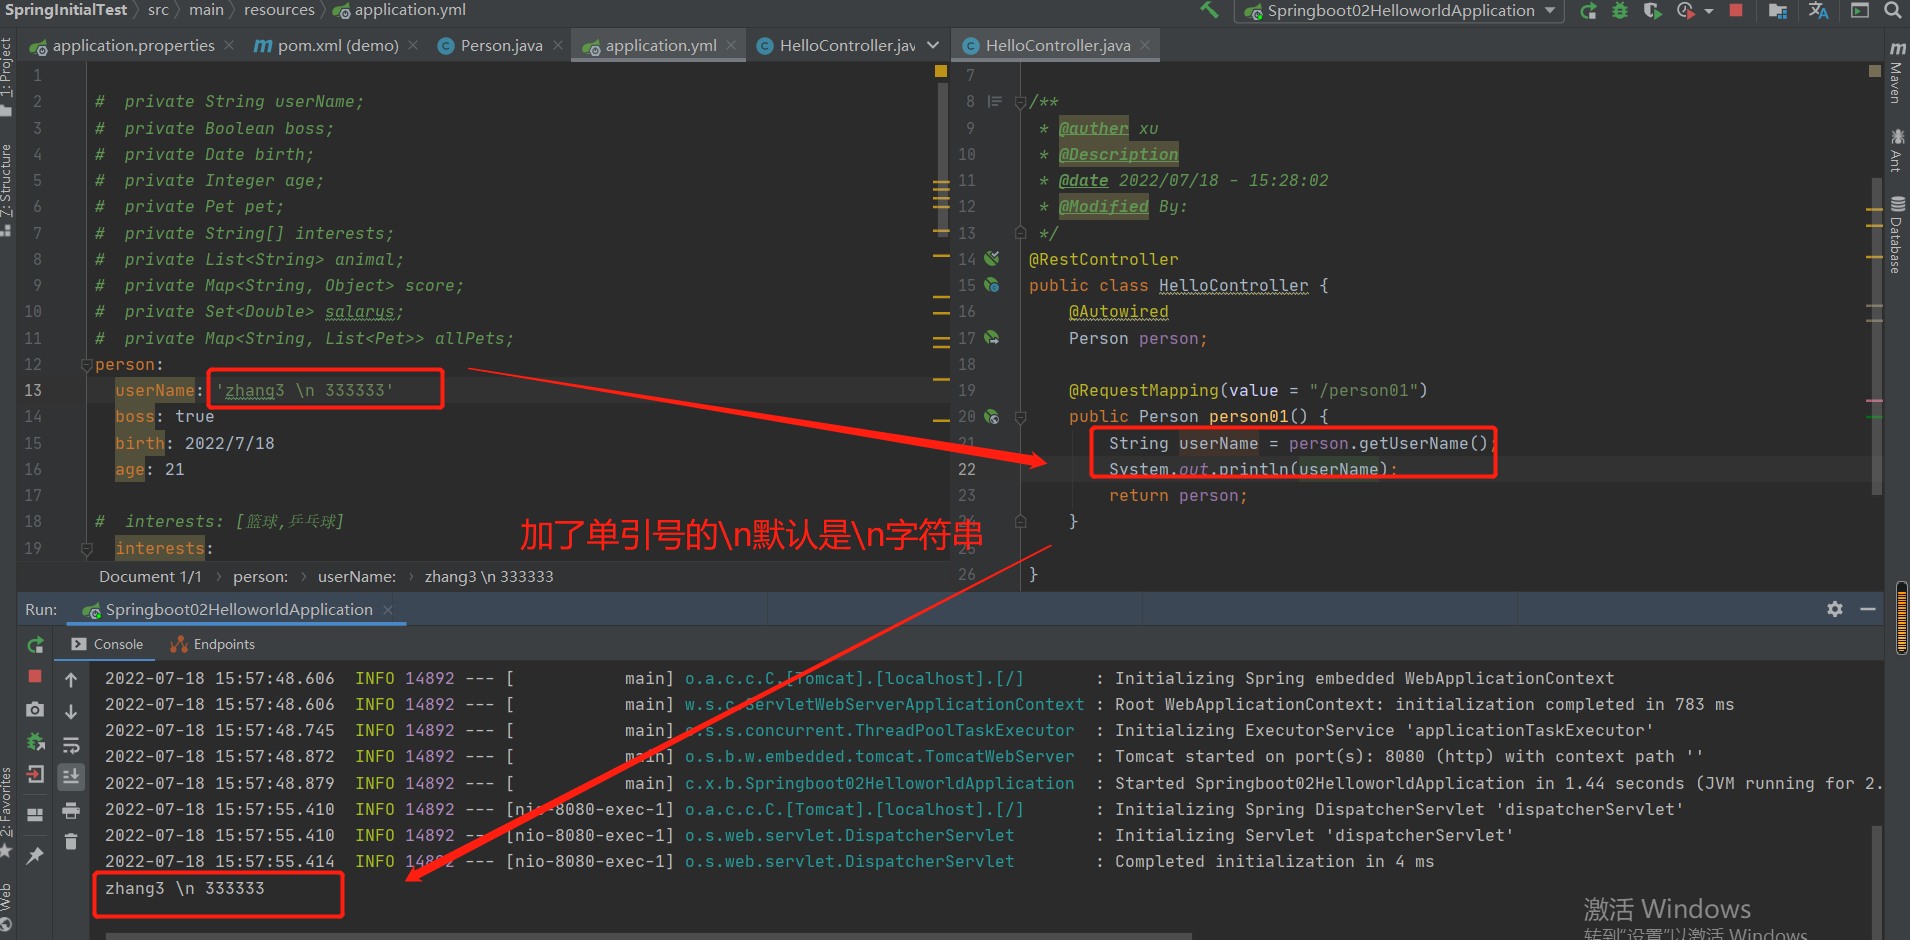
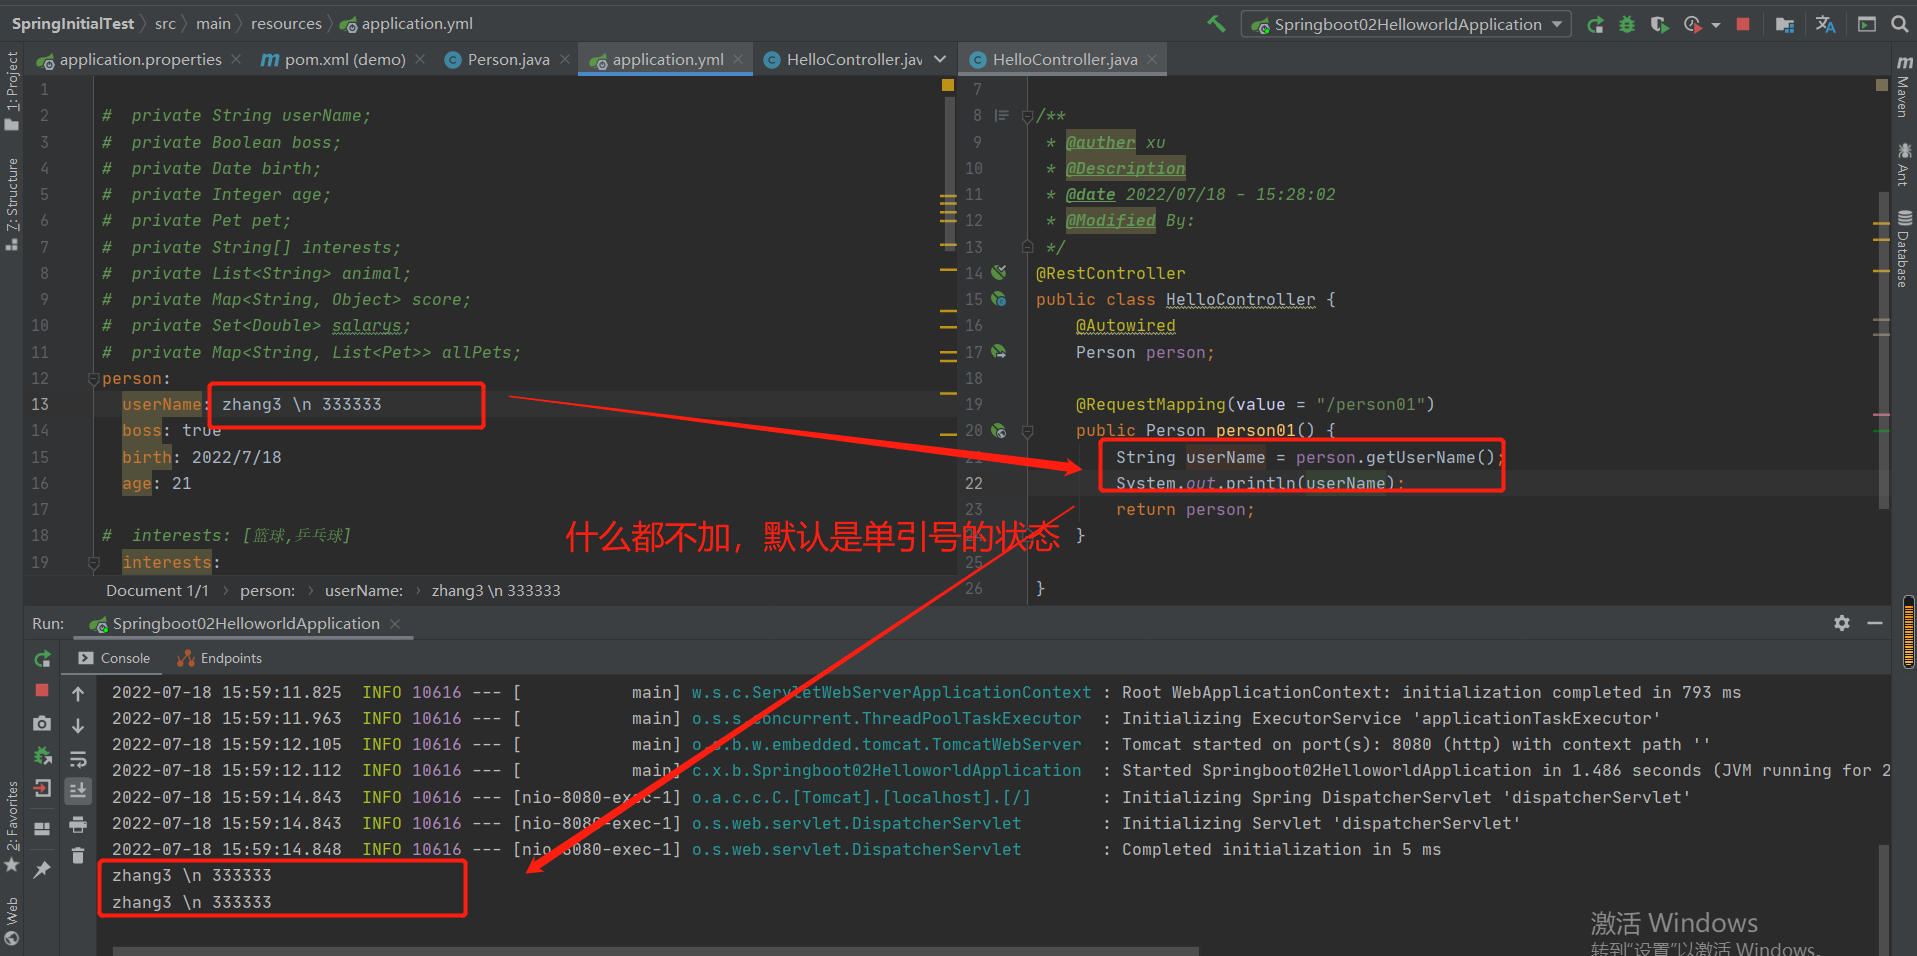
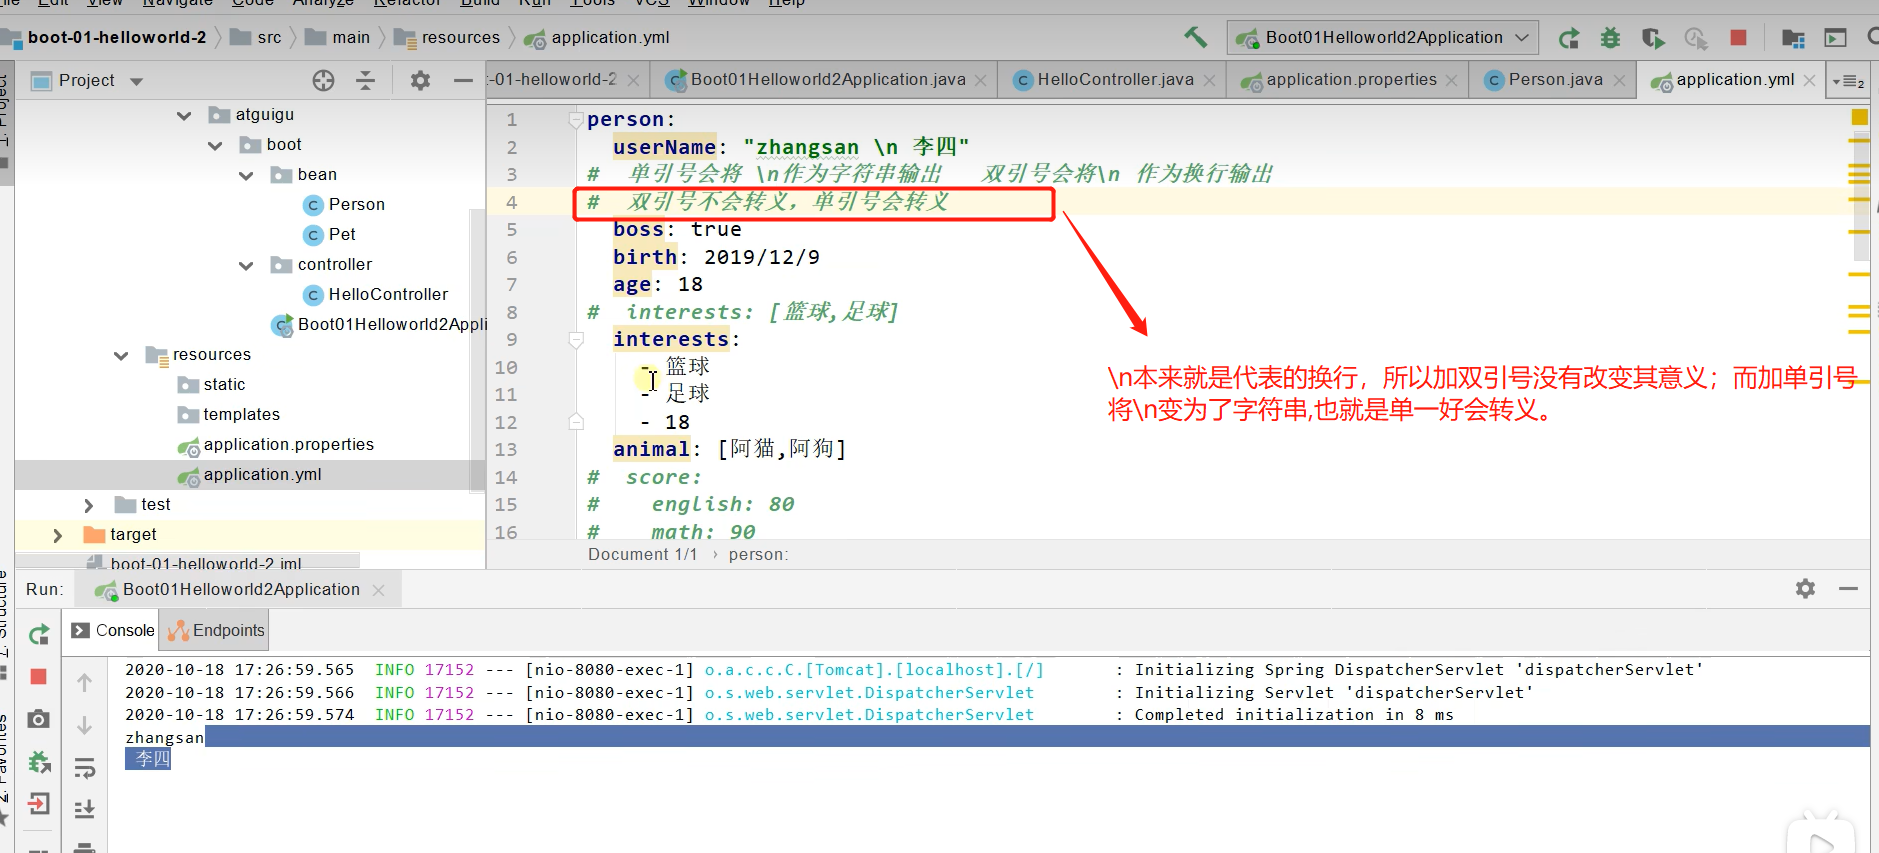
字符串无需加引号,如果要加,''与""表示字符串内容 会被 转义/不转义
5-2-3 数据类型
-
字面量:单个的、不可再分的值。date、boolean、string、number、null
k: v -
对象:键值对的集合。map、hash、set、object
行内写法: k: {k1:v1,k2:v2,k3:v3} #或 k: k1: v1 k2: v2 k3: v3 -
数组:一组按次序排列的值。array、list、queue
行内写法:  k: [v1,v2,v3]
#或者
k:
 - v1
 - v2
 - v3
5-2-4 示例
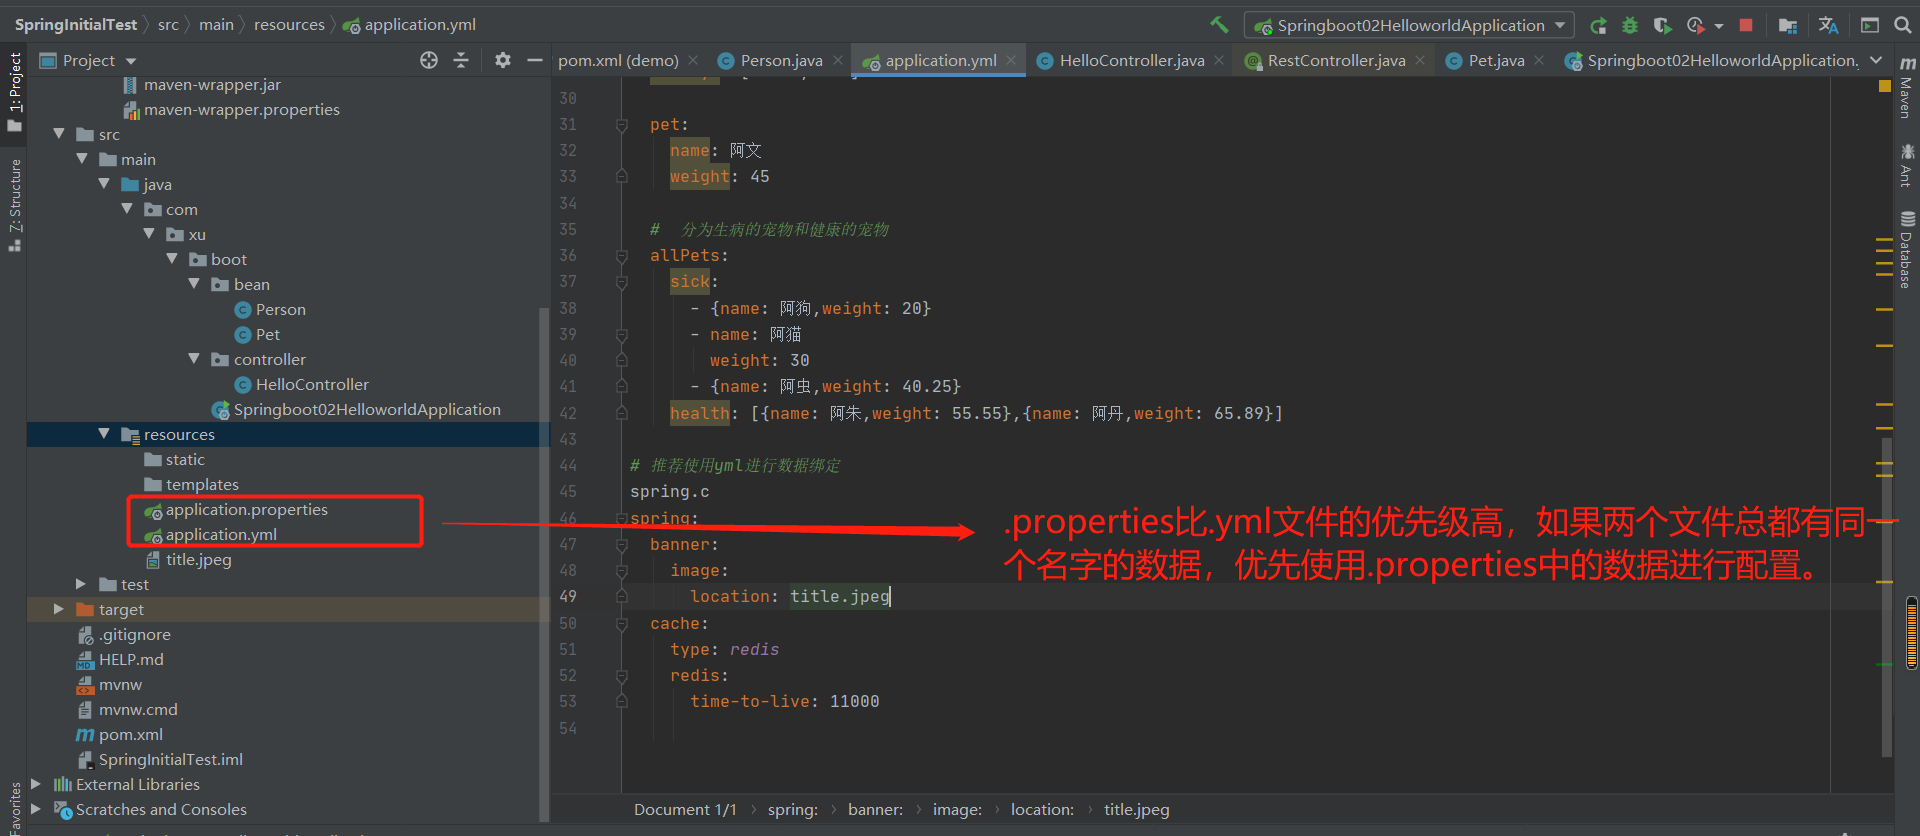
使用application.yml完成对Person对象的数据绑定
#  private String userName;
#  private Boolean boss;
#  private Date birth;
#  private Integer age;
#  private Pet pet;
#  private String[] interests;
#  private List<String> animal;
#  private Map<String, Object> score;
#  private Set<Double> salarys;
#  private Map<String, List<Pet>> allPets;
person:
  userName: zhang3
  boss: true
  birth: 2022/7/18
  age: 21

#  interests: [篮球,乒乓球]
  interests:
    - 篮球
    - 乒乓球
  animal: [小猫,小狗]

#  score:
#    English: 110
#    math: 90
  score: {English: 110,math: 90}

  salarys: [40000,4100]

  pet:
    name: 阿文
    weight: 45

  #  分为生病的宠物和健康的宠物
  allPets:
    sick:
      - {name: 阿狗,weight: 20}
      - name: 阿猫
        weight: 30
      - {name: 阿虫,weight: 40.25}
    health: [{name: 阿朱,weight: 55.55},{name: 阿丹,weight: 65.89}]

# 推荐使用yml进行数据绑定
spring.c
spring:
  banner:
    image:
      location: title.jpeg
  cache:
    type: redis
    redis:
      time-to-live: 11000
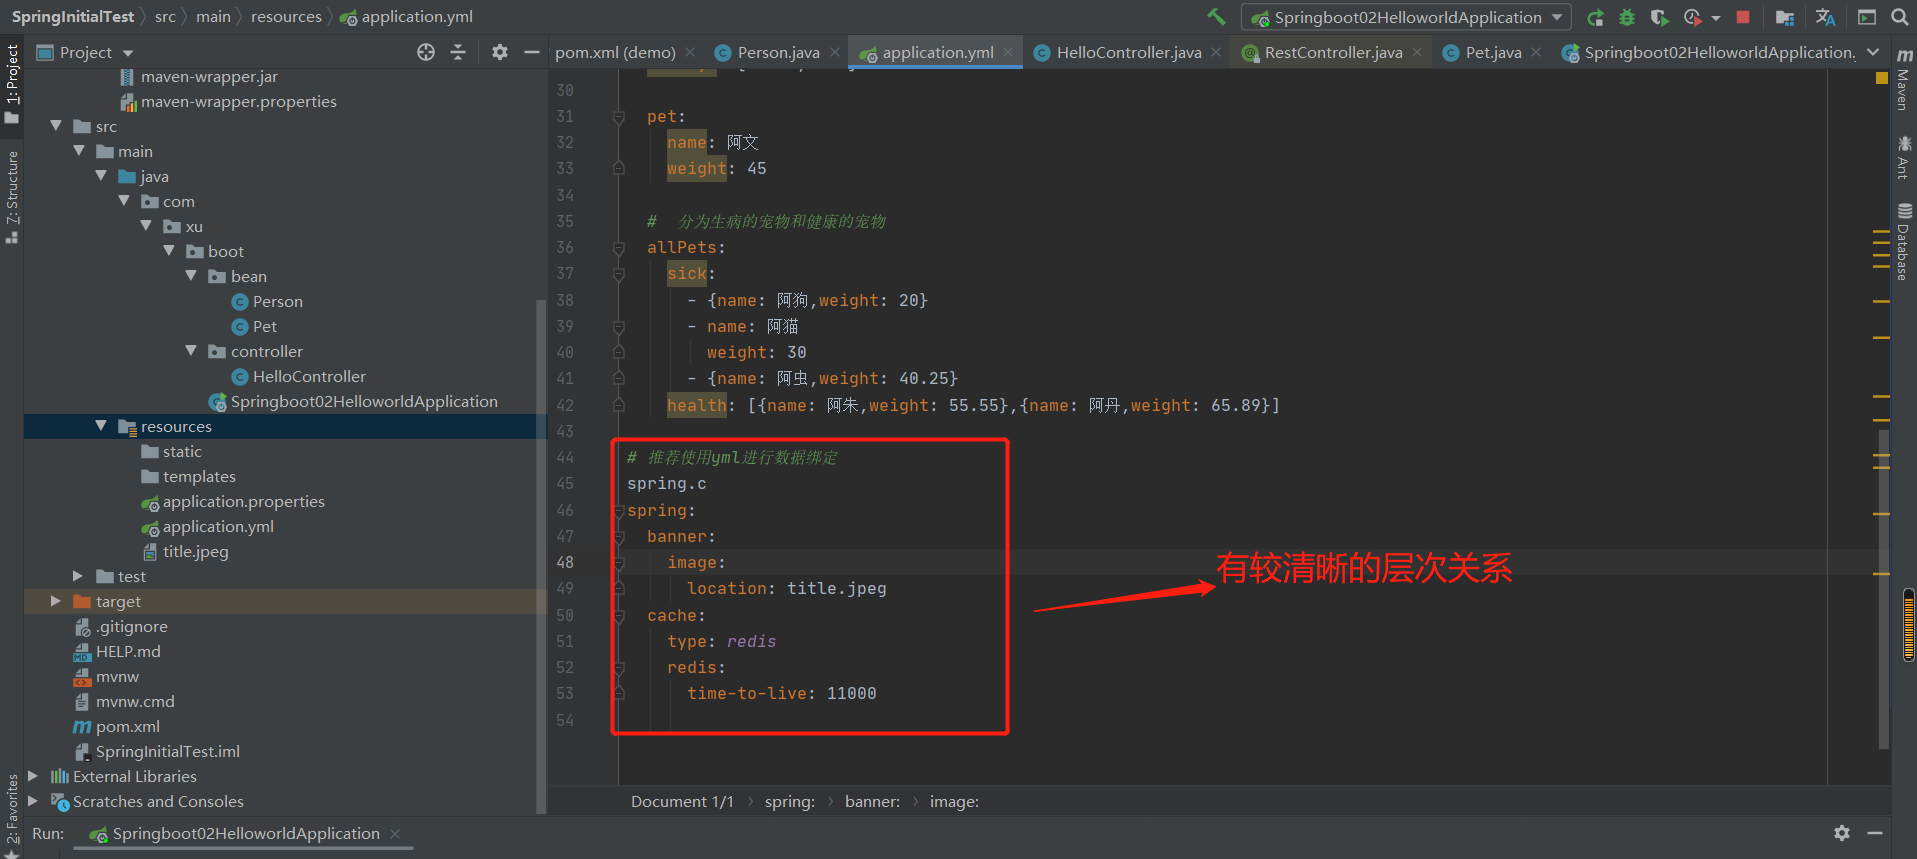
结果:
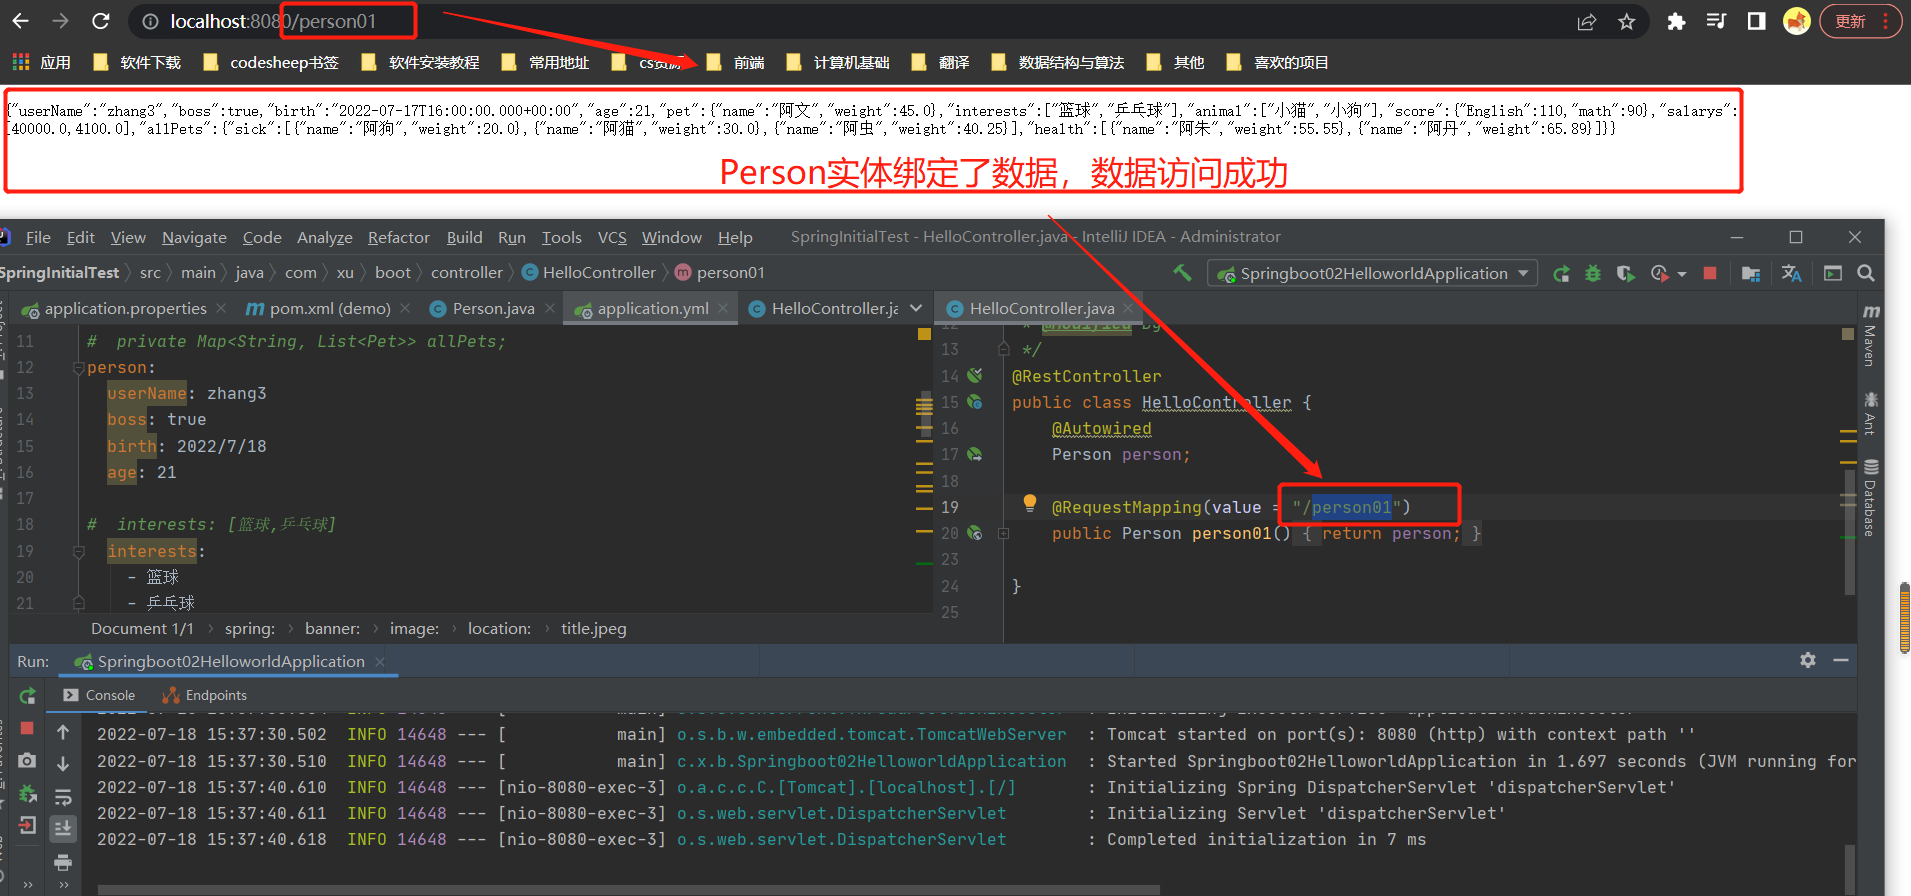
注意:
5-3 自定义类绑定的配置提示
5-3-1 使用
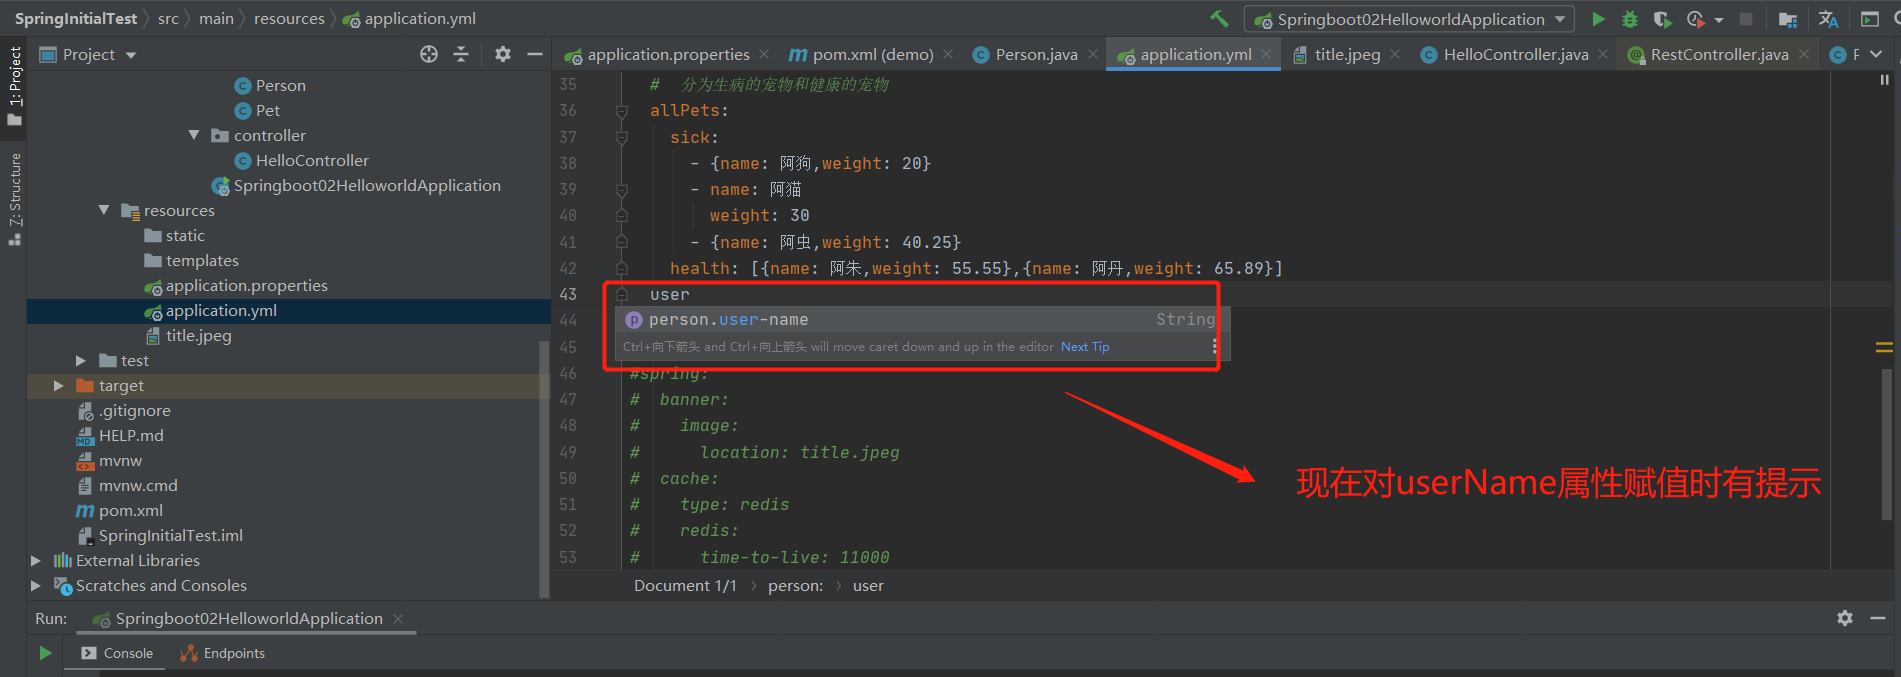
注意:
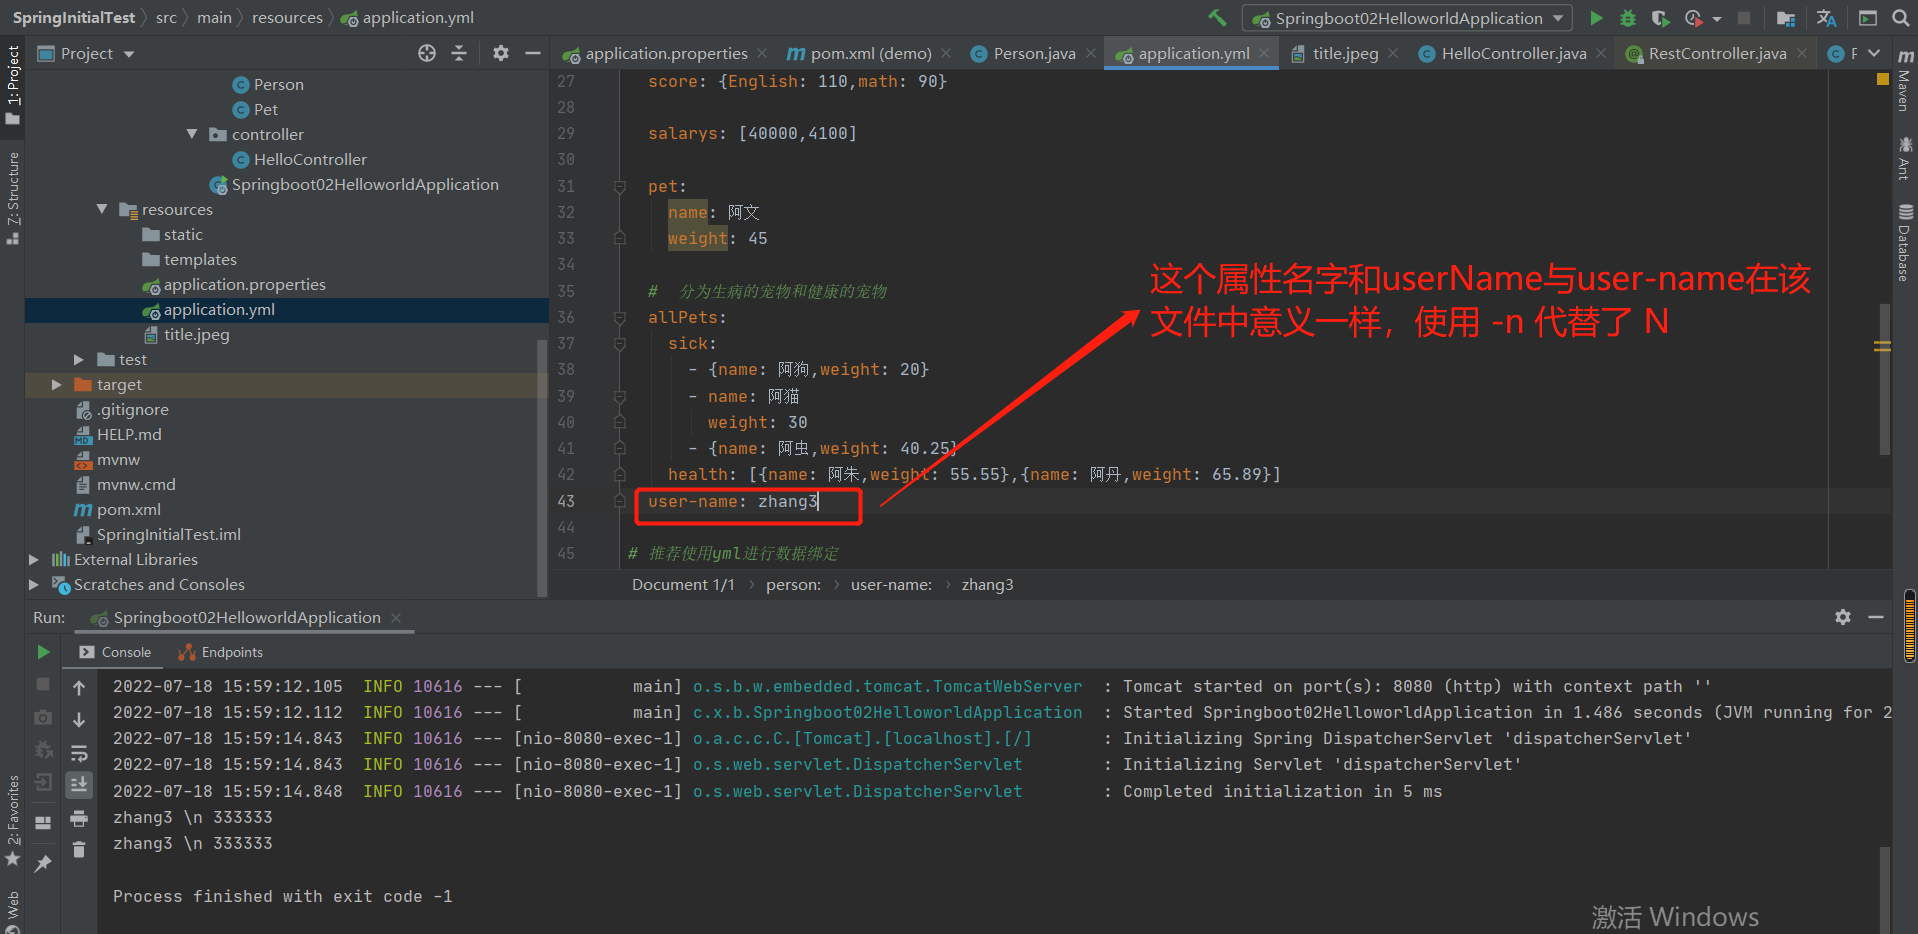
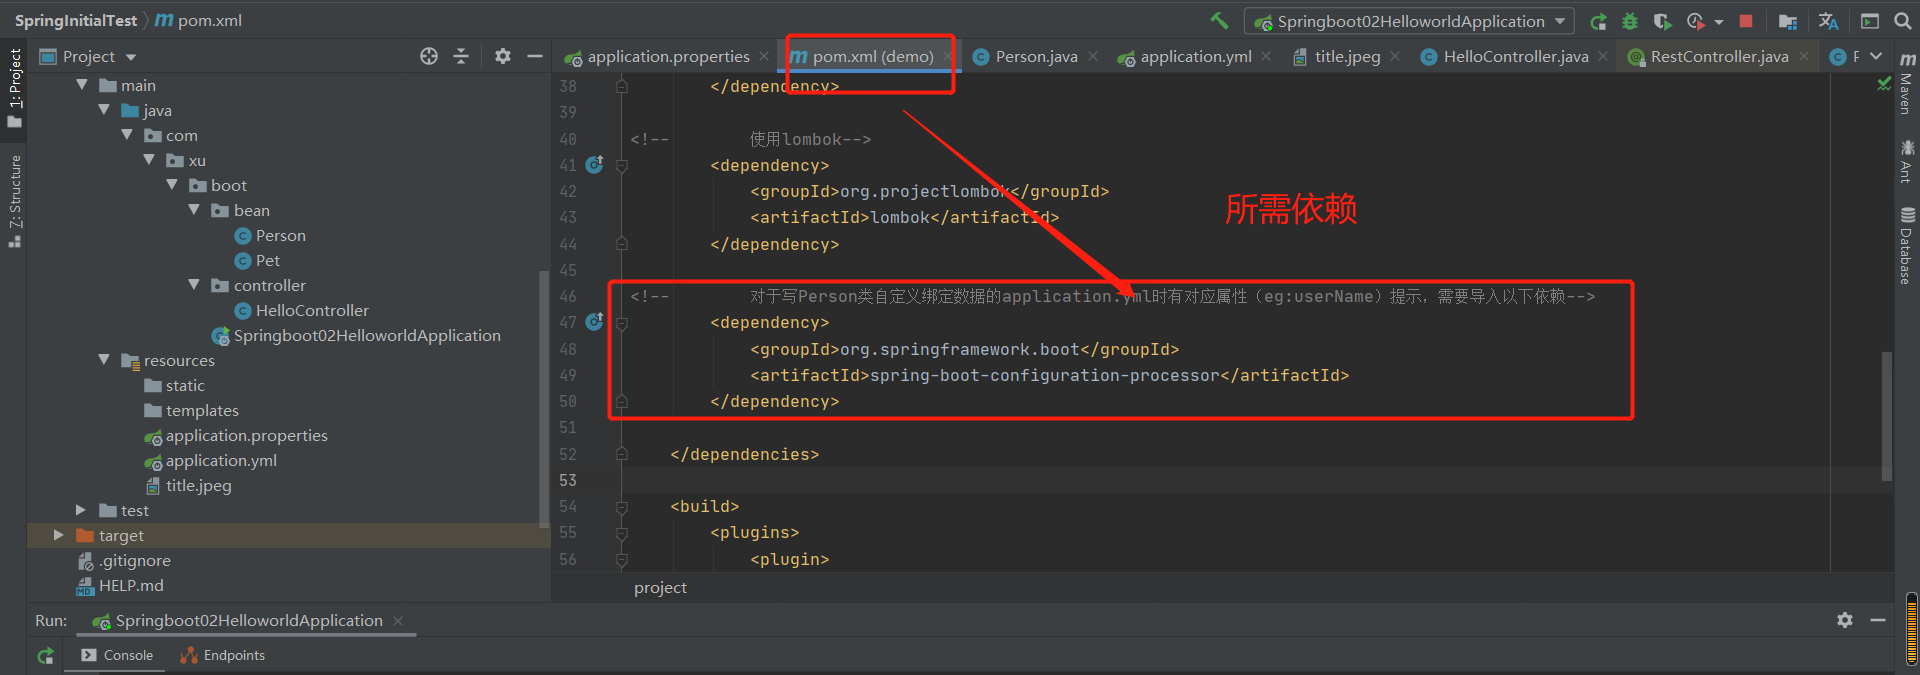
<!--        对于写Person类自定义绑定数据的application.yml时有对应属性(eg:userName)提示,需要导入以下依赖-->
        <dependency>
            <groupId>org.springframework.boot</groupId>
            <artifactId>spring-boot-configuration-processor</artifactId>
        </dependency>
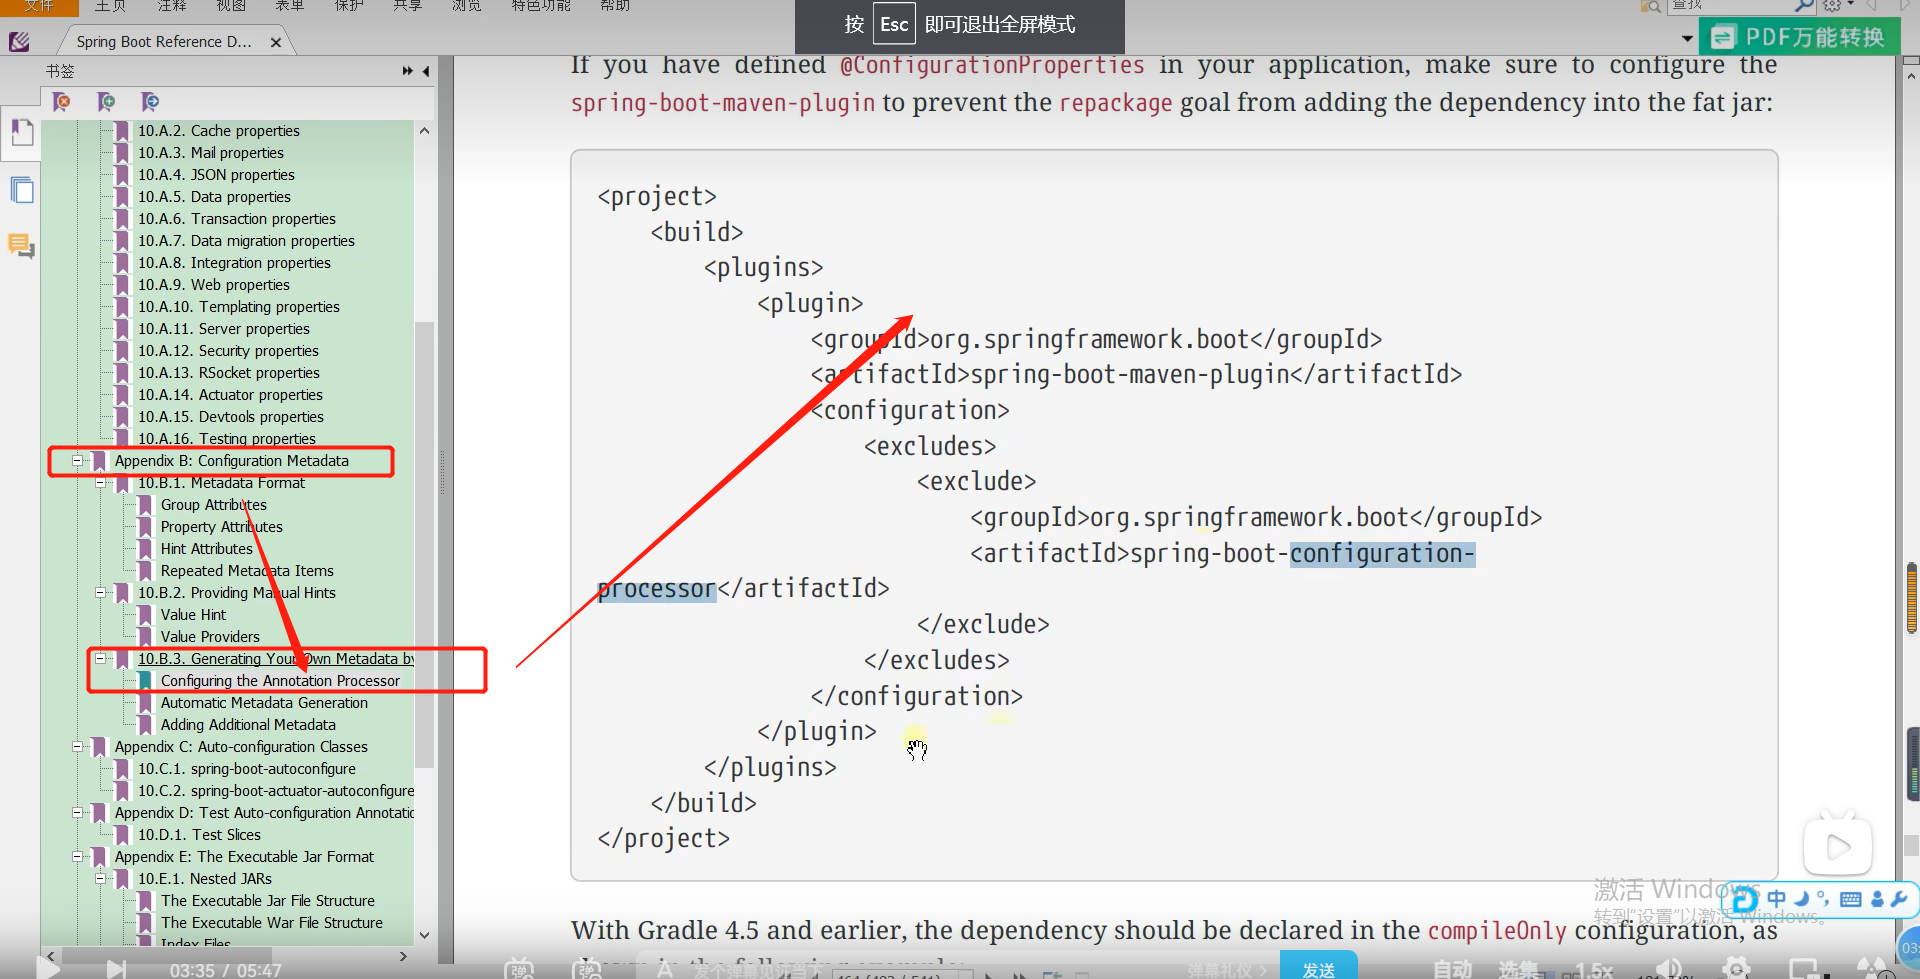
5-3-2 打包的时候排除处理器
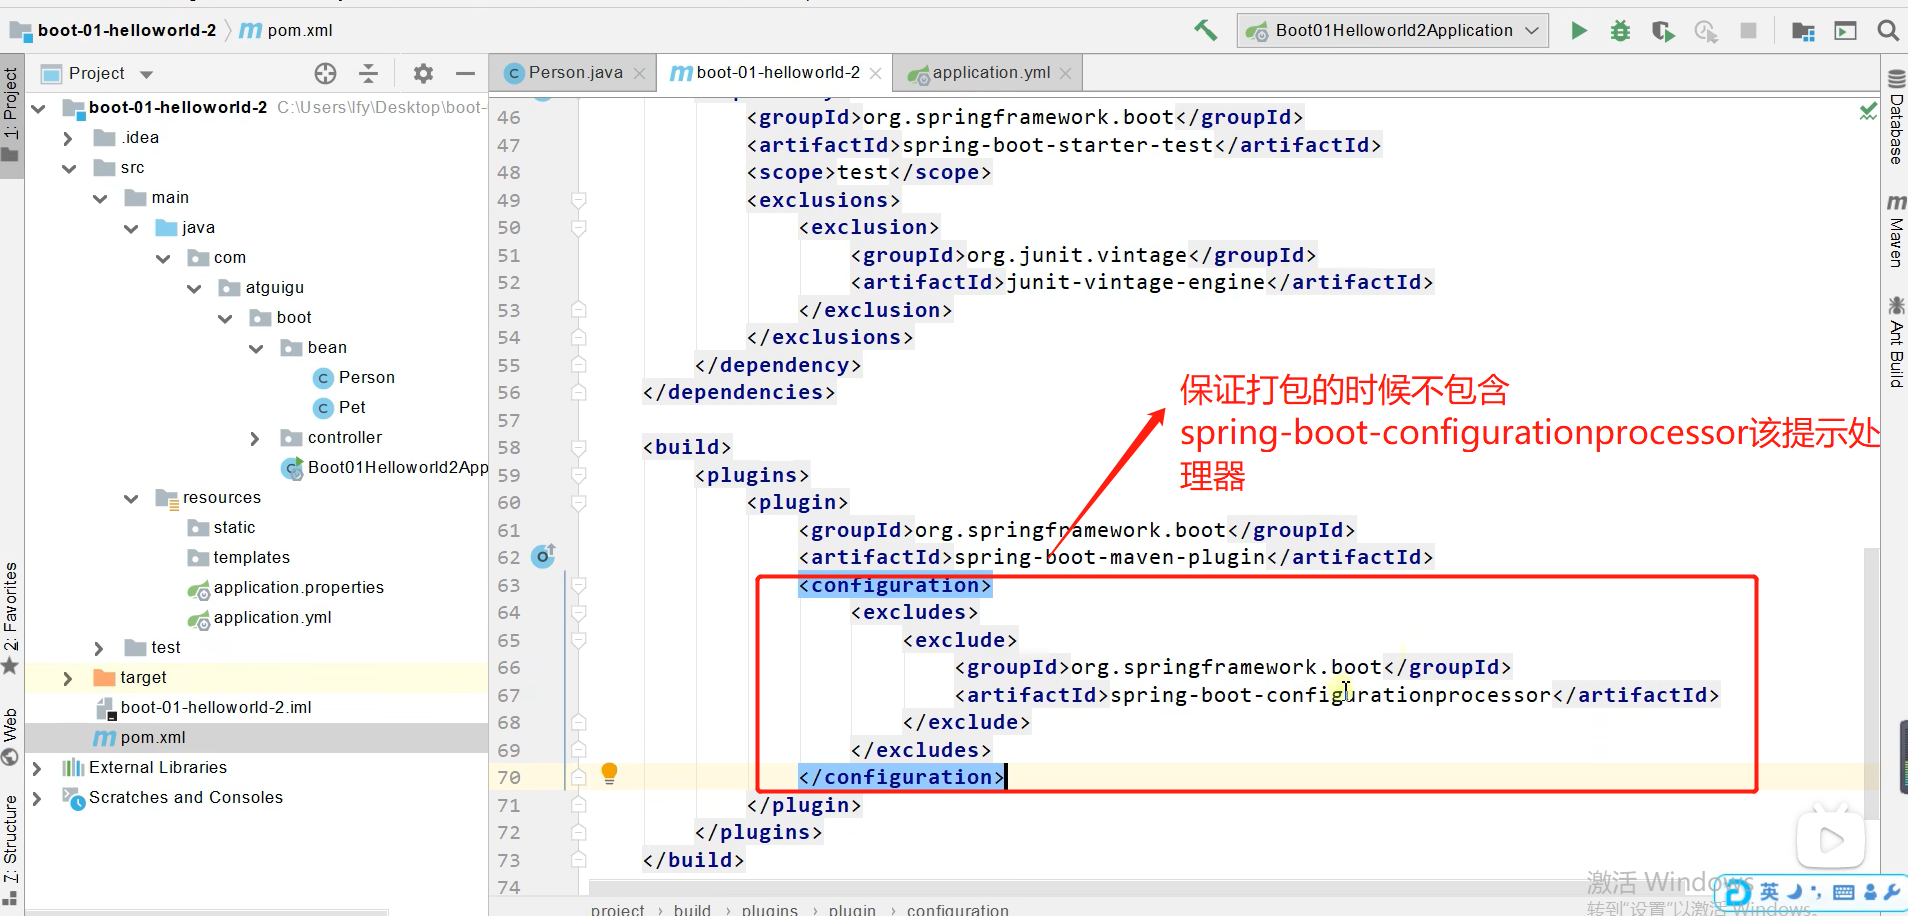
代码参考:注意(spring-boot-configuration-processor)有“-”
 <build>
        <plugins>
            <plugin>
                <groupId>org.springframework.boot</groupId>
                <artifactId>spring-boot-maven-plugin</artifactId>
                <configuration>
                    <excludes>
                        <exclude>
                            <groupId>org.springframework.boot</groupId>
                            <artifactId>spring-boot-configuration-processor</artifactId>
                        </exclude>
                    </excludes>
                </configuration>
            </plugin>
        </plugins>
    </build>
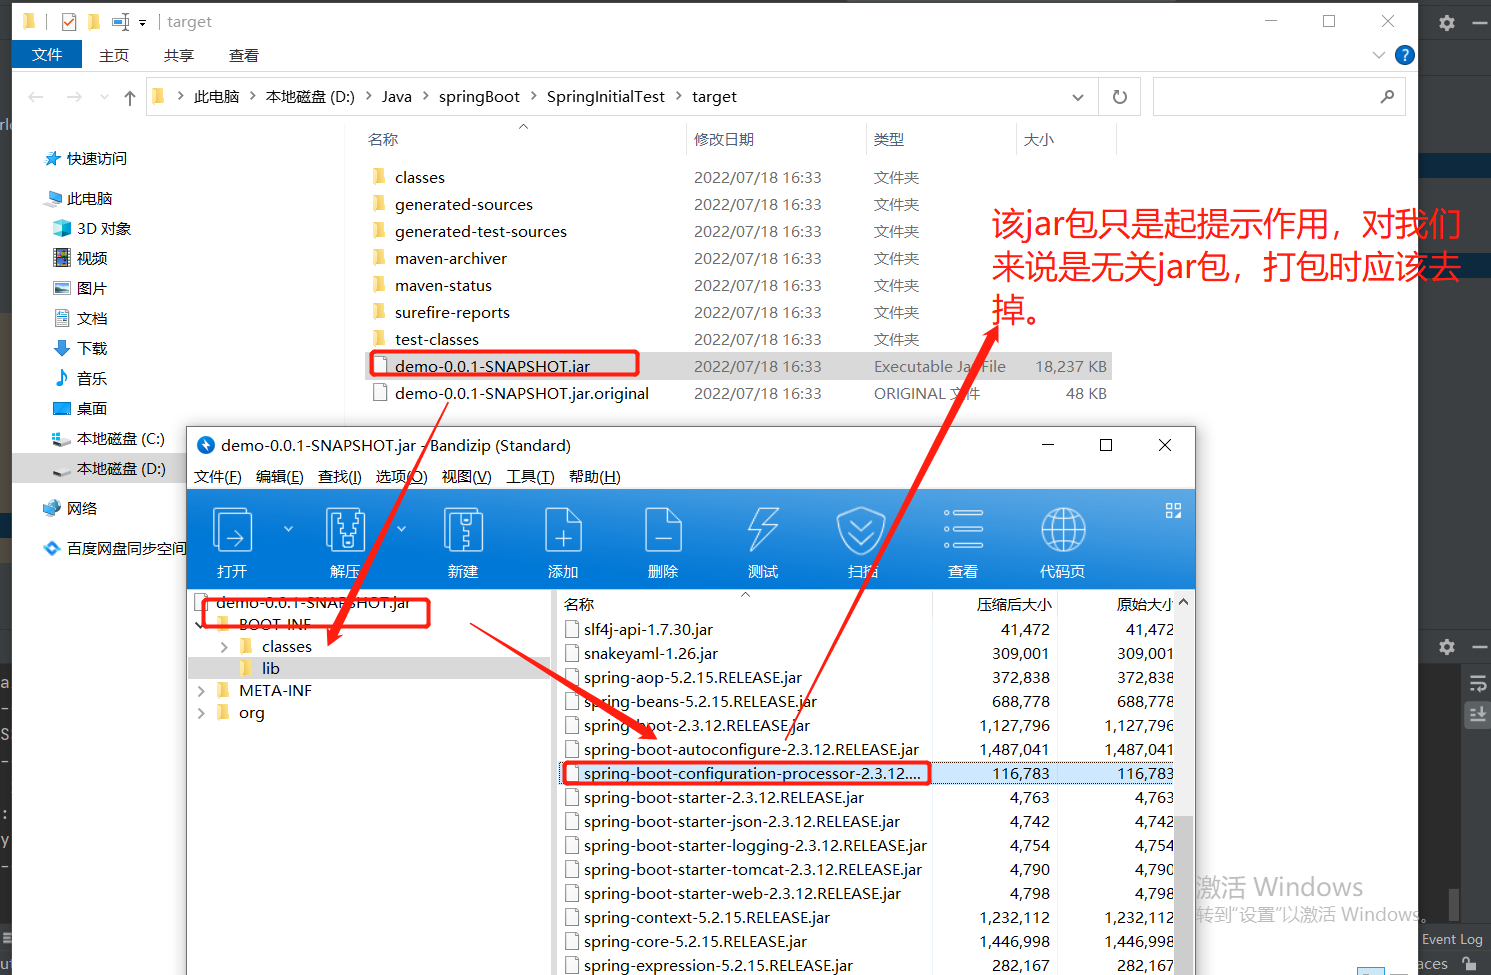
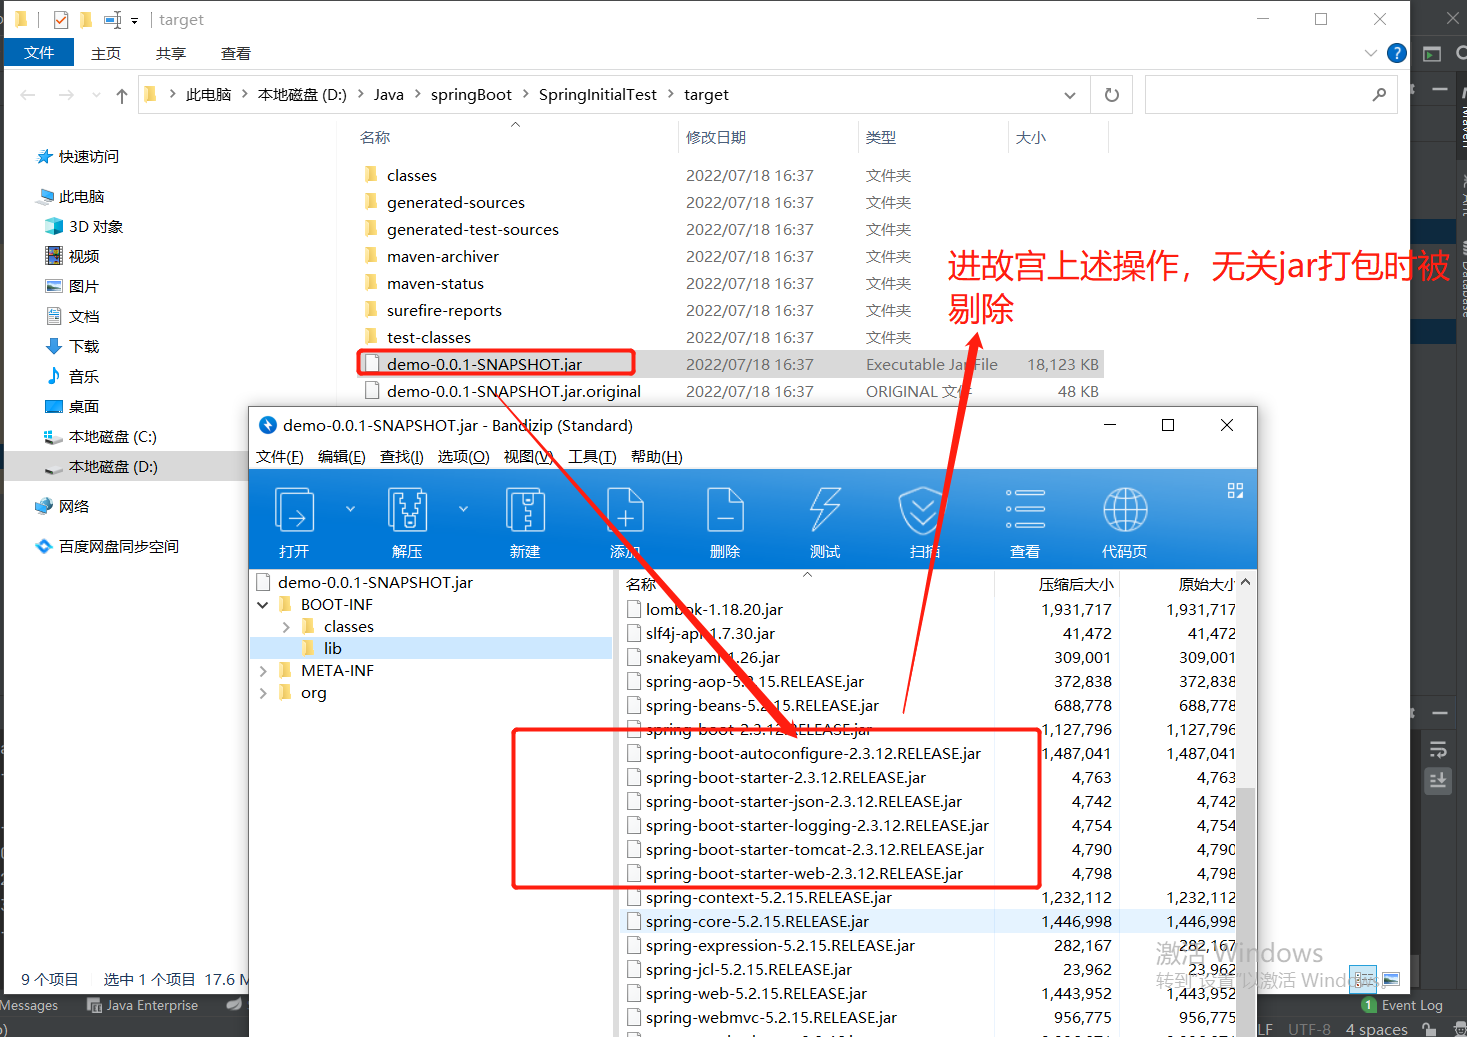
结果参考:
第6章 (springboot核心)web开发
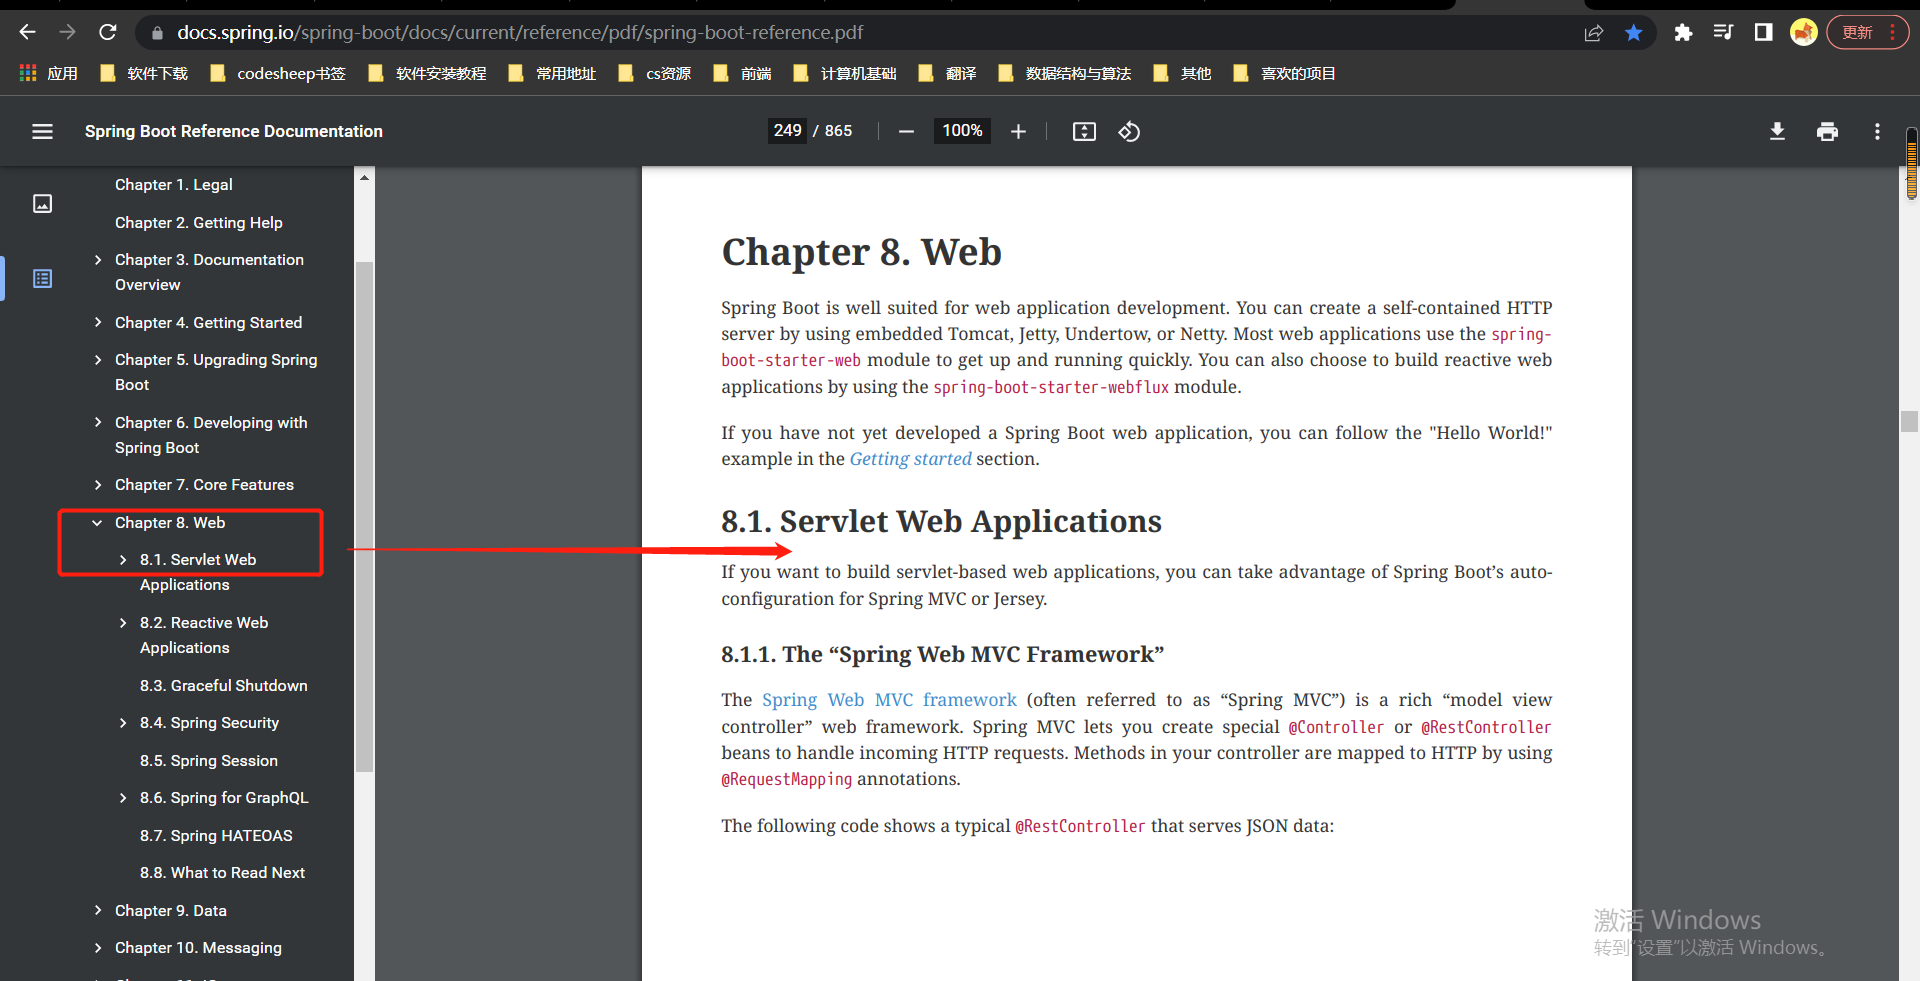
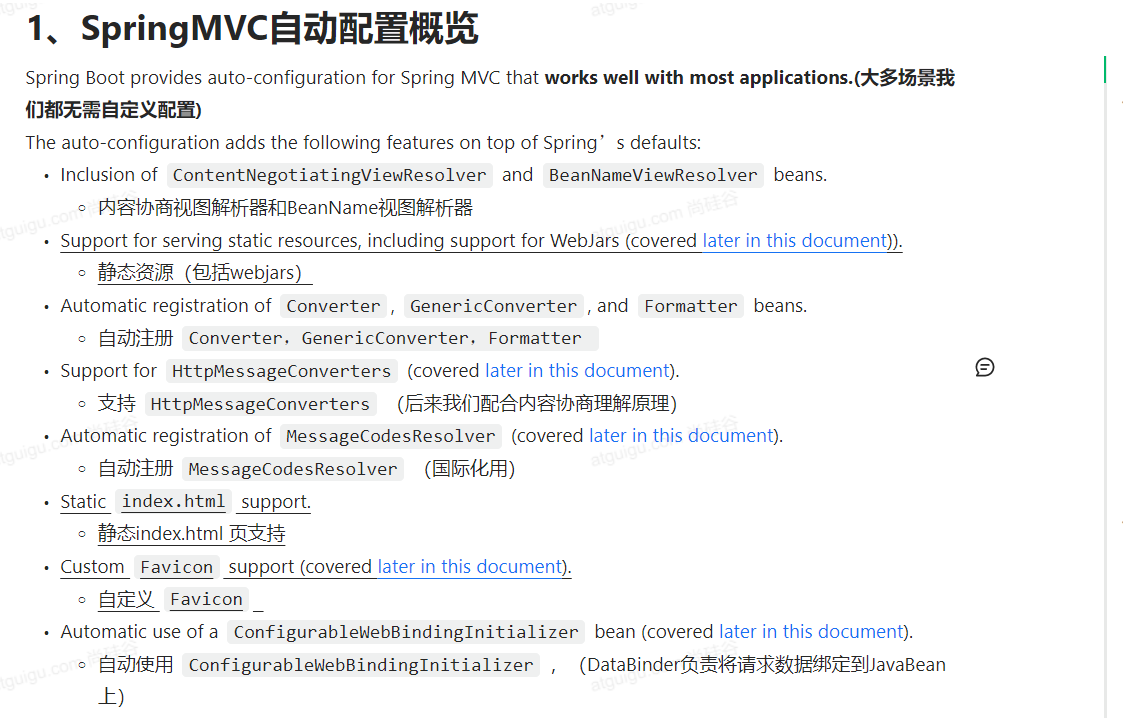
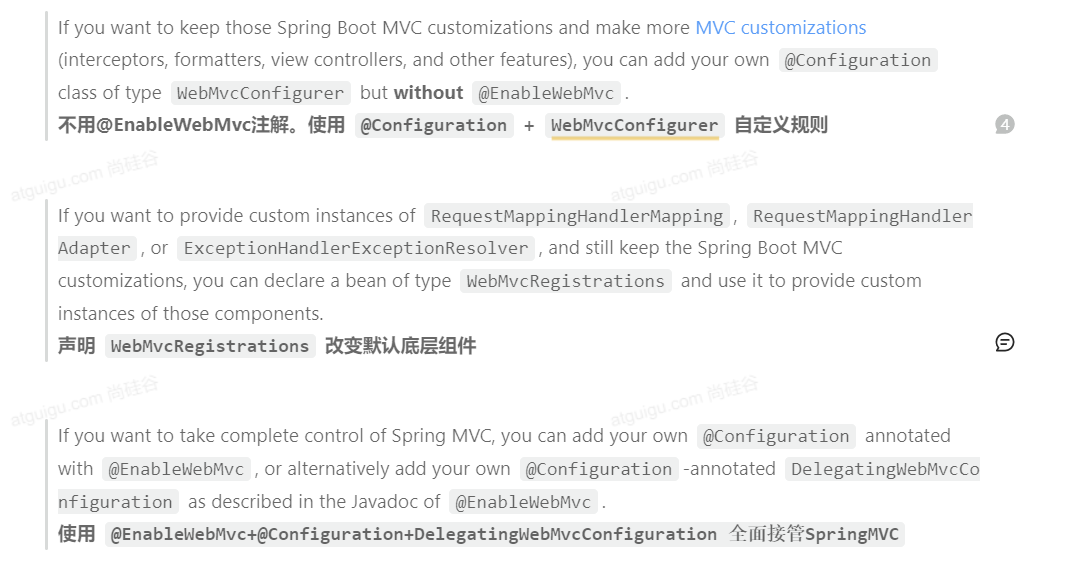
6-1 简单功能分析
1、静态资源目录
1-1 直接访问静态资源
只要静态资源放在类路径下: called /static (or /public or /resources or /META-INF/resources
访问 : 当前项目根路径/ + 静态资源名
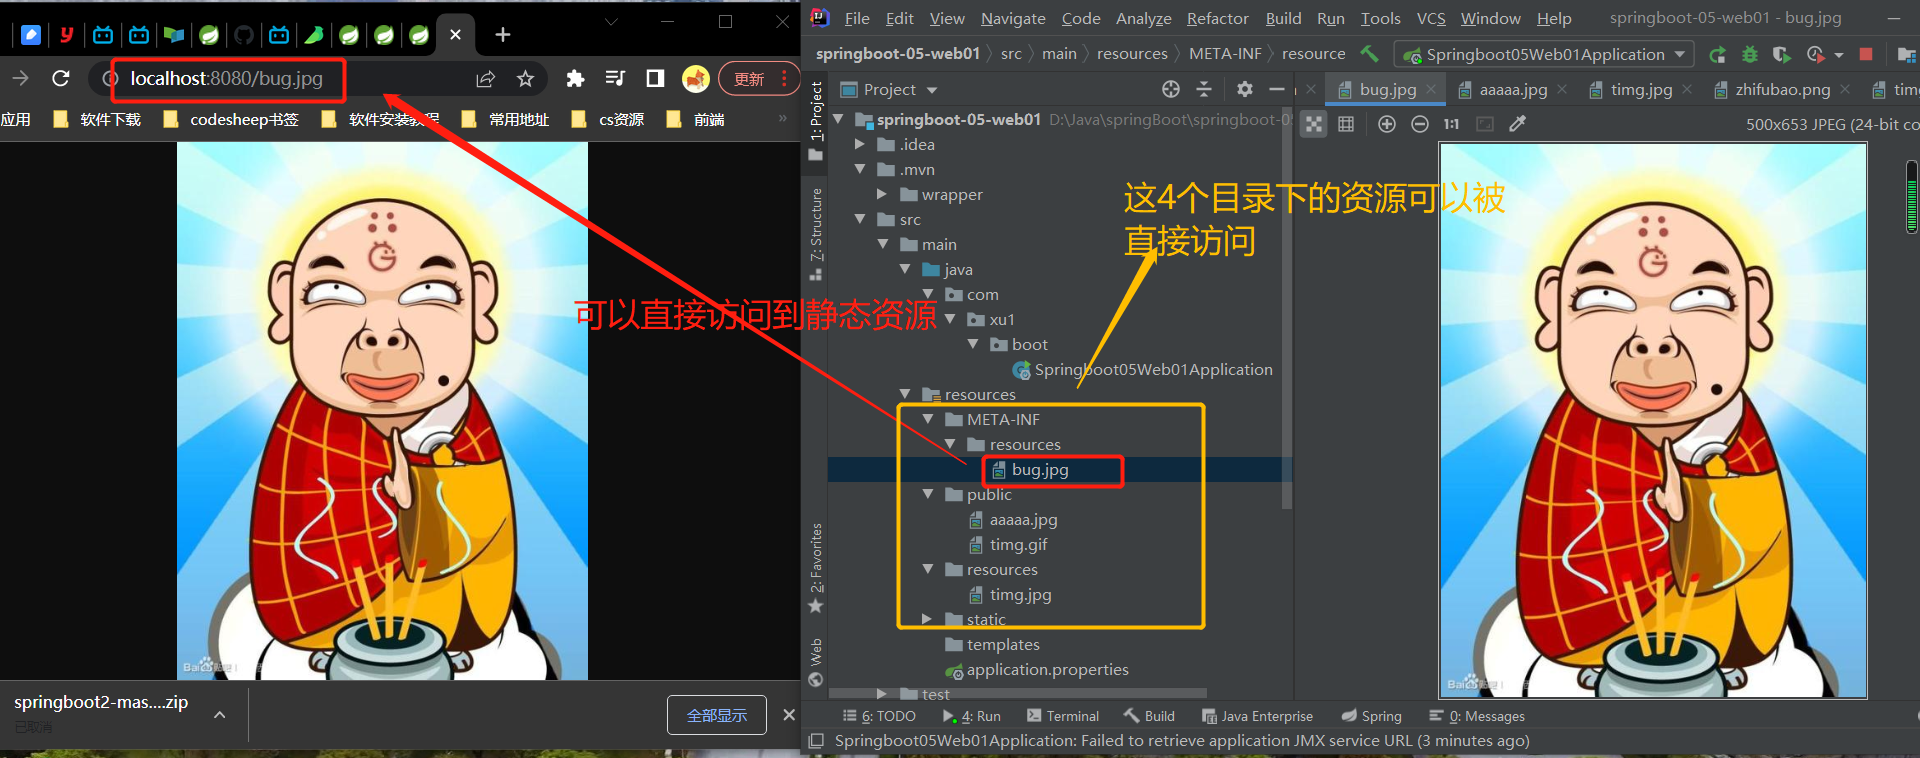
更正:图中是:这4个目录下的静态资源可以直接访问。
1-2 关于动态资源处理器(Controller)与静态资源处理器处理请求的优先原则
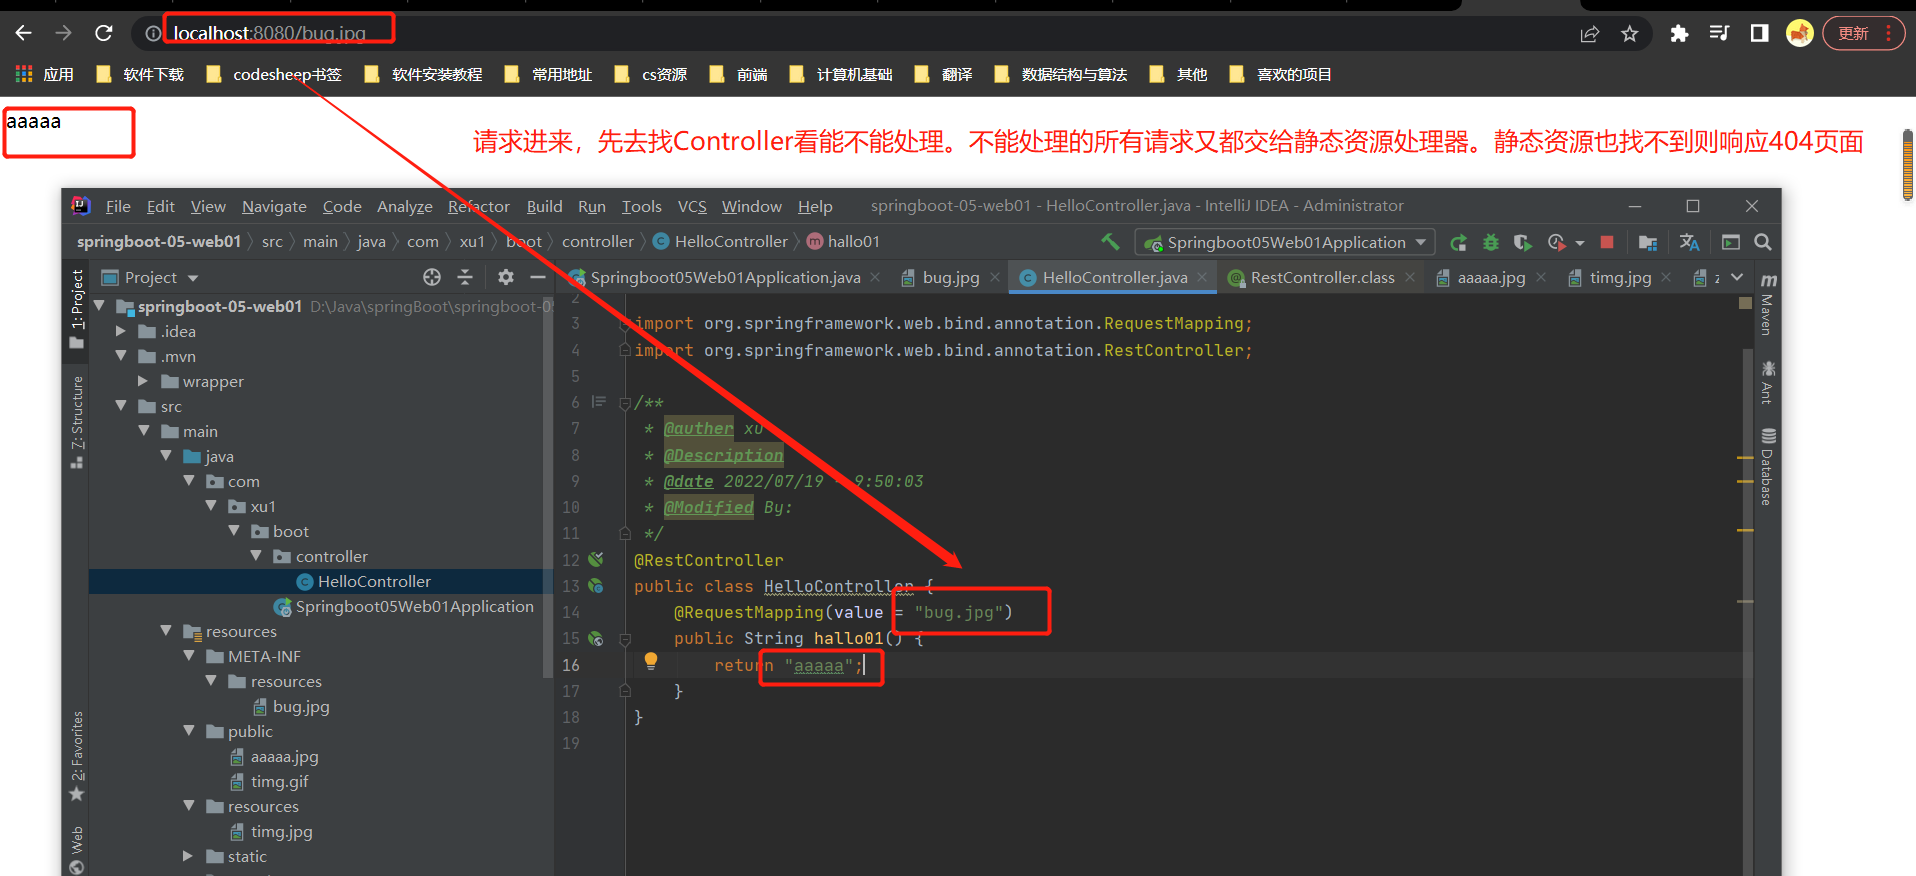
说明:虽然有bug.jpg图片,这是一个静态资源,但是Controller处理器能够处理,所以返回的是字符串aaaa.
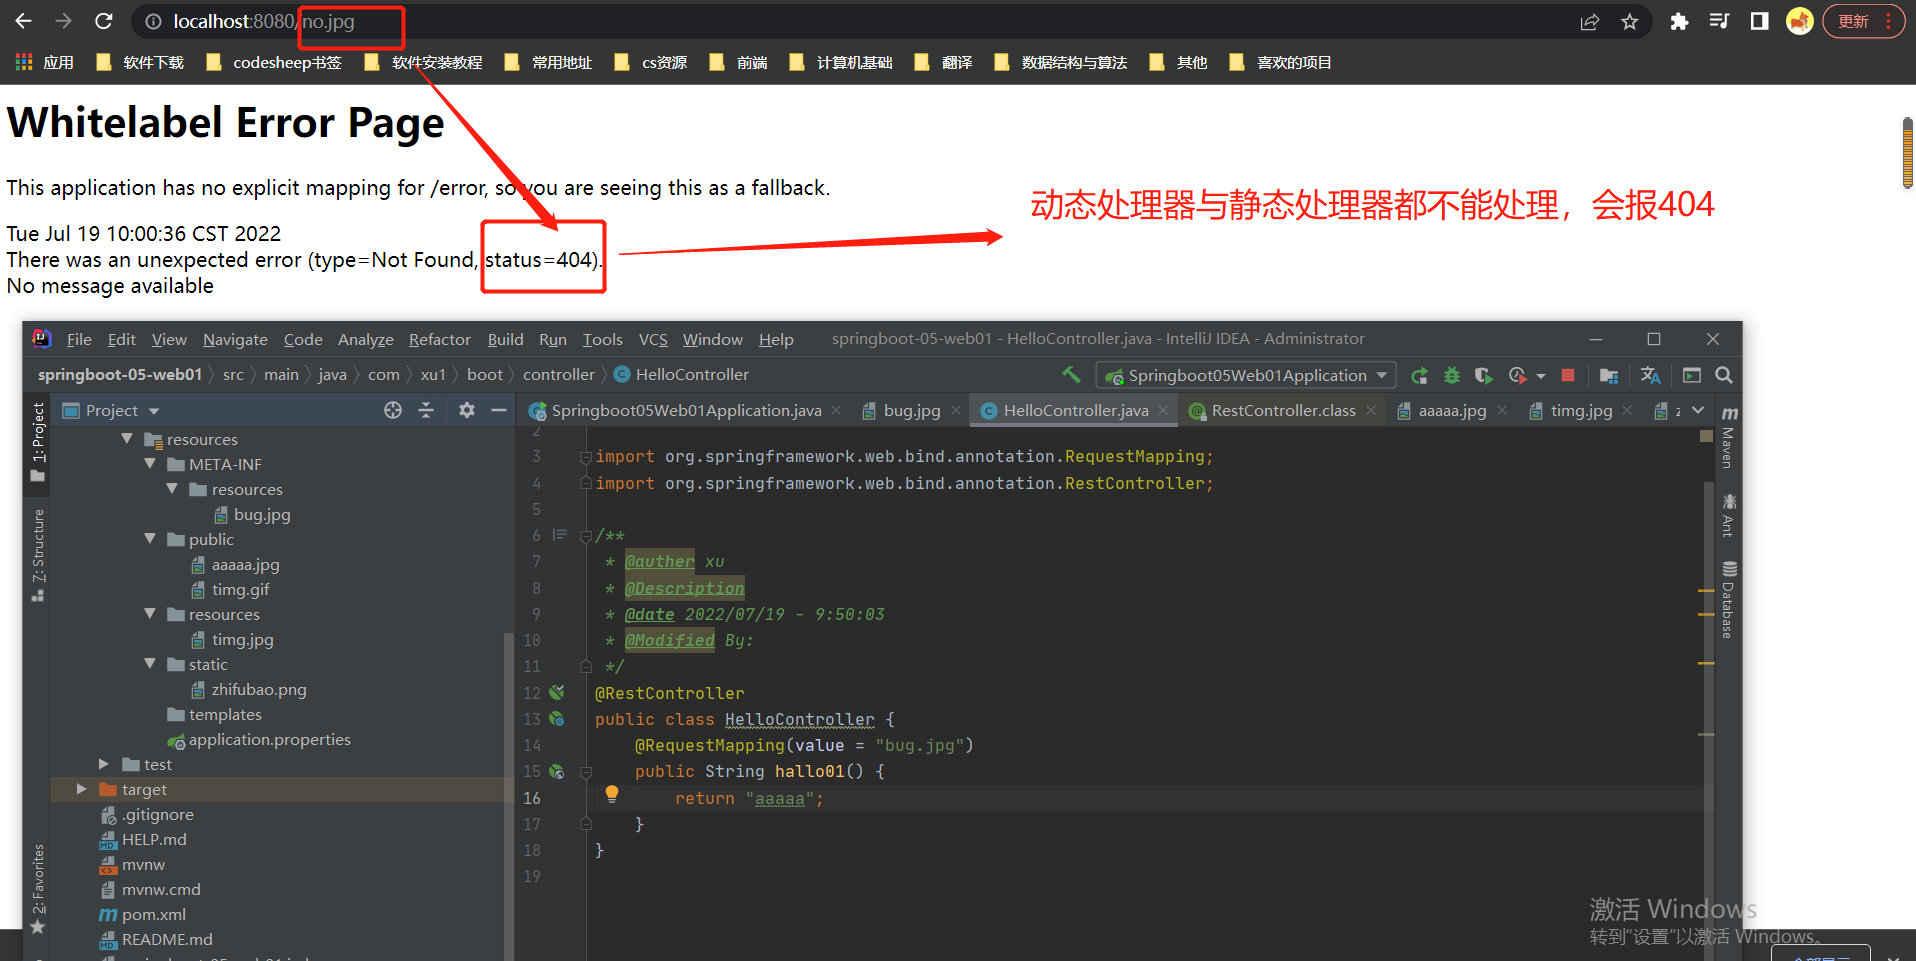
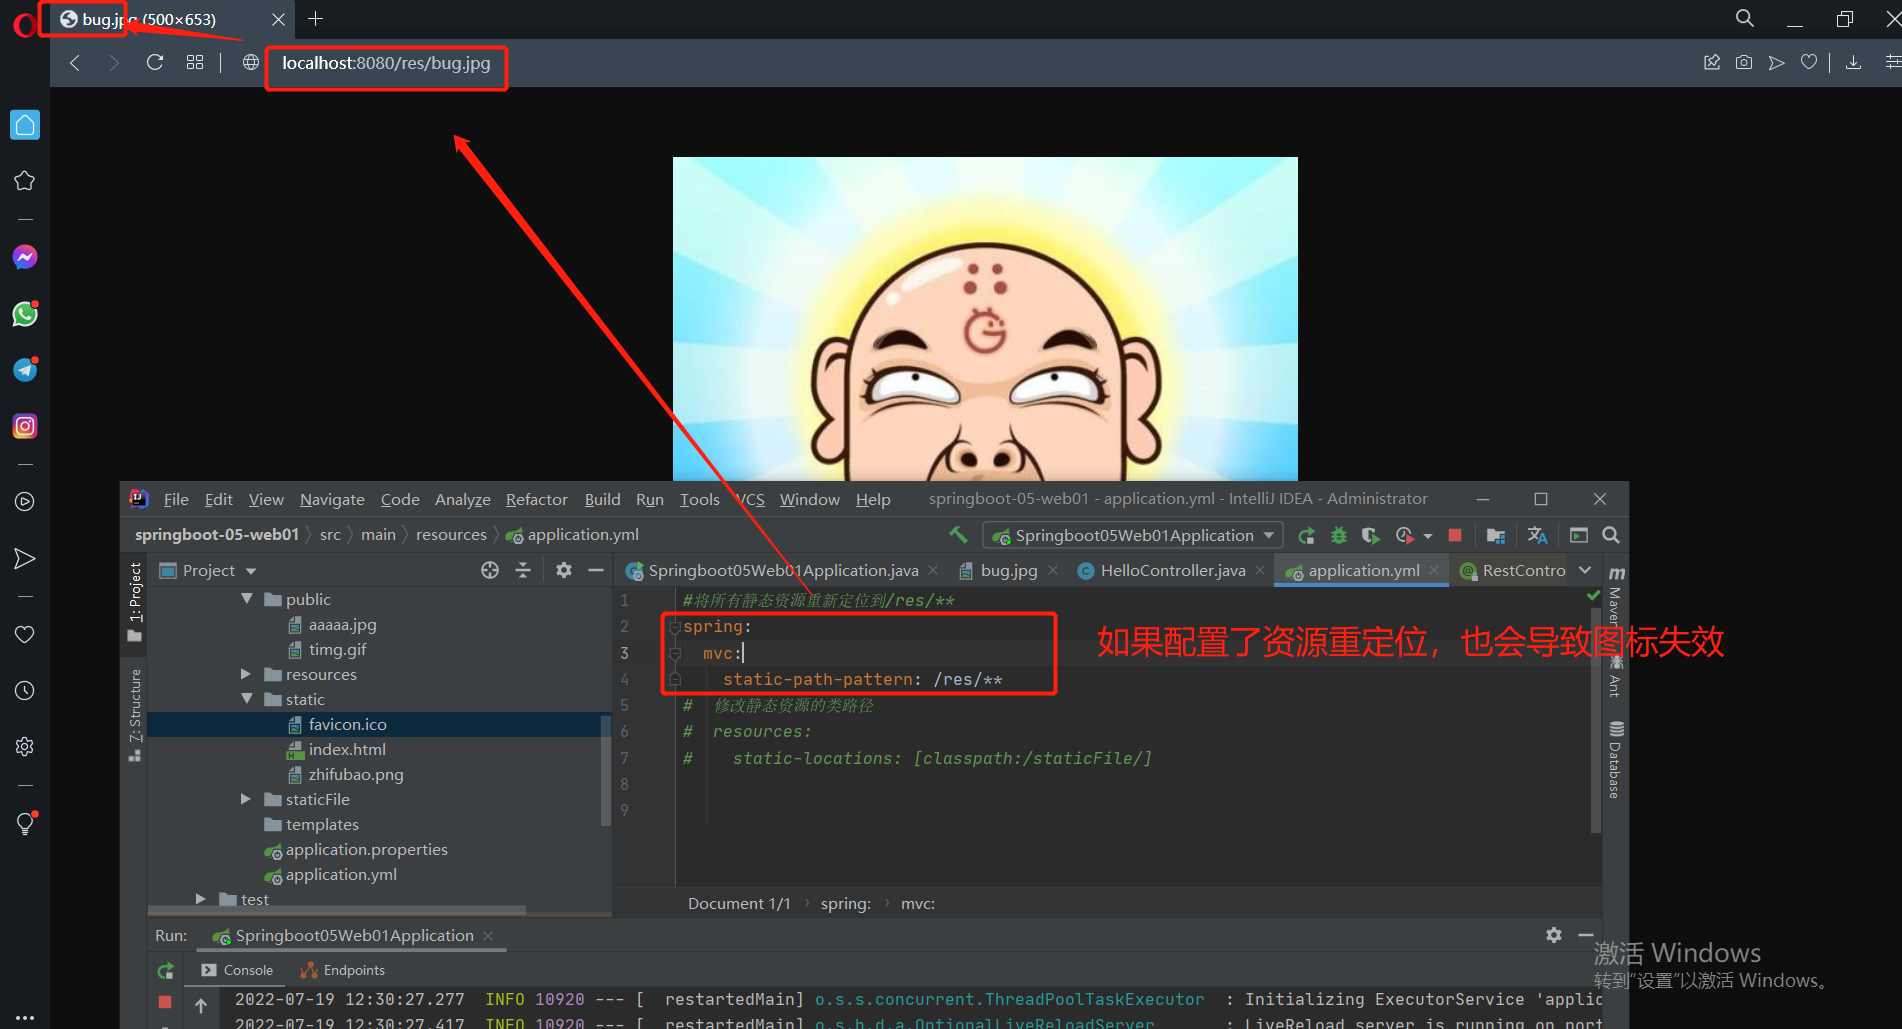
1-3 将静态资源访问路径重新定位
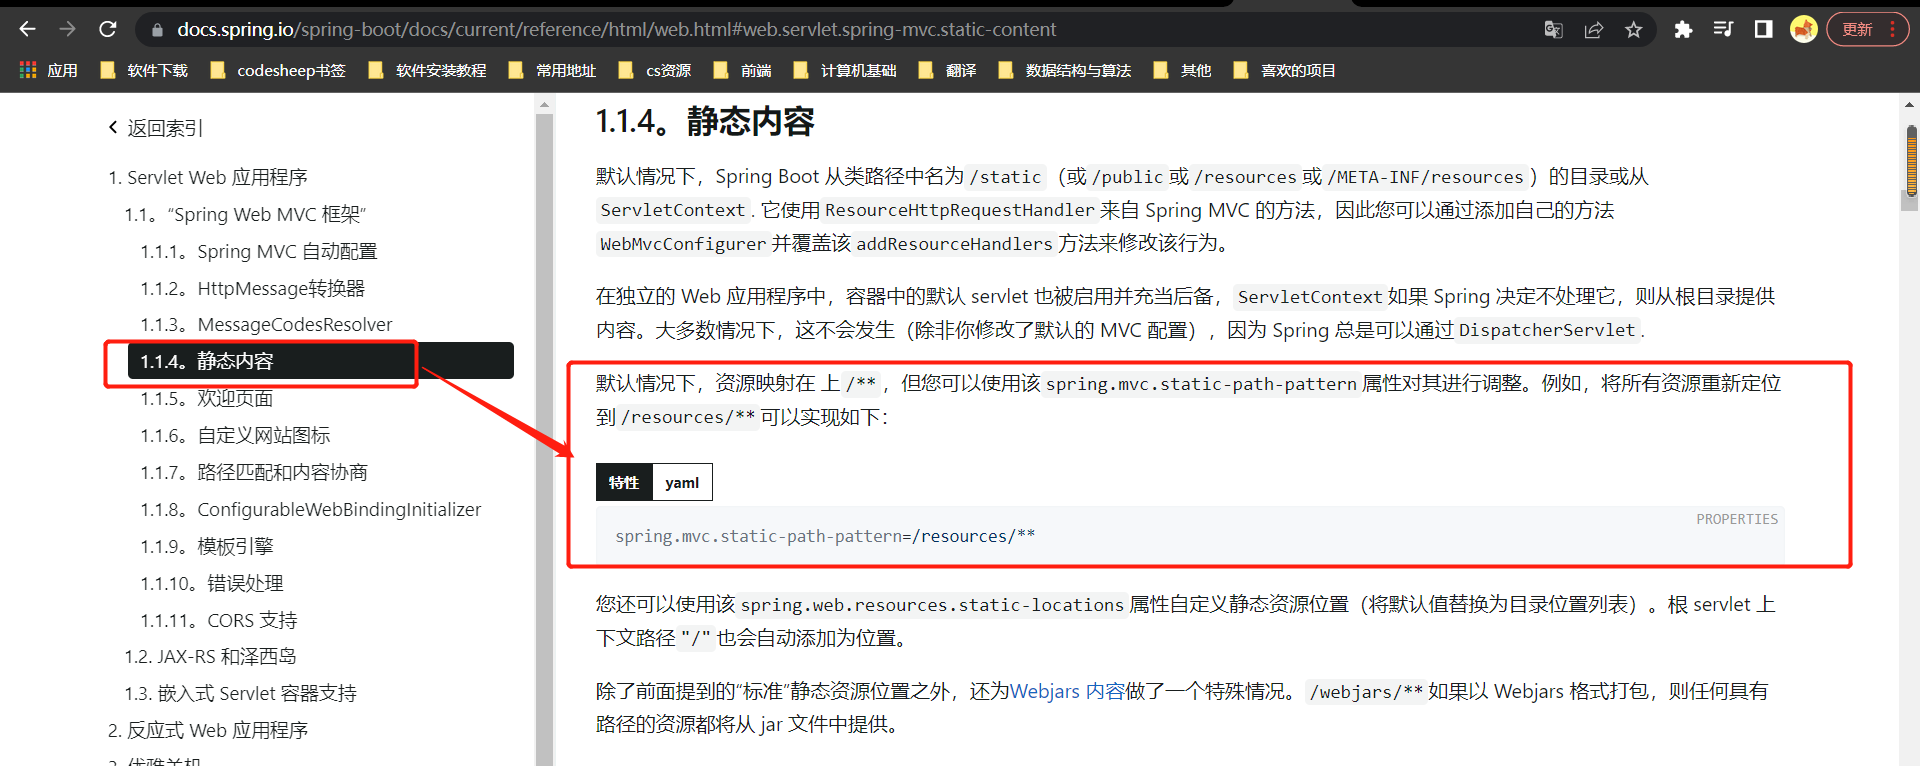
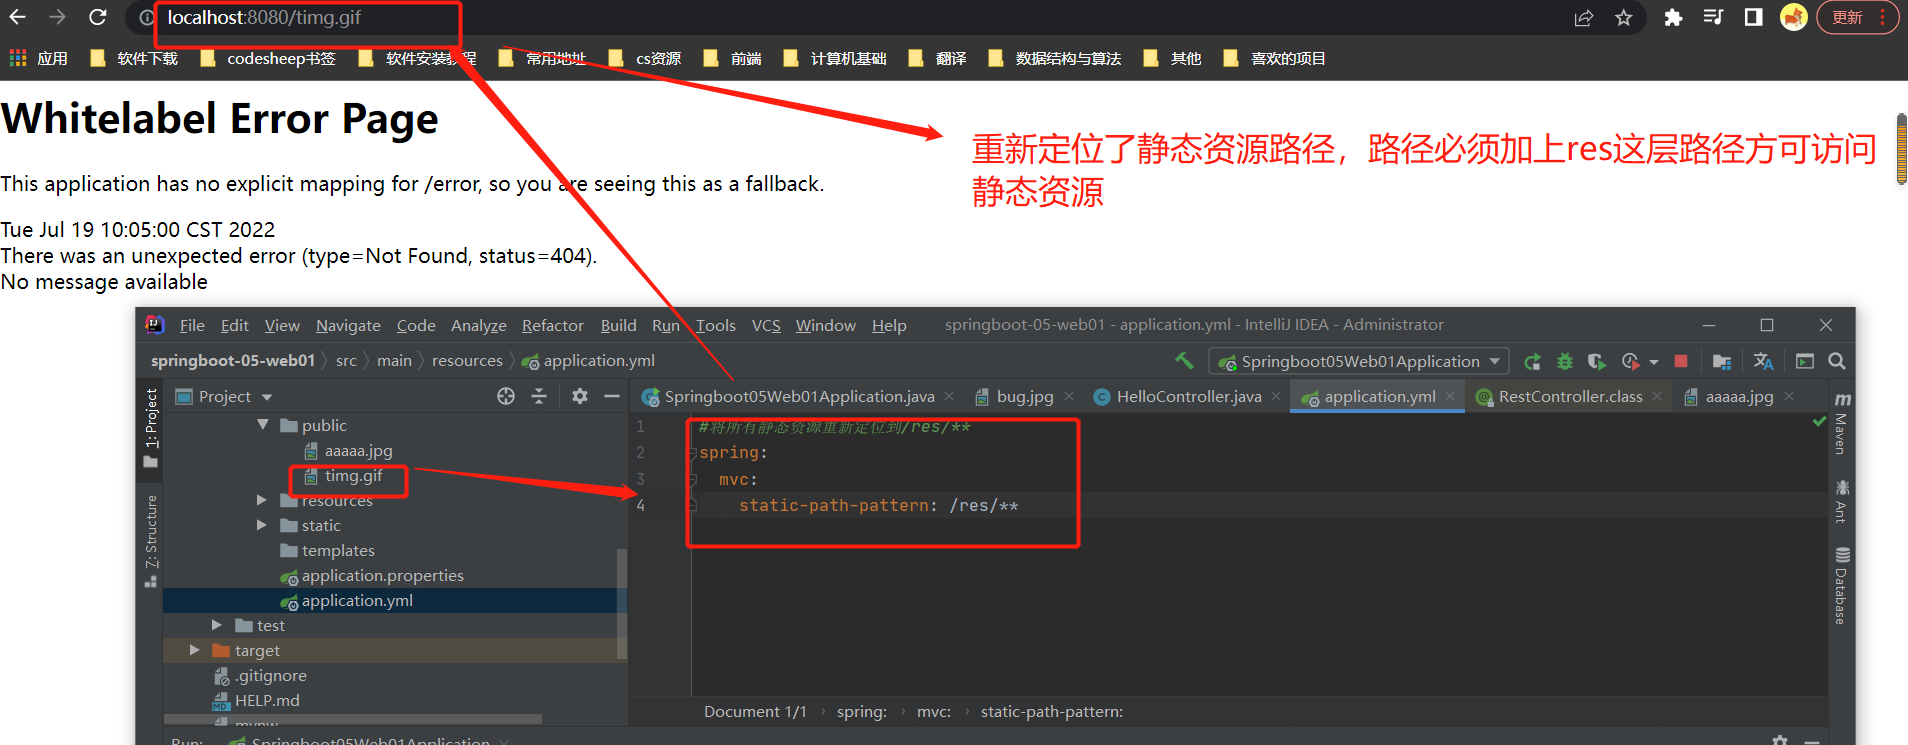
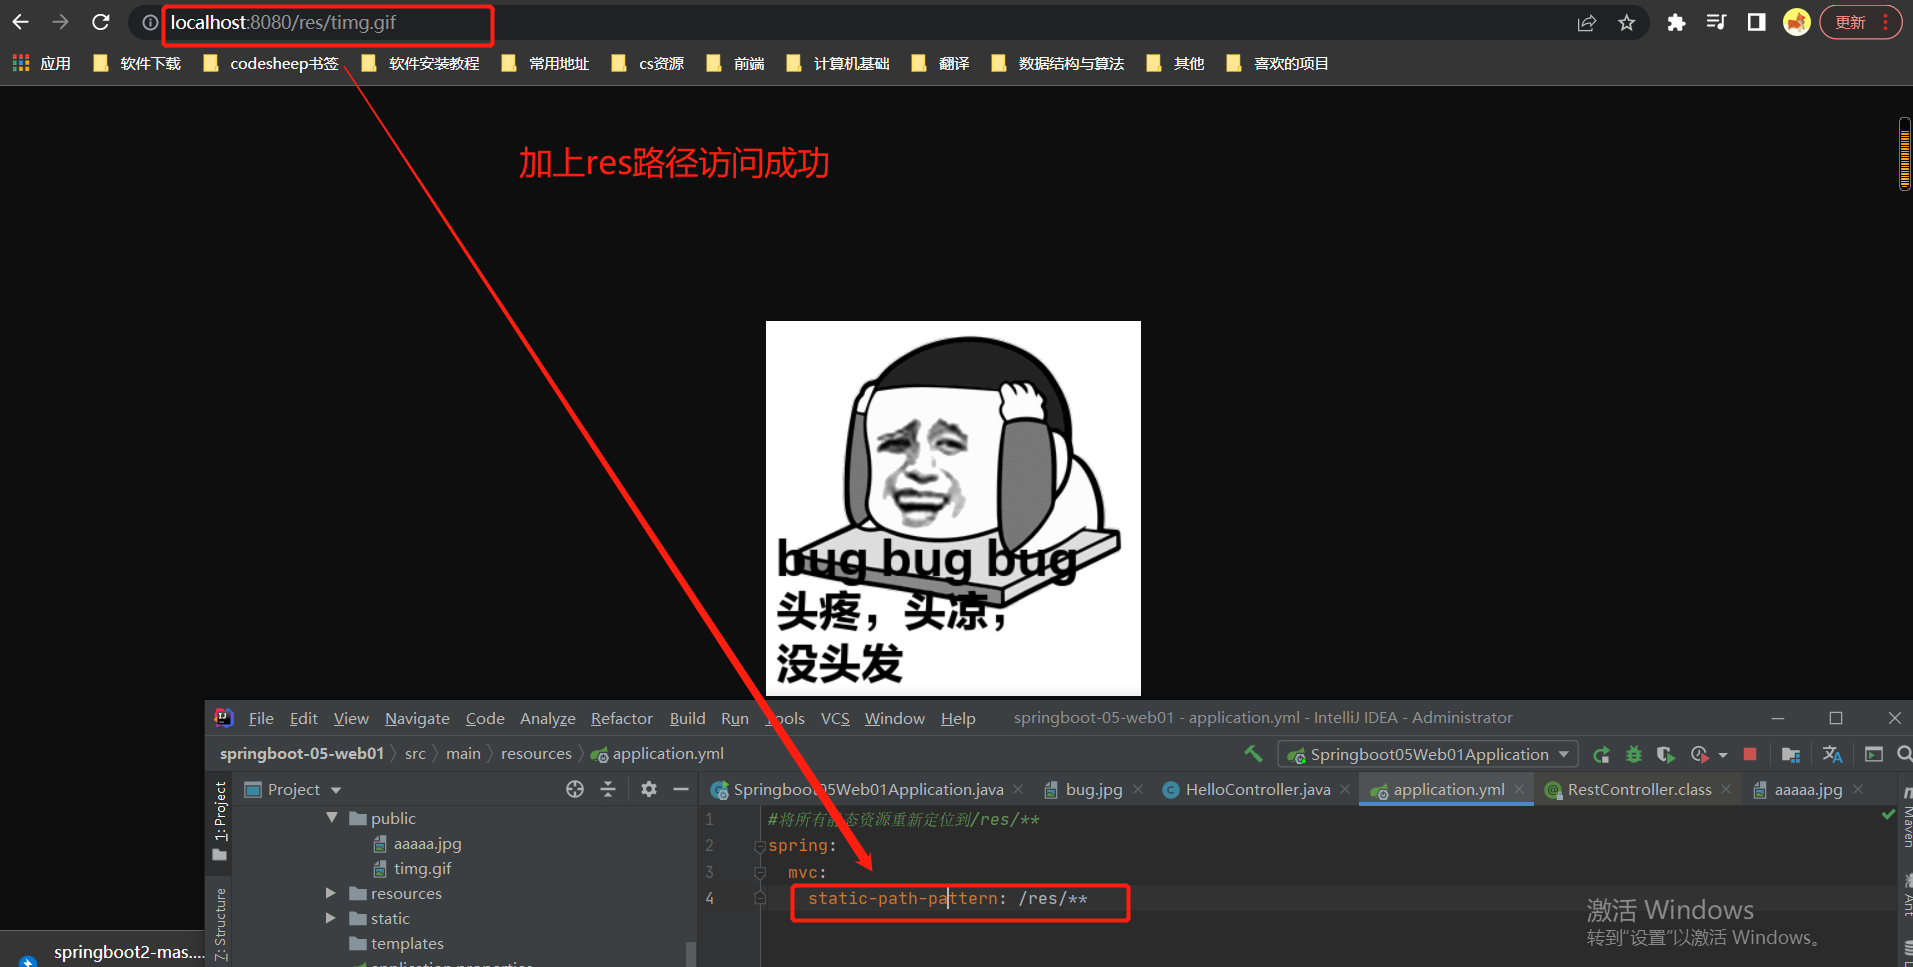
1-4 修改静态资源路径
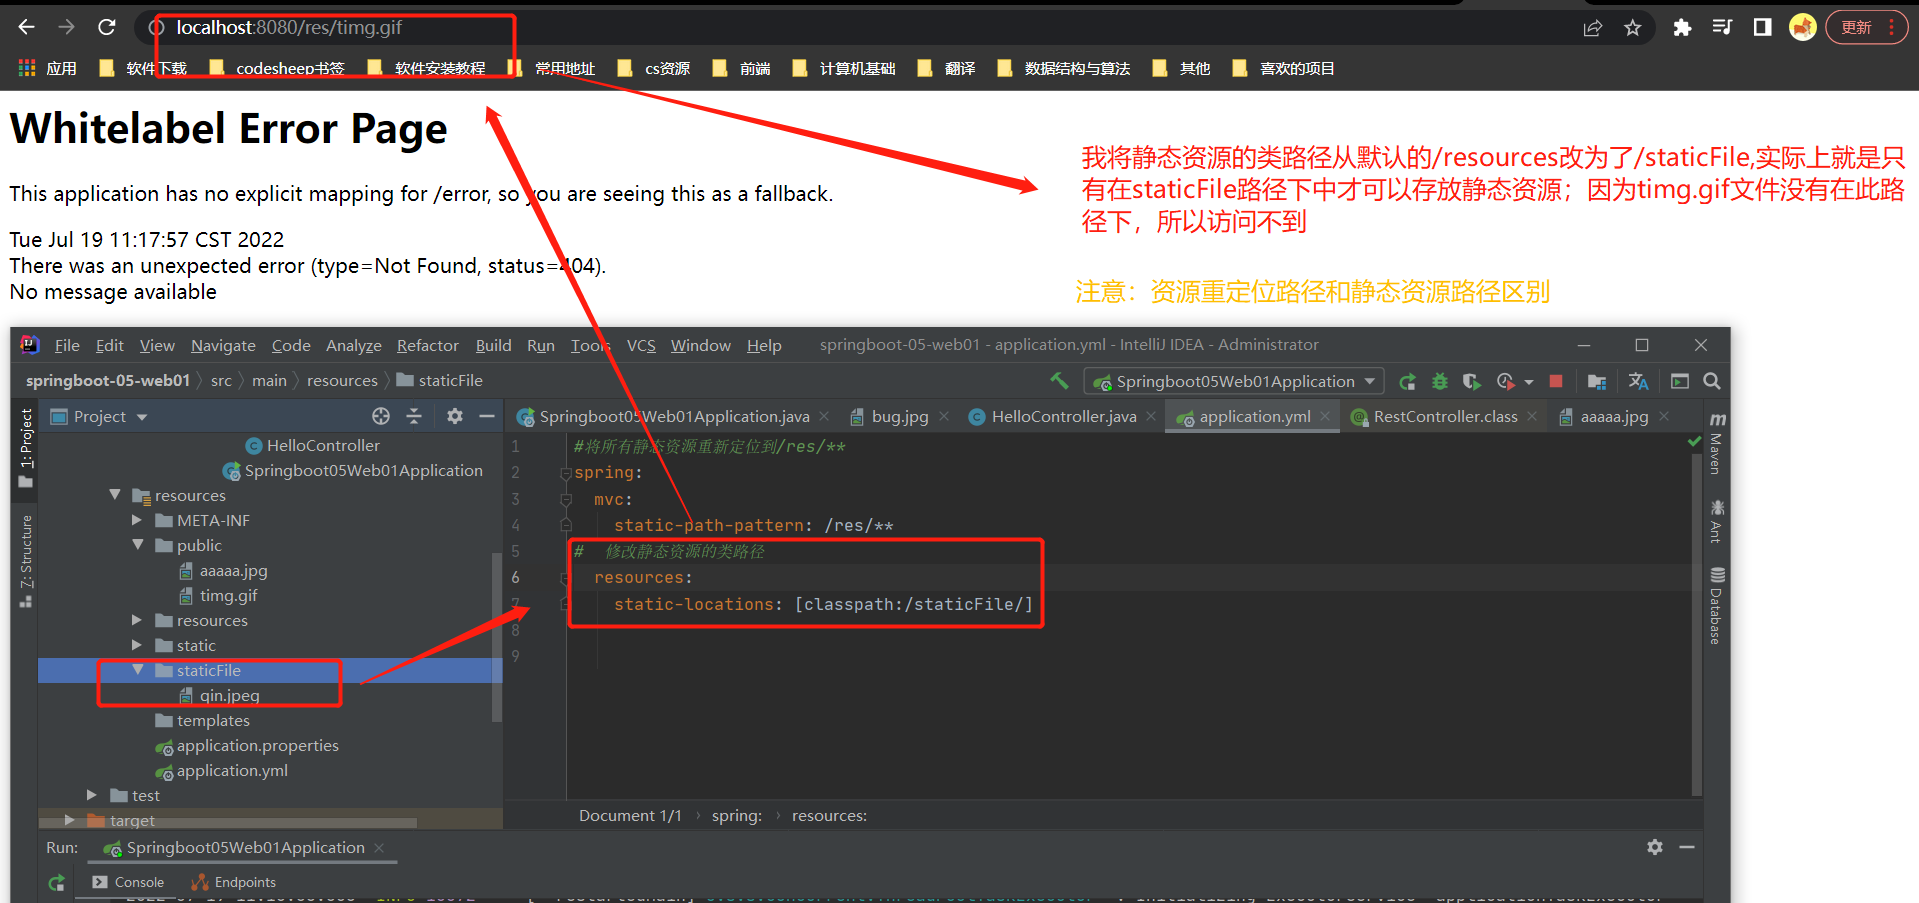
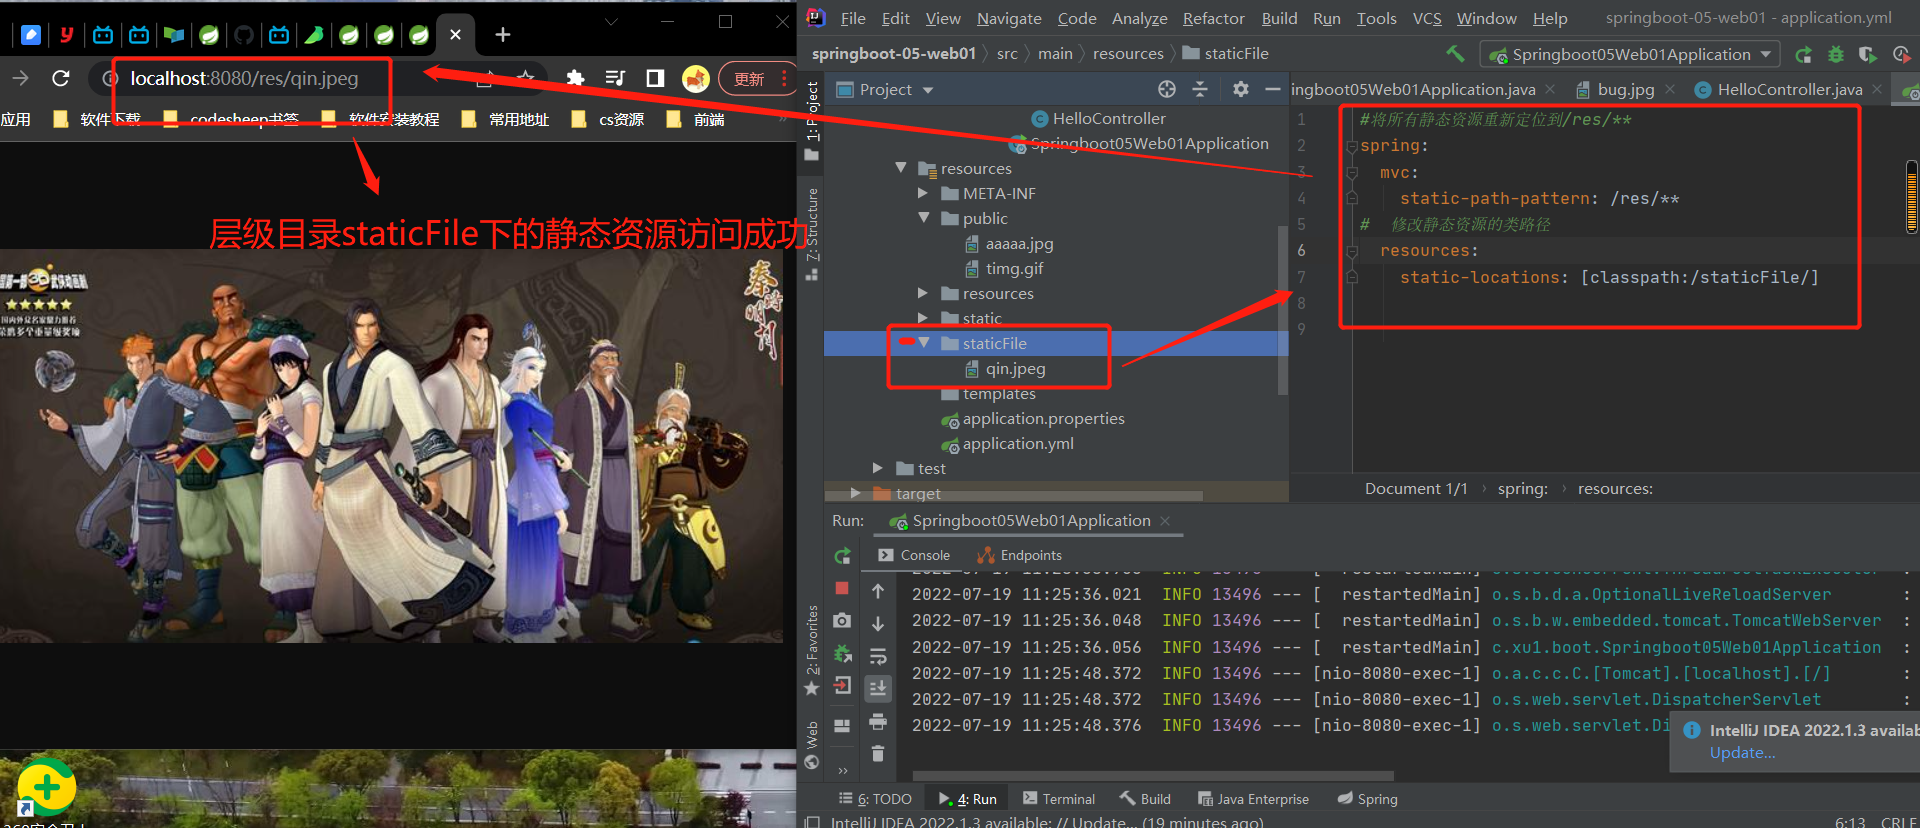
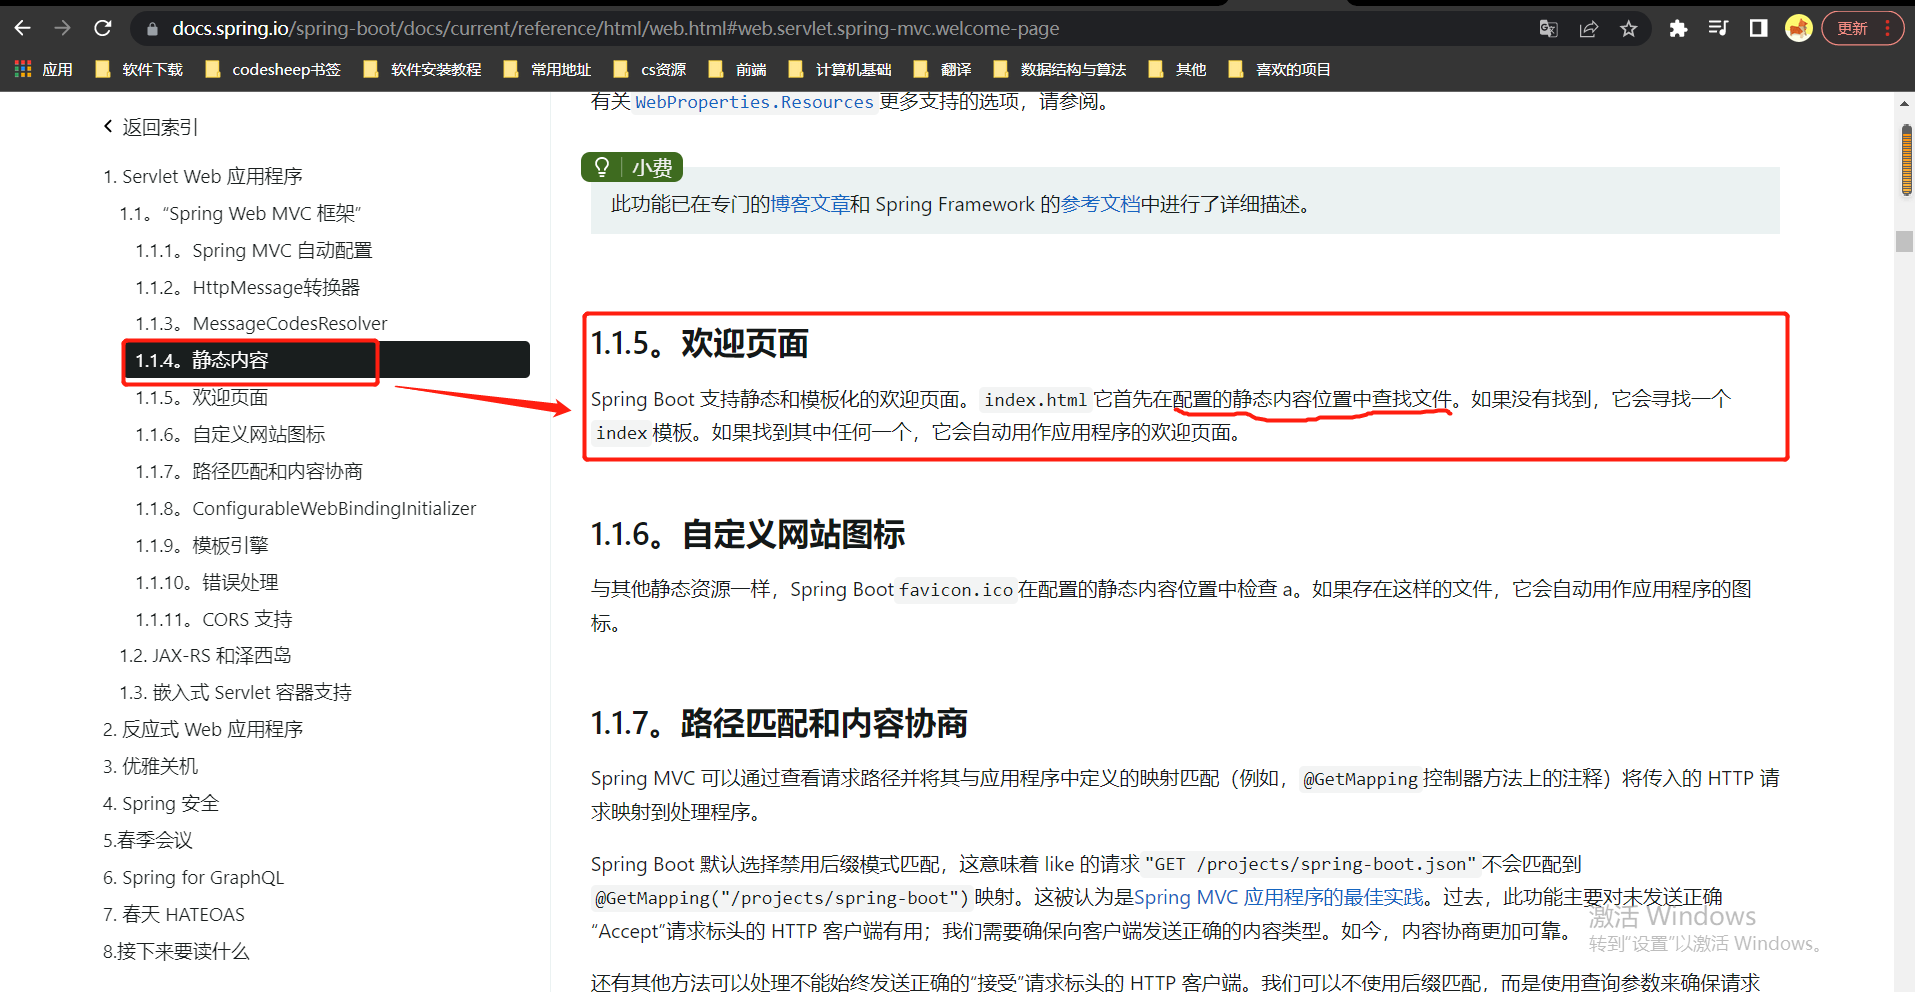
2.欢迎页面
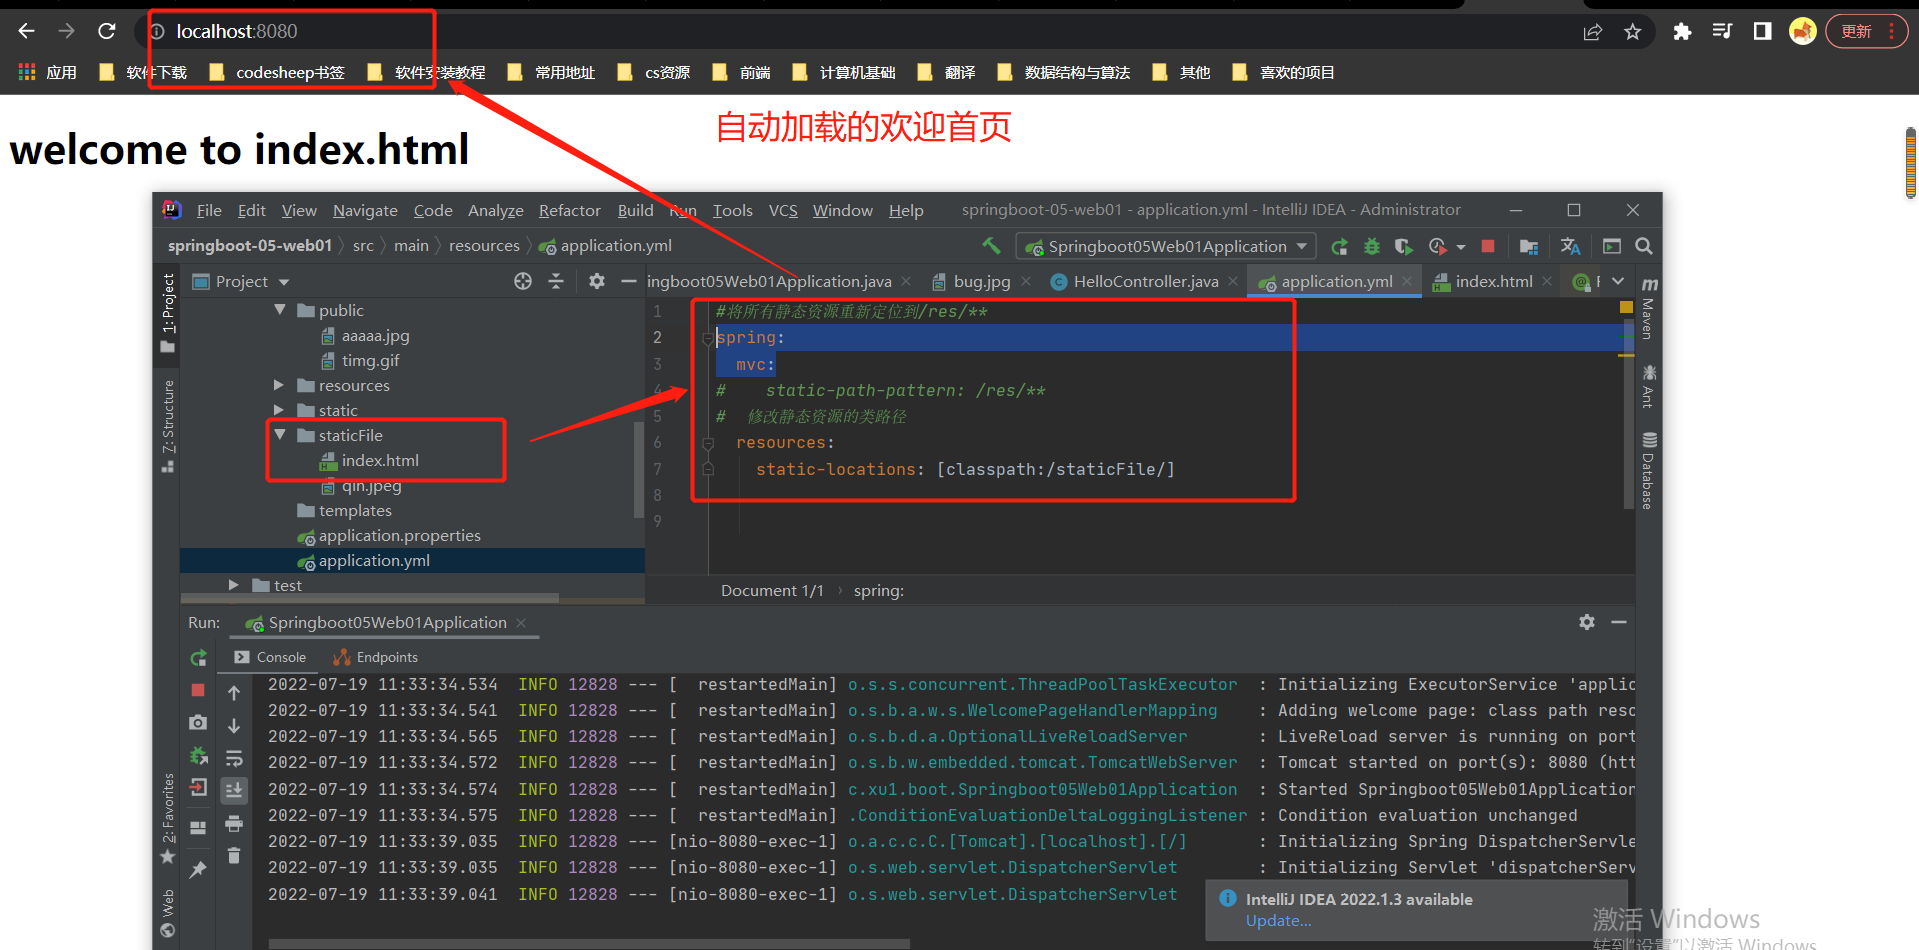
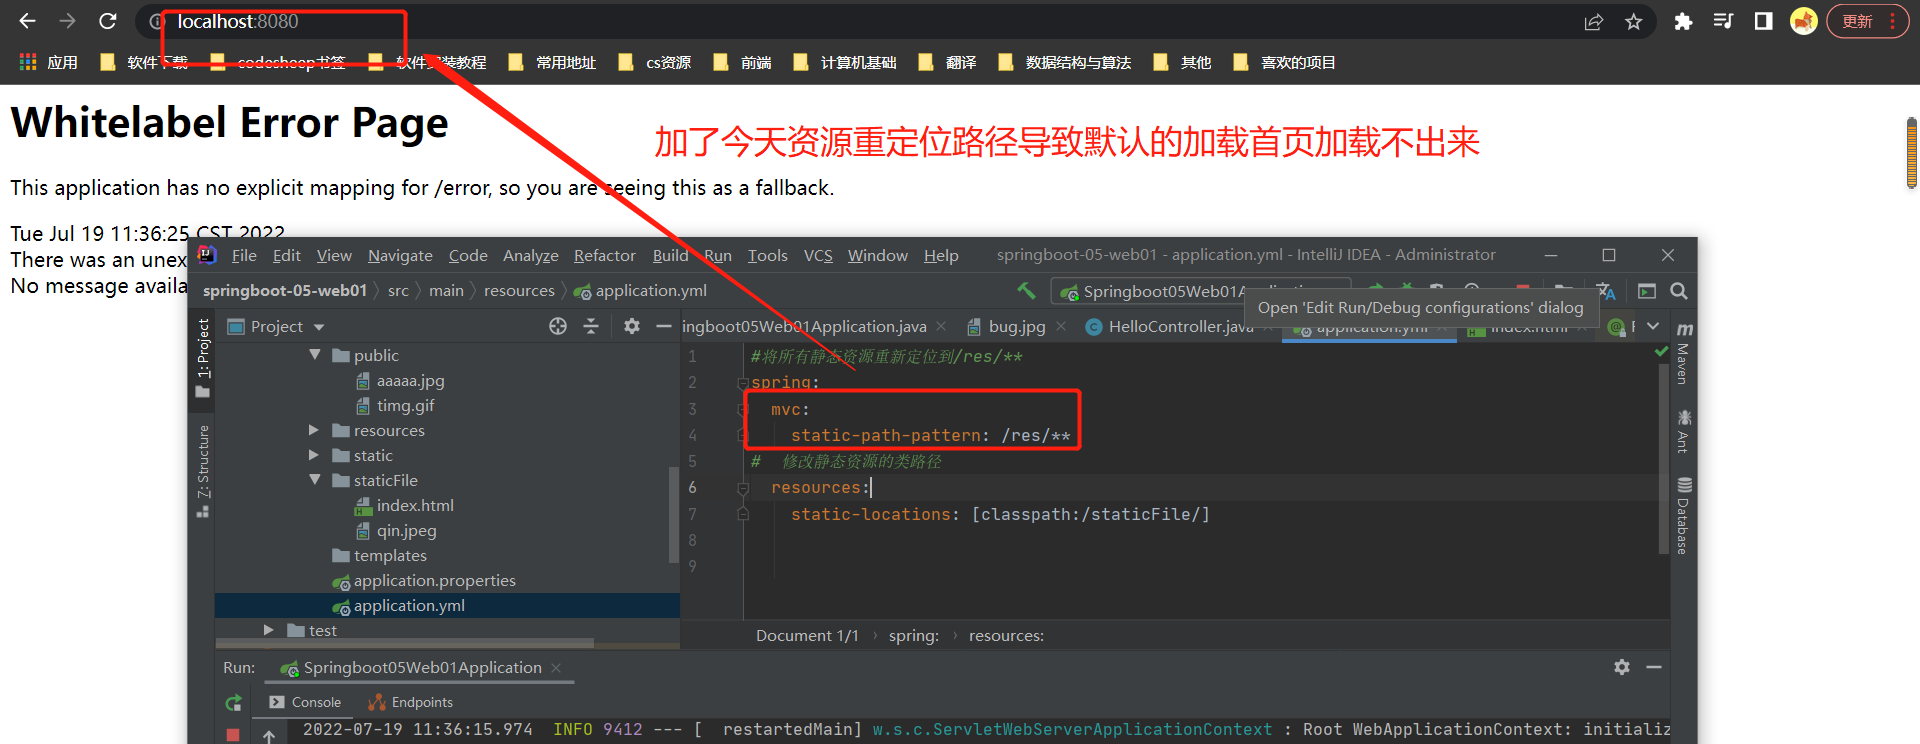
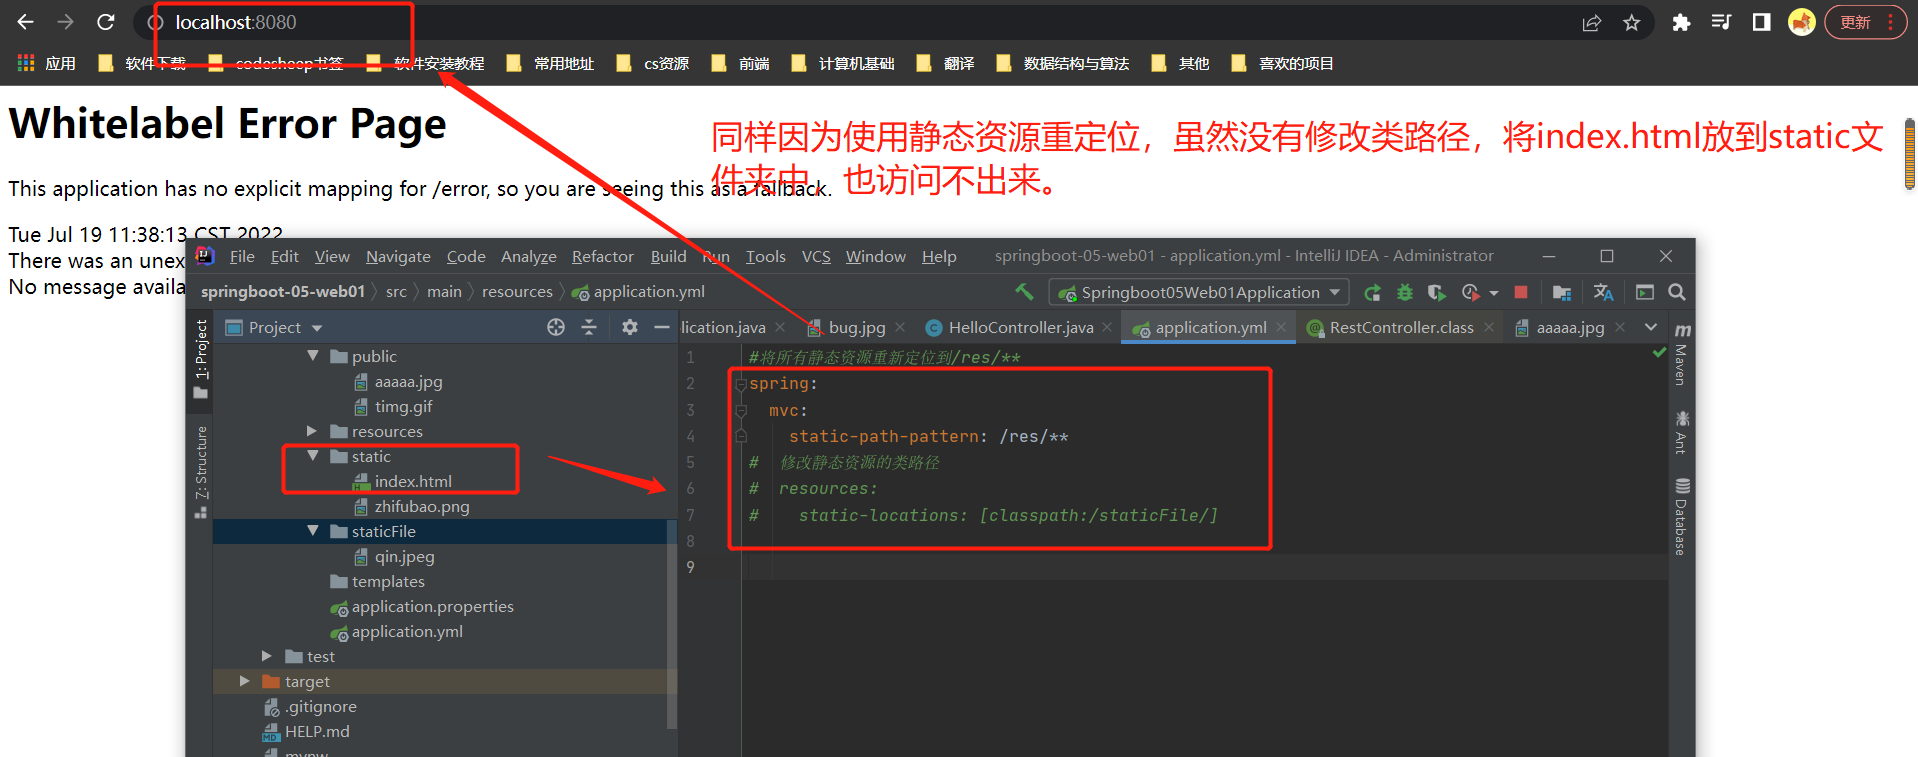
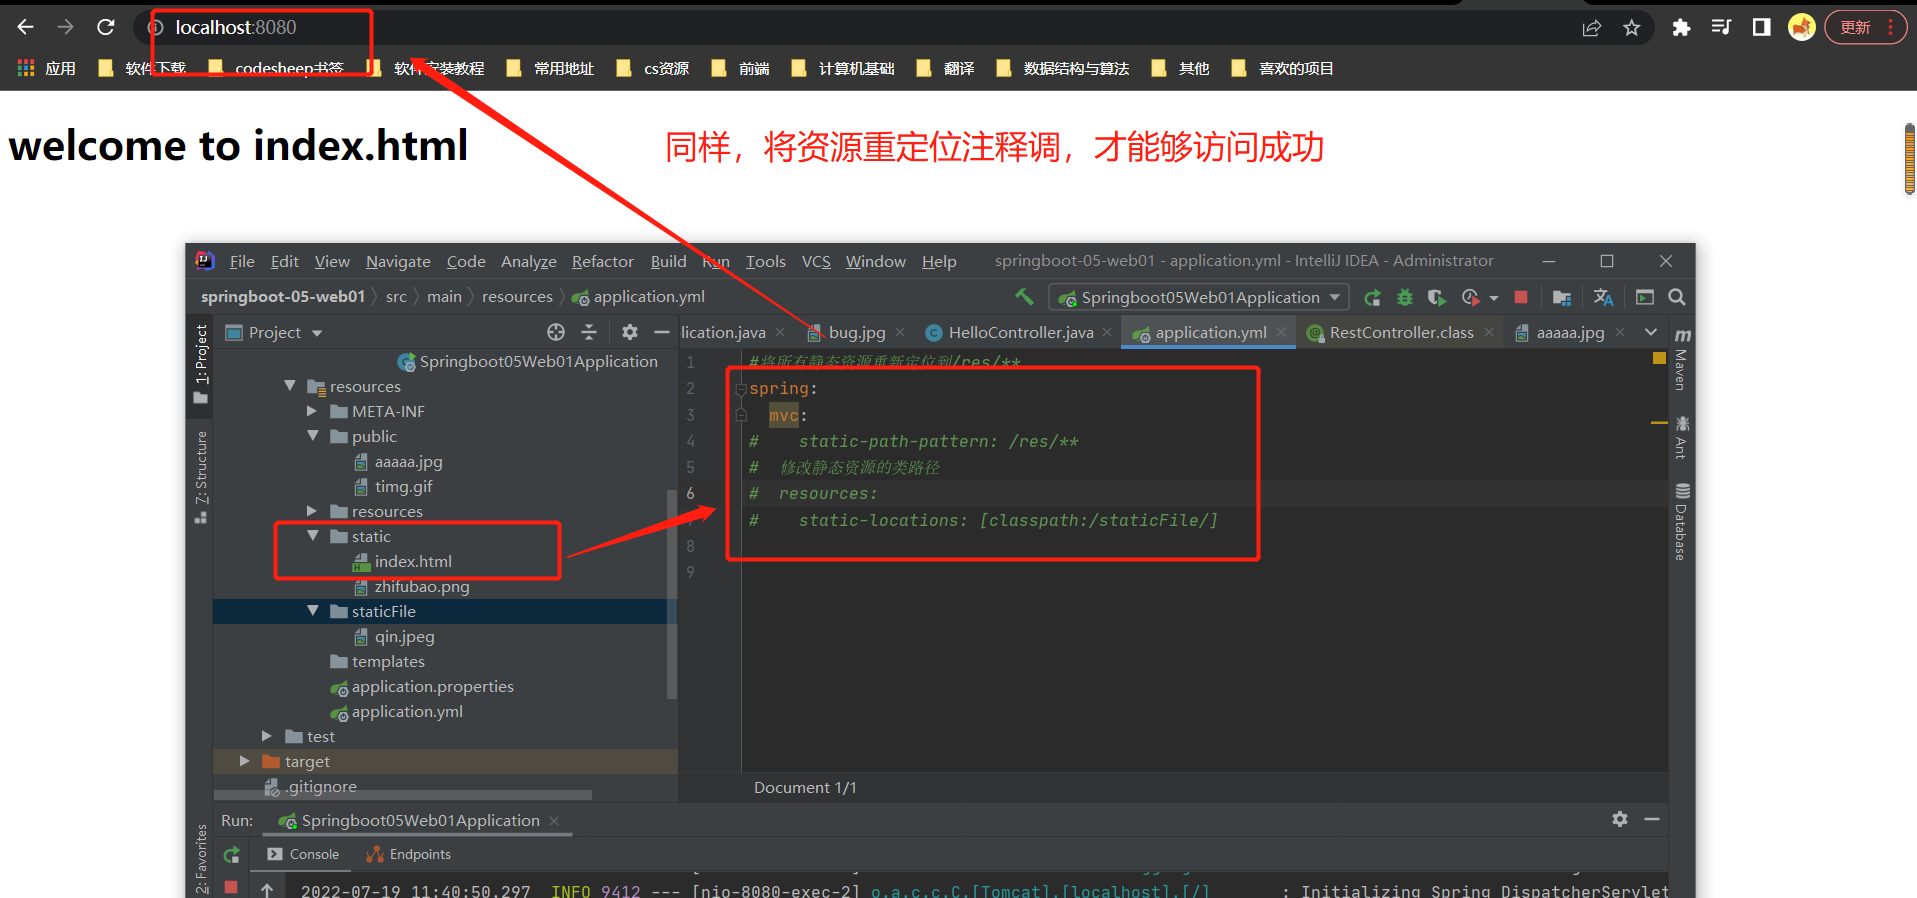
3.自定义网站图标
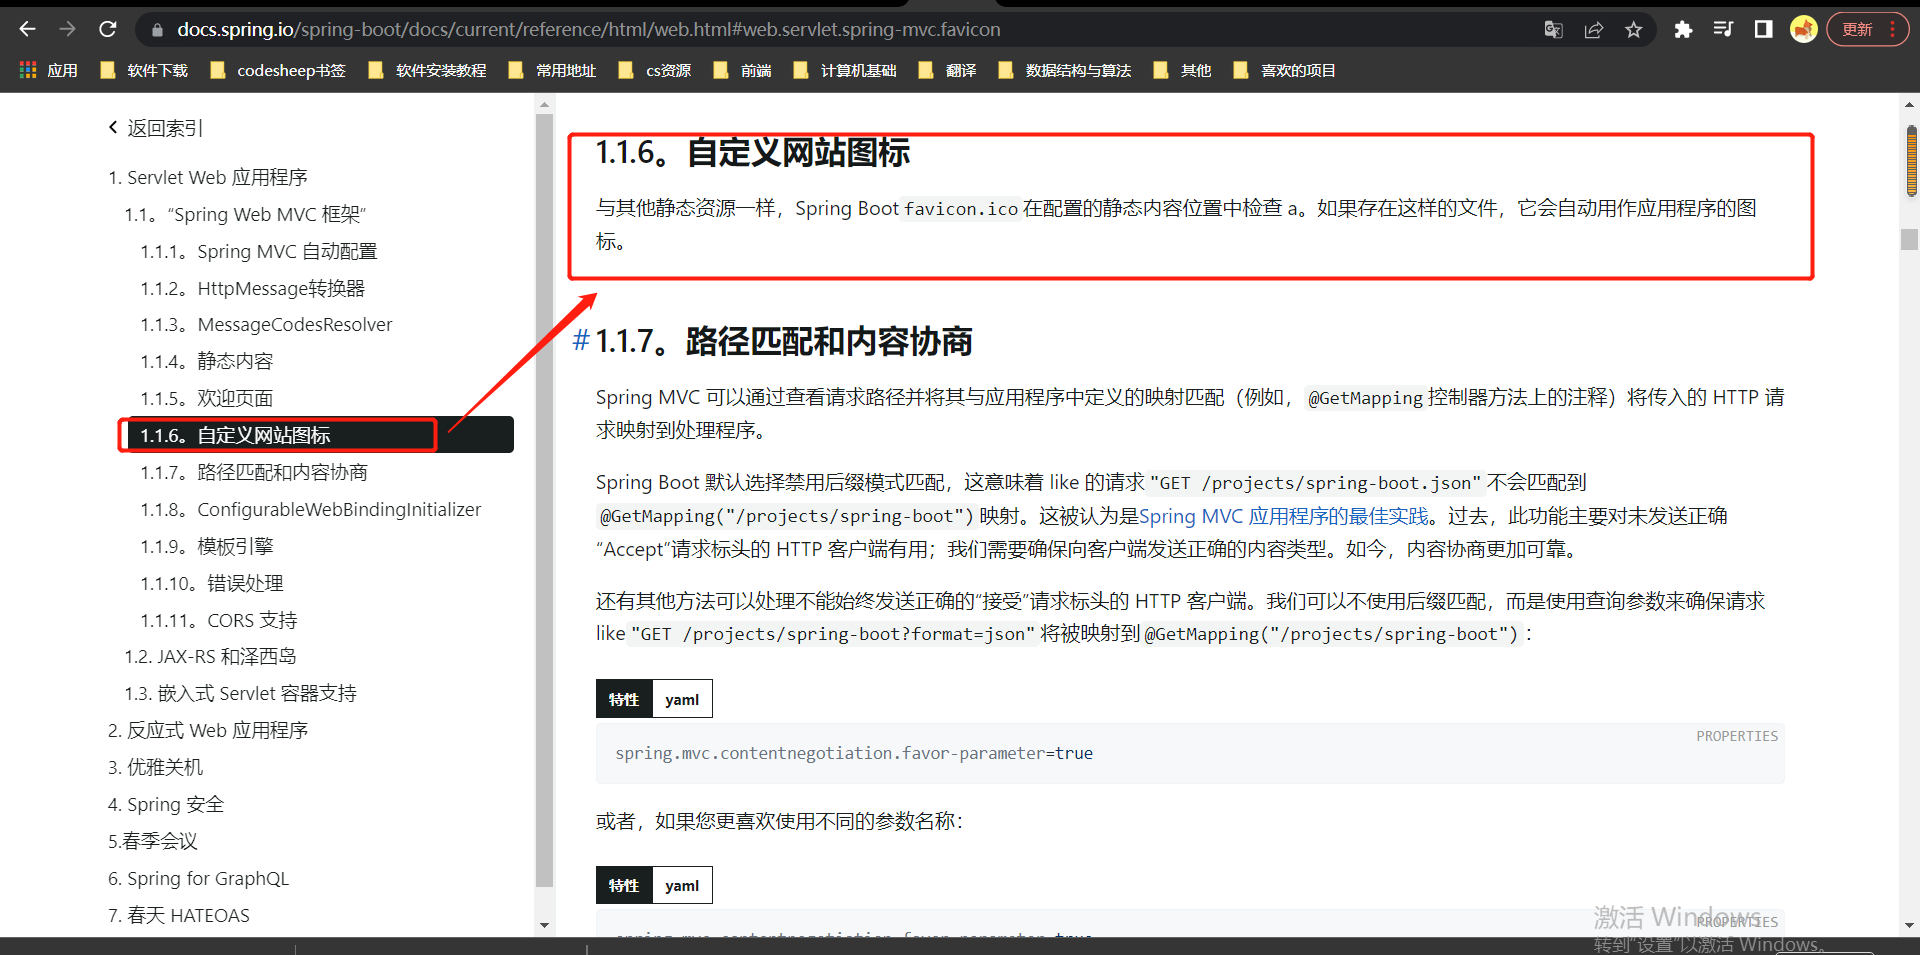
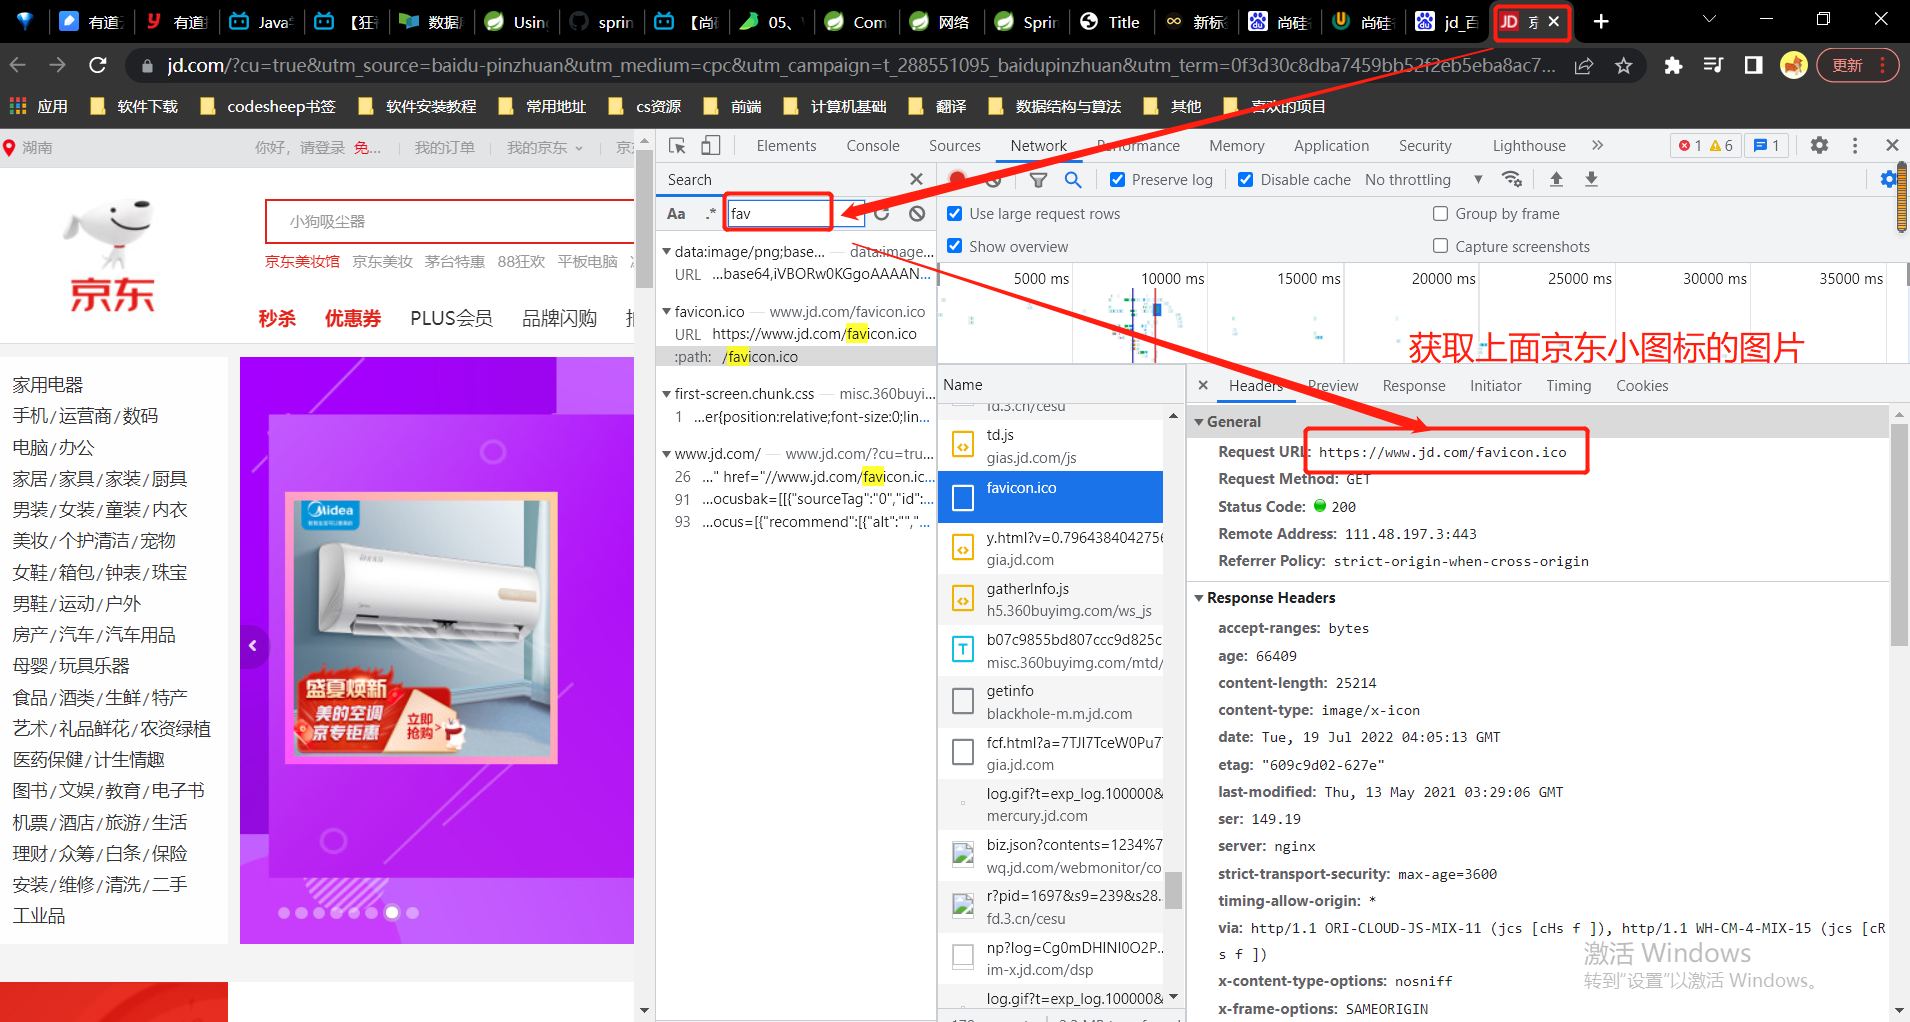
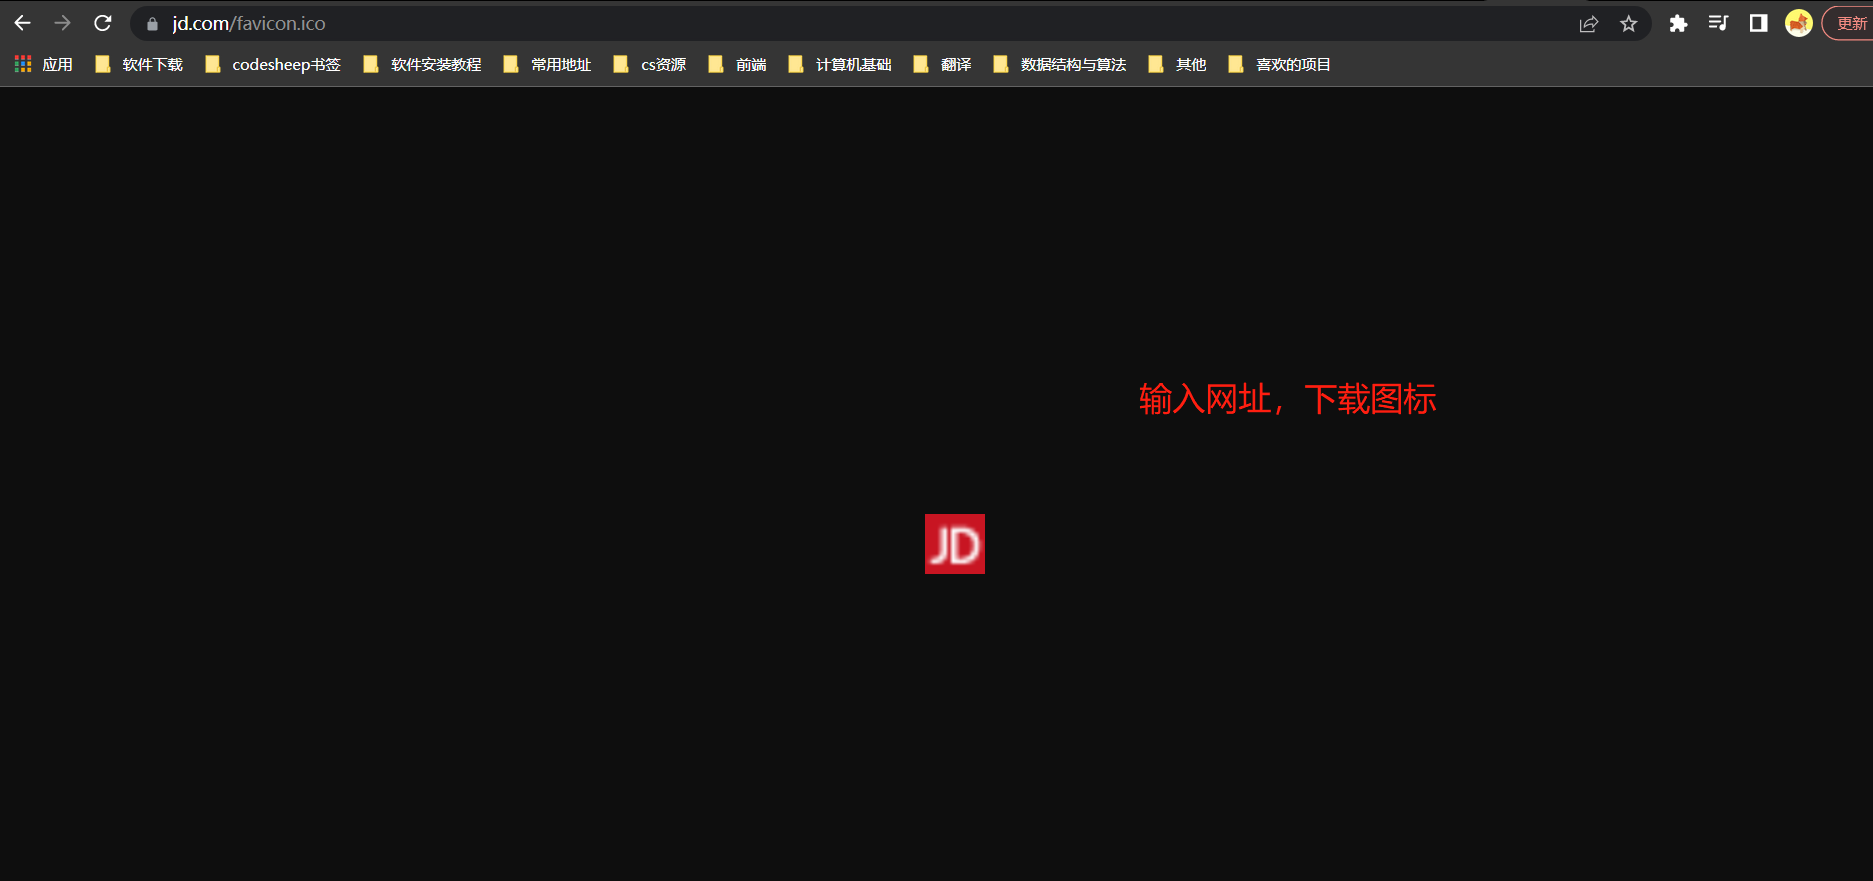
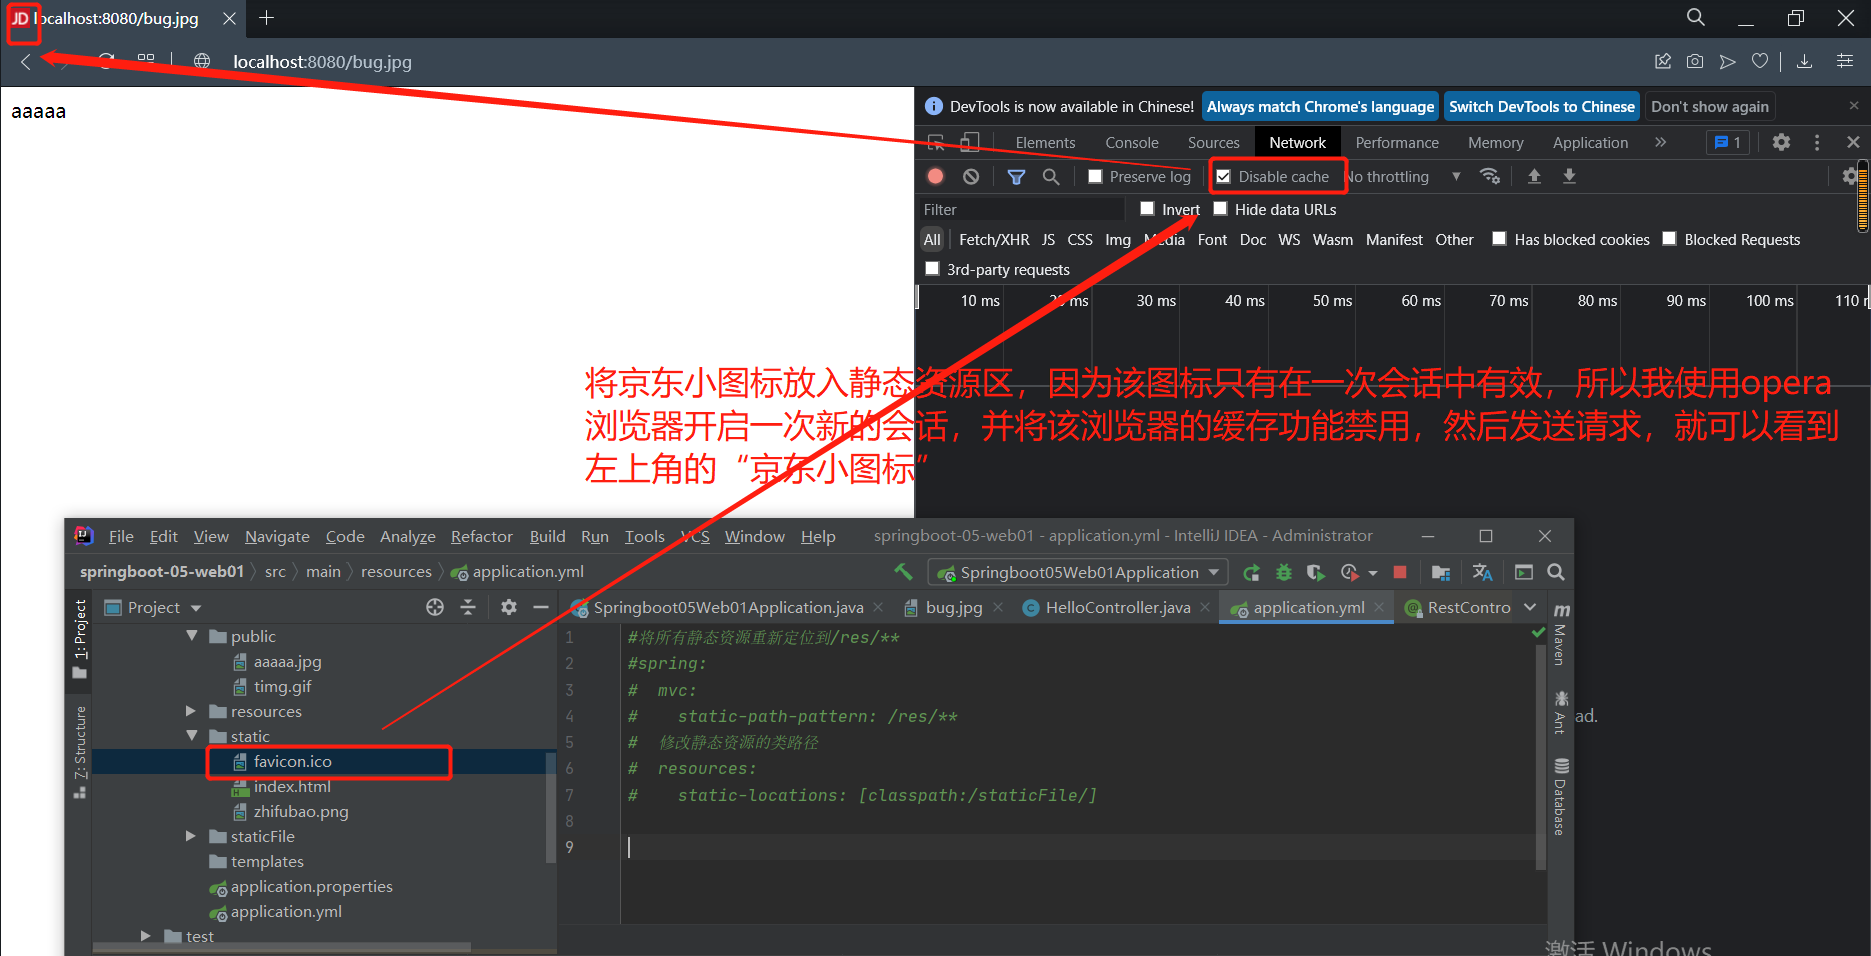
注意:需要发起新的会话才能有效;静态路径的访问前缀有影响(如下)。
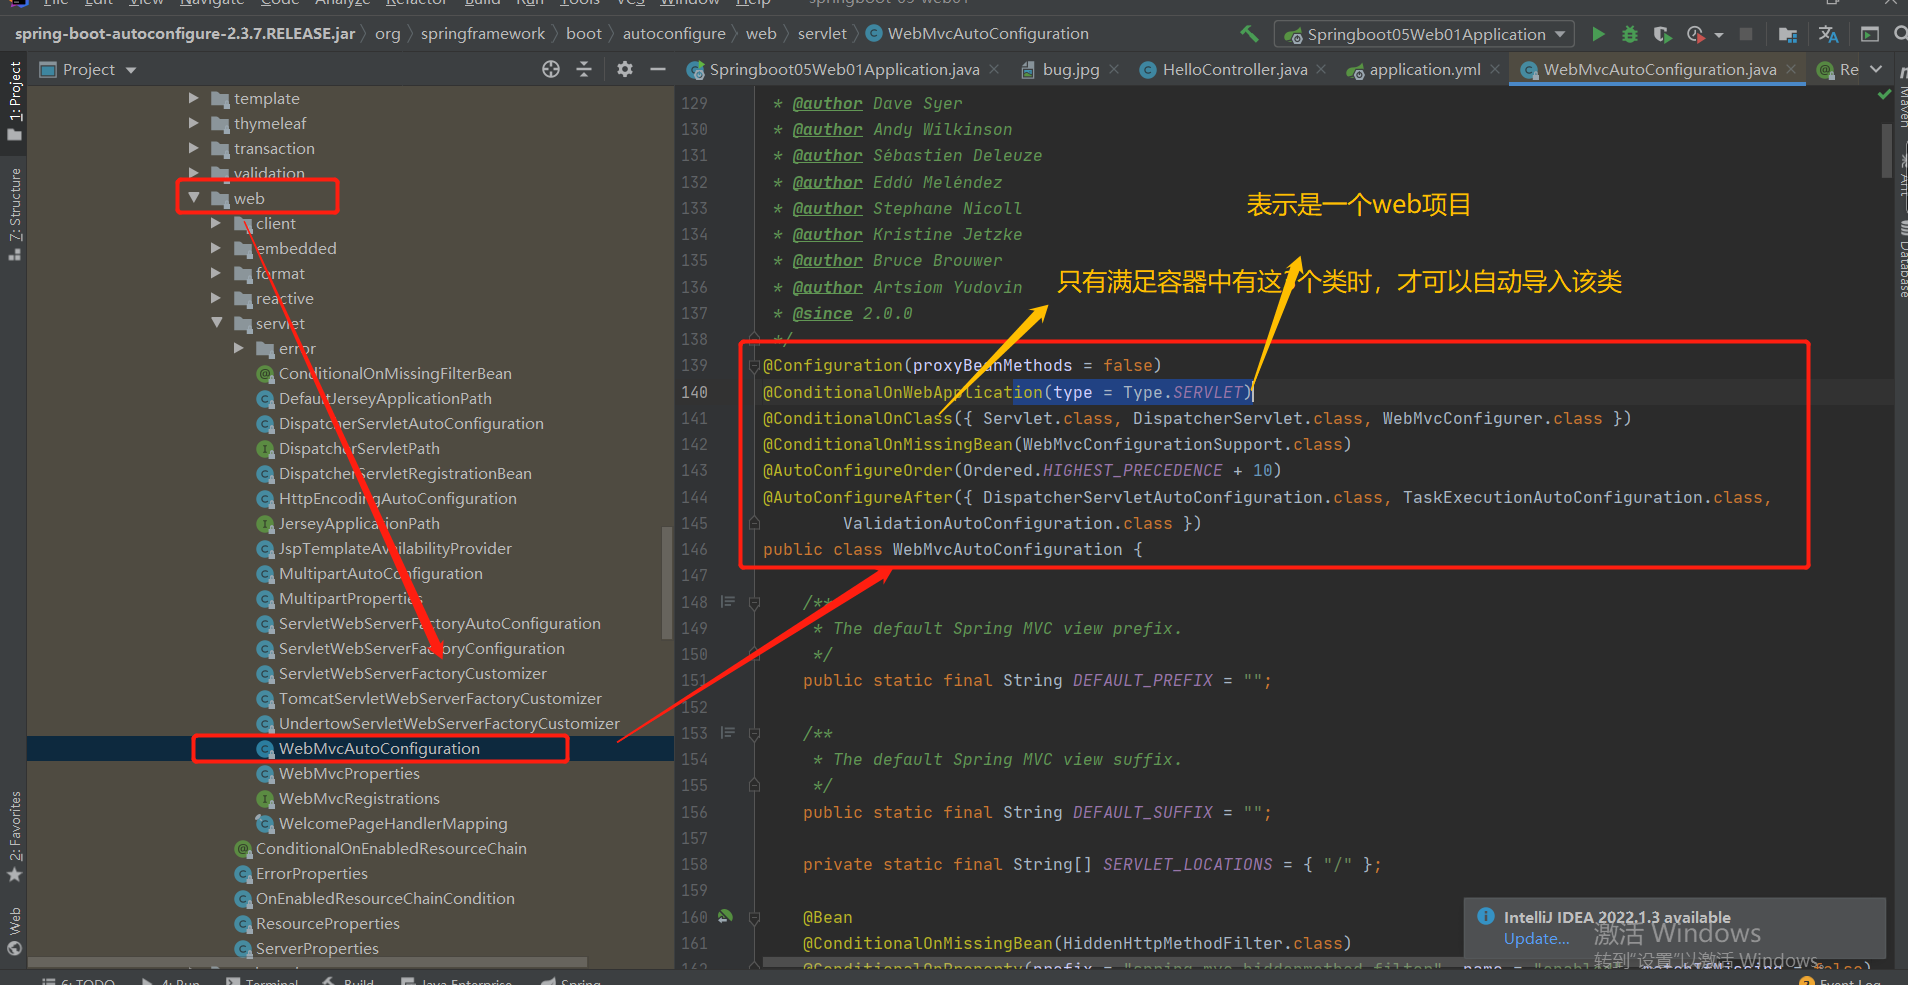
4.静态资源管理之源码分析
-
SpringBoot启动默认加载 xxxAutoConfiguration 类(自动配置类)
-
SpringMVC功能的自动配置类 WebMvcAutoConfiguration,生效
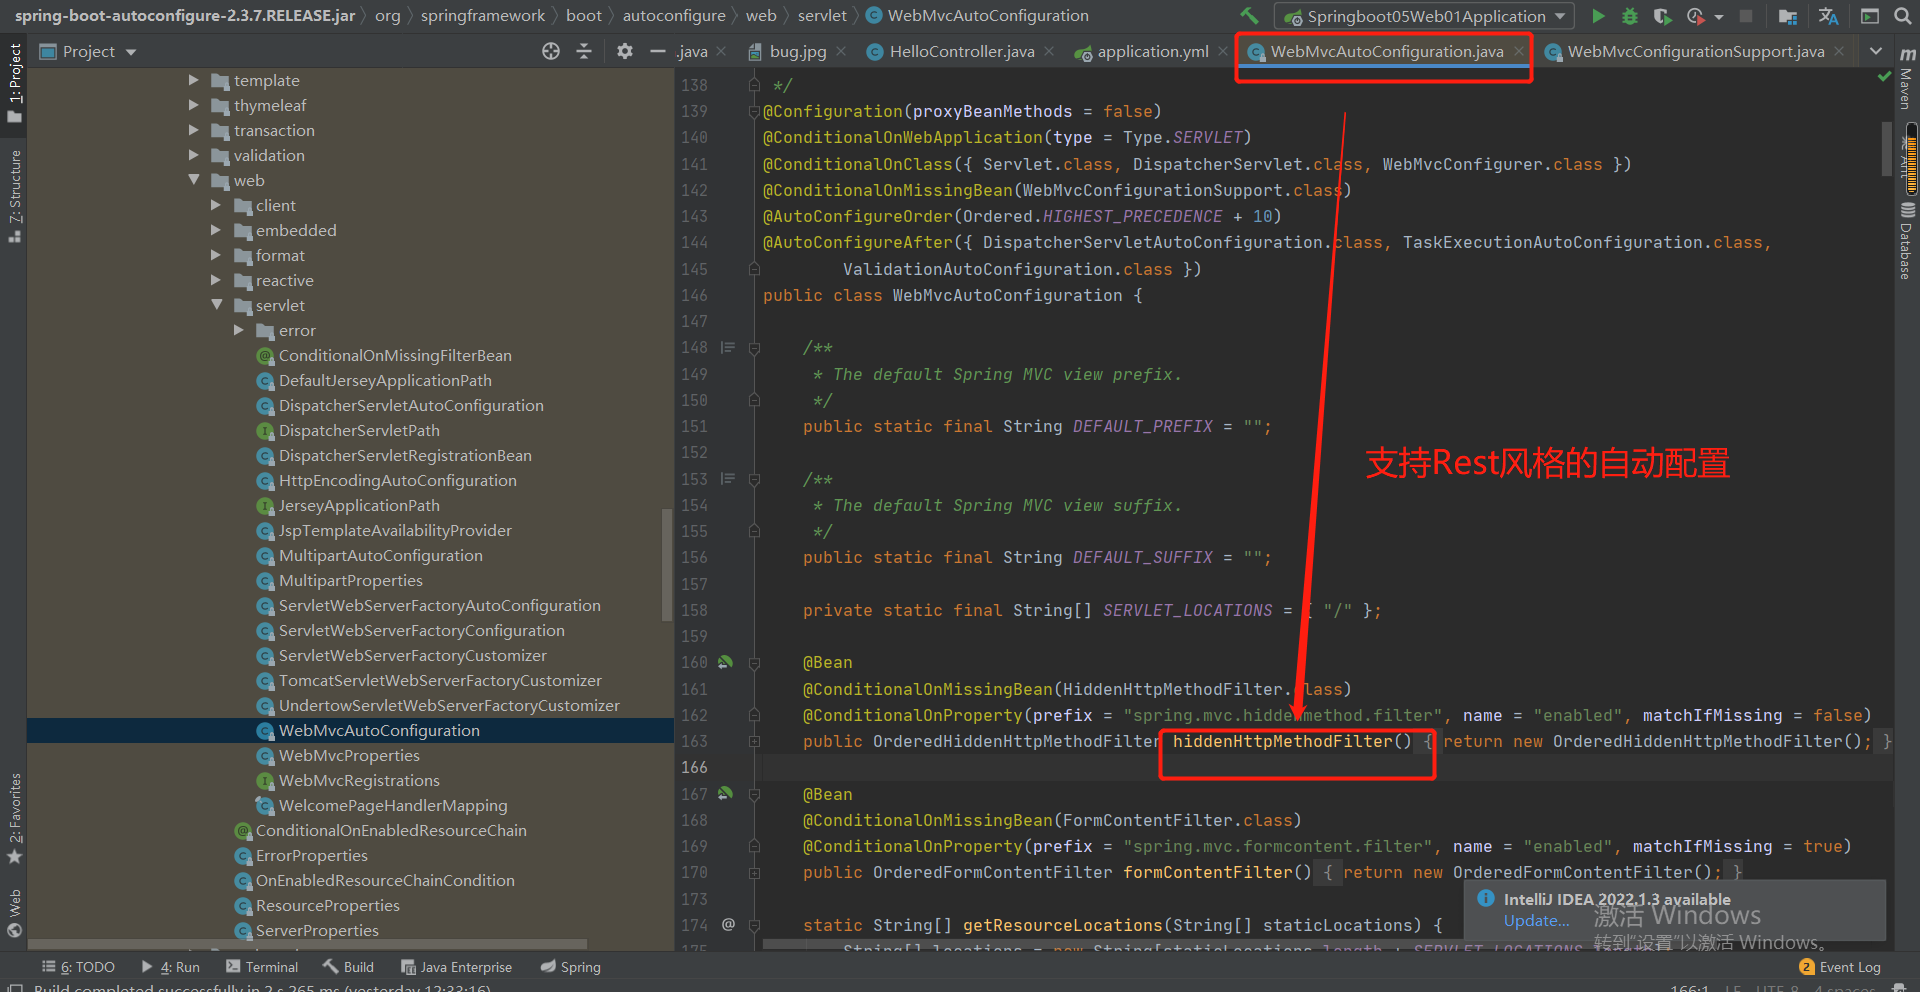
-
-
给容器中配了什么。
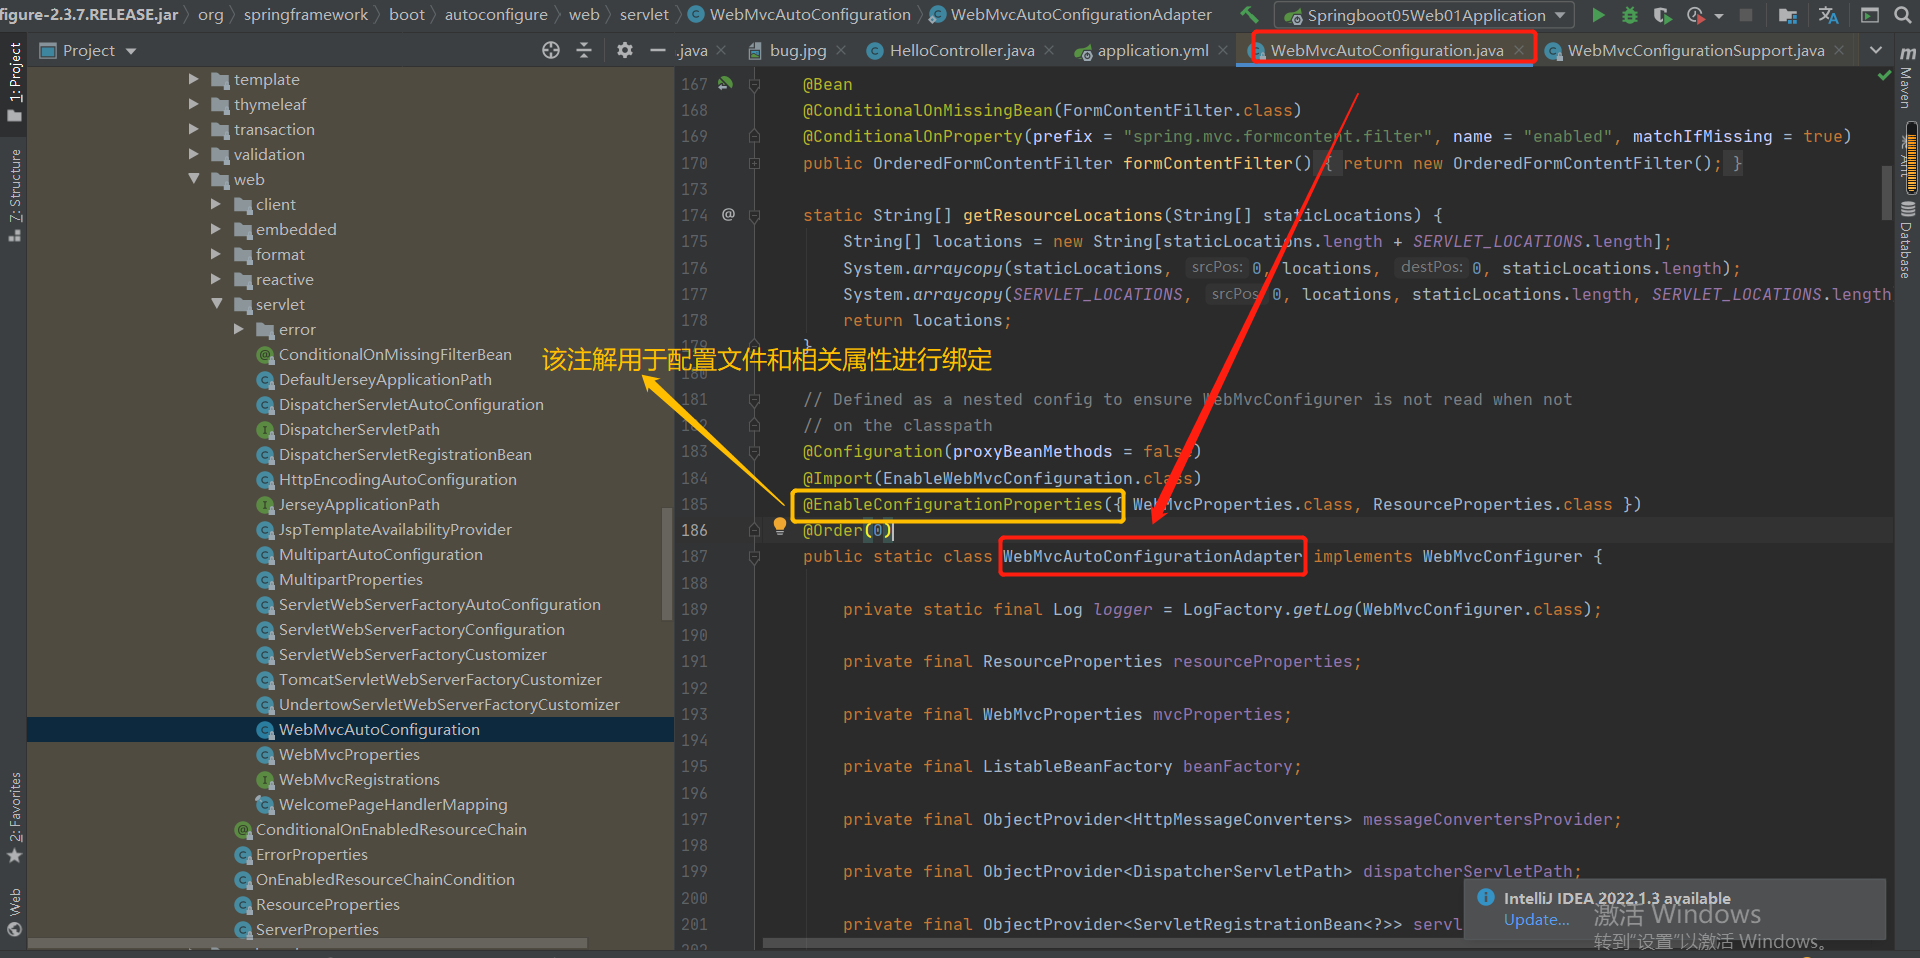
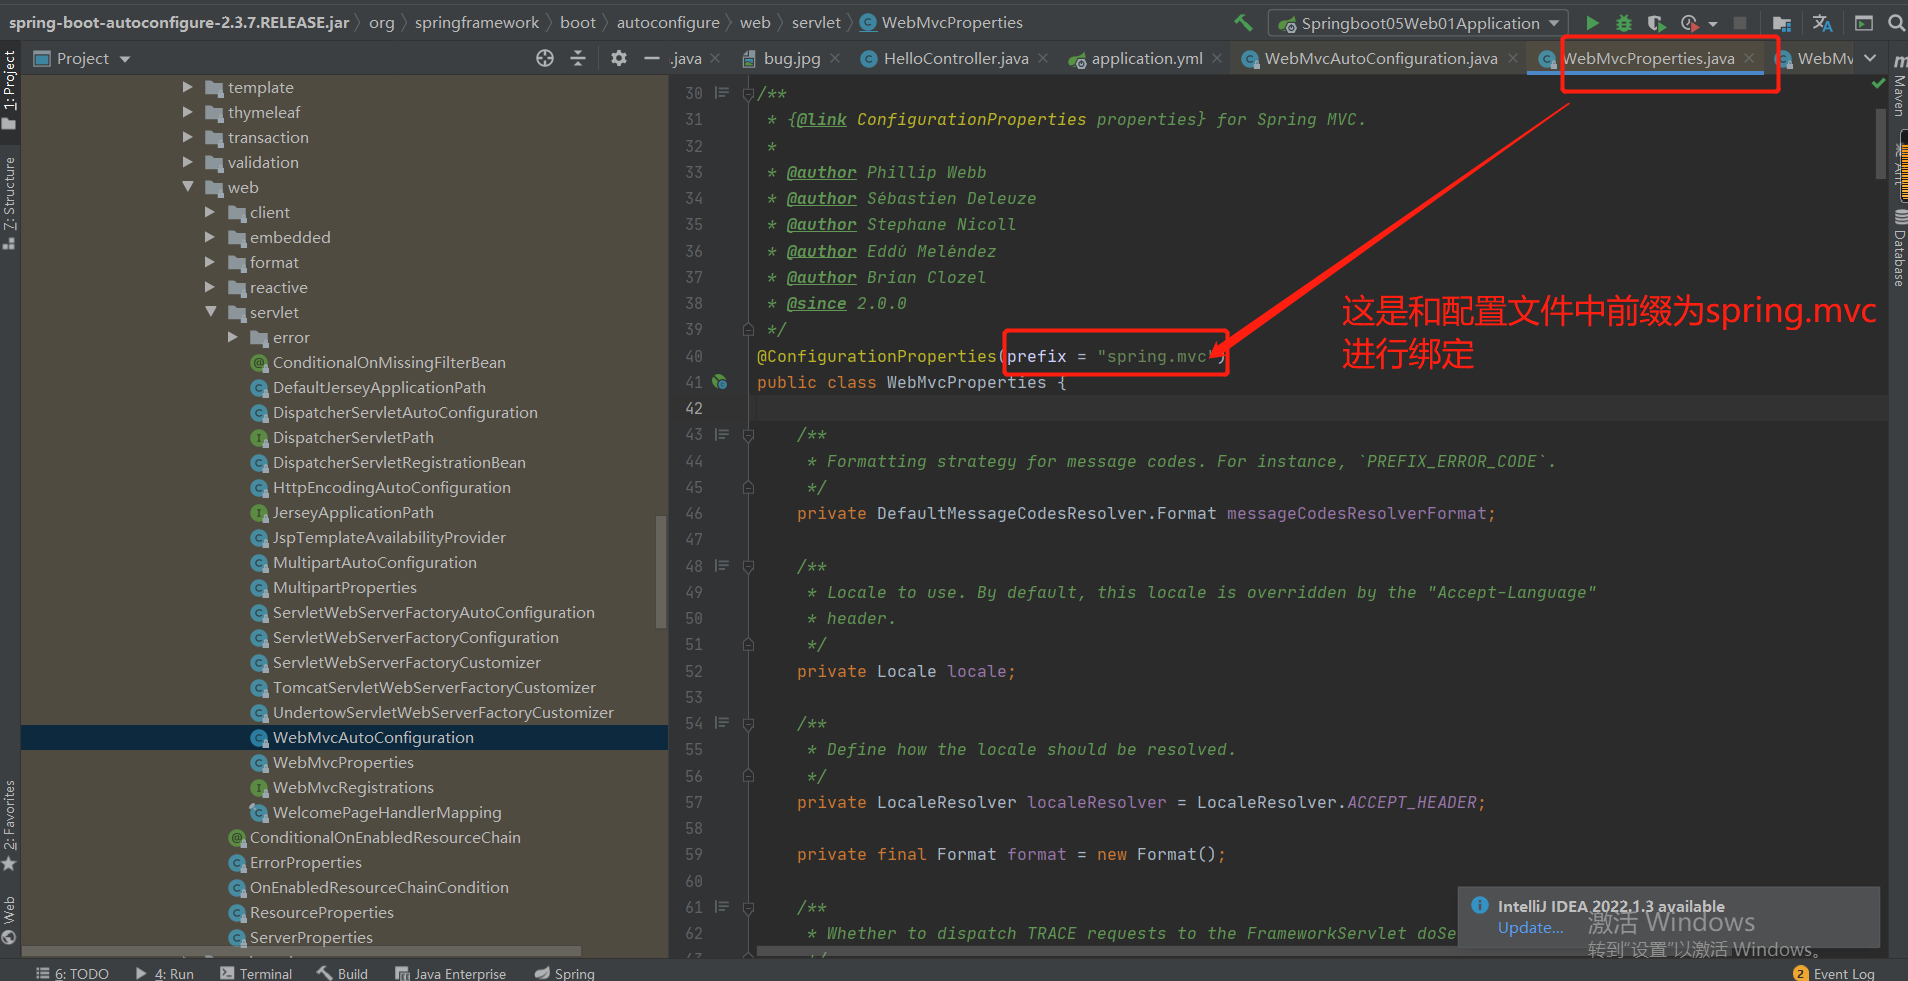
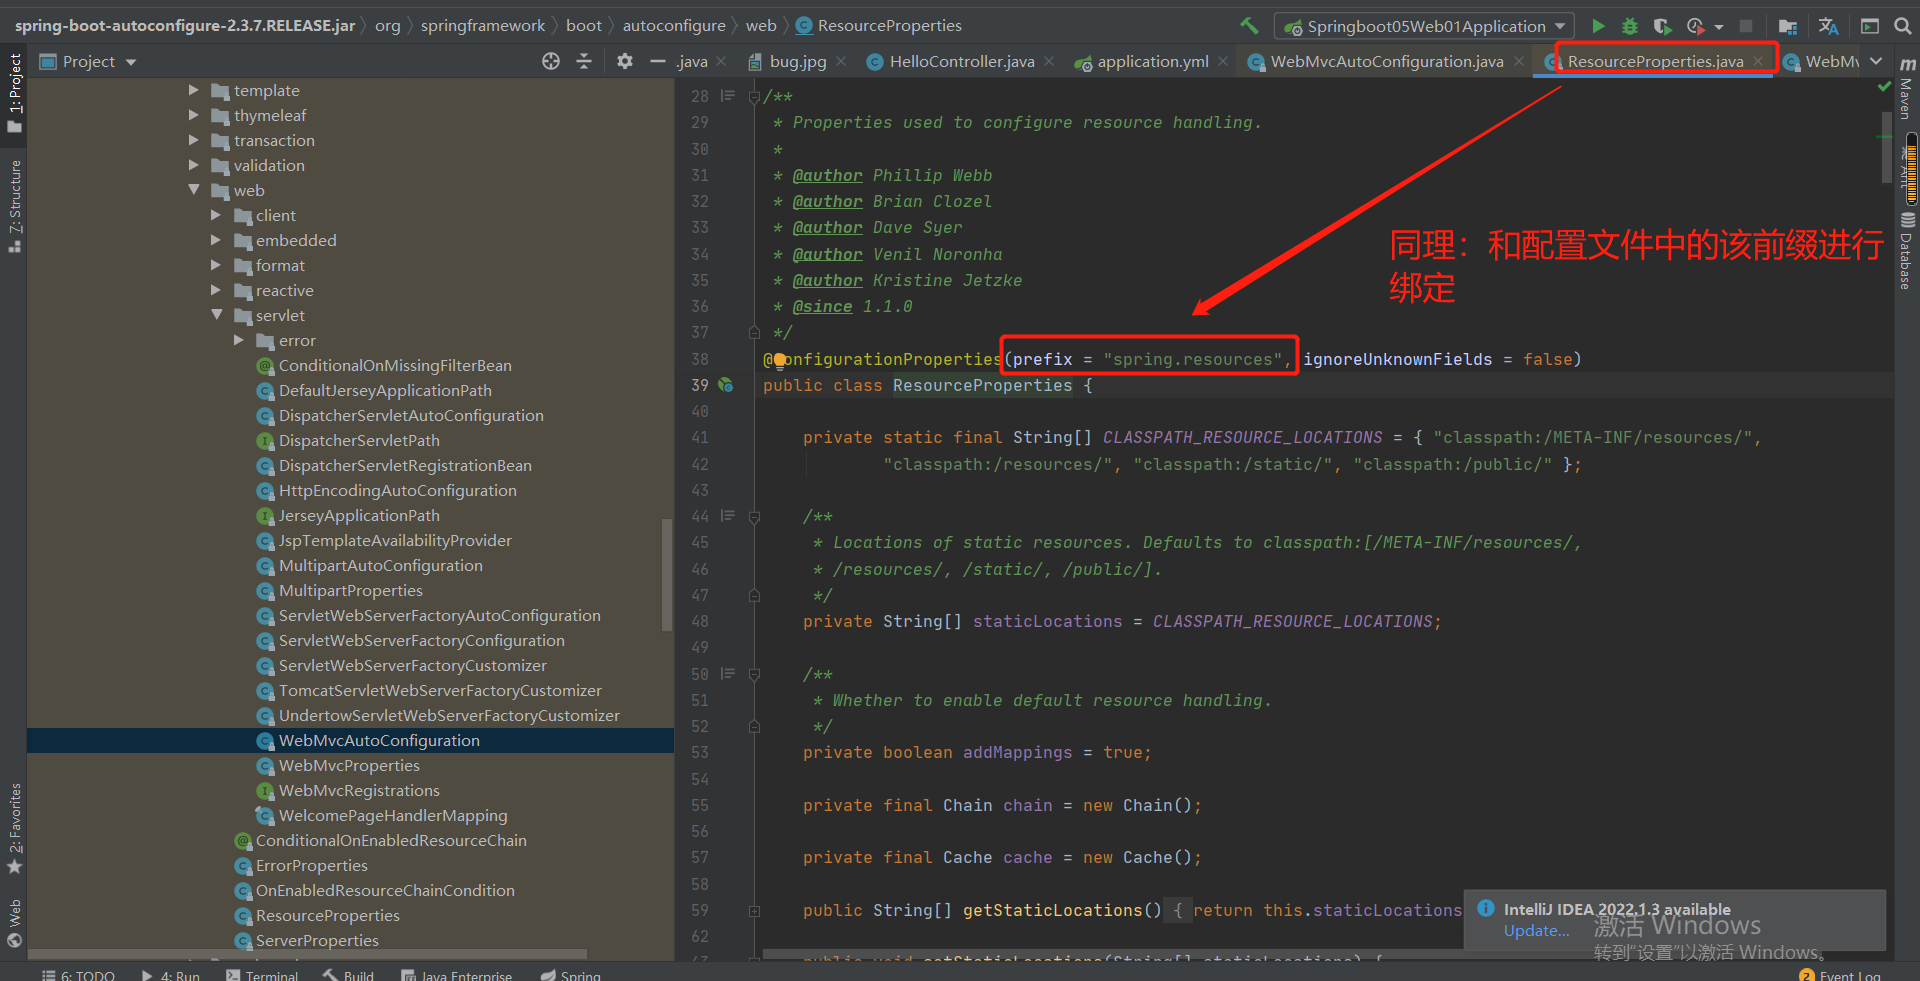
- 配置文件的相关属性和xxx进行了绑定。WebMvcPropertiesspring.mvc、ResourcePropertiesspring.resources
1、配置类只有一个有参构造器
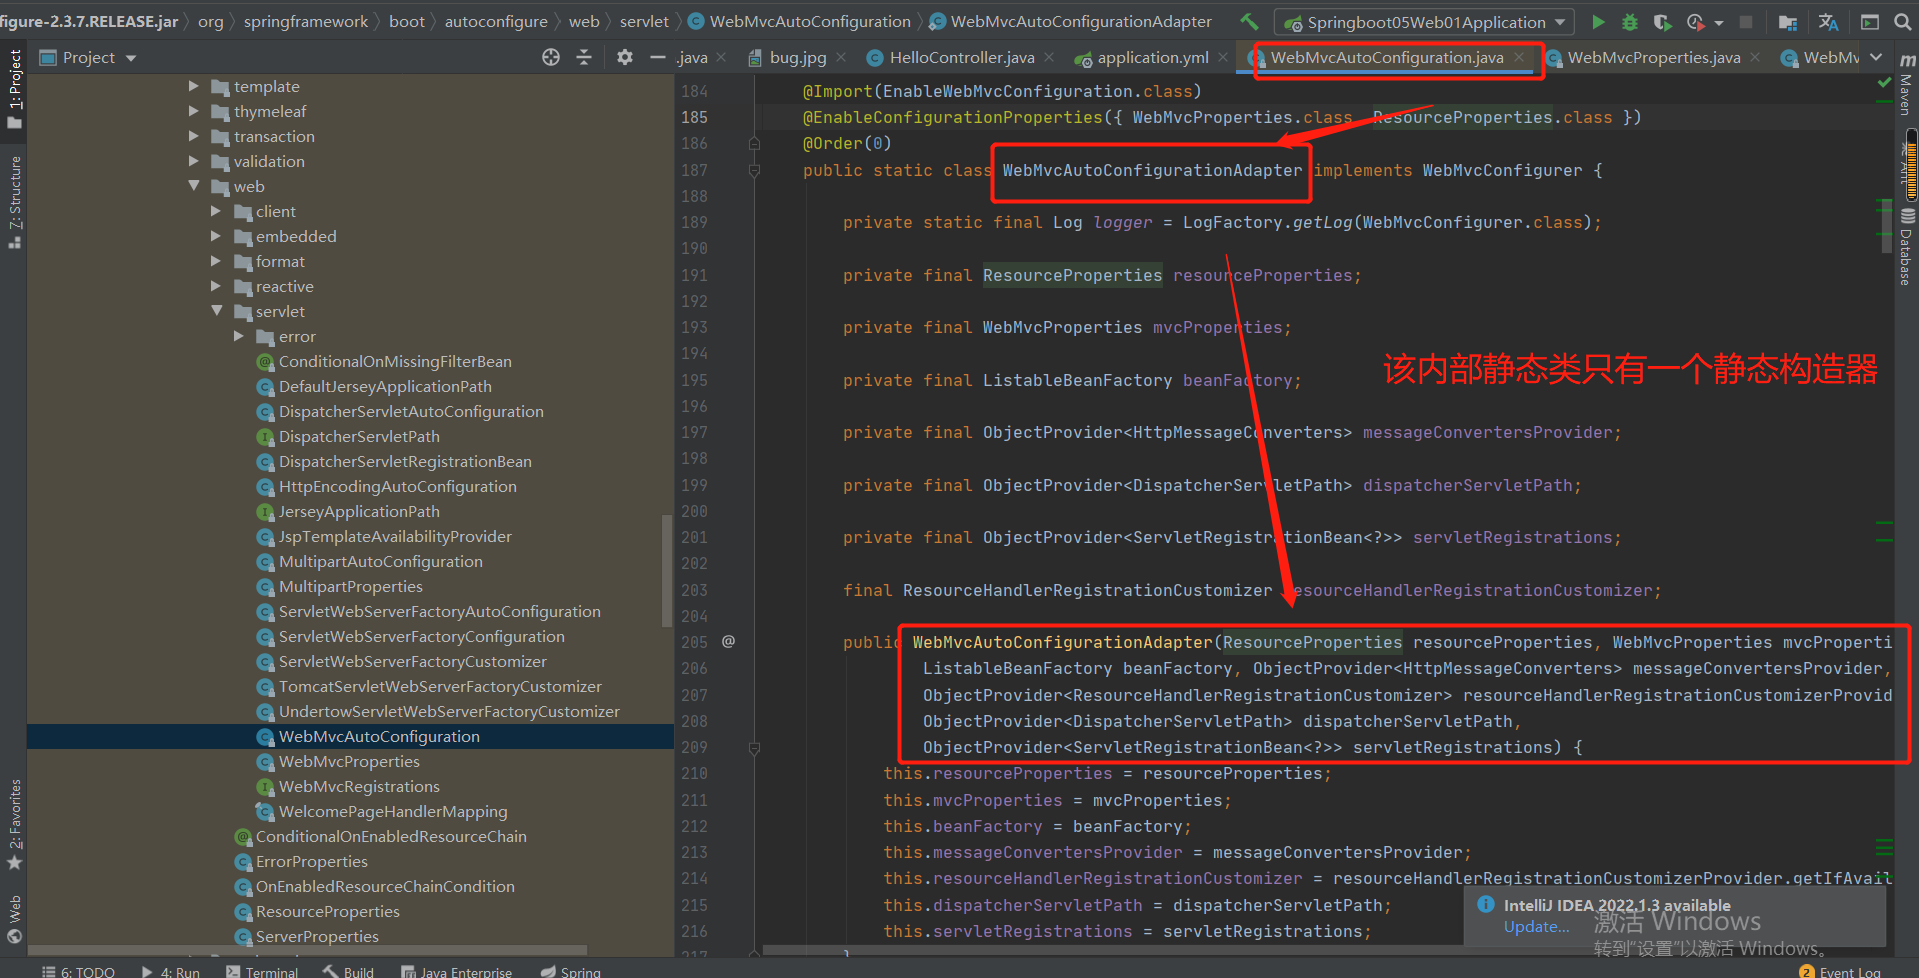
//有参构造器所有参数的值都会从容器中确定
//ResourceProperties resourceProperties:获取和spring.resources绑定的所有的值的对象
//WebMvcProperties mvcProperties :获取和spring.mvc绑定的所有的值的对象
//ListableBeanFactory beanFactory : Spring的beanFactory
//HttpMessageConverters :找到所有的HttpMessageConverters
//ResourceHandlerRegistrationCustomizer : 找到 资源处理器的自定义器。=========
//DispatcherServletPath
//ServletRegistrationBean :  给应用注册Servlet、Filter....
	public WebMvcAutoConfigurationAdapter(ResourceProperties resourceProperties, WebMvcProperties mvcProperties,
				ListableBeanFactory beanFactory, ObjectProvider<HttpMessageConverters> messageConvertersProvider,
				ObjectProvider<ResourceHandlerRegistrationCustomizer> resourceHandlerRegistrationCustomizerProvider,
				ObjectProvider<DispatcherServletPath> dispatcherServletPath,
				ObjectProvider<ServletRegistrationBean<?>> servletRegistrations) {
			this.resourceProperties = resourceProperties;
			this.mvcProperties = mvcProperties;
			this.beanFactory = beanFactory;
			this.messageConvertersProvider = messageConvertersProvider;
			this.resourceHandlerRegistrationCustomizer = resourceHandlerRegistrationCustomizerProvider.getIfAvailable();
			this.dispatcherServletPath = dispatcherServletPath;
			this.servletRegistrations = servletRegistrations;
		}
2、资源处理的默认规则
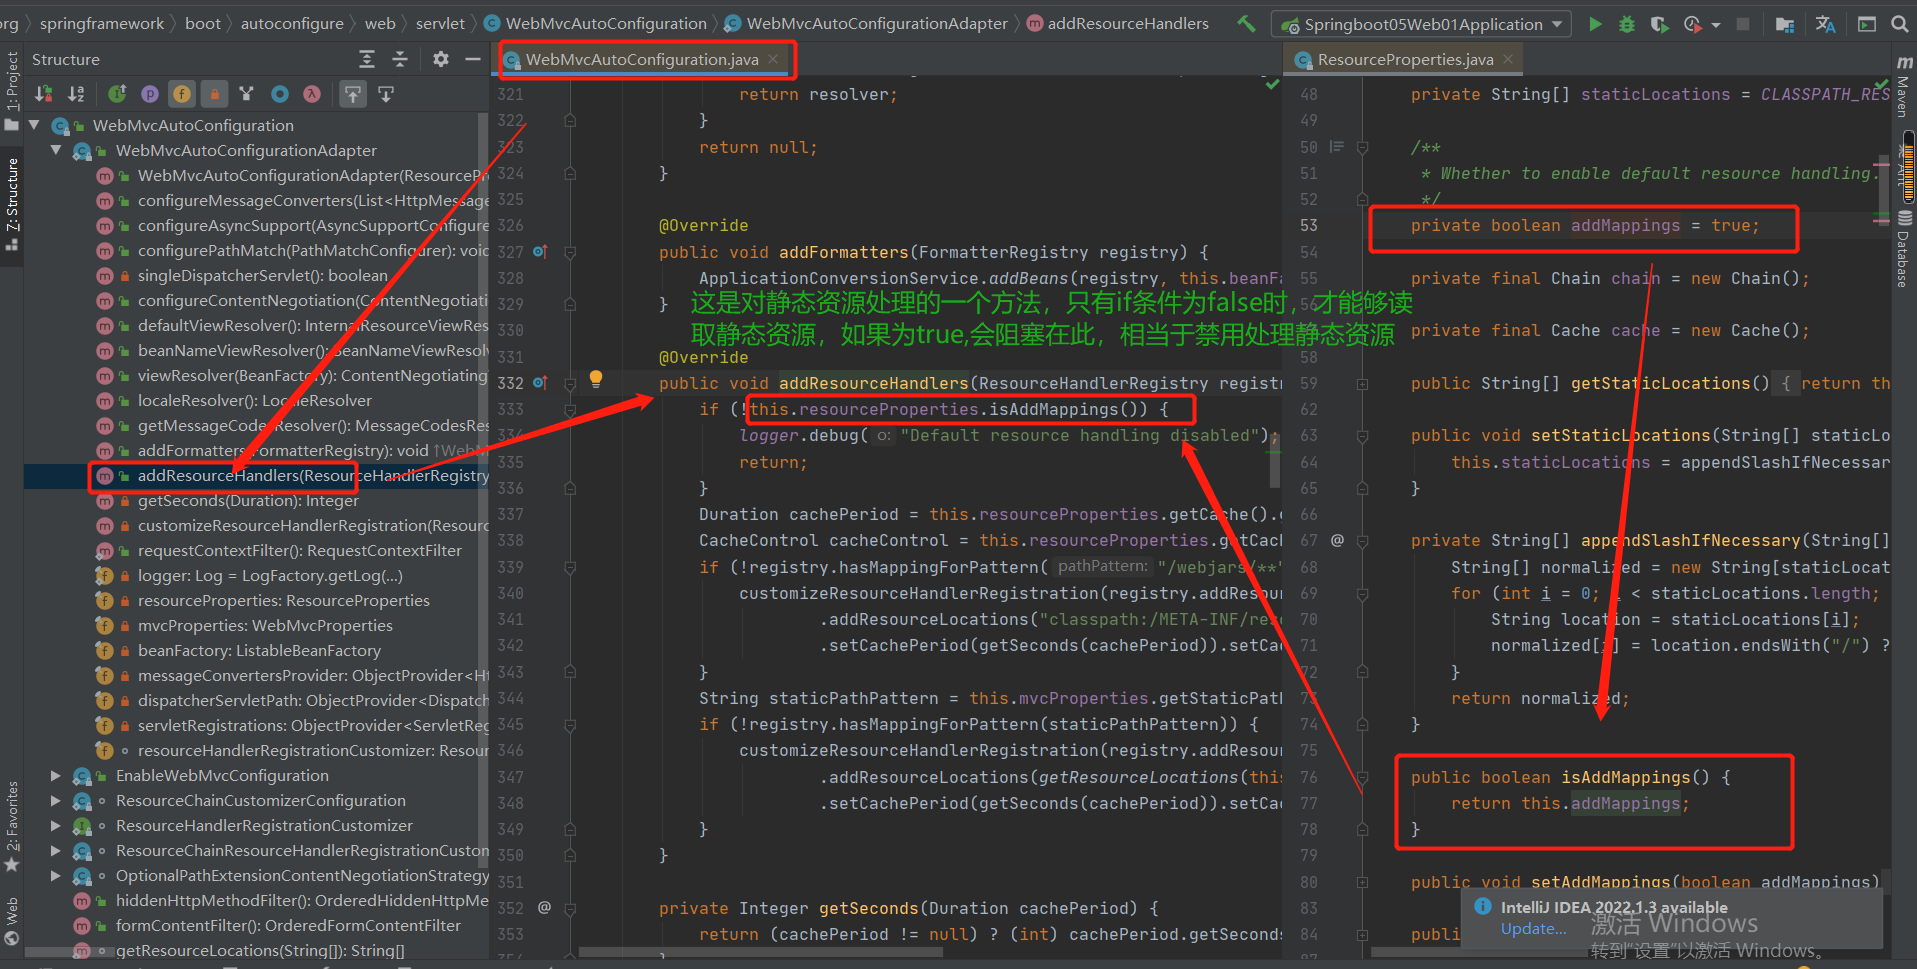
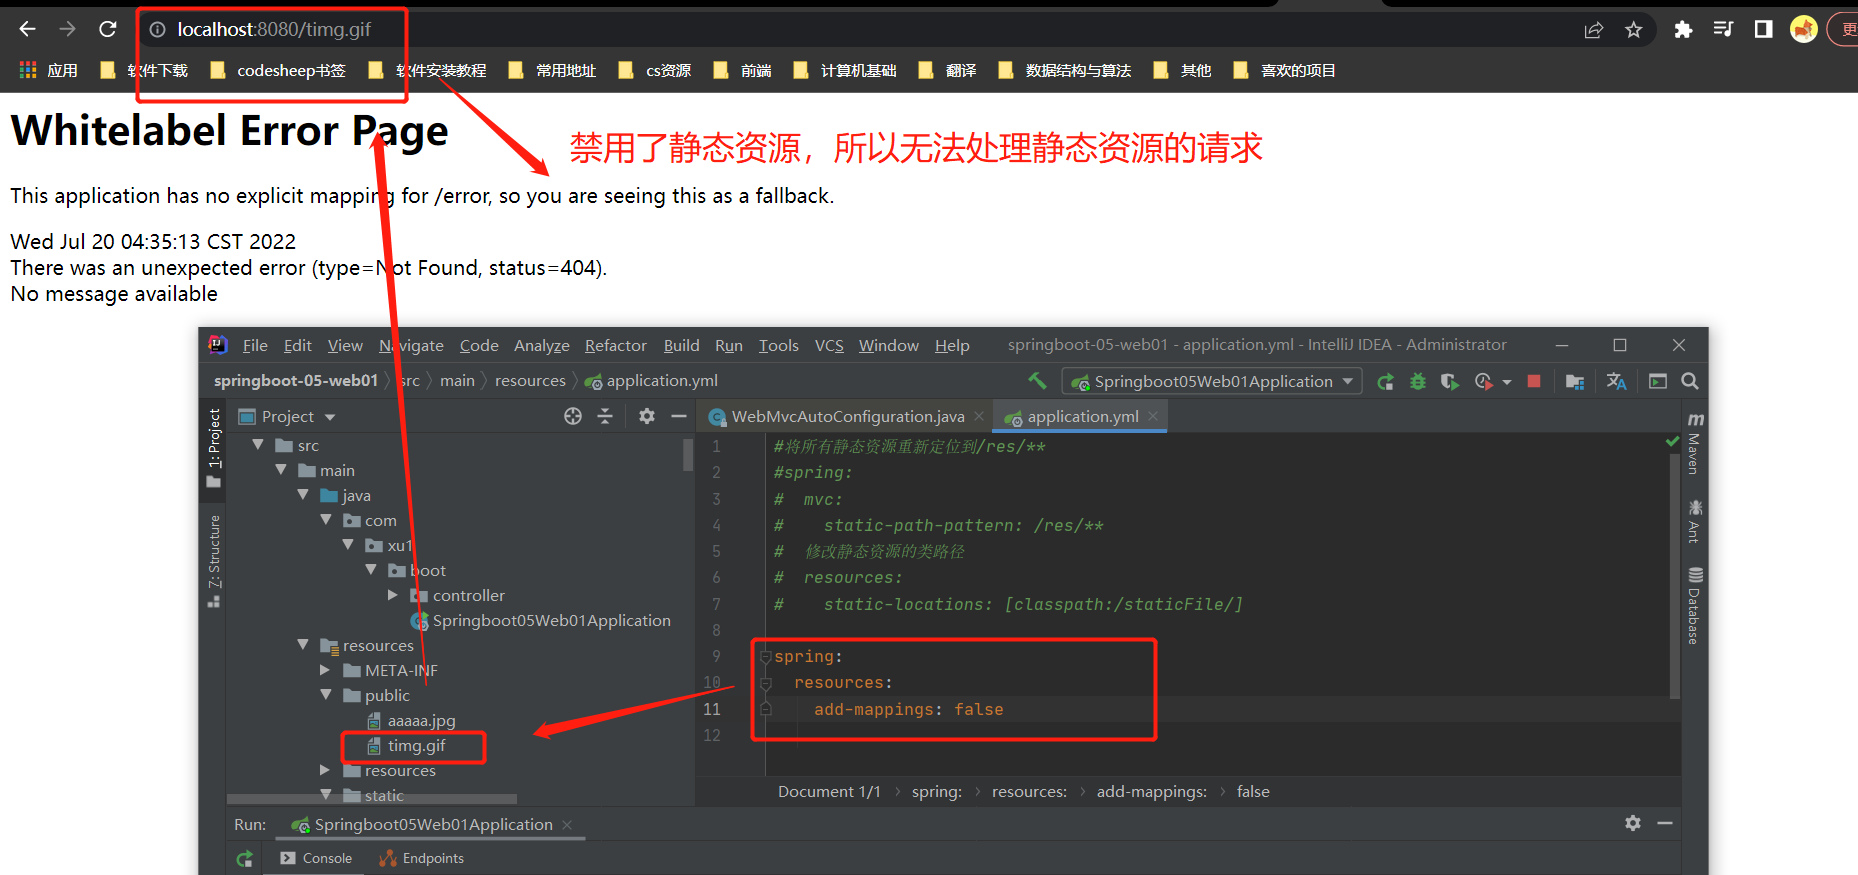
规则1:静态资源的禁用
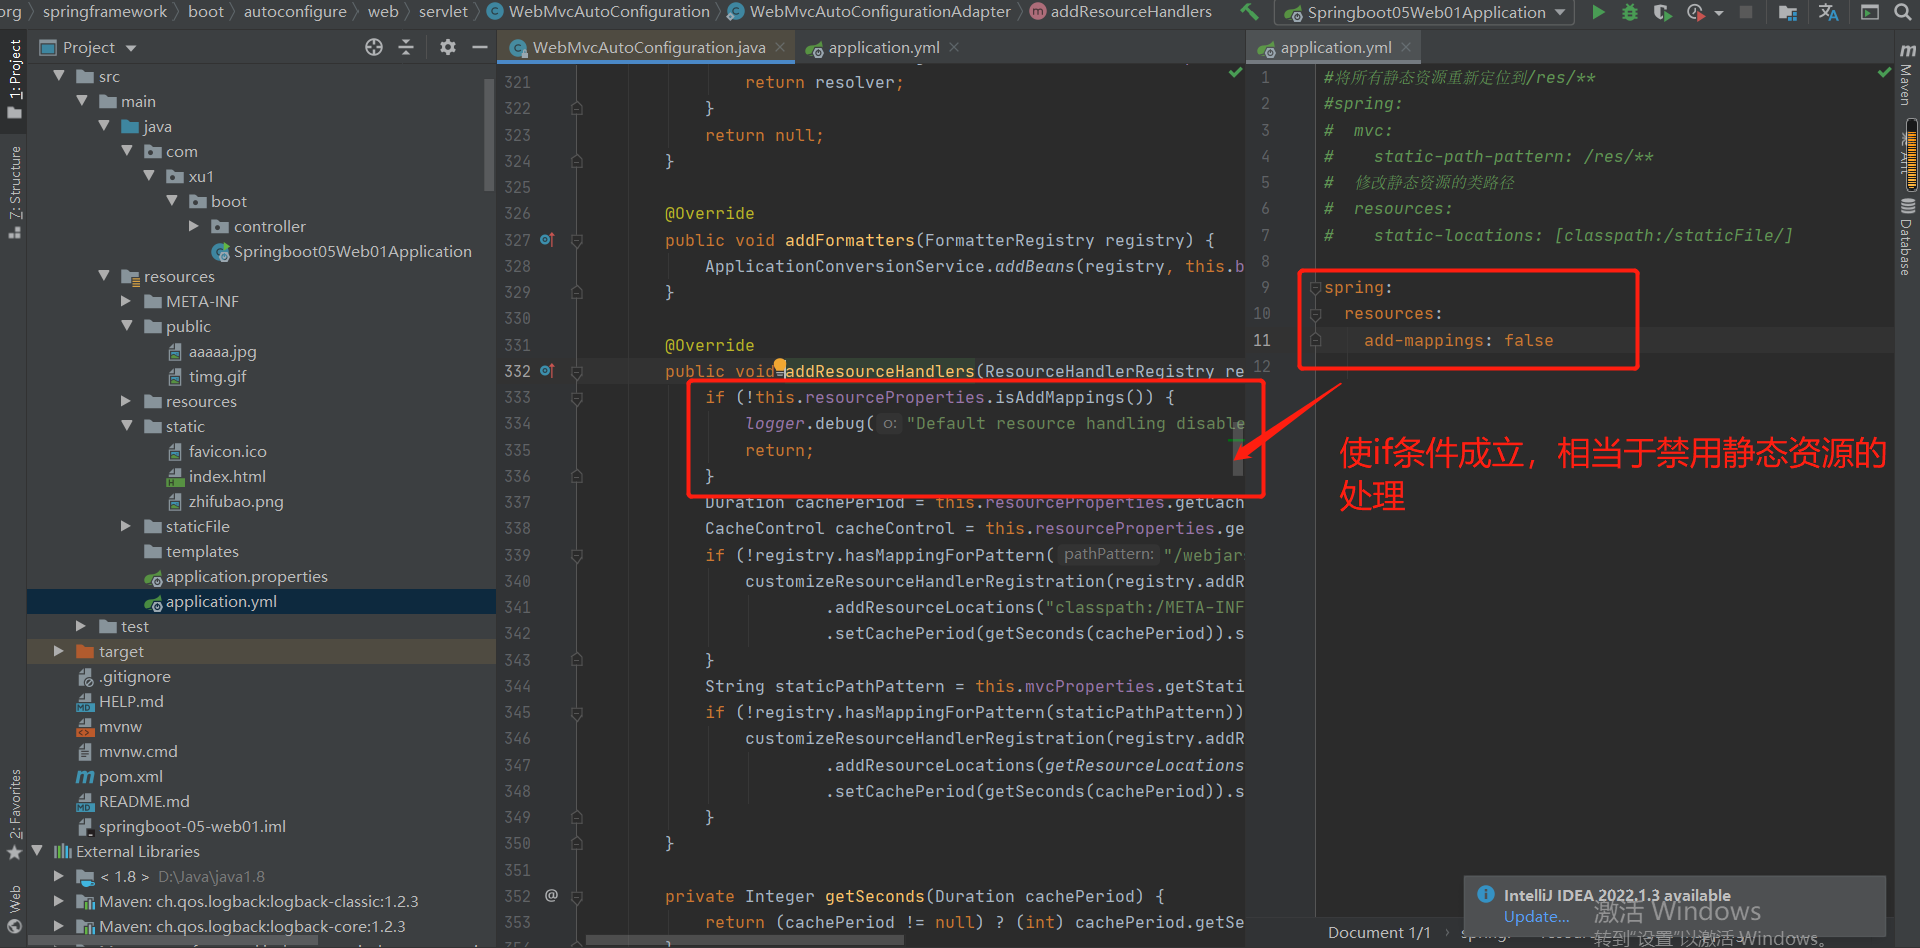
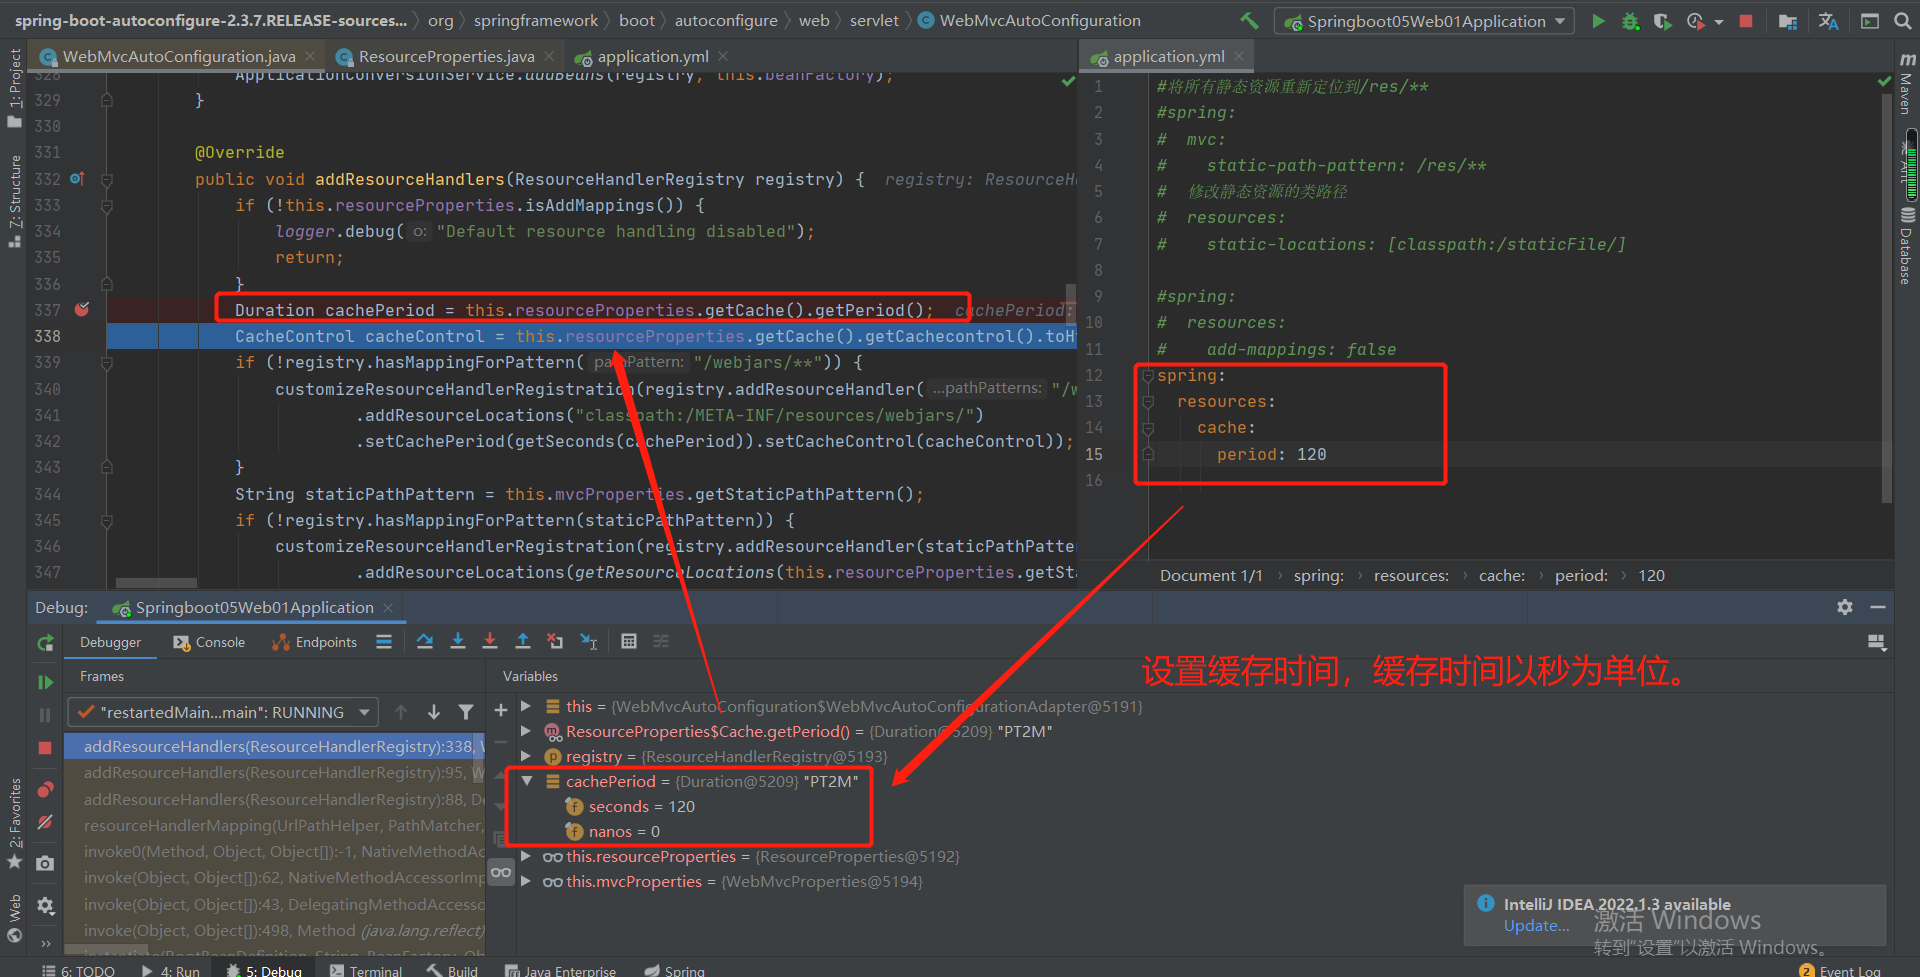
规则2:设置缓存时间
规则3:对webjars请求的设置
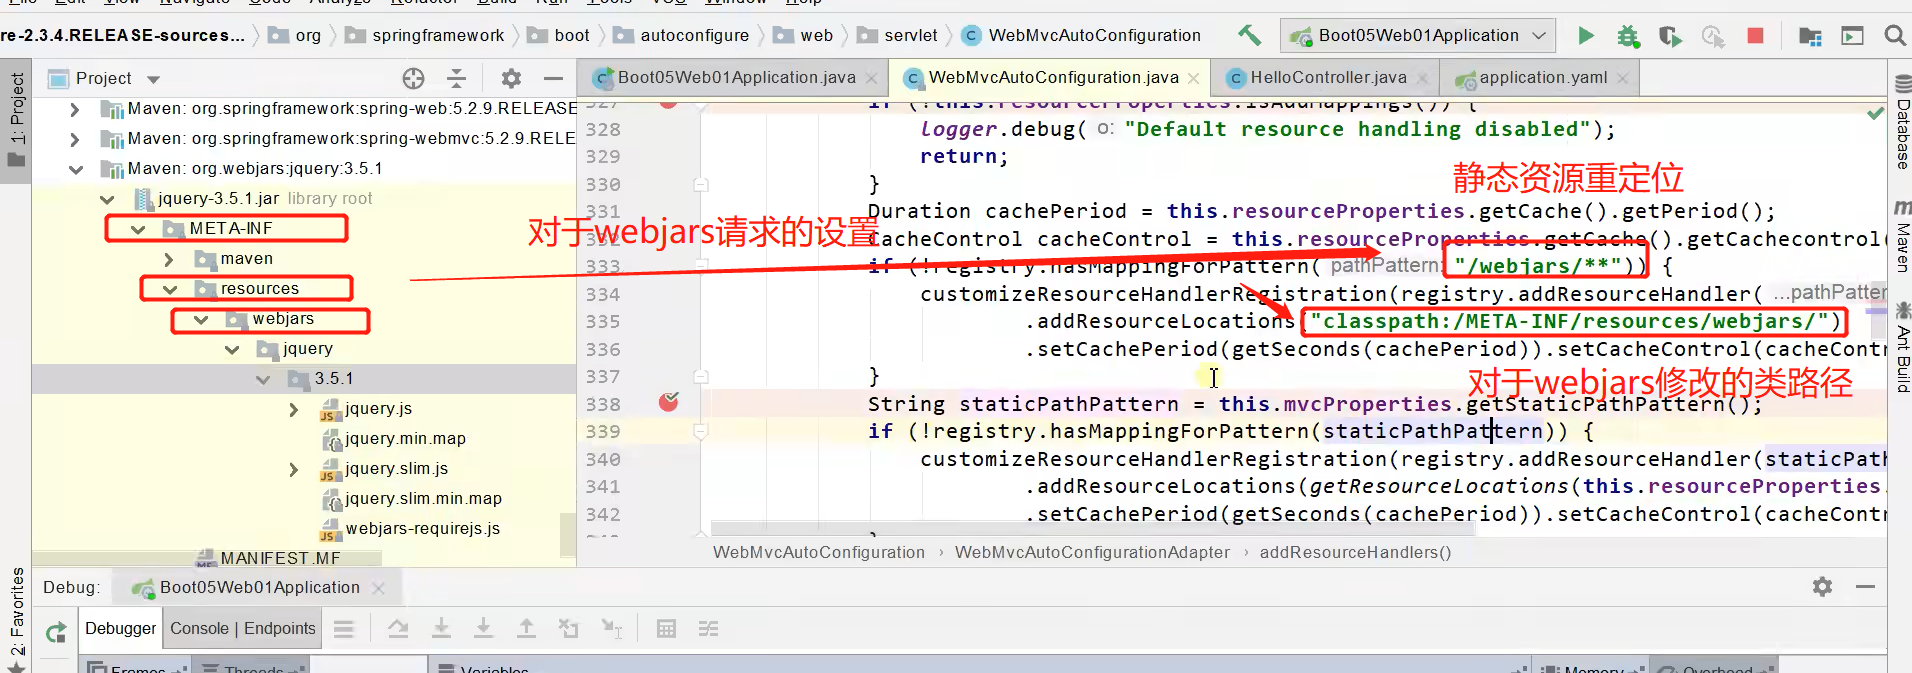
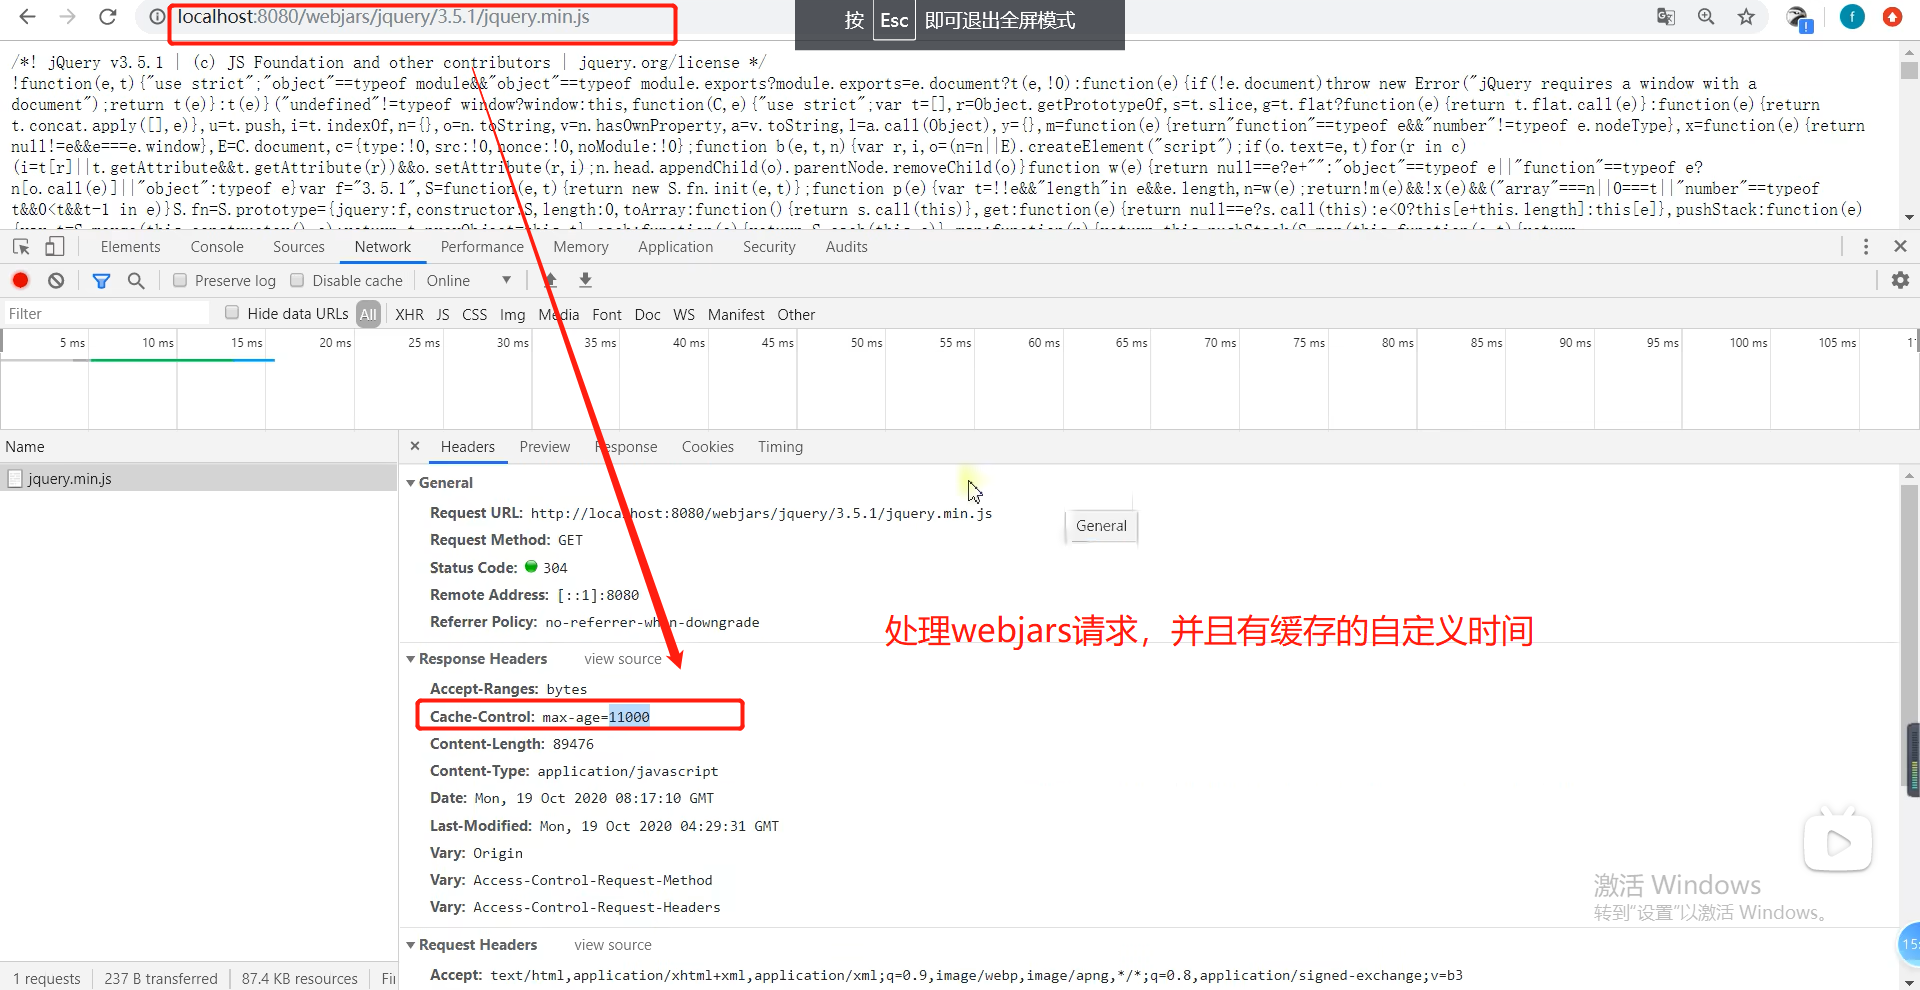
补充:这个方法是用来处理静态资源webjars请求的,webjars也是静态资源,是封装为jar包的静态资源,如jquery等,官网:webjars.io
规则4:静态资源的默认路径
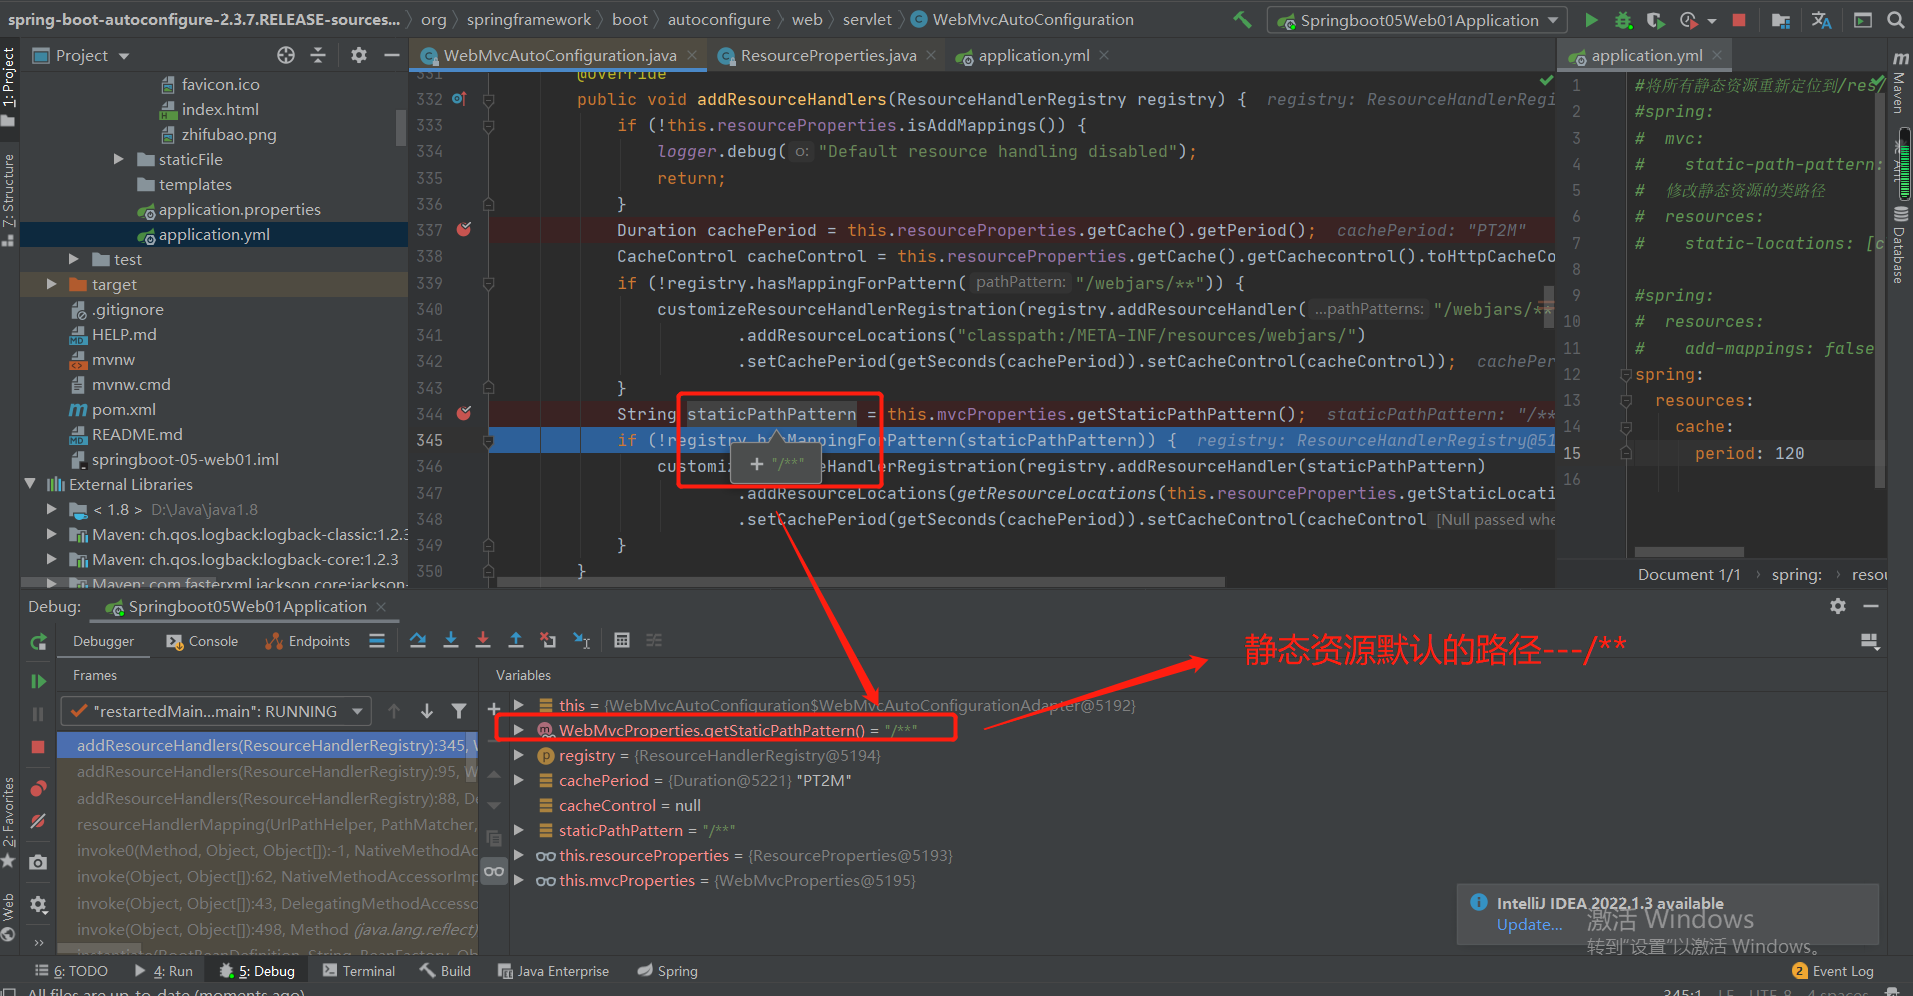
补充:也就是相当于重定位静态资源的路径
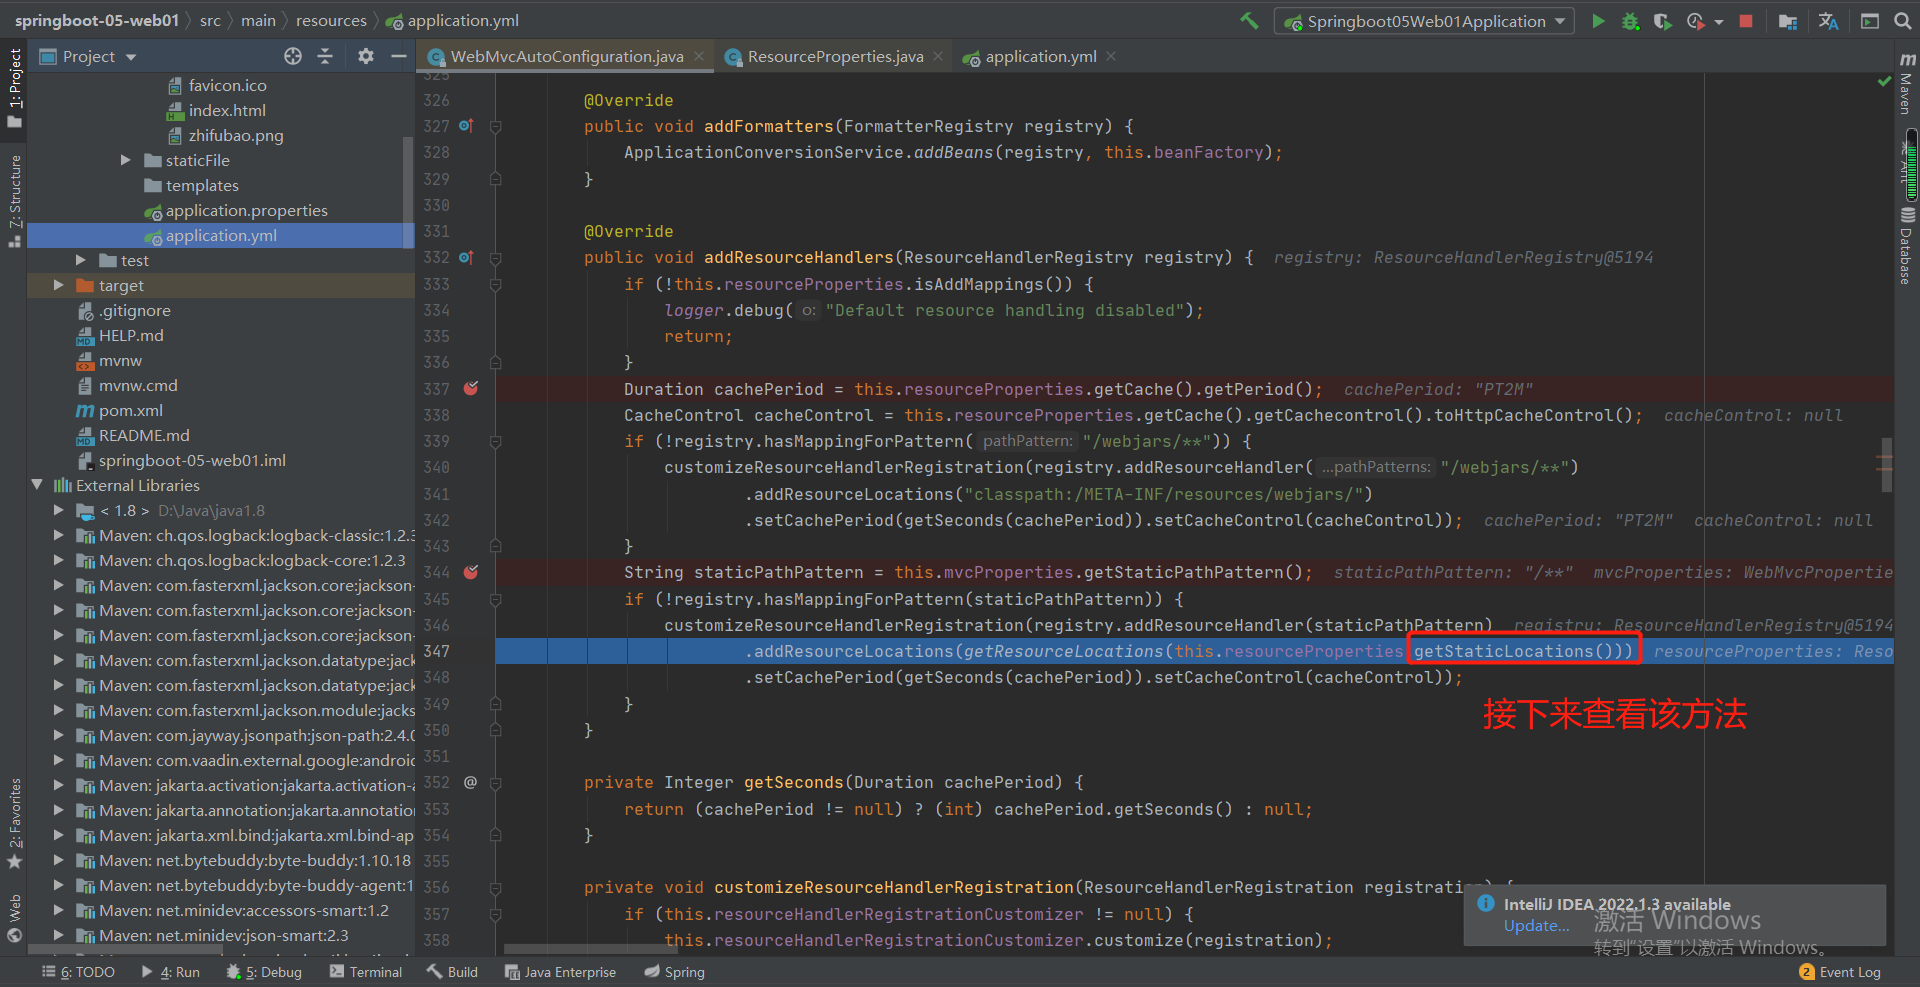
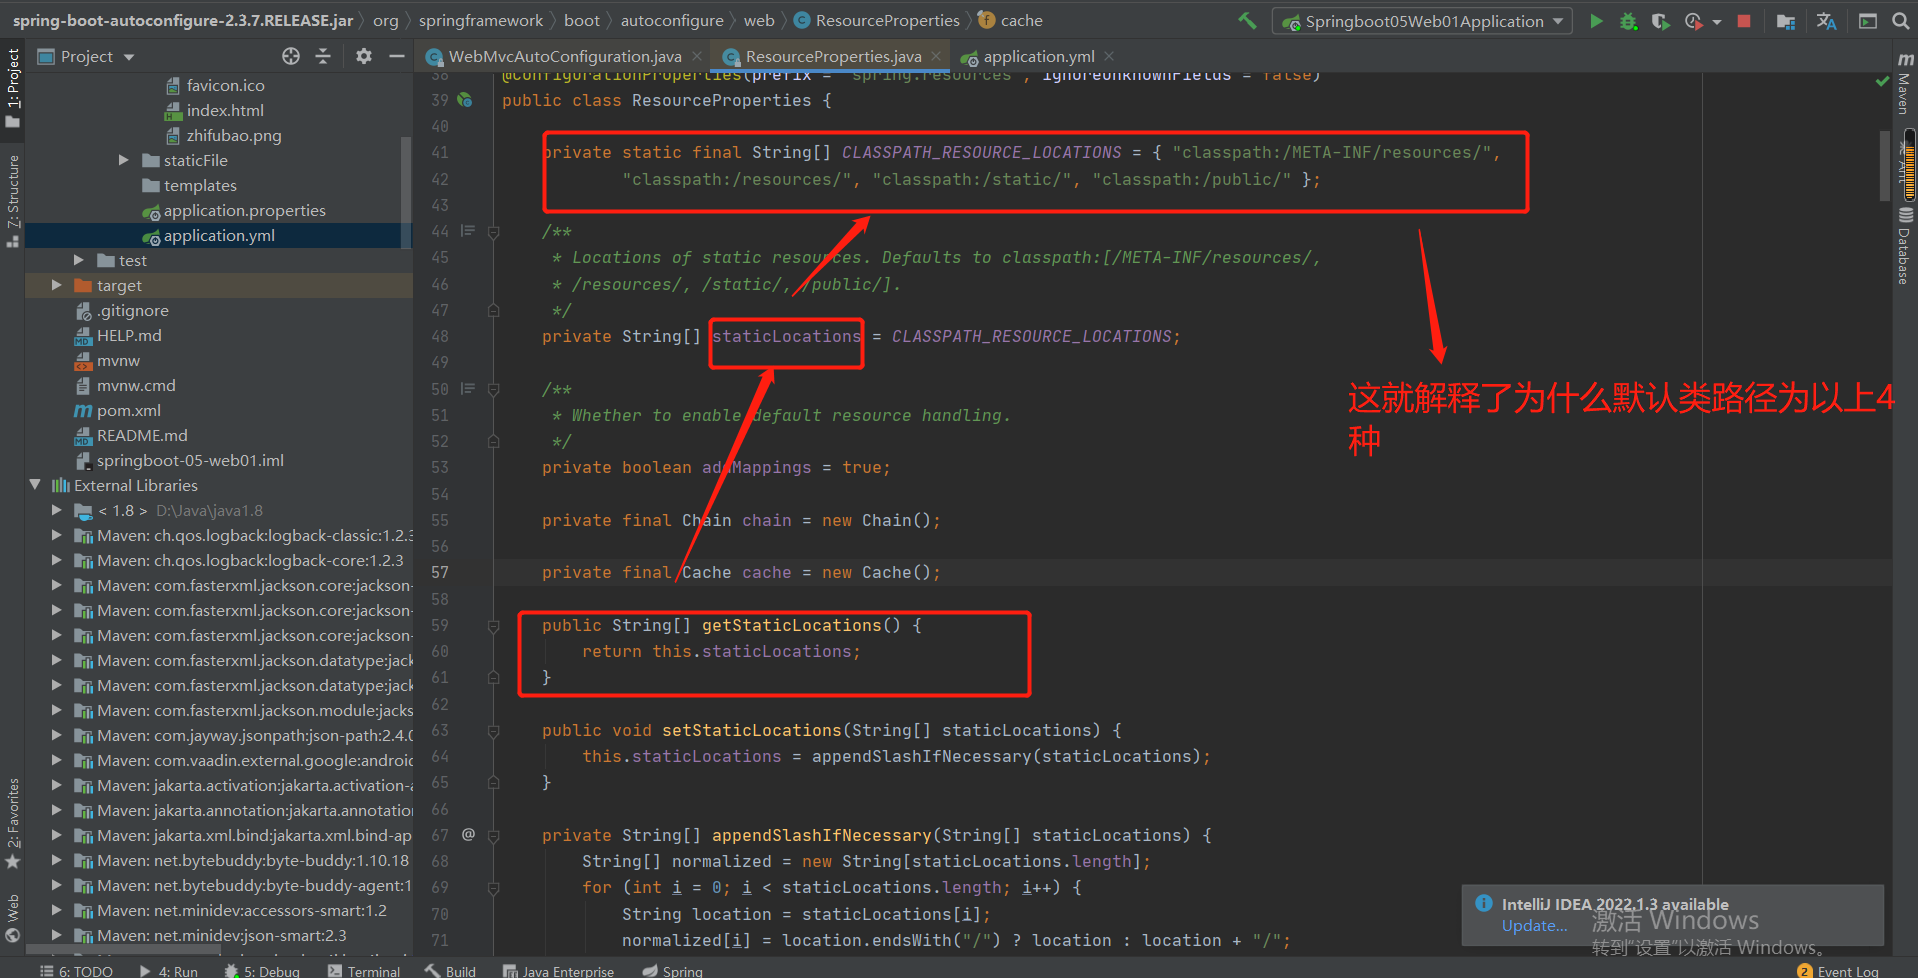
补充:类似,这是静态资源的类路径
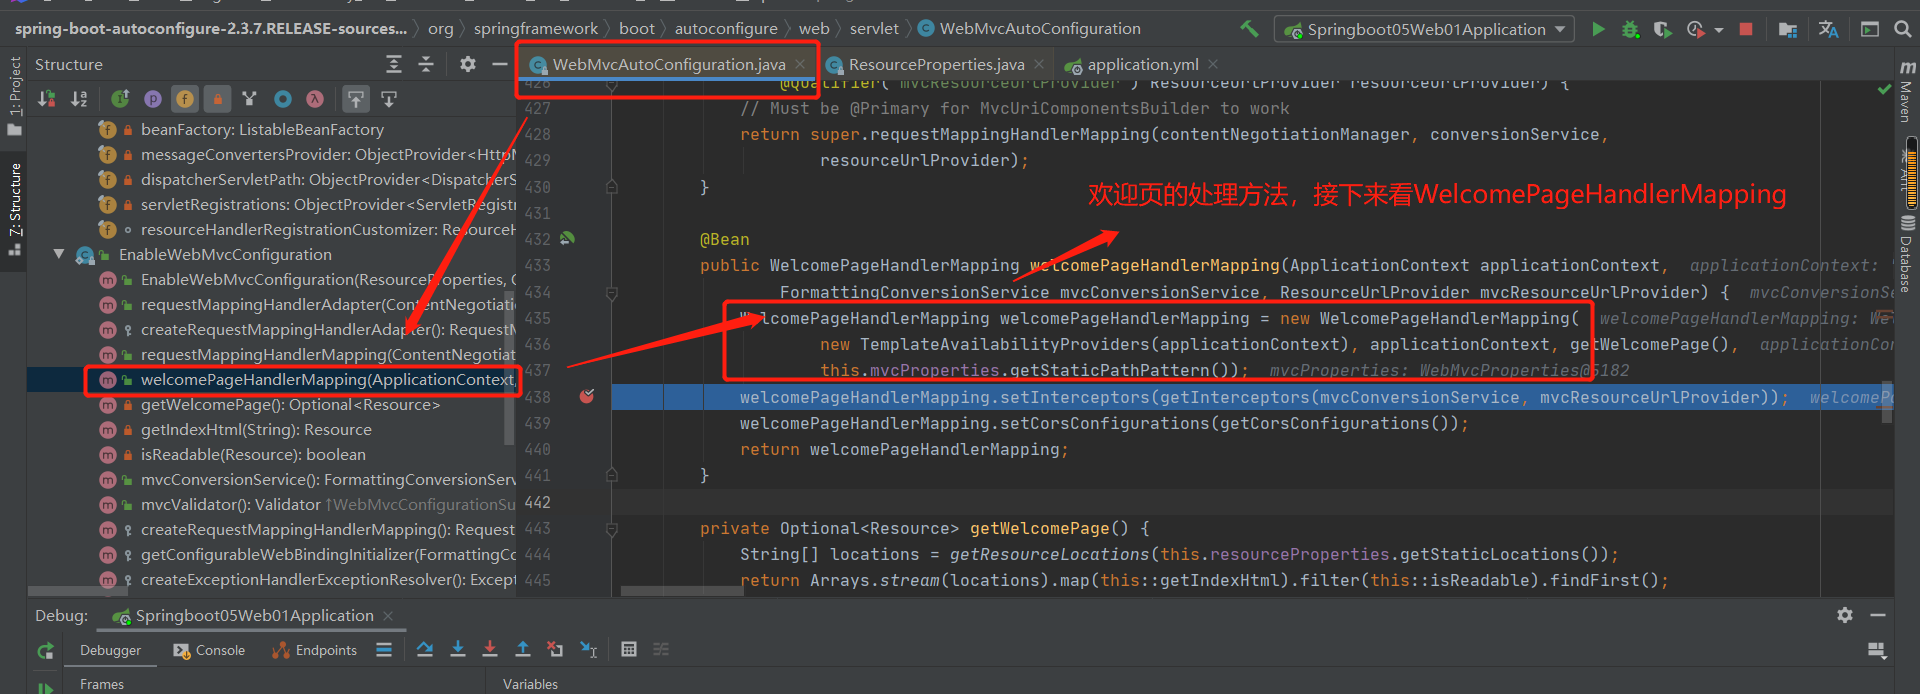
规则5:欢迎页处理规则
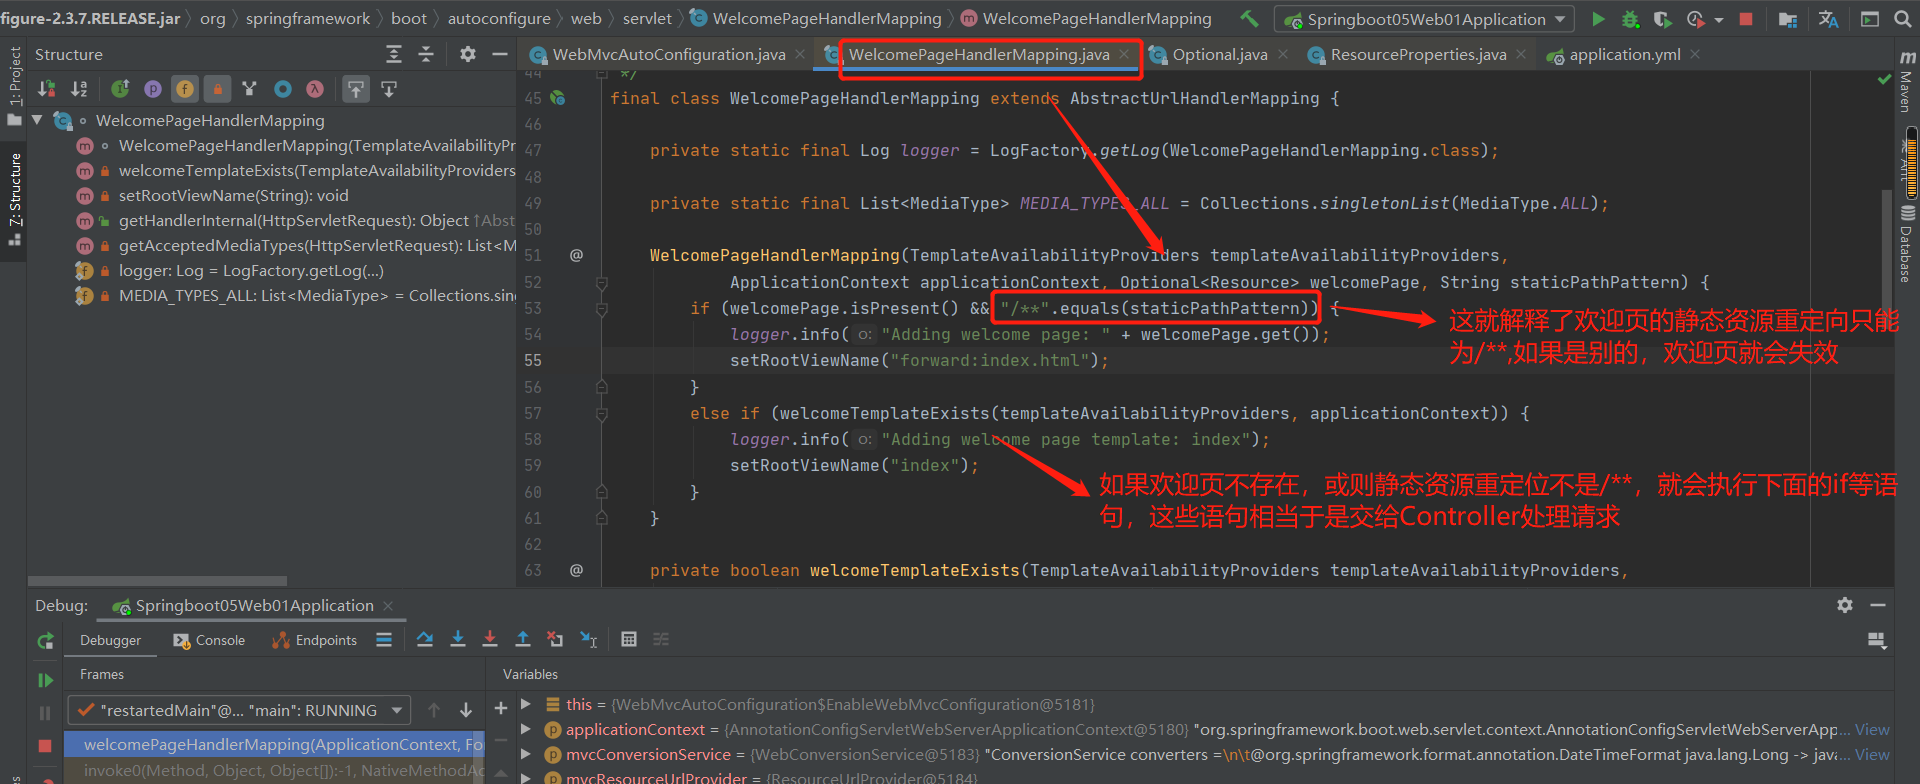
规则5:favicon
说明:跟代码没有关系,浏览器默认静态资源重定位路径为/**,当改变该路径时,自然无法找到。
6-2 请求处理---Rest风格
1.基本使用
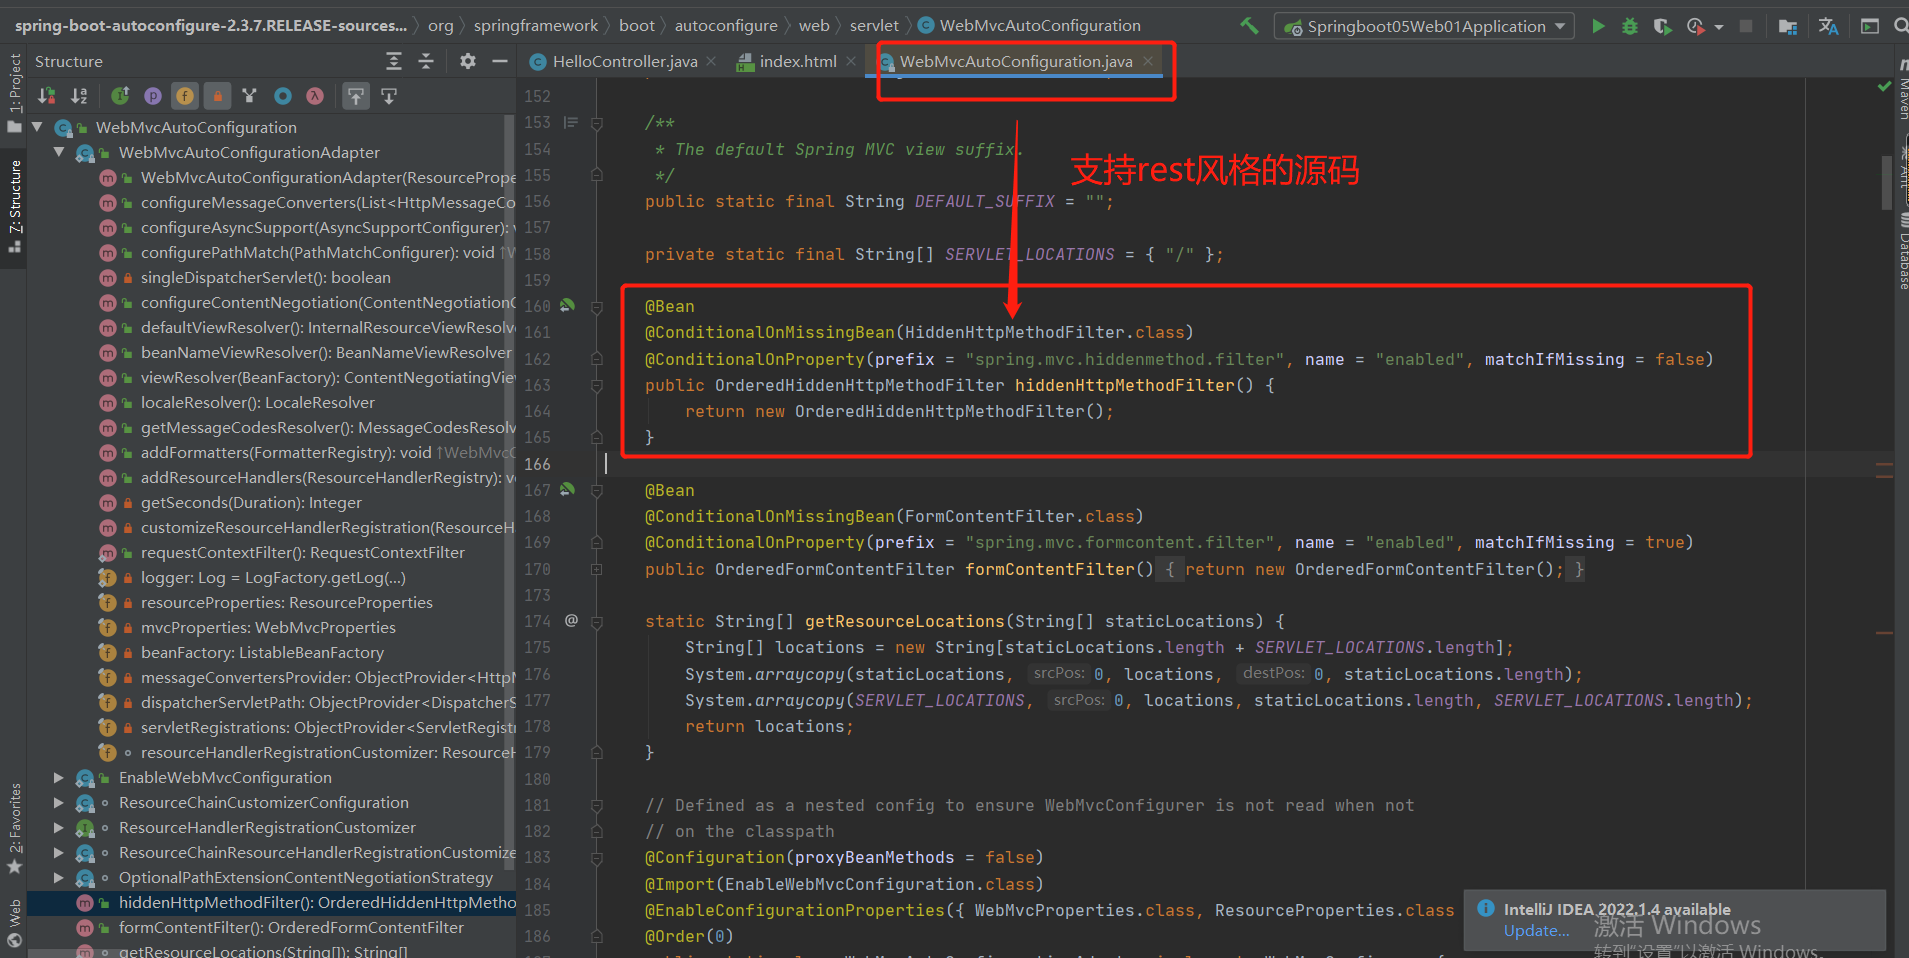
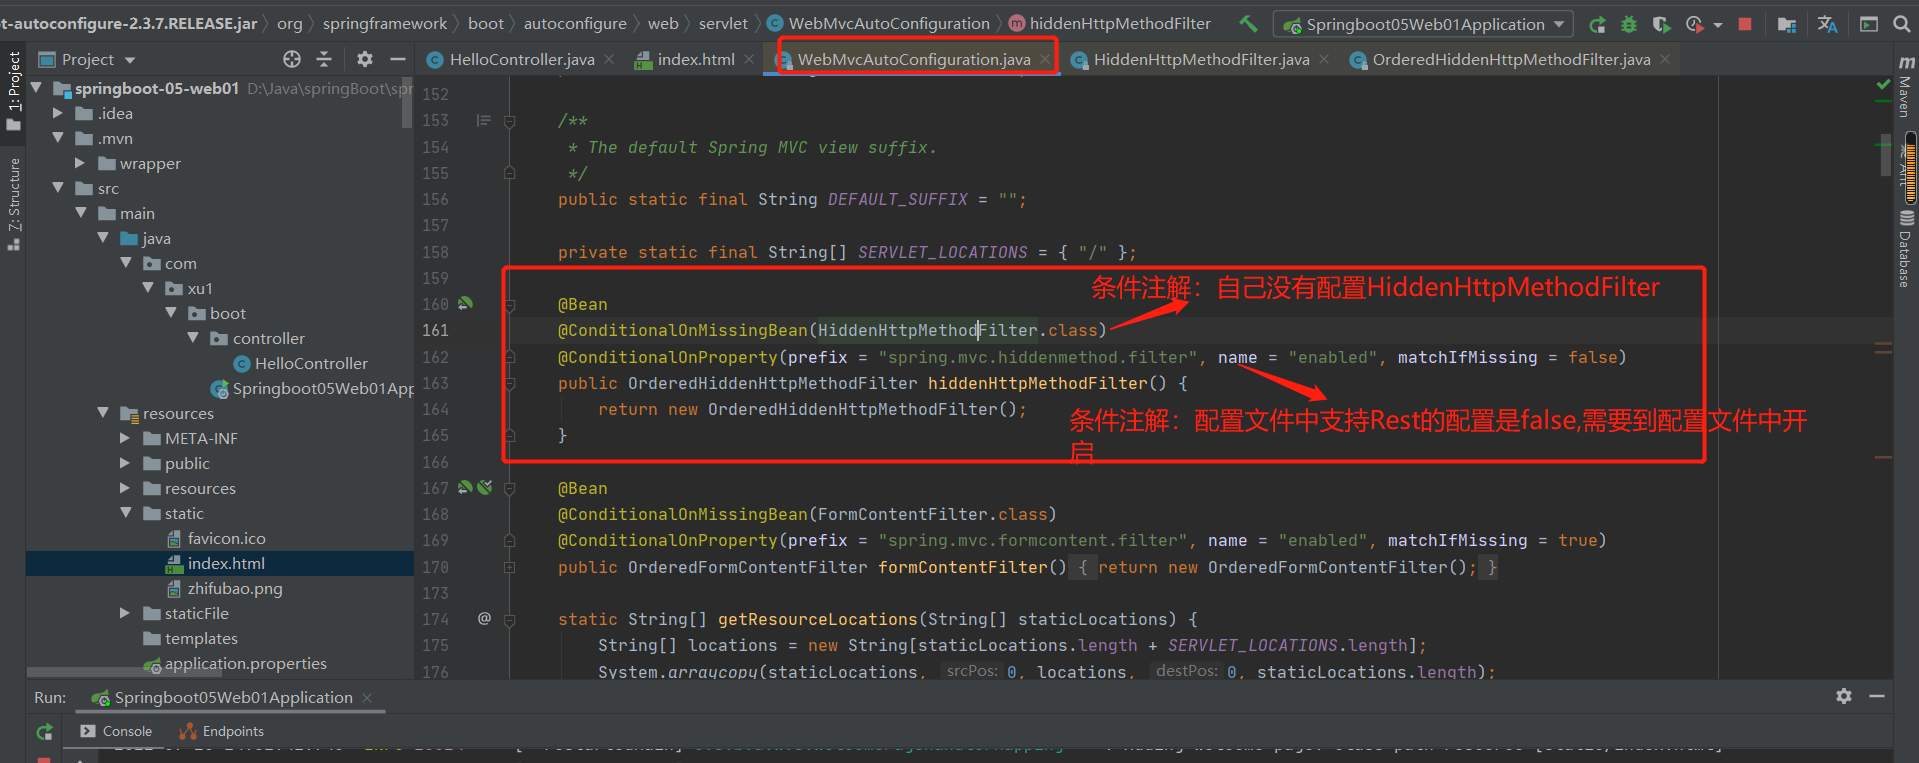
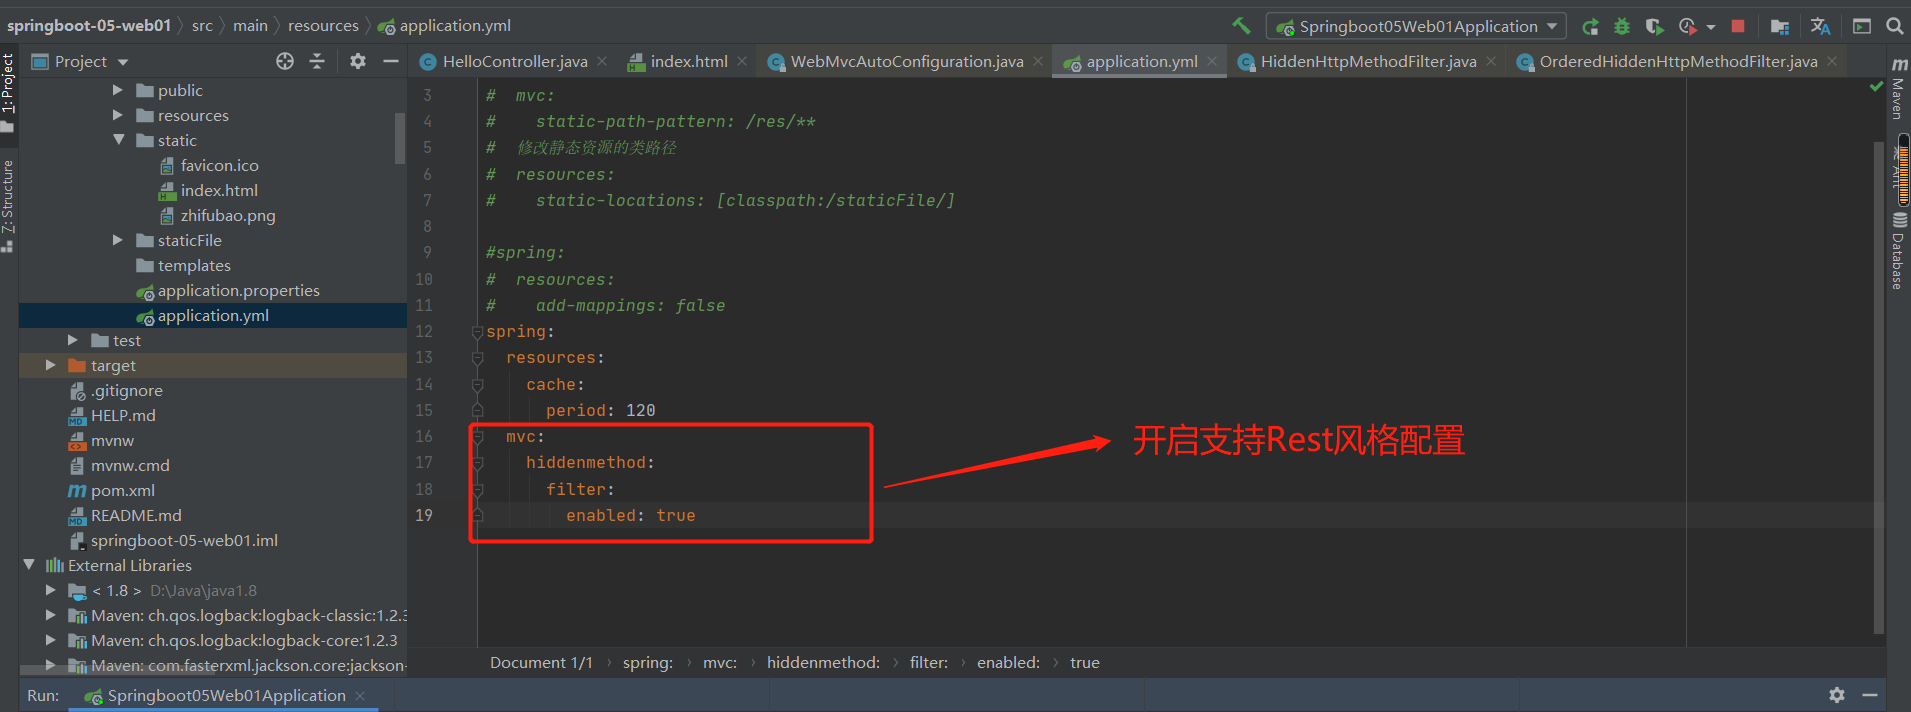
代码参考:
package com.xu1.boot.controller;

import org.springframework.web.bind.annotation.*;

/**
 * @auther xu
 * @Description
 * @date 2022/07/19 - 9:50:03
 * @Modified By:
 */
@RestController
public class HelloController {
    @RequestMapping(value = "bug.jpg")
    public String hallo01() {
        return "aaaaa";
    }

    /**
     *
     * @Description
     * 使用rest风格---处理get请求
     * @auther xu
     */
//    @RequestMapping(value = "/user",method = RequestMethod.GET)
    @GetMapping(value = "/user")
    public String getUser(){
        return "GET-张三";
    }

    /**
     *
     * @Description
     * 使用rest风格---处理post请求
     * @auther xu
     */
//    @RequestMapping(value = "/user",method = RequestMethod.POST)
    @PostMapping(value = "/user")
    public String saveUser(){
        return "POST-张三";
    }


    /**
     *
     * @Description
     * 使用rest风格---处理put请求
     * @auther xu
     */
//    @RequestMapping(value = "/user",method = RequestMethod.PUT)
    @PutMapping(value = "/user")
    public String putUser(){
        return "PUT-张三";
    }

    /**
     *
     * @Description
     * 使用rest风格---处理delete请求(删除)
     * @auther xu
     */
//    @RequestMapping(value = "/user",method = RequestMethod.DELETE)
    @DeleteMapping(value = "/user")
    public String deleteUser(){
        return "DELETE-张三";
    }
}
结果测试:


2.源码探究原理
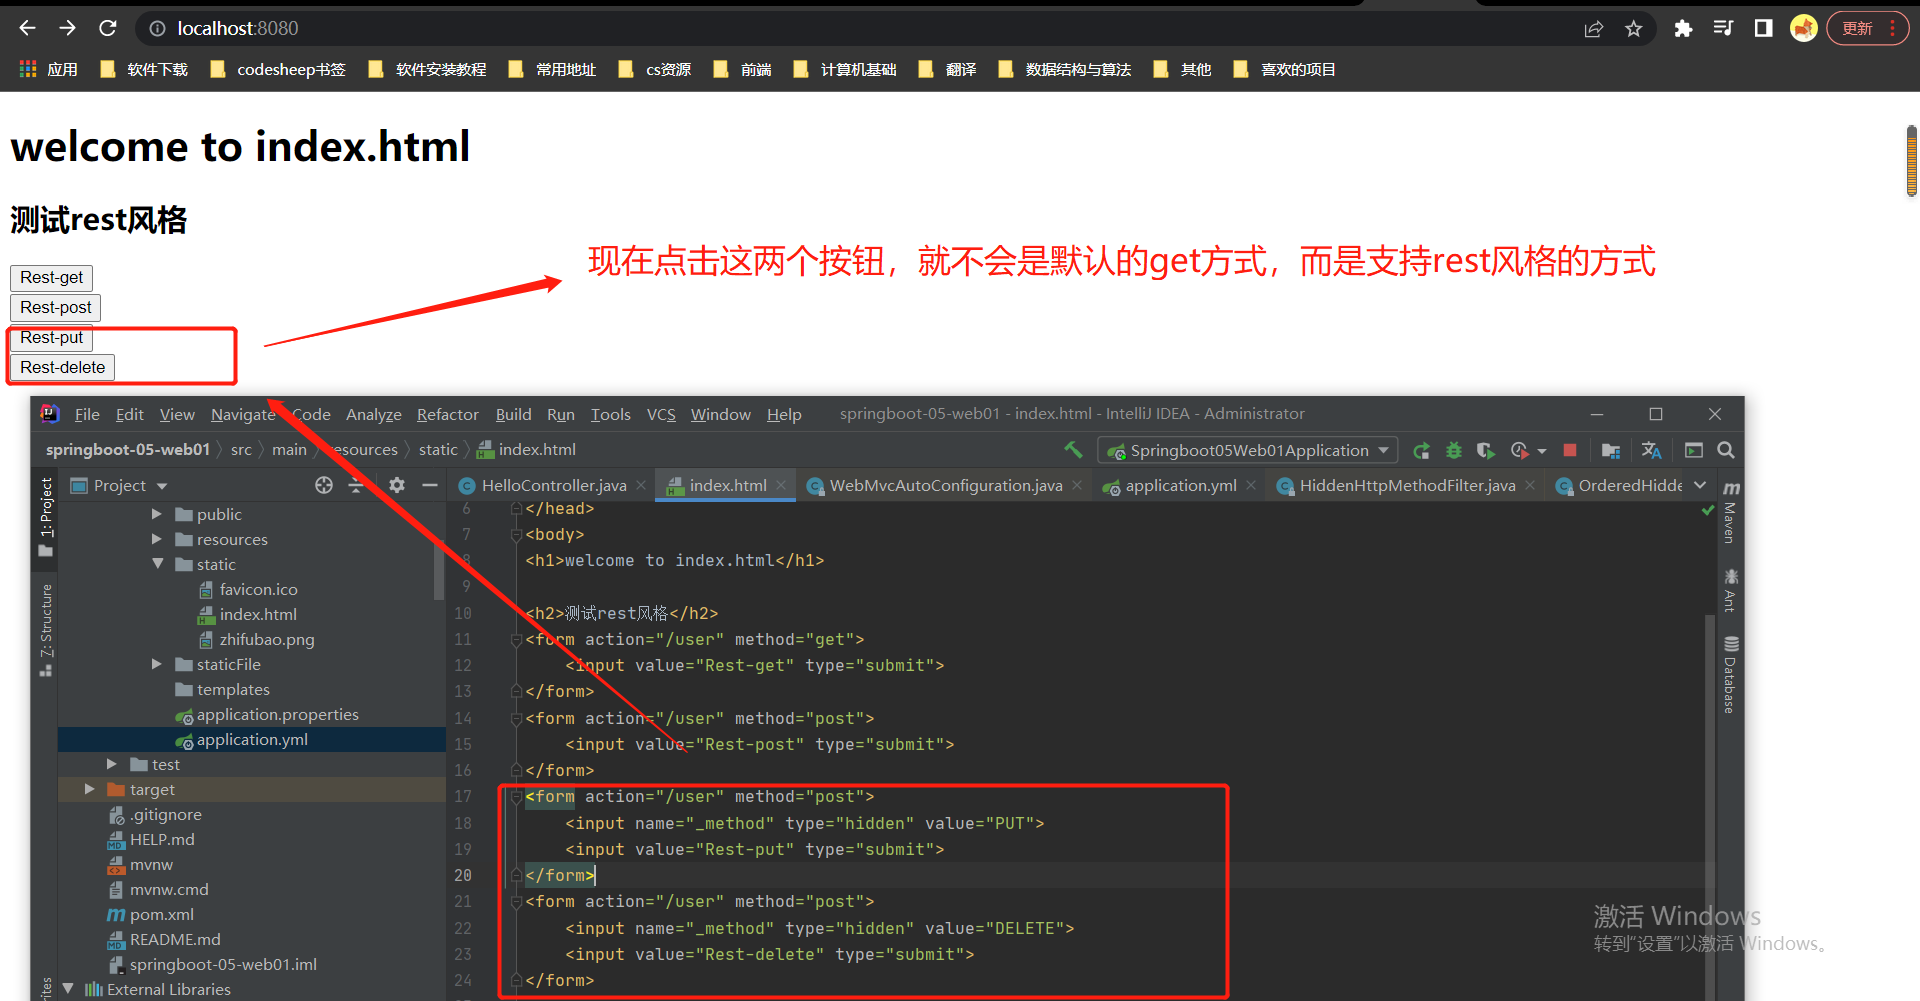
1.表单
index.html代码参考:
<!DOCTYPE html>
<html lang="en">
<head>
    <meta charset="UTF-8">
    <title>Title</title>
</head>
<body>
<h1>welcome to index.html</h1>

<h2>测试rest风格</h2>
<form action="/user" method="get">
    <input value="Rest-get" type="submit">
</form>
<form action="/user" method="post">
    <input value="Rest-post" type="submit">
</form>
<form action="/user" method="post">
    <input name="_method" type="hidden" value="PUT">
    <input value="Rest-put" type="submit">
</form>
<form action="/user" method="post">
    <input name="_method" type="hidden" value="delete">
    <input value="Rest-delete" type="submit">
</form>
</body>
</html>
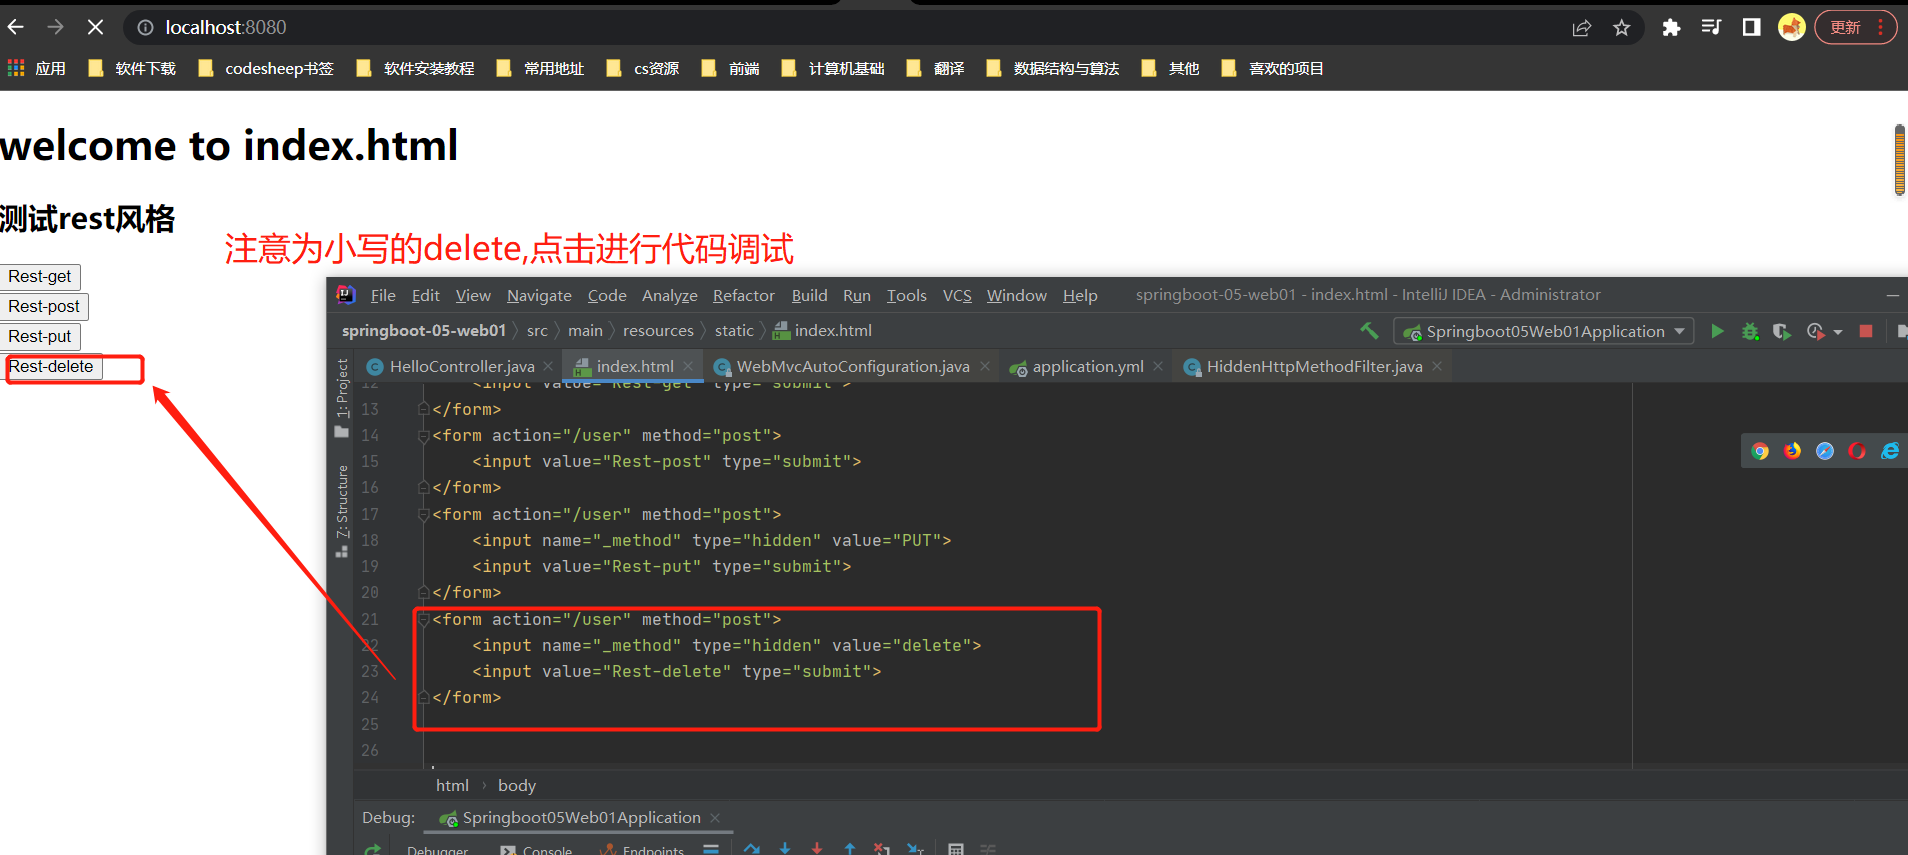
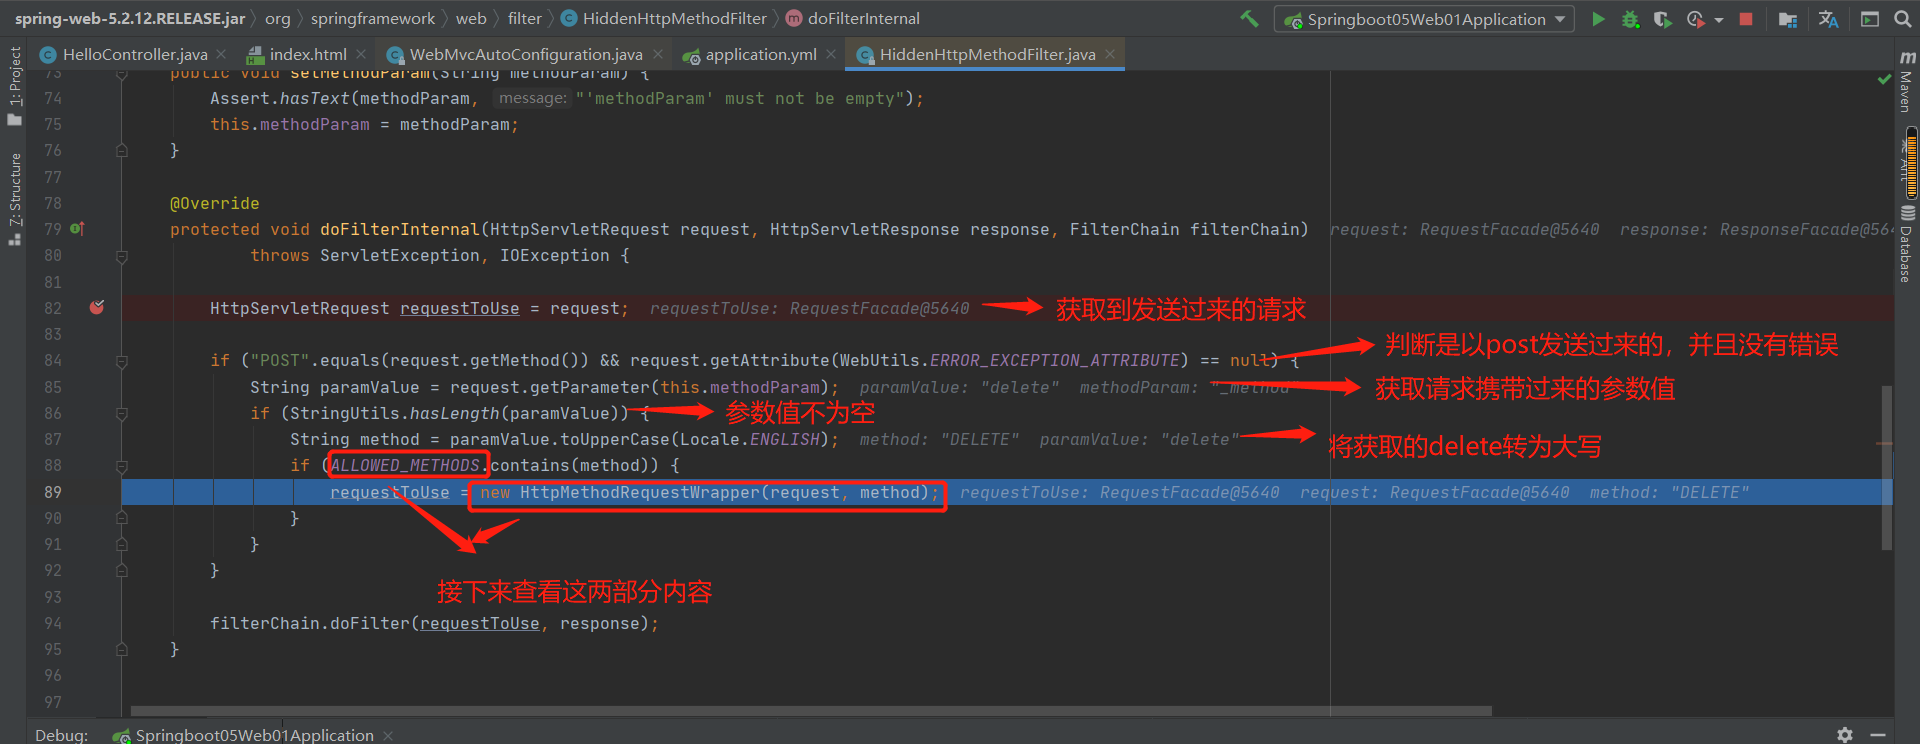
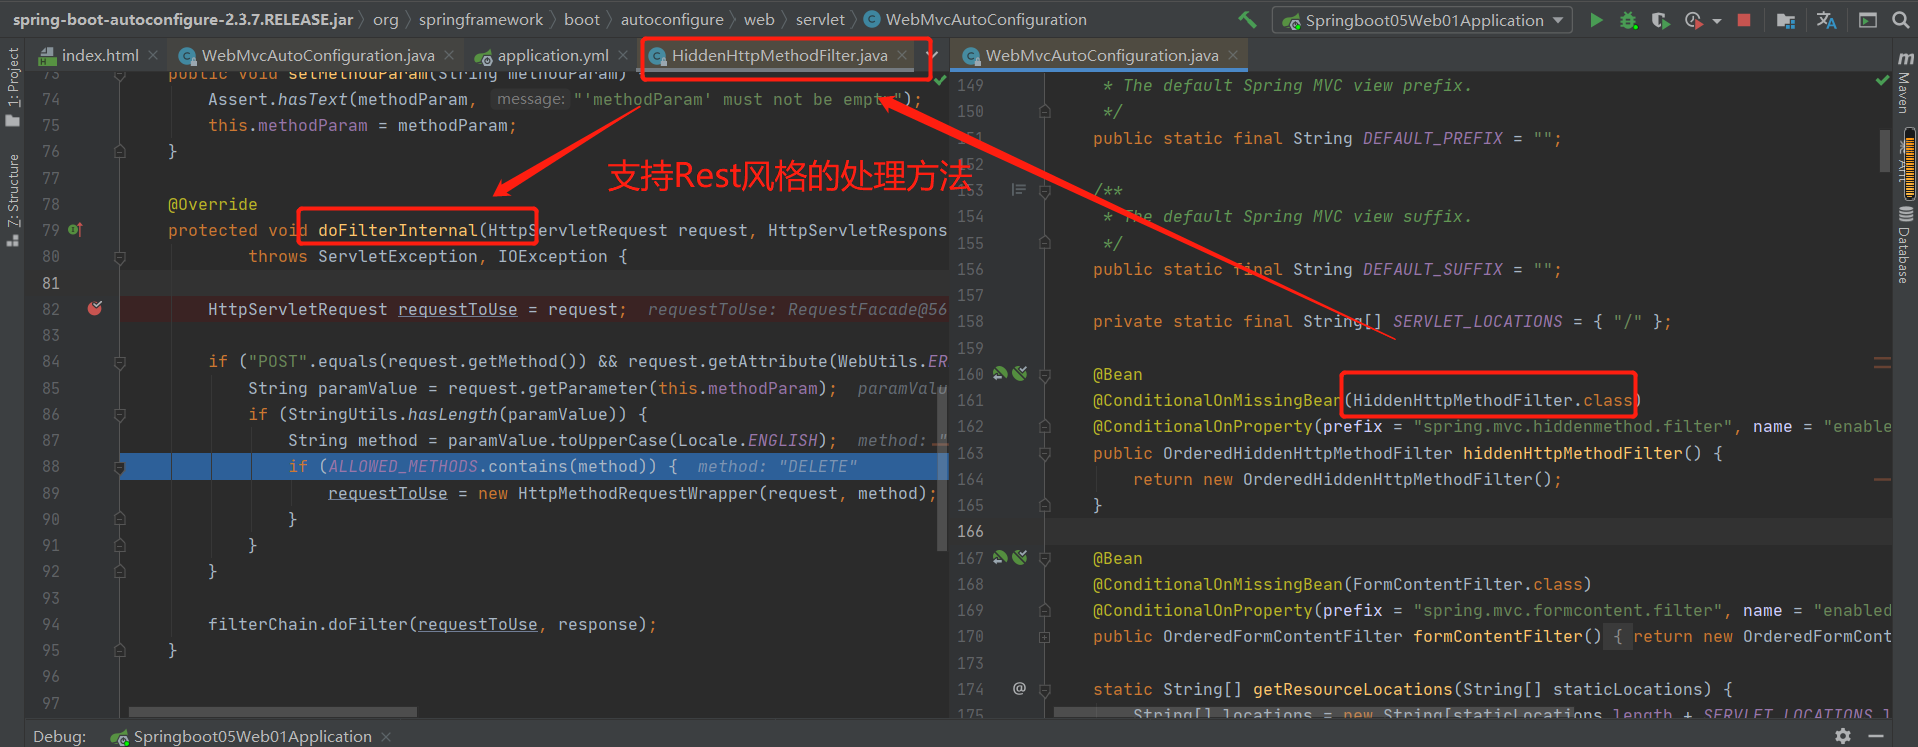
注意:图中只有一个断点进行调试。
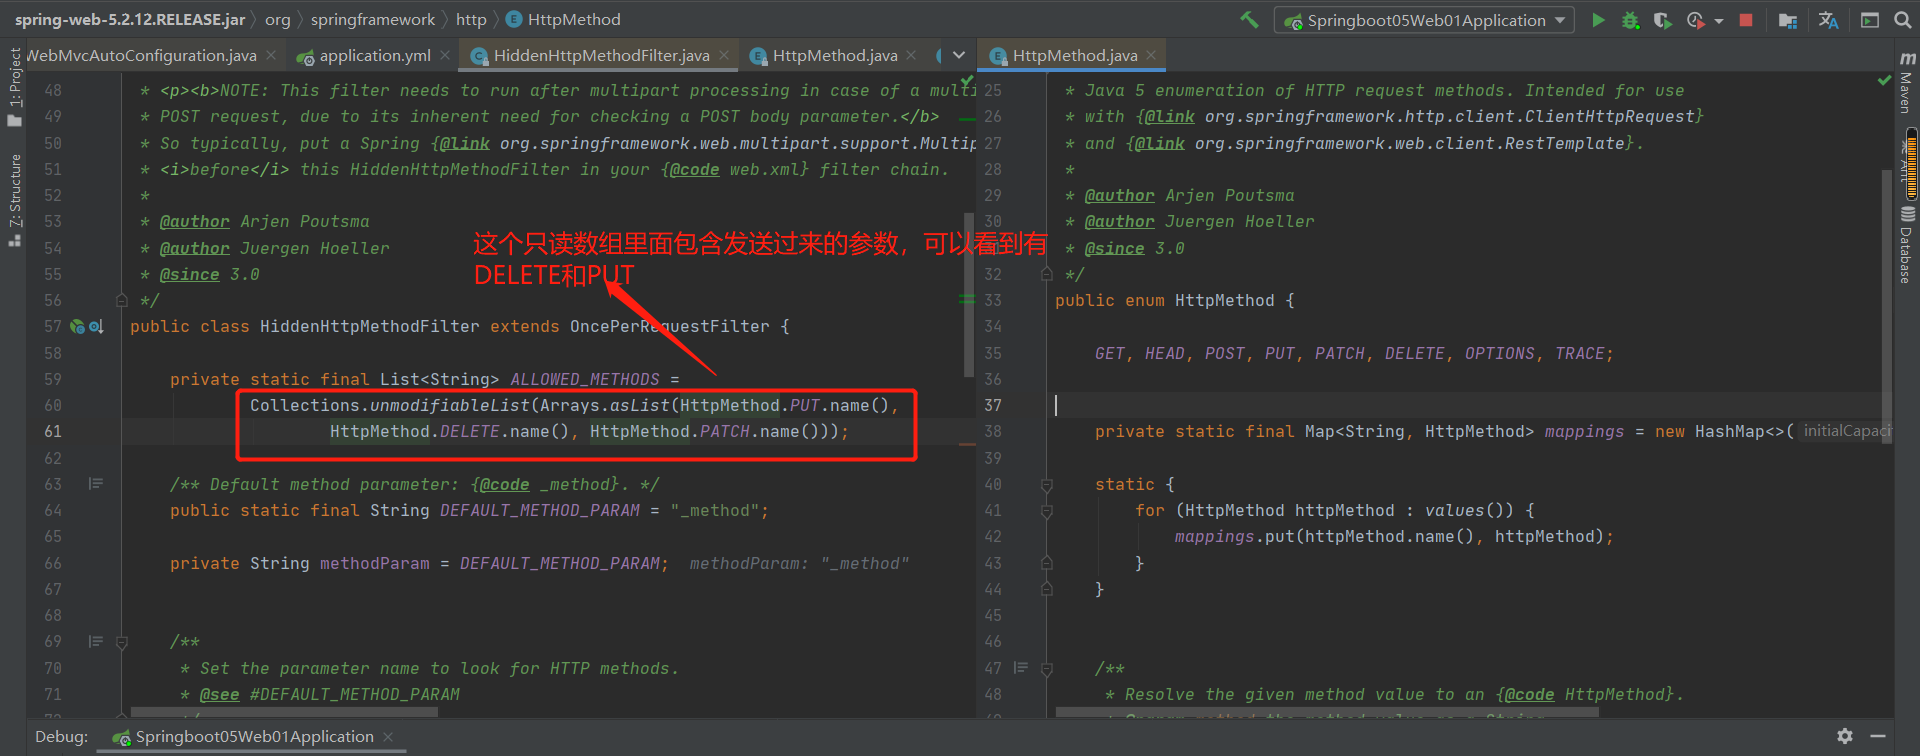
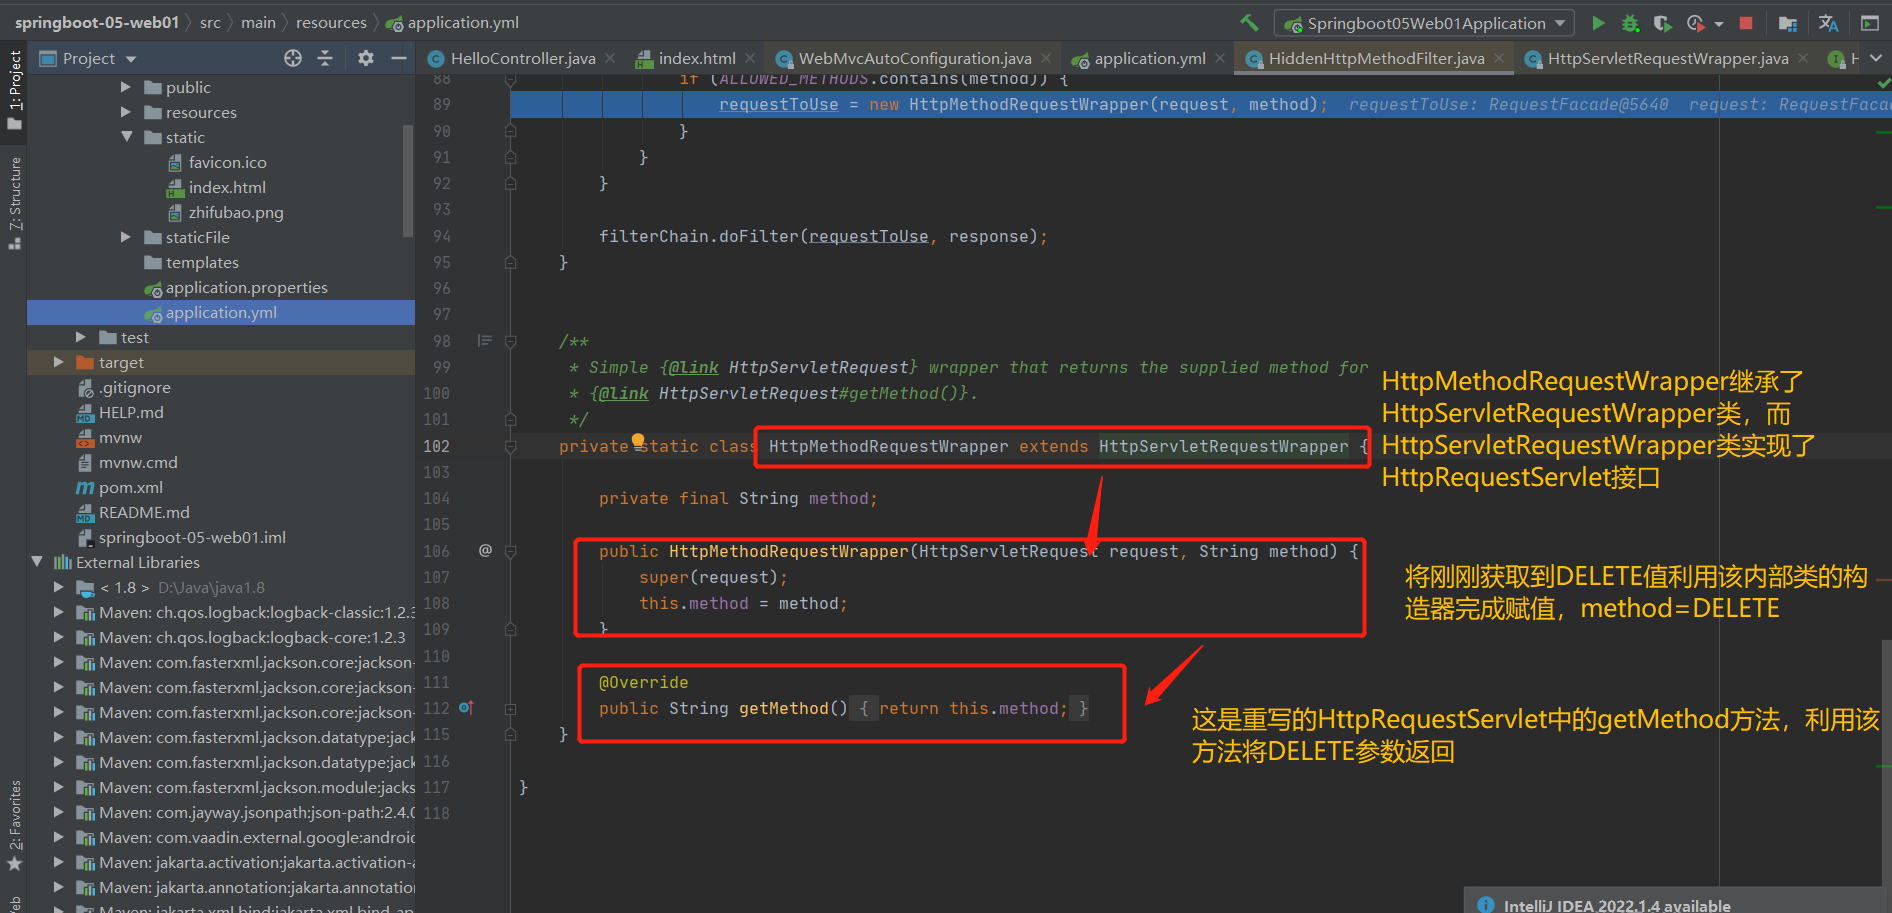
补充:也就是说,以后调用getMethod()方法都是使用重写的该方法,返回的值(eg:DELETE)
总结:

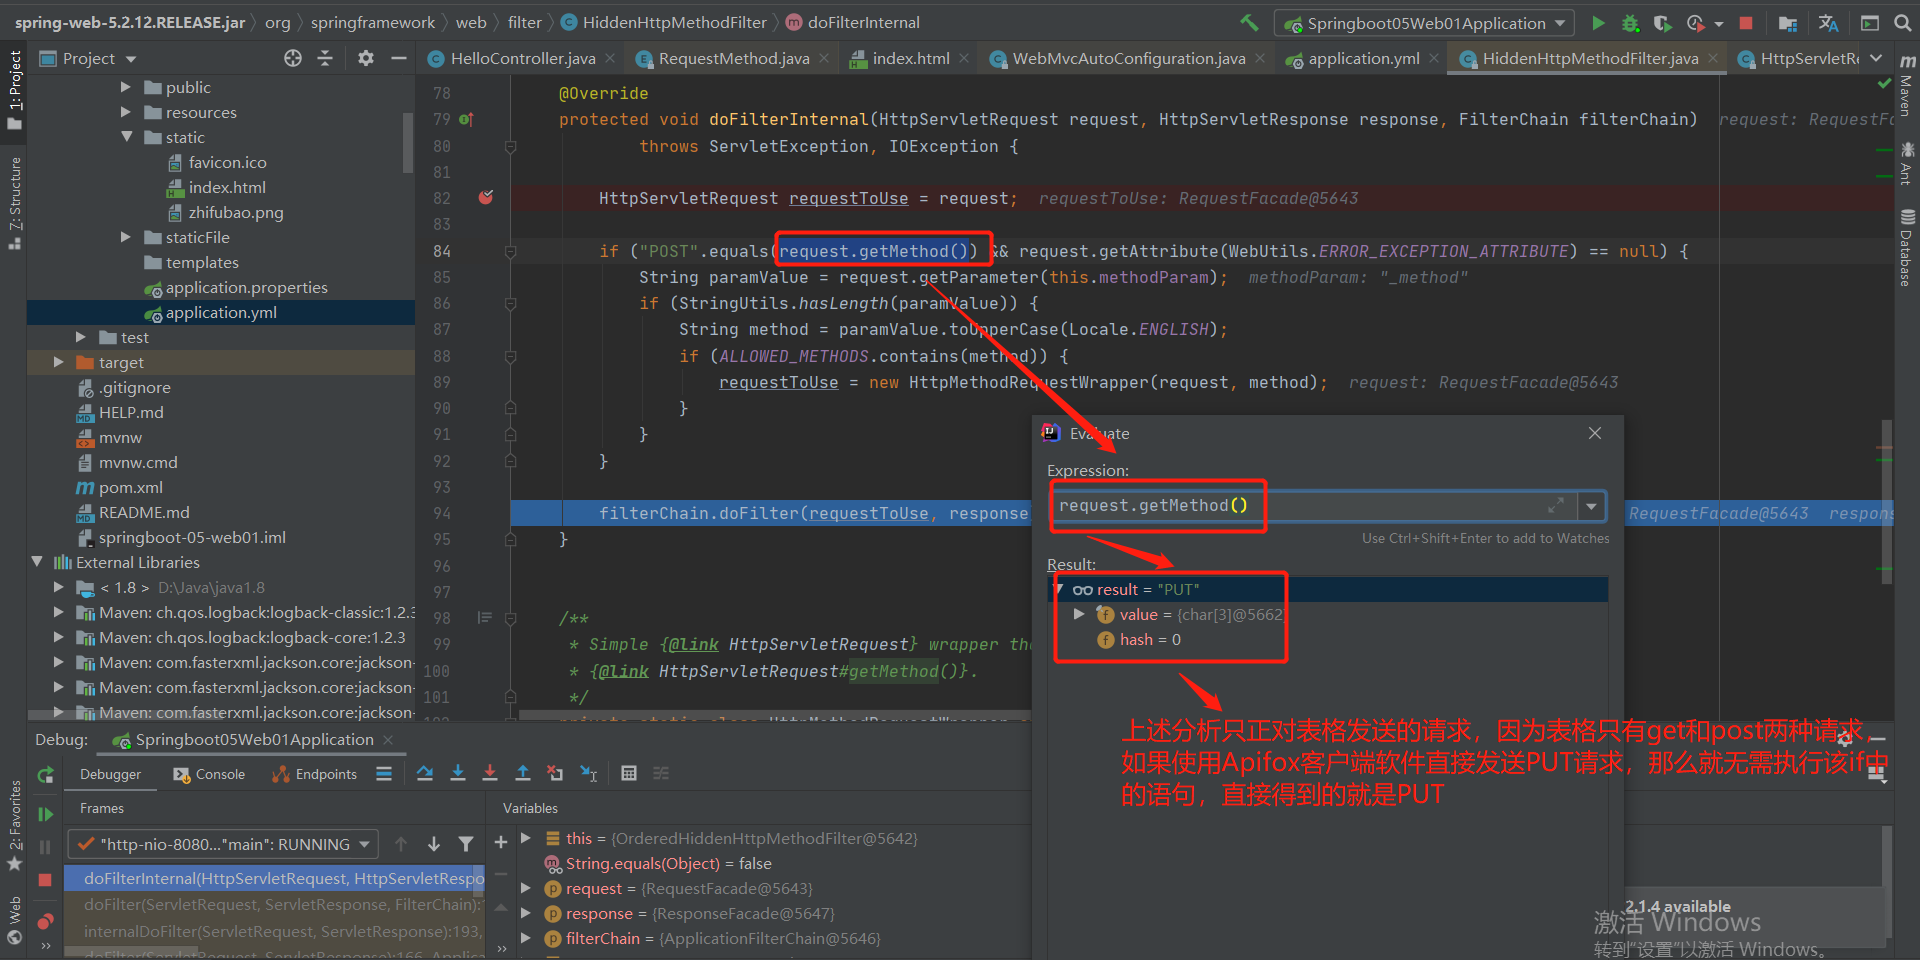
2.非表单
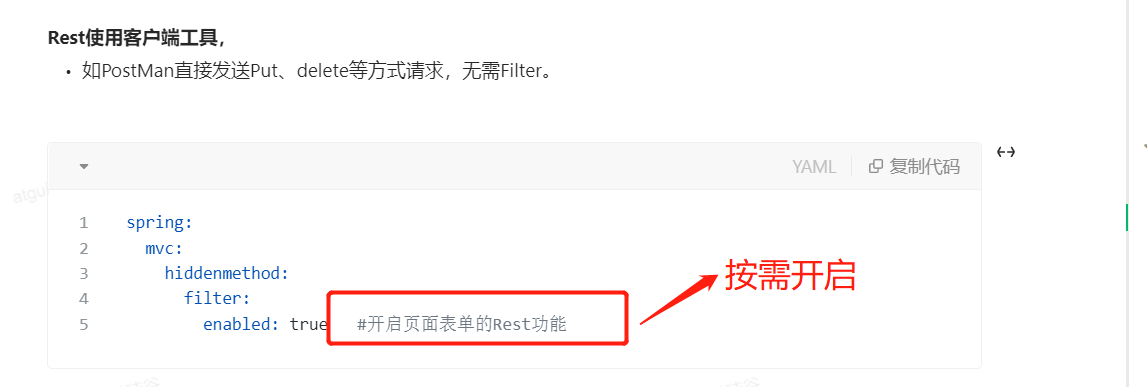
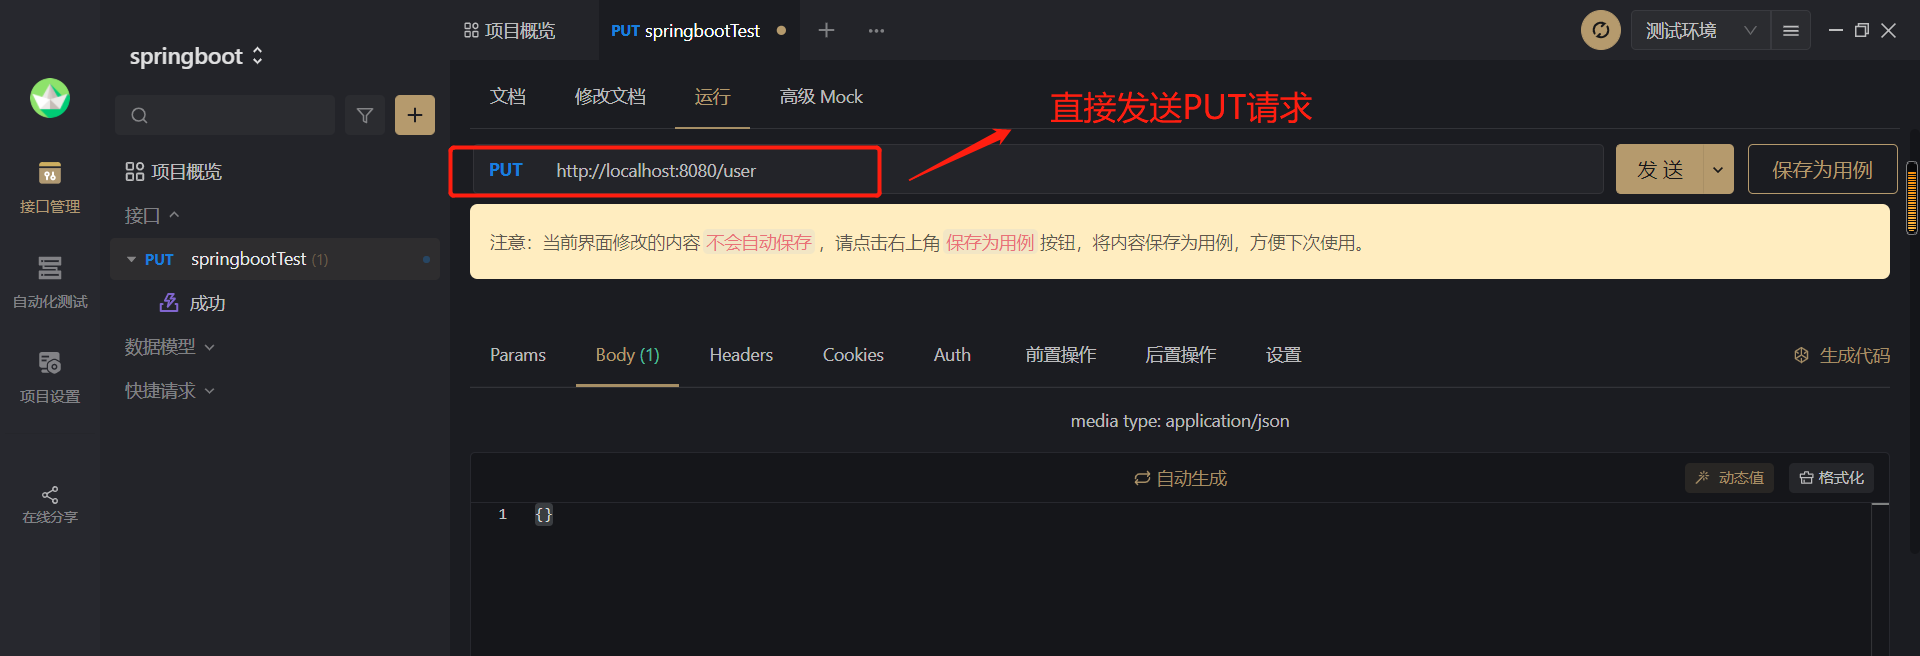
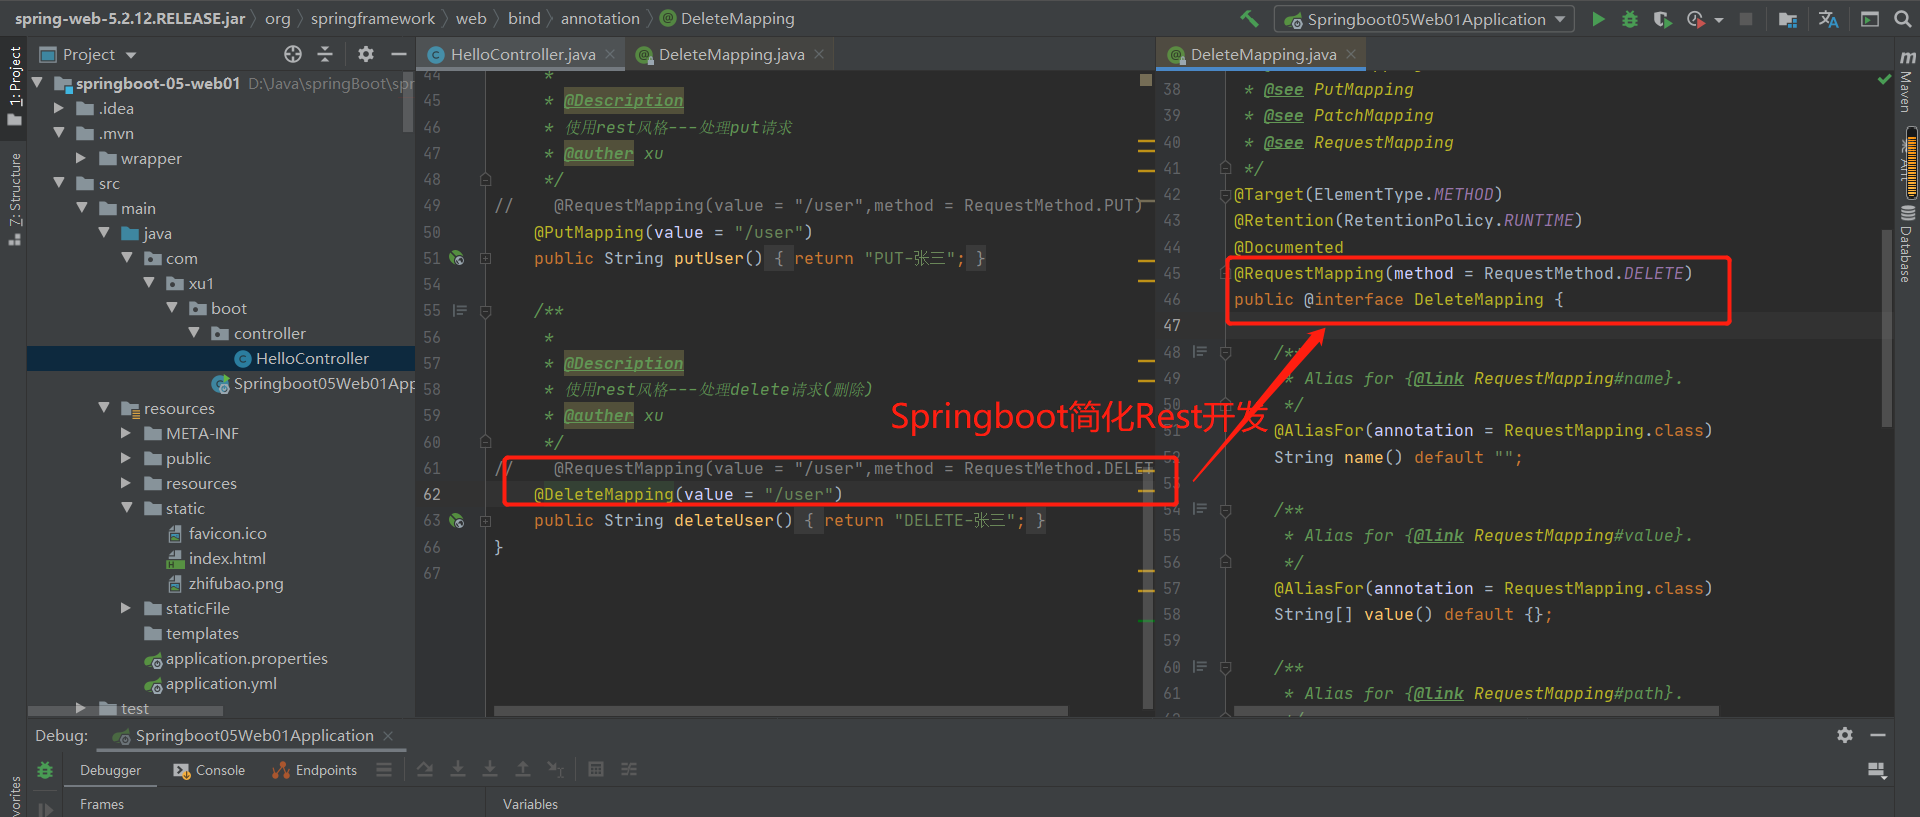
3.springboot简化Rest风格的开发
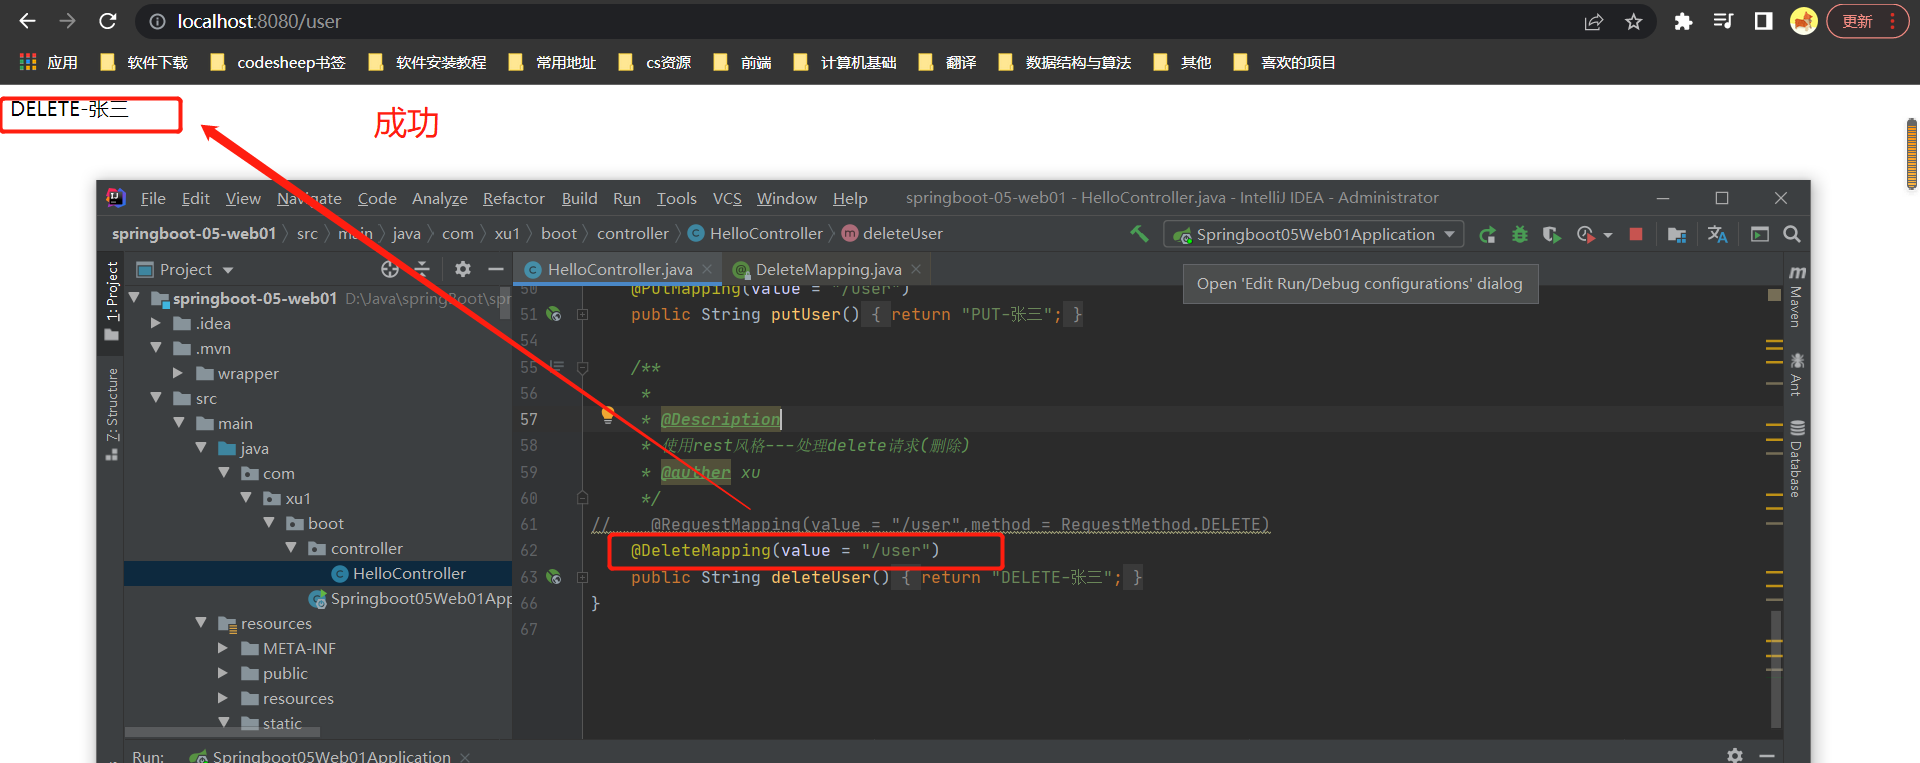
结果:
代码参考:
package com.xu1.boot.controller;

import org.springframework.web.bind.annotation.*;

/**
 * @auther xu
 * @Description
 * @date 2022/07/19 - 9:50:03
 * @Modified By:
 */
@RestController
public class HelloController {
    @RequestMapping(value = "bug.jpg")
    public String hallo01() {
        return "aaaaa";
    }

    /**
     *
     * @Description
     * 使用rest风格---处理get请求
     * @auther xu
     */
//    @RequestMapping(value = "/user",method = RequestMethod.GET)
    @GetMapping(value = "/user")
    public String getUser(){
        return "GET-张三";
    }

    /**
     *
     * @Description
     * 使用rest风格---处理post请求
     * @auther xu
     */
//    @RequestMapping(value = "/user",method = RequestMethod.POST)
    @PostMapping(value = "/user")
    public String saveUser(){
        return "POST-张三";
    }


    /**
     *
     * @Description
     * 使用rest风格---处理put请求
     * @auther xu
     */
//    @RequestMapping(value = "/user",method = RequestMethod.PUT)
    @PutMapping(value = "/user")
    public String putUser(){
        return "PUT-张三";
    }

    /**
     *
     * @Description
     * 使用rest风格---处理delete请求(删除)
     * @auther xu
     */
//    @RequestMapping(value = "/user",method = RequestMethod.DELETE)
    @DeleteMapping(value = "/user")
    public String deleteUser(){
        return "DELETE-张三";
    }
}
4改变Rest请求参数_method
不使用默认的HiddenHttpMethodFilter,自定义一个HiddenHttpMethodFilter,然后将其"_method"变为"_m"
package com.xu1.boot.config;

import org.springframework.context.annotation.Bean;
import org.springframework.context.annotation.Configuration;
import org.springframework.web.filter.HiddenHttpMethodFilter;

/**
 * @auther xu
 * @Description
 * @date 2022/07/21 - 5:55:51
 * @Modified By:
 */
@Configuration(proxyBeanMethods = false)
public class WebConfig {
    @Bean
    public HiddenHttpMethodFilter hiddenHttpMethodFilter() {
        HiddenHttpMethodFilter hiddenHttpMethodFilter = new HiddenHttpMethodFilter();
        hiddenHttpMethodFilter.setMethodParam("_m");
        return hiddenHttpMethodFilter;
    }
}
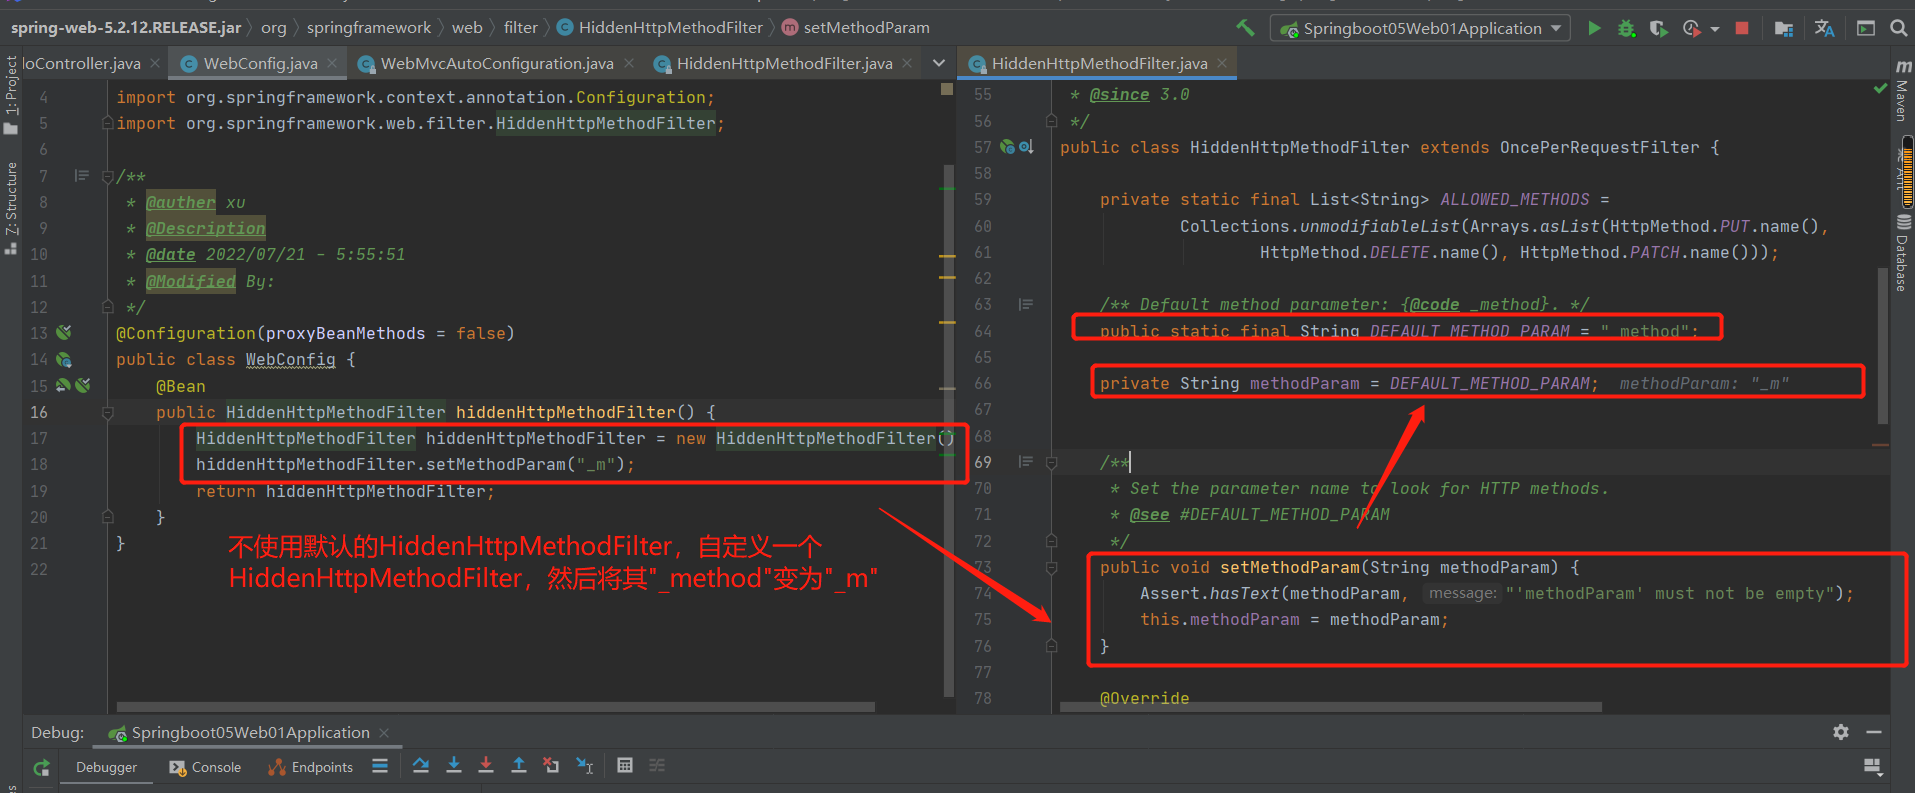
结果:
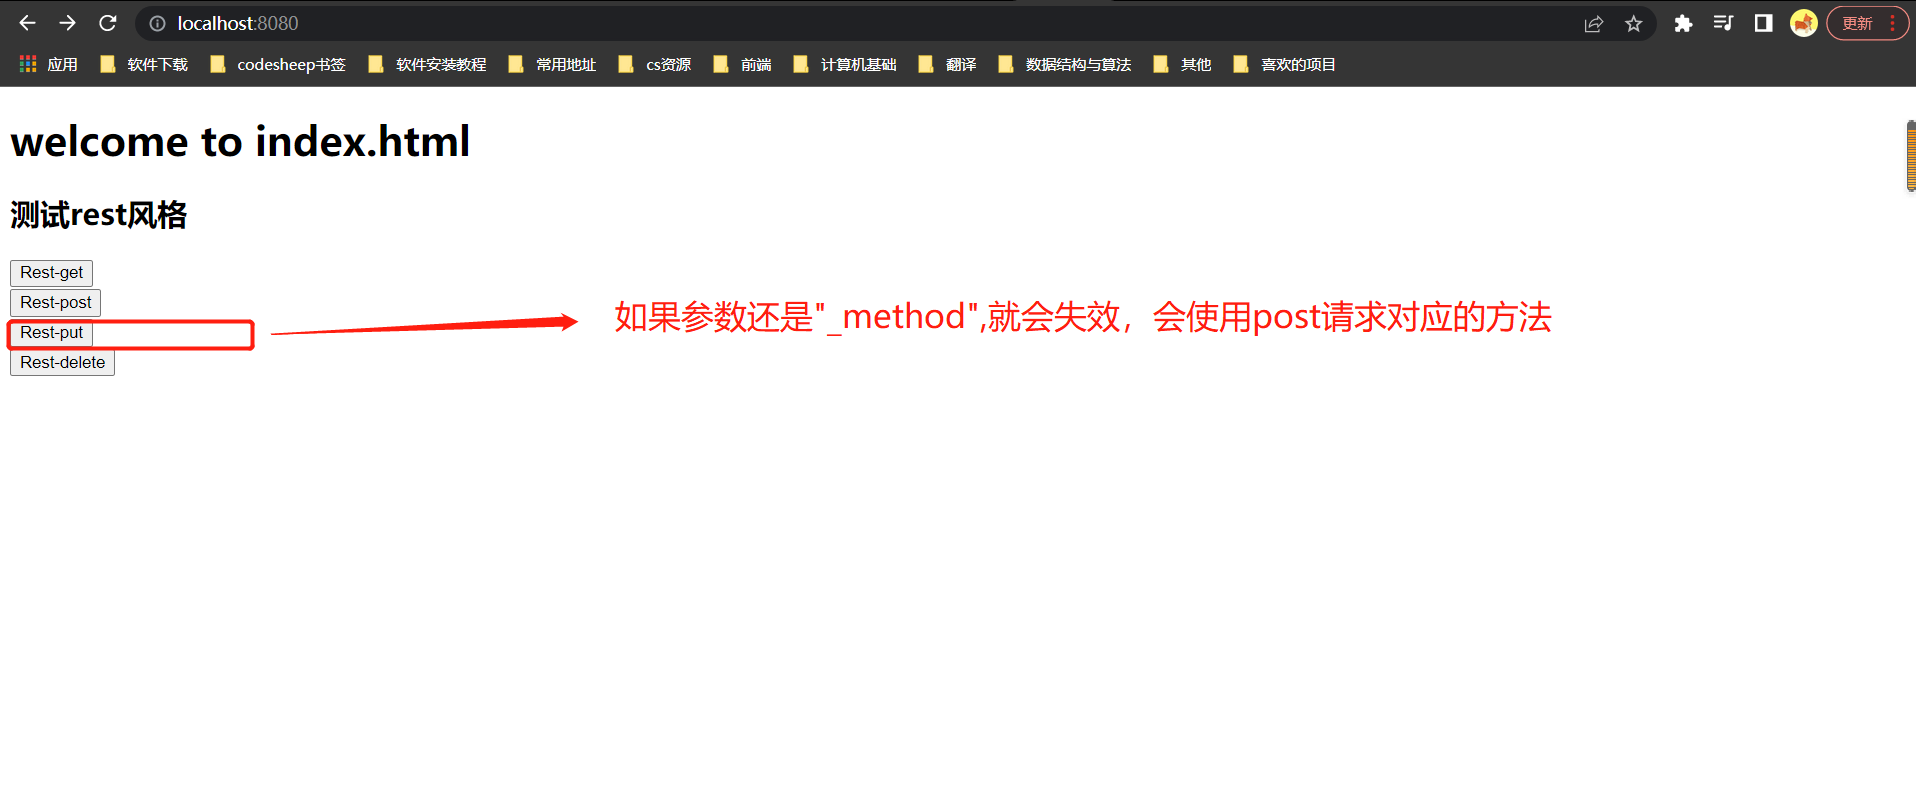

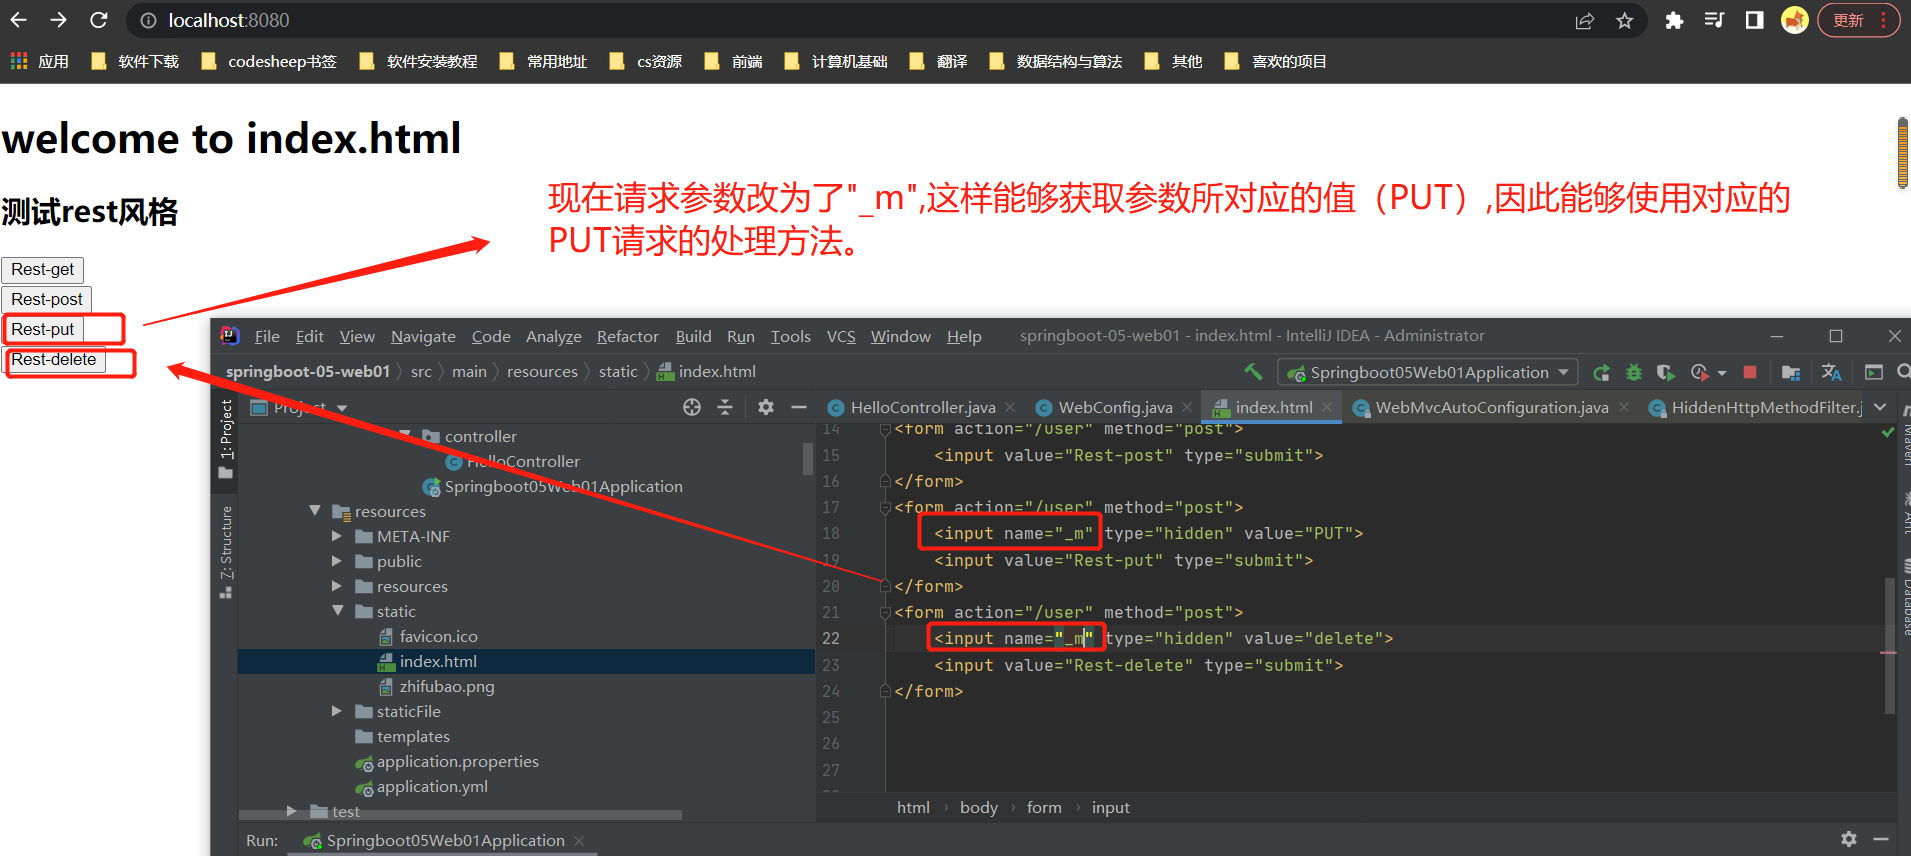
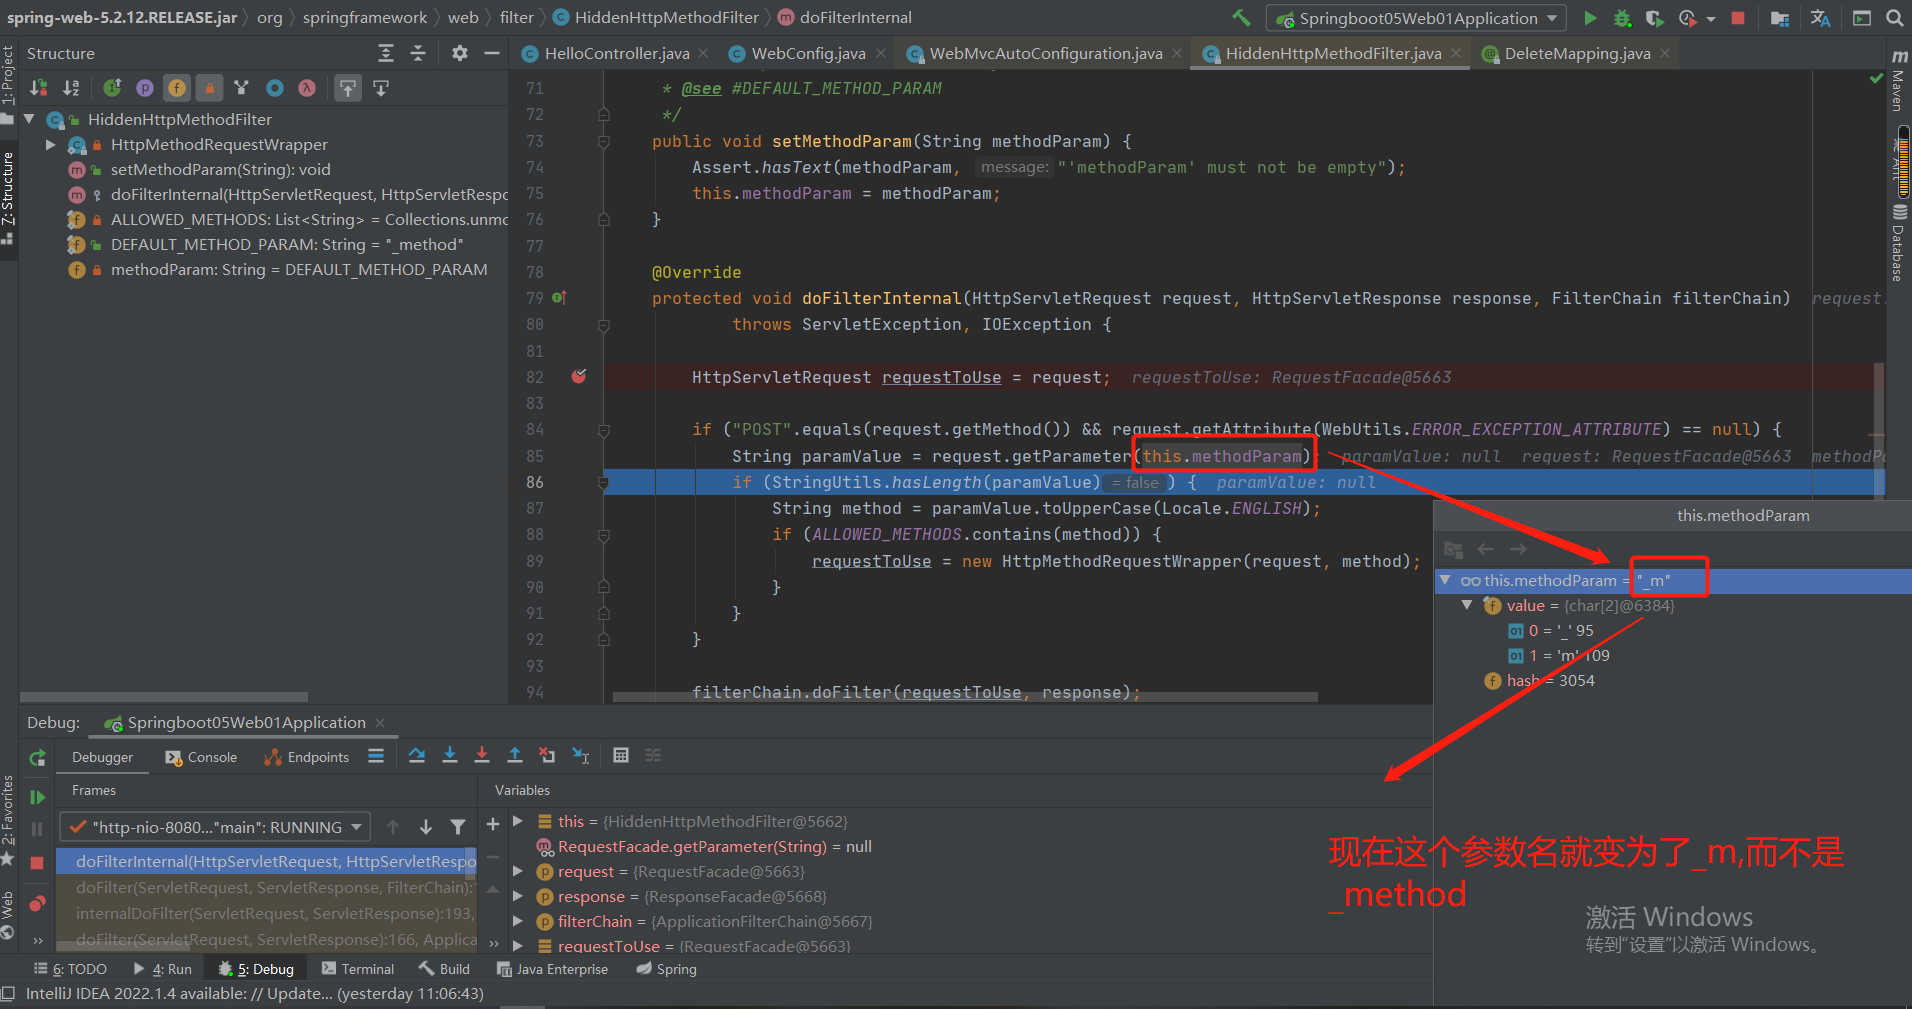
源码调试分析,可见参数变为了"_m"而不是原来的"_method":
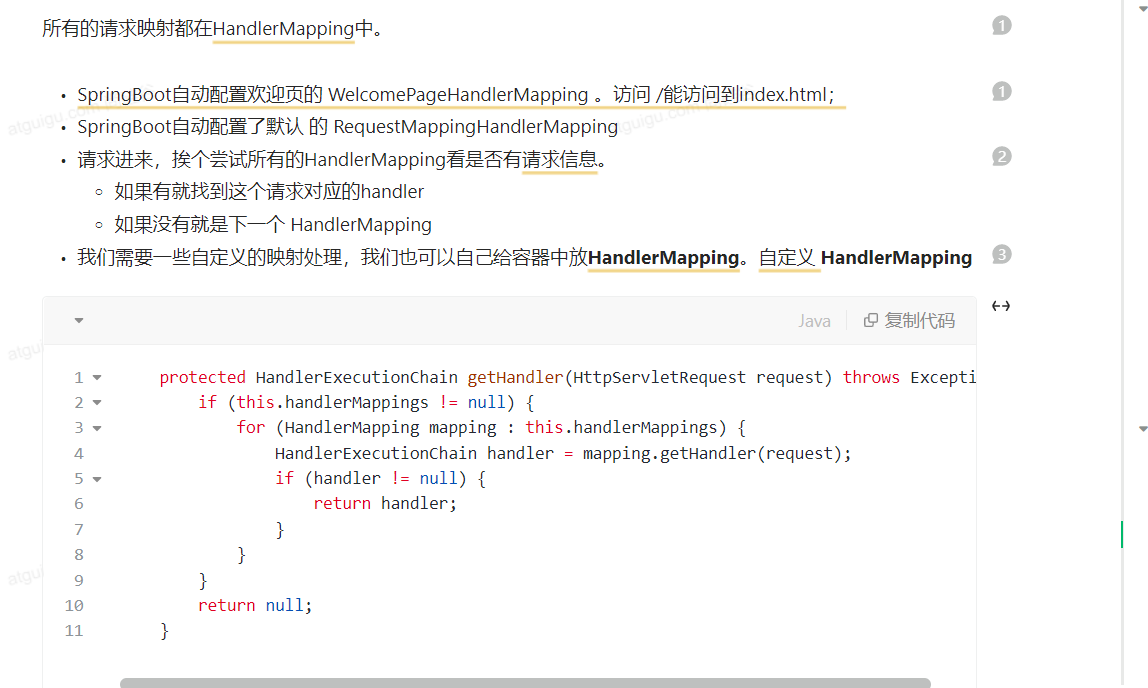
5.请求映射原理(源码分析)

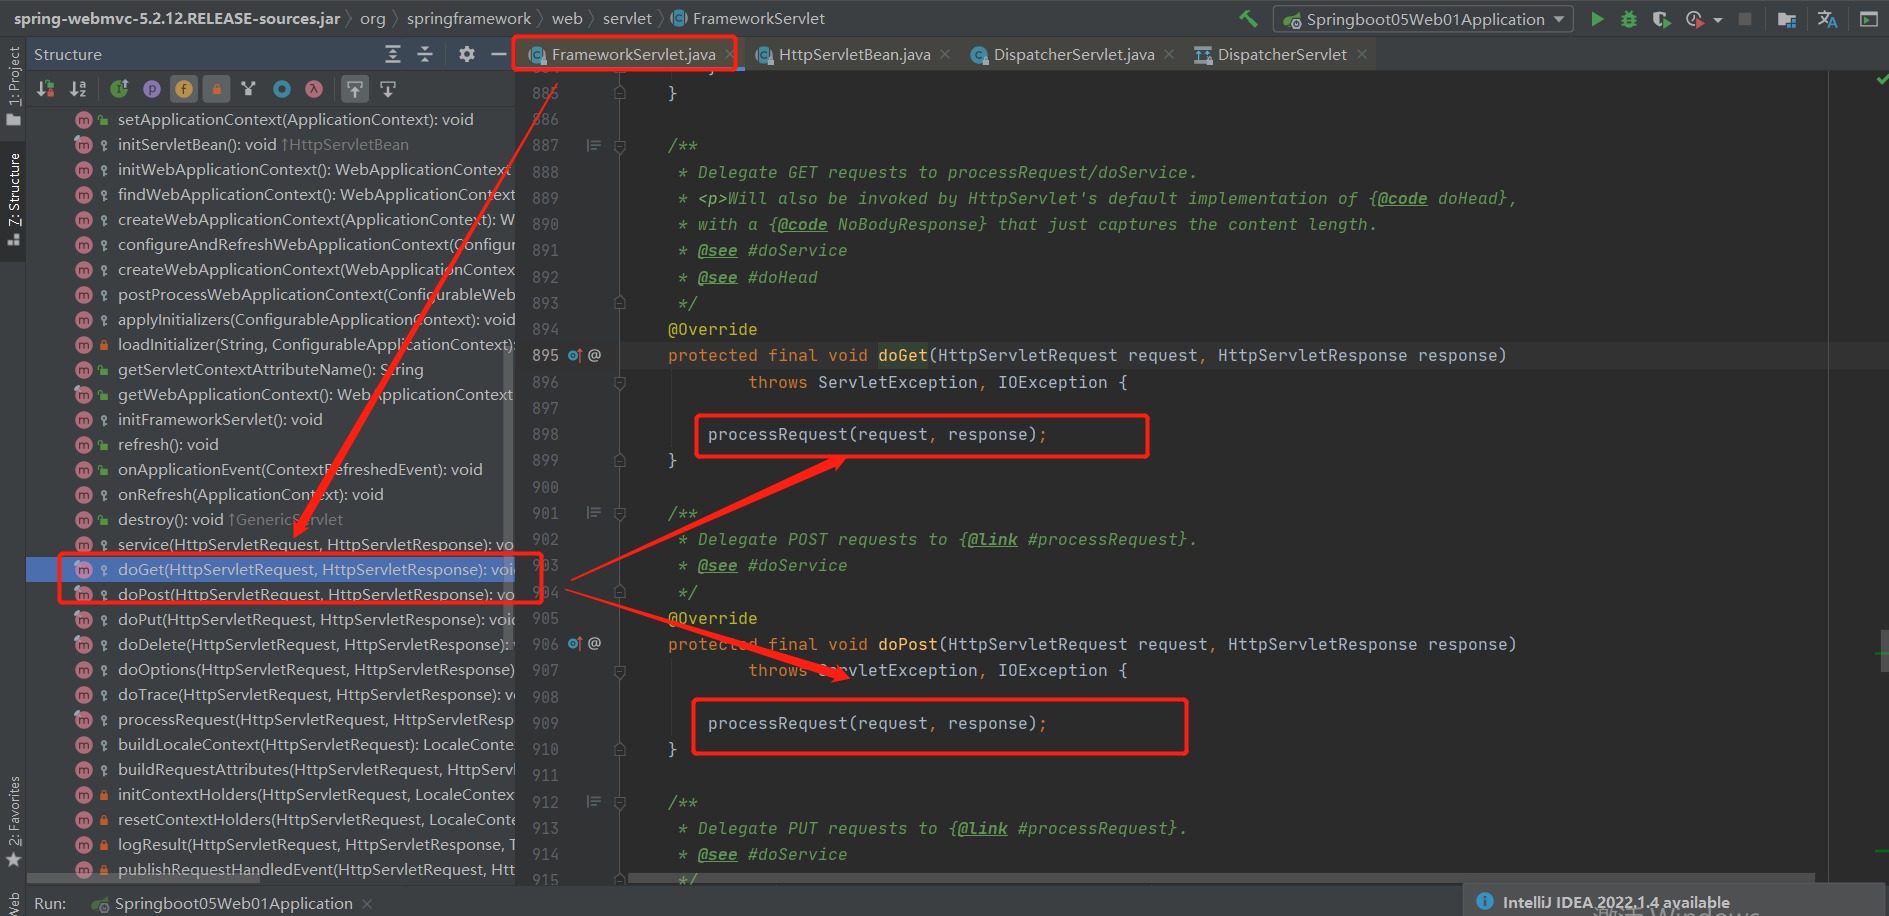
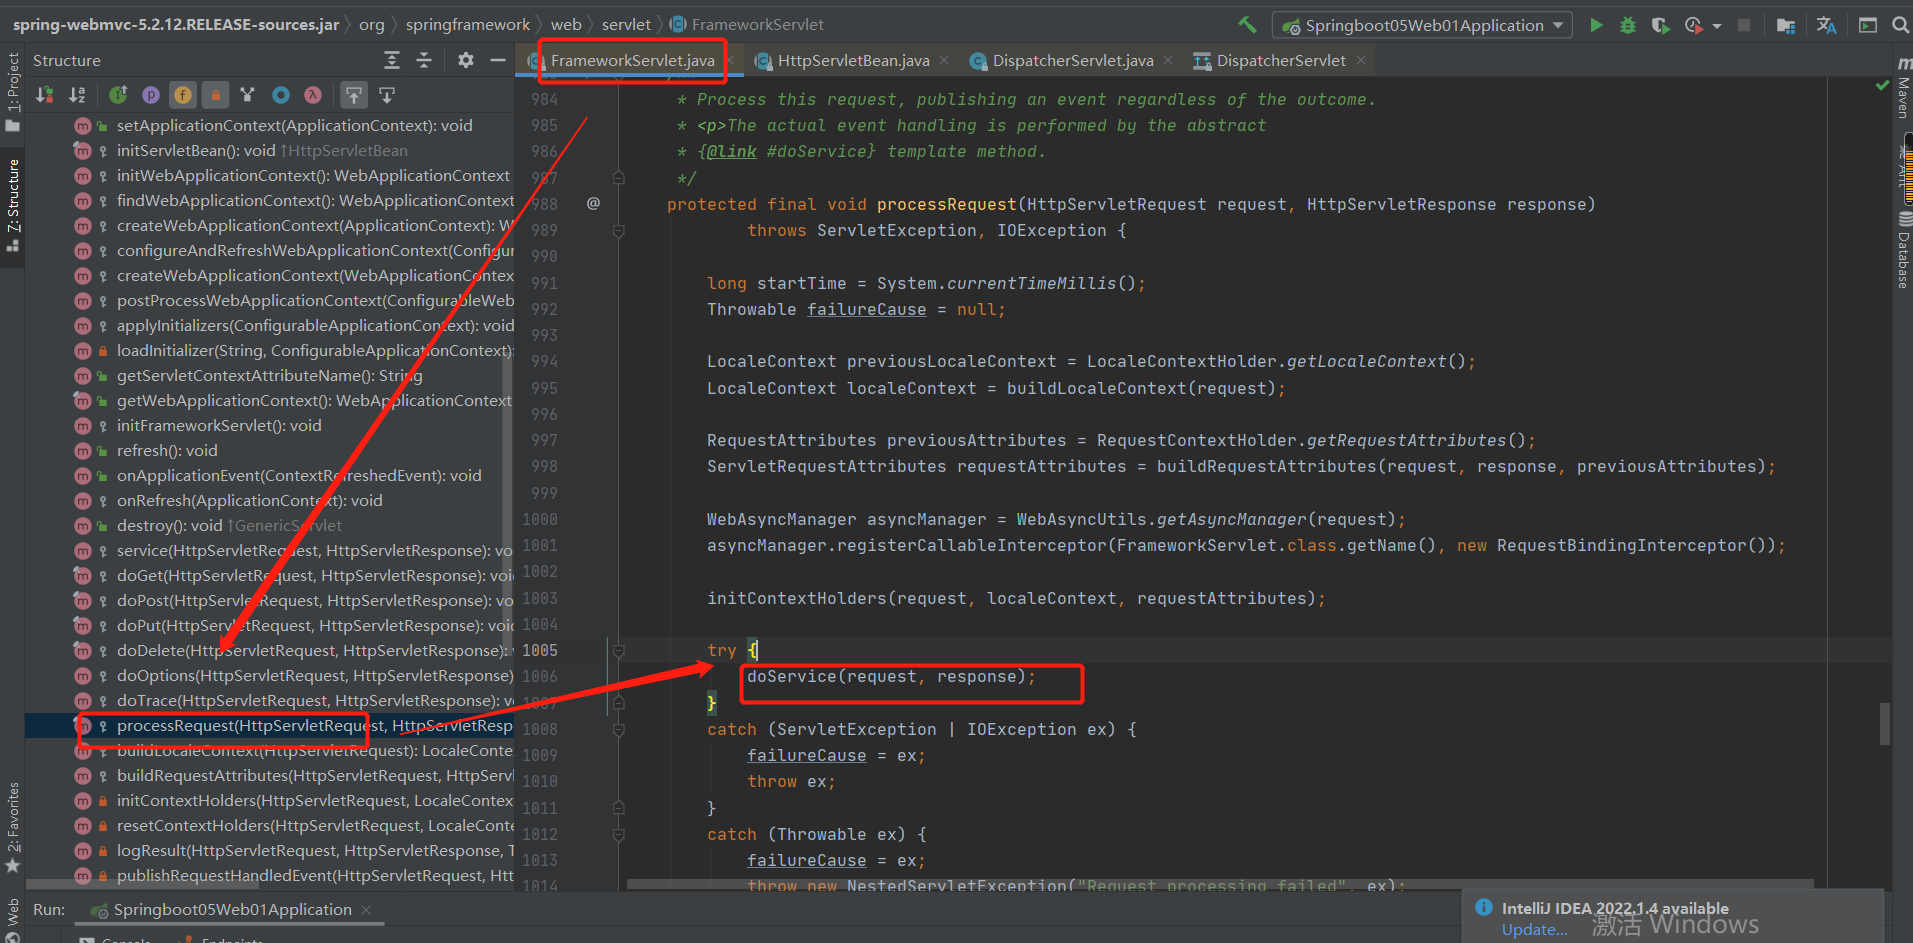
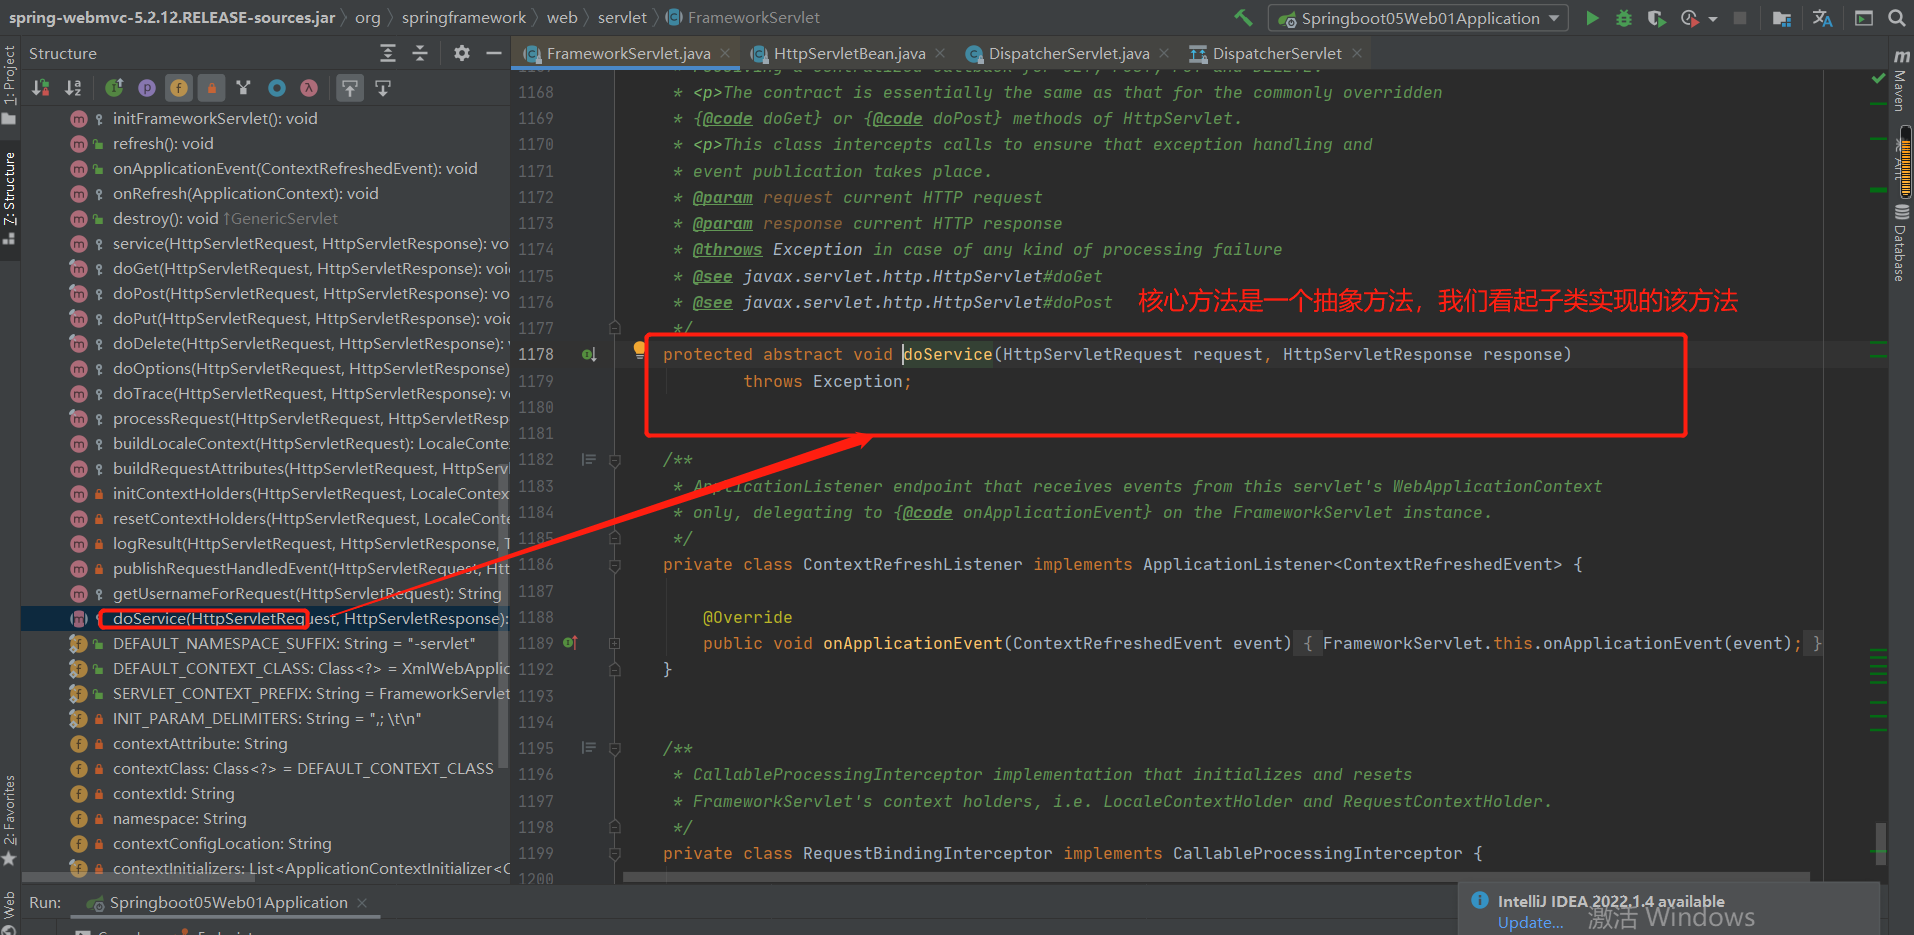
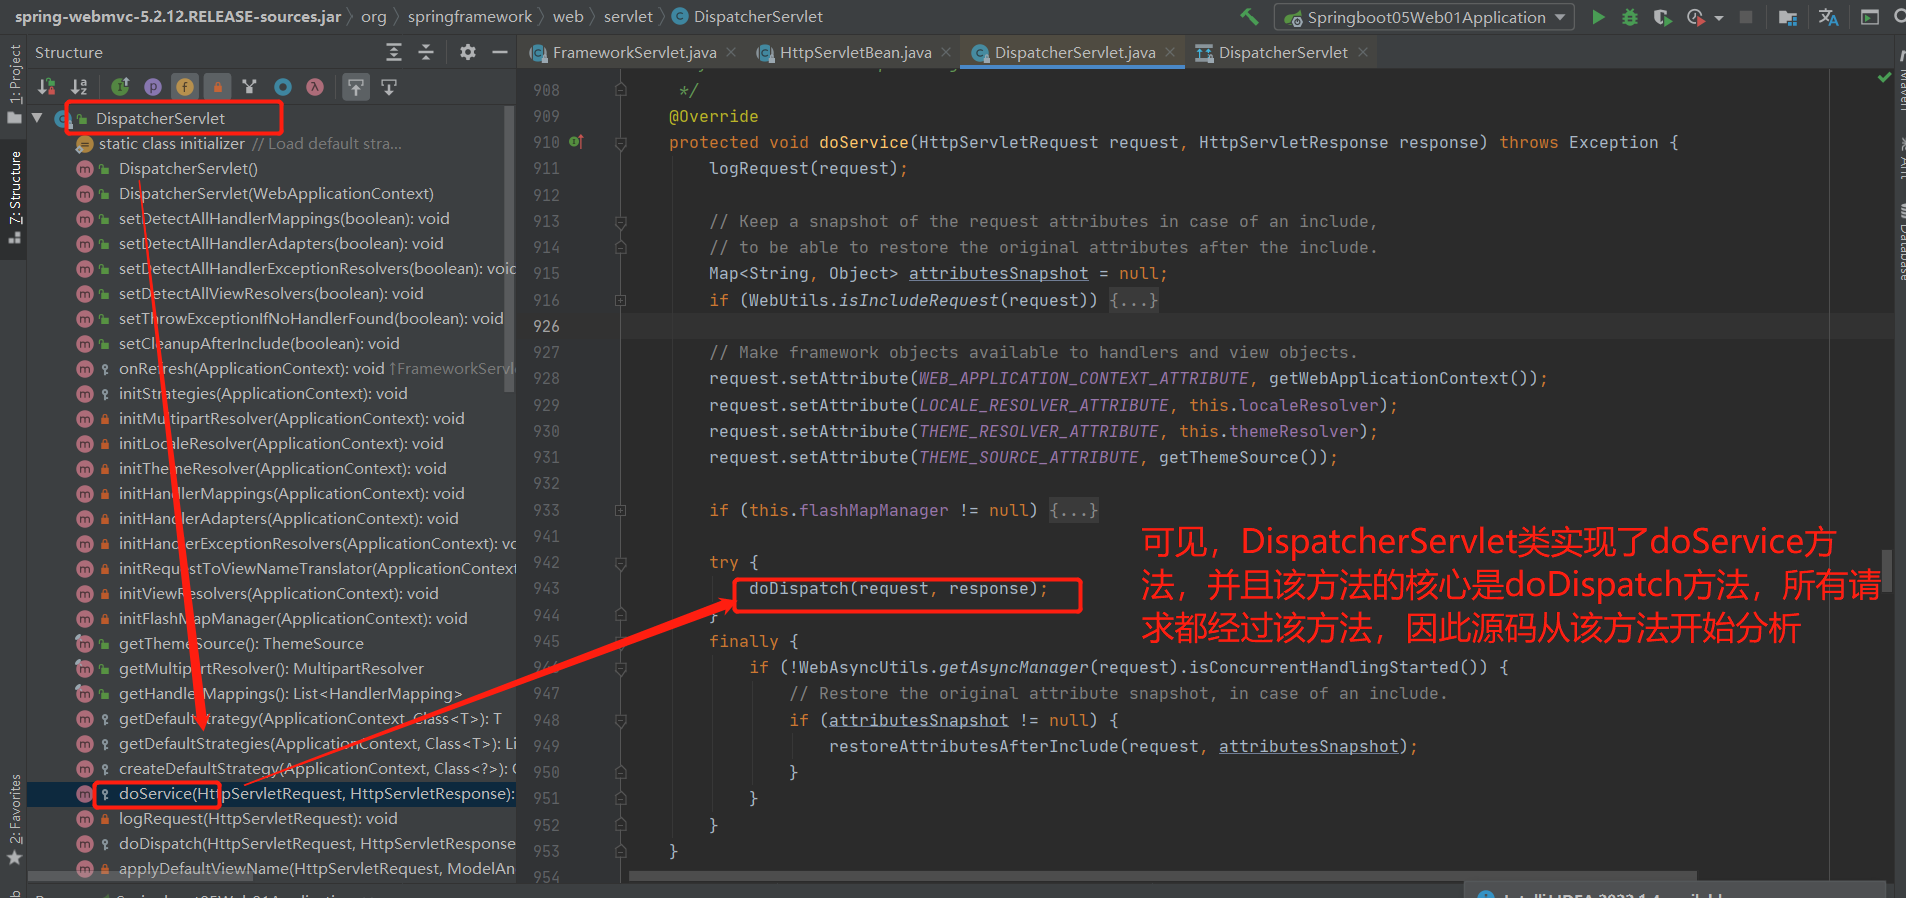
开始分析:
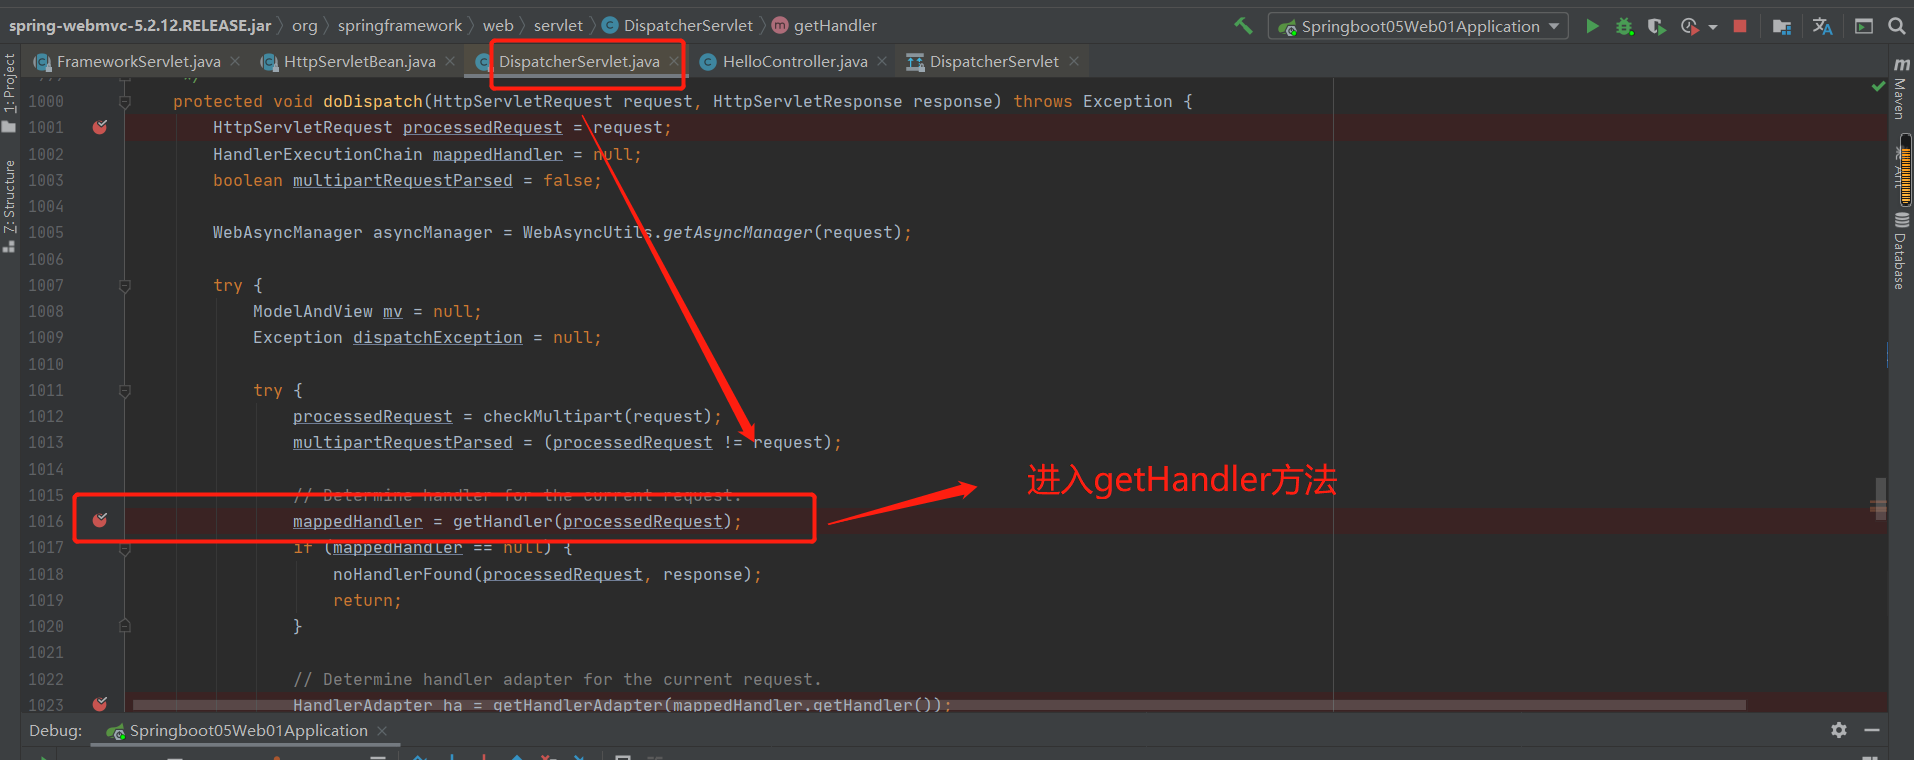
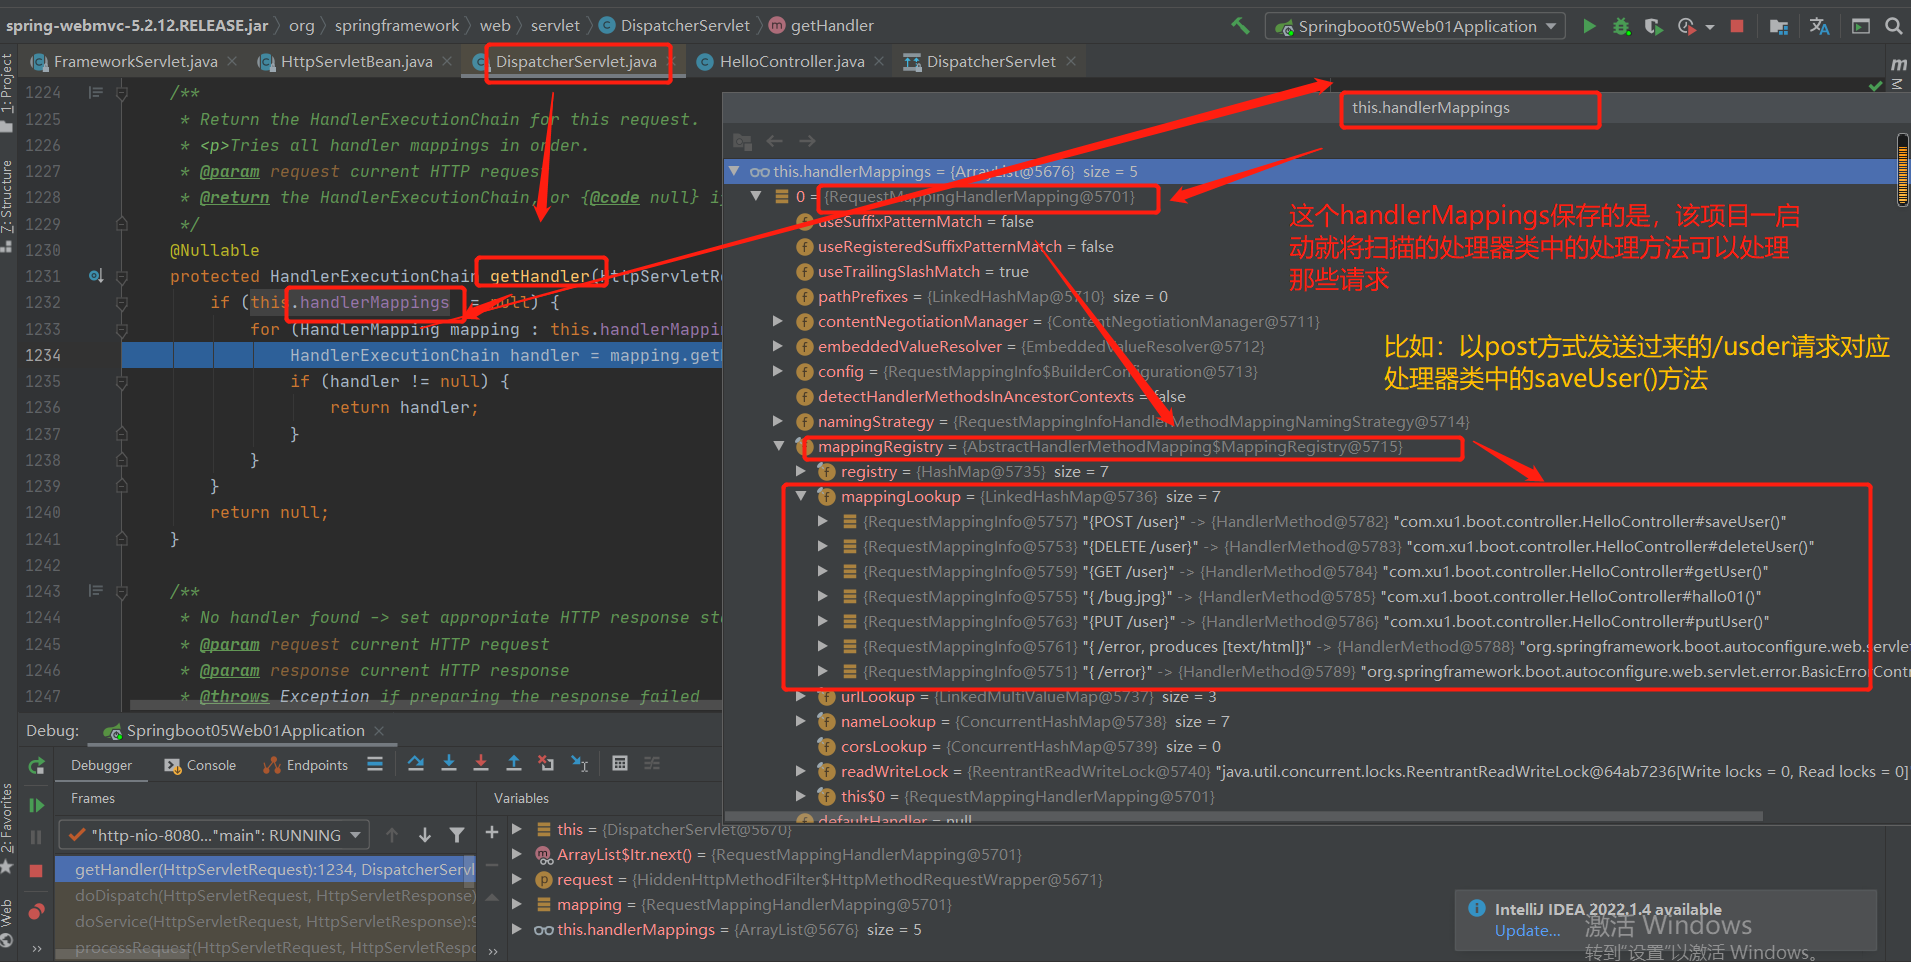
接下里分析,如何找到对应的处理器类的处理器方法处理对应的请求:
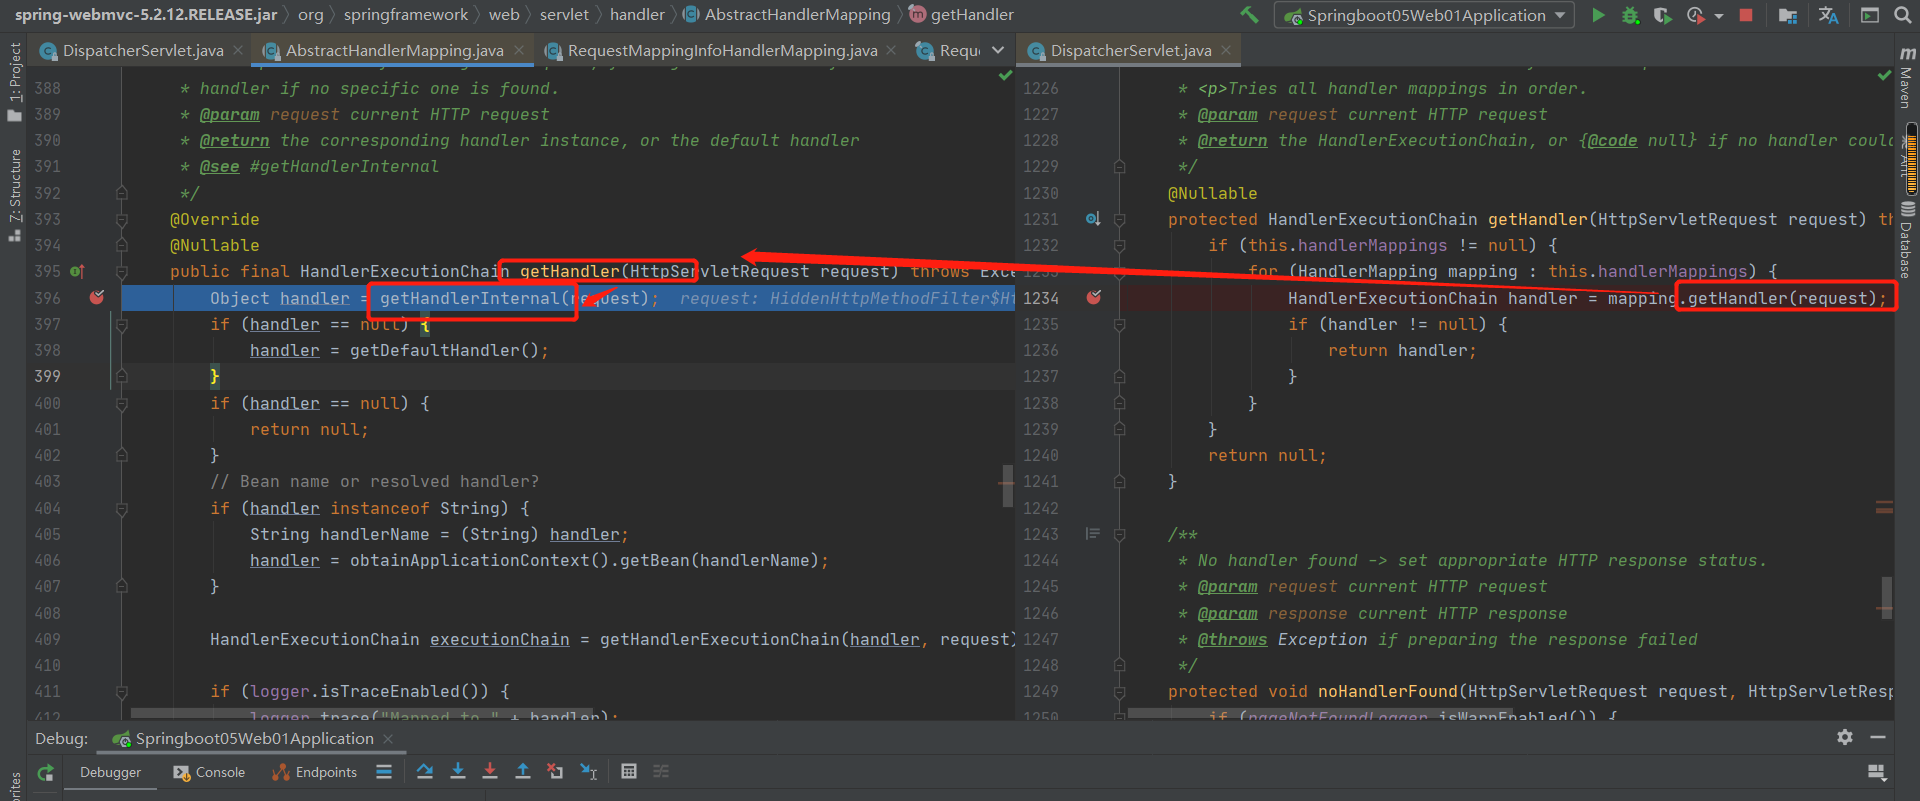
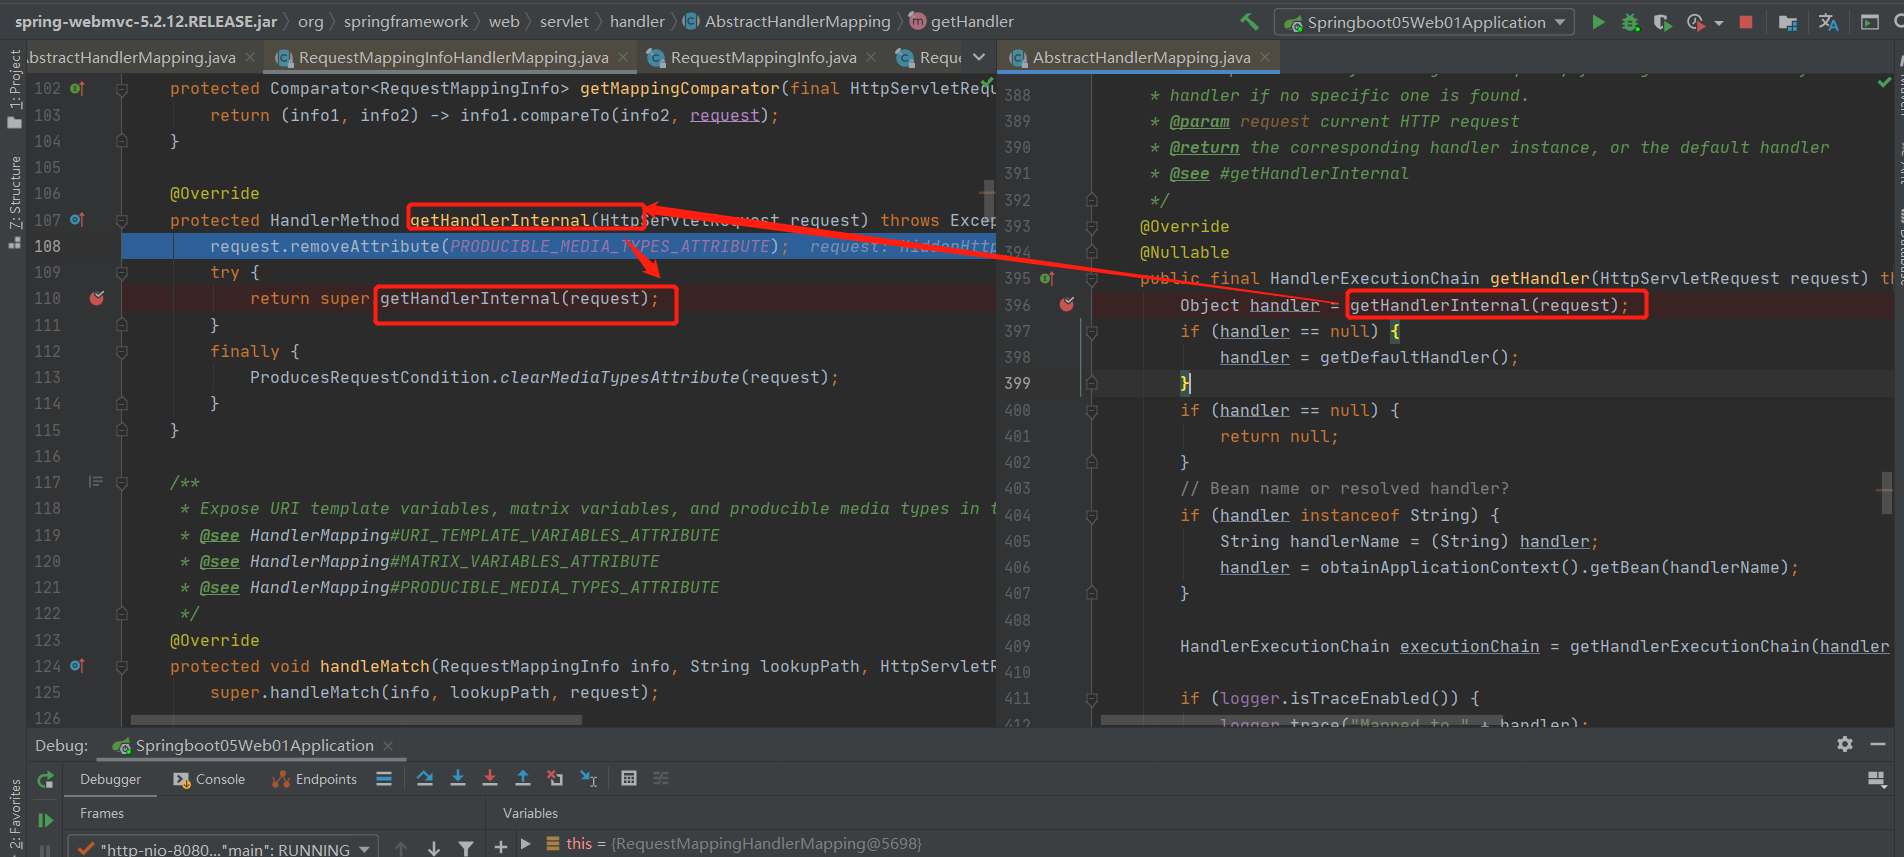
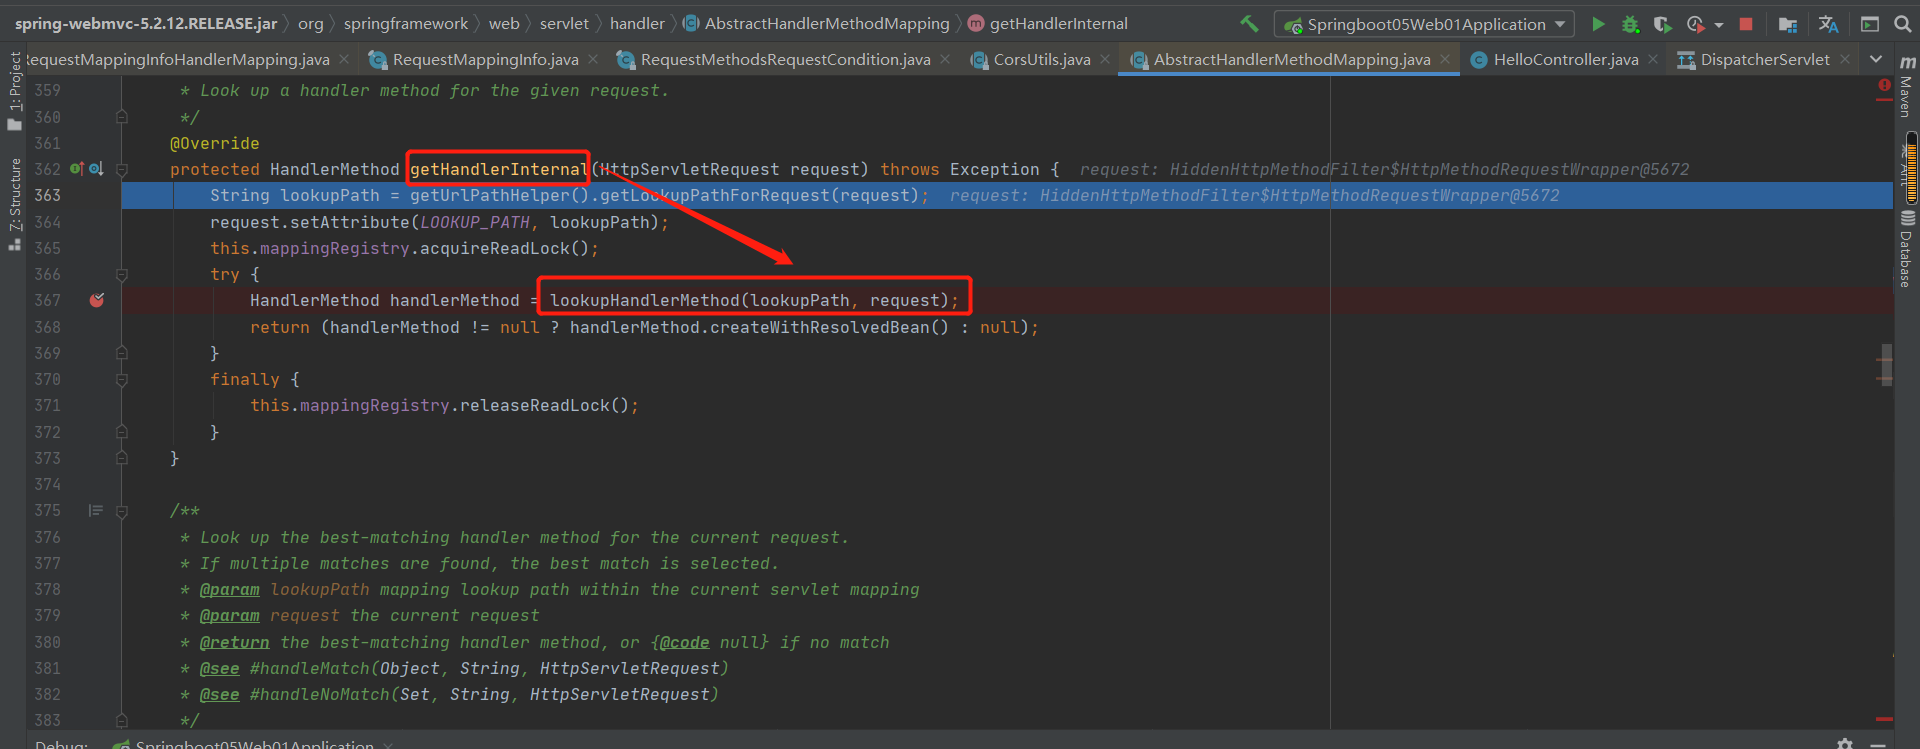
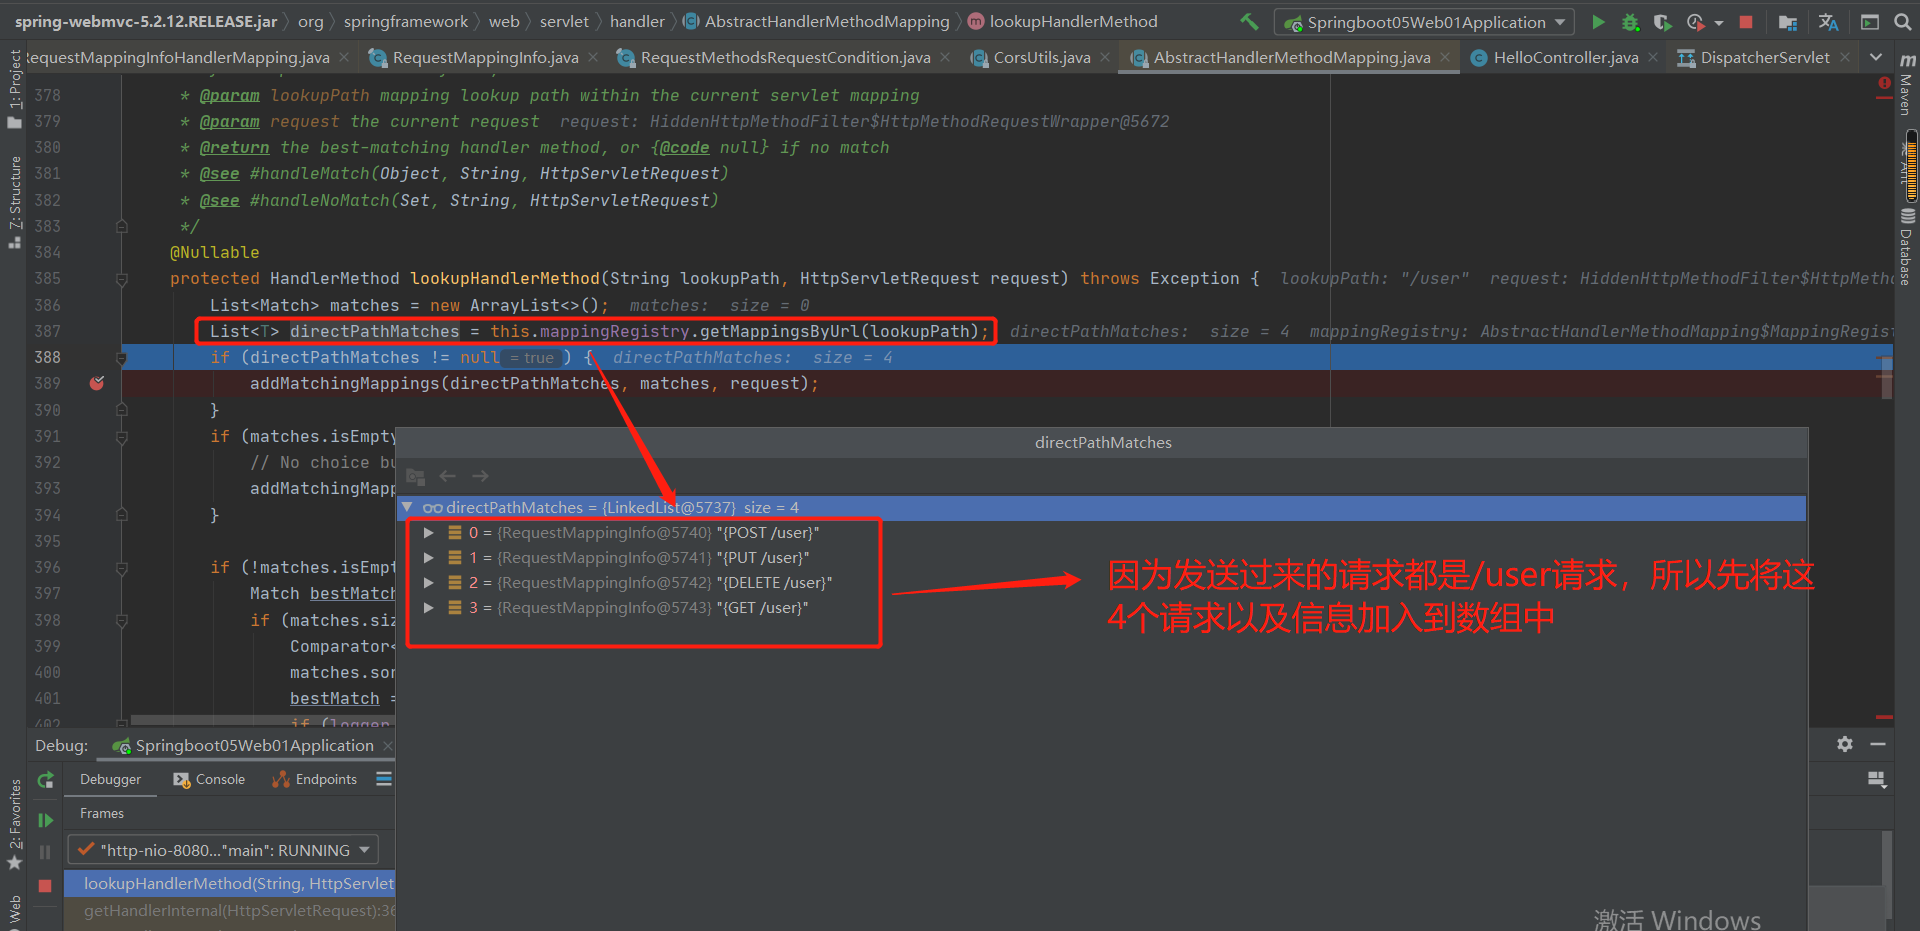
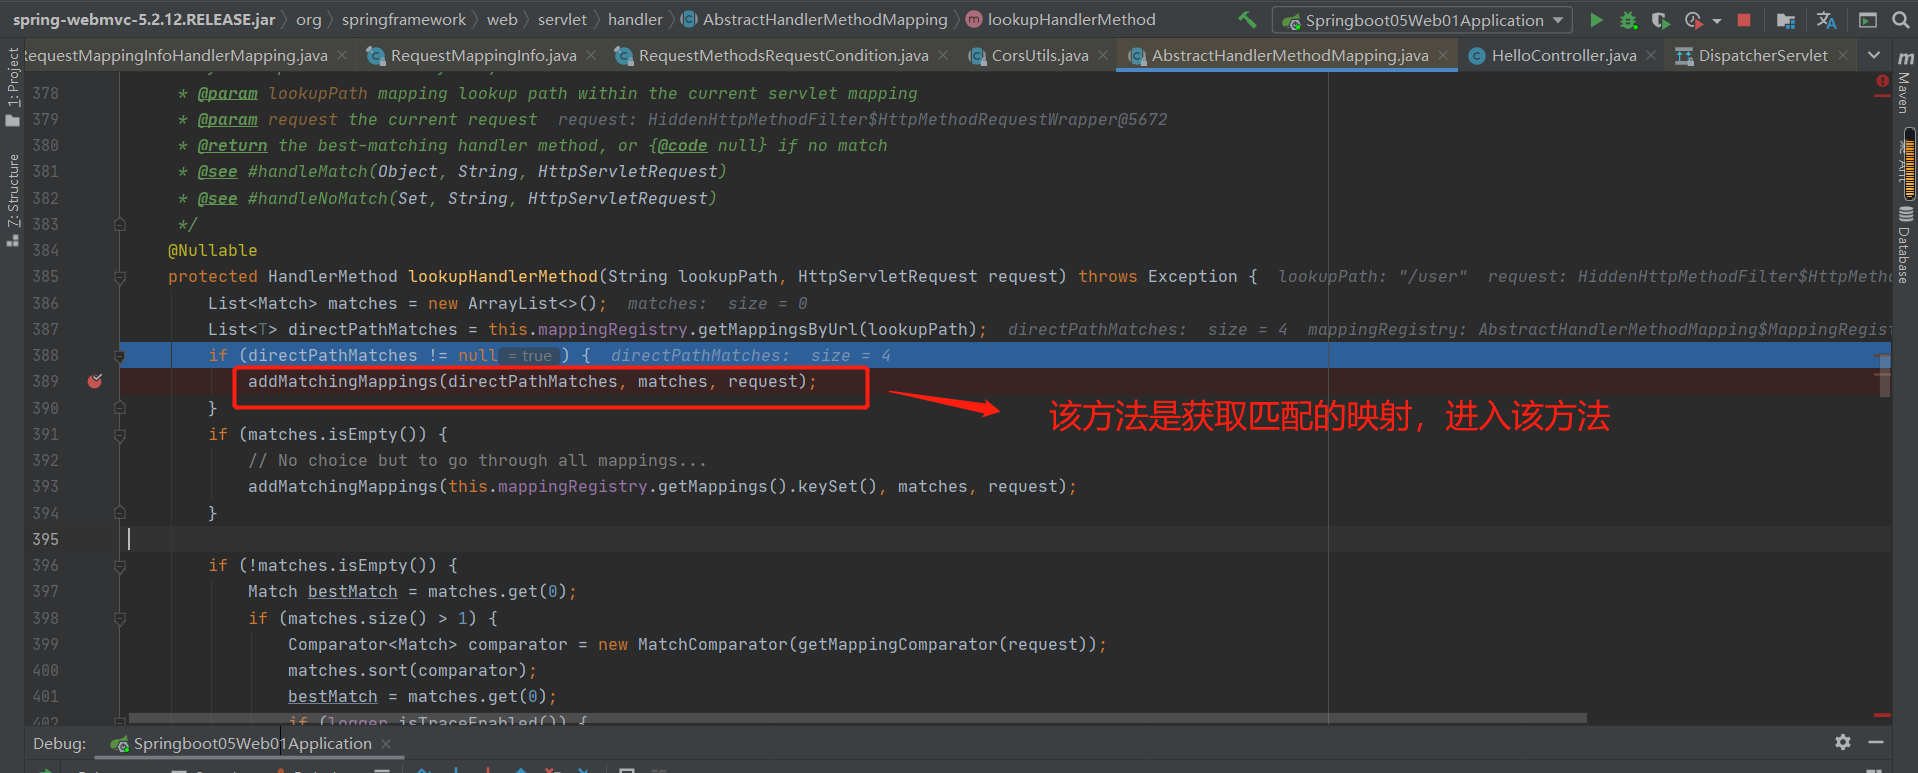
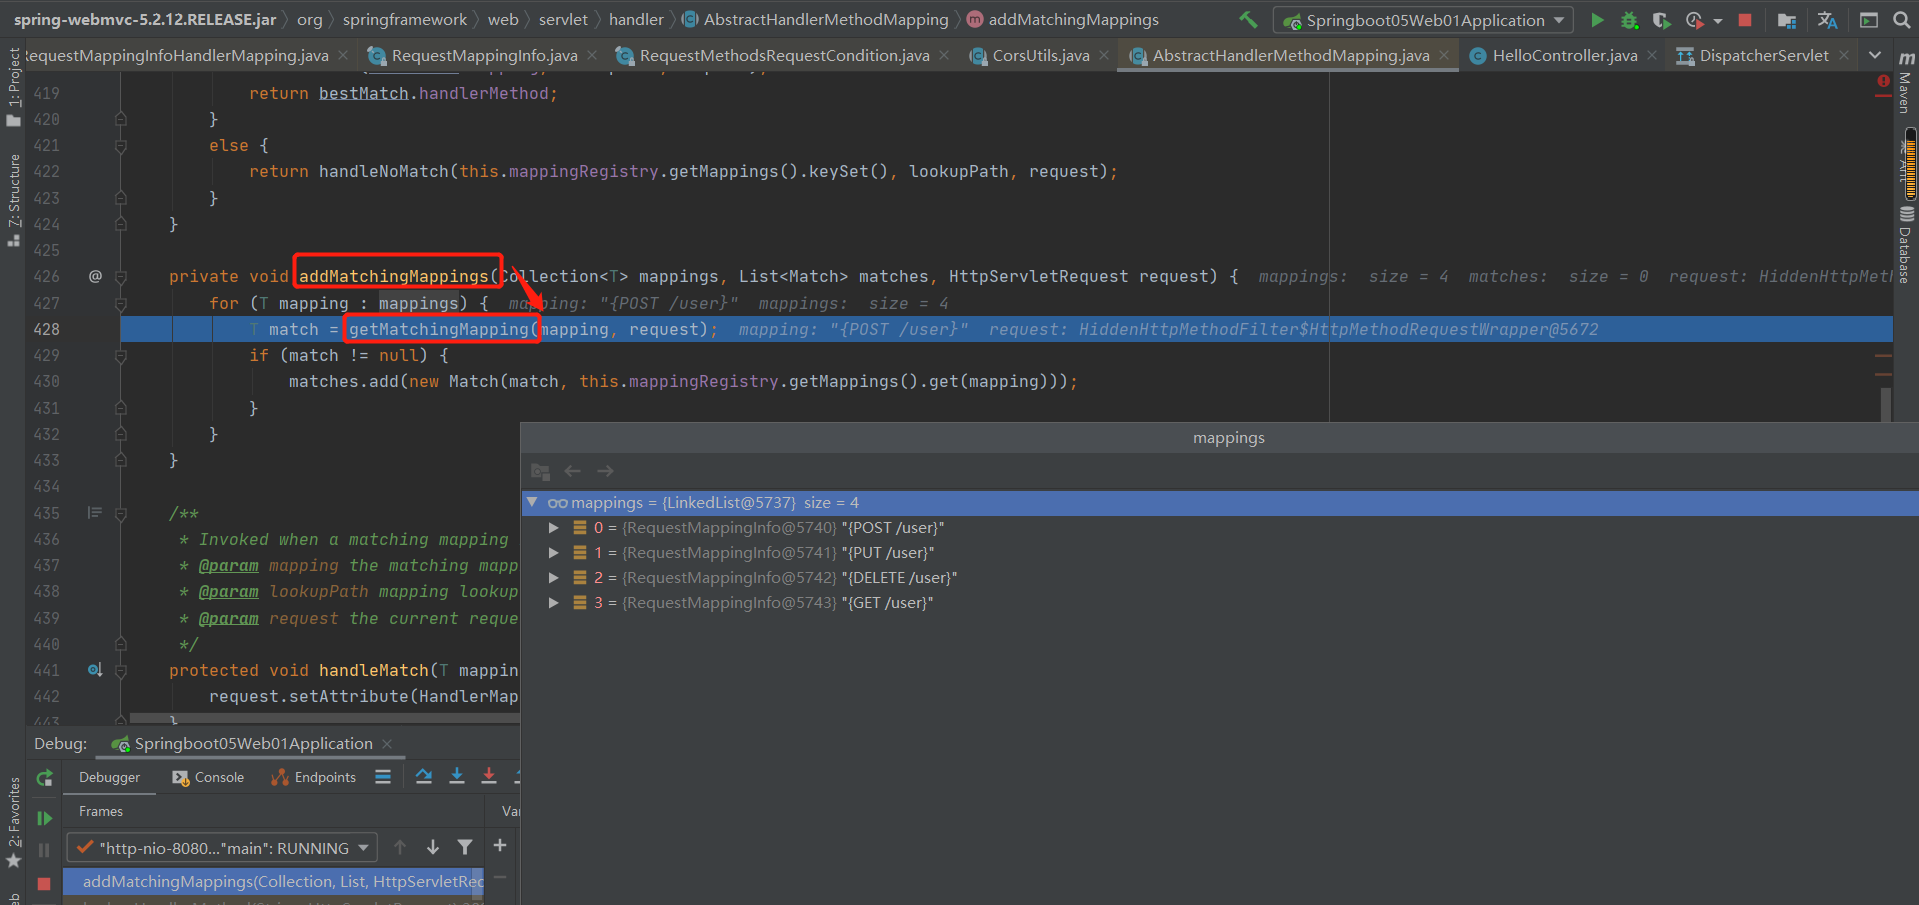
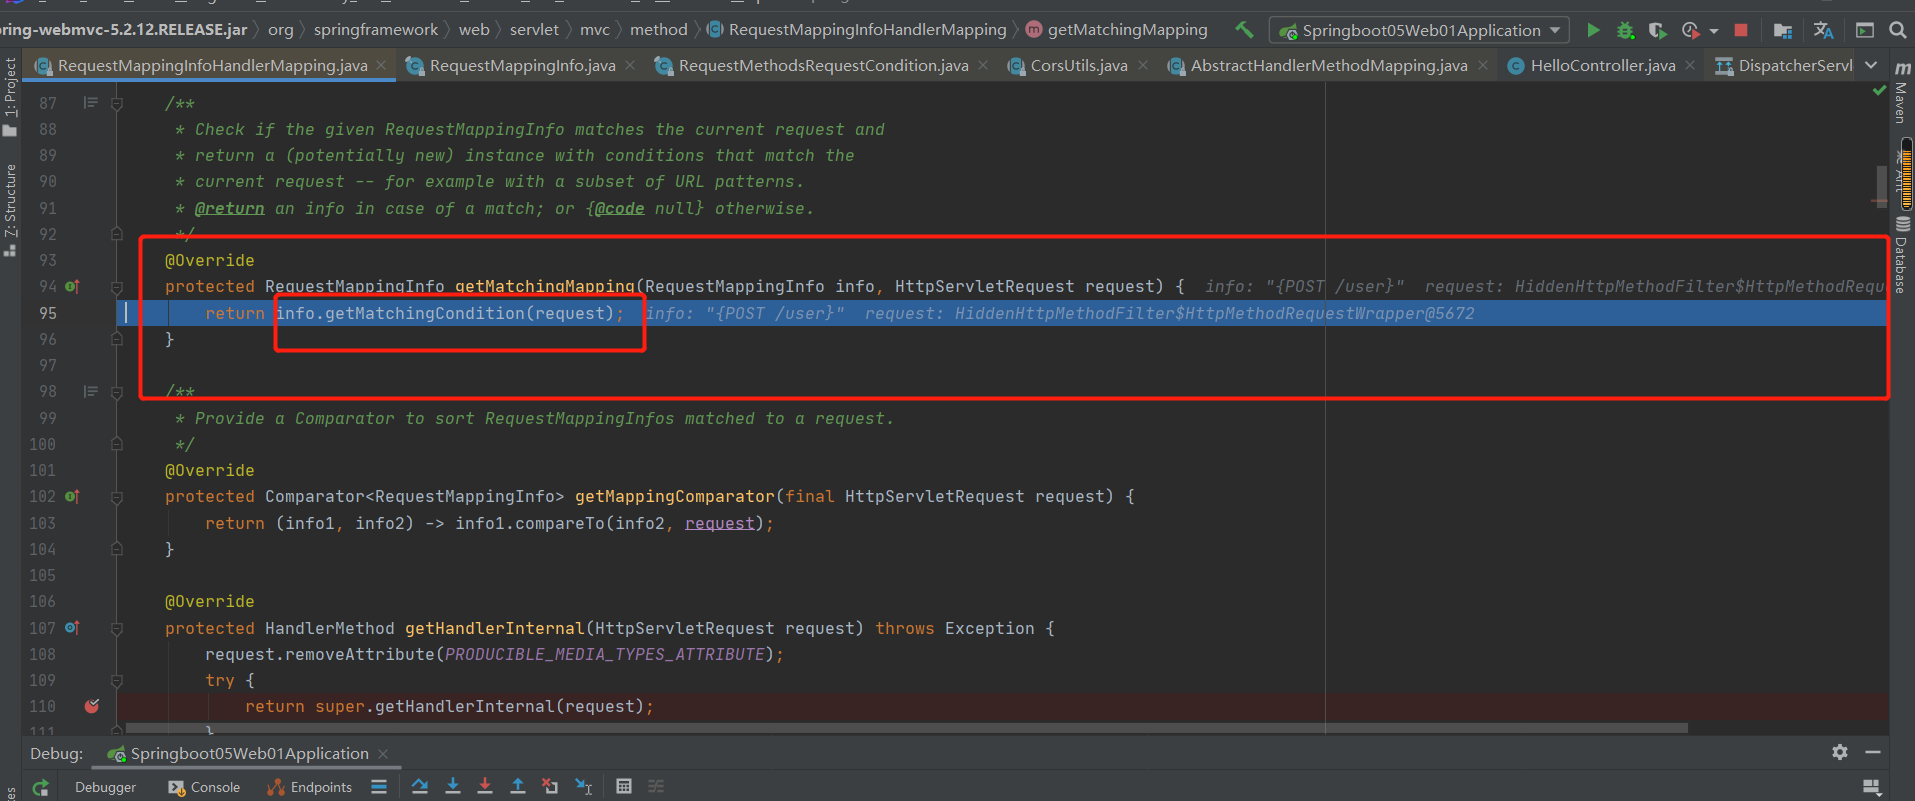
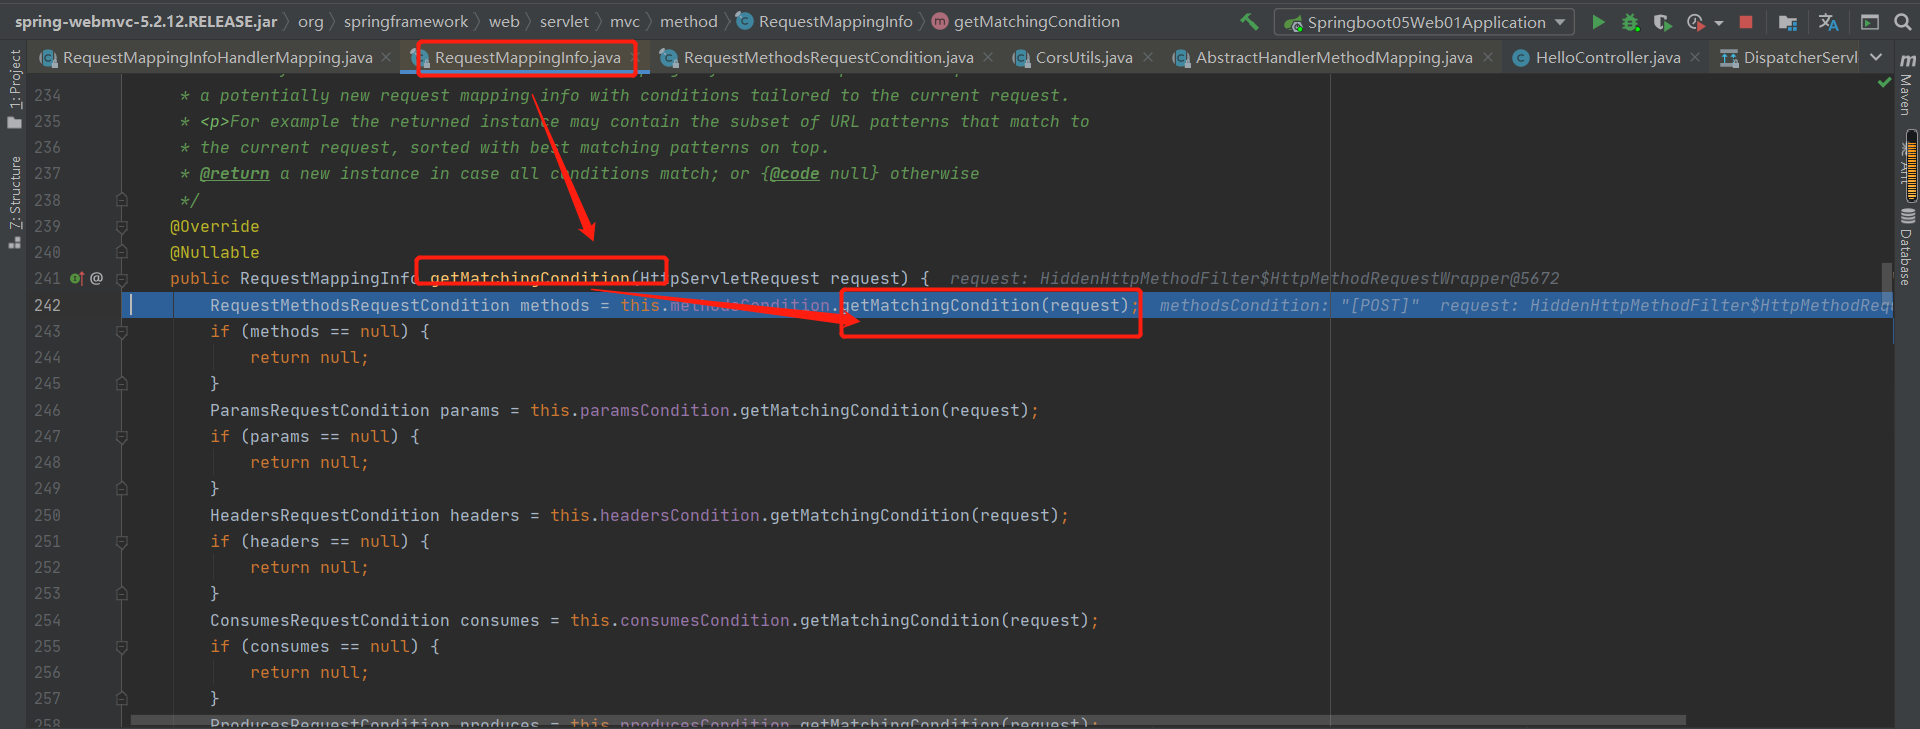
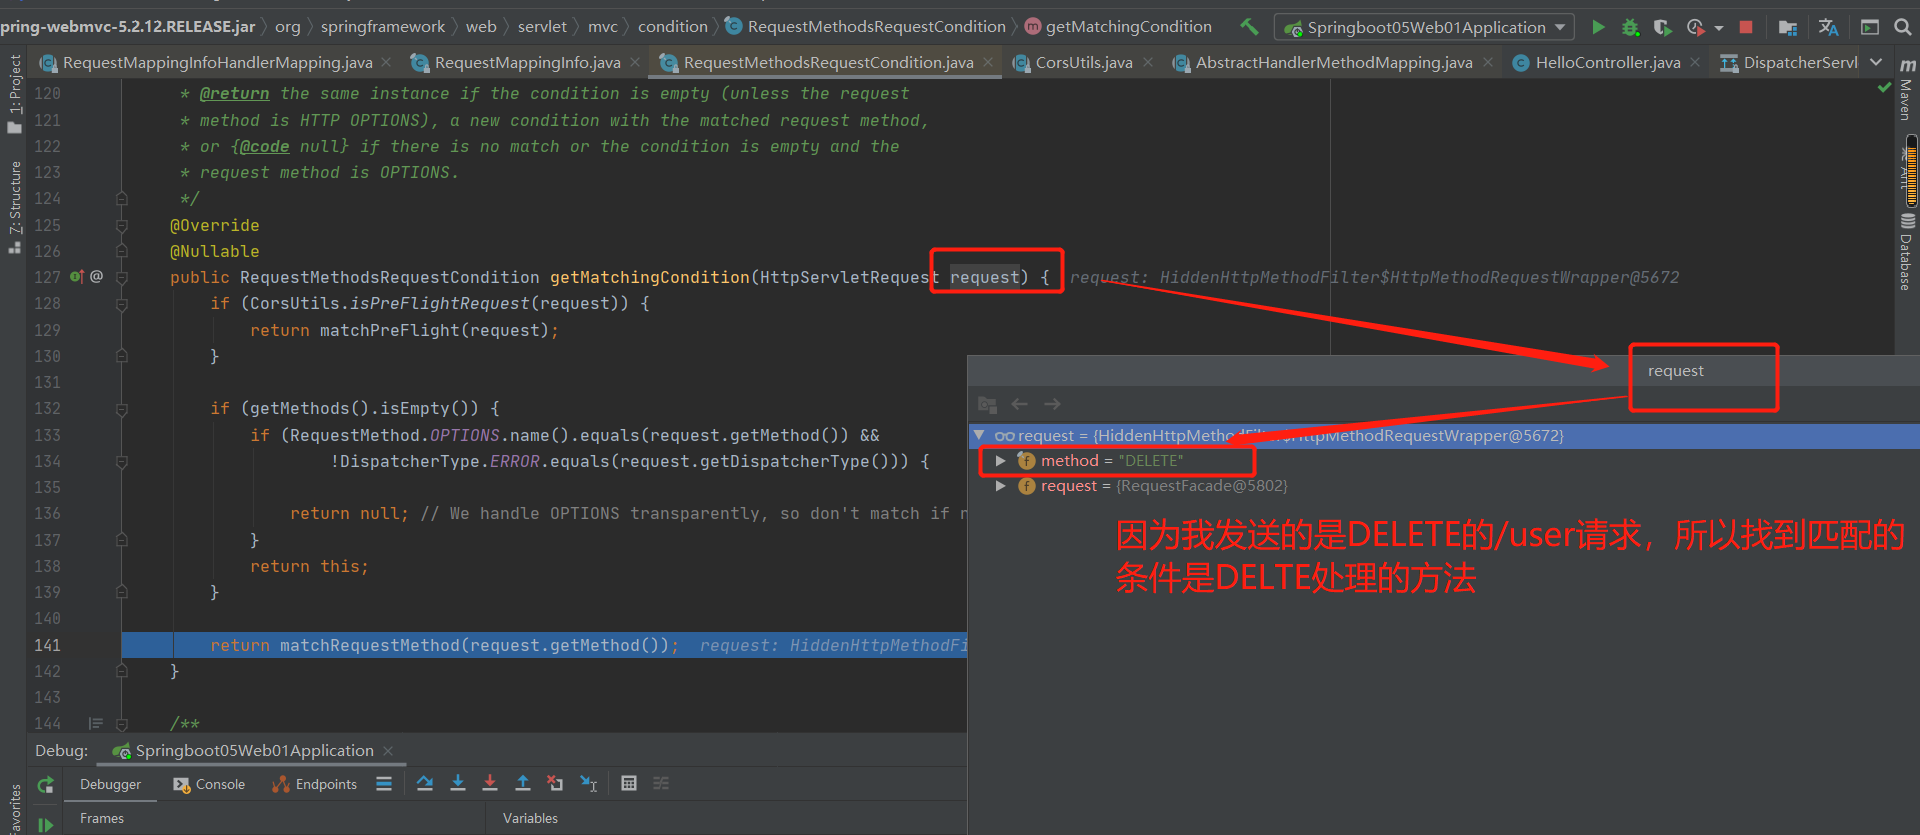
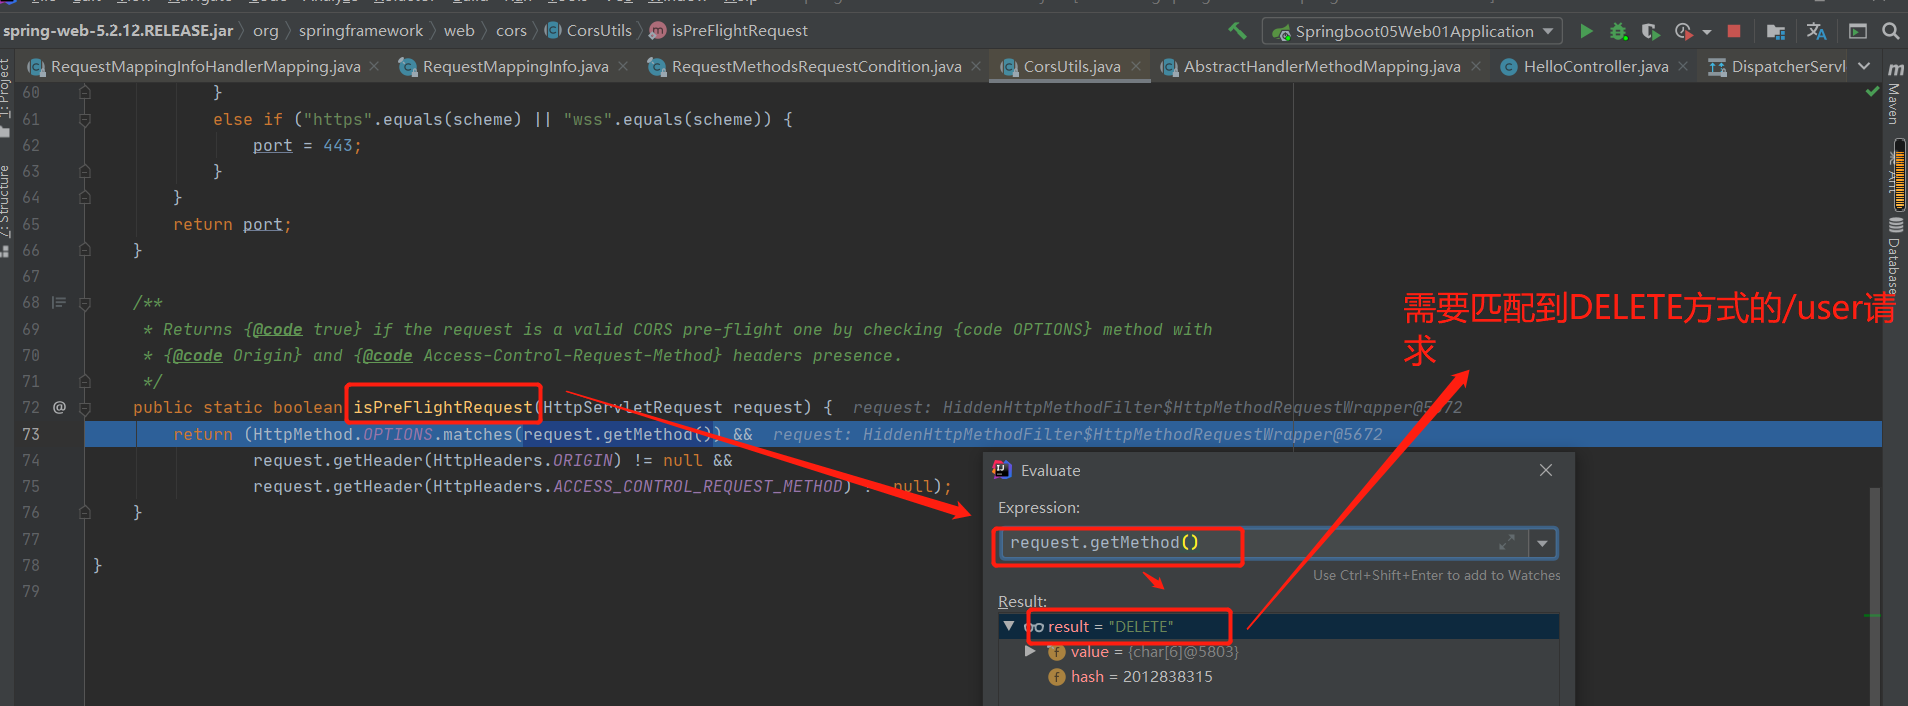
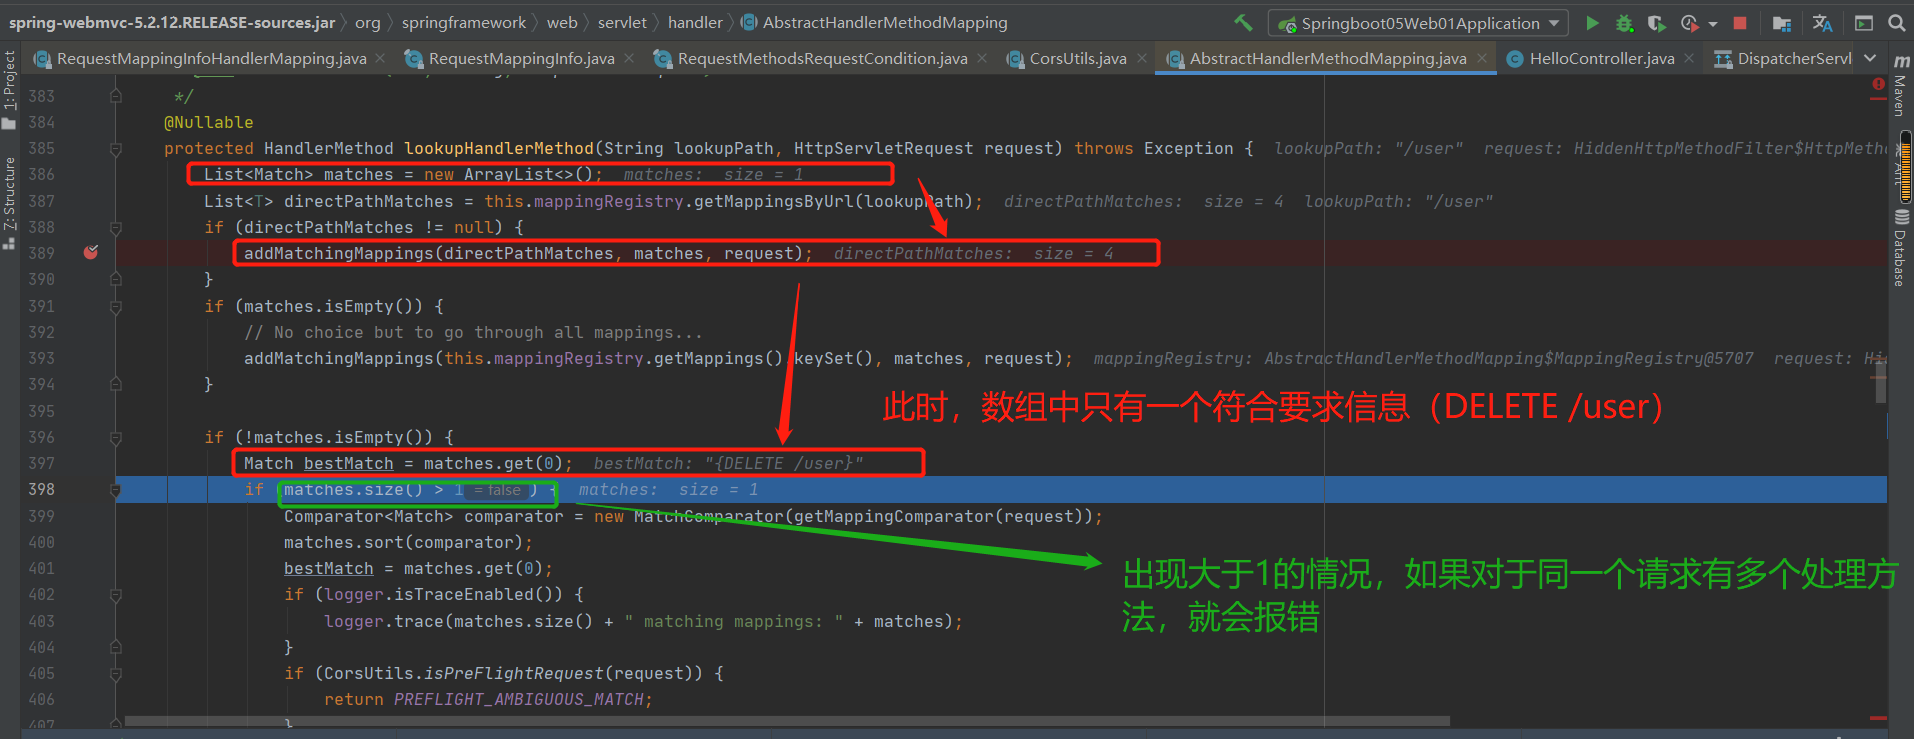
以上源码还是自己多调试几遍,原理于SpringMVC中的doDispatcher方法类似。
老师的总结:
6-3 请求处理--常用参数注解的使用
1.@PathVariable
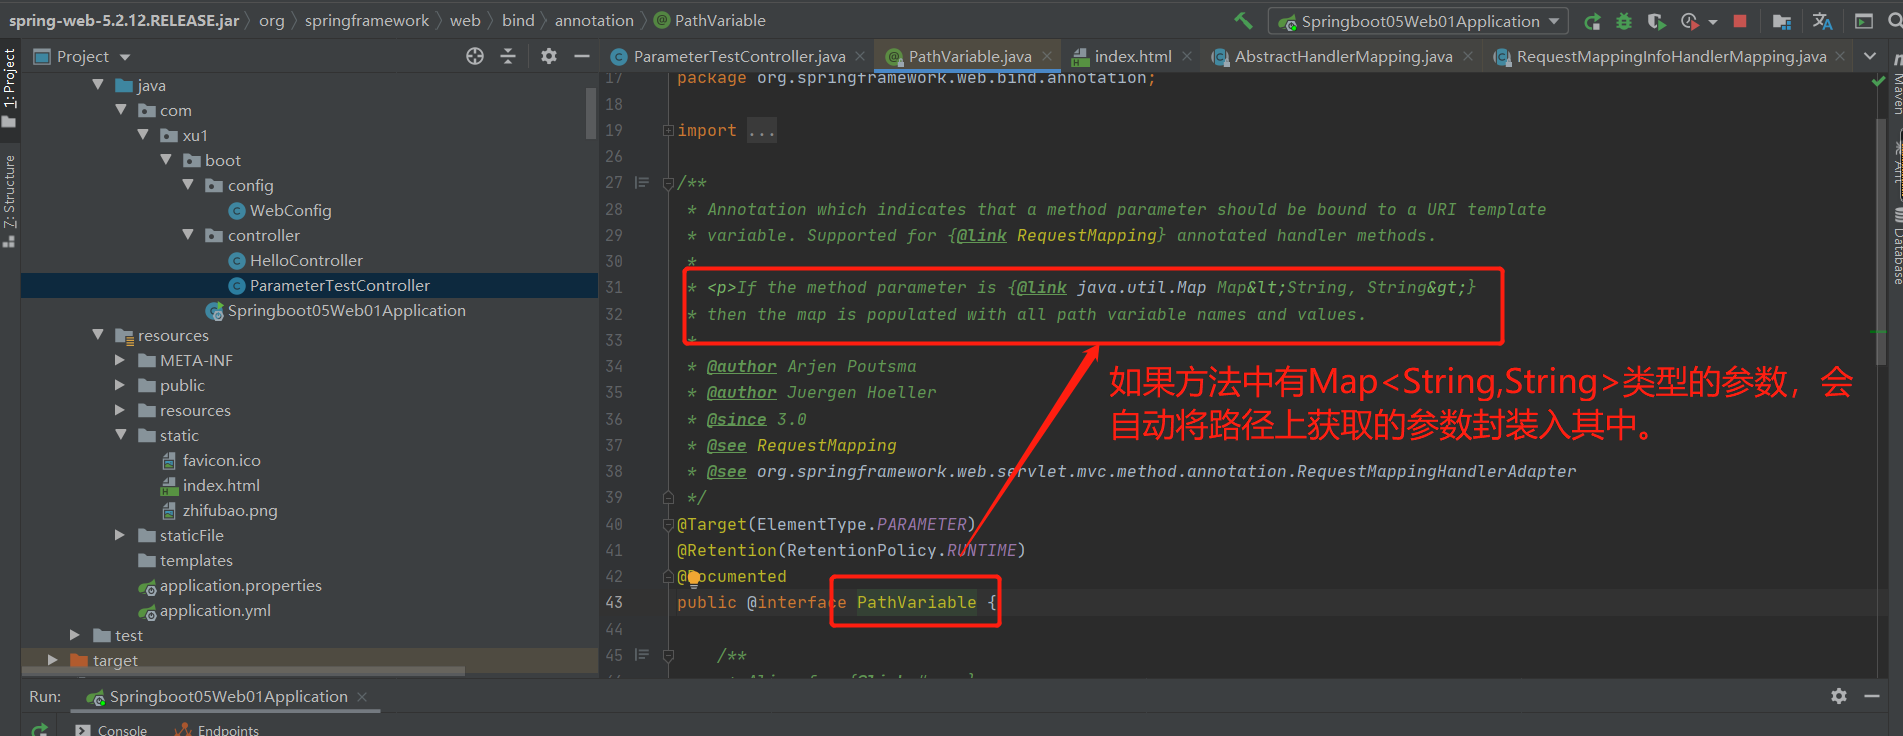
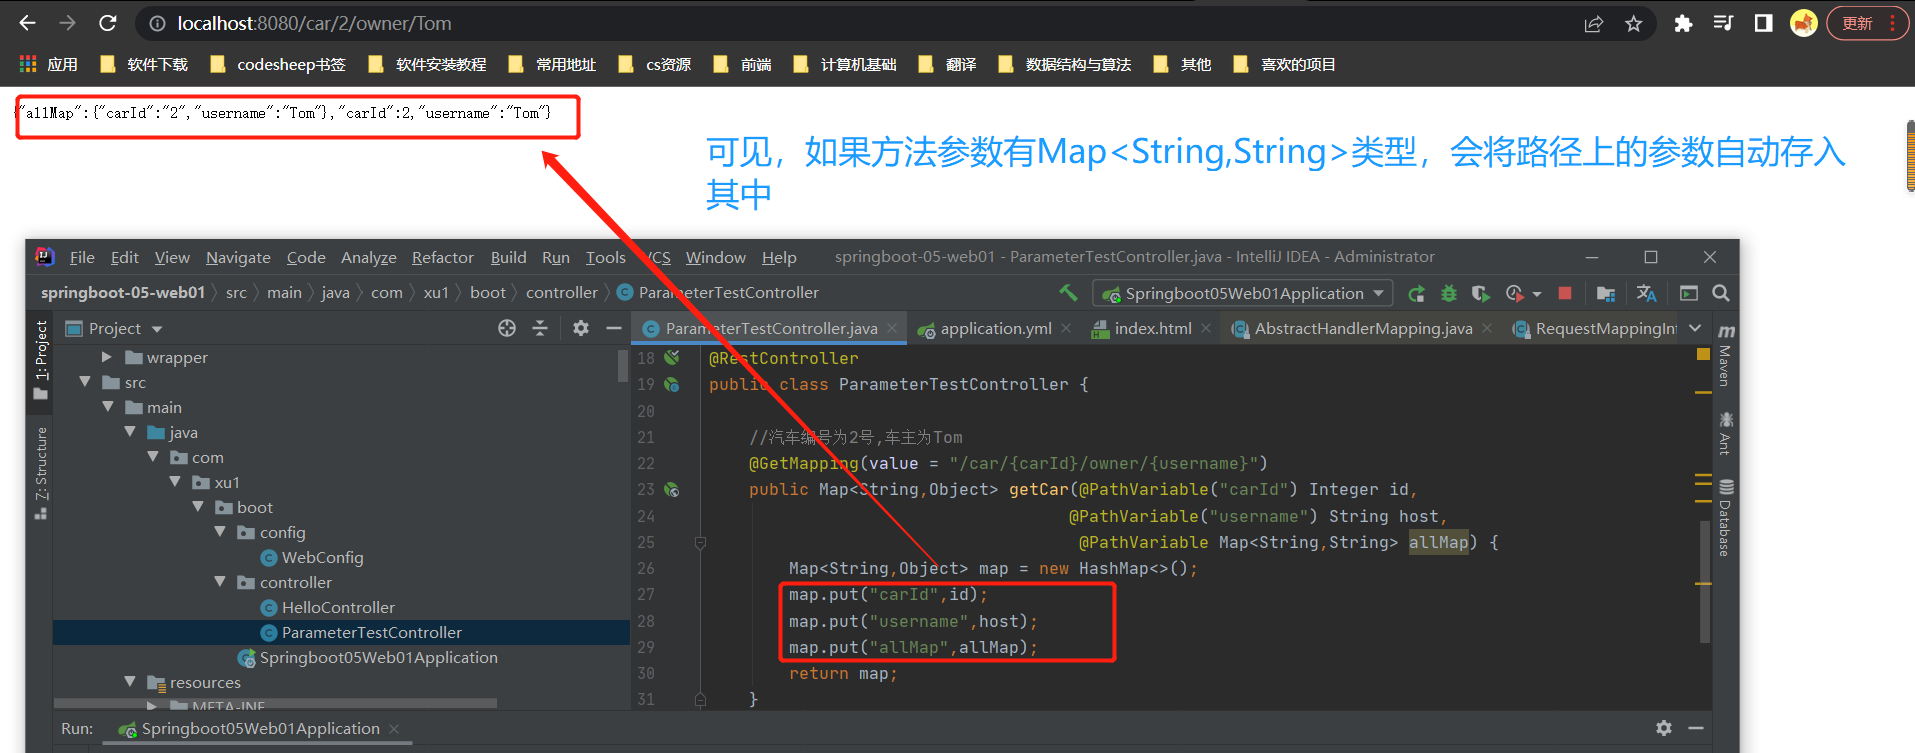
代码参考:
//汽车编号为2号,车主为Tom
@GetMapping(value = "/car/{carId}/owner/{username}")
public Map<String,Object> getCar(@PathVariable("carId") Integer id,
                                @PathVariable("username") String host,
                                 @PathVariable Map<String,String> allMap) {
    Map<String,Object> map = new HashMap<>();
    map.put("carId",id);
    map.put("username",host);
    map.put("allMap",allMap);
    return map;
}
<li><a href="car/2/owner/Tom">@PathVariable</a></li>
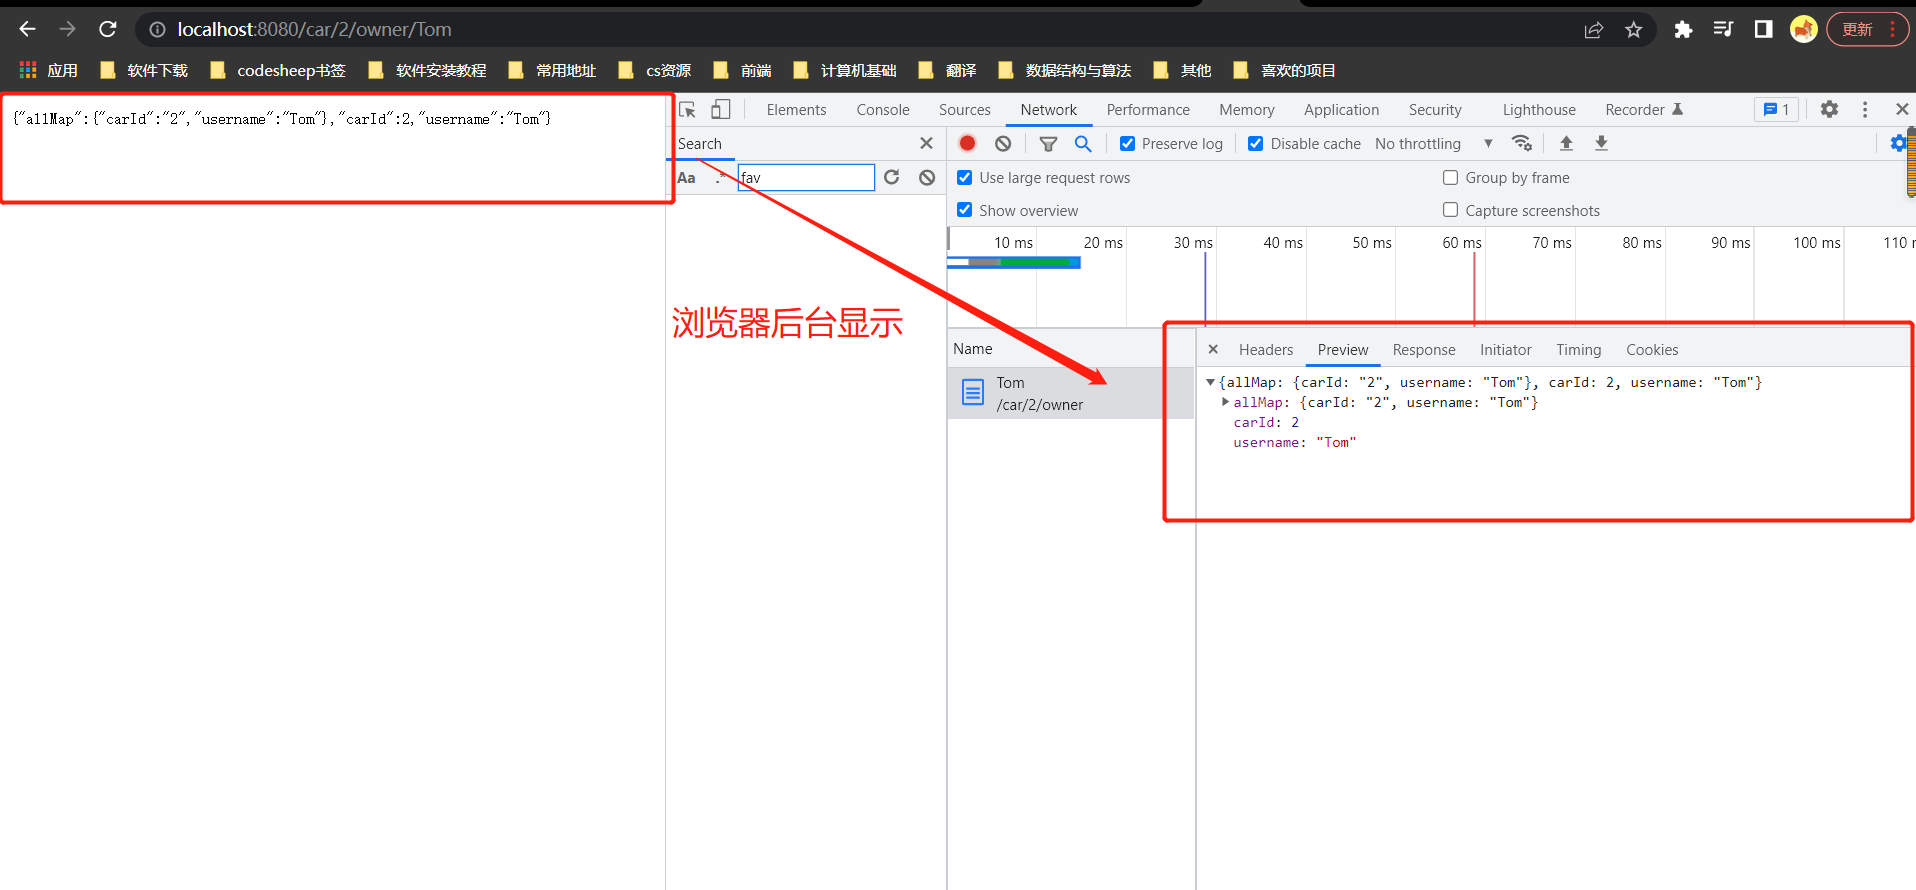
输出结果:
2.@RequestHeader
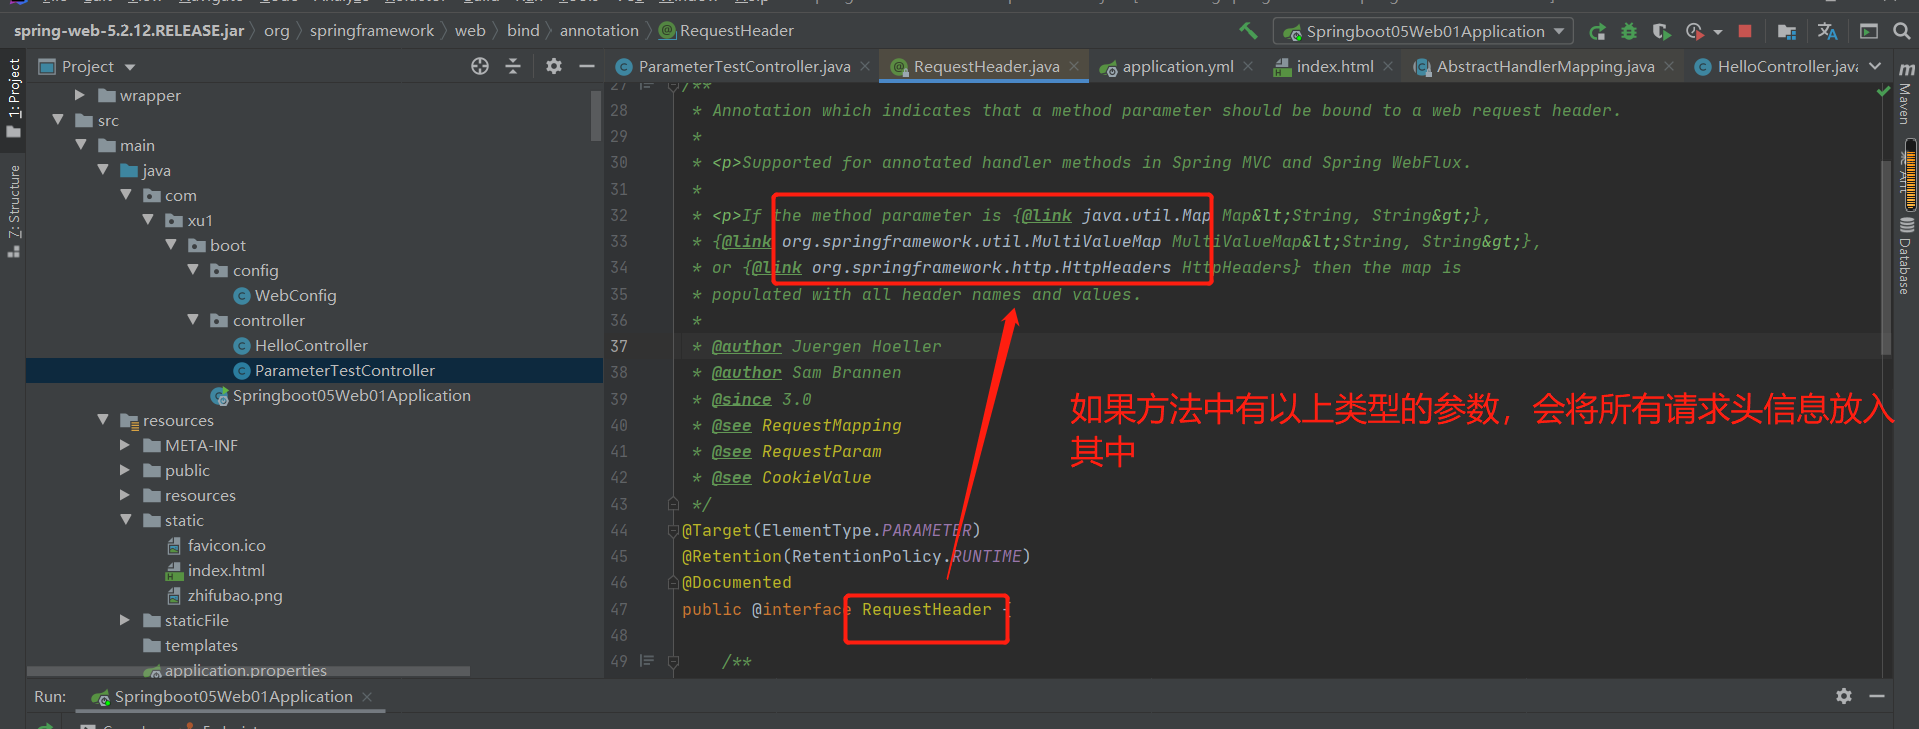
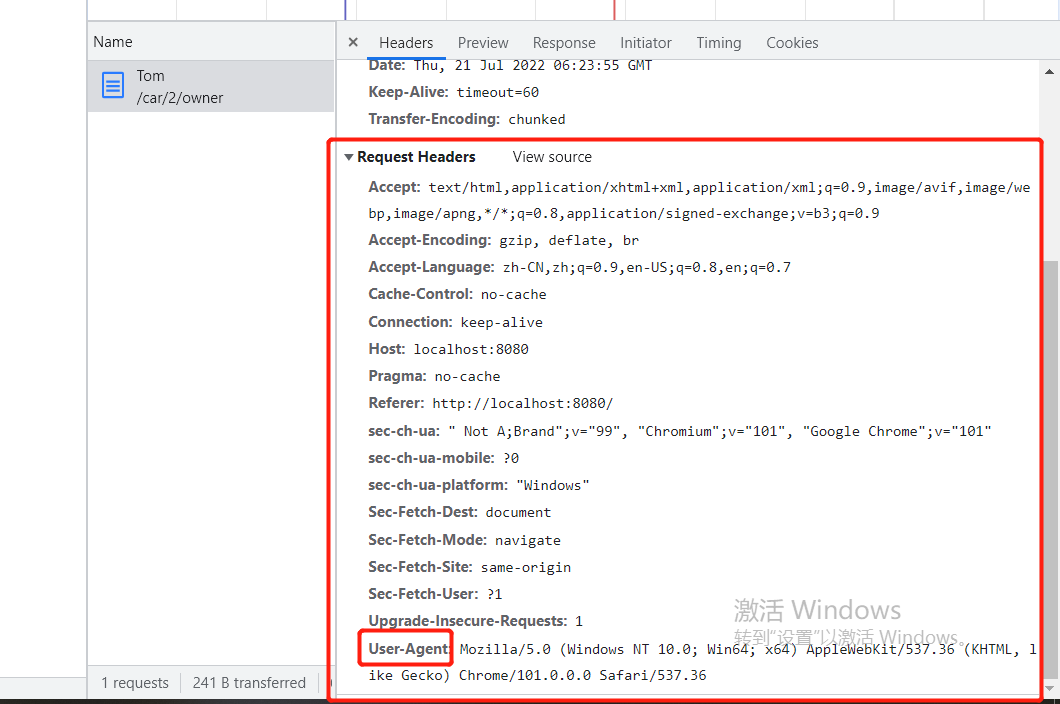
代码参考:
//汽车编号为2号,车主为Tom
@GetMapping(value = "/car/{carId}/owner/{username}")
public Map<String,Object> getCar(@PathVariable("carId") Integer id,
                                 @PathVariable("username") String host,
                                 @PathVariable Map<String,String> allMap,
                                 @RequestHeader("User-Agent") String userAgent,
                                 @RequestHeader Map<String,String> headersMap) {
    //获取请求路径上的值Test
    Map<String,Object> map = new HashMap<>();
    map.put("carId",id);
    map.put("username",host);
    map.put("allMap",allMap);
    //获取请求头信息Test
    map.put("User-Agent",userAgent);
    map.put("headers",headersMap);
    return map;
}
<a href="car/2/owner/Tom">getCar测试</a>
输出结果:
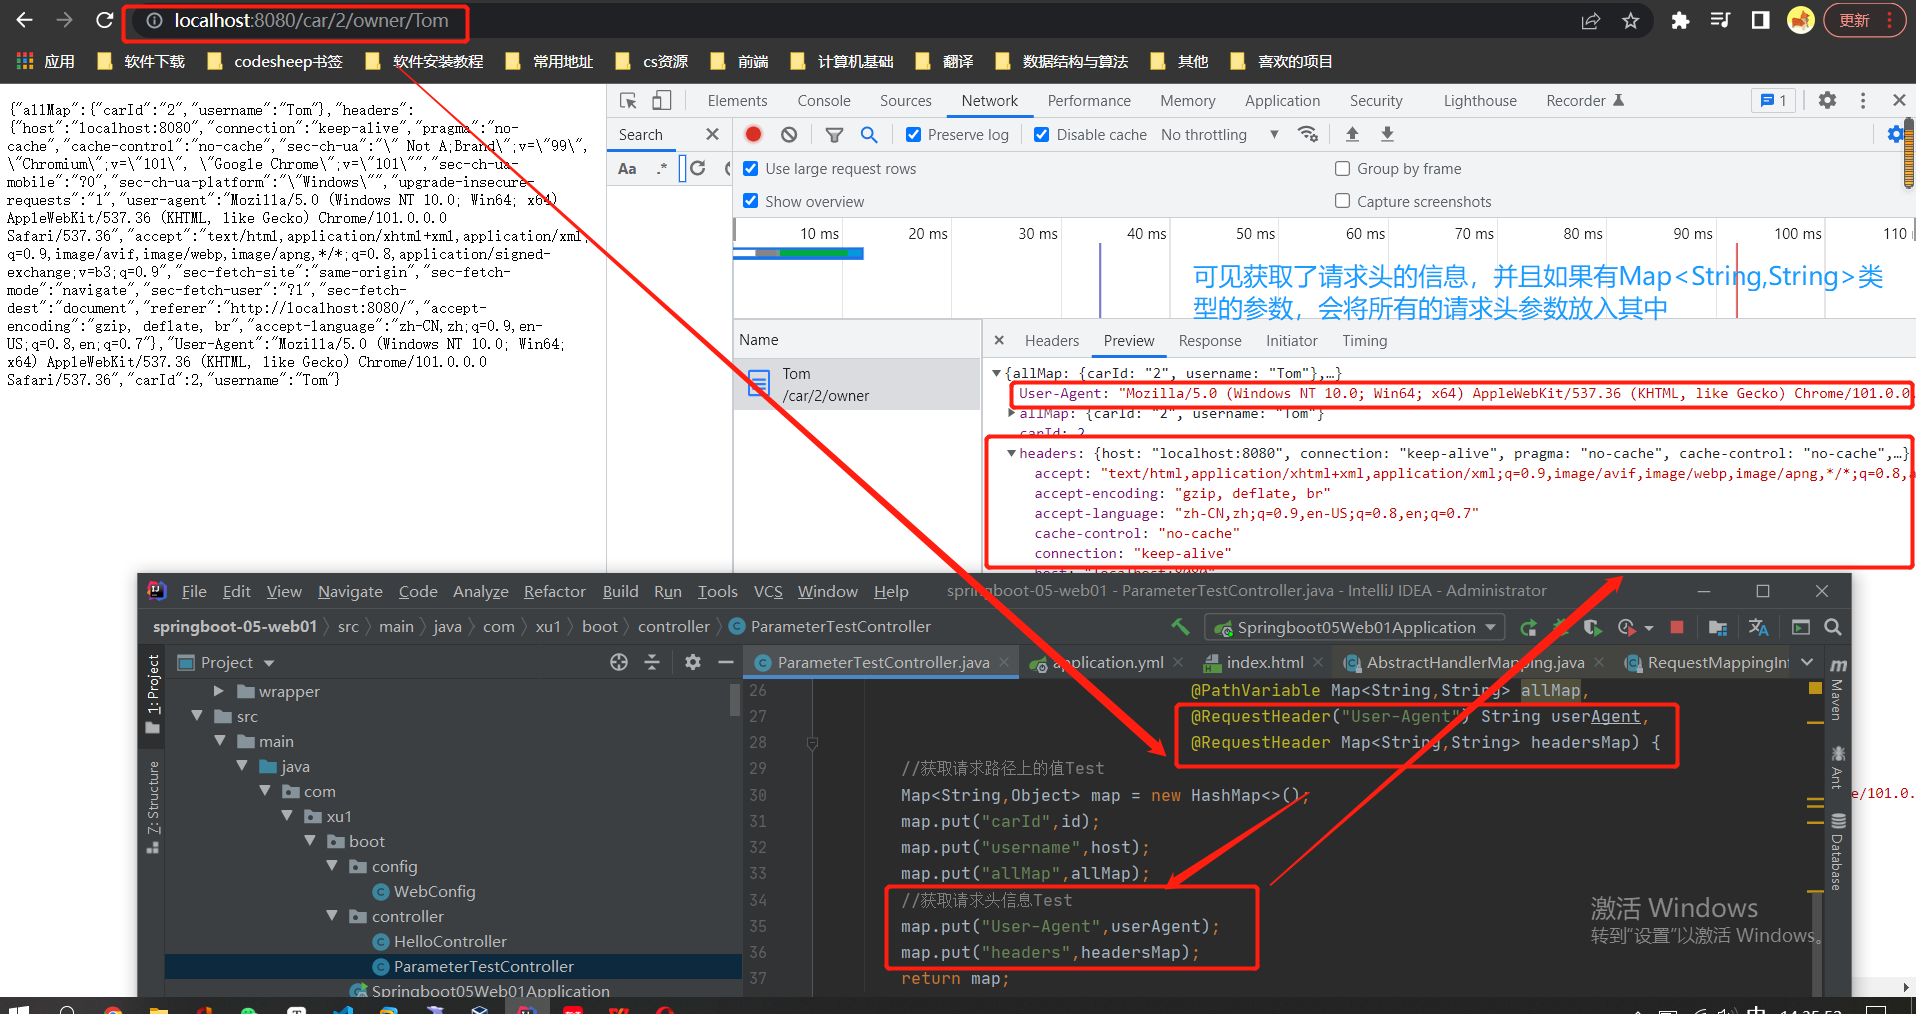
3.@RequestParam
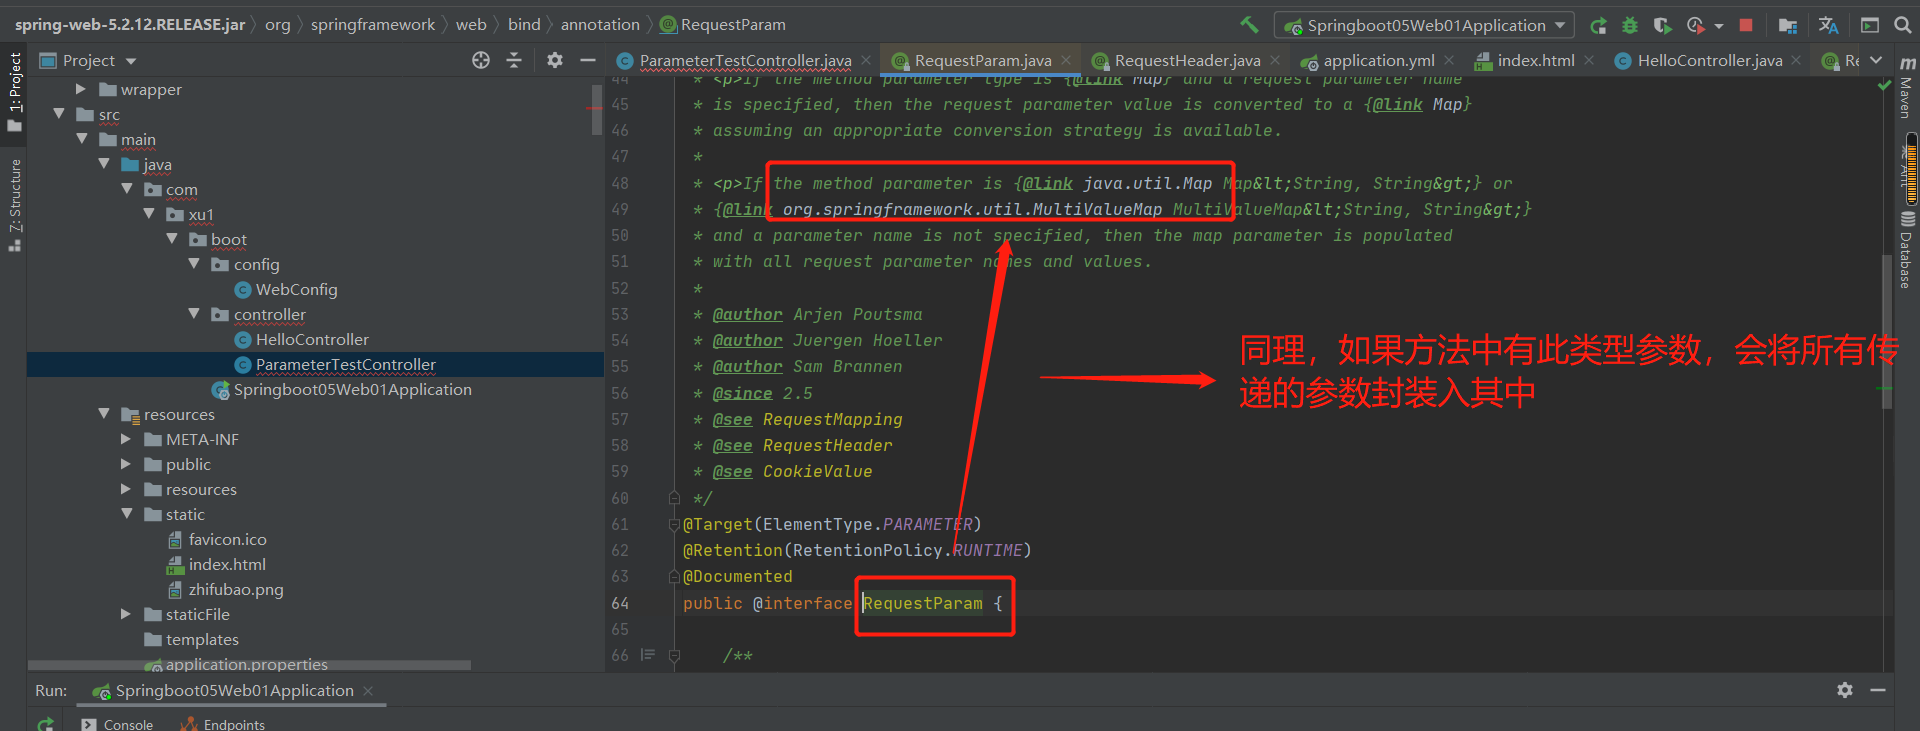
代码参考:
 //汽车编号为2号,车主为Tom
   @GetMapping(value = "/car/{carId}/owner/{username}")
    public Map<String,Object> getCar(
                                     @RequestParam("age") String age,
                                     @RequestParam("inters") List<String> insList,
                                     @RequestParam Map<String,String> parasMap) {
        Map<String,Object> map = new HashMap<>();
        //请求参数值Test
        map.put("age",age);
        map.put("inters",insList);
        map.put("parasMap",parasMap);
        return map;
    }
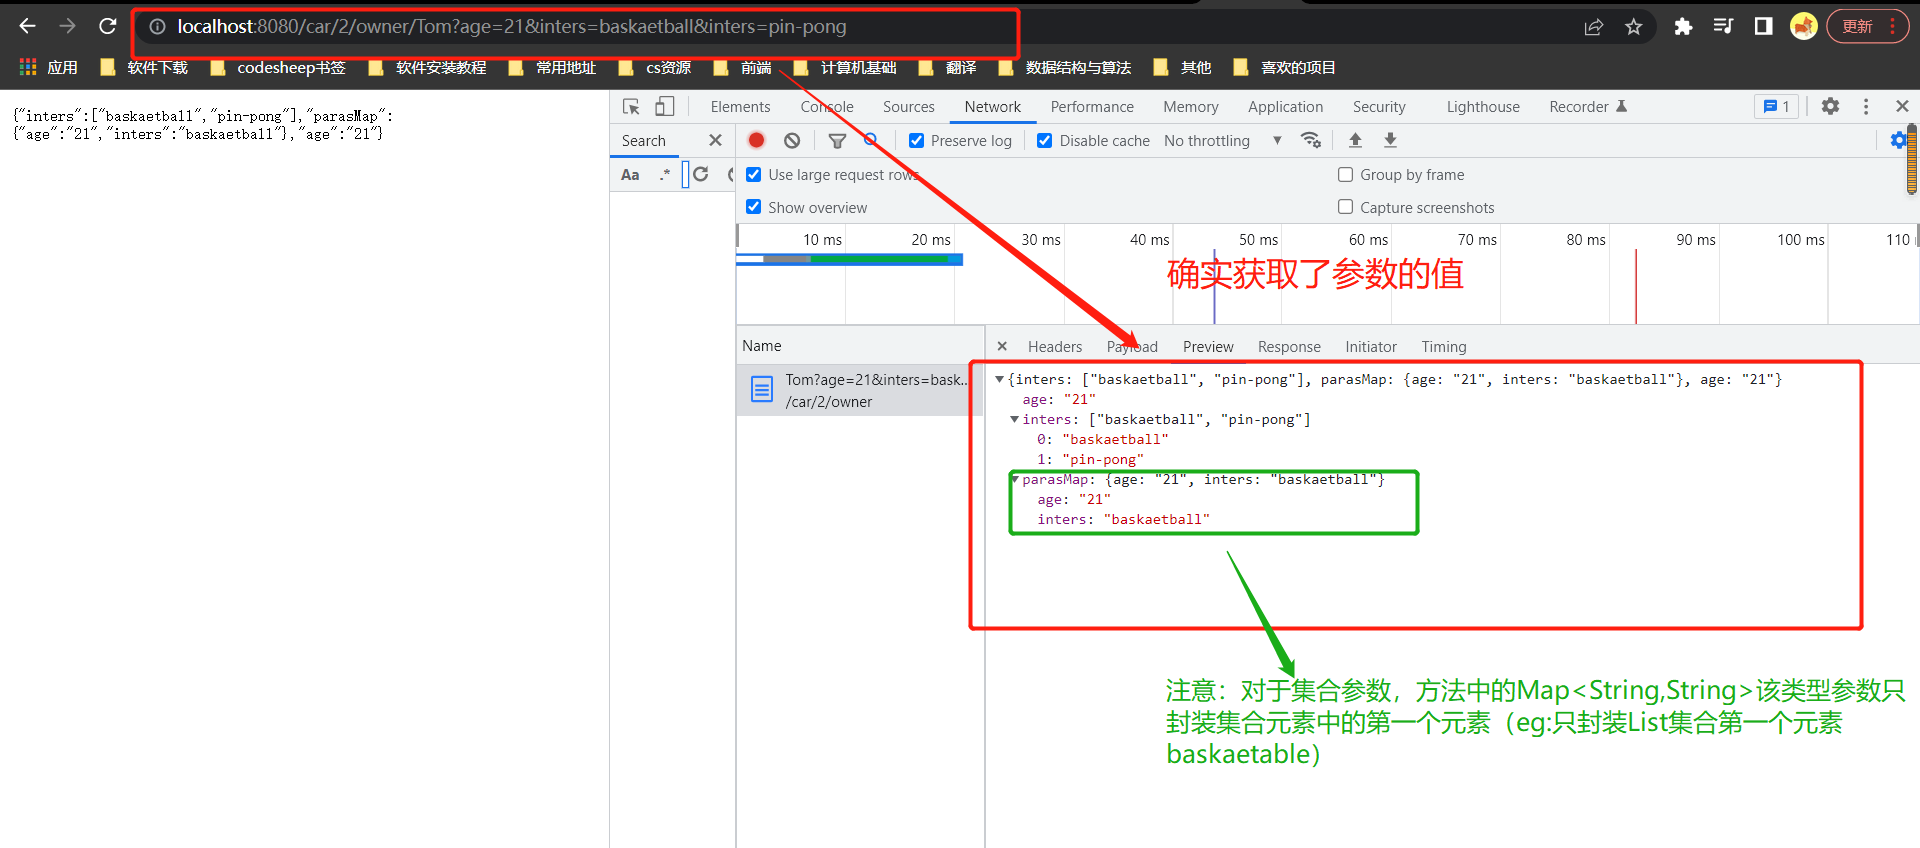
<a href="car/2/owner/Tom?age=21&inters=baskaetball&inters=pin-pong">getCar测试</a>
补充:该传值可以使用多选框传值
输出结果:
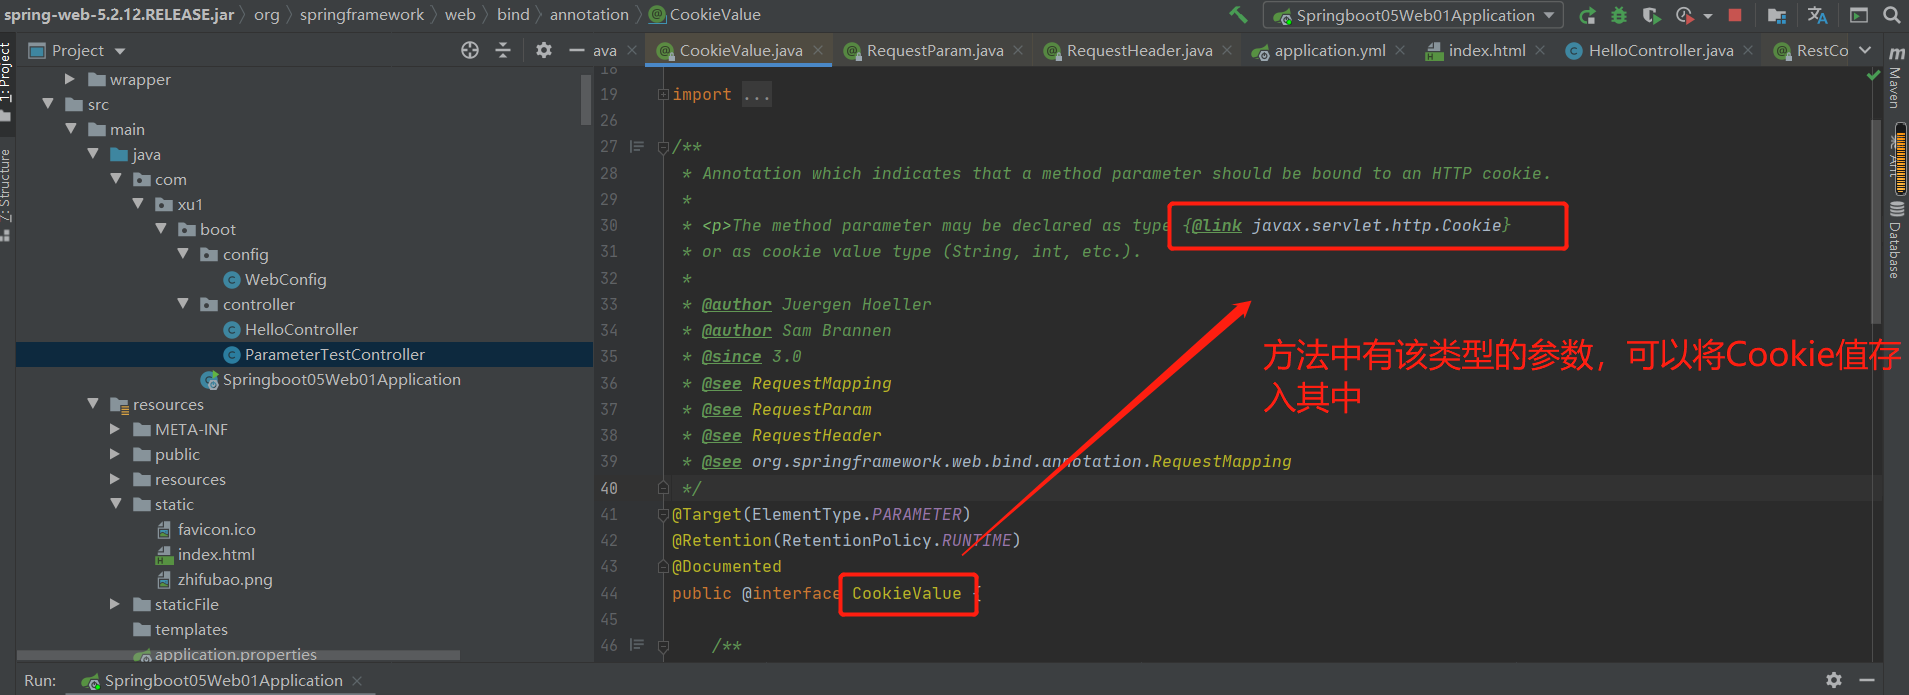
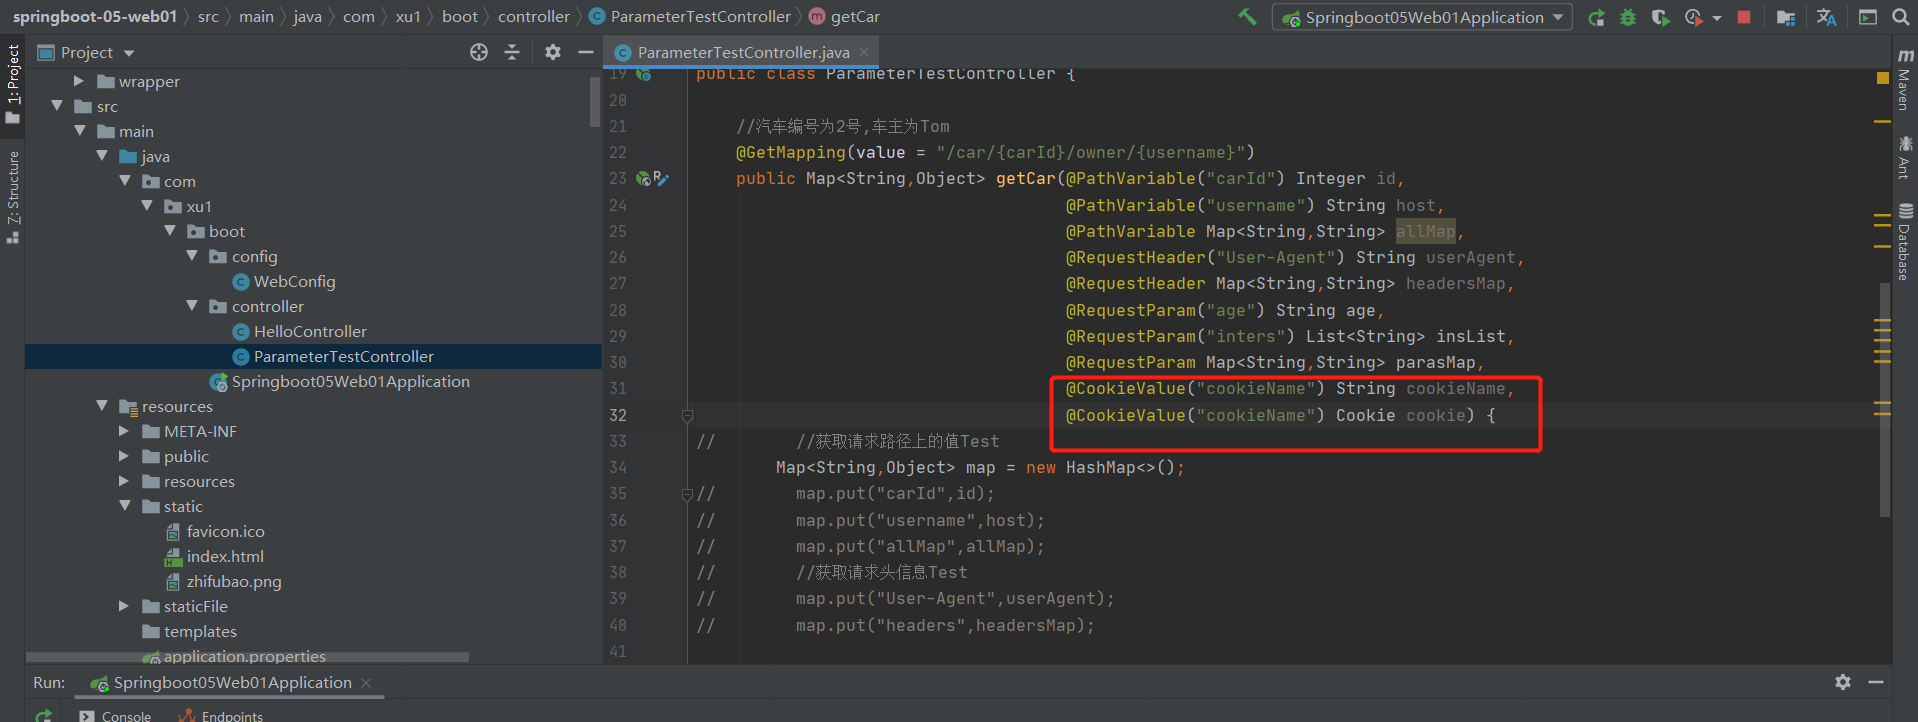
4.@CookieValue
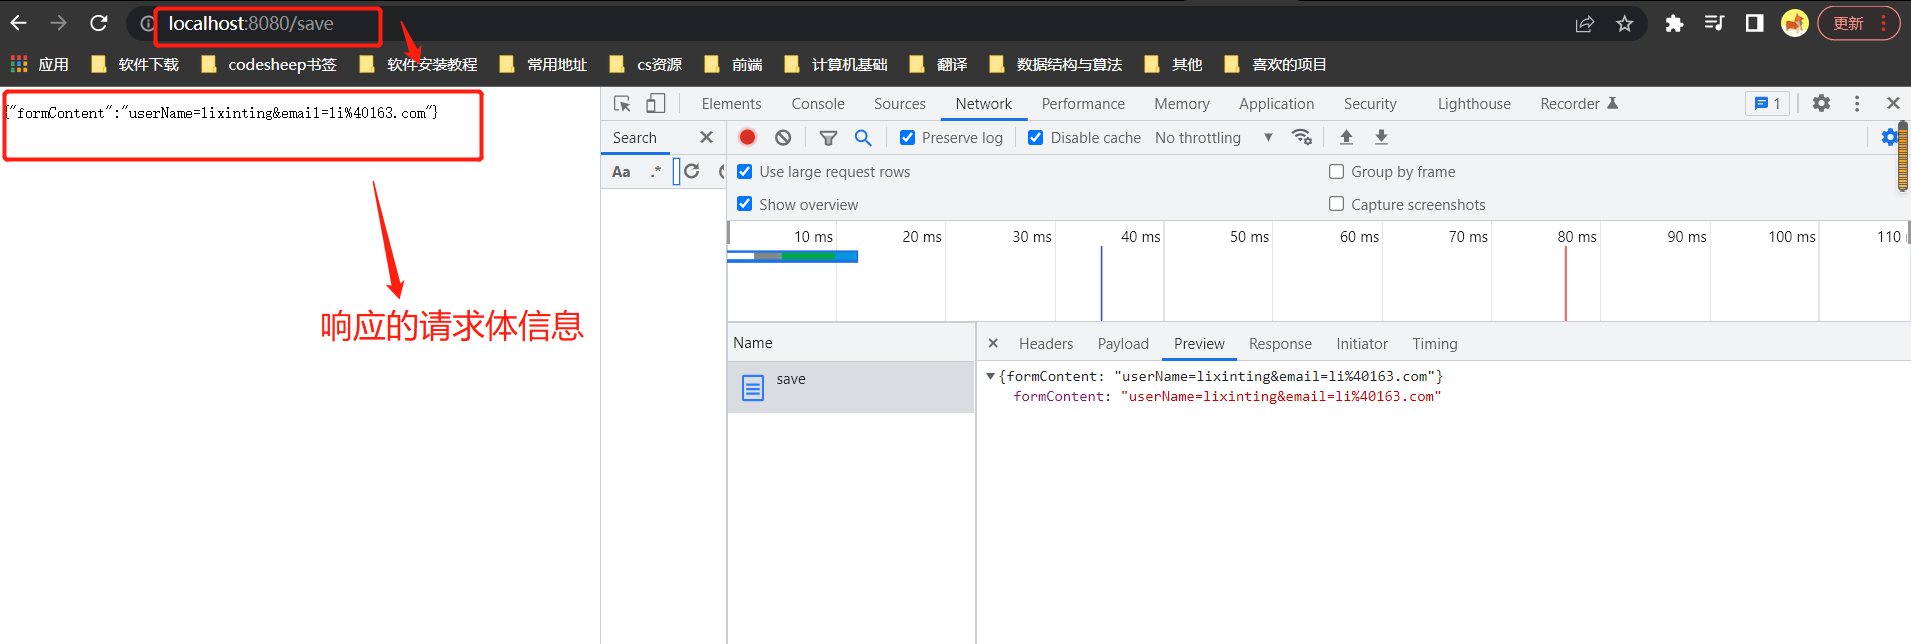
5.@RequestBody
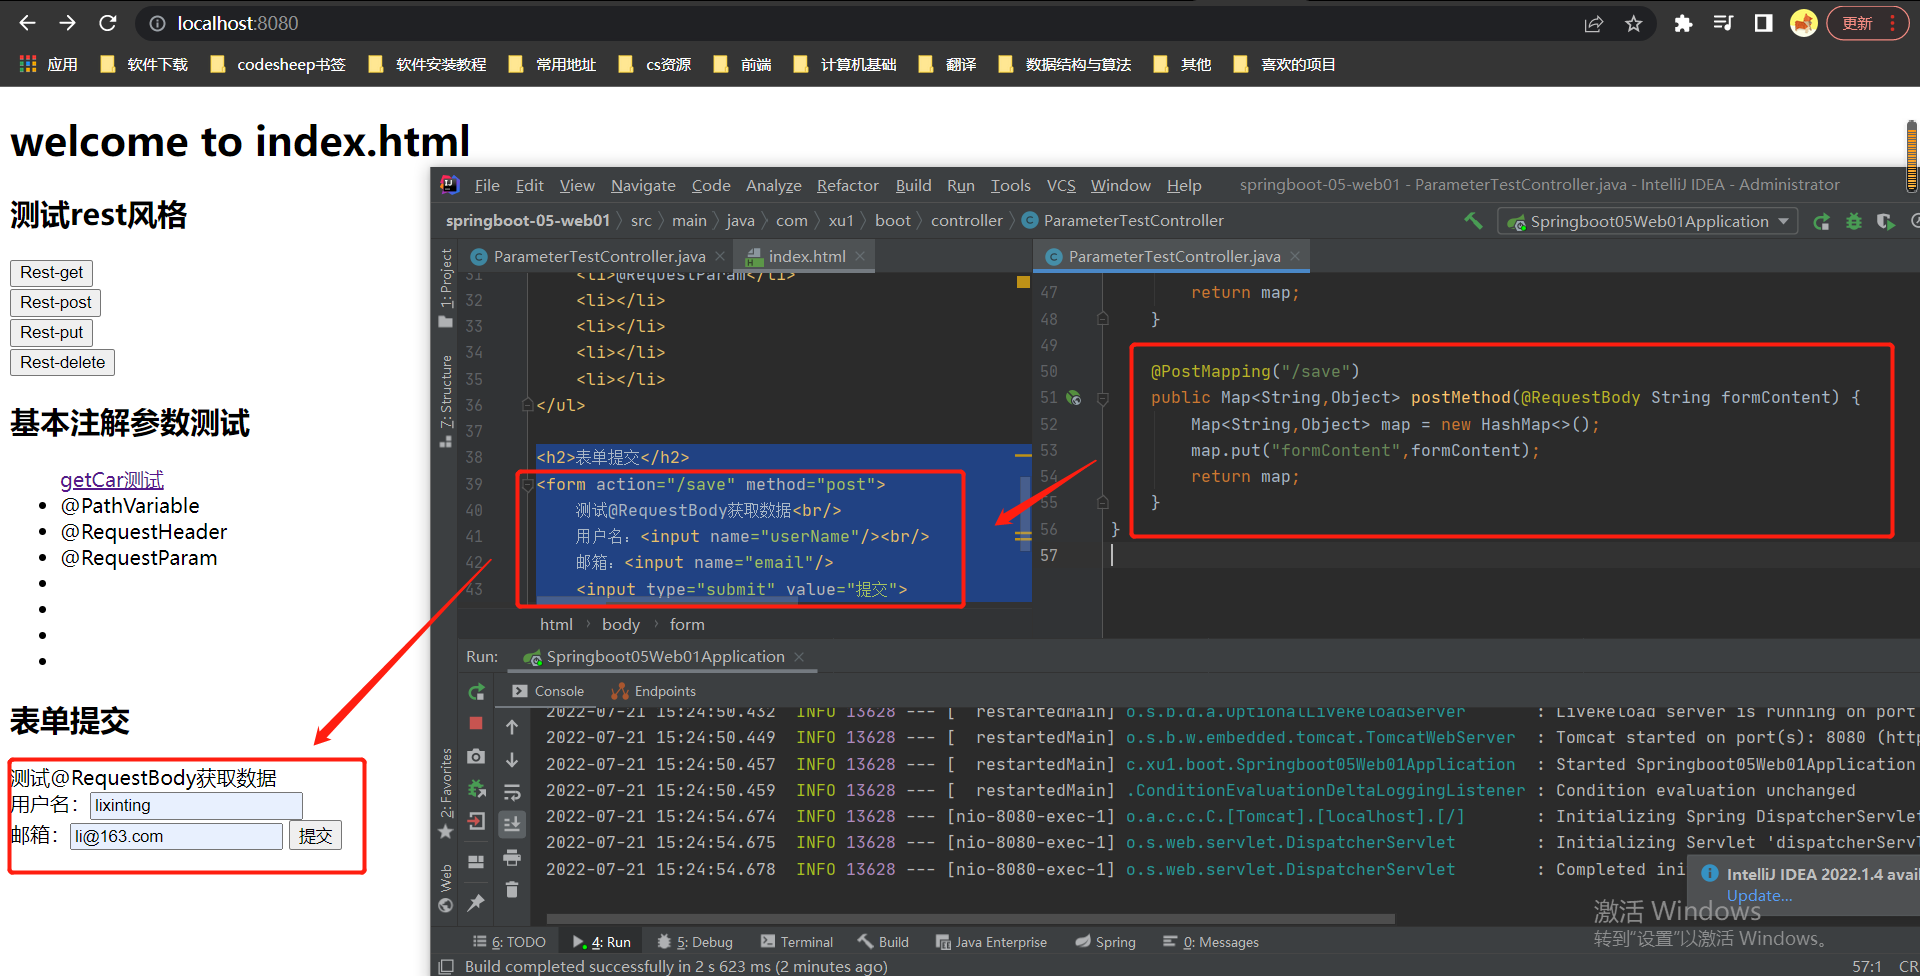
获取请求体的信息,表单有请求体
代码参考:
<h2>表单提交</h2>
<form action="/save" method="post">
    测试@RequestBody获取数据<br/>
    用户名:<input name="userName"/><br/>
    邮箱:<input name="email"/>
    <input type="submit" value="提交">
</form>
@PostMapping("/save")
public Map<String,Object> postMethod(@RequestBody String formContent) {
    Map<String,Object> map = new HashMap<>();
    map.put("formContent",formContent);
    return map;
}
结果测试:
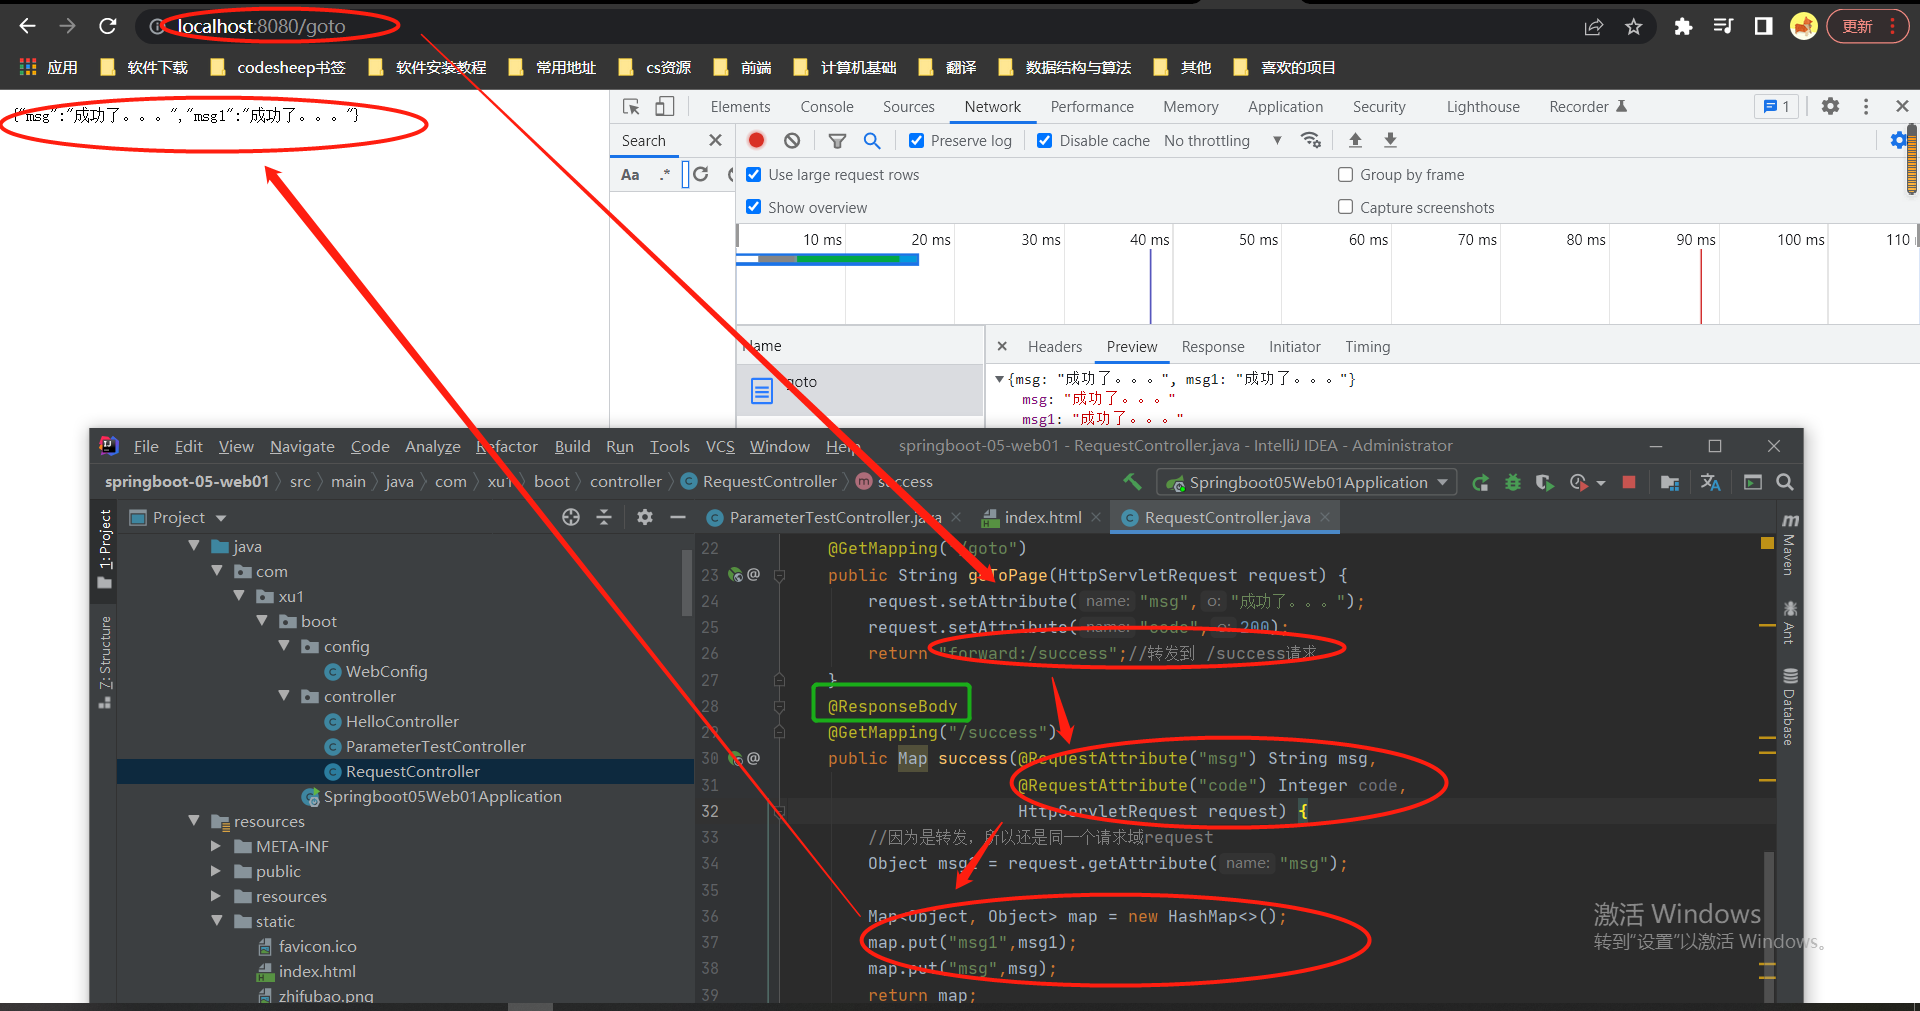
6.@RequestAttribut--获取请求域中的参数值
package com.xu1.boot.controller;

import org.springframework.stereotype.Controller;
import org.springframework.web.bind.annotation.GetMapping;
import org.springframework.web.bind.annotation.RequestAttribute;
import org.springframework.web.bind.annotation.RequestBody;
import org.springframework.web.bind.annotation.ResponseBody;

import javax.servlet.http.HttpServletRequest;
import java.util.HashMap;
import java.util.Map;

/**
 * @auther xu
 * @Description
 * @date 2022/07/21 - 17:04:51
 * @Modified By:
 */
@Controller
public class RequestController {

    @GetMapping("/goto")
    public String goToPage(HttpServletRequest request) {
        request.setAttribute("msg","成功了。。。");
        request.setAttribute("code",200);
        return "forward:/success";//转发到 /success请求

    }
    @ResponseBody
    @GetMapping("/success")
    public Map success(@RequestAttribute("msg") String msg,
                       @RequestAttribute("code") Integer code,
                       HttpServletRequest request) {

        //因为是转发,所以还是同一个请求域request
        Object msg1 = request.getAttribute("msg");

        Map<Object, Object> map = new HashMap<>();
        map.put("msg1",msg1);
        map.put("msg",msg);
        return map;
    }
}
<h2>@RequestAttribute获取请求域中参数的值</h2>
<a href="goto">@RequestAttribute</a>
结果参考:
6-4 请求处理之@MatrixVariable注解(矩阵变量)

1.源码分析
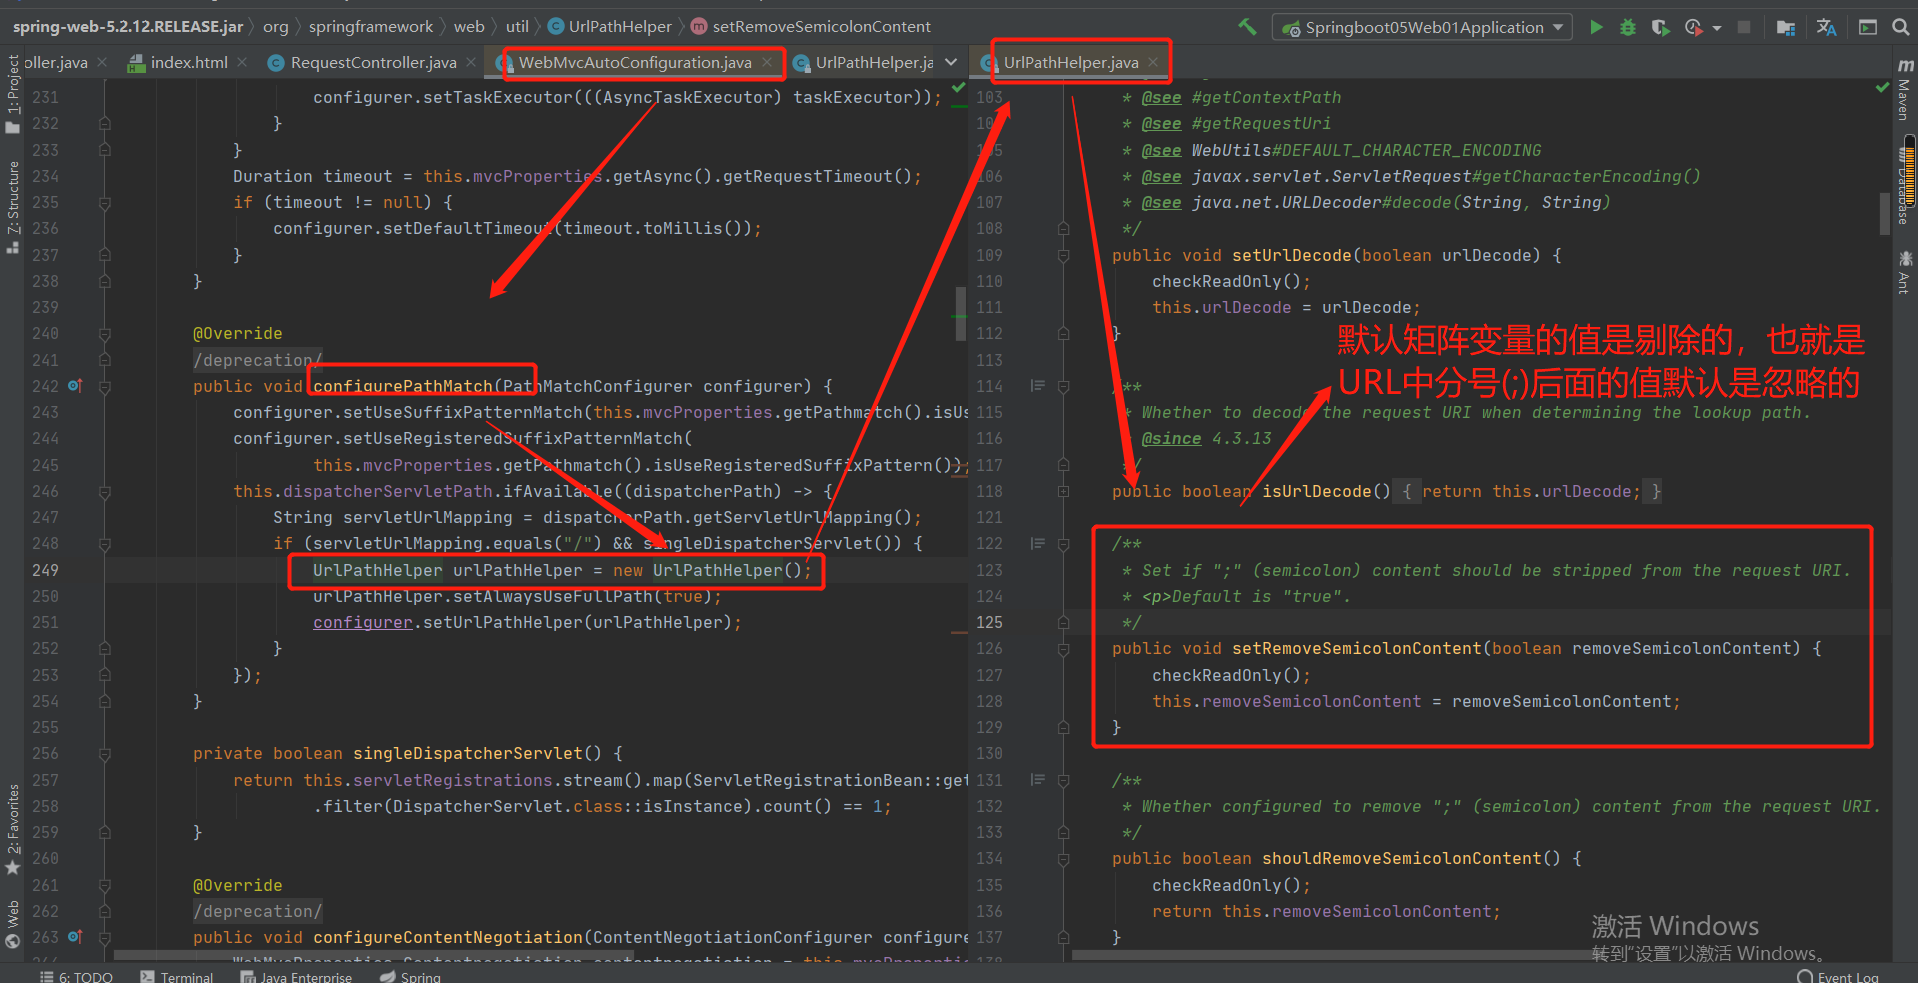
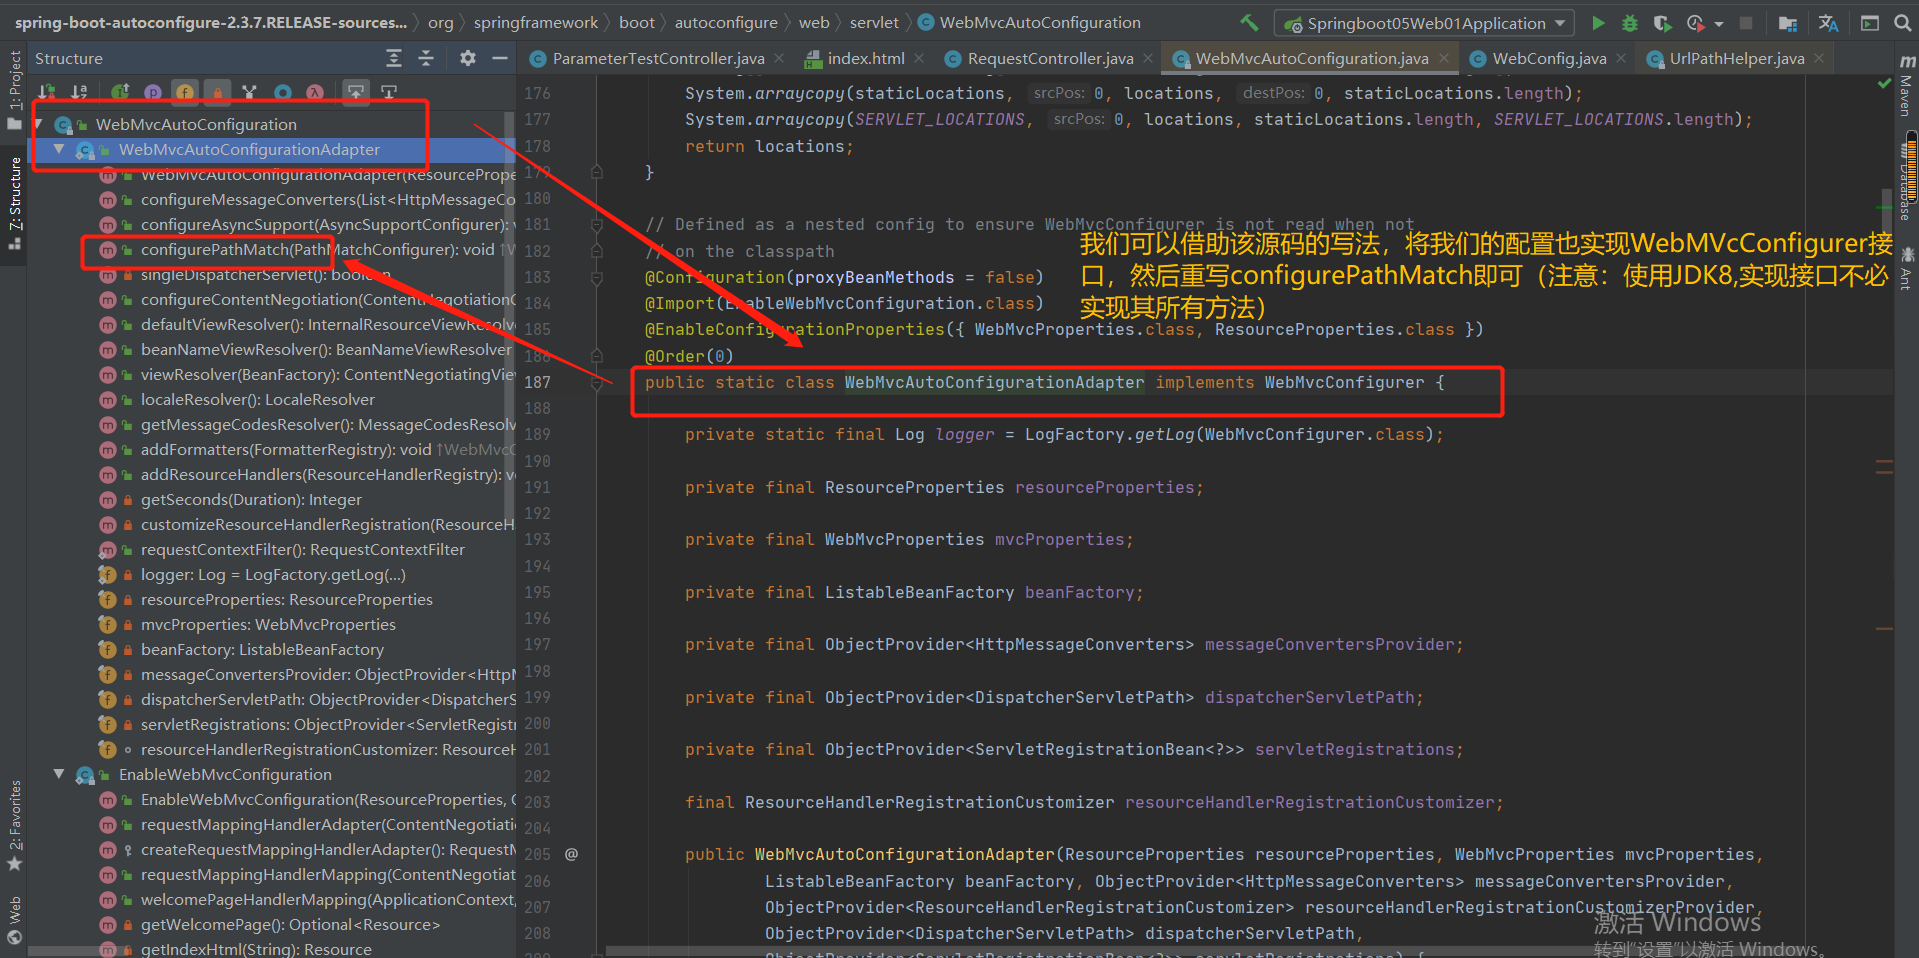
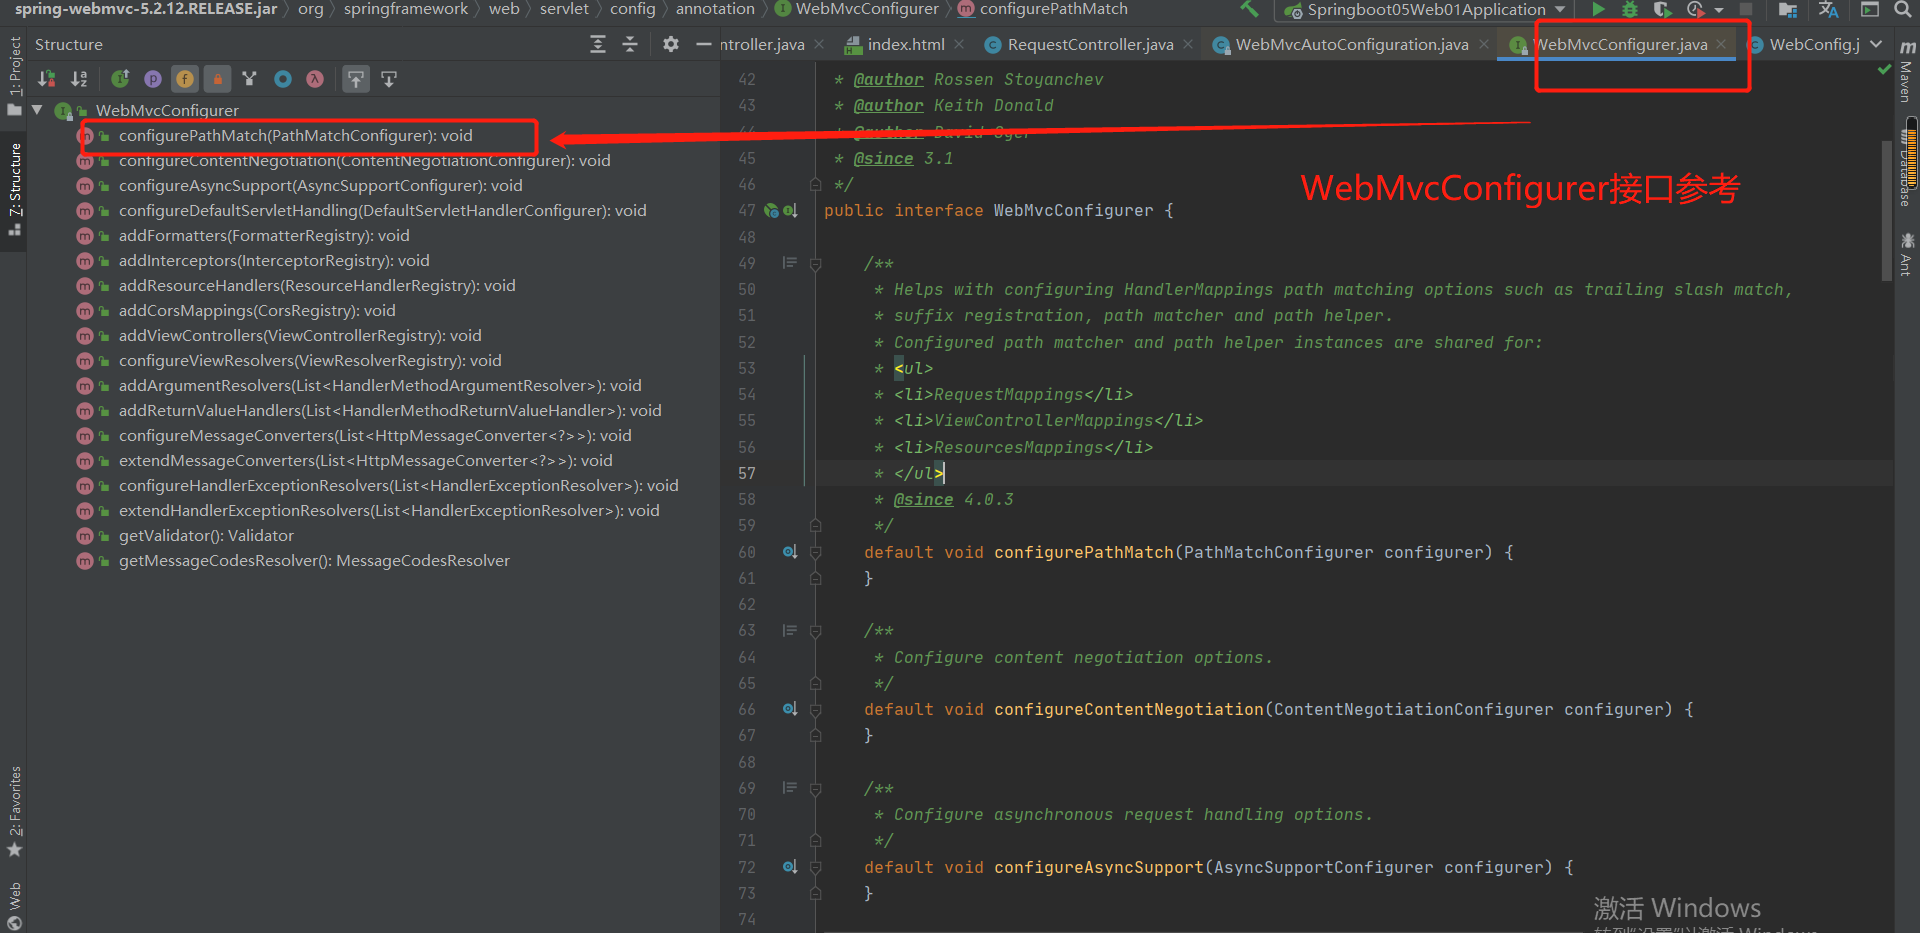
补充:我们自定义的配置类优先于springboot默认的配置类,自然方法也优先于重写的方法。
2.代码实践:
开启矩阵变量功能--写法1:
package com.xu1.boot.config;

import org.springframework.context.annotation.Bean;
import org.springframework.context.annotation.Configuration;
import org.springframework.web.filter.HiddenHttpMethodFilter;
import org.springframework.web.servlet.config.annotation.PathMatchConfigurer;
import org.springframework.web.servlet.config.annotation.WebMvcConfigurer;
import org.springframework.web.util.UrlPathHelper;

/**
 * @auther xu
 * @Description
 * @date 2022/07/21 - 5:55:51
 * @Modified By:
 */
@Configuration(proxyBeanMethods = false)
public class WebConfig implements WebMvcConfigurer {
    @Bean
    public HiddenHttpMethodFilter hiddenHttpMethodFilter() {
        HiddenHttpMethodFilter hiddenHttpMethodFilter = new HiddenHttpMethodFilter();
        hiddenHttpMethodFilter.setMethodParam("_m");
        return hiddenHttpMethodFilter;
    }

    @Override
    public void configurePathMatch(PathMatchConfigurer configurer) {
        UrlPathHelper urlPathHelper = new UrlPathHelper();
        urlPathHelper.setRemoveSemicolonContent(false);//默认是true,禁用掉了矩阵变量功能
        configurer.setUrlPathHelper(urlPathHelper);
    }
}
开启矩阵变量功能--写法2:
@Configuration(proxyBeanMethods = false)
public class WebConfig{
    @Bean
    public HiddenHttpMethodFilter hiddenHttpMethodFilter() {
        HiddenHttpMethodFilter hiddenHttpMethodFilter = new HiddenHttpMethodFilter();
        hiddenHttpMethodFilter.setMethodParam("_m");
        return hiddenHttpMethodFilter;
    }

   @Bean
    public WebMvcConfigurer webMvcConfigurer() {
        return new WebMvcConfigurer() {
            @Override
            public void configurePathMatch(PathMatchConfigurer configurer) {
                UrlPathHelper urlPathHelper = new UrlPathHelper();
                urlPathHelper.setRemoveSemicolonContent(false);//默认是true,禁用掉了矩阵变量功能
                configurer.setUrlPathHelper(urlPathHelper);
            }
        };
   }
}
说明:该配置类实现了WebMvcConfigurer,并重写了configurePathMatch方法,将其矩阵变量功能开启。
3.代码测试
测试1:
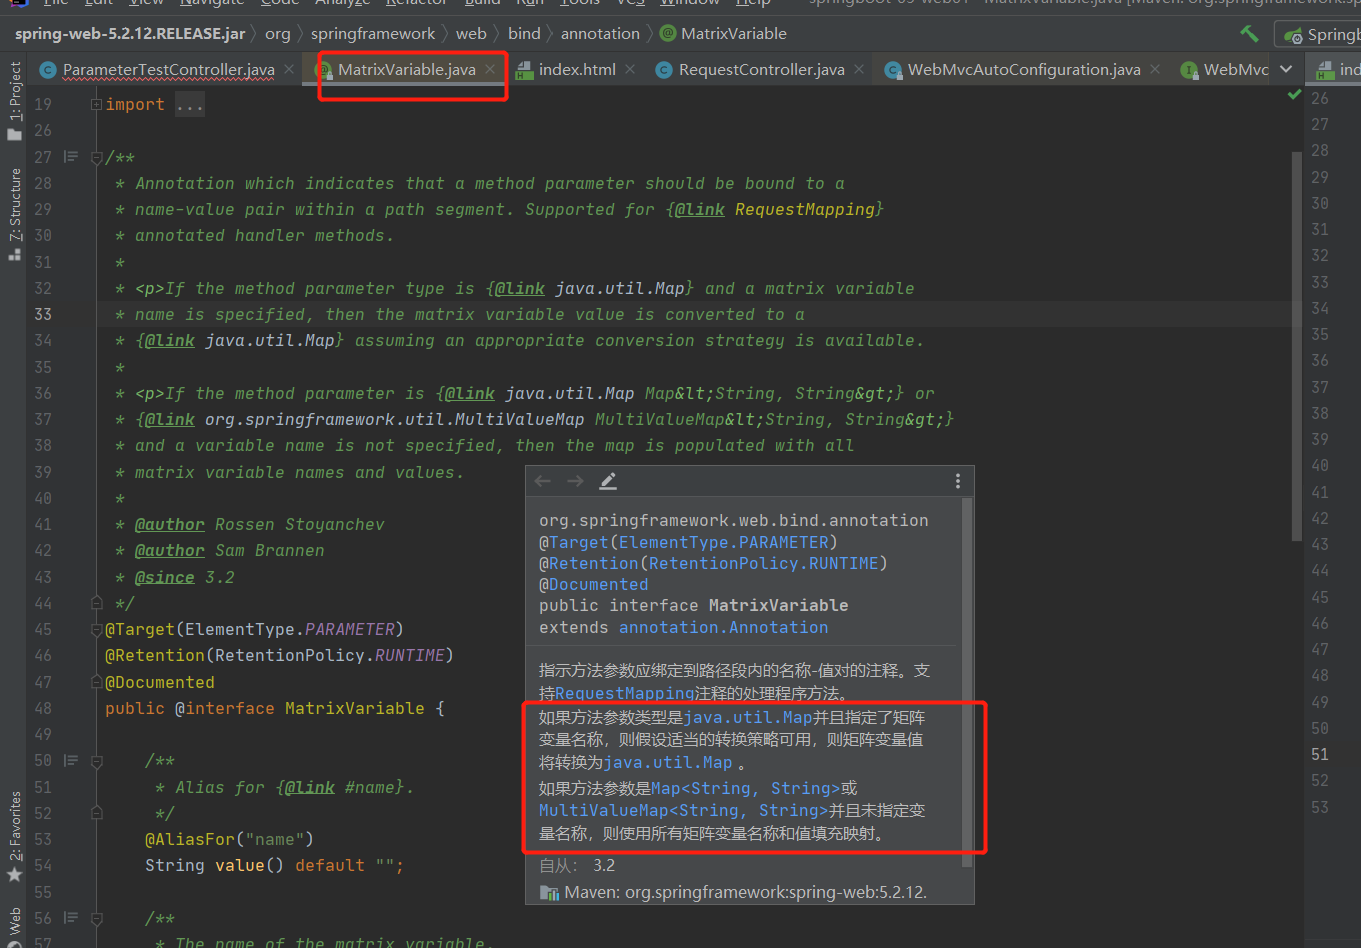
    //cars/sell;low=34;brand=Nike,palyboy,LiNi

@GetMapping("/cars/{sell}")//注意将路径上的变量用{}括起来
public Map<String,Object> carSell(@MatrixVariable("low") Integer low,
                                  @MatrixVariable("brand") List<String> brands,
                                  @MatrixVariable Map<String,String> allMatrixMap) {
    Map<String,Object> map = new HashMap<>();
    map.put("low",low);
    map.put("brands",brands);
    map.put("allMatrixMap",allMatrixMap);
    return map;
}
<h2>矩阵变量测试</h2>
<a href="/cars/sell;low=34;brand=Nike,palyboy,LiNi">矩阵变量测试</a>
注意:sell具有矩阵值(分号后面的值),在请求映射中需要用大括号将sell括起来。
输出结果:
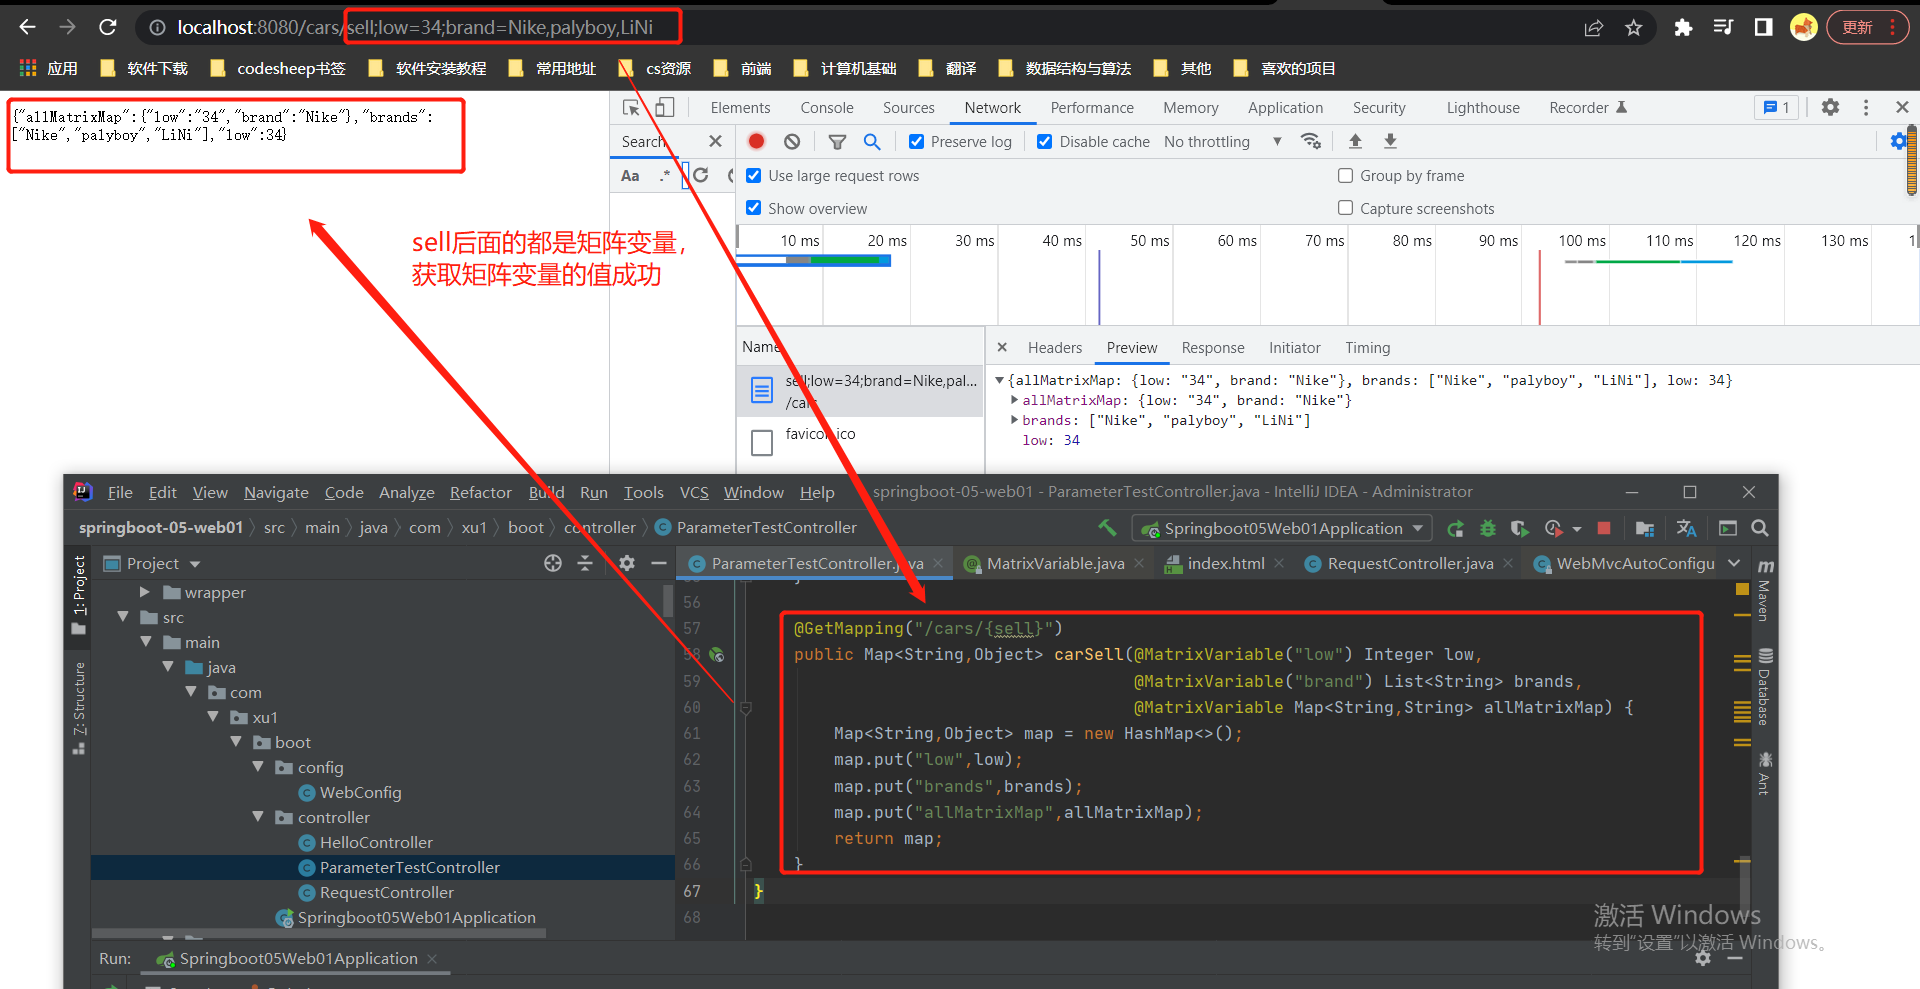
测试2:
/**
 *
 * @Description
 * 使用pathVar指定路径名,从而消除路径名中相同矩阵变量名歧义问题
 * @Date 2022/07/22 11:01:29
 *
 */
//boss/1;age=20/2;age=22
@GetMapping("/boss/{bossId}/{emplId}")
public Map<String,Object> bossAndEmpl(@MatrixVariable(value = "age",pathVar = "bossId") Integer bossId,
                                  @MatrixVariable(value = "age",pathVar = "emplId") Integer emplId) {
    Map<String,Object> map = new HashMap<>();
   map.put("bossId",bossId);
   map.put("emplId",emplId);
    return map;
}
<a href="/boss/1;age=20/2;age=22">矩阵变量测试2--pathVar</a>
输出结果:
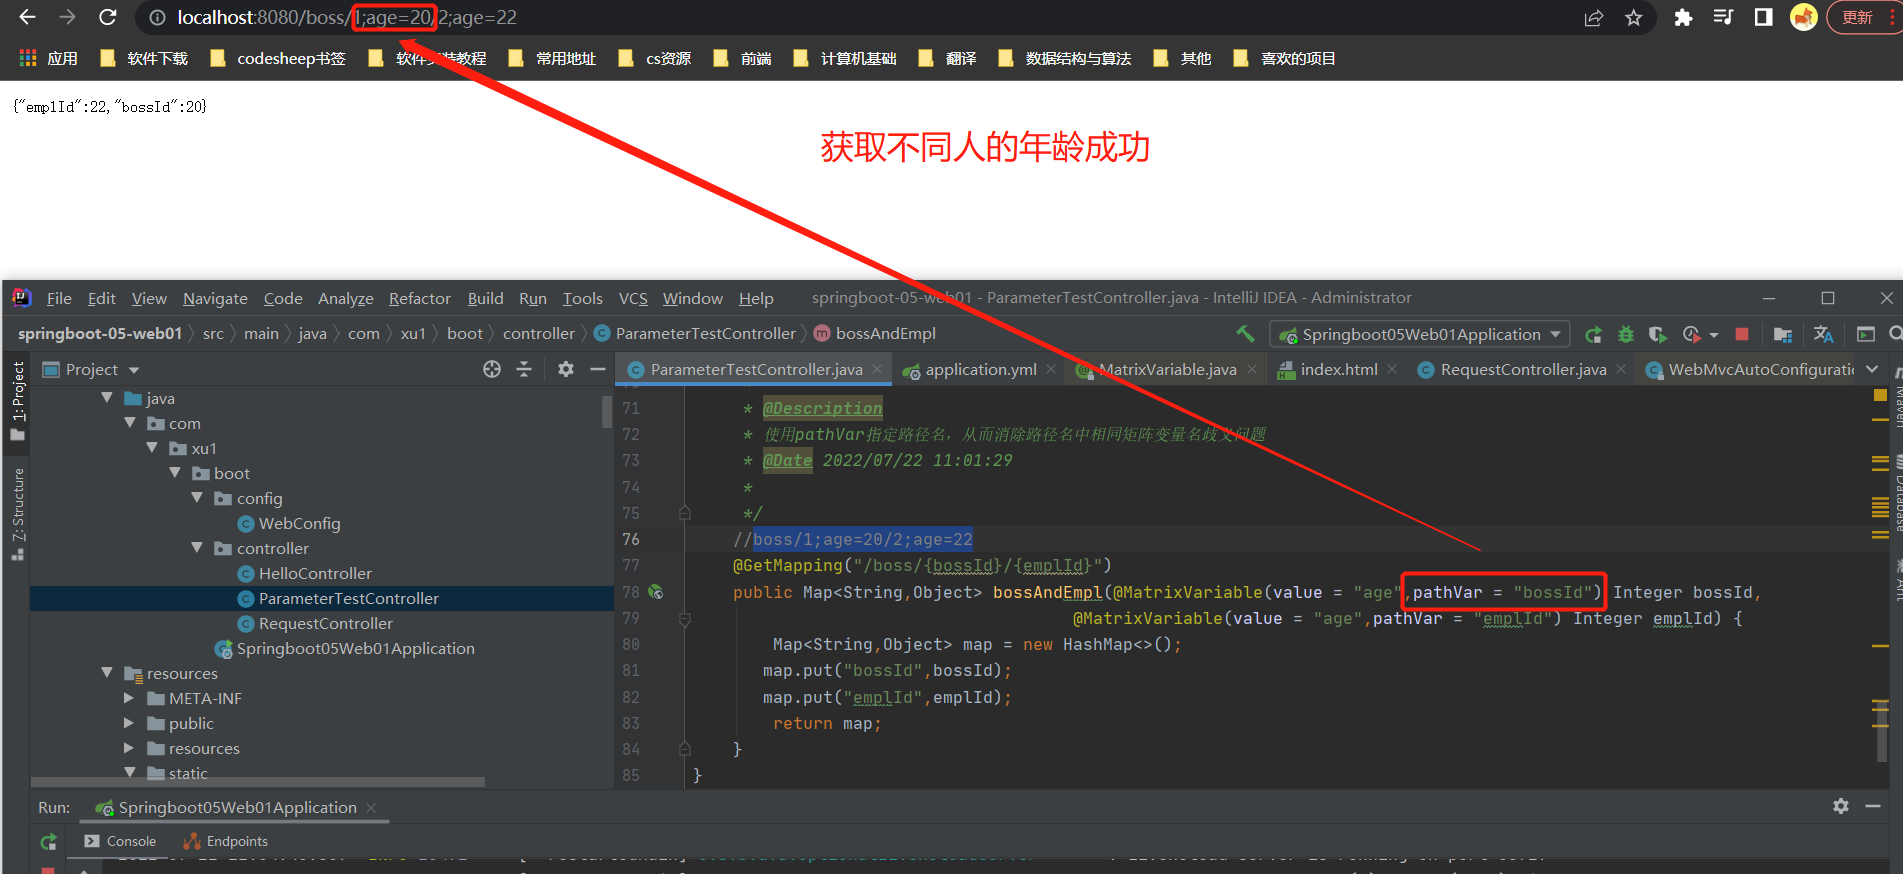
6-5 对于目标方法中参数解析器----源码分析
调试前提:
 //汽车编号为2号,车主为Tom
    @GetMapping(value = "/car/{carId}/owner/{username}")
    public Map<String,Object> getCar(@PathVariable("carId") Integer id,
                                     @PathVariable("username") String host,
                                     @PathVariable Map<String,String> allMap,
                                     @RequestHeader("User-Agent") String userAgent,
                                     @RequestHeader Map<String,String> headersMap,
                                     @RequestParam("age") String age,
                                     @RequestParam("inters") List<String> insList,
                                     @RequestParam Map<String,String> parasMap
//                                     @CookieValue("cookieName") String cookieName,
//                                     @CookieValue("cookieName") Cookie cookie) {
                                                                                ){
//        //获取请求路径上的值Test
        Map<String,Object> map = new HashMap<>();
//        map.put("carId",id);
//        map.put("username",host);
//        map.put("allMap",allMap);
//        //获取请求头信息Test
//        map.put("User-Agent",userAgent);
//        map.put("headers",headersMap);

        //请求参数值Test
        map.put("age",age);
        map.put("inters",insList);
        map.put("parasMap",parasMap);

        return map;
    }
<a href="car/2/owner/Tom?age=21&inters=baskaetball&inters=pin-pong">getCar测试</a>
正式调试:
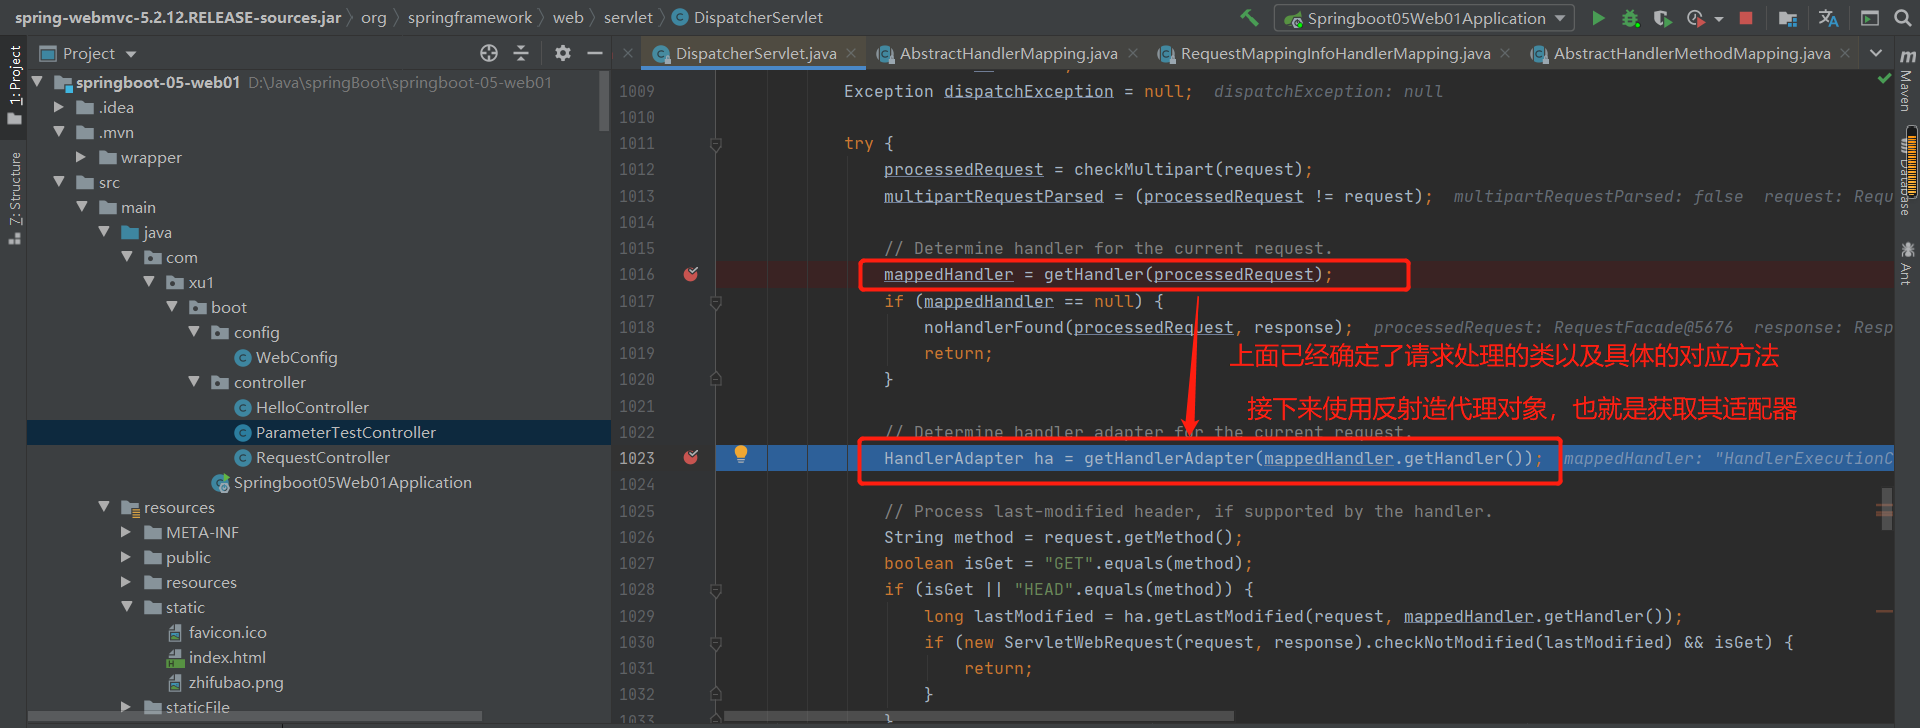
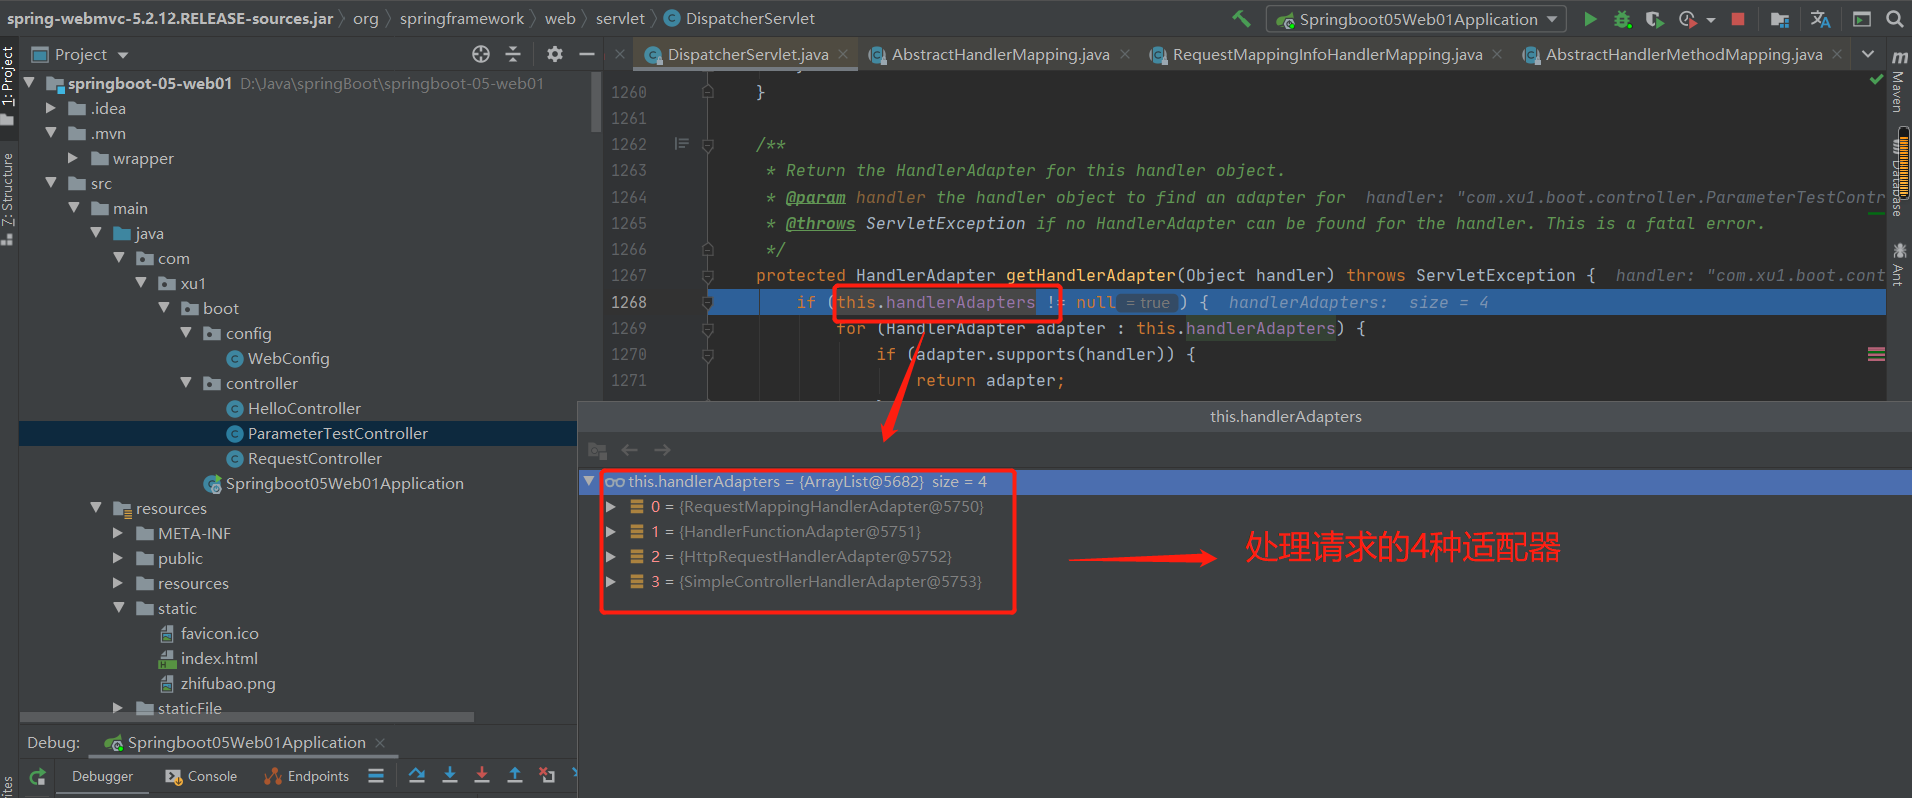
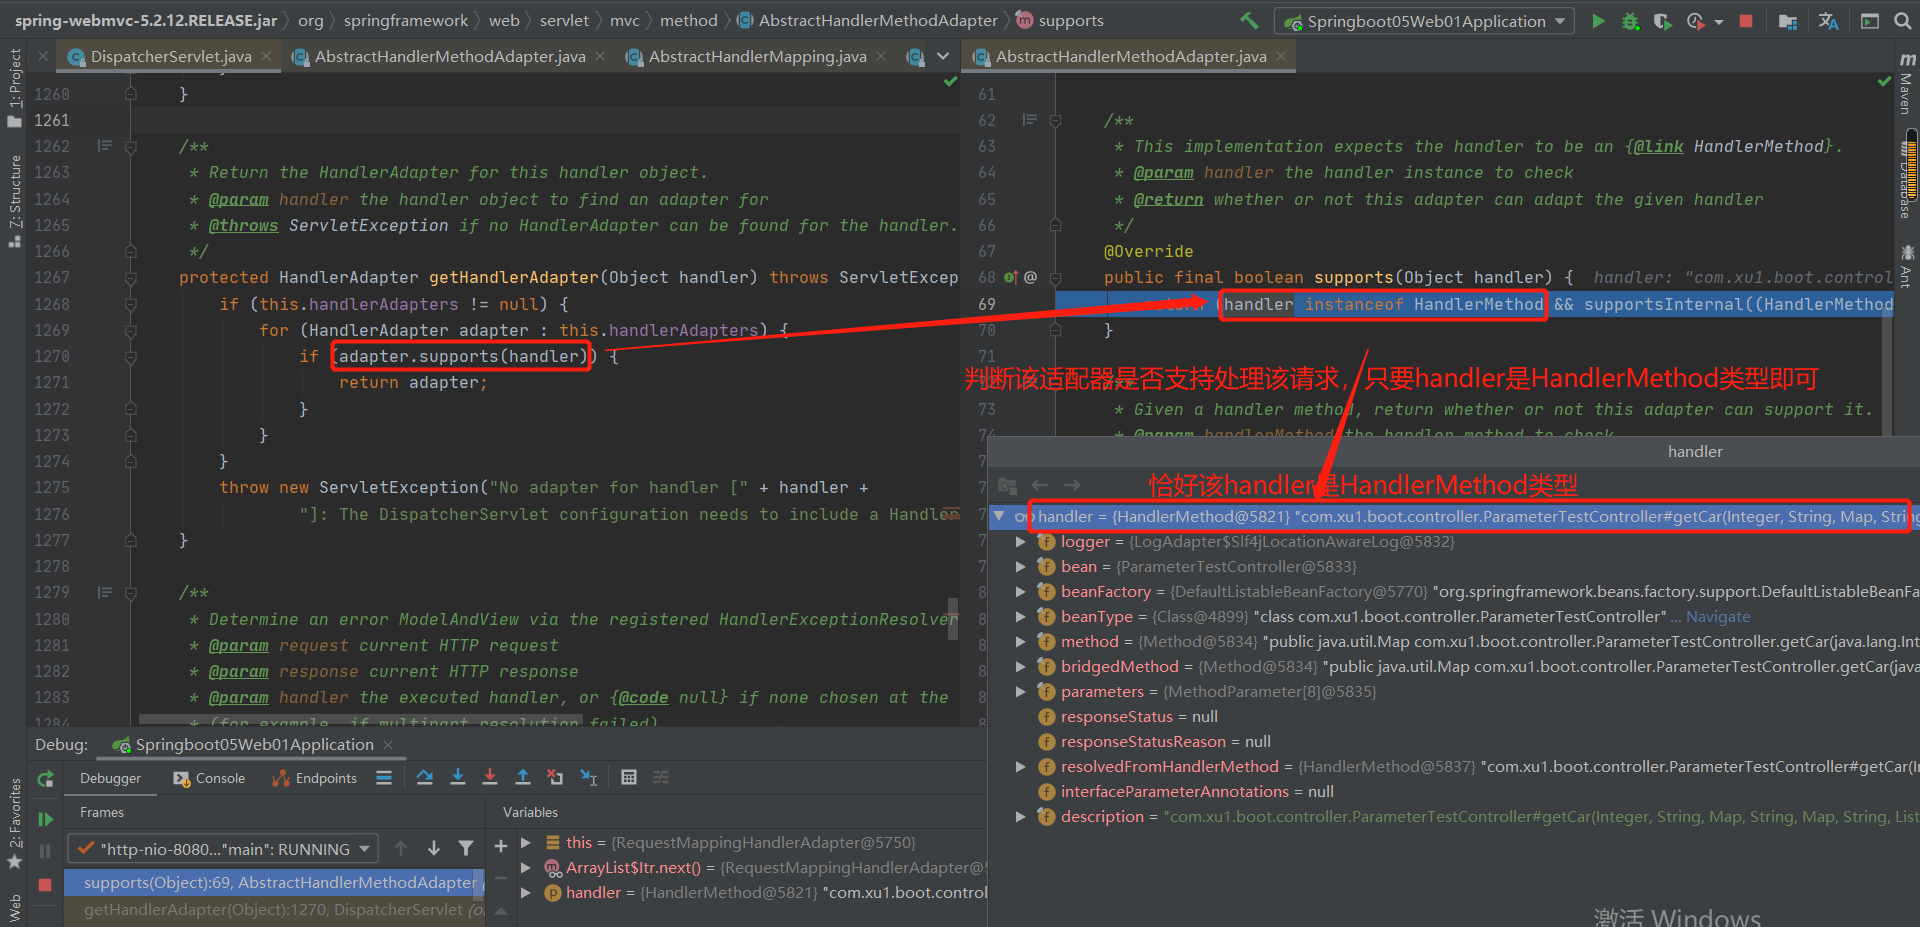
真正执行目标方法:
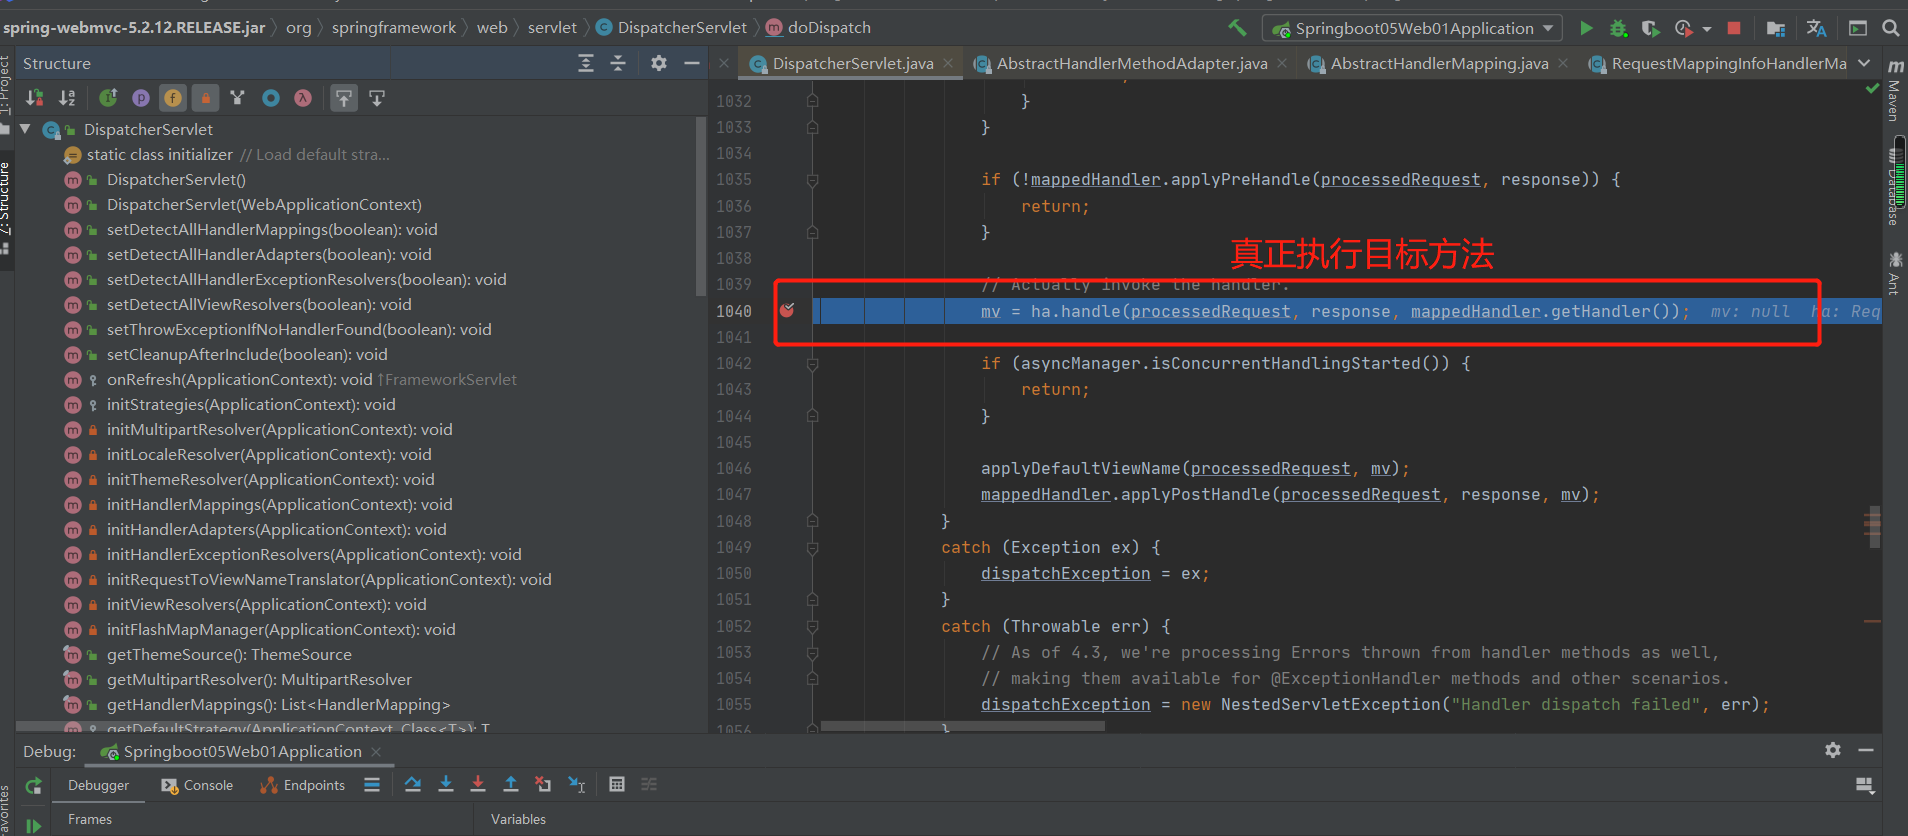
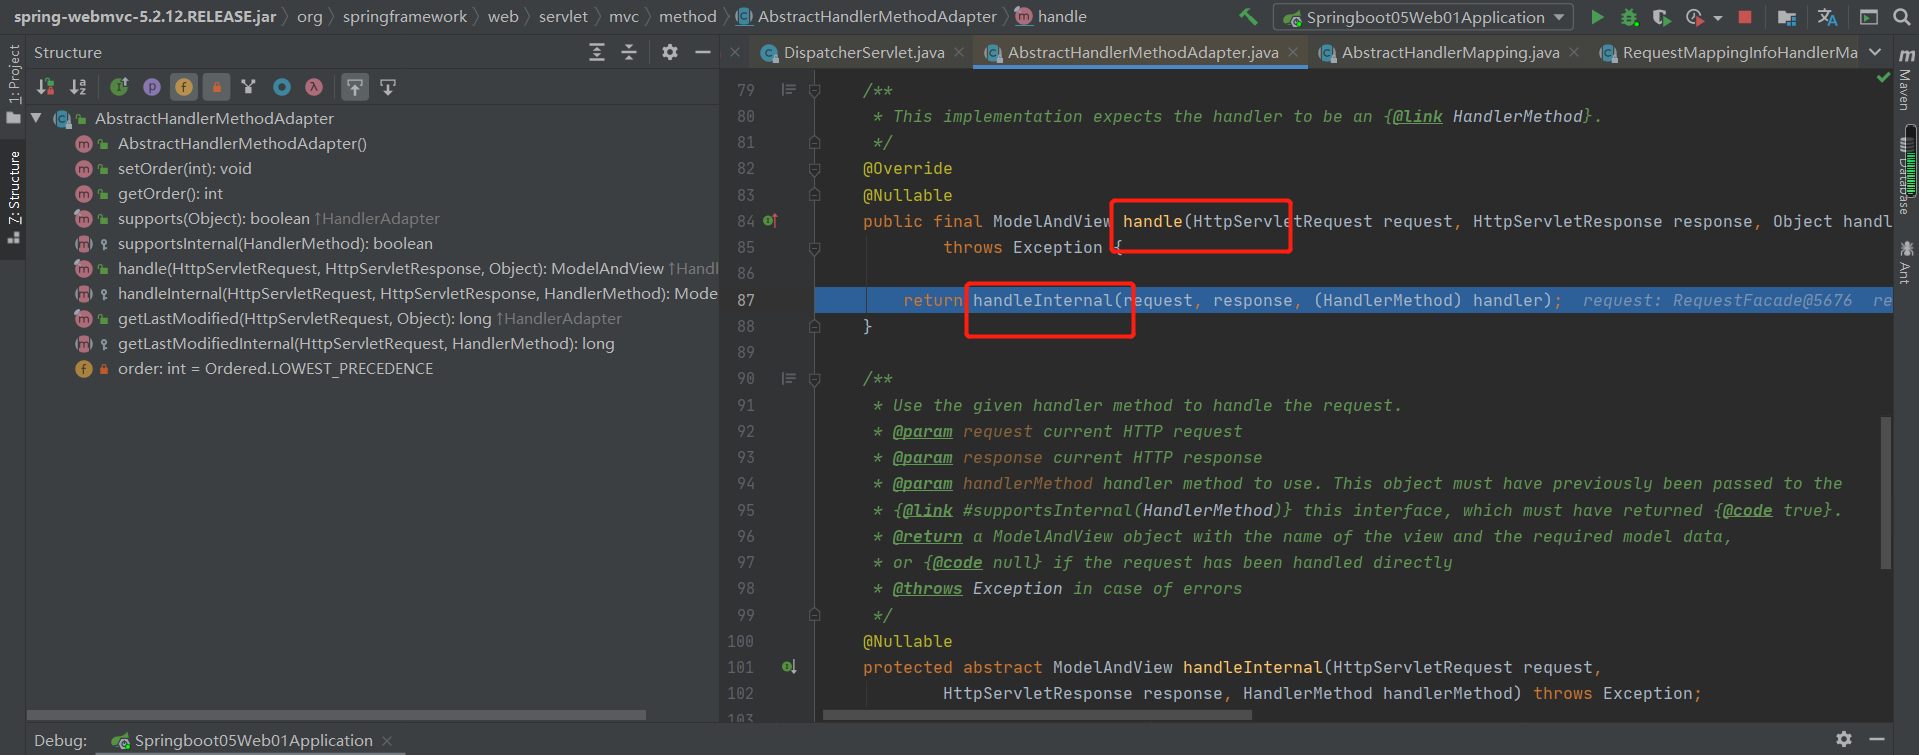
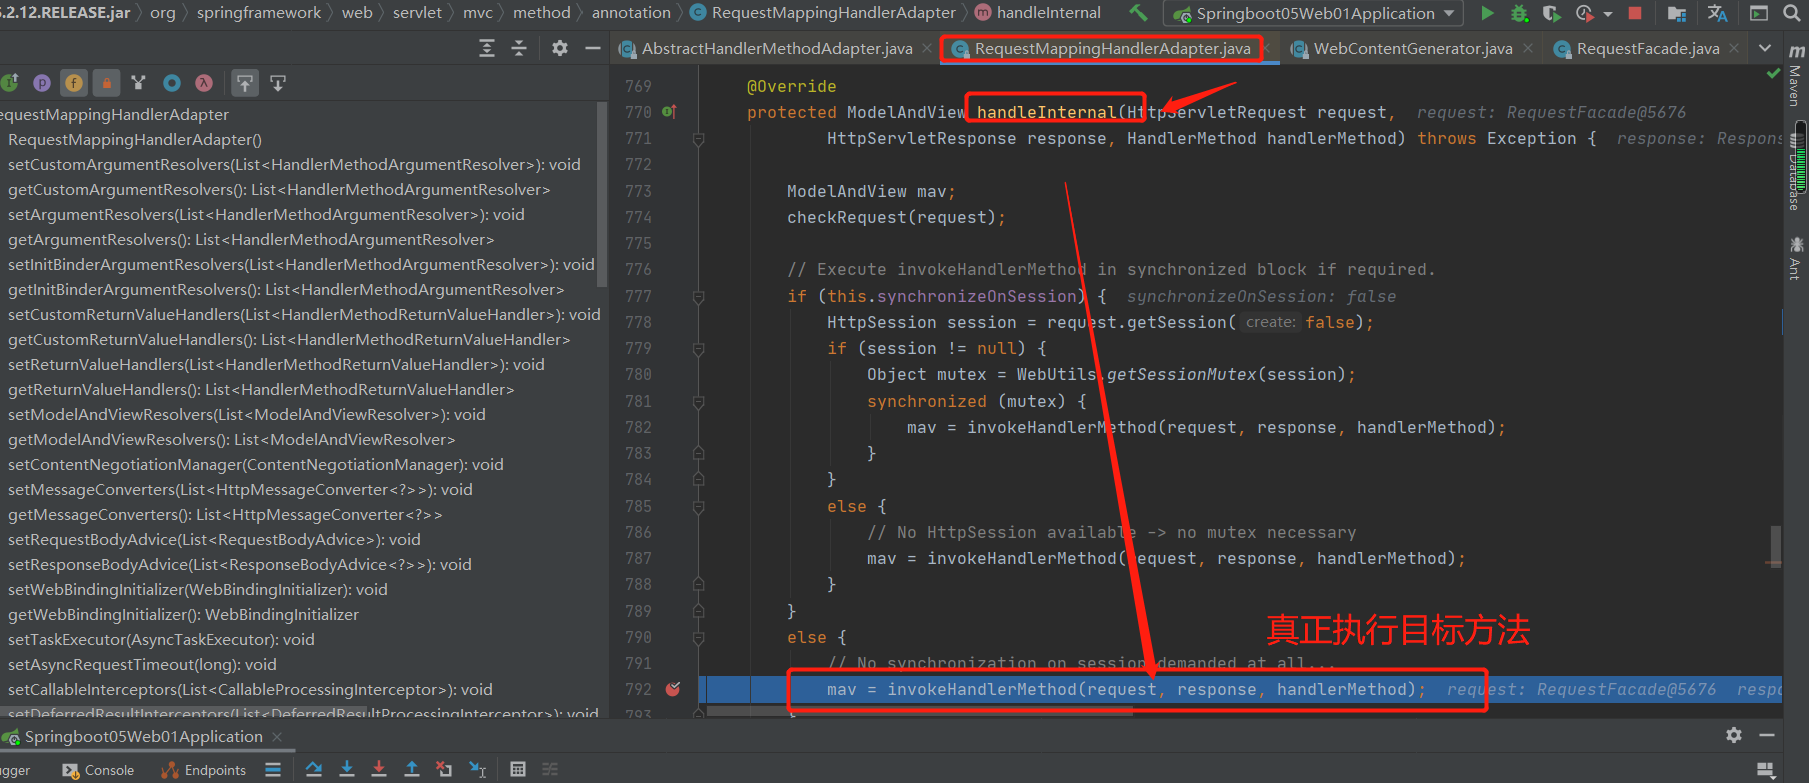
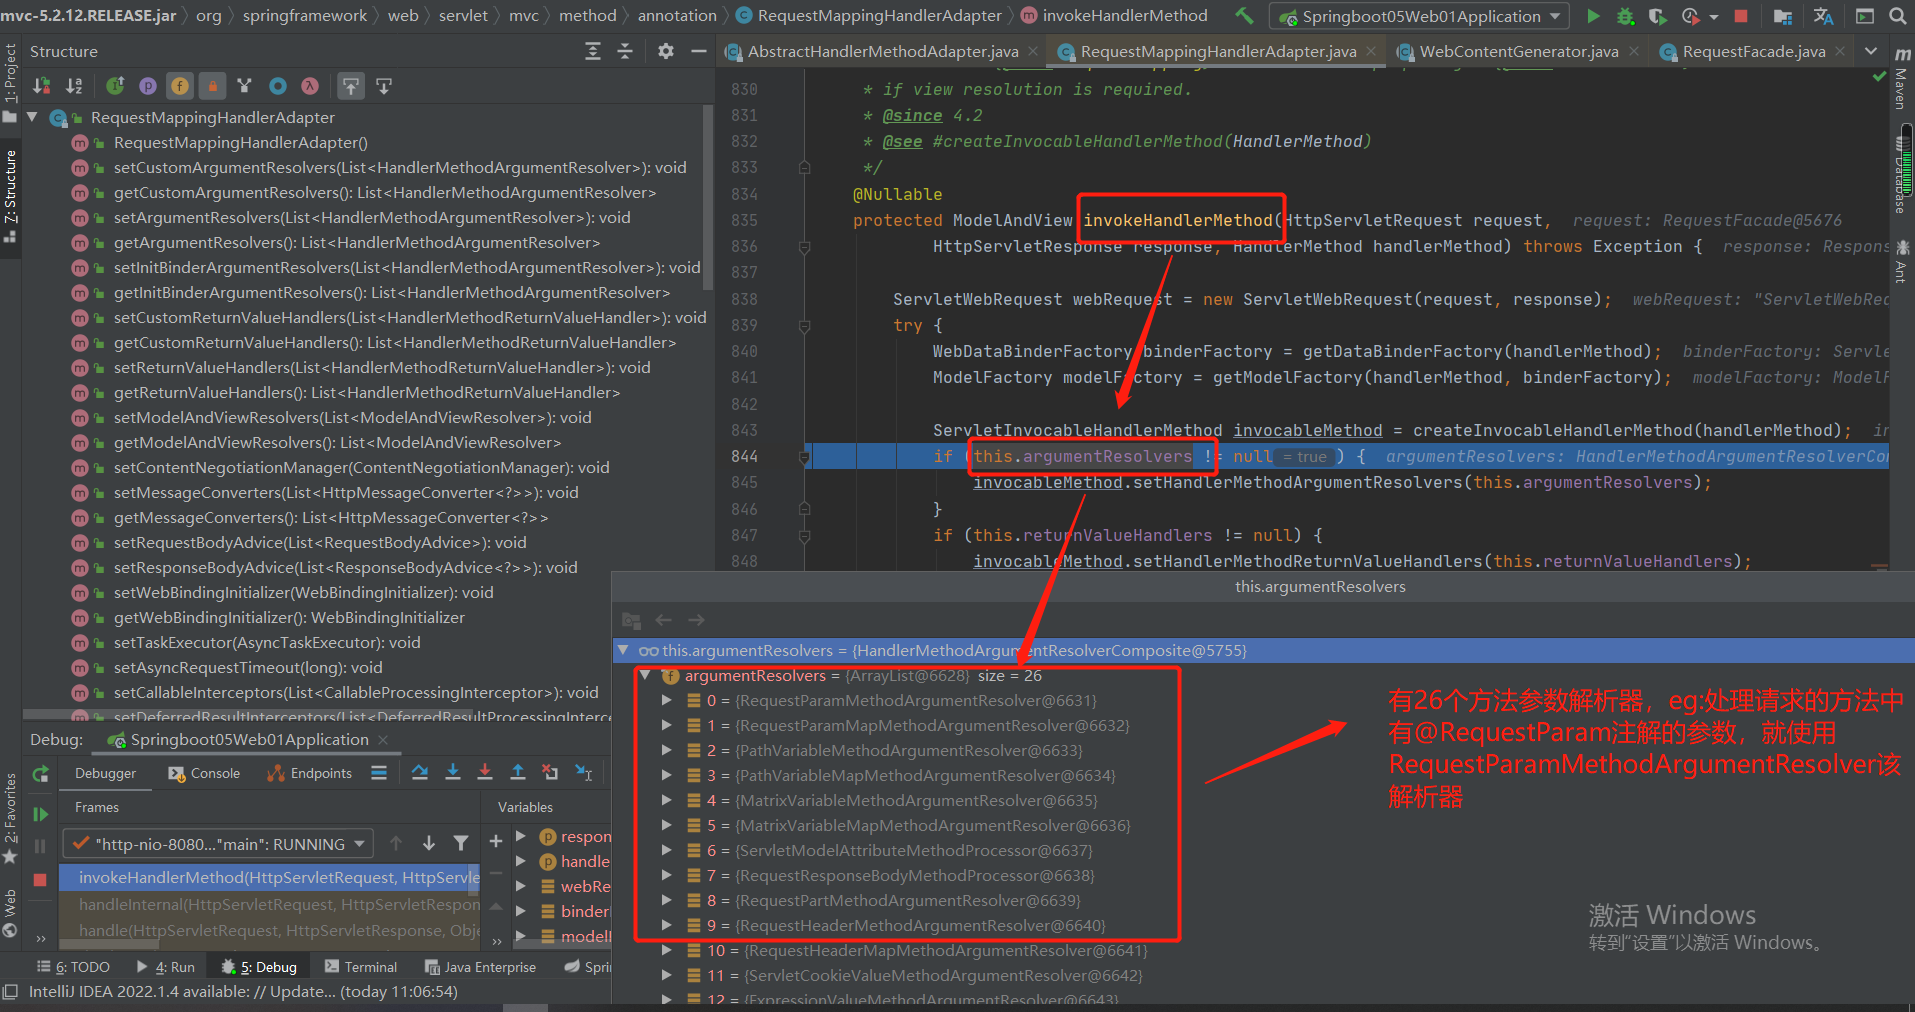
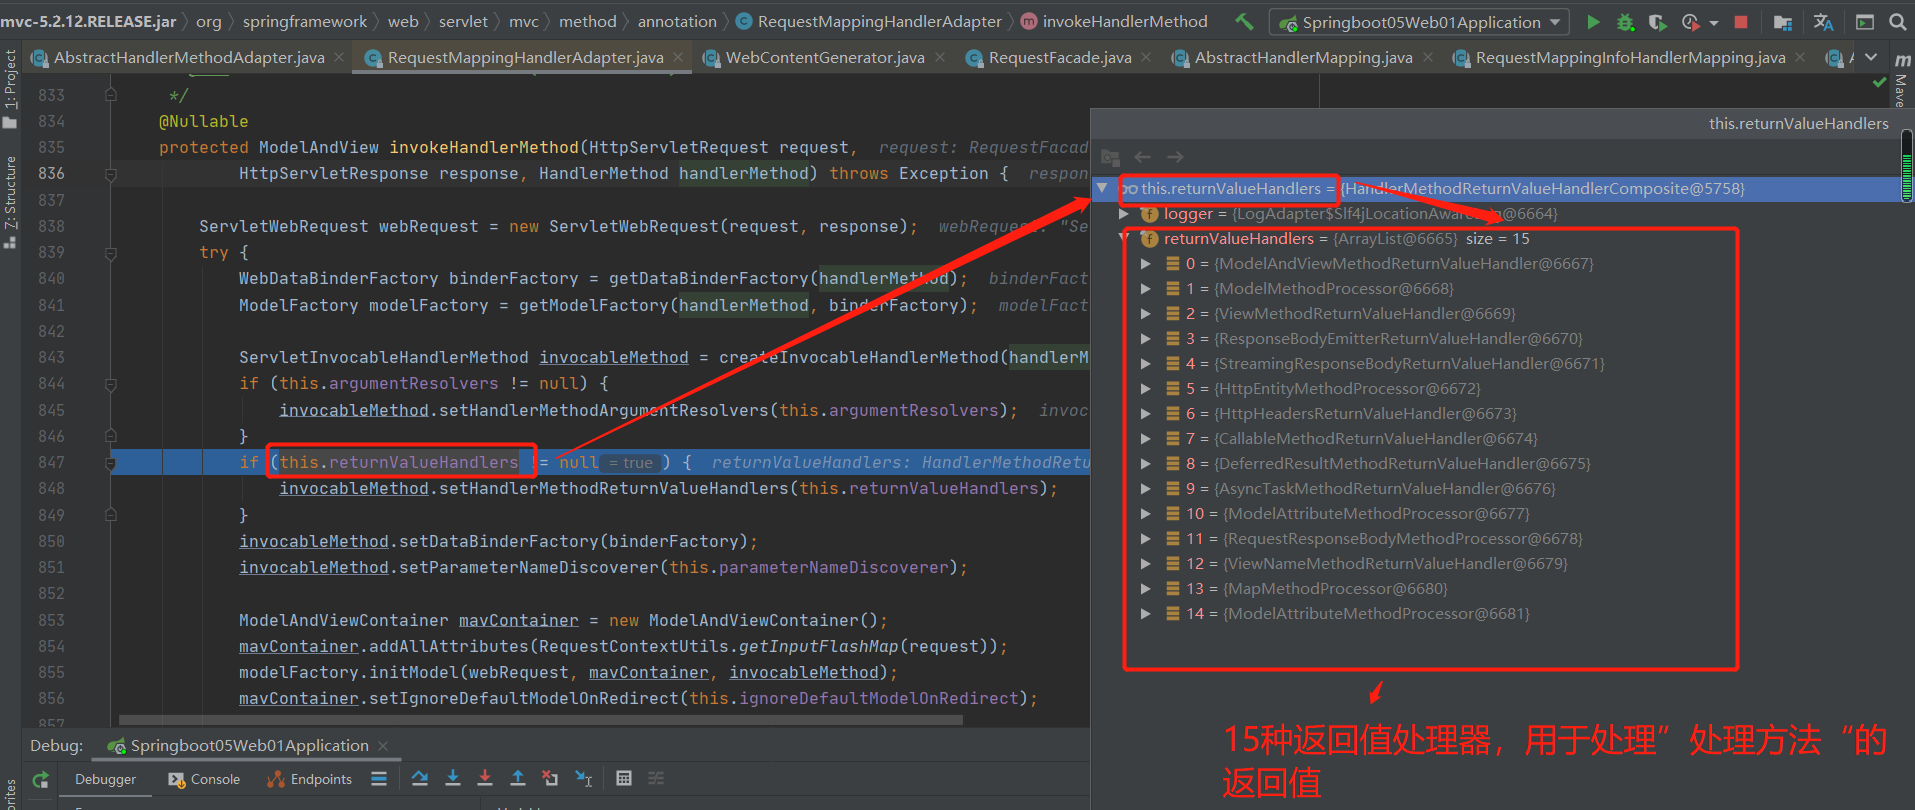
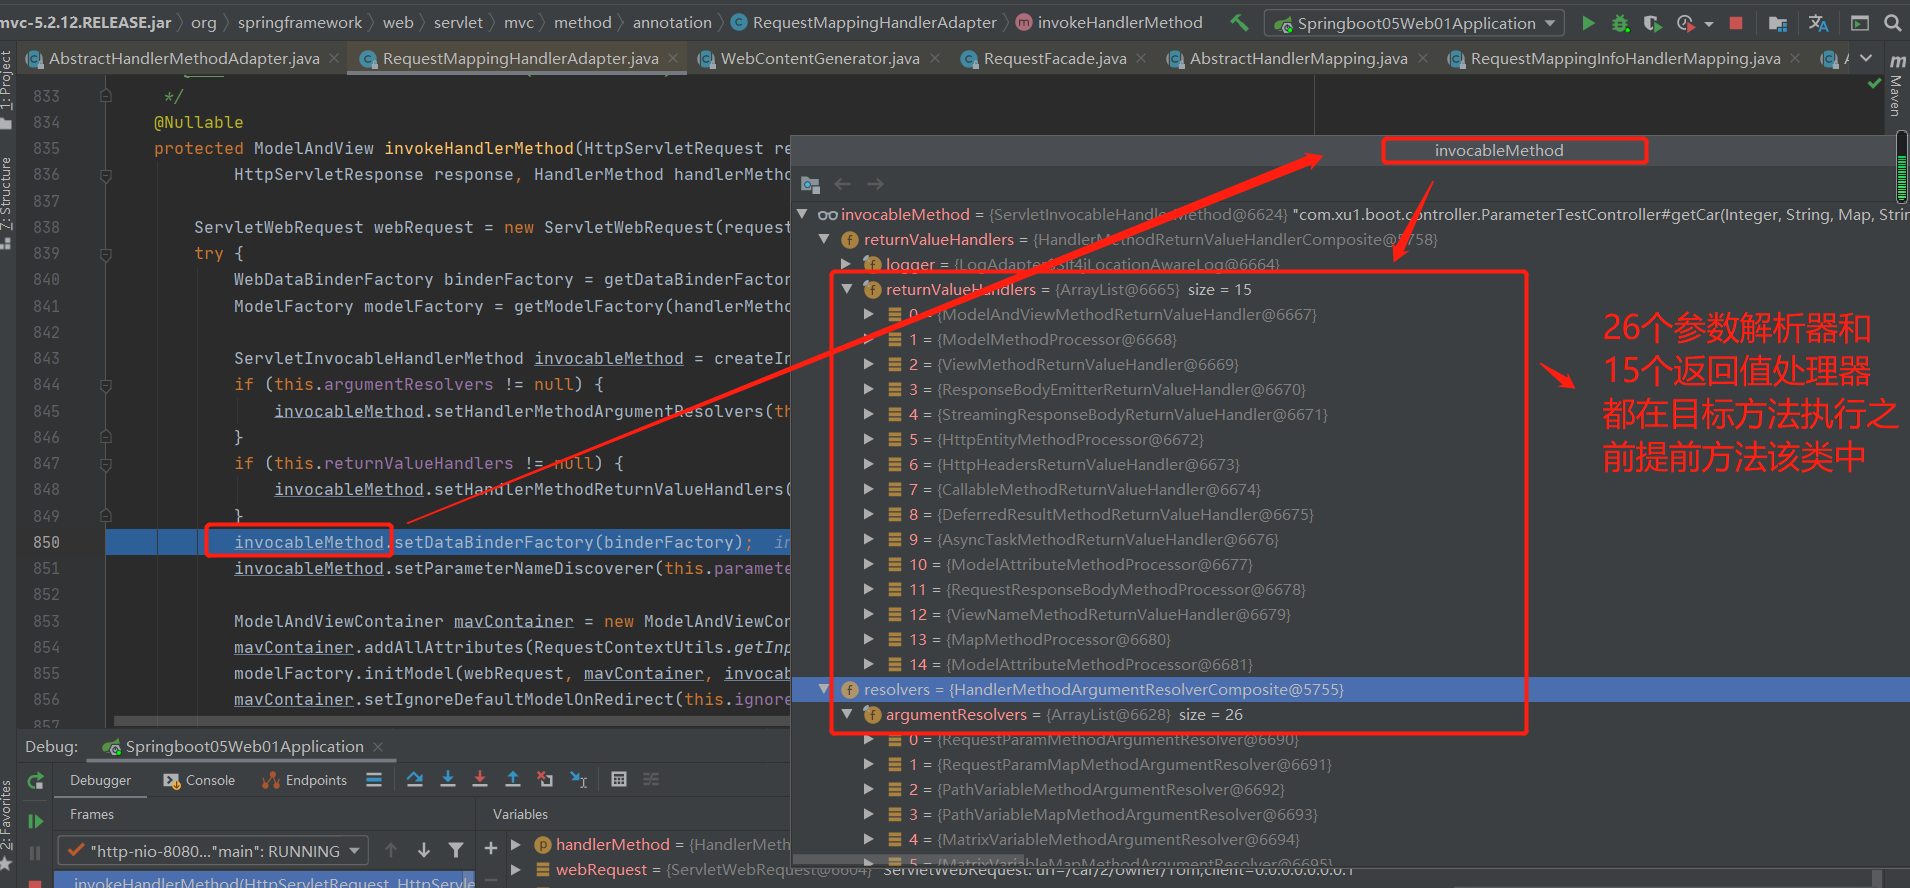
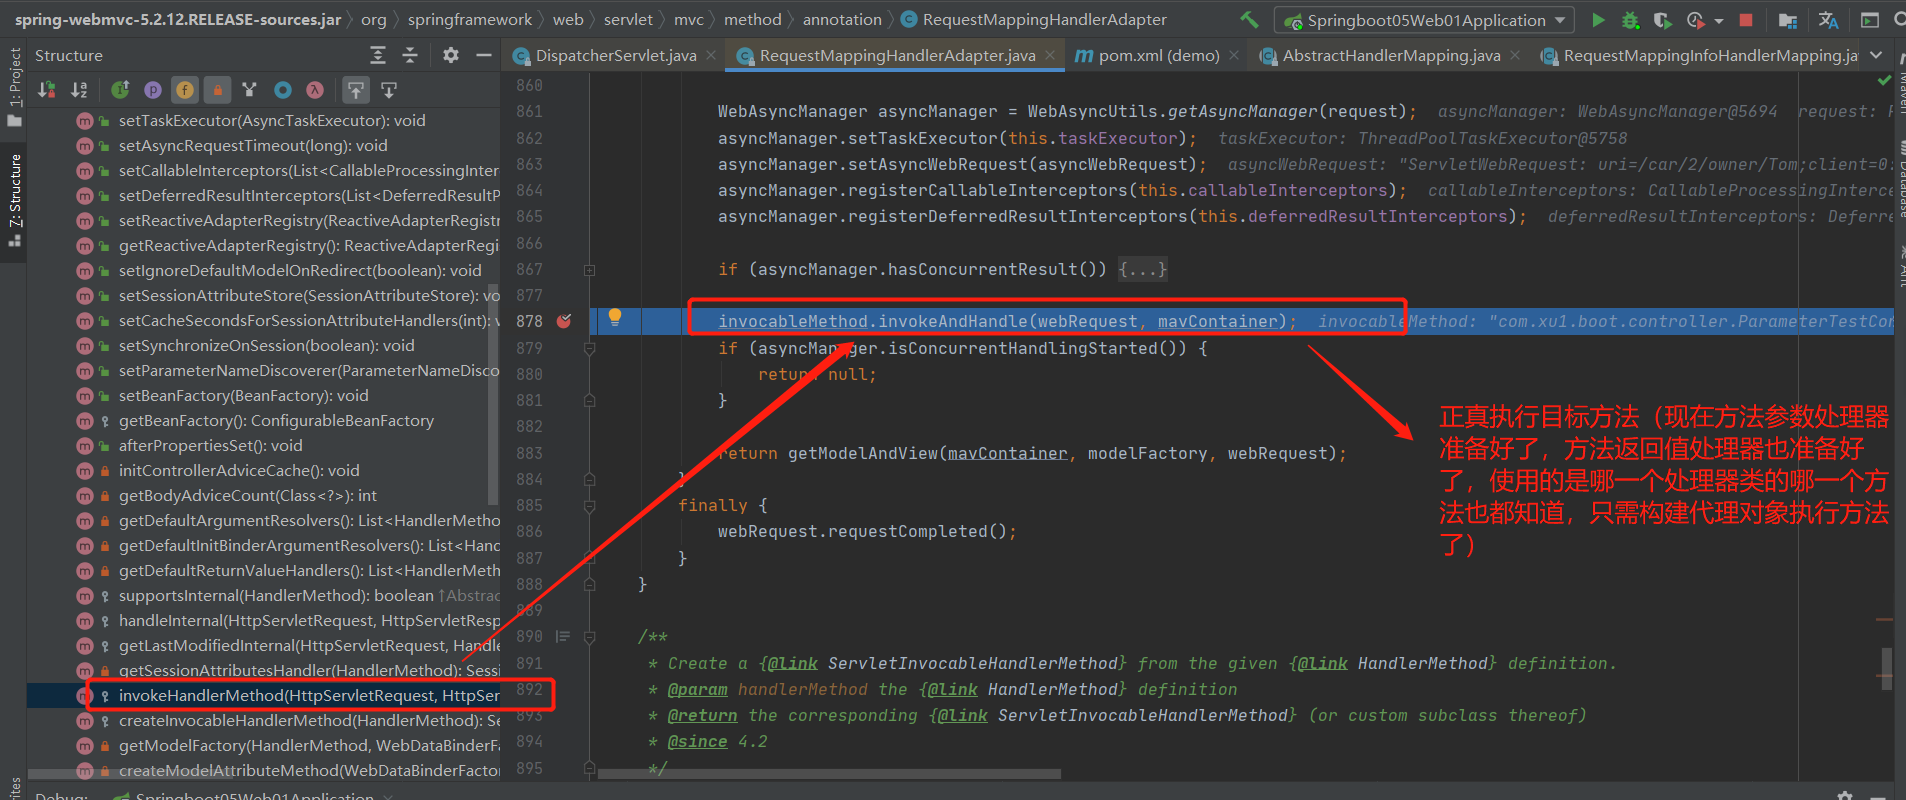
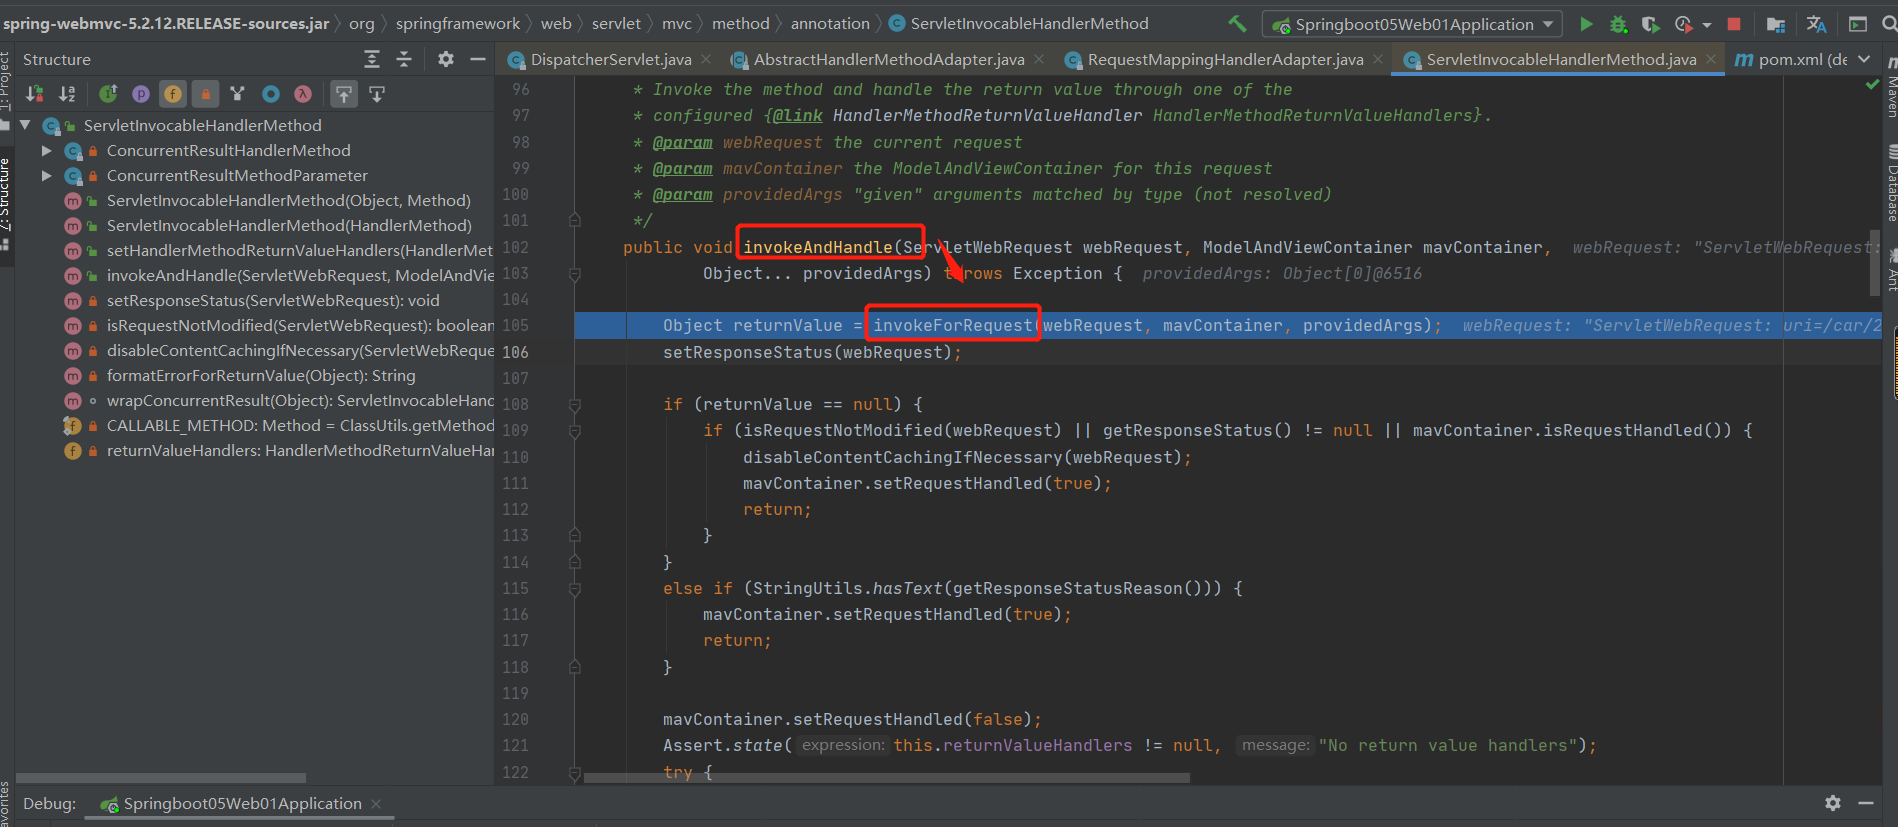
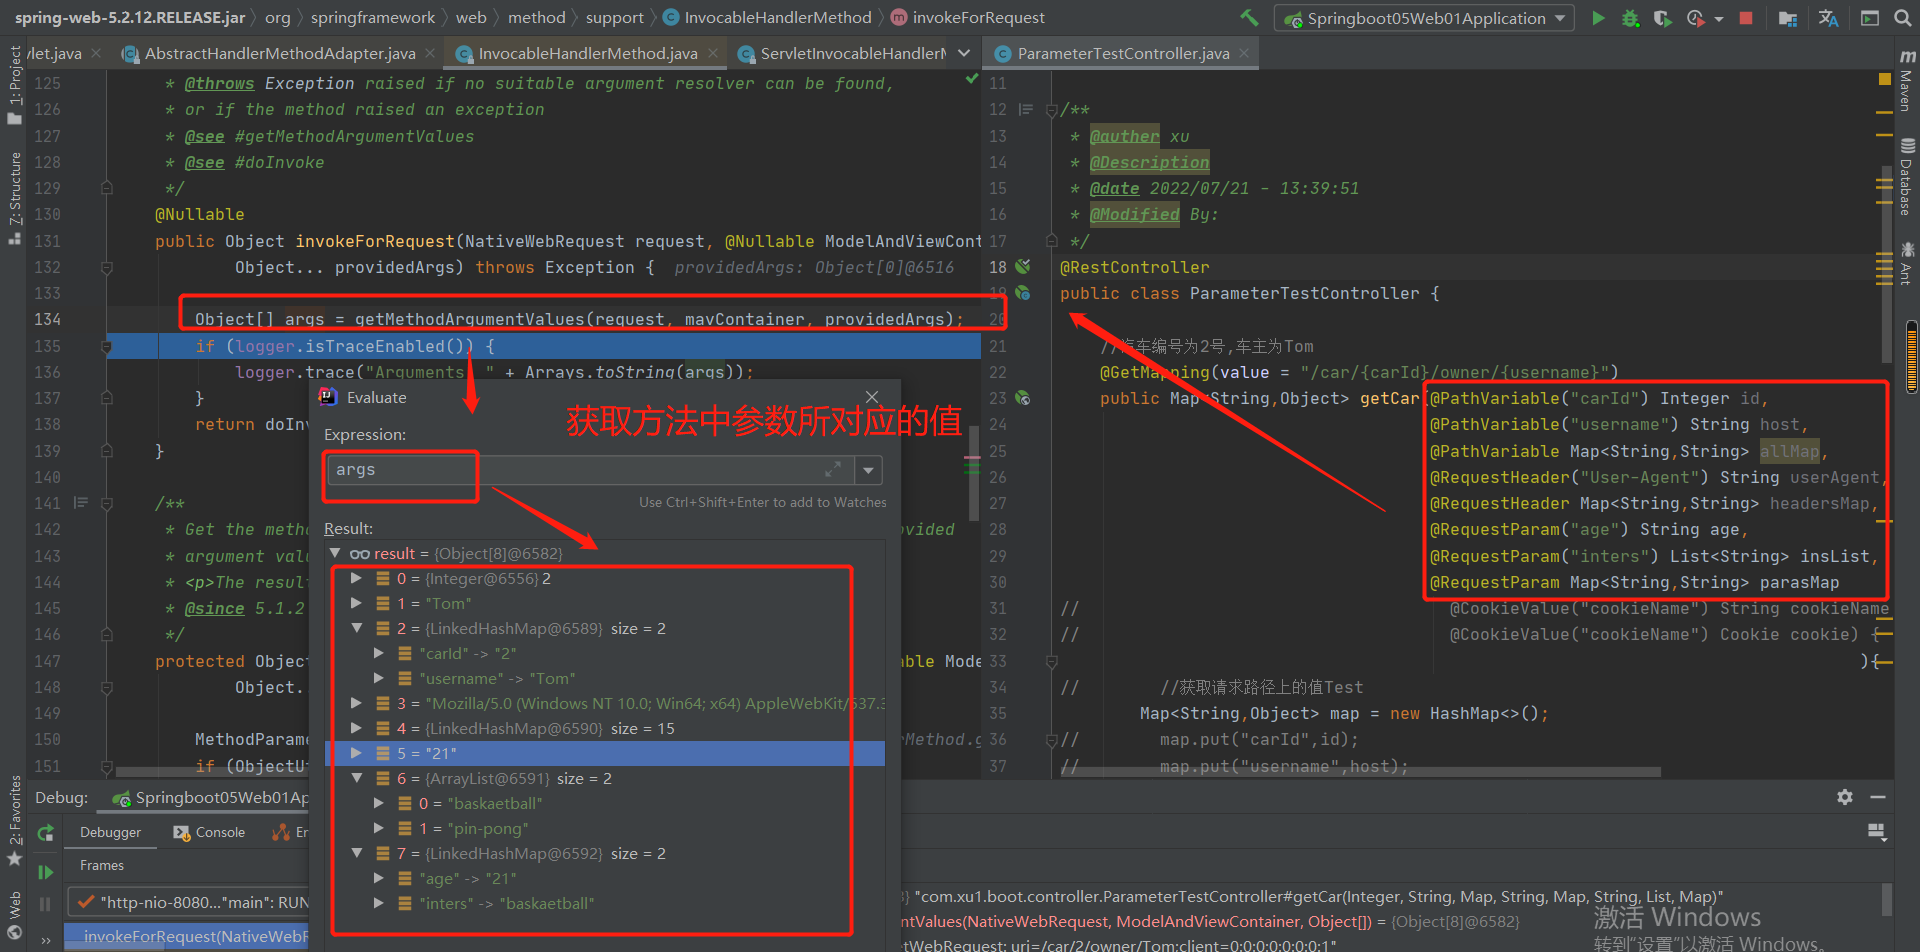
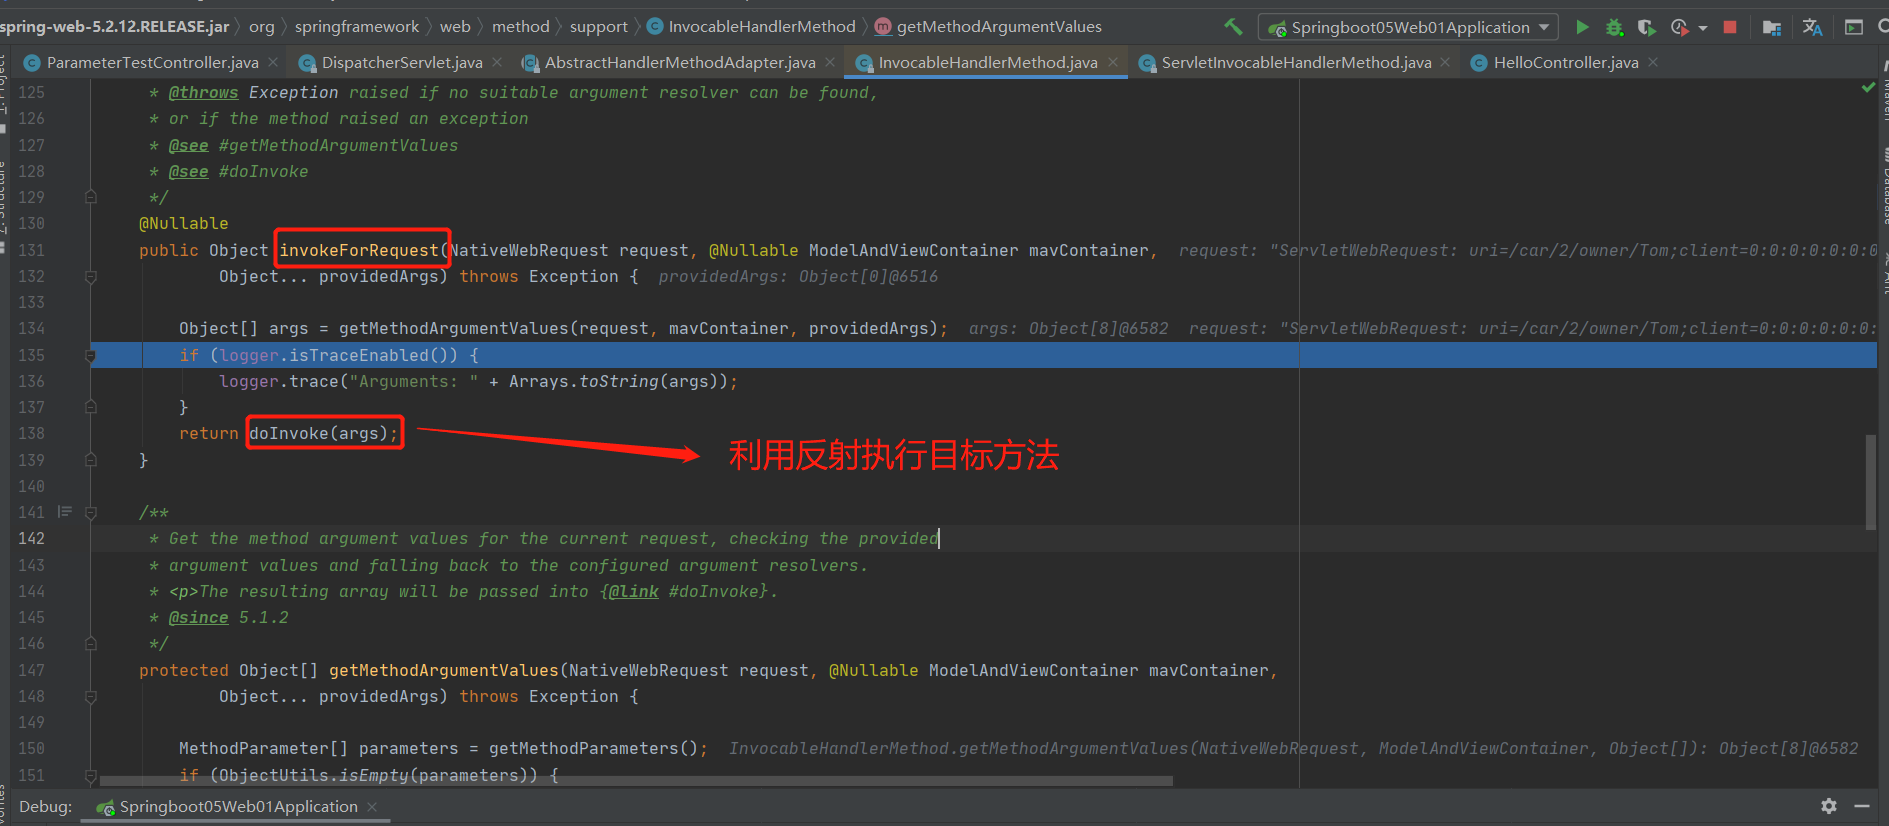
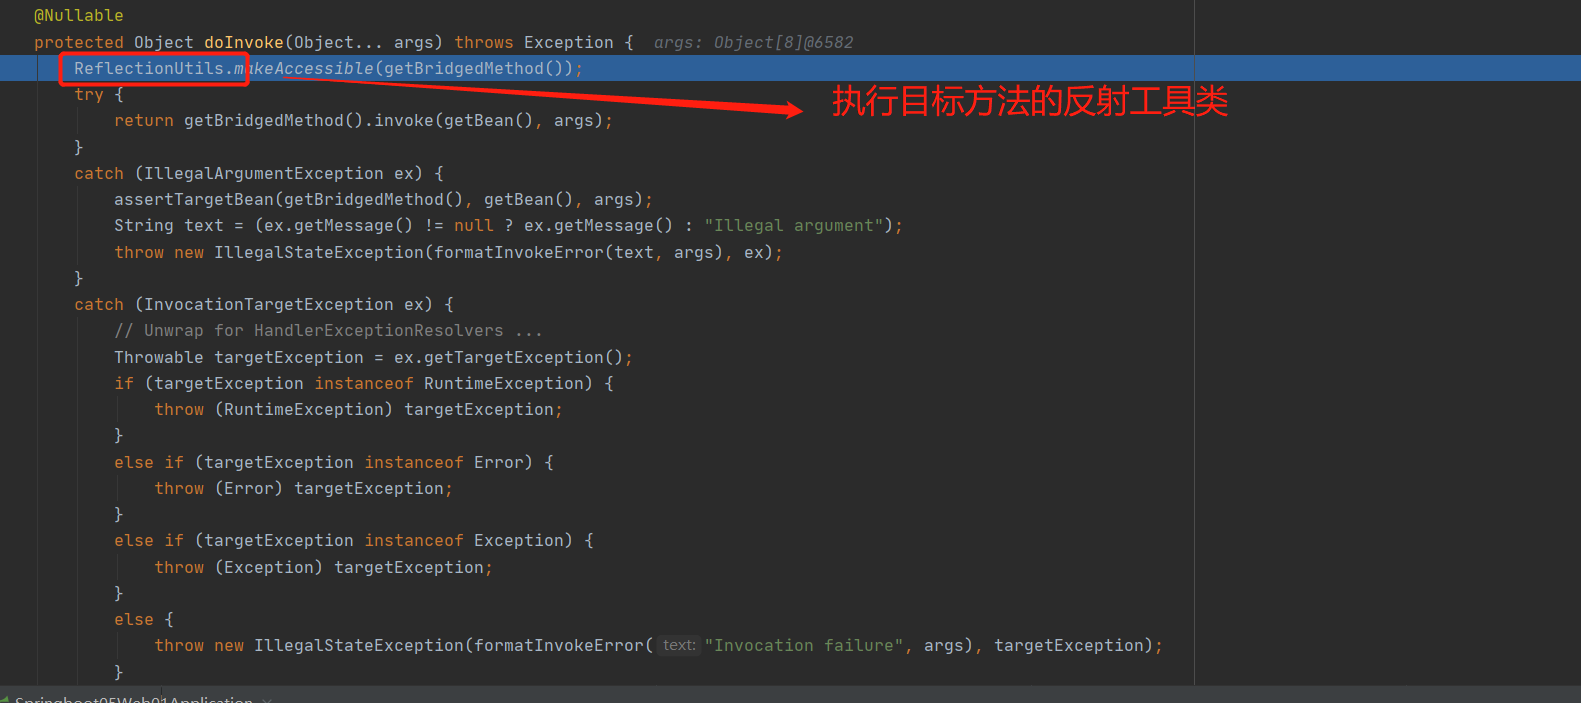
接下来重点分析获取目标方法参数的值:
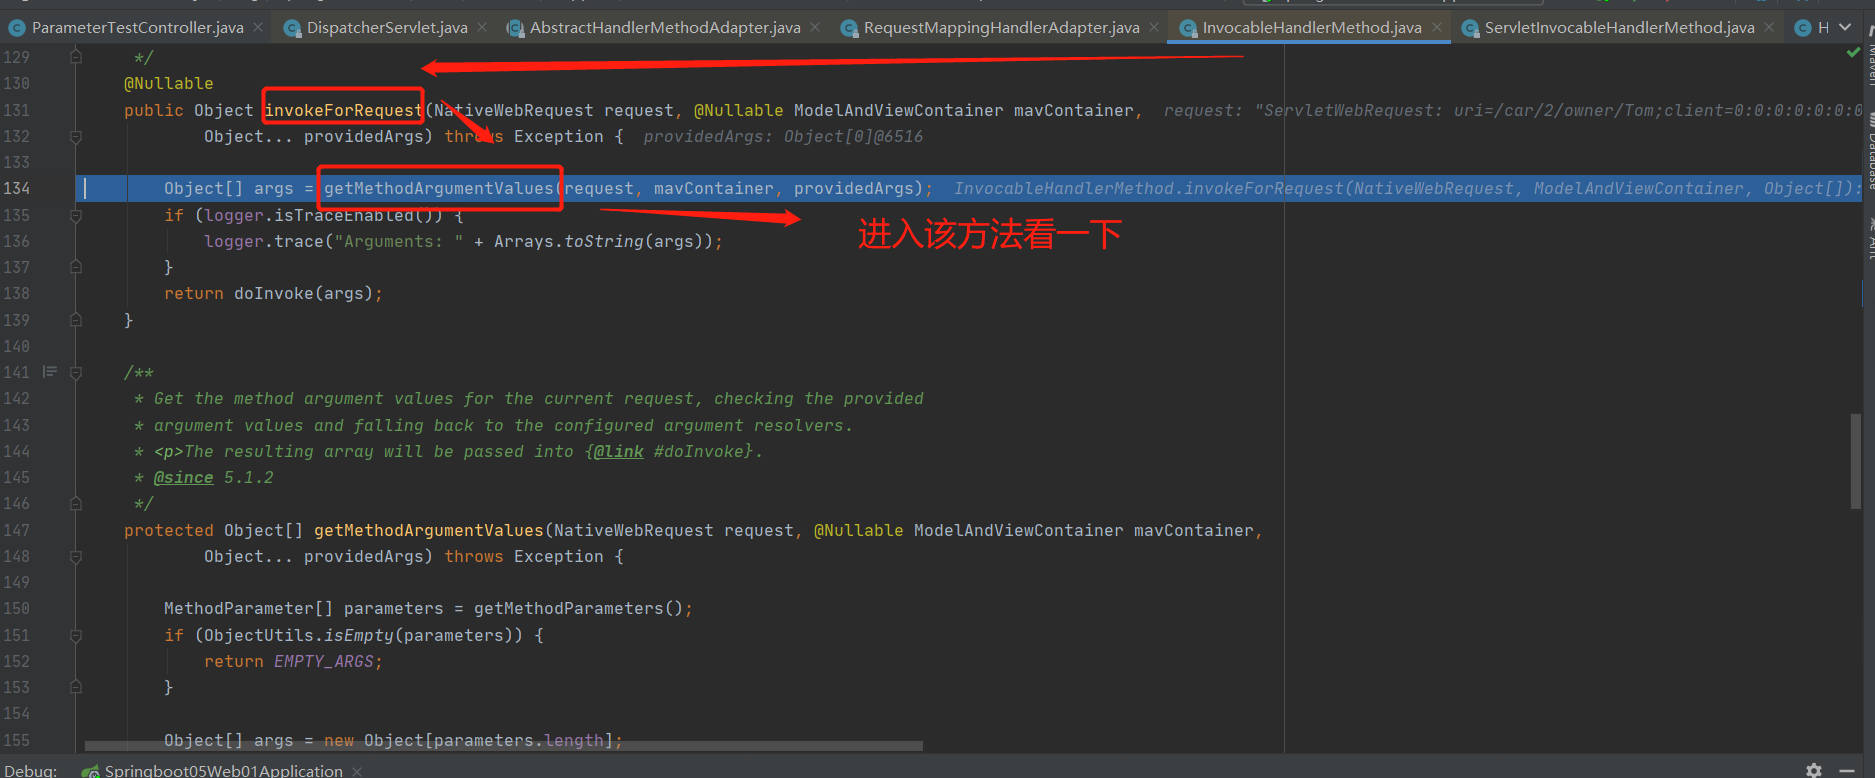
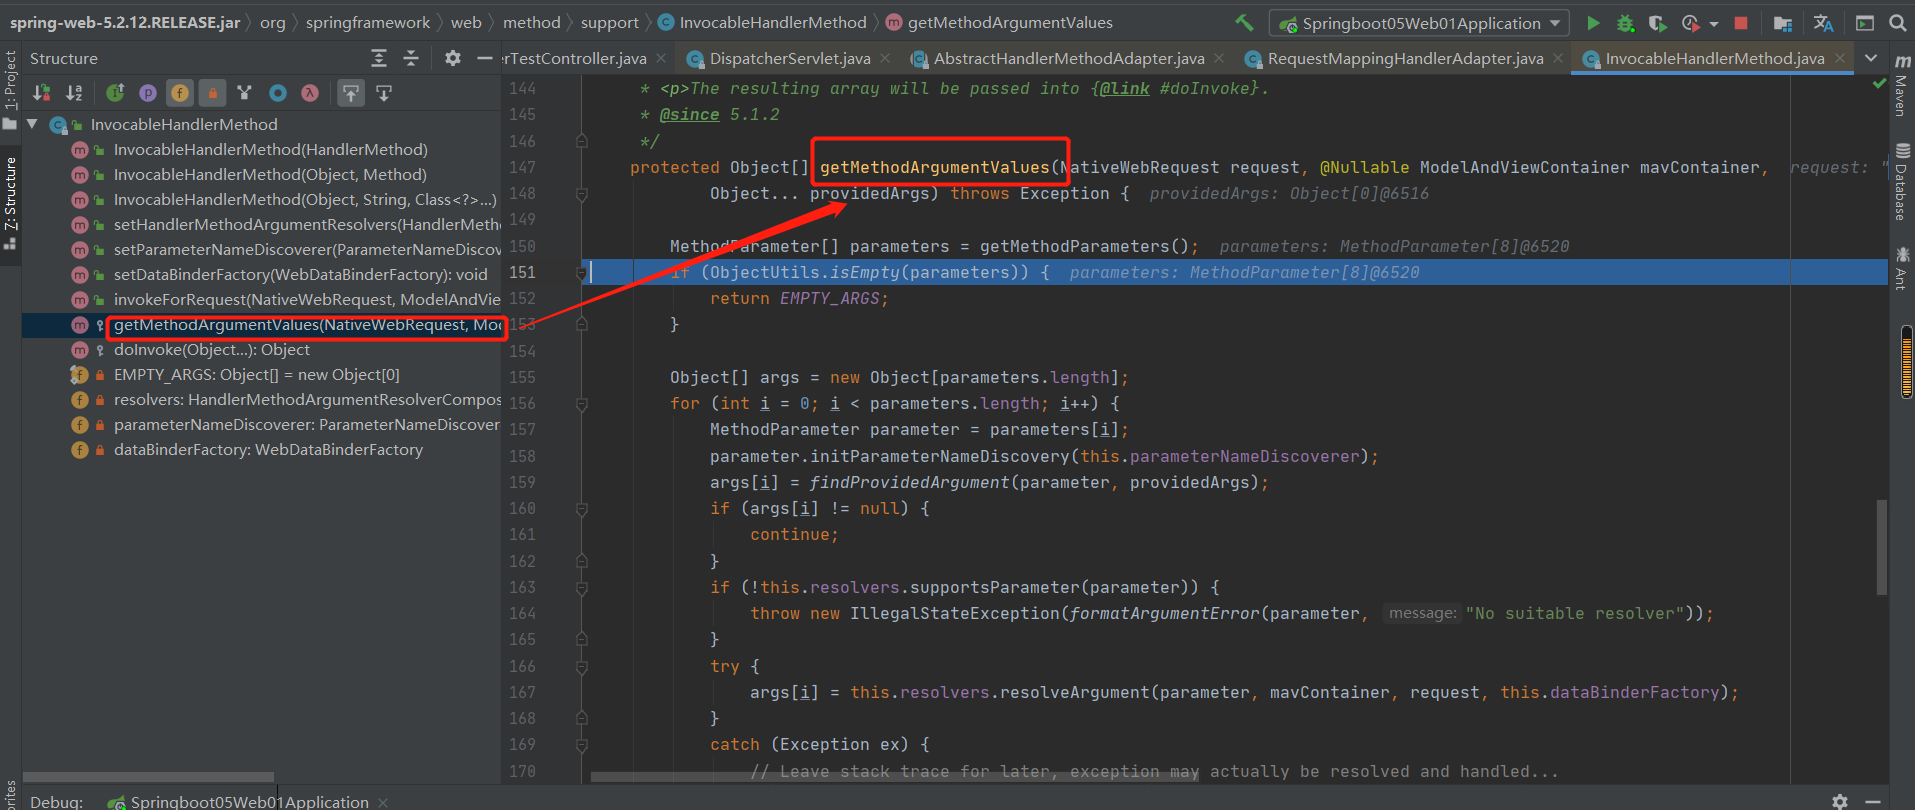
源码分析:
/**
 * Get the method argument values for the current request, checking the provided
 * argument values and falling back to the configured argument resolvers.
 * <p>The resulting array will be passed into {@link #doInvoke}.
 * @since 5.1.2
 */
protected Object[] getMethodArgumentValues(NativeWebRequest request, @Nullable ModelAndViewContainer mavContainer,
      Object... providedArgs) throws Exception {

   MethodParameter[] parameters = getMethodParameters();
   if (ObjectUtils.isEmpty(parameters)) {
      return EMPTY_ARGS;
   }

   Object[] args = new Object[parameters.length];
   for (int i = 0; i < parameters.length; i++) {
      MethodParameter parameter = parameters[i];
      parameter.initParameterNameDiscovery(this.parameterNameDiscoverer);
      args[i] = findProvidedArgument(parameter, providedArgs);
      if (args[i] != null) {
         continue;
      }
      if (!this.resolvers.supportsParameter(parameter)) {
         throw new IllegalStateException(formatArgumentError(parameter, "No suitable resolver"));
      }
      try {
         args[i] = this.resolvers.resolveArgument(parameter, mavContainer, request, this.dataBinderFactory);
      }
      catch (Exception ex) {
         // Leave stack trace for later, exception may actually be resolved and handled...
         if (logger.isDebugEnabled()) {
            String exMsg = ex.getMessage();
            if (exMsg != null && !exMsg.contains(parameter.getExecutable().toGenericString())) {
               logger.debug(formatArgumentError(parameter, exMsg));
            }
         }
         throw ex;
      }
   }
   return args;
}
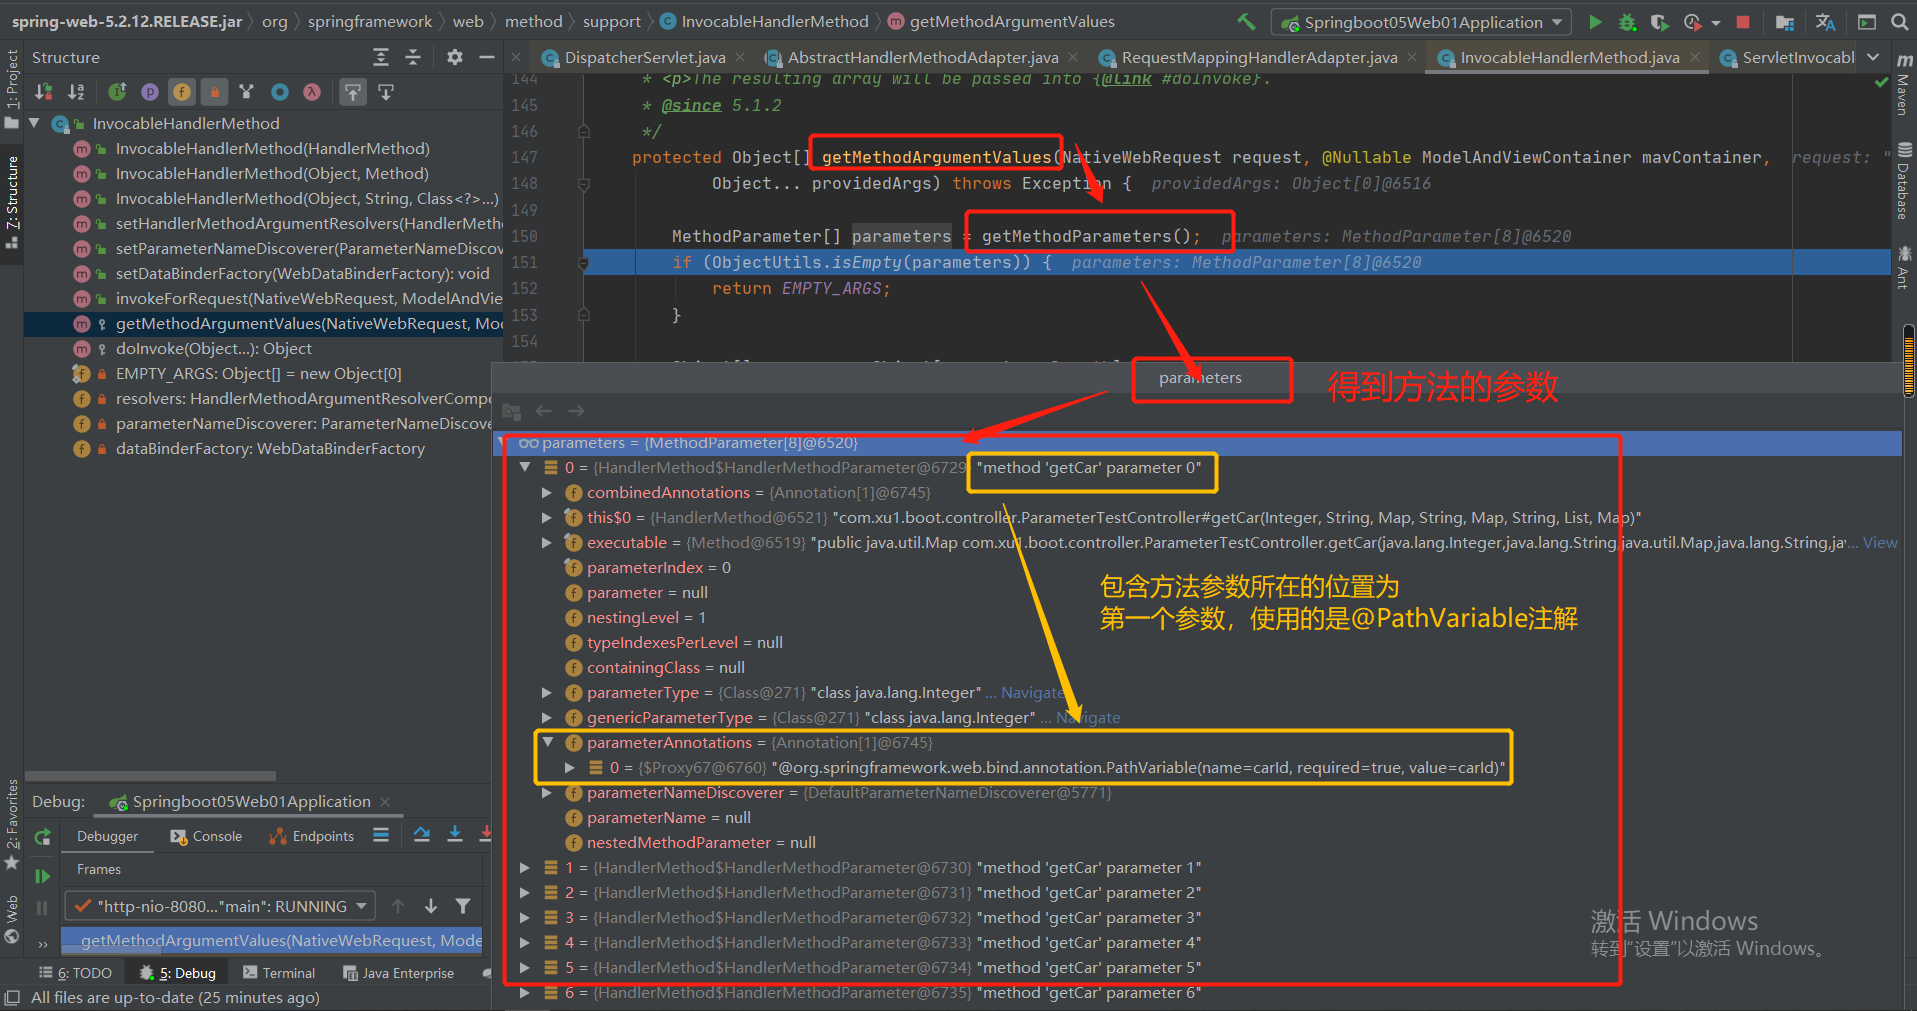
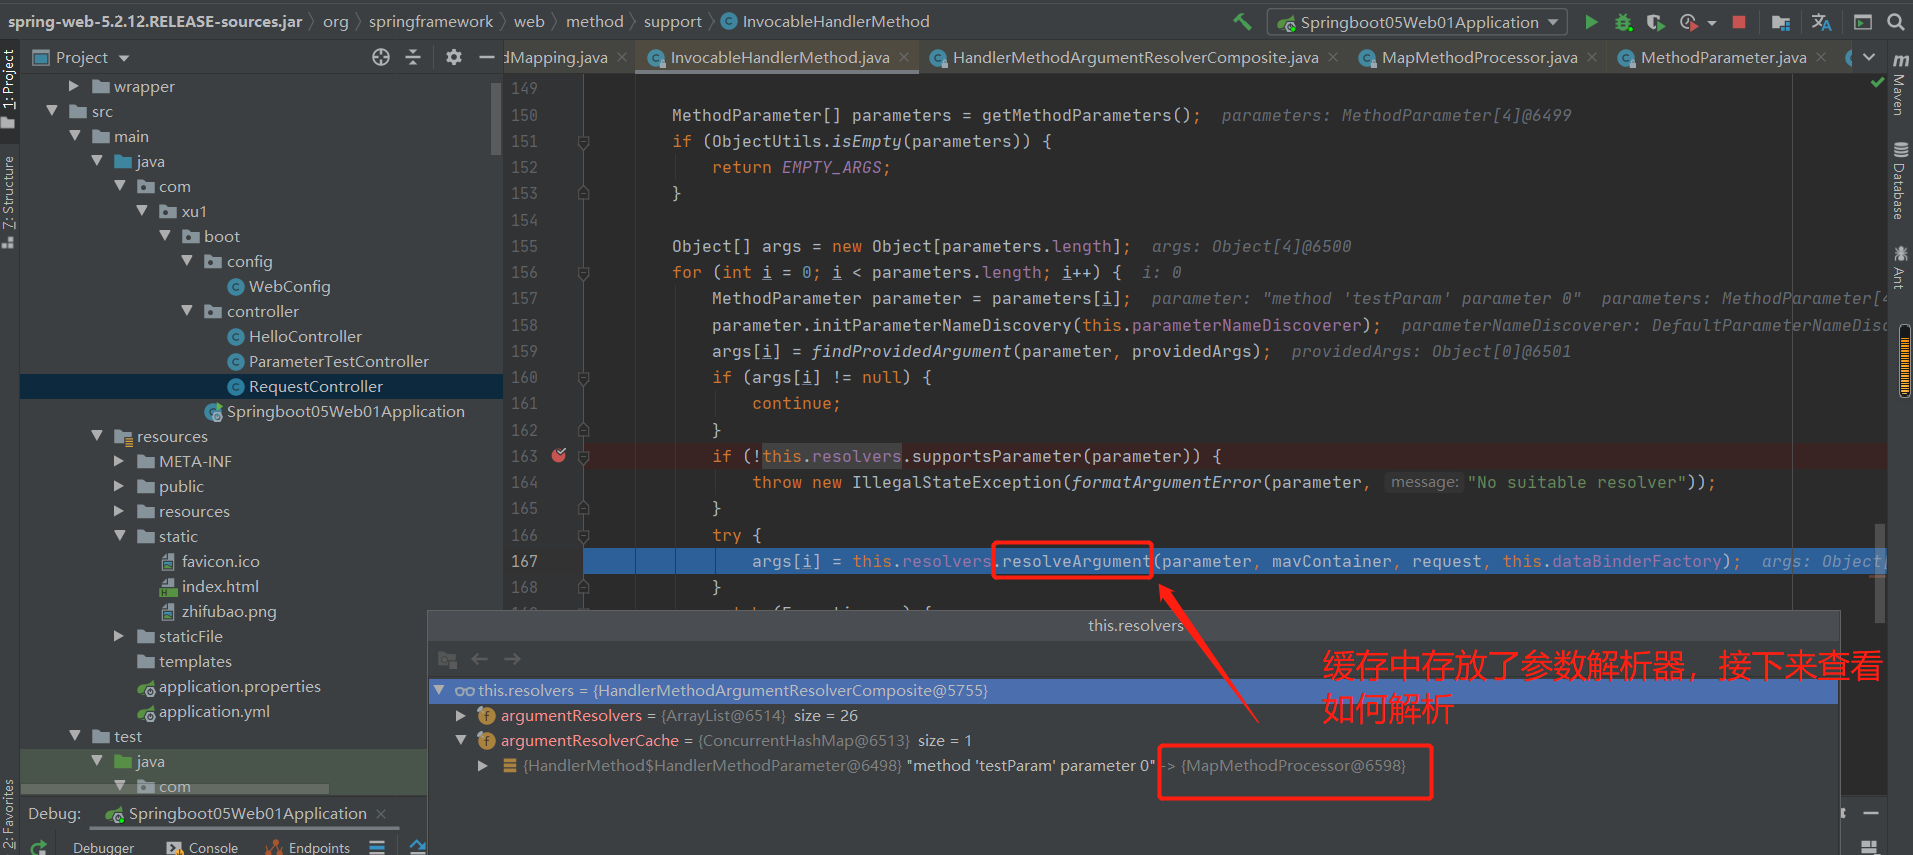
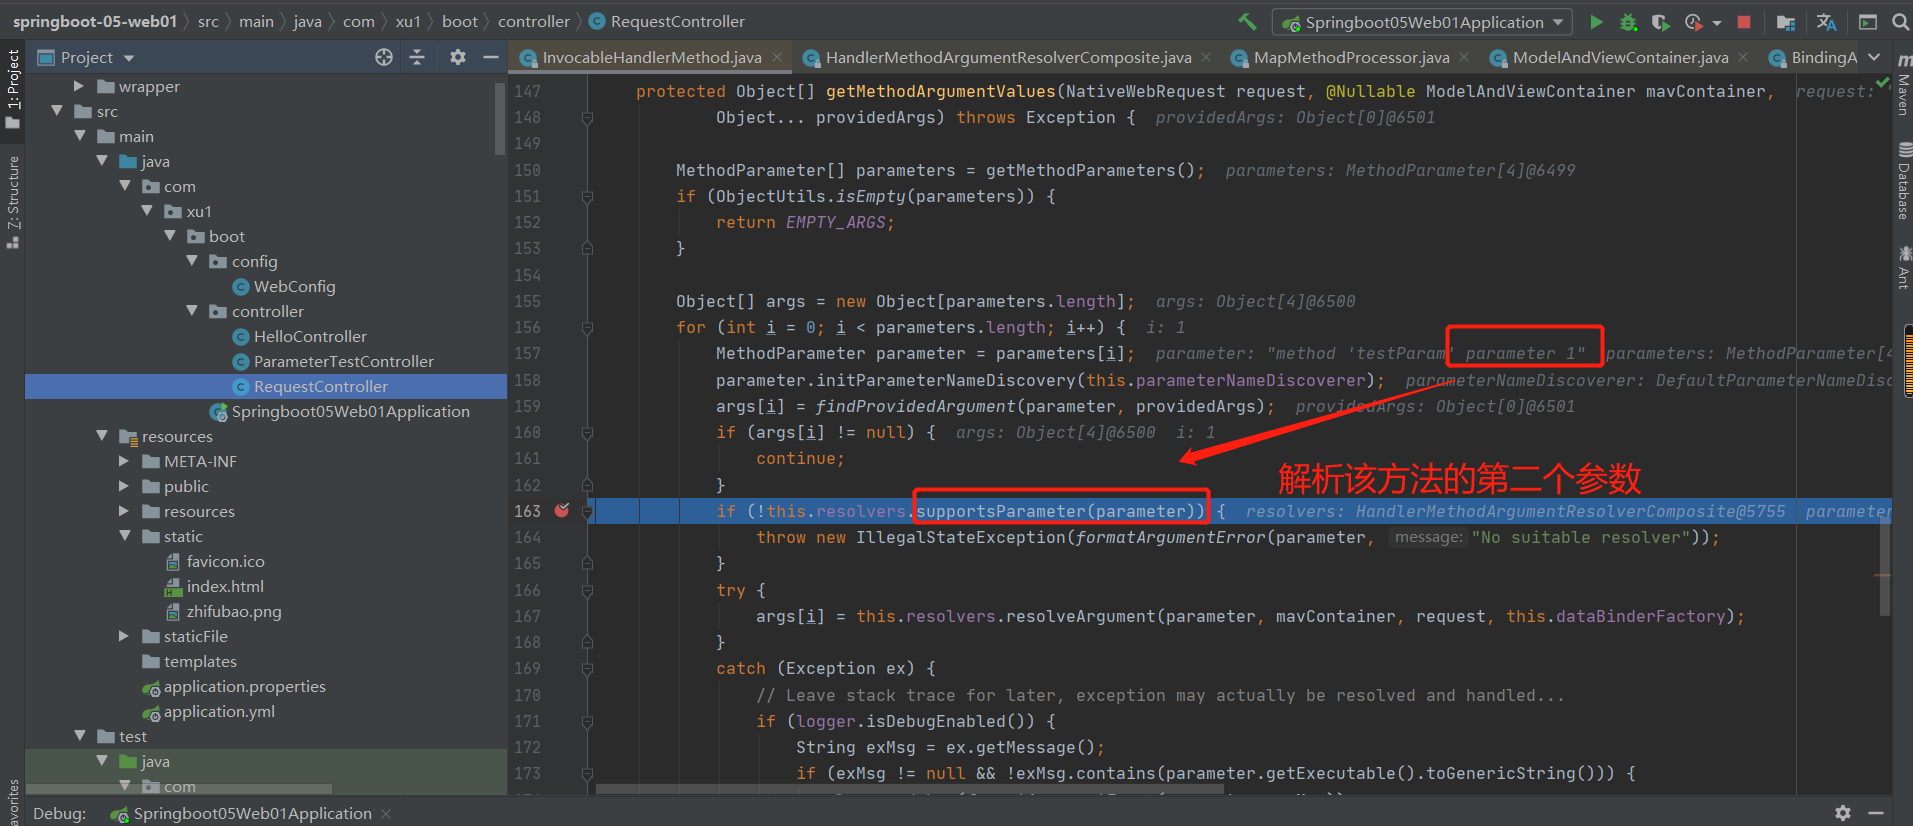
查看26中解析器是否支持解析该方法参数:
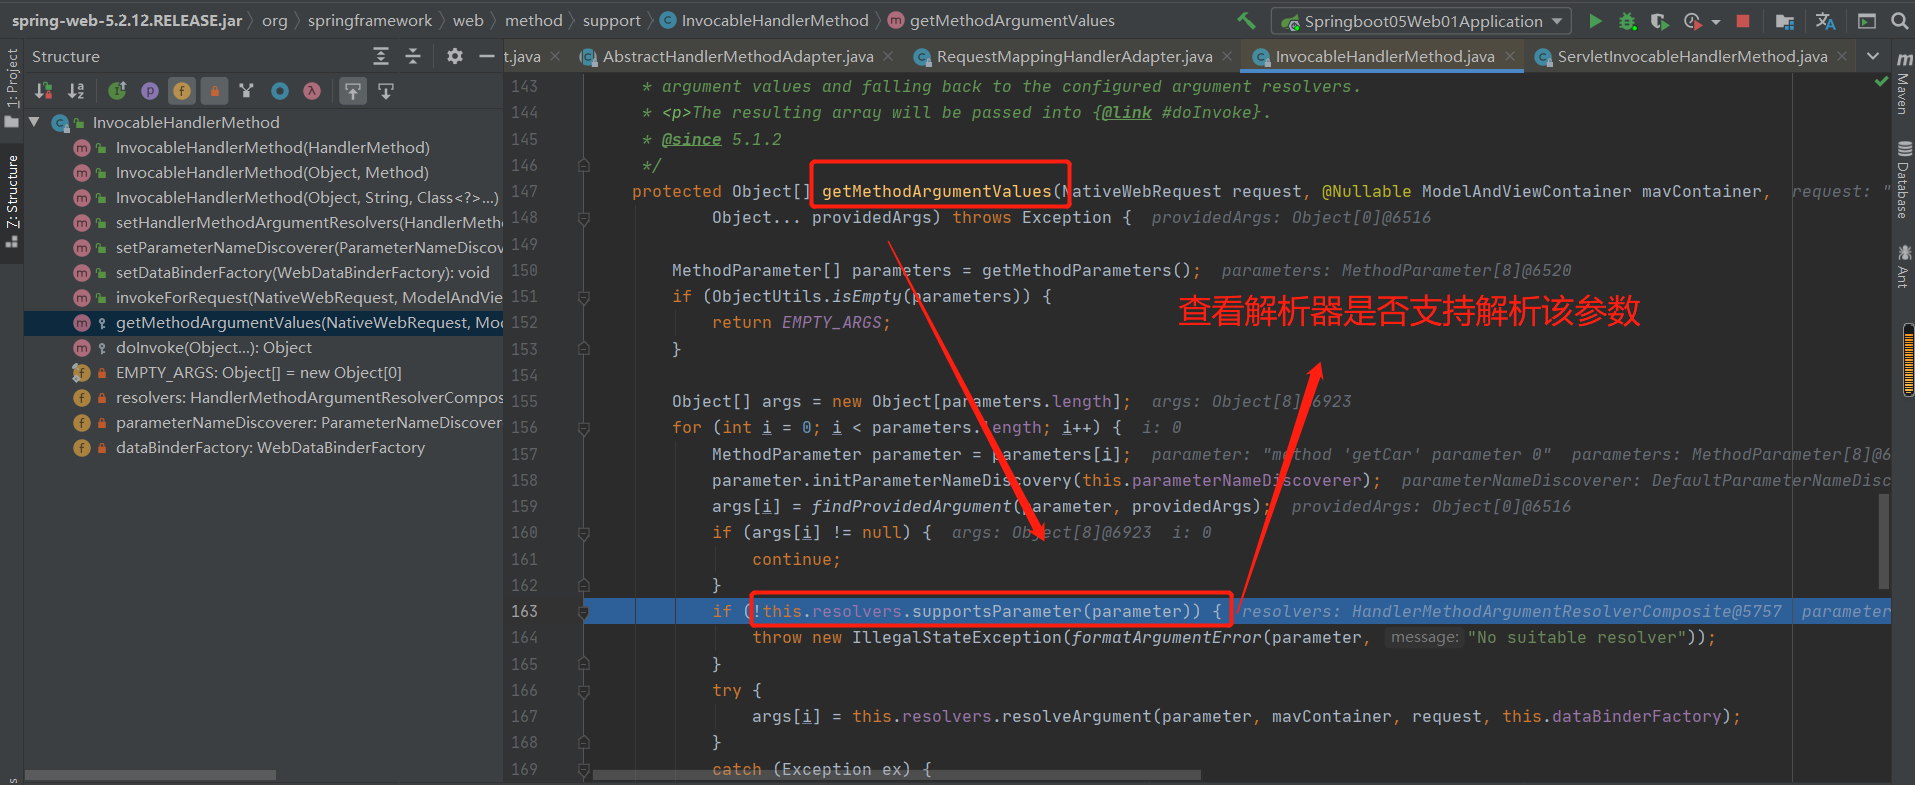
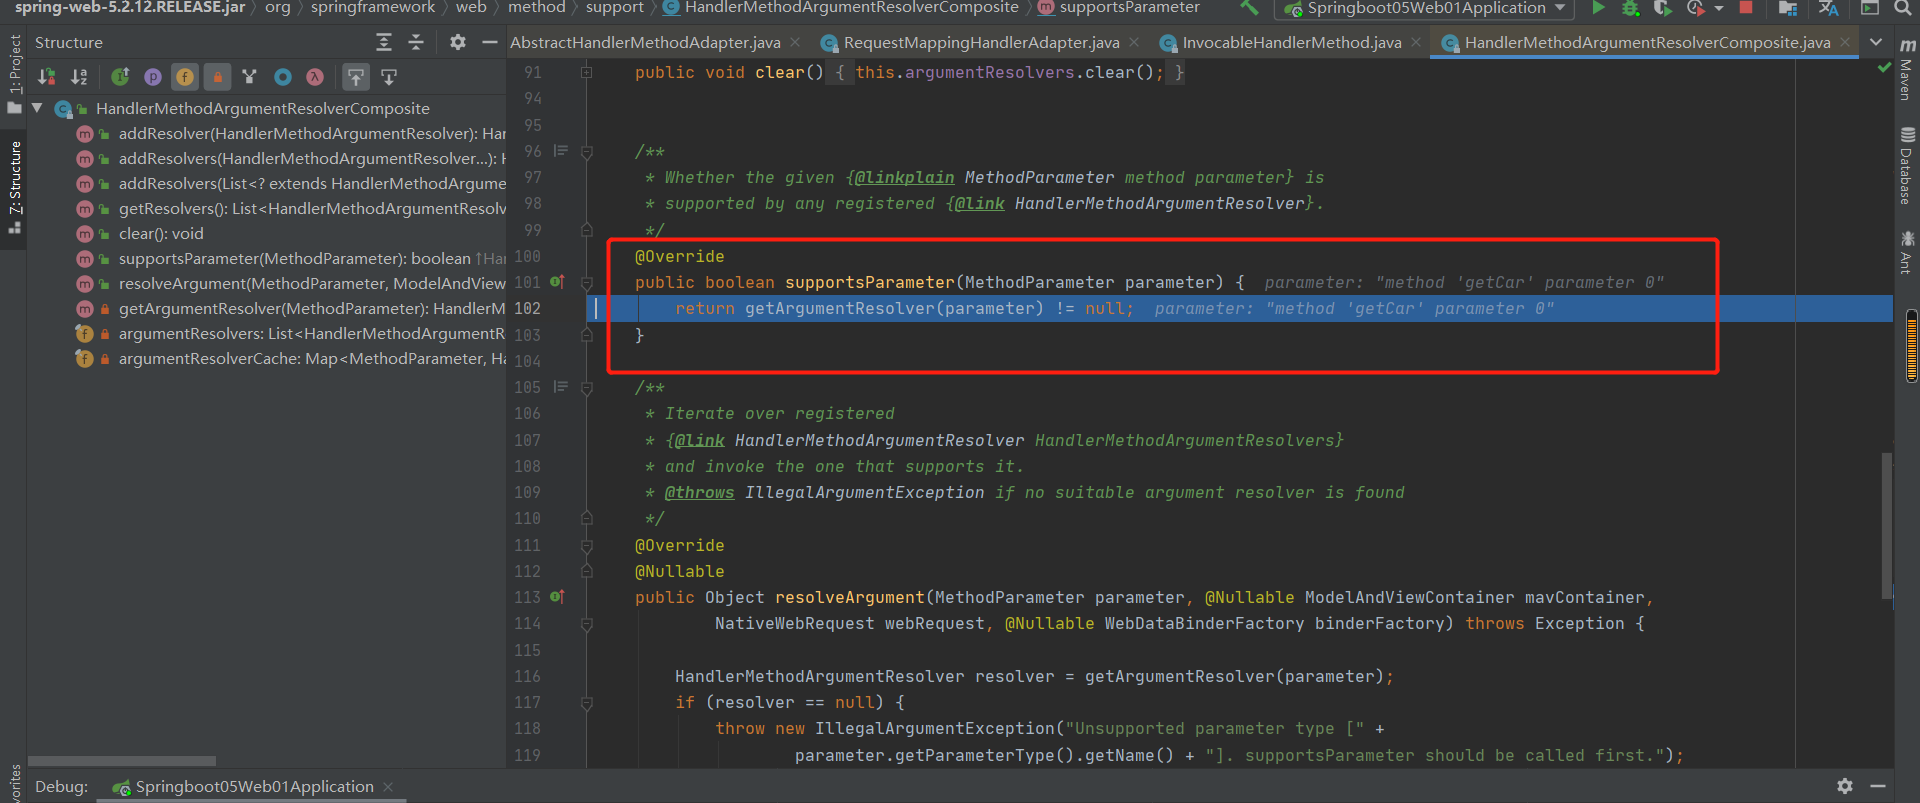
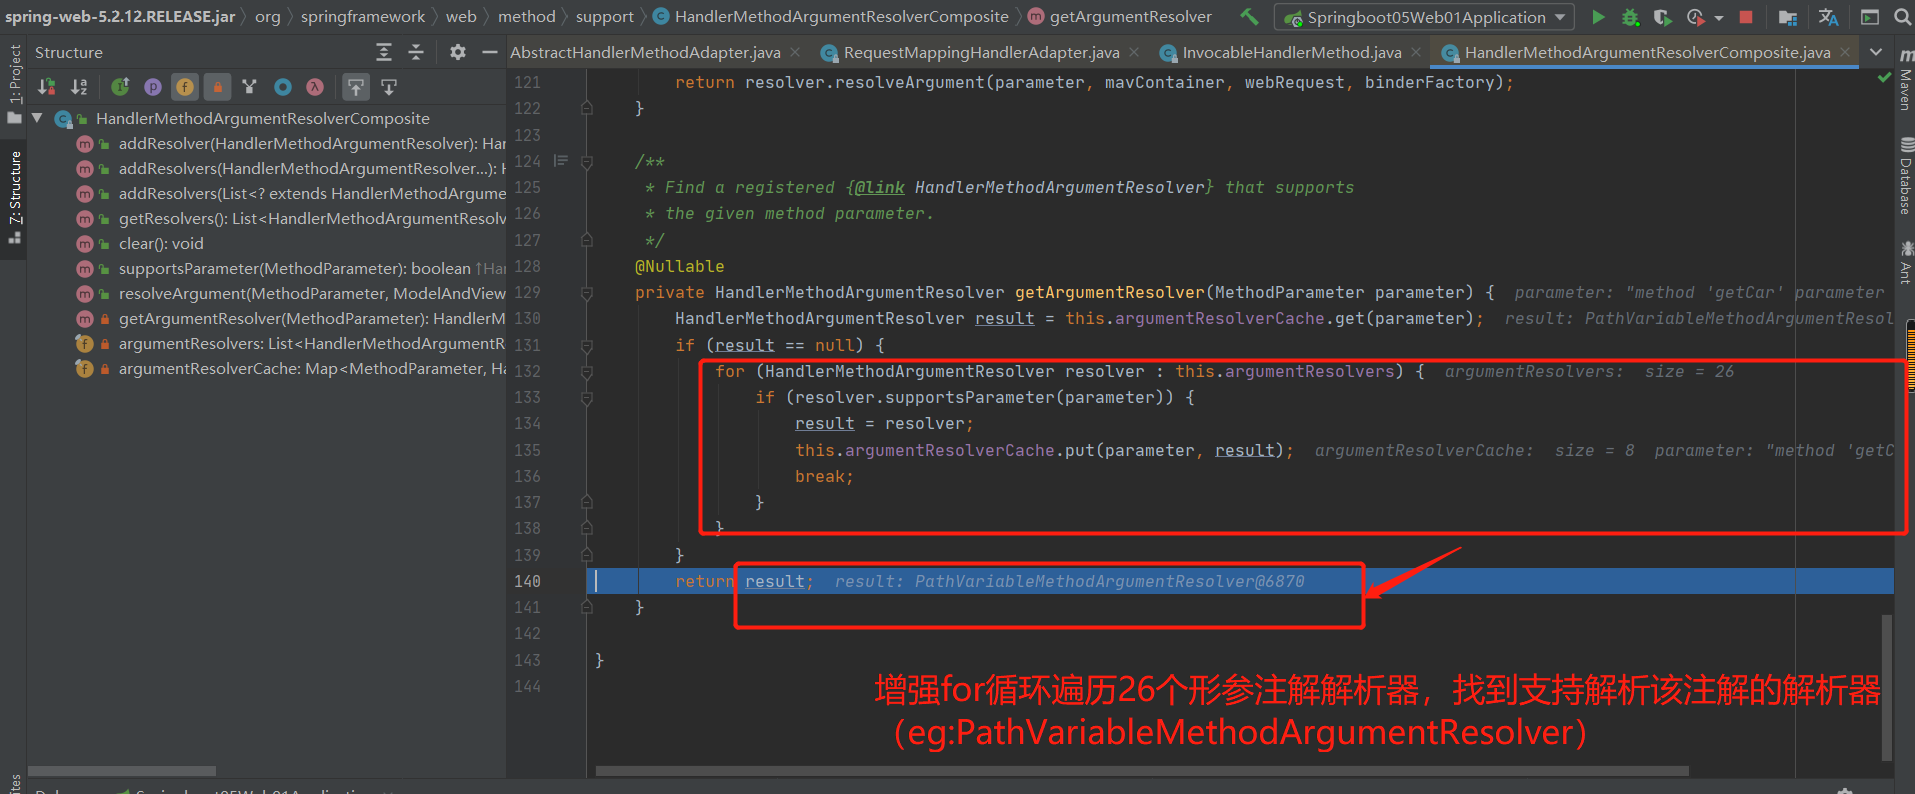
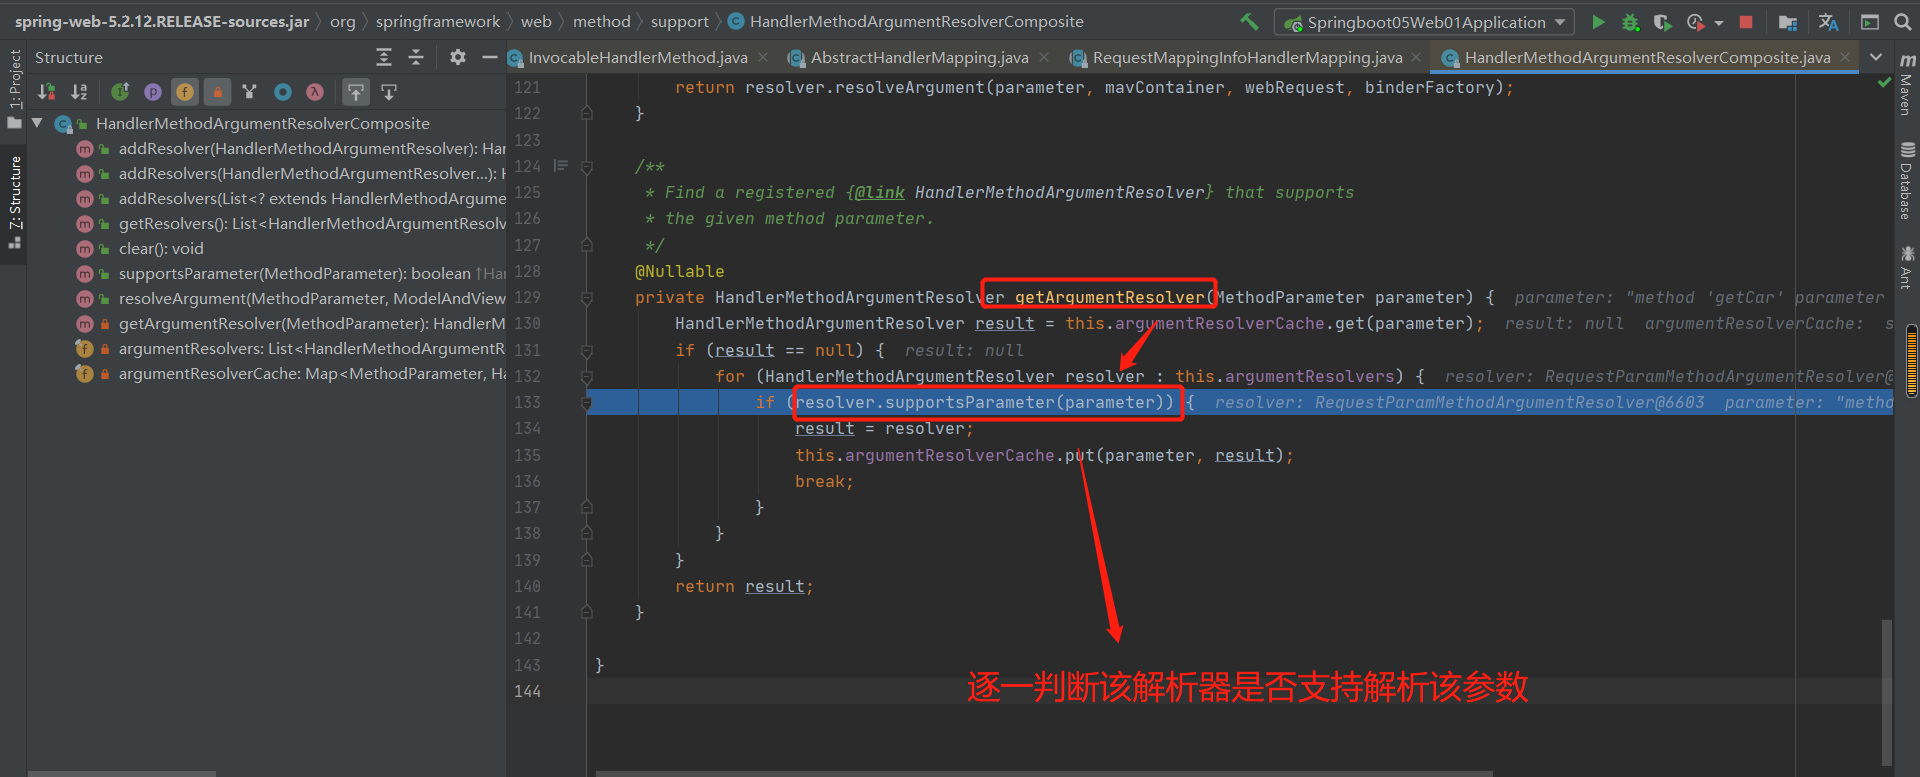
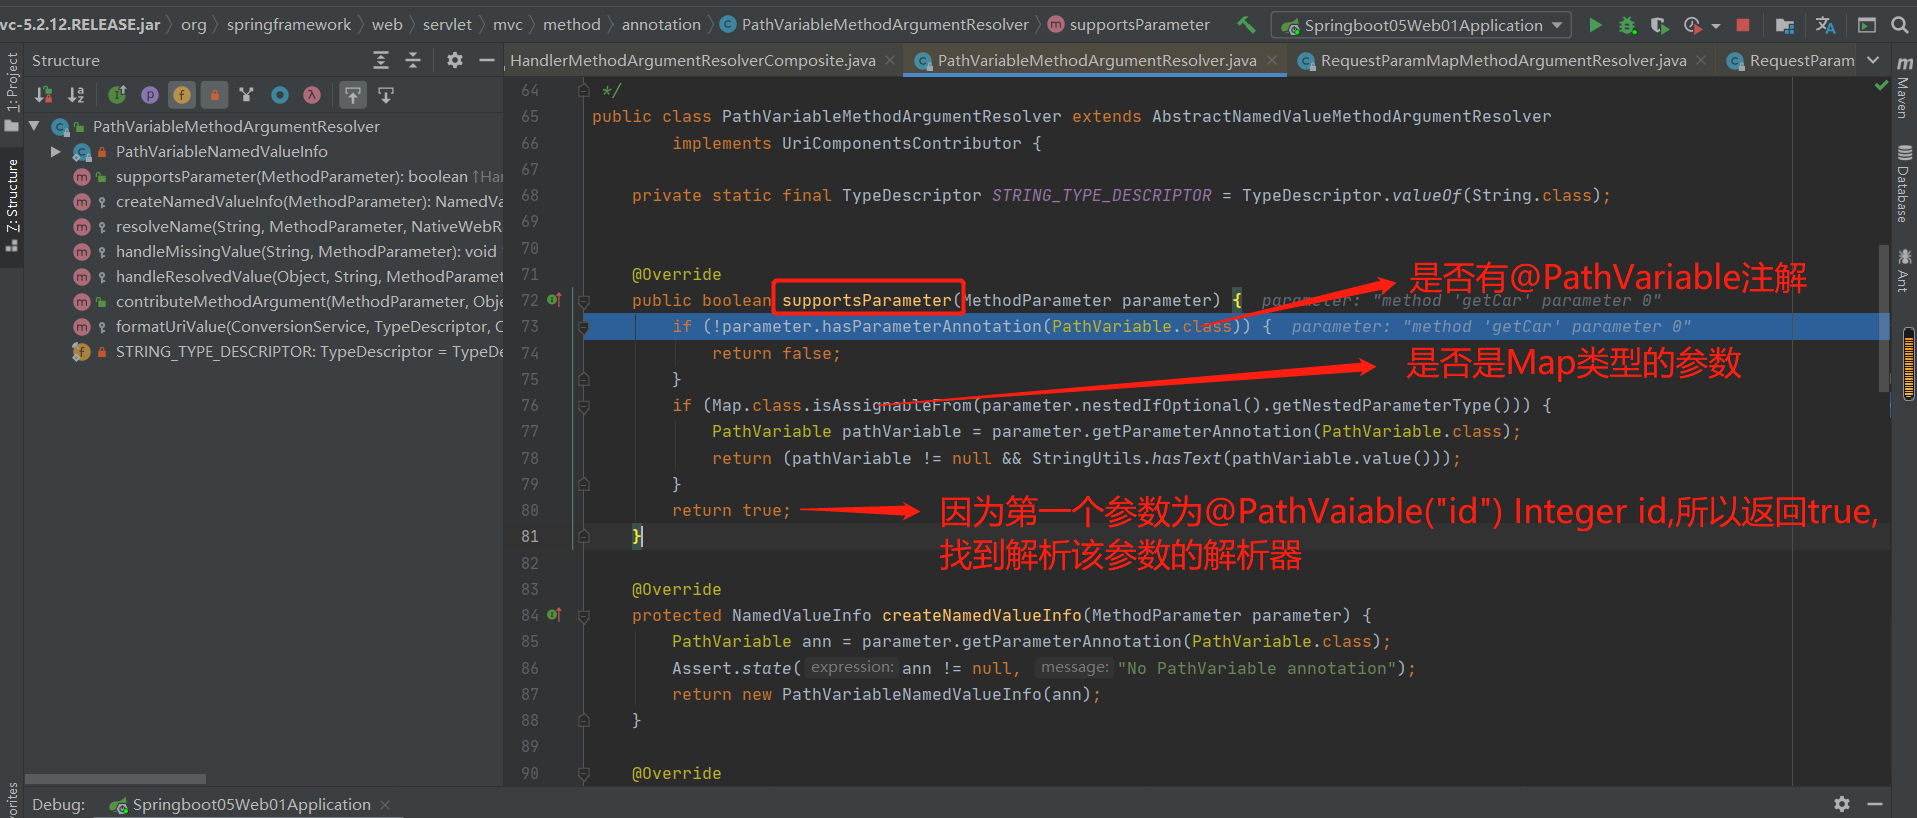
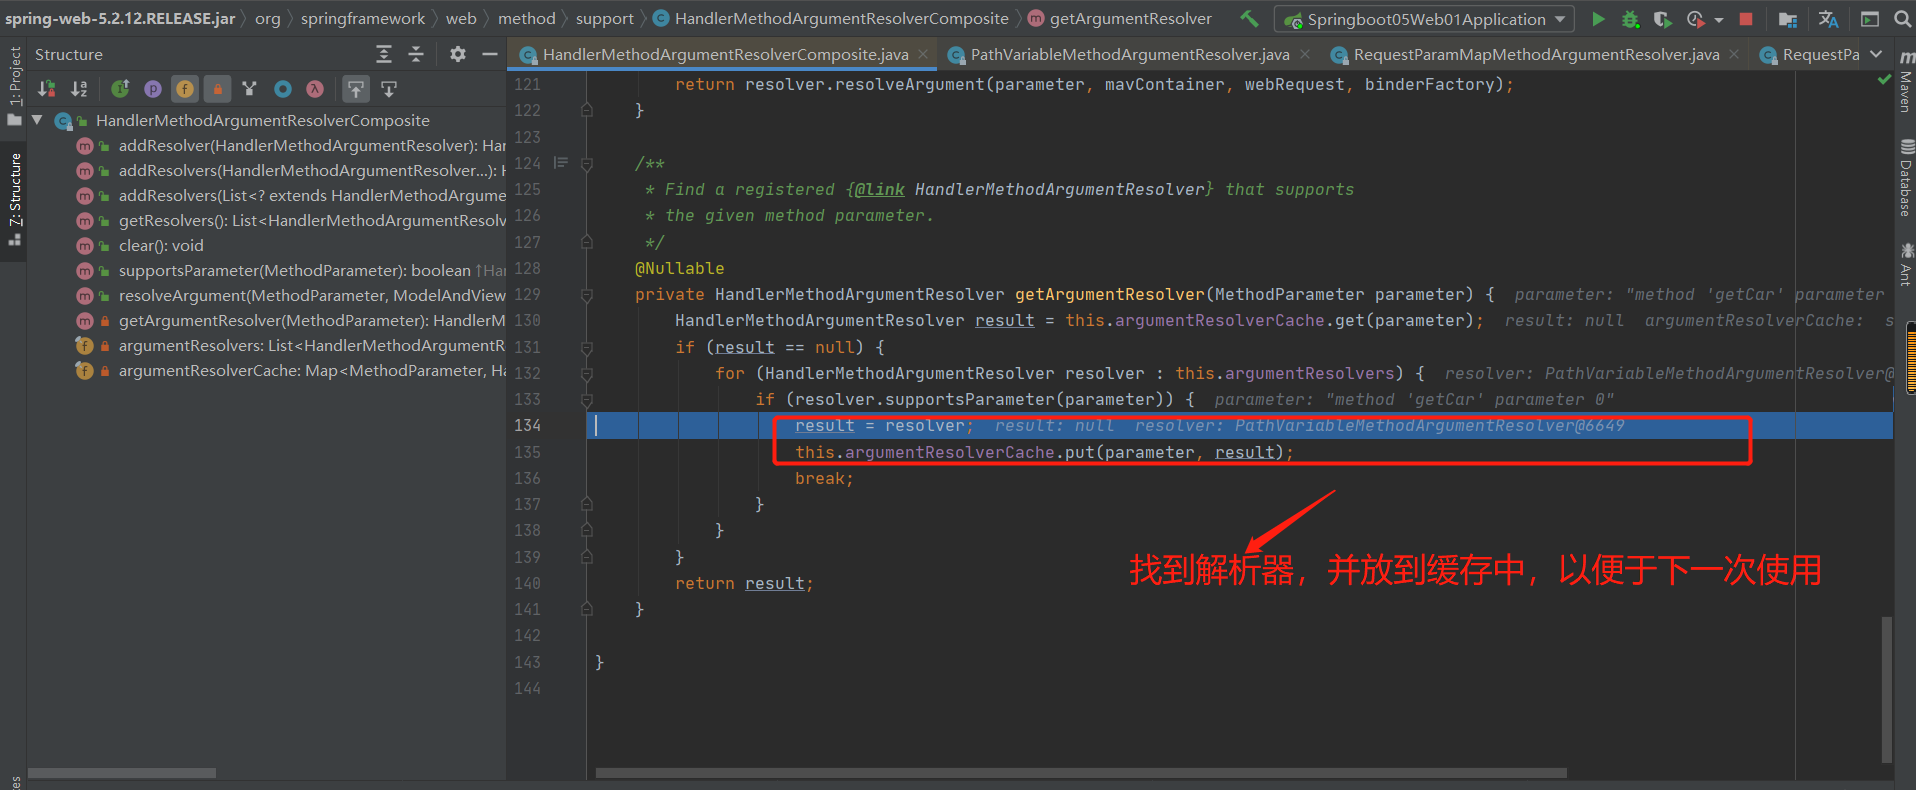
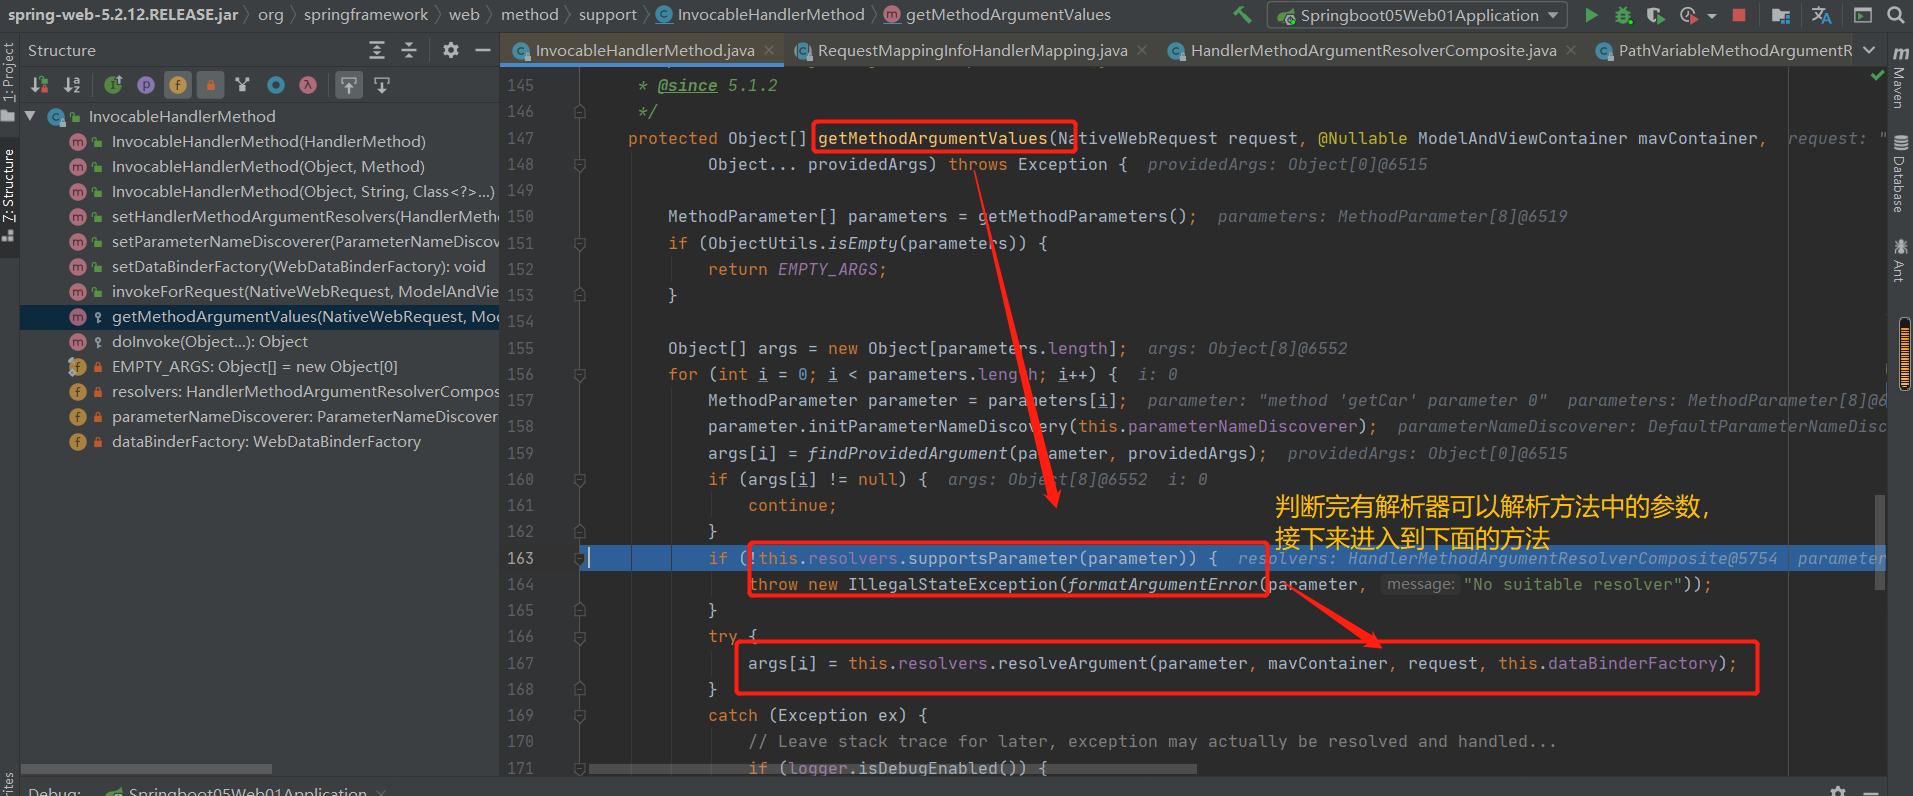
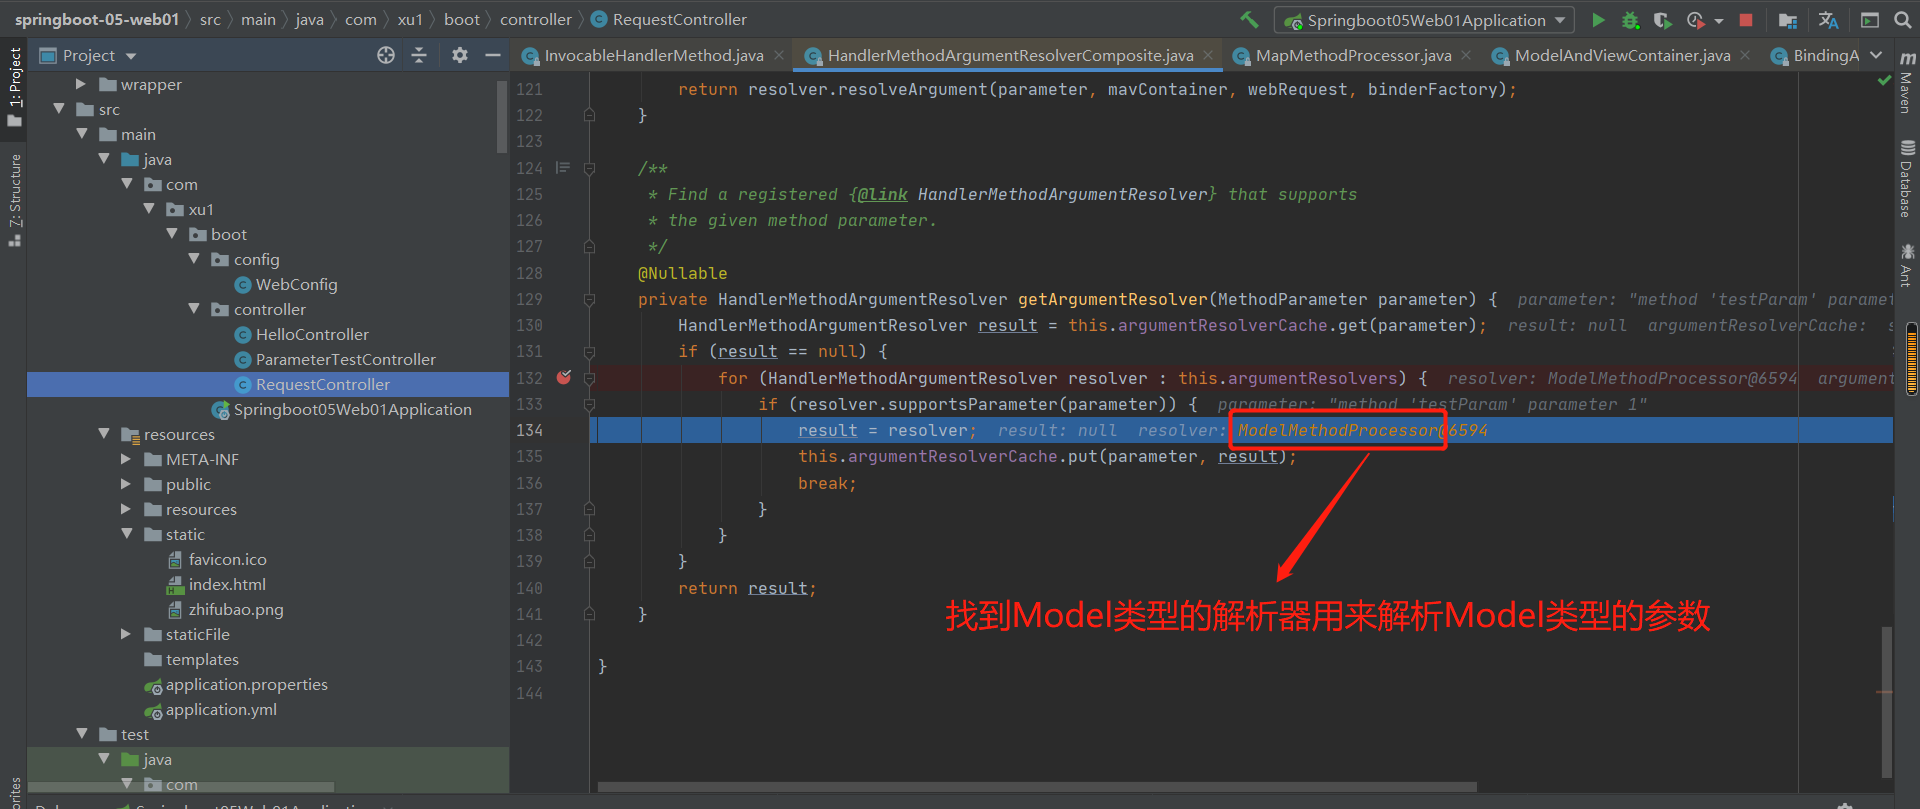
调用解析器的方法去解析方法参数:
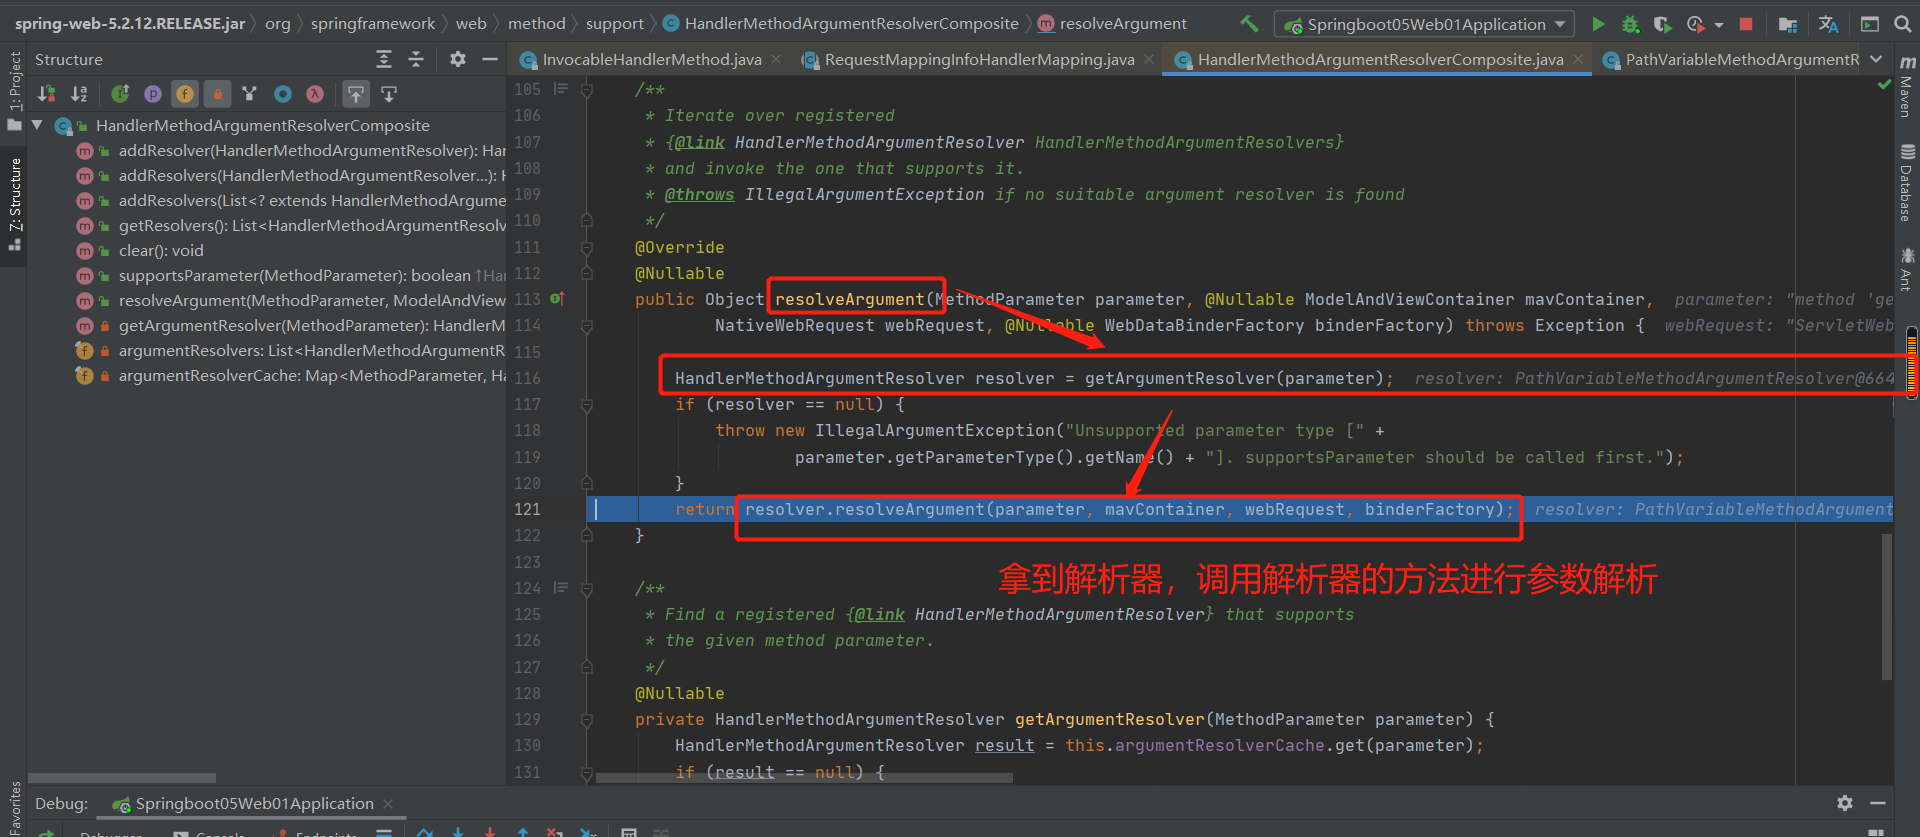
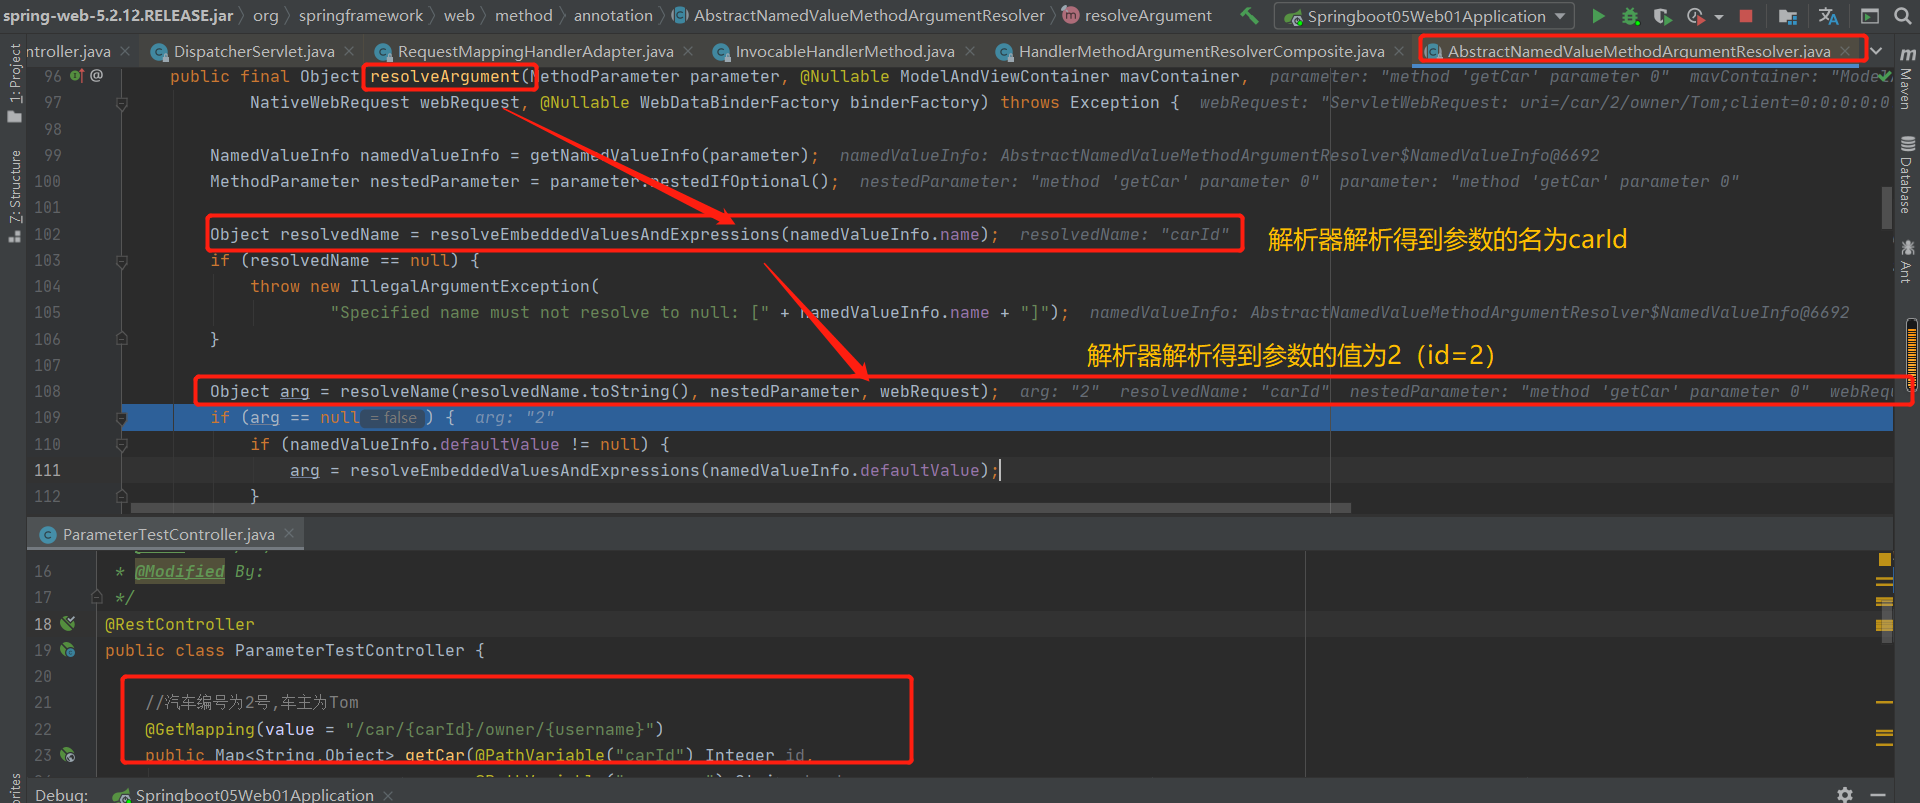
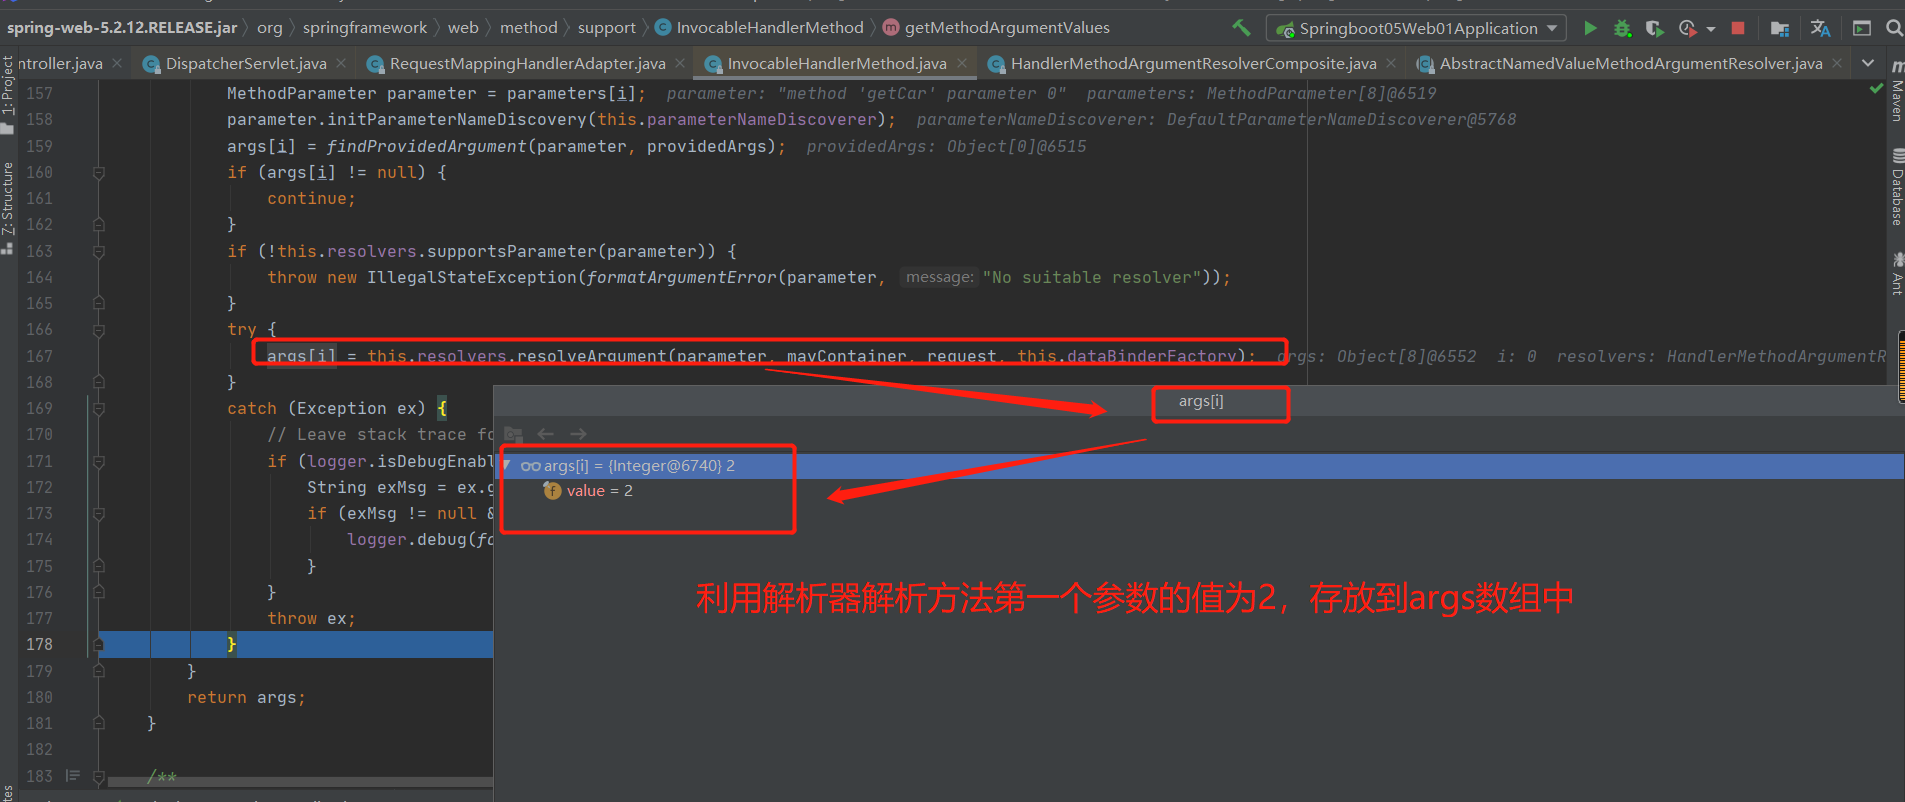
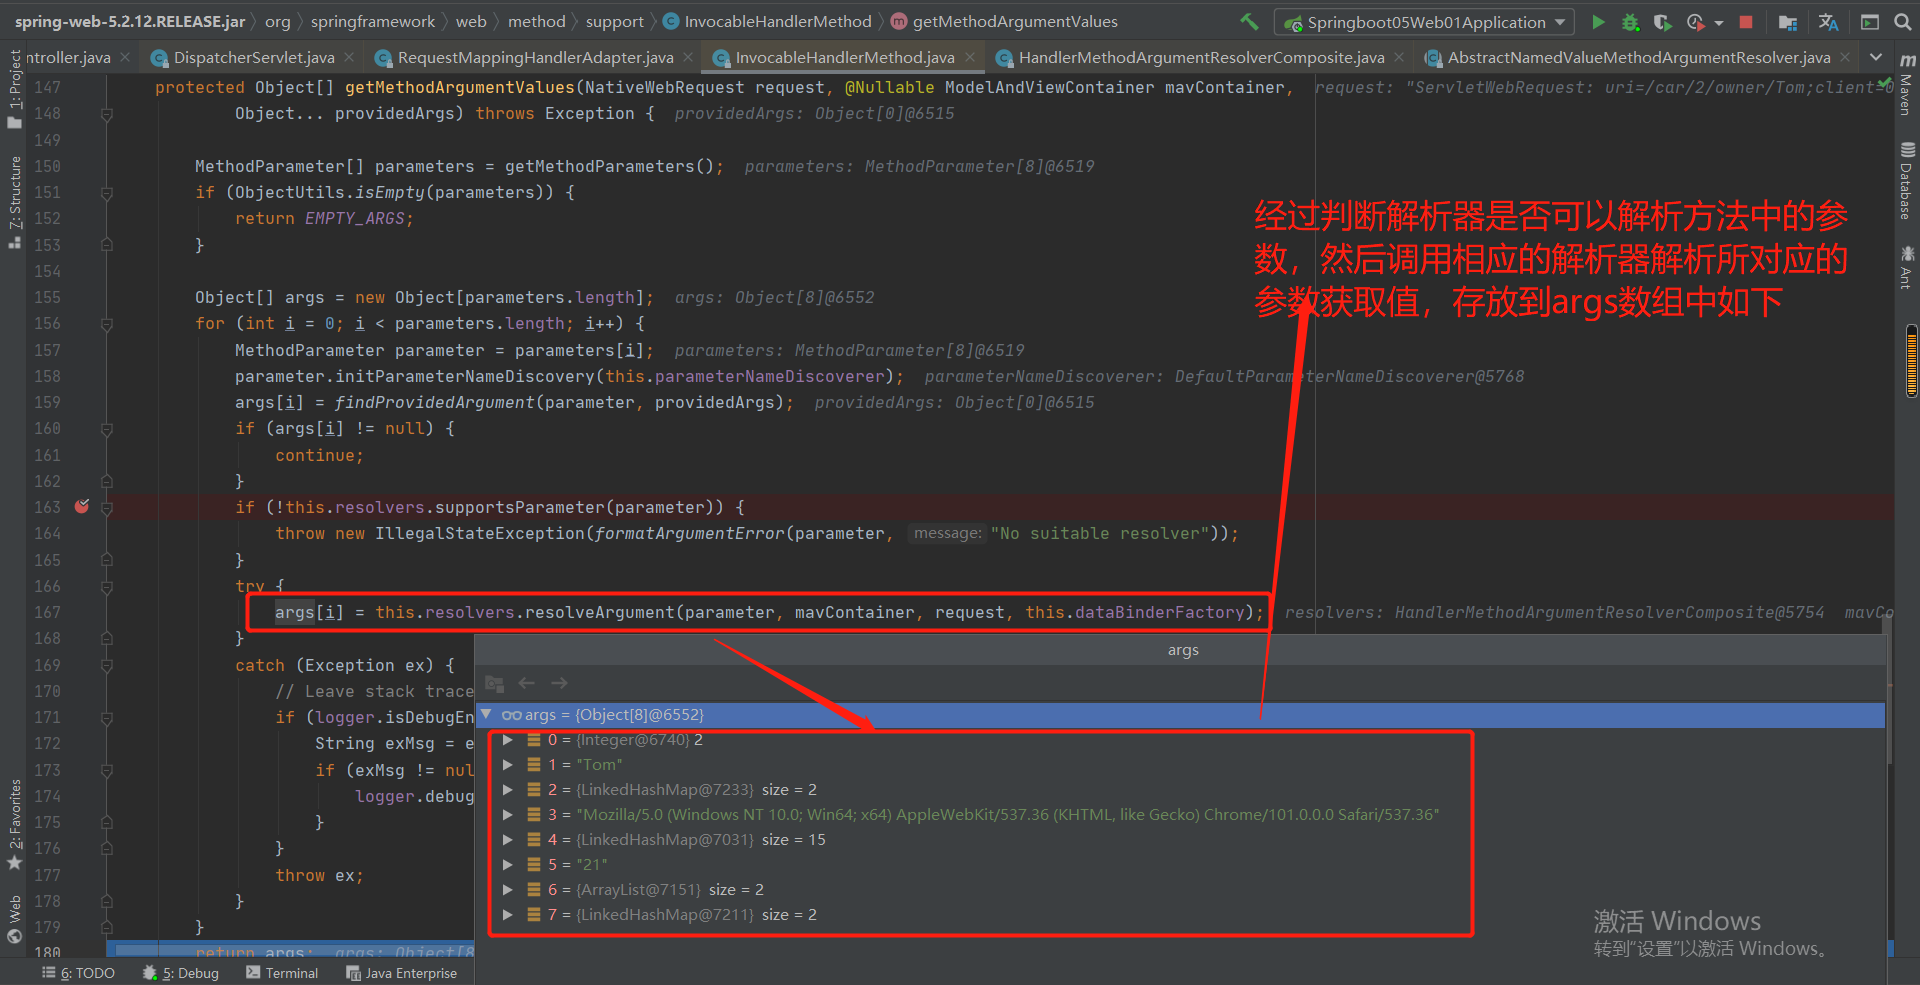

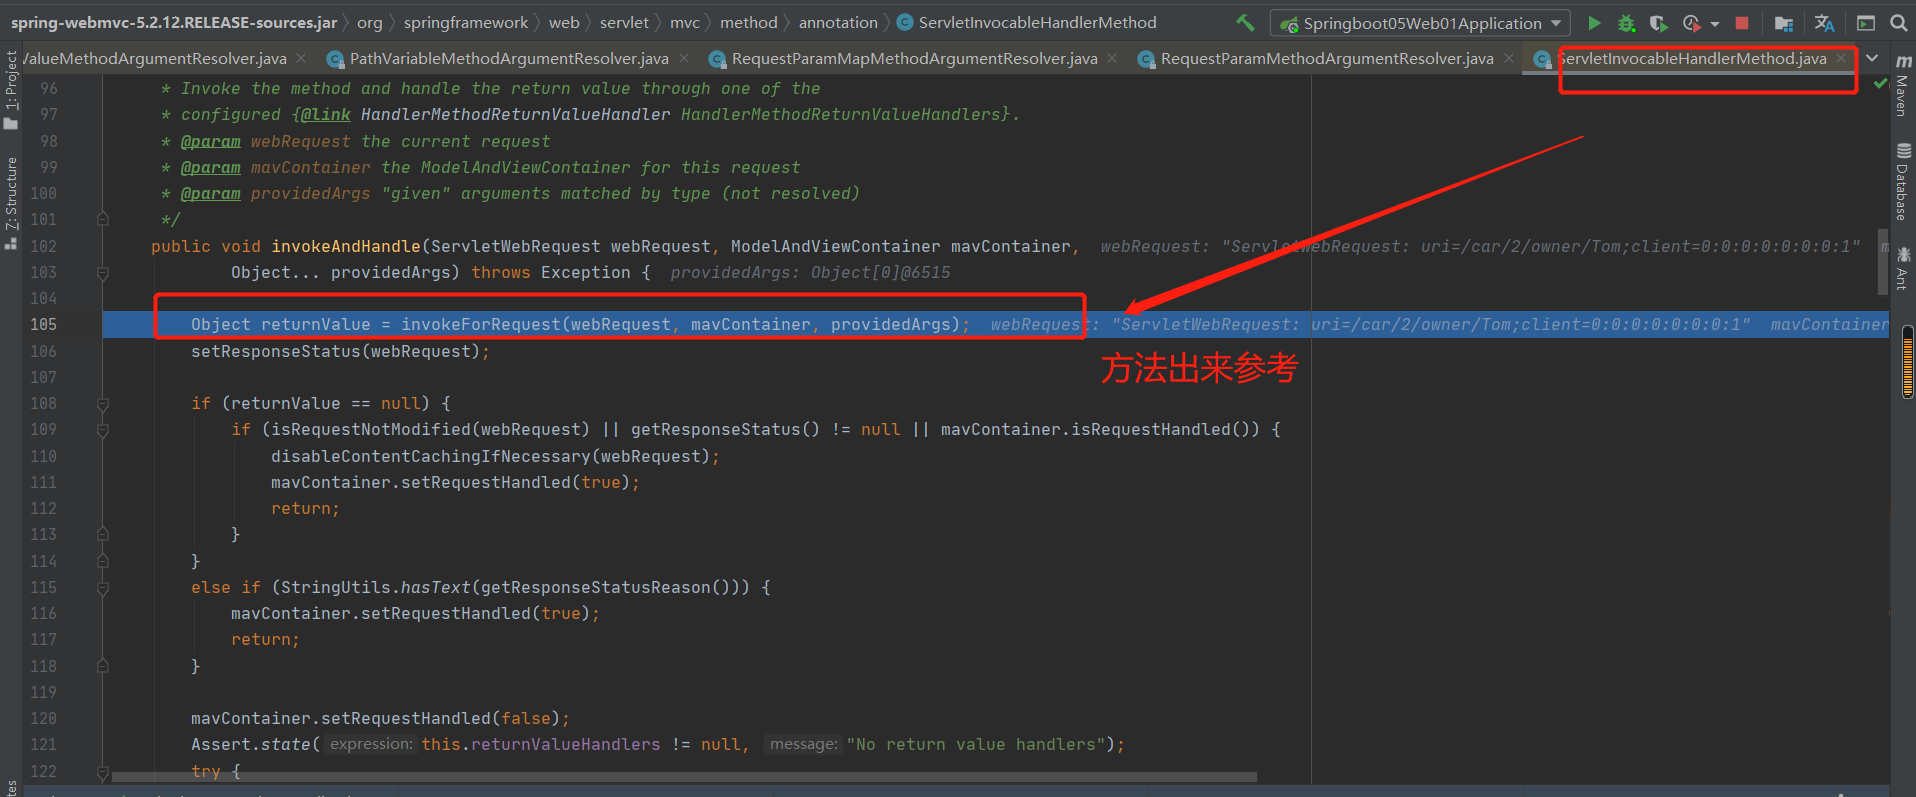
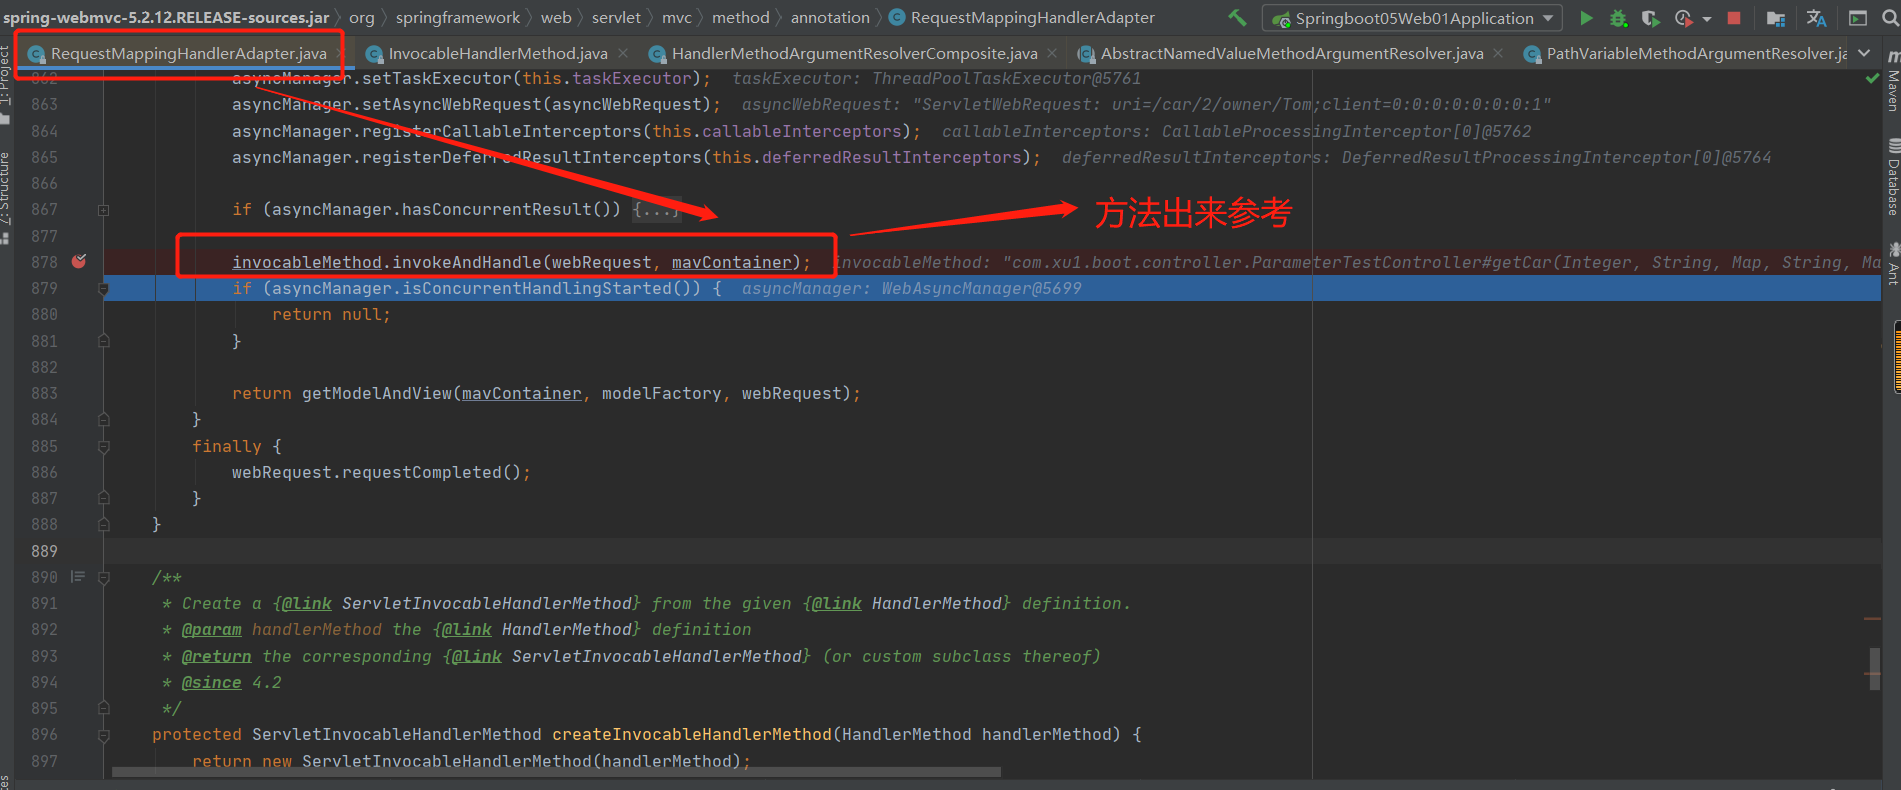
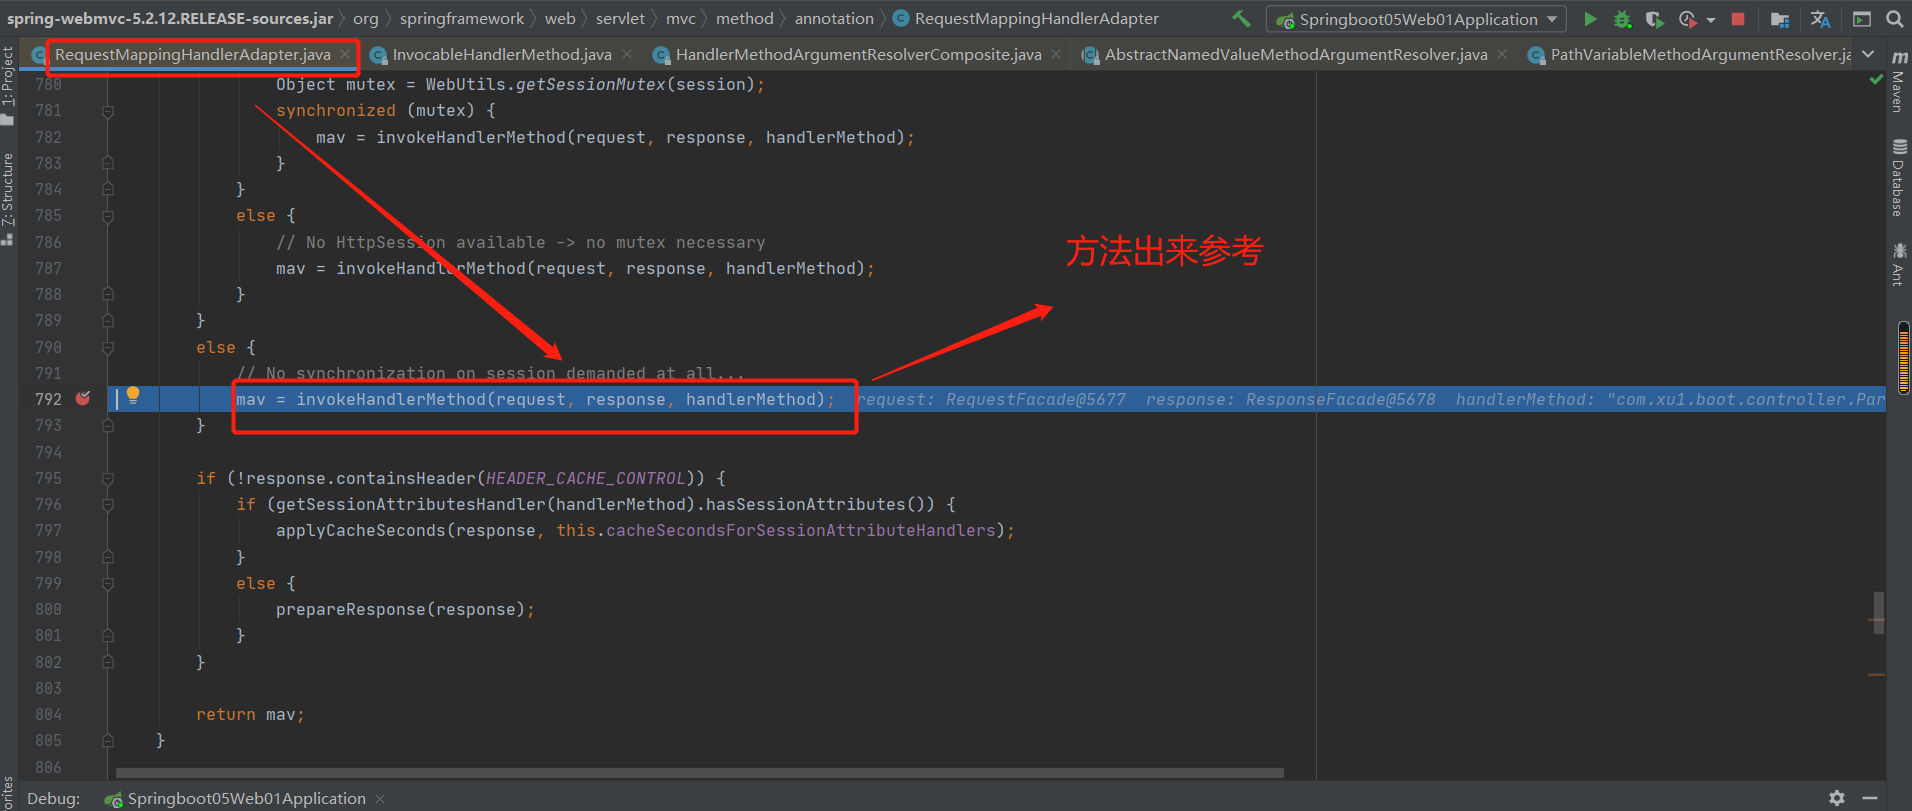
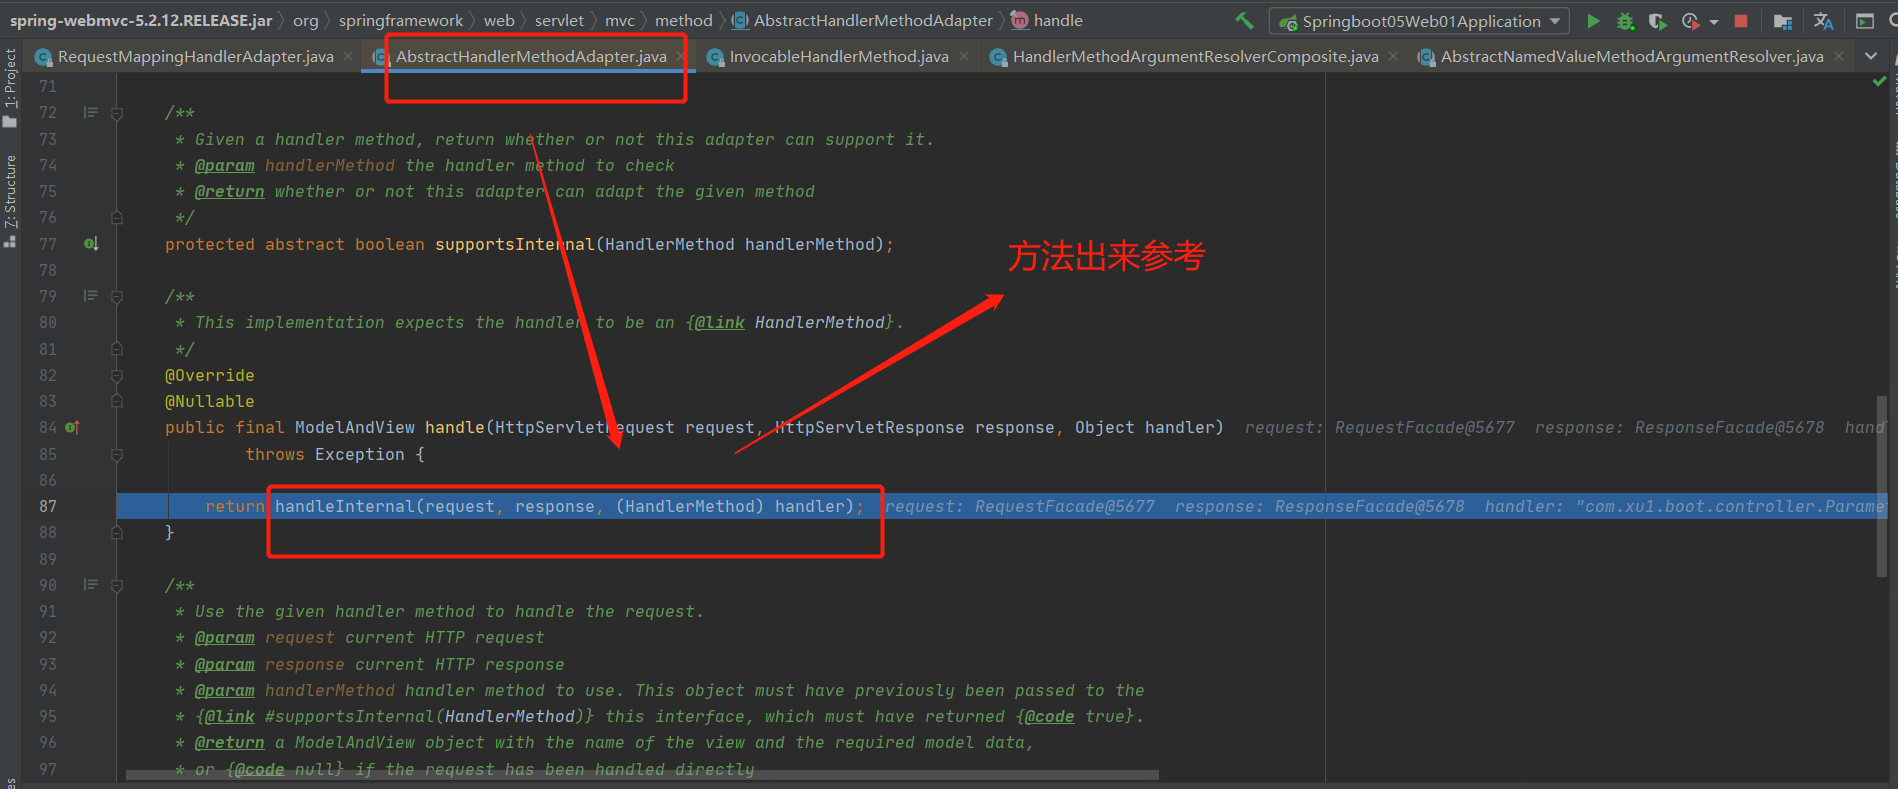
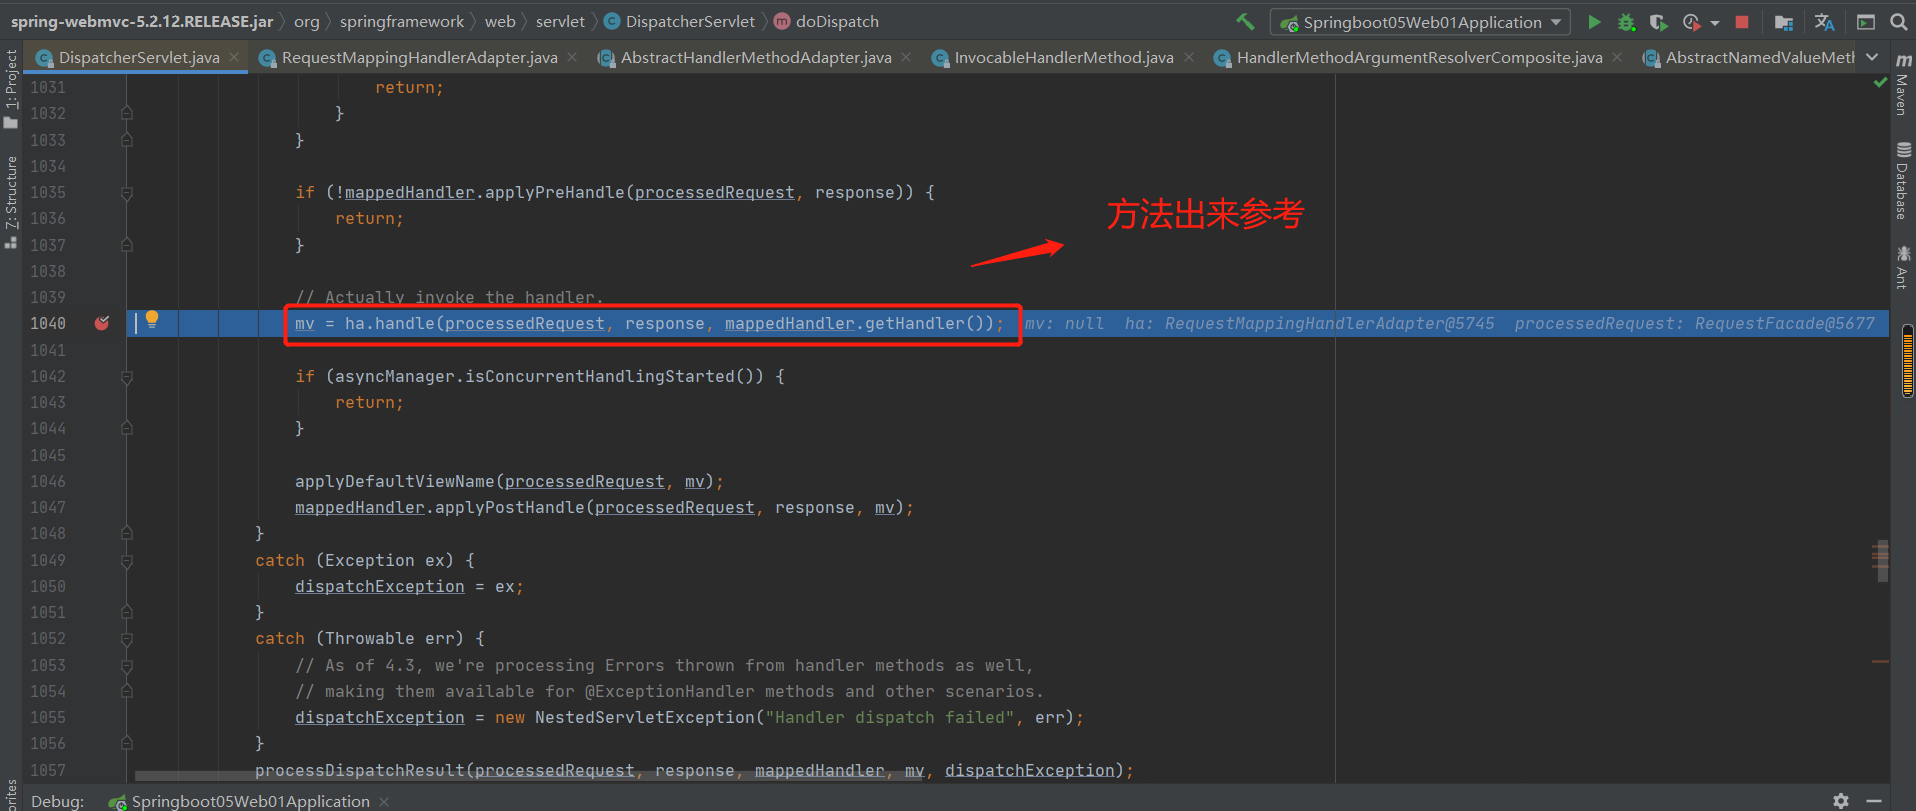
6-6 Servlet API参数(方法中原生的servlet参数)解析原理---源码分析
Servlet API参数:
WebRequest、ServletRequest、MultipartRequest、 HttpSession、javax.servlet.http.PushBuilder、Principal、InputStream、Reader、HttpMethod、Locale、TimeZone、ZoneId
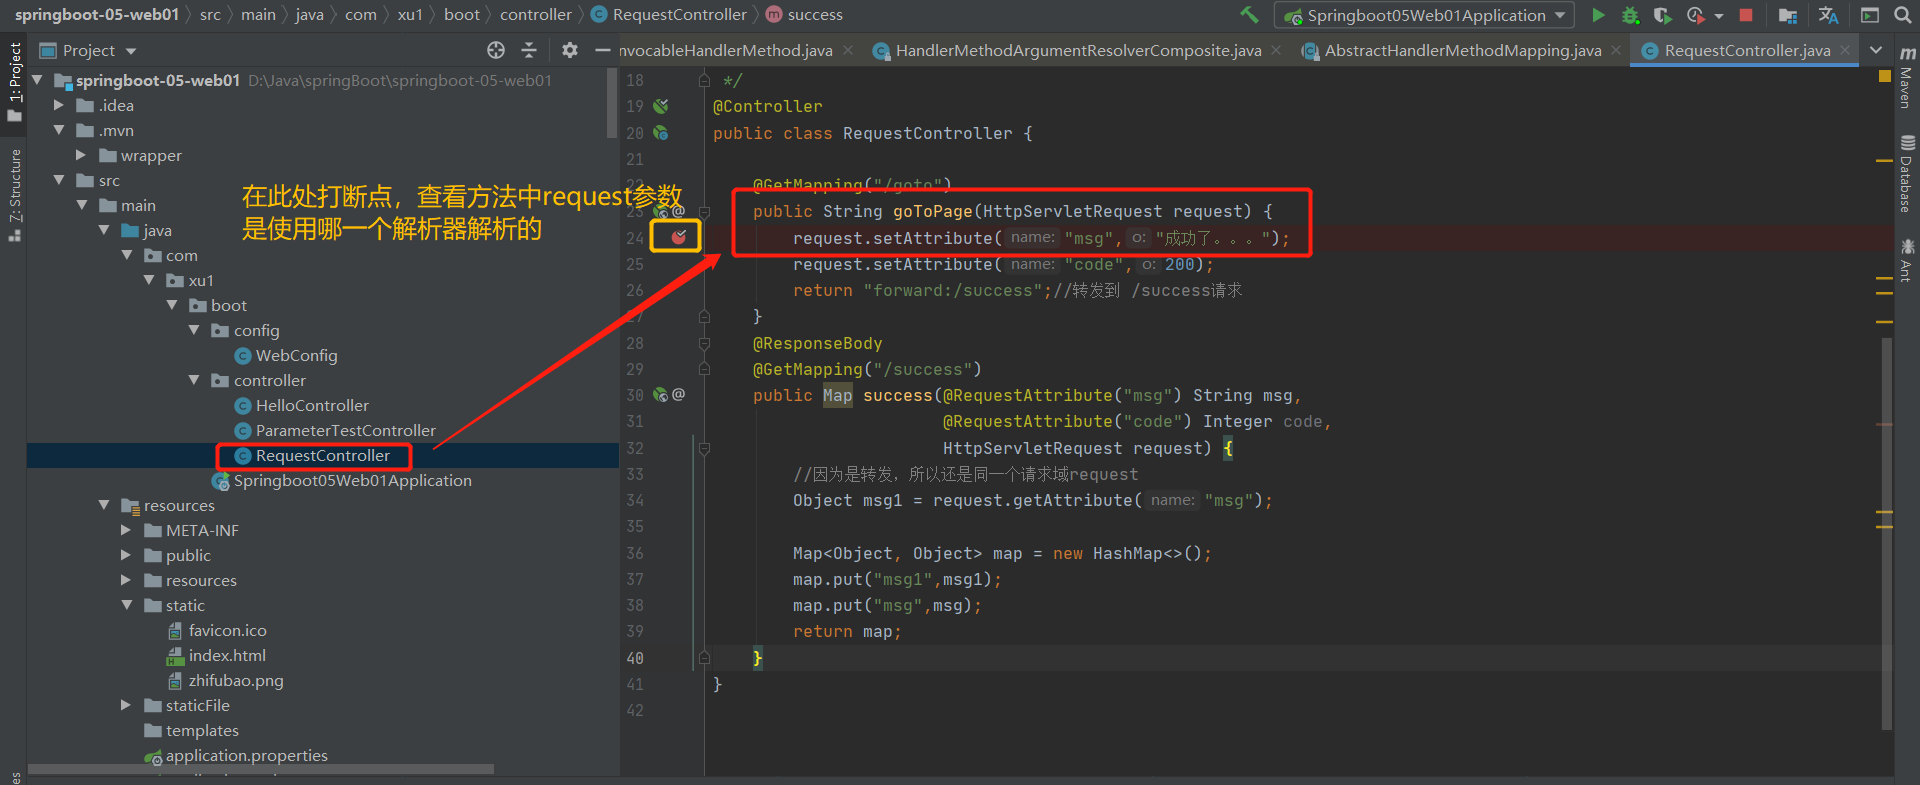
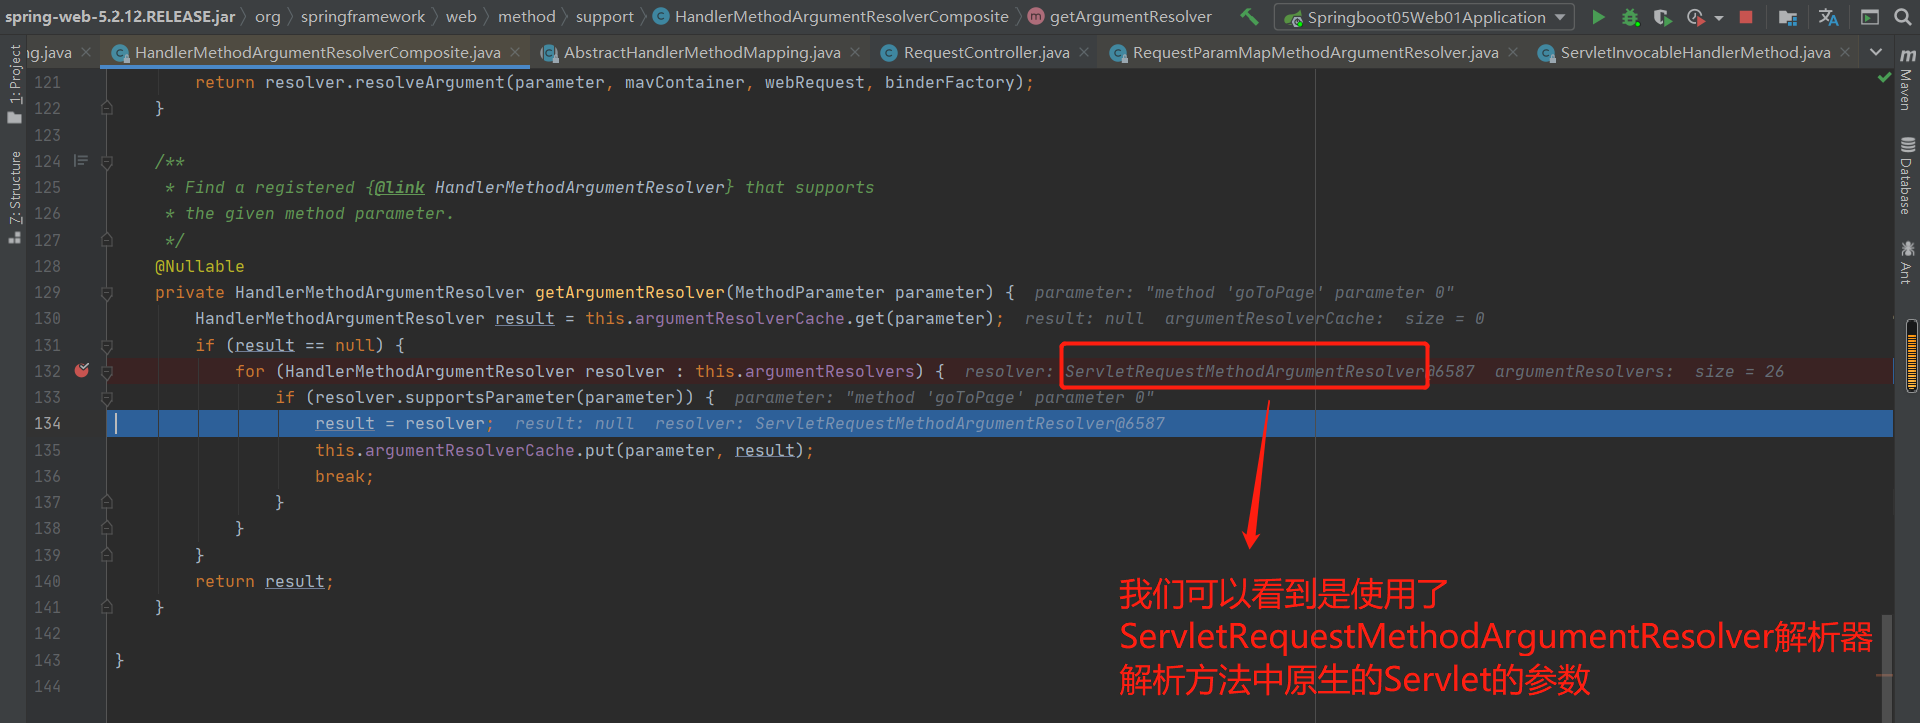
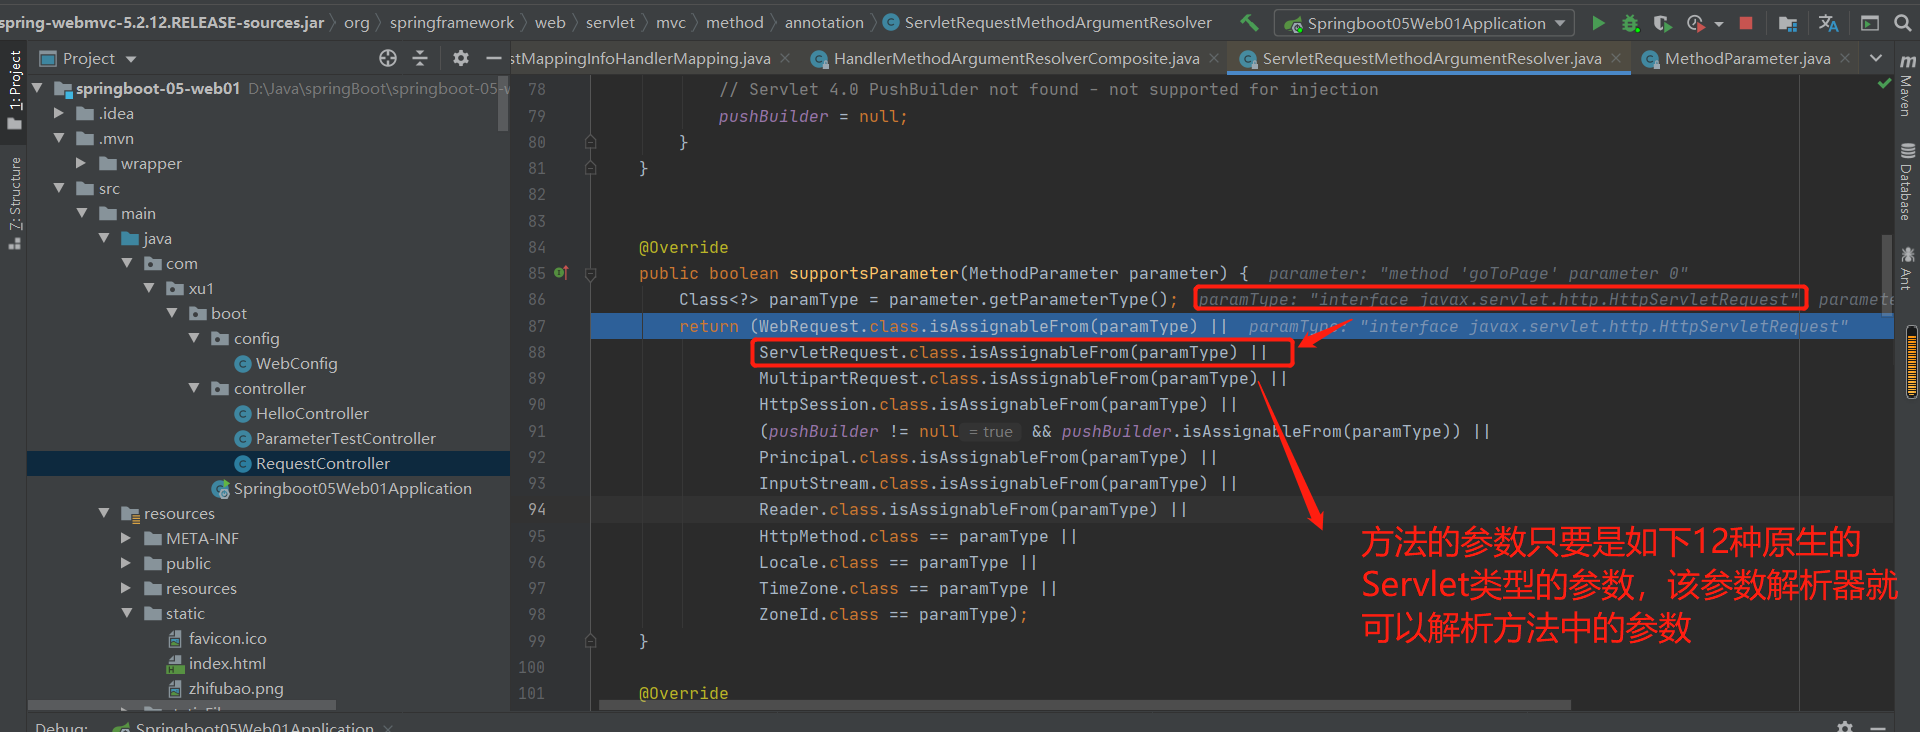
6-7 复杂参数(以Map、Model分析为例)
Map、Model(map、model里面的数据会被放在request的请求域 request.setAttribute)、Errors/BindingResult、RedirectAttributes( 重定向携带数据)、ServletResponse(response)、SessionStatus、UriComponentsBuilder、ServletUriComponentsBuilder
1.初步实验
 @GetMapping("/params")
    public String testParam(Map<String,Object> map,
                            Model model,
                            HttpServletRequest request,
                            HttpServletResponse response) {
        map.put("hello","world666");
        model.addAttribute("world","hello666");
        request.setAttribute("message","HelloWorld");

        Cookie cookie = new Cookie("c1", "v1");
        cookie.setDomain("localhost");
        response.addCookie(cookie);
        return "forward:/success";
    }
    @ResponseBody
    @GetMapping("/success")
    public Map success(@RequestAttribute(value = "msg",required = false) String msg,
                       @RequestAttribute(value = "code",required = false) Integer code,
                       HttpServletRequest request) {
        //因为是转发,所以还是同一个请求域request
        Object msg1 = request.getAttribute("msg");

        Map<Object, Object> map = new HashMap<>();
        map.put("msg1",msg1);
        map.put("msg",msg);


        //获取请求域中的值
        Object hello = request.getAttribute("hello");
        Object world = request.getAttribute("world");
        Object message = request.getAttribute("message");
        //将请求域中的值放入到map中
        map.put("hello",hello);
        map.put("world",world);
        map.put("message",message);

        return map;
    }
结果:
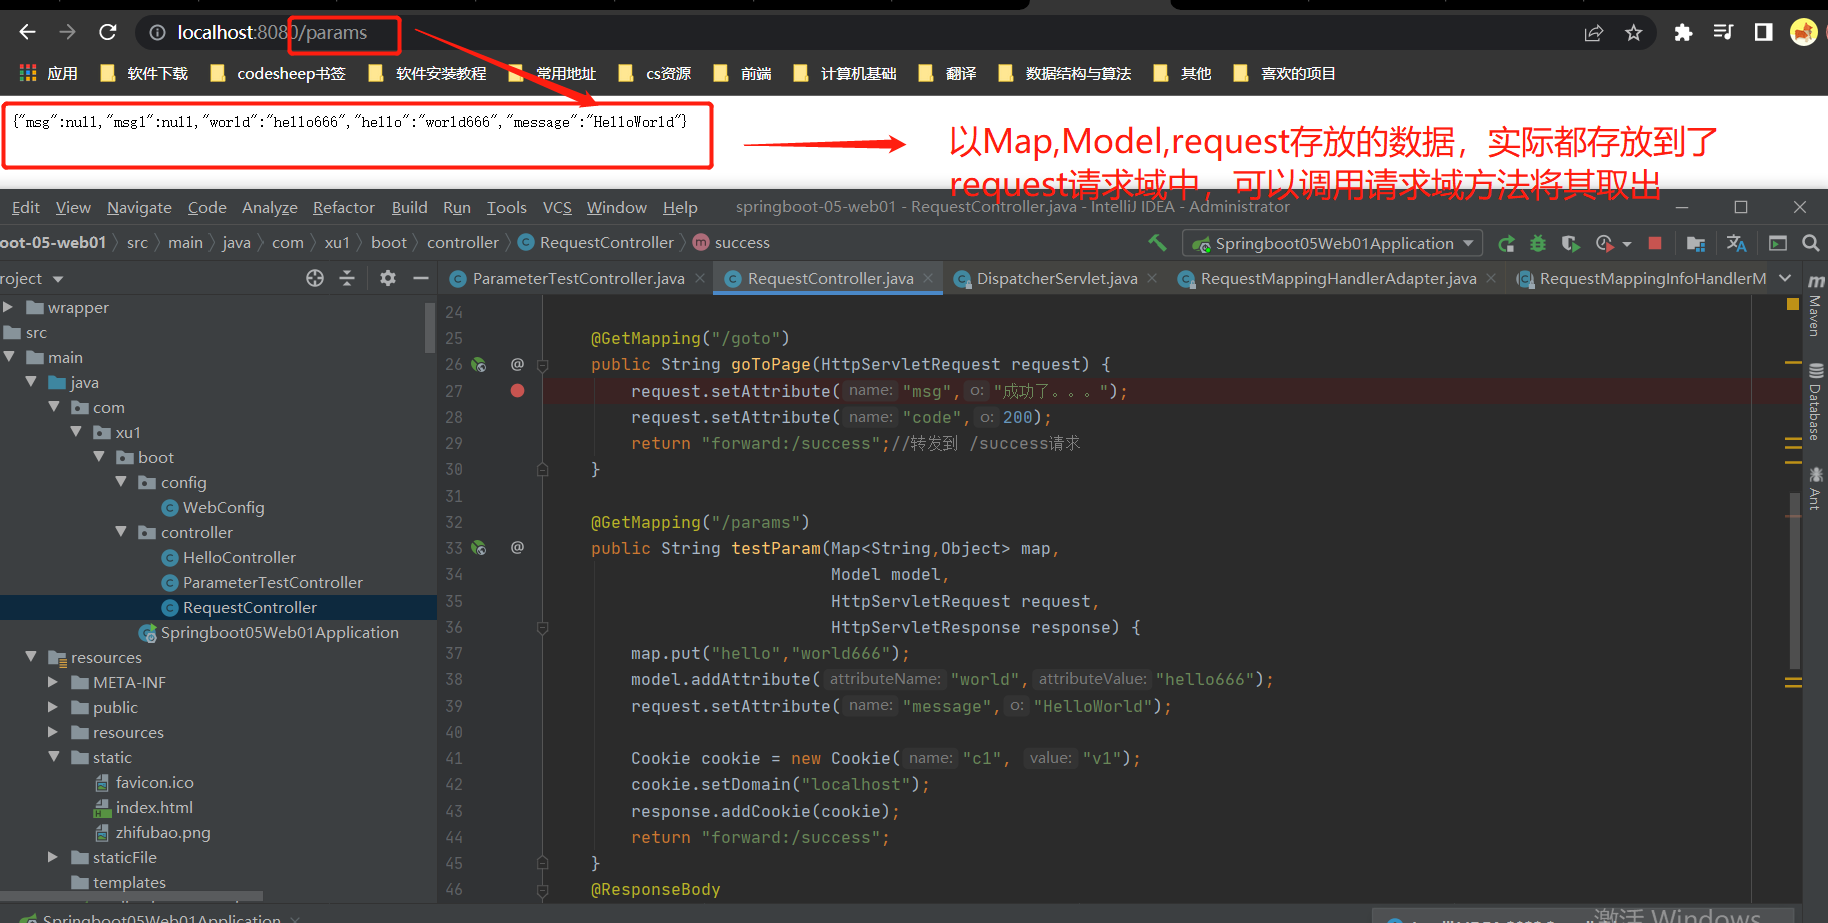
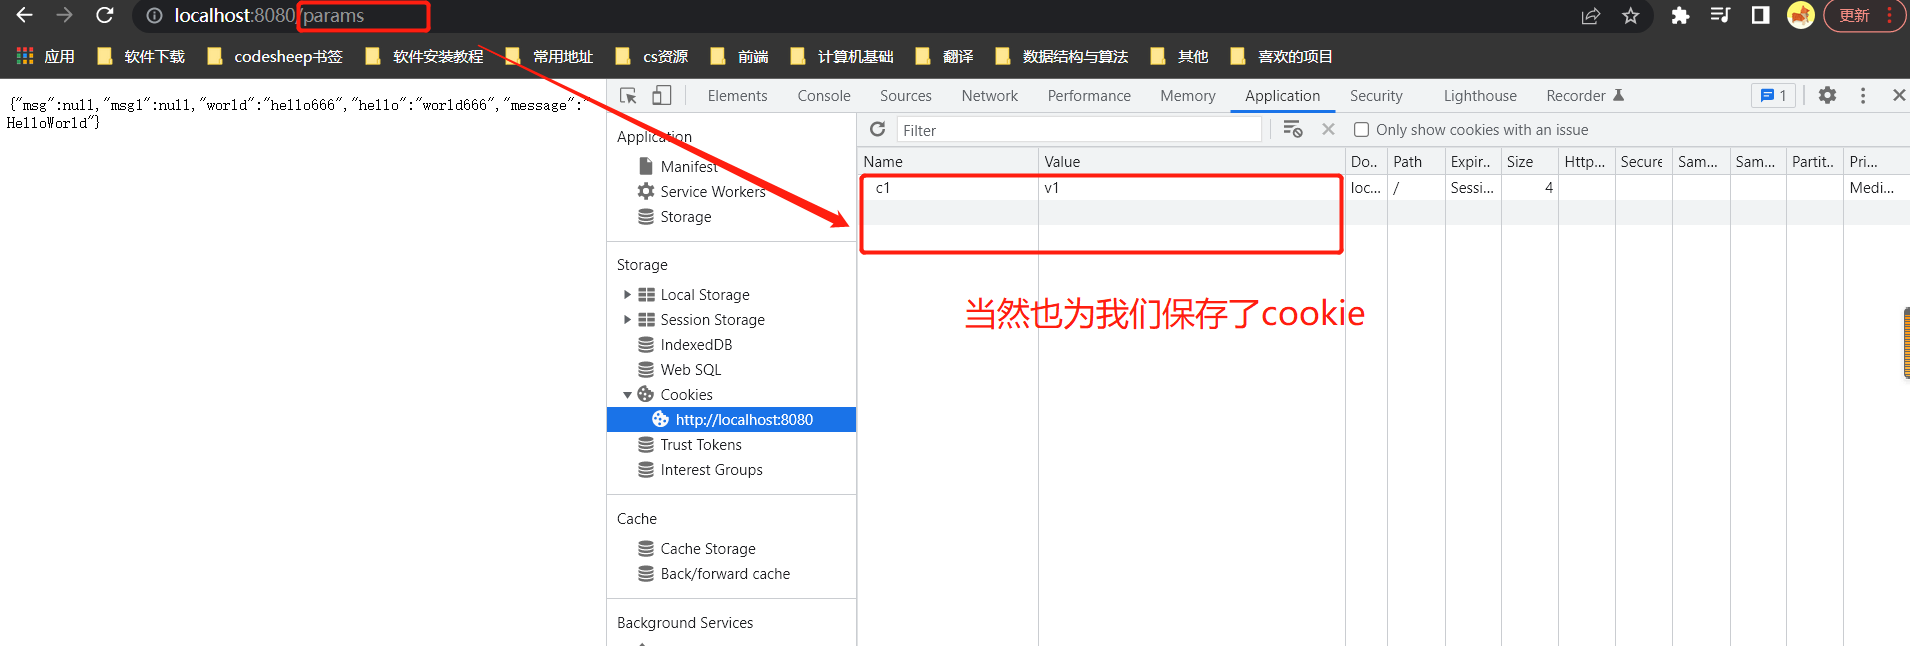
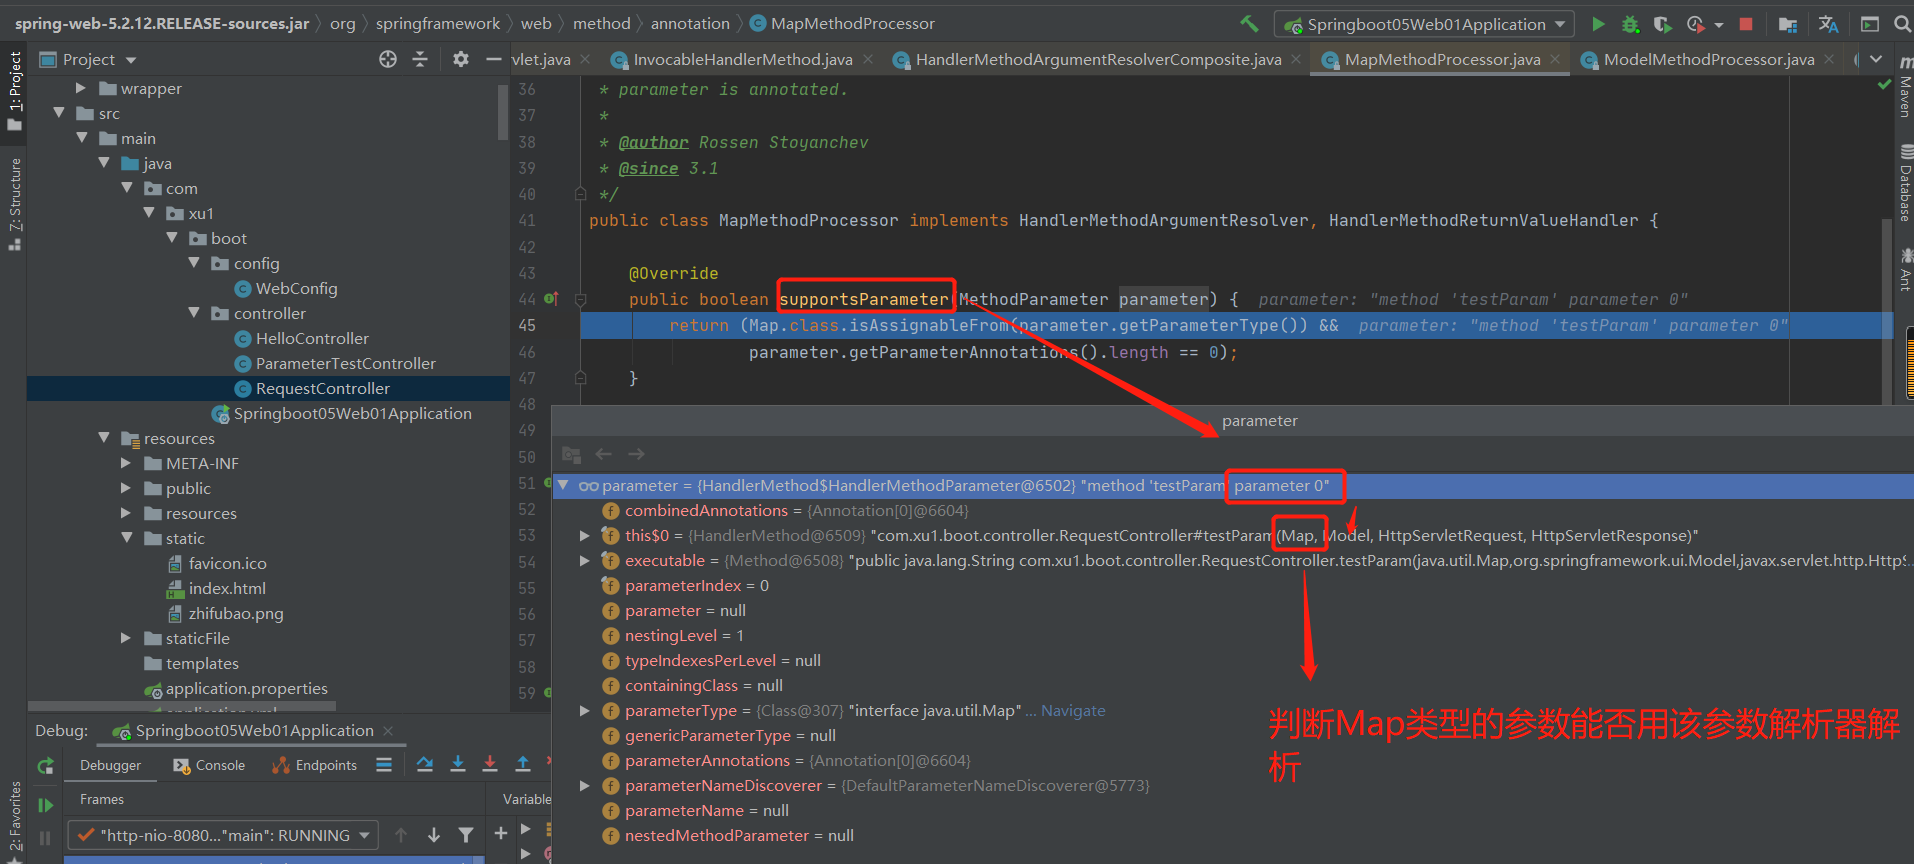
2.源码分析
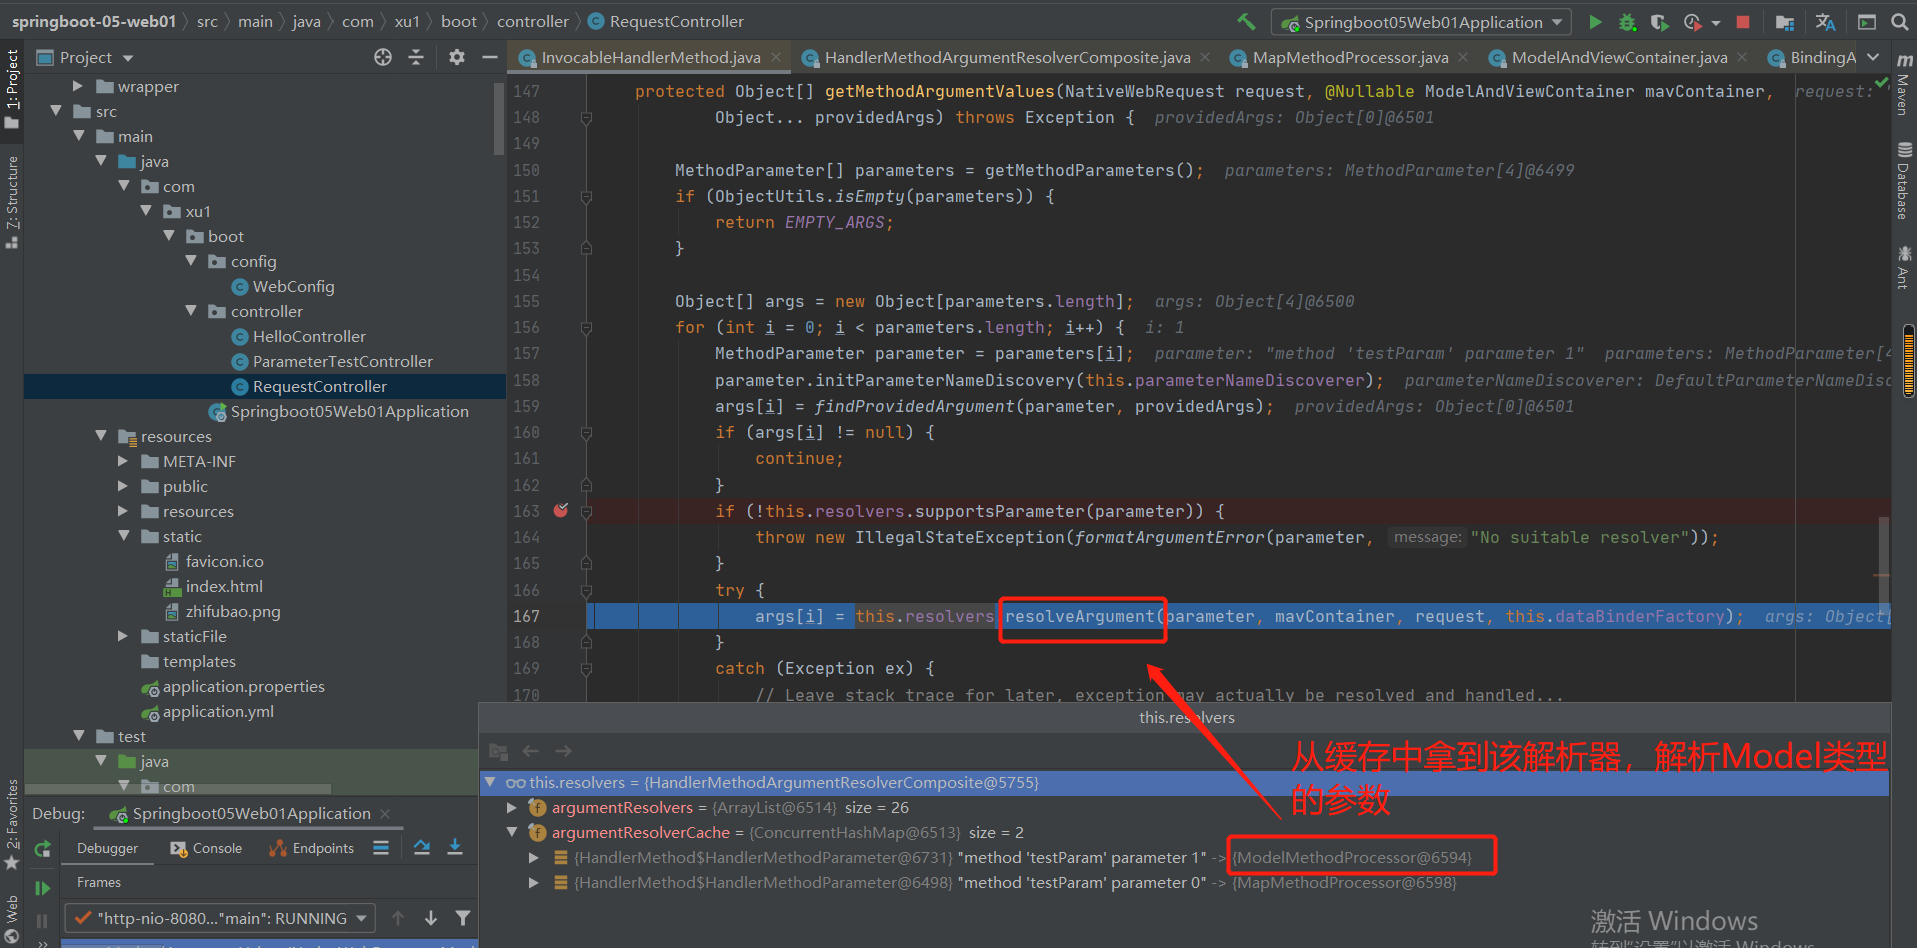
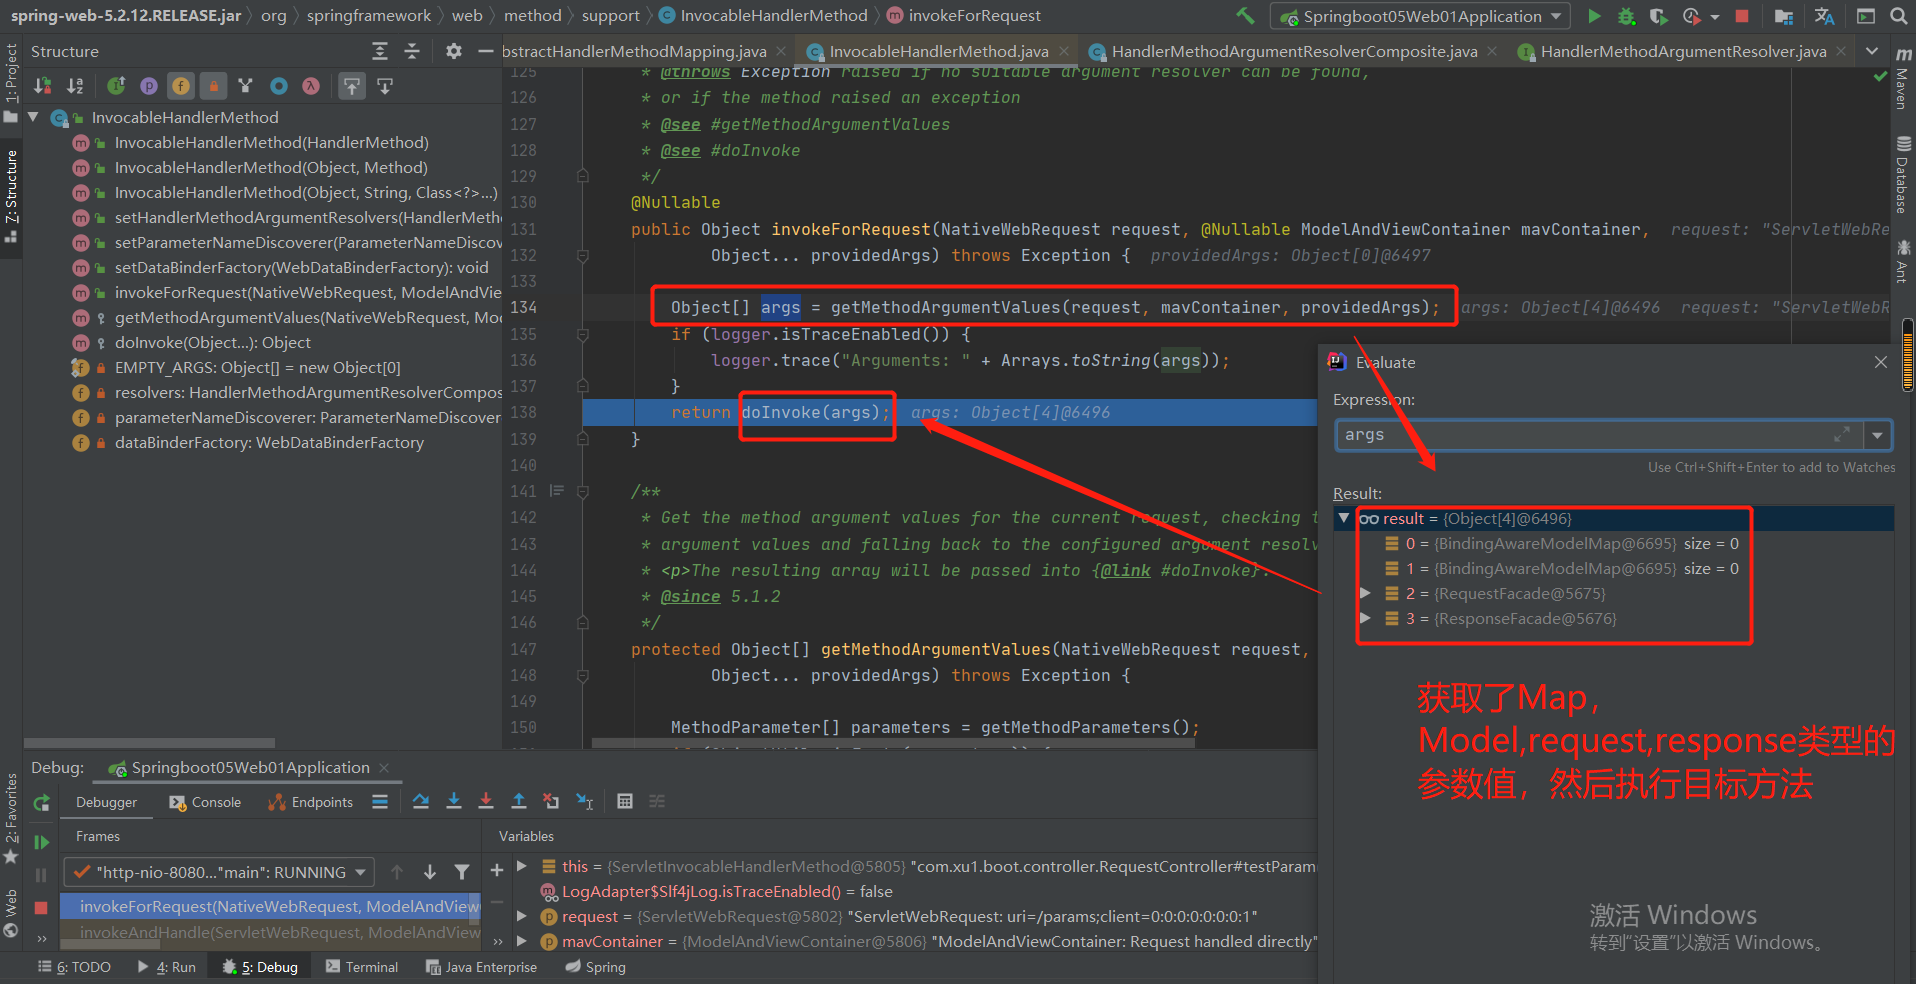
1.第一个参数---解析Map类型参数的解析:
testParam(Map<String,Object> map,
                            Model model,
                            HttpServletRequest request,
                            HttpServletResponse response)
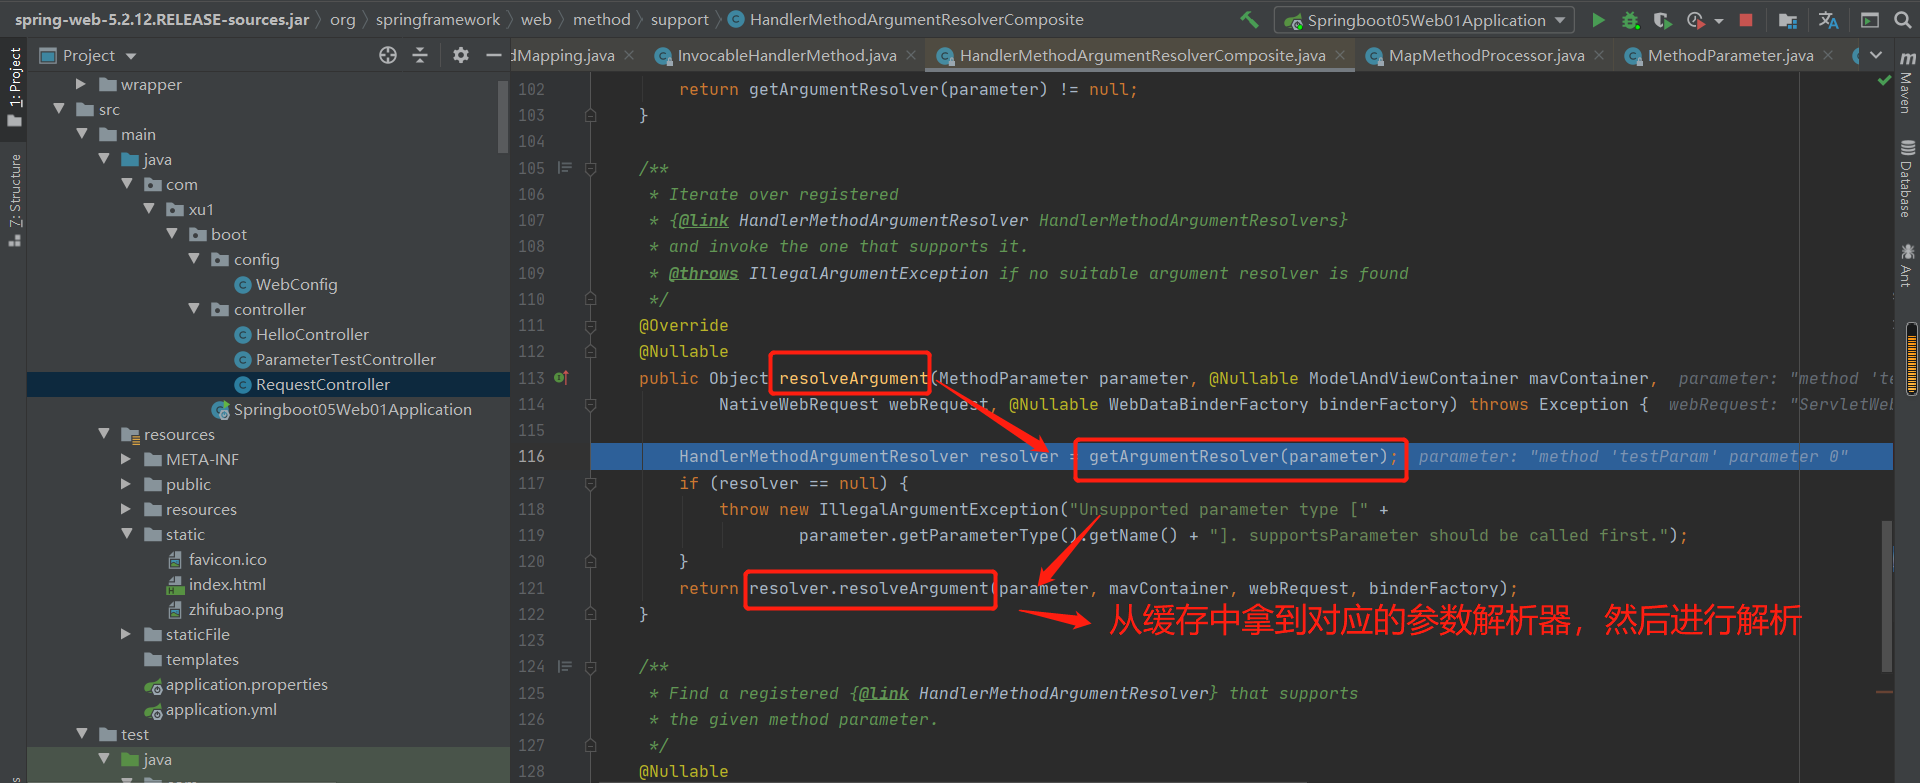
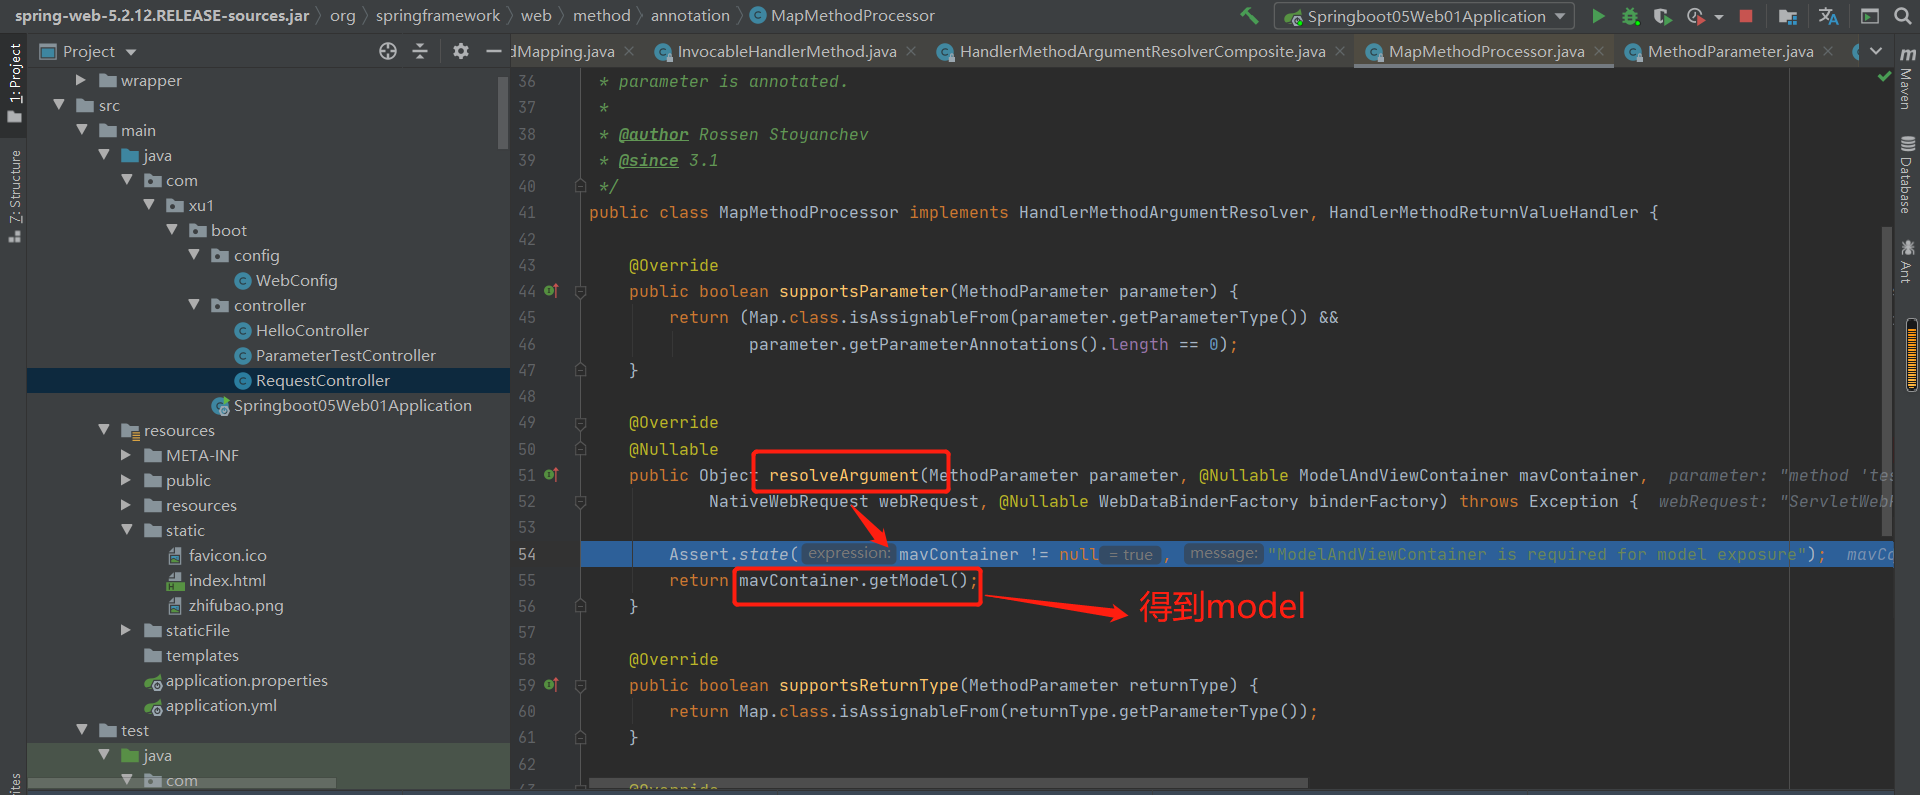
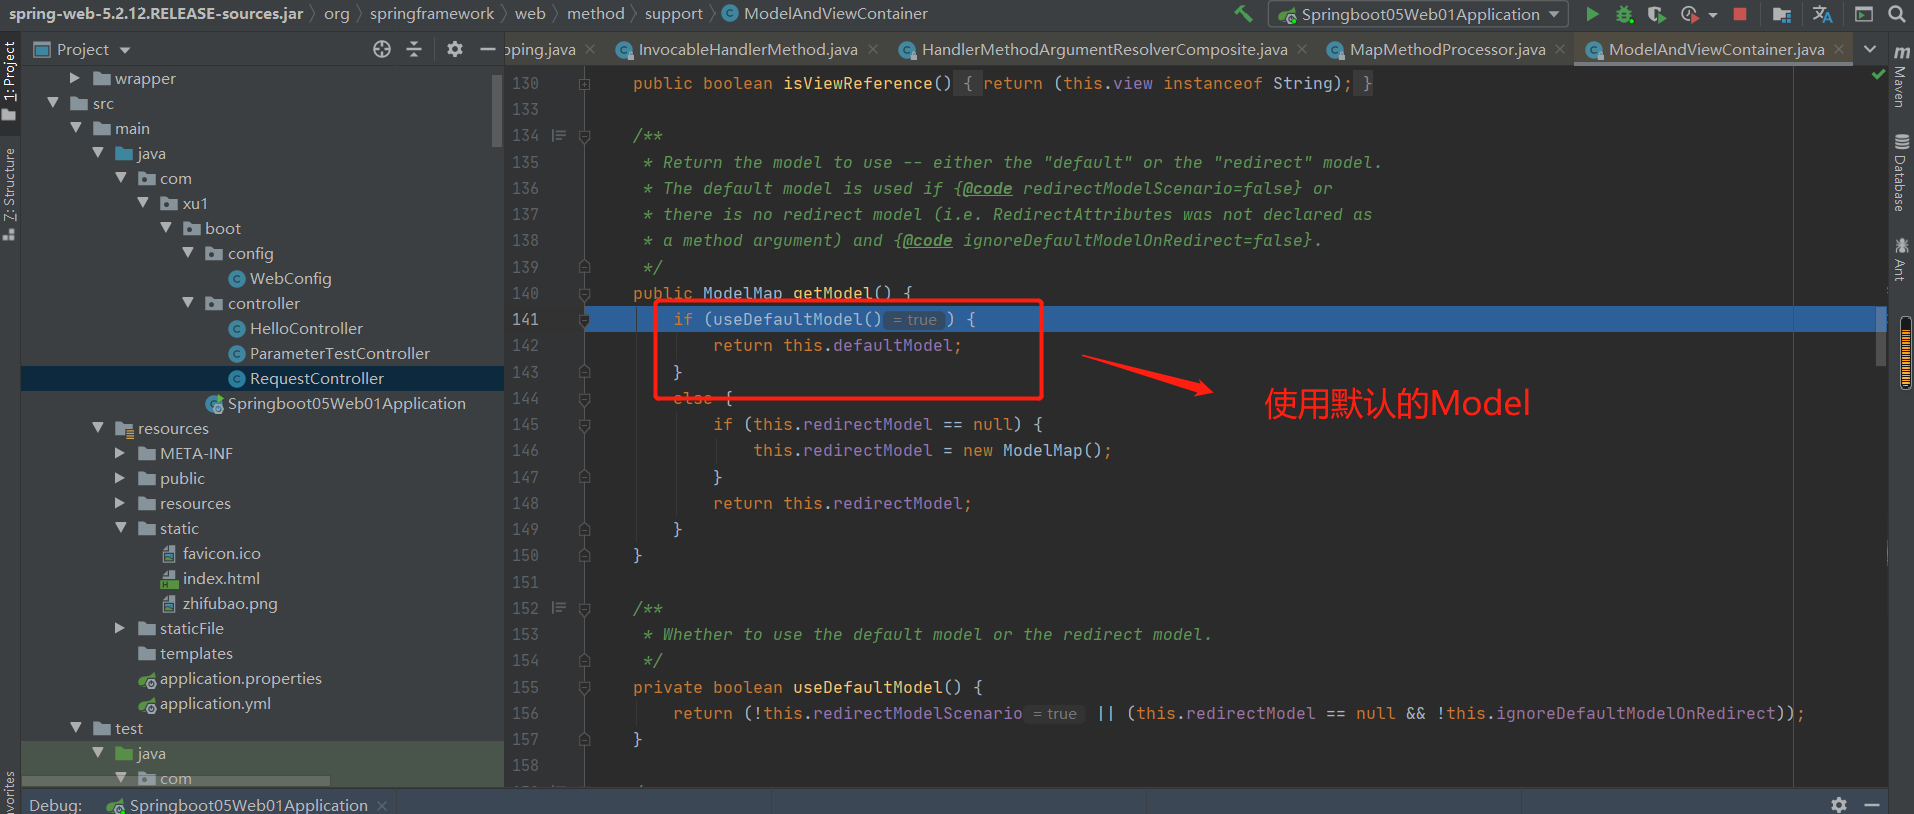
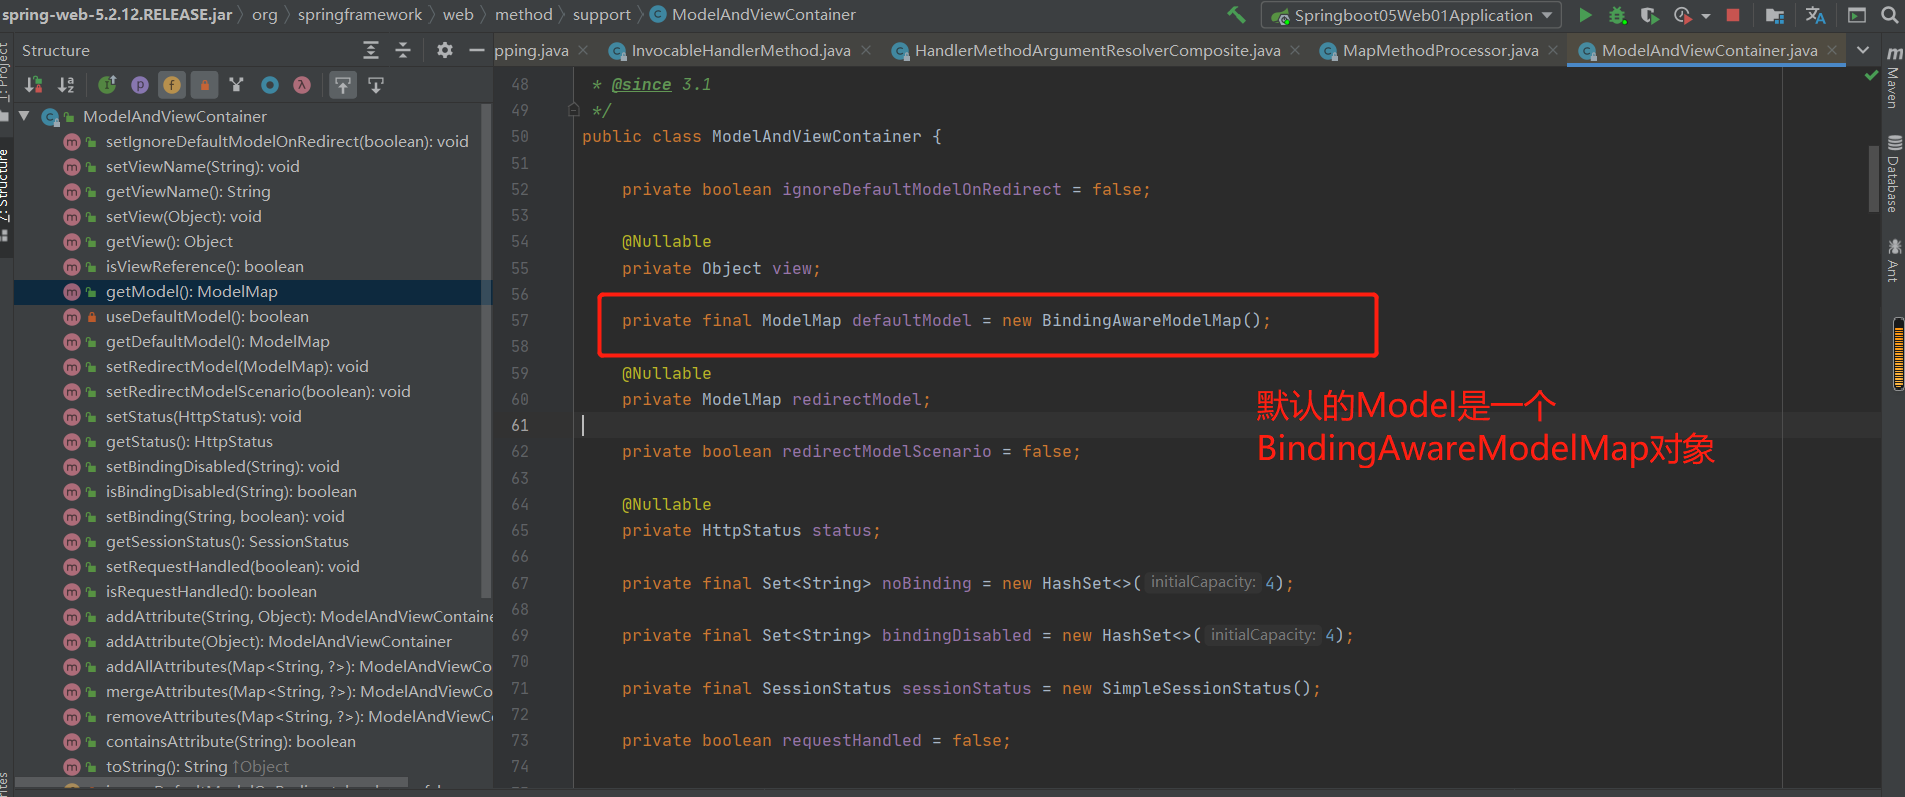
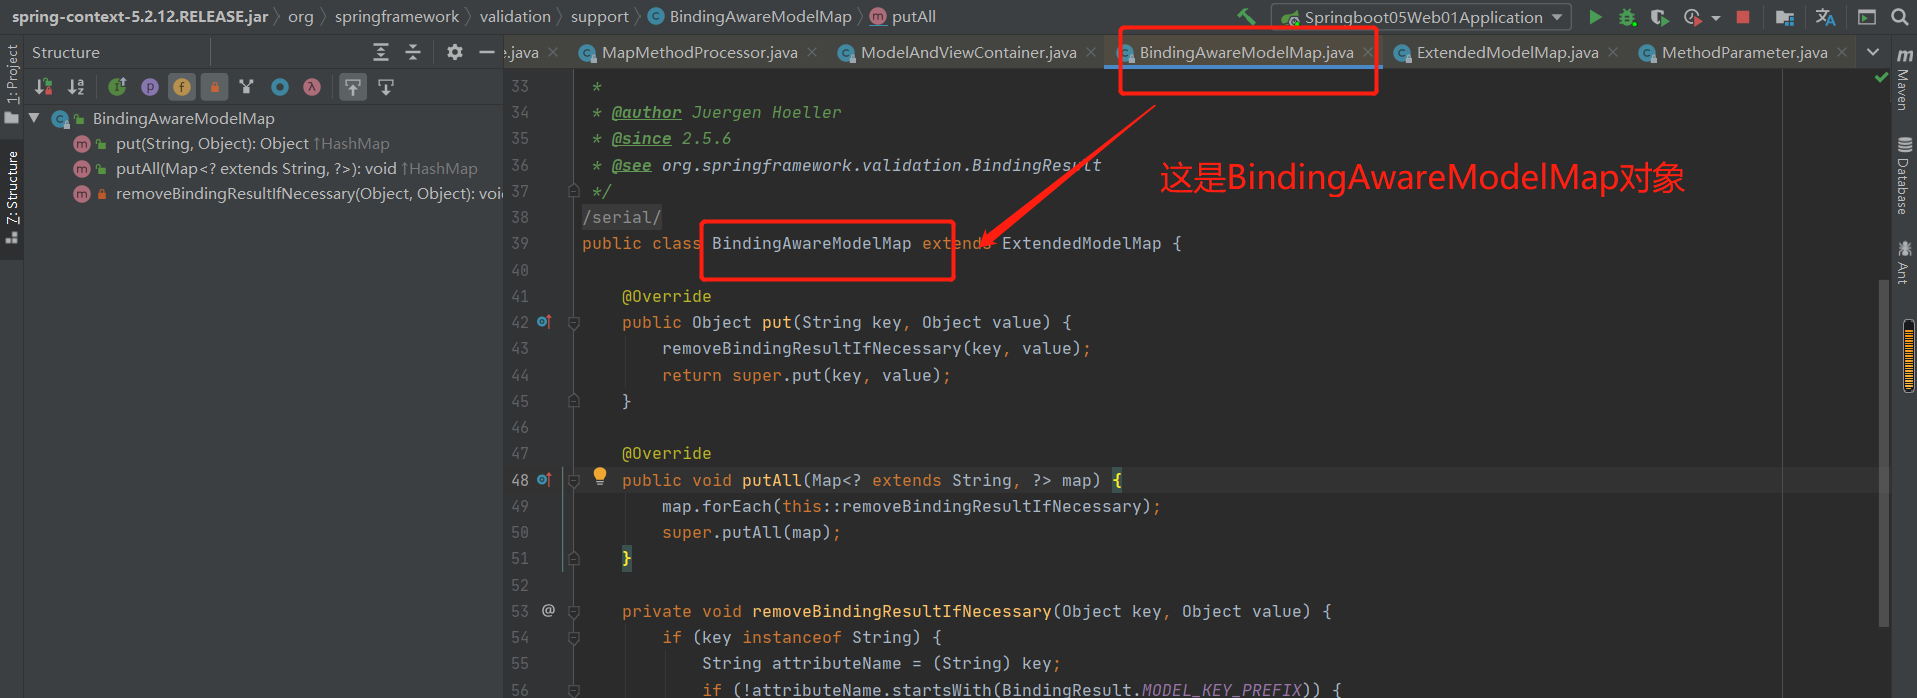
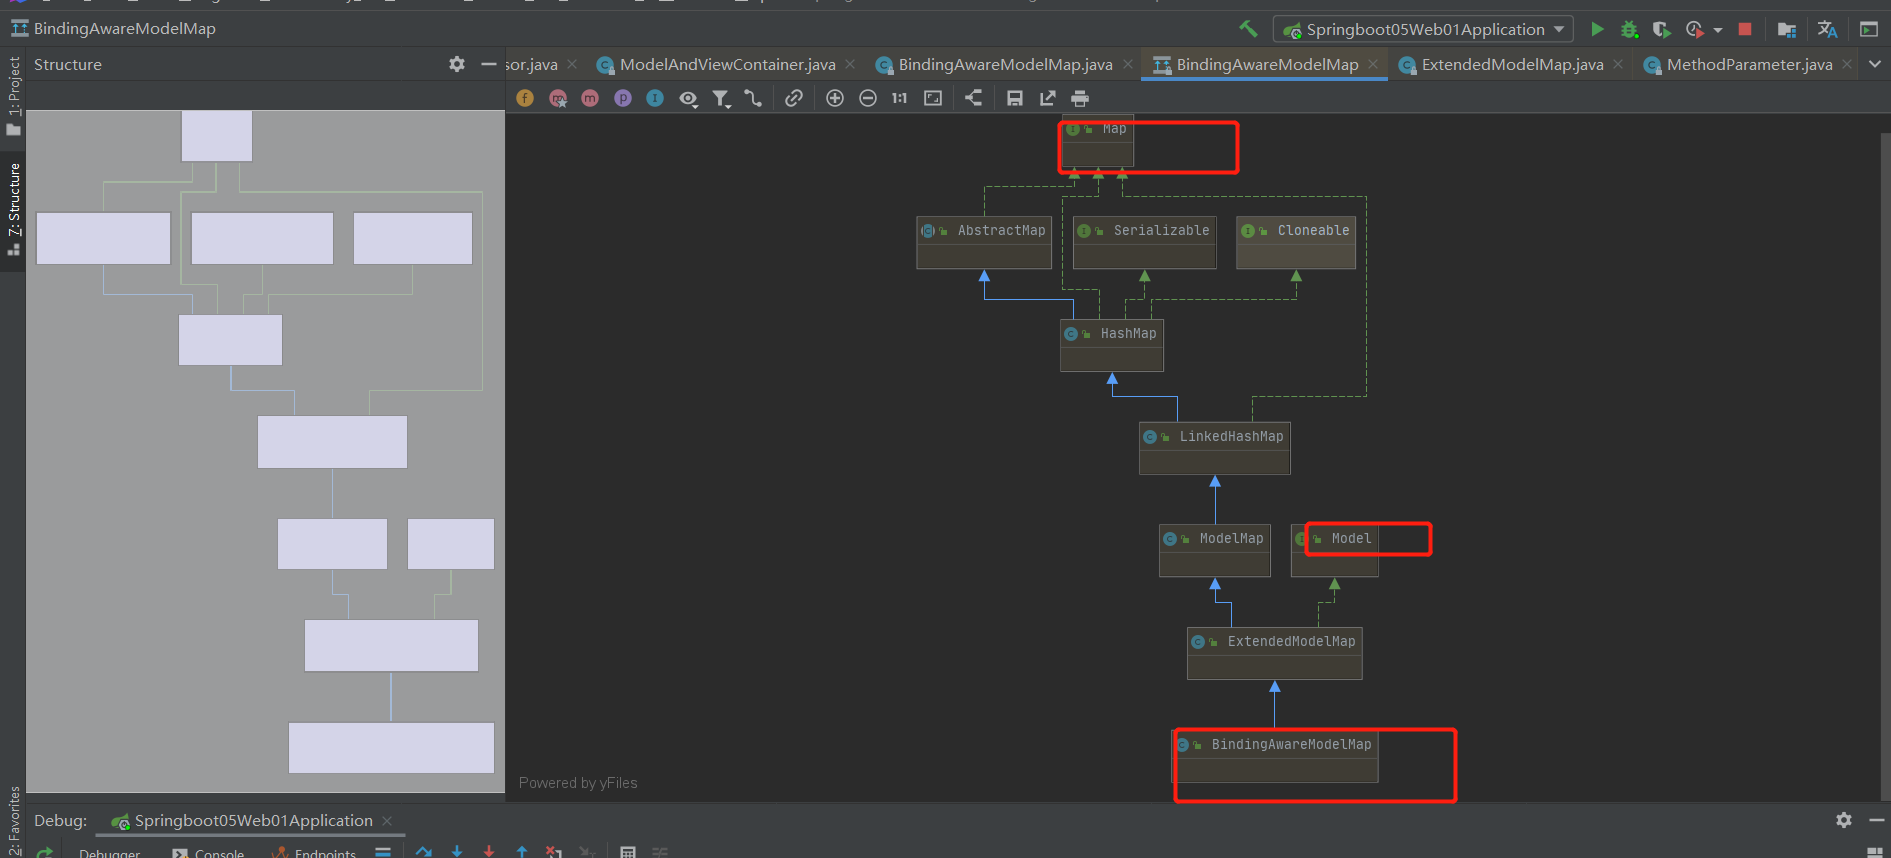
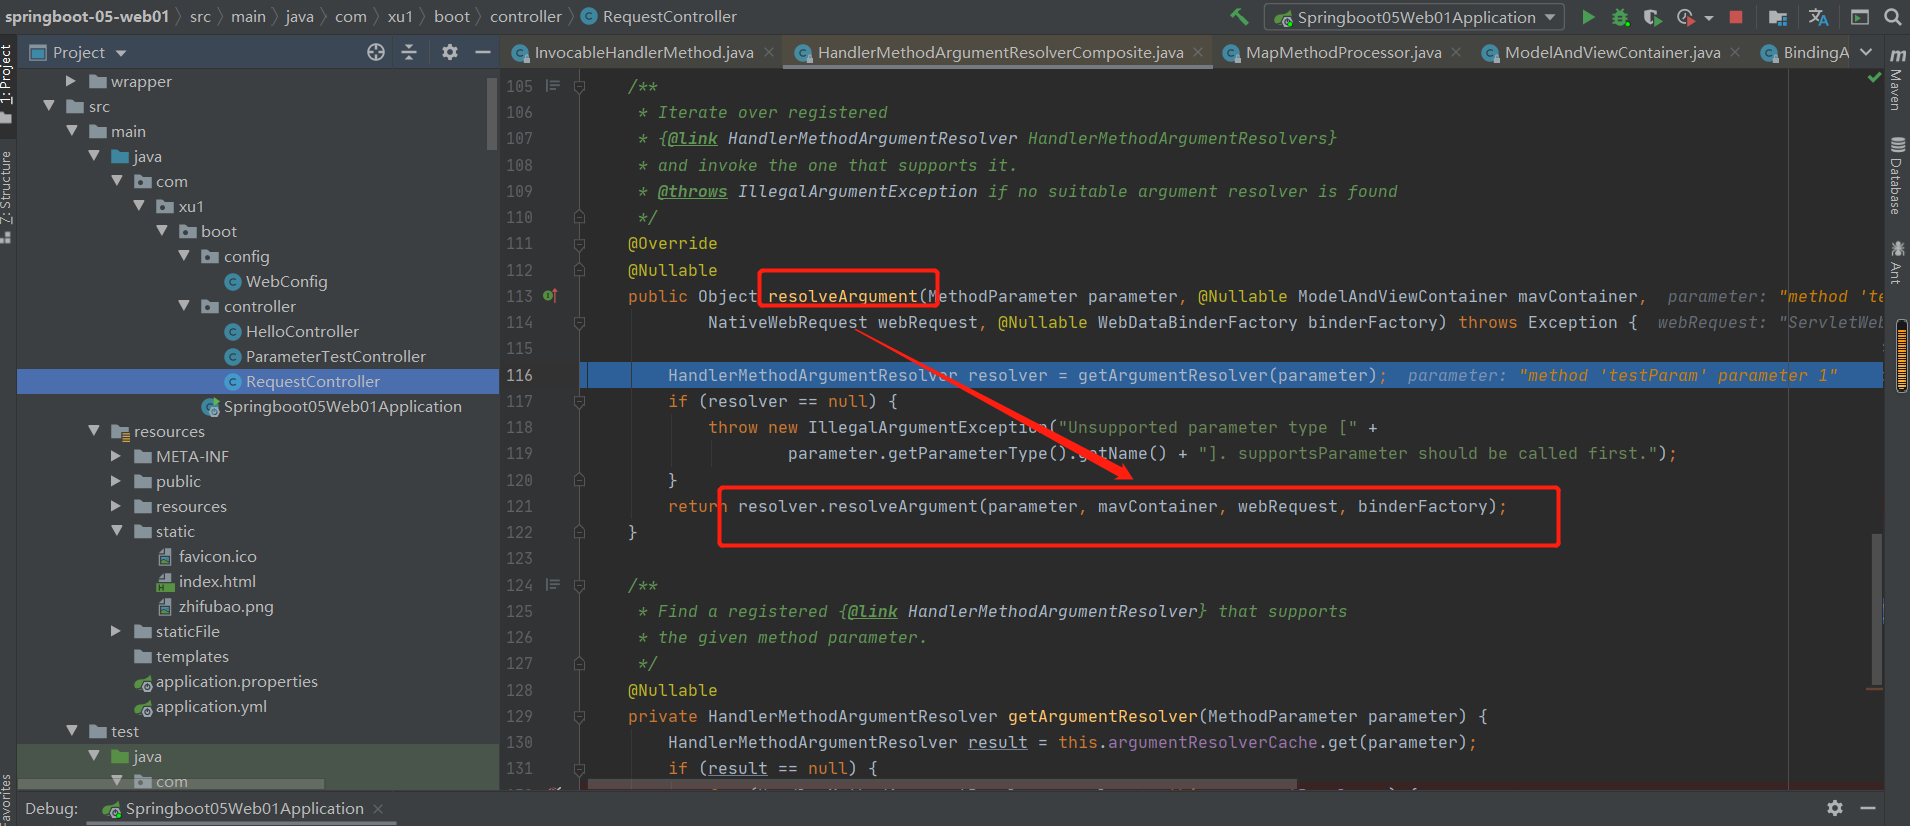
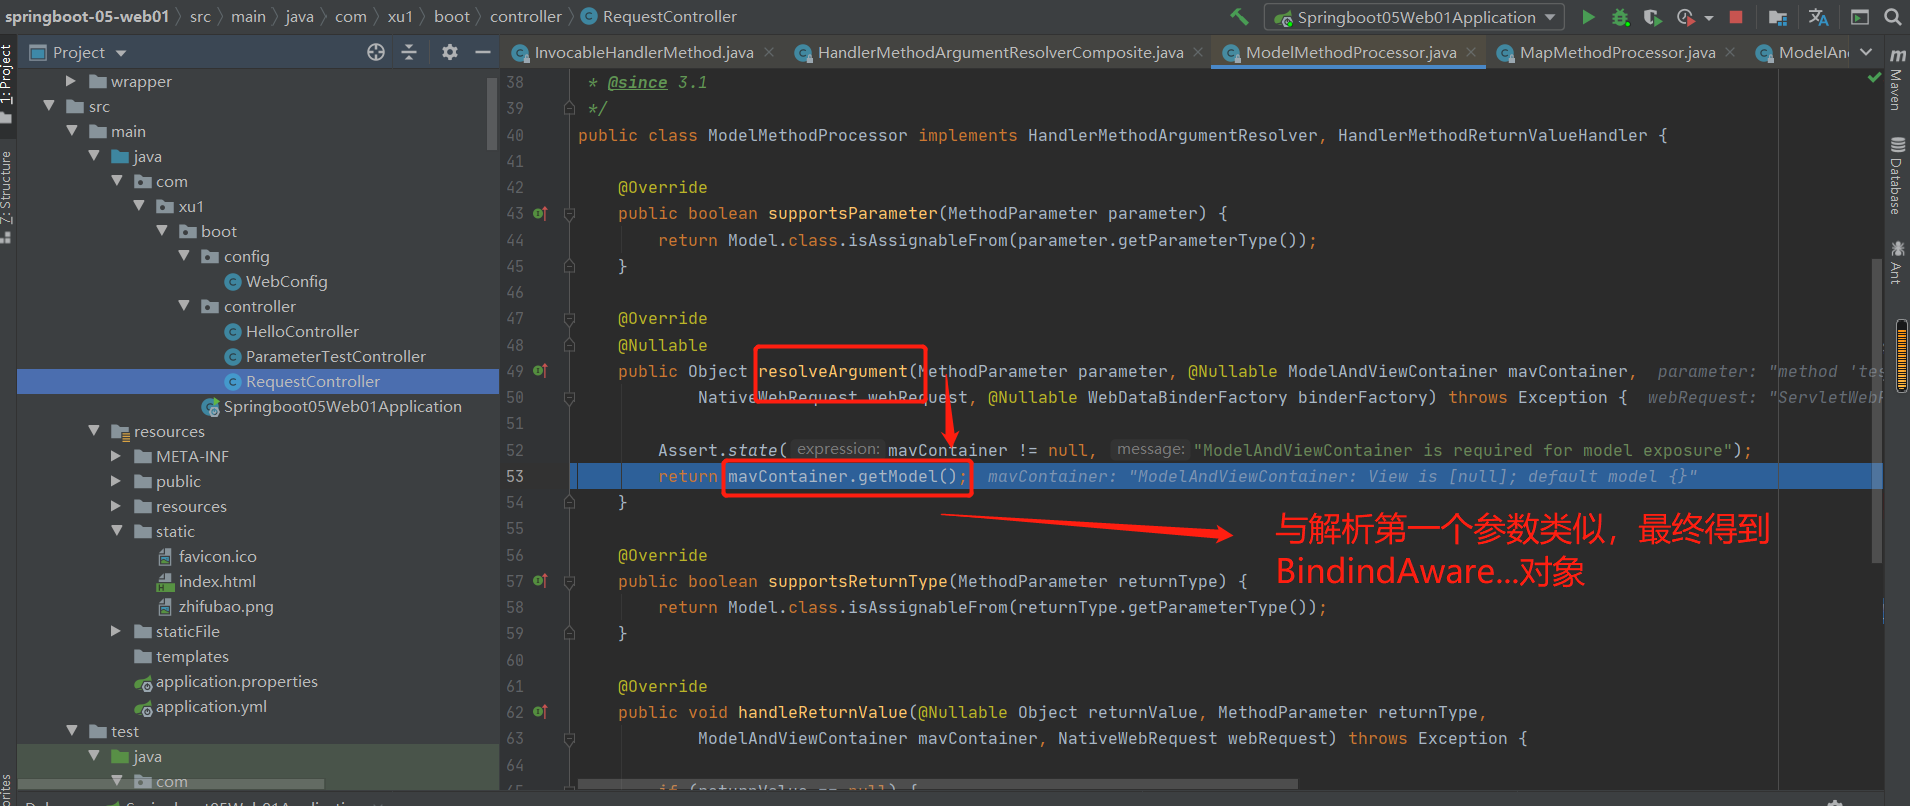
2.第2个参数---解析Model类型参数的解析器:
testParam(Map<String,Object> map,
                            Model model,
                            HttpServletRequest request,
                            HttpServletResponse response)

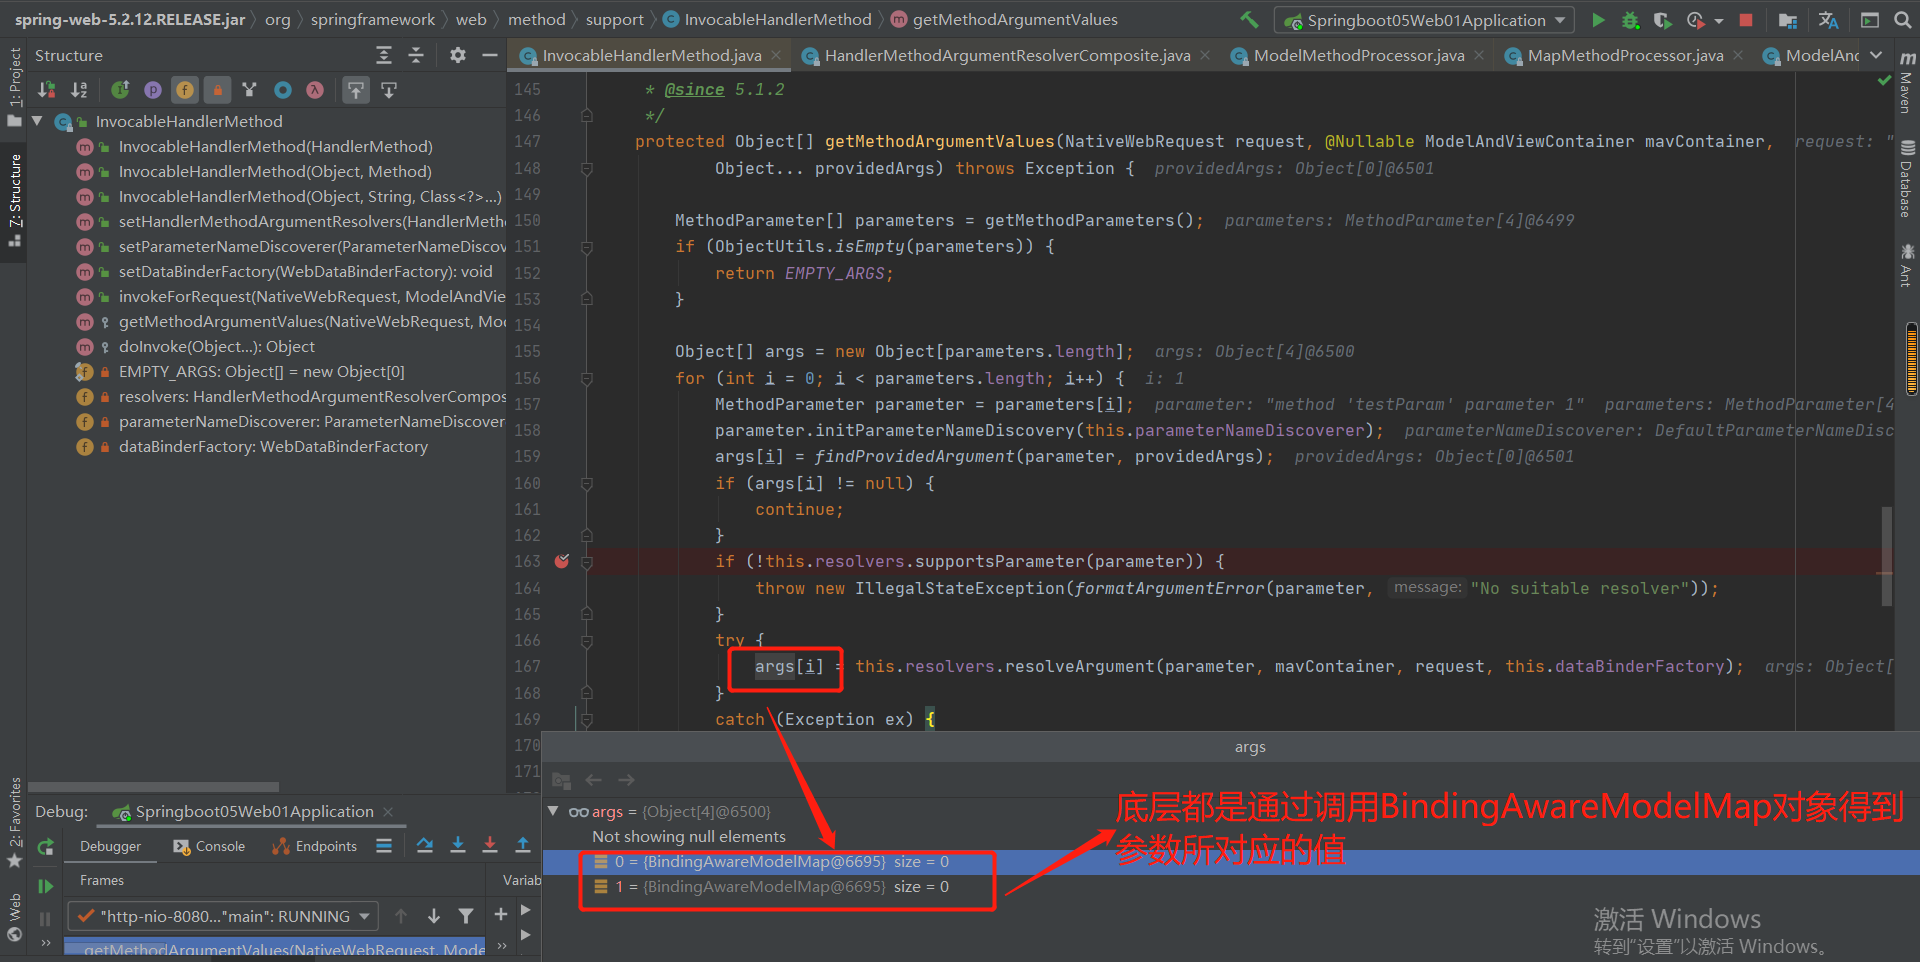
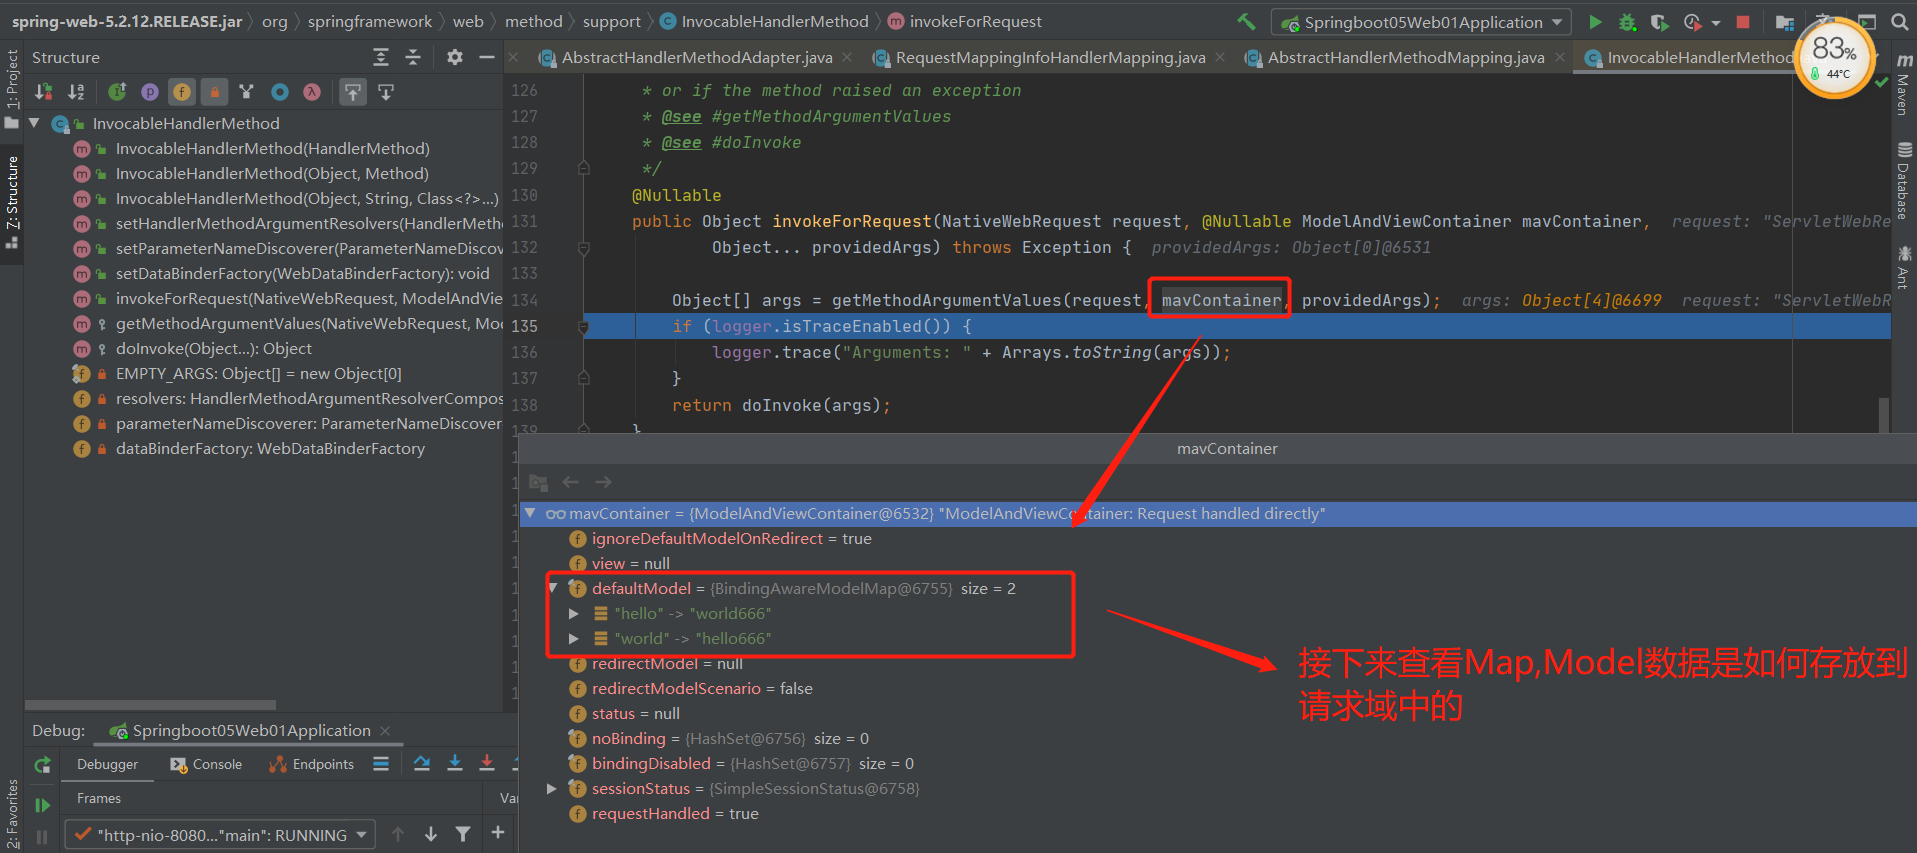
补充:BindingAwareModelMap
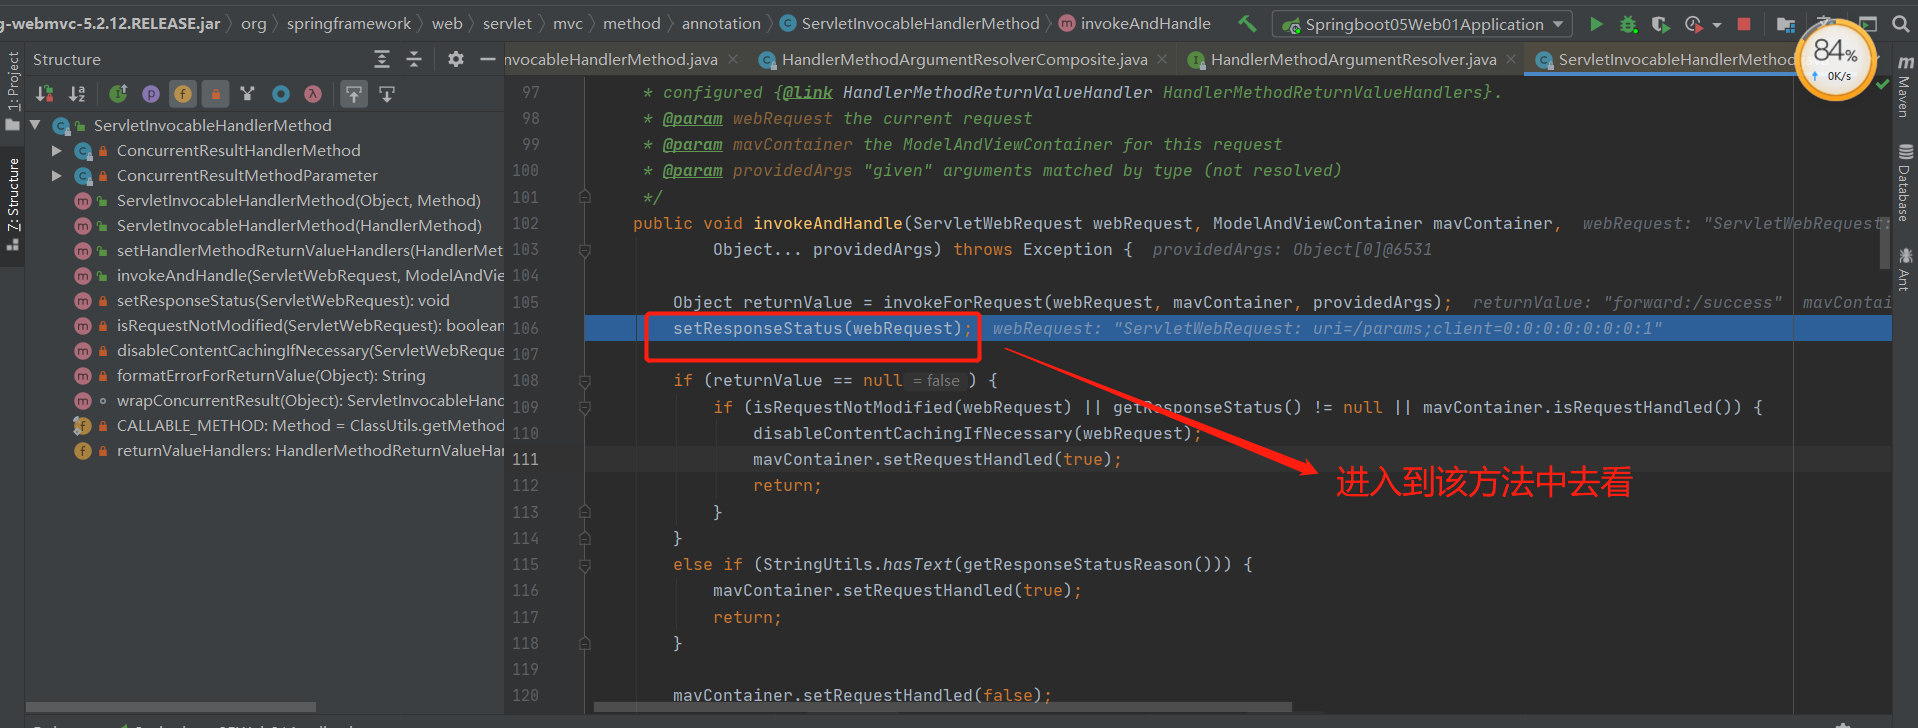
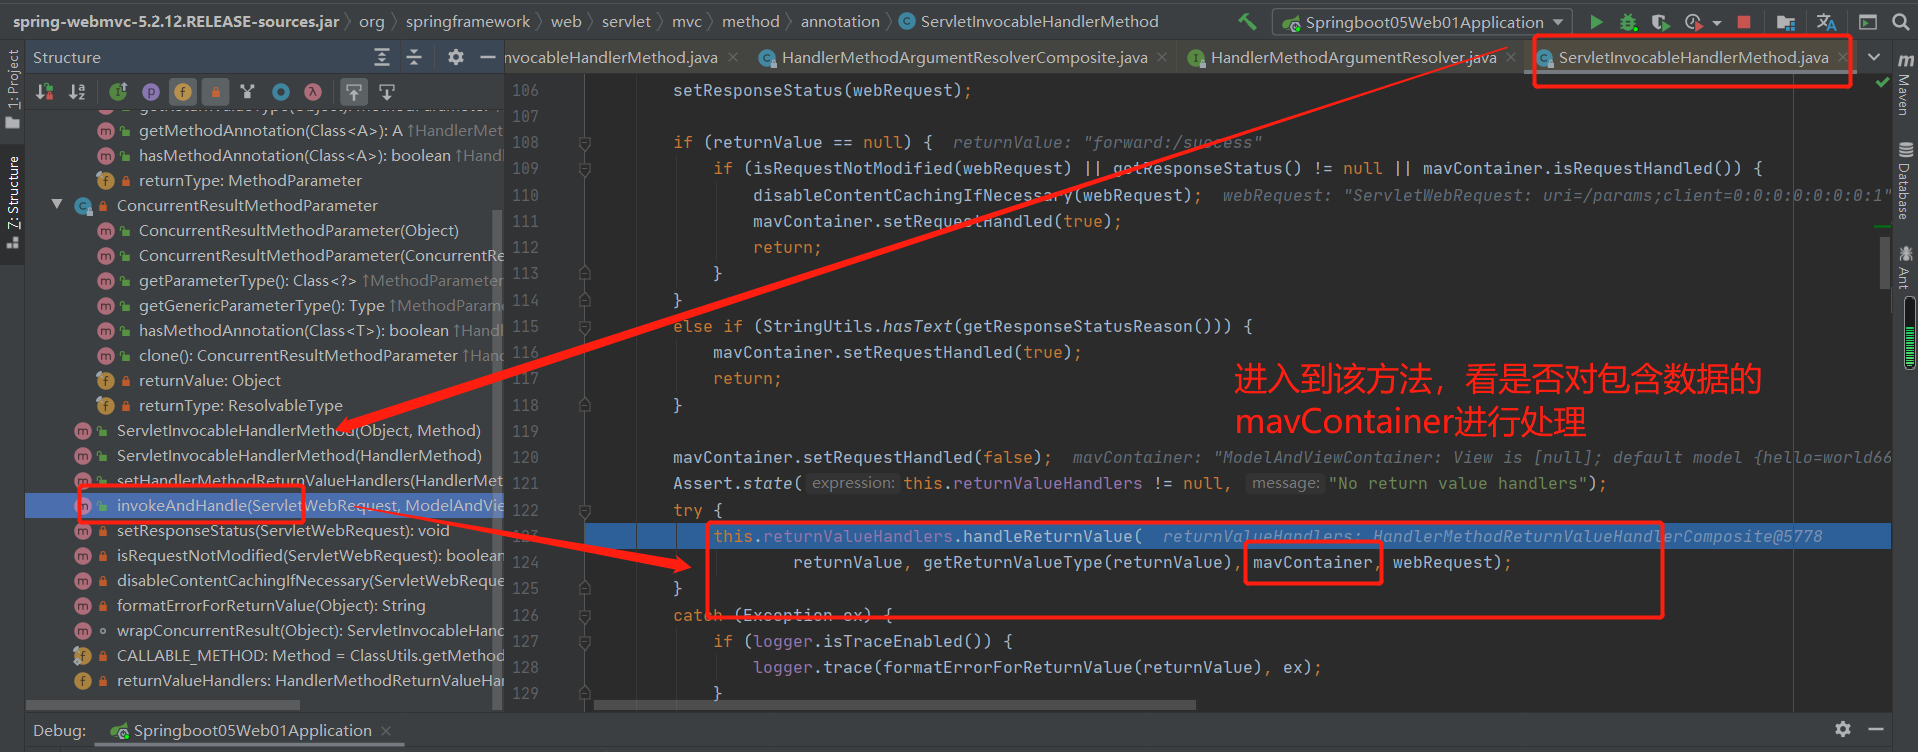
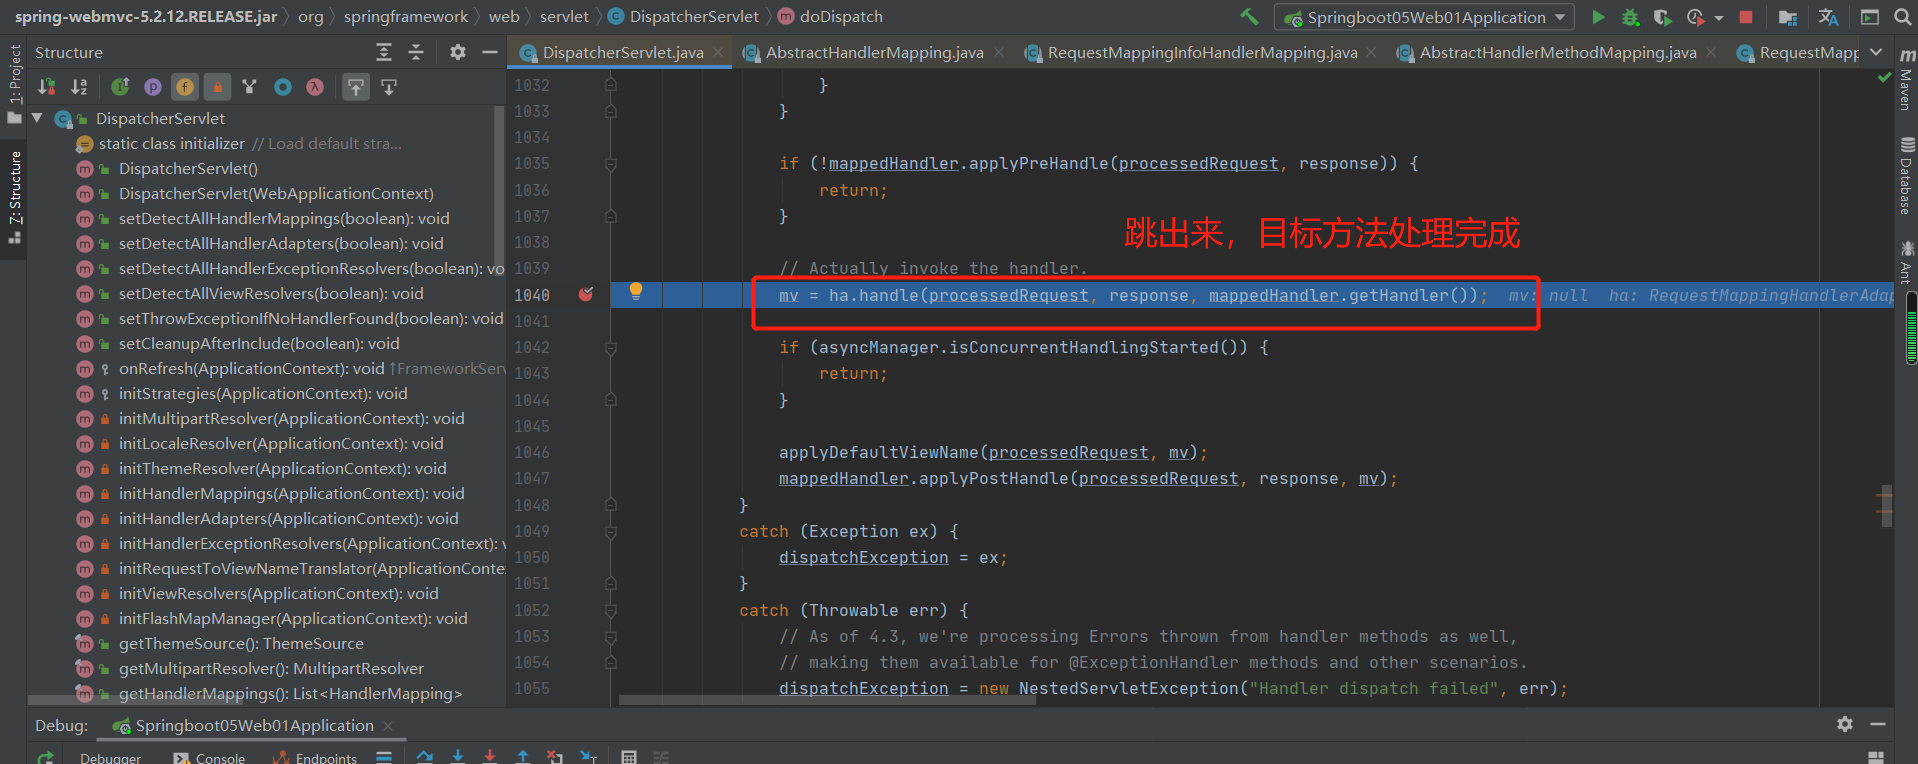
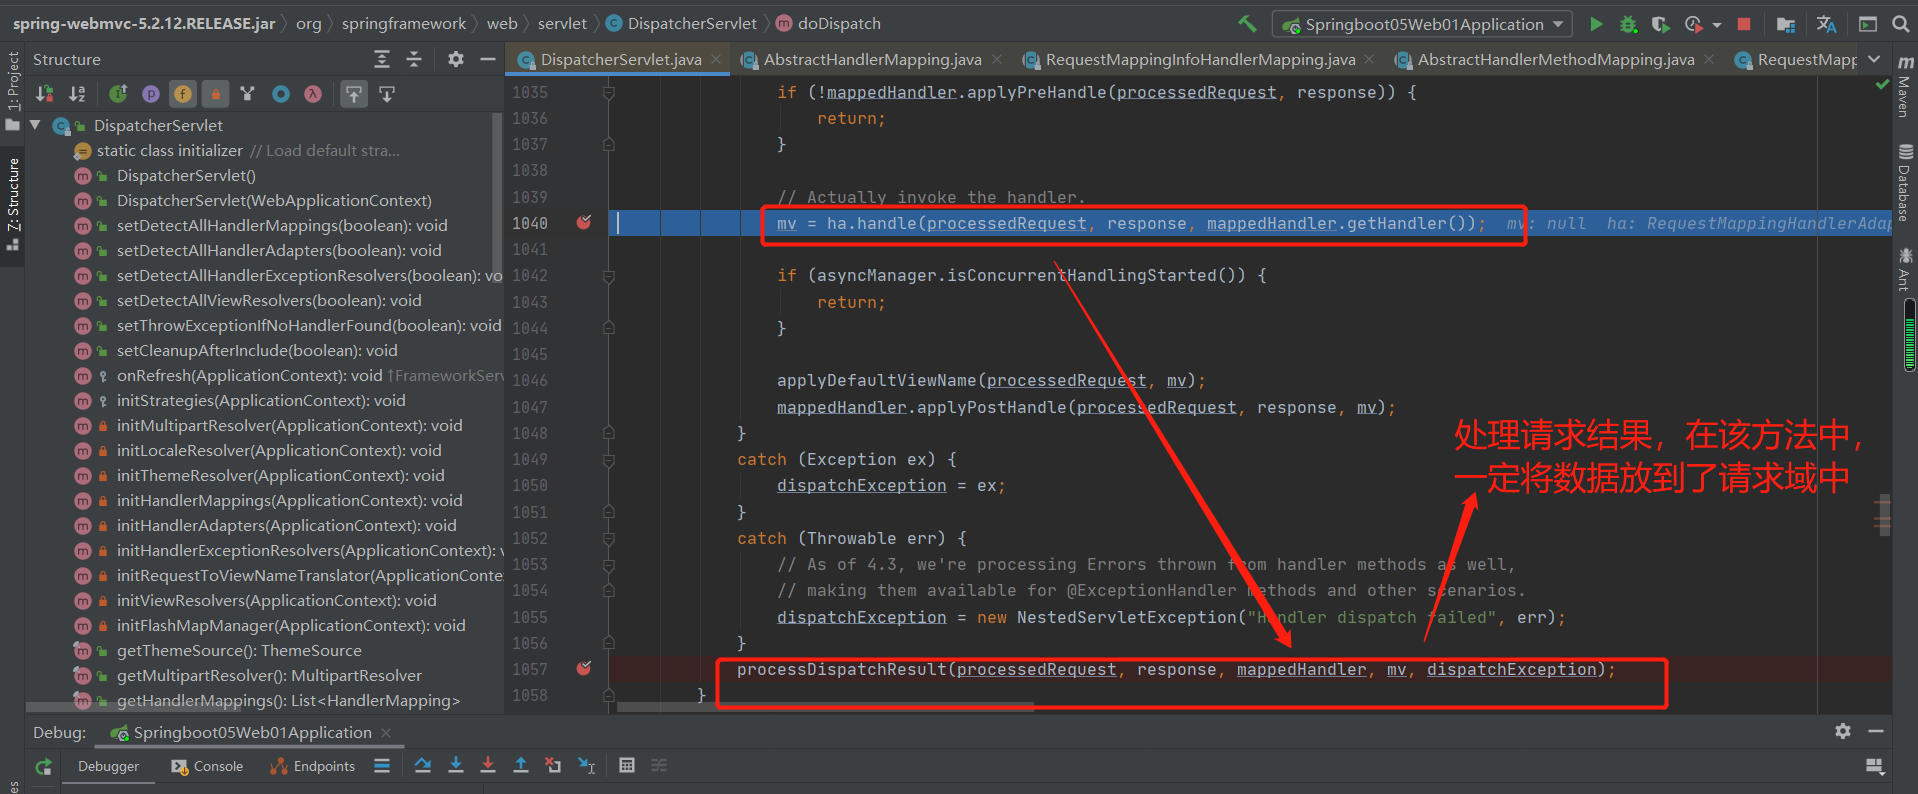
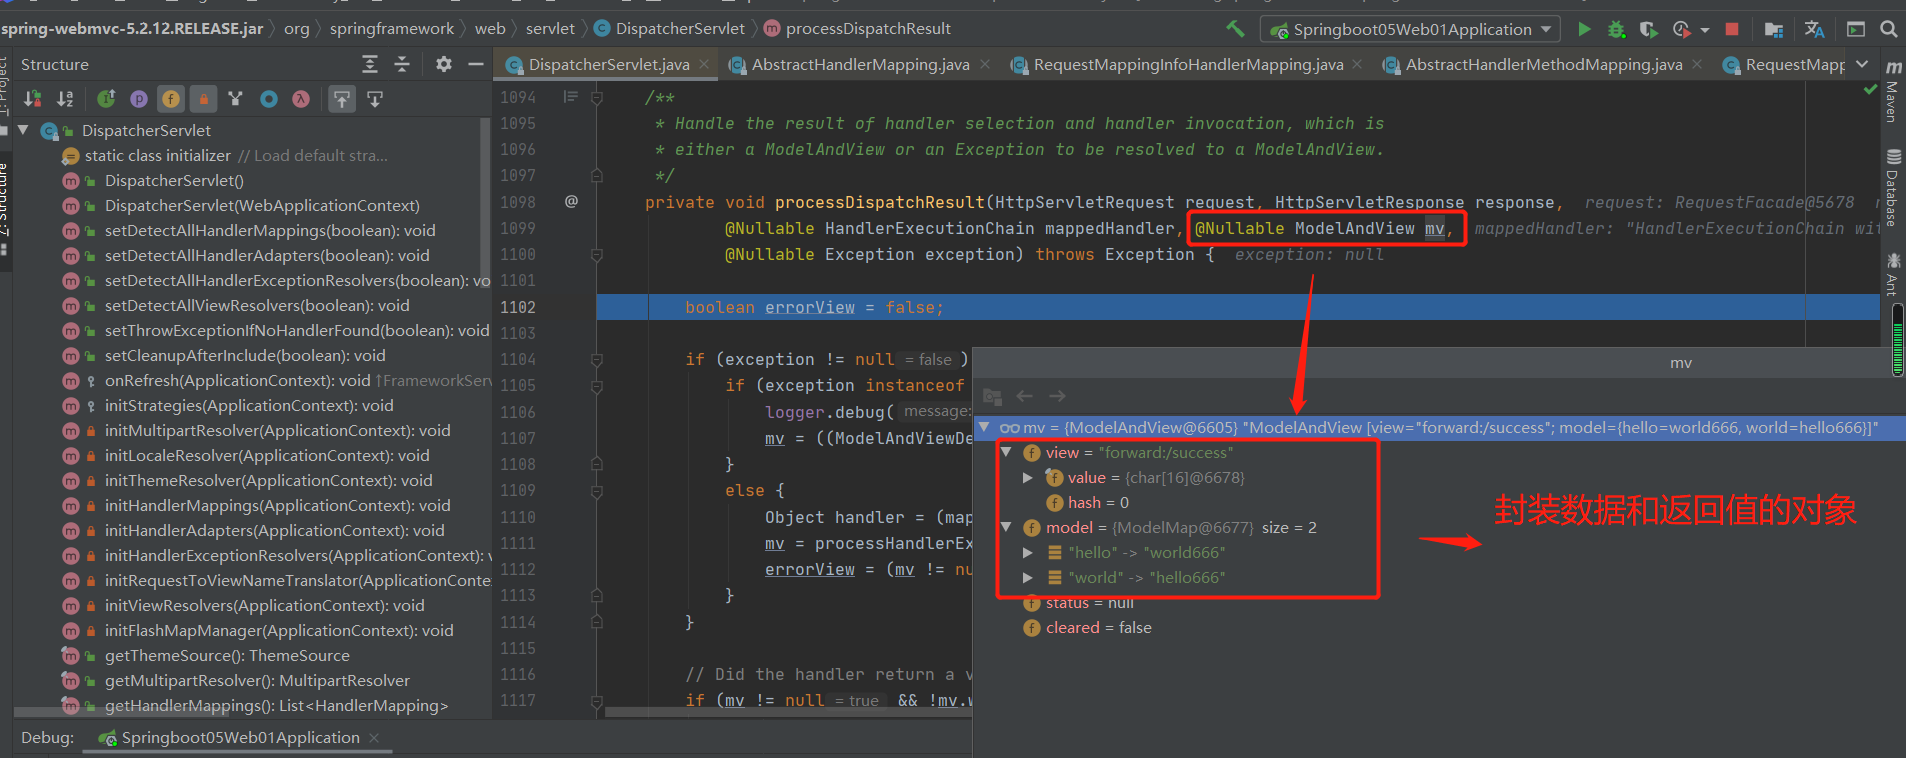
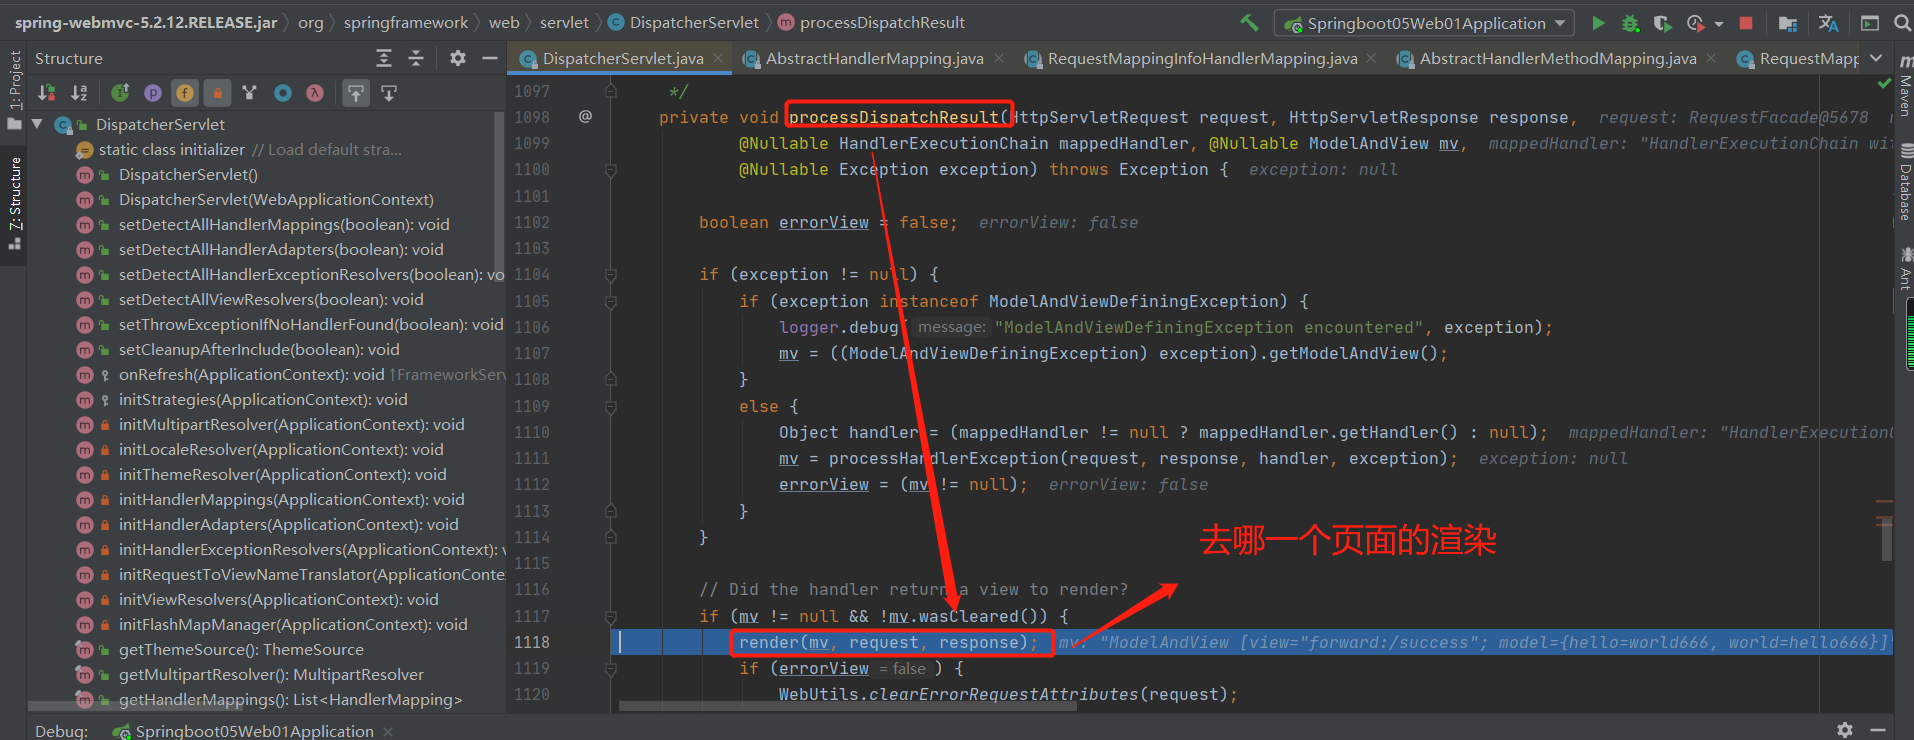
接下来查看数据如何存放到请求域中的:
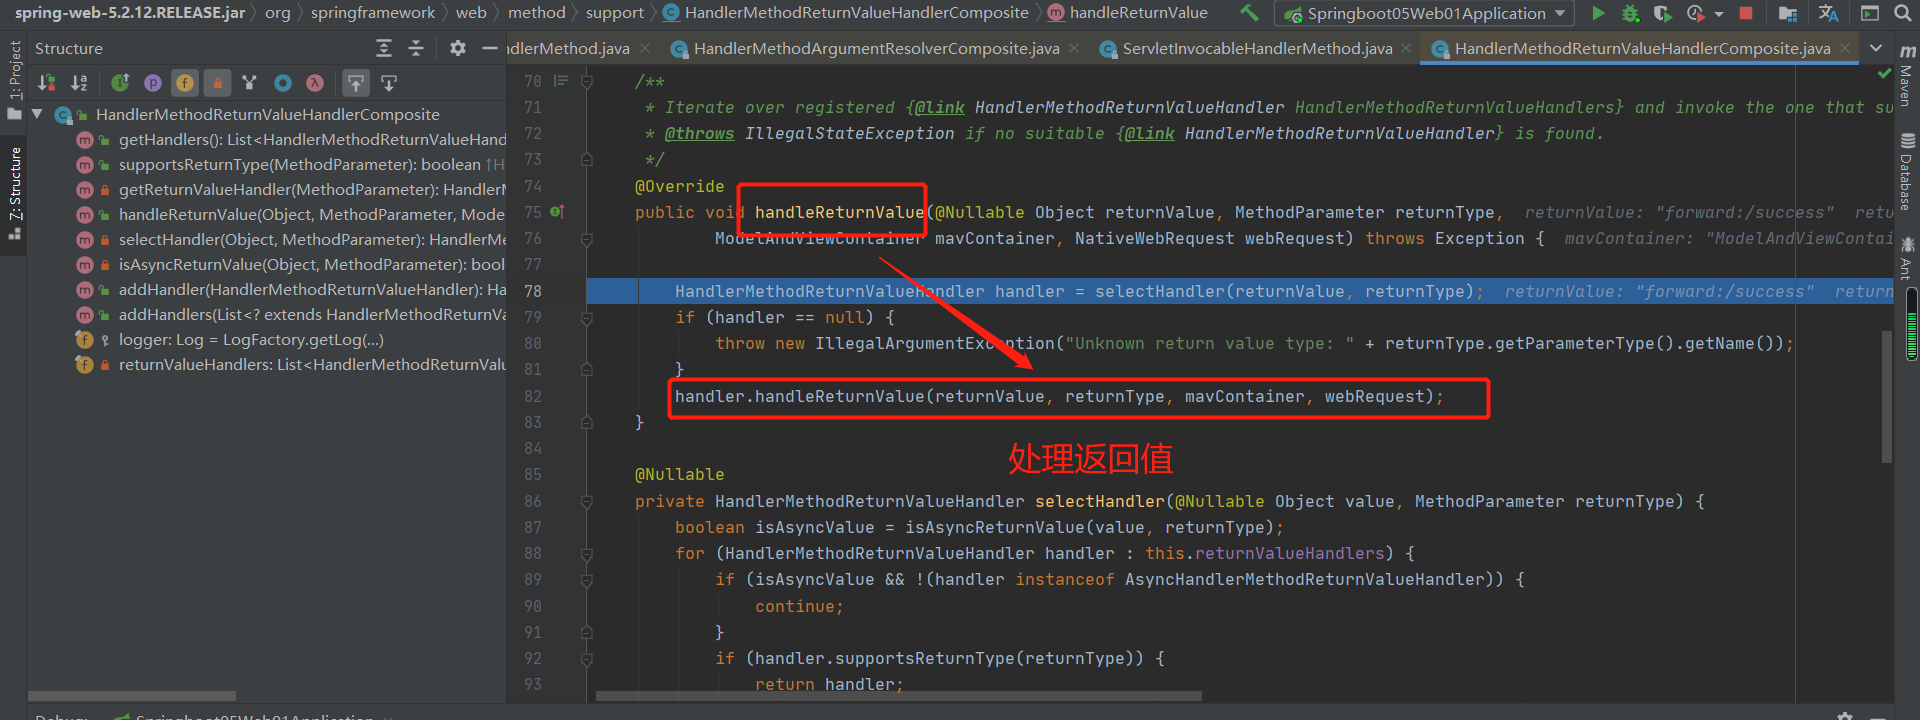
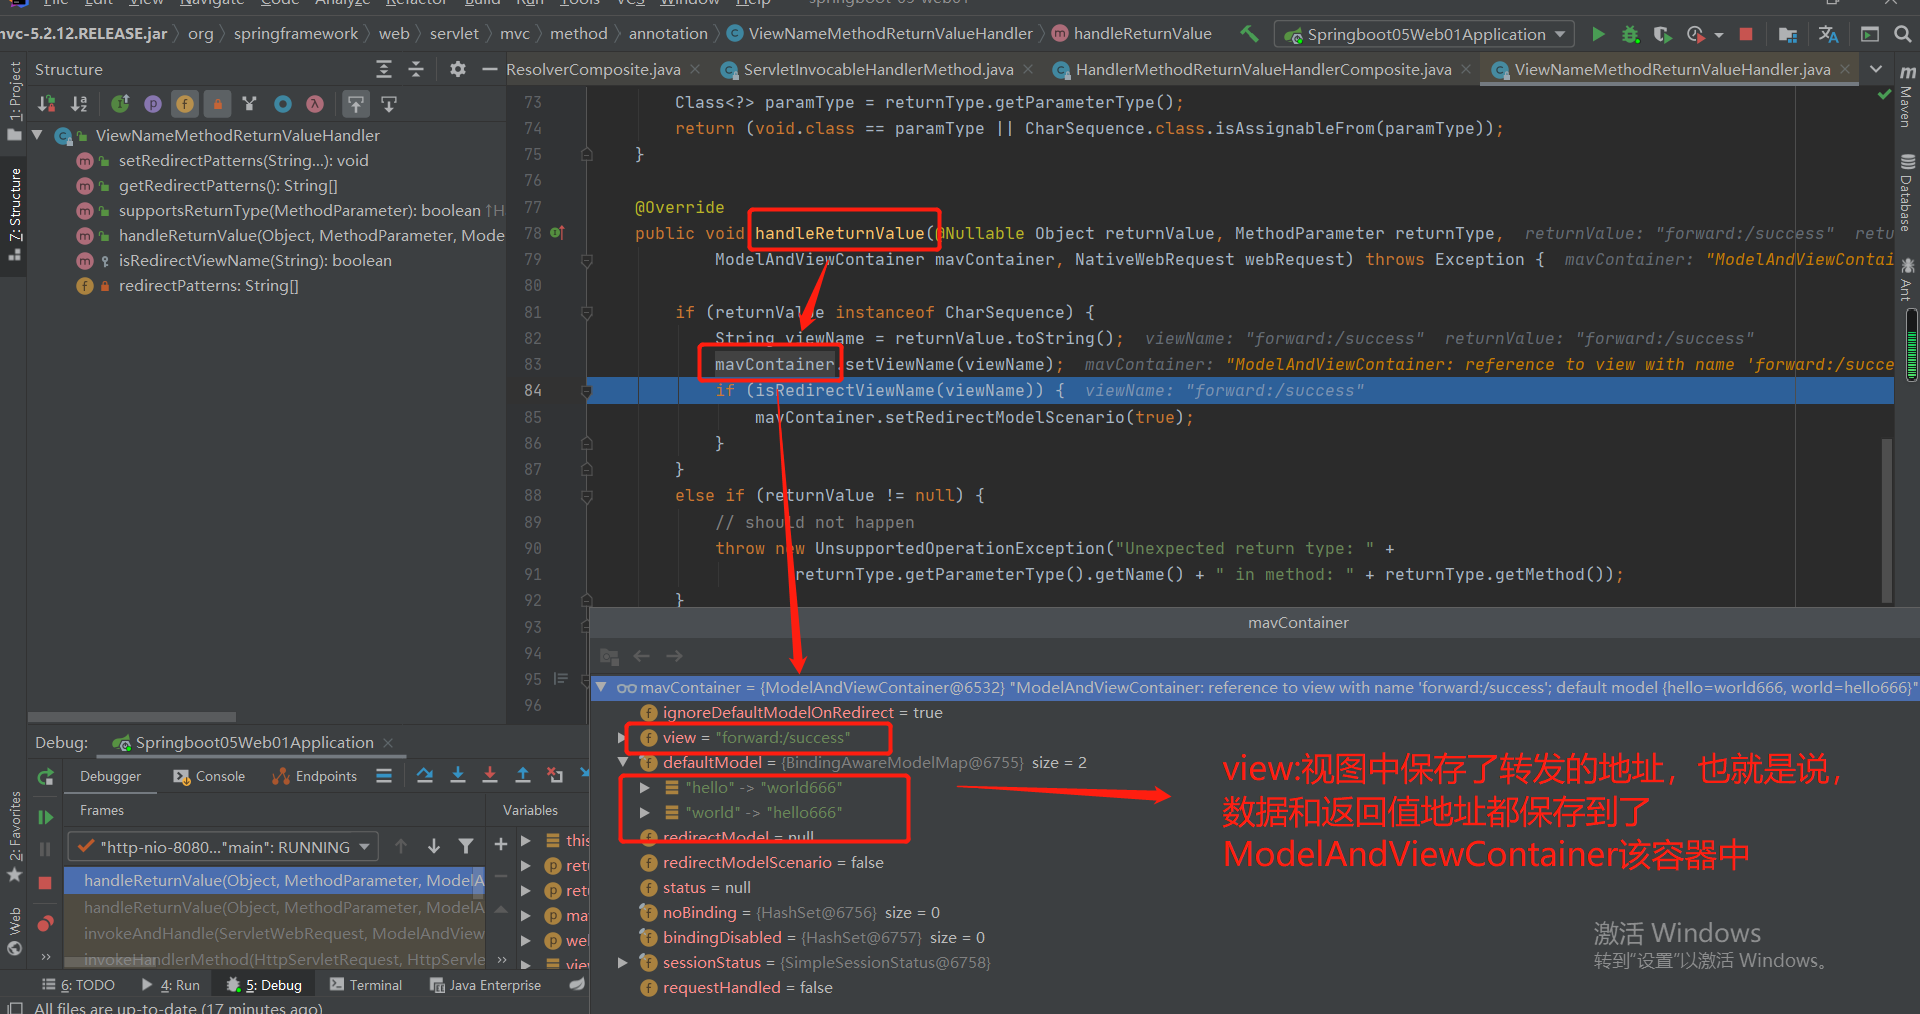
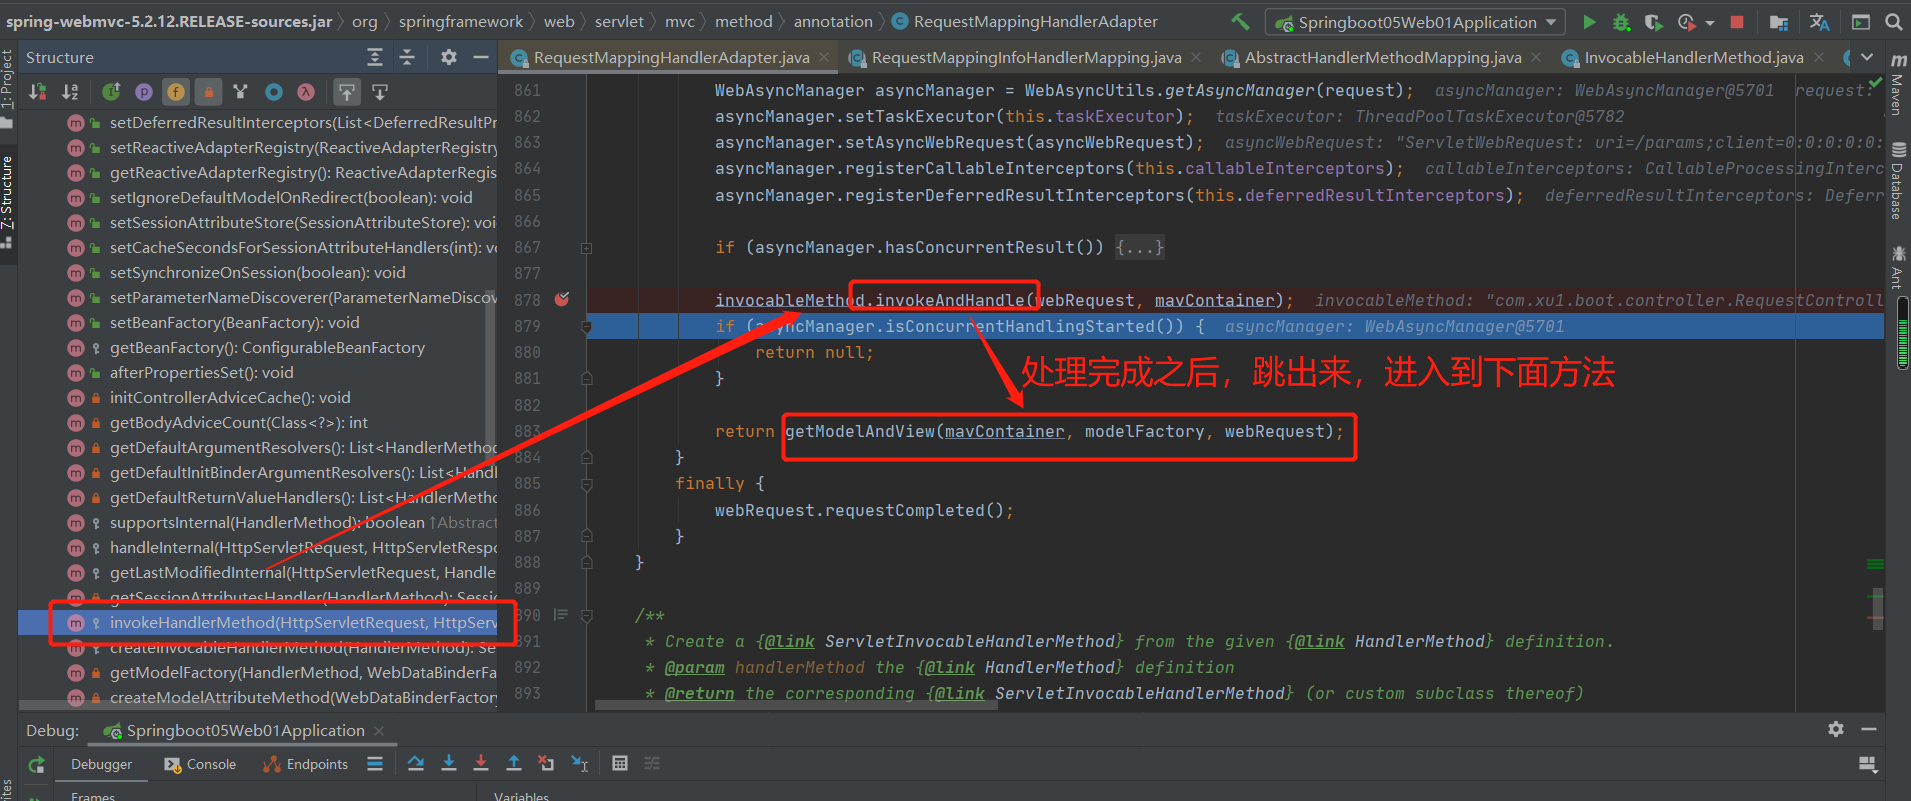
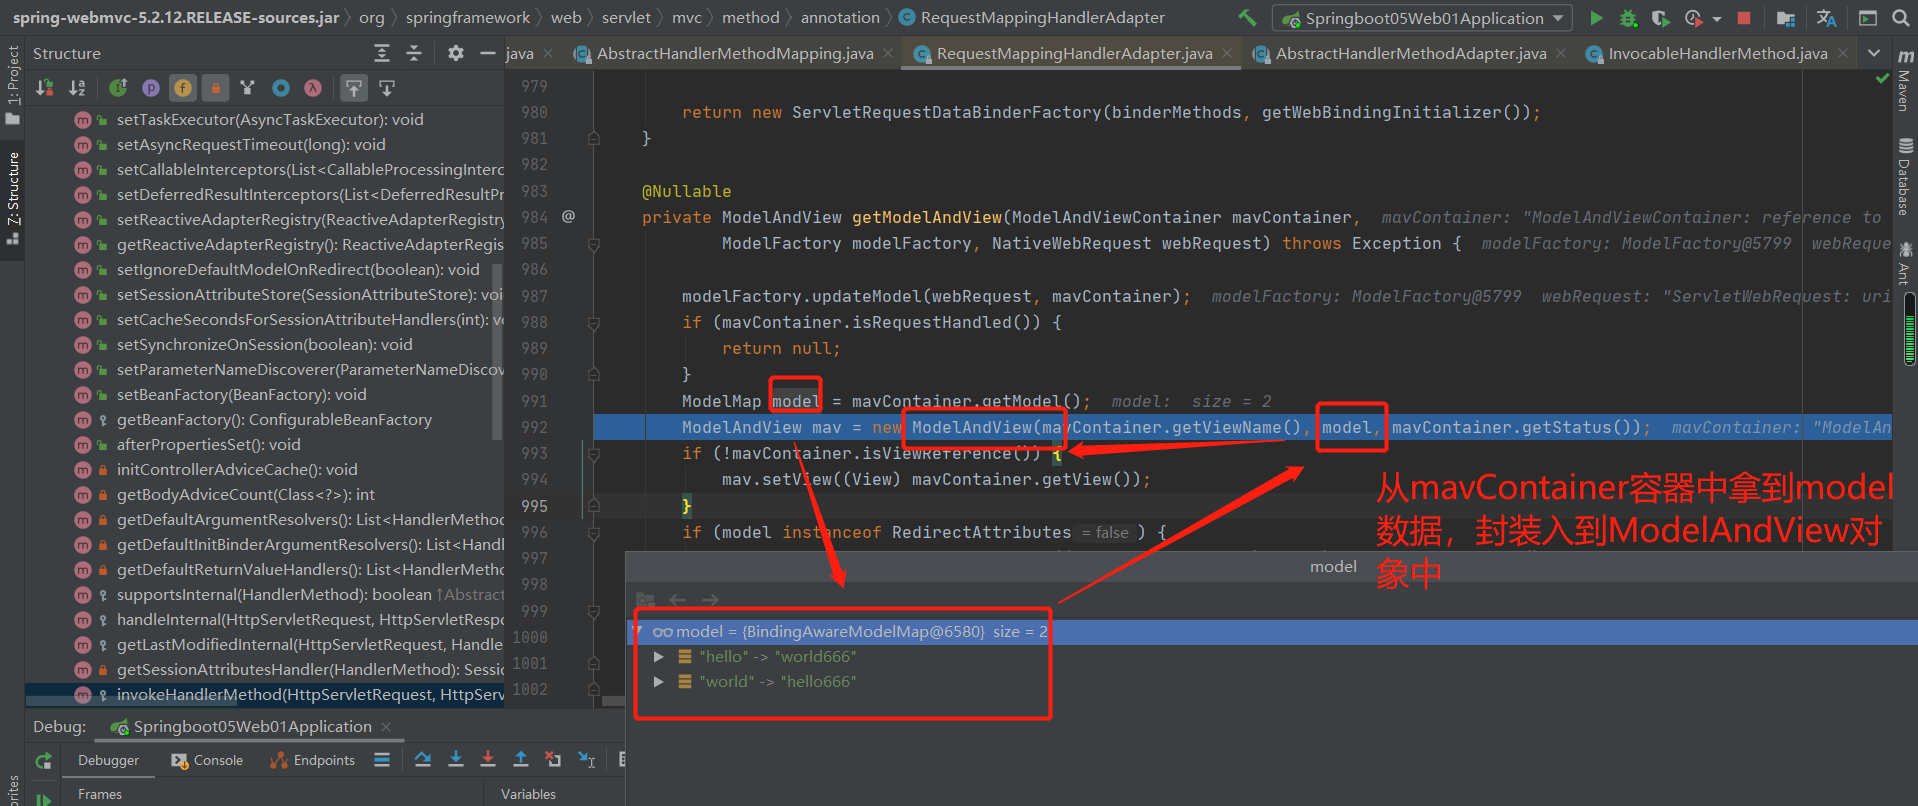
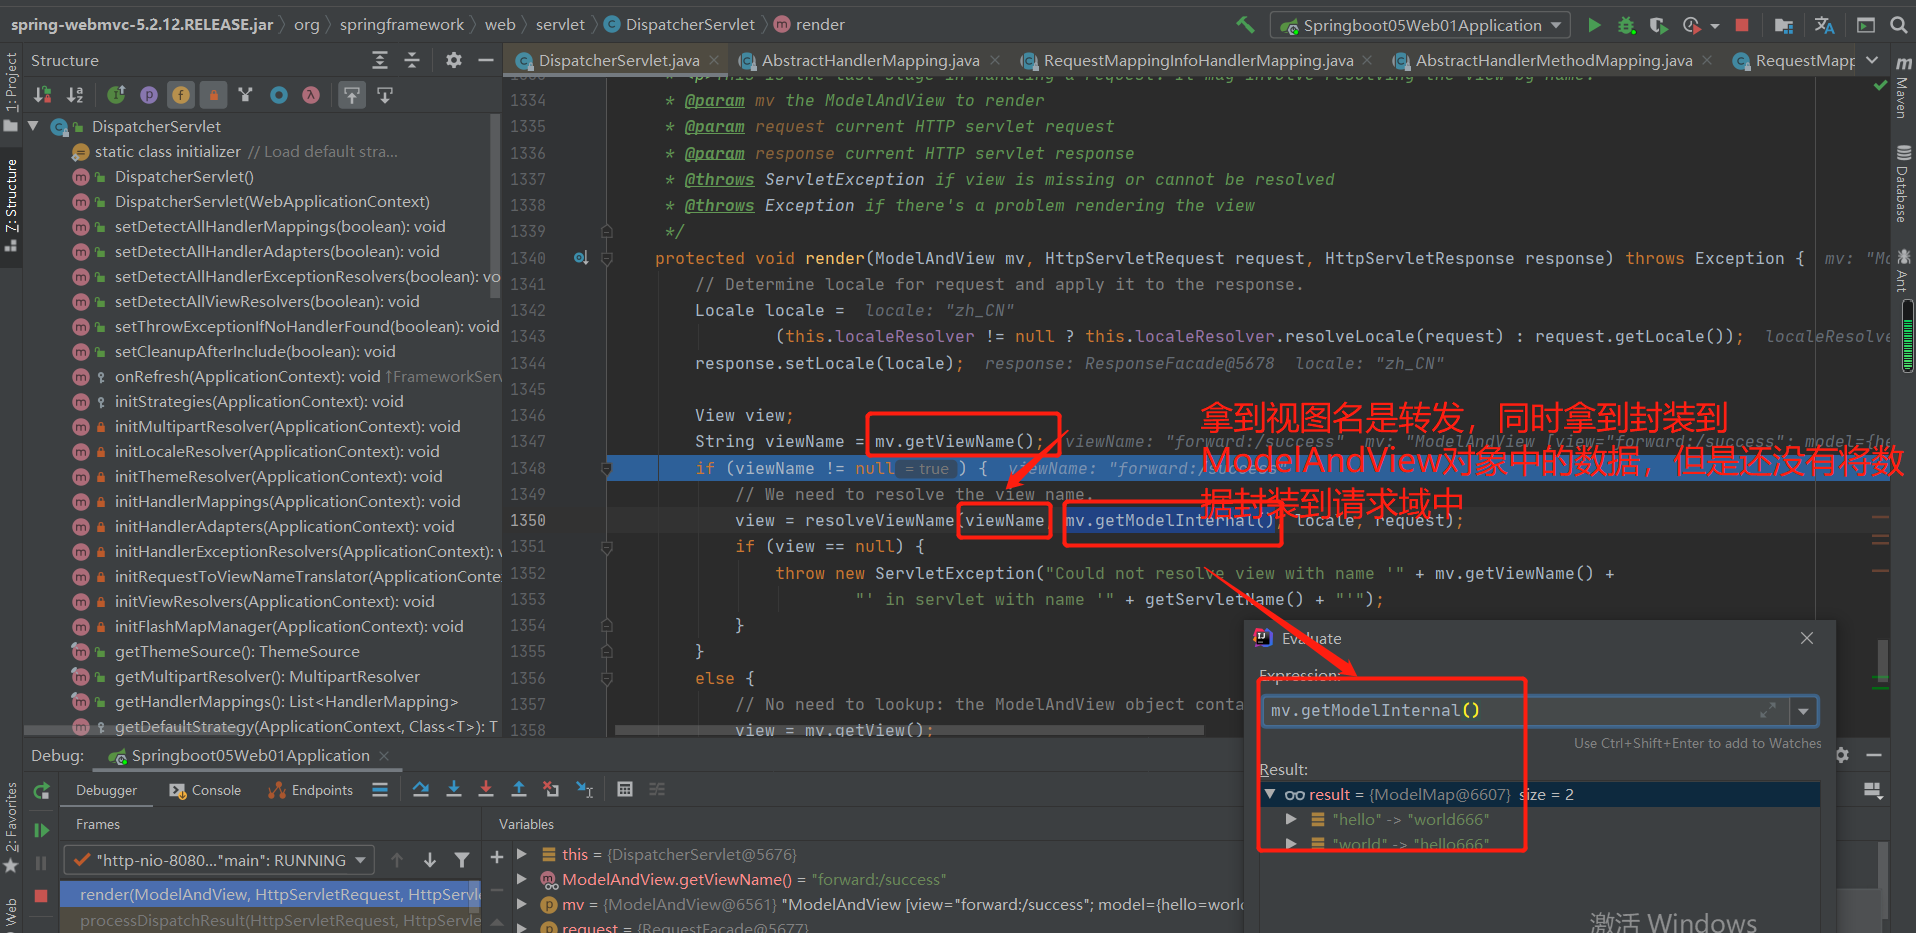
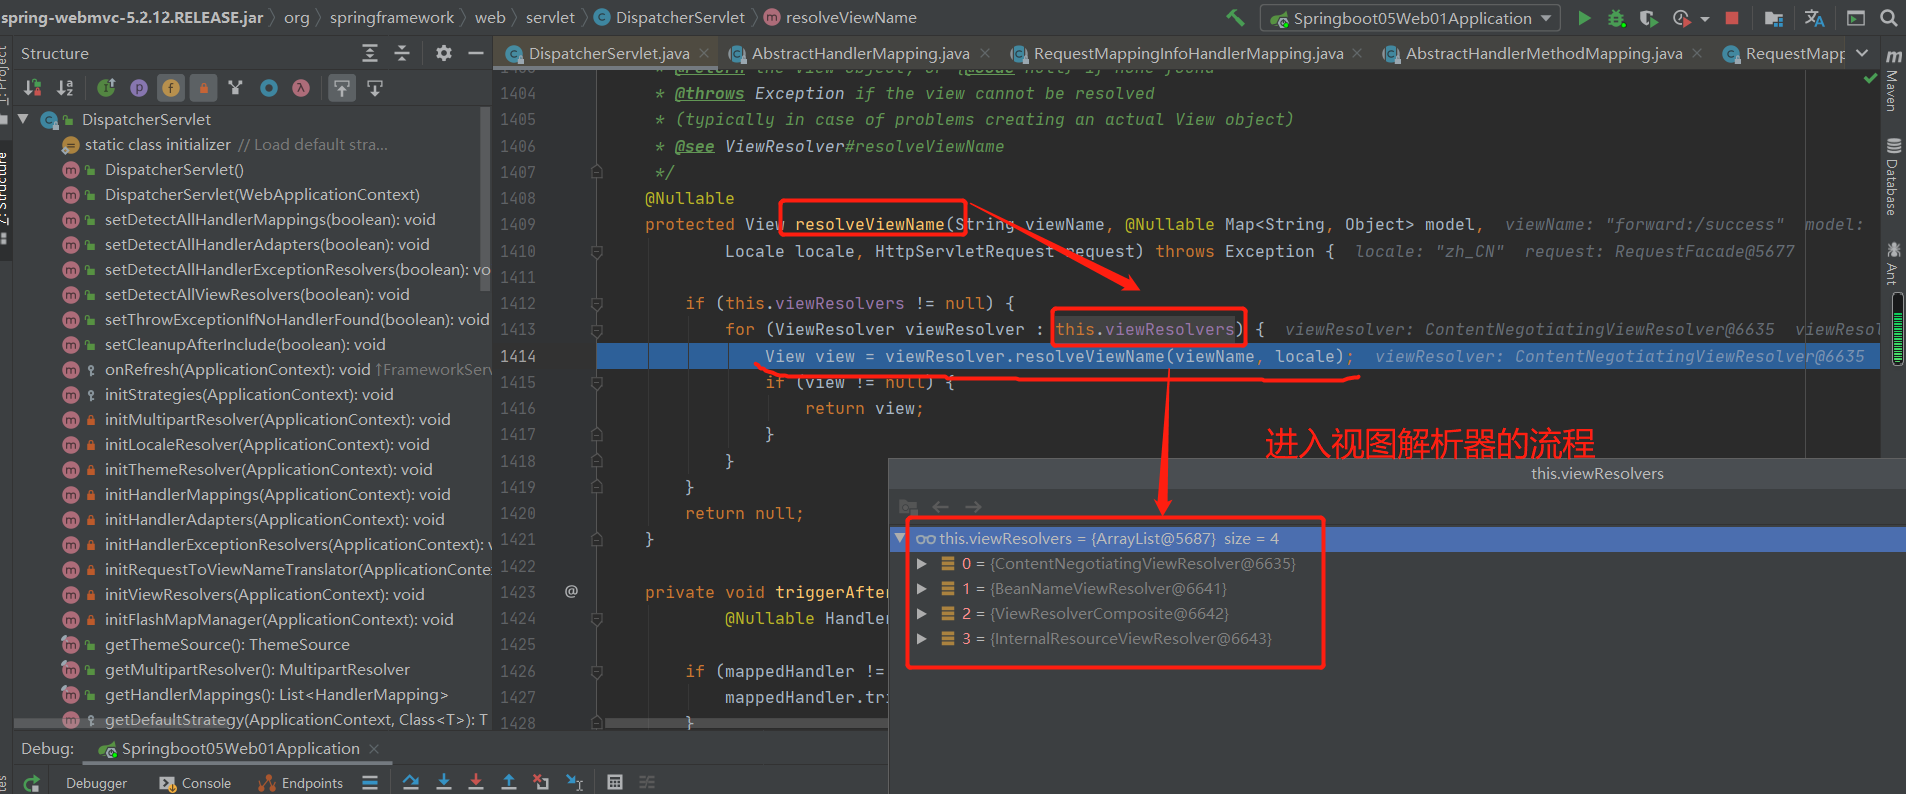
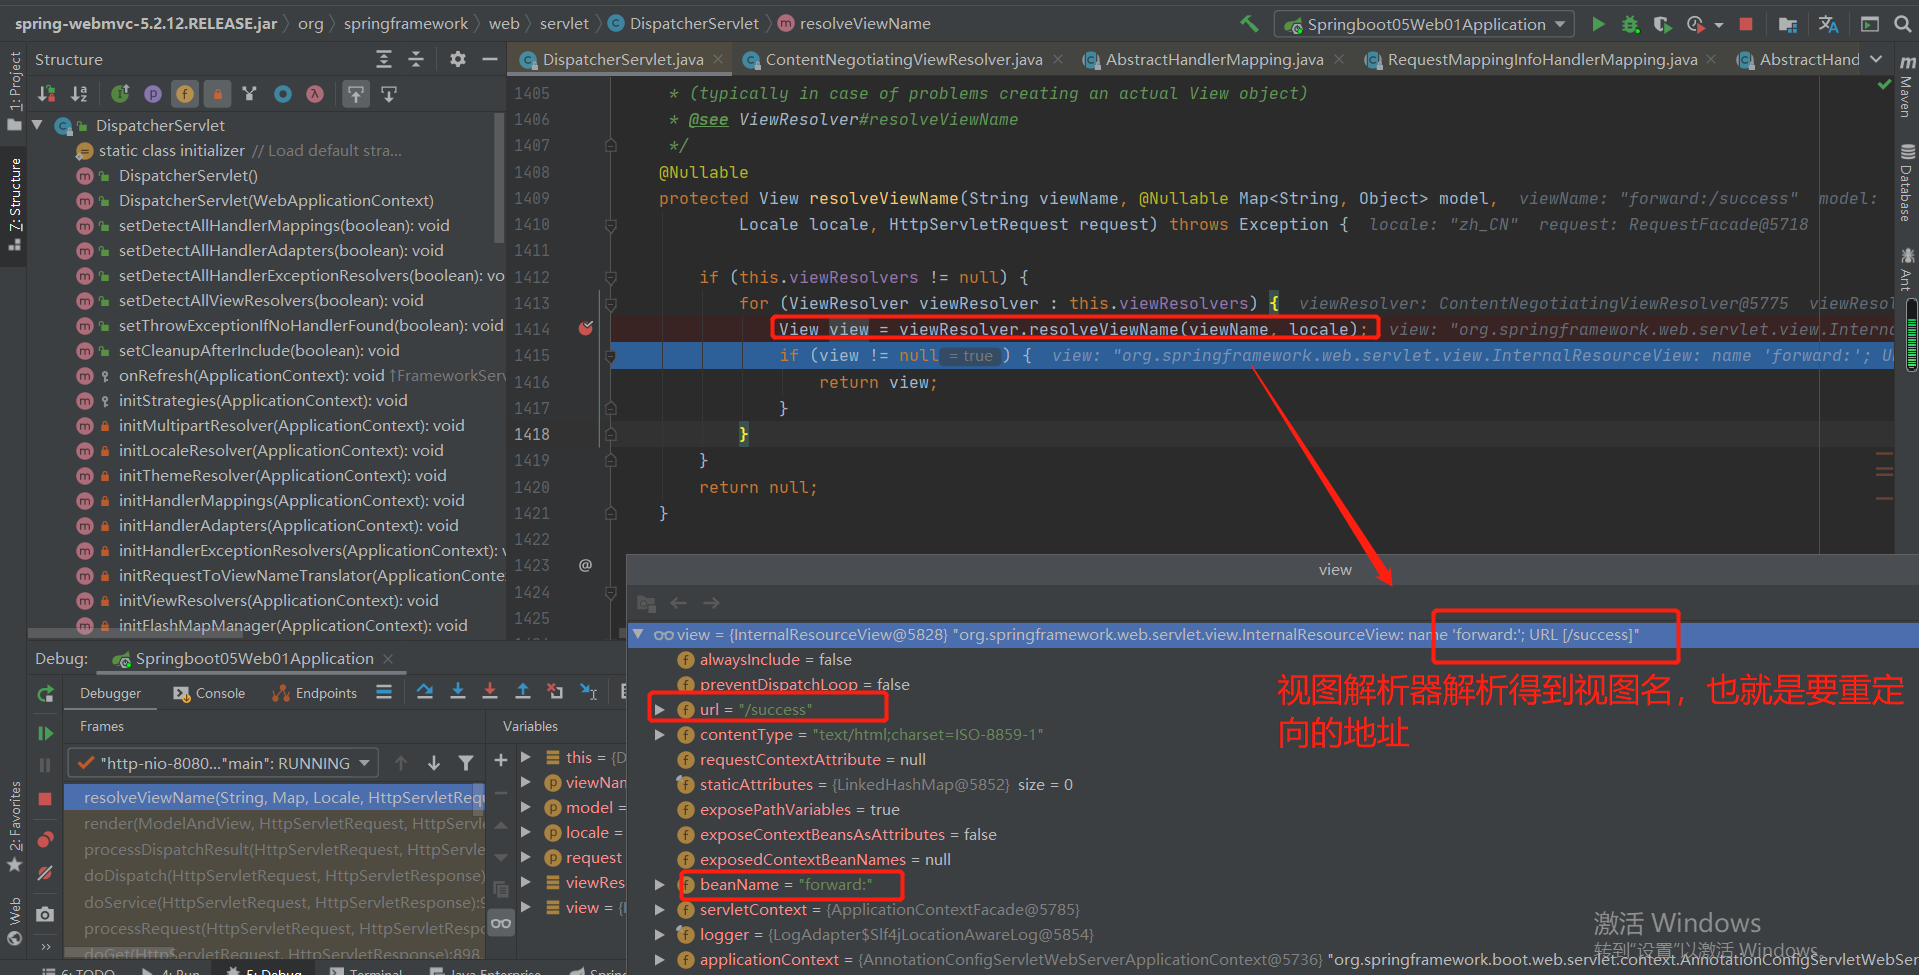
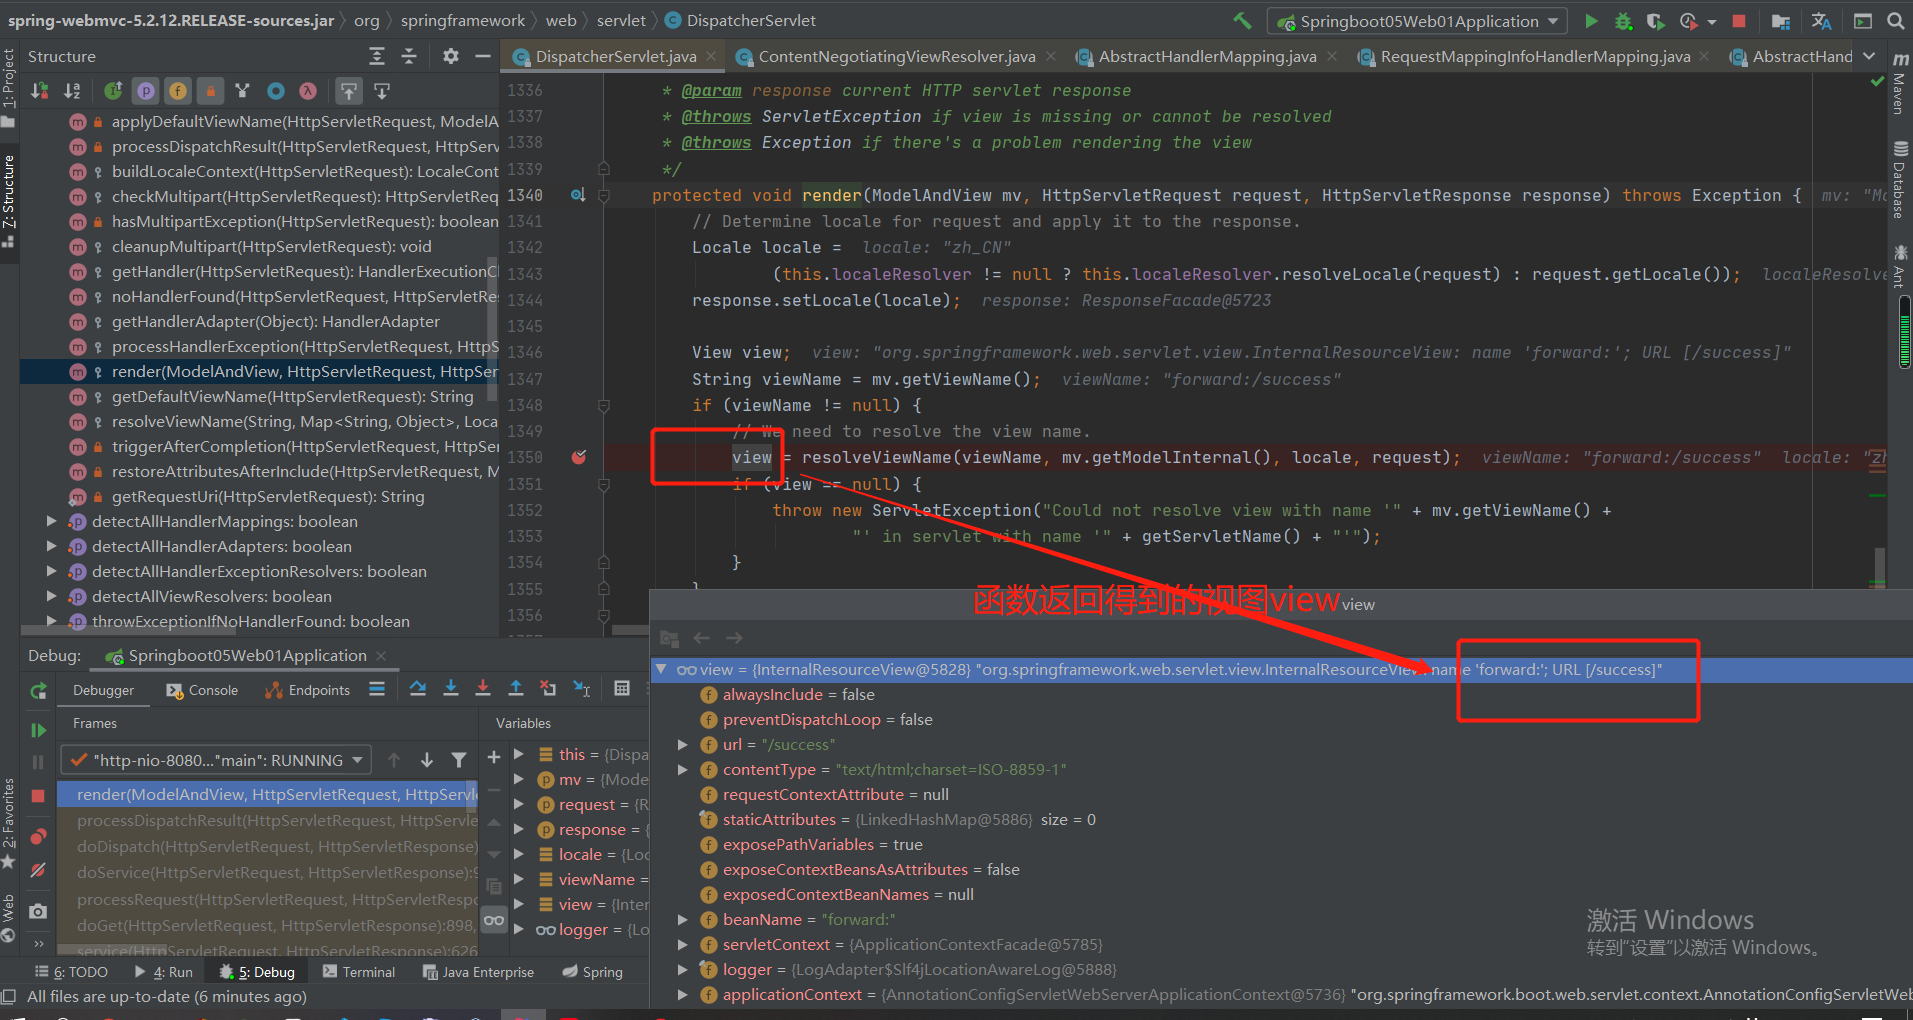
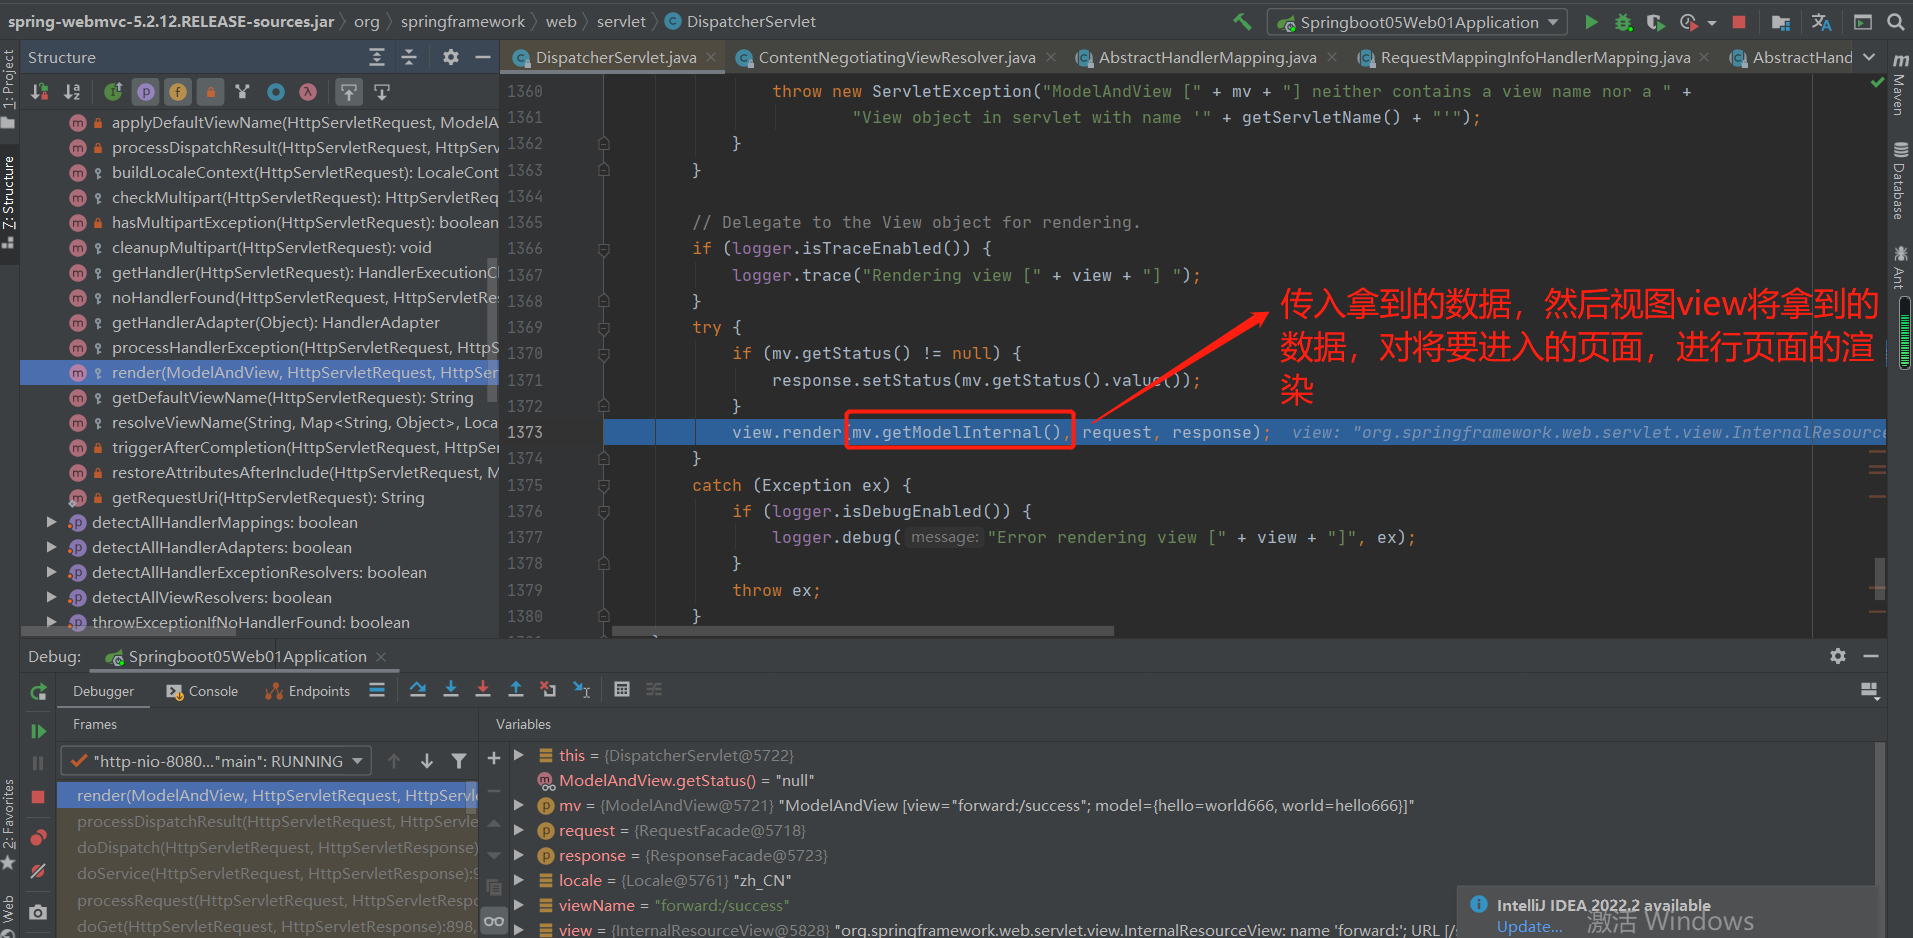
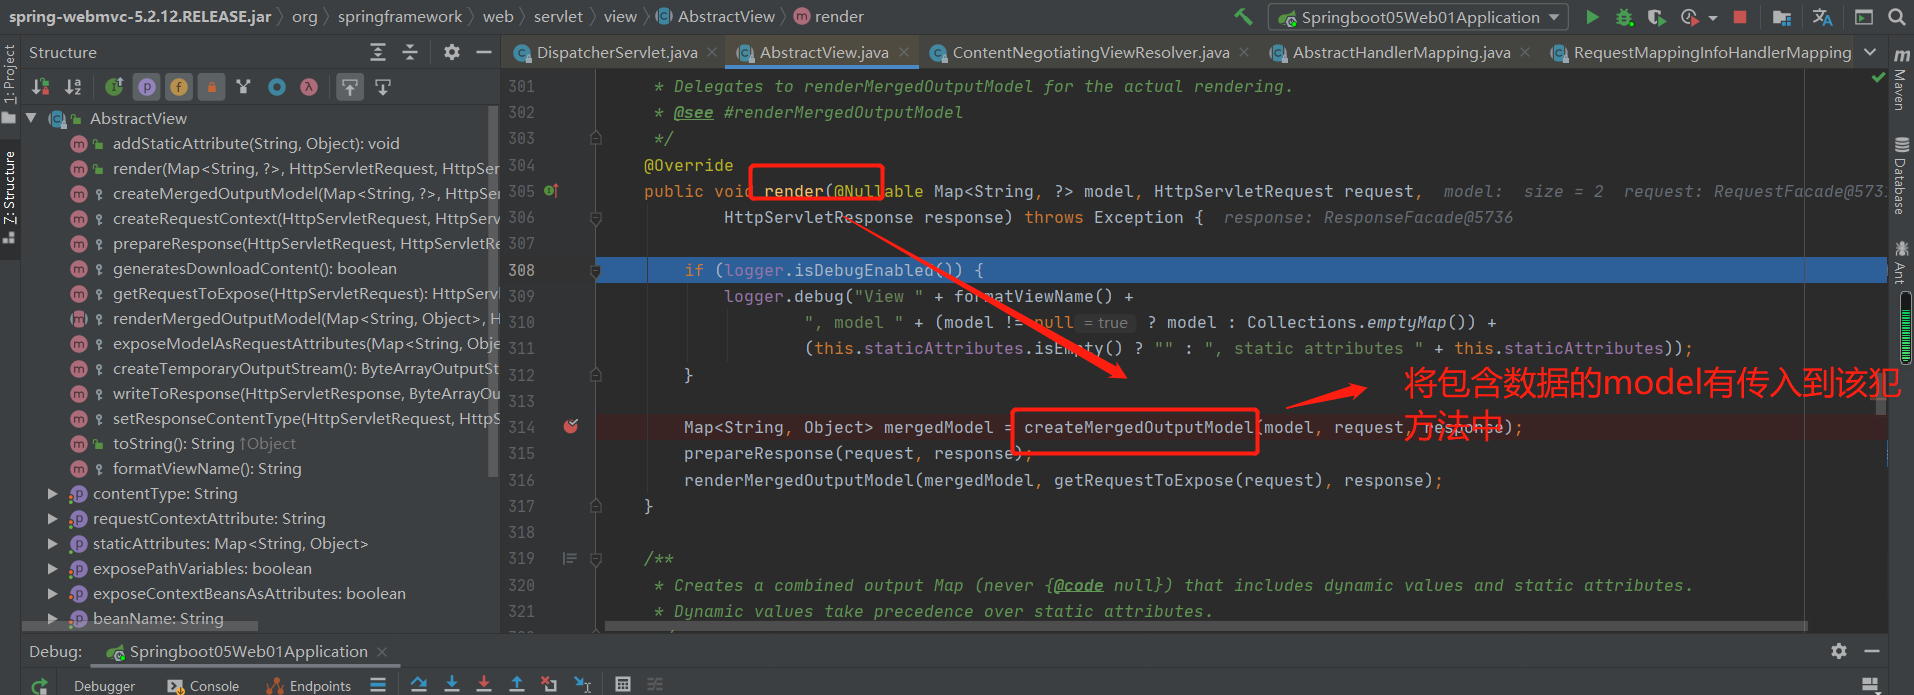
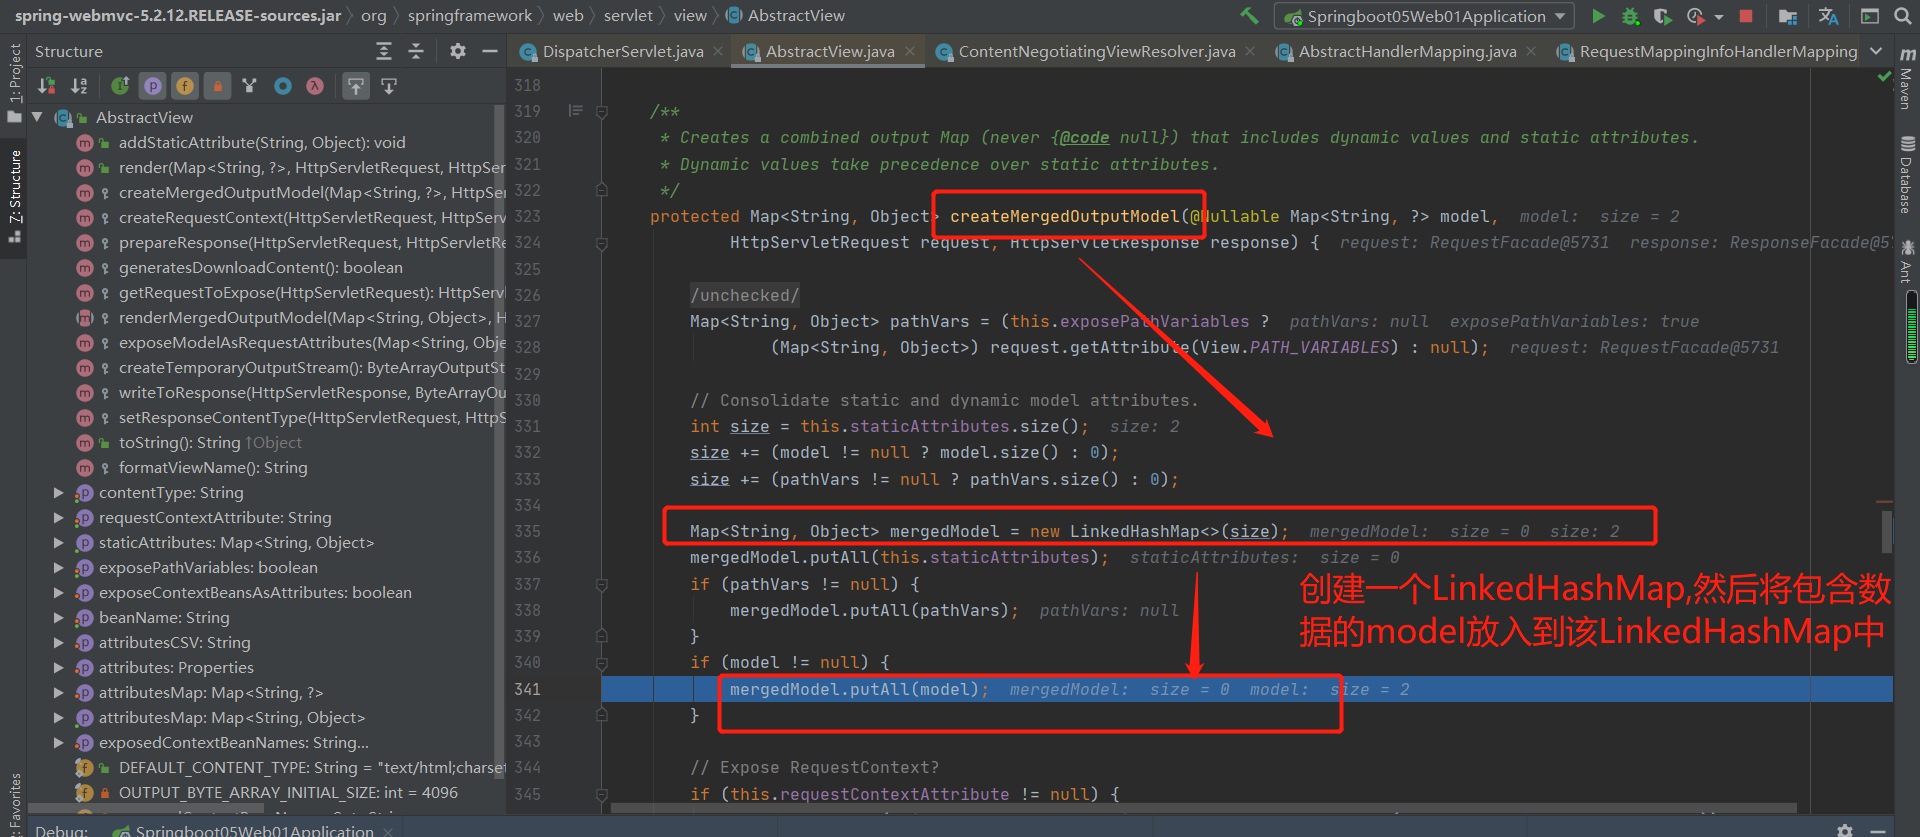
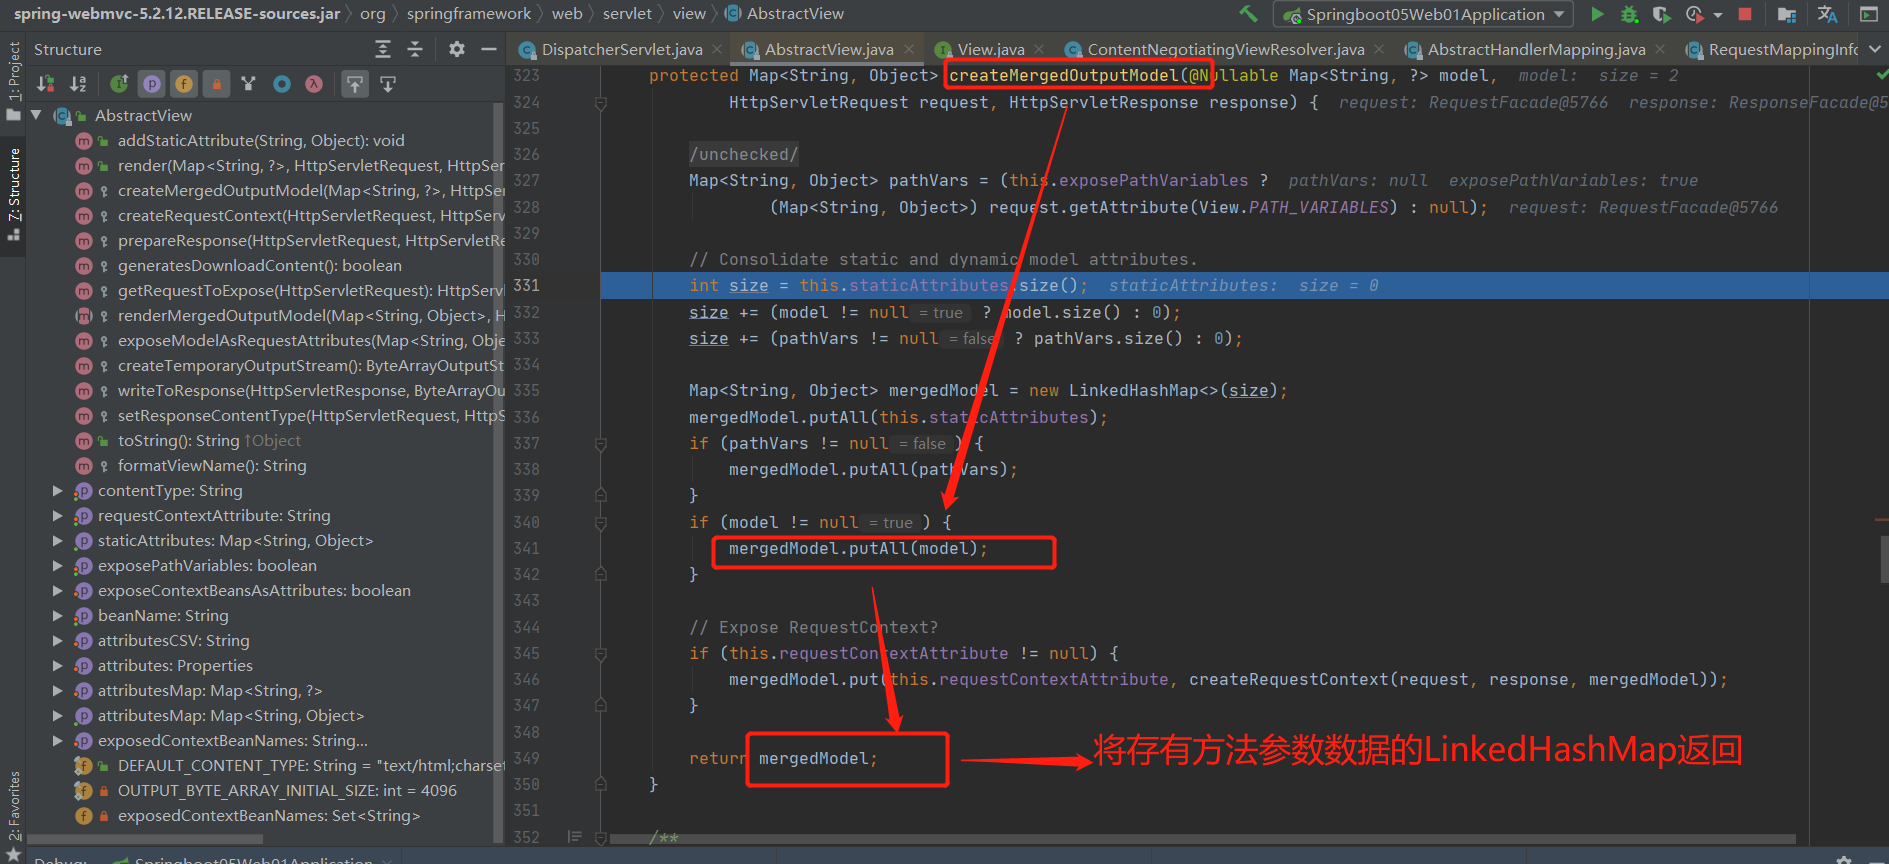
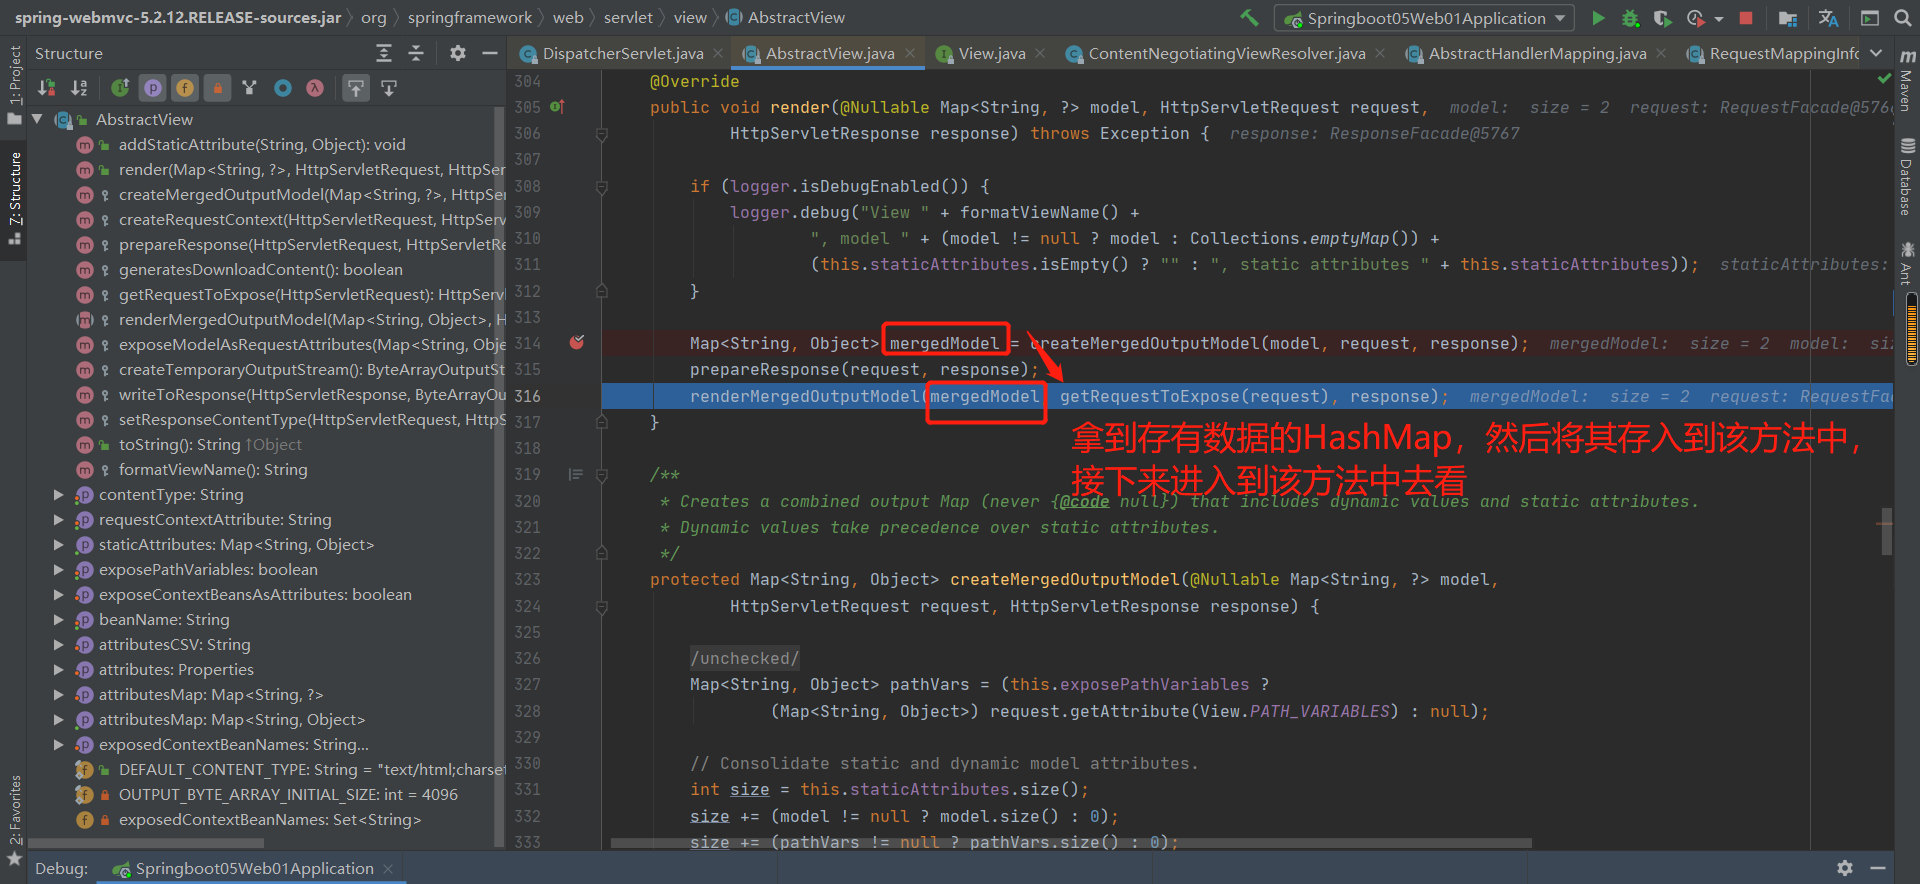
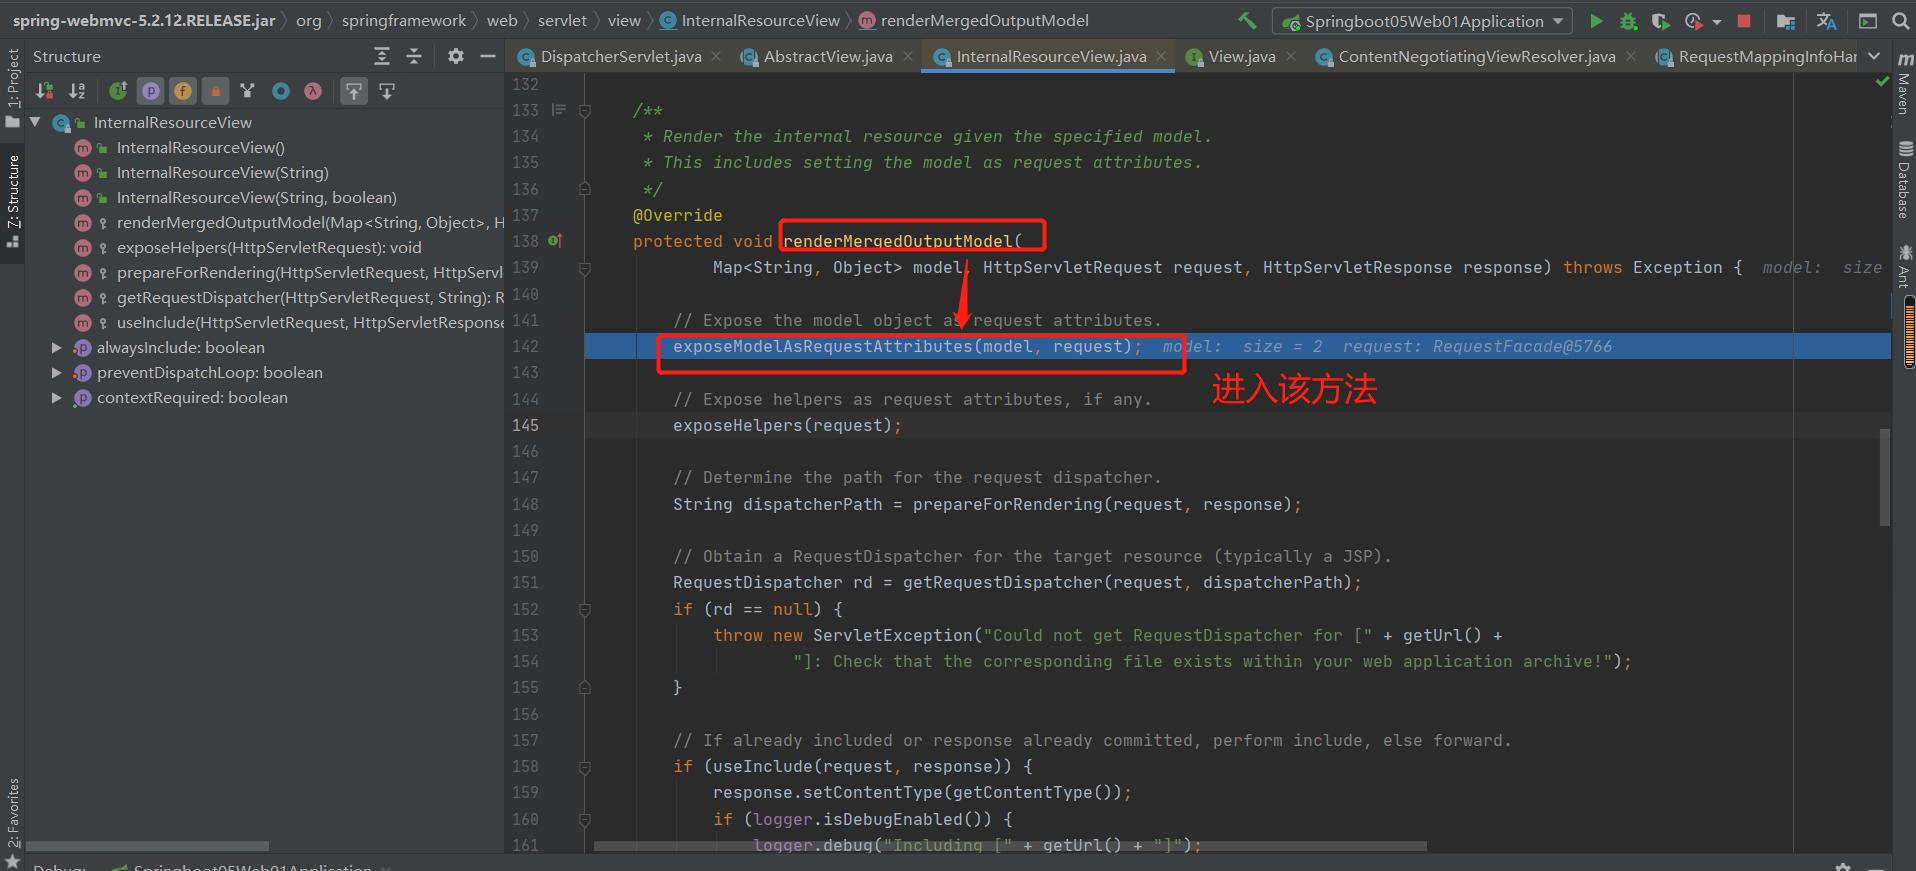
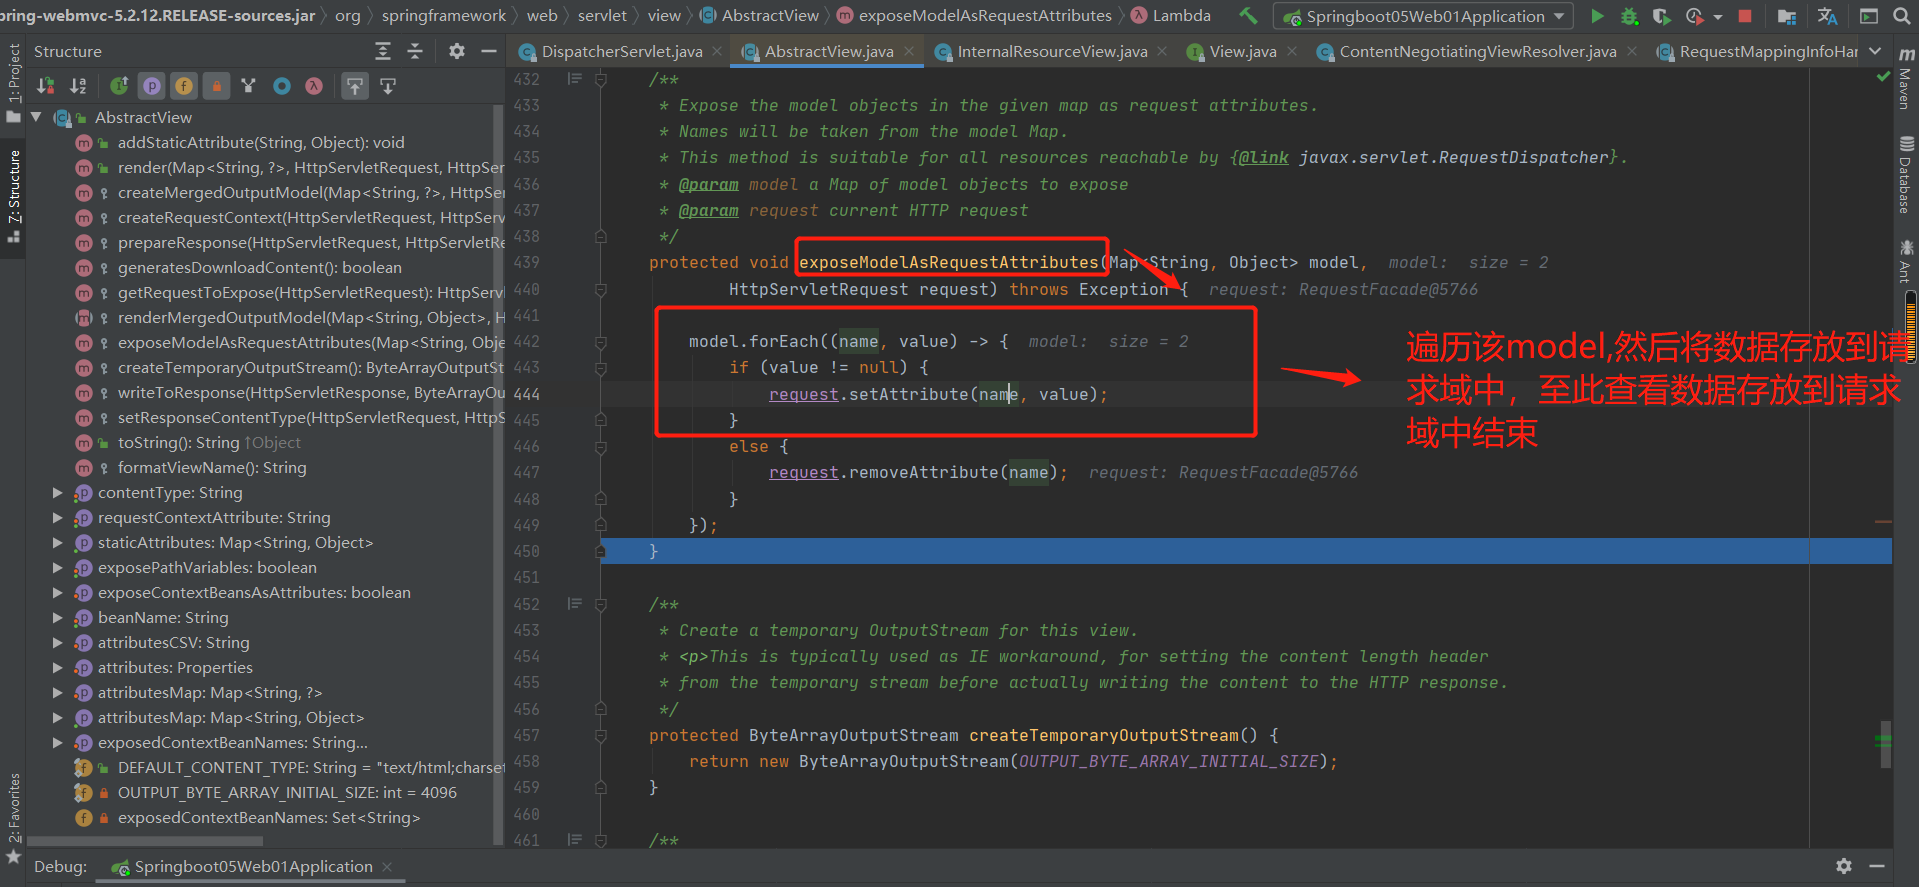
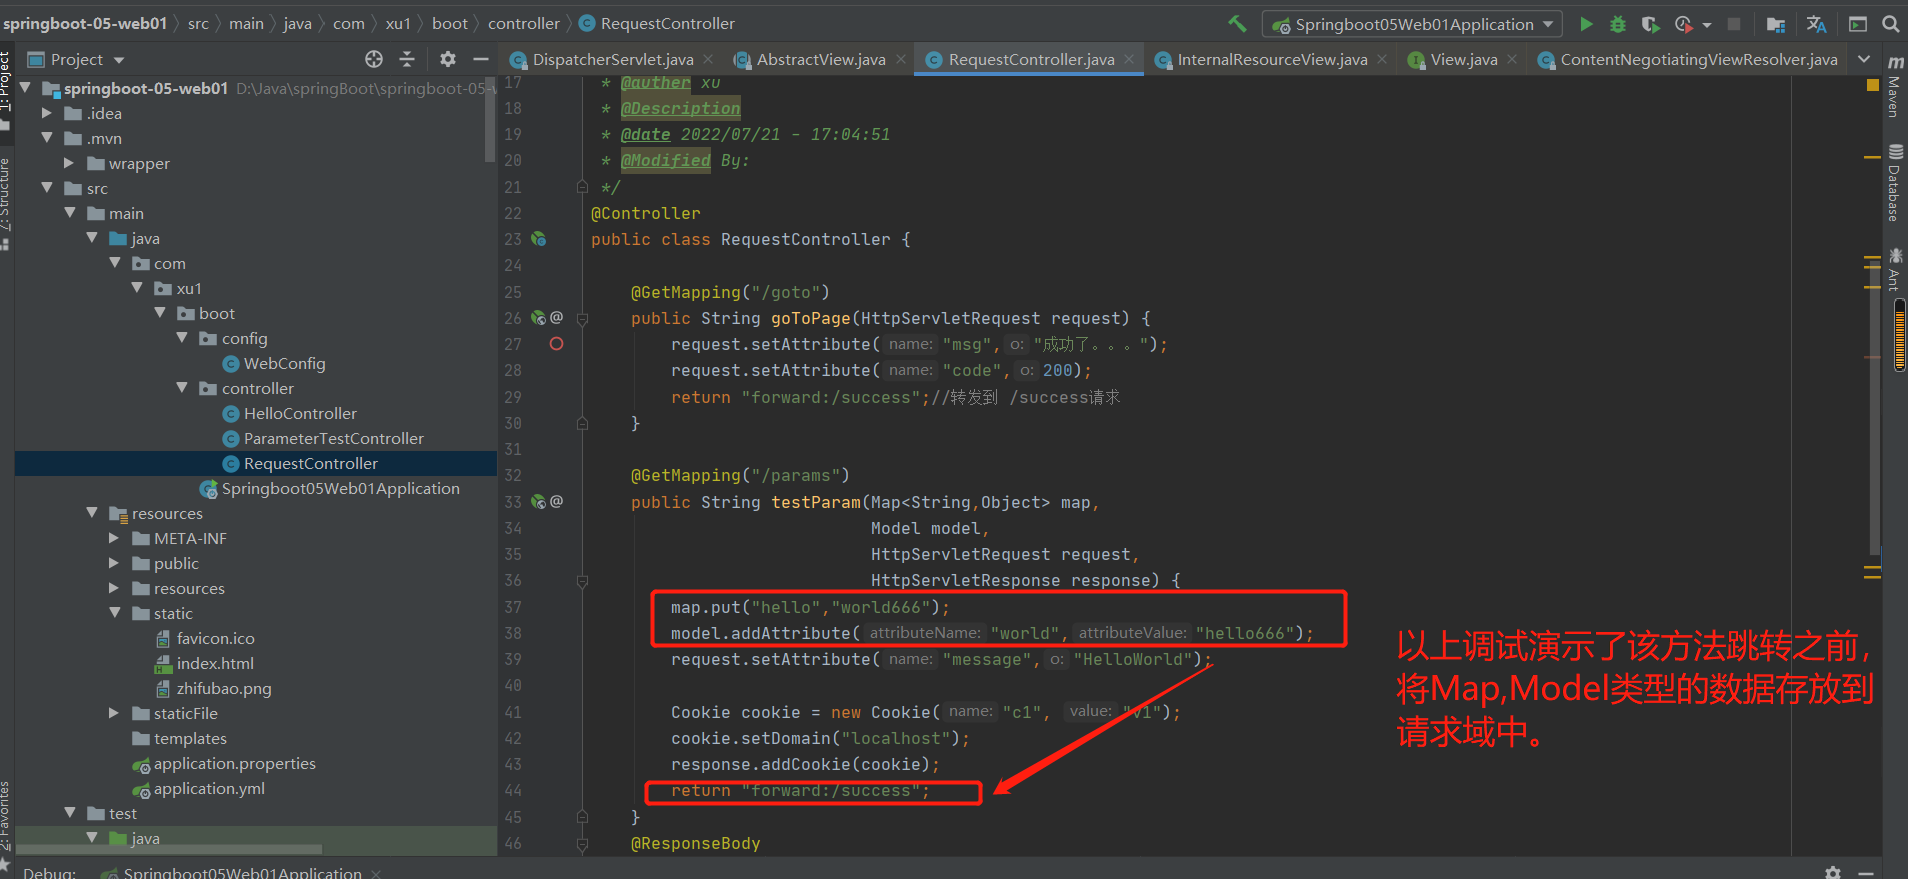
6-8 自定义参数绑定原理分析
1.条件准备:
<h2>测试封装POJO</h2>
<form action="/saveuser" method="post">
    姓名:<input name="usrName" value="zhang3"><br/>
    年龄:<input name="age" value="22"><br/>
    生日:<input name="birth" value="2022/12/12"><br/>
    宠物姓名:<input name="pet.name" value="阿猫"><br/>
    宠物年龄:<input name="pet.age" value="5"><br/>
    <input type="submit" value="保存"/>
</form>
/**
 *
 * @Description
 * 用于测试自定义类型的参数封装
 * @Date 2022/07/29 5:13:31
 *
 */
@PostMapping(value = "/saveuser")
public Person saveuser(Person person) {
    return person;
}
输出结果:
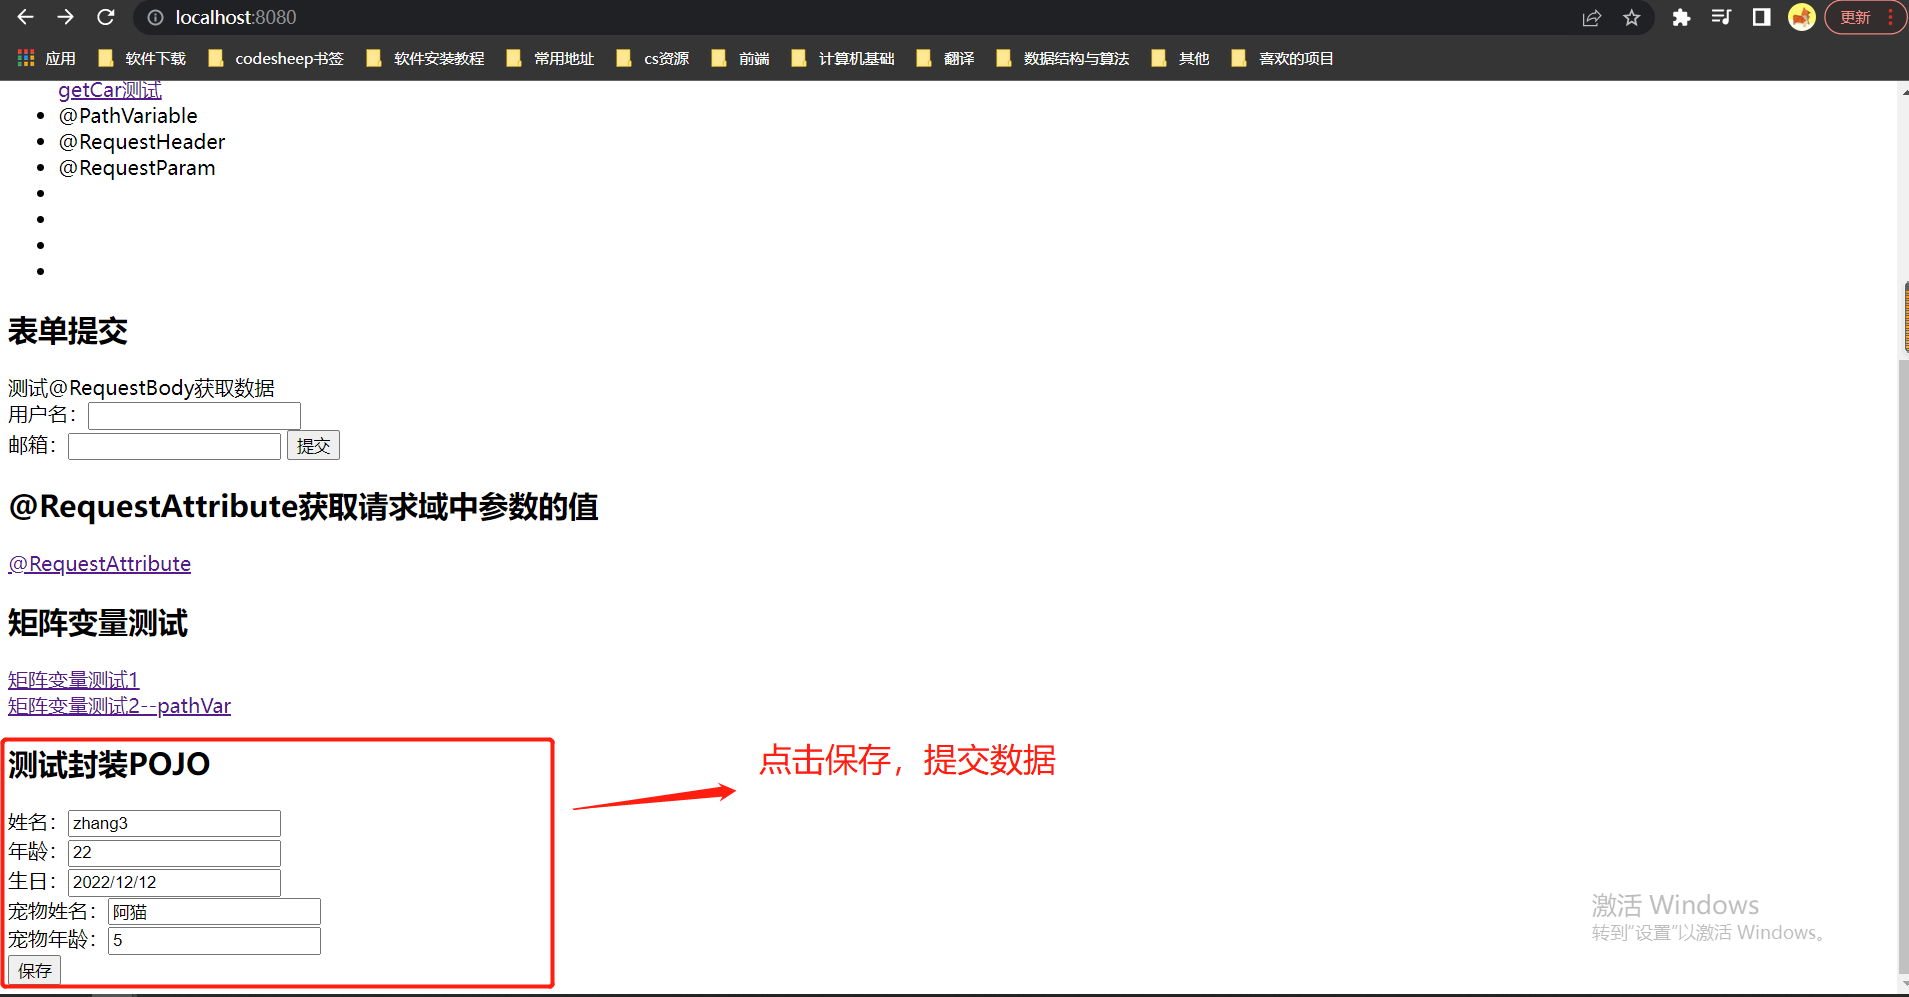
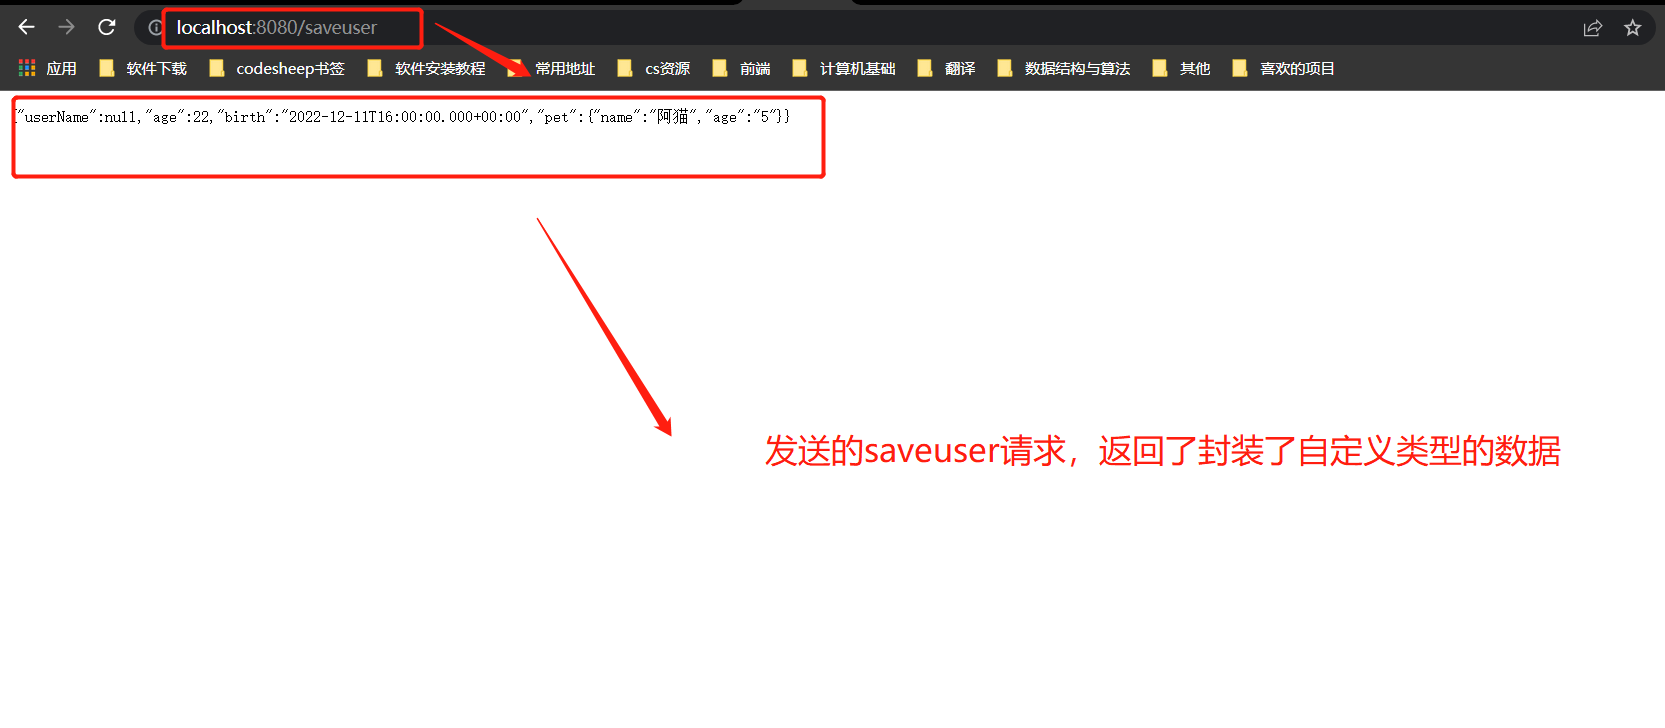
2.源码分析
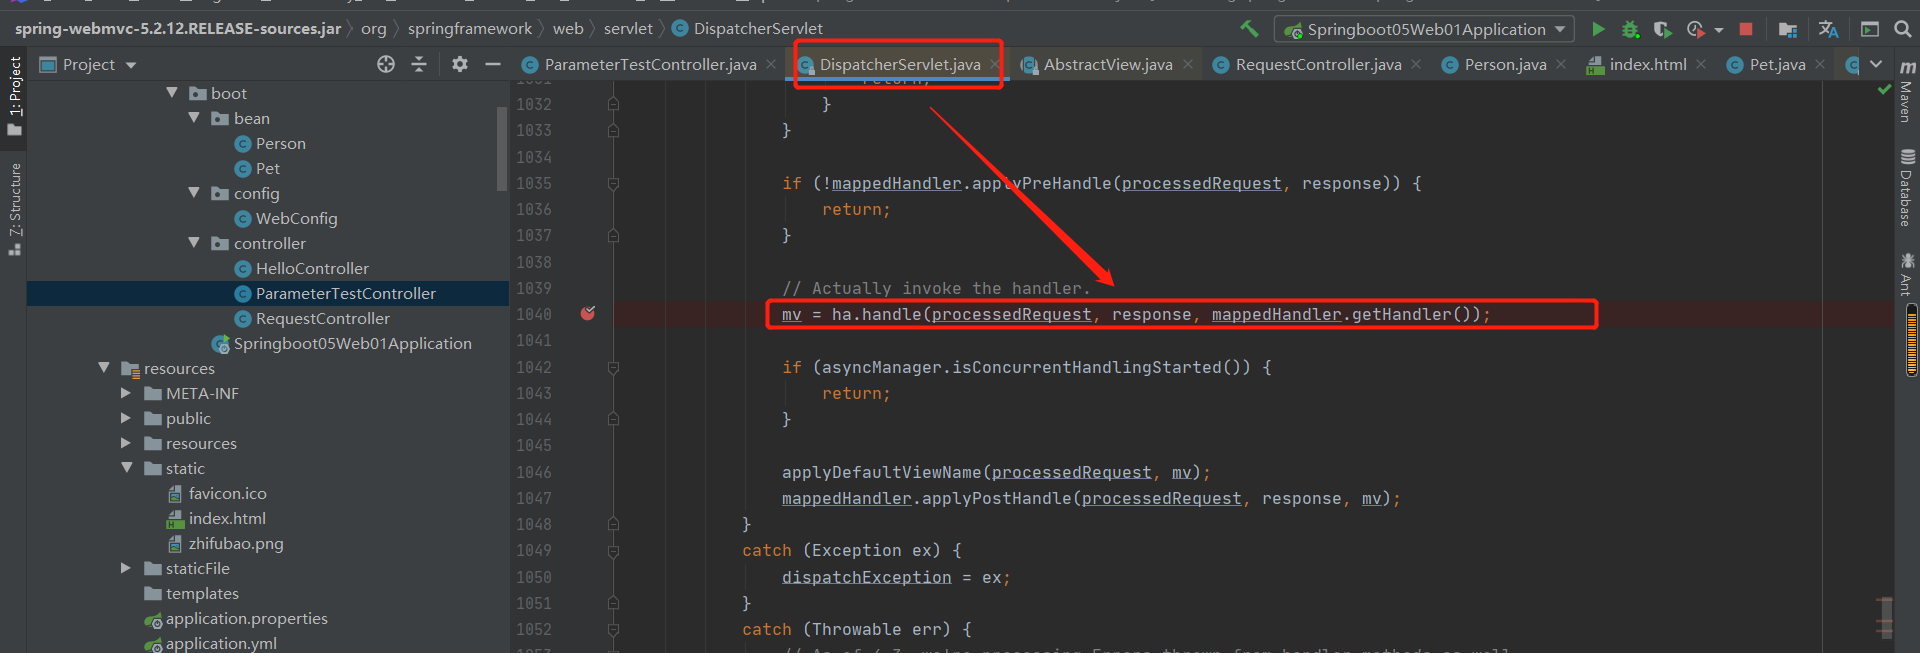
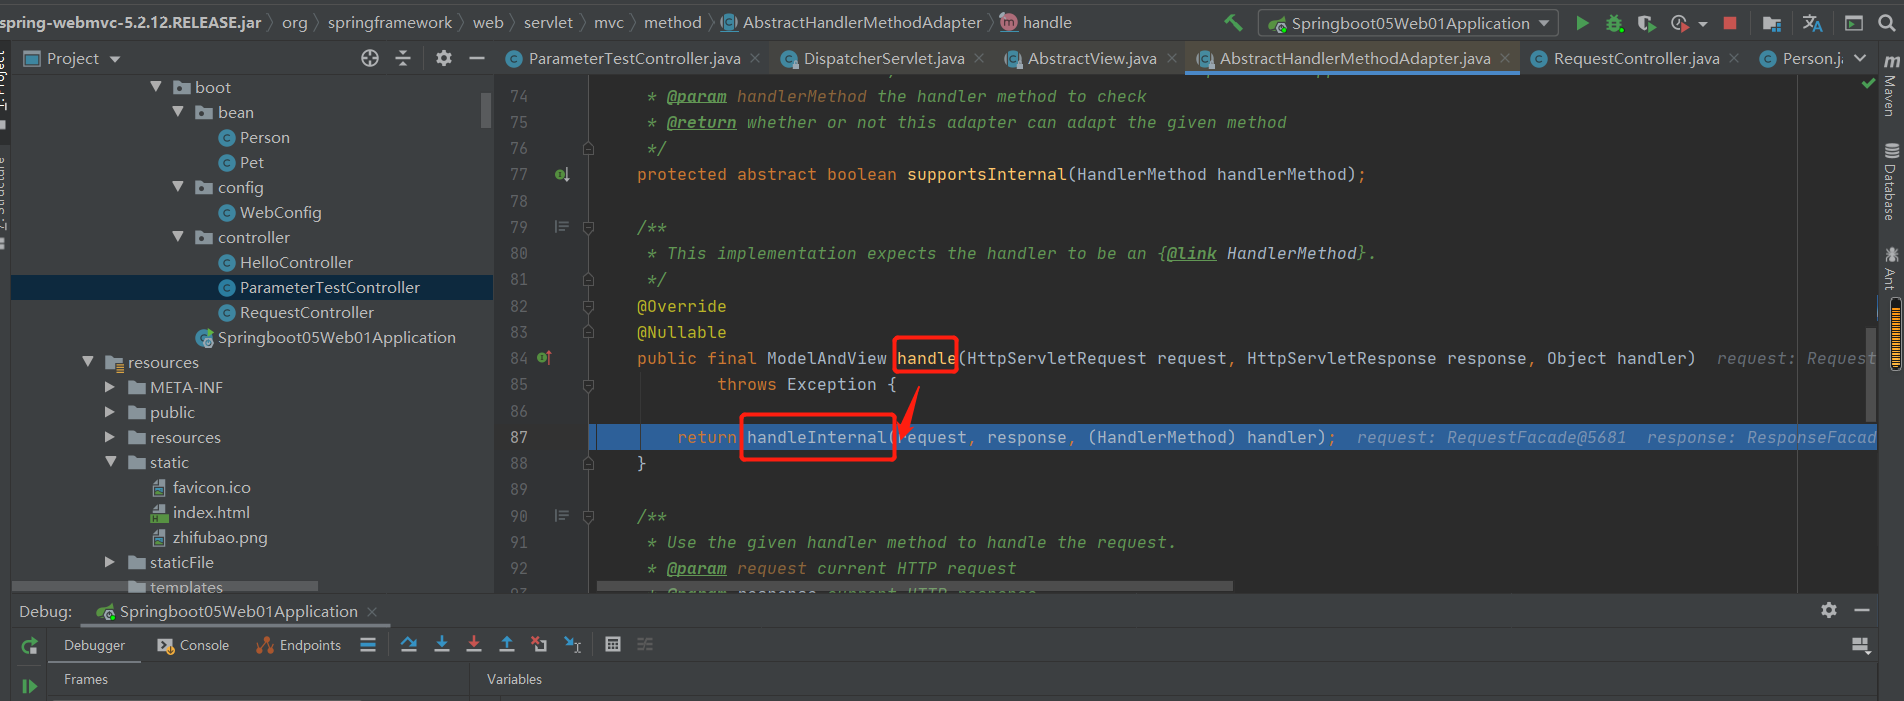
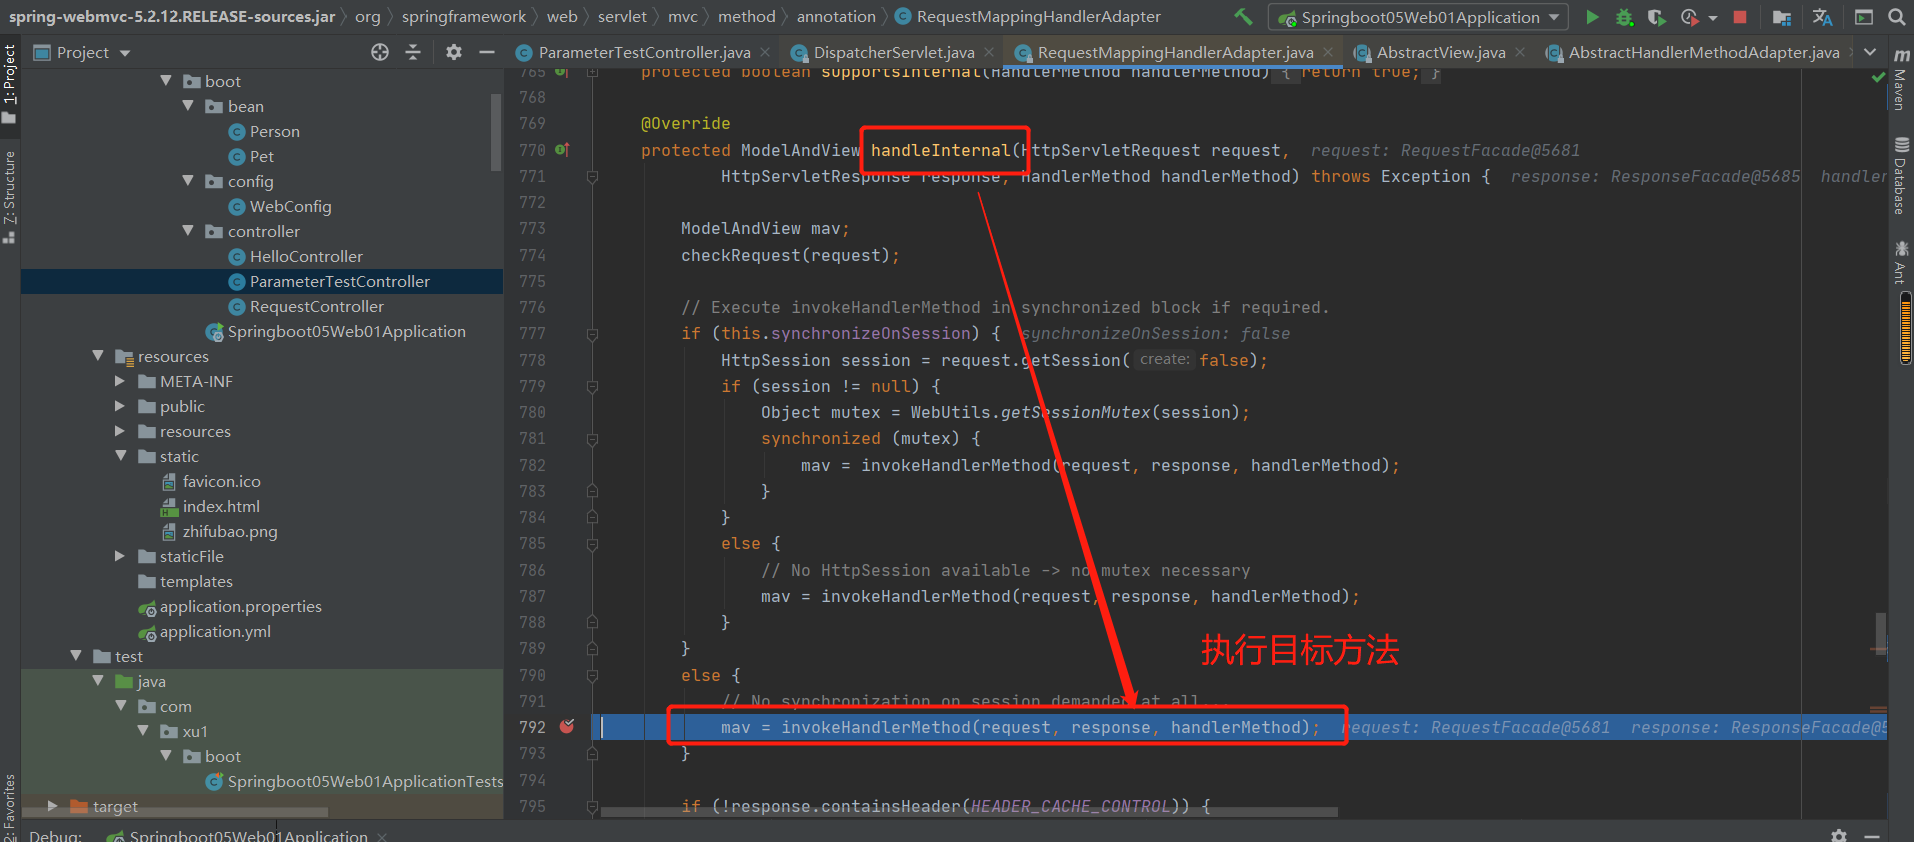
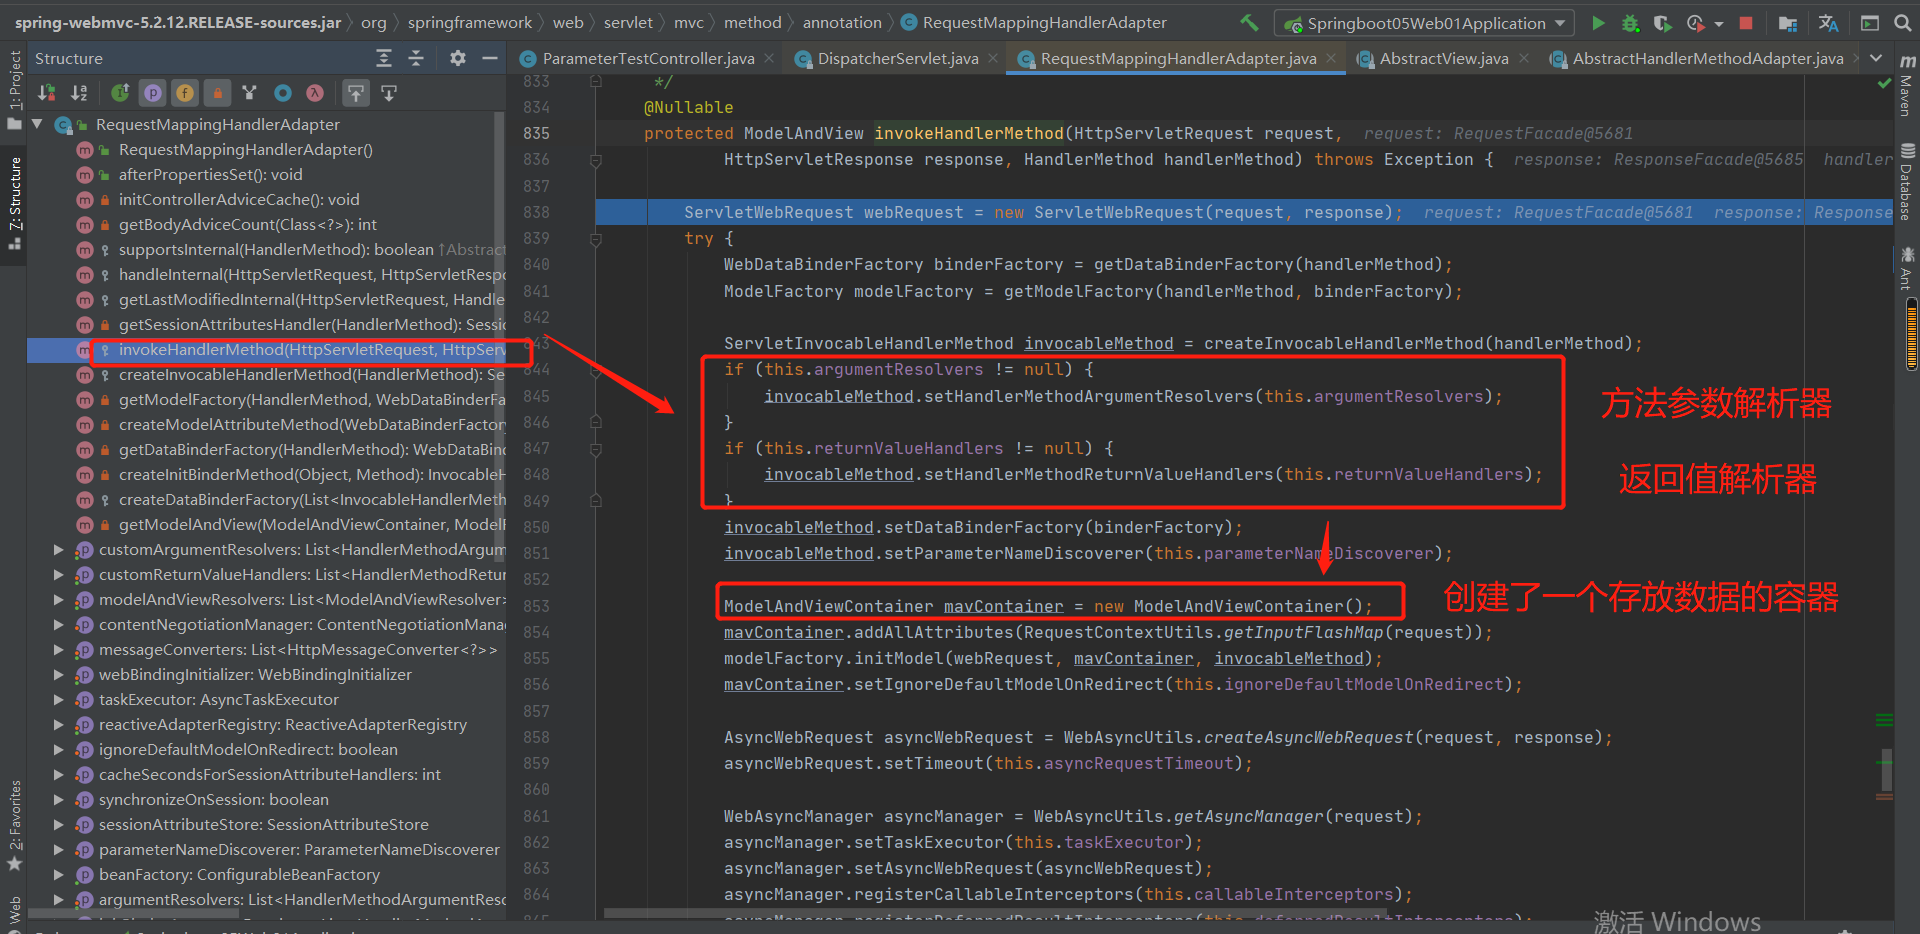
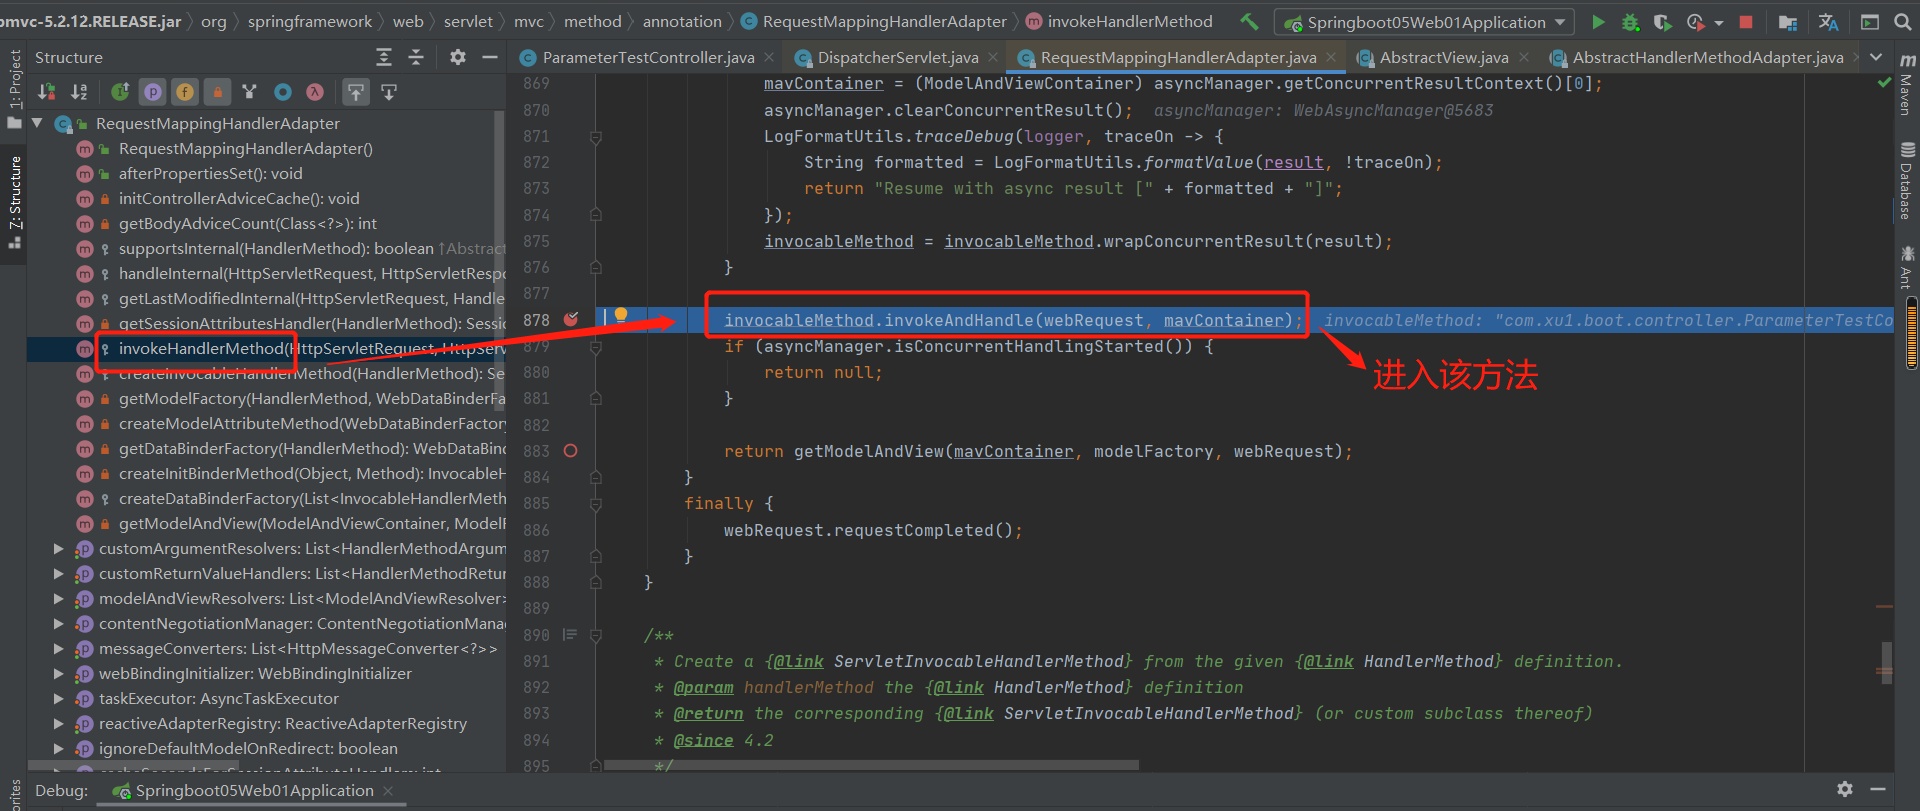
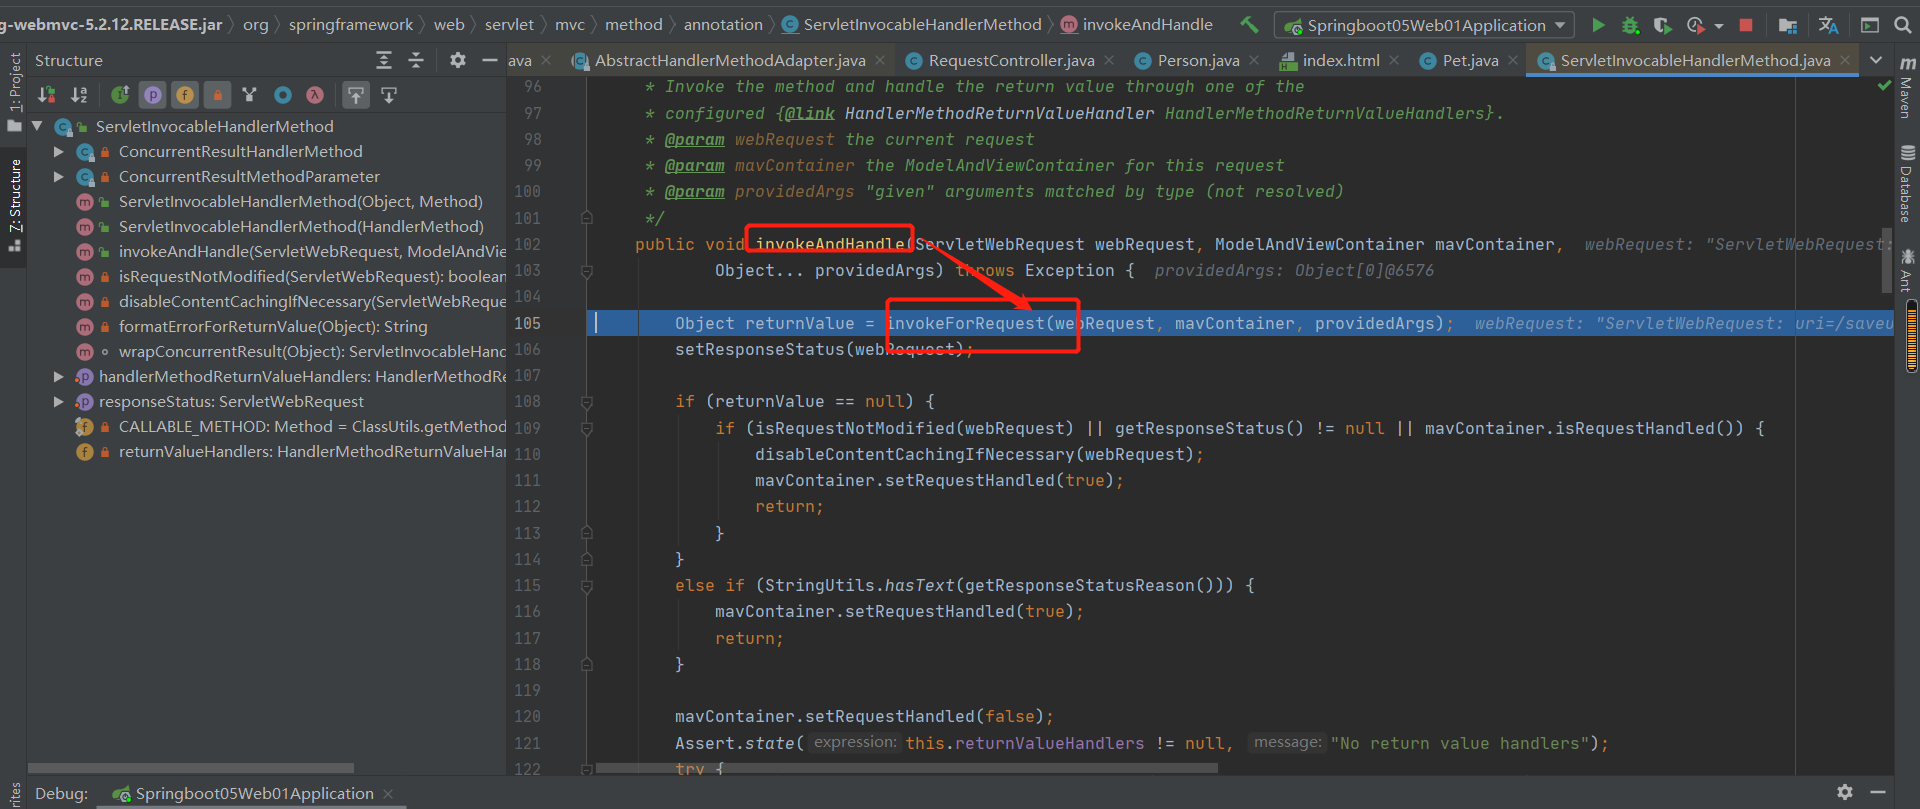
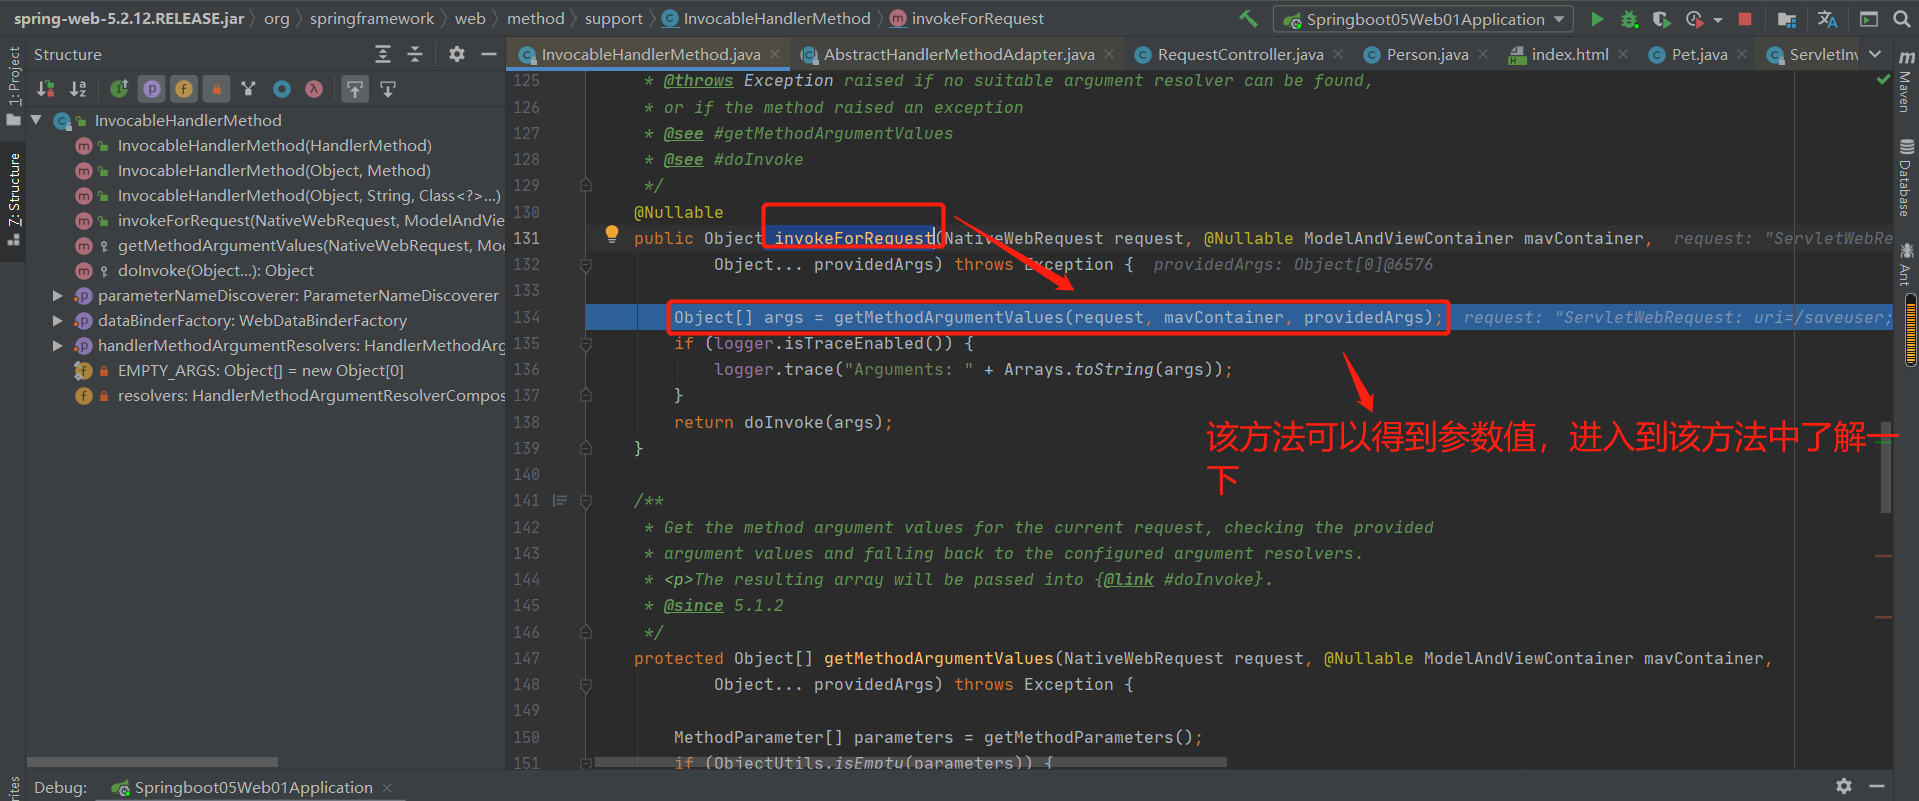
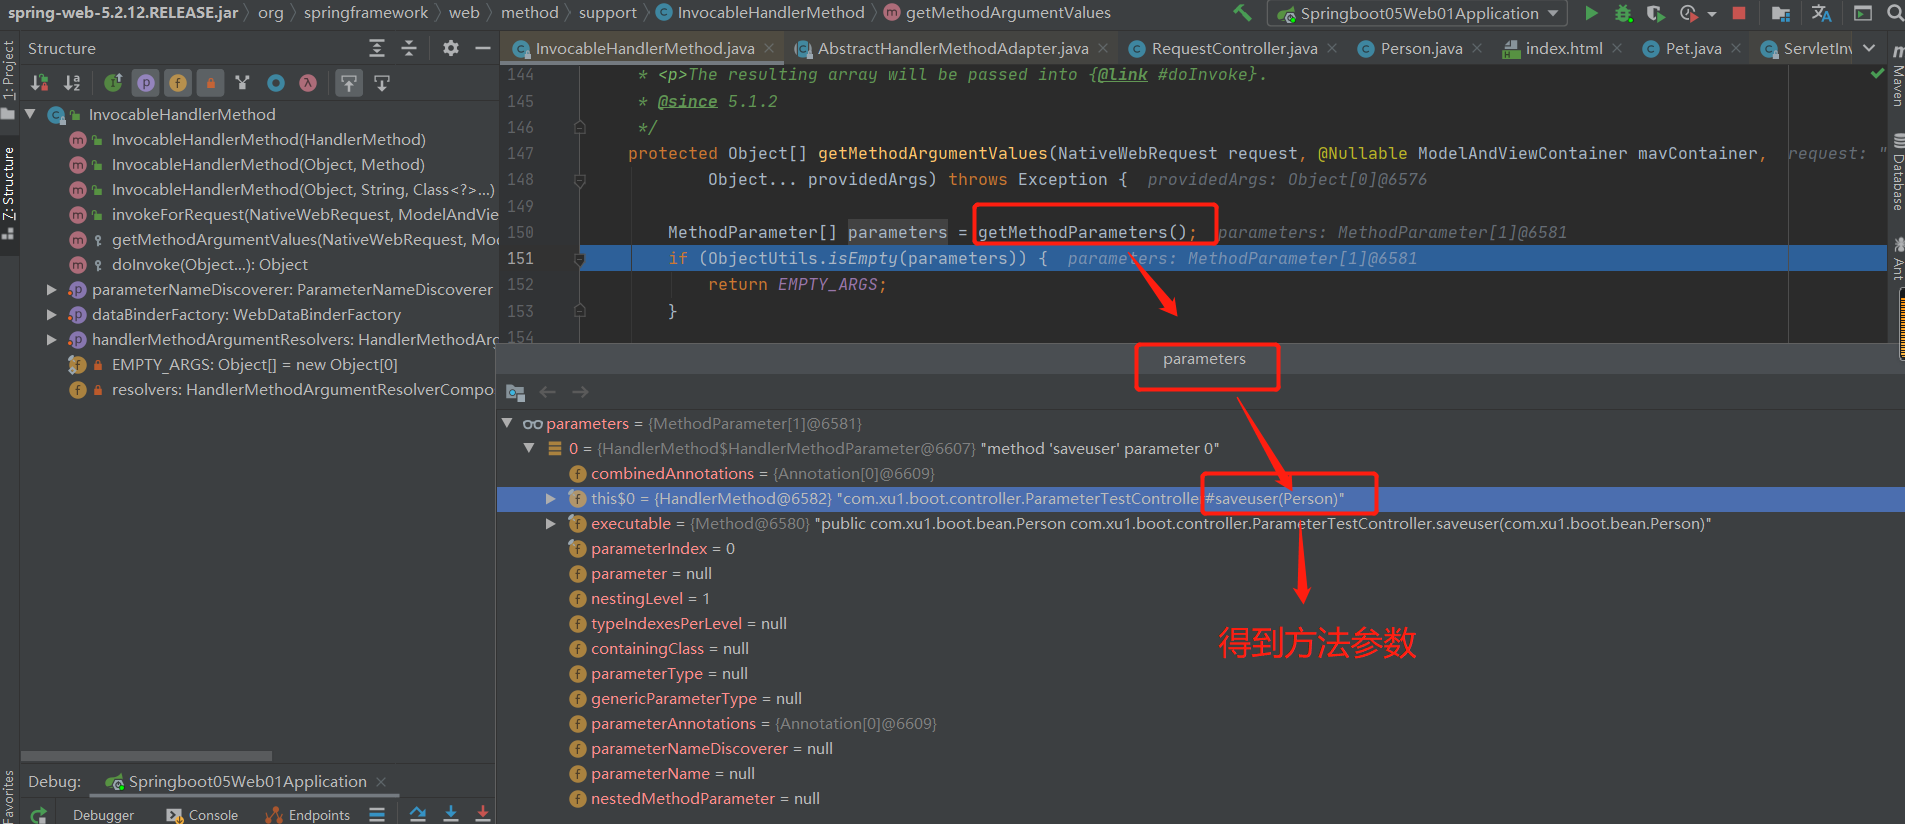
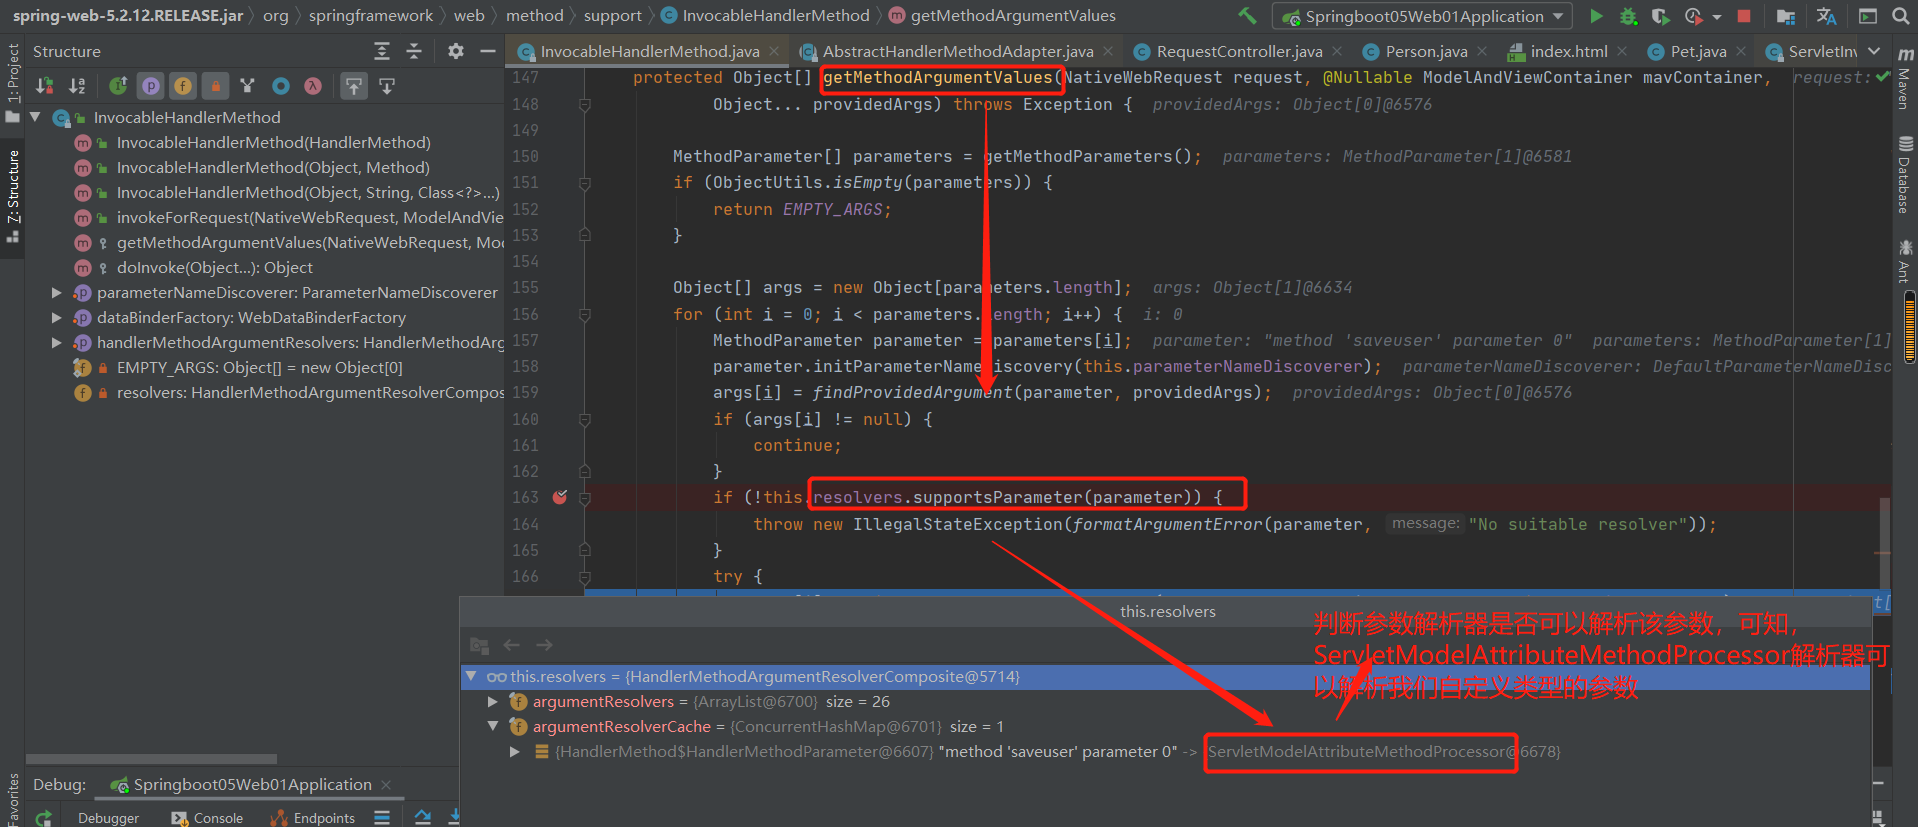
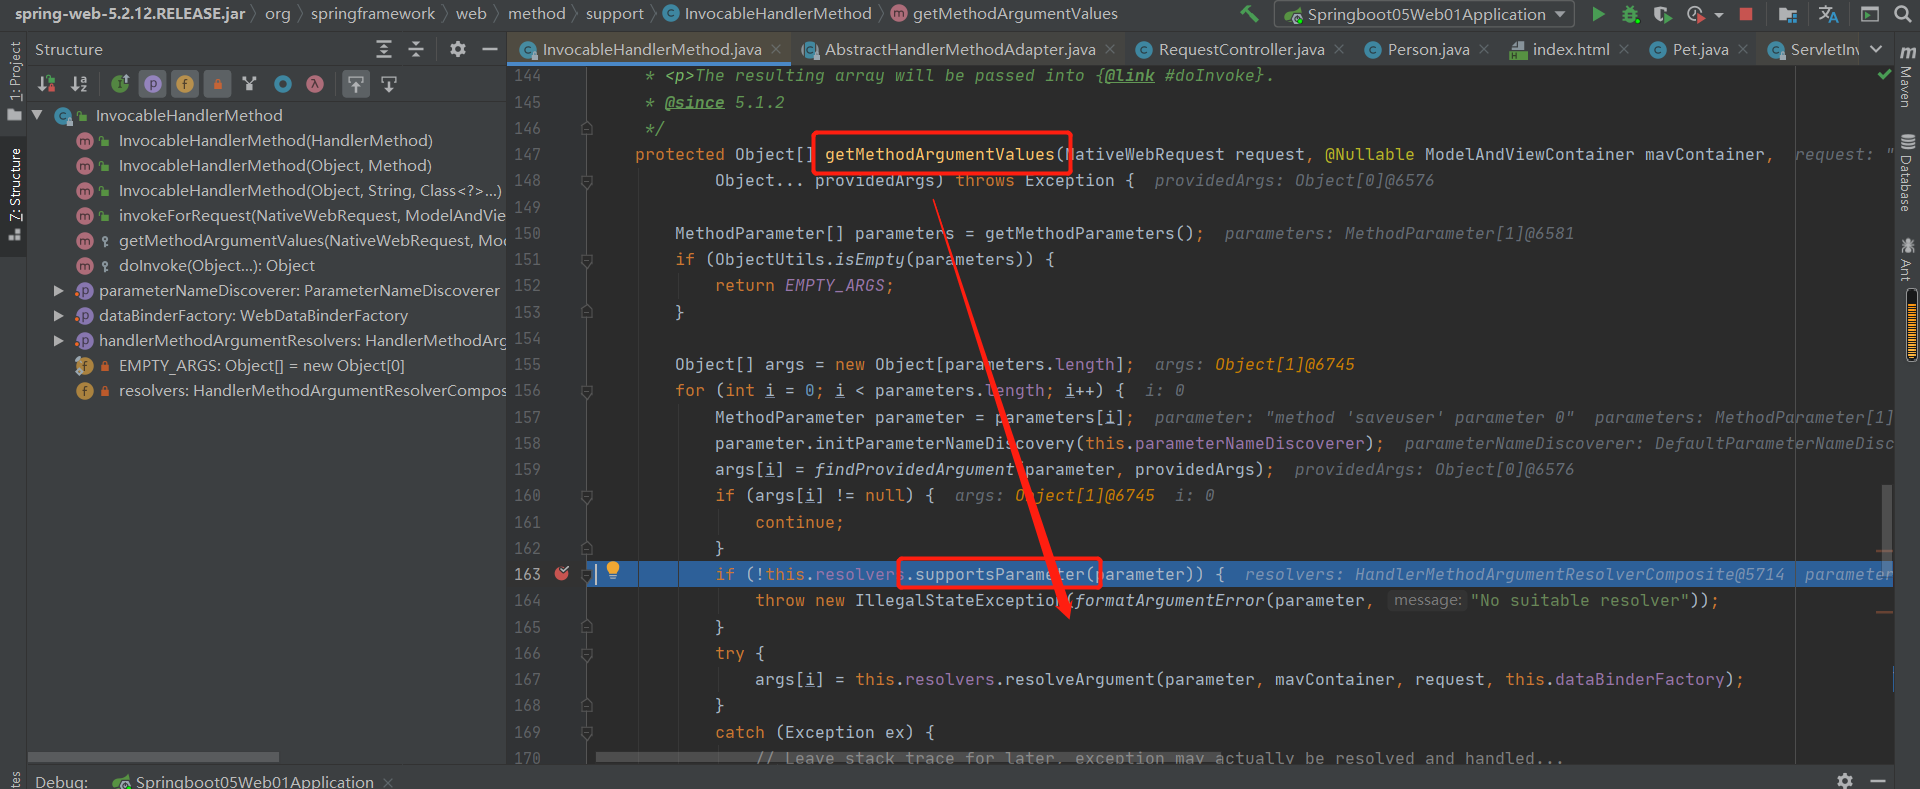
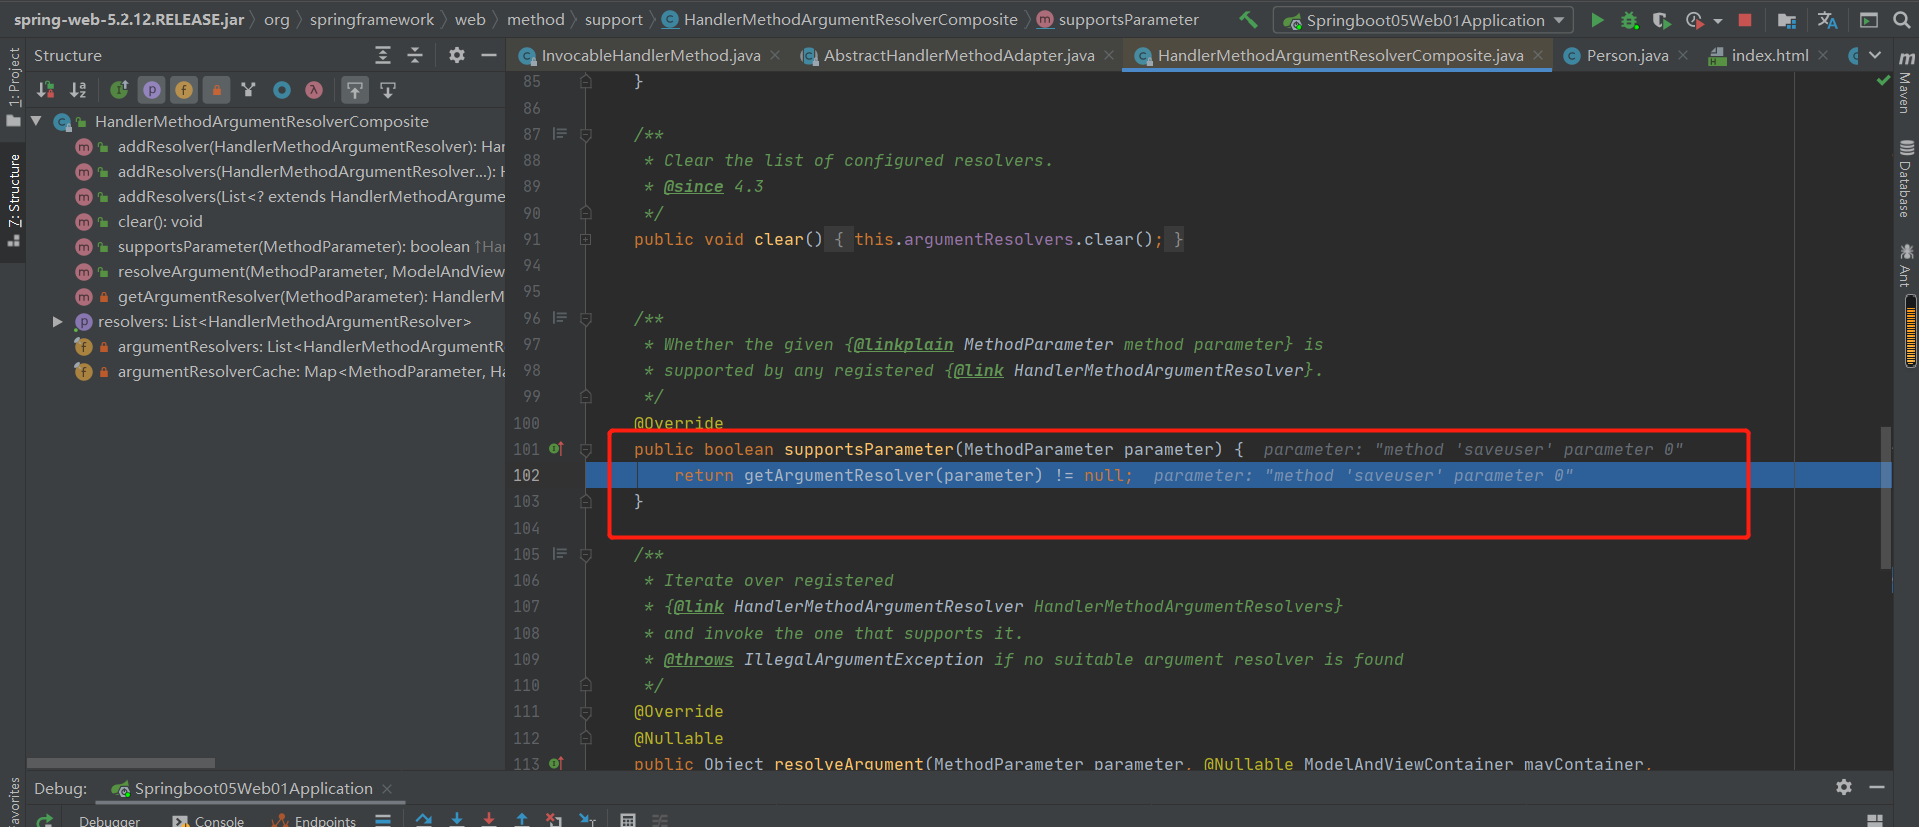
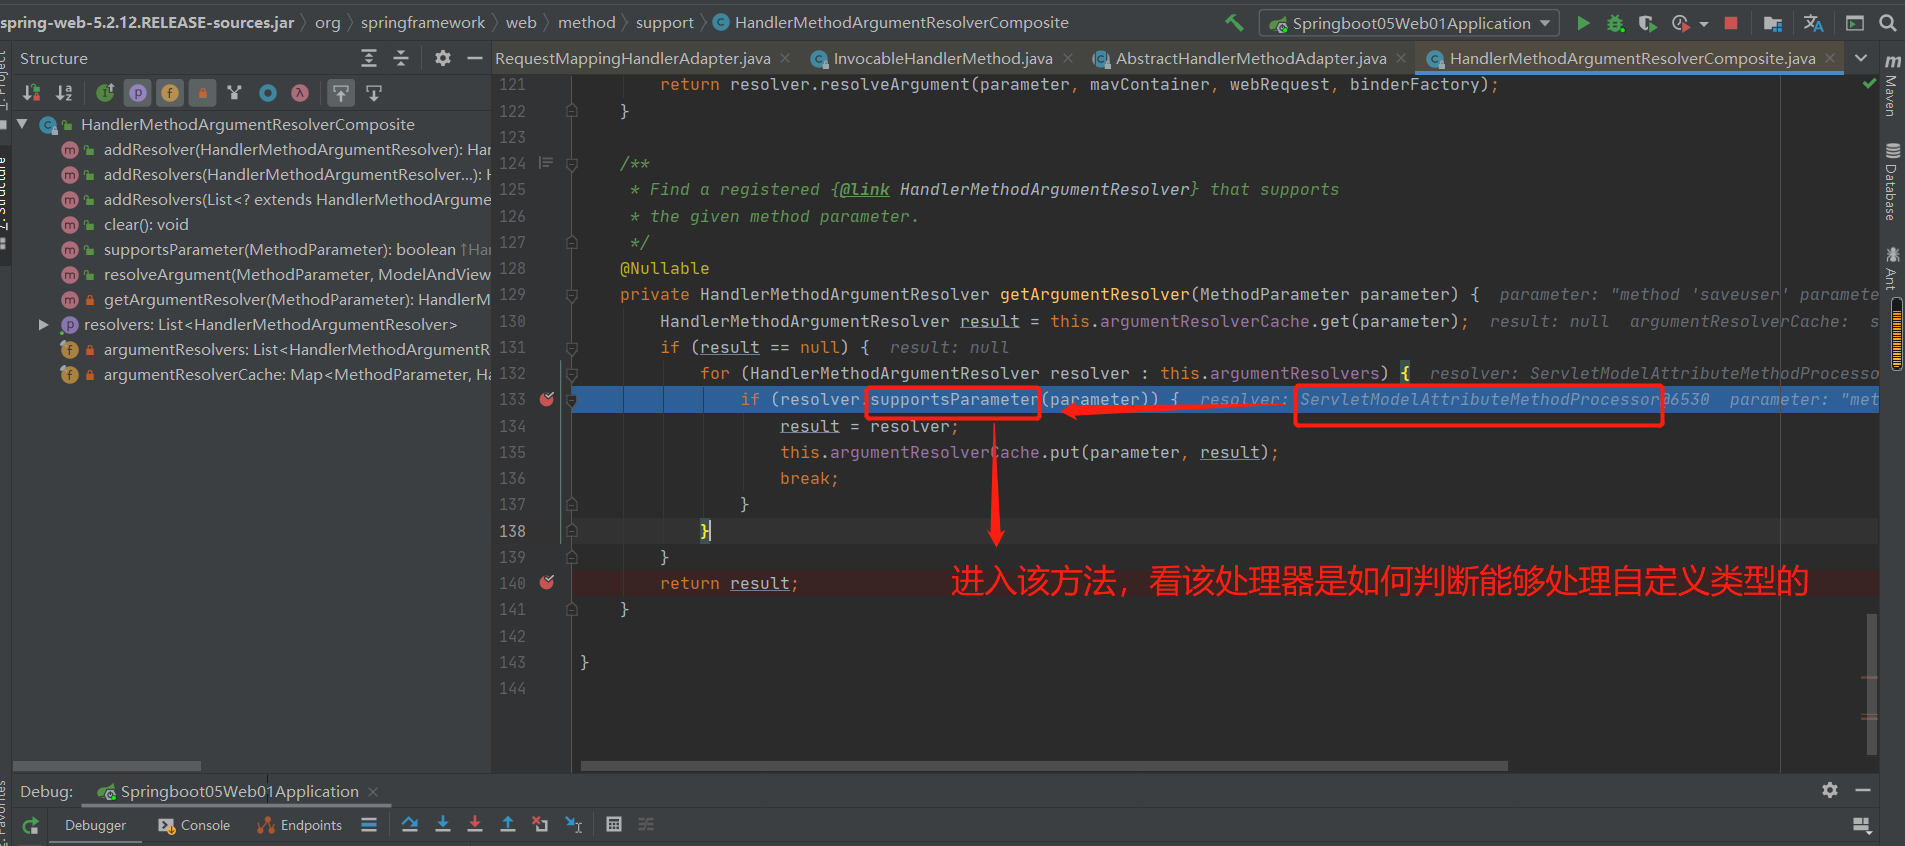
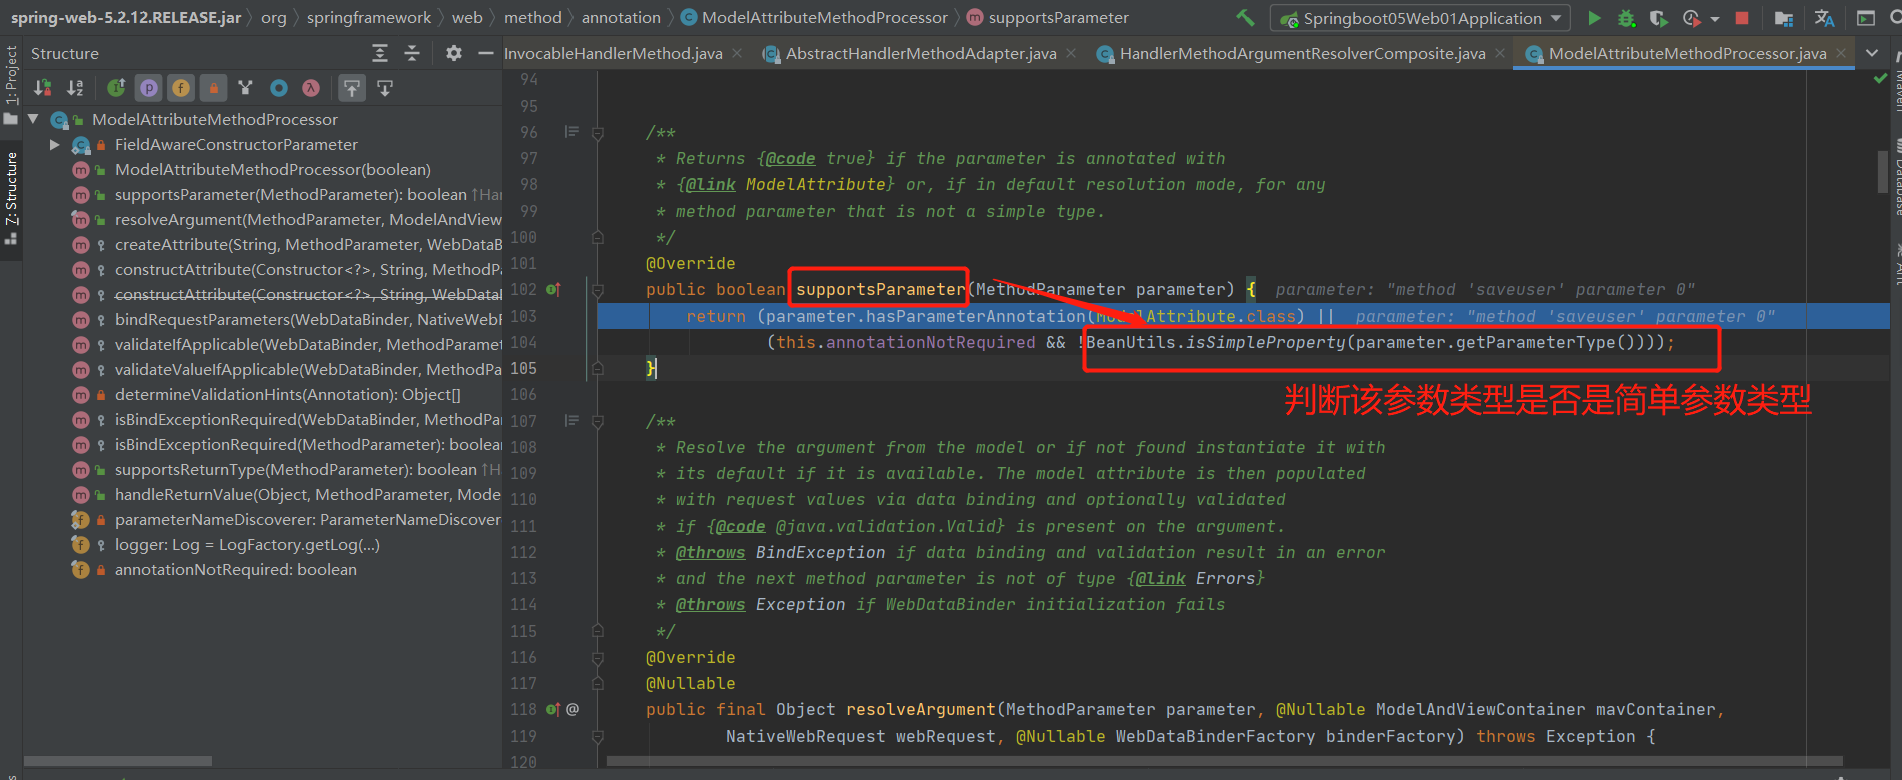
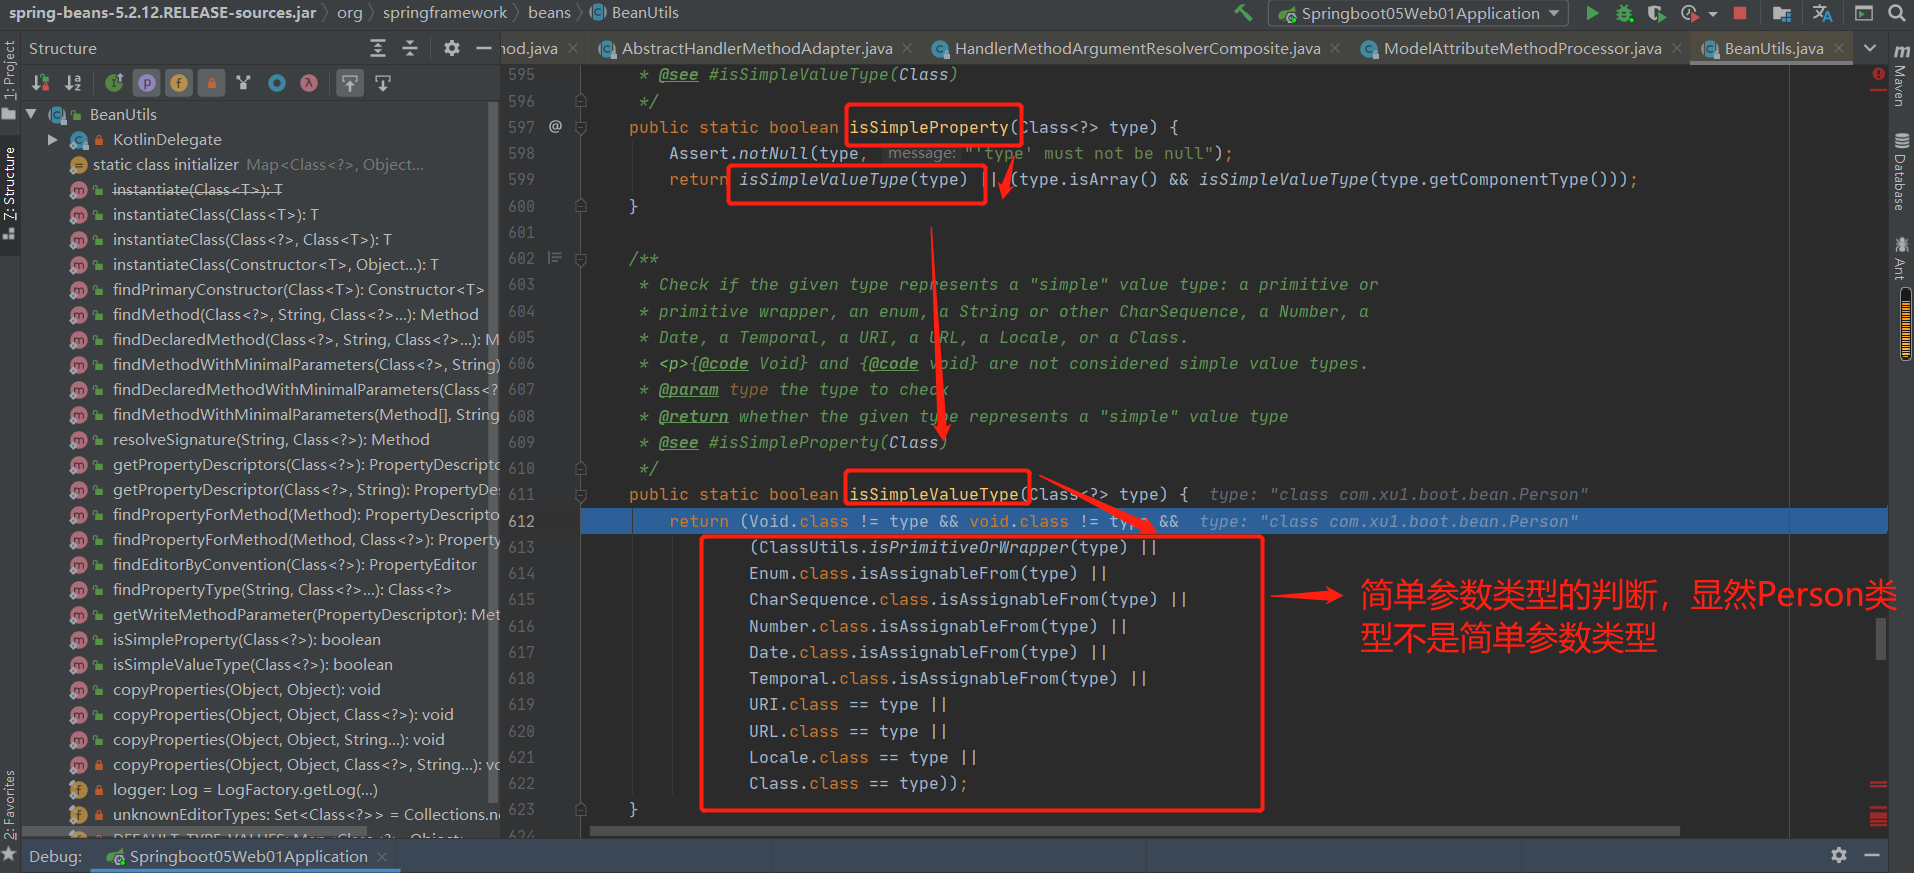
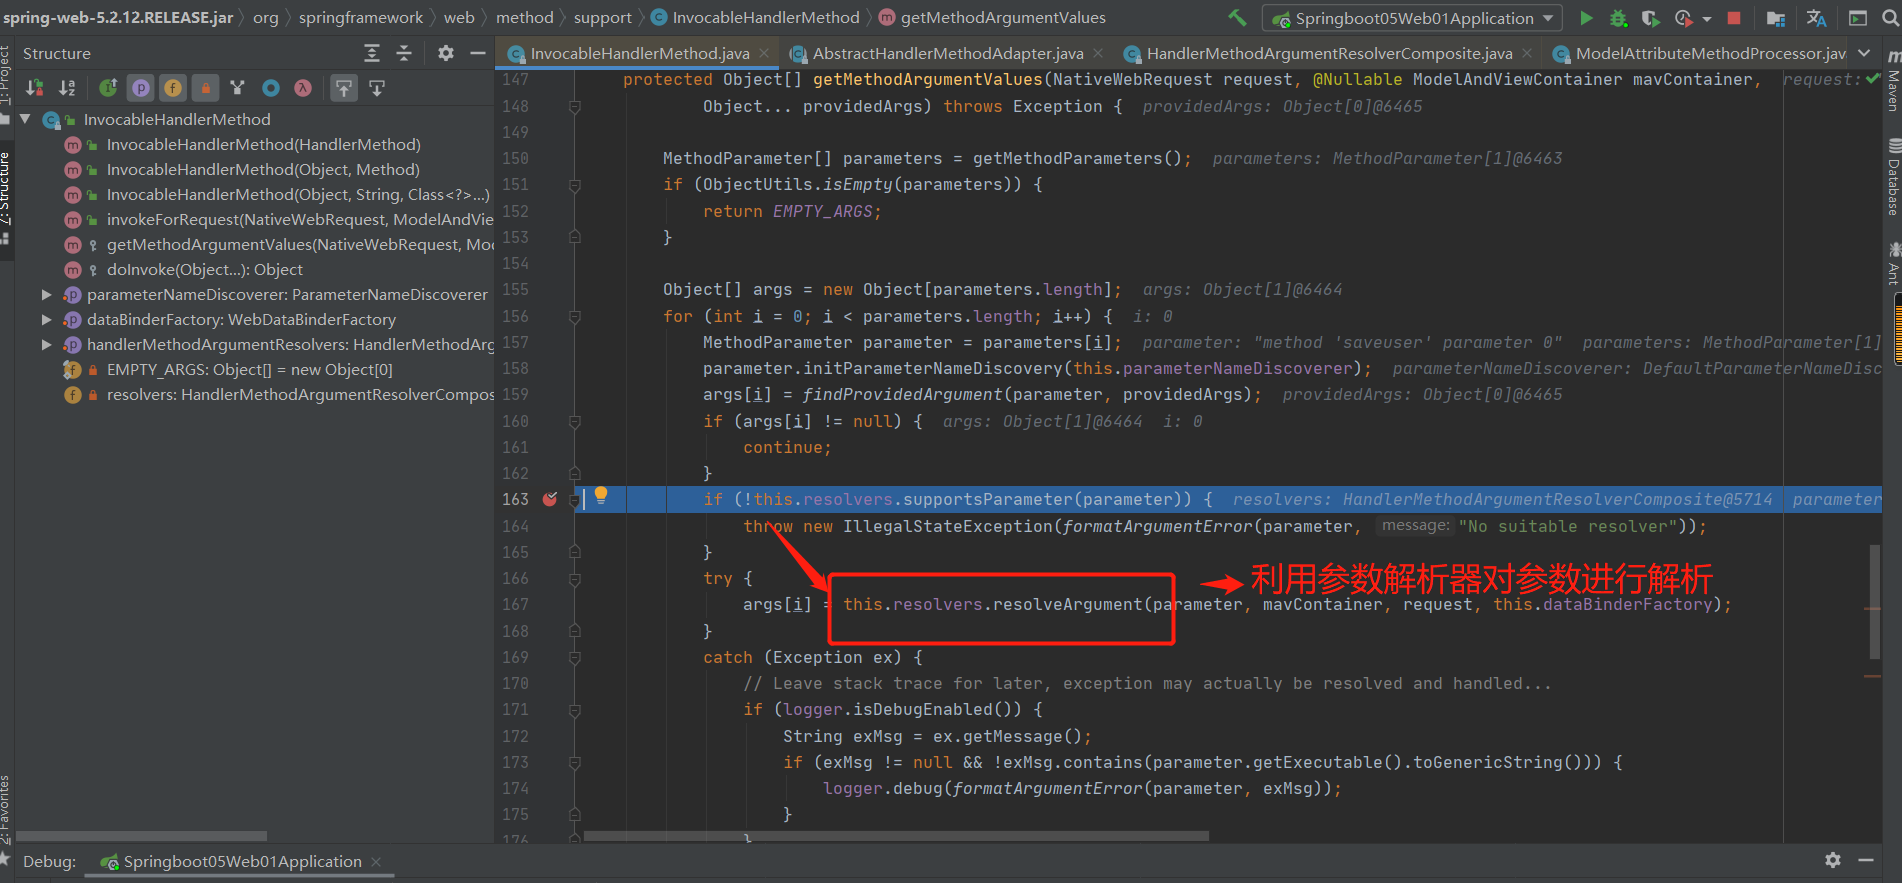
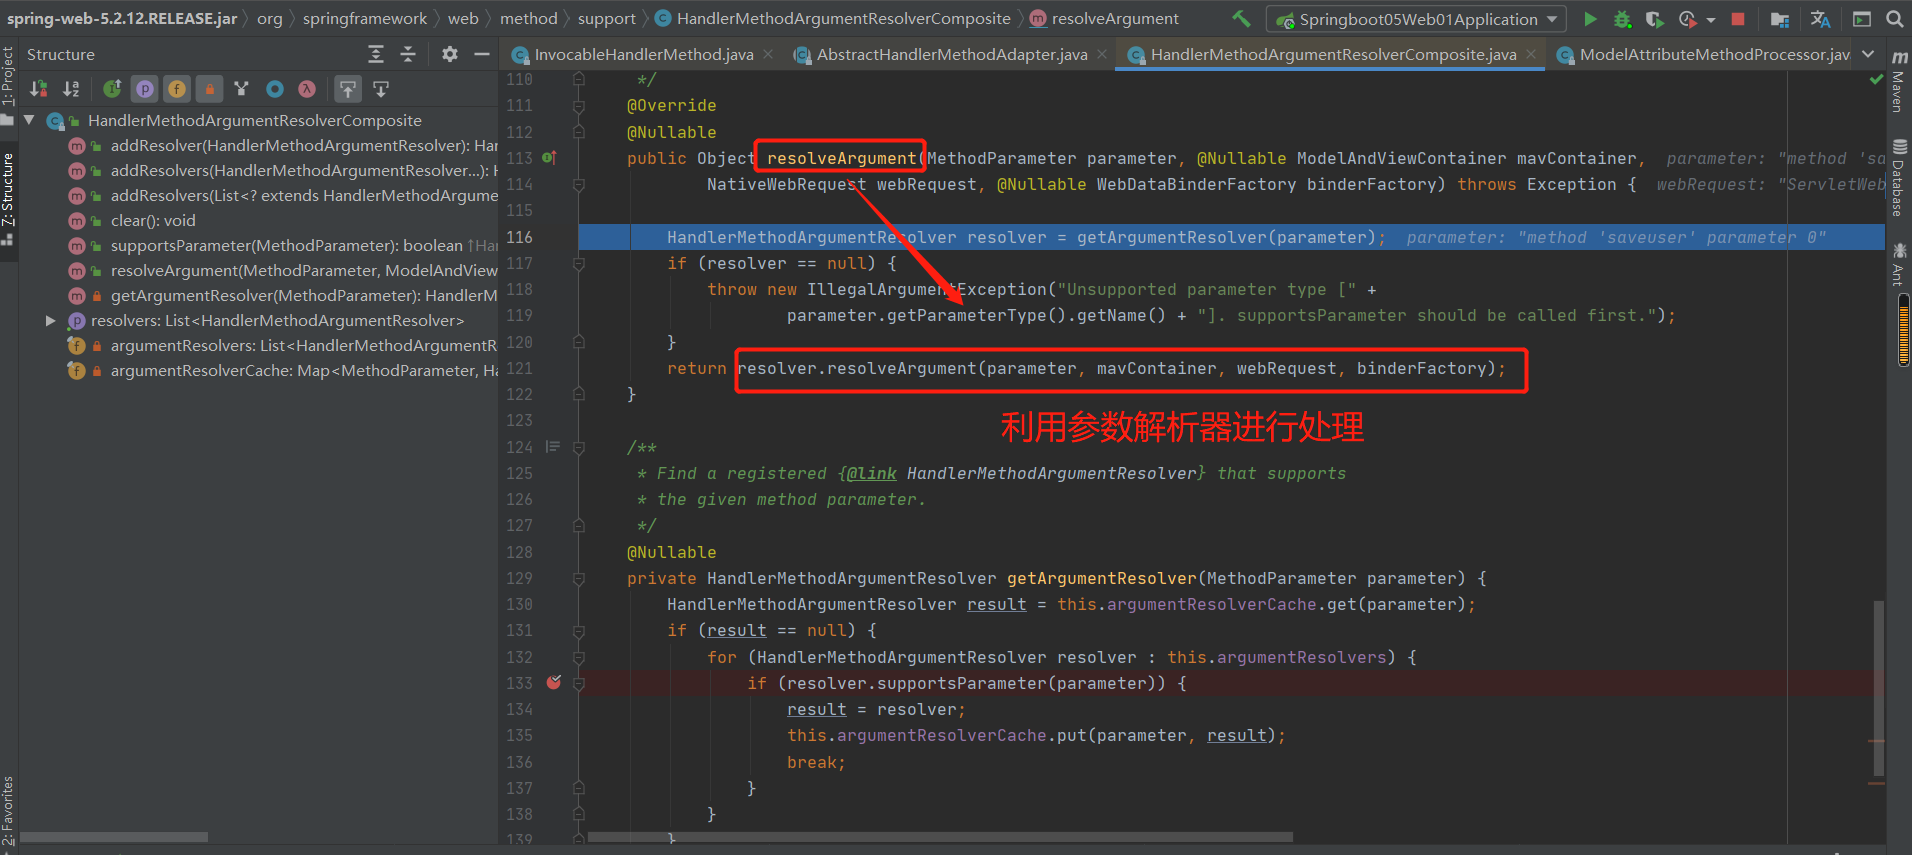
以下为核心重要代码分析:
源码参考:
@Override
@Nullable
public final Object resolveArgument(MethodParameter parameter, @Nullable ModelAndViewContainer mavContainer,
      NativeWebRequest webRequest, @Nullable WebDataBinderFactory binderFactory) throws Exception {

   Assert.state(mavContainer != null, "ModelAttributeMethodProcessor requires ModelAndViewContainer");
   Assert.state(binderFactory != null, "ModelAttributeMethodProcessor requires WebDataBinderFactory");

   String name = ModelFactory.getNameForParameter(parameter);
   ModelAttribute ann = parameter.getParameterAnnotation(ModelAttribute.class);
   if (ann != null) {
      mavContainer.setBinding(name, ann.binding());
   }

   Object attribute = null;
   BindingResult bindingResult = null;

   if (mavContainer.containsAttribute(name)) {
      attribute = mavContainer.getModel().get(name);
   }
   else {
      // Create attribute instance
      try {
         attribute = createAttribute(name, parameter, binderFactory, webRequest);
      }
      catch (BindException ex) {
         if (isBindExceptionRequired(parameter)) {
            // No BindingResult parameter -> fail with BindException
            throw ex;
         }
         // Otherwise, expose null/empty value and associated BindingResult
         if (parameter.getParameterType() == Optional.class) {
            attribute = Optional.empty();
         }
         bindingResult = ex.getBindingResult();
      }
   }

   if (bindingResult == null) {
      // Bean property binding and validation;
      // skipped in case of binding failure on construction.
      WebDataBinder binder = binderFactory.createBinder(webRequest, attribute, name);
      if (binder.getTarget() != null) {
         if (!mavContainer.isBindingDisabled(name)) {
            bindRequestParameters(binder, webRequest);
         }
         validateIfApplicable(binder, parameter);
         if (binder.getBindingResult().hasErrors() && isBindExceptionRequired(binder, parameter)) {
            throw new BindException(binder.getBindingResult());
         }
      }
      // Value type adaptation, also covering java.util.Optional
      if (!parameter.getParameterType().isInstance(attribute)) {
         attribute = binder.convertIfNecessary(binder.getTarget(), parameter.getParameterType(), parameter);
      }
      bindingResult = binder.getBindingResult();
   }

   // Add resolved attribute and BindingResult at the end of the model
   Map<String, Object> bindingResultModel = bindingResult.getModel();
   mavContainer.removeAttributes(bindingResultModel);
   mavContainer.addAllAttributes(bindingResultModel);

   return attribute;
}
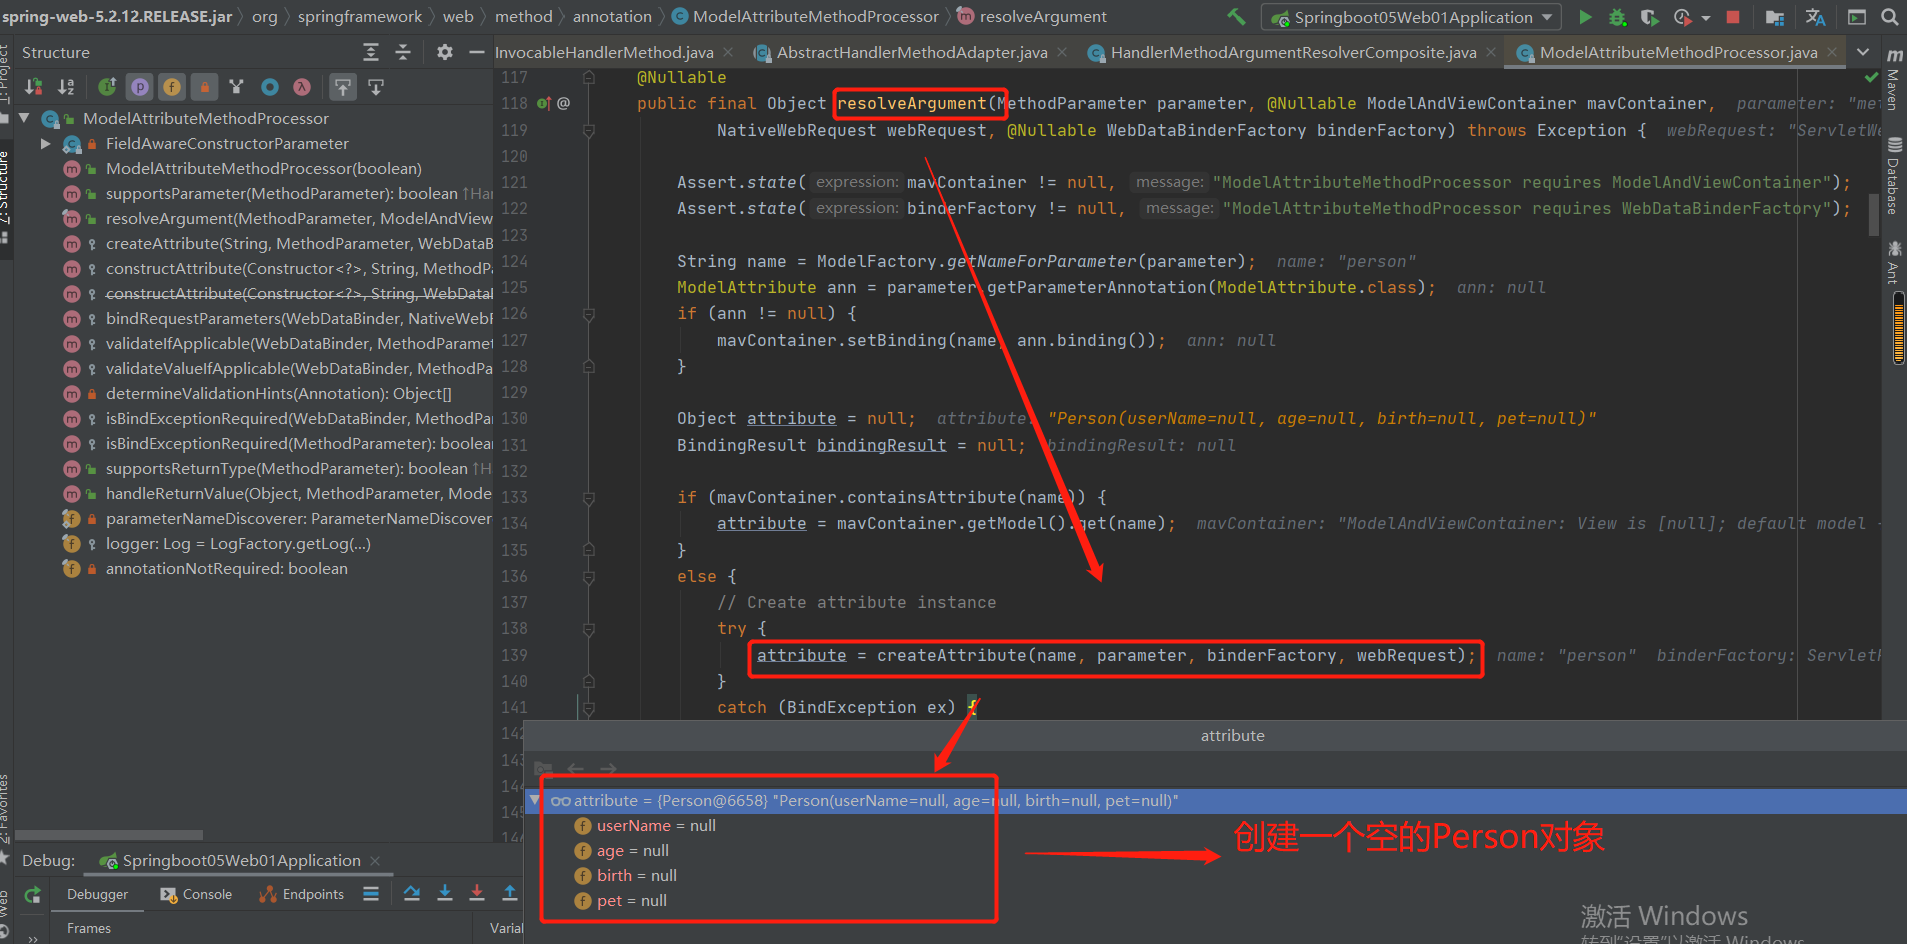
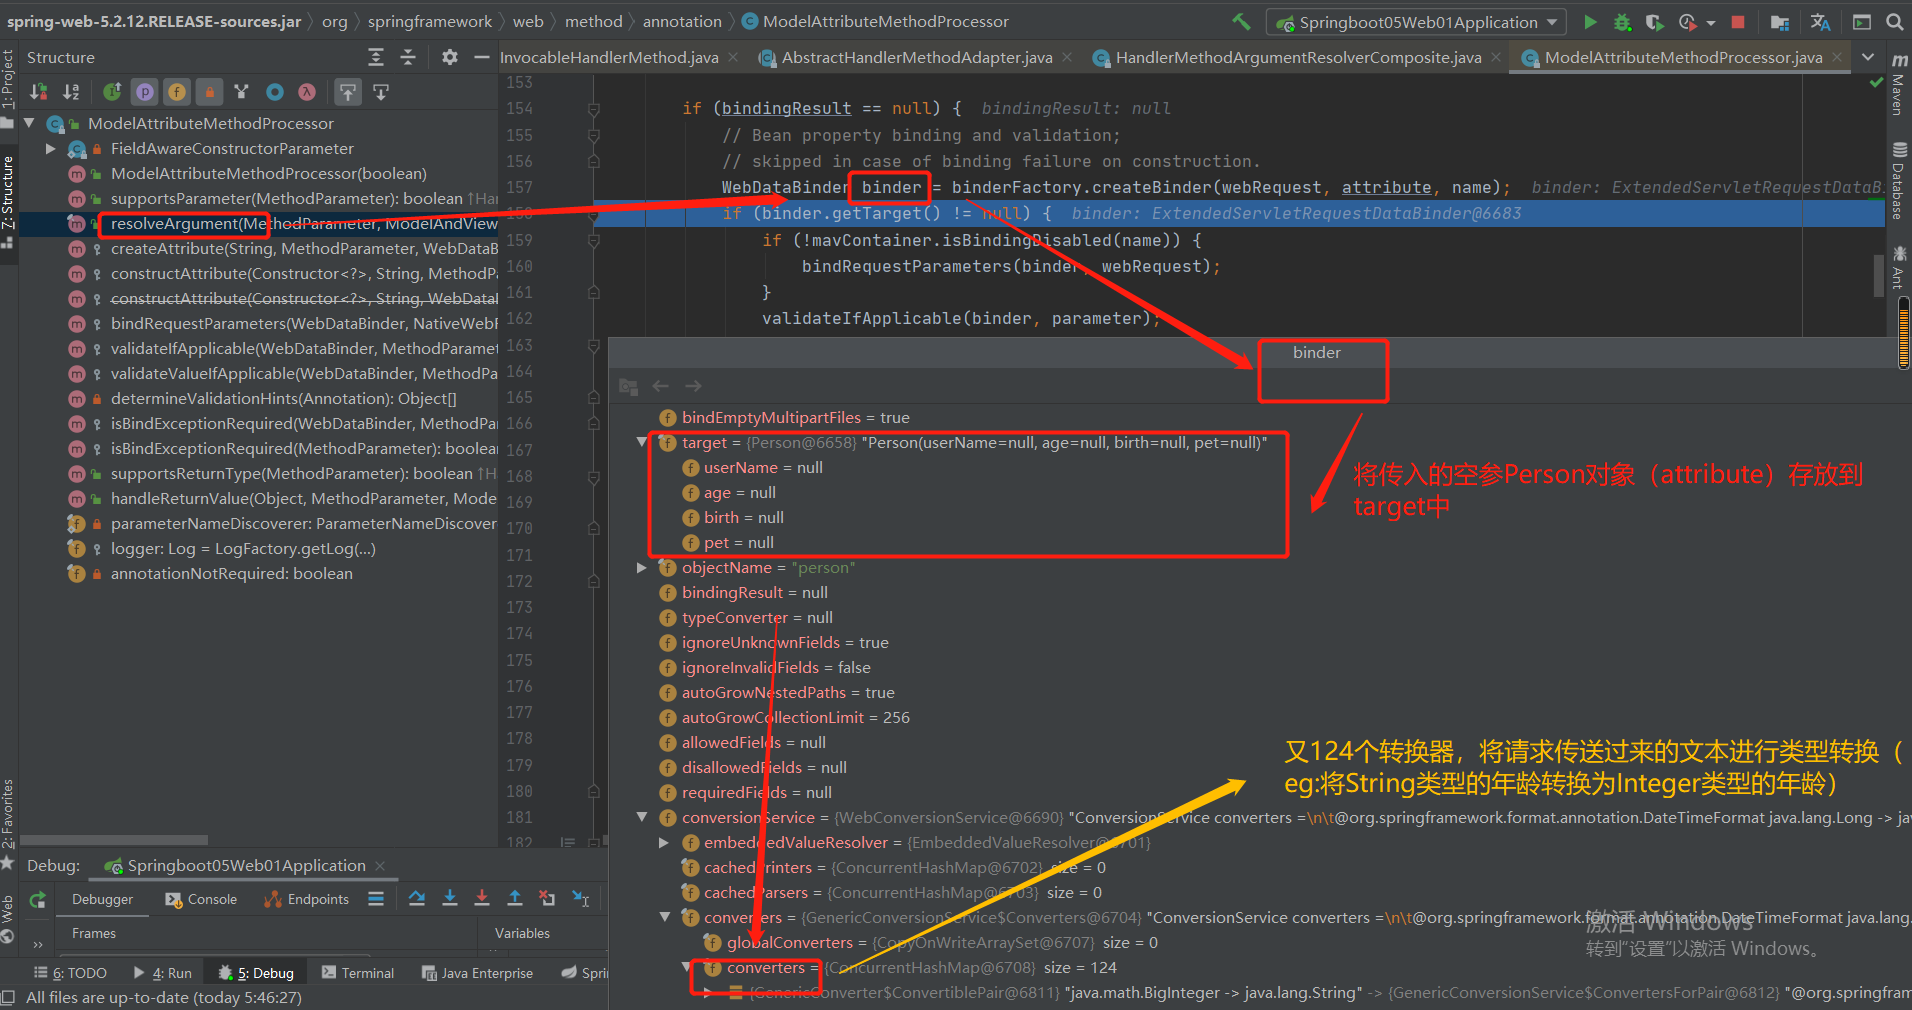
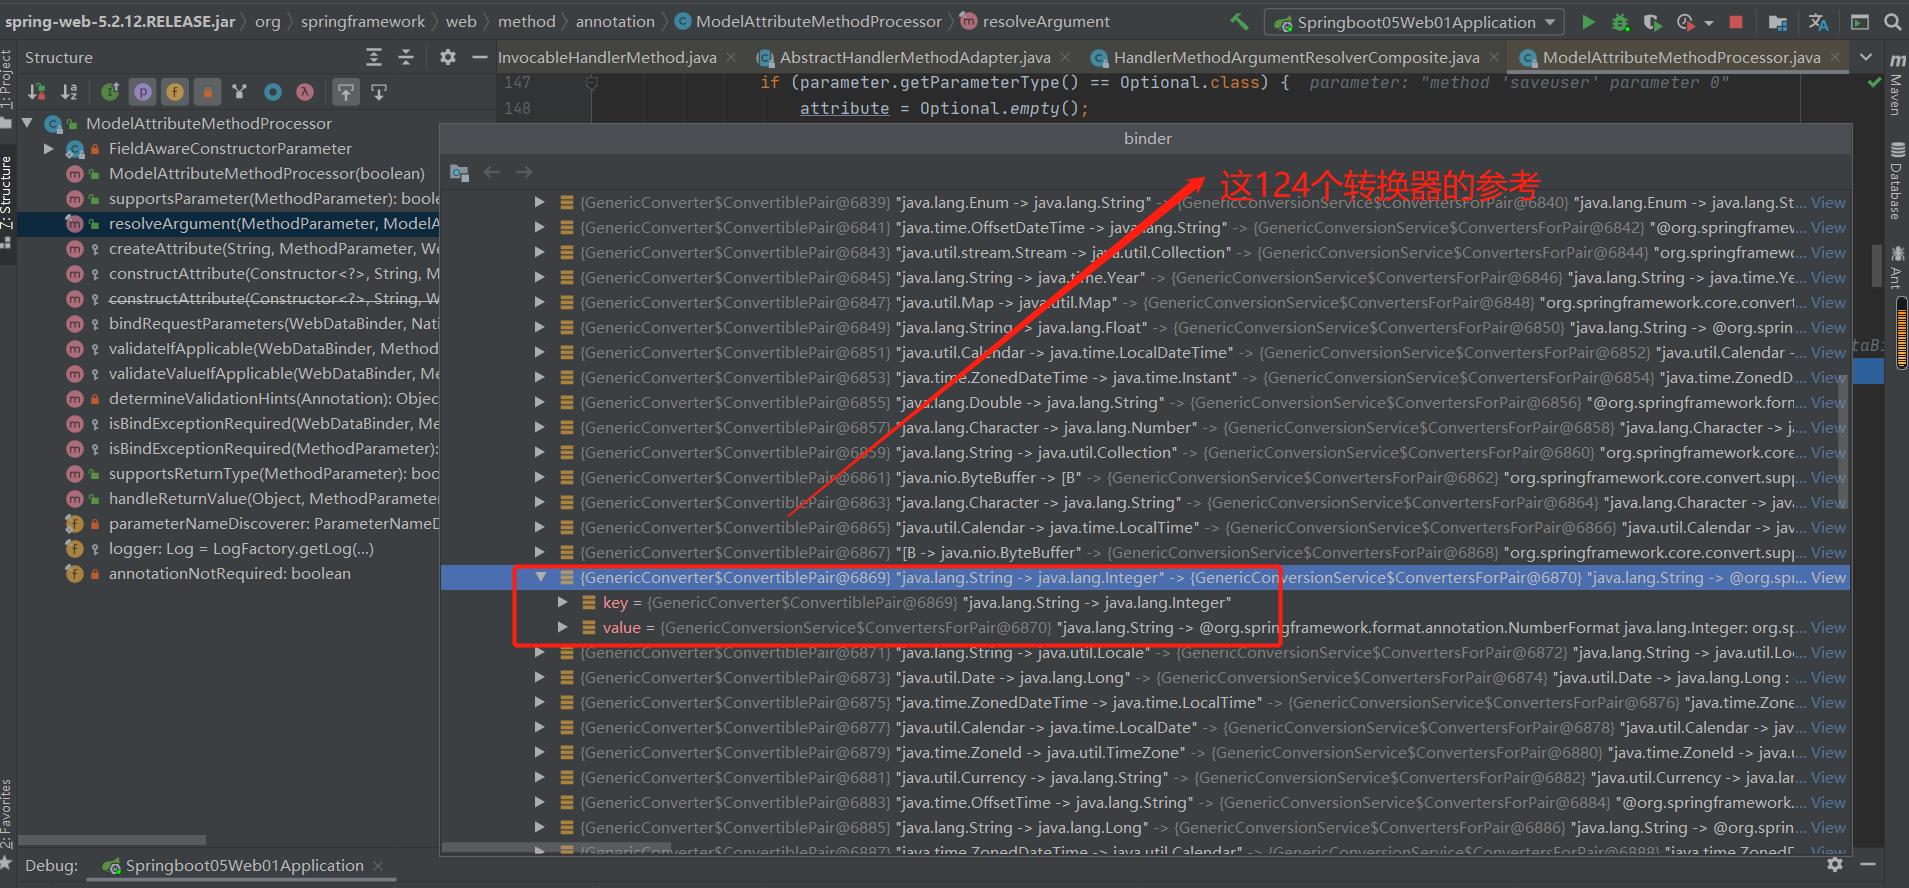
总结:WebDataBinder利用其中的124个转换器(converters)将HTTP协议请求发送过来的文本转变为指定的类型数据,然后利用反射将数据封装到空参的attribute对象中。
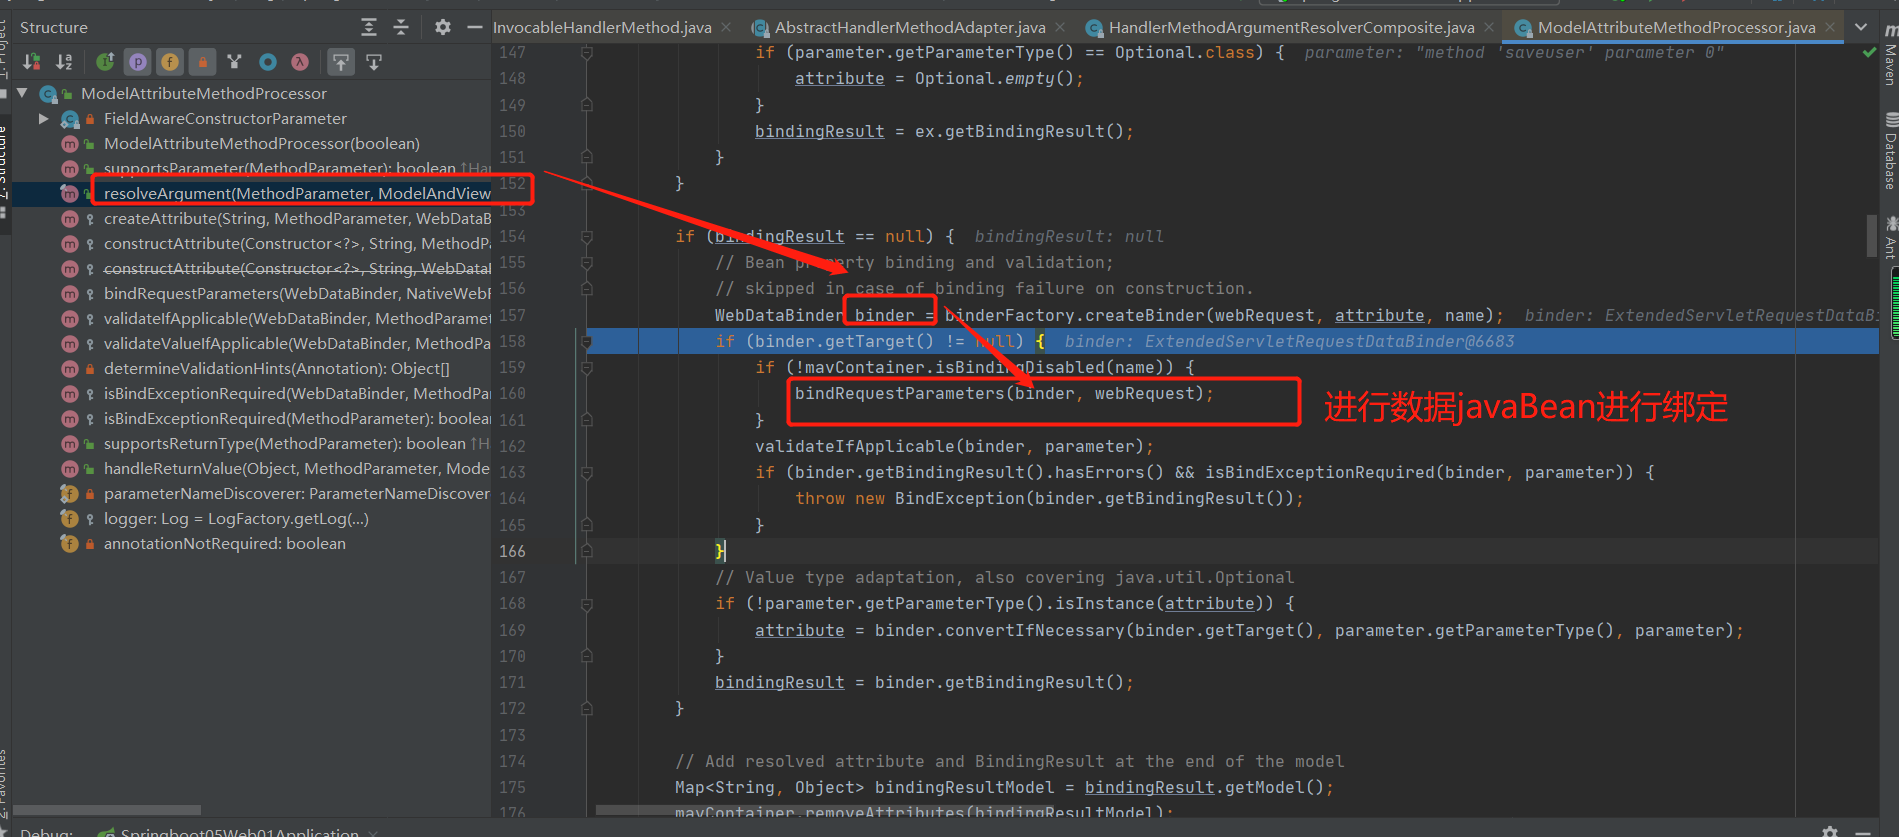
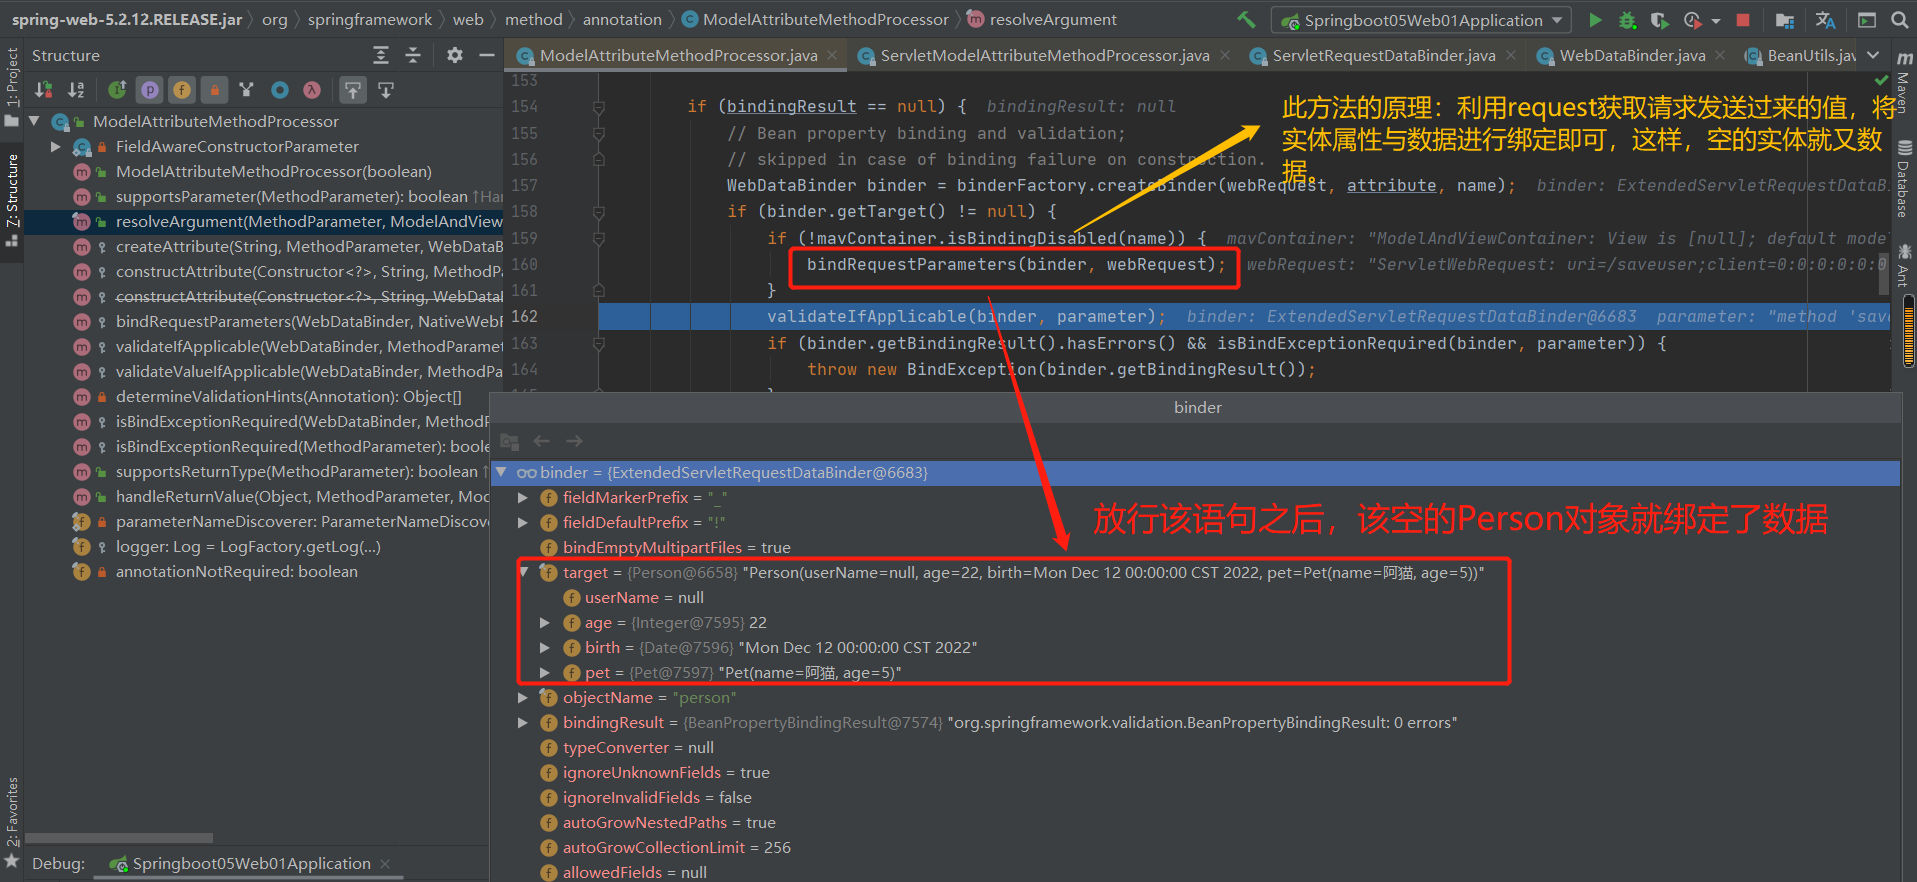
补充:

6-9 自定义Converter原理
1.使用
未来我们可以给WebDataBinder里面放自己的Converter;
private static final class StringToNumber<T extends Number> implements Converter<String, T>
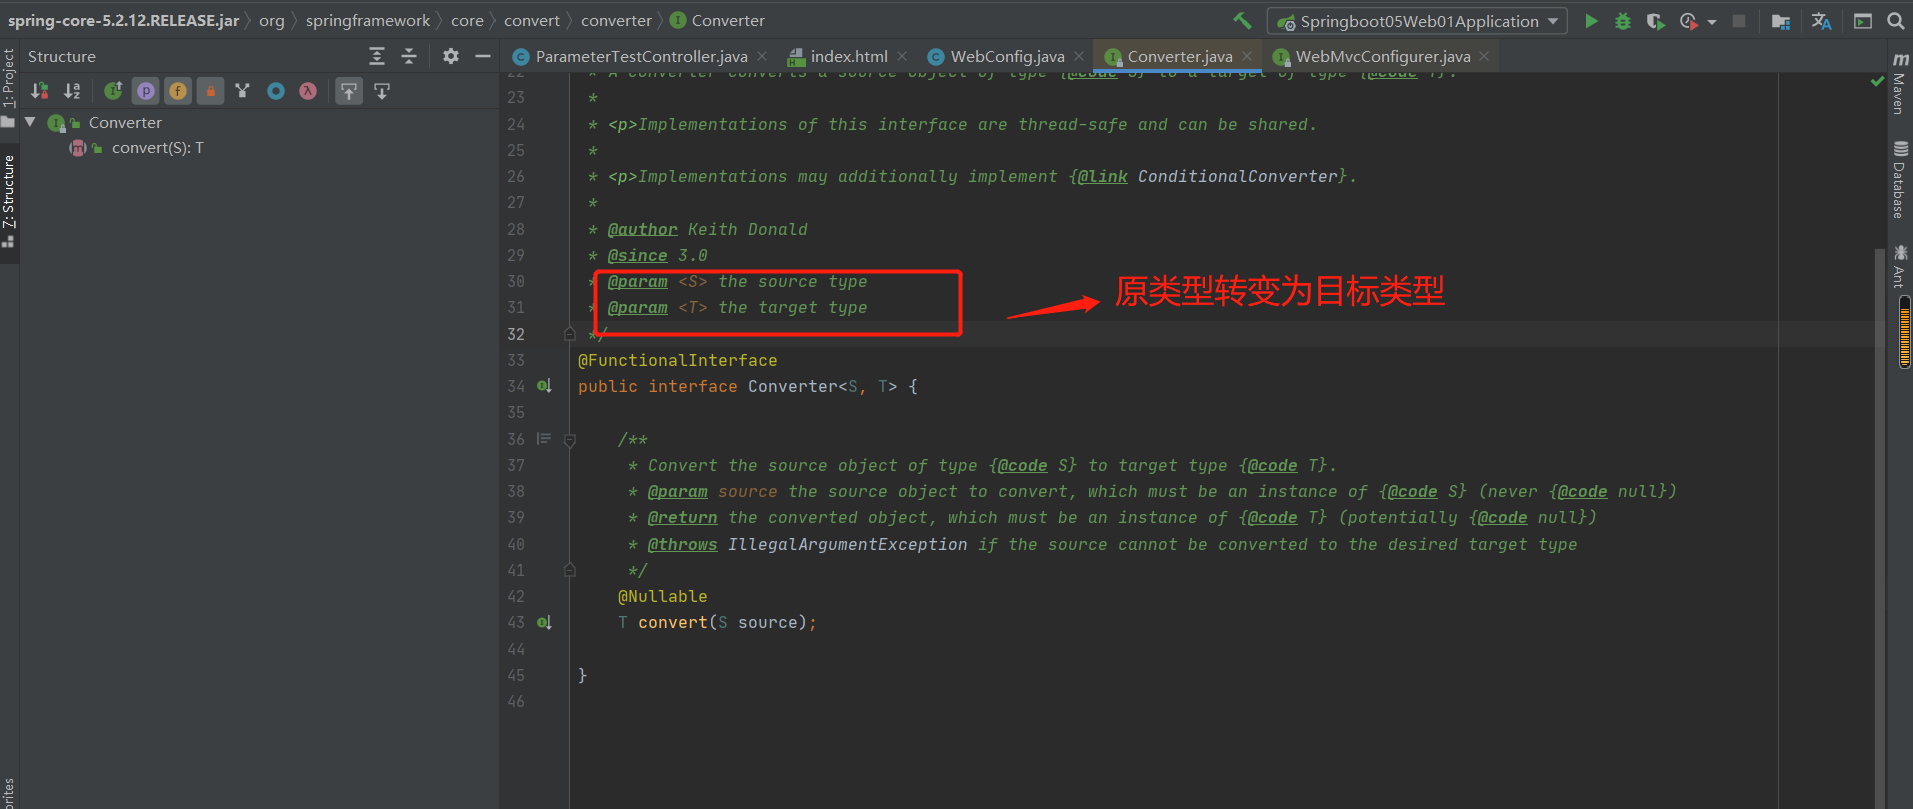
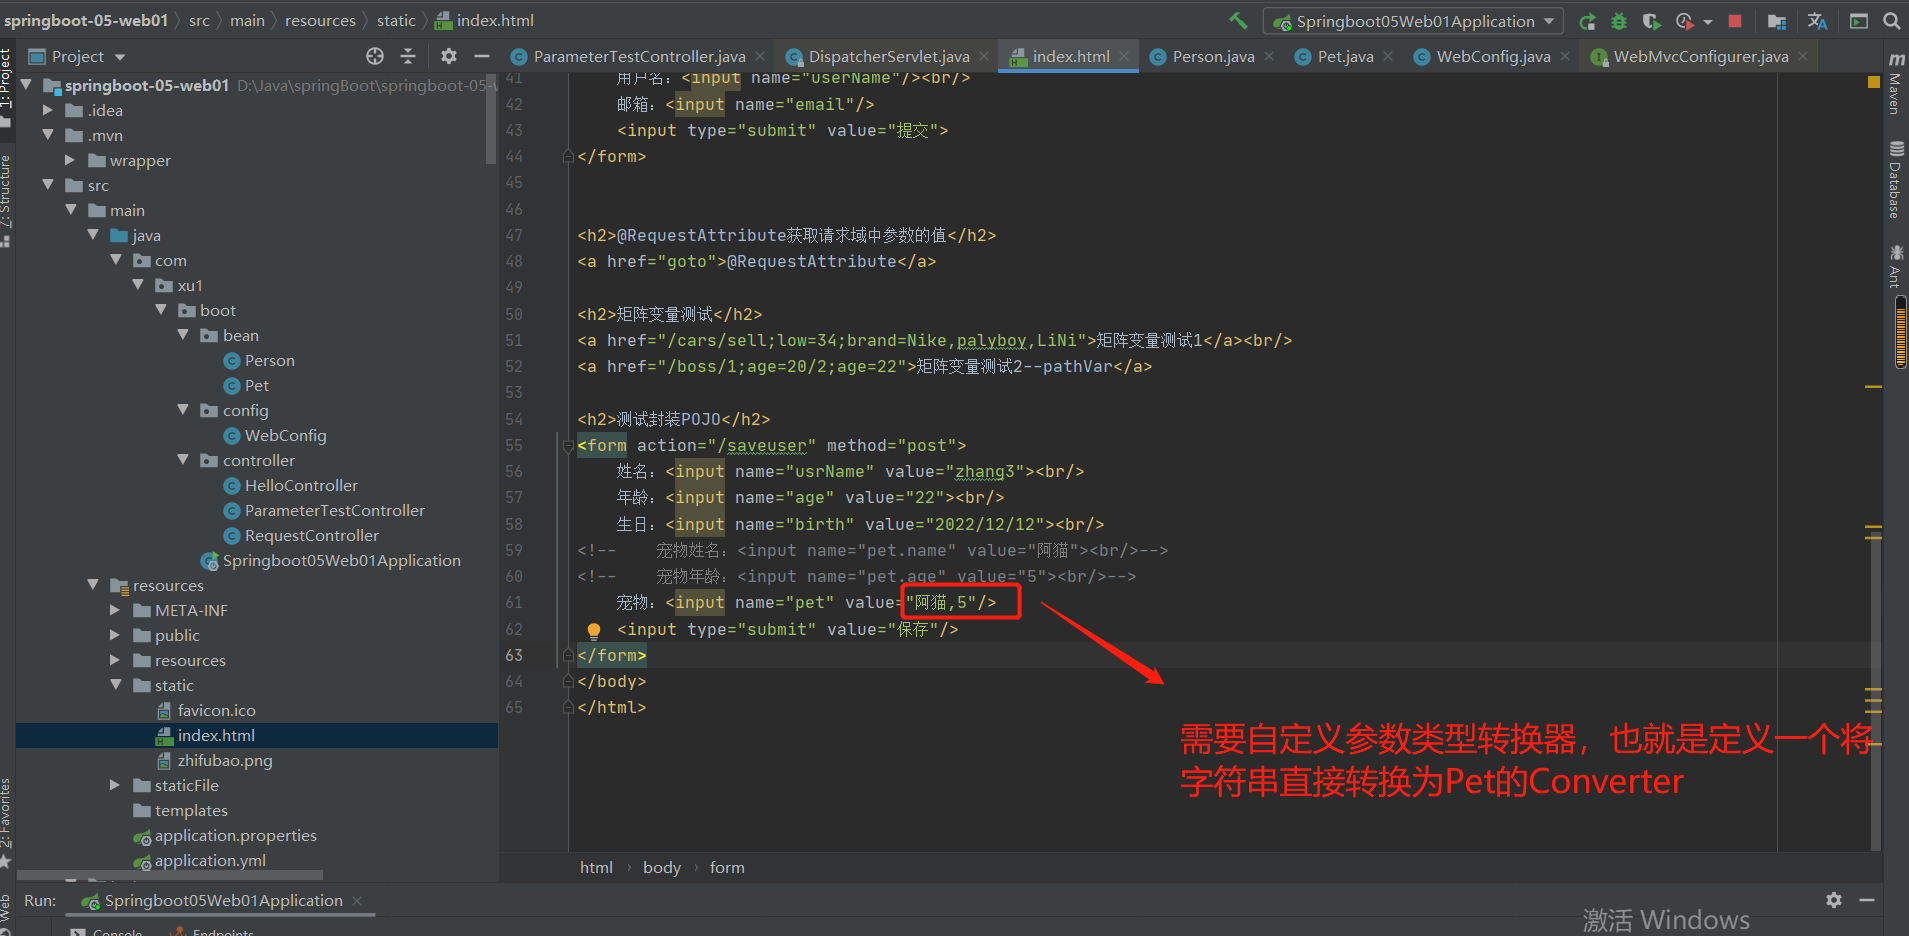
重写WebMvcConfigurer接口的方法,增添一个自定义的转换器:
package com.xu1.boot.config;

import com.xu1.boot.bean.Pet;
import org.springframework.boot.context.properties.EnableConfigurationProperties;
import org.springframework.context.annotation.Bean;
import org.springframework.context.annotation.Configuration;
import org.springframework.core.convert.converter.Converter;
import org.springframework.format.FormatterRegistry;
import org.springframework.util.StringUtils;
import org.springframework.web.filter.HiddenHttpMethodFilter;
import org.springframework.web.servlet.config.annotation.PathMatchConfigurer;
import org.springframework.web.servlet.config.annotation.WebMvcConfigurer;
import org.springframework.web.util.UrlPathHelper;

/**
 * @auther xu
 * @Description
 * @date 2022/07/21 - 5:55:51
 * @Modified By:
 */
@Configuration(proxyBeanMethods = false)
public class WebConfig implements WebMvcConfigurer {
    @Bean
    public HiddenHttpMethodFilter hiddenHttpMethodFilter() {
        HiddenHttpMethodFilter hiddenHttpMethodFilter = new HiddenHttpMethodFilter();
        hiddenHttpMethodFilter.setMethodParam("_m");
        return hiddenHttpMethodFilter;
    }

    /**
     *
     * @Description
     * 开启矩阵变量的功能
     * @Date 2022/07/29 9:49:15
     *
     */
    @Override
    public void configurePathMatch(PathMatchConfigurer configurer) {
        UrlPathHelper urlPathHelper = new UrlPathHelper();
        urlPathHelper.setRemoveSemicolonContent(false);//默认是true,禁用掉了矩阵变量功能
        configurer.setUrlPathHelper(urlPathHelper);
    }

    /**
     *
     * @Description
     * 增加类型转换器
     * 将字符串---"阿猫,5",转变为Pet类型
     * @Date 2022/07/29 9:53:03
     *
     */
    @Override
    public void addFormatters(FormatterRegistry registry) {
        registry.addConverter(new Converter<String, Pet>() {

            @Override
            public Pet convert(String source) {

                //org.springframework.util public abstract class StringUtils
                //已利用spring的字符串工具类判断被转换的类不是空,方可进行数据所对应类型的转换

                if (!StringUtils.isEmpty(source)) {
                    Pet pet = new Pet();

                    String[] split = source.split(",");
                    //将"阿猫,5"利用正则表达式分割存入到数组中,数组中第一个值为猫的name,第2个值为猫的age
                    pet.setName(split[0]);
                    pet.setAge(split[1]);
                    return pet;
                }
                return null;
            }
        });

    }

}
//@Configuration(proxyBeanMethods = false)
//public class WebConfig{
//    @Bean
//    public HiddenHttpMethodFilter hiddenHttpMethodFilter() {
//        HiddenHttpMethodFilter hiddenHttpMethodFilter = new HiddenHttpMethodFilter();
//        hiddenHttpMethodFilter.setMethodParam("_m");
//        return hiddenHttpMethodFilter;
//    }
//
//   @Bean
//    public WebMvcConfigurer webMvcConfigurer() {
//        return new WebMvcConfigurer() {
//            @Override
//            public void configurePathMatch(PathMatchConfigurer configurer) {
//                UrlPathHelper urlPathHelper = new UrlPathHelper();
//                urlPathHelper.setRemoveSemicolonContent(false);//默认是true,禁用掉了矩阵变量功能
//                configurer.setUrlPathHelper(urlPathHelper);
//            }
//        };
//   }
//}
输出结果:
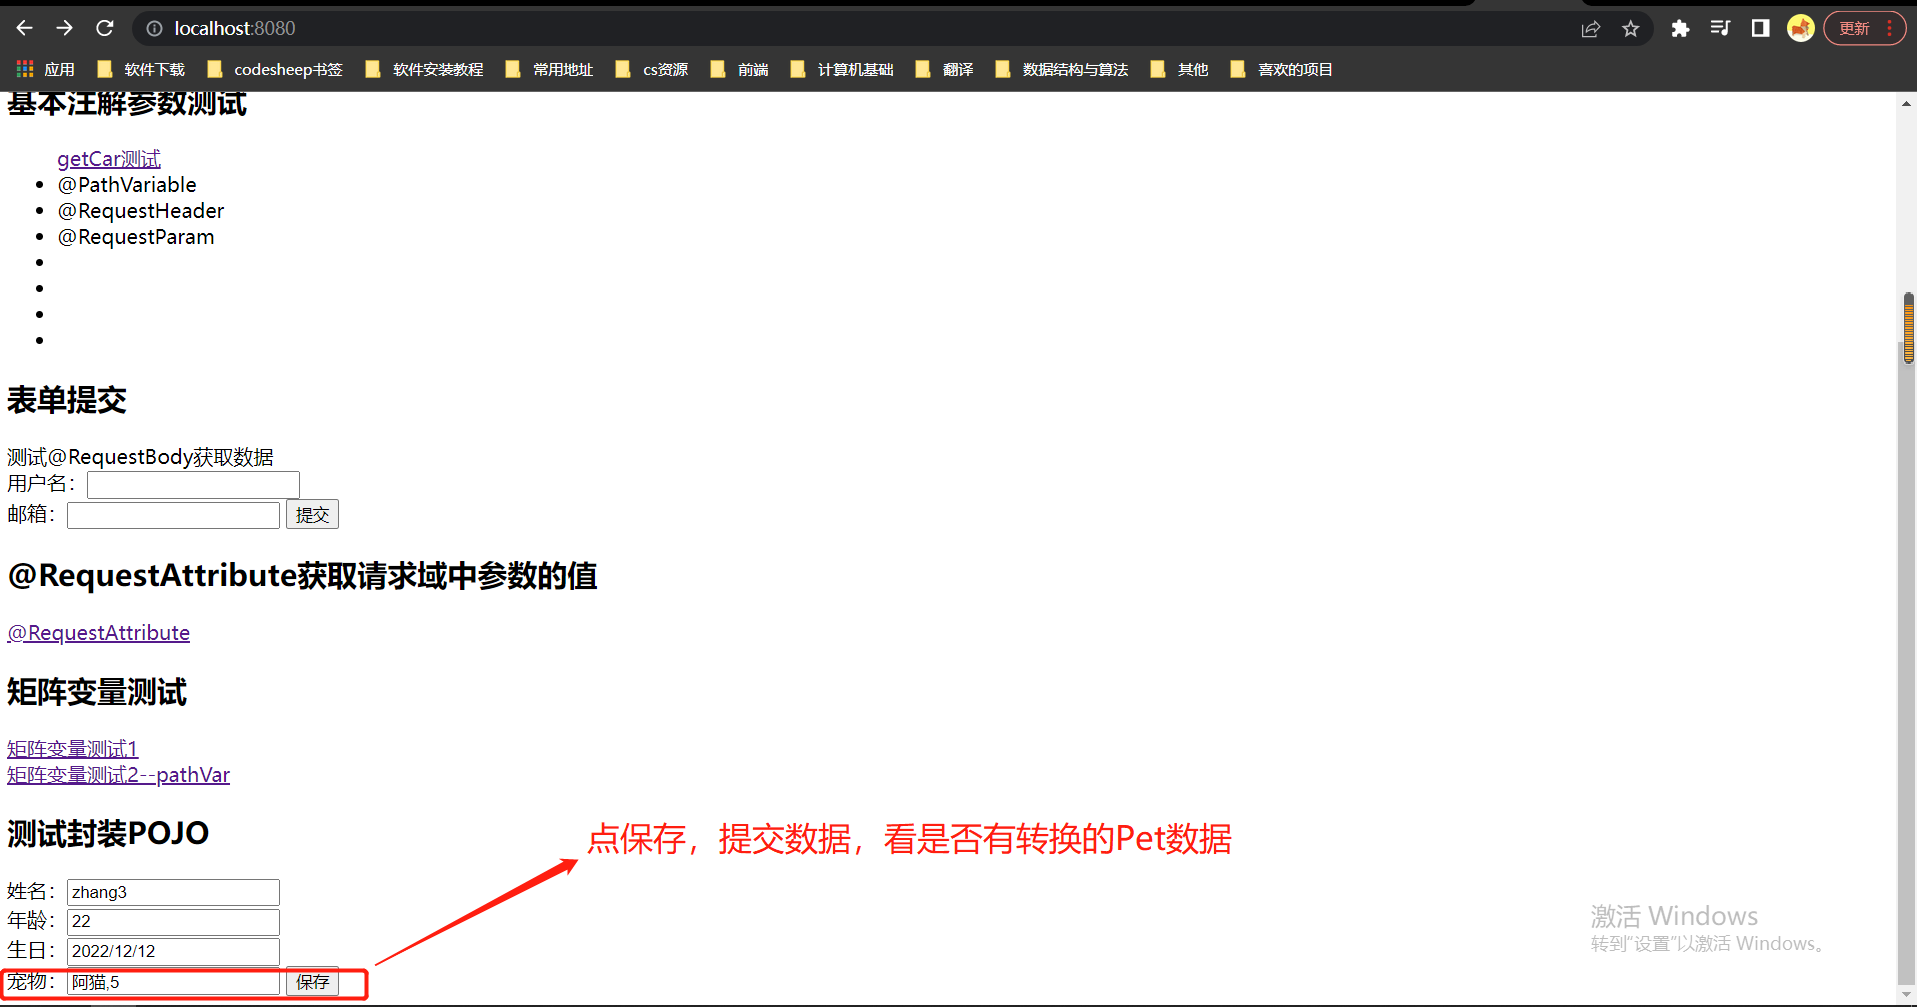
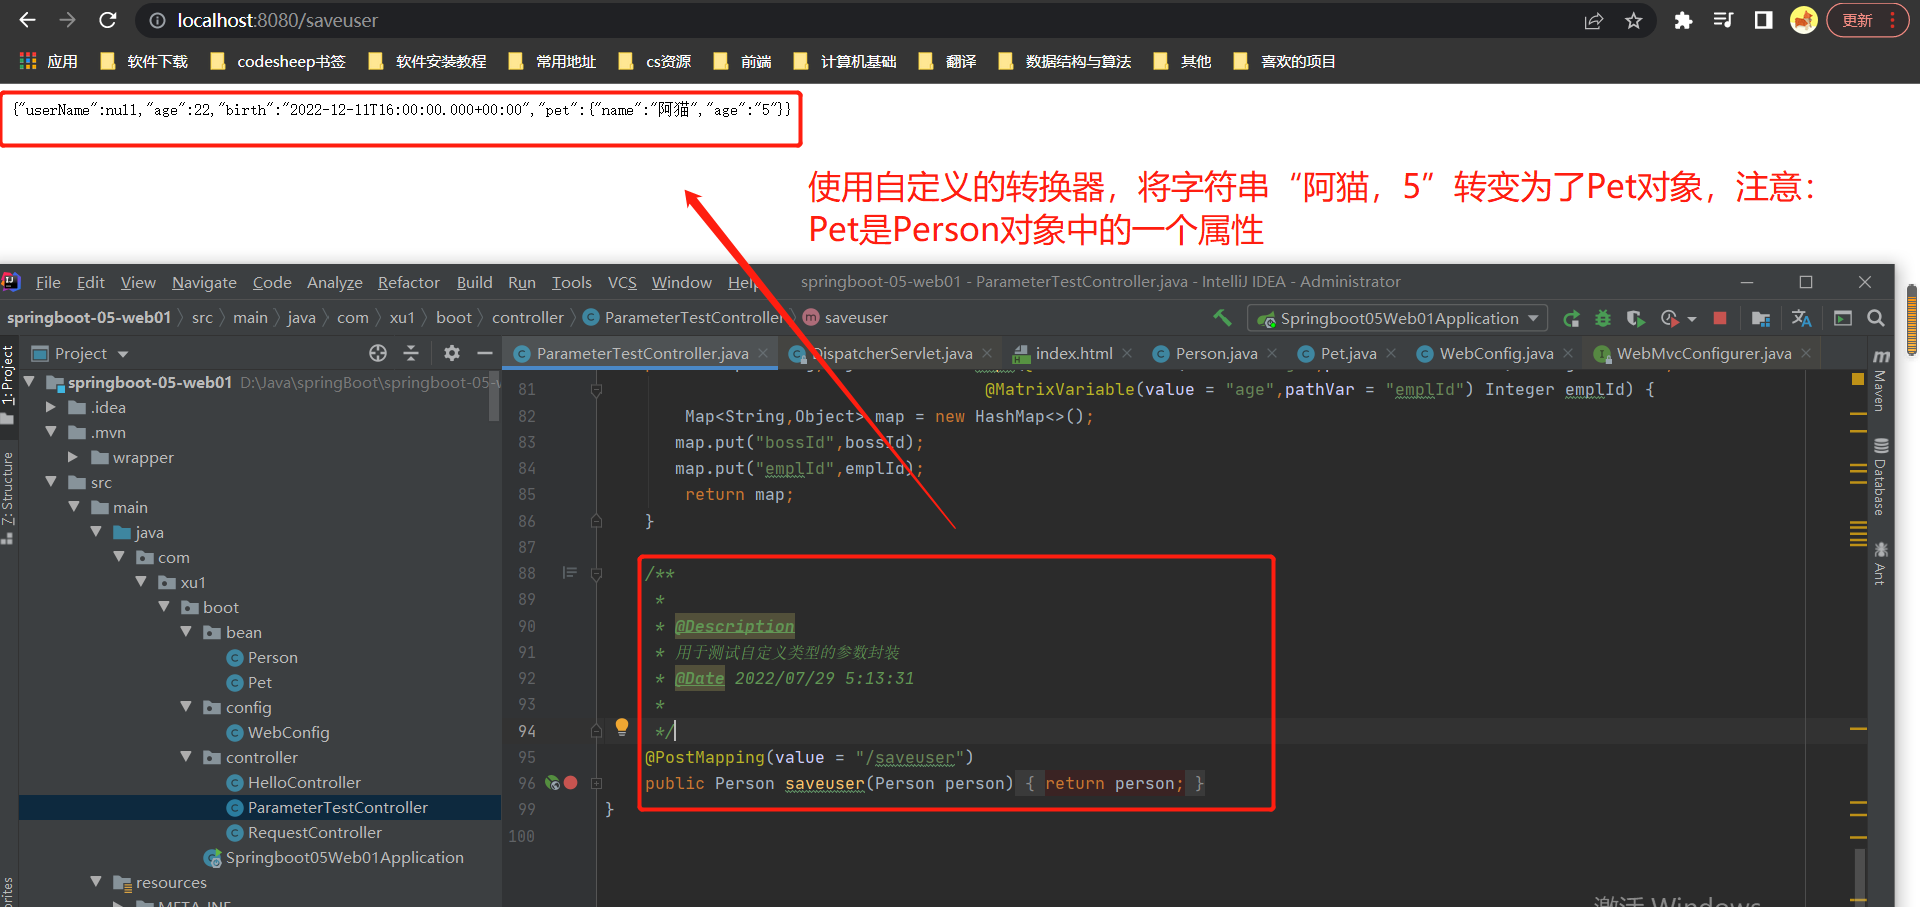
2.源码分析
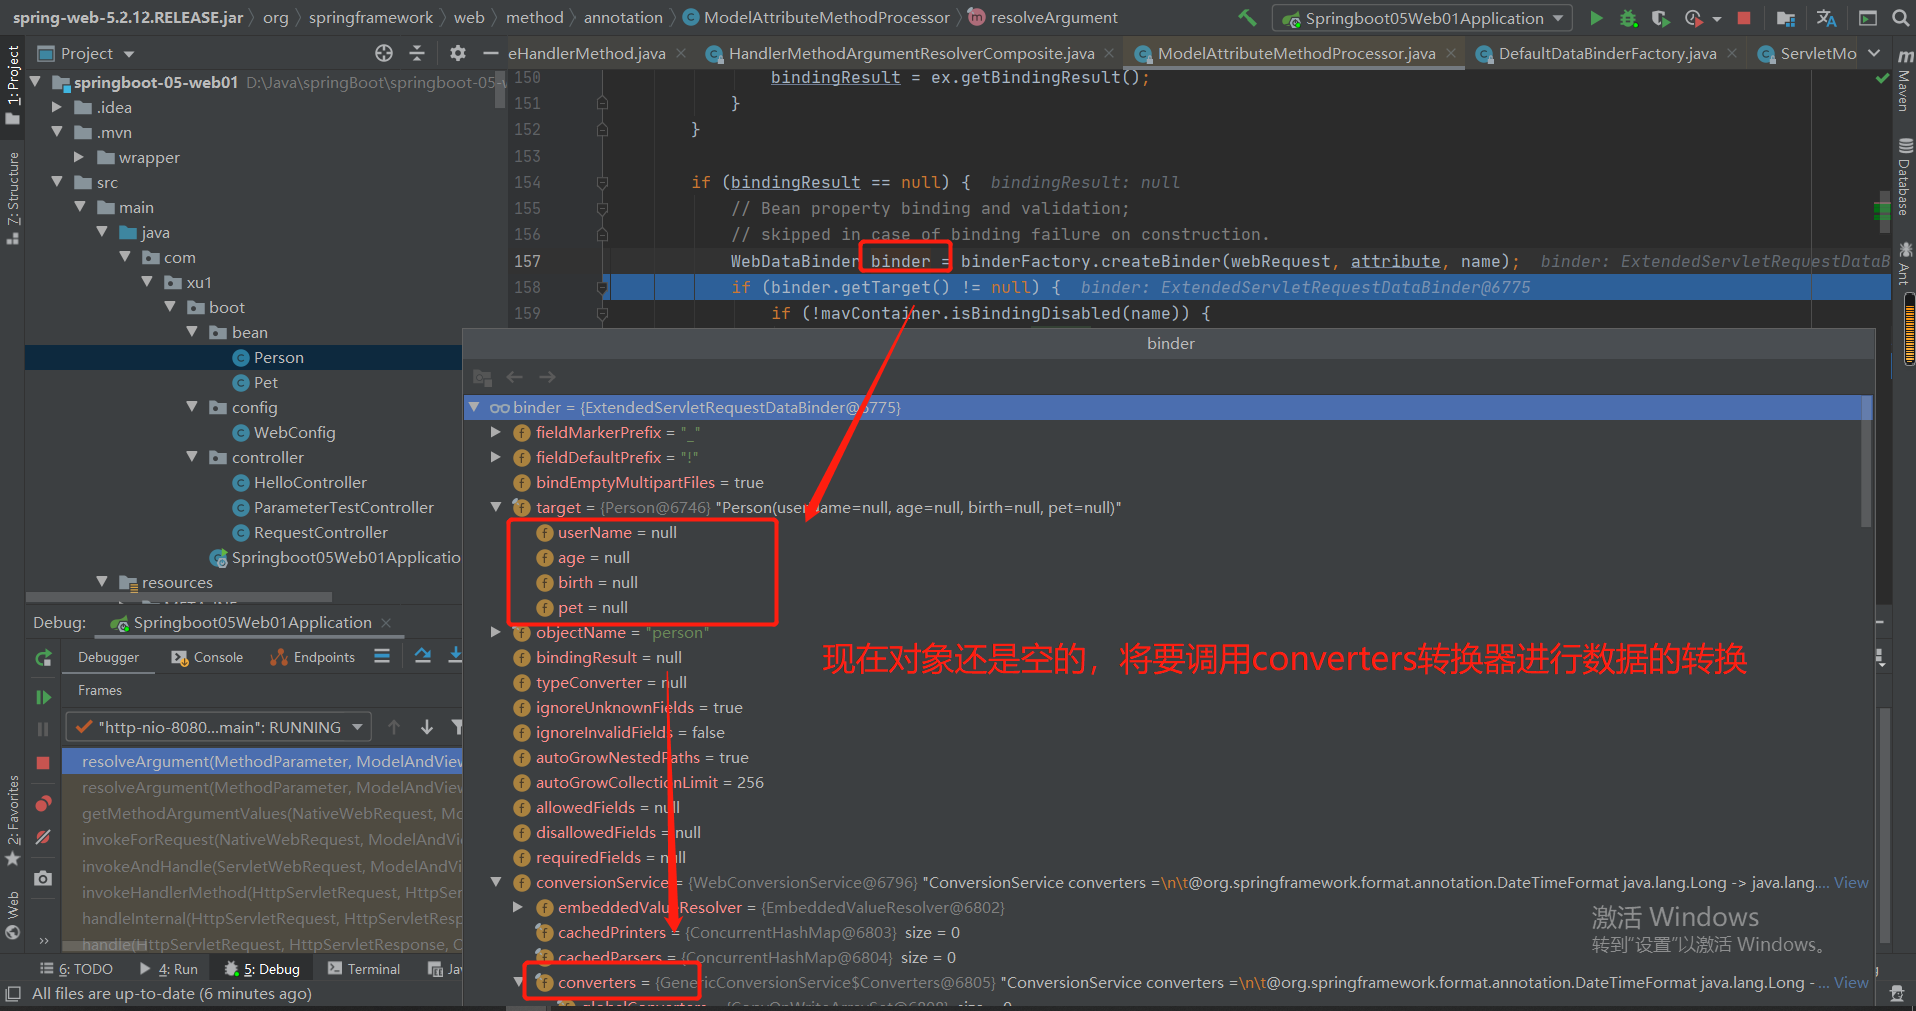
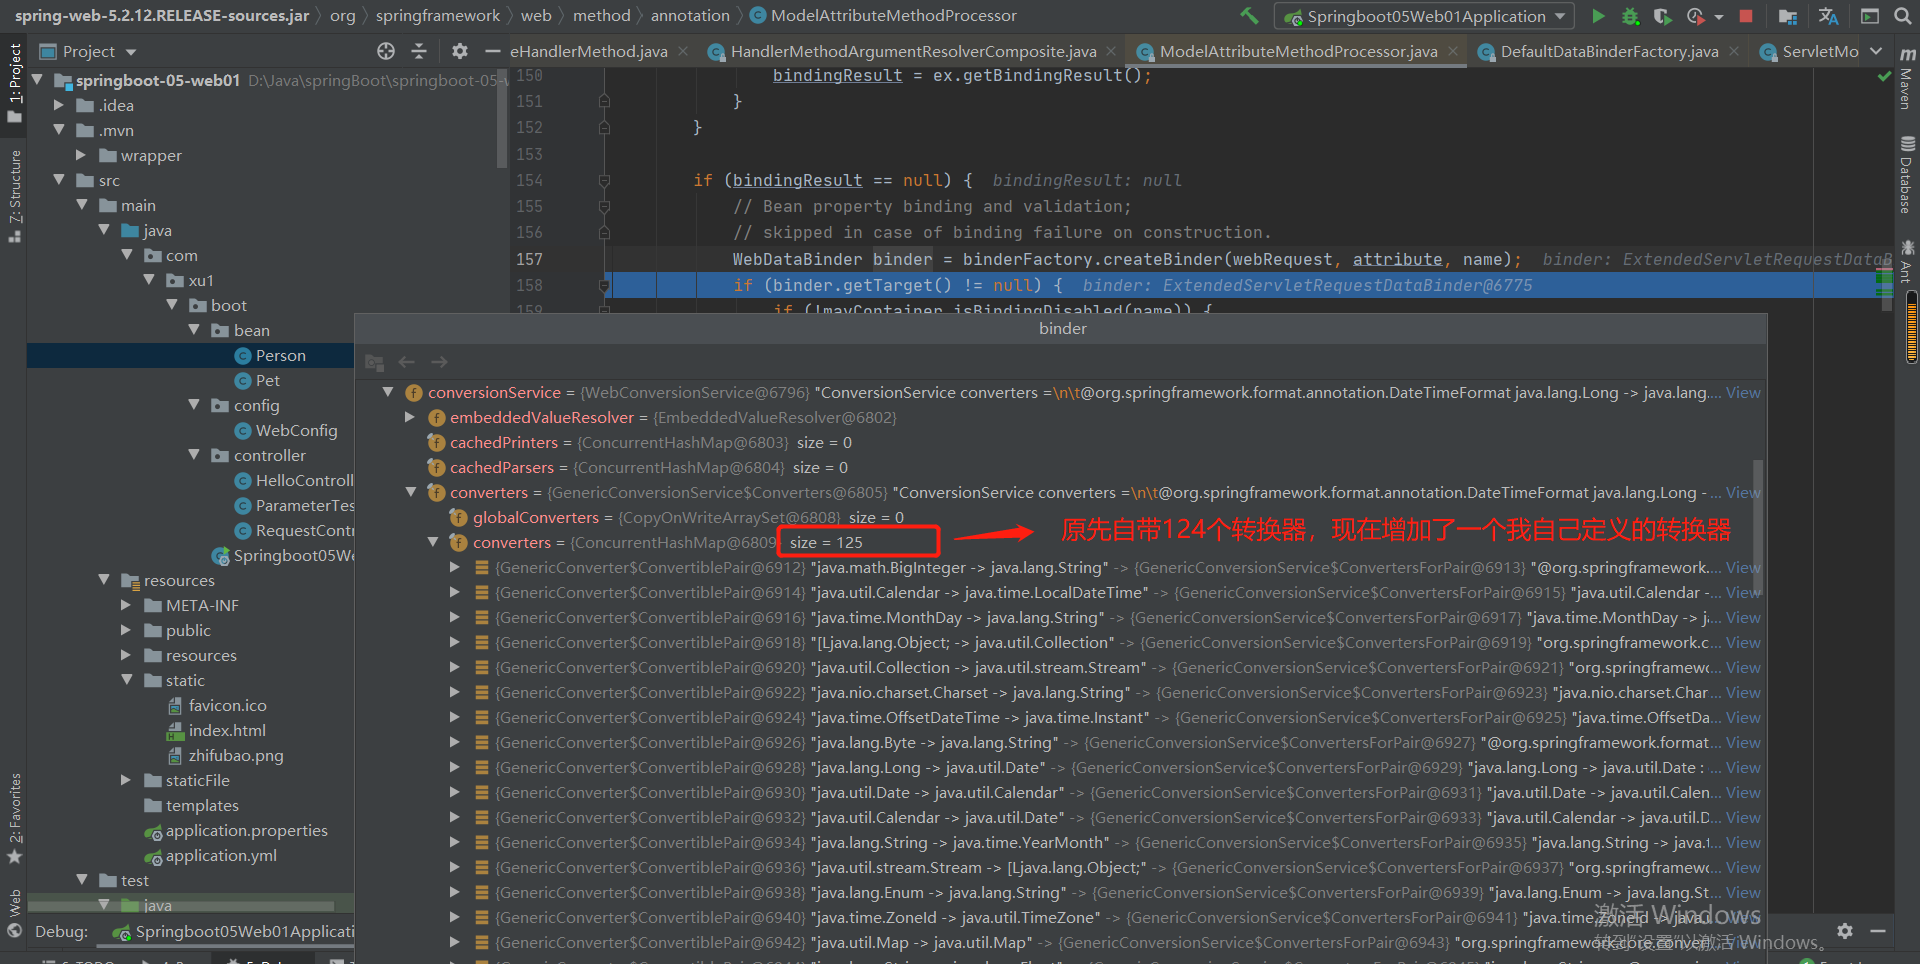
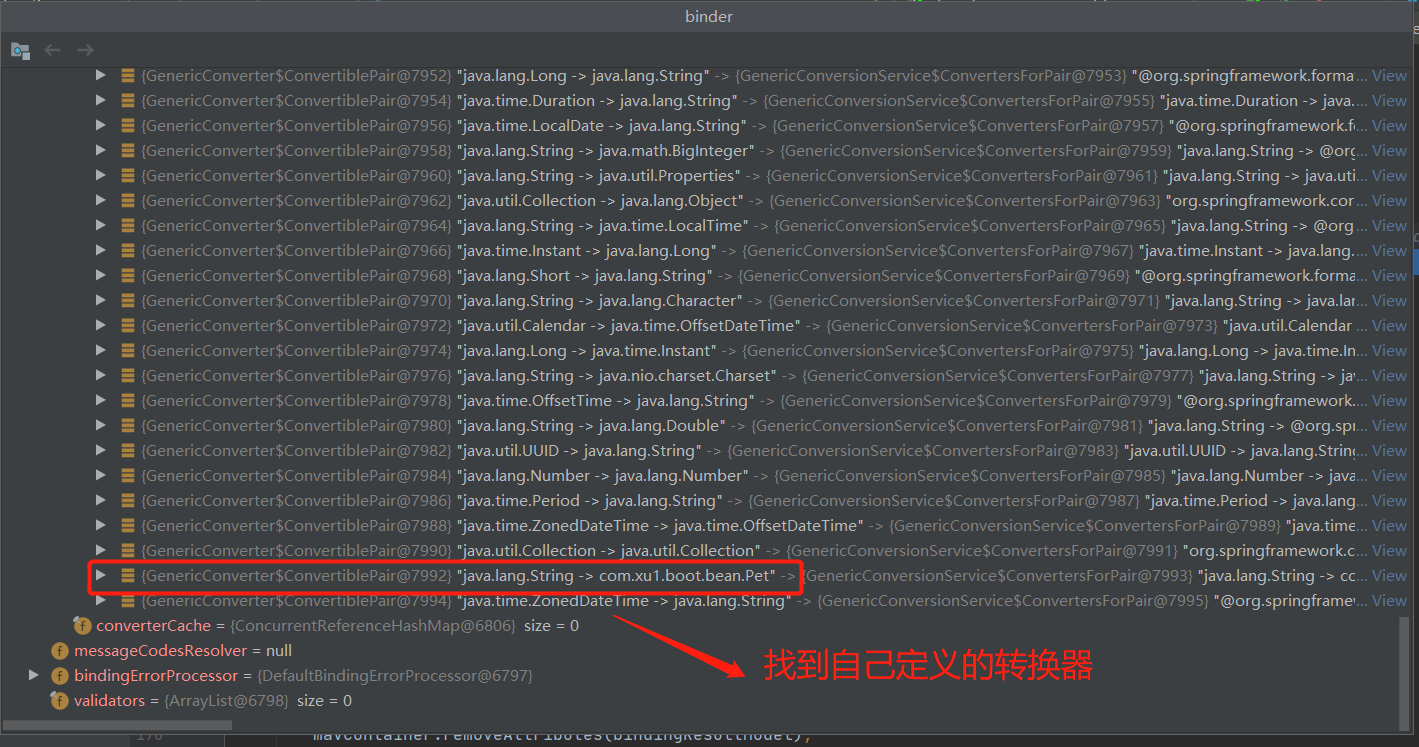
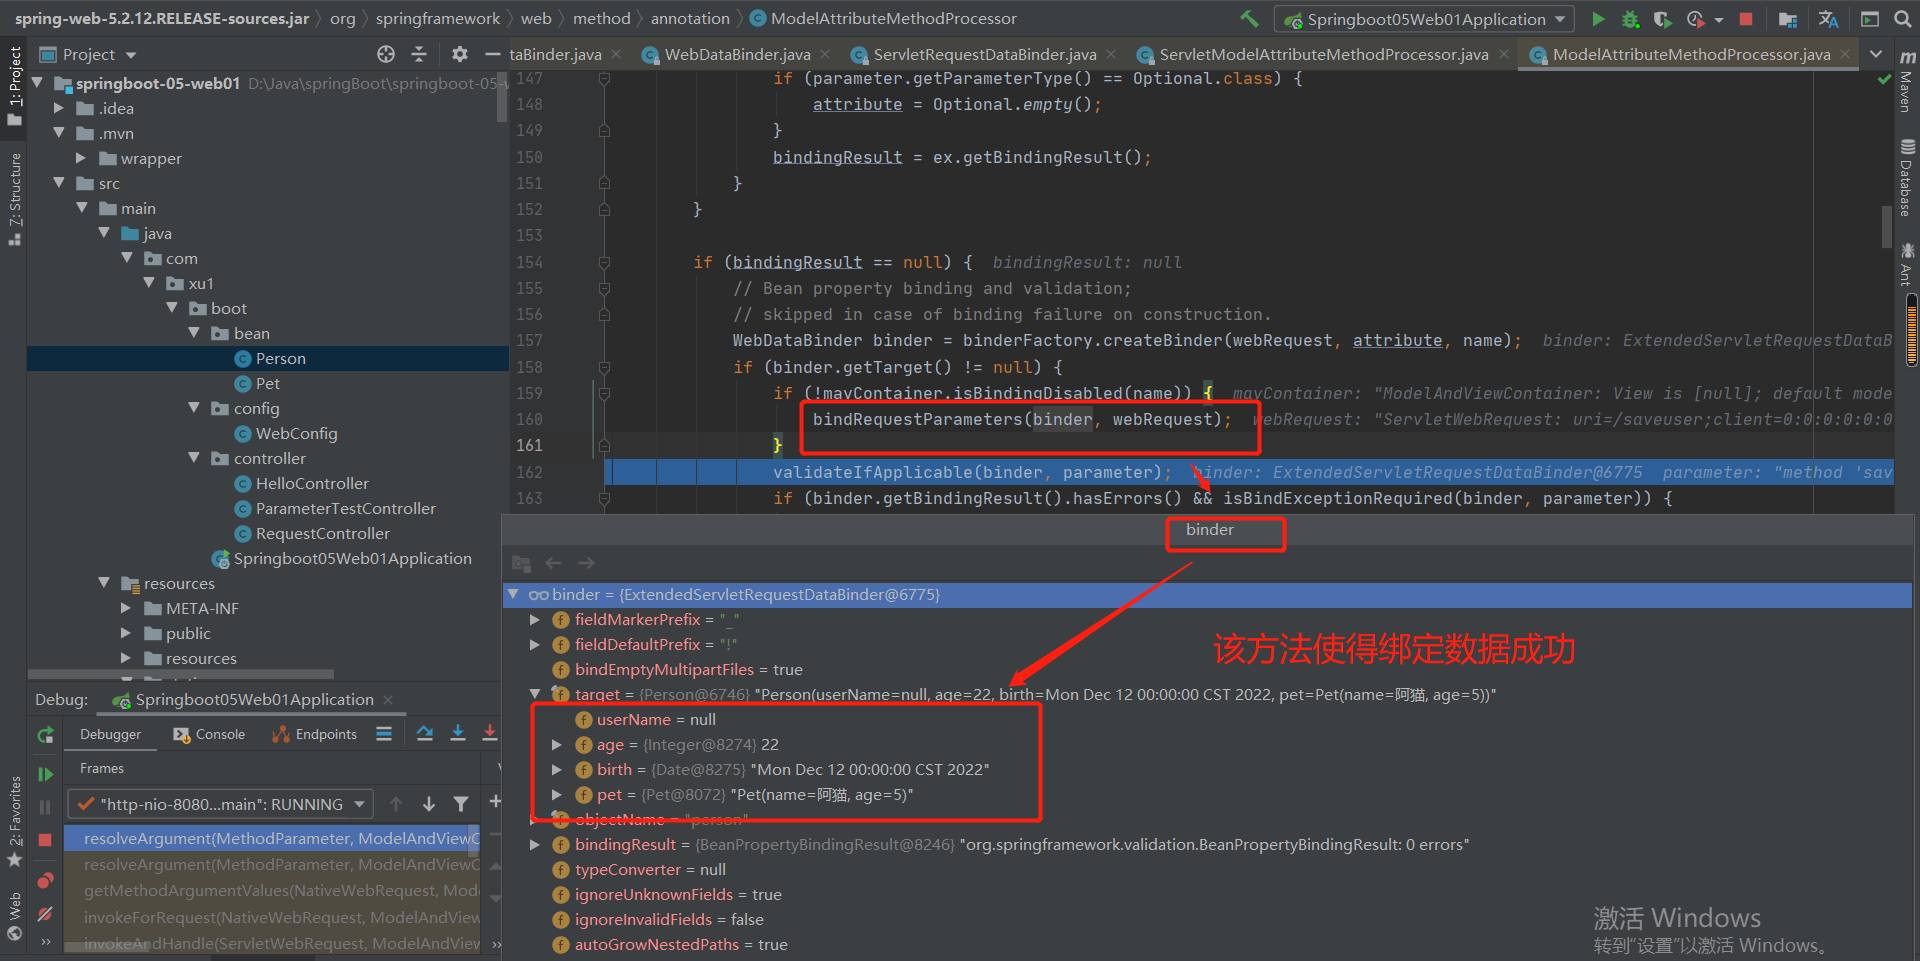
总结:页面传送过来参数,需要用对应的解析器进行解析方法参数,在解析时,需要将HTTP传送过来的文本转换为对应的目标类型,此时需要用到对应的转换器,没有对应的转换器就需要自己定义一个转换器。
第6章 (Springboot核心)web开发--第2部分
6-10 响应数据
6-10-1 ReturnValueHandler原理分析--源码
1.使用
返回json数据所需依赖,在jar包中:
<dependency>
  <groupId>org.springframework.boot</groupId>
  <artifactId>spring-boot-starter-json</artifactId>
  <version>2.3.7.RELEASE</version>
  <scope>compile</scope>
</dependency>
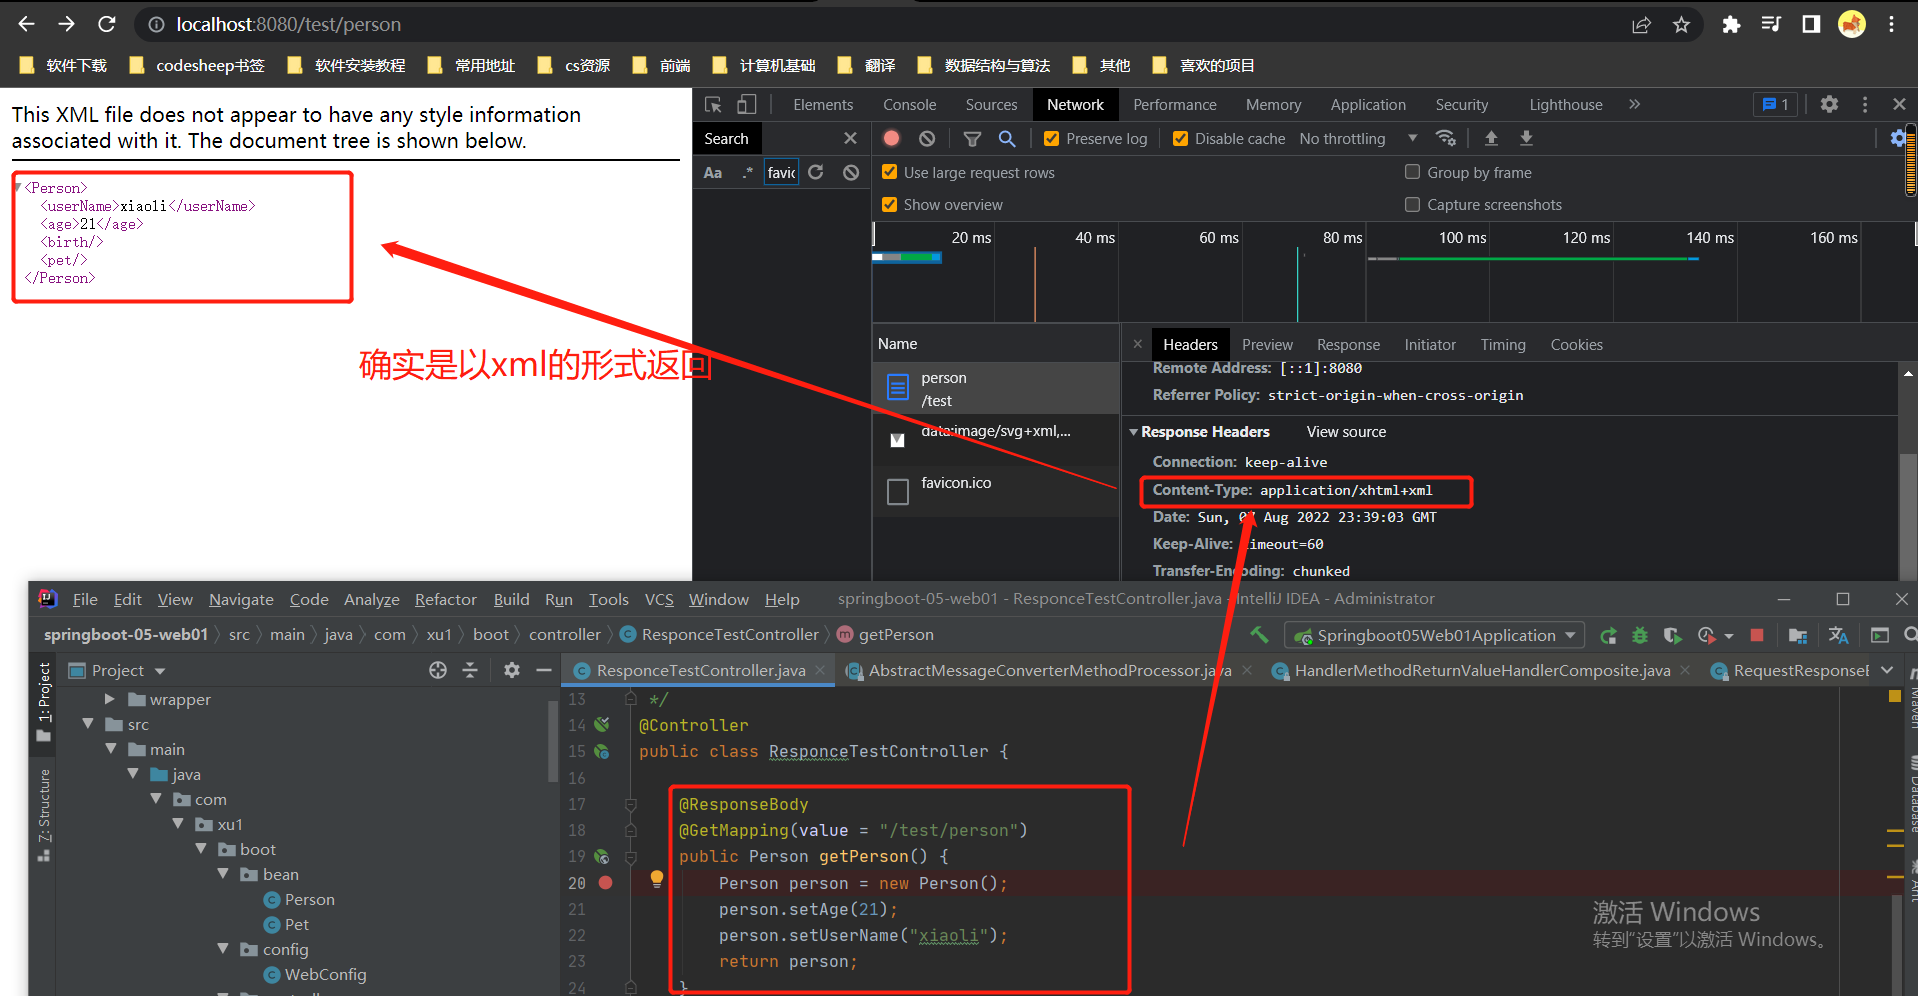
注意:如果使用了页面返回xml的依赖,那么页面将会以xml的形式返回,不会返回json
上述依赖中使用:
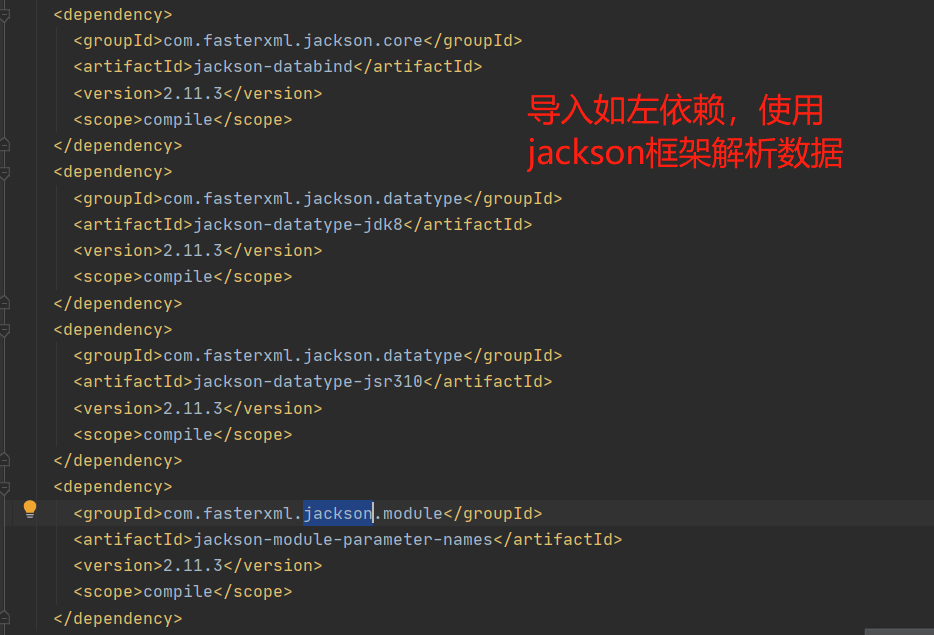
测试结果:
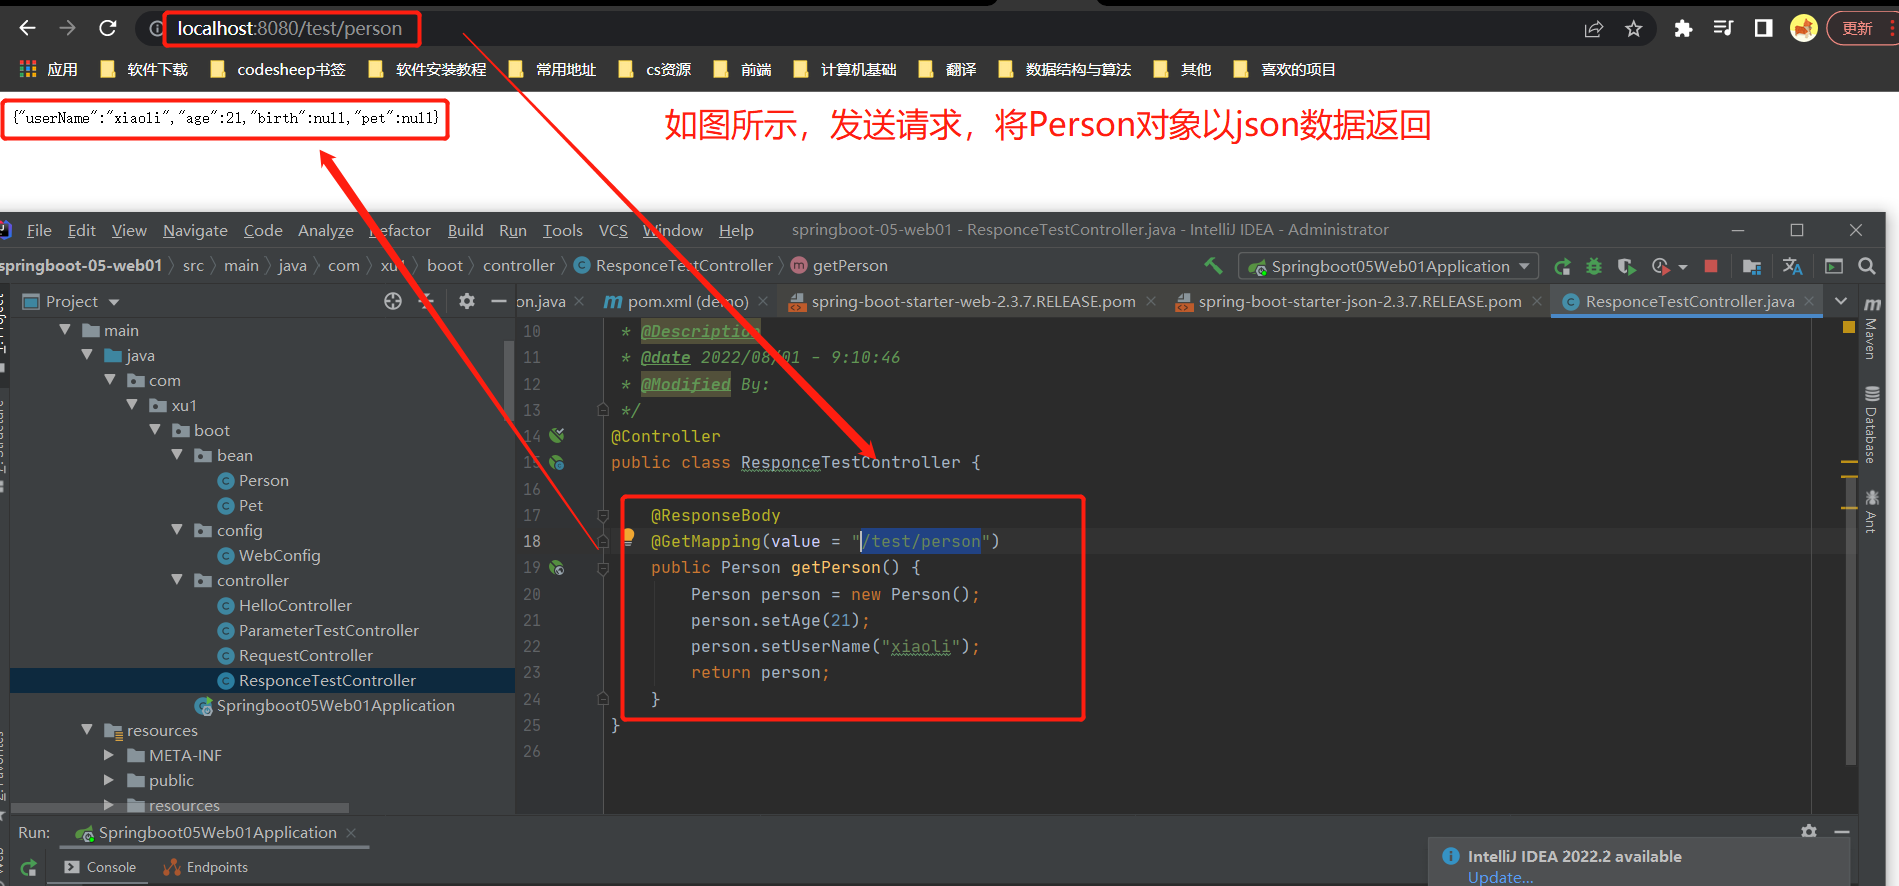
注意:还需要标注@ResponseBody注解,即可返回json数据
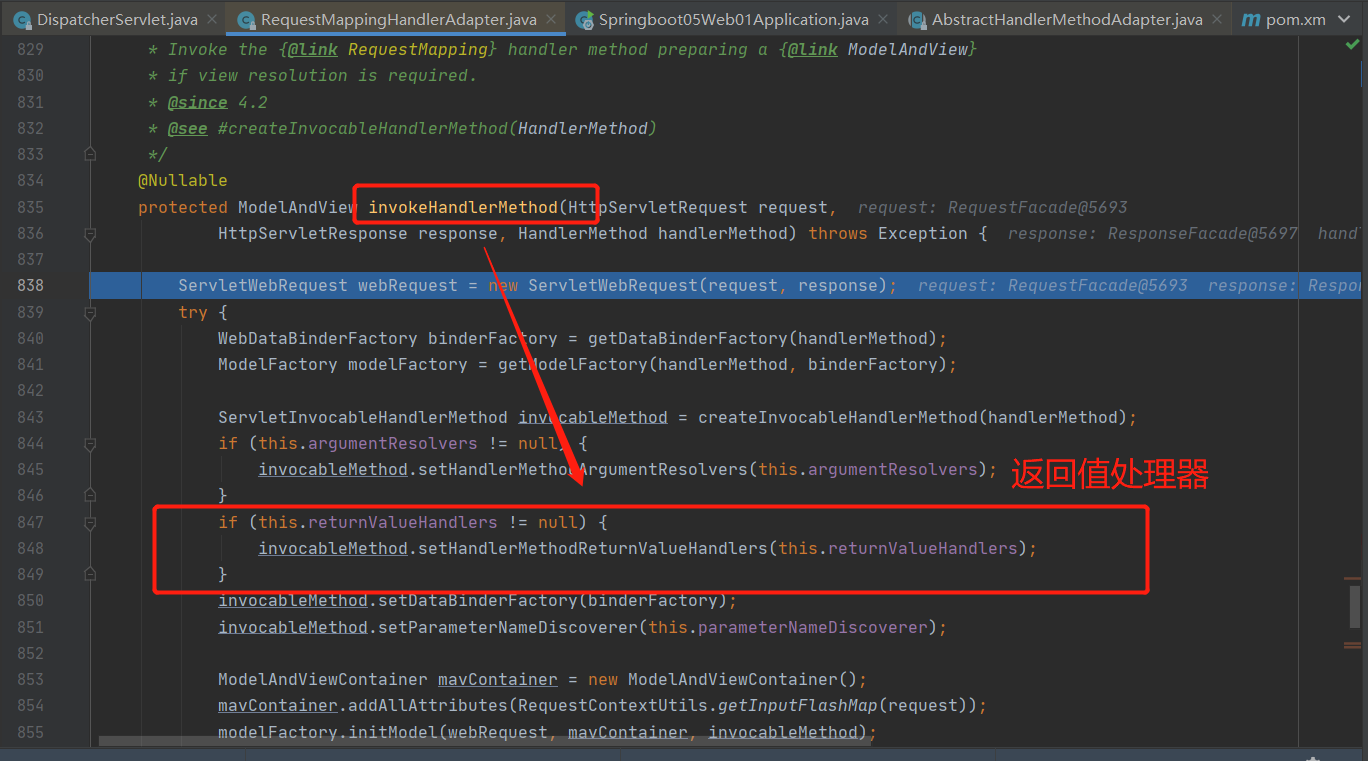
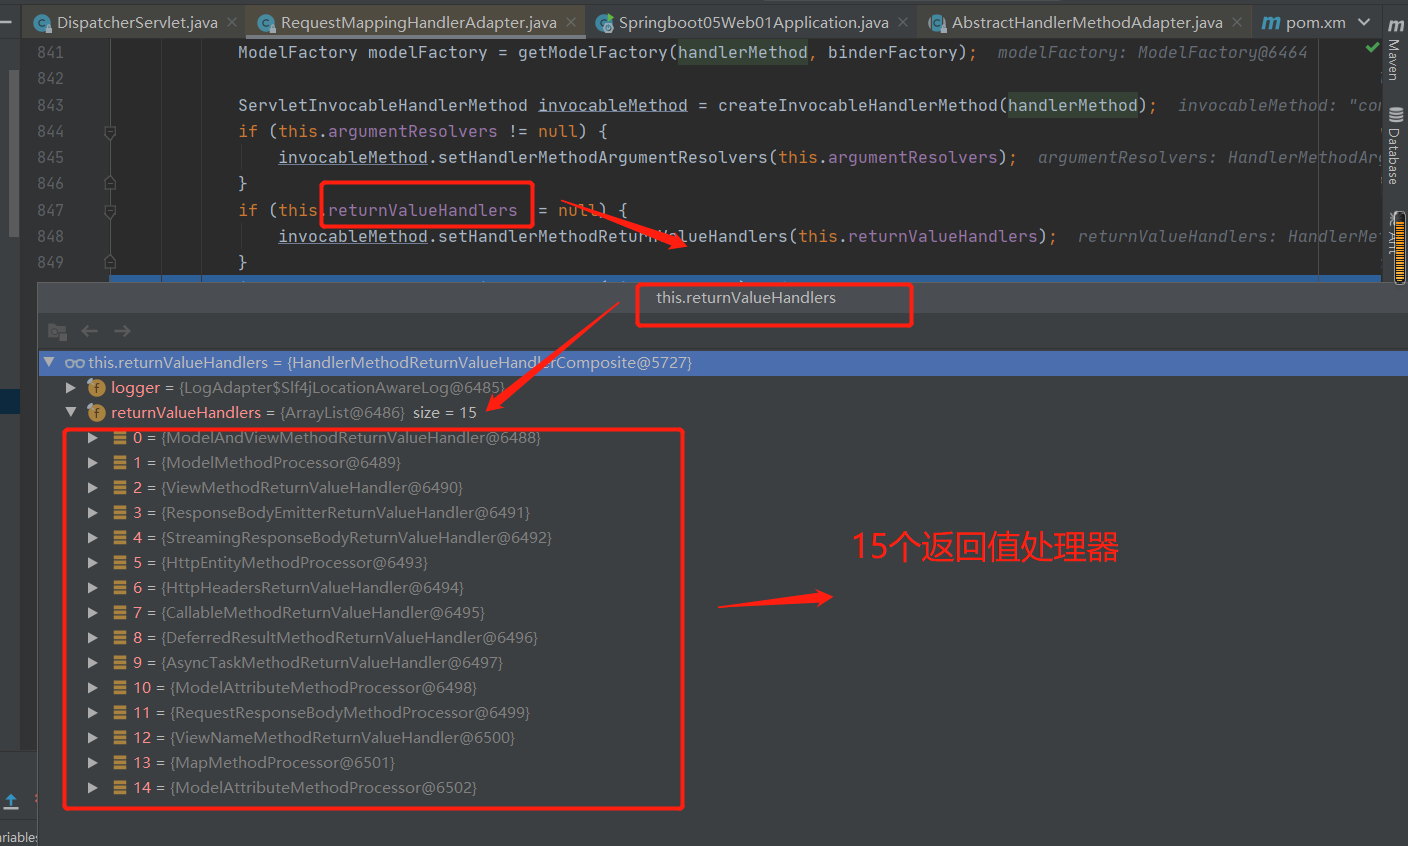
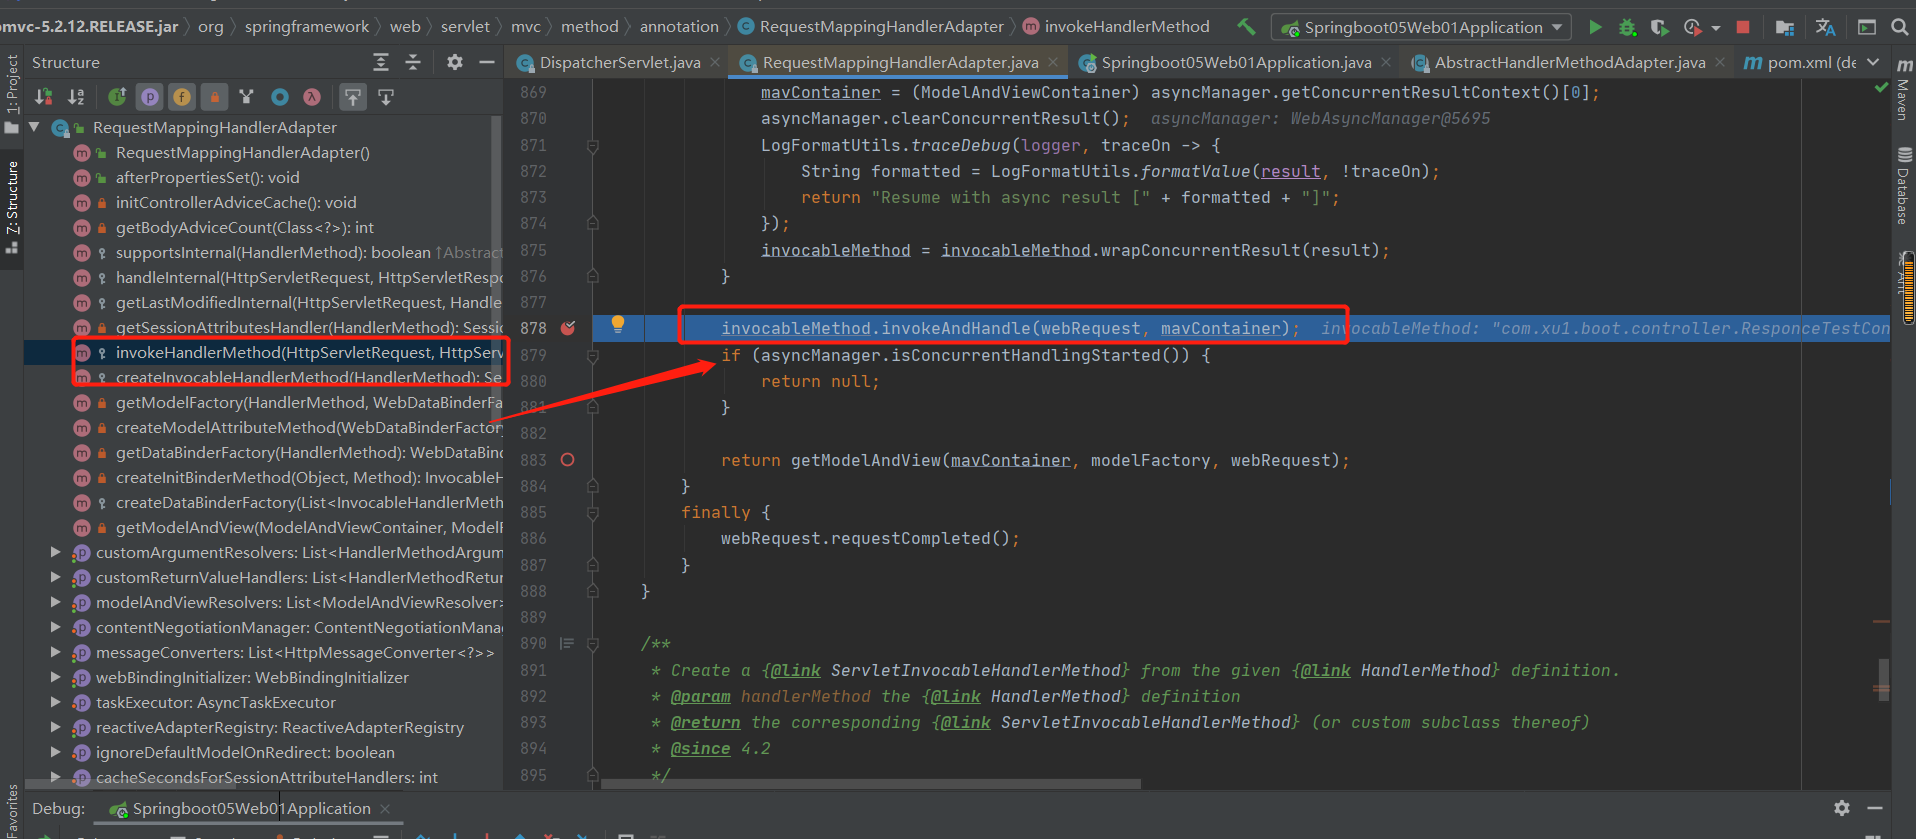
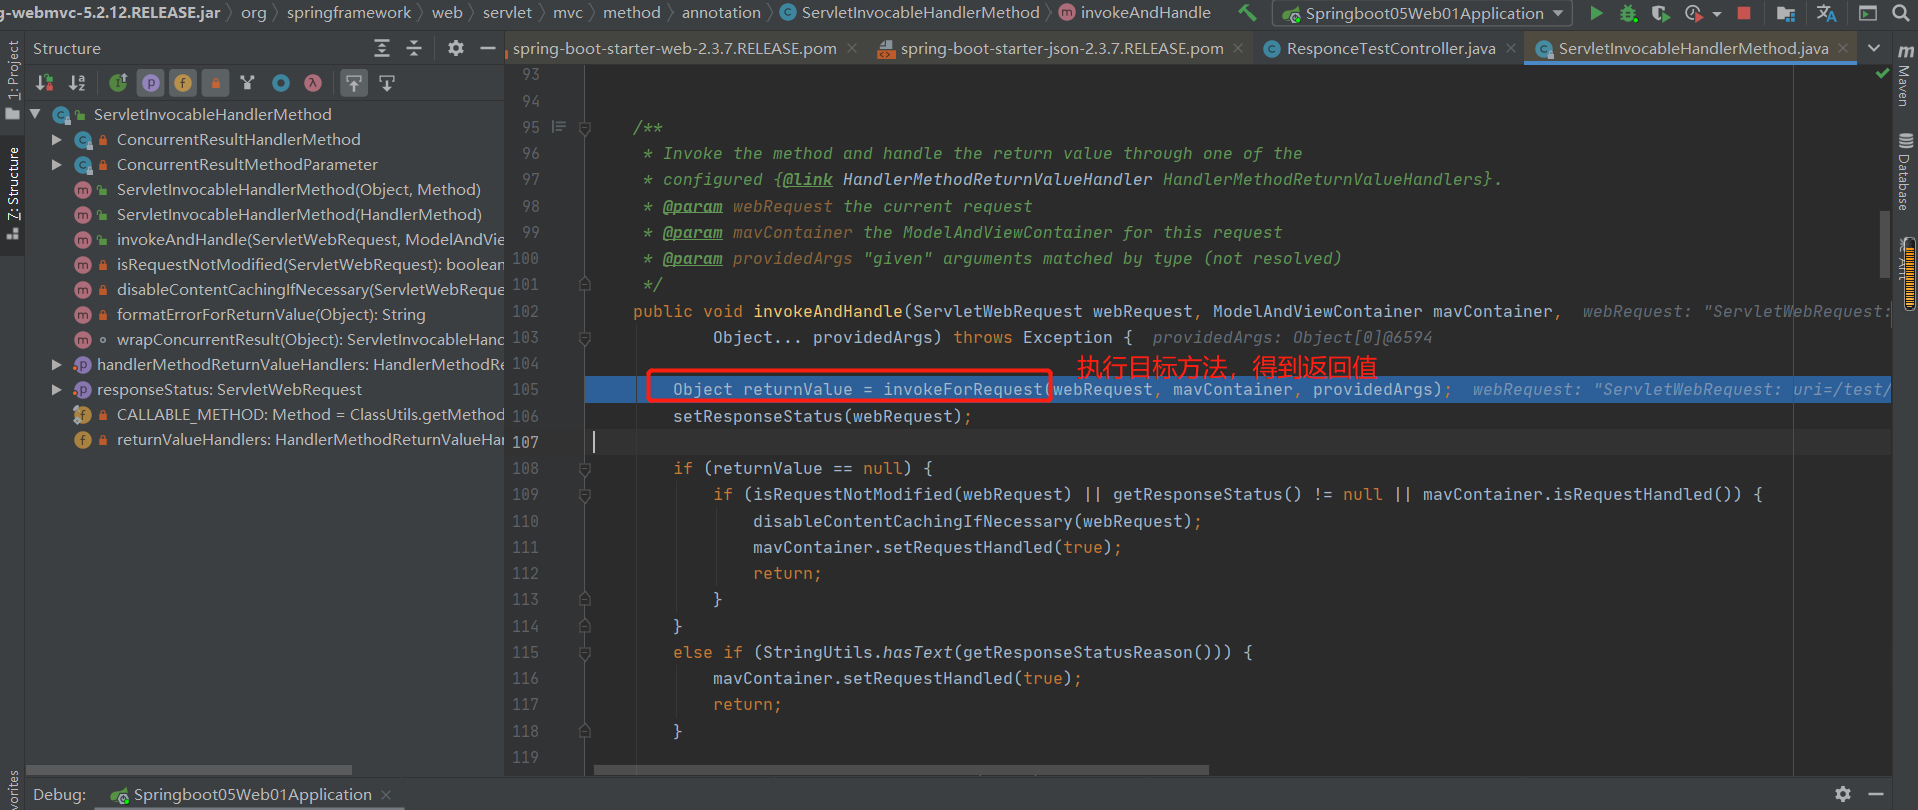
2源码探究返回json数据:
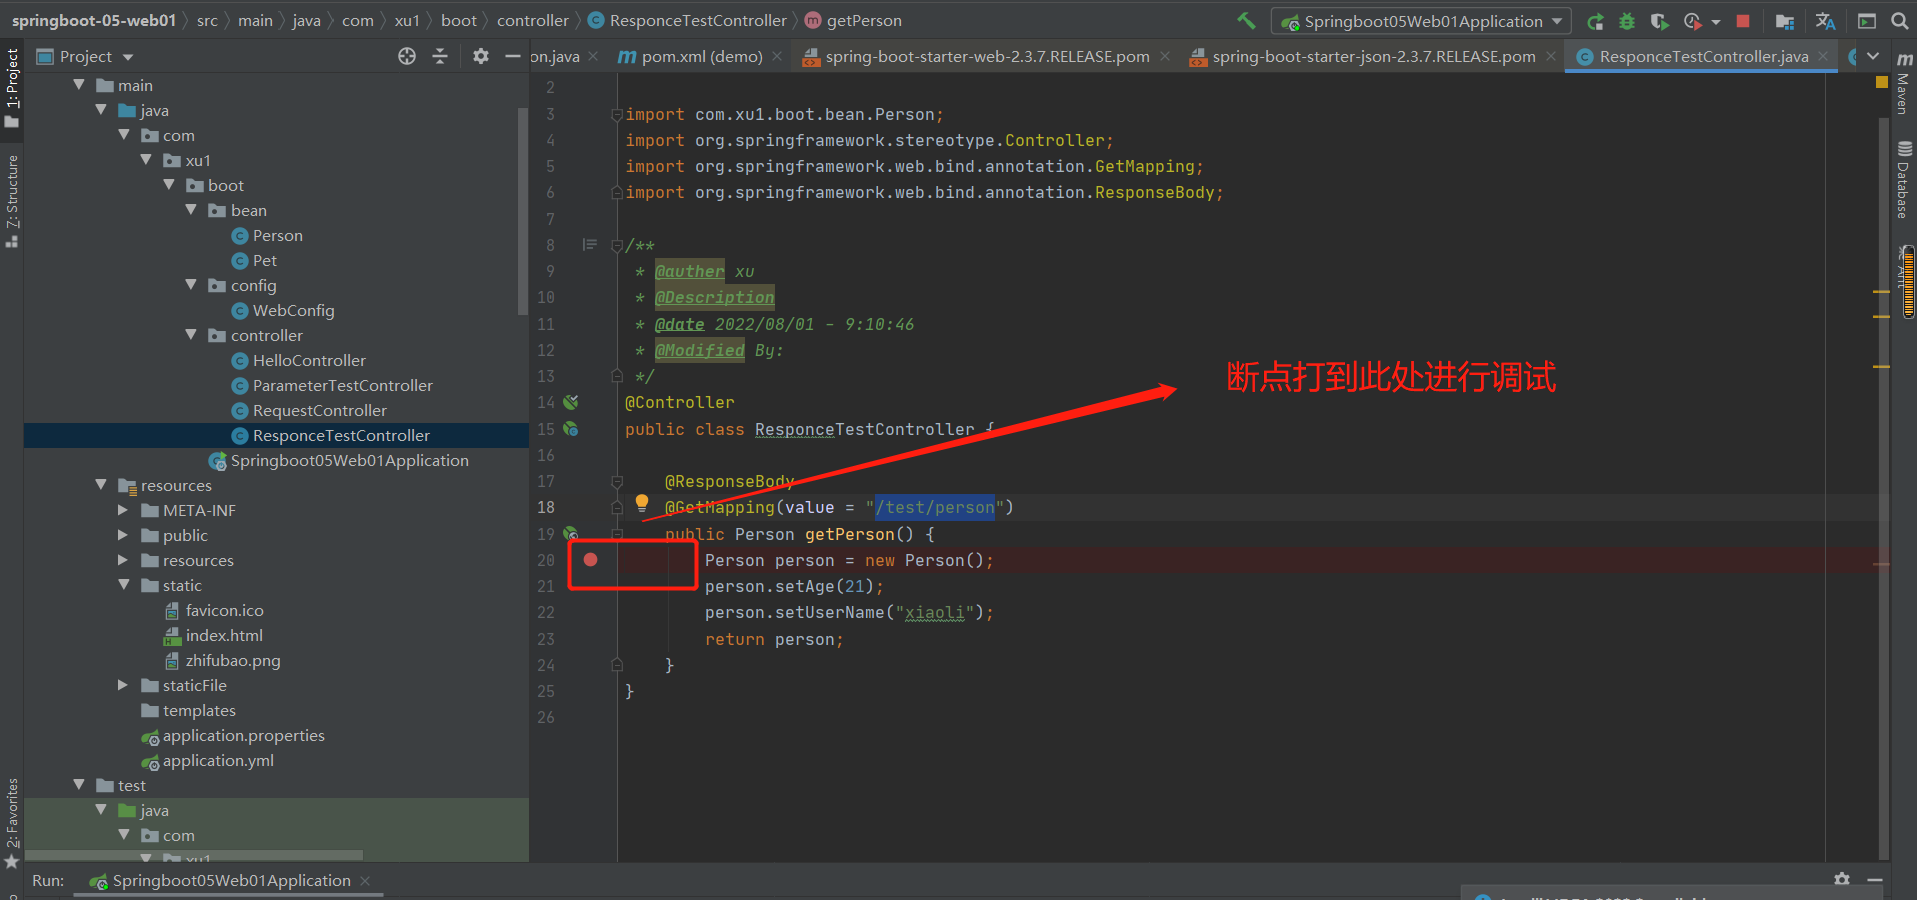
发送请求,开始调试:
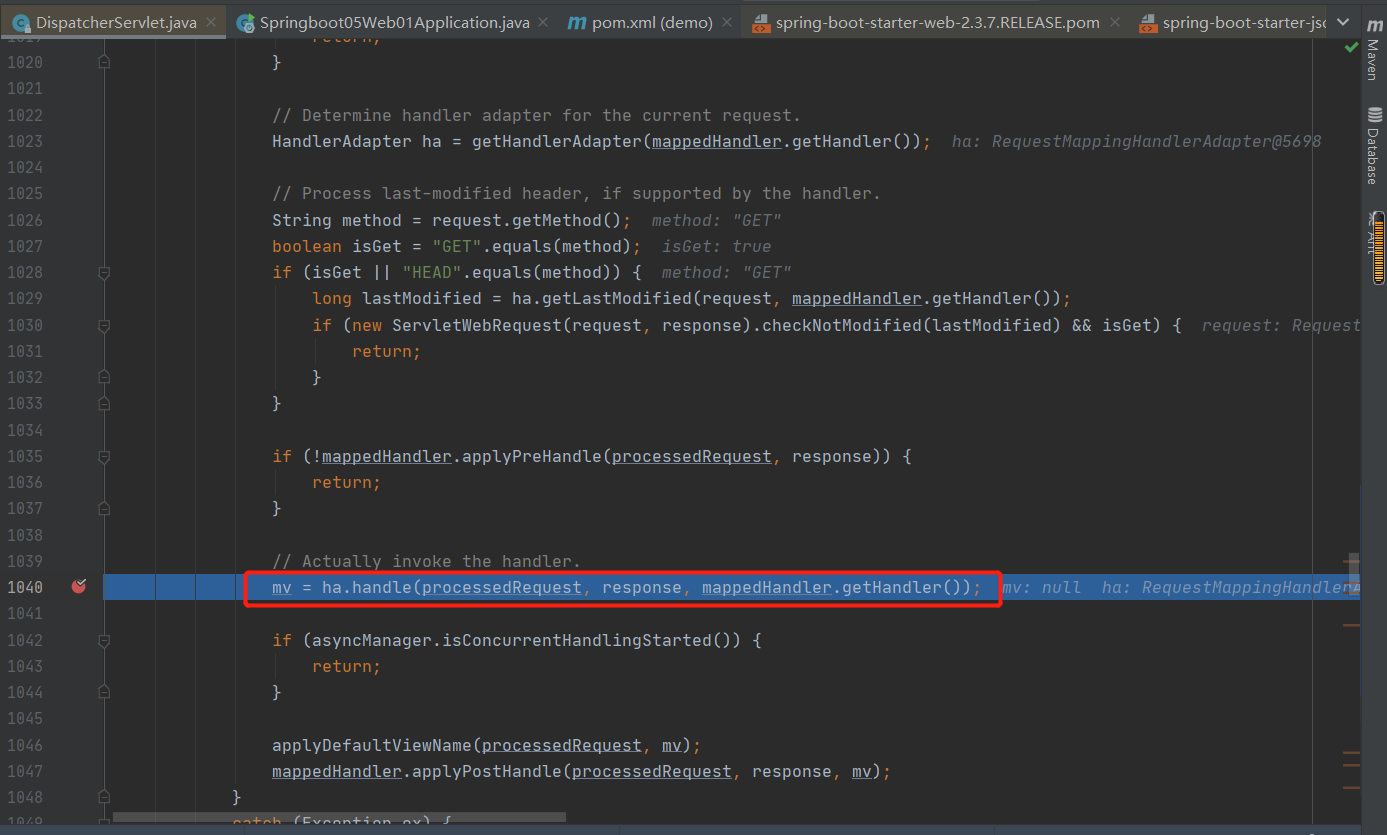

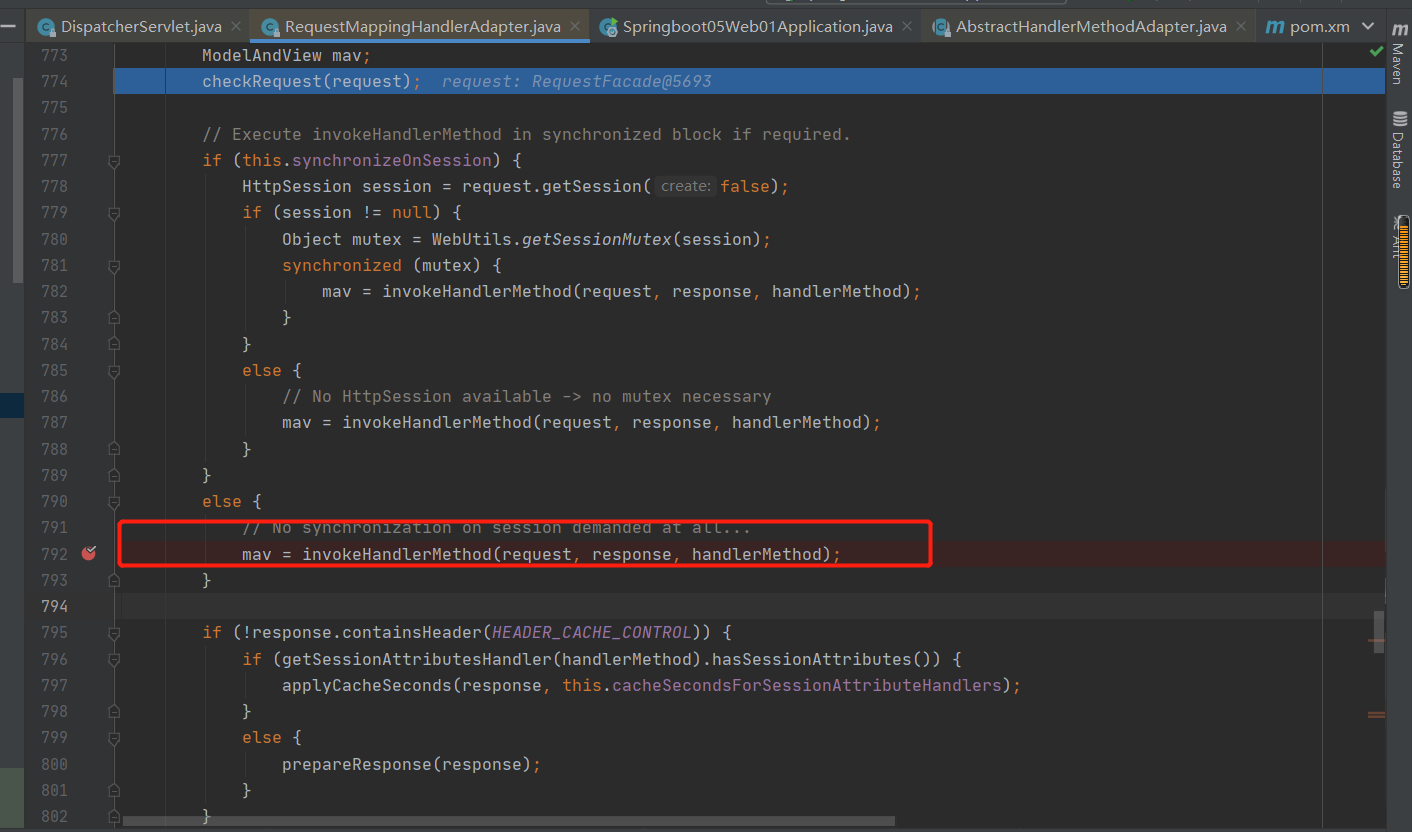
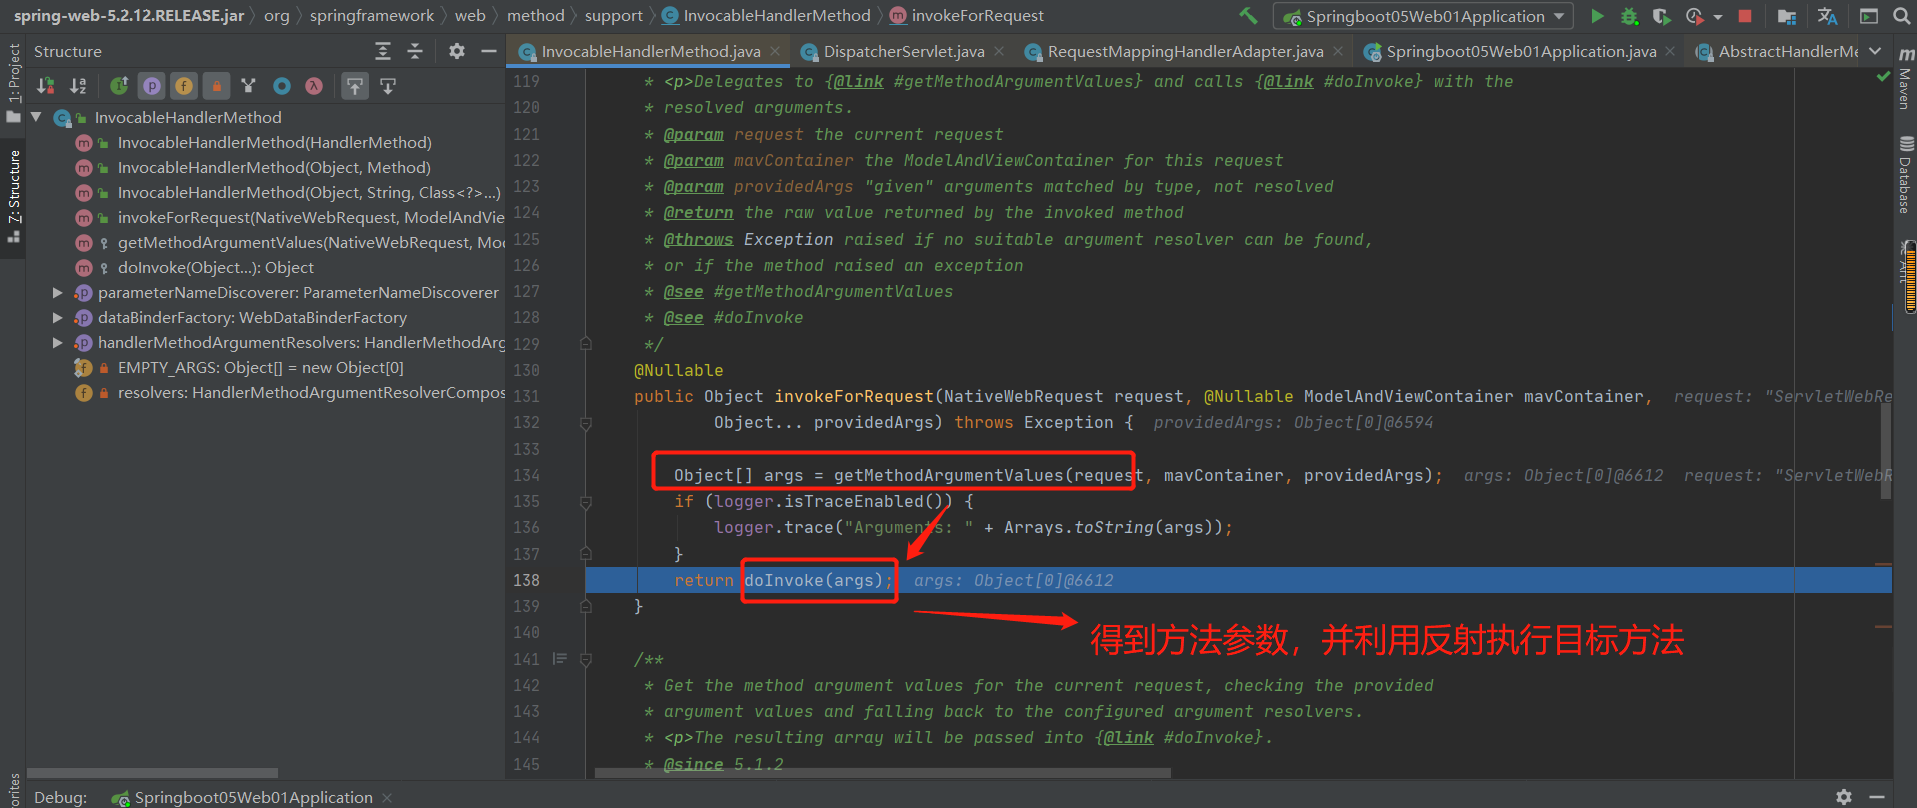
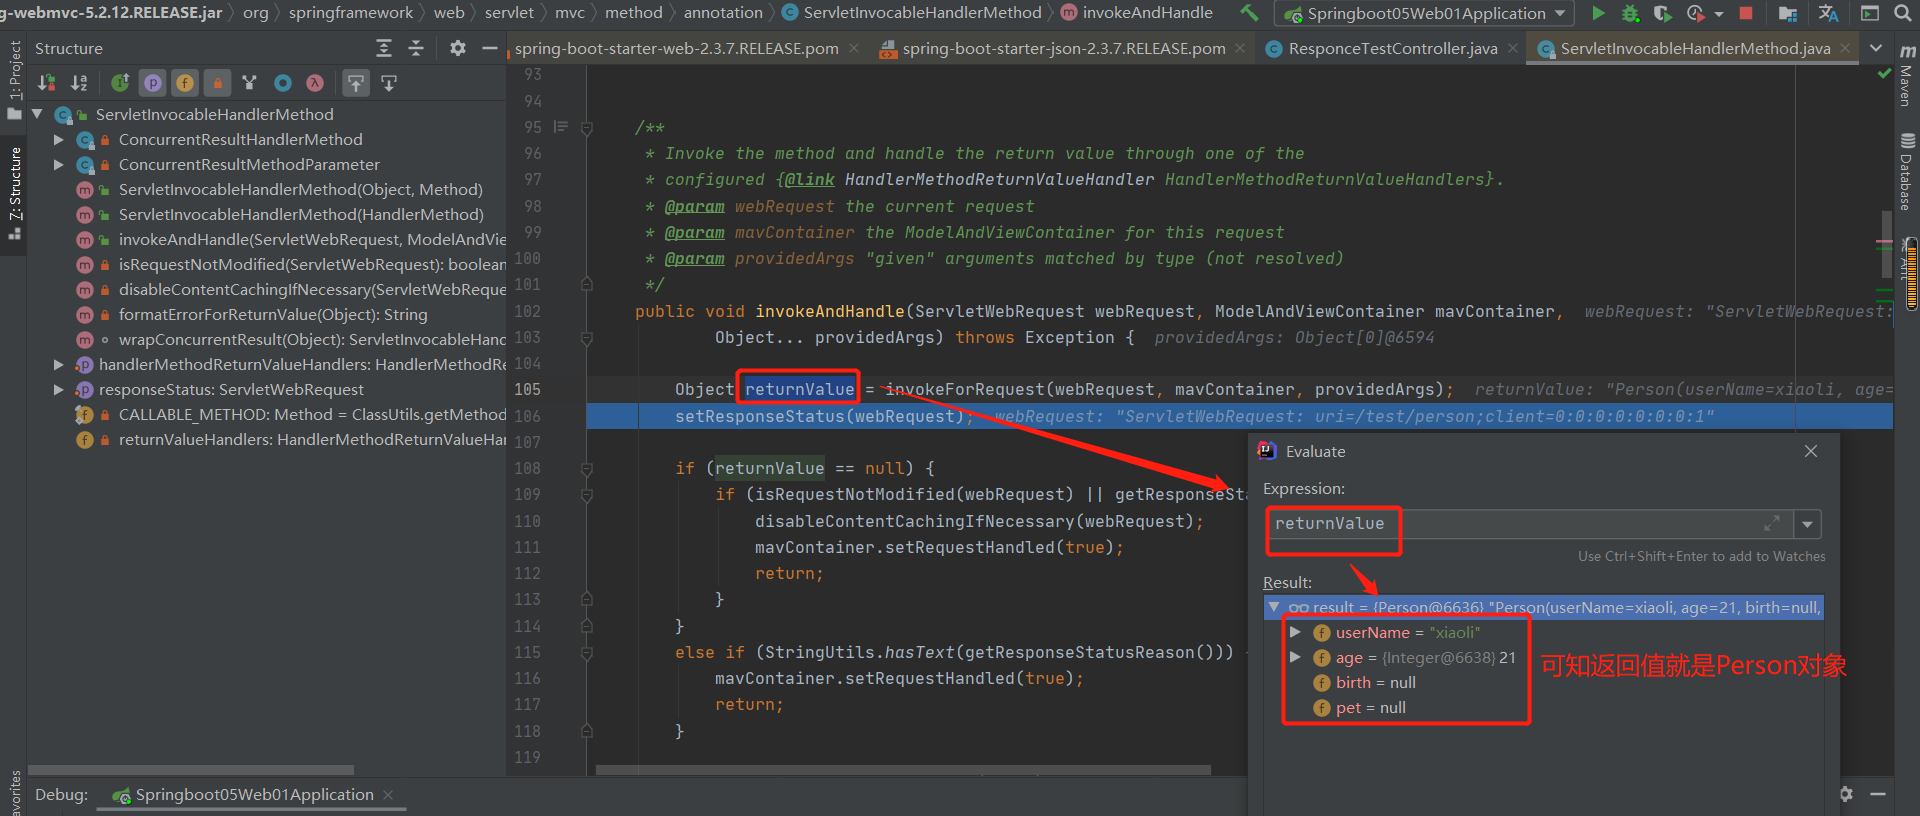
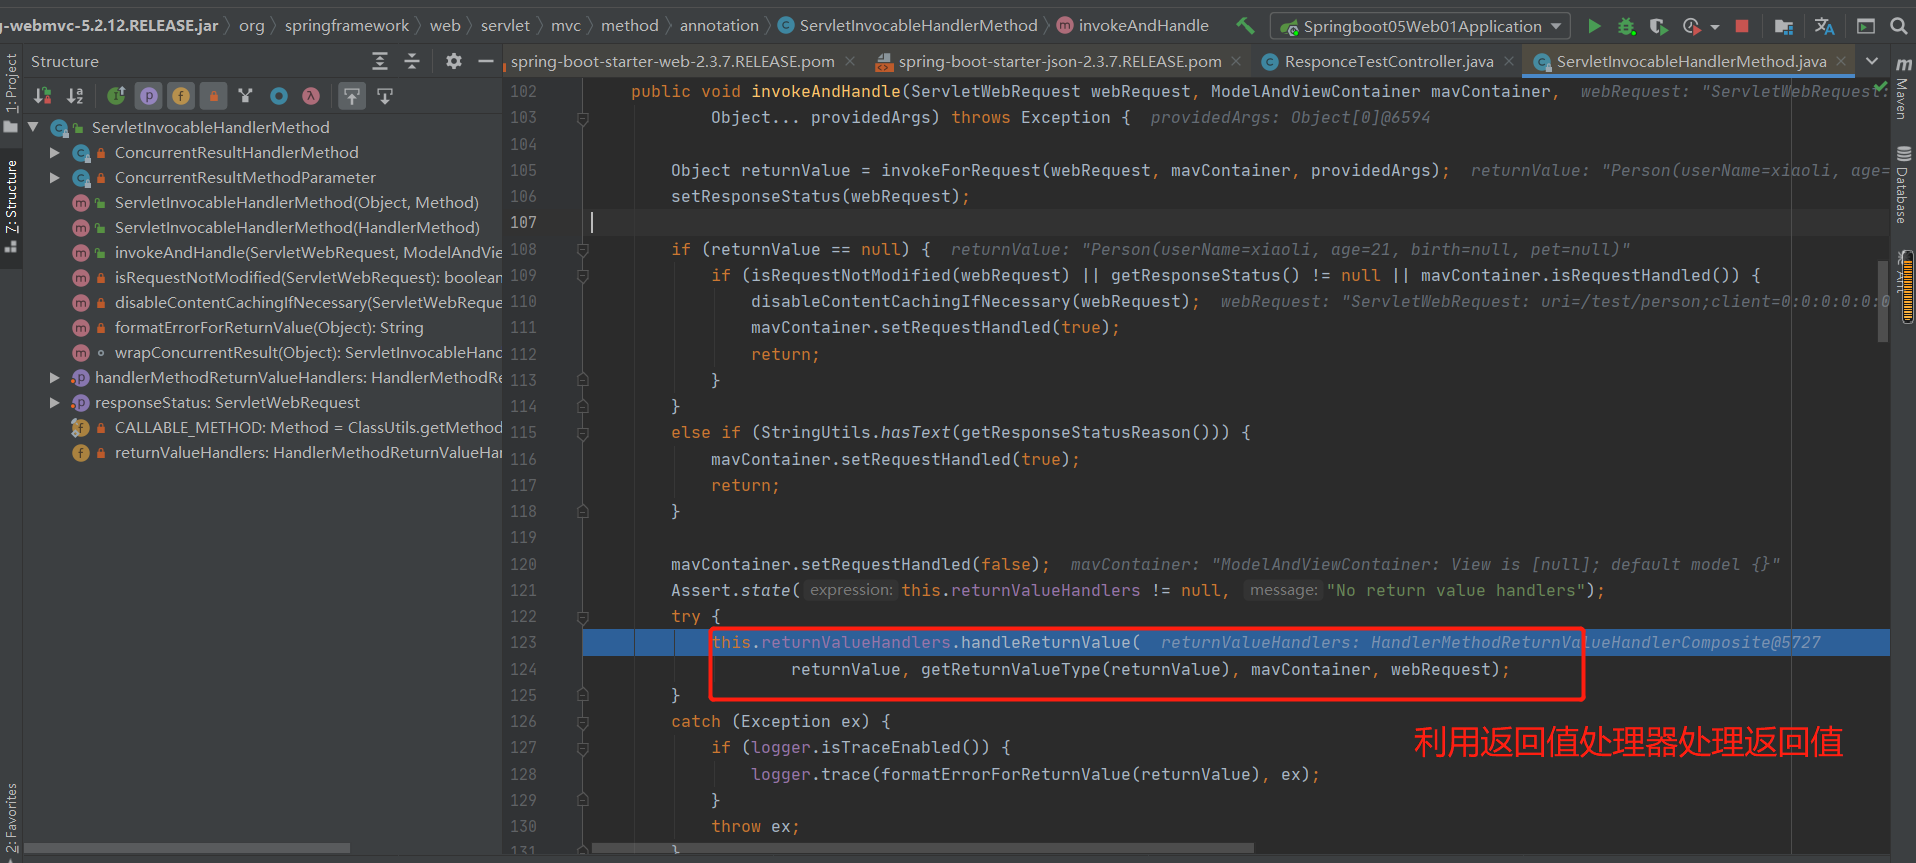
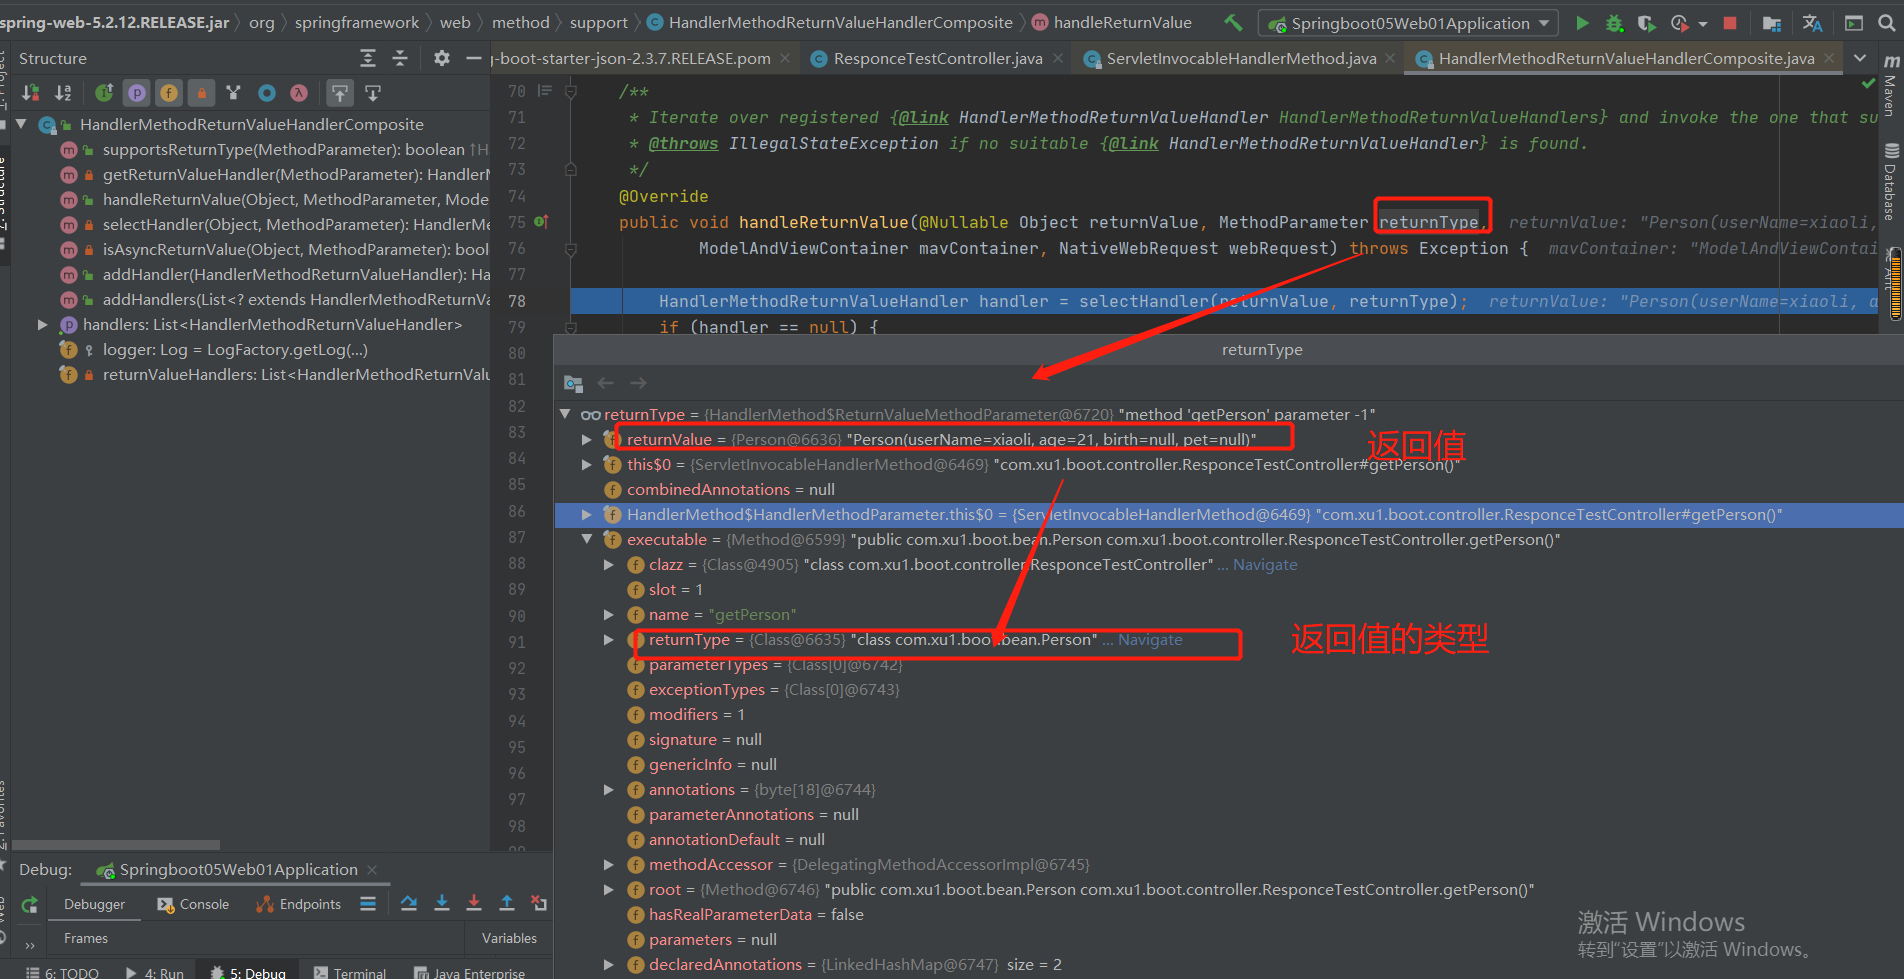
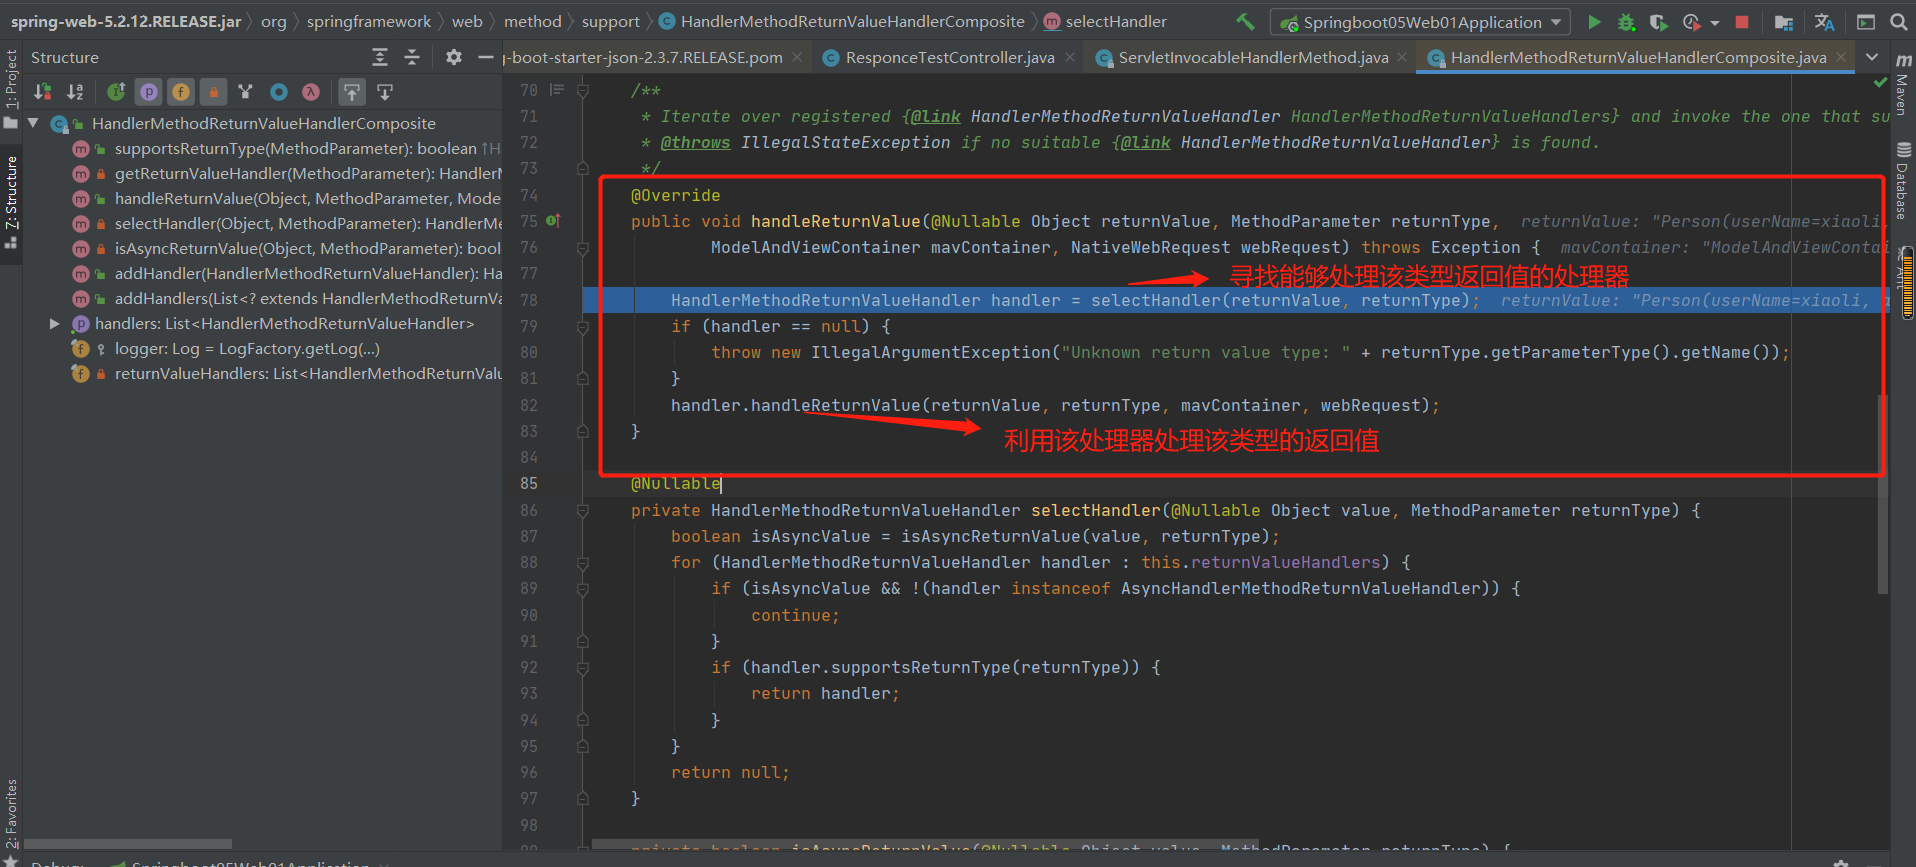
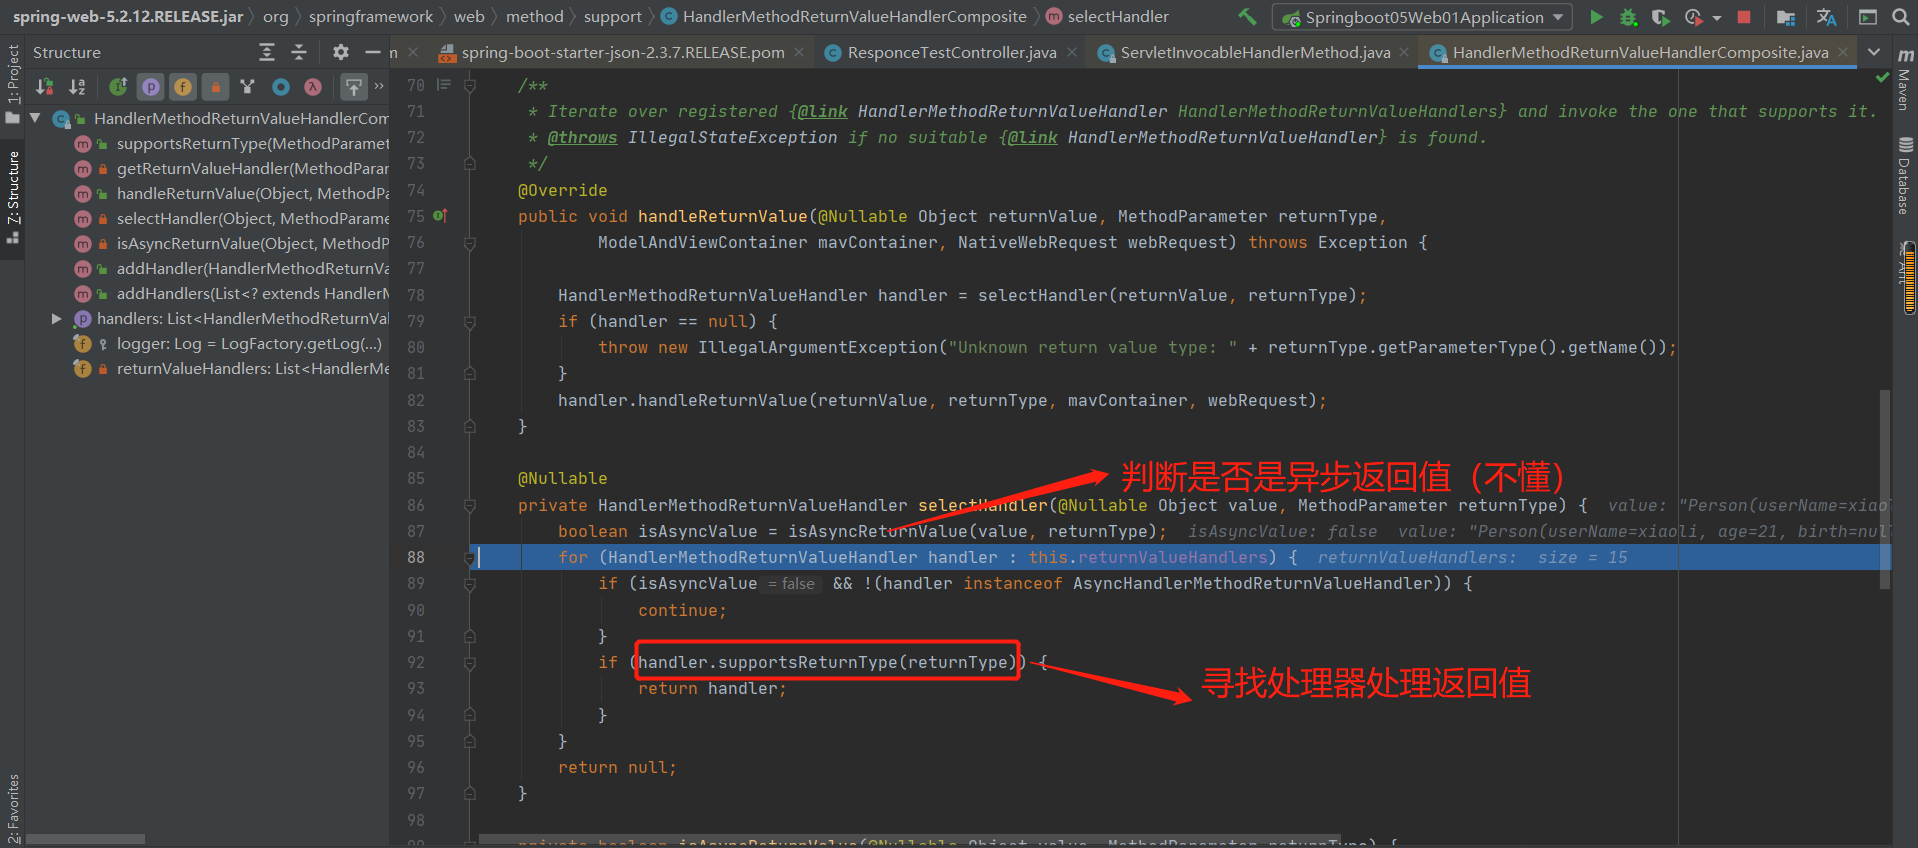
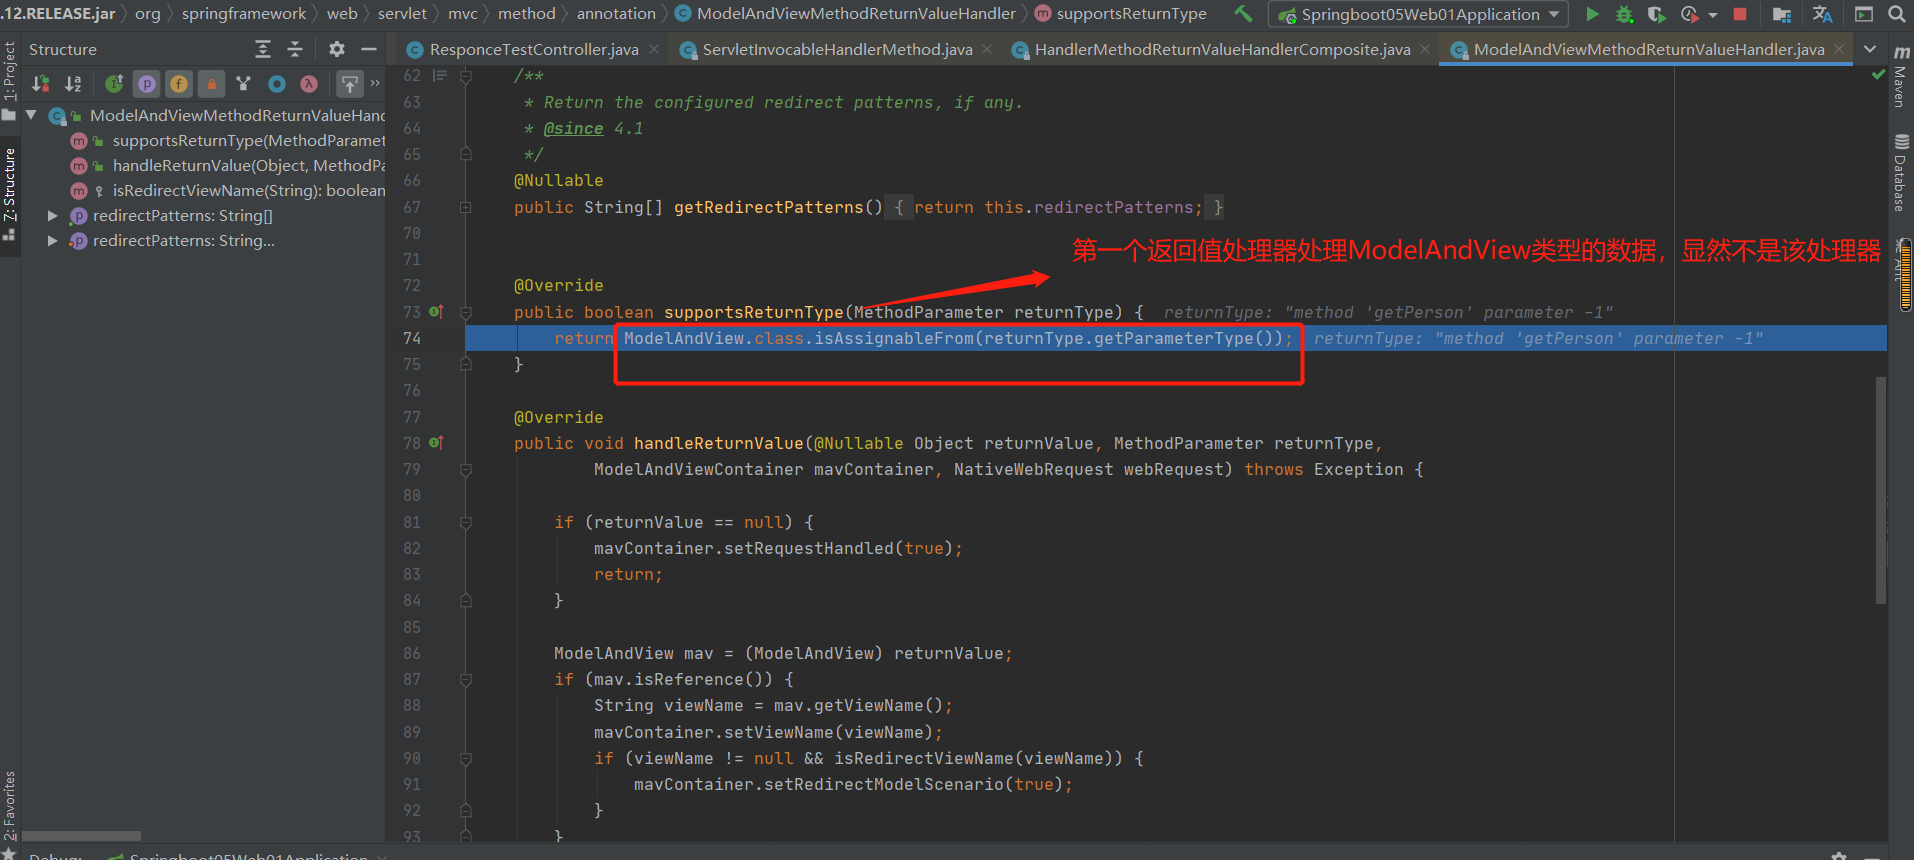
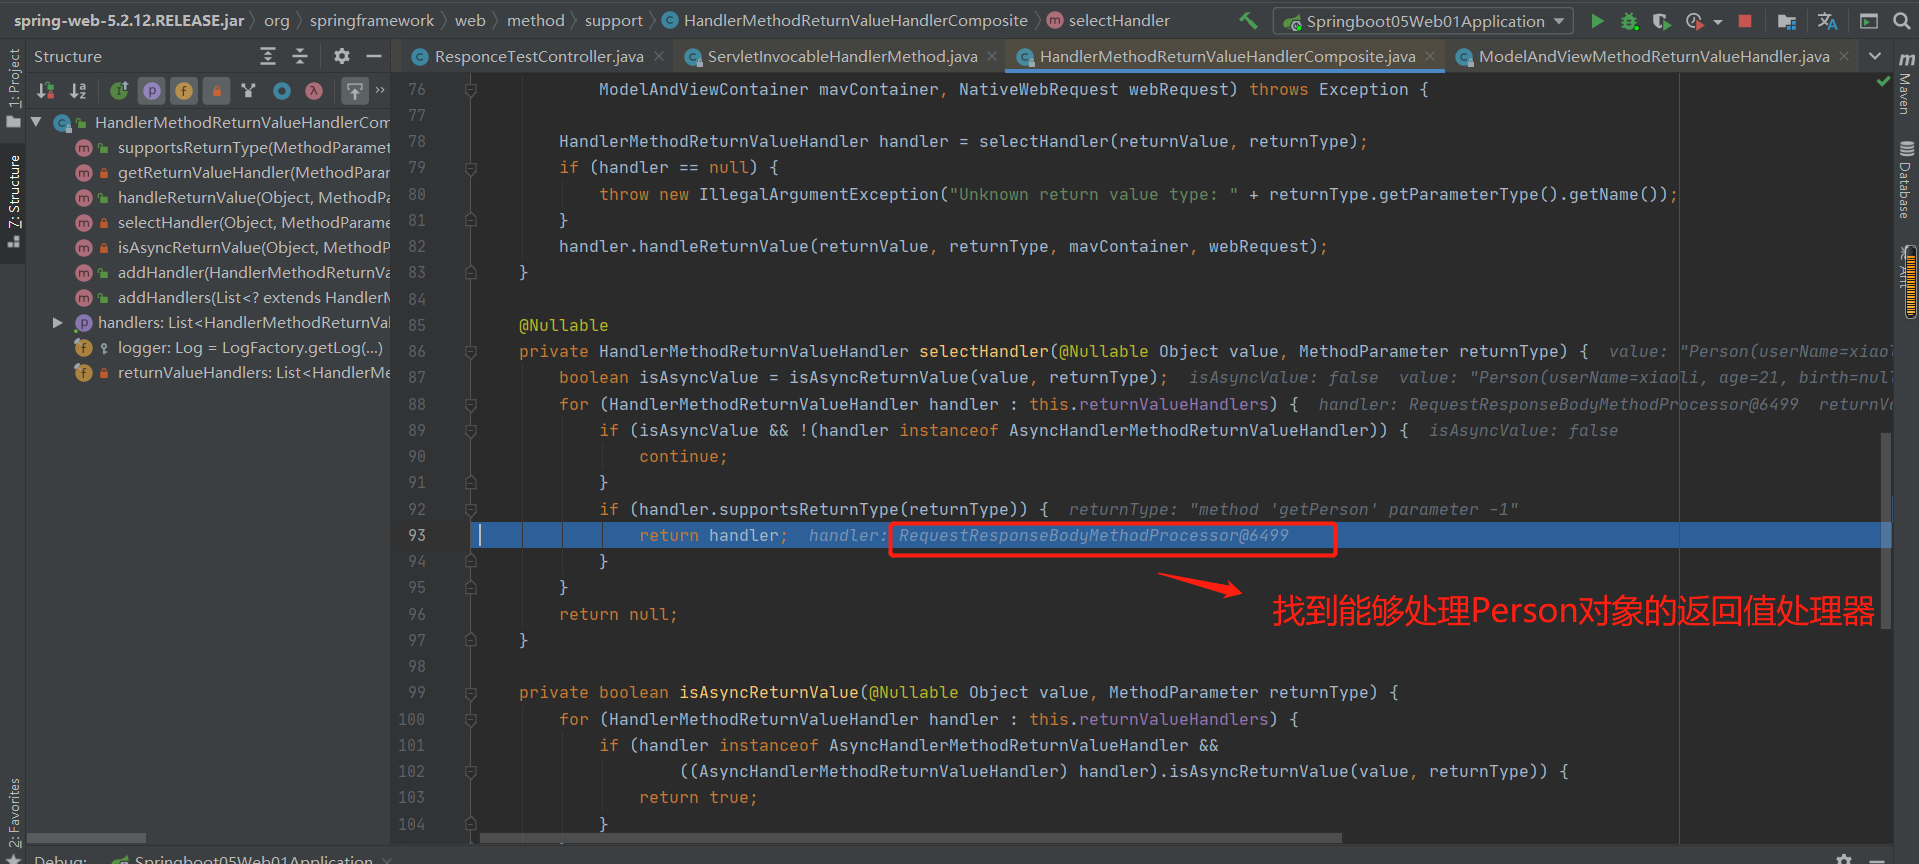
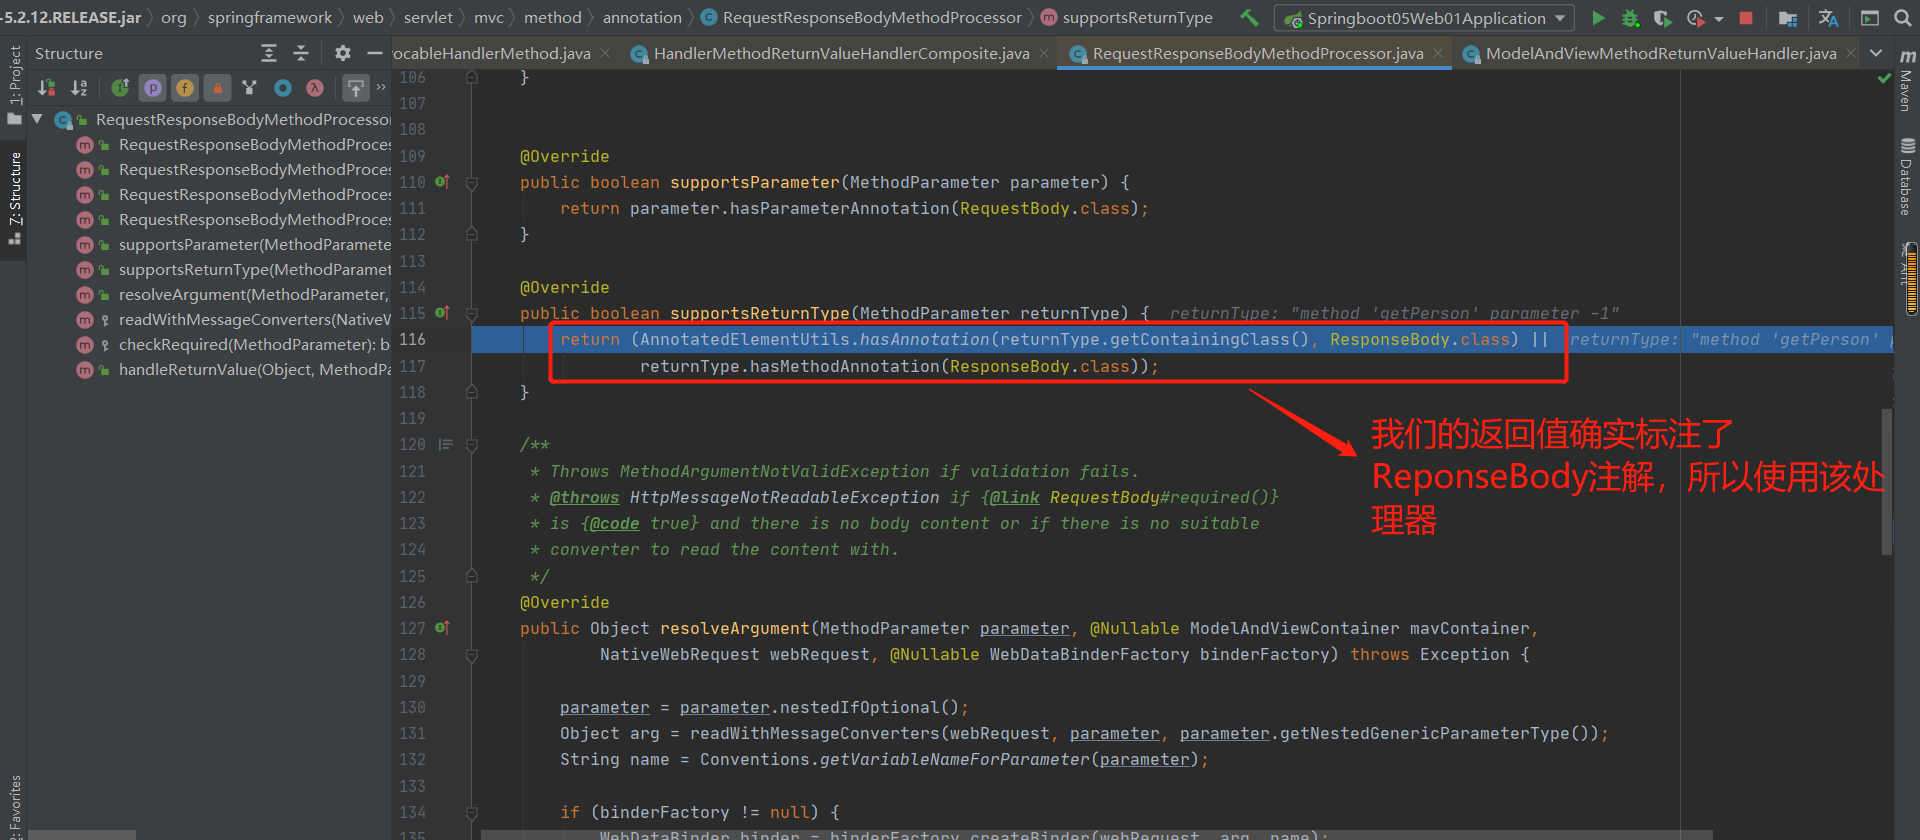
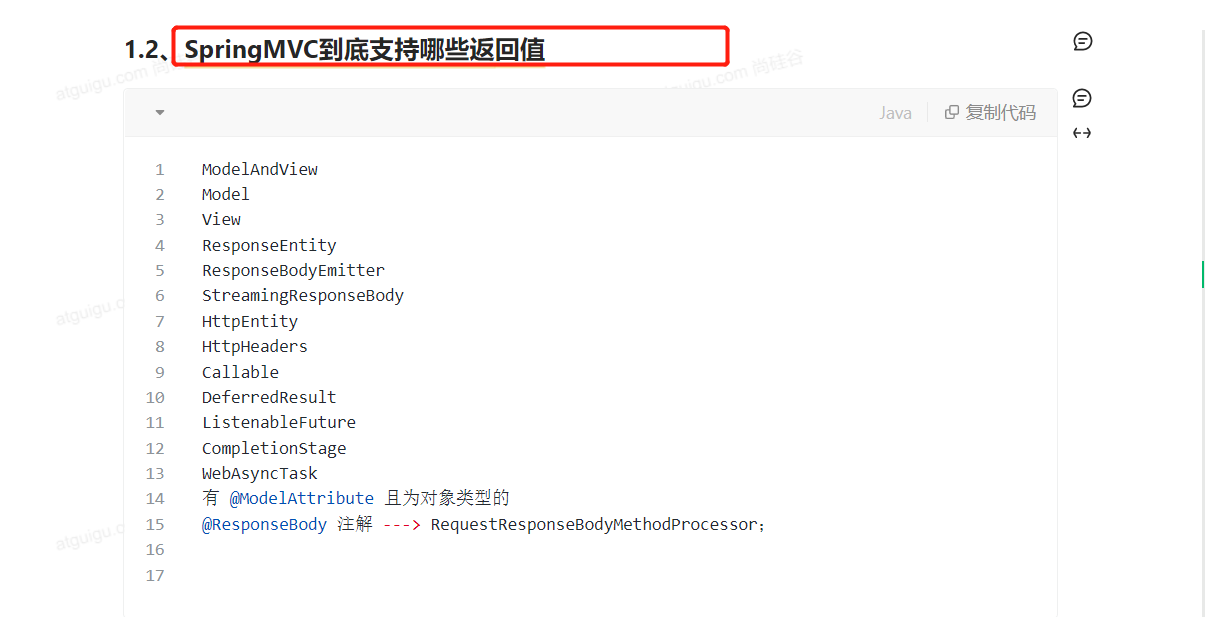
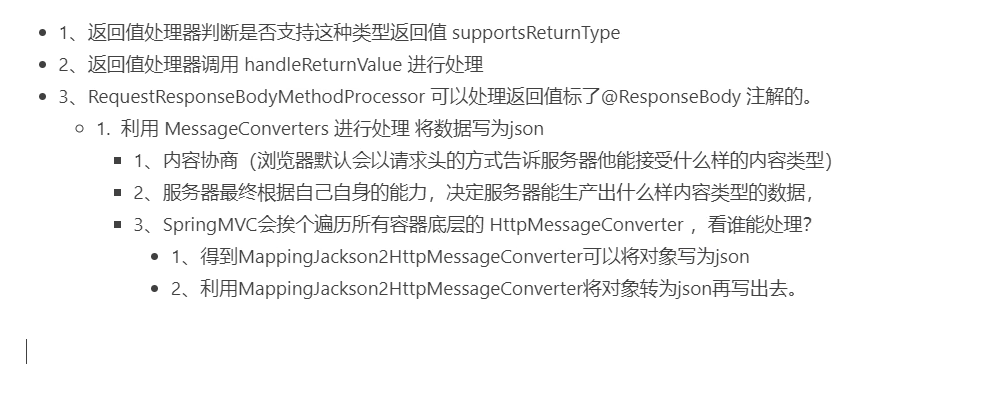
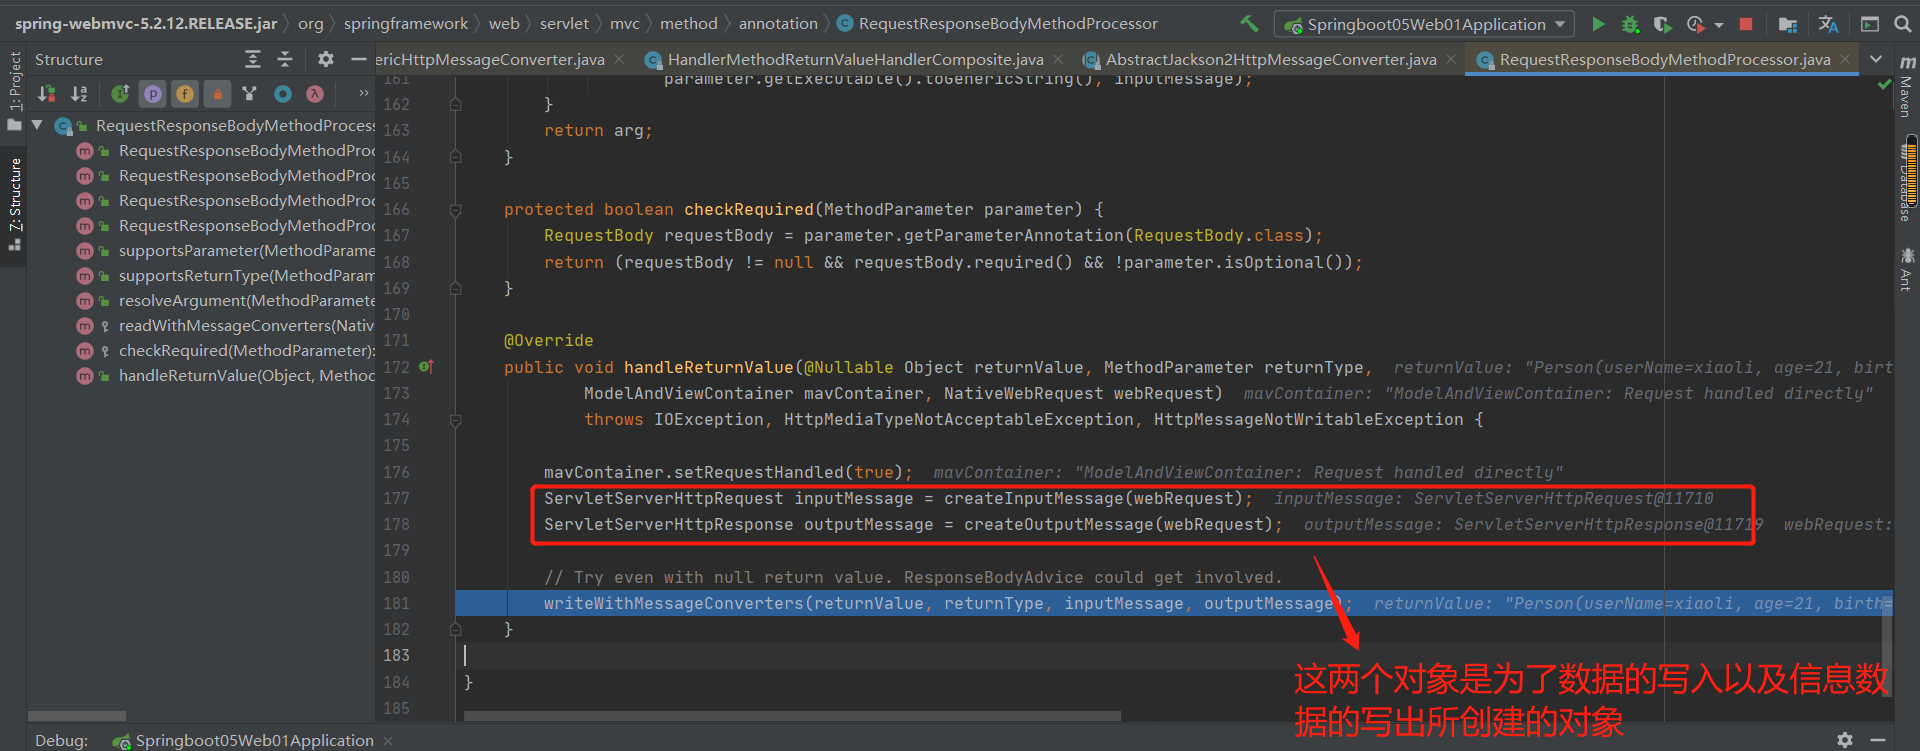
3.找到处理器,接下来使用返回值处理器处理返回值
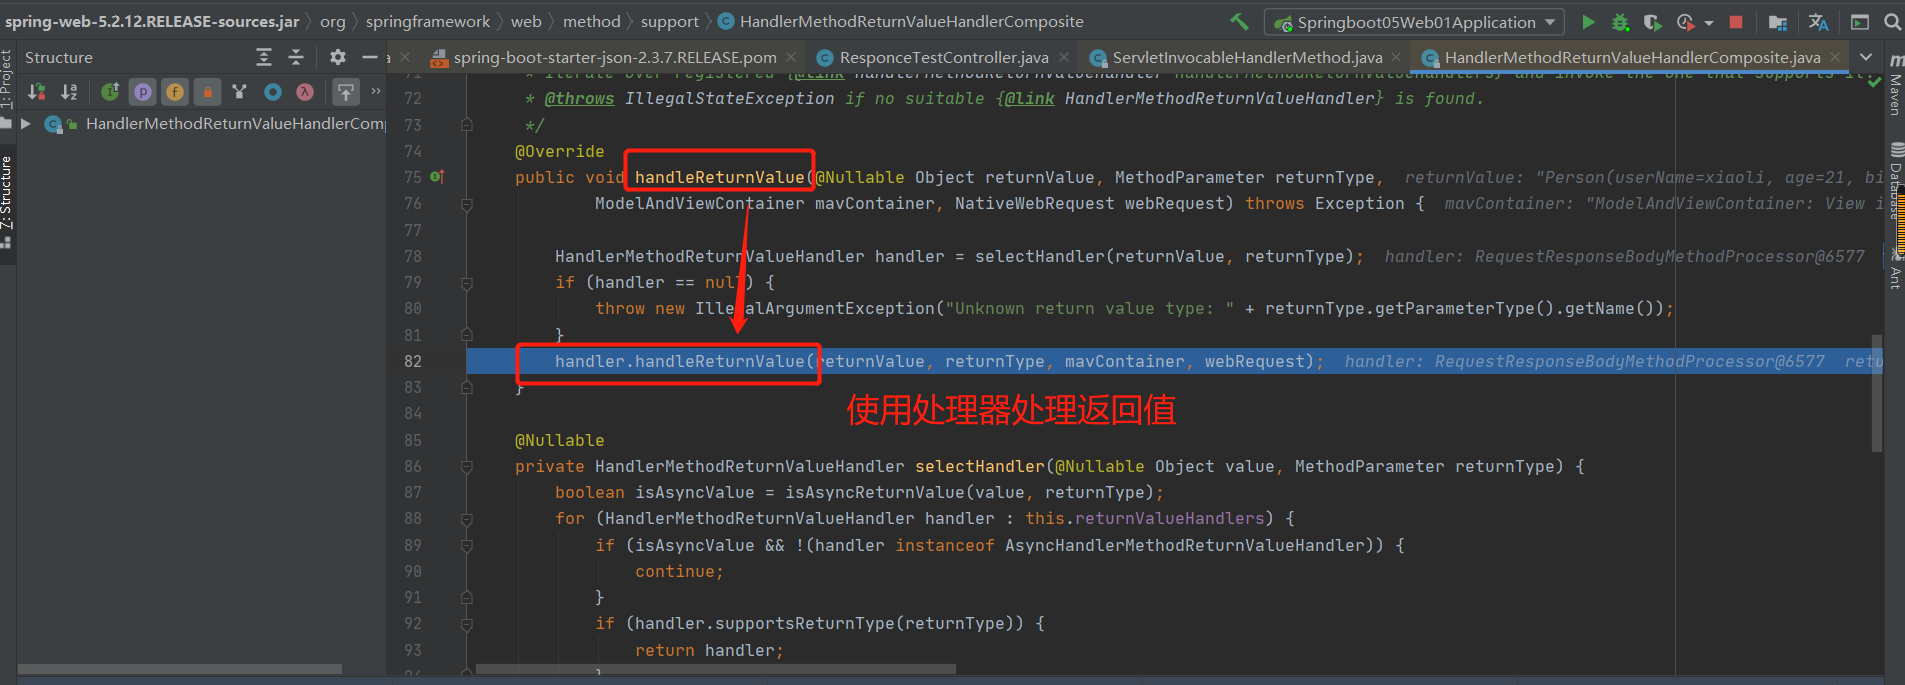
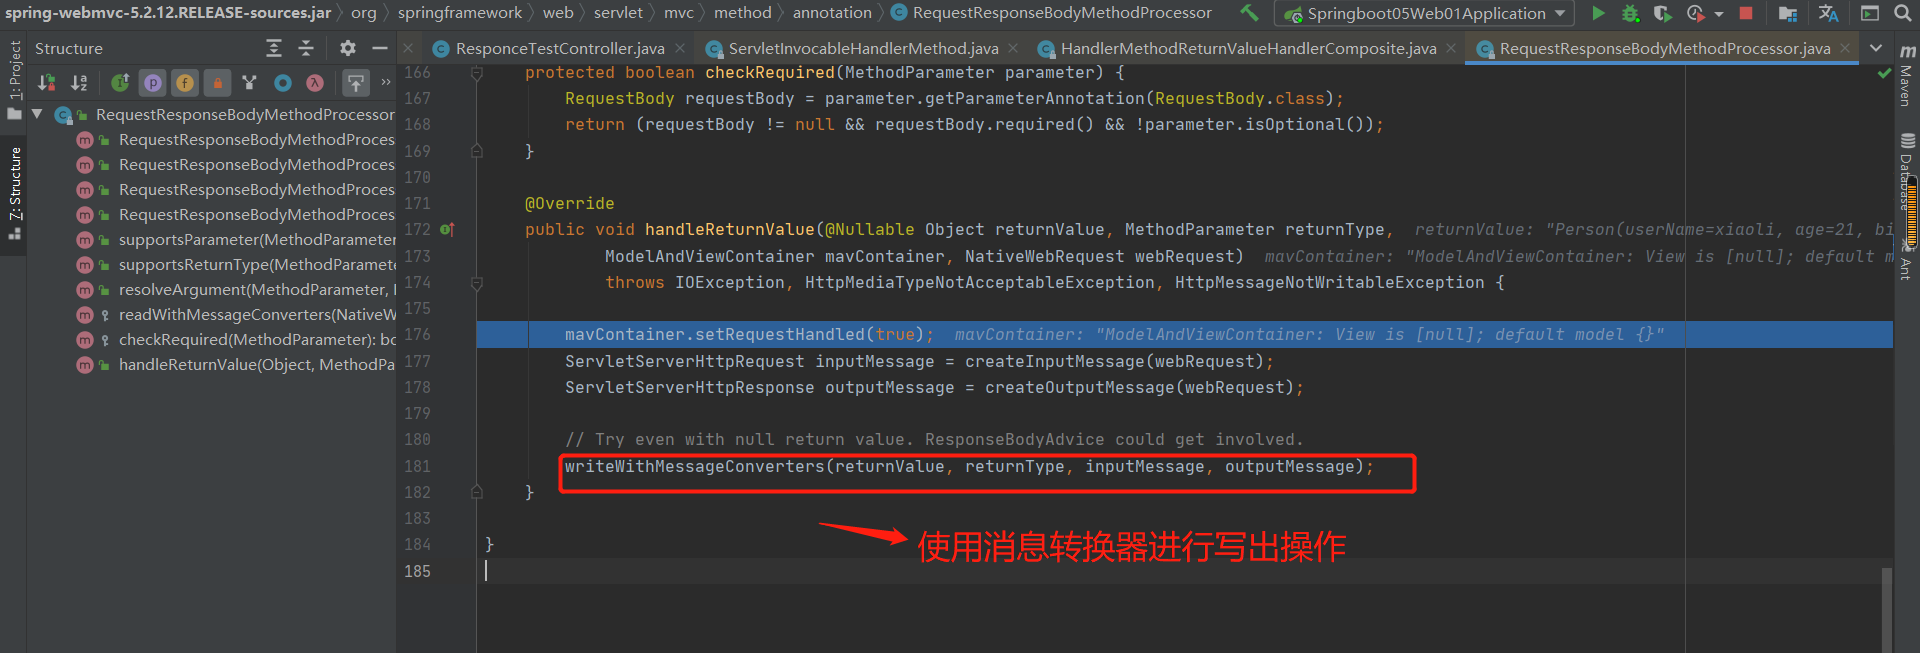
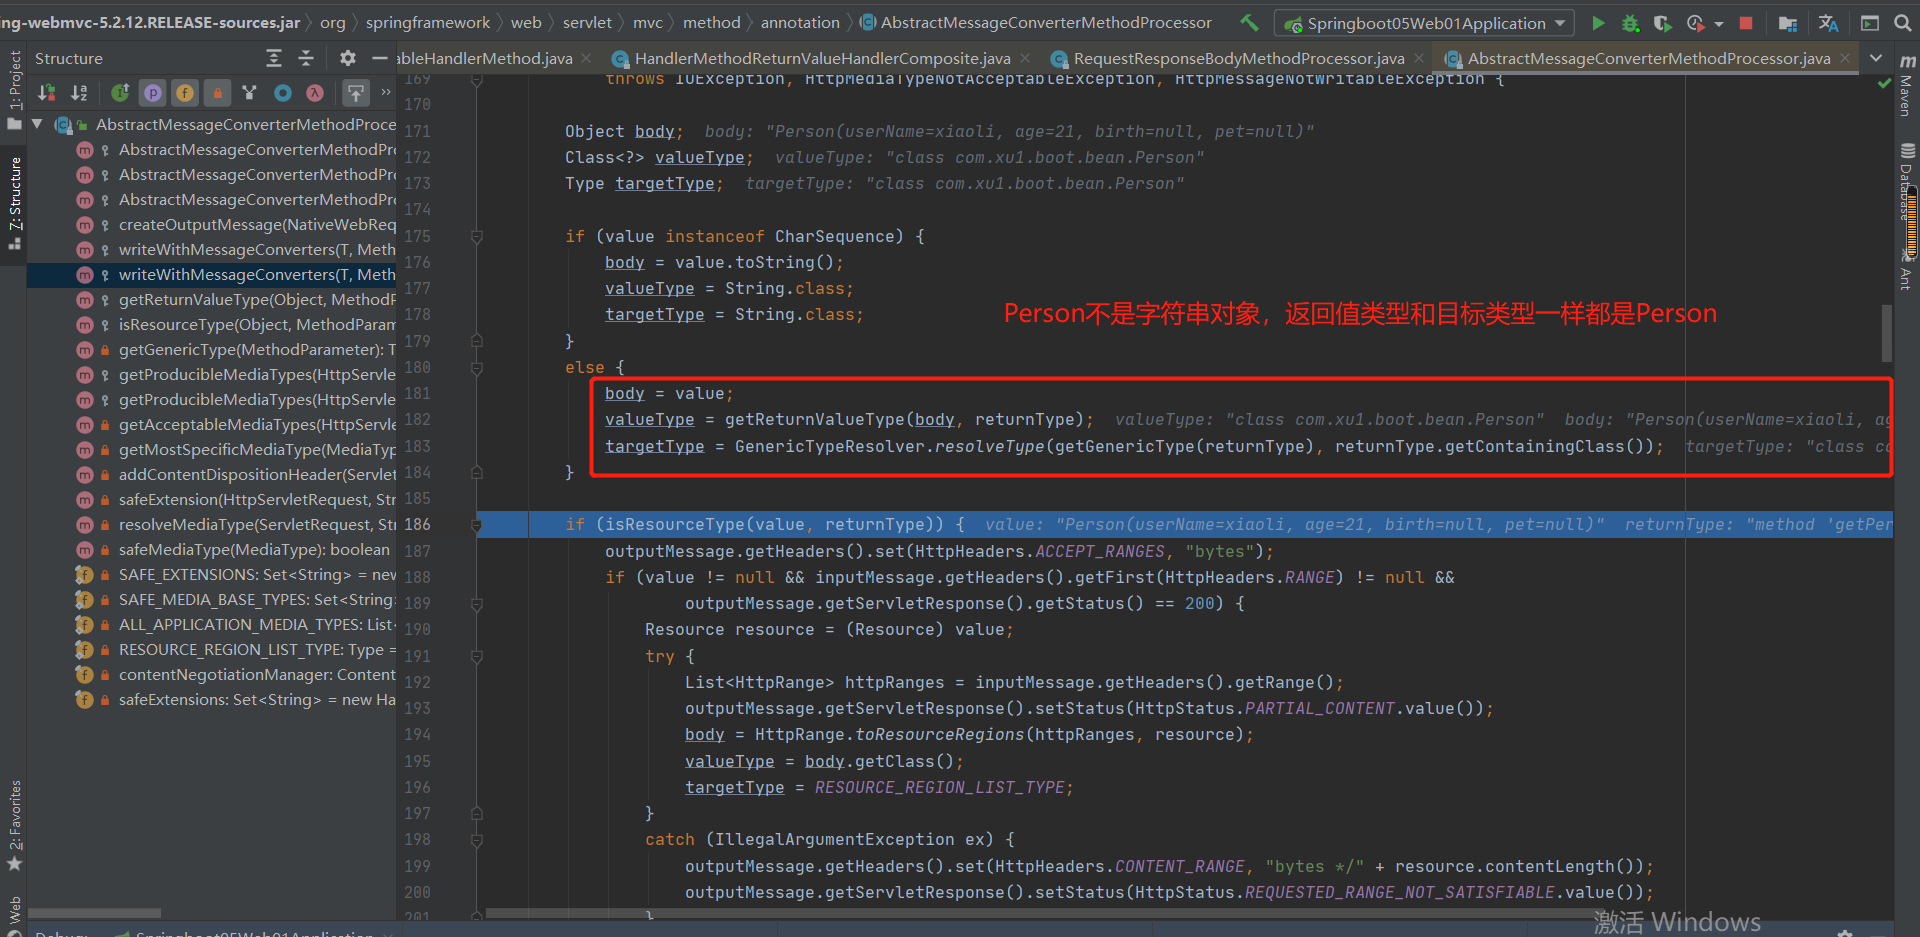
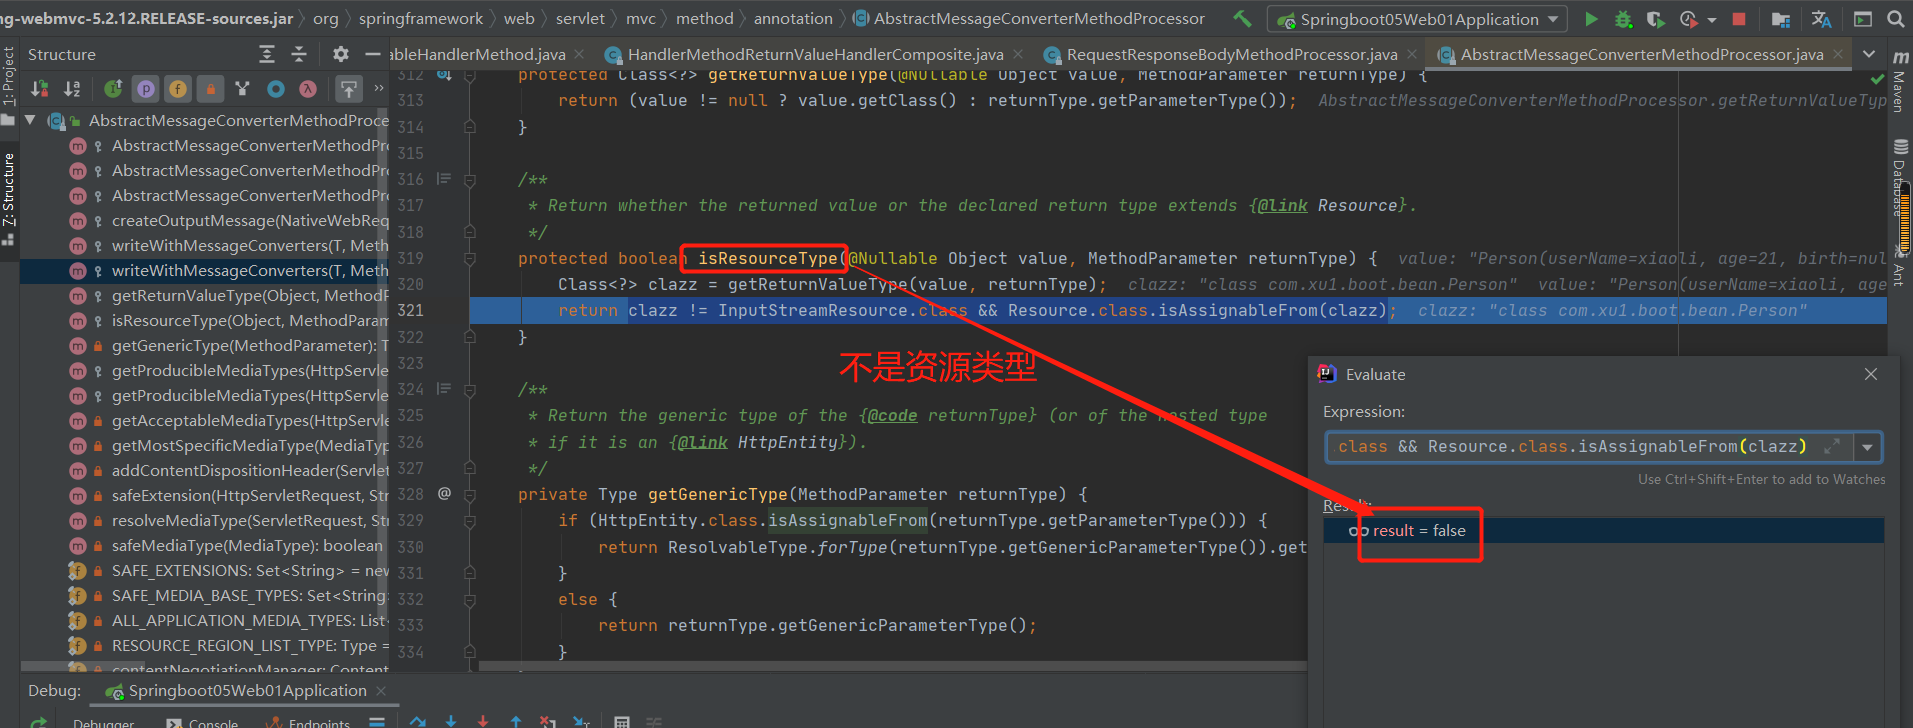
1.内容协商:
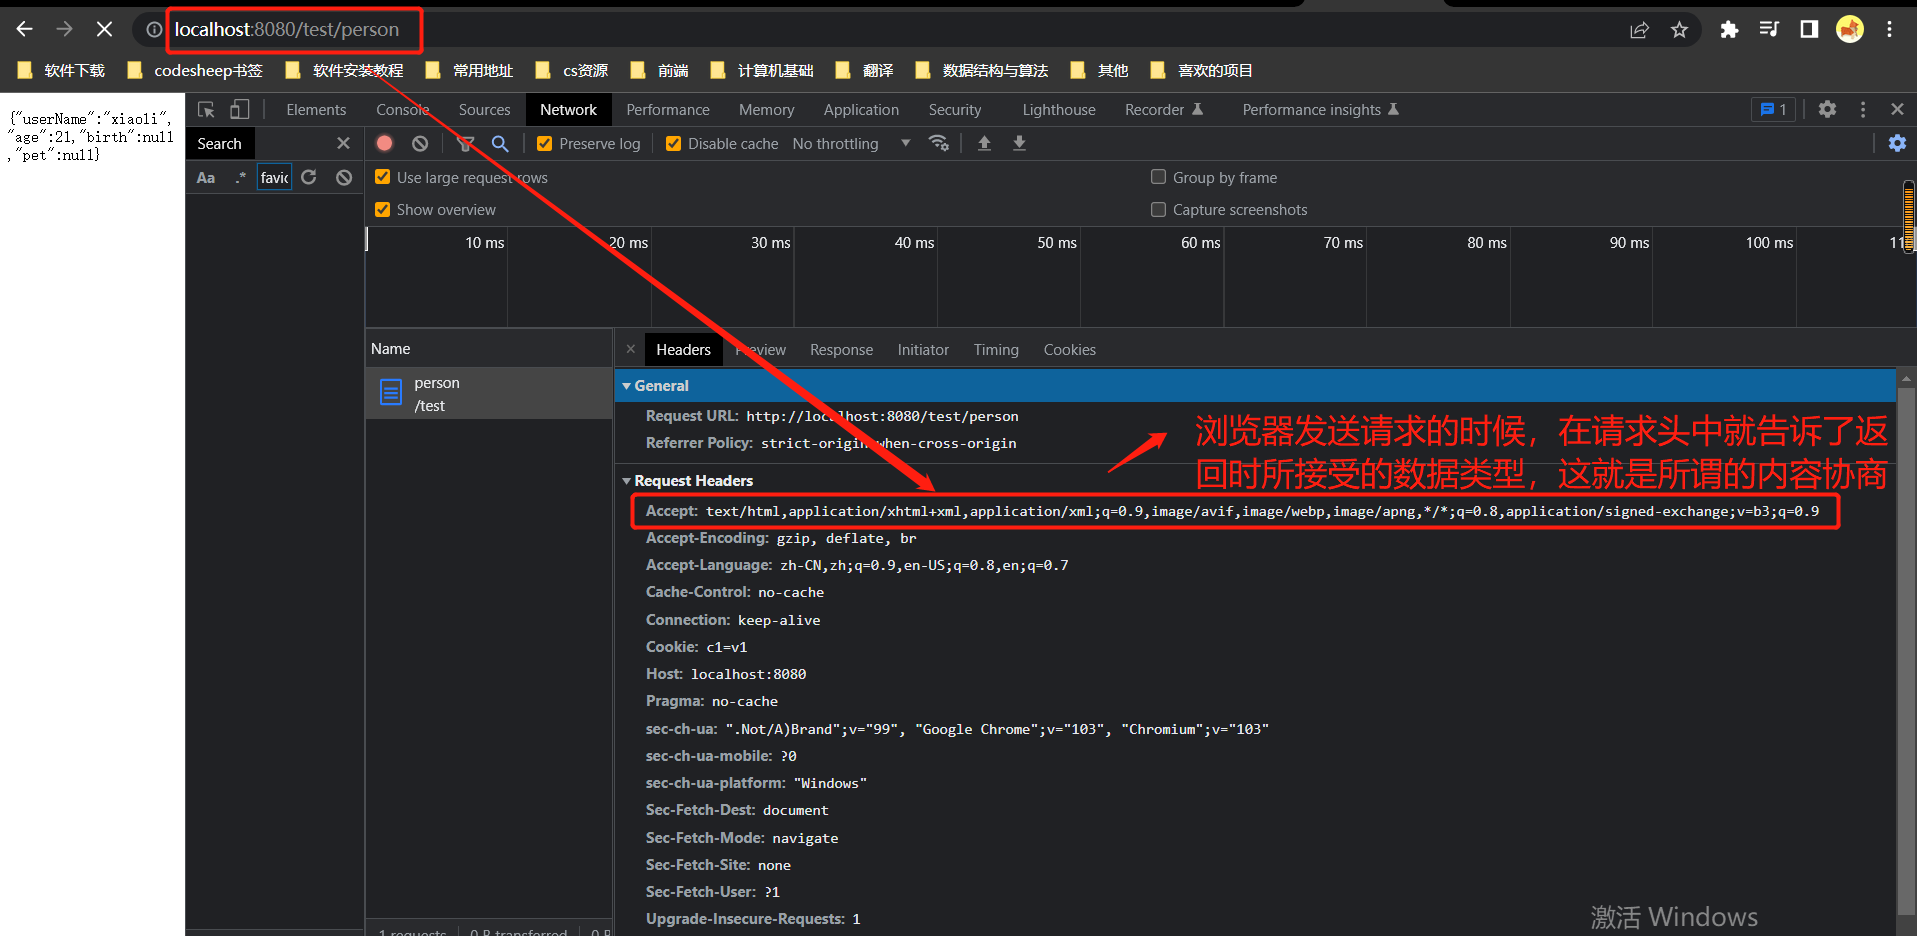
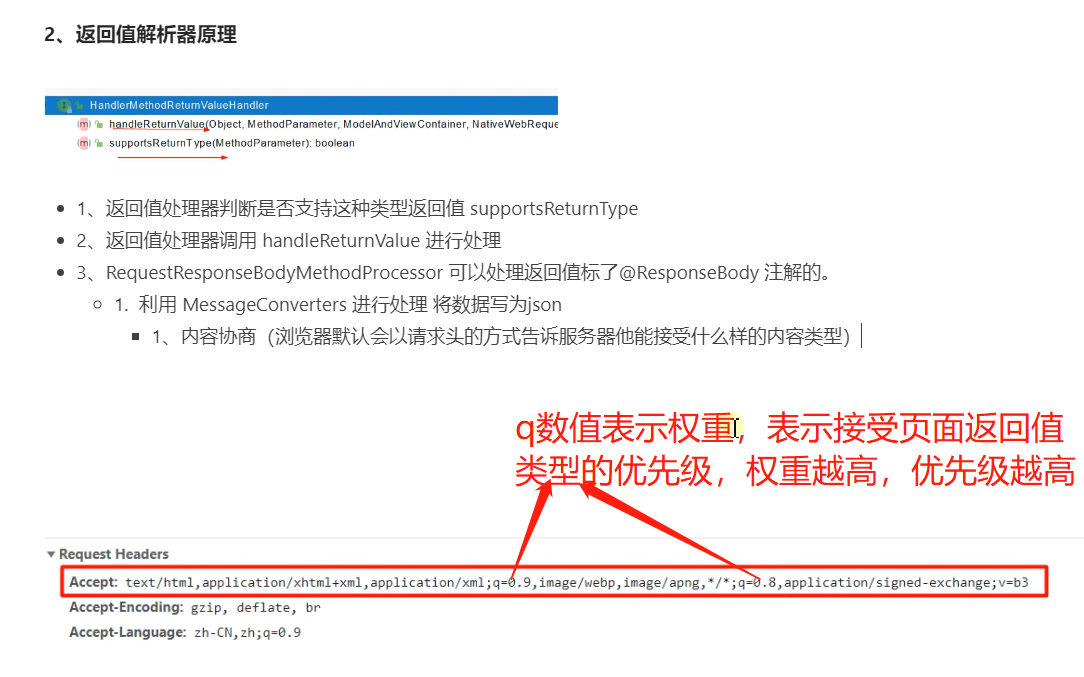
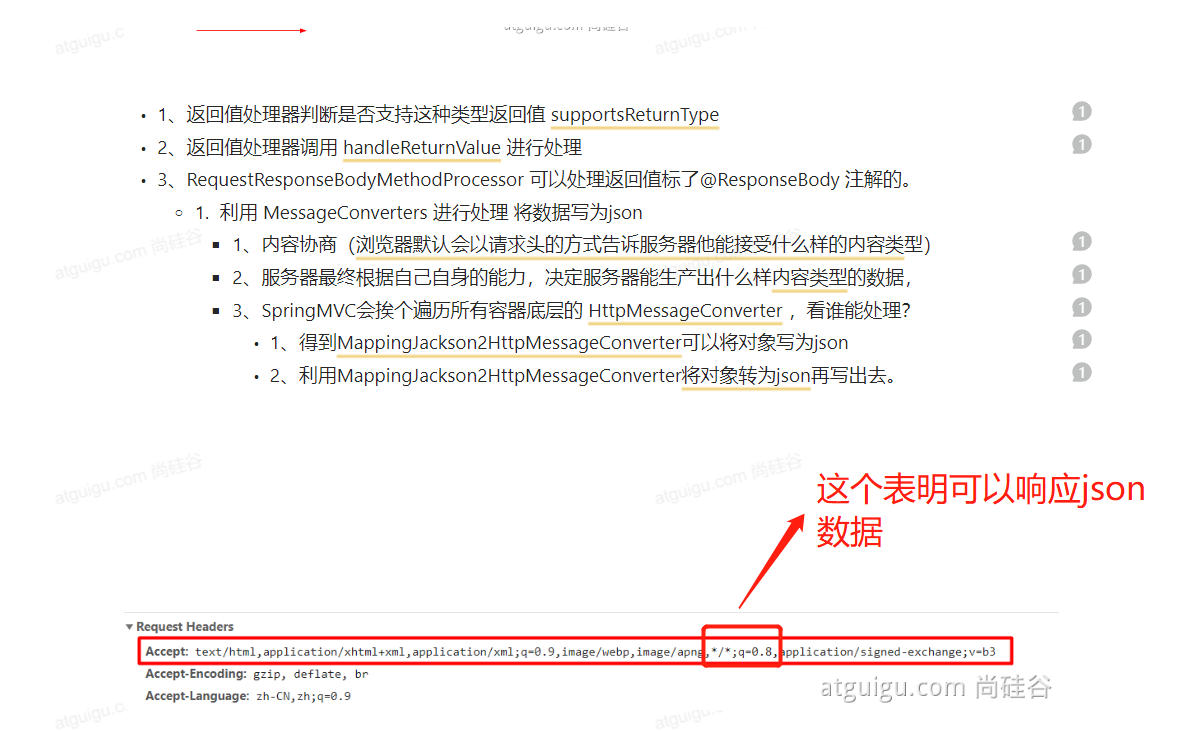
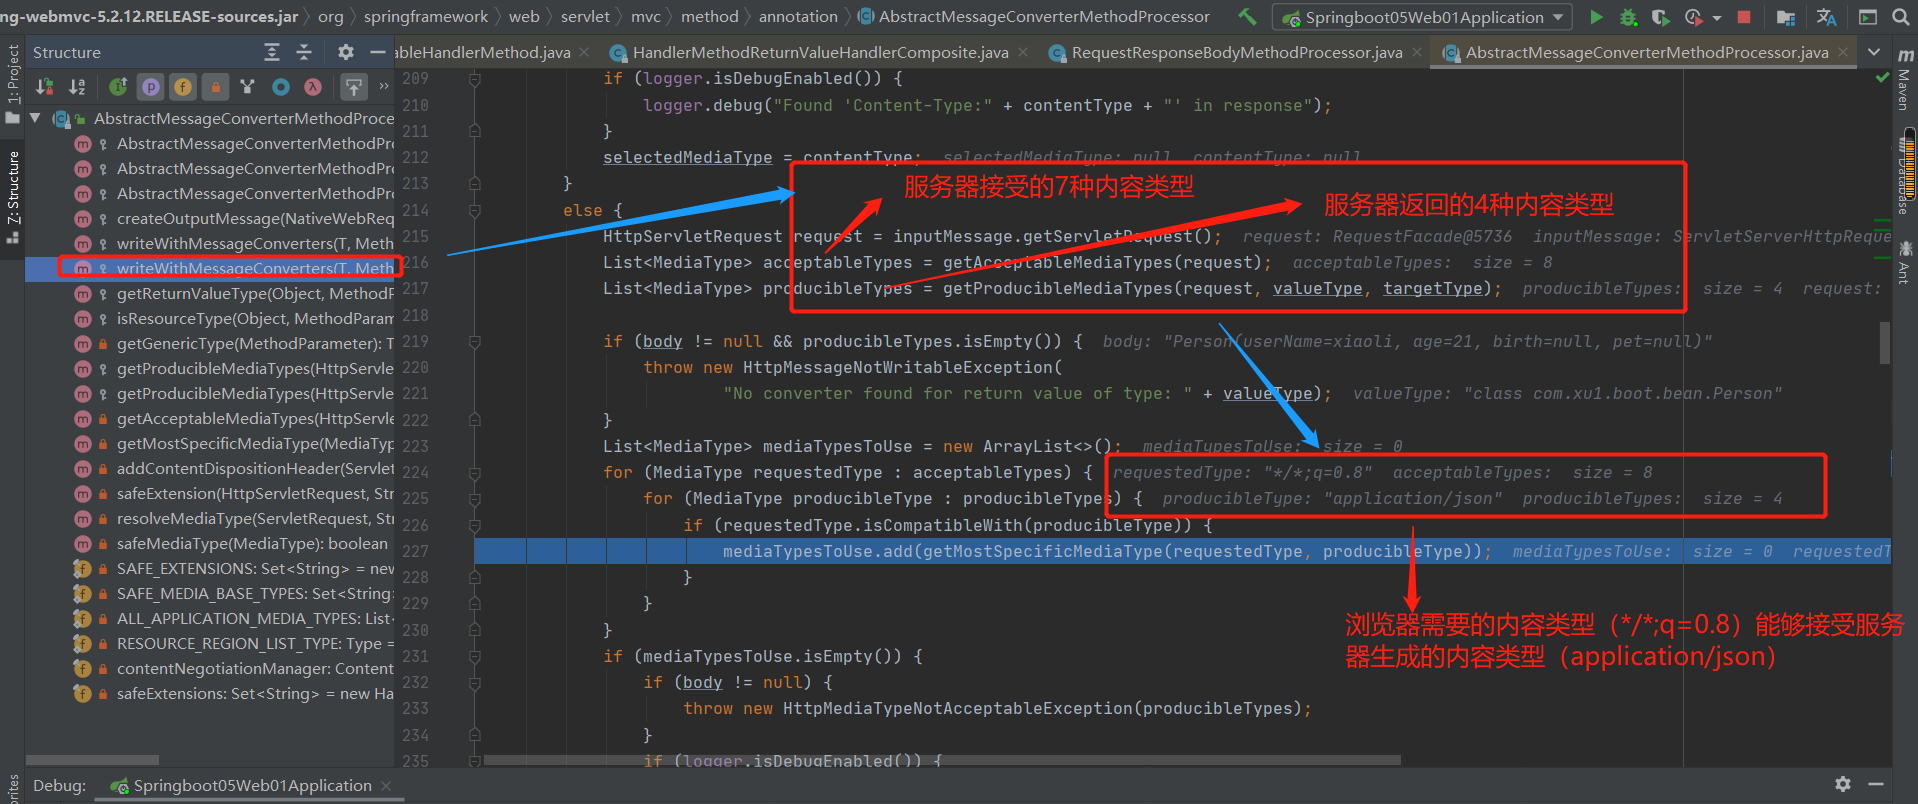
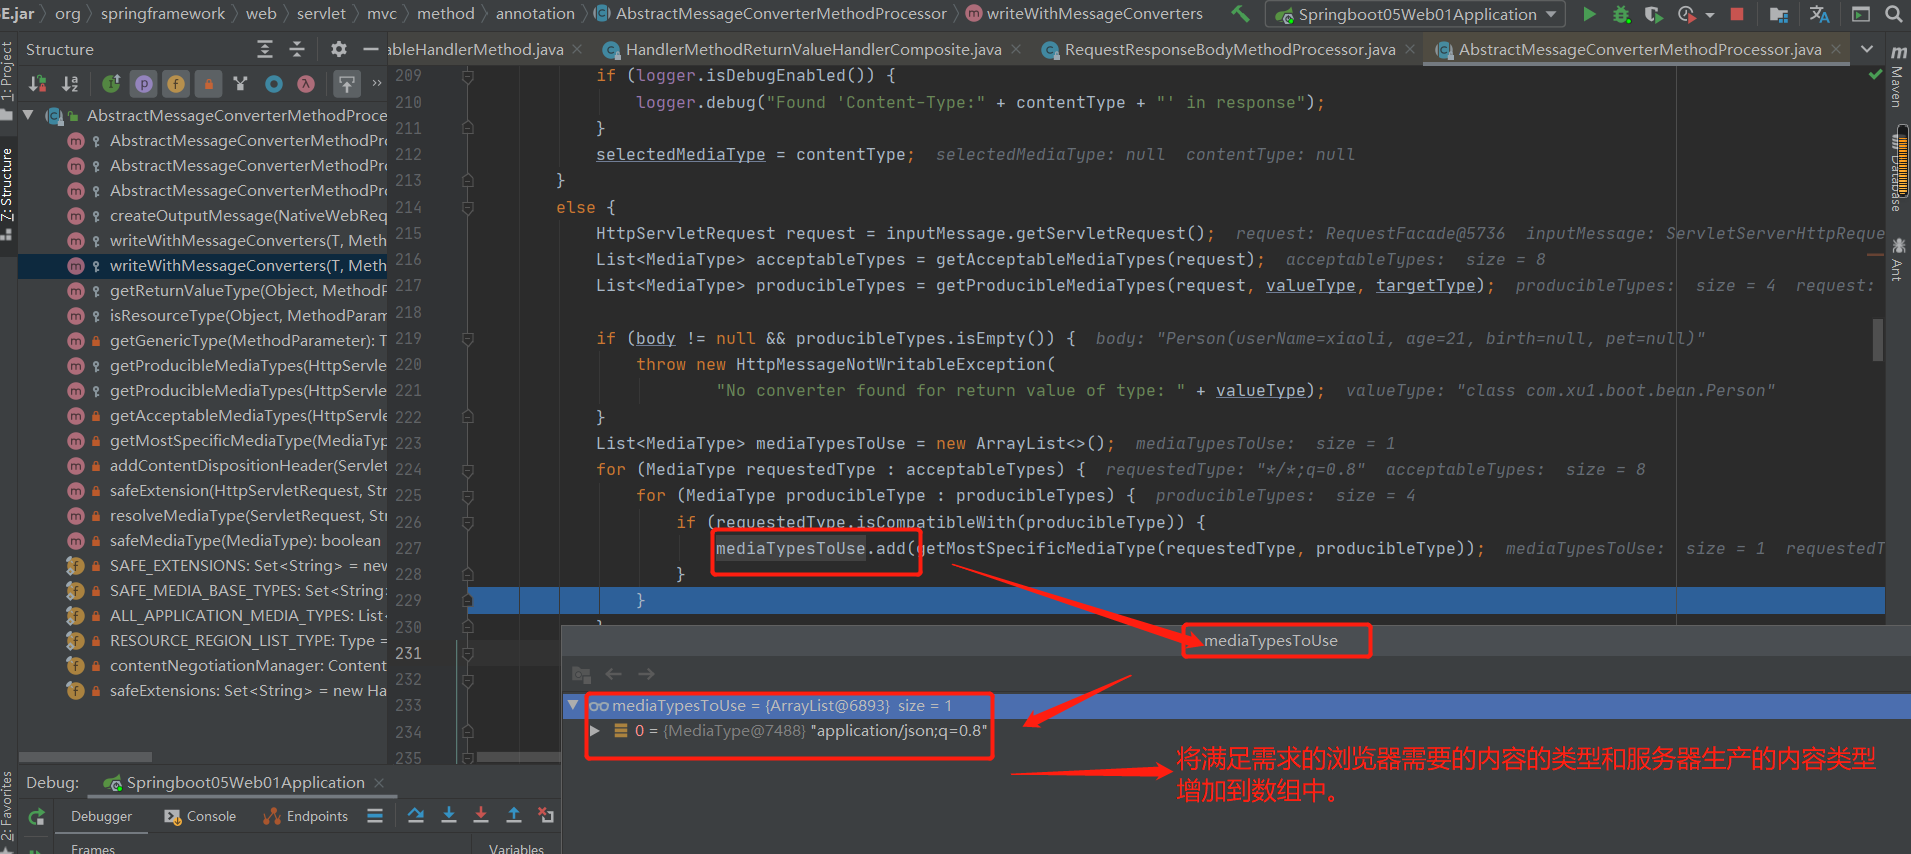
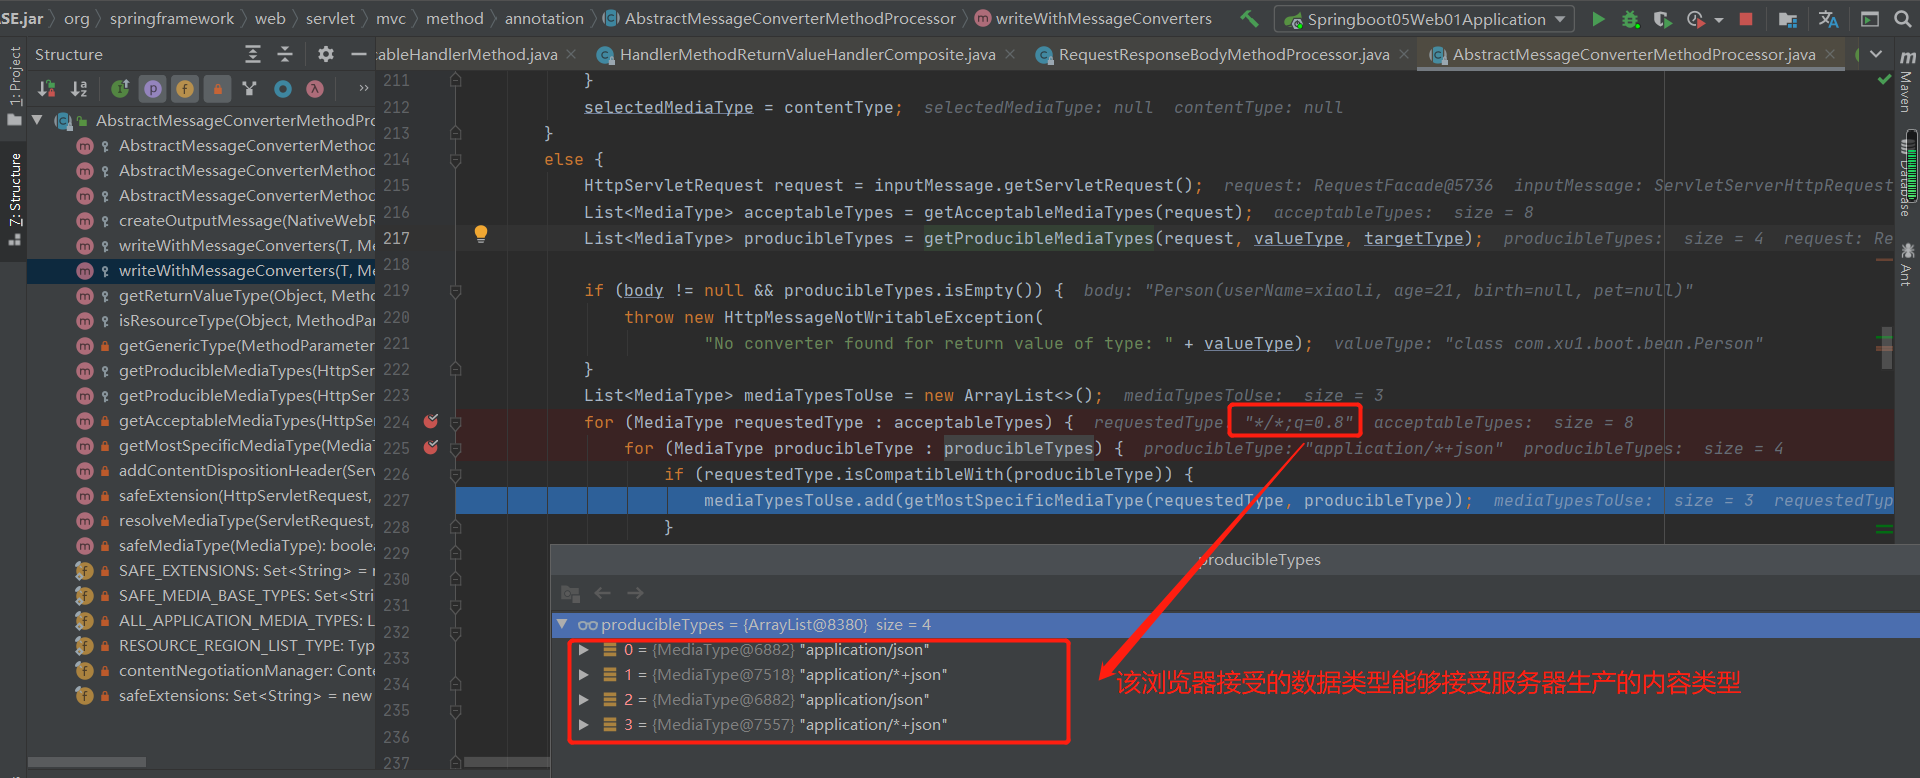
2.HTTPMessageConverter原理:
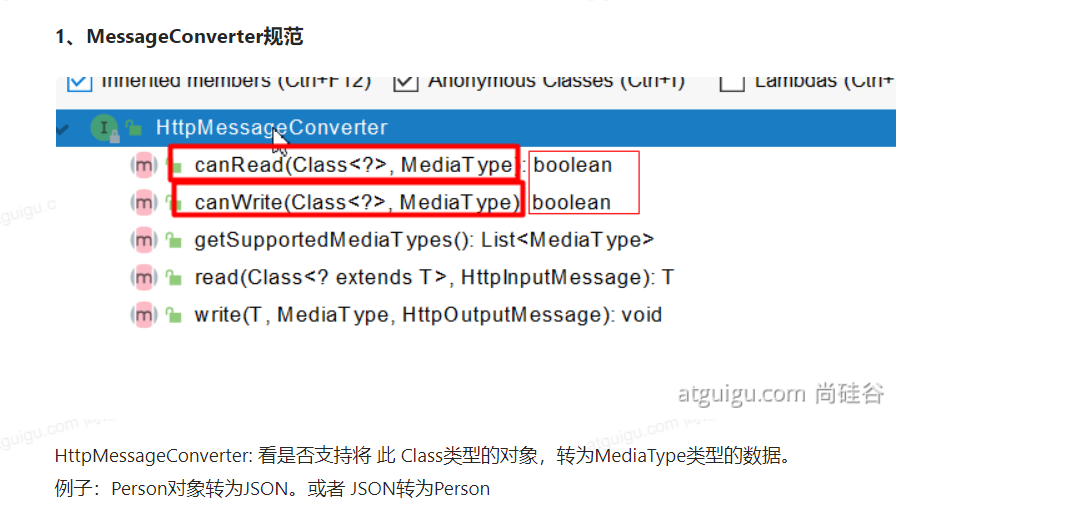
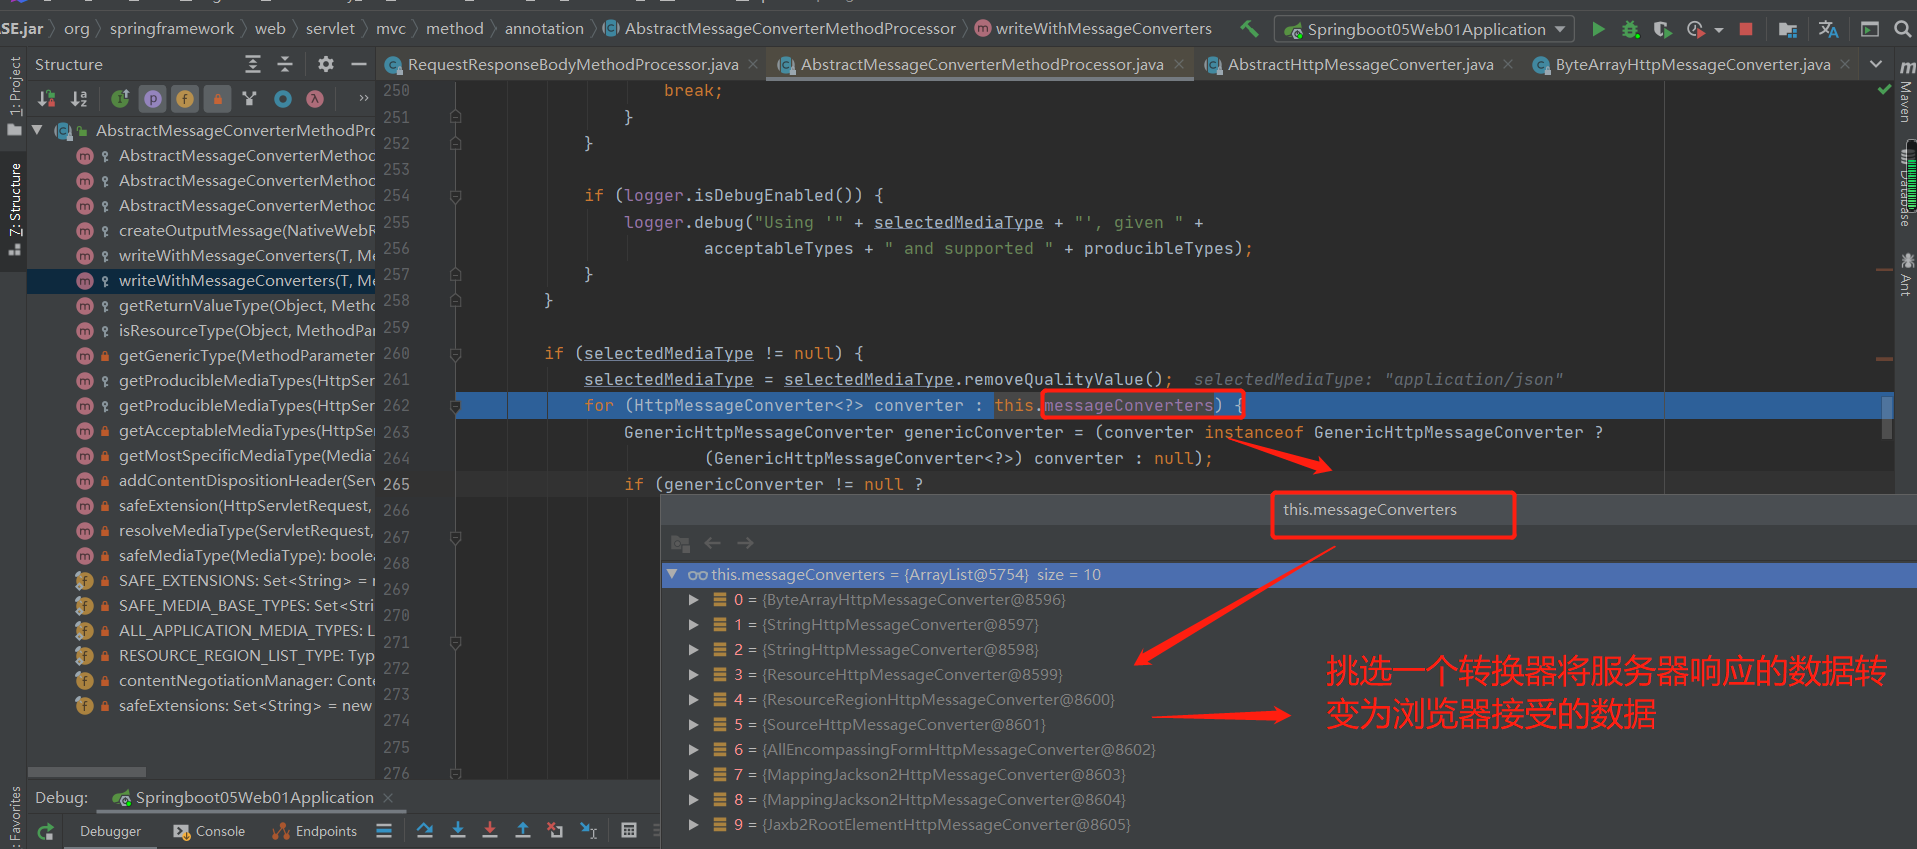
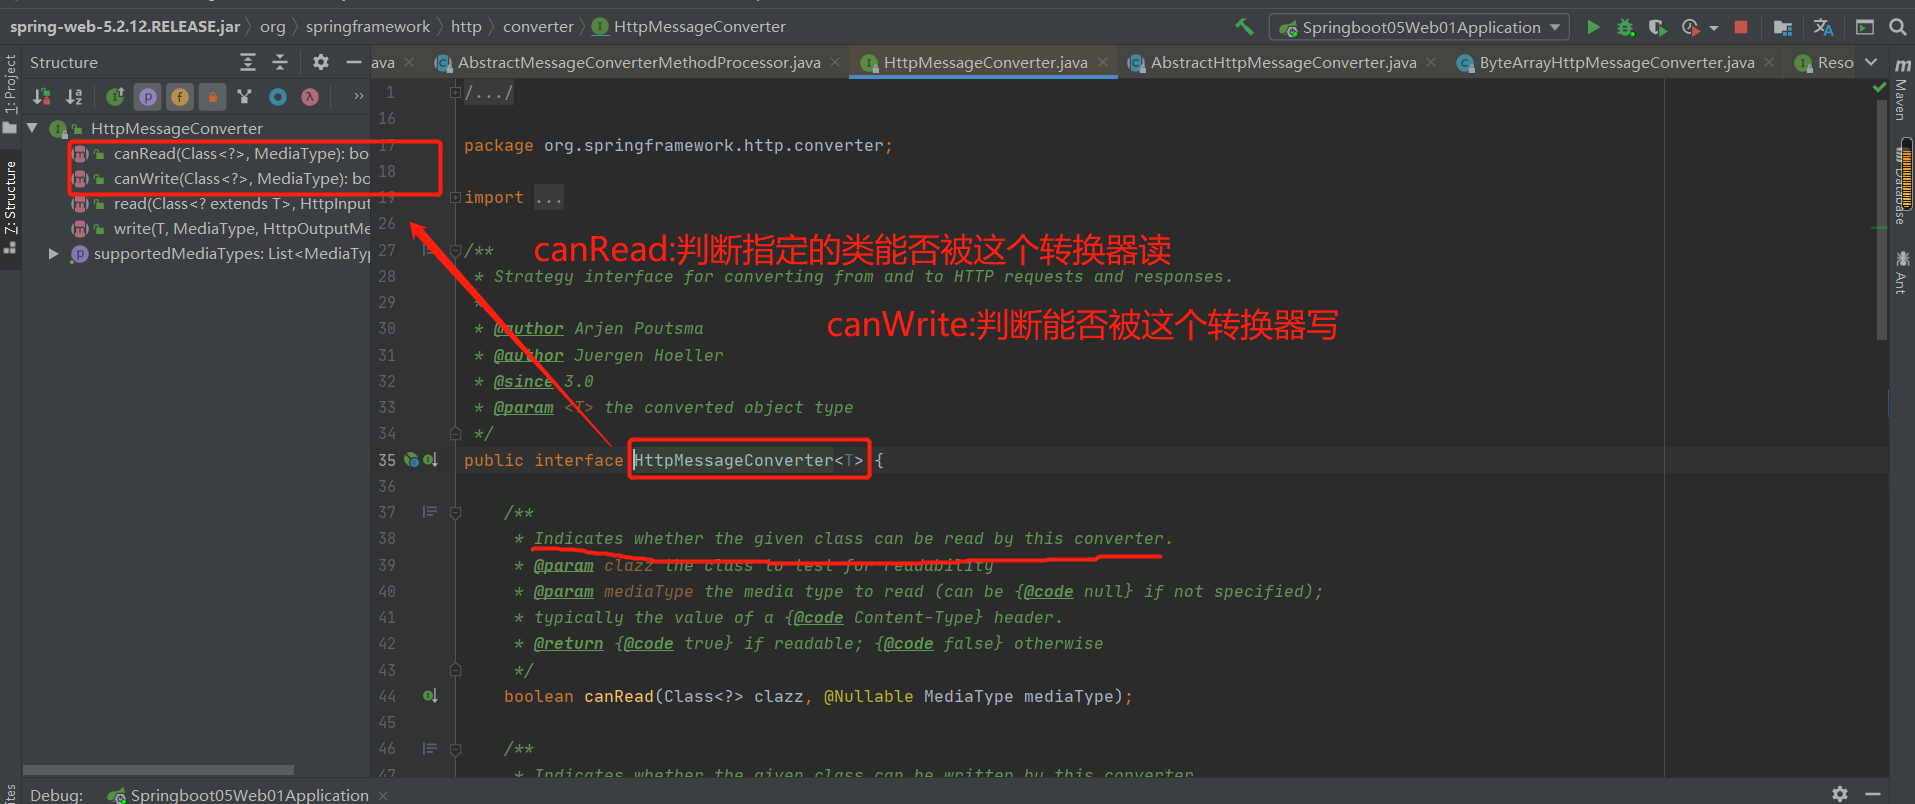
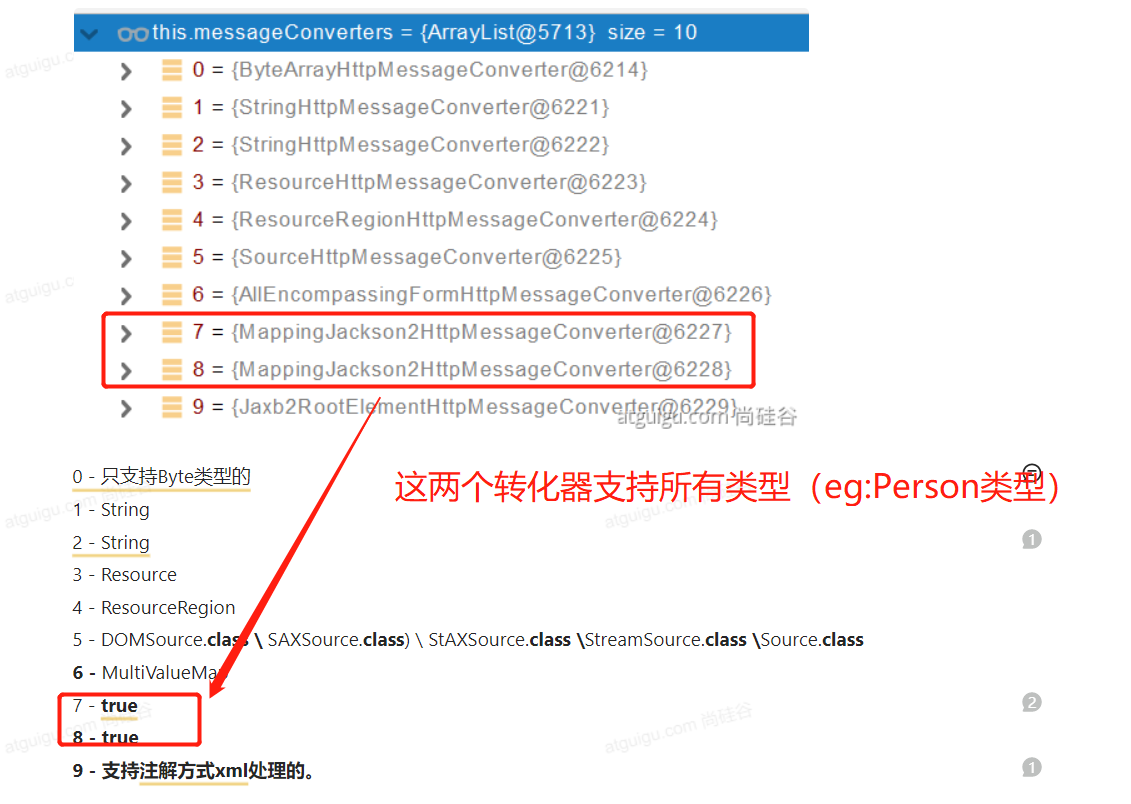
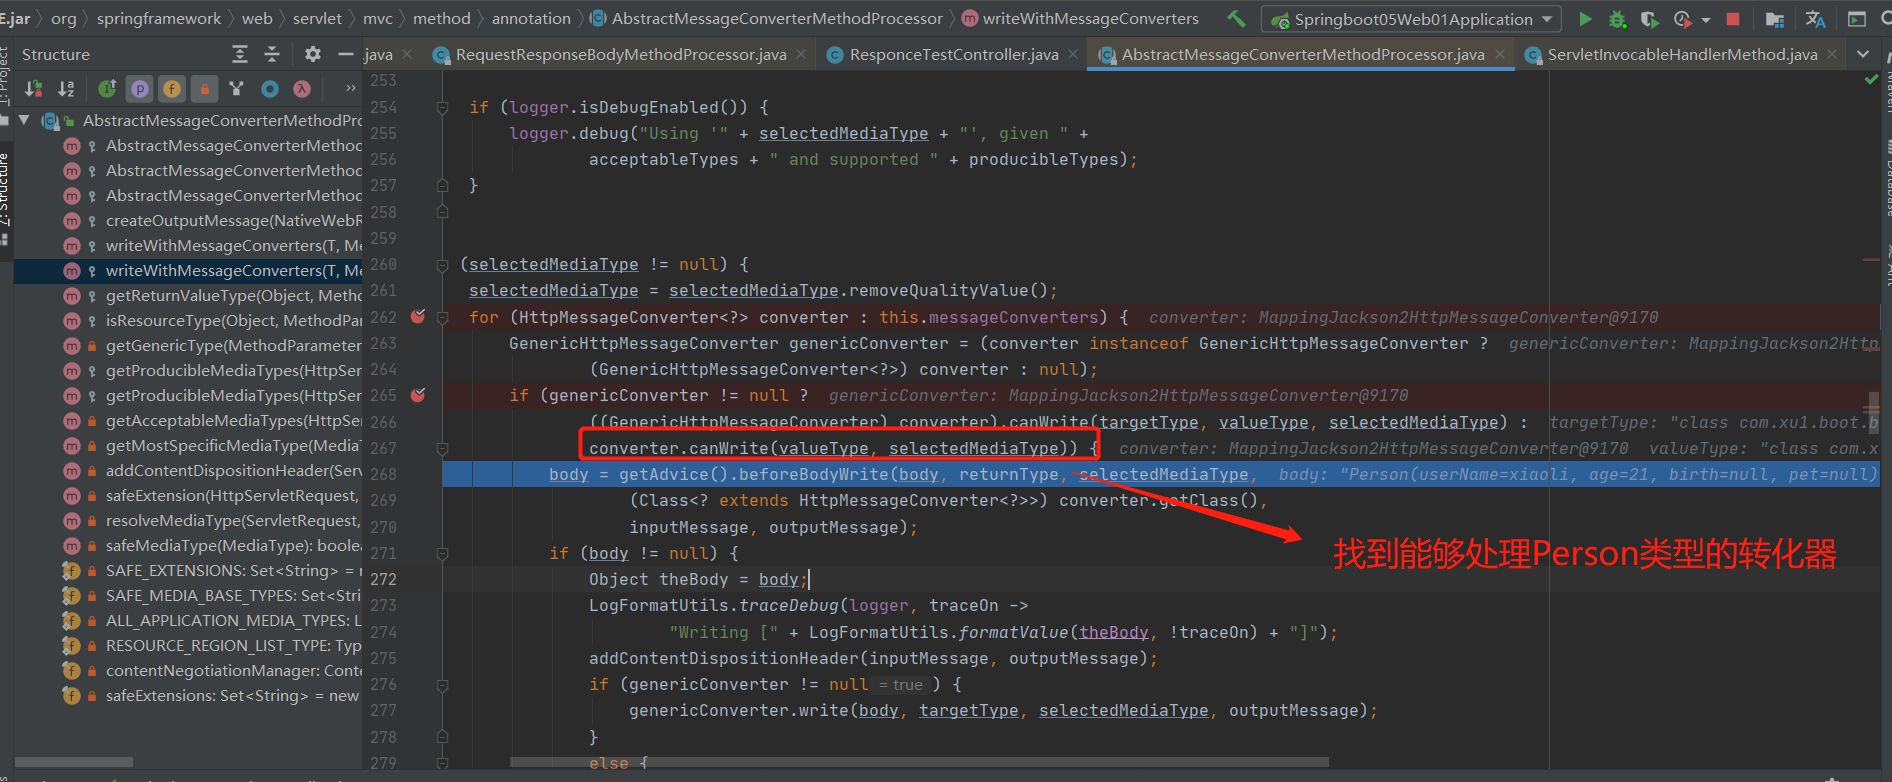
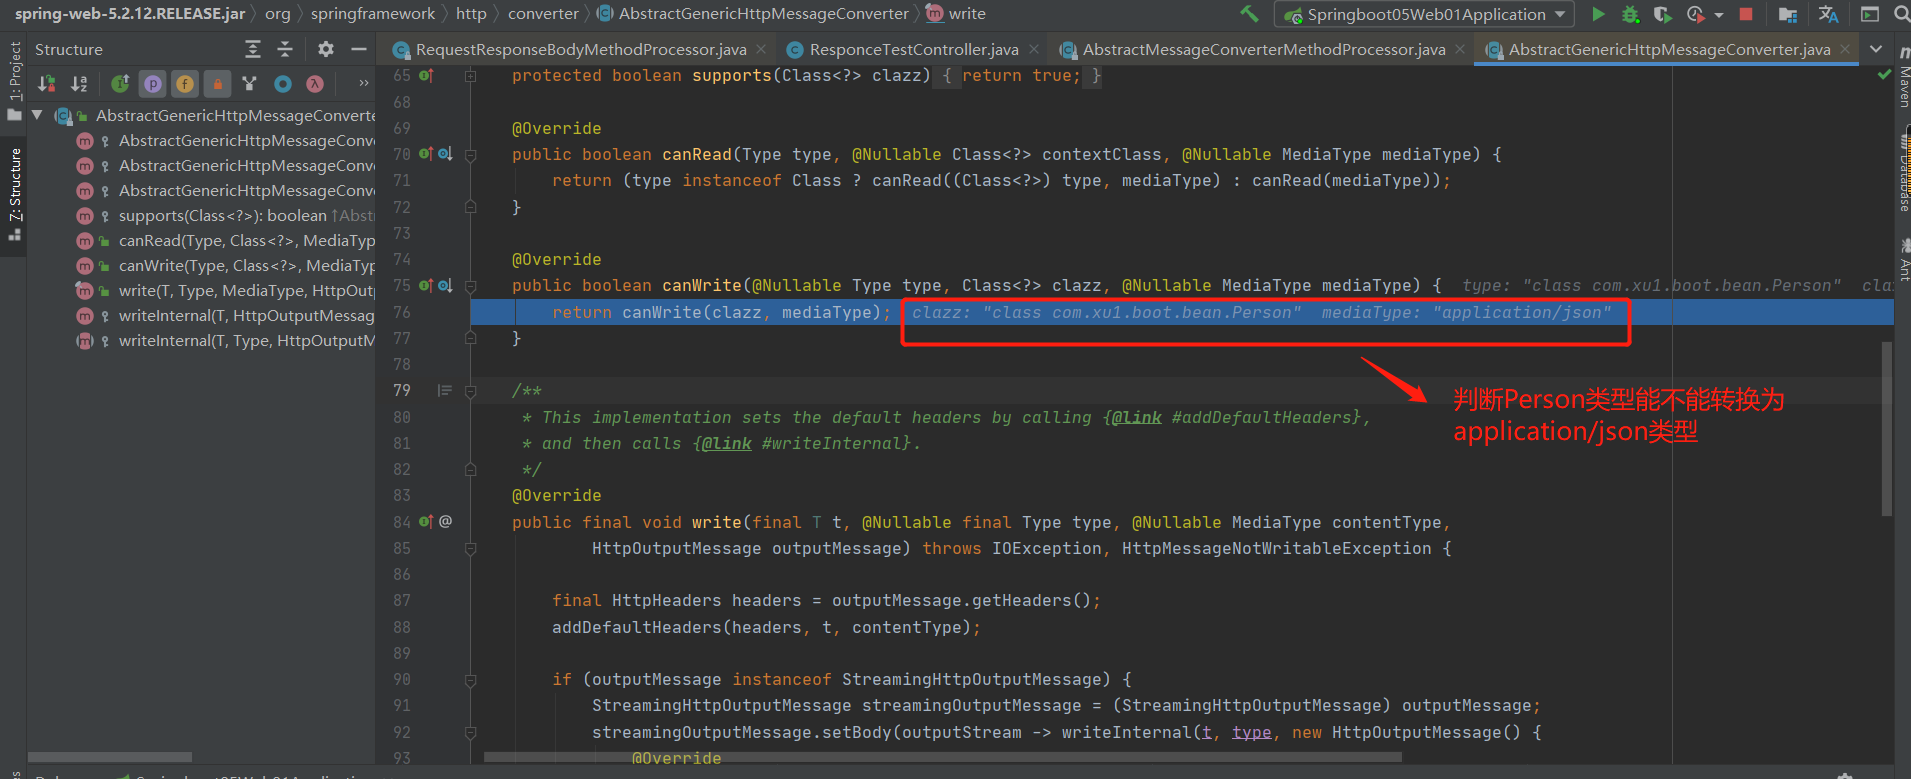
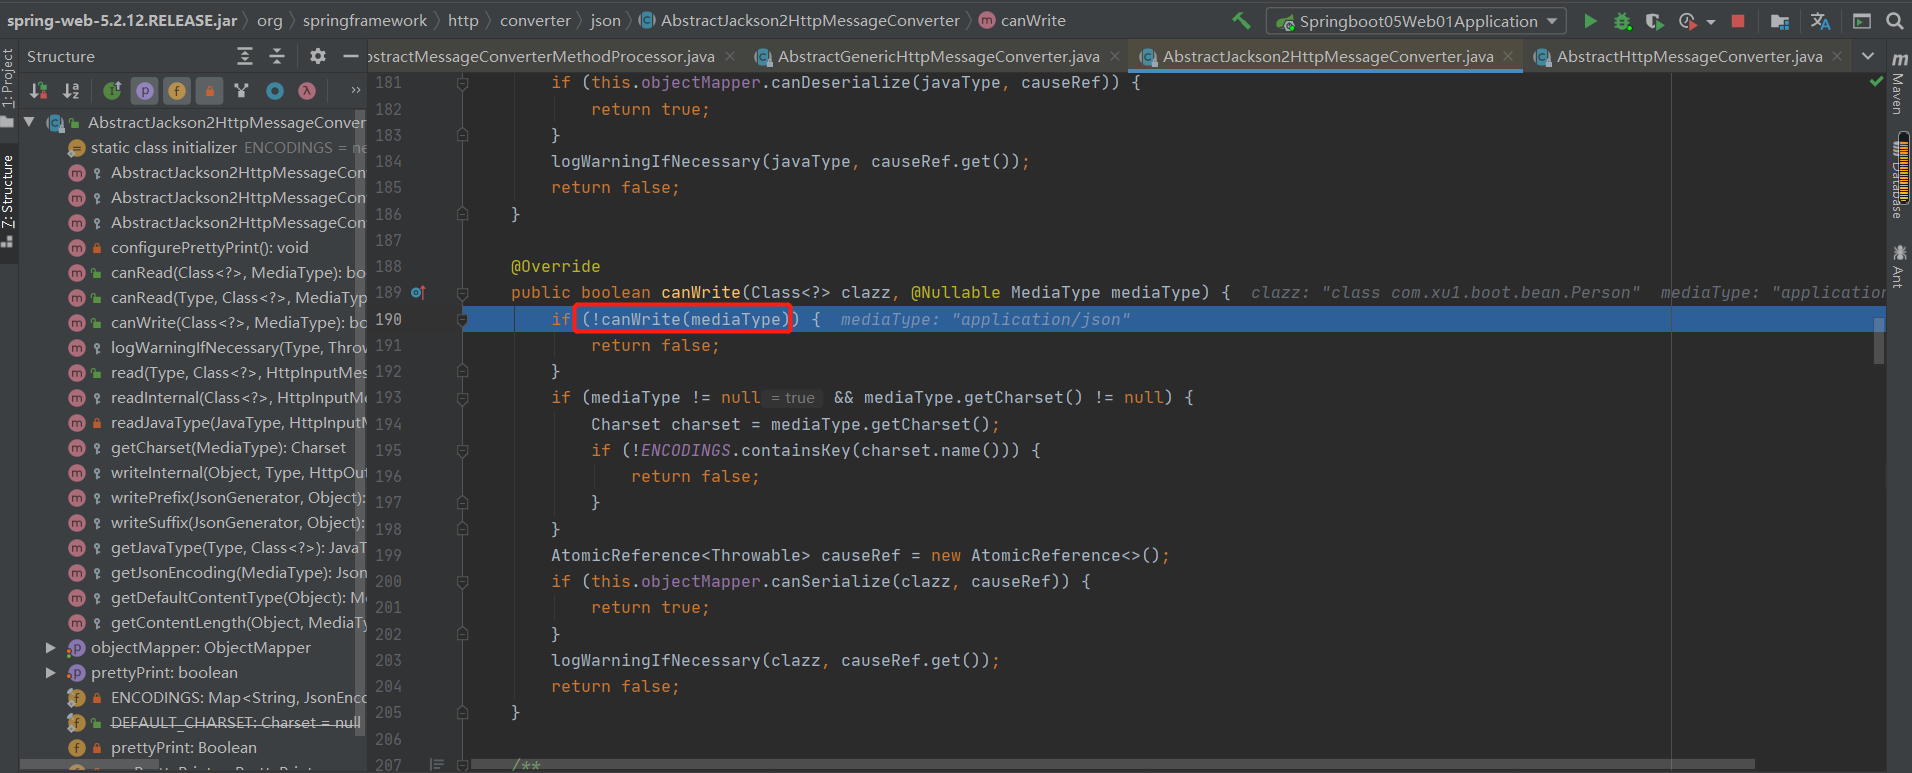
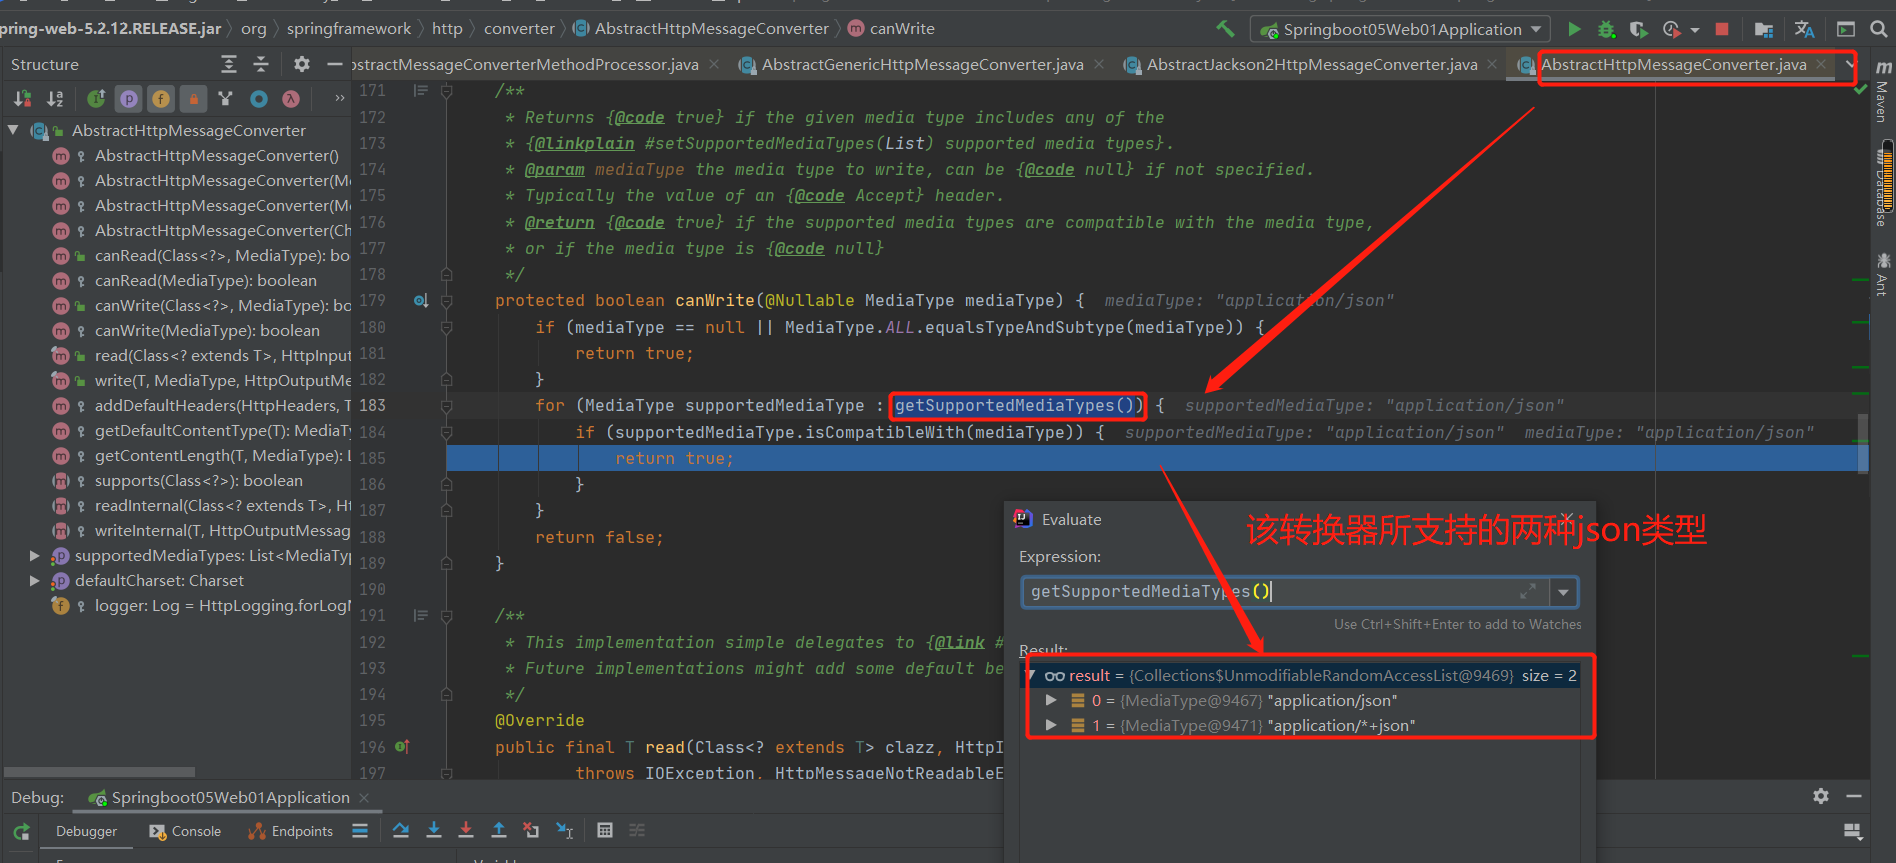
补充:每一个转换器都有支持特定的媒体类型。服务器能够响应json,而浏览器能够接受json类型,那么就判断该转换器ok.
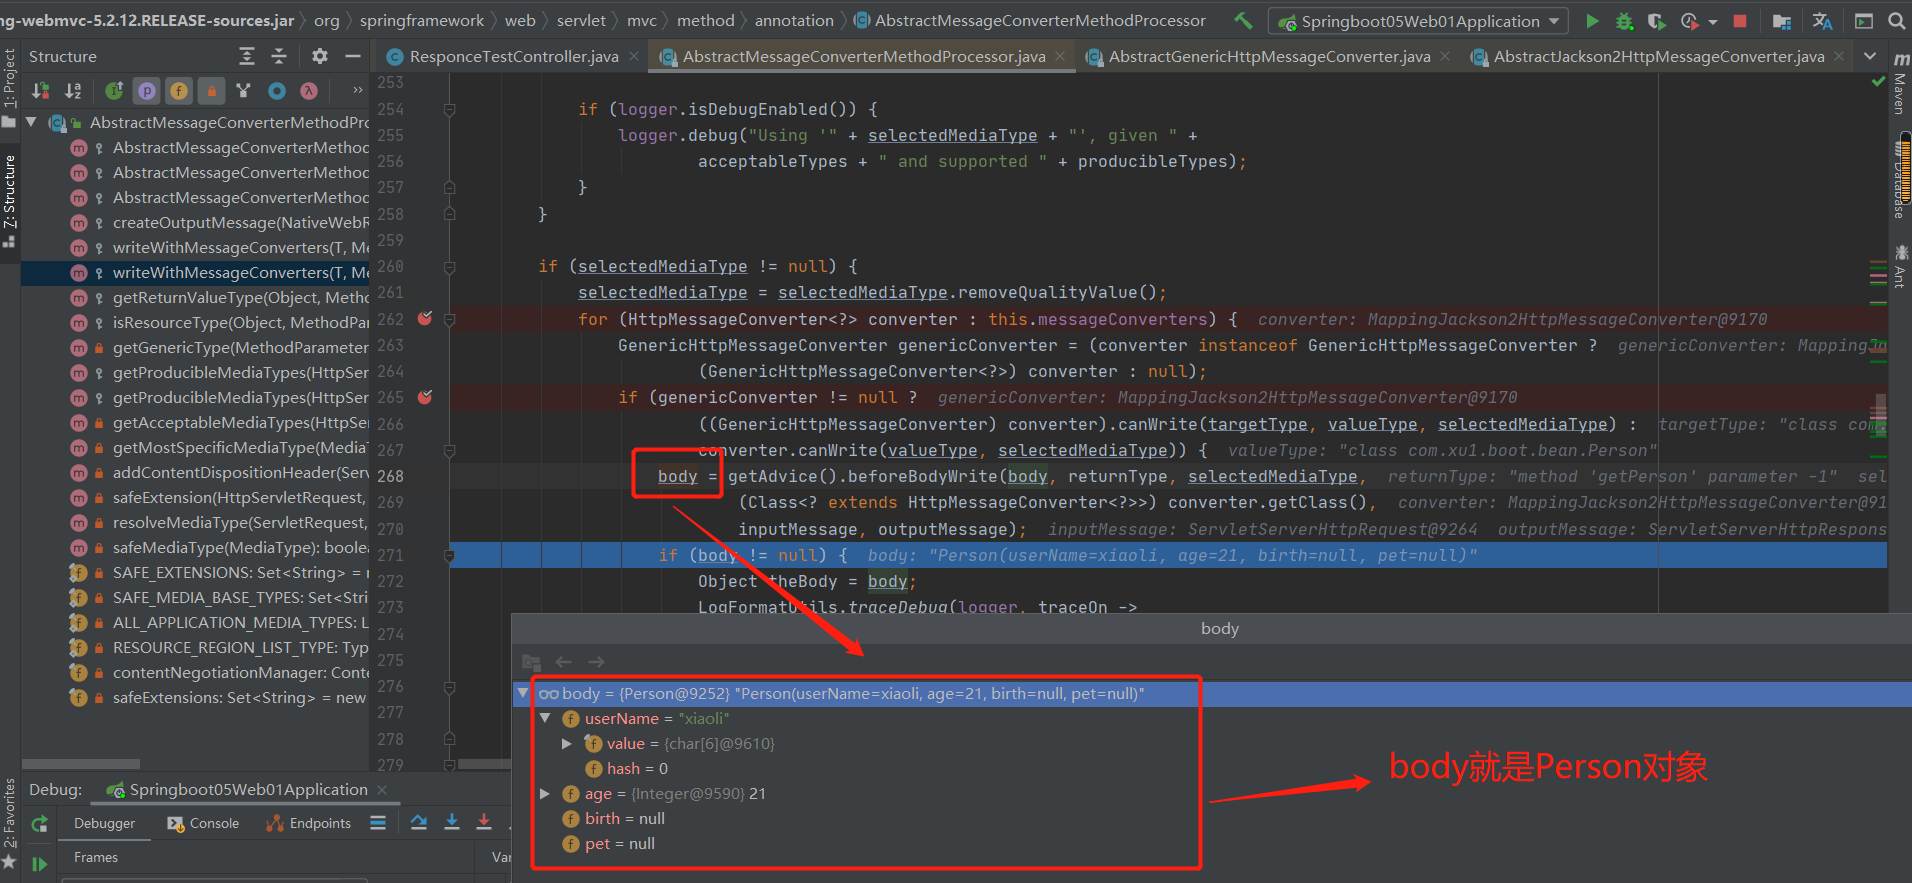
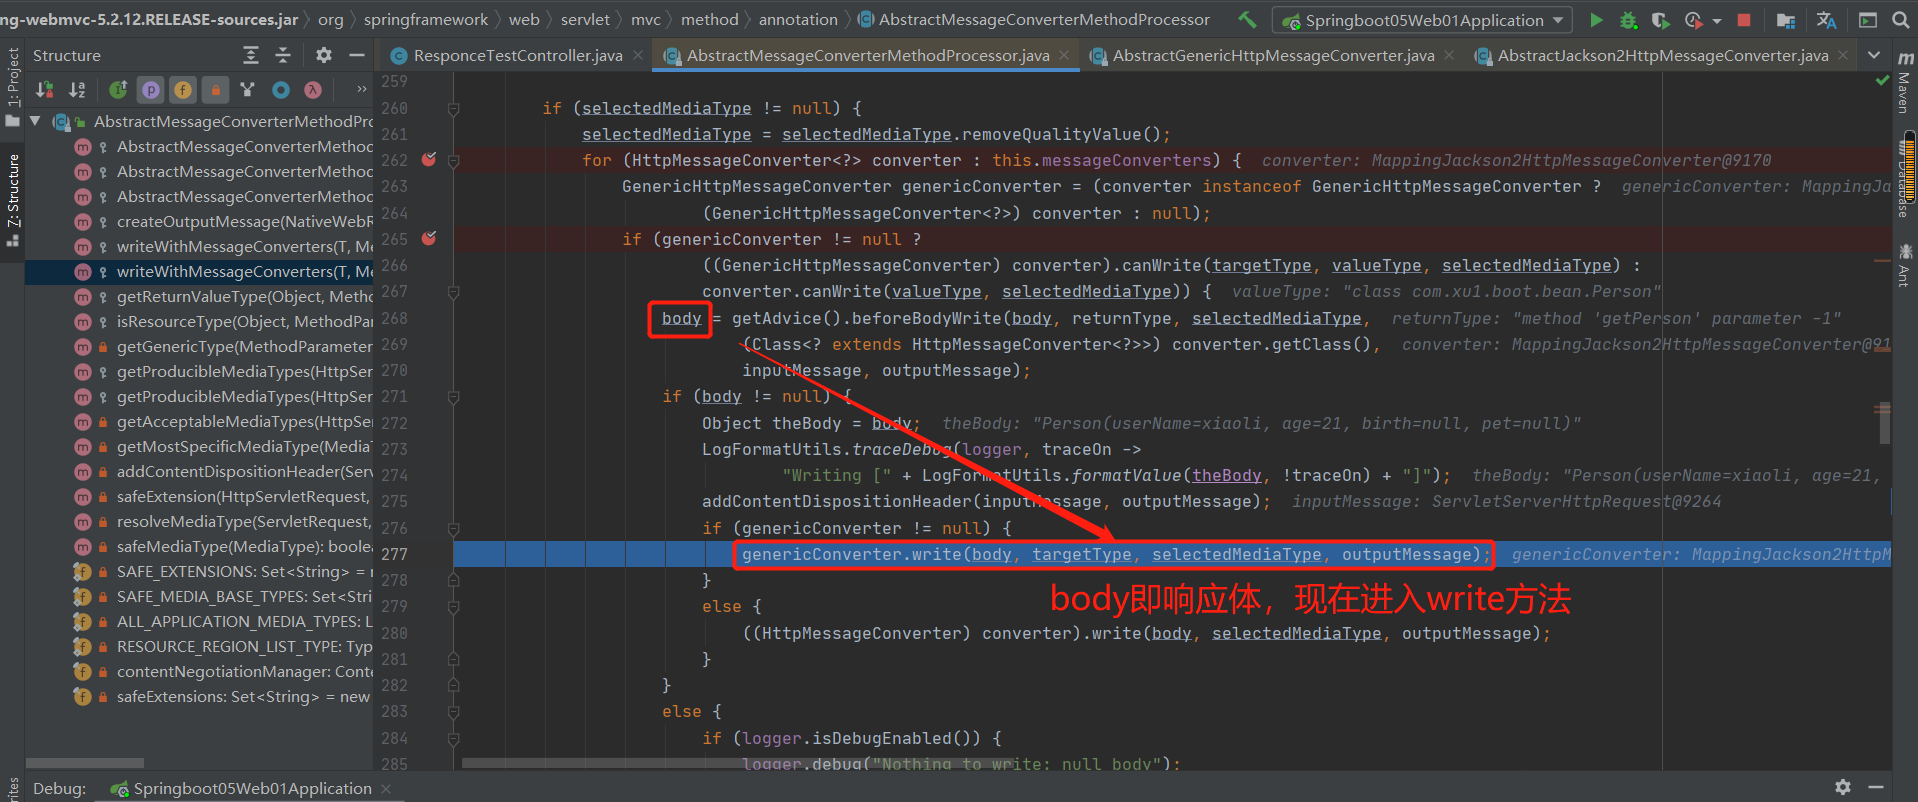
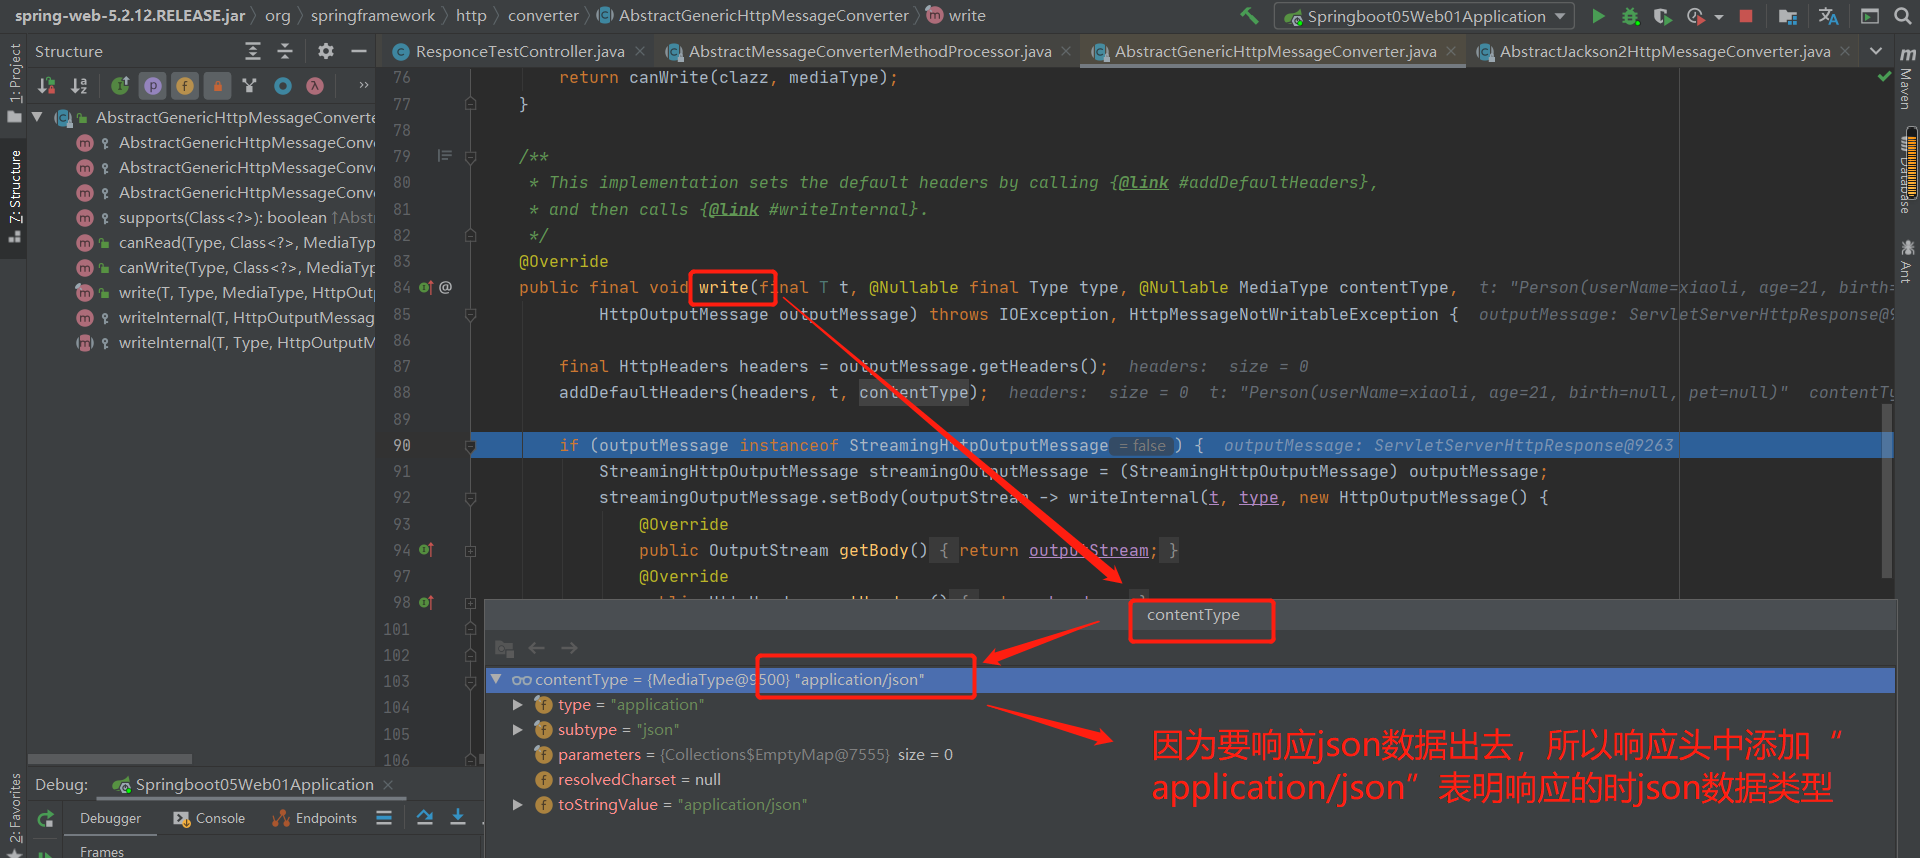
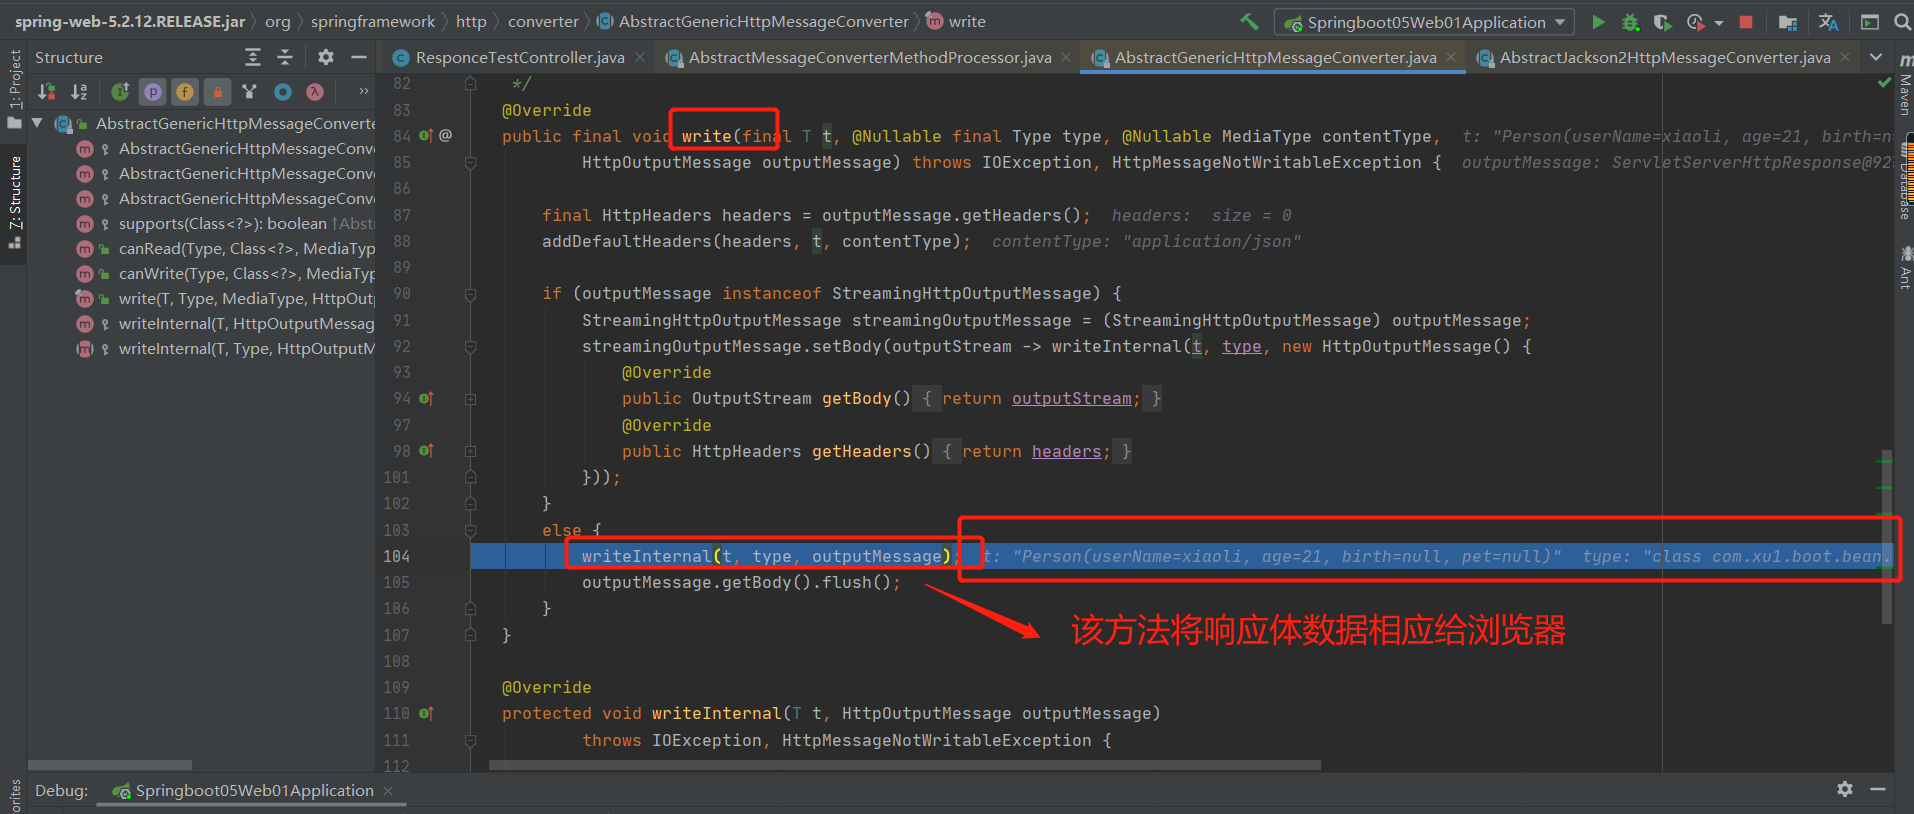
(相应改为响应)
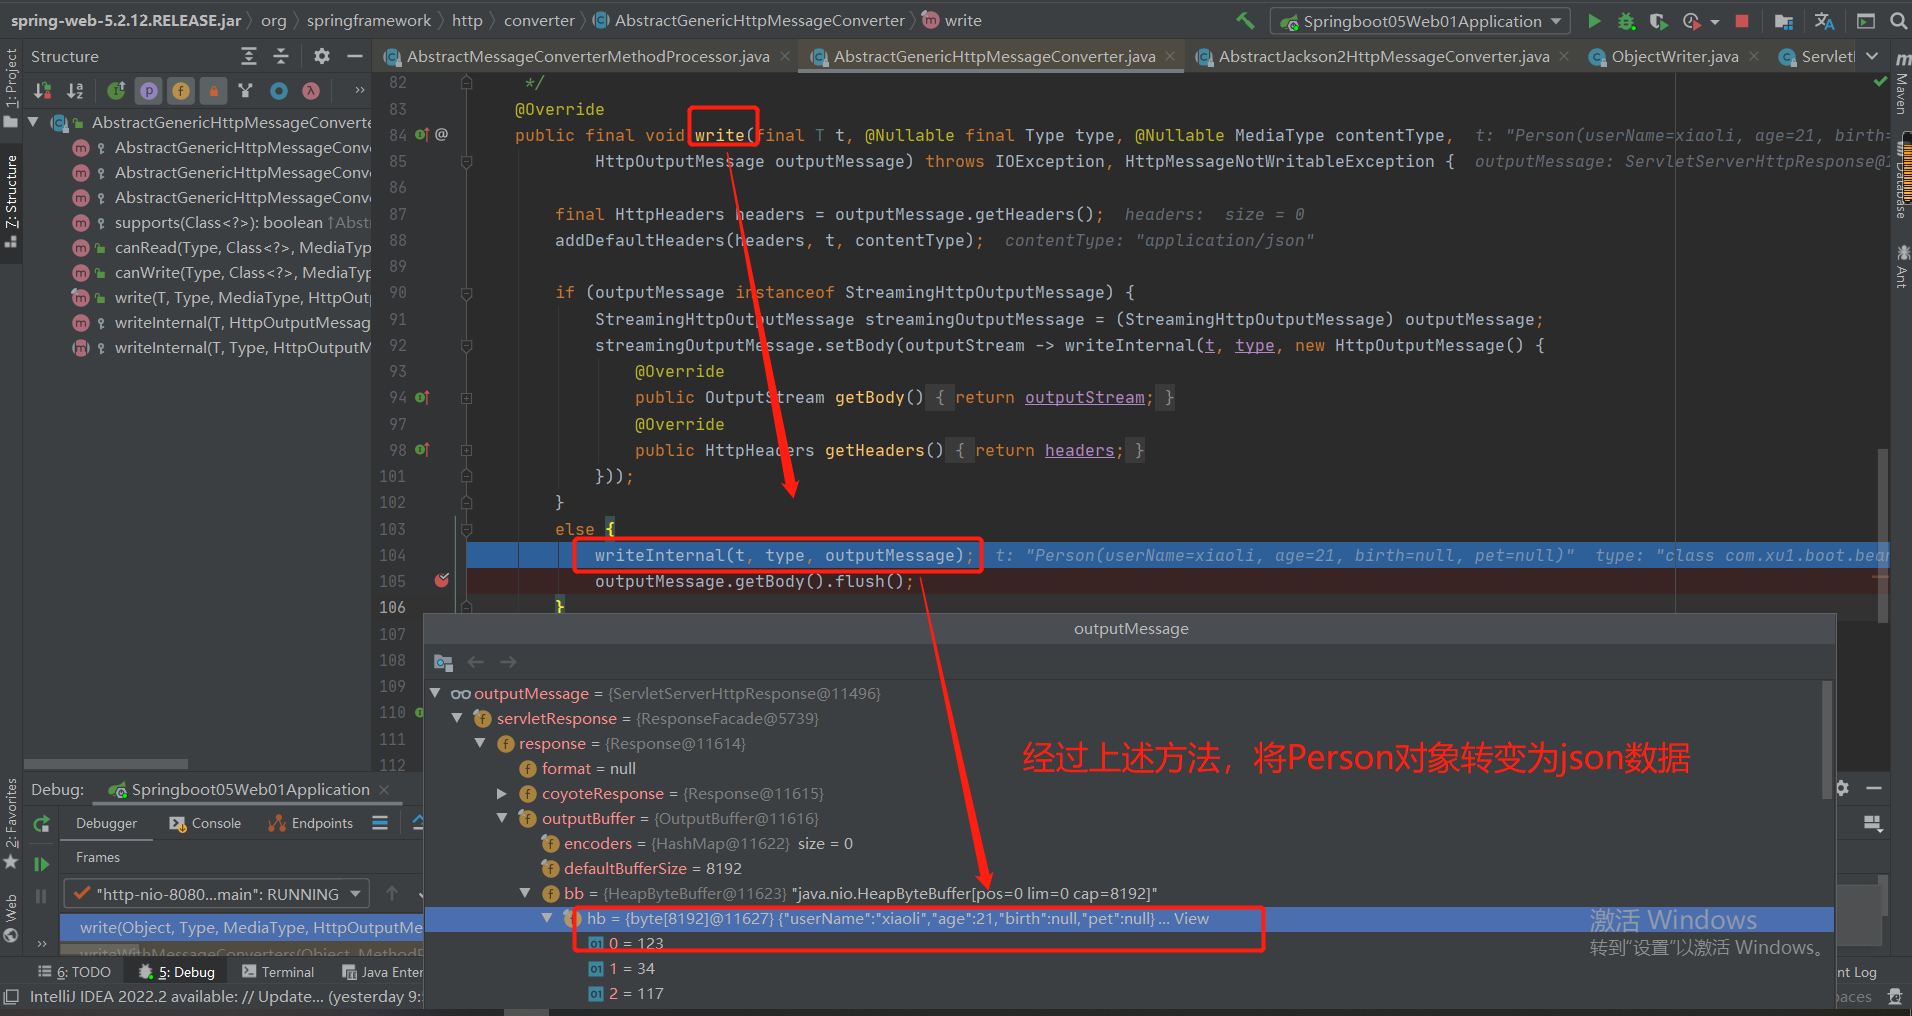
总结:
6-11 相应处理--内容协商原理
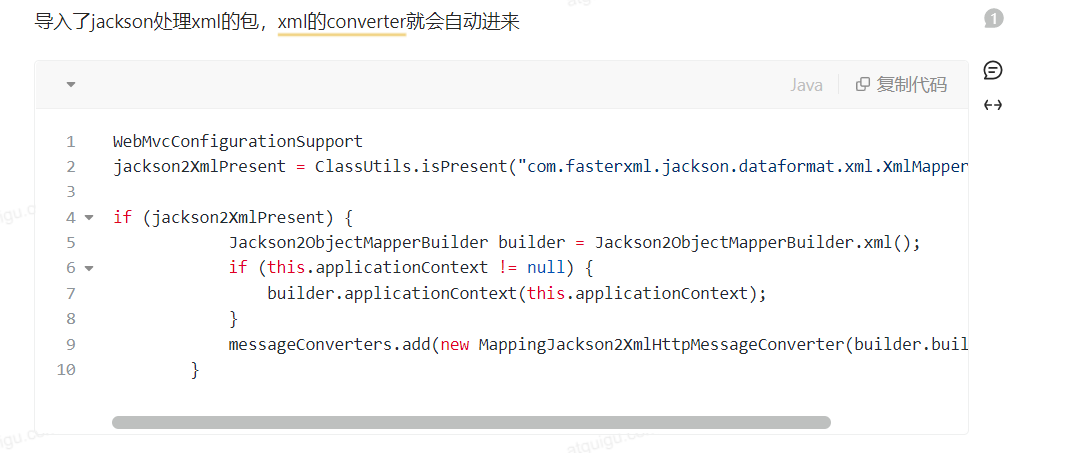
1.将数据以xml形式返回
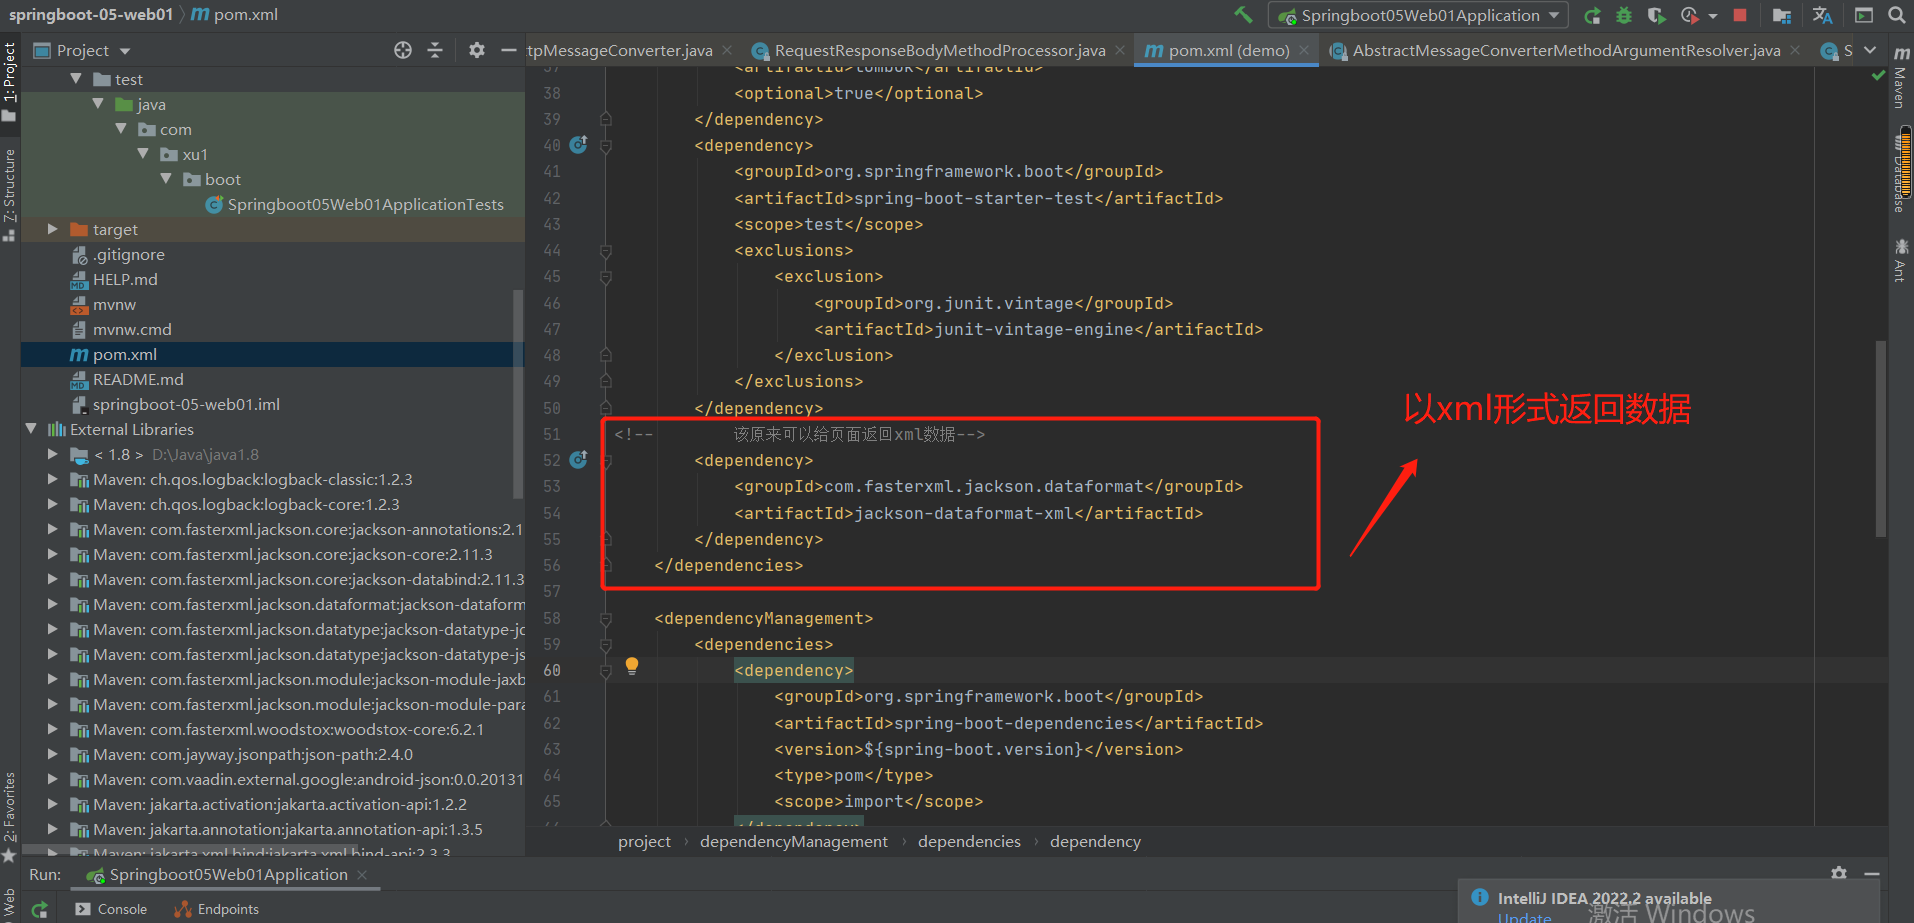
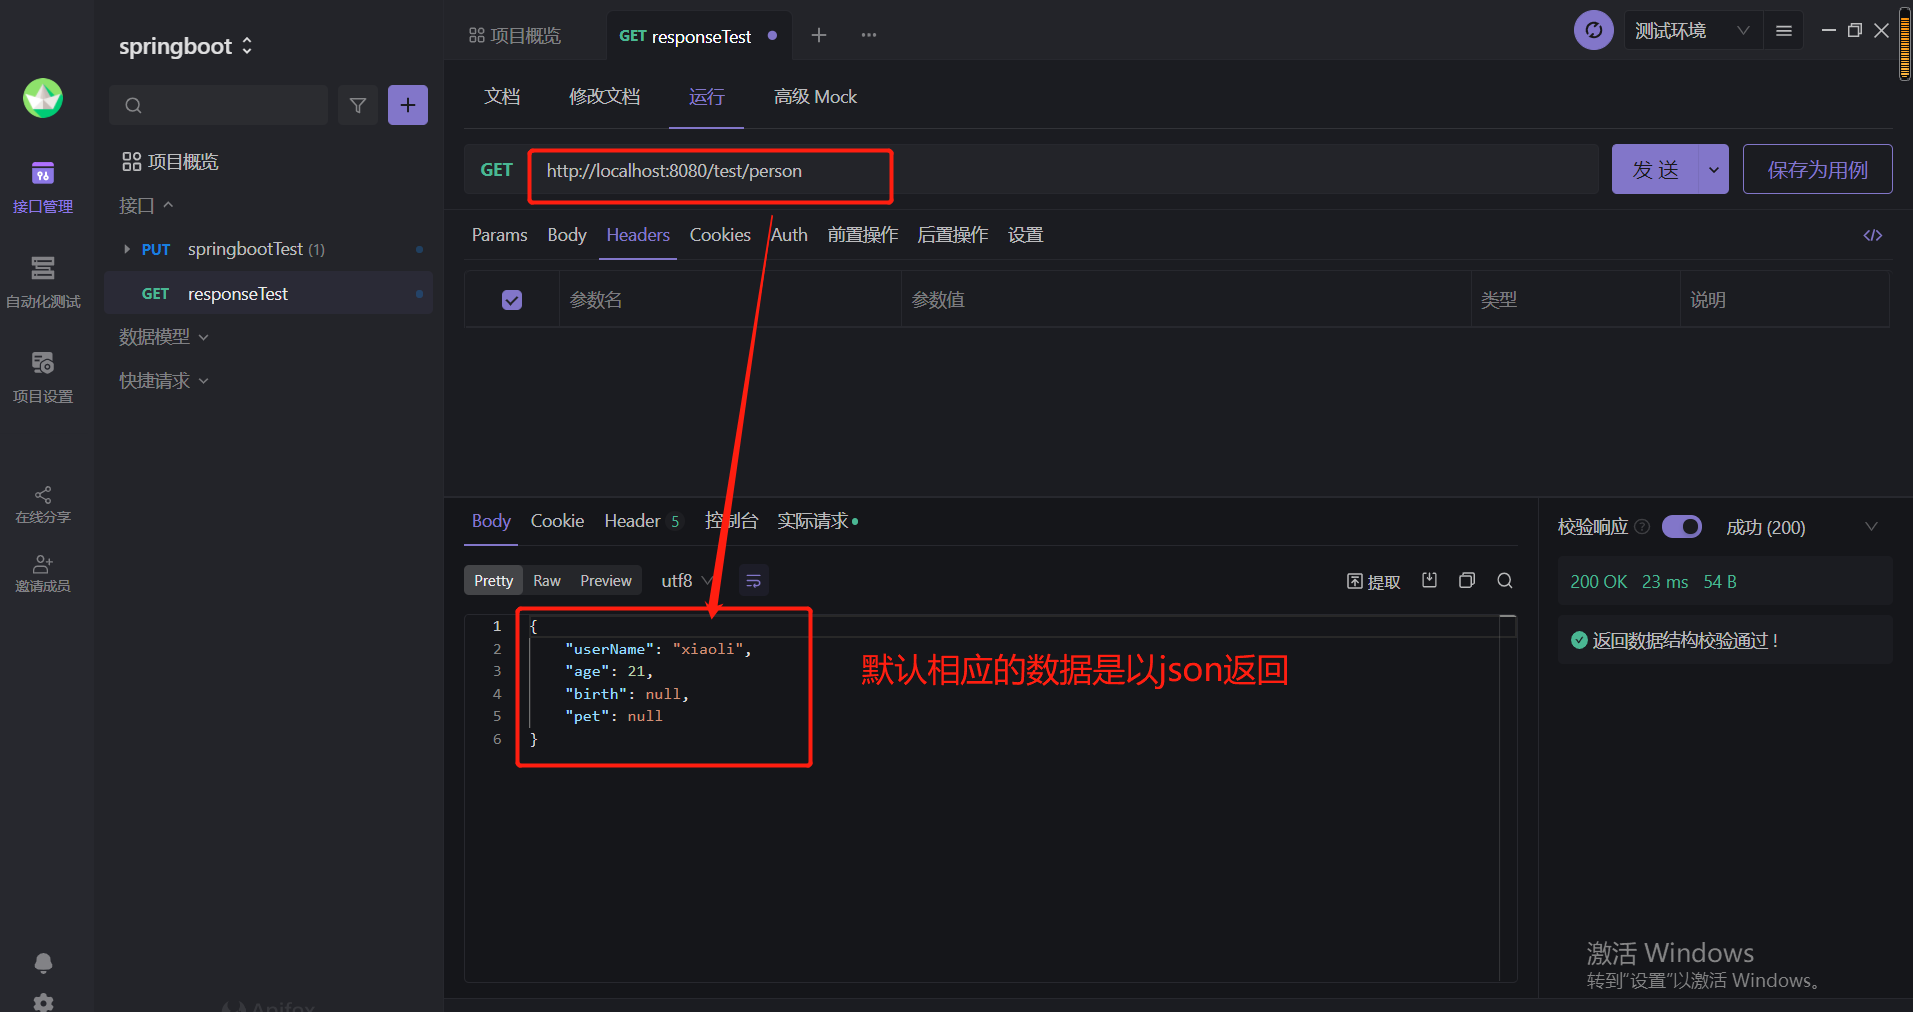
使用Apifox:
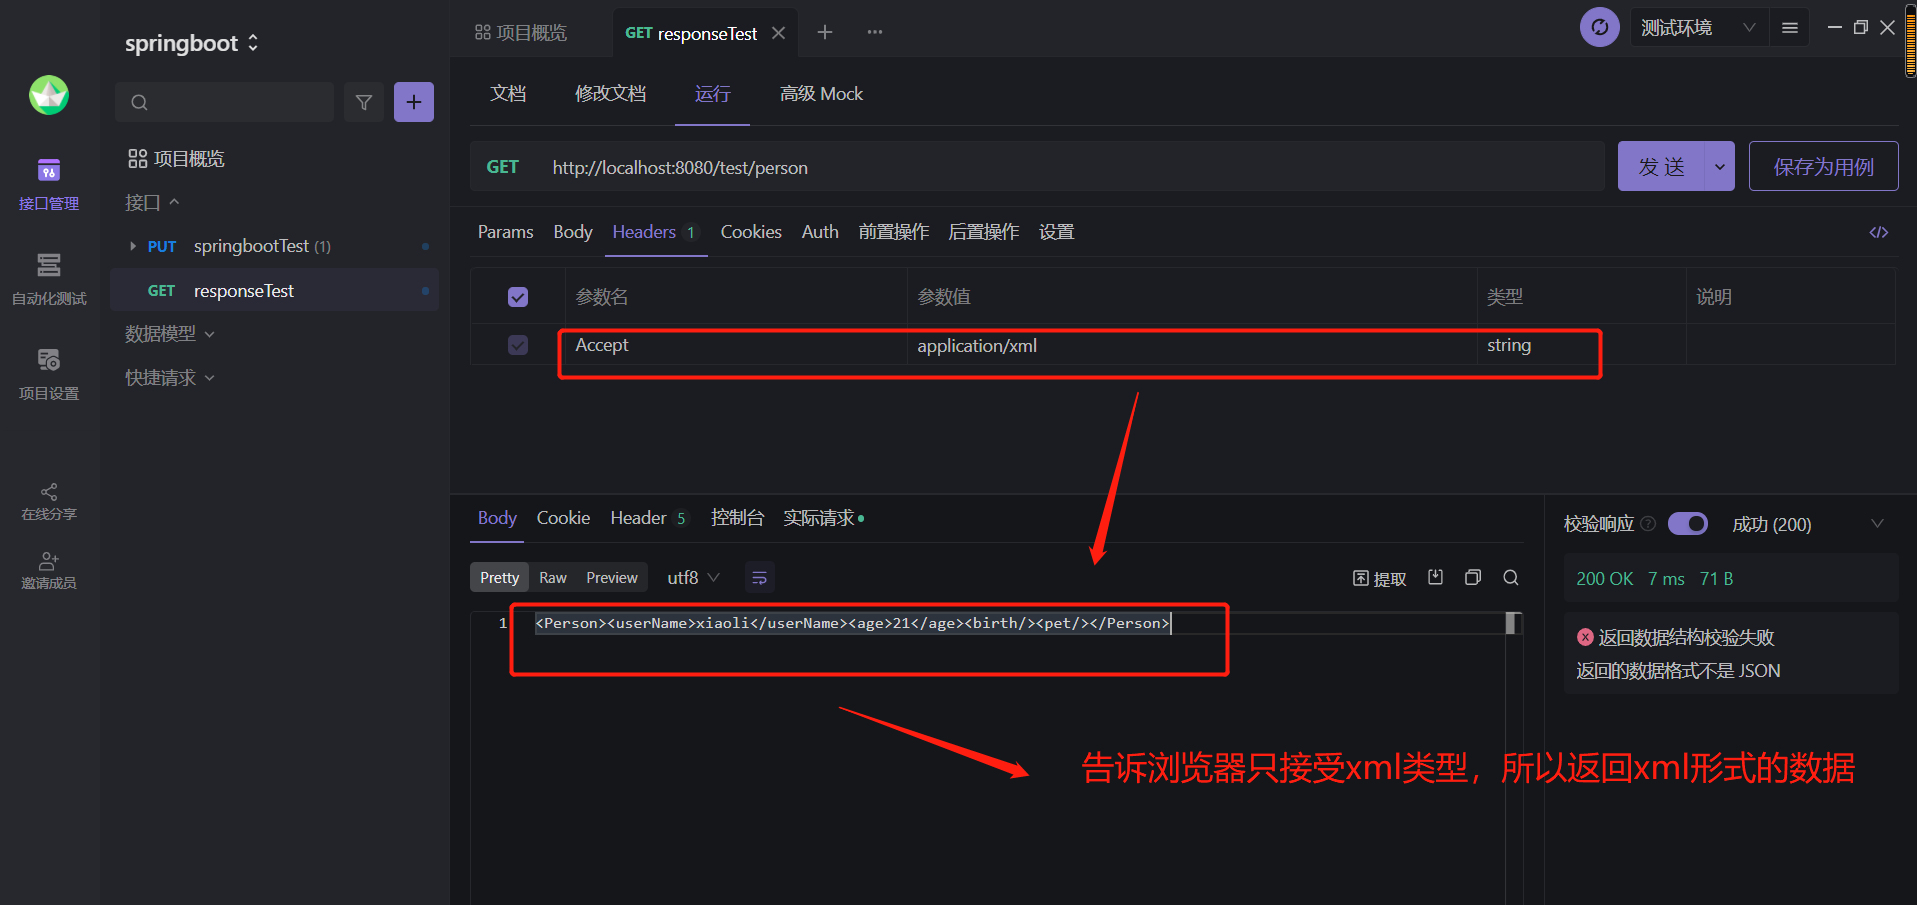
2.分析xml形式返回数据的原理
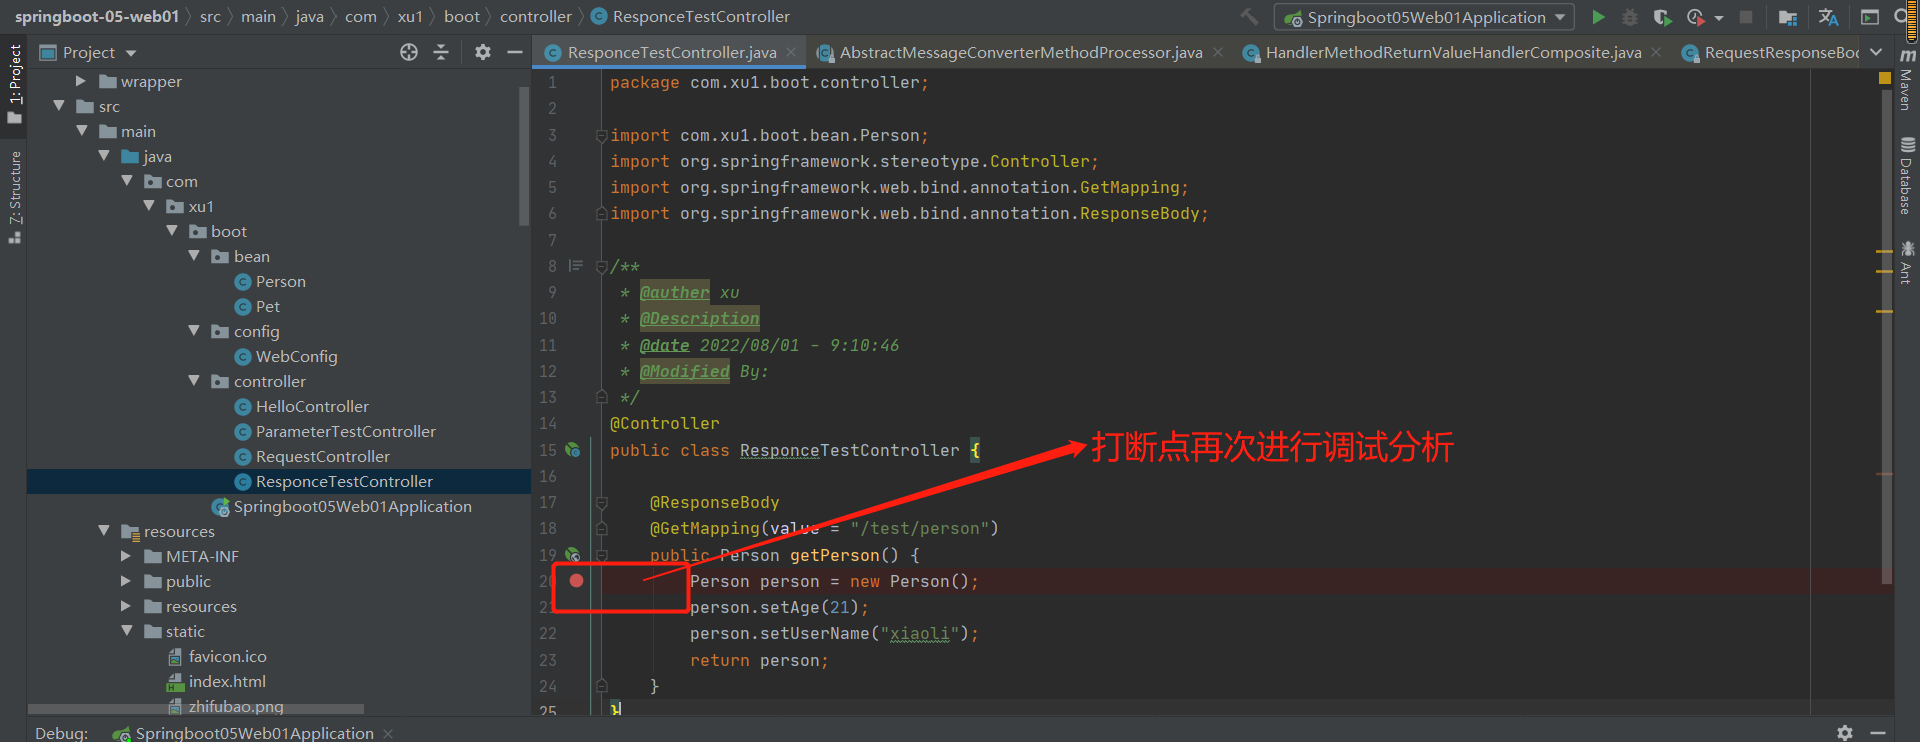
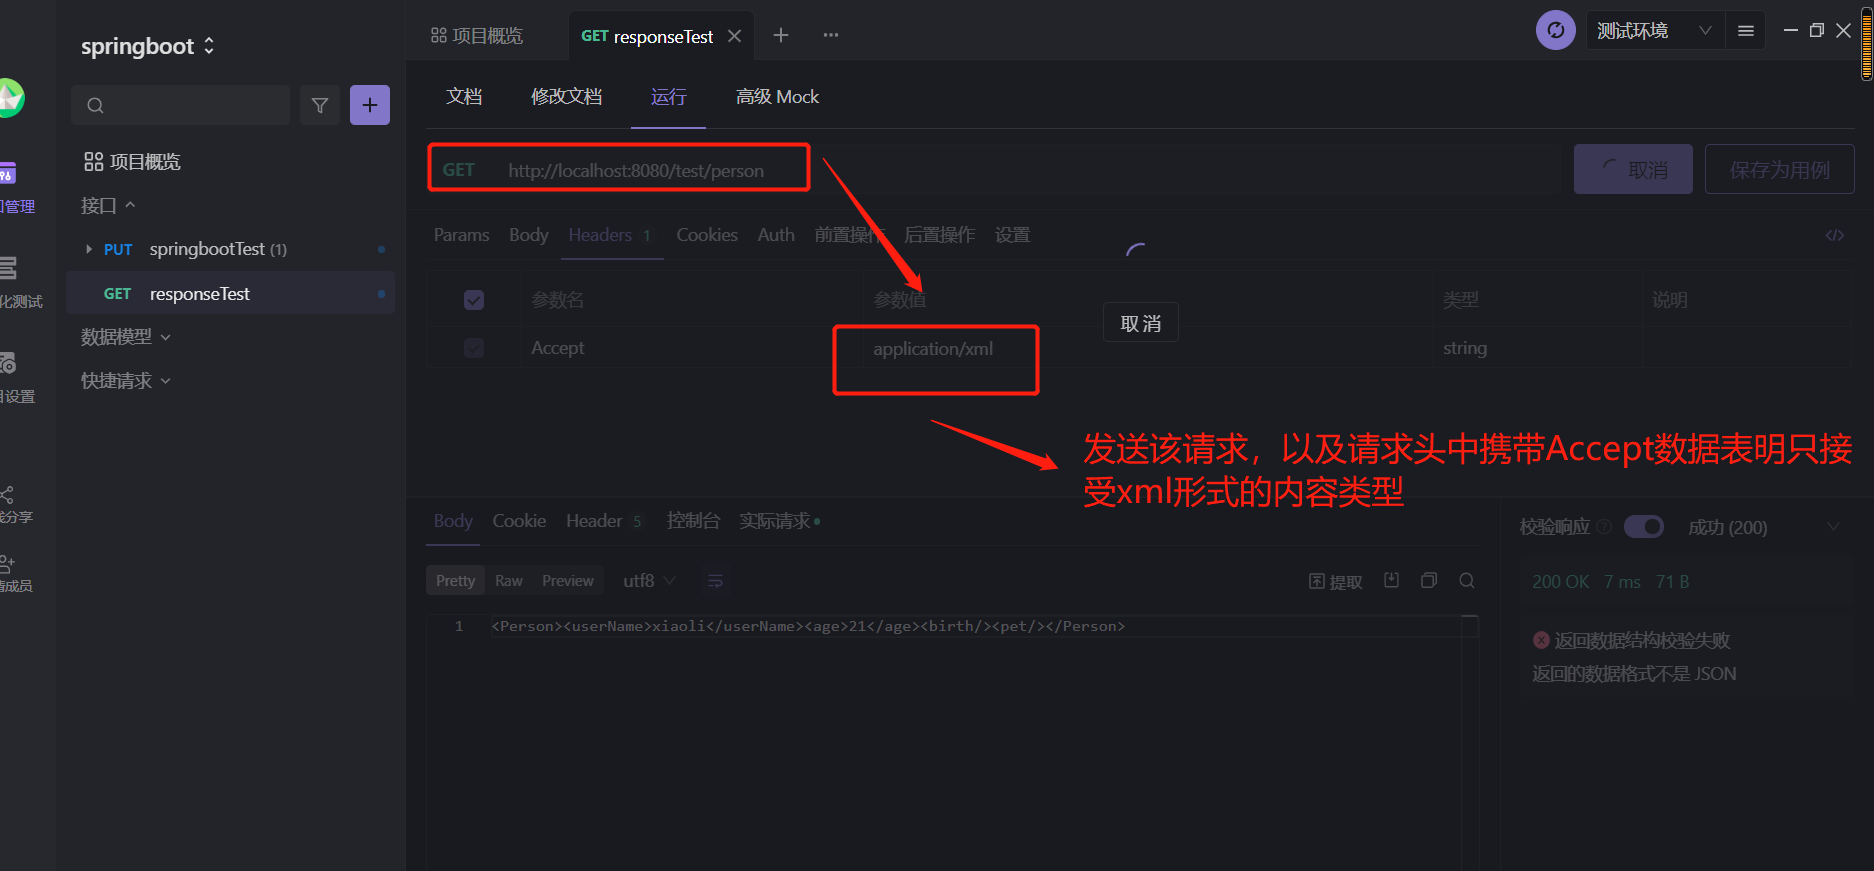
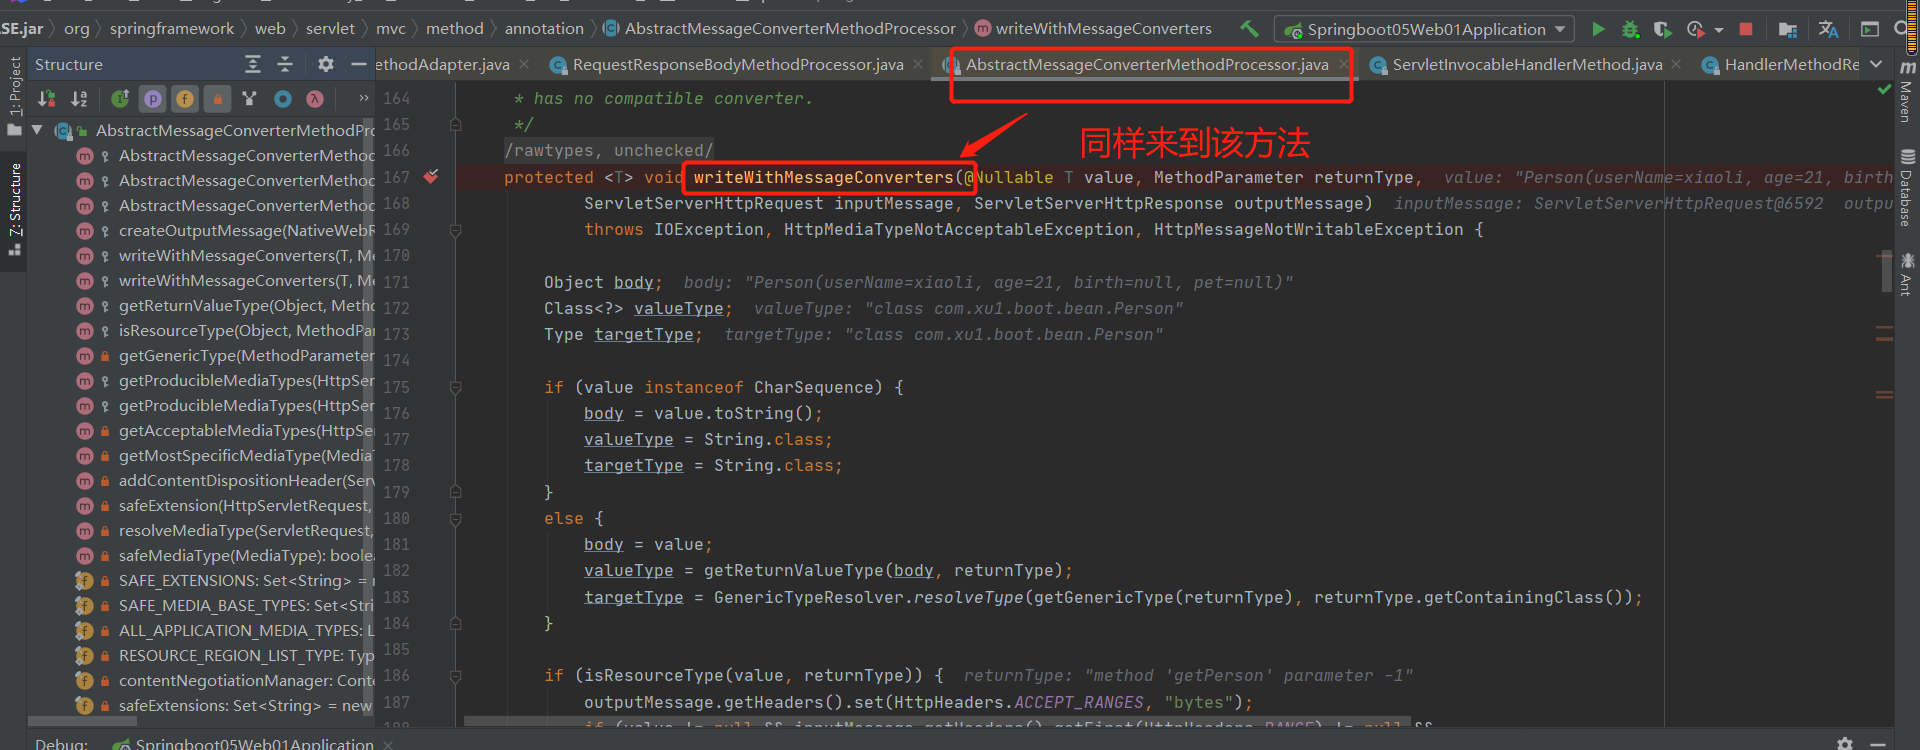
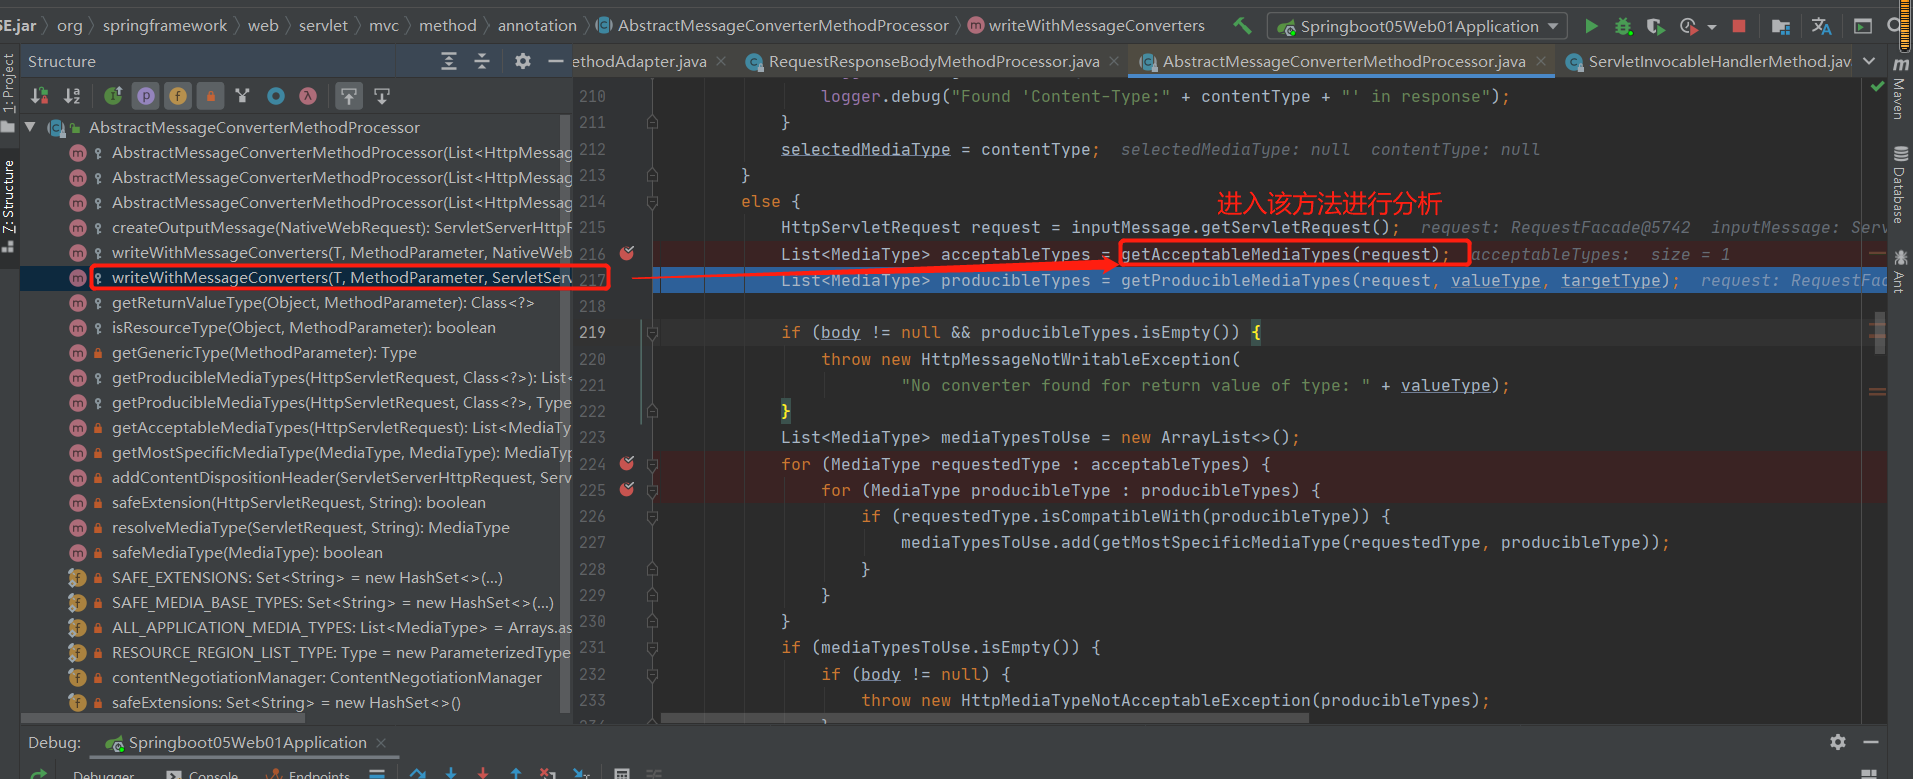
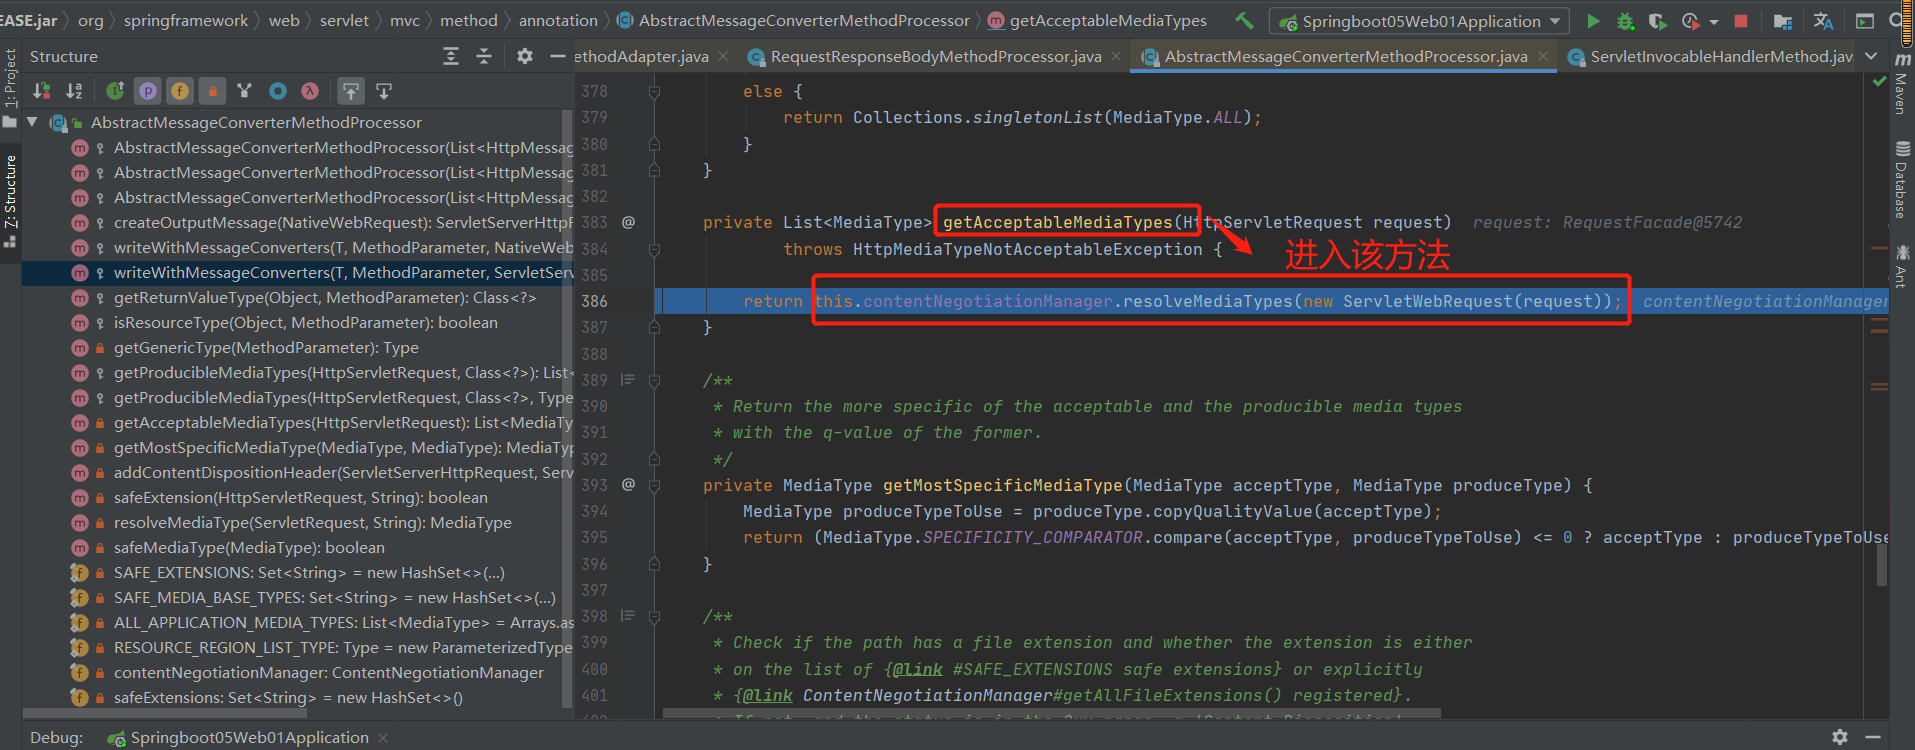
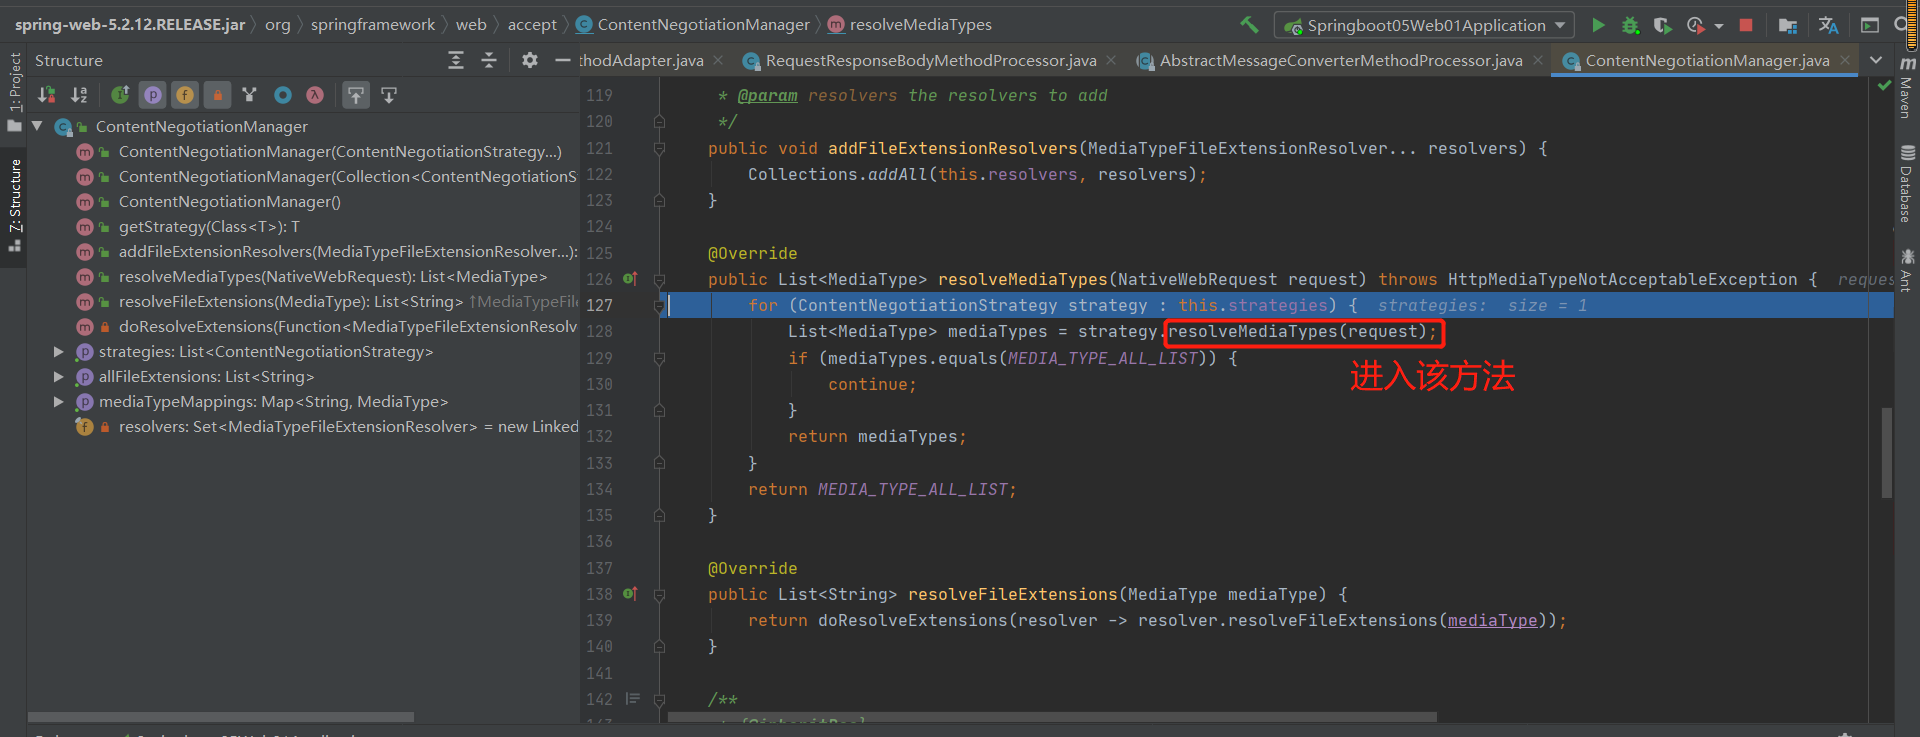
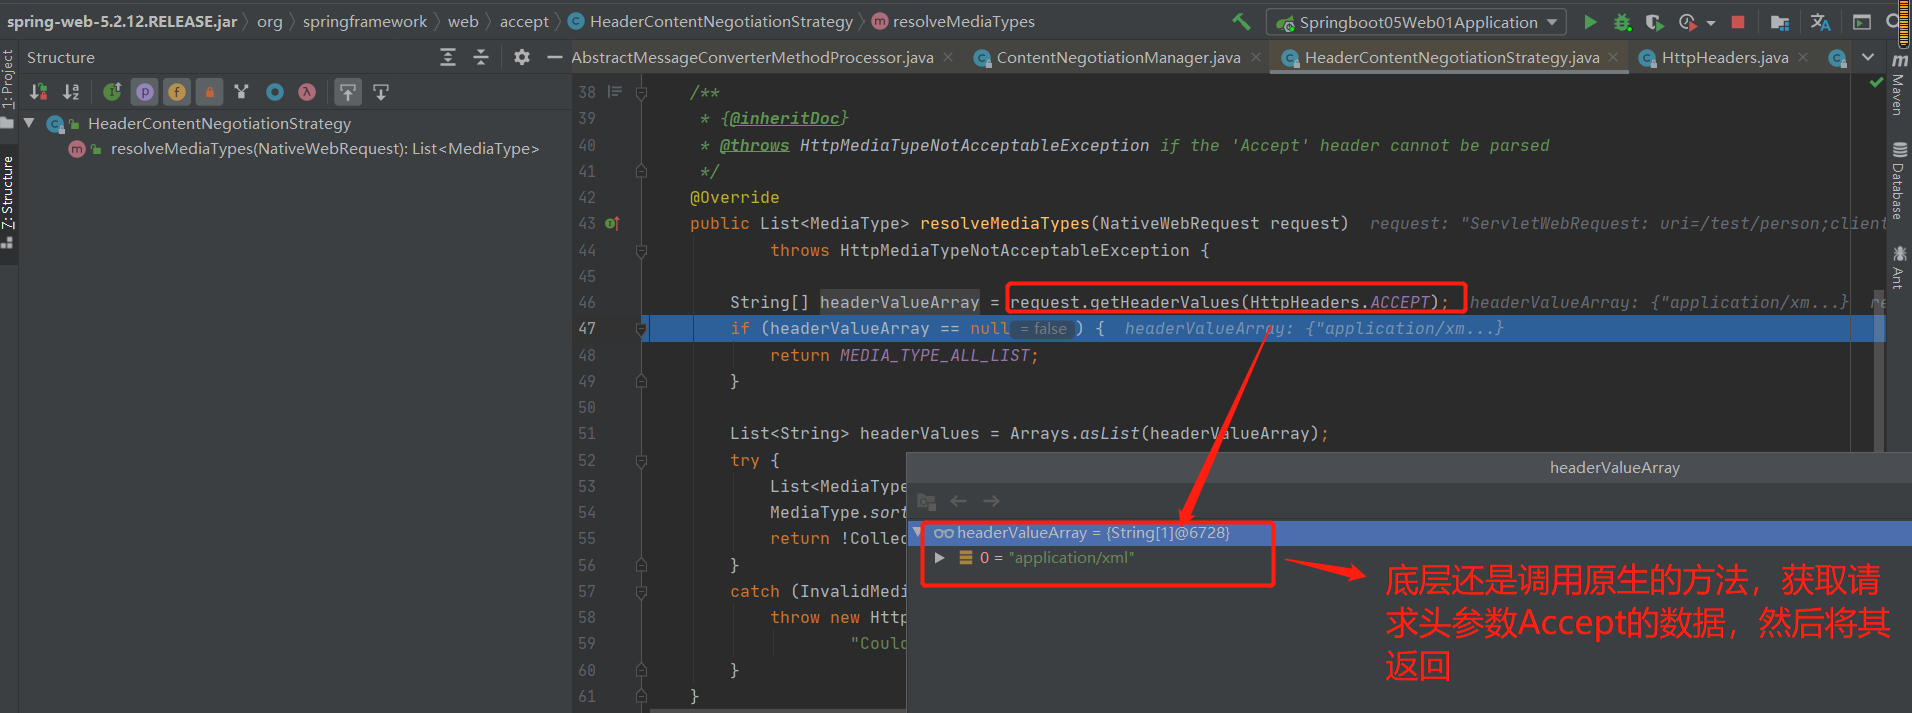
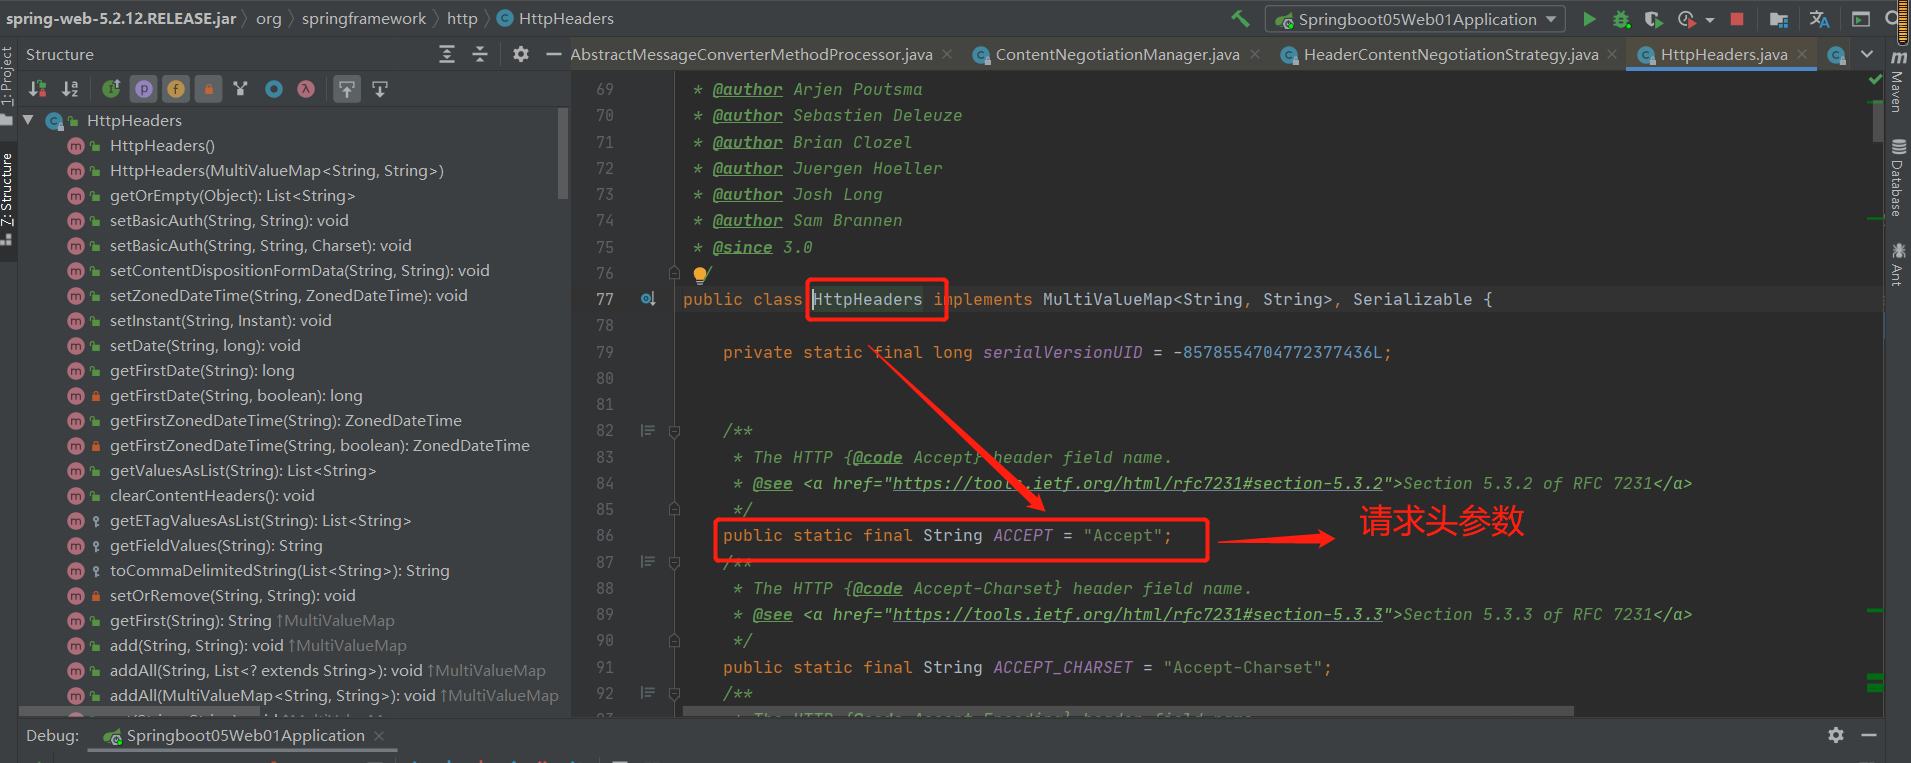
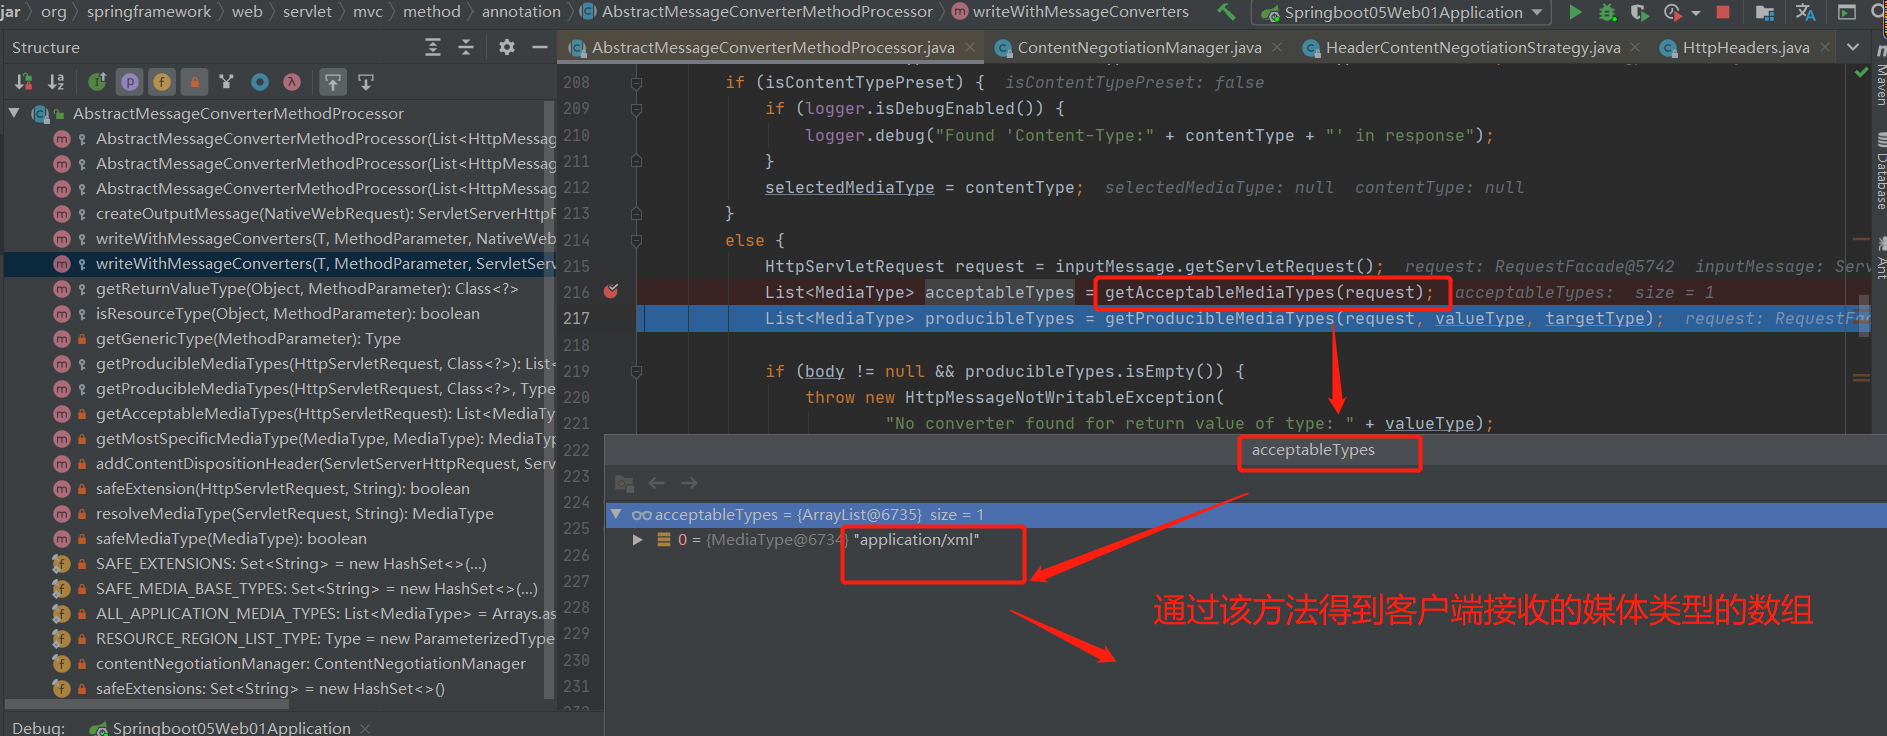
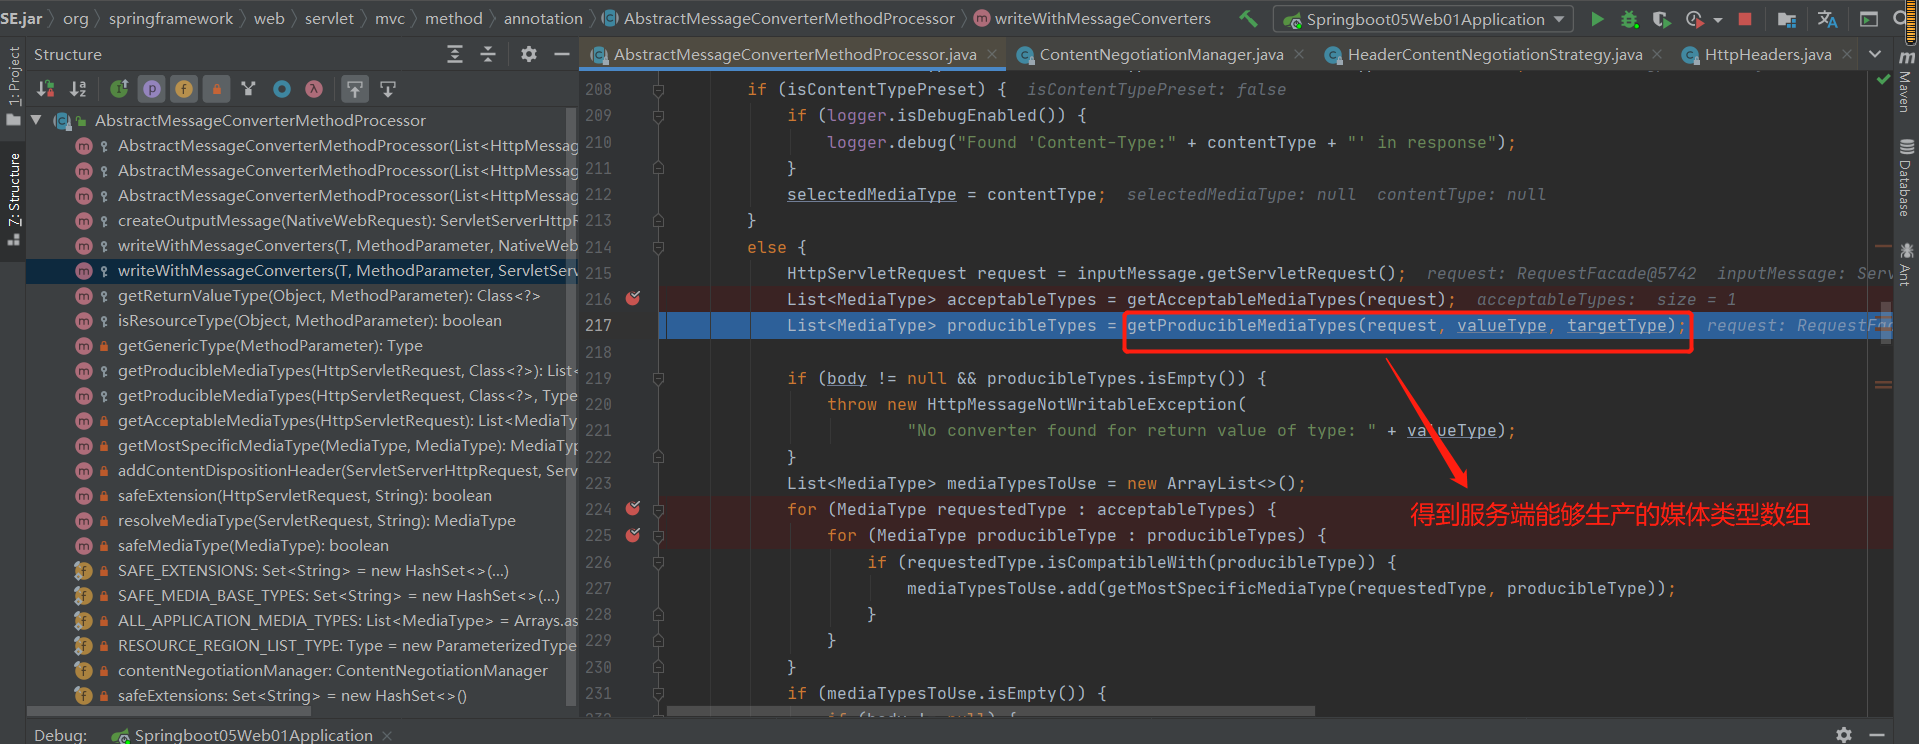
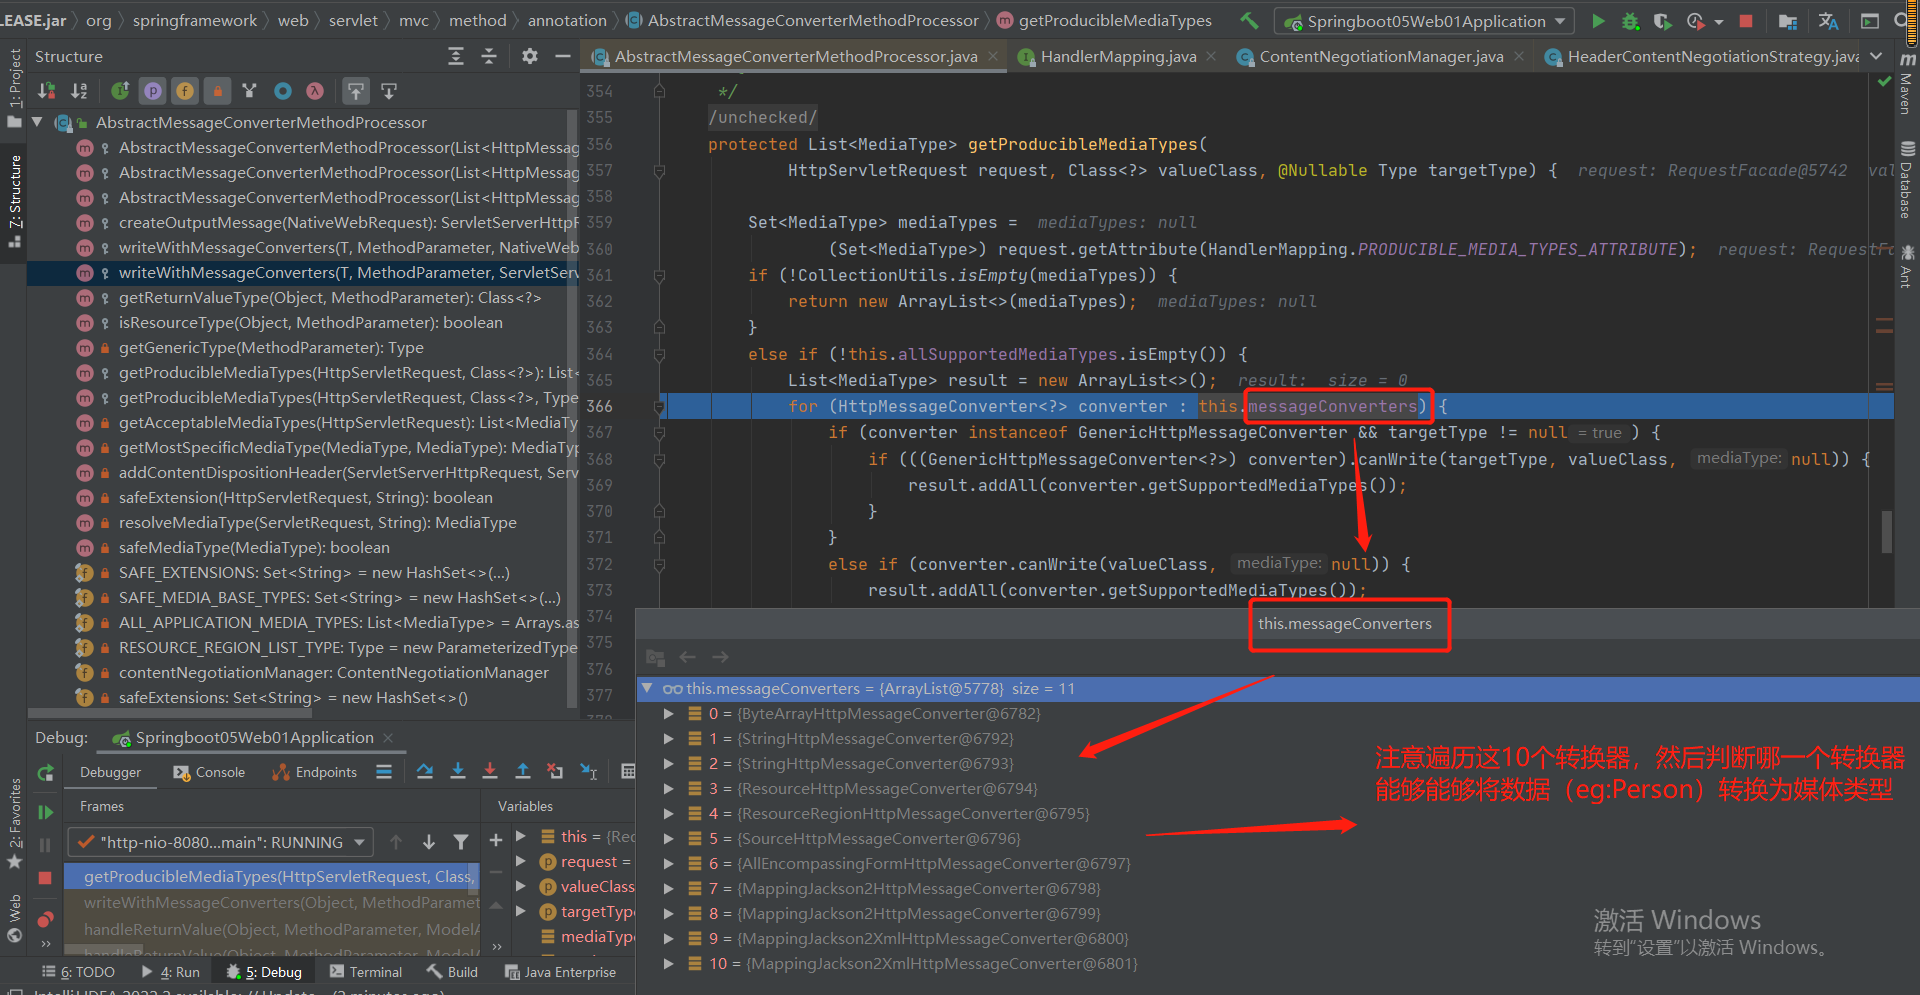
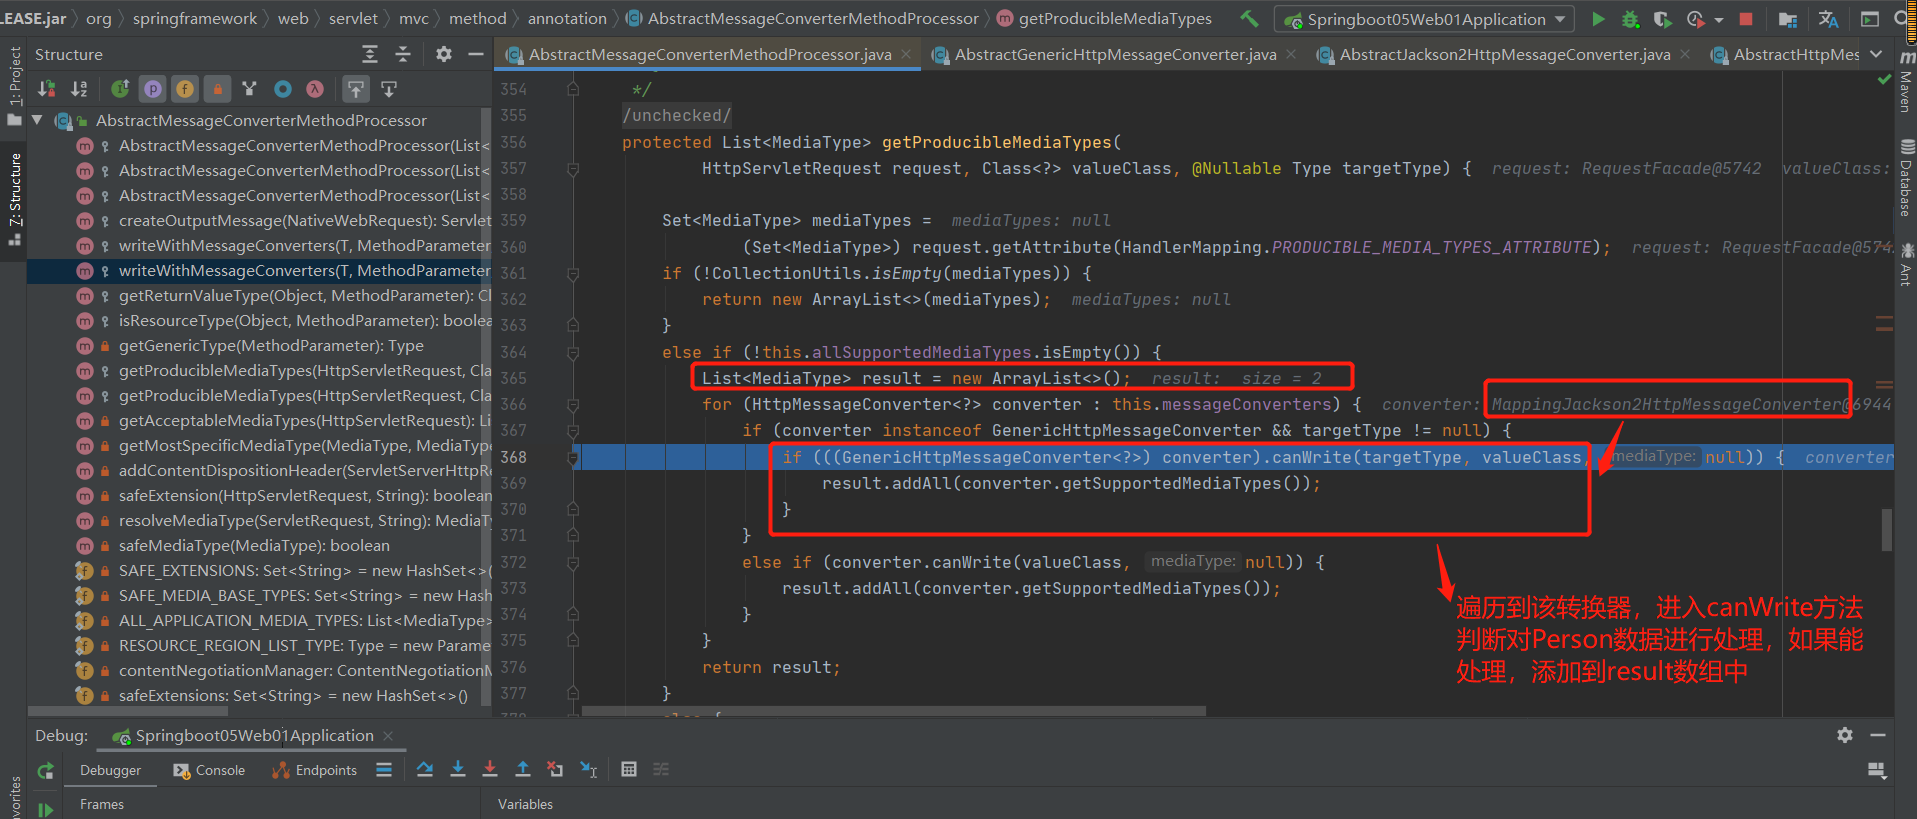
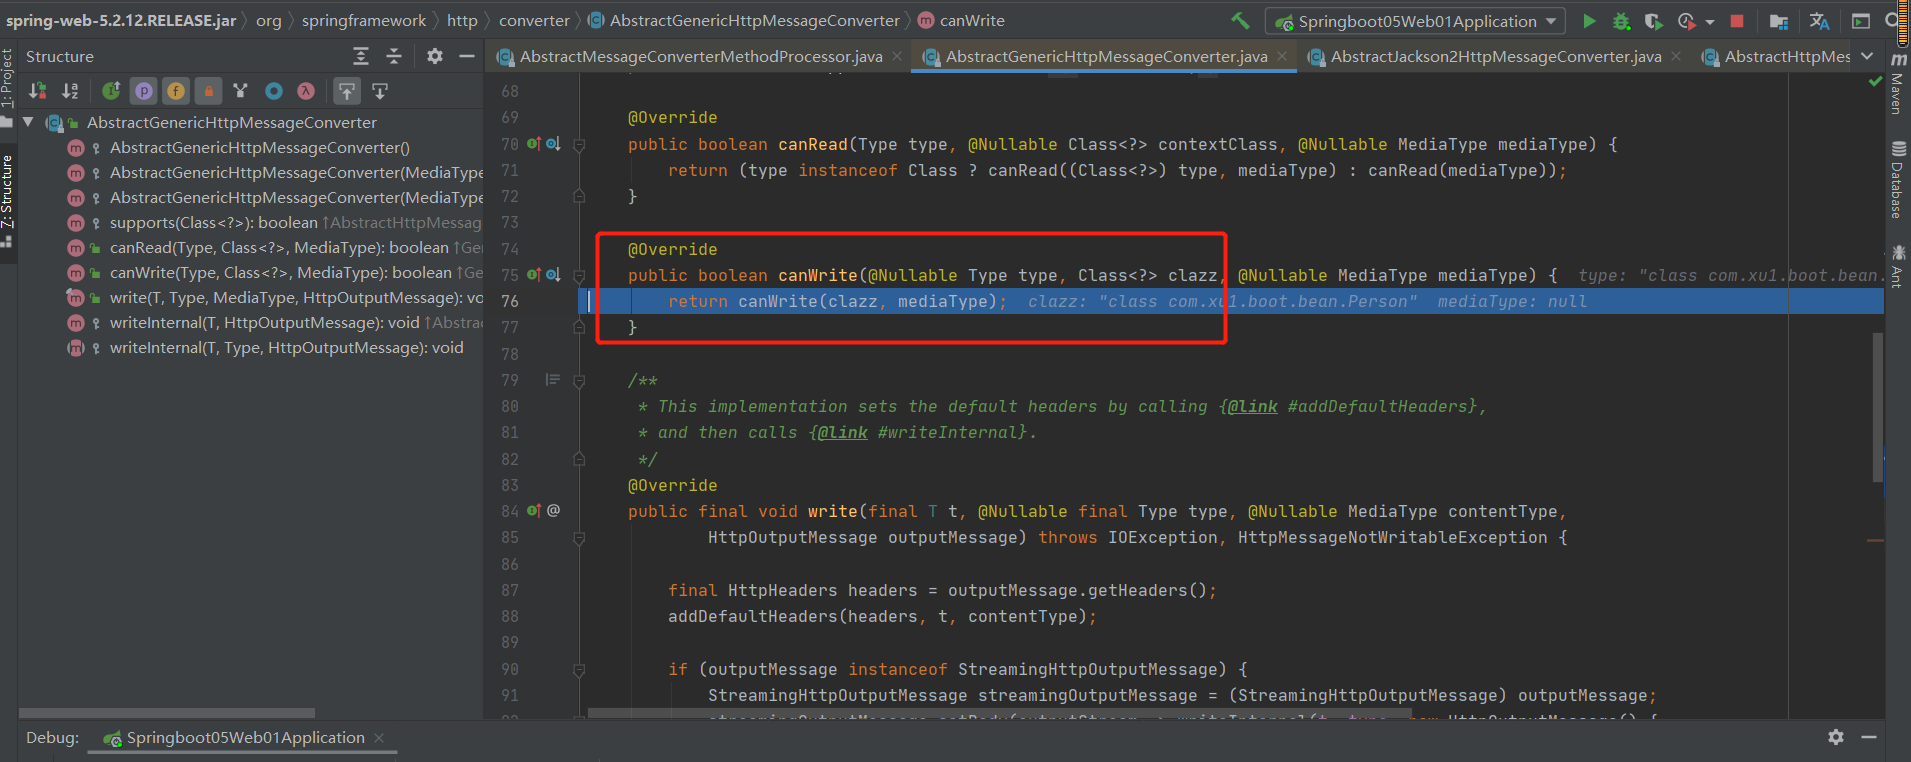
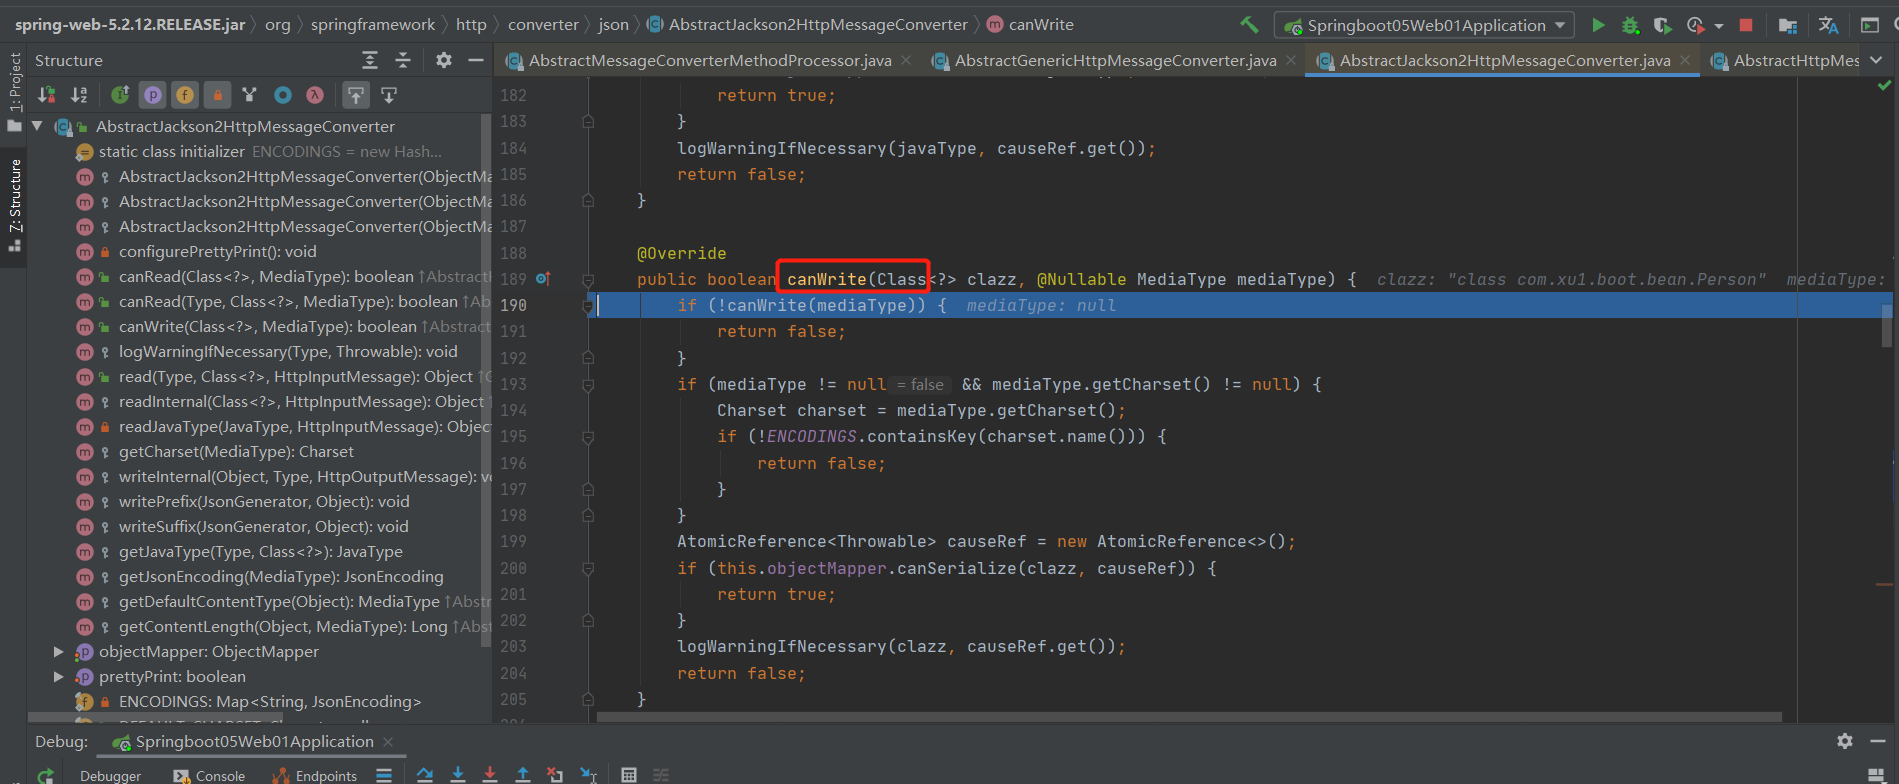
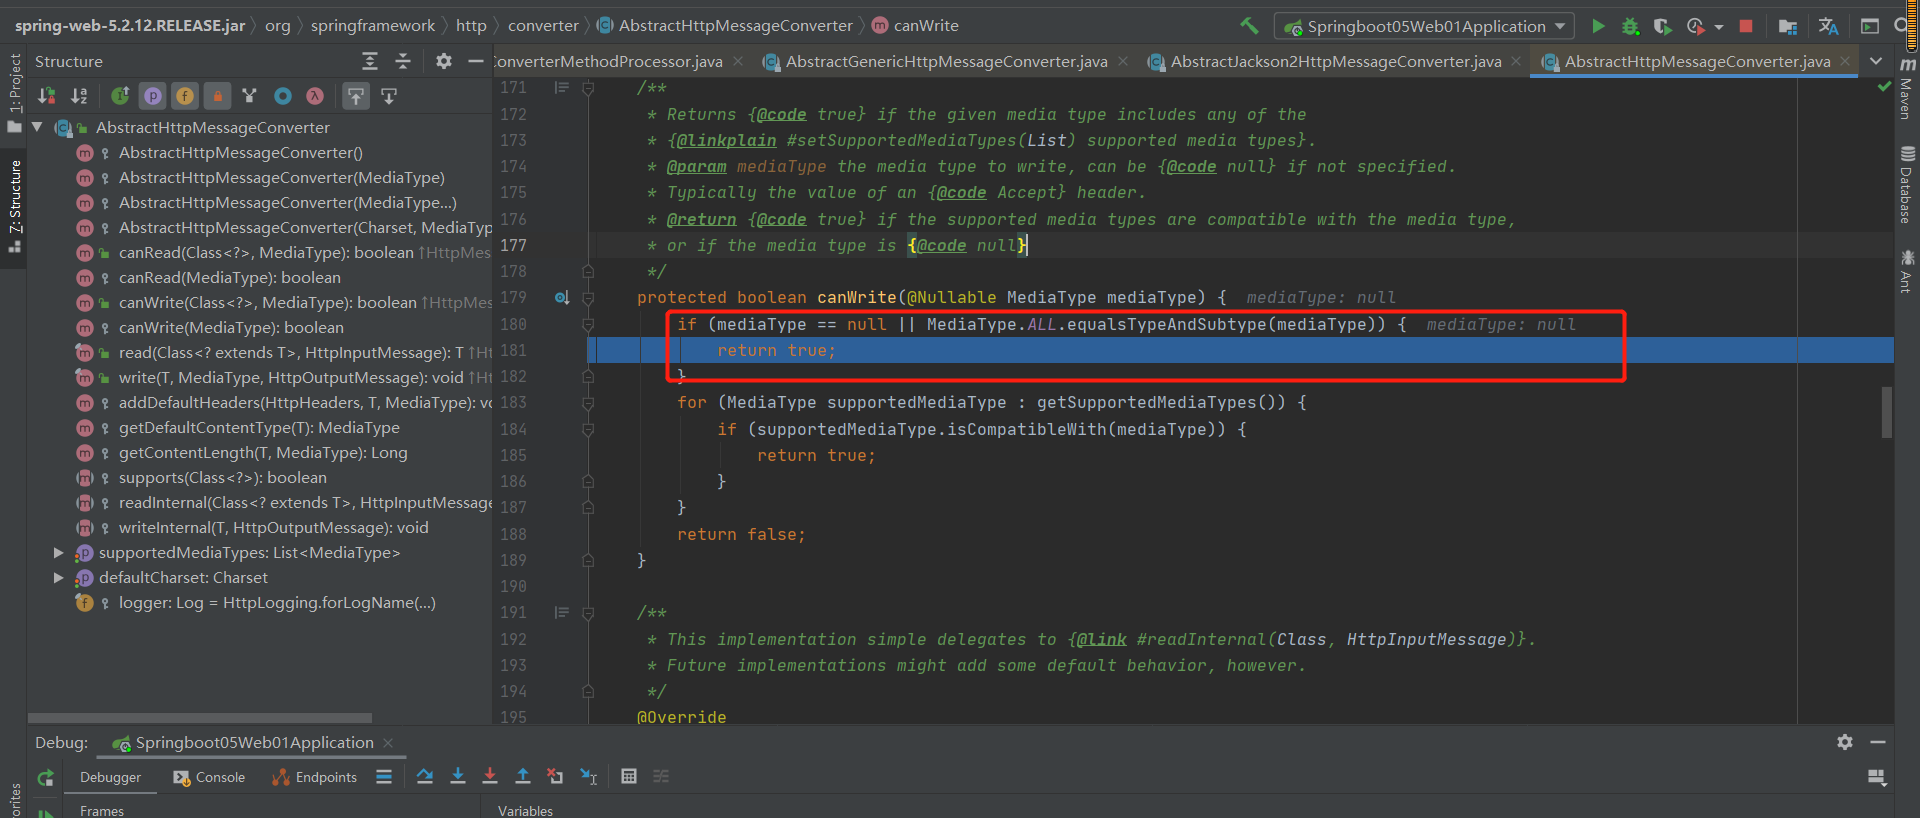
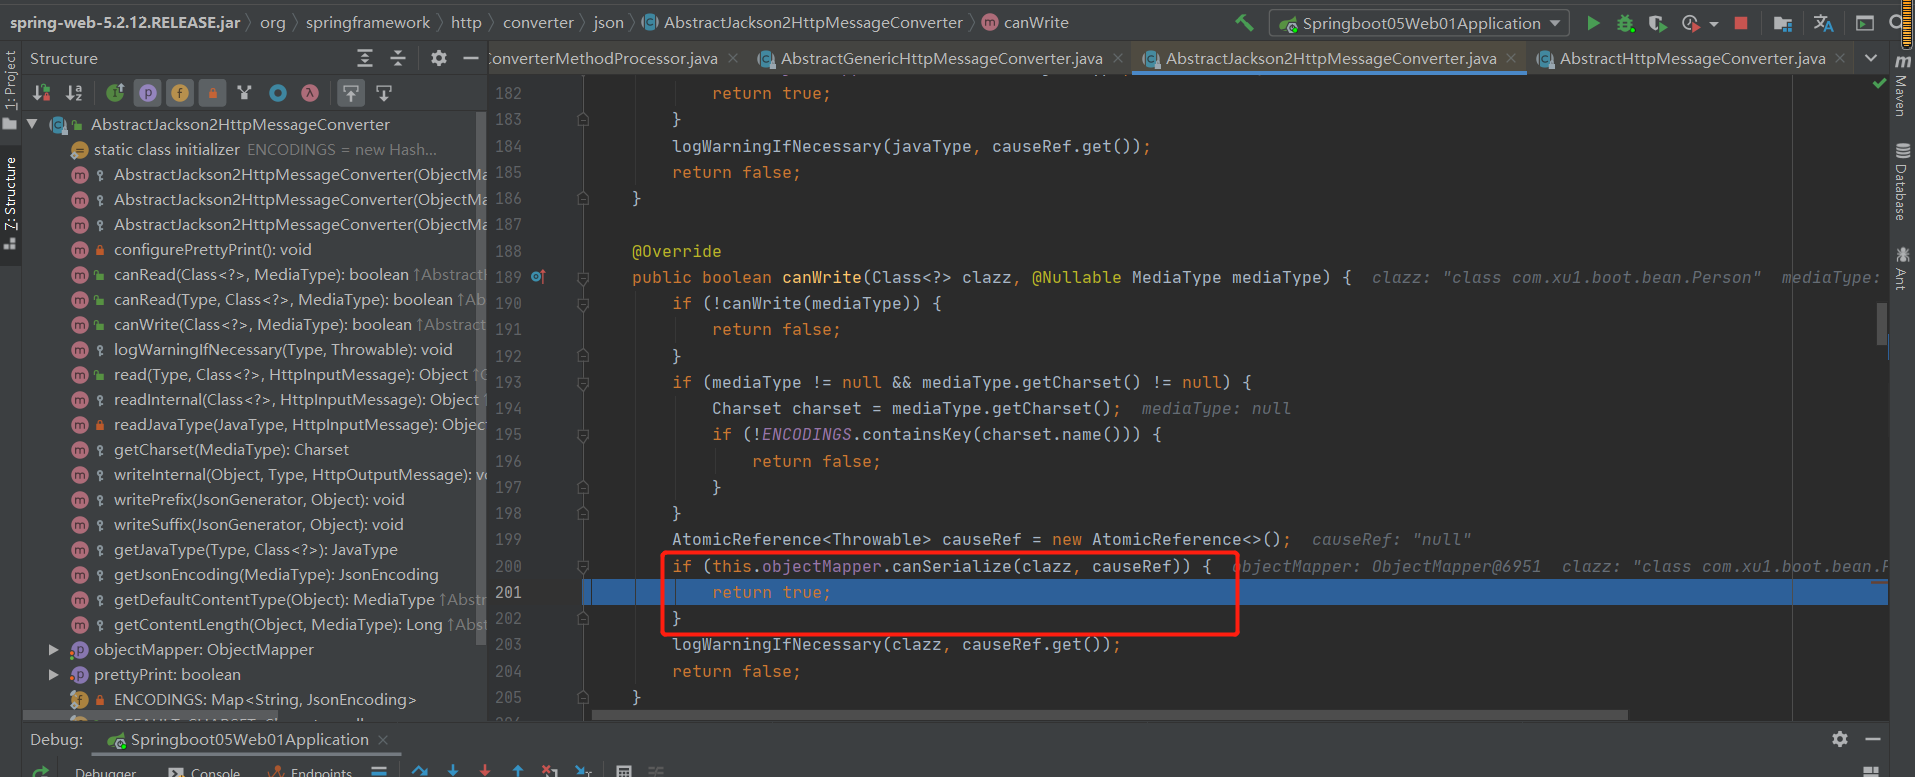
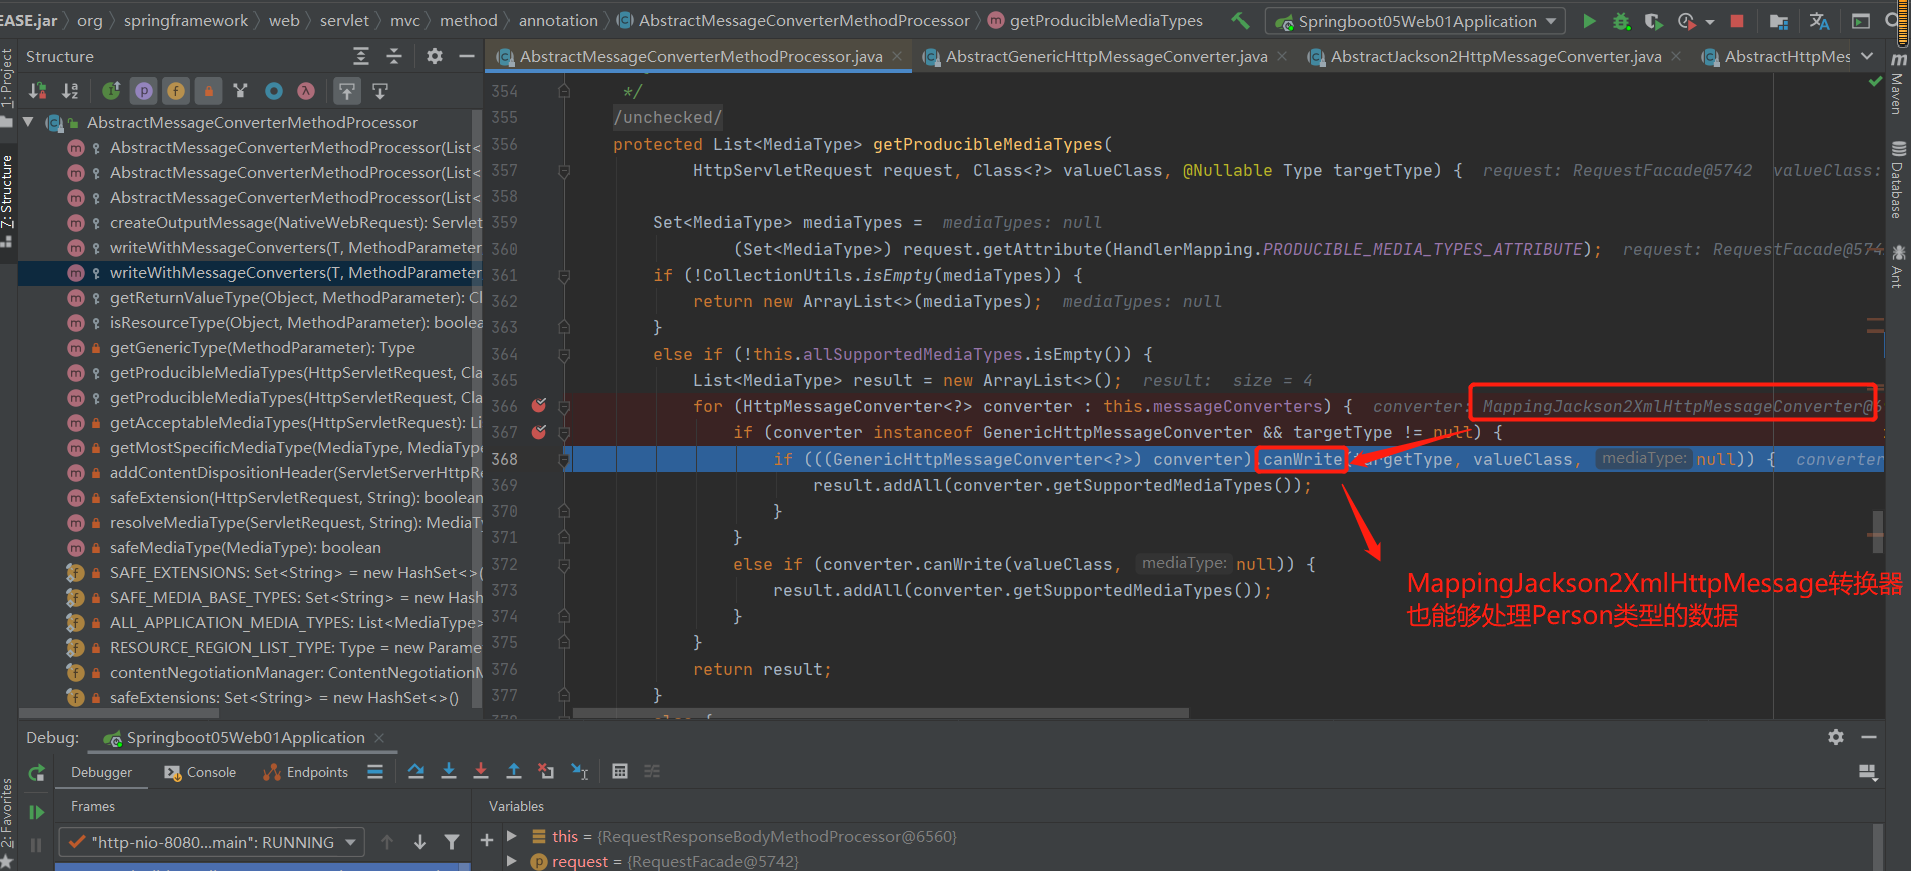
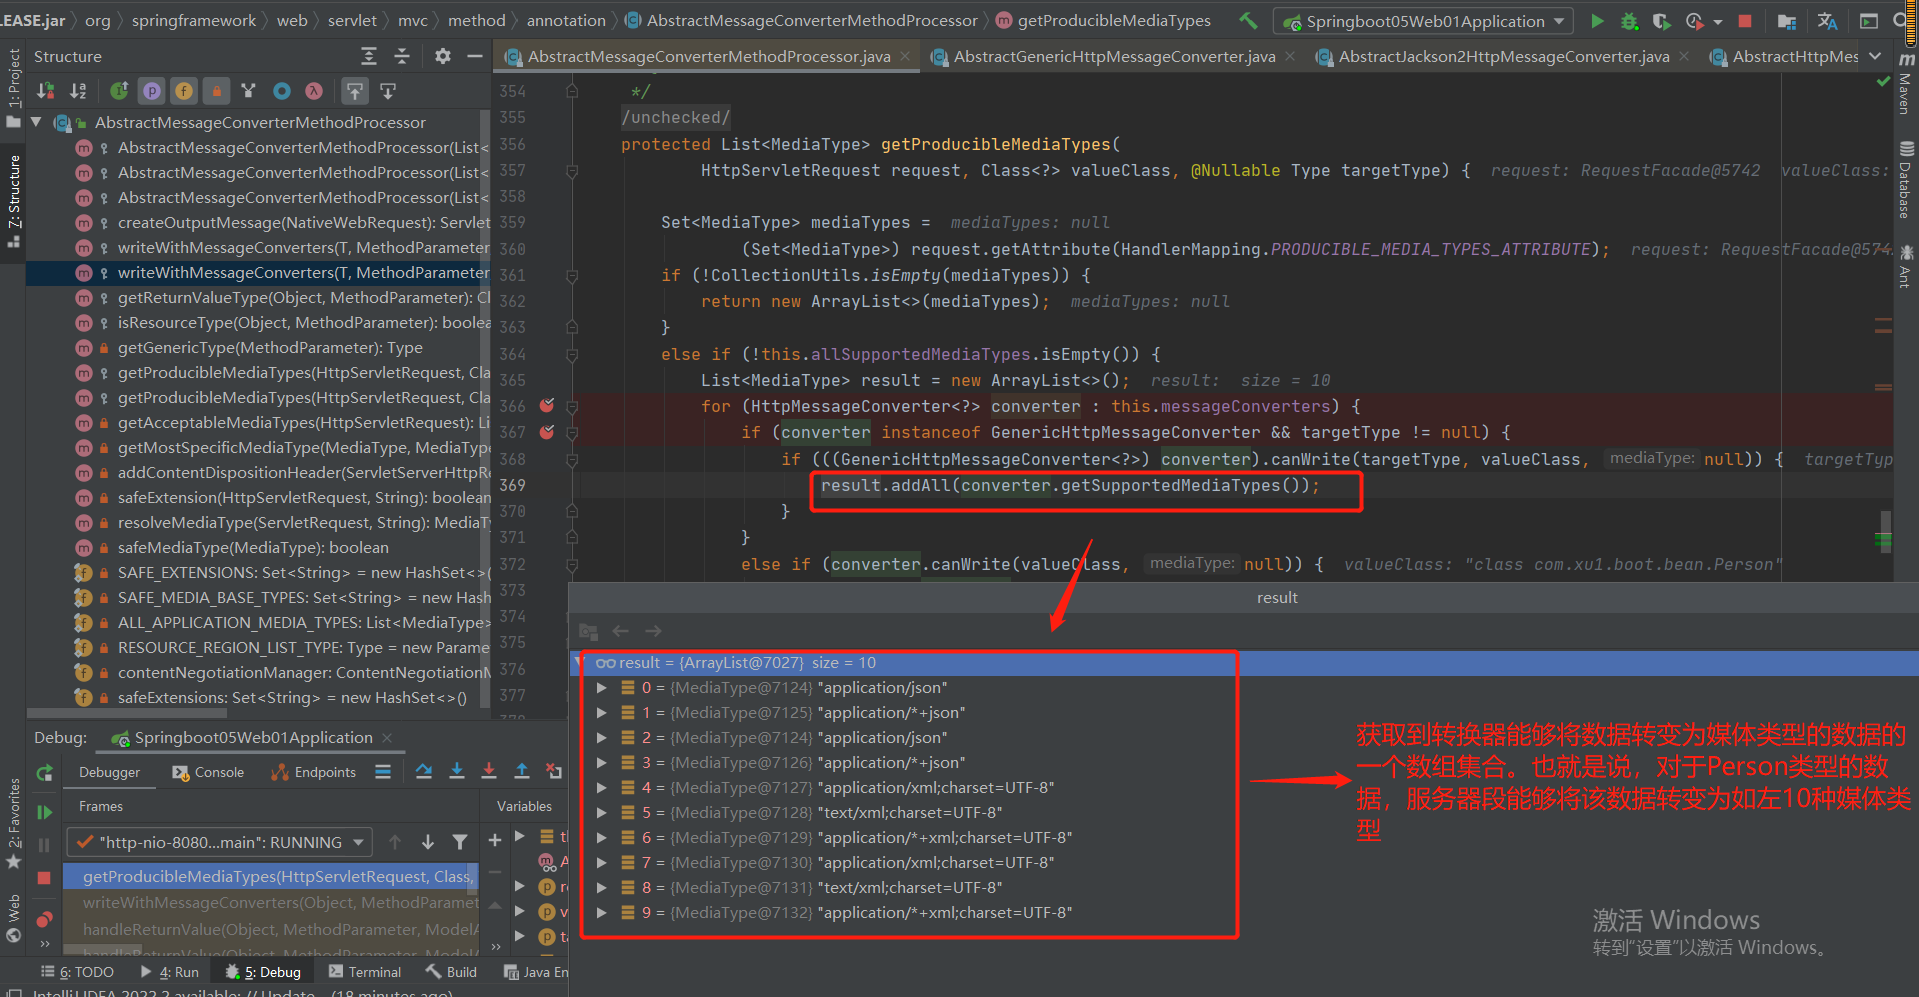
补充说明:
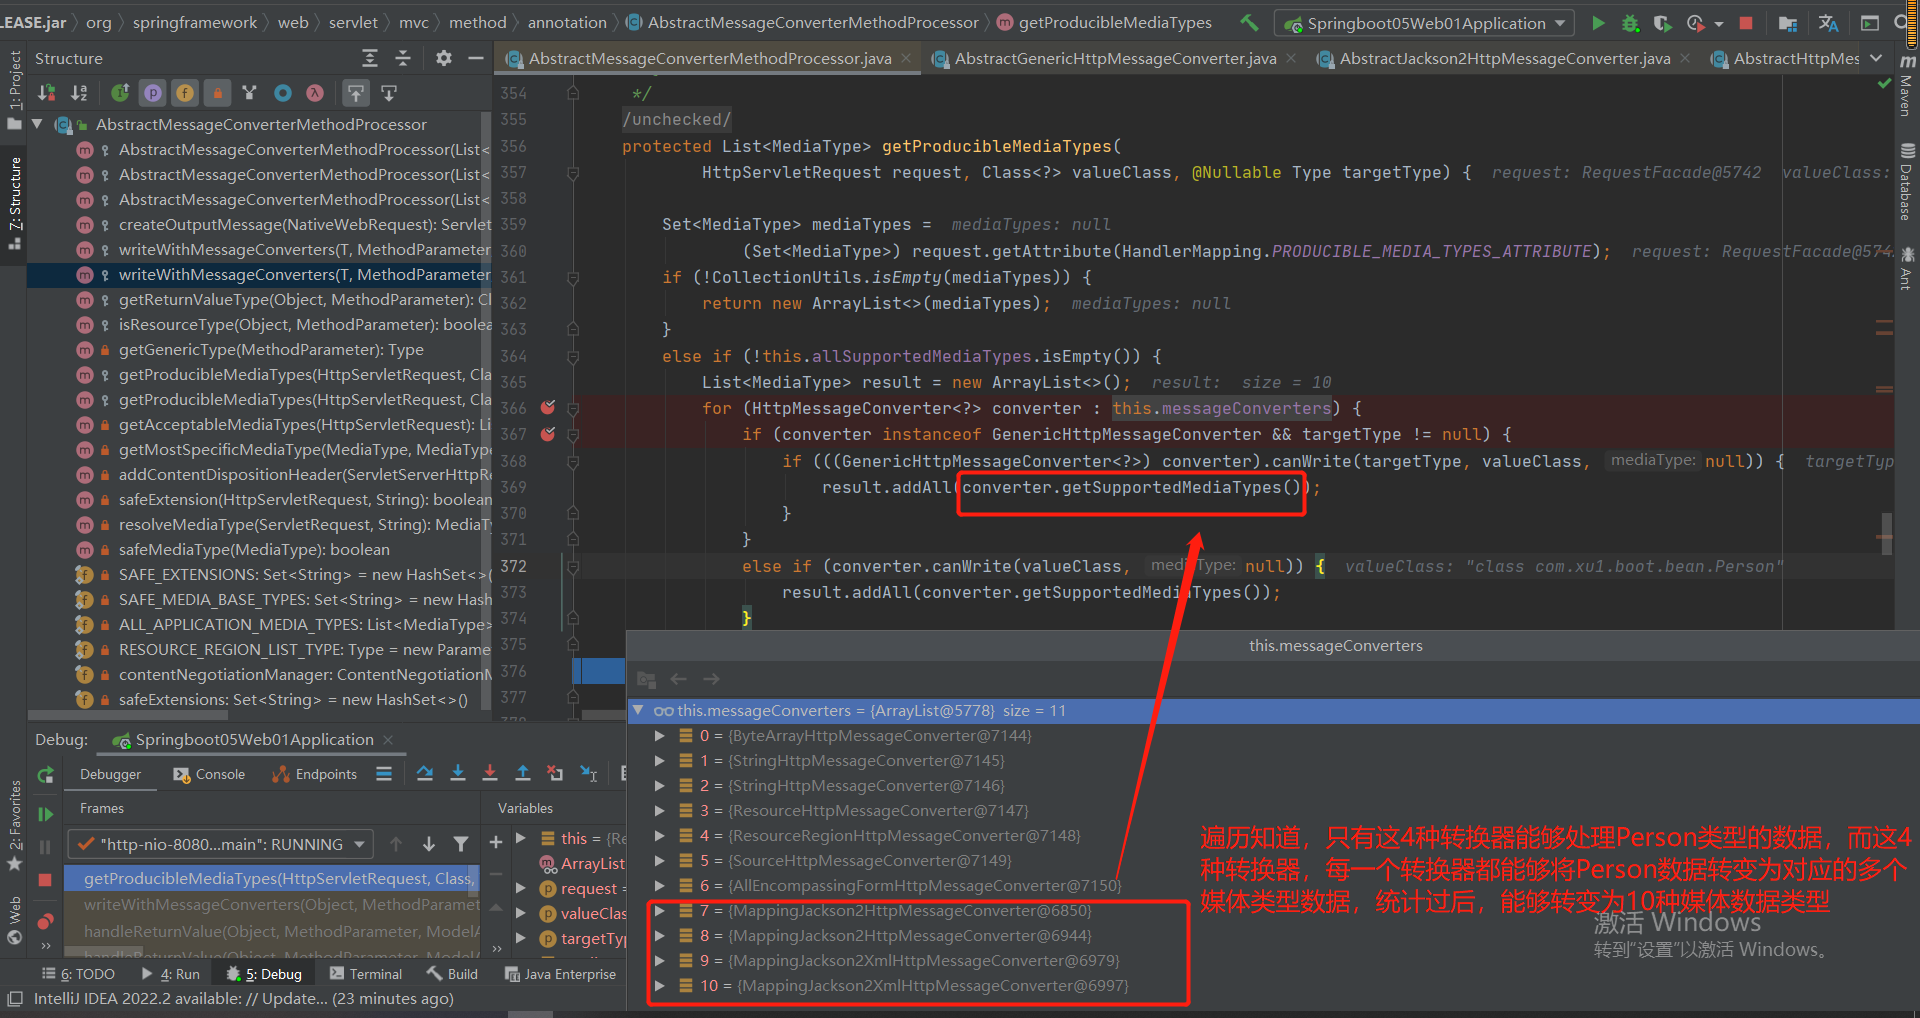
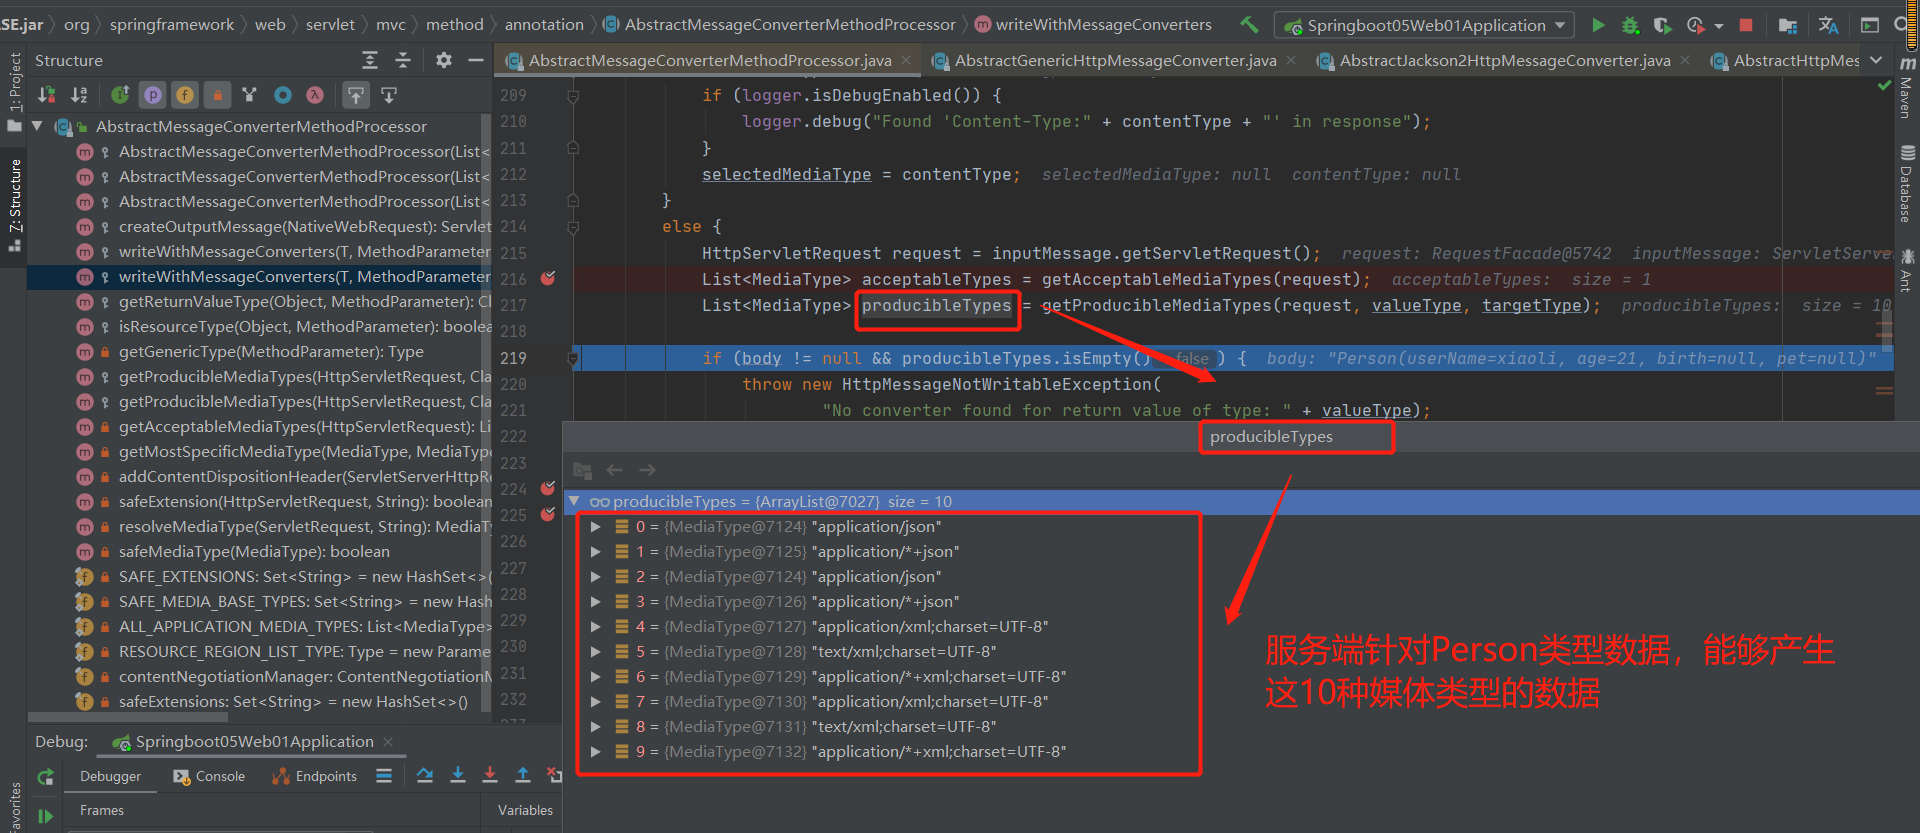
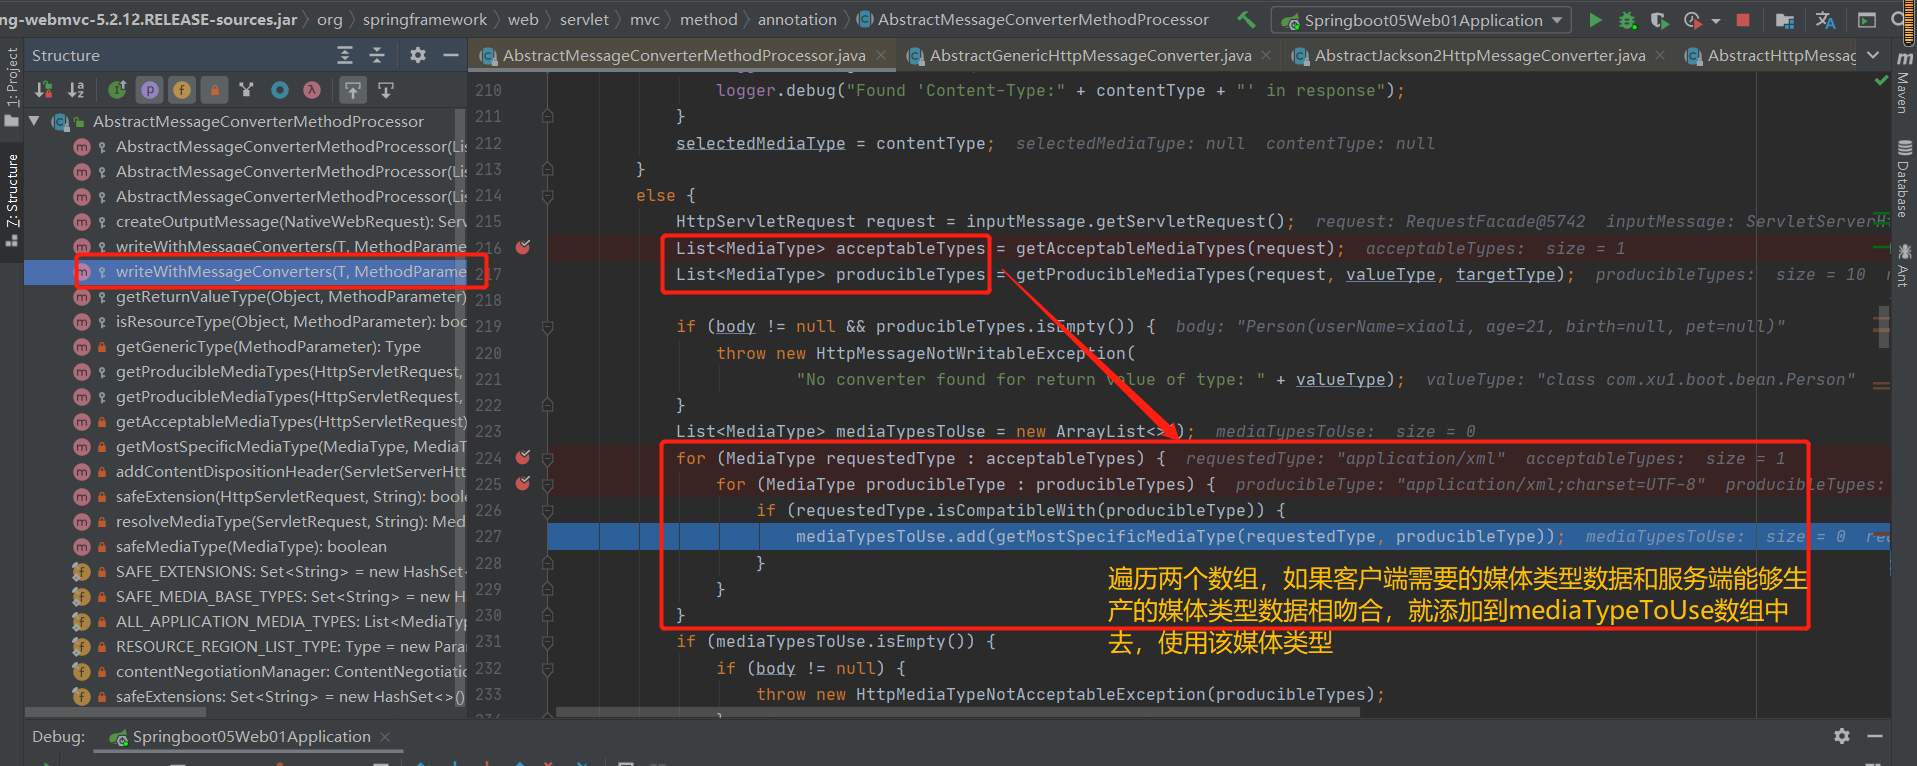
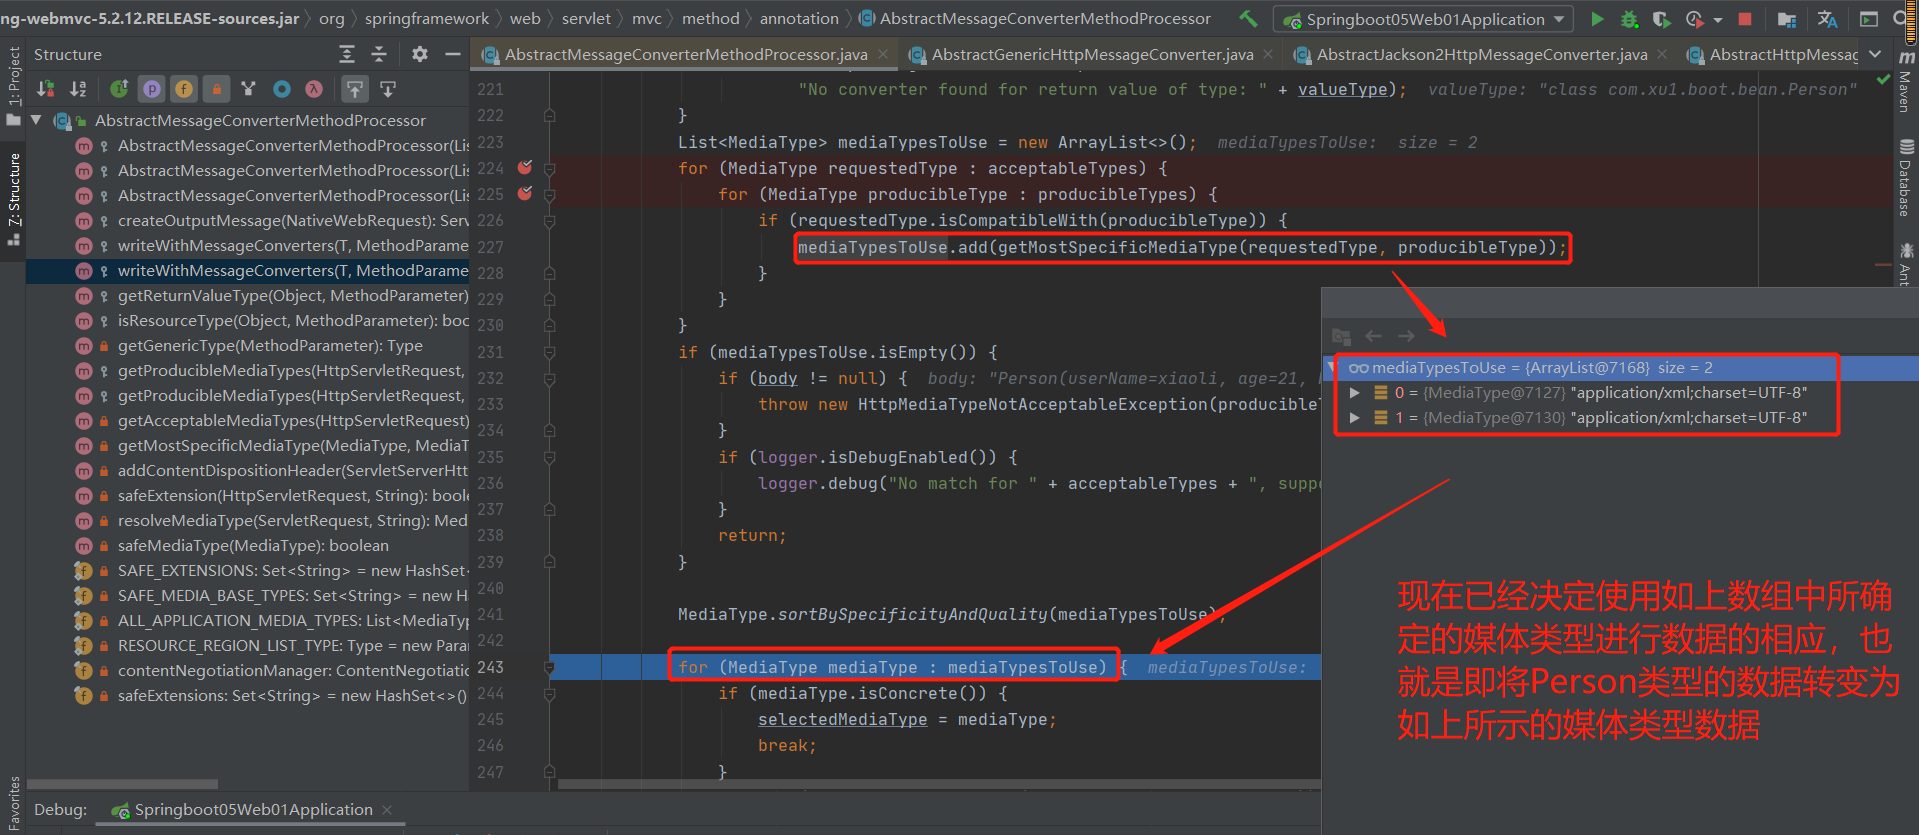
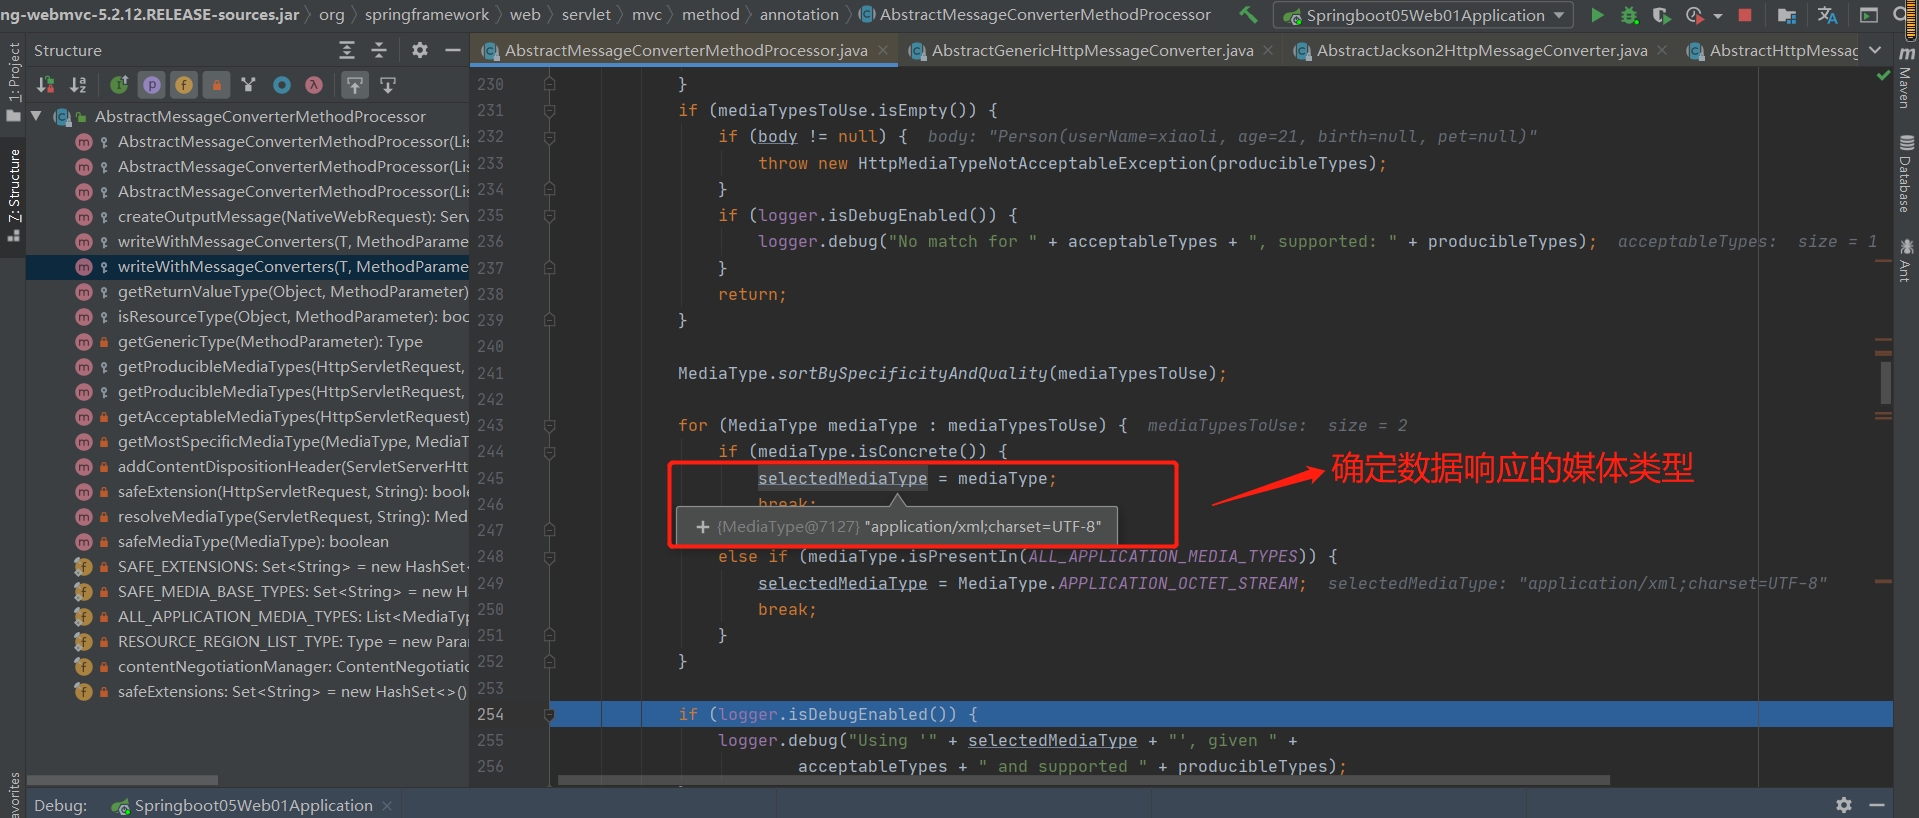
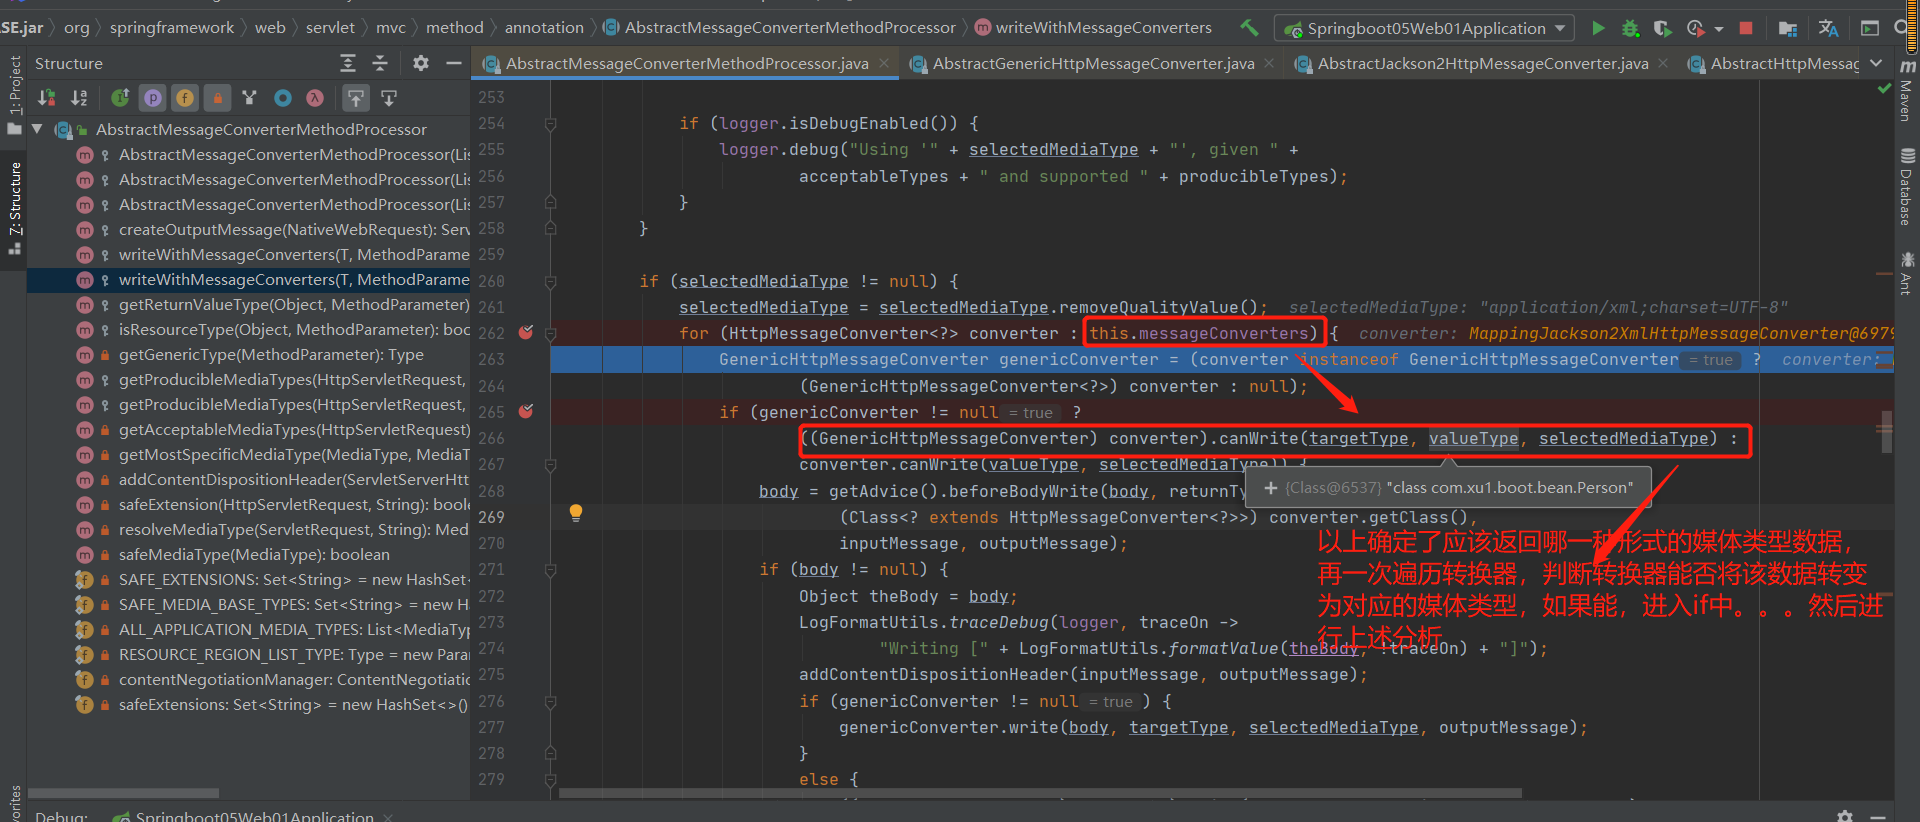
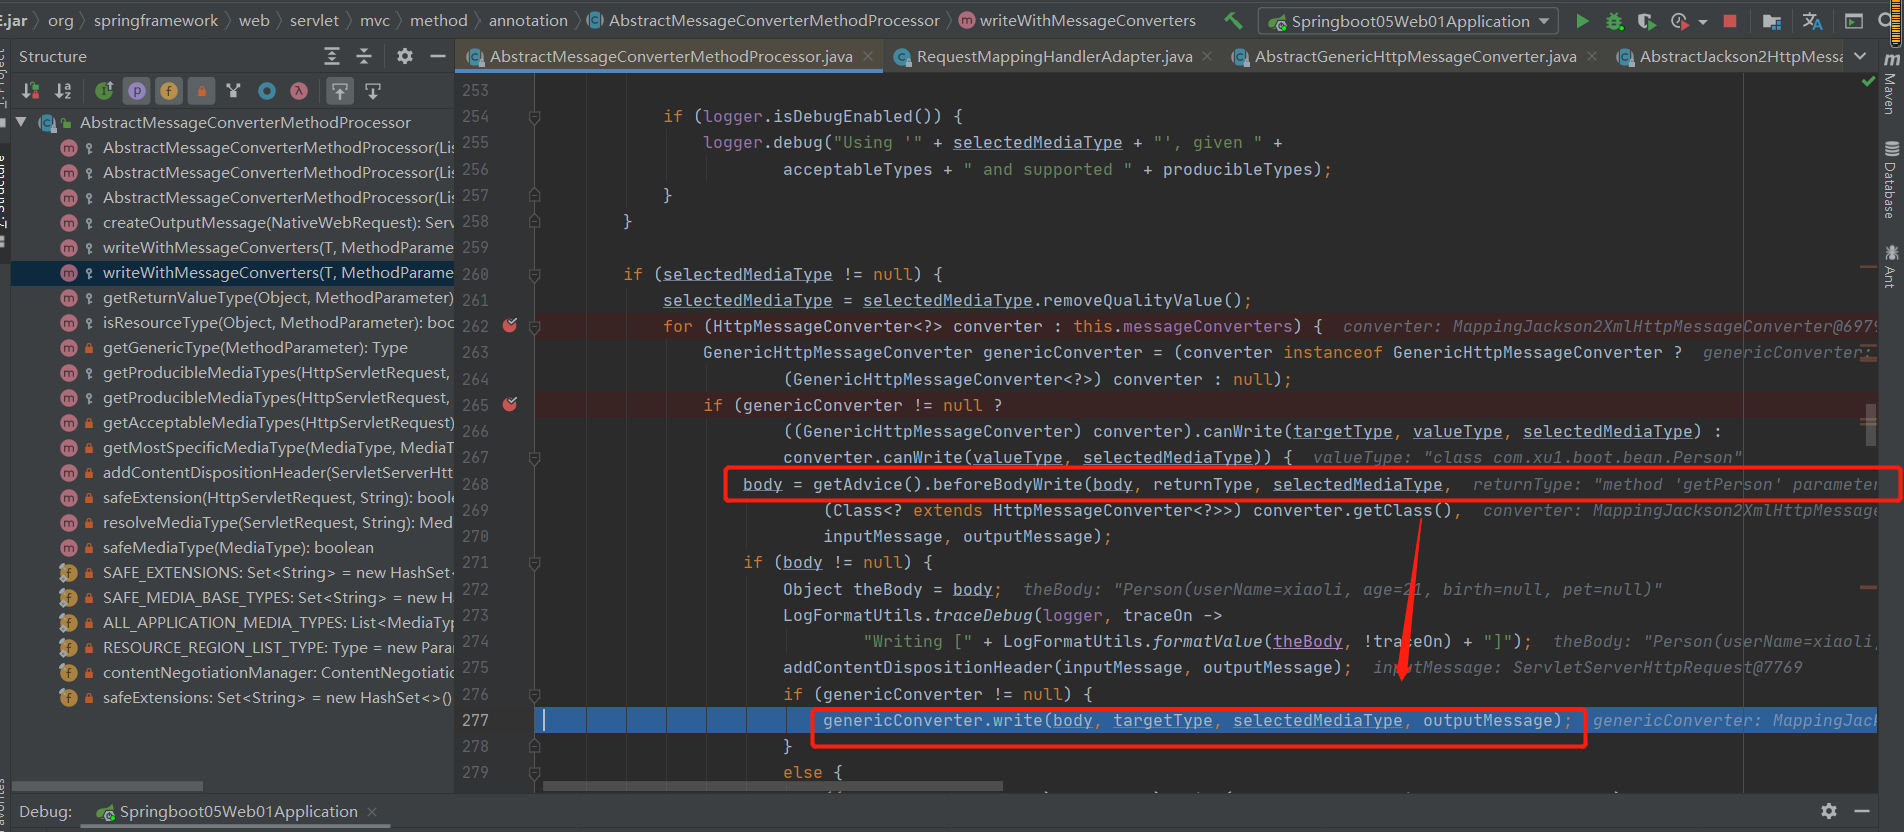
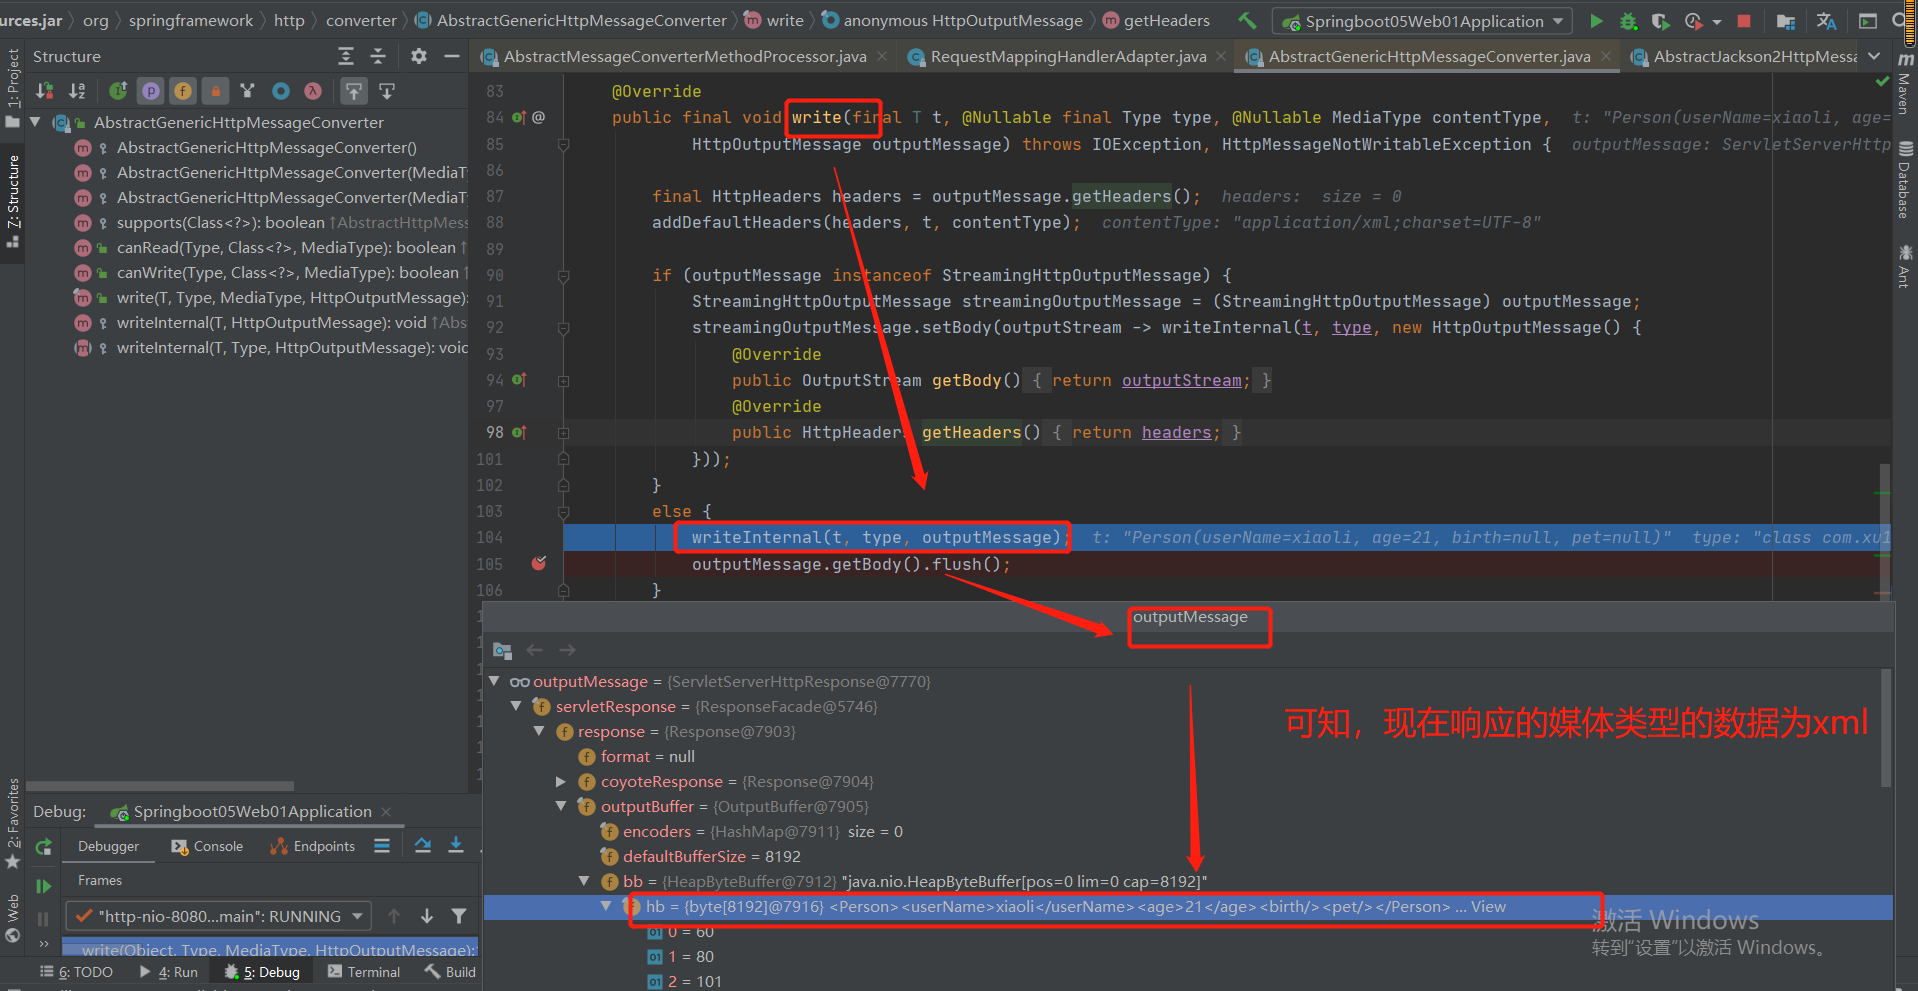
补充说明:
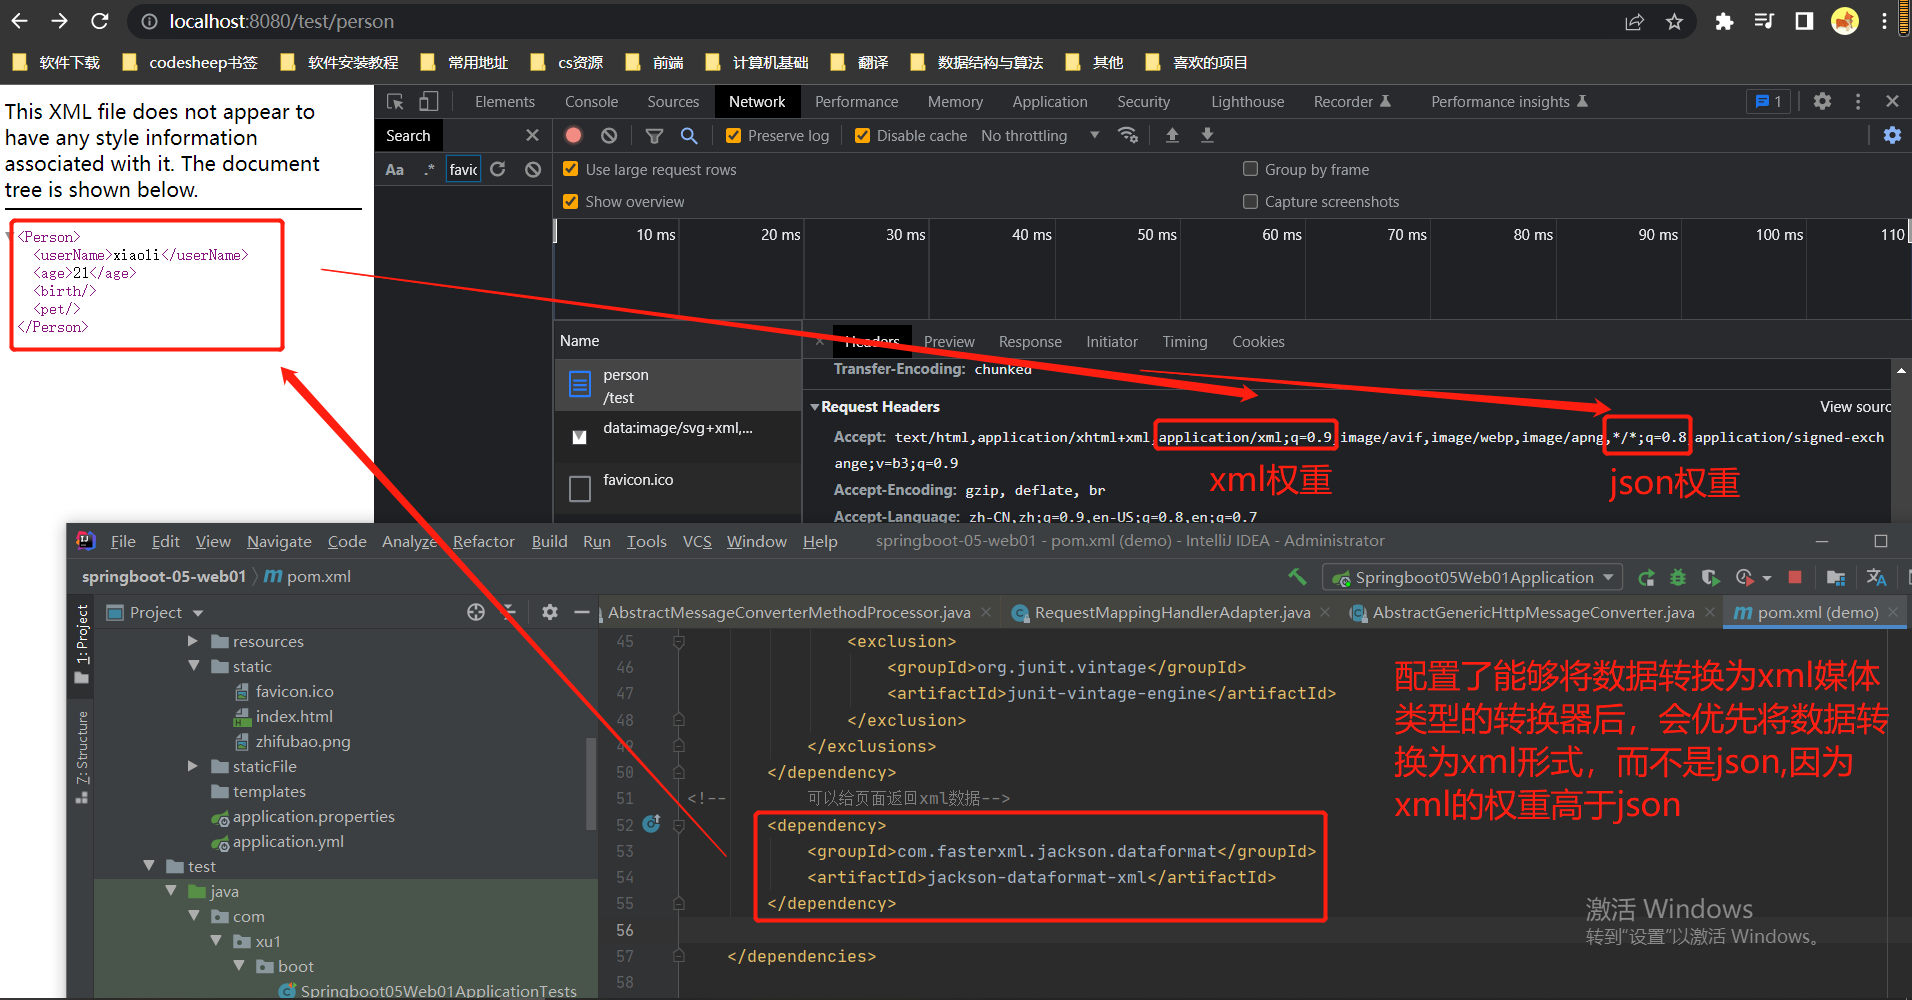
老师总结:
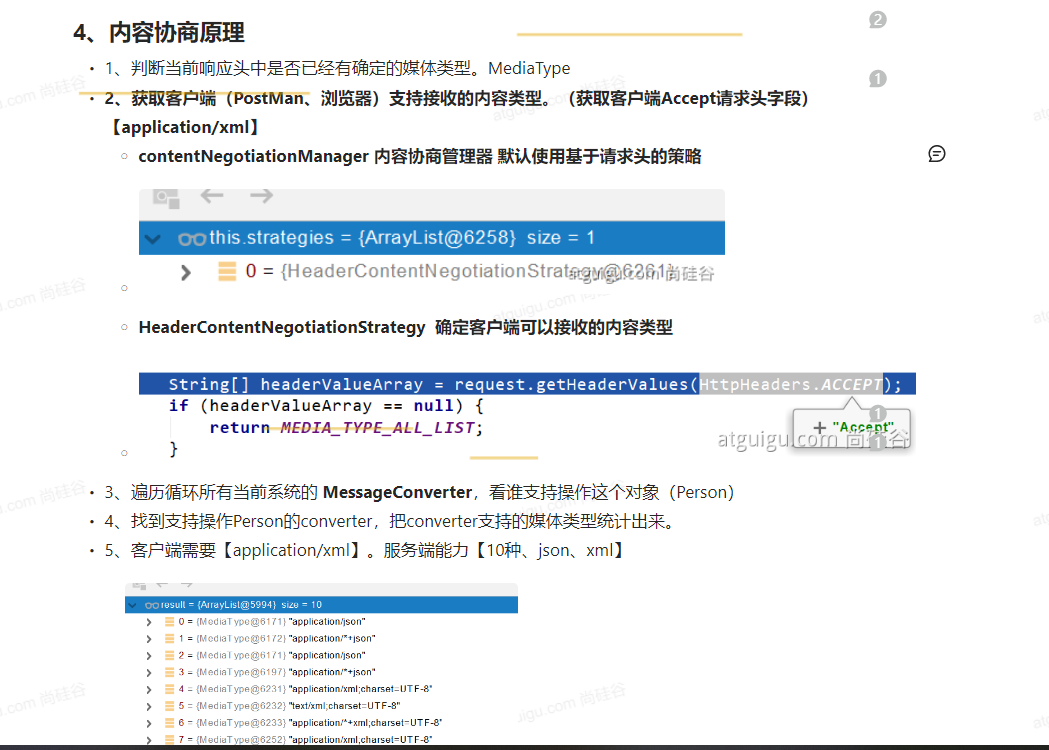
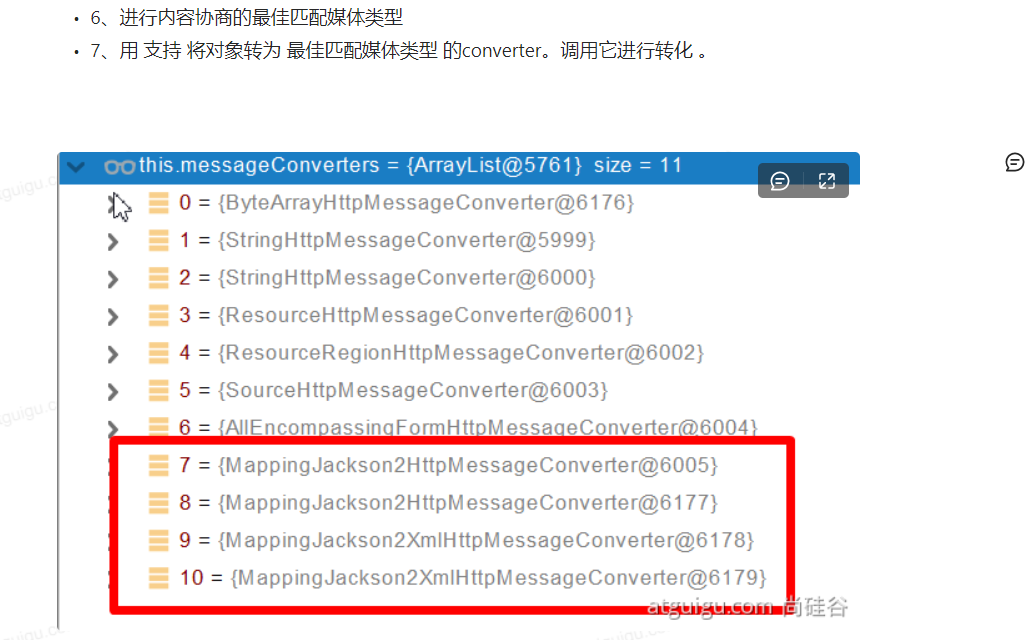
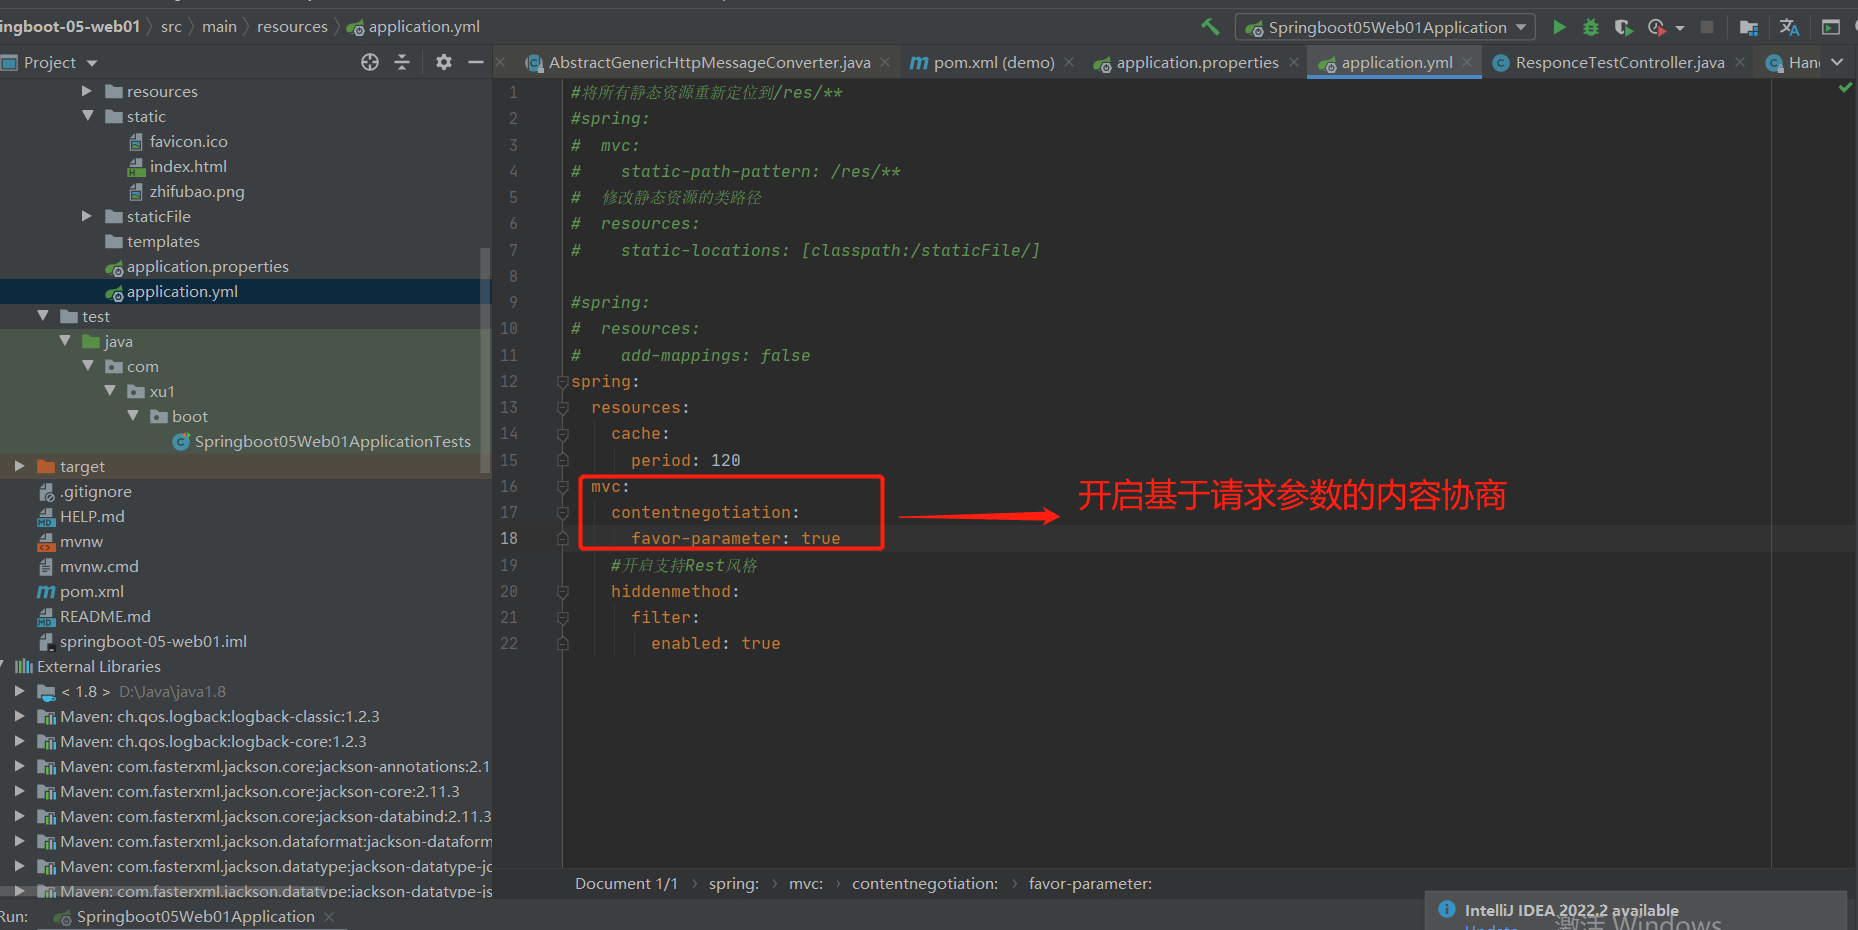
6-12 基于请求参数的内容协商(也就是说再请求参数中指定客户端接受哪种媒体类型)
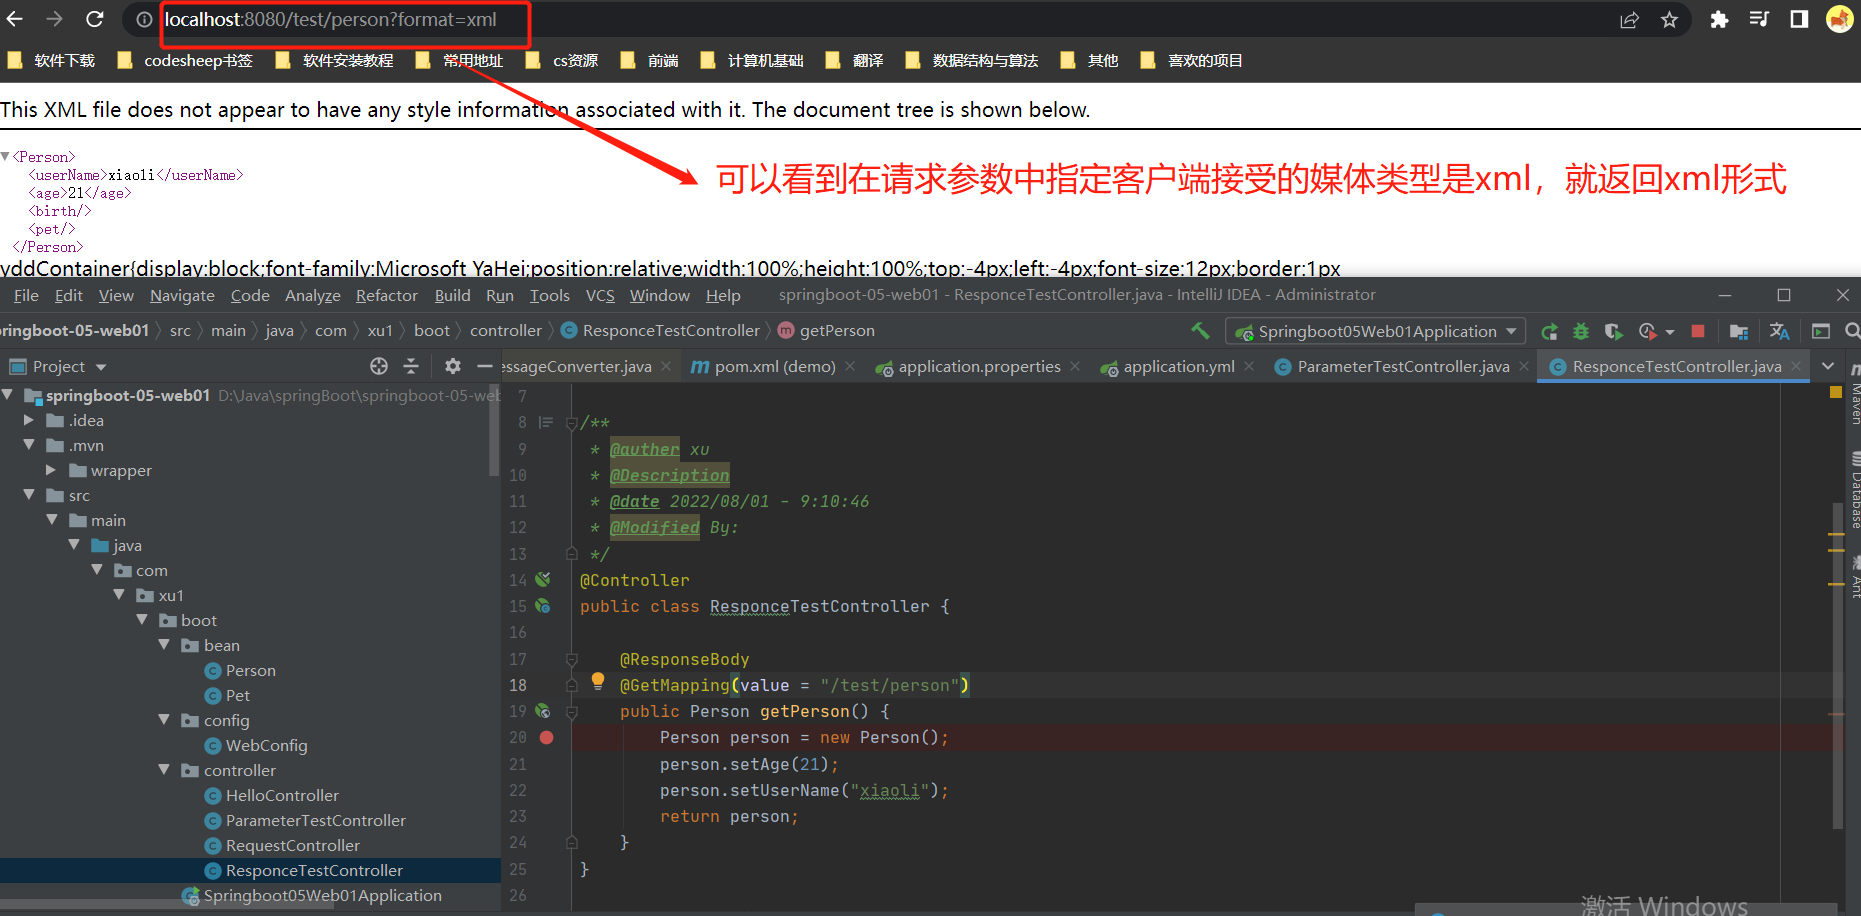
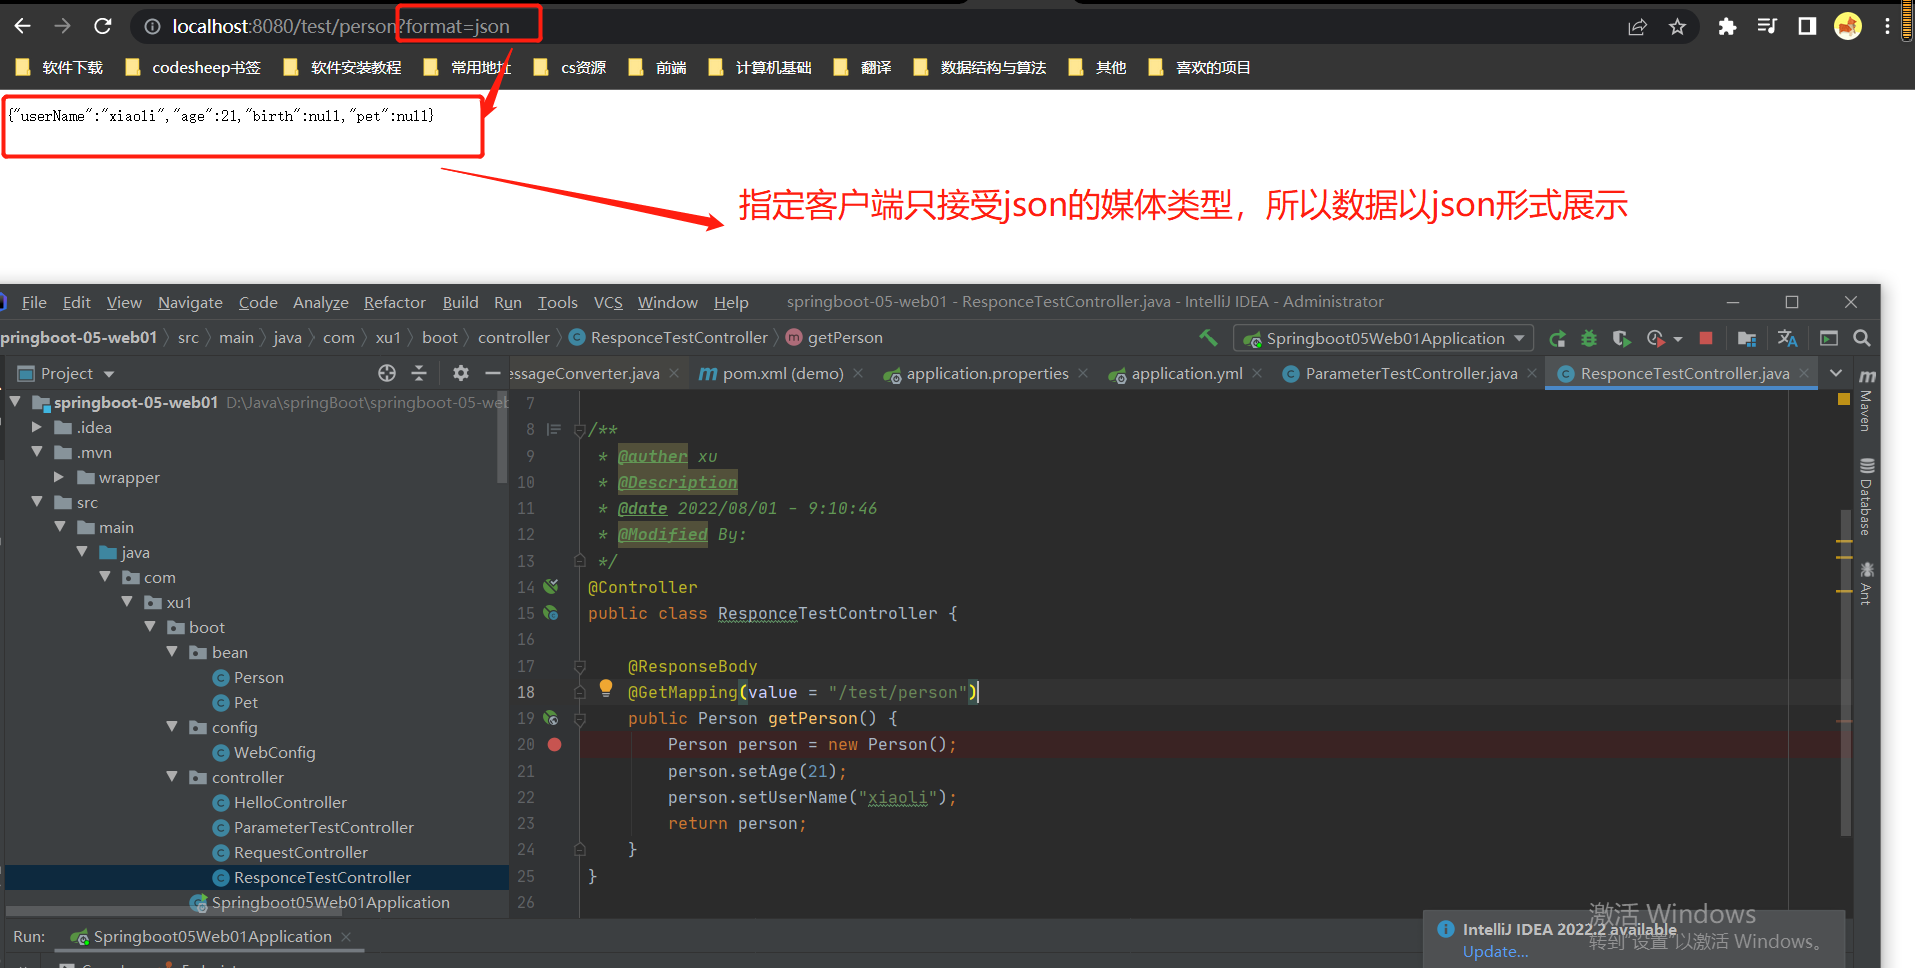
1.基本使用
结果测试:
2.源码分析
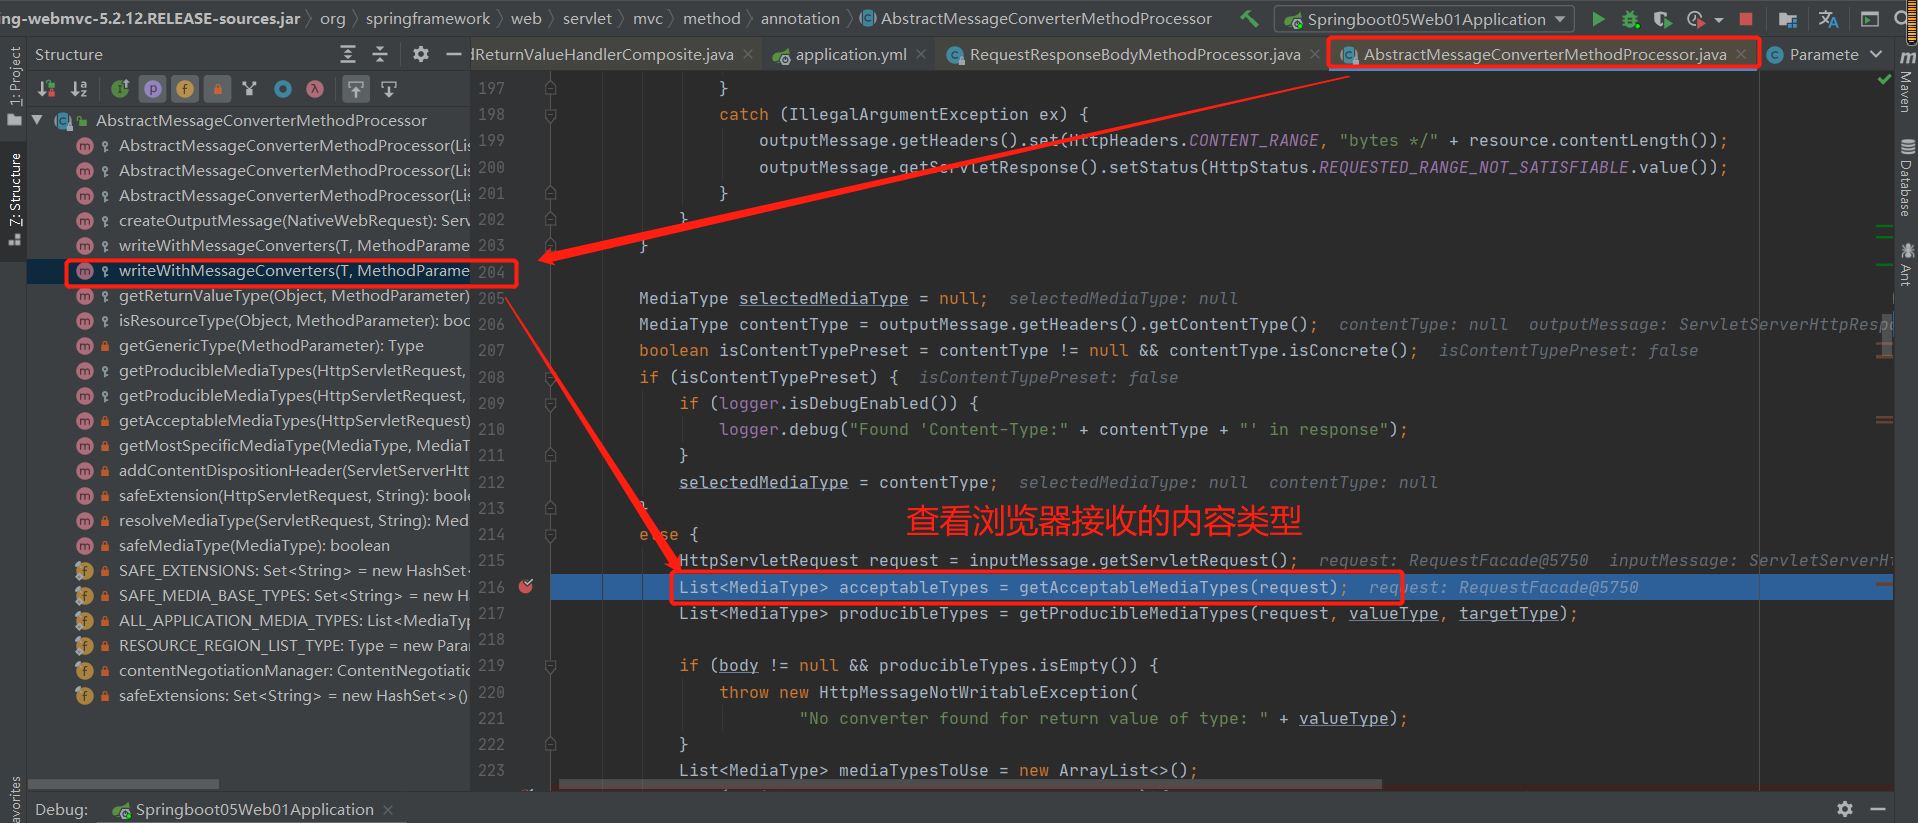
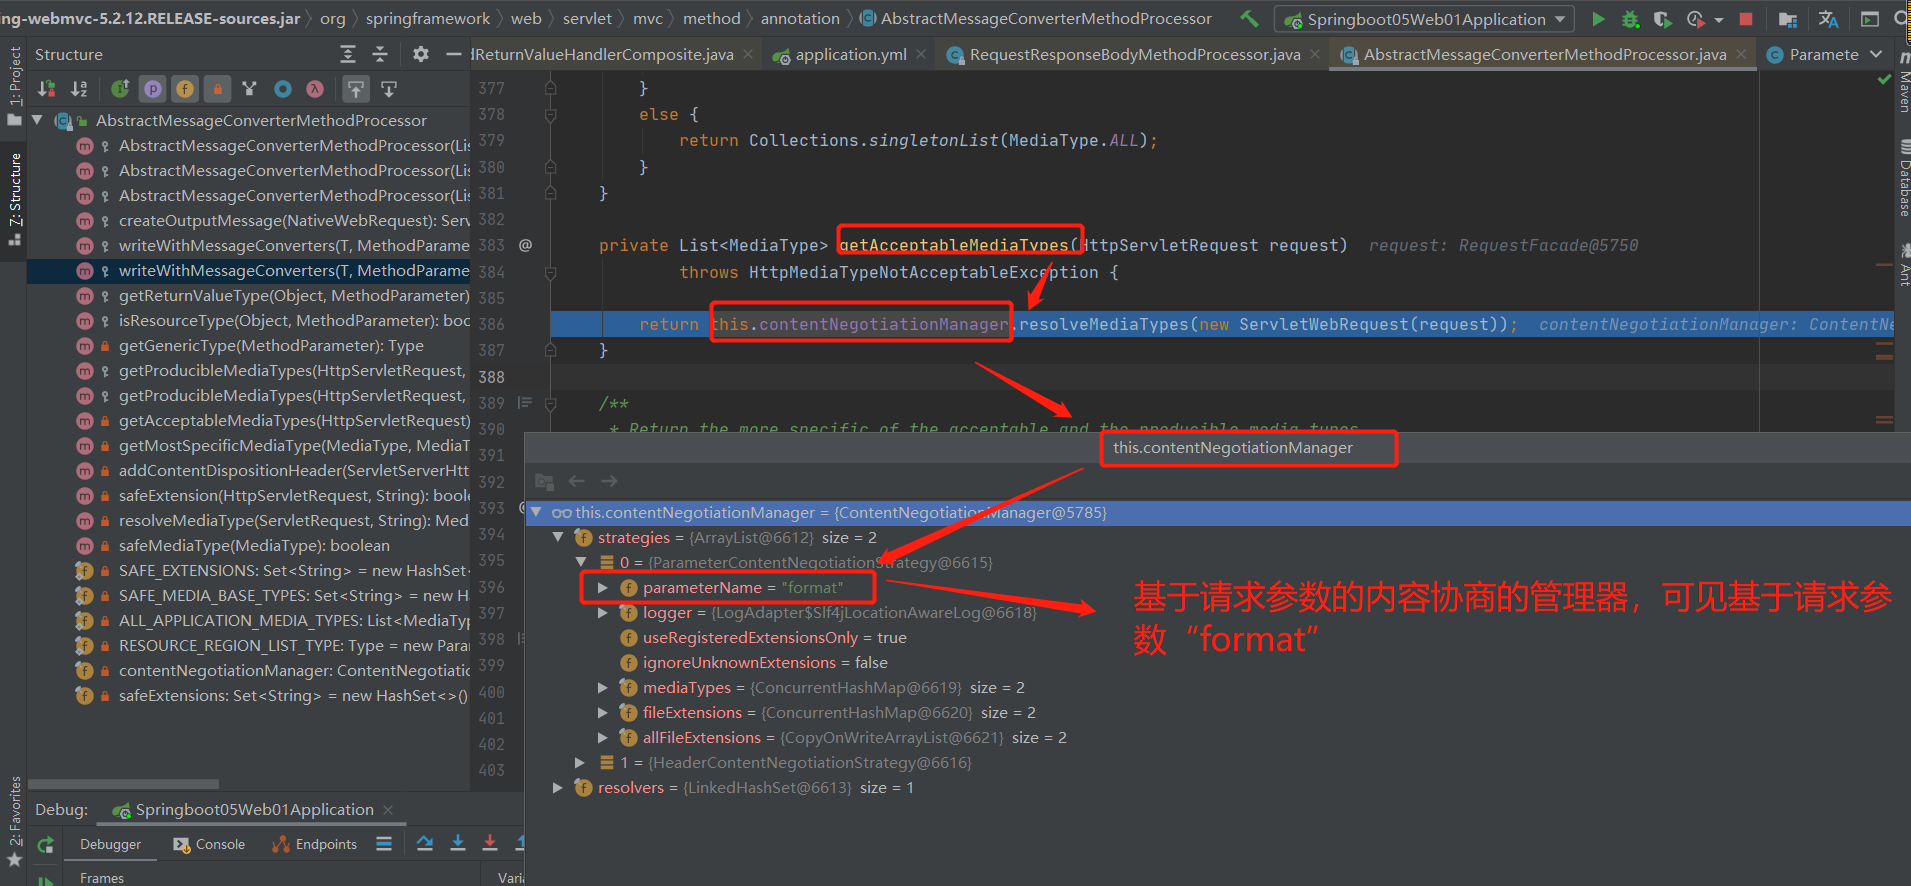
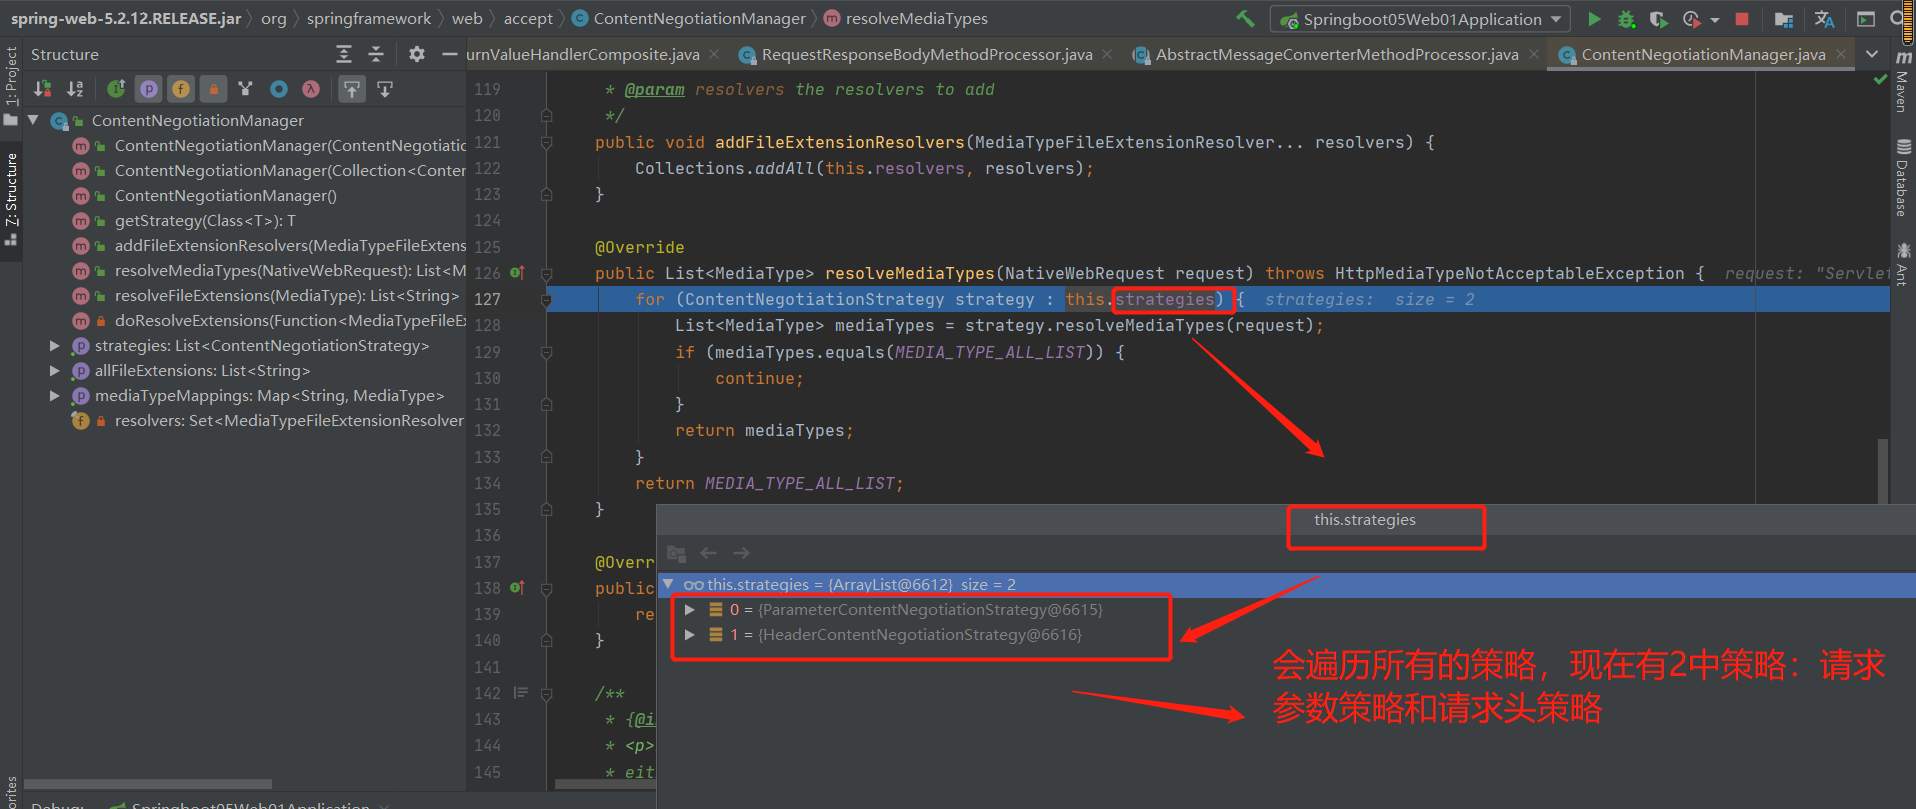
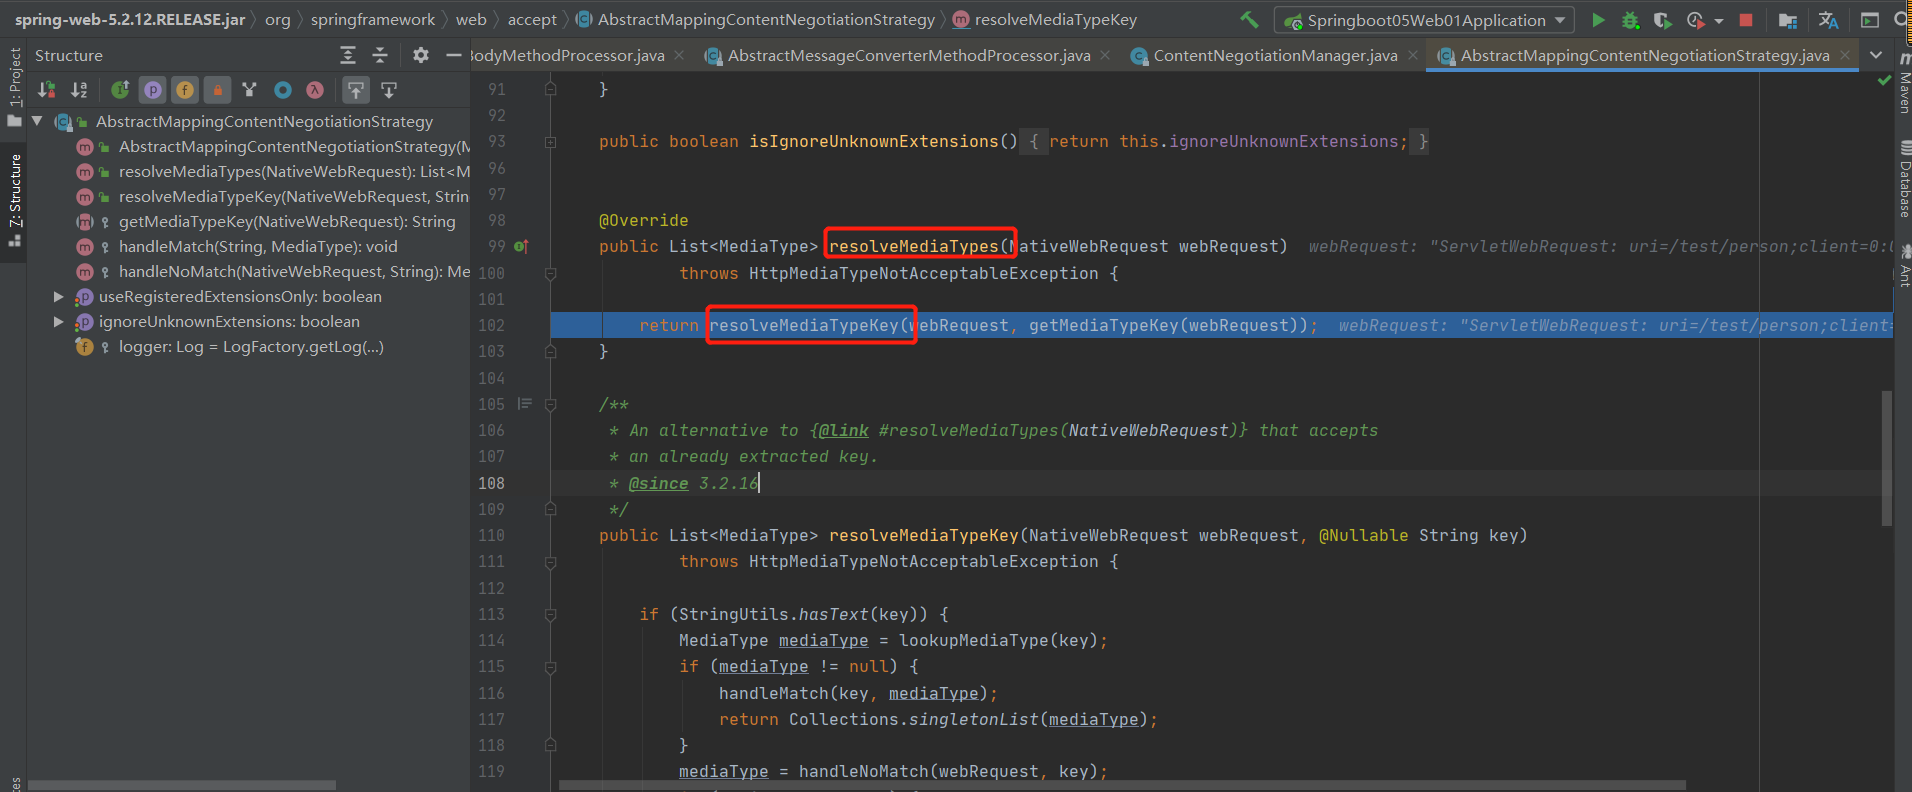
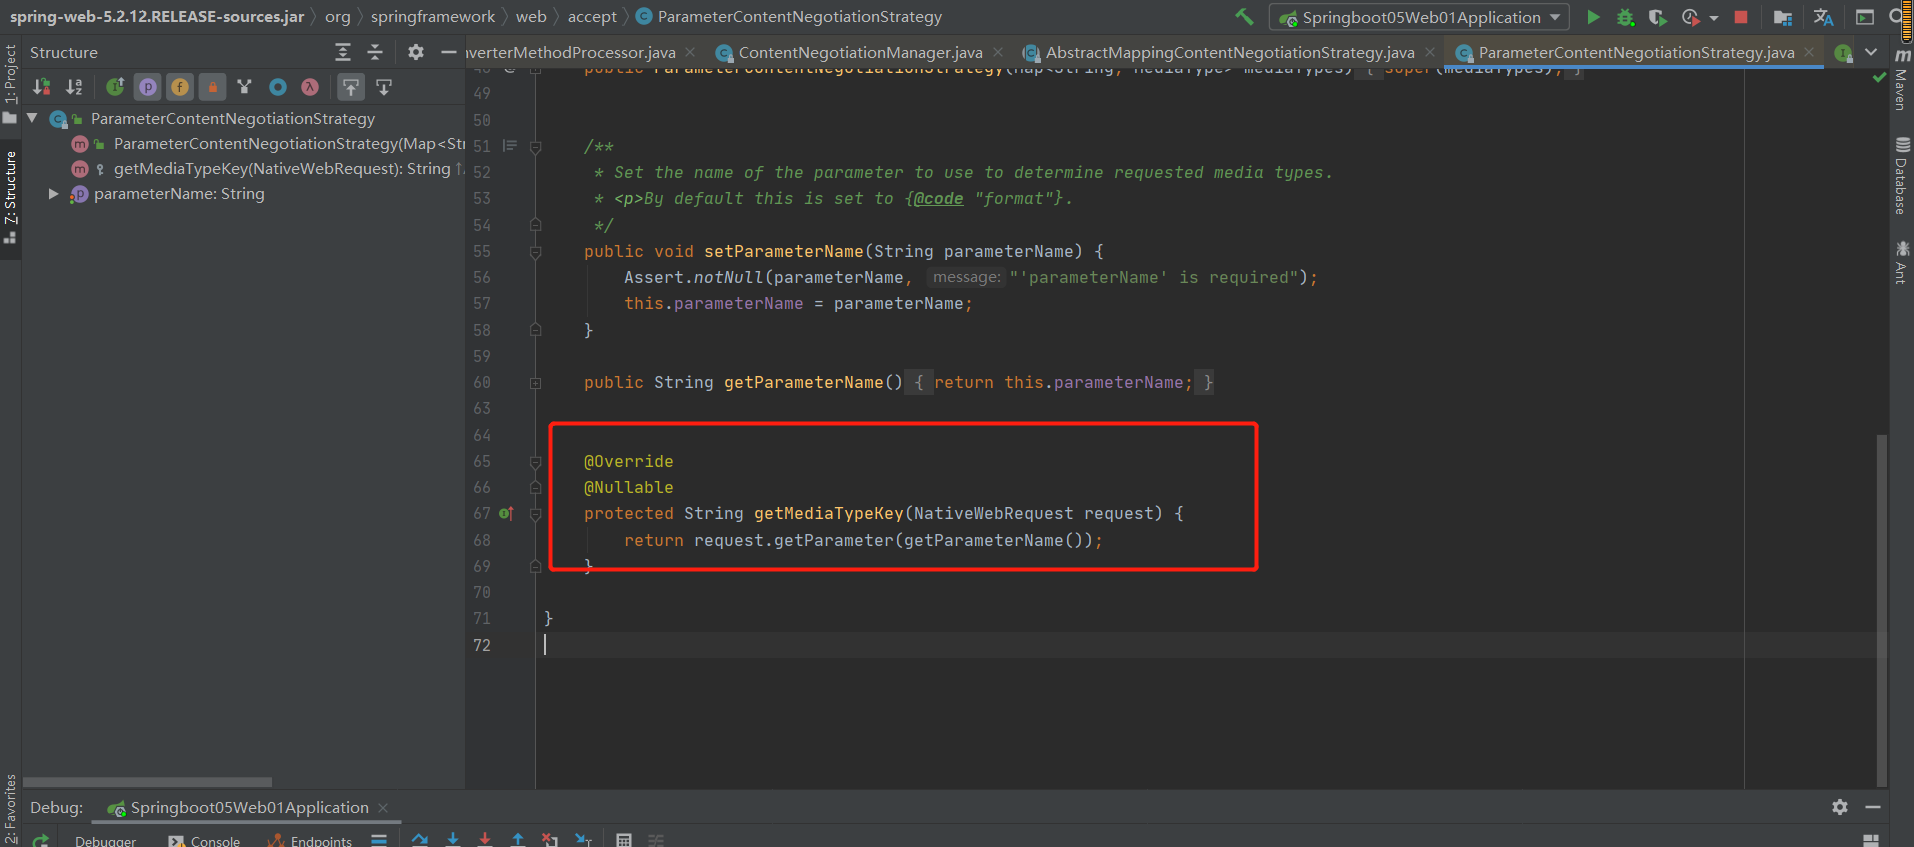
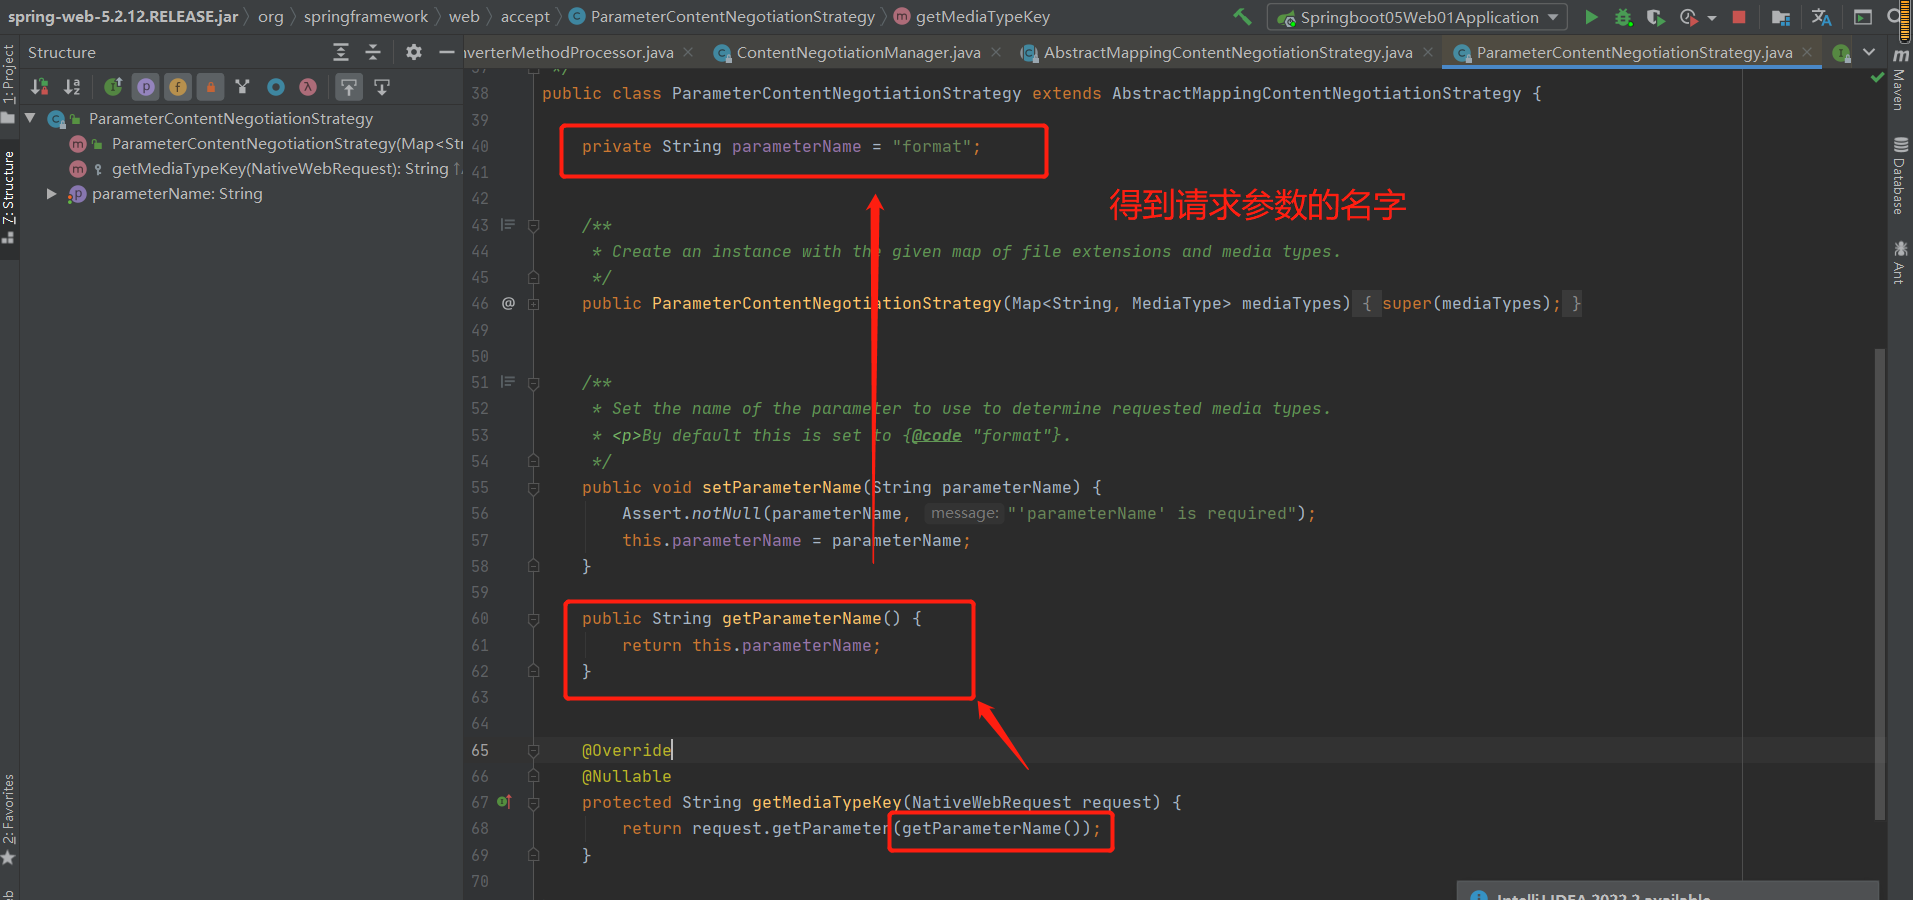
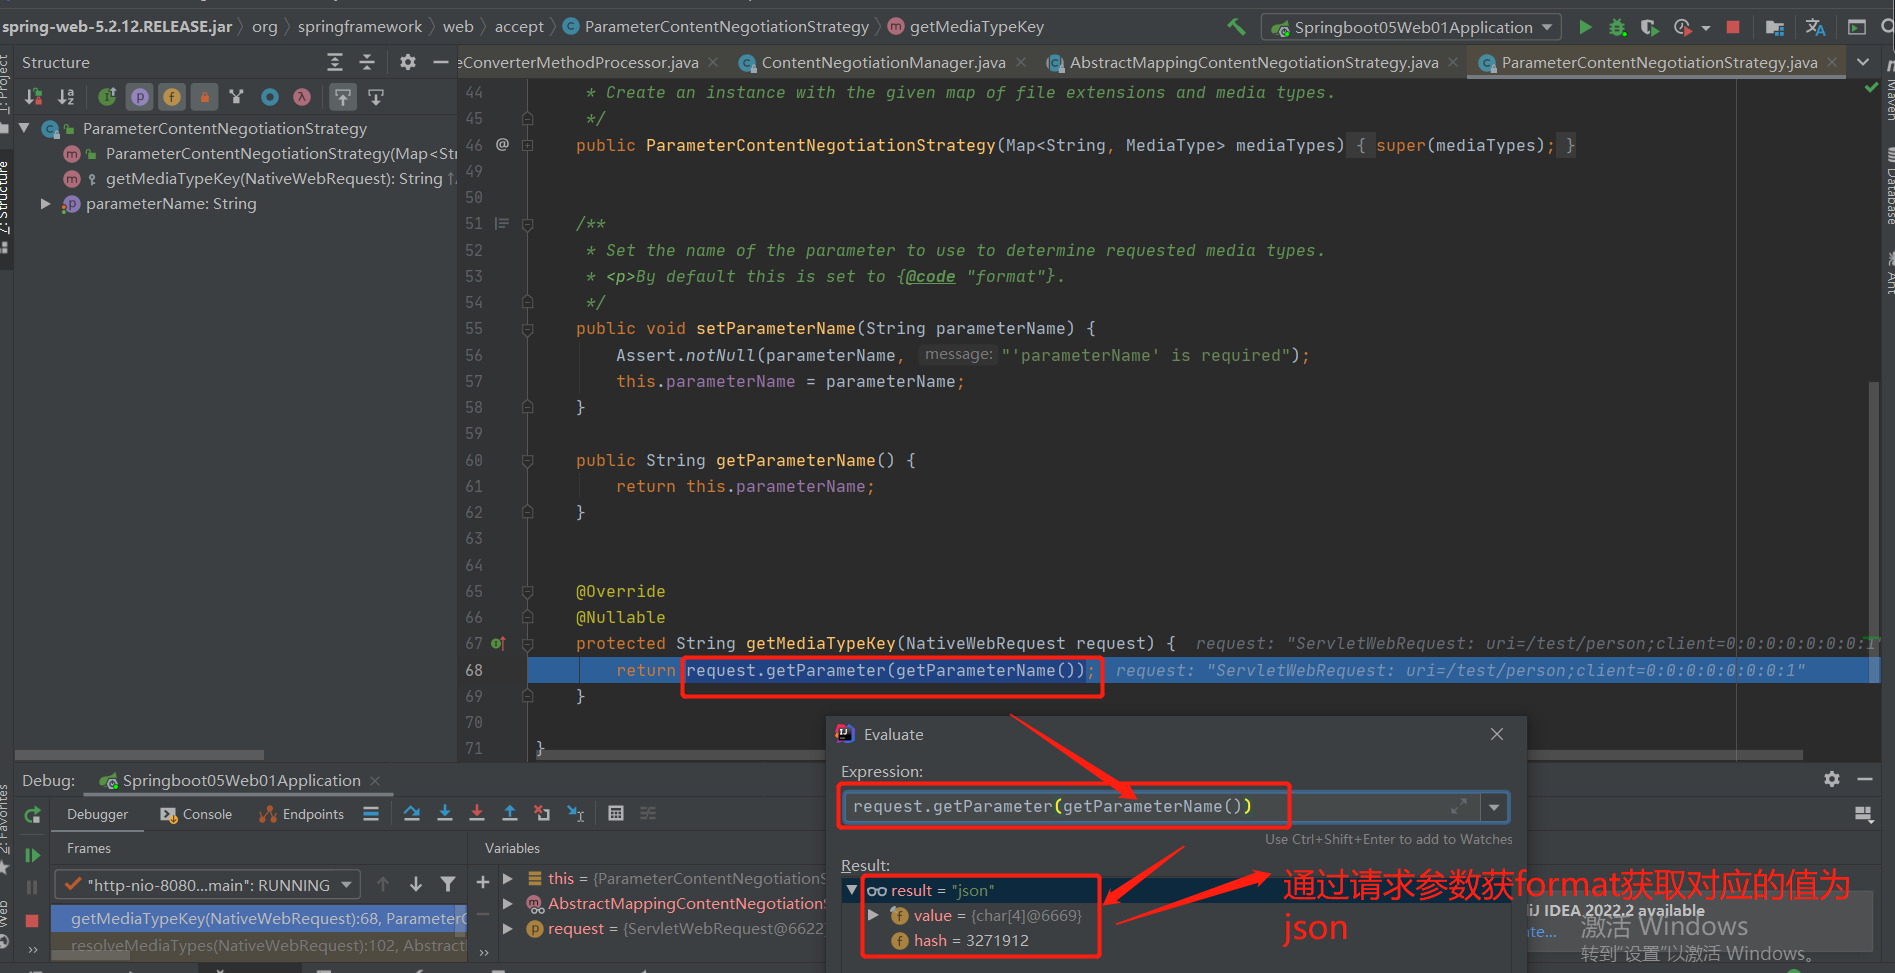
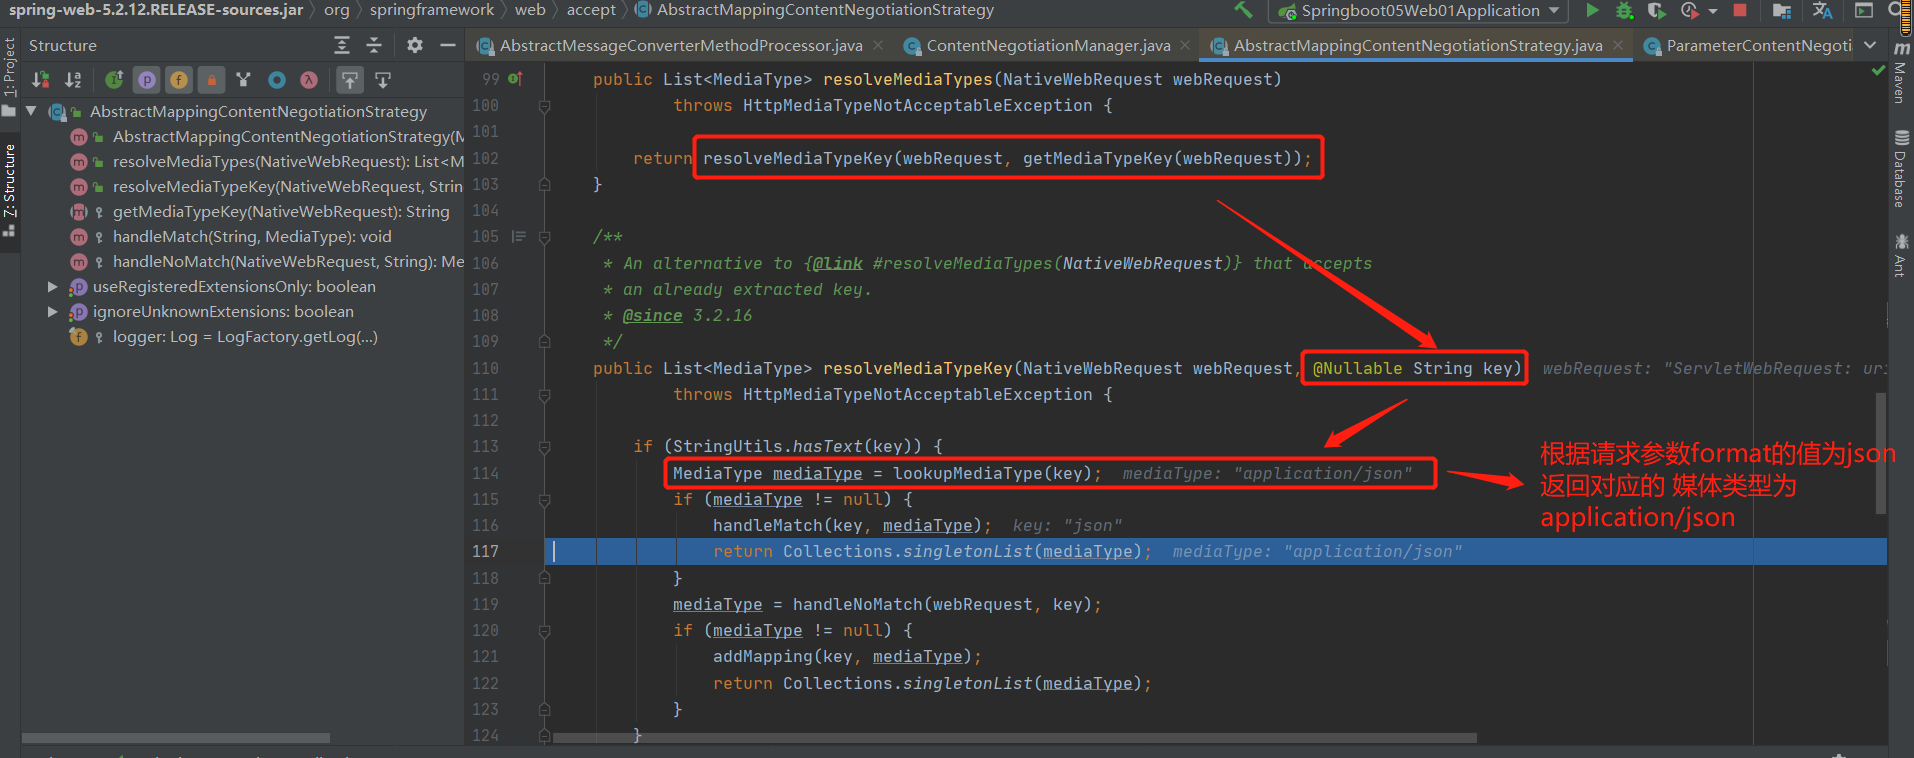
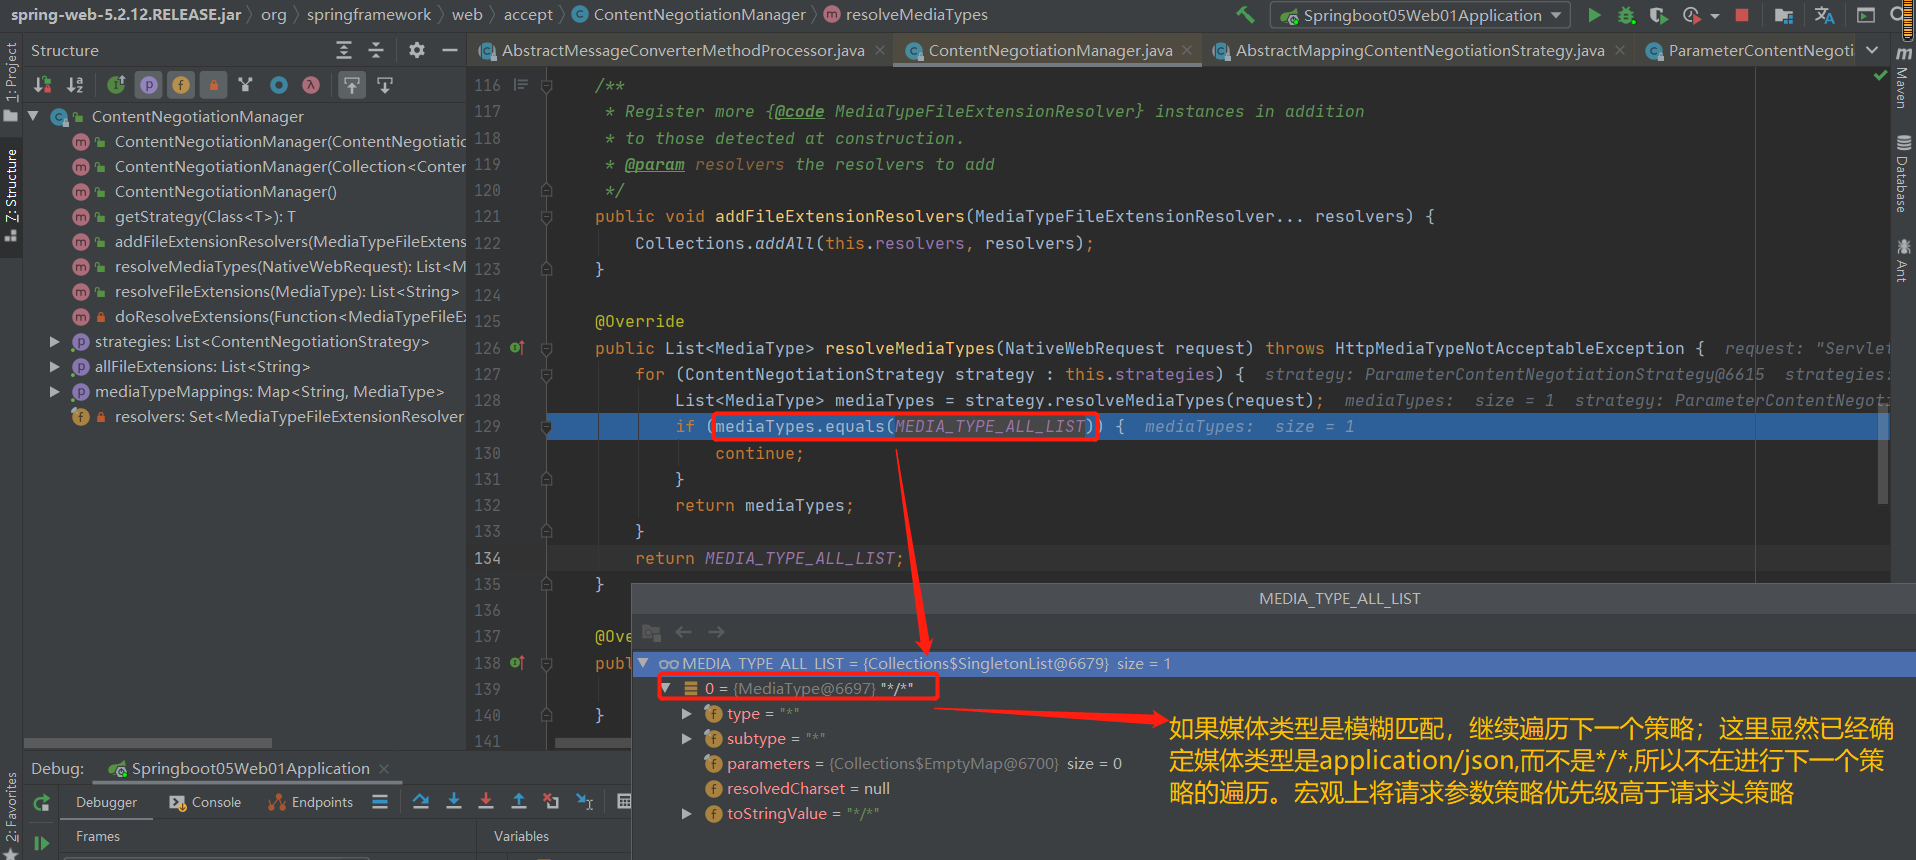
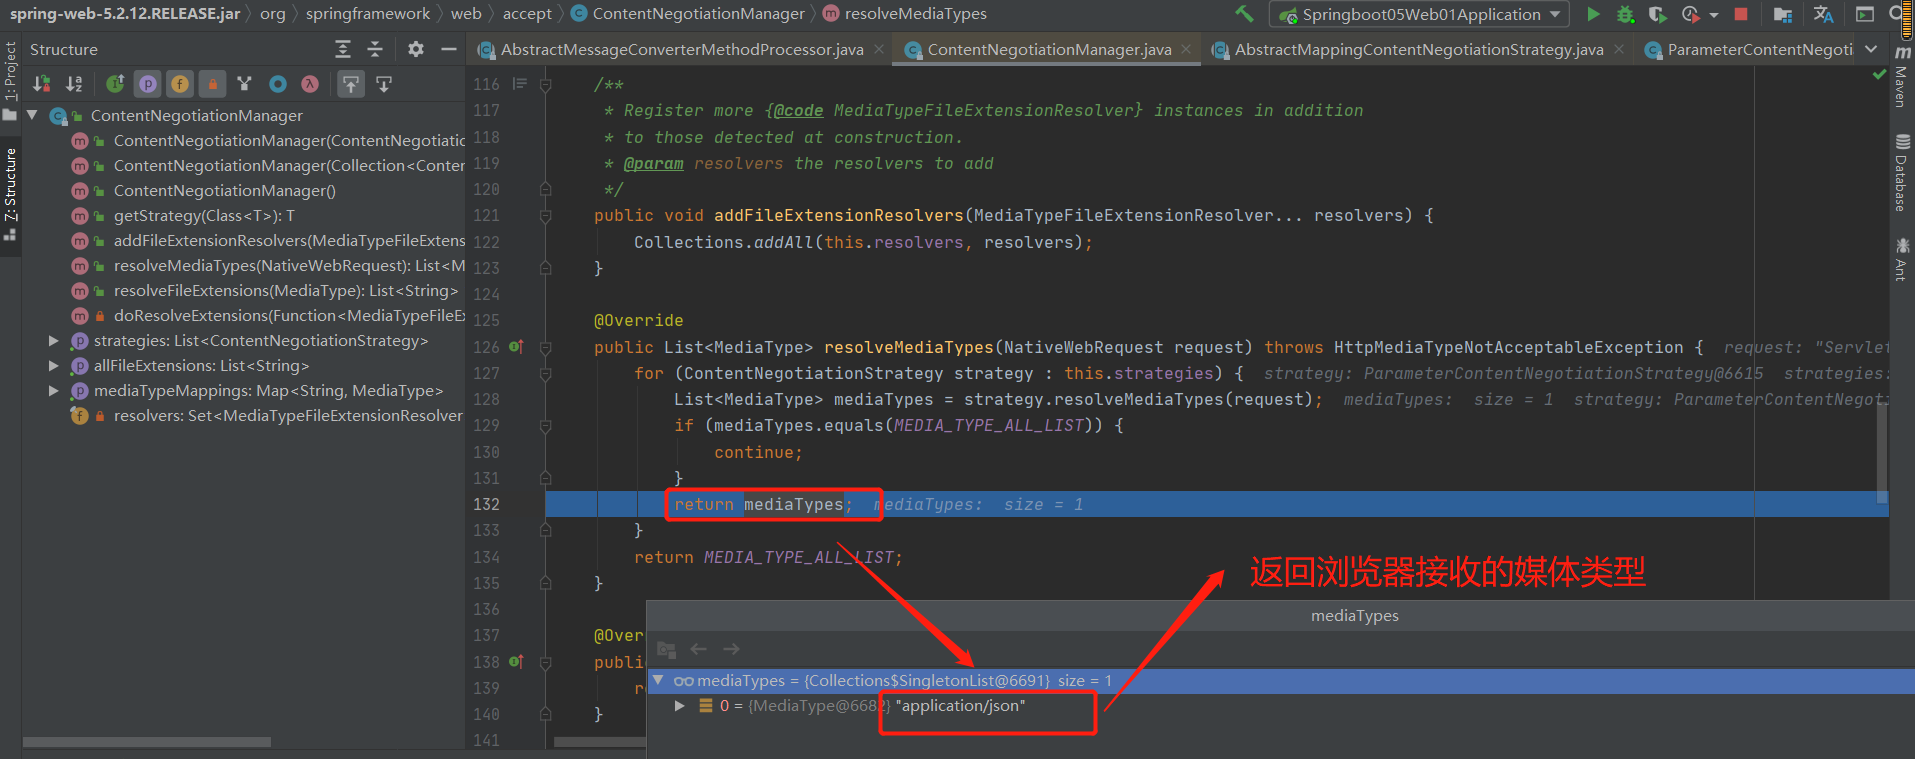
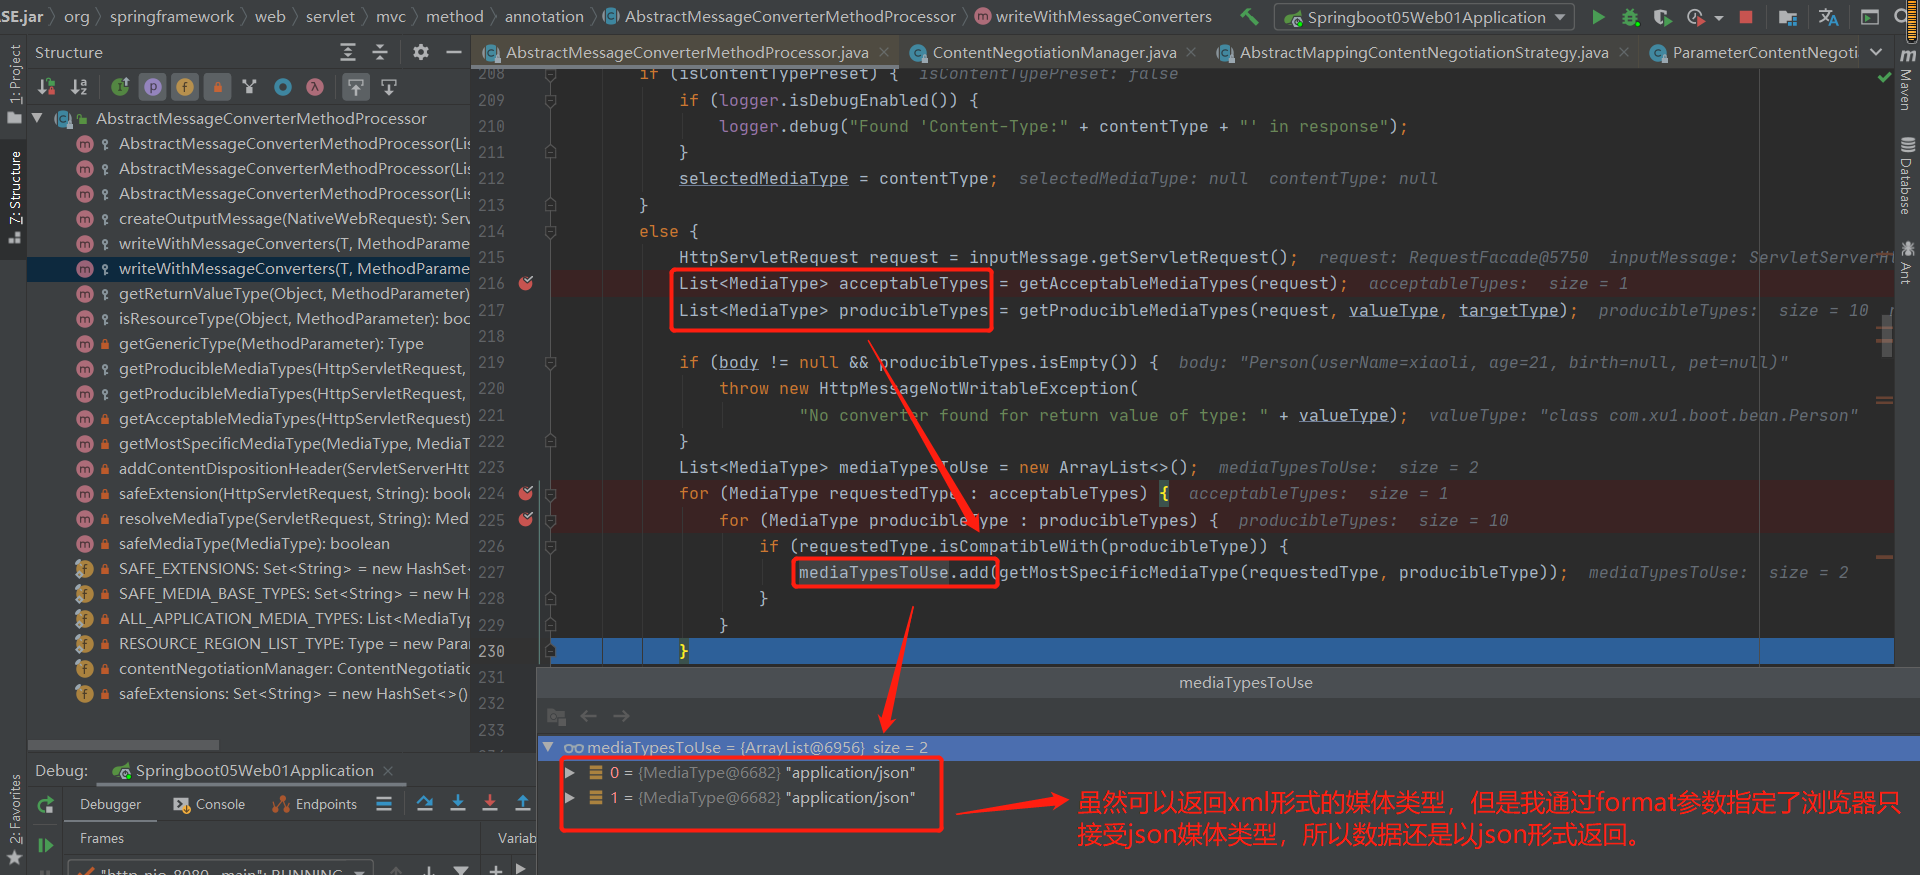
6-13 自定义MessageConverter
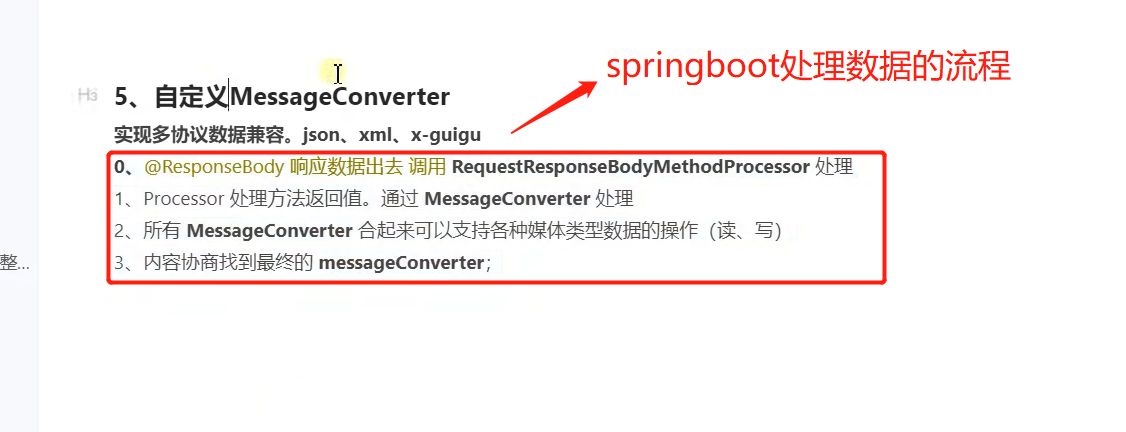

查看源码,底层自定义的converter:
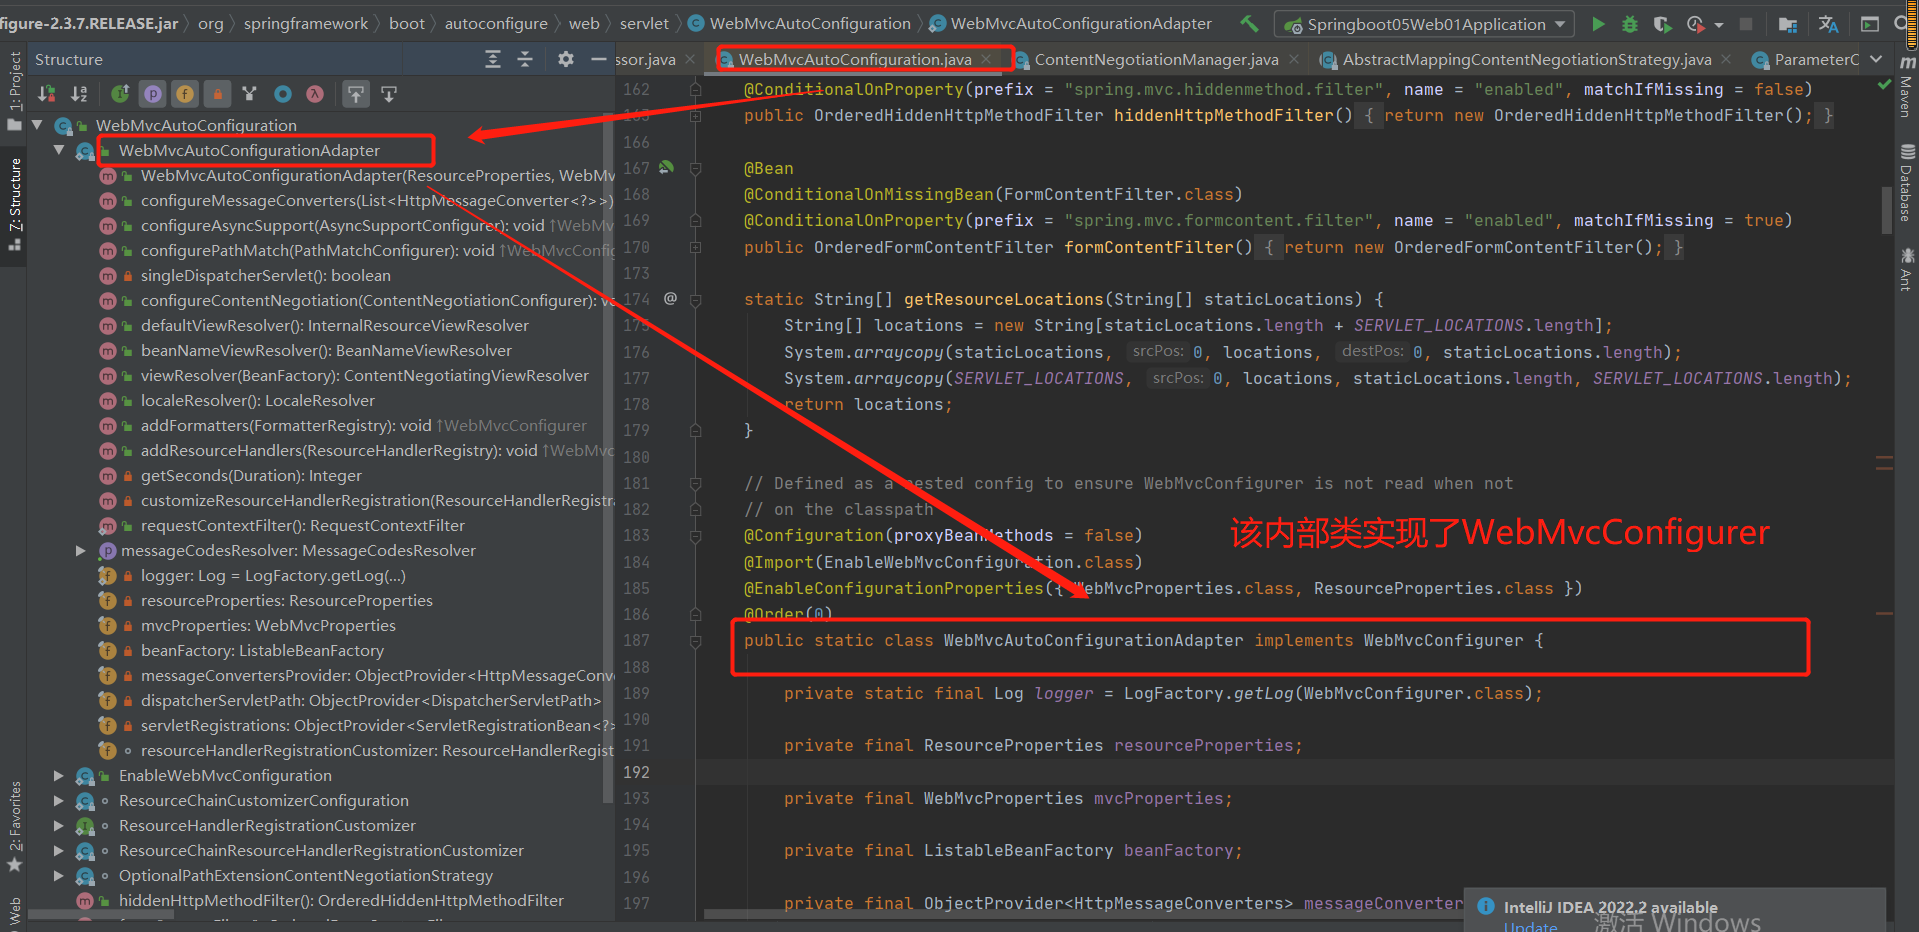
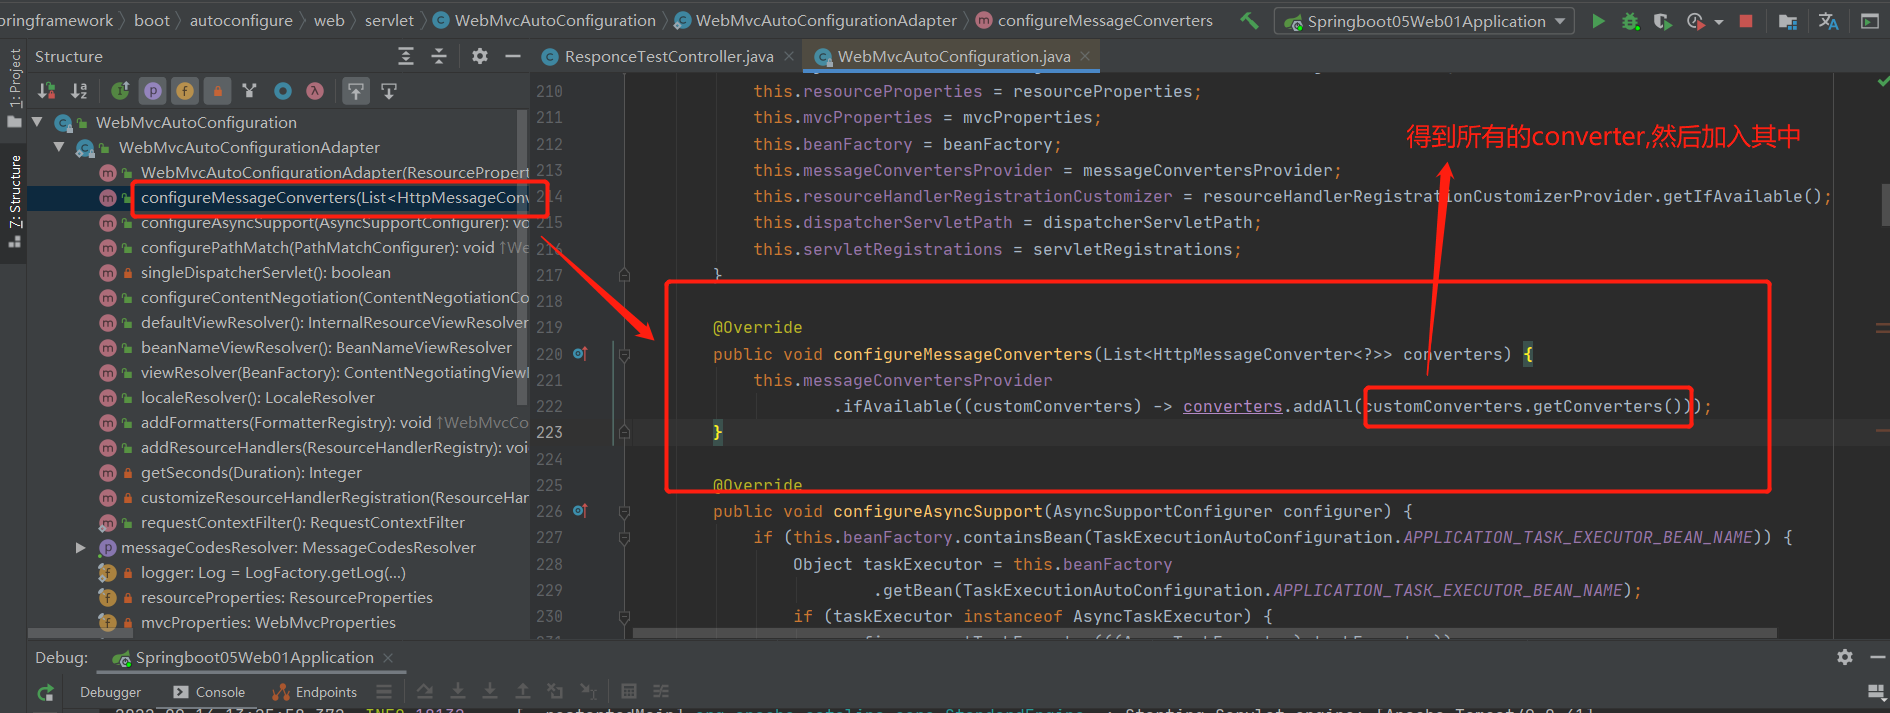
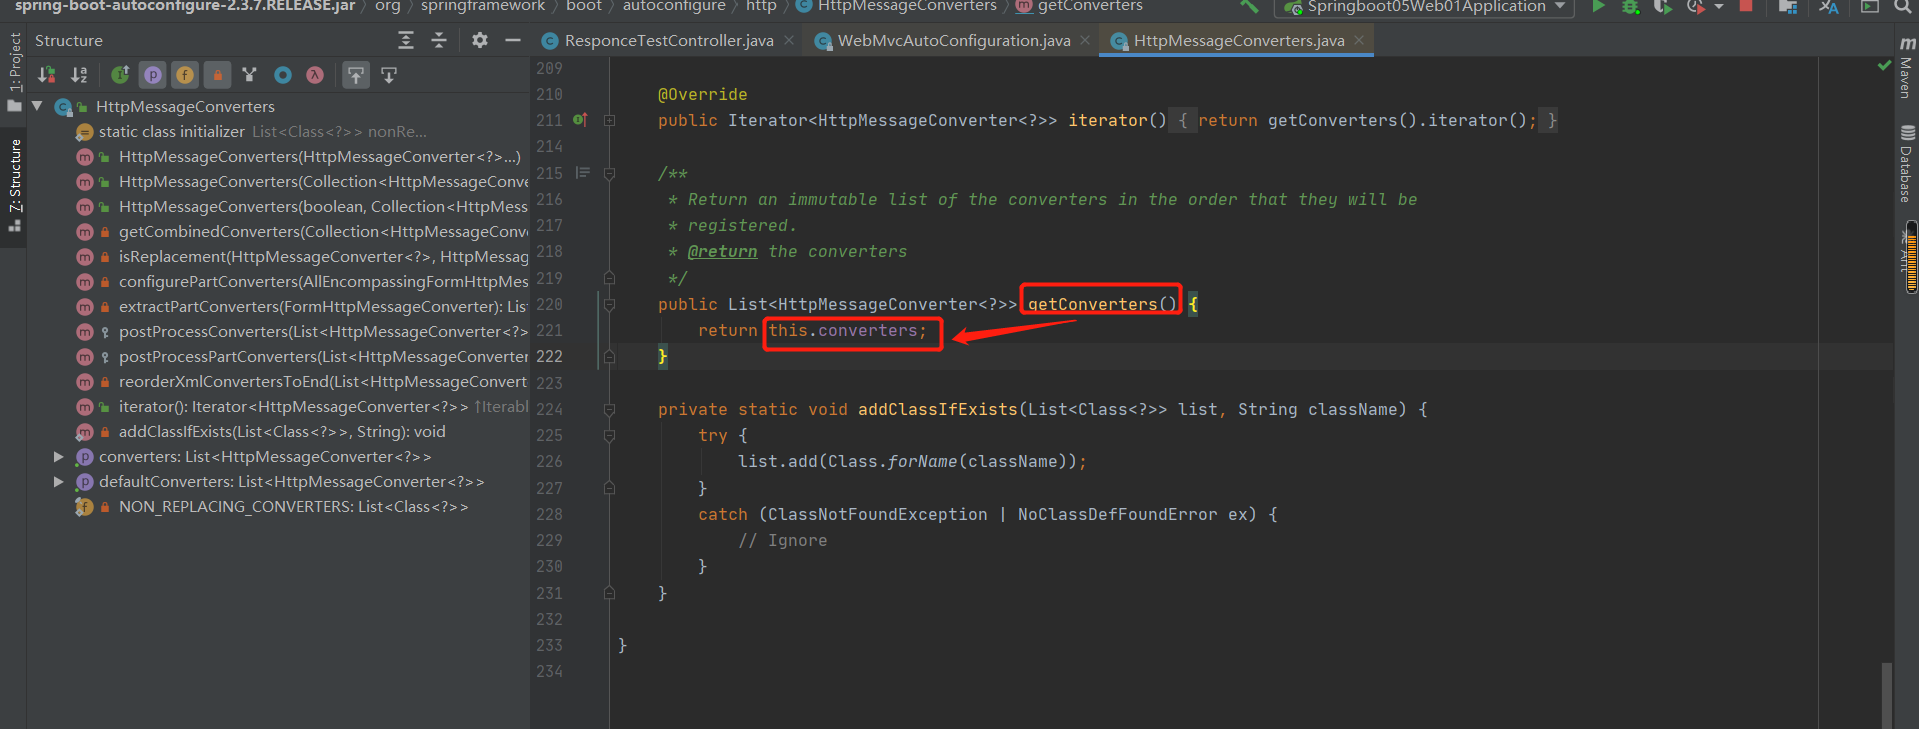
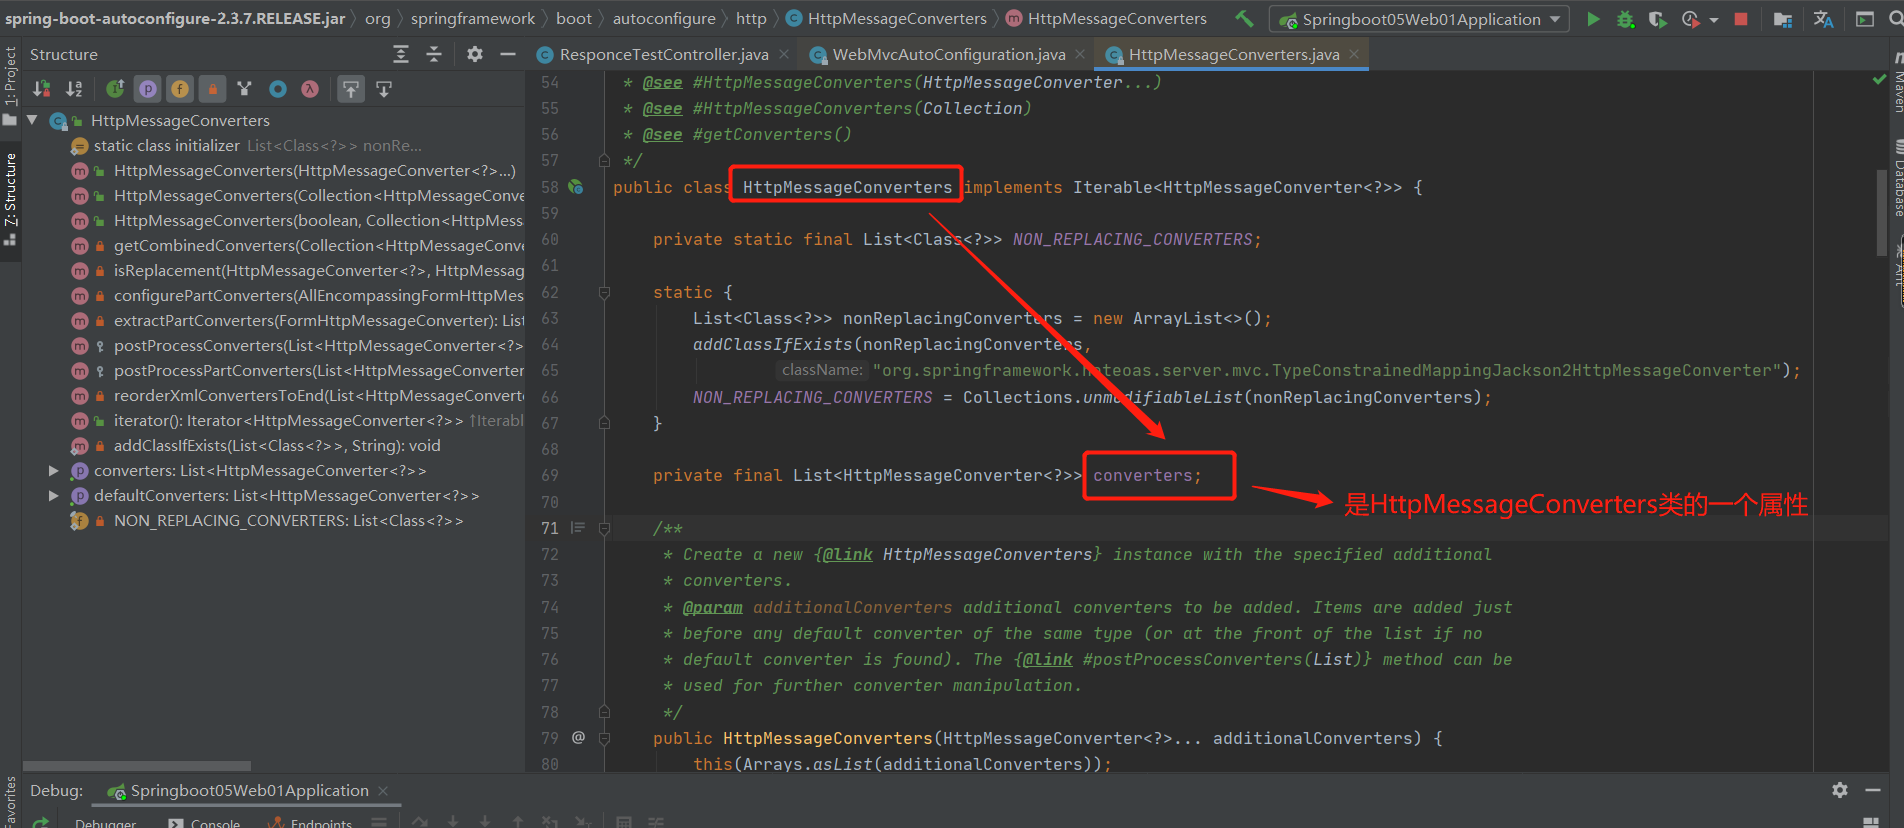
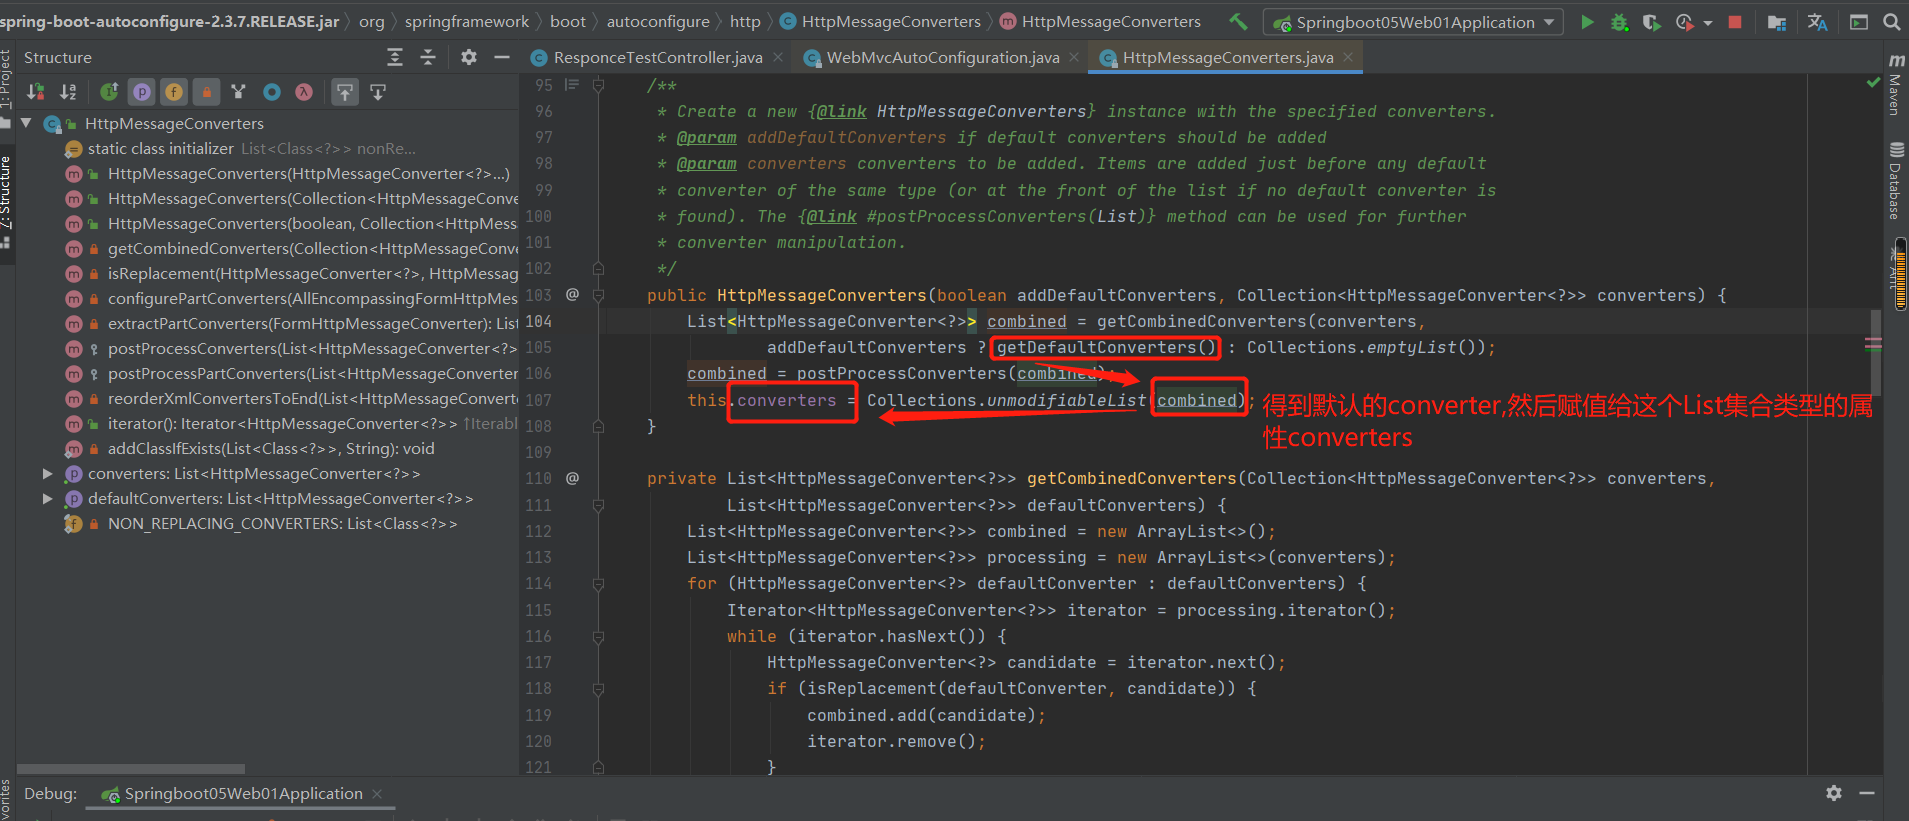
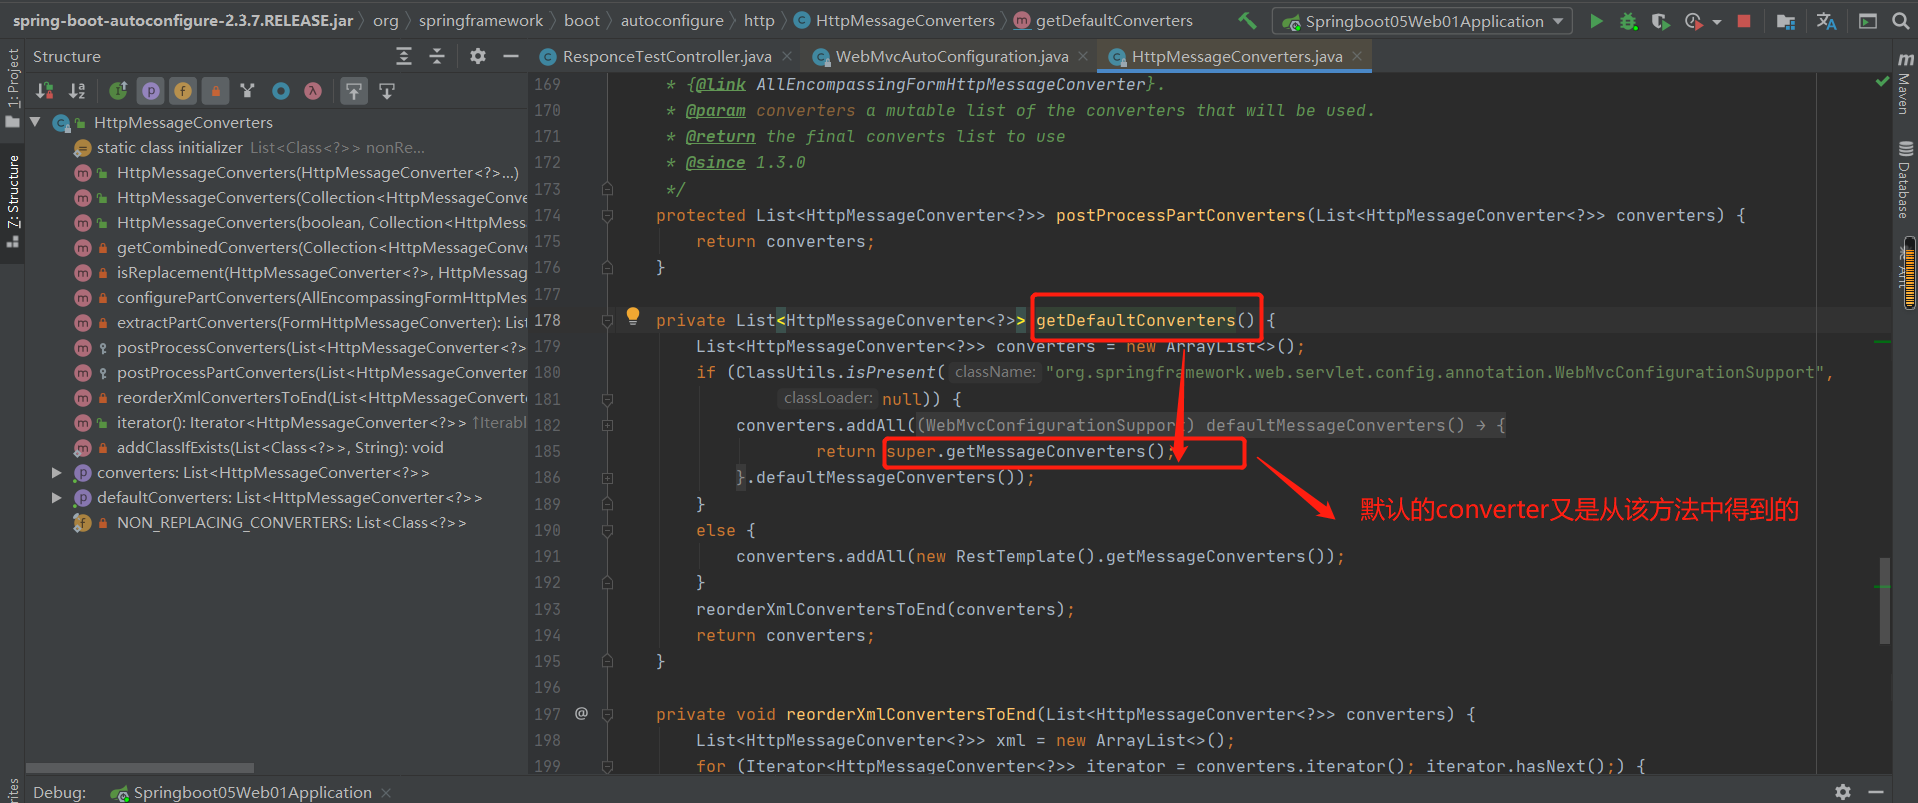
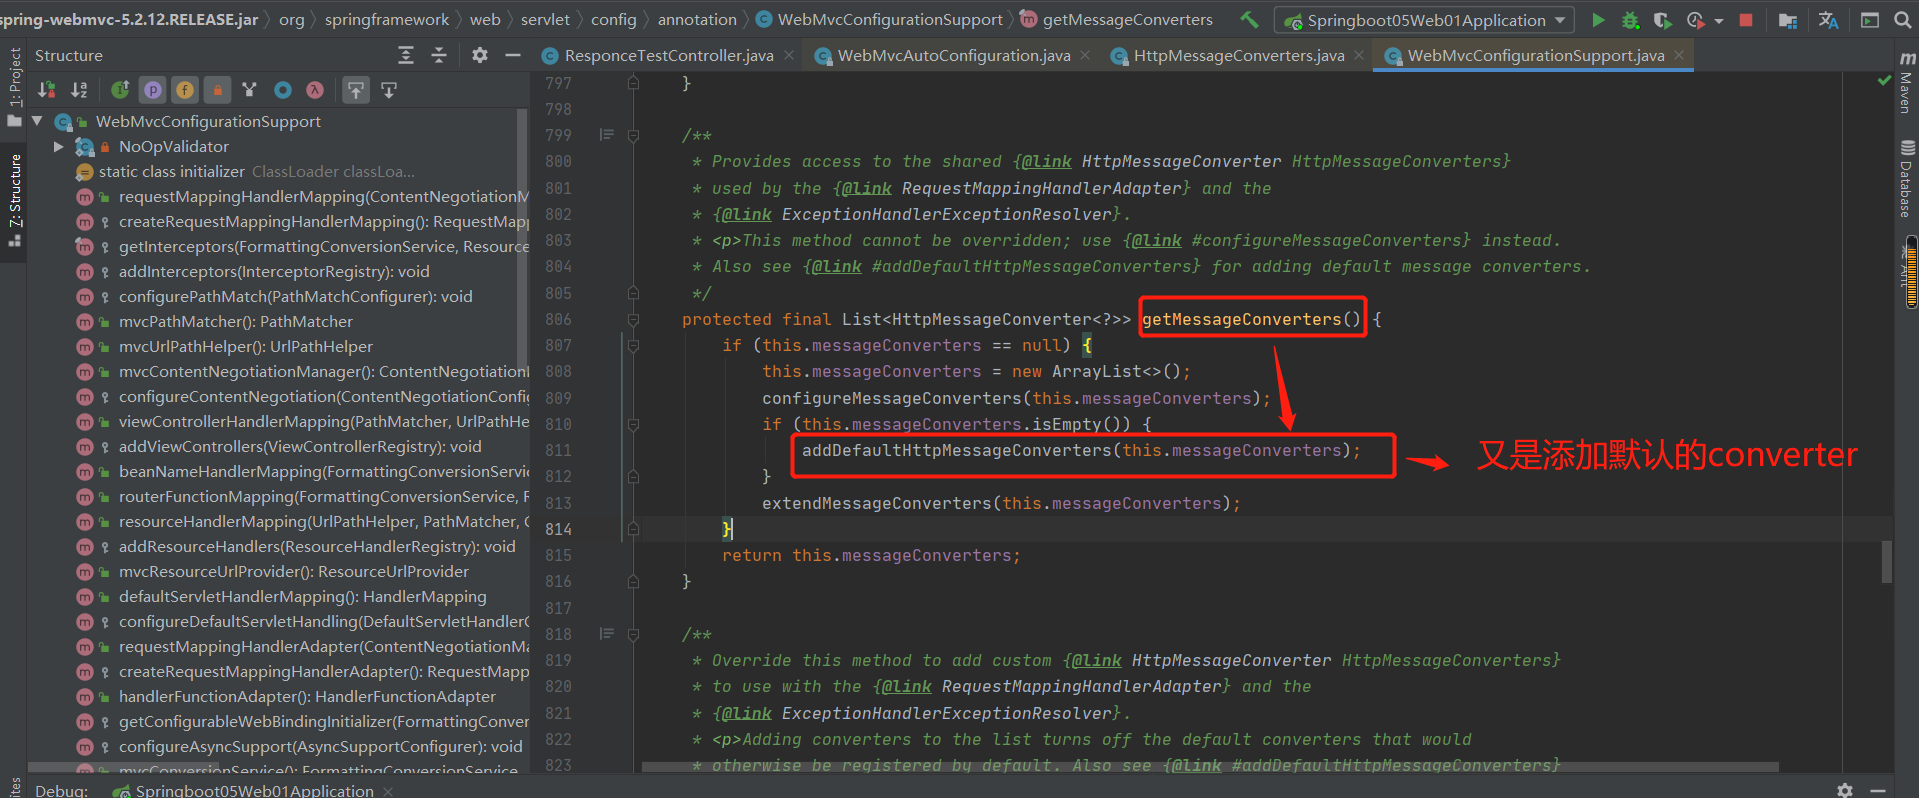
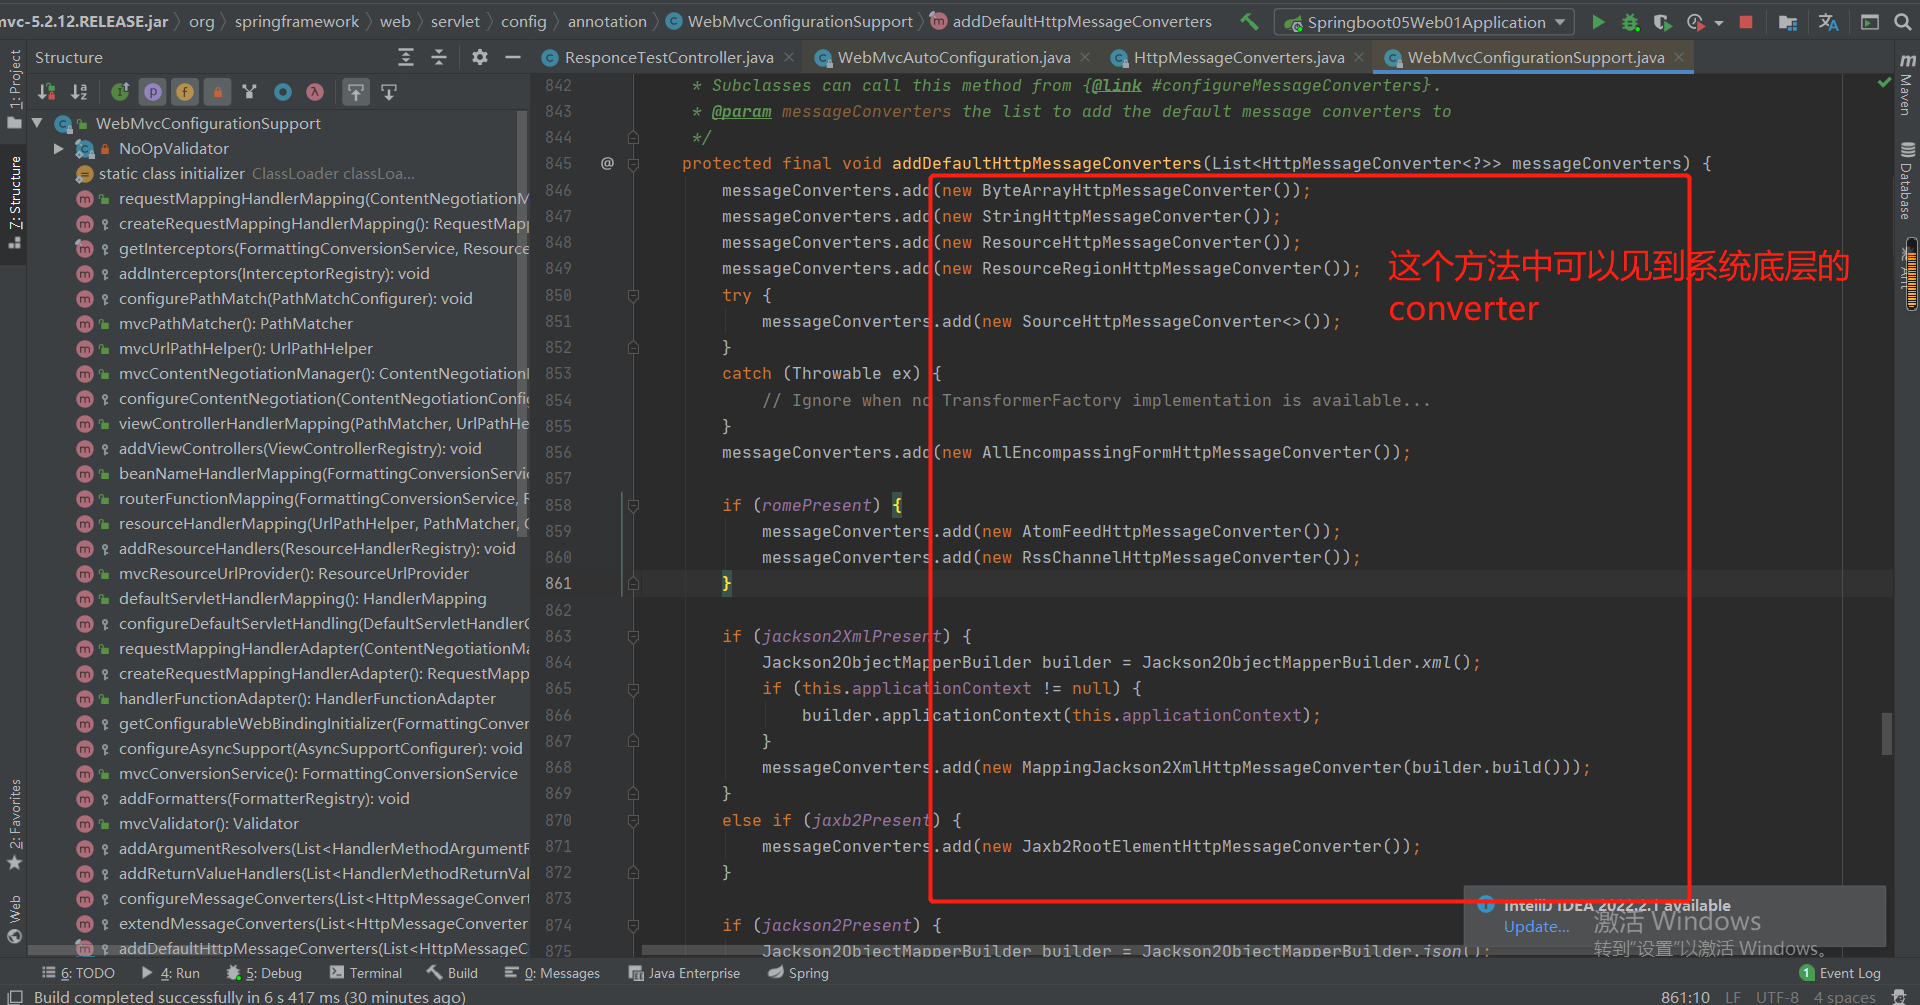
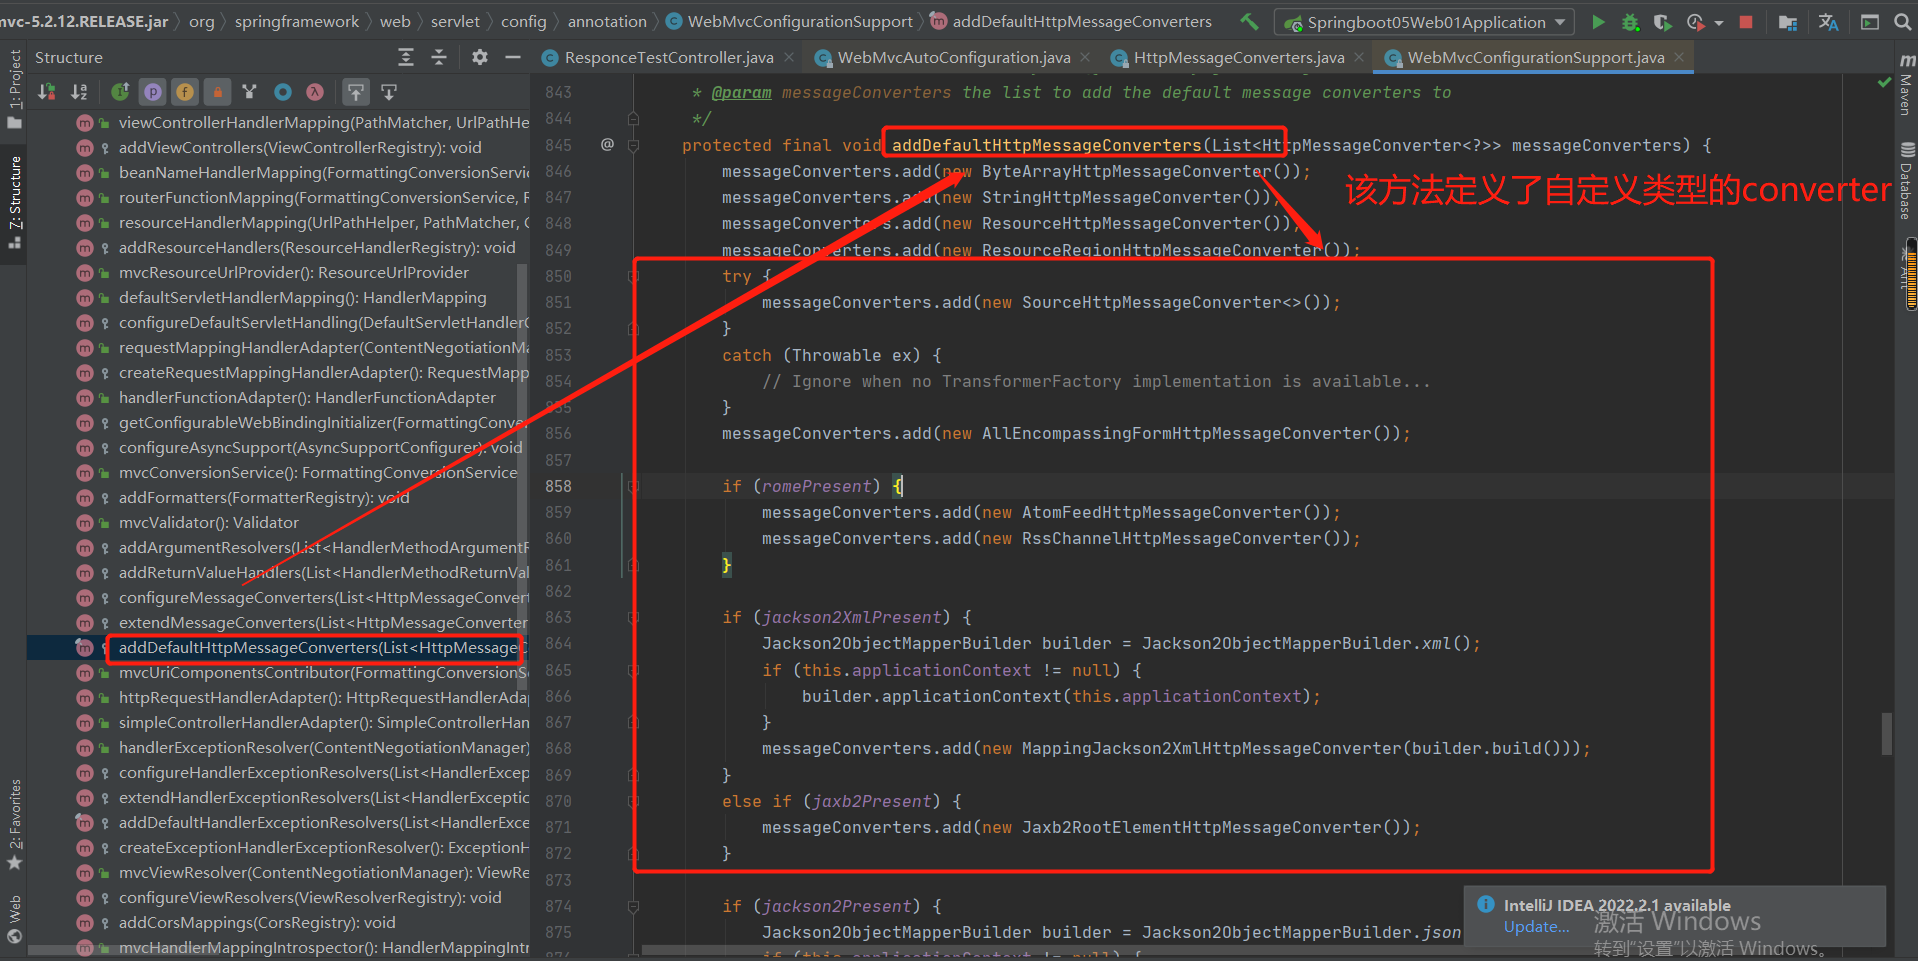
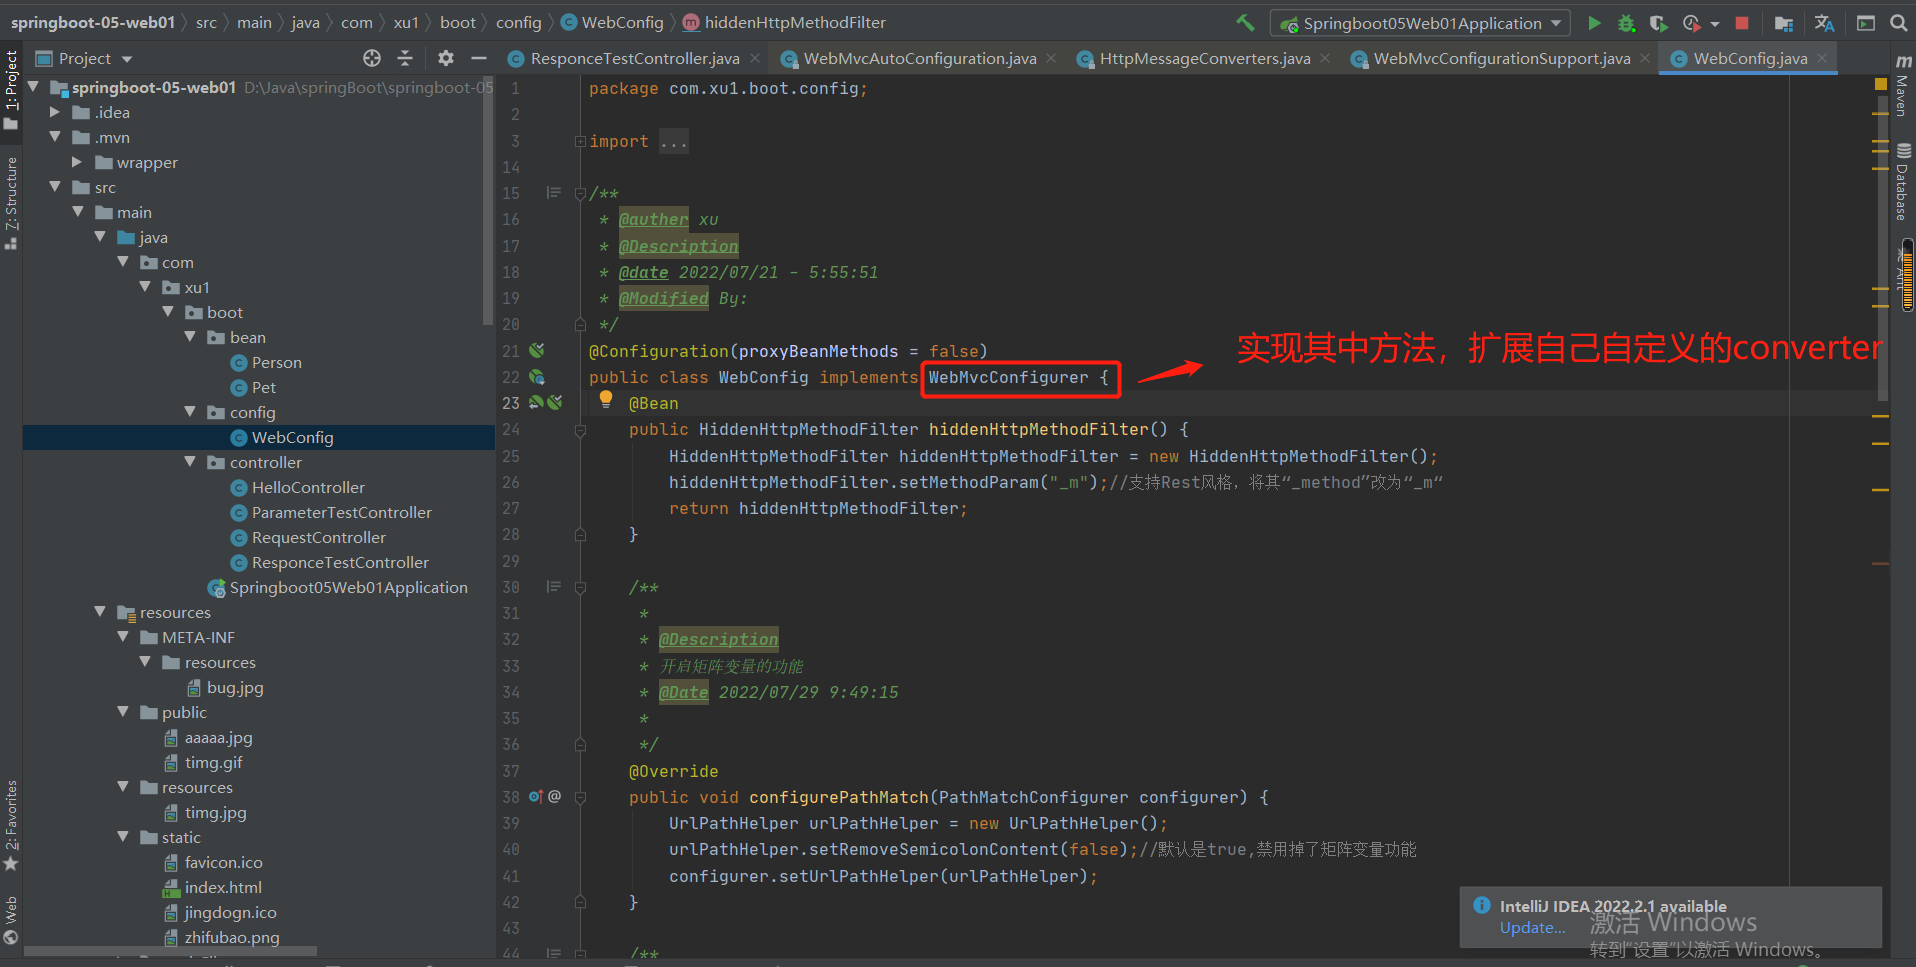
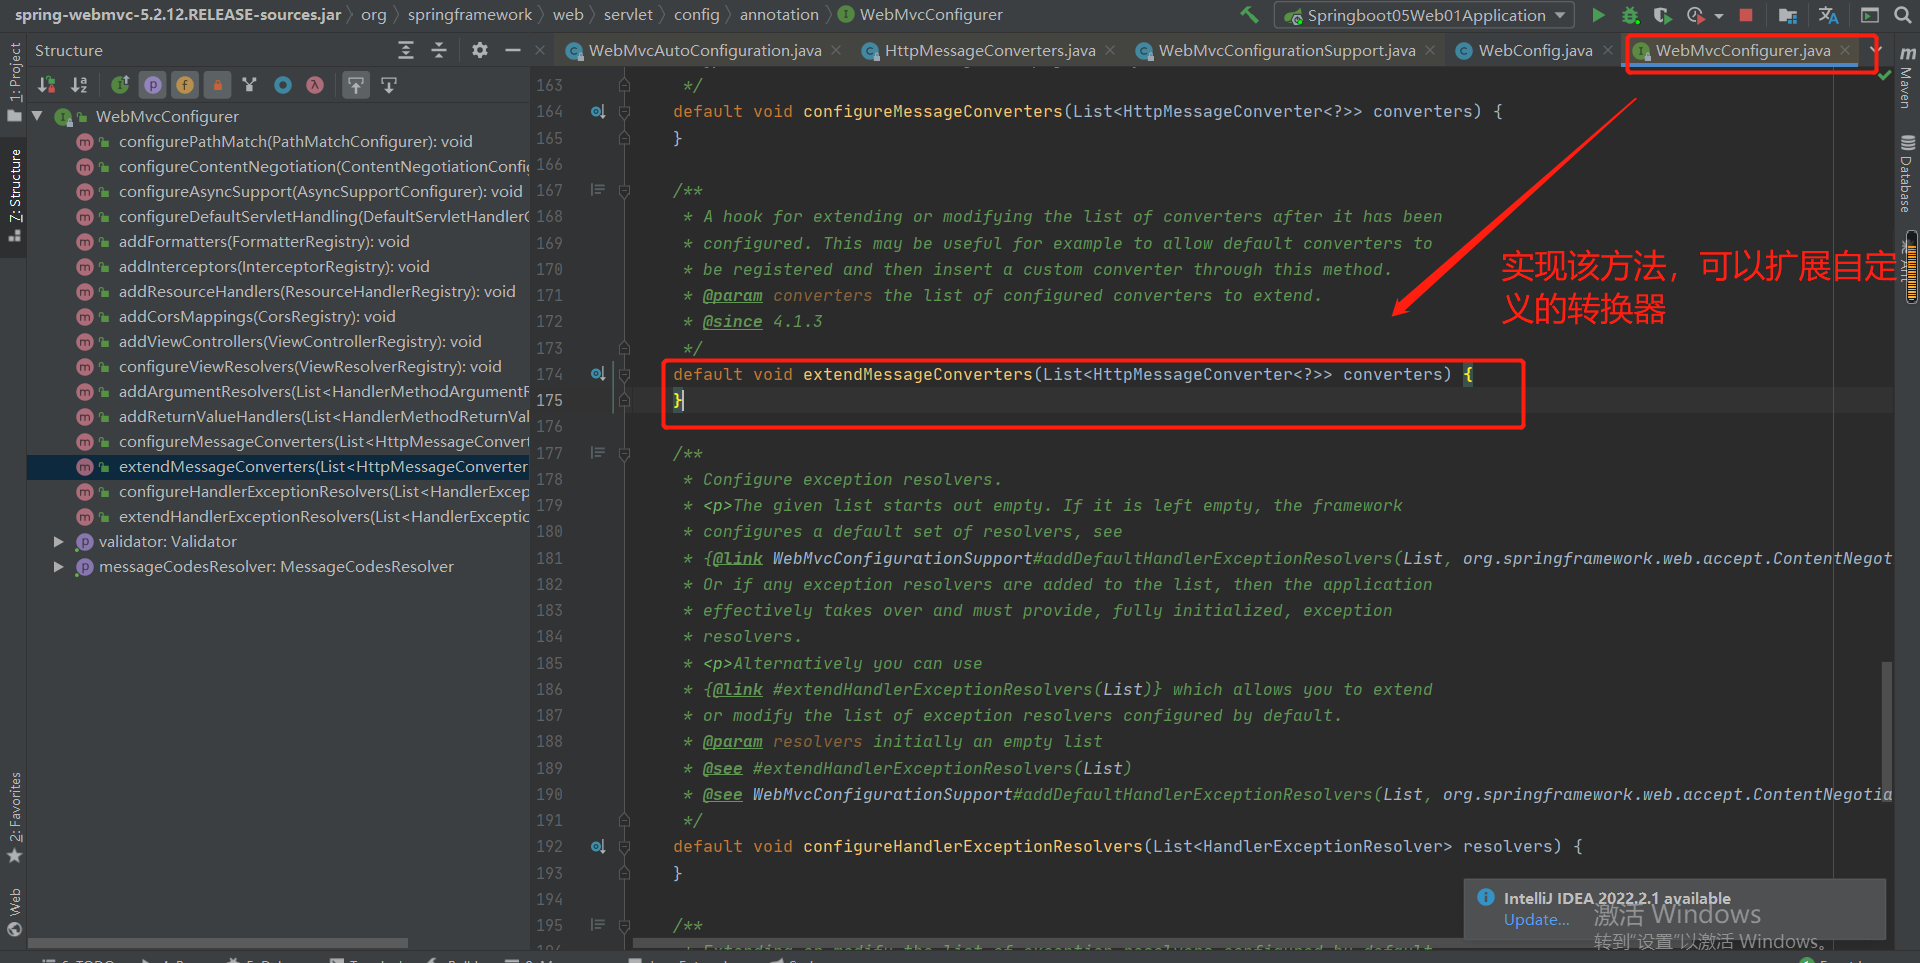
自定义MessageConverter:
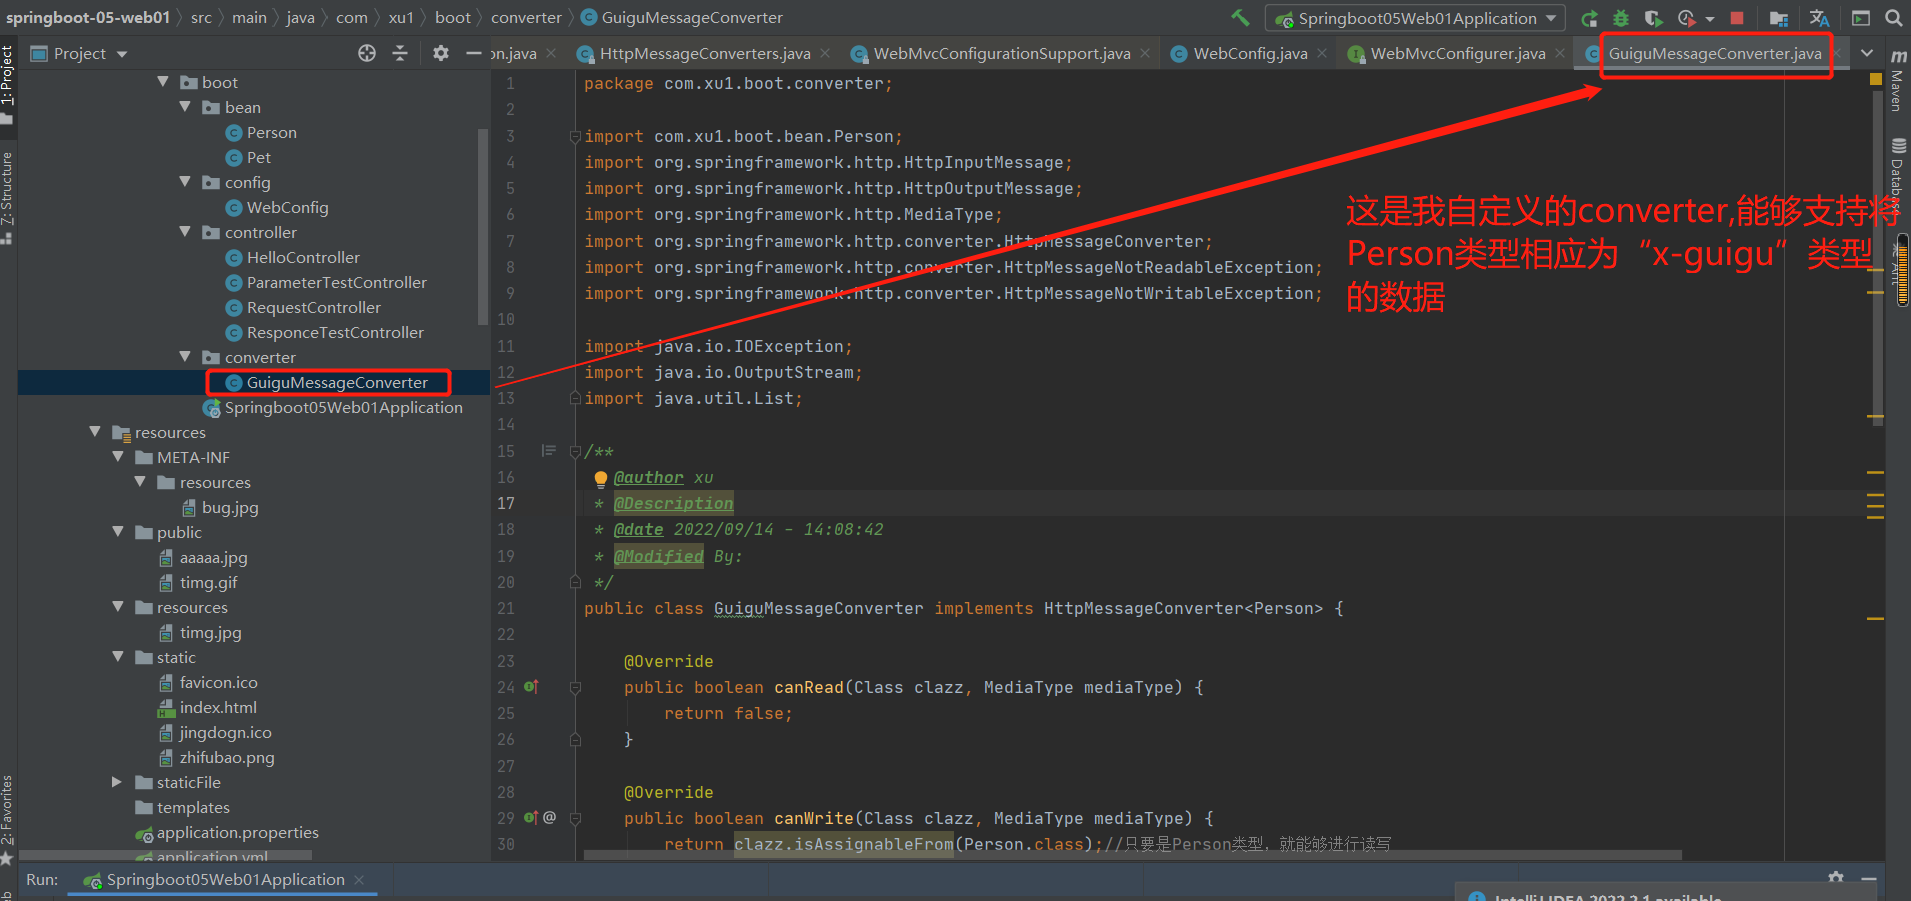
package com.xu1.boot.converter;

import com.xu1.boot.bean.Person;
import org.springframework.http.HttpInputMessage;
import org.springframework.http.HttpOutputMessage;
import org.springframework.http.MediaType;
import org.springframework.http.converter.HttpMessageConverter;
import org.springframework.http.converter.HttpMessageNotReadableException;
import org.springframework.http.converter.HttpMessageNotWritableException;

import java.io.IOException;
import java.io.OutputStream;
import java.util.List;

/**
 * @author xu
 * @Description
 * @date 2022/09/14 - 14:08:42
 * @Modified By:
 */
public class GuiguMessageConverter implements HttpMessageConverter<Person> {

    @Override
    public boolean canRead(Class clazz, MediaType mediaType) {
        return false;
    }

    @Override
    public boolean canWrite(Class clazz, MediaType mediaType) {
        return clazz.isAssignableFrom(Person.class);//只要是Person类型,就能够进行读写
    }

    /**
     *
     * @Description
     * 服务器要统计所有MessageConverter都能写出哪些内容类型(eg:application/x-guigu)
     * @param
     * @Author xu
     * @Date 2022/09/14 14:13:22
     *
     */
    @Override
    public List<MediaType> getSupportedMediaTypes() {
        return MediaType.parseMediaTypes("application/x-guigu");
    }

    @Override
    public Person read(Class clazz, HttpInputMessage inputMessage) throws IOException, HttpMessageNotReadableException {
        return null;
    }

    @Override
    public void write(Person person, MediaType contentType, HttpOutputMessage outputMessage) throws IOException, HttpMessageNotWritableException {

        //自定义协议数据的写出
        String data = person.getUserName()+";"+person.getAge()+";"+person.getBirth();//响应的数据以“;”分割

        //将得到数据以流的形式响应出去
        OutputStream body = outputMessage.getBody();
        body.write(data.getBytes());
    }
}
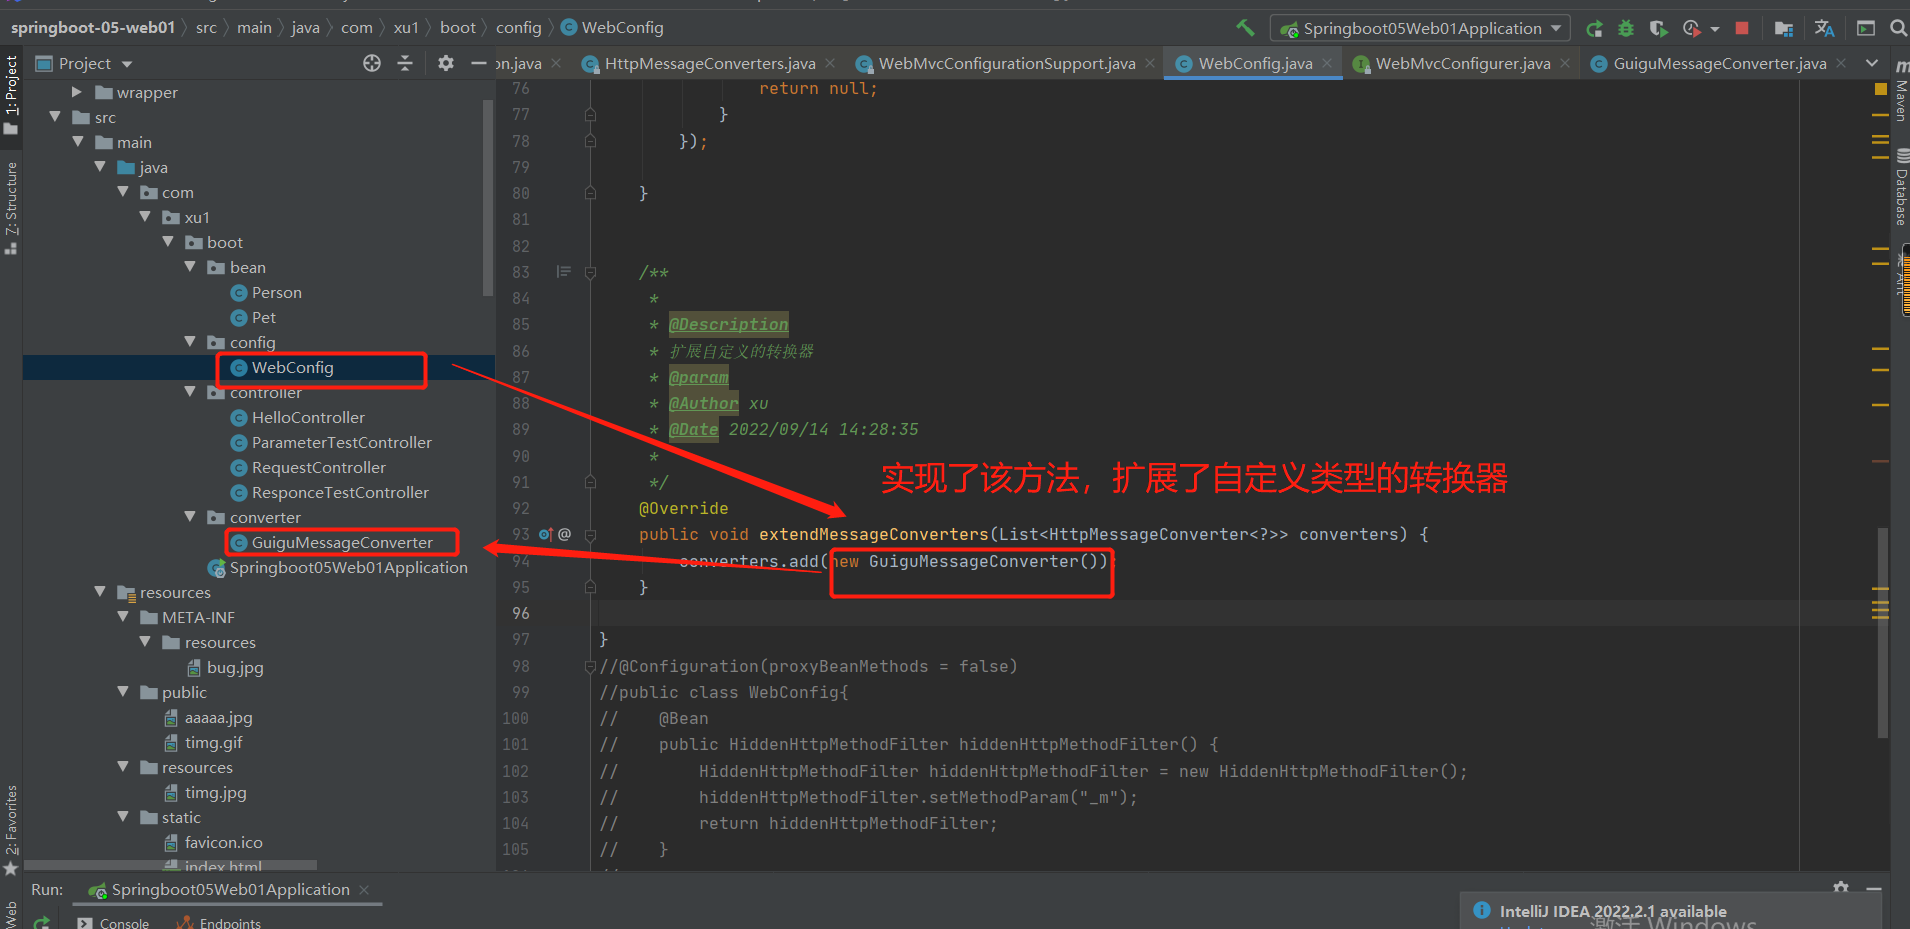
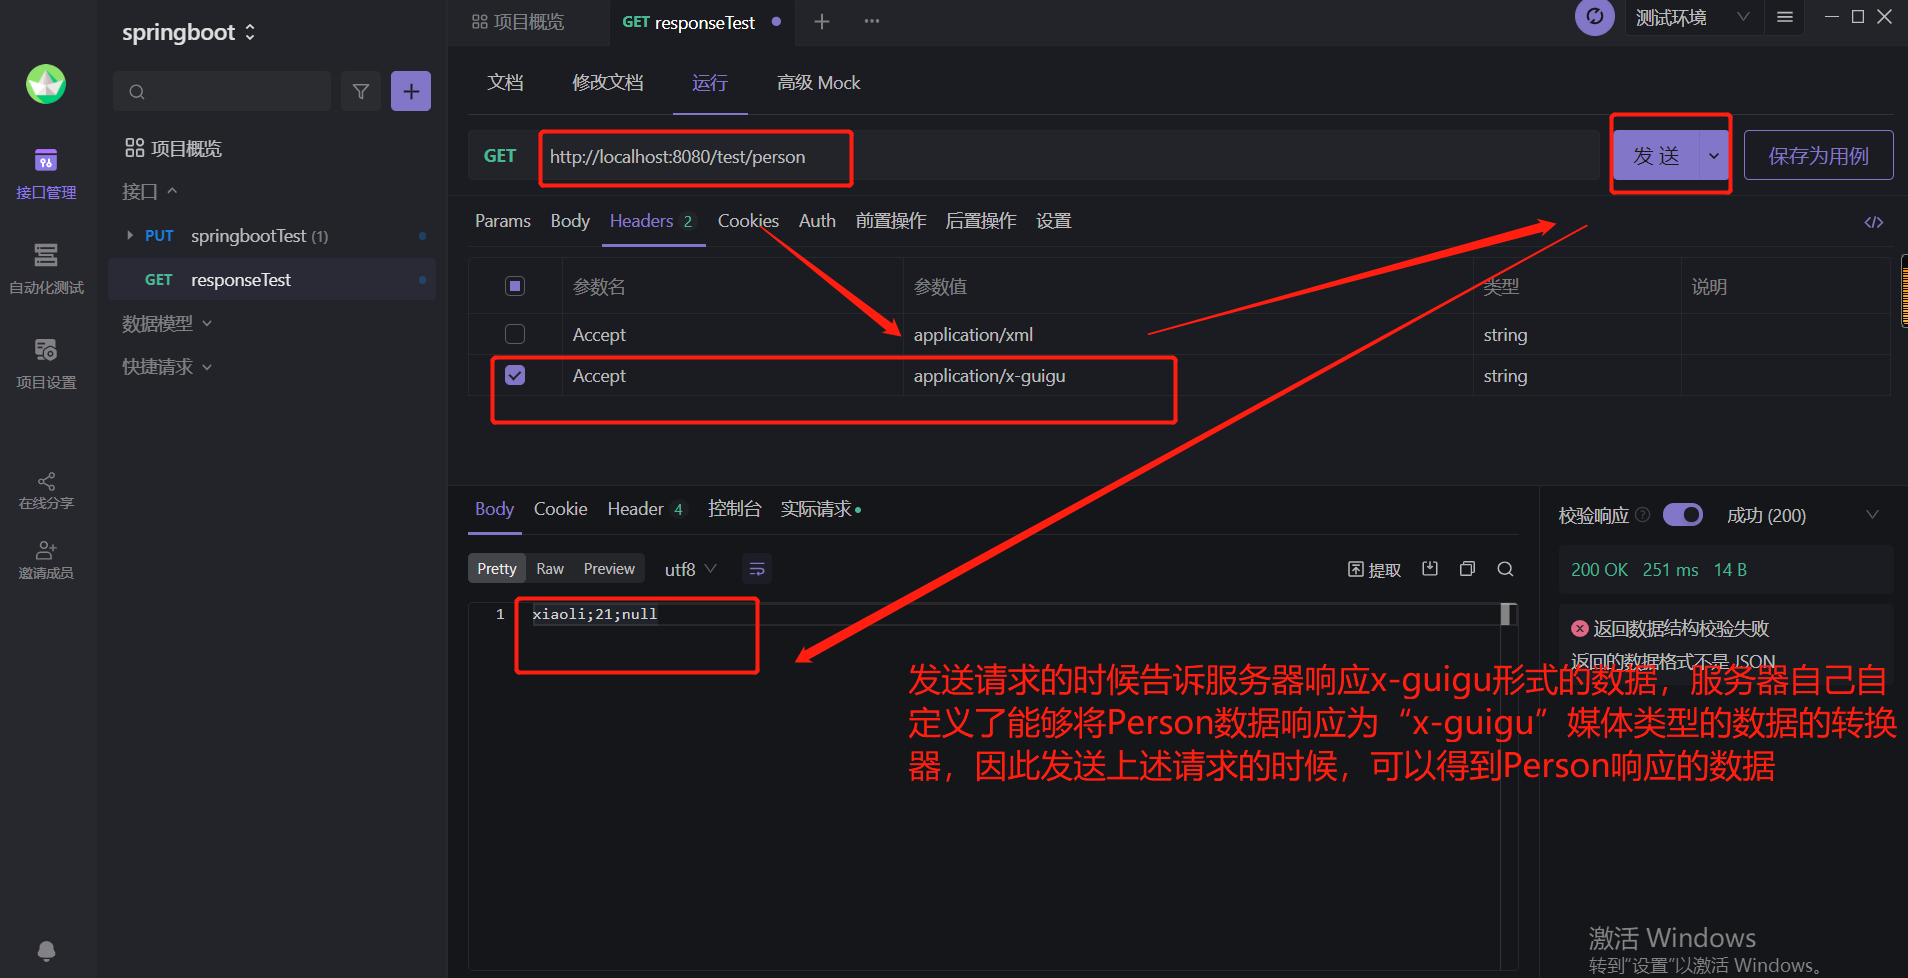
结果:
源码调试参考6-12中,可以看到多了自己自定义的一个转换器--GuiguMessageConverter
6-14 以请求参数的方式指定返回按一种媒体类型
回顾:浏览器确定接收哪一种数据类型2种方式:一种是基于请求头,另一种是基于请求参数(所谓请求参数,也就是url携带的参数)
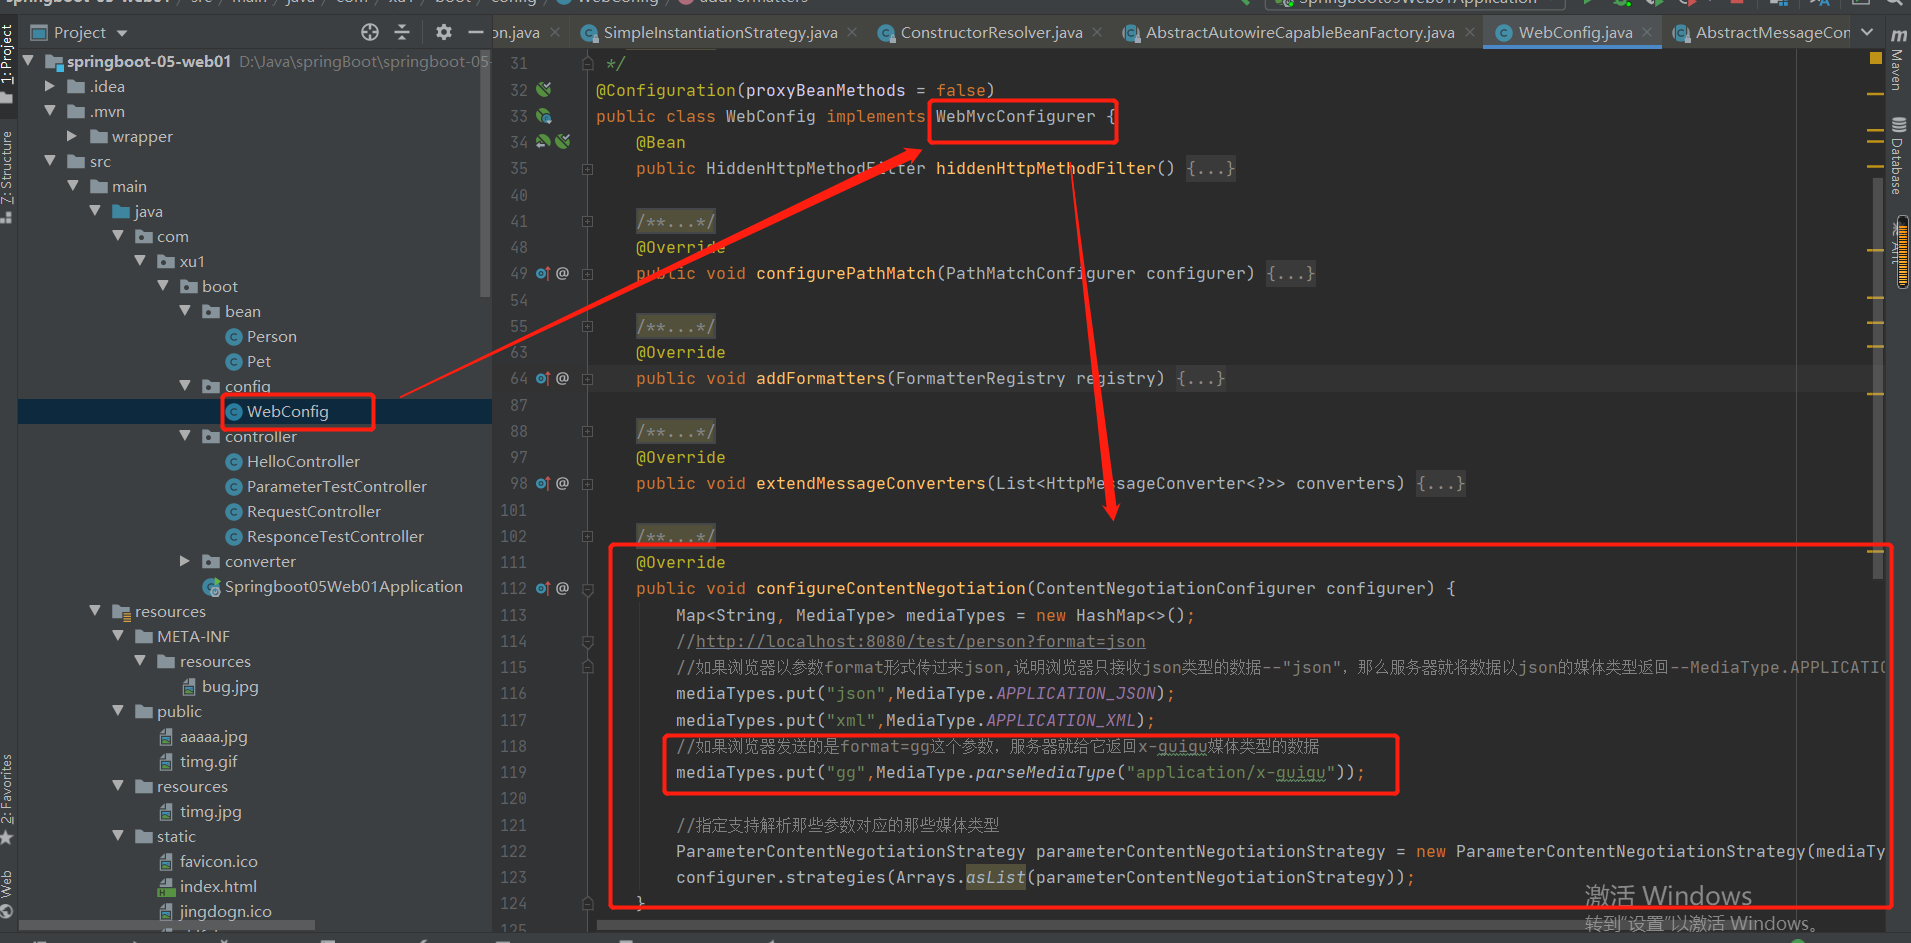
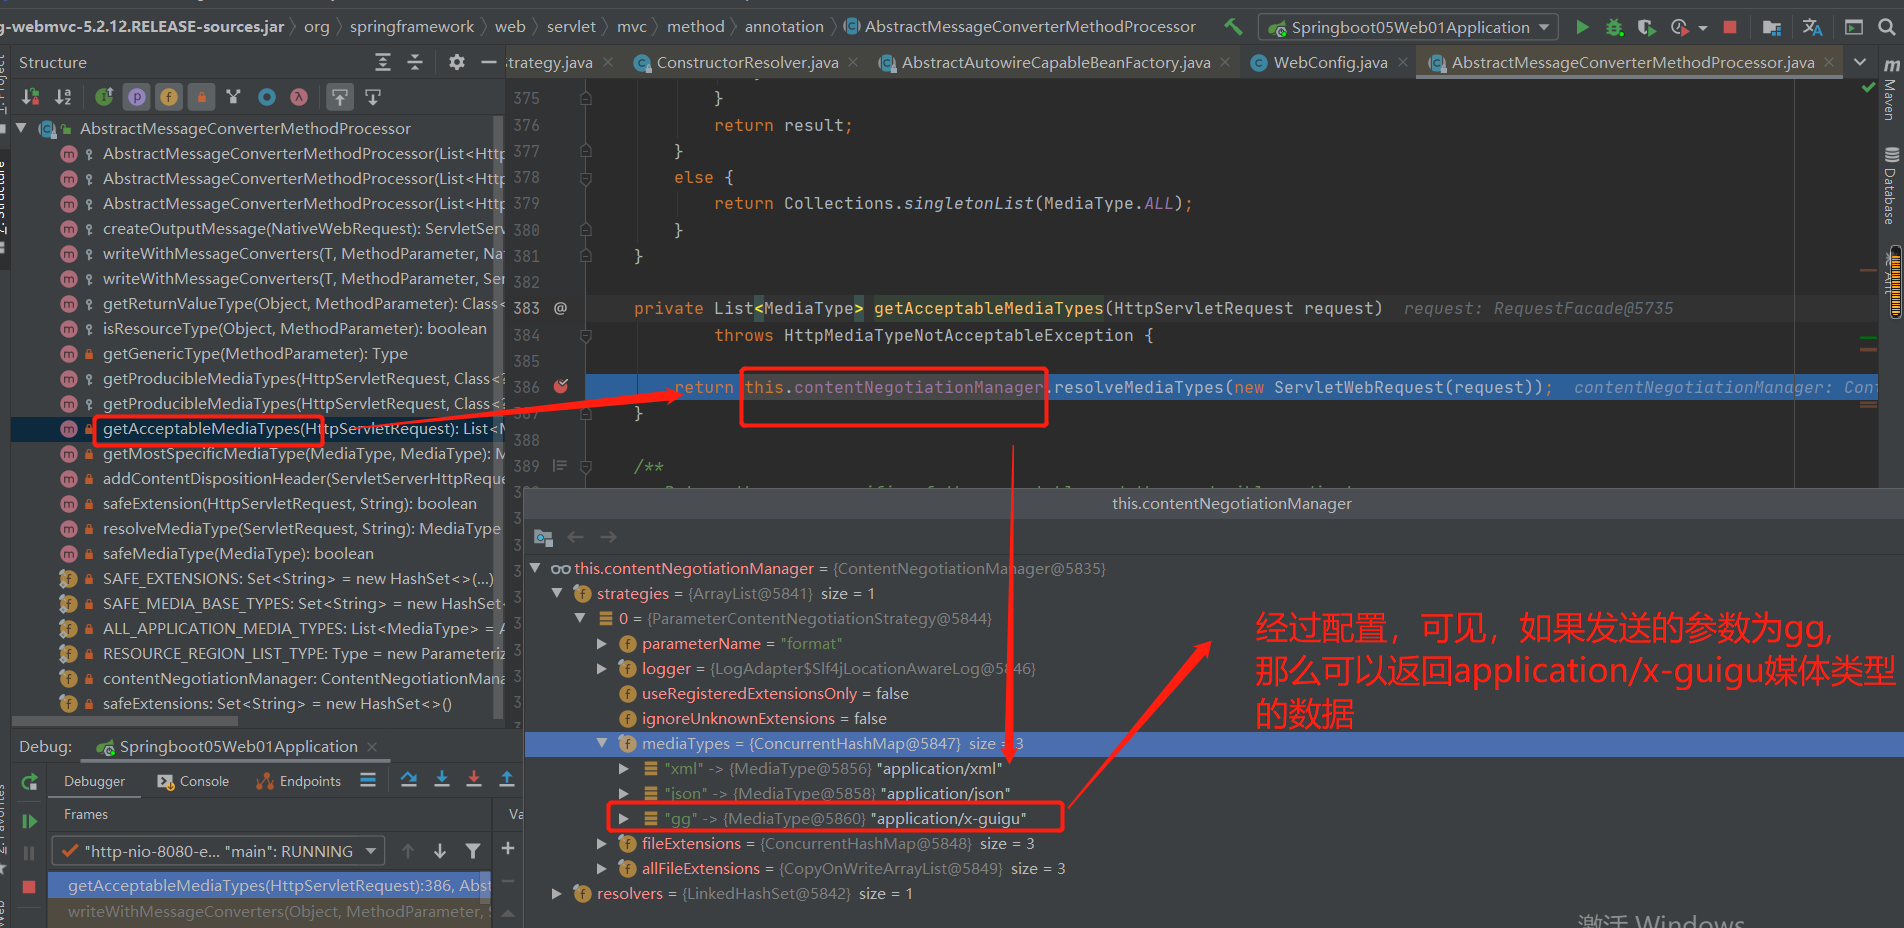
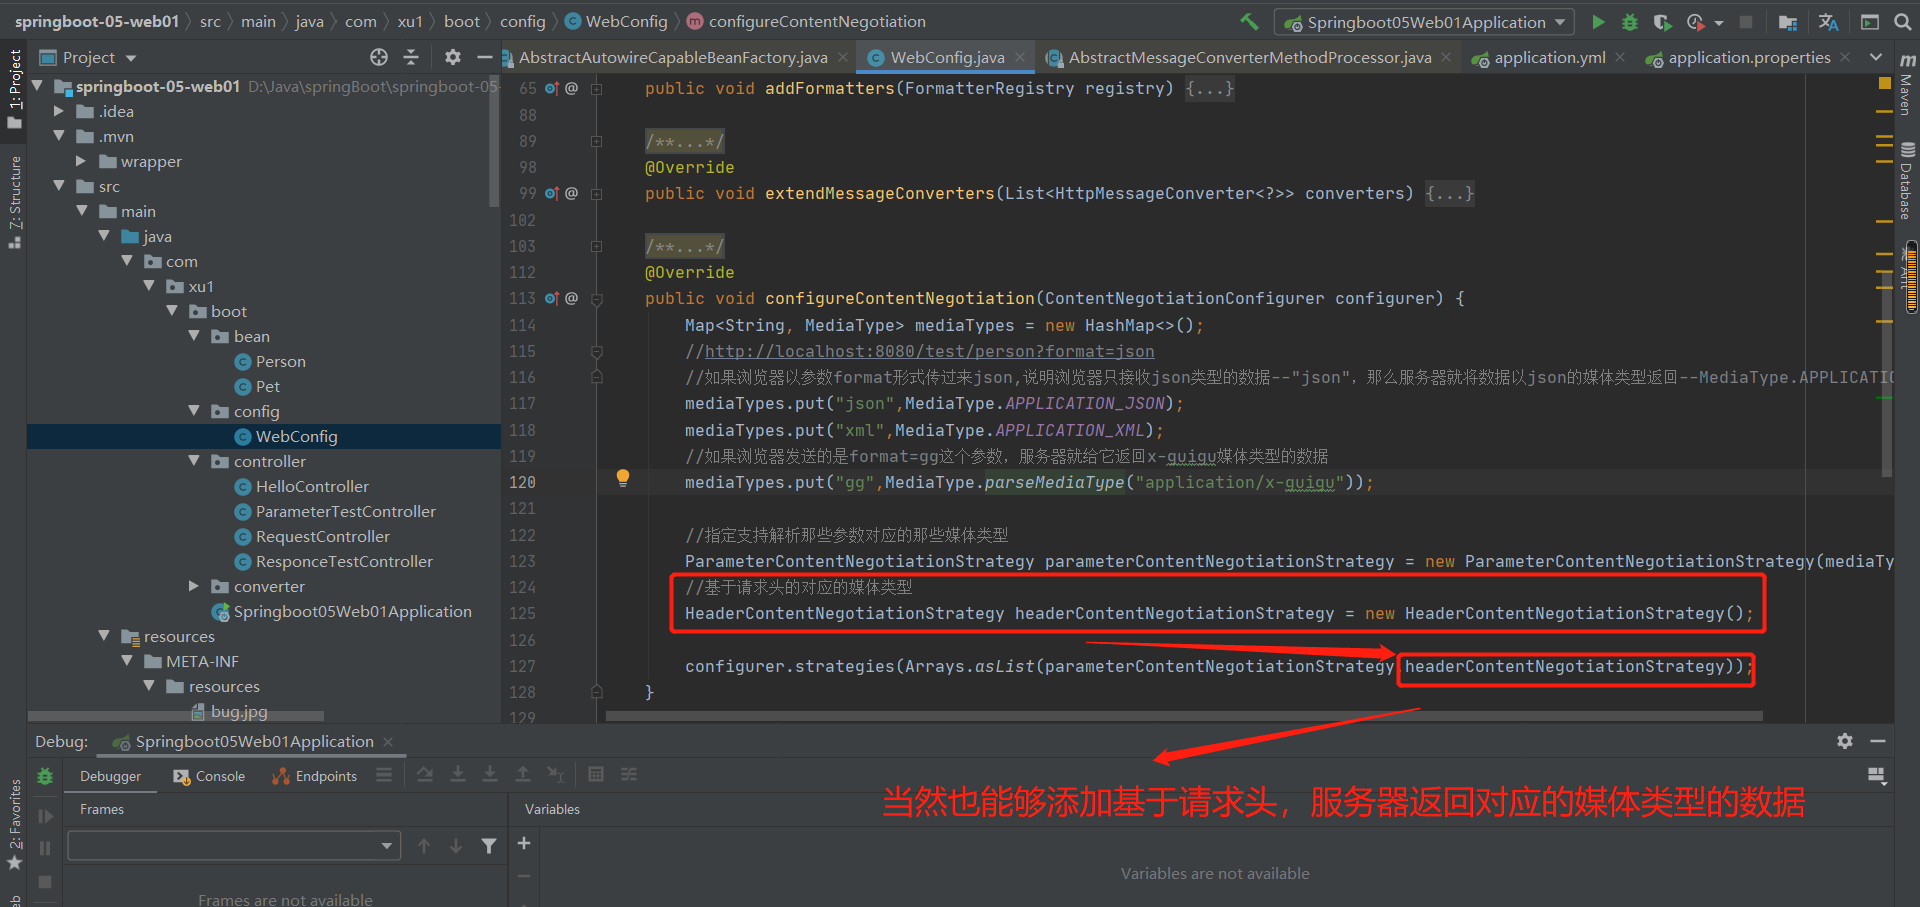
源码参考:
package com.xu1.boot.config;

import com.xu1.boot.bean.Person;
import com.xu1.boot.bean.Pet;
import com.xu1.boot.converter.GuiguMessageConverter;
import org.springframework.boot.context.properties.EnableConfigurationProperties;
import org.springframework.context.annotation.Bean;
import org.springframework.context.annotation.Configuration;
import org.springframework.core.convert.converter.Converter;
import org.springframework.format.FormatterRegistry;
import org.springframework.http.MediaType;
import org.springframework.http.converter.HttpMessageConverter;
import org.springframework.util.StringUtils;
import org.springframework.web.accept.HeaderContentNegotiationStrategy;
import org.springframework.web.accept.ParameterContentNegotiationStrategy;
import org.springframework.web.filter.HiddenHttpMethodFilter;
import org.springframework.web.servlet.config.annotation.ContentNegotiationConfigurer;
import org.springframework.web.servlet.config.annotation.PathMatchConfigurer;
import org.springframework.web.servlet.config.annotation.WebMvcConfigurer;
import org.springframework.web.util.UrlPathHelper;

import java.util.Arrays;
import java.util.HashMap;
import java.util.List;
import java.util.Map;

/**
 * @auther xu
 * @Description
 * @date 2022/07/21 - 5:55:51
 * @Modified By:
 */
@Configuration(proxyBeanMethods = false)
public class WebConfig implements WebMvcConfigurer {
    @Bean
    public HiddenHttpMethodFilter hiddenHttpMethodFilter() {
        HiddenHttpMethodFilter hiddenHttpMethodFilter = new HiddenHttpMethodFilter();
        hiddenHttpMethodFilter.setMethodParam("_m");//支持Rest风格,将其“_method”改为“_m“
        return hiddenHttpMethodFilter;
    }

    /**
     *
     * @Description
     * 开启矩阵变量的功能
     * @Date 2022/07/29 9:49:15
     *
     */
    @Override
    public void configurePathMatch(PathMatchConfigurer configurer) {
        UrlPathHelper urlPathHelper = new UrlPathHelper();
        urlPathHelper.setRemoveSemicolonContent(false);//默认是true,禁用掉了矩阵变量功能
        configurer.setUrlPathHelper(urlPathHelper);
    }

    /**
     *
     * @Description
     * 增加类型转换器
     * 将字符串---"阿猫,5",转变为Pet类型
     * @Date 2022/07/29 9:53:03
     *
     */
    @Override
    public void addFormatters(FormatterRegistry registry) {
        registry.addConverter(new Converter<String, Pet>() {

            @Override
            public Pet convert(String source) {

                //org.springframework.util public abstract class StringUtils
                //已利用spring的字符串工具类判断被转换的类不是空,方可进行数据所对应类型的转换

                if (!StringUtils.isEmpty(source)) {
                    Pet pet = new Pet();

                    String[] split = source.split(",");
                    //将"阿猫,5"利用正则表达式分割存入到数组中,数组中第一个值为猫的name,第2个值为猫的age
                    pet.setName(split[0]);
                    pet.setAge(split[1]);
                    return pet;
                }
                return null;
            }
        });

    }

    /**
     *
     * @Description
     * 扩展自定义的转换器
     * @param
     * @Author xu
     * @Date 2022/09/14 14:28:35
     *
     */
    @Override
    public void extendMessageConverters(List<HttpMessageConverter<?>> converters) {
        converters.add(new GuiguMessageConverter());
    }

    /**
     *
     * @Description 基于请求参数返回对应的媒体类型
     * 自定义内容协商策略
     * @param
     * @Author xu
     * @Date 2022/09/15 13:54:49
     *
     */
    @Override
    public void configureContentNegotiation(ContentNegotiationConfigurer configurer) {
        Map<String, MediaType> mediaTypes = new HashMap<>();
        //http://localhost:8080/test/person?format=json
        //如果浏览器以参数format形式传过来json,说明浏览器只接收json类型的数据--"json",那么服务器就将数据以json的媒体类型返回--MediaType.APPLICATION_JSON
        mediaTypes.put("json",MediaType.APPLICATION_JSON);
        mediaTypes.put("xml",MediaType.APPLICATION_XML);
        //如果浏览器发送的是format=gg这个参数,服务器就给它返回x-guigu媒体类型的数据
        mediaTypes.put("gg",MediaType.parseMediaType("application/x-guigu"));

        //指定支持解析那些参数对应的那些媒体类型
        ParameterContentNegotiationStrategy parameterContentNegotiationStrategy = new ParameterContentNegotiationStrategy(mediaTypes);
        //基于请求头的对应的媒体类型
        HeaderContentNegotiationStrategy headerContentNegotiationStrategy = new HeaderContentNegotiationStrategy();

        configurer.strategies(Arrays.asList(parameterContentNegotiationStrategy,headerContentNegotiationStrategy));
    }

}
//@Configuration(proxyBeanMethods = false)
//public class WebConfig{
//    @Bean
//    public HiddenHttpMethodFilter hiddenHttpMethodFilter() {
//        HiddenHttpMethodFilter hiddenHttpMethodFilter = new HiddenHttpMethodFilter();
//        hiddenHttpMethodFilter.setMethodParam("_m");
//        return hiddenHttpMethodFilter;
//    }
//
//   @Bean
//    public WebMvcConfigurer webMvcConfigurer() {
//        return new WebMvcConfigurer() {
//            @Override
//            public void configurePathMatch(PathMatchConfigurer configurer) {
//                UrlPathHelper urlPathHelper = new UrlPathHelper();
//                urlPathHelper.setRemoveSemicolonContent(false);//默认是true,禁用掉了矩阵变量功能
//                configurer.setUrlPathHelper(urlPathHelper);
//            }
//        };
//   }
//}
第7章 视图解析与模板引擎
7-1 使用thymeleaf作为视图的渲染
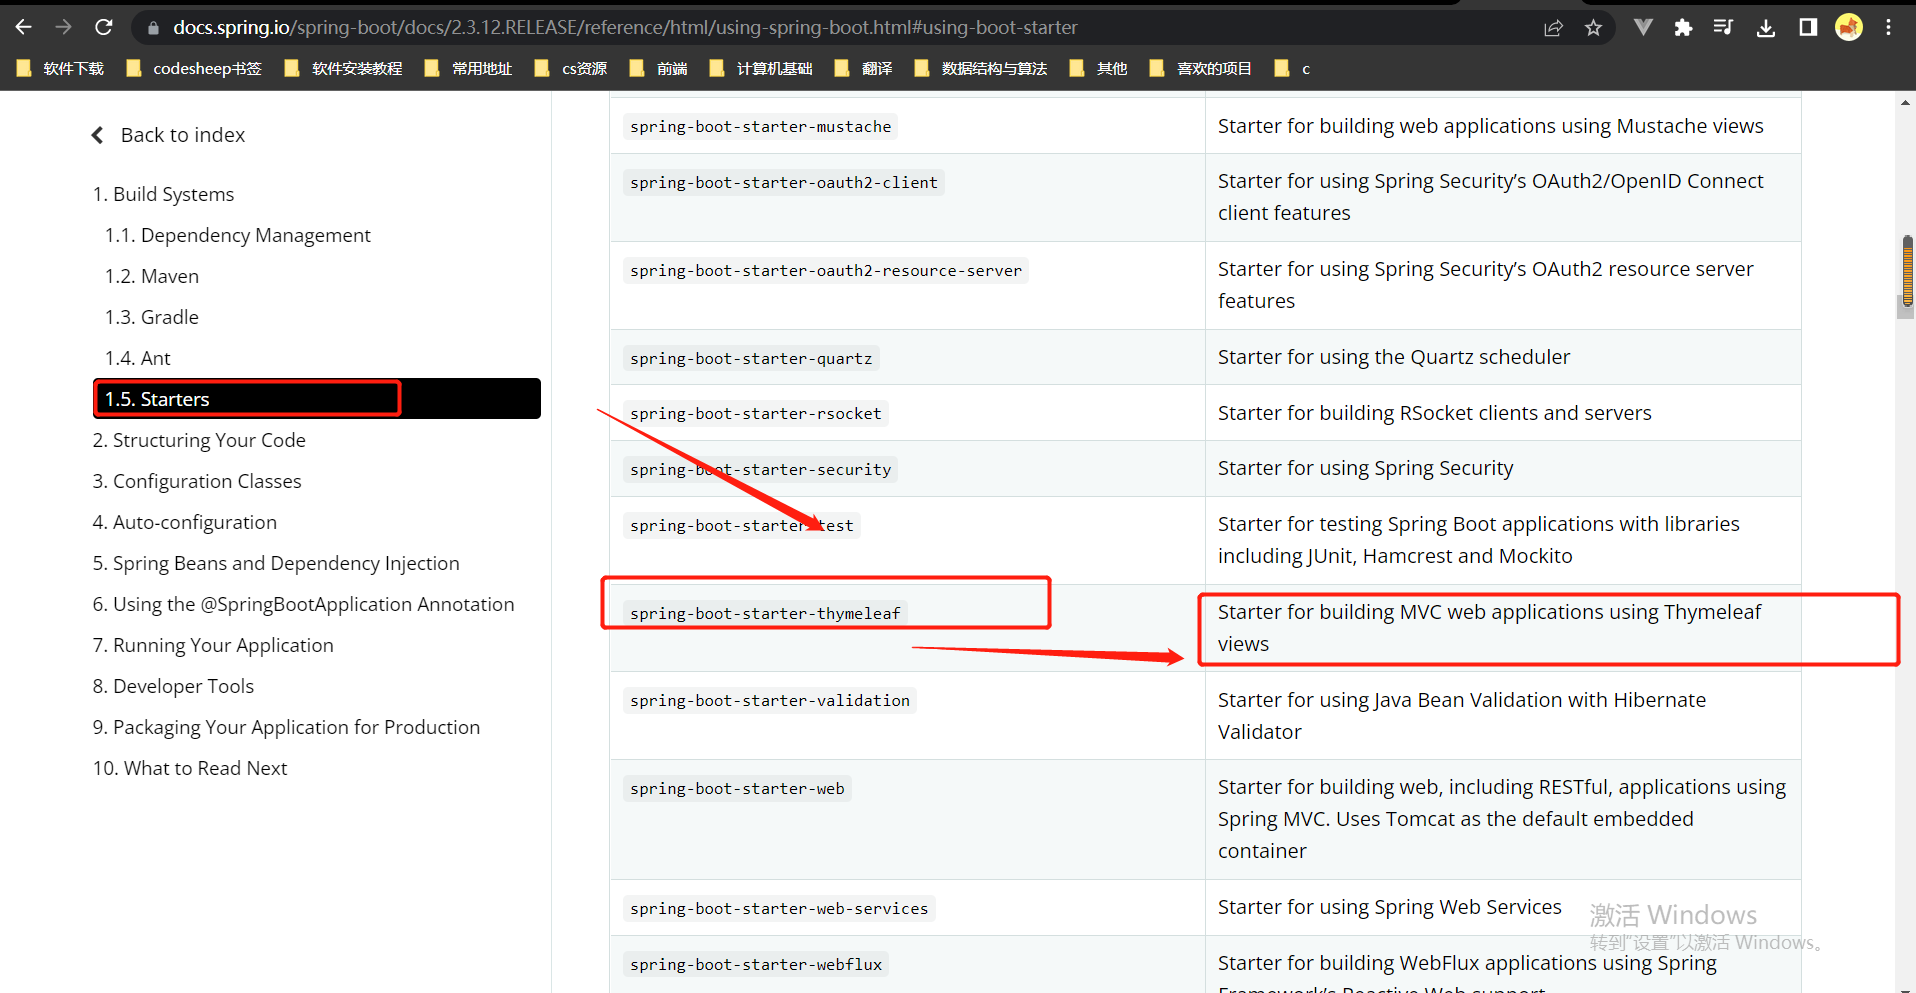
缺点:对于高并发的项目,不要使用该模板渲染,使用别的模板渲染
7-2 使用thymeleaf
第一步:引入依赖:
<!-- 官方引入thymeleaf的场景依赖 -->
<dependency>
    <groupId>org.springframework.boot</groupId>
    <artifactId>spring-boot-starter-thymeleaf</artifactId>
</dependency>
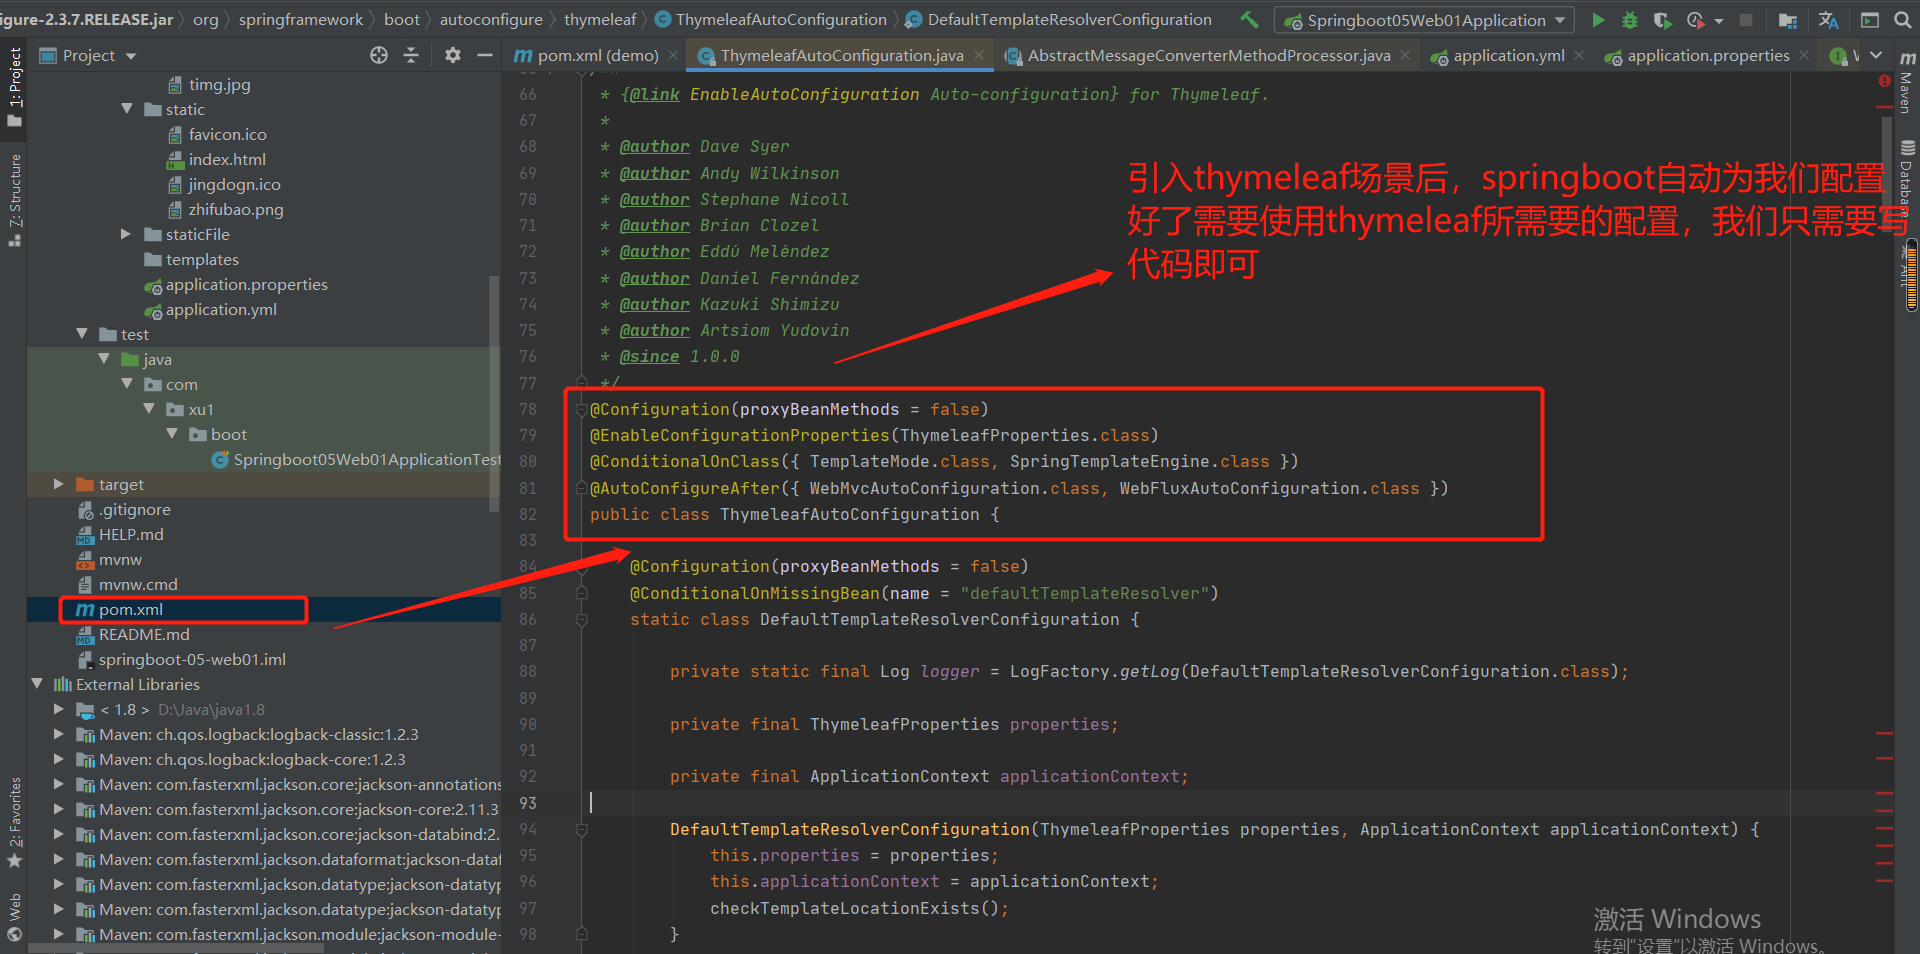
第二步:在templates路径下创建.html文件
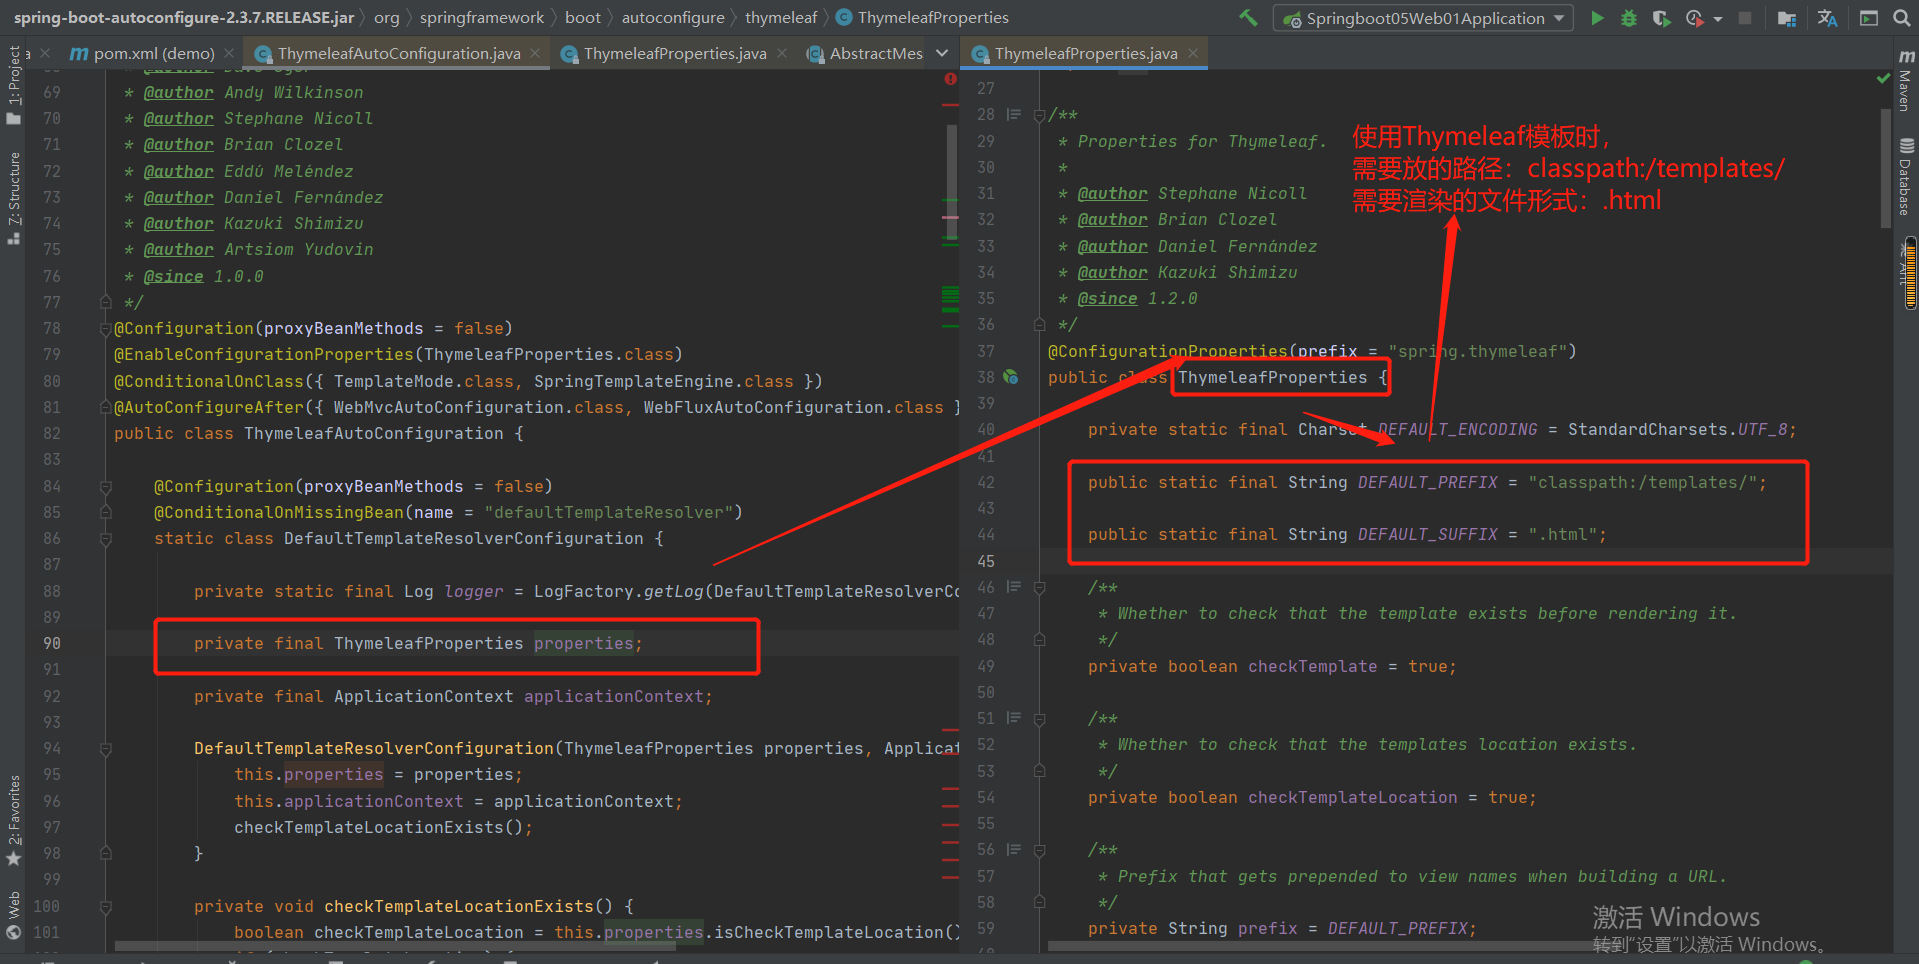
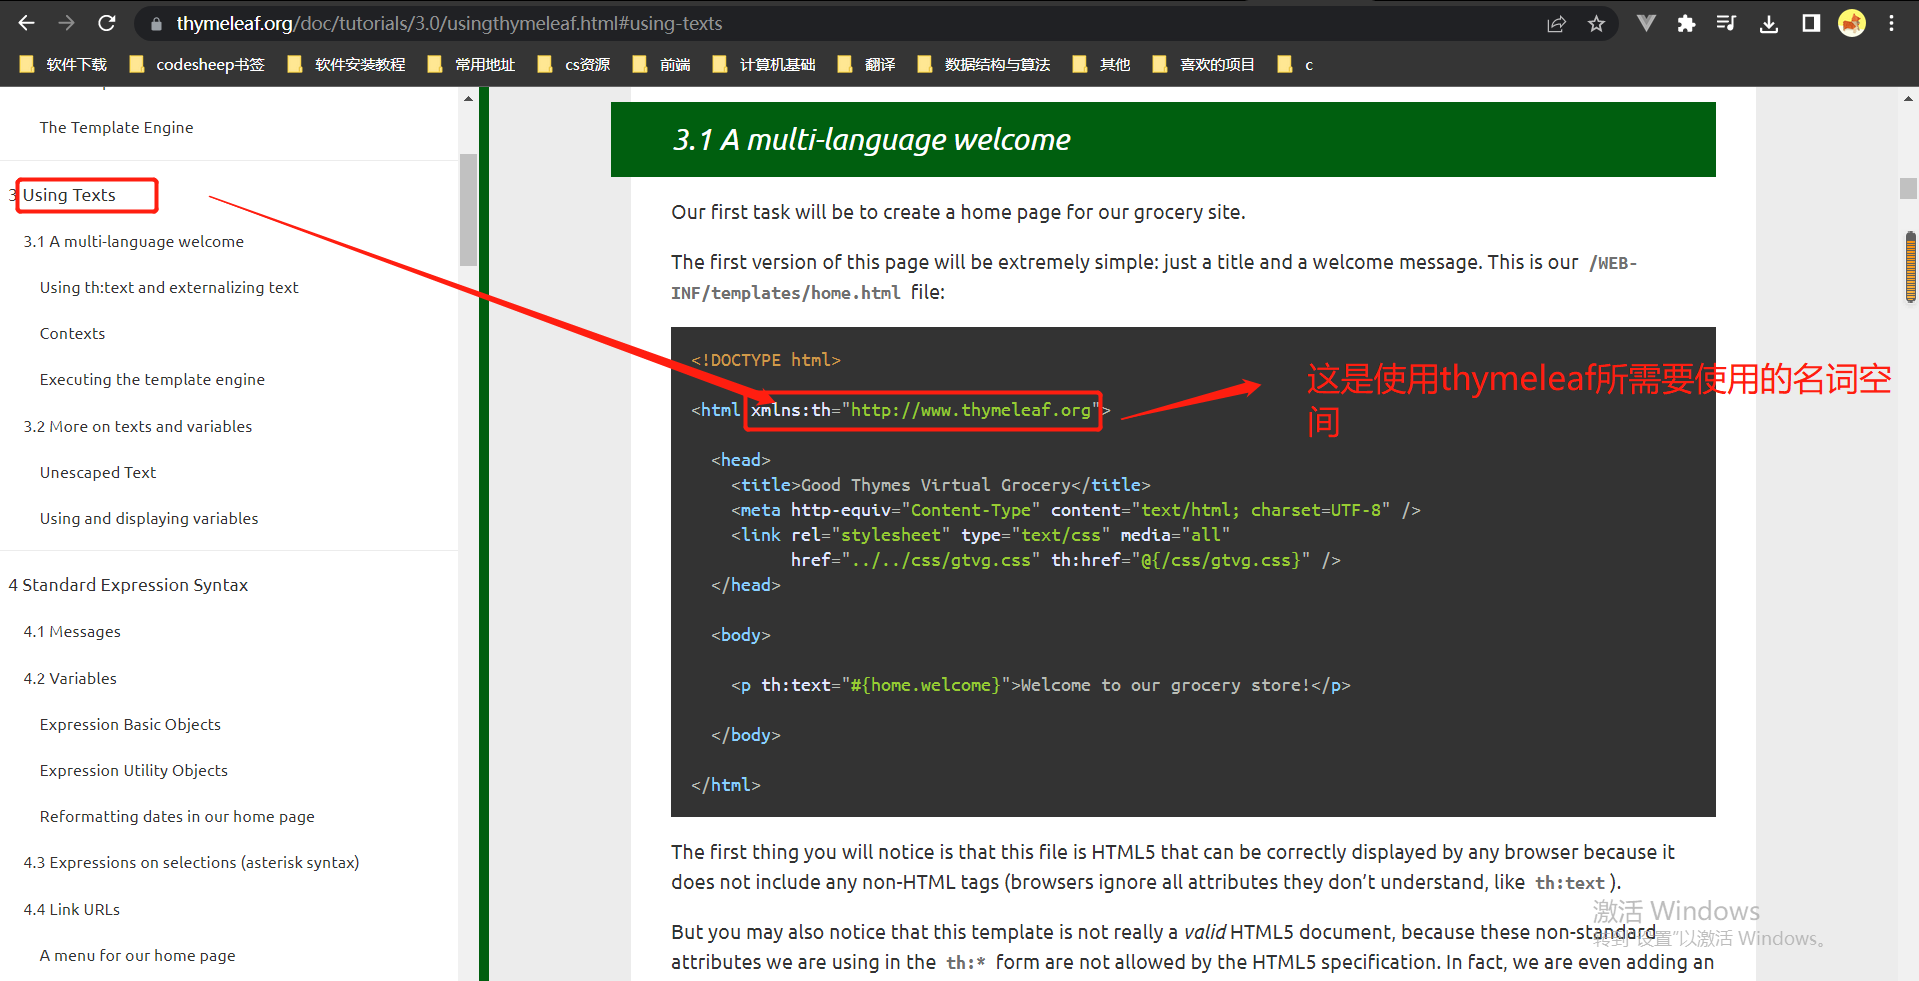
更正:名称空间
第3步:测试
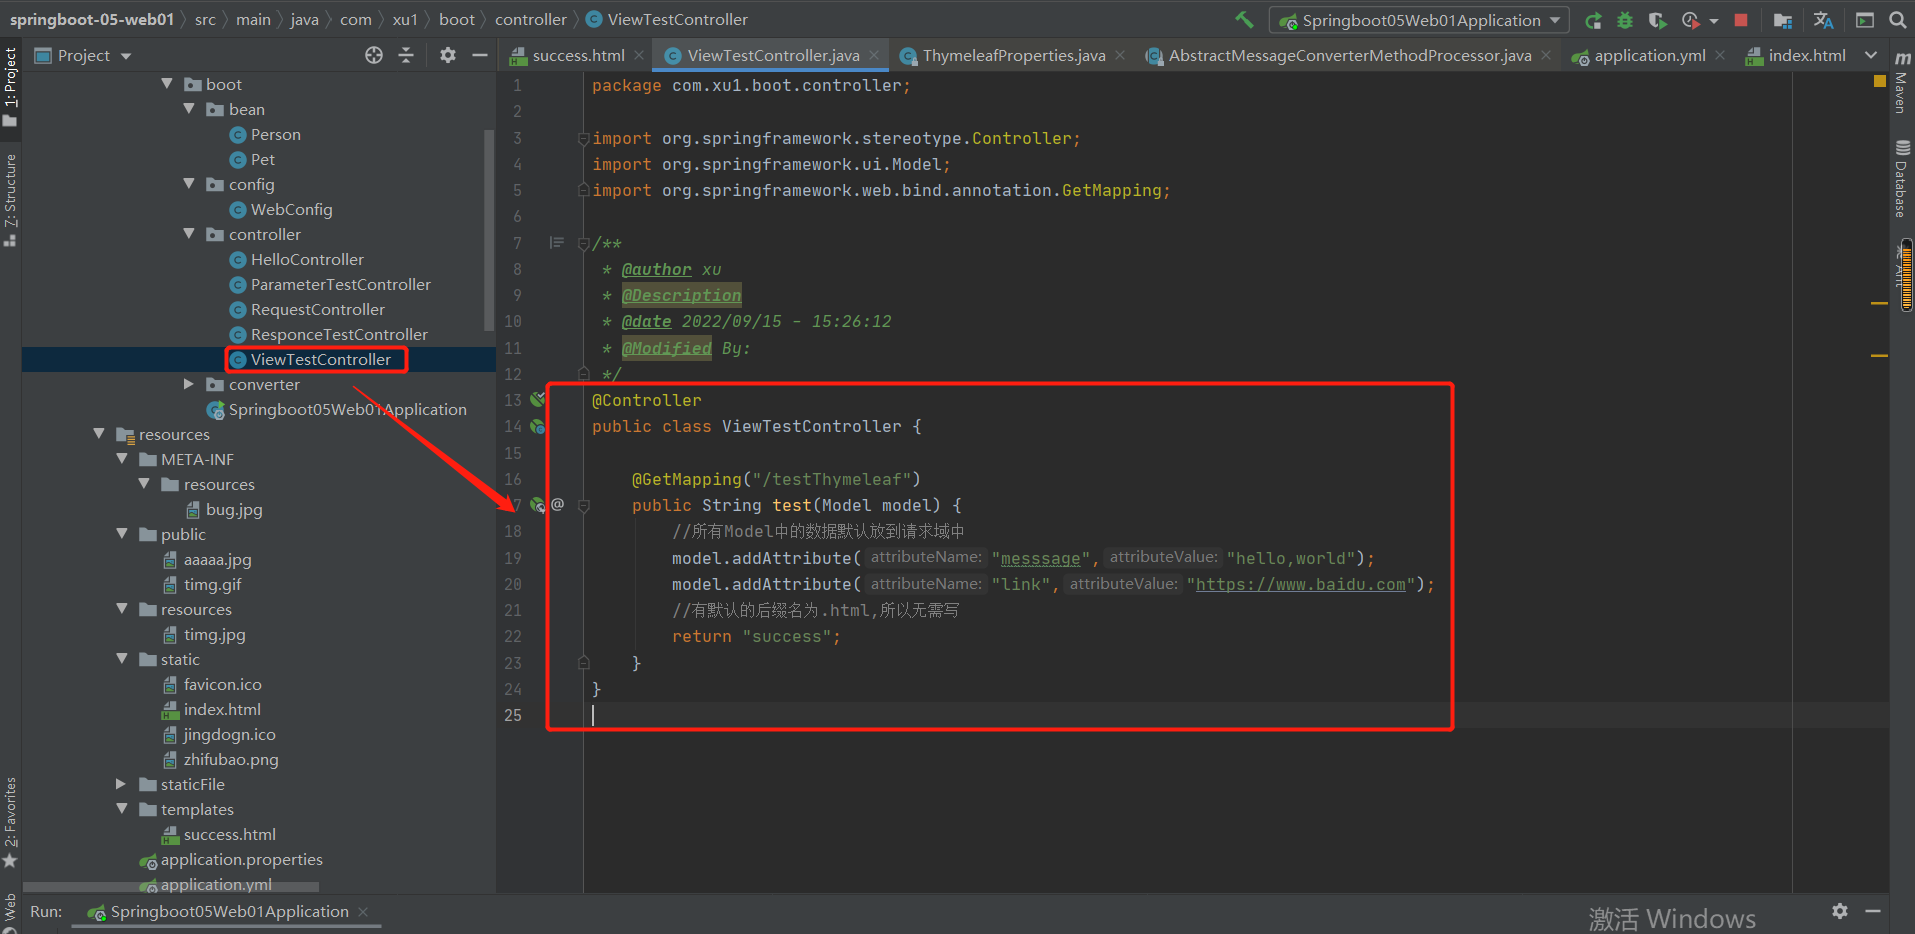
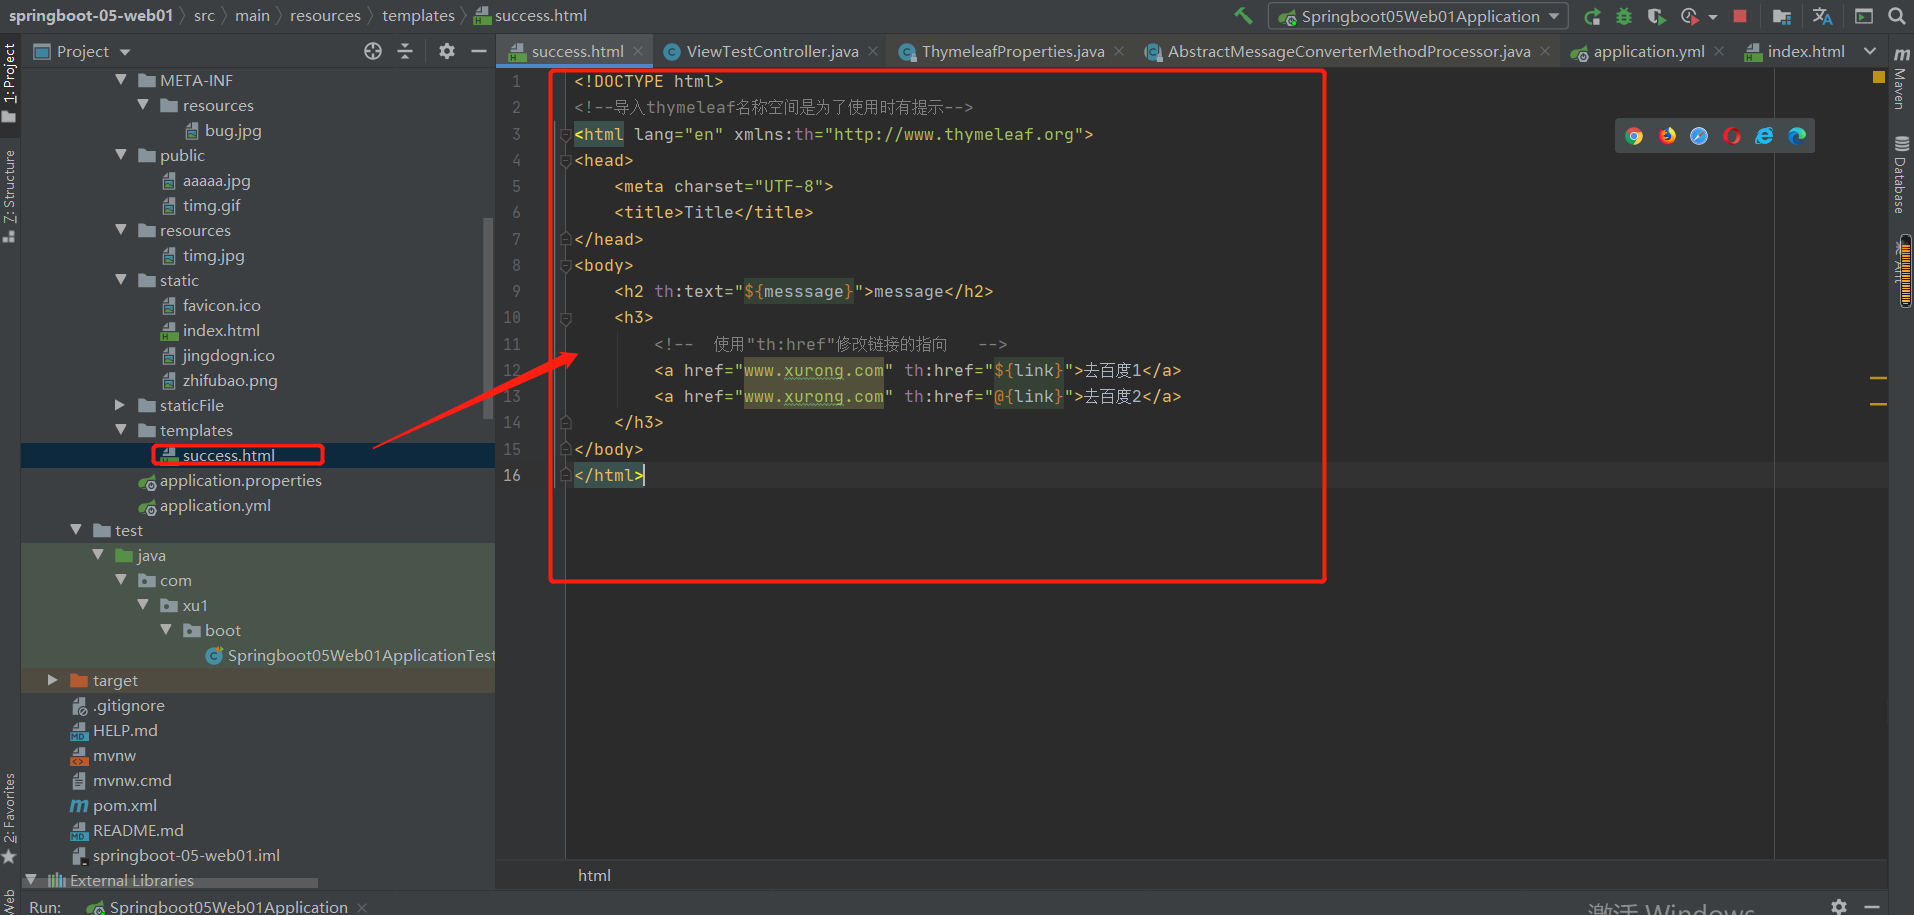
结果:
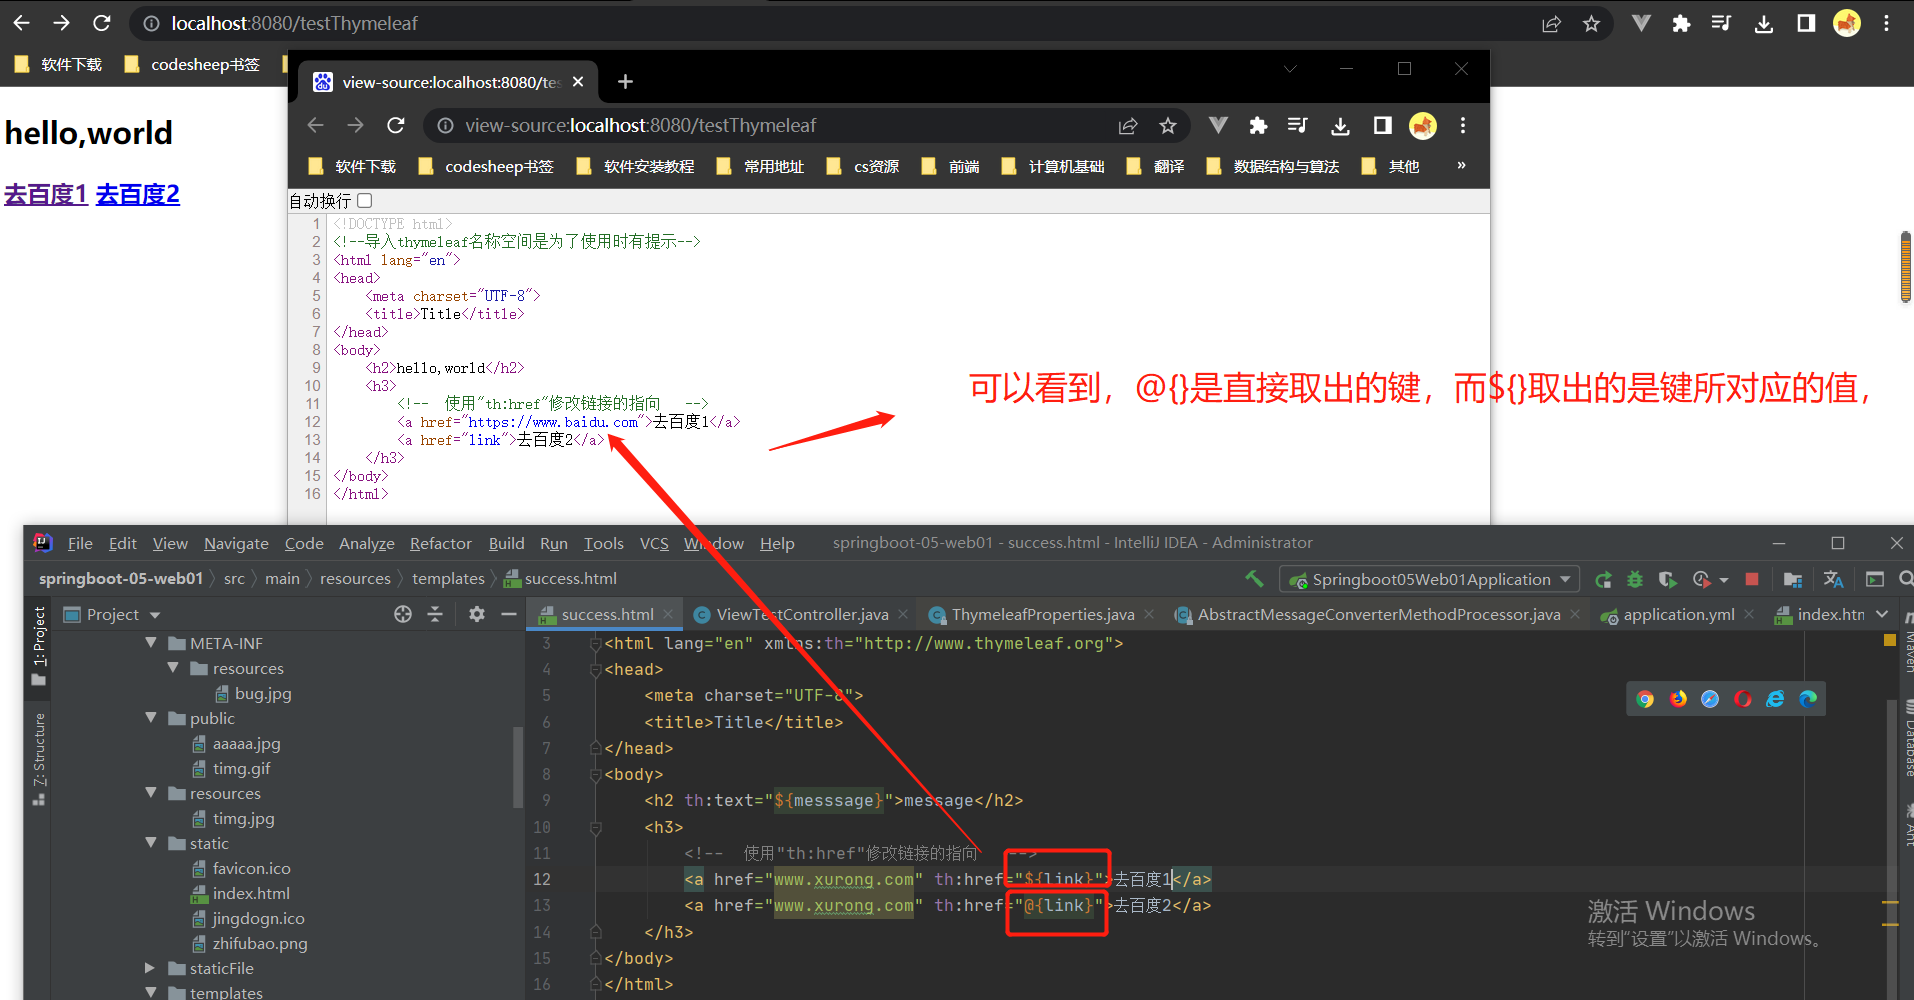
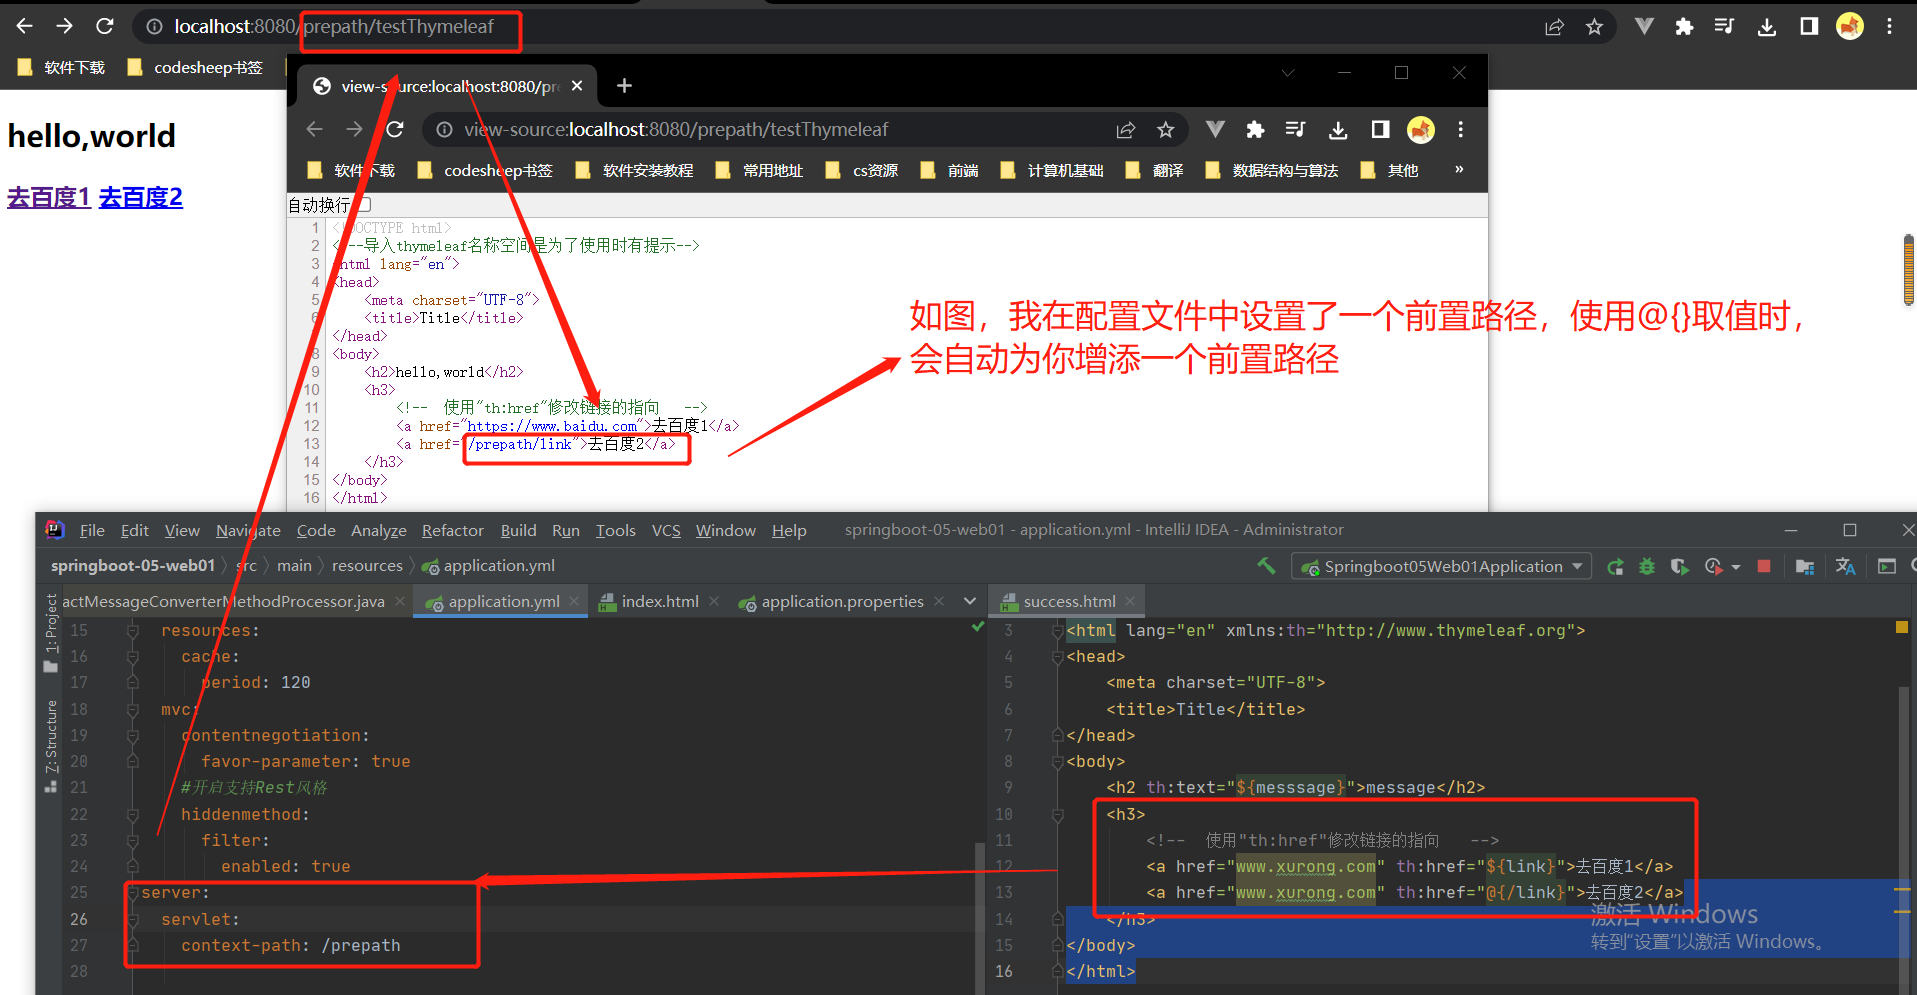
补充:@取值的另一个妙用
第8章--web实验
8-1:后台管理的基本功能
8-2:抽取公共页面
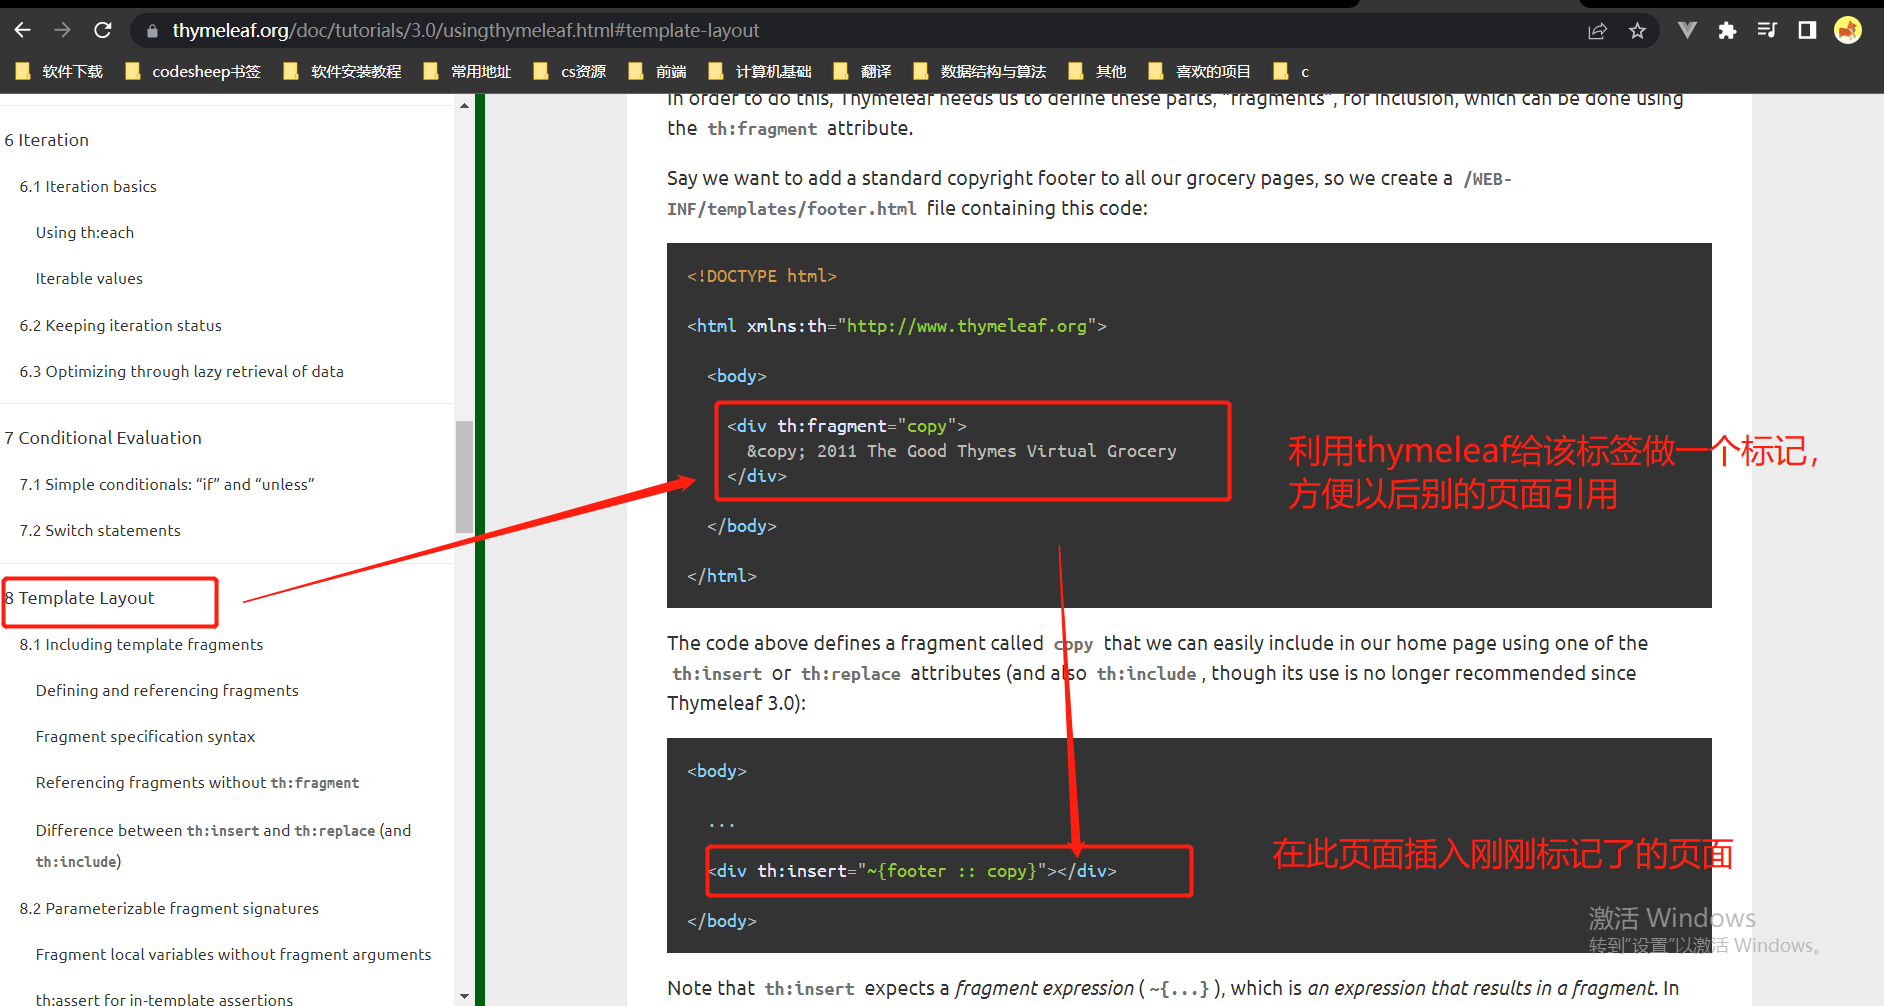
引用公共页面方式1:
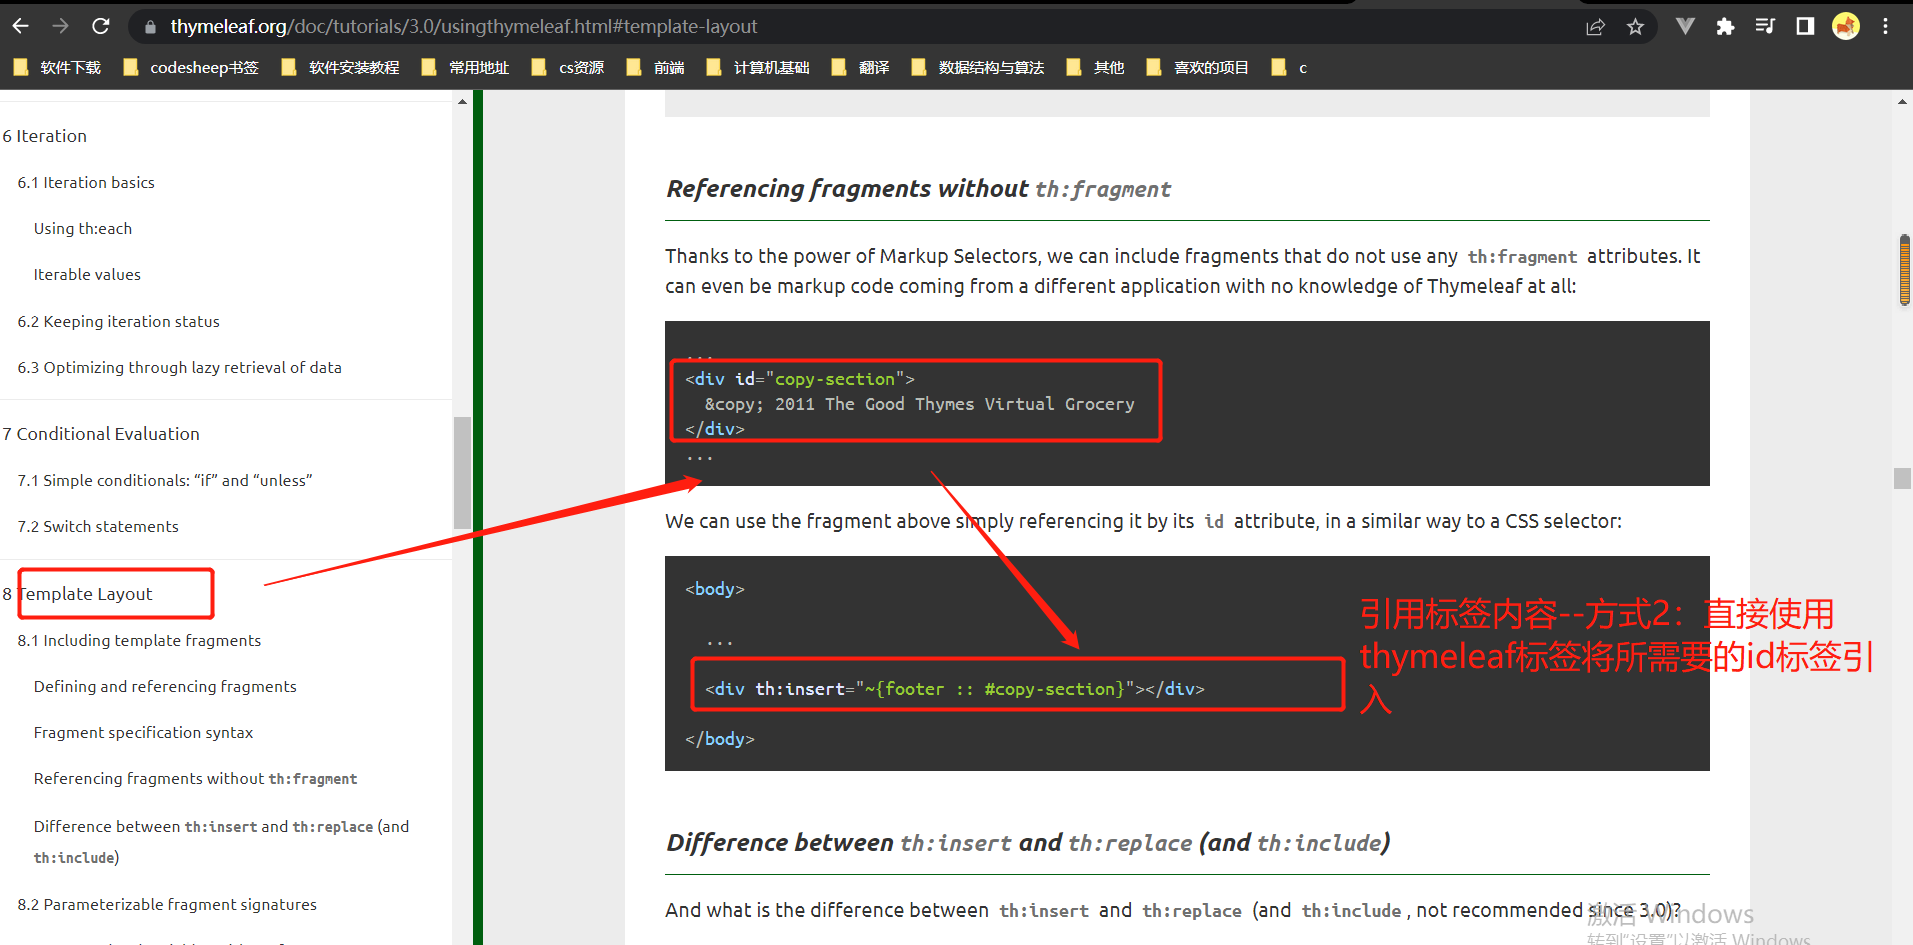
引用公共页面方式2:
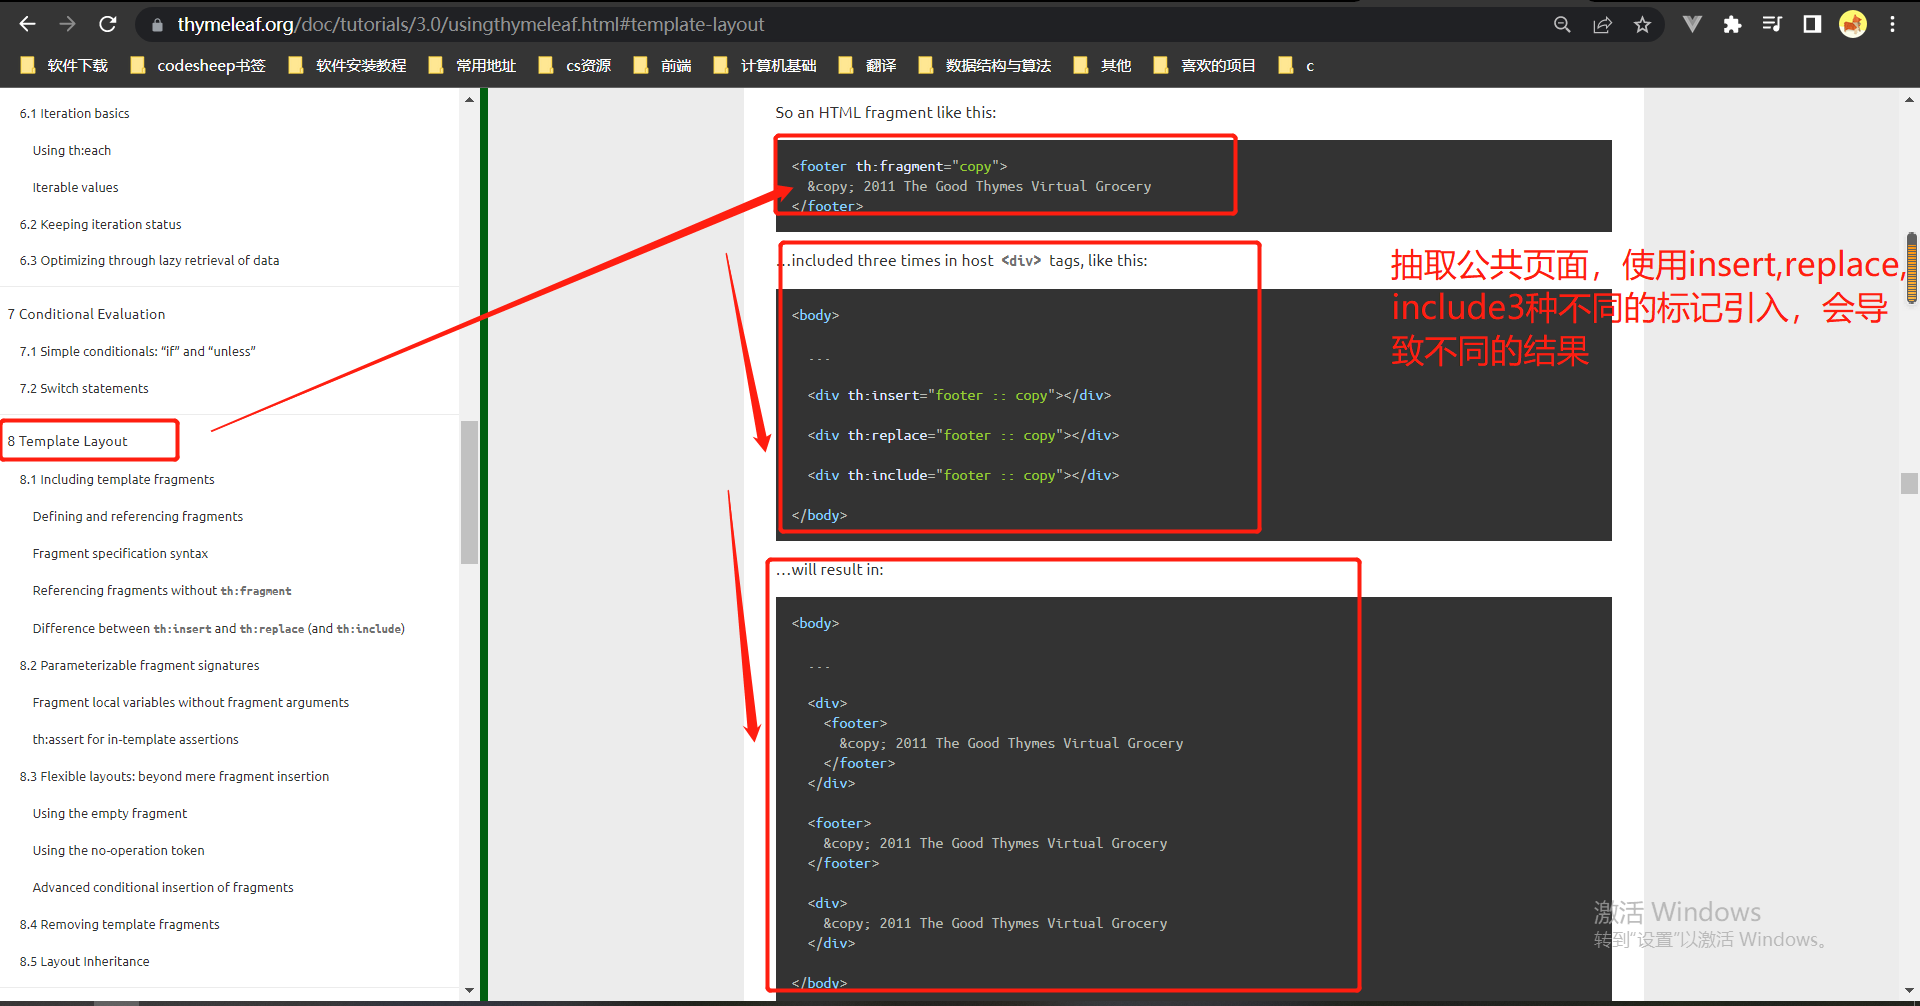
不同方式将页面引入将会导致不同的结果:
8-3:遍历数据与页面bug修改
8-4 视图解析器与视图源码分析
第1部分:
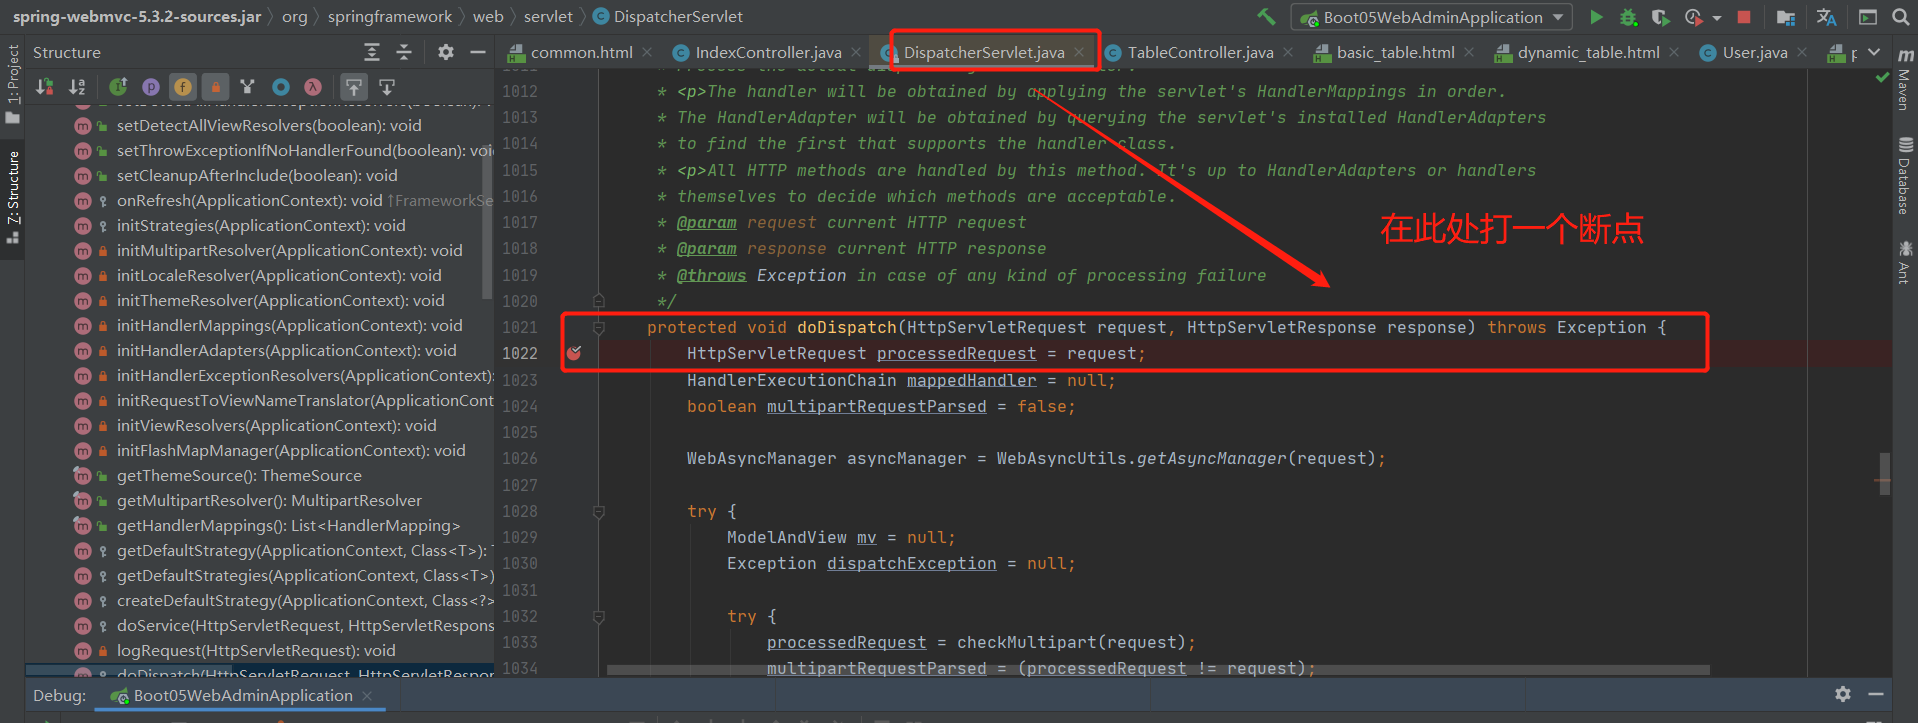
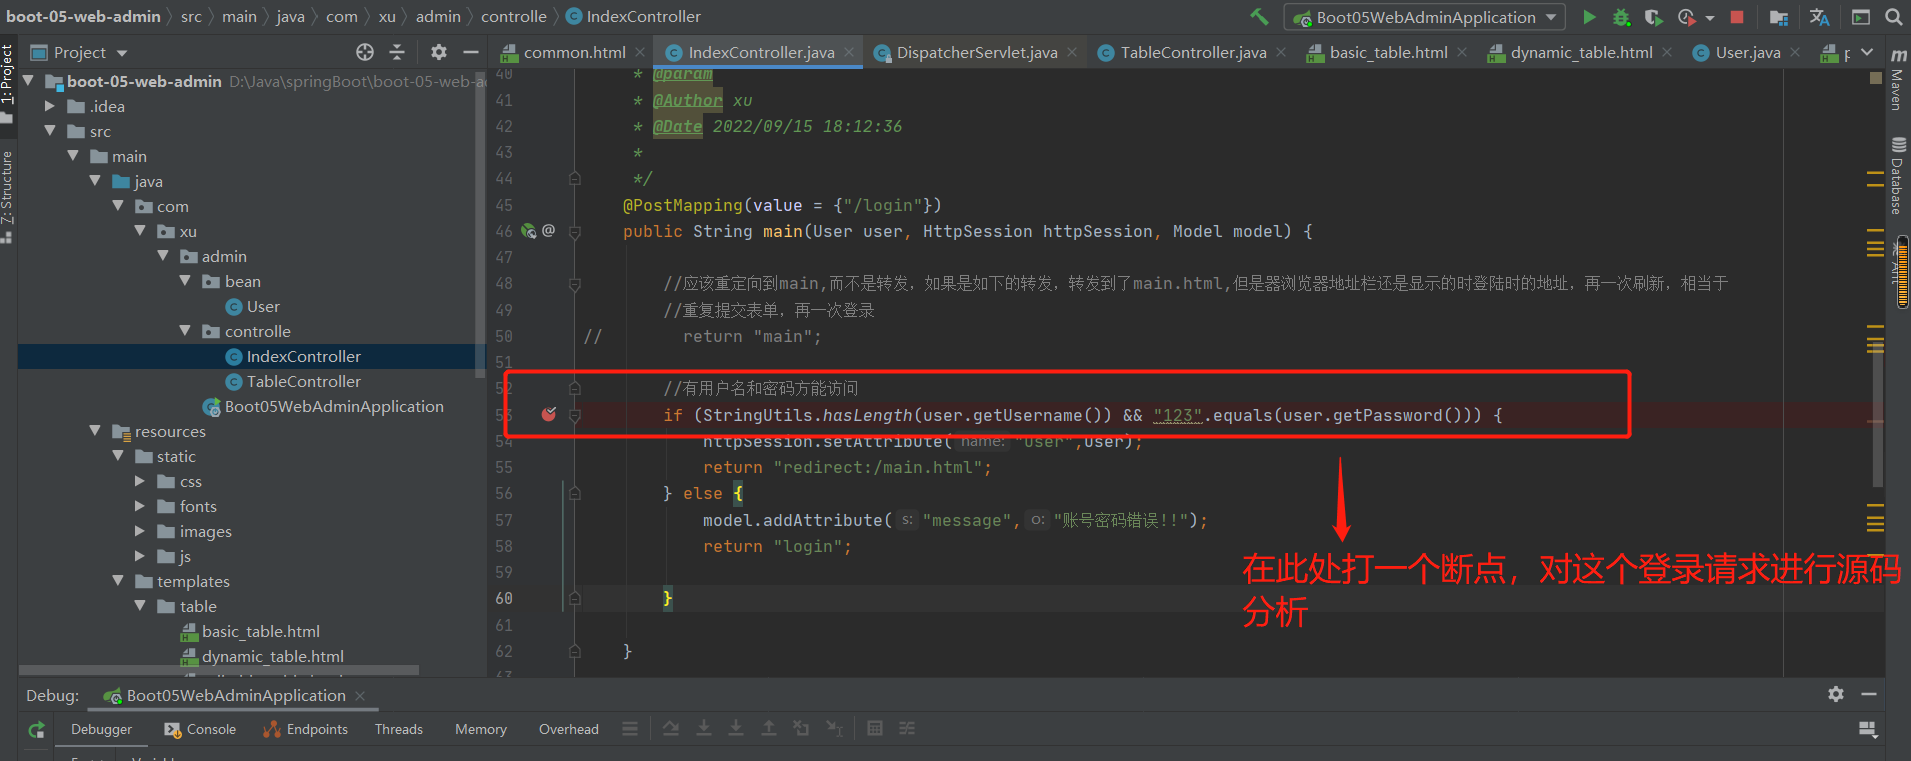
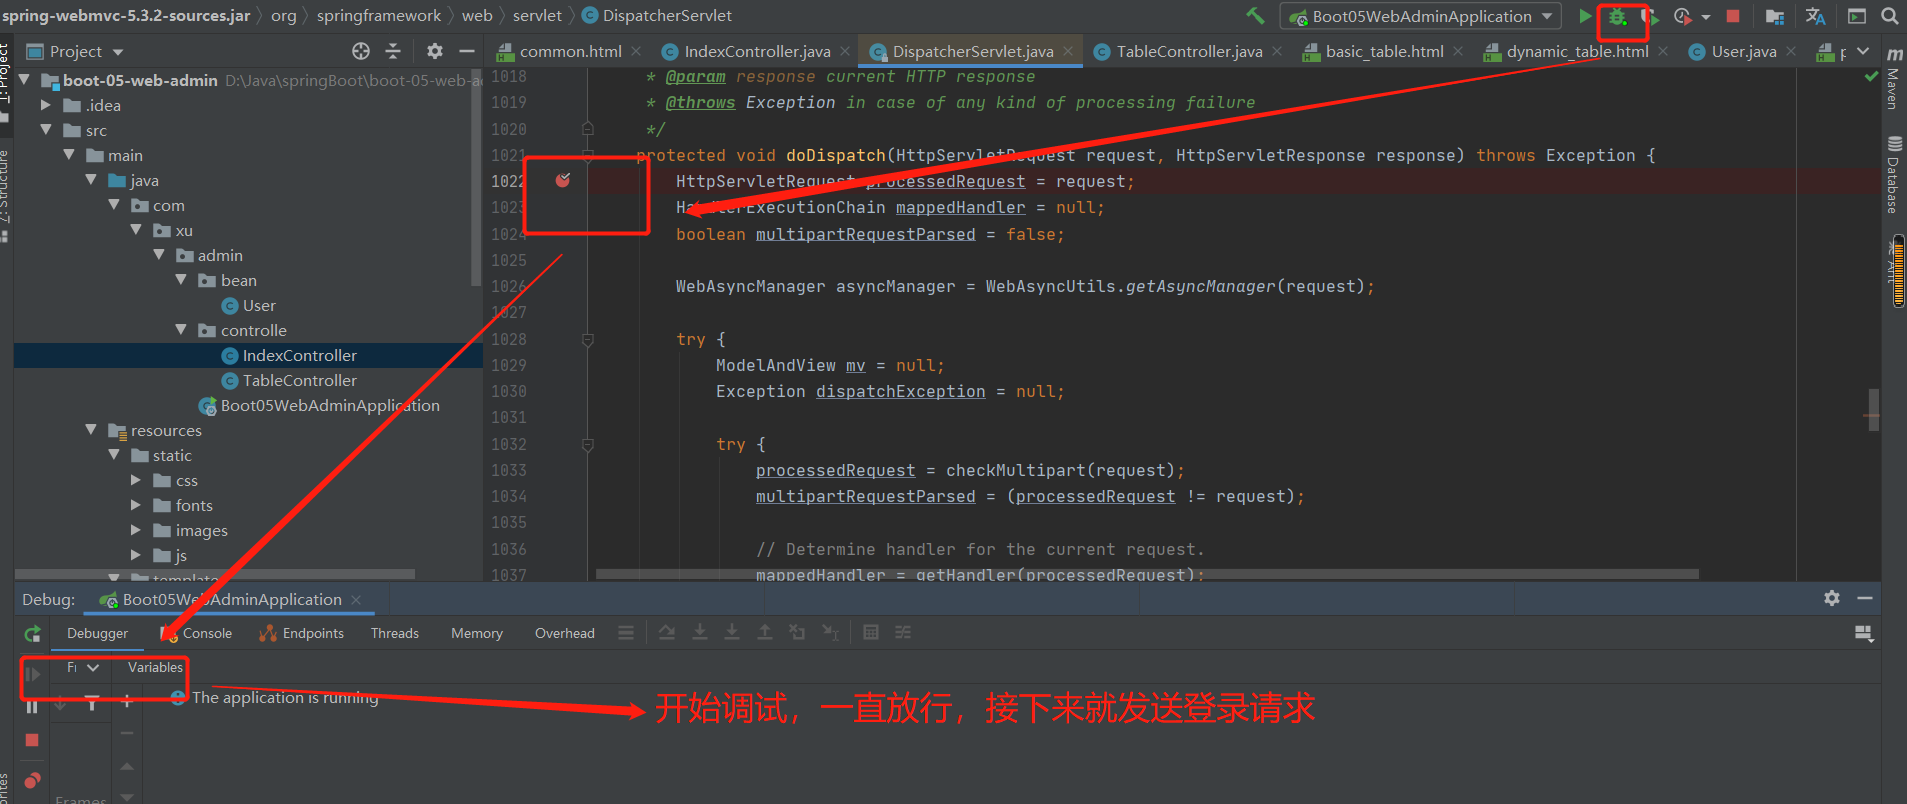
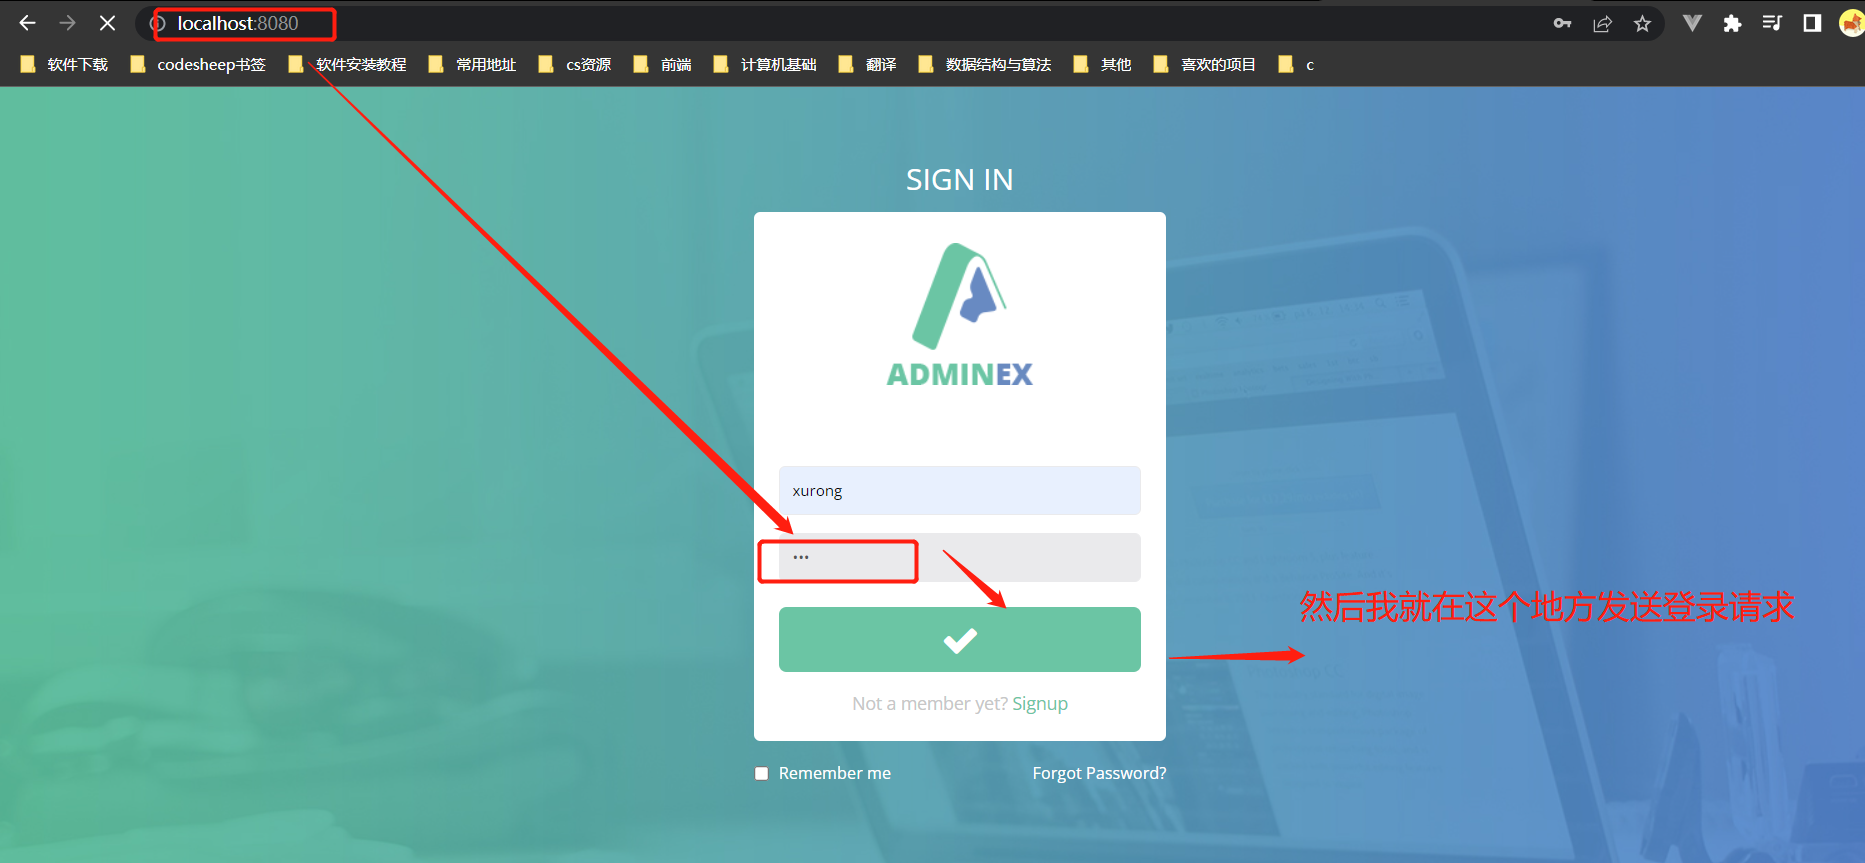
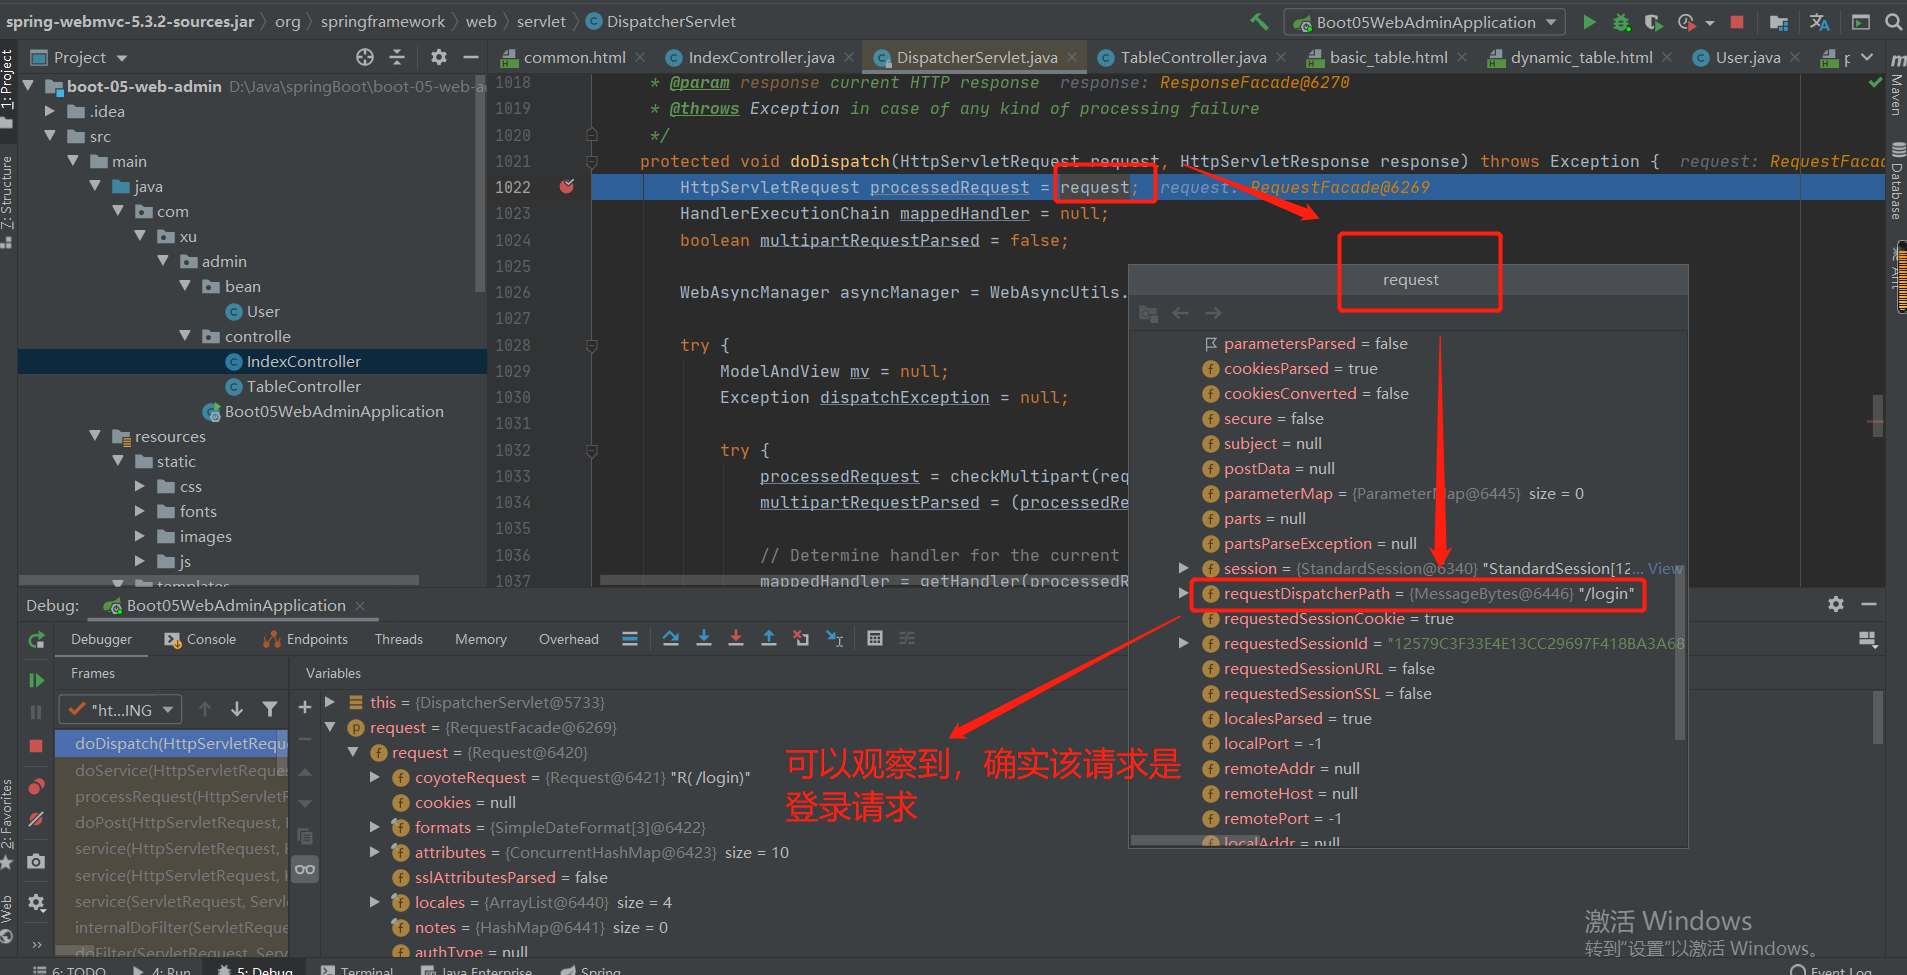
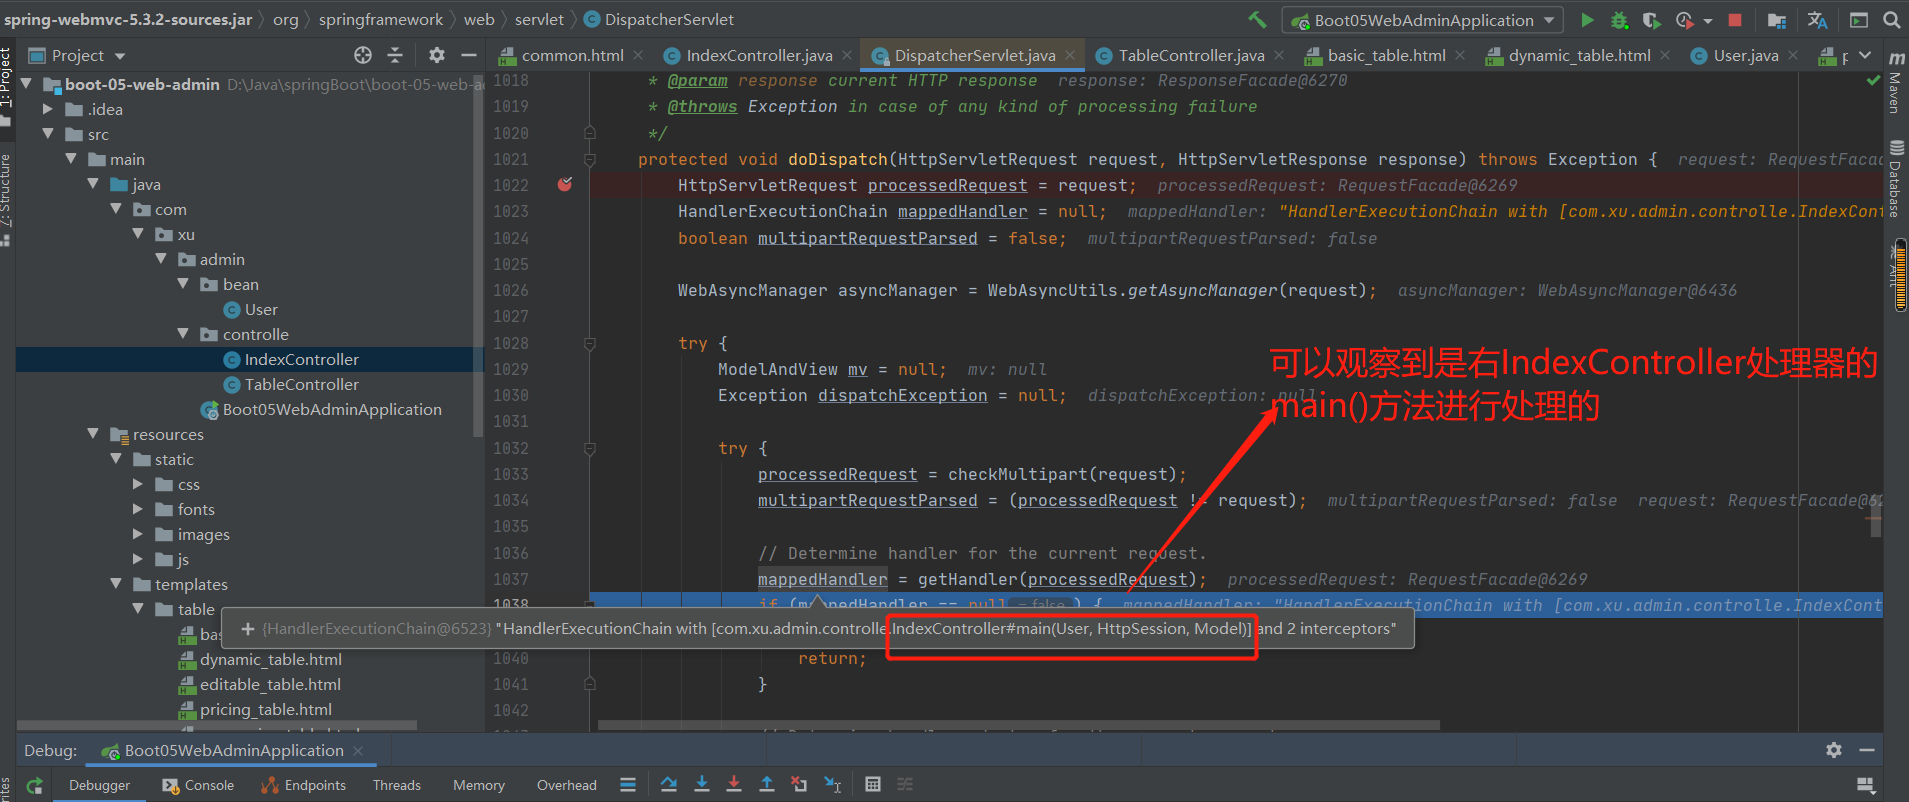
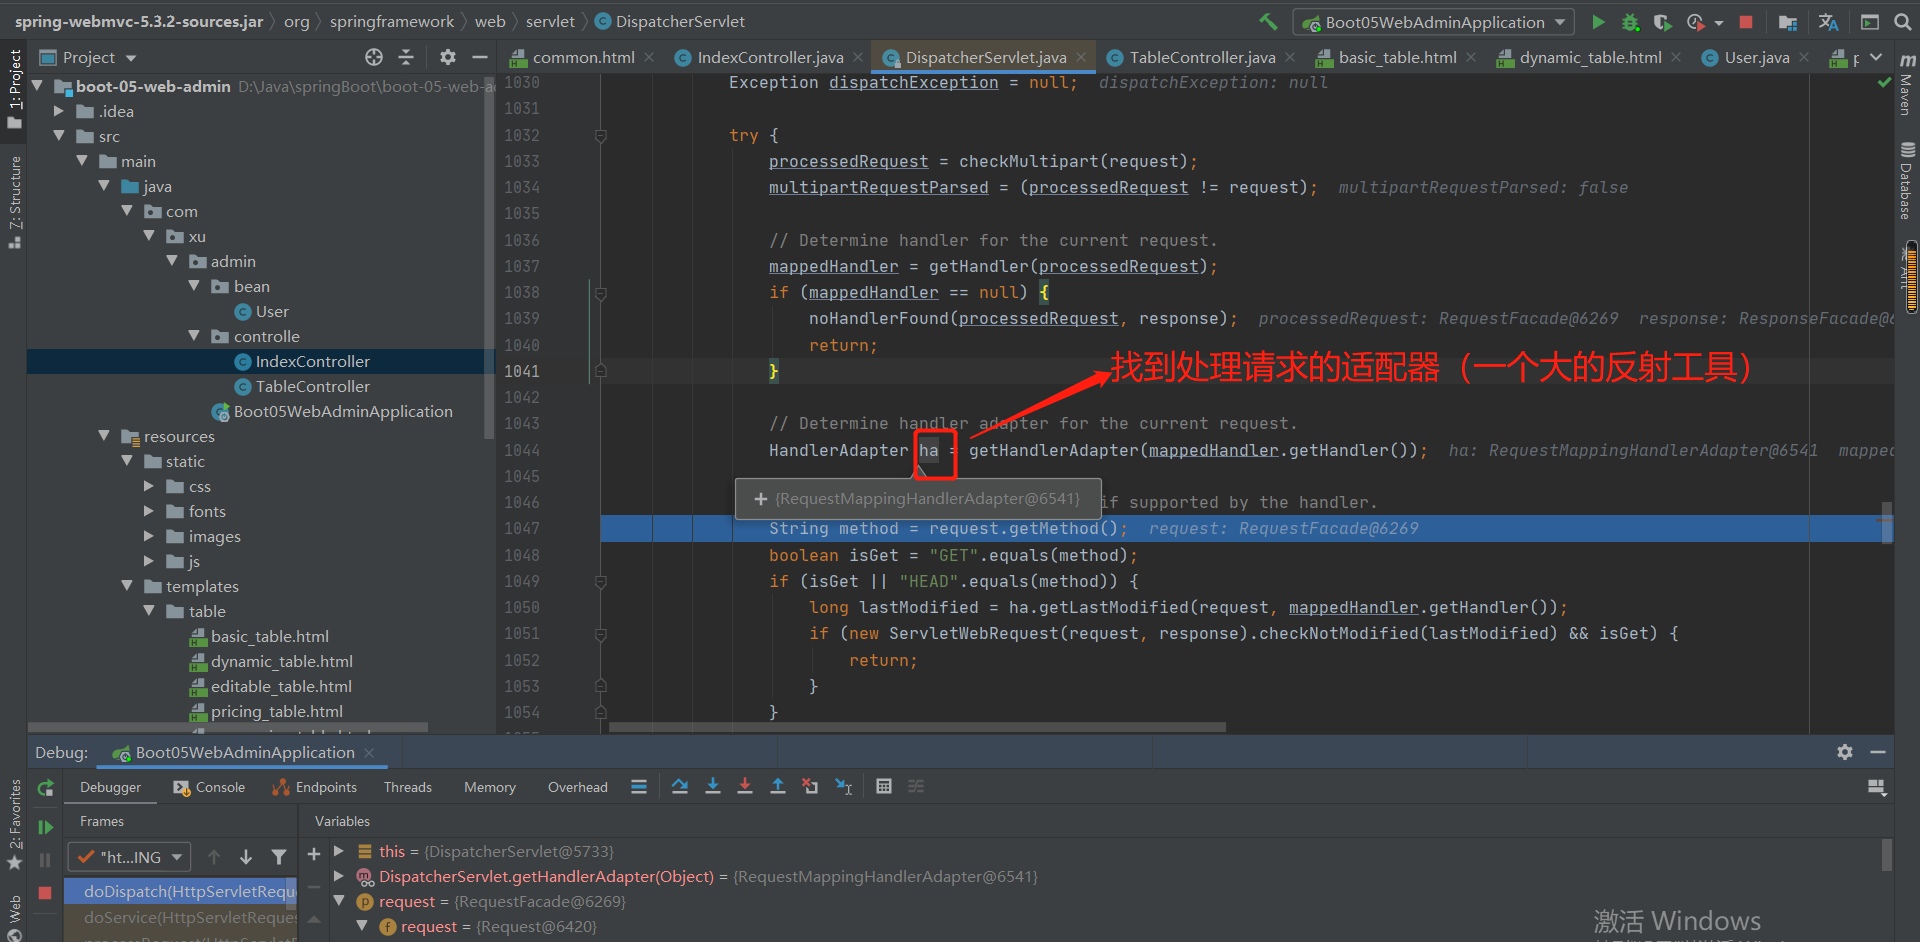
分析ha.handle()方法:
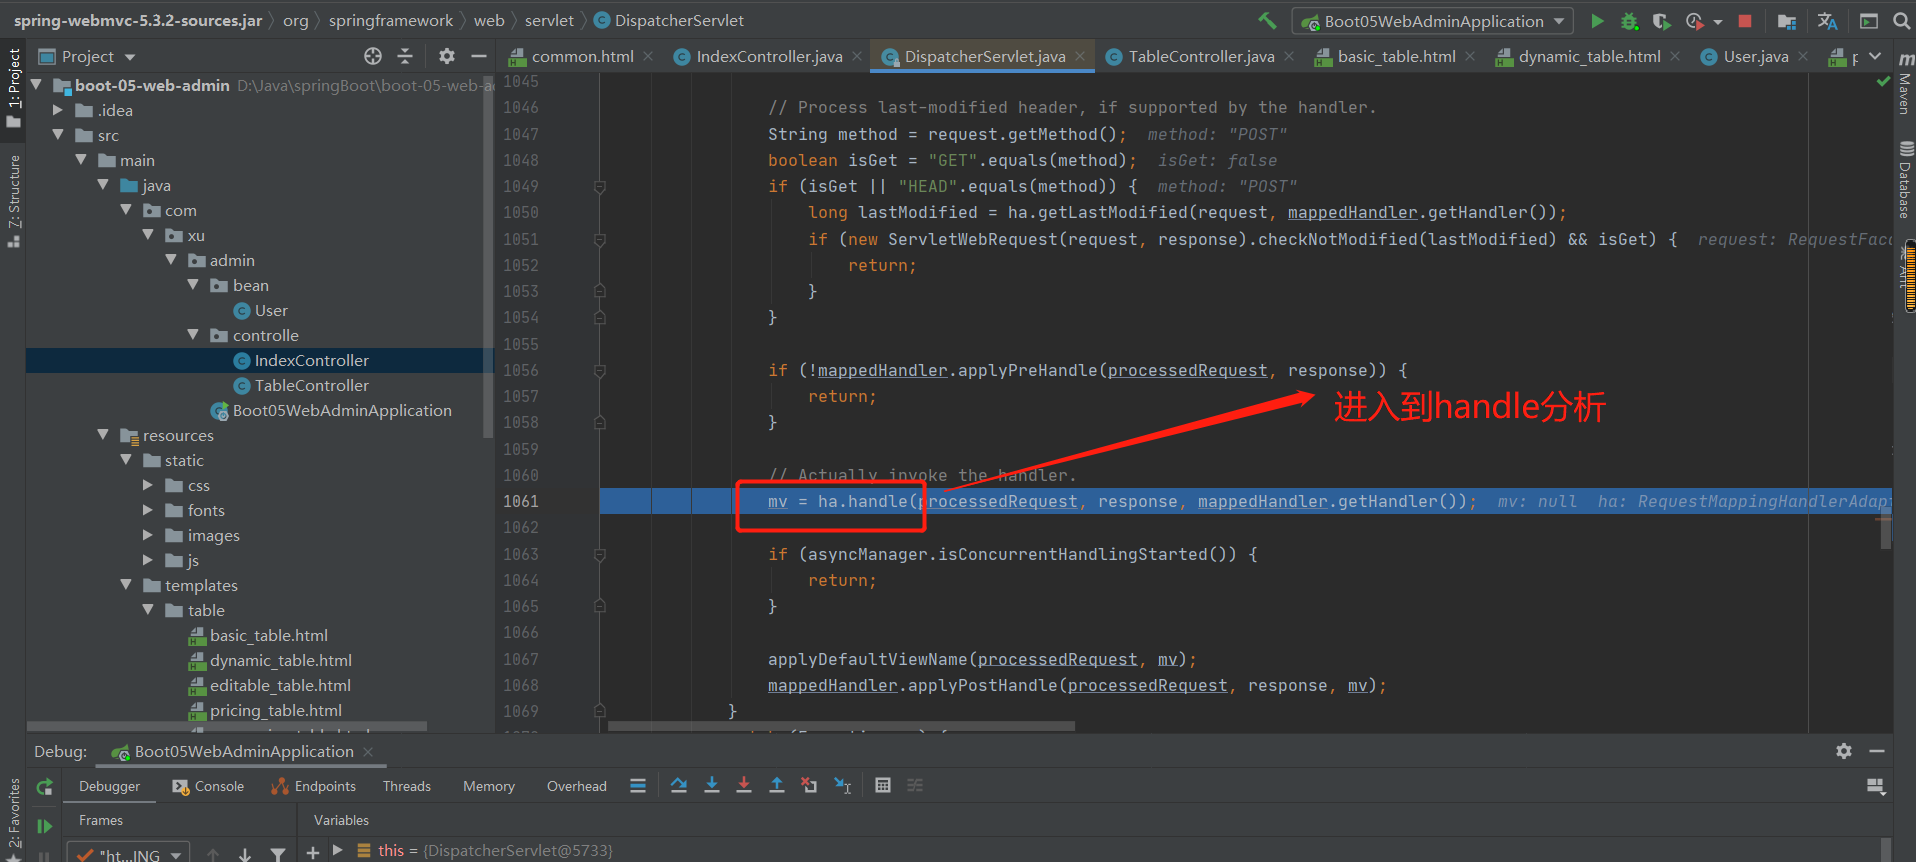
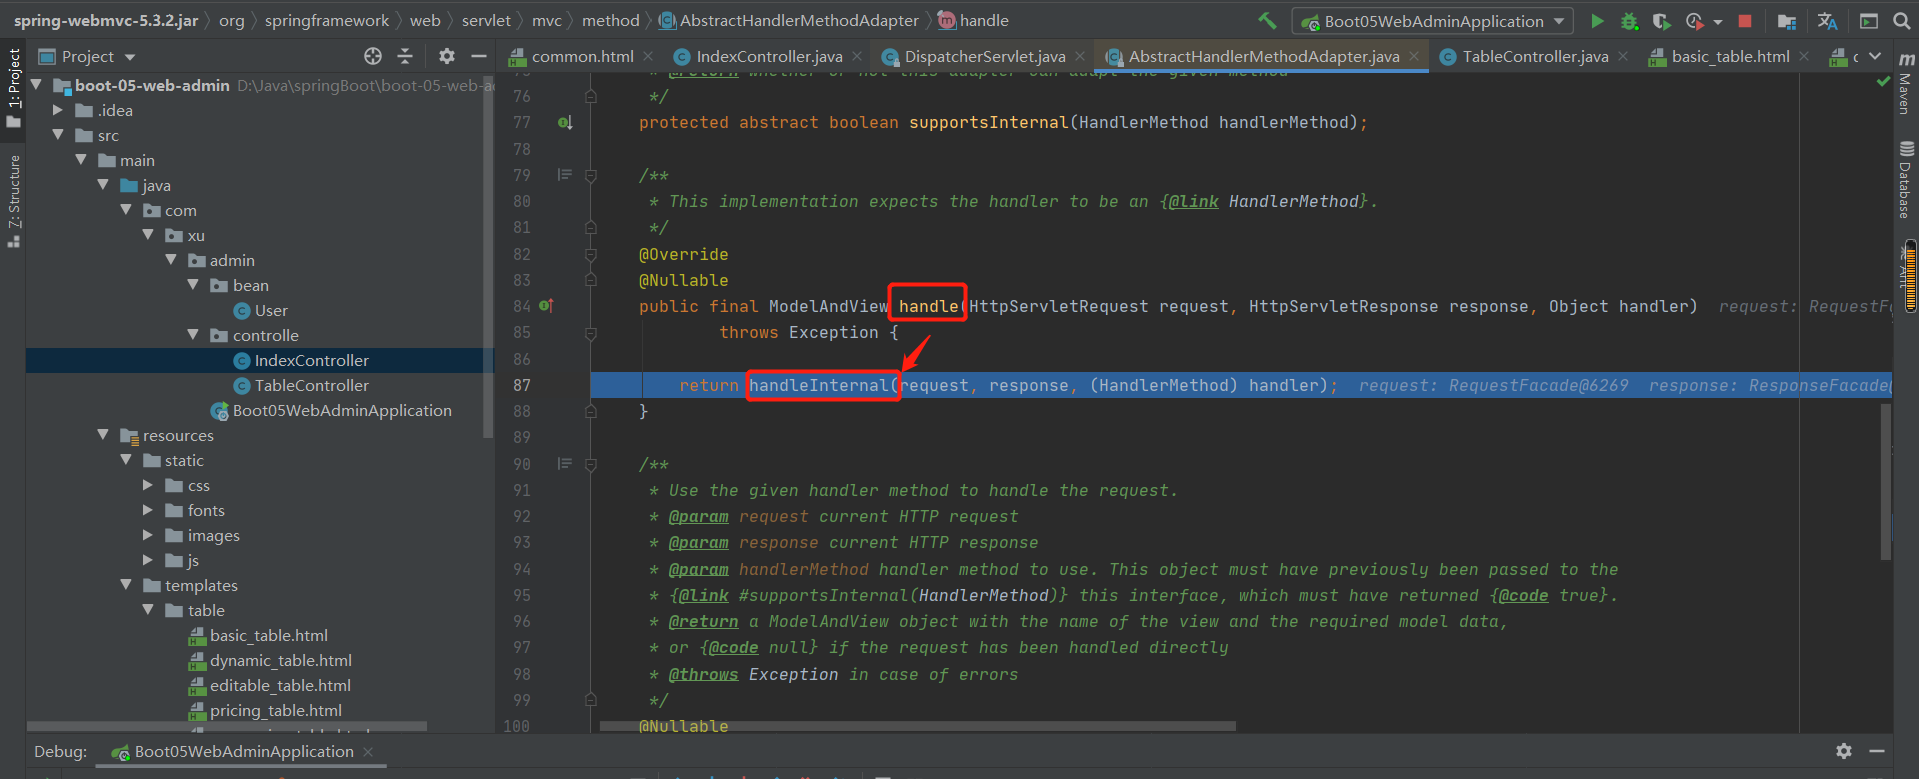
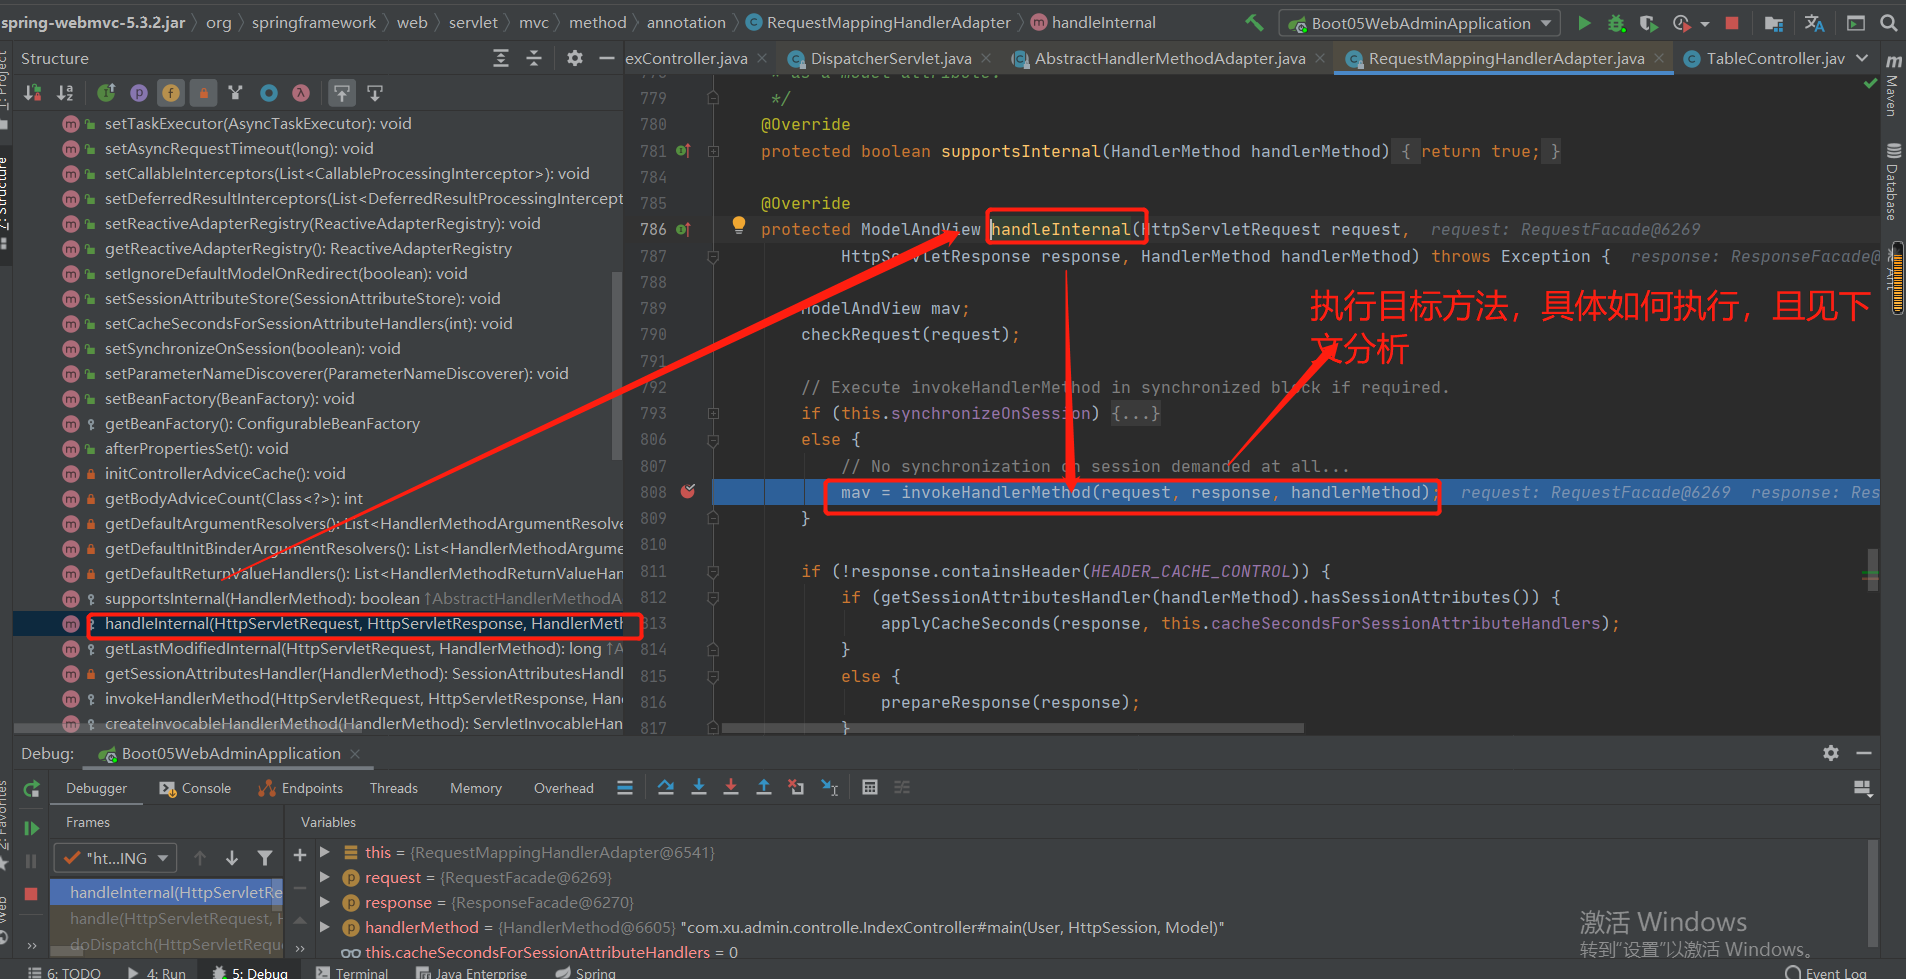
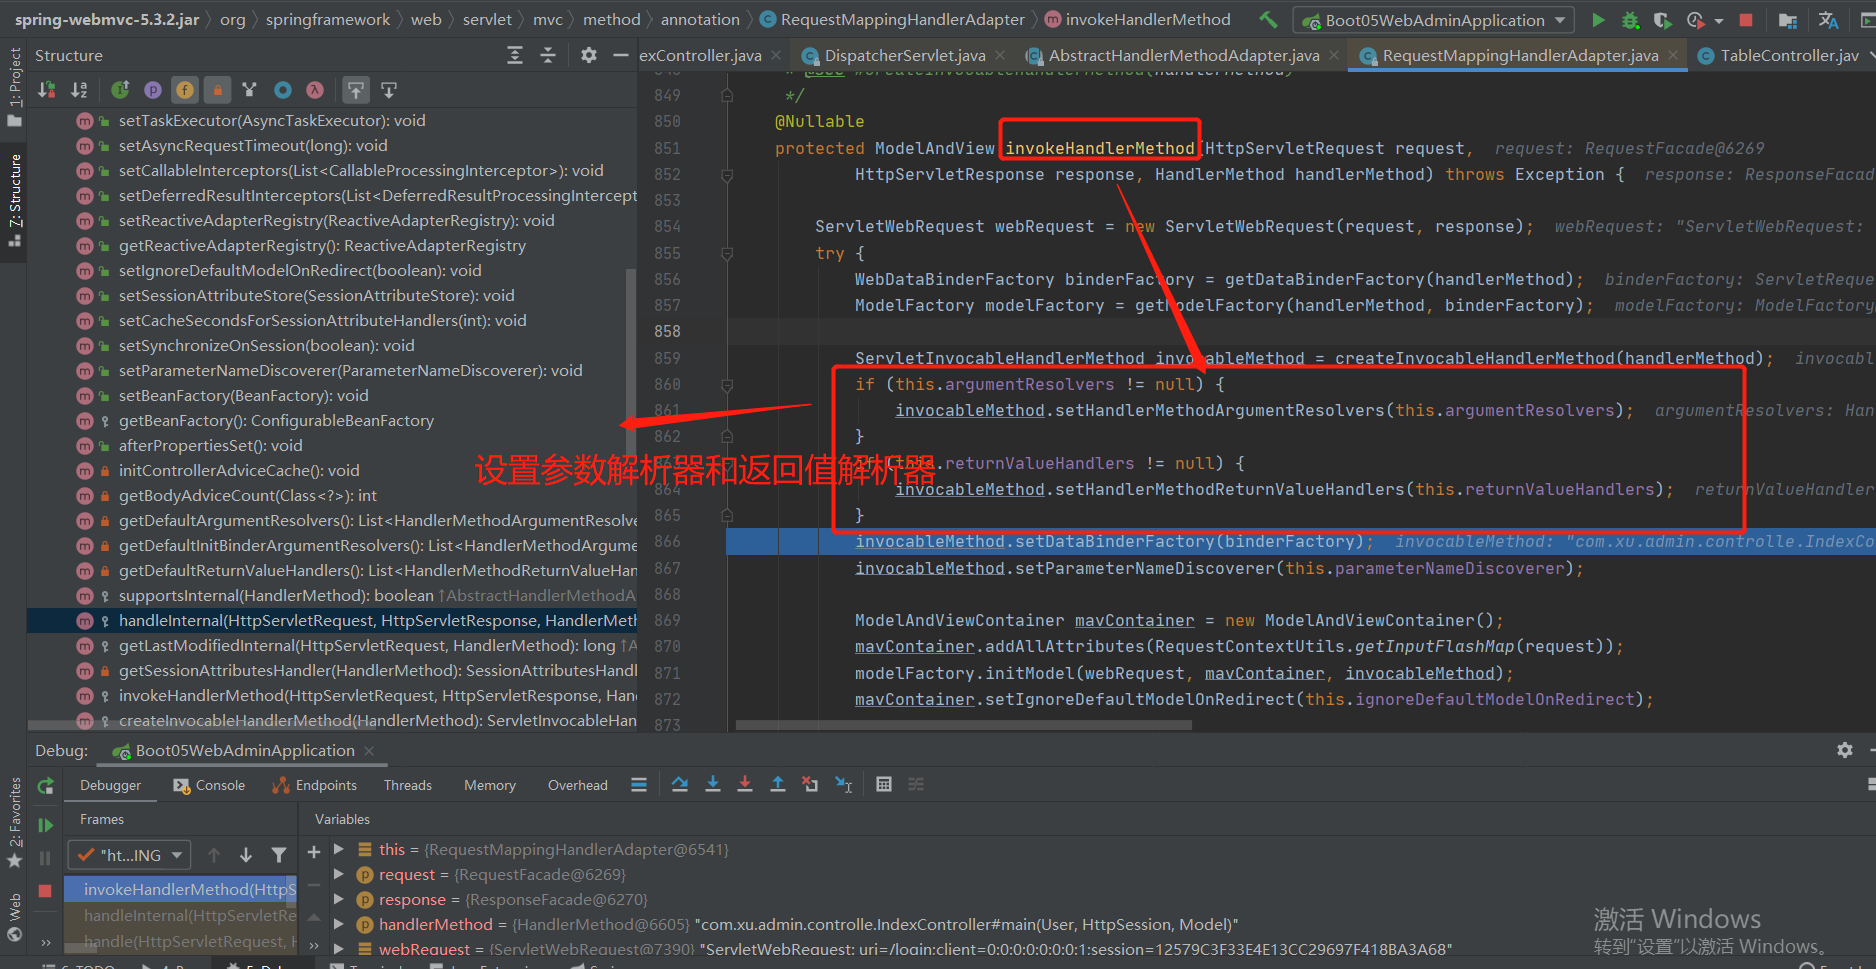
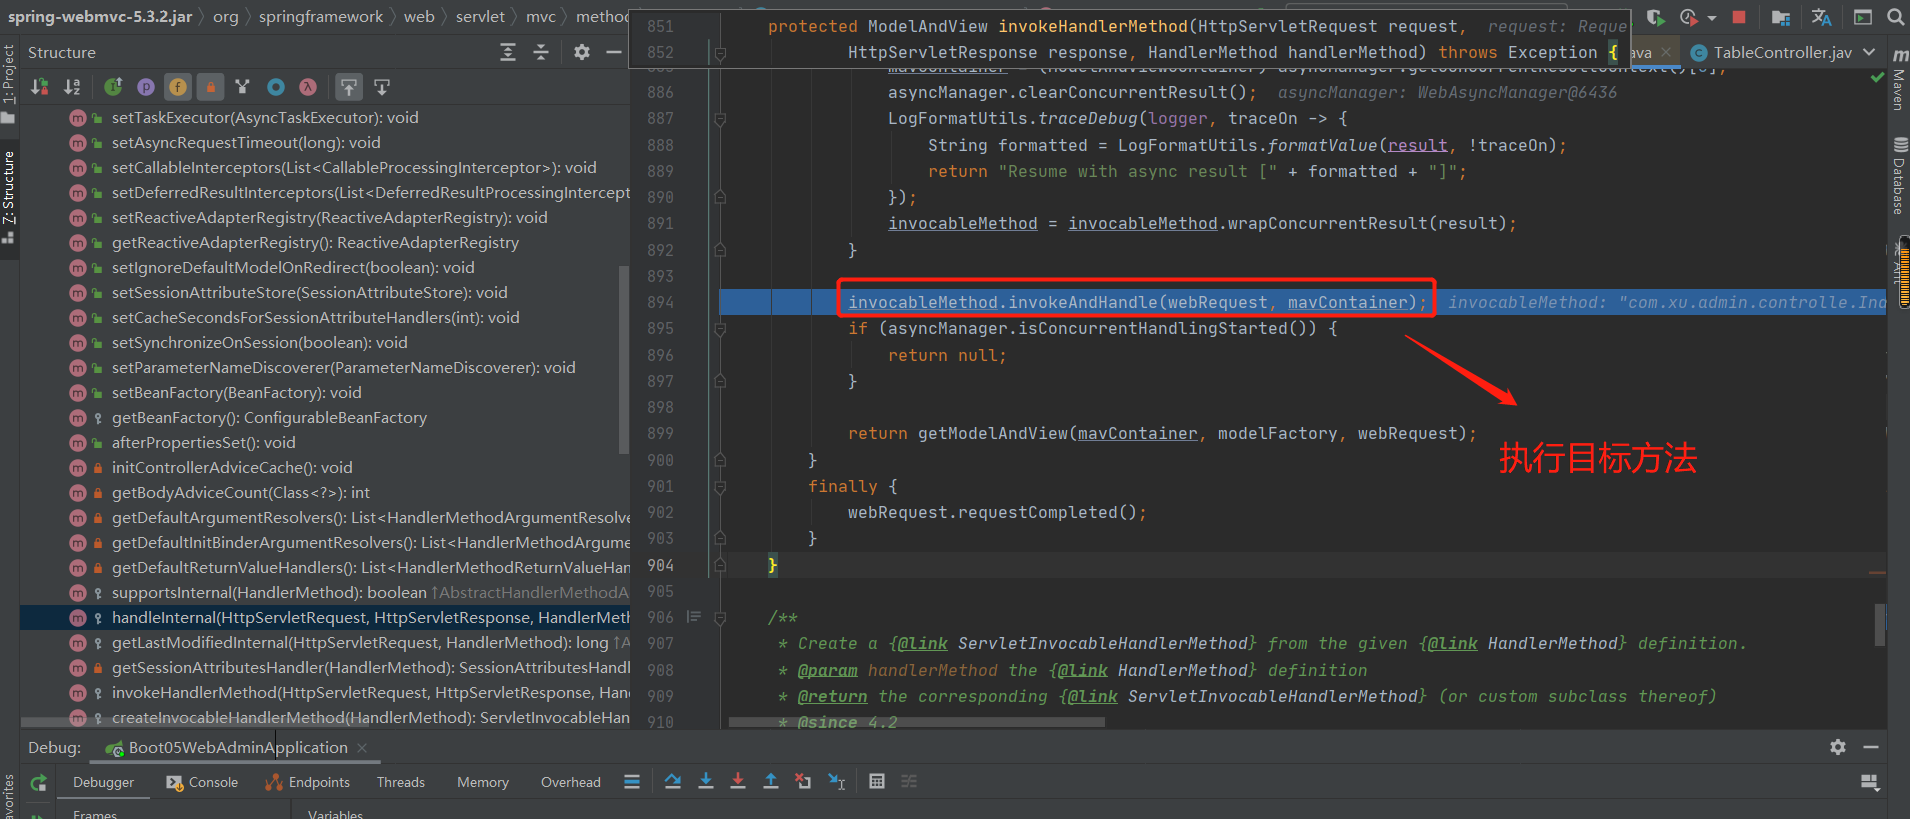
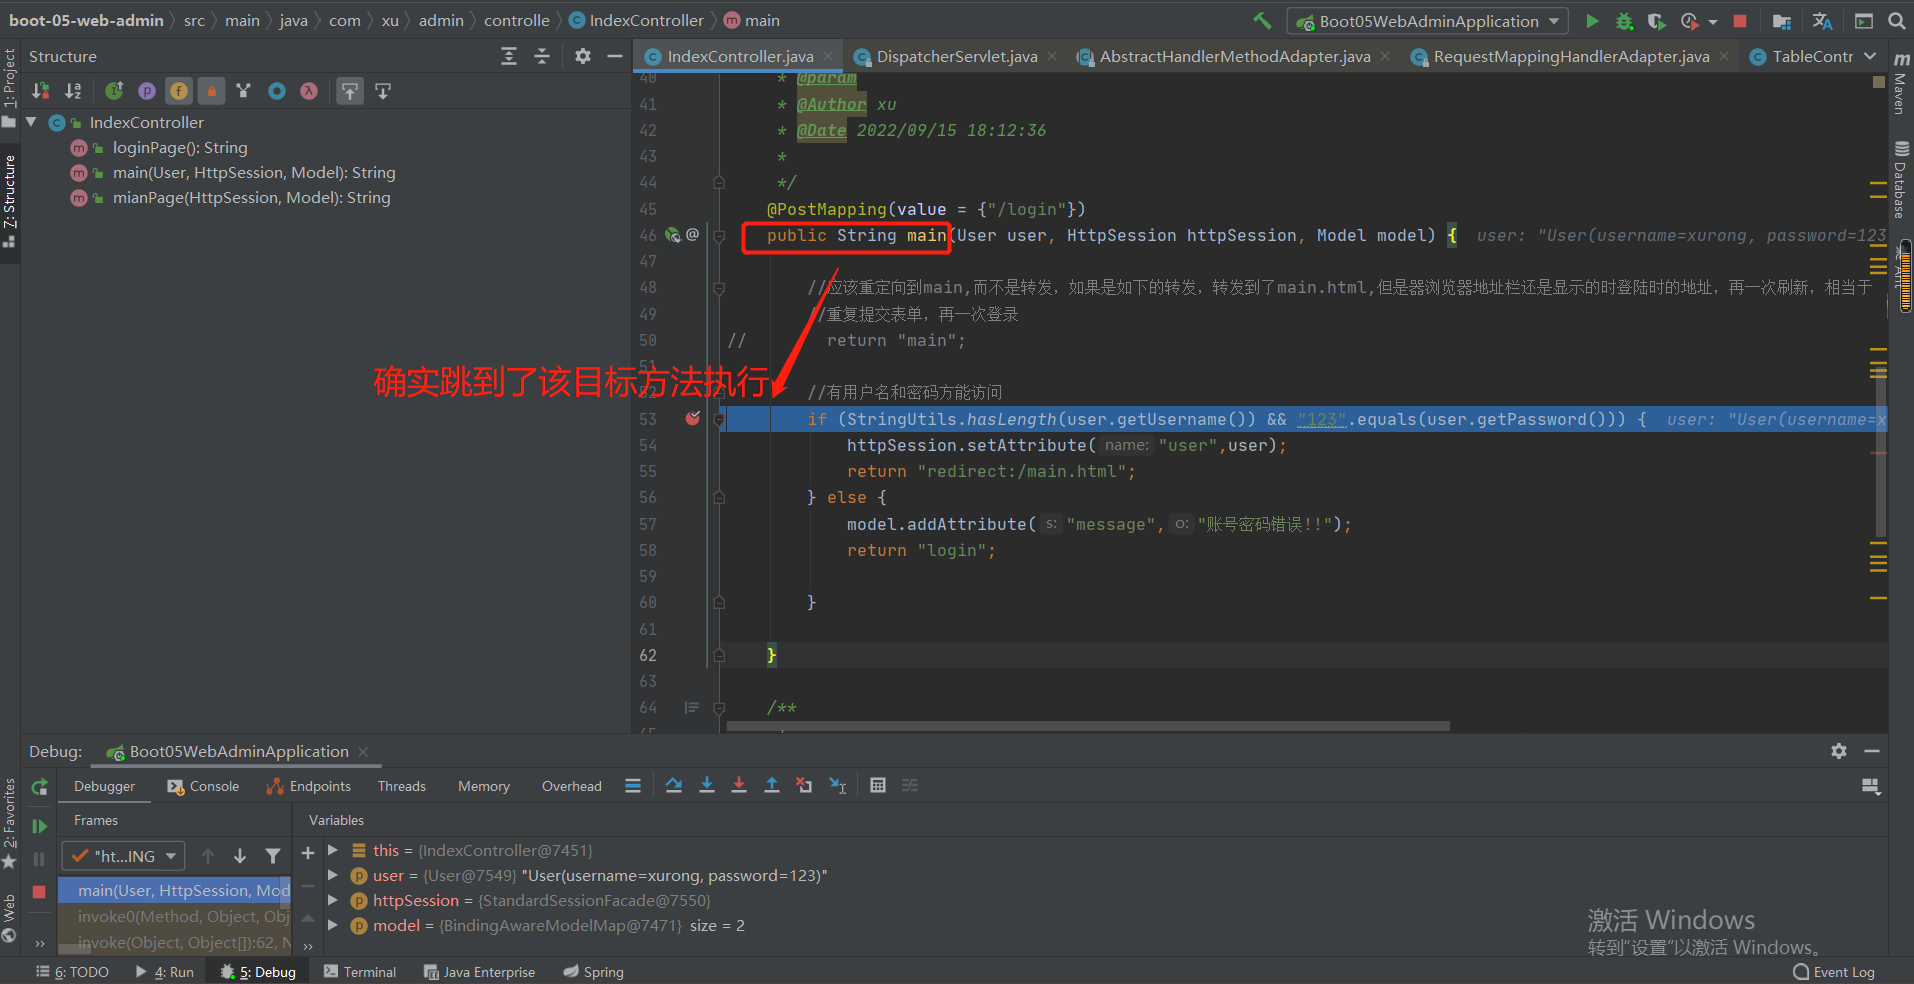
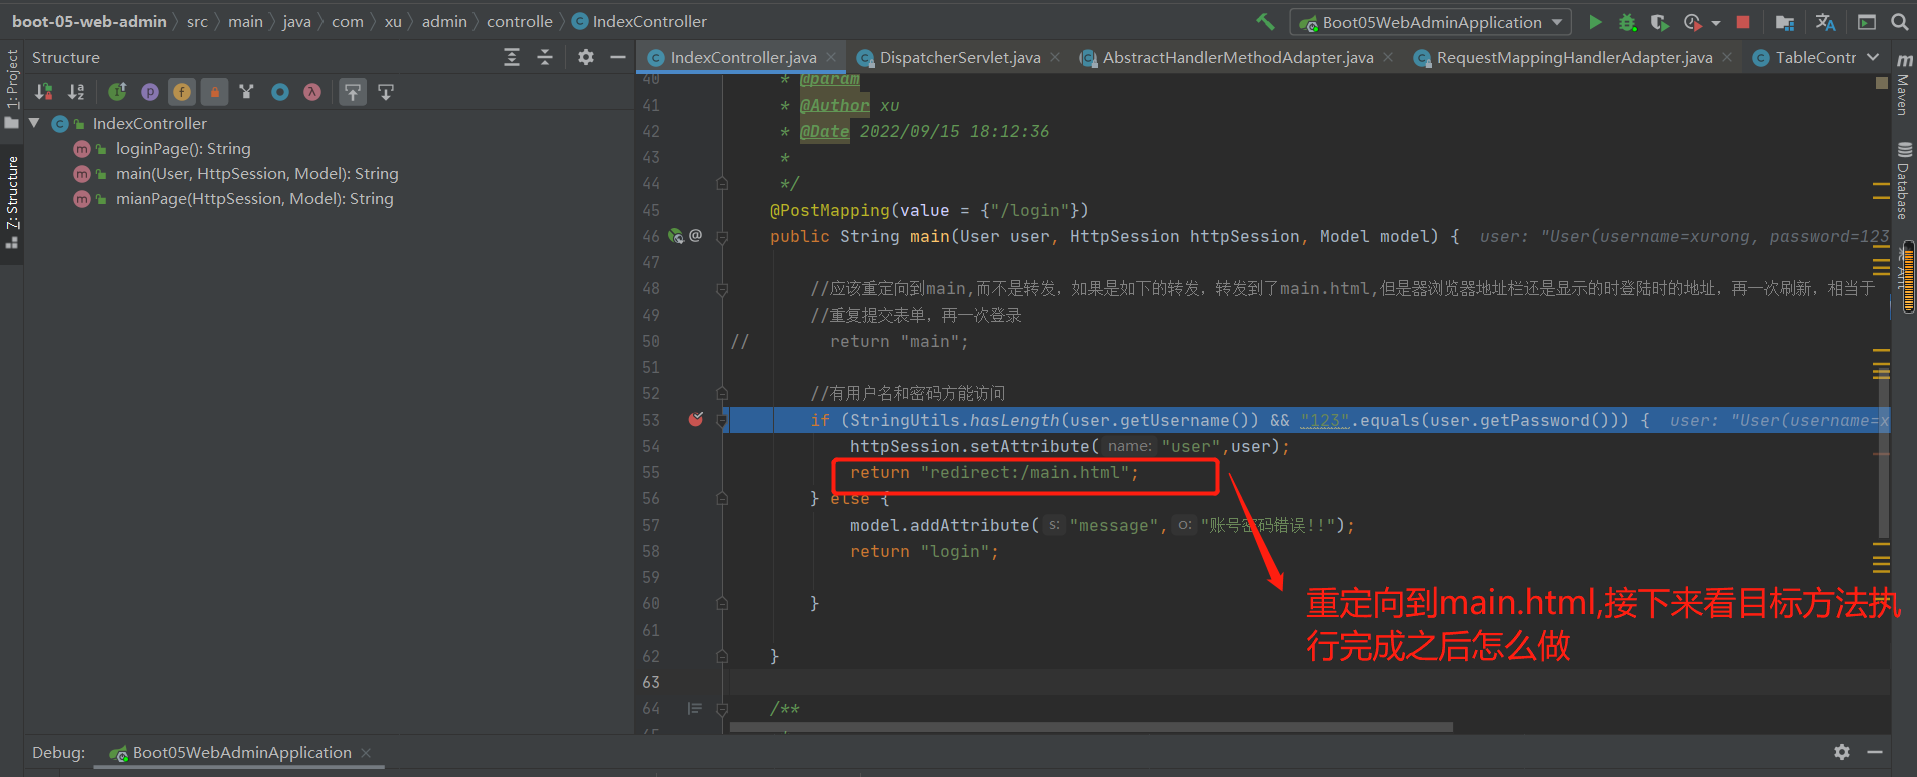
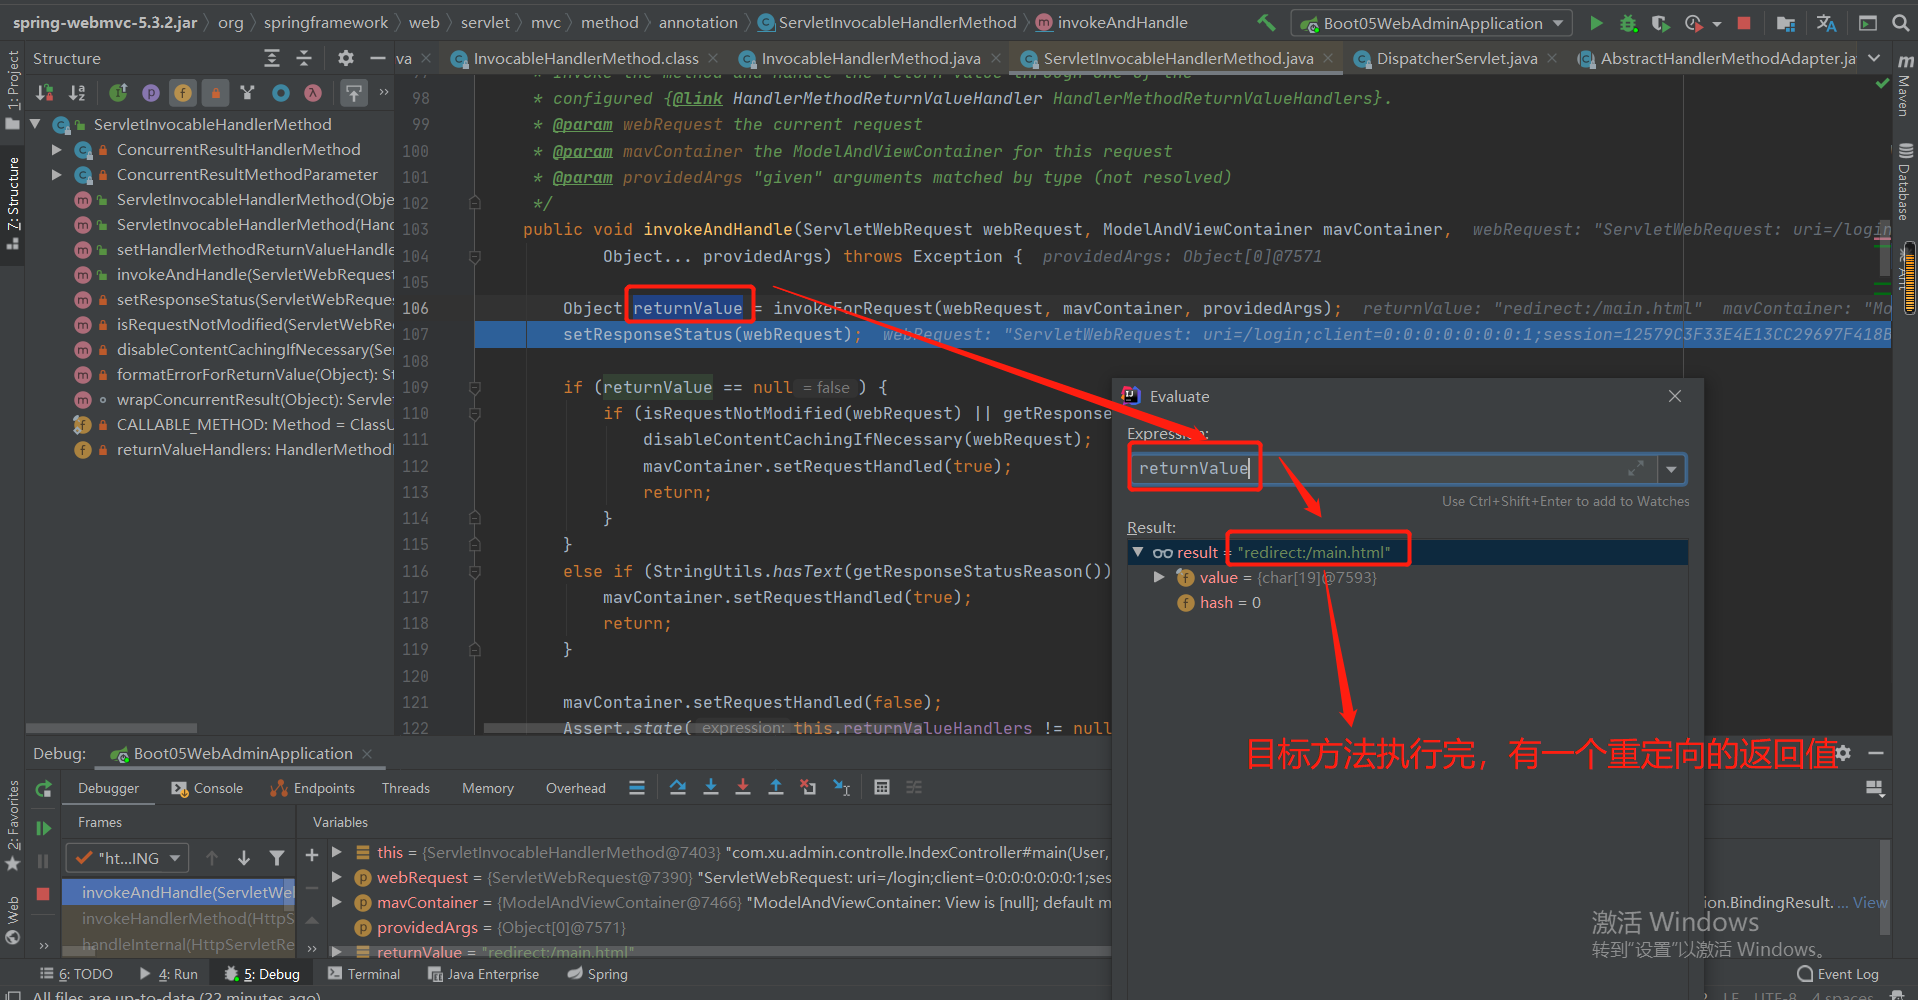
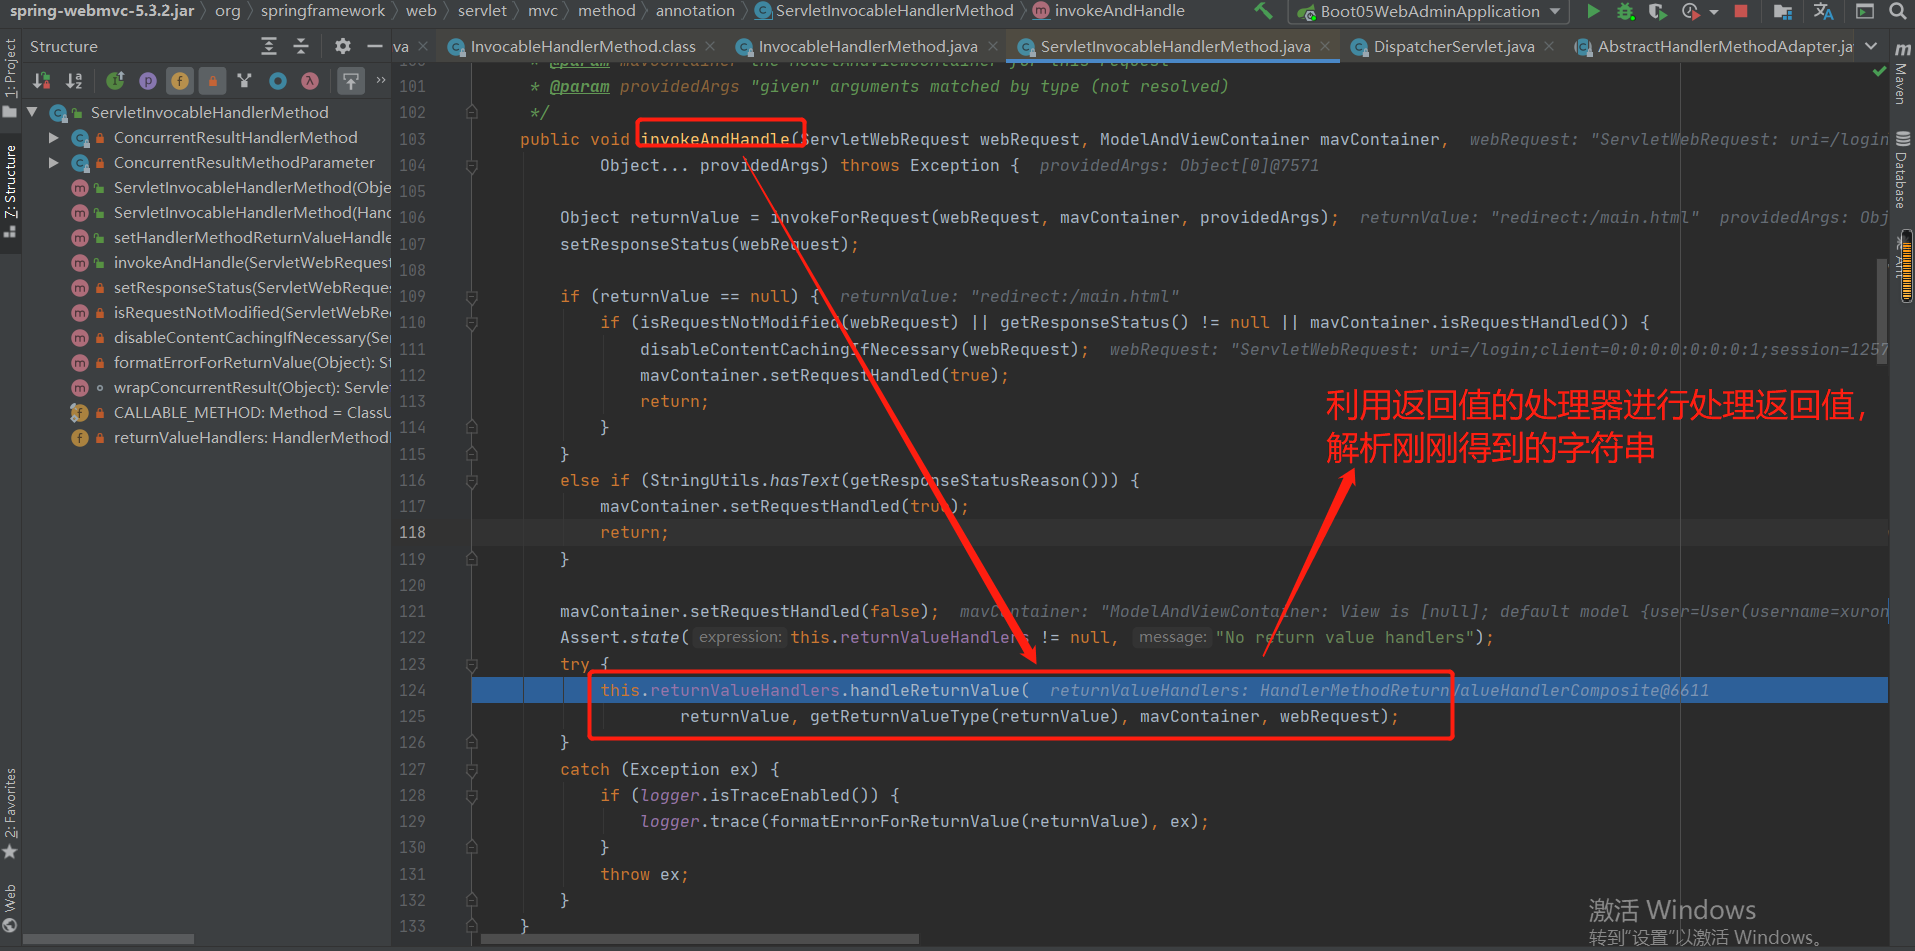
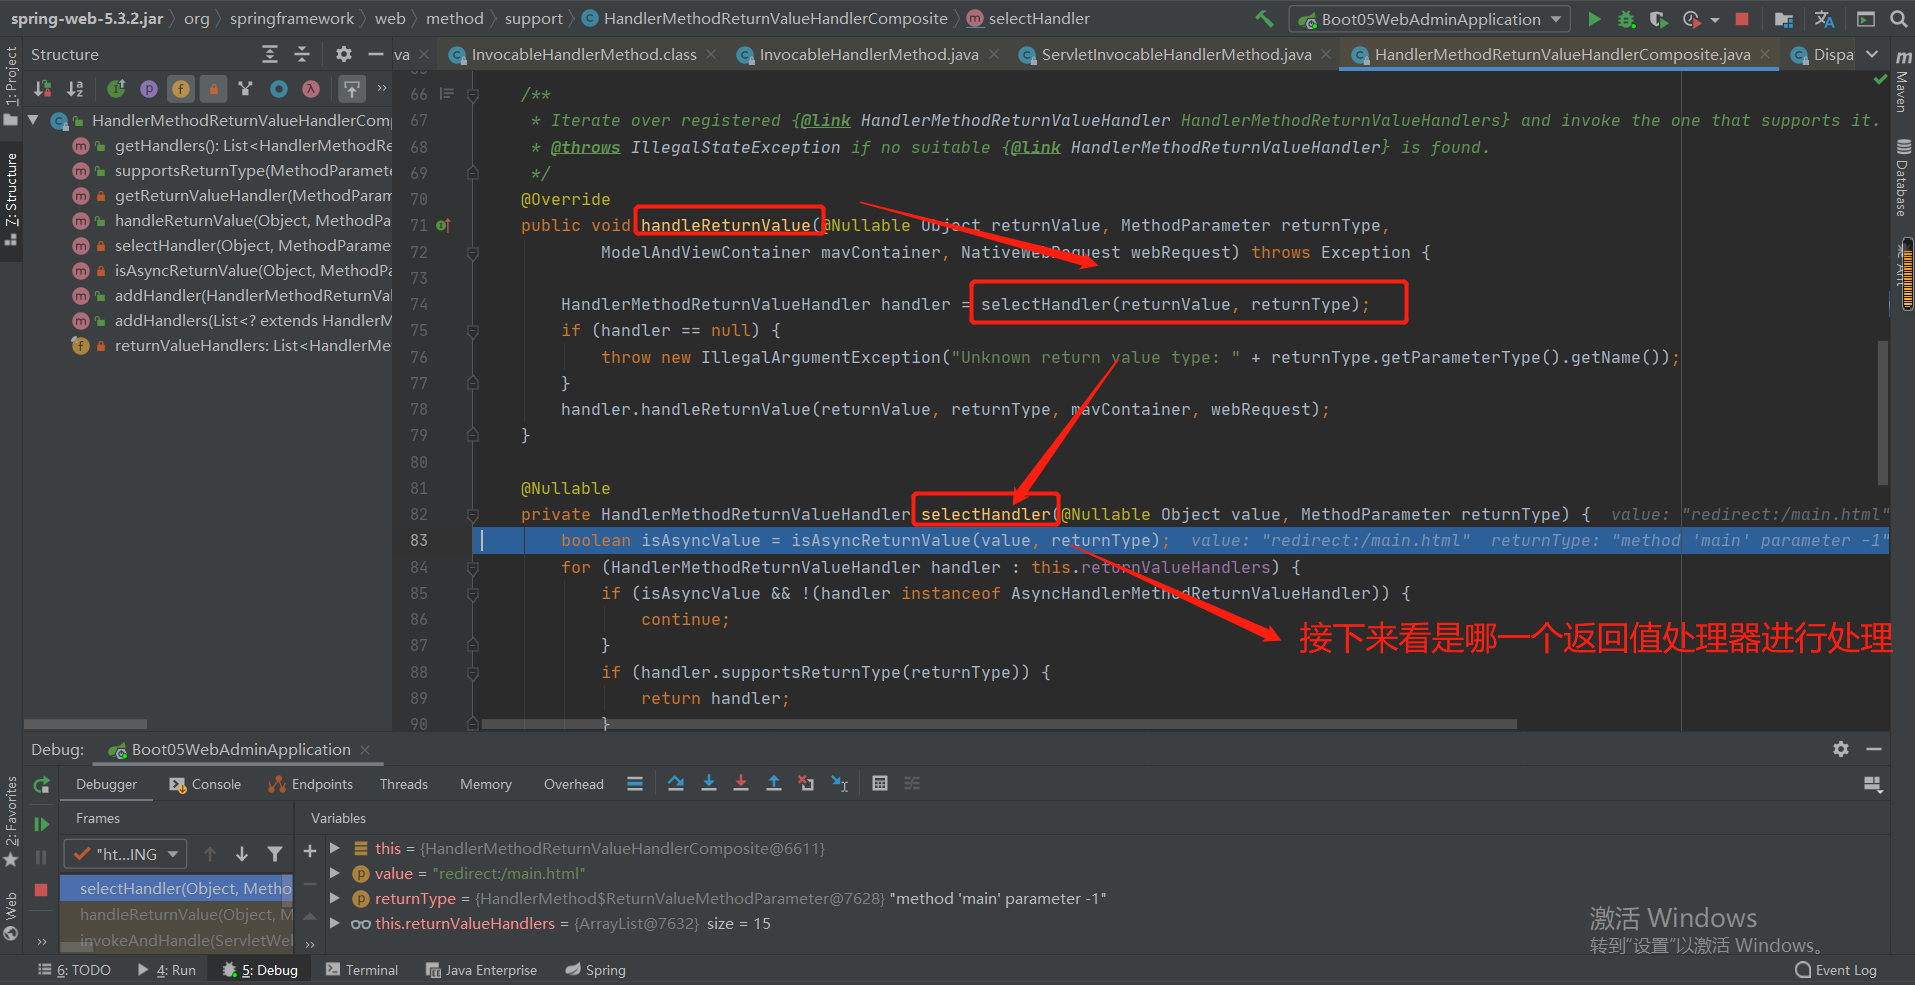
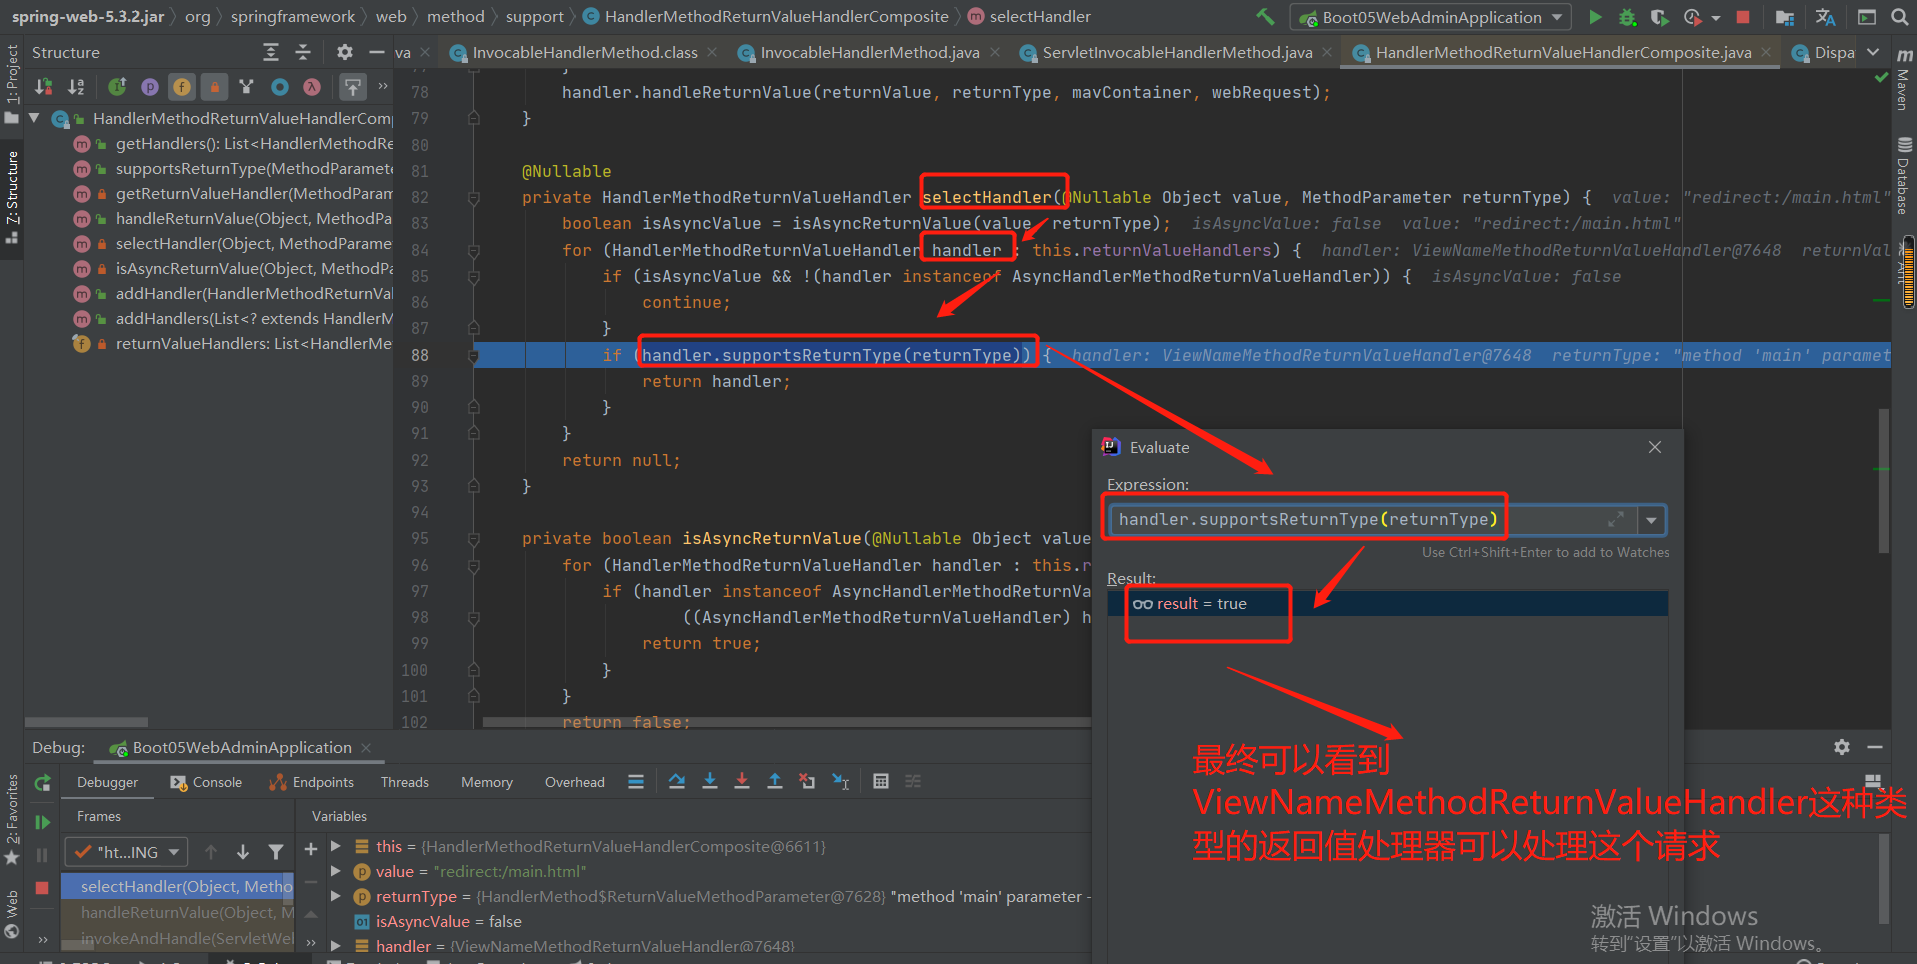
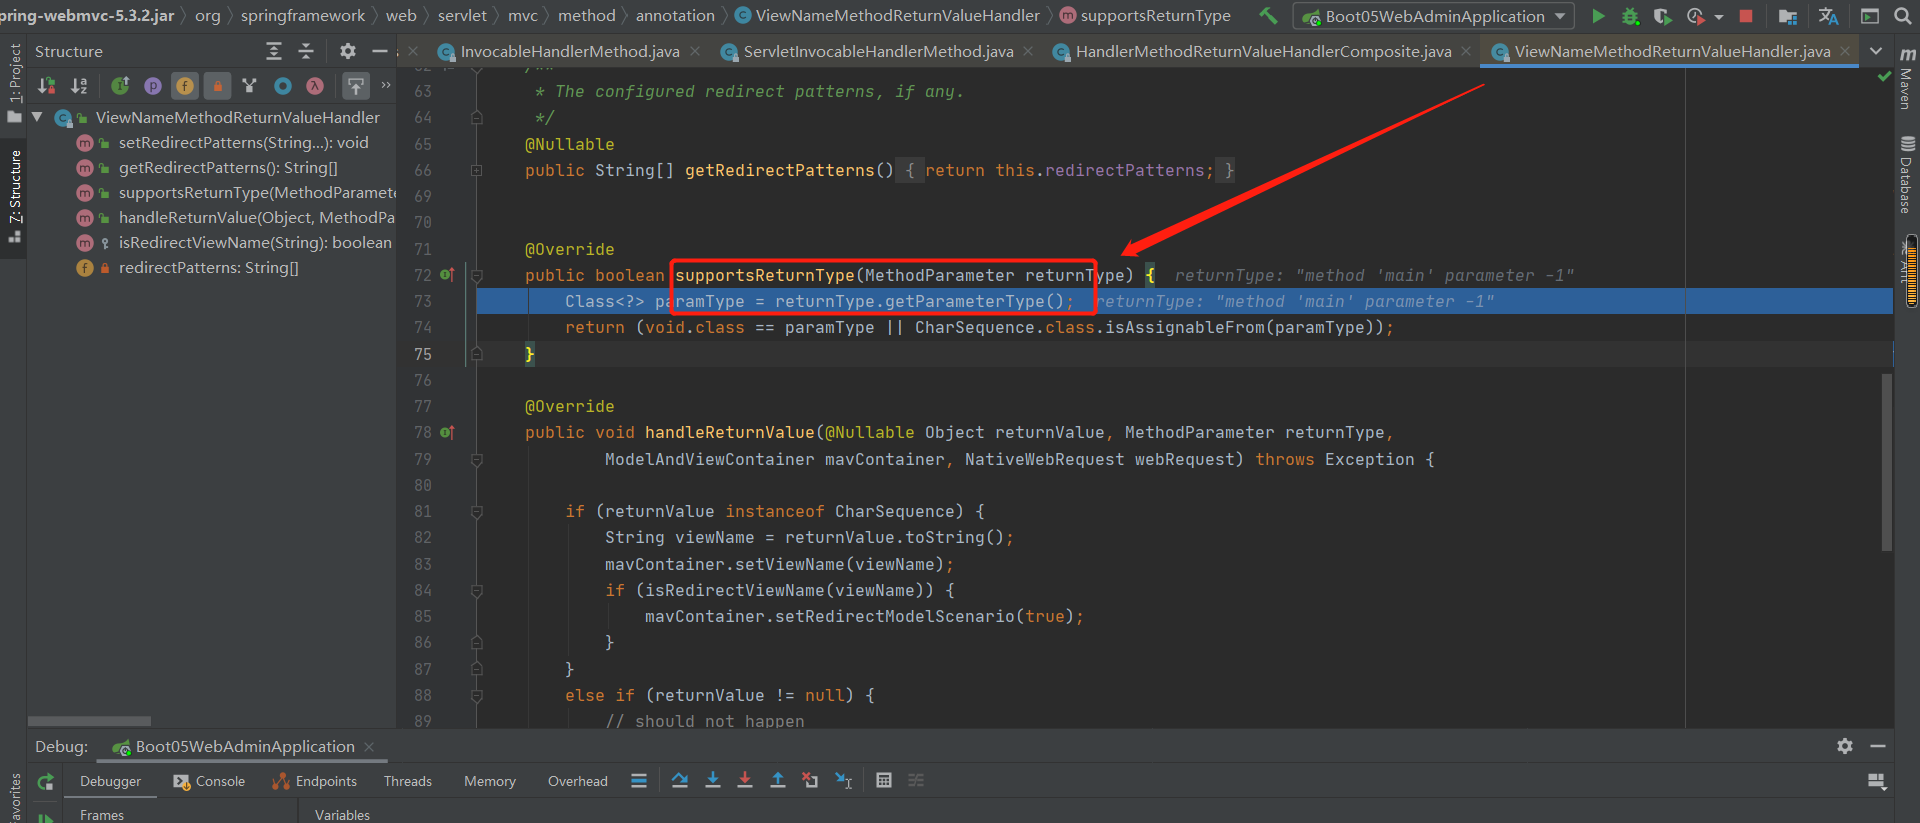
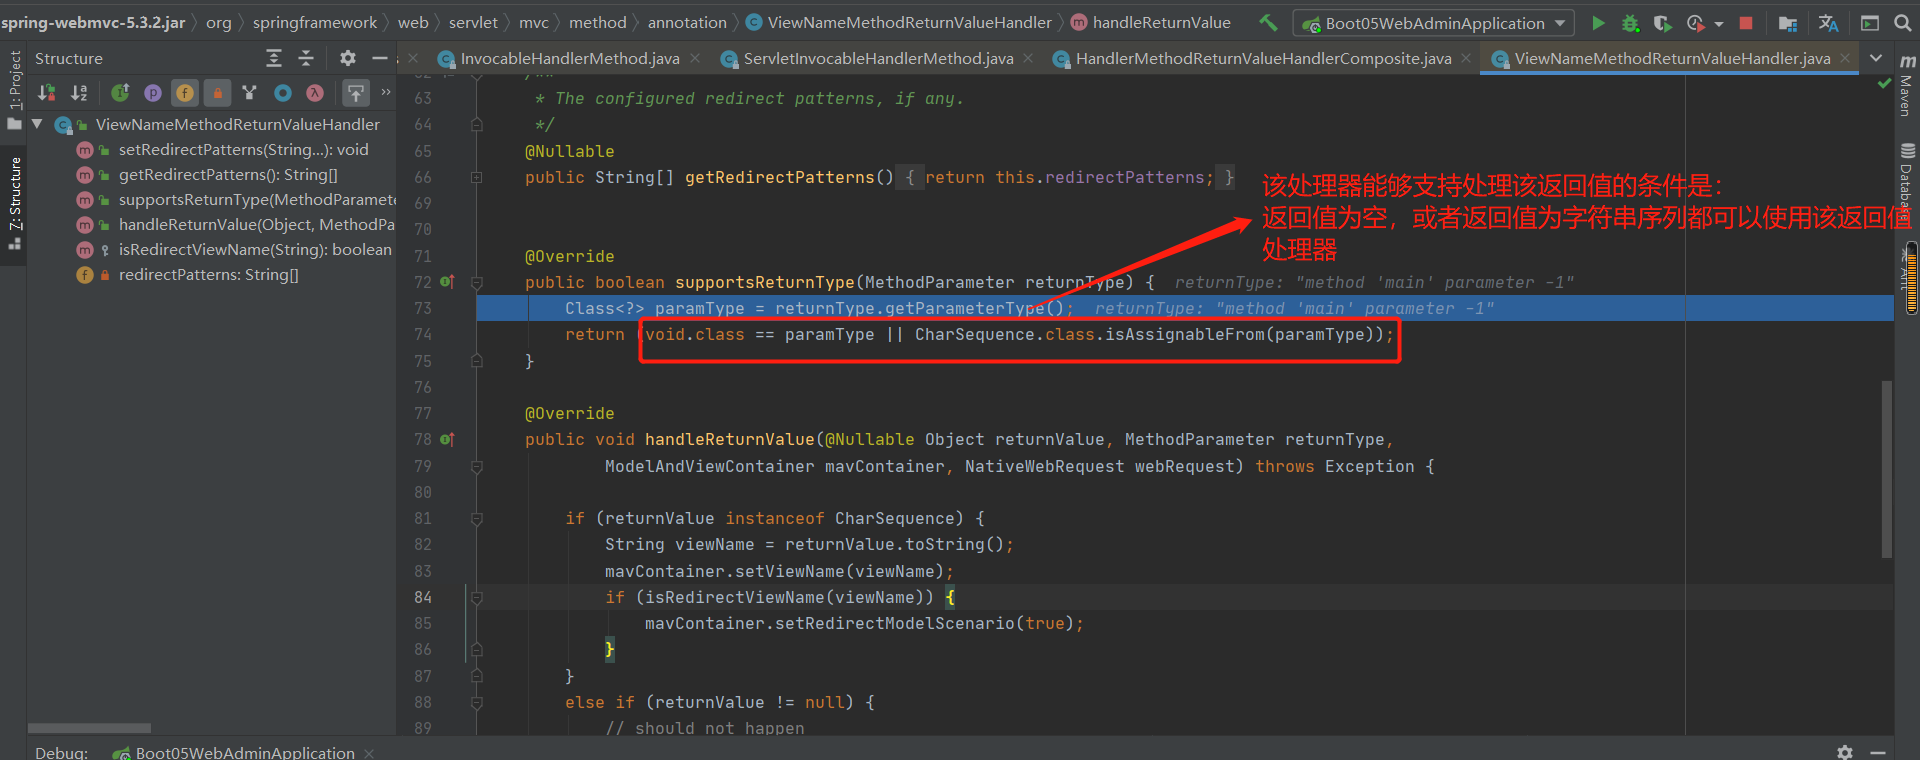
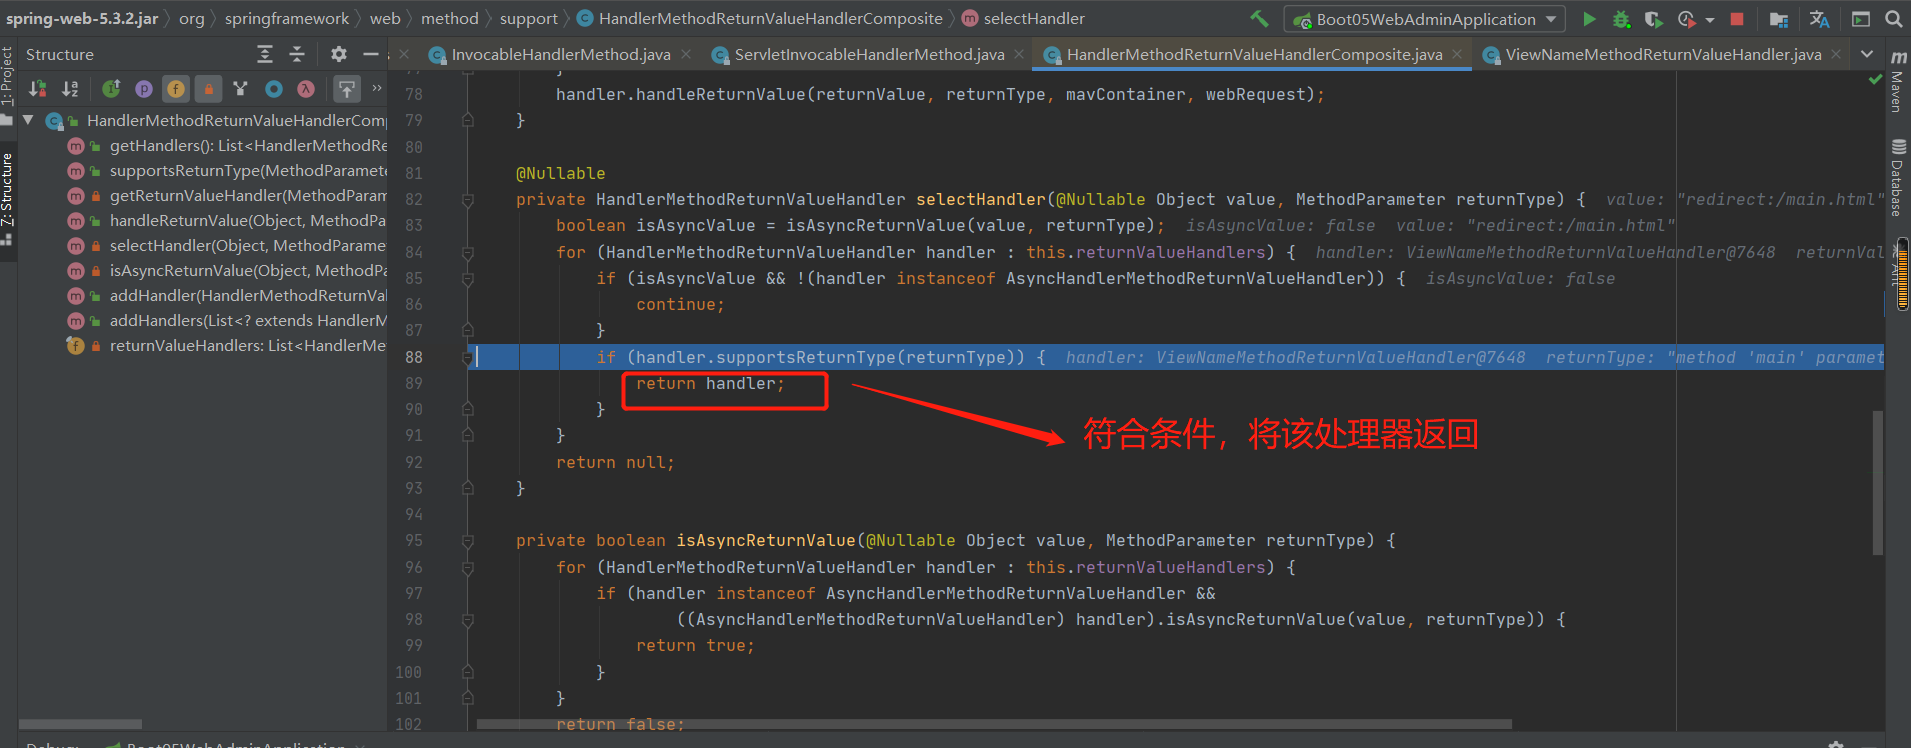
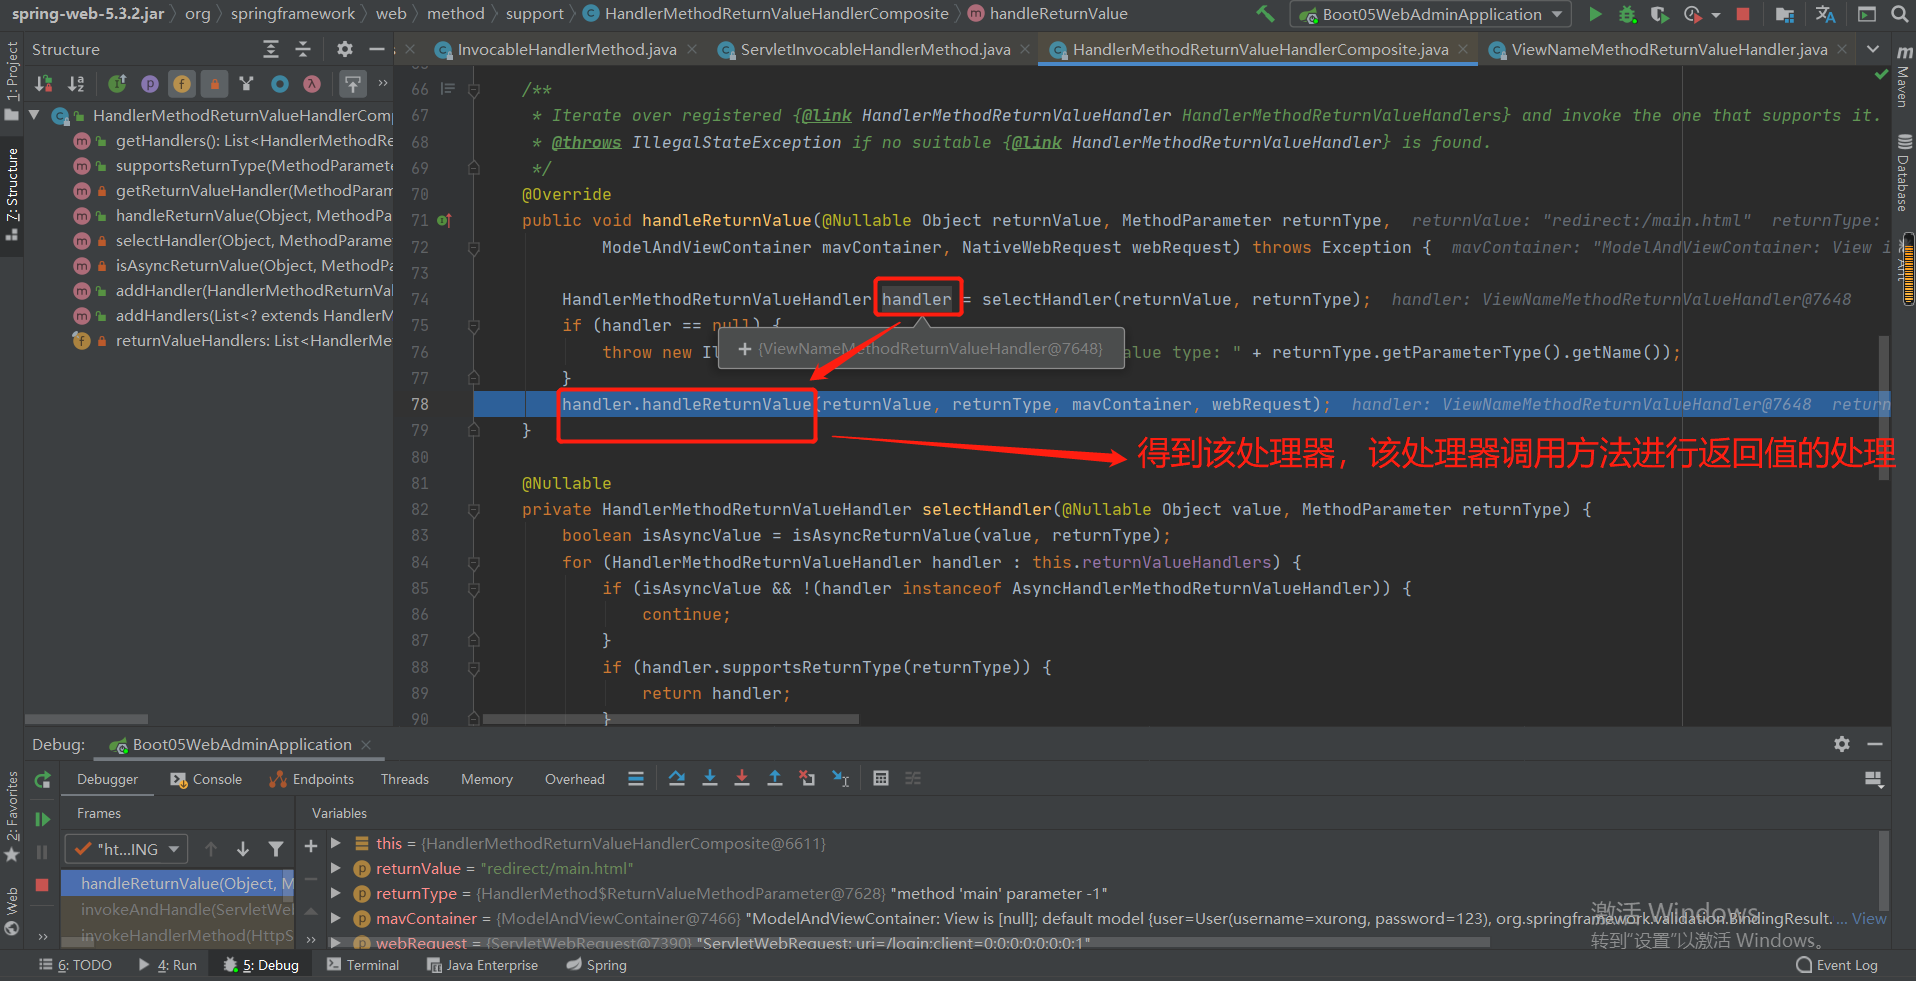
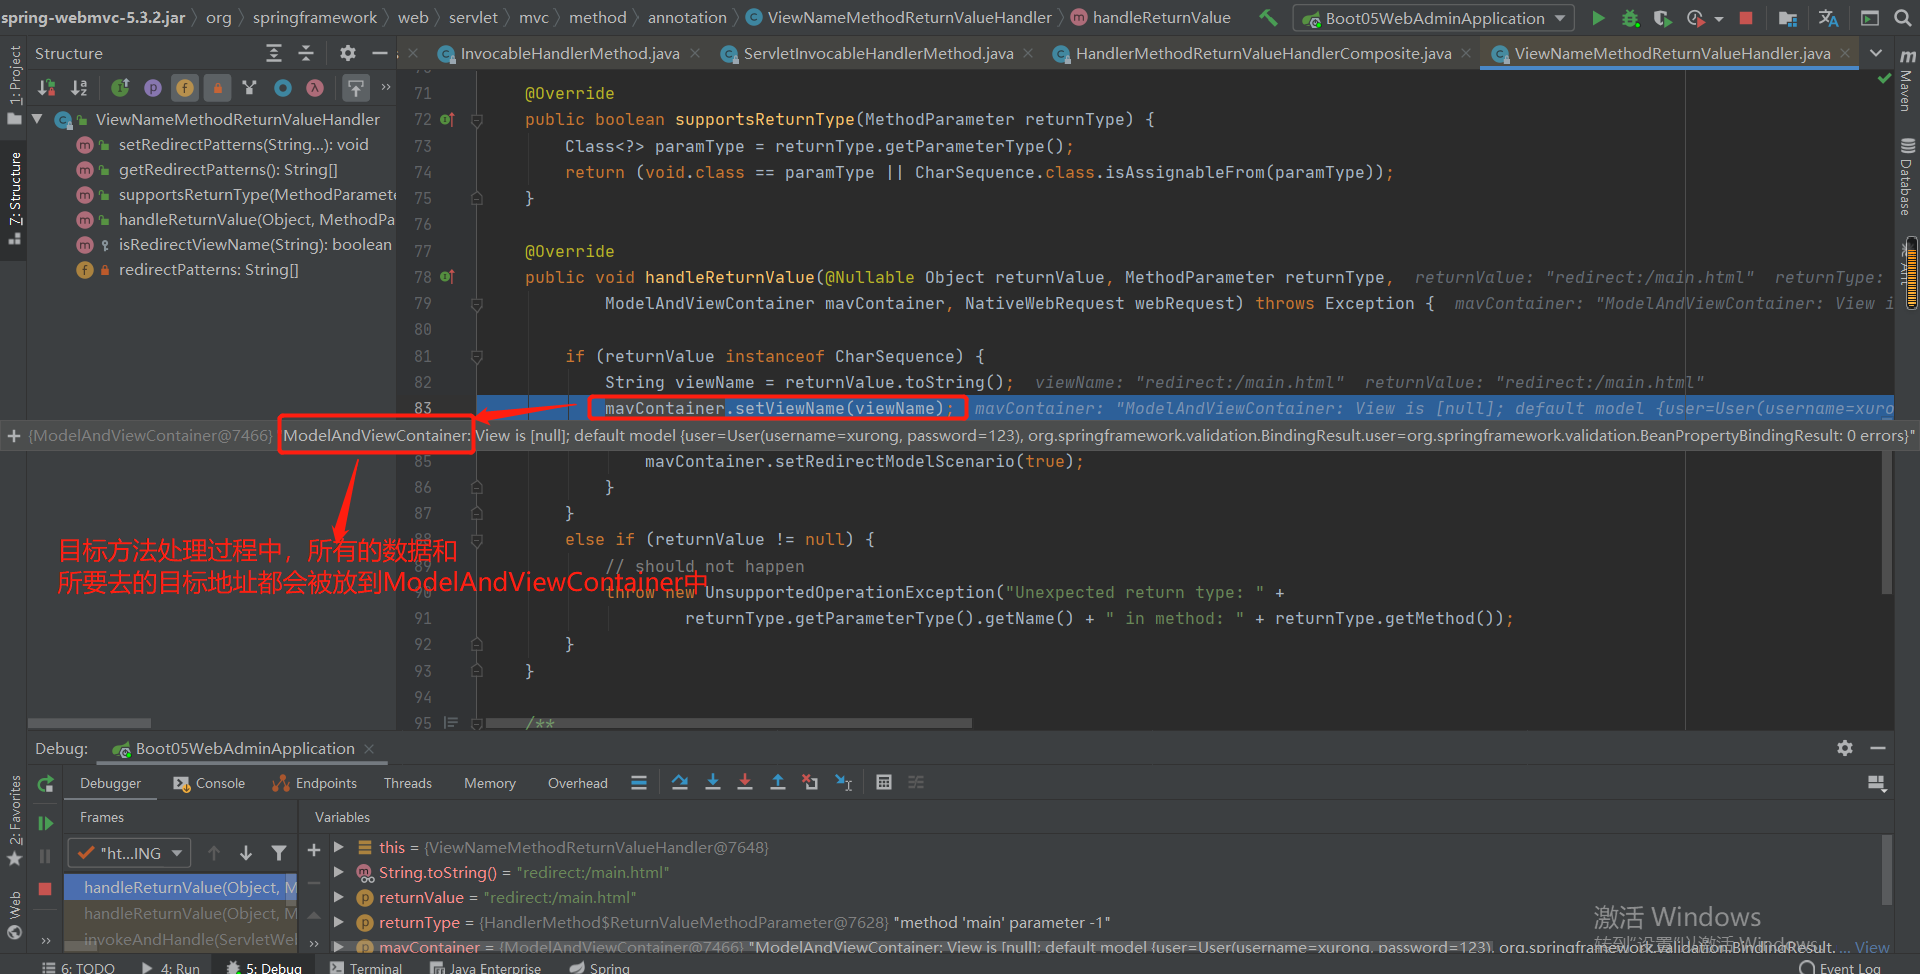
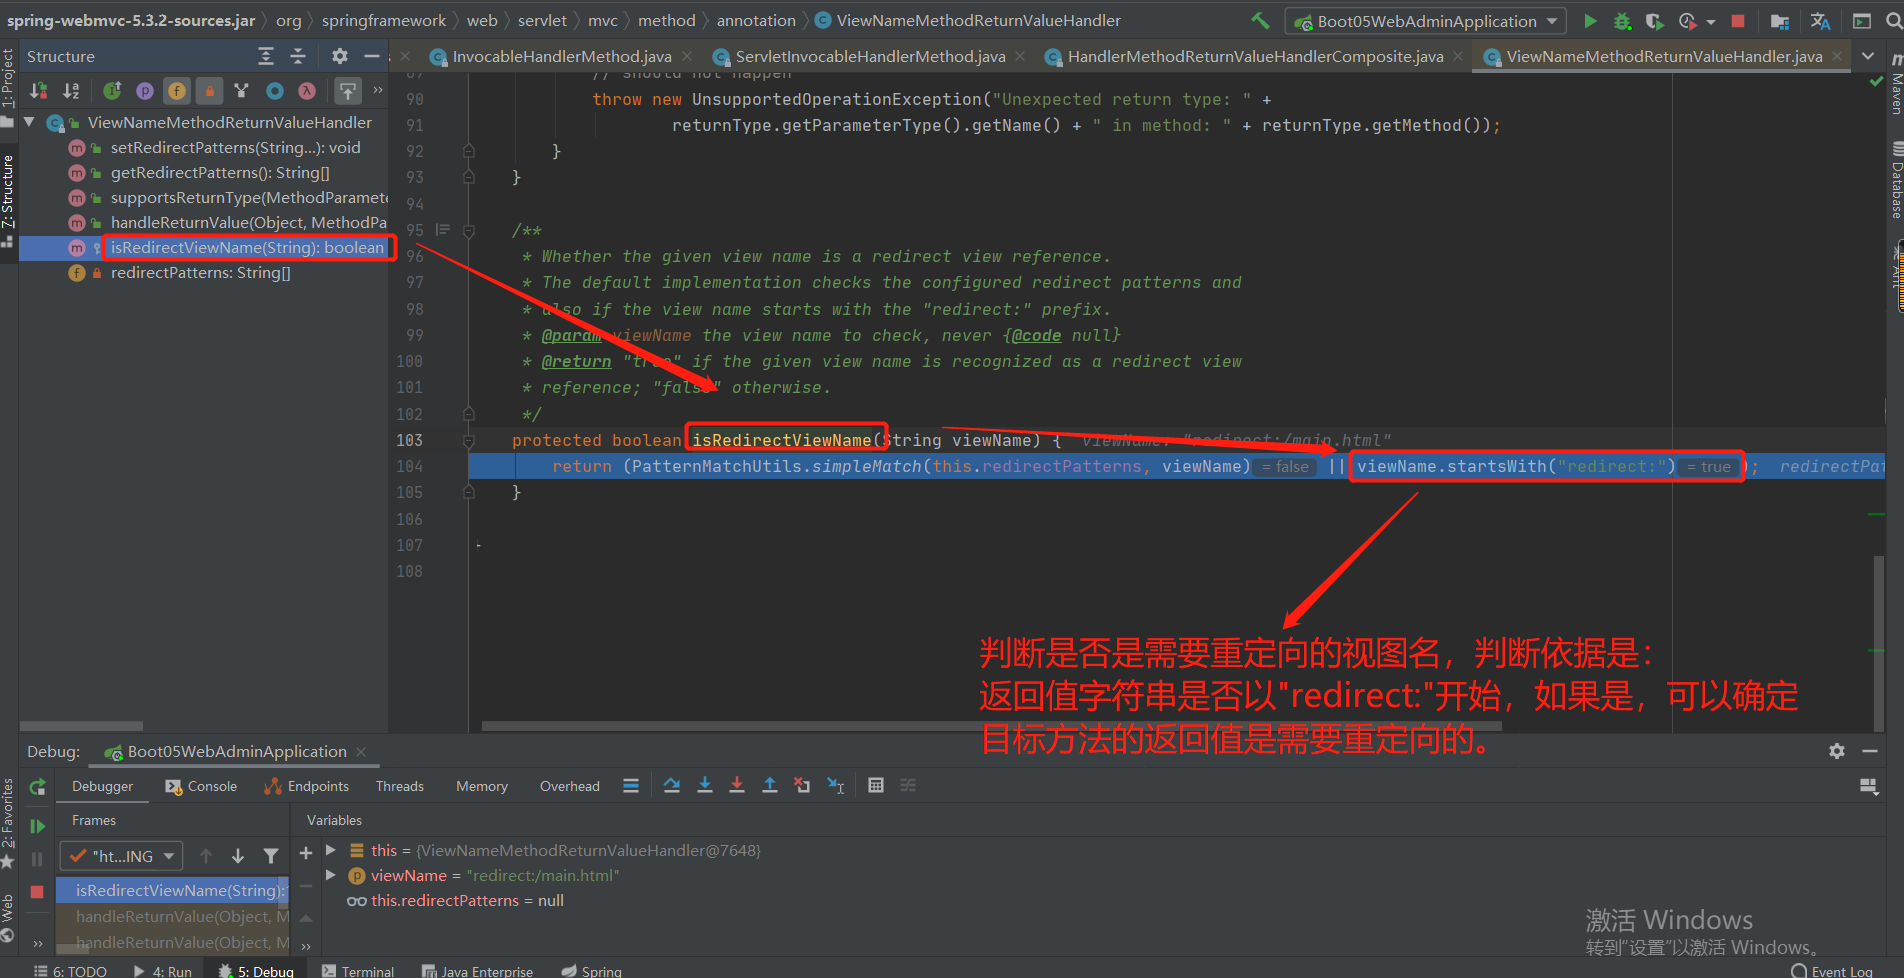
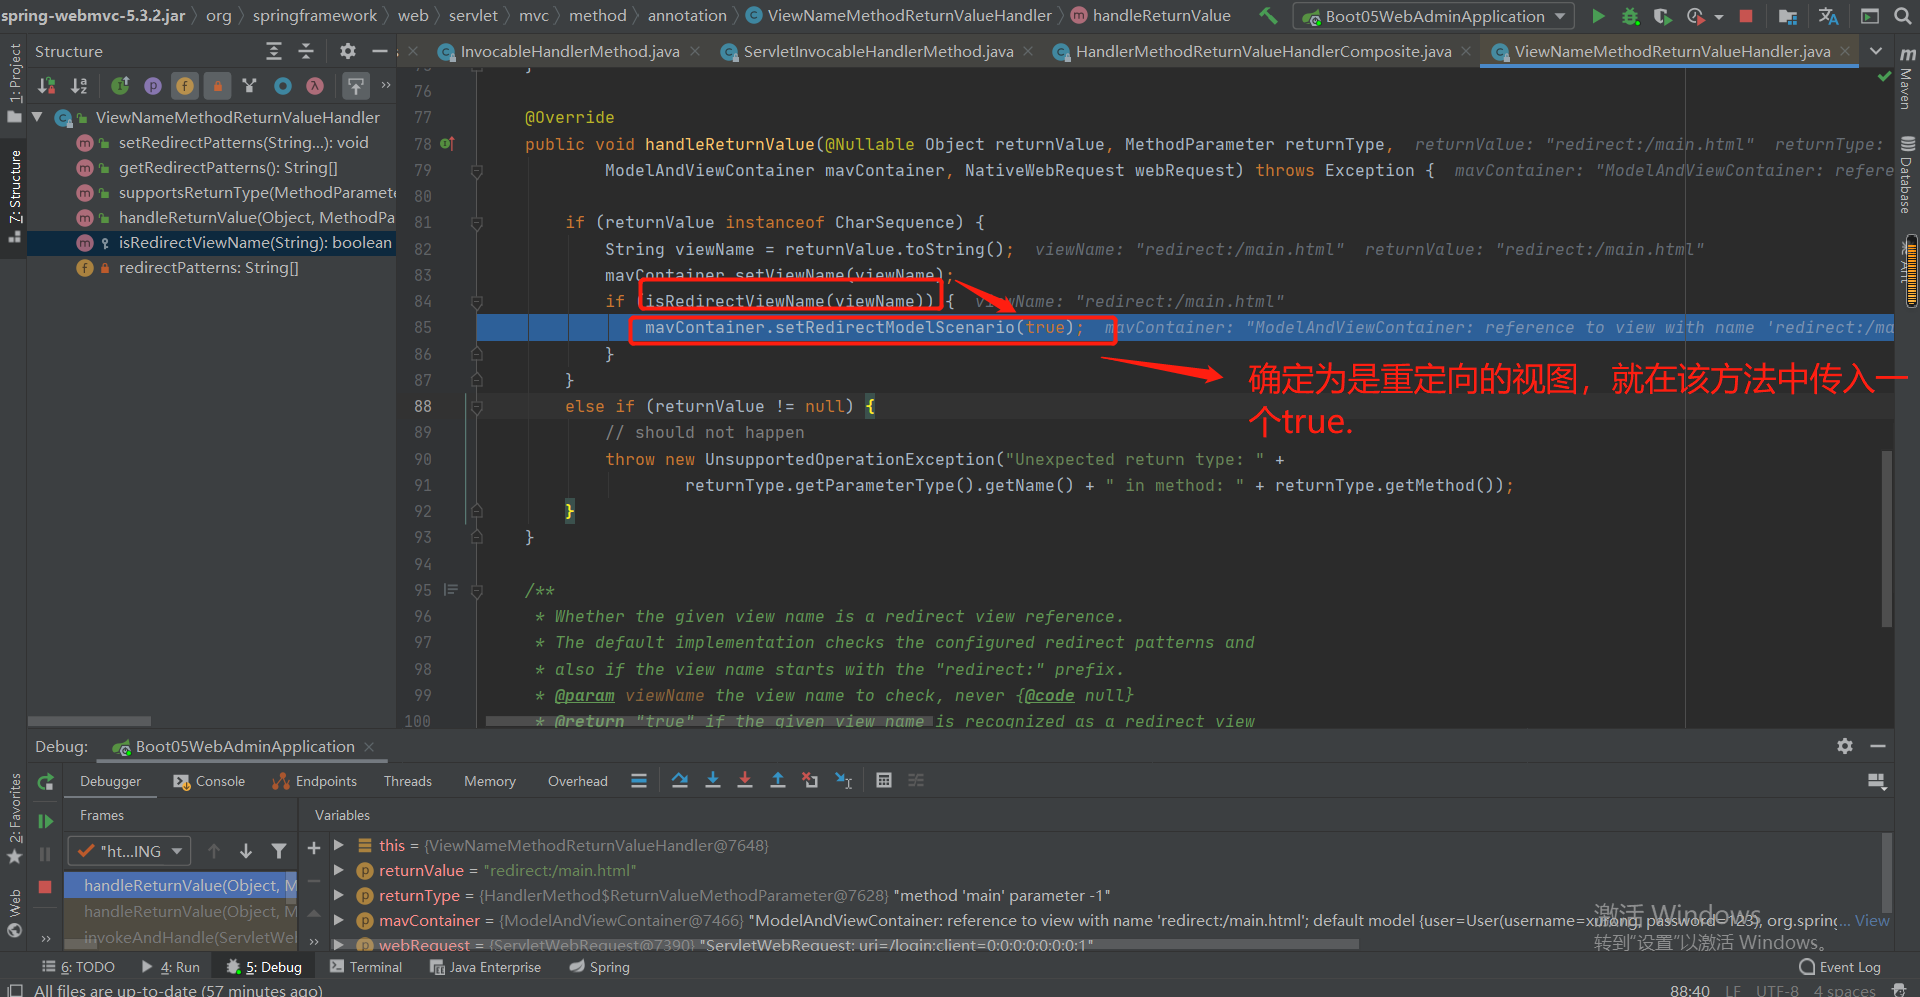
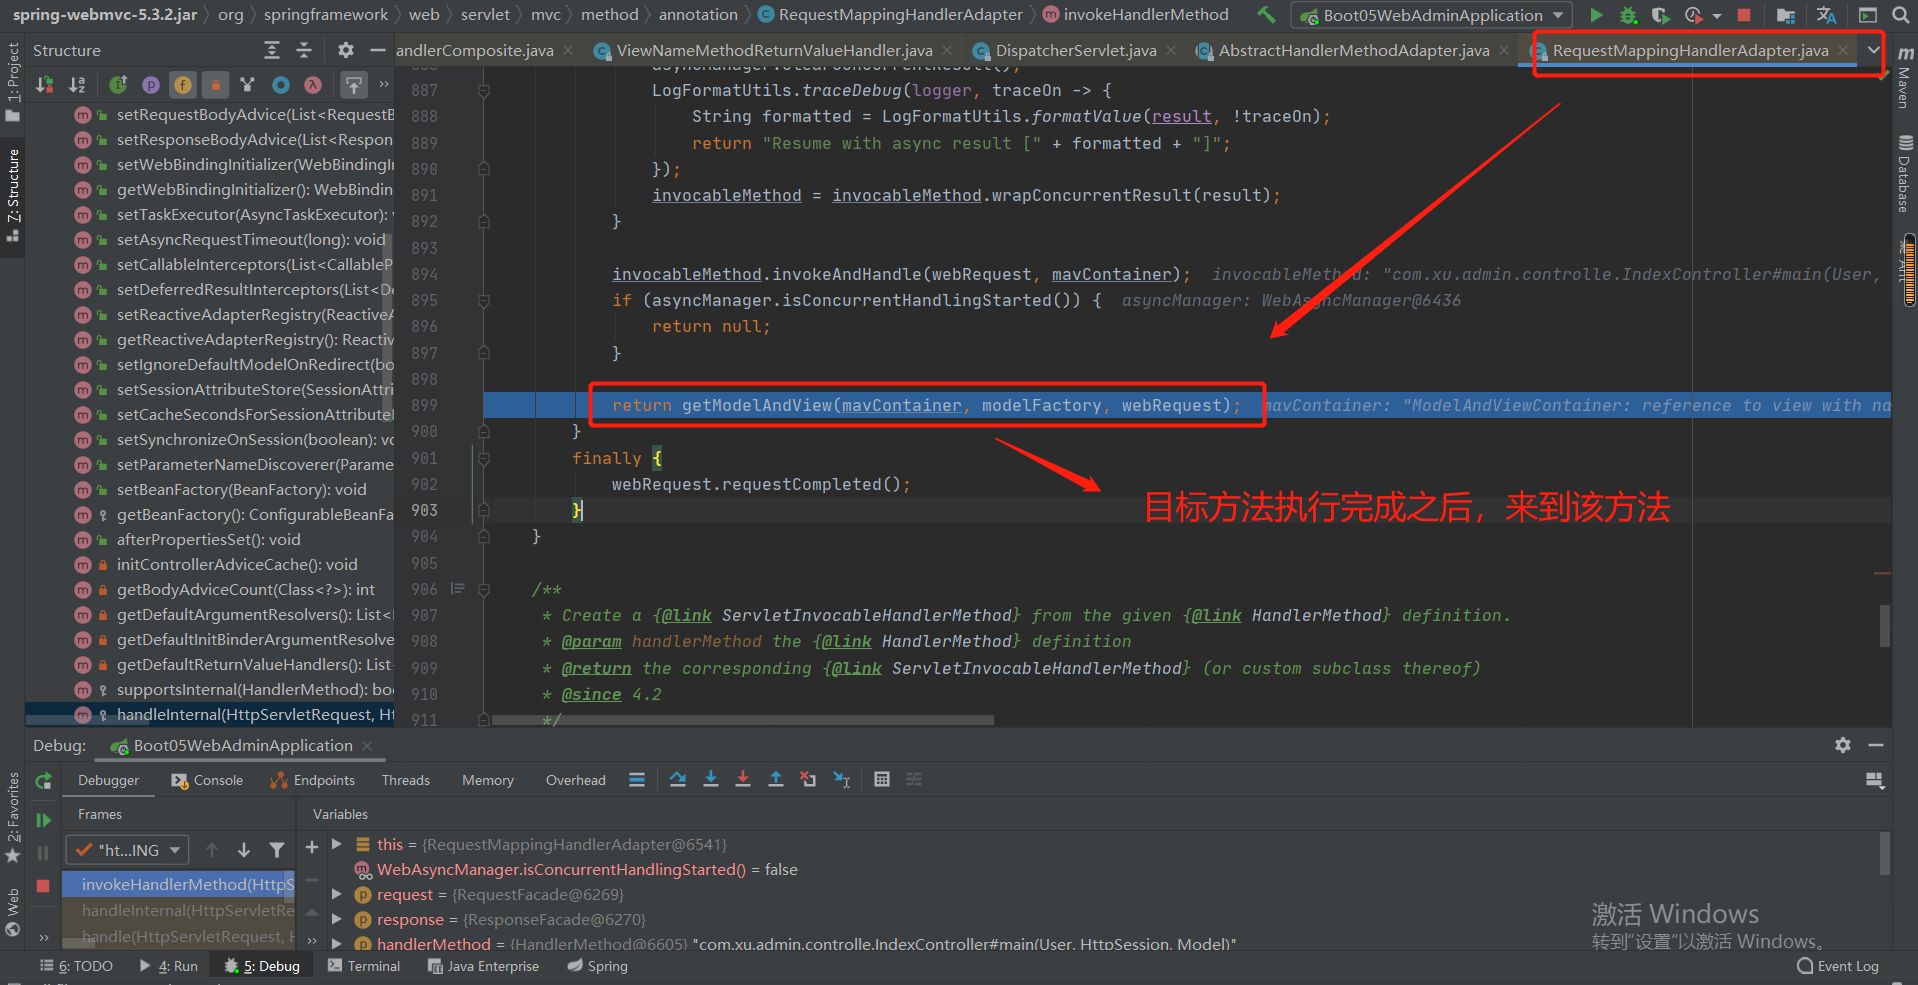
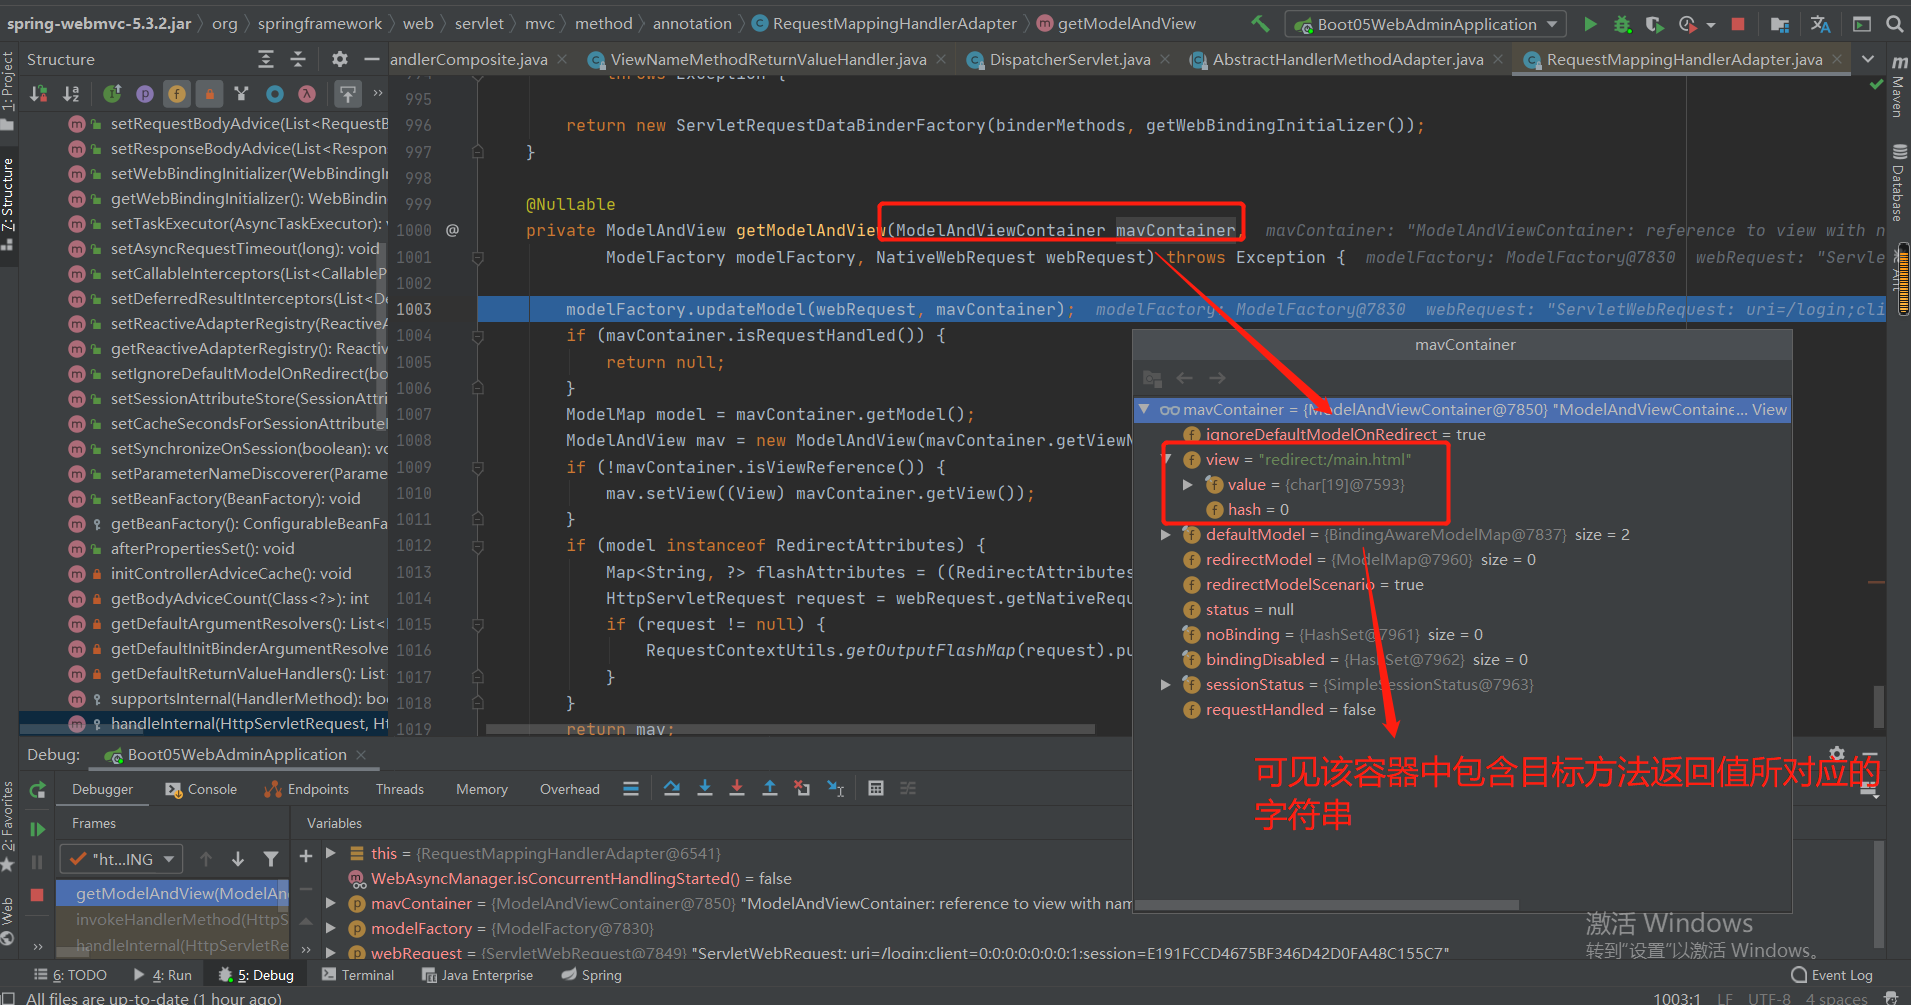
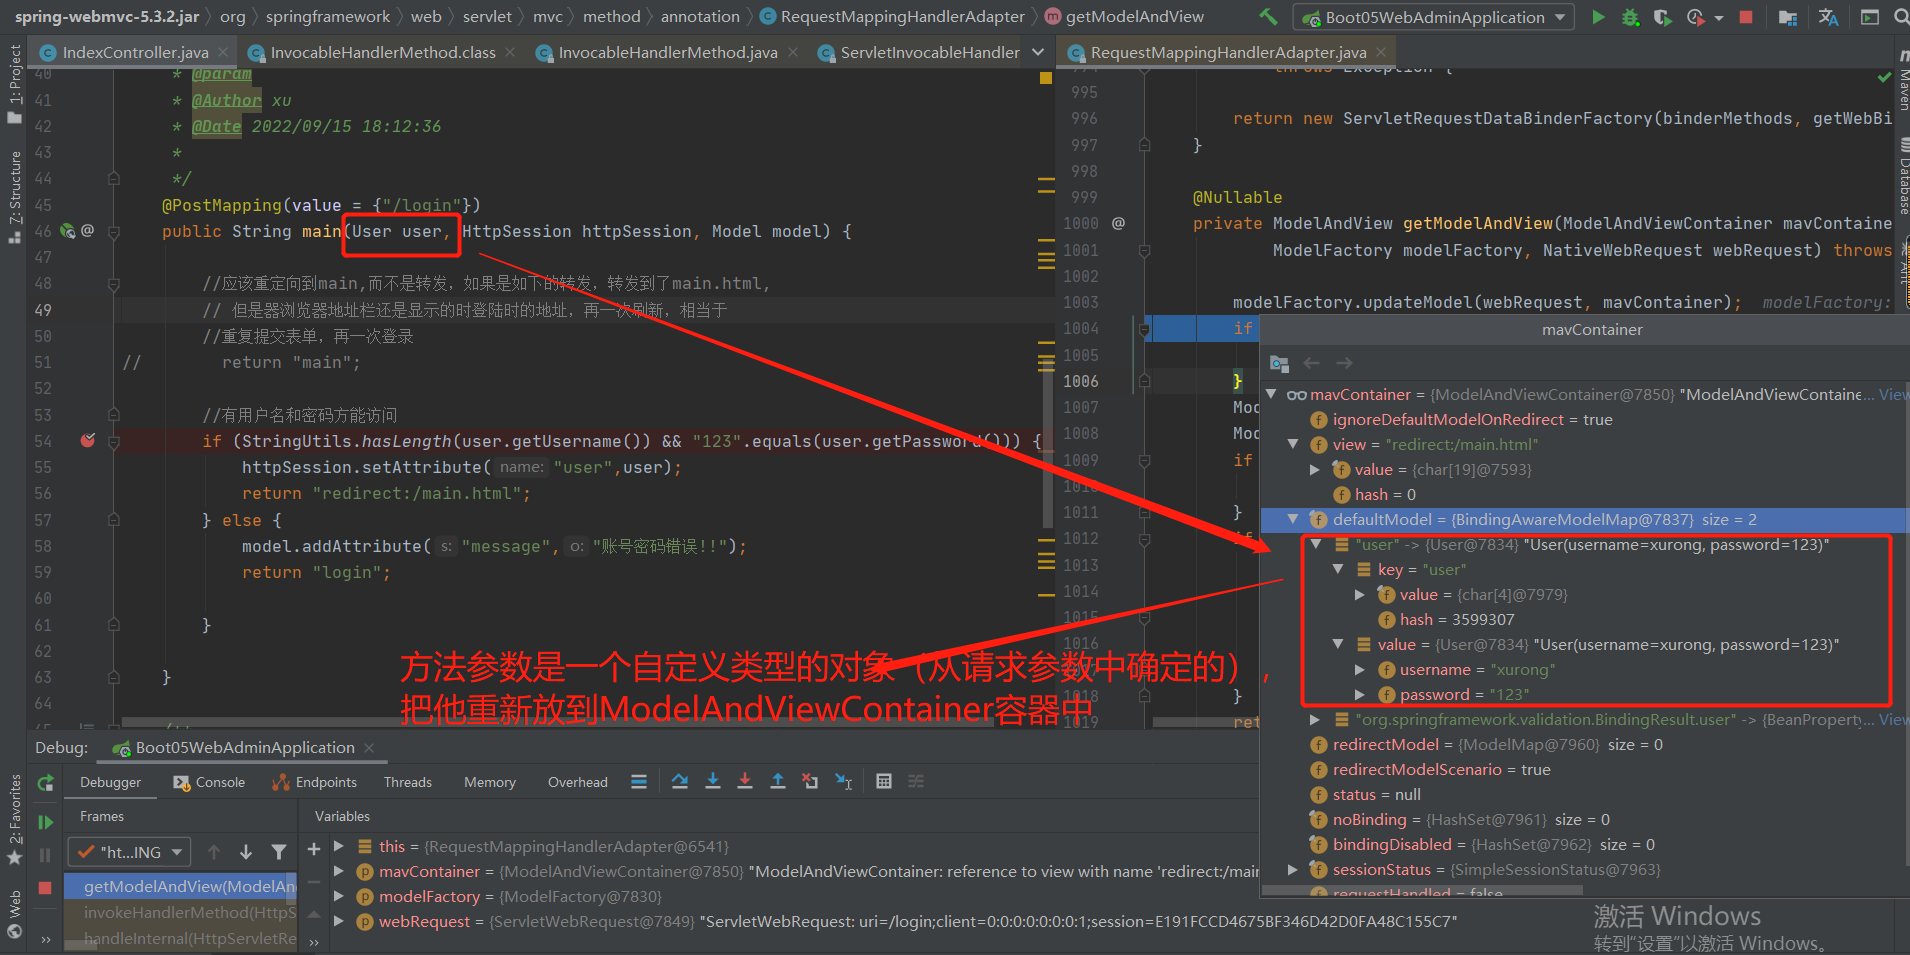
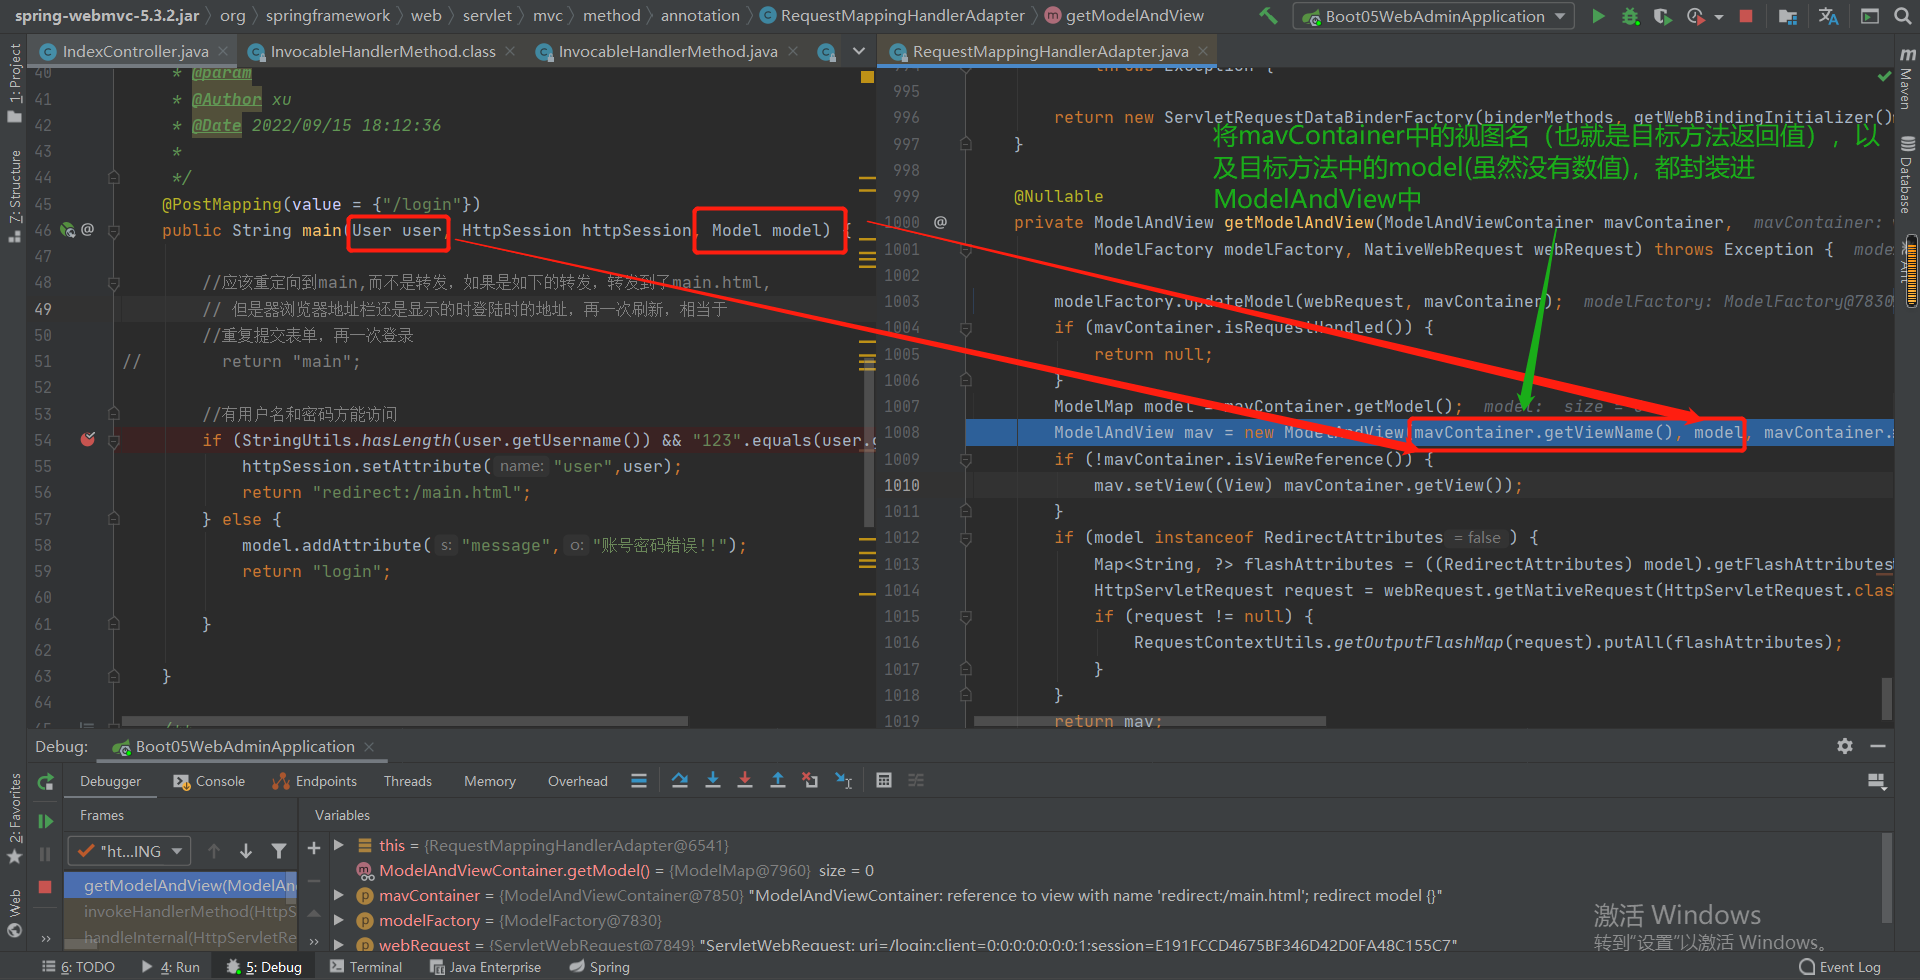
补充:都封装到ModelAndView对象中。
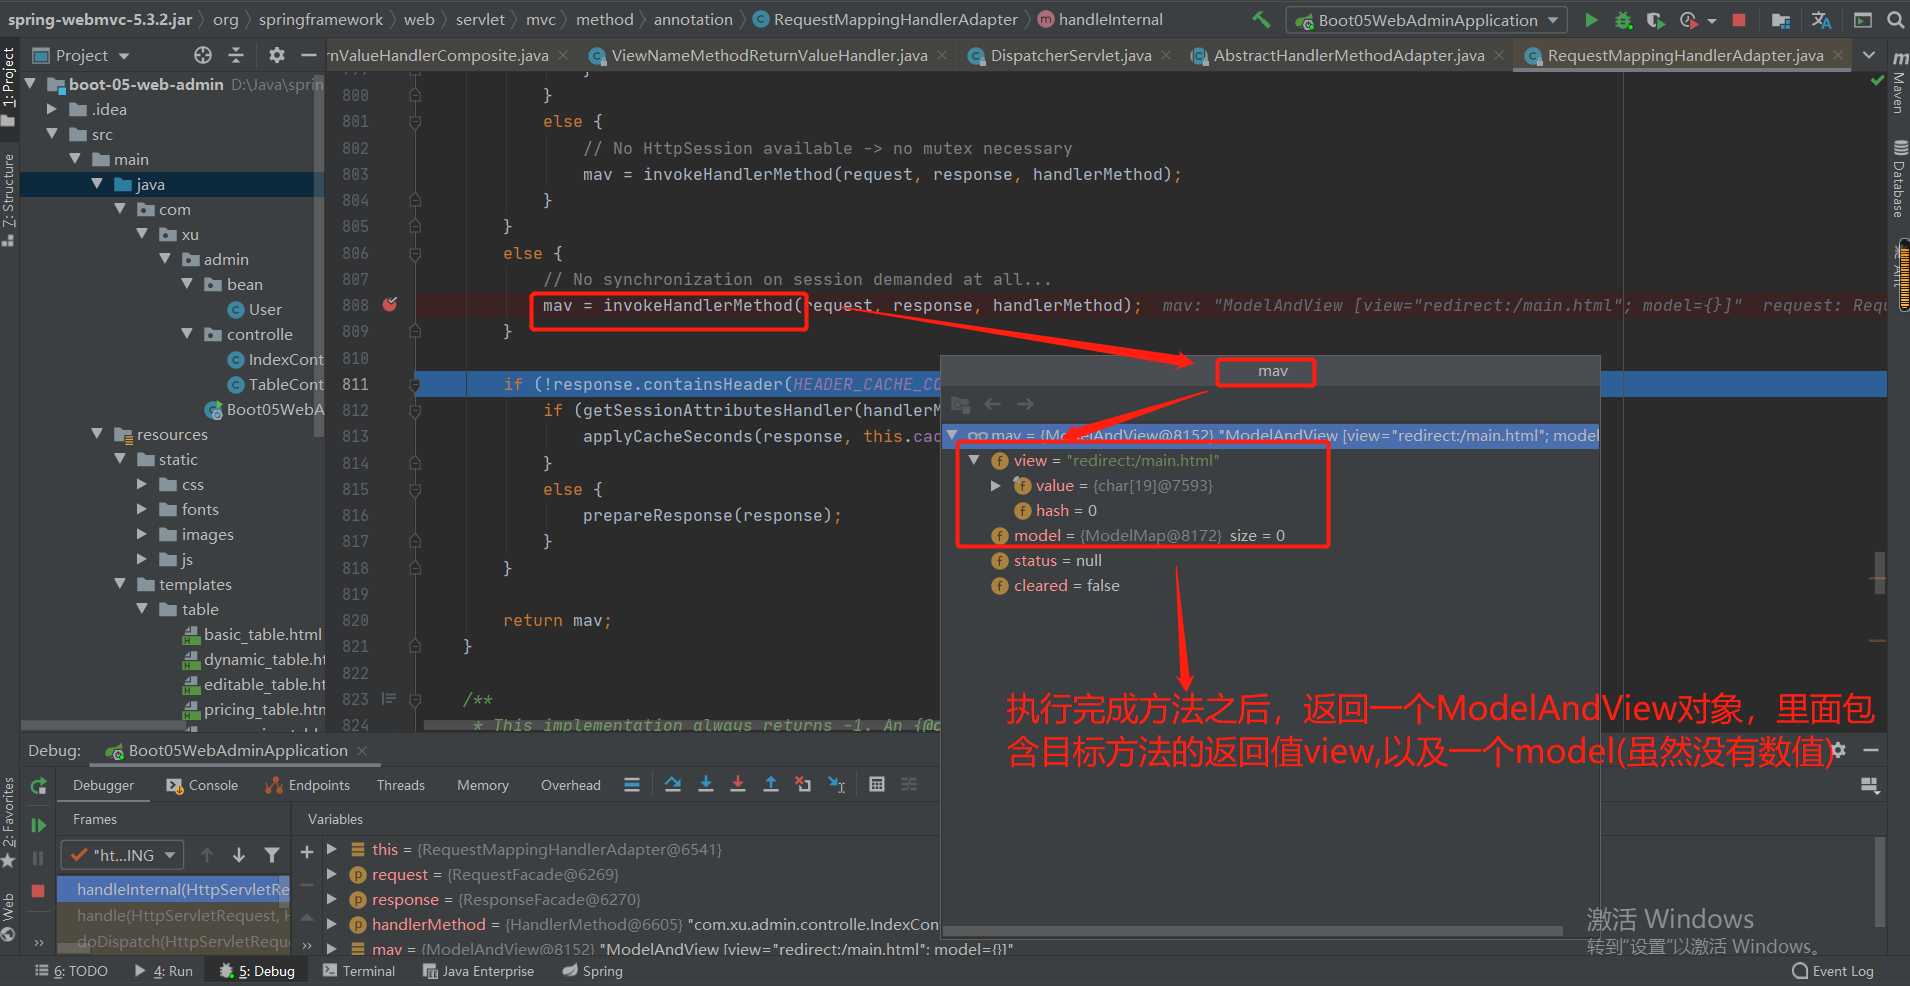
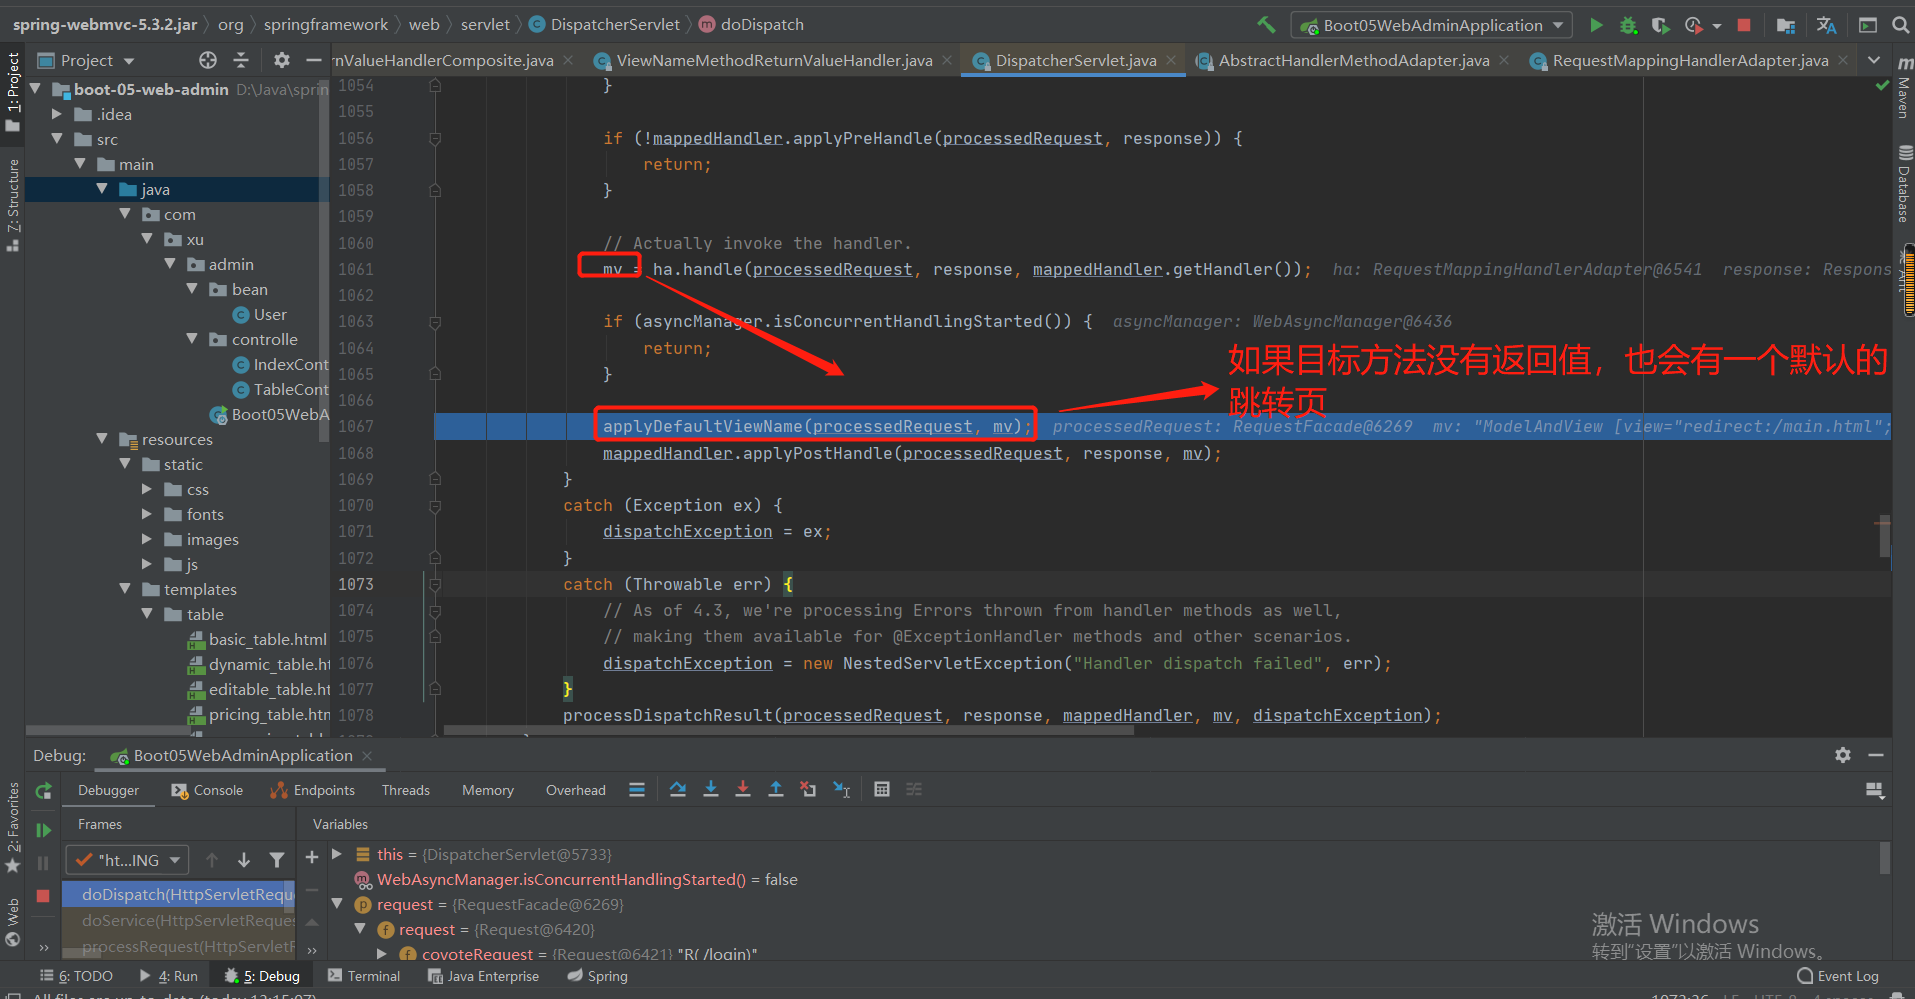
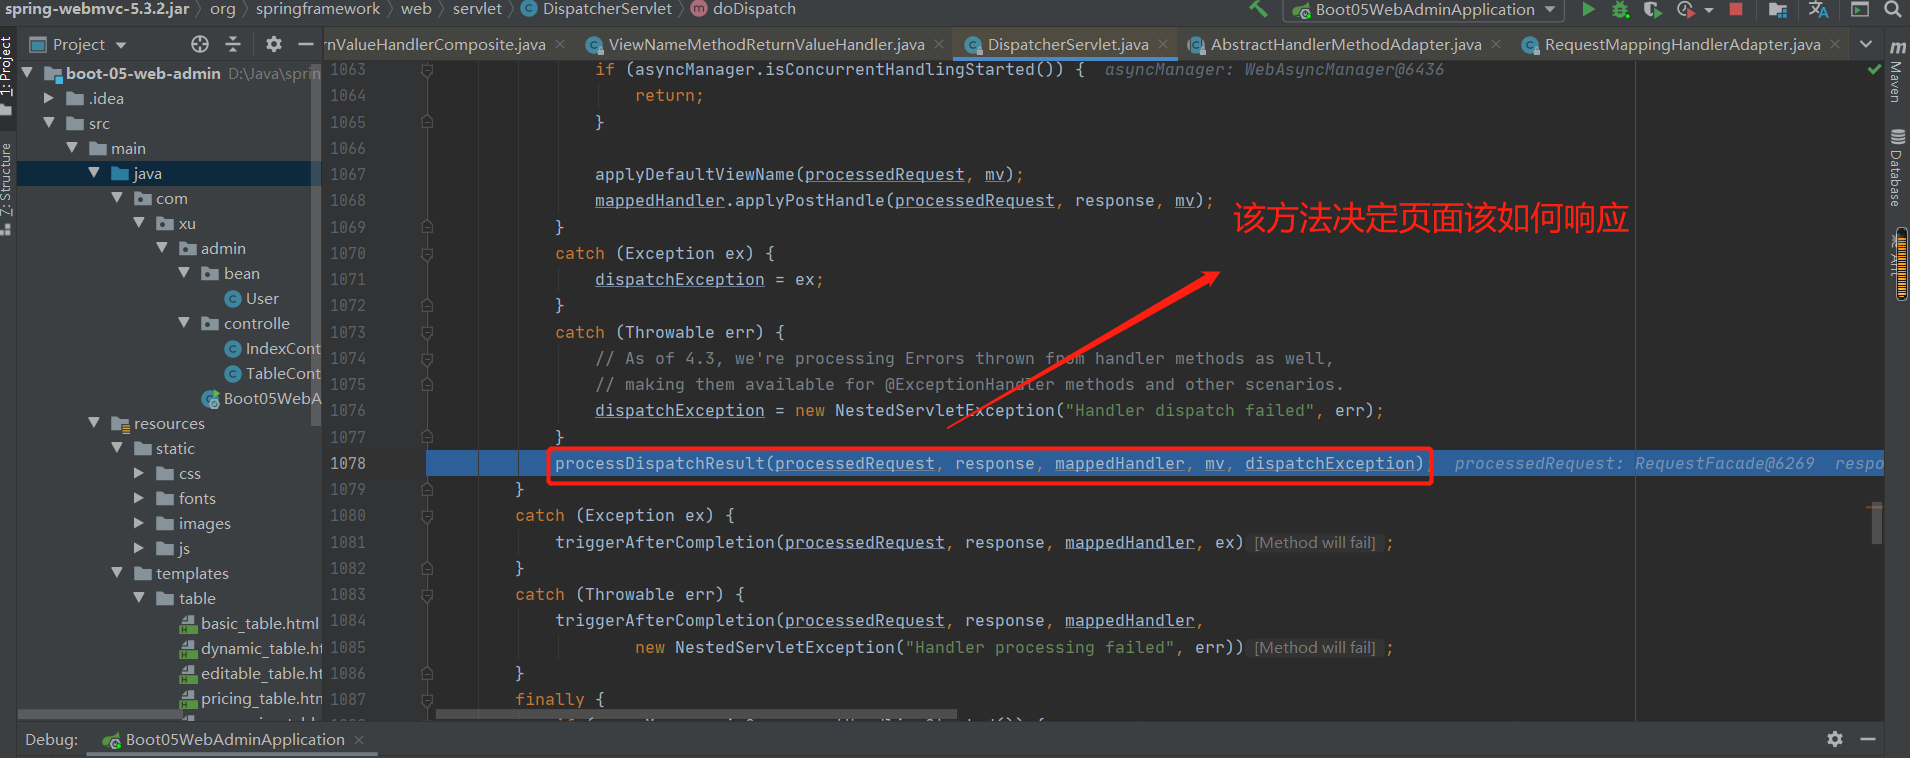
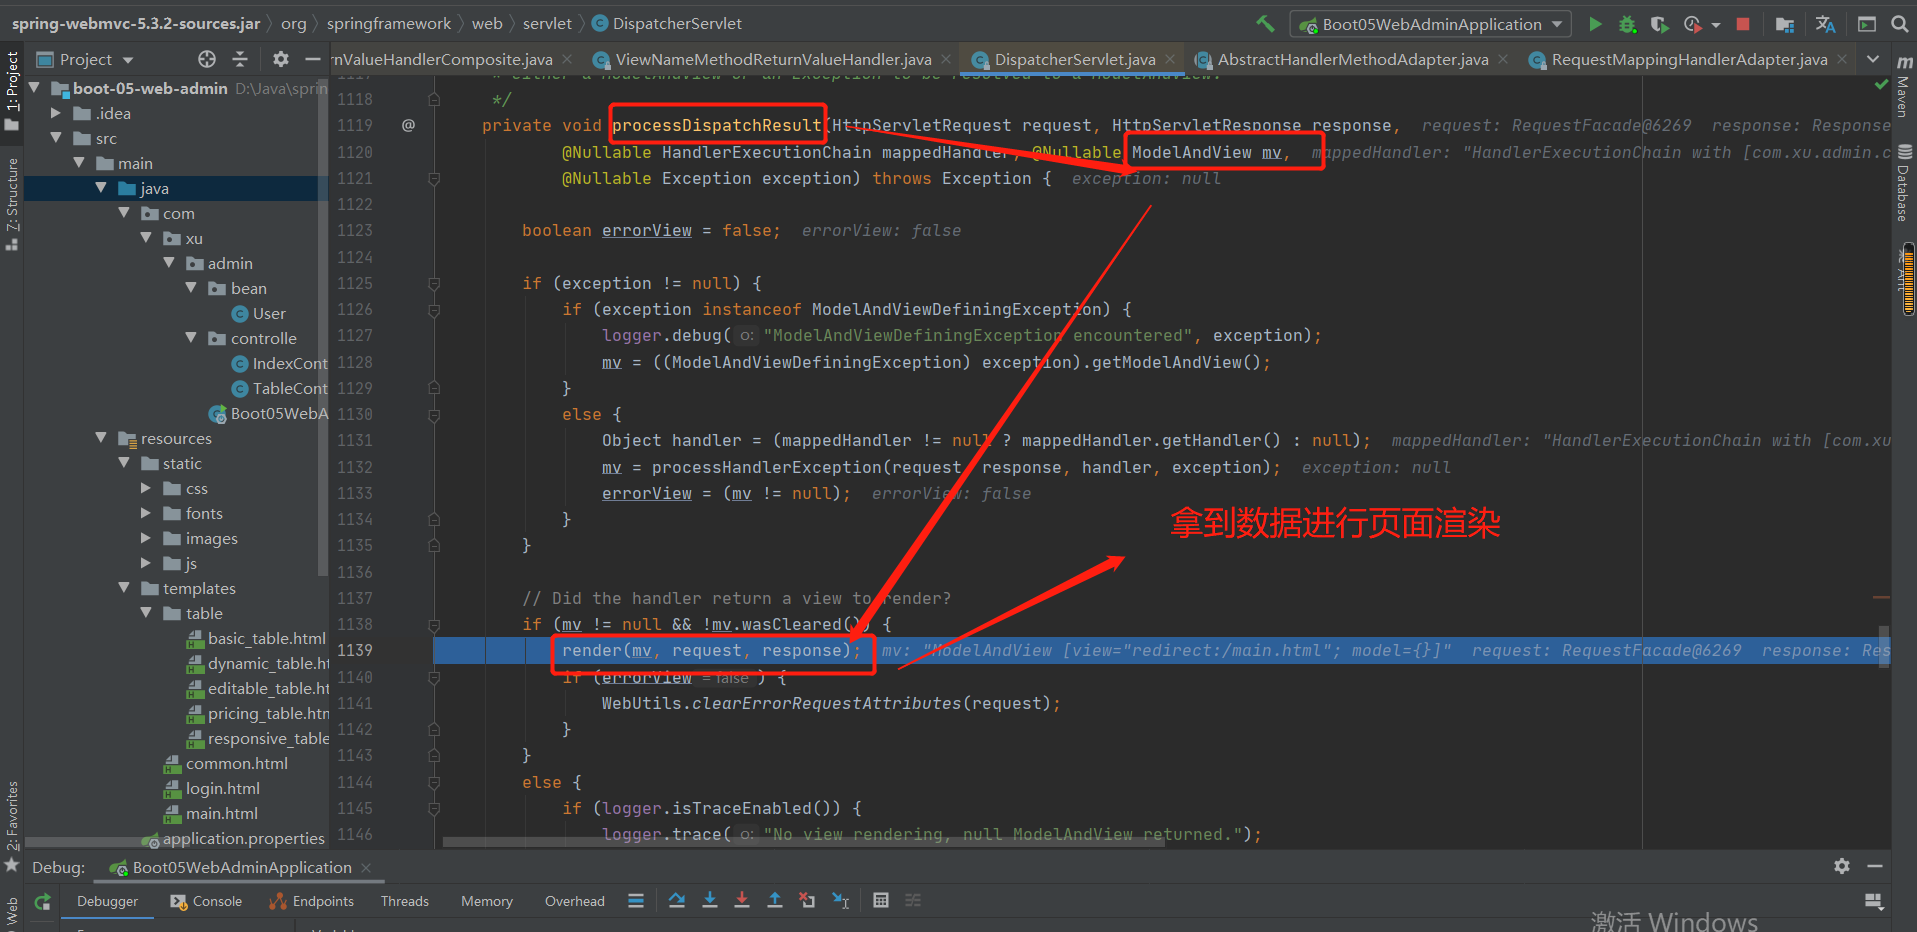
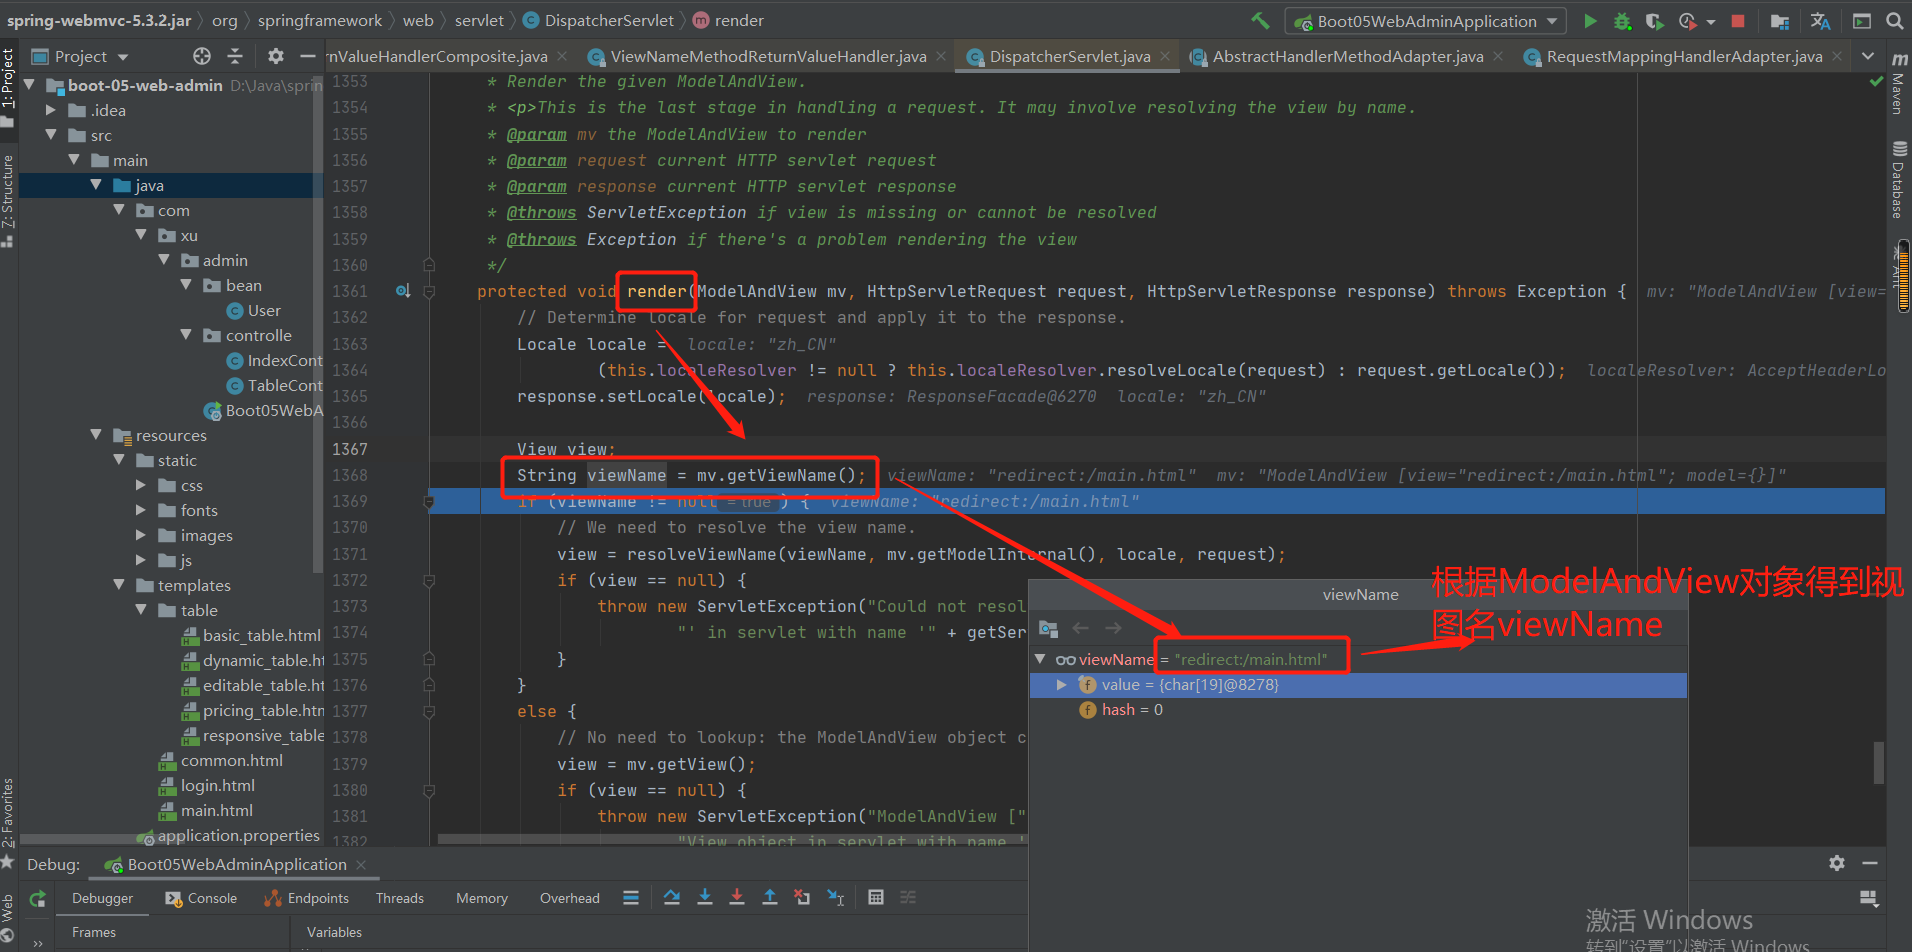
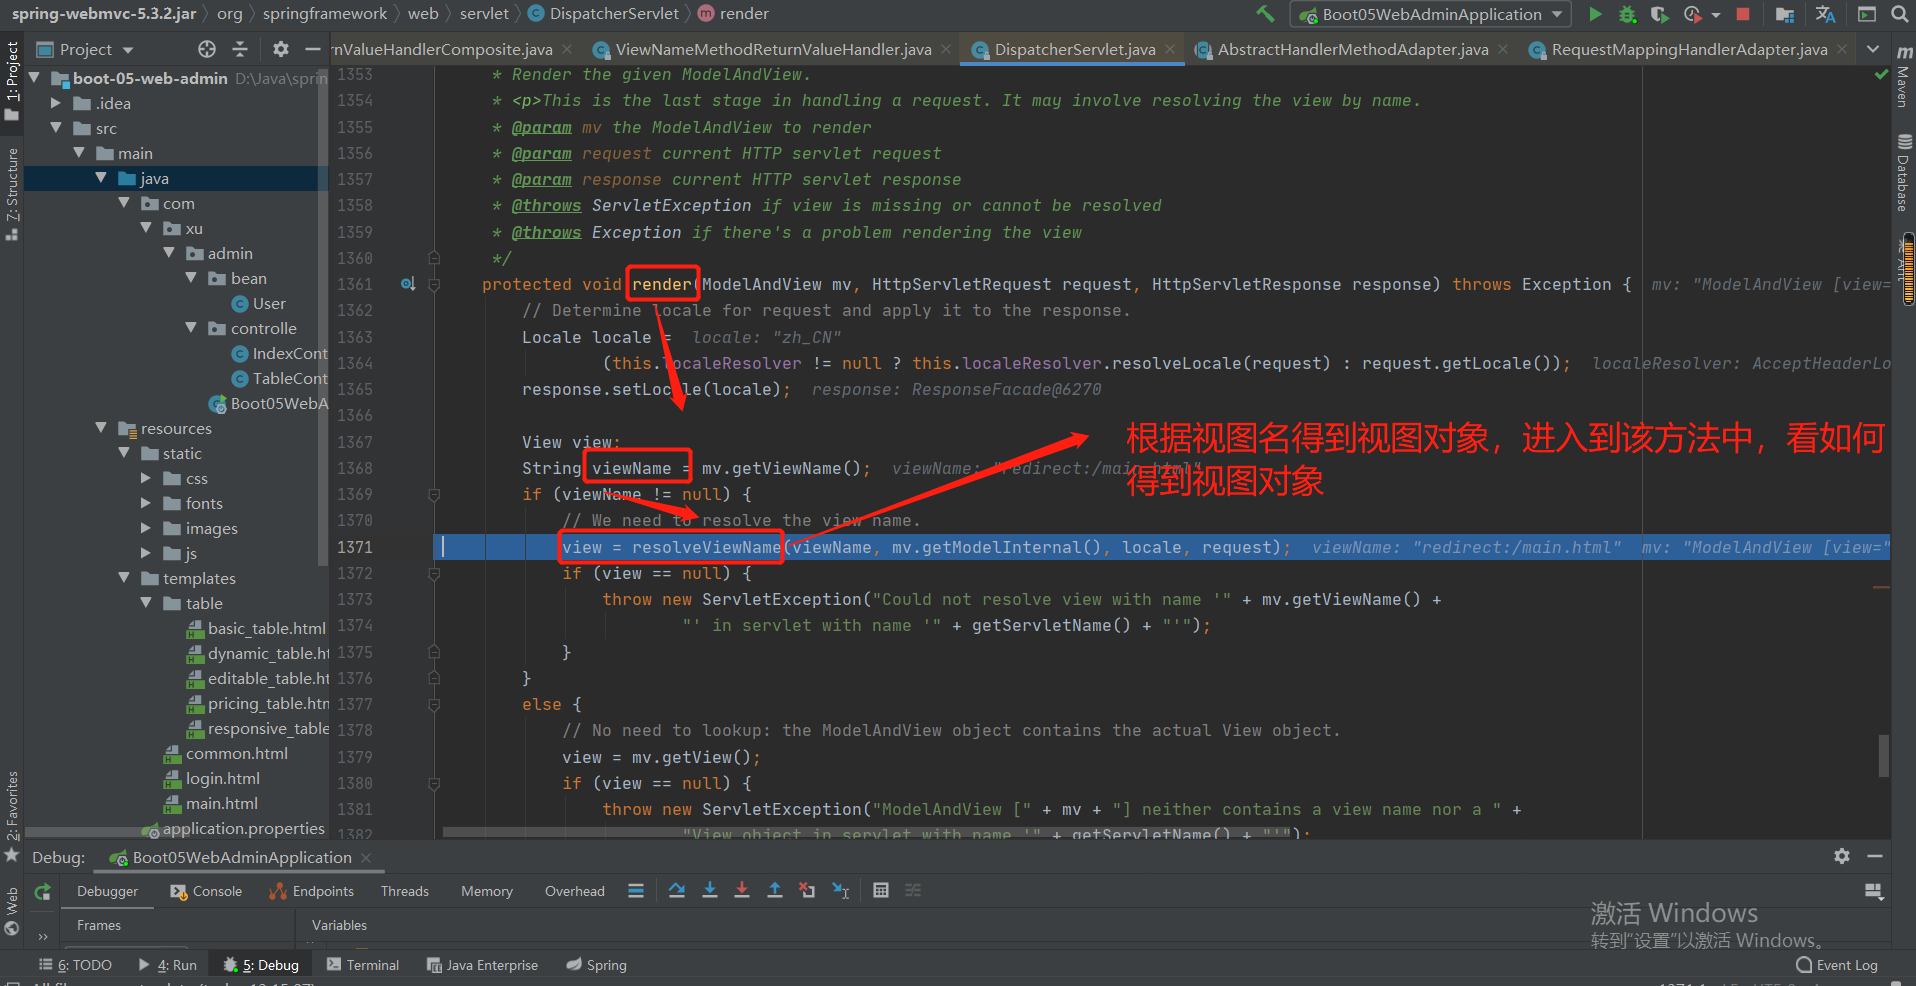
视图解析器解析得到视图对象:
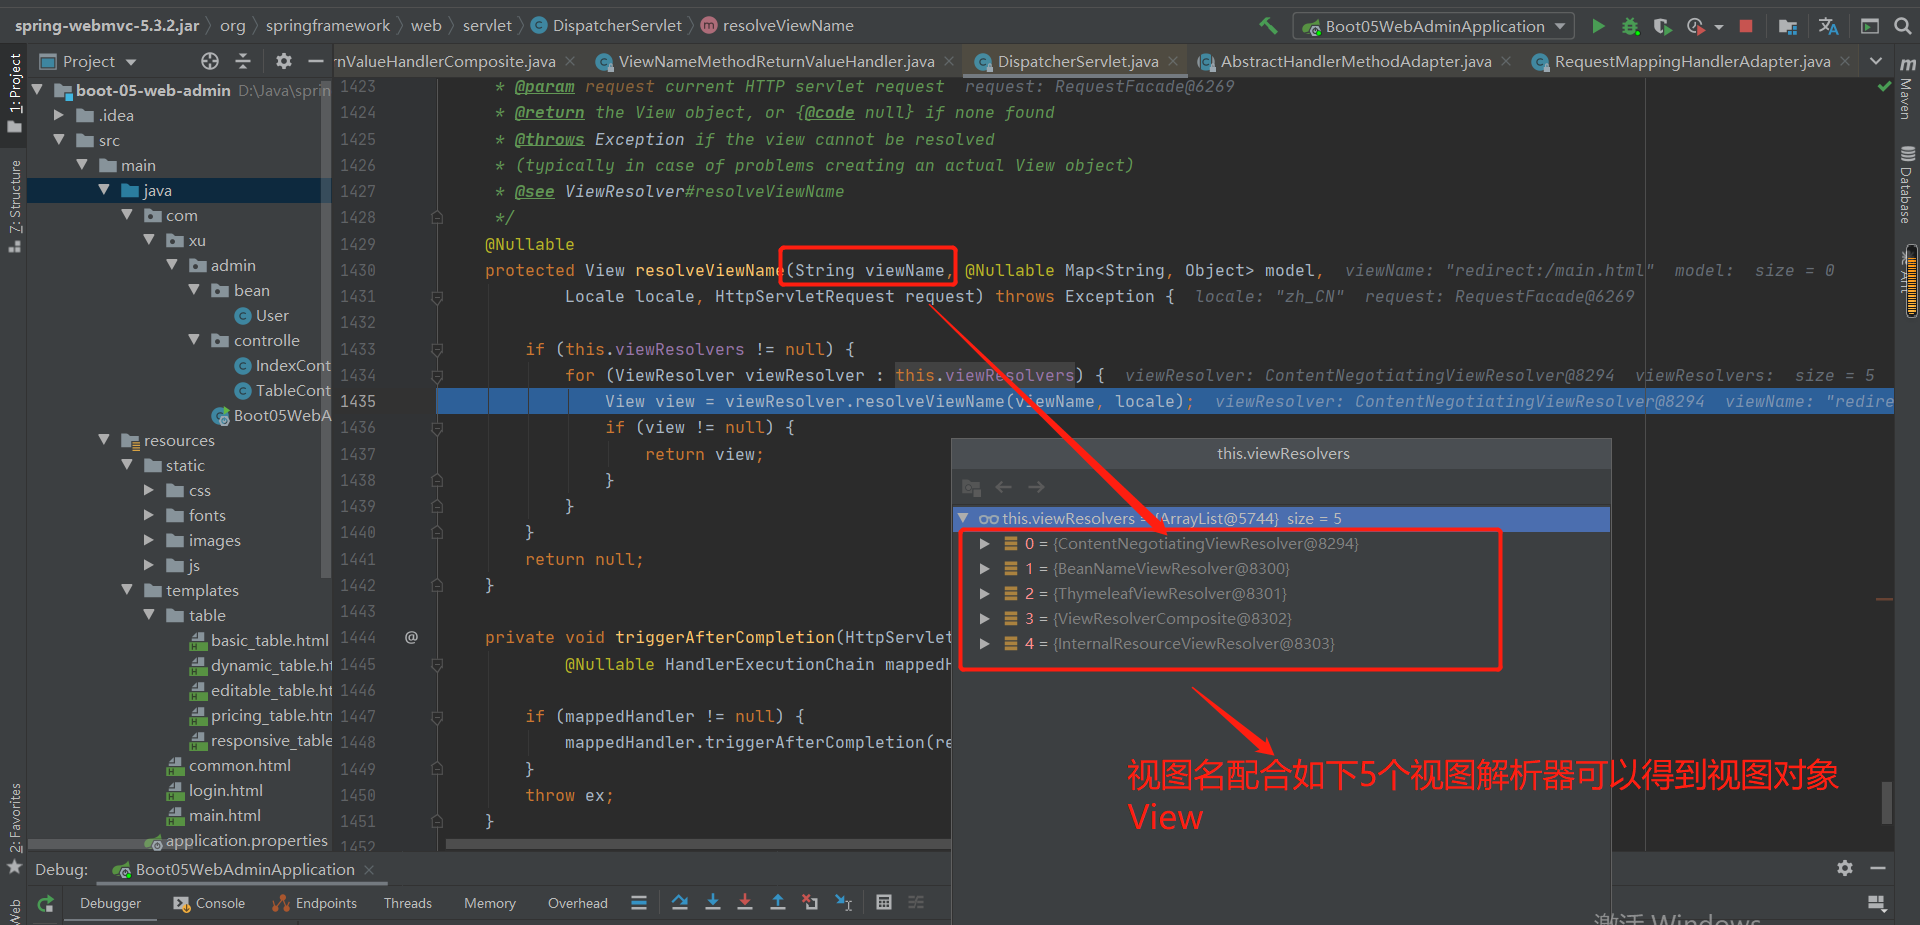
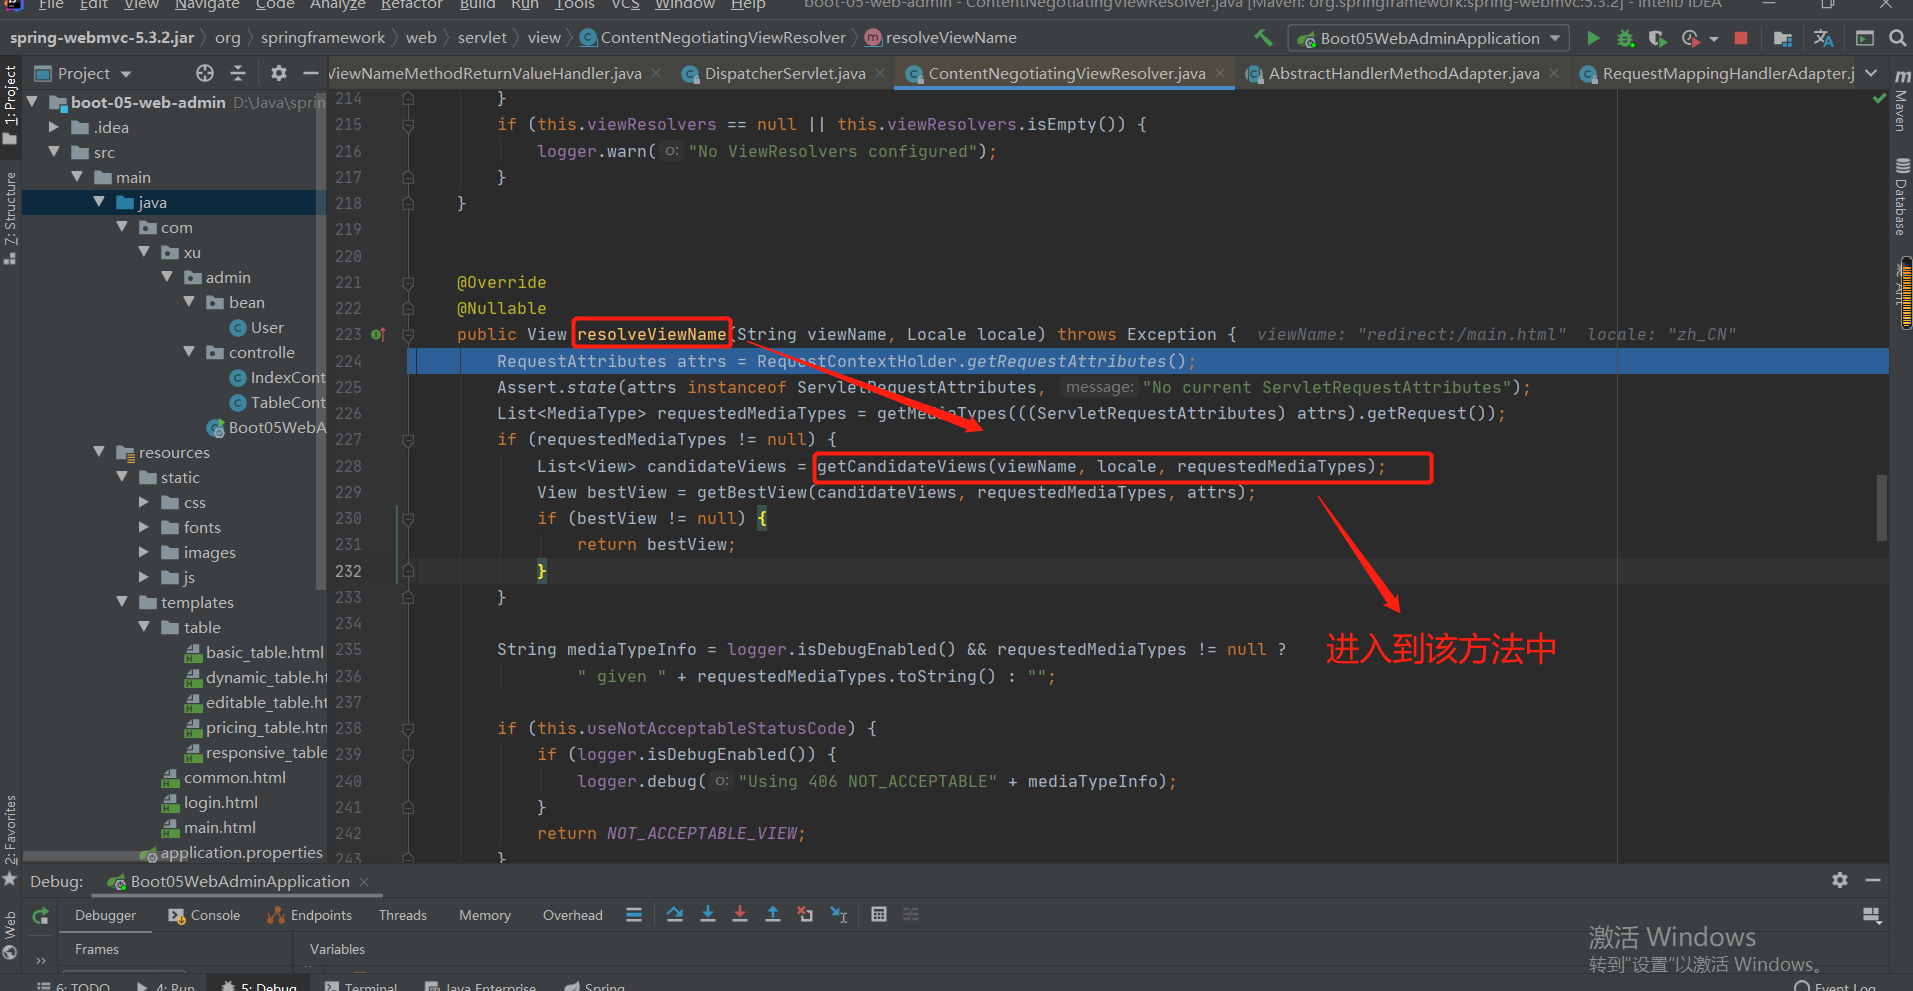
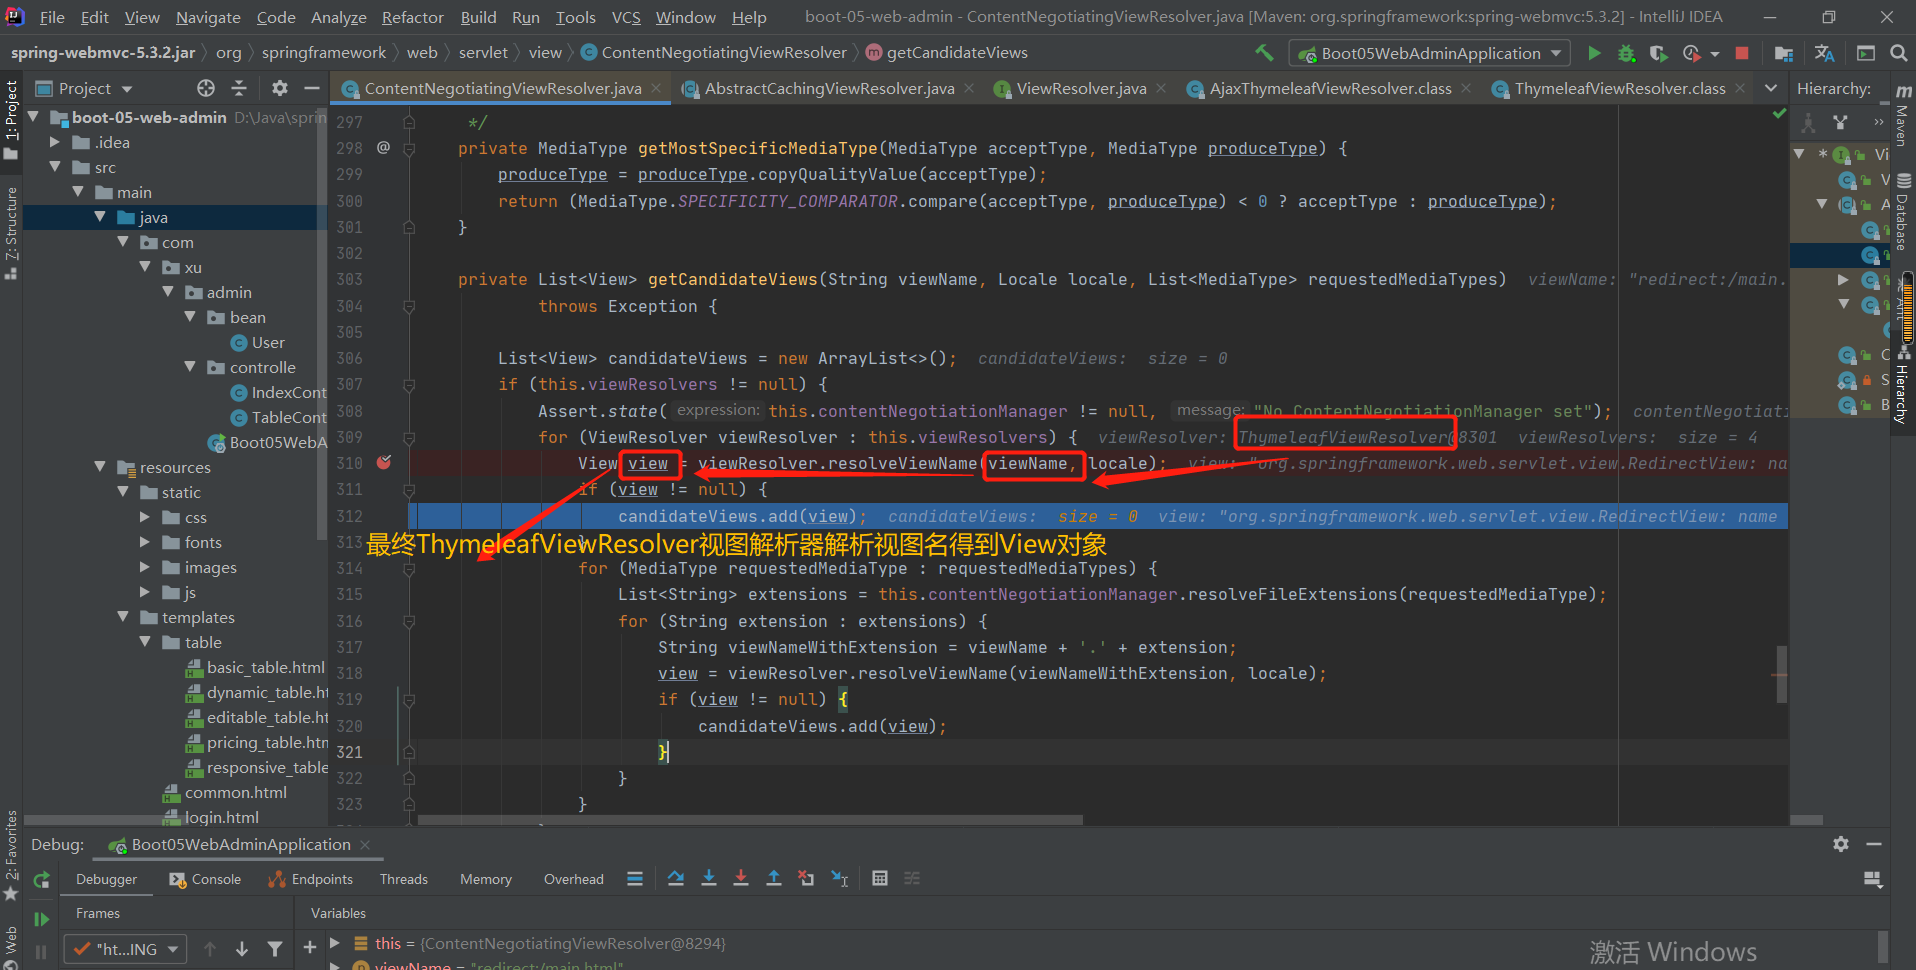
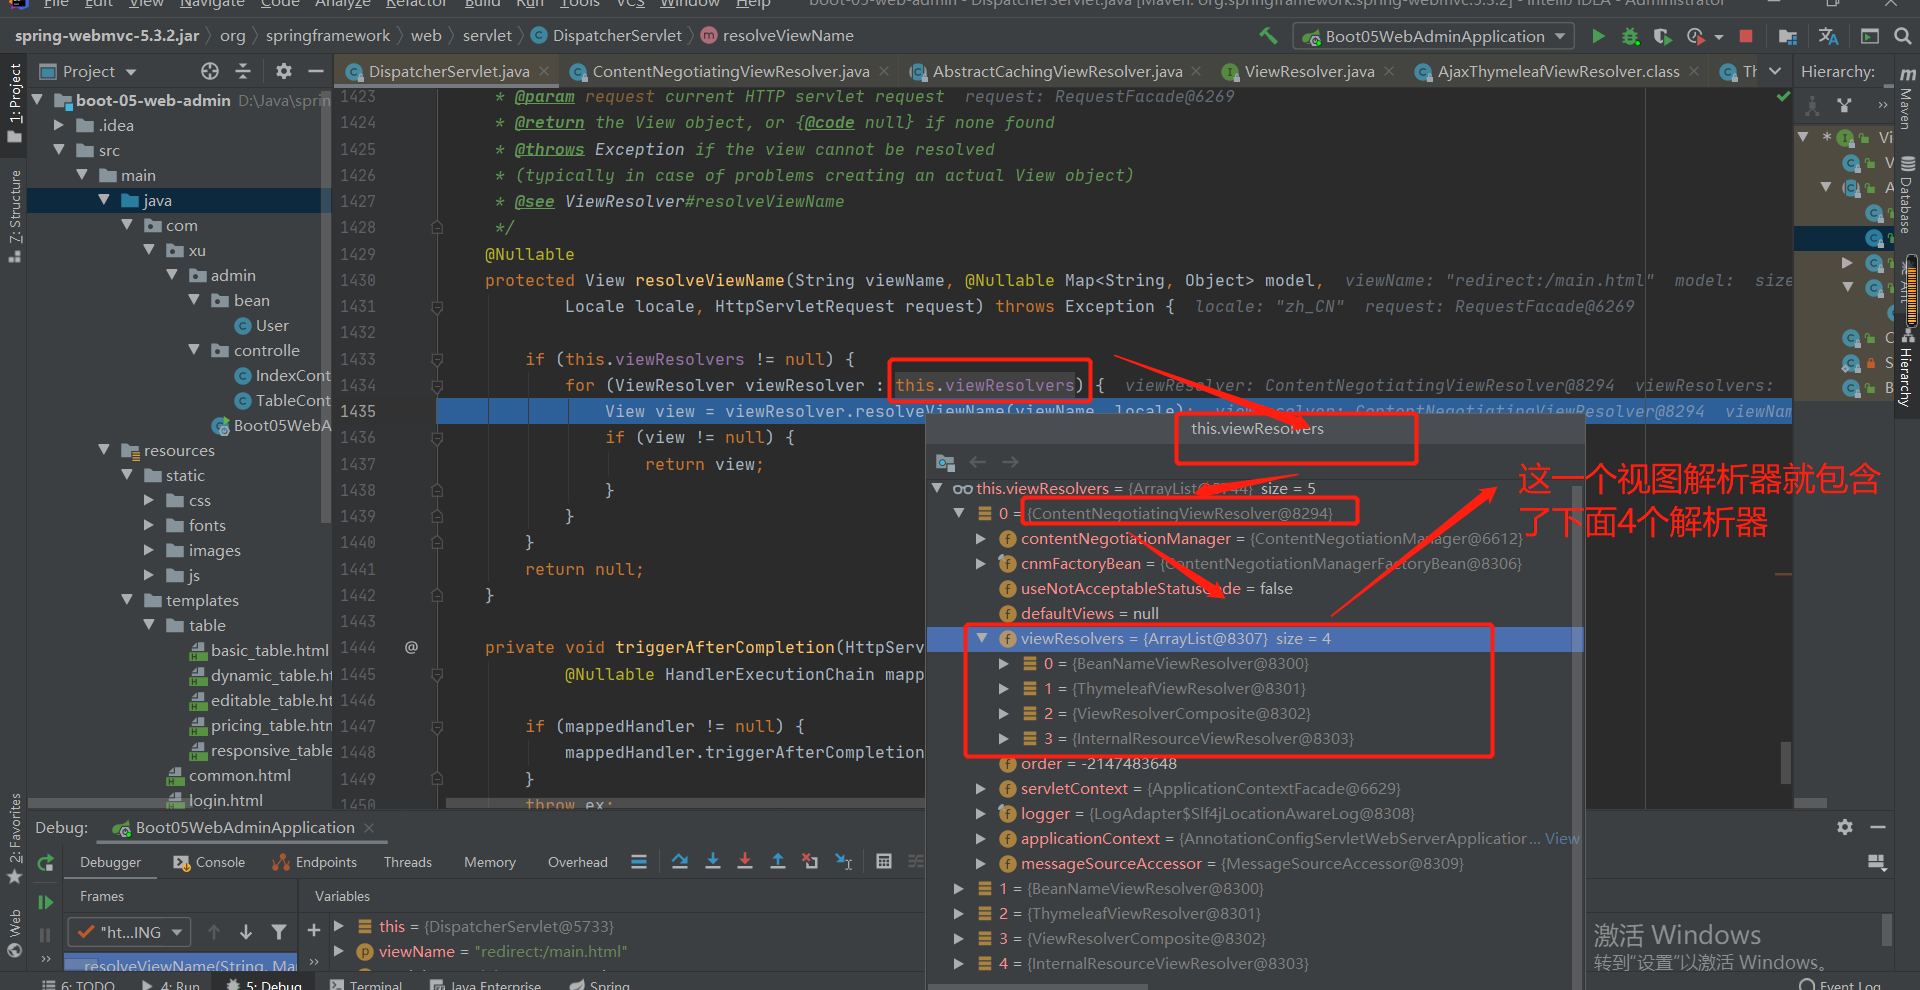
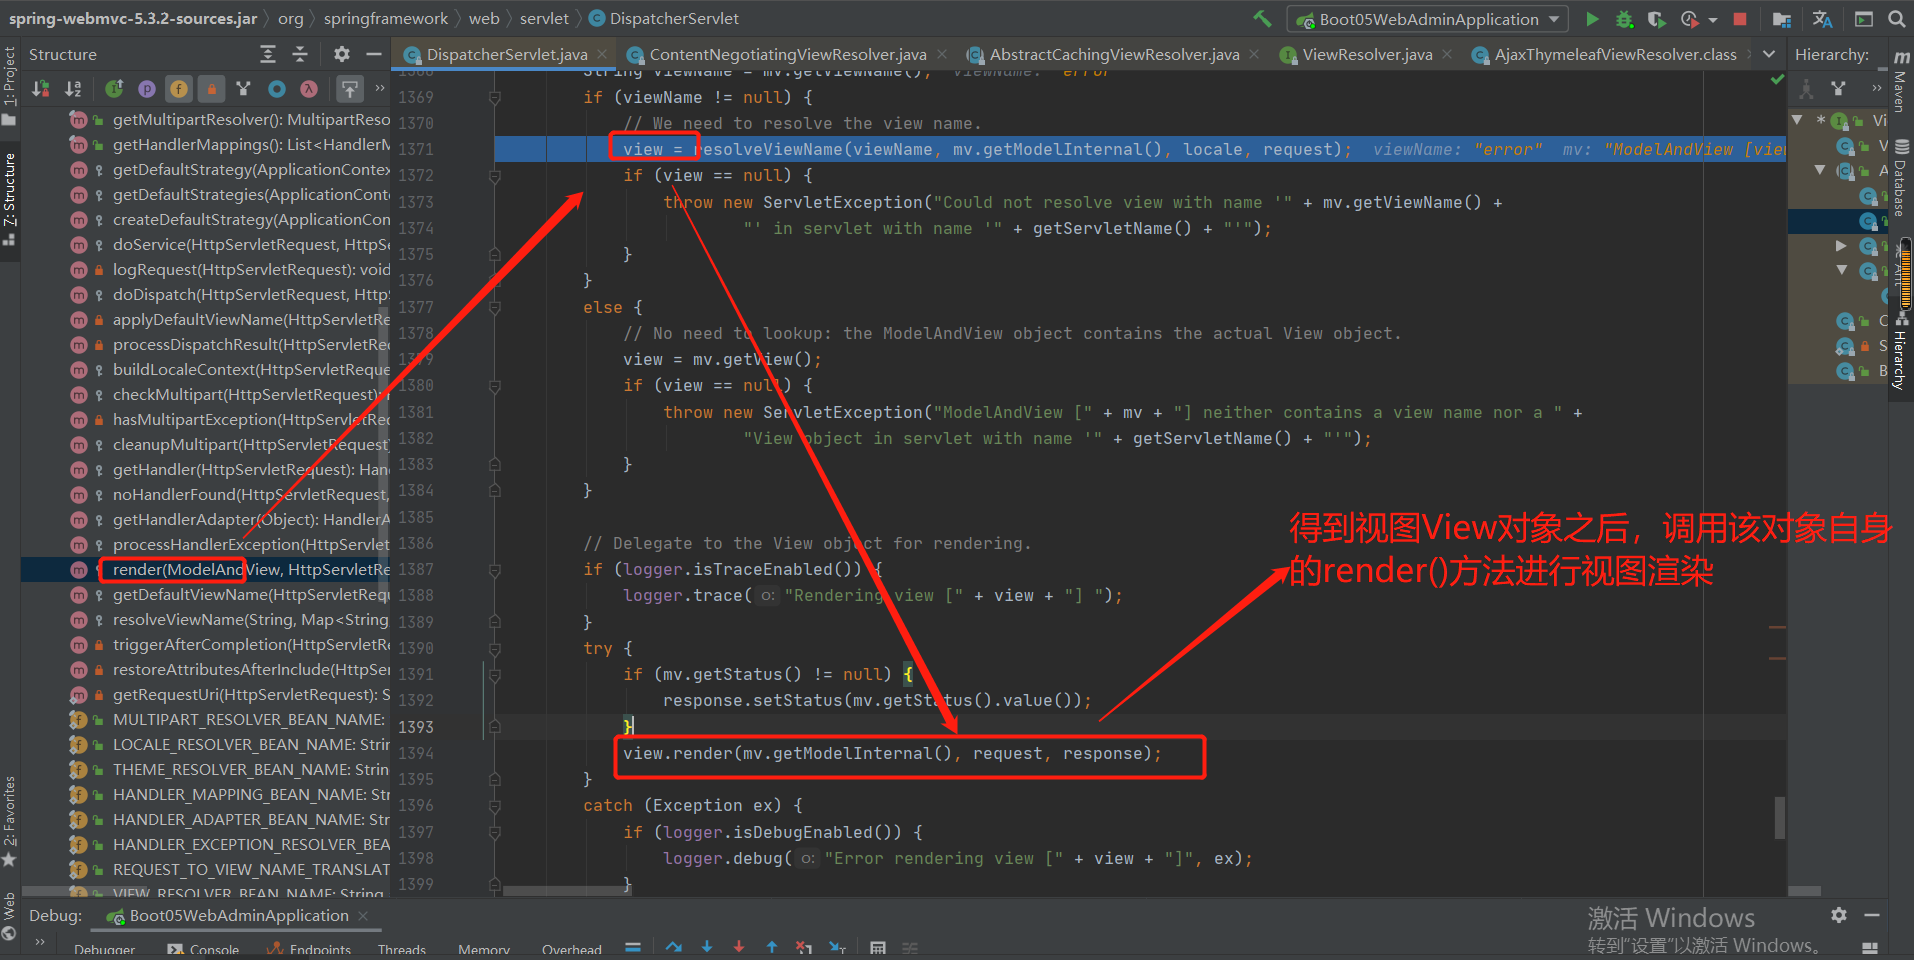
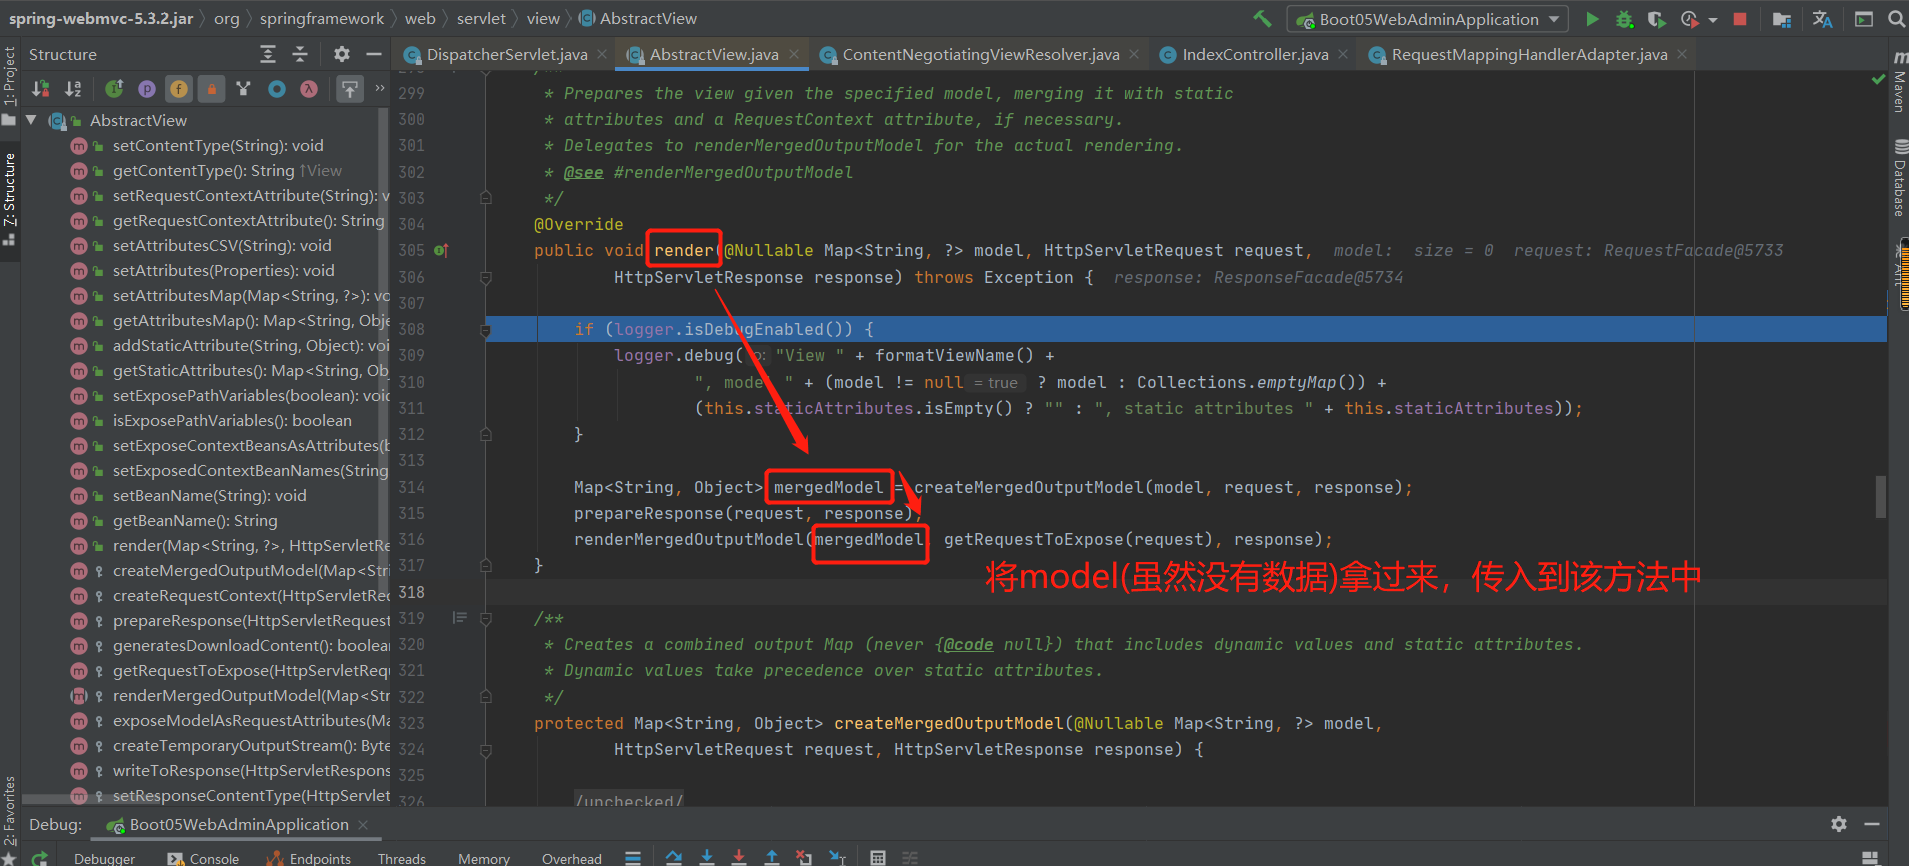
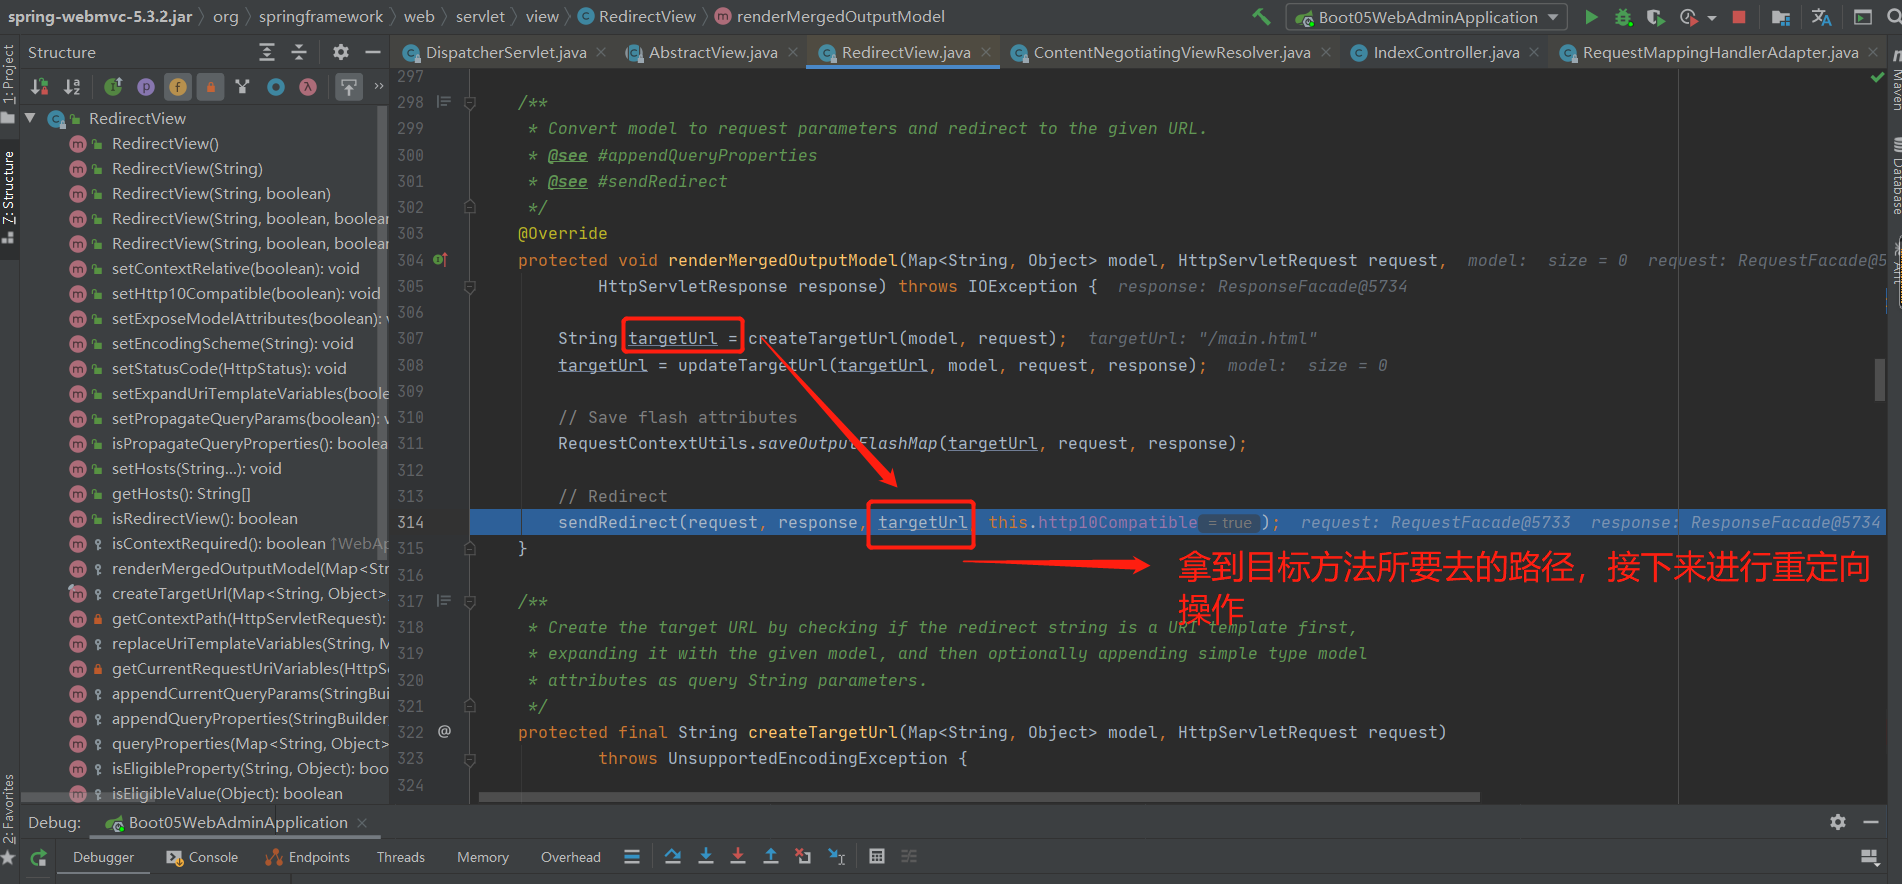
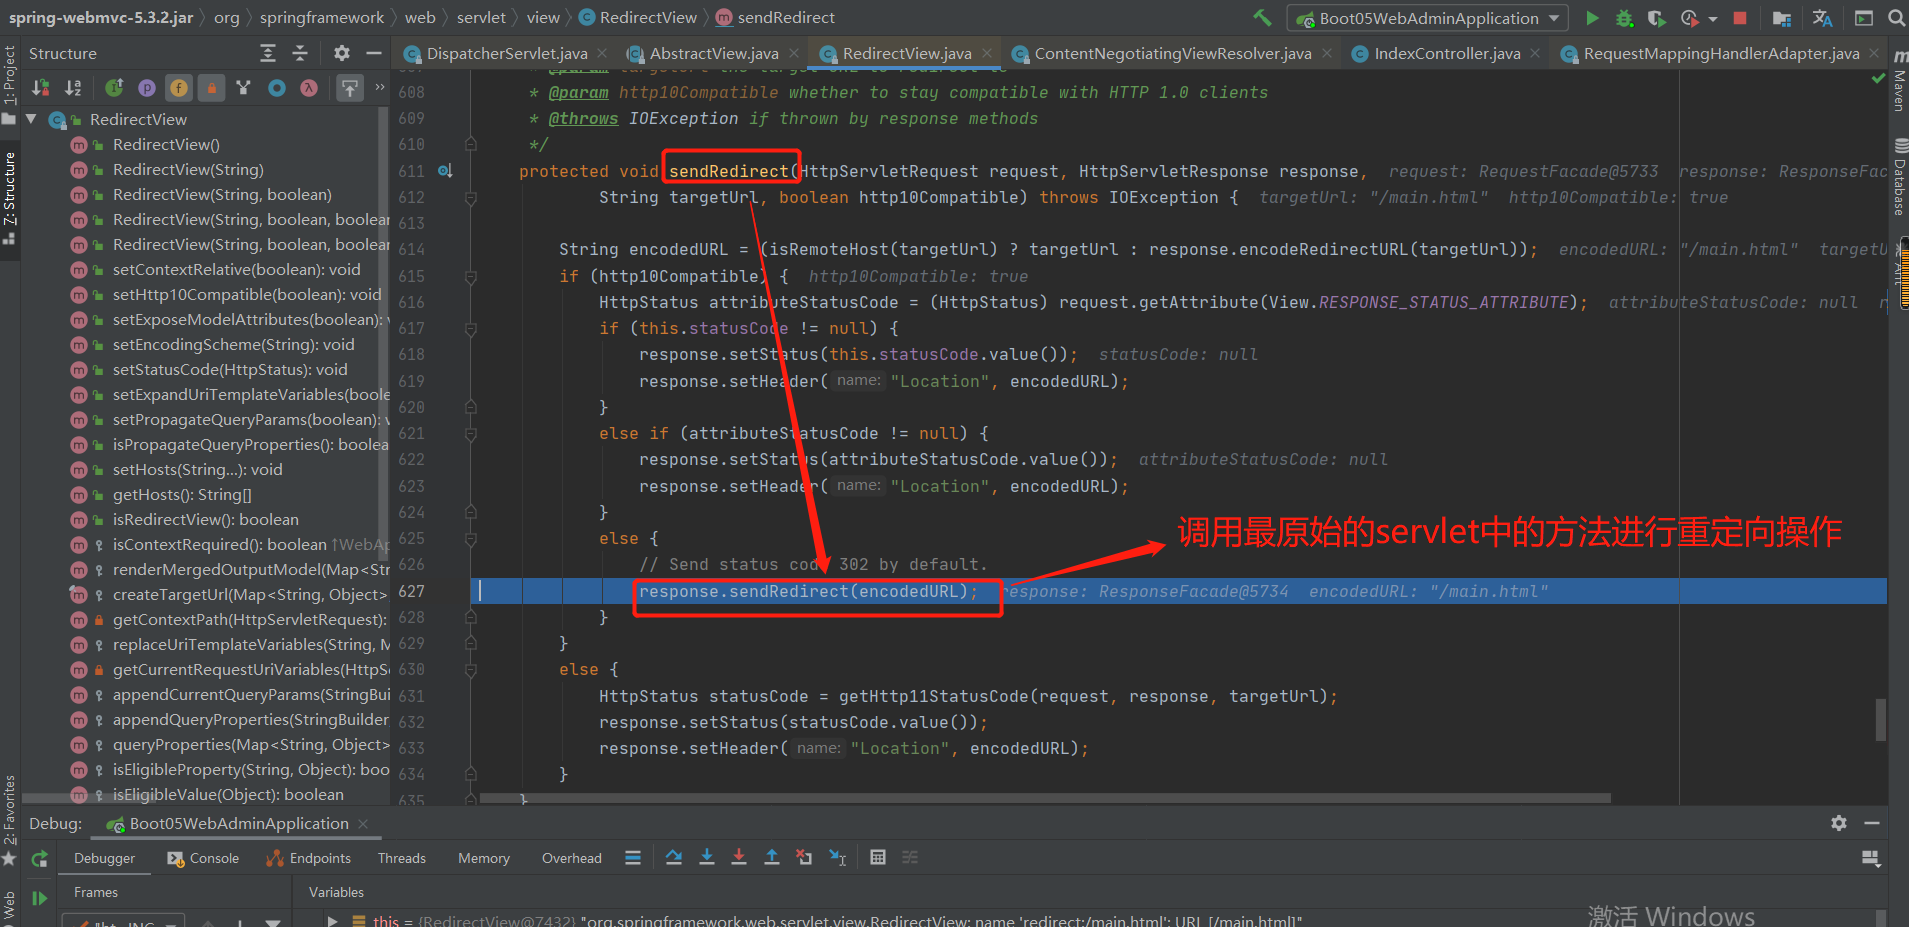
如此完成了重定向的操作。
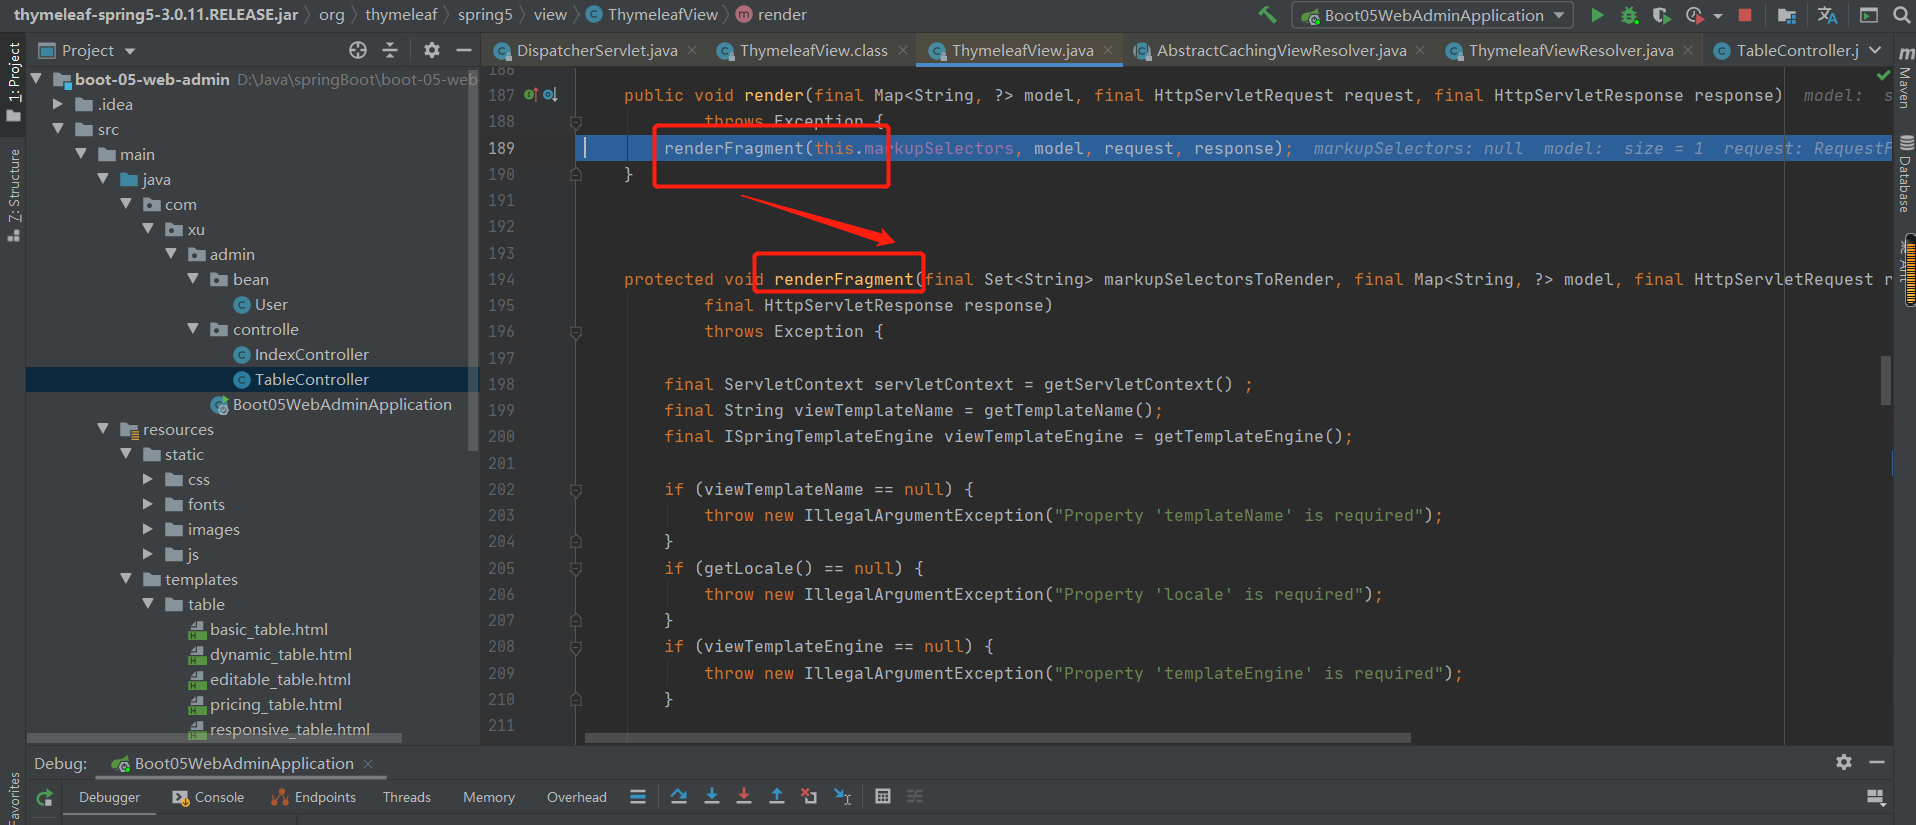
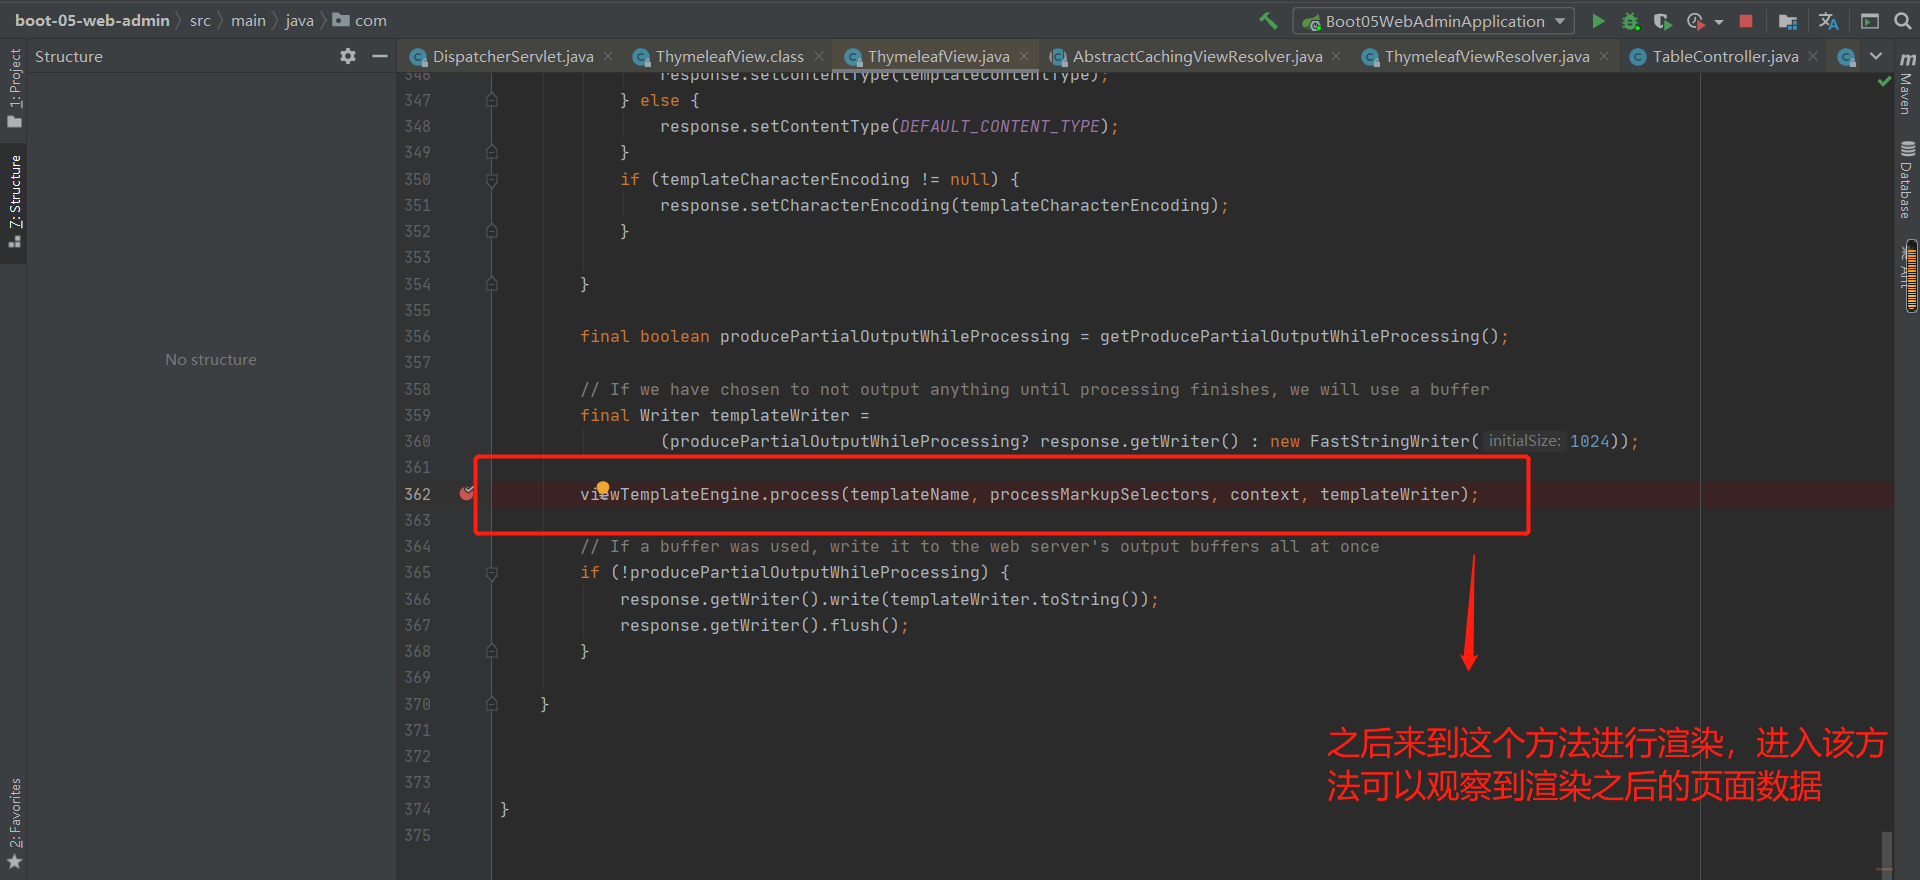
第2部分:探究dynamic_table目标方法如何进行数据填充的(不是很懂---源码太难)
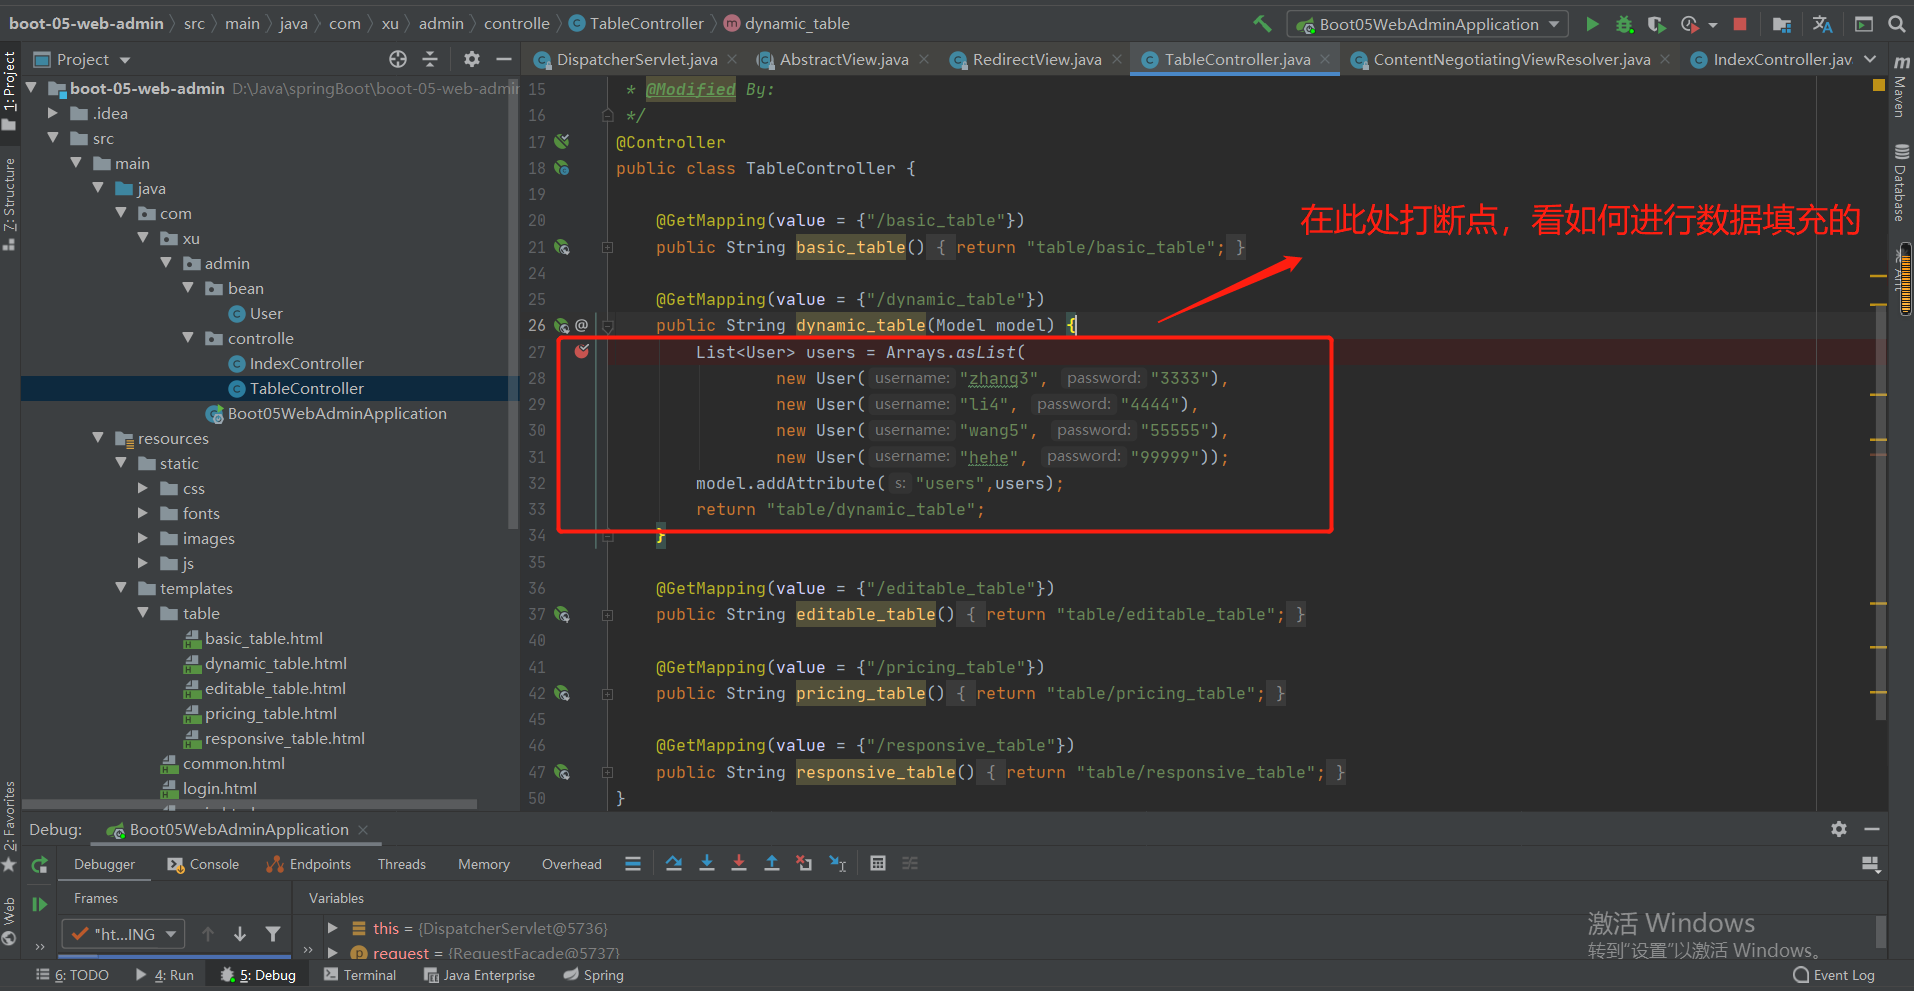
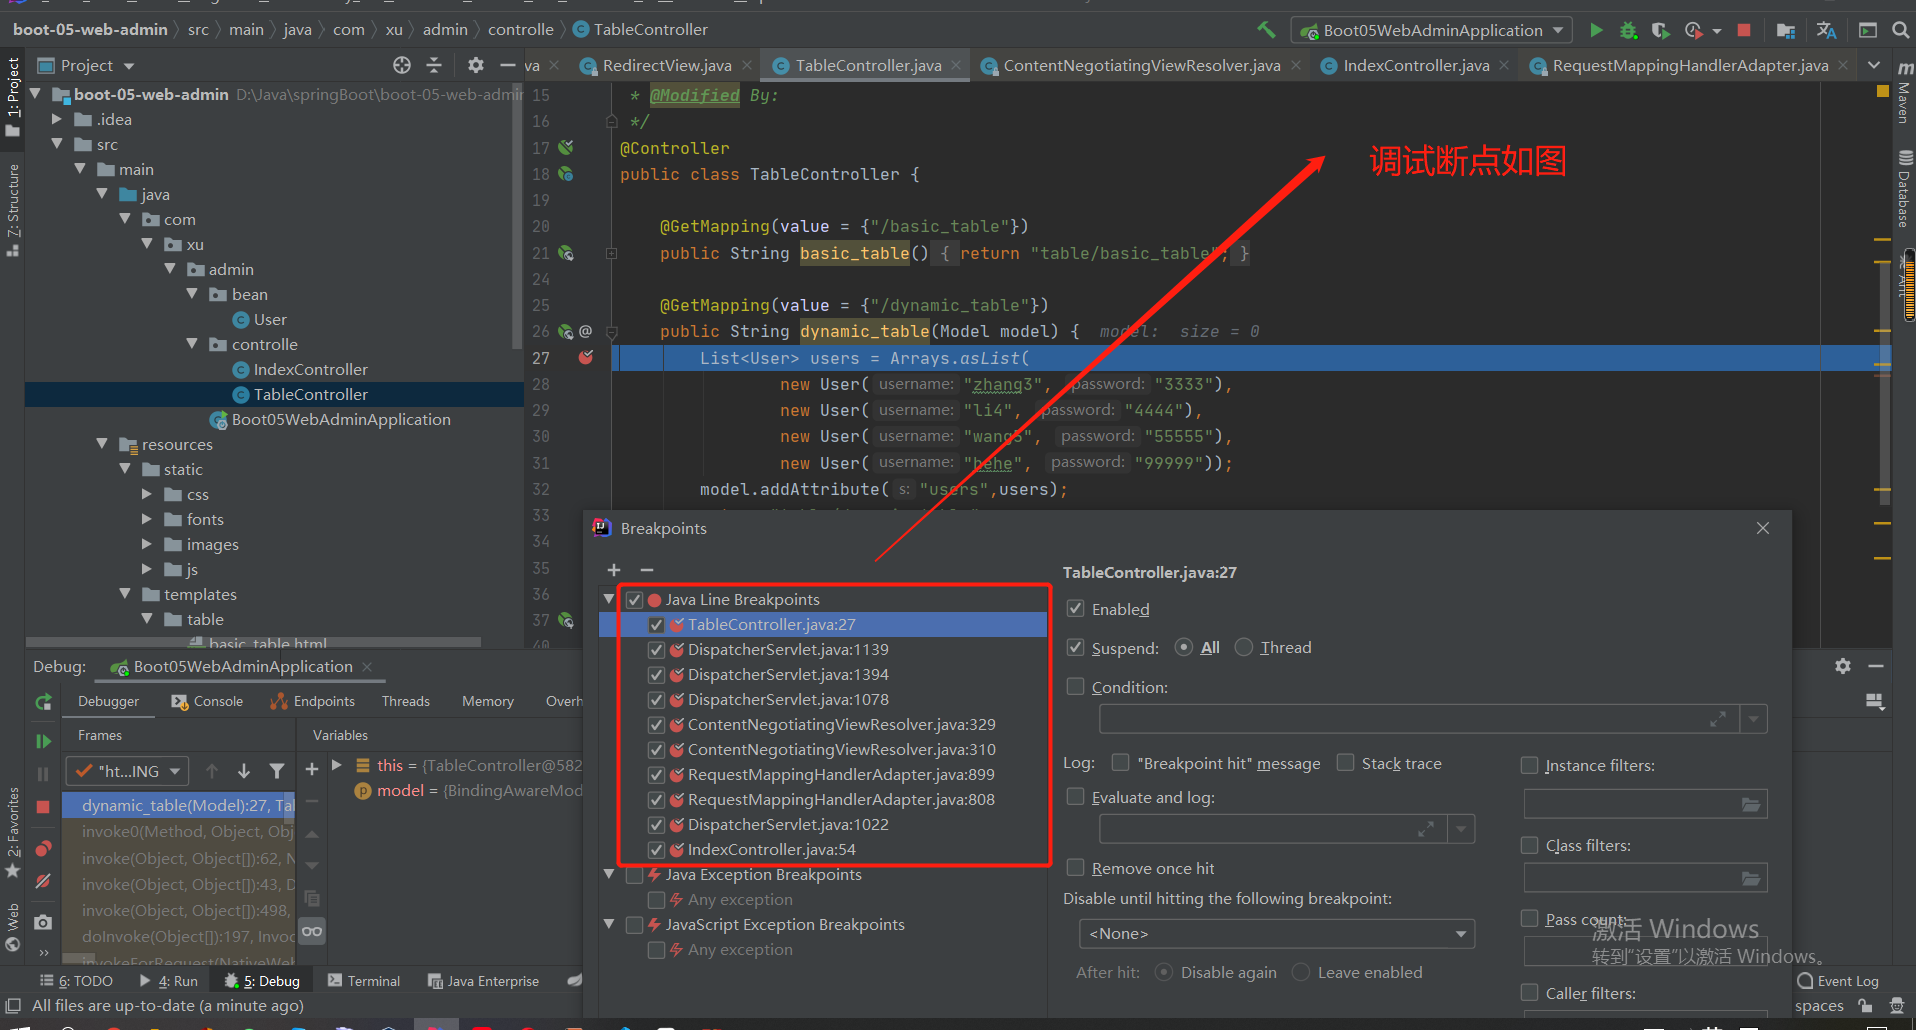
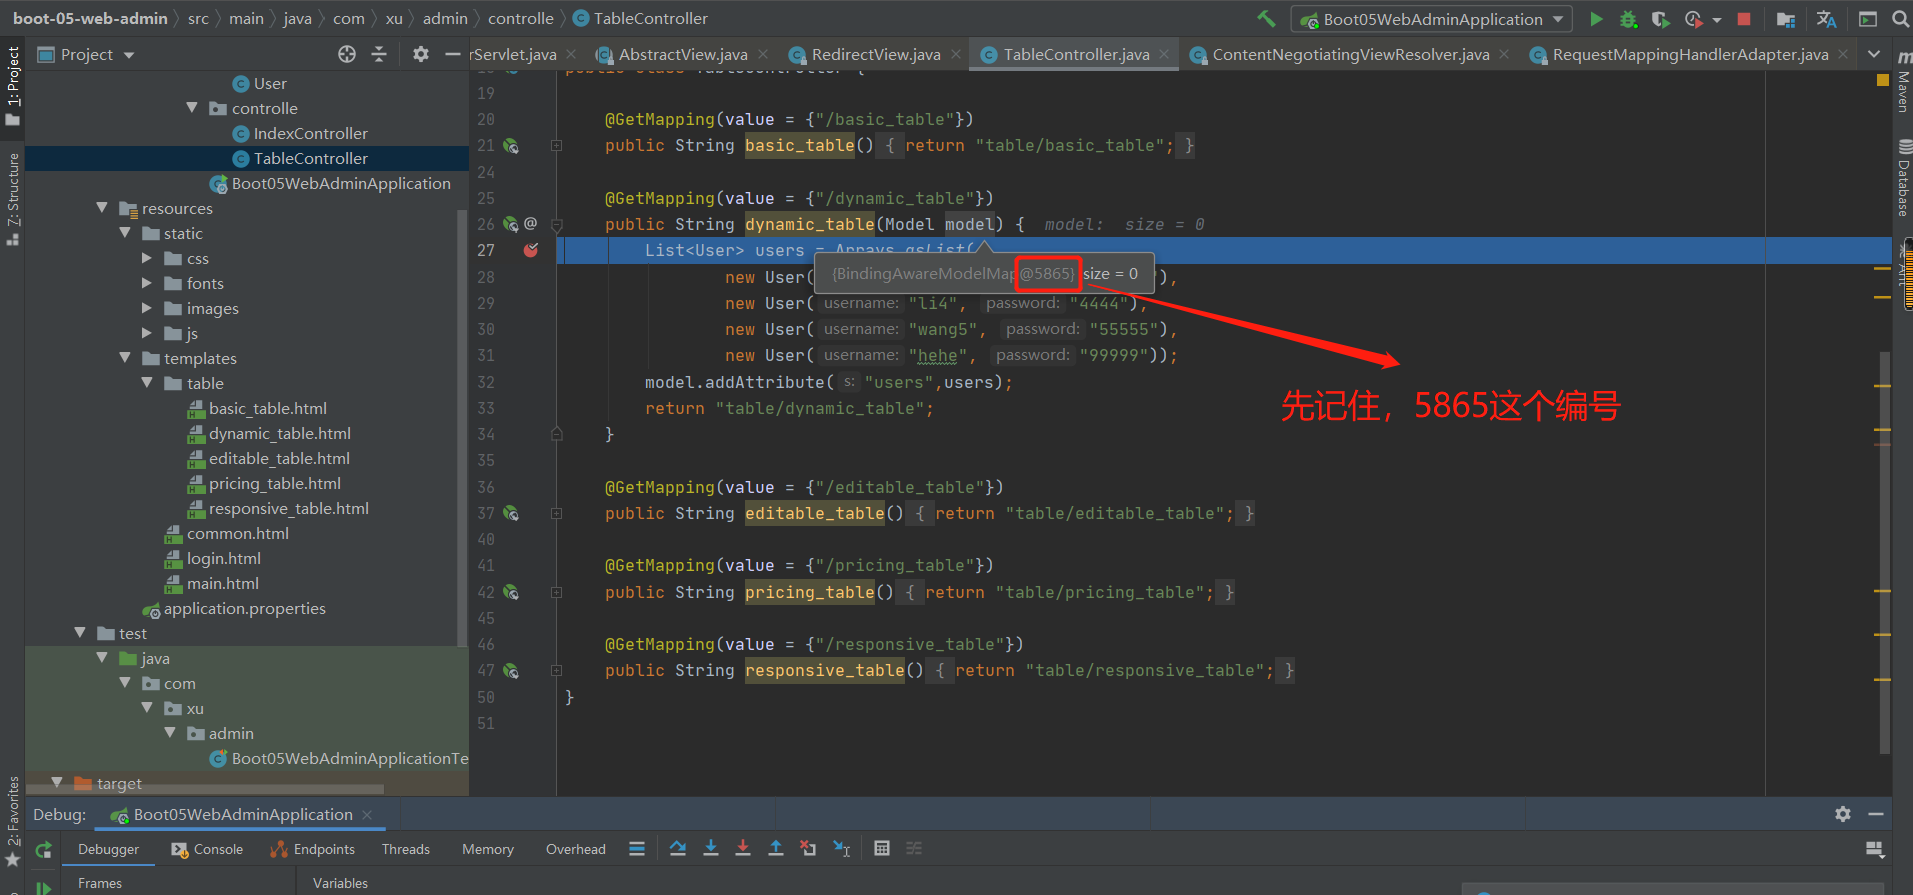
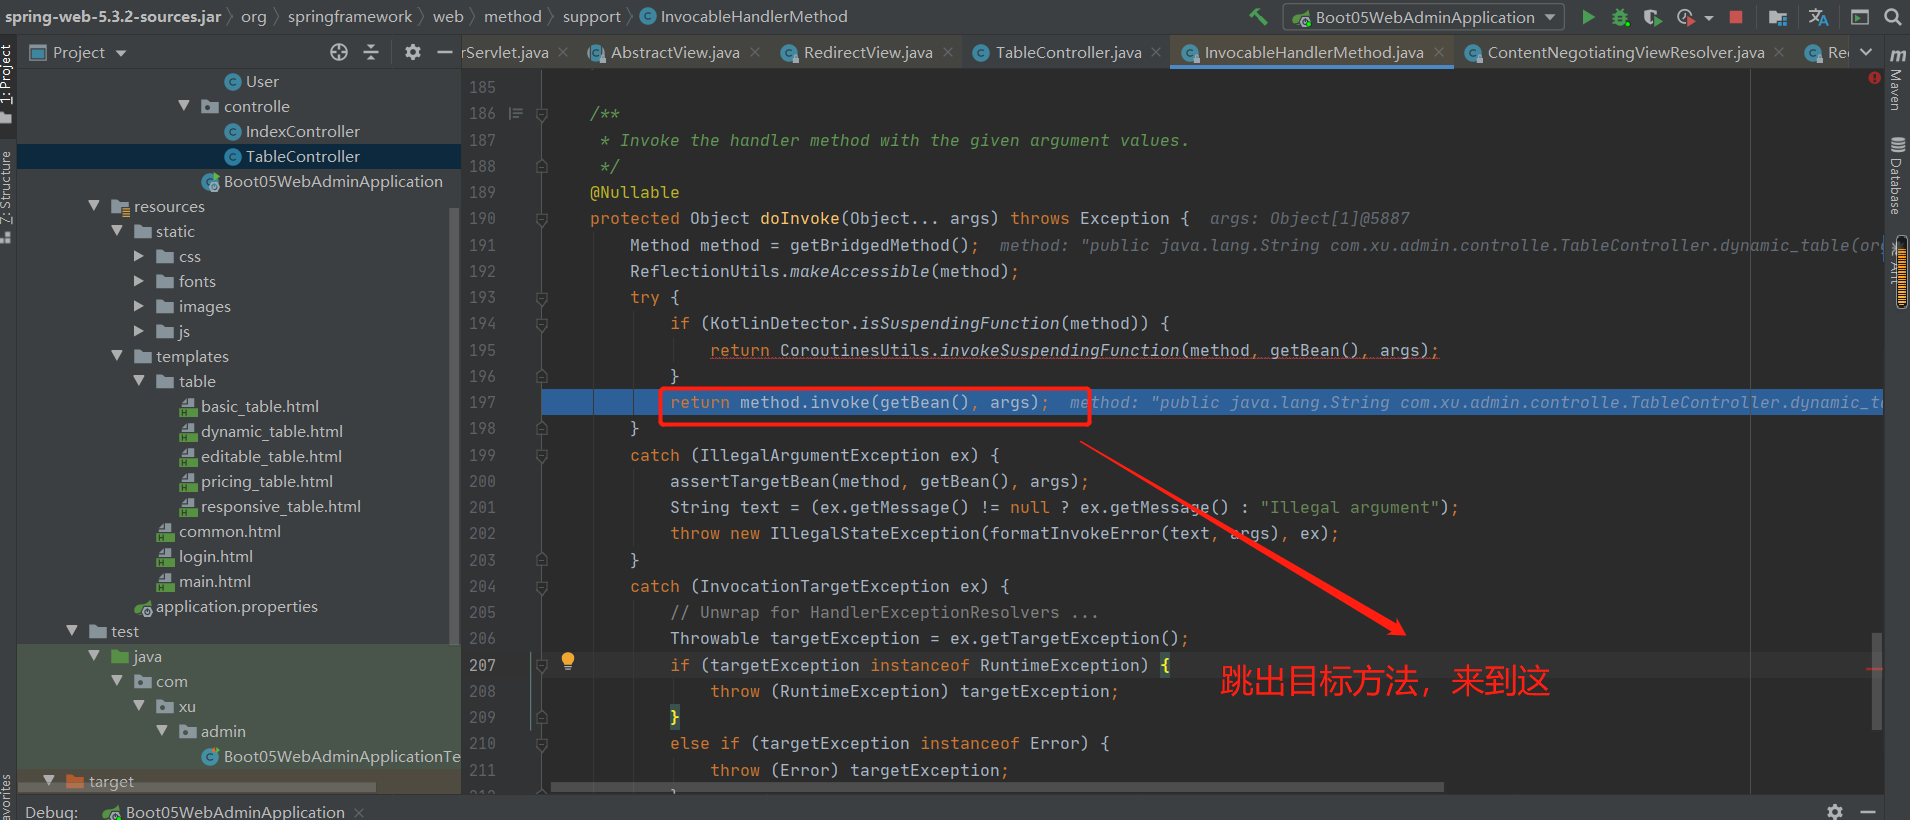
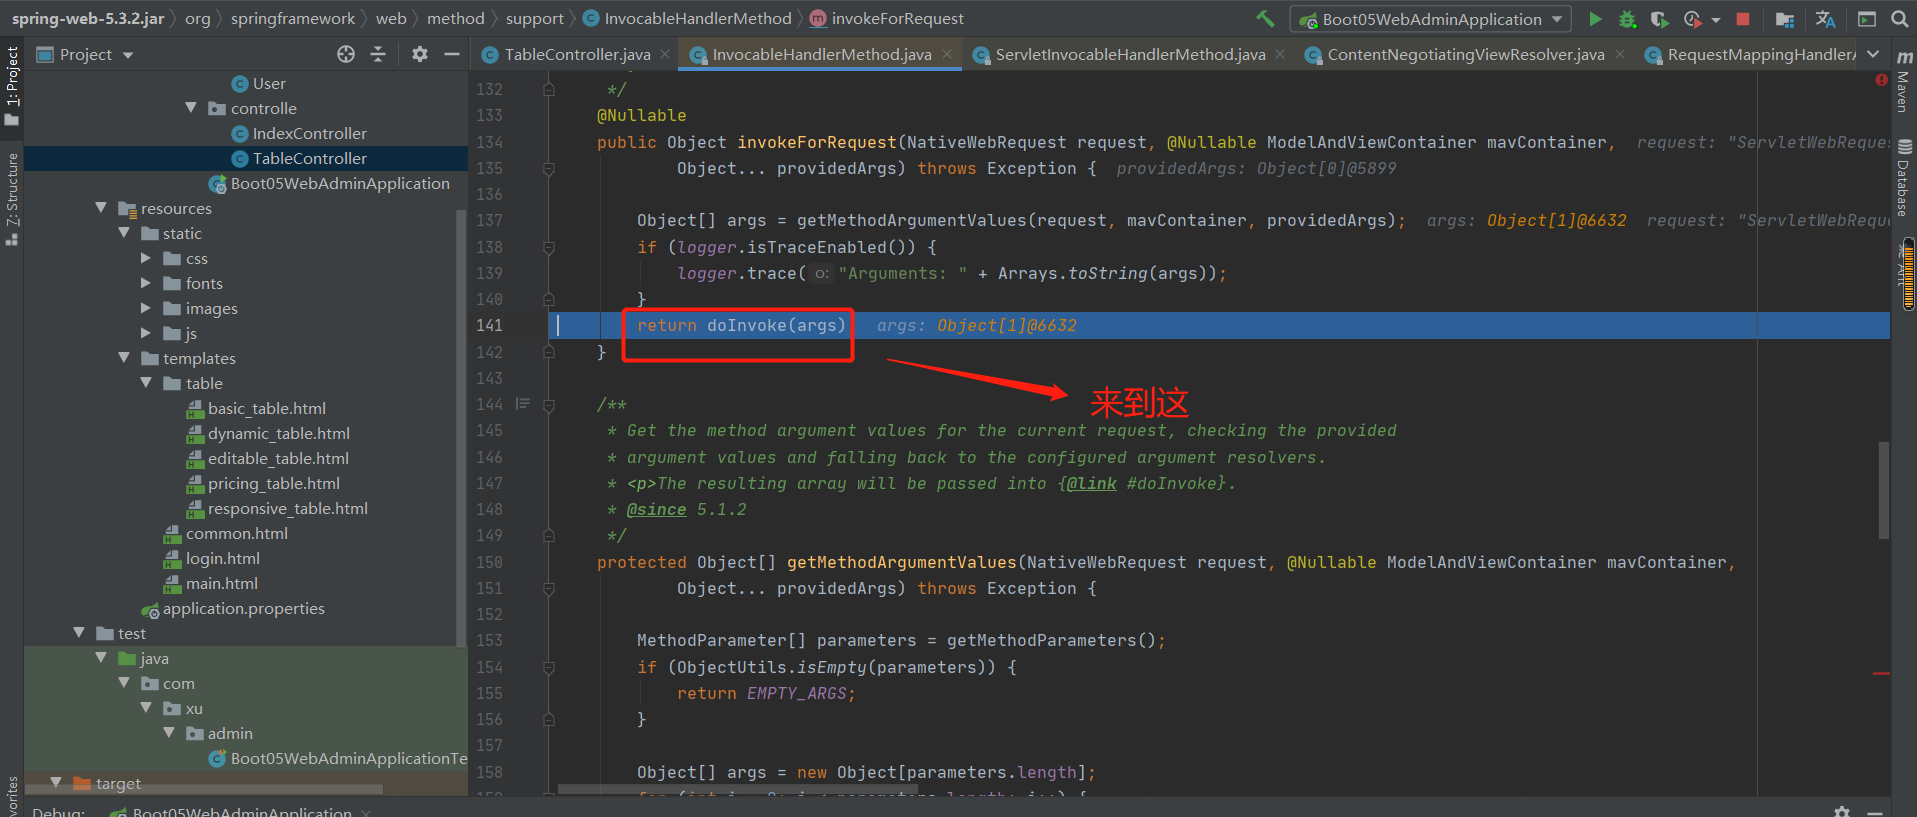
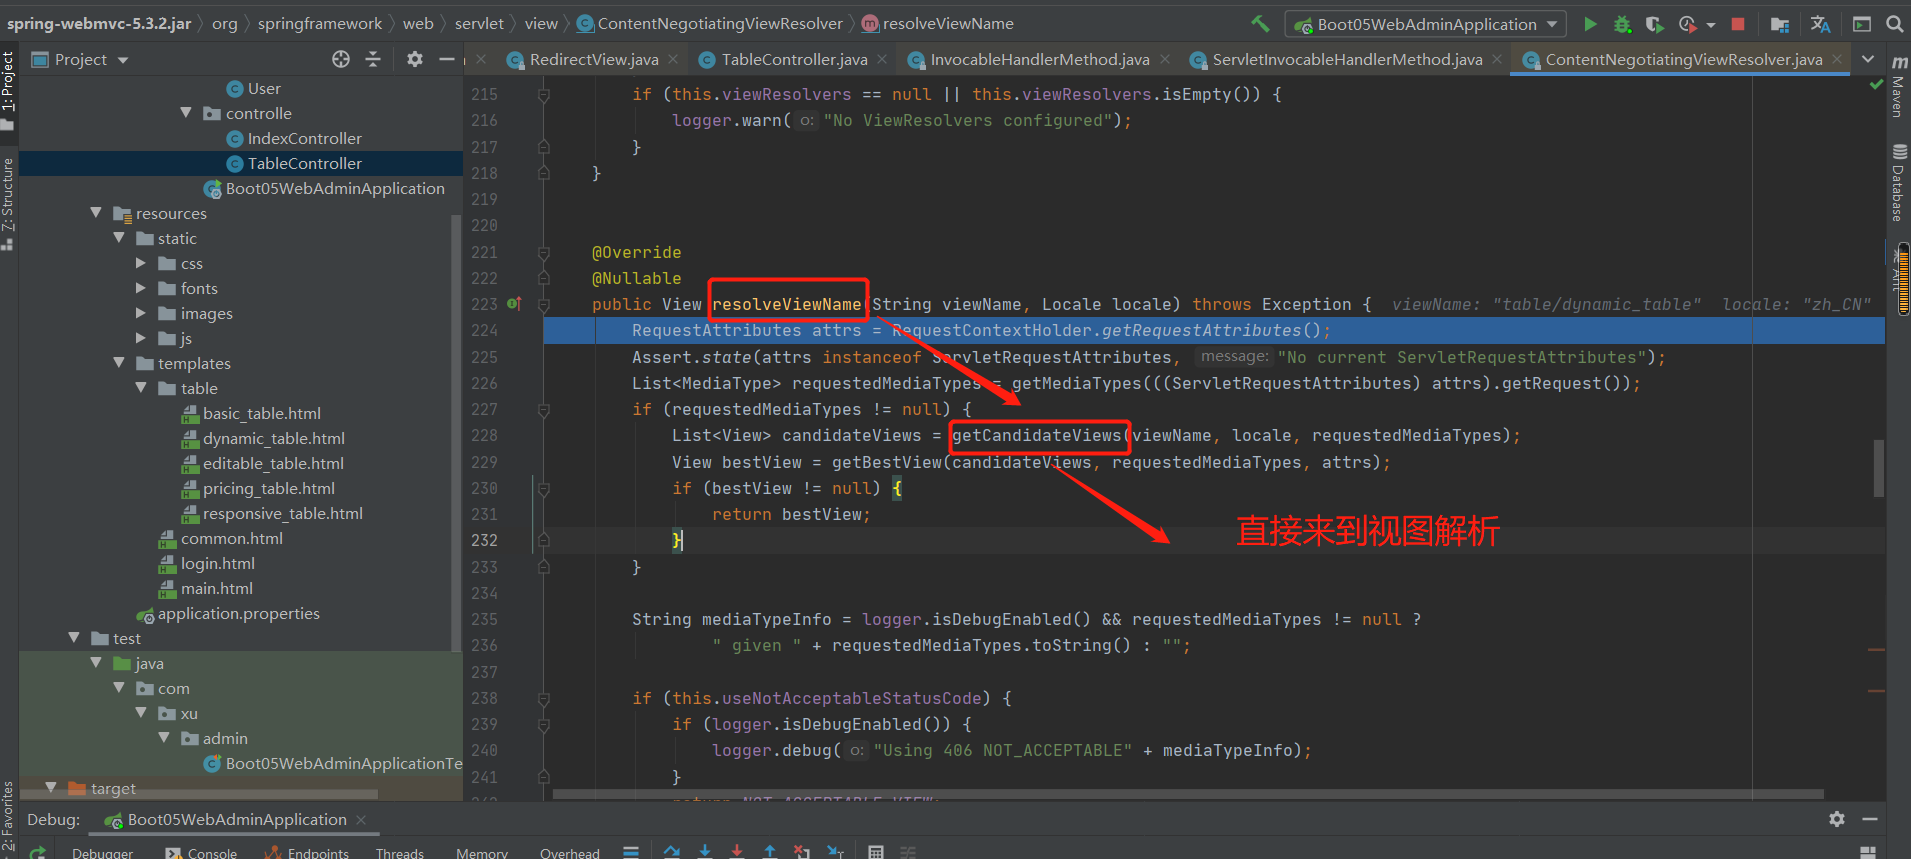
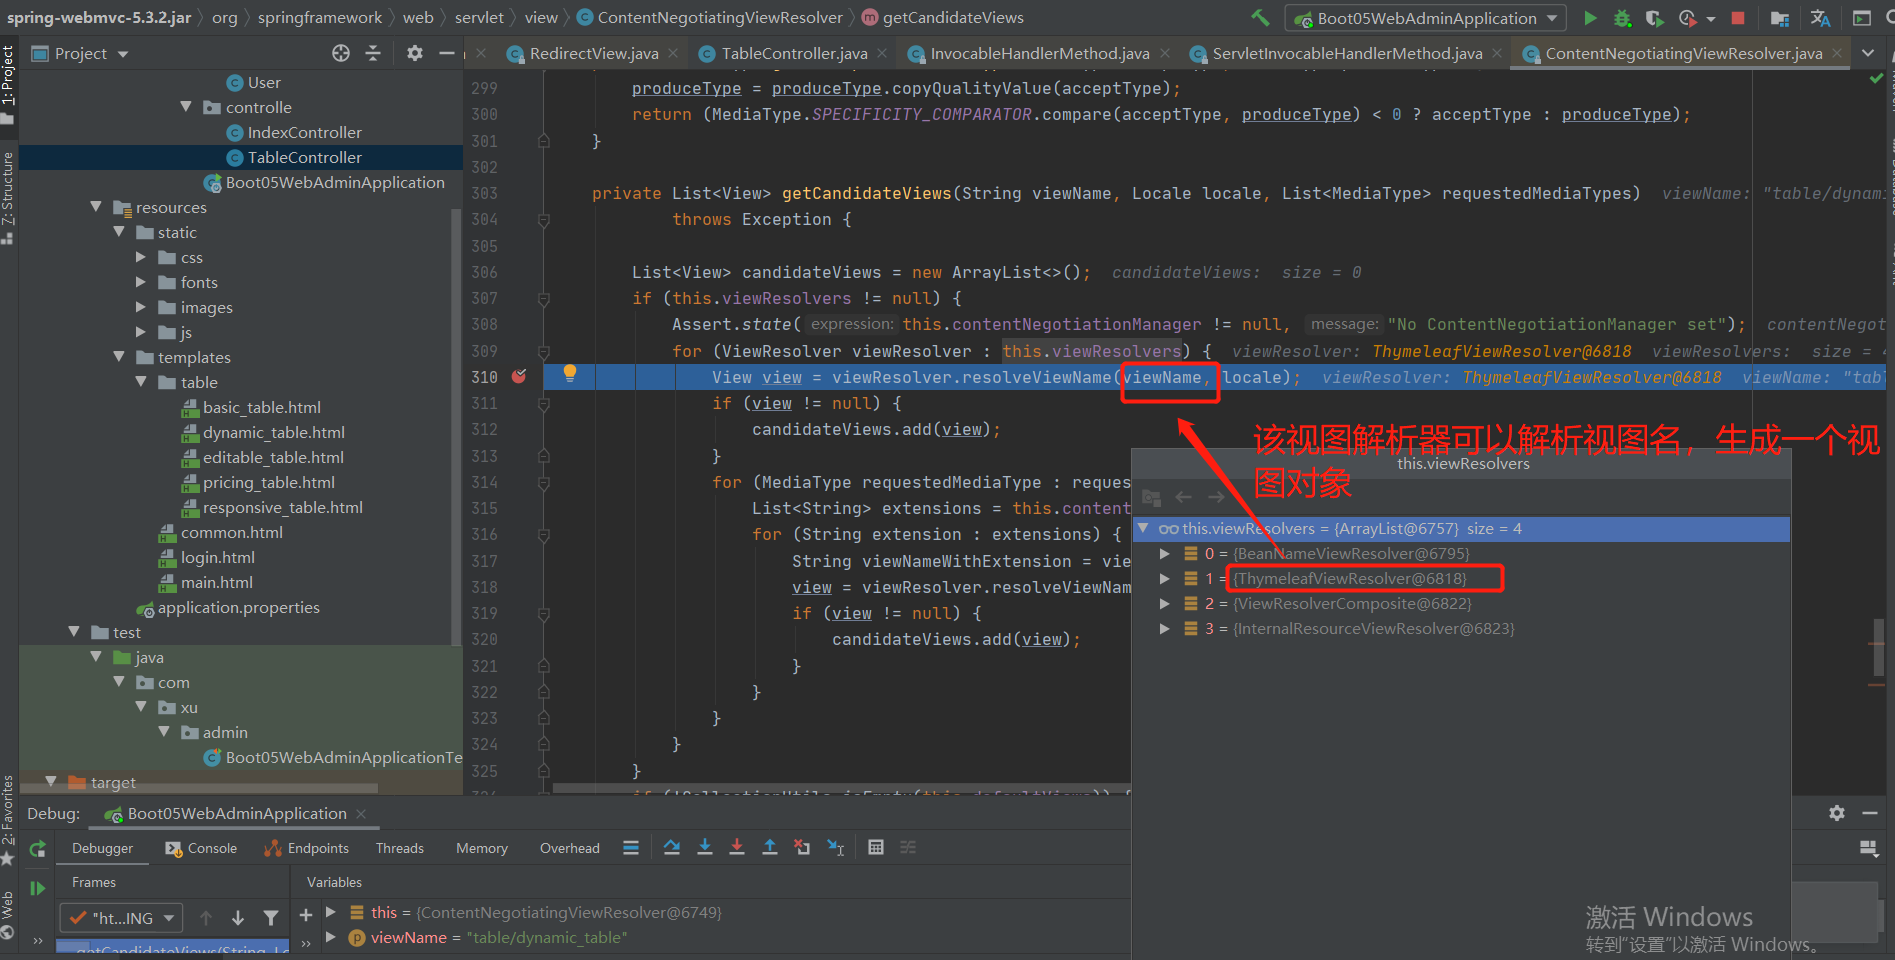
补充:

省略步骤见第一部分。。。。。
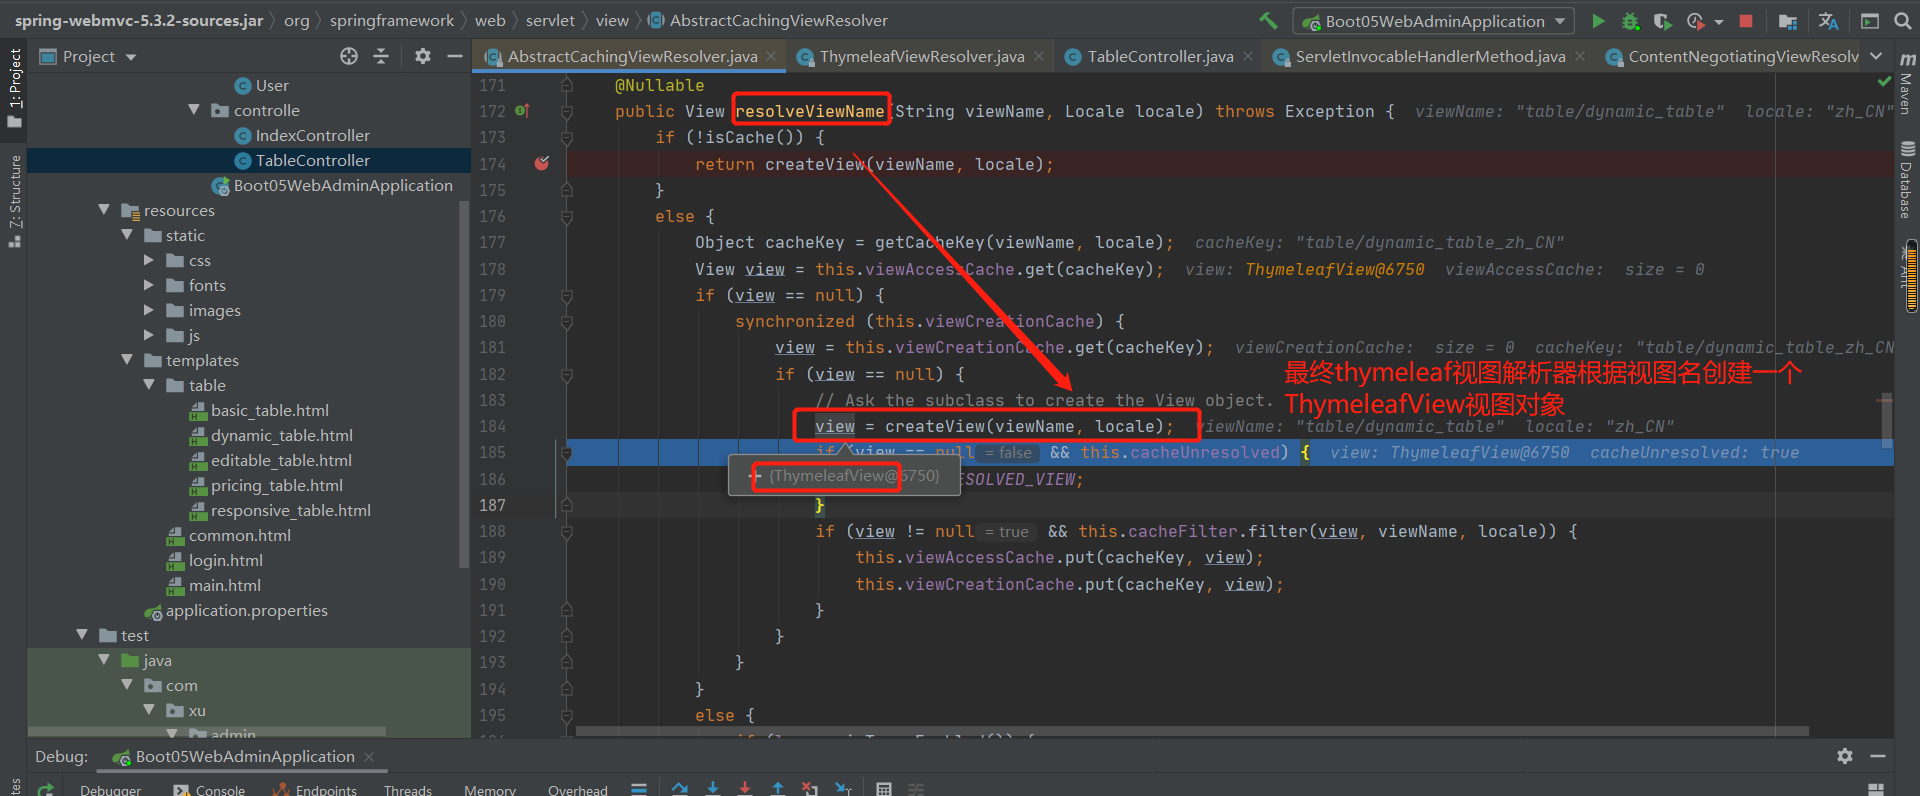
上图补充:如果是普通字符串,会返回一个Thymeleaf视图对象。
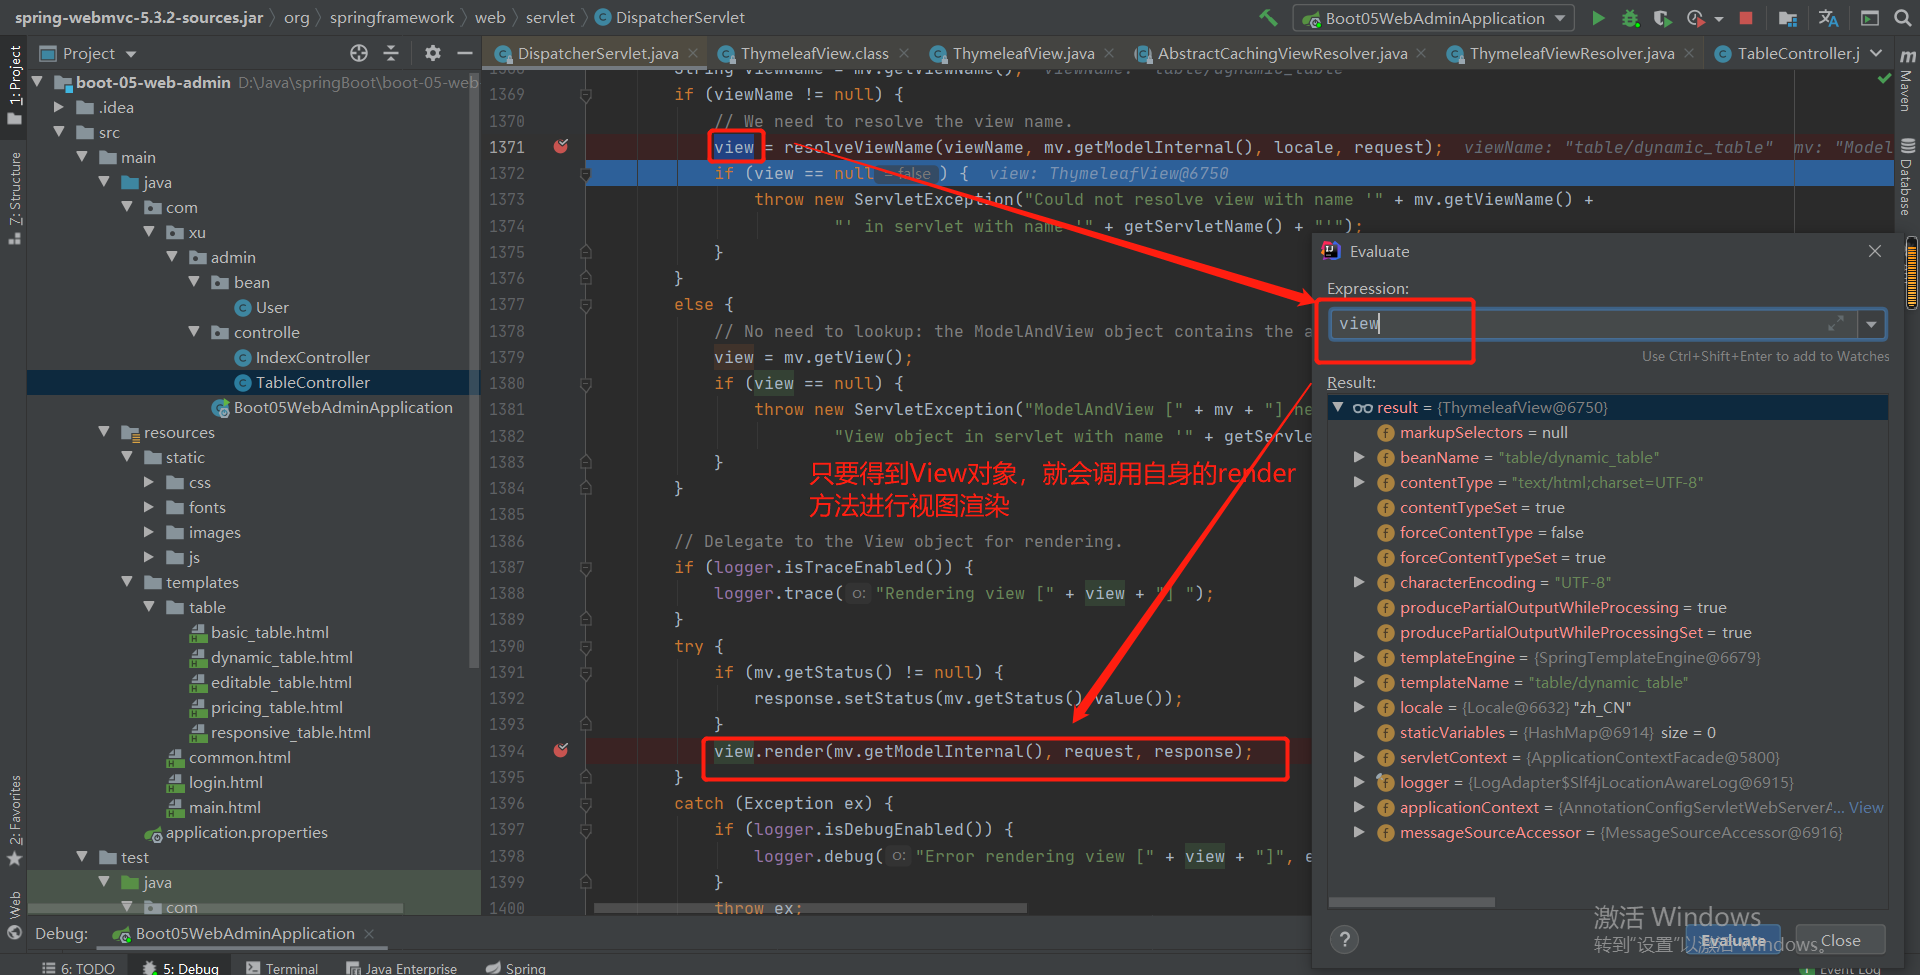
第8章 拦截器
8-1 登录检查与静态资源放行
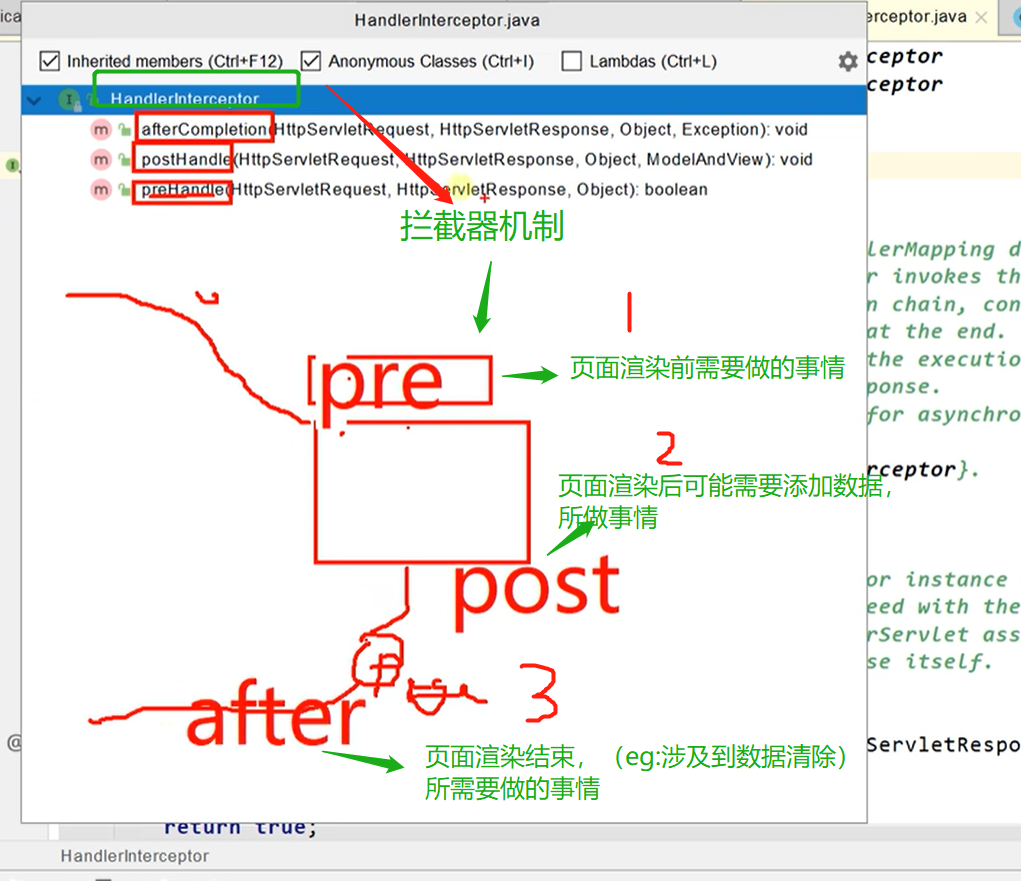
第一步:实现一个拦截器
package com.xu.admin.interceptor;

import org.springframework.web.servlet.HandlerInterceptor;
import org.springframework.web.servlet.ModelAndView;

import javax.servlet.http.HttpServletRequest;
import javax.servlet.http.HttpServletResponse;
import javax.servlet.http.HttpSession;
import javax.swing.*;

/**
 * @author xu
 * @Description
 *
 * 使用拦截器的步骤:
 * 1.编写一个拦截器实现HandlerInterceptor接口
 * 2.将拦截器注册到容器中(实现WebMvcConfigurer的addInterceptors)
 * 3.指定拦截器规则,如果是拦截所有,静态资源也会被拦截
 *
 * @date 2022/09/17 - 14:36:14
 * @Modified By:
 */
public class LoginInterceptor implements HandlerInterceptor {


    /**
     *
     * @Description 目标方法执行之前
     * @param
     * @Author xu
     * @Date 2022/09/17 14:36:55
     *
     */
    @Override
    public boolean preHandle(HttpServletRequest request, HttpServletResponse response, Object handler) throws Exception {
        HttpSession session = request.getSession();
        Object user = session.getAttribute("user");
        //只要进行了登录,session中就会存放一个user对象,只要该对象不为空,不必进行登录拦截,否则就需要进行登录拦截
        if (user != null) {
            return true;
        }
        //拦截住了,表示没有登录,需要返回登录页面,可以重定向到登录页面
        session.setAttribute("message","请先登录");

        //使用重定向到当前的登录页面
//        response.sendRedirect("/");

        //使用转发,便于取到信息
        request.getRequestDispatcher("/").forward(request,response);
        return false;
    }

    /**
     *
     * @Description 目标方法执行之后
     * @param
     * @Author xu
     * @Date 2022/09/17 14:37:27
     *
     */
    @Override
    public void postHandle(HttpServletRequest request, HttpServletResponse response, Object handler, ModelAndView modelAndView) throws Exception {


    }

    /**
     *
     * @Description 页面渲染以后
     * @param
     * @Author xu
     * @Date 2022/09/17 14:38:15
     *
     */
    @Override
    public void afterCompletion(HttpServletRequest request, HttpServletResponse response, Object handler, Exception ex) throws Exception {

    }
}
第2步:将拦截器注册到容器中:
package com.xu.admin.config;

import com.xu.admin.interceptor.LoginInterceptor;
import org.springframework.context.annotation.Configuration;
import org.springframework.web.servlet.config.annotation.InterceptorRegistry;
import org.springframework.web.servlet.config.annotation.WebMvcConfigurer;

/**
 * @author xu
 * @Description
 * @date 2022/09/17 - 14:44:56
 * @Modified By:
 */
@Configuration
public class AdminWebConfig implements WebMvcConfigurer {


    @Override
    public void addInterceptors(InterceptorRegistry registry) {
        registry.addInterceptor(new LoginInterceptor())
                //表示拦截所有请求
                .addPathPatterns("/**")
                //不要拦截的请求
                //将css,fonts,images,js静态资源放行(不拦截)
                .excludePathPatterns("/","/login","/css/**","/fonts/**","/images/**","/js/**");
    }
}
实验结果:
没有登录,导致被拦截,转发到登录页面:
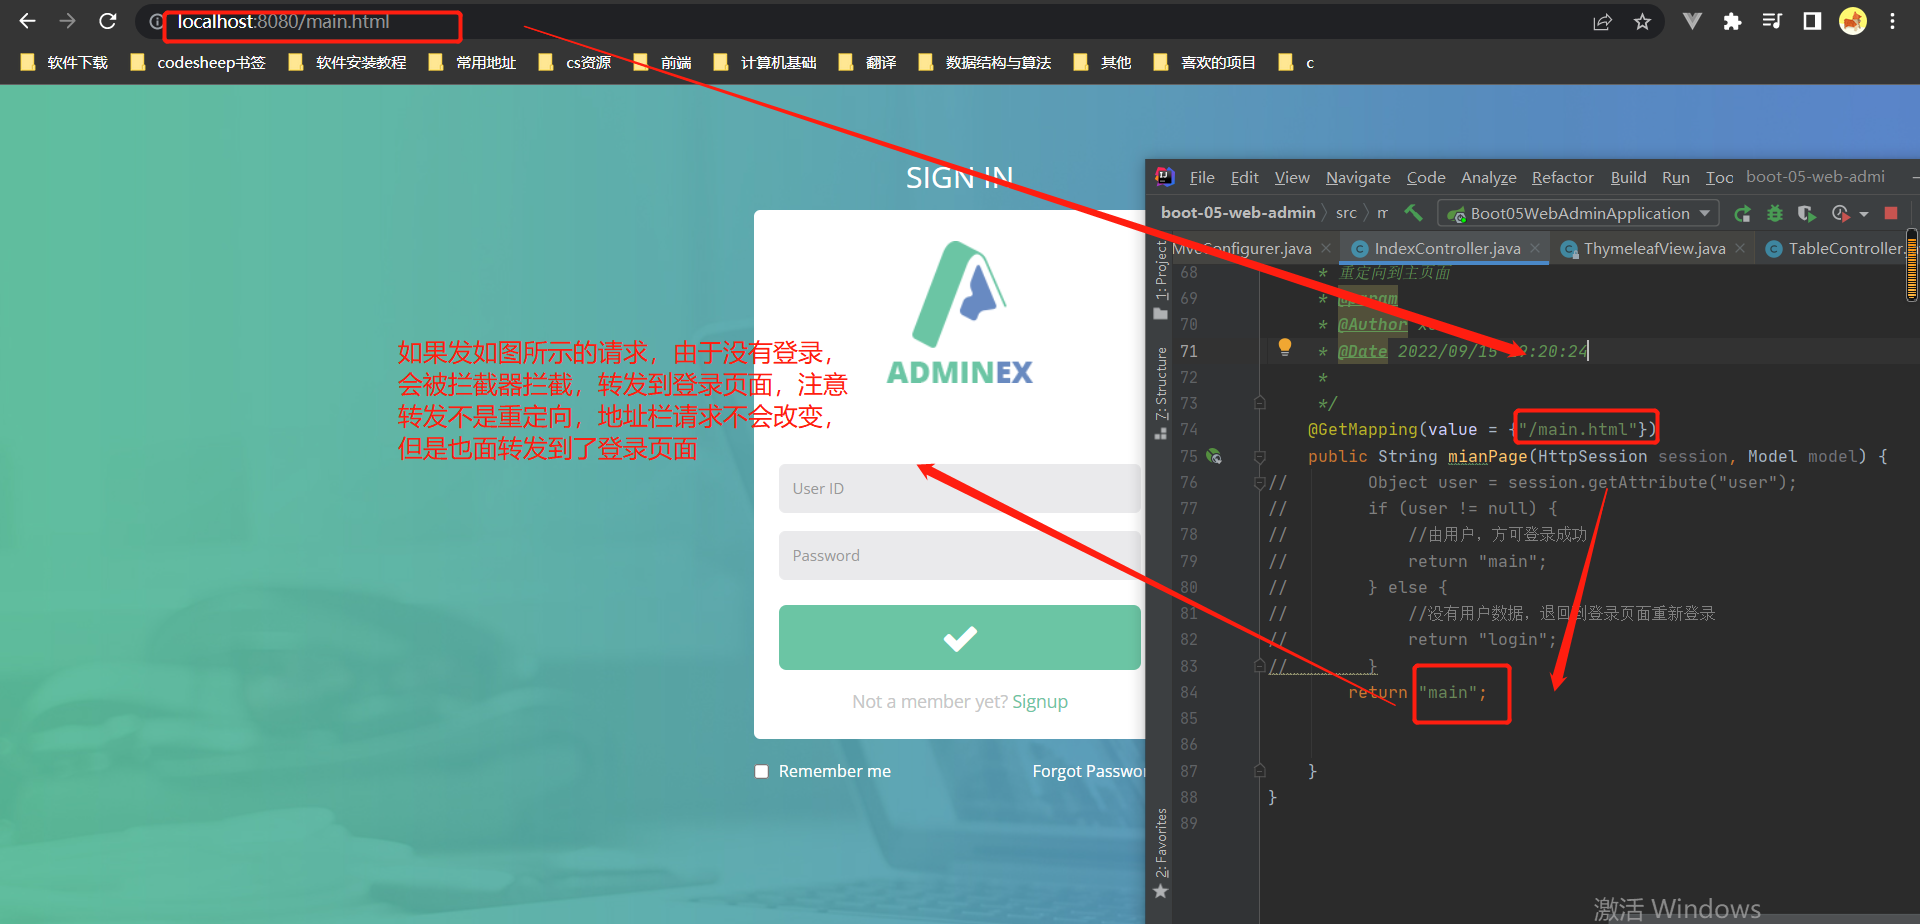
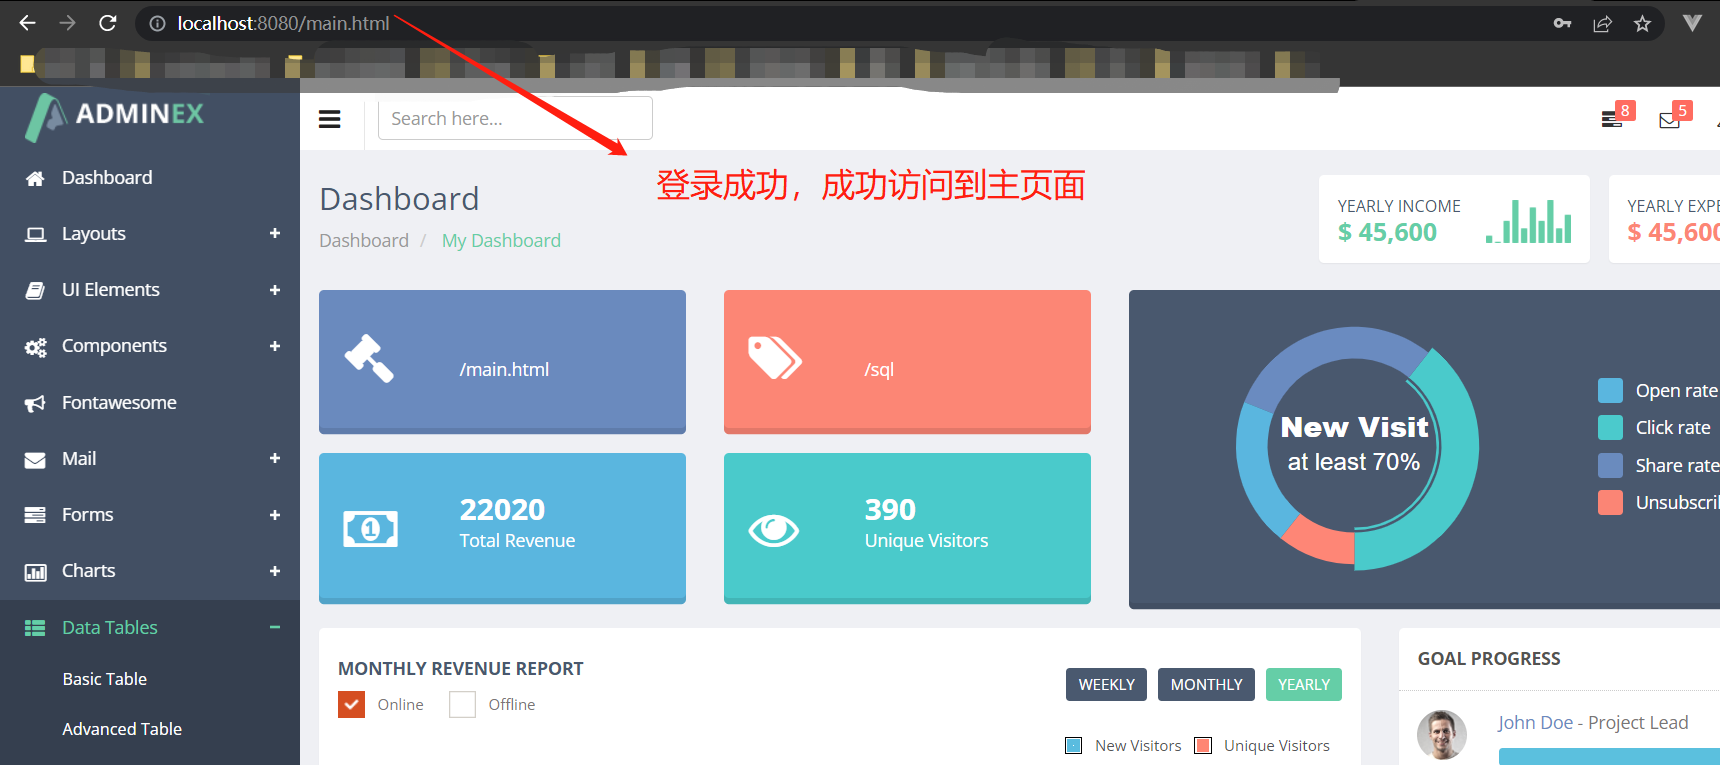
登录之后,成功进入主页面:
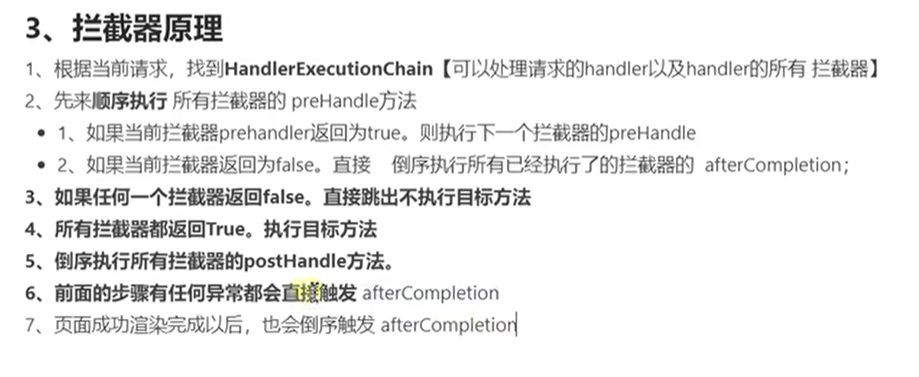
8-2 拦截器原理:
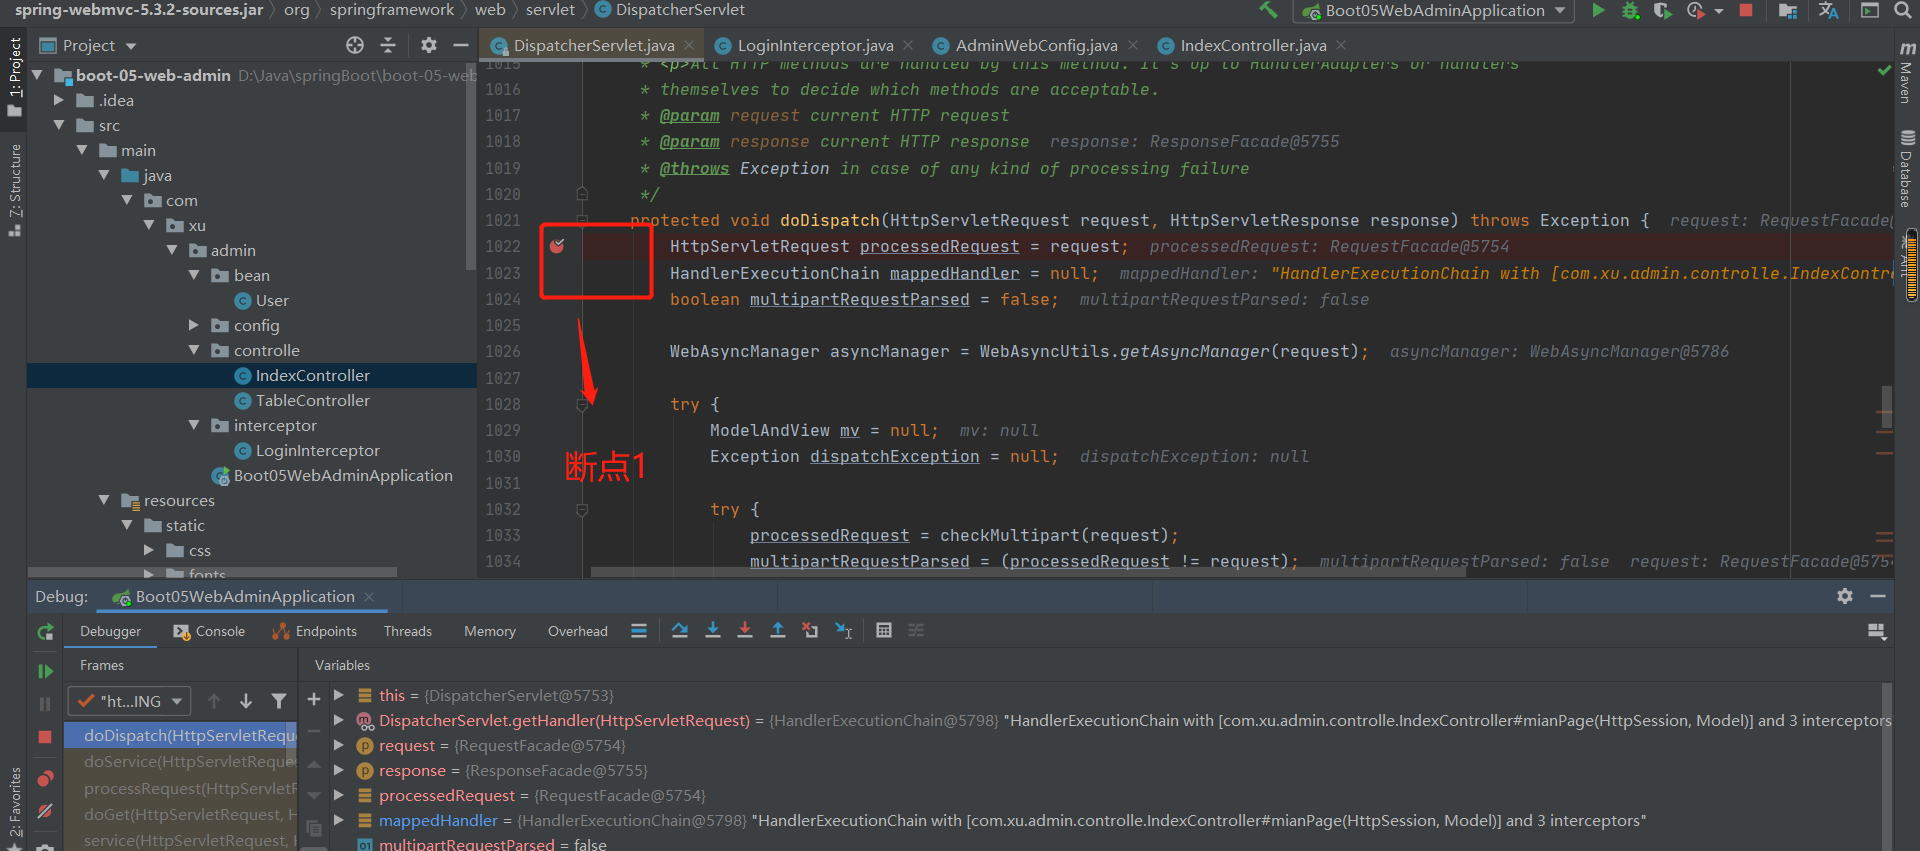
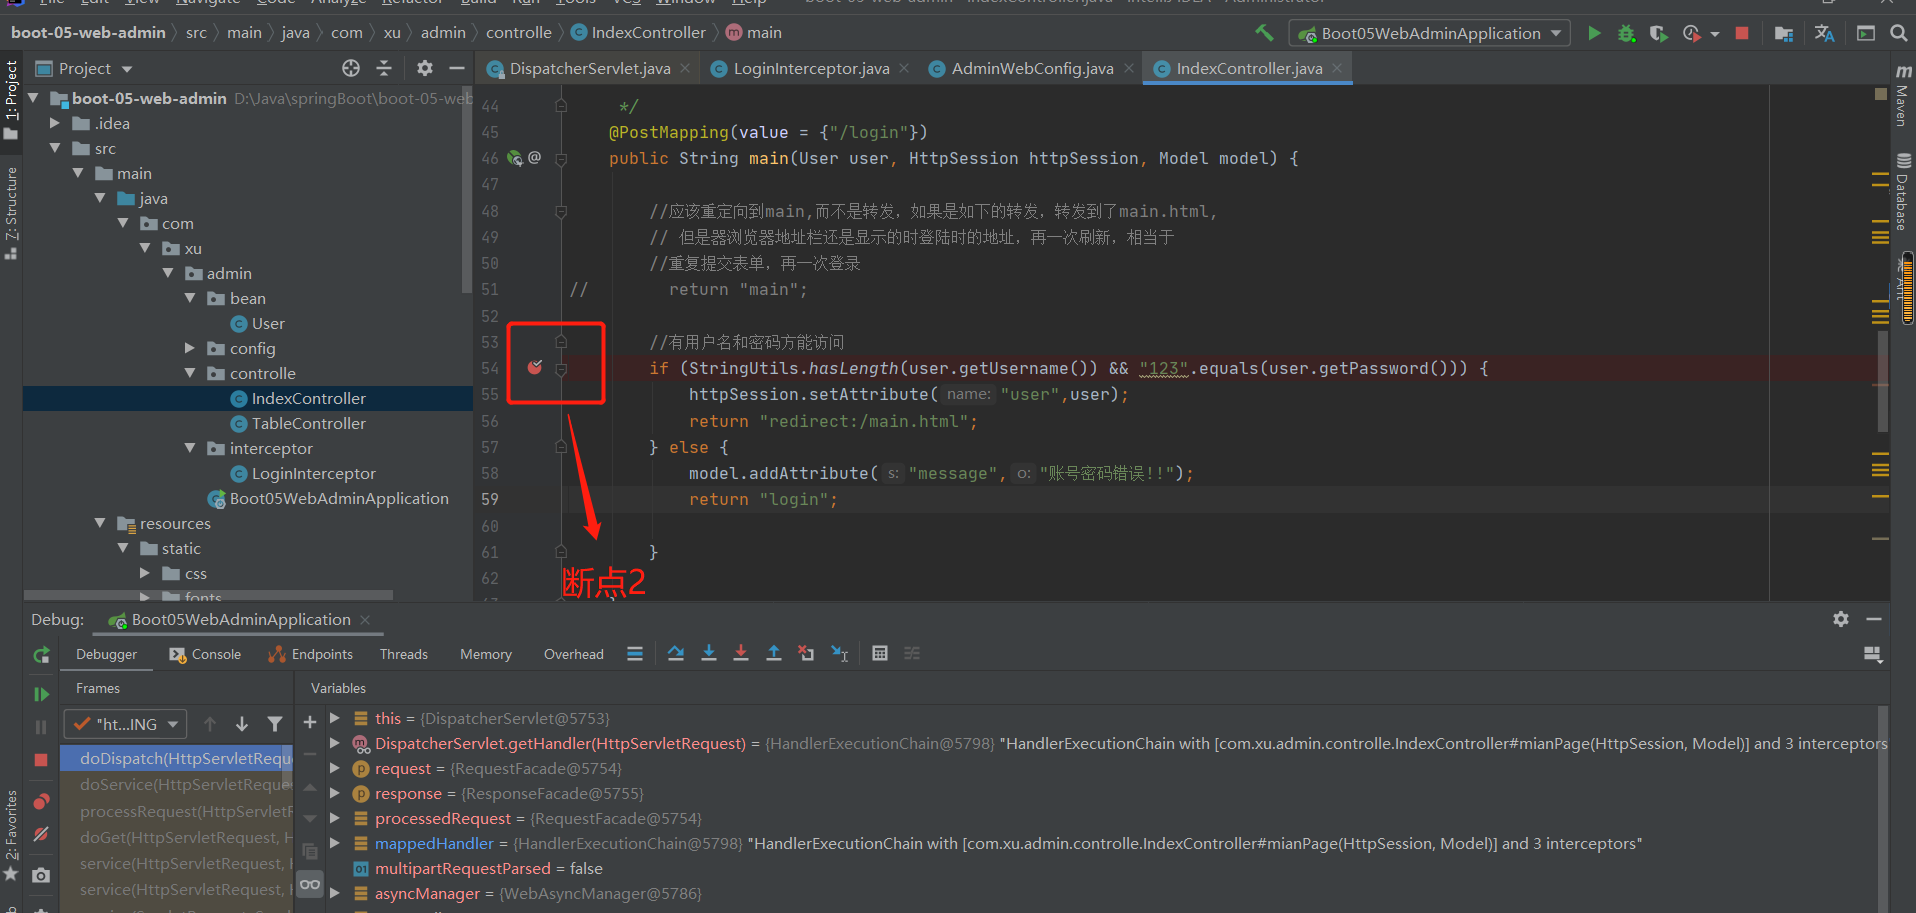

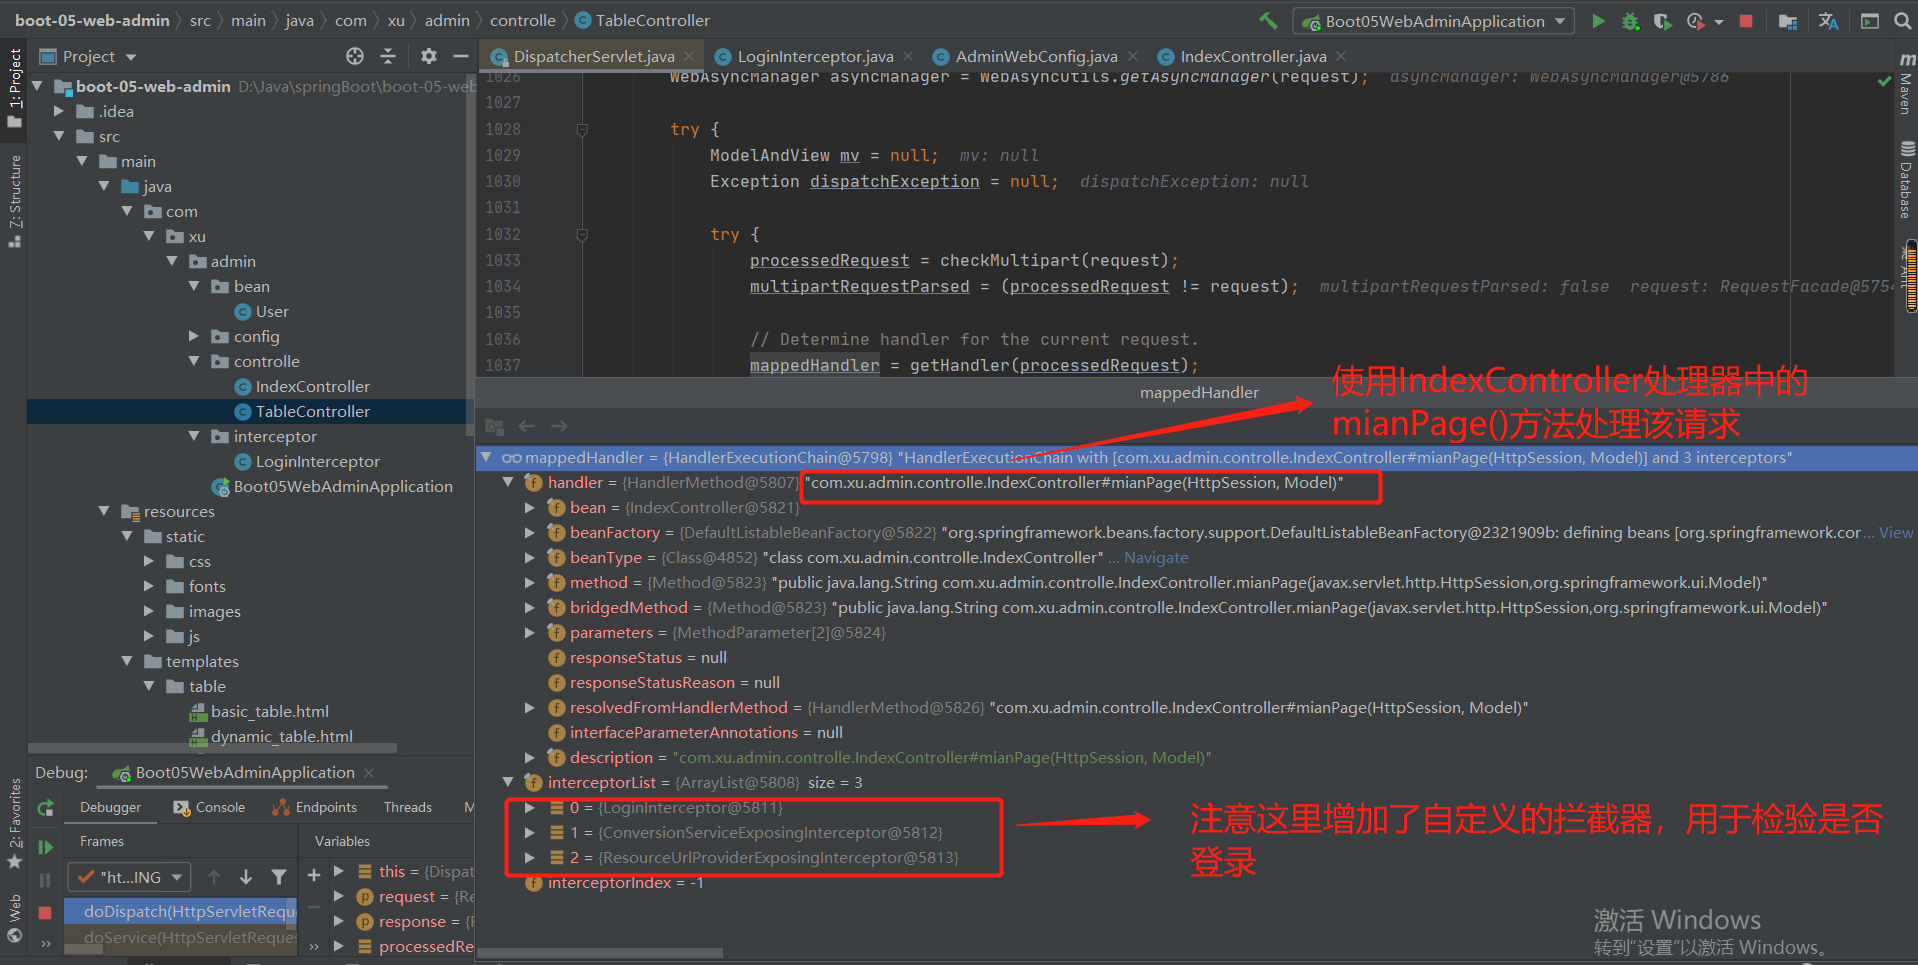
拦截器源码分析:
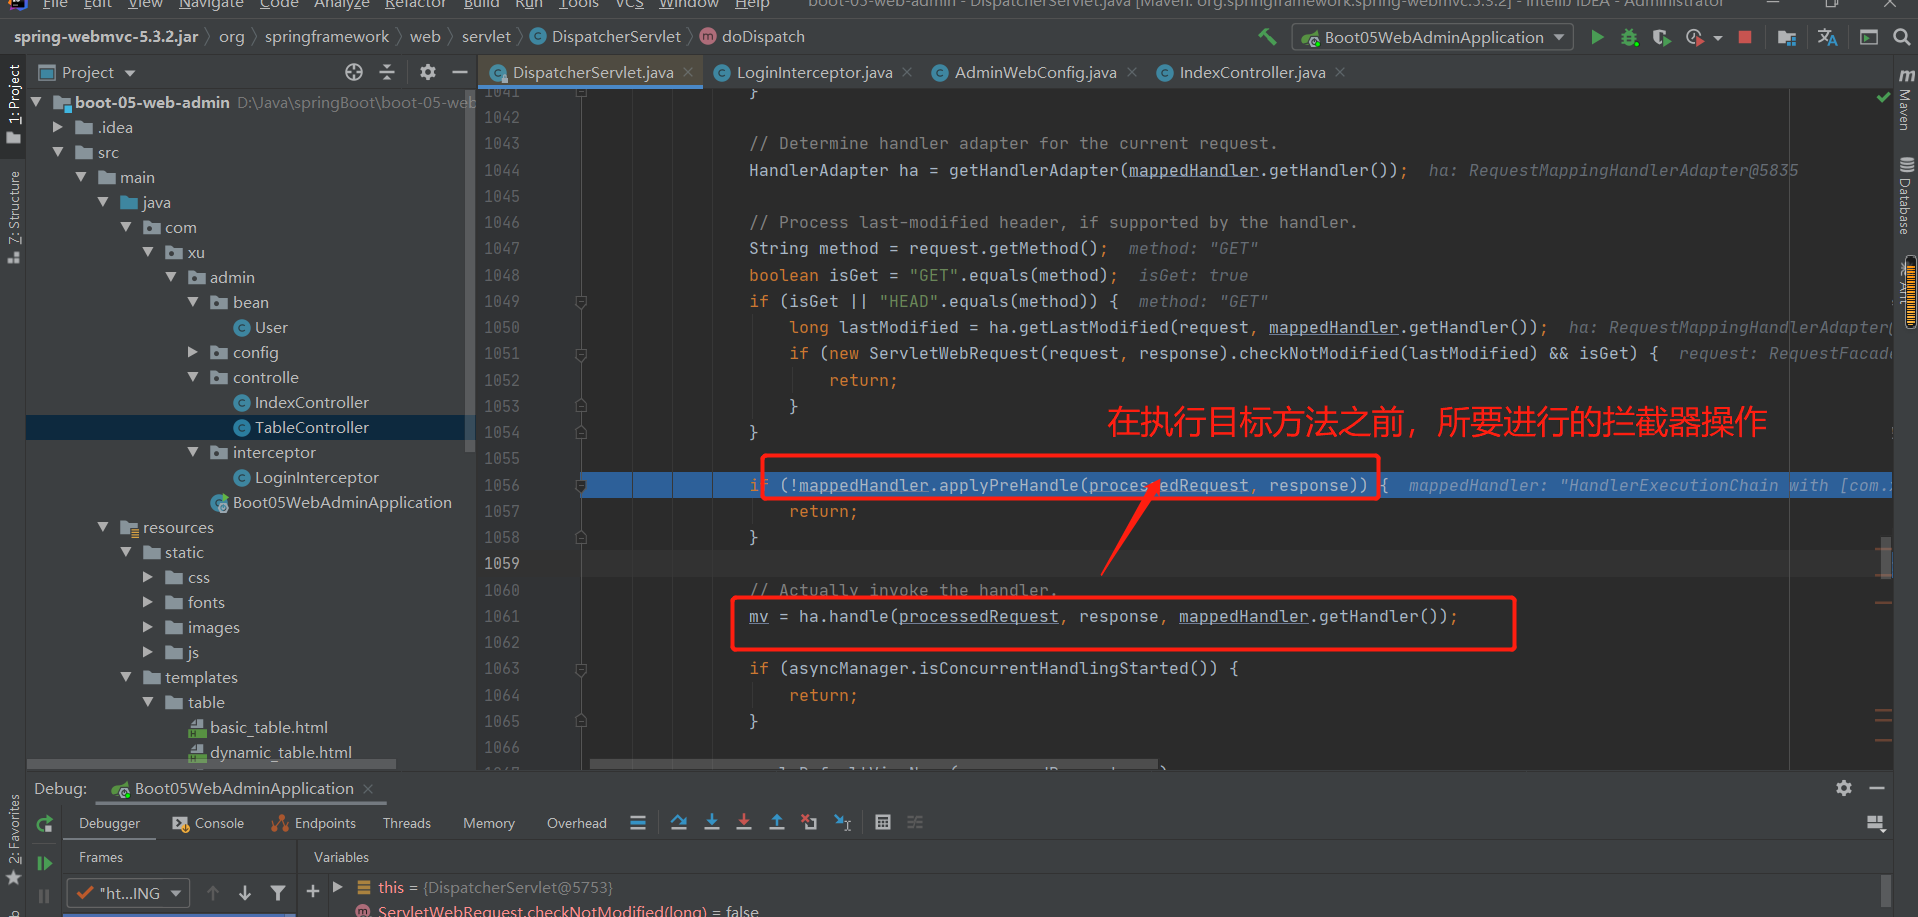
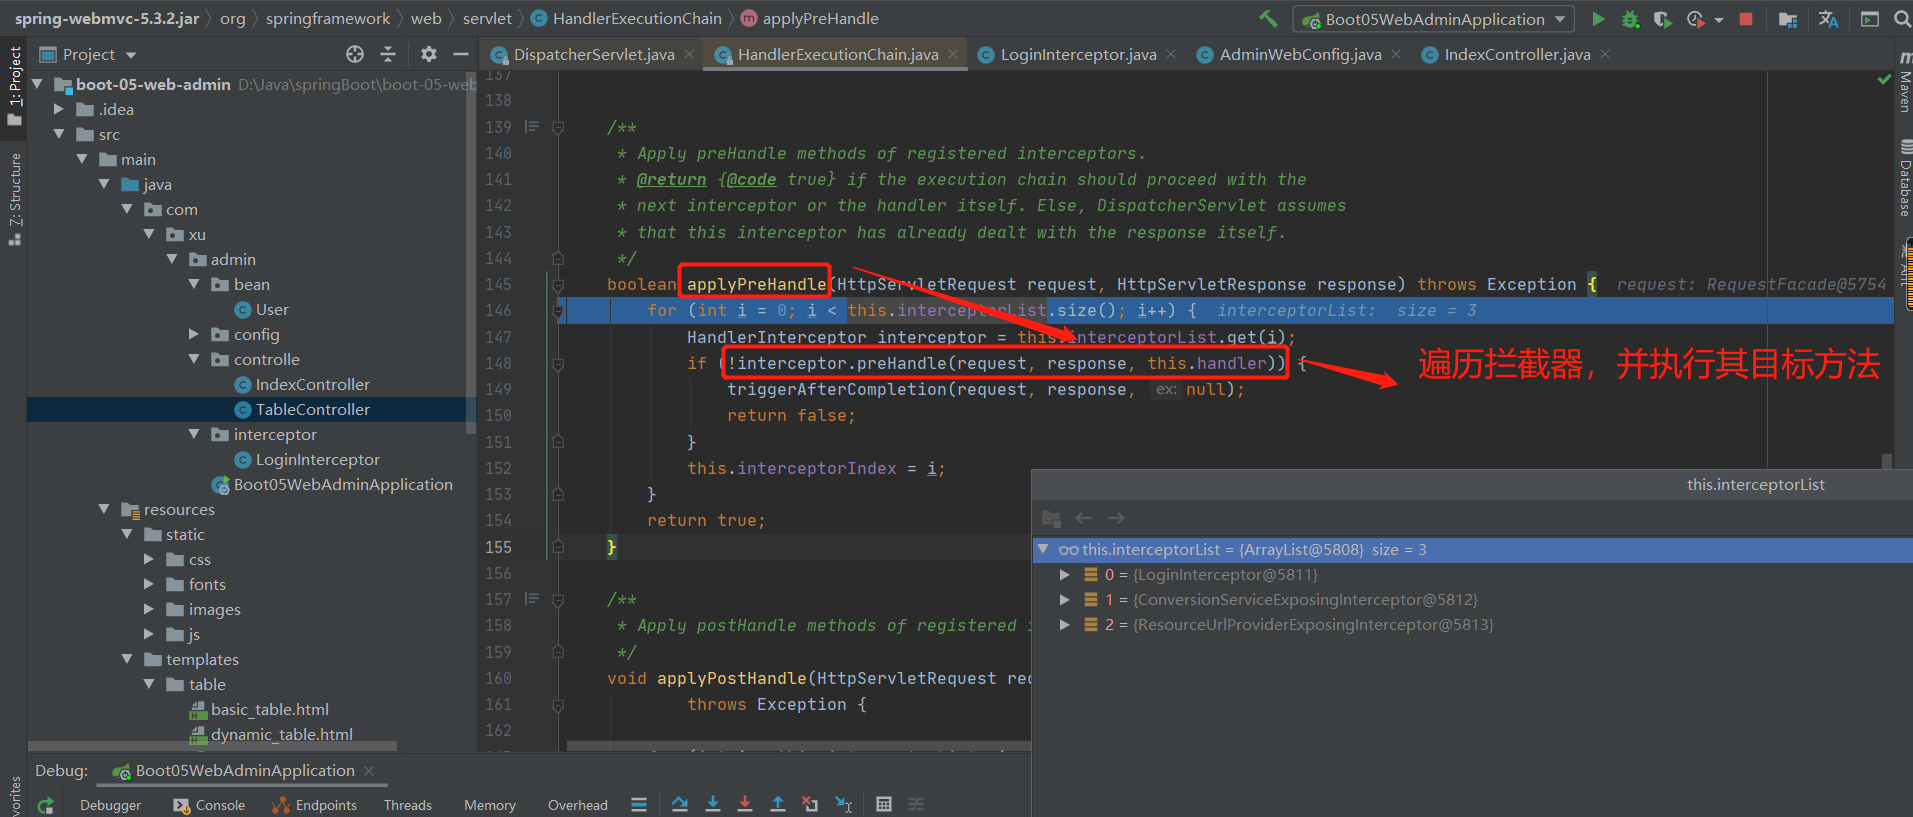
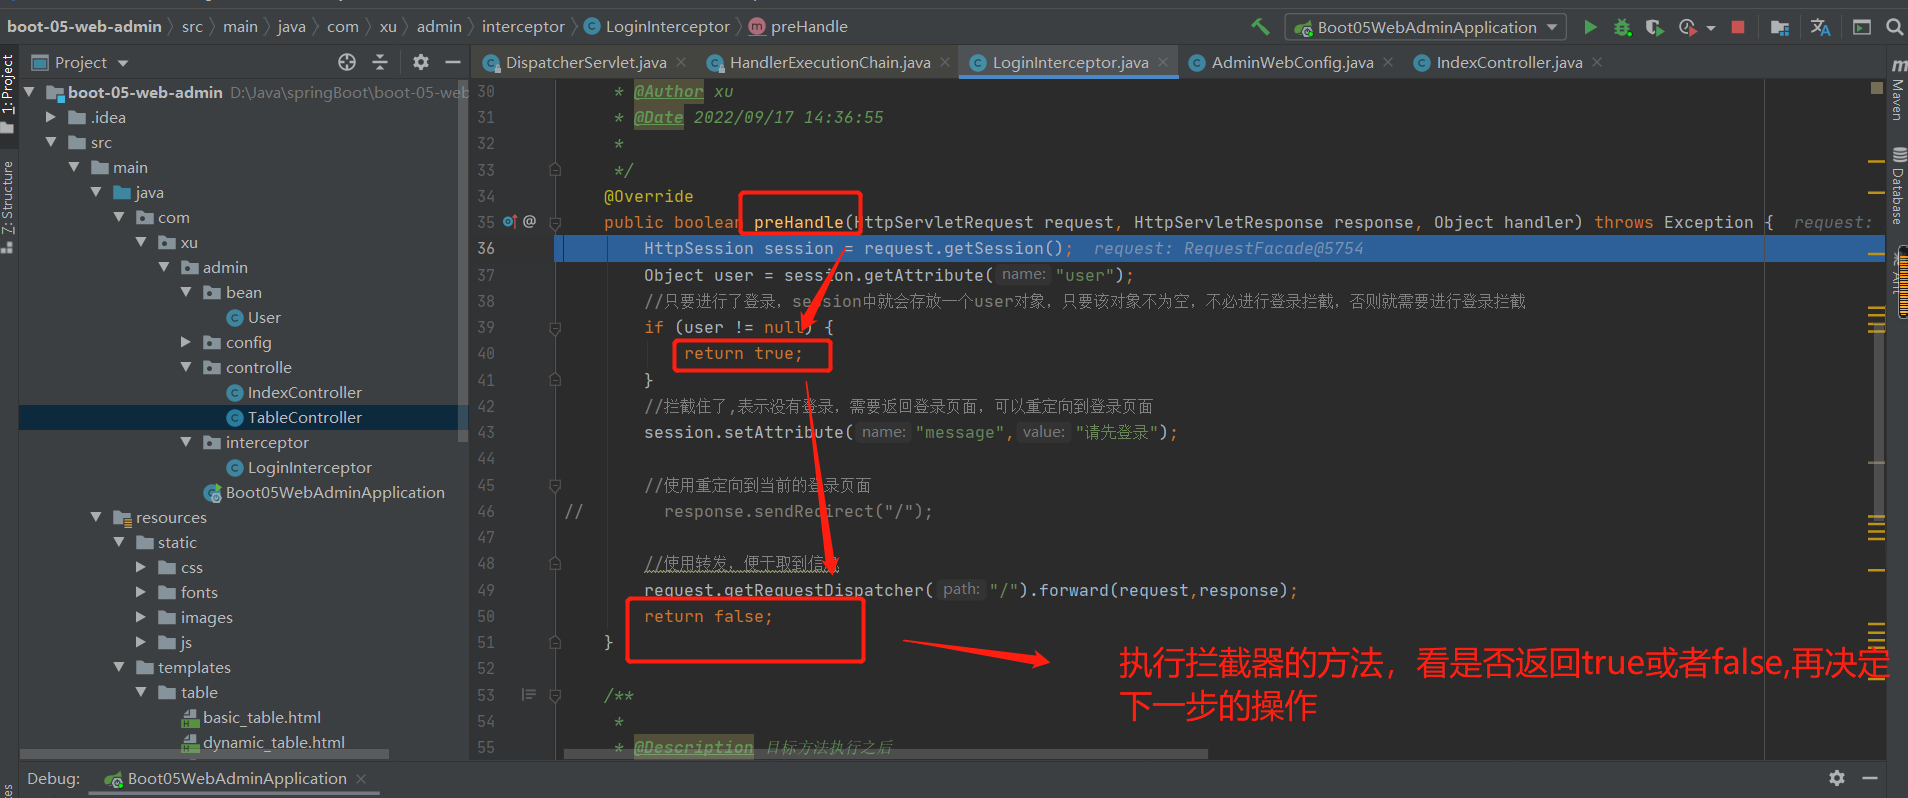
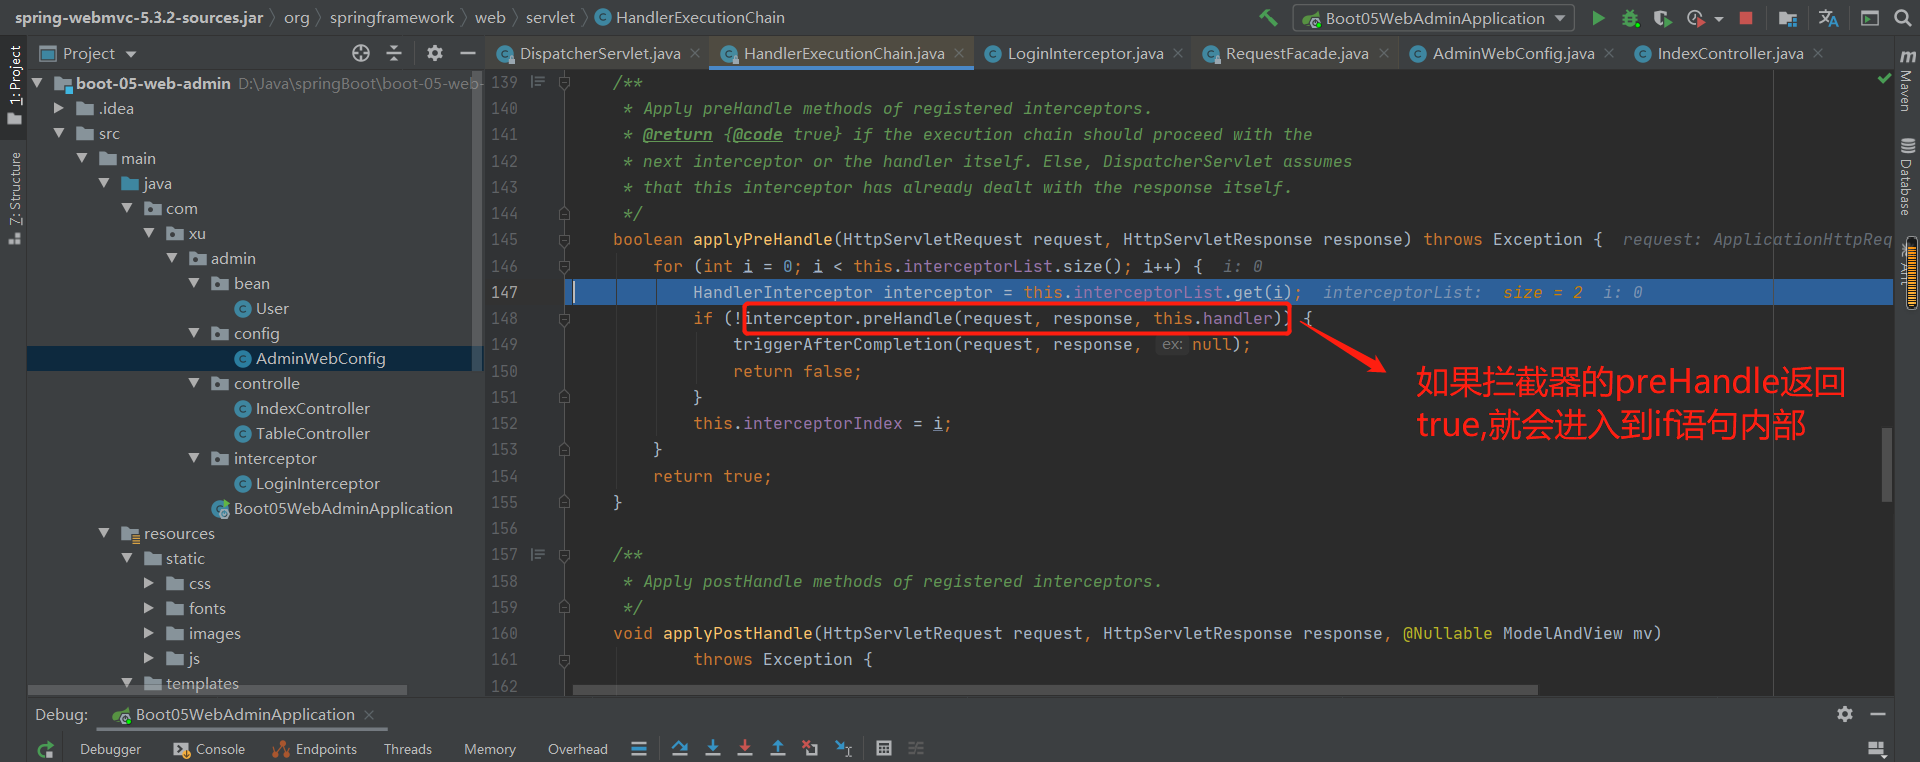
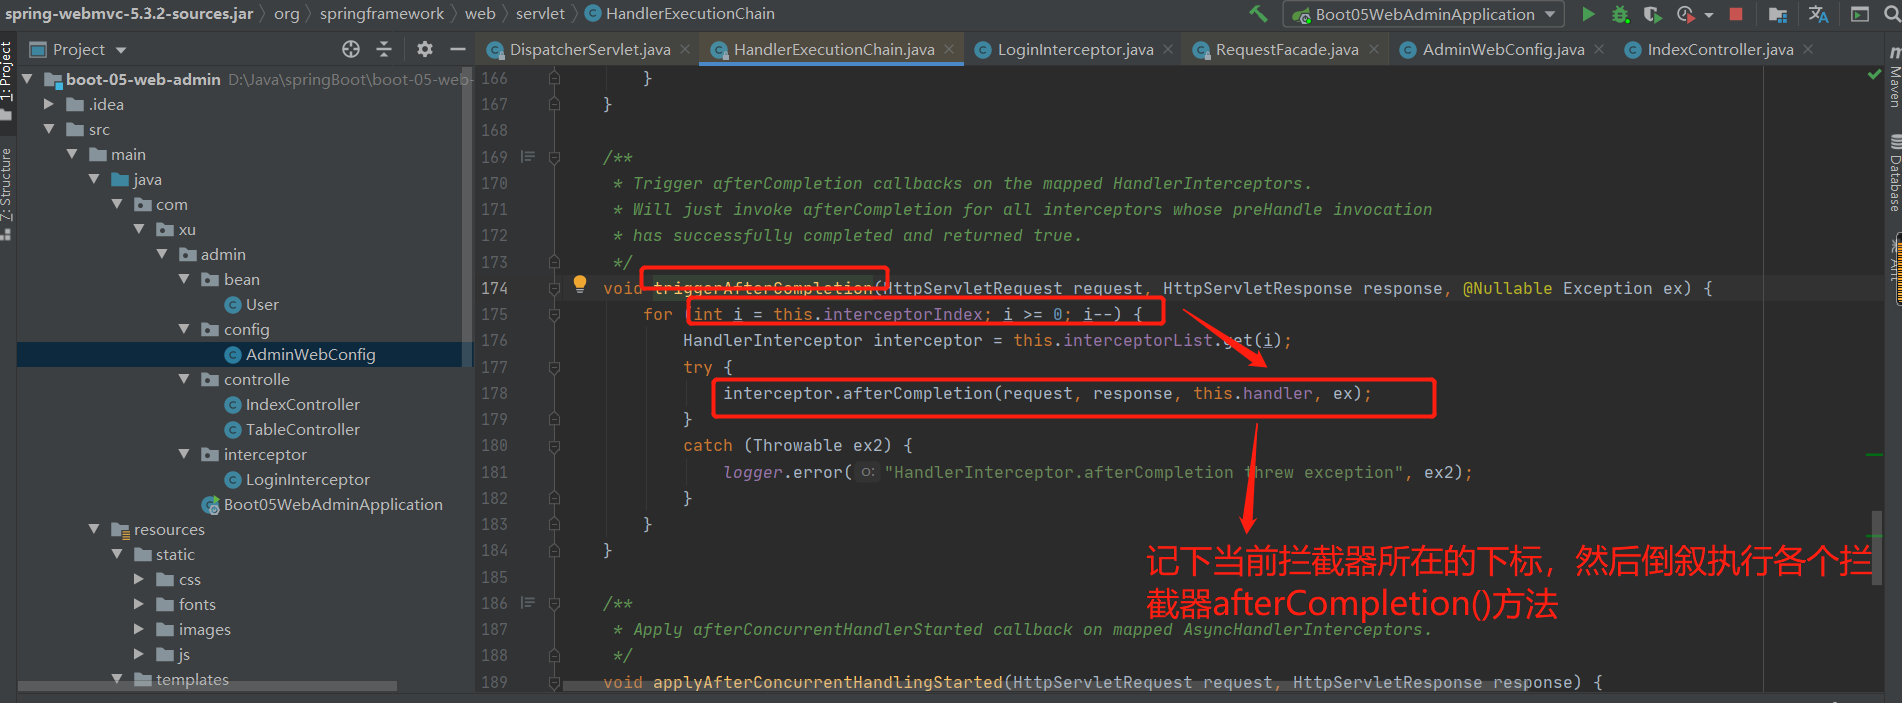
补充:由于我没有登录,导致拦截器拦截成功,preHandle()方法返回true,也就导致无法进入到该if语句中。

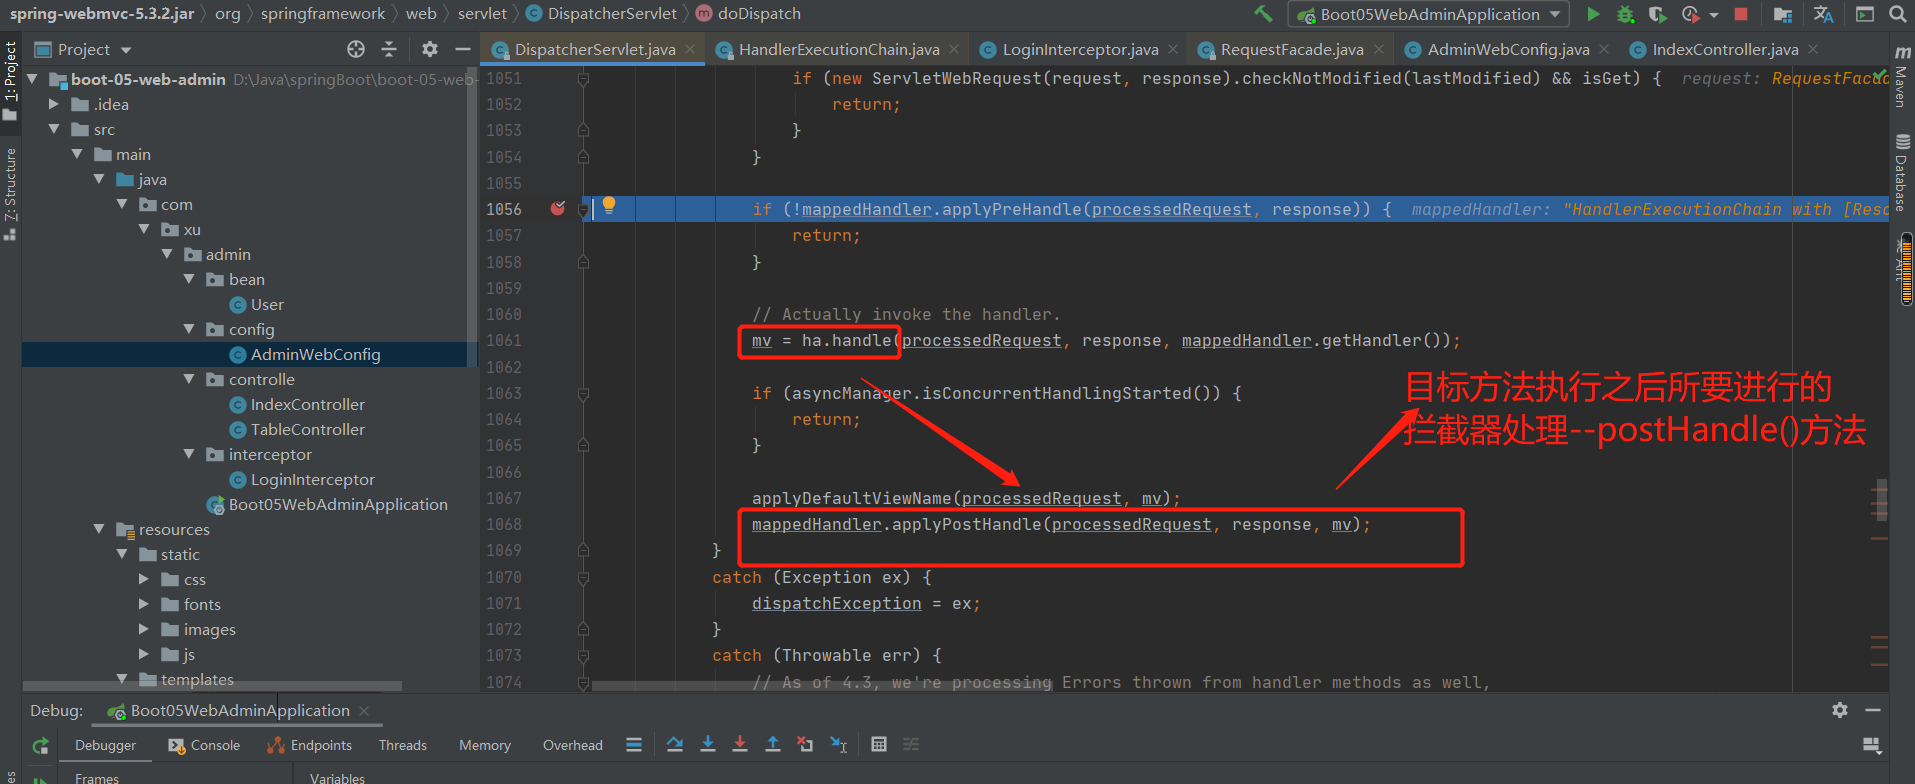
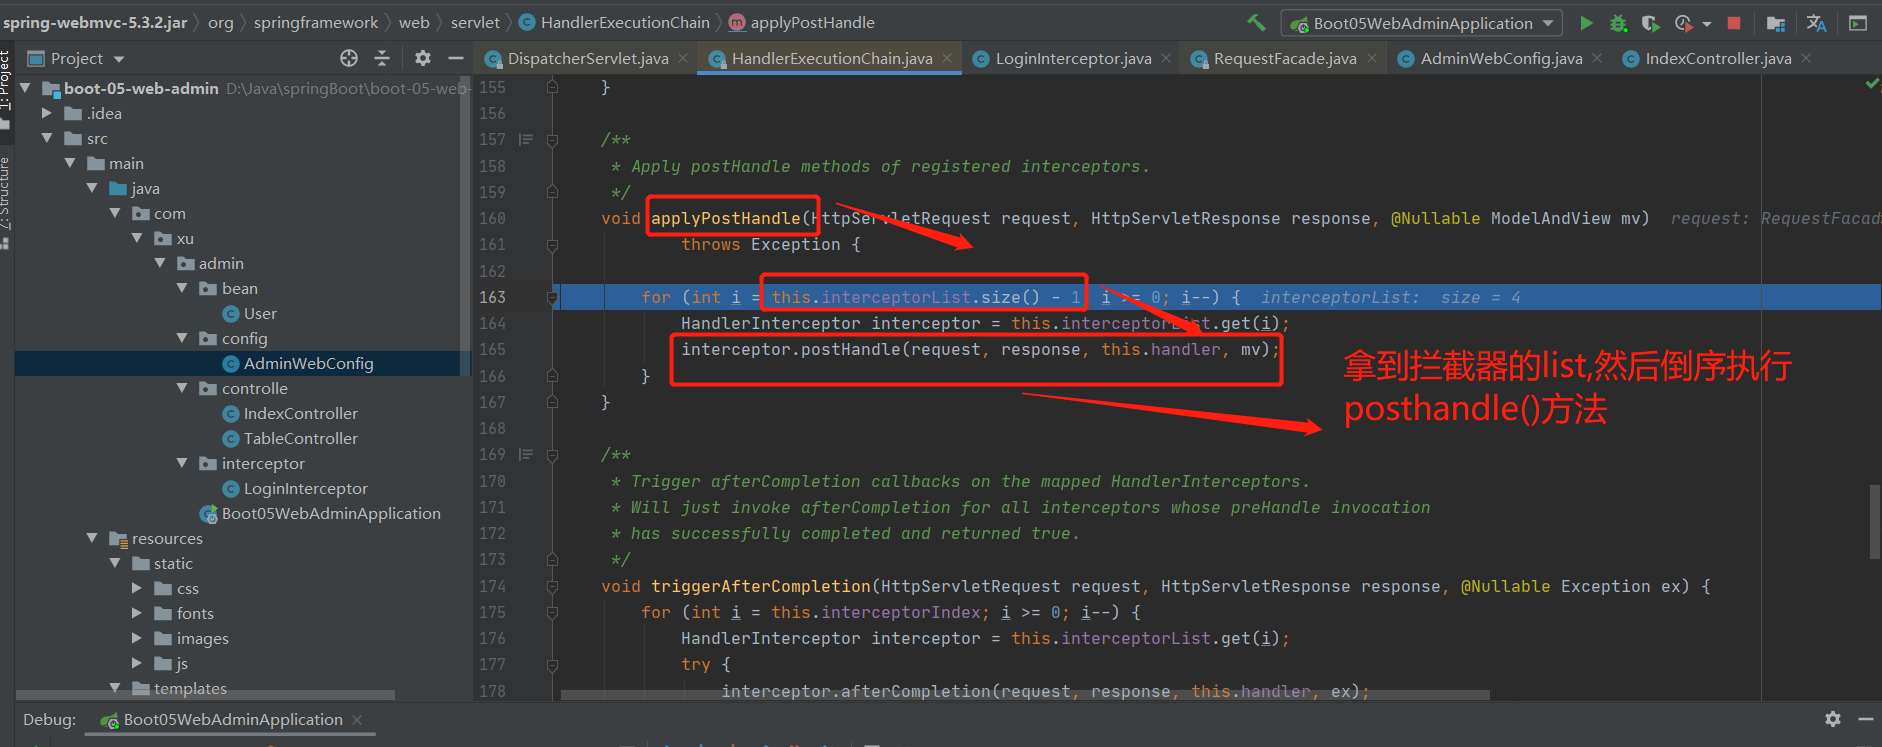
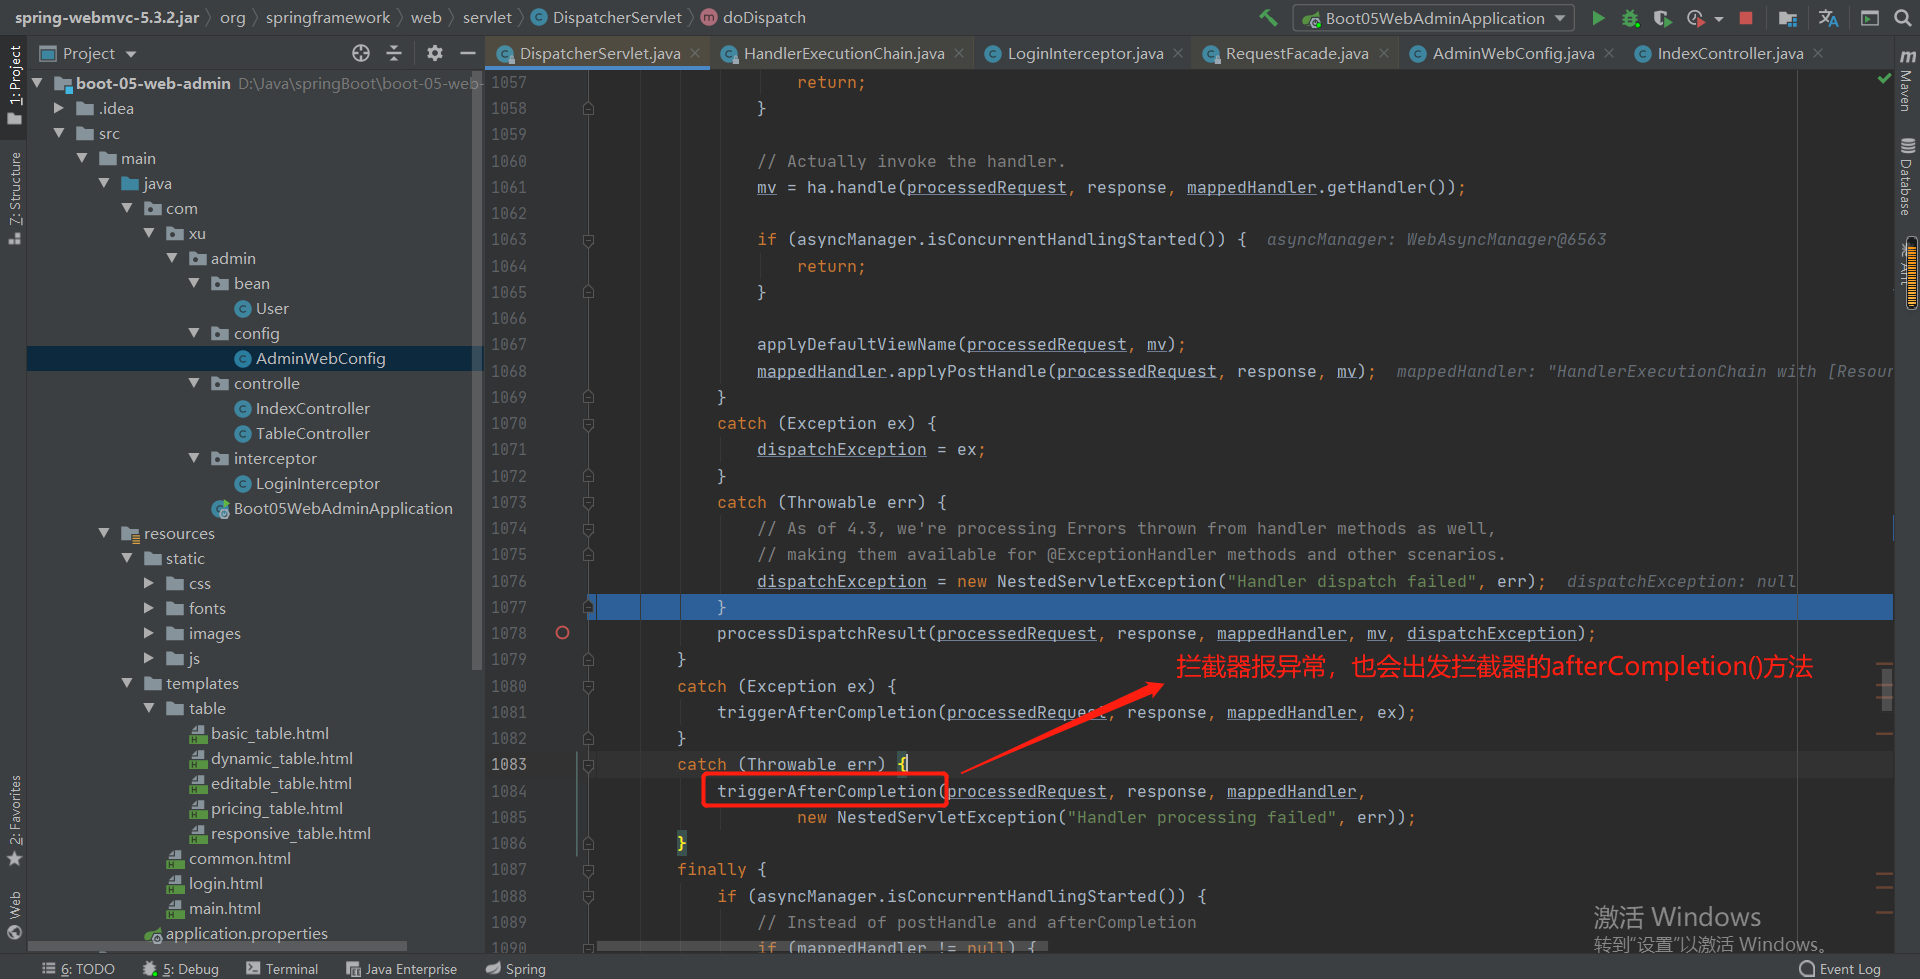
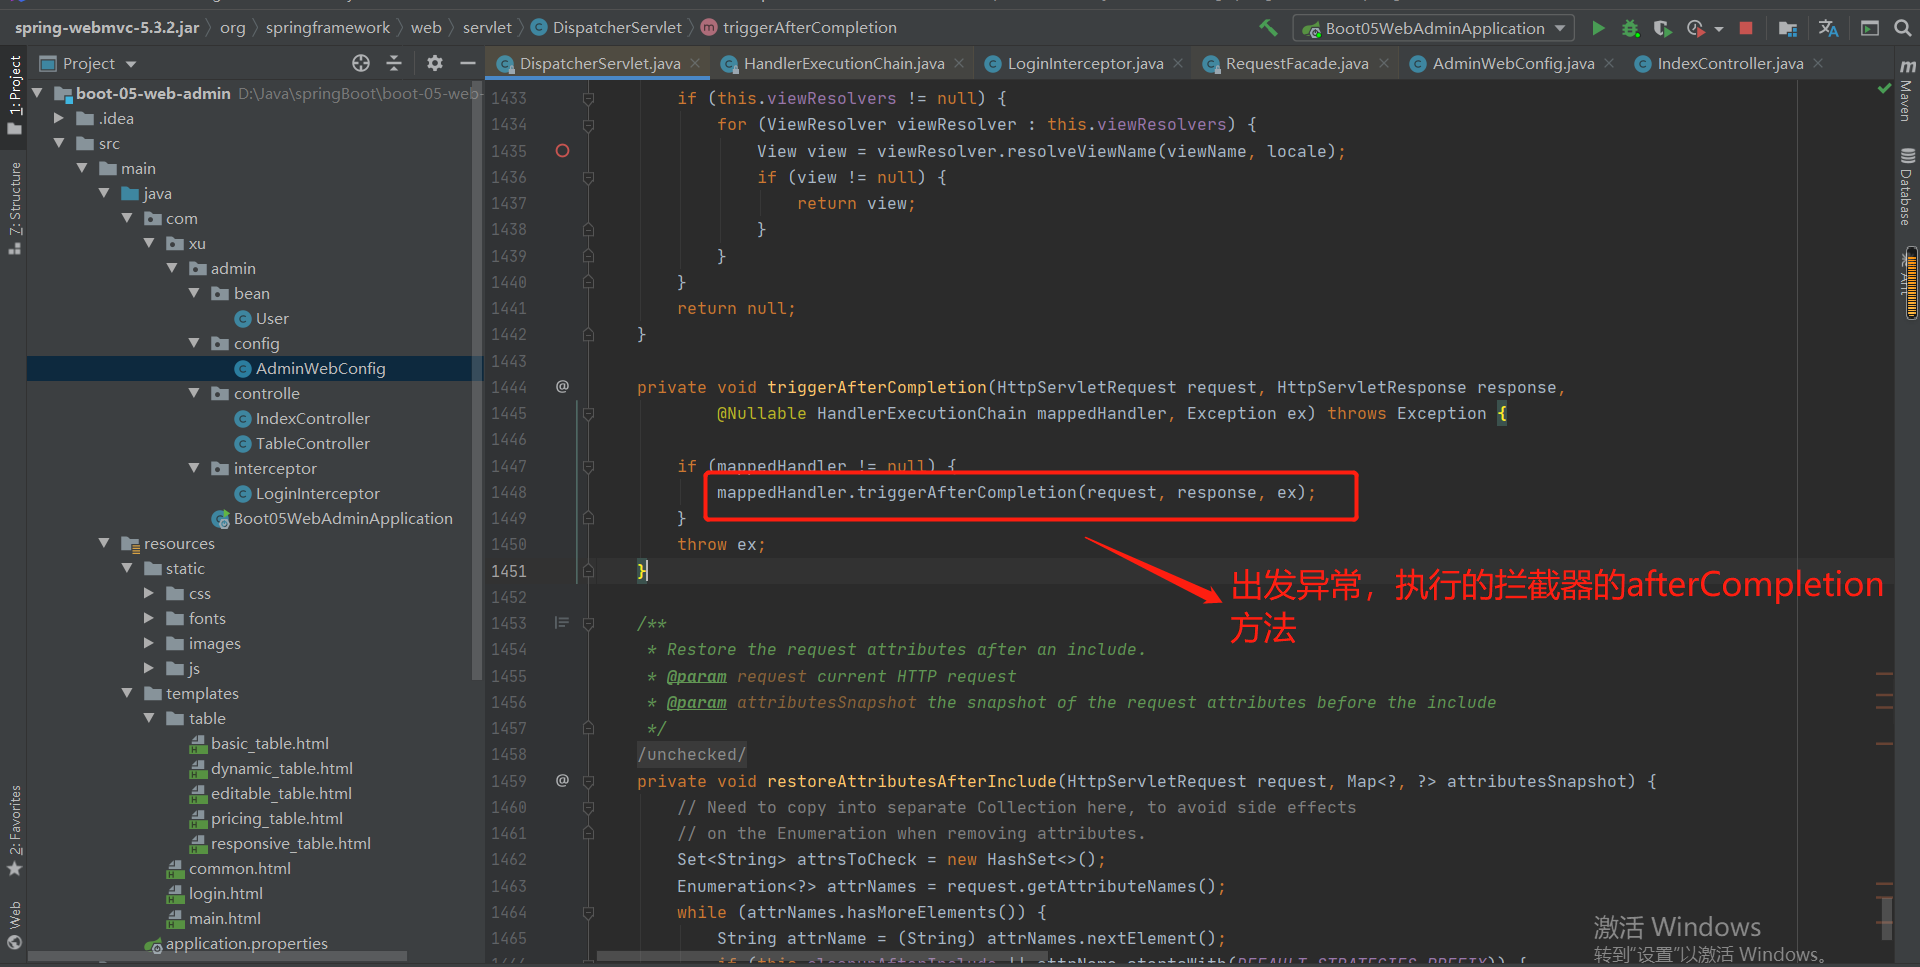
补充:页面渲染完成之后,也会出发拦截器的afterCompletion方法
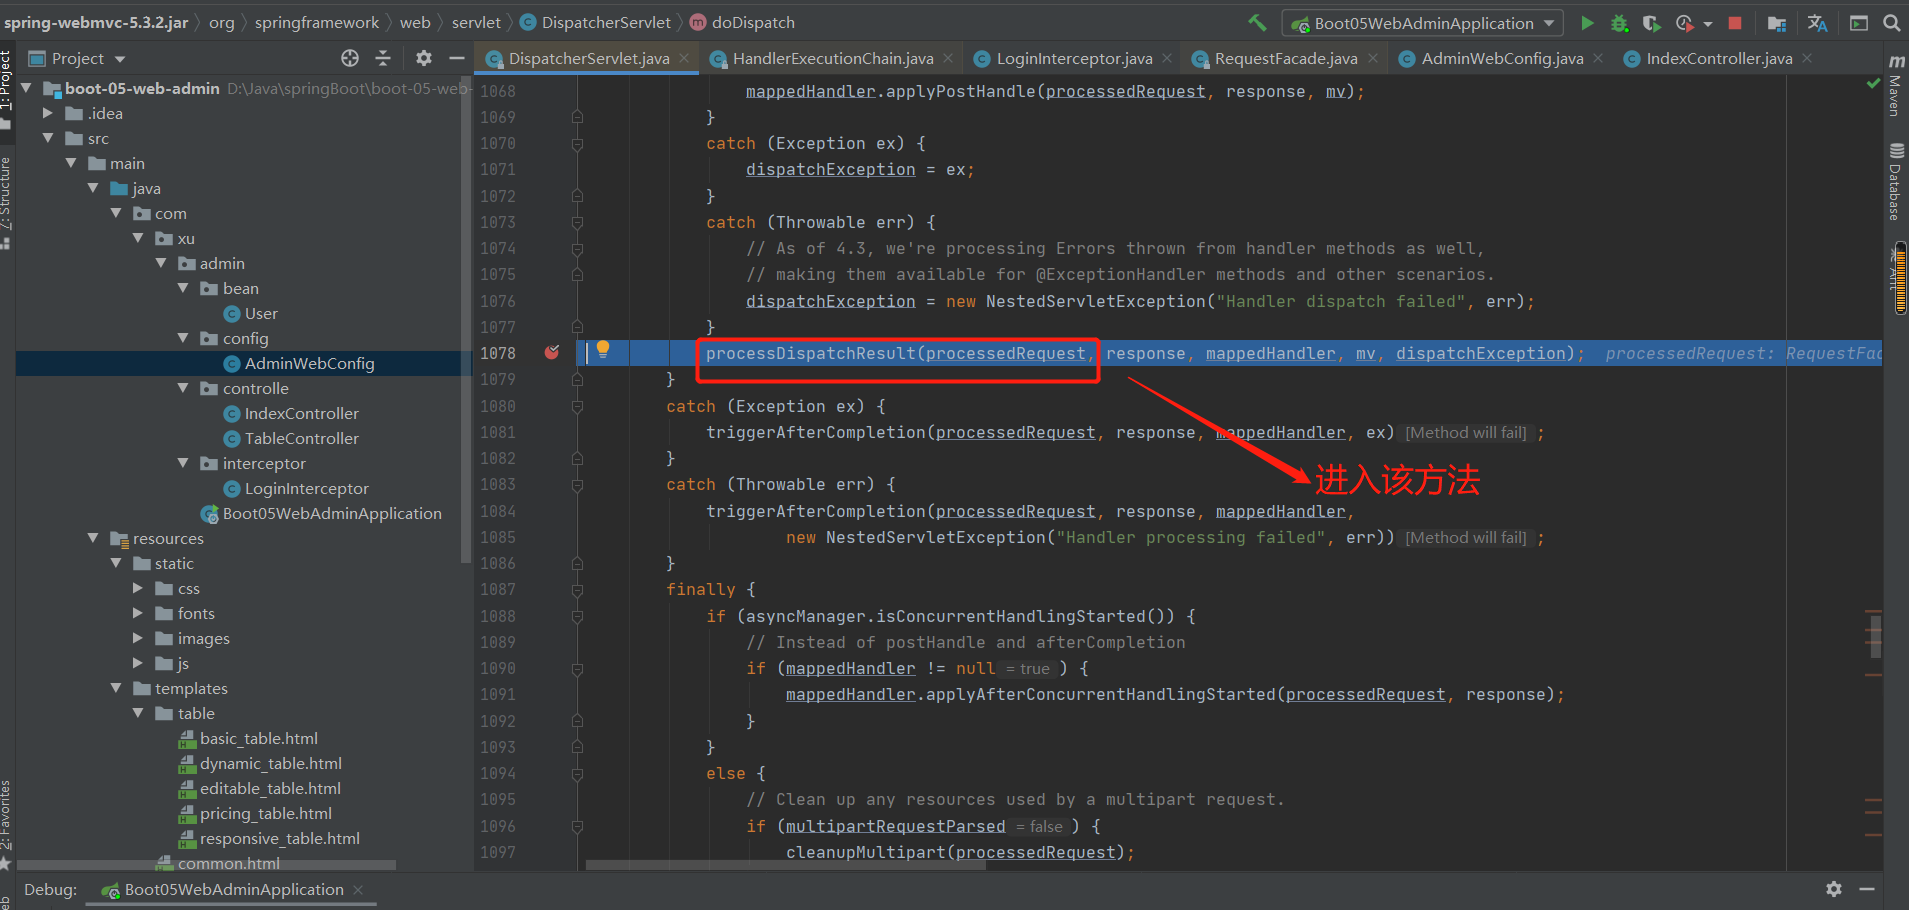
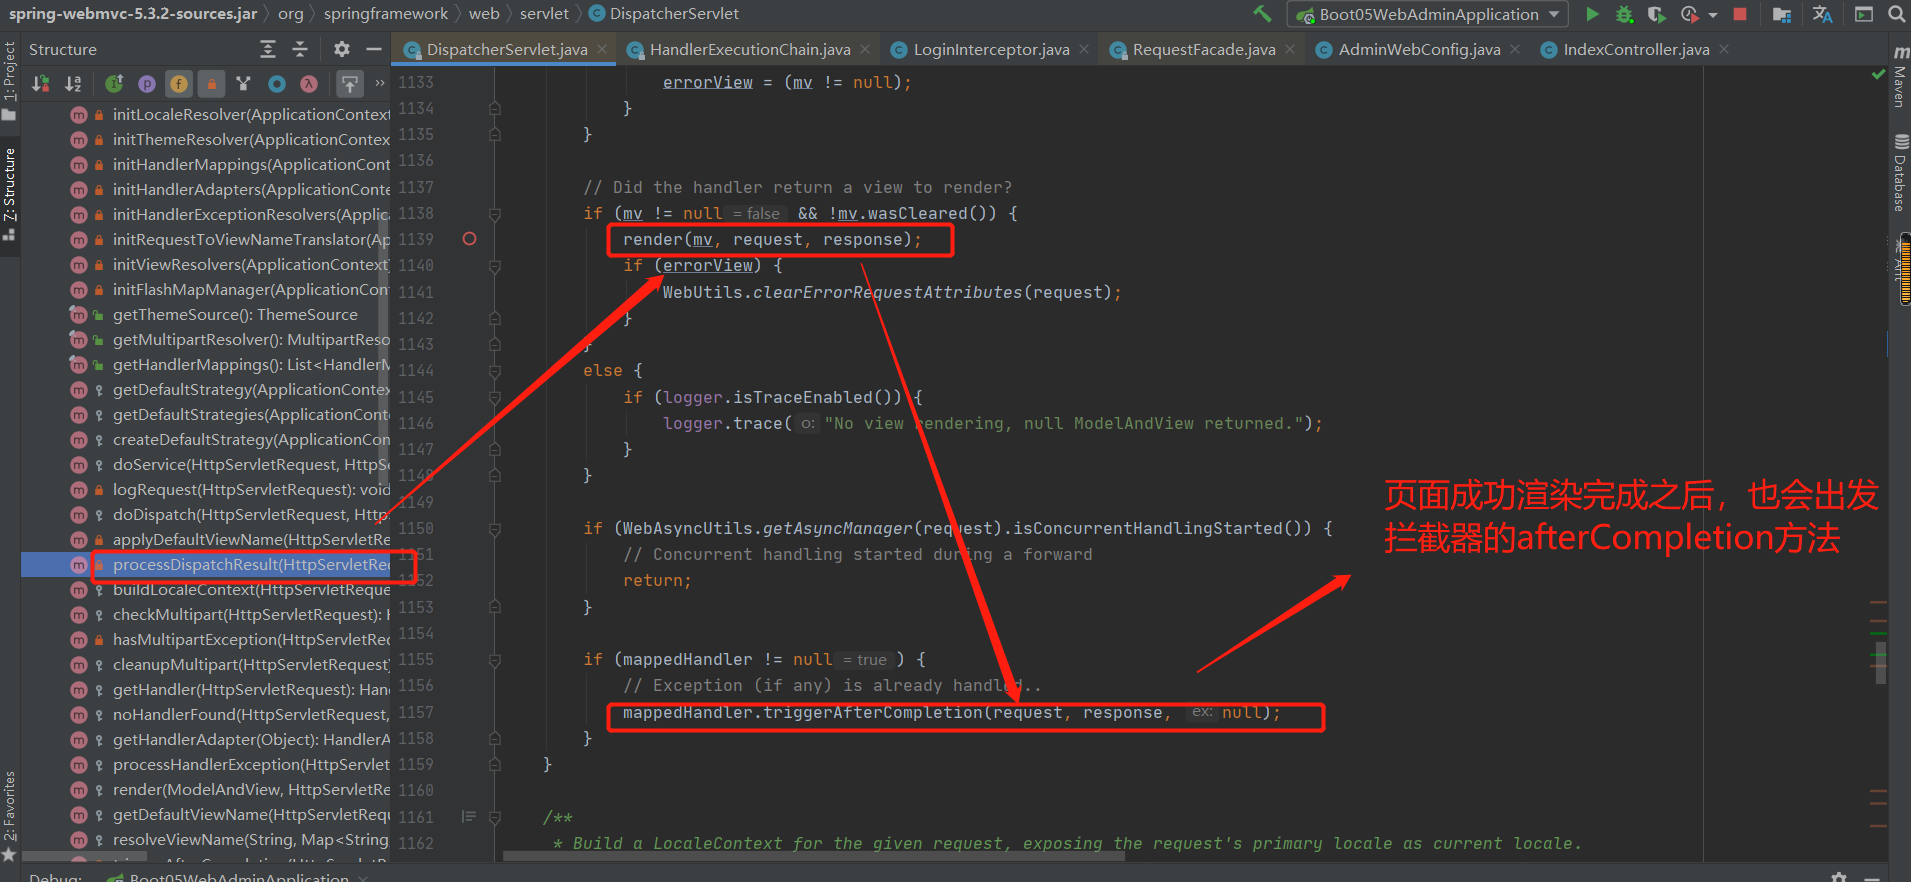
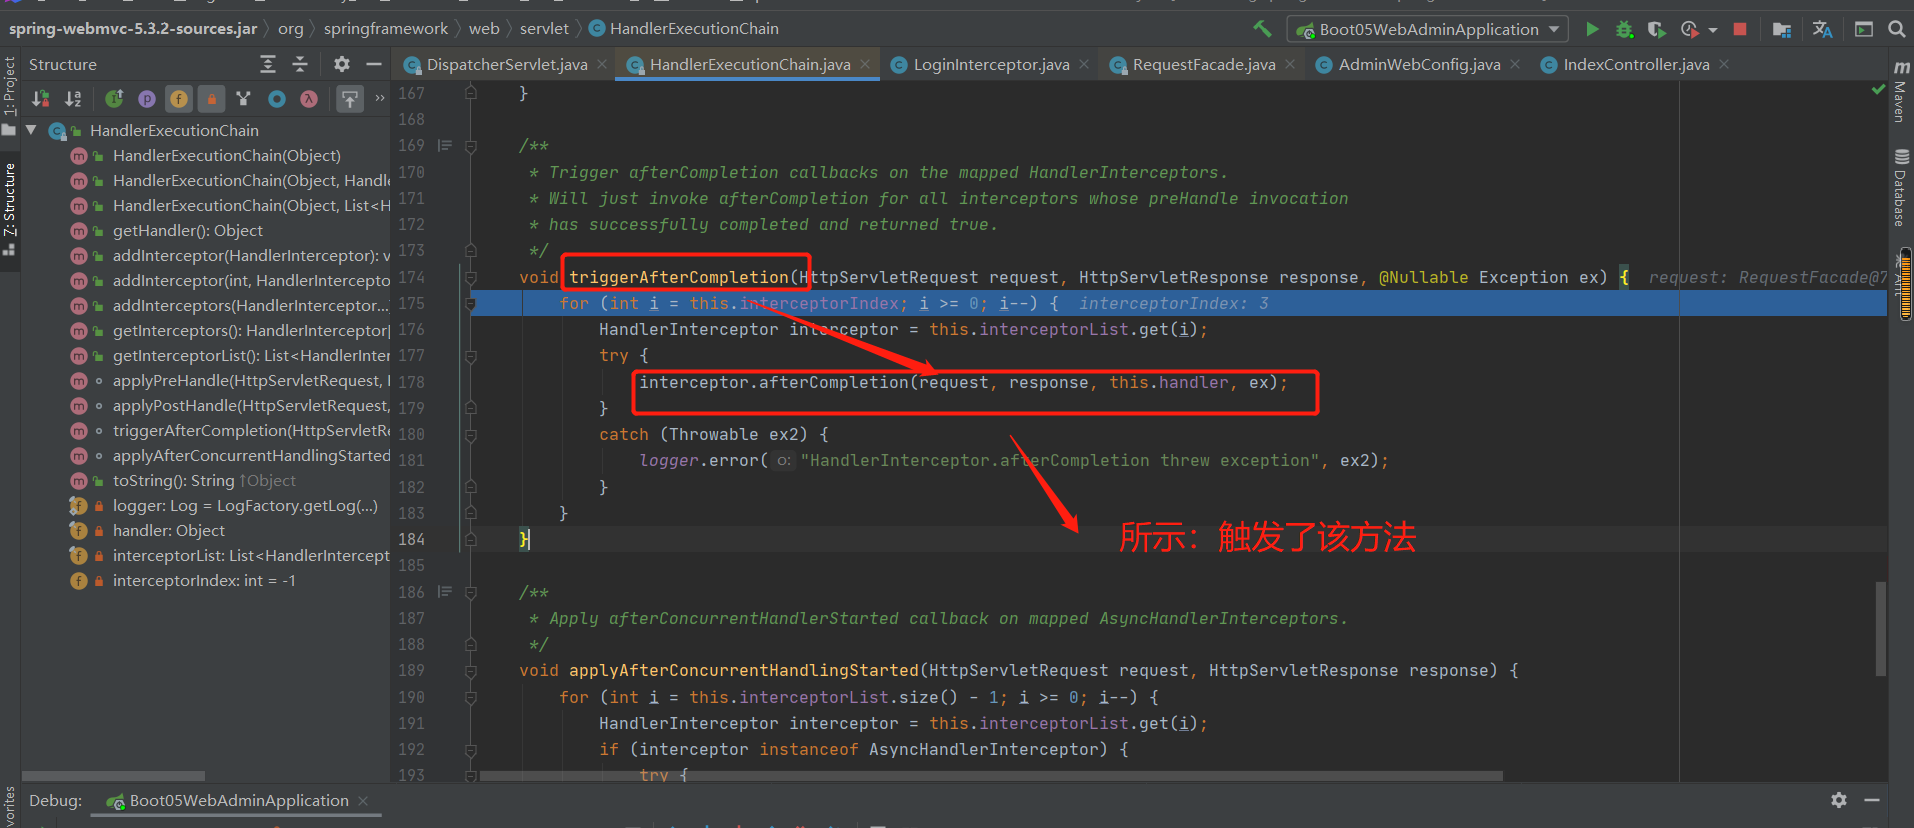
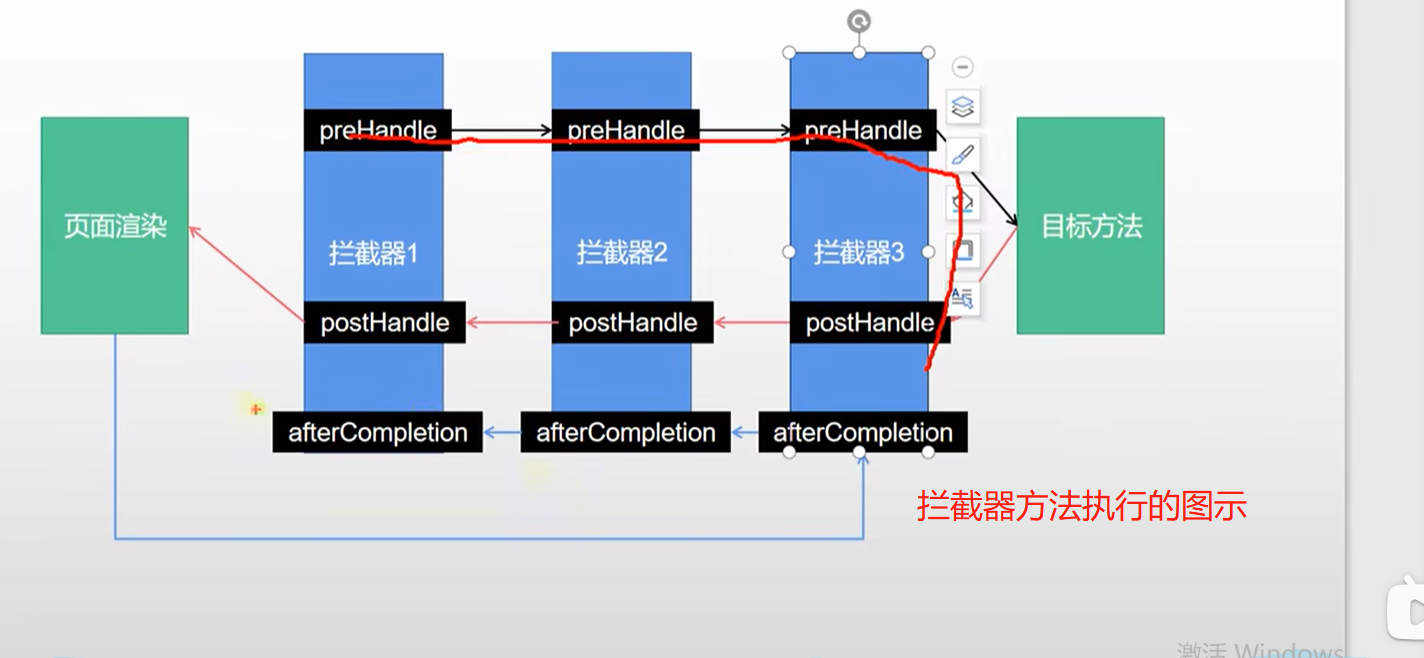
总结:
第9章:文件上传
9-1 单文件与多文件上传的使用
关于文件上传的限制:
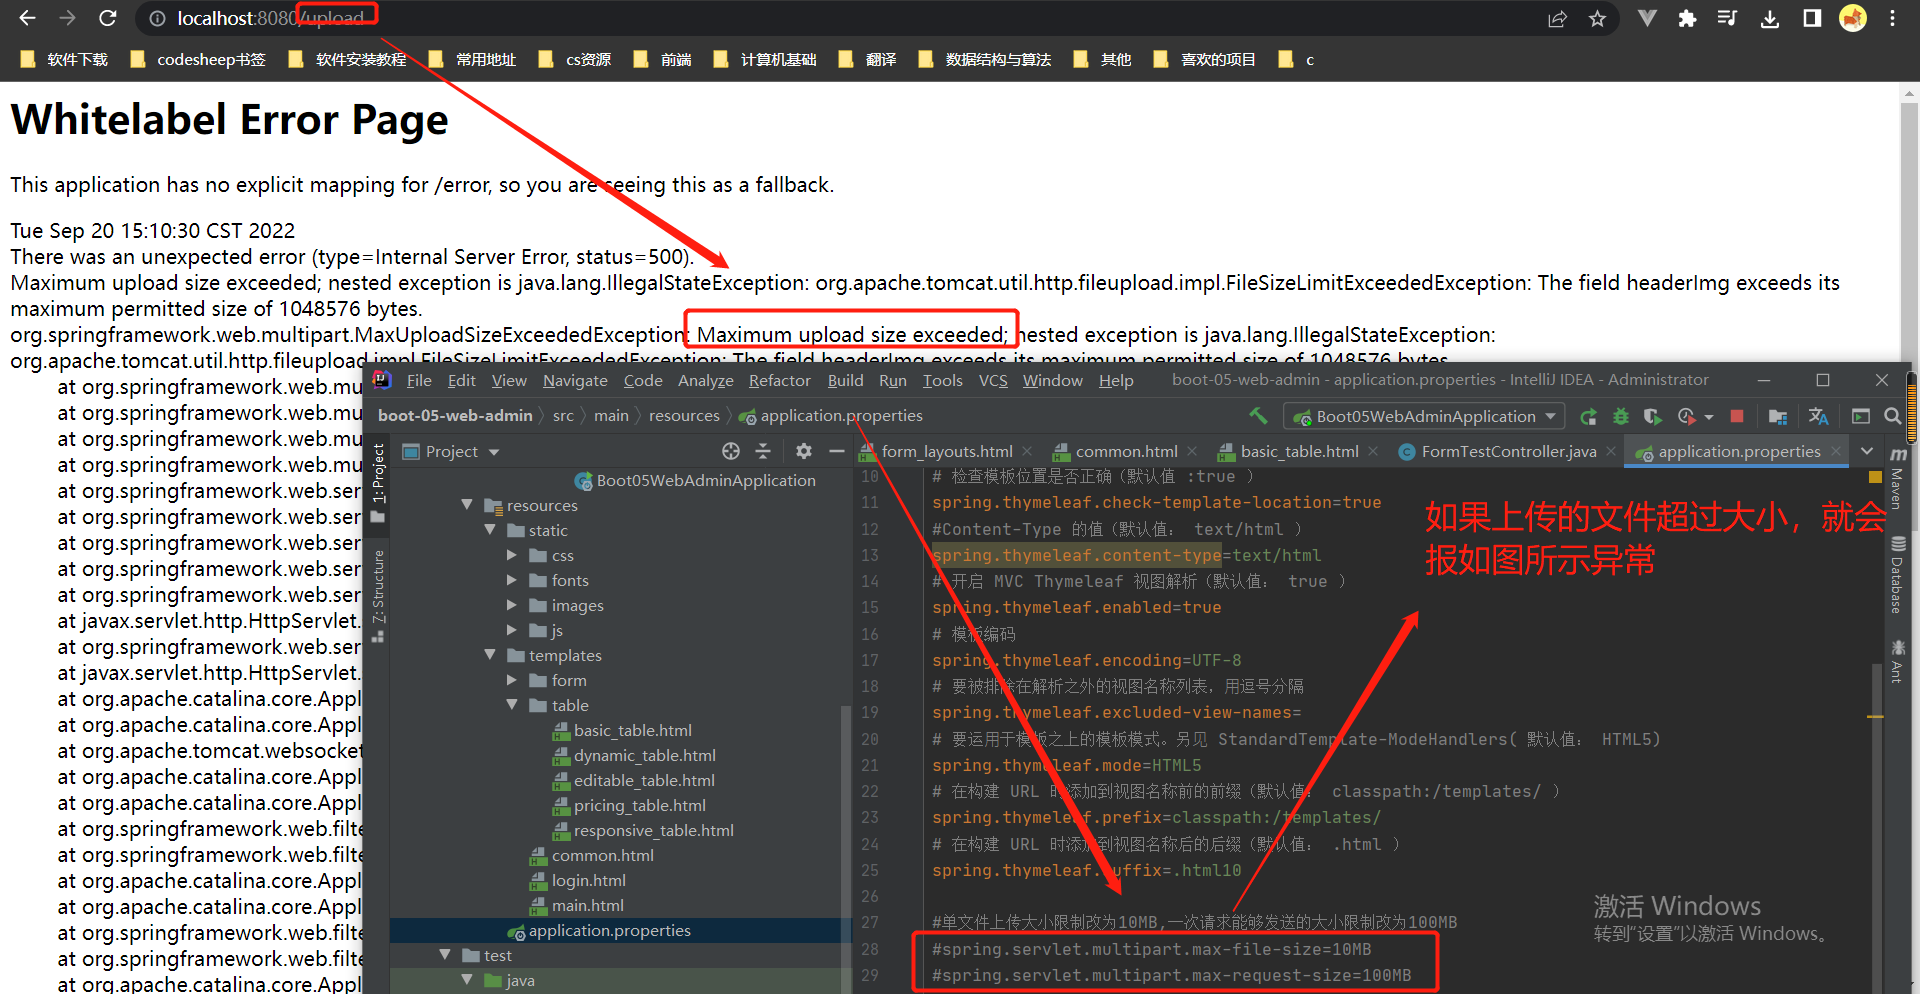
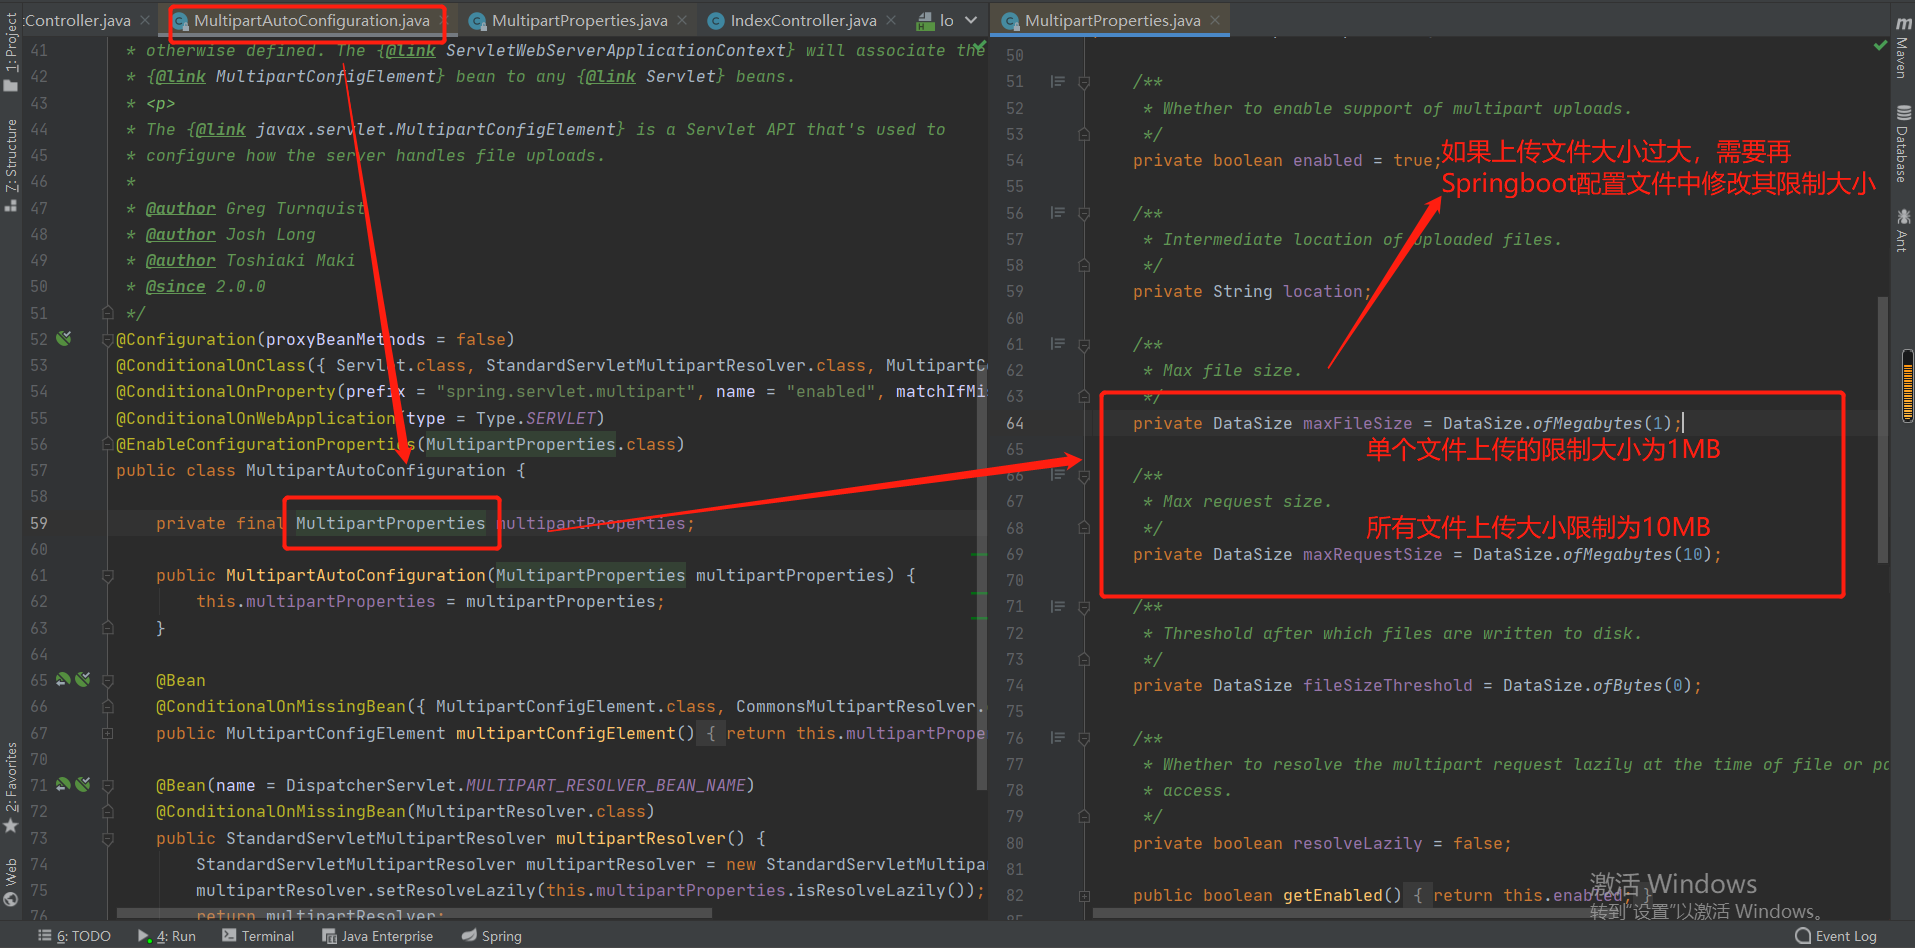
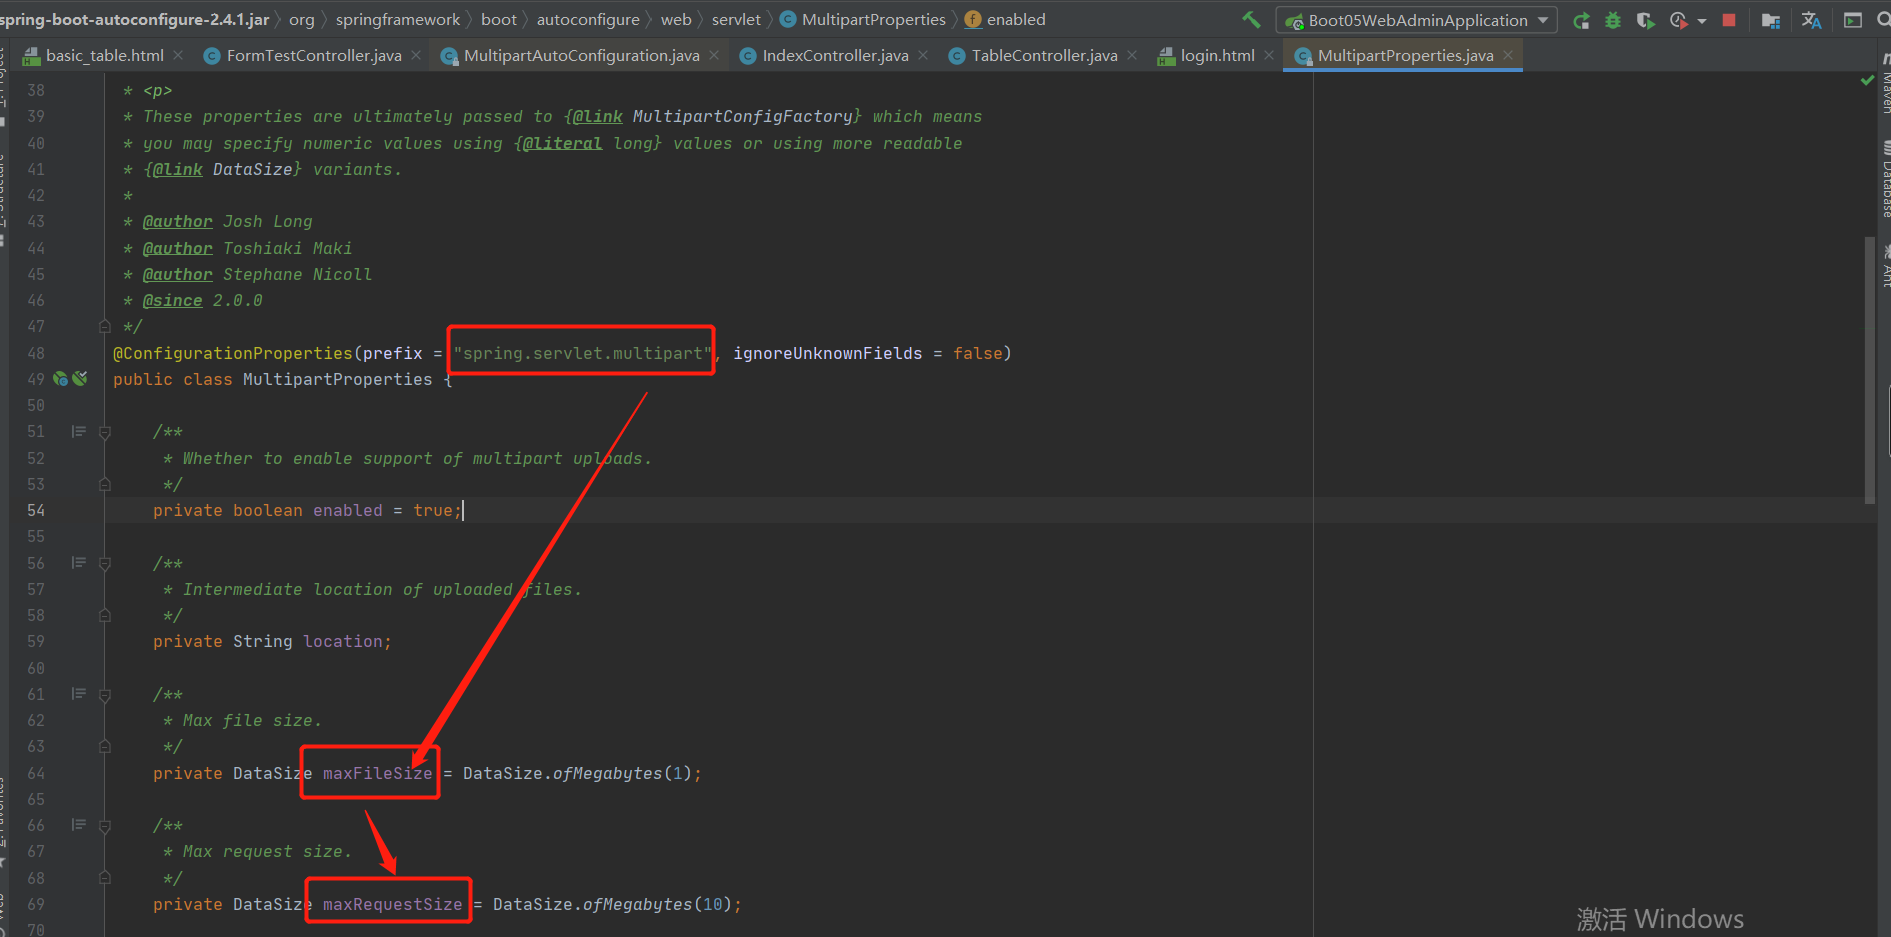
关于异步上传文件所报异常及解决办法参考:
https://www.cnblogs.com/rong-xu-drum/p/16711478.html
输出结果:
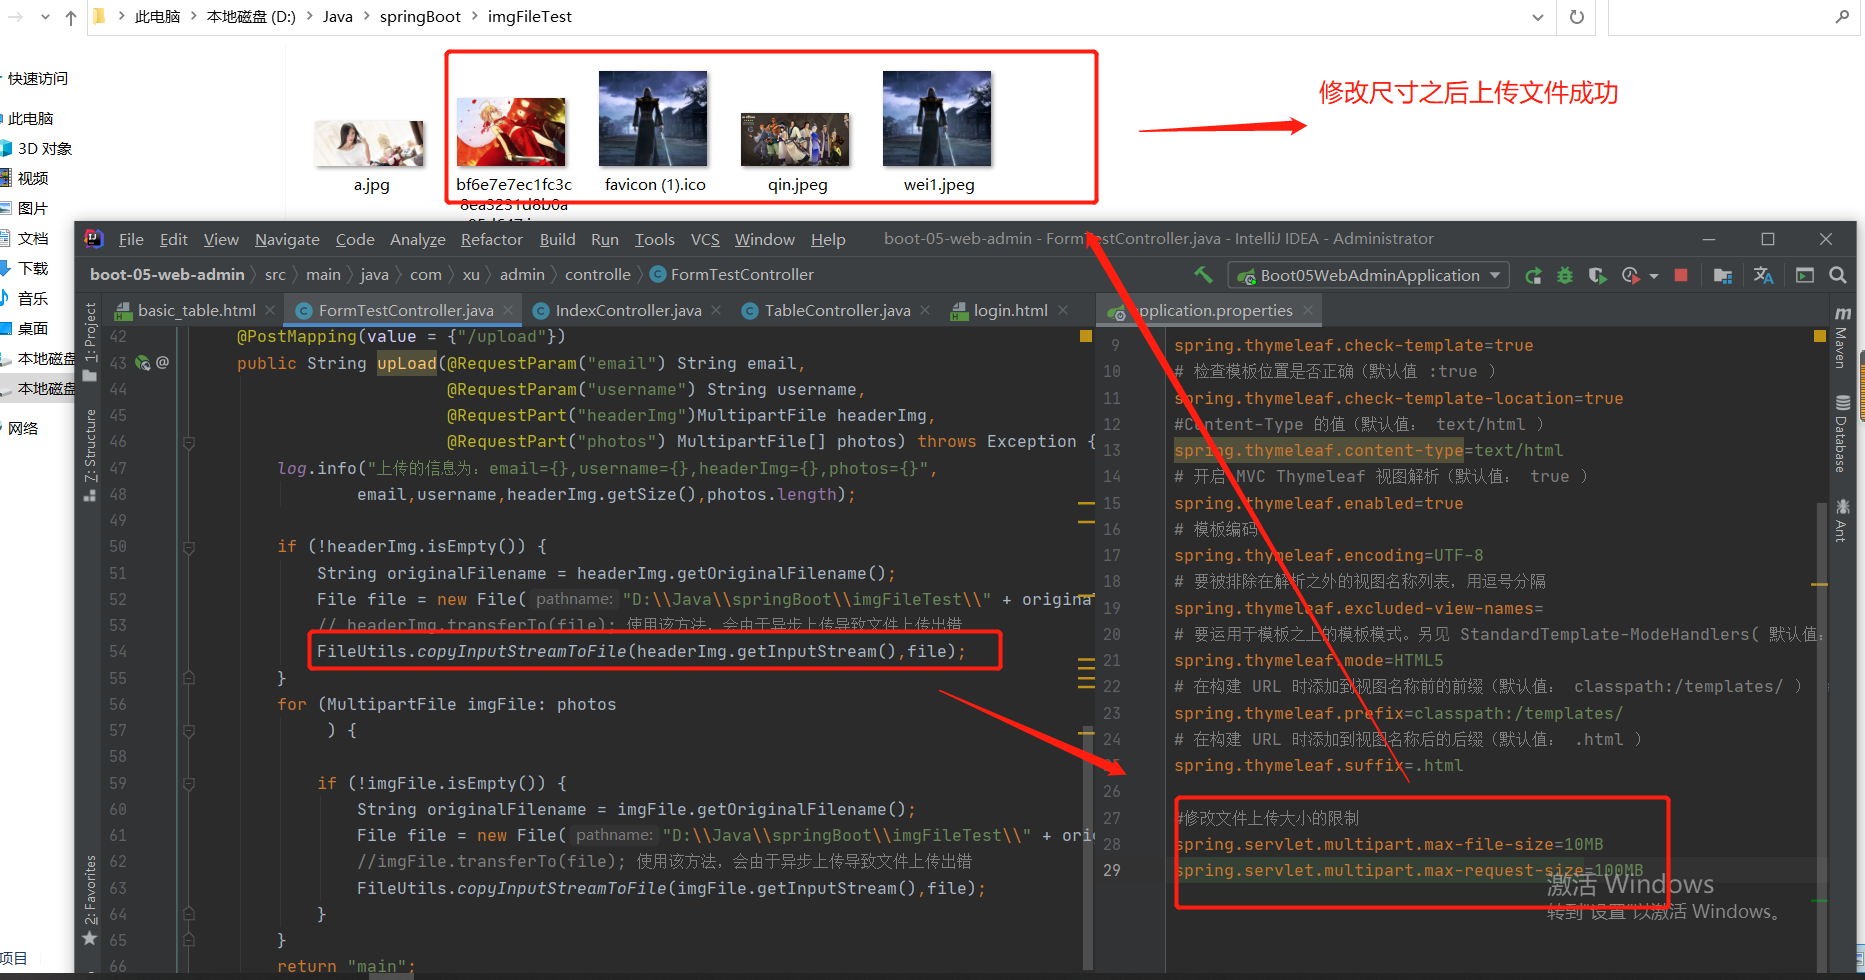
源码参考:
@PostMapping(value = {"/upload"})
public String upLoad(@RequestParam("email") String email,
                     @RequestParam("username") String username,
                     @RequestPart("headerImg")MultipartFile headerImg,
                     @RequestPart("photos") MultipartFile[] photos) throws Exception {
    log.info("上传的信息为:email={},username={},headerImg={},photos={}",
             email,username,headerImg.getSize(),photos.length);

    if (!headerImg.isEmpty()) {
        String originalFilename = headerImg.getOriginalFilename();
        File file = new File("D:\\Java\\springBoot\\imgFileTest\\" + originalFilename);
        // headerImg.transferTo(file); 使用该方法,会由于异步上传导致文件上传出错
        FileUtils.copyInputStreamToFile(headerImg.getInputStream(),file);
    }
    for (MultipartFile imgFile: photos
        ) {

        if (!imgFile.isEmpty()) {
            String originalFilename = imgFile.getOriginalFilename();
            File file = new File("D:\\Java\\springBoot\\imgFileTest\\" + originalFilename);
            //imgFile.transferTo(file); 使用该方法,会由于异步上传导致文件上传出错
            FileUtils.copyInputStreamToFile(imgFile.getInputStream(),file);
        }
    }
    return "main";
}
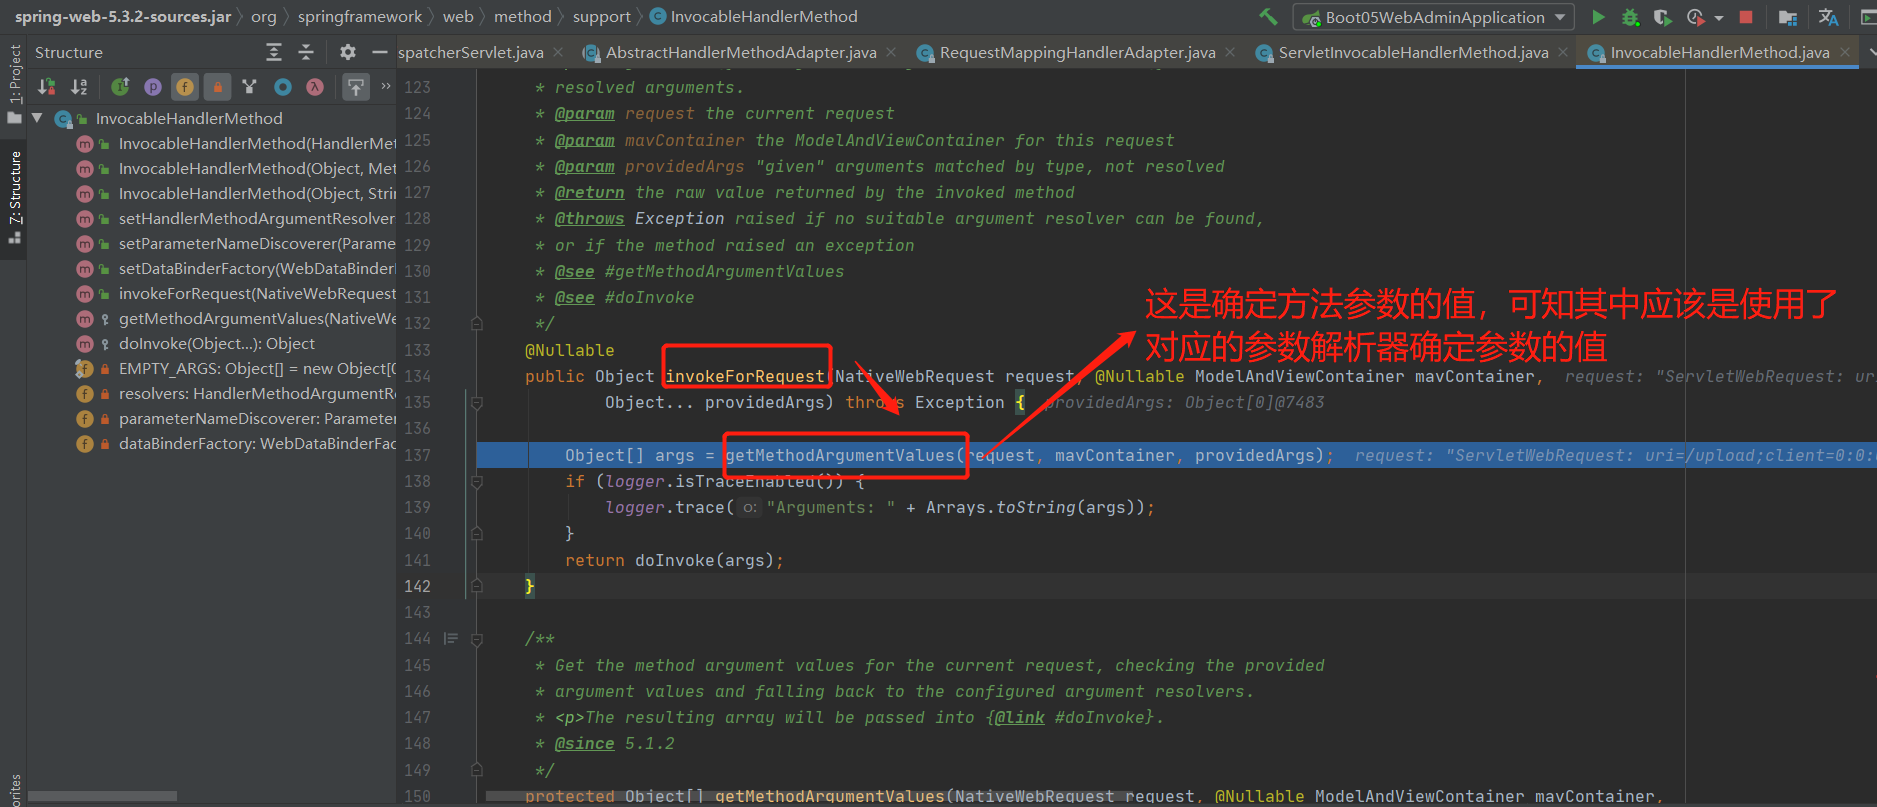
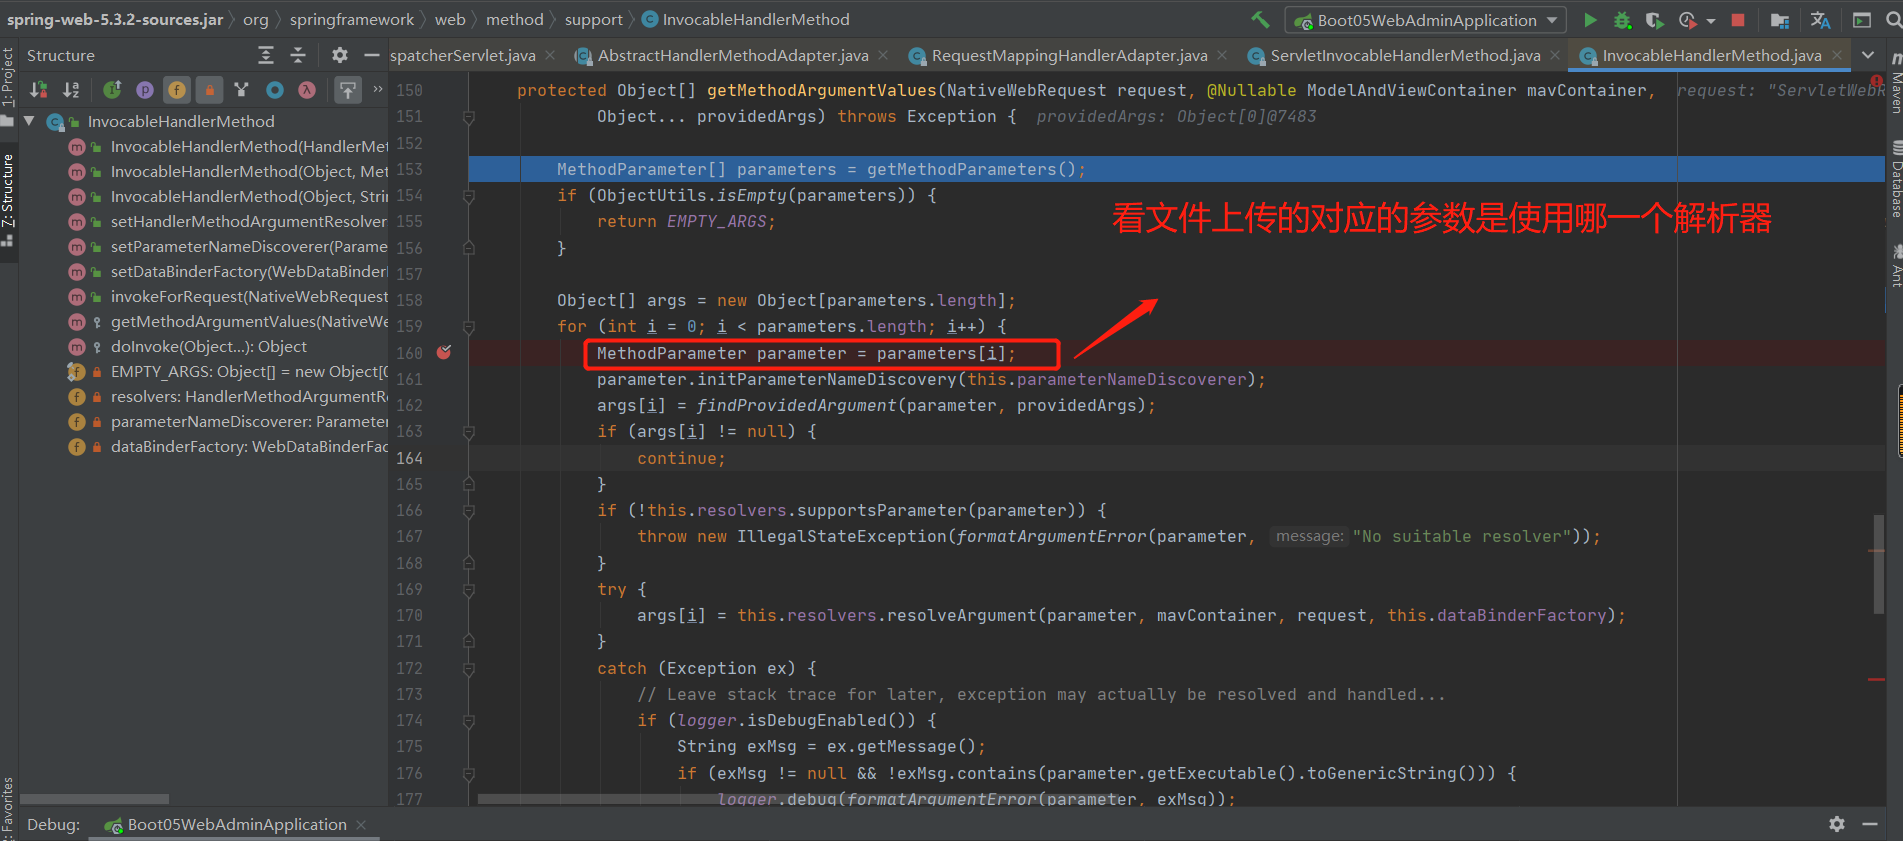
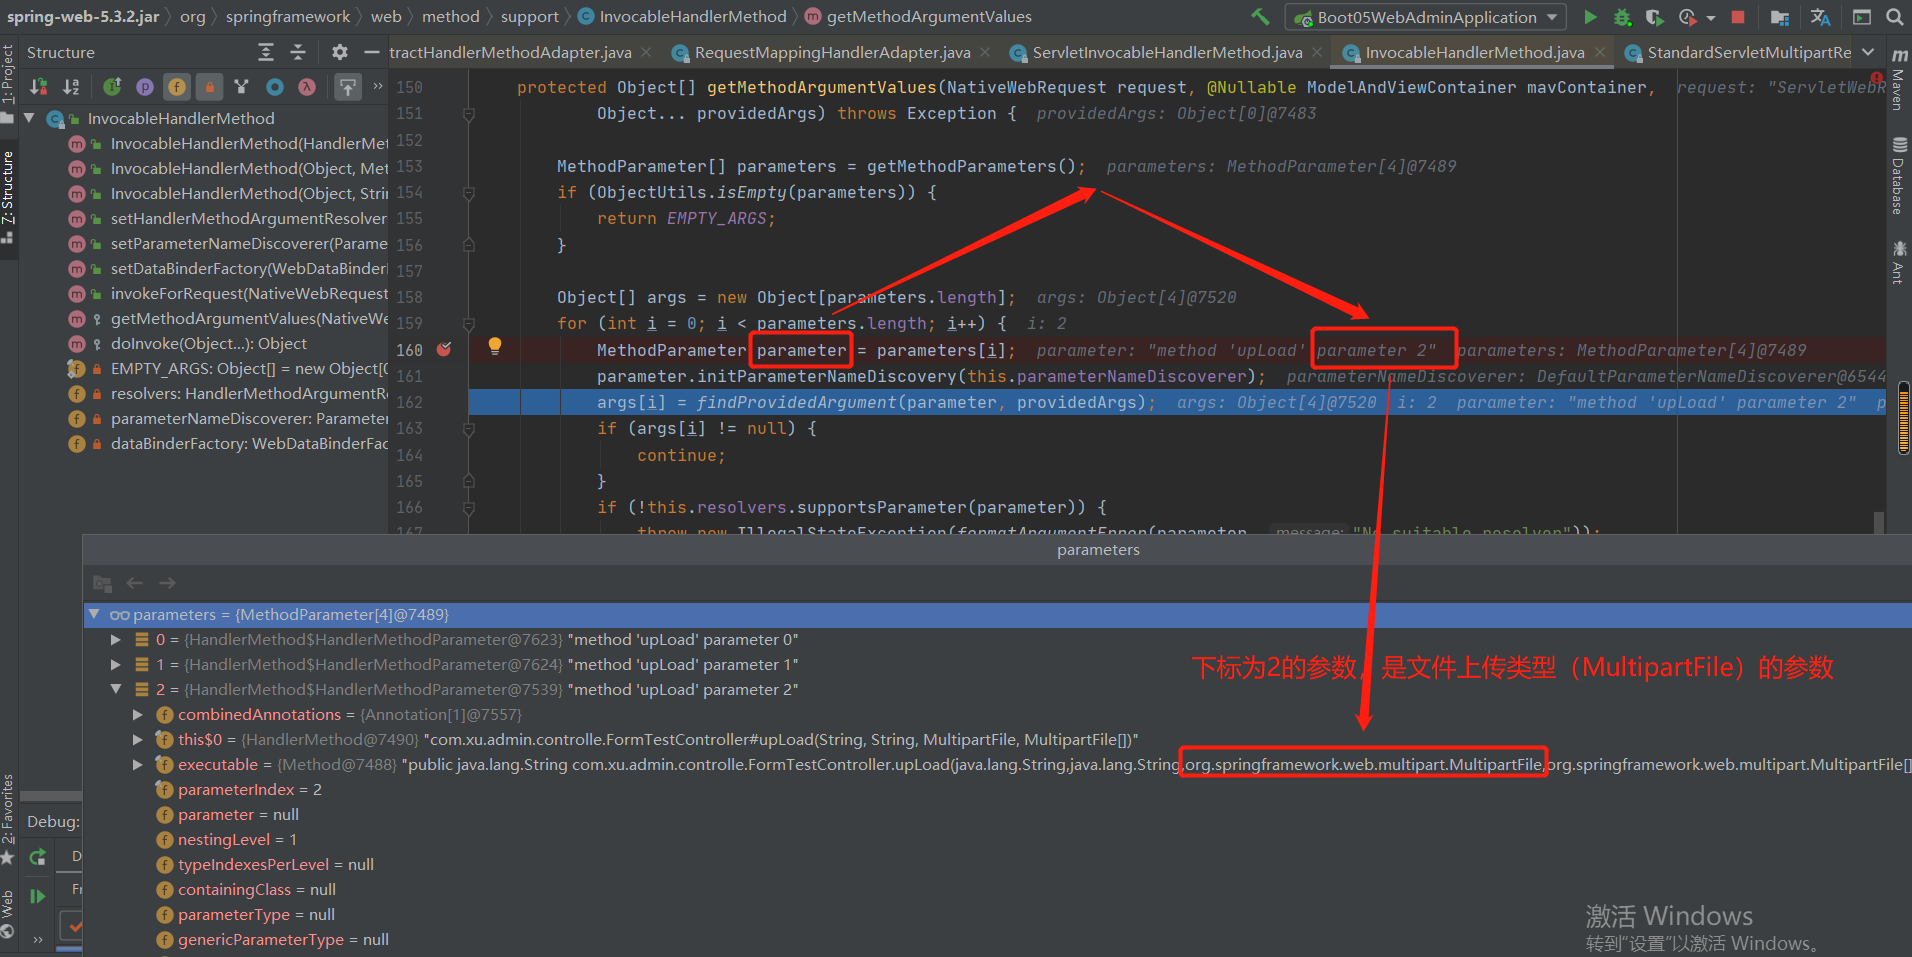
9-2 上传文件源码分析
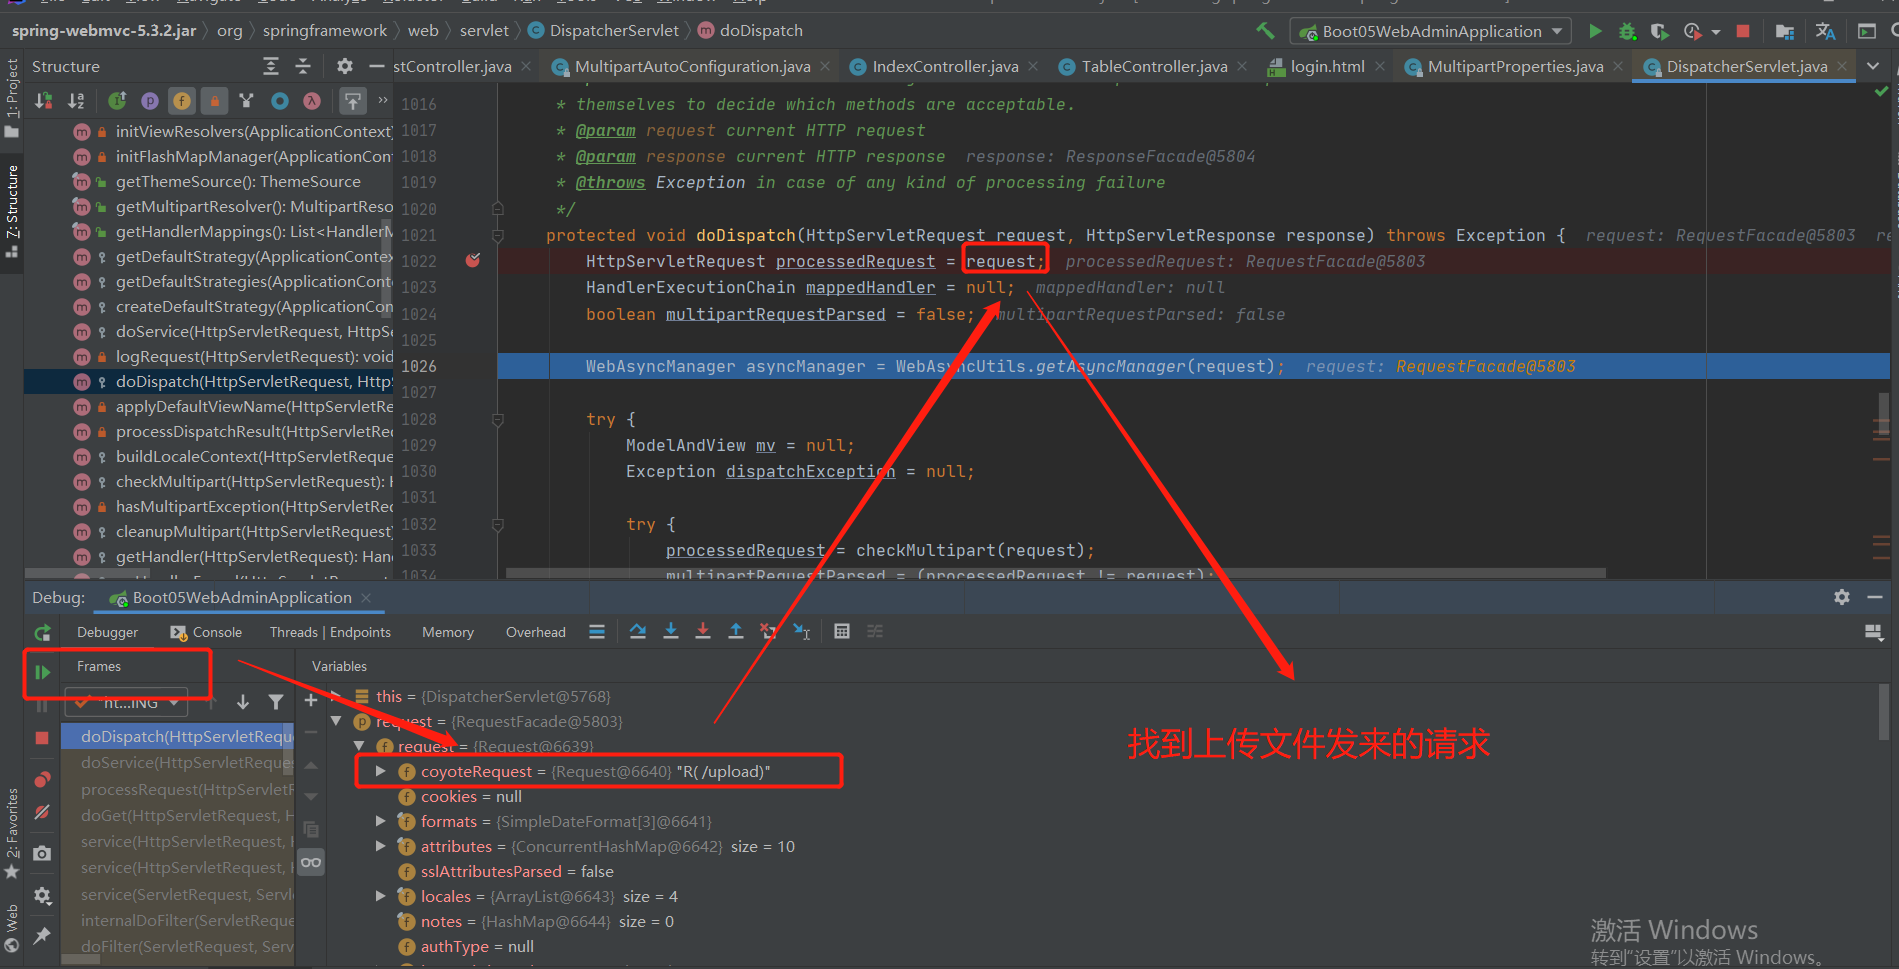
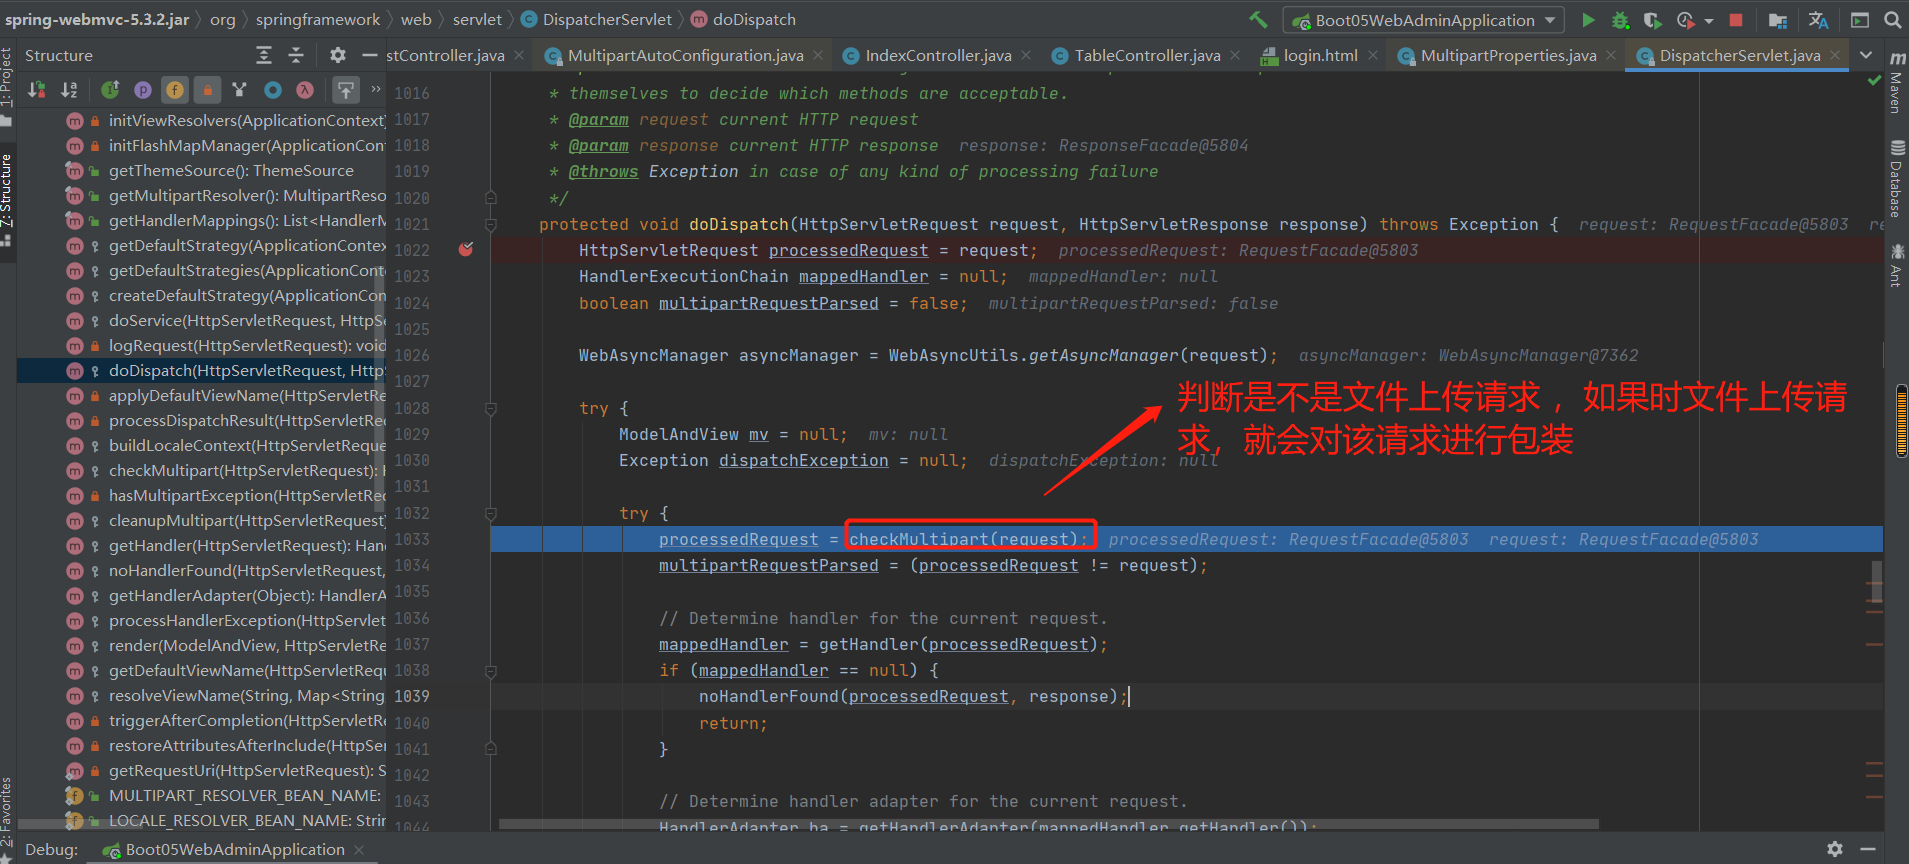
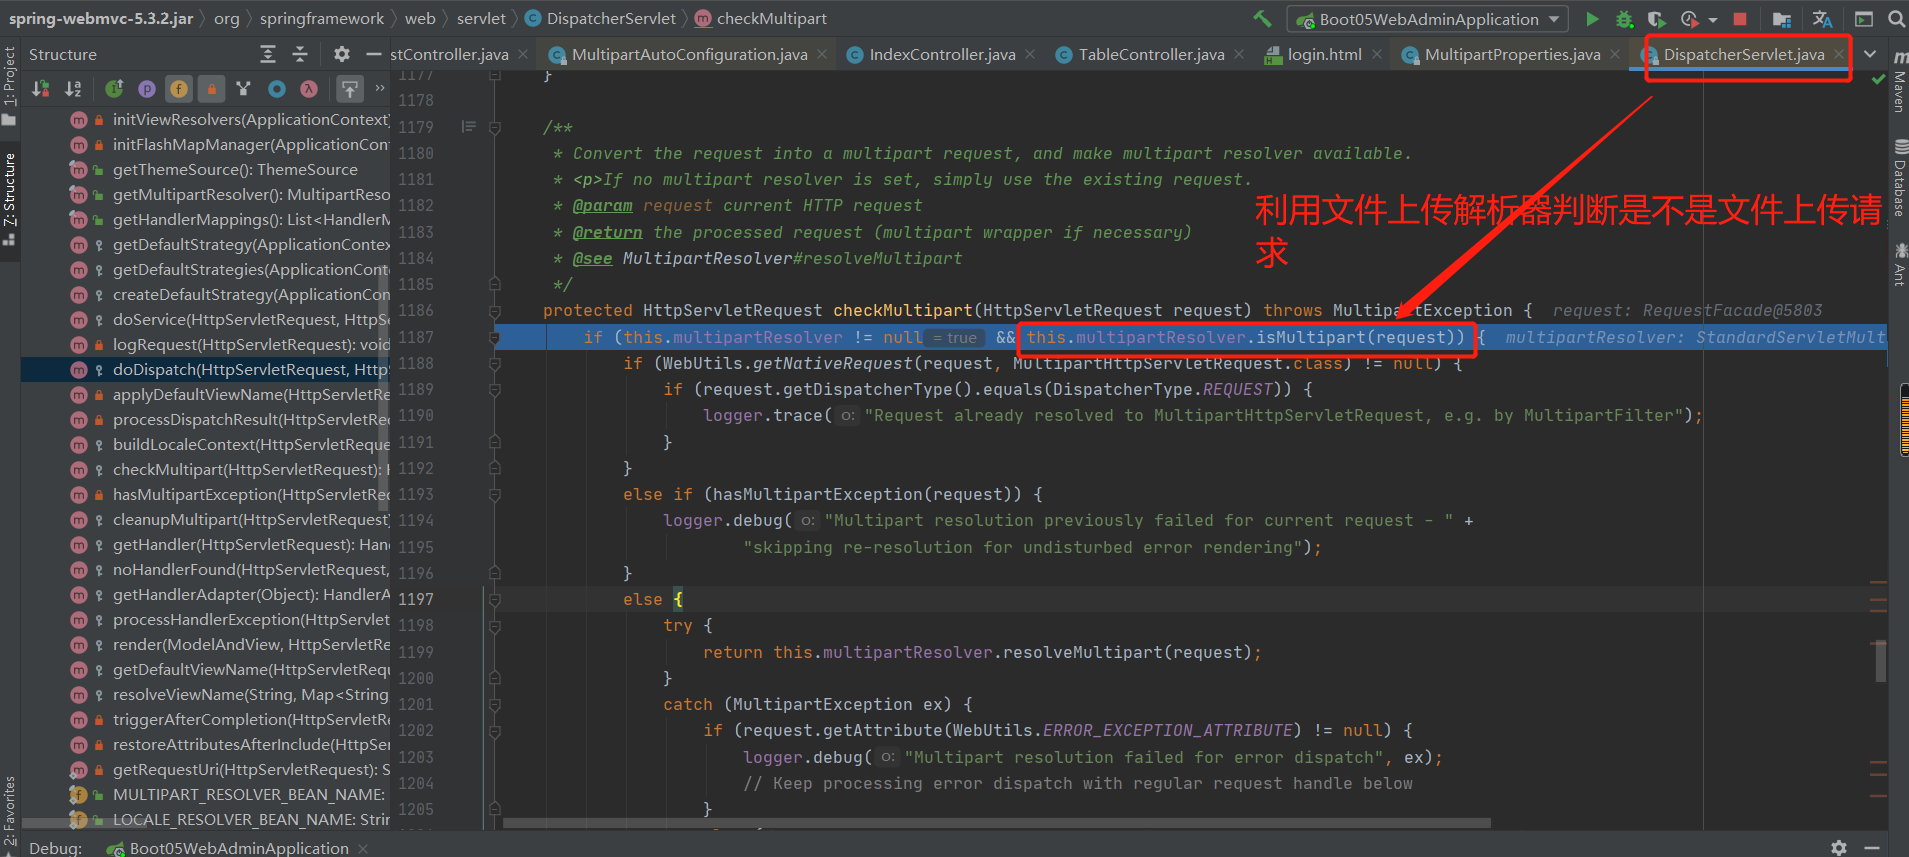
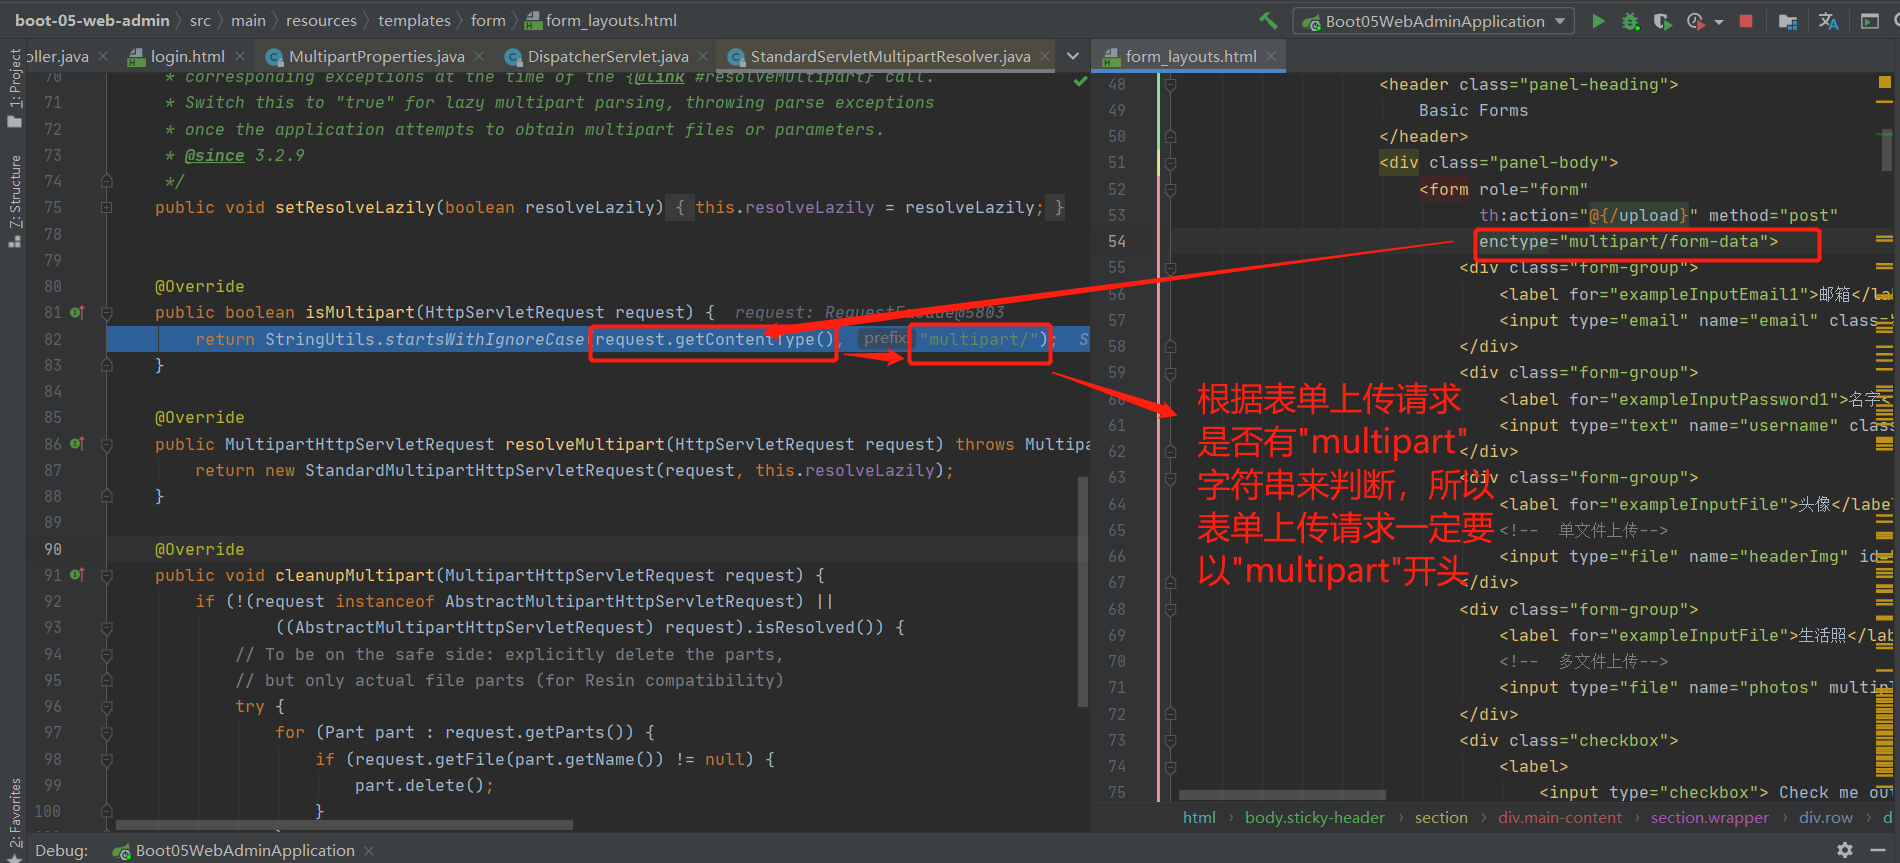
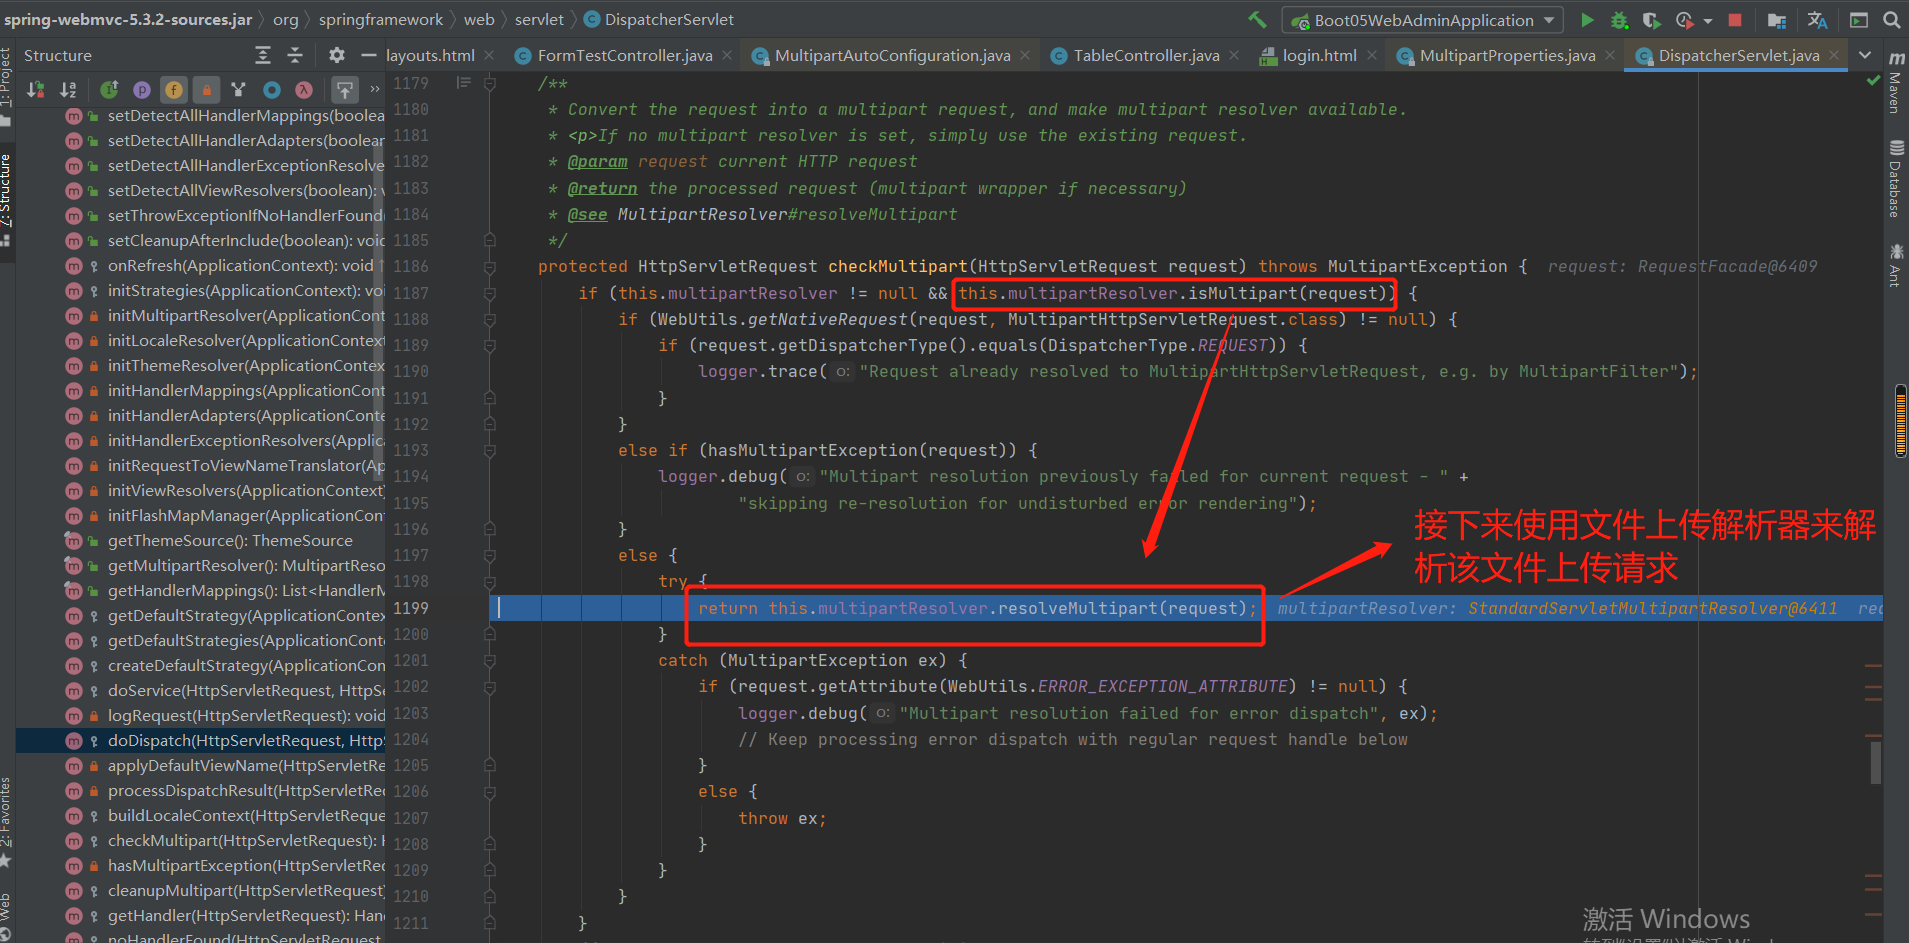
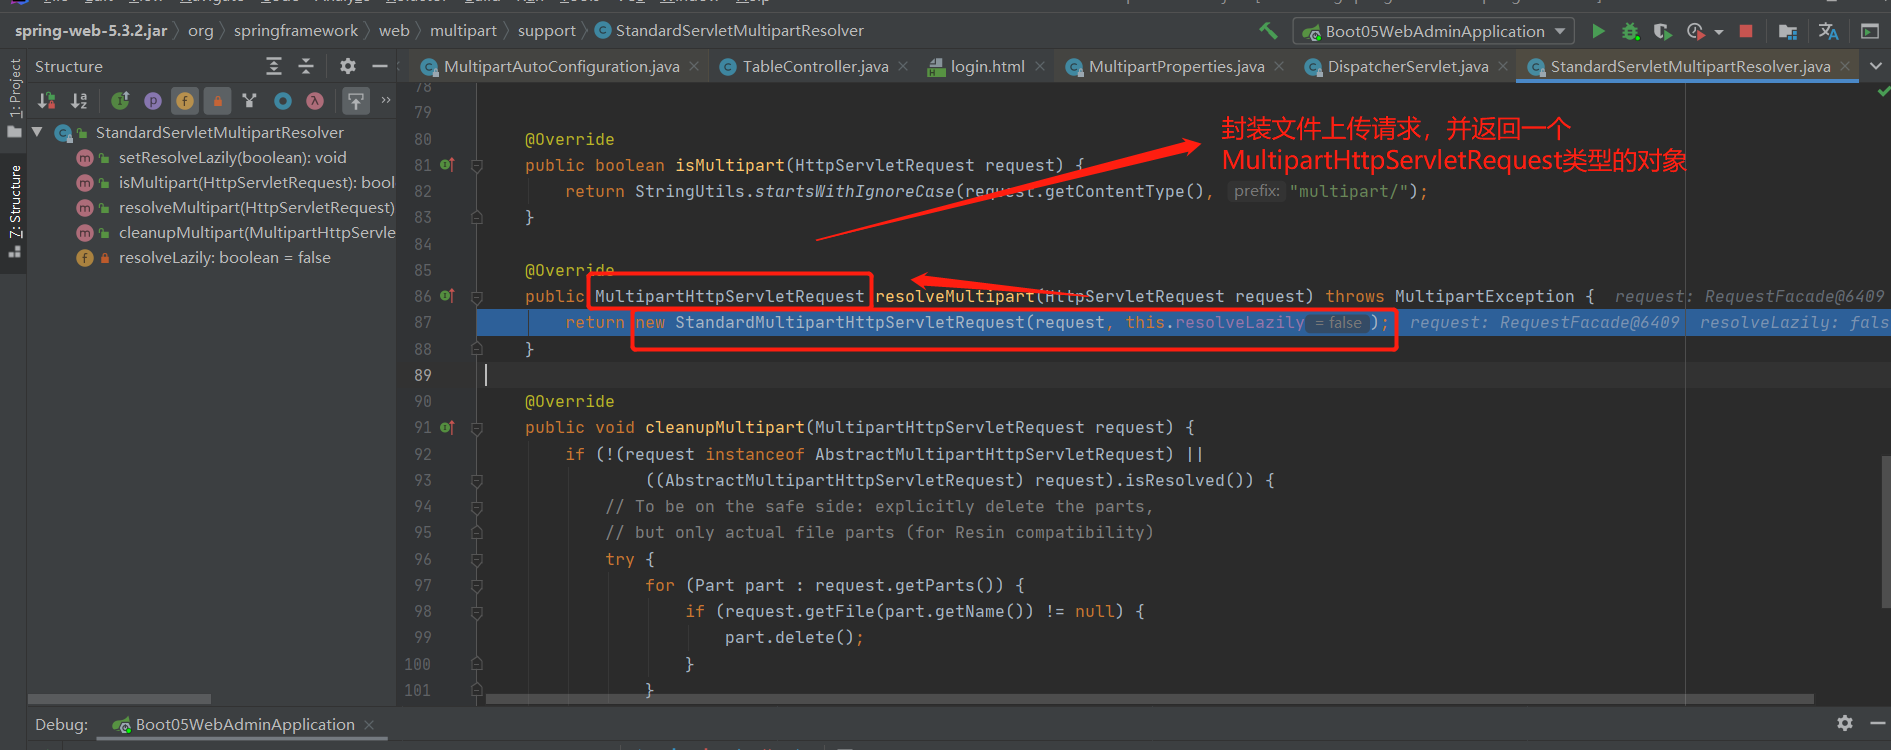
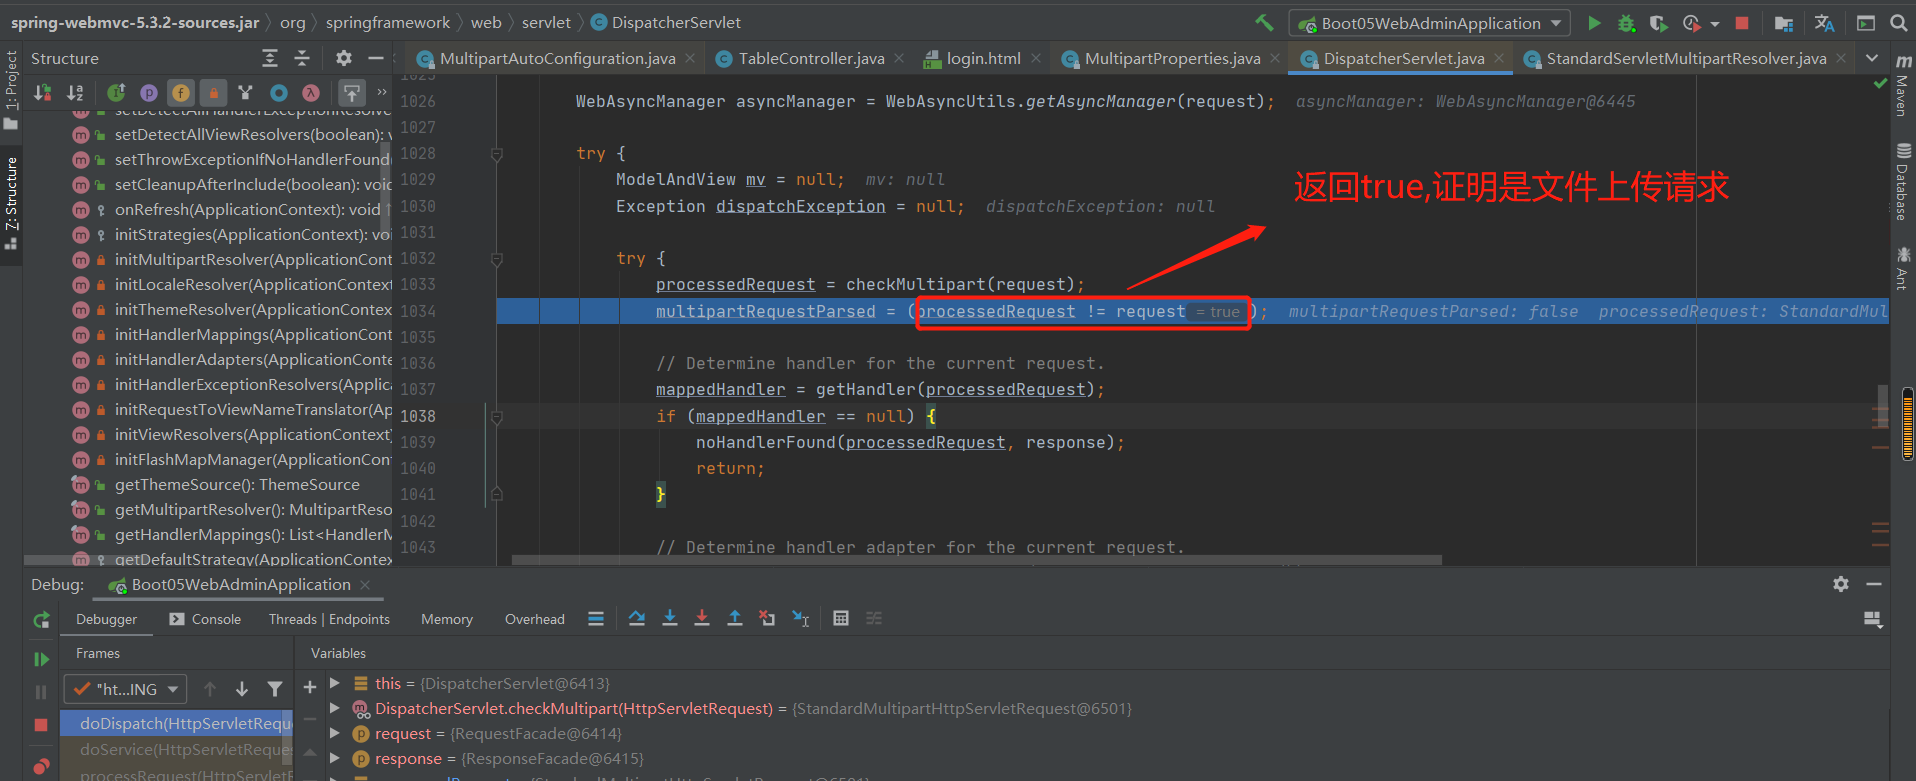
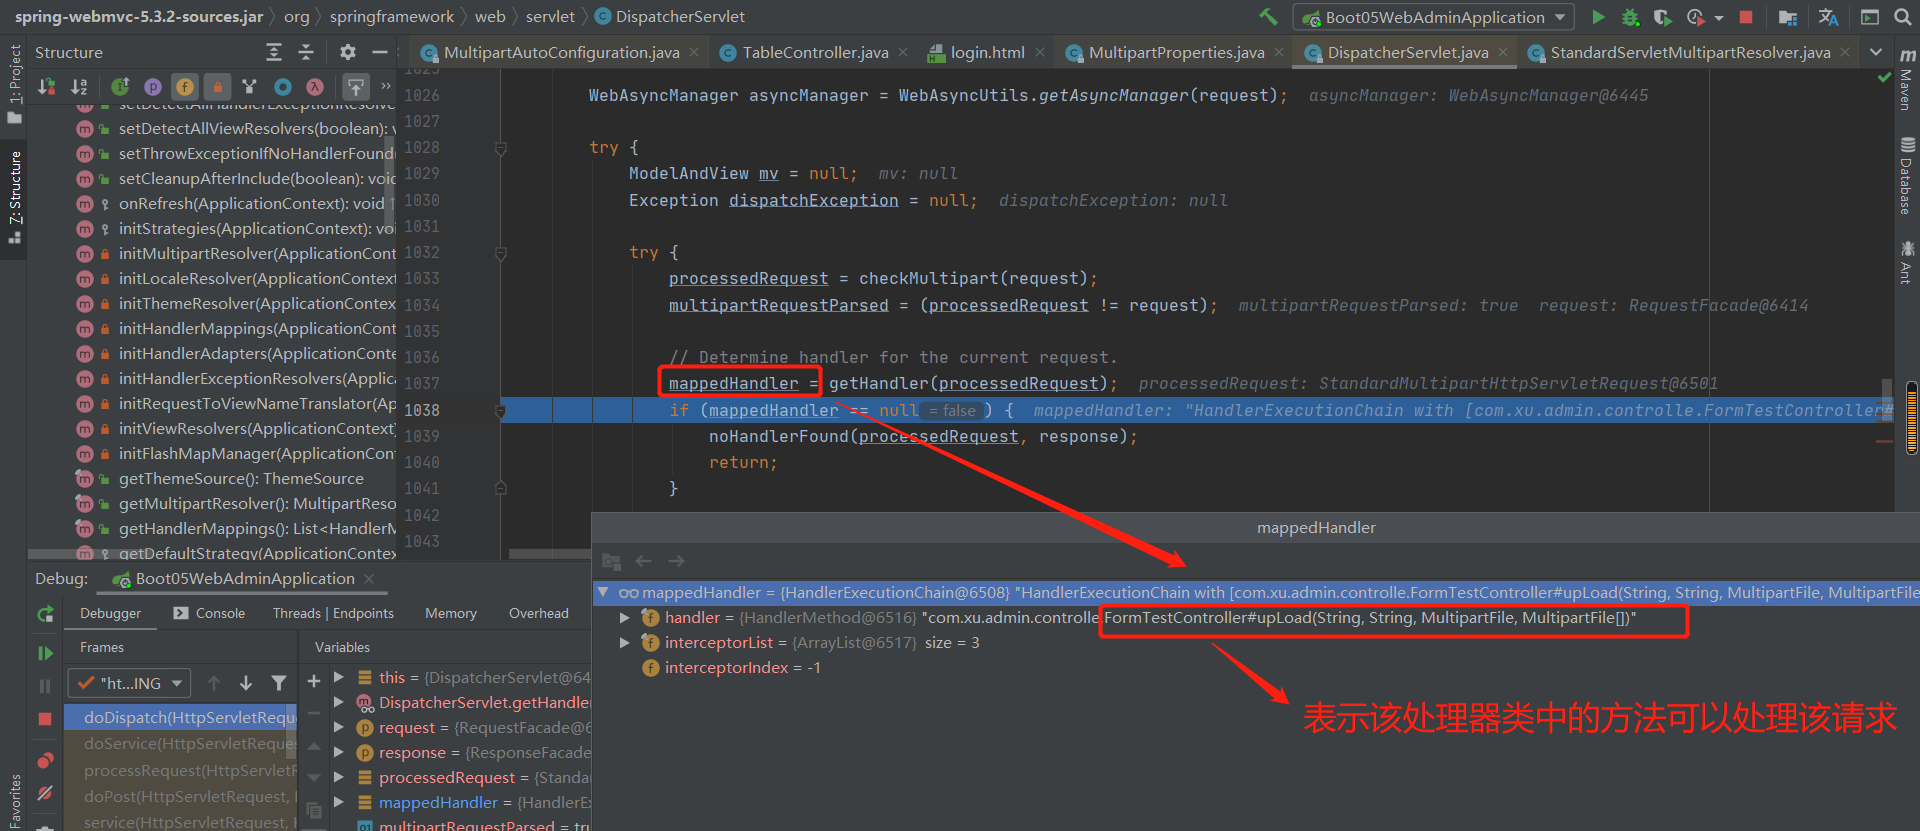
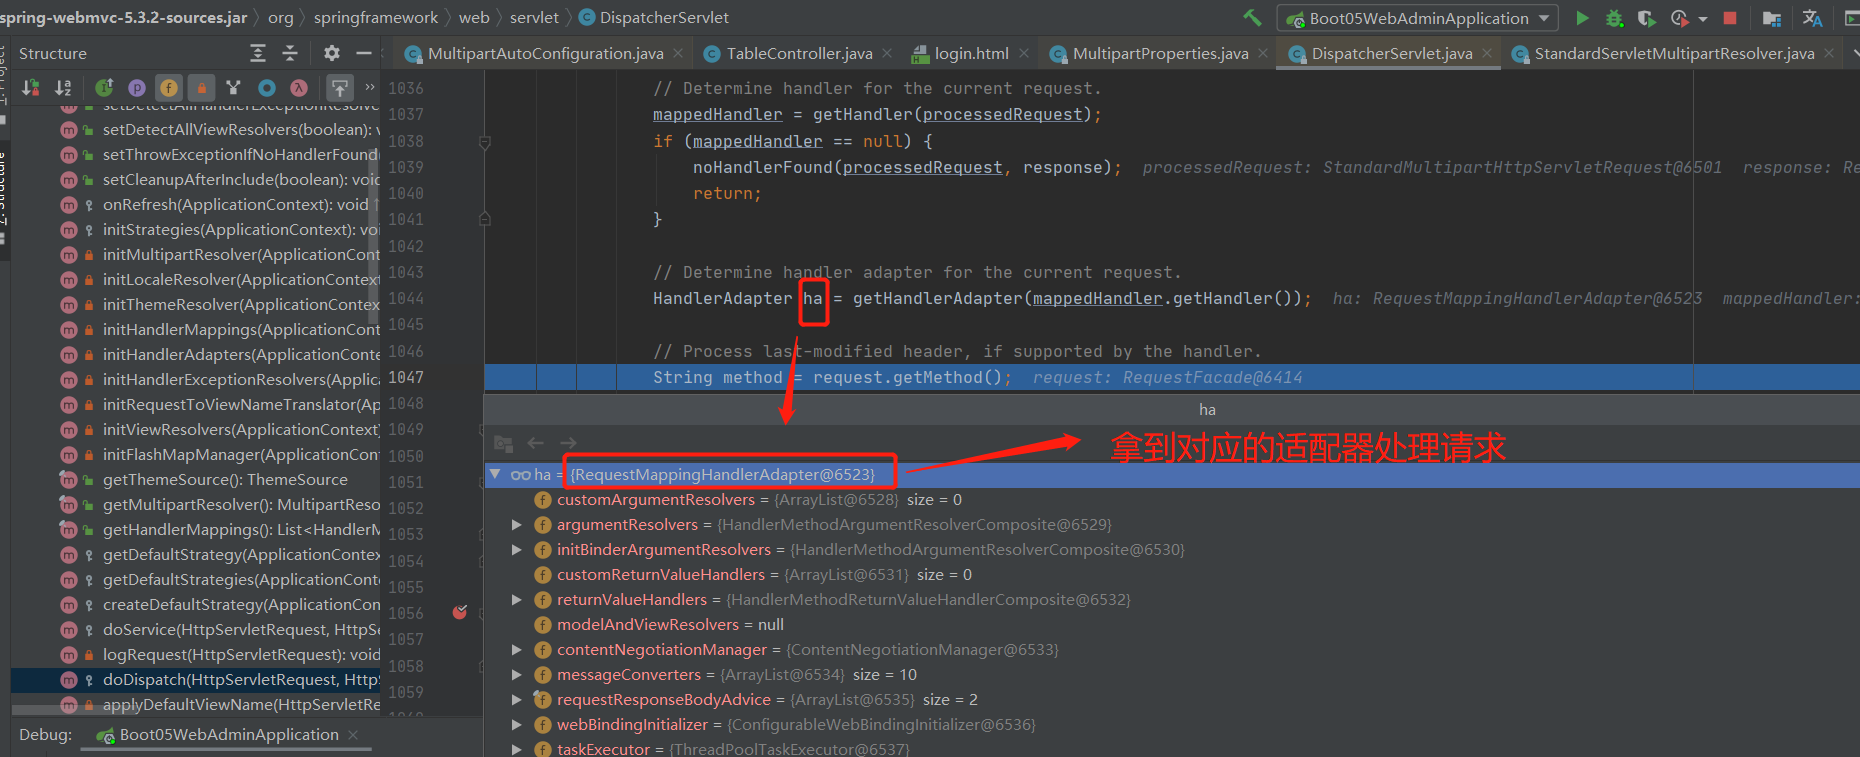
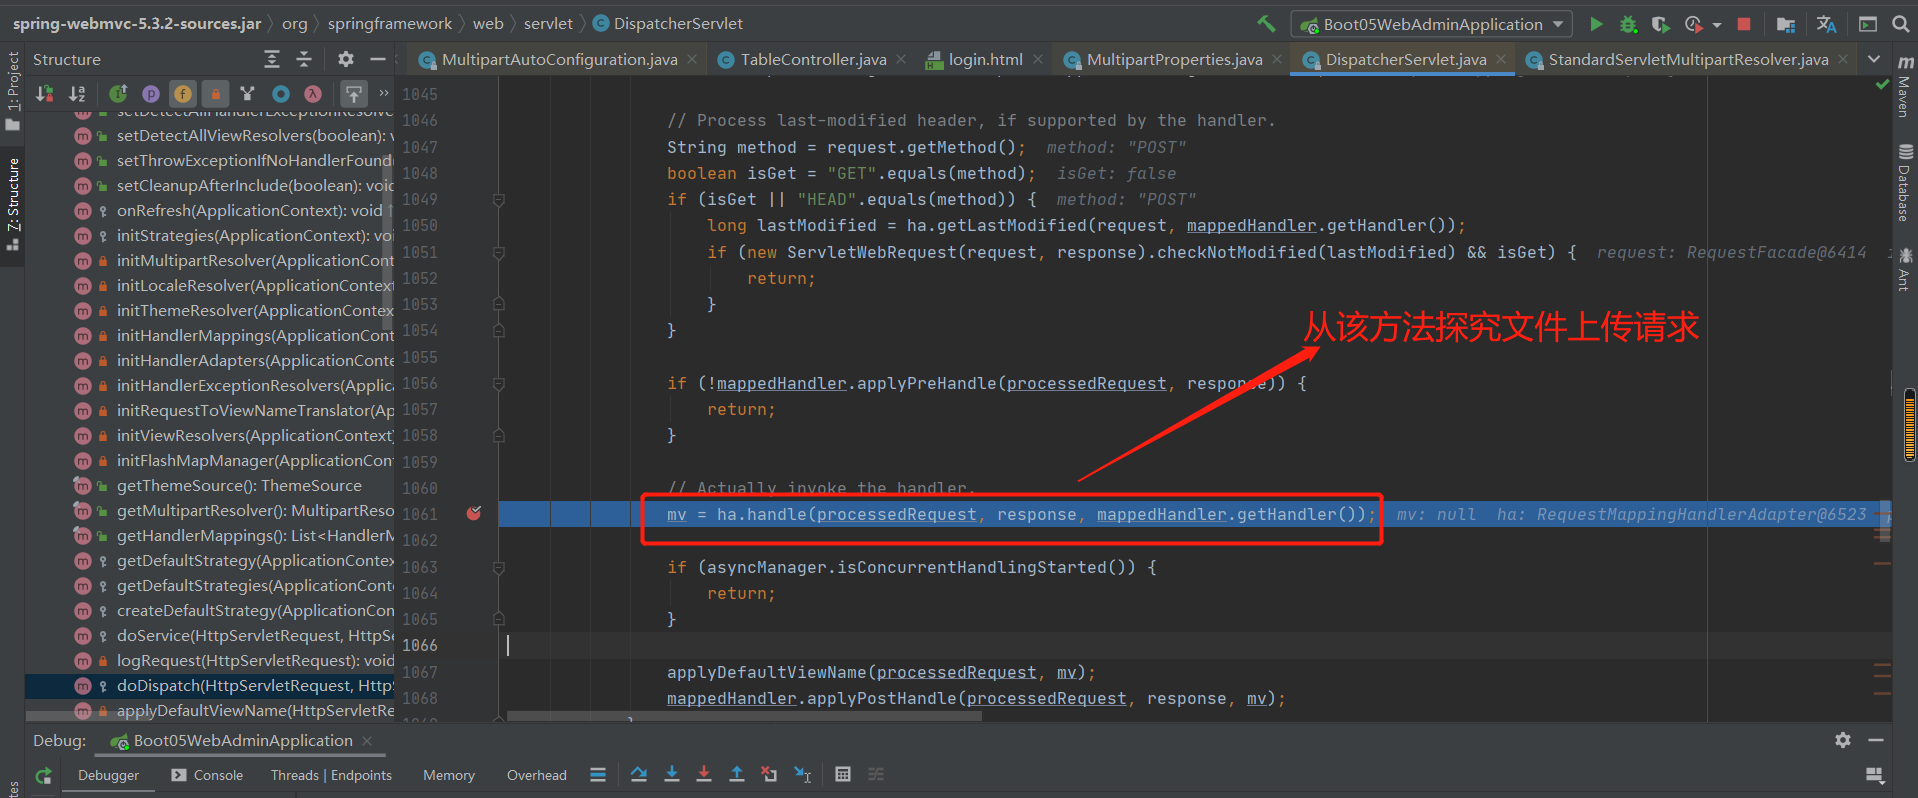
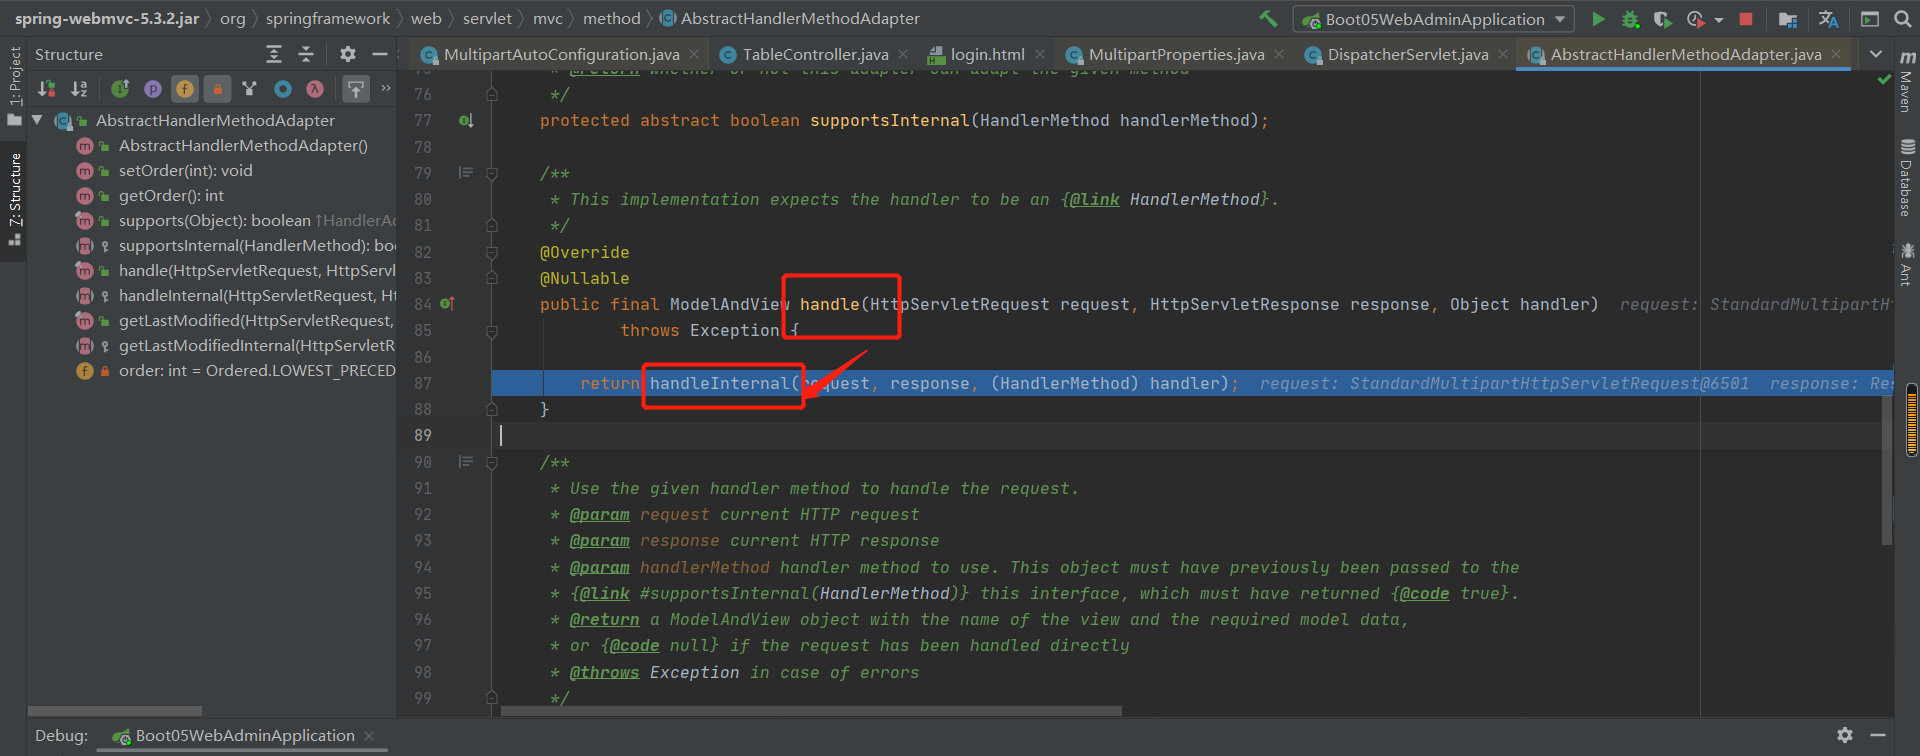
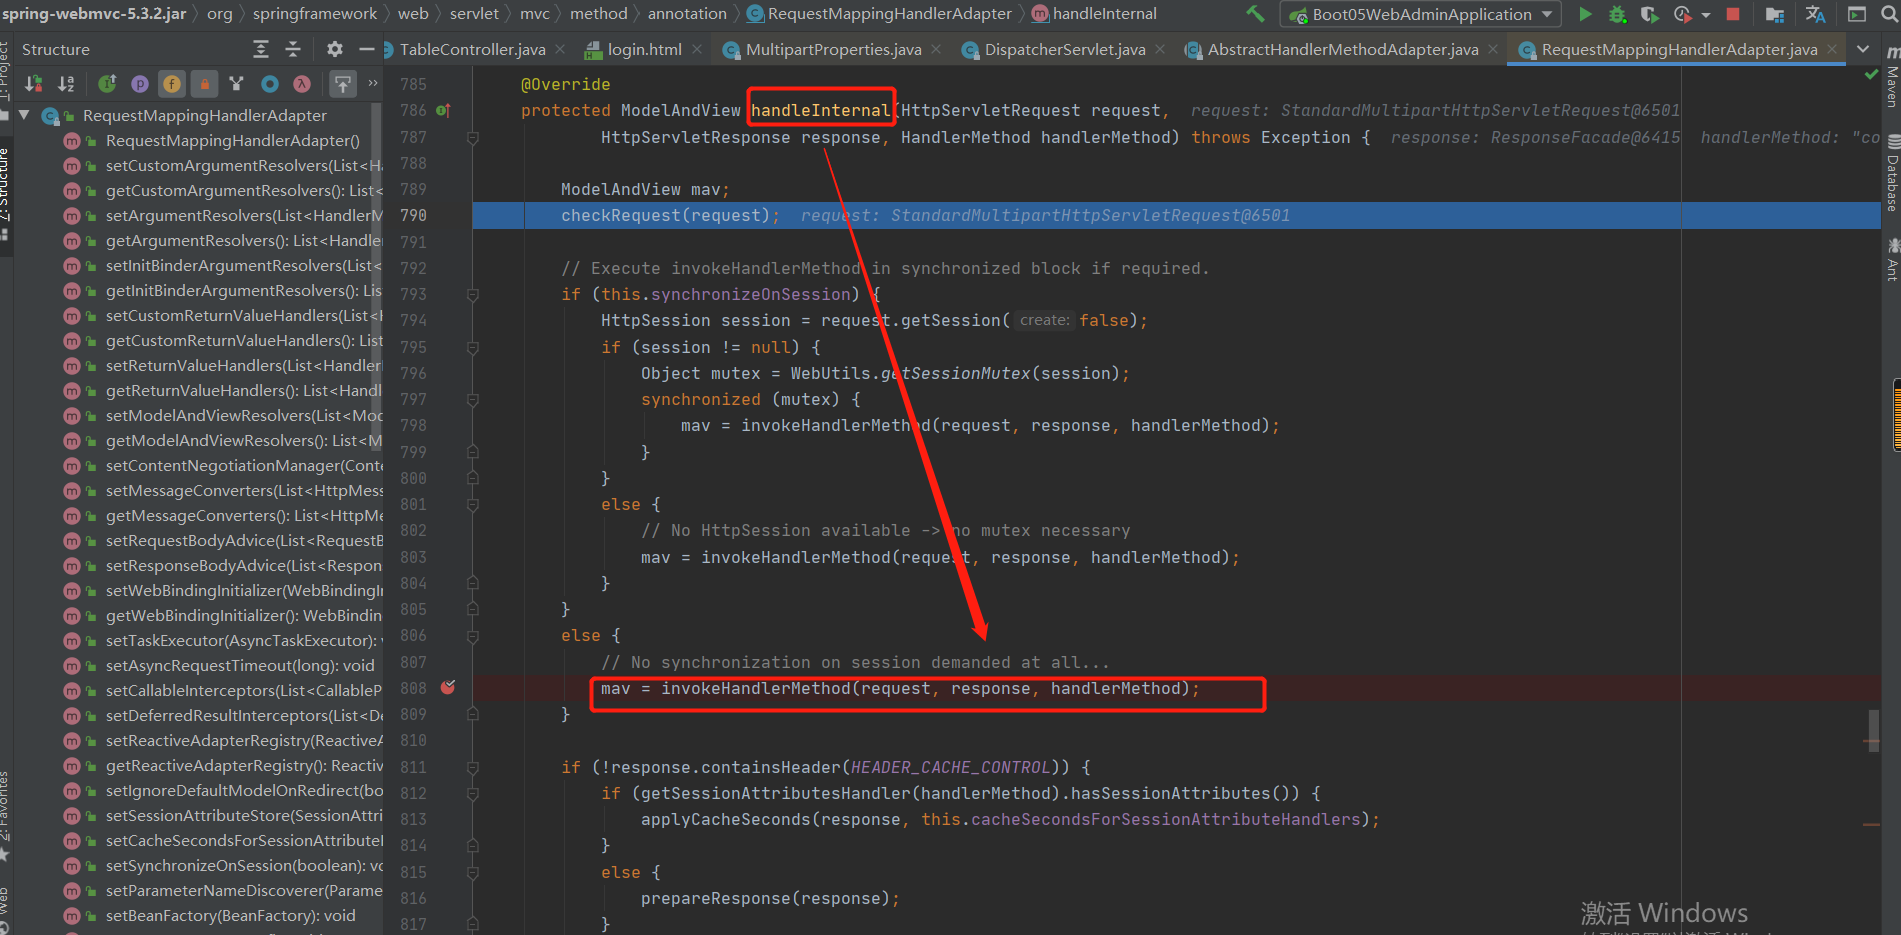
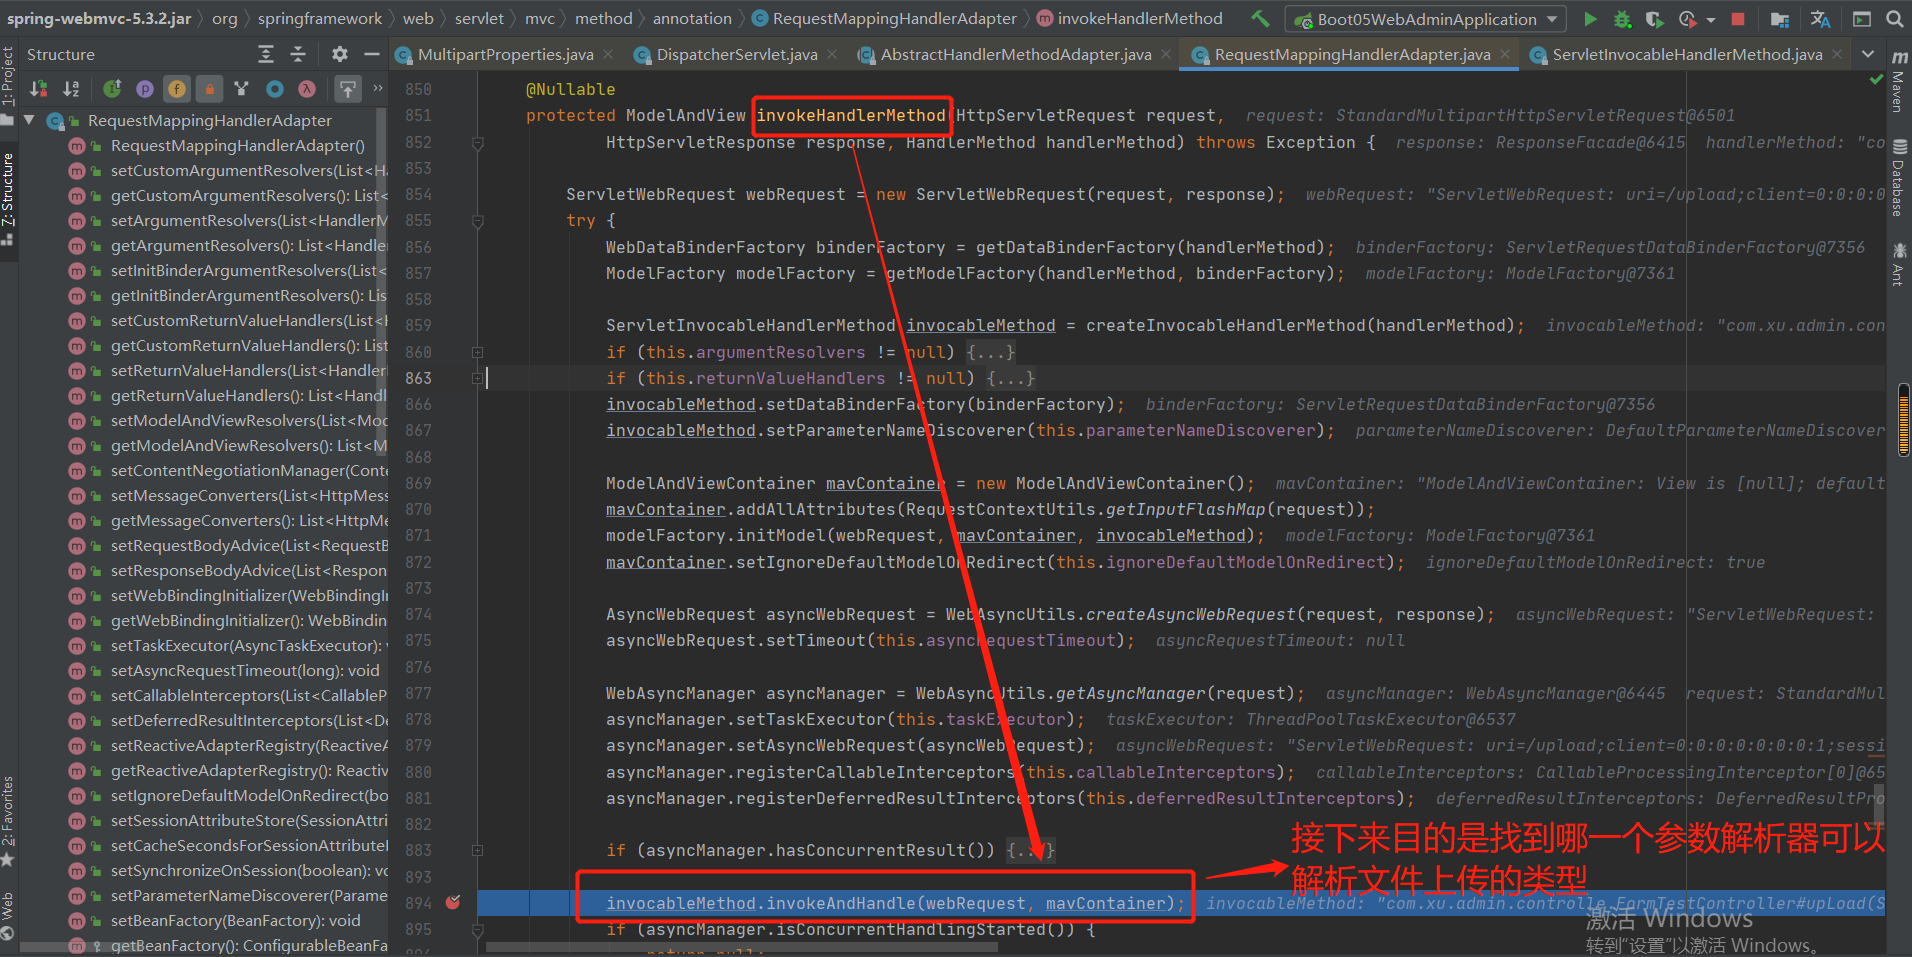
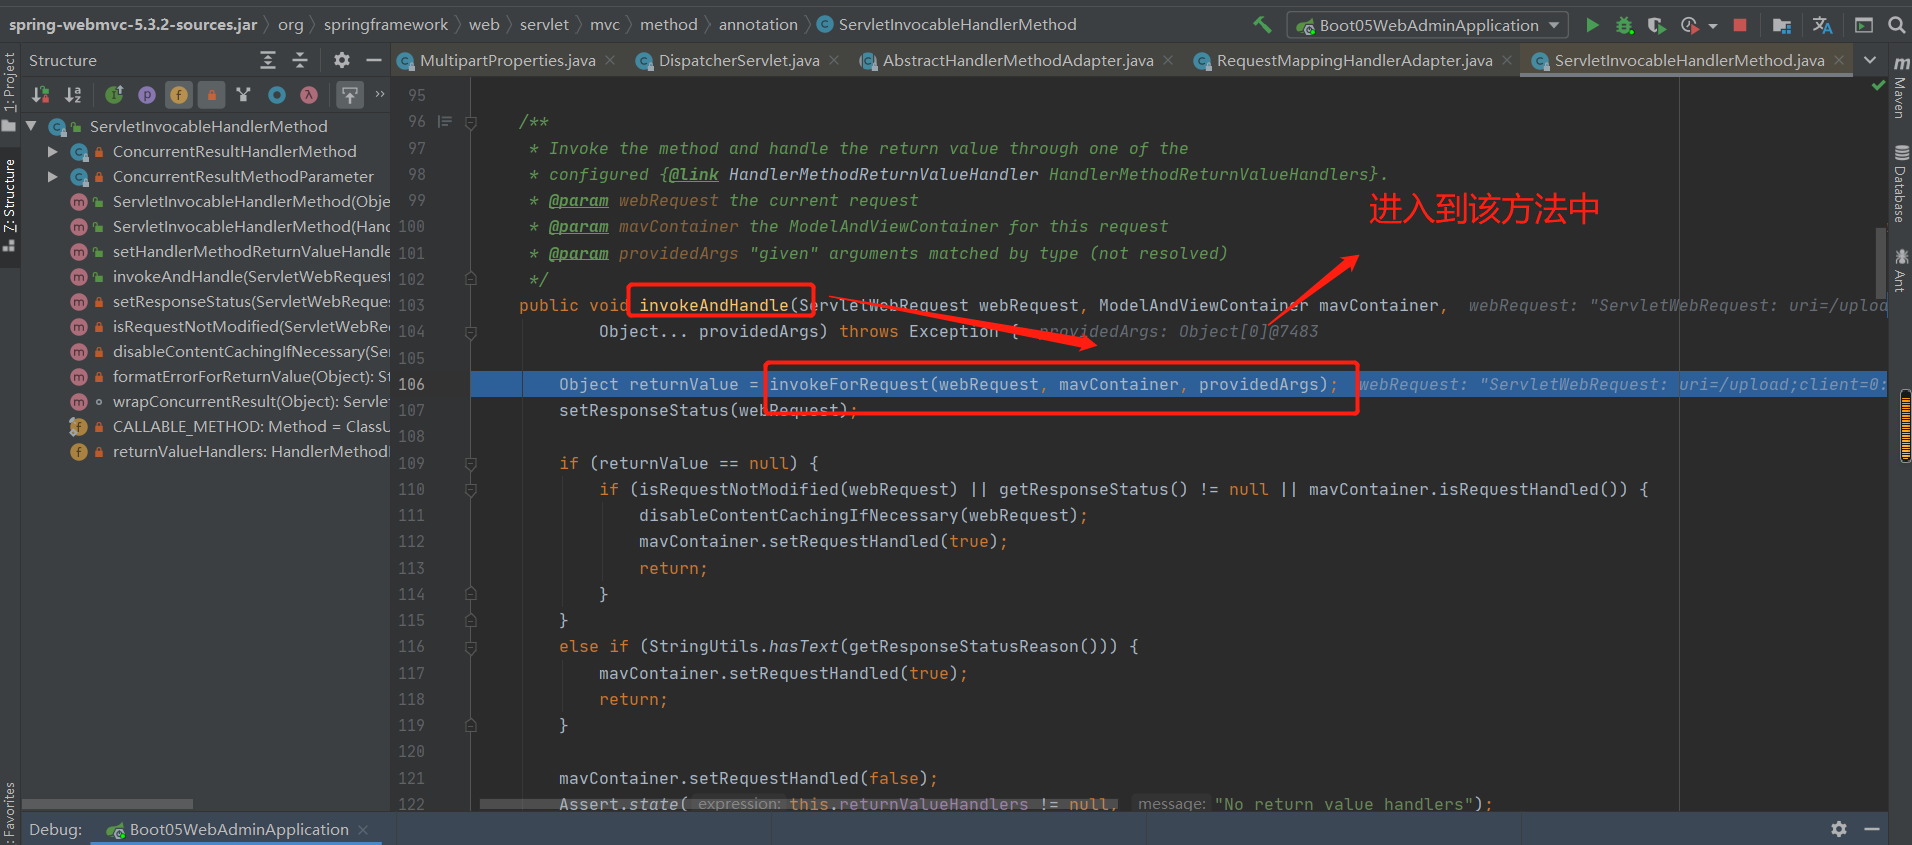
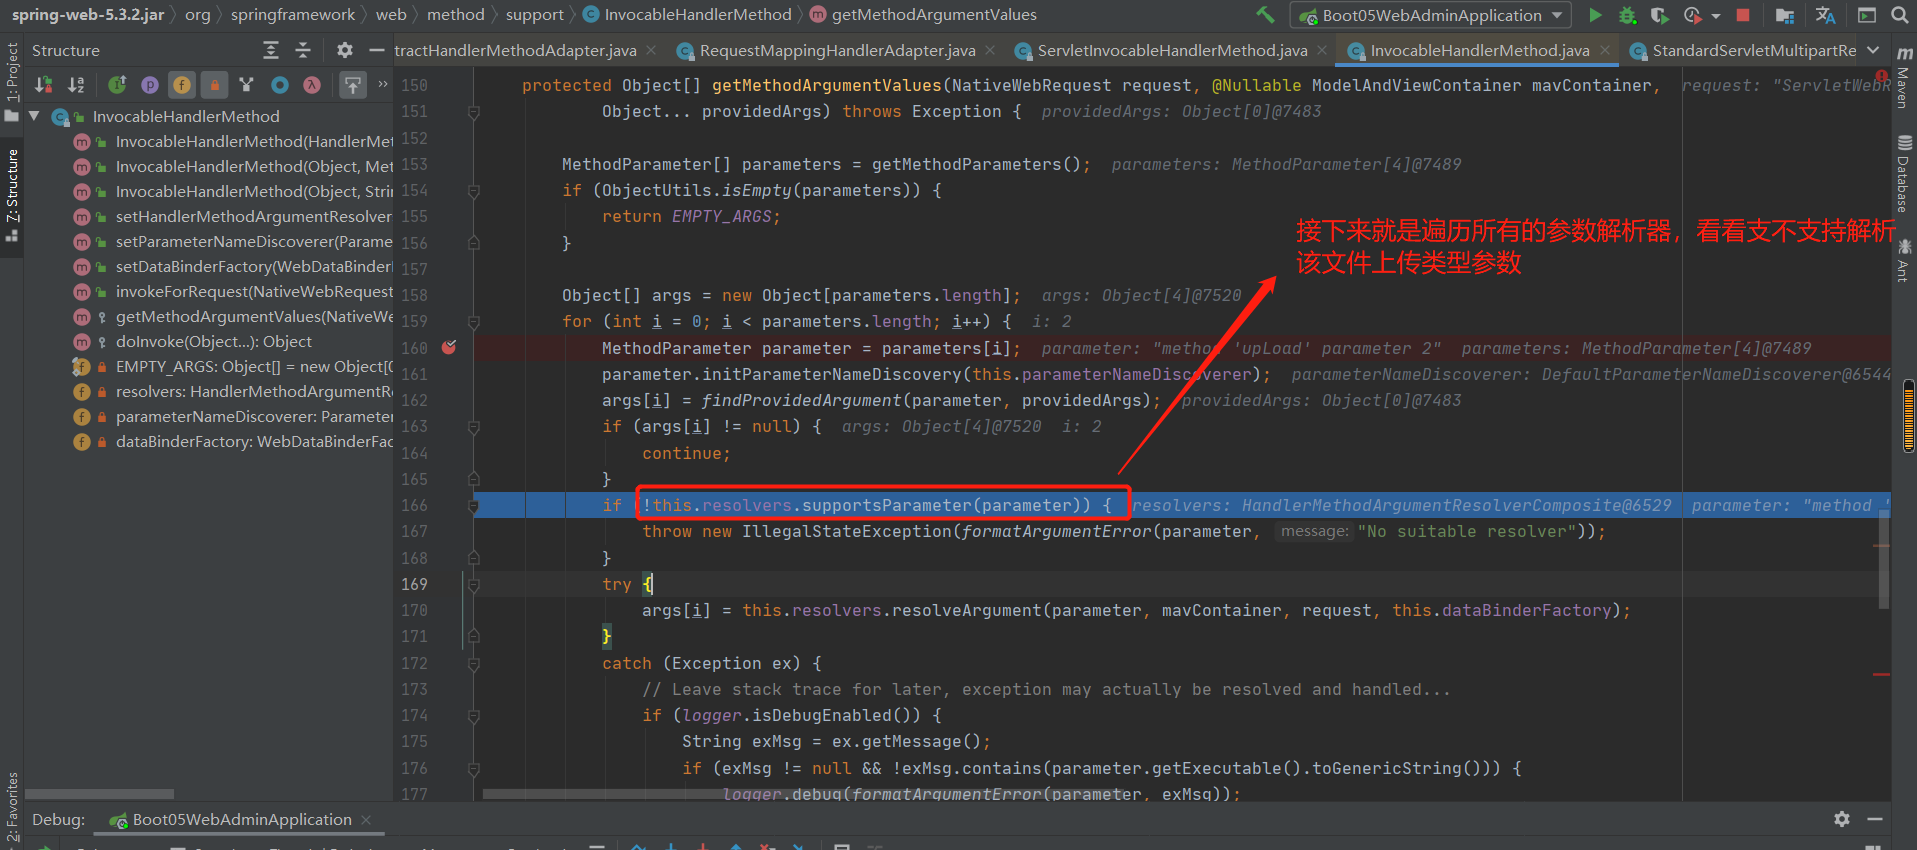
接下来就是遍历所有的参数解析器,看看支不支持解析该文件上传类型参数:
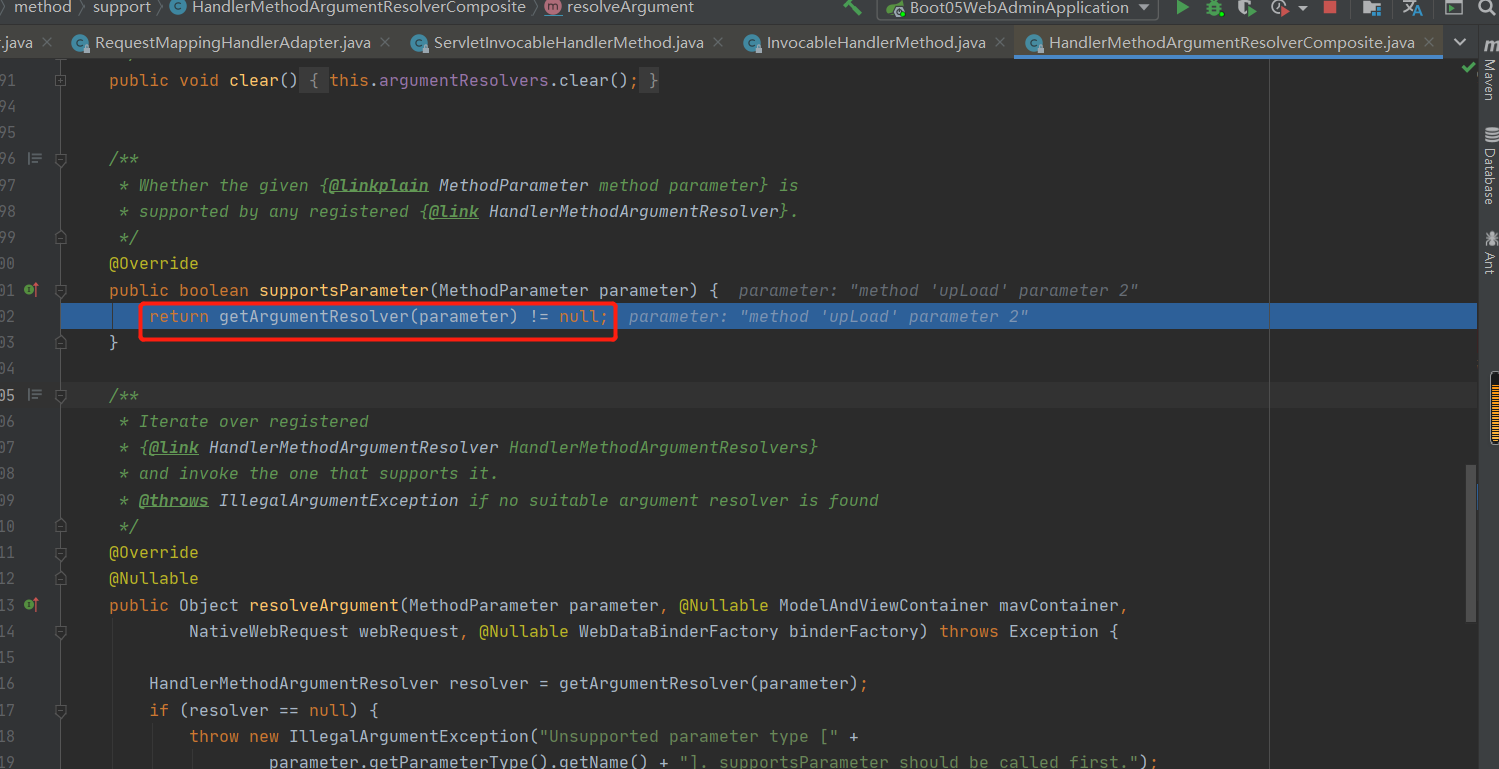
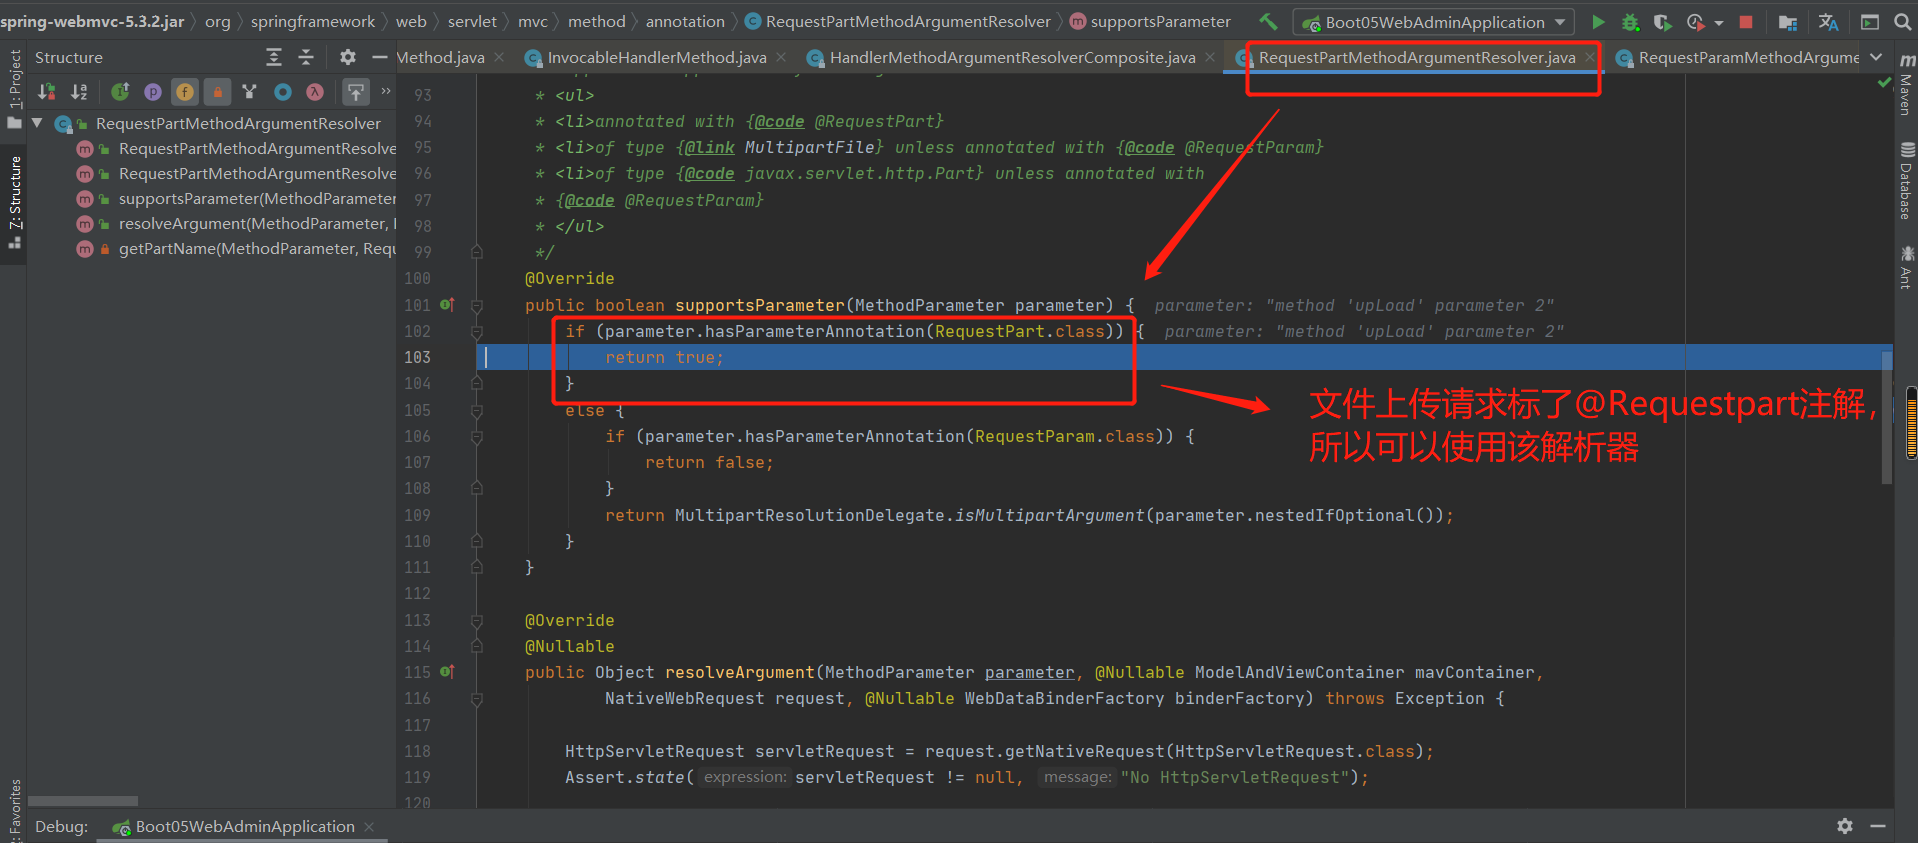
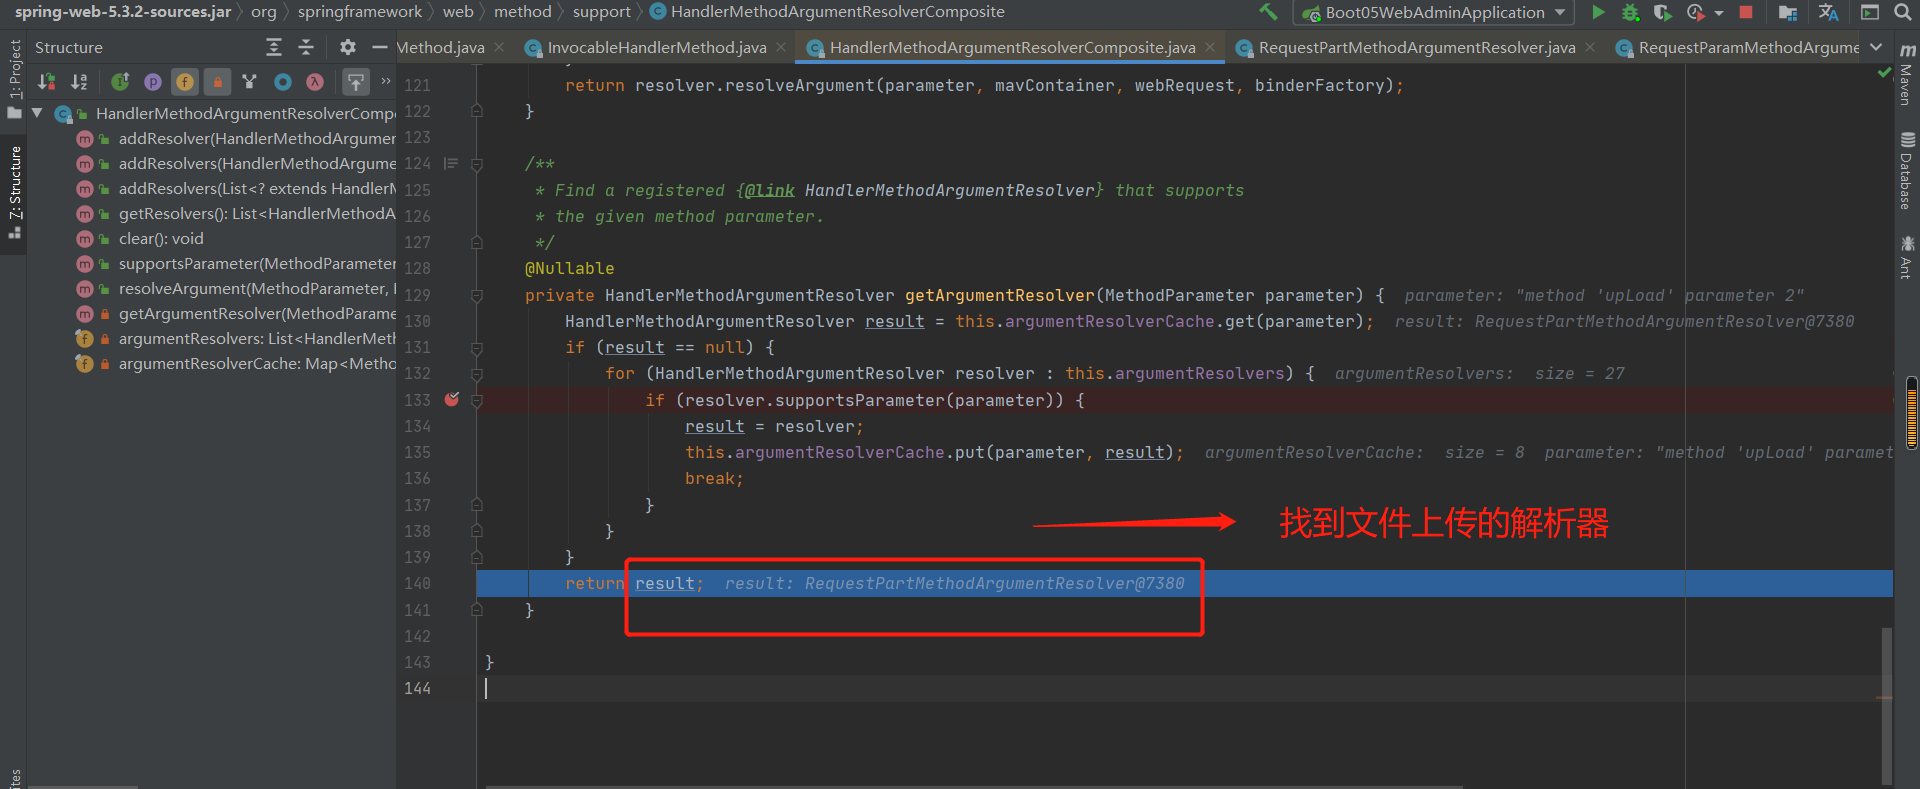
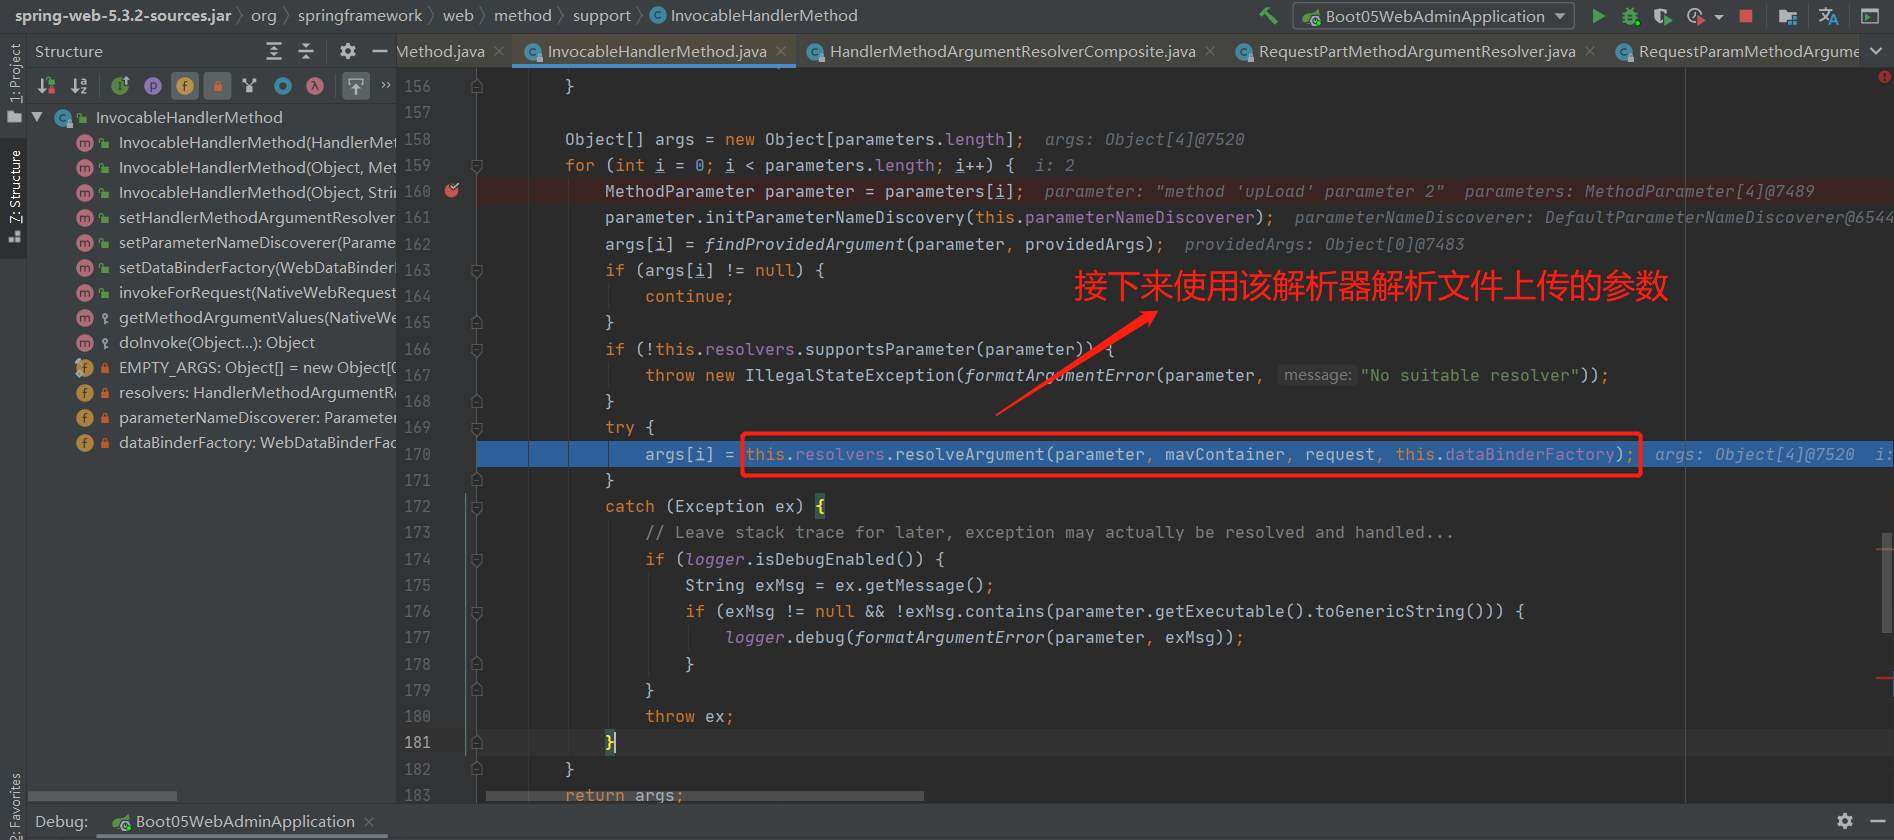
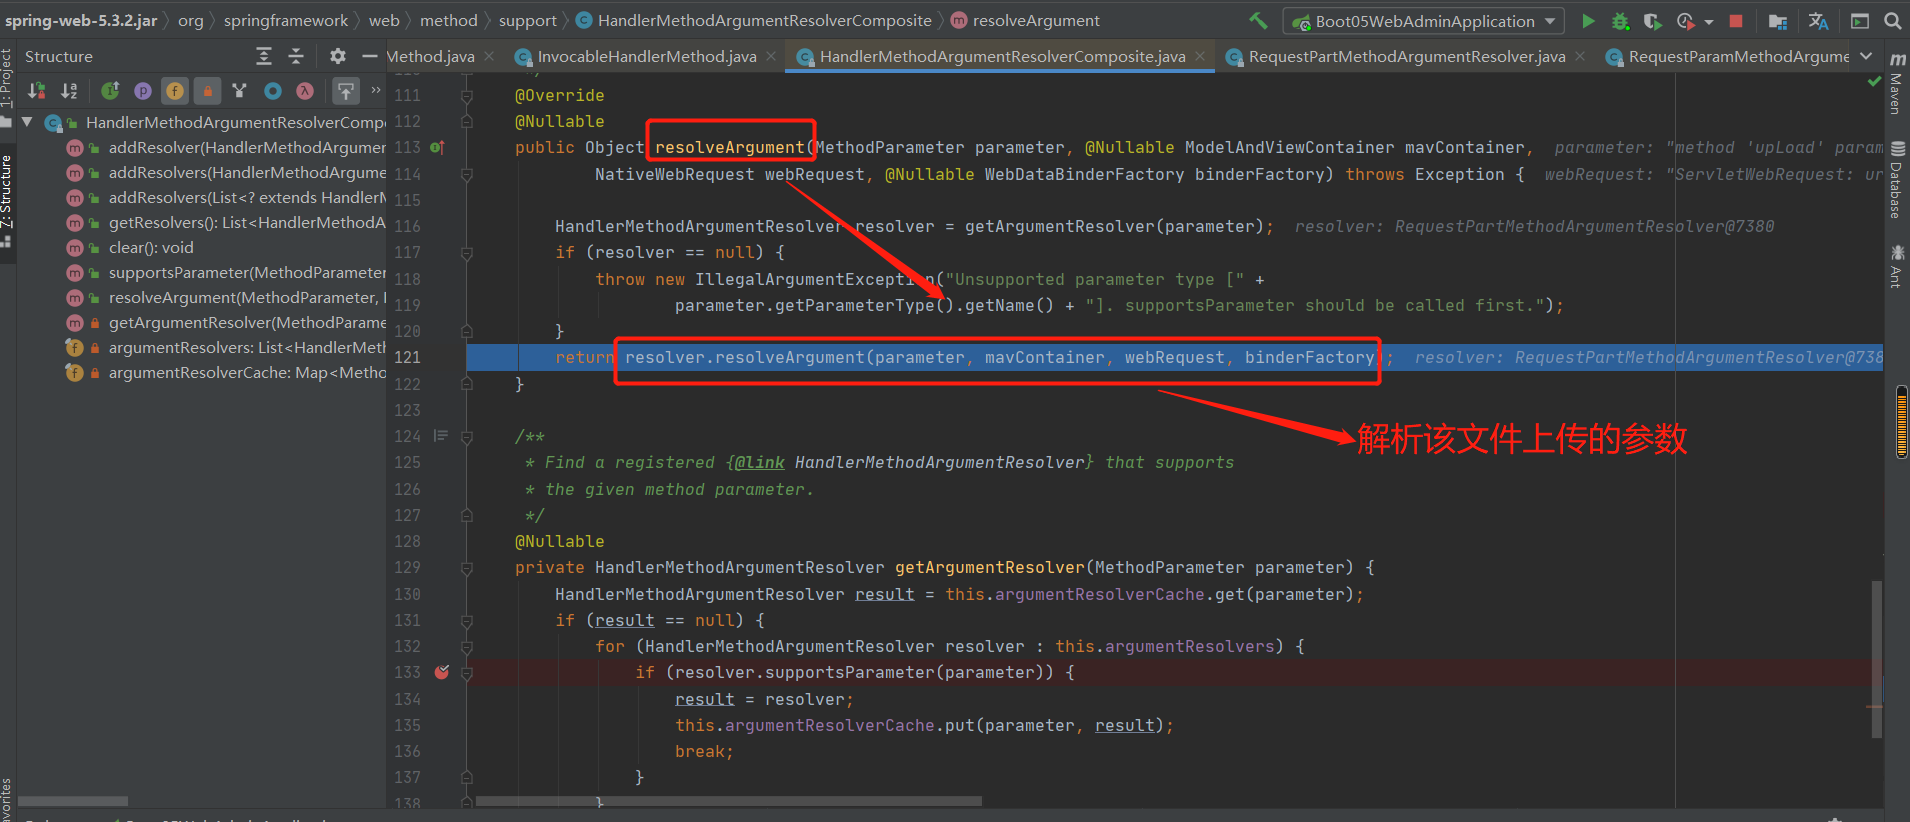
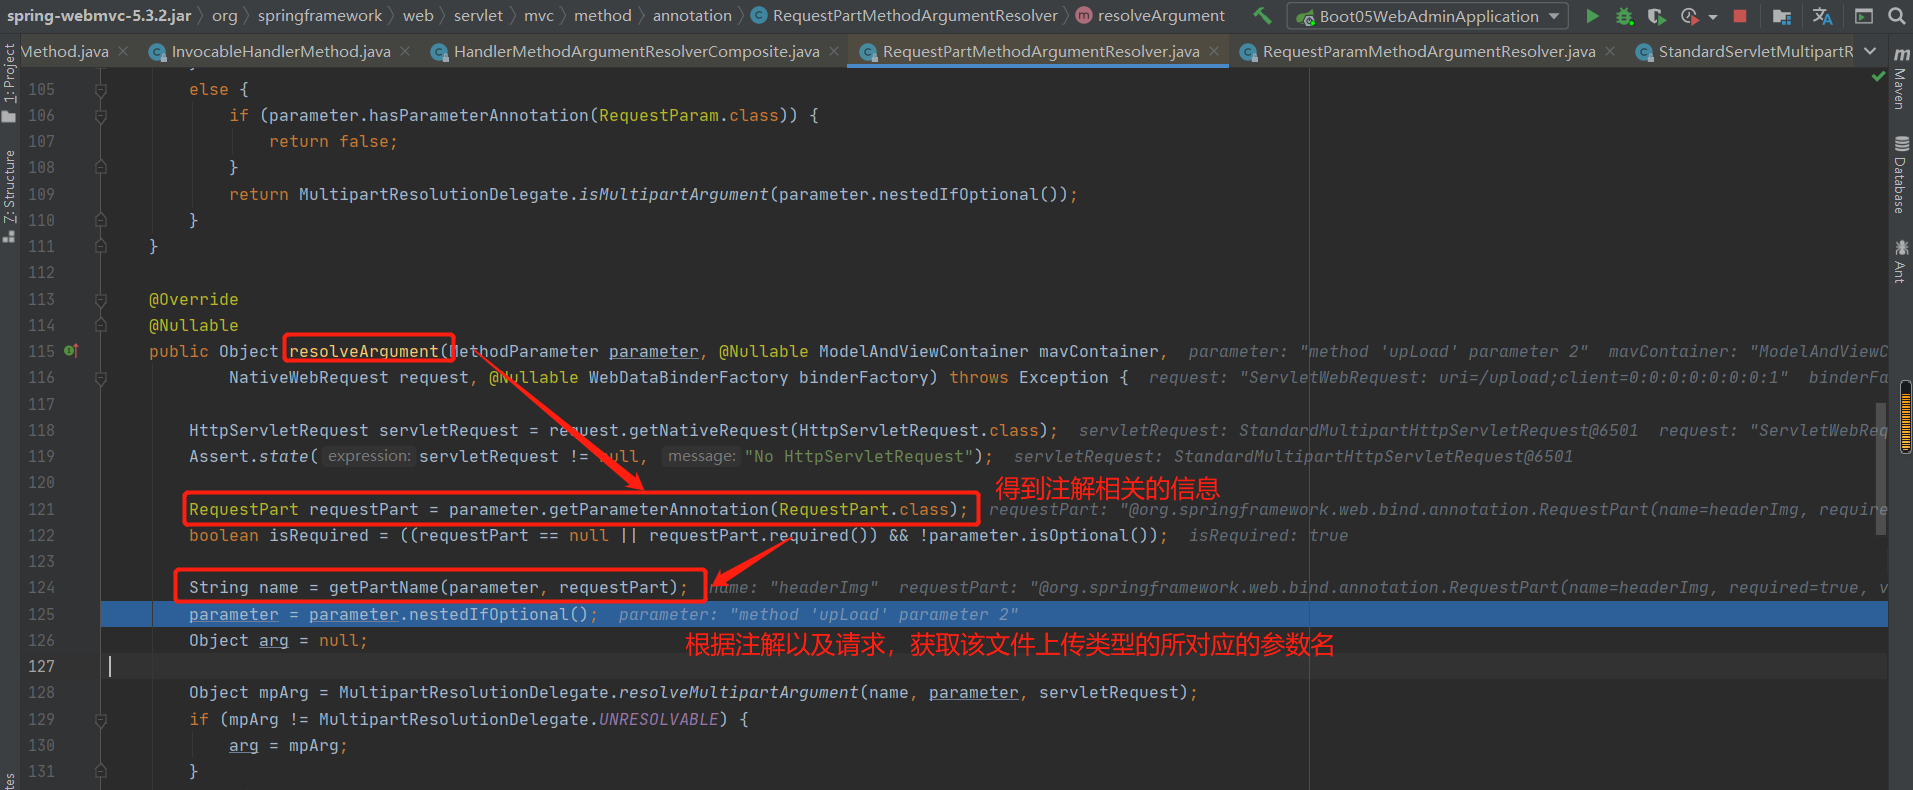
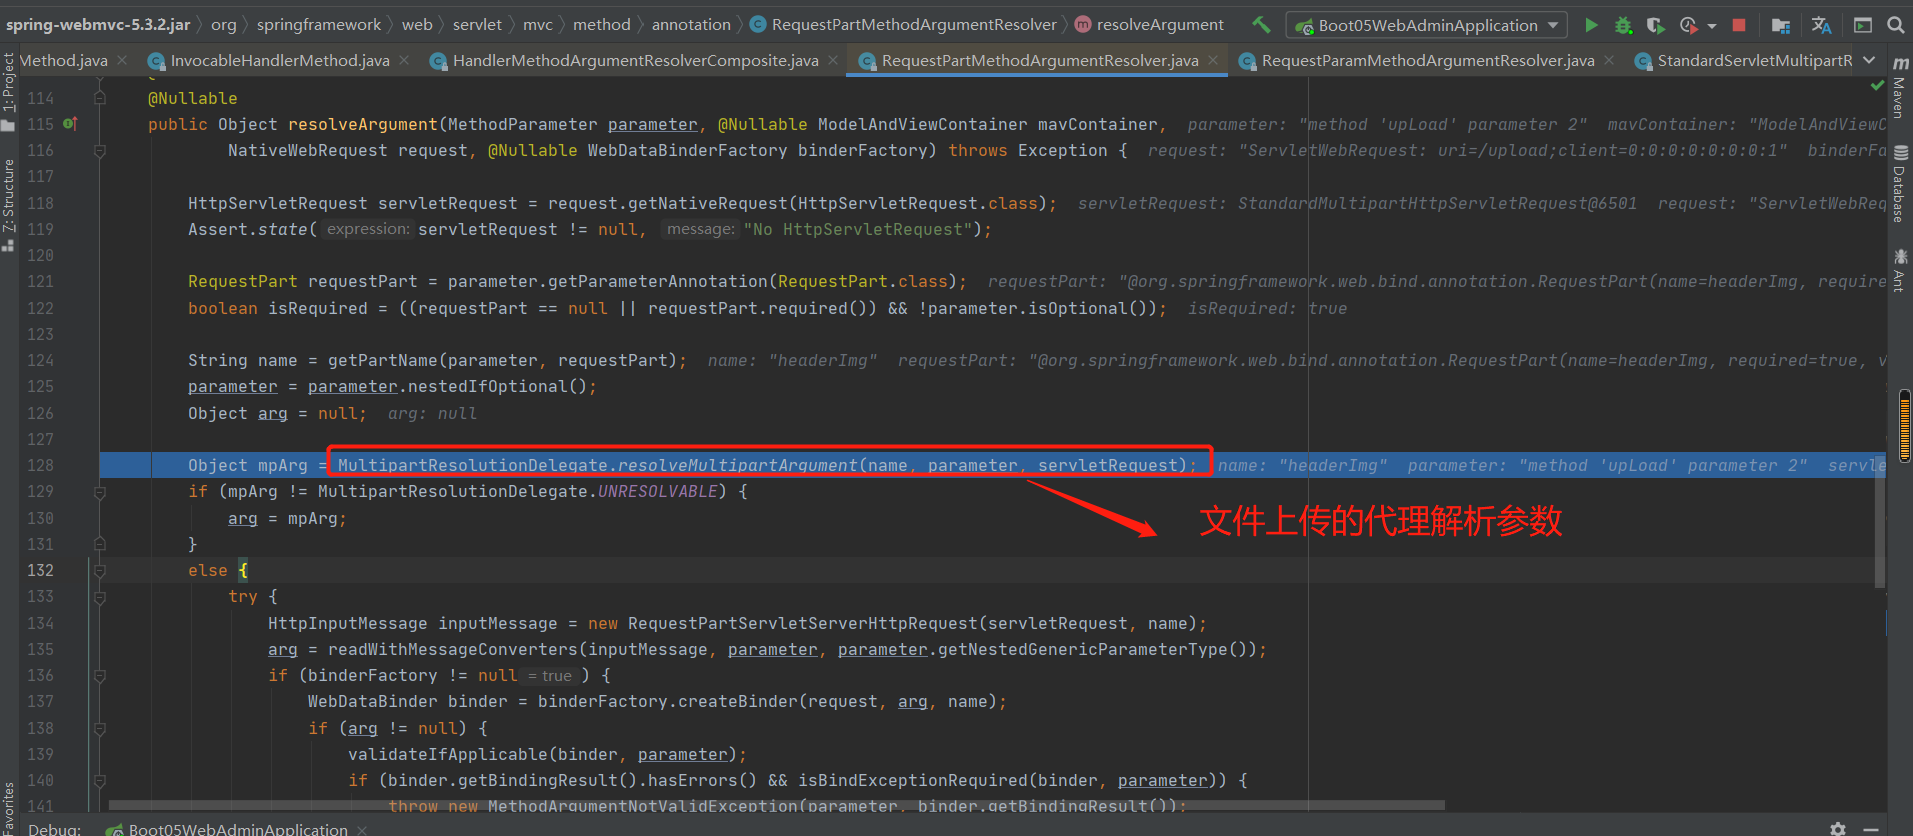
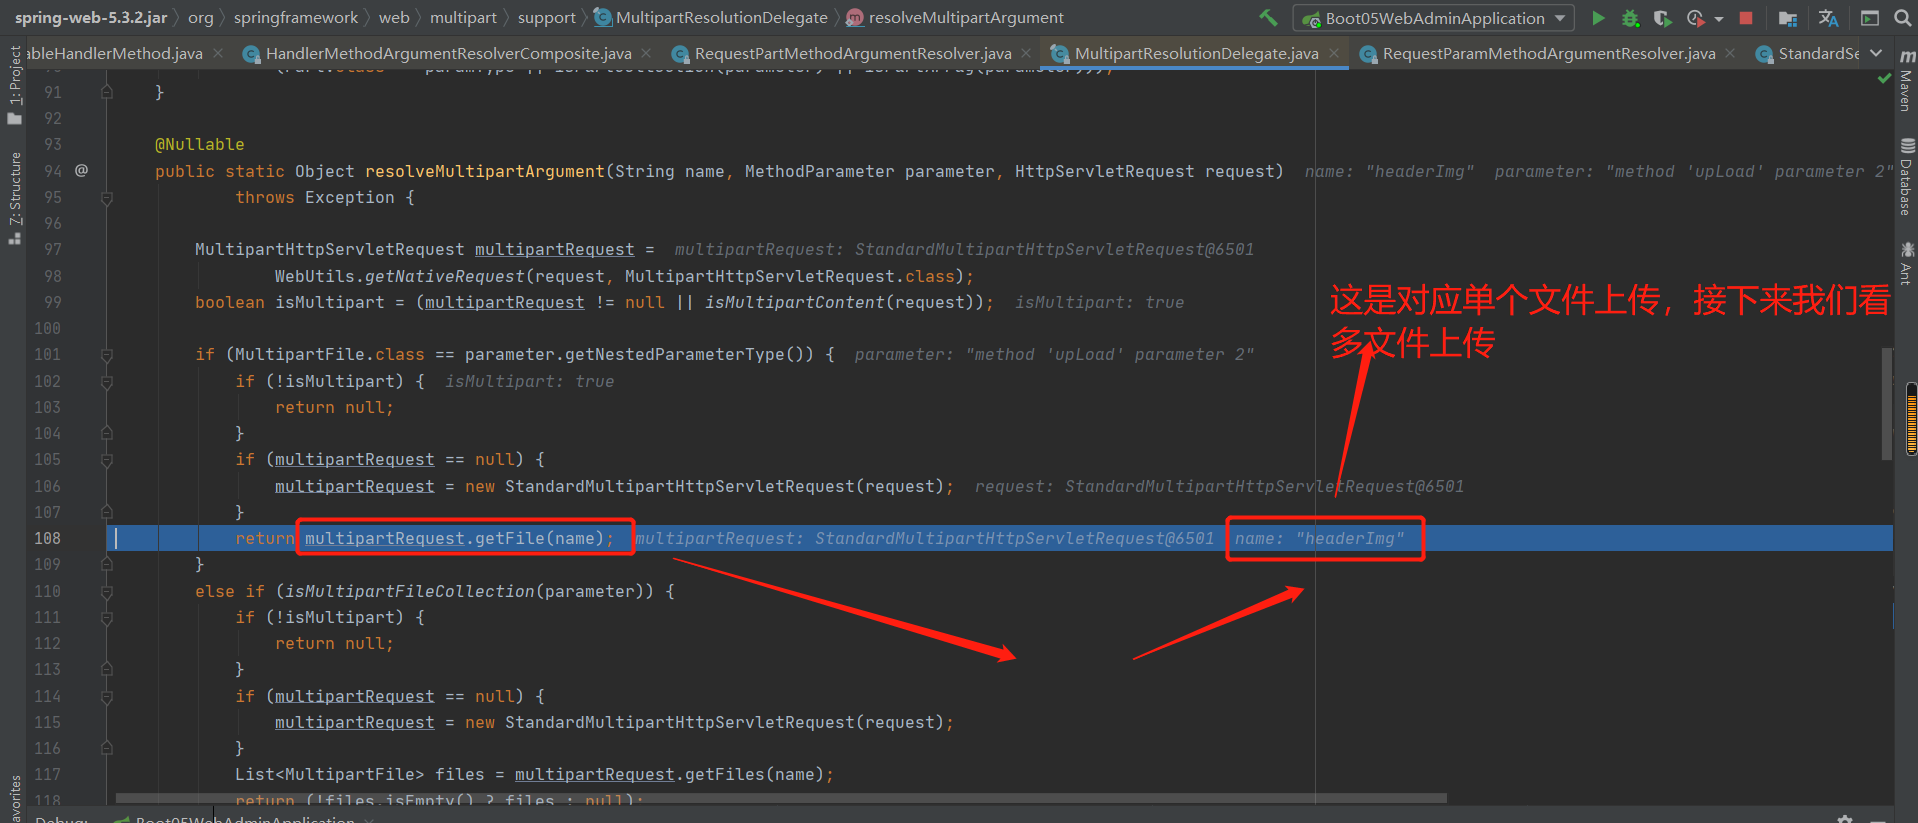
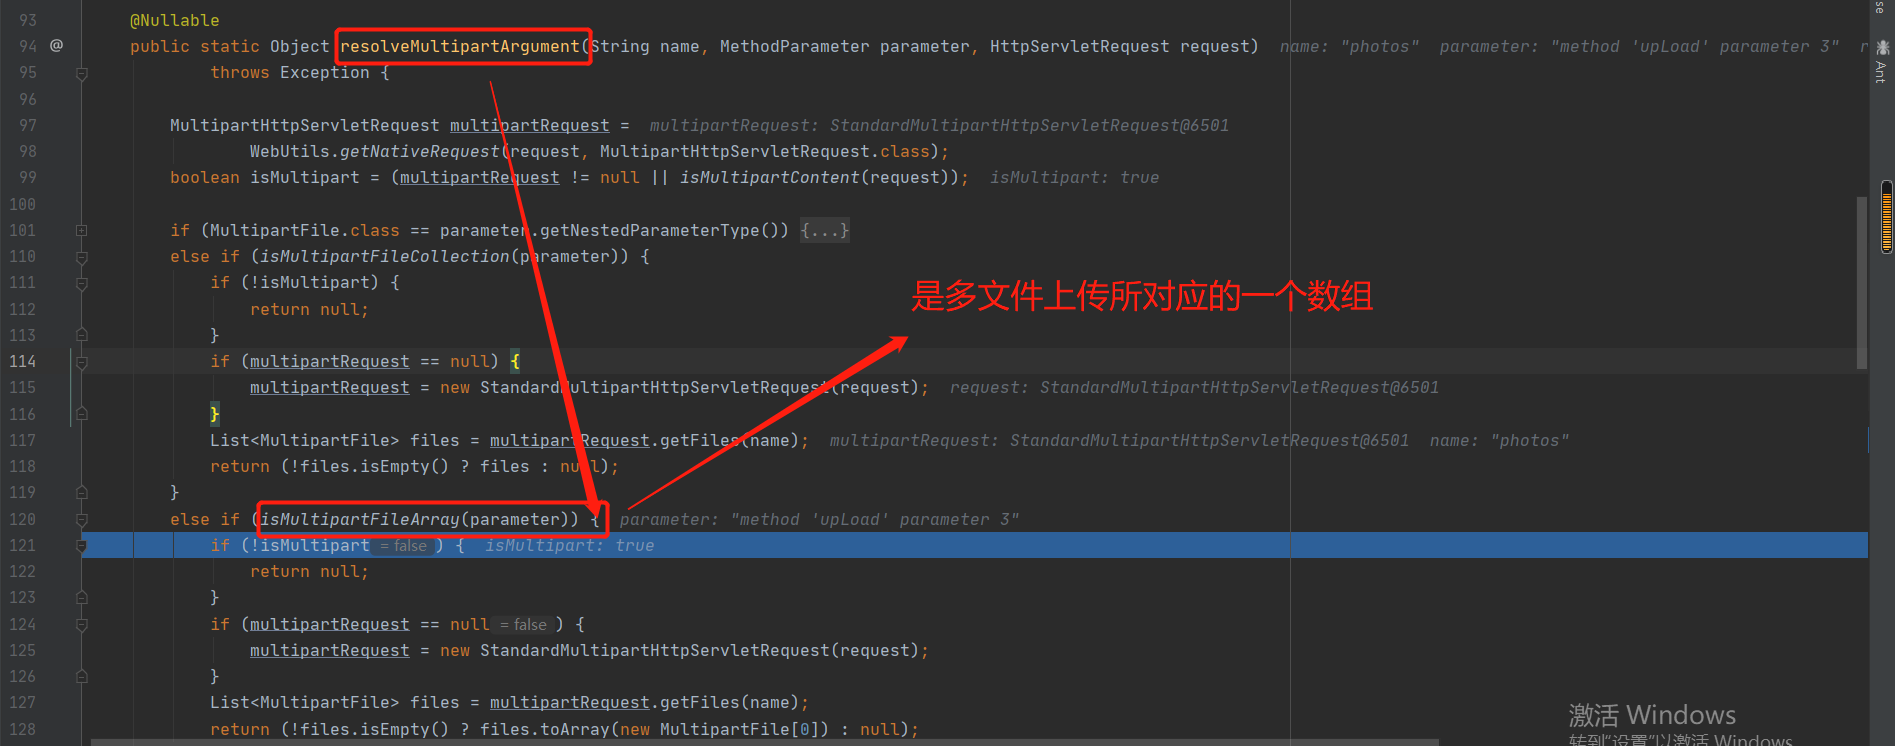
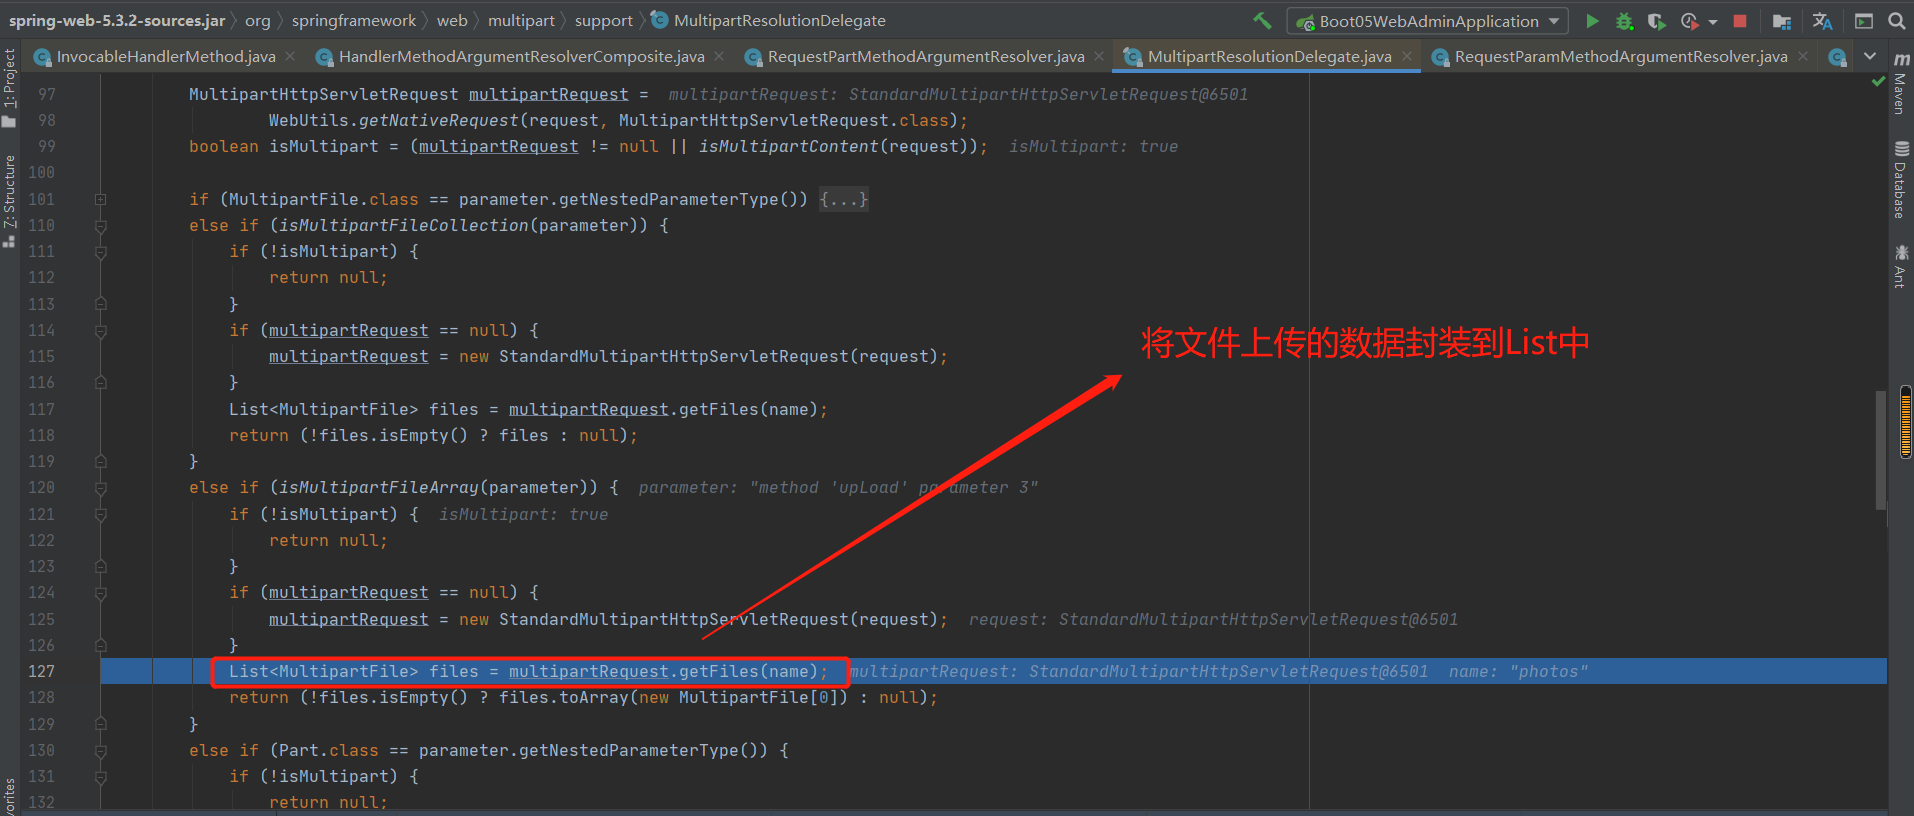

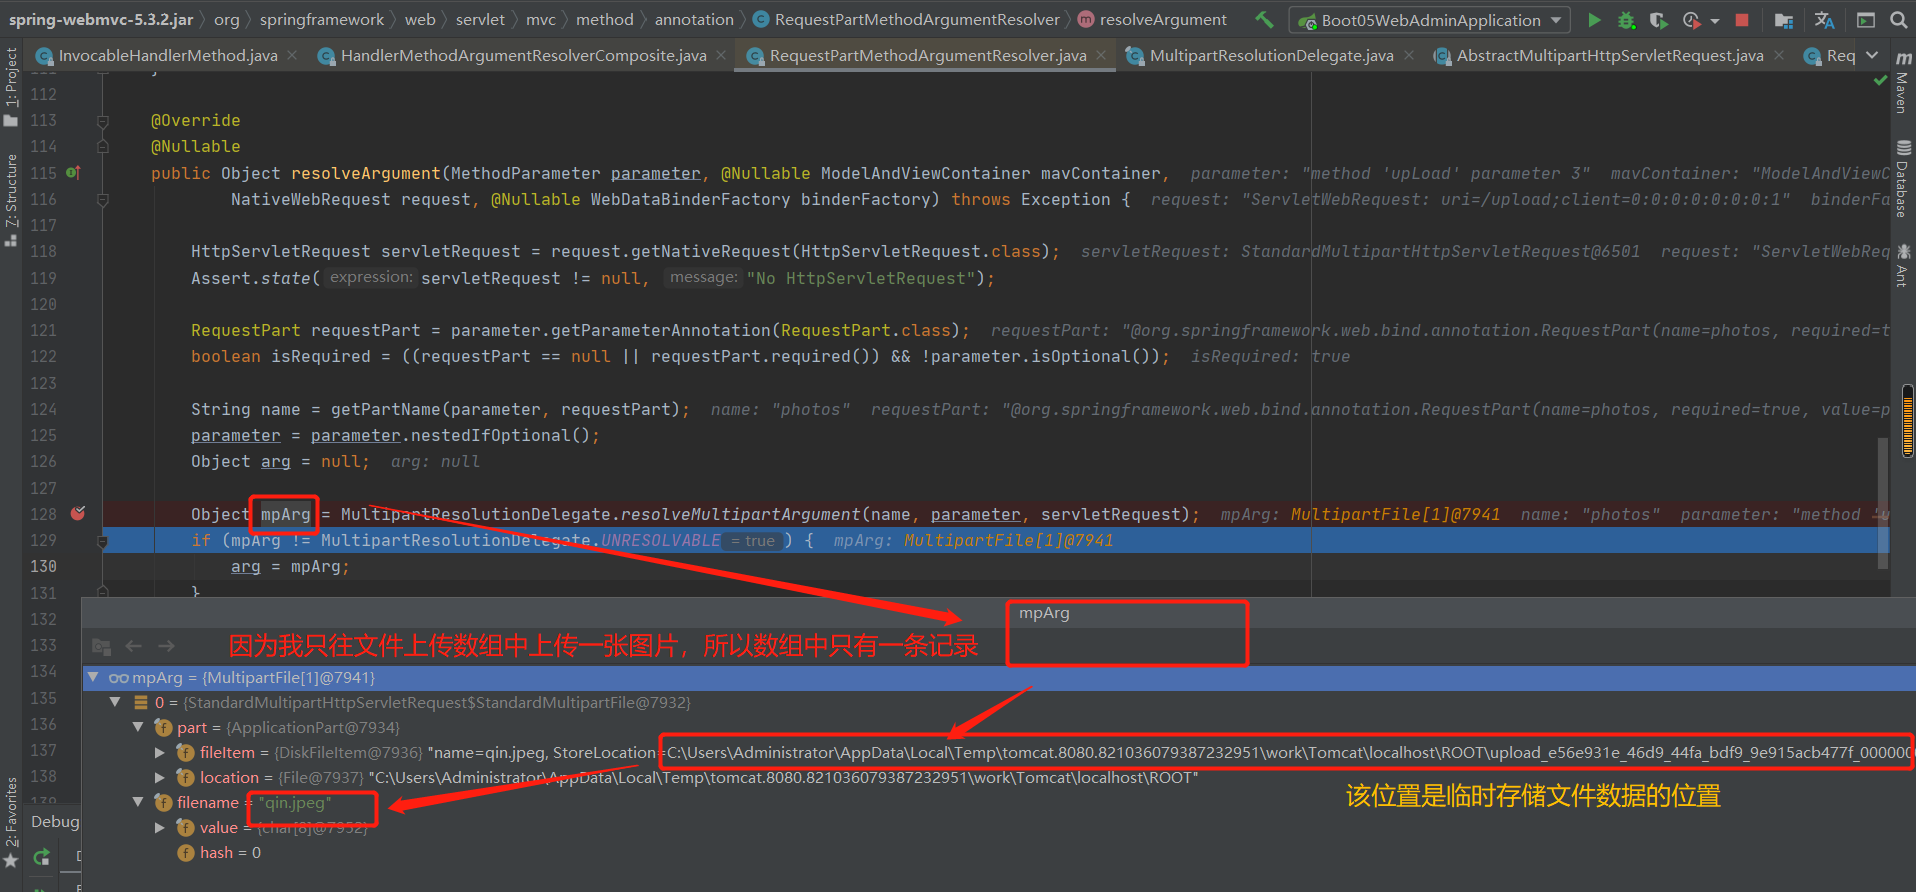
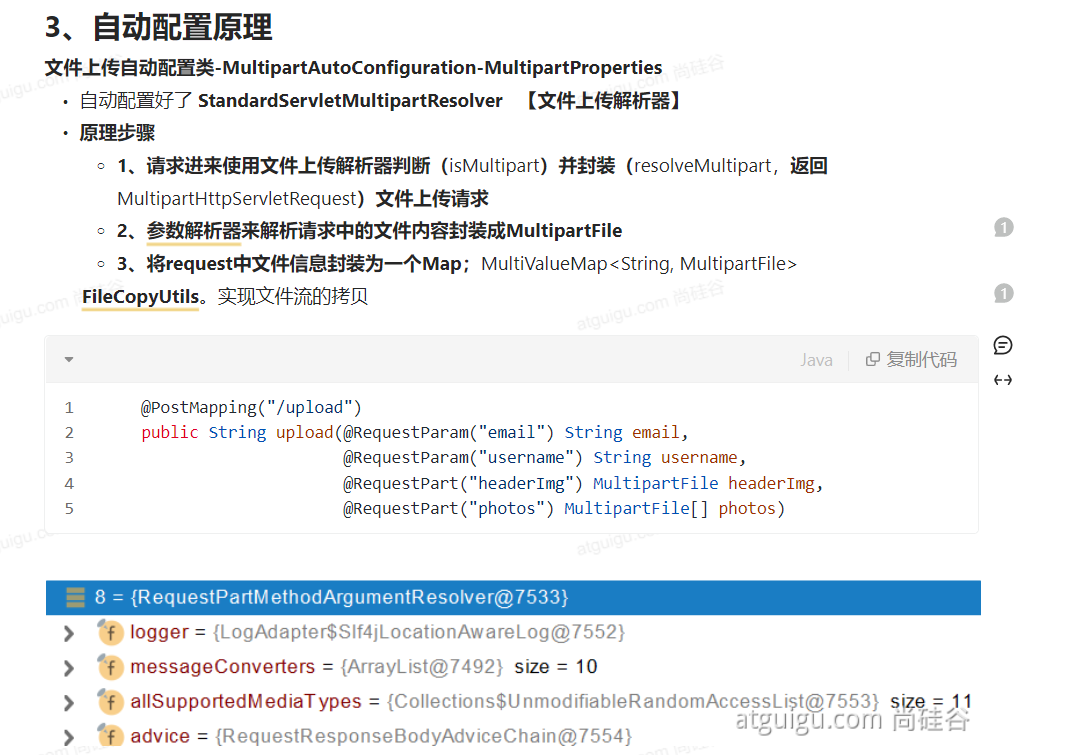
老师总结:
第10章--错误处理
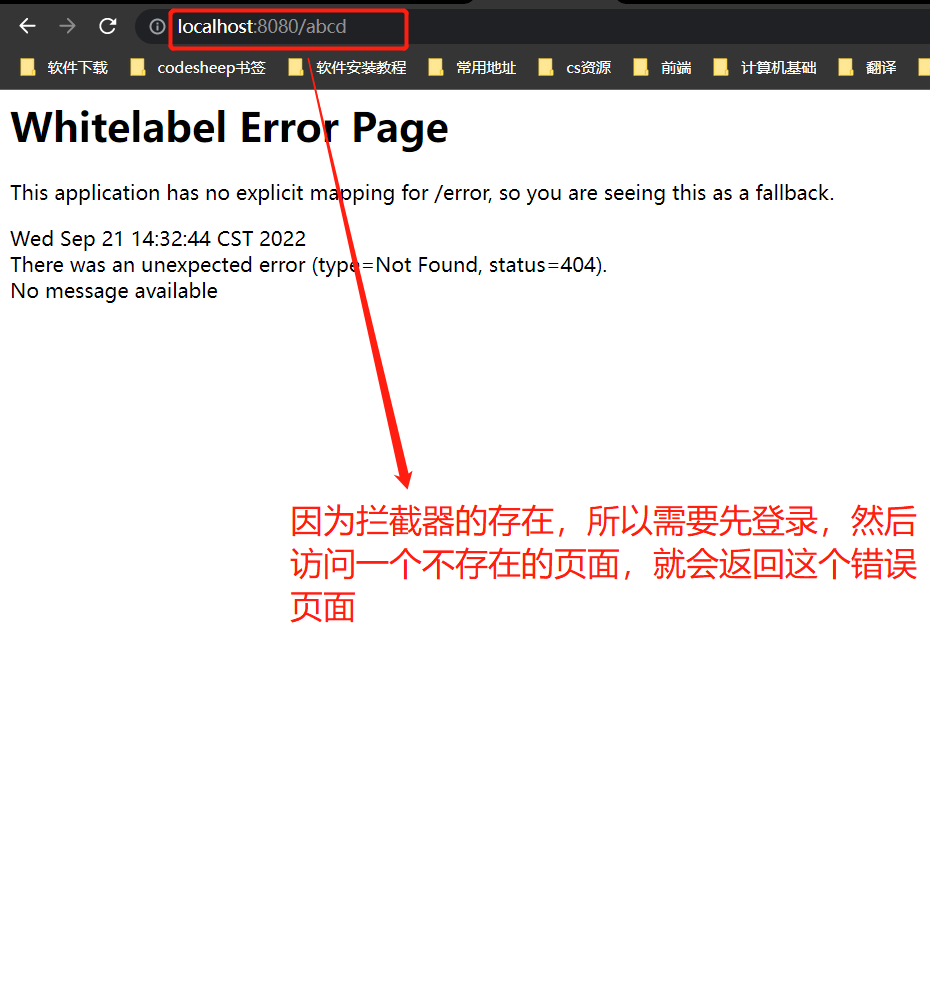
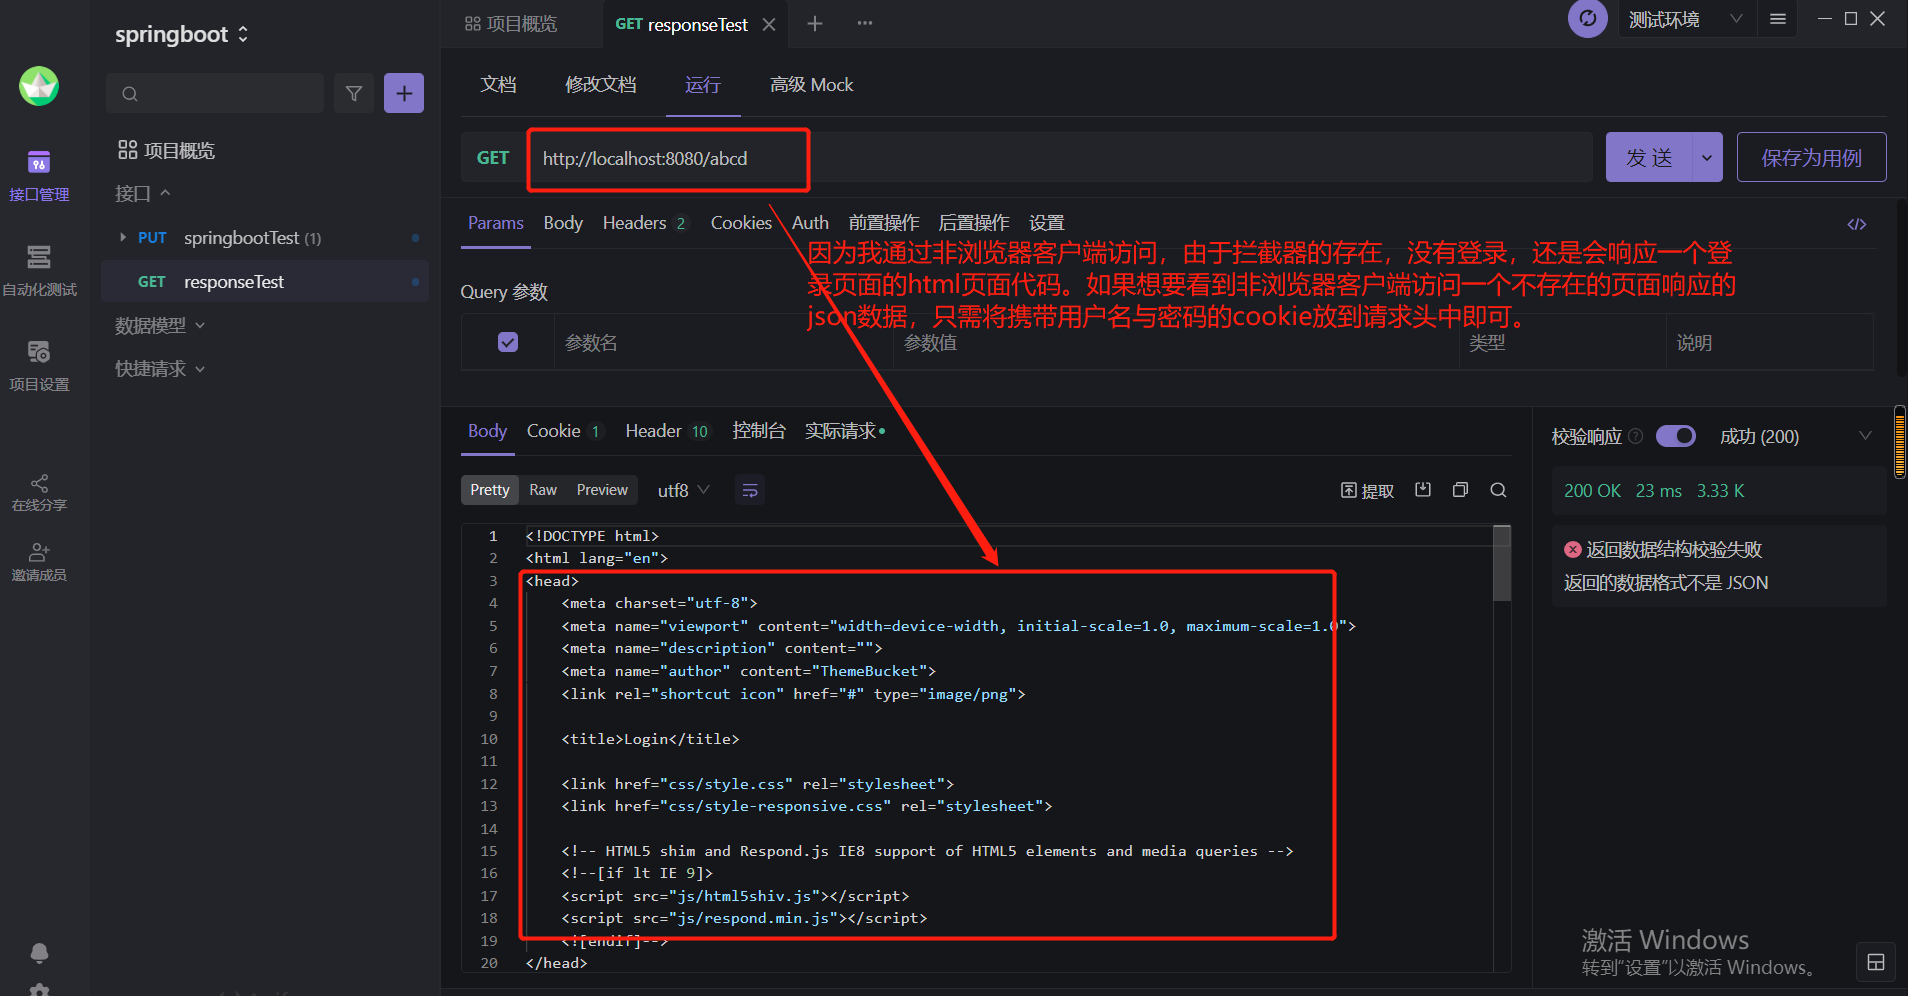
10-1 错误处理时:对于浏览器客户端,发送一个错误请求,会返回一个错误页面;对于非浏览器客户端,发送一个错误请求,会响应json数据。
如下:浏览器响应错误页面
如下:非浏览器响应json数据
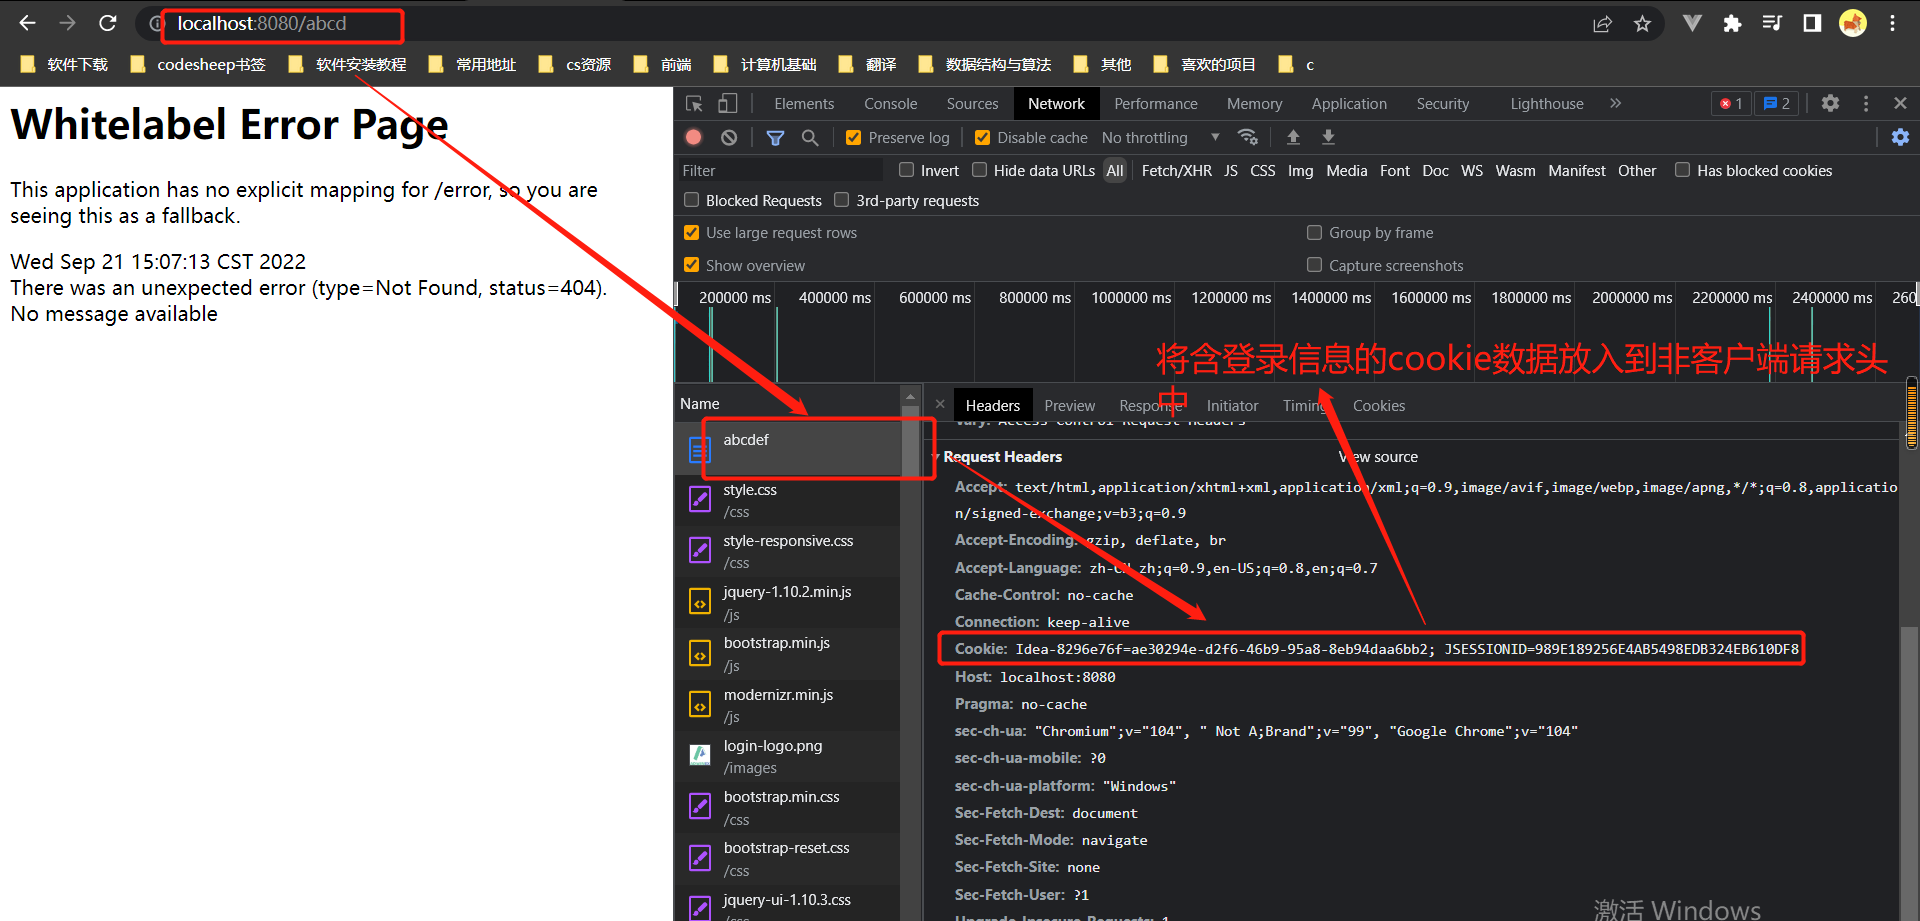
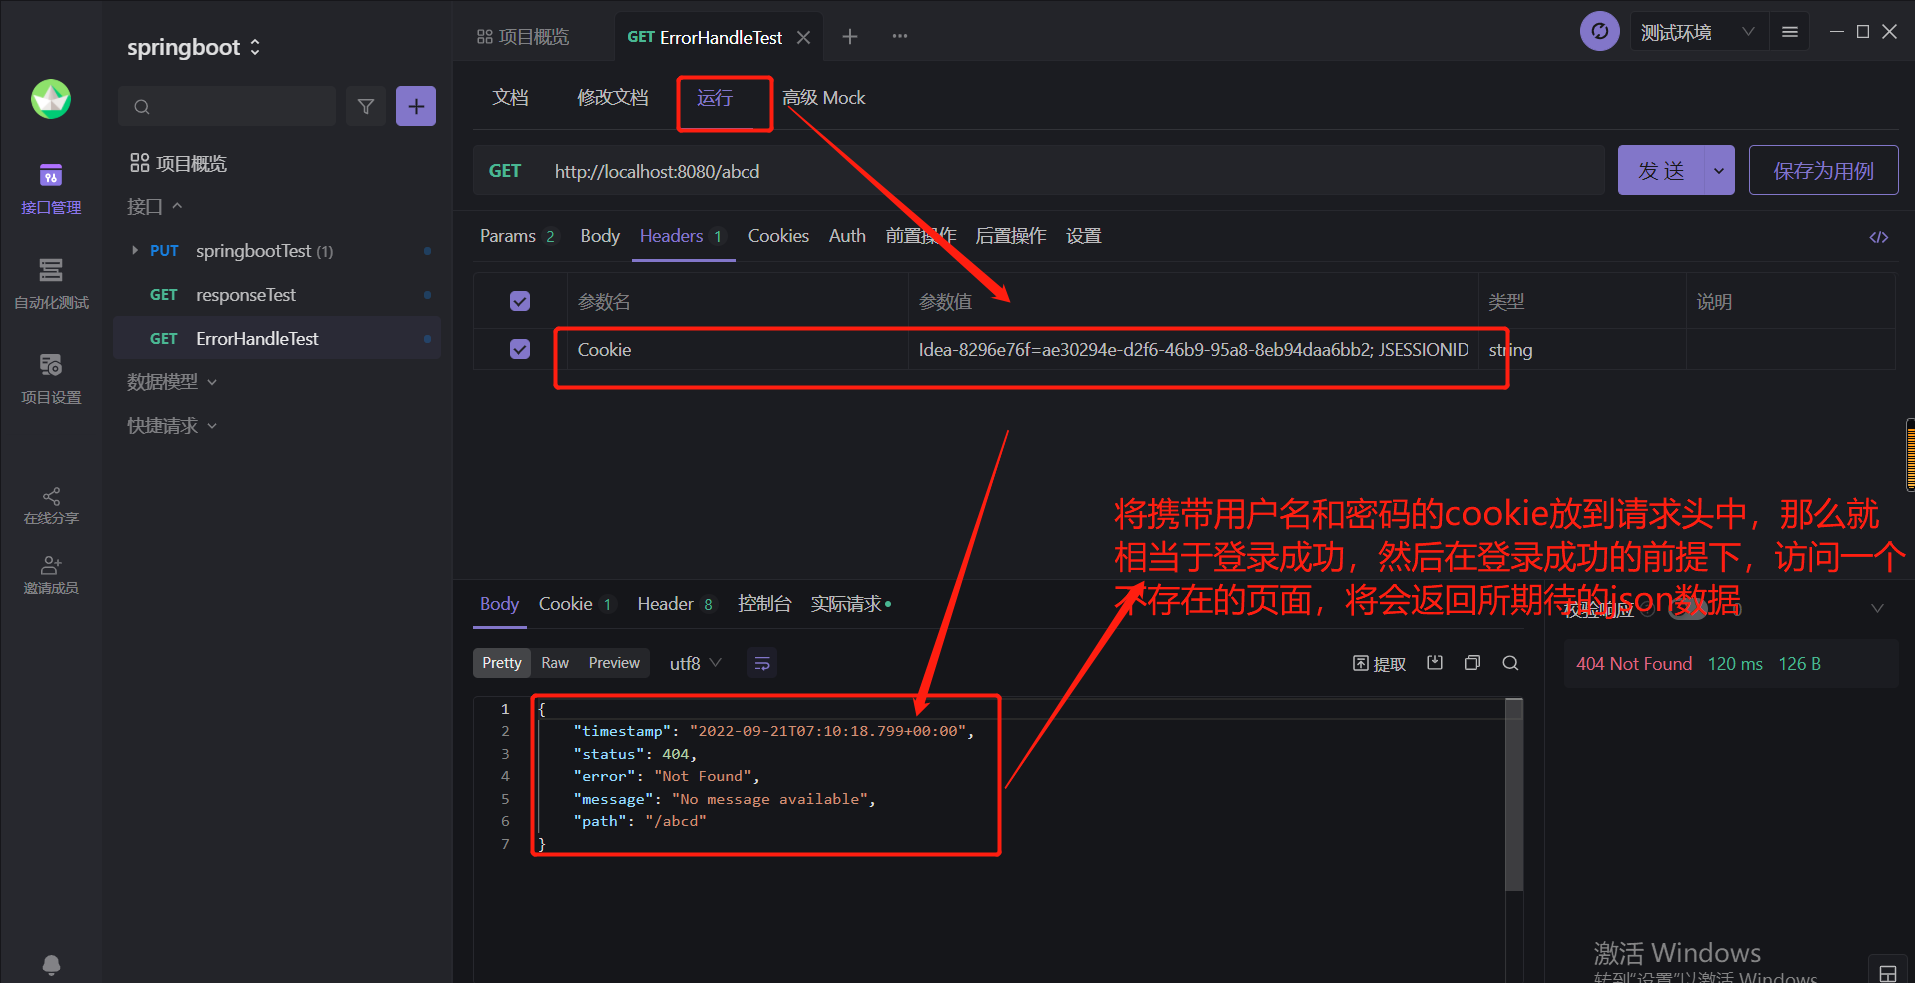
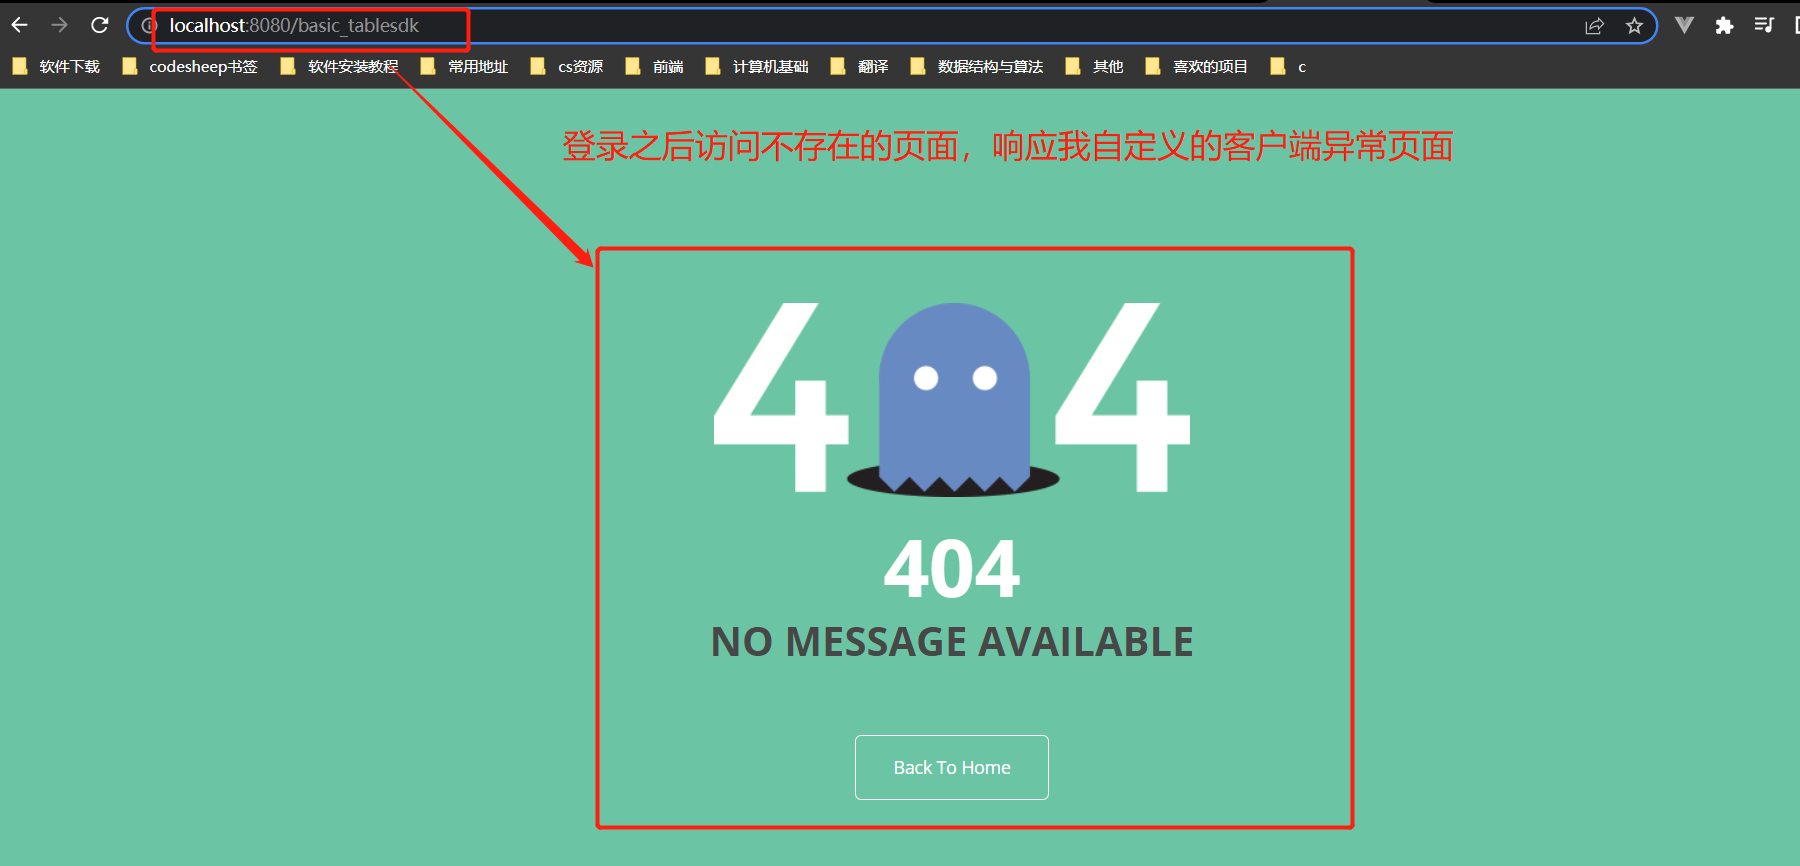
10-2 响应自定义的错误页面
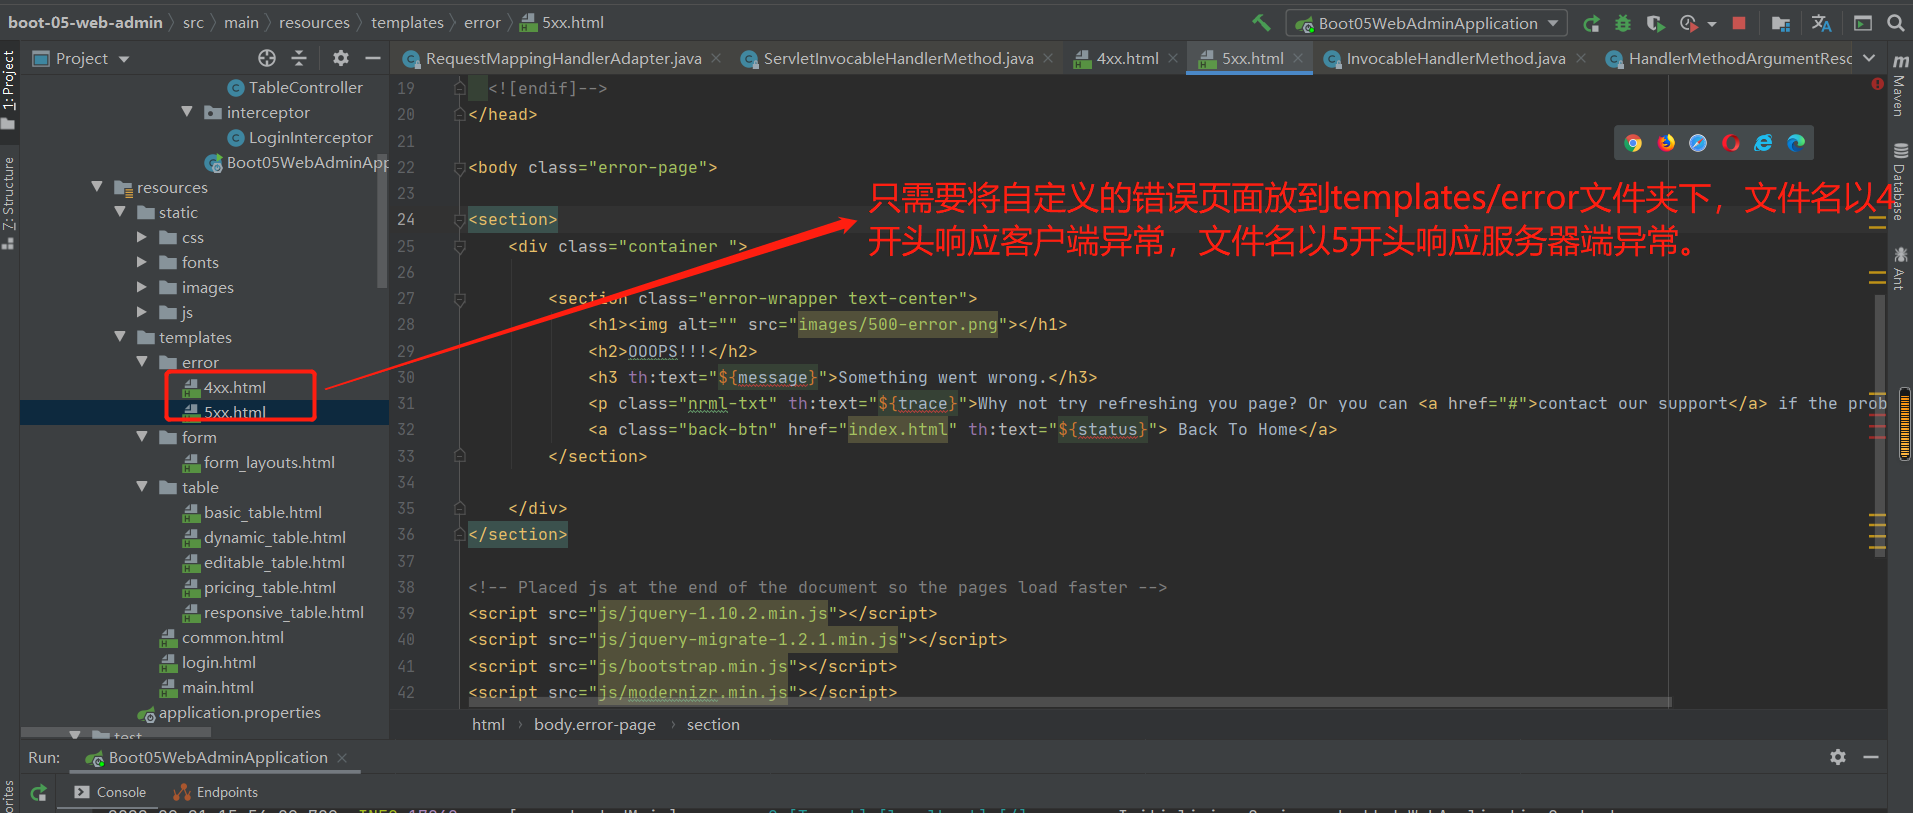
结果测试:
10-3底层组件功能的源码分析
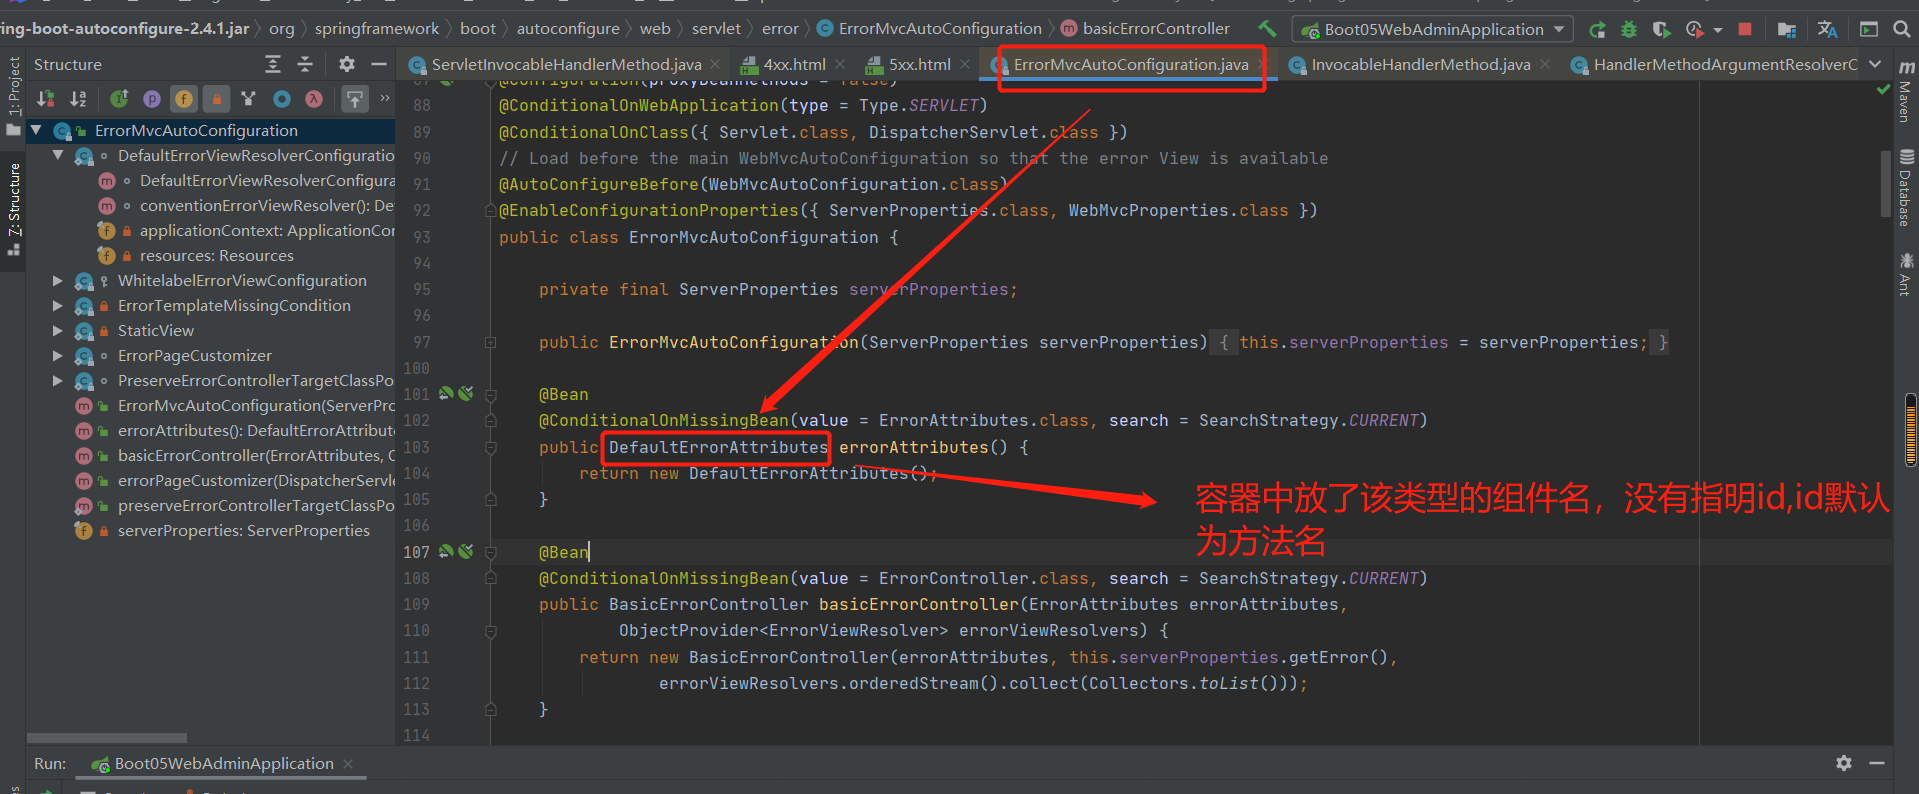
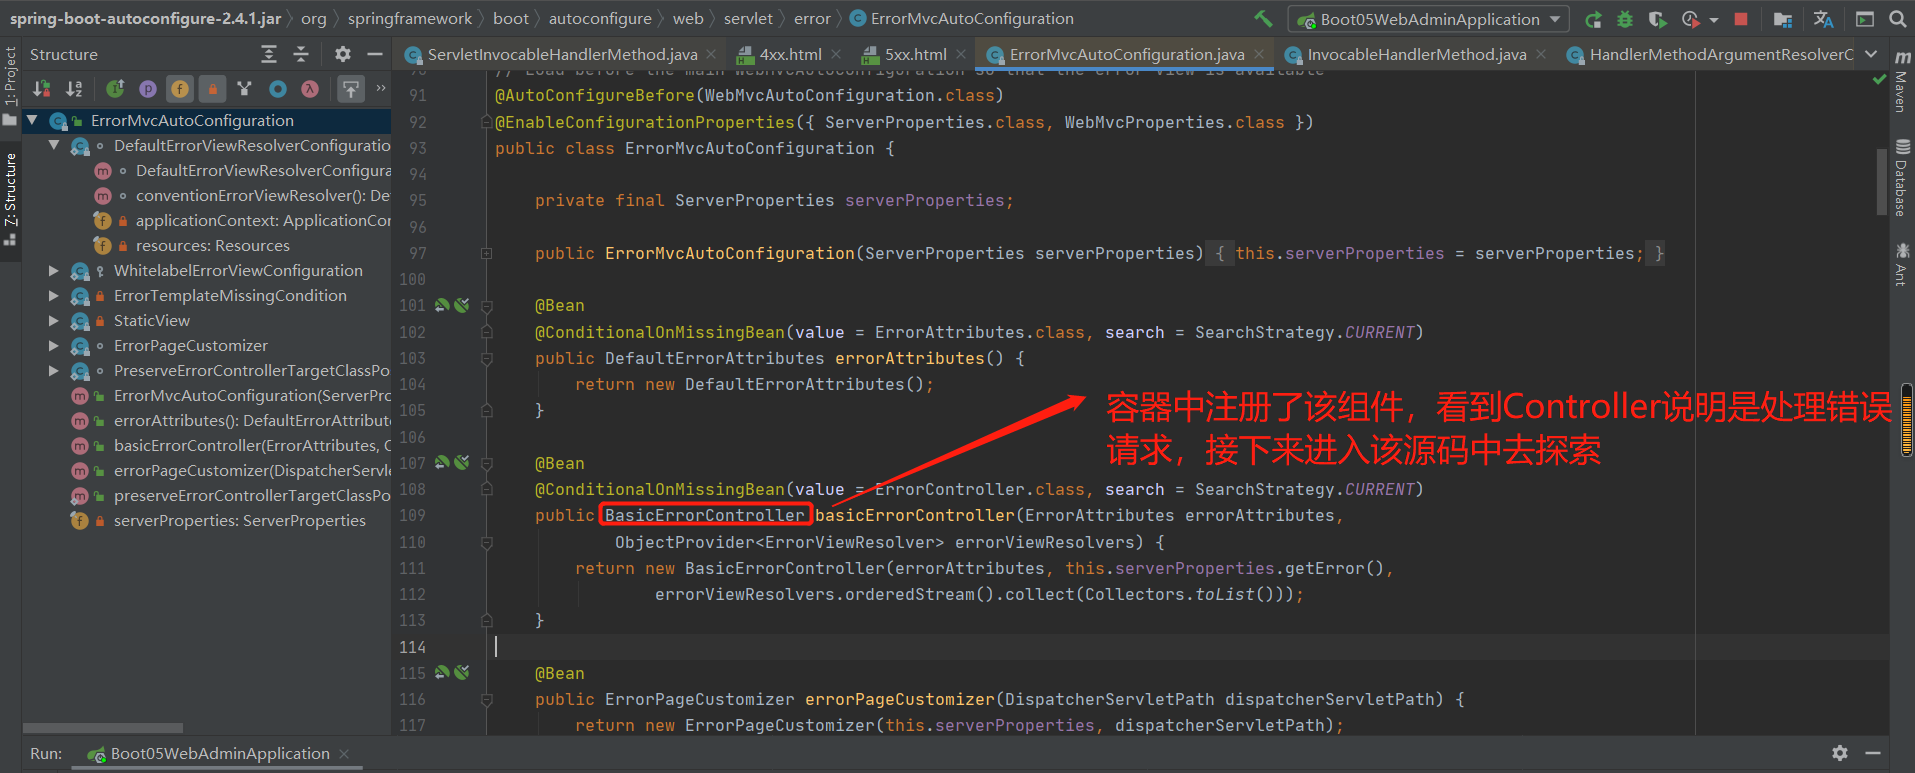
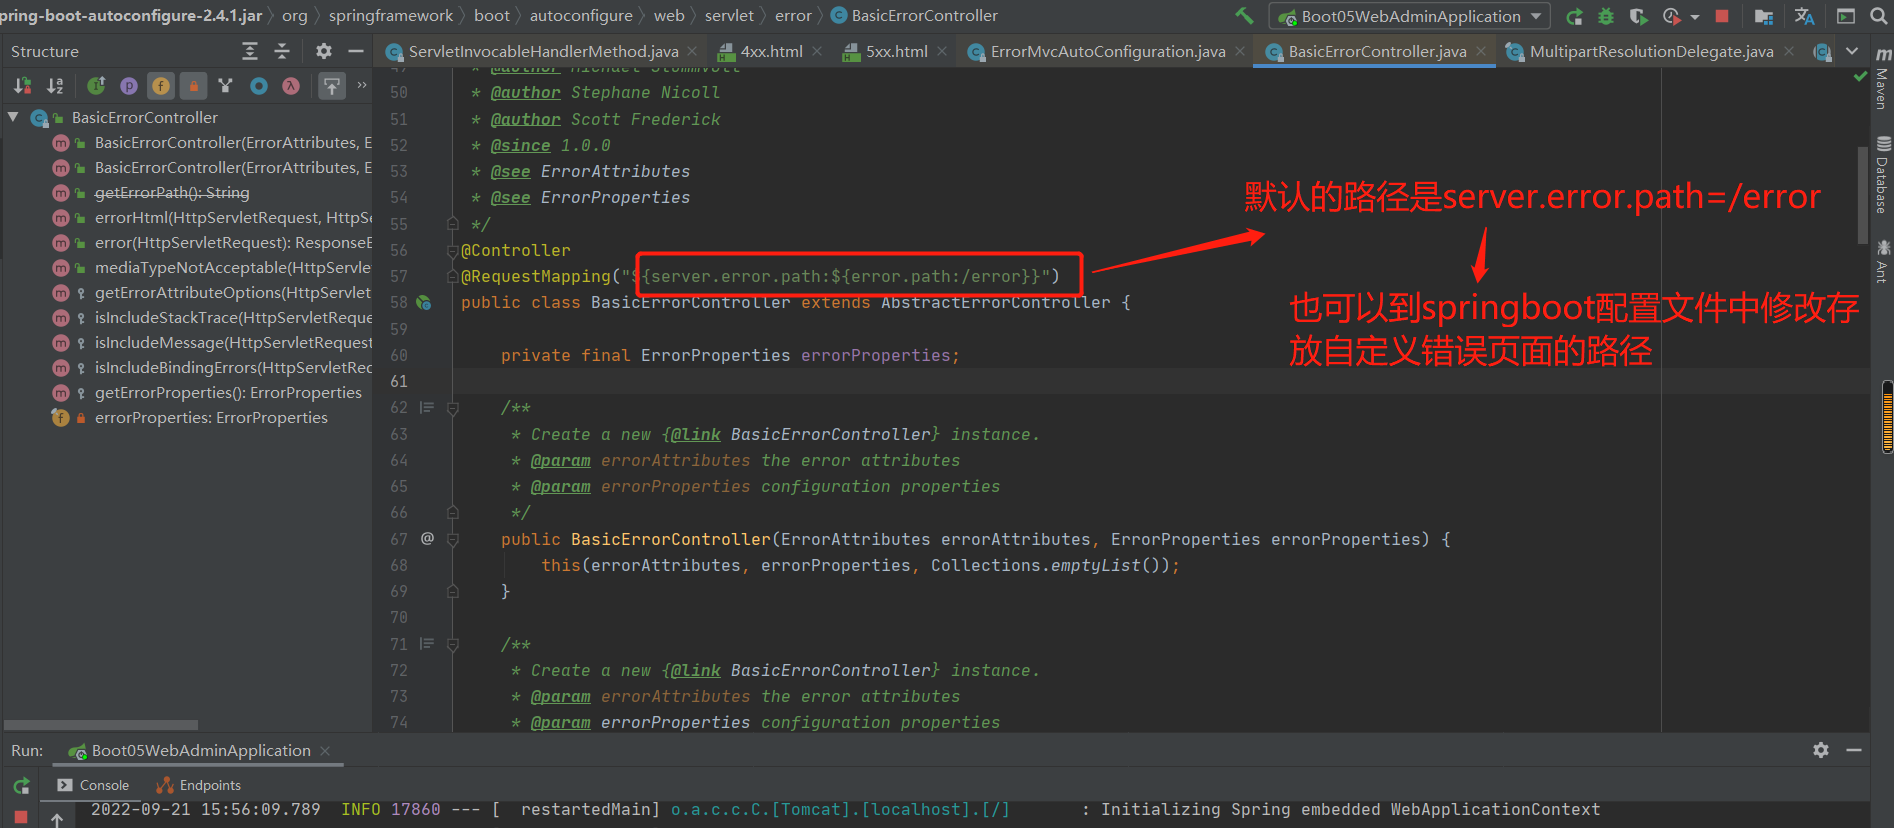
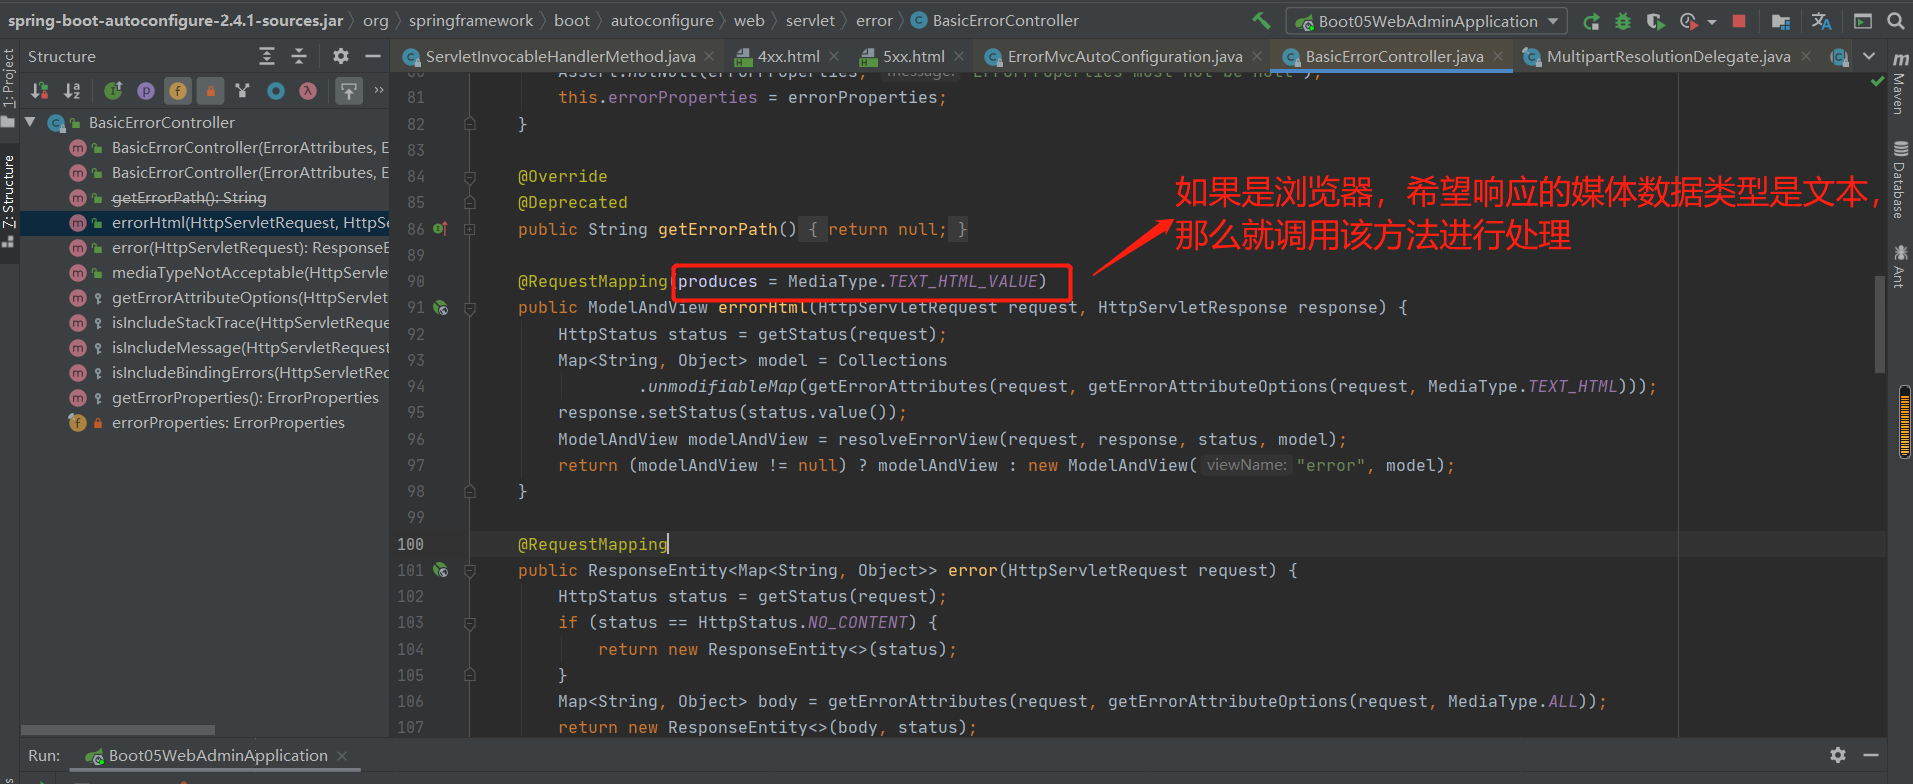
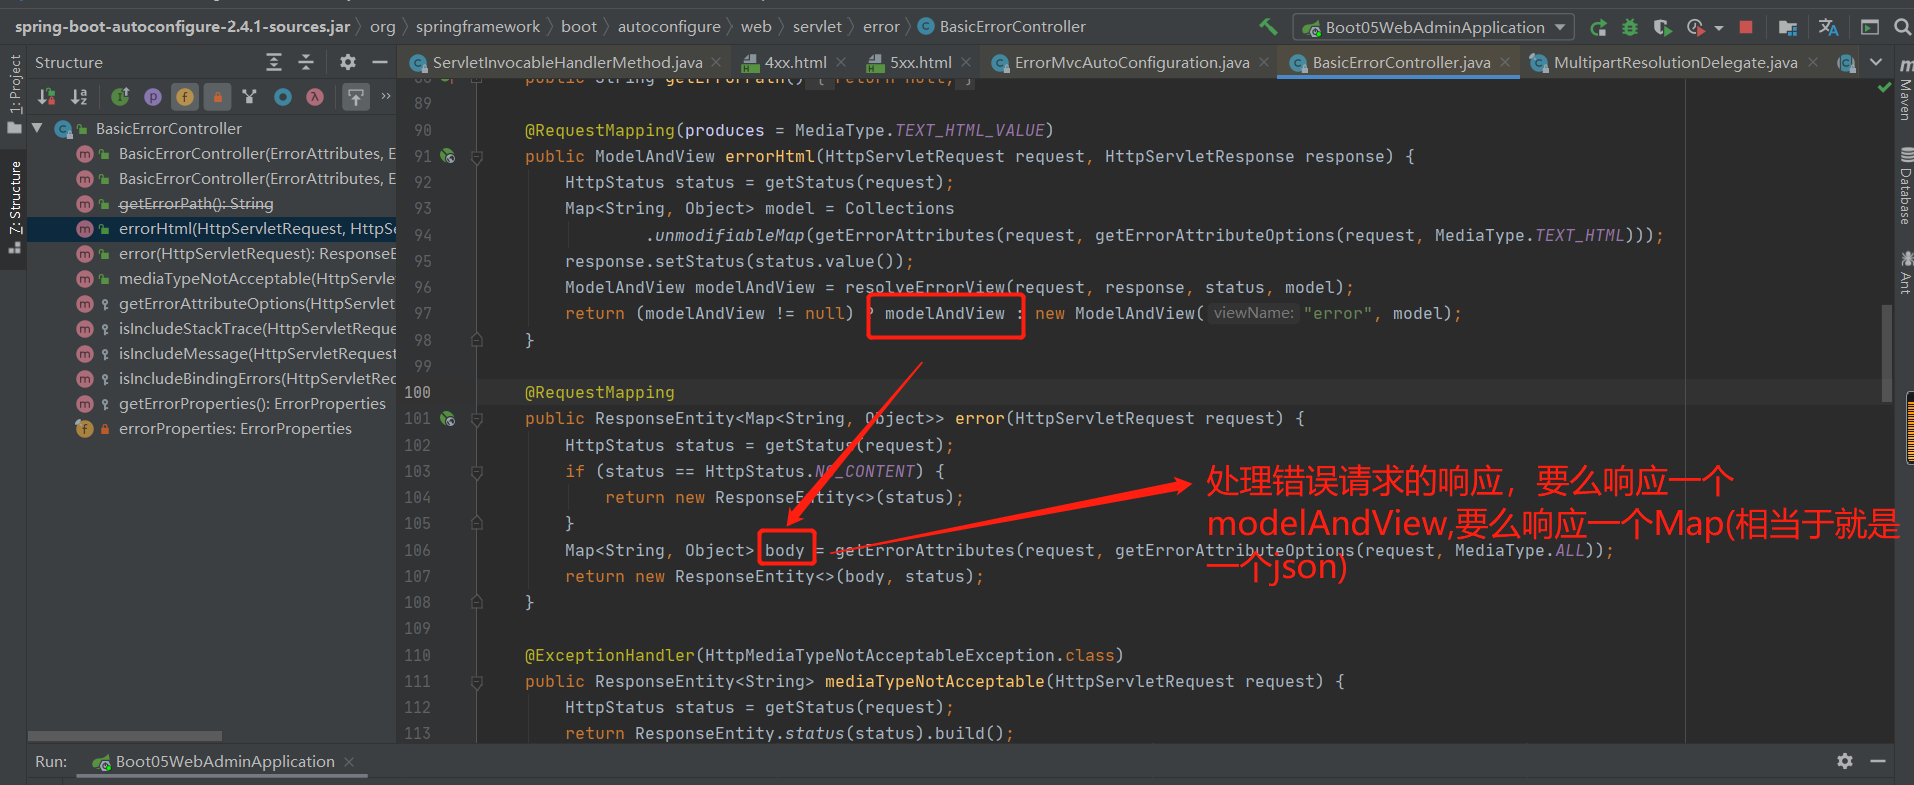
更正:响应的媒体数据类型是text/html
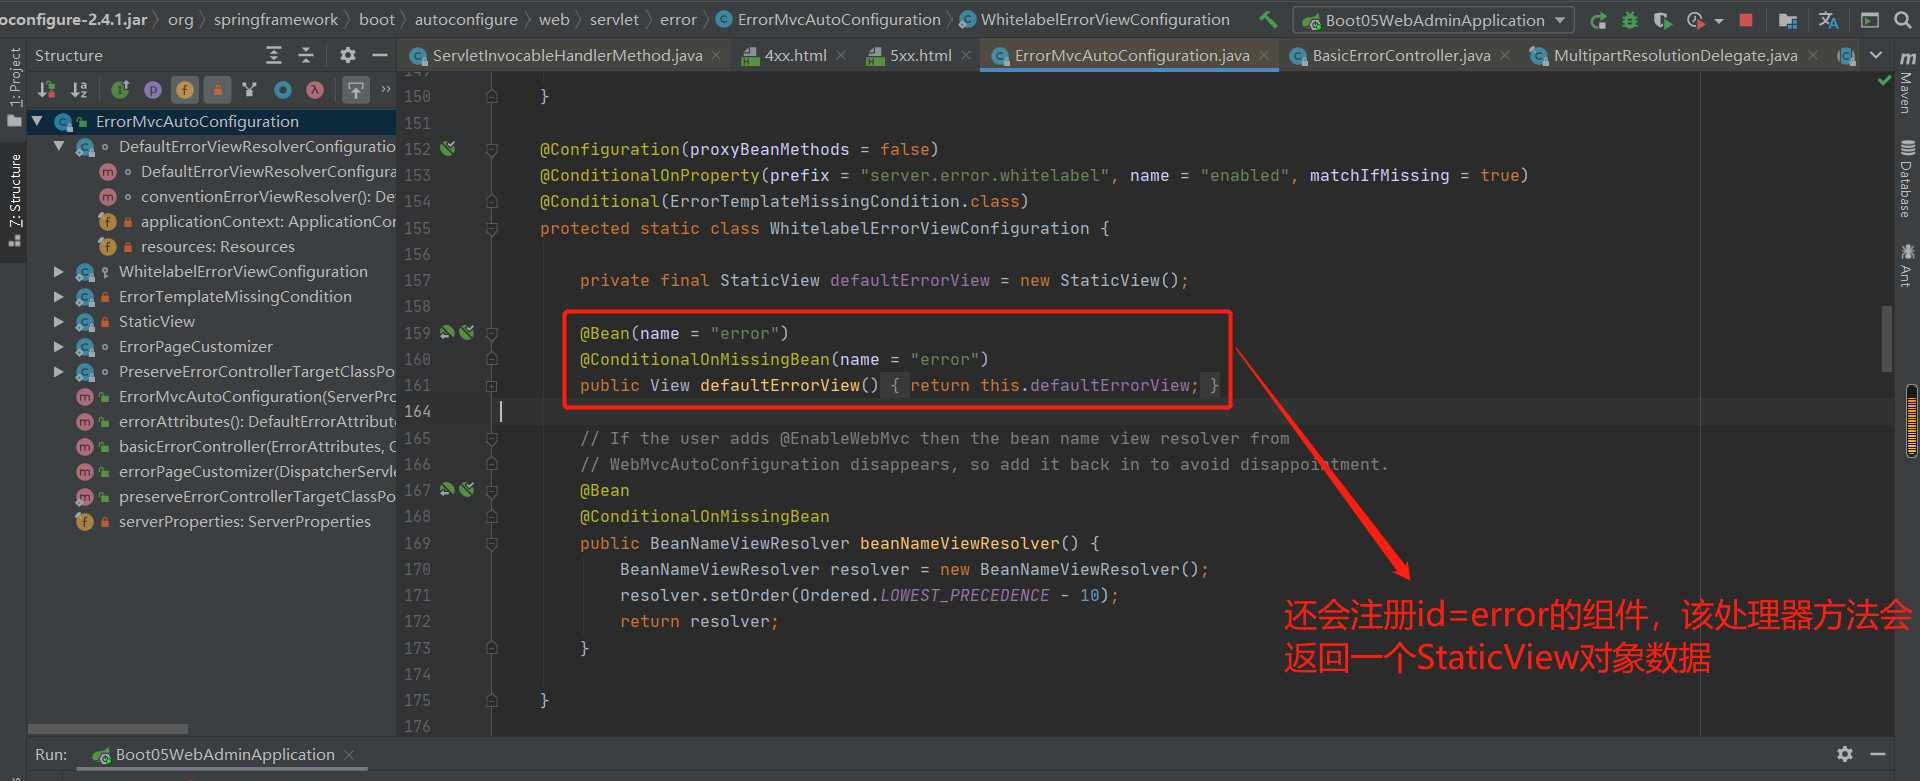
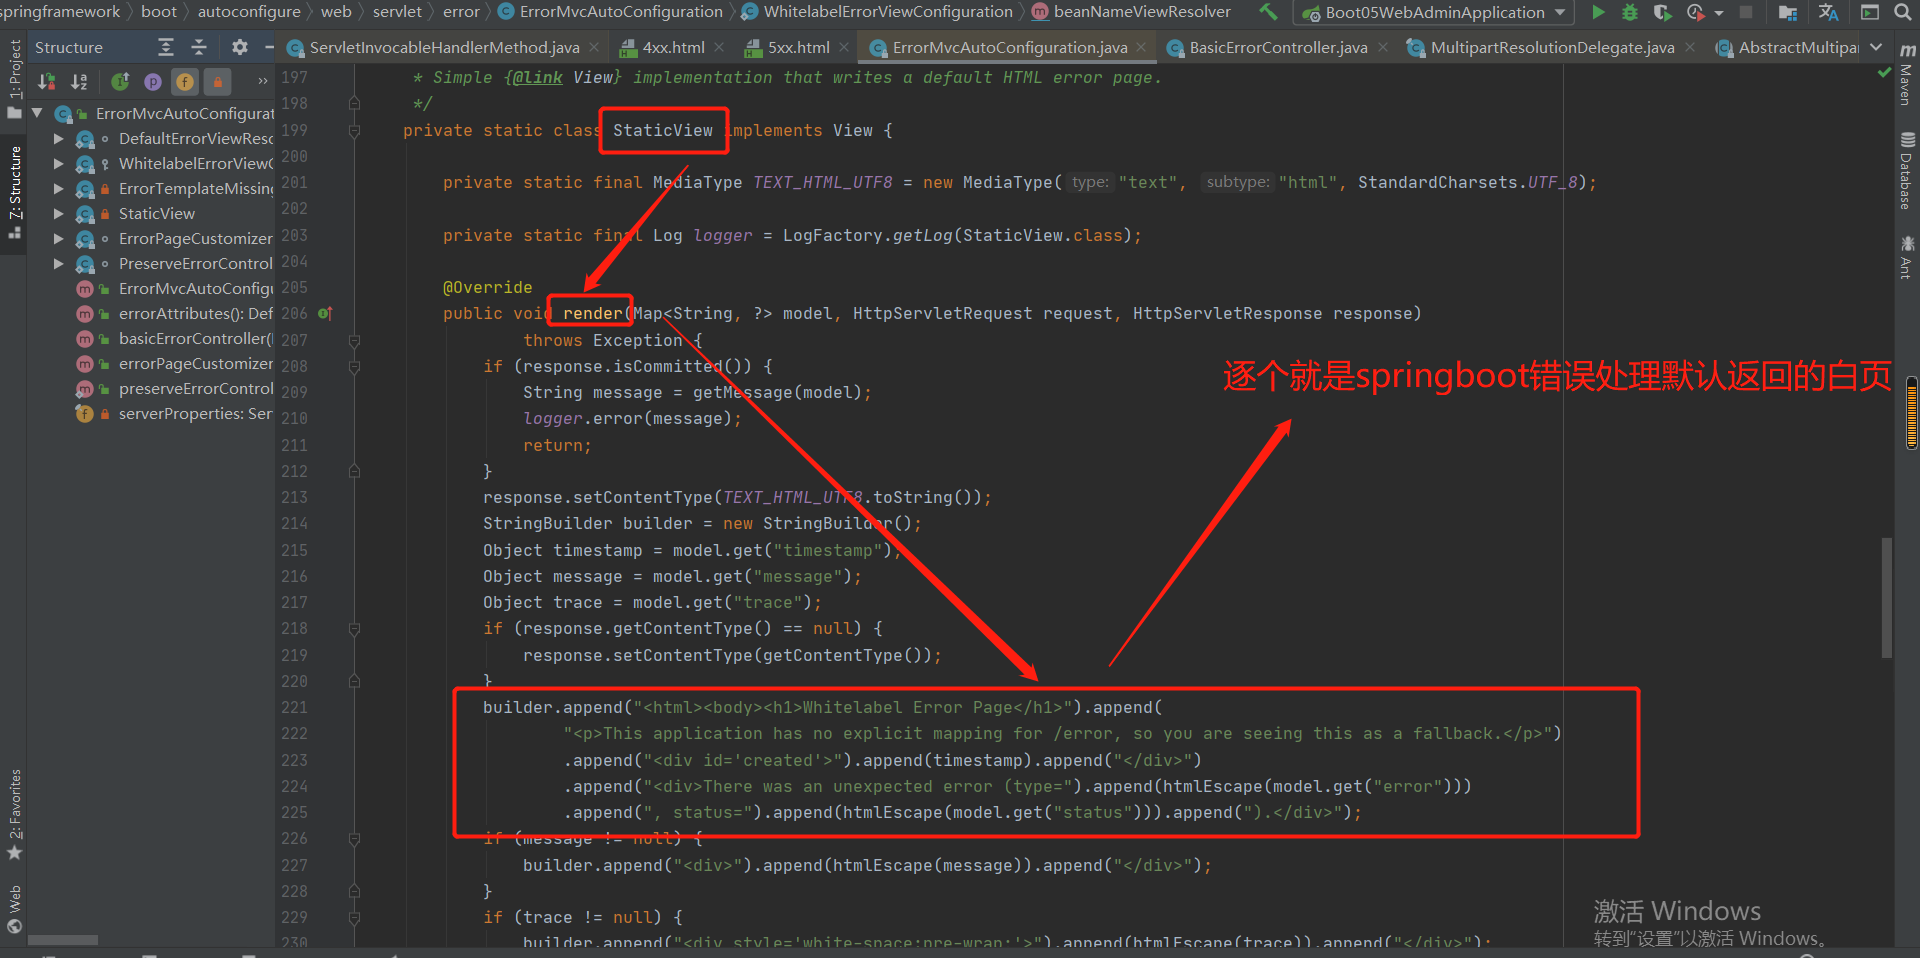
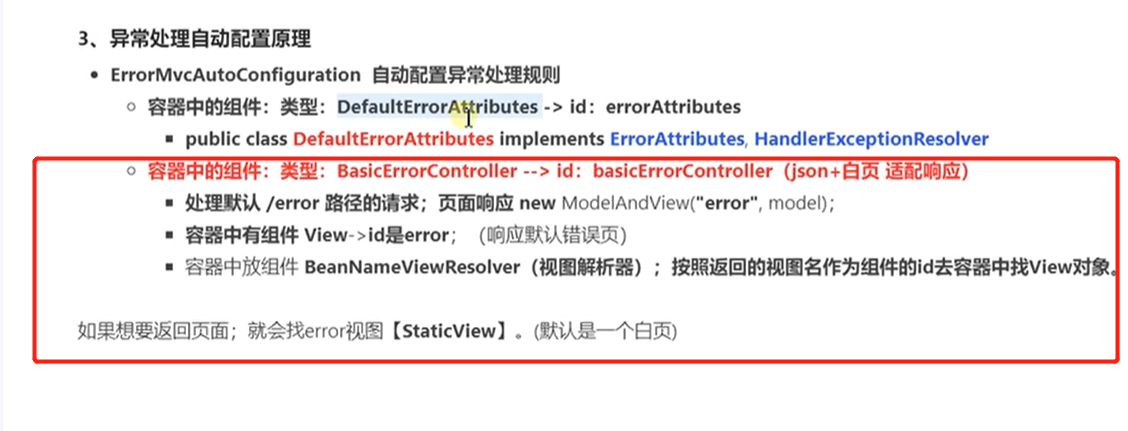
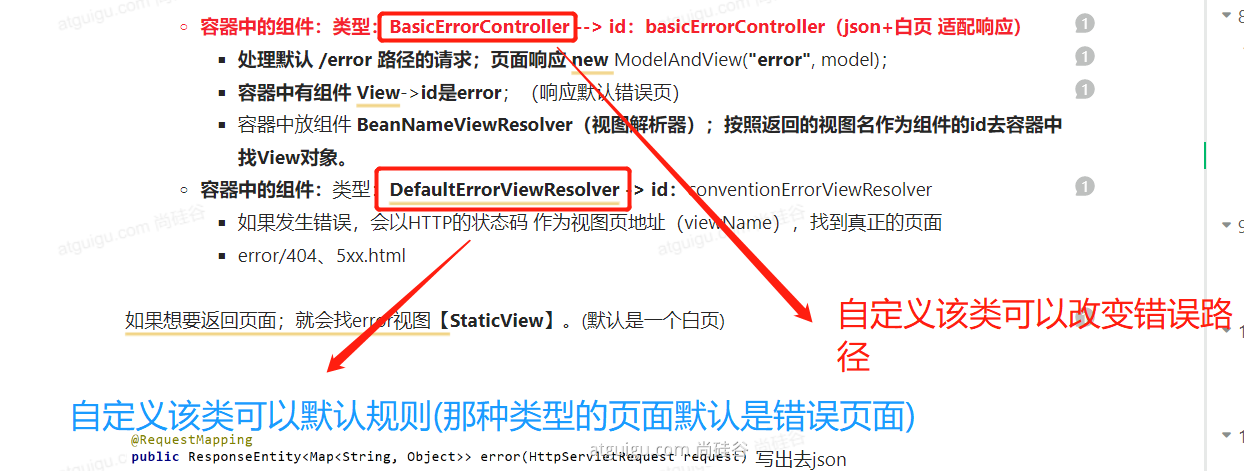
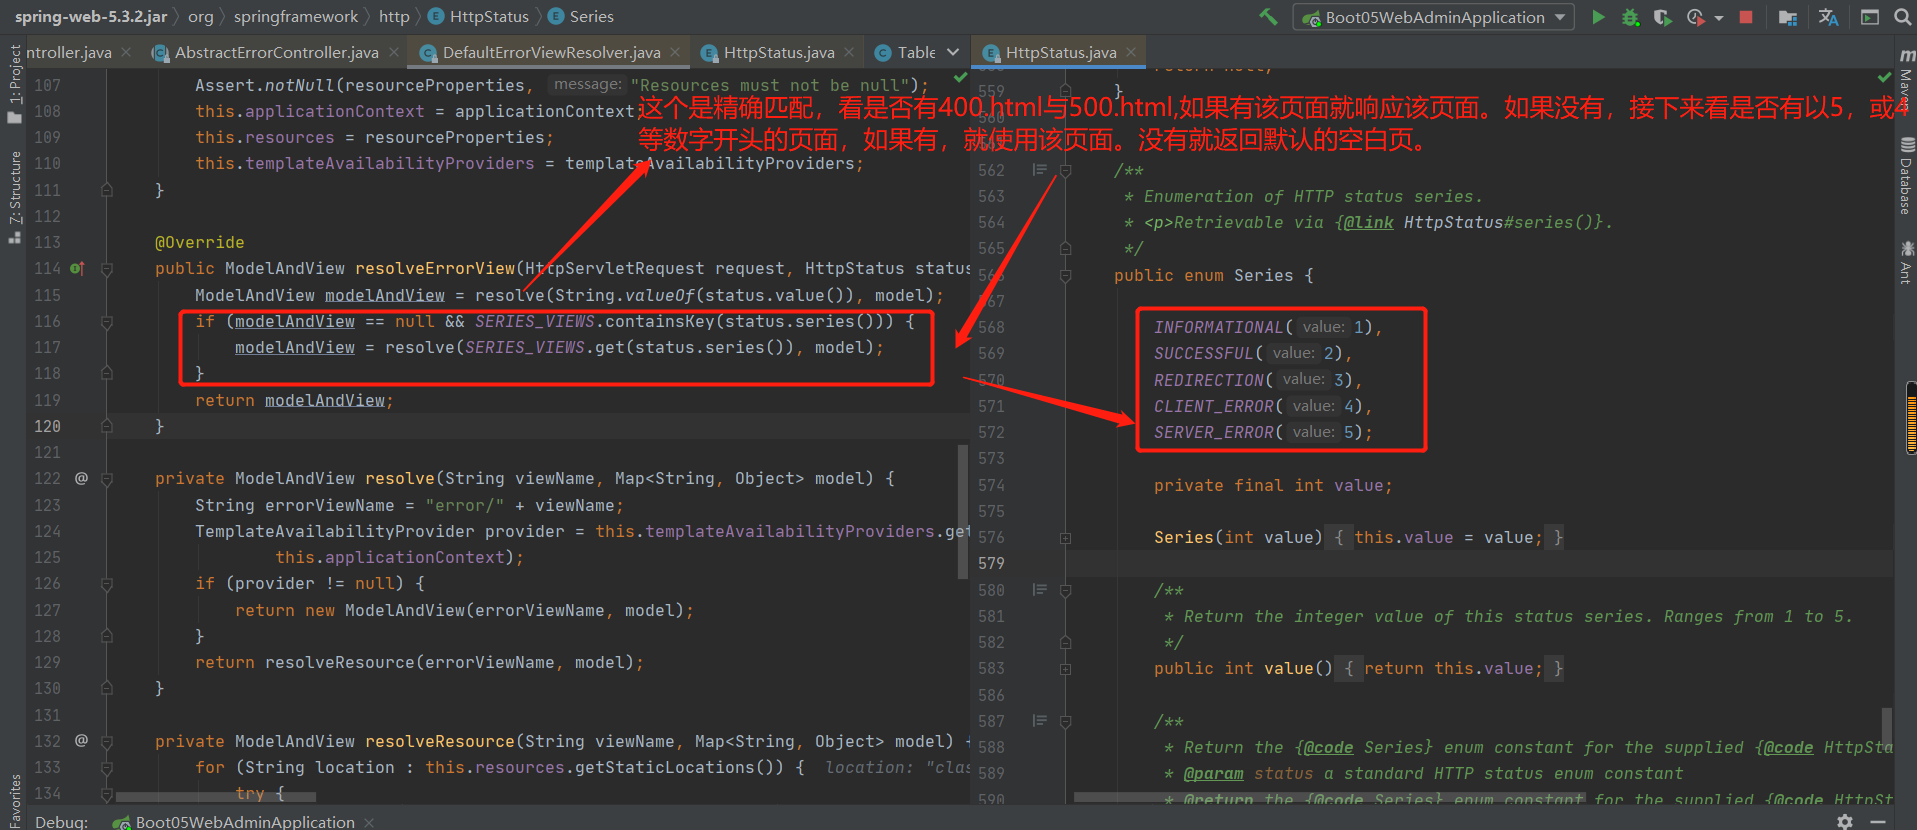
容器中的组件DefaultErrorViewResolver:
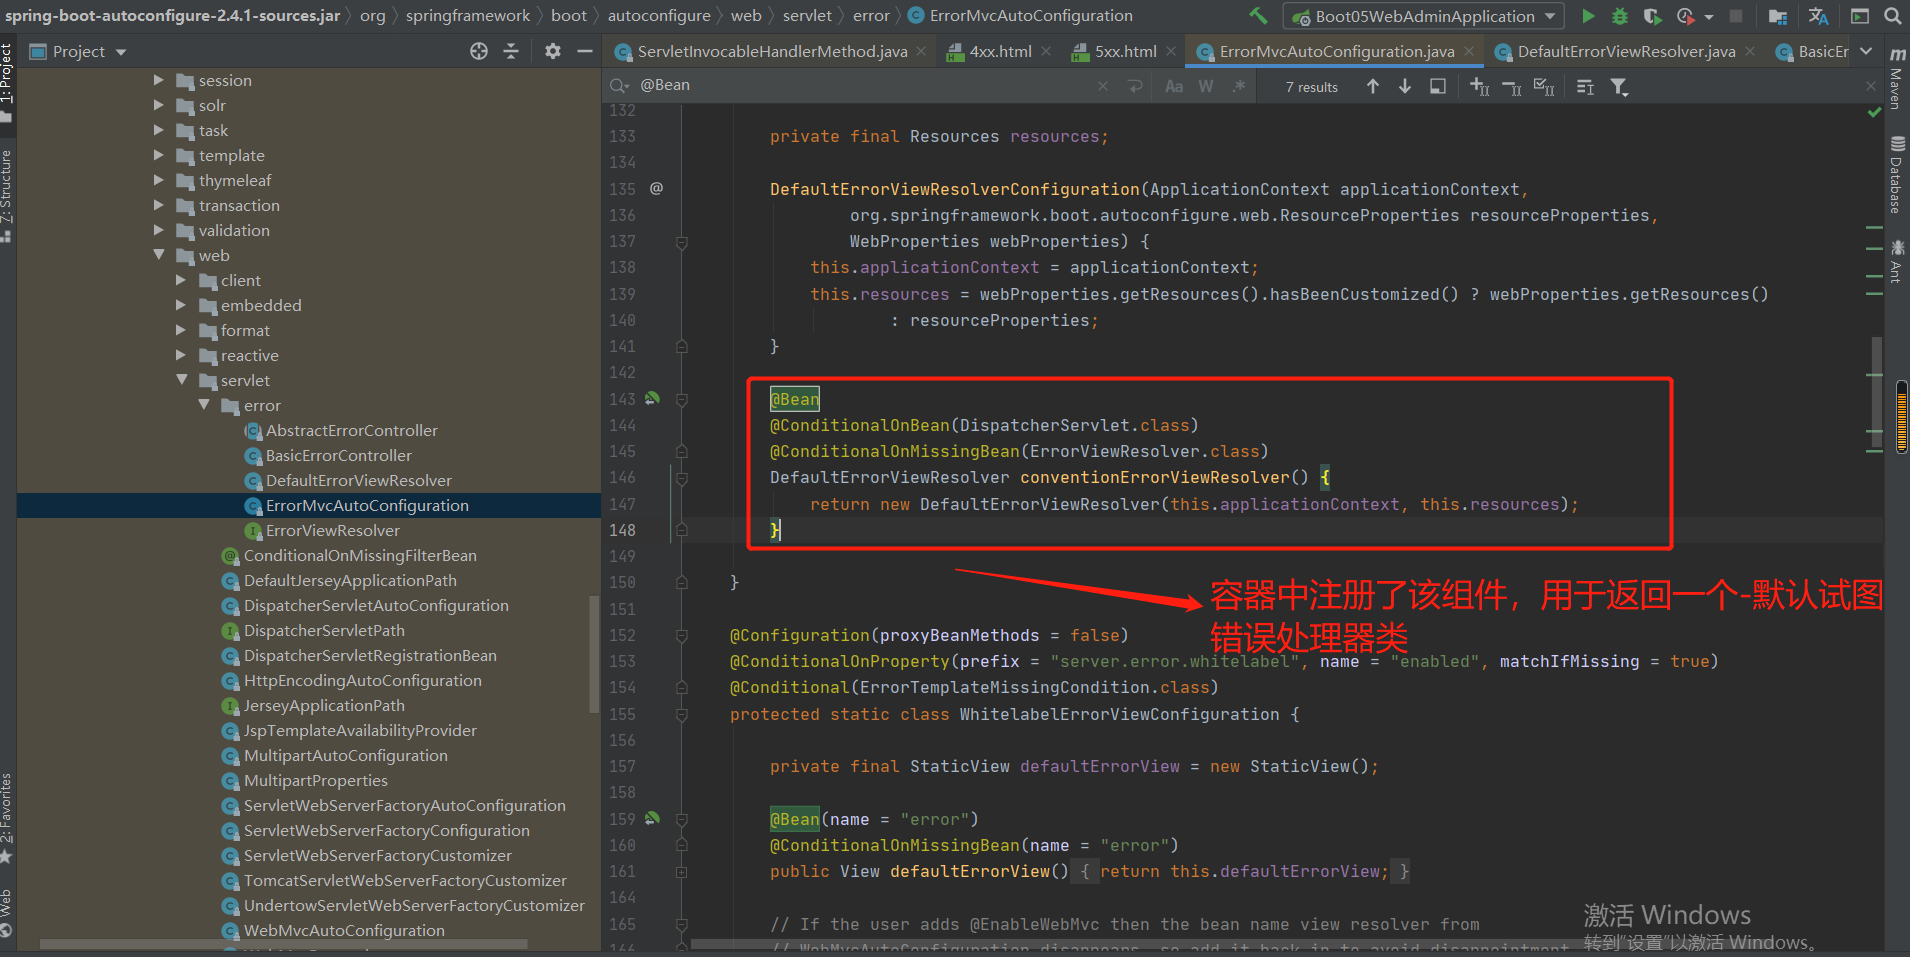
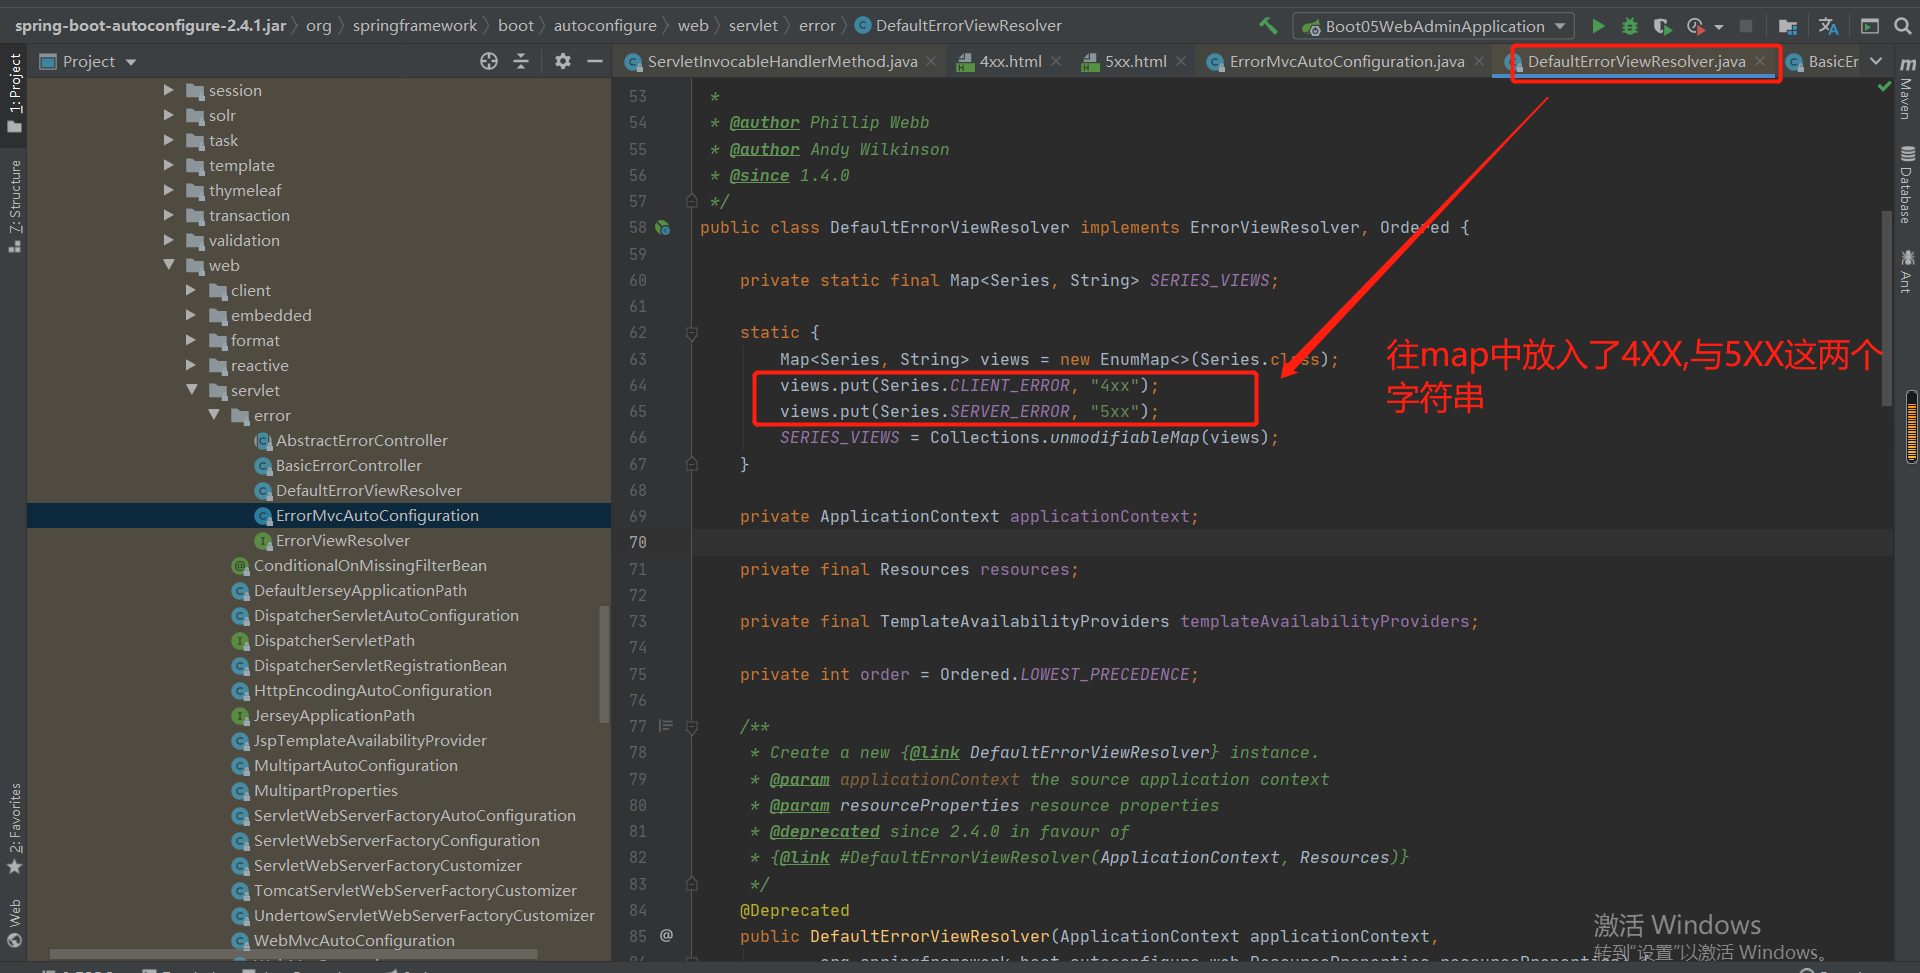
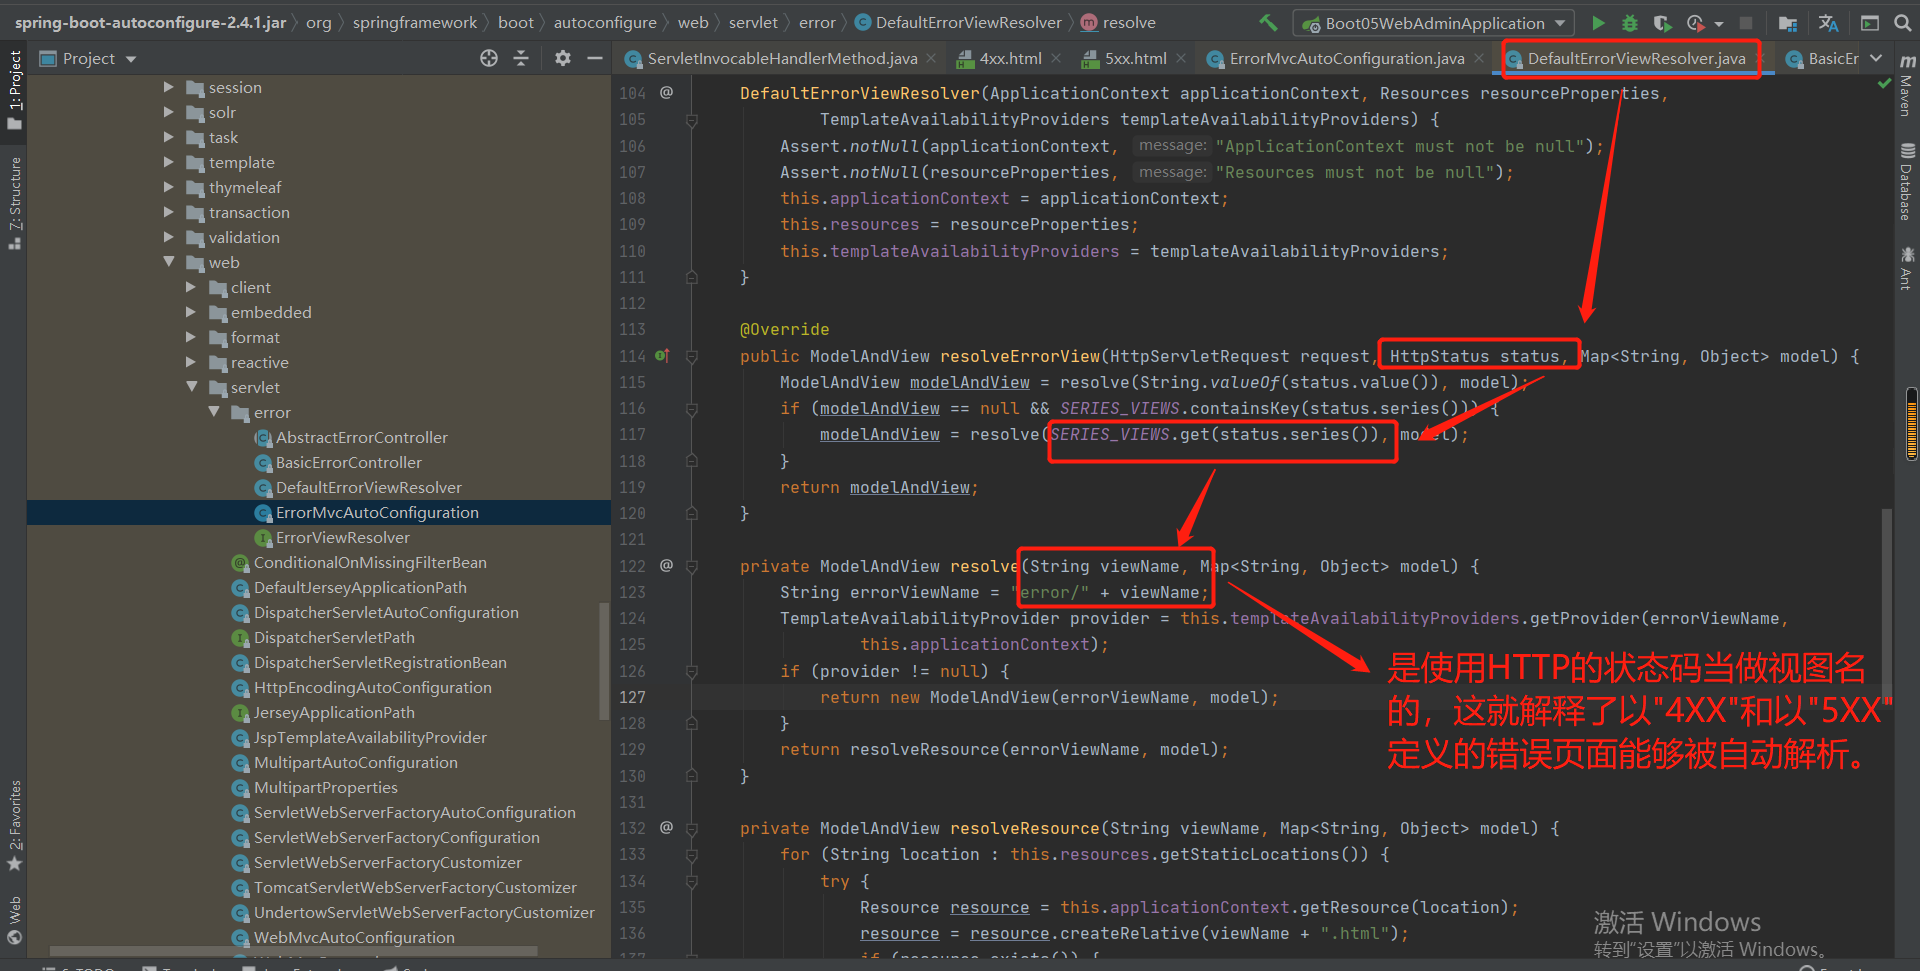
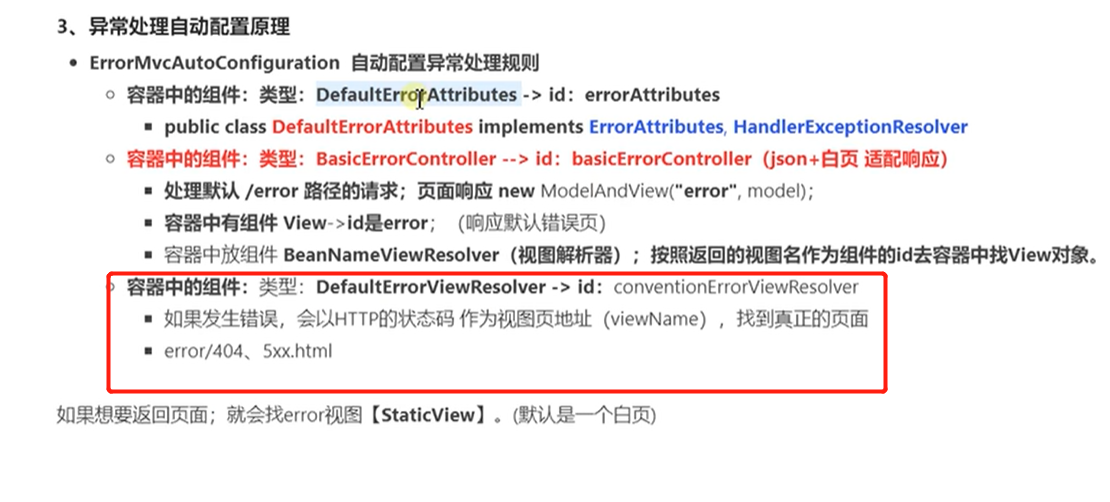
接下来分析DefaultErrorAttribute:
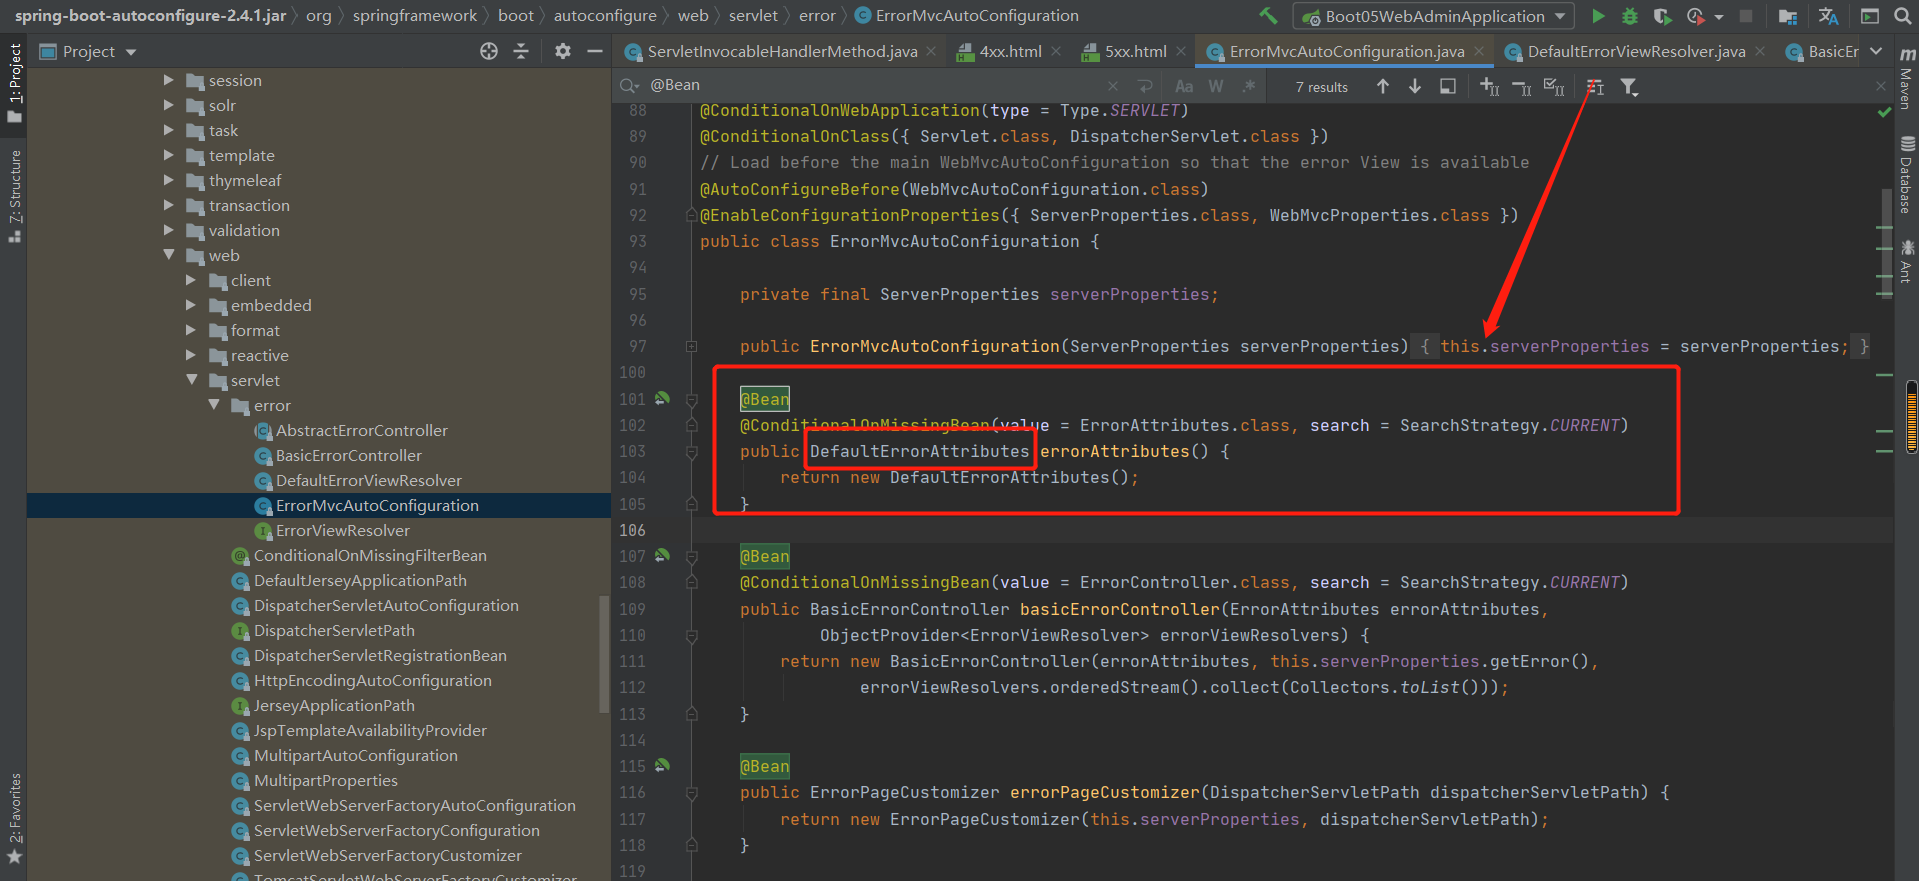
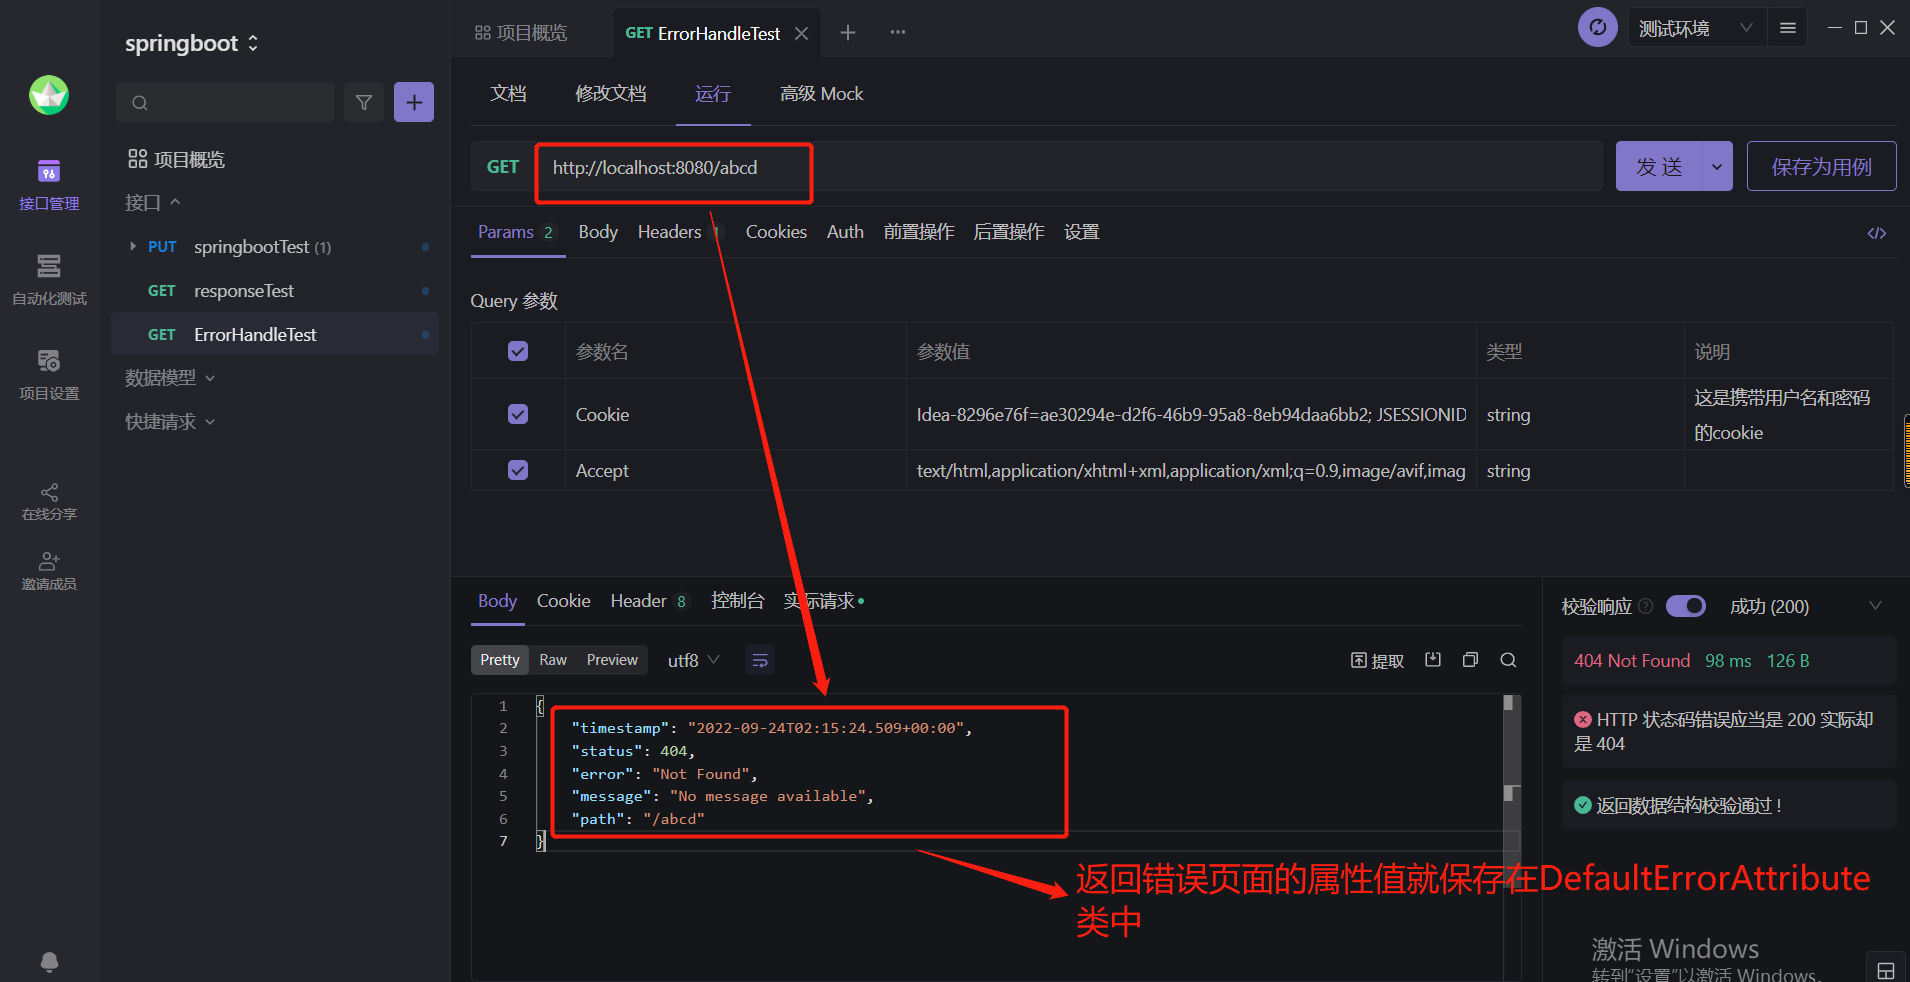
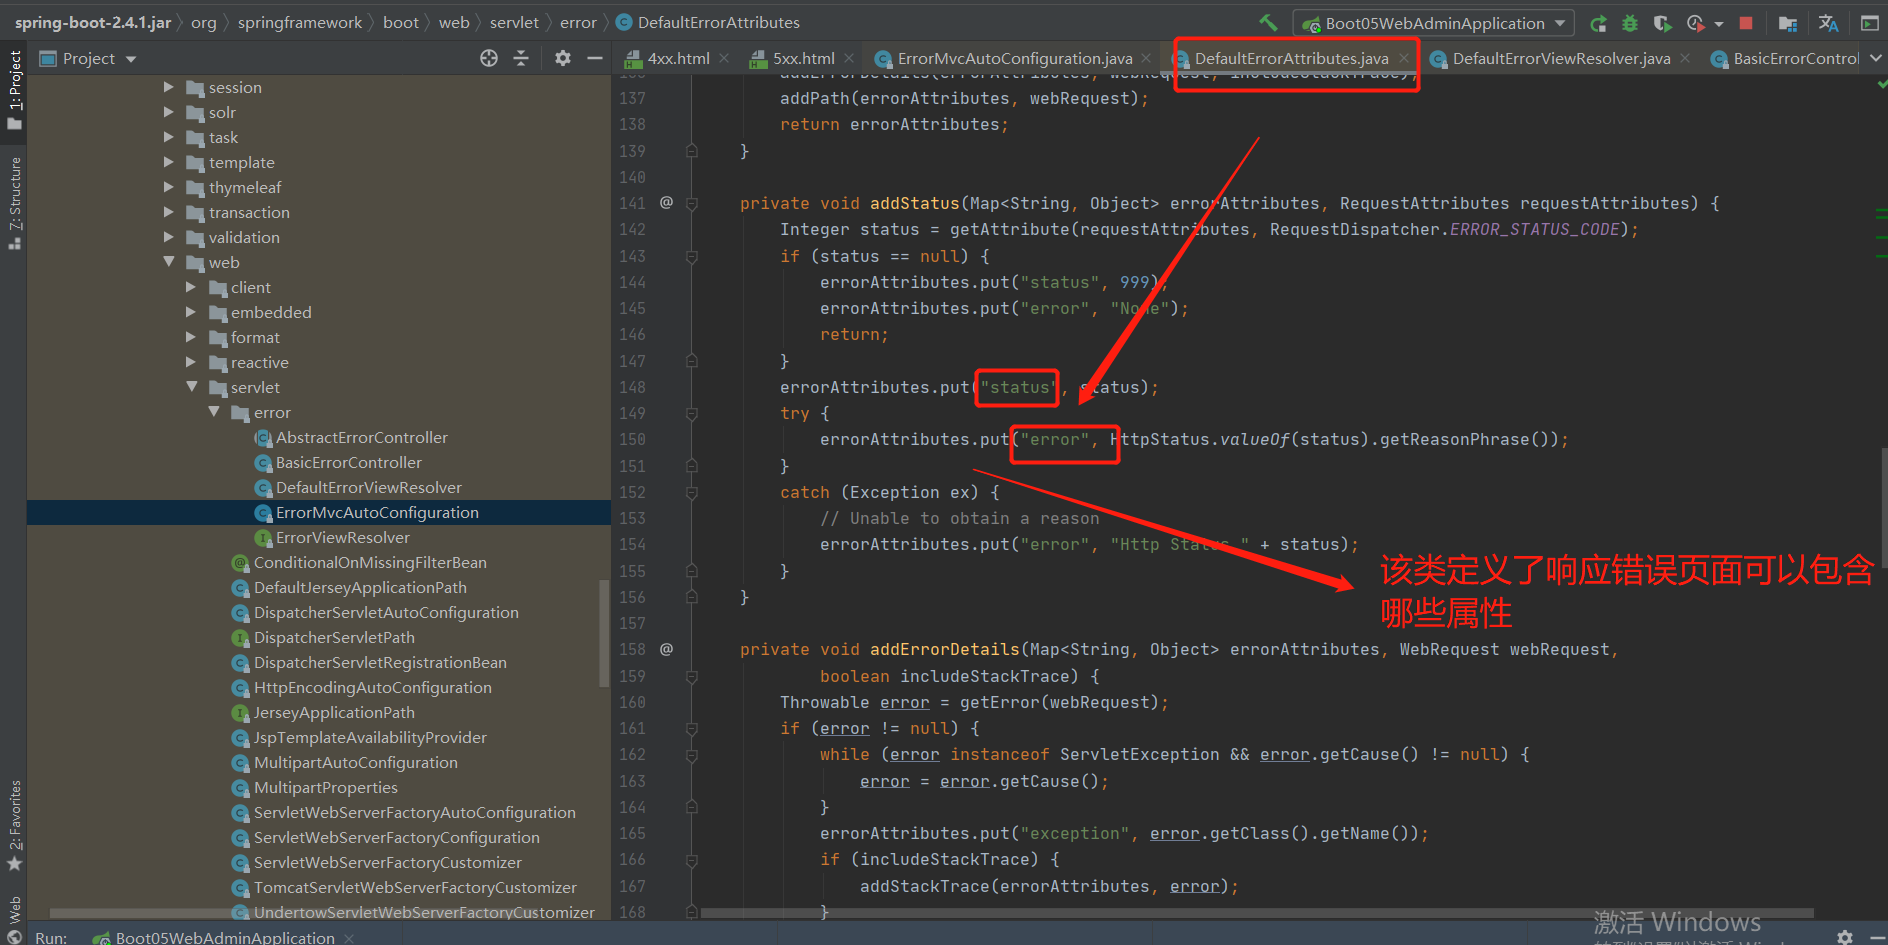
总结:
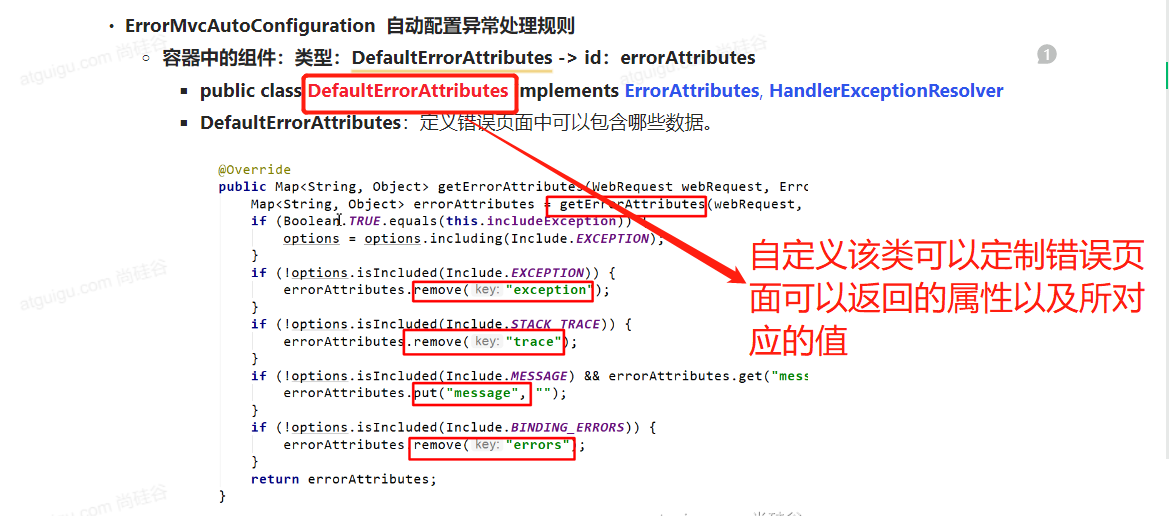
10-4 异常处理的源码流程分析
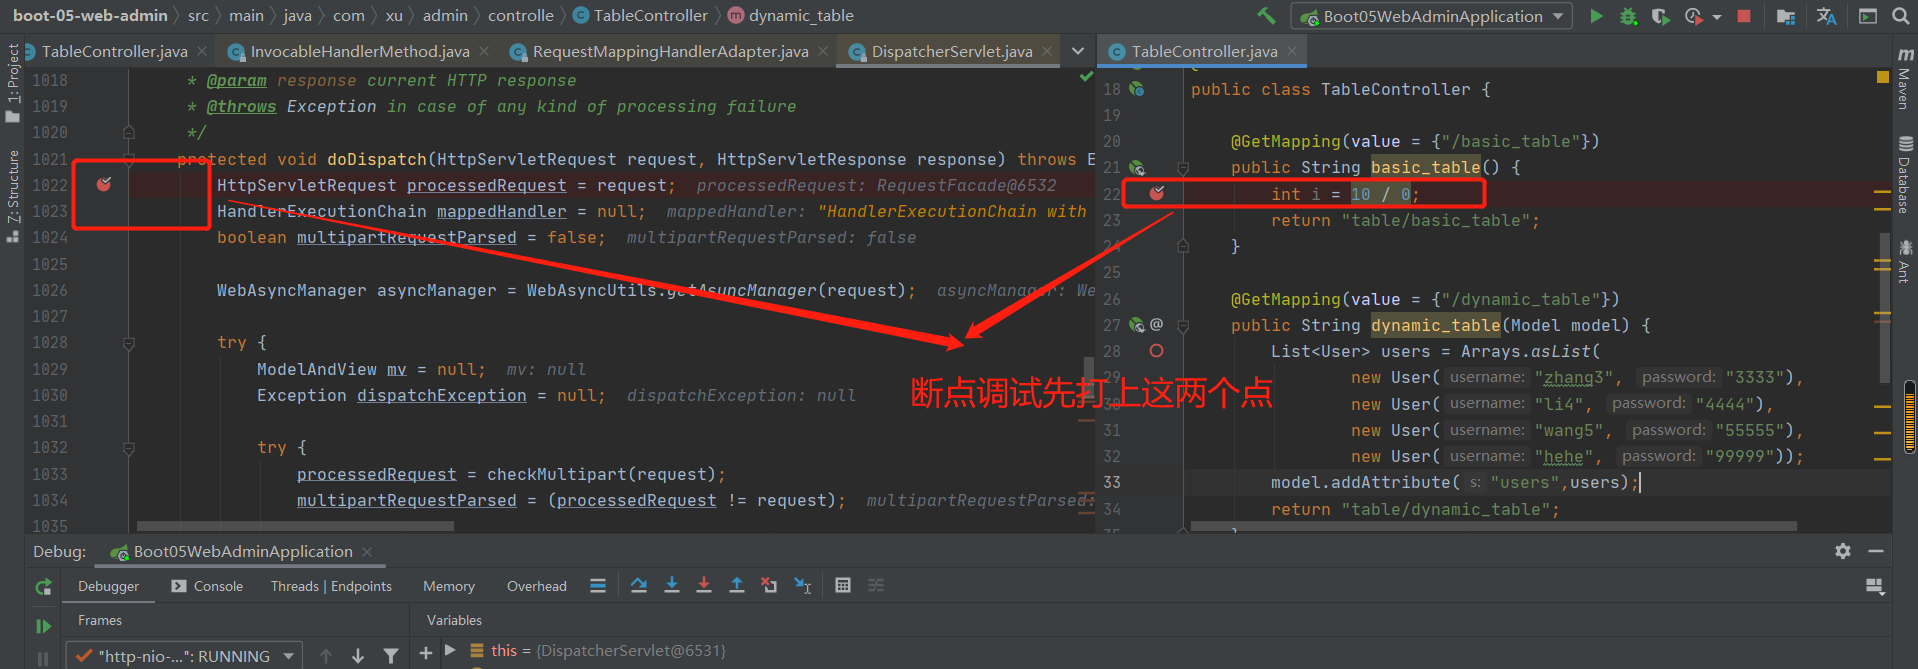
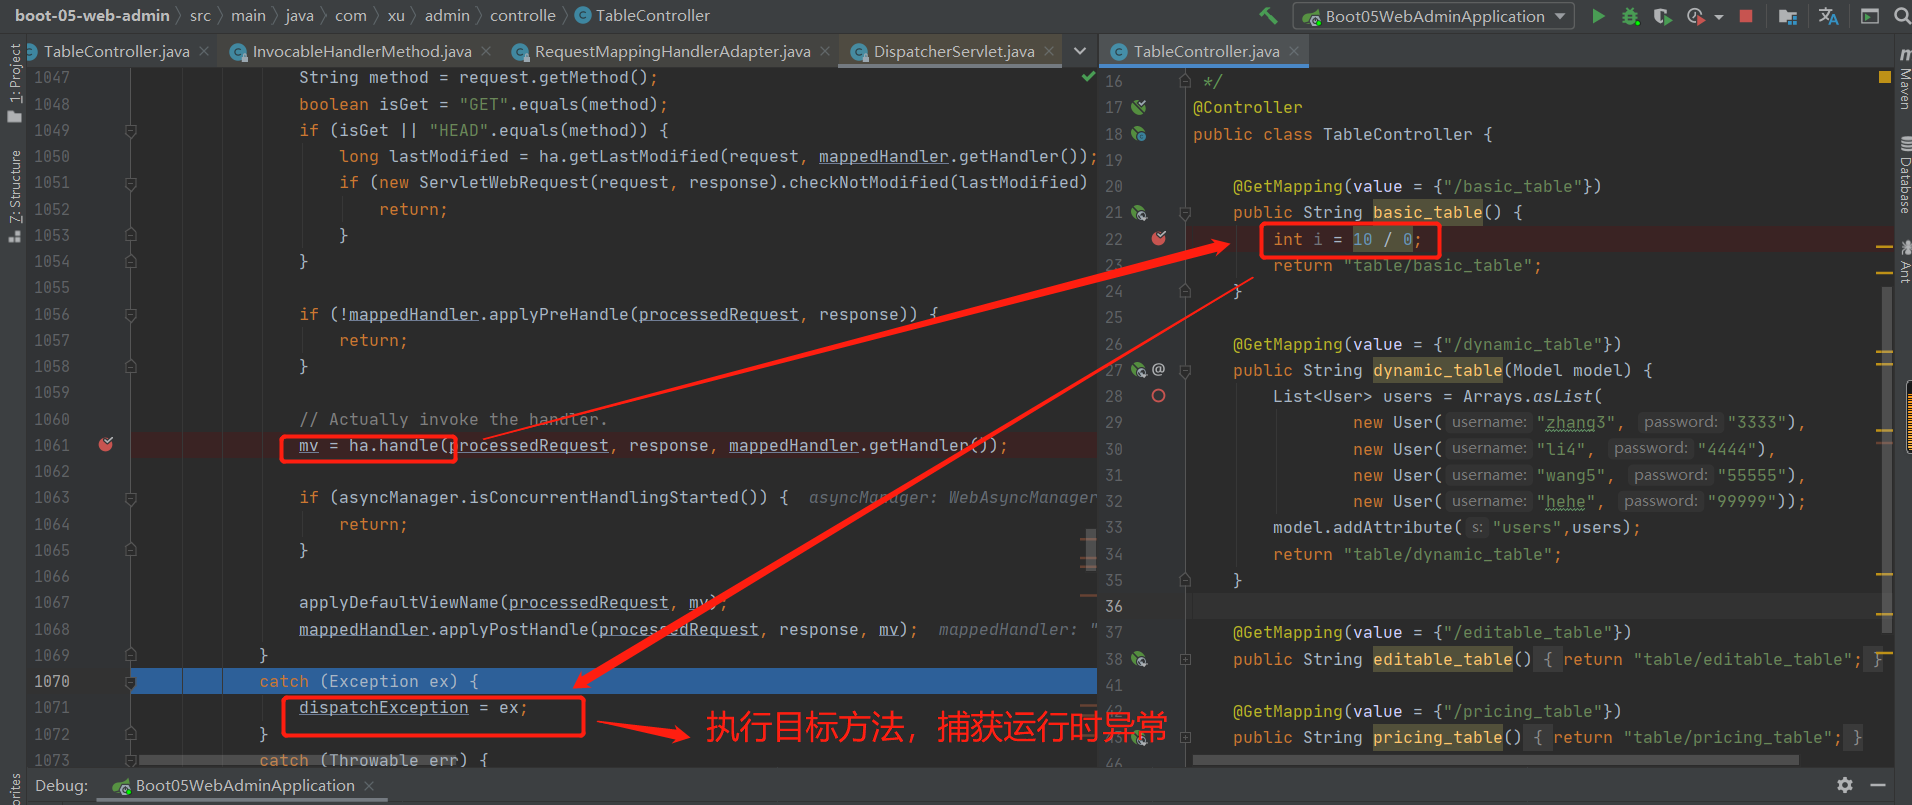
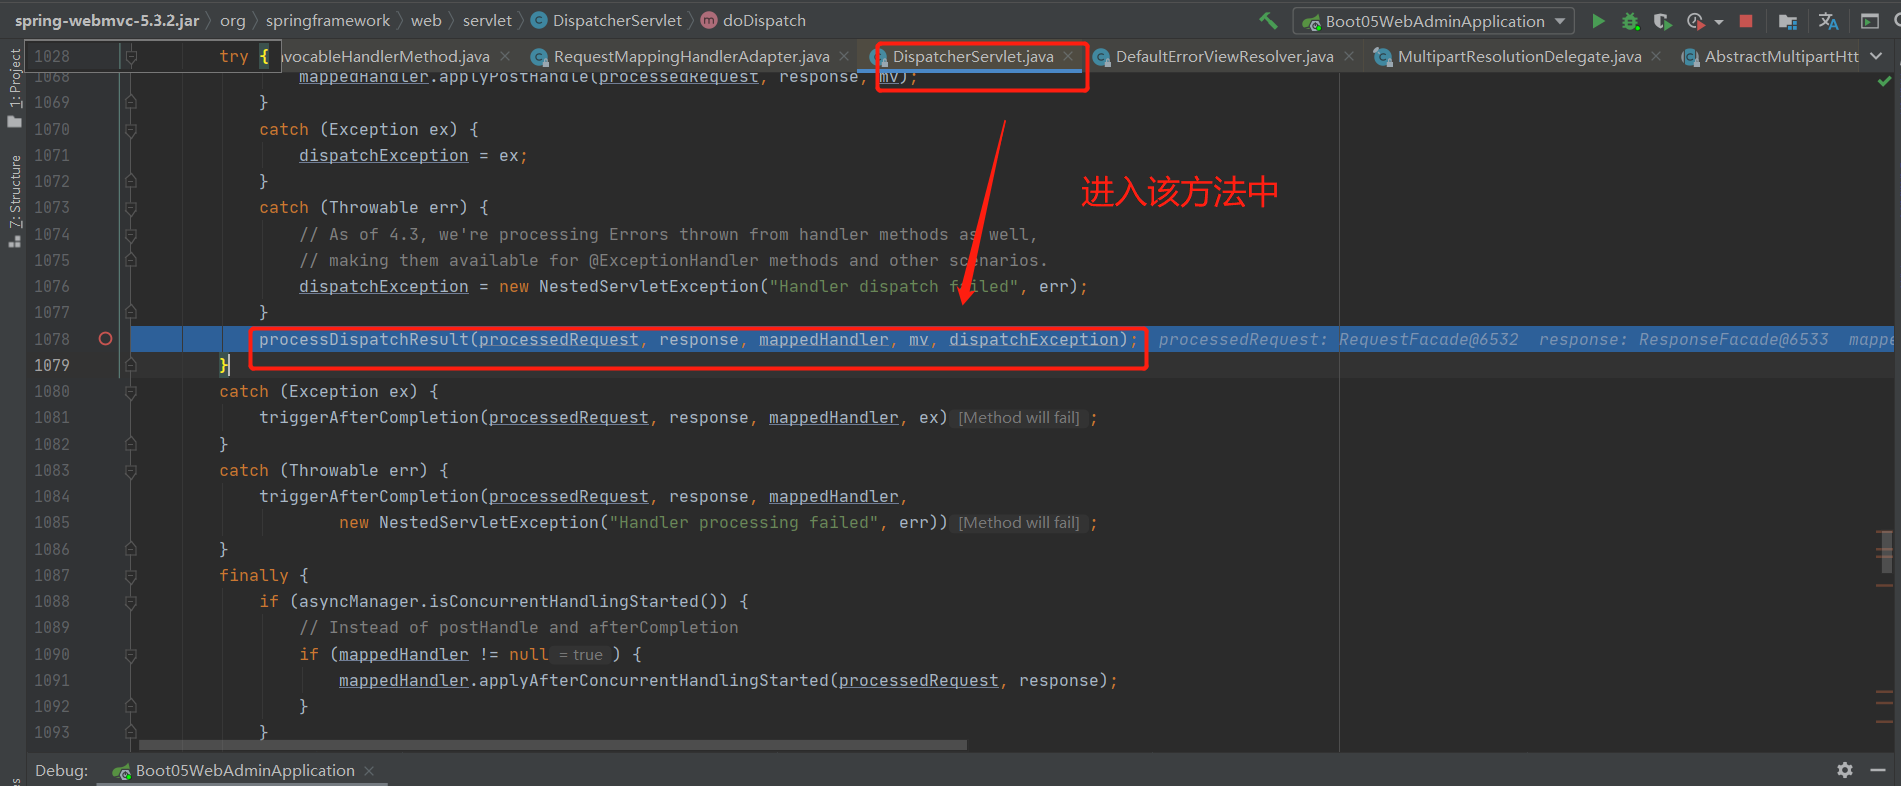
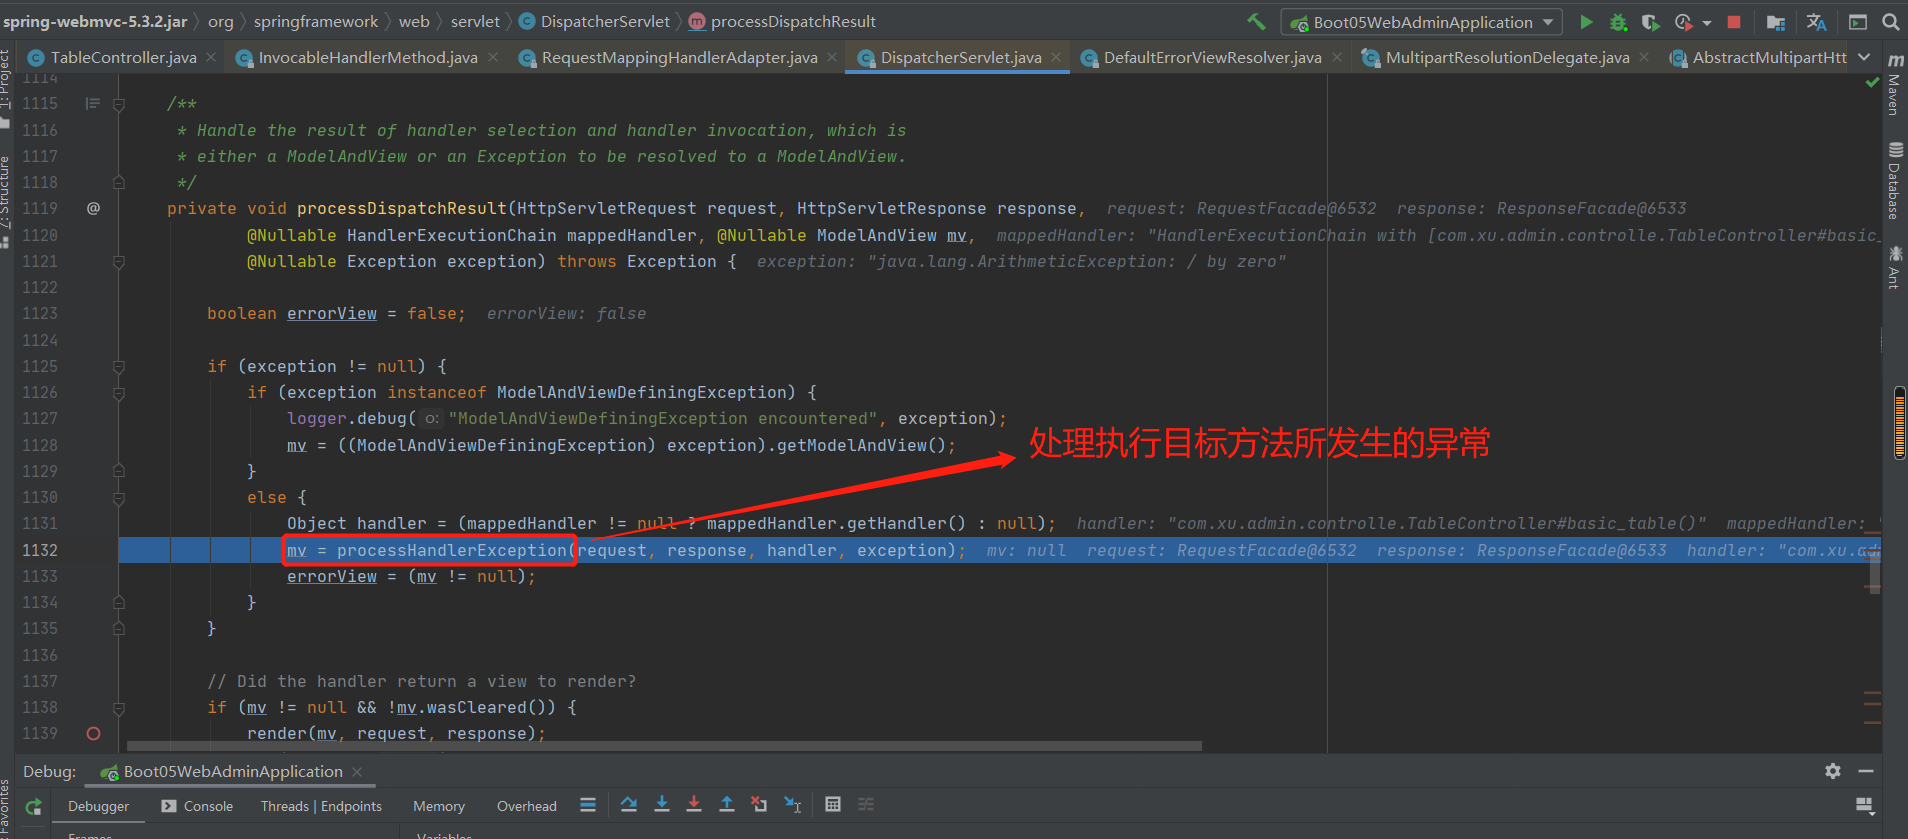
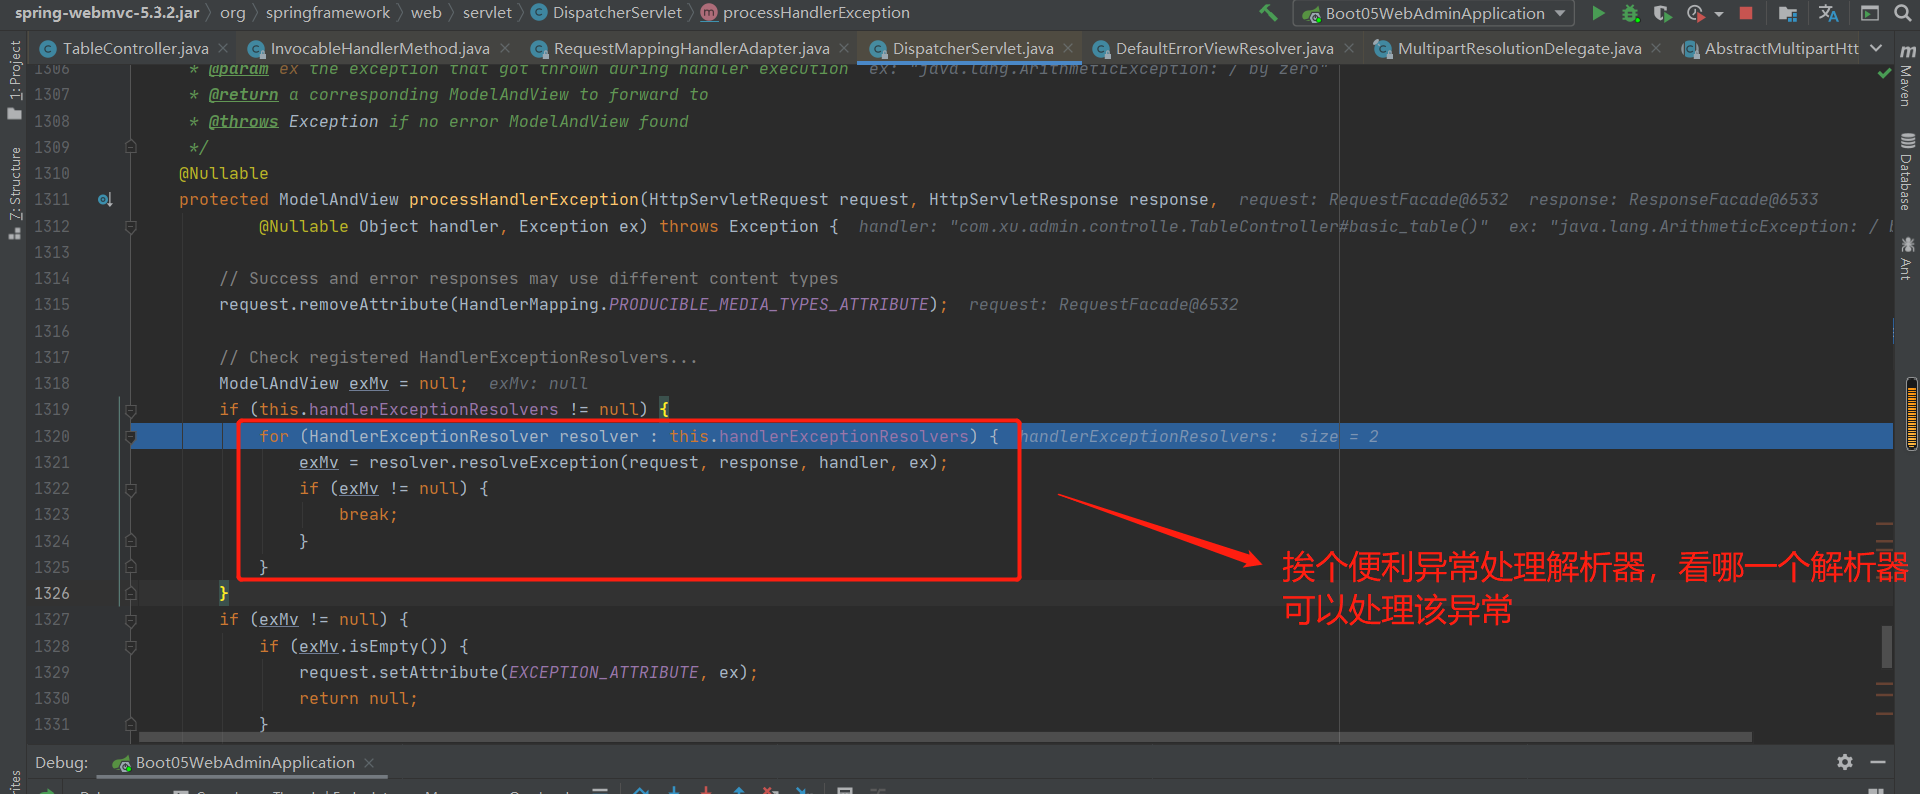
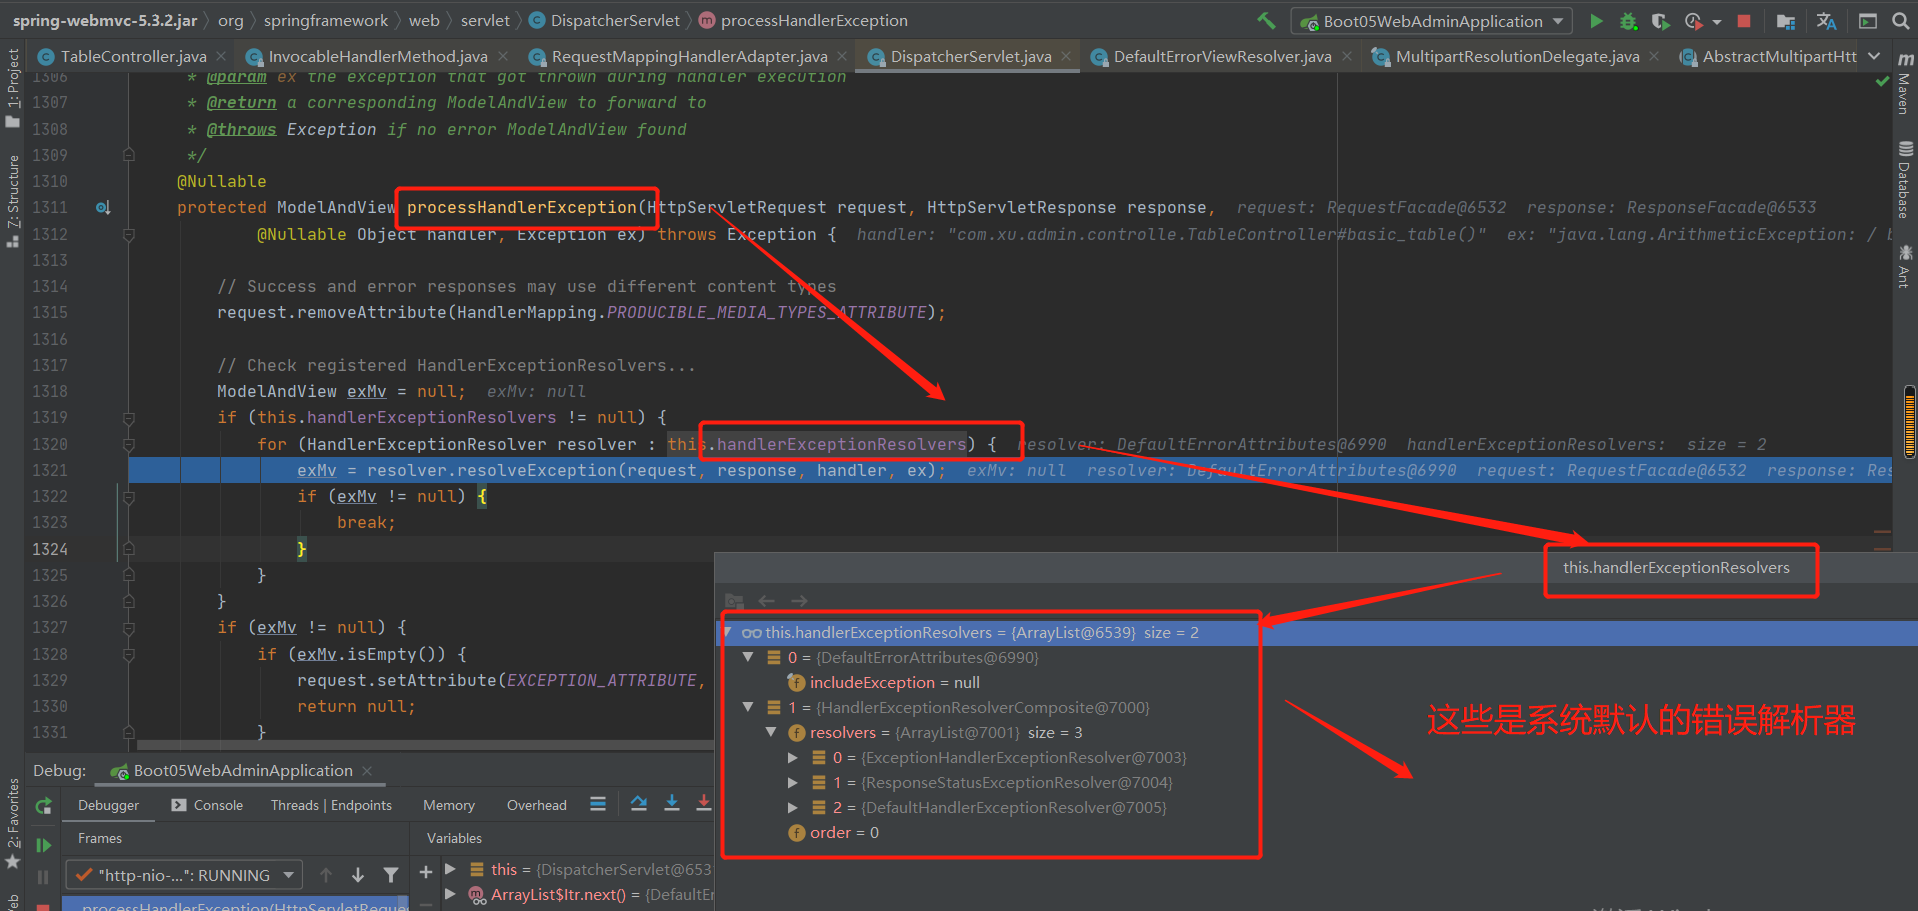
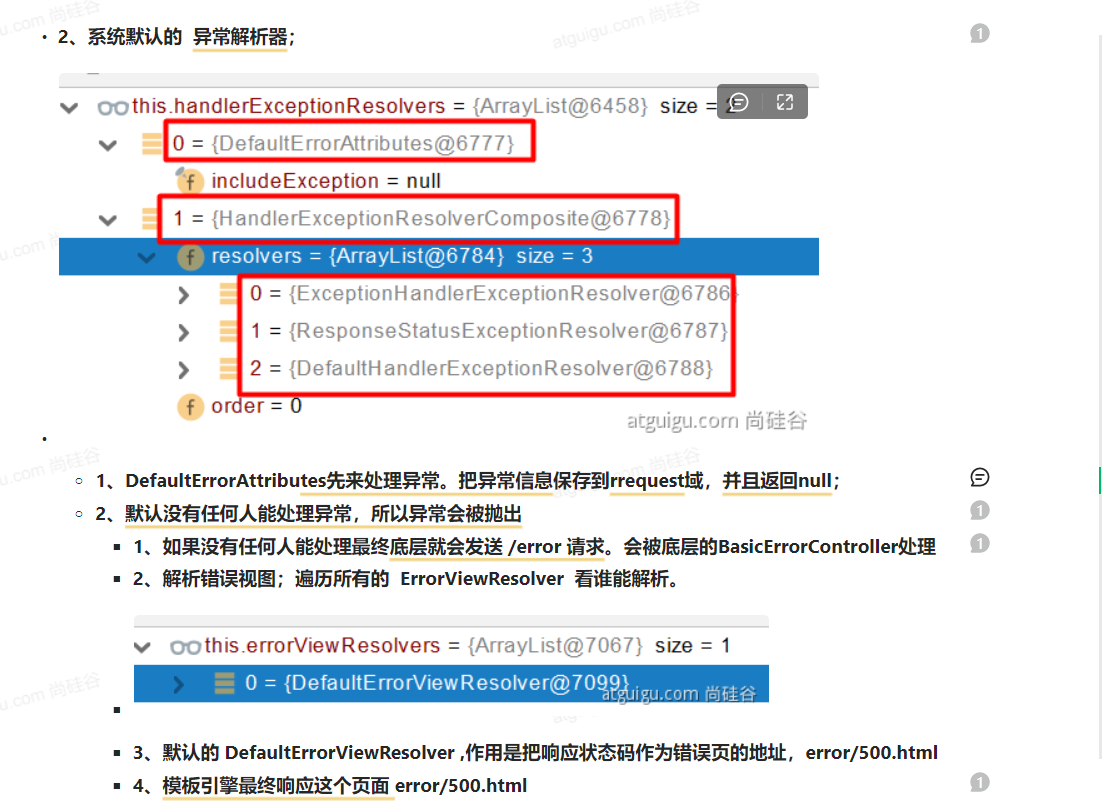
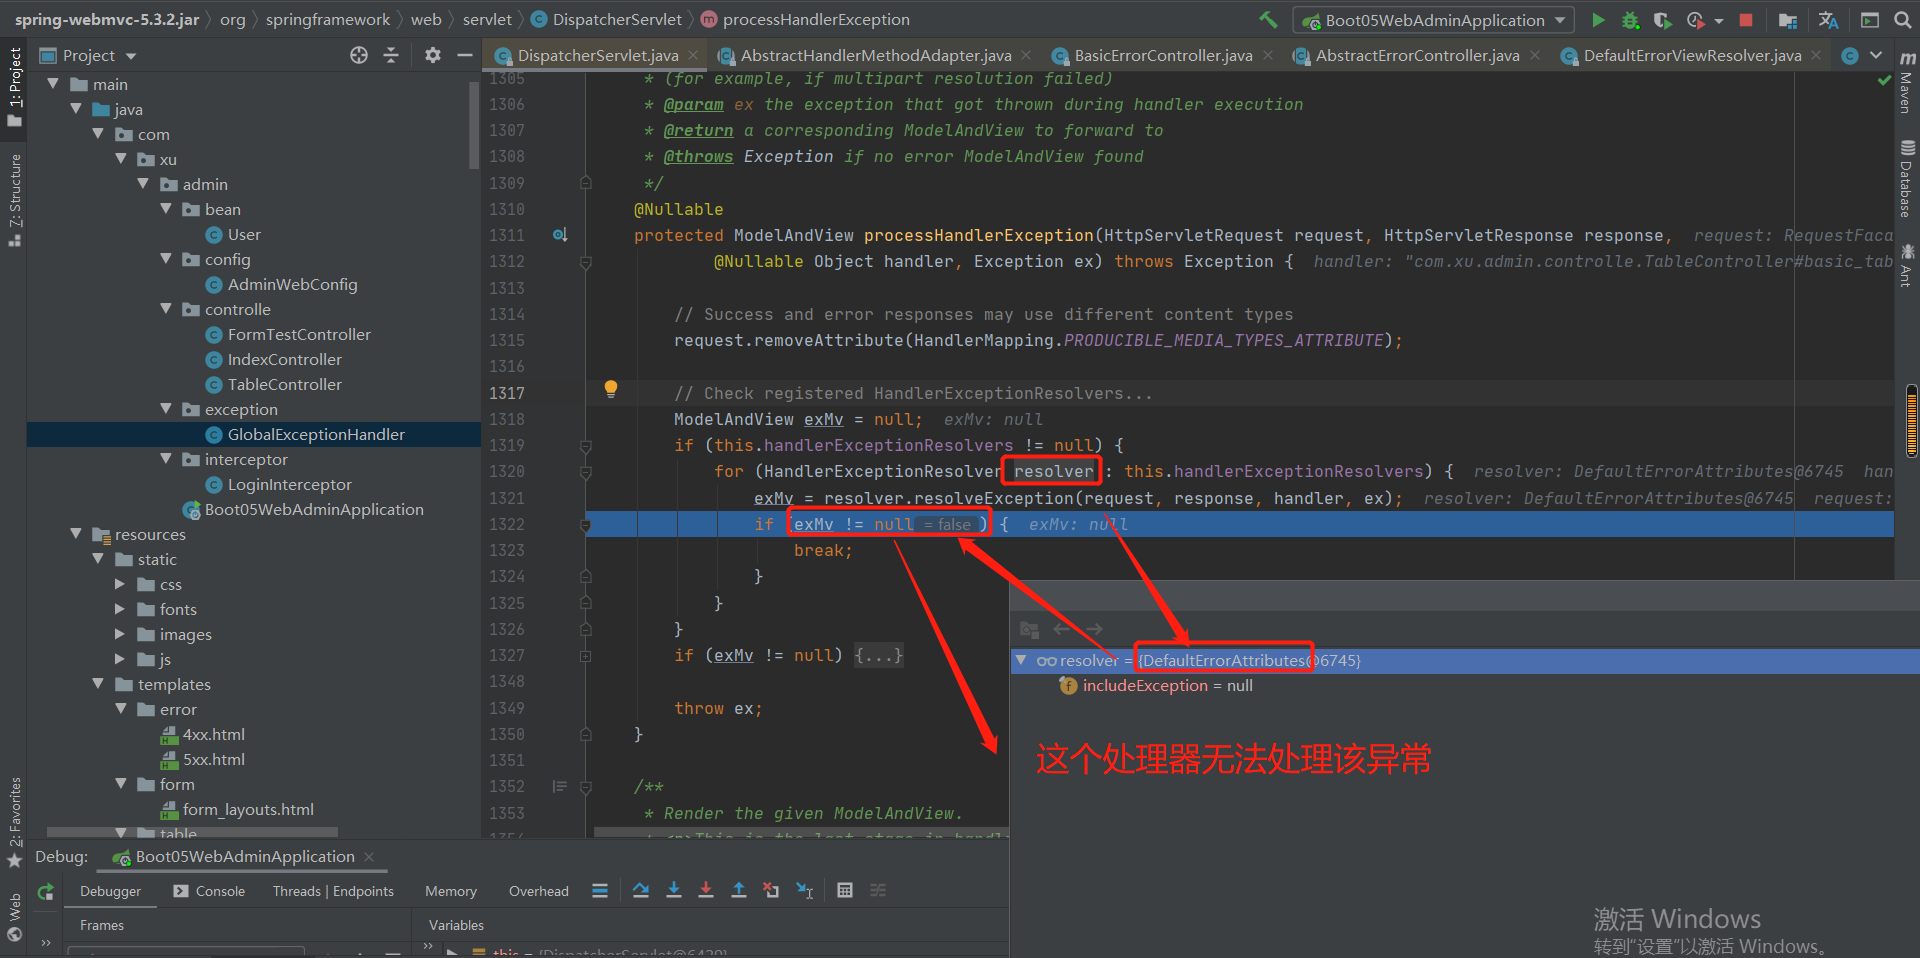
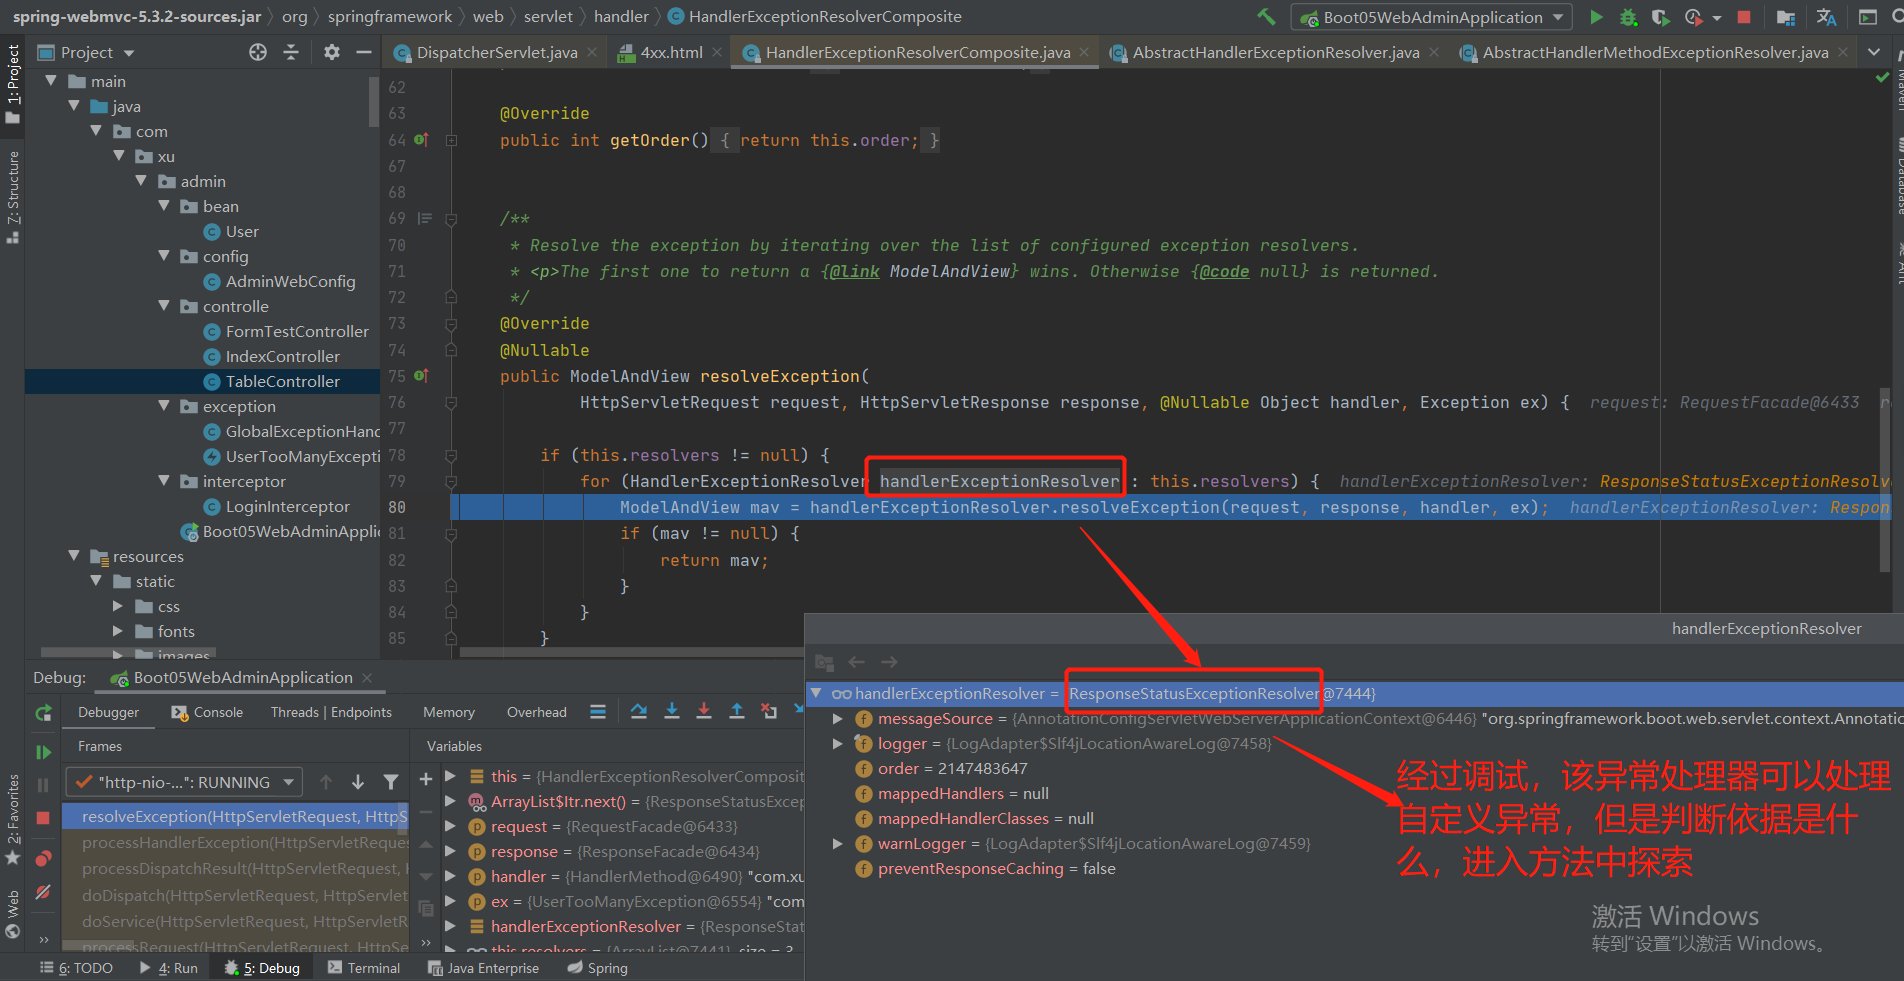
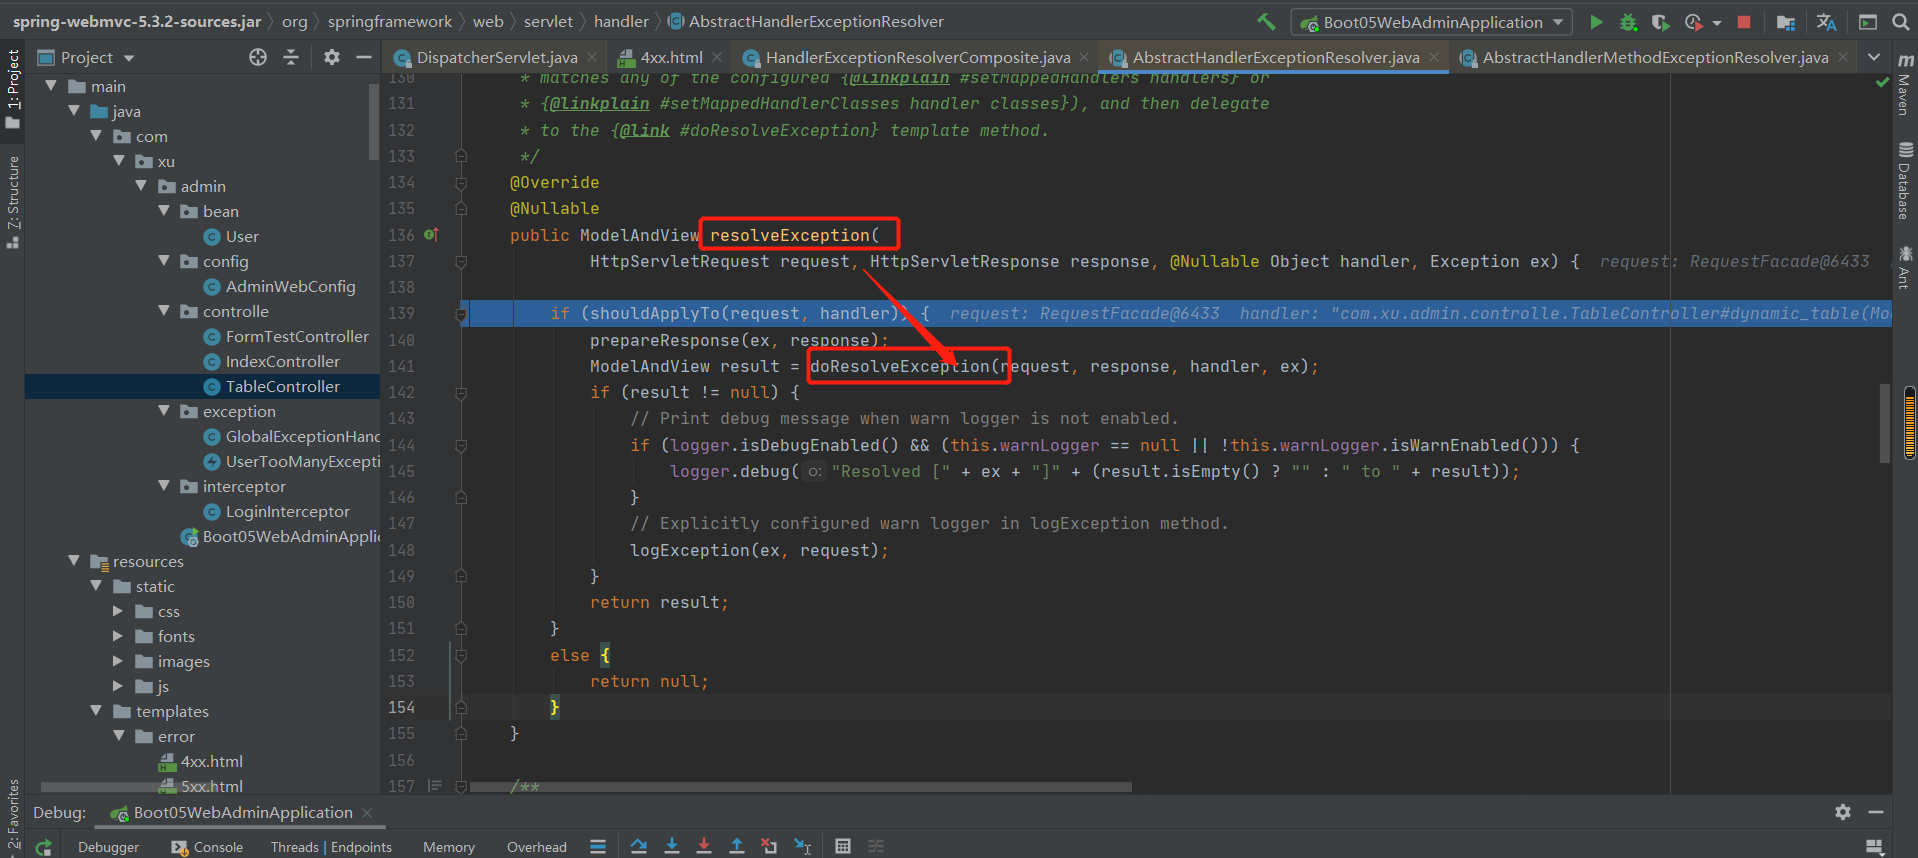
各个异常解析器解析异常的原理探索:
第一个异常处理器:
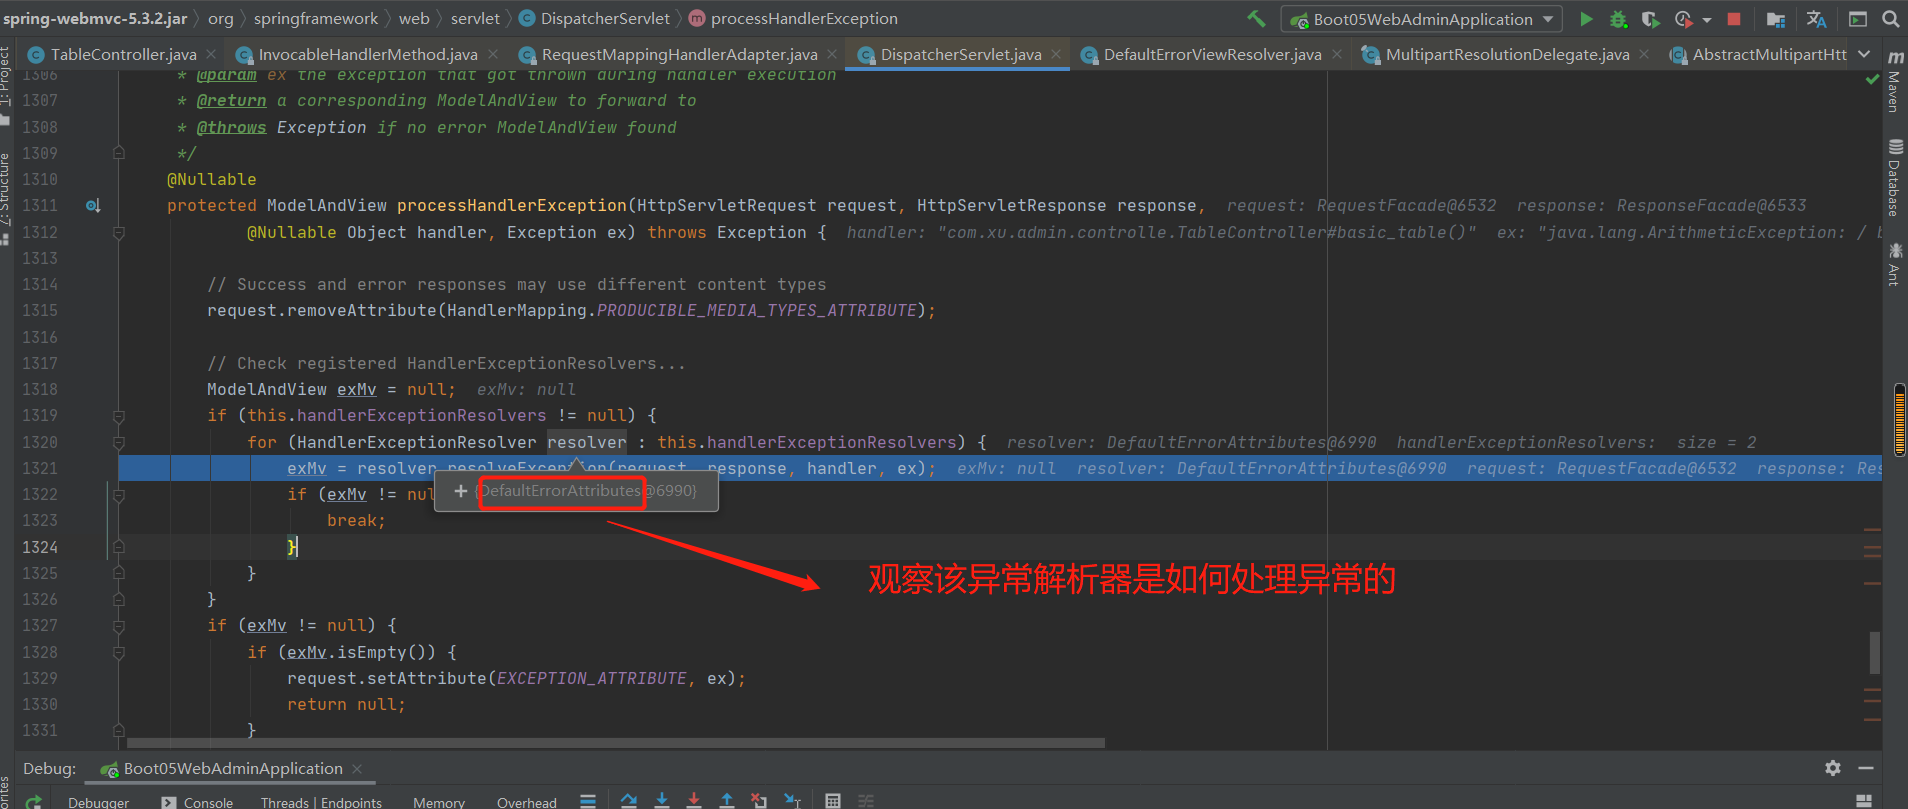
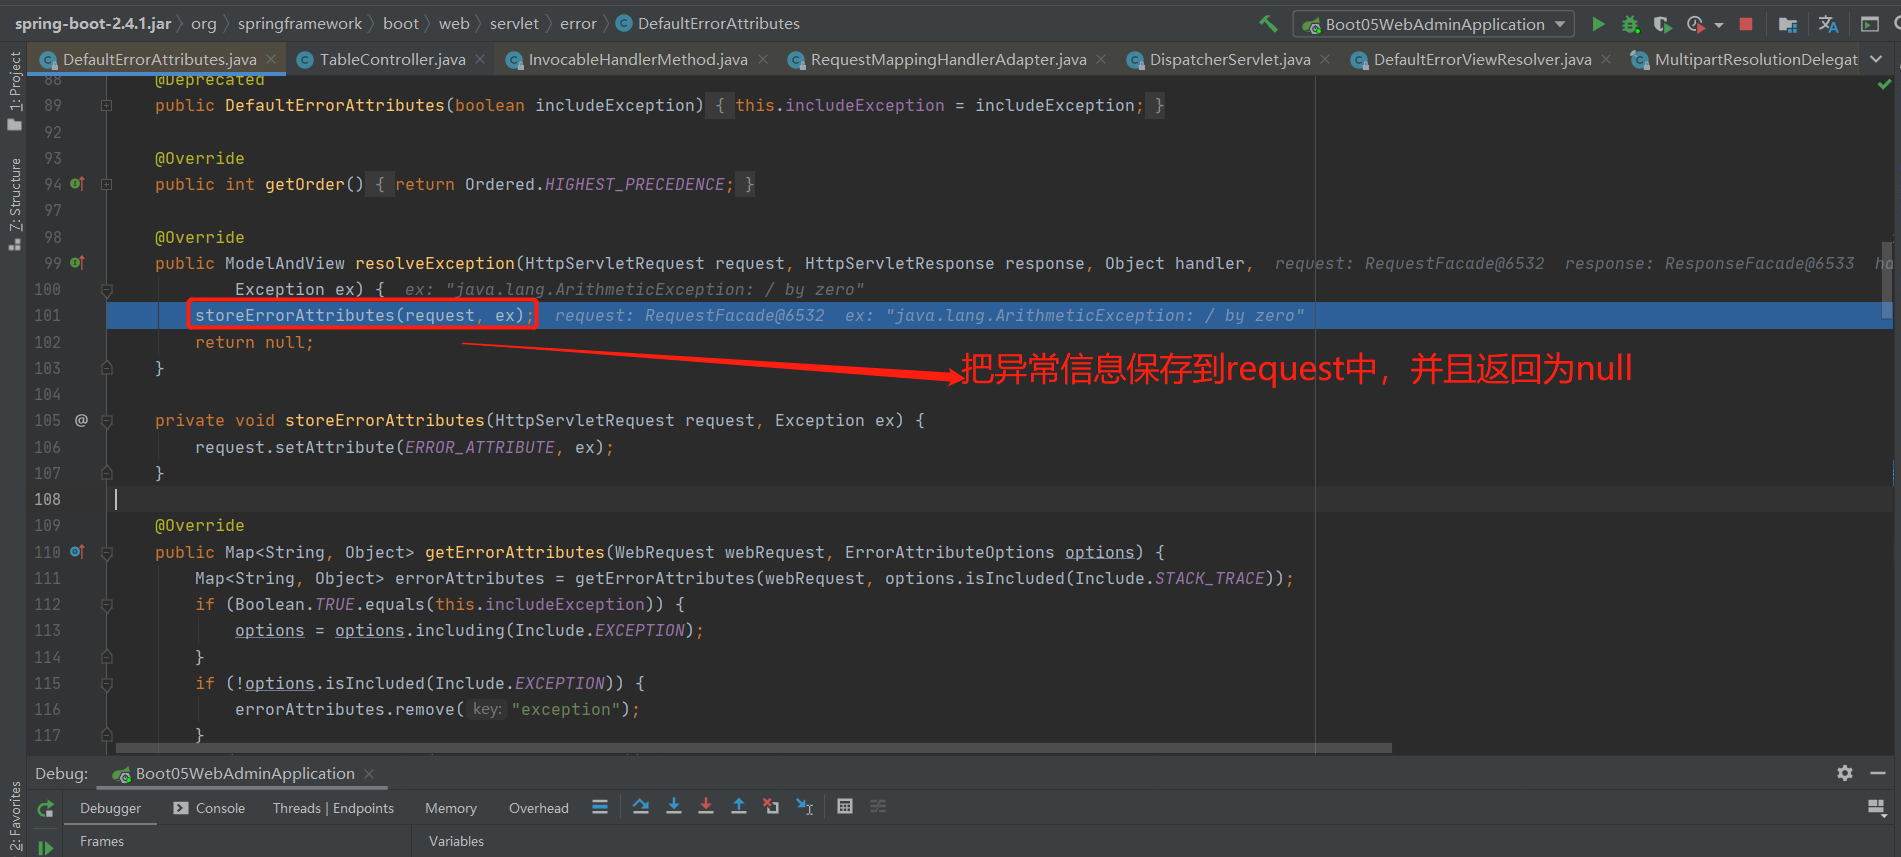
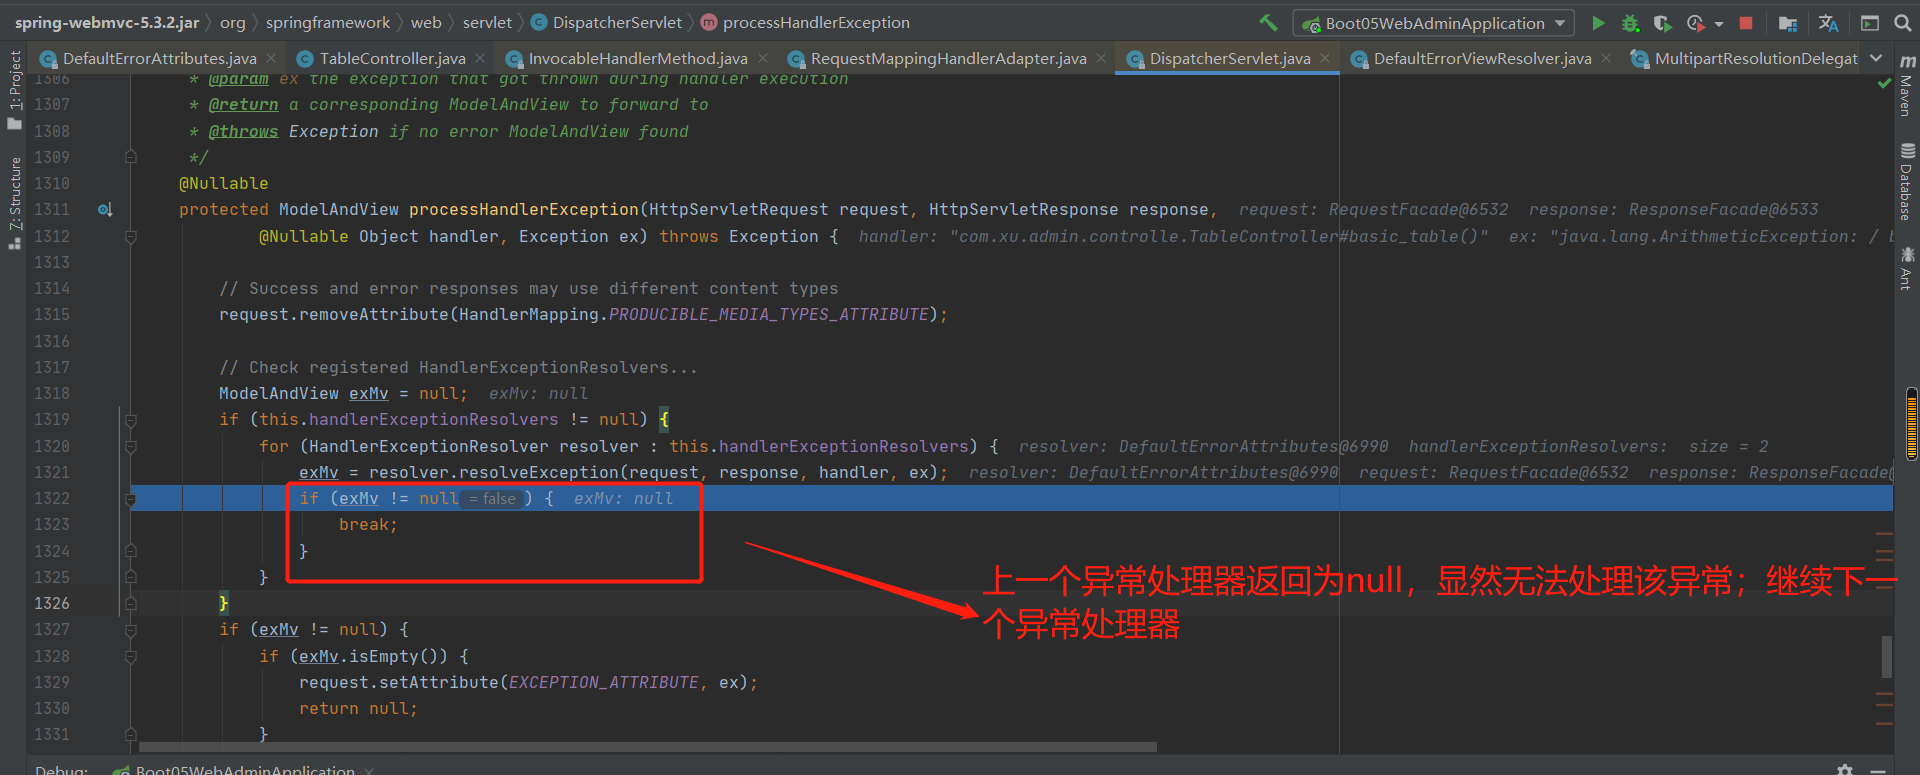
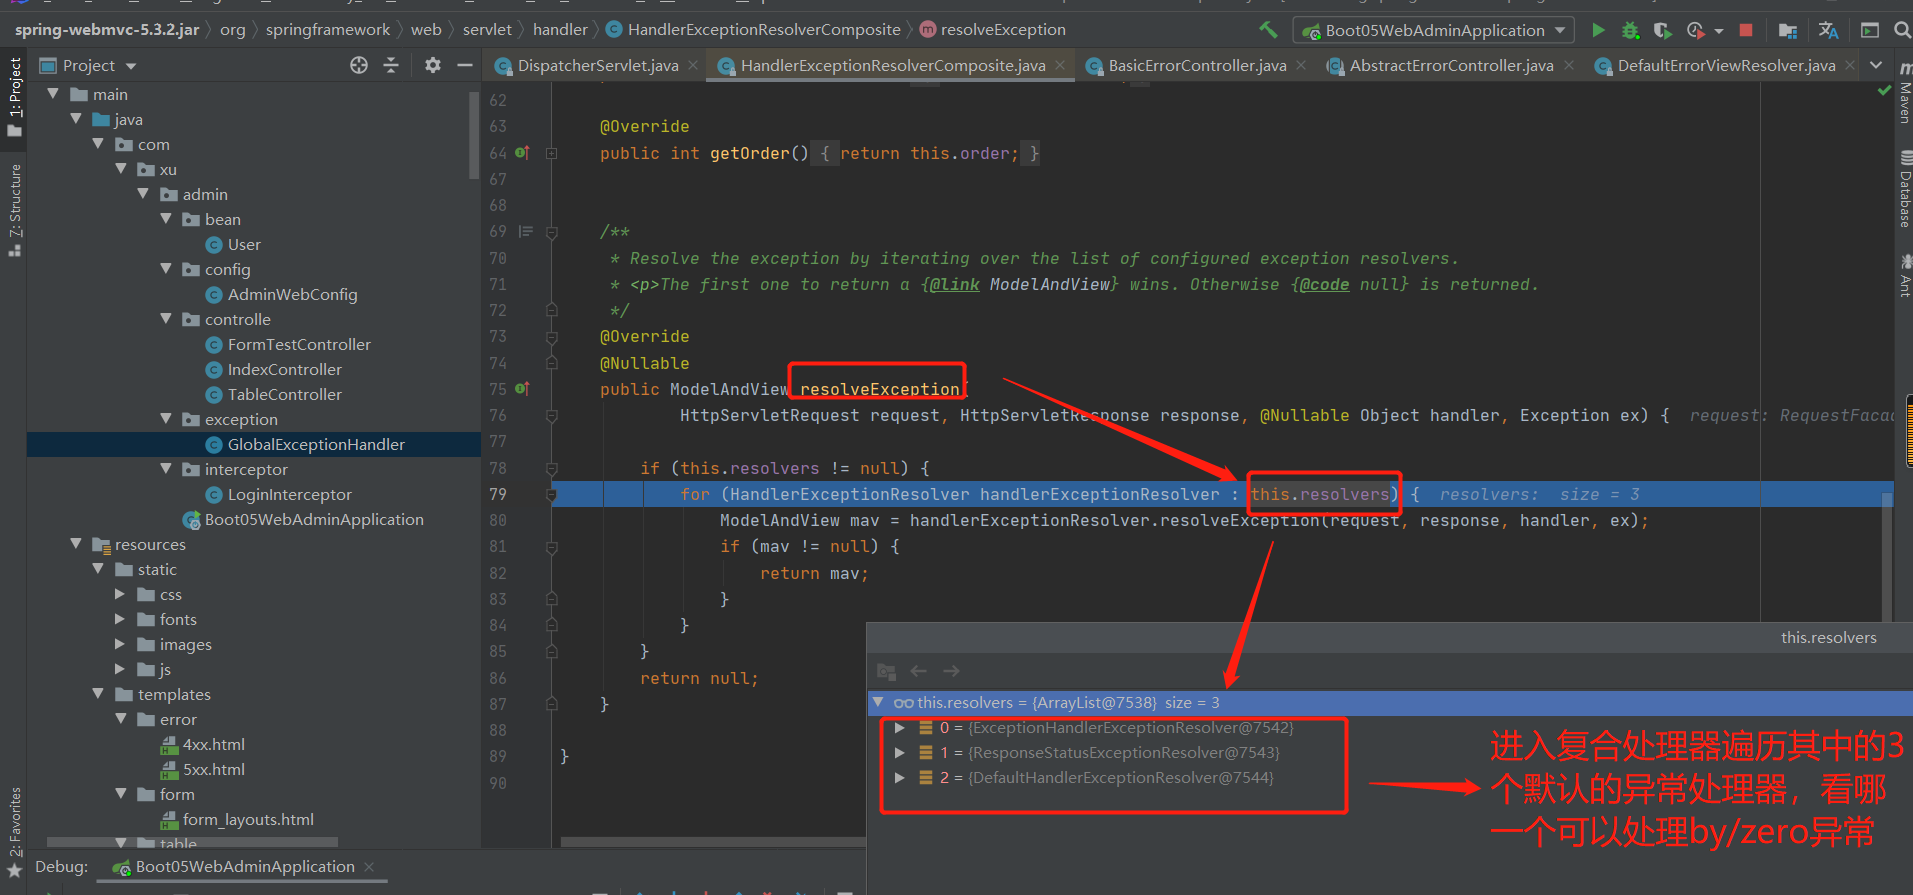
第二个异常处理器:HandleExceptionResolverComprosite(该解析器有包含3个异常解析器,见上图)
第一个解析器:
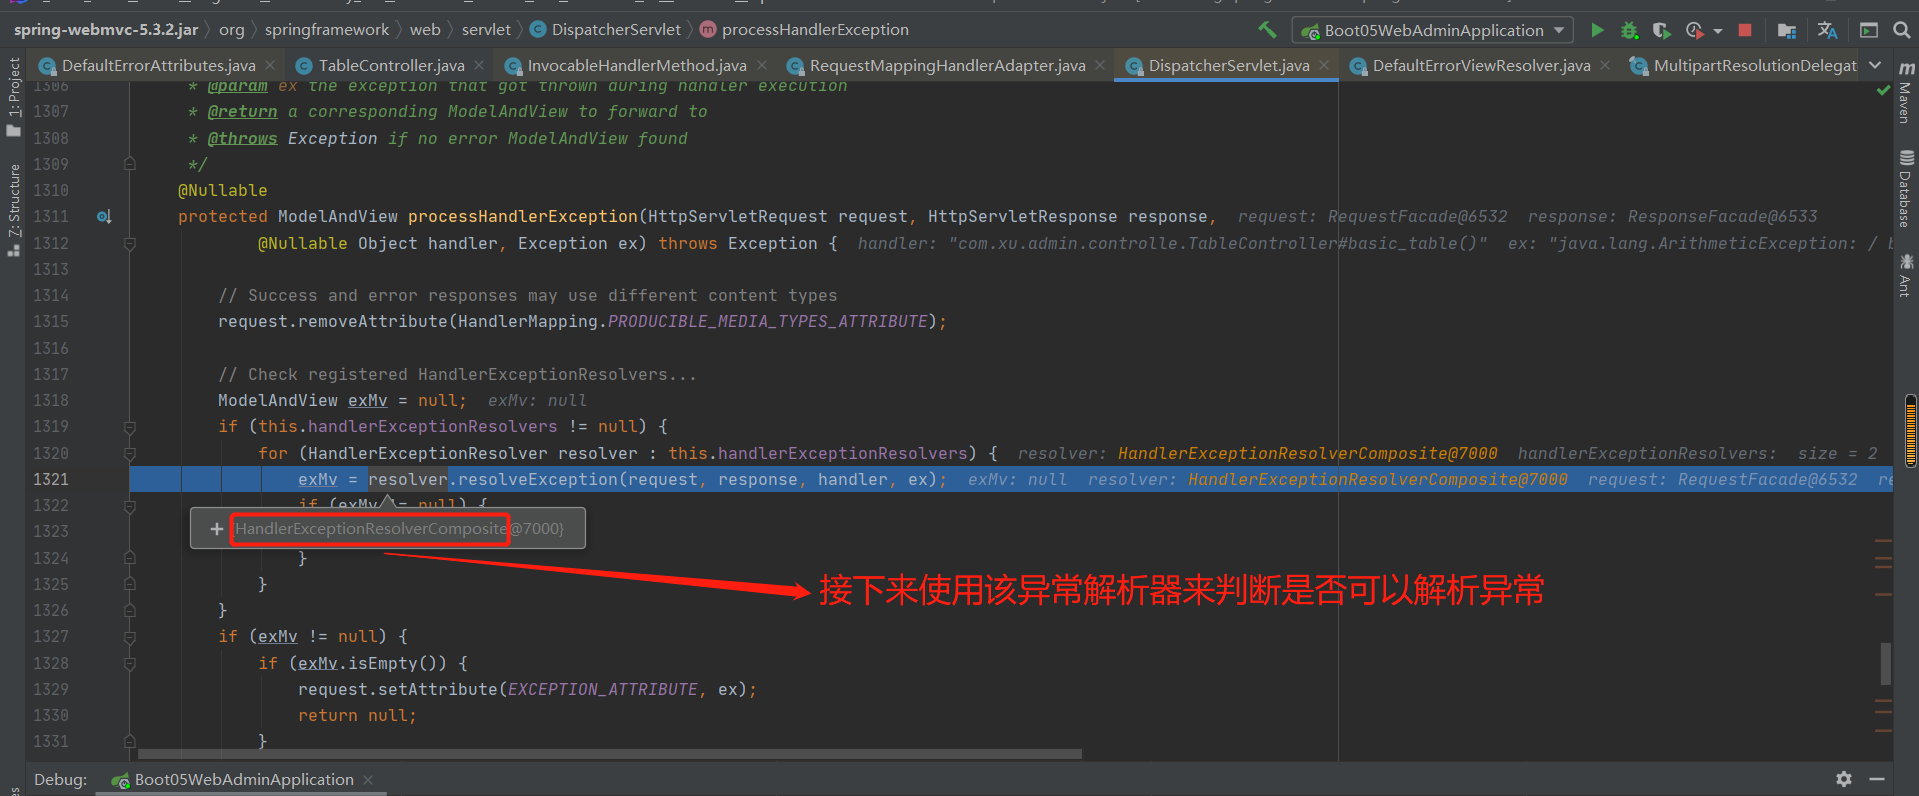
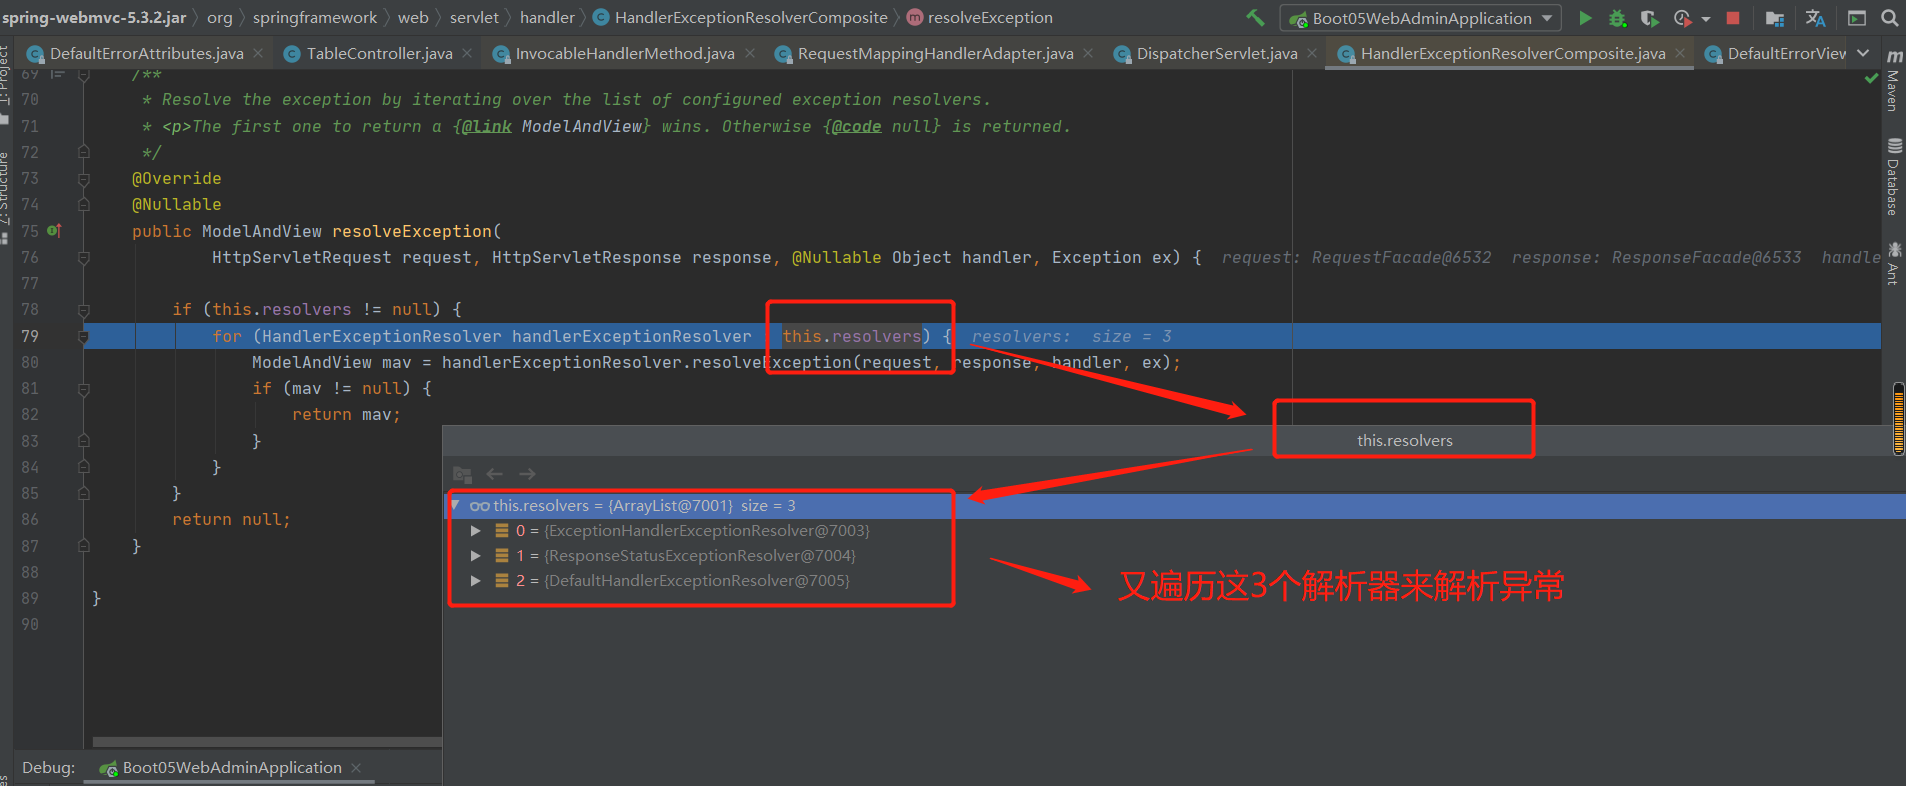
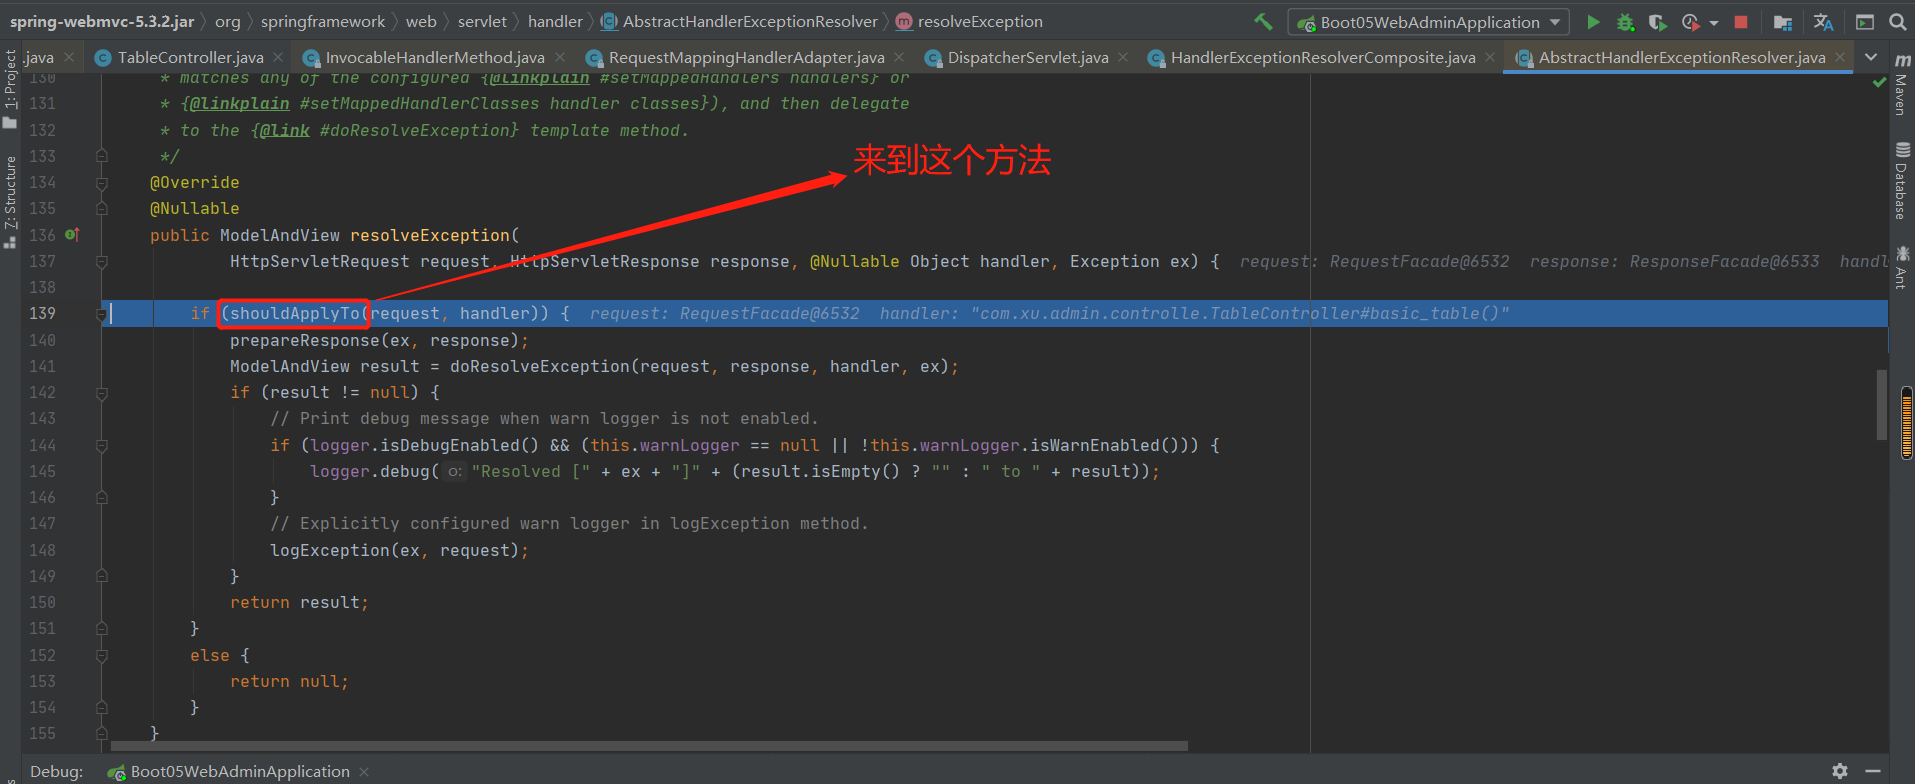
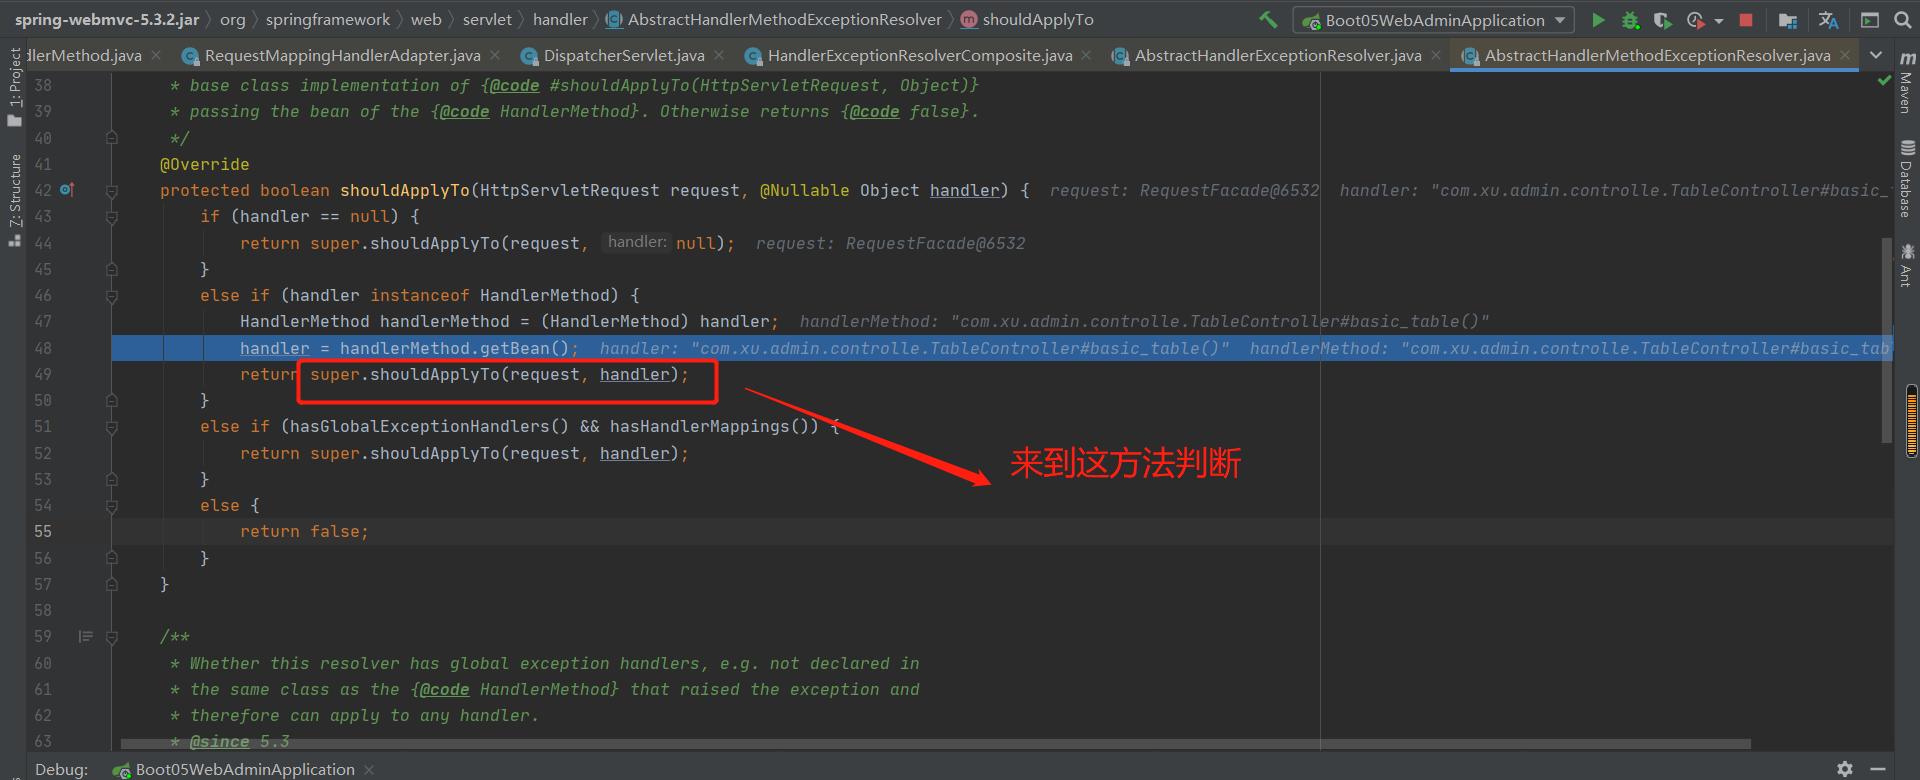
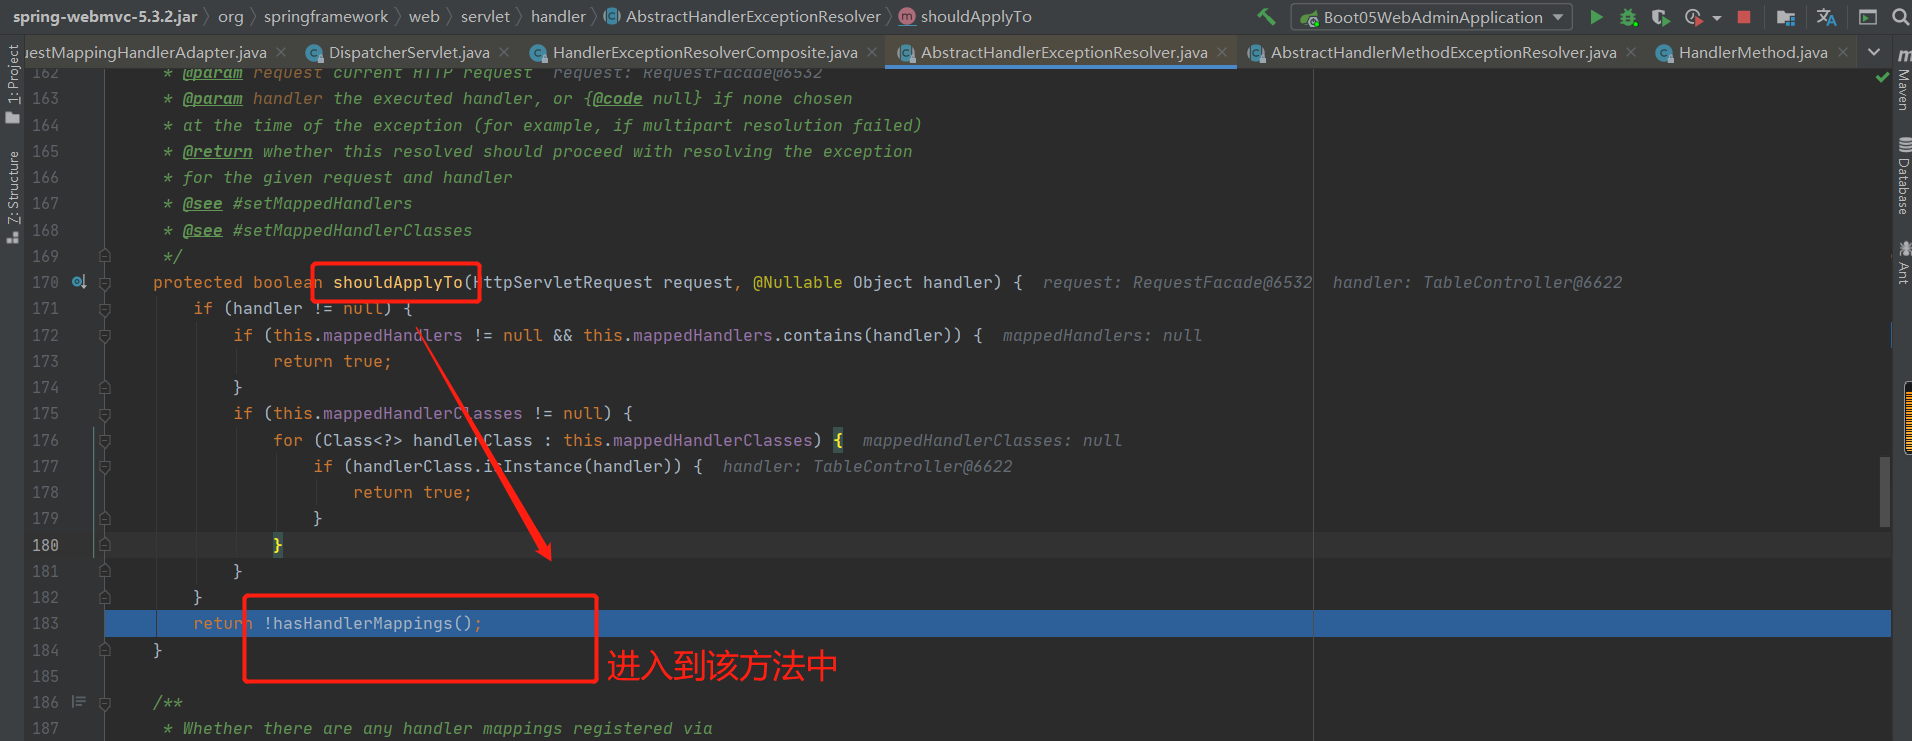
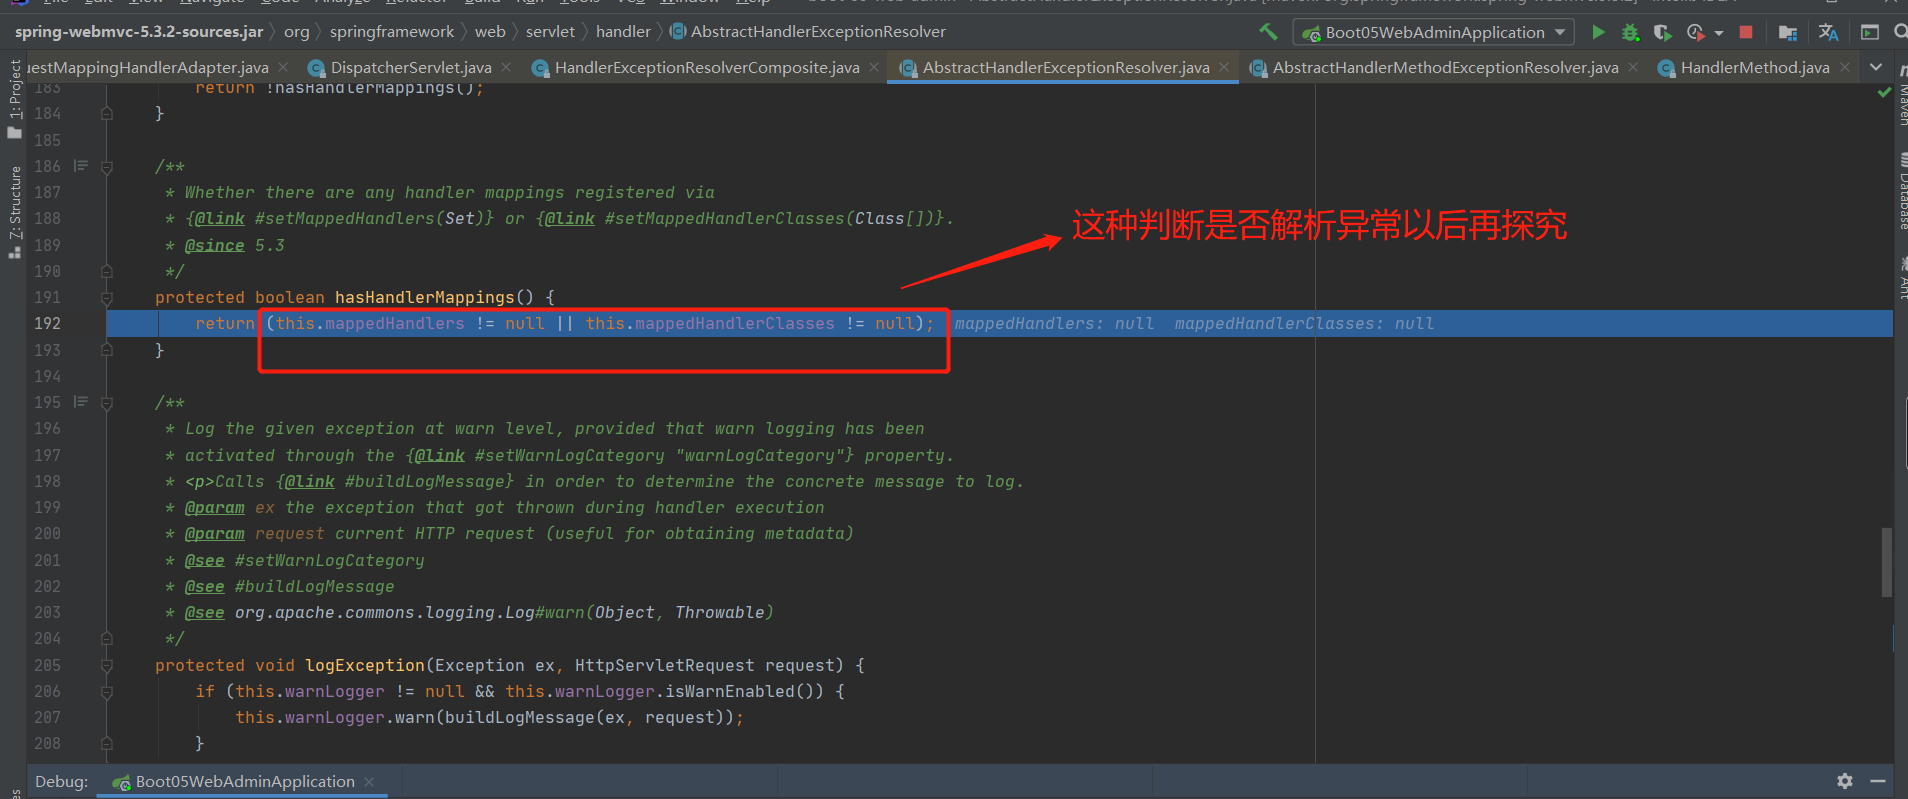
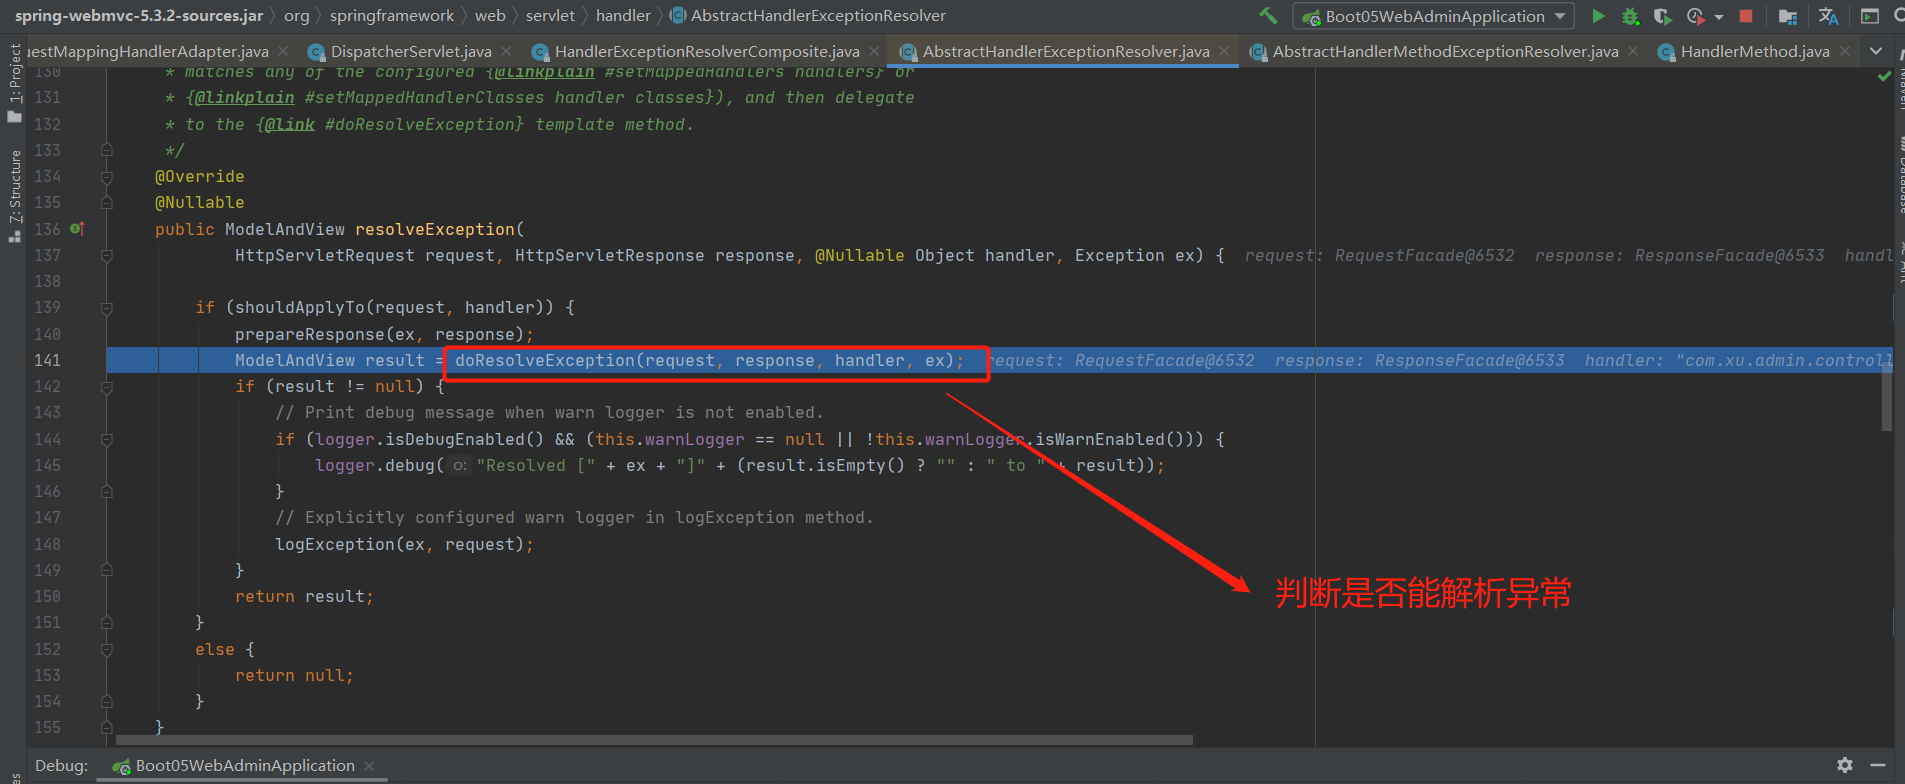
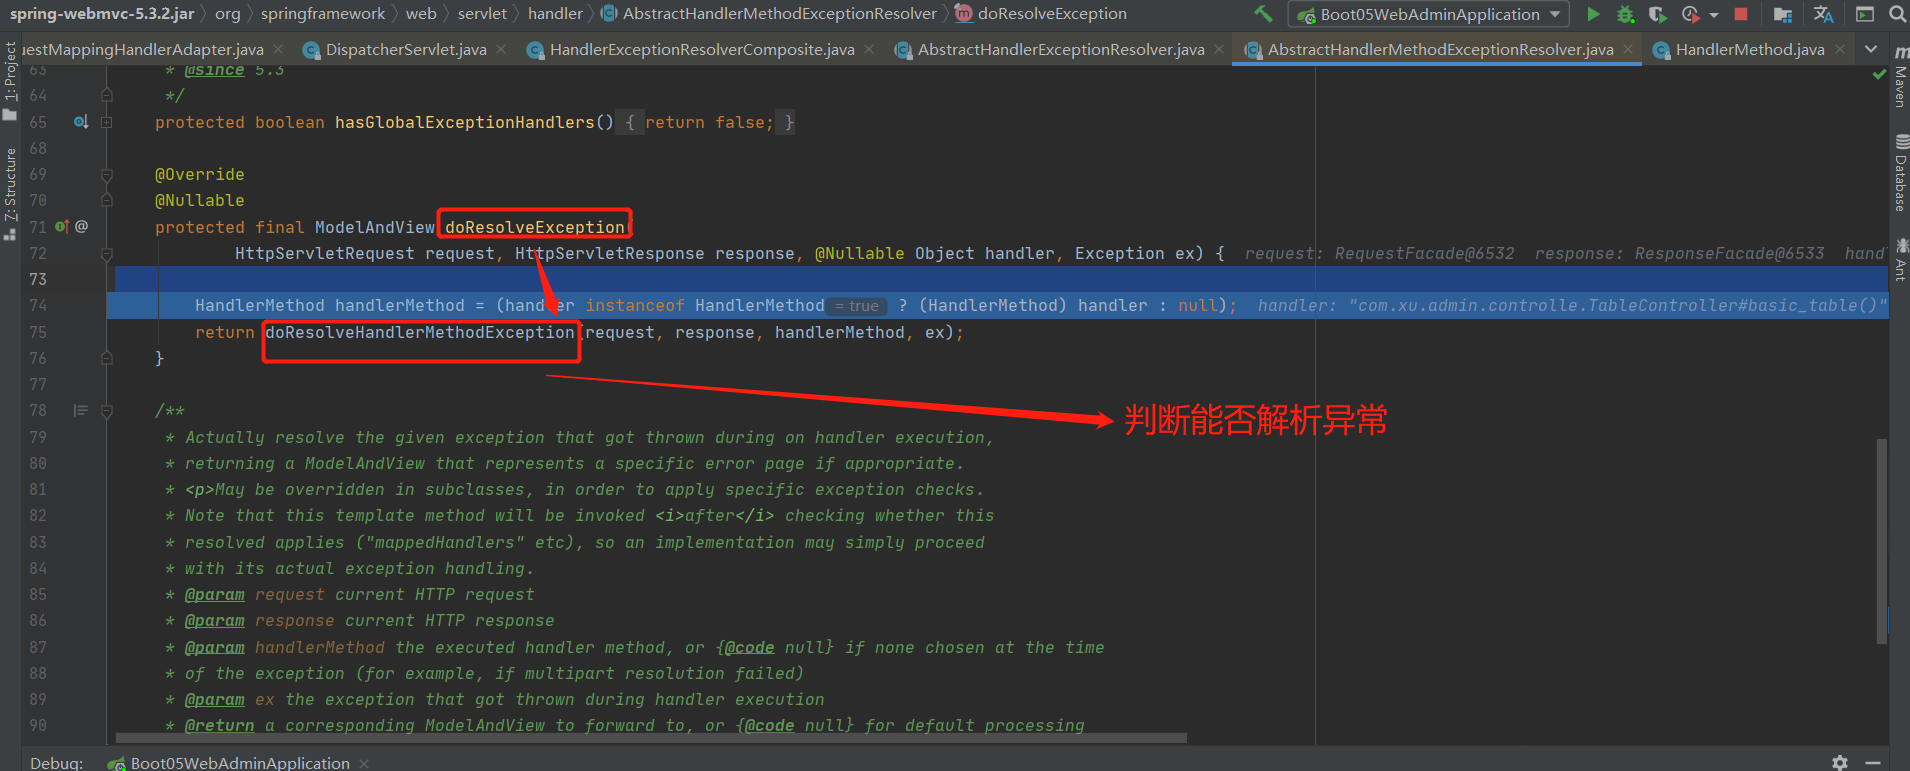
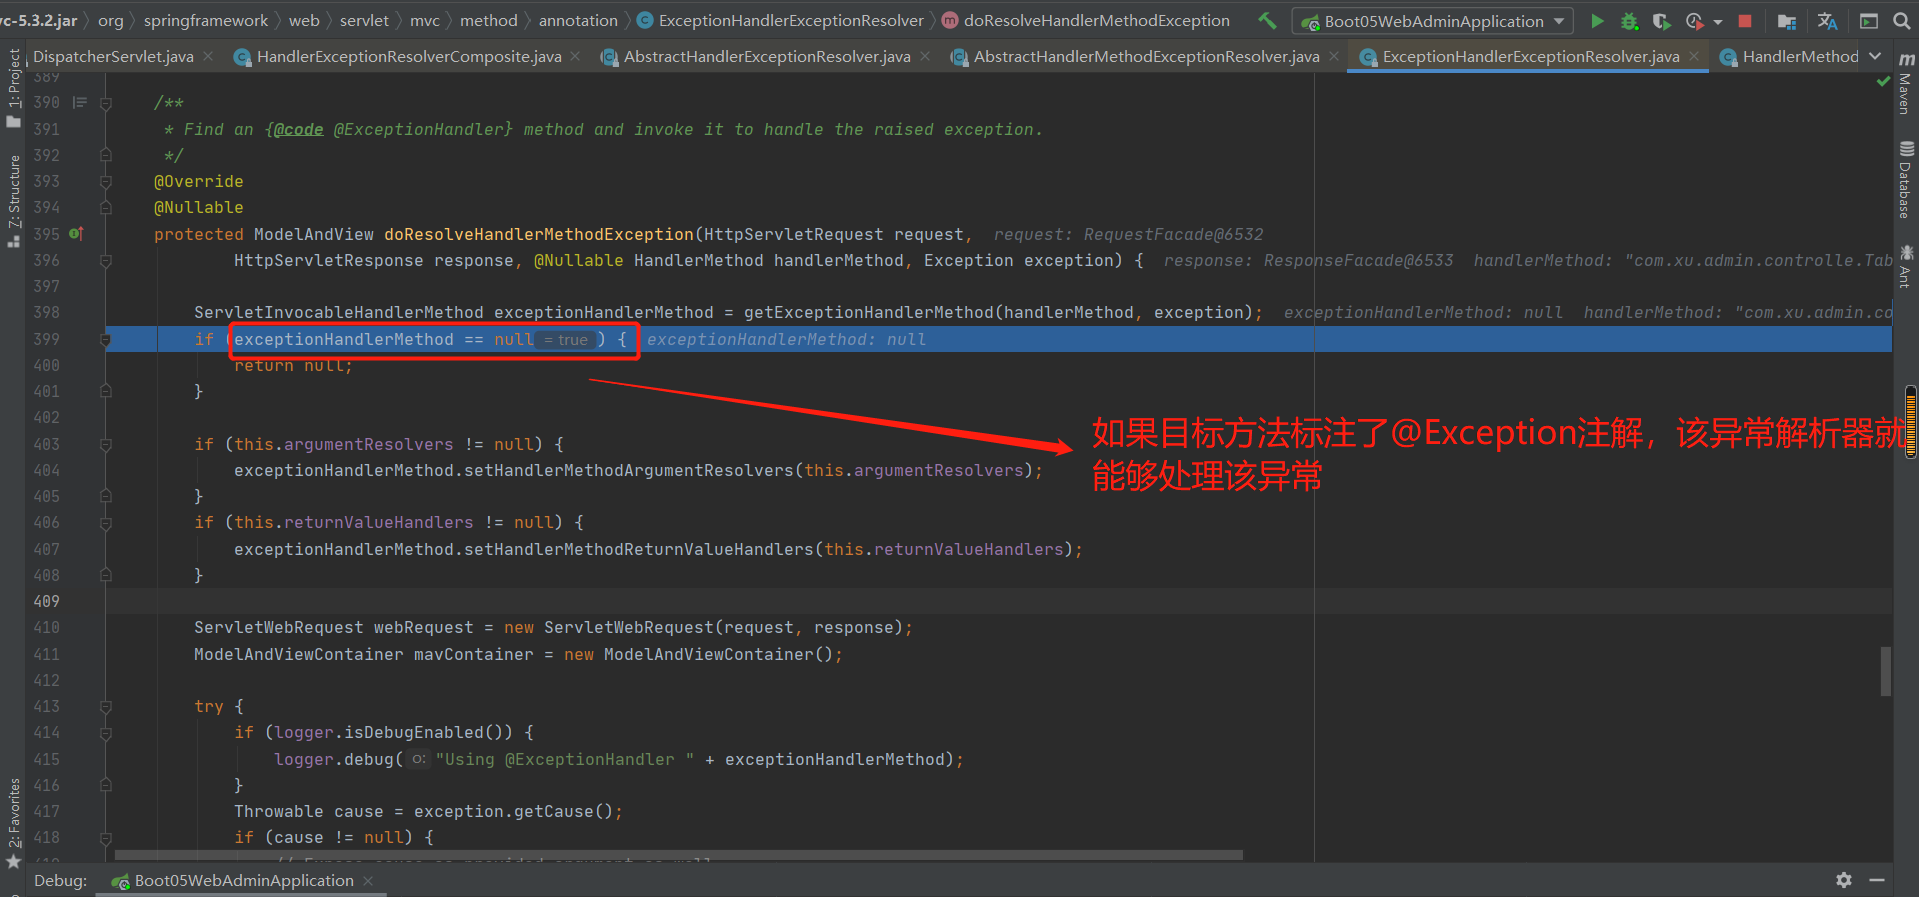
更正:应该是@ExceptionHandle注
第二个解析器:
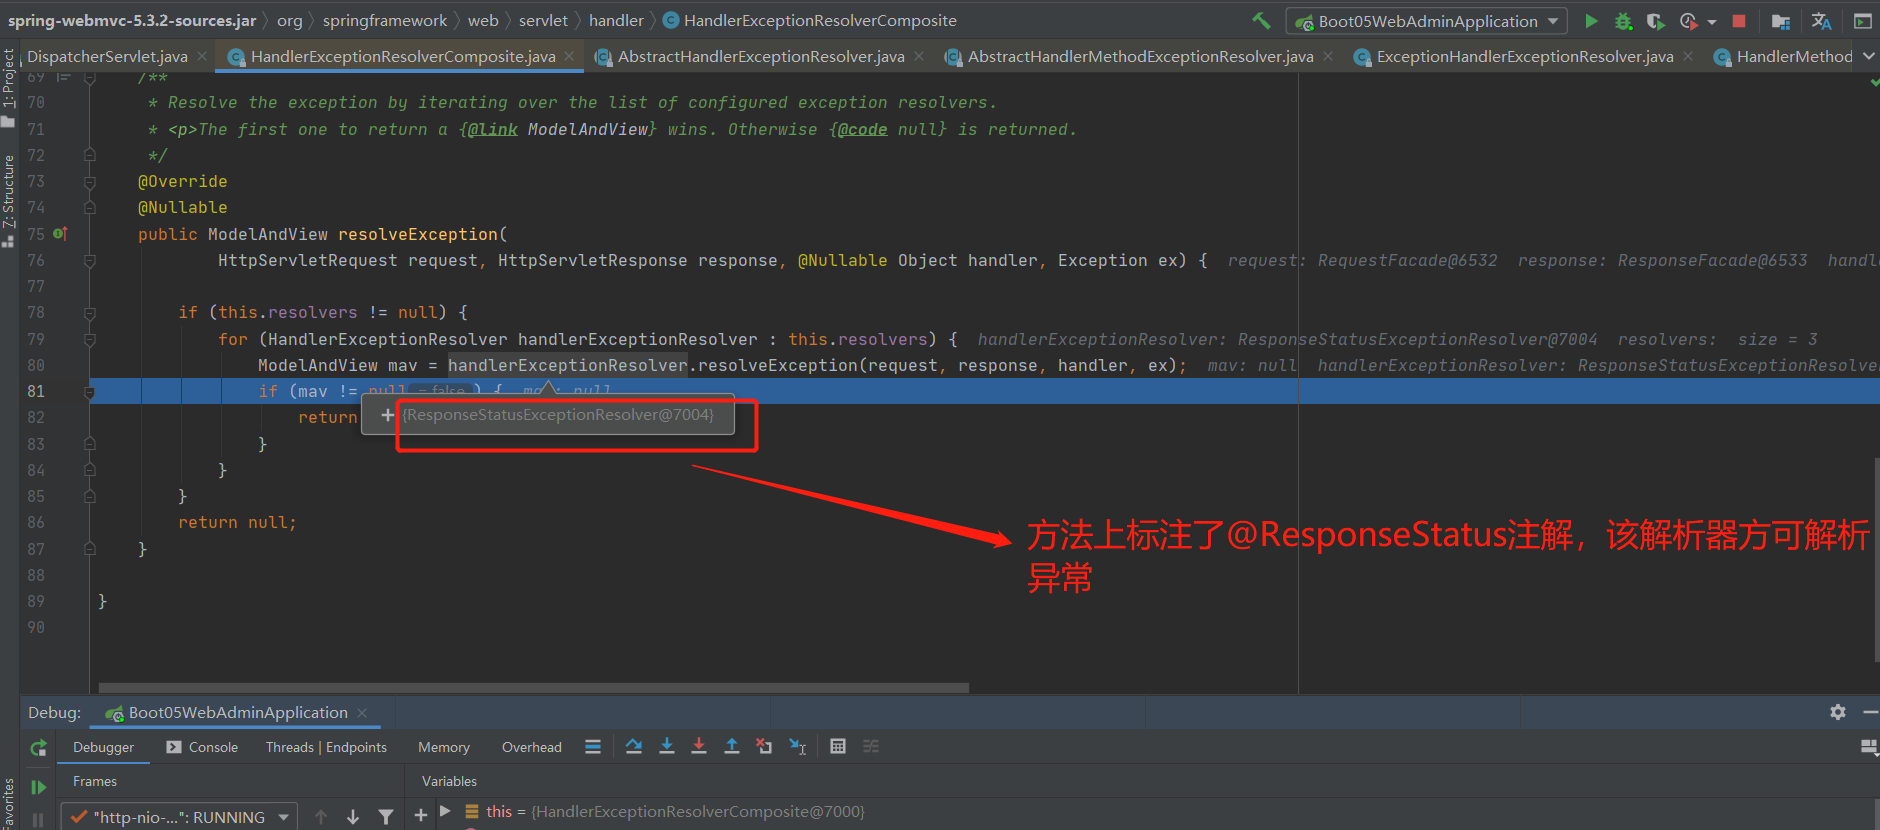
第三个解析器:
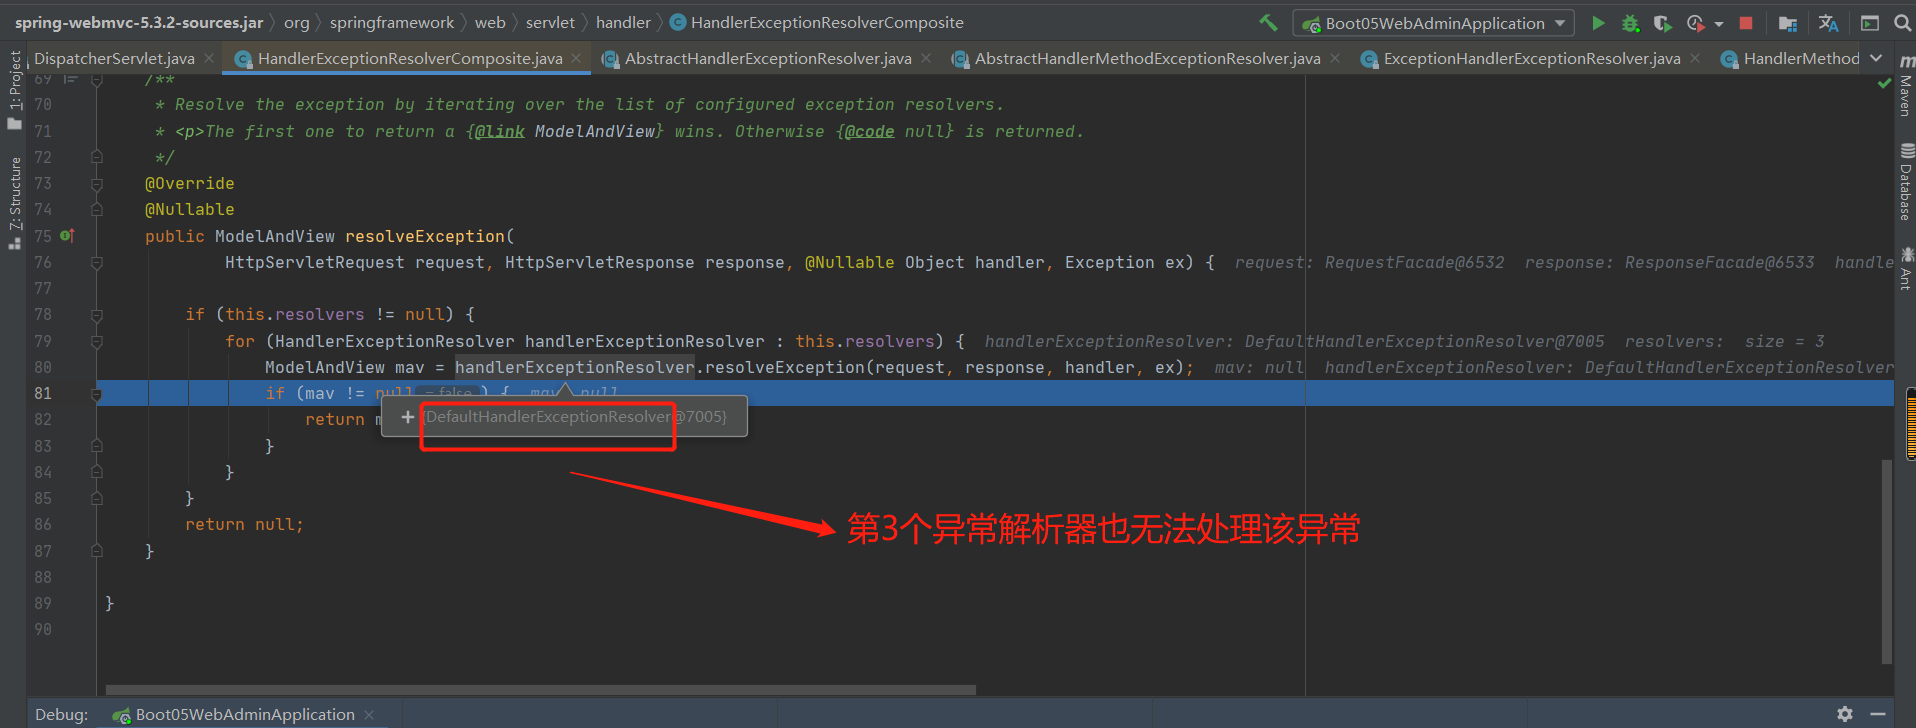
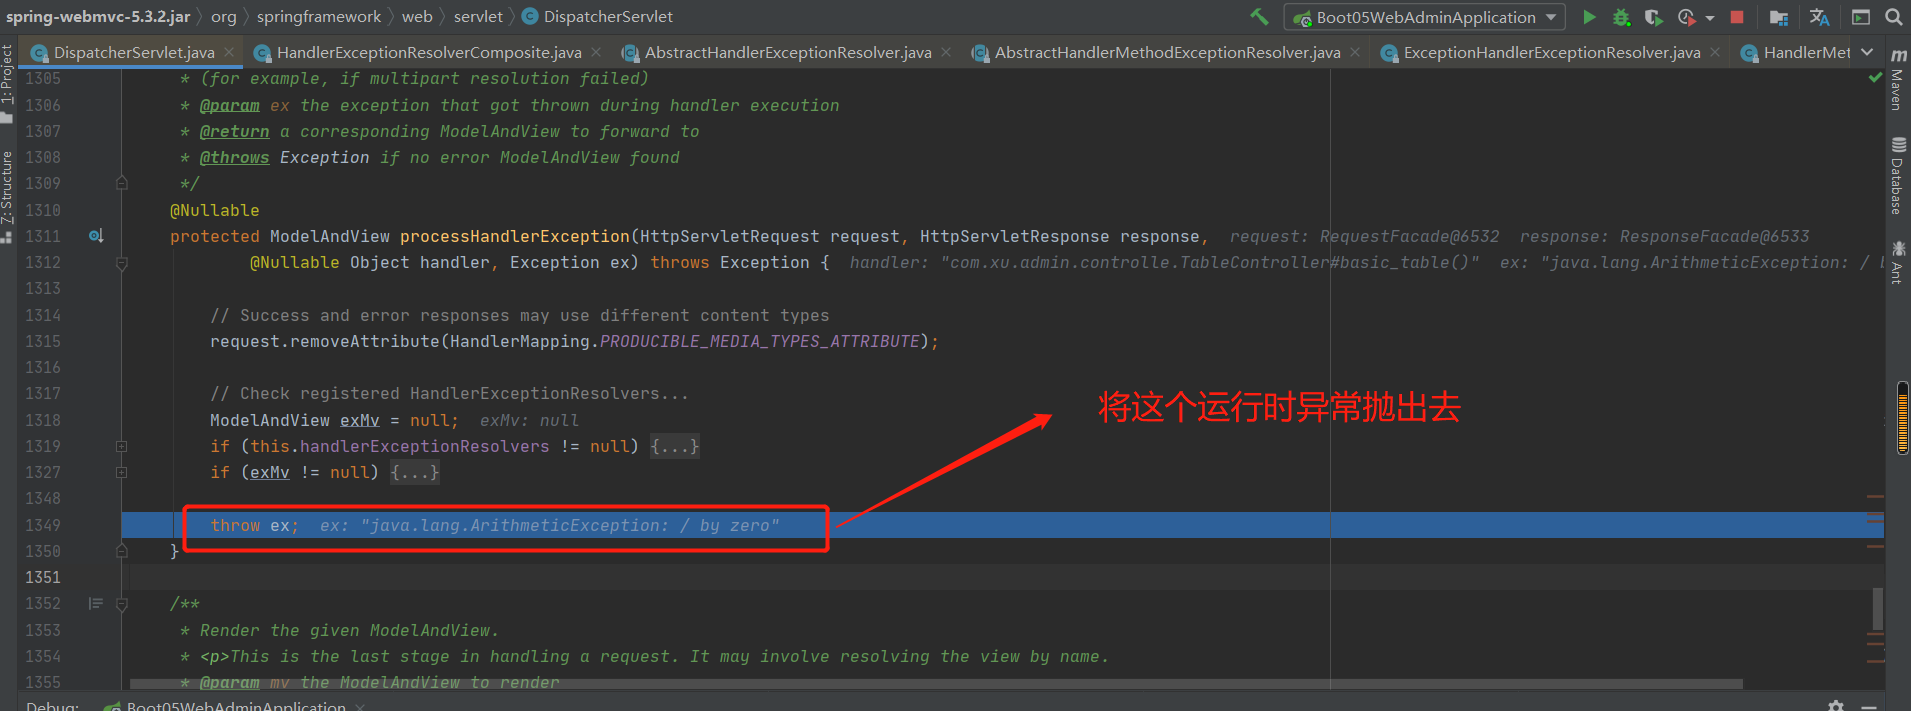
综上:遍历默认的异常解析器,没有一个异常解析器可以解析异常,就会将异常抛出去。
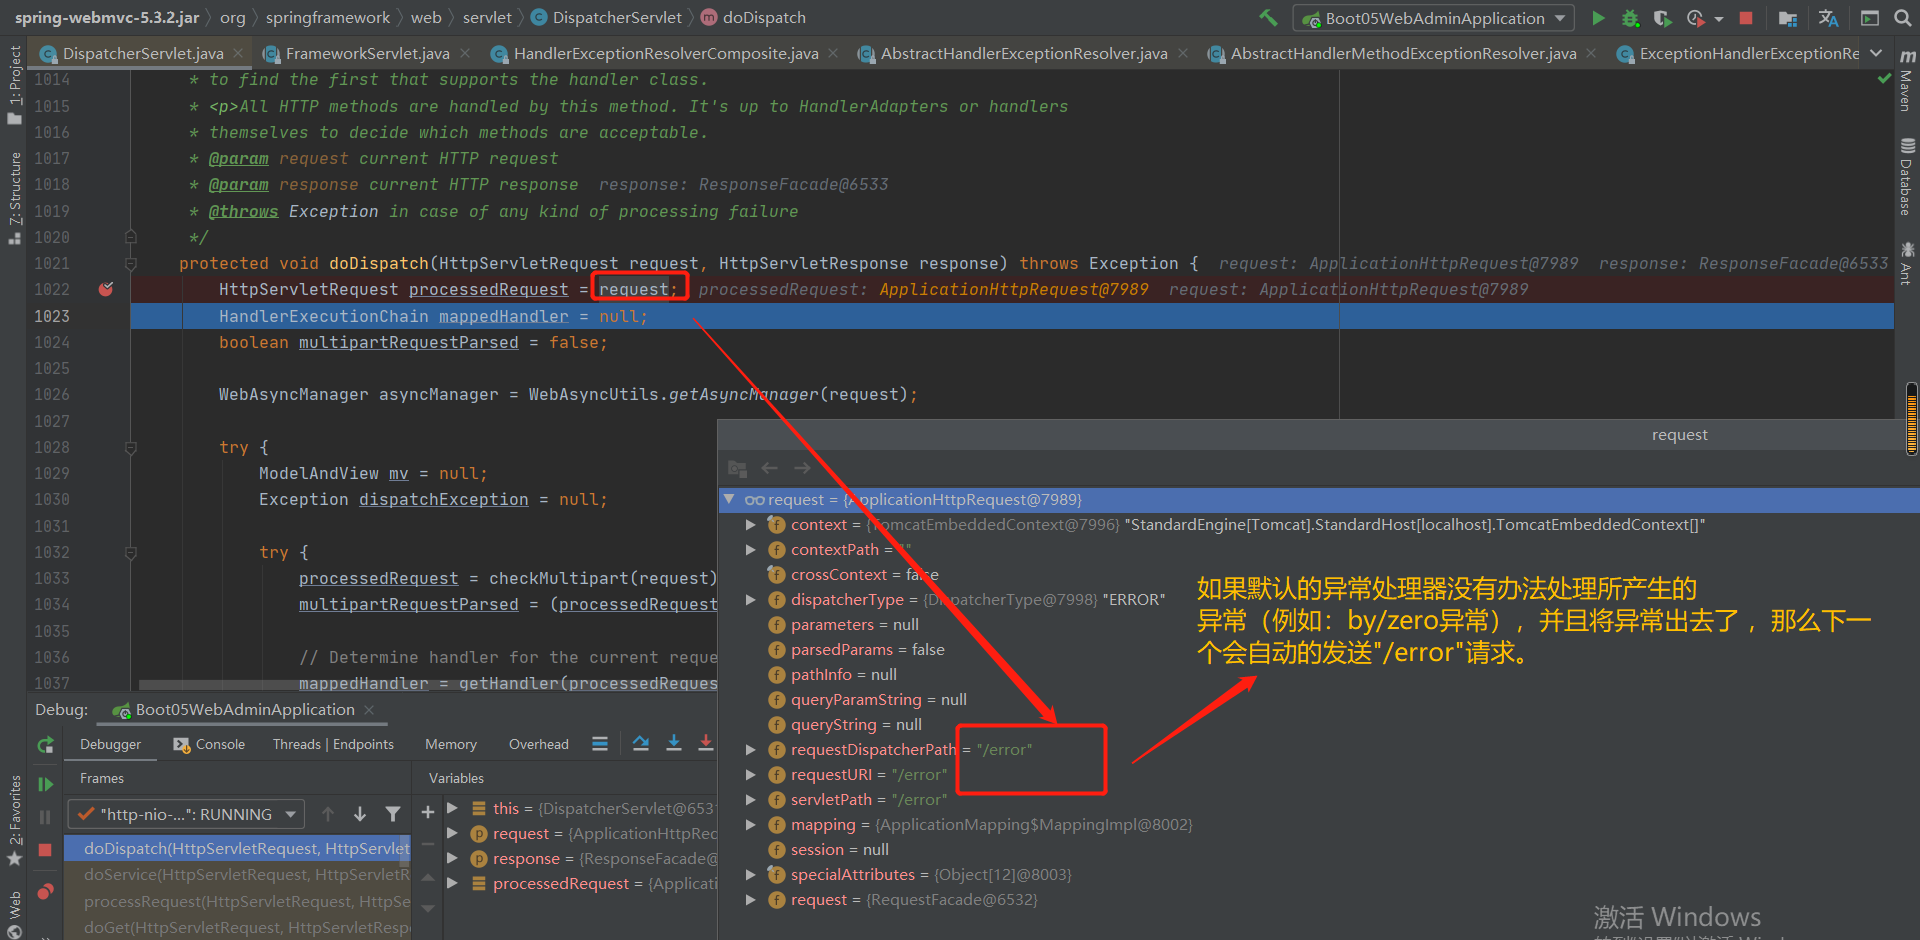
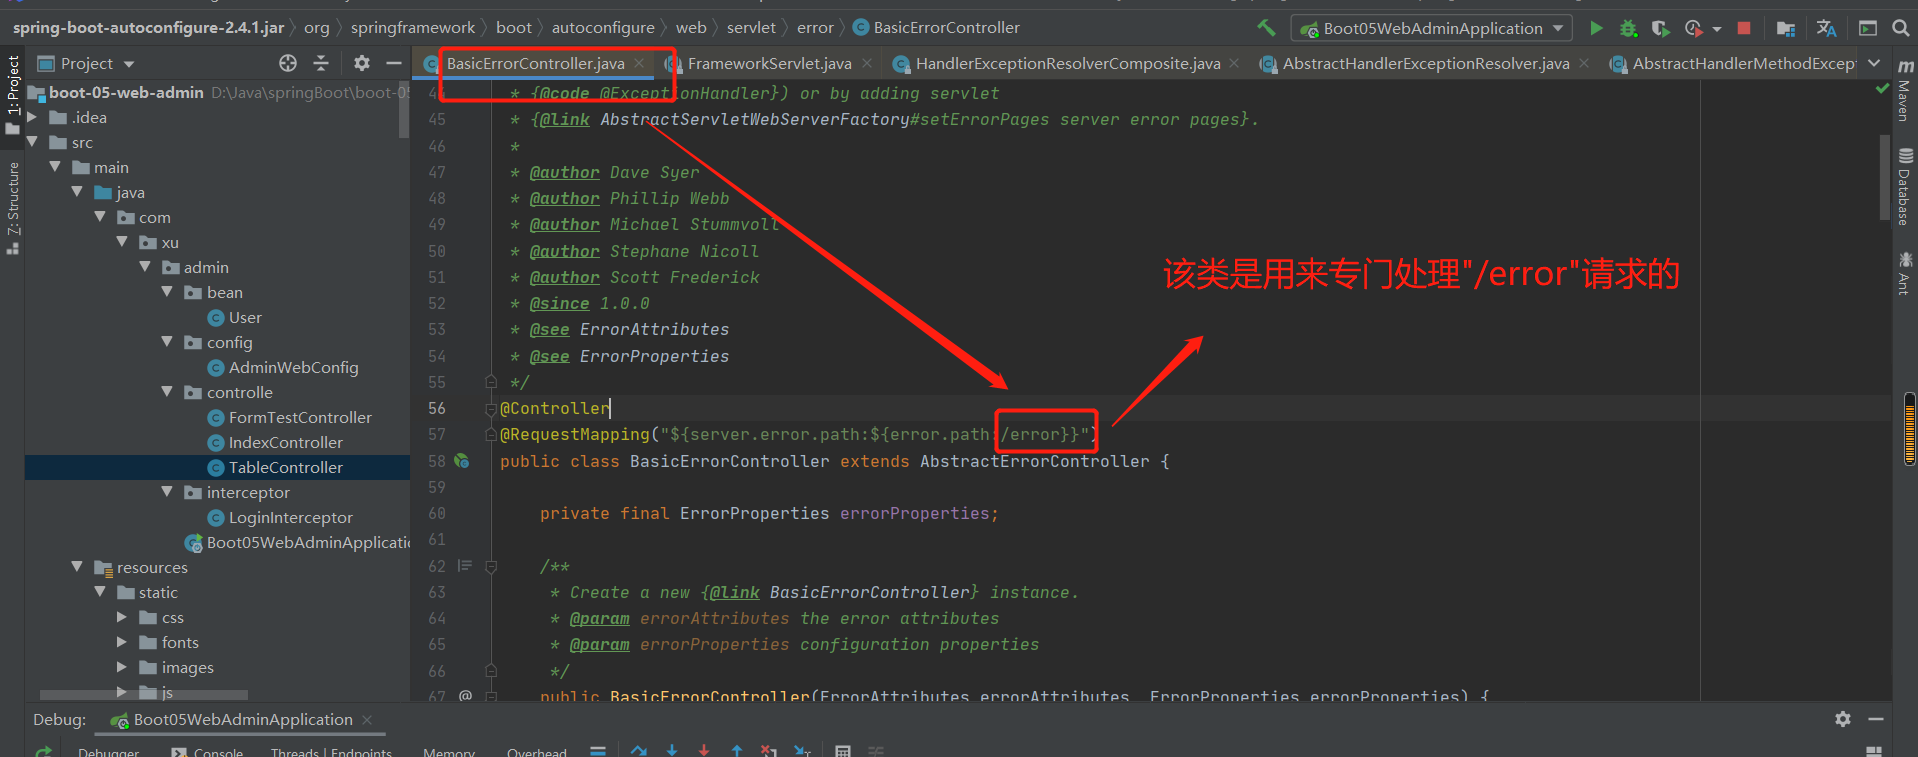
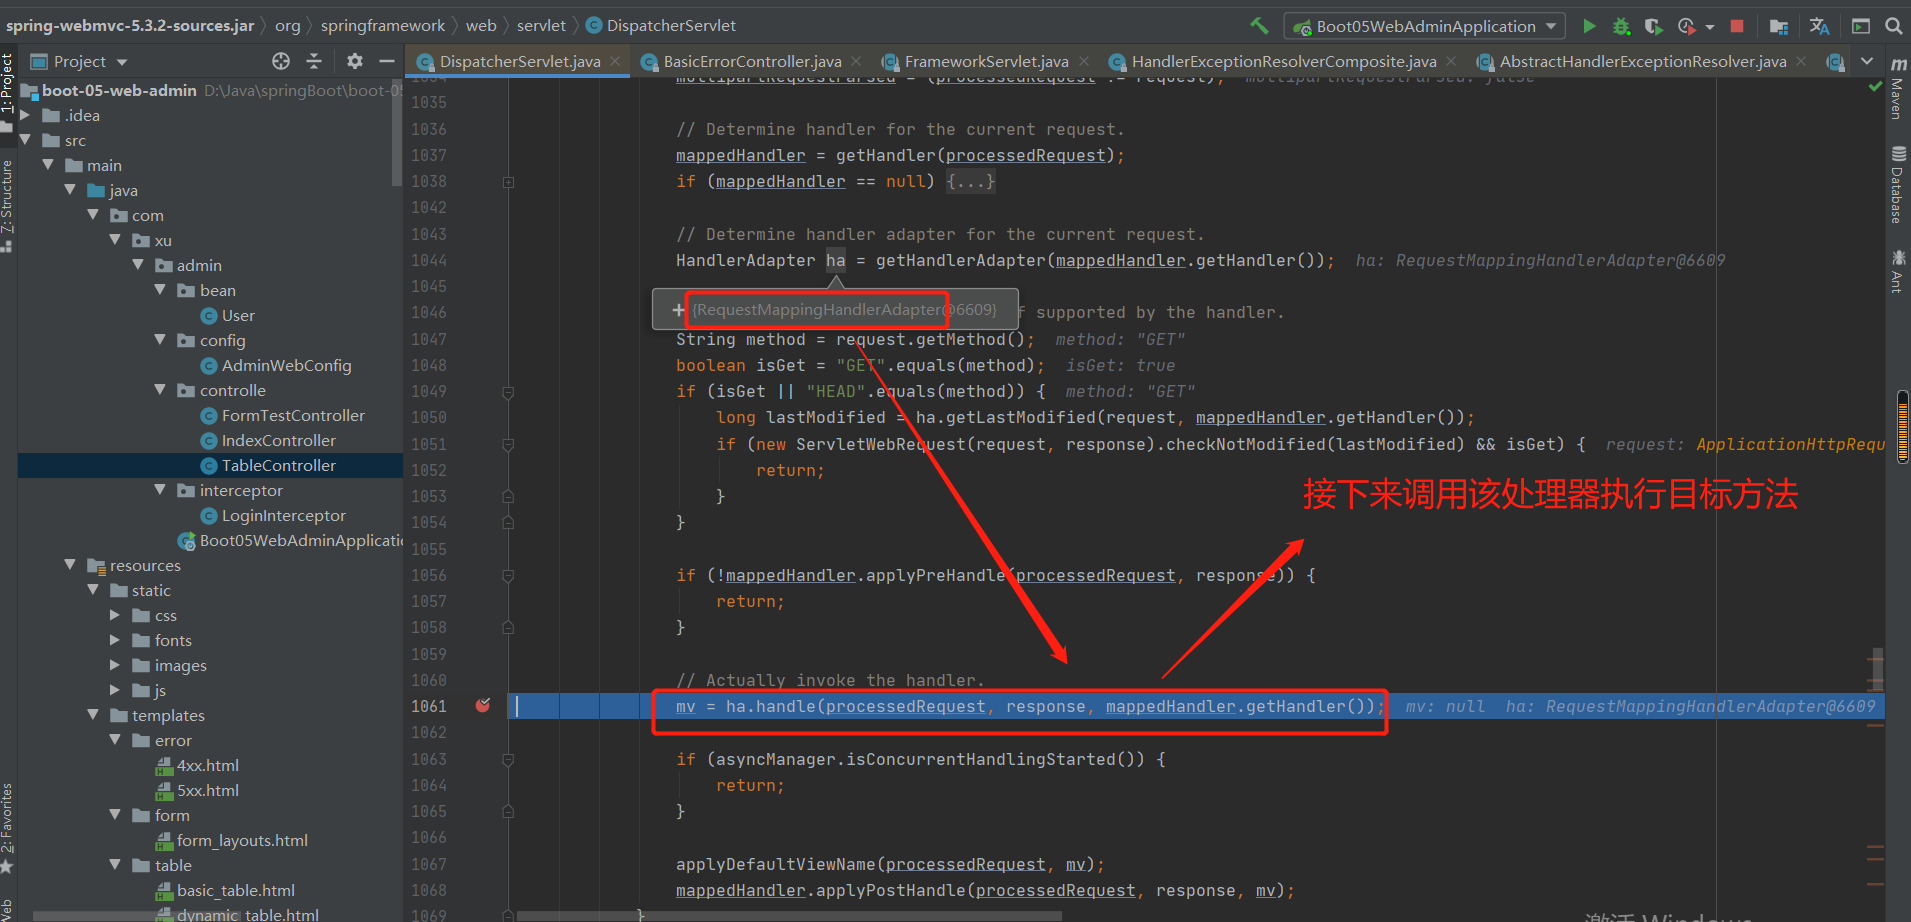
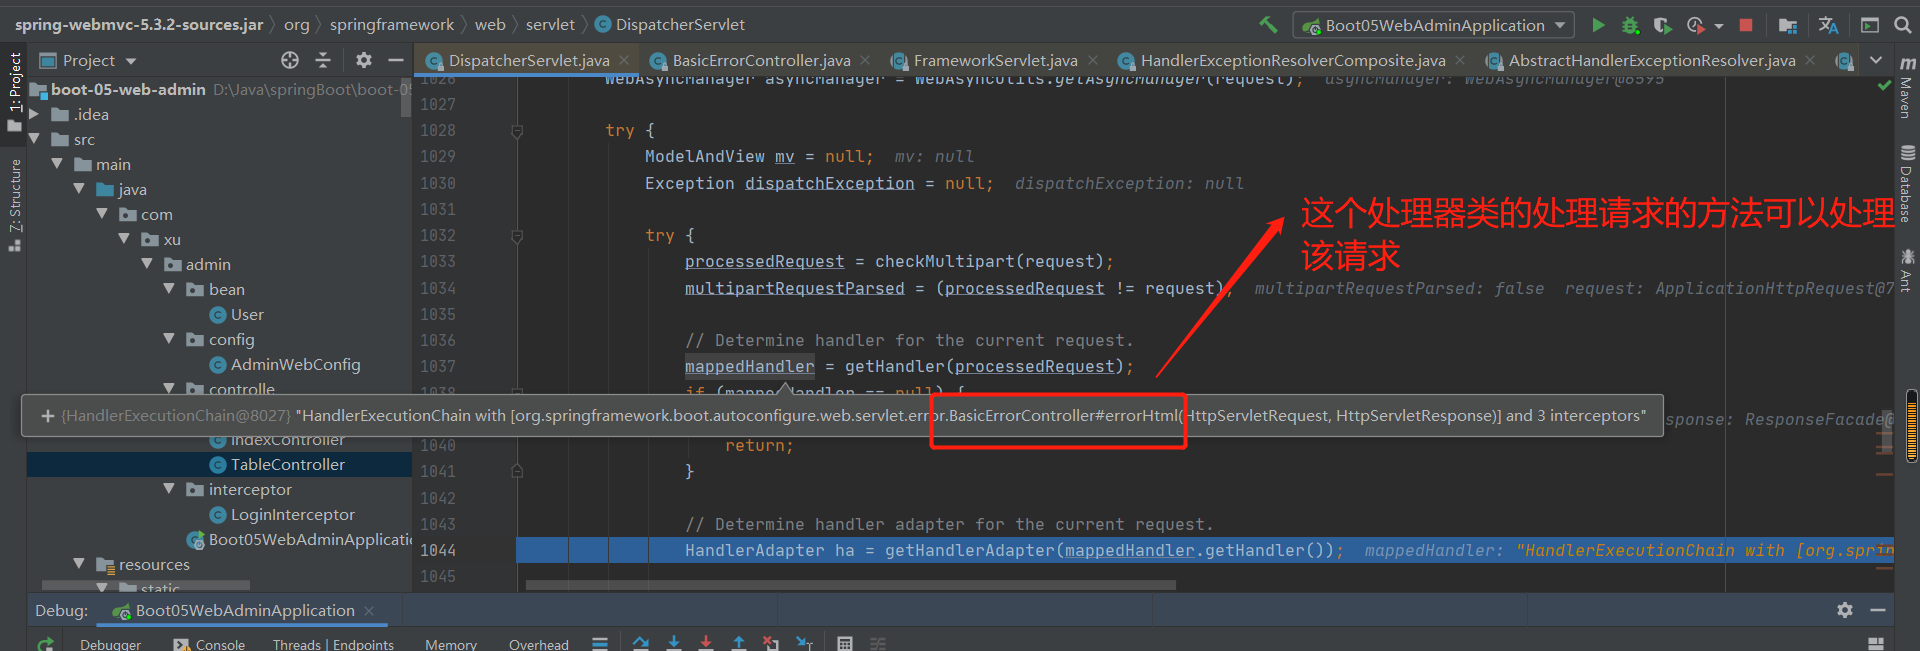
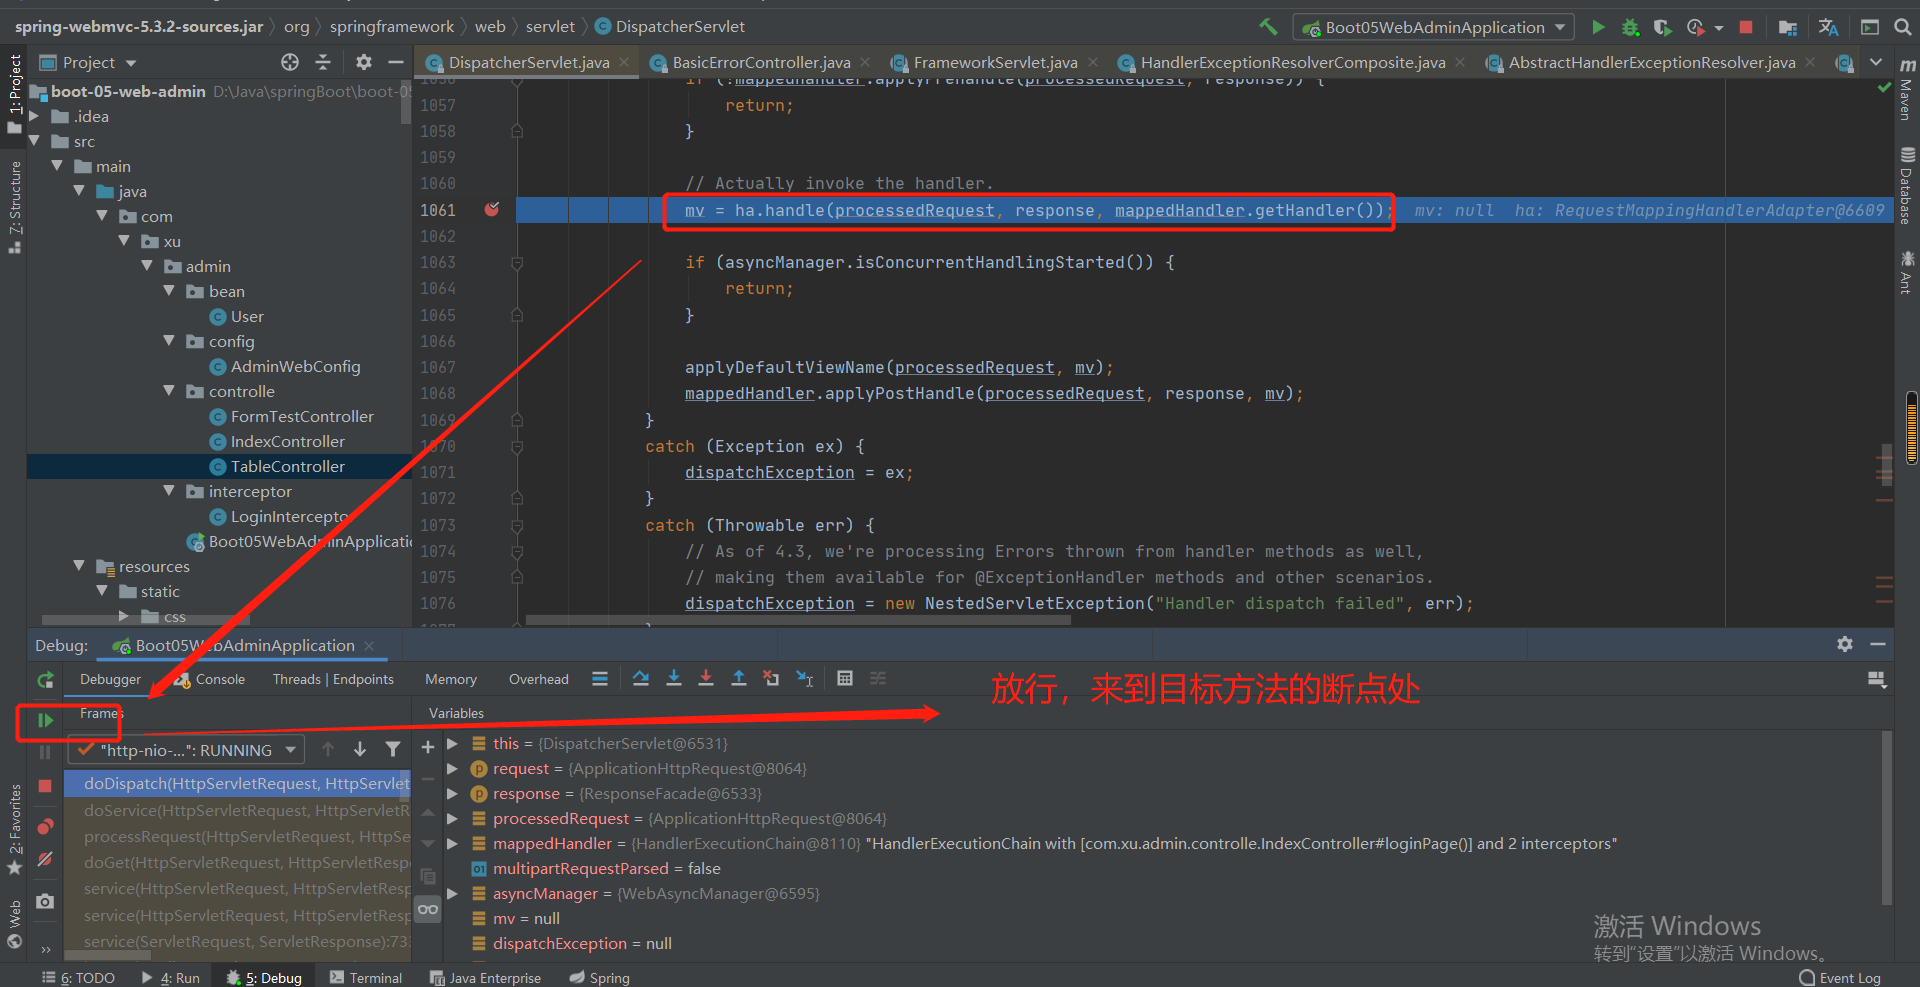
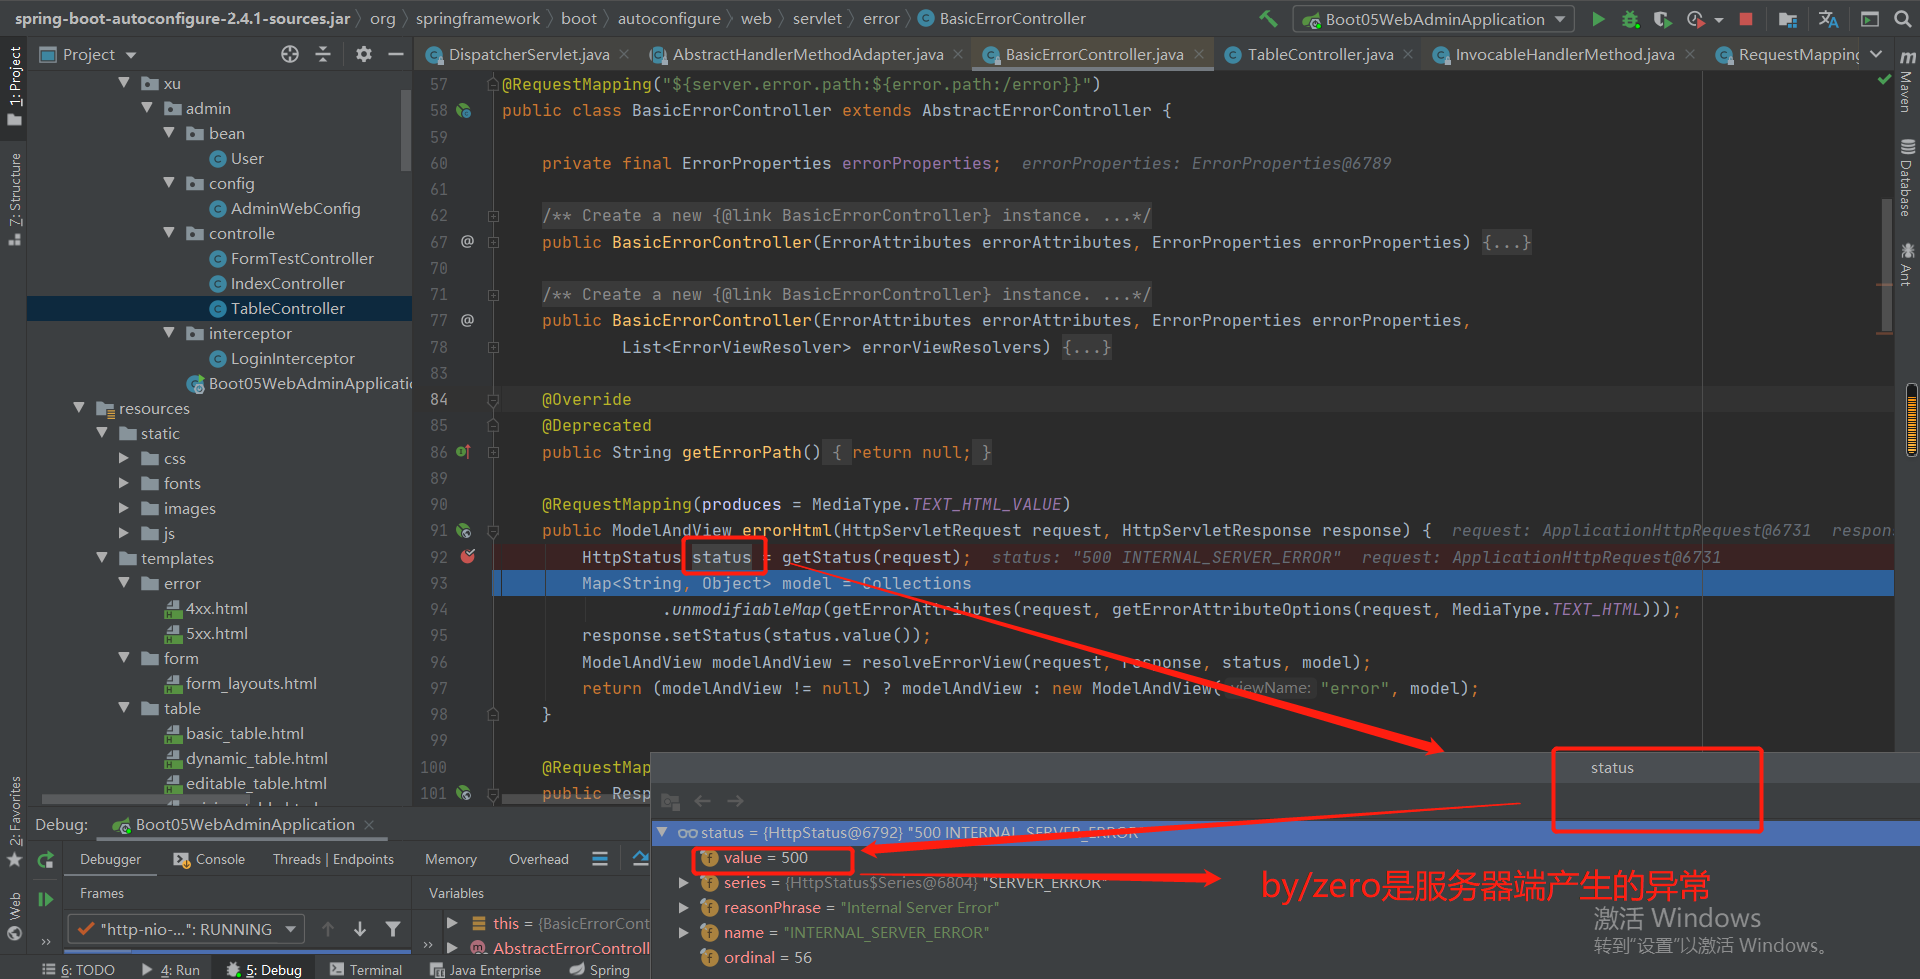
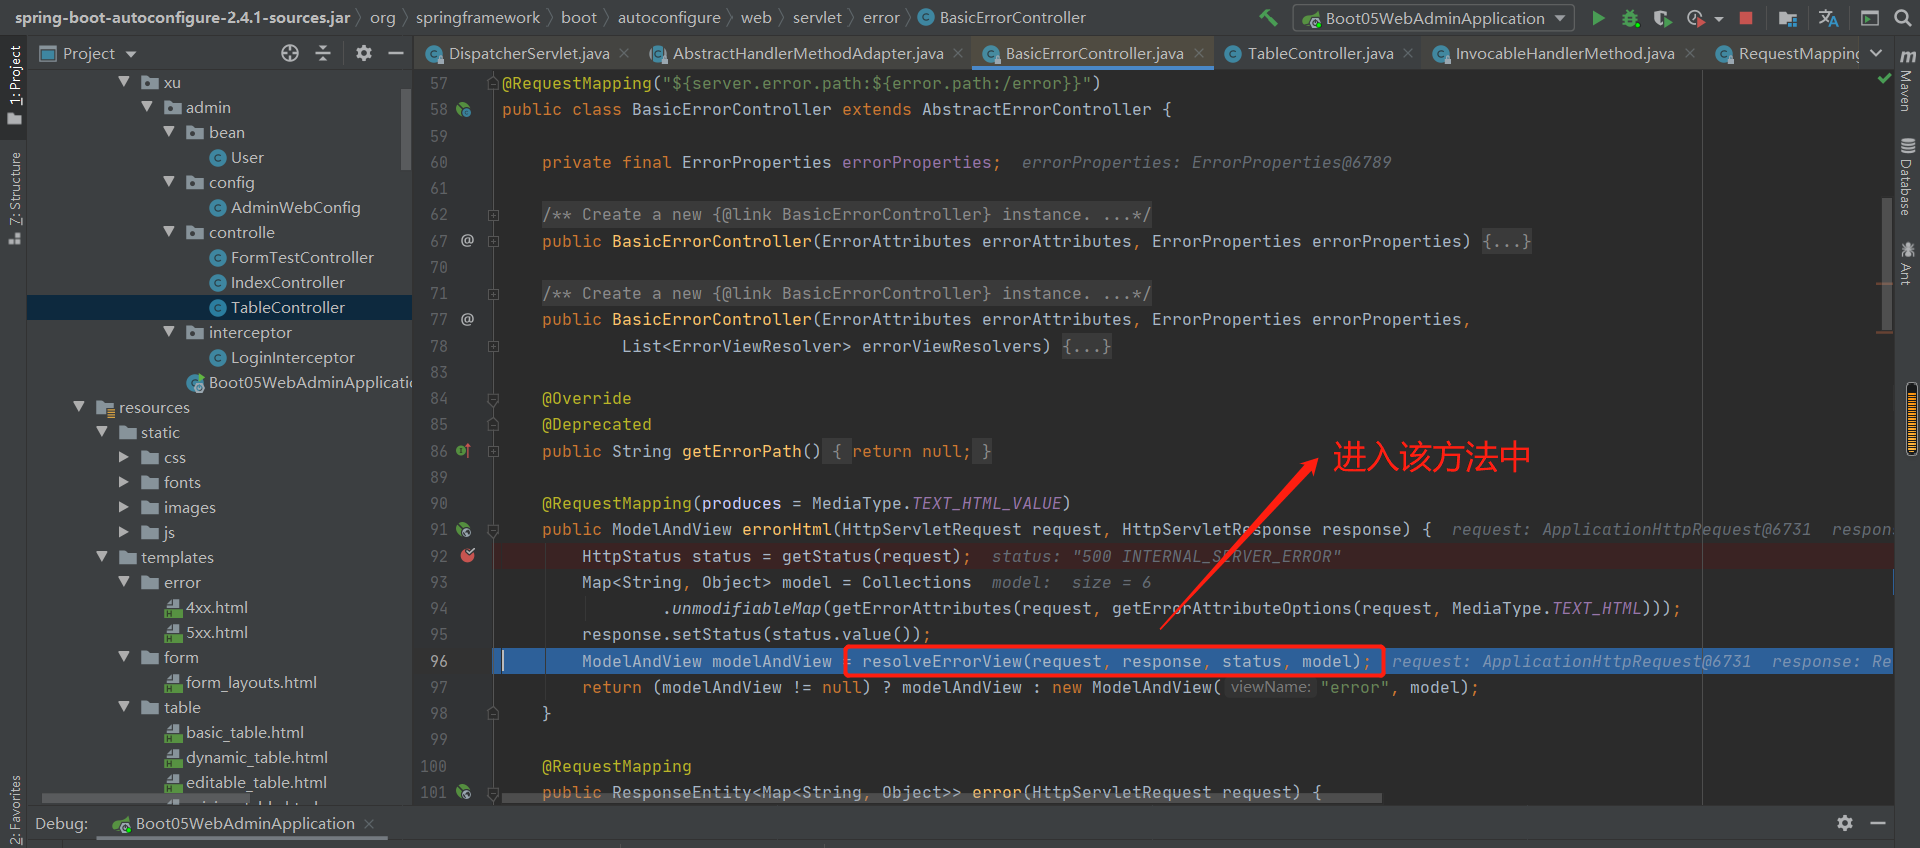
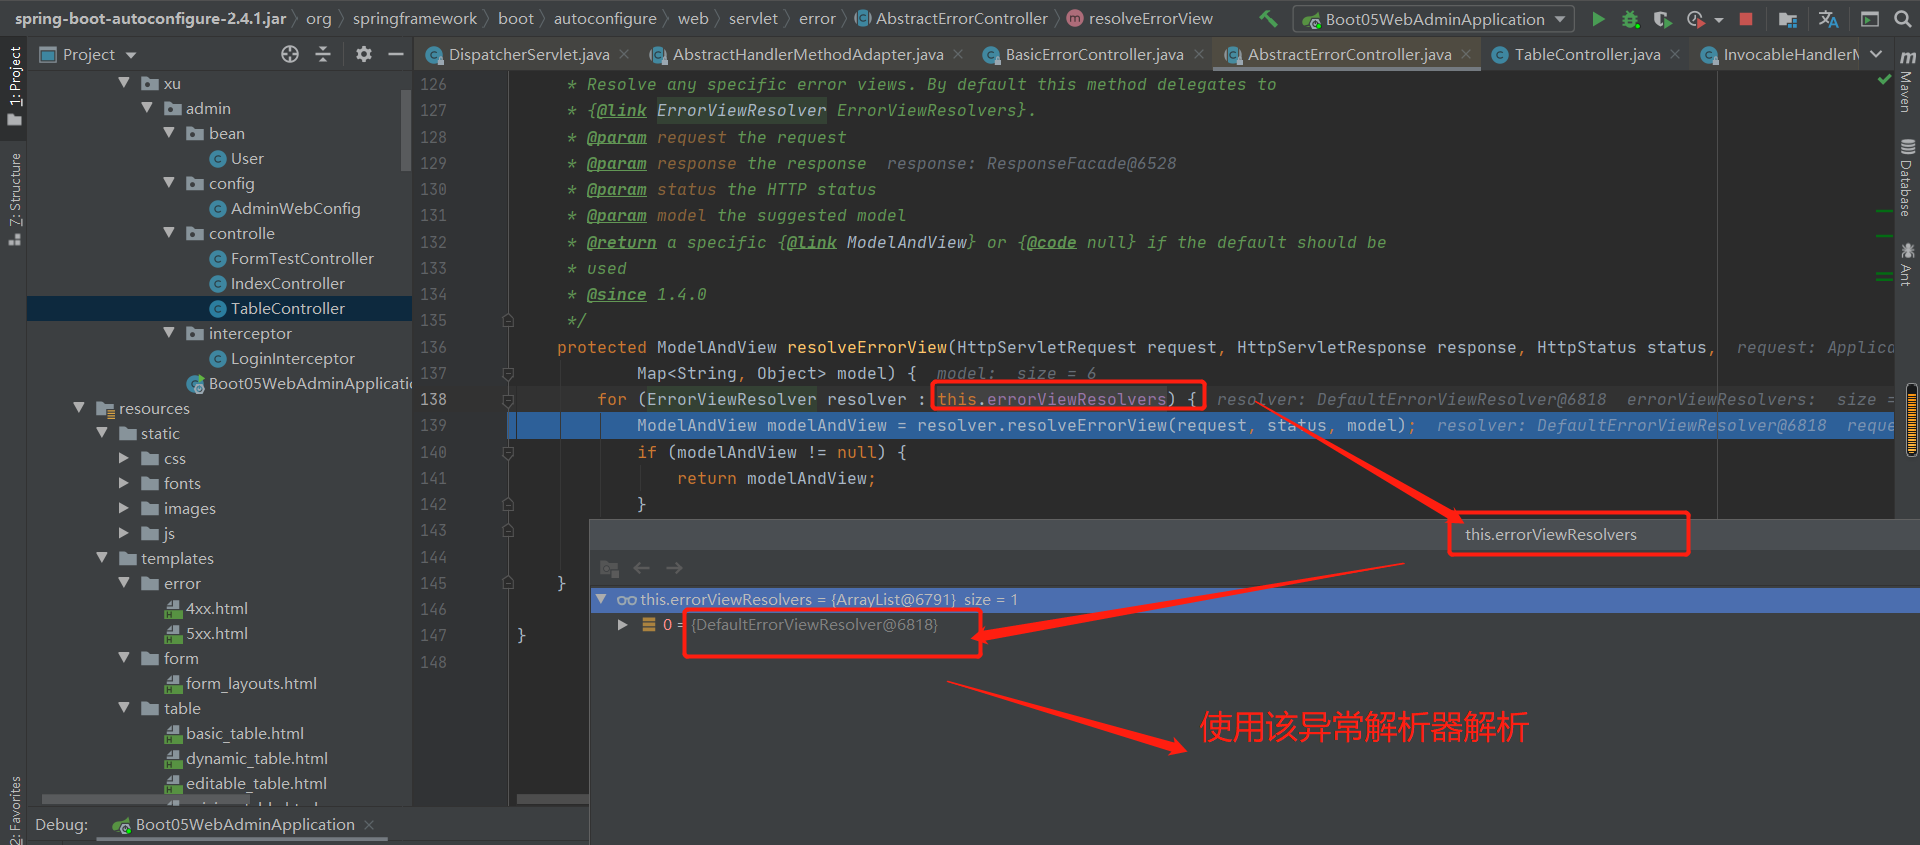
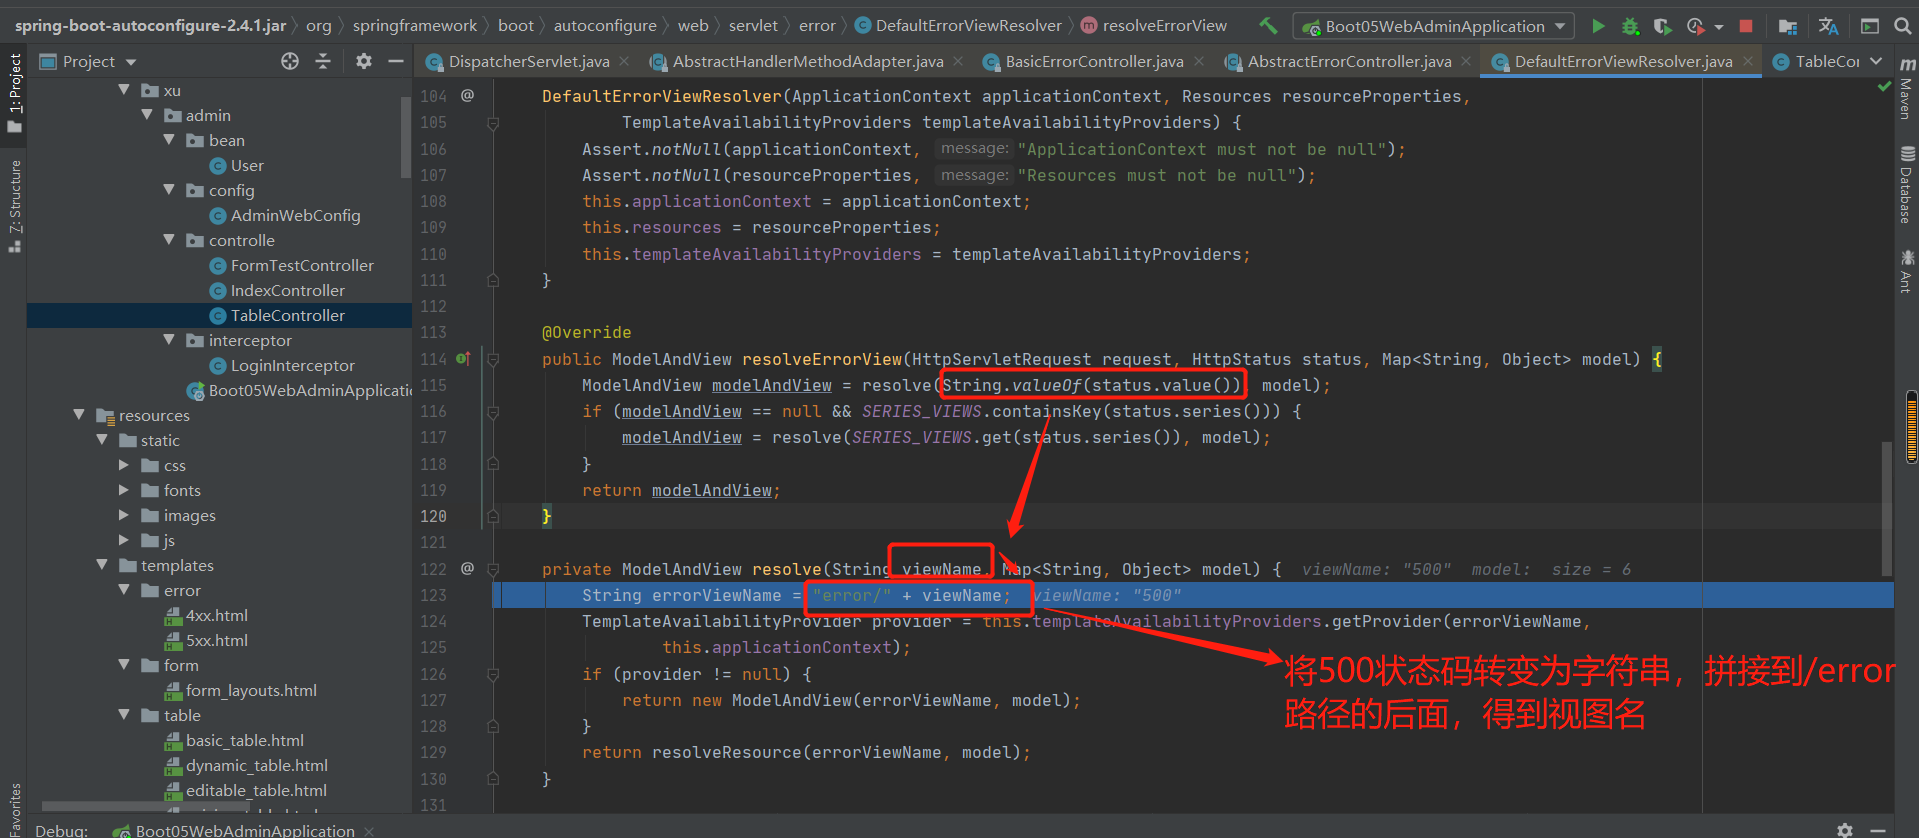
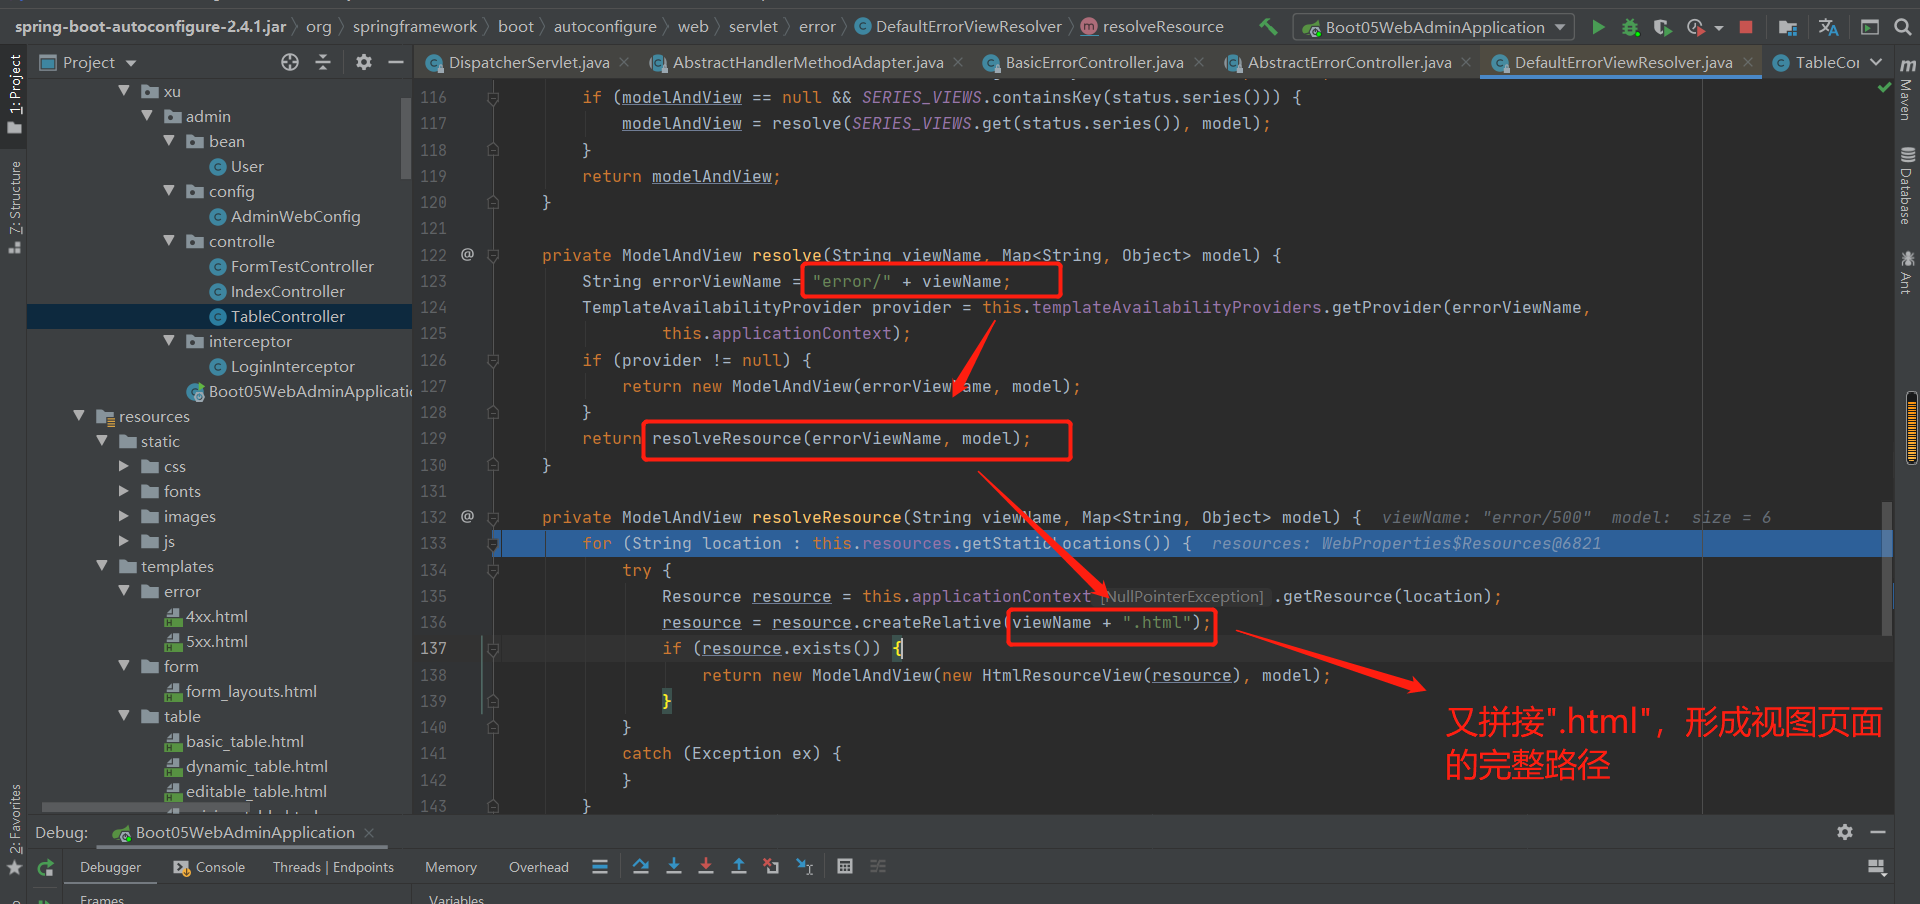
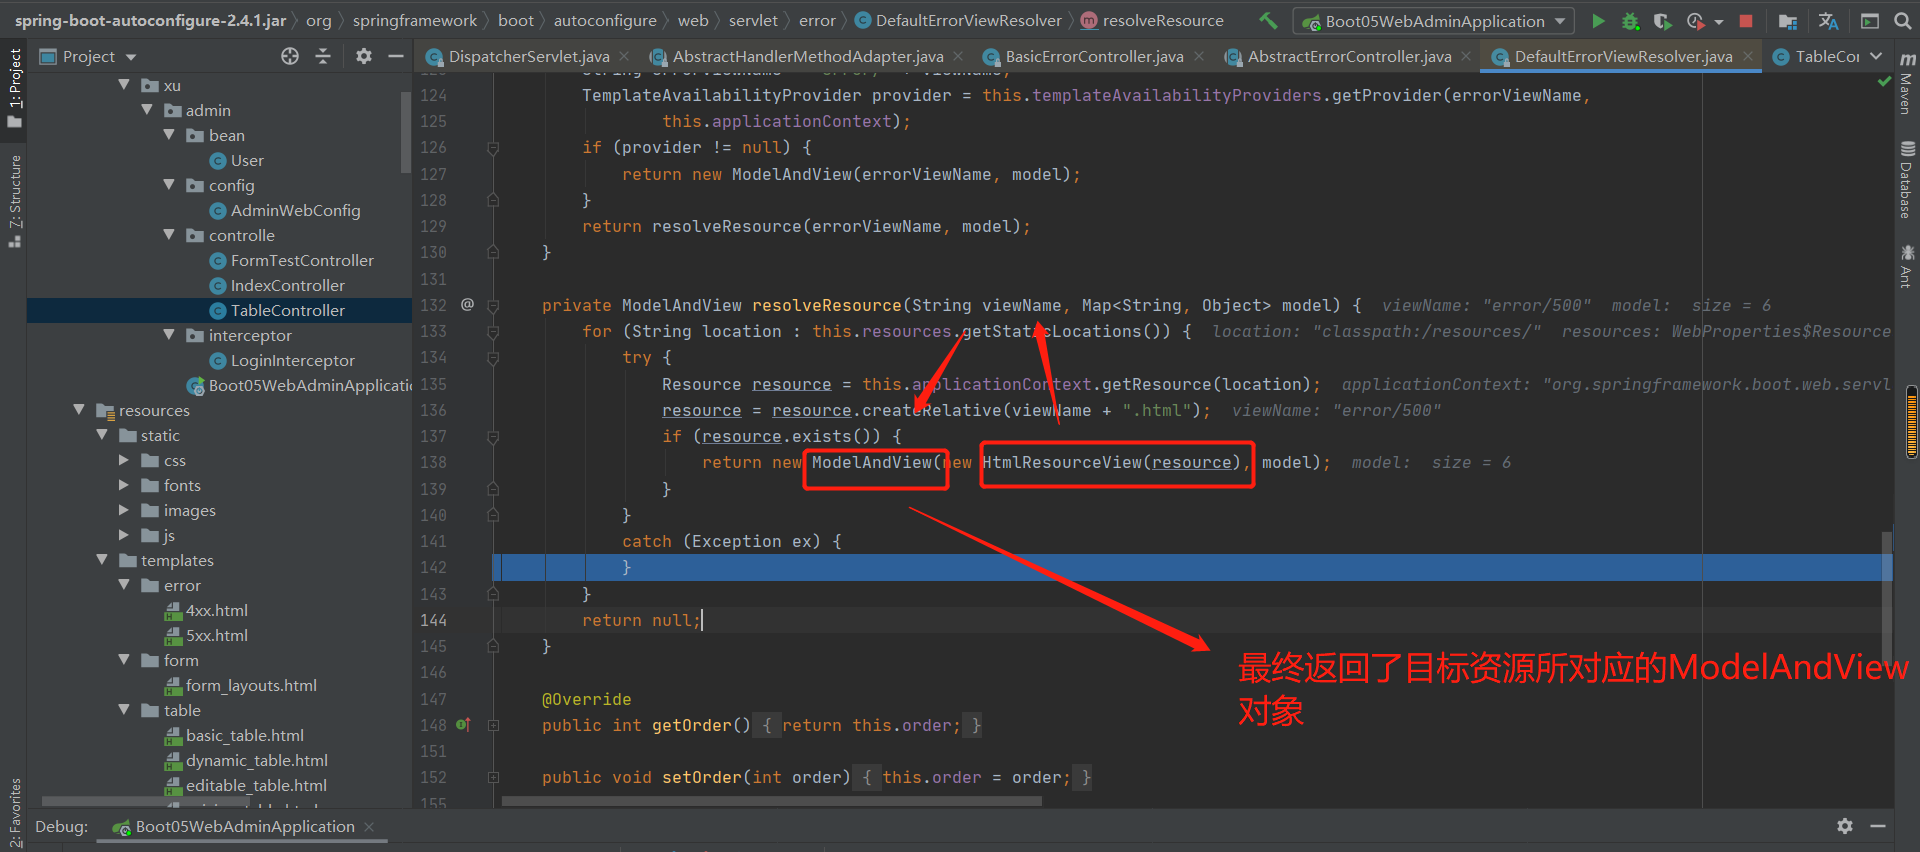
补充:也就是模板引擎响应对应的页面。
总结:
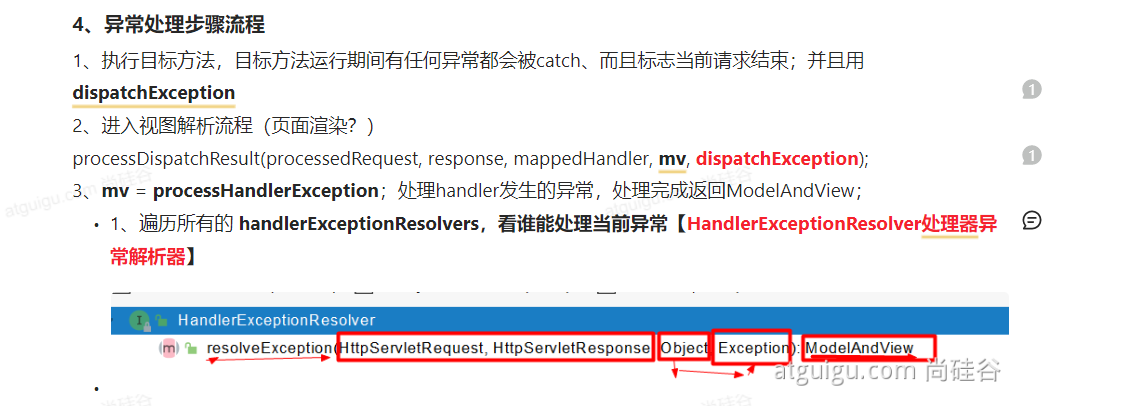
10-5:几种异常处理原理

1.自定义错误页:
2.@ControllerAdvice+@ExceptionHandler处理异常:
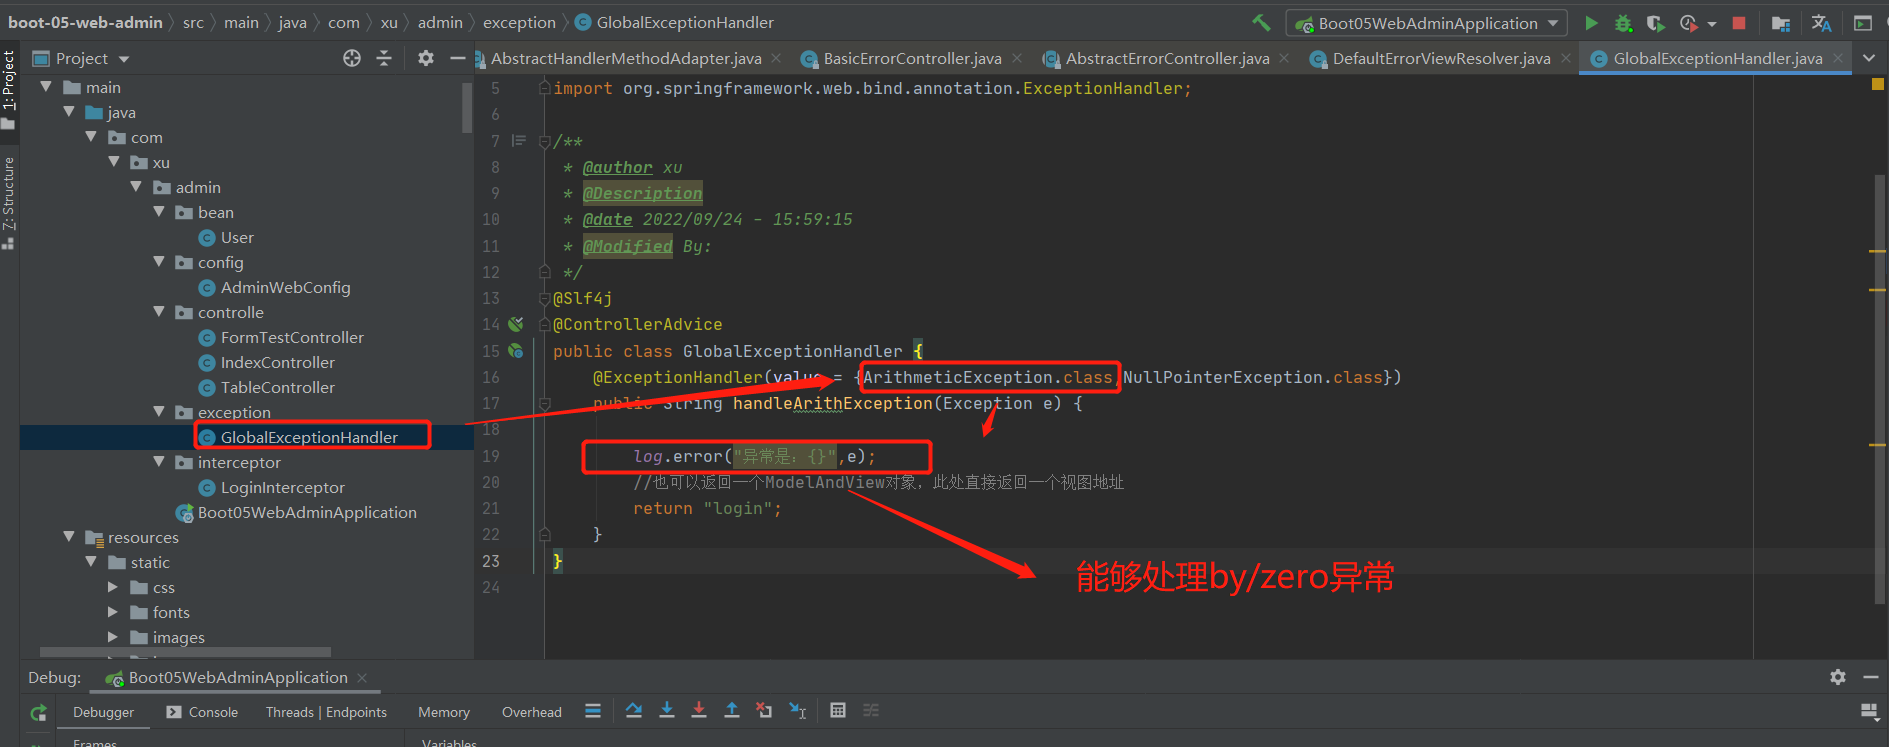
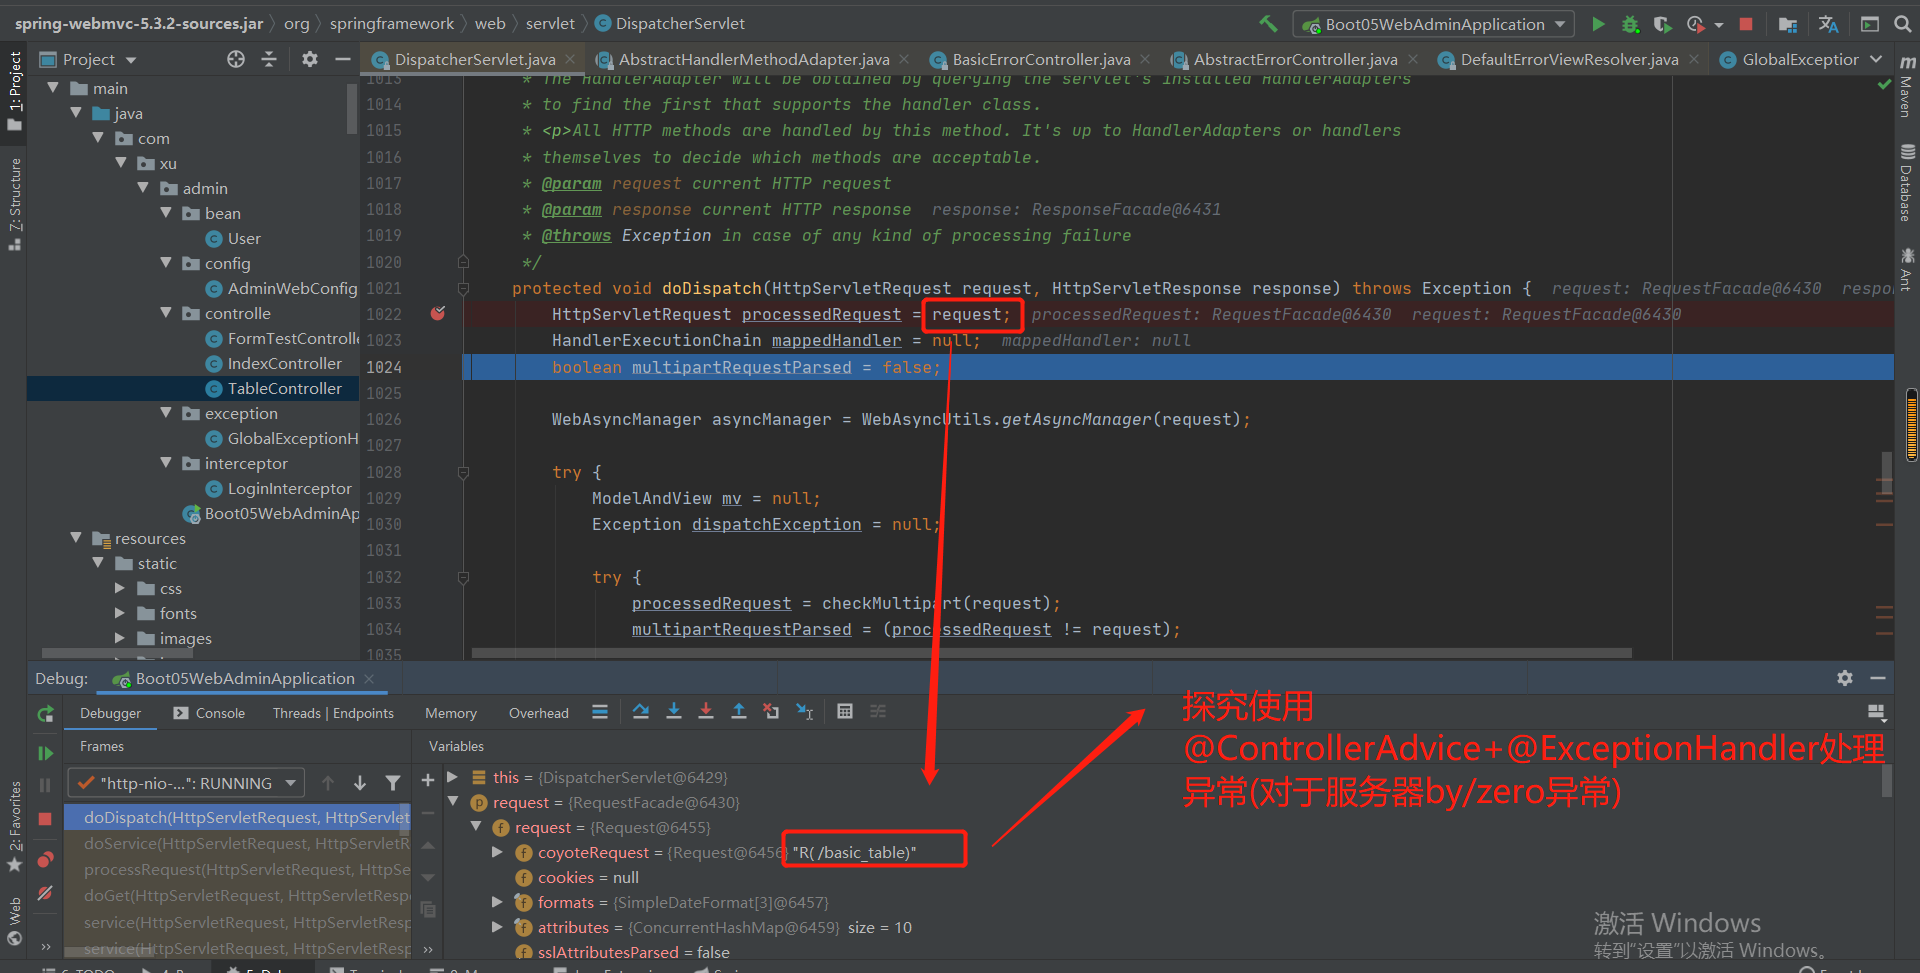
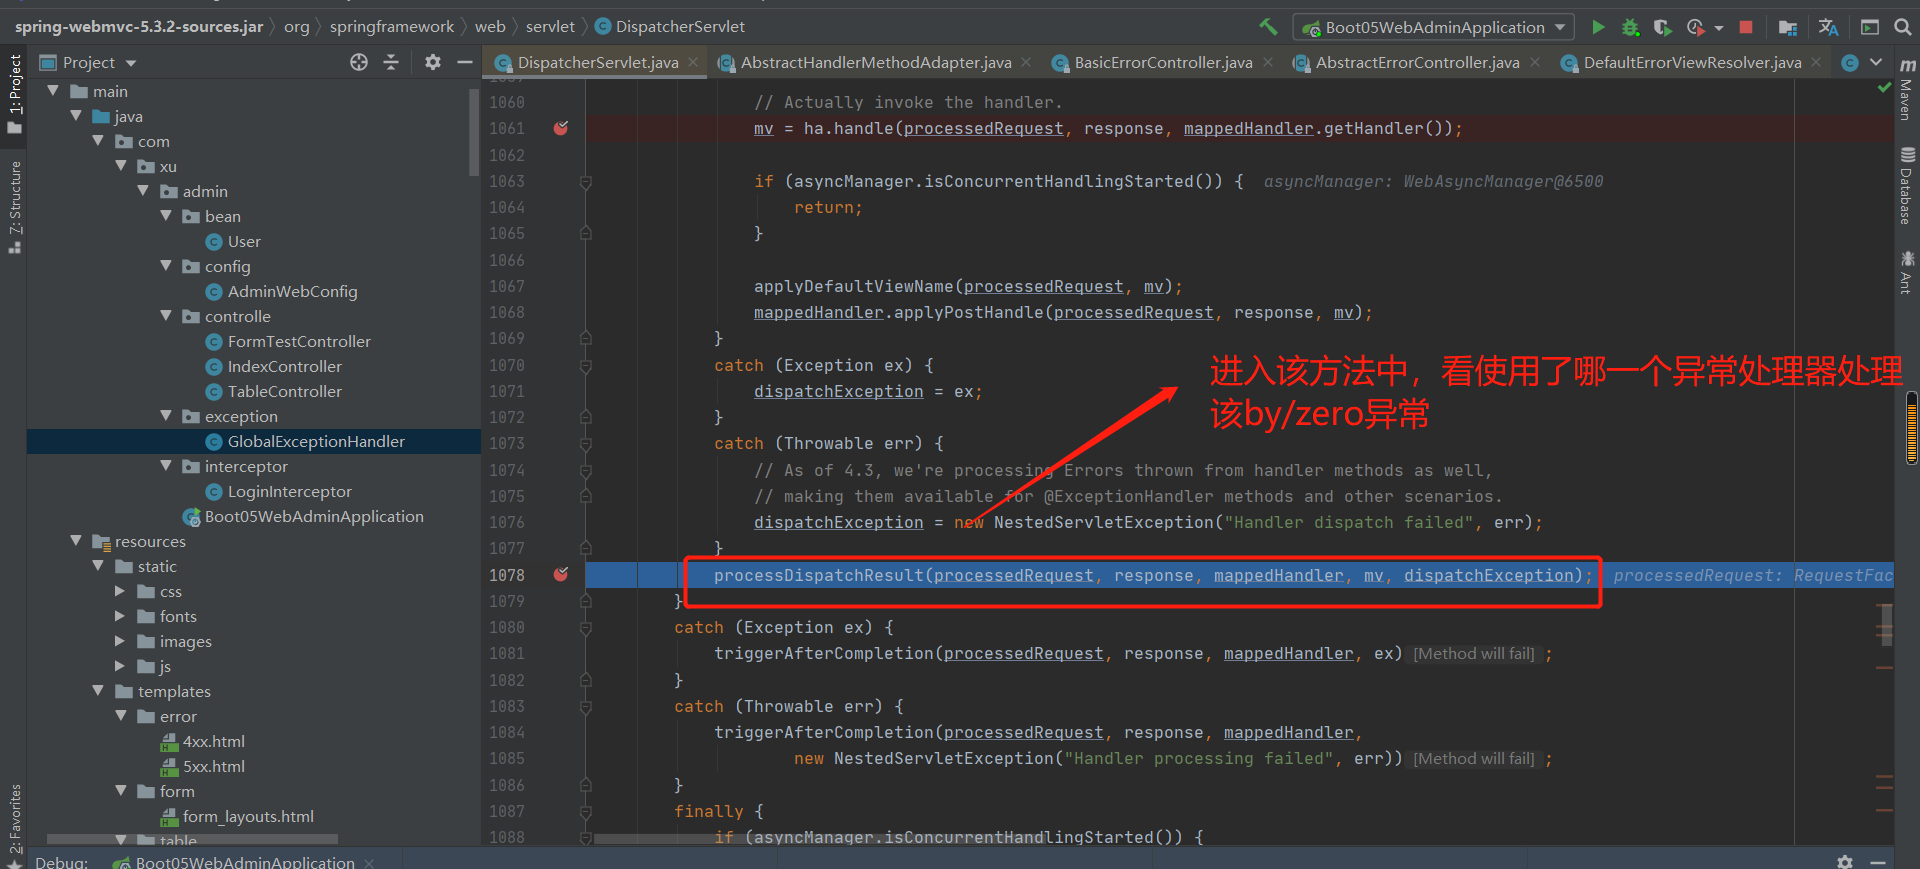
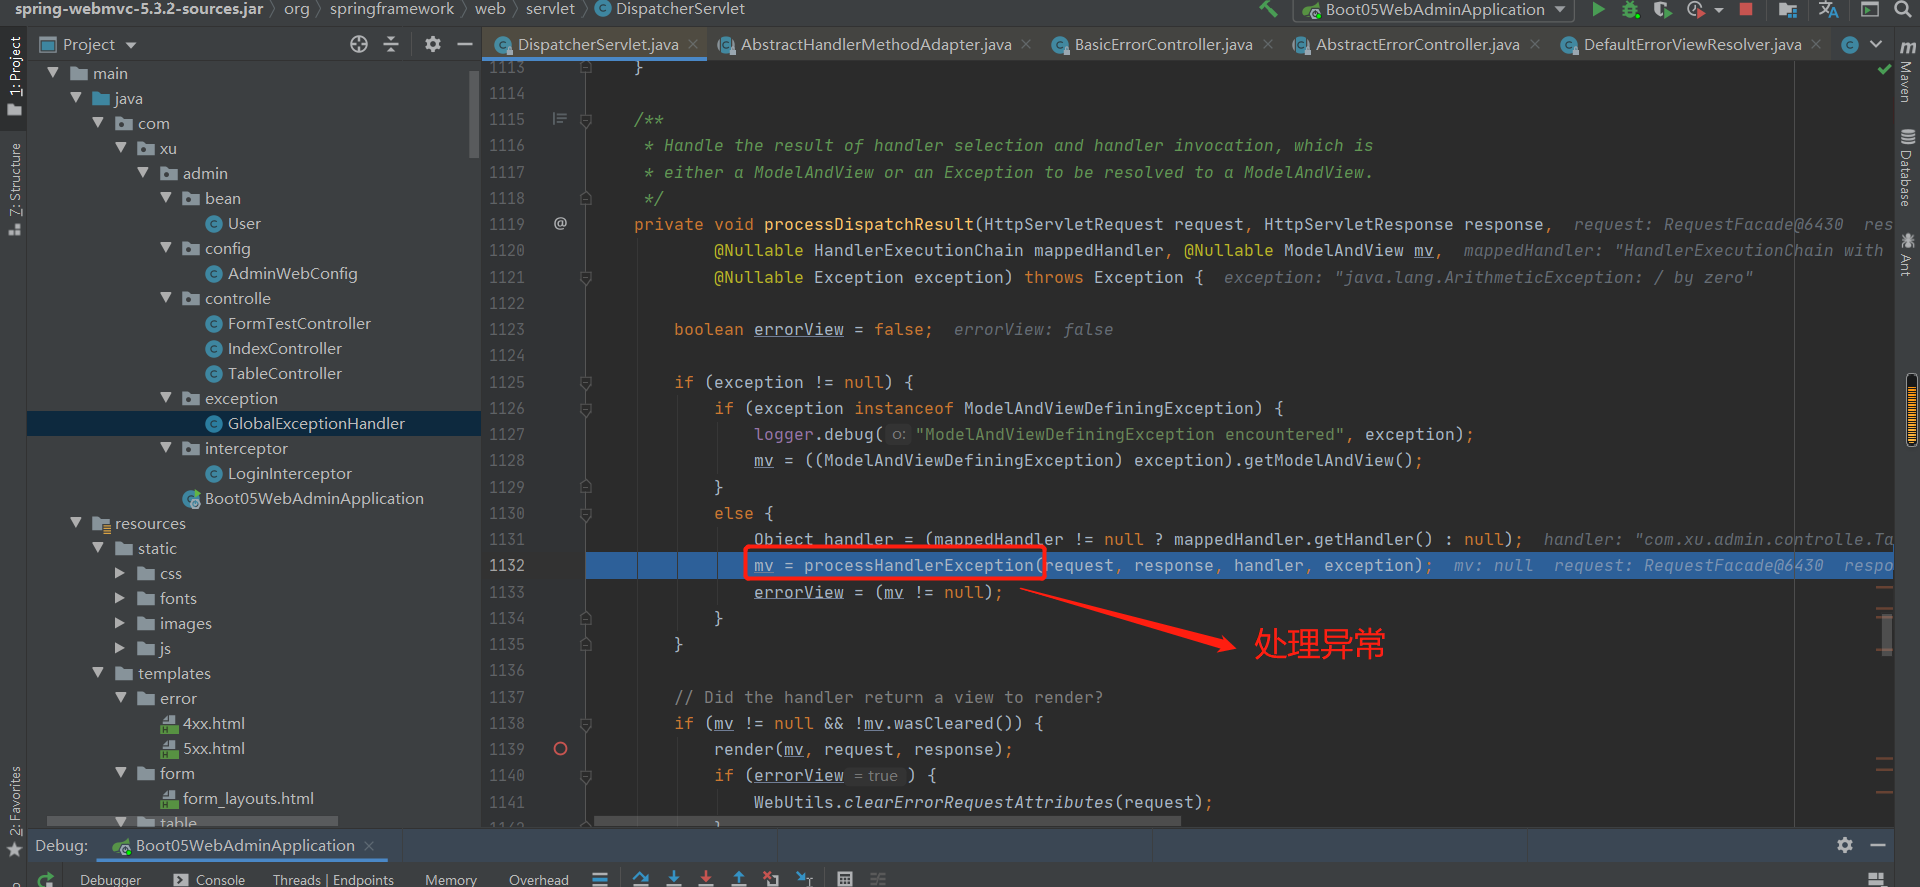
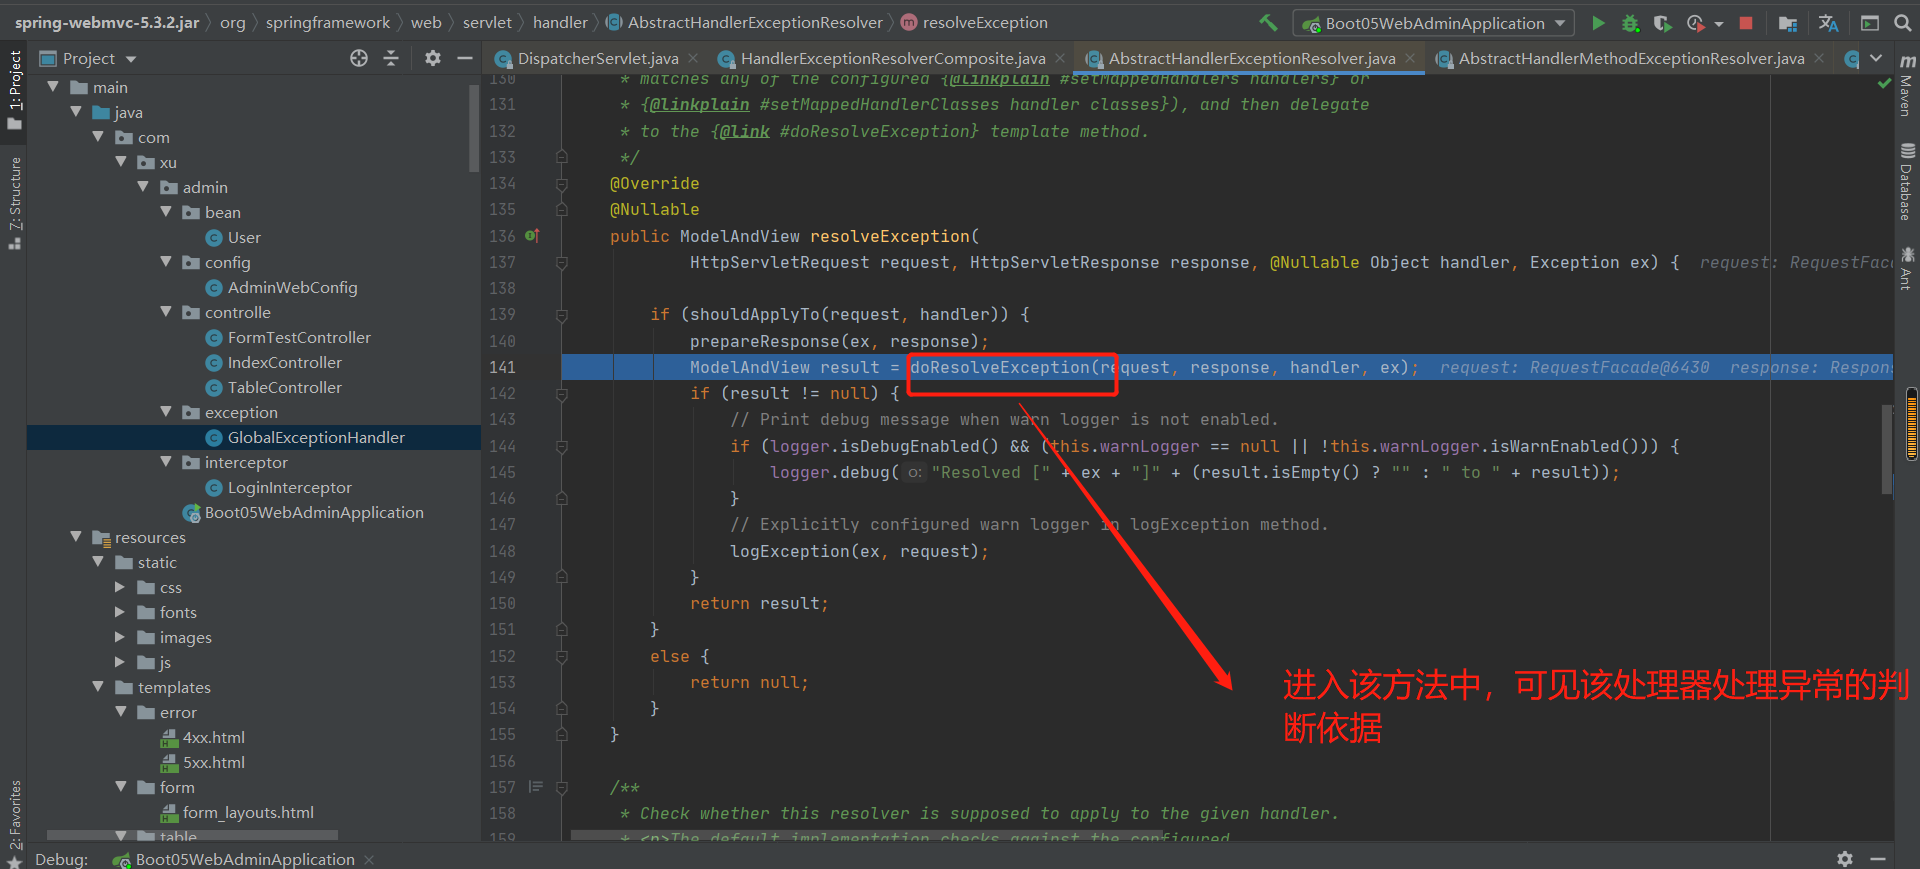
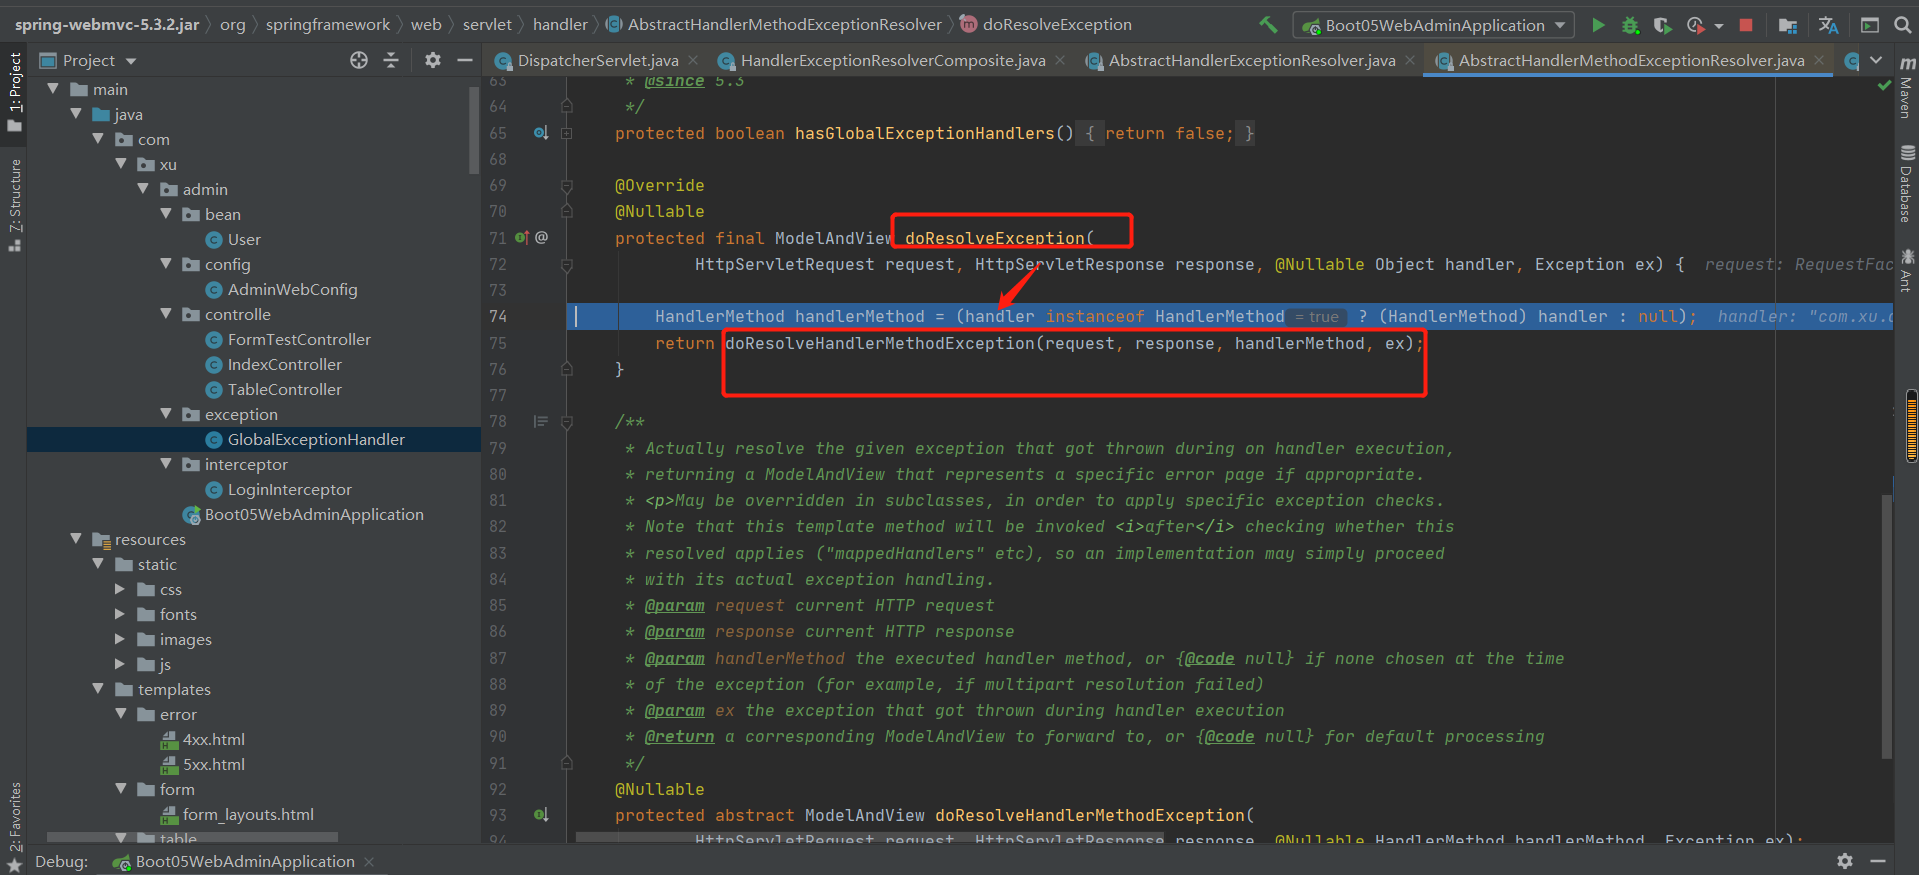
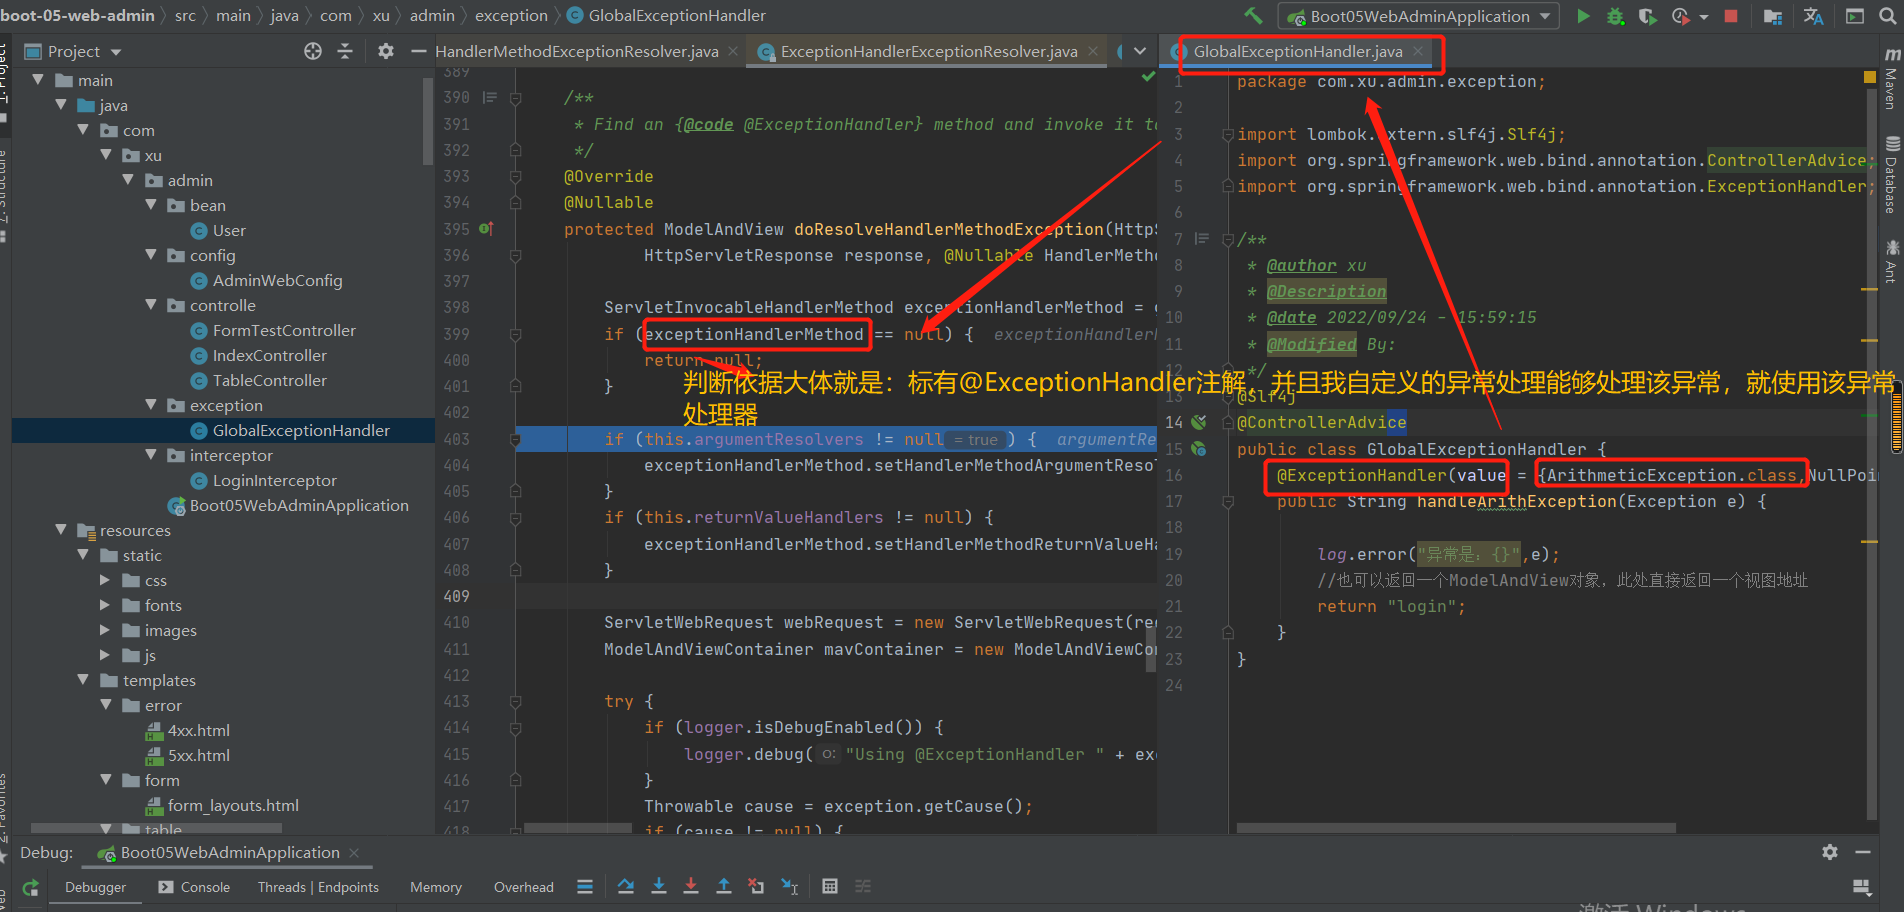
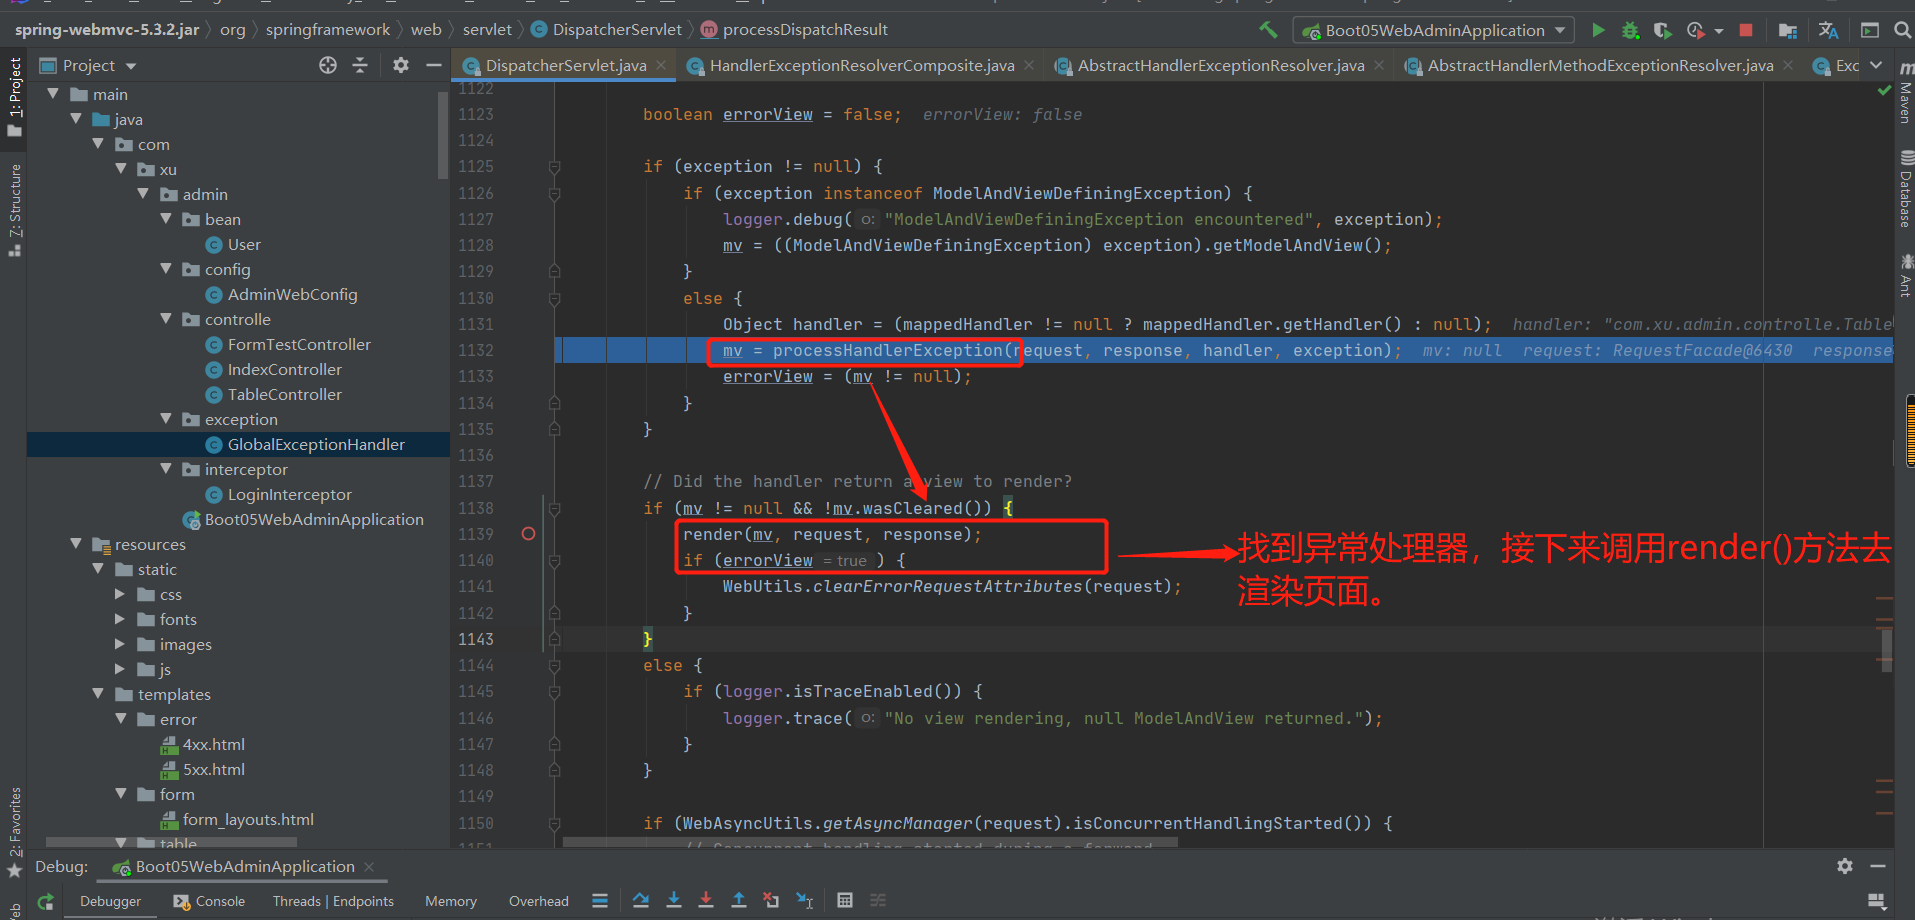
代码参考:
package com.xu.admin.exception;

import lombok.extern.slf4j.Slf4j;
import org.springframework.web.bind.annotation.ControllerAdvice;
import org.springframework.web.bind.annotation.ExceptionHandler;

/**
 * @author xu
 * @Description
 * @date 2022/09/24 - 15:59:15
 * @Modified By:
 */
@Slf4j
@ControllerAdvice
public class GlobalExceptionHandler {
    @ExceptionHandler(value = {ArithmeticException.class,NullPointerException.class})
    public String handleArithException(Exception e) {

        log.error("异常是:{}",e);
        //也可以返回一个ModelAndView对象,此处直接返回一个视图地址
        return "login";
    }
}
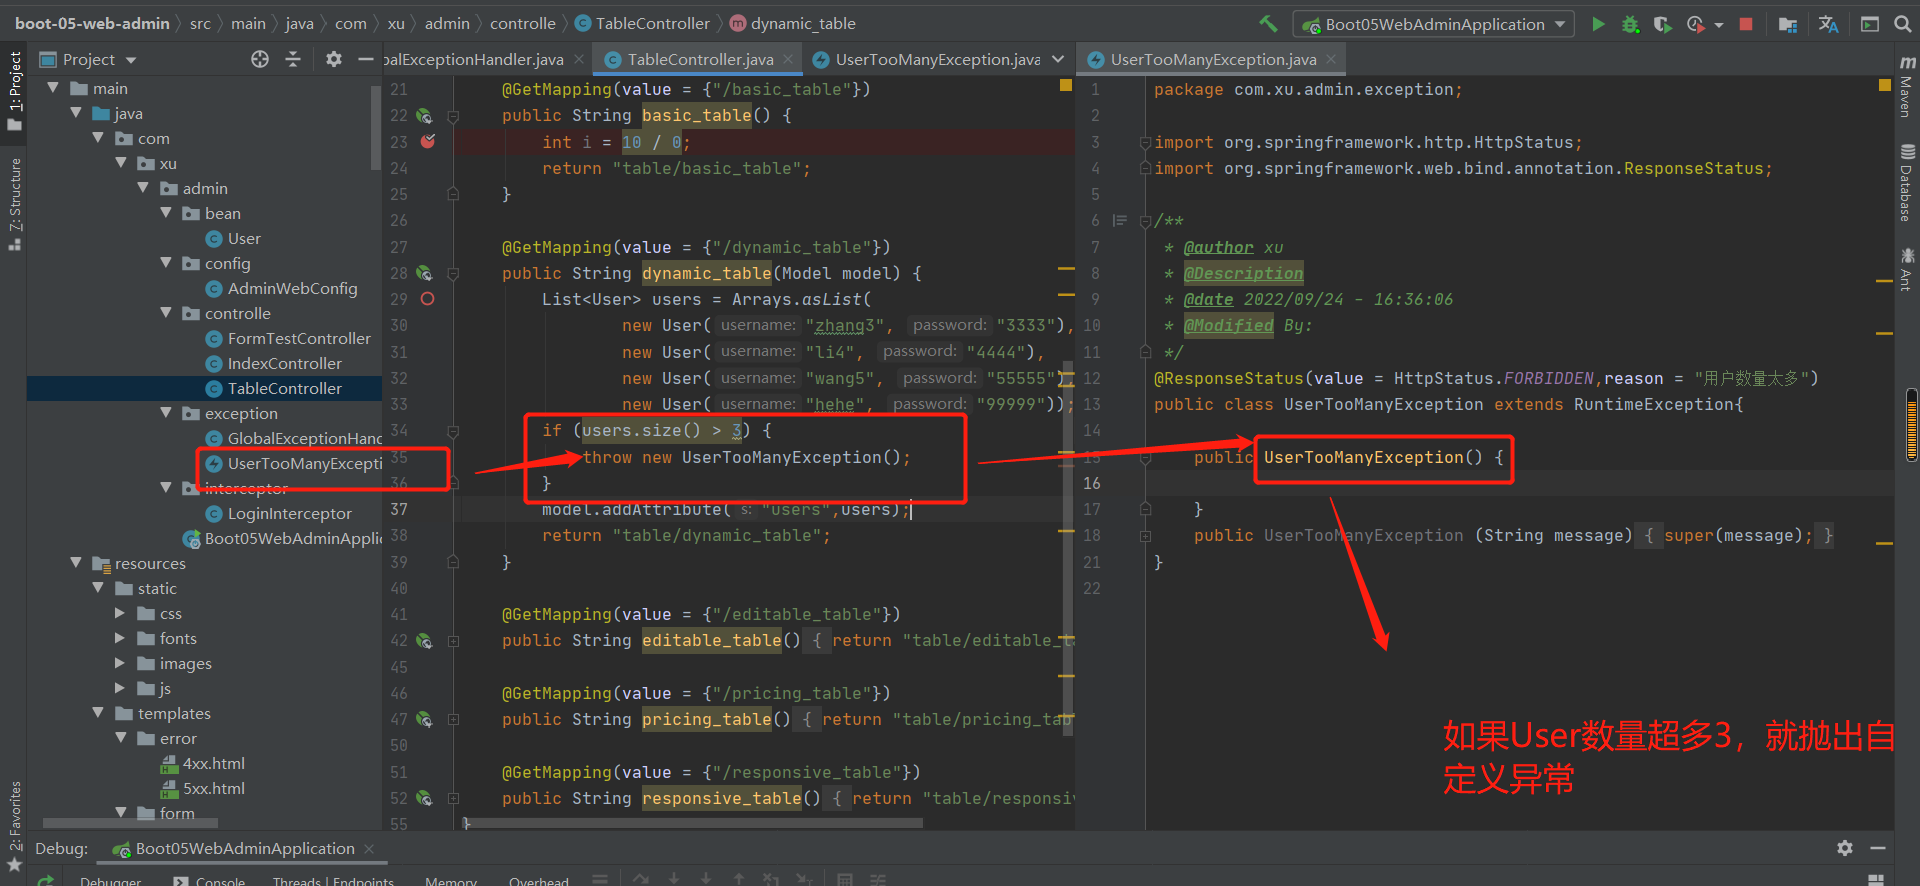
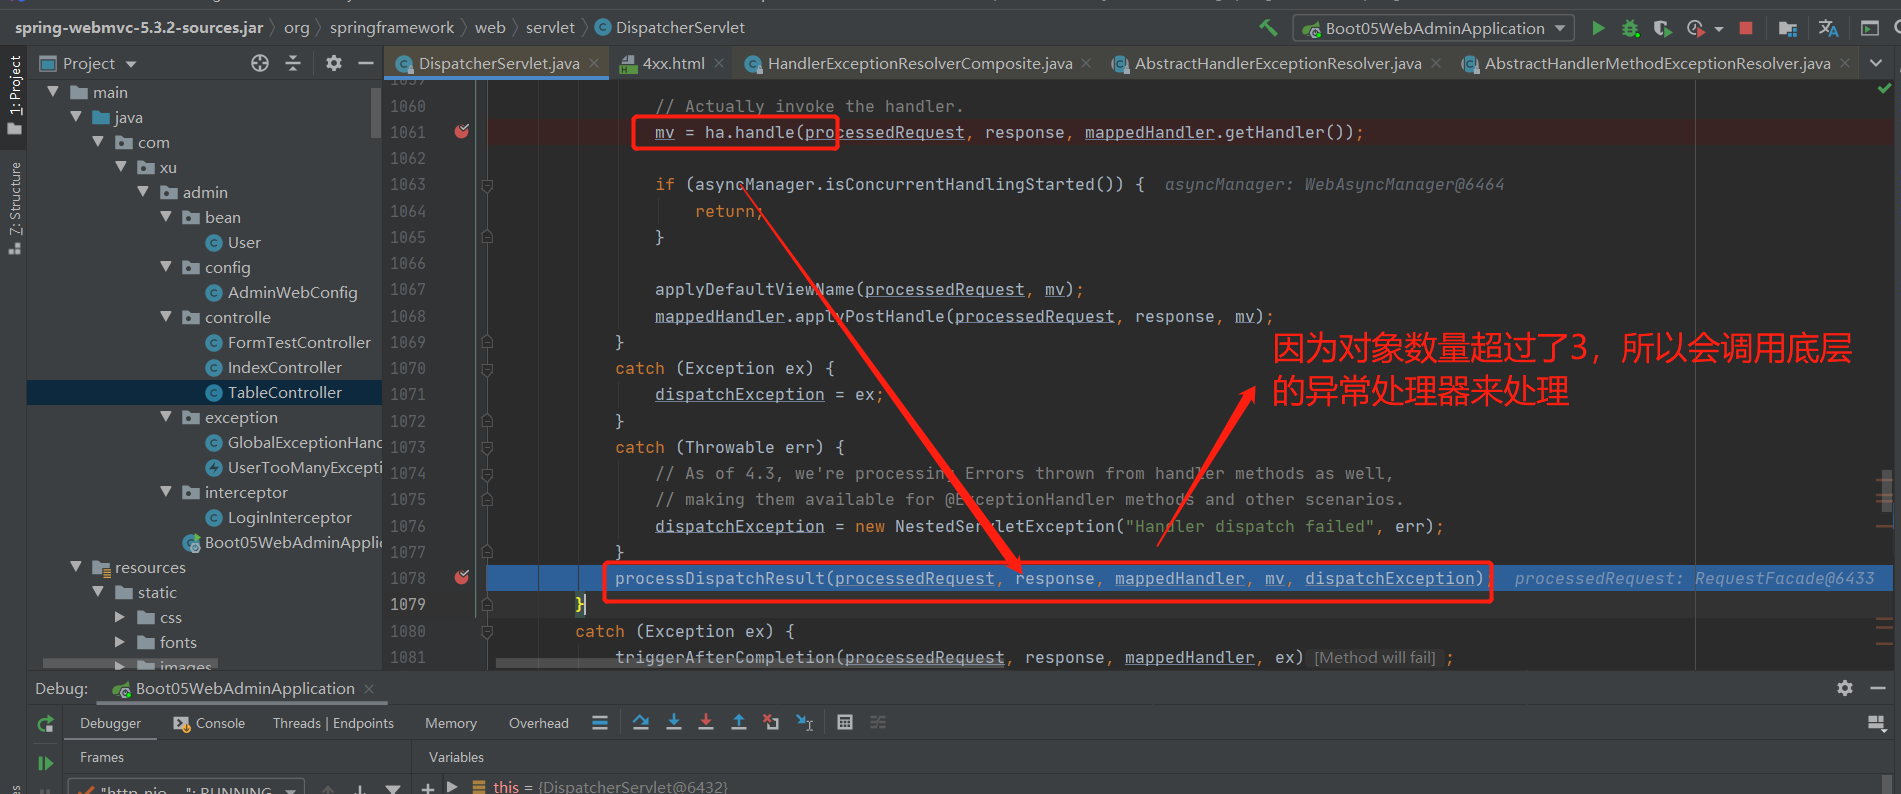
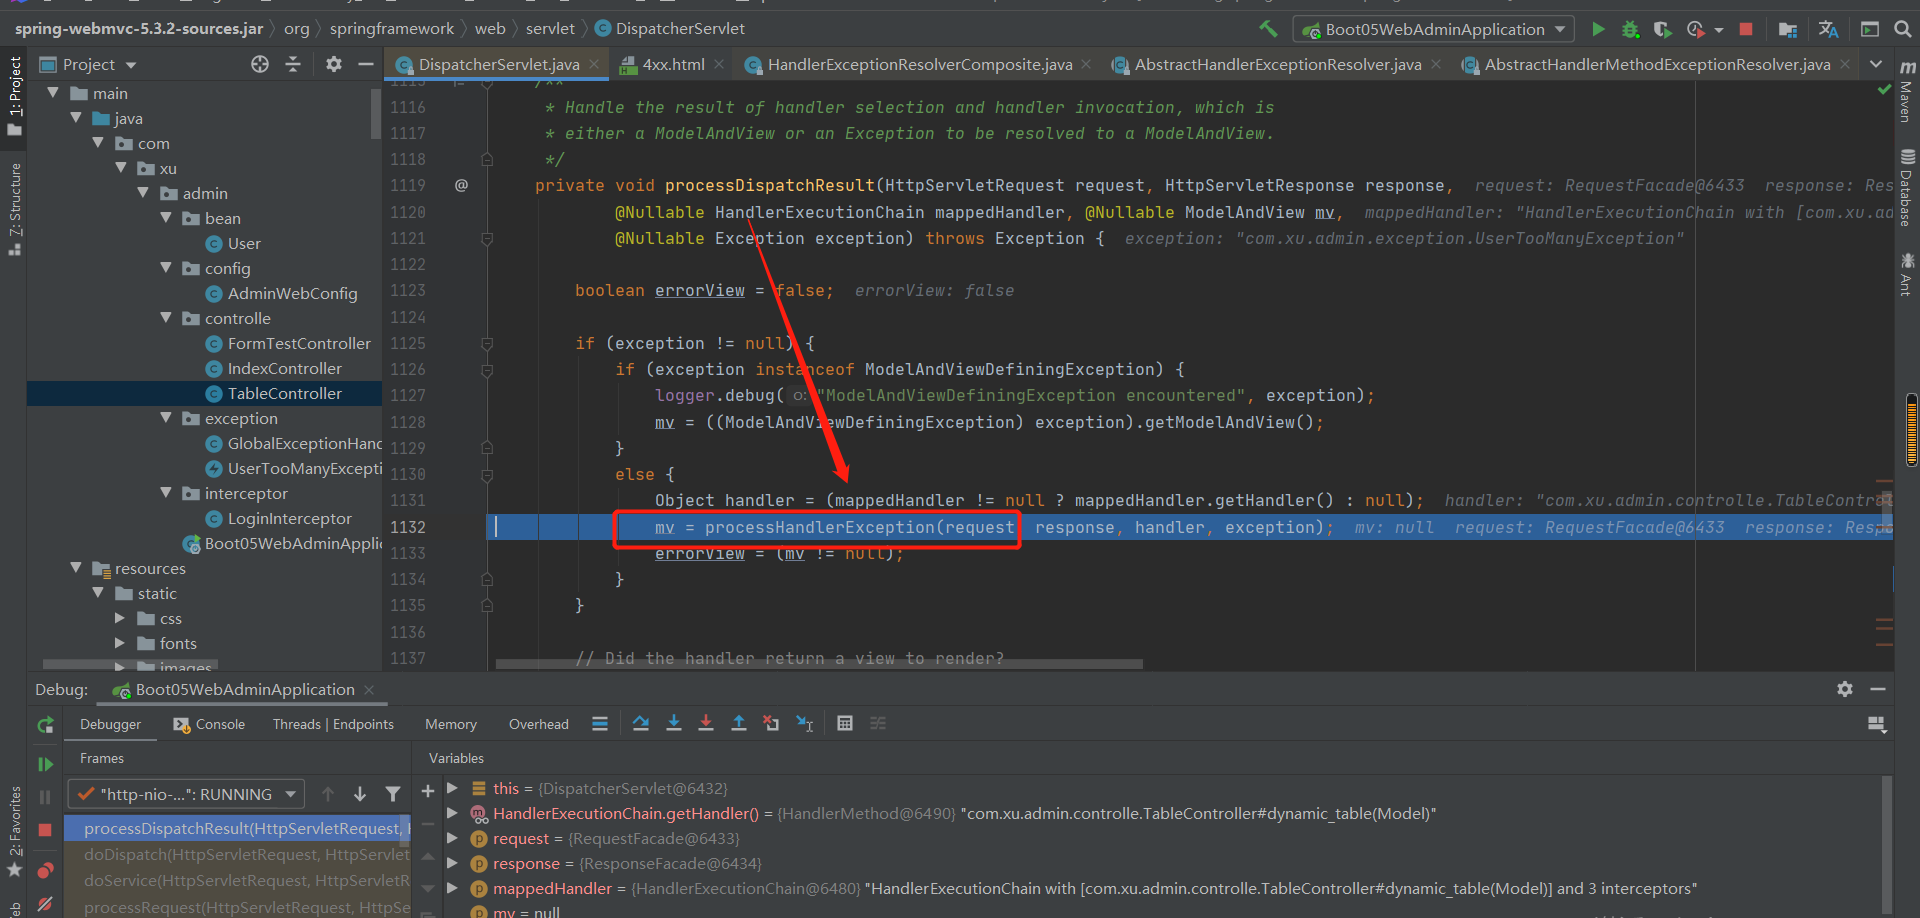
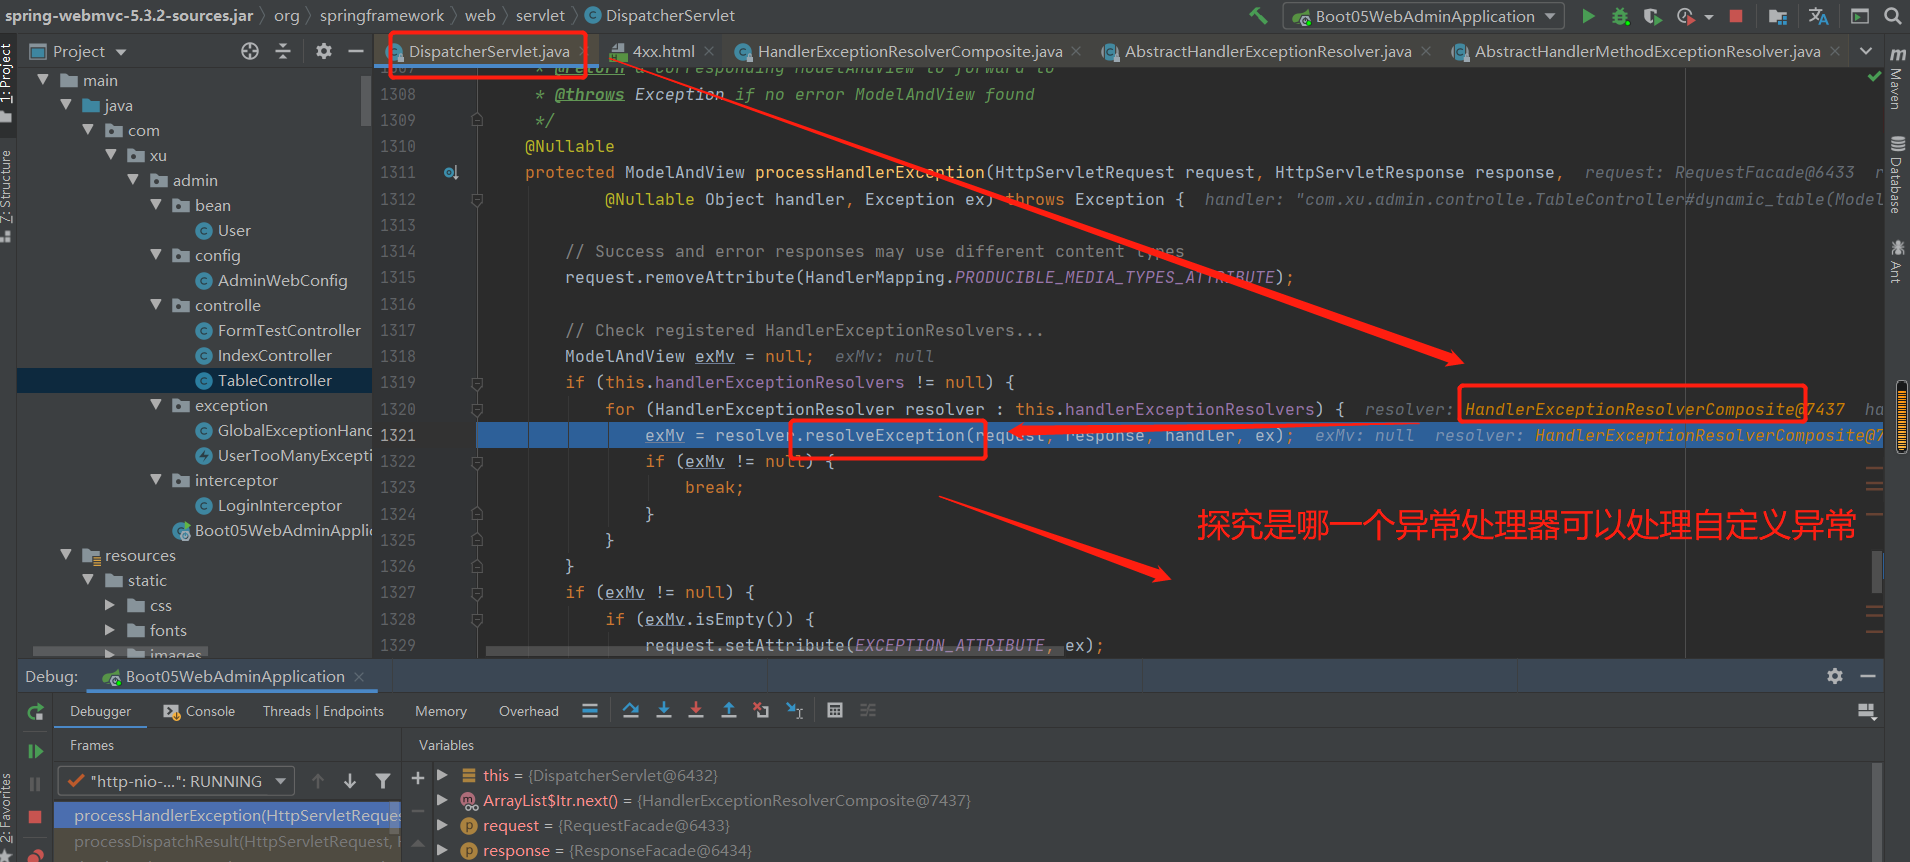
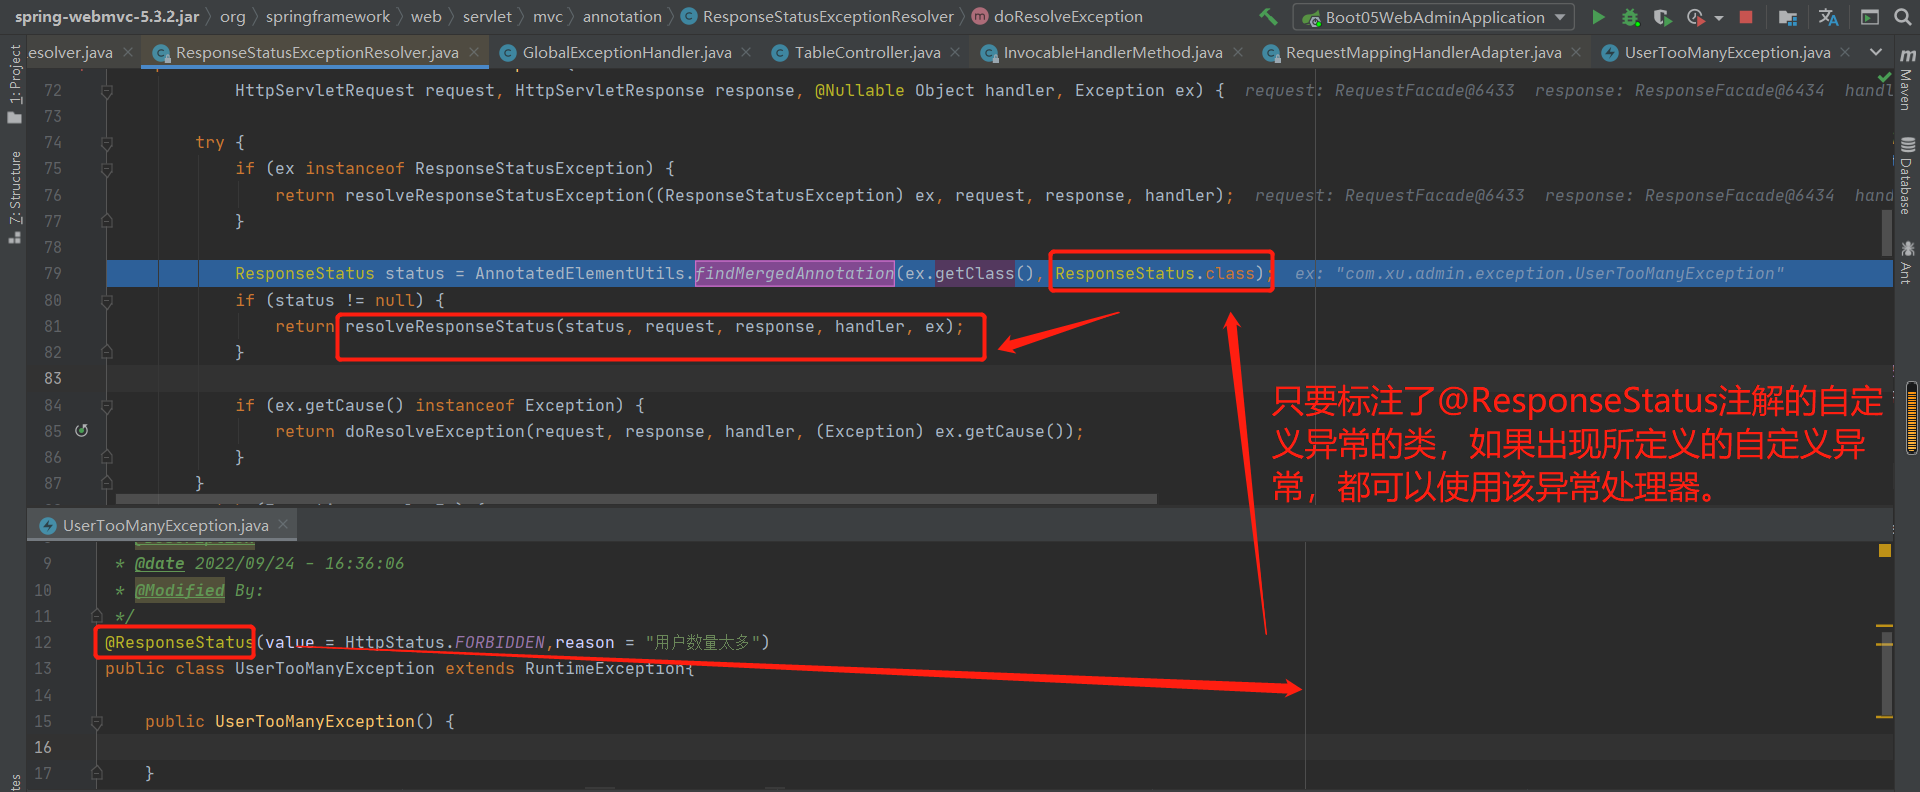
3.@ResponseStatus+自定义异常
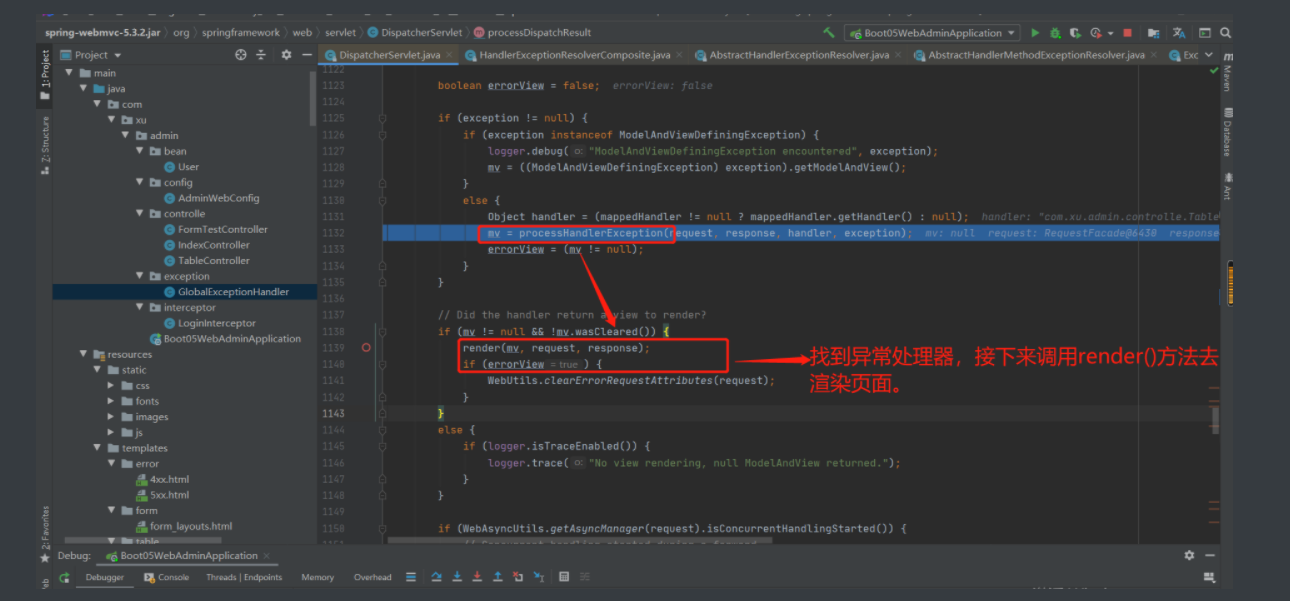
4.Spring底层的异常,eg:请求传参所引发的异常
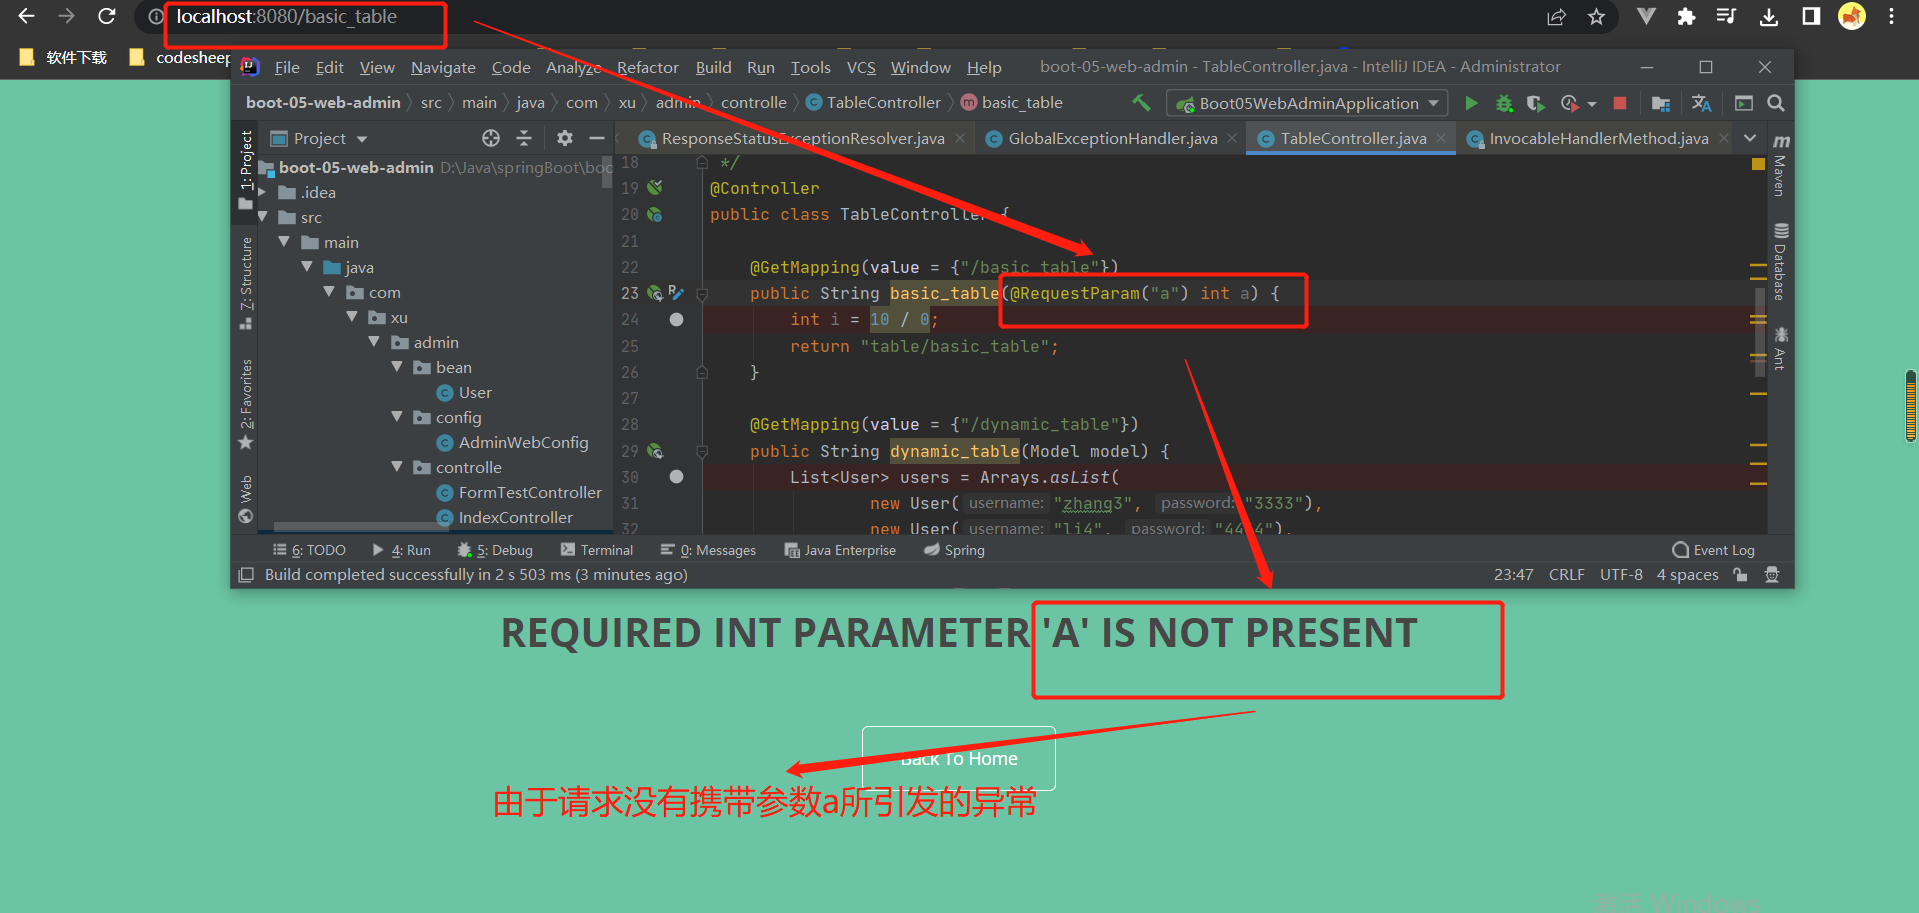
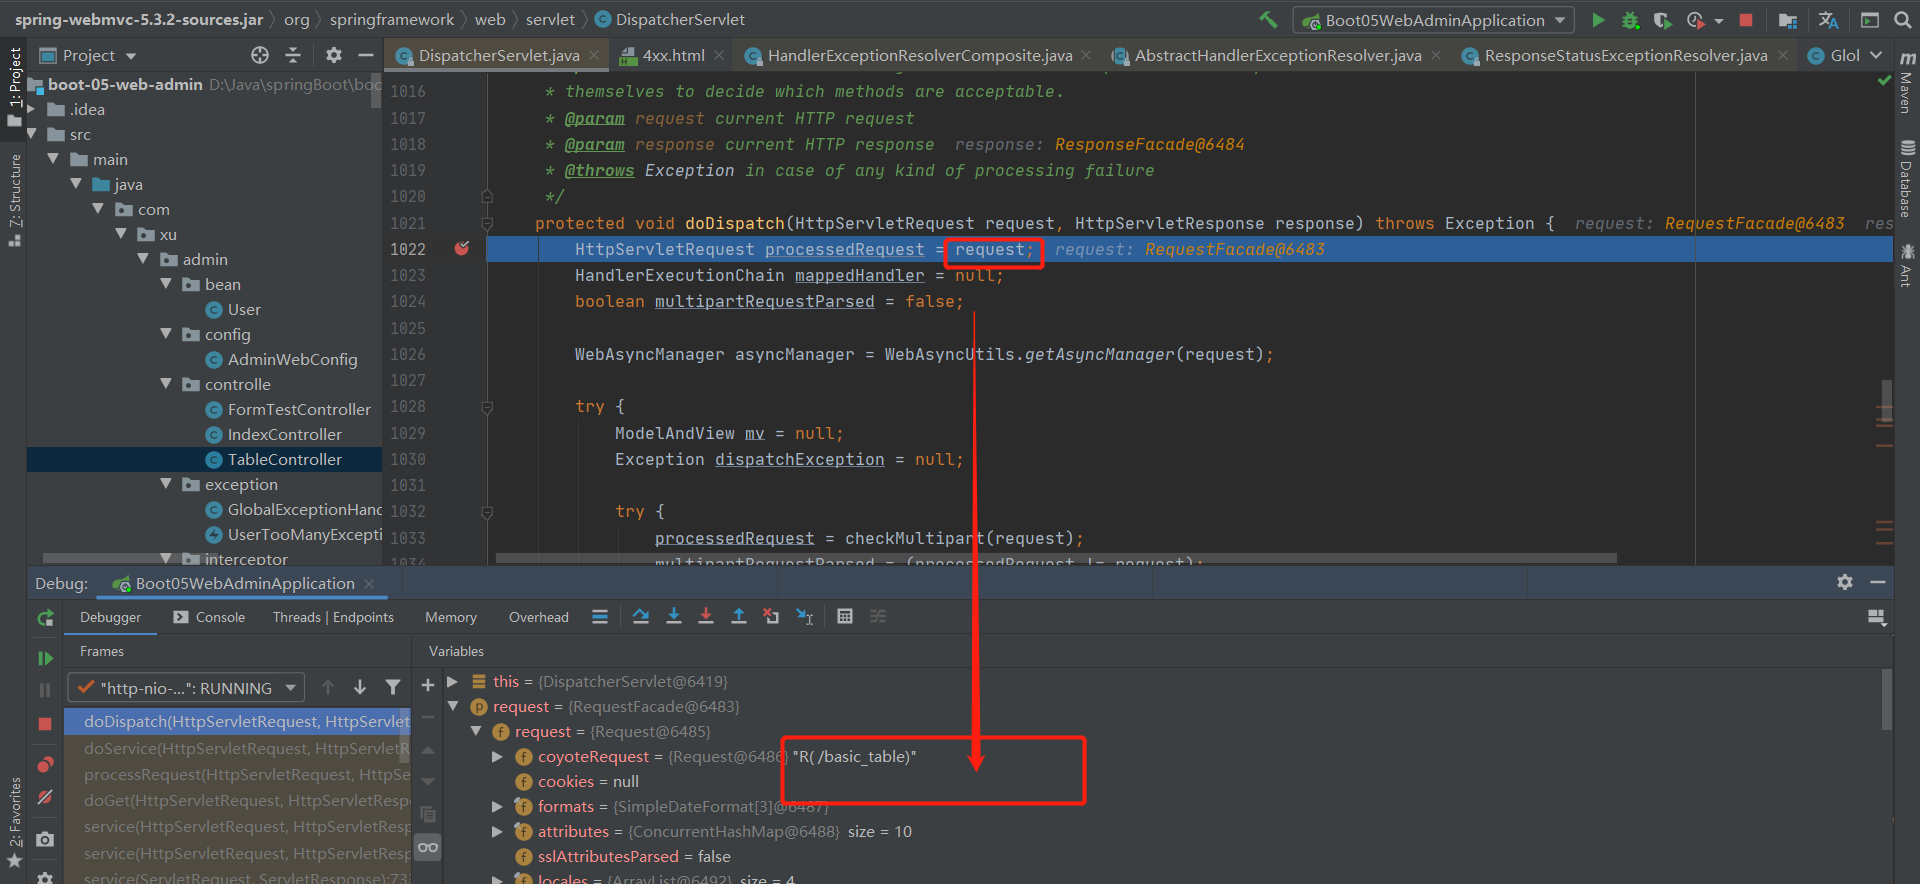
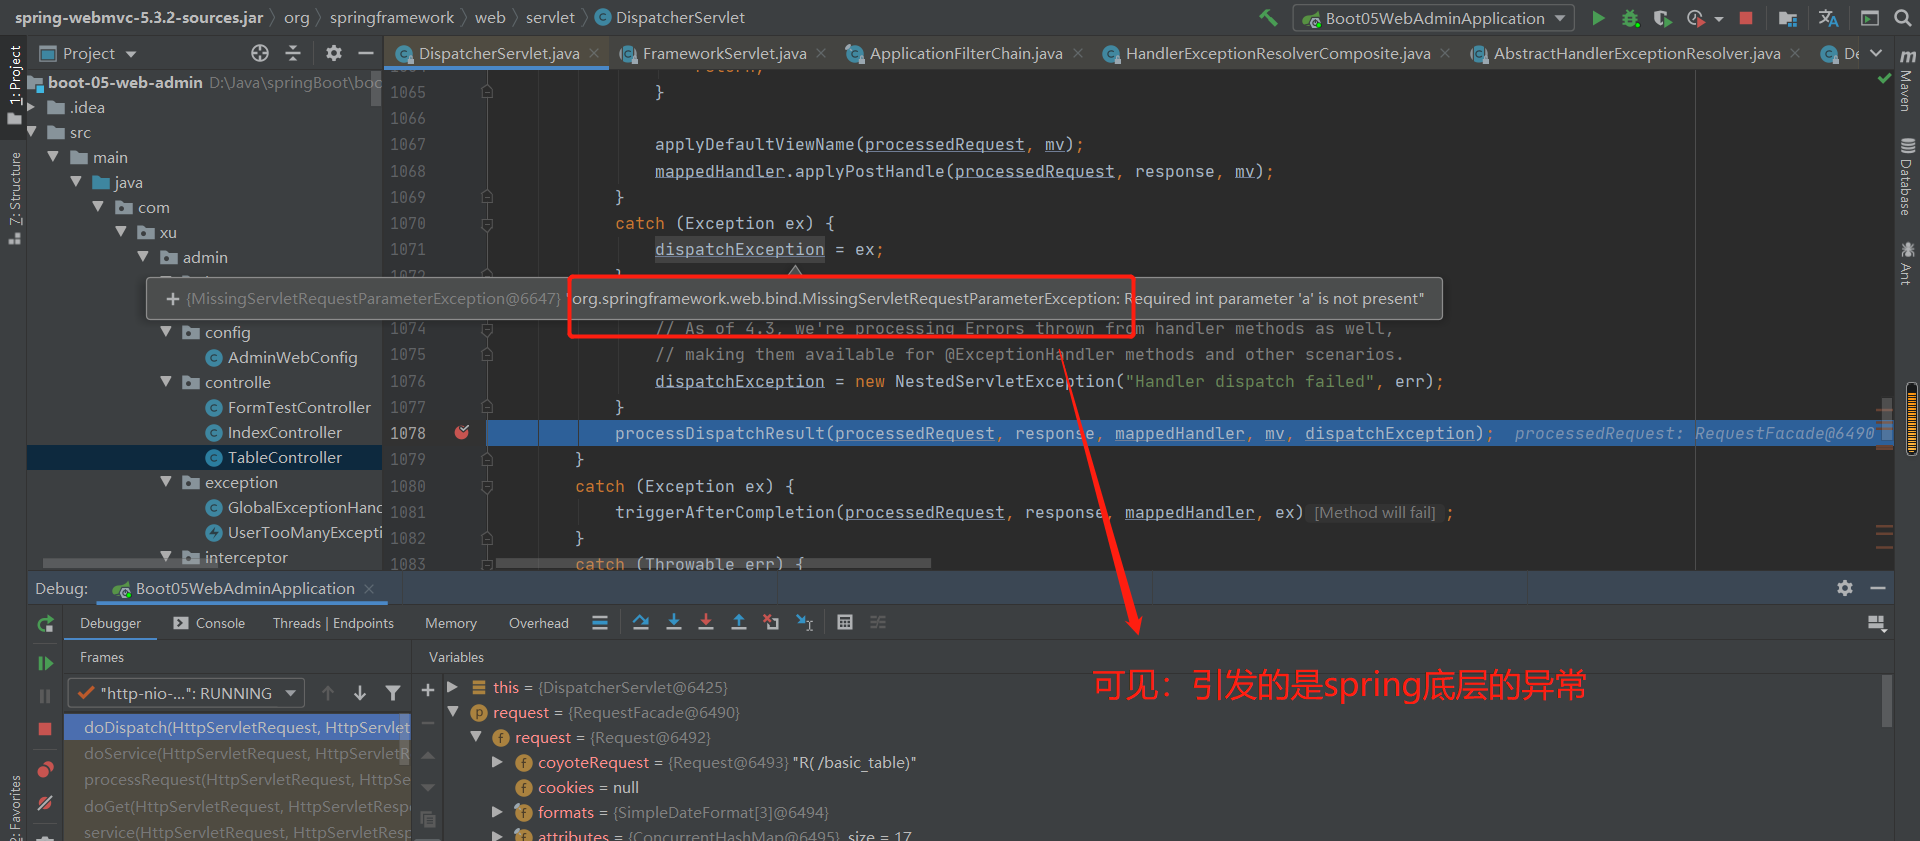
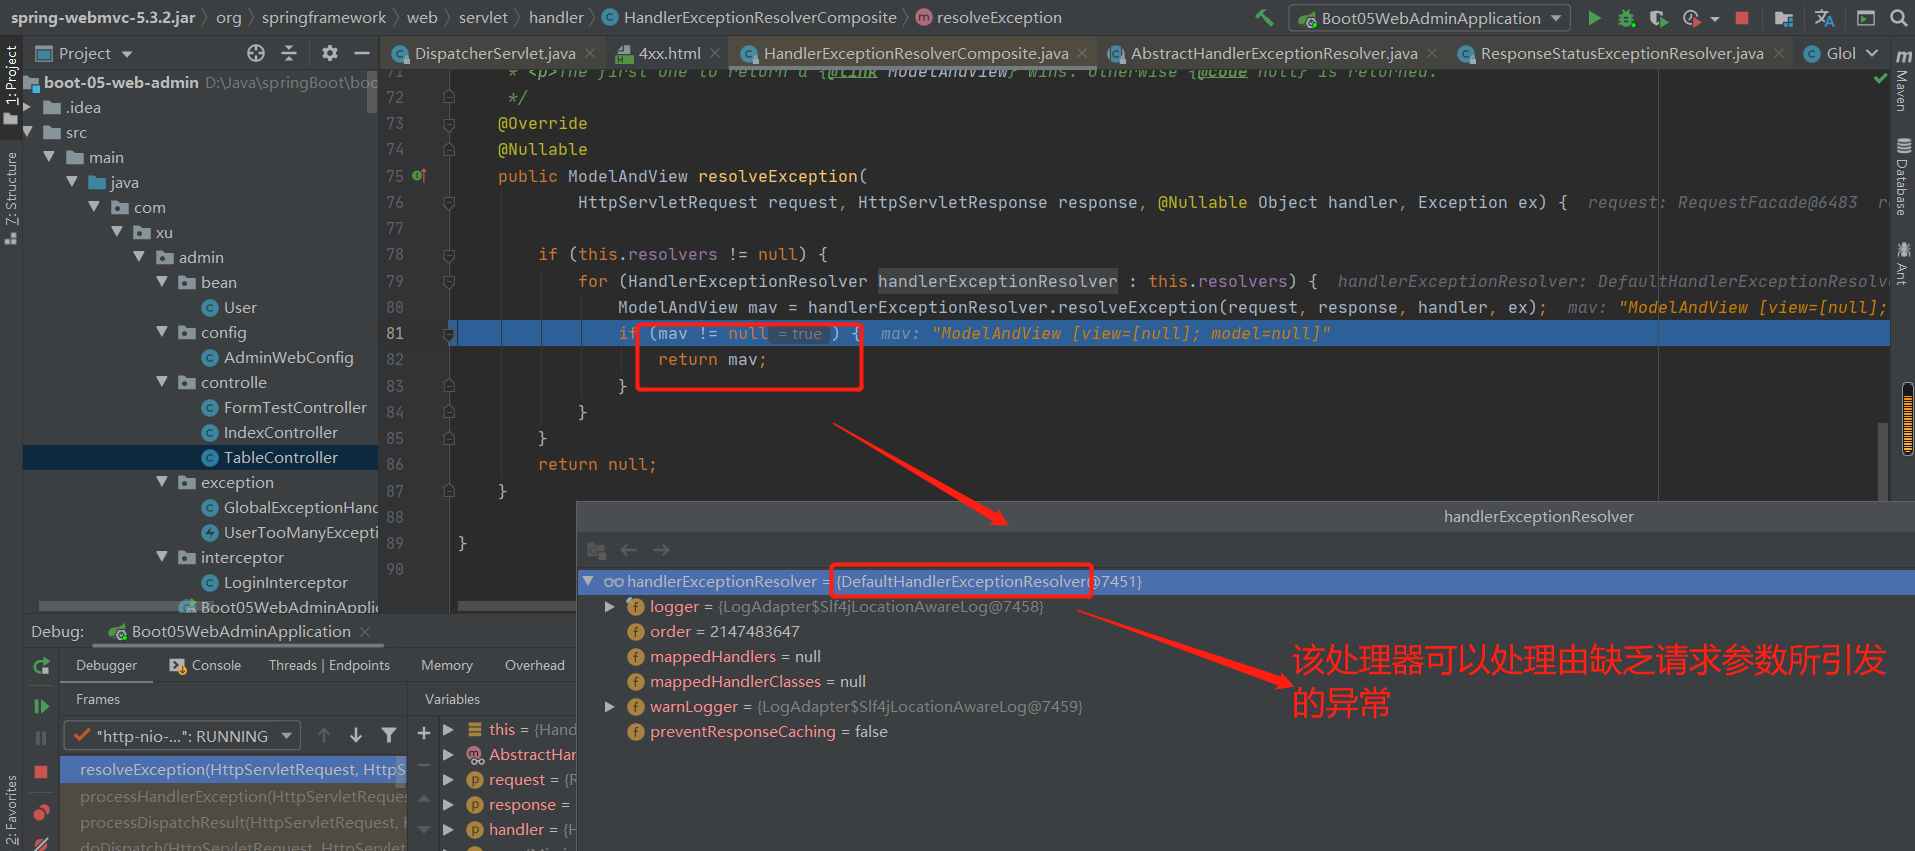
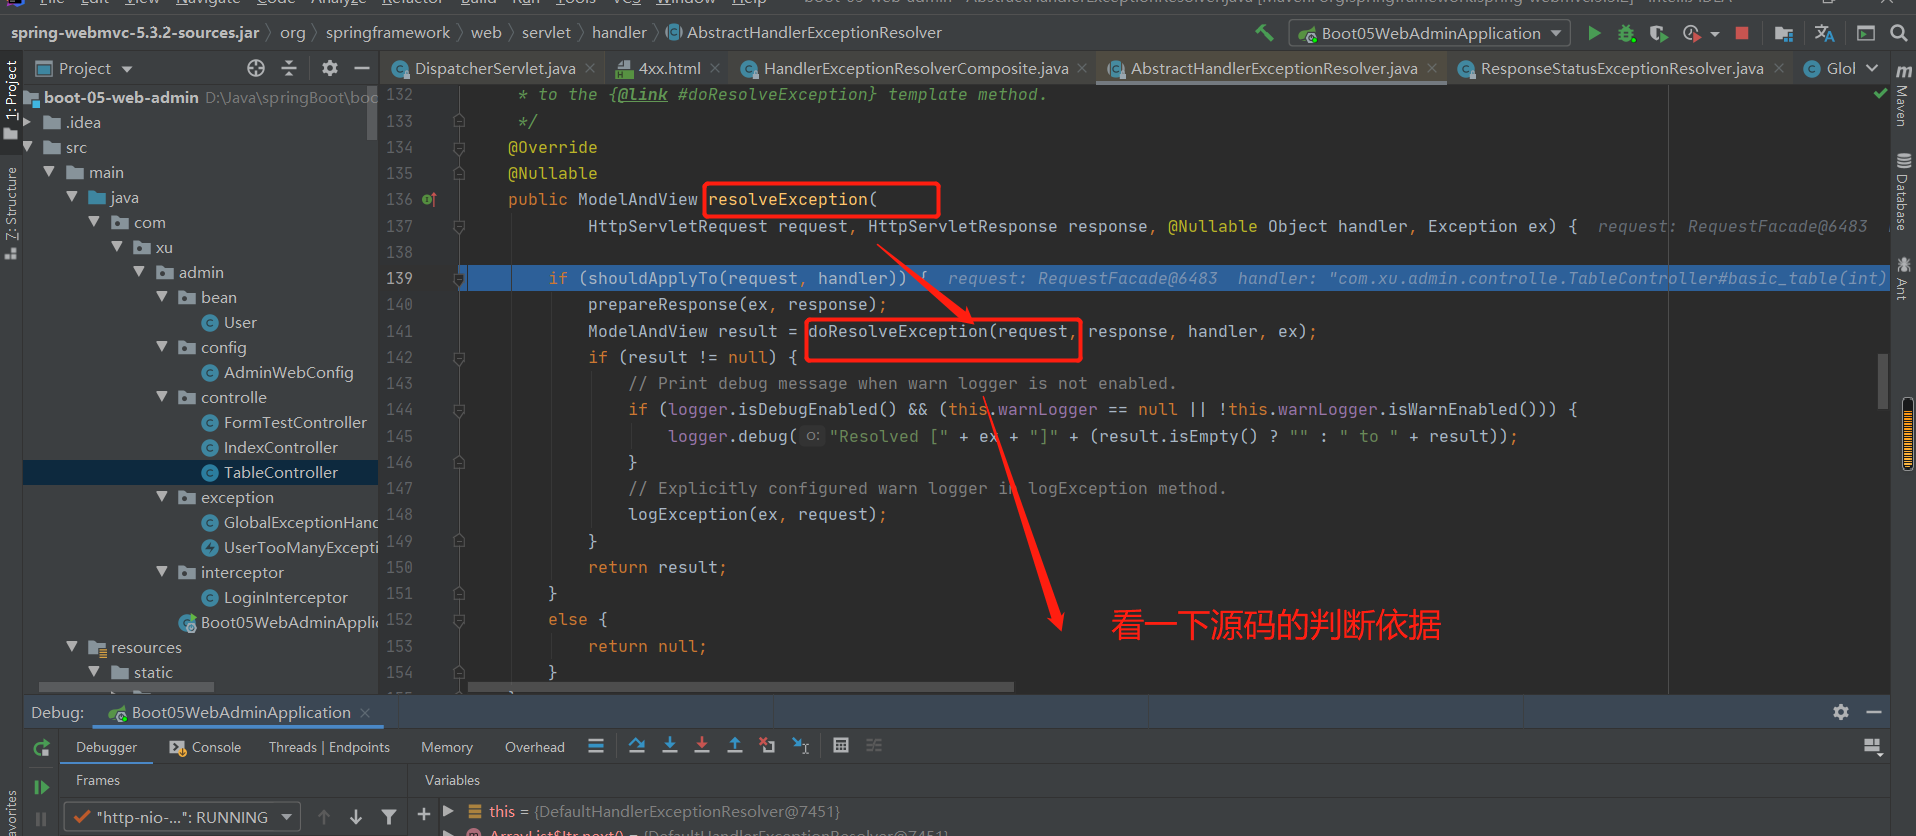
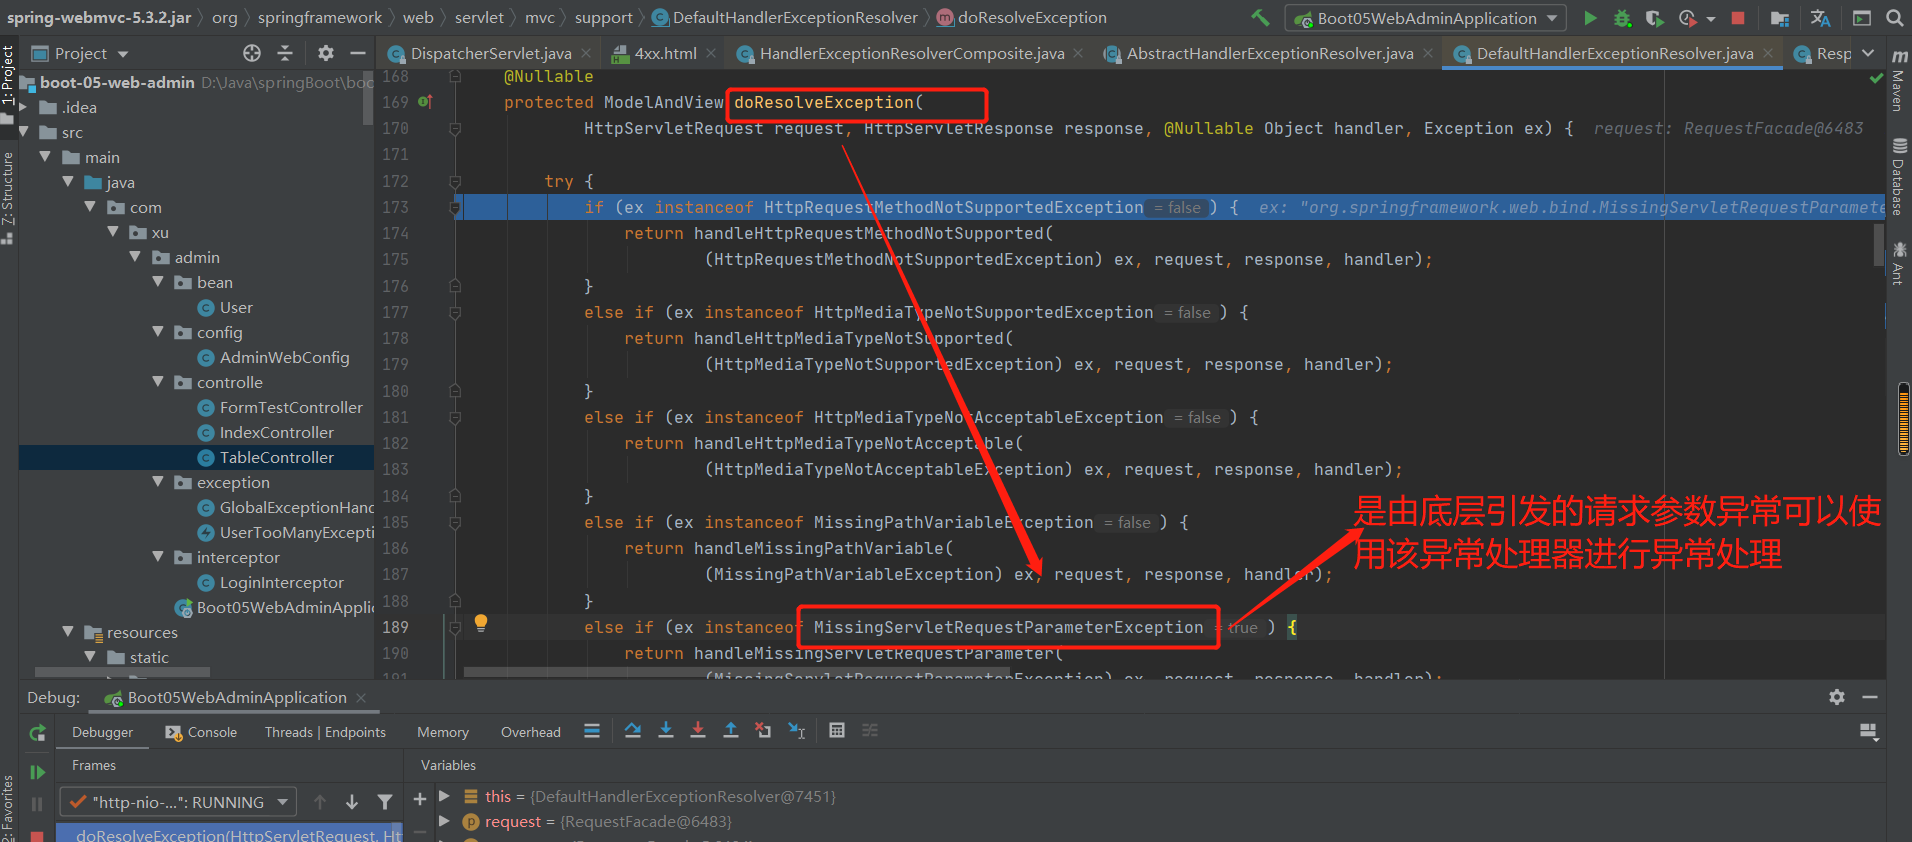
渲染即可:
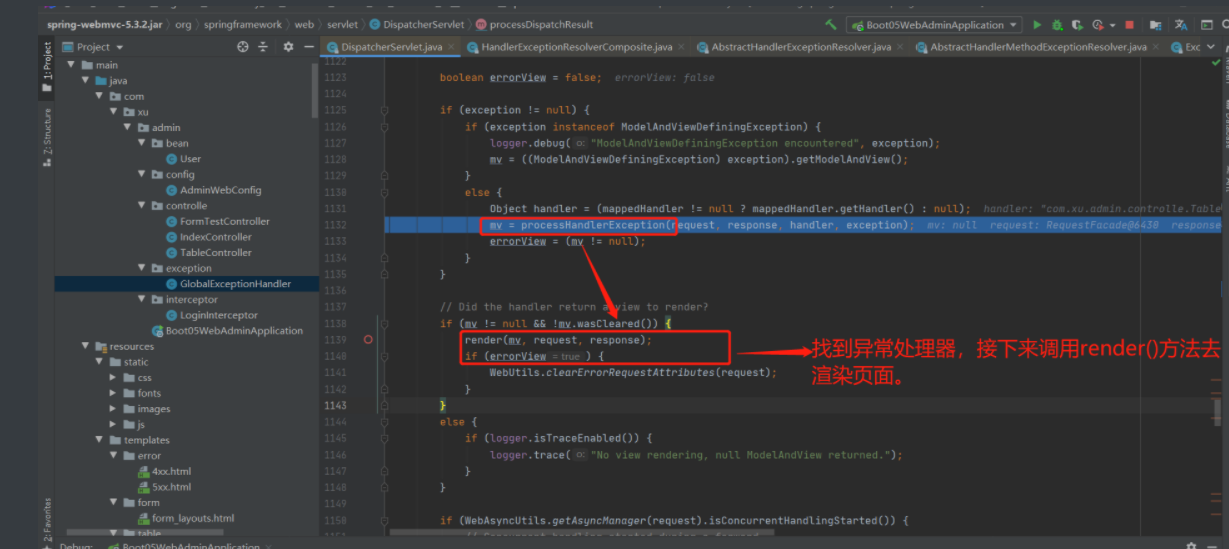
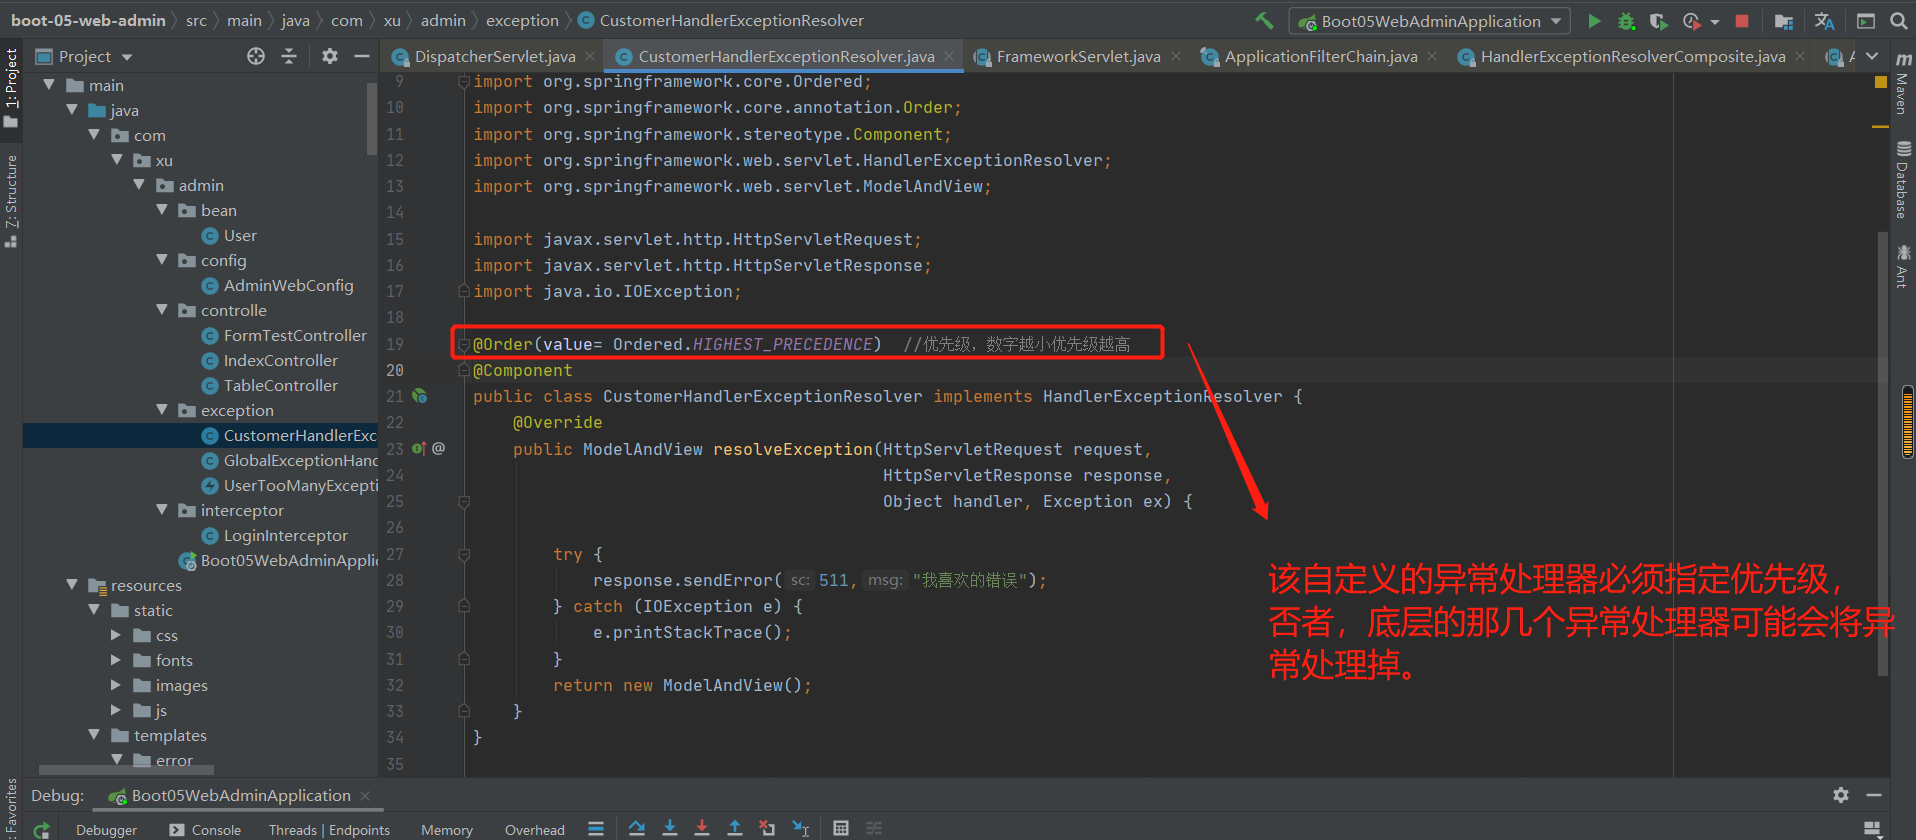
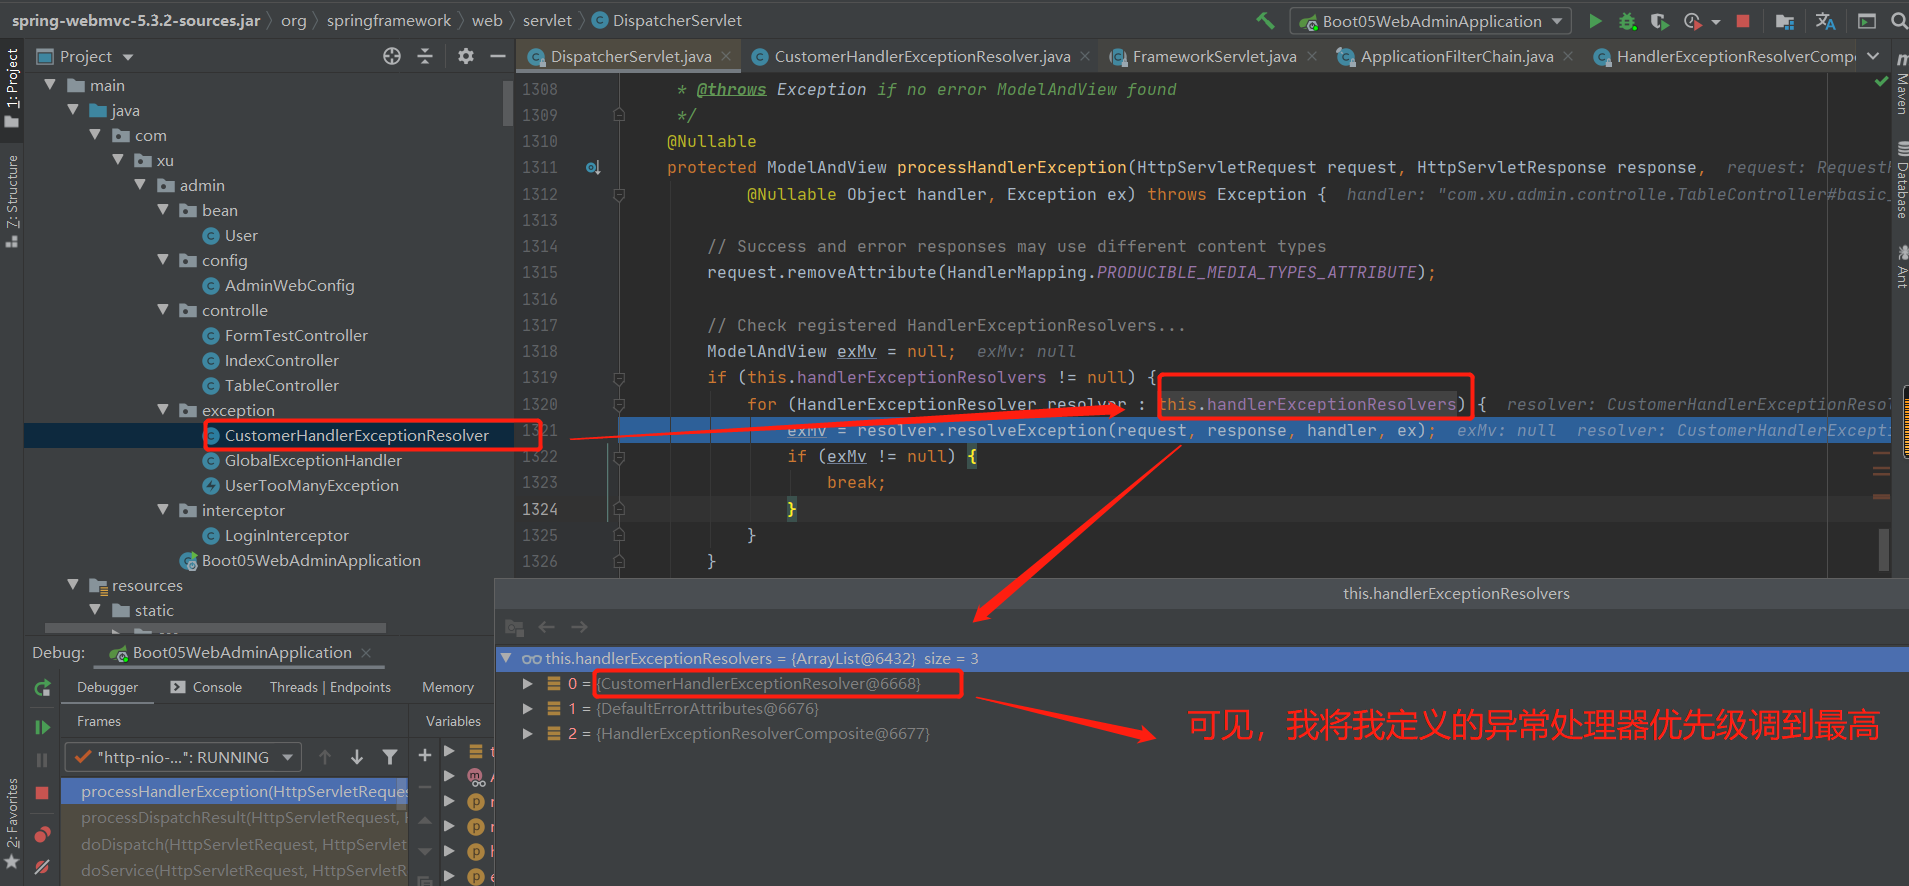
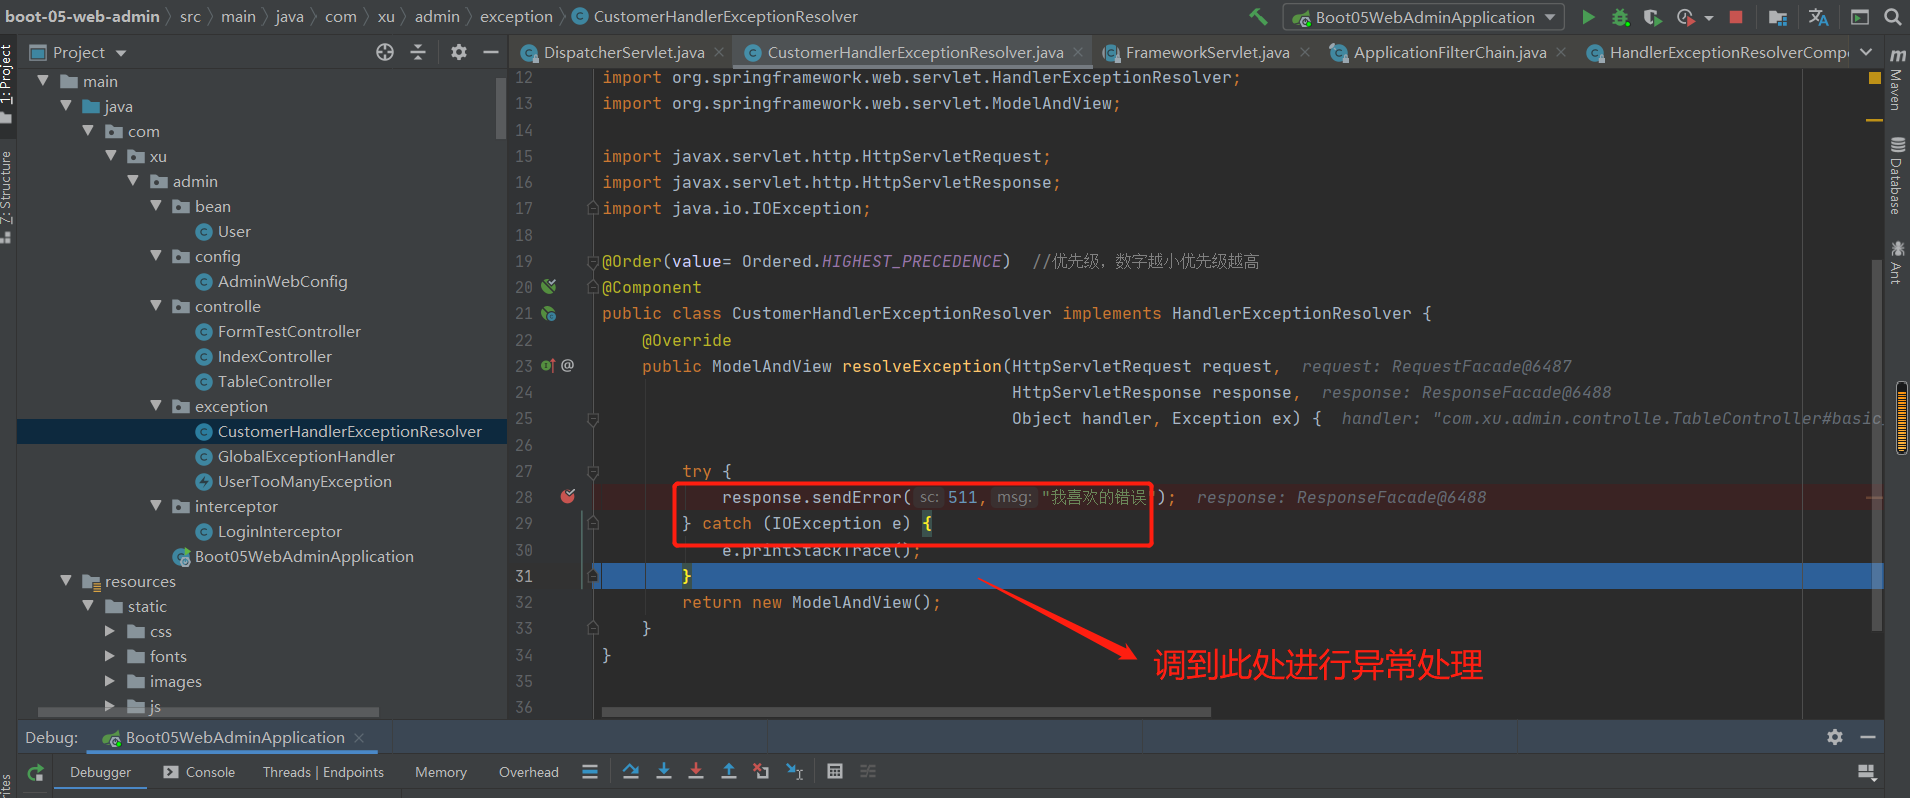
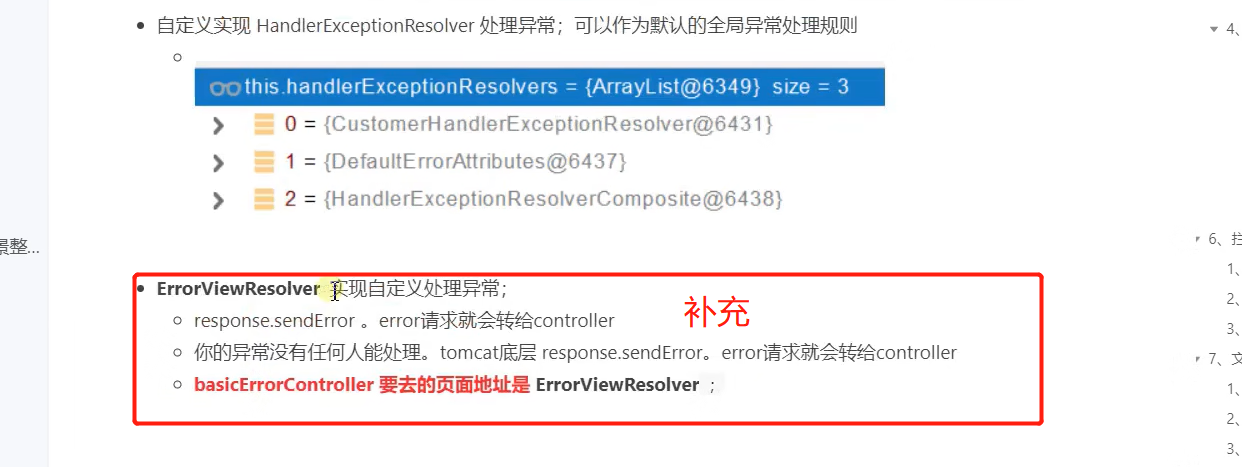
至此:异常处理分析结束。
第11章 原生组件注入
11-1方式1:
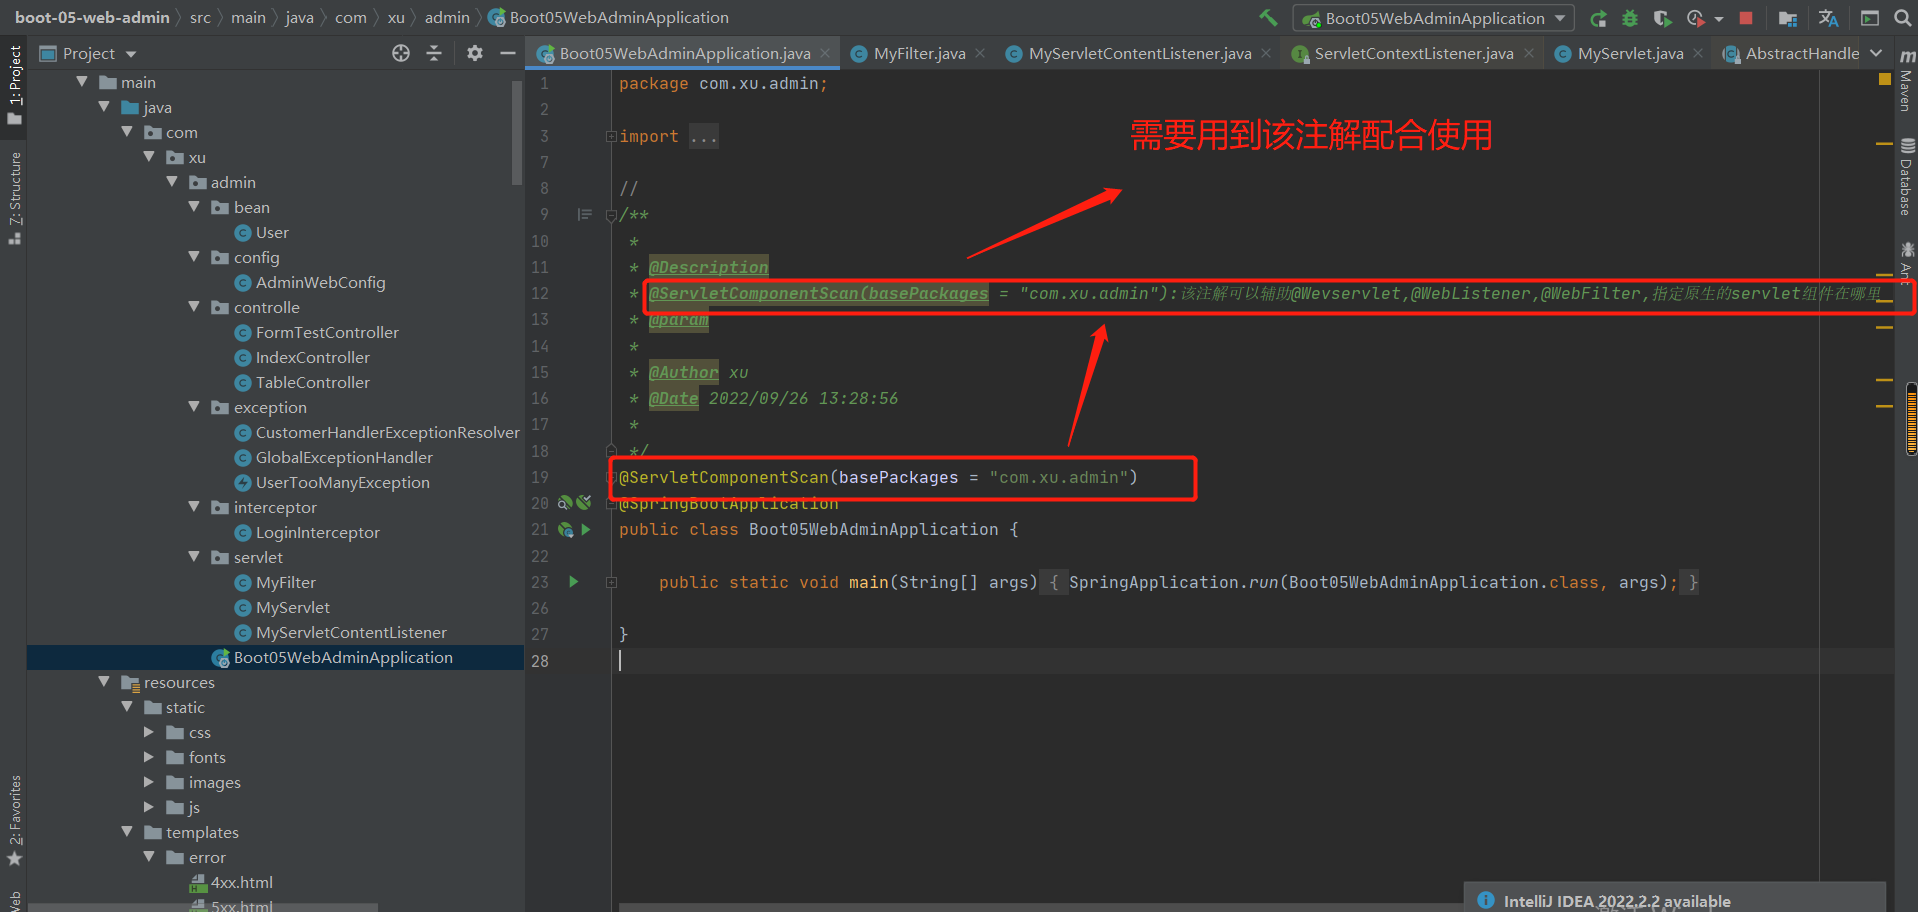
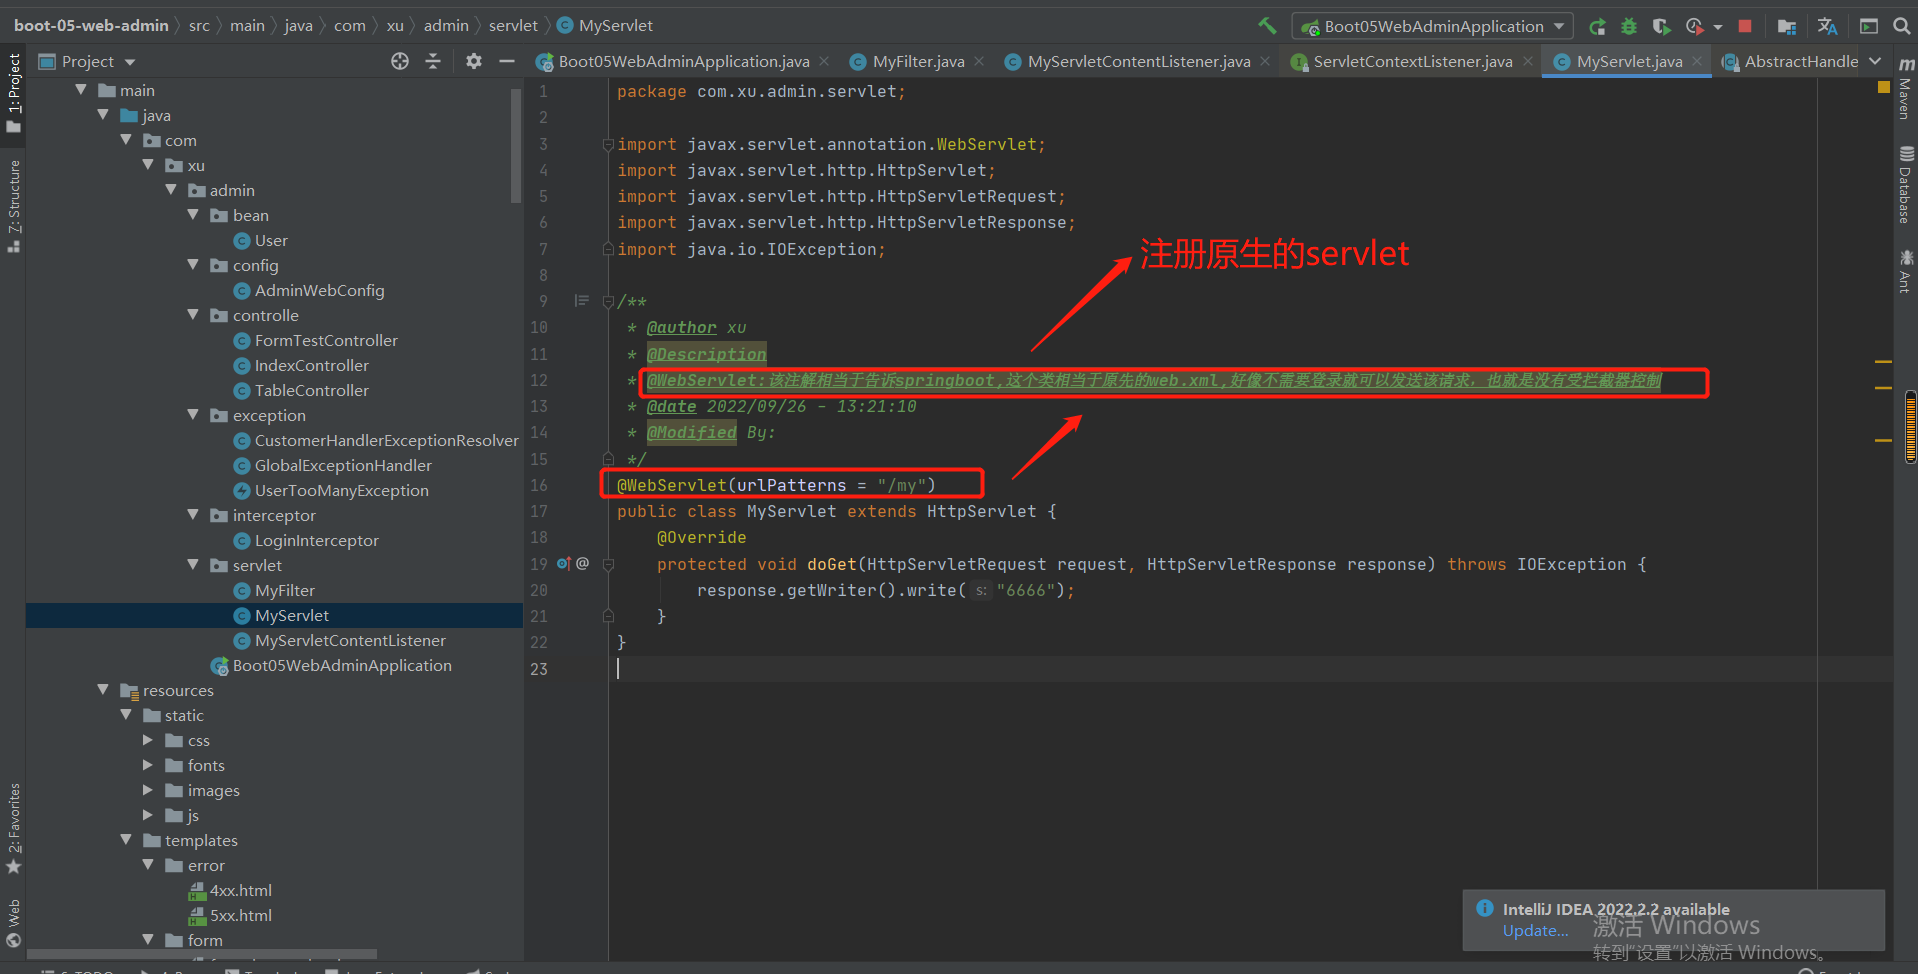
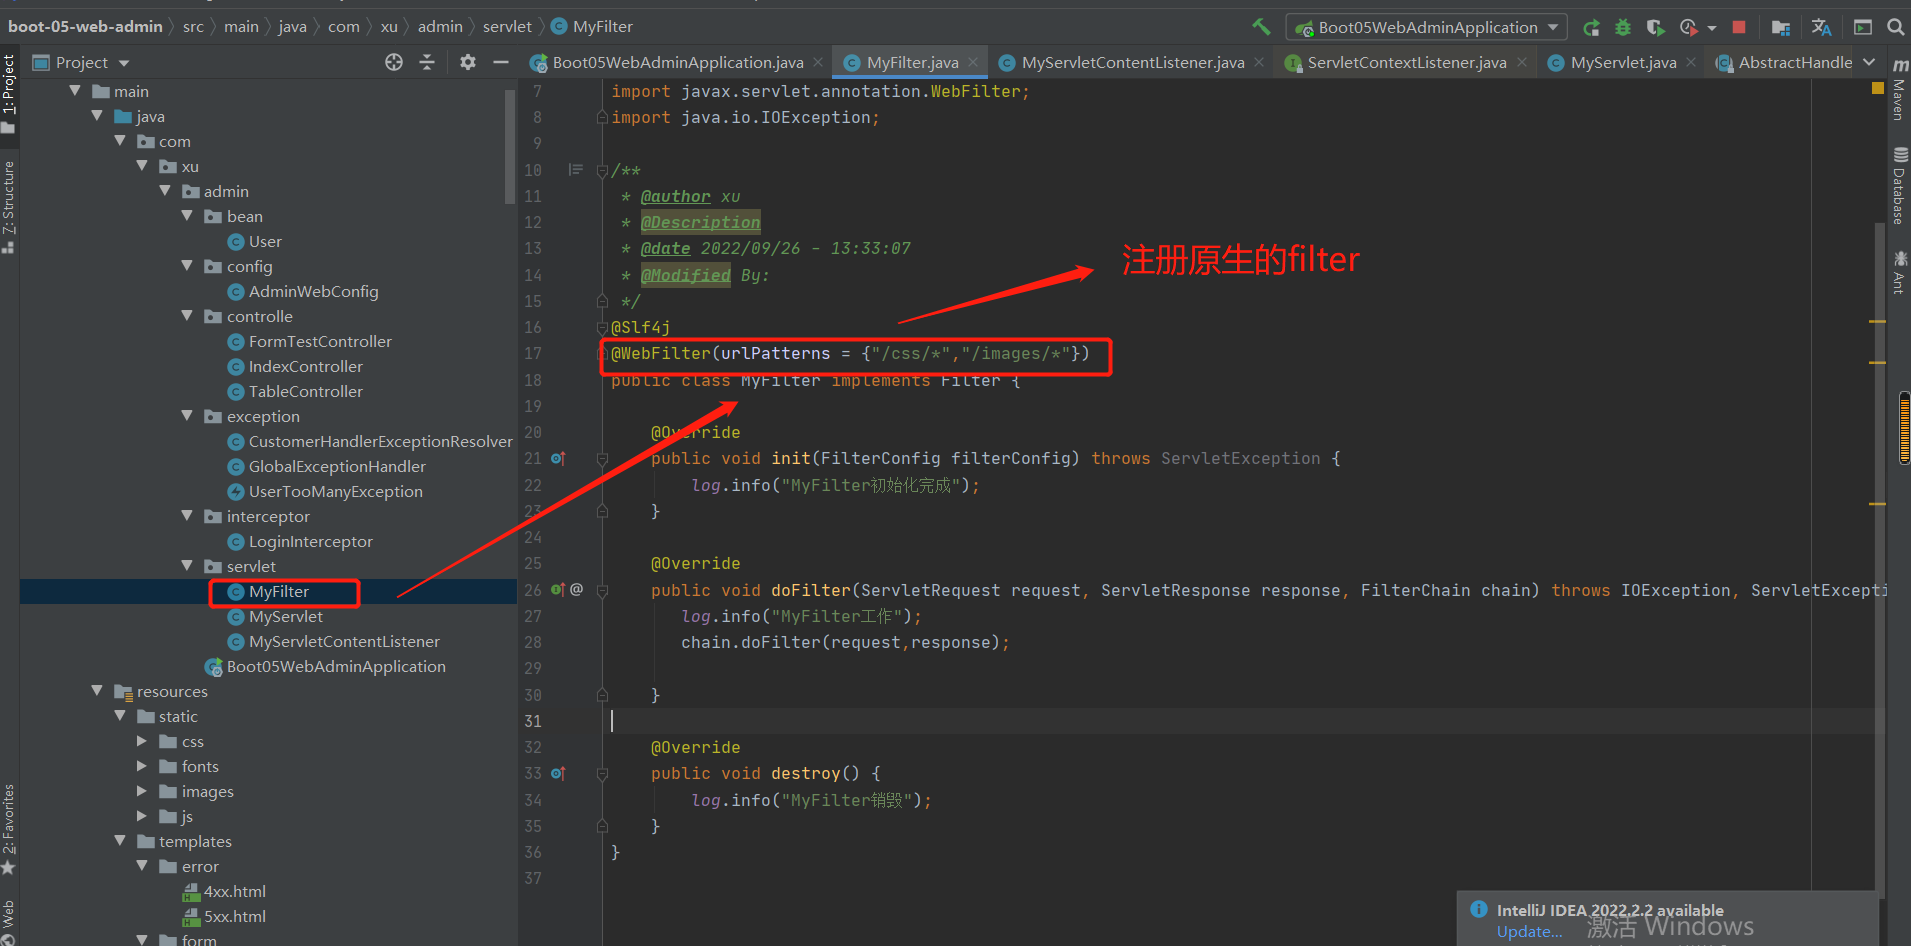
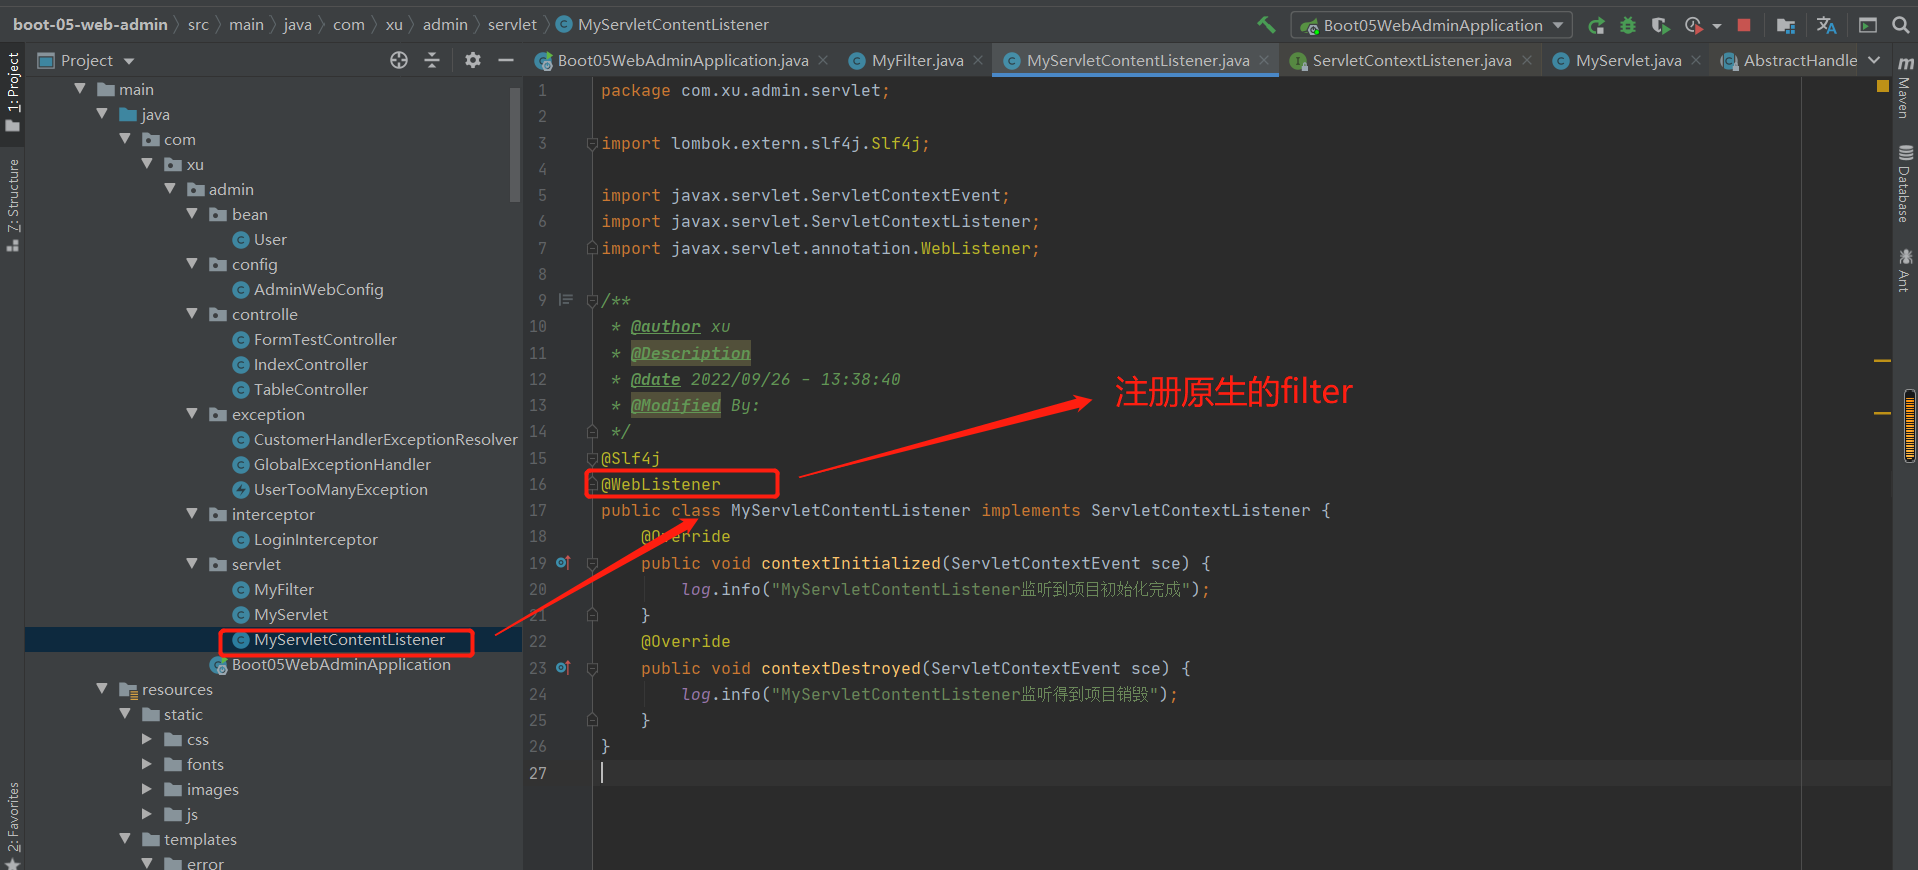
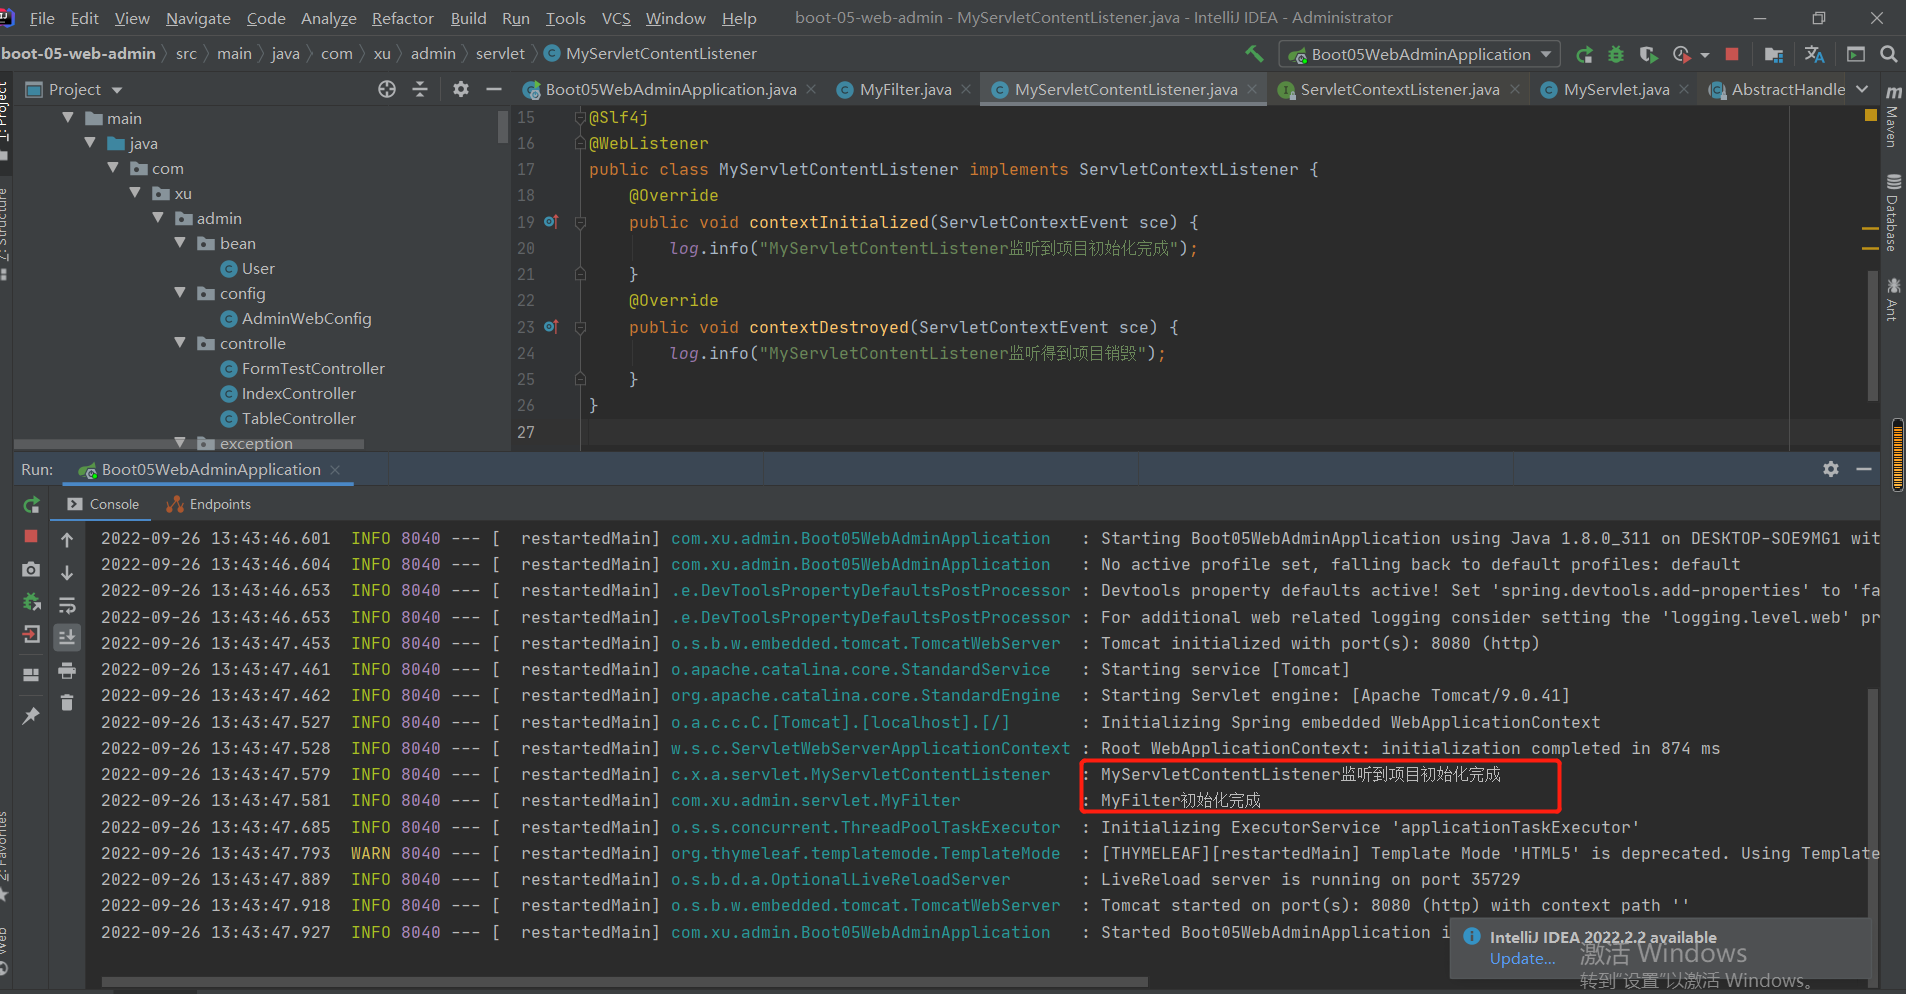
输出结果参考:
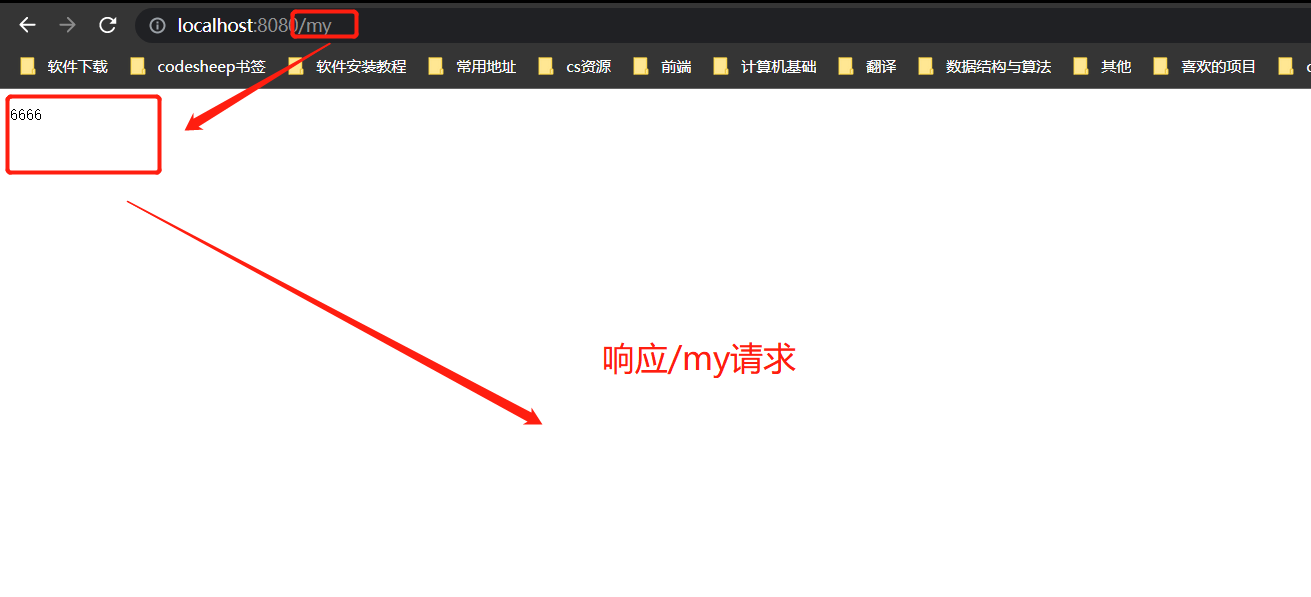
11-2 方式2:
说明:注意实现将@WebServlet,@FilterServlet,@WebListener注释的情况下来探索方式2如何进行原生组件注入
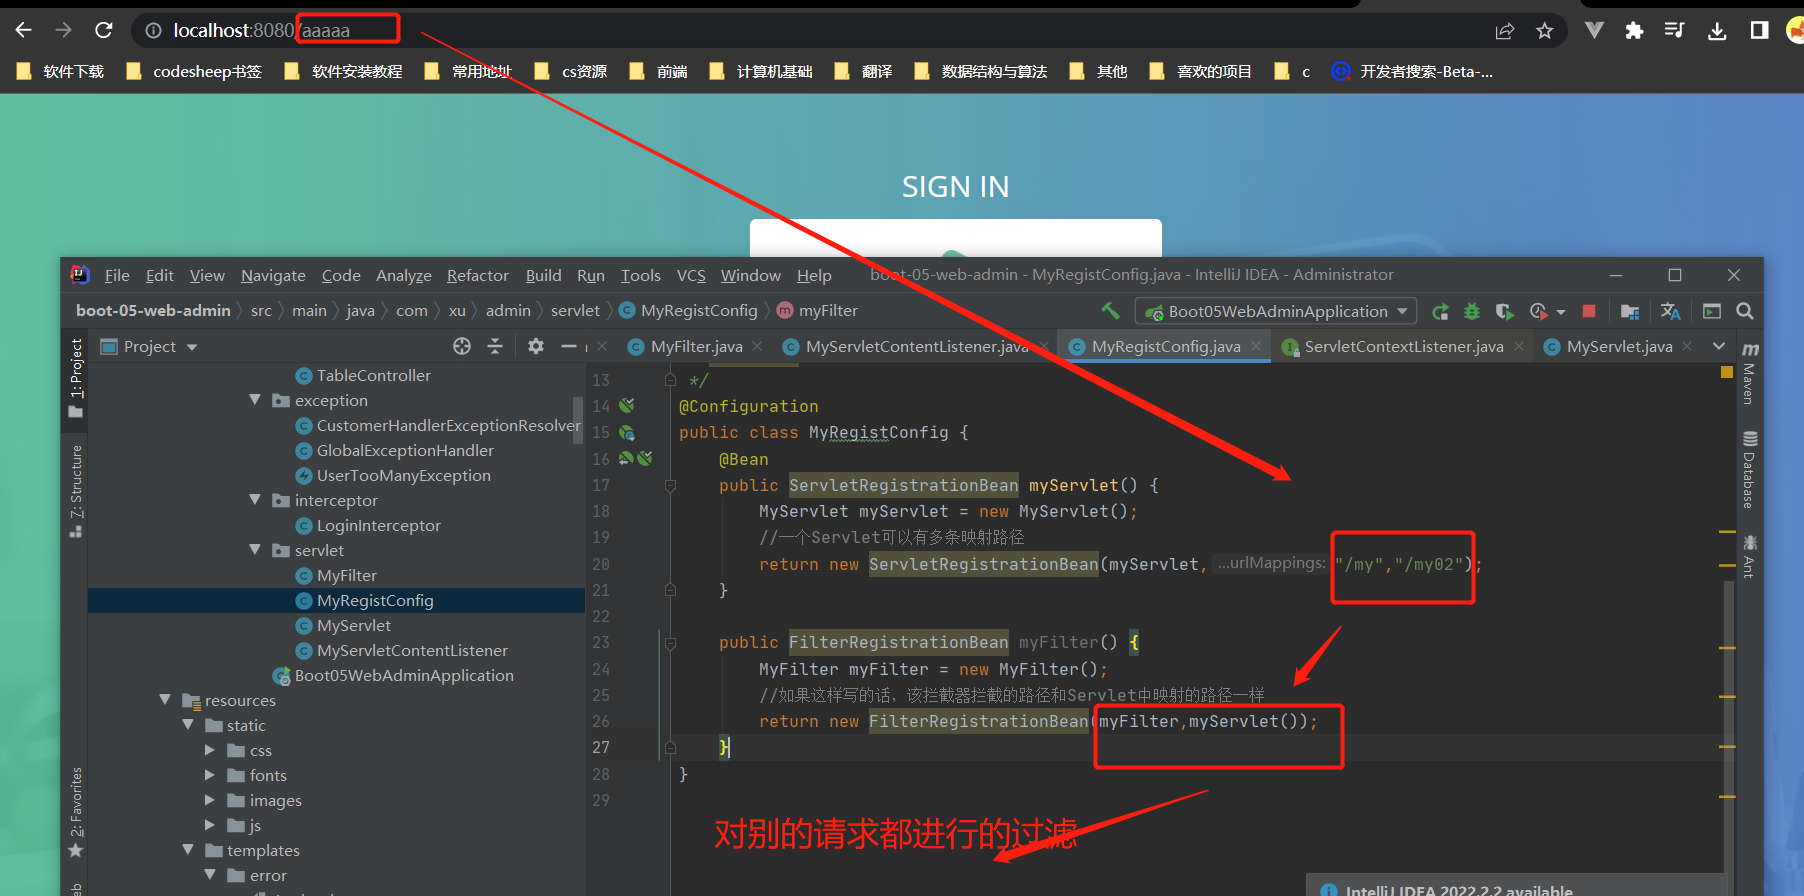
代码实现:
原生实体类:
MyServlet.java
package com.xu.admin.servlet;

import javax.servlet.annotation.WebServlet;
import javax.servlet.http.HttpServlet;
import javax.servlet.http.HttpServletRequest;
import javax.servlet.http.HttpServletResponse;
import java.io.IOException;

/**
 * @author xu
 * @Description
 * @WebServlet:该注解相当于告诉springboot,这个类相当于原先的web.xml,好像不需要登录就可以发送该请求,也就是没有受拦截器控制
 * @date 2022/09/26 - 13:21:10
 * @Modified By:
 */
//@WebServlet(urlPatterns = "/my")
public class MyServlet extends HttpServlet {
    @Override
    protected void doGet(HttpServletRequest request, HttpServletResponse response) throws IOException {
        response.getWriter().write("6666");
    }
}
MyFilter.java:
package com.xu.admin.servlet;


import lombok.extern.slf4j.Slf4j;

import javax.servlet.*;
import javax.servlet.annotation.WebFilter;
import java.io.IOException;

/**
 * @author xu
 * @Description
 * @date 2022/09/26 - 13:33:07
 * @Modified By:
 */
@Slf4j
//@WebFilter(urlPatterns = {"/css/*","/images/*"})
public class MyFilter implements Filter {

    @Override
    public void init(FilterConfig filterConfig) throws ServletException {
        log.info("MyFilter初始化完成");
    }

    @Override
    public void doFilter(ServletRequest request, ServletResponse response, FilterChain chain) throws IOException, ServletException {
       log.info("MyFilter工作");
       chain.doFilter(request,response);

    }

    @Override
    public void destroy() {
        log.info("MyFilter销毁");
    }
}
MyServletContentListener.java:
package com.xu.admin.servlet;

import lombok.extern.slf4j.Slf4j;

import javax.servlet.ServletContextEvent;
import javax.servlet.ServletContextListener;
import javax.servlet.annotation.WebListener;

/**
 * @author xu
 * @Description
 * @date 2022/09/26 - 13:38:40
 * @Modified By:
 */
@Slf4j
//@WebListener
public class MyServletContentListener implements ServletContextListener {
    @Override
    public void contextInitialized(ServletContextEvent sce) {
        log.info("MyServletContentListener监听到项目初始化完成");
    }
    @Override
    public void contextDestroyed(ServletContextEvent sce) {
        log.info("MyServletContentListener监听得到项目销毁");
    }
}
配置类实现上述实体类的组件注册:
package com.xu.admin.servlet;

import org.springframework.boot.web.servlet.FilterRegistrationBean;
import org.springframework.boot.web.servlet.ServletListenerRegistrationBean;
import org.springframework.boot.web.servlet.ServletRegistrationBean;
import org.springframework.context.annotation.Bean;
import org.springframework.context.annotation.Configuration;

import java.util.Arrays;
import java.util.EventListener;

/**
 * @author xu
 * @Description
 * @date 2022/09/26 - 13:59:38
 * @Modified By:
 */
@Configuration
public class MyRegistConfig {
    @Bean
    public ServletRegistrationBean myServlet() {
        MyServlet myServlet = new MyServlet();
        //一个Servlet可以有多条映射路径
        return new ServletRegistrationBean(myServlet,"/my","/my02");
    }

    @Bean
    public FilterRegistrationBean myFilter() {
        MyFilter myFilter = new MyFilter();
        //如果这样写的话,该拦截器拦截的路径和Servlet中映射的路径一样
//        return new FilterRegistrationBean(myFilter,myServlet());

        FilterRegistrationBean<MyFilter> myFilterFilterRegistrationBean = new FilterRegistrationBean<>(myFilter);
        //现在过滤的路径就是指定的("/my","/css/*")路径
        myFilterFilterRegistrationBean.setUrlPatterns(Arrays.asList("/my","/css/*"));
        return myFilterFilterRegistrationBean;
    }

    @Bean
    public ServletListenerRegistrationBean myListener() {
        MyServletContentListener myServletContentListener = new MyServletContentListener();
        ServletListenerRegistrationBean<EventListener> myServletListenerRegistrationBean = new ServletListenerRegistrationBean<>(myServletContentListener);
        return myServletListenerRegistrationBean;

    }
}
一样达到原始组件注册的目的:
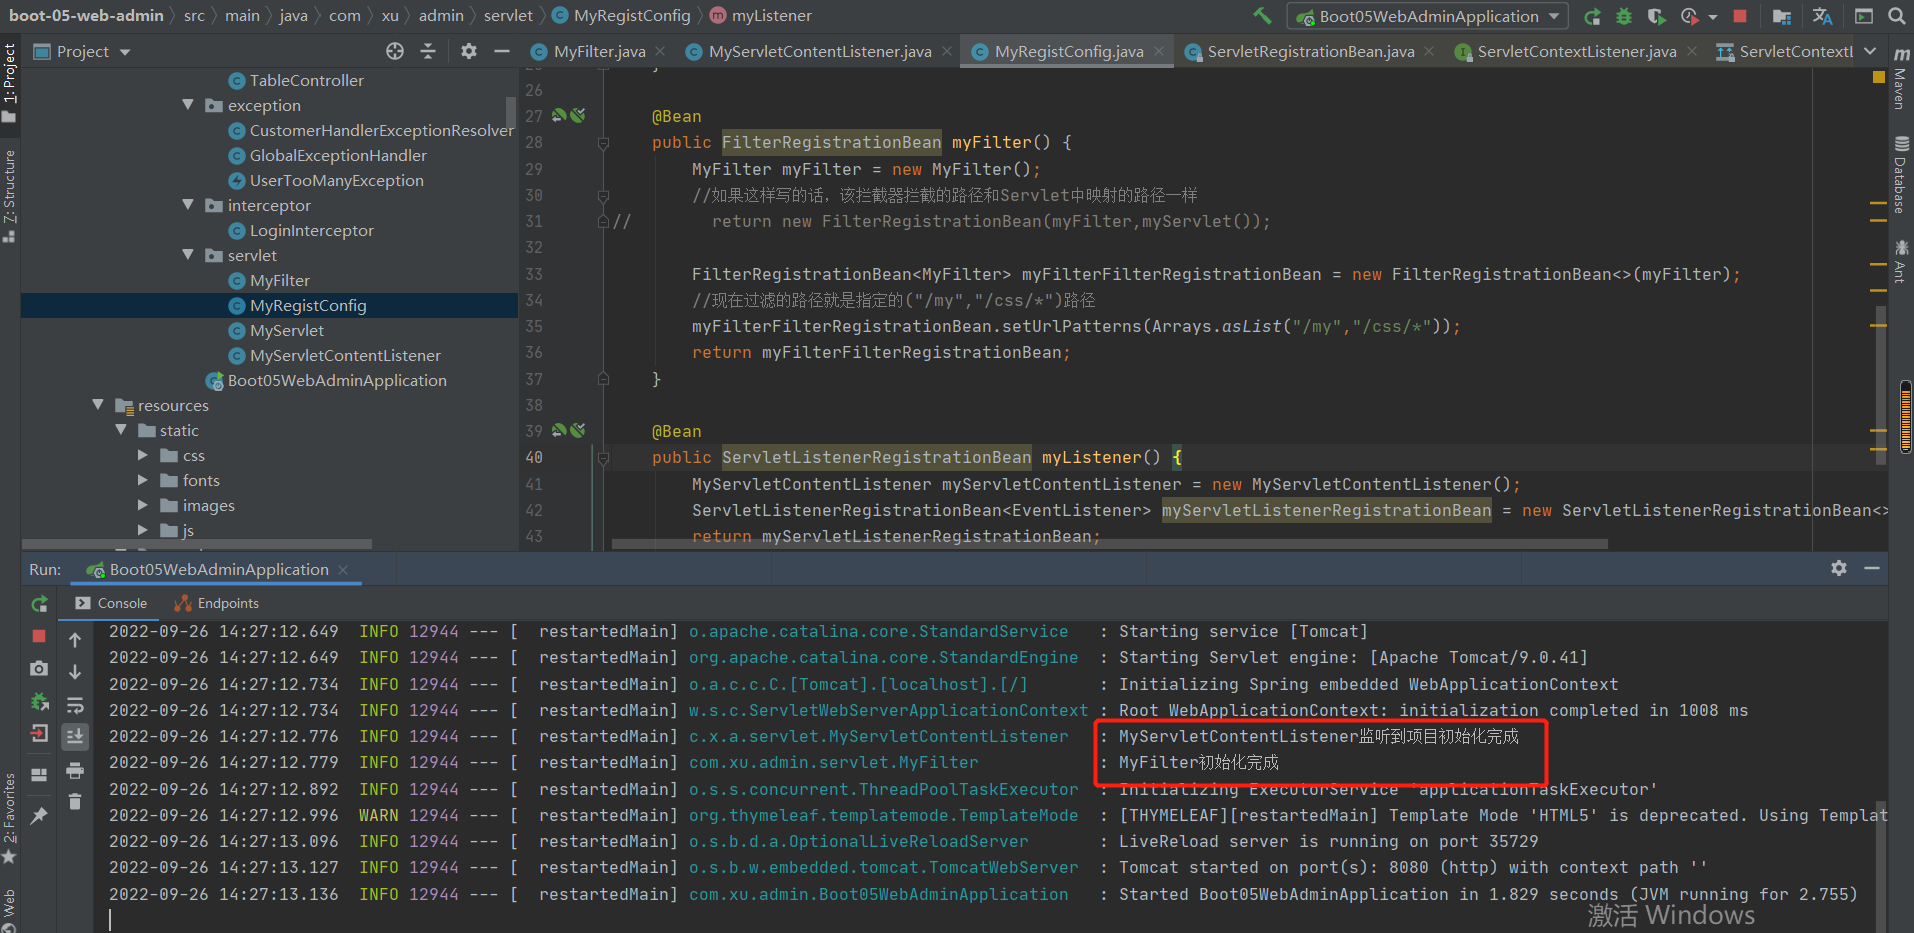
补充:
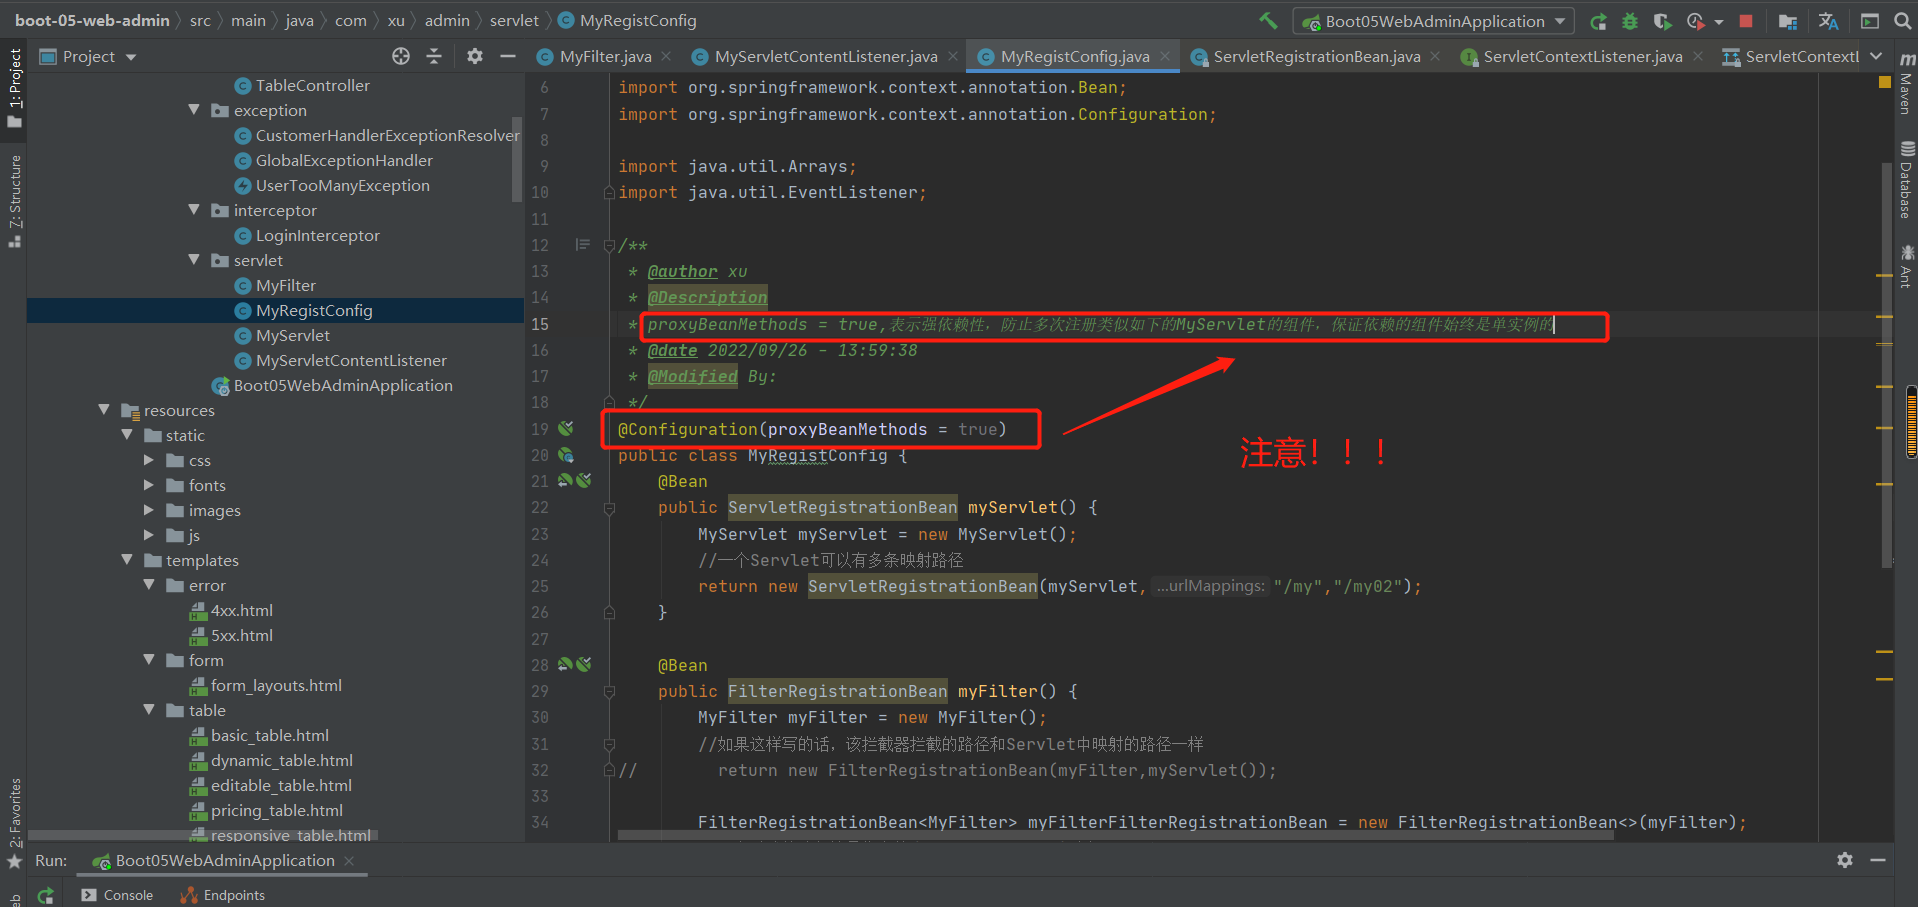
11-3 源码分析:以DispatchServlet为例
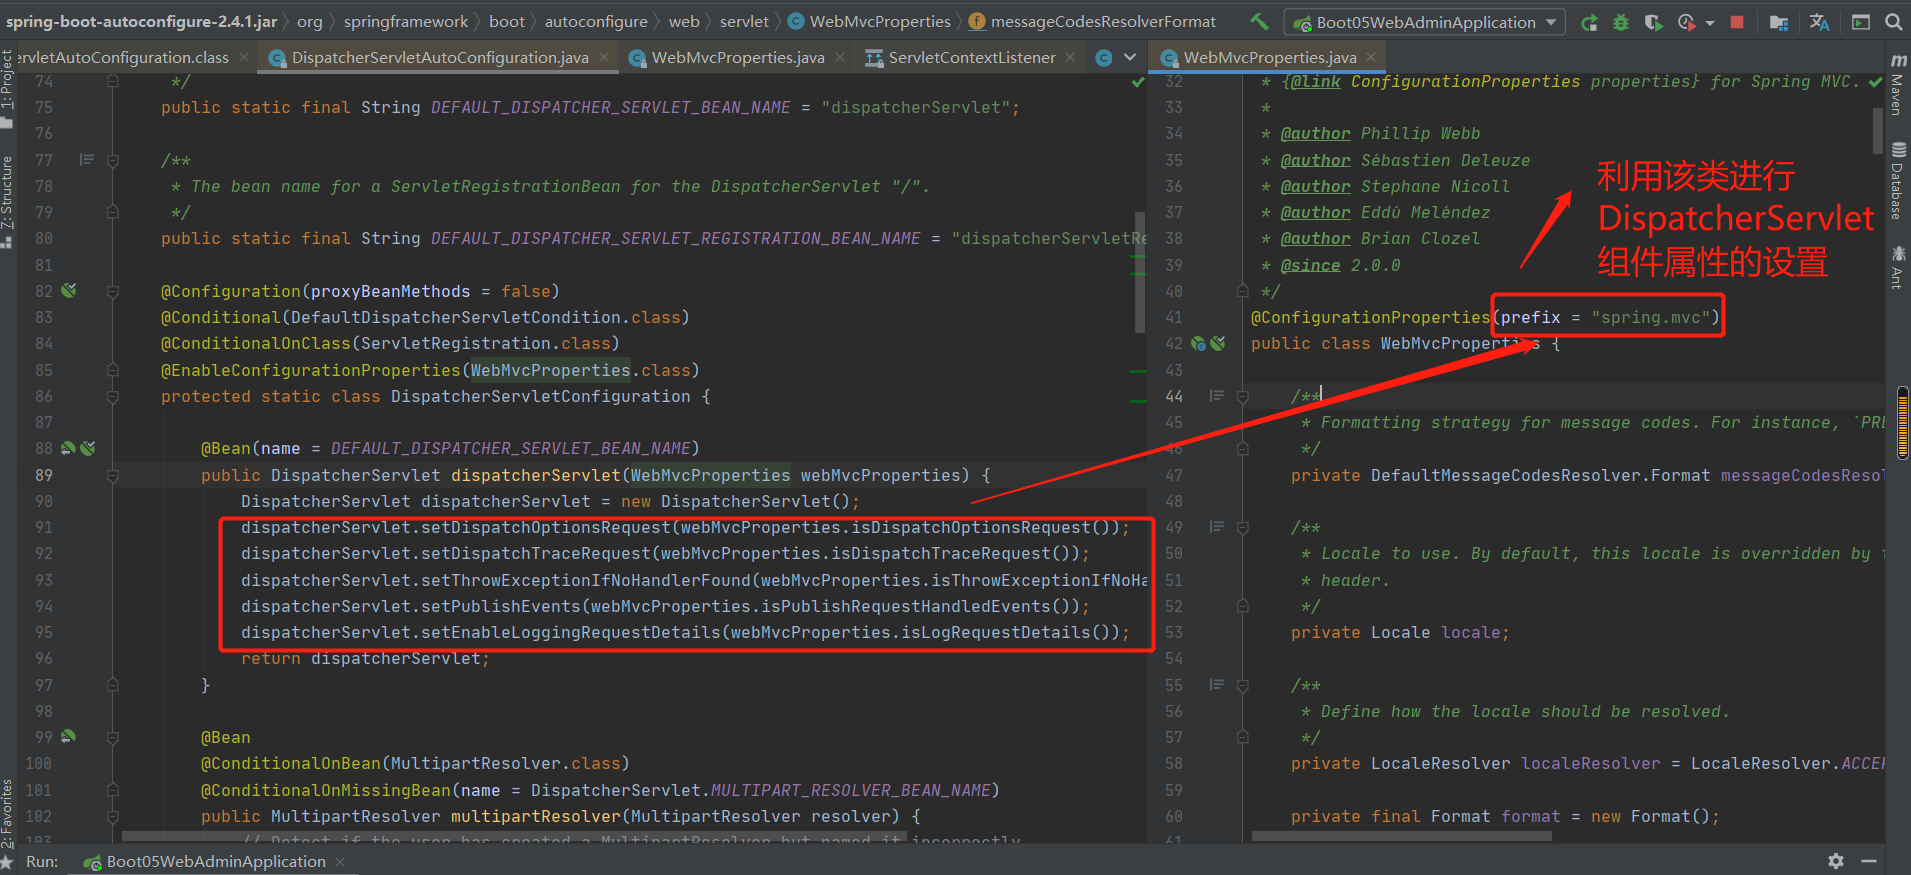
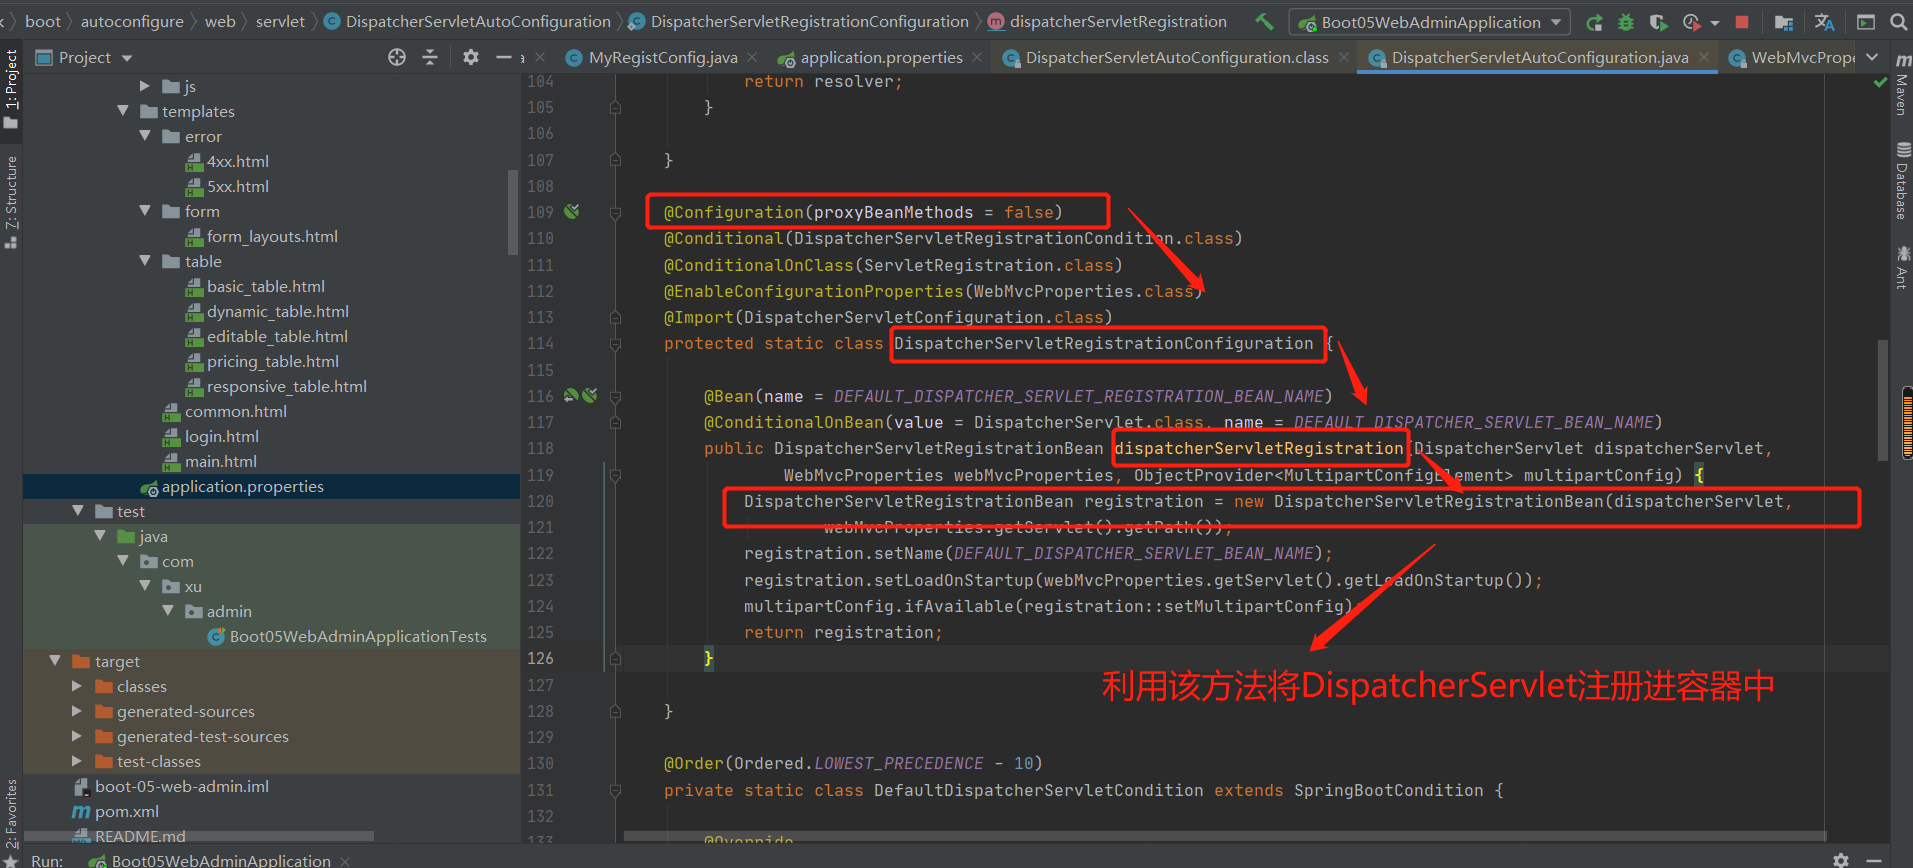
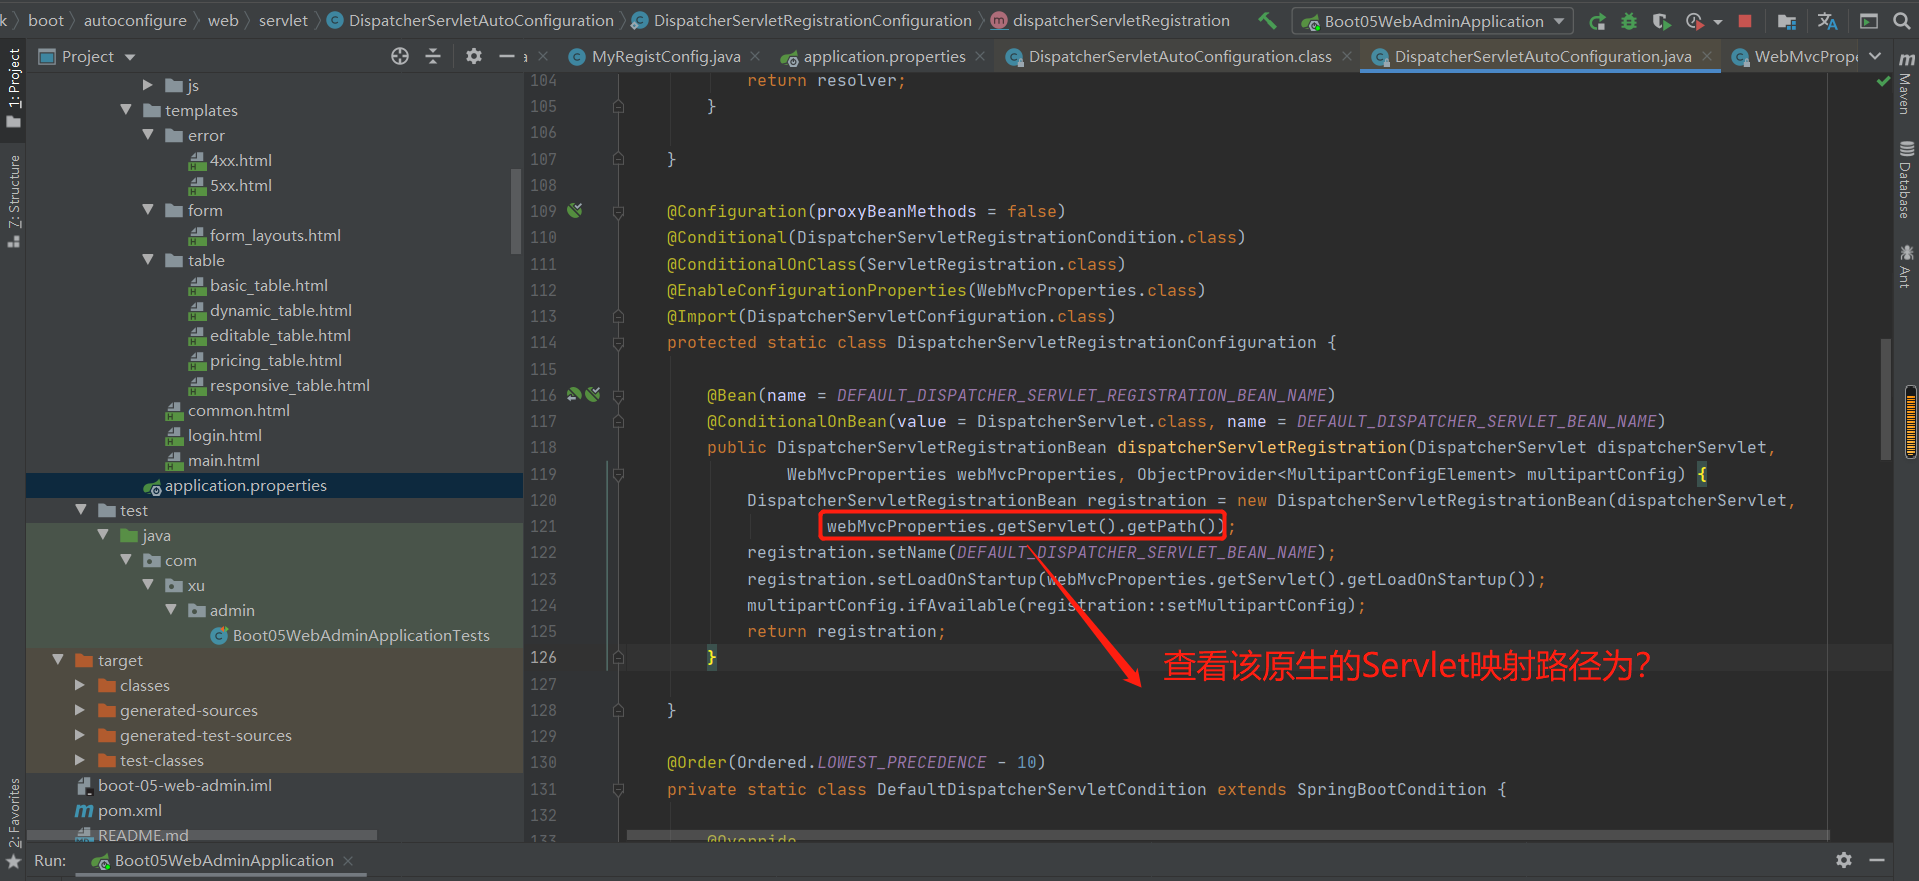
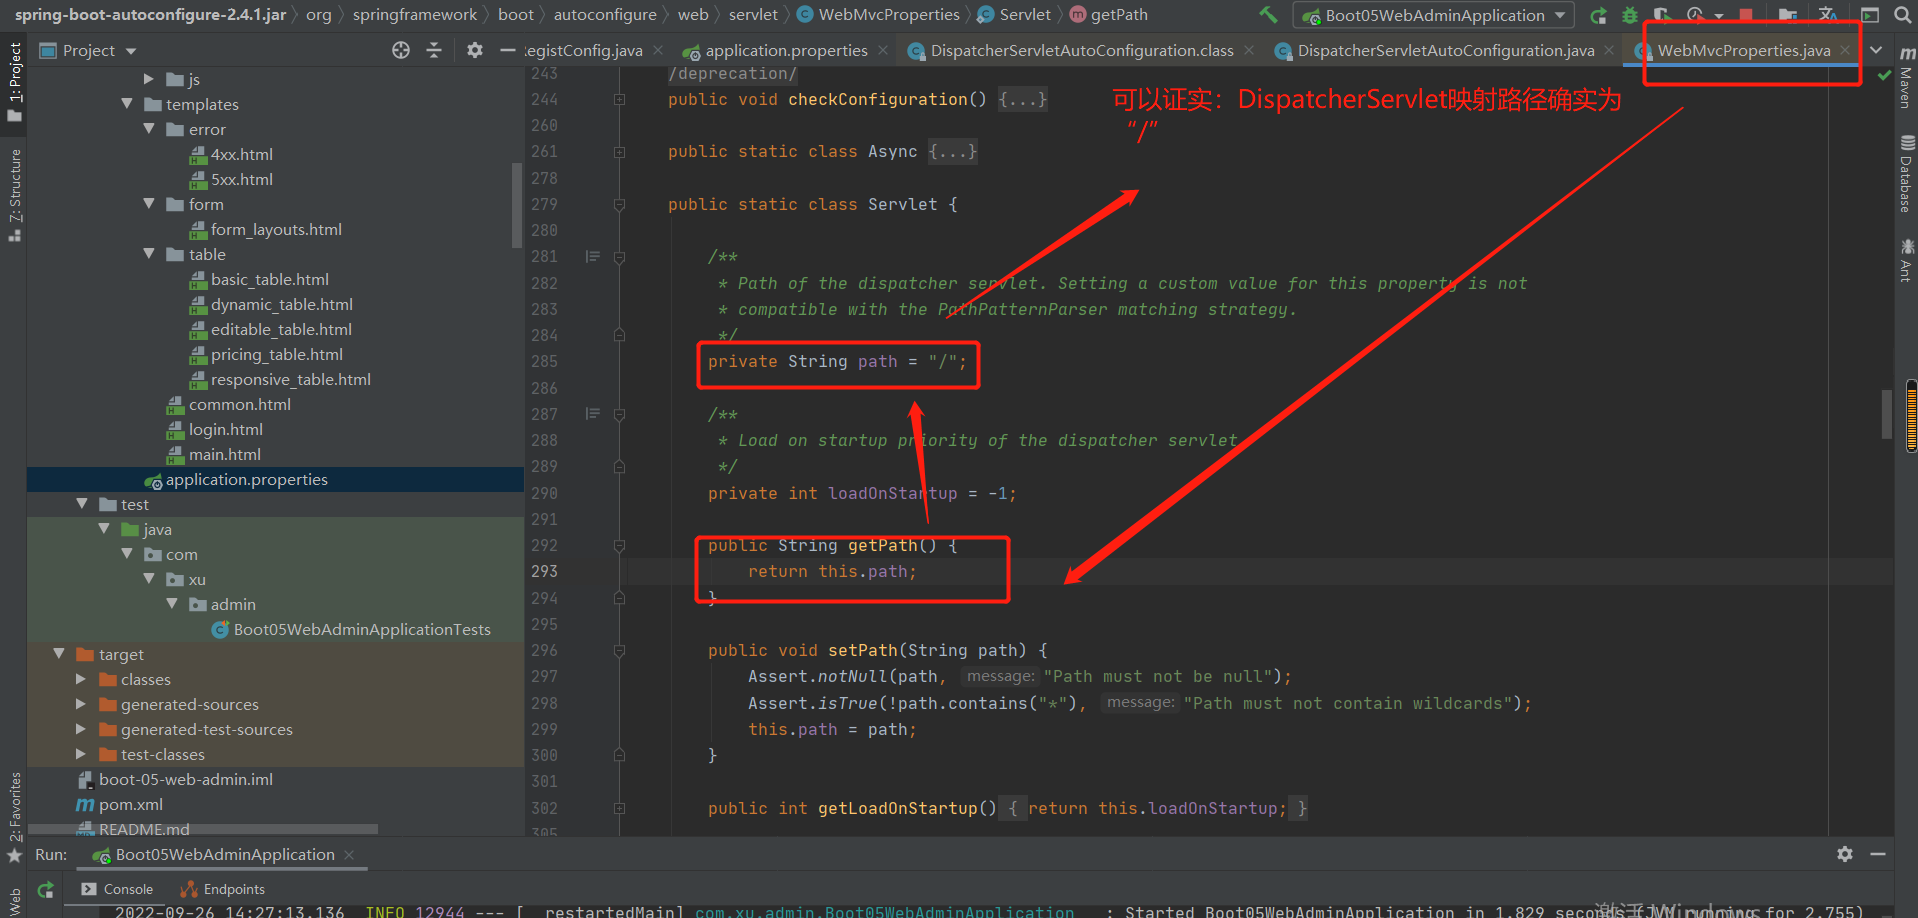
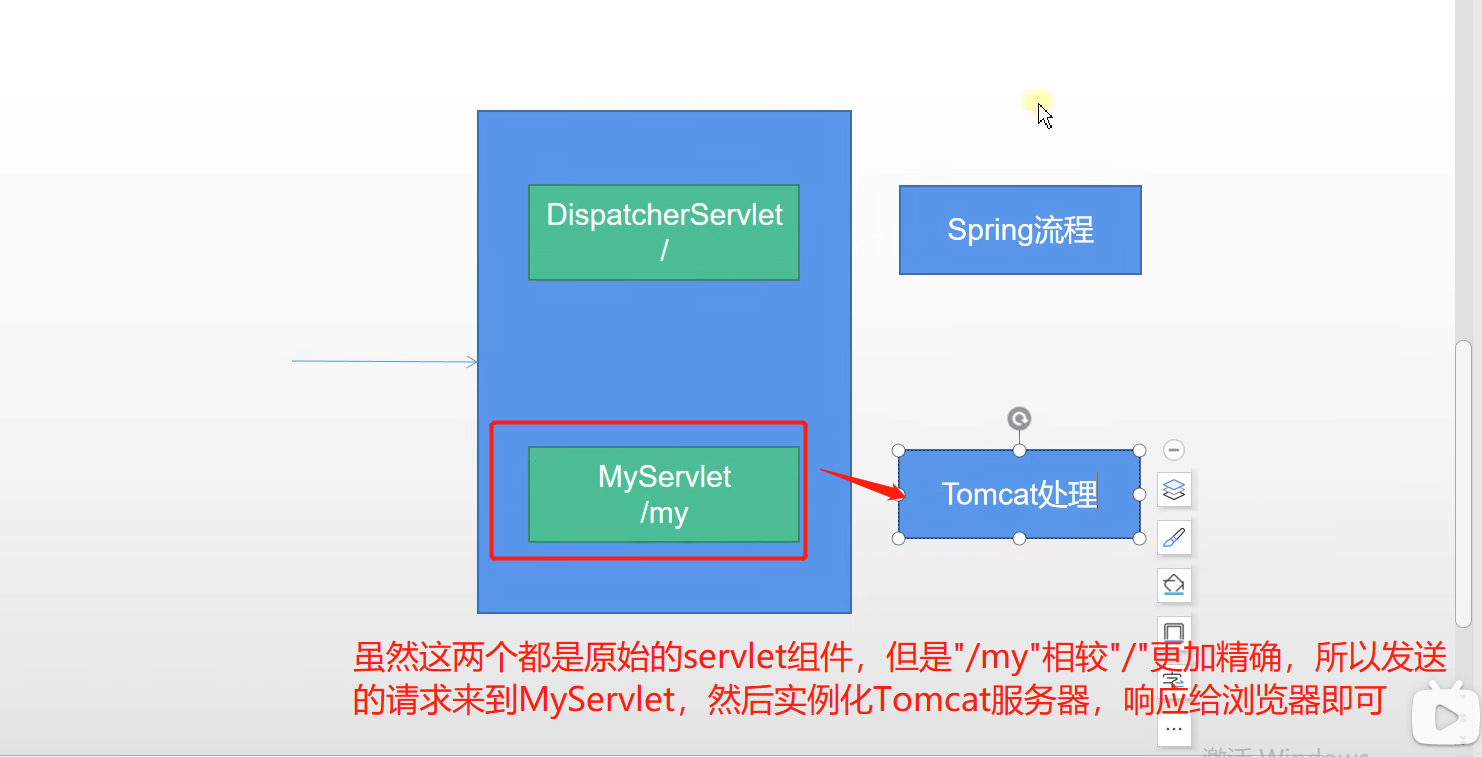
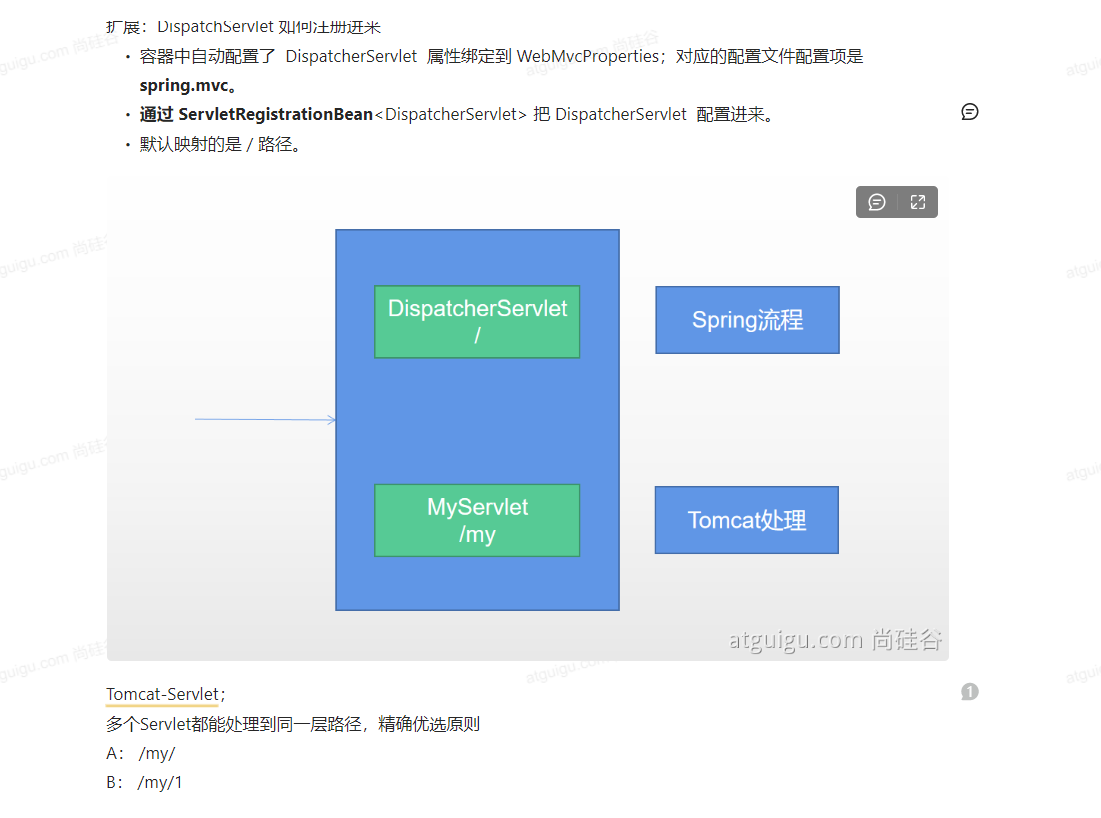
第12章--嵌入式Servlet容器,切换web服务器与定制化(源码分析)
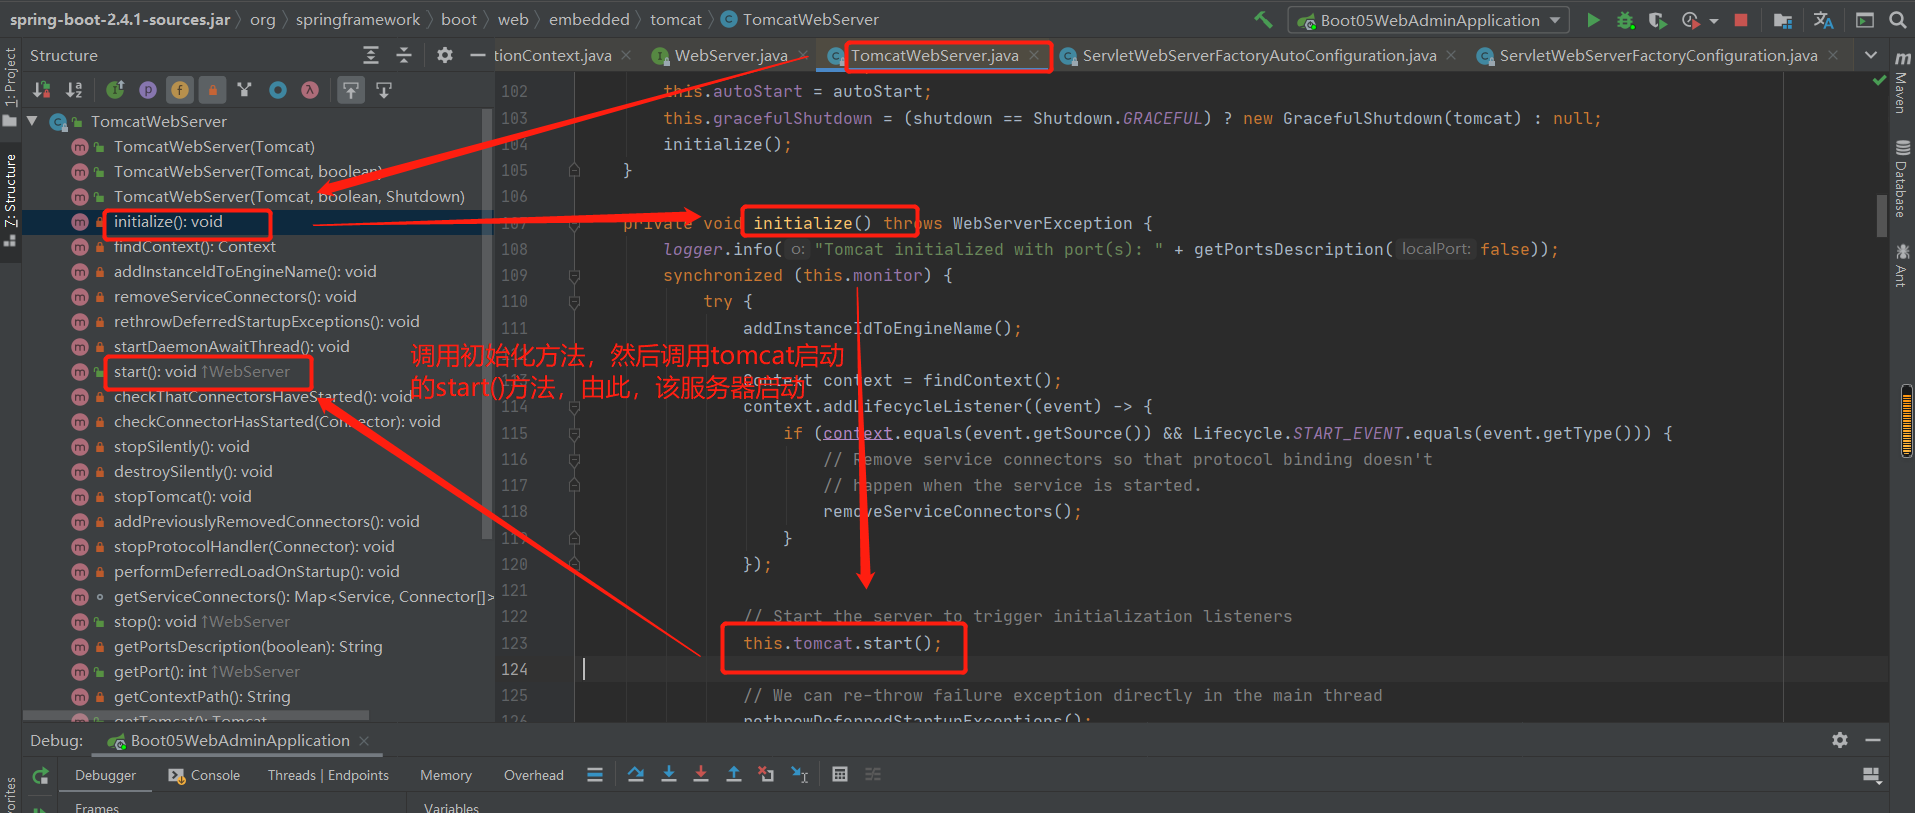
12-1 tomcat启动源码探究
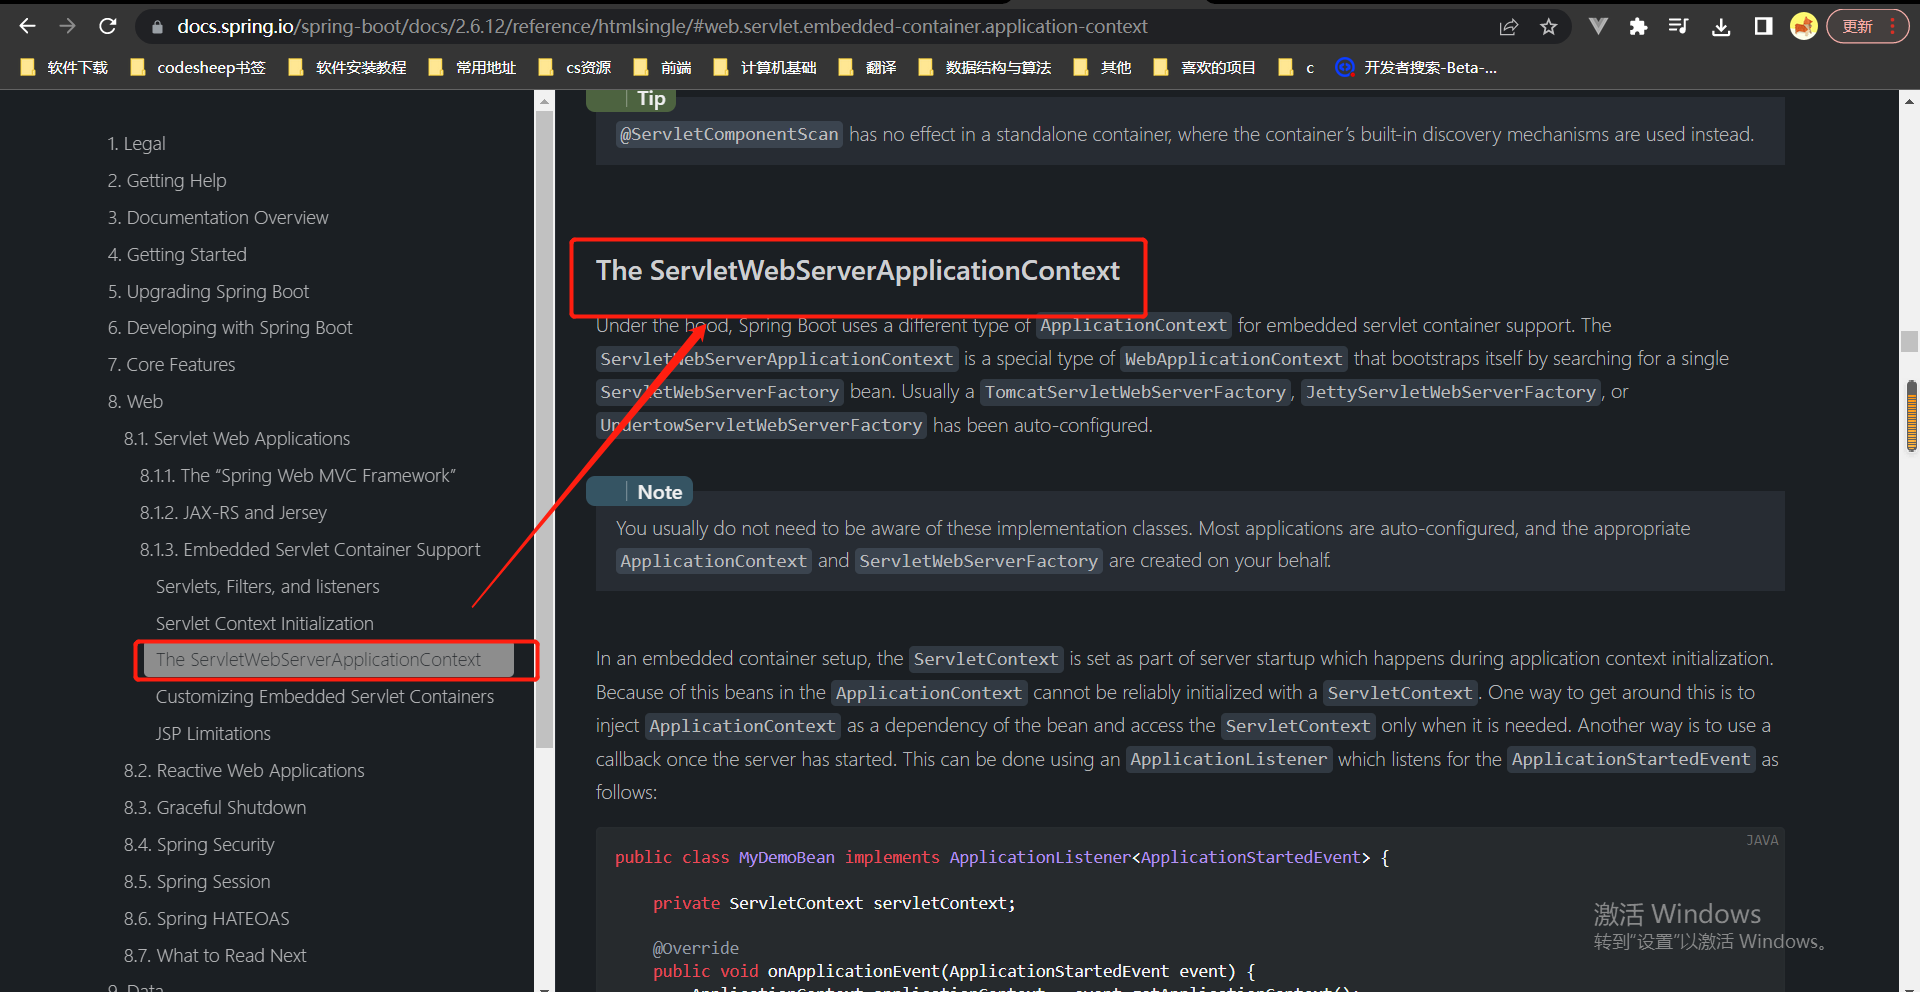
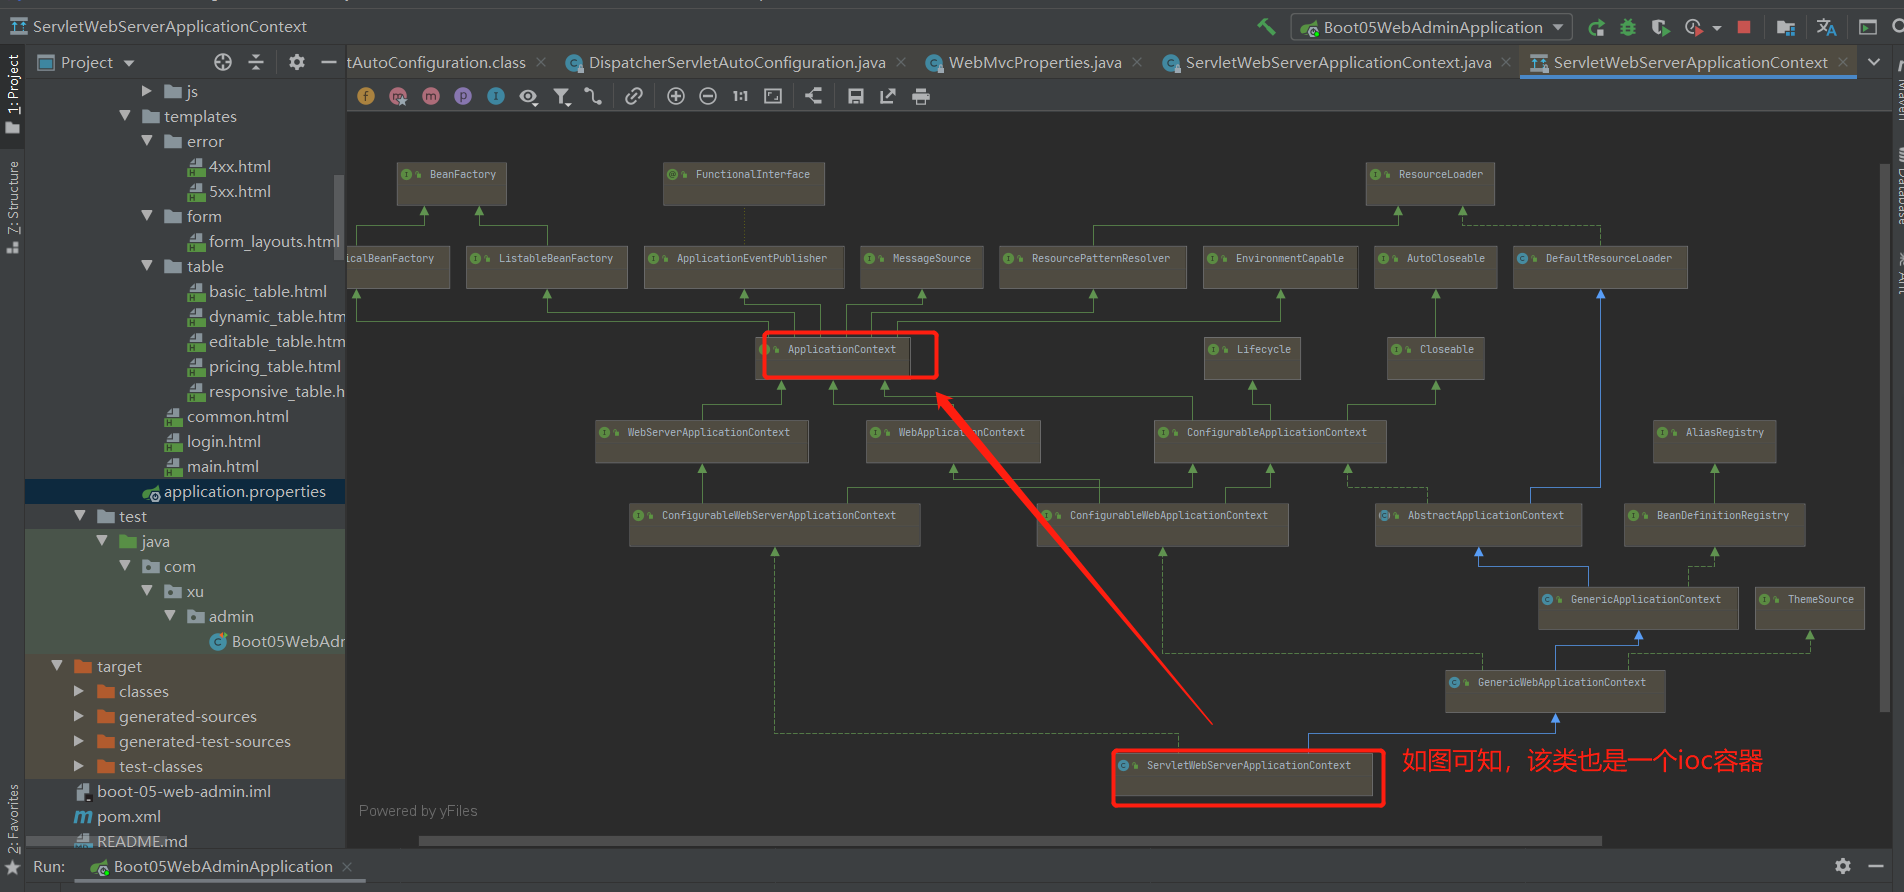
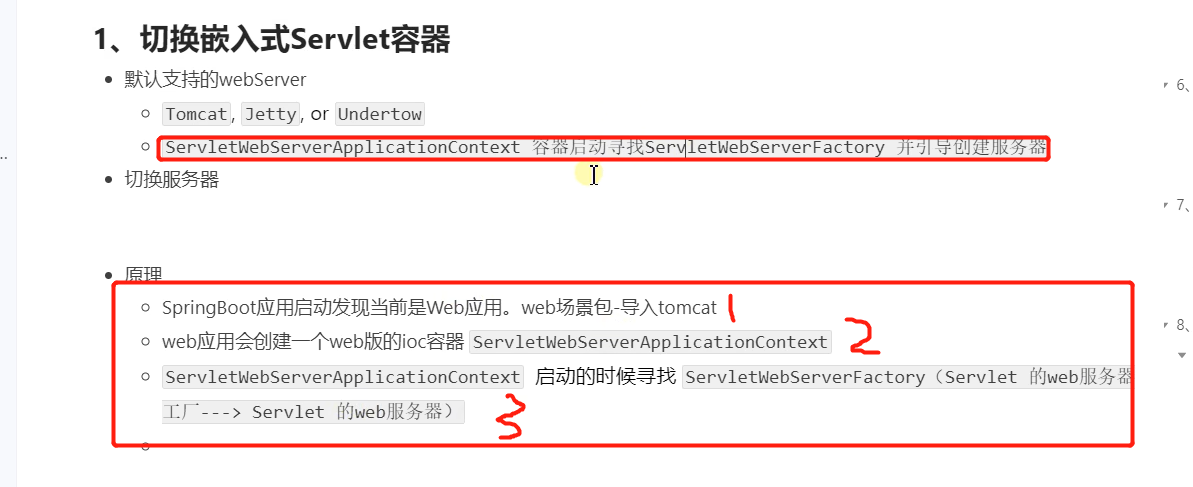
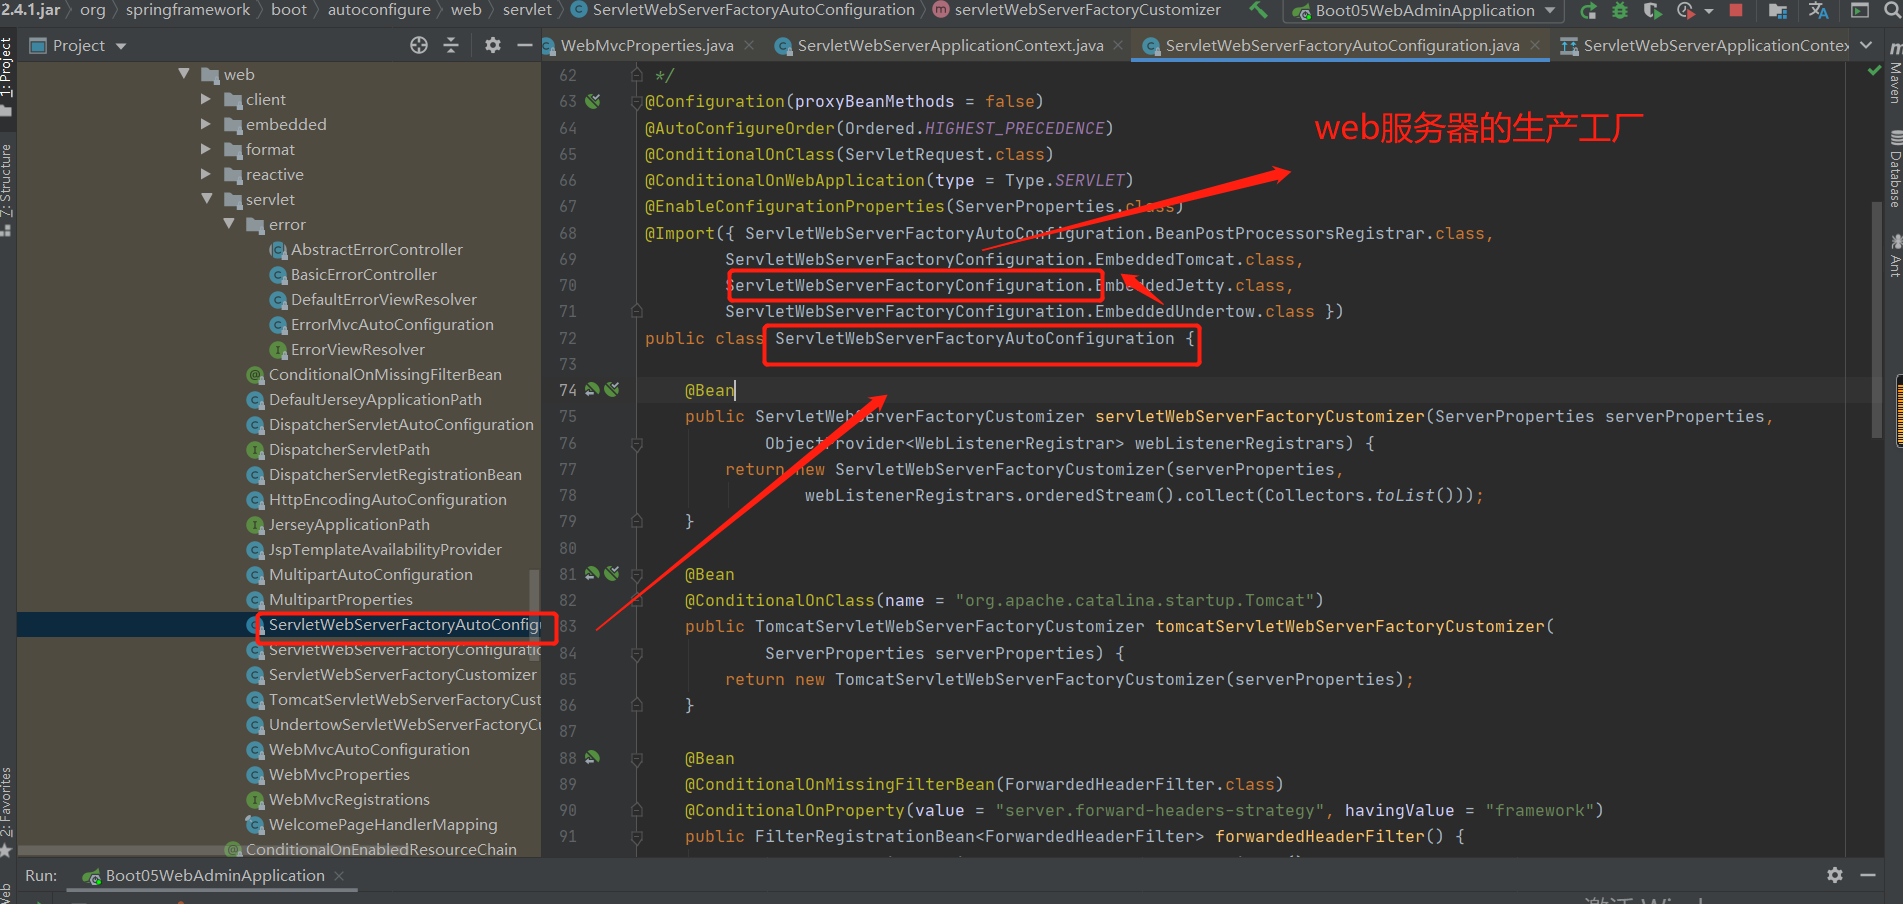
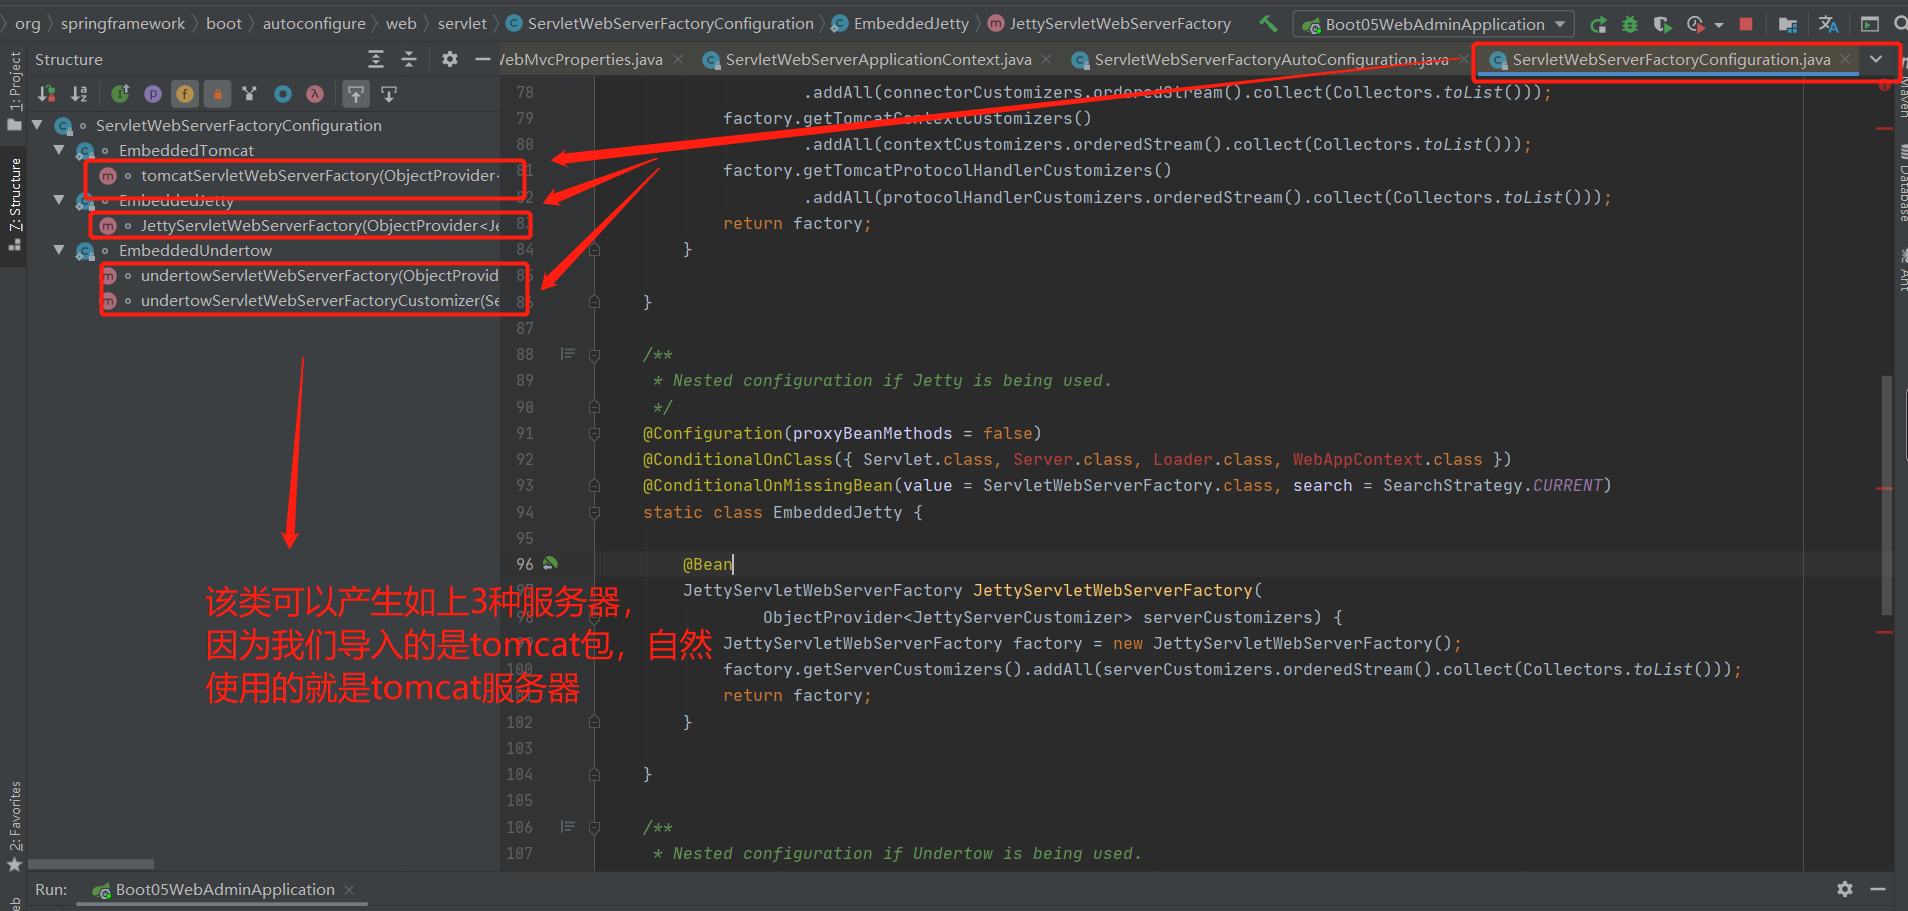
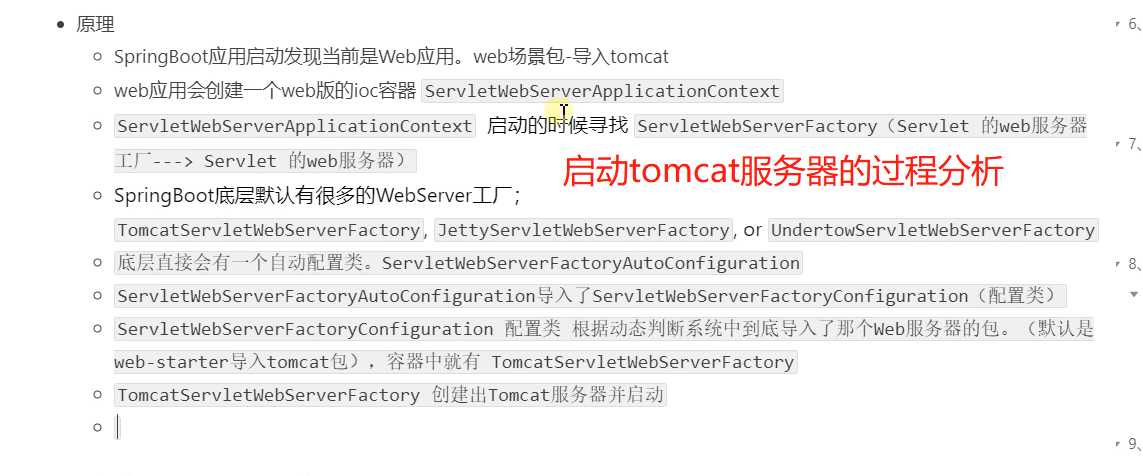
创建web服务器断点调试:
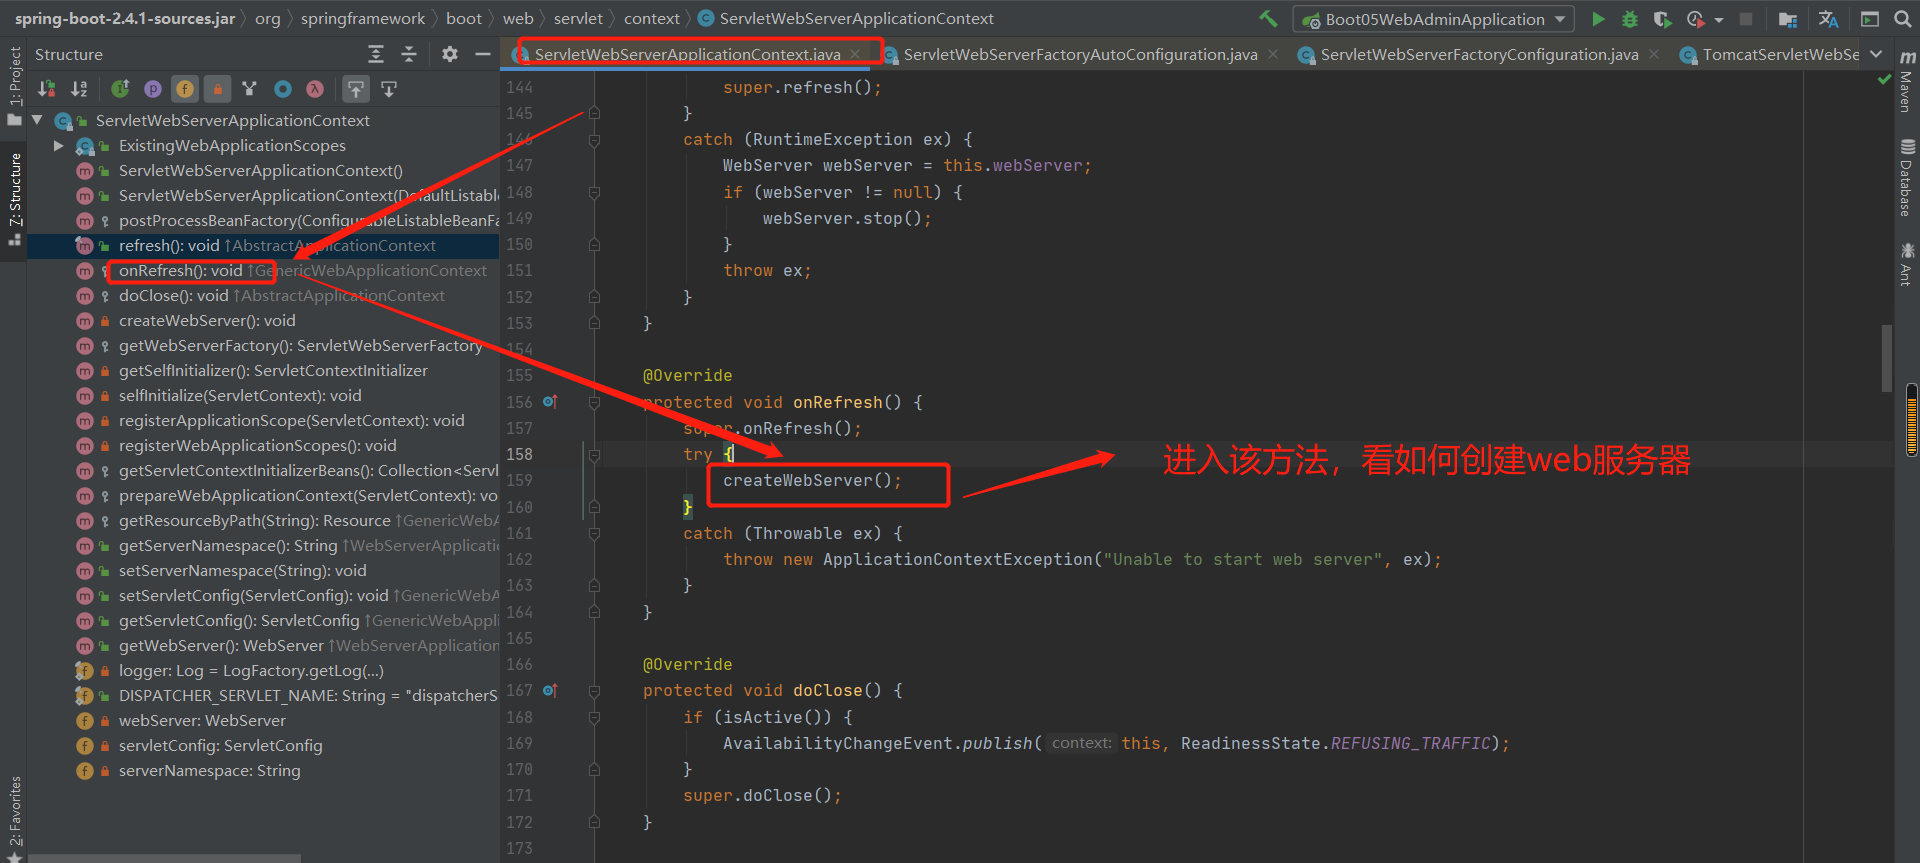
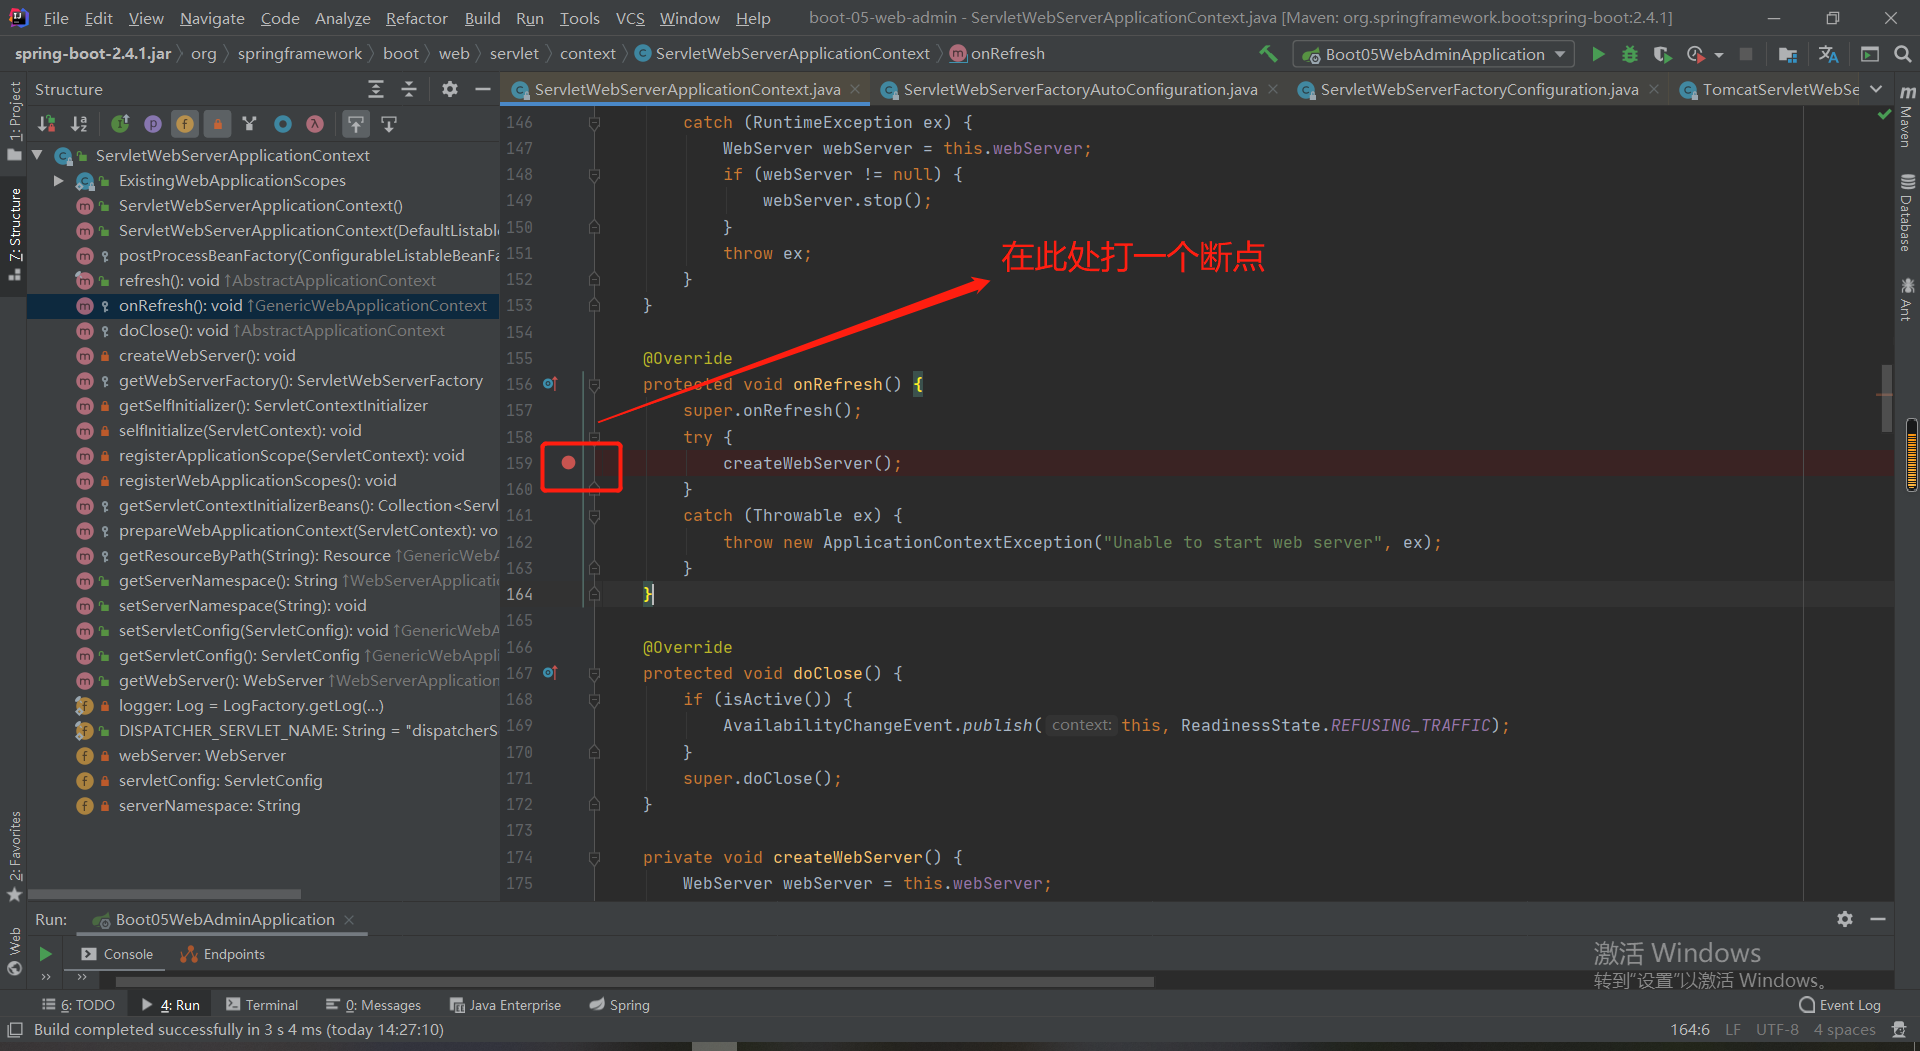
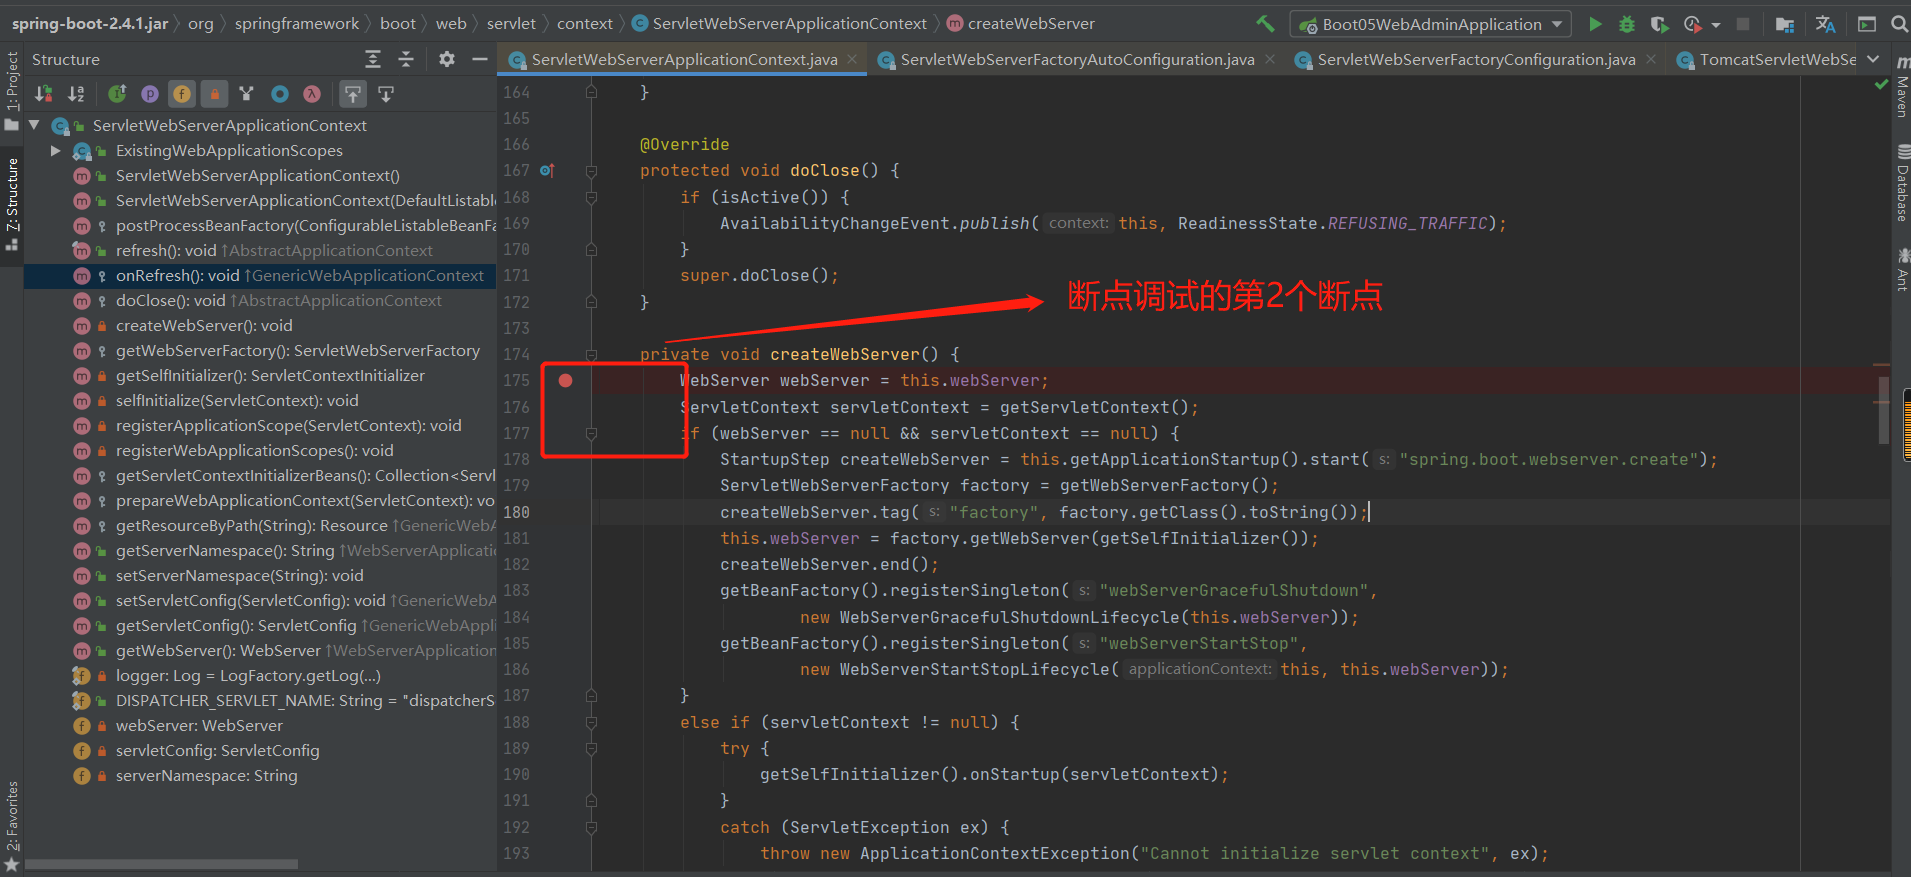
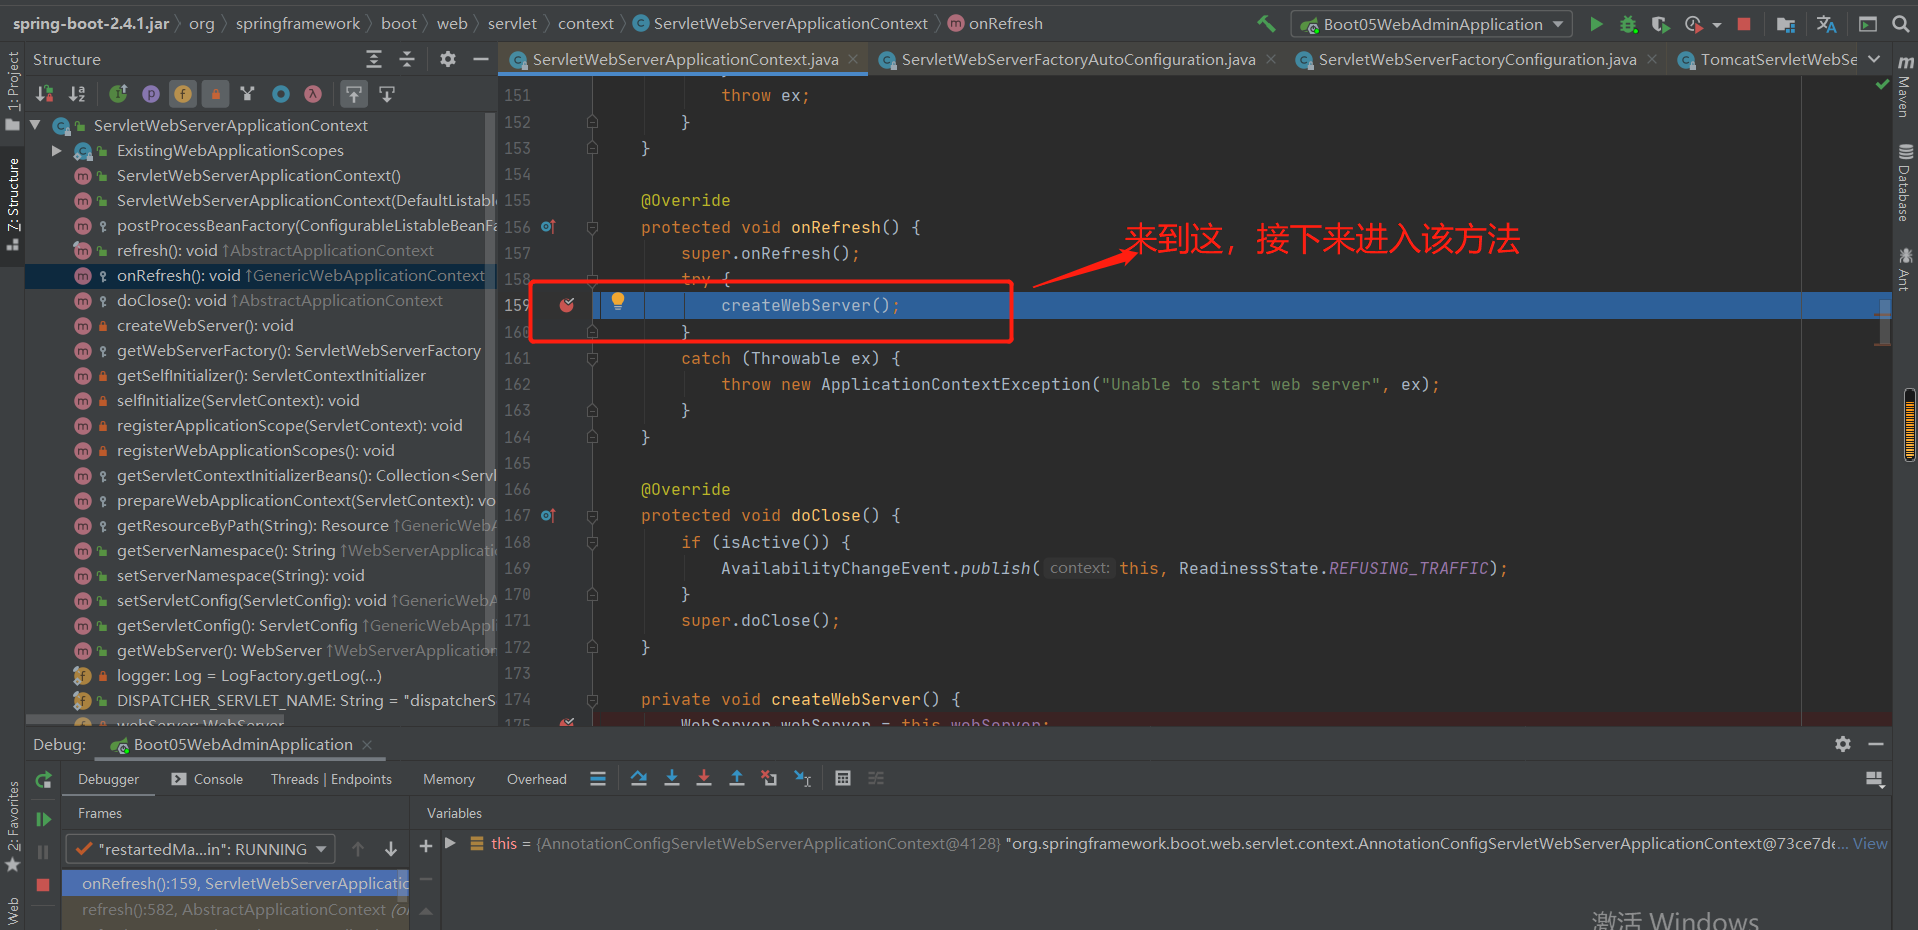
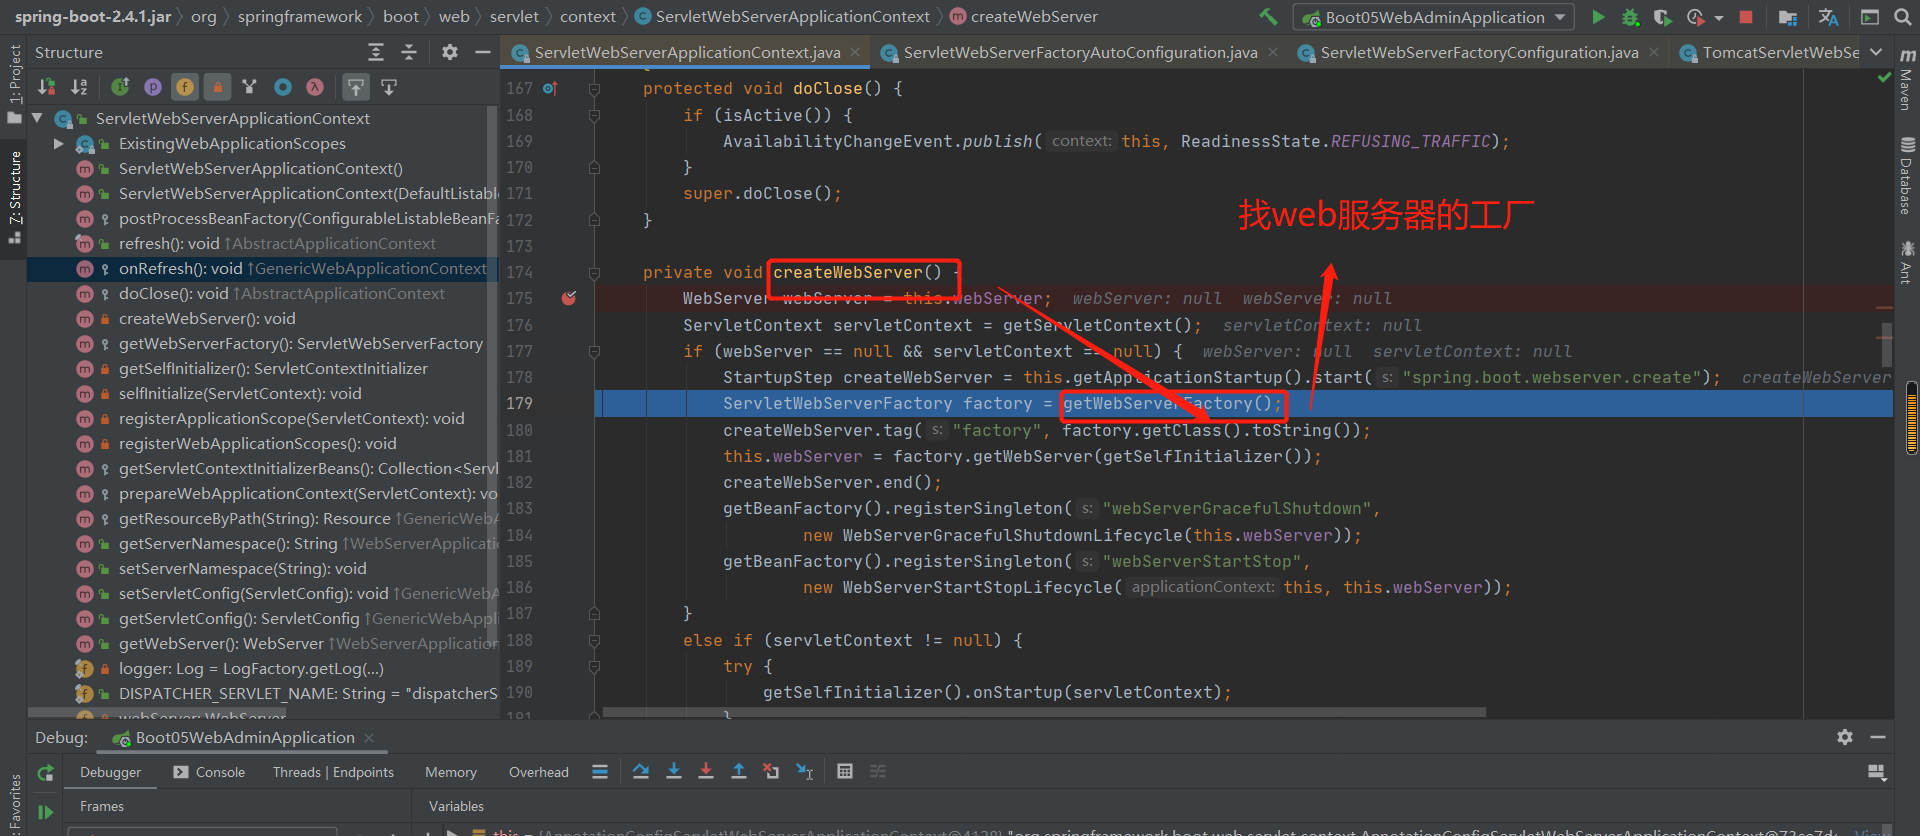
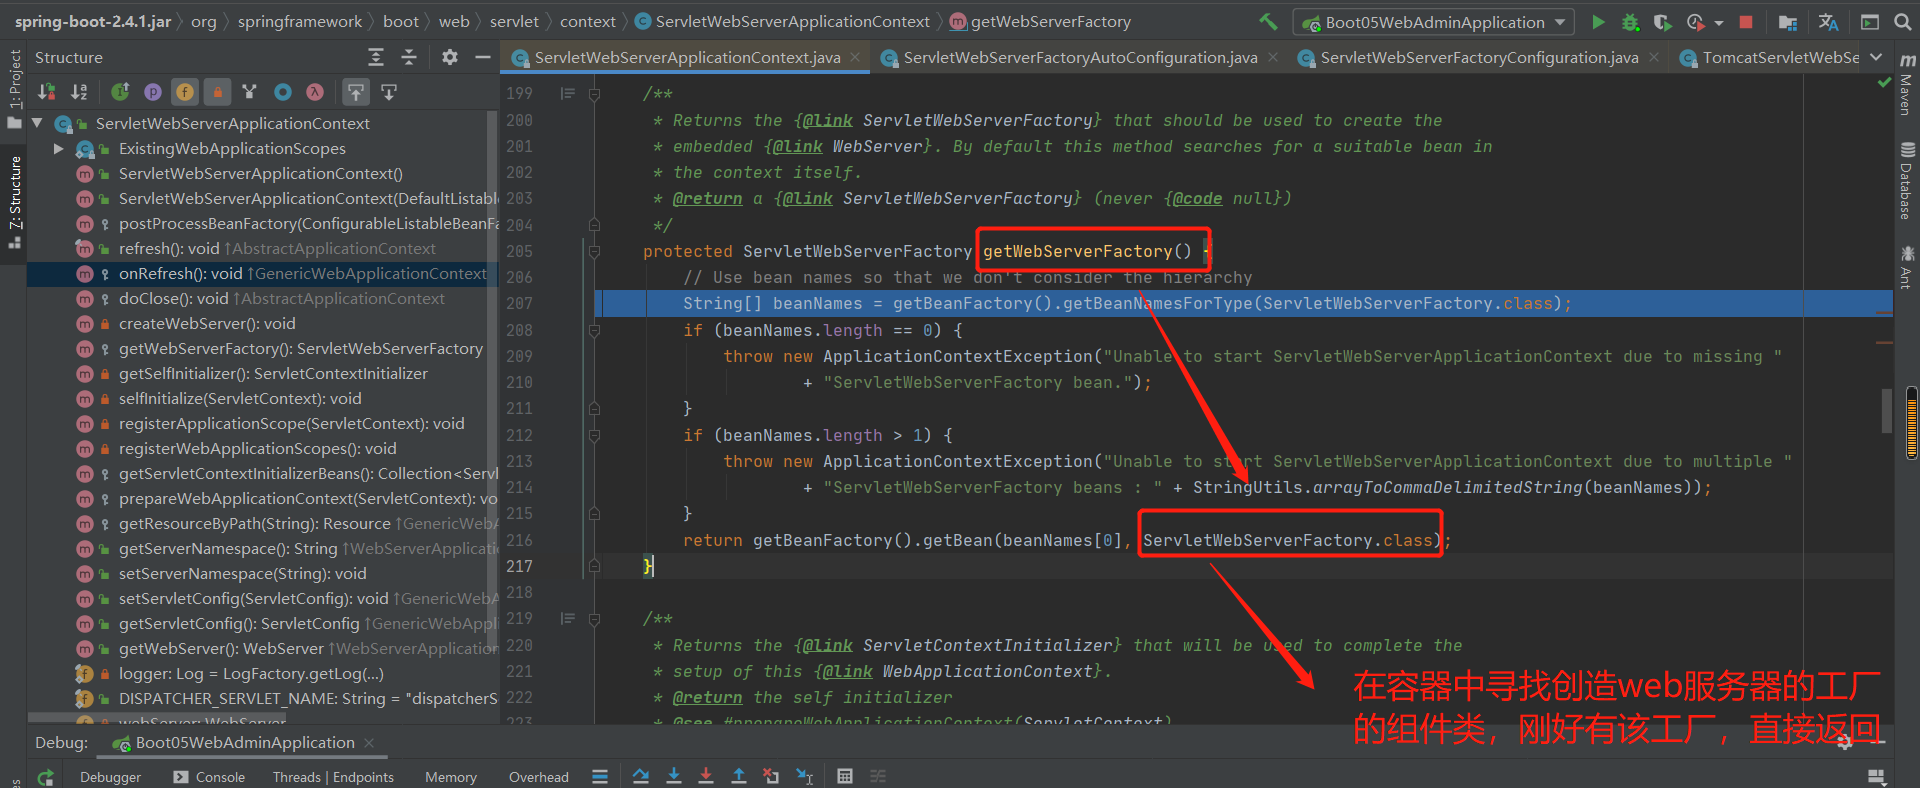
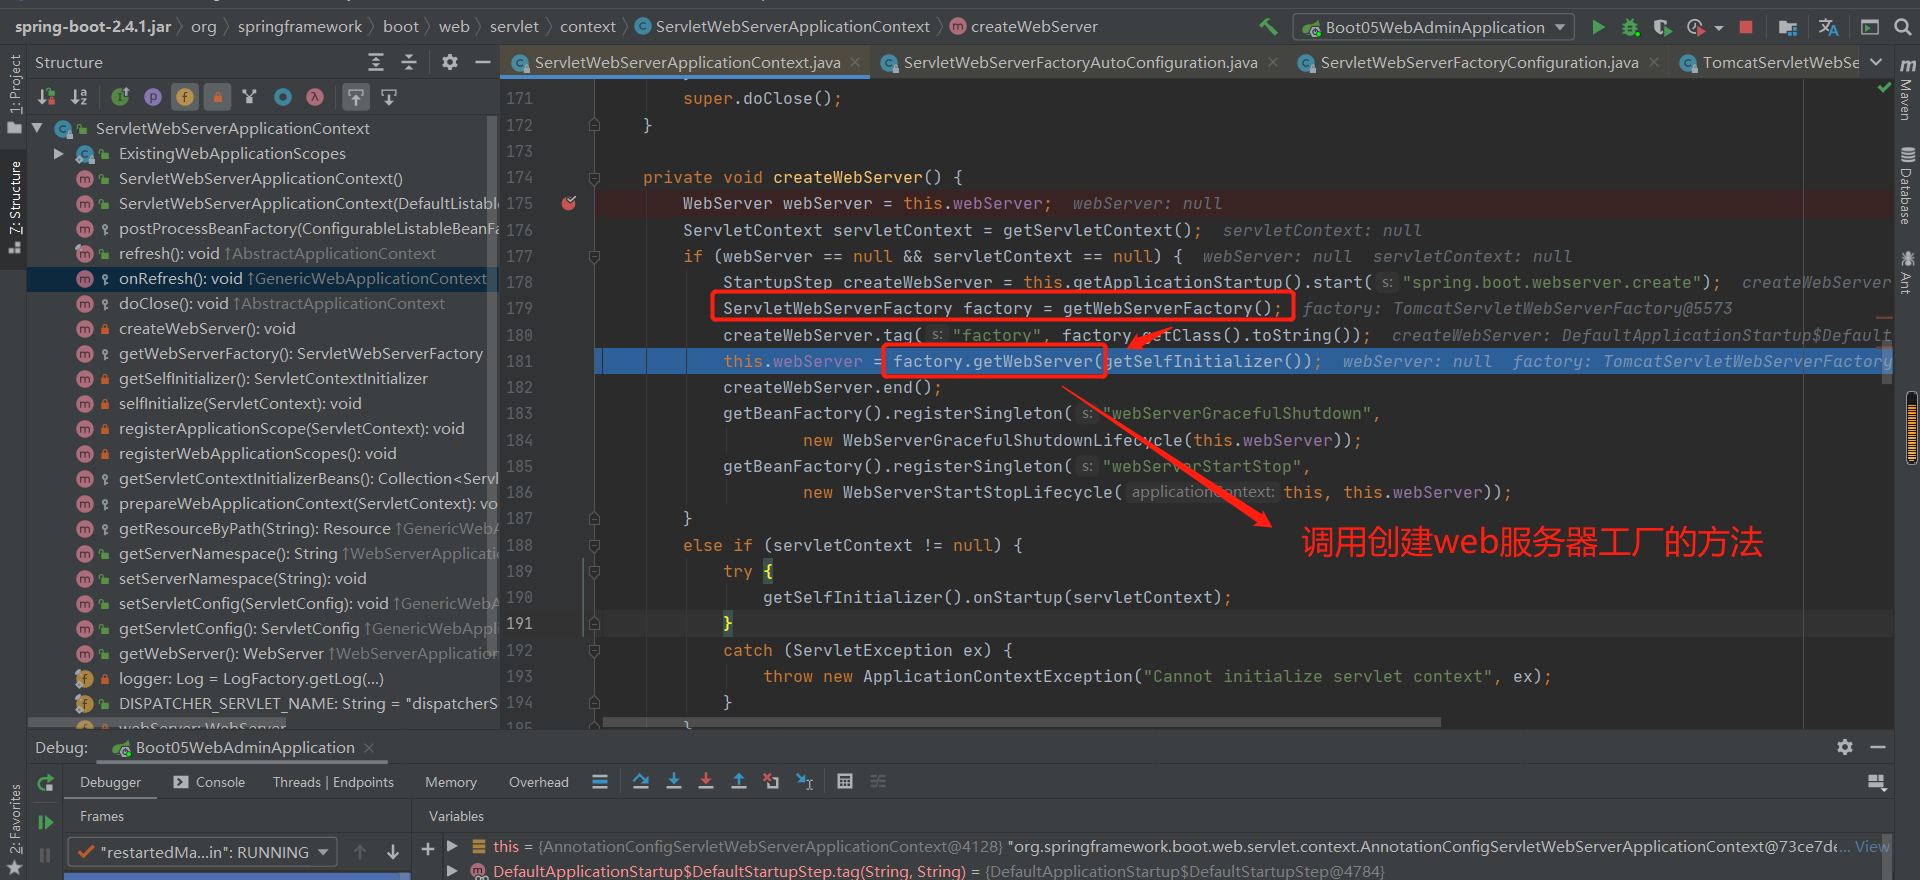
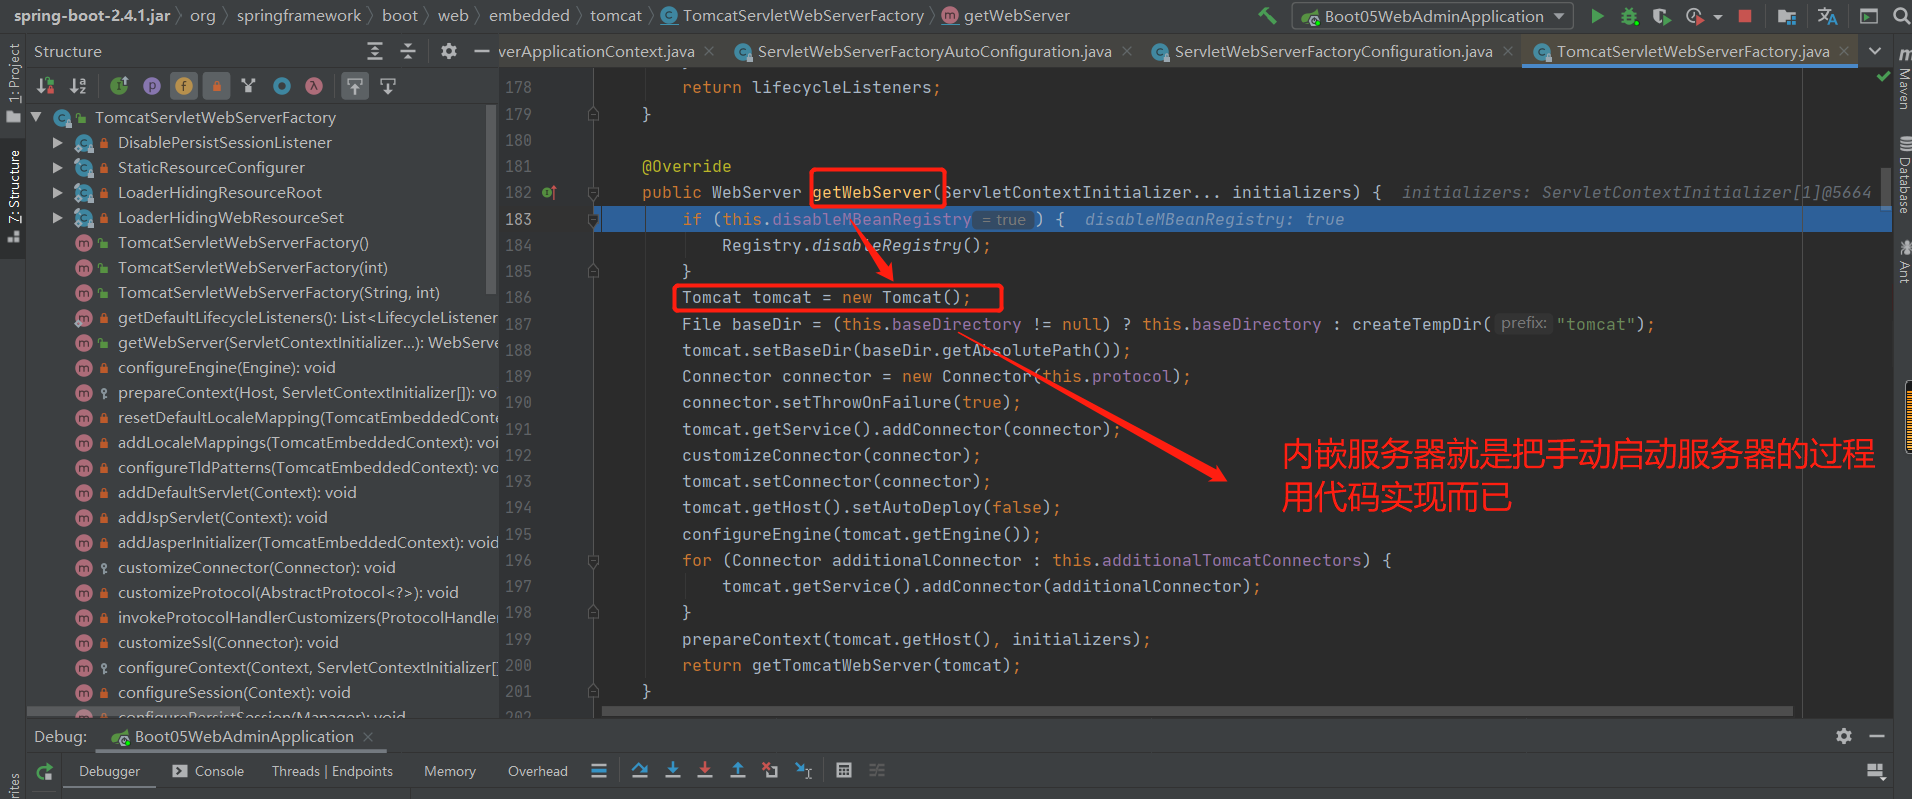
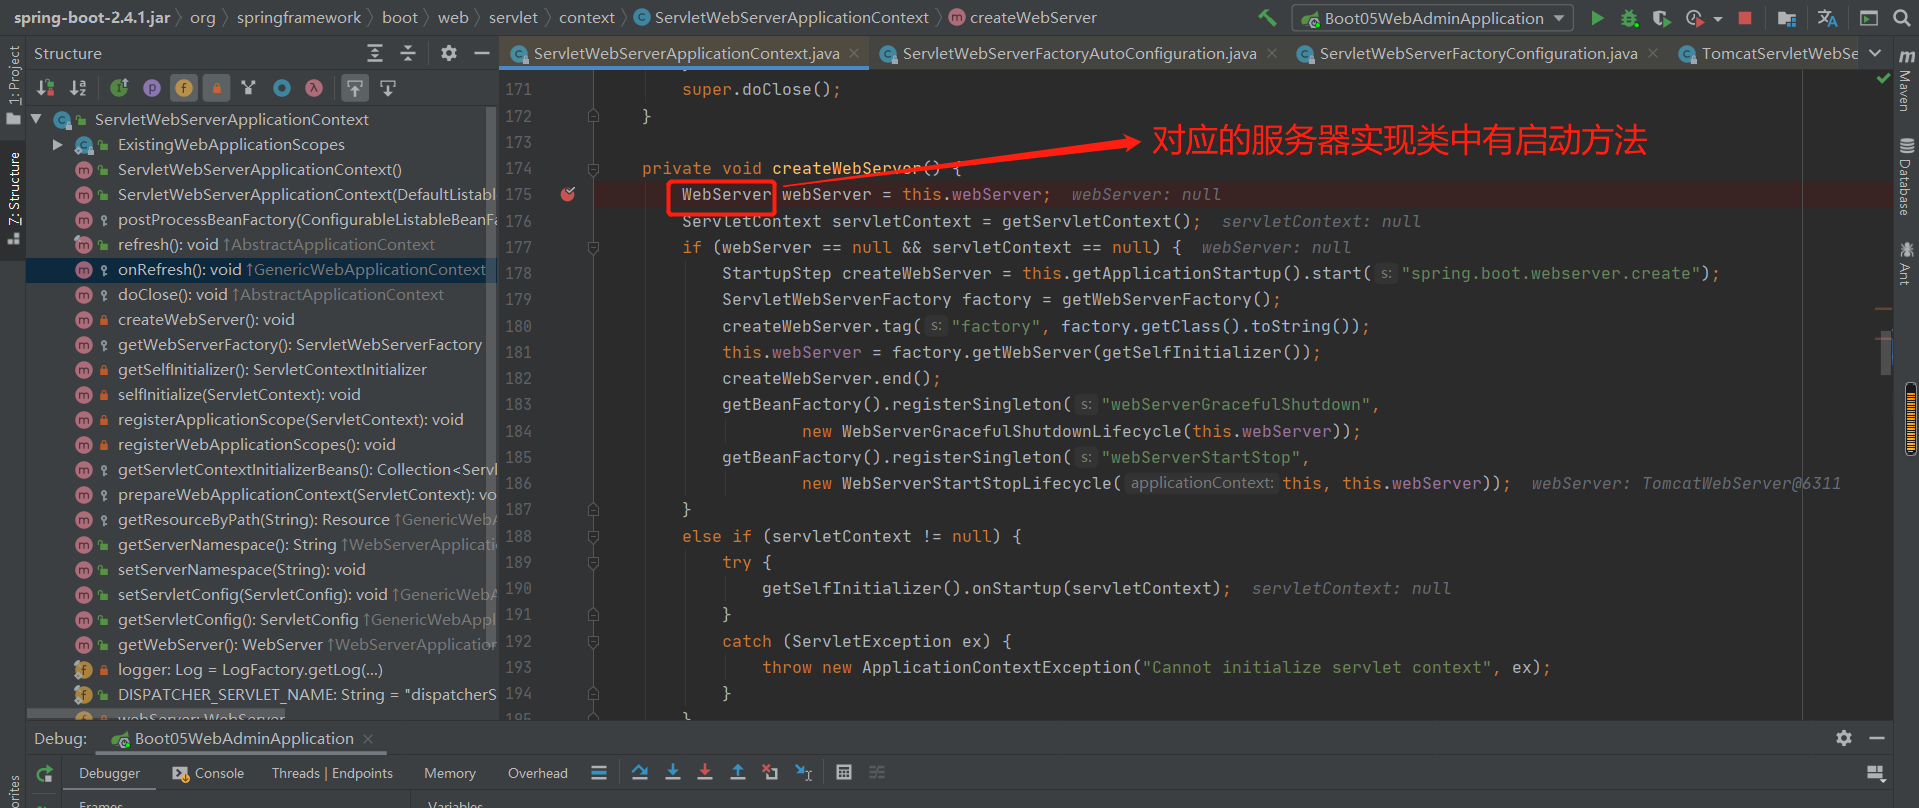
注意:TomcatWebServer实现了WebServer接口
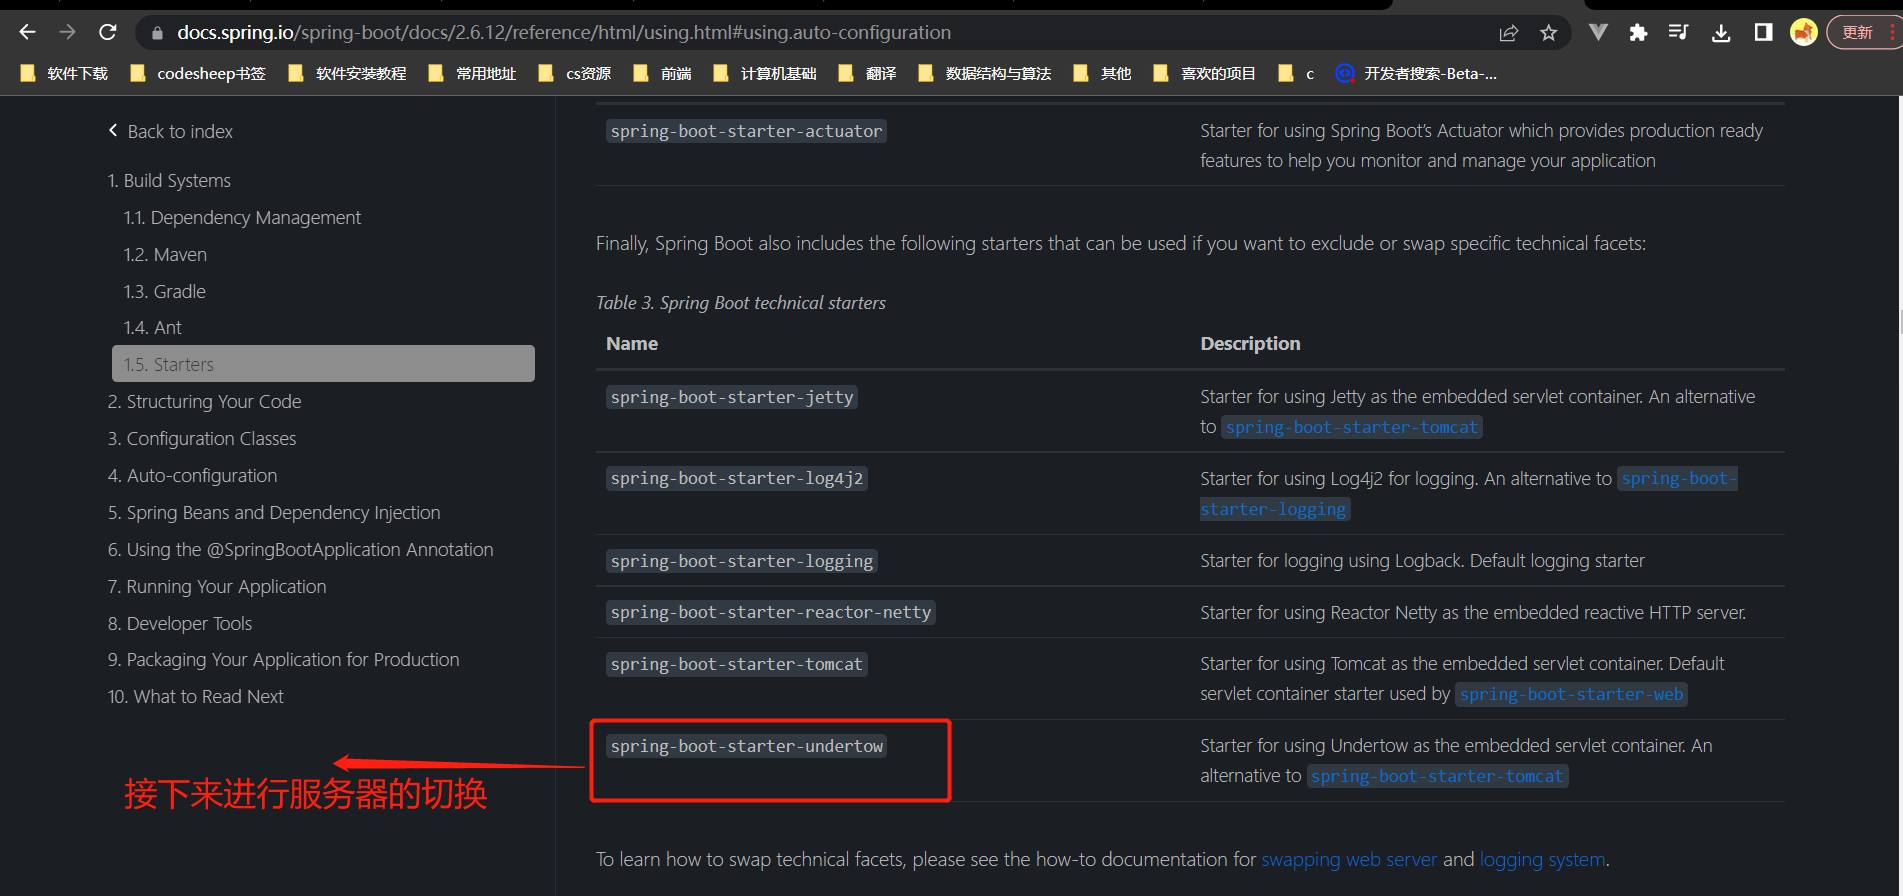
从tomcat服务器切换为undertow服务器:
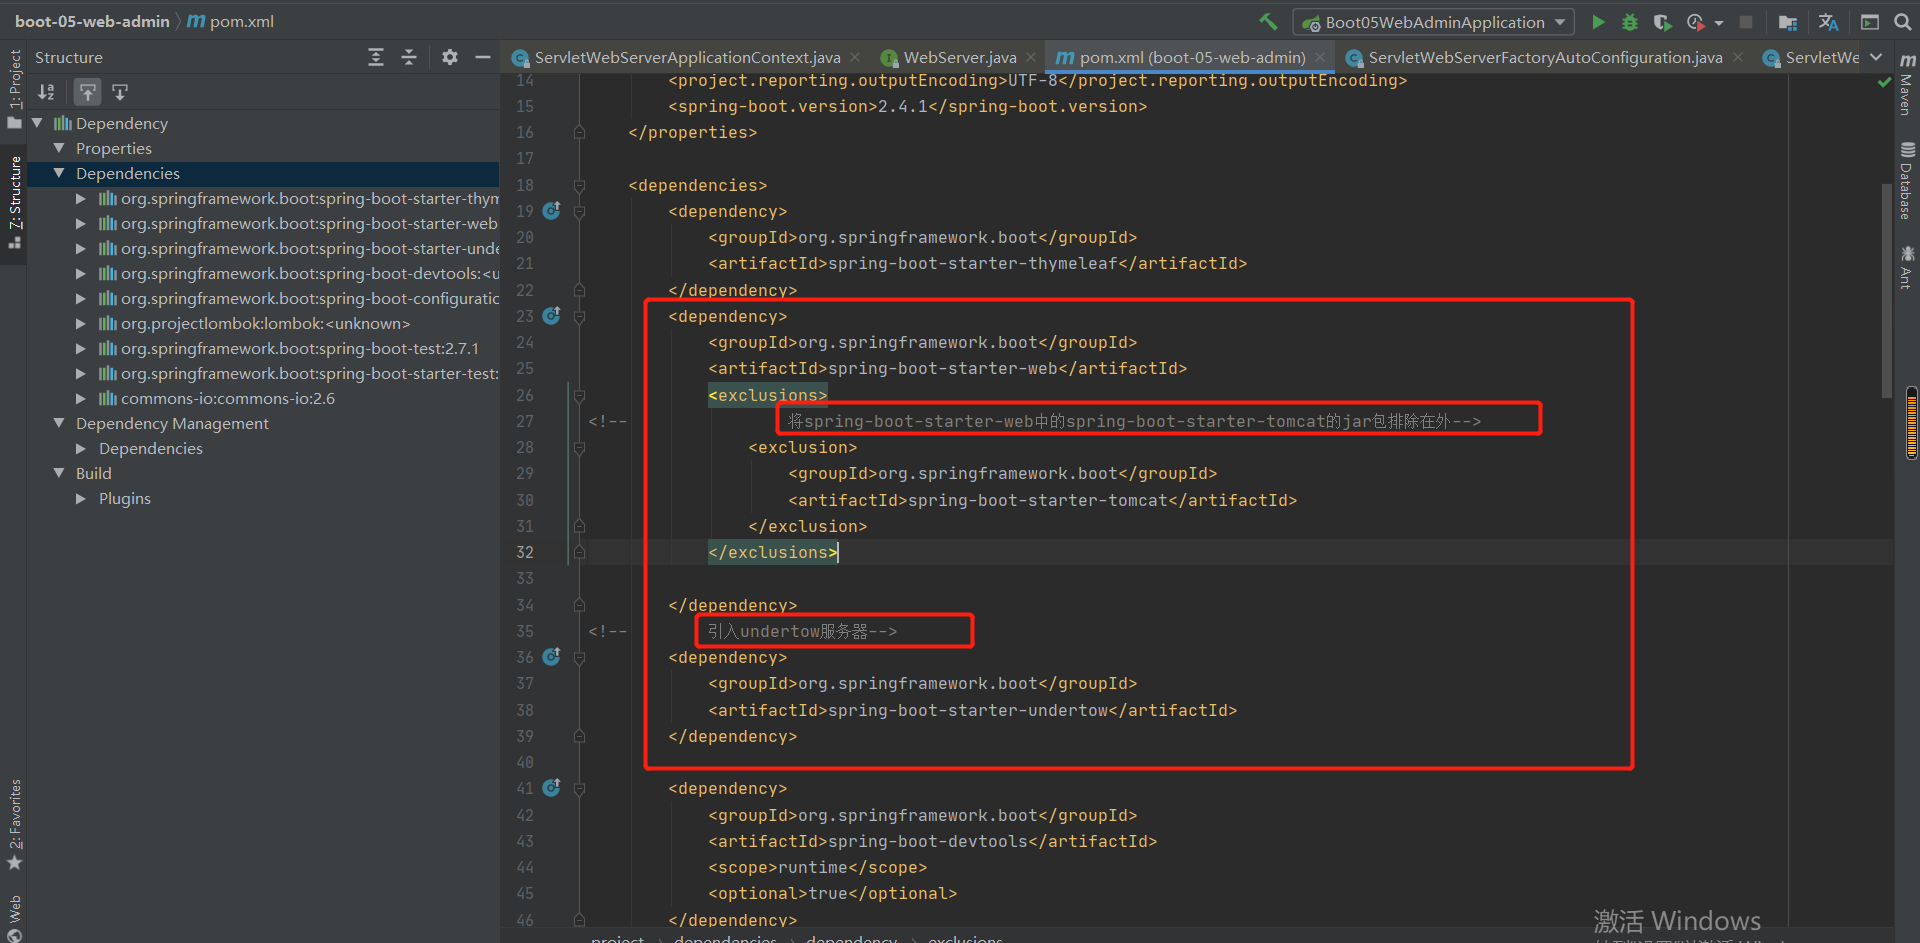
结果:
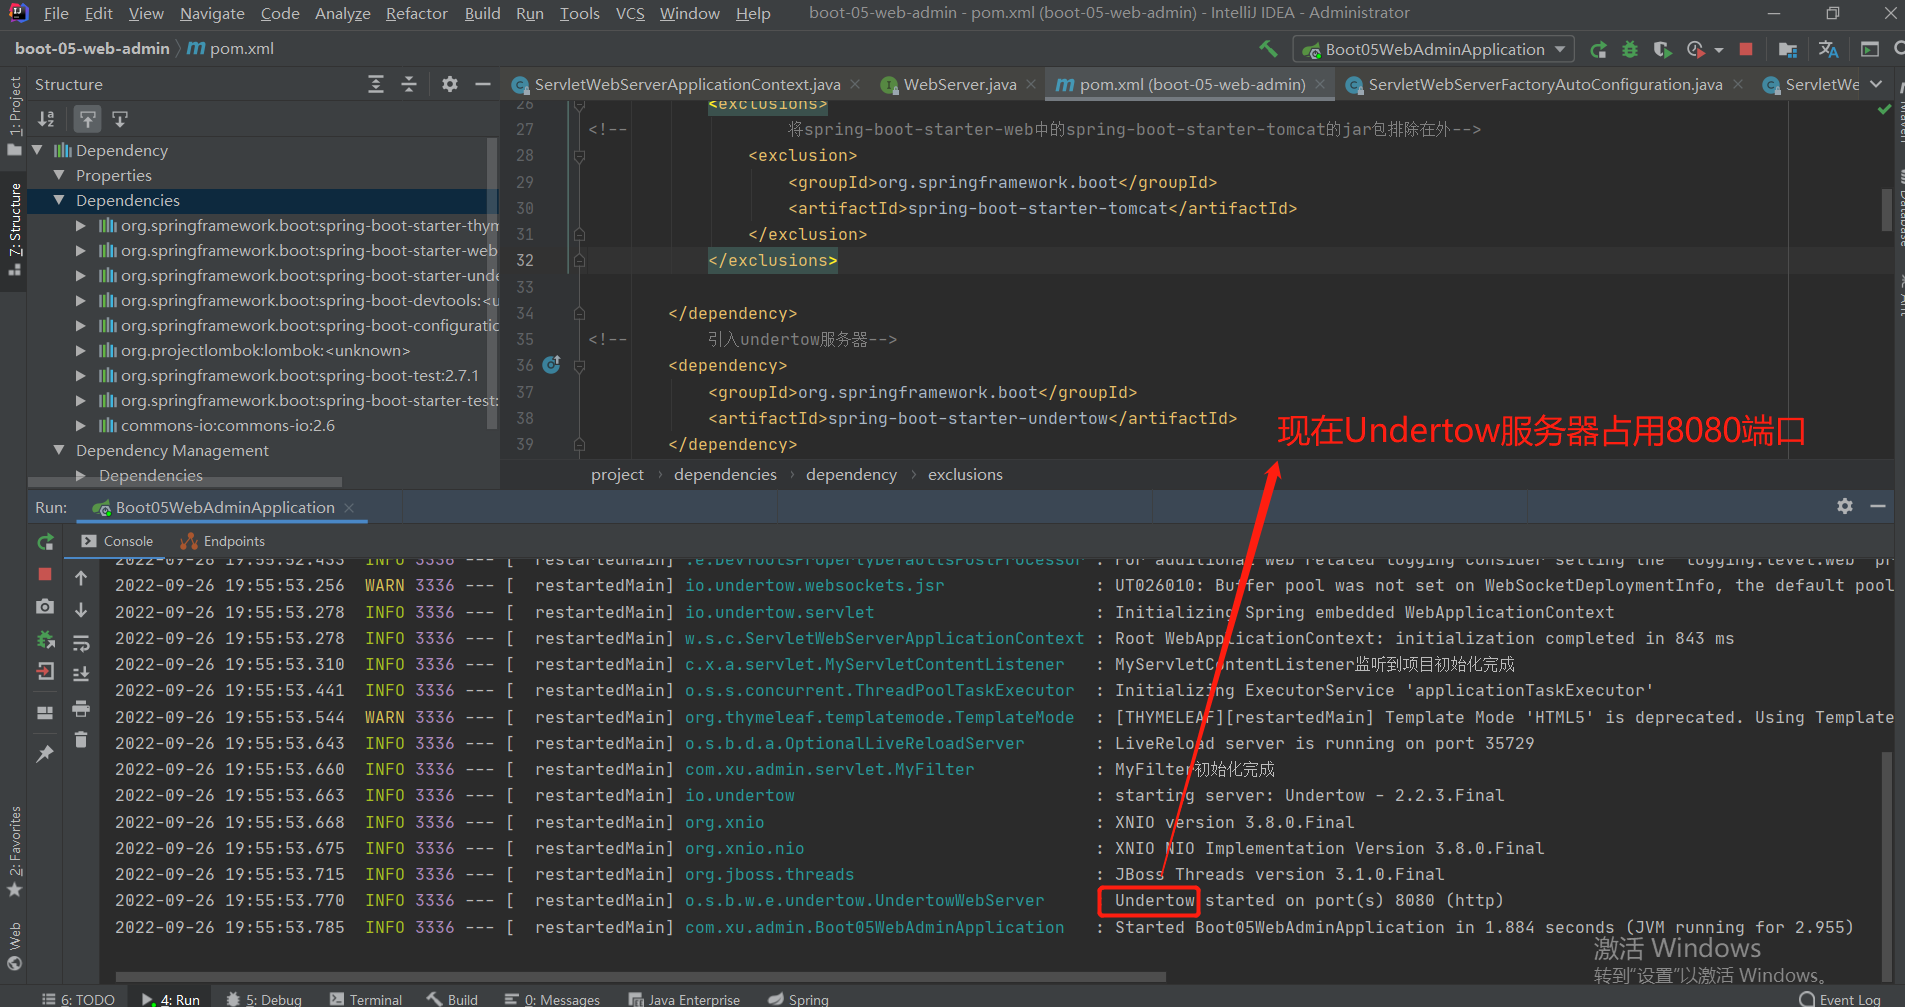
补充:一般还是使用tomcat服务器。
12-2 定制化容器:
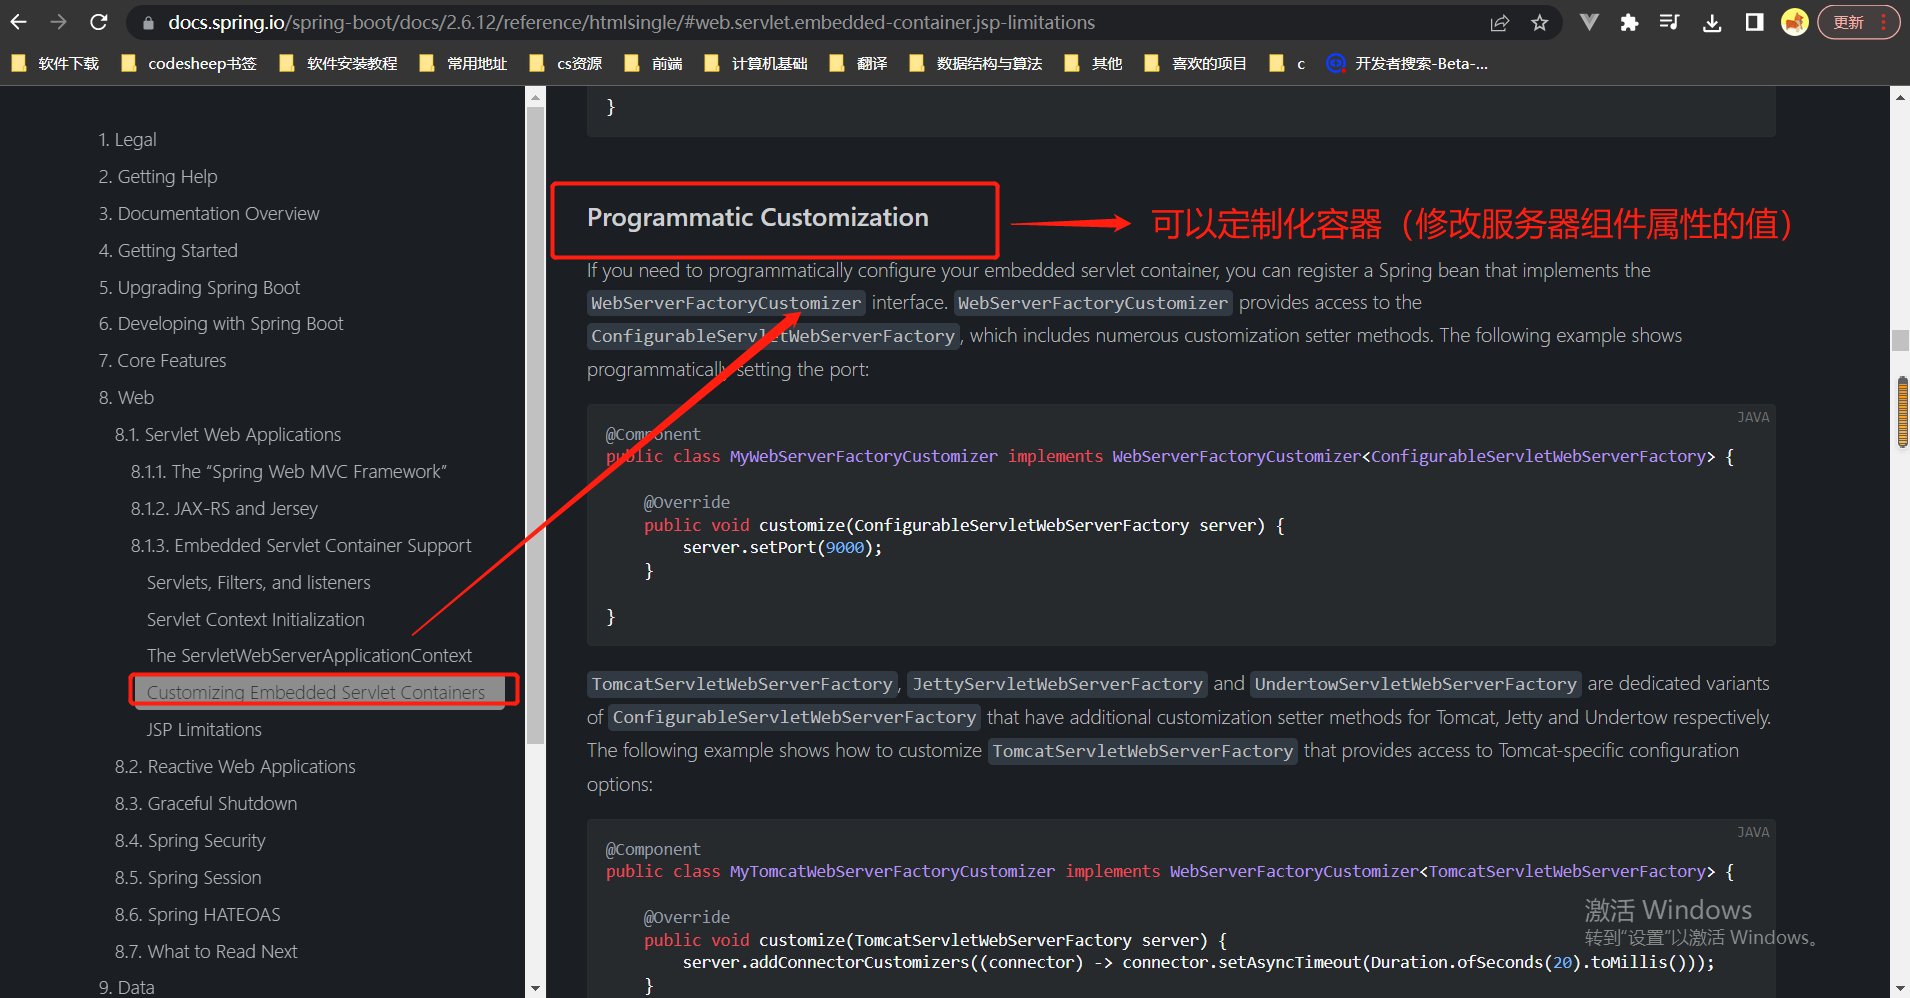

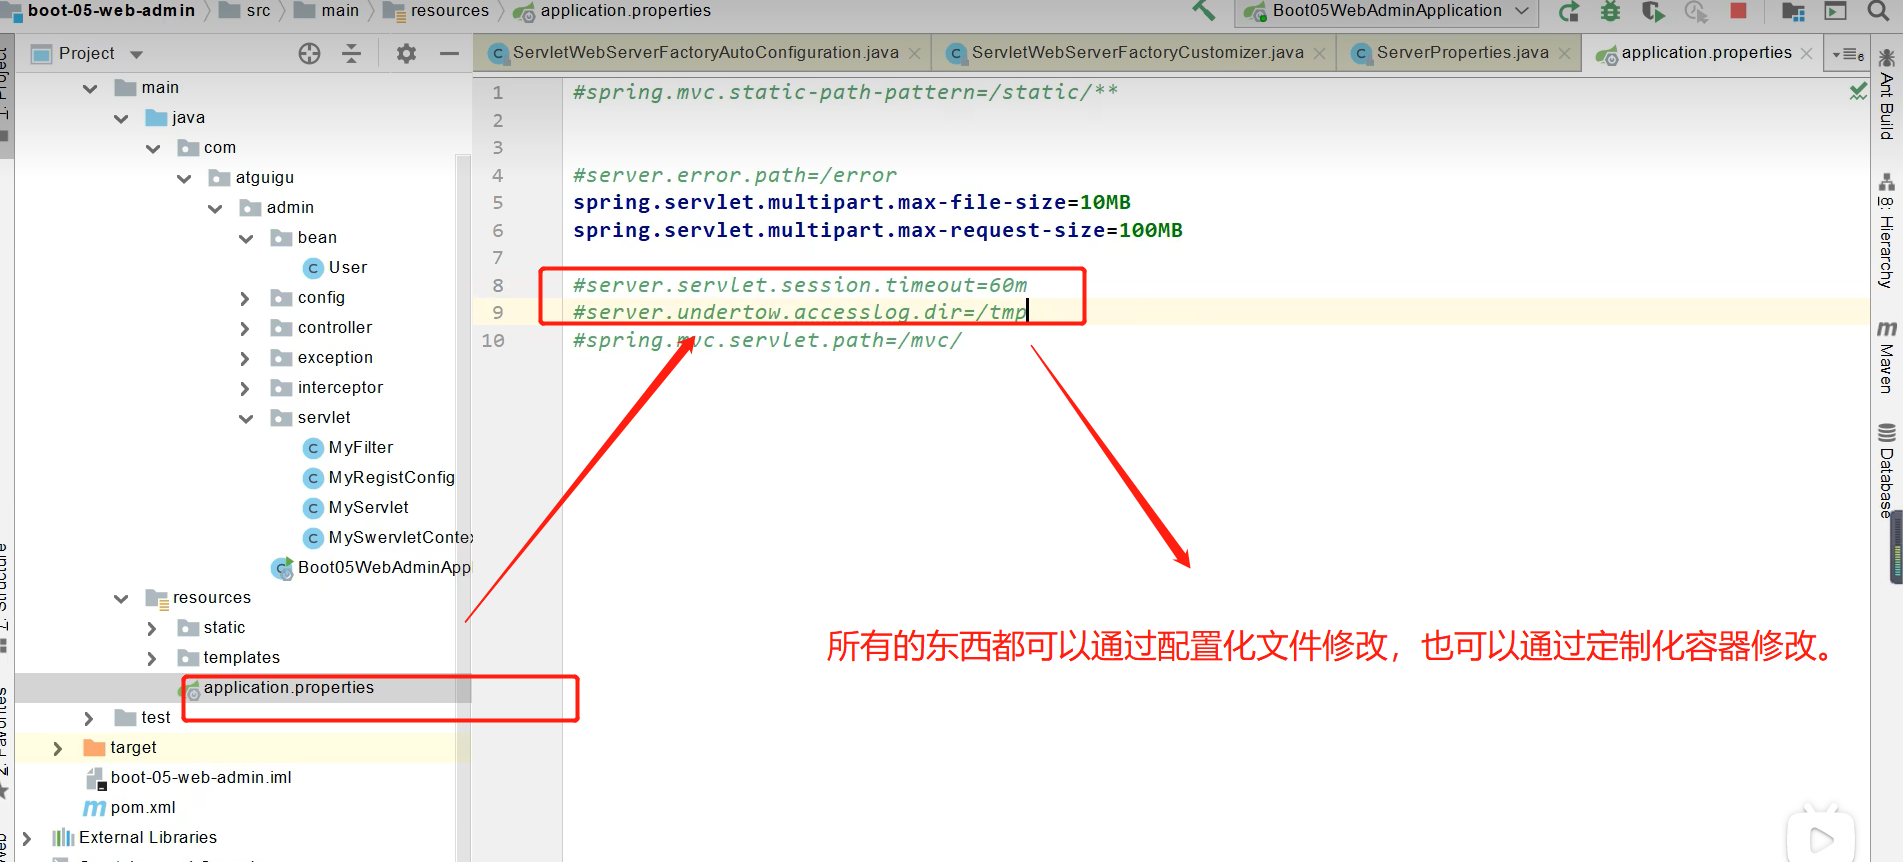
12-3 定制化原理--springboot定制化组件的几种方式:
1.对于特定的请求响应特定路径下的资源:
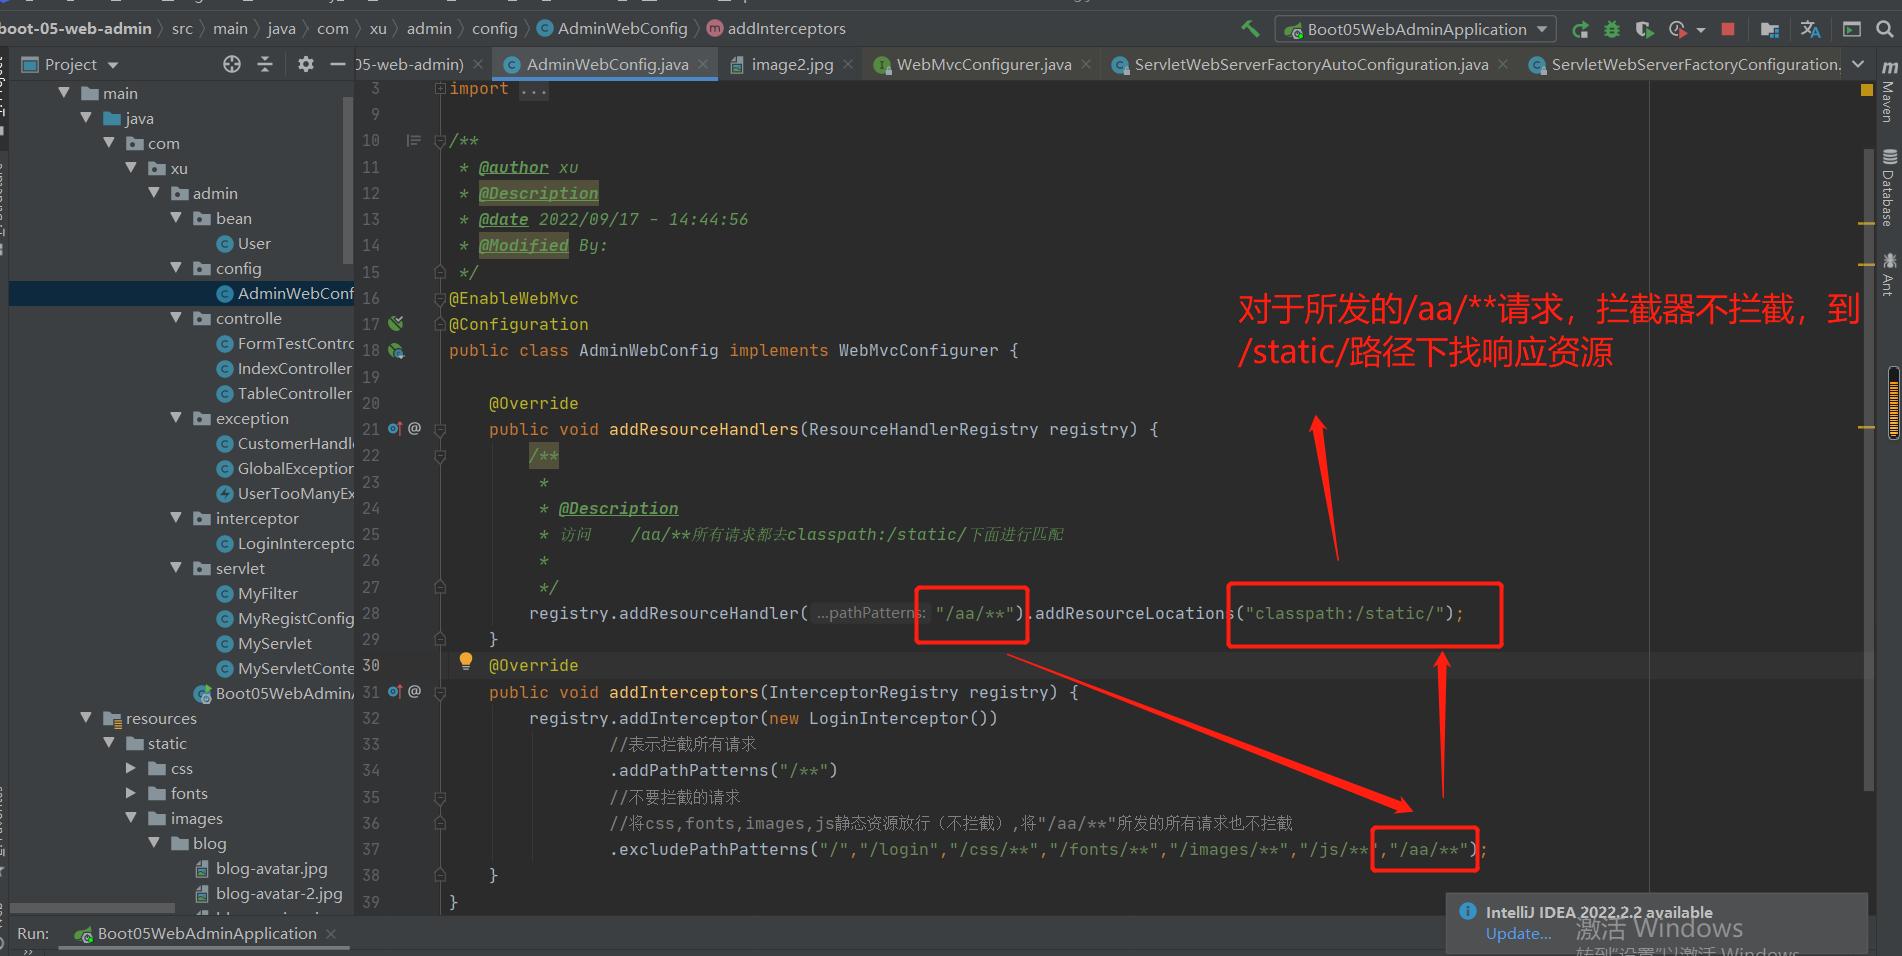
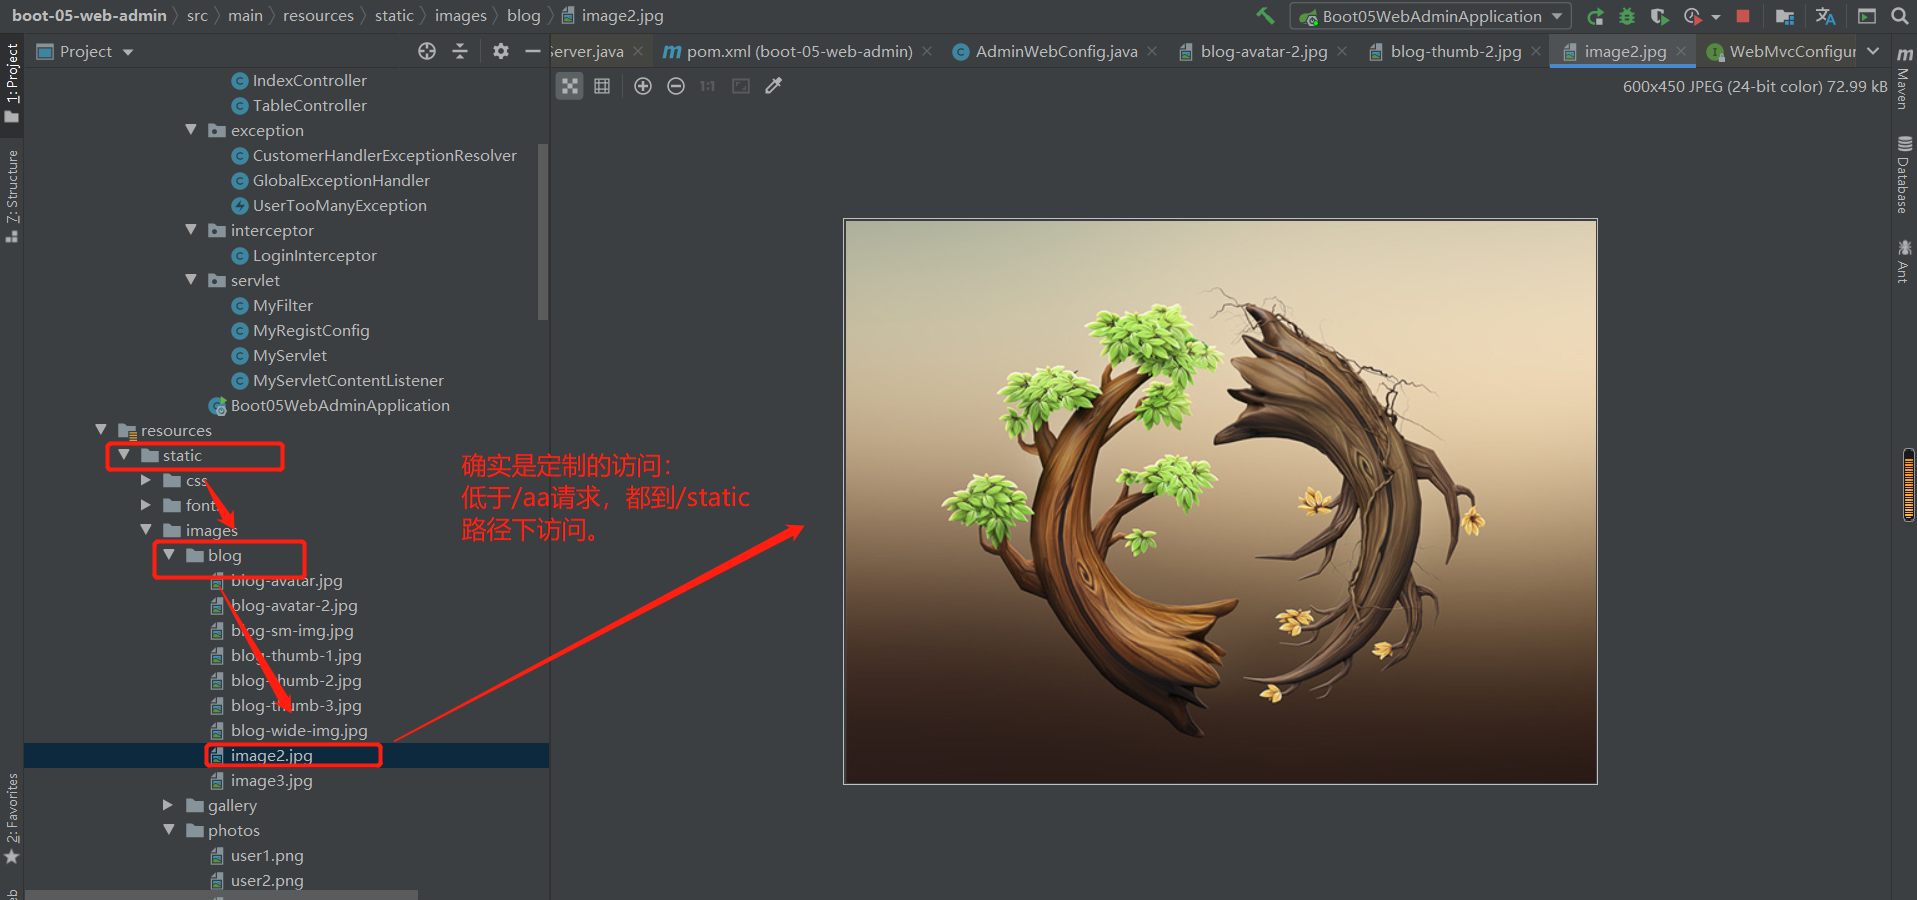
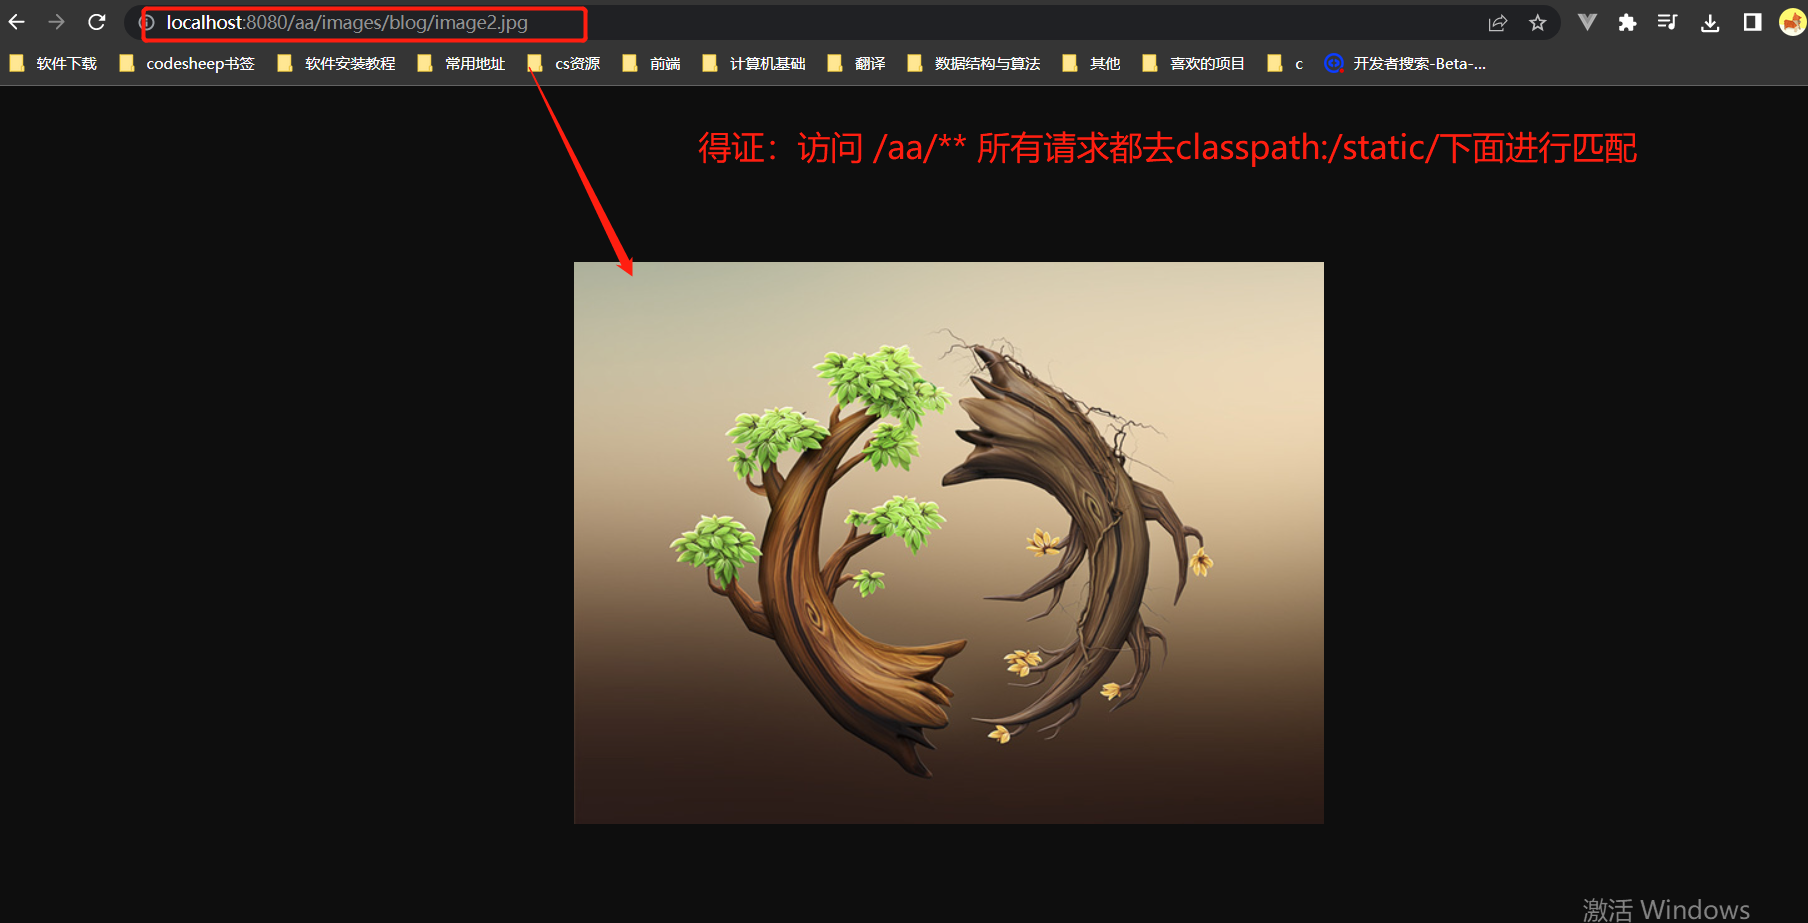
代码参考:
package com.xu.admin.config;

import com.xu.admin.interceptor.LoginInterceptor;
import org.springframework.context.annotation.Configuration;
import org.springframework.web.servlet.config.annotation.EnableWebMvc;
import org.springframework.web.servlet.config.annotation.InterceptorRegistry;
import org.springframework.web.servlet.config.annotation.ResourceHandlerRegistry;
import org.springframework.web.servlet.config.annotation.WebMvcConfigurer;

/**
 * @author xu
 * @Description
 *
 * @EnableWebMvc:
 * 如果使用该注解,那么底层的默认规则(对资源处理的规则)就会失效(一定要慎用),可以自定义自己的访问规则
 * 1.静态资源?视图解析器?欢迎页。。。全部失效
 * @date 2022/09/17 - 14:44:56
 * @Modified By:
 */
@EnableWebMvc
@Configuration
public class AdminWebConfig implements WebMvcConfigurer {

    @Override
    public void addResourceHandlers(ResourceHandlerRegistry registry) {
        /**
         *
         * @Description 定义了静态资源规则如下
         * 访问    /aa/**所有请求都去classpath:/static/下面进行匹配
         *
         */
        registry.addResourceHandler("/aa/**").addResourceLocations("classpath:/static/");
    }
    @Override
    public void addInterceptors(InterceptorRegistry registry) {
        registry.addInterceptor(new LoginInterceptor())
                //表示拦截所有请求
                .addPathPatterns("/**")
                //不要拦截的请求
                //将css,fonts,images,js静态资源放行(不拦截),将"/aa/**"所发的所有请求也不拦截
                .excludePathPatterns("/","/login","/css/**","/fonts/**","/images/**","/js/**","/aa/**");
    }
}
2.源码探索:
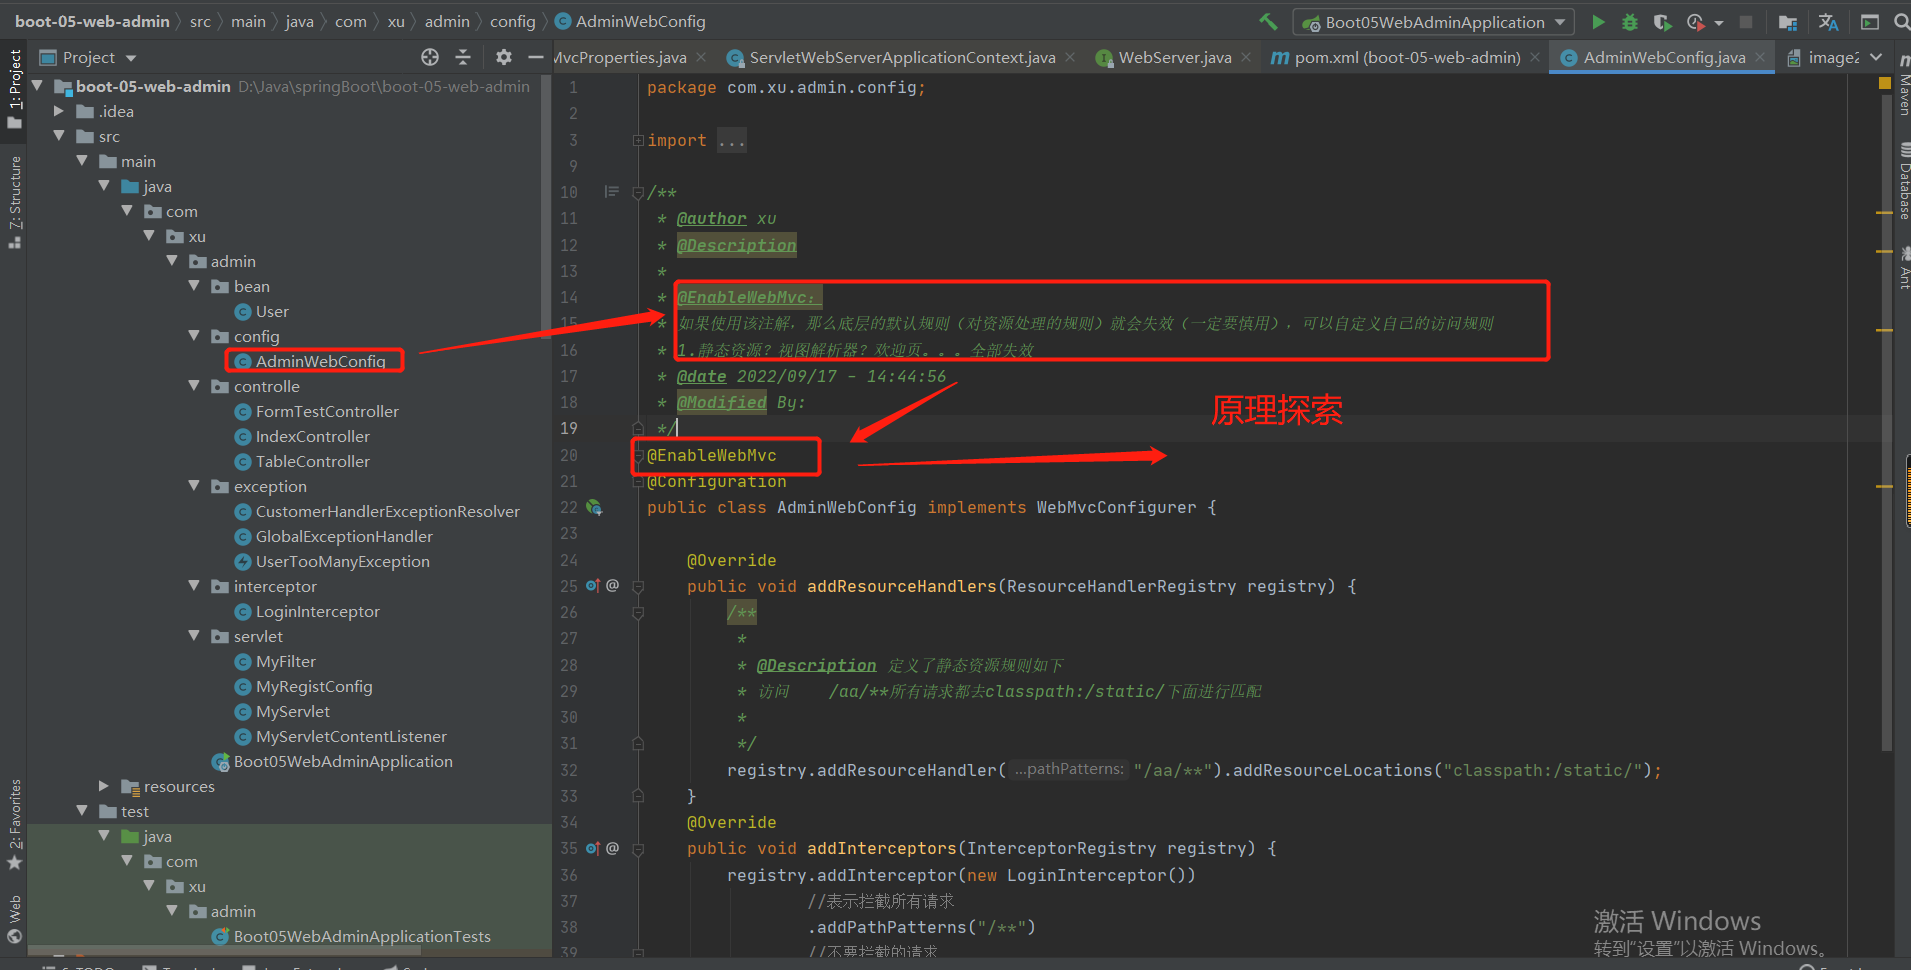
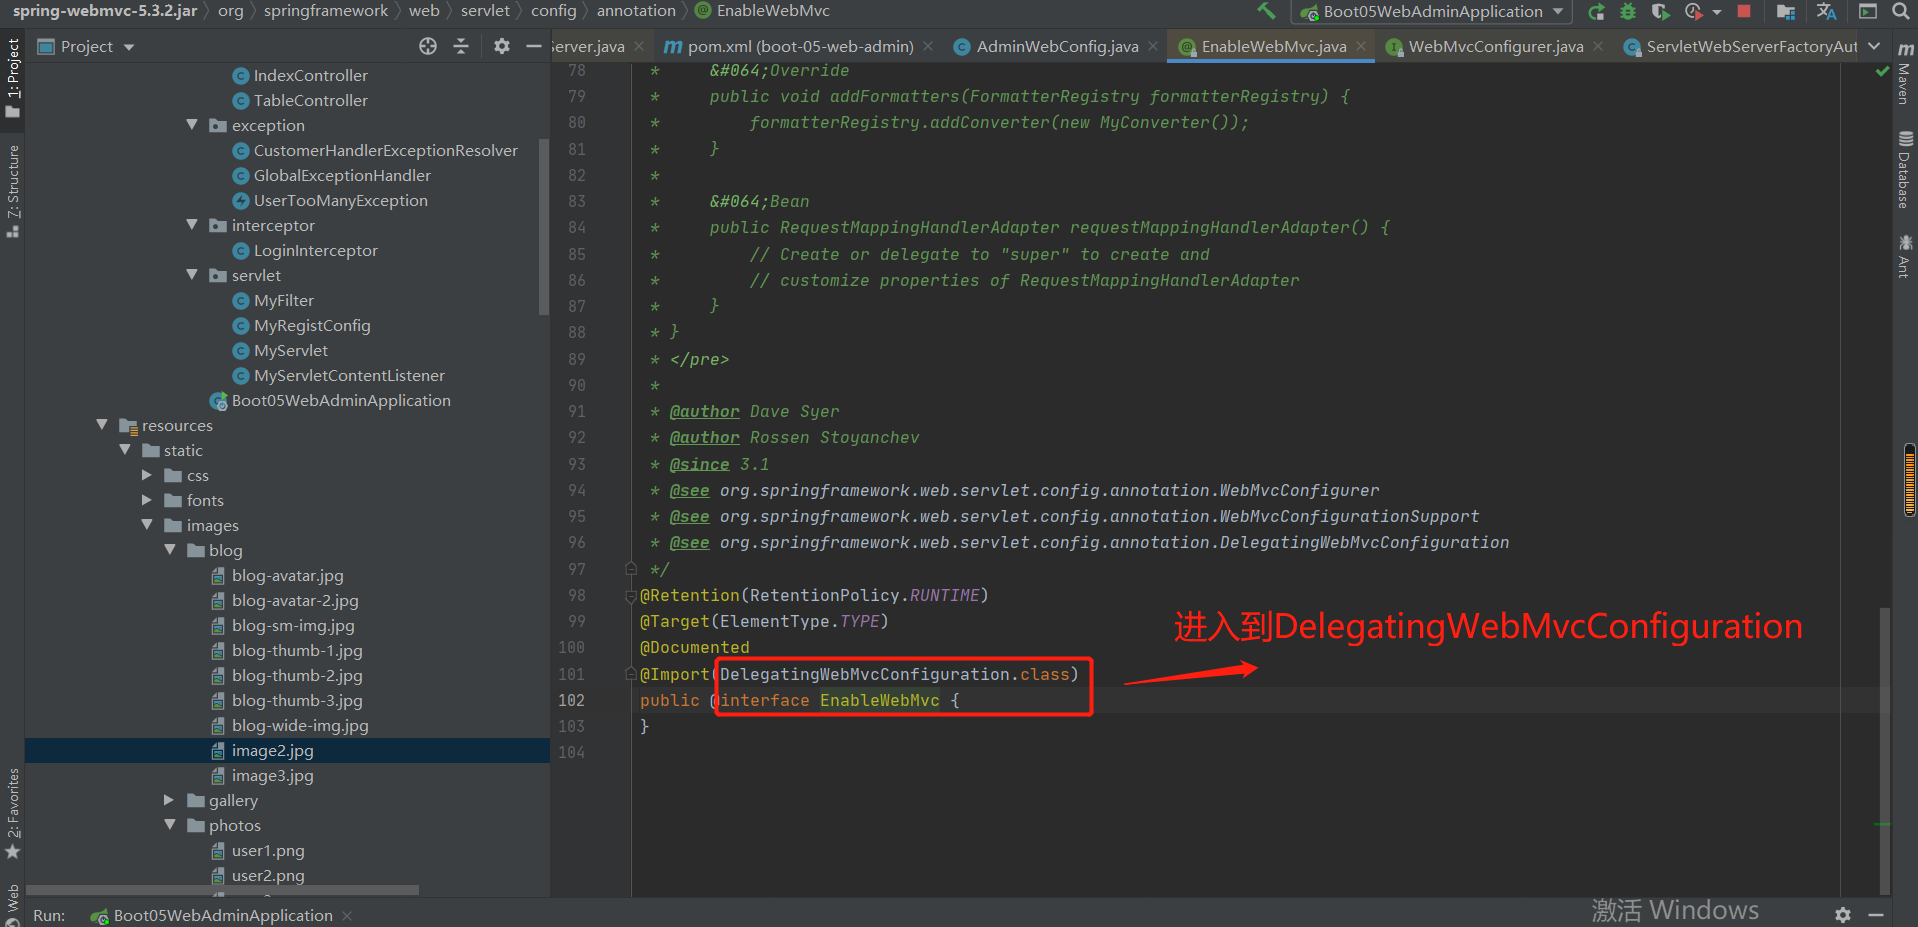
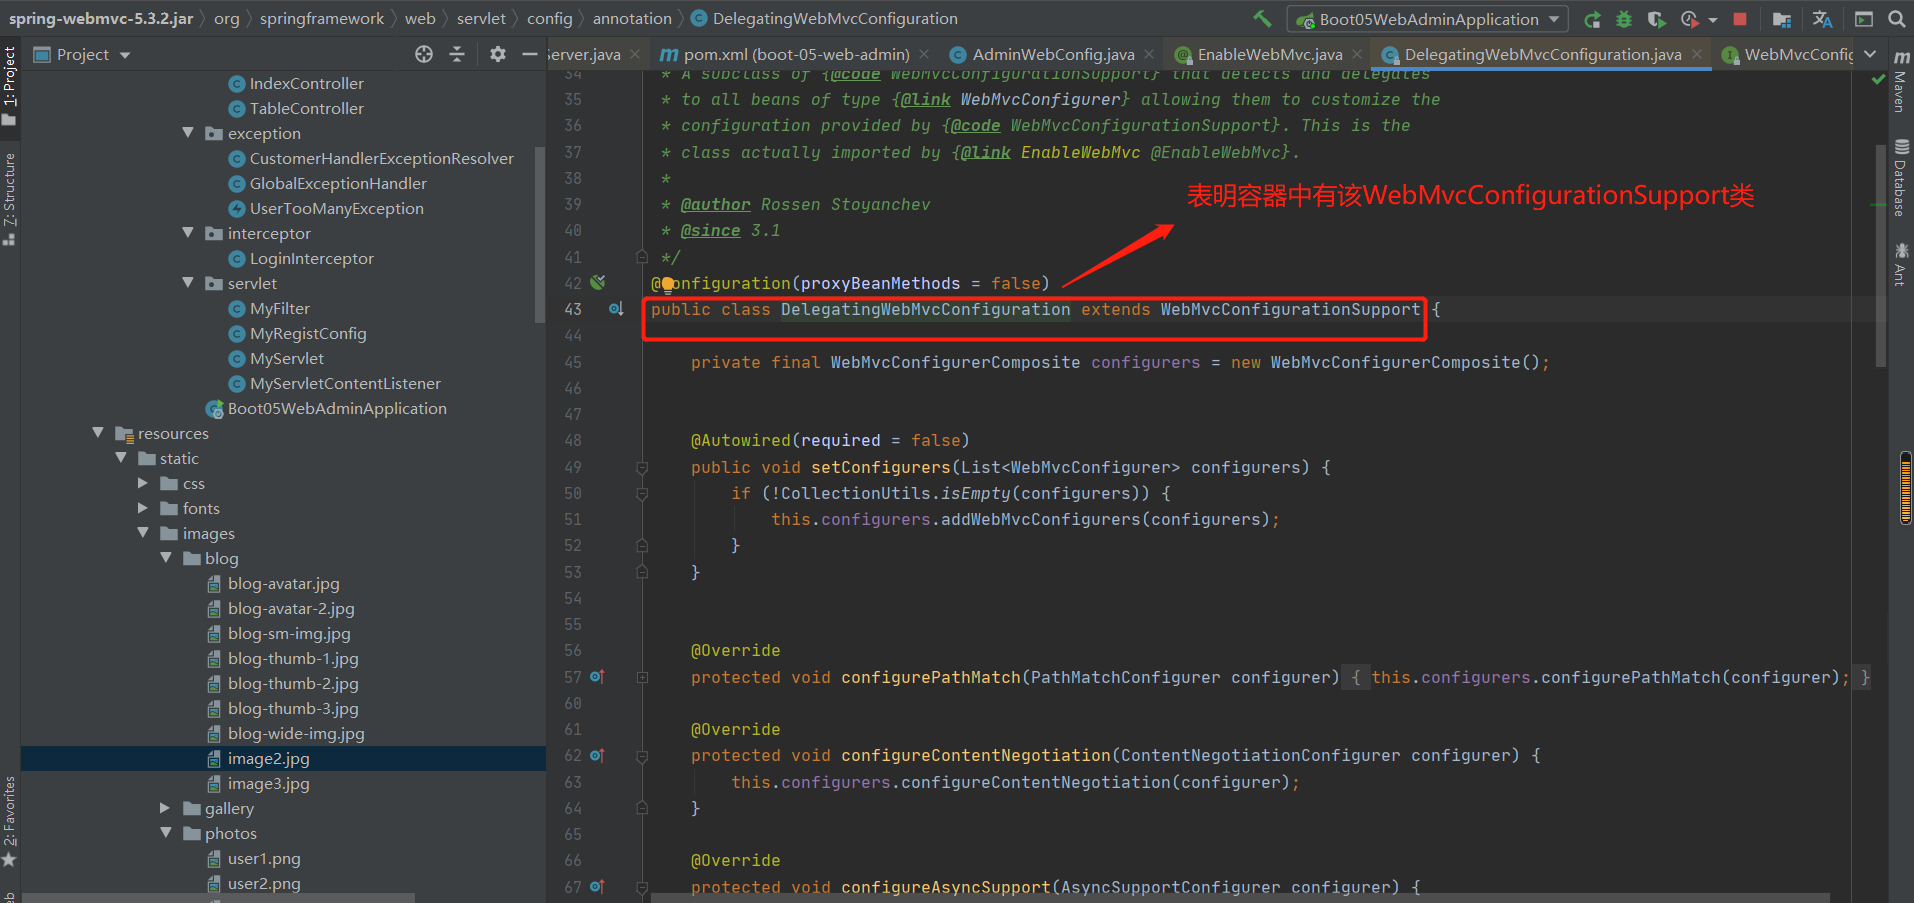
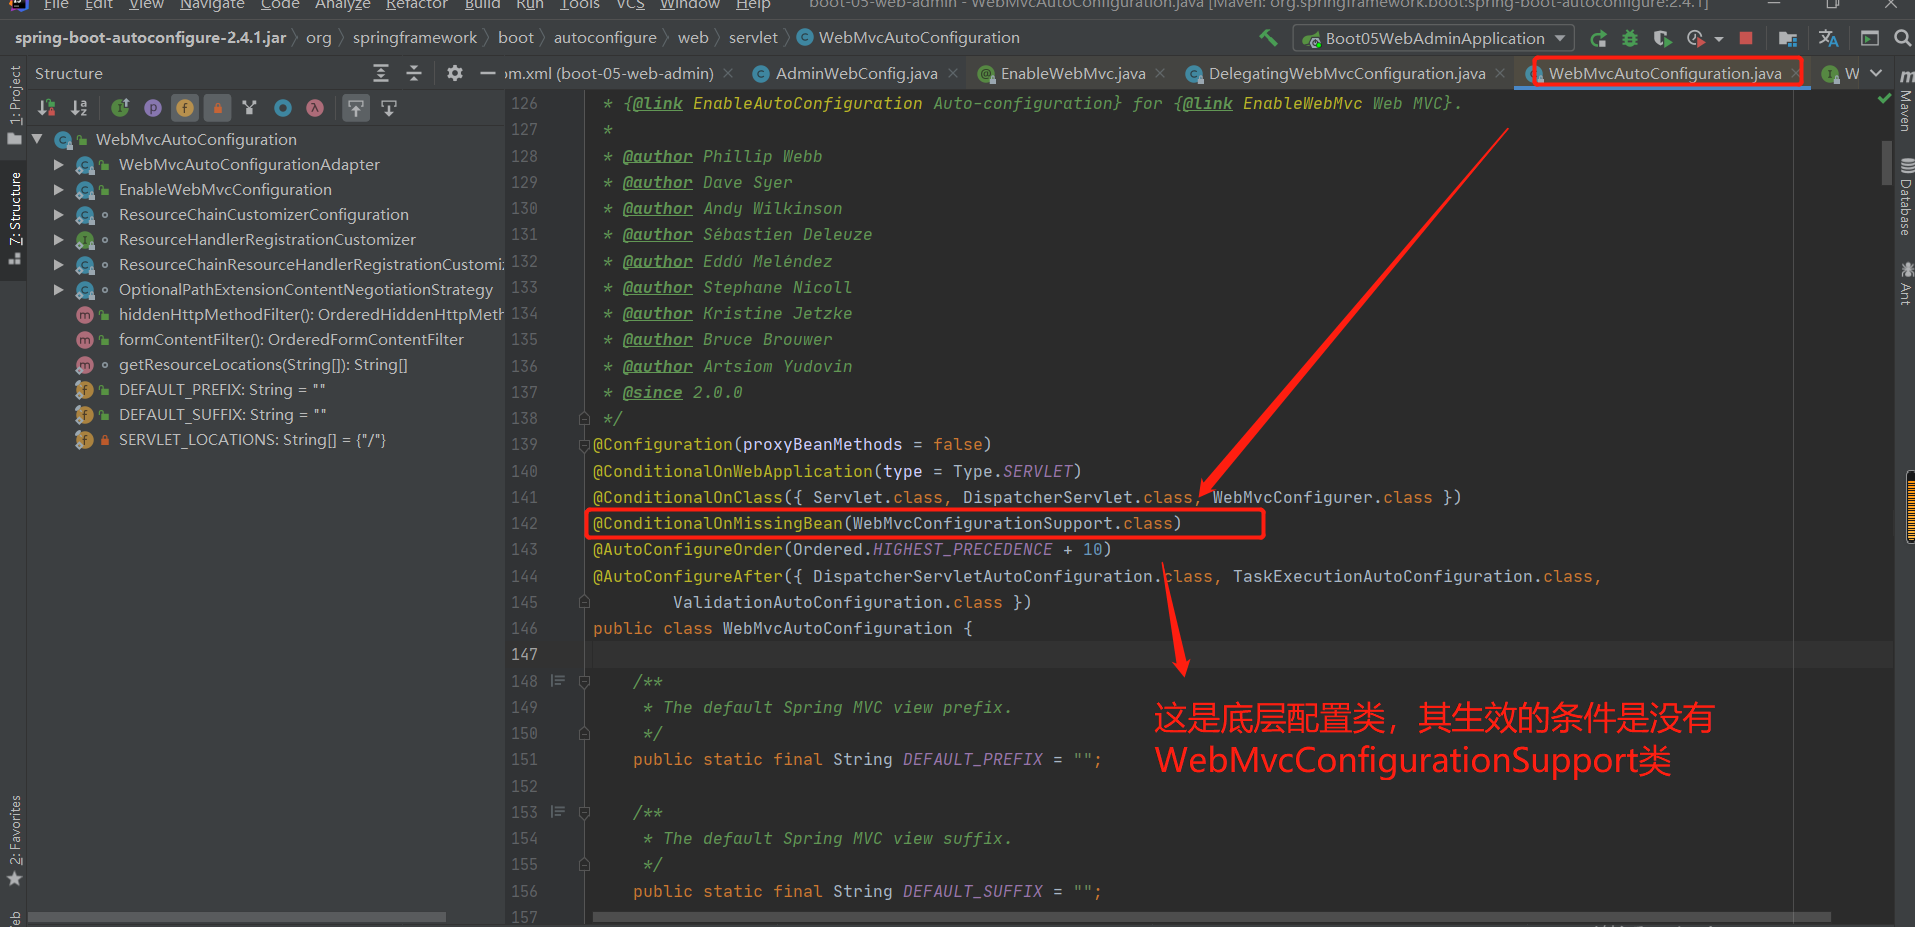
总结:
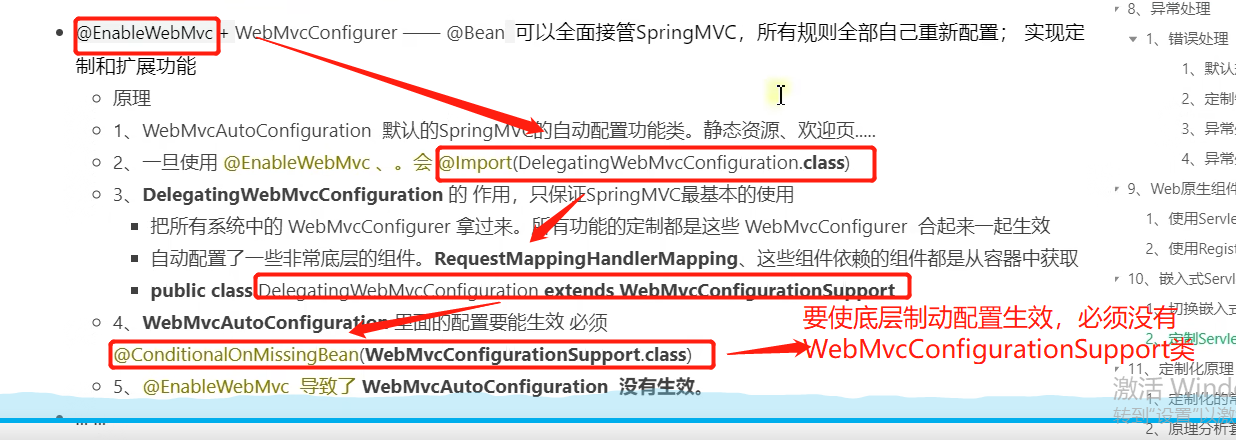
第13章 数据访问
13-1 数据库场景的自动配置分析与整合测试
第一步:导入场景
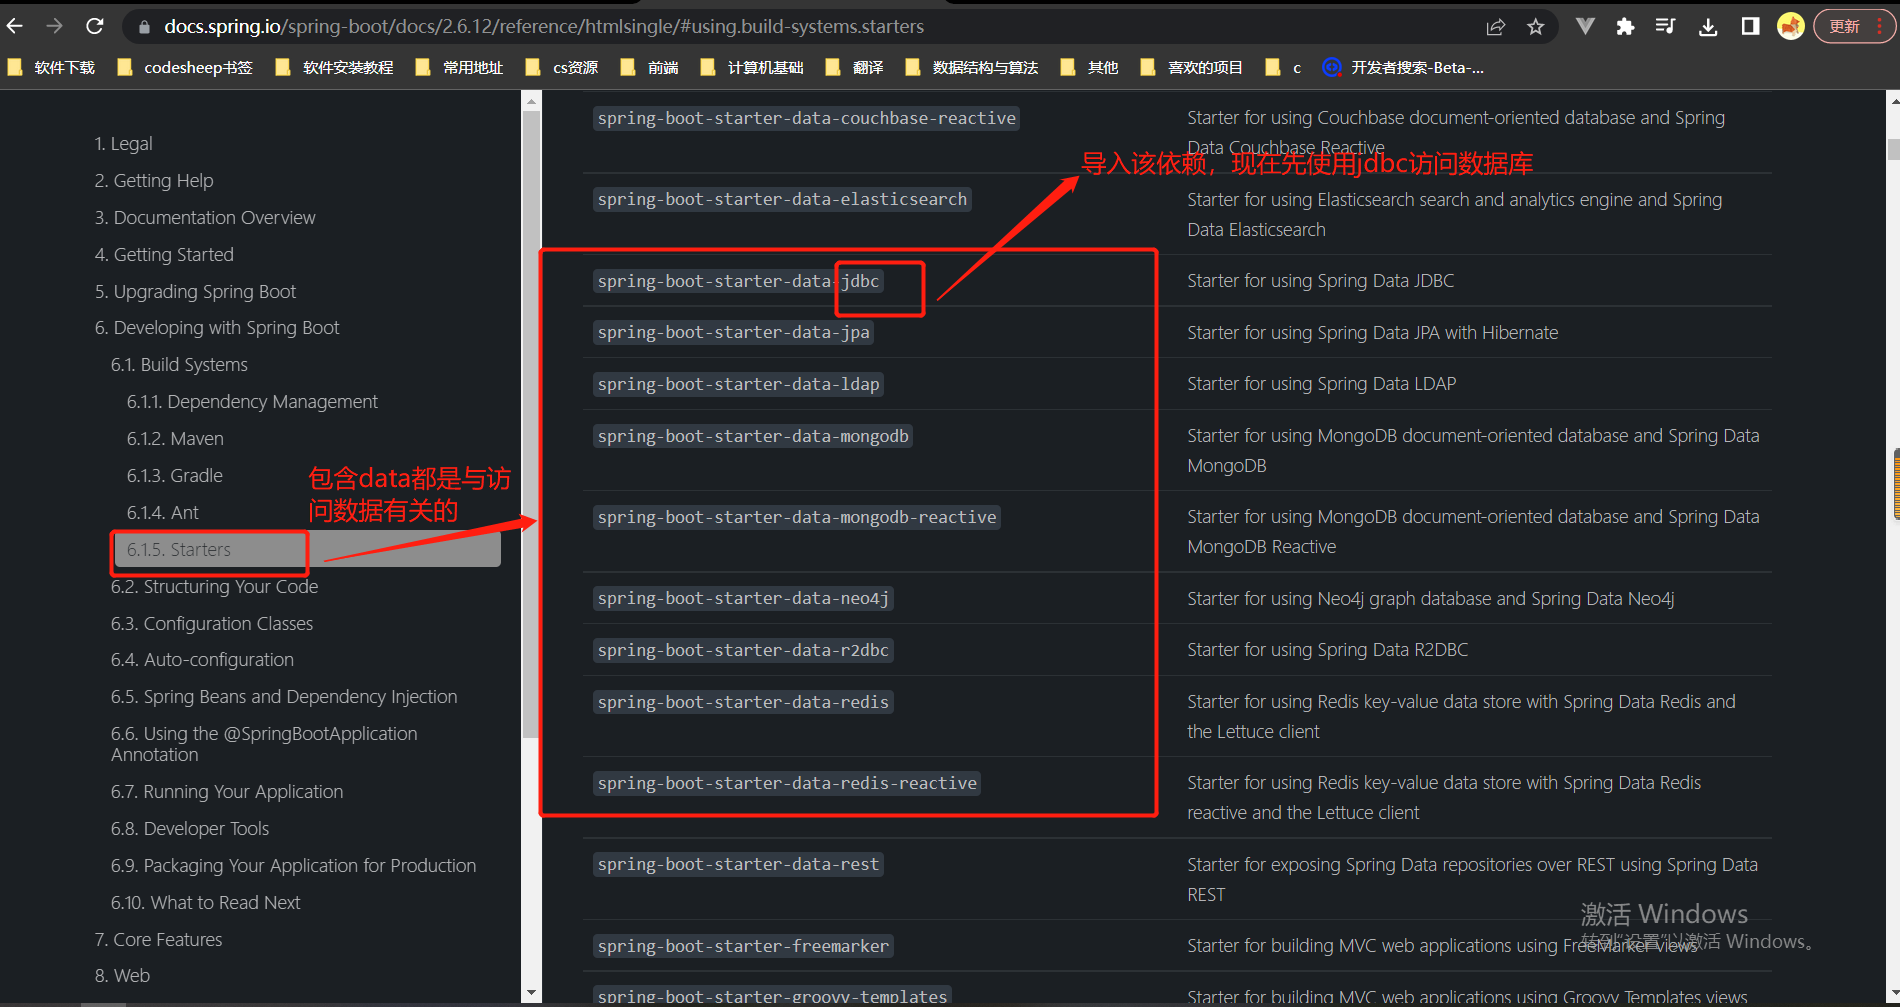
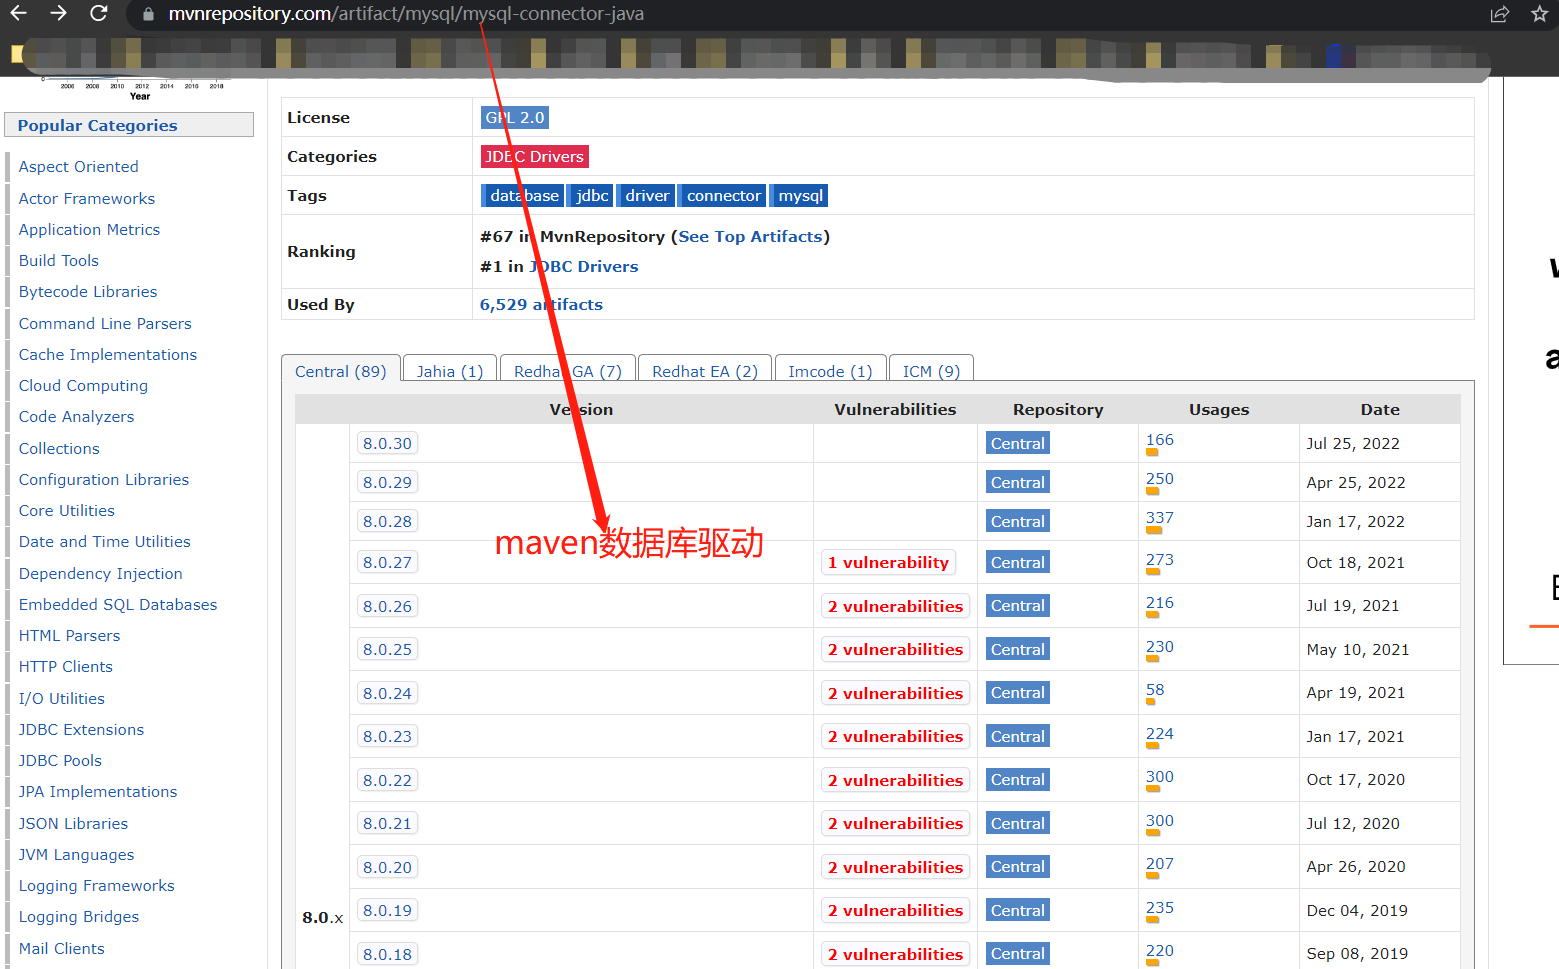
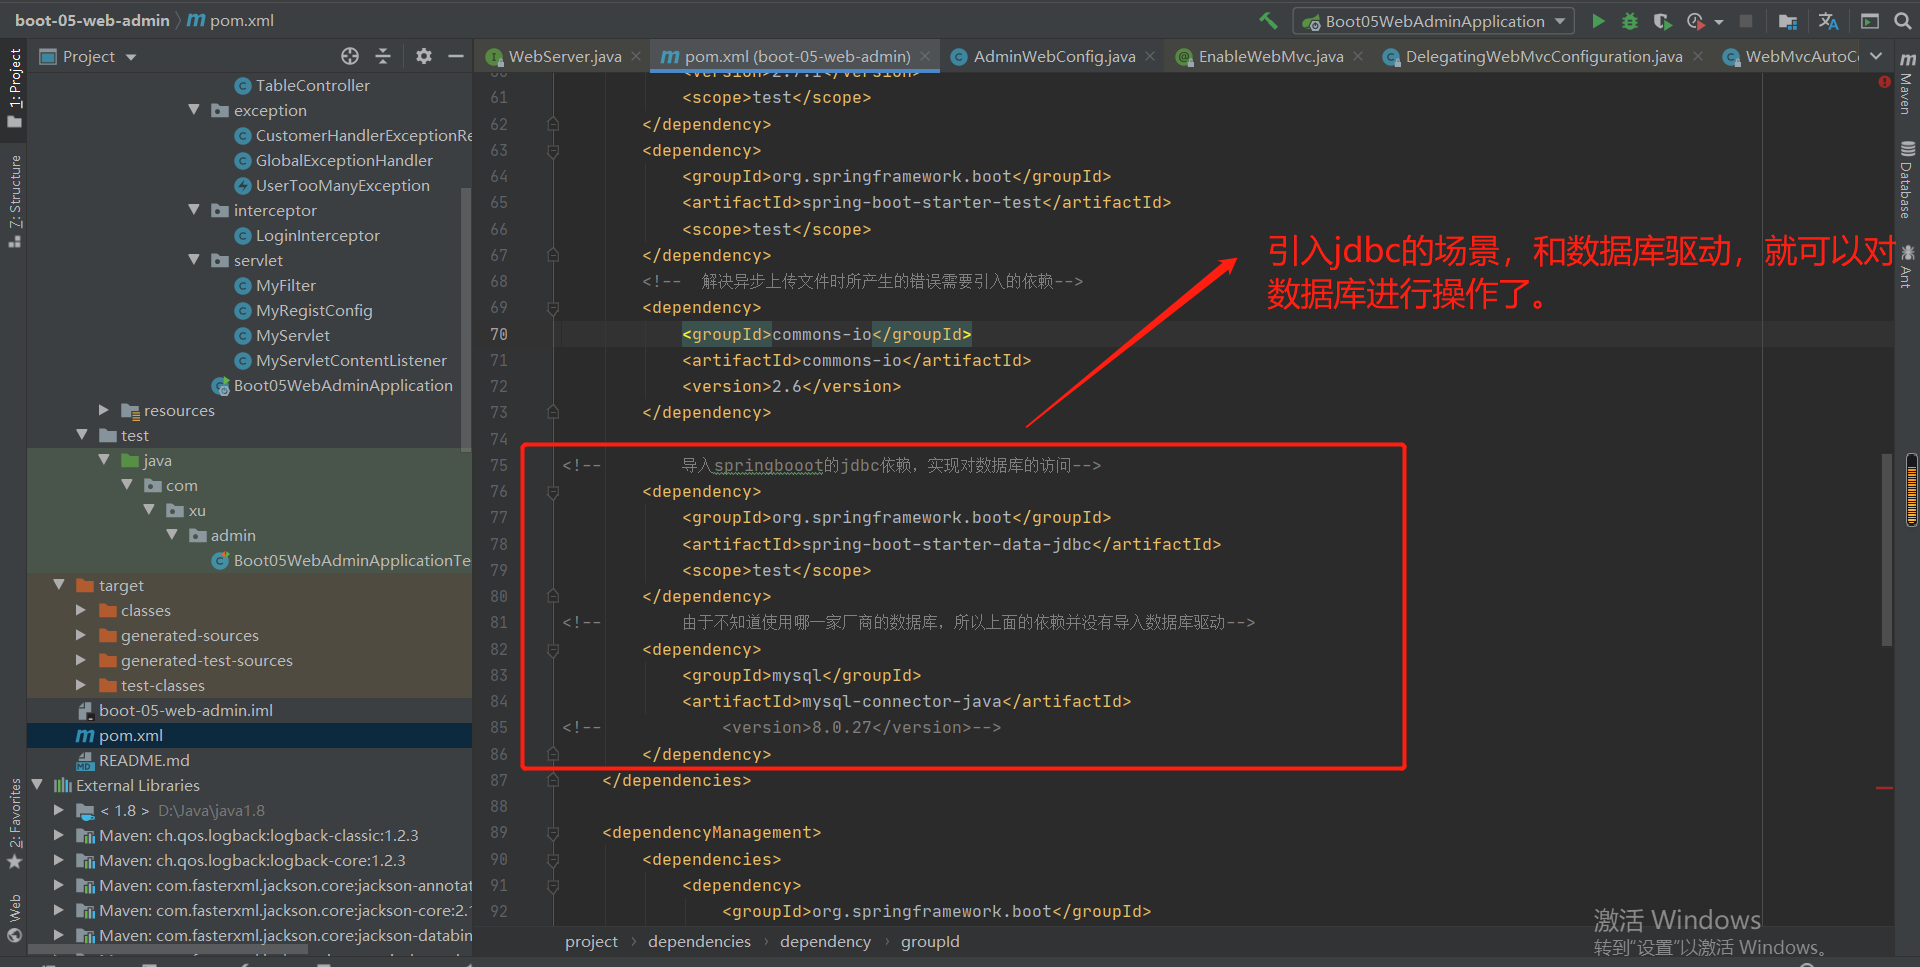
<!--        导入springbooot的jdbc依赖,实现对数据库的访问-->
        <dependency>
            <groupId>org.springframework.boot</groupId>
            <artifactId>spring-boot-starter-data-jdbc</artifactId>
            <scope>test</scope>
        </dependency>
<!--        由于不知道使用哪一家厂商的数据库,所以上面的依赖并没有导入数据库驱动-->
        <dependency>
            <groupId>mysql</groupId>
            <artifactId>mysql-connector-java</artifactId>
<!--            <version>8.0.27</version>-->
        </dependency>
第二步:自动配(连向哪一个数据库,用户名是哪个)
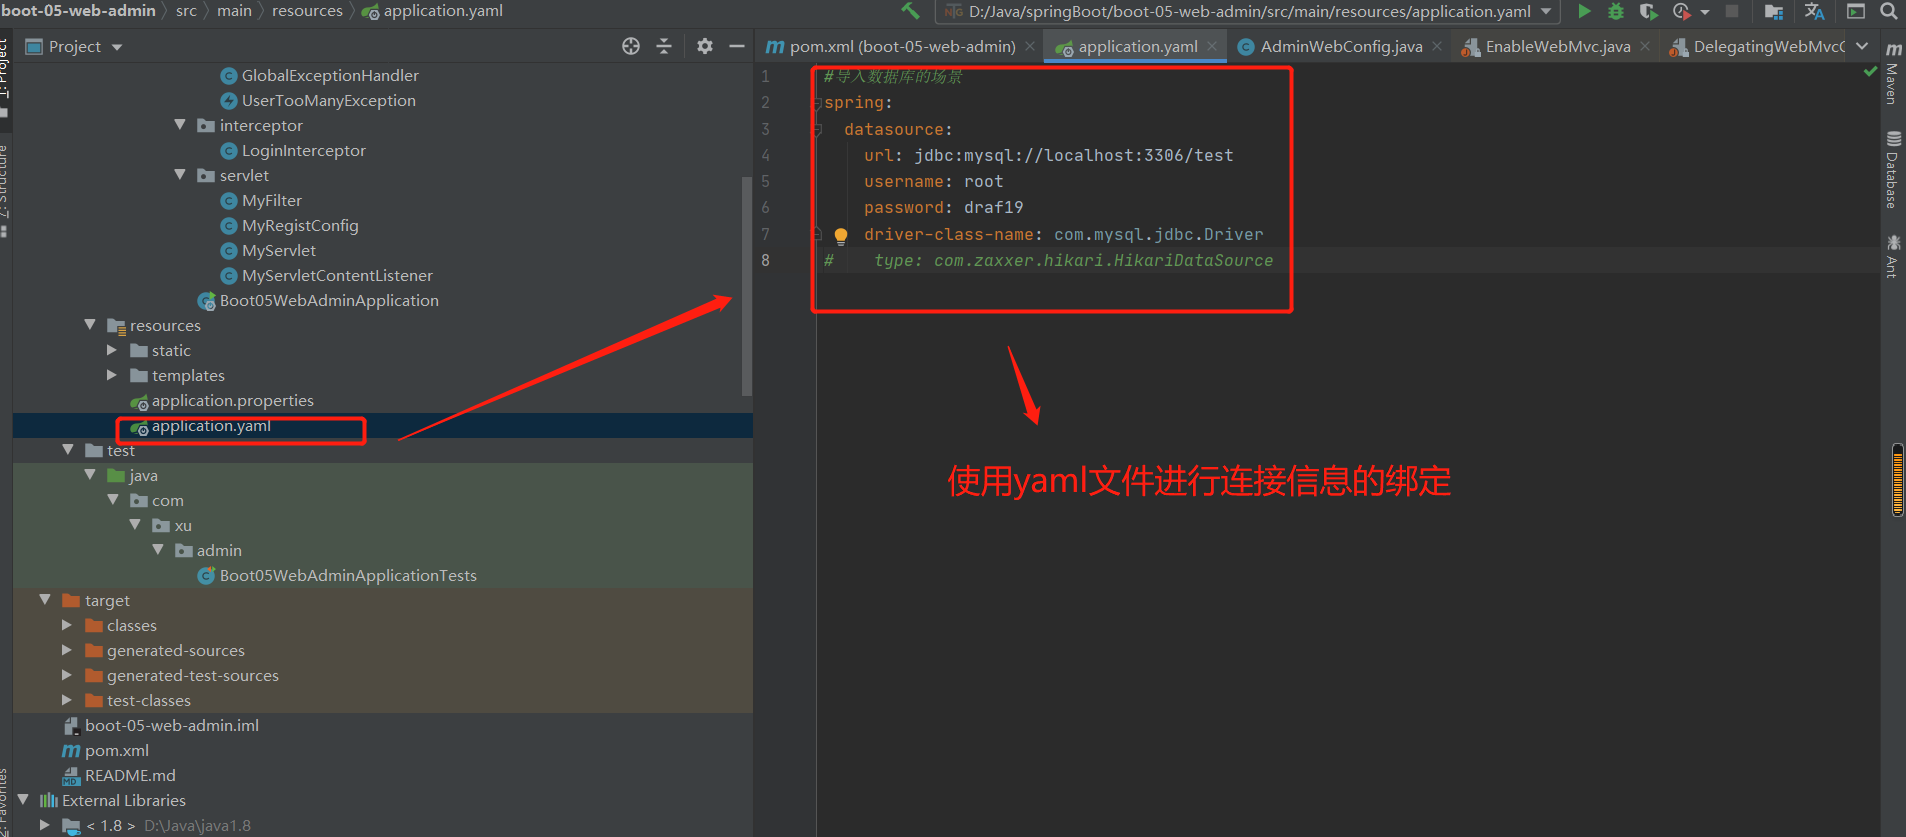
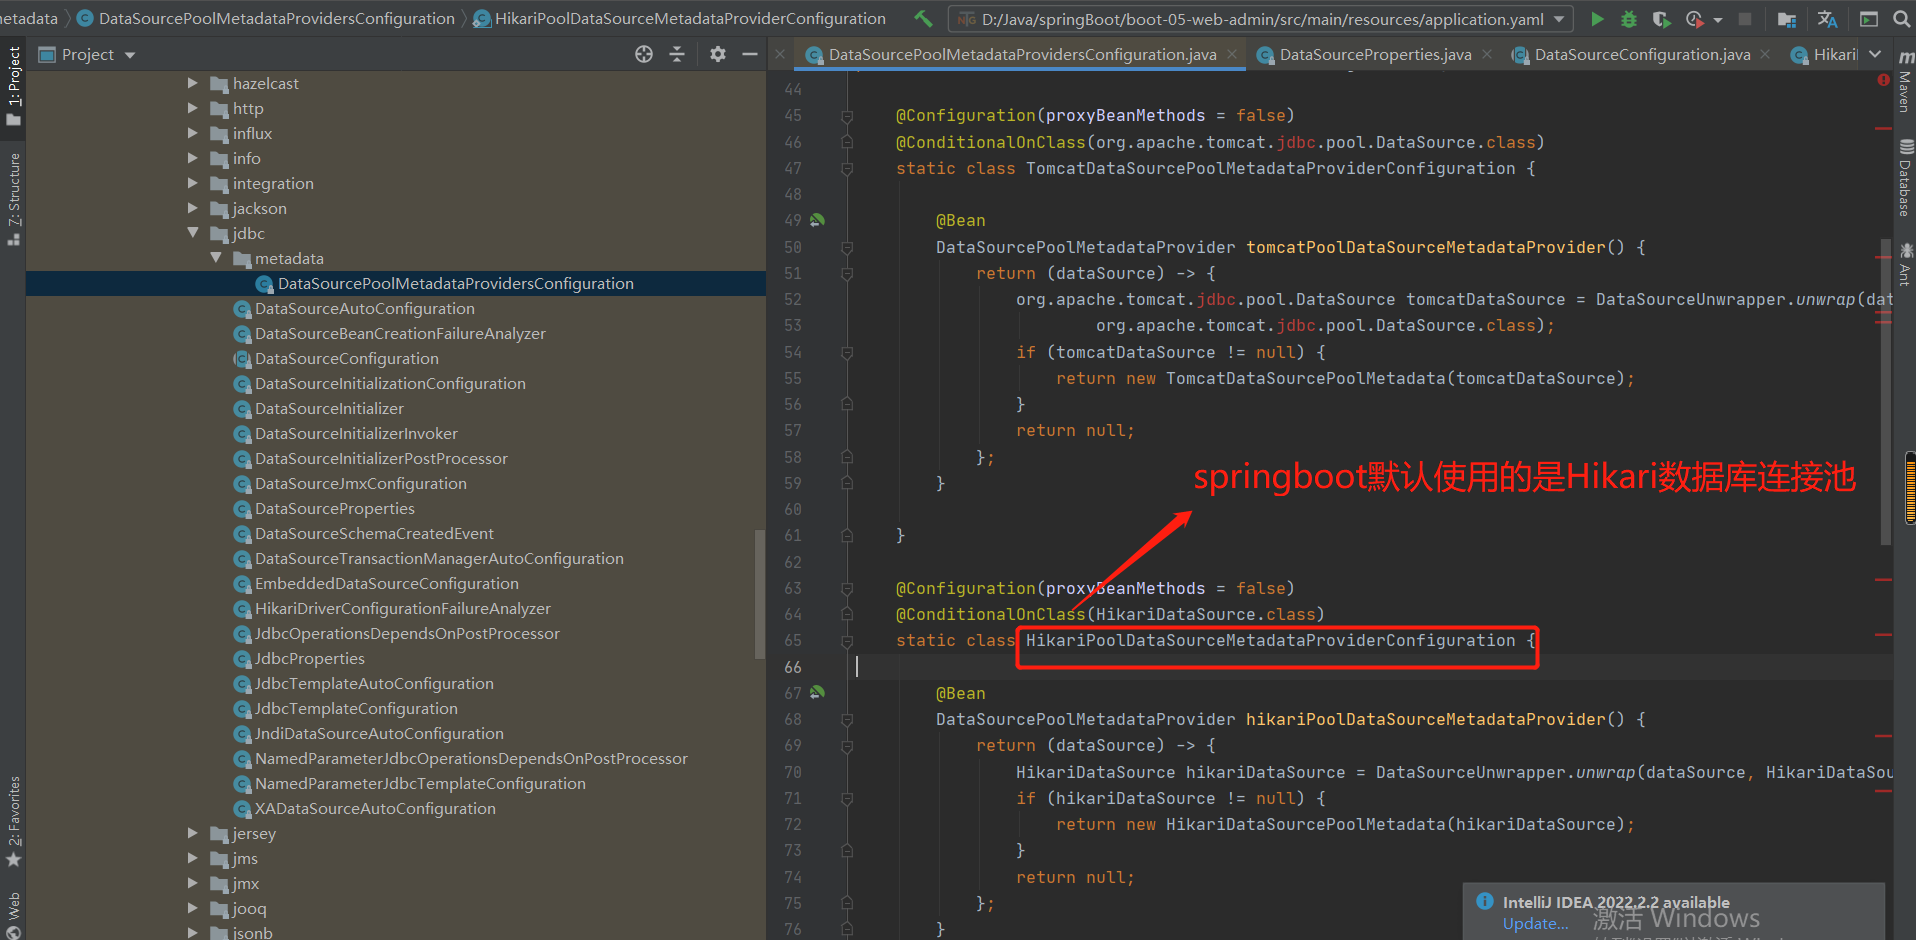
测试:结果参考
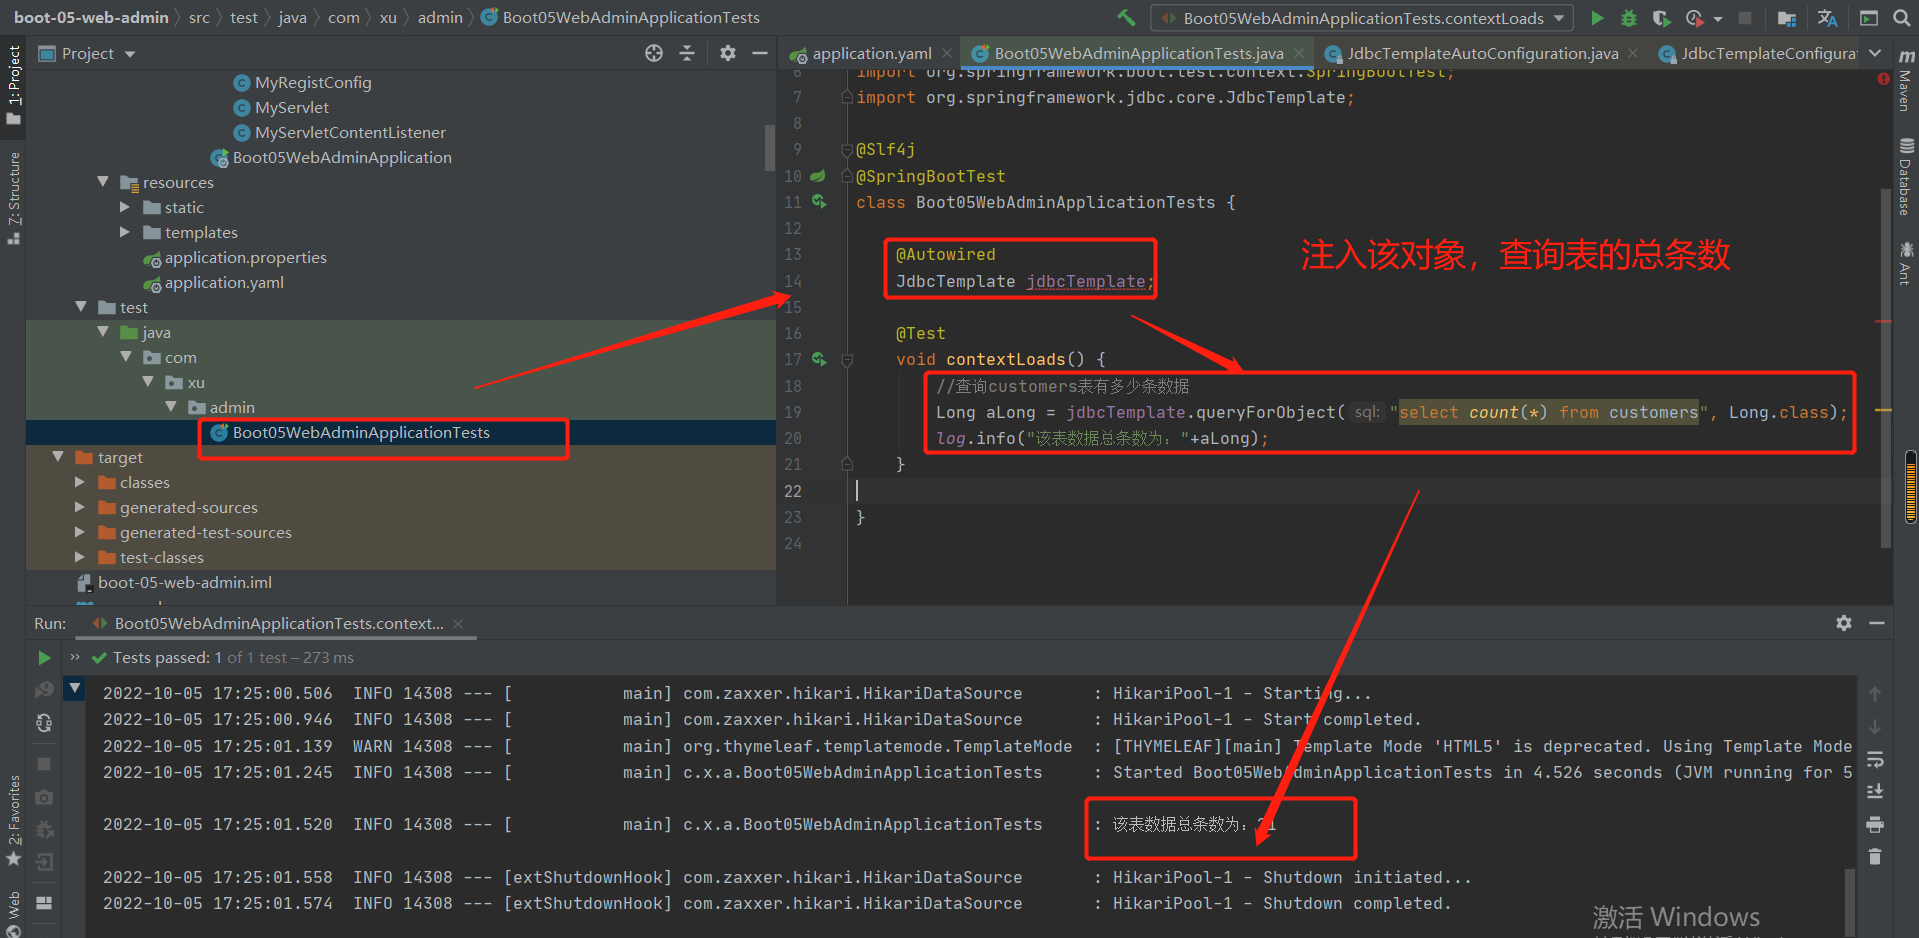
自动配置类老师总结:
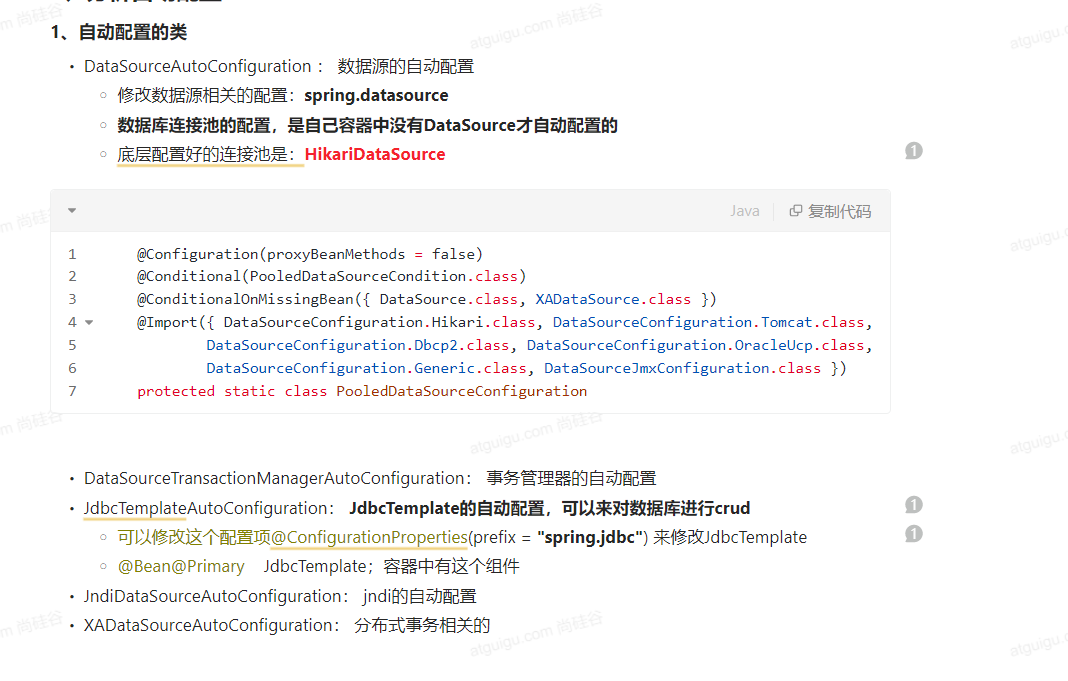
13-2自定义方式整合Druid数据源
1.整合第3方技术方式1:自定义方式(纯手工)
第一步:导入数据源依赖
<!--  导入Druid数据源  -->
<dependency>
    <groupId>com.alibaba</groupId>
    <artifactId>druid</artifactId>
    <version>1.0.9</version>
</dependency>
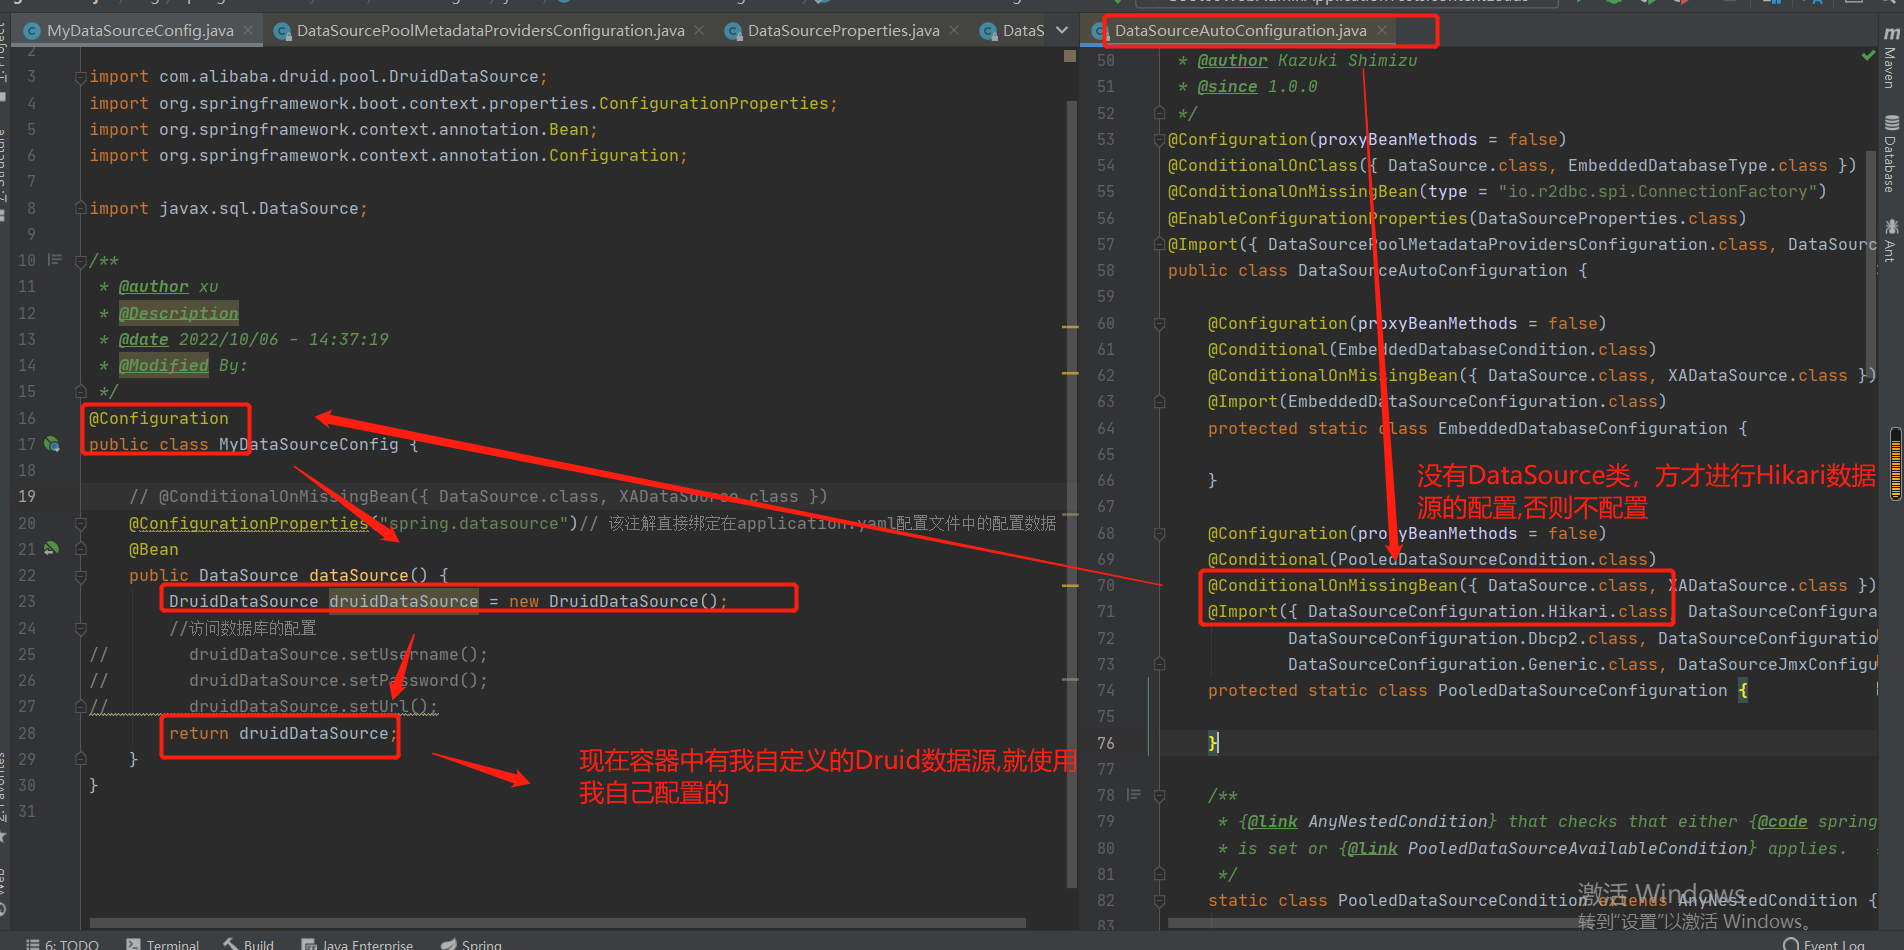
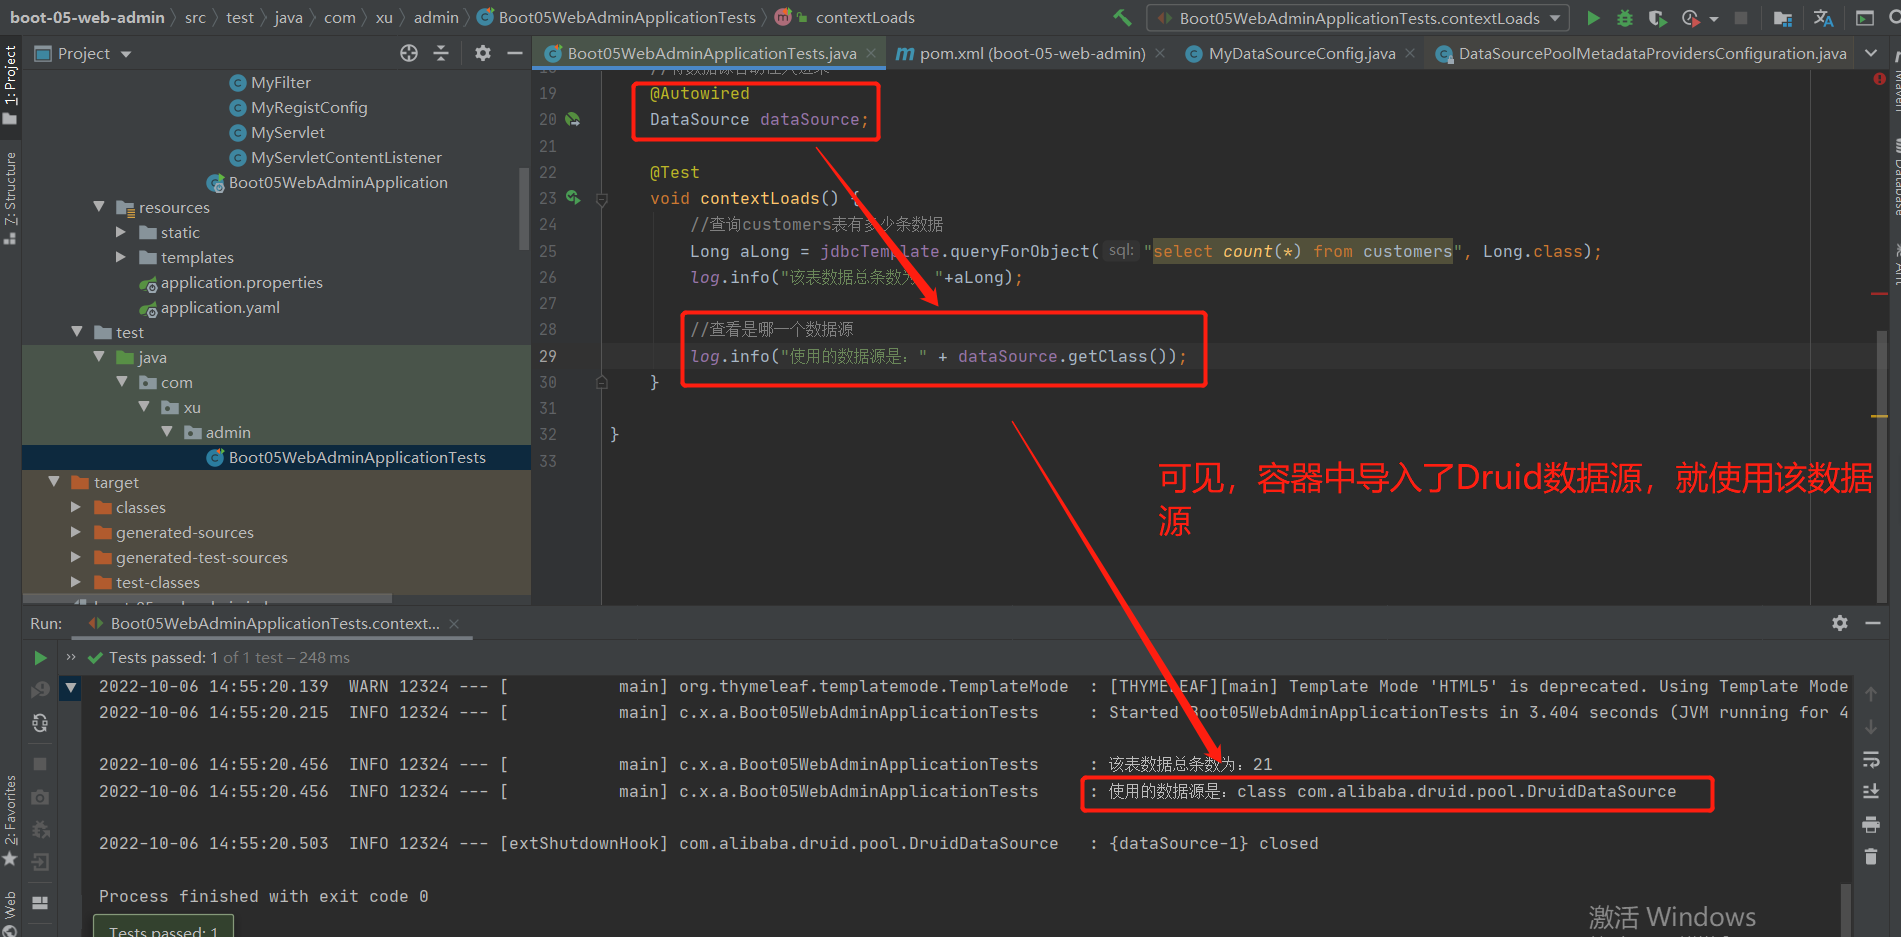
2.Druid监控页面与统计功能
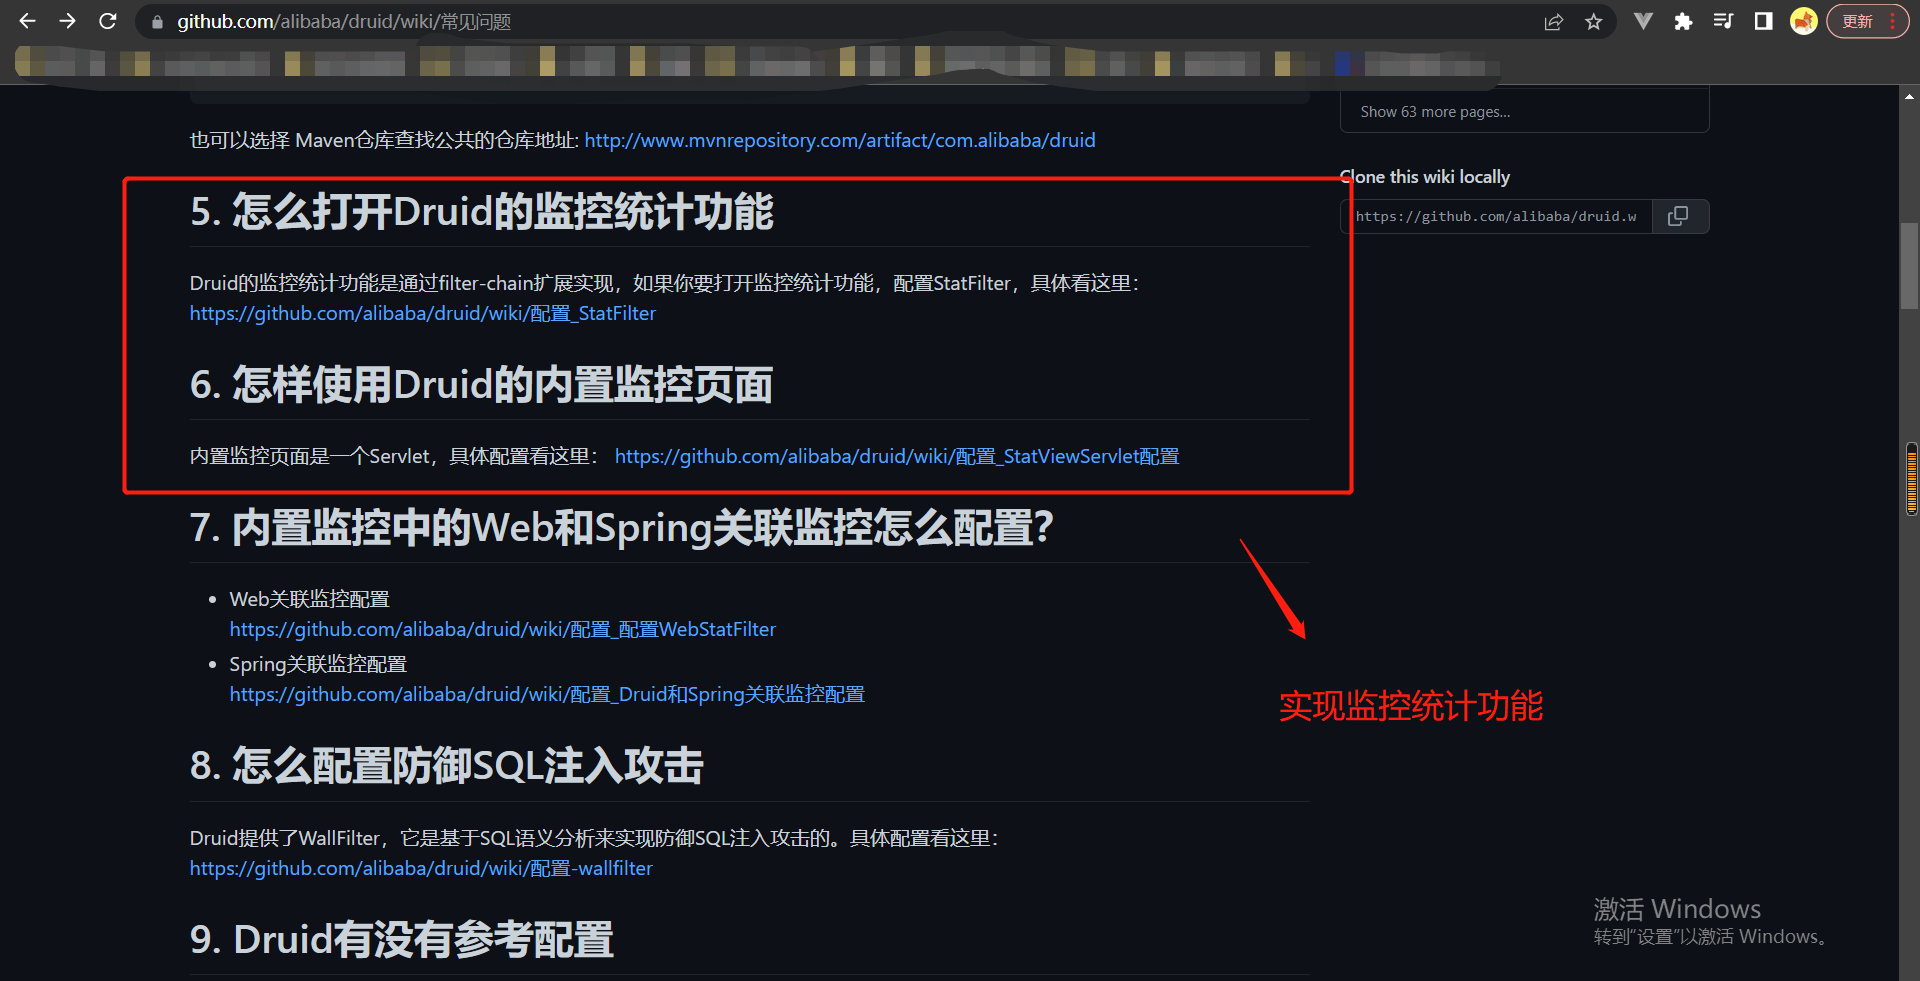
实验测试:
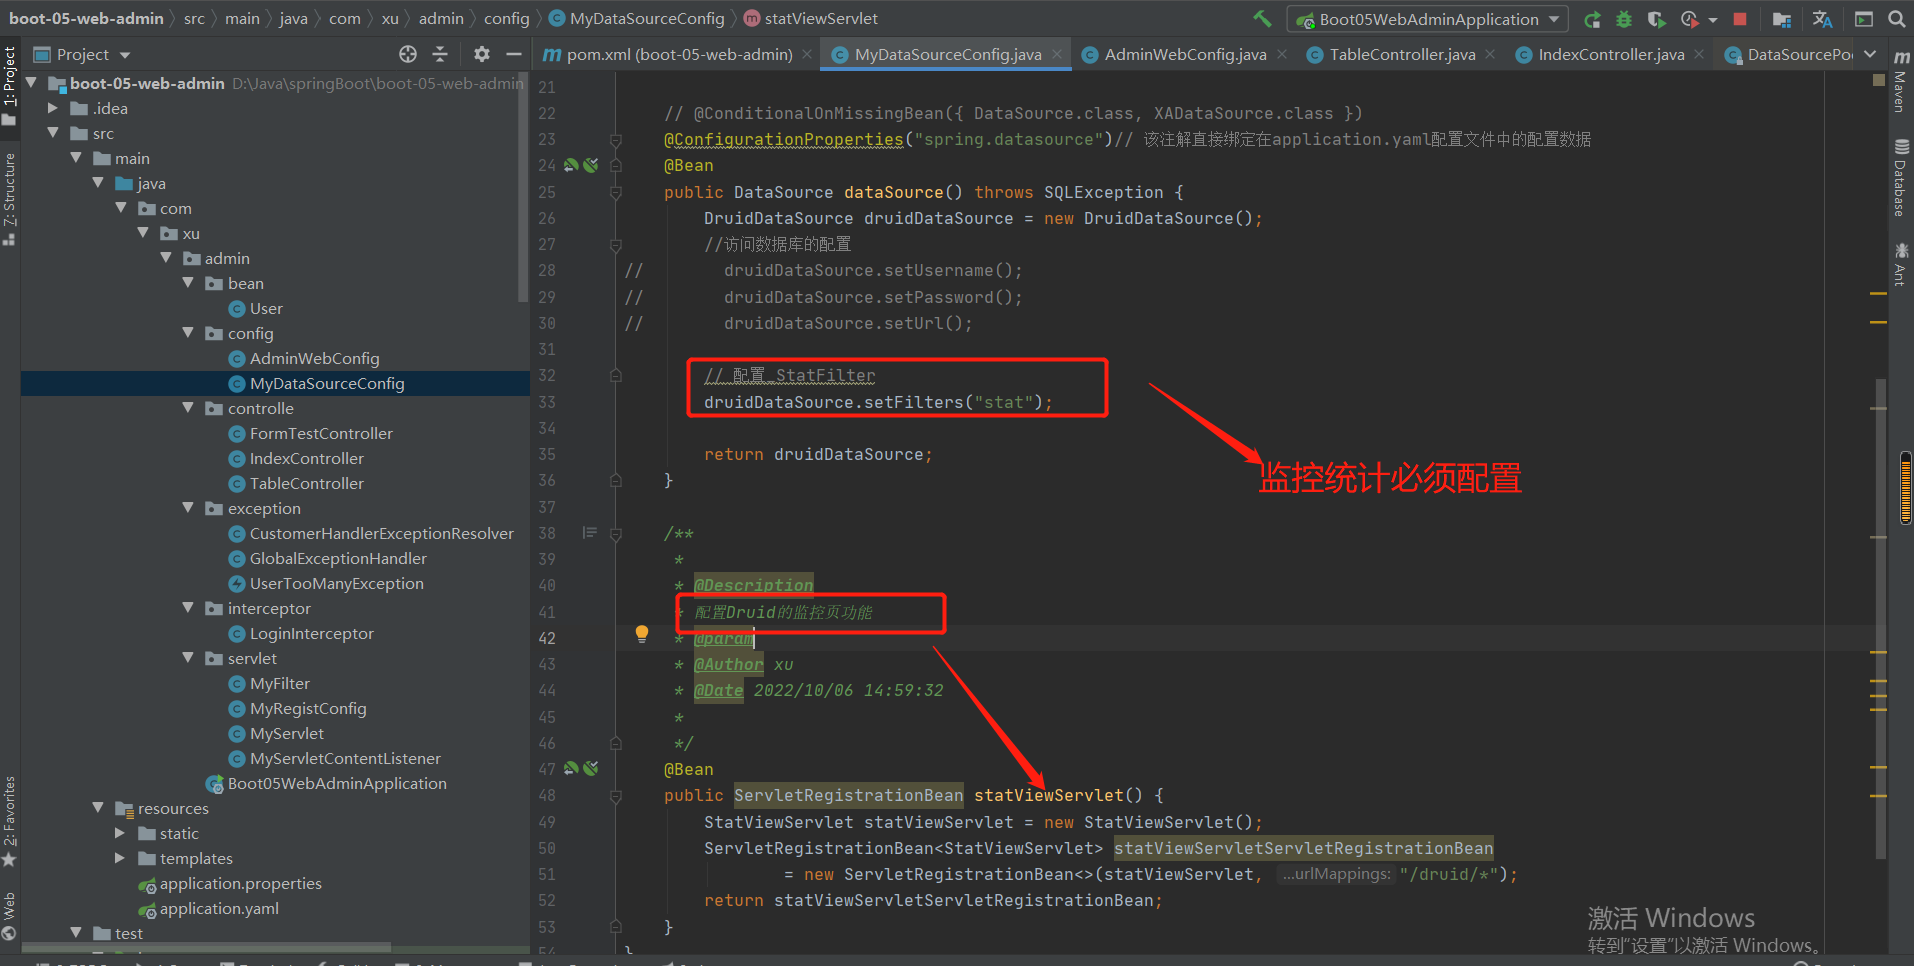
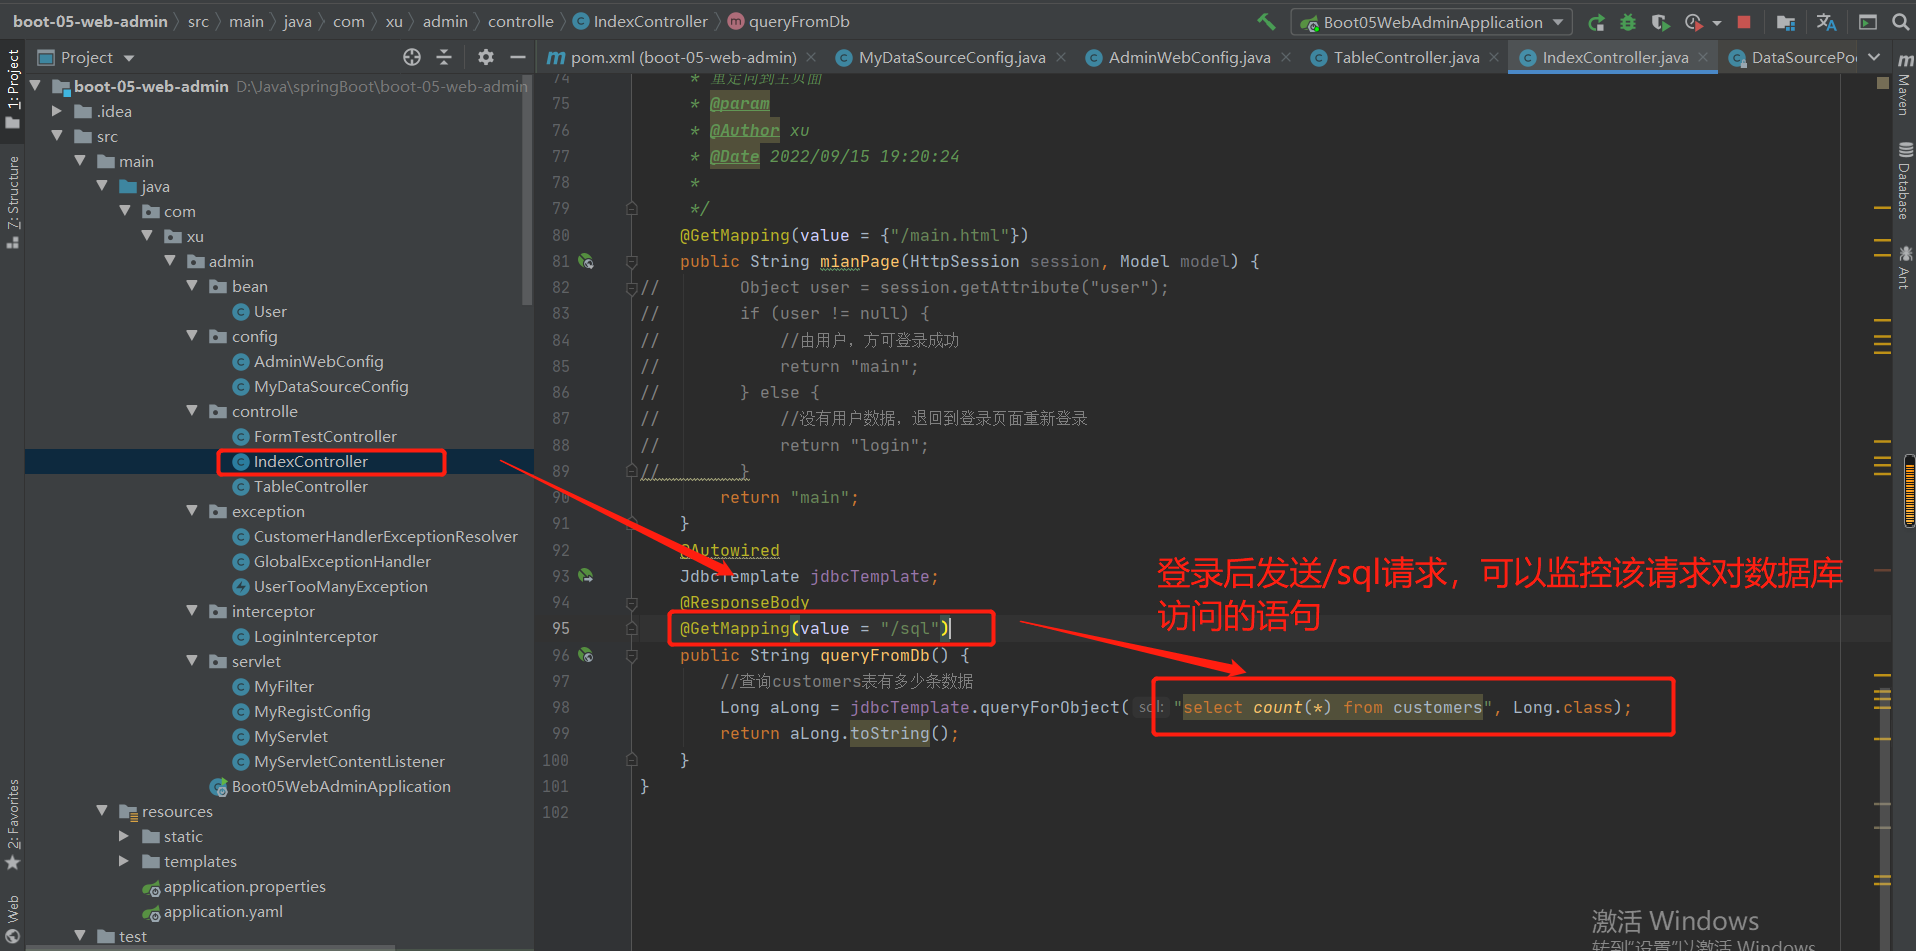
结果参考:
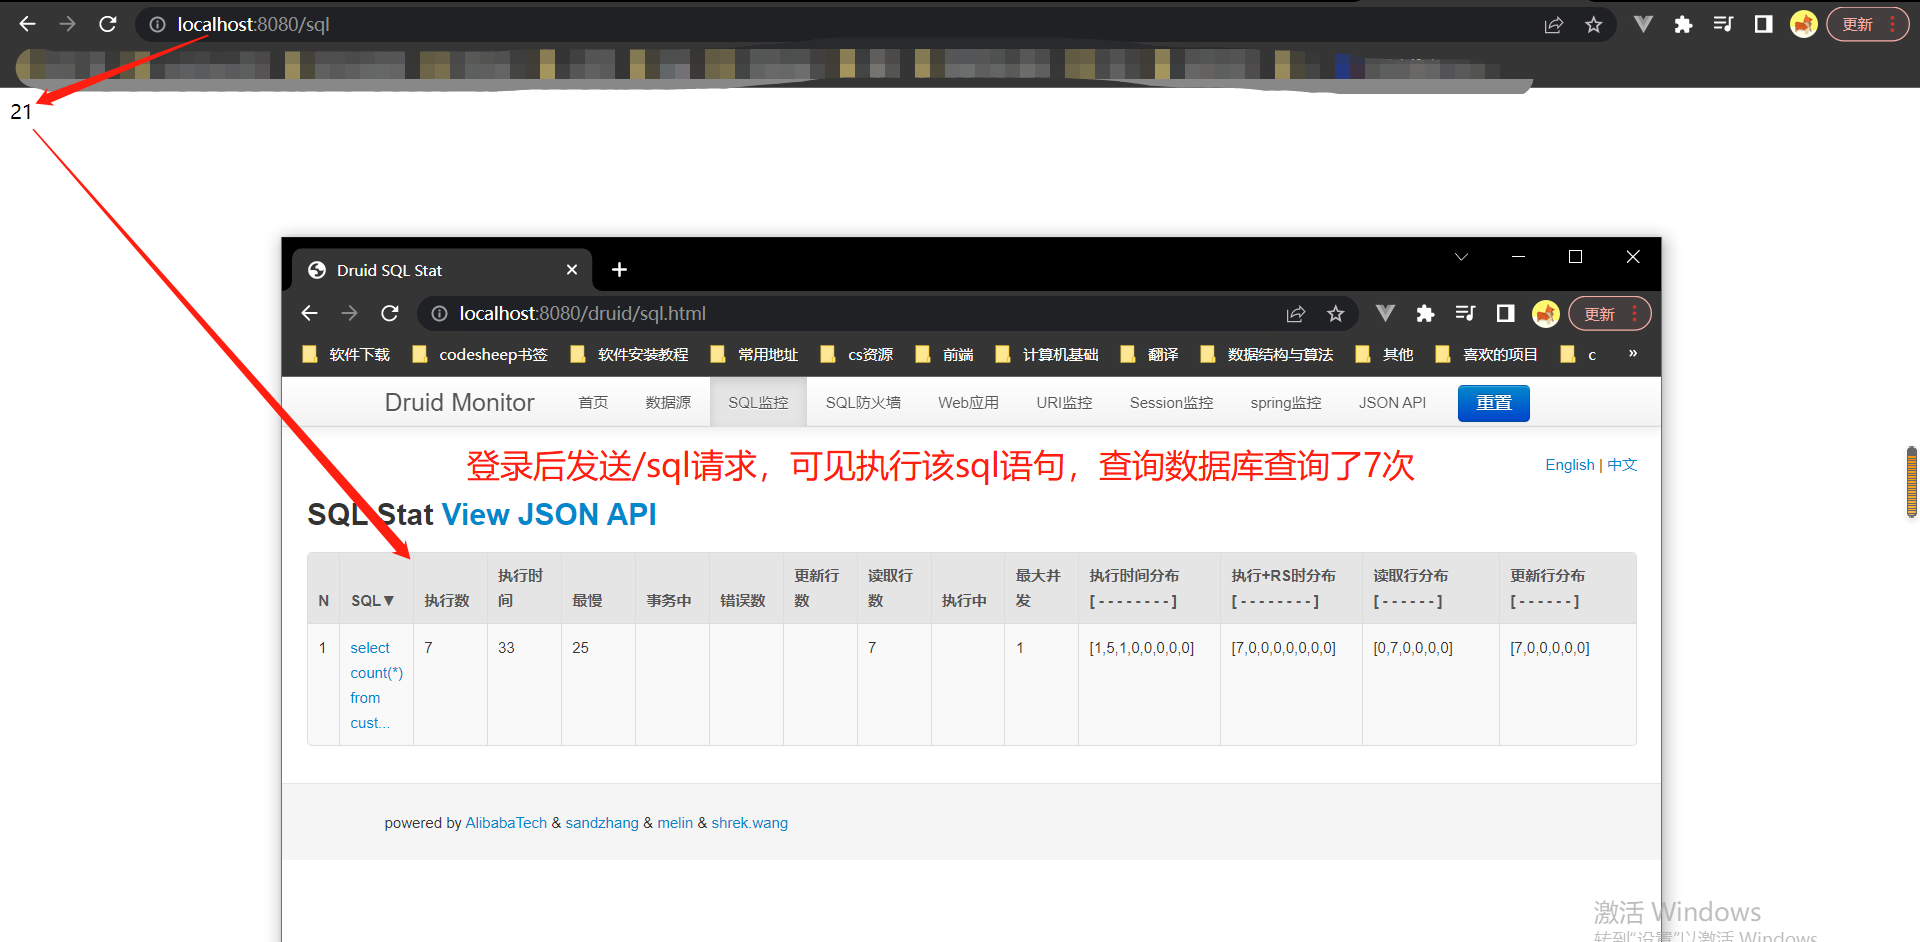
3.配置_配置WebStatFilter
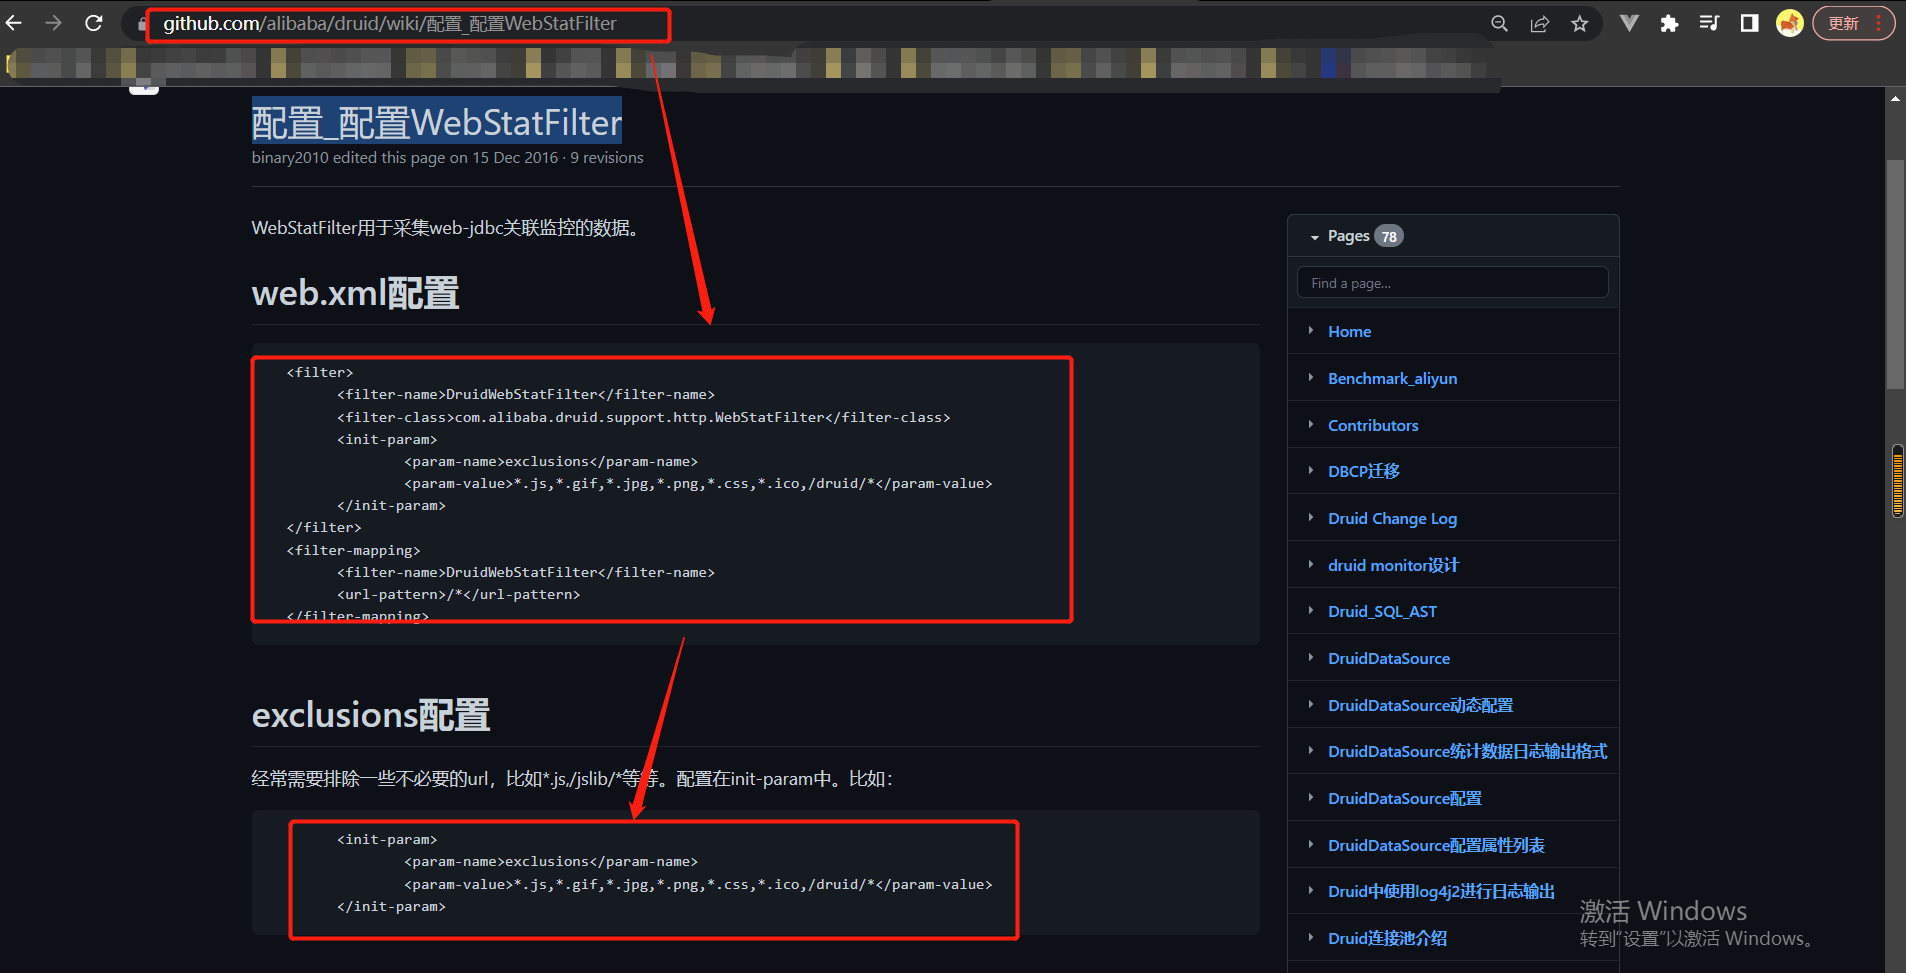
由于每一次发送"/sql"请求我都需要登录,先到拦截器将/sql请求放行:
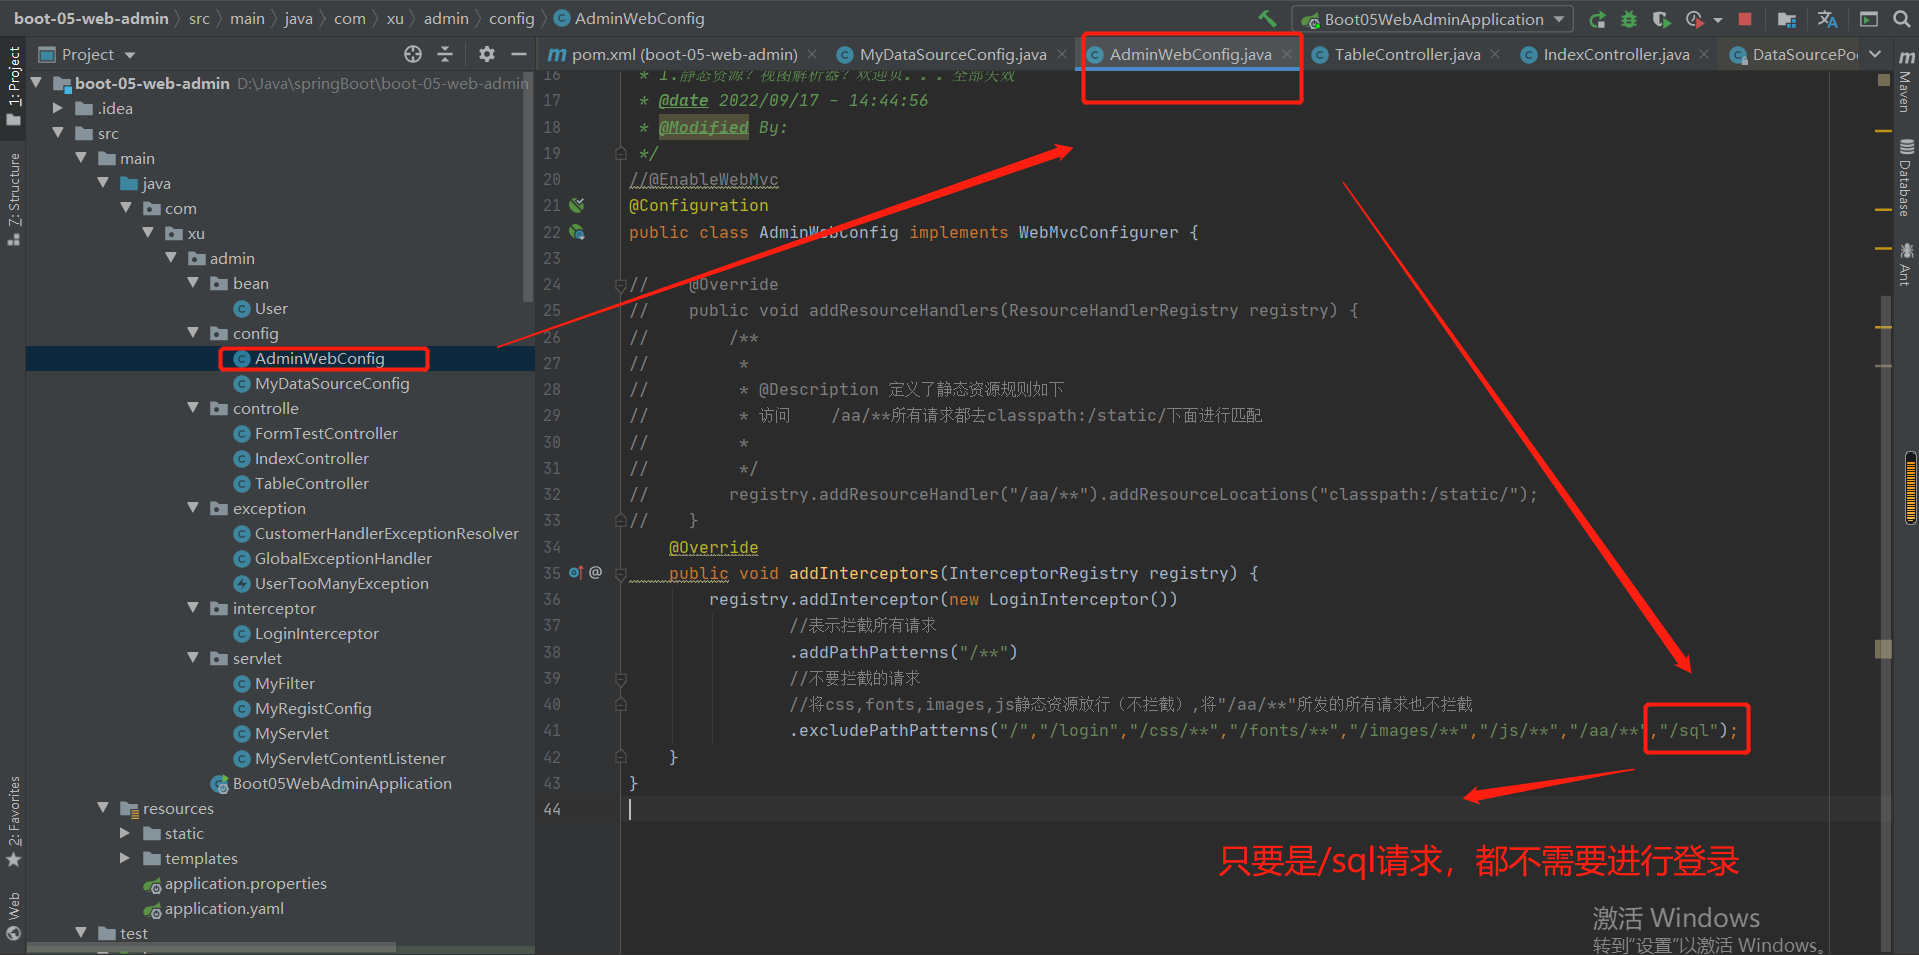
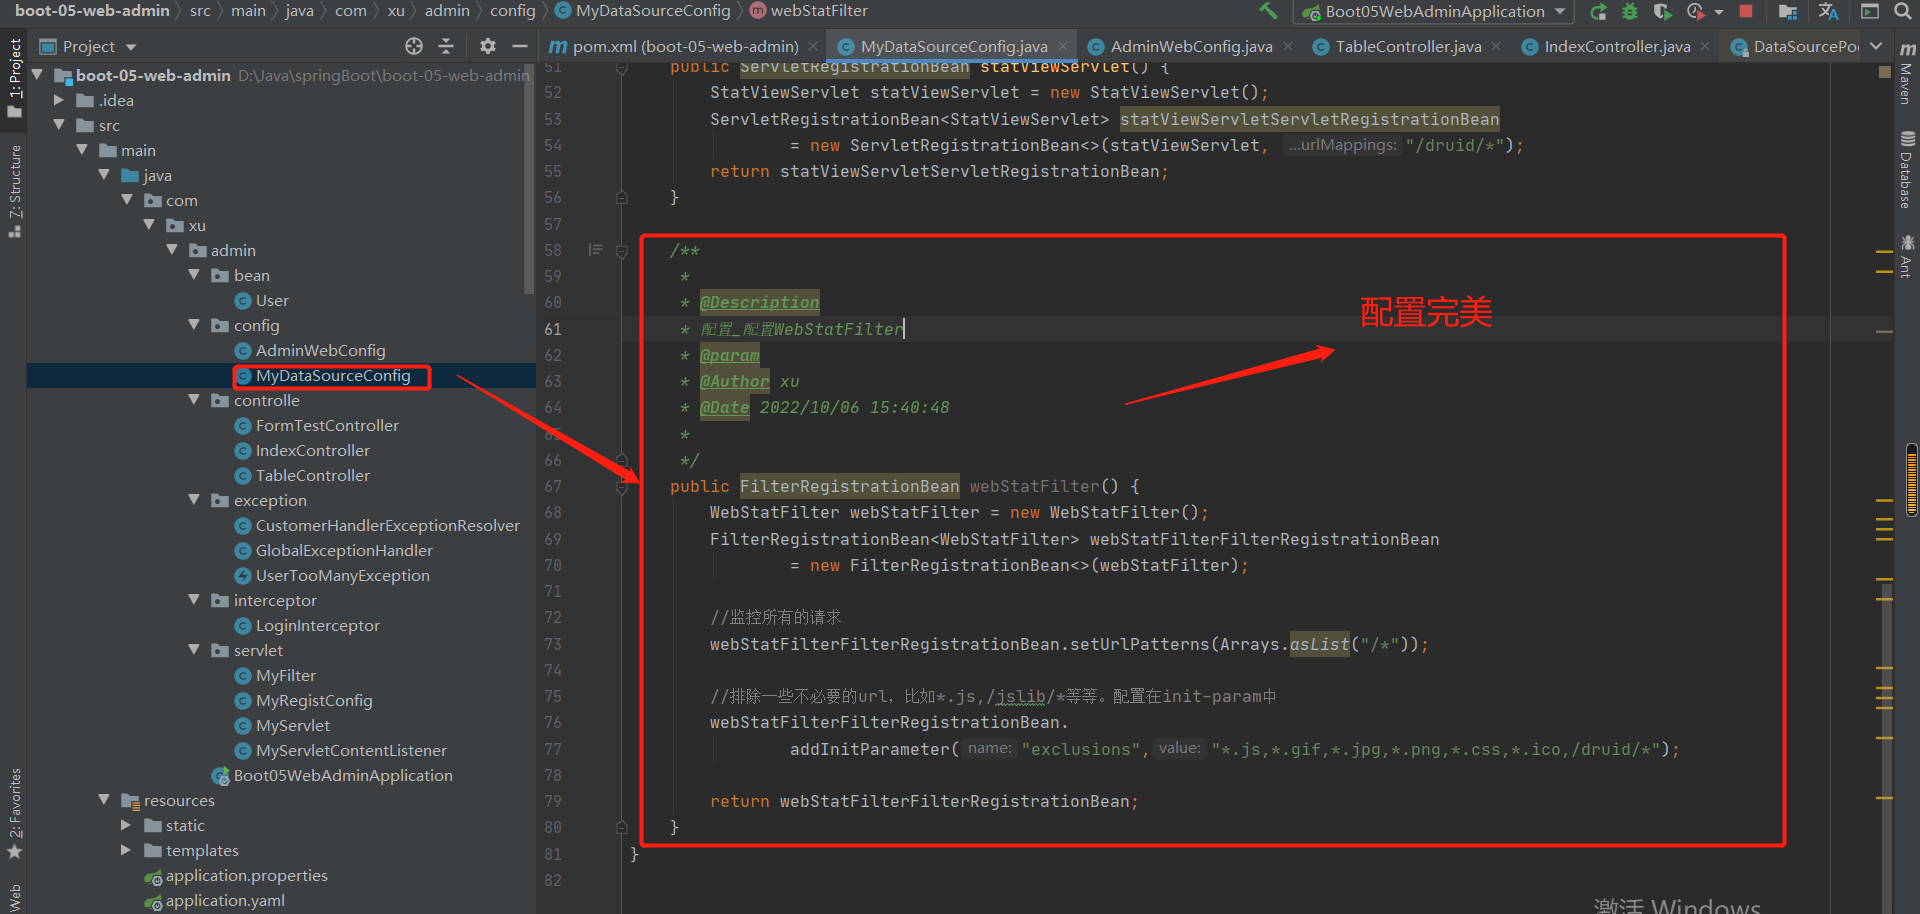
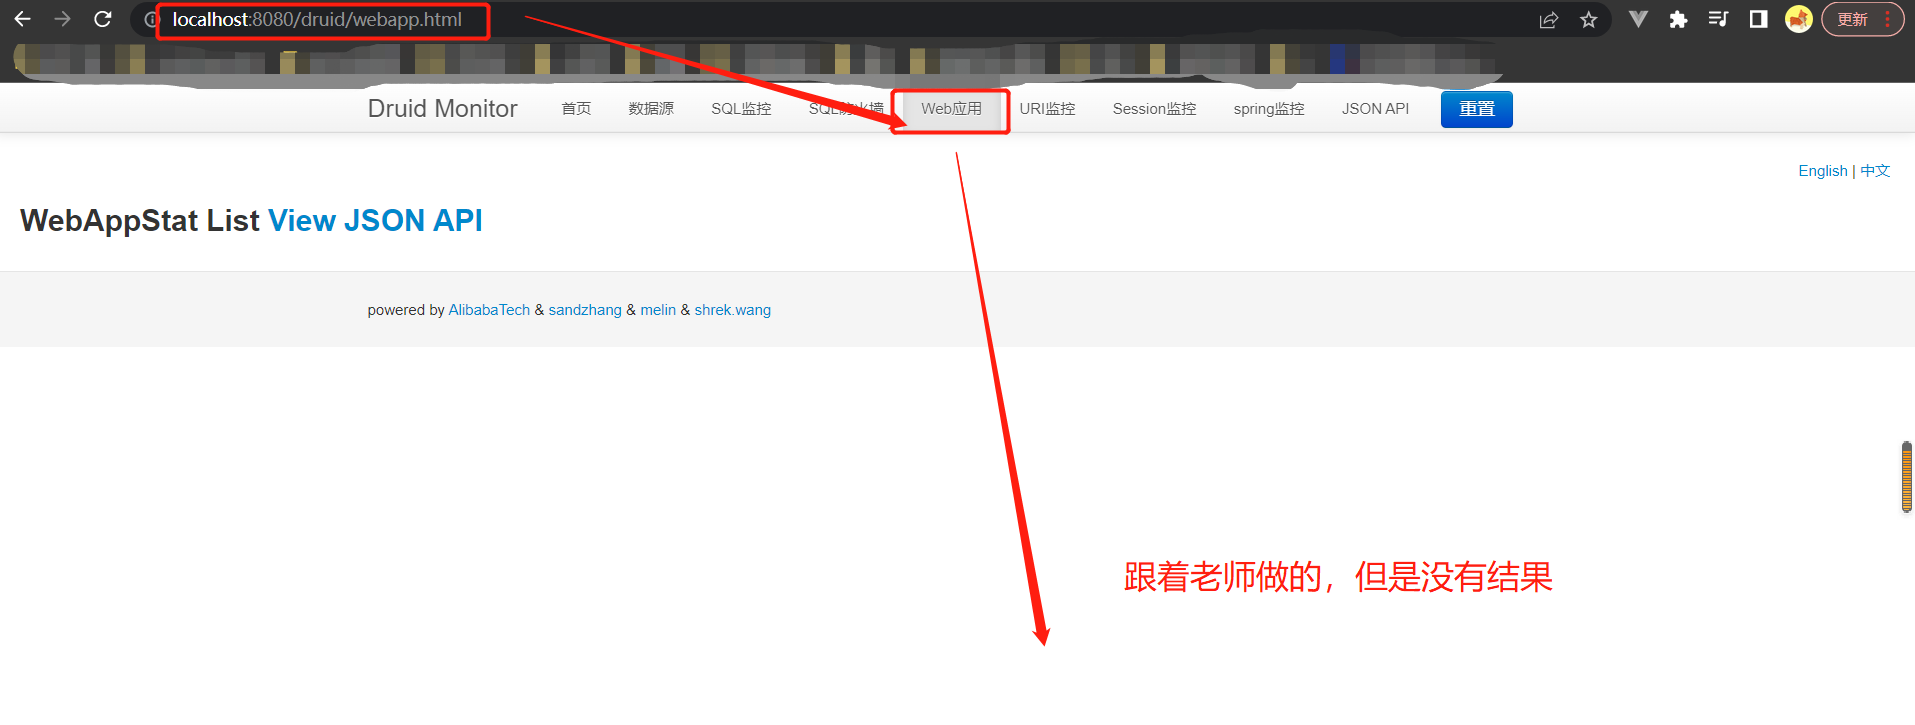
4.配置 wallfilter
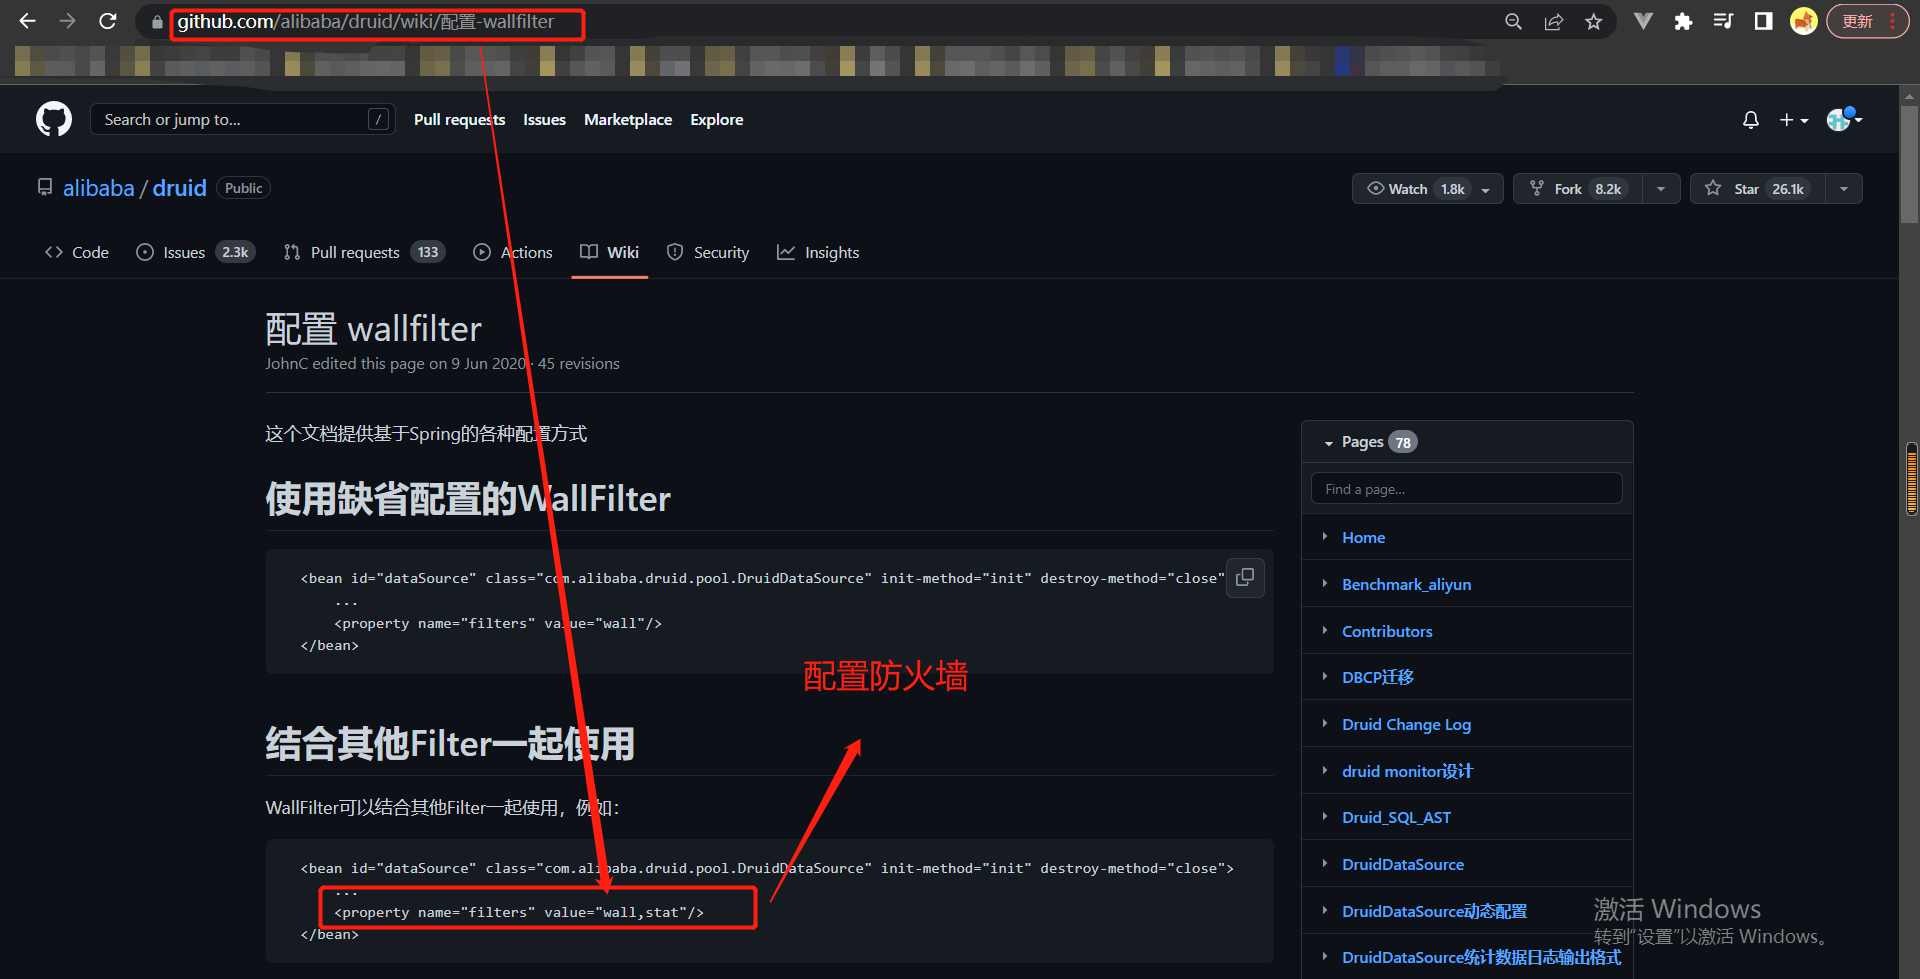
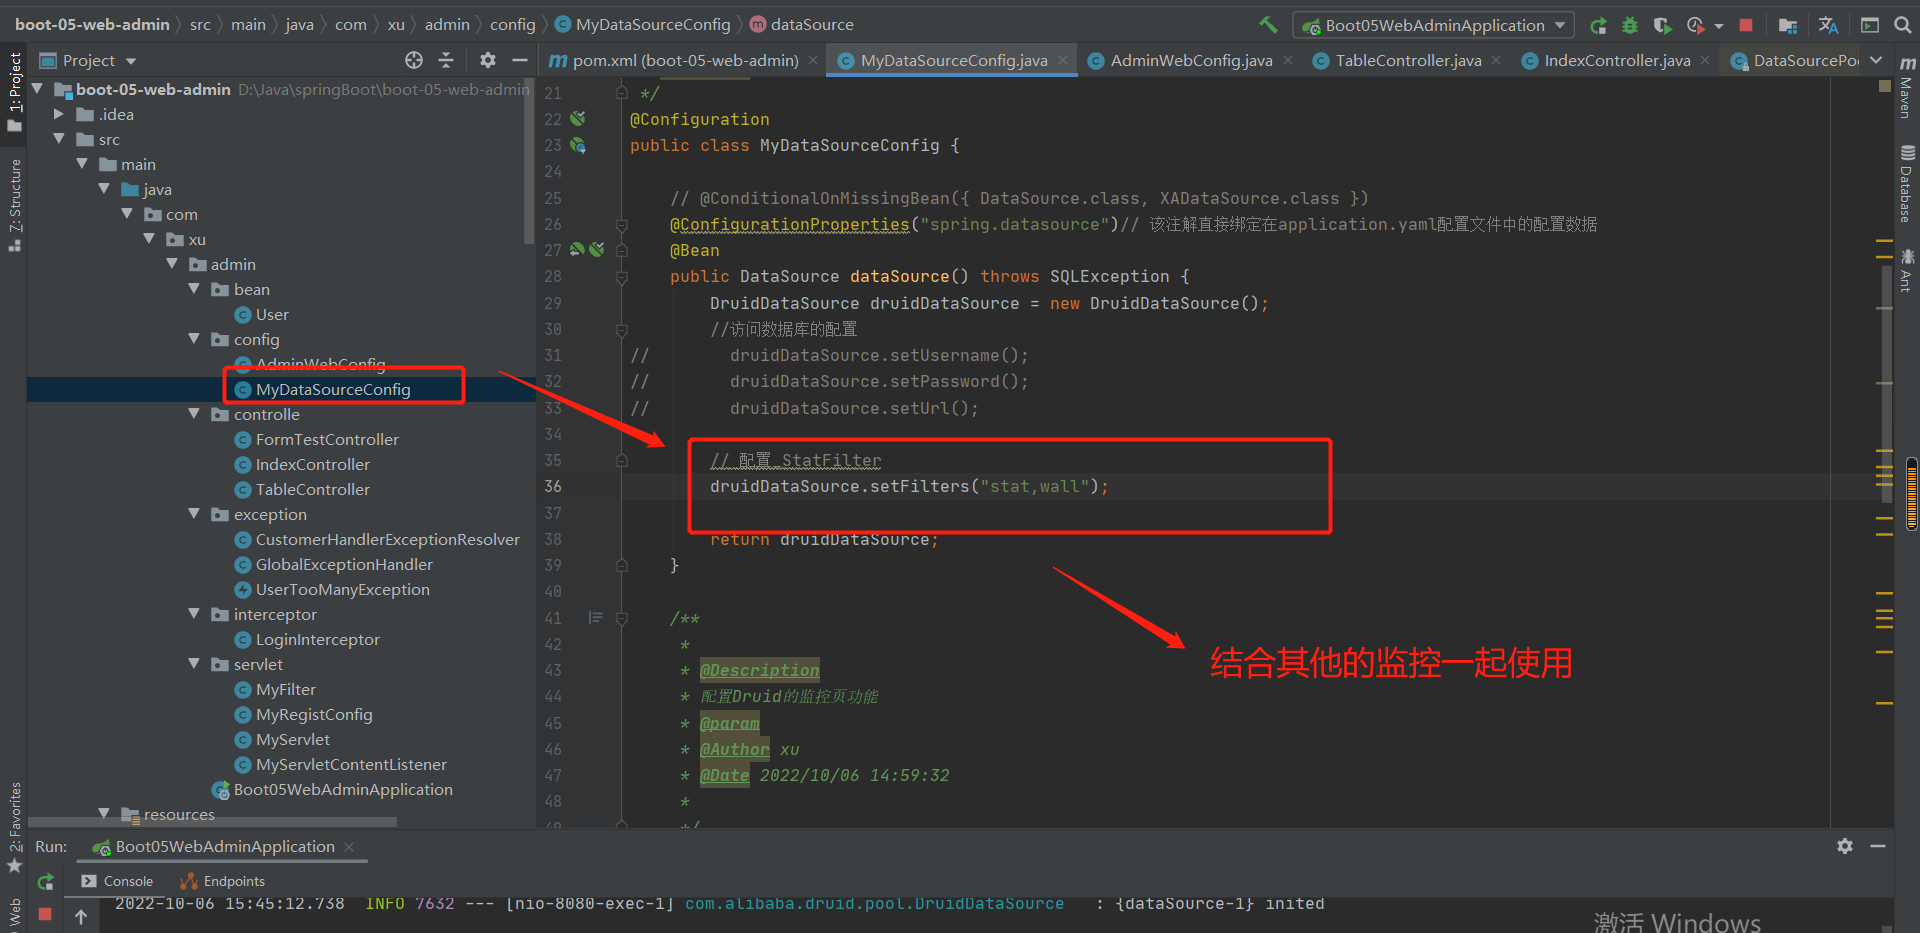
实验结果:
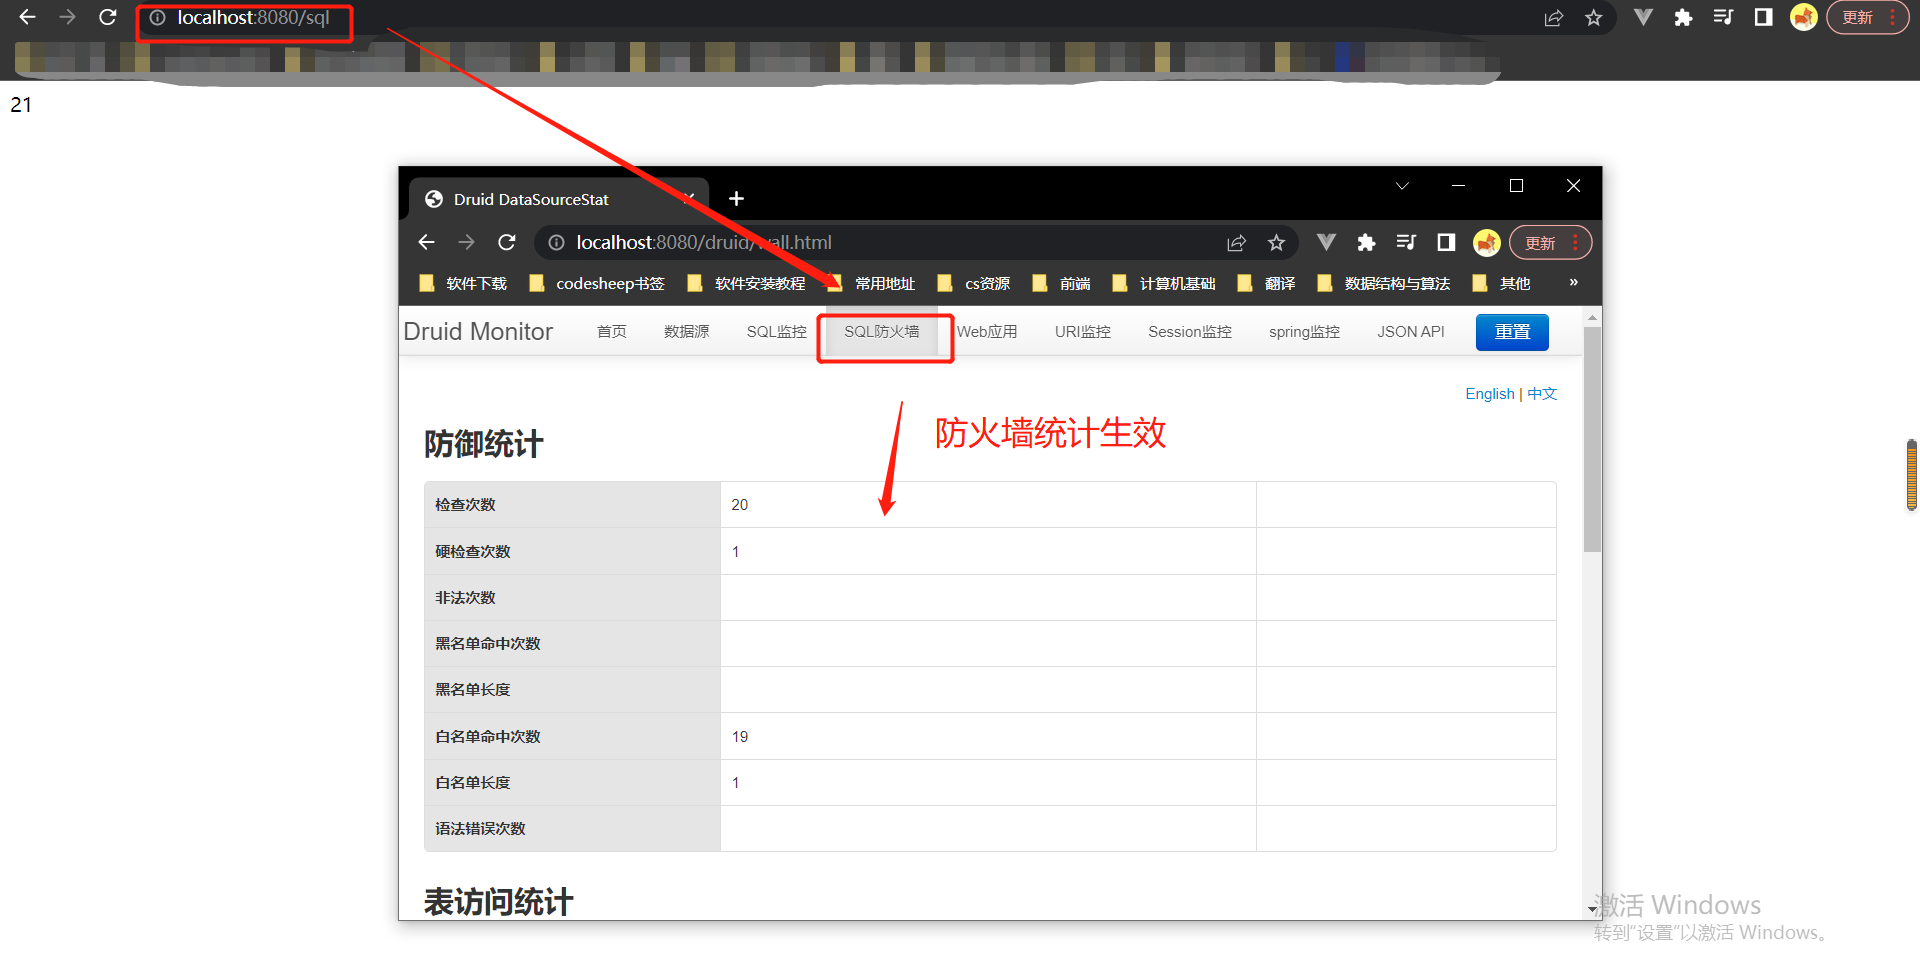
5.配置监控页面访问密码
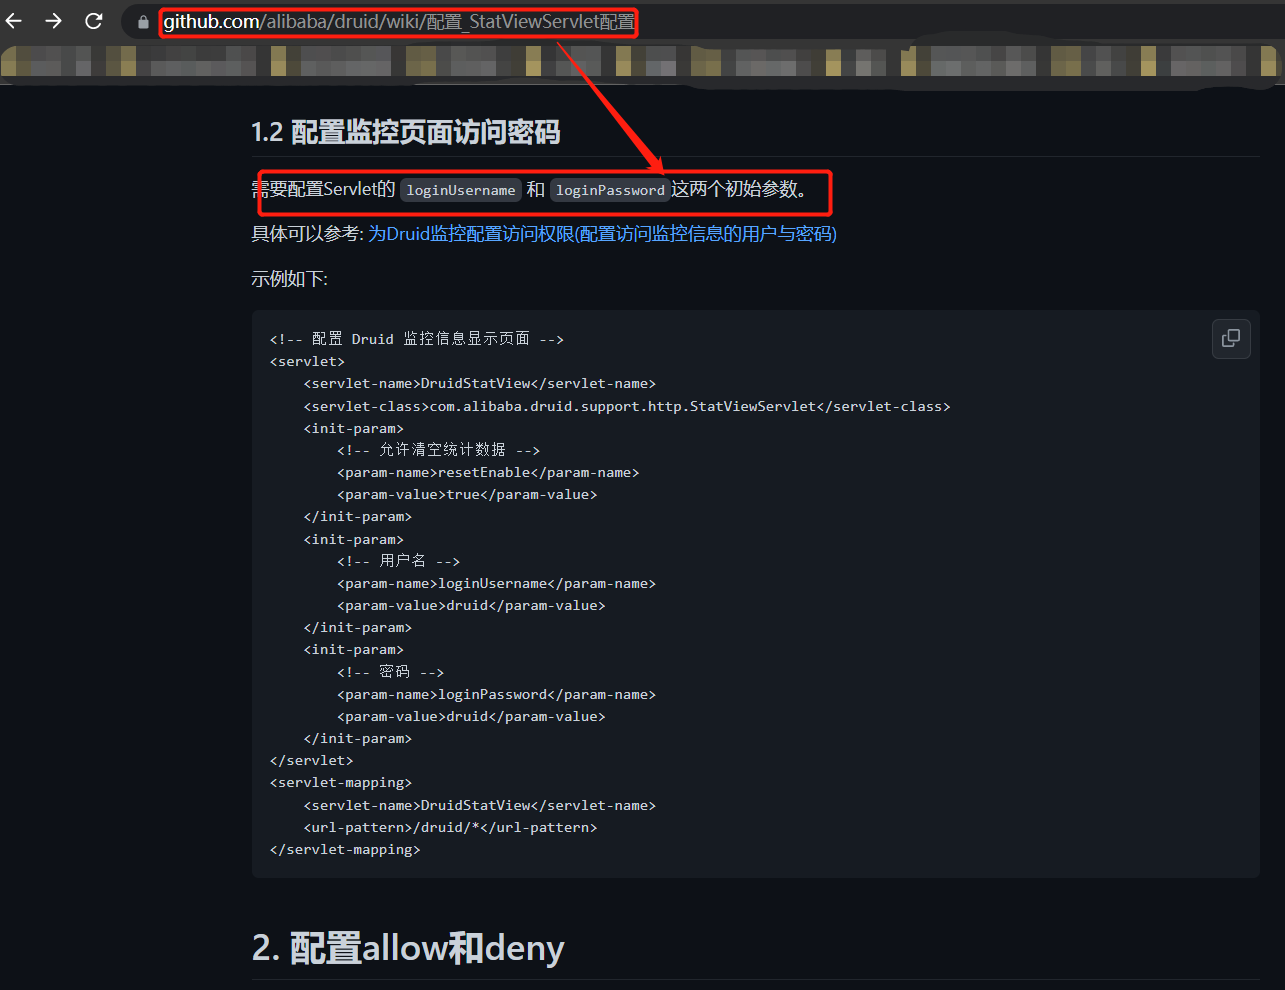
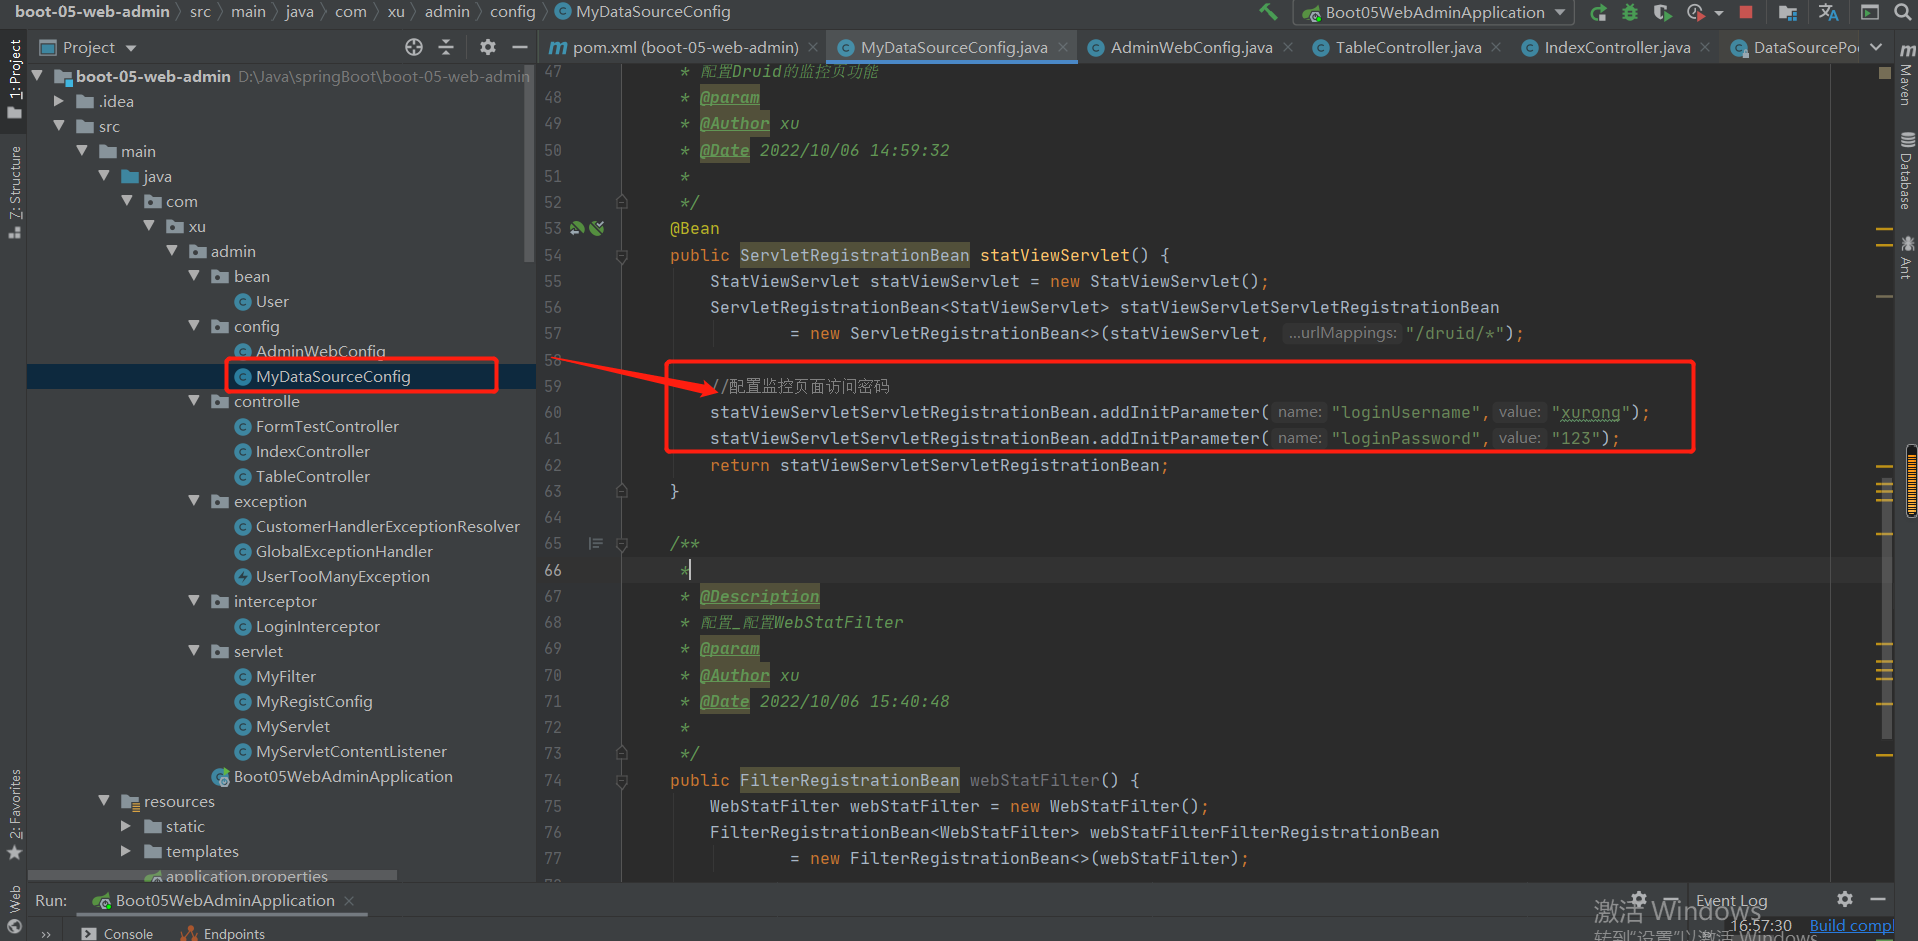
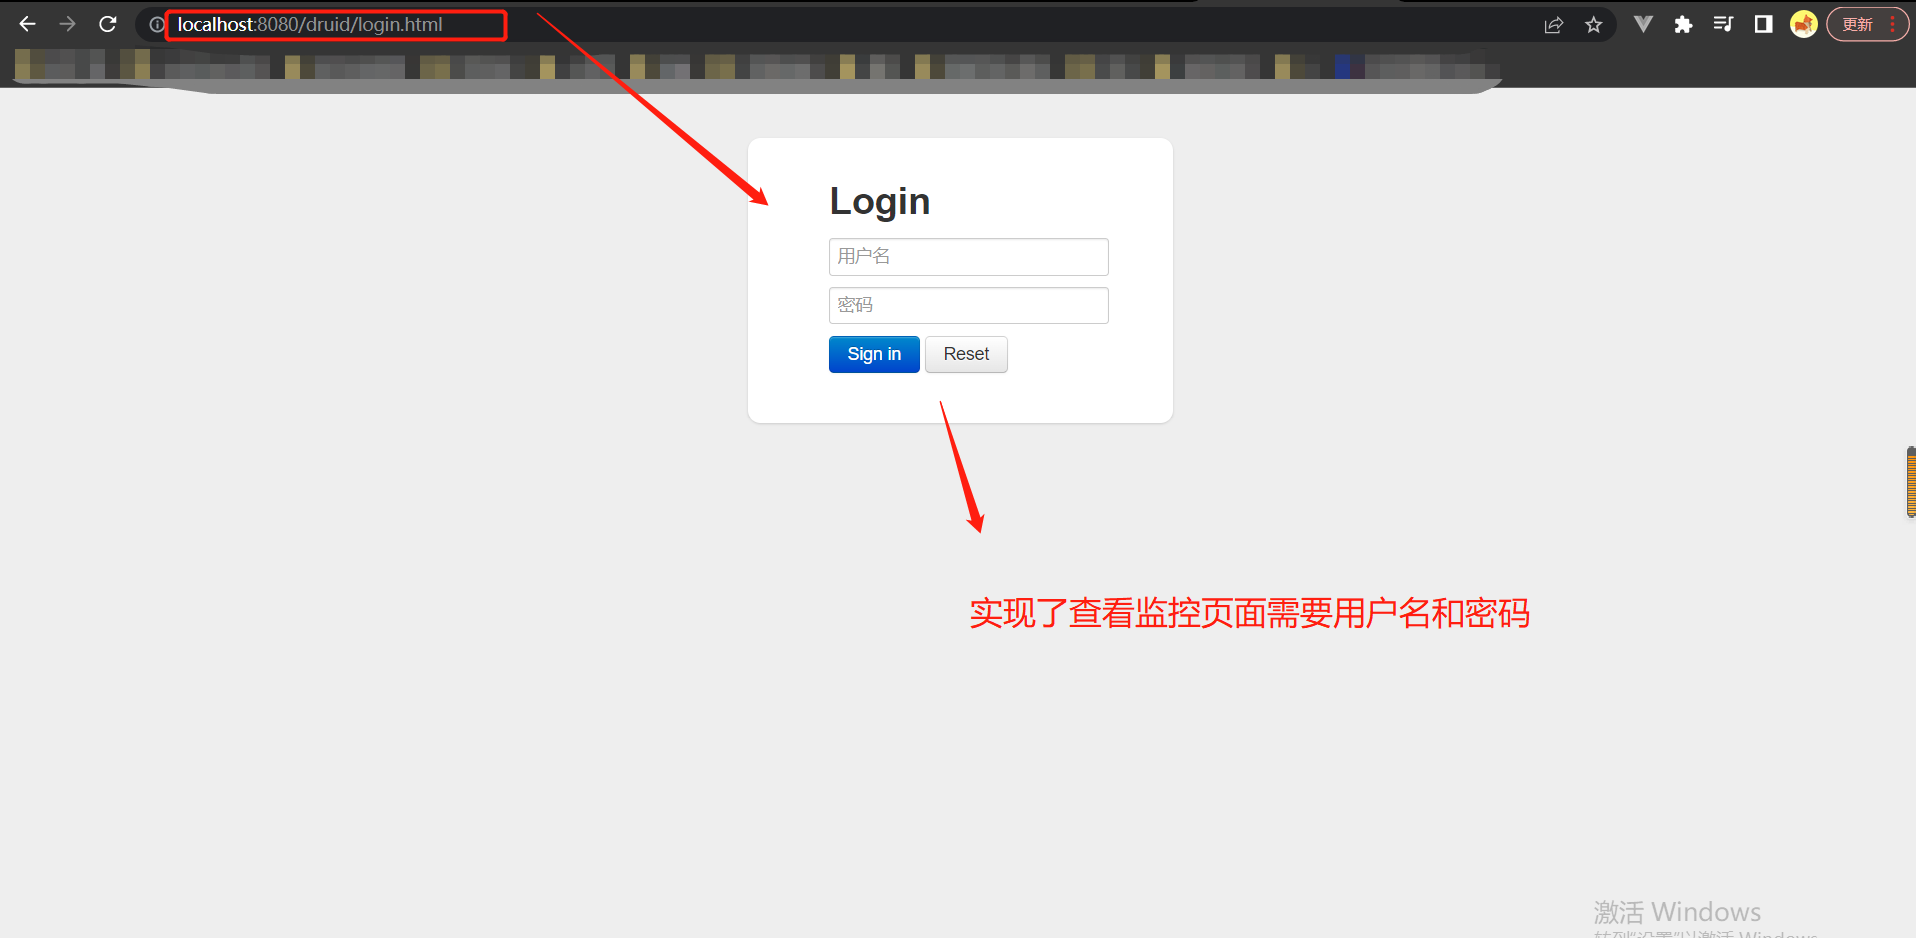
补充的小技巧:
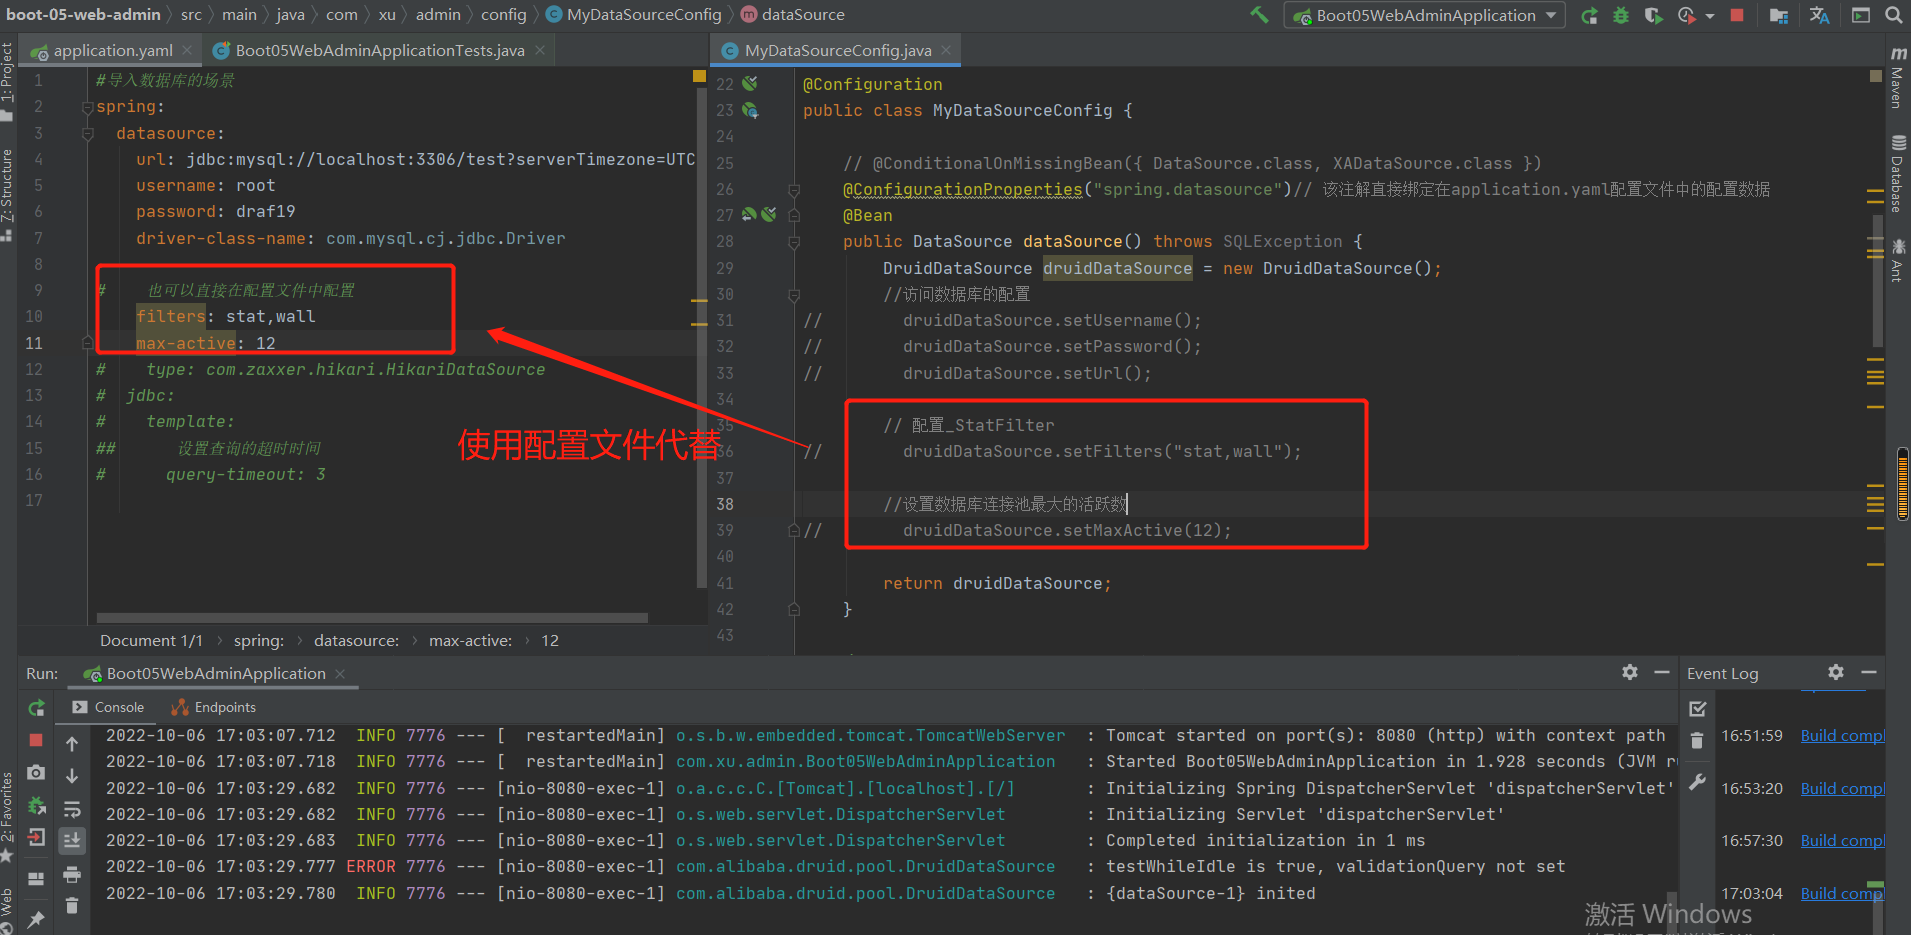
结果:
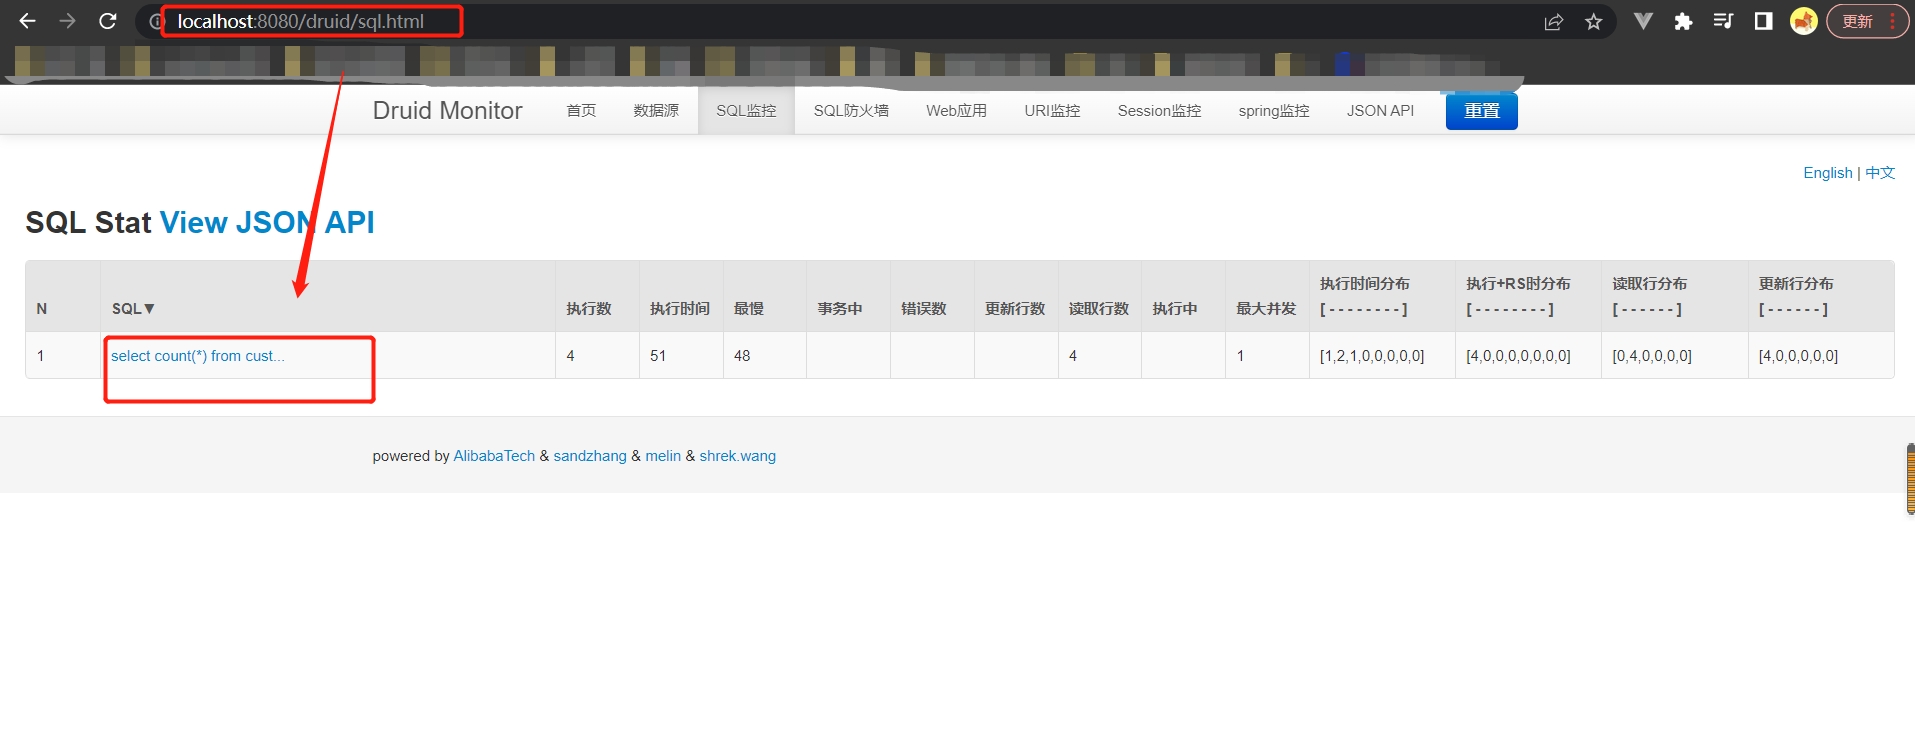
13-3 druid数据源start整合方式:
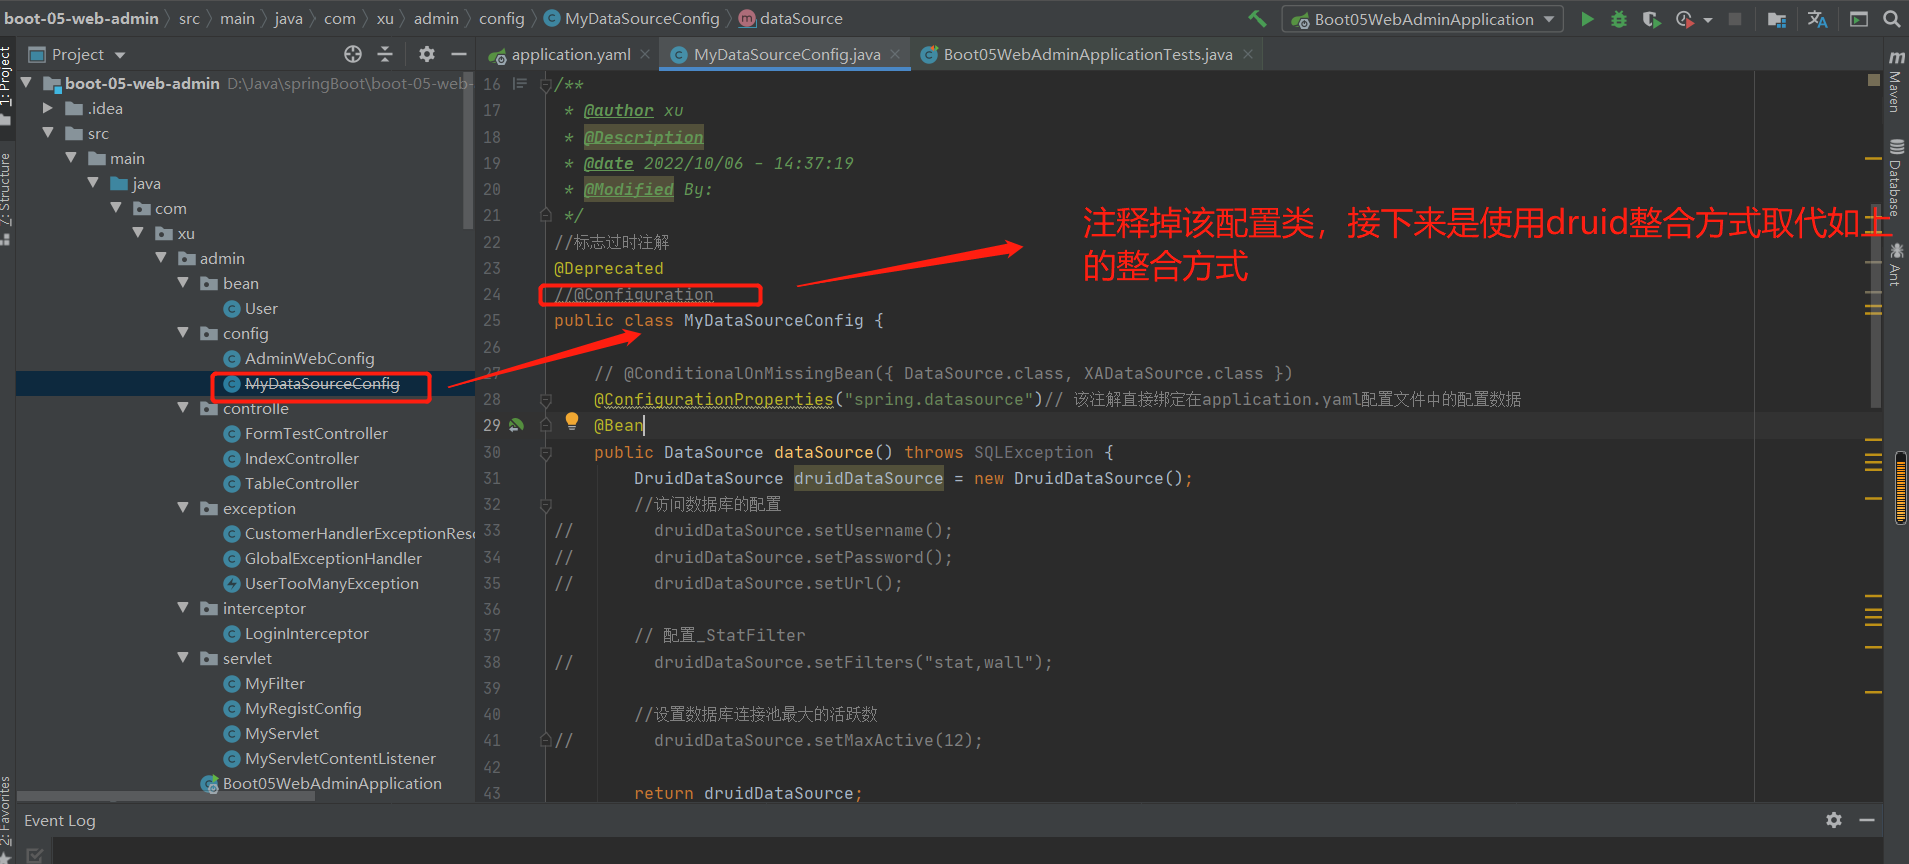
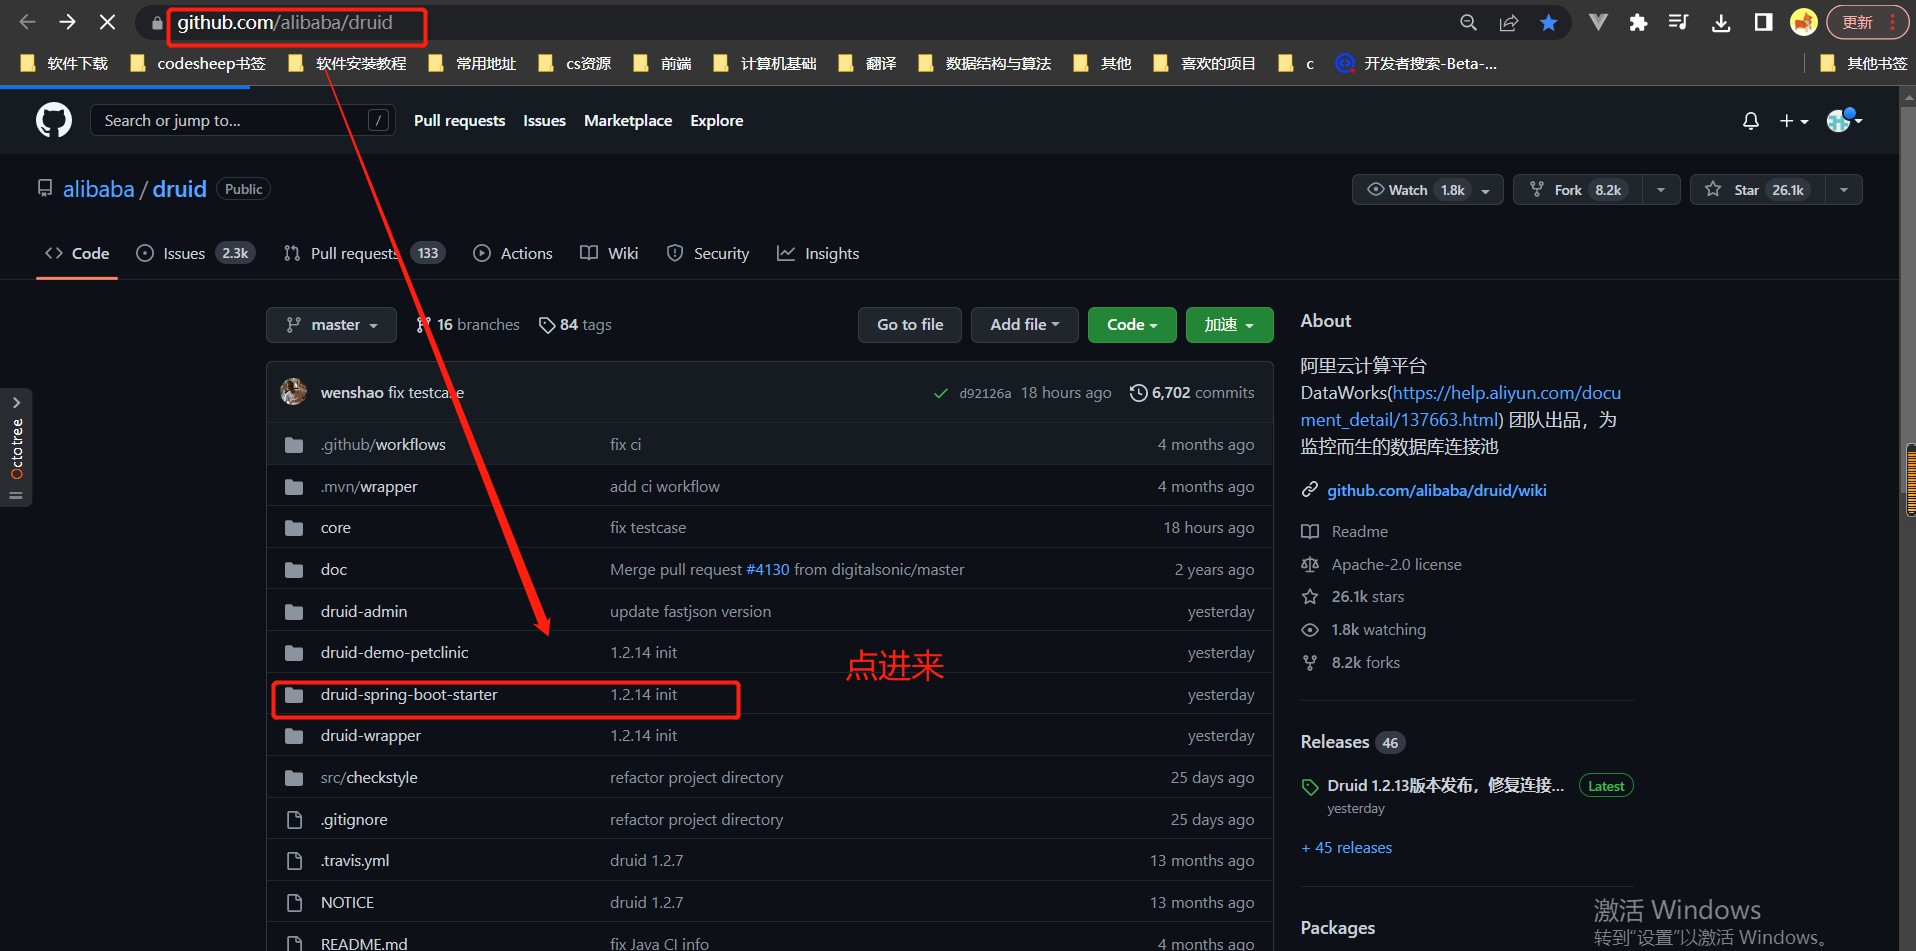
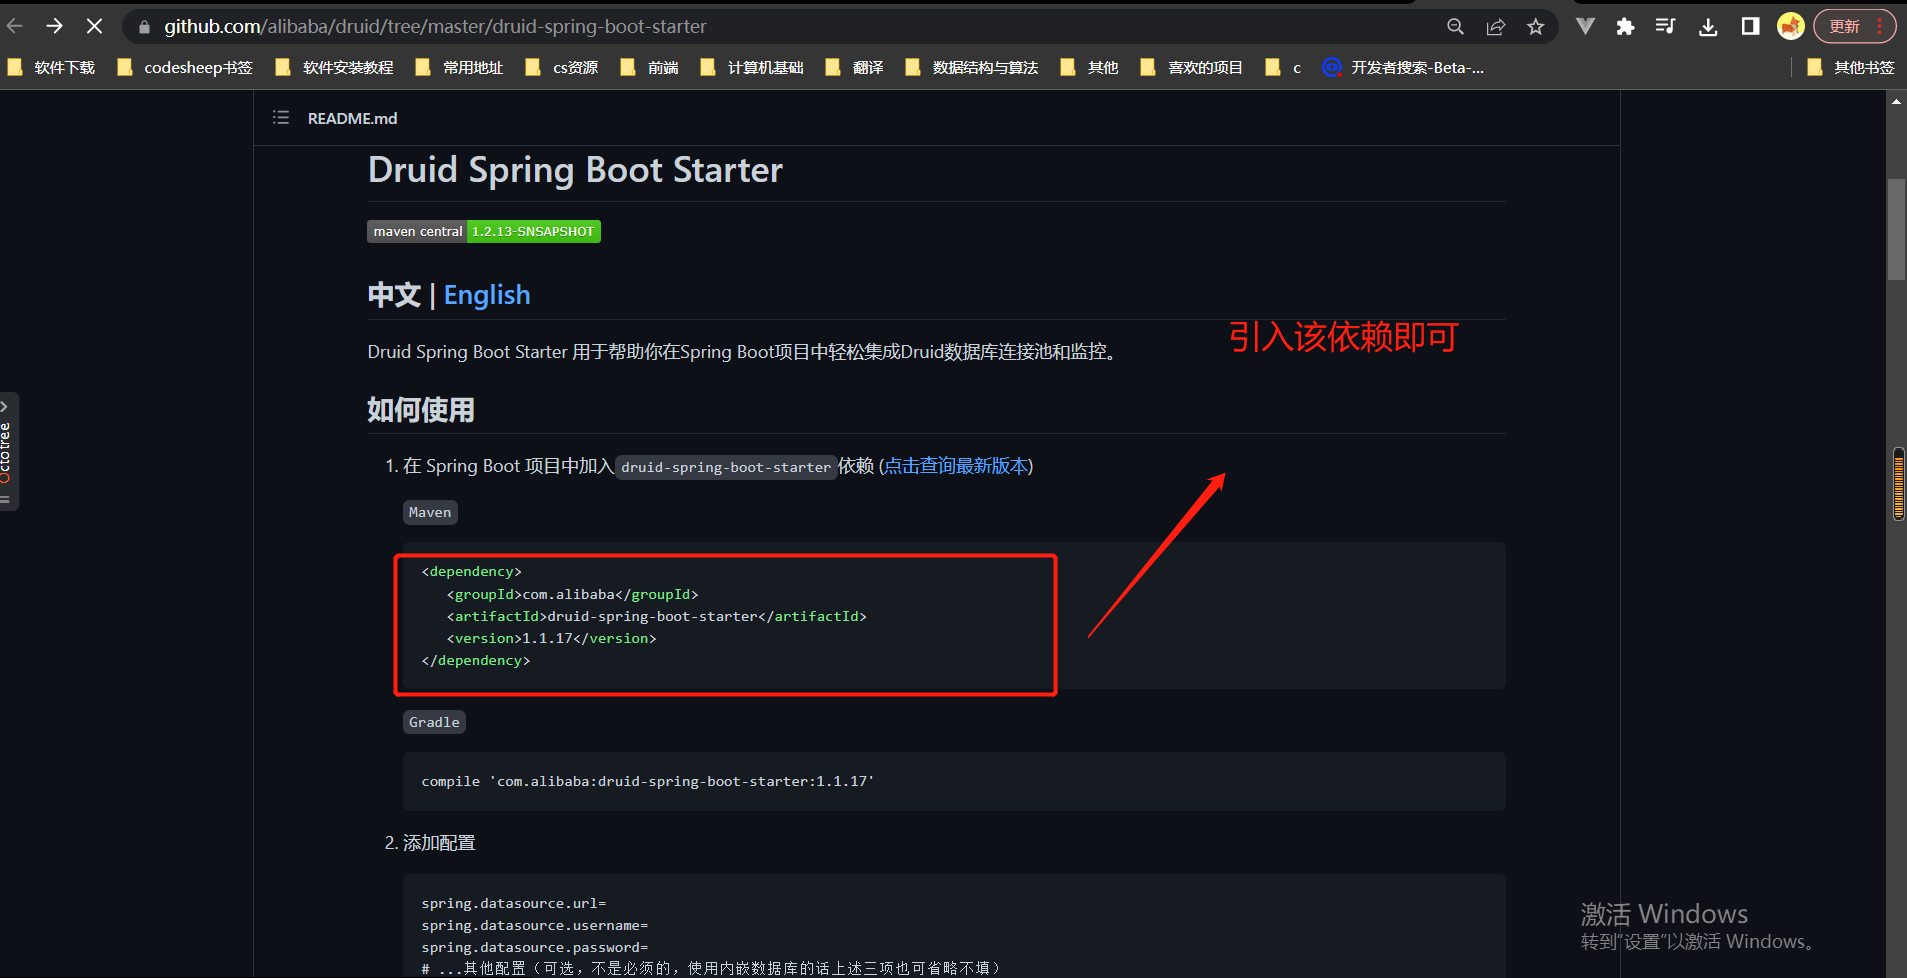
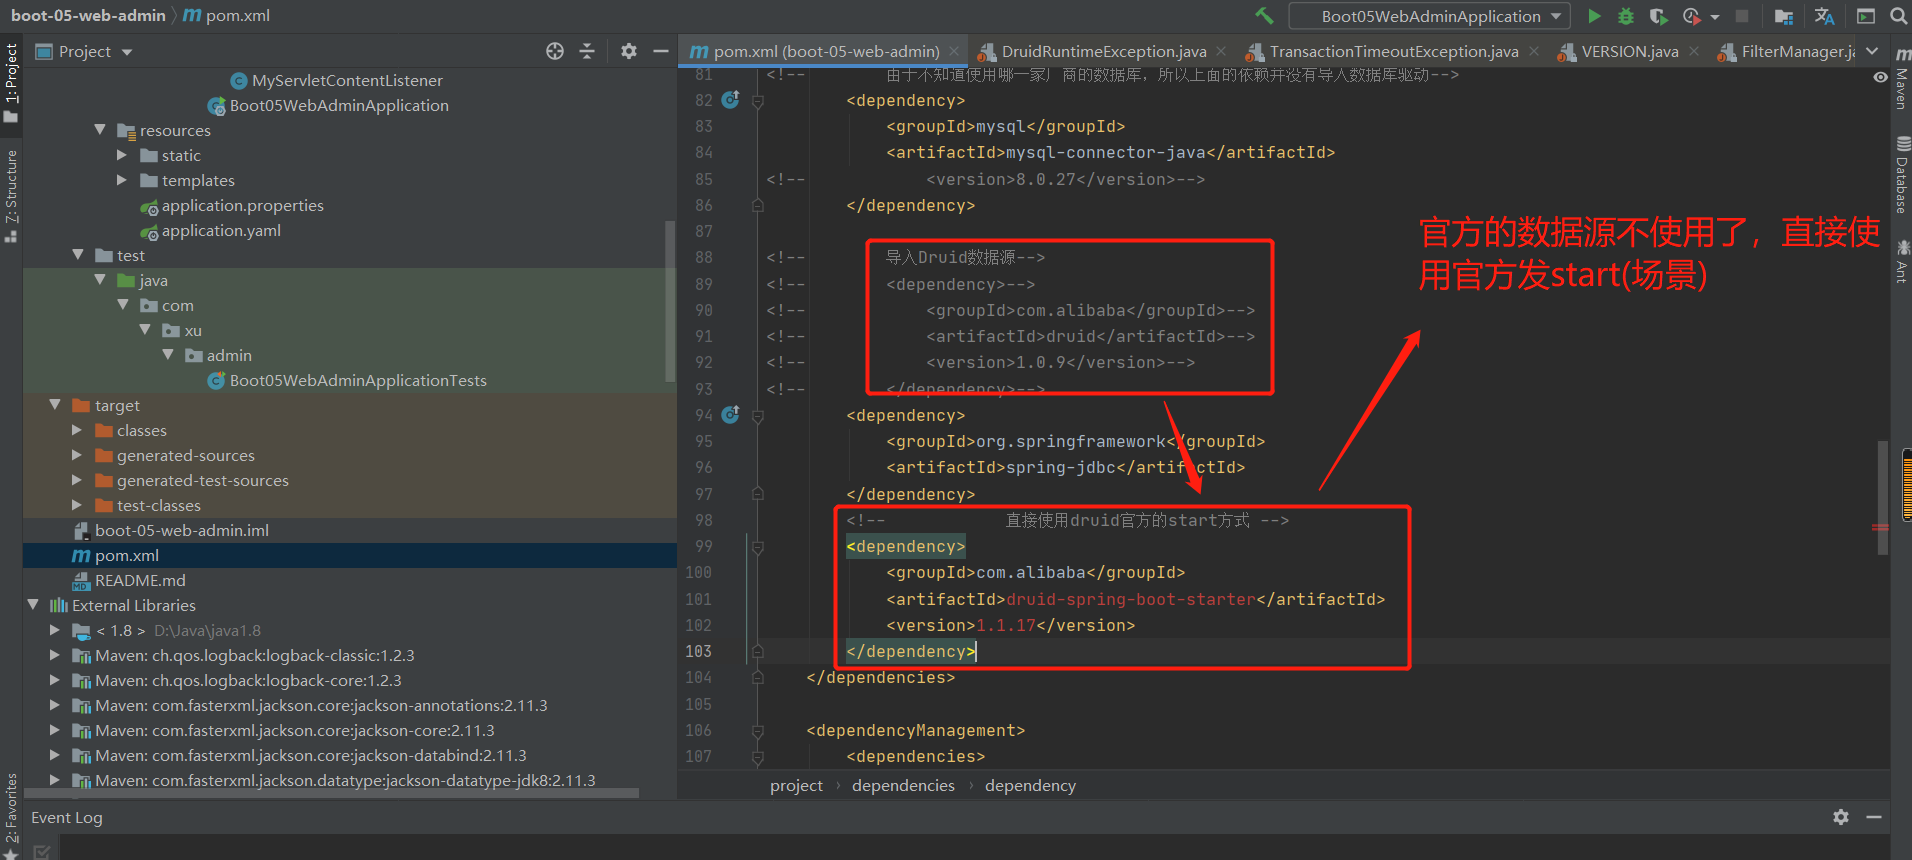
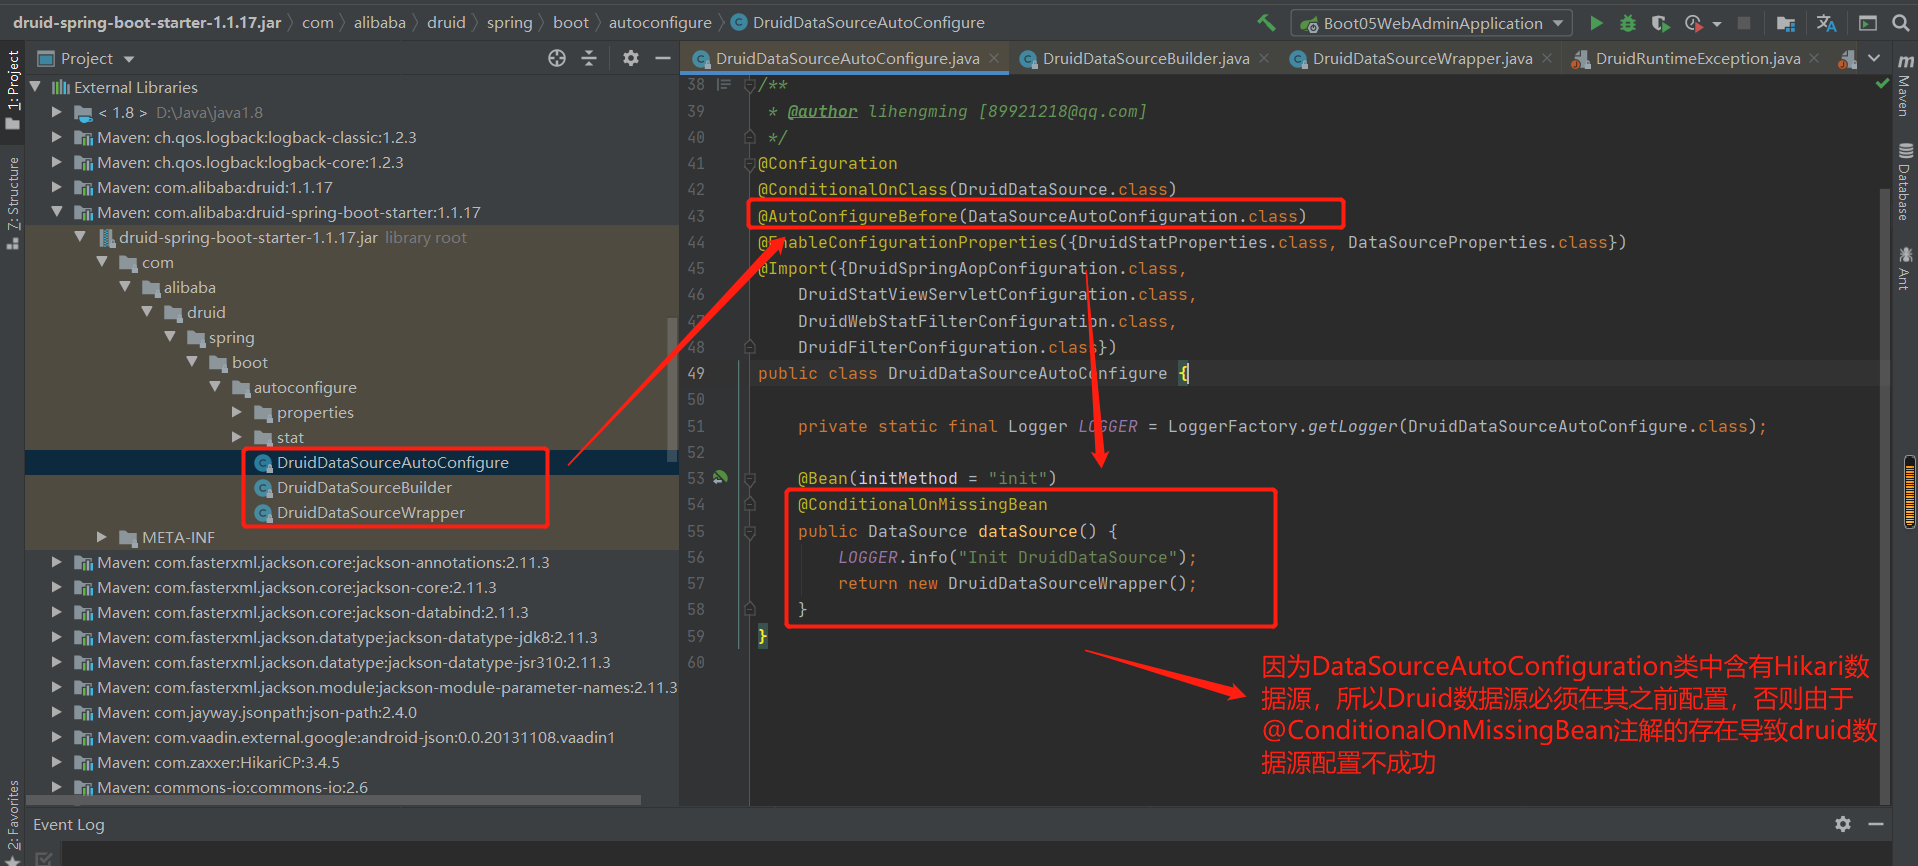
分析导入了那些类:
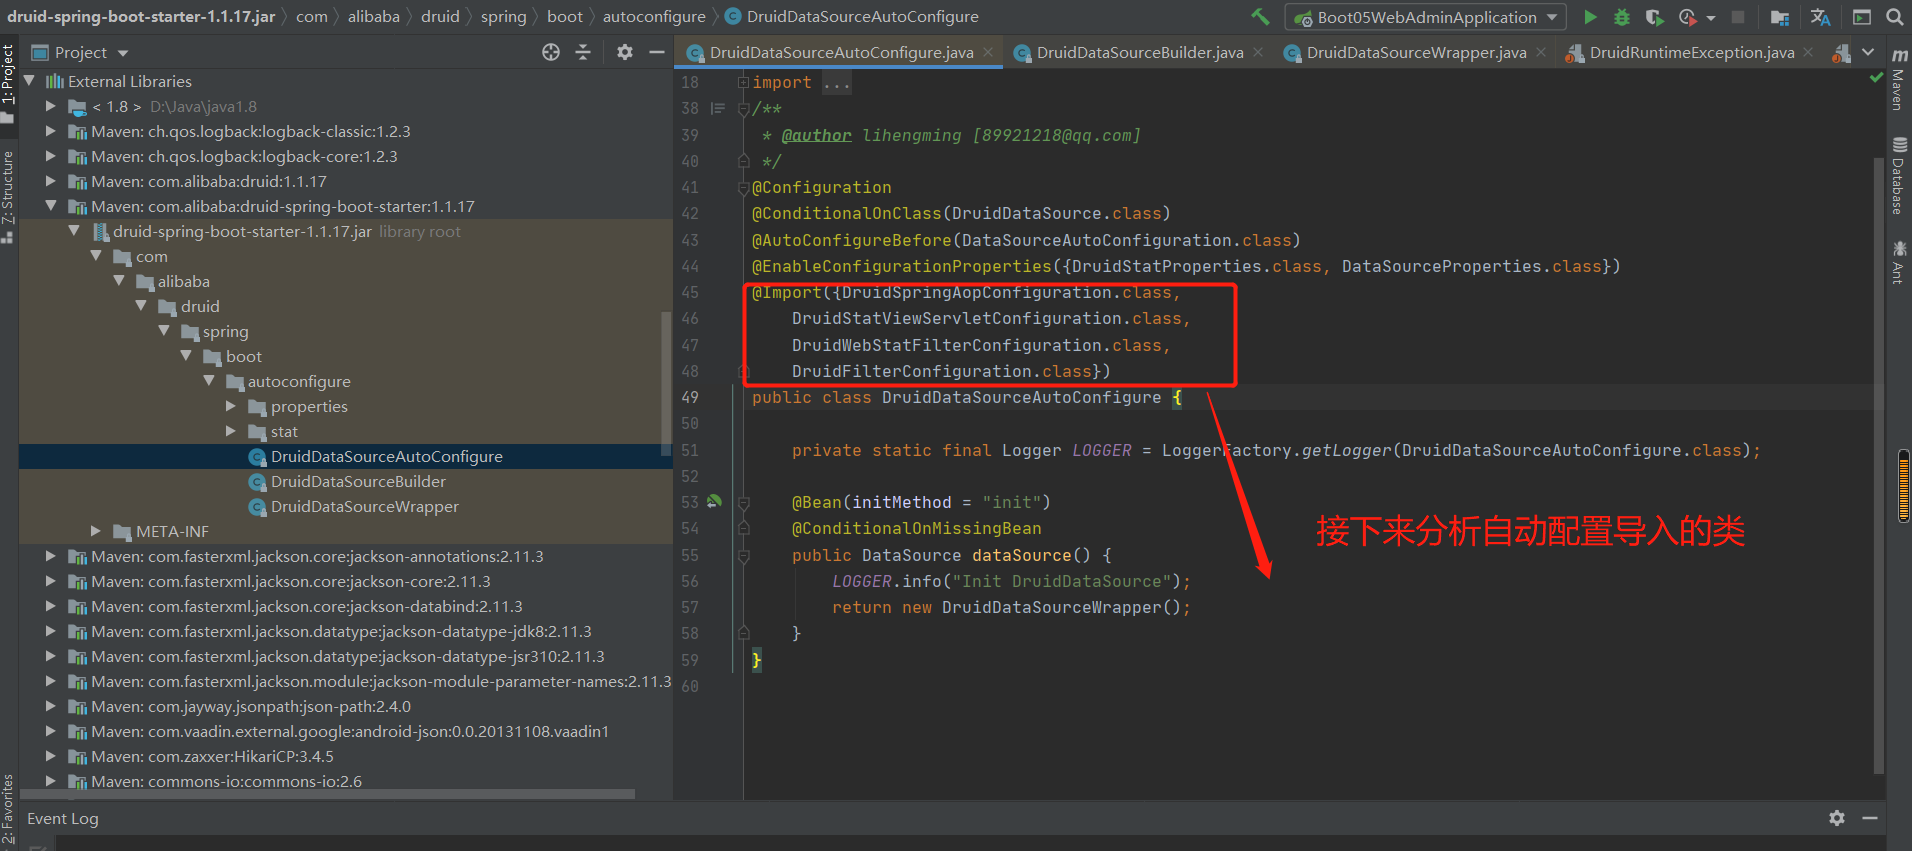
@Import({DruidSpringAopConfiguration.class,
    DruidStatViewServletConfiguration.class,
    DruidWebStatFilterConfiguration.class,
    DruidFilterConfiguration.class})
第1,DruidSpringAopConfiguration.class:
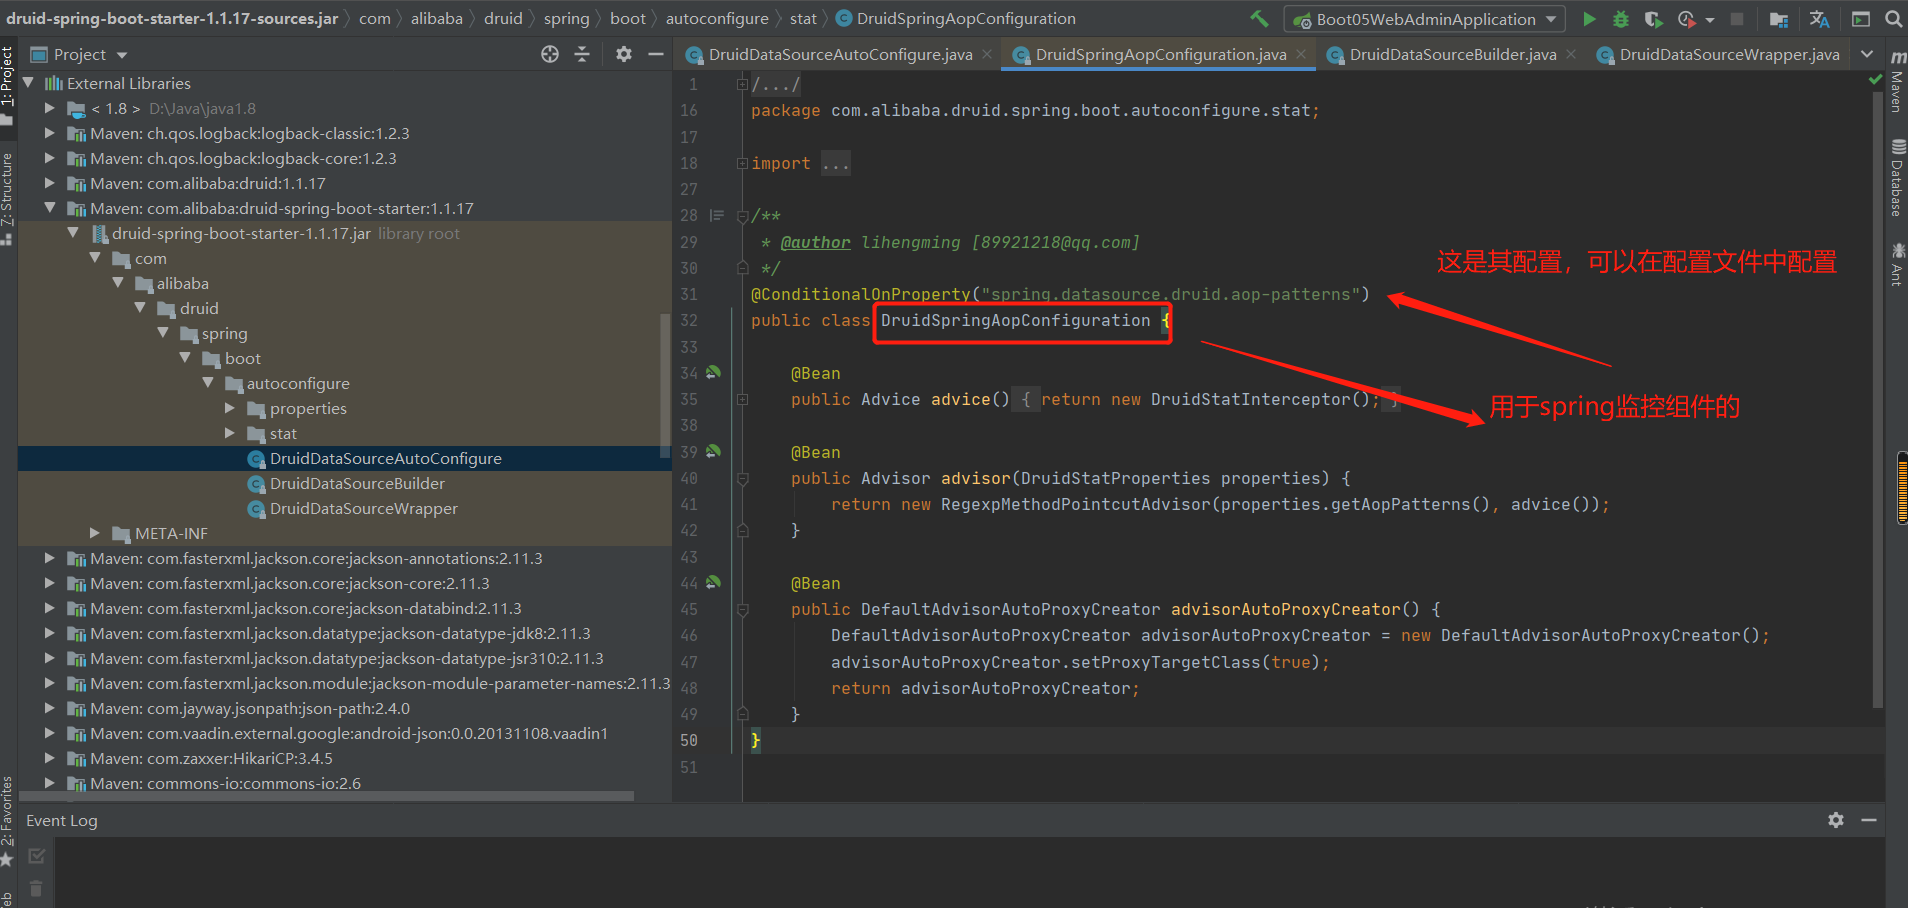
第2,DruidStatViewServletConfiguration.class:
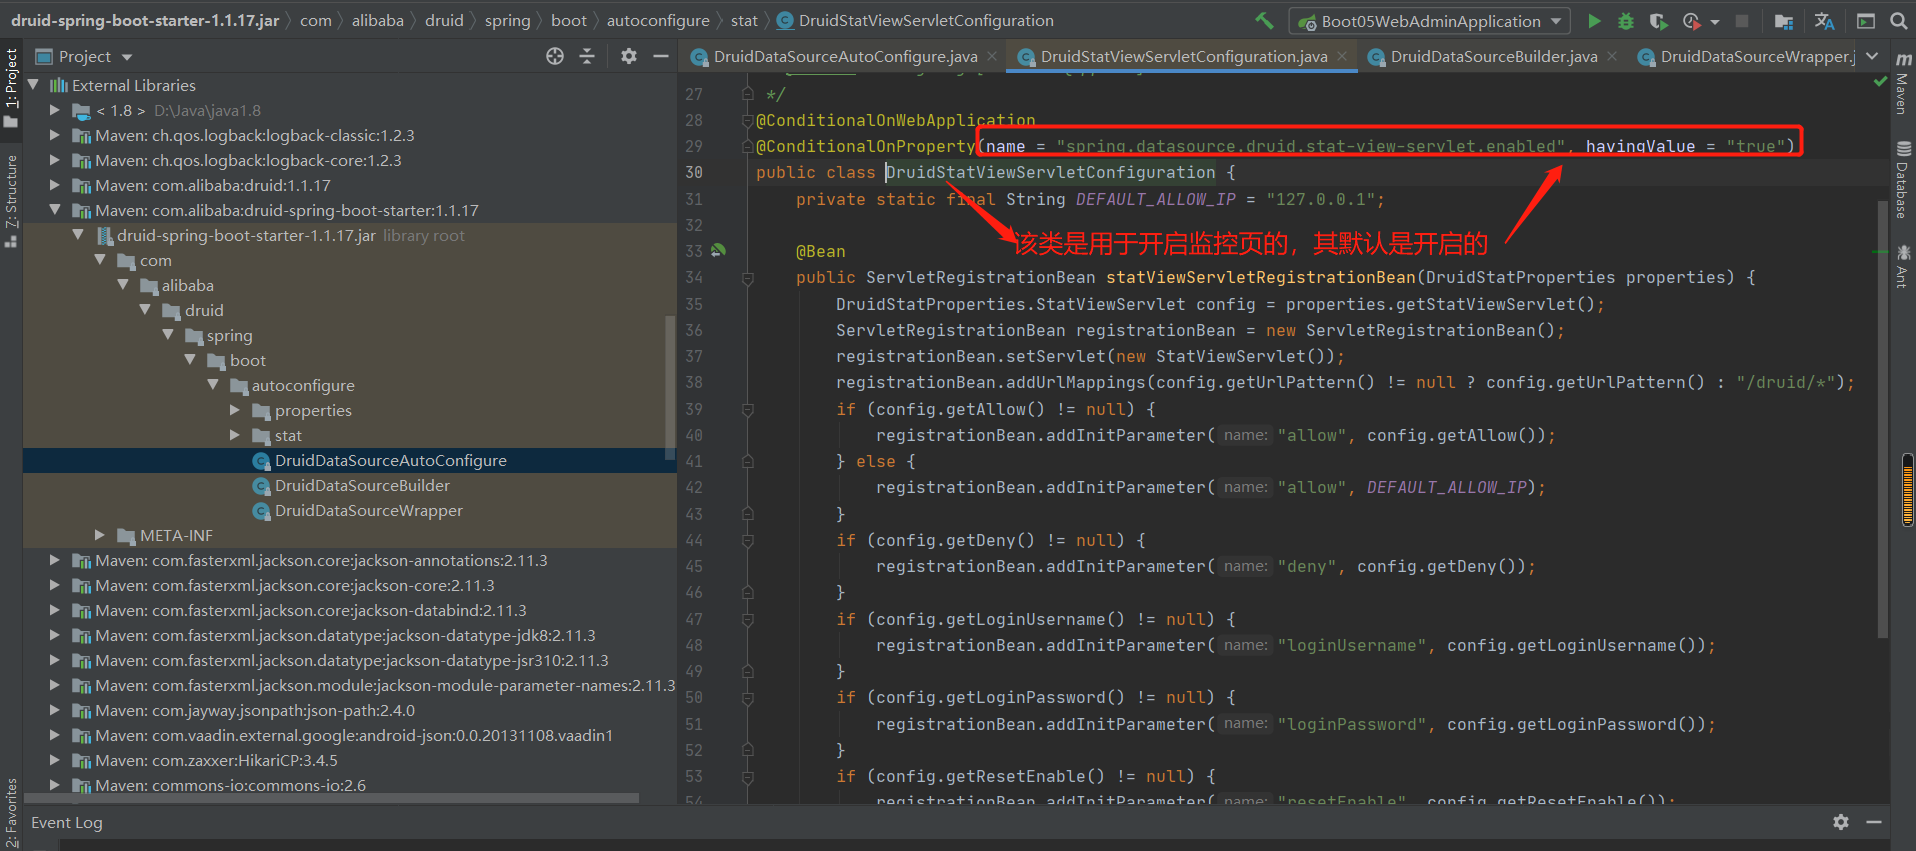
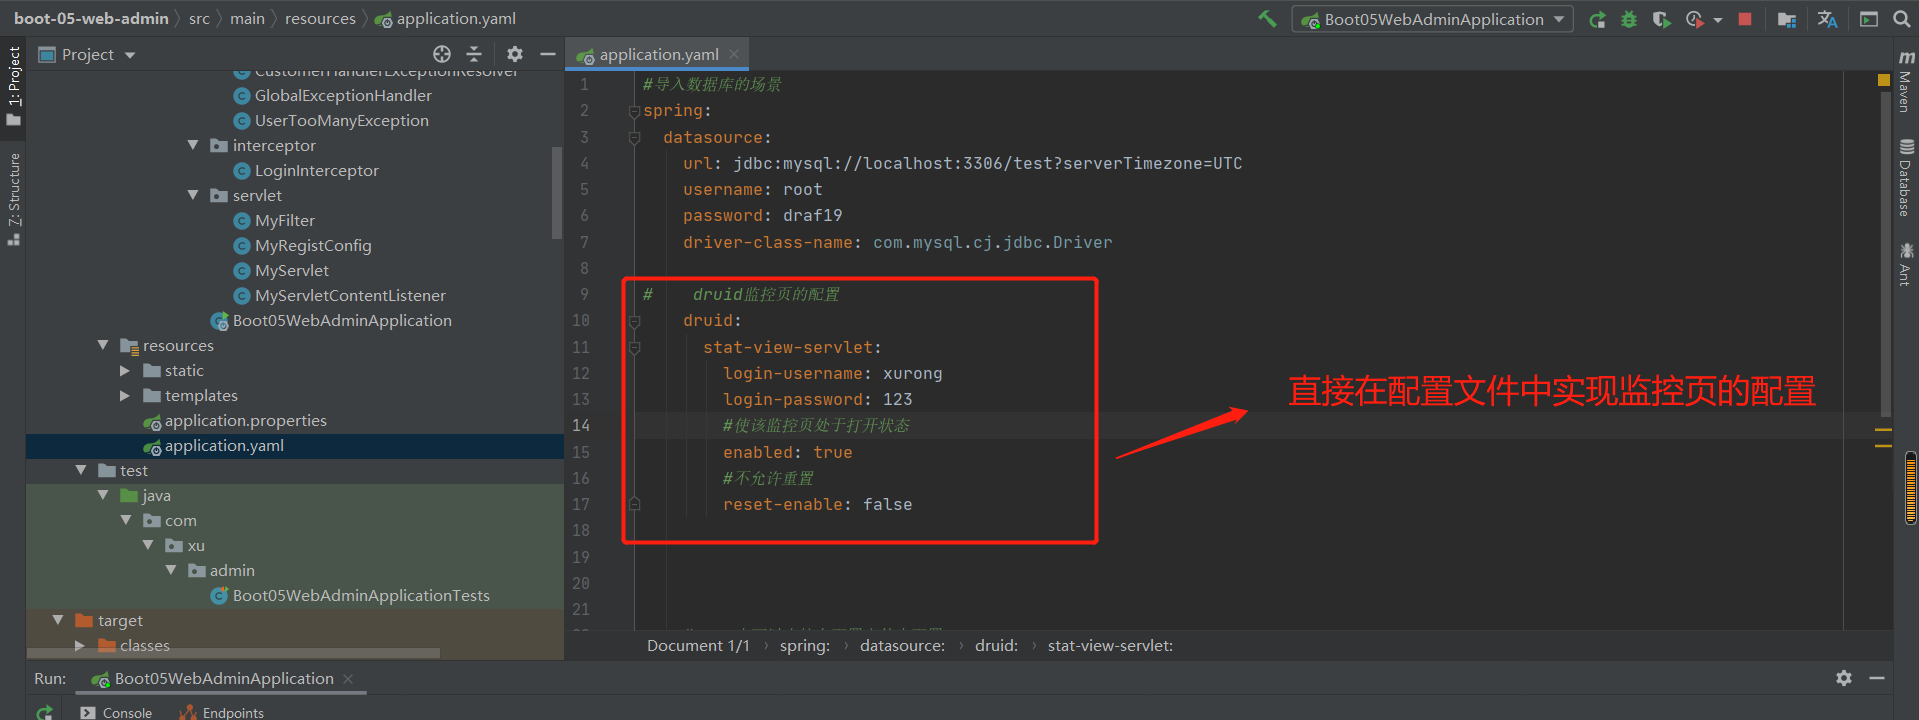
第3,DruidWebStatFilterConfiguration.class:
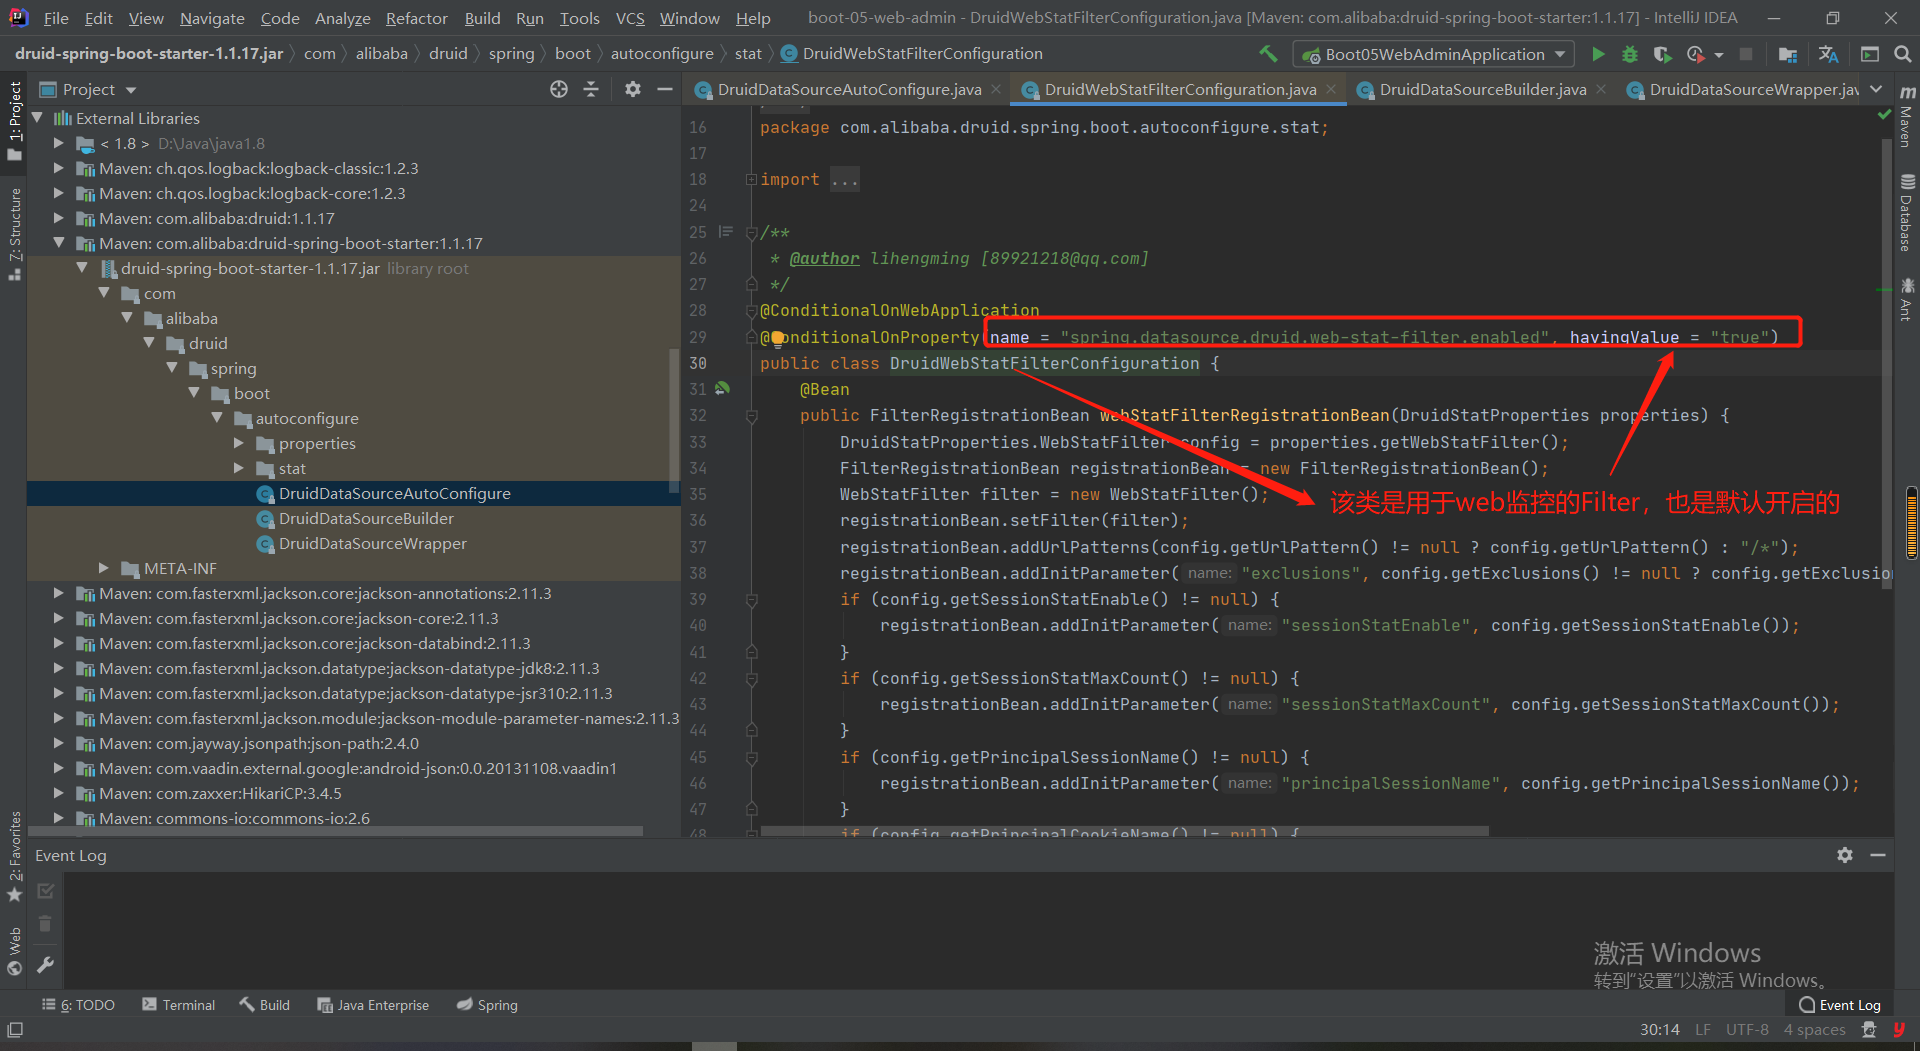
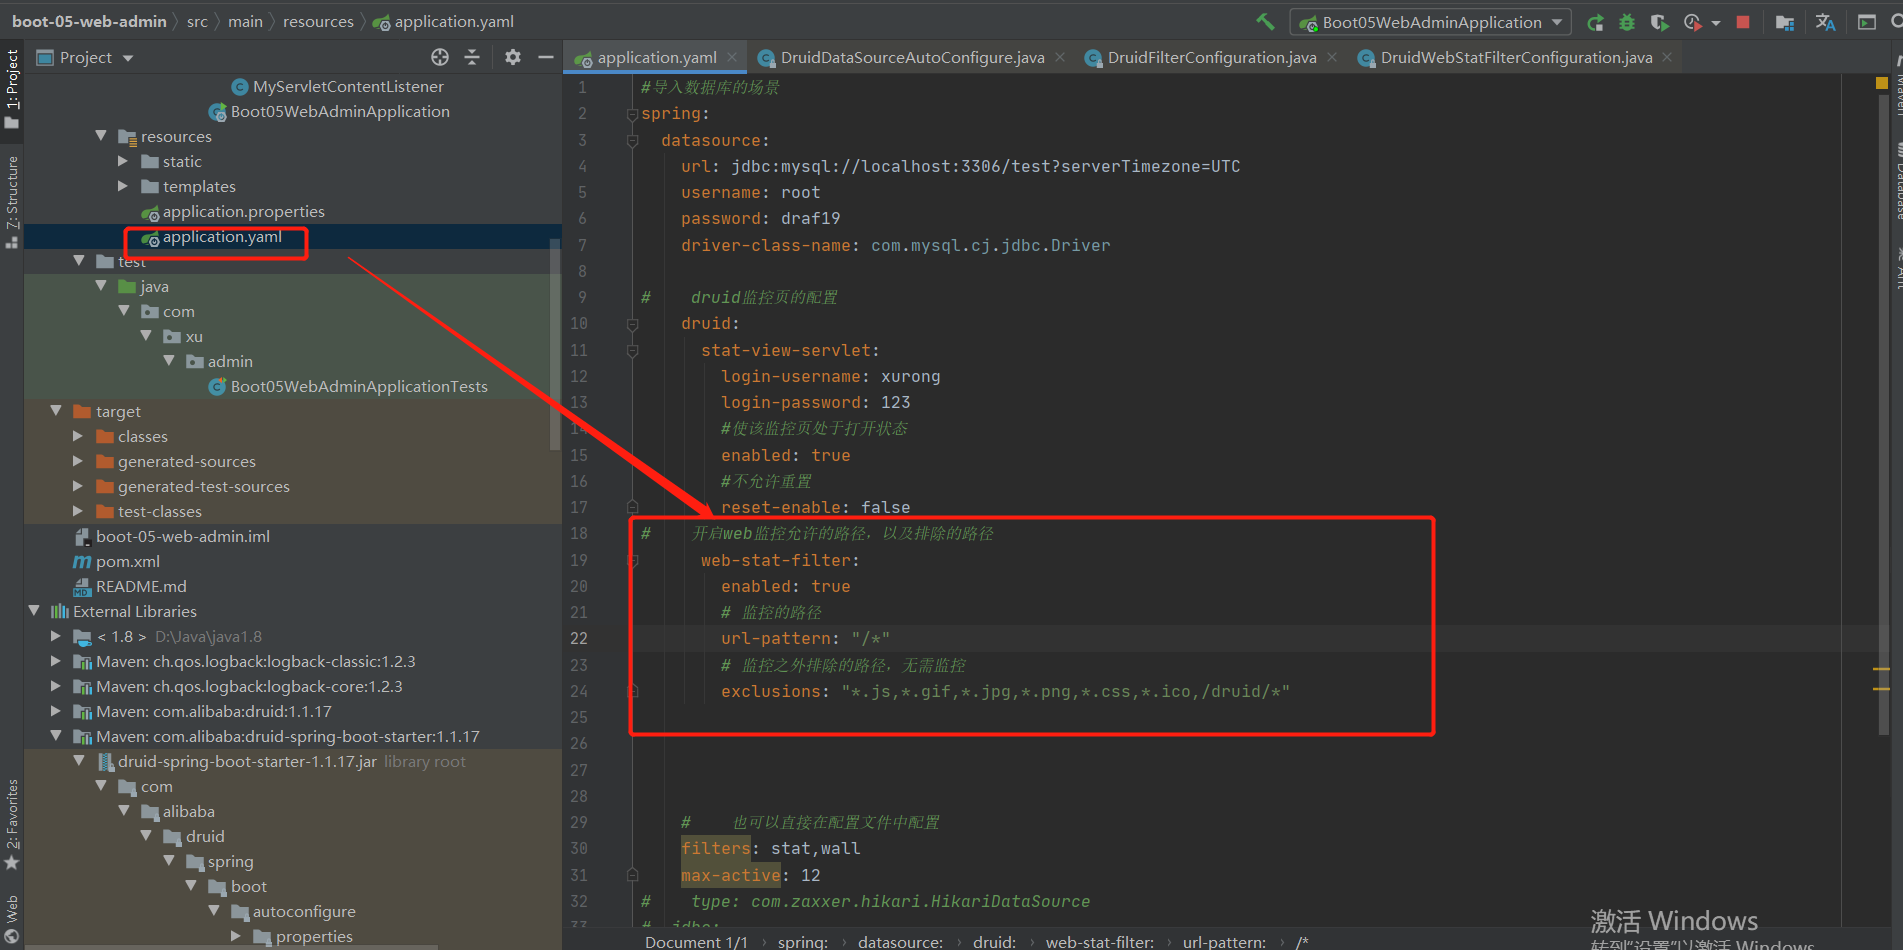
第4,DruidFilterConfiguration.class:
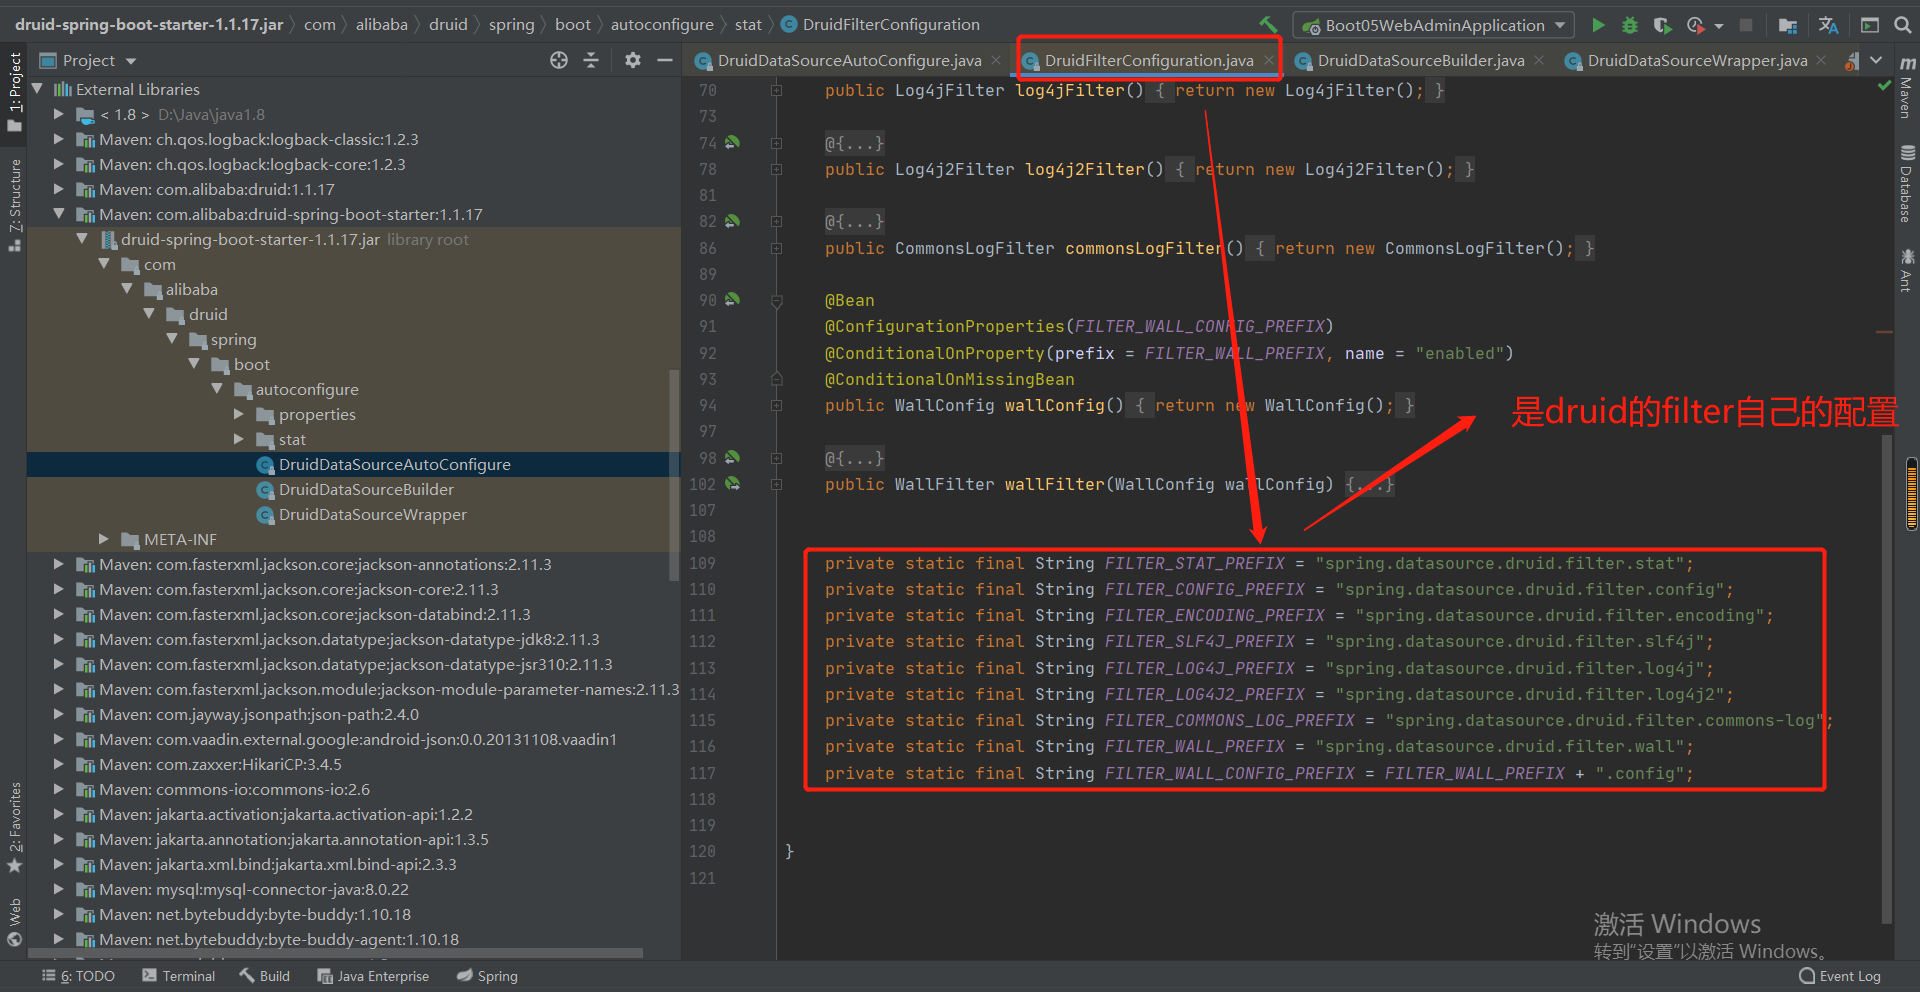
stat:web监控属性
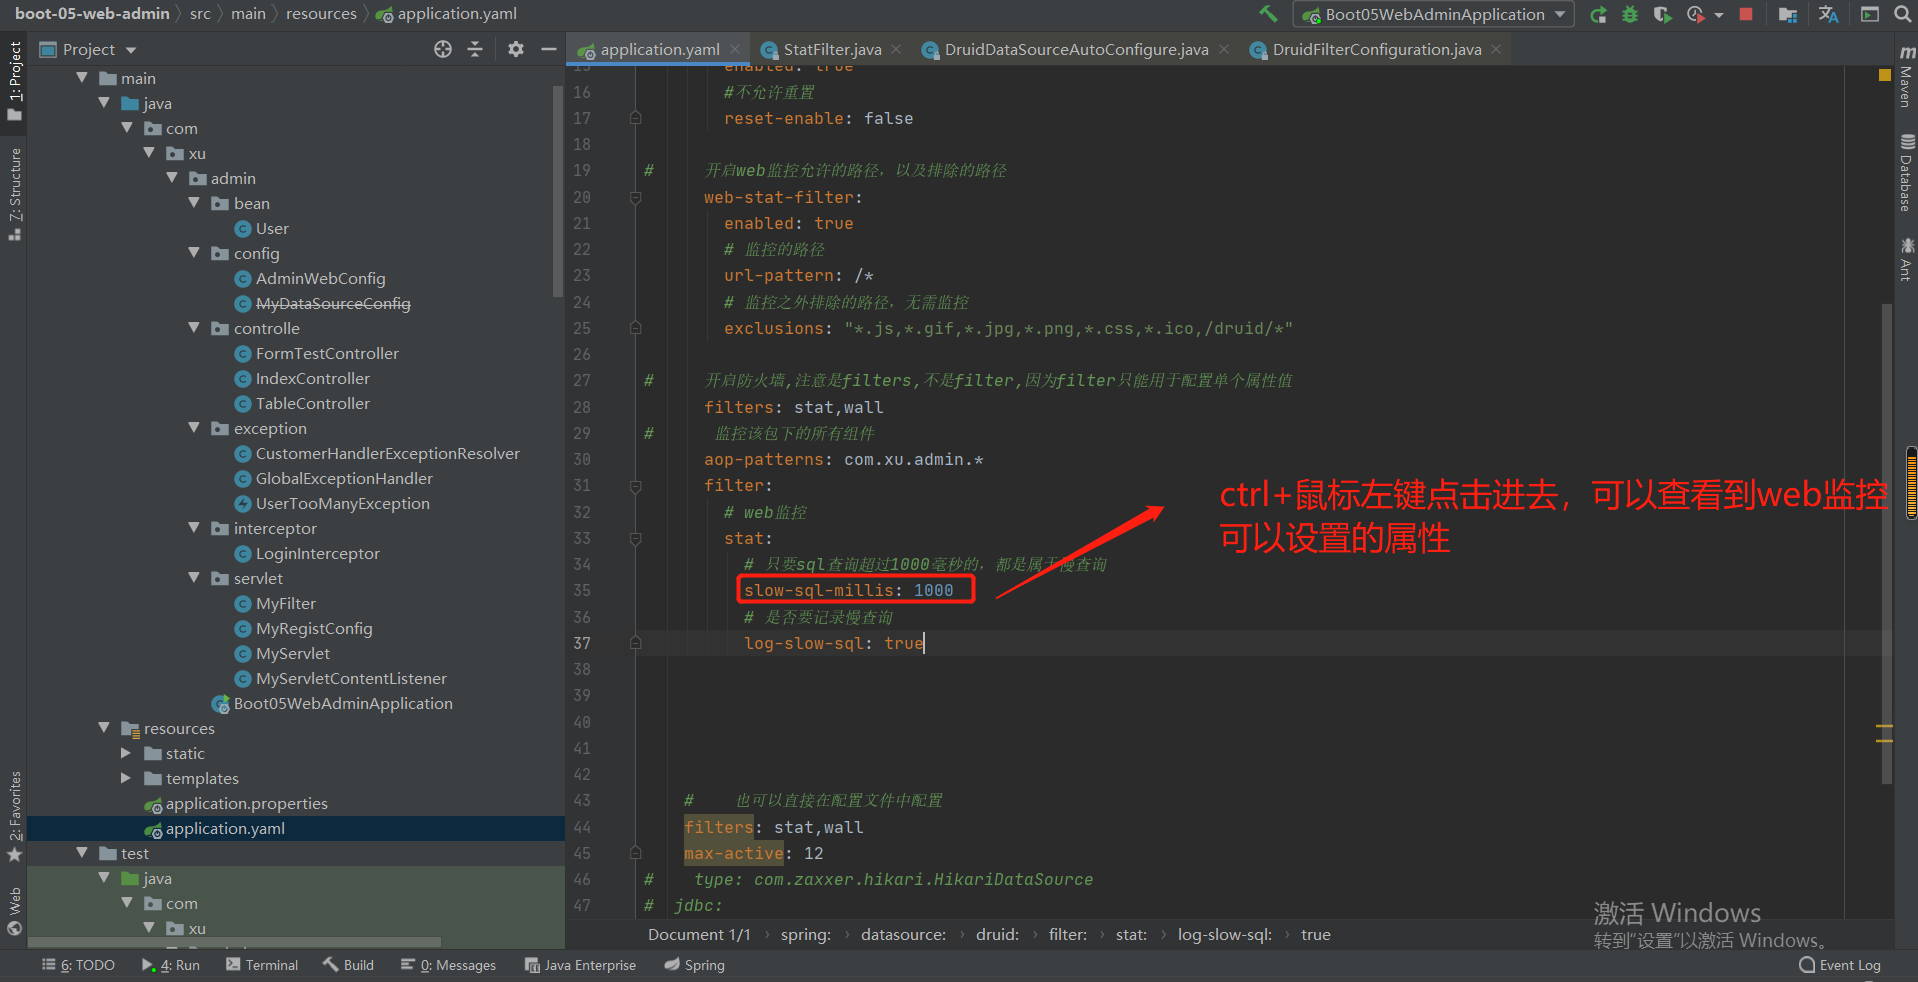
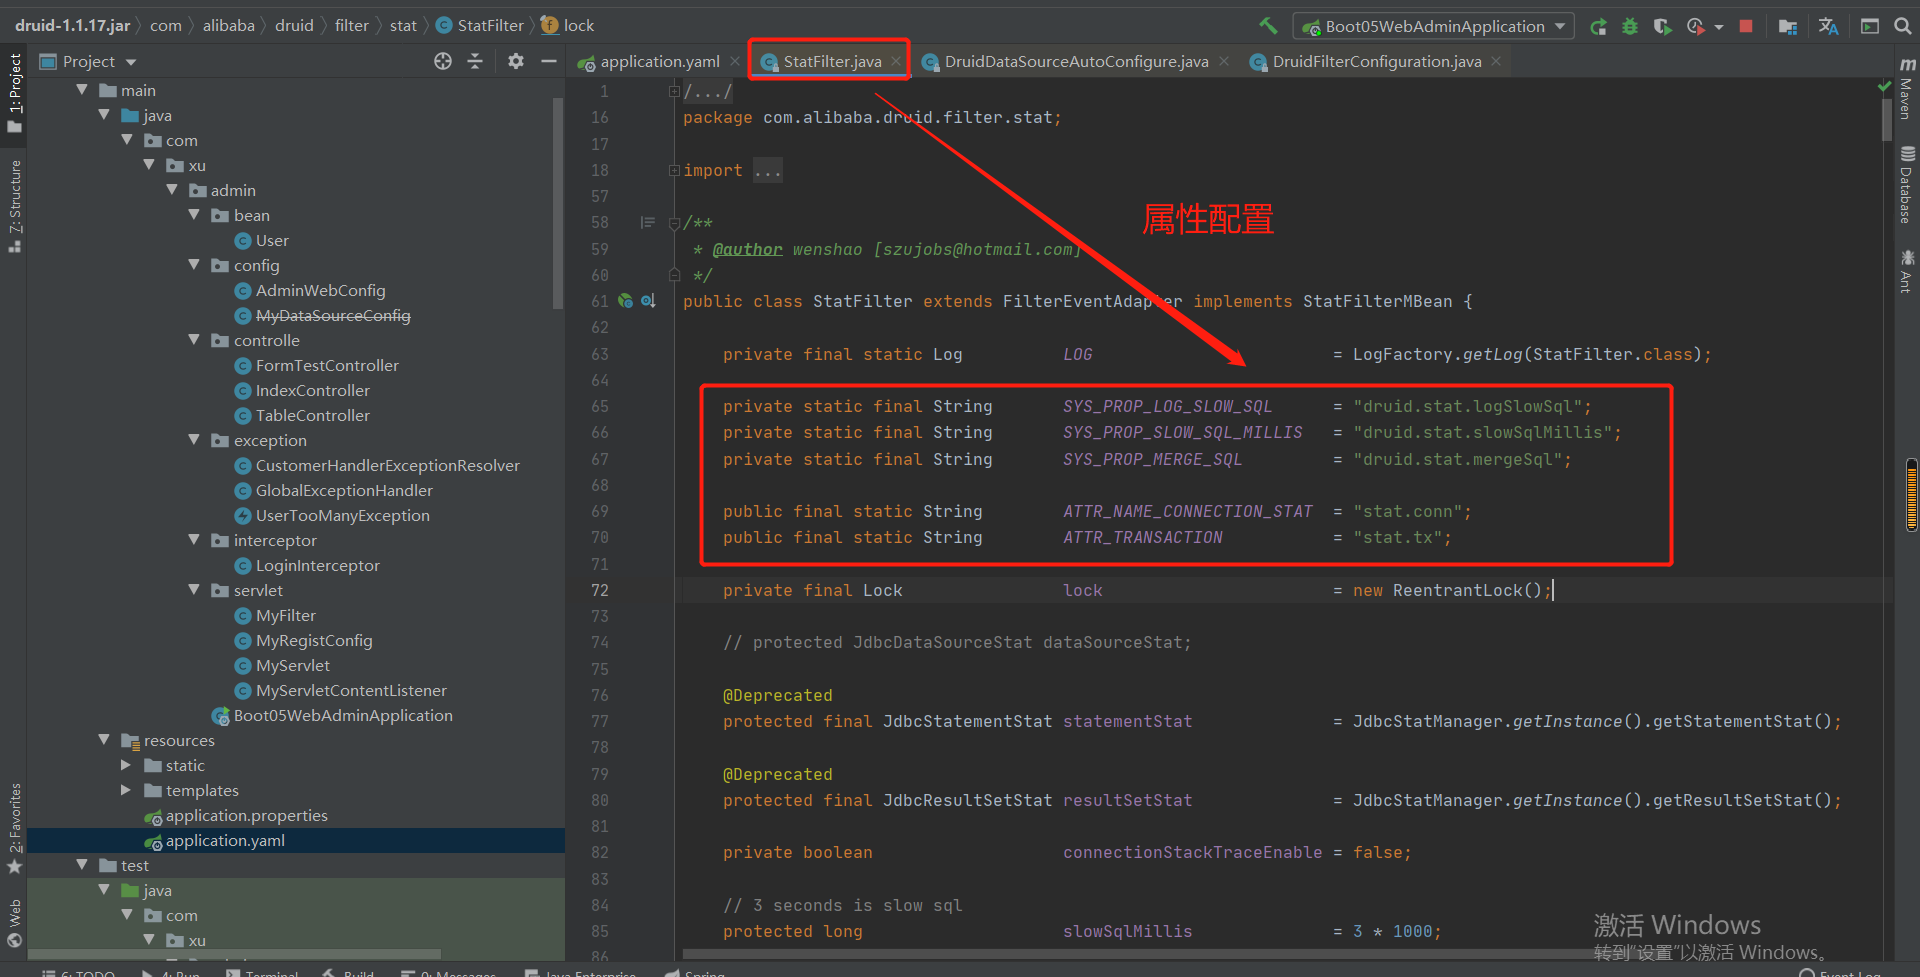
wall:防火墙的配置
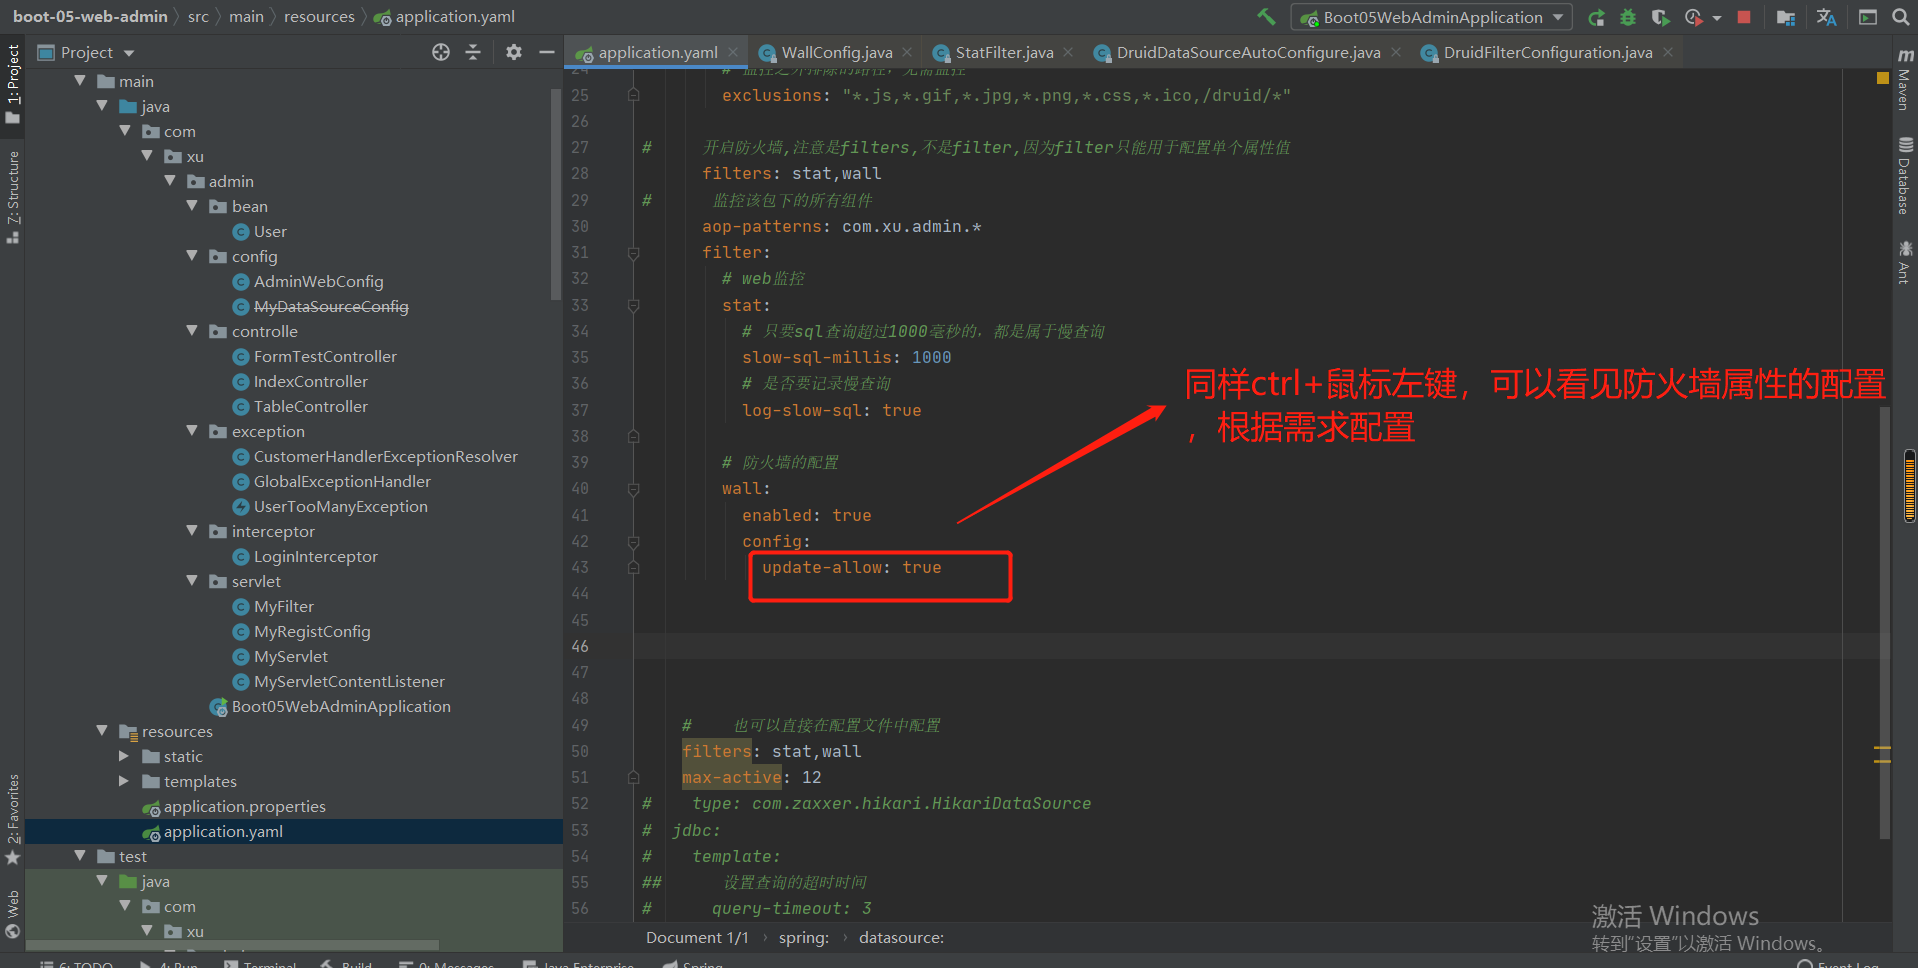
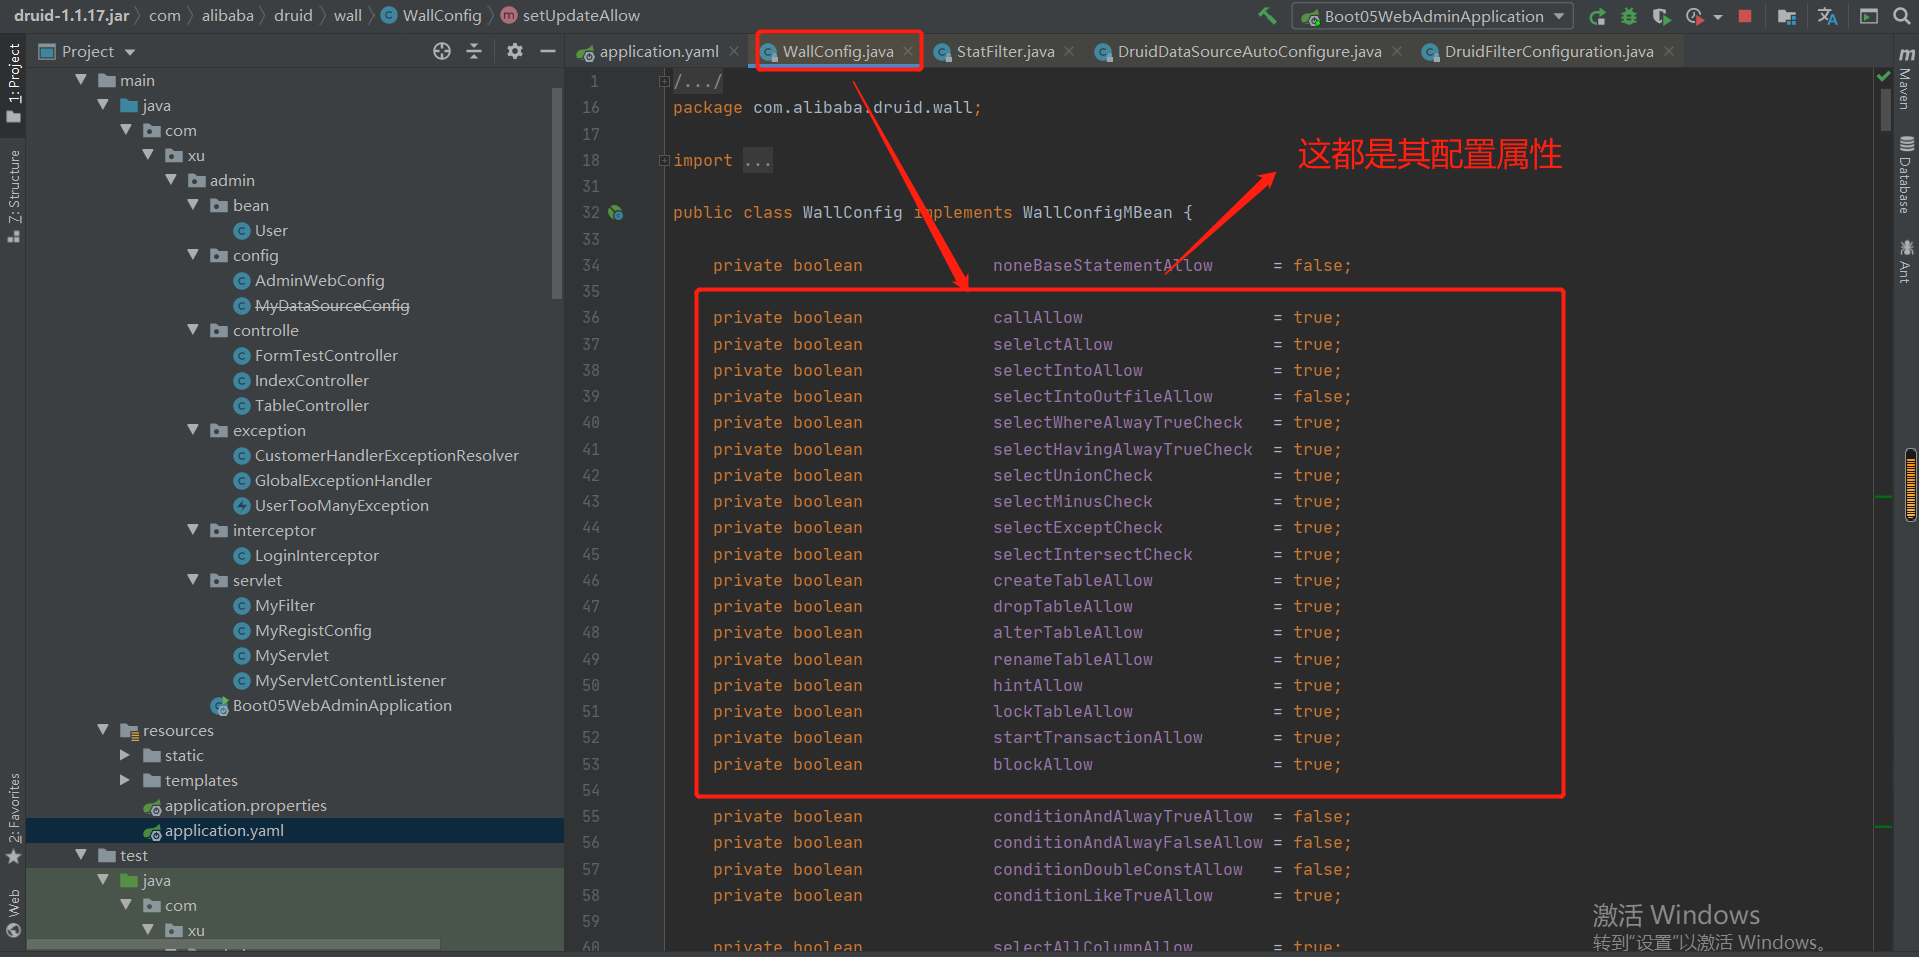
5.结果
进行上述配置之后,运行程序,可见监控页面的数据
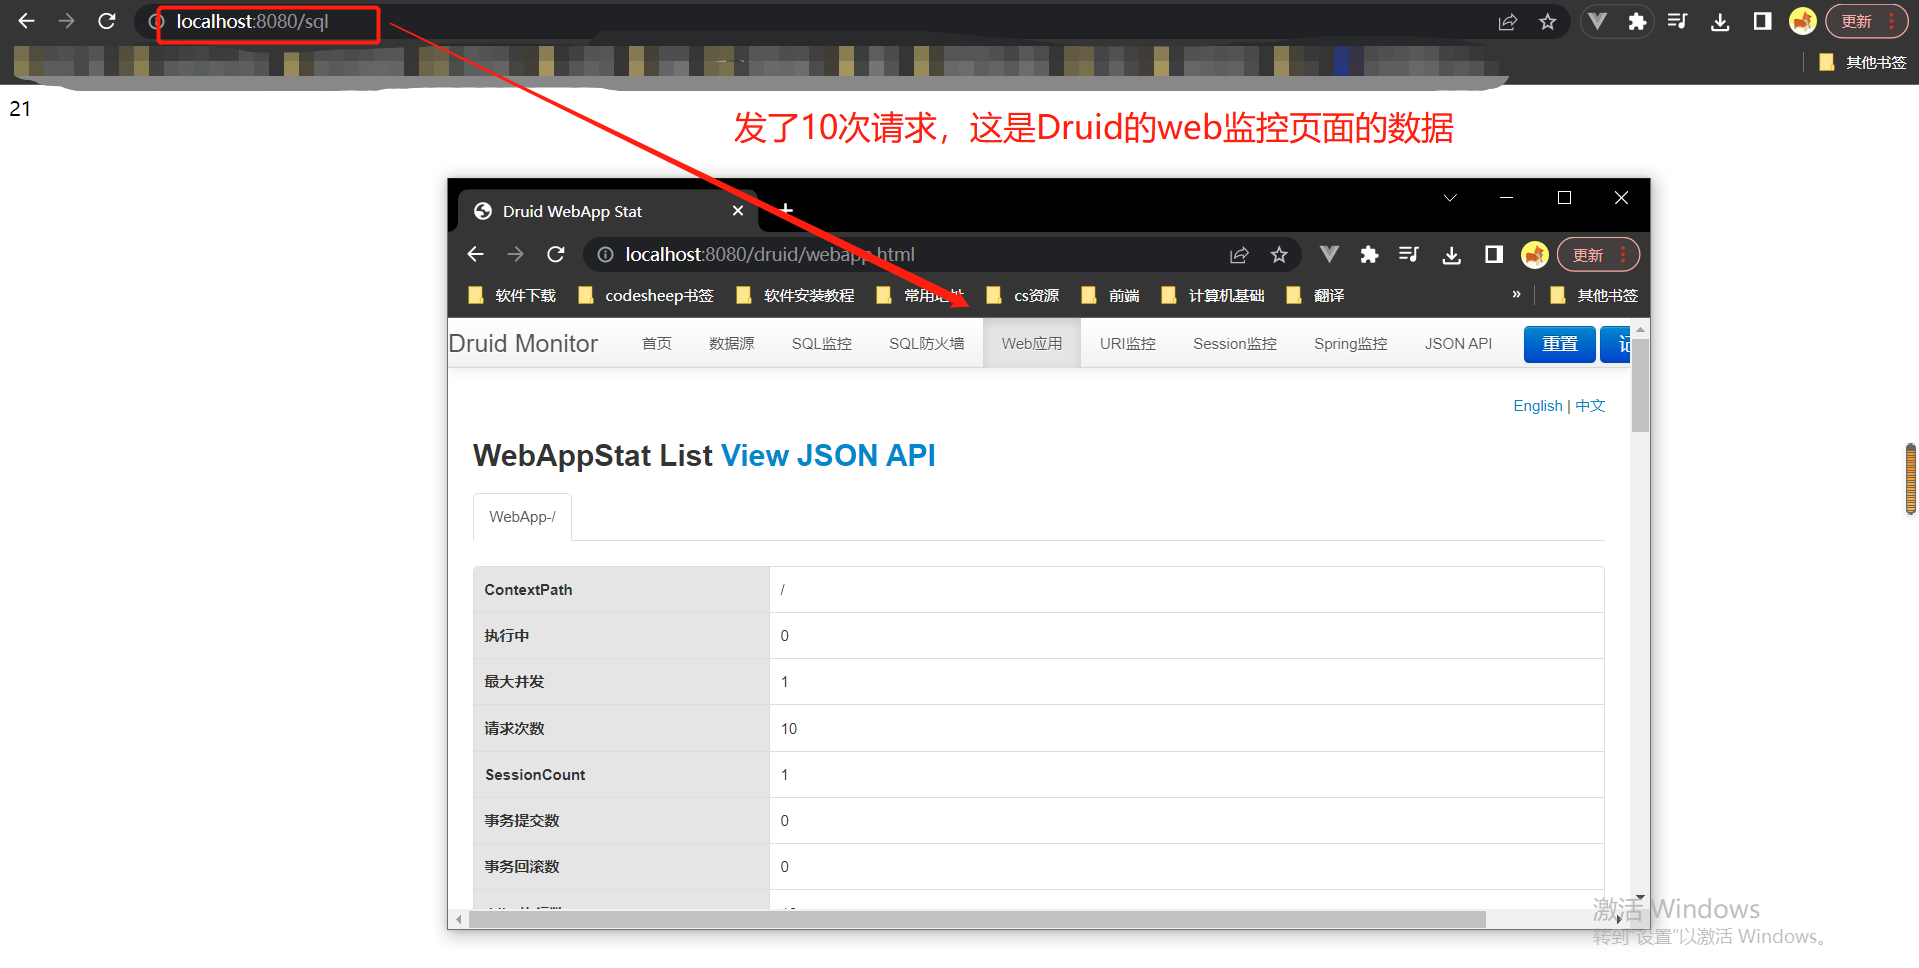
配置文件代码参考:
#导入数据库的场景
spring:
  datasource:
    url: jdbc:mysql://localhost:3306/test?serverTimezone=UTC
    username: root
    password: draf19
    driver-class-name: com.mysql.cj.jdbc.Driver

#    druid监控页的配置
    druid:
      stat-view-servlet:
        login-username: xurong
        login-password: 123
        #使该监控页处于打开状态
        enabled: true
        #不允许重置
        reset-enable: false

#     开启web监控允许的路径,以及排除的路径
      web-stat-filter:
        enabled: true
        # 监控的路径
        url-pattern: /*
        # 监控之外排除的路径,无需监控
        exclusions: "*.js,*.gif,*.jpg,*.png,*.css,*.ico,/druid/*"

#     开启防火墙,注意是filters,不是filter,因为filter只能用于配置单个属性值
      filters: stat,wall,slf4j
#      监控该包下的所有组件
      aop-patterns: com.xu.admin.*

#      这是对filters中的属性的详细配置
      filter:
        # web监控
        stat:
          # 只要sql查询超过1000毫秒的,都是属于慢查询
          slow-sql-millis: 1000
          # 是否要记录慢查询
          log-slow-sql: true

        # 防火墙的配置
        wall:
          enabled: true
          config:
            # 对所有的删除表操作进行拦截
            drop-table-allow: true
    #            update-allow: true

    max-active: 12
#    type: com.zaxxer.hikari.HikariDataSource
#  jdbc:
#    template:
##      设置查询的超时时间
#      query-timeout: 3
总结:直接使用start整合的方式,只需要配置配置文件,就可以实现上一节的自定义方式整合Druid数据源
13-4 整合mybatis-配置版
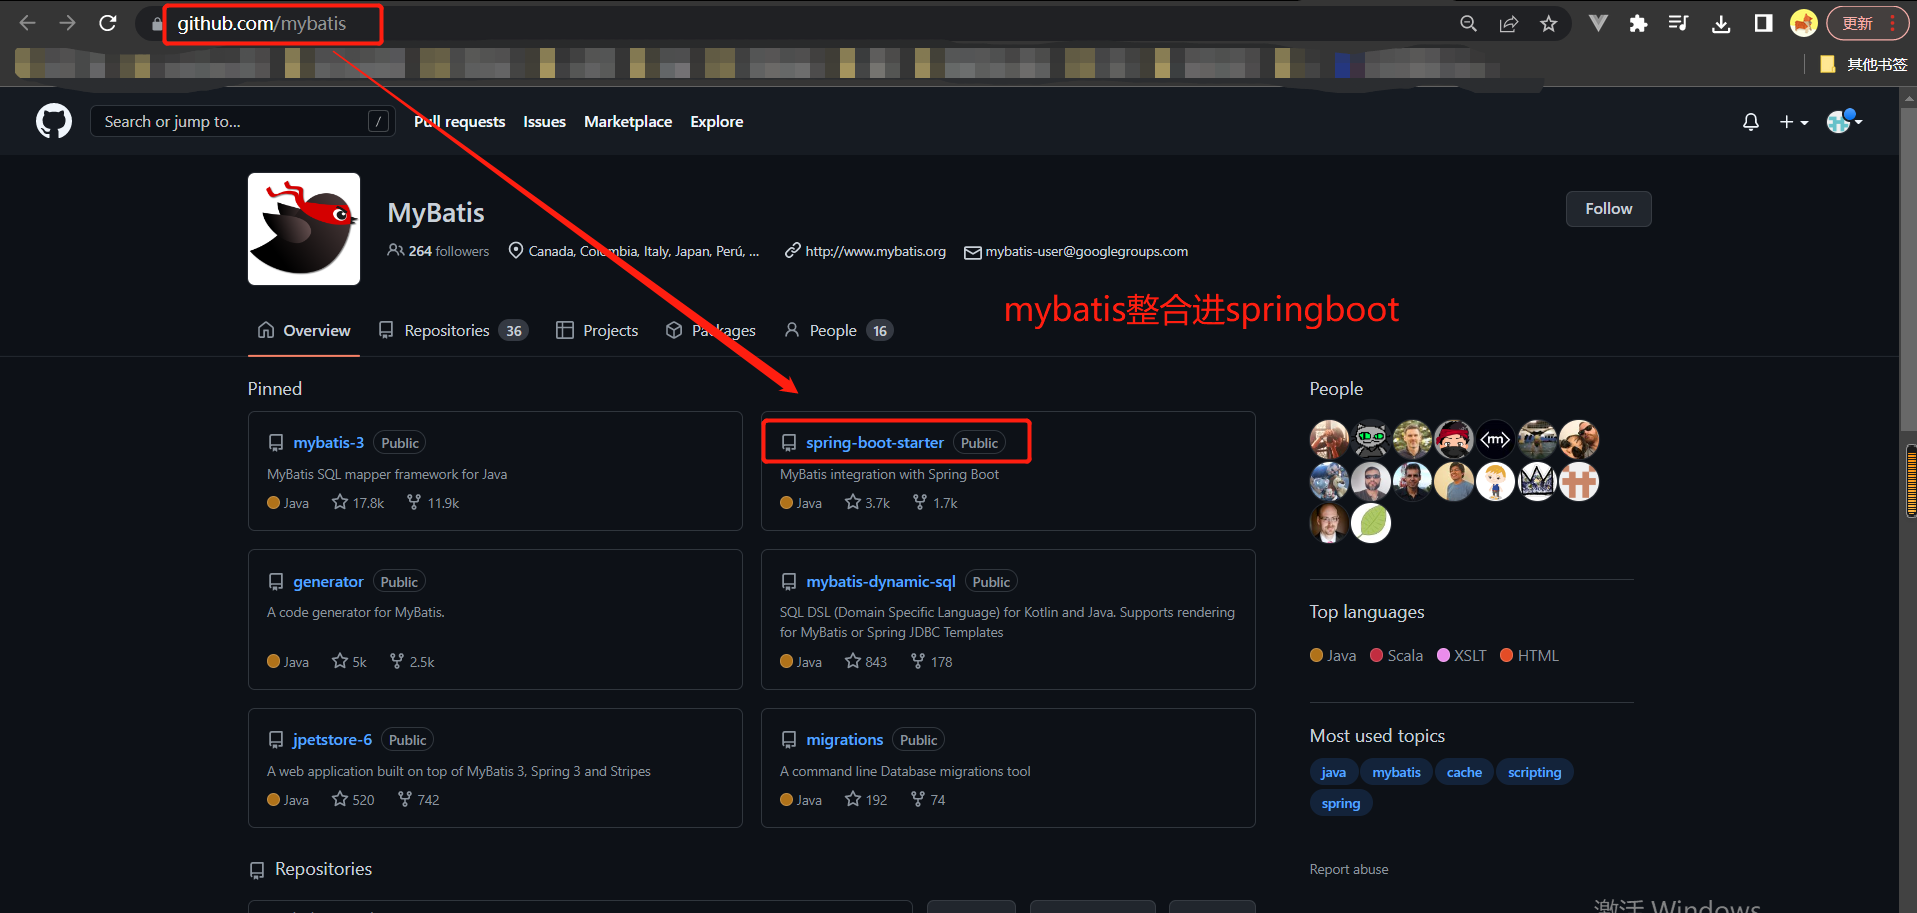
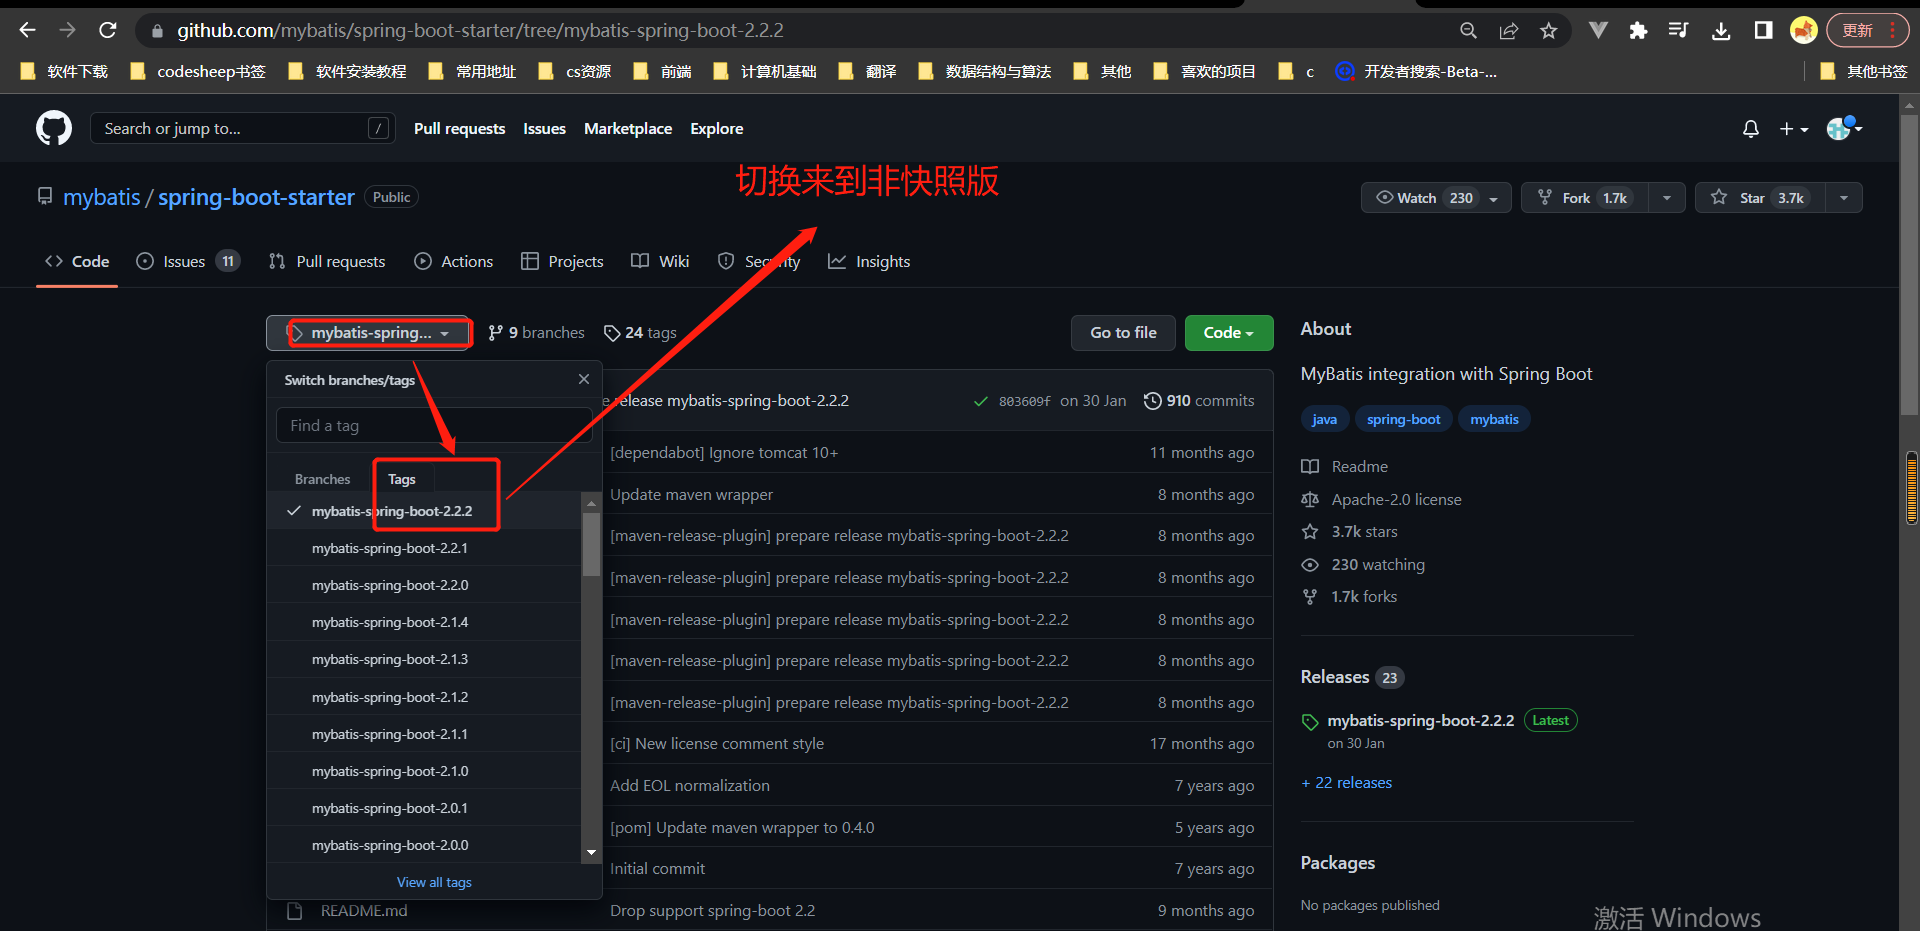
关于快照版和稳定版区别:
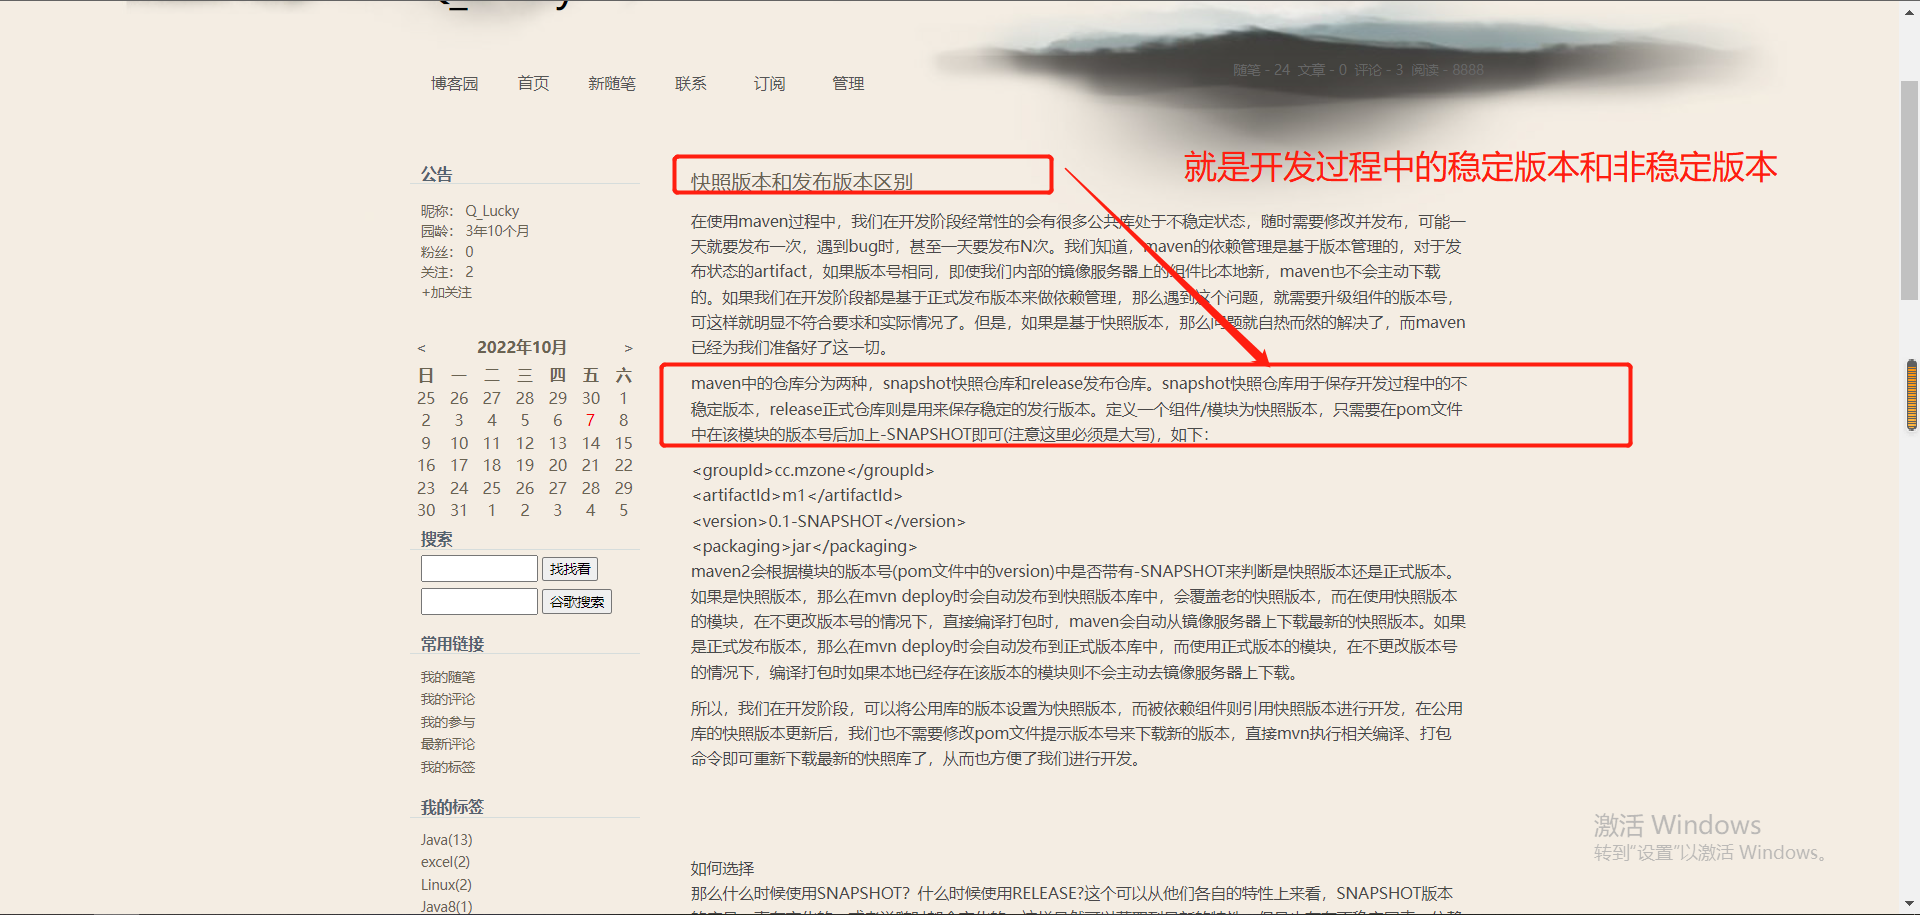
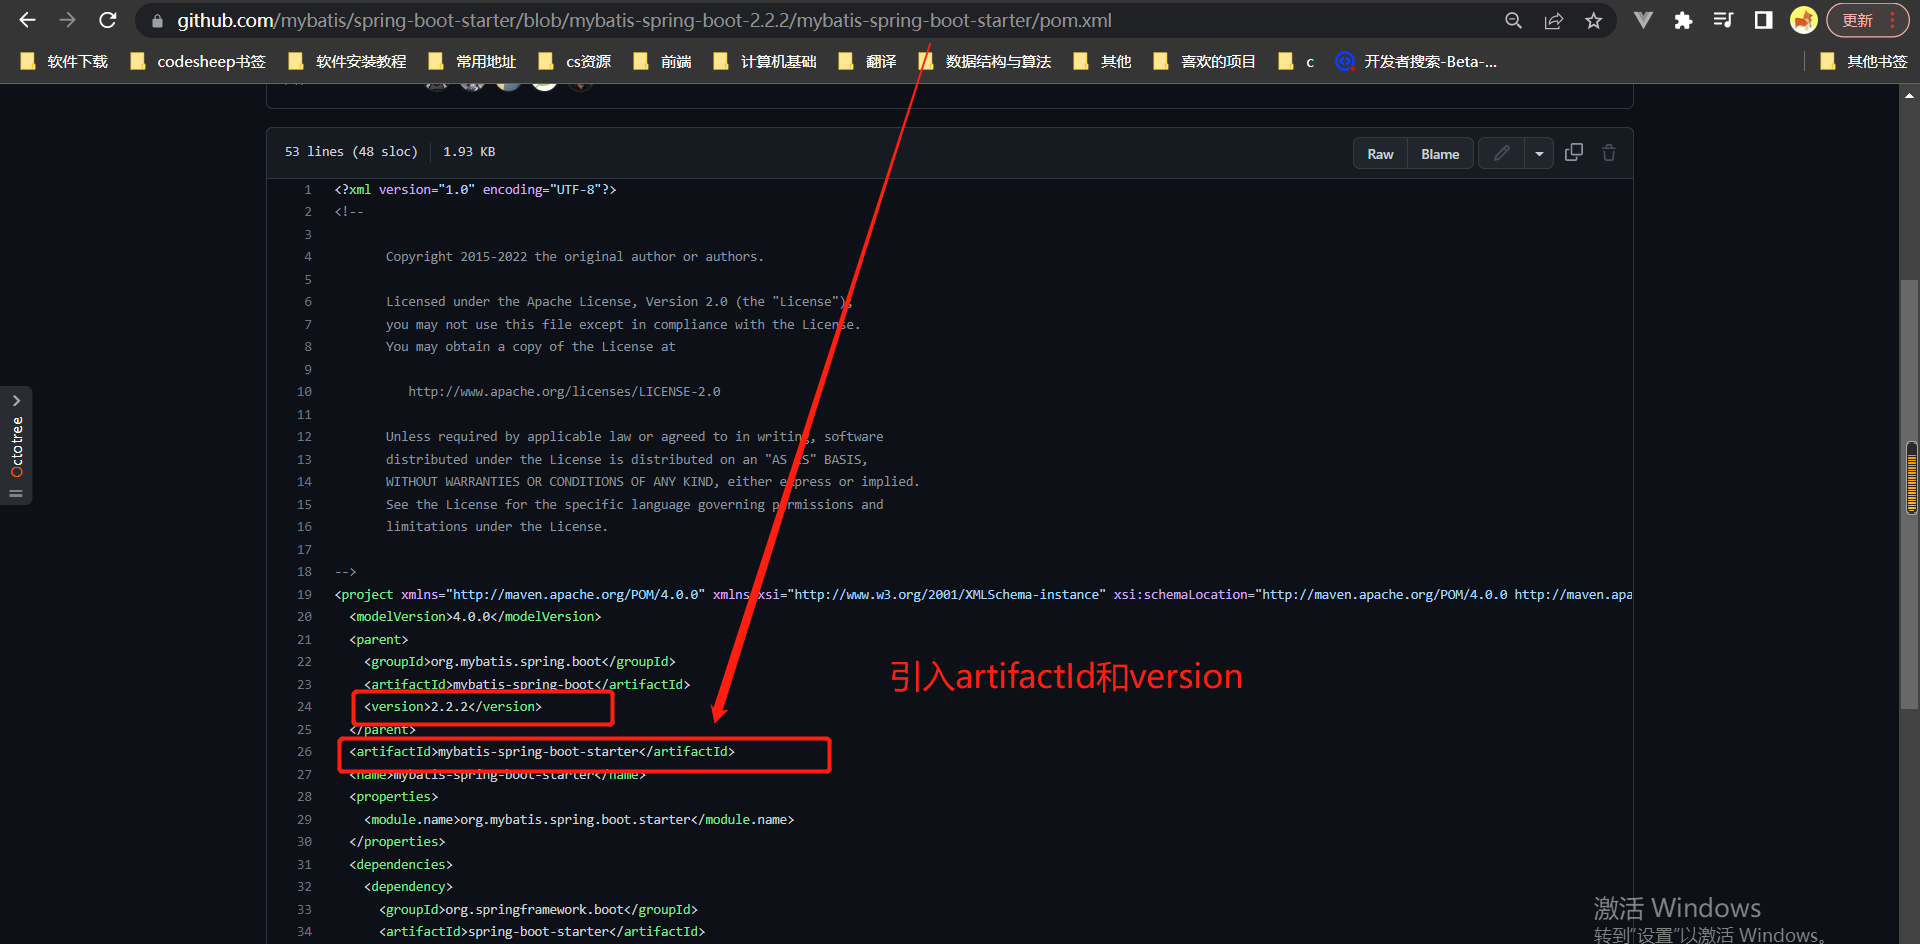
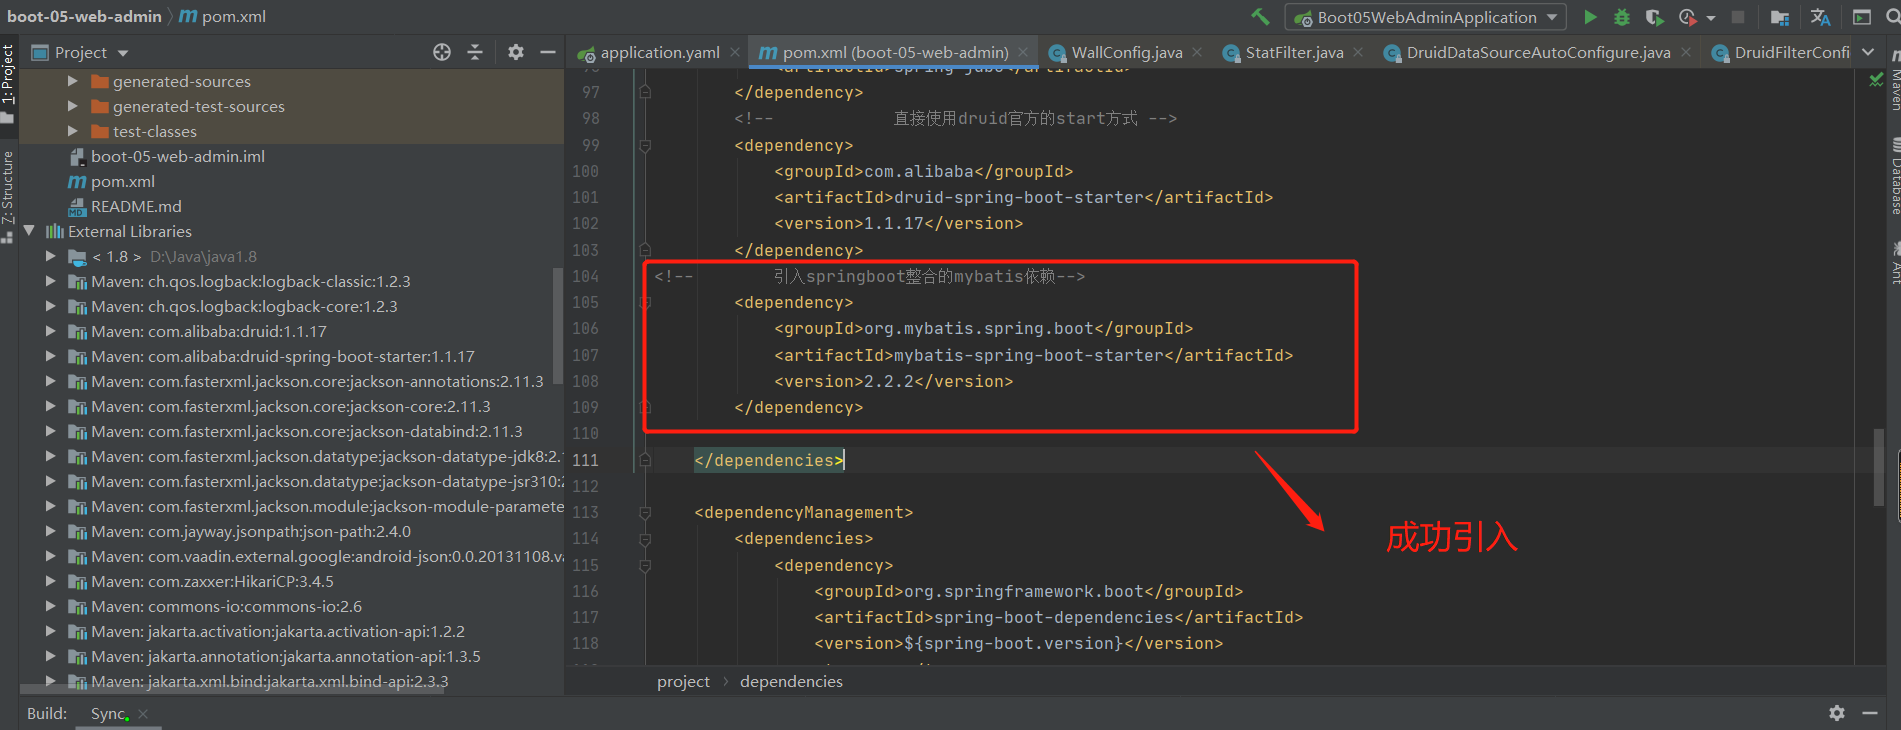
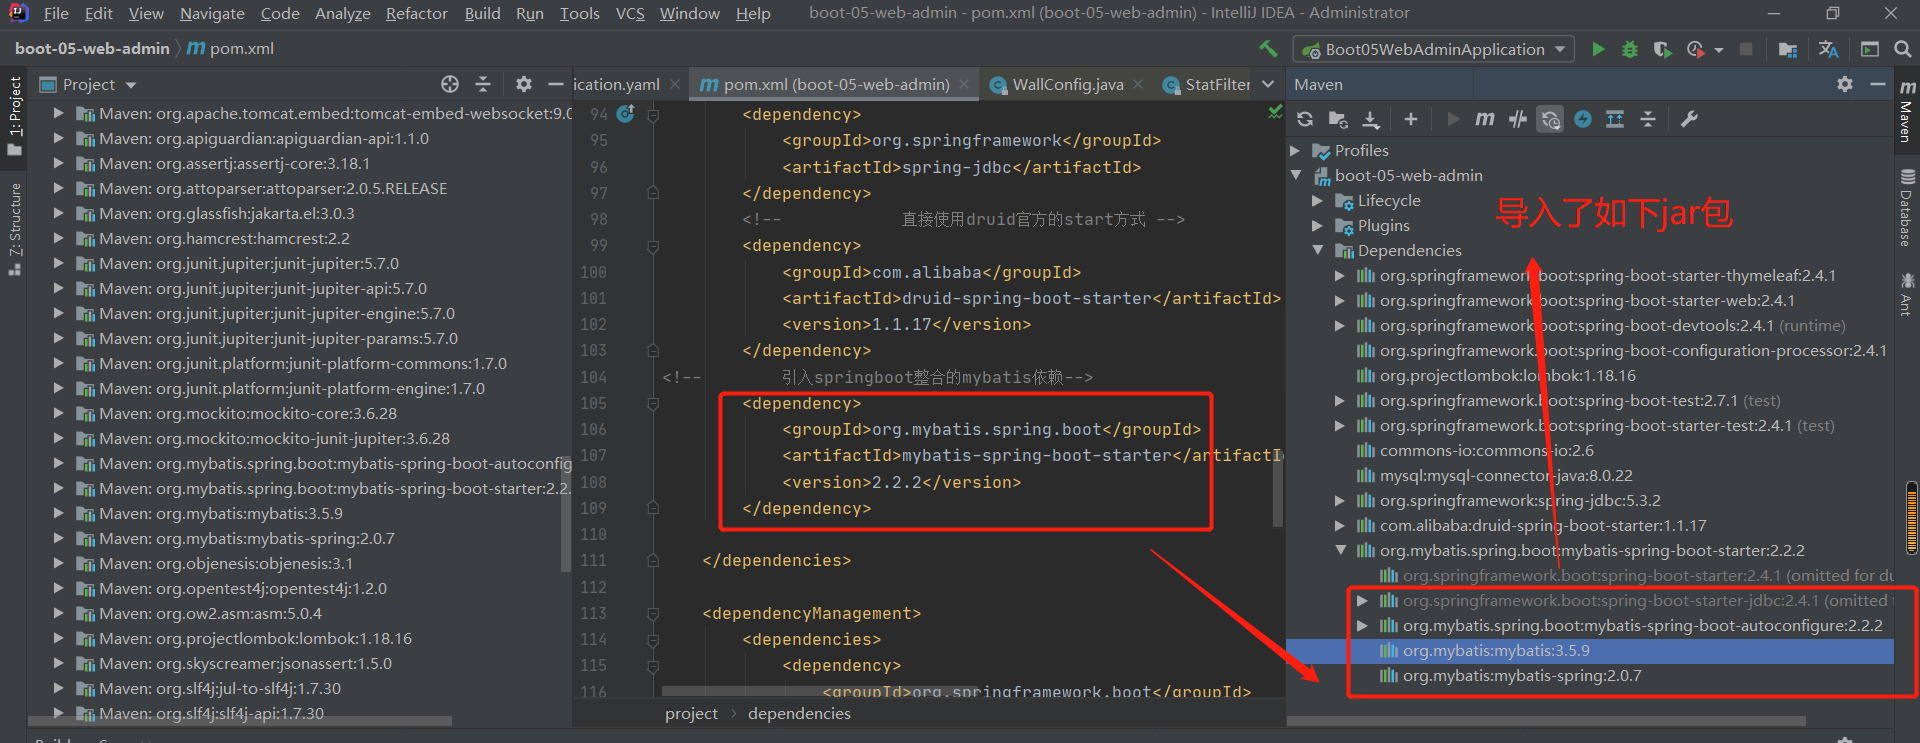
第2步,首先对配置文件类进行分析:
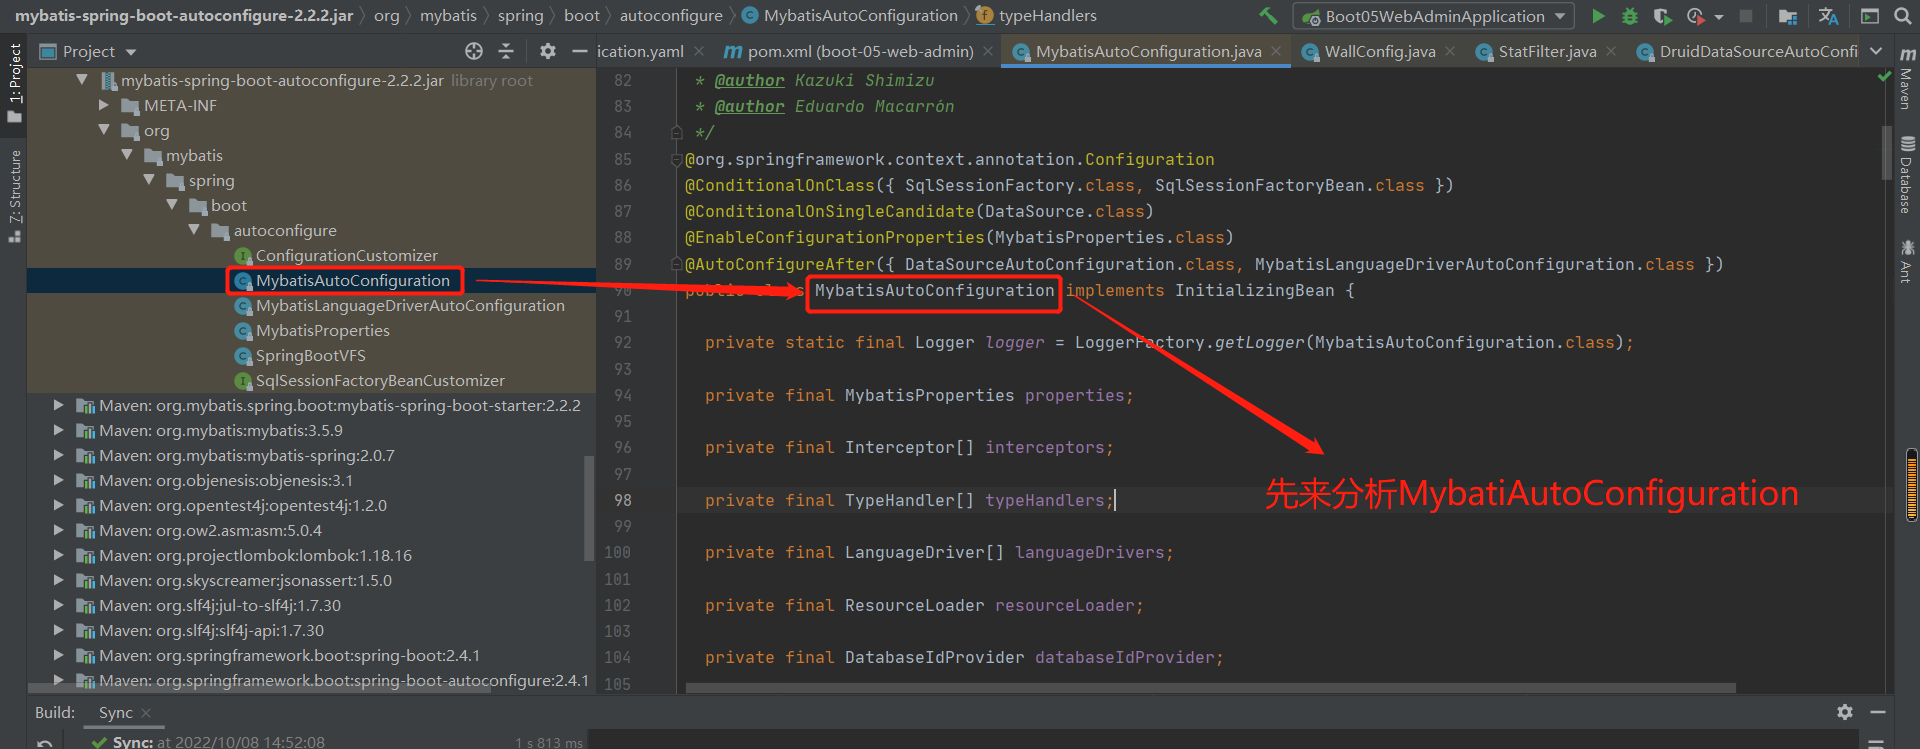
第2步,mybatis绑定的类分析
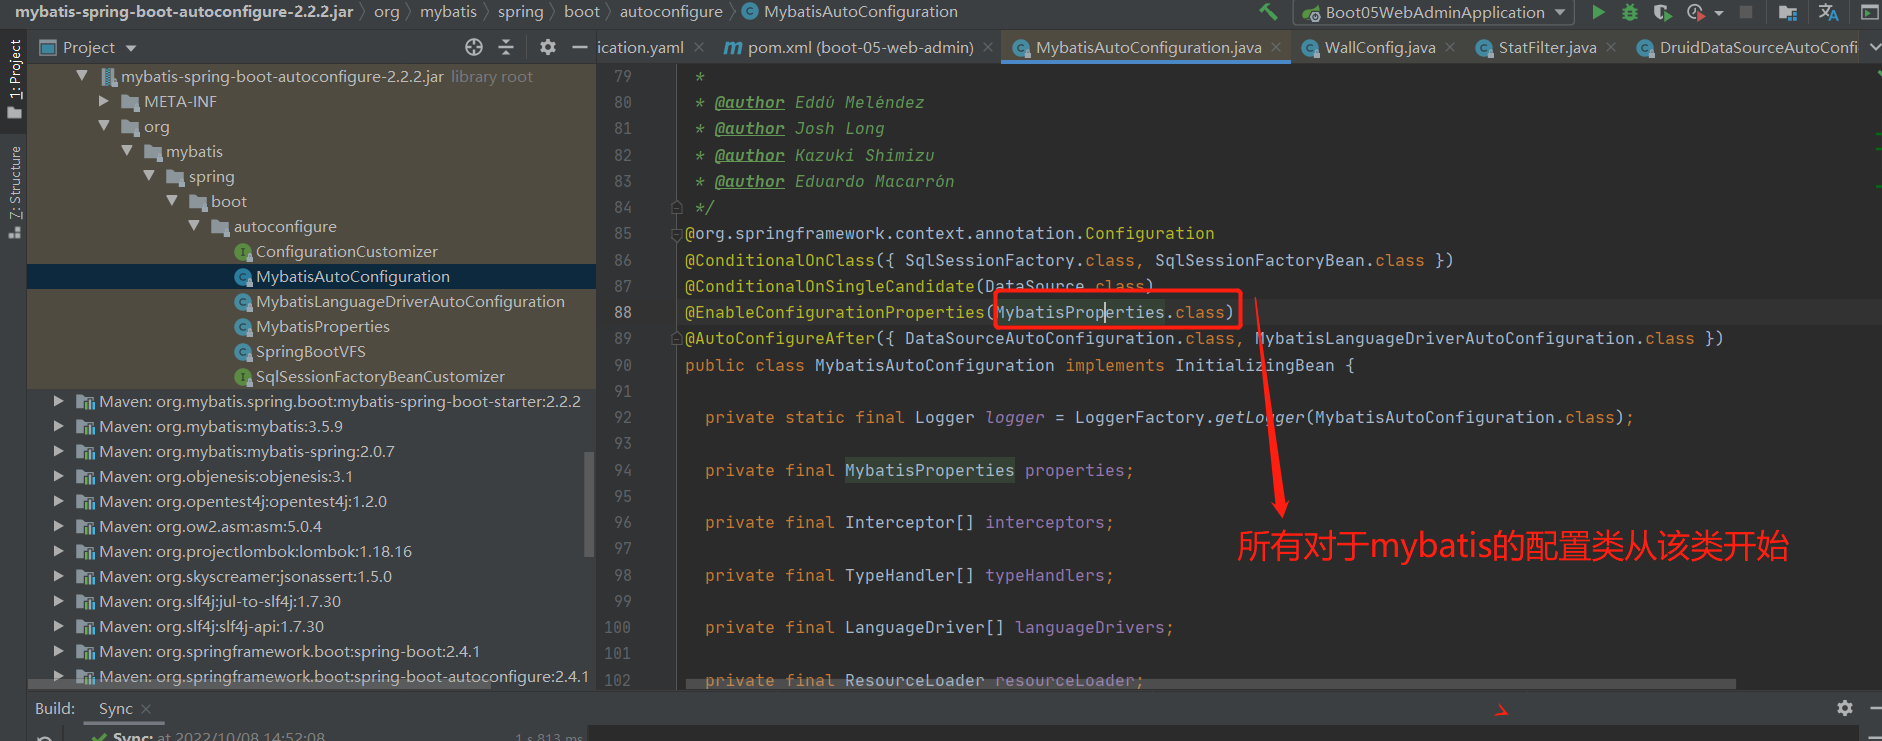
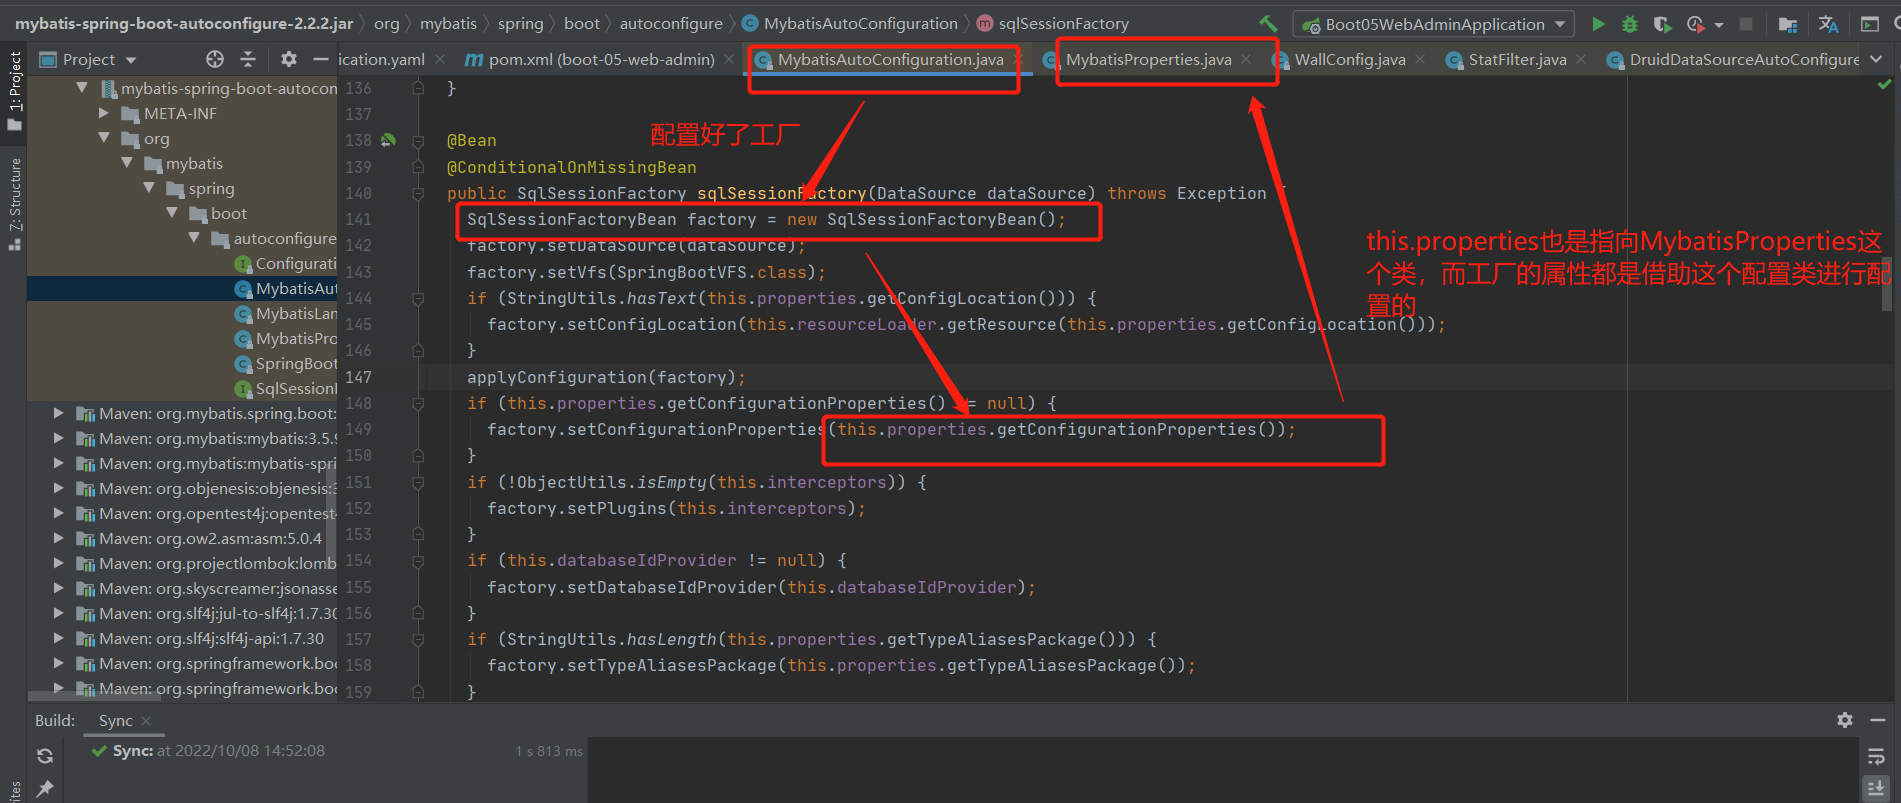
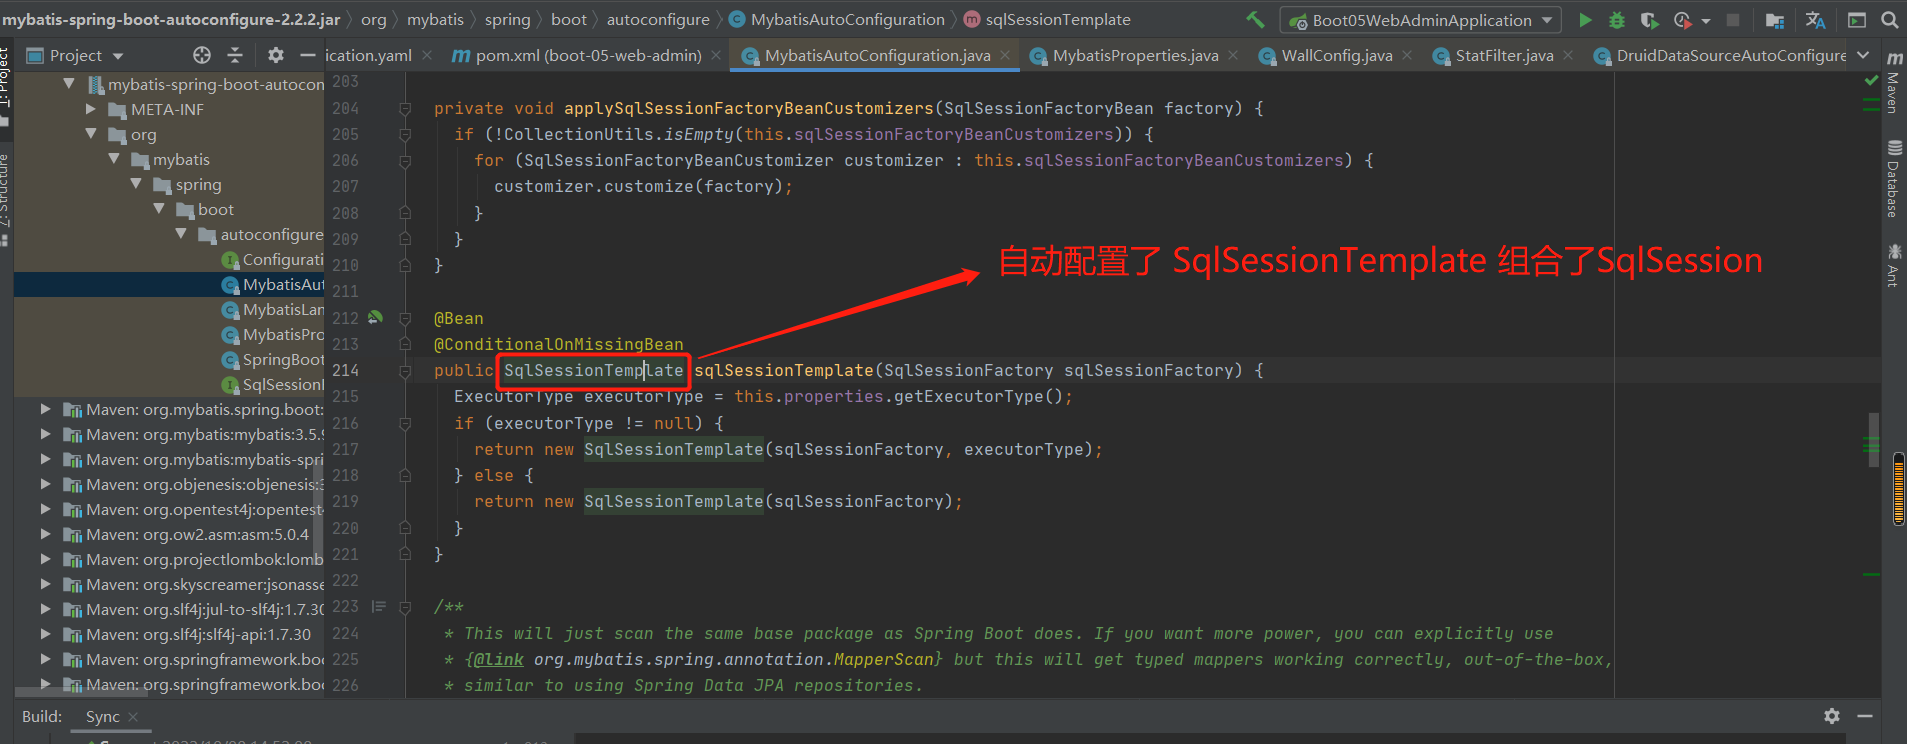
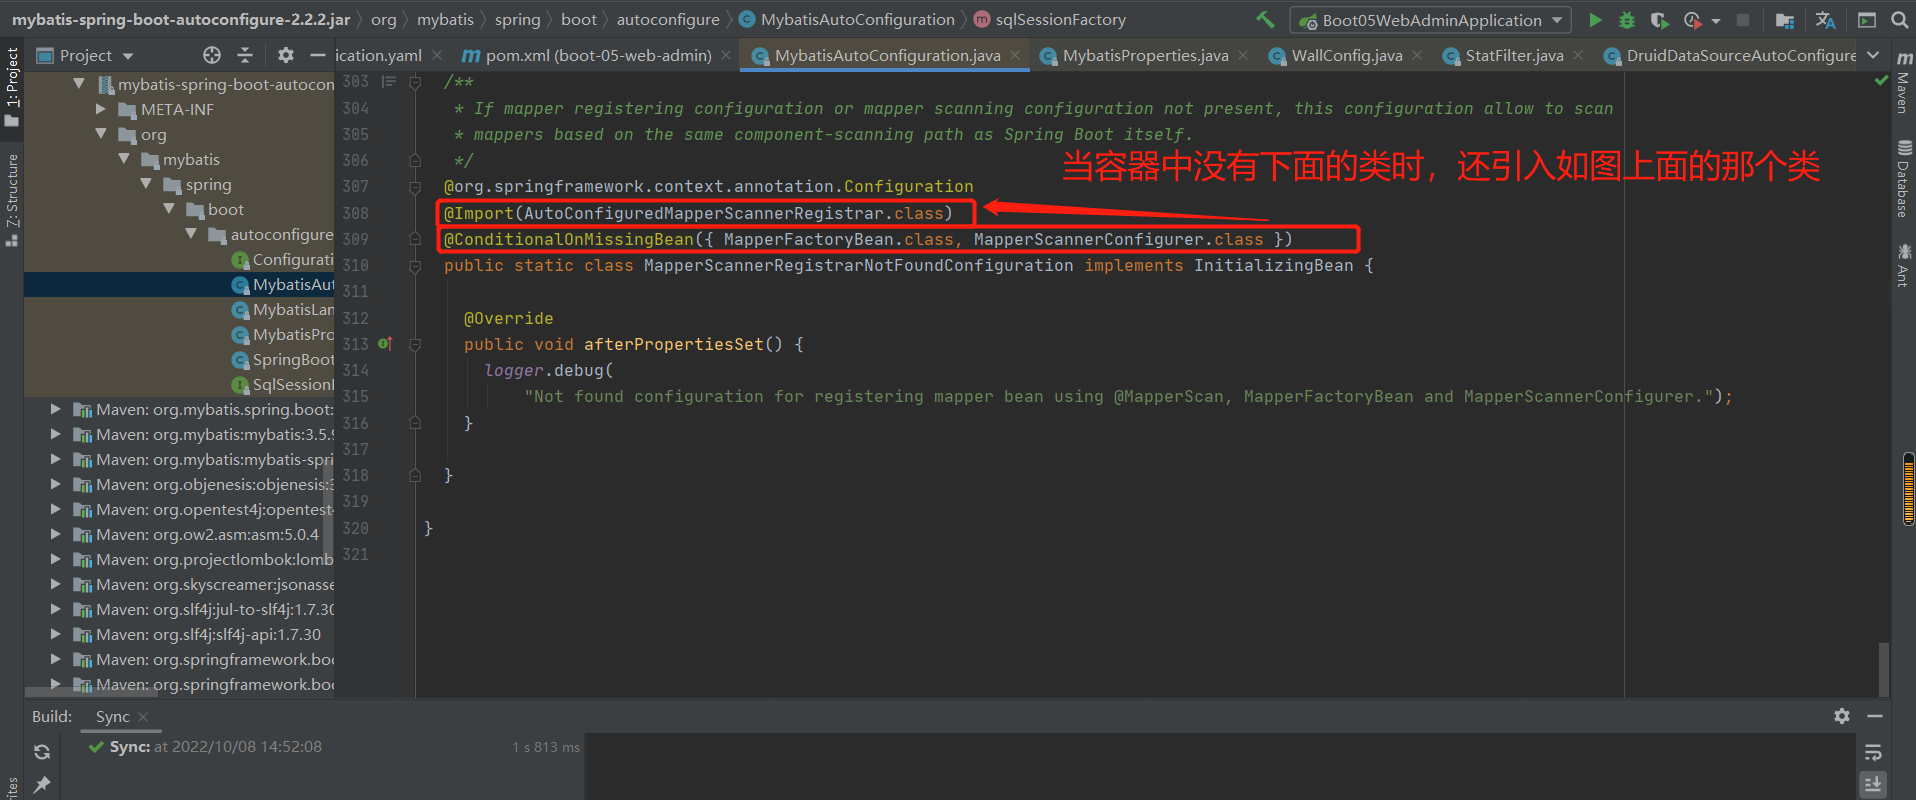
老师总结:
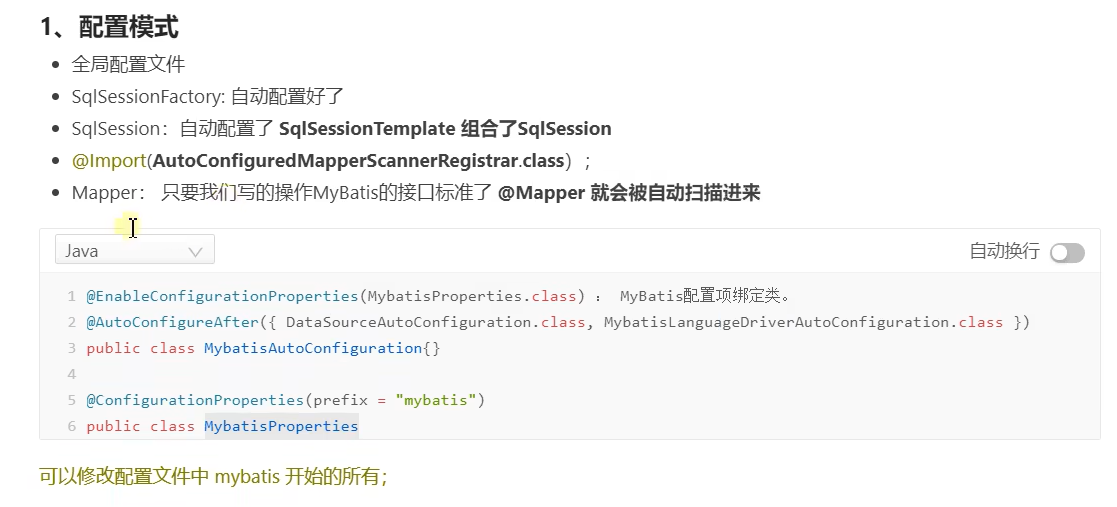
1.配置模式
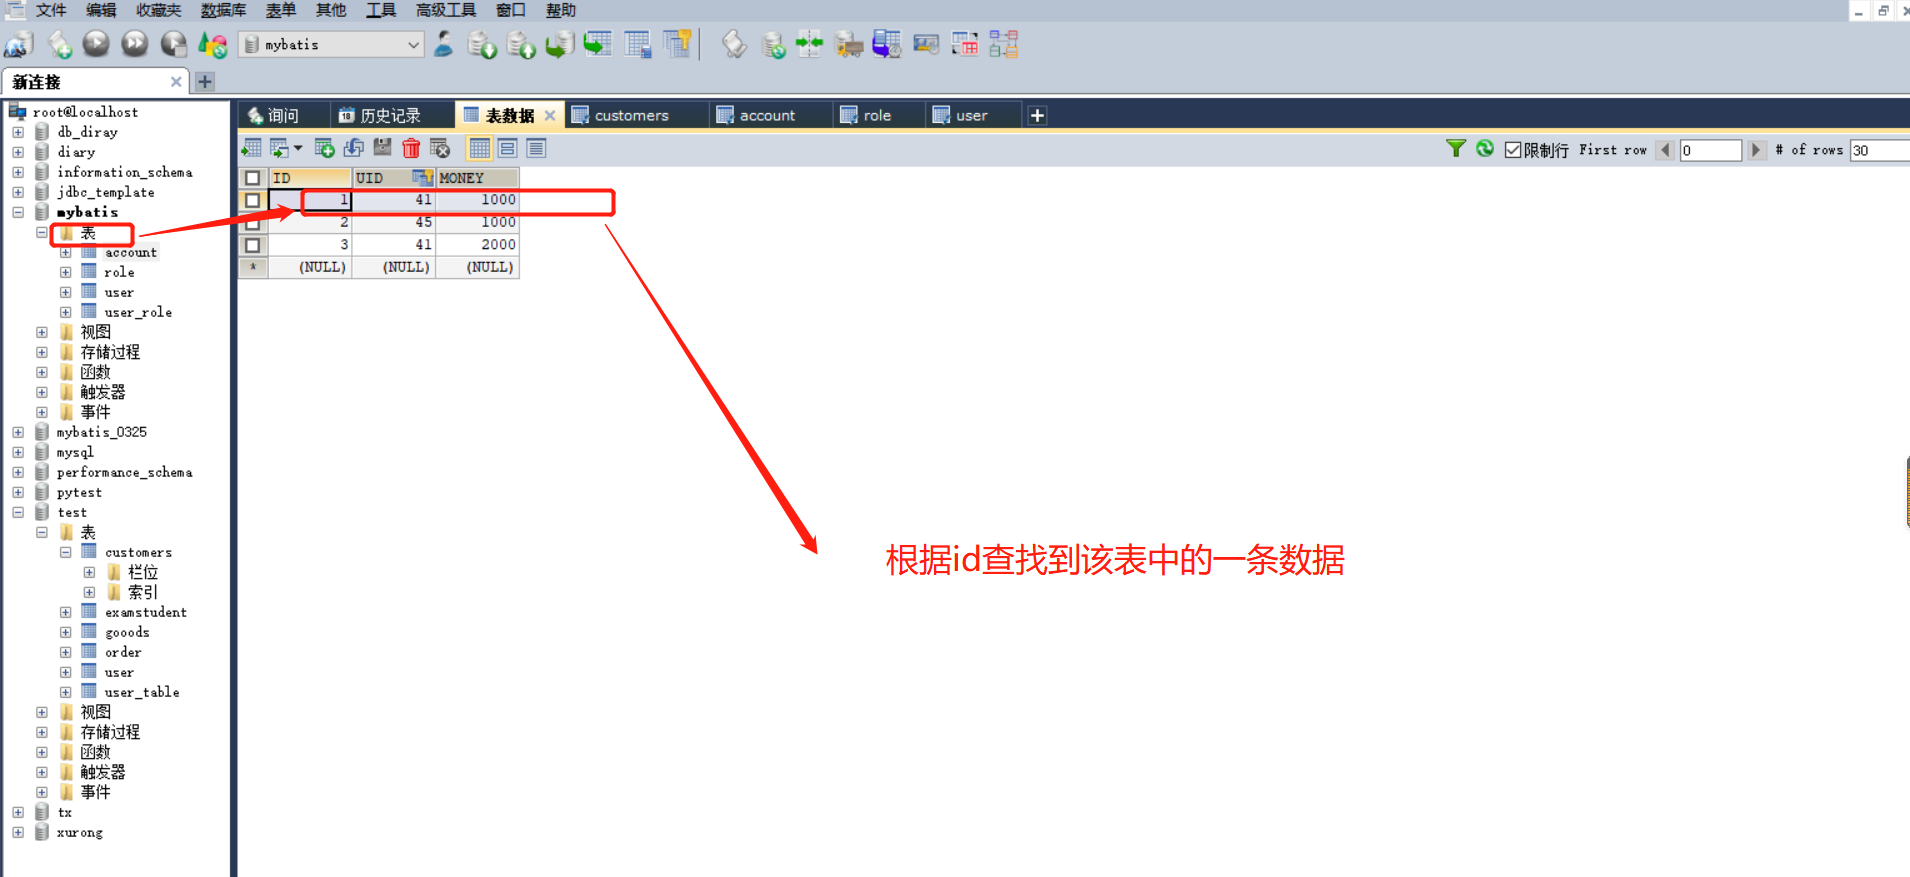
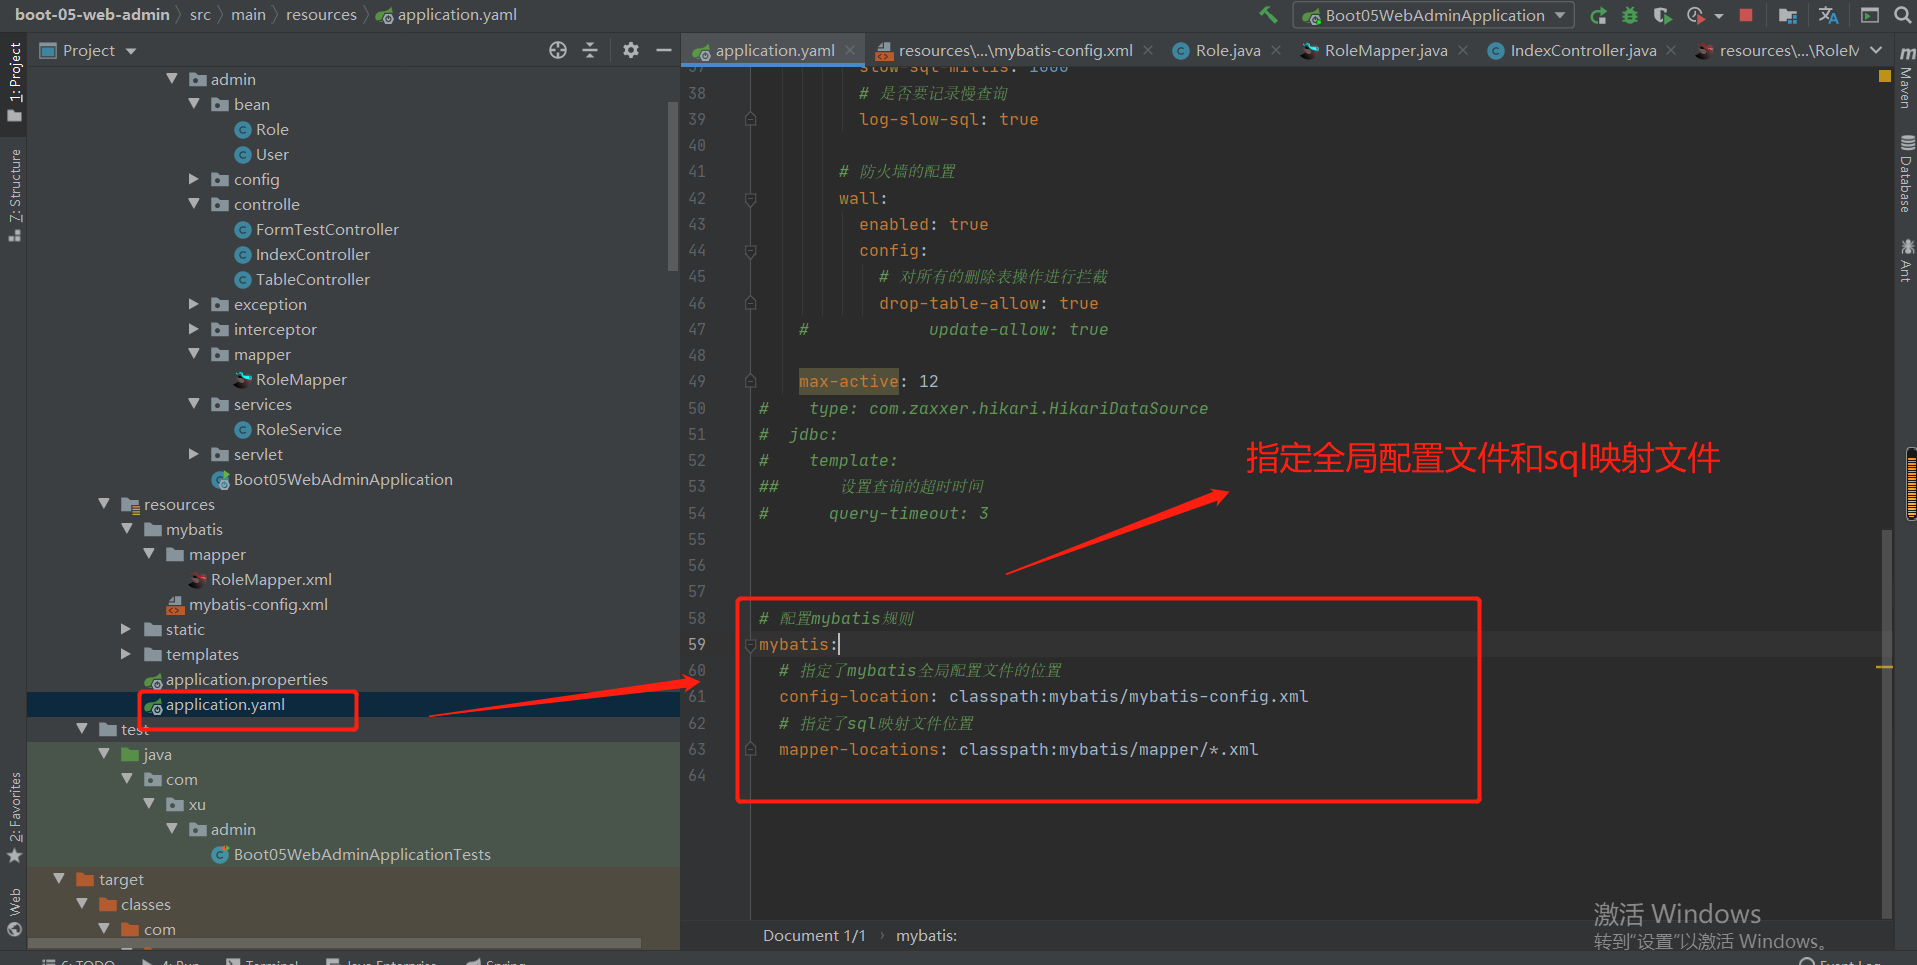
mybatis-config.xml:
<?xml version="1.0" encoding="UTF-8" ?>
<!DOCTYPE configuration
        PUBLIC "-//mybatis.org//DTD Config 3.0//EN"
        "https://mybatis.org/dtd/mybatis-3-config.dtd">
<configuration>
<!--    数据源场景已经由springboot中的application.yaml配置文件配置好,无需再配置-->
<!--    <environments default="development">-->
<!--        <environment id="development">-->
<!--            <transactionManager type="JDBC"/>-->
<!--            <dataSource type="POOLED">-->
<!--                <property name="driver" value="${driver}"/>-->
<!--                <property name="url" value="${url}"/>-->
<!--                <property name="username" value="${username}"/>-->
<!--                <property name="password" value="${password}"/>-->
<!--            </dataSource>-->
<!--        </environment>-->
<!--    </environments>-->
<!--    <mappers>-->
<!--        <mapper resource="org/mybatis/example/BlogMapper.xml"/>-->
<!--    </mappers>-->


</configuration>
RoleMapper.xml:
<?xml version="1.0" encoding="UTF-8" ?>
<!DOCTYPE mapper
        PUBLIC "-//mybatis.org//DTD Mapper 3.0//EN"
        "https://mybatis.org/dtd/mybatis-3-mapper.dtd">
<!--
该文件就是对应RoleMapper接口实现类,也就是实现接口中操作数据库的方法
-->
<mapper namespace="com.xu.admin.RoleMapper">

<!--
实现接口中通过id
public Role getRoleById(Long id);

-->
    <select id="getRoleById" resultType="com.xu.admin.bean.Role">
        select * from role where id = #{id}
    </select>
</mapper>
代码参考:
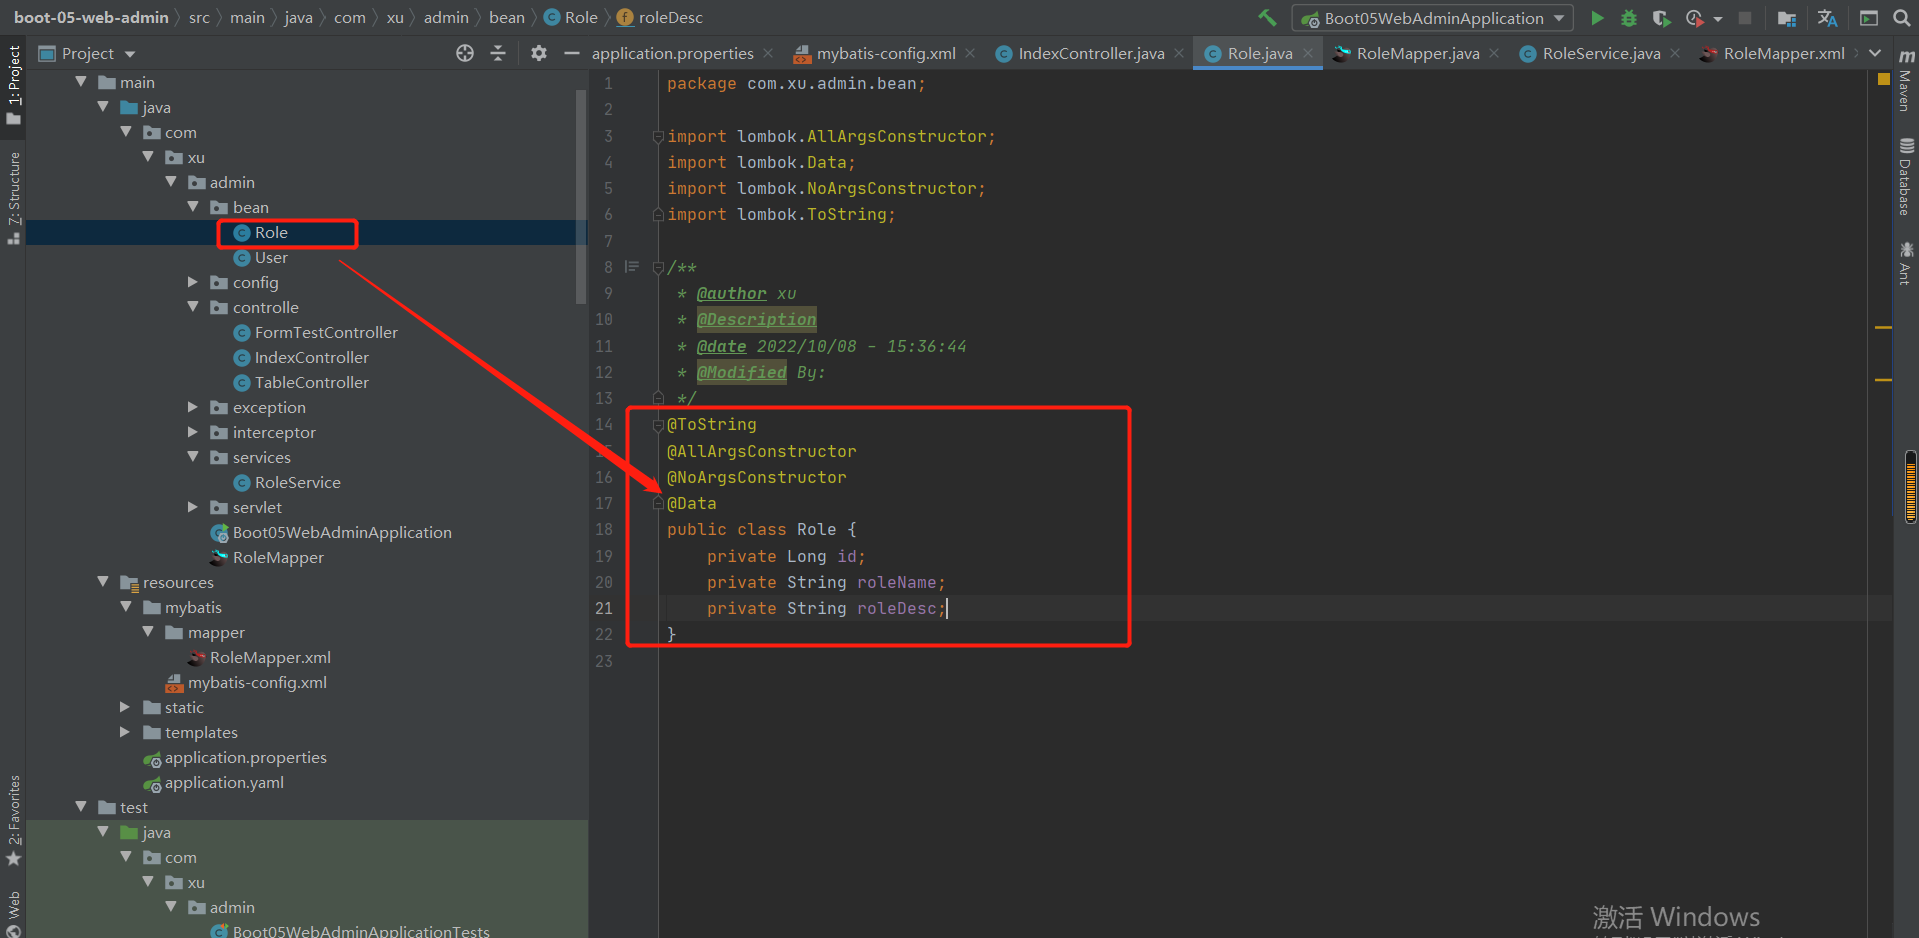
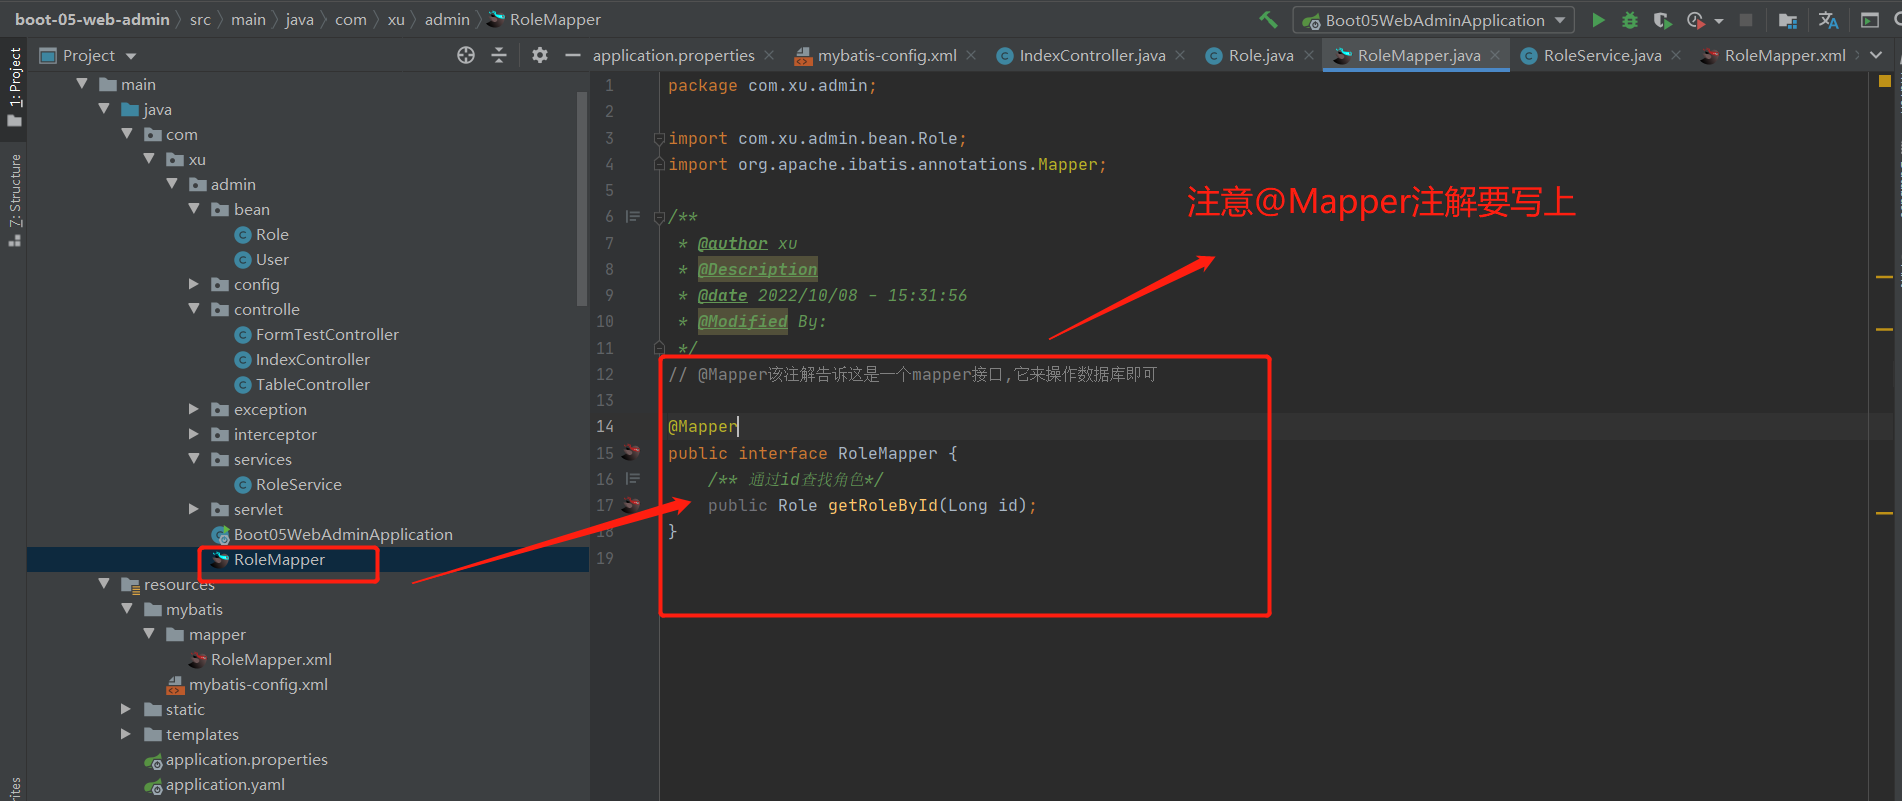
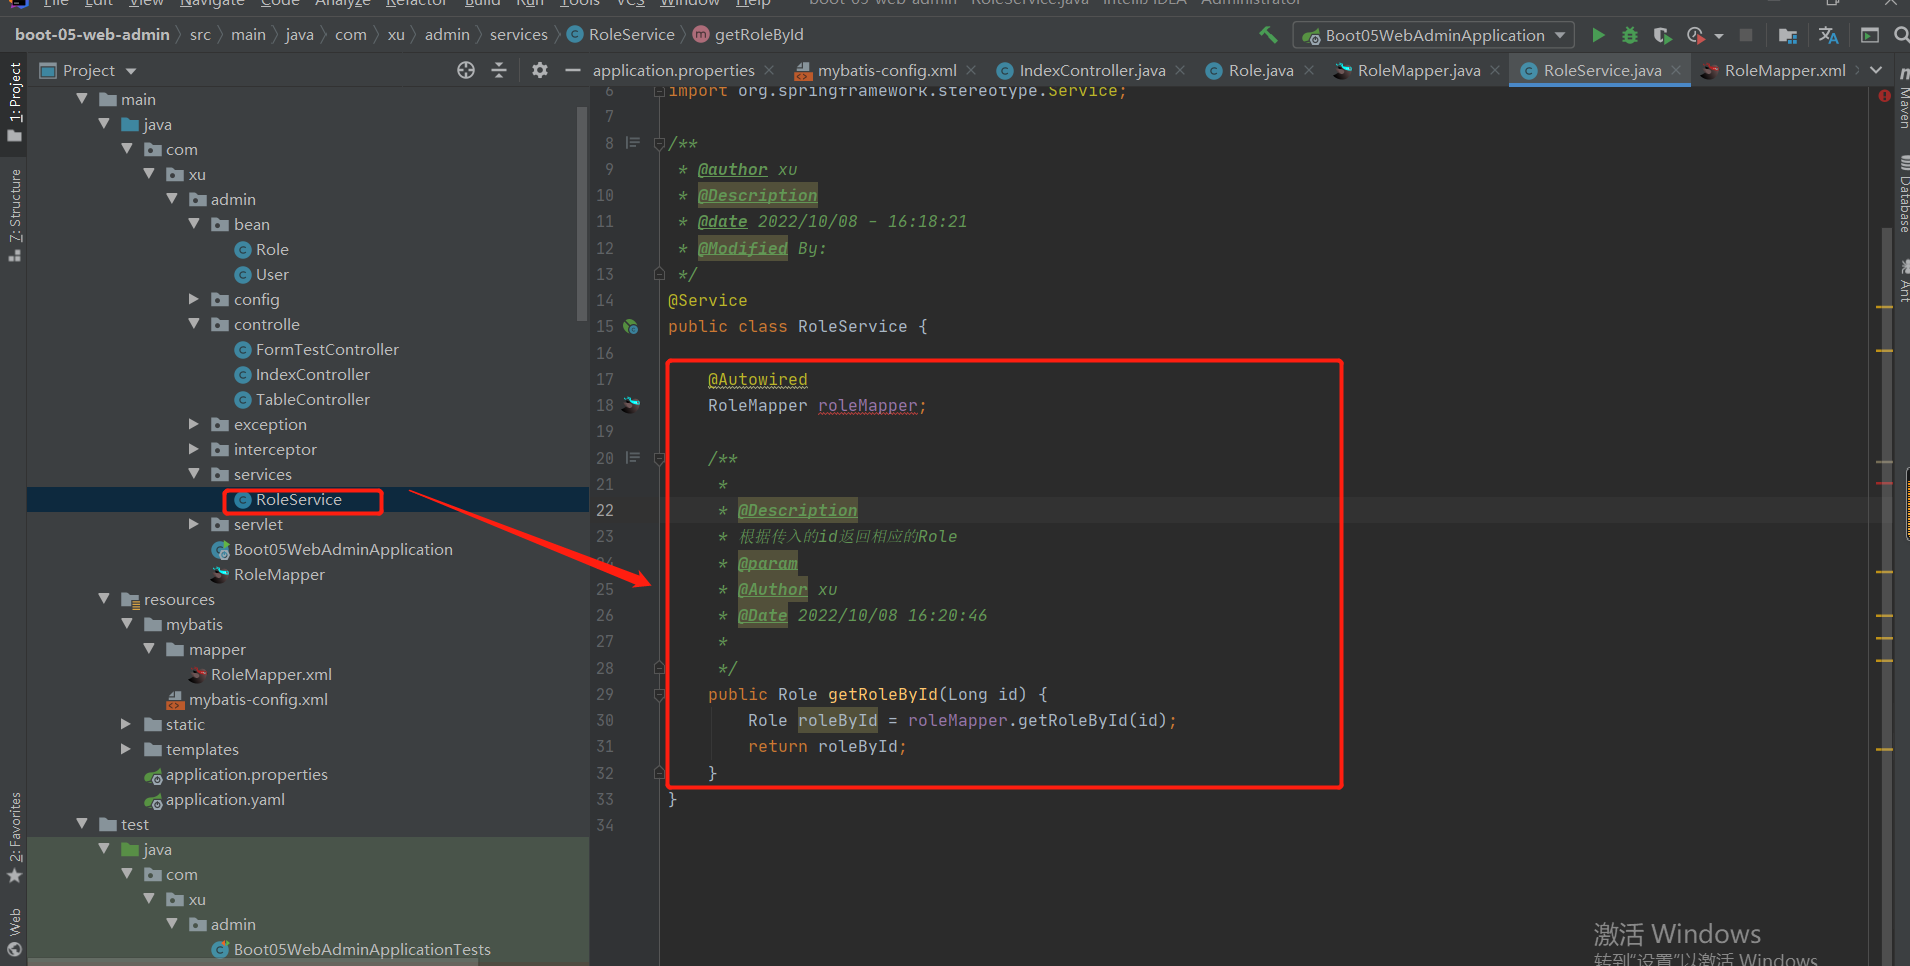
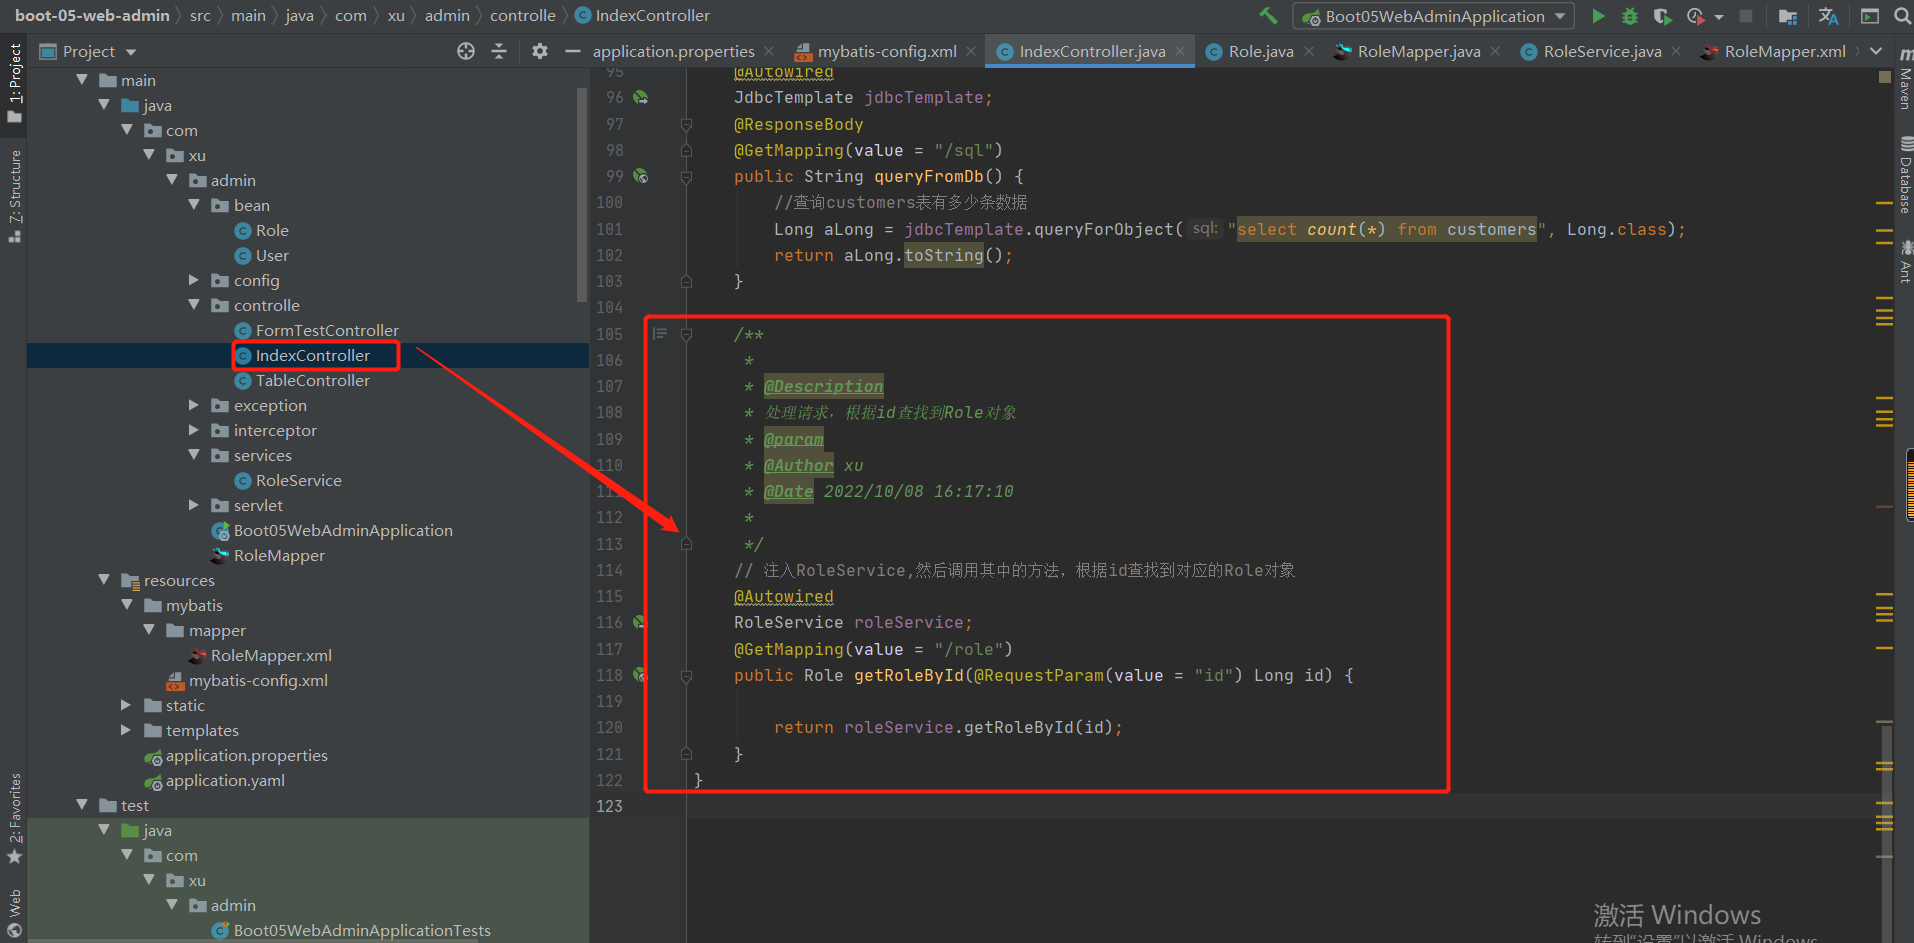
测试:
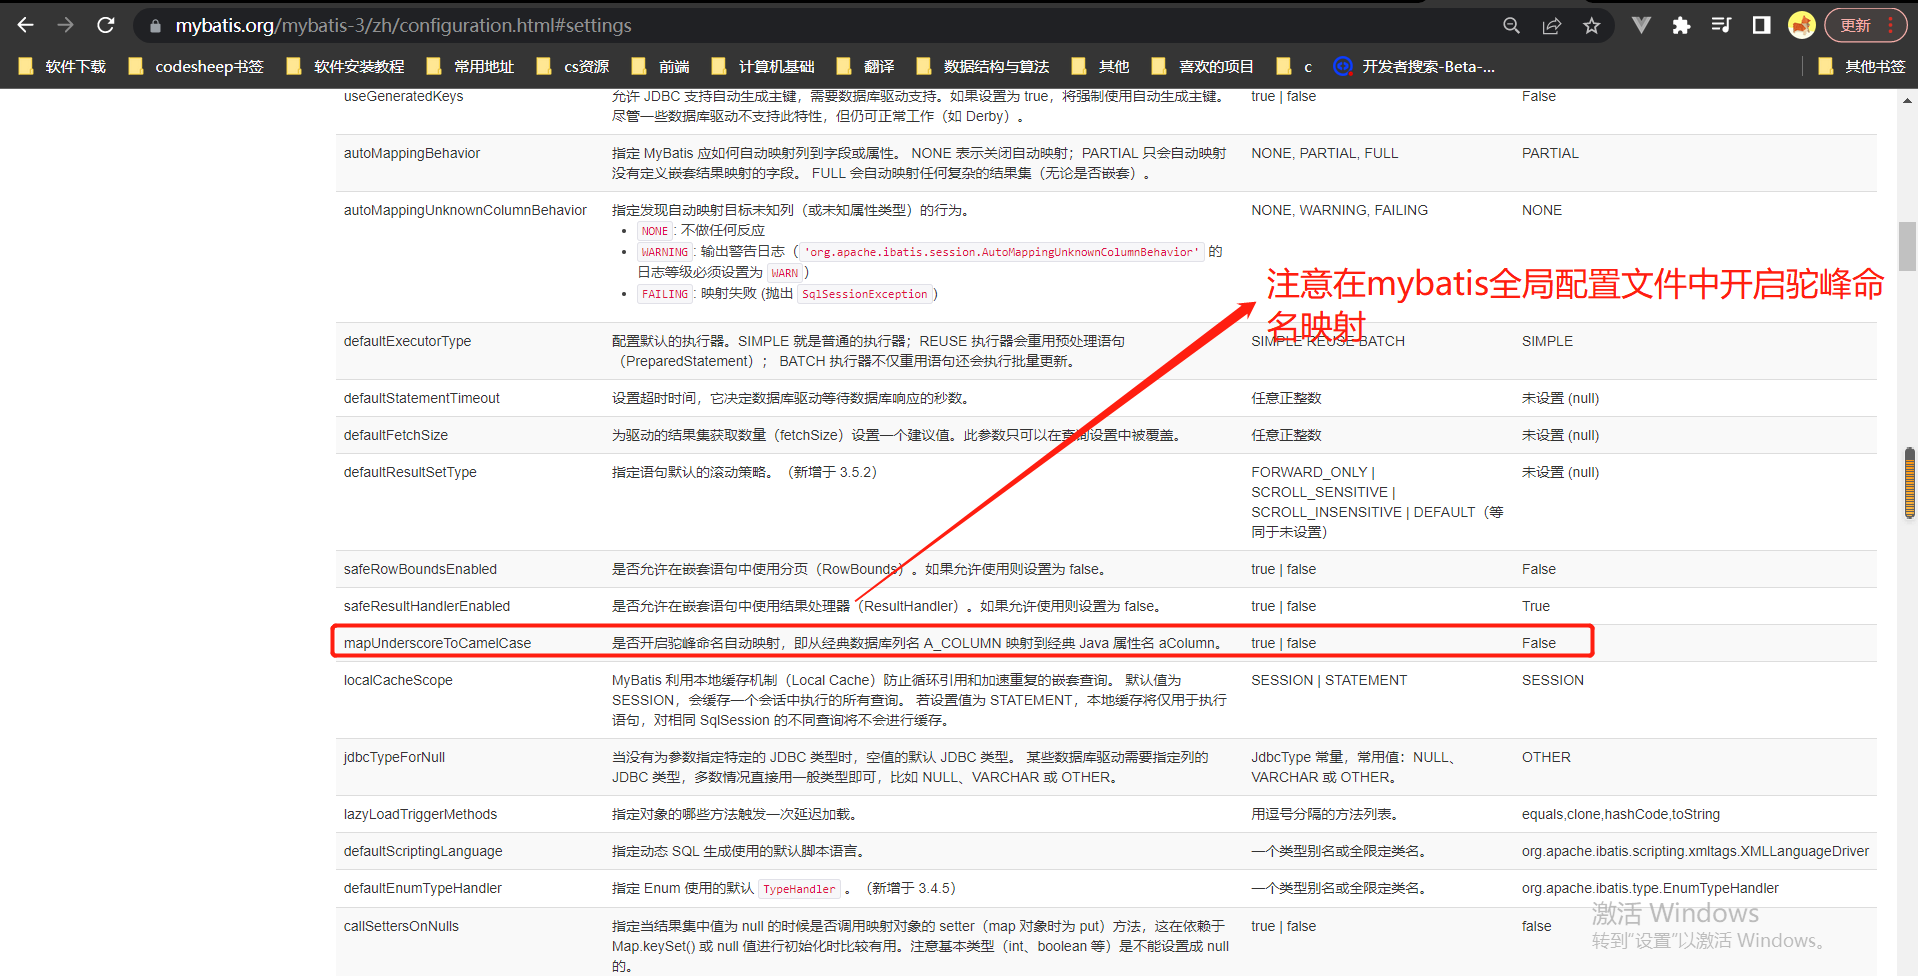
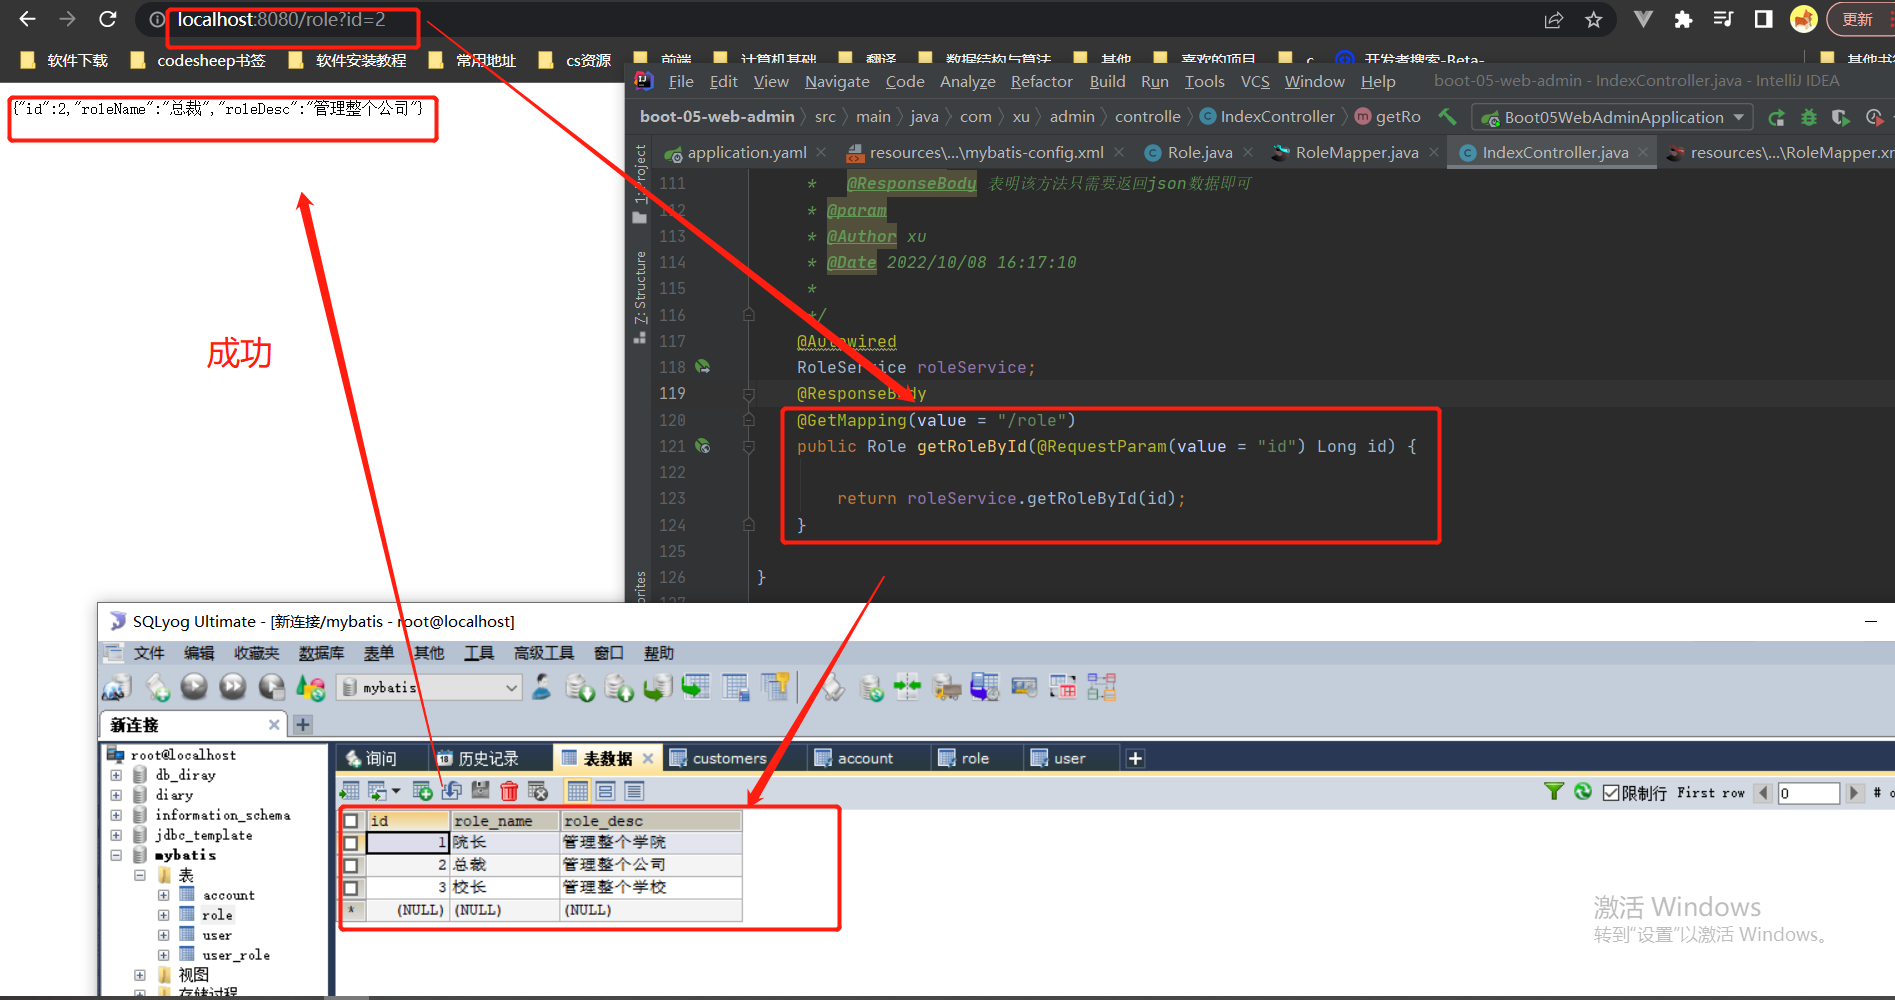
全局配置文件中的属性值可以被springboot配置文件中的属性值取代:
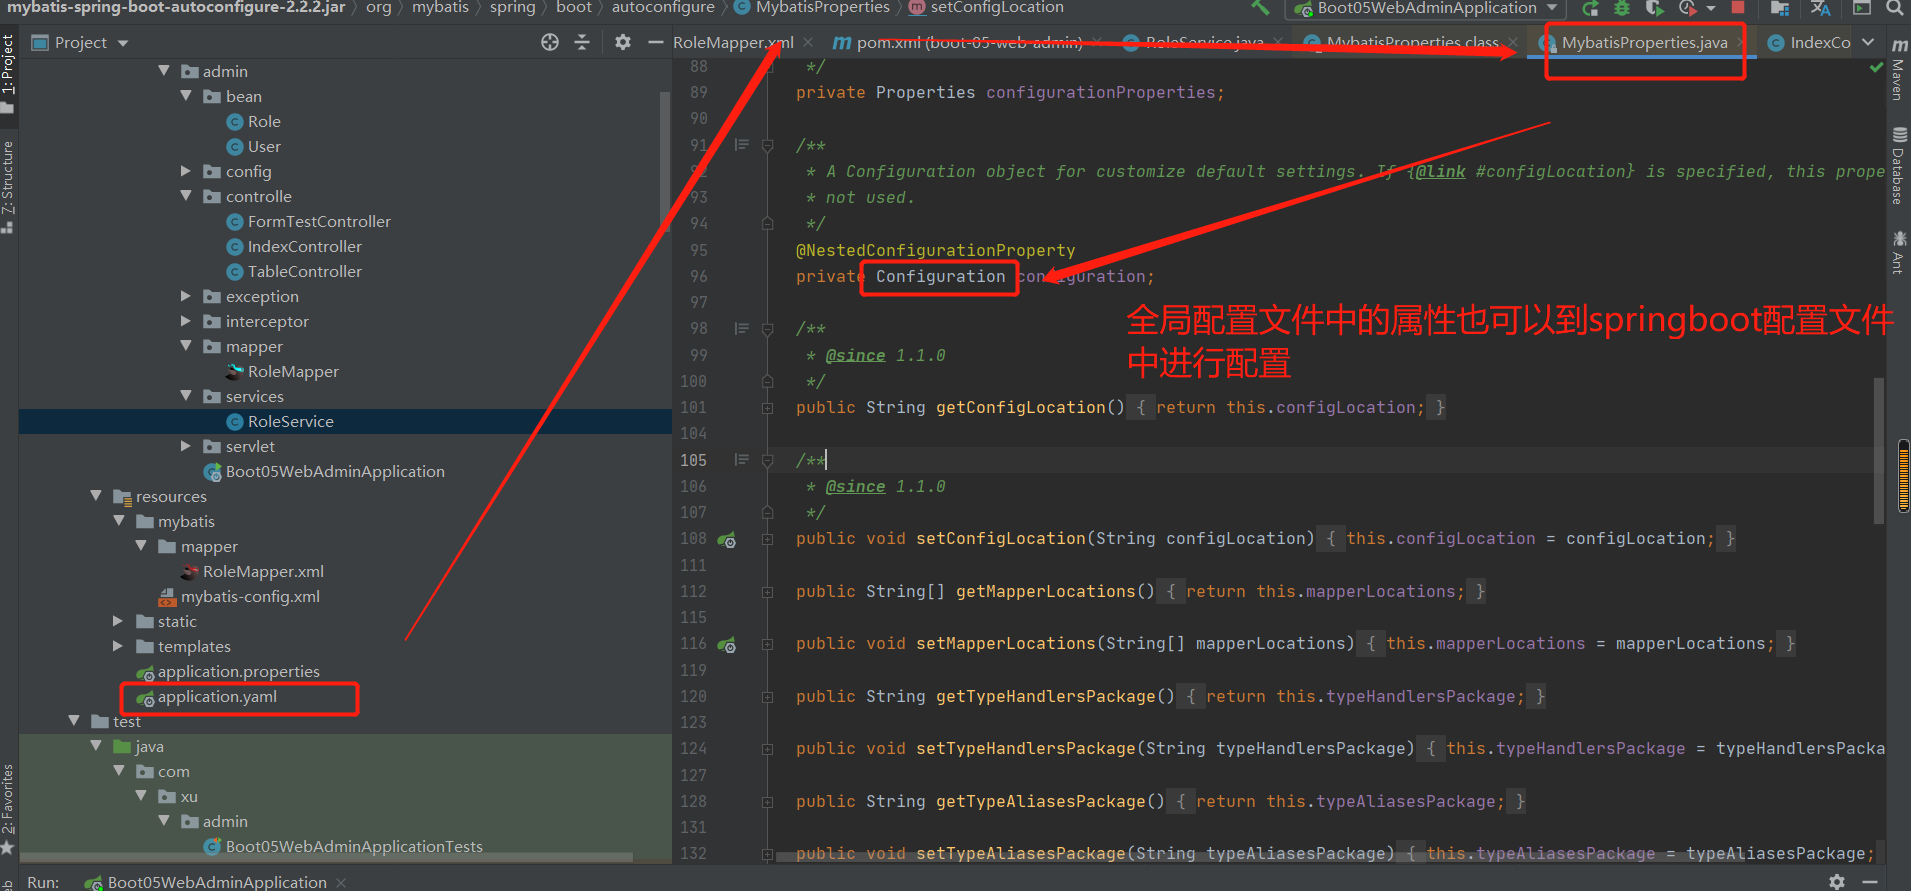
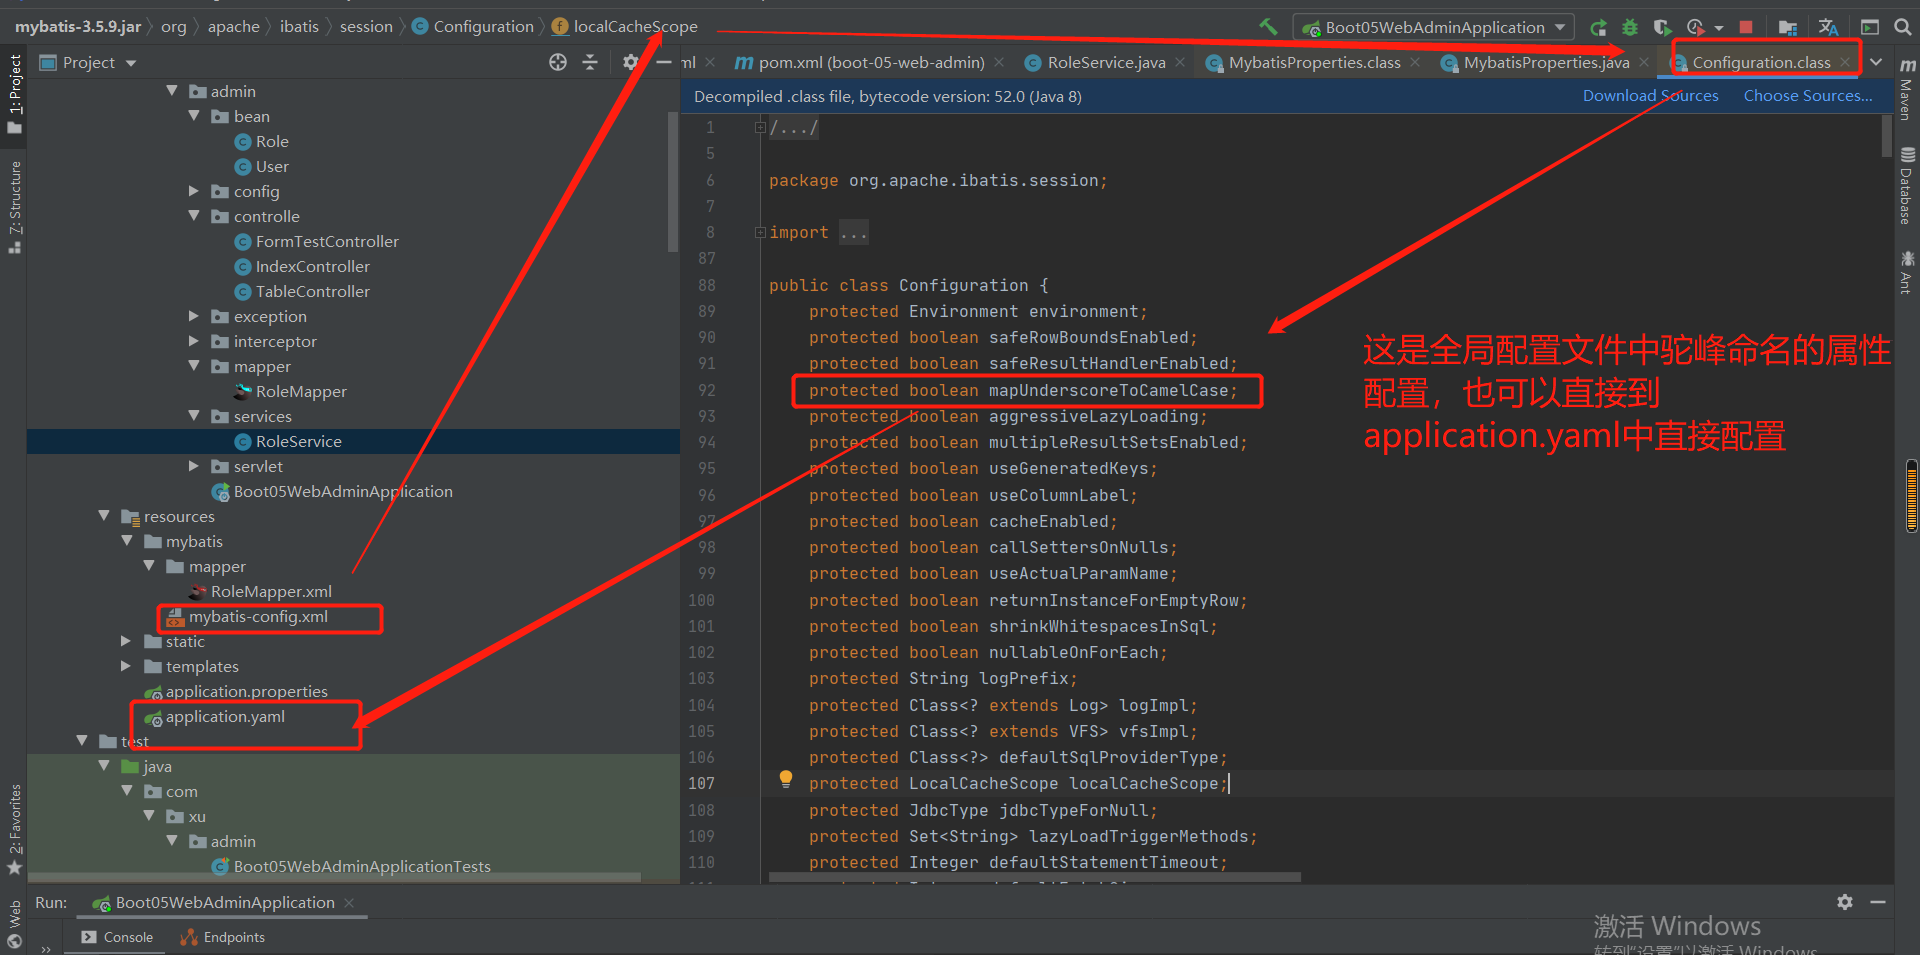
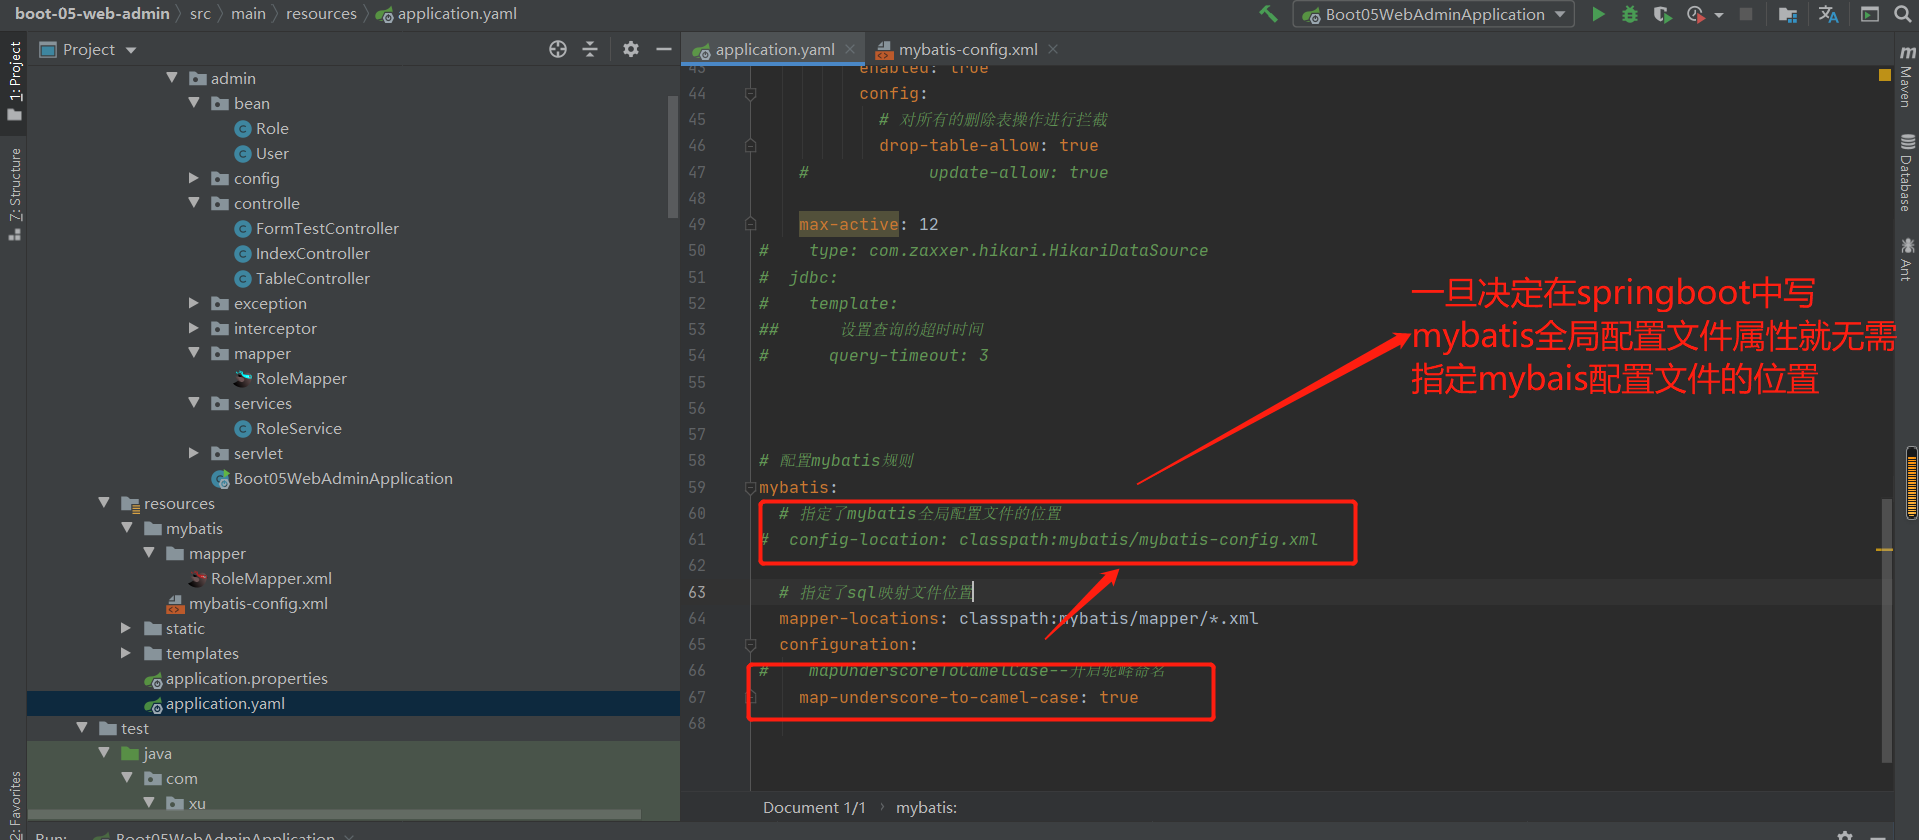
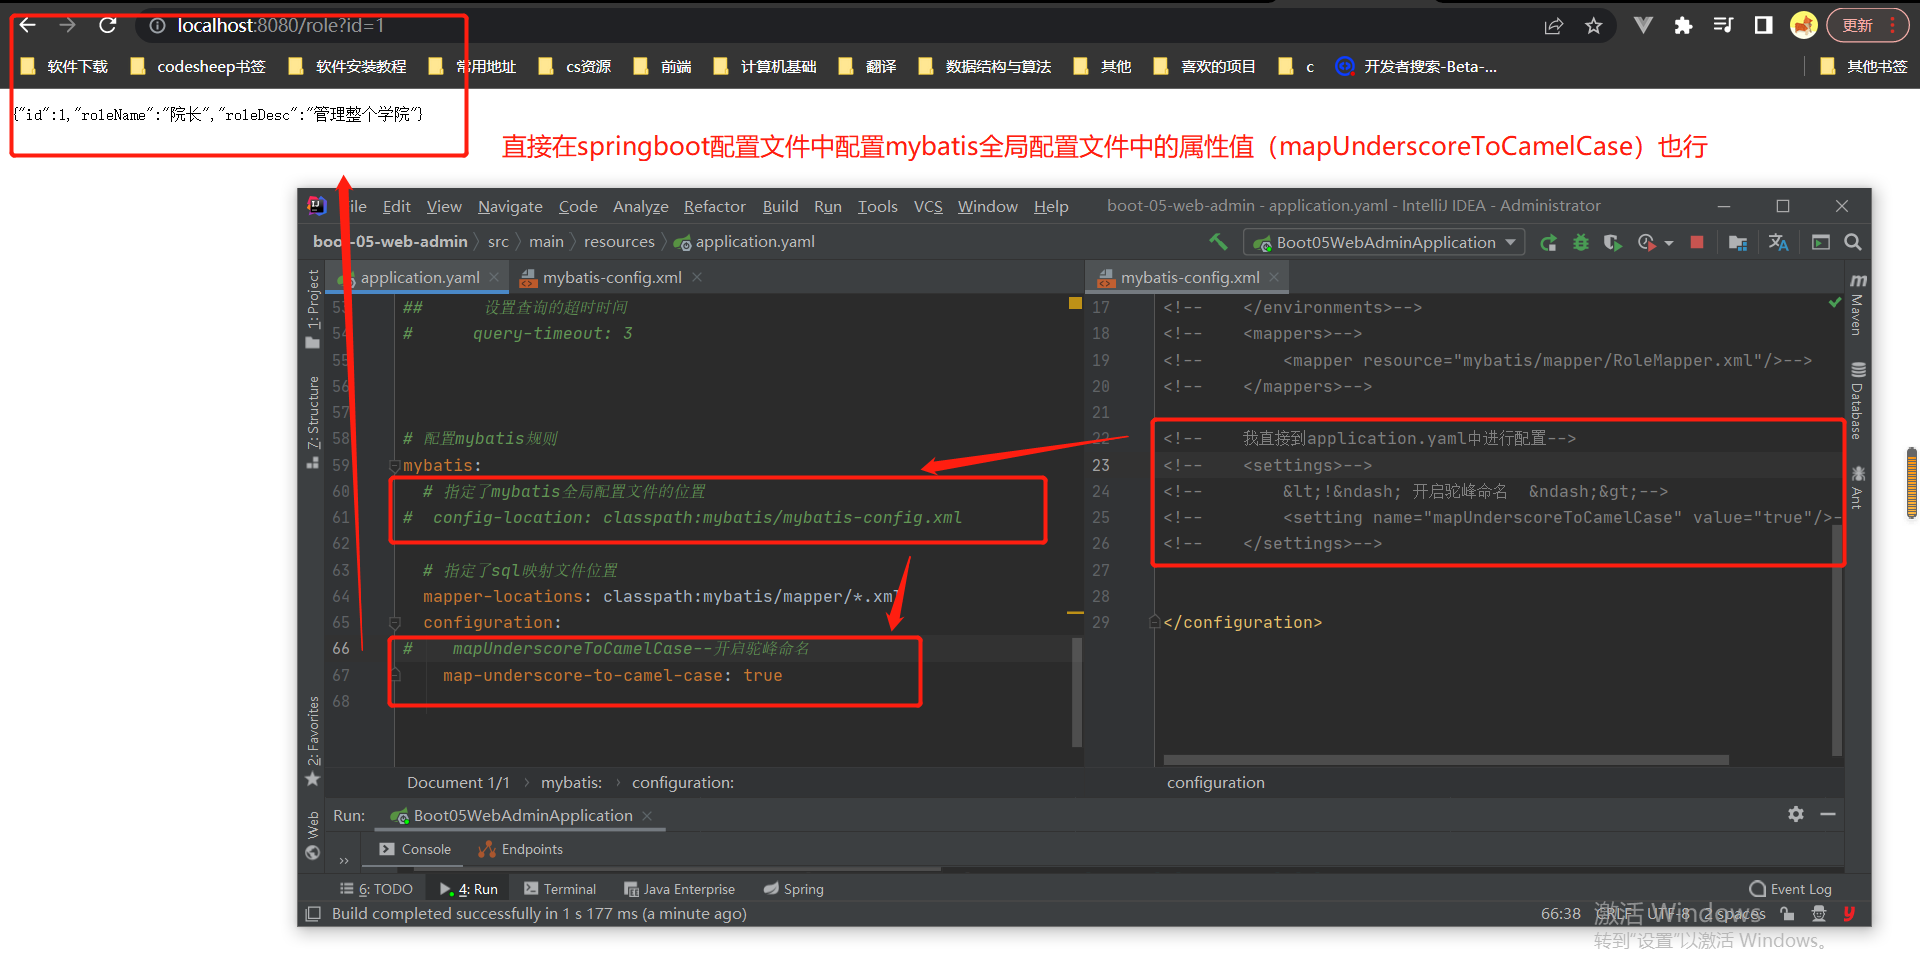
总结一下使用配置模式的开发步骤:

2.注解配置混合版
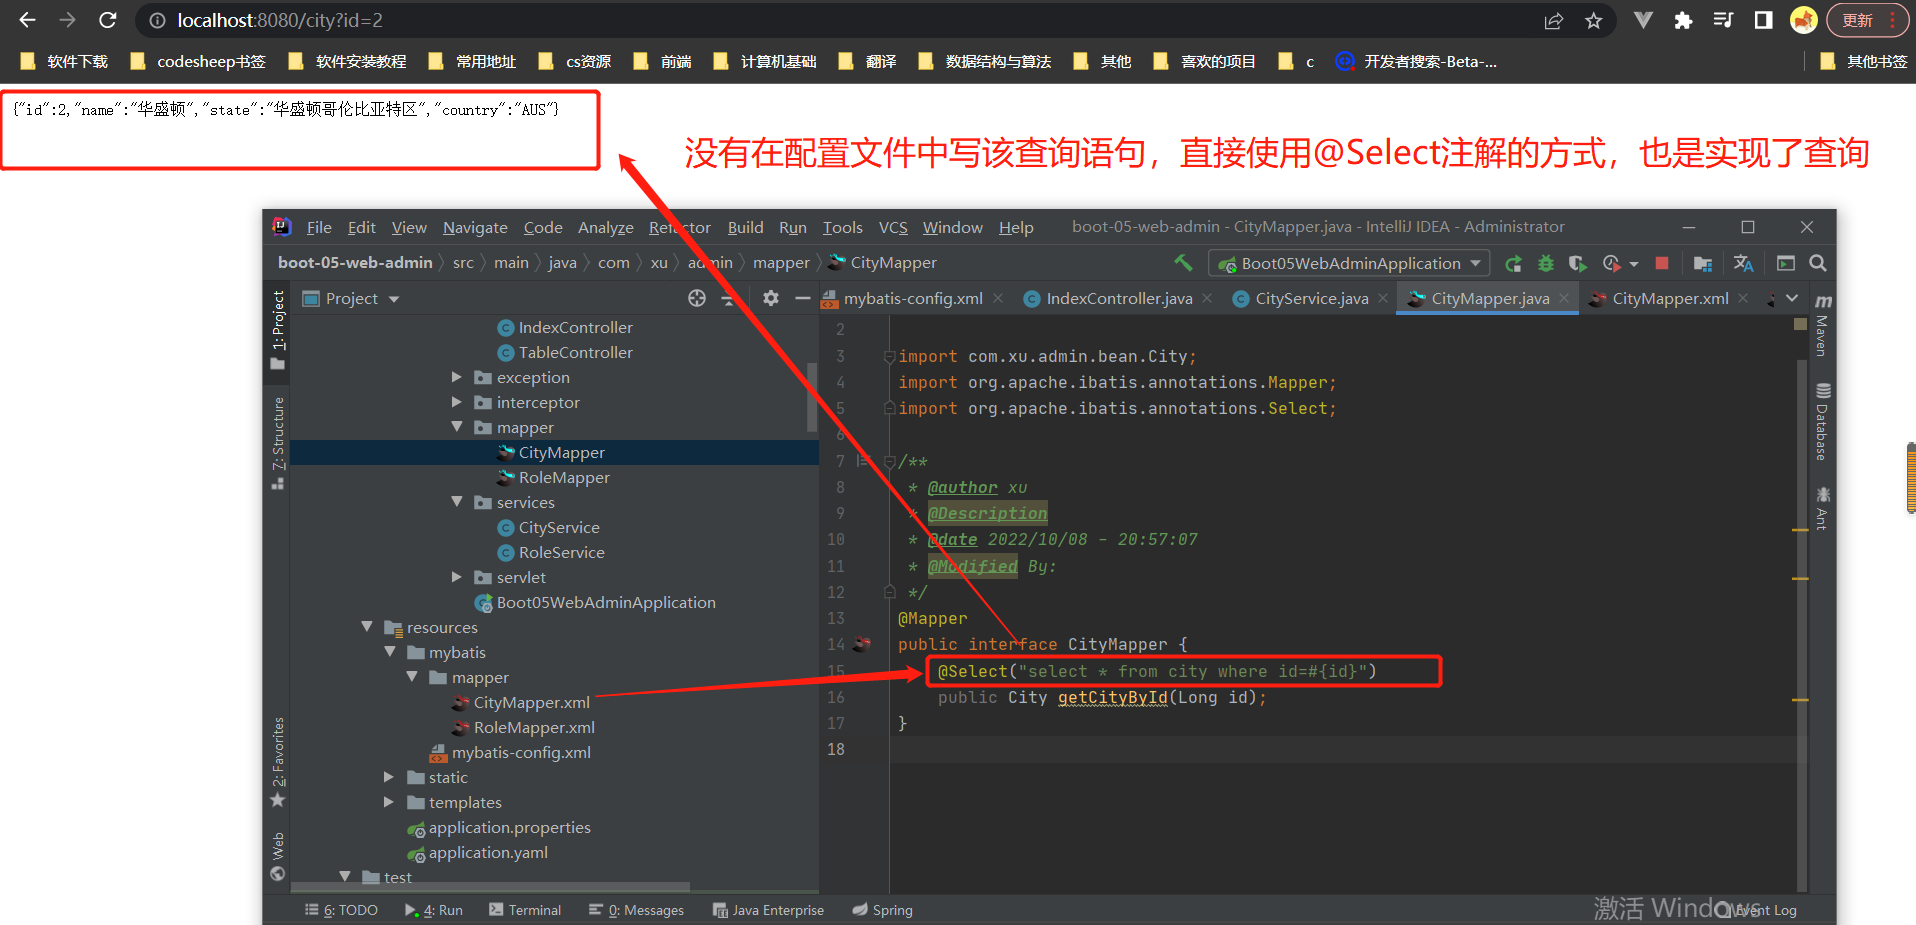
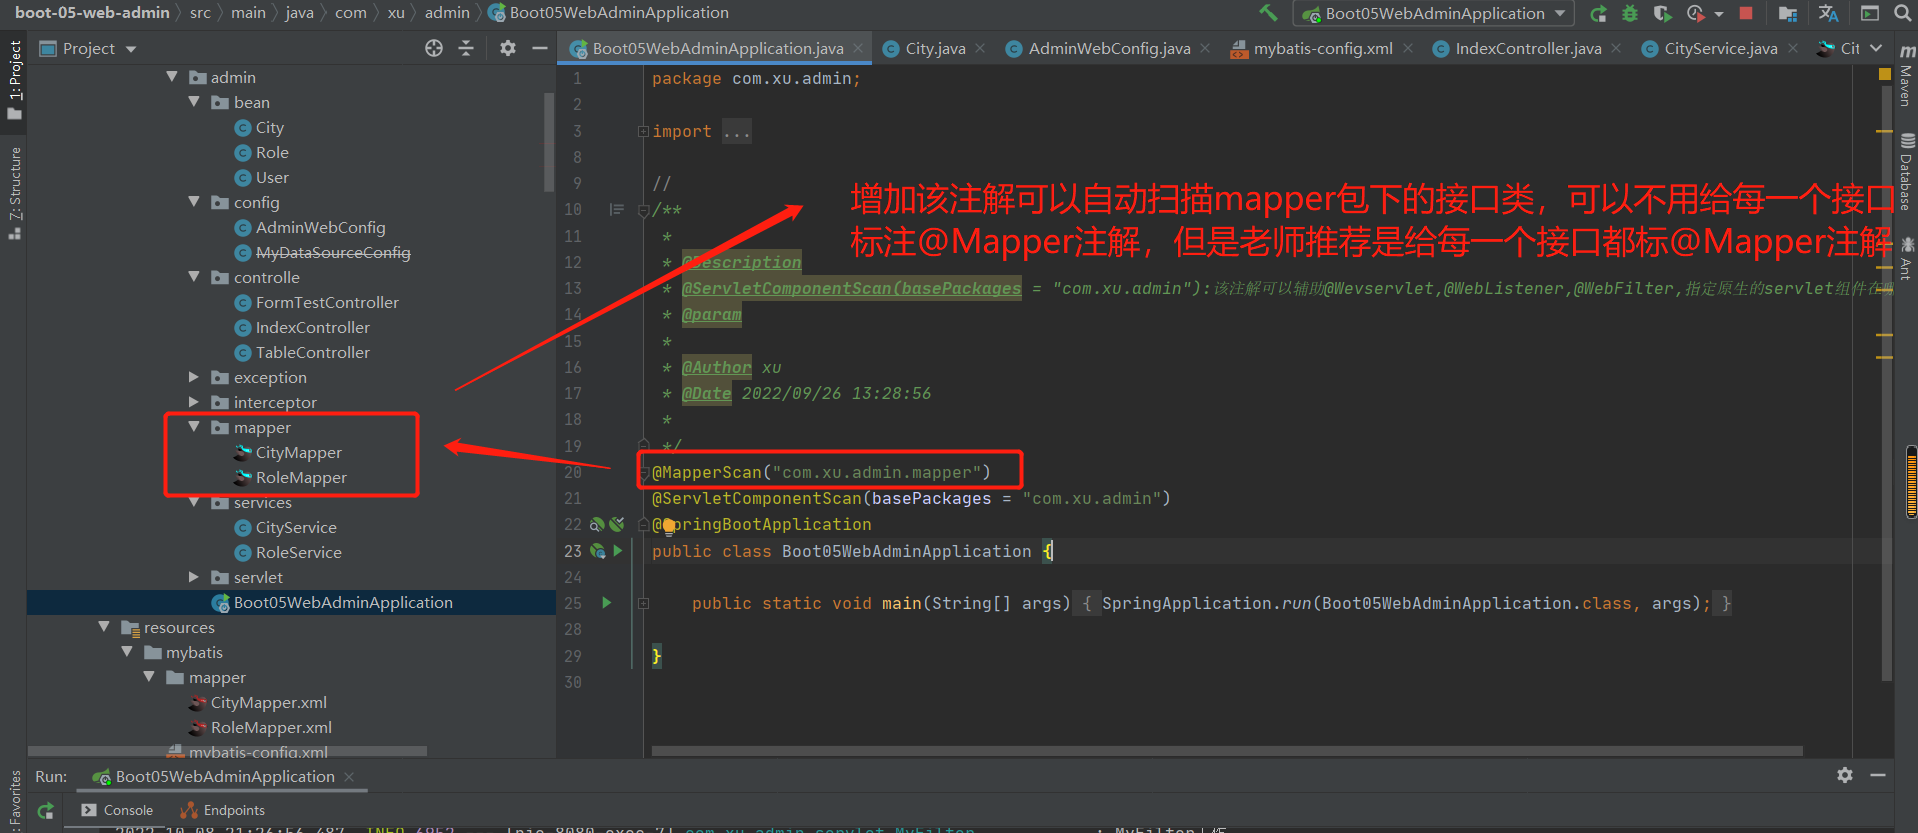
测试结果:
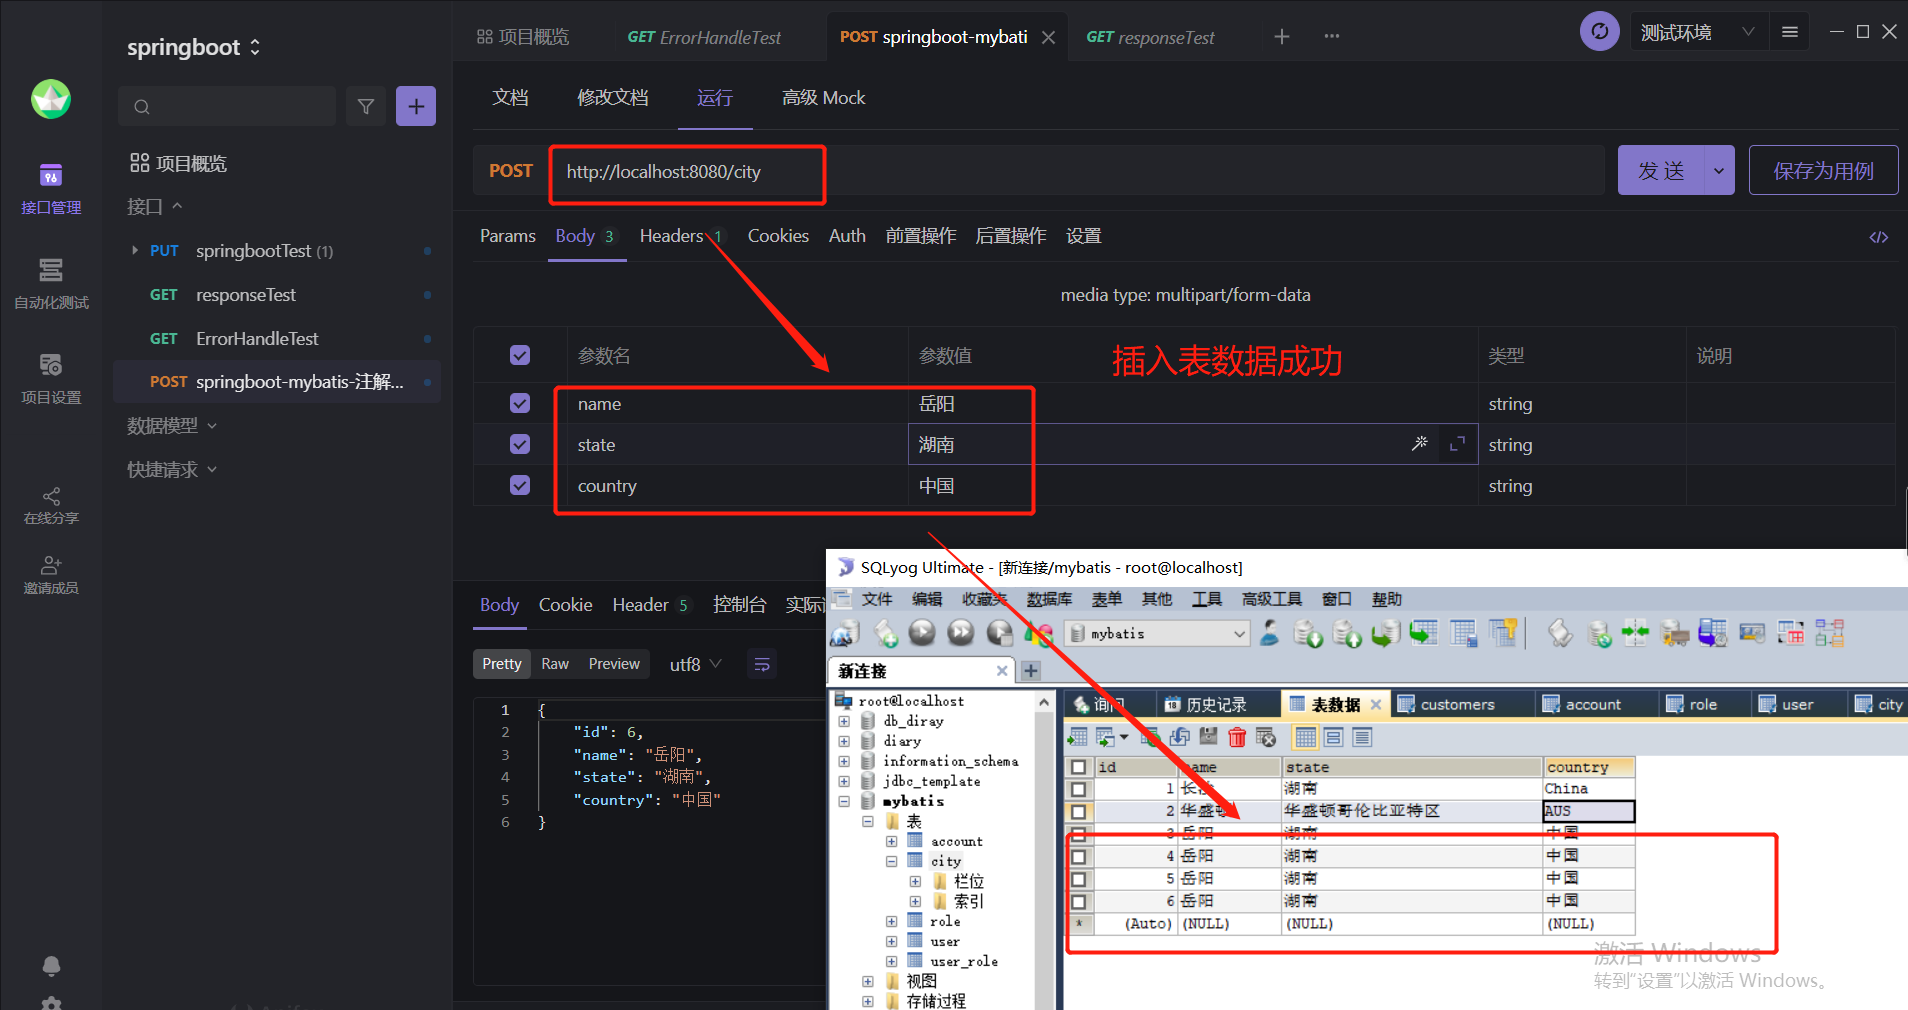
注意:如果拦截器没有放行,需要给请求头传入携带密码的cookie

最佳实战:

13-5 mybatis-plus操作数据库
1.引入依赖,源码分析
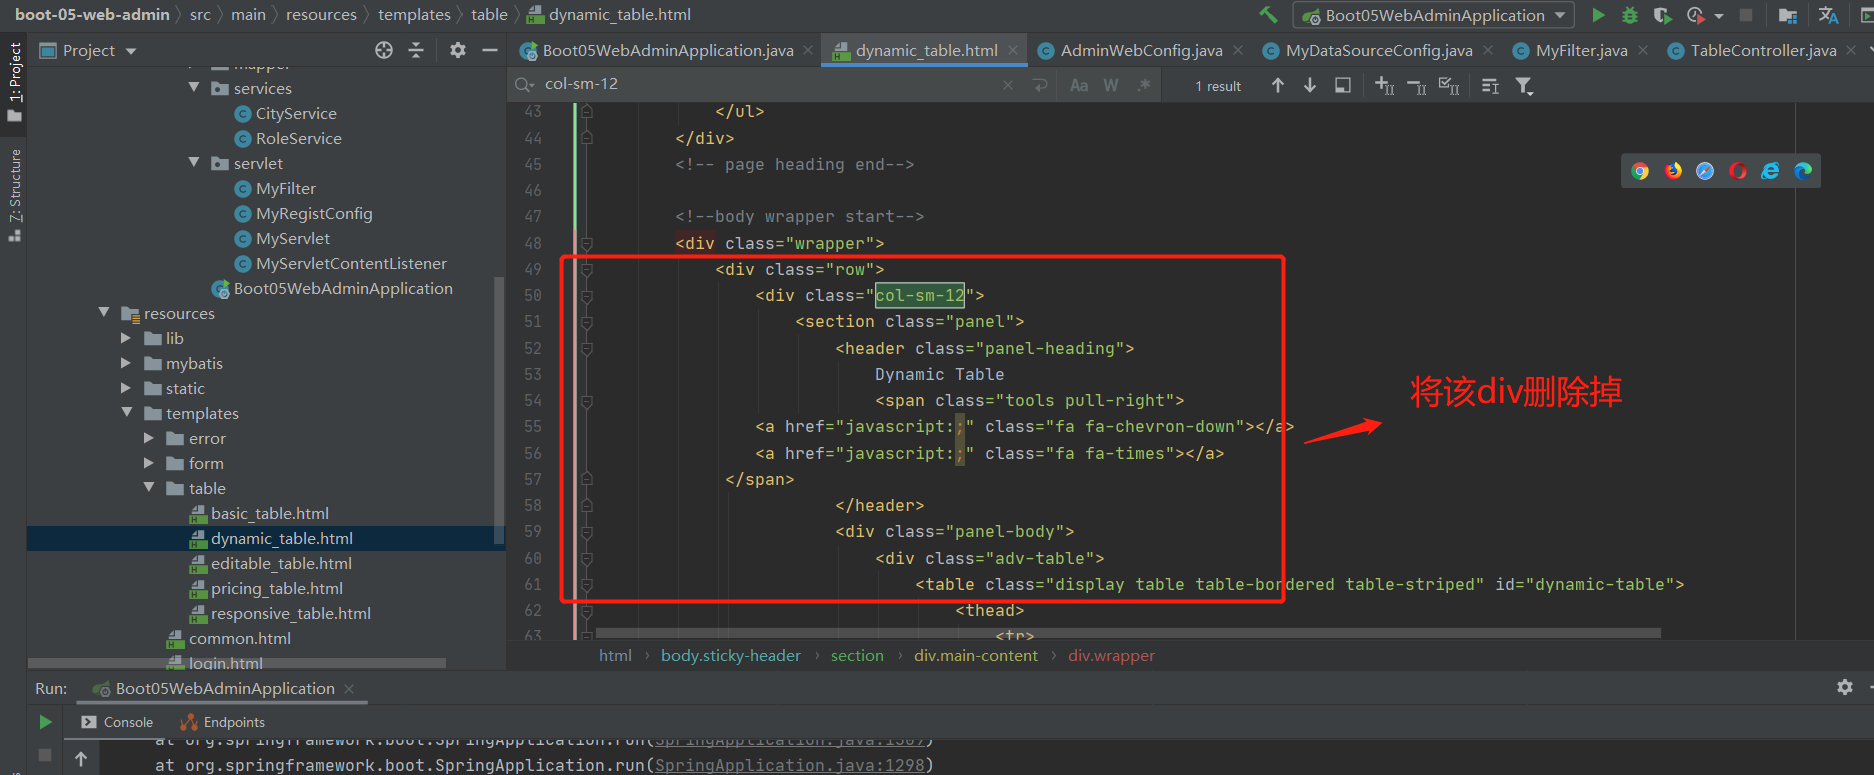
引入使用mybatis-plus所需要的依赖,如果没有该版本的依赖,可能是镜像版本过老旧,可以在控制台使用mvn install进行镜像依赖的跟新
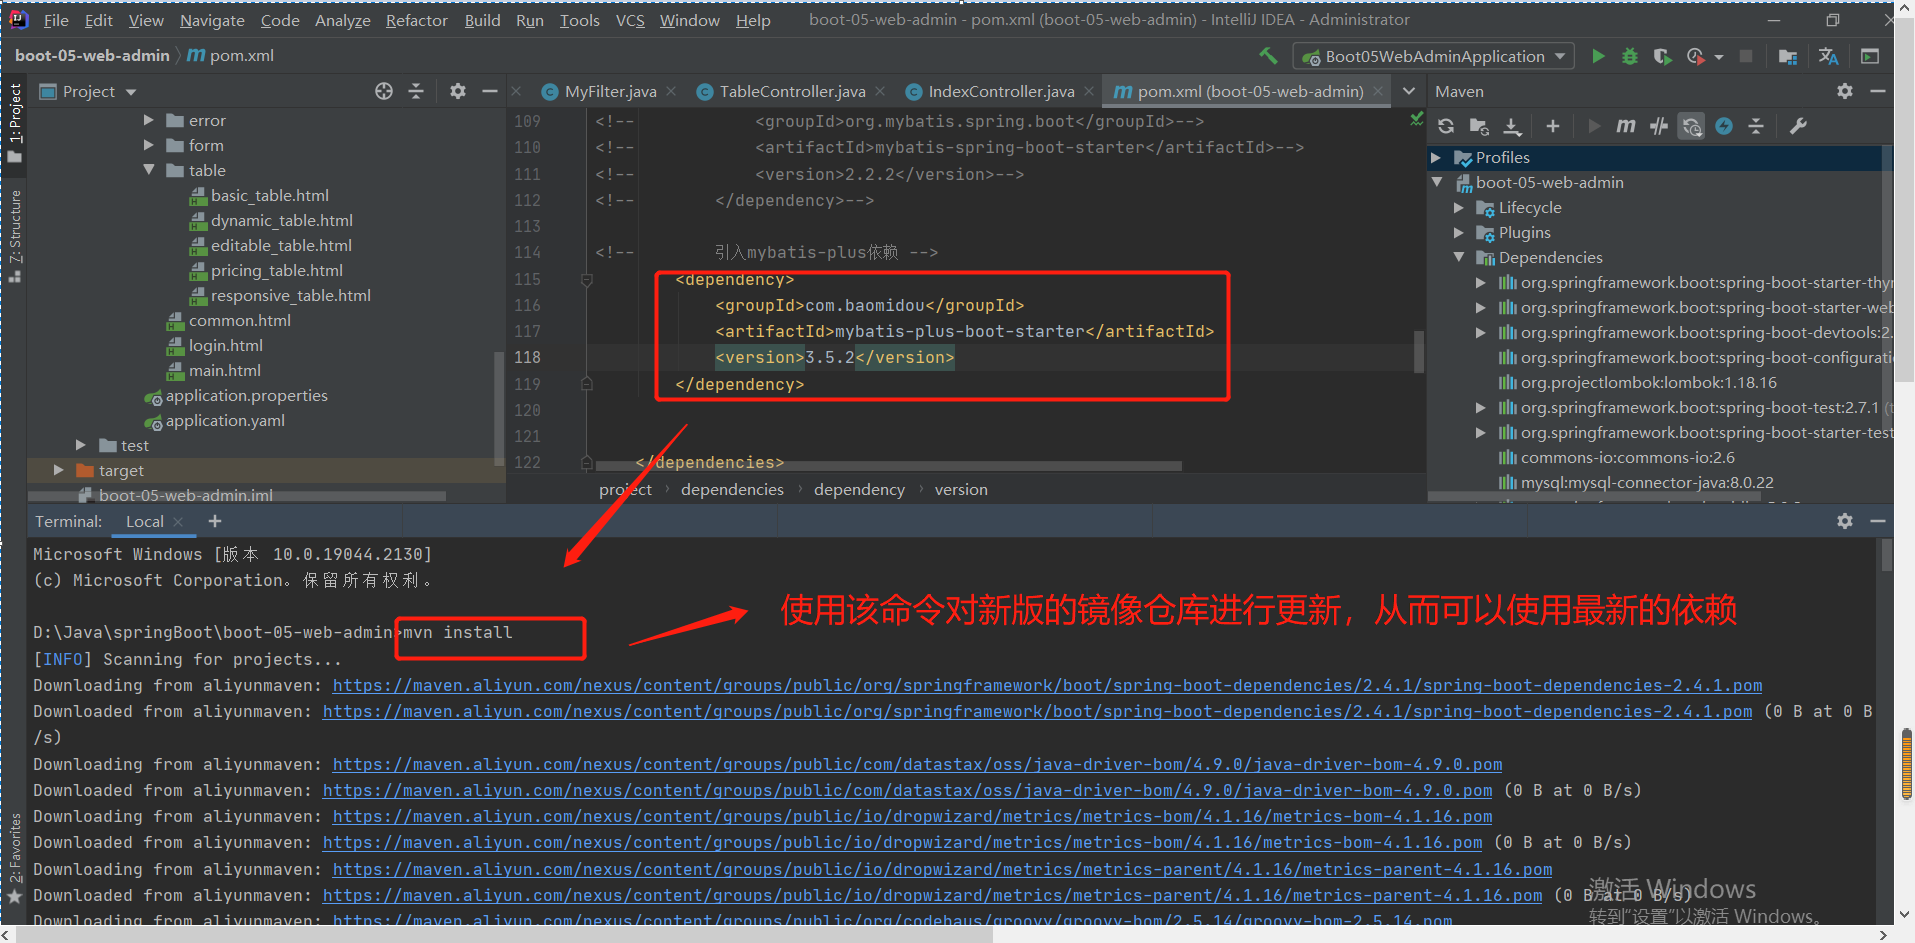
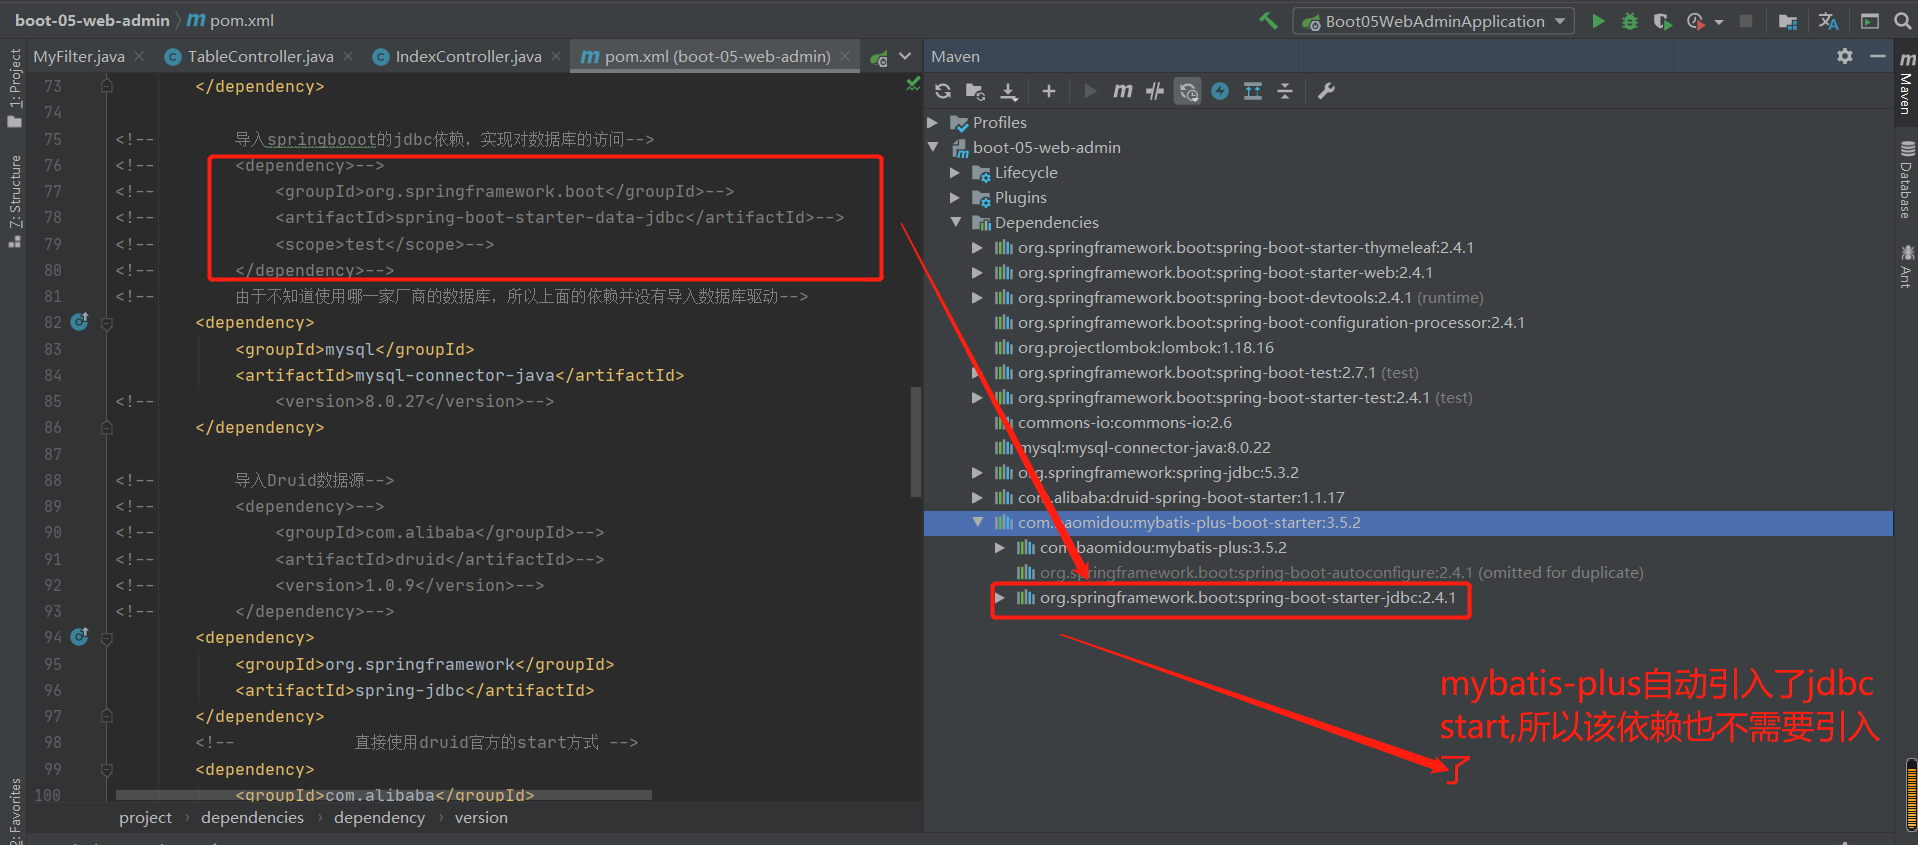
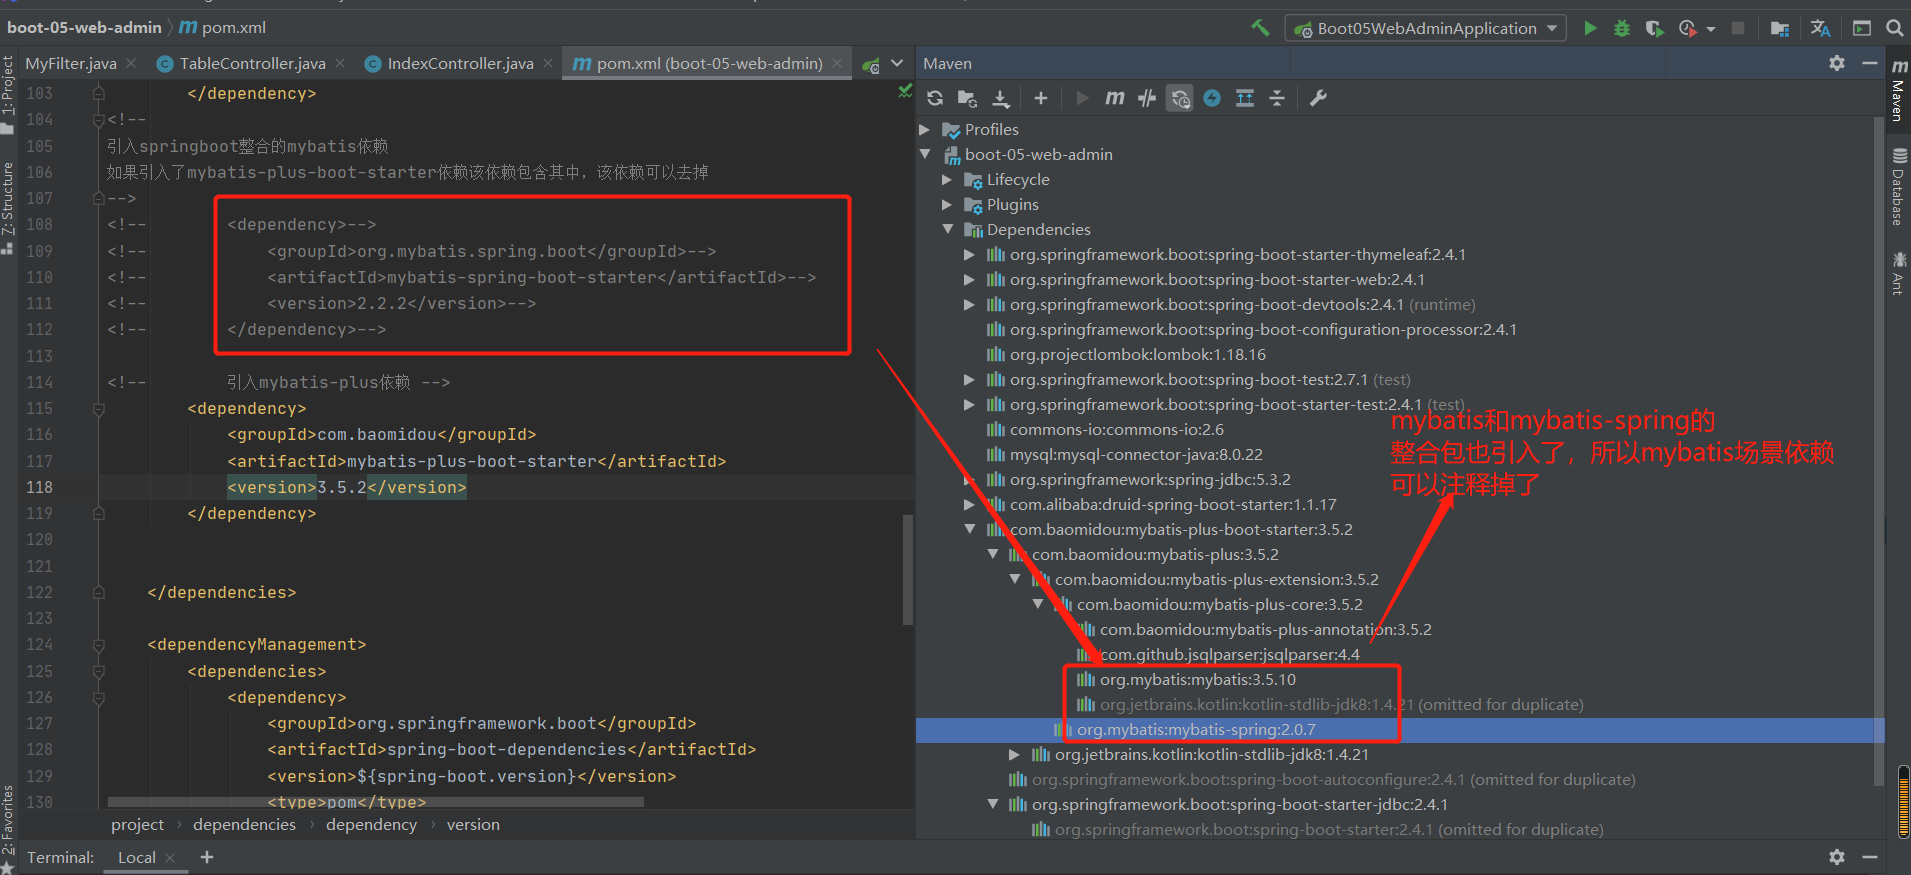
源码分析:
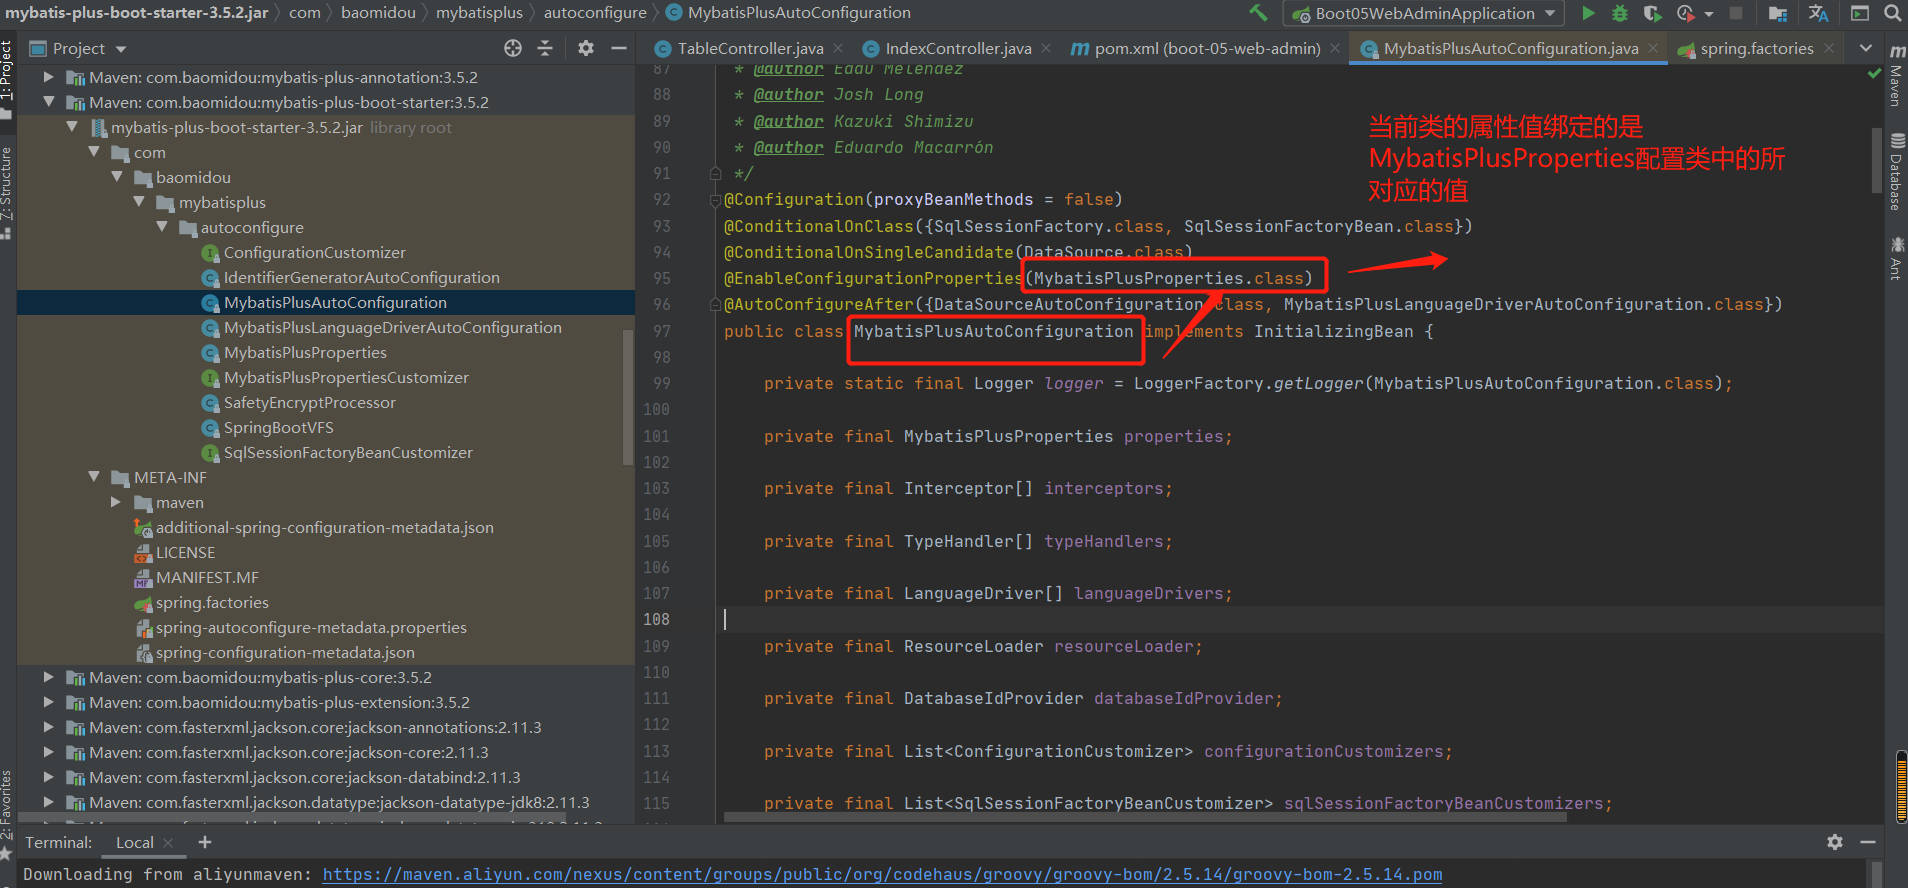
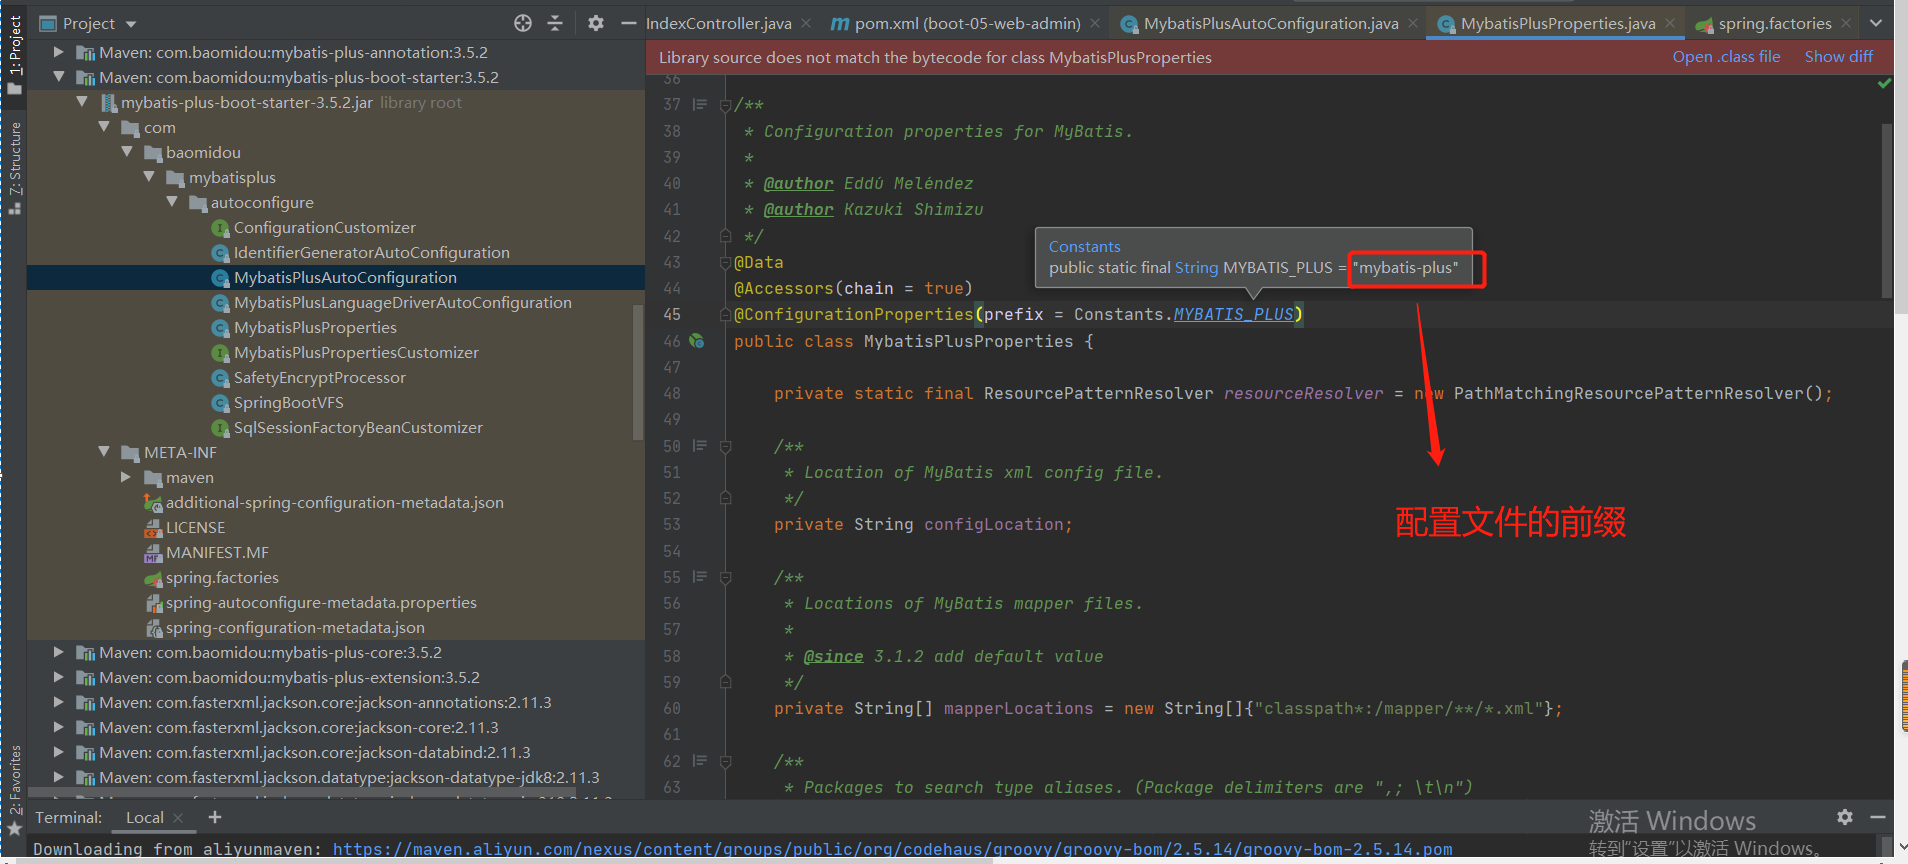
对于自动配置类---MybatisPlusAutoConfiguration.java 的一些简单分析:看看自动配置了那些东西
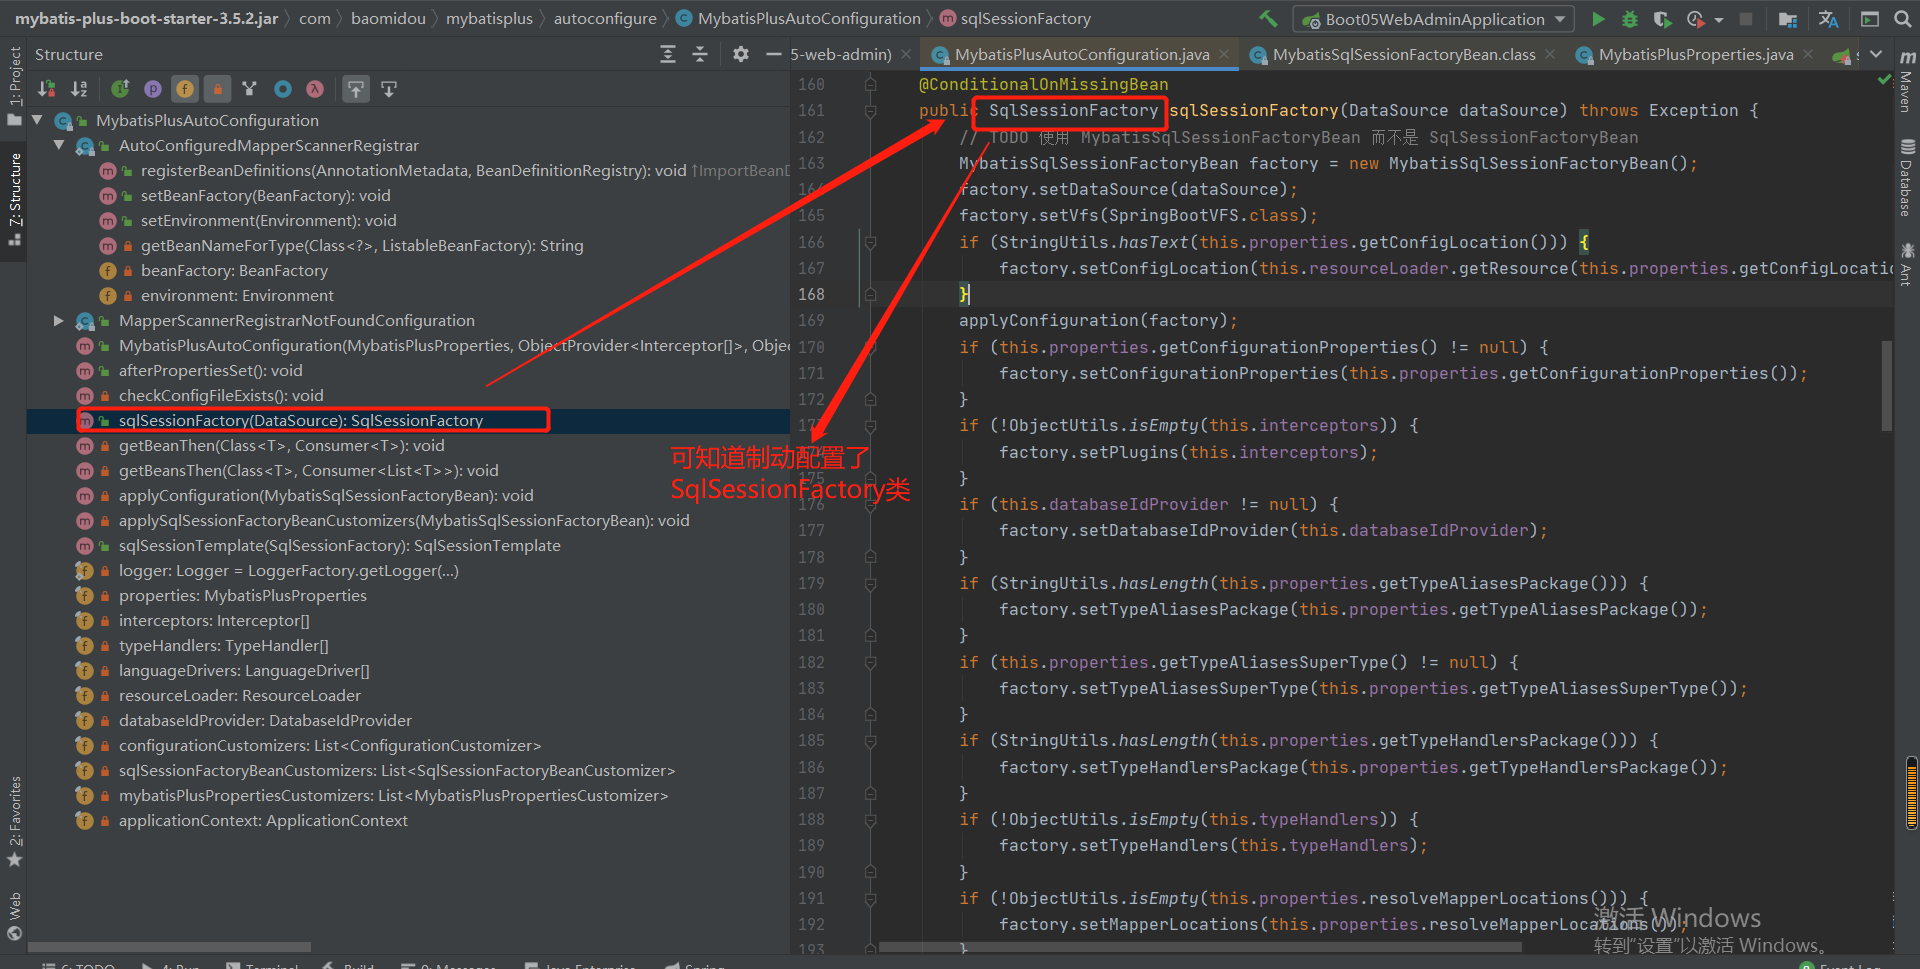
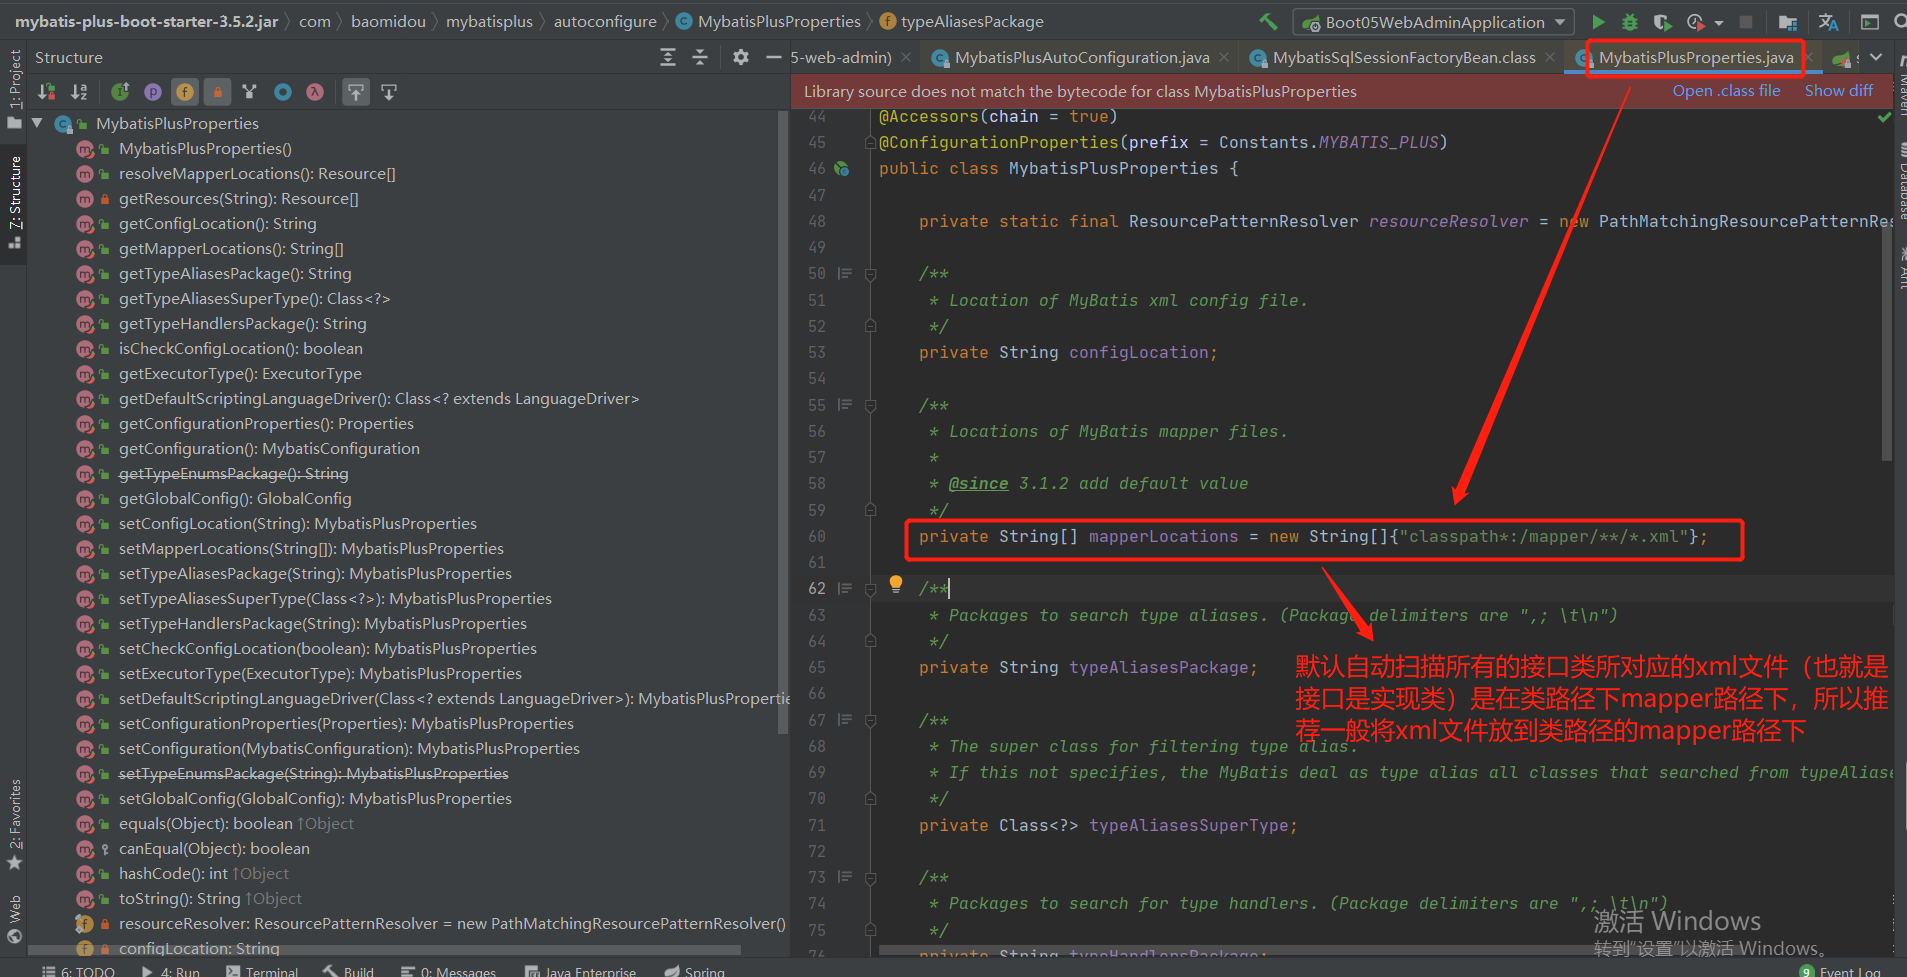
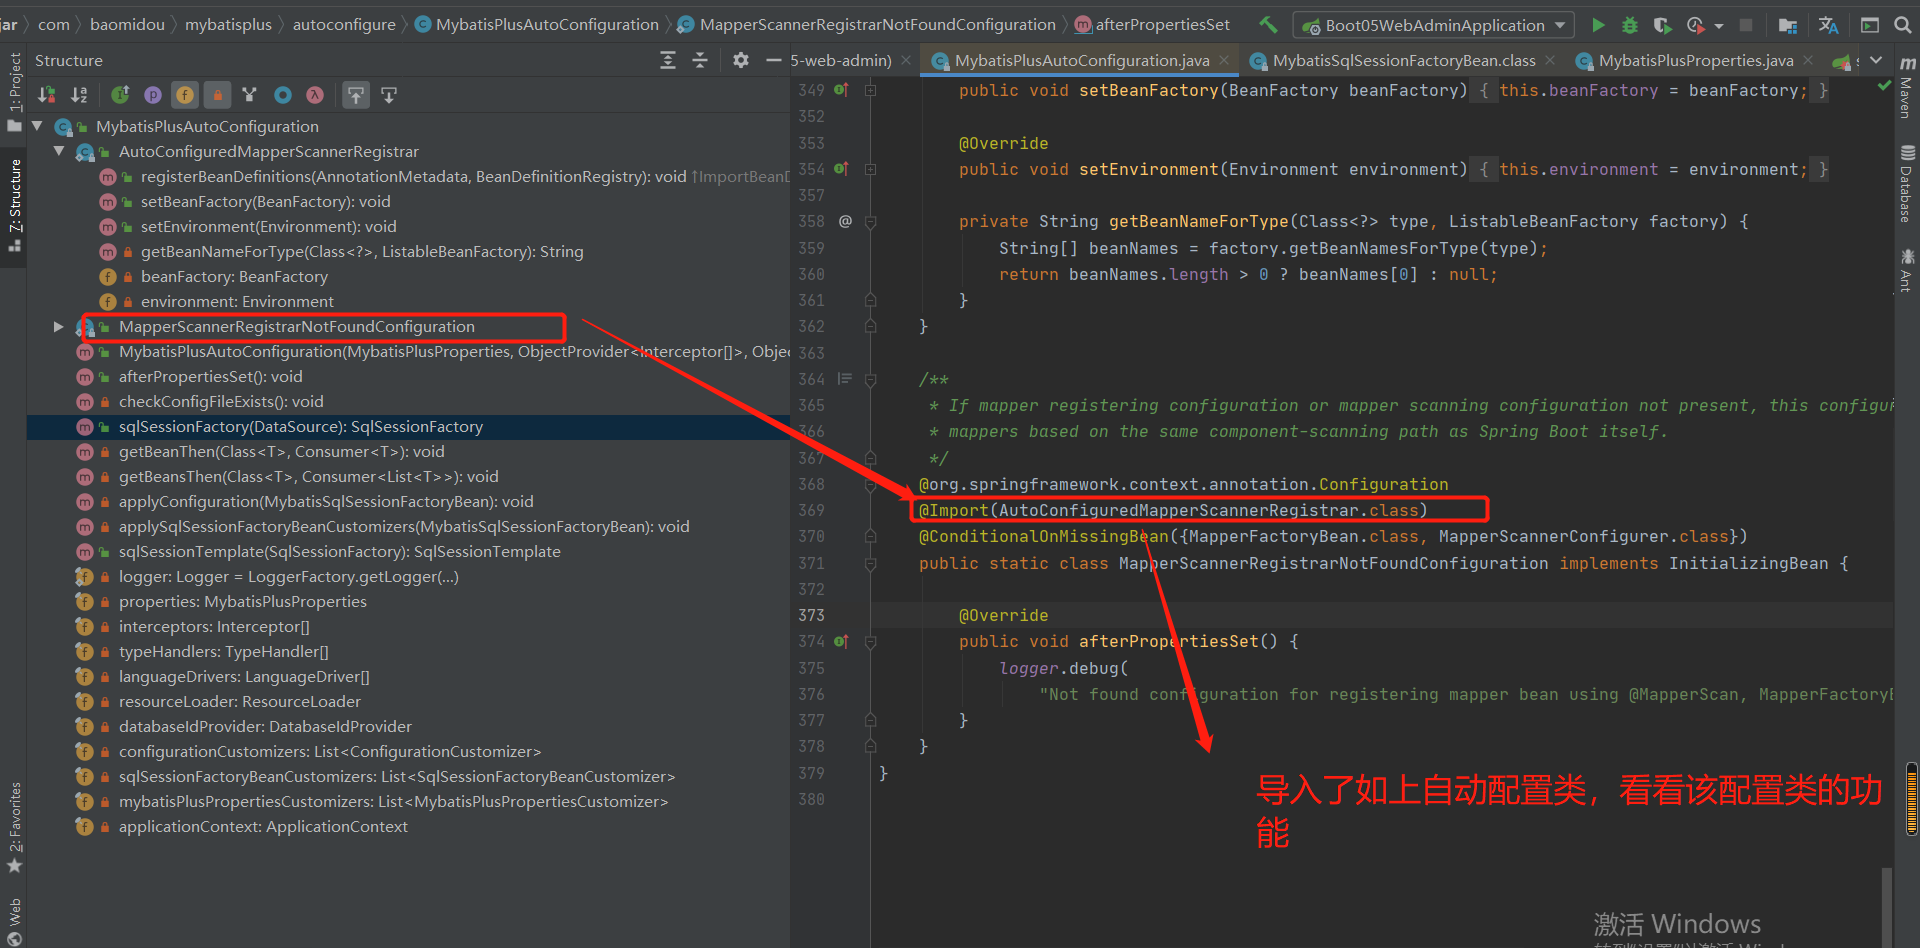
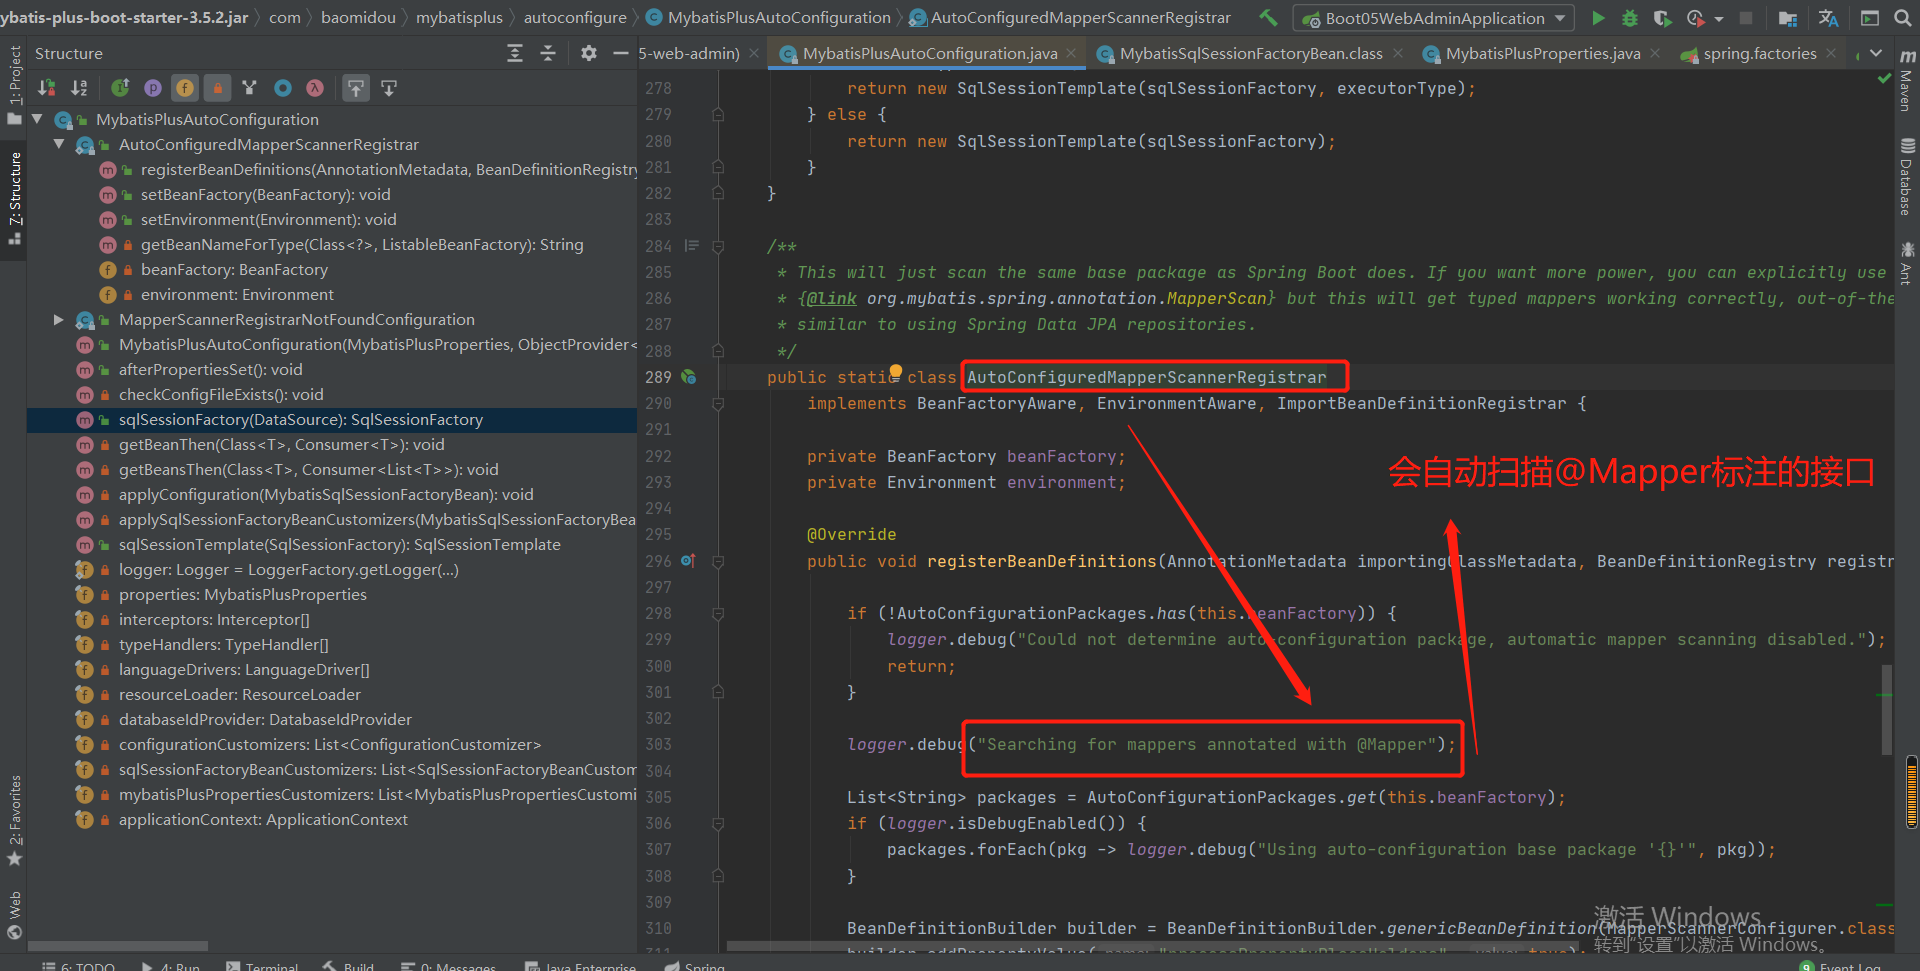
源码分析整合:
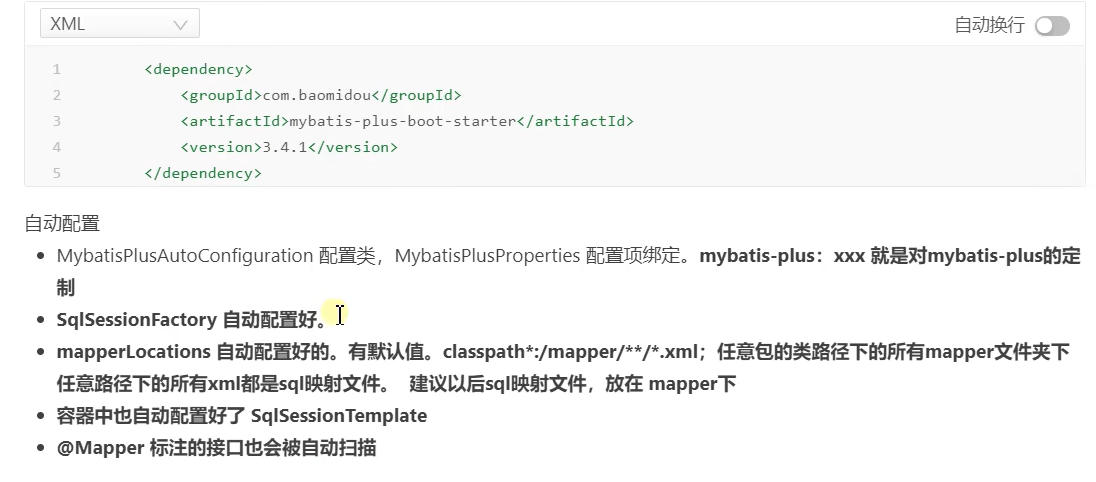
补充:默认数据源是使用的druid
2.基本的使用
创建了用户表:
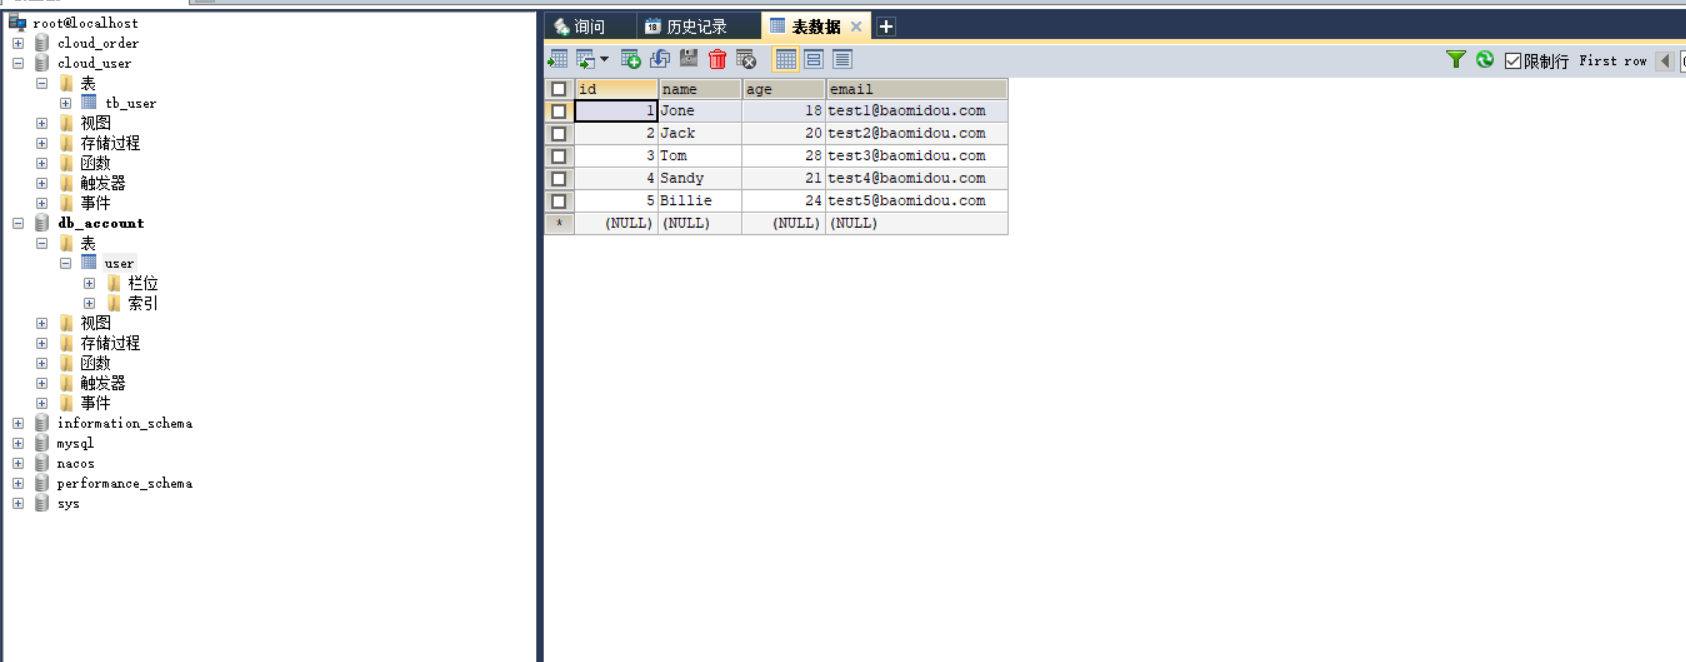
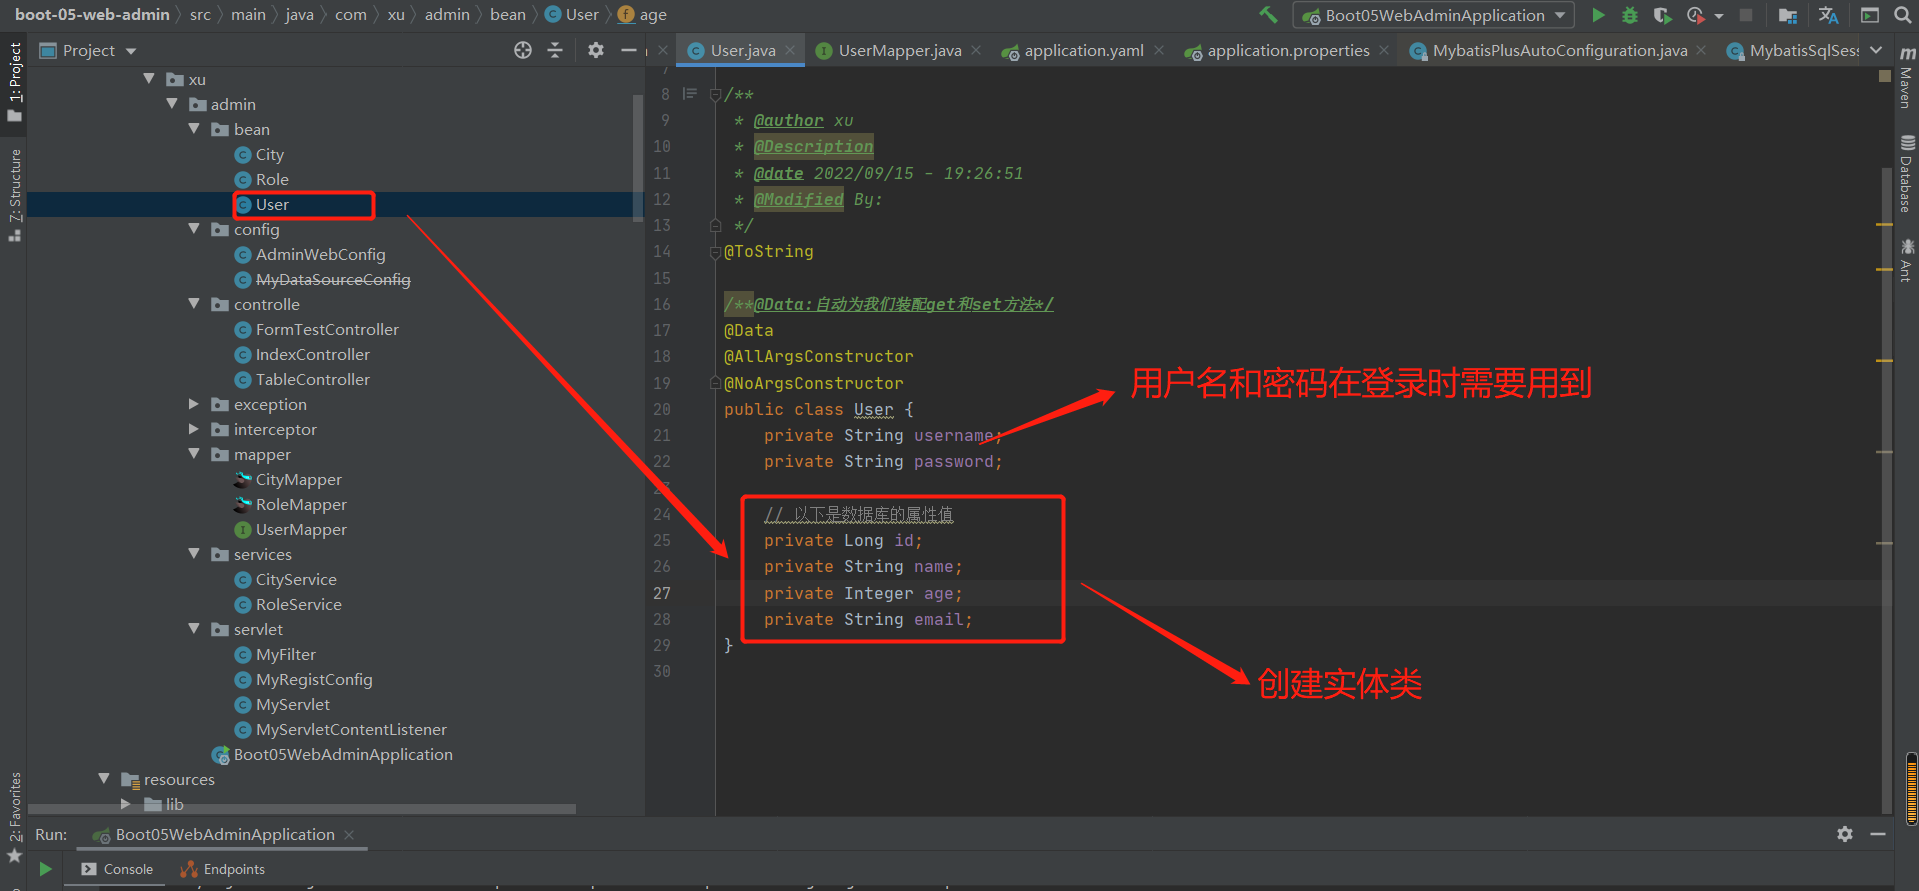
补充:@TableField(exist = false)表示表中不存在该属性值,自然也不会因为查询不到这两个属性值而导致报错
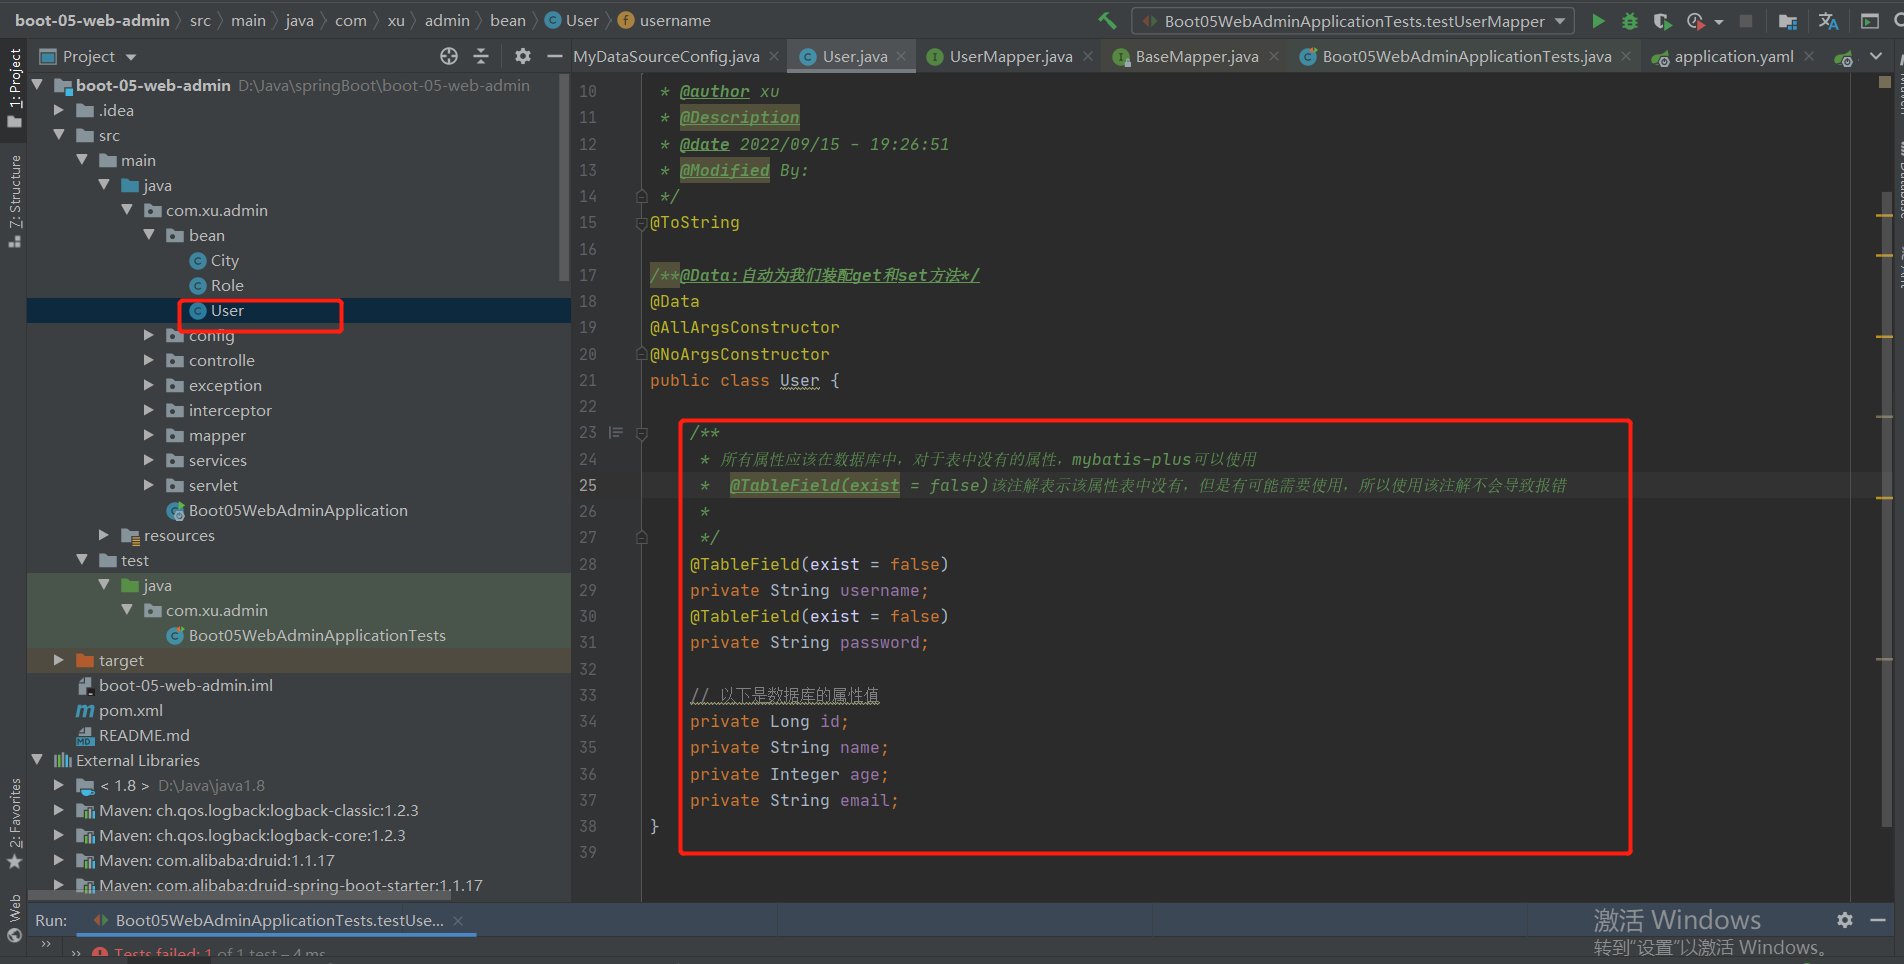
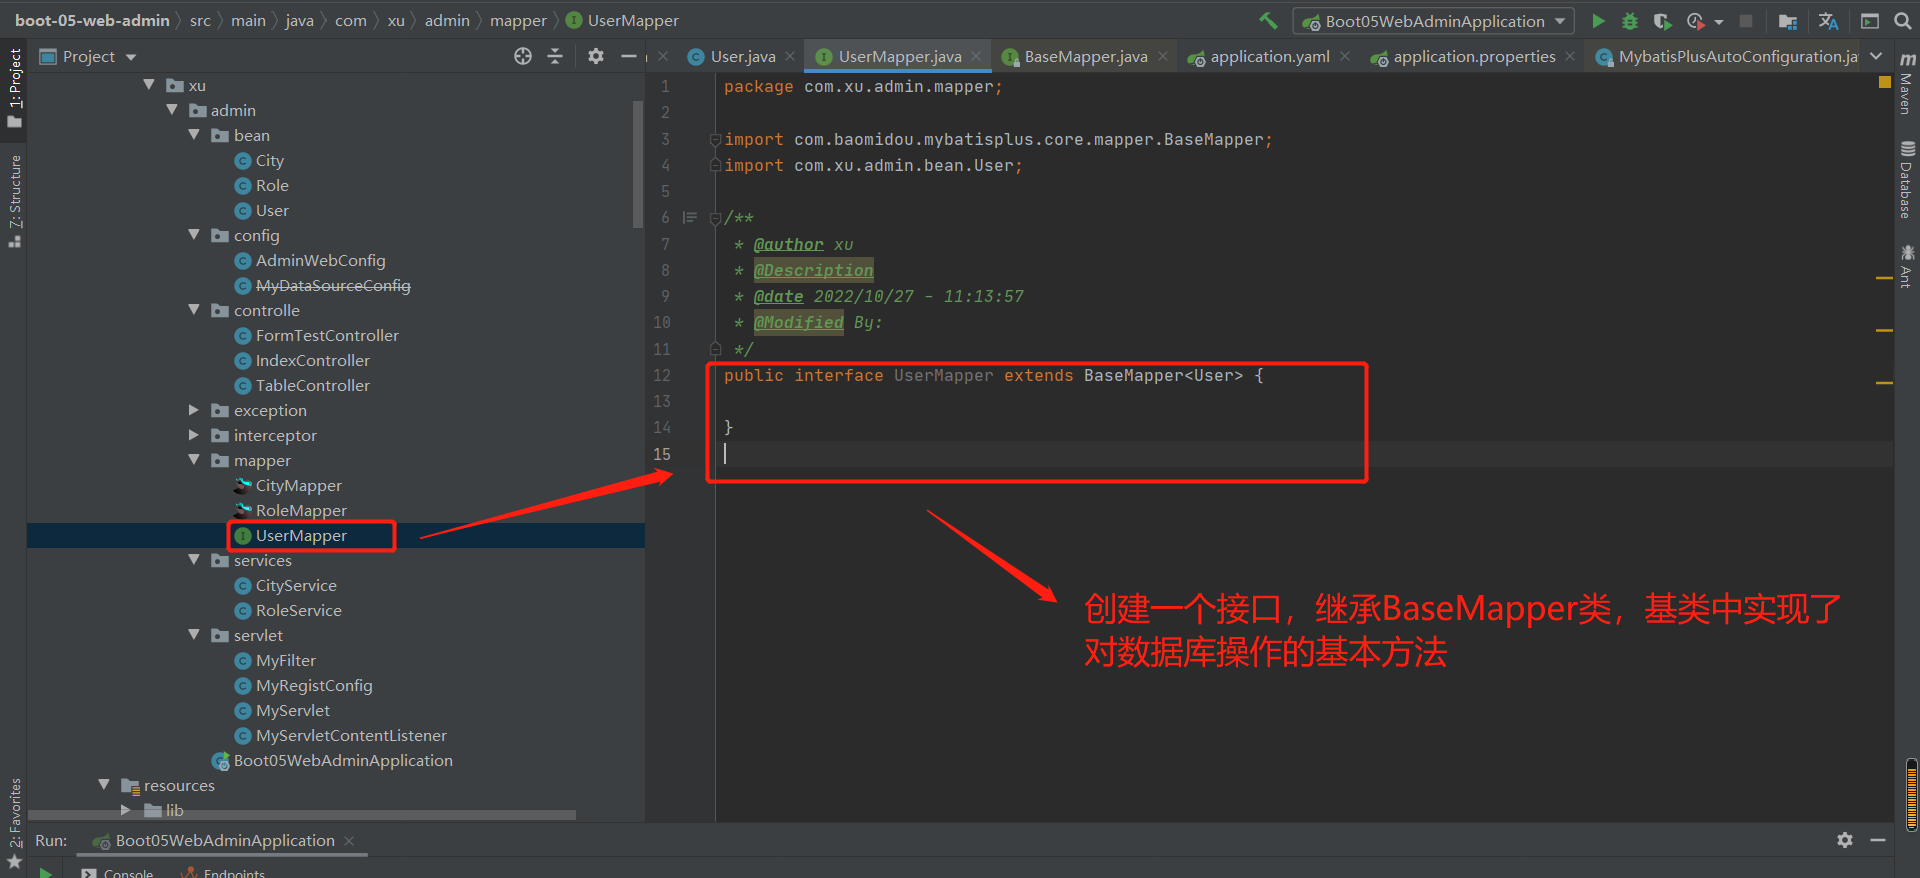
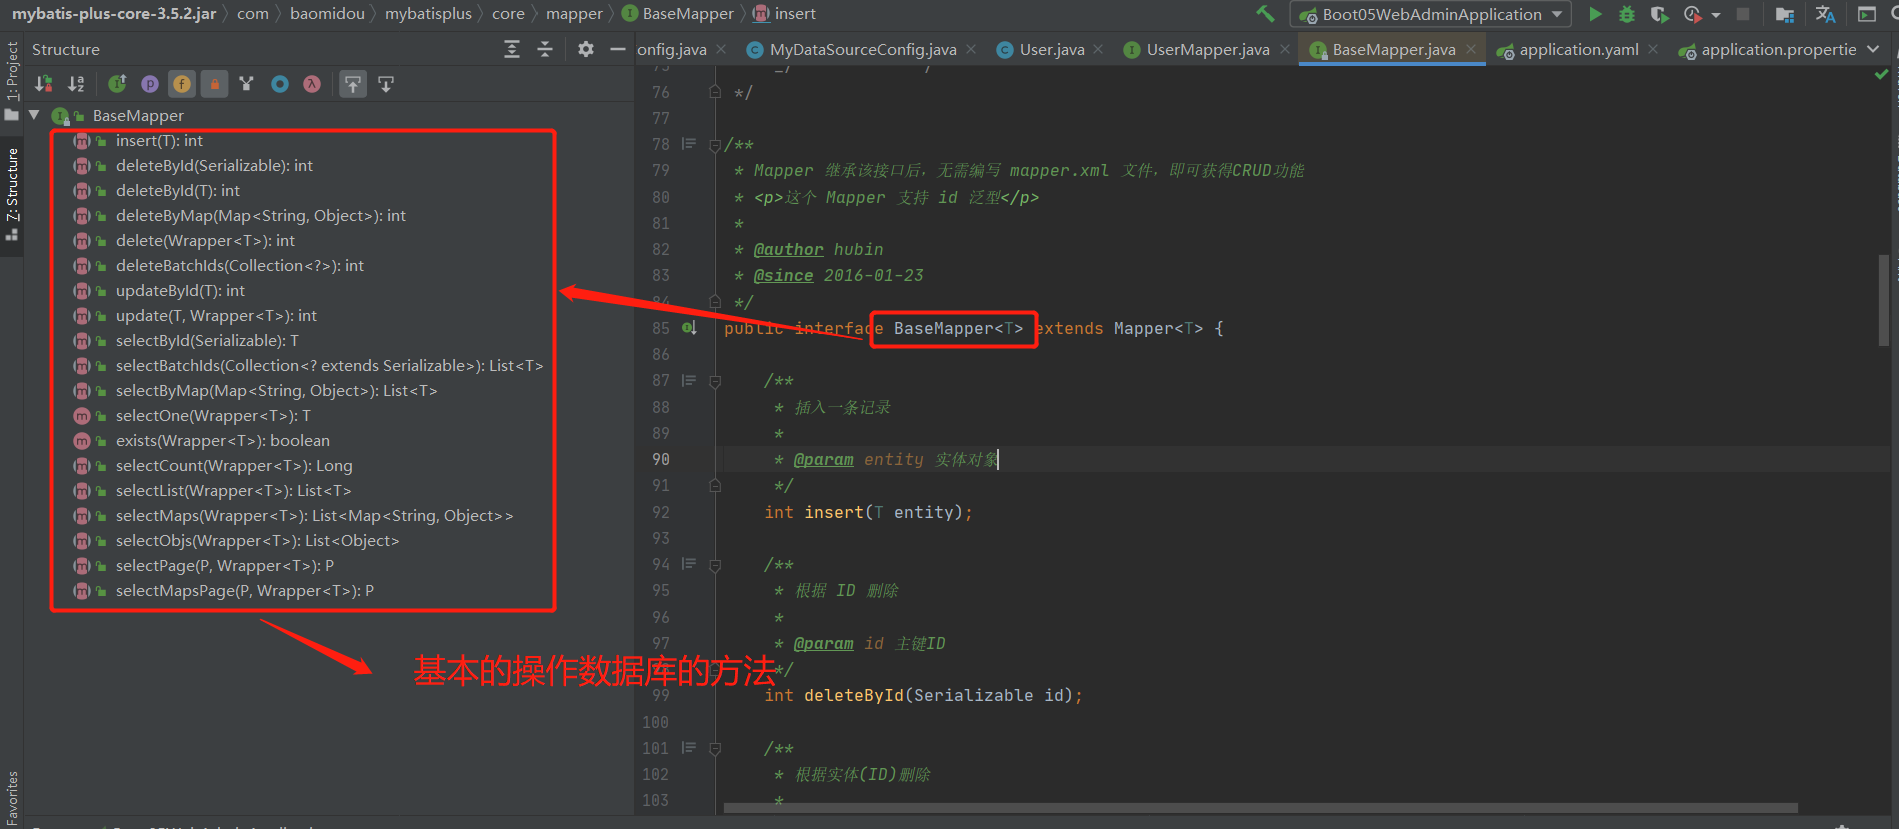
结果:
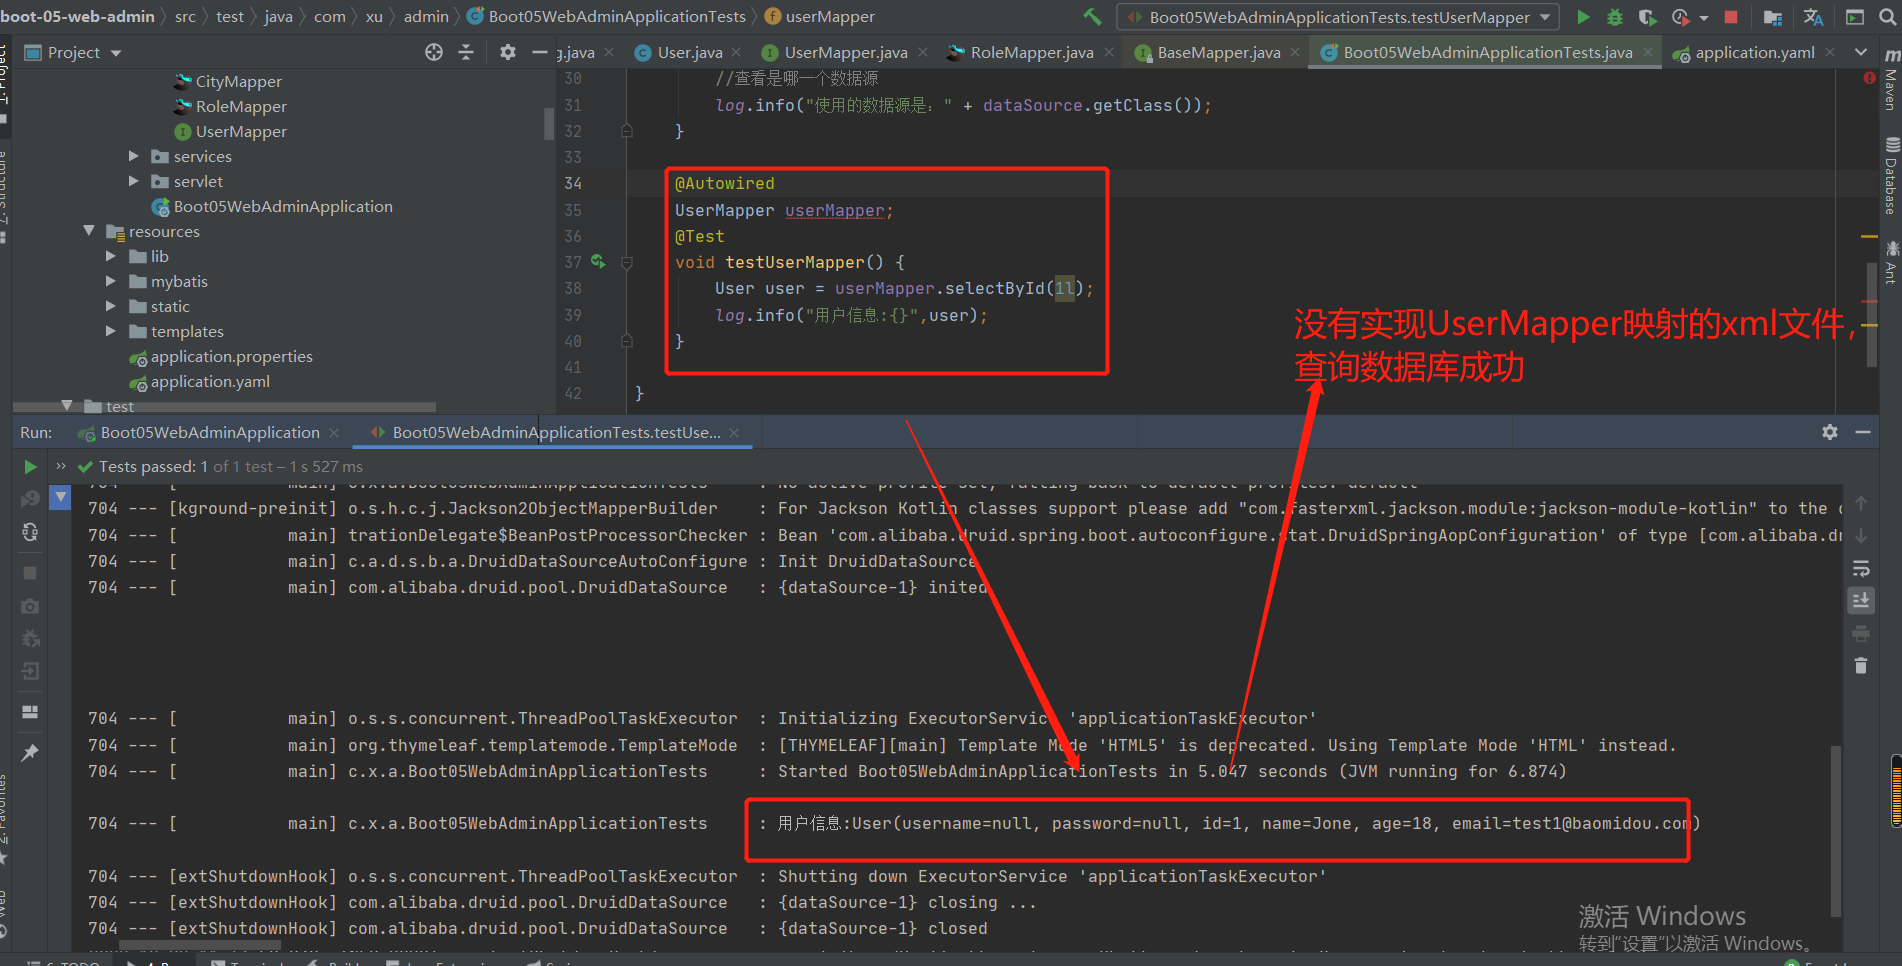
13-6 crud实验_数据列表展示
1.使用@TableName指定表的名称
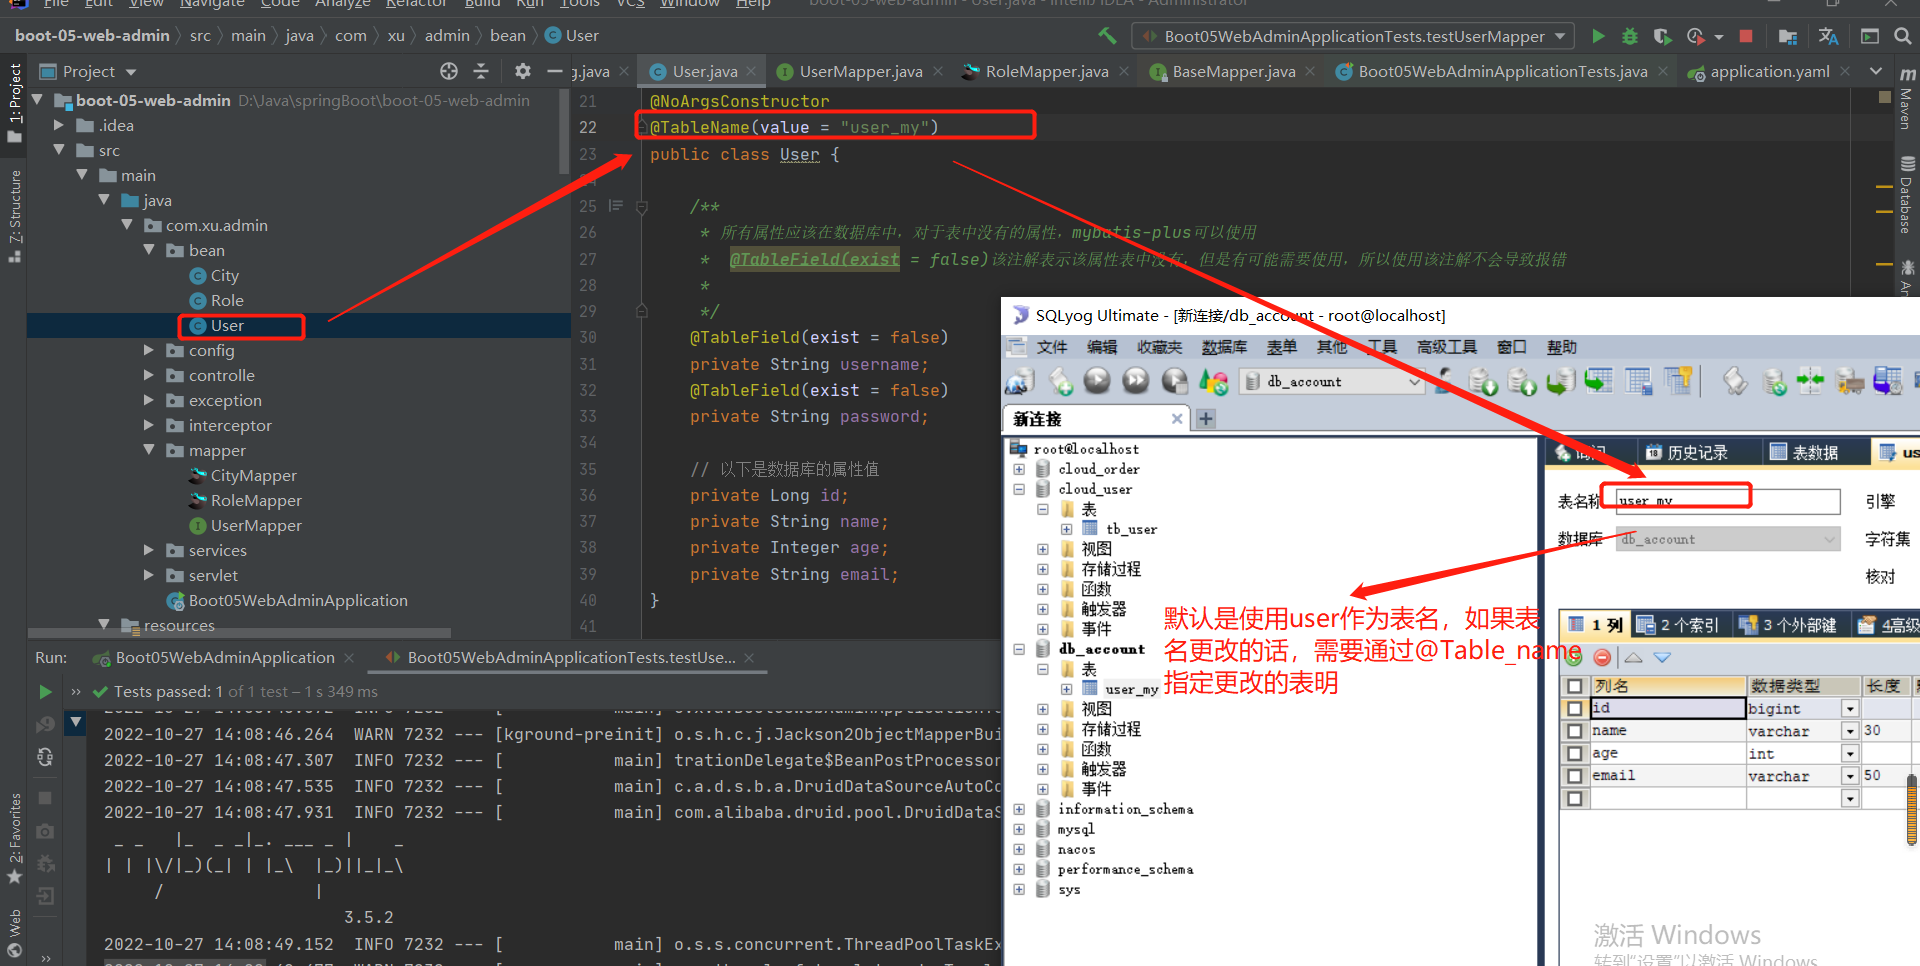
2.关于UserService接口的定义,以及其实现类的定义
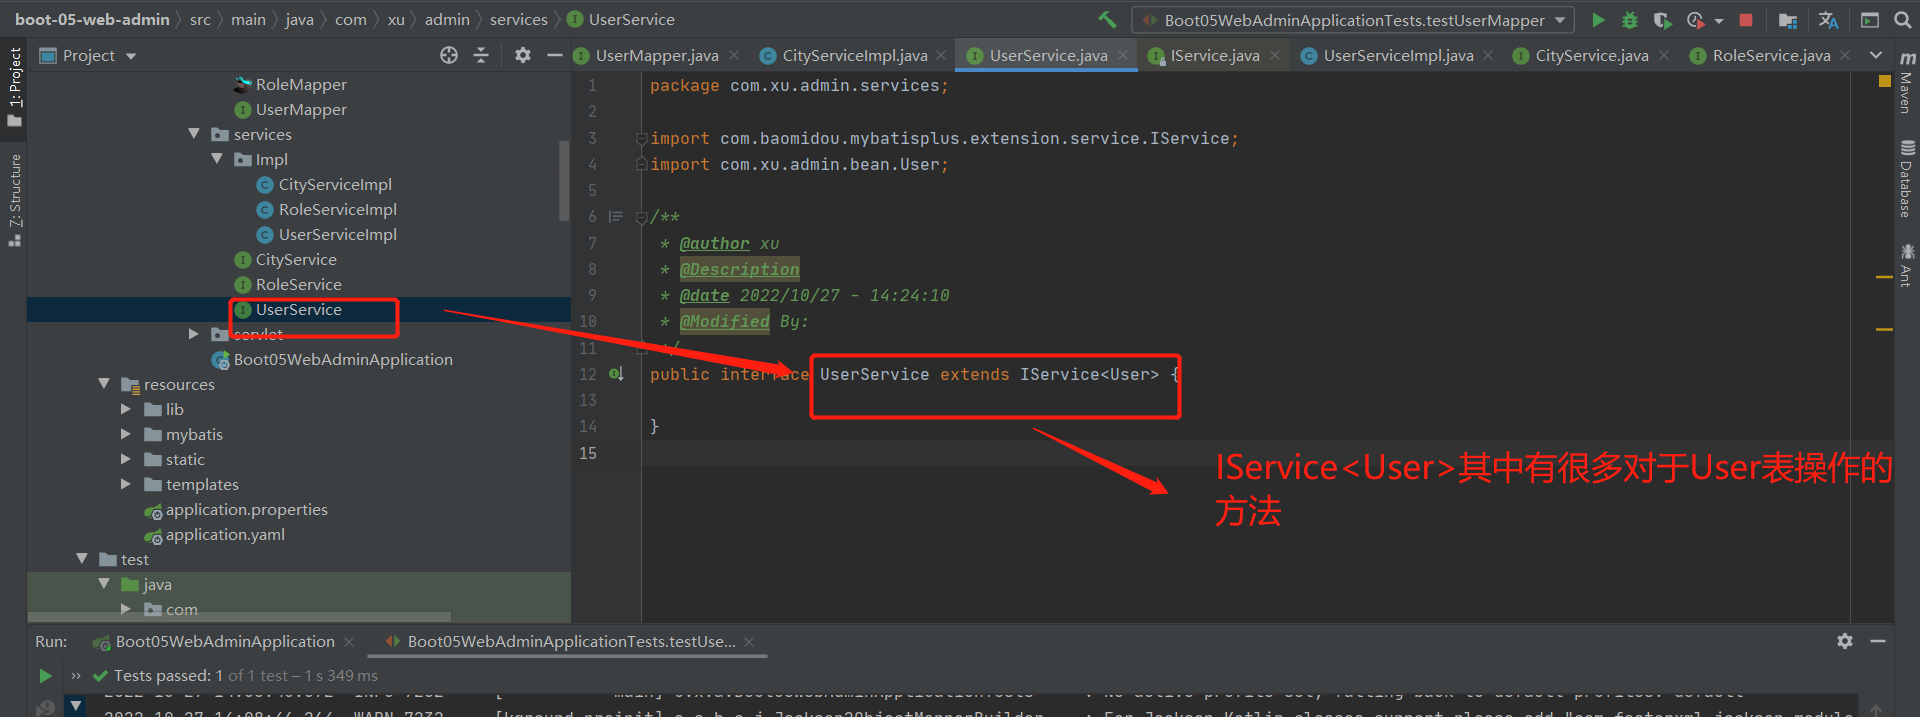
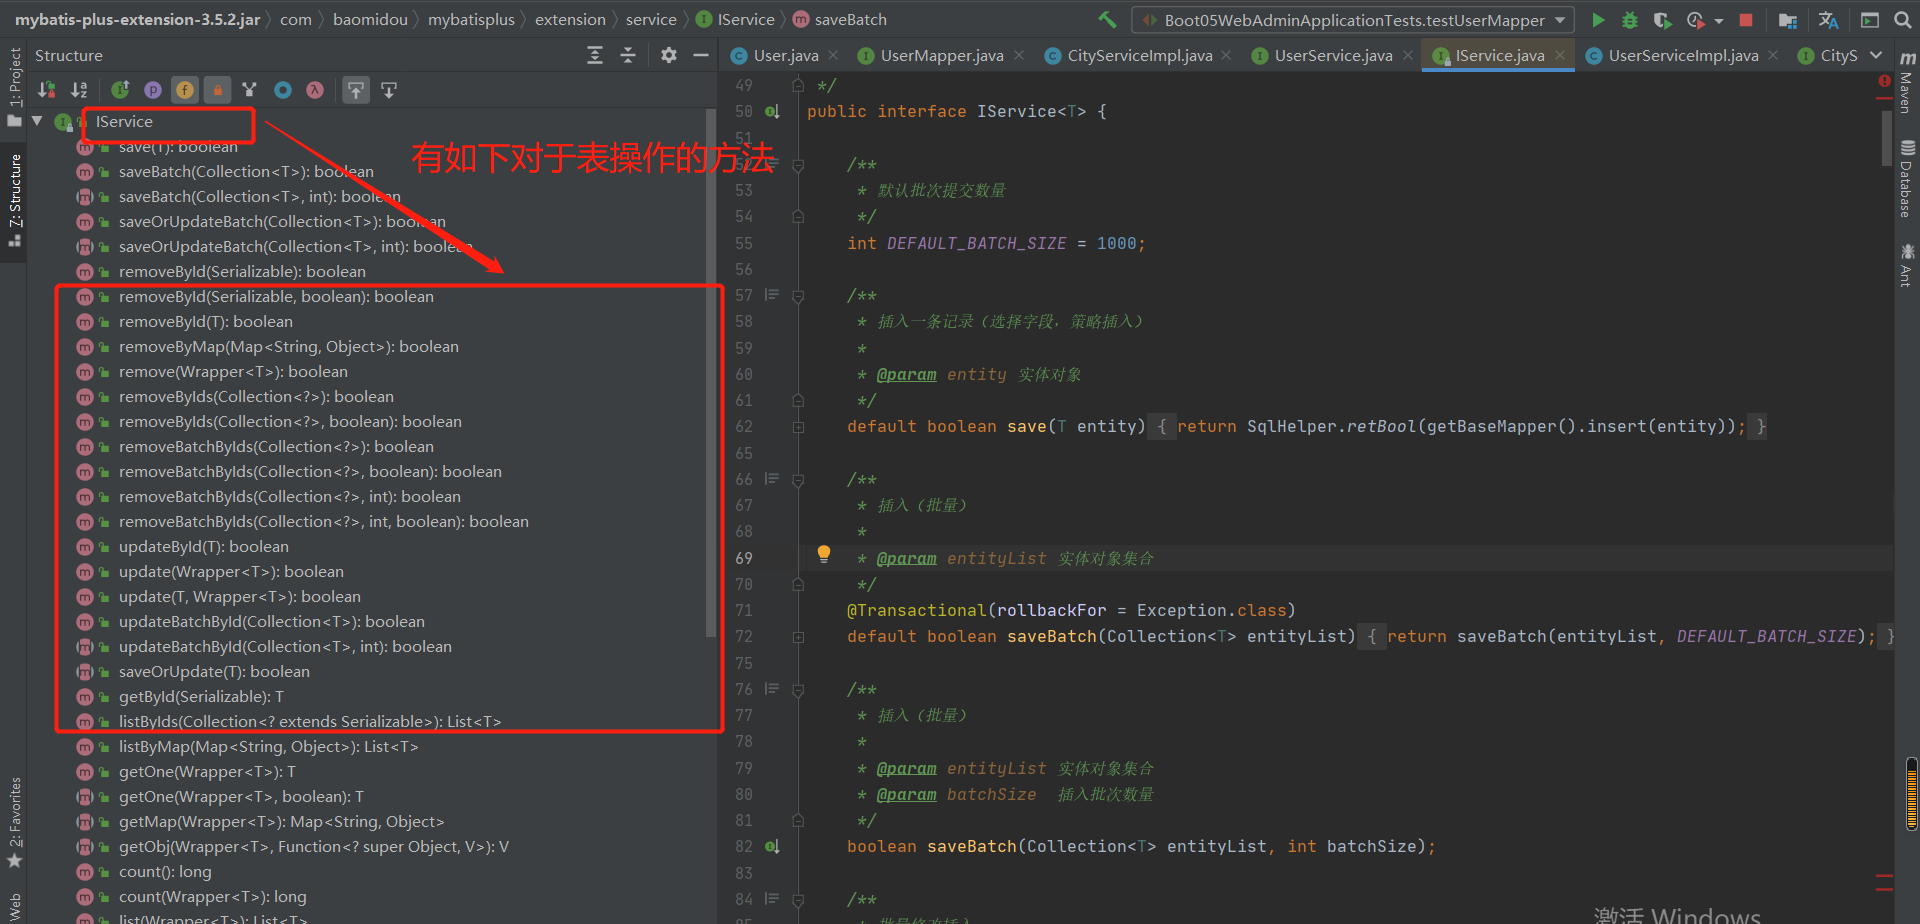
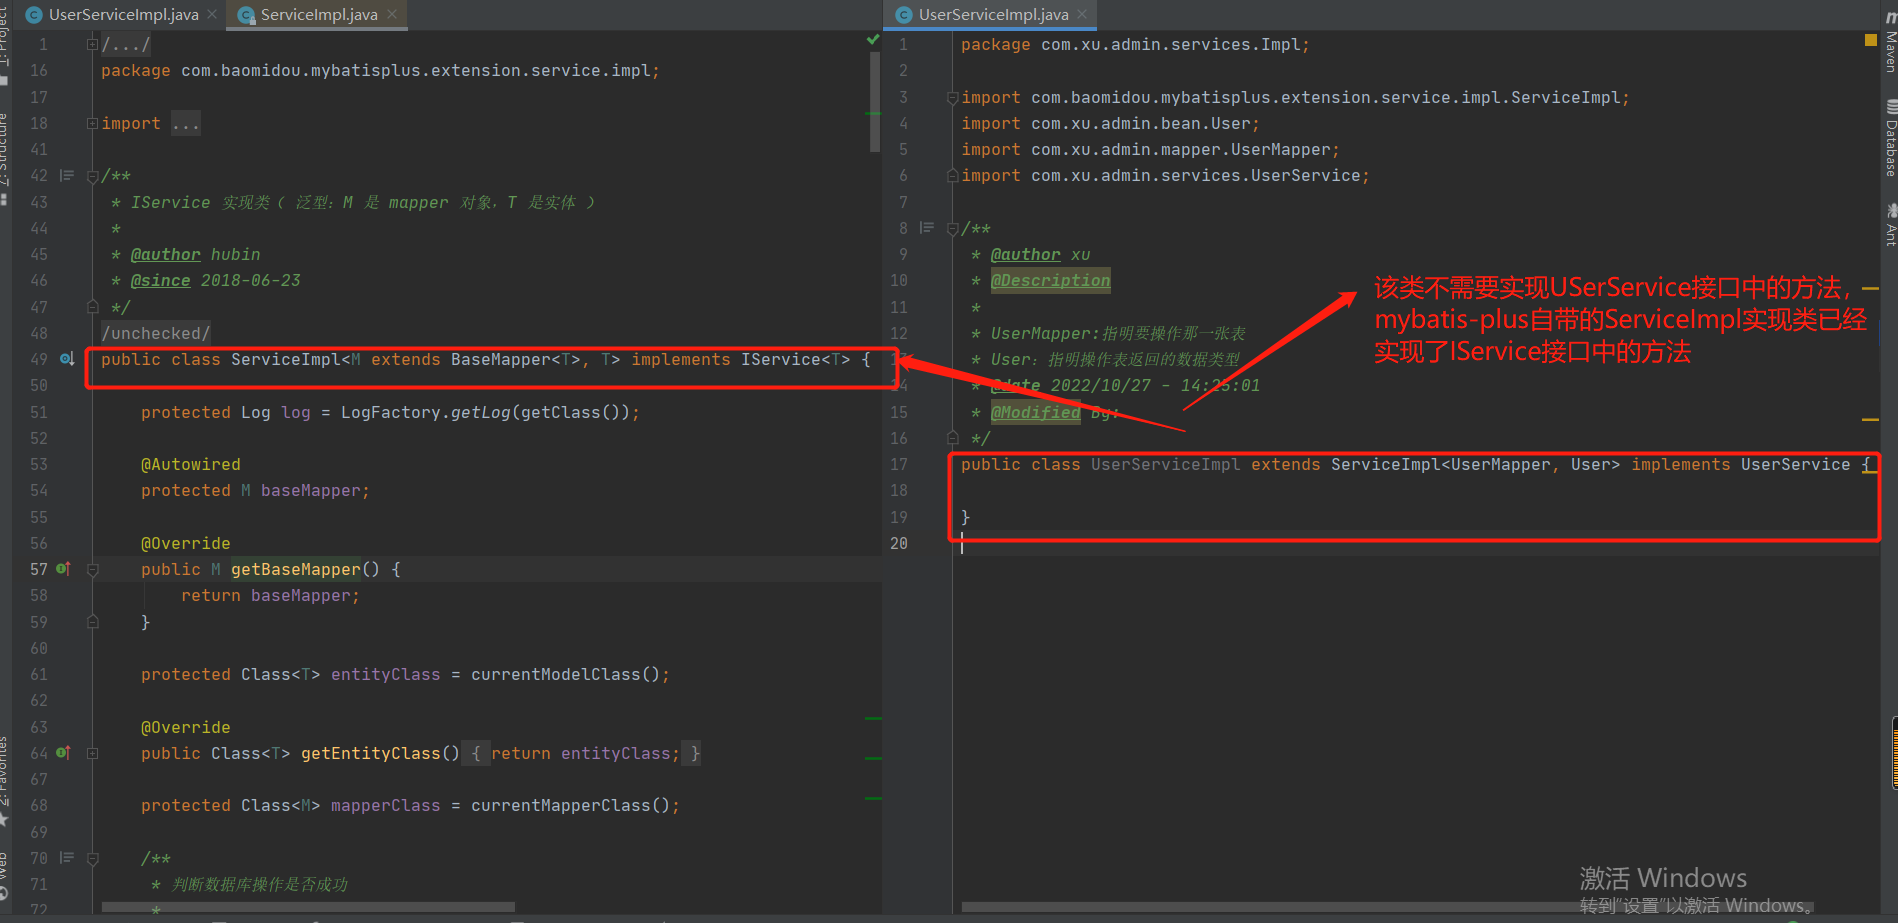
测试结果:
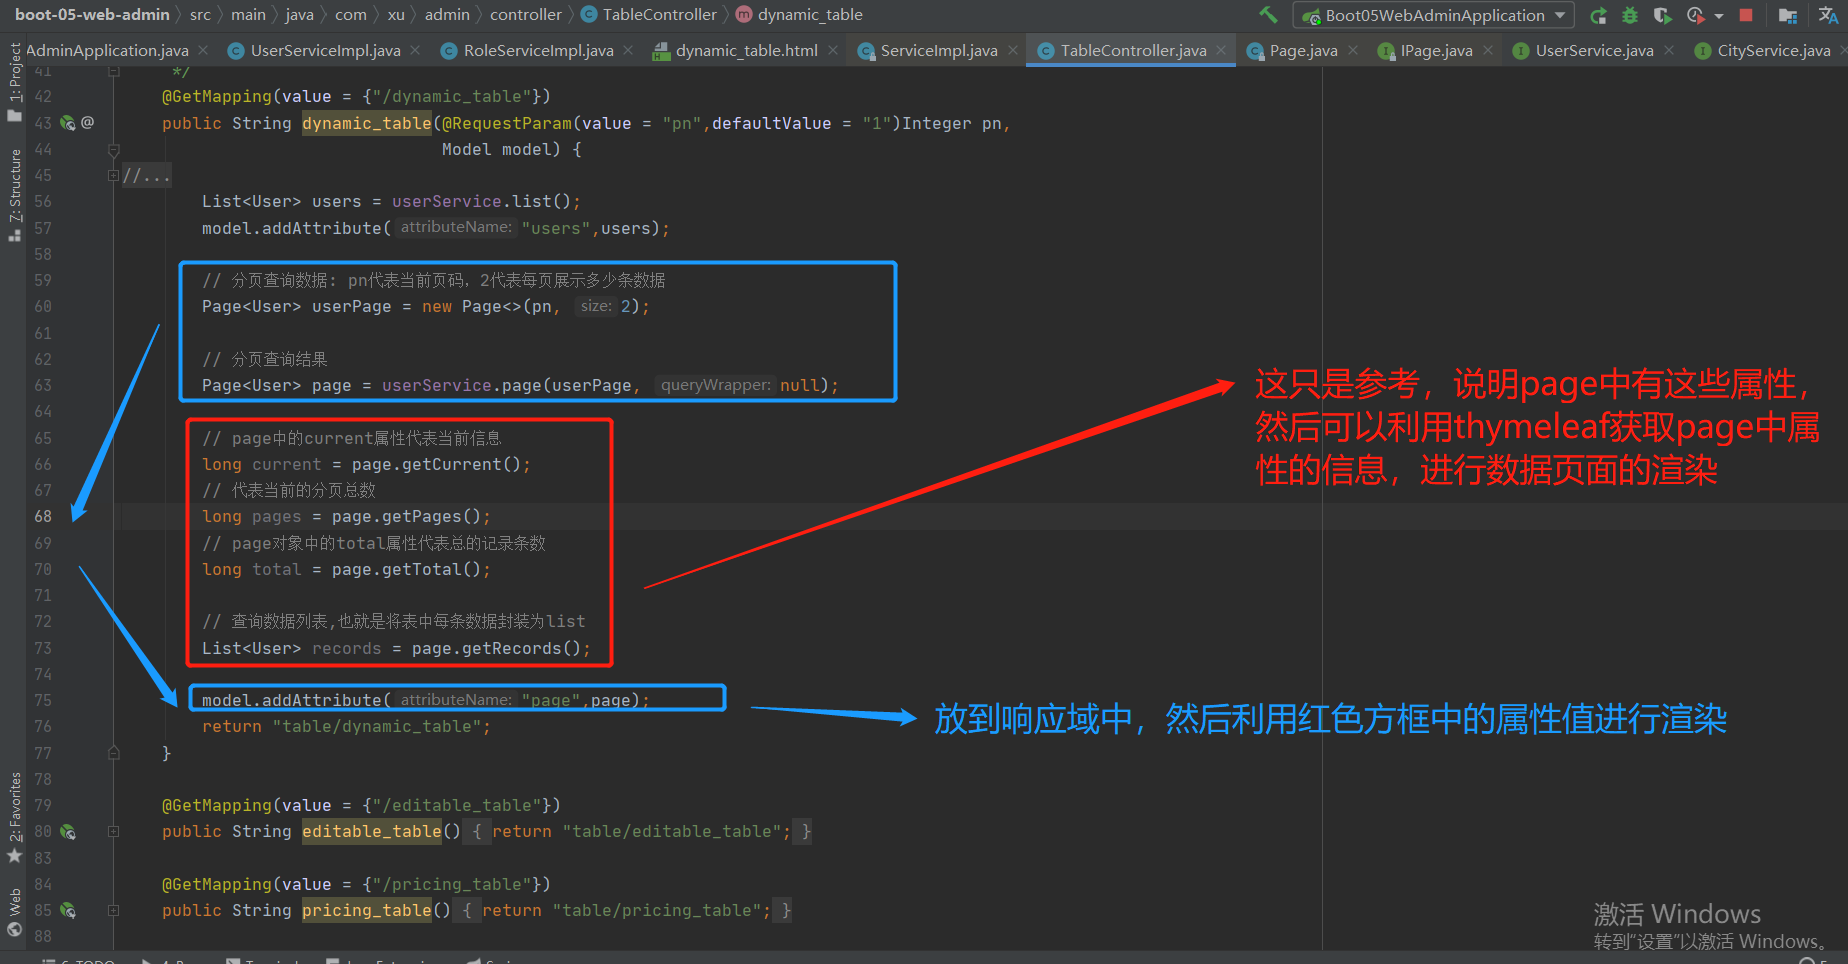
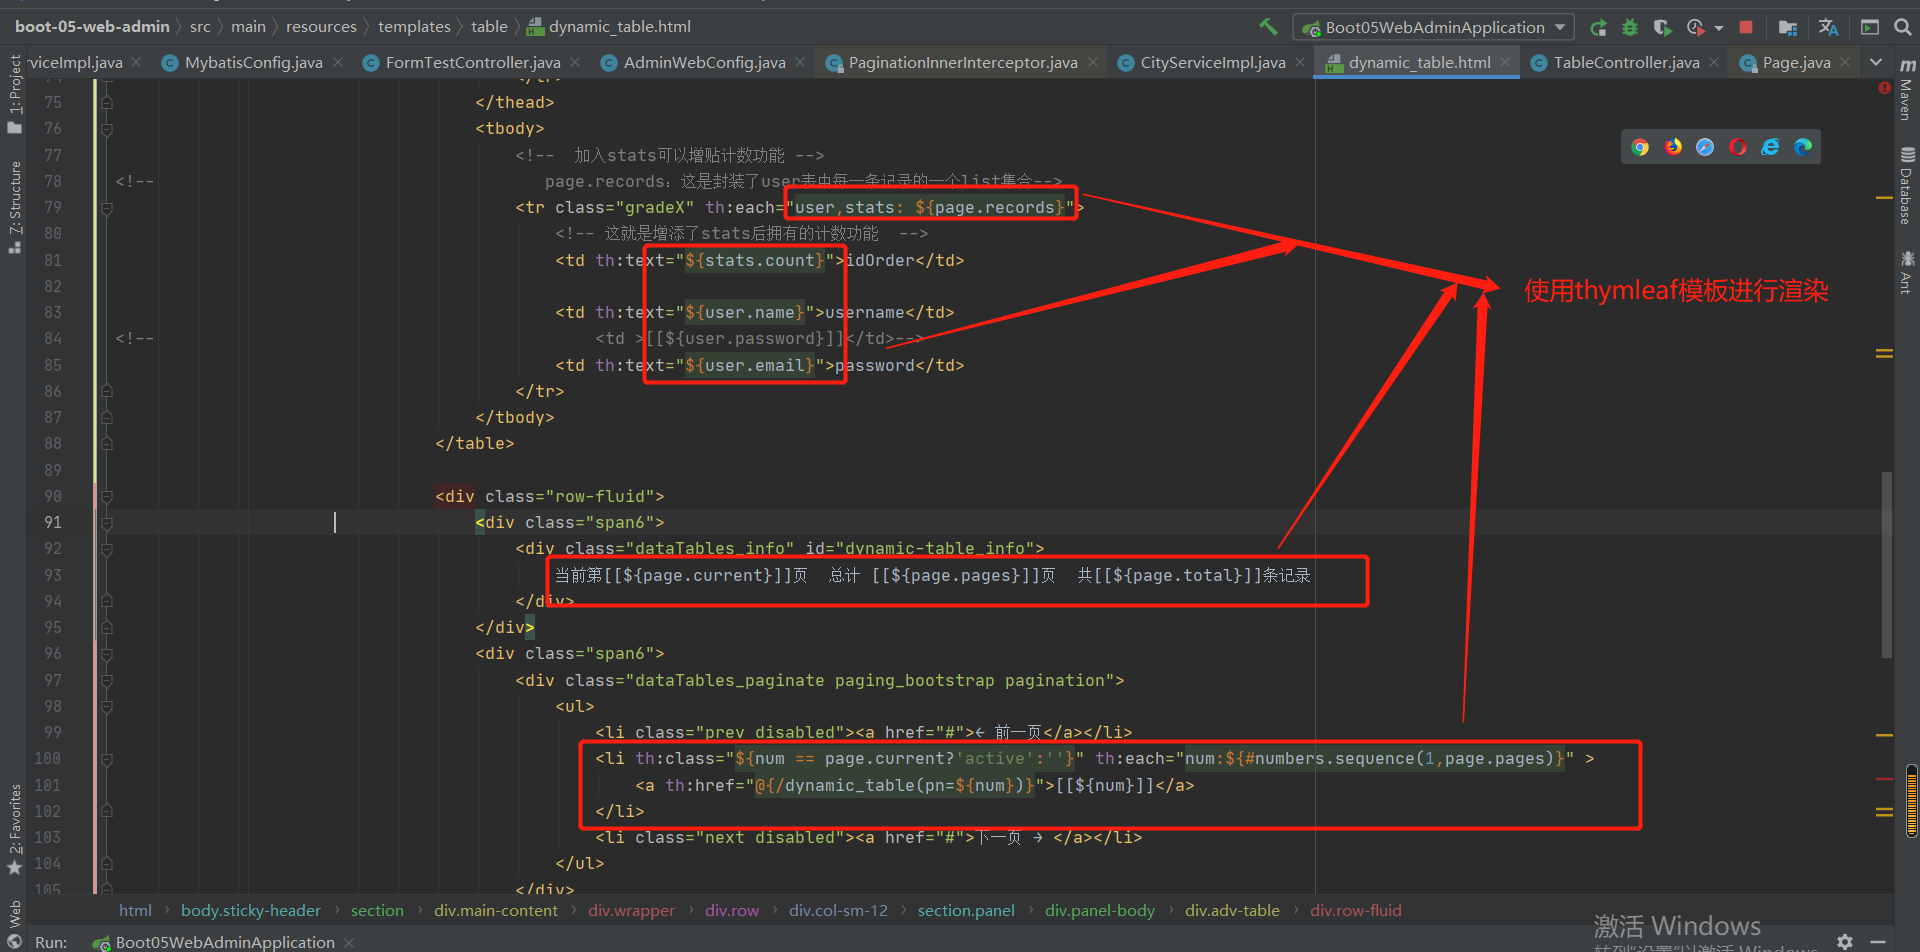
结果:
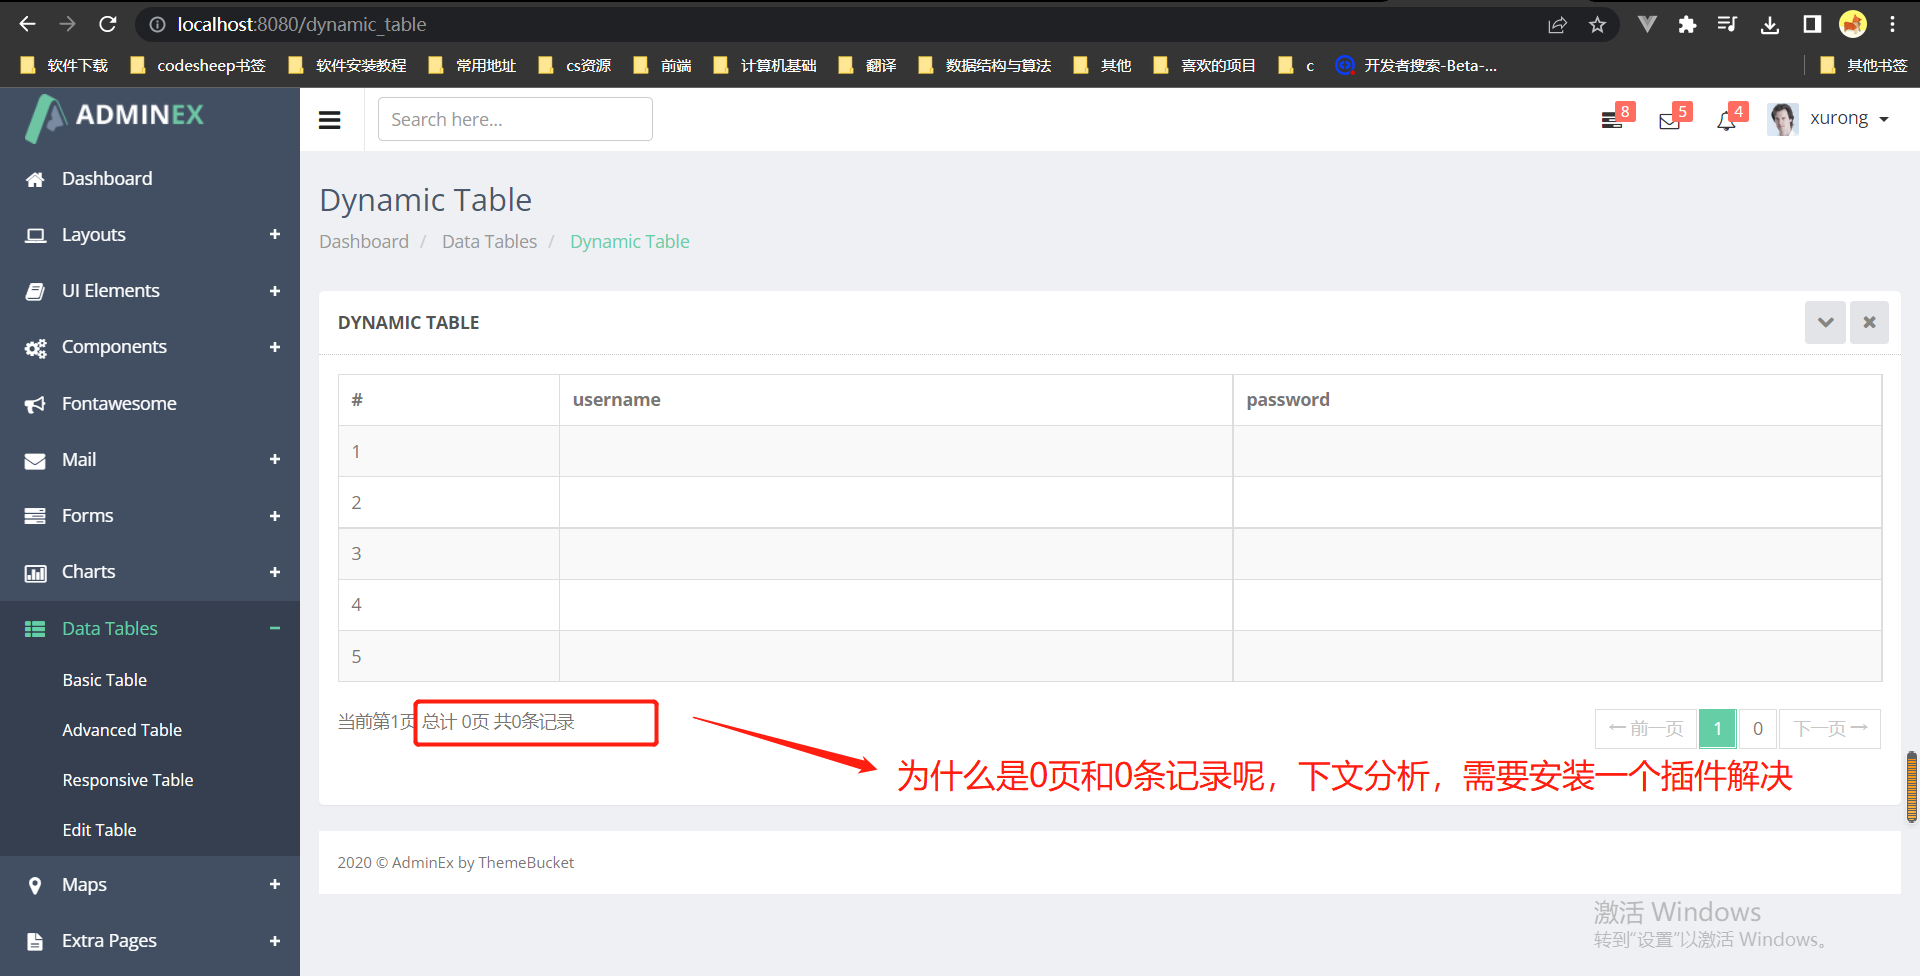
接下来,安装一个分页插件,解决上诉显示0条记录的问题:
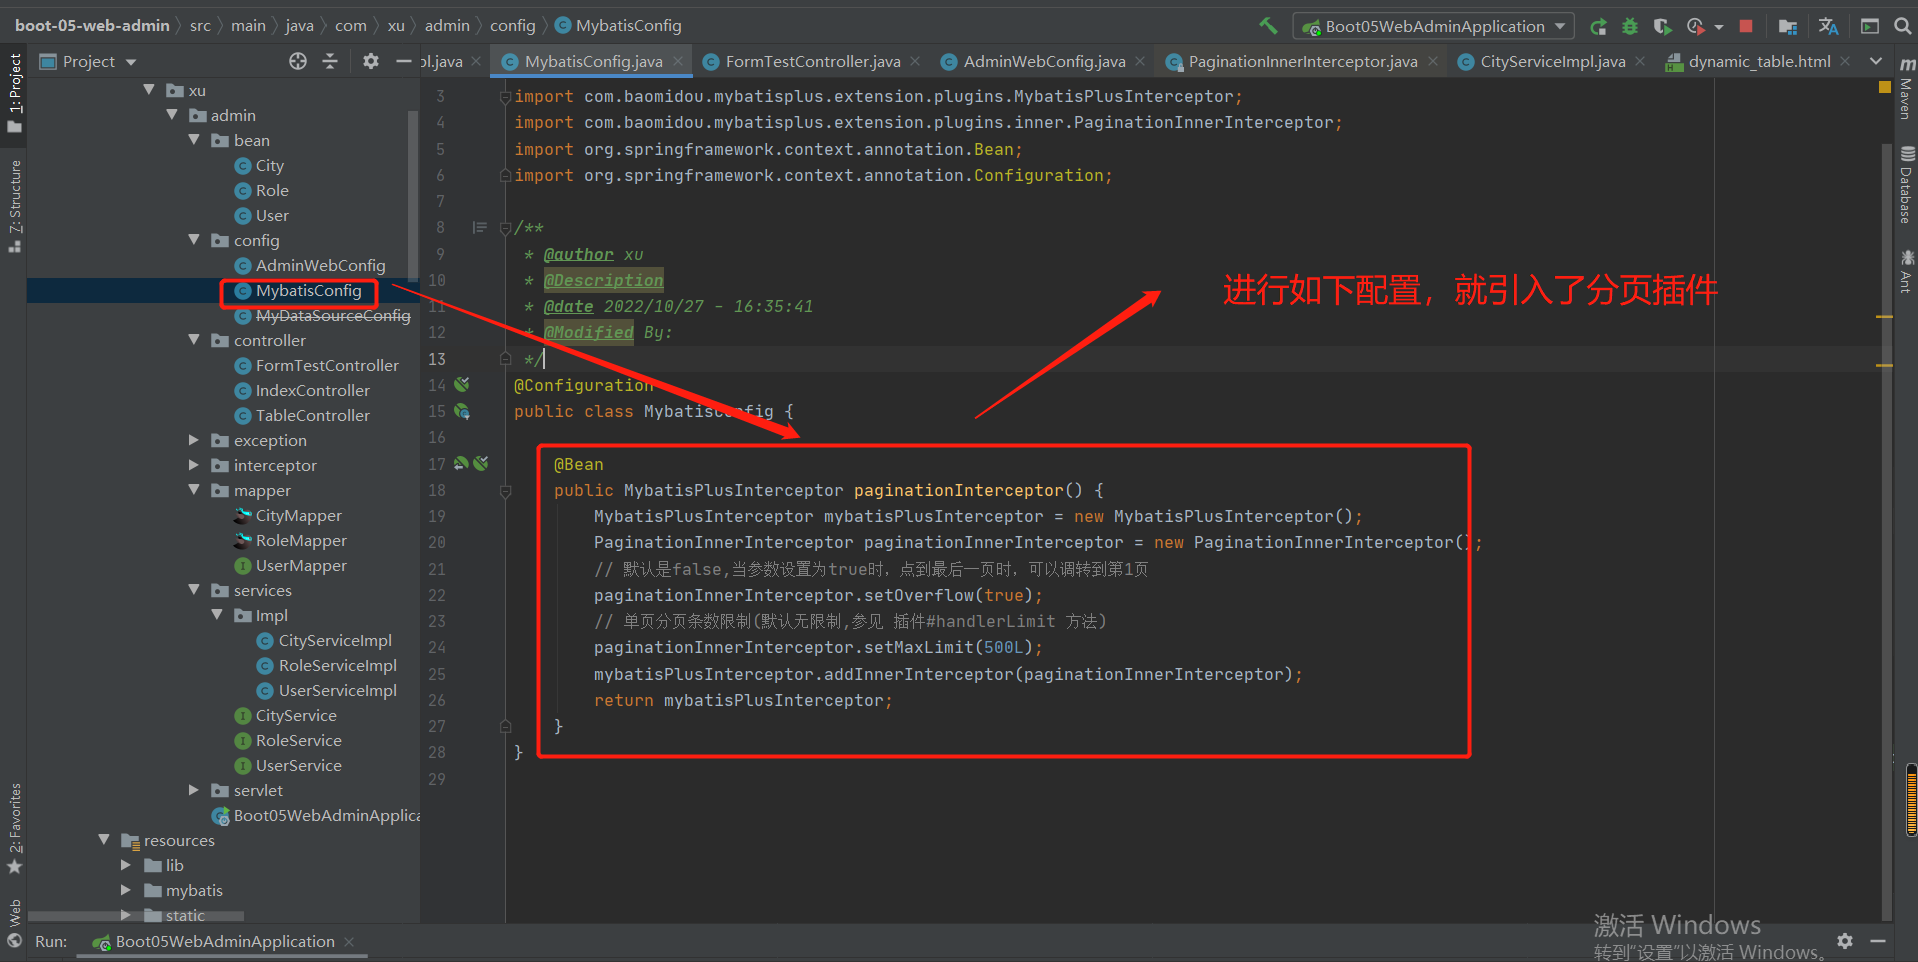
结果:
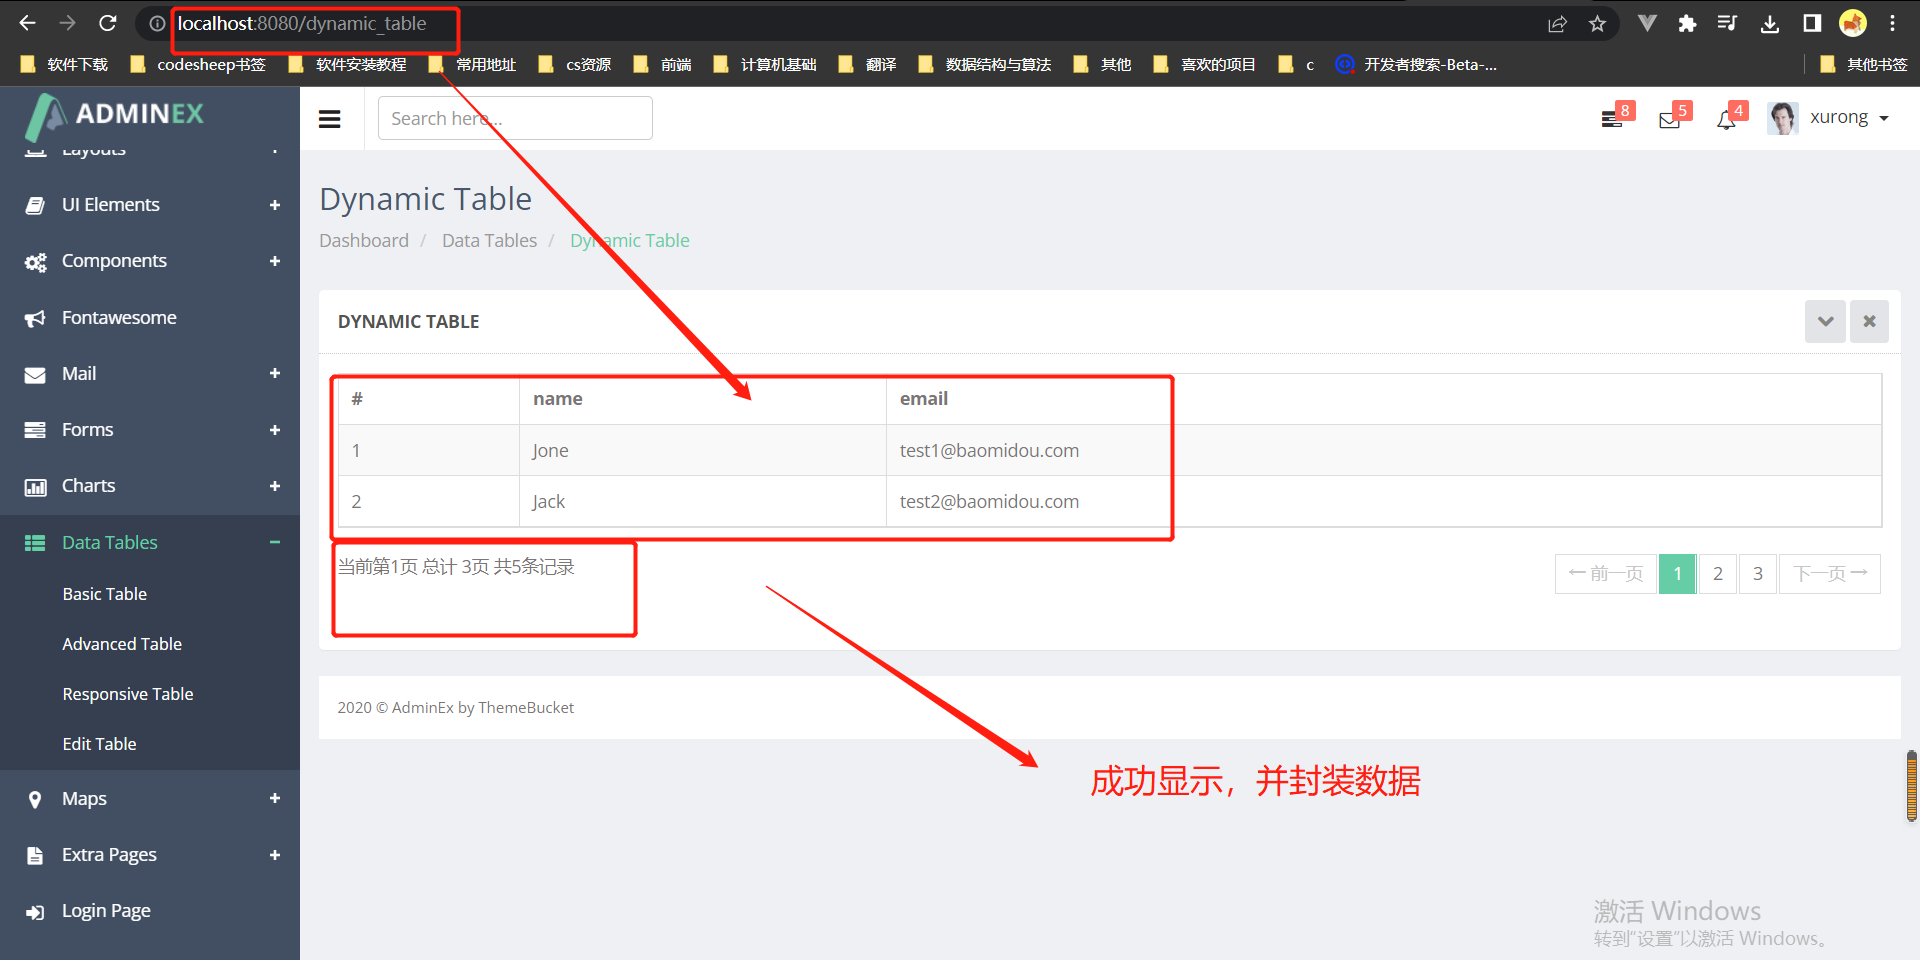
增添删除按钮:
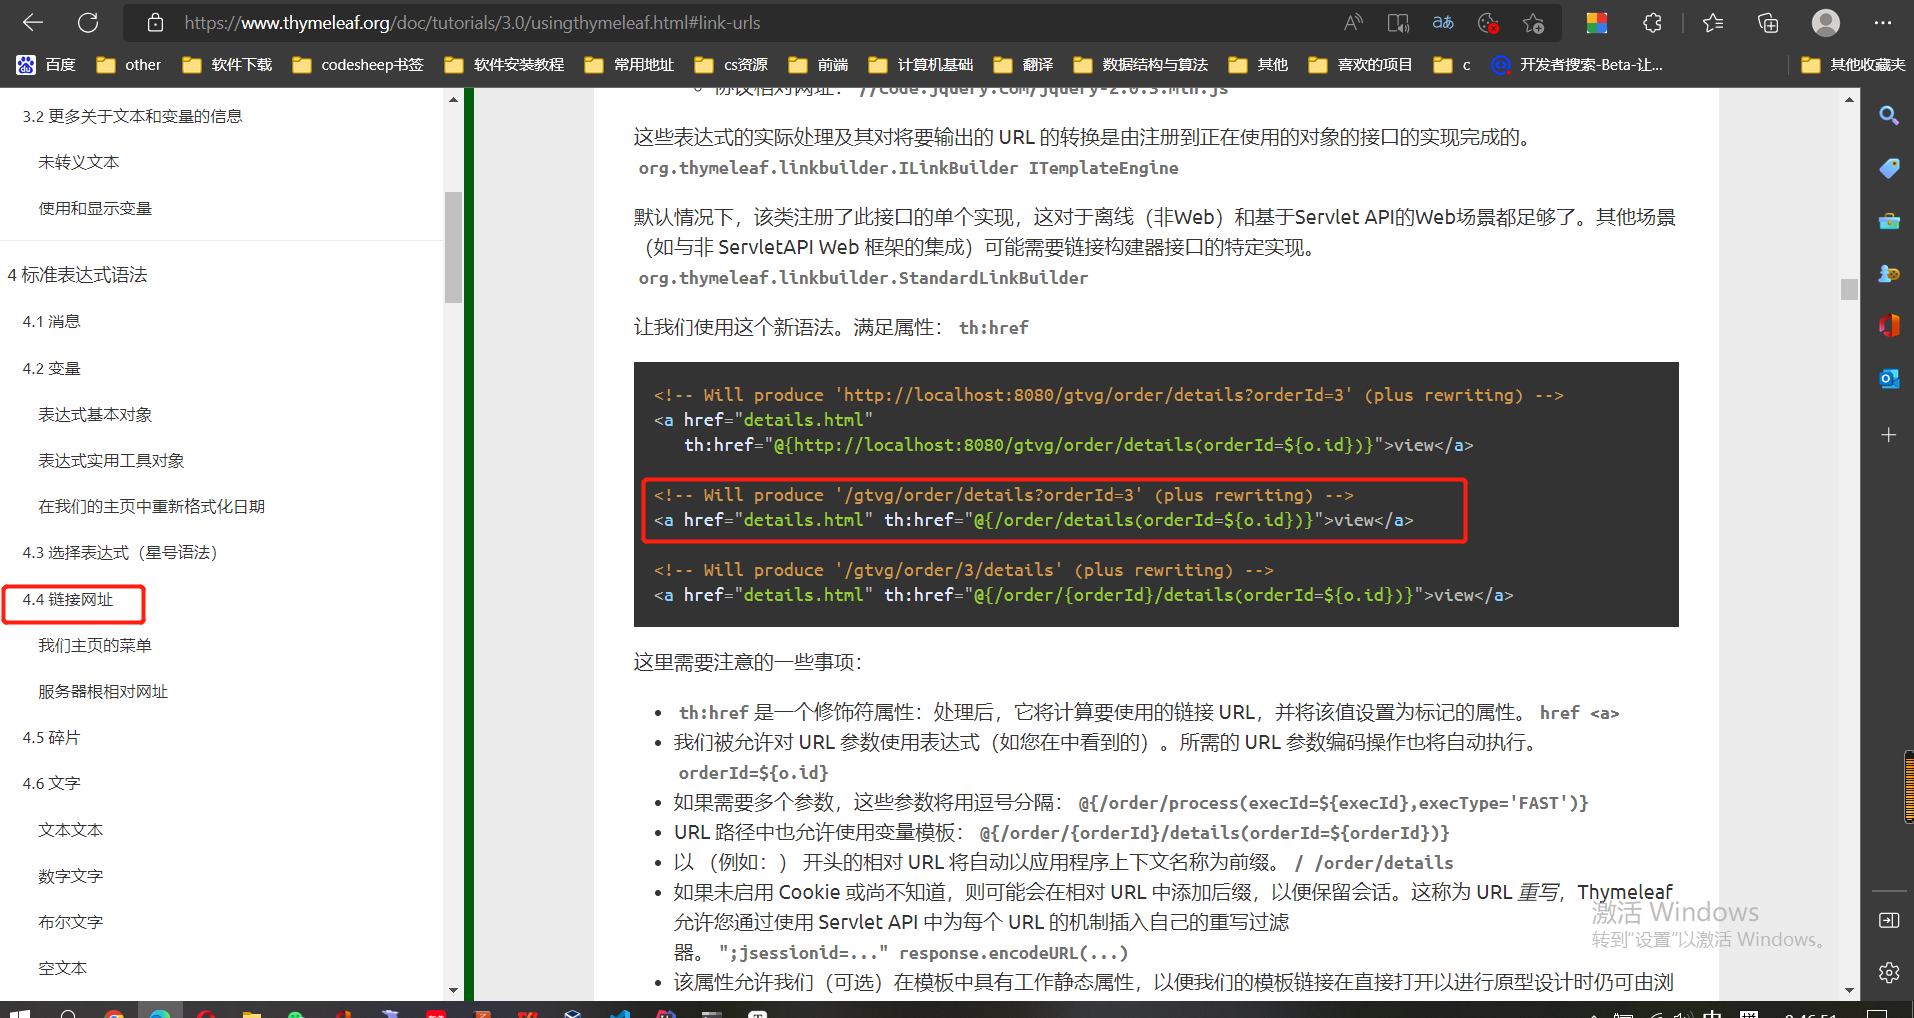
删除某一个用户:
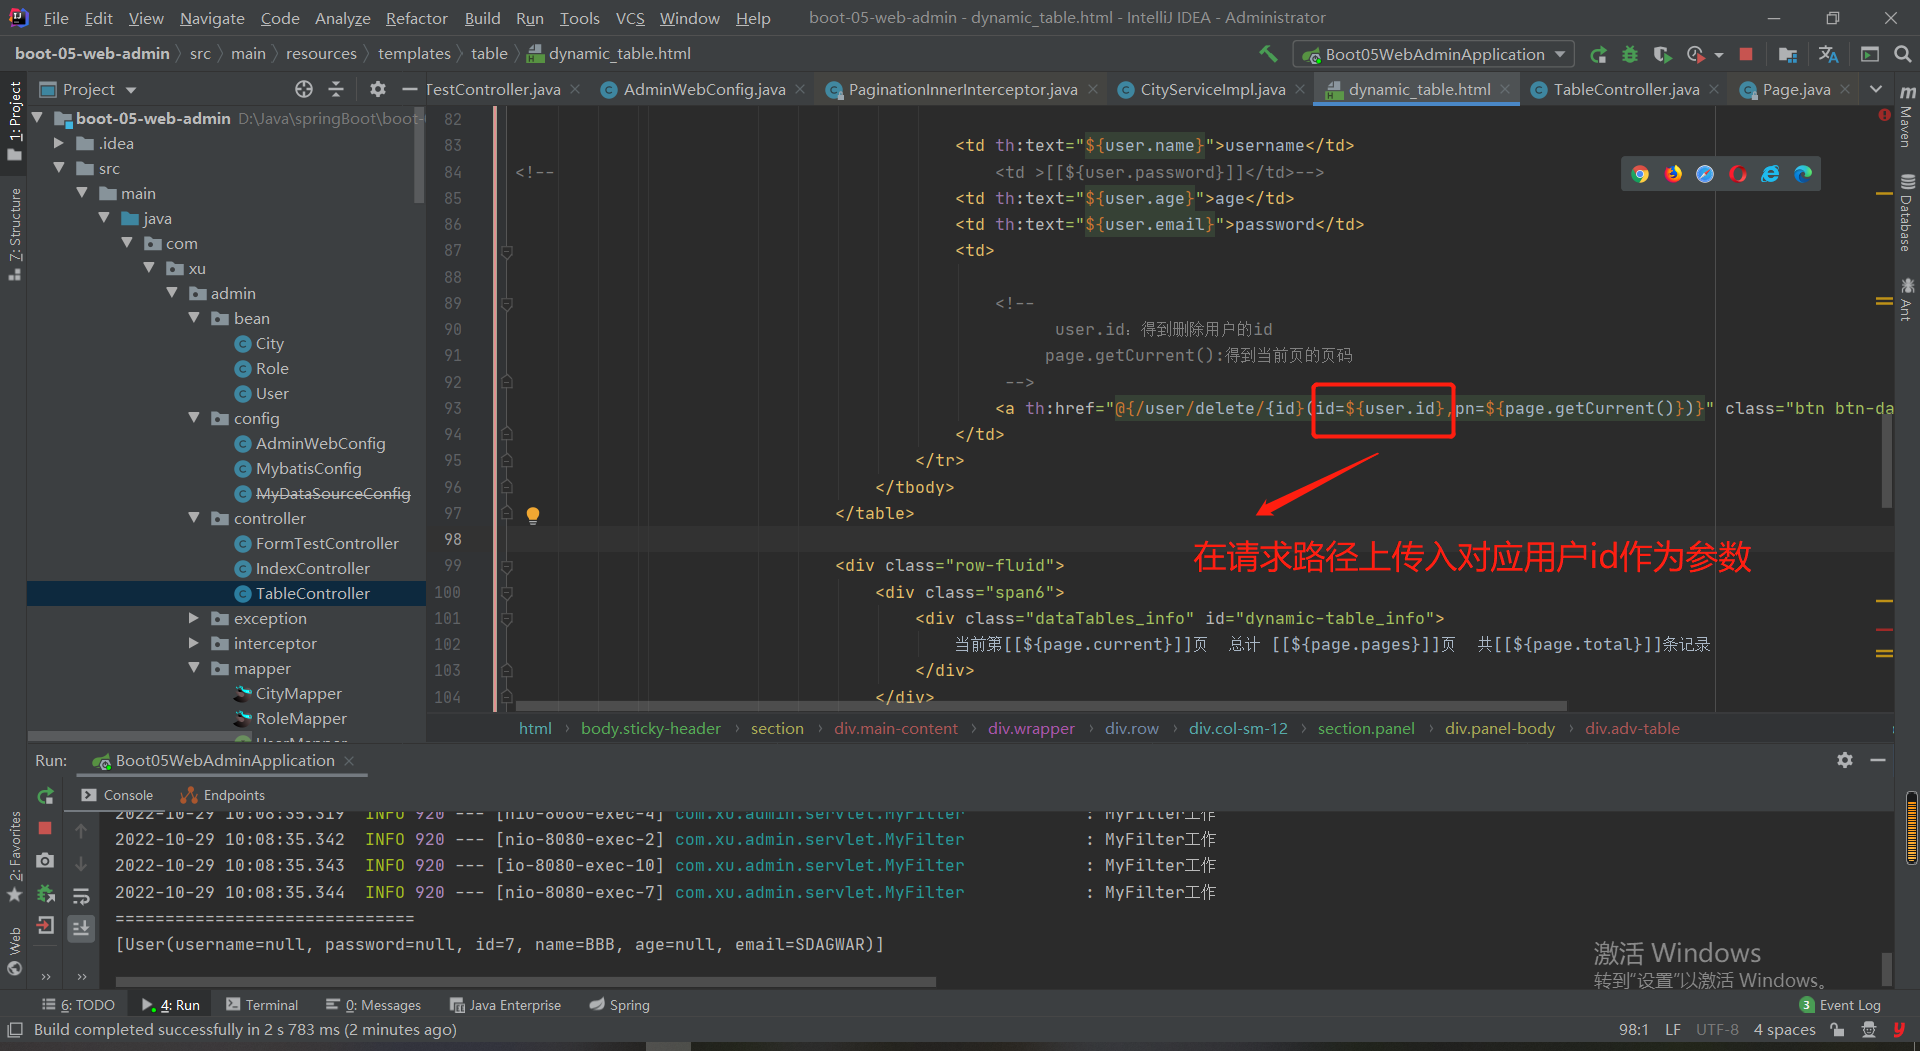
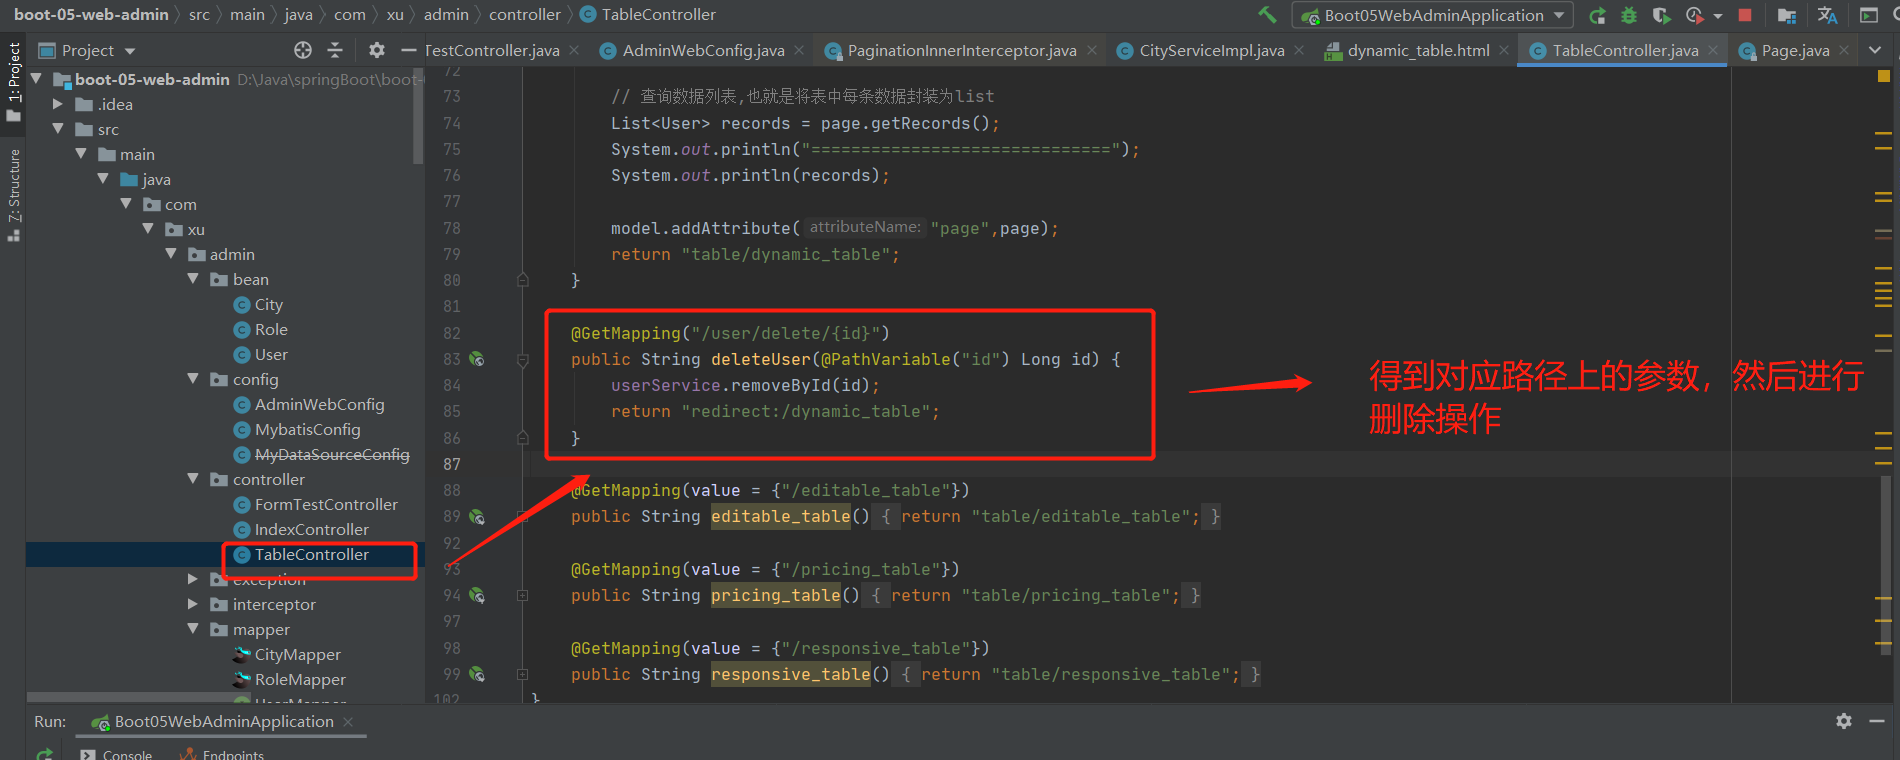
结果:
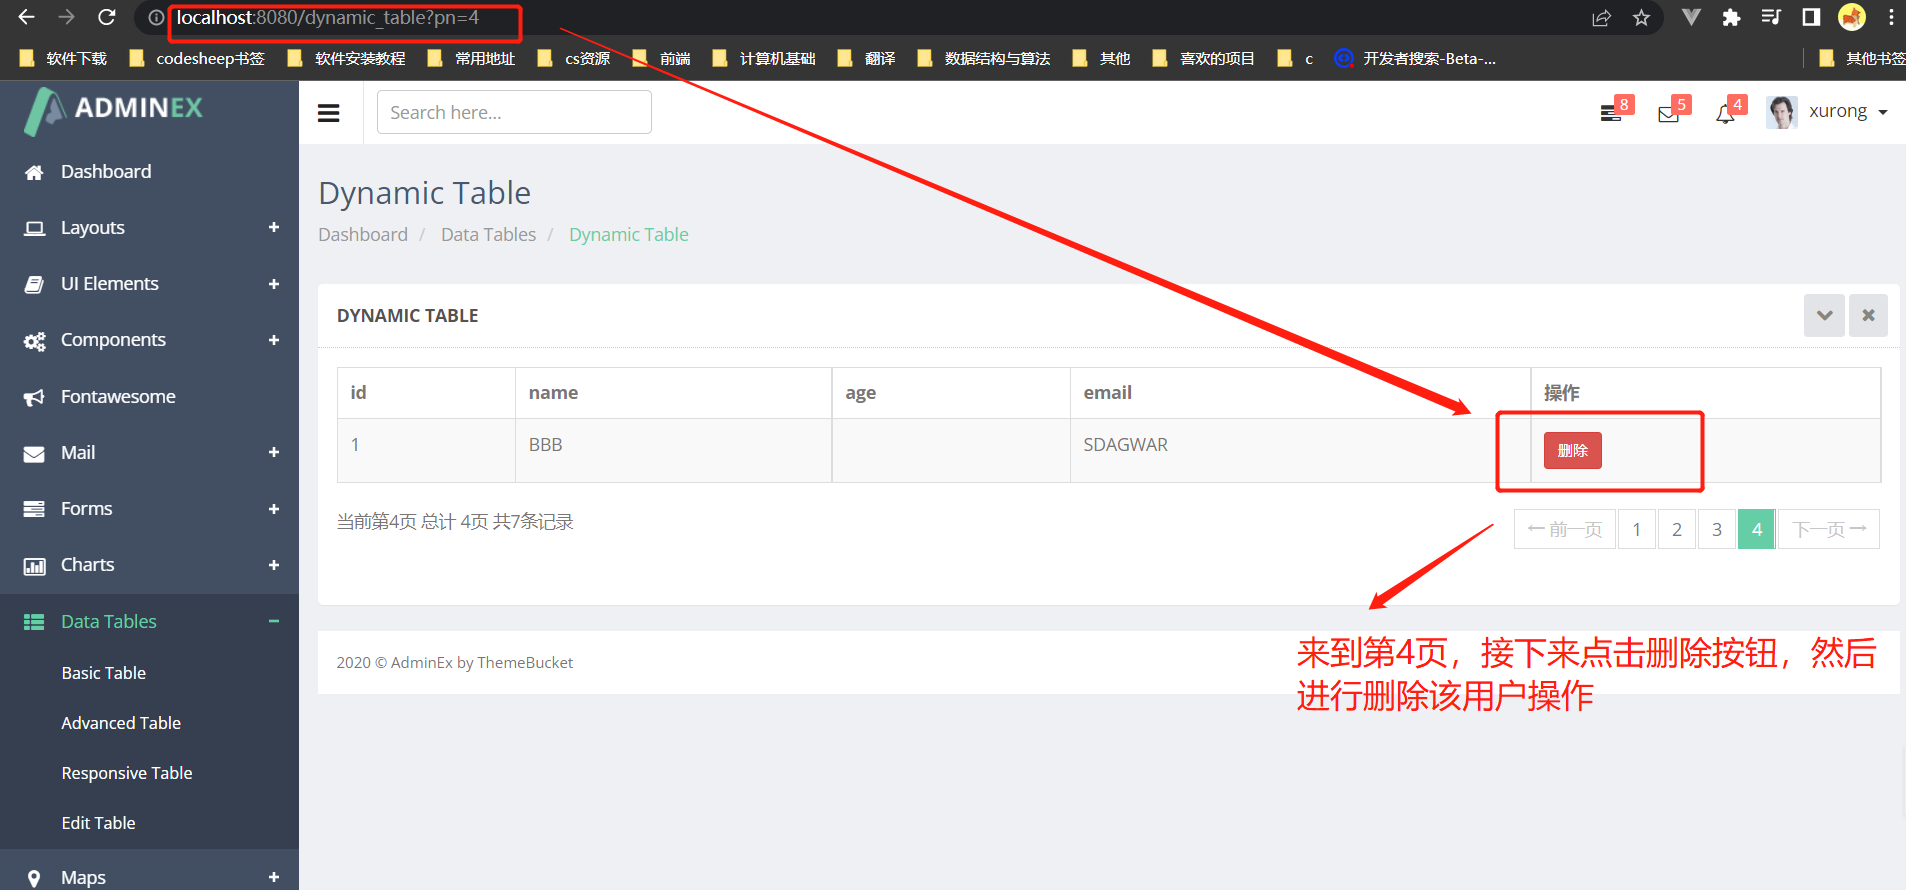
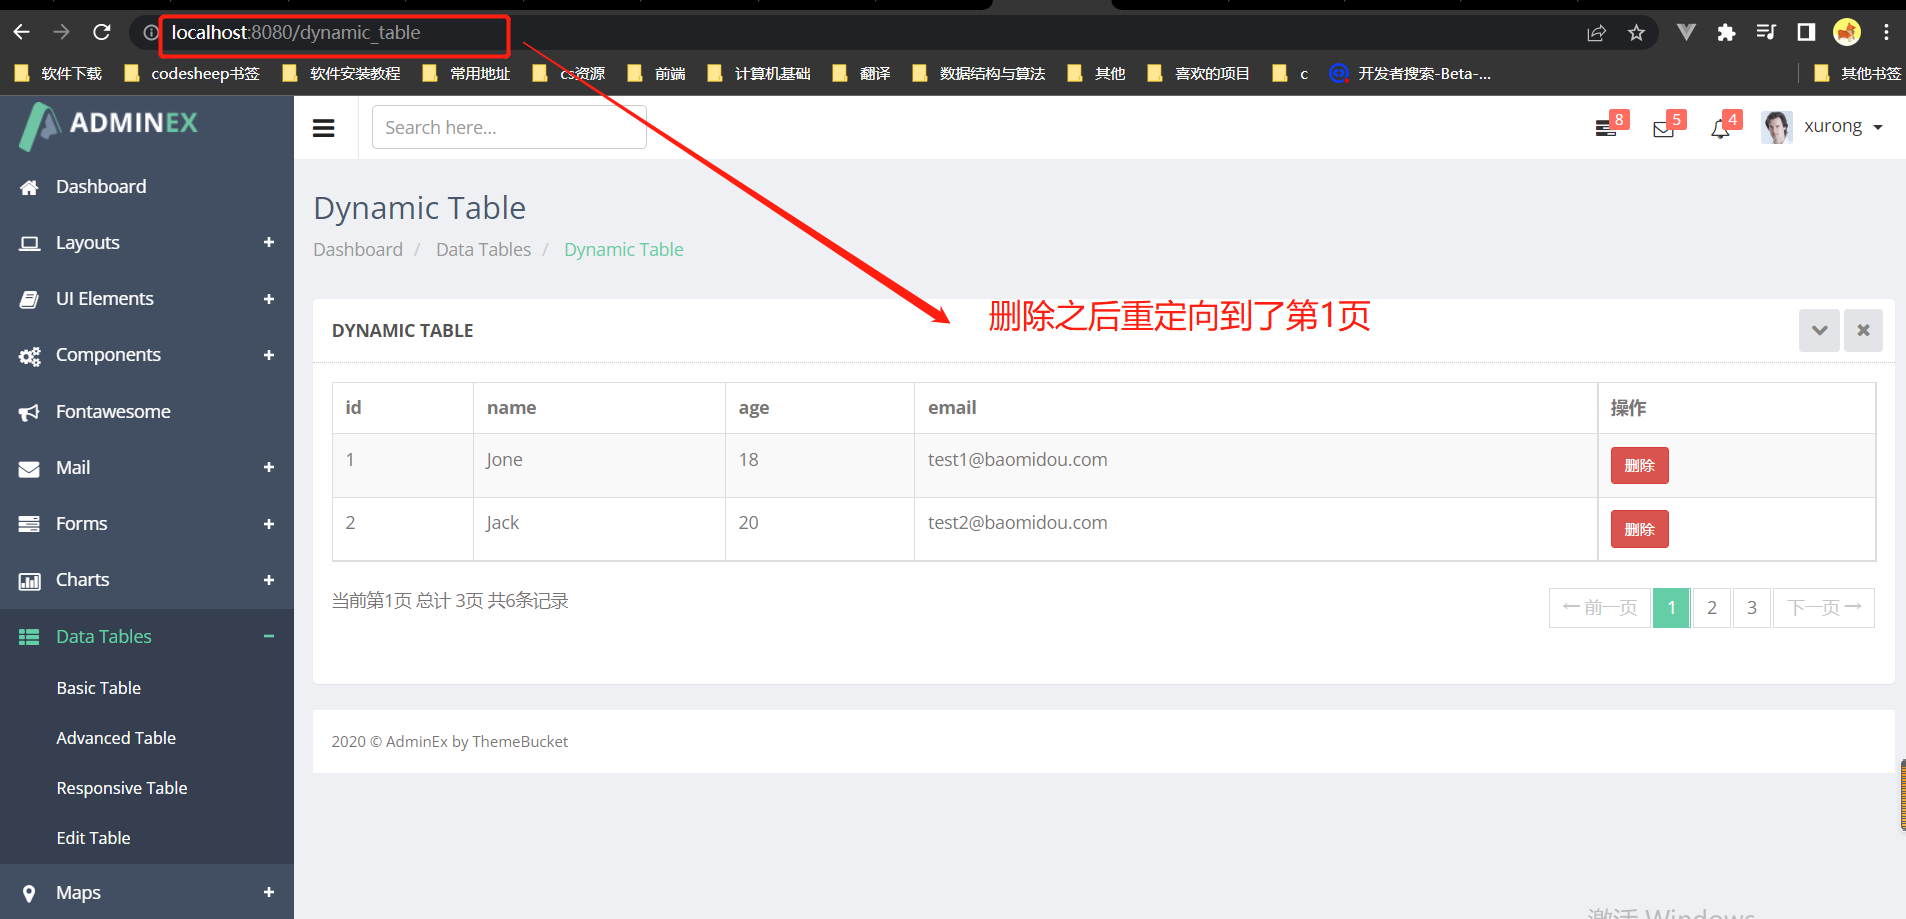
改进:删除之后还停留在当前页,而不是跳转到第一页,只需在重定向时,携带需要重定向的页码即可。
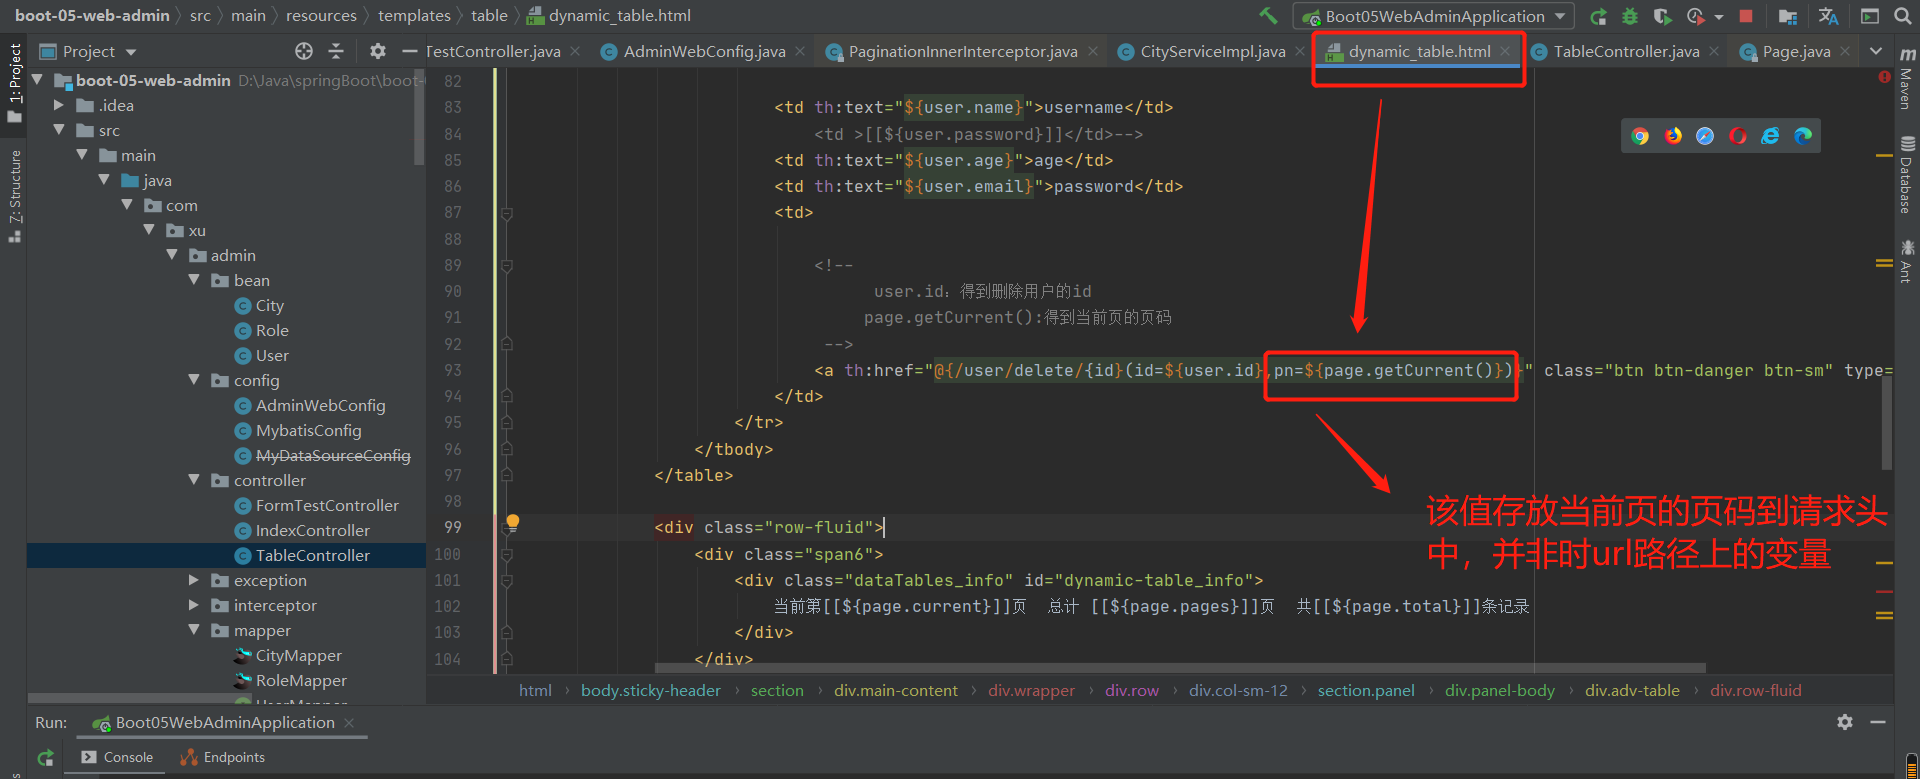
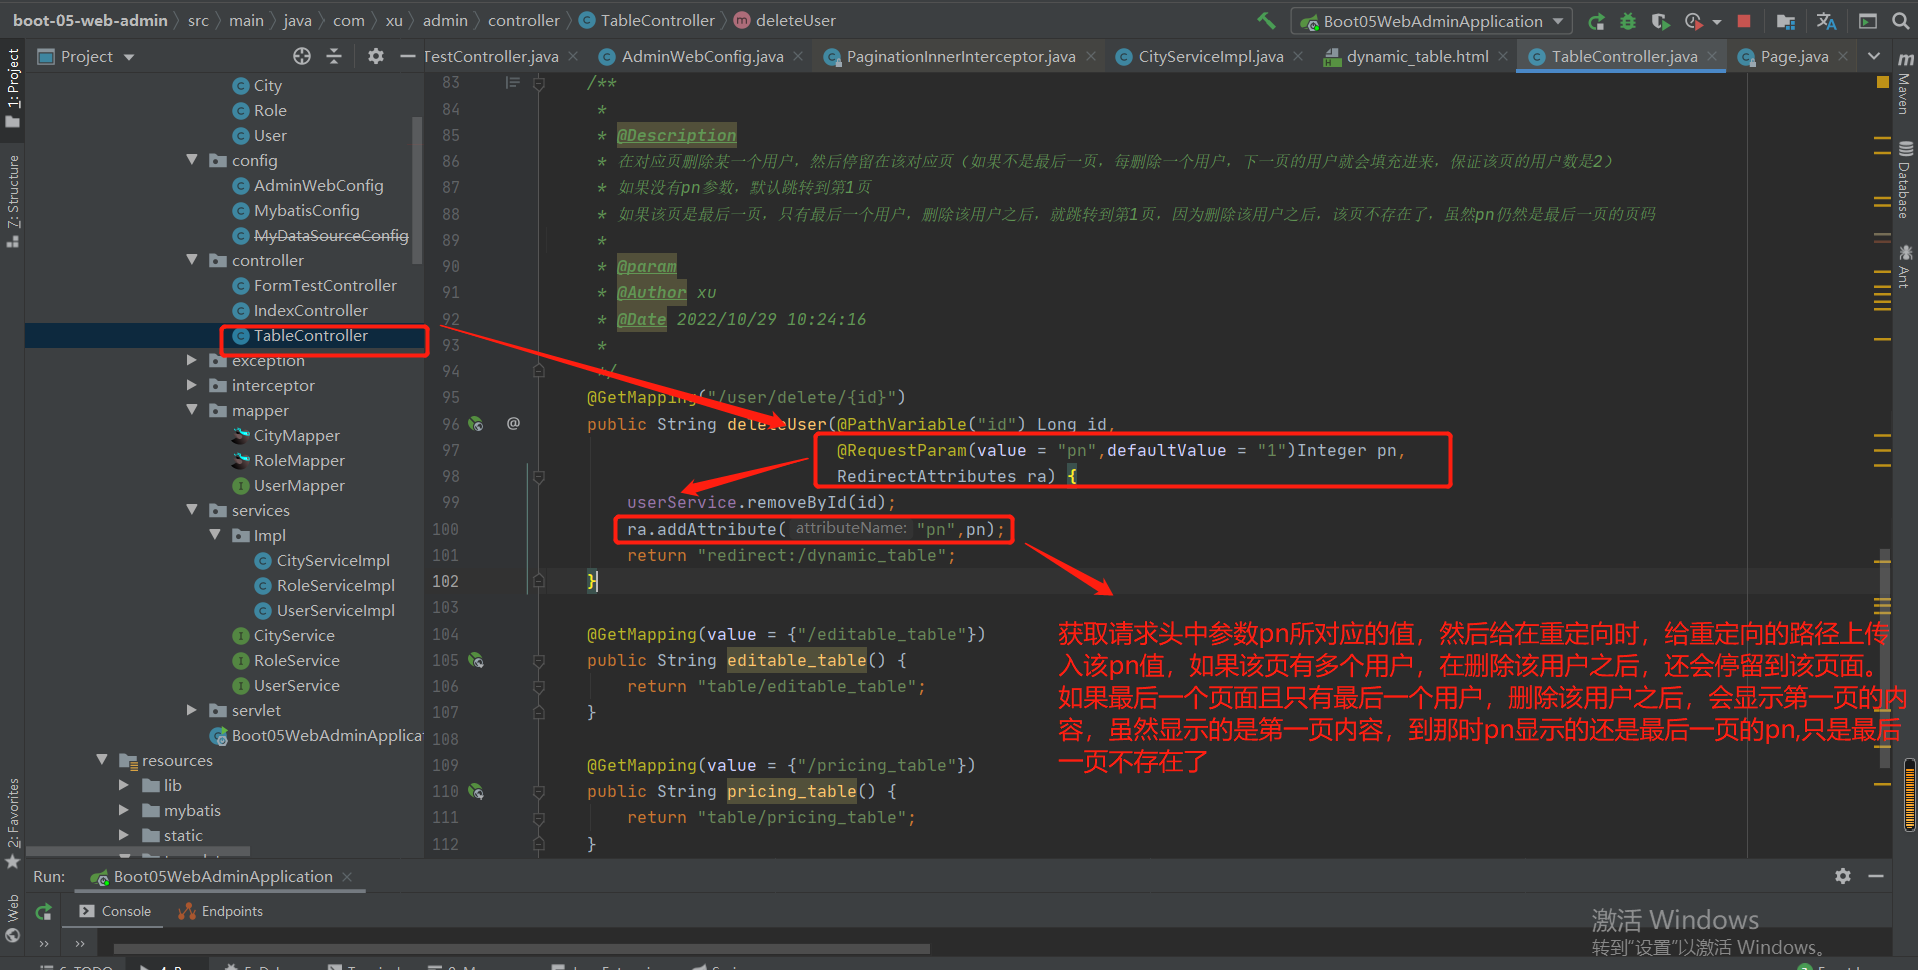
实验结果:
测试1:
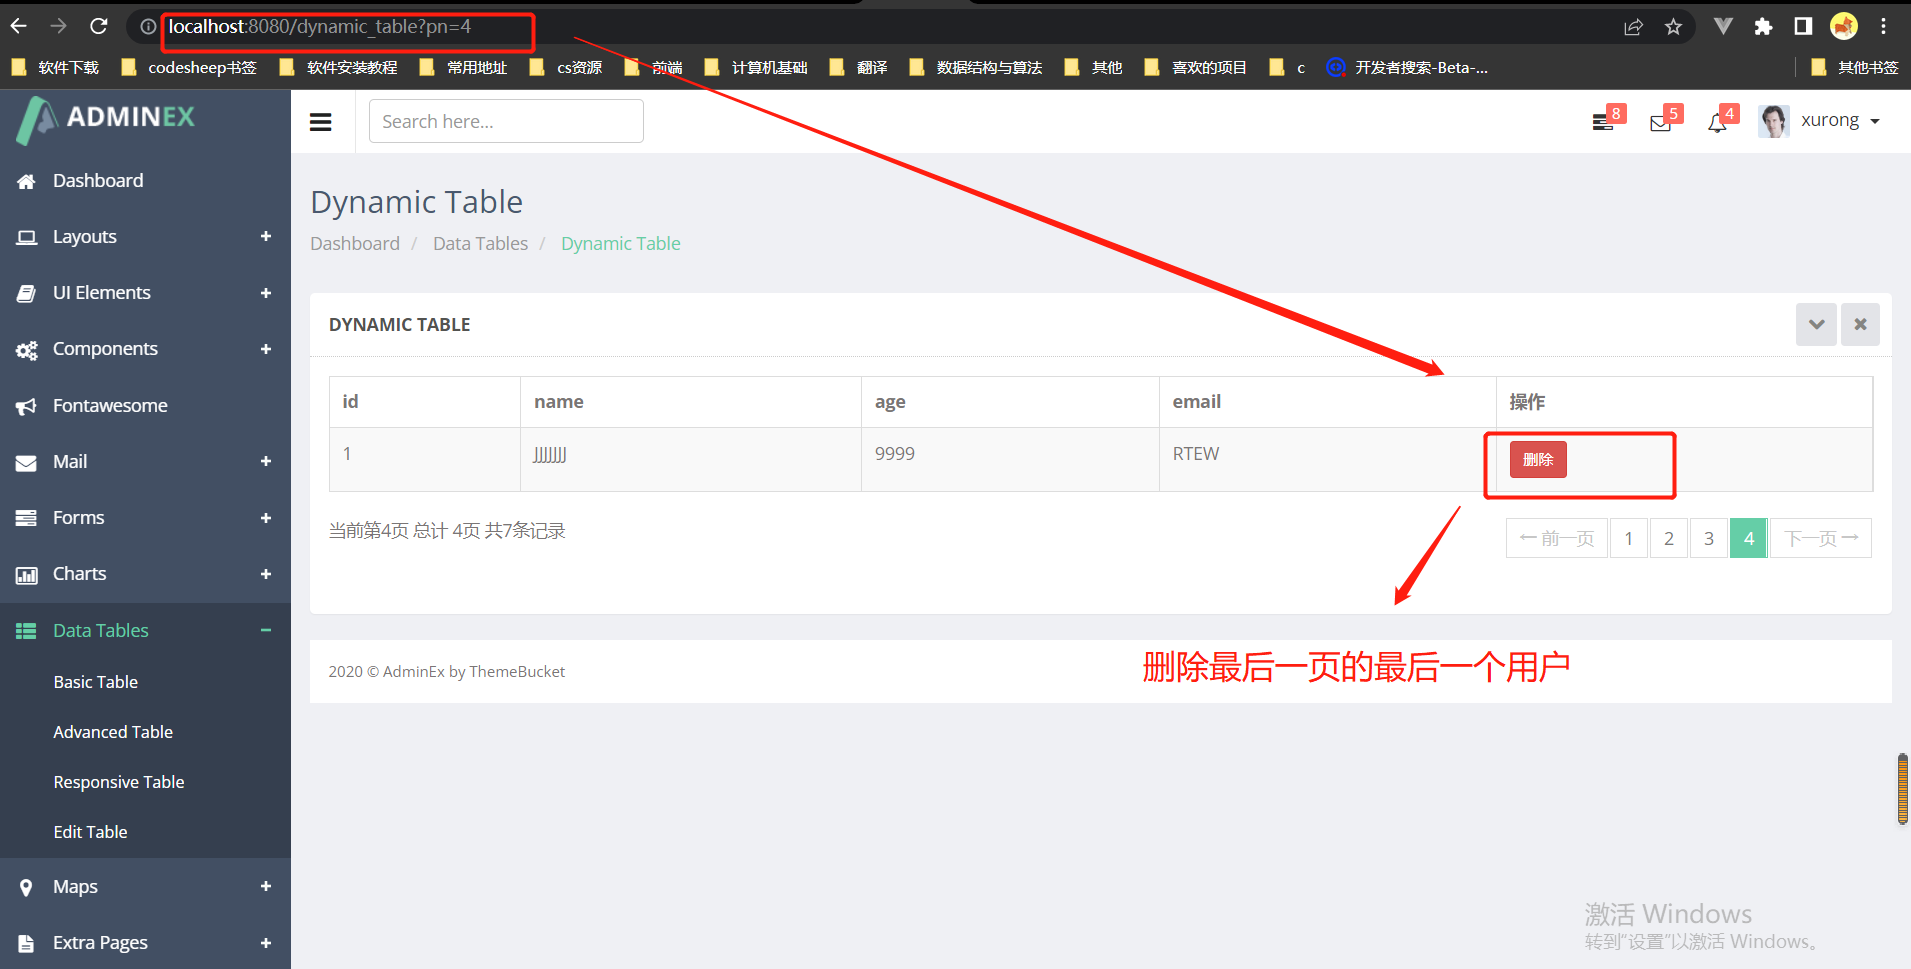
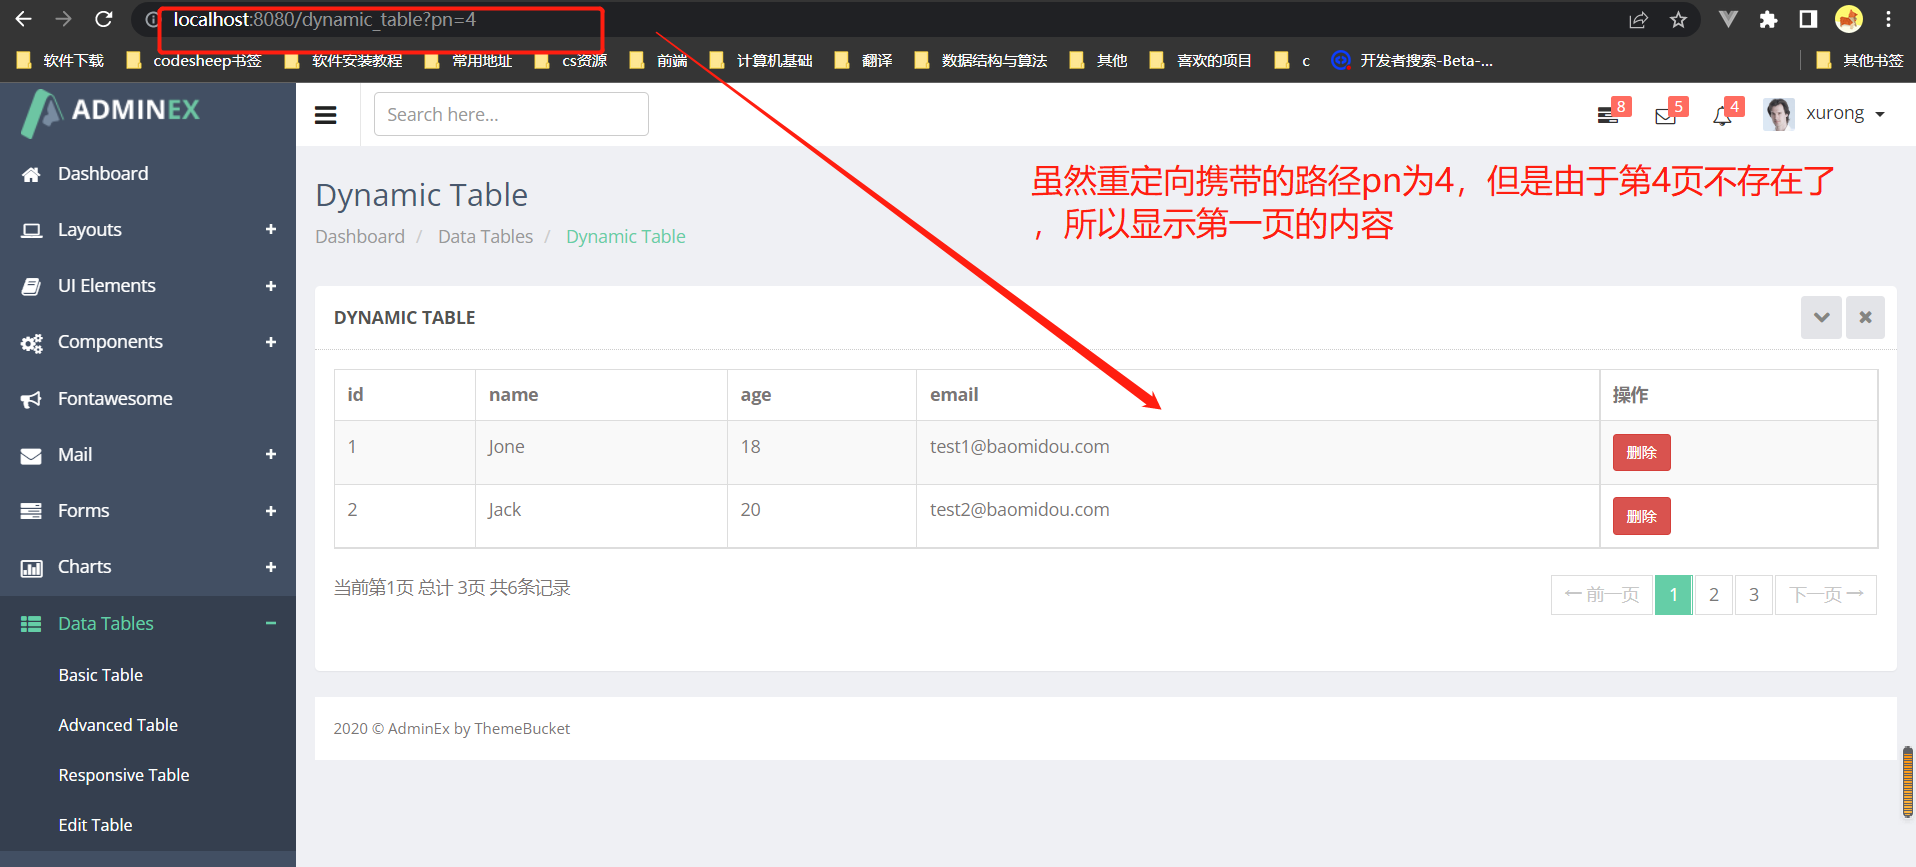
测试2:
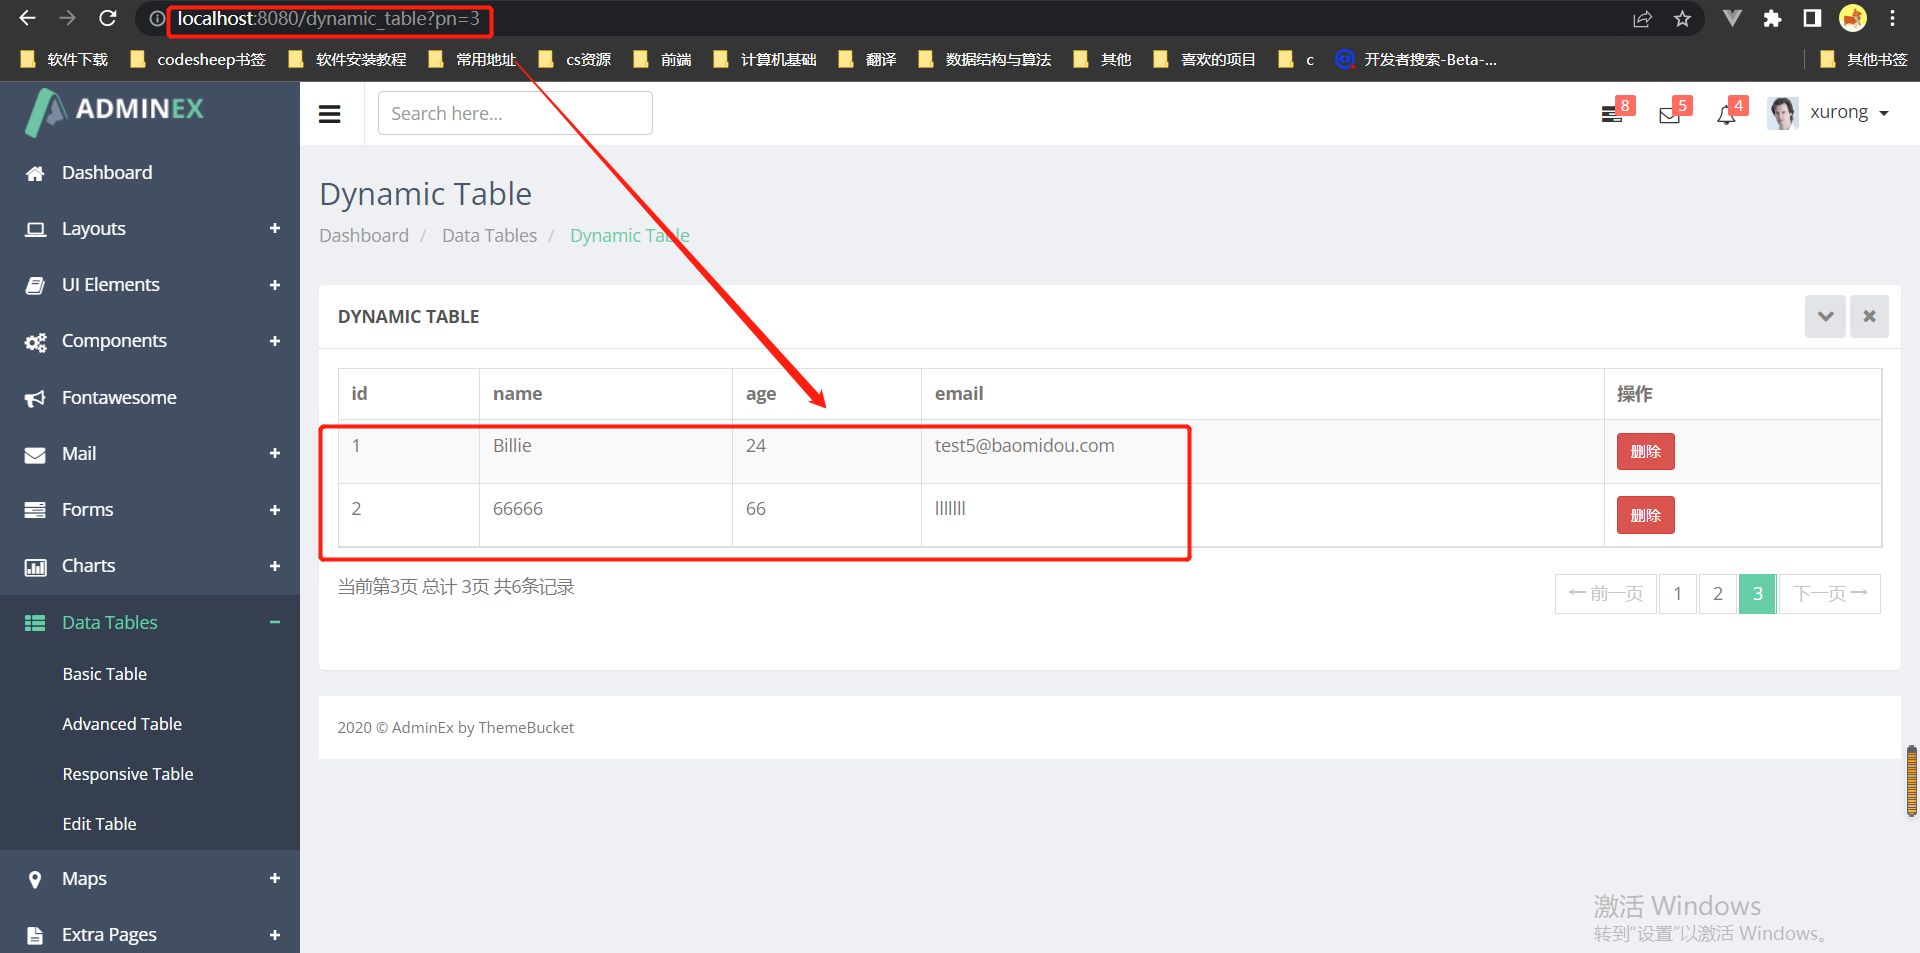
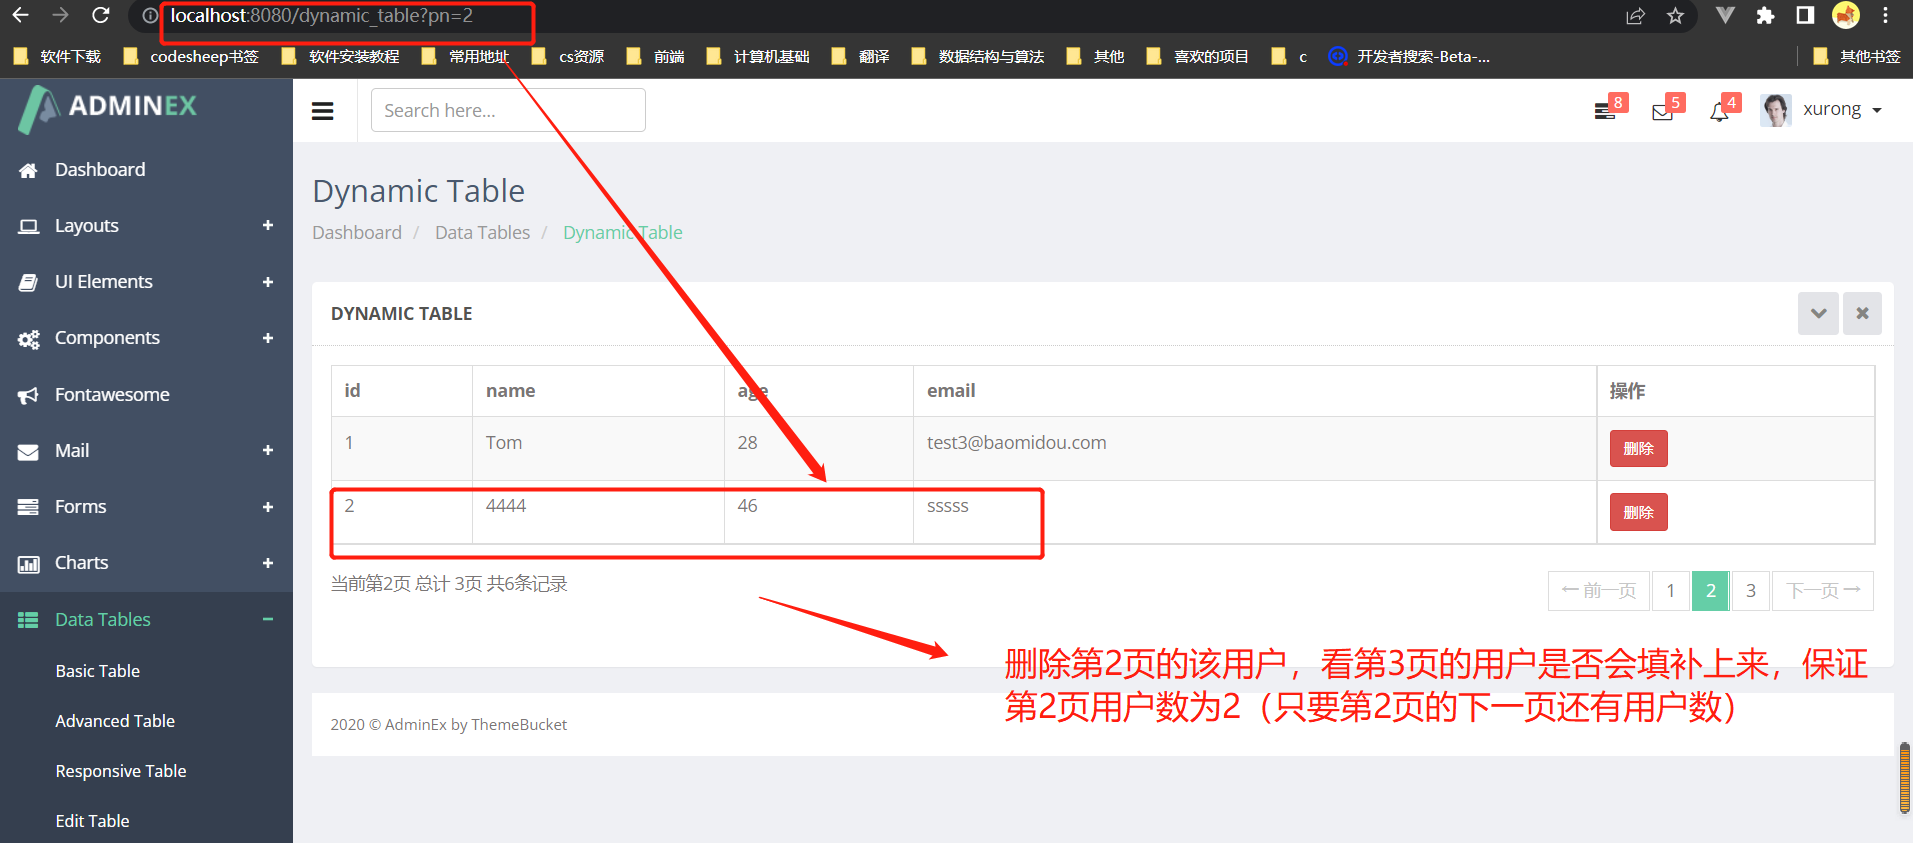
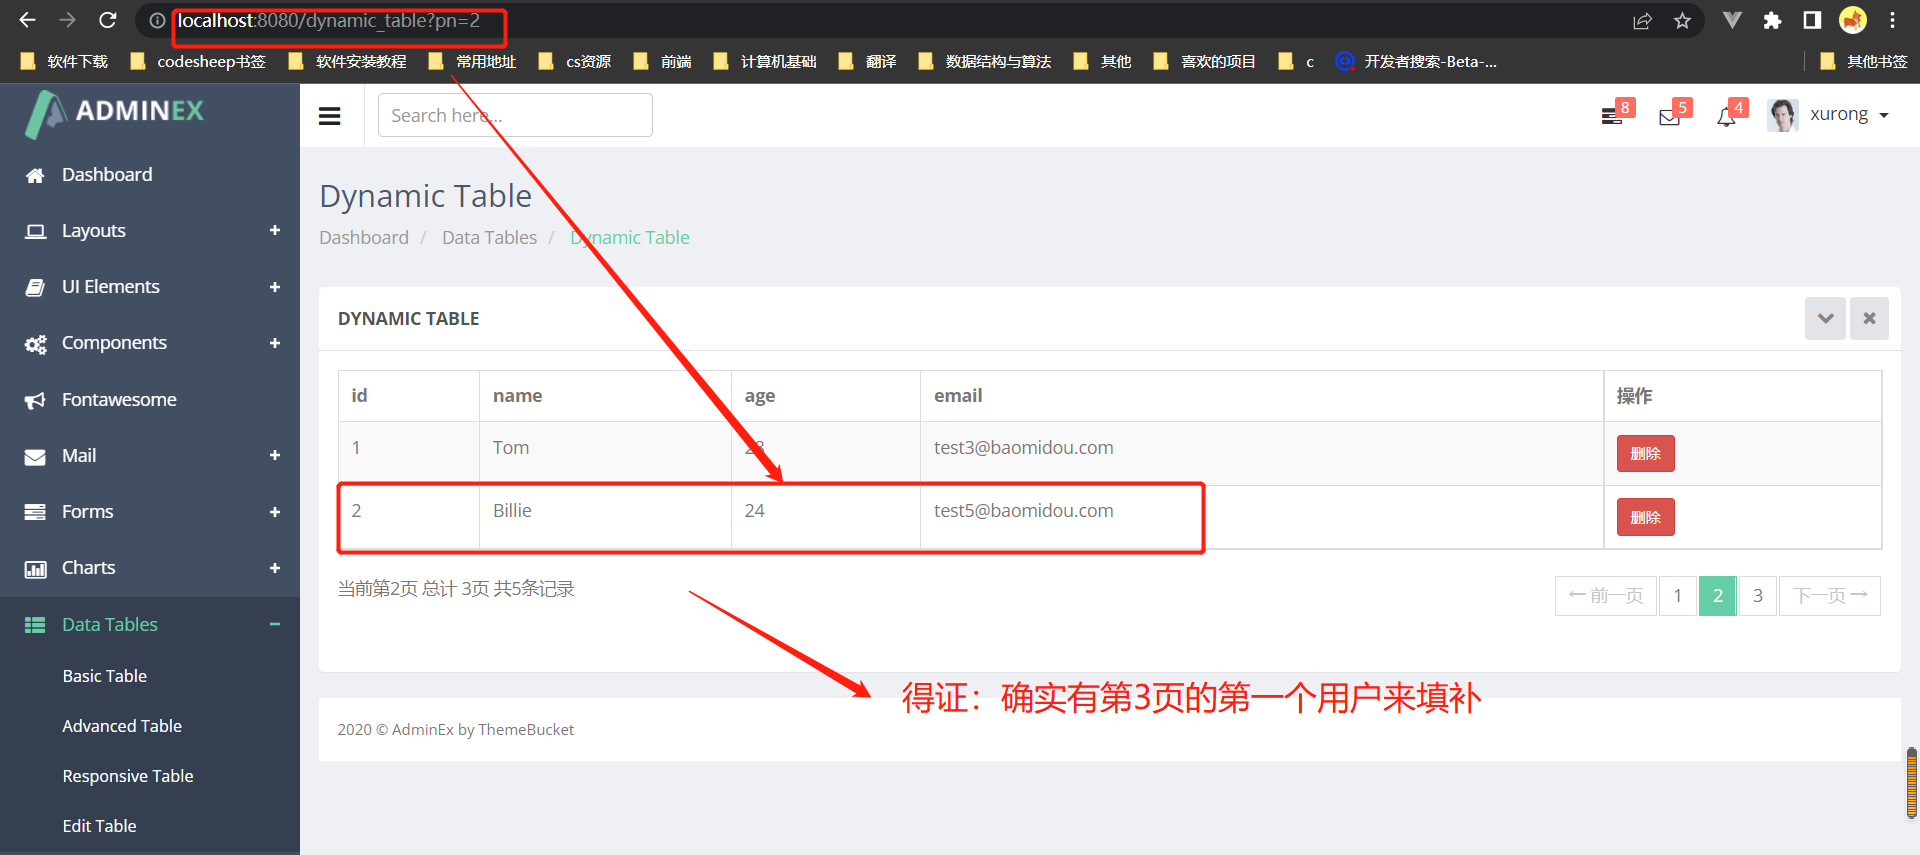
自己改进思路方向:
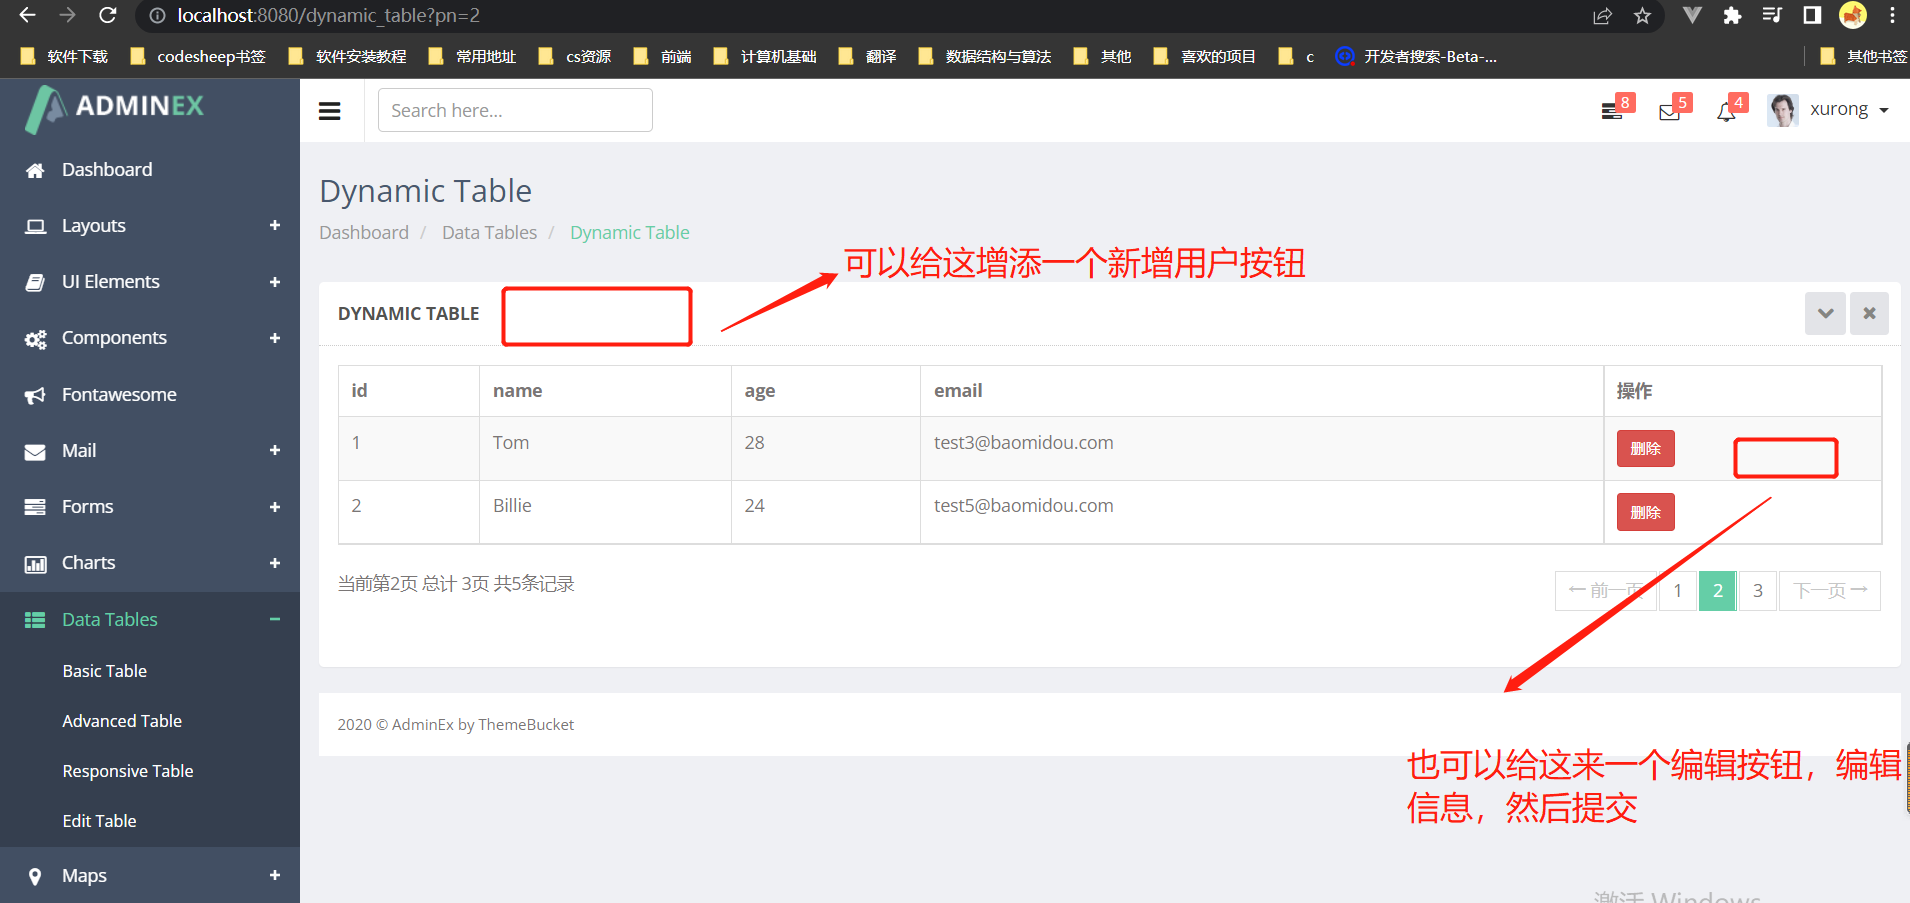
13-7 准备阿里云redis环境---redis操作与统计小实验(需要重听)
源码简要分析:
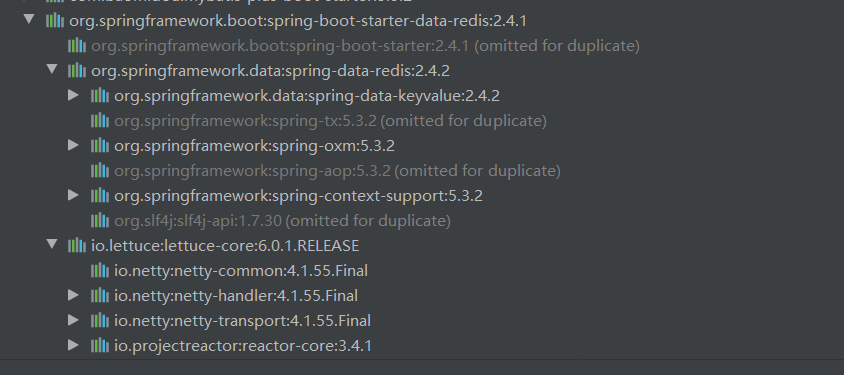
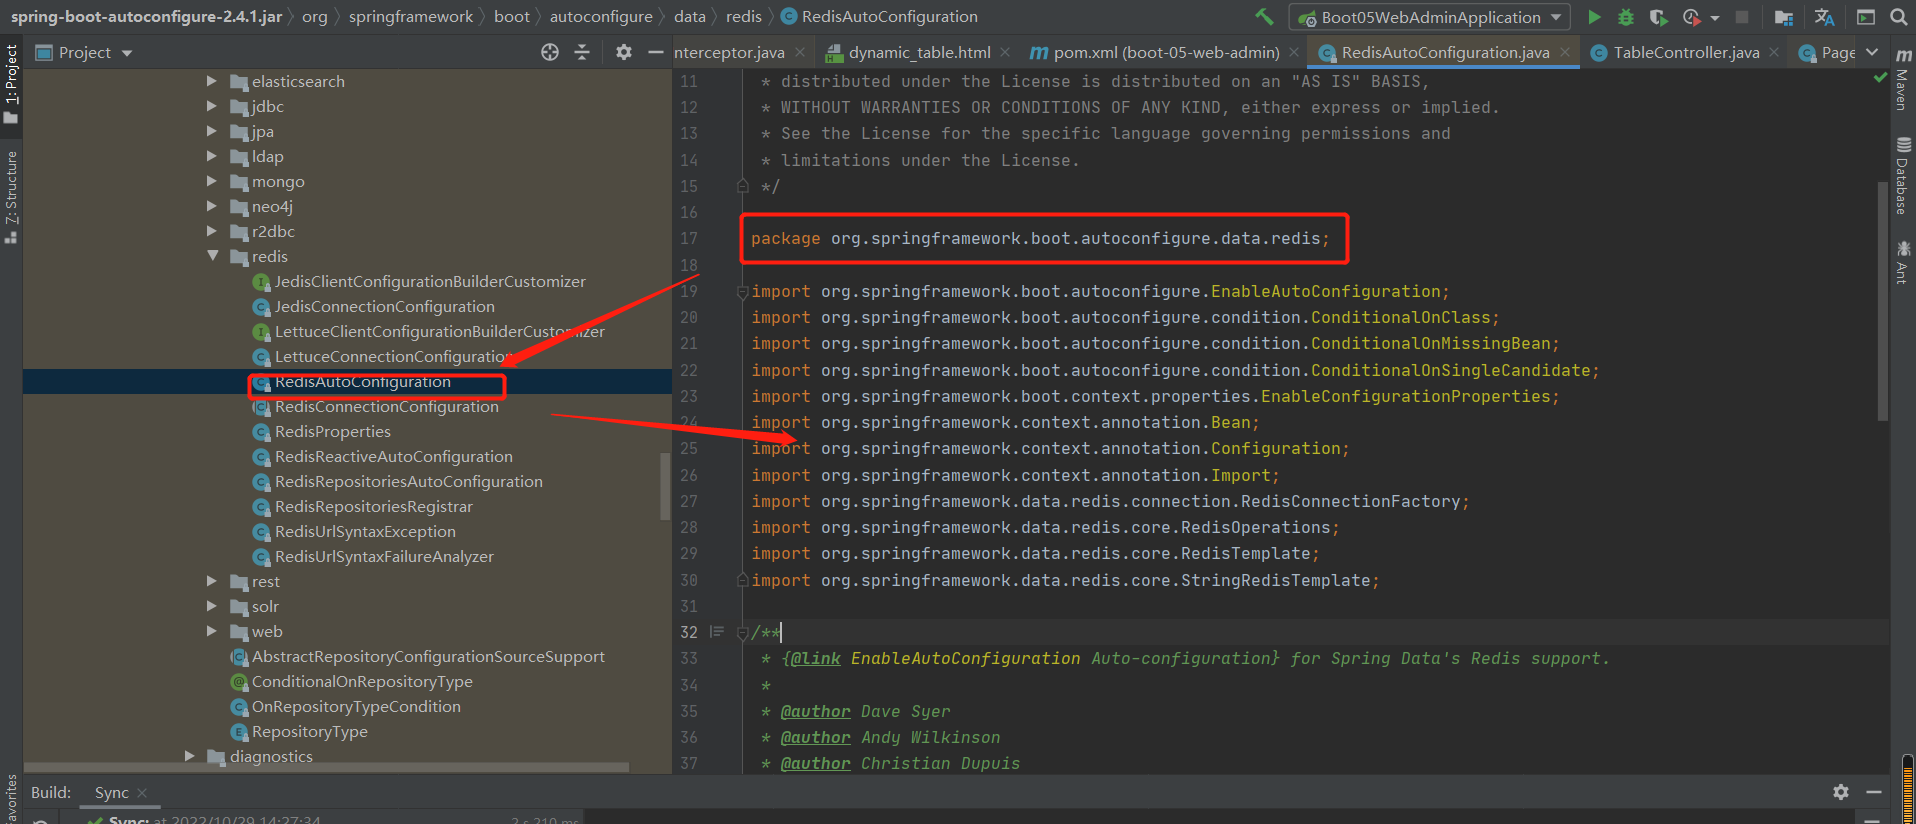
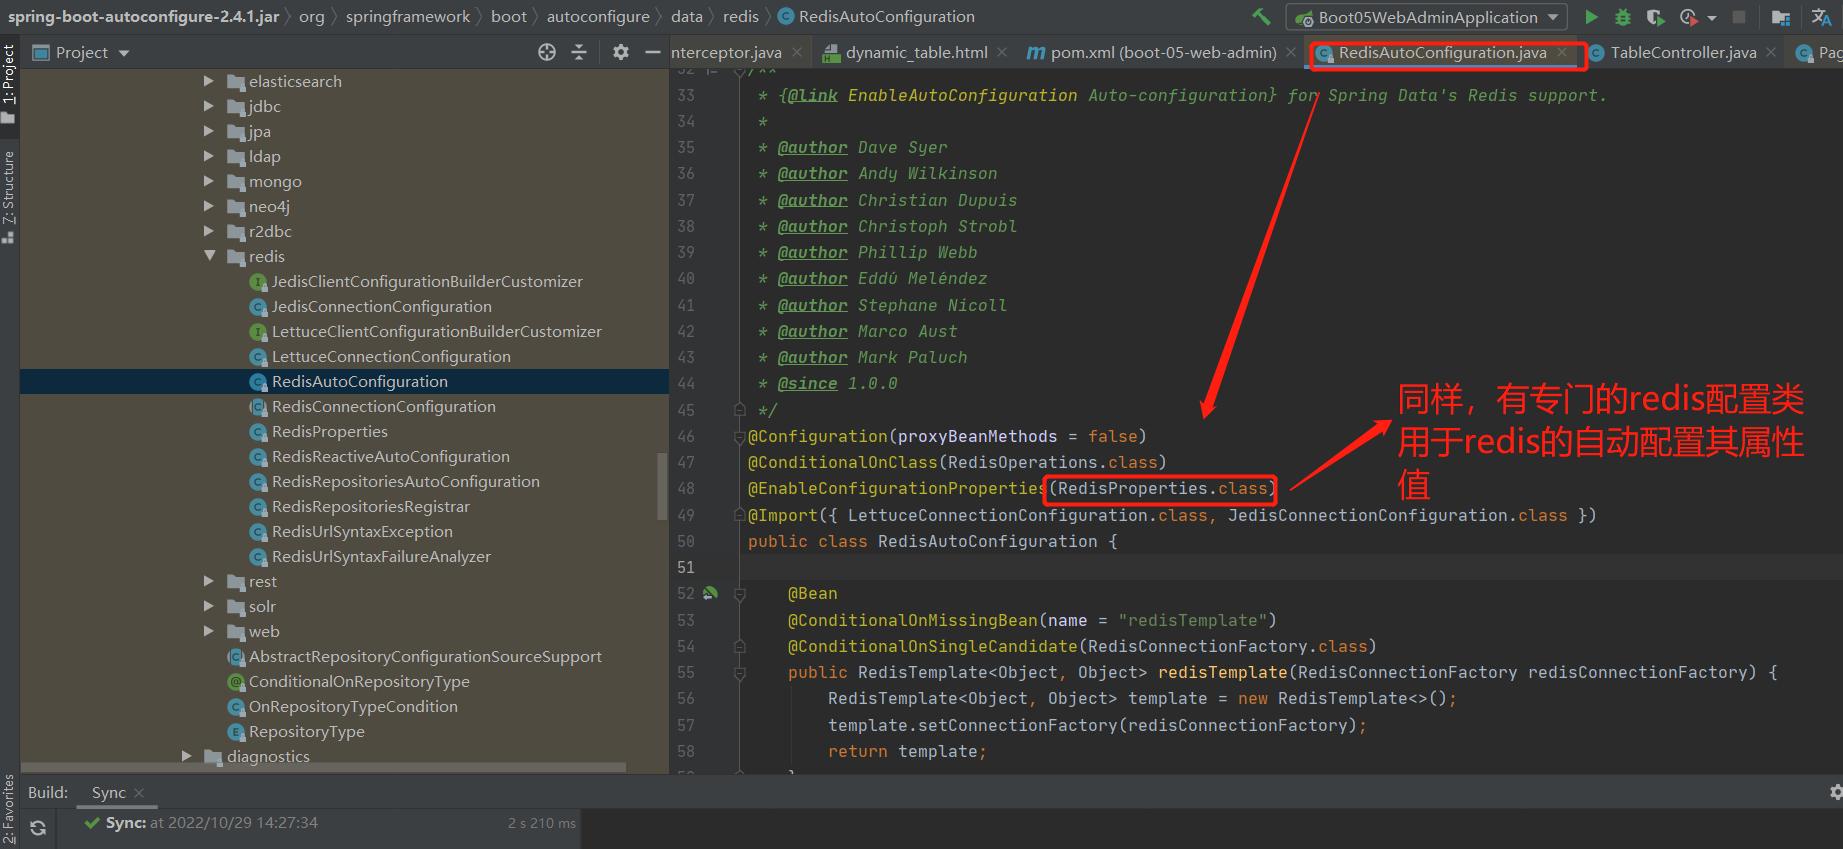
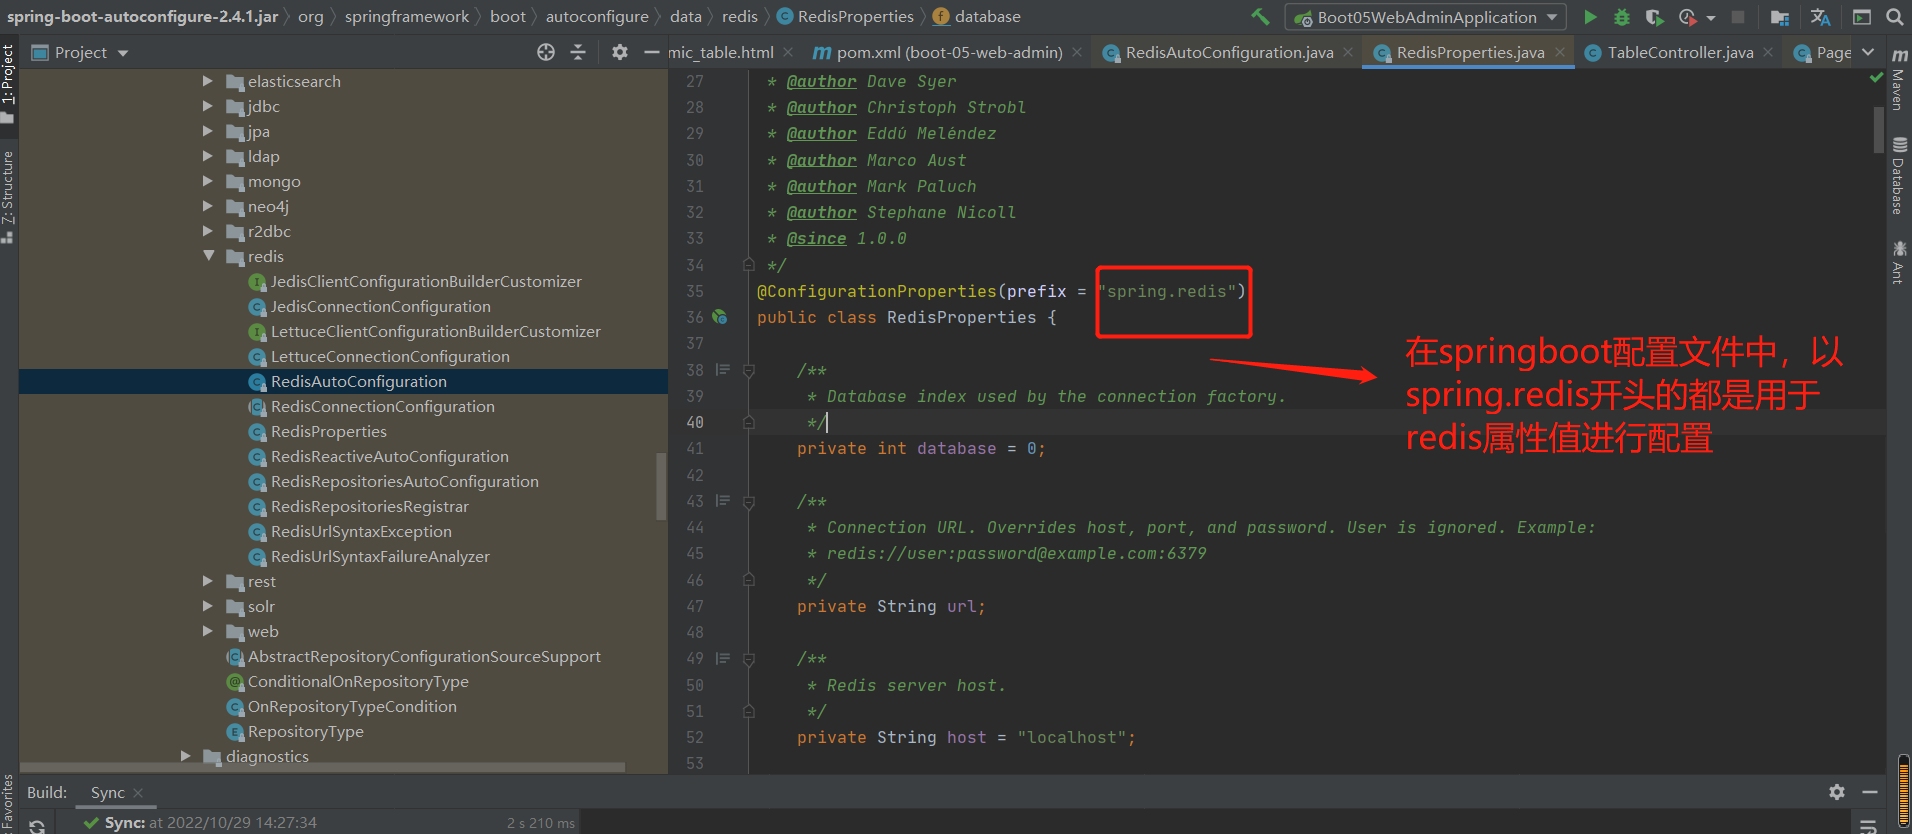
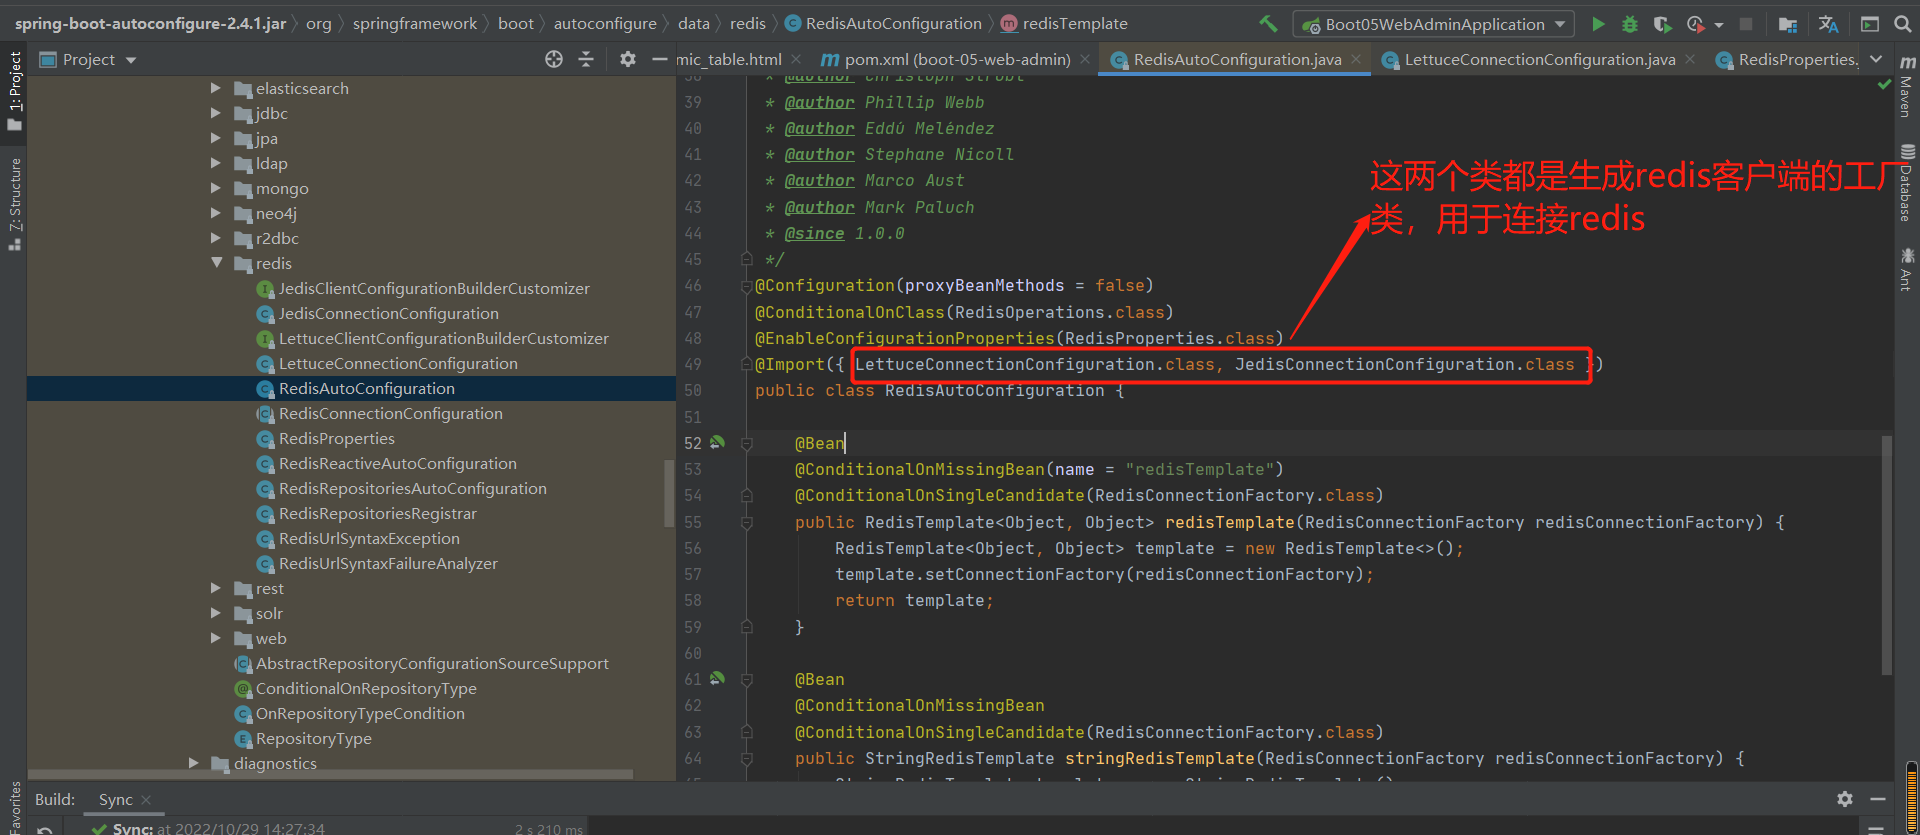

注意:需要重听,大体就是在阿里云上购买云服务器并部署redis,然后通过后台引入的redis的依赖,通过实体类(也就是客户端)实现对部署的redis的数据存储以及访问。
第14章 单元测试
14-1 junit4与junit5对比,以及依赖的使用
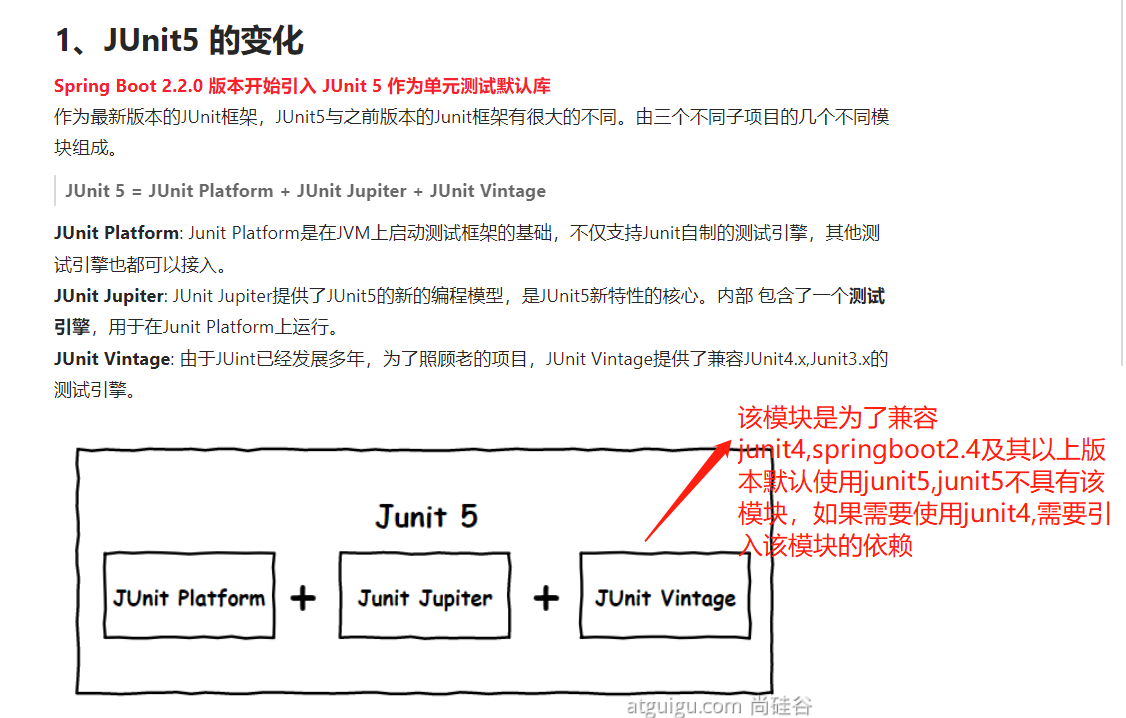

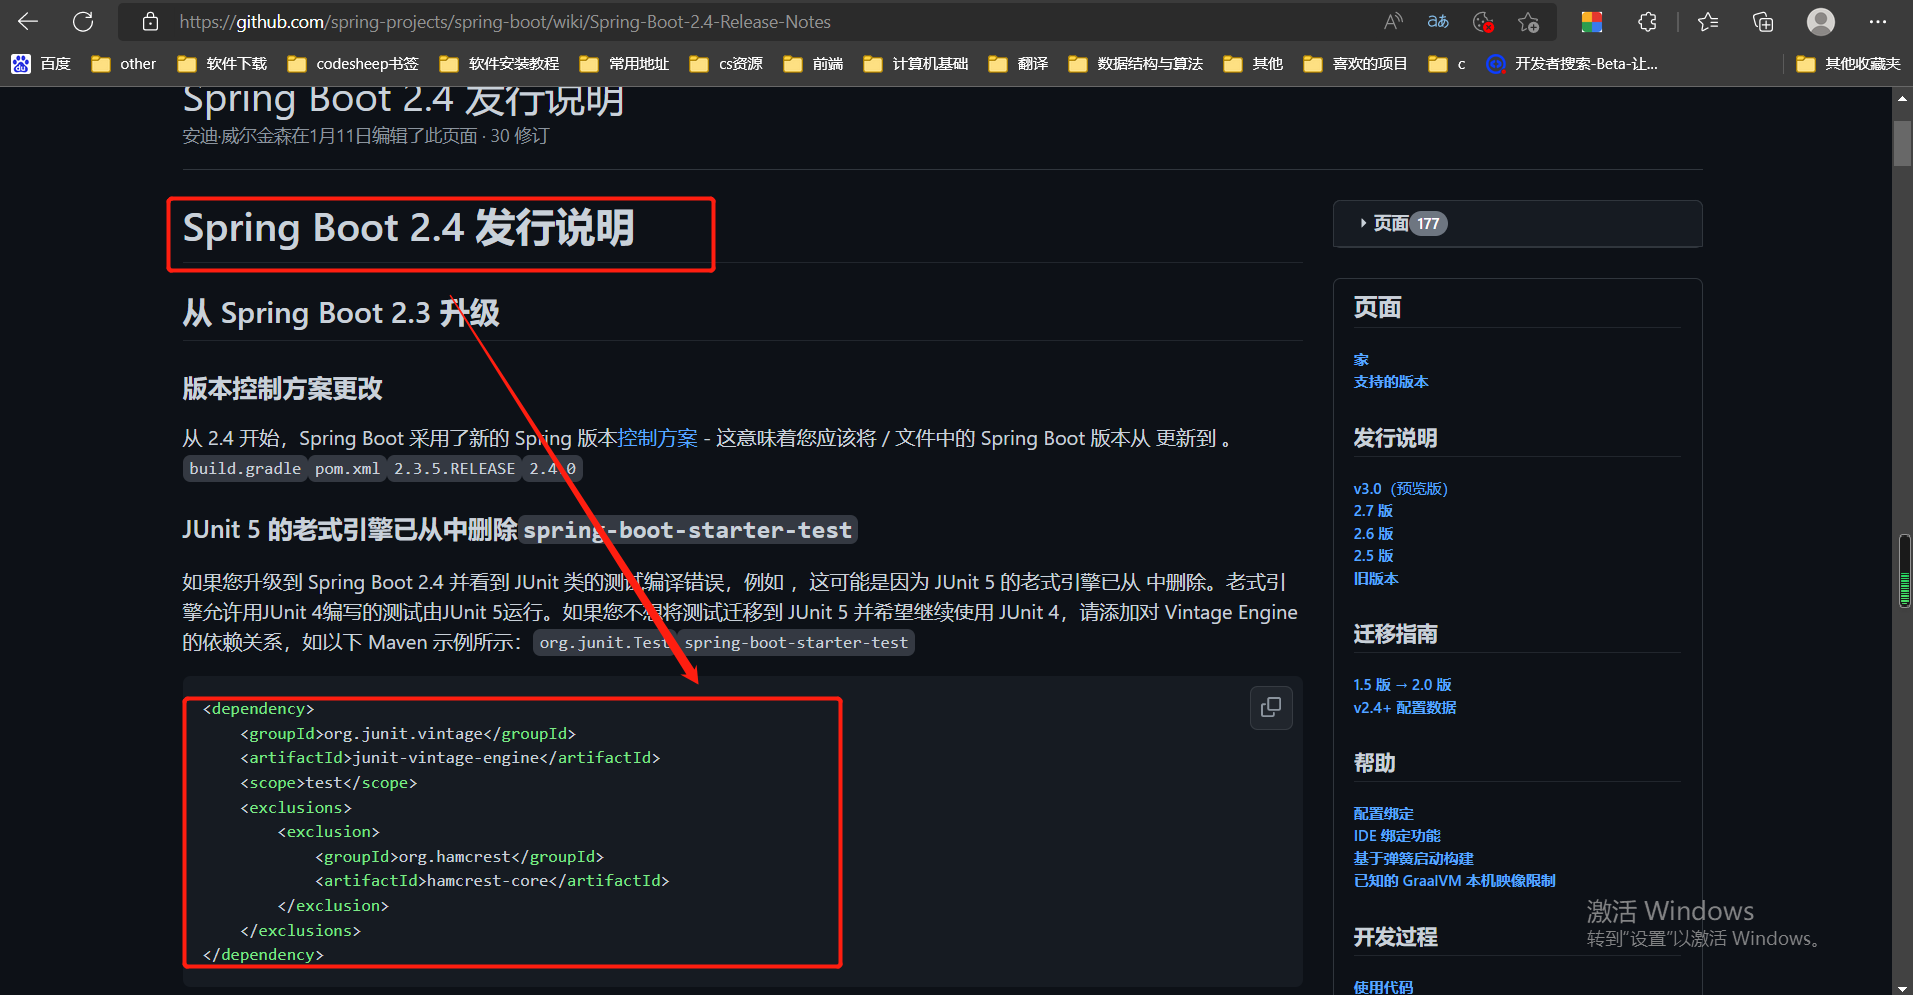
以下就是vintage依赖:
<dependency>
    <groupId>org.junit.vintage</groupId>
    <artifactId>junit-vintage-engine</artifactId>
    <scope>test</scope>
    <exclusions>
        <exclusion>
            <groupId>org.hamcrest</groupId>
            <artifactId>hamcrest-core</artifactId>
        </exclusion>
    </exclusions>
</dependency>
springboot引入使用junit5的依赖:
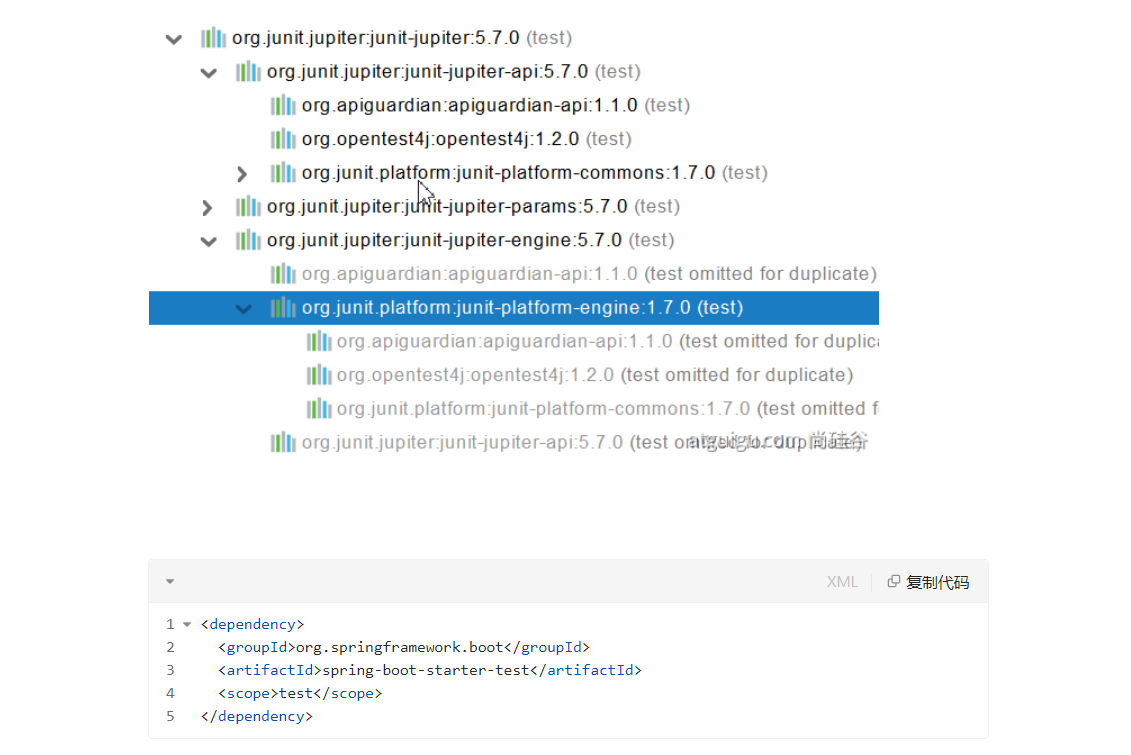
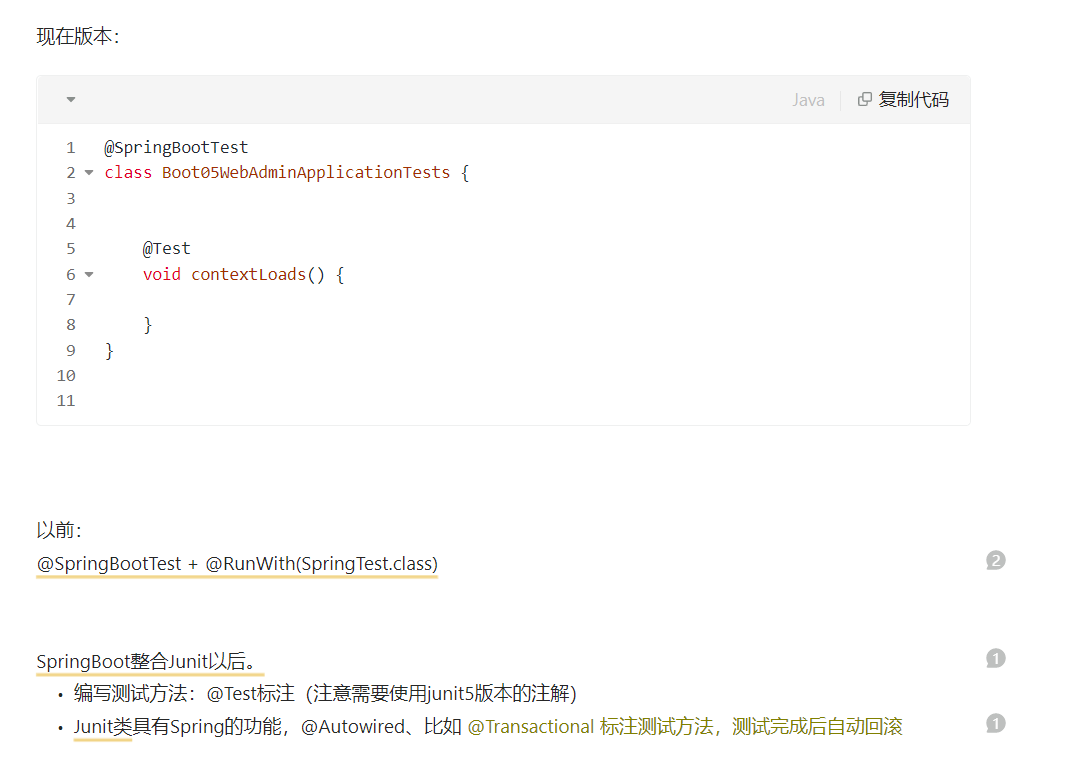
14-2 Junit5常用测试注解
官网:[常用注解参考](JUnit 5 用户指南)
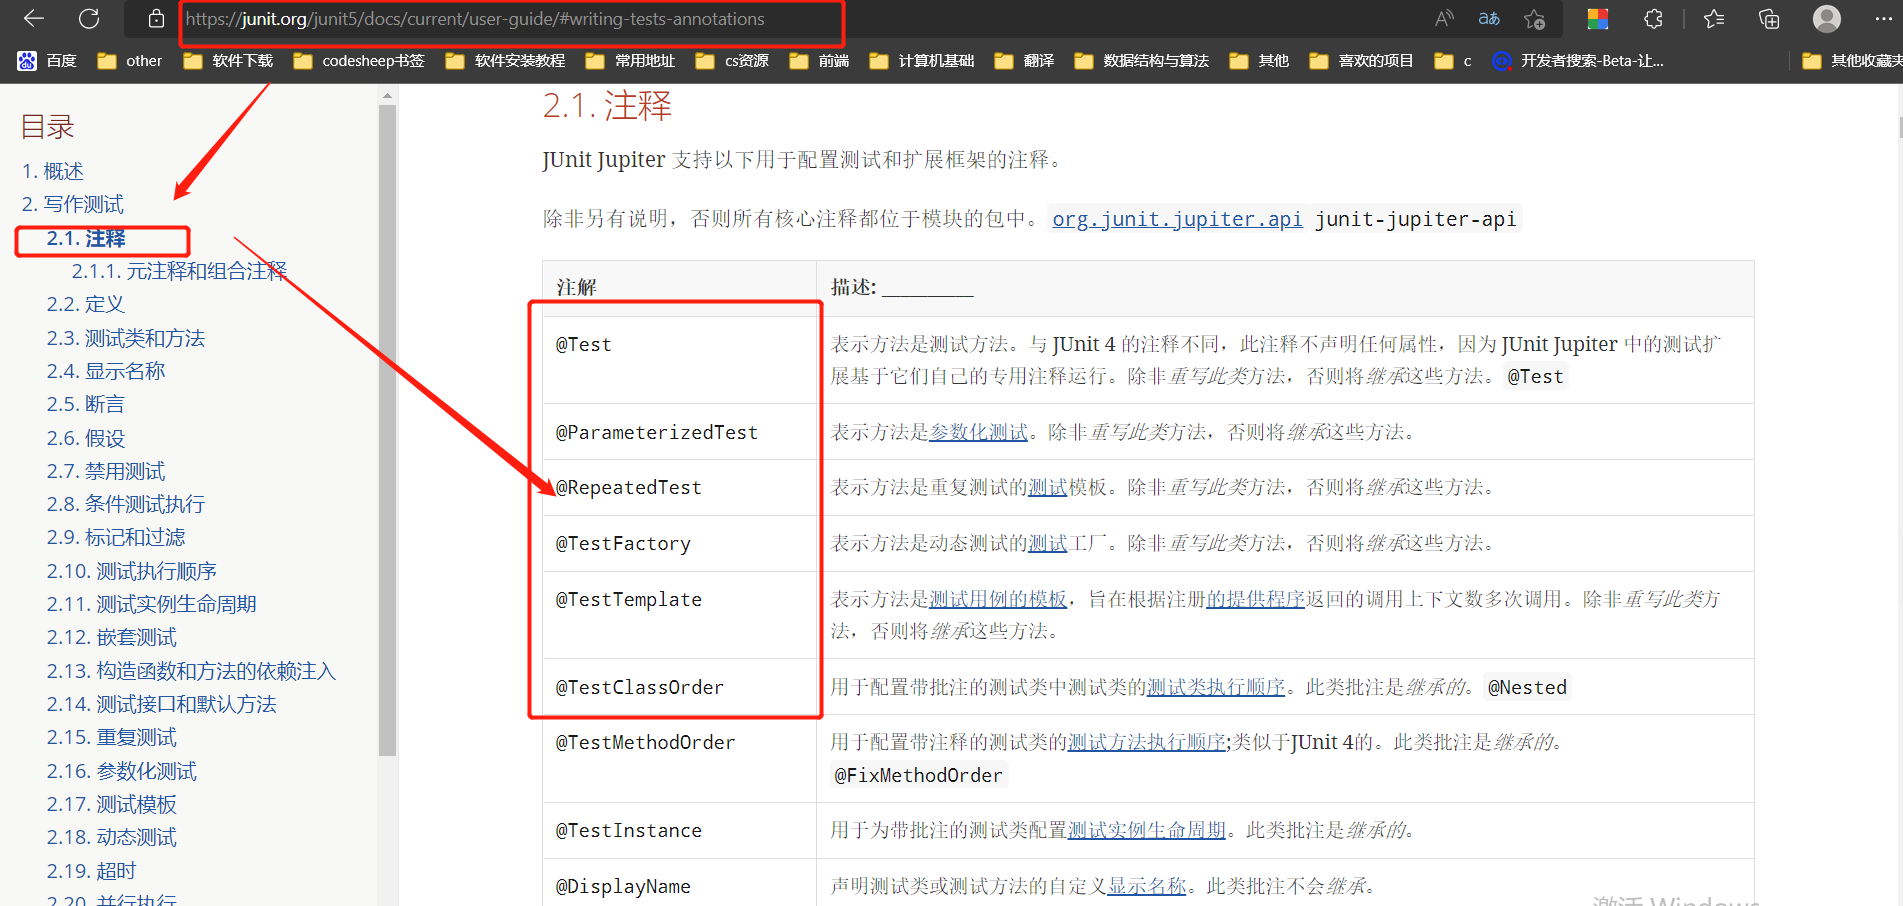
常用代码参考:
package com.xu.admin;

import org.junit.jupiter.api.*;
import org.springframework.beans.factory.annotation.Autowired;
import org.springframework.boot.test.context.SpringBootTest;
import org.springframework.jdbc.core.JdbcTemplate;
import org.springframework.test.annotation.Repeat;

import java.util.concurrent.TimeUnit;

/**
 * @author xu
 * @Description
 * @date 2022/10/29 - 22:42:50
 * @Modified By:
 */
@SpringBootTest
@DisplayName("junits功能测试类")
public class Junit5Test {

    @Autowired
    JdbcTemplate jdbcTemplate;

    // @RepeatedTest(4)用于反复执行测试

    @DisplayName("测试displayname注解")
    @Test
    void testDisplayName1() {
        System.out.println(1111);
        // 需要使用该@SpringBootTest,jdbcTemplate才不是null
        System.out.println(jdbcTemplate);
    }
    @RepeatedTest(4)
    void testRepeatedTest() {
        System.out.println("测试@RepeatedTest(4)");
    }
    // 将这个测试类禁用掉
//    @Disabled
    @DisplayName("测试displayname注解")
    @Test
    void testDisplayName2() {
        System.out.println(2222);
    }
    @BeforeEach
    void testBeforeEach() {
        System.out.println("测试方法将要开始了");
    }

    @AfterEach
    void testAfterEach() {
        System.out.println("测试方法结束了");
    }

    @BeforeAll
    static void testBeforeAll() {
        System.out.println("所有测试方法就要开始了。。。");
    }

    @AfterAll
    static void testAfterAll() {
        System.out.println("所有测试方法已经结束了");
    }

    @Timeout(value = 500,unit = TimeUnit.MILLISECONDS)
    @Test
    void testTimeOUt() throws InterruptedException {
        //将该函数线程挂起505毫秒,肯定超过了500毫秒.会报超时异常:java.util.concurrent.TimeoutException:
        // testTimeOUt() timed out after 500 milliseconds
        Thread.sleep(505);
    }
}
输出结果:
所有测试方法就要开始了。。。
. ____ _ __ _ _
/\\ / ___'_ __ _ _(_)_ __ __ _ \ \ \ \
( ( )\___ | '_ | '_| | '_ \/ _` | \ \ \ \
\\/ ___)| |_)| | | | | || (_| | ) ) ) )
' |____| .__|_| |_|_| |_\__, | / / / /
=========|_|==============|___/=/_/_/_/
:: Spring Boot :: (v2.4.1)
2022-10-29 23:27:17.198 INFO 9768 --- [ main] com.xu.admin.Junit5Test : Starting Junit5Test using Java 1.8.0_311 on DESKTOP-SOE9MG1 with PID 9768 (started by 许荣 in D:\Java\springBoot\boot-05-web-admin)
2022-10-29 23:27:17.200 INFO 9768 --- [ main] com.xu.admin.Junit5Test : No active profile set, falling back to default profiles: default
2022-10-29 23:27:17.370 WARN 9768 --- [kground-preinit] o.s.h.c.j.Jackson2ObjectMapperBuilder : For Jackson Kotlin classes support please add "com.fasterxml.jackson.module:jackson-module-kotlin" to the classpath
2022-10-29 23:27:17.900 INFO 9768 --- [ main] .s.d.r.c.RepositoryConfigurationDelegate : Multiple Spring Data modules found, entering strict repository configuration mode!
2022-10-29 23:27:17.904 INFO 9768 --- [ main] .s.d.r.c.RepositoryConfigurationDelegate : Bootstrapping Spring Data Redis repositories in DEFAULT mode.
2022-10-29 23:27:17.940 INFO 9768 --- [ main] .s.d.r.c.RepositoryConfigurationDelegate : Finished Spring Data repository scanning in 16 ms. Found 0 Redis repository interfaces.
2022-10-29 23:27:18.328 INFO 9768 --- [ main] trationDelegate$BeanPostProcessorChecker : Bean 'com.alibaba.druid.spring.boot.autoconfigure.stat.DruidSpringAopConfiguration' of type [com.alibaba.druid.spring.boot.autoconfigure.stat.DruidSpringAopConfiguration] is not eligible for getting processed by all BeanPostProcessors (for example: not eligible for auto-proxying)
2022-10-29 23:27:18.451 INFO 9768 --- [ main] trationDelegate$BeanPostProcessorChecker : Bean 'spring.datasource.druid-com.alibaba.druid.spring.boot.autoconfigure.properties.DruidStatProperties' of type [com.alibaba.druid.spring.boot.autoconfigure.properties.DruidStatProperties] is not eligible for getting processed by all BeanPostProcessors (for example: not eligible for auto-proxying)
2022-10-29 23:27:18.463 INFO 9768 --- [ main] trationDelegate$BeanPostProcessorChecker : Bean 'advisor' of type [org.springframework.aop.support.RegexpMethodPointcutAdvisor] is not eligible for getting processed by all BeanPostProcessors (for example: not eligible for auto-proxying)
2022-10-29 23:27:18.696 INFO 9768 --- [ main] c.a.d.s.b.a.DruidDataSourceAutoConfigure : Init DruidDataSource
2022-10-29 23:27:19.158 INFO 9768 --- [ main] com.alibaba.druid.pool.DruidDataSource : {dataSource-1} inited
_ _ |_ _ _|_. ___ _ | _
| | |\/|_)(_| | |_\ |_)||_|_\
/ |
3.5.2
2022-10-29 23:27:20.726 INFO 9768 --- [ main] o.s.s.concurrent.ThreadPoolTaskExecutor : Initializing ExecutorService 'applicationTaskExecutor'
2022-10-29 23:27:21.065 WARN 9768 --- [ main] org.thymeleaf.templatemode.TemplateMode : [THYMELEAF][main] Template Mode 'HTML5' is deprecated. Using Template Mode 'HTML' instead.
2022-10-29 23:27:21.922 INFO 9768 --- [ main] com.xu.admin.Junit5Test : Started Junit5Test in 5.207 seconds (JVM running for 6.724)
测试方法将要开始了
测试方法结束了
java.util.concurrent.TimeoutException: testTimeOUt() timed out after 500 milliseconds
at org.junit.jupiter.engine.extension.TimeoutInvocation.createTimeoutException(TimeoutInvocation.java:70)
at org.junit.jupiter.engine.extension.TimeoutInvocation.proceed(TimeoutInvocation.java:59)
at org.junit.jupiter.engine.extension.TimeoutExtension.intercept(TimeoutExtension.java:149)
at org.junit.jupiter.engine.extension.TimeoutExtension.interceptTestableMethod(TimeoutExtension.java:140)
at org.junit.jupiter.engine.extension.TimeoutExtension.interceptTestMethod(TimeoutExtension.java:84)
at org.junit.jupiter.engine.execution.ExecutableInvoker$ReflectiveInterceptorCall.lambda$ofVoidMethod$0(ExecutableInvoker.java:115)
at org.junit.jupiter.engine.execution.ExecutableInvoker.lambda$invoke$0(ExecutableInvoker.java:105)
at org.junit.jupiter.engine.execution.InvocationInterceptorChain$InterceptedInvocation.proceed(InvocationInterceptorChain.java:106)
at org.junit.jupiter.engine.execution.InvocationInterceptorChain.proceed(InvocationInterceptorChain.java:64)
at org.junit.jupiter.engine.execution.InvocationInterceptorChain.chainAndInvoke(InvocationInterceptorChain.java:45)
at org.junit.jupiter.engine.execution.InvocationInterceptorChain.invoke(InvocationInterceptorChain.java:37)
at org.junit.jupiter.engine.execution.ExecutableInvoker.invoke(ExecutableInvoker.java:104)
at org.junit.jupiter.engine.execution.ExecutableInvoker.invoke(ExecutableInvoker.java:98)
at org.junit.jupiter.engine.descriptor.TestMethodTestDescriptor.lambda$invokeTestMethod$6(TestMethodTestDescriptor.java:210)
at org.junit.platform.engine.support.hierarchical.ThrowableCollector.execute(ThrowableCollector.java:73)
at org.junit.jupiter.engine.descriptor.TestMethodTestDescriptor.invokeTestMethod(TestMethodTestDescriptor.java:206)
at org.junit.jupiter.engine.descriptor.TestMethodTestDescriptor.execute(TestMethodTestDescriptor.java:131)
at org.junit.jupiter.engine.descriptor.TestMethodTestDescriptor.execute(TestMethodTestDescriptor.java:65)
at org.junit.platform.engine.support.hierarchical.NodeTestTask.lambda$executeRecursively$5(NodeTestTask.java:139)
at org.junit.platform.engine.support.hierarchical.ThrowableCollector.execute(ThrowableCollector.java:73)
at org.junit.platform.engine.support.hierarchical.NodeTestTask.lambda$executeRecursively$7(NodeTestTask.java:129)
at org.junit.platform.engine.support.hierarchical.Node.around(Node.java:137)
at org.junit.platform.engine.support.hierarchical.NodeTestTask.lambda$executeRecursively$8(NodeTestTask.java:127)
at org.junit.platform.engine.support.hierarchical.ThrowableCollector.execute(ThrowableCollector.java:73)
at org.junit.platform.engine.support.hierarchical.NodeTestTask.executeRecursively(NodeTestTask.java:126)
at org.junit.platform.engine.support.hierarchical.NodeTestTask.execute(NodeTestTask.java:84)
at java.util.ArrayList.forEach(ArrayList.java:1259)
at org.junit.platform.engine.support.hierarchical.SameThreadHierarchicalTestExecutorService.invokeAll(SameThreadHierarchicalTestExecutorService.java:38)
at org.junit.platform.engine.support.hierarchical.NodeTestTask.lambda$executeRecursively$5(NodeTestTask.java:143)
at org.junit.platform.engine.support.hierarchical.ThrowableCollector.execute(ThrowableCollector.java:73)
at org.junit.platform.engine.support.hierarchical.NodeTestTask.lambda$executeRecursively$7(NodeTestTask.java:129)
at org.junit.platform.engine.support.hierarchical.Node.around(Node.java:137)
at org.junit.platform.engine.support.hierarchical.NodeTestTask.lambda$executeRecursively$8(NodeTestTask.java:127)
at org.junit.platform.engine.support.hierarchical.ThrowableCollector.execute(ThrowableCollector.java:73)
at org.junit.platform.engine.support.hierarchical.NodeTestTask.executeRecursively(NodeTestTask.java:126)
at org.junit.platform.engine.support.hierarchical.NodeTestTask.execute(NodeTestTask.java:84)
at org.junit.platform.engine.support.hierarchical.SameThreadHierarchicalTestExecutorService.submit(SameThreadHierarchicalTestExecutorService.java:32)
at org.junit.platform.engine.support.hierarchical.HierarchicalTestExecutor.execute(HierarchicalTestExecutor.java:57)
at org.junit.platform.engine.support.hierarchical.HierarchicalTestEngine.execute(HierarchicalTestEngine.java:51)
at org.junit.platform.launcher.core.EngineExecutionOrchestrator.execute(EngineExecutionOrchestrator.java:108)
at org.junit.platform.launcher.core.EngineExecutionOrchestrator.execute(EngineExecutionOrchestrator.java:88)
at org.junit.platform.launcher.core.EngineExecutionOrchestrator.lambda$execute$0(EngineExecutionOrchestrator.java:54)
at org.junit.platform.launcher.core.EngineExecutionOrchestrator.withInterceptedStreams(EngineExecutionOrchestrator.java:67)
at org.junit.platform.launcher.core.EngineExecutionOrchestrator.execute(EngineExecutionOrchestrator.java:52)
at org.junit.platform.launcher.core.DefaultLauncher.execute(DefaultLauncher.java:96)
at org.junit.platform.launcher.core.DefaultLauncher.execute(DefaultLauncher.java:75)
at com.intellij.junit5.JUnit5IdeaTestRunner.startRunnerWithArgs(JUnit5IdeaTestRunner.java:69)
at com.intellij.rt.junit.IdeaTestRunner$Repeater.startRunnerWithArgs(IdeaTestRunner.java:33)
at com.intellij.rt.junit.JUnitStarter.prepareStreamsAndStart(JUnitStarter.java:230)
at com.intellij.rt.junit.JUnitStarter.main(JUnitStarter.java:58)
Suppressed: java.lang.InterruptedException: sleep interrupted
at java.lang.Thread.sleep(Native Method)
at com.xu.admin.Junit5Test.testTimeOUt(Junit5Test.java:69)
at sun.reflect.NativeMethodAccessorImpl.invoke0(Native Method)
at sun.reflect.NativeMethodAccessorImpl.invoke(NativeMethodAccessorImpl.java:62)
at sun.reflect.DelegatingMethodAccessorImpl.invoke(DelegatingMethodAccessorImpl.java:43)
at java.lang.reflect.Method.invoke(Method.java:498)
at org.junit.platform.commons.util.ReflectionUtils.invokeMethod(ReflectionUtils.java:688)
at org.junit.jupiter.engine.execution.MethodInvocation.proceed(MethodInvocation.java:60)
at org.junit.jupiter.engine.execution.InvocationInterceptorChain$ValidatingInvocation.proceed(InvocationInterceptorChain.java:131)
at org.junit.jupiter.engine.extension.TimeoutInvocation.proceed(TimeoutInvocation.java:46)
... 58 more
测试方法将要开始了
1111
org.springframework.jdbc.core.JdbcTemplate@424f02b8
测试方法结束了
测试方法将要开始了
2222
测试方法结束了
测试方法将要开始了
测试@RepeatedTest(4)
测试方法结束了
测试方法将要开始了
测试@RepeatedTest(4)
测试方法结束了
测试方法将要开始了
测试@RepeatedTest(4)
测试方法结束了
测试方法将要开始了
测试@RepeatedTest(4)
测试方法结束了
所有测试方法已经结束了
2022-10-29 23:27:22.797 INFO 9768 --- [extShutdownHook] o.s.s.concurrent.ThreadPoolTaskExecutor : Shutting down ExecutorService 'applicationTaskExecutor'
2022-10-29 23:27:22.798 INFO 9768 --- [extShutdownHook] com.alibaba.druid.pool.DruidDataSource : {dataSource-1} closing ...
2022-10-29 23:27:22.800 INFO 9768 --- [extShutdownHook] com.alibaba.druid.pool.DruidDataSource : {dataSource-1} closed
Process finished with exit code -1
14-3 断言
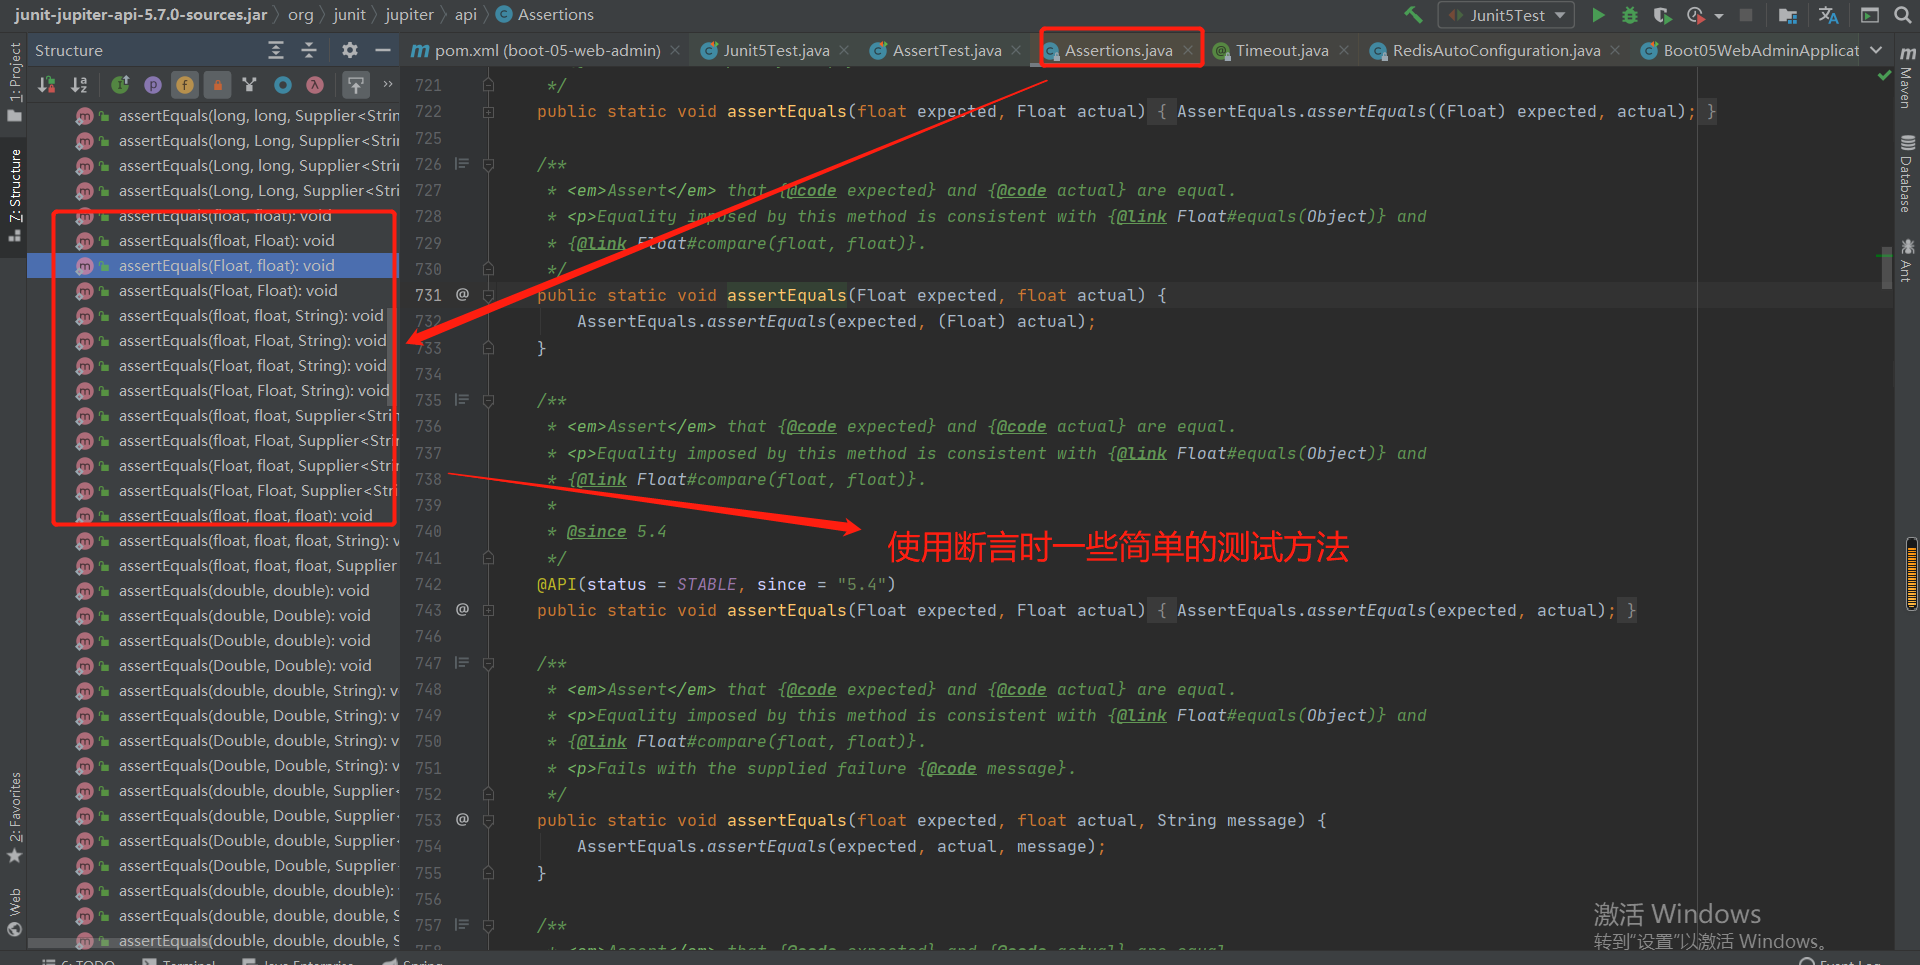
常用的断言参考:
package com.xu.admin;

import org.junit.jupiter.api.*;

/**
 * @author xu
 * @Description
 * @date 2022/10/30 - 8:12:40
 * @Modified By:
 */
public class AssertTest {

    @BeforeEach
    void testBefore() {
        System.out.println("开始测试");
    }
    @AfterEach
    void testAfter() {
        System.out.println("测试结束");
    }

    /**
     *
     * @Description
     * 如果前面的断言失败,后面的断言就不会执行
     * @param
     * @Author xu
     * @Date 2022/10/30 8:27:44
     *
     */
    @DisplayName("简单断言测试")
    @Test
    void testSimpleAssertion() {
        int calc = calc(1, 2);
        // 判断两个对象是否相等
        Assertions.assertEquals(3,calc);

        // 判断2个对象地址是否一致
        Object o1 = new Object();
        Object o2 = new Object();
        Assertions.assertSame(o1, o2);

    }

    int calc(int a, int b) {
        return a + b;
    }

    @DisplayName("组合断言")
    @Test
    void allAssertion() {
        /**
         *
         * @Description
         * 所有断言全部需要成功方可称之为成功
         * ()-> Assertions.assertTrue(true && true): 采用函数式编程的写法(我不知道)
         * @param
         * @Author xu
         * @Date 2022/10/30 8:35:03
         *
         */
        Assertions.assertAll("test",
                ()-> Assertions.assertTrue(true && true,"结果不是true"),
                ()-> Assertions.assertEquals(3,3,"结果不是3"));
        System.out.println("==============================");
    }

    // 数组断言
    @Test
    @DisplayName("array assertion")
    public void array() {
        Assertions.assertArrayEquals(new int[]{1, 2}, new int[] {1, 2});
    }

    @DisplayName("异常断言")
    @Test
    void testException() {
        Assertions.assertThrows(ArithmeticException.class,() -> {
            int i = 2 / 1;
        },"断言不成功抛出的信息,也就是没有出现算术异常");
    }
}
老师笔记参考:
Junit5官网参考:Junit5官网参考
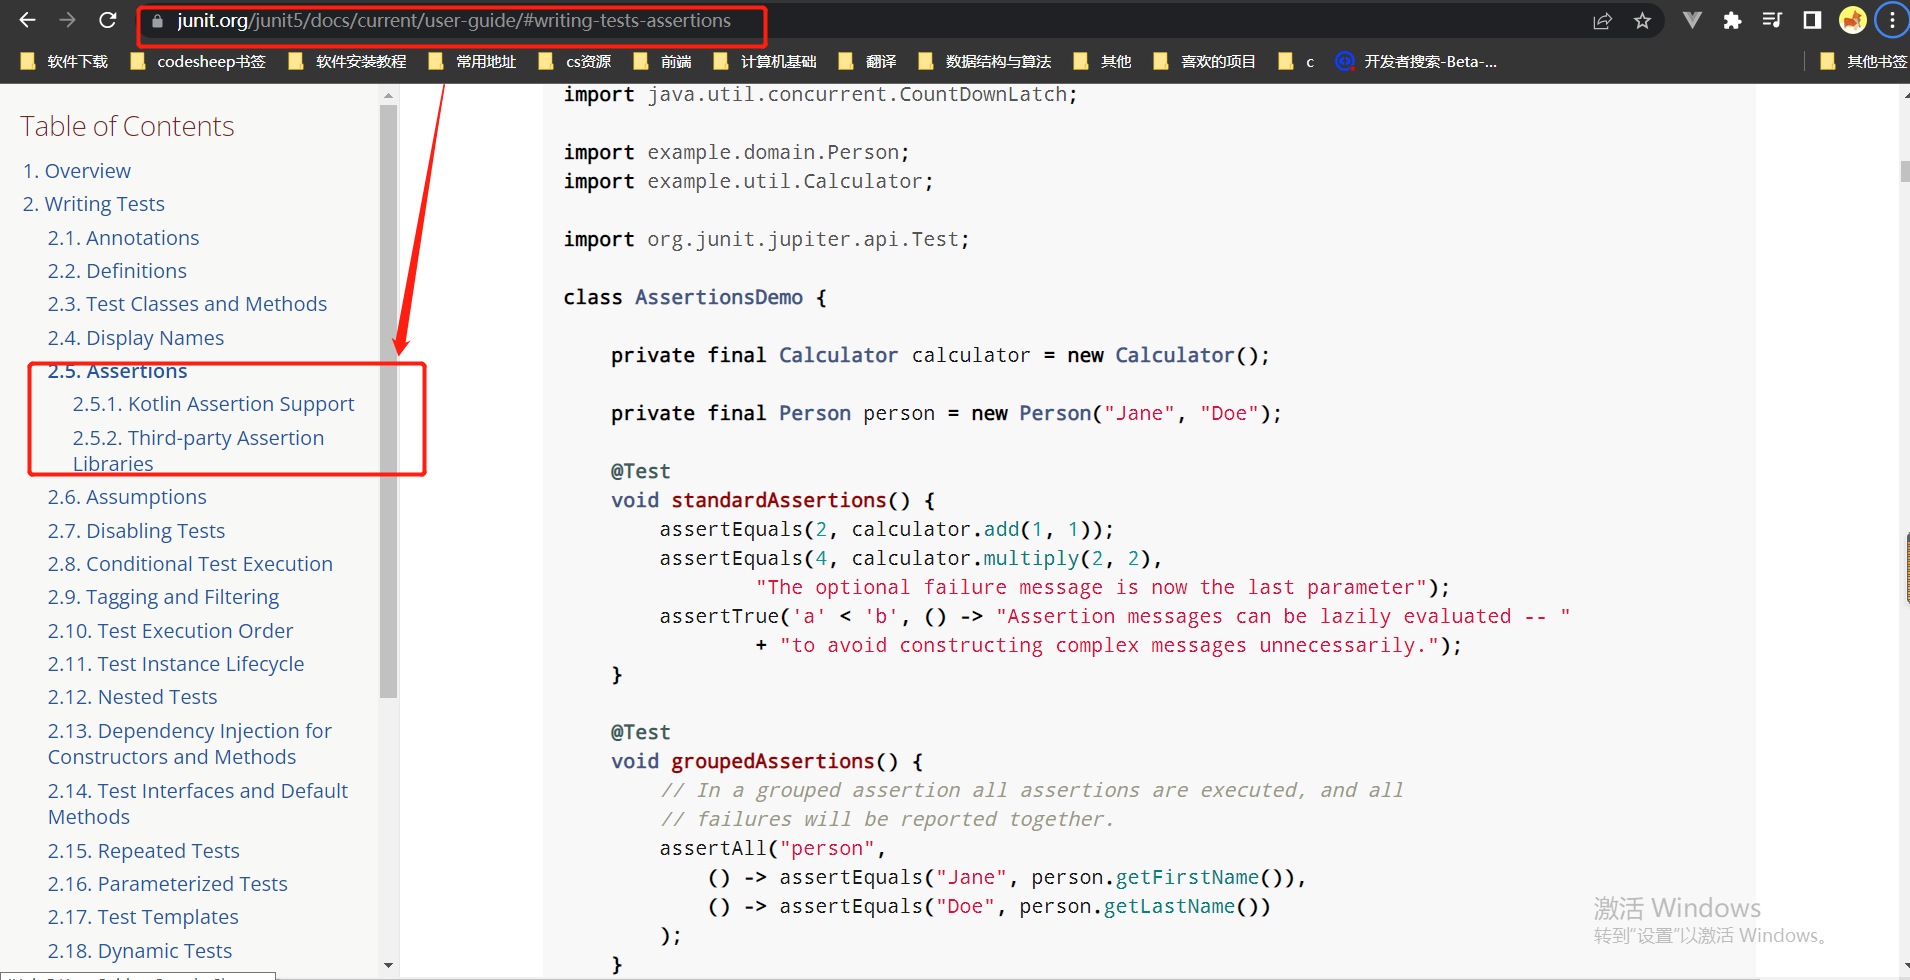
14-4 前置条件
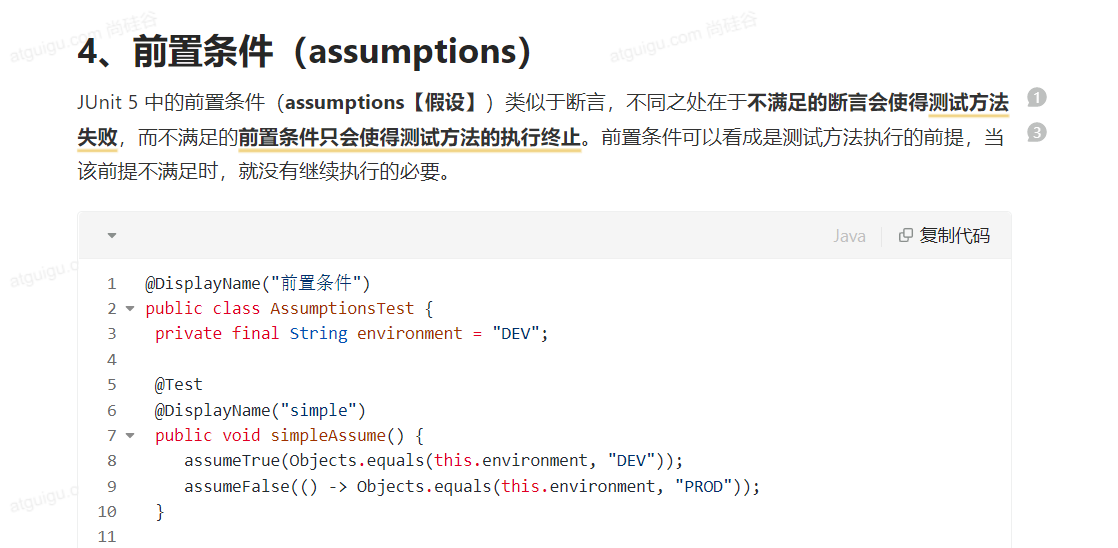
实验测试:
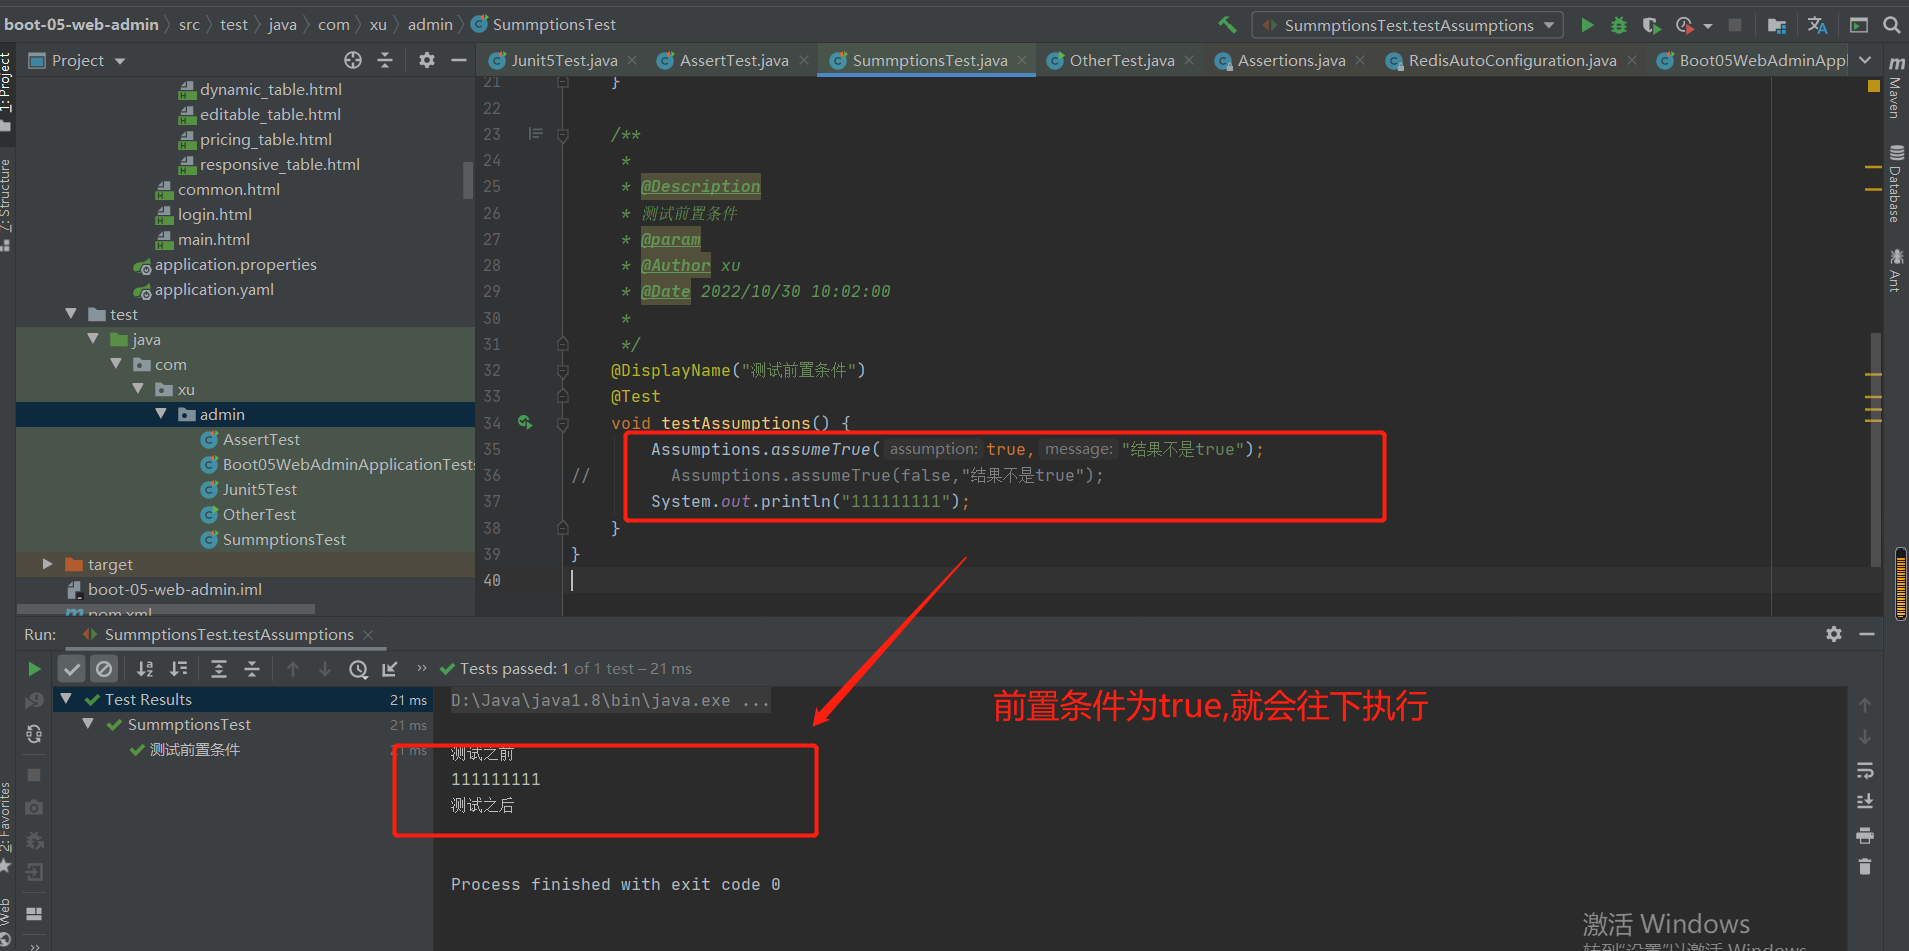
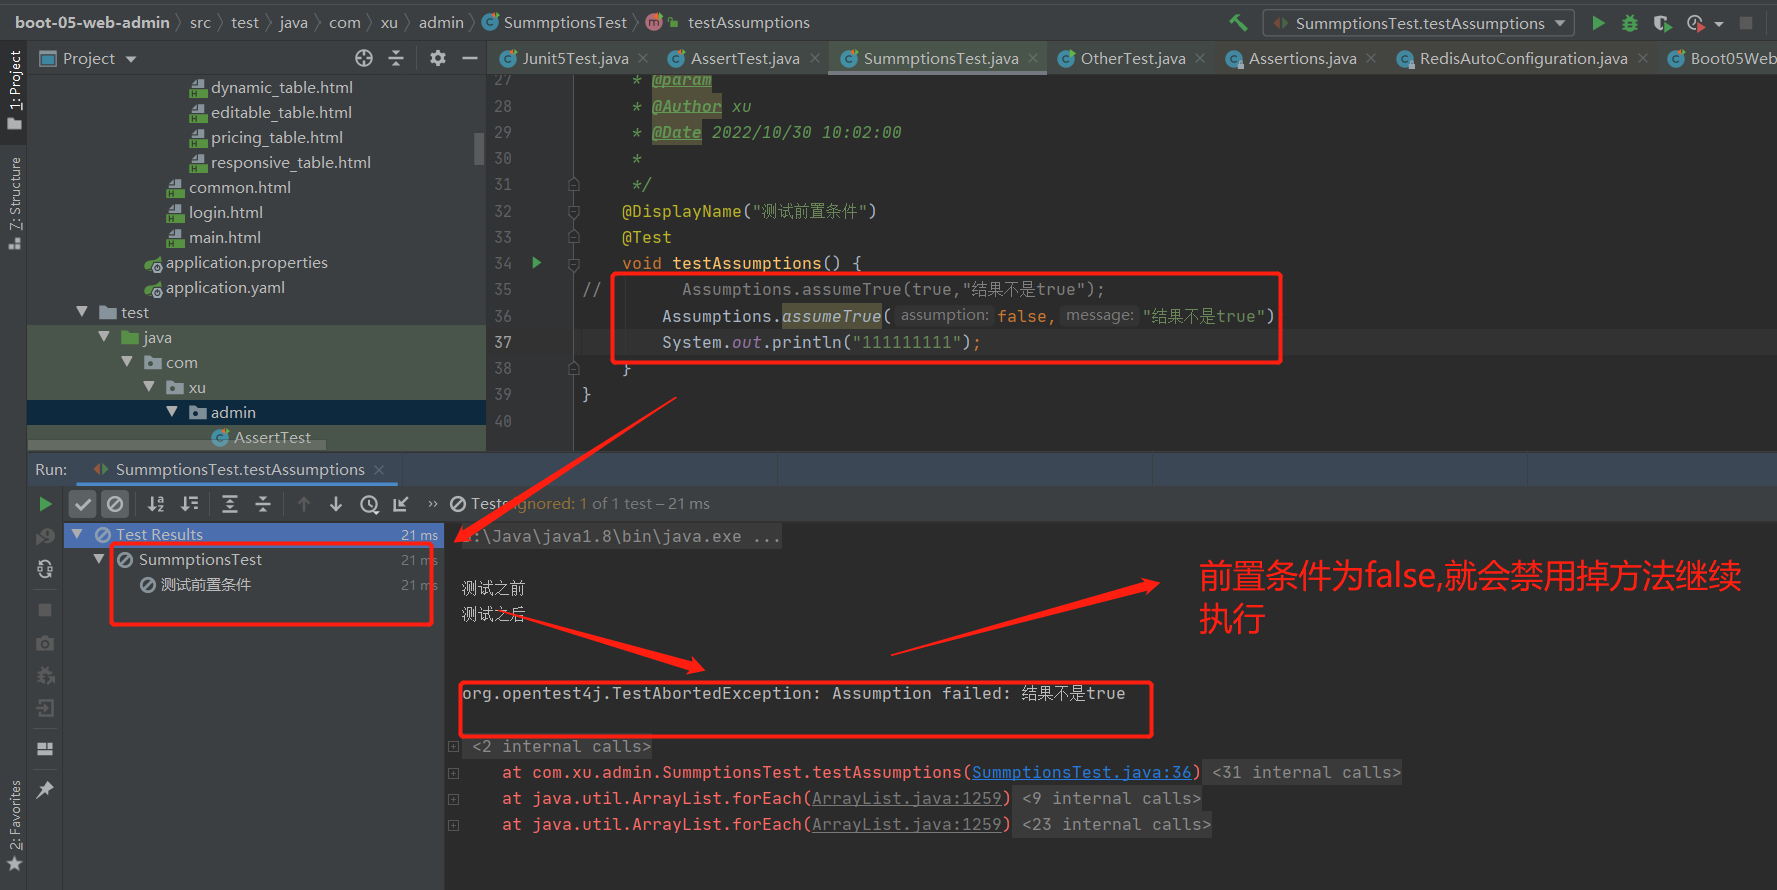
14-5 嵌套测试
官网参考:
package com.xu.admin;

/**
 * @author xu
 * @Description
 * @date 2022/10/30 - 10:14:43
 * @Modified By:
 */
import static org.junit.jupiter.api.Assertions.assertEquals;
import static org.junit.jupiter.api.Assertions.assertFalse;
import static org.junit.jupiter.api.Assertions.assertThrows;
import static org.junit.jupiter.api.Assertions.assertTrue;

import java.util.EmptyStackException;
import java.util.Stack;

import org.junit.jupiter.api.*;

@DisplayName("A stack")
class TestingAStackDemo {

    Stack<Object> stack;

    @Test
    @DisplayName("is instantiated with new Stack()")
    void isInstantiatedWithNew() {
        new Stack<>();
        // 断言stack是否为空,因为内层的@BeforeEach对stack进行了实例化,验证内层的@BeforeEach/All等方法在外层的测试方法不起作用
        Assertions.assertNull(stack);
        // 没有输出结果,确实为null
        // 总结:嵌套测试情况下,外层的Test不能驱动内层的@BeforeEach/All之类的方法提前/之后 执行
    }

    @Nested
    @DisplayName("when new")
    class WhenNew {

        @BeforeEach
        void createNewStack() {
            stack = new Stack<>();
        }

        @Test
        @DisplayName("is empty")
        void isEmpty() {
            assertTrue(stack.isEmpty());
        }

        @Test
        @DisplayName("throws EmptyStackException when popped")
        void throwsExceptionWhenPopped() {
            assertThrows(EmptyStackException.class, stack::pop);
        }

        @Test
        @DisplayName("throws EmptyStackException when peeked")
        void throwsExceptionWhenPeeked() {
            assertThrows(EmptyStackException.class, stack::peek);
        }

        @Nested
        @DisplayName("after pushing an element")
        class AfterPushing {

            String anElement = "an element";

            @BeforeEach
            void pushAnElement() {
                stack.push(anElement);
            }

            @Test
            @DisplayName("it is no longer empty")
            void isNotEmpty() {
                assertFalse(stack.isEmpty());
            }

            @Test
            @DisplayName("returns the element when popped and is empty")
            void returnElementWhenPopped() {
                assertEquals(anElement, stack.pop());
                assertTrue(stack.isEmpty());
            }

            @Test
            @DisplayName("returns the element when peeked but remains not empty")
            void returnElementWhenPeeked() {
                assertEquals(anElement, stack.peek());
                assertFalse(stack.isEmpty());
            }
        }
    }
}


/*
总结:
内层的单元测试方法可以驱动外层的@BeforeEach,@AfterEach等方法,
但是外层的单元测试方法无法驱动内层的@BeforeEach,@AfterEach等方法
 *///:~
14-6 参数化测试
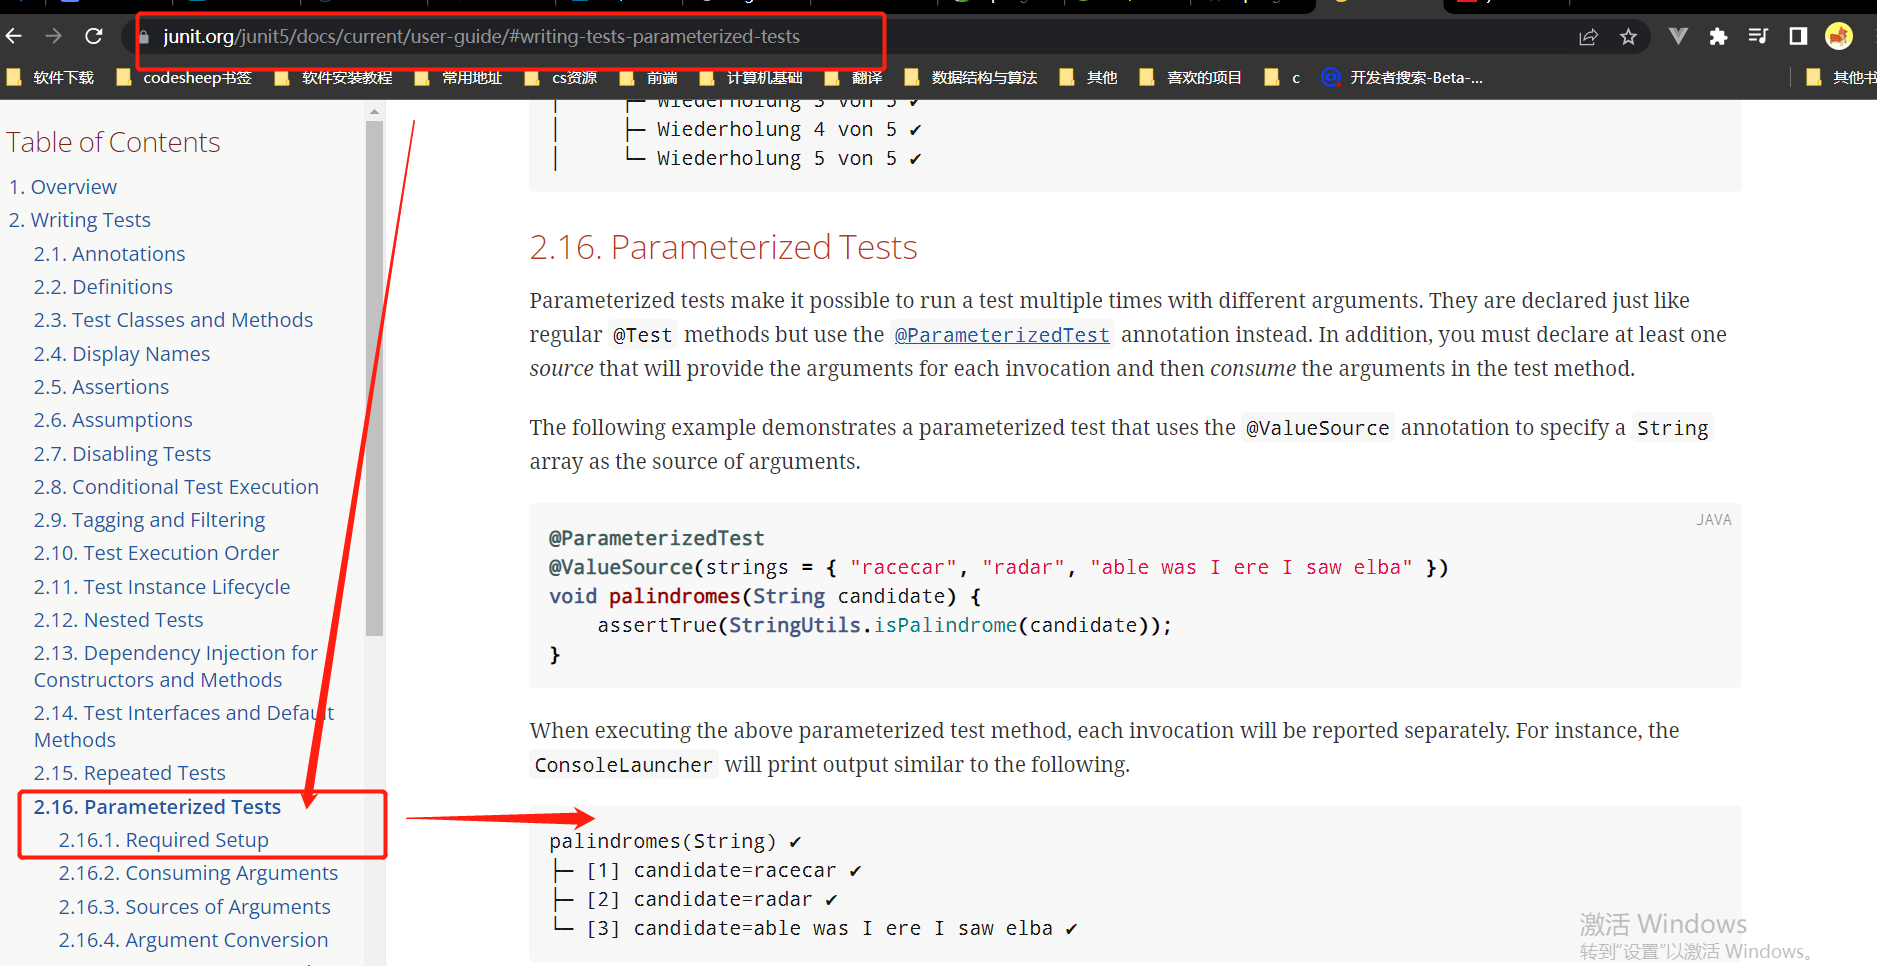
测试:
package com.xu.admin;

import org.junit.jupiter.api.AfterEach;
import org.junit.jupiter.api.Assertions;
import org.junit.jupiter.api.BeforeEach;
import org.junit.jupiter.params.ParameterizedTest;
import org.junit.jupiter.params.provider.MethodSource;
import org.junit.jupiter.params.provider.ValueSource;

import java.util.stream.Stream;

import static org.junit.jupiter.api.Assertions.assertTrue;

/**
 * @author xu
 * @Description
 * @date 2022/10/30 - 10:46:00
 * @Modified By:
 */
public class ParameterizedTests {


    @BeforeEach
    void testBefore() {
        System.out.println("开始测试");
    }
    @AfterEach
    void testAfter() {
        System.out.println("测试结束");
    }

    /**
     *
     * @Description
     * 参数从String类型的数组来
     * @param
     * @Author xu
     * @Date 2022/10/30 10:49:47
     *
     */
    @ParameterizedTest
    @ValueSource(strings = { "racecar", "radar", "able was I ere I saw elba" })
    void palindromes(String candidate) {
        System.out.println(candidate);
    }


    /**
     *
     * @Description
     * 参数测试的参数也可以通过方法名得到
     * @param
     * @Author xu
     * @Date 2022/10/30 10:53:10
     *
     */
    @ParameterizedTest
    @MethodSource("stringProvider")
    void testWithExplicitLocalMethodSource(String argument) {
        System.out.println(argument);
    }

    static Stream<String> stringProvider() {
        return Stream.of("apple", "banana");
    }


}
测试结果:
开始测试
apple
测试结束


开始测试
banana
测试结束
补充:从junit4迁移到junit5注解的变化
直接参考官网:
第15章 指标监控
15-1 SpringBoot Actuator 与 Endpoint
1.官网:指标监控
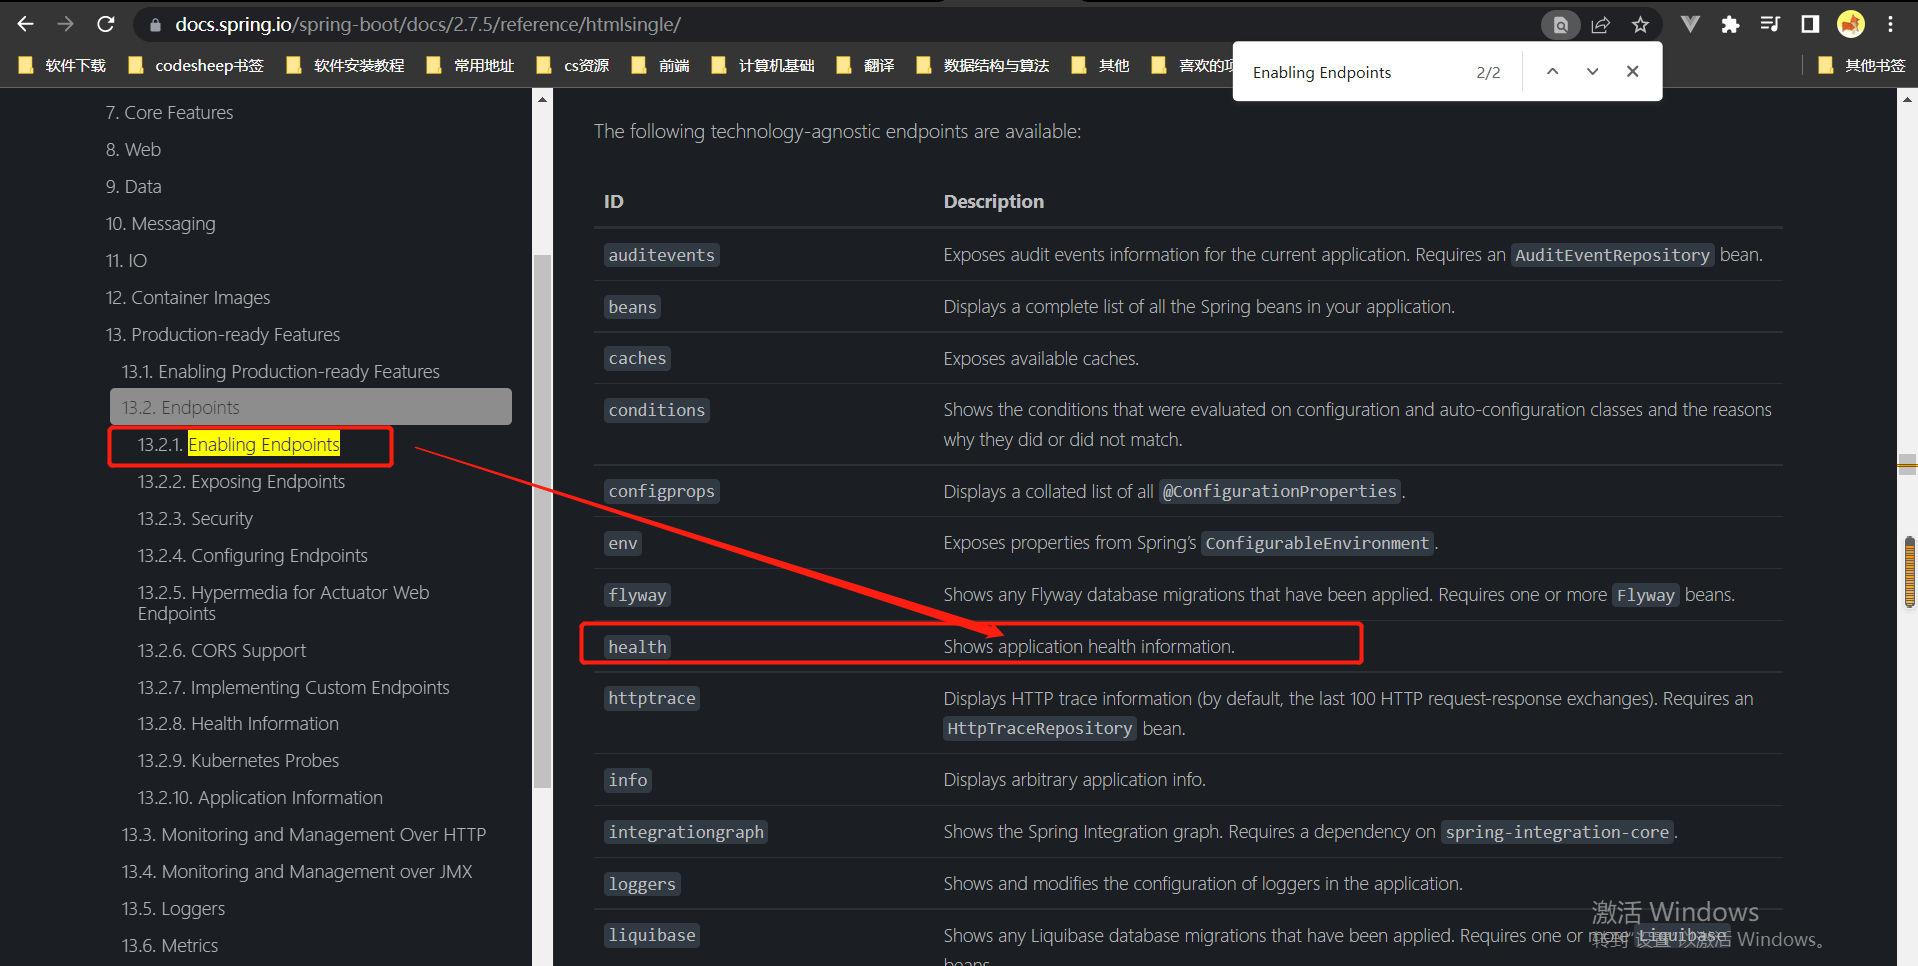
使用java自带的控制台查看容器中的bean:
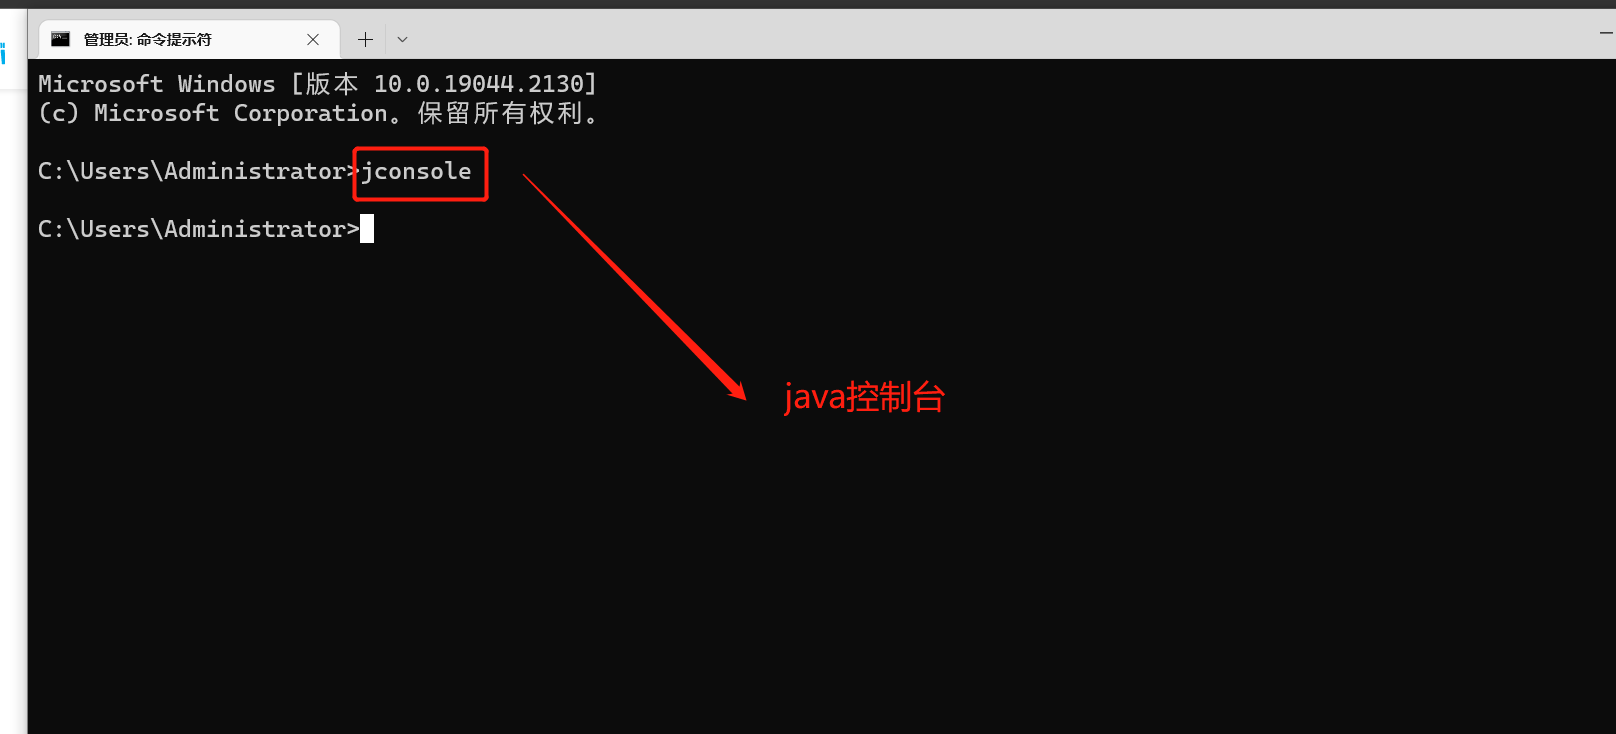
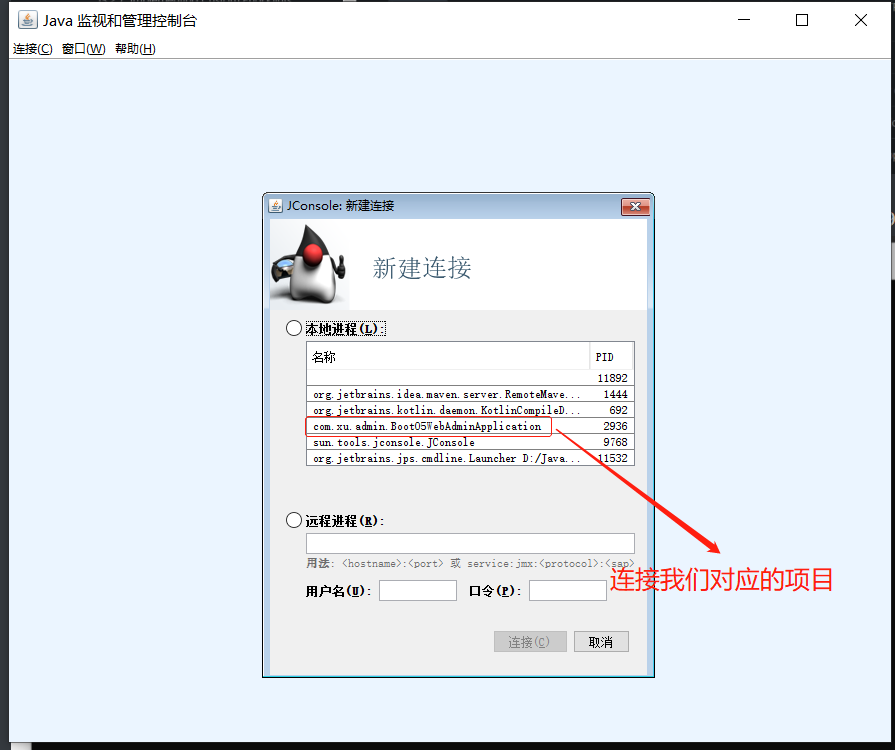
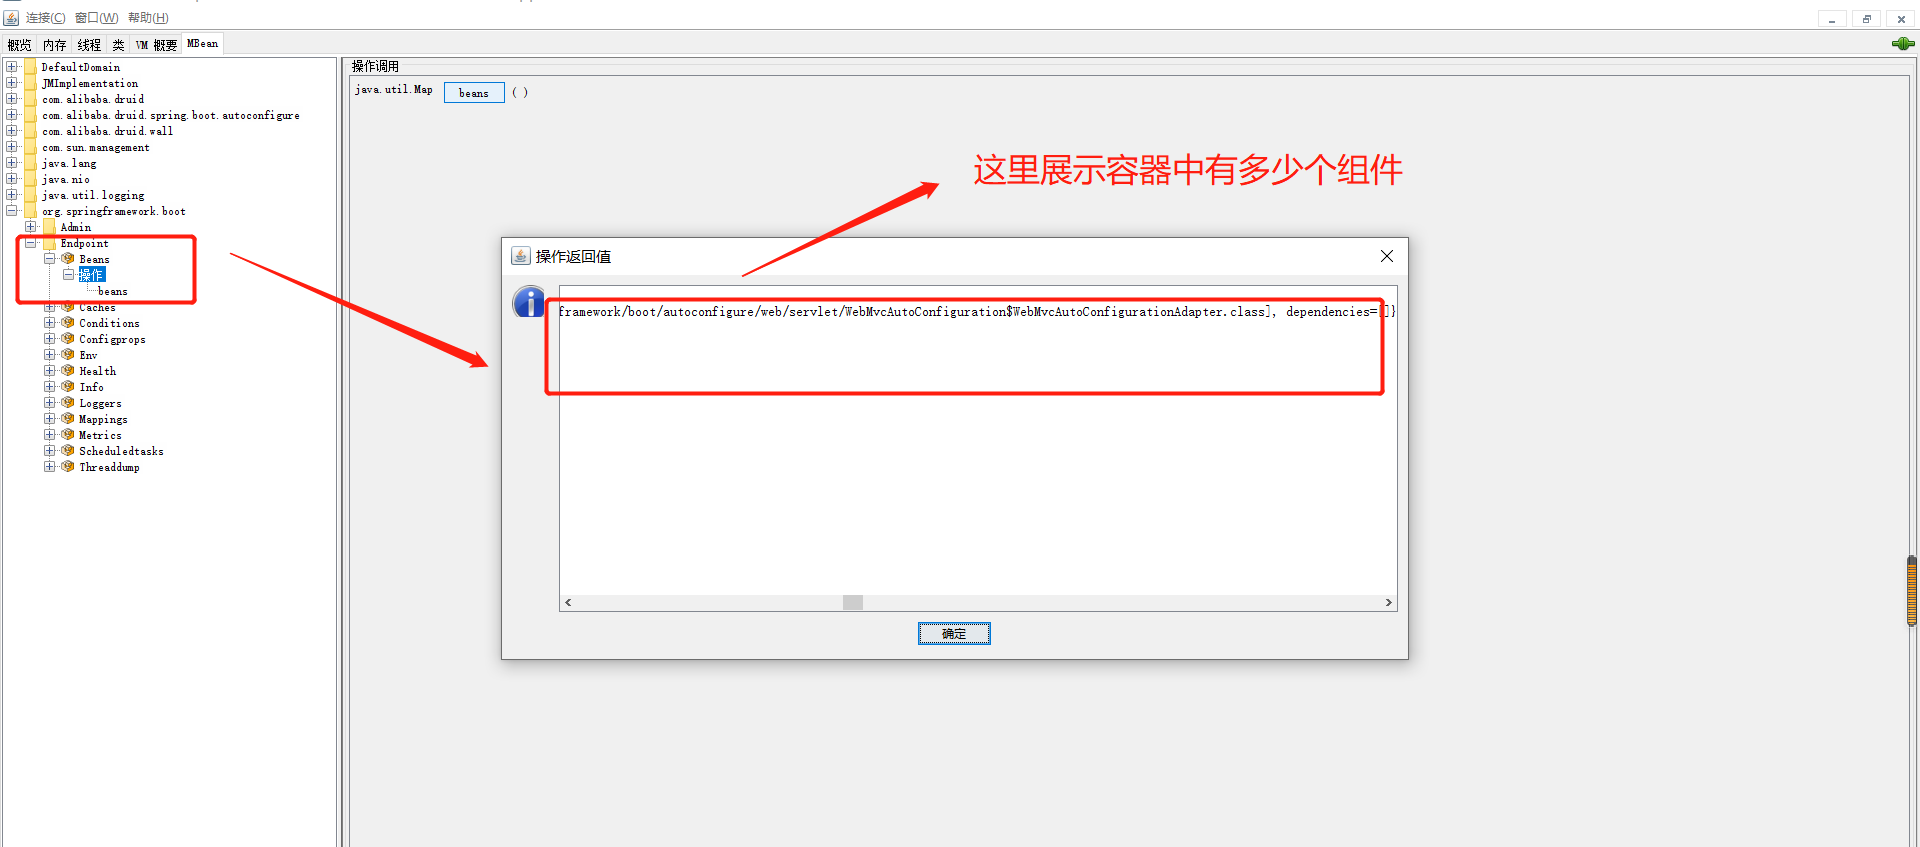
2.直接使用客户端的方式查看容器中的bean:

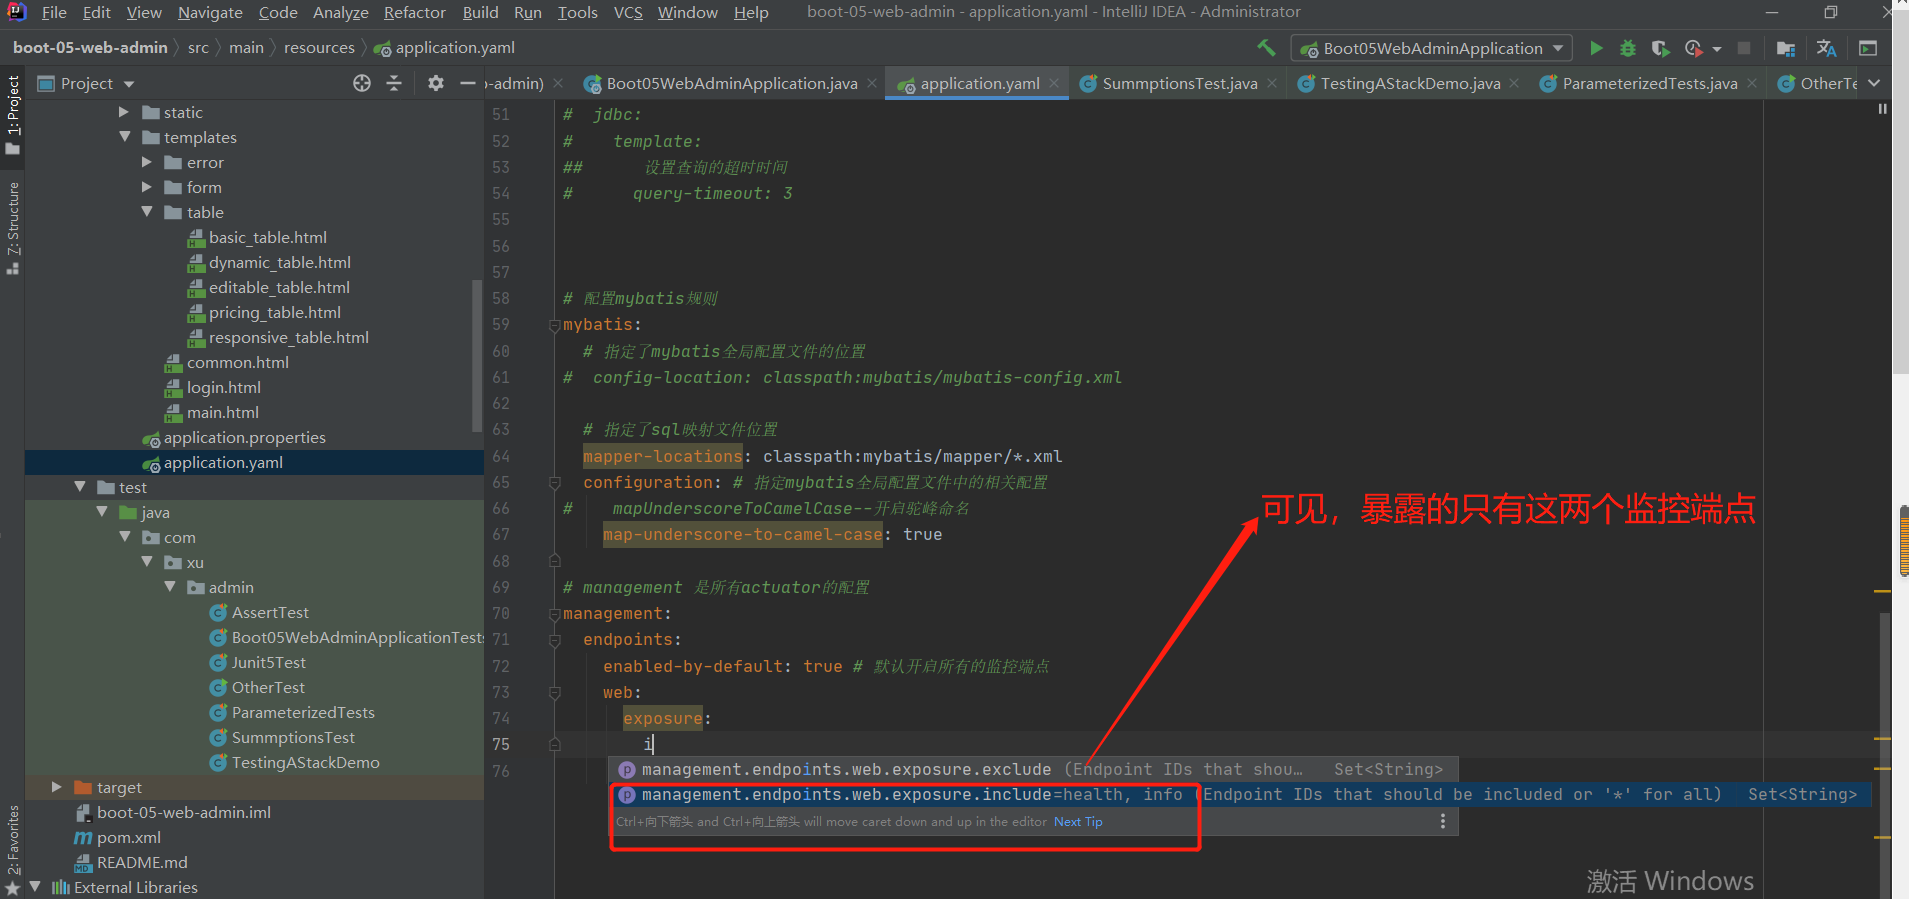
结果:通过客户端访问容器中有多少个bean成功
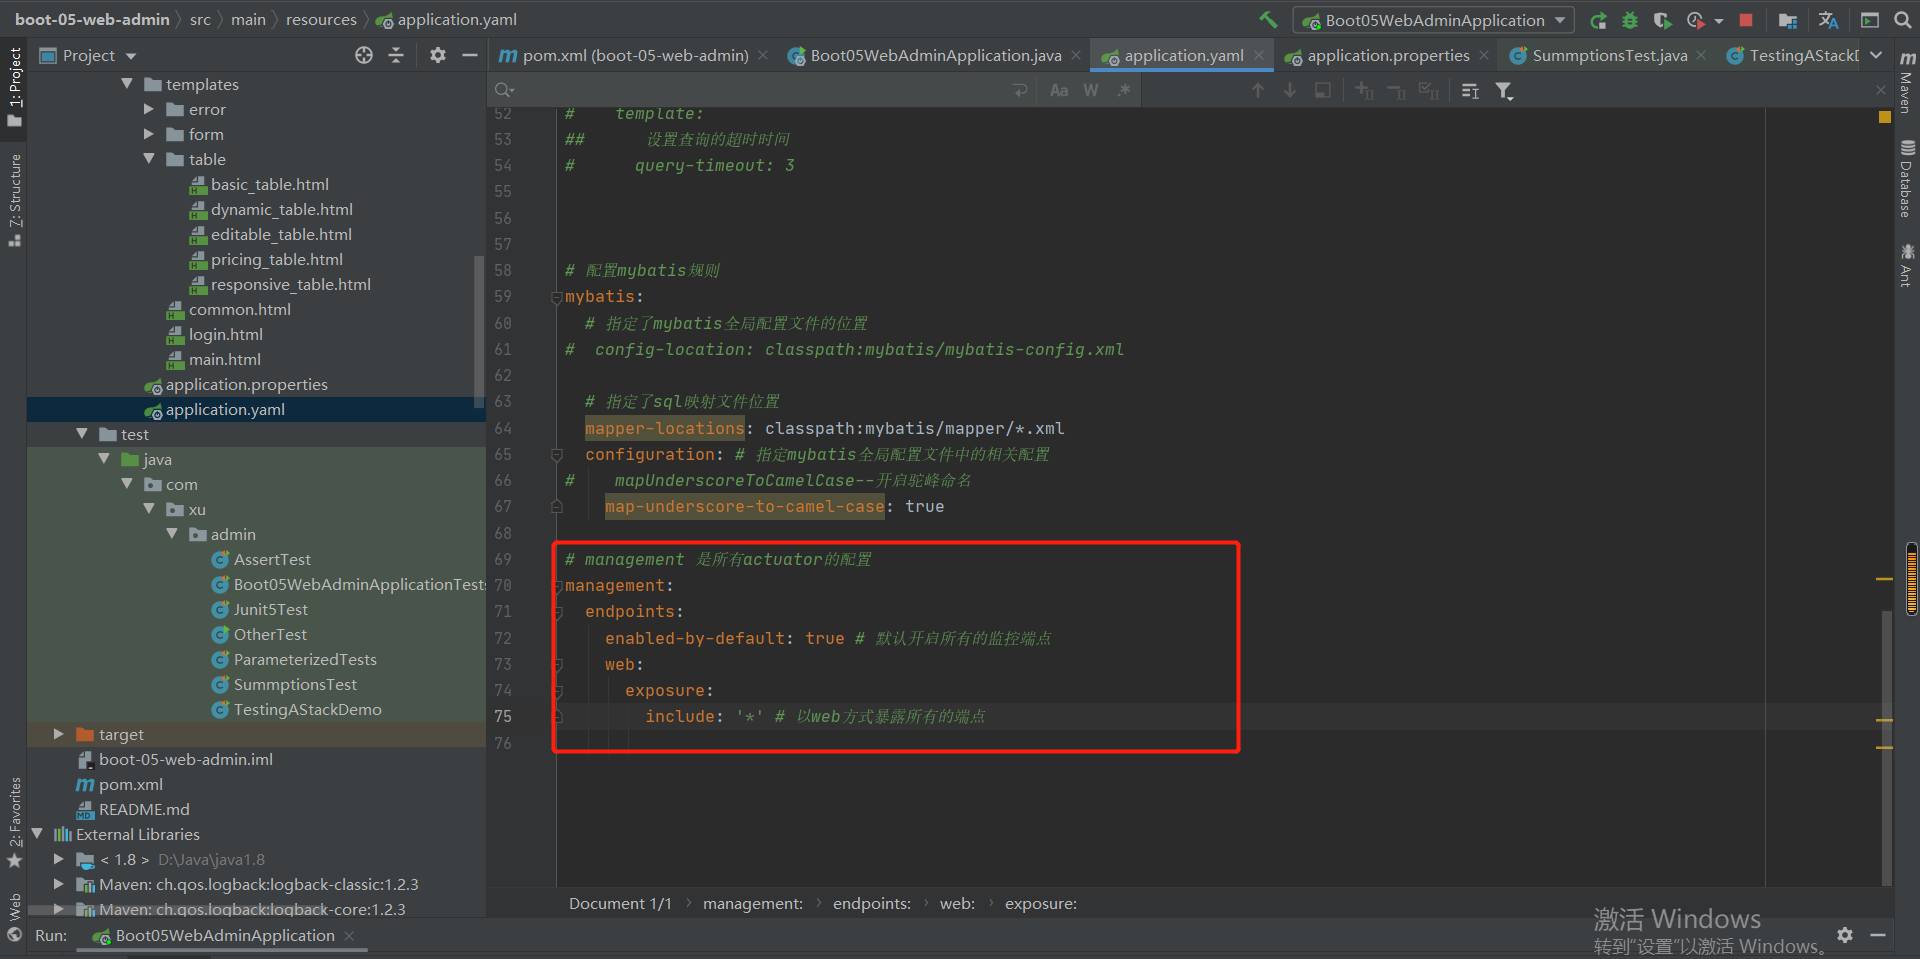
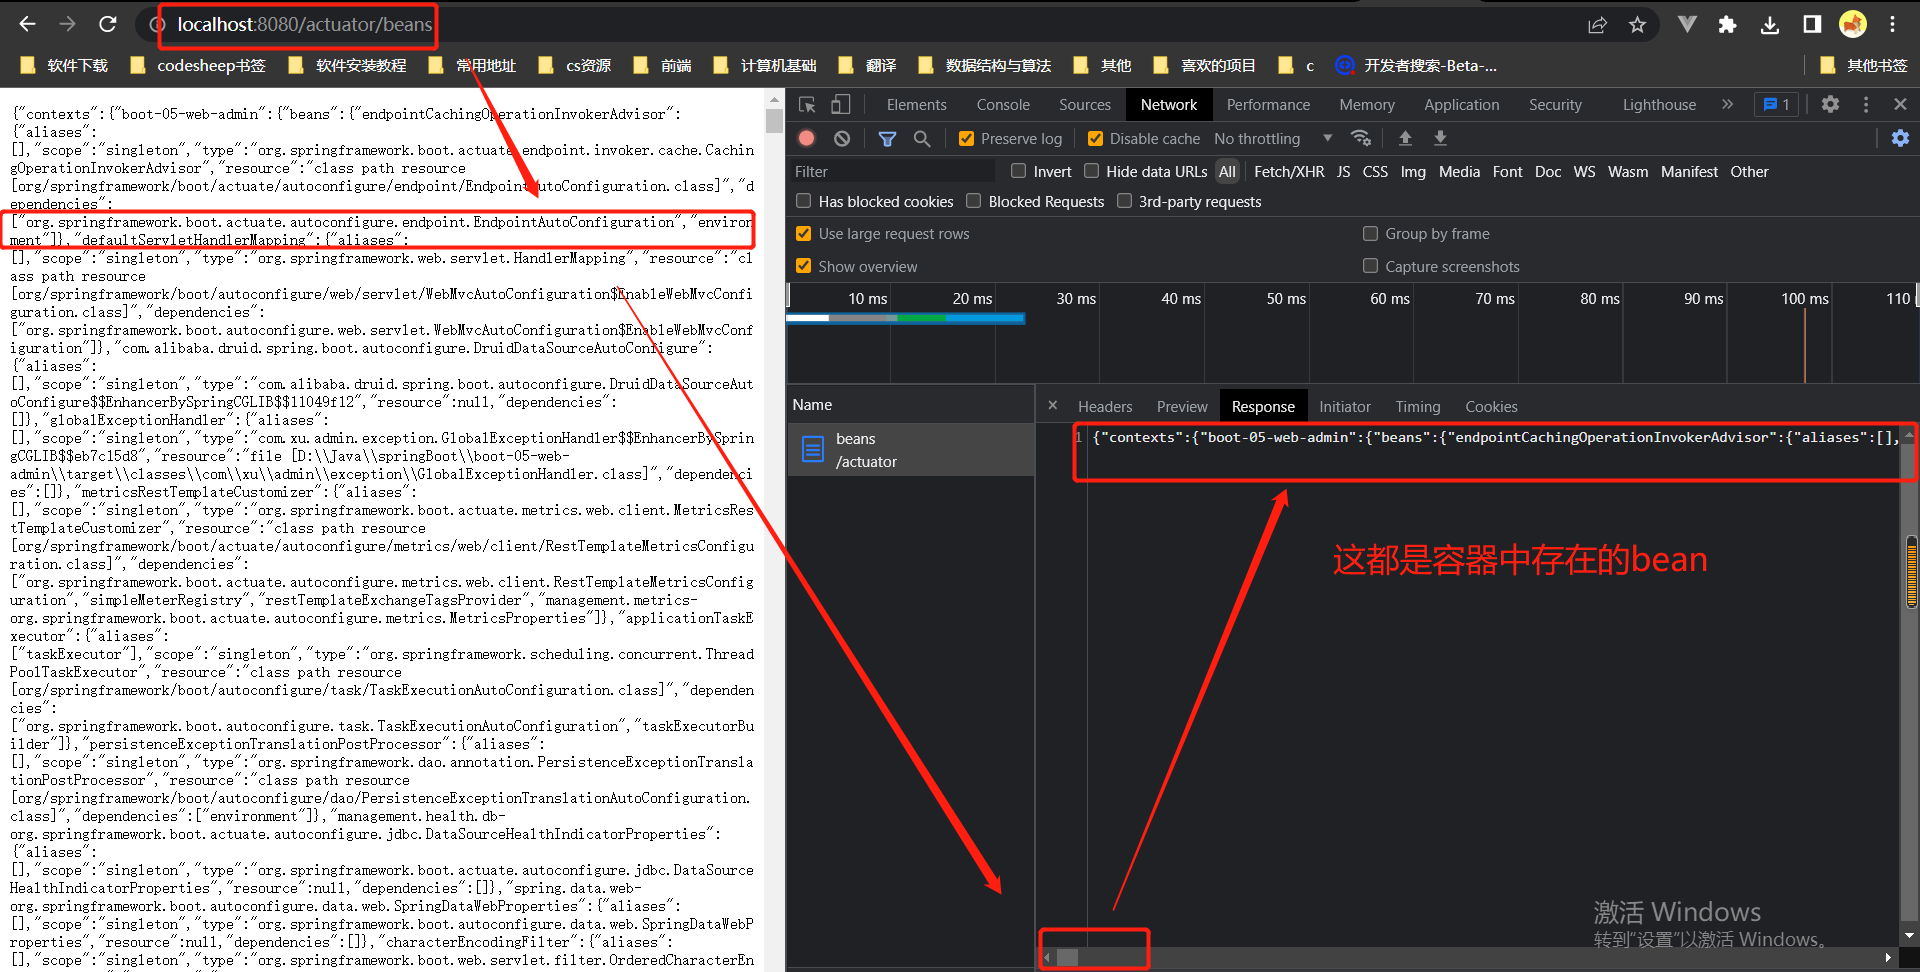
拿到当前系统的配置报告:

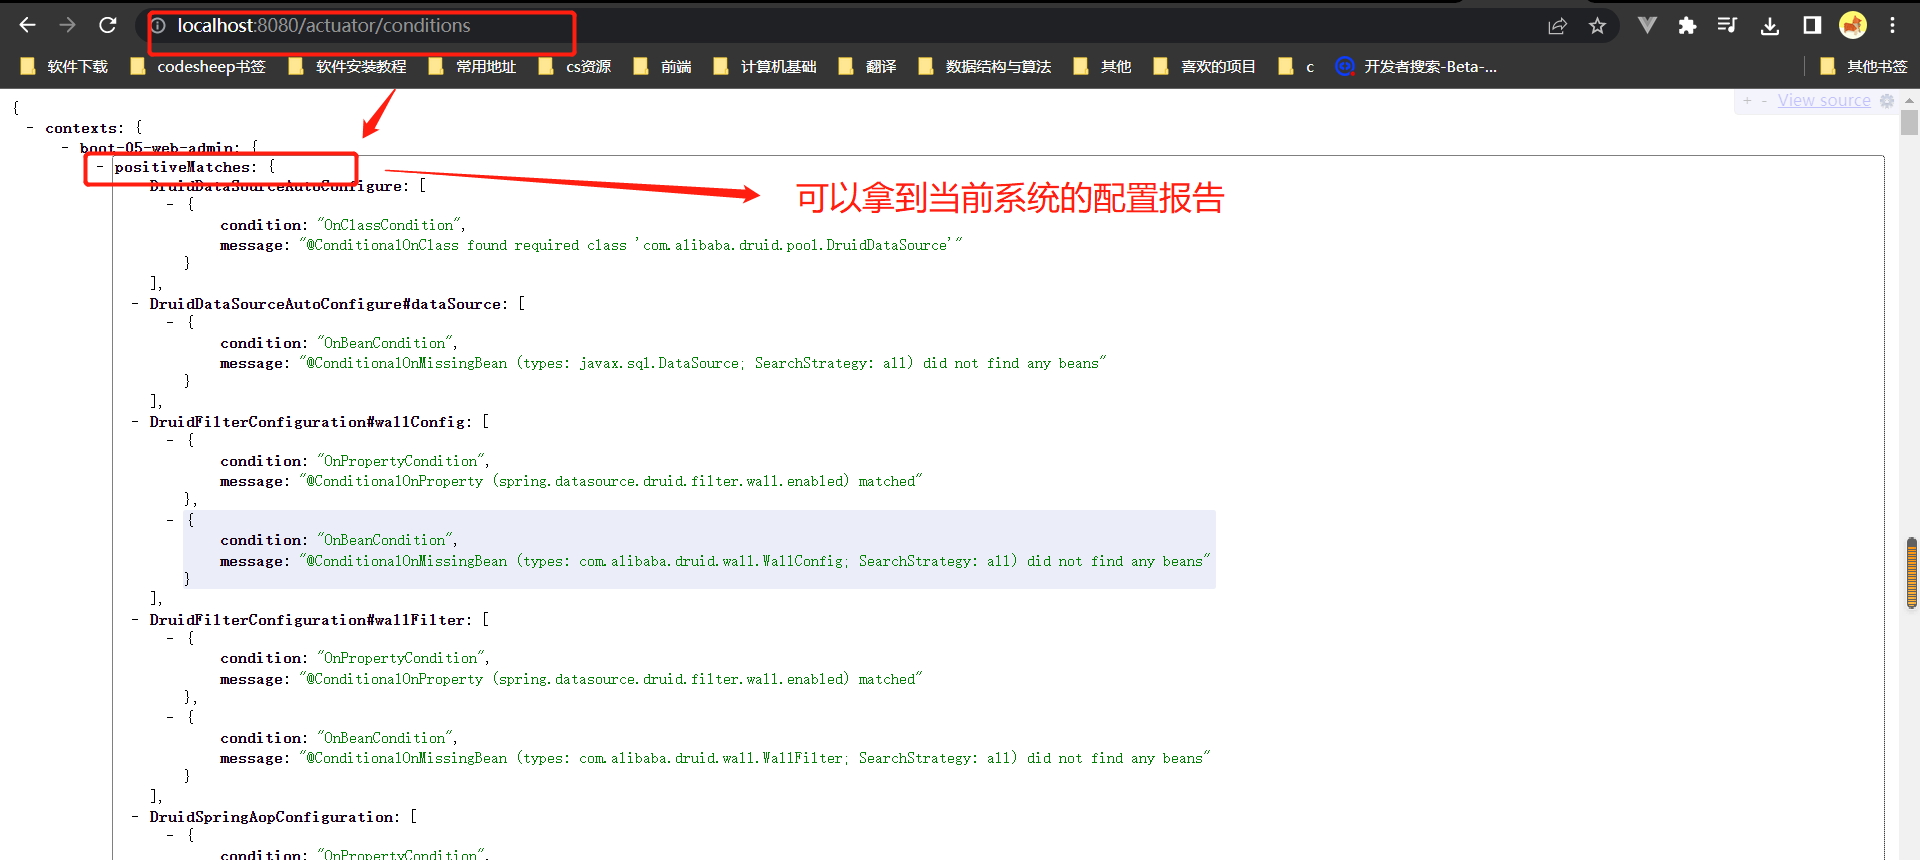
查看指标信息:
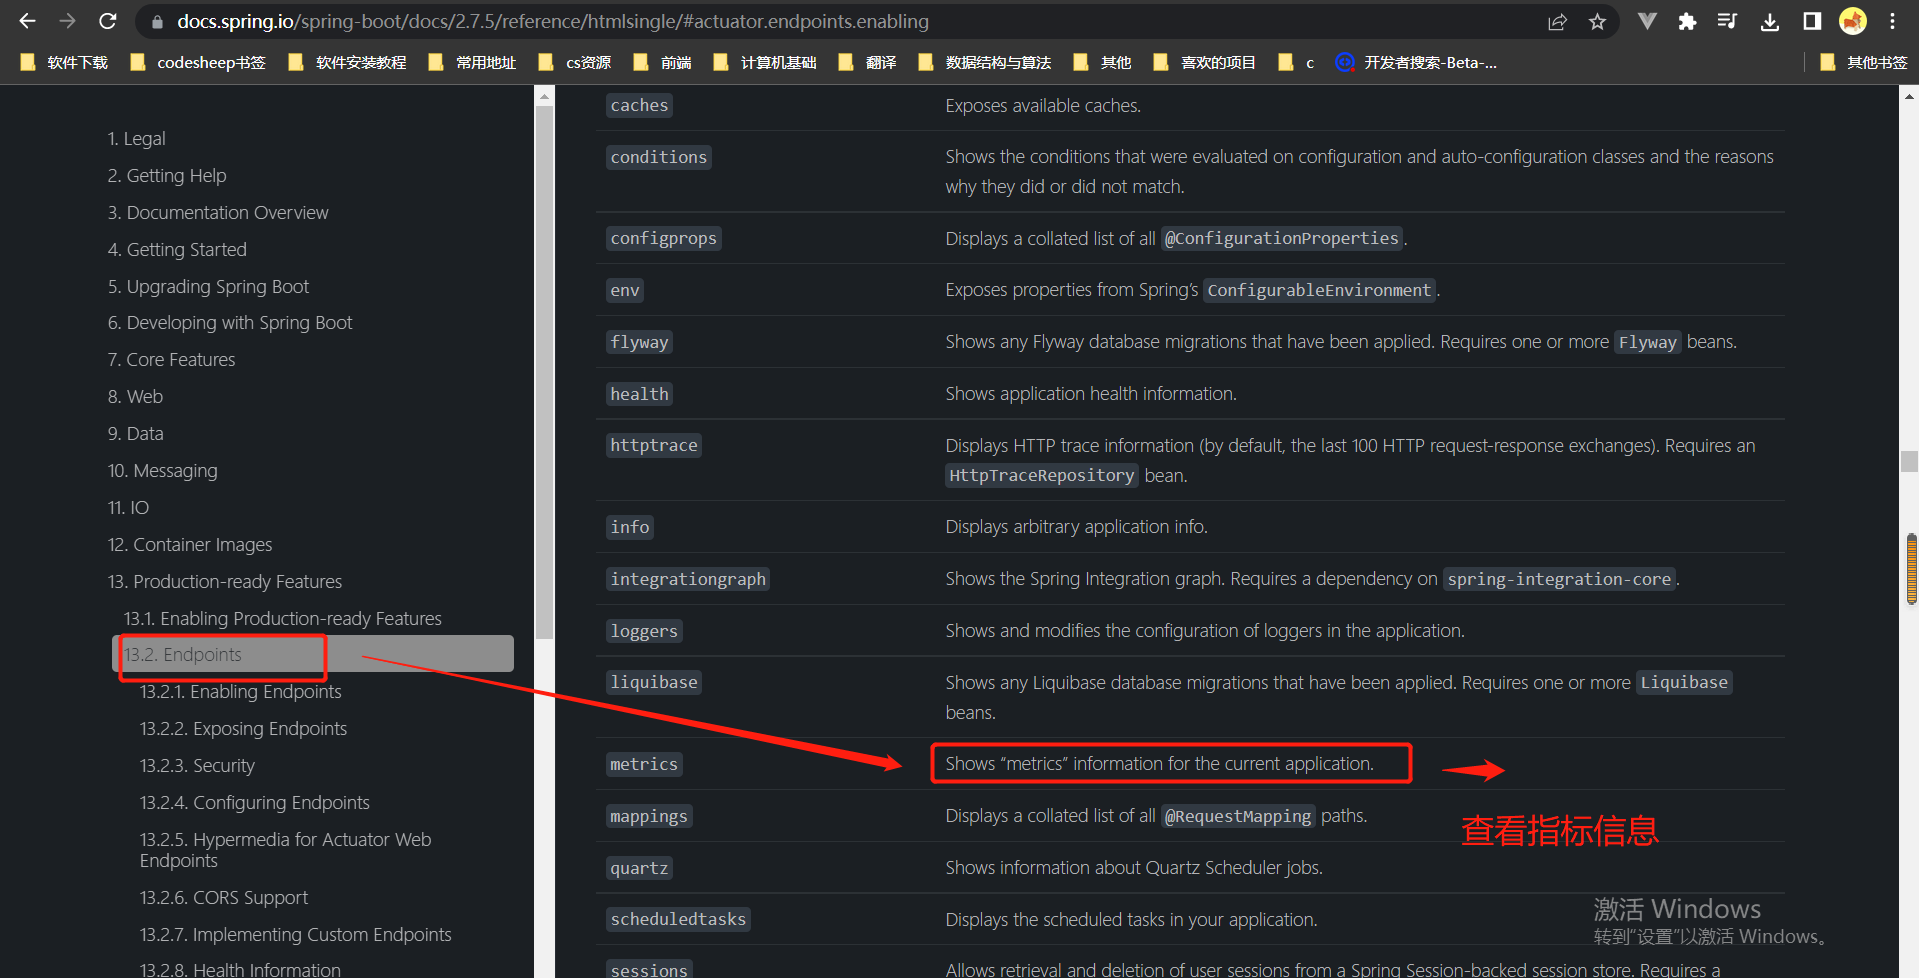
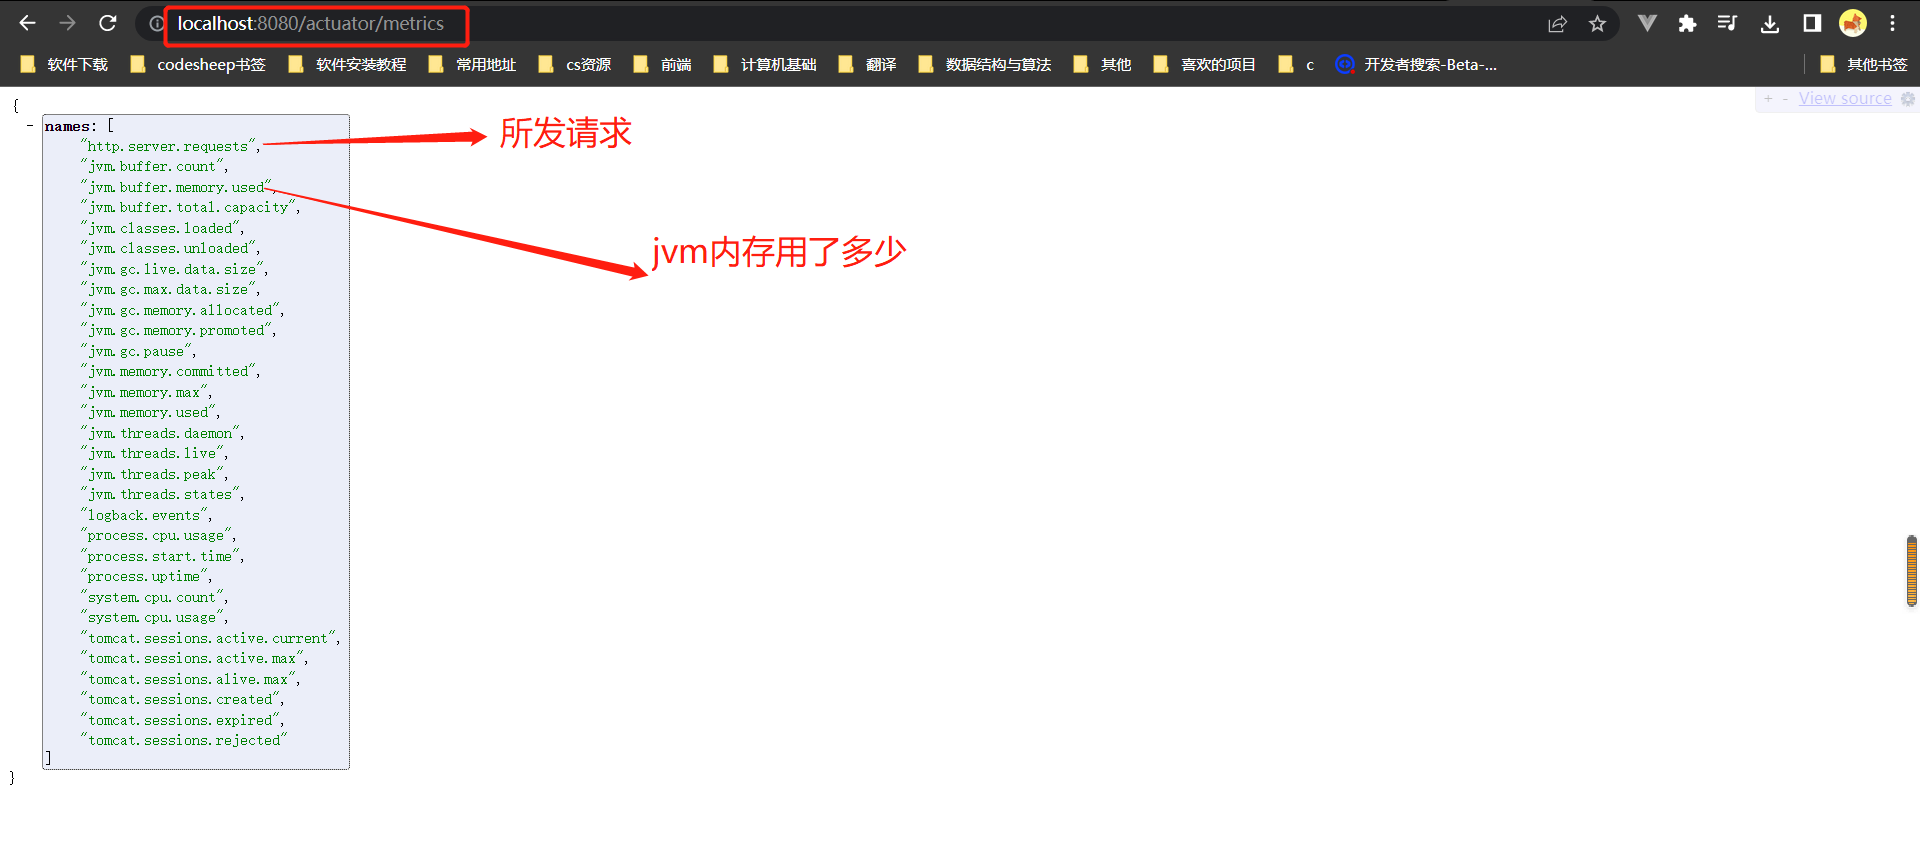
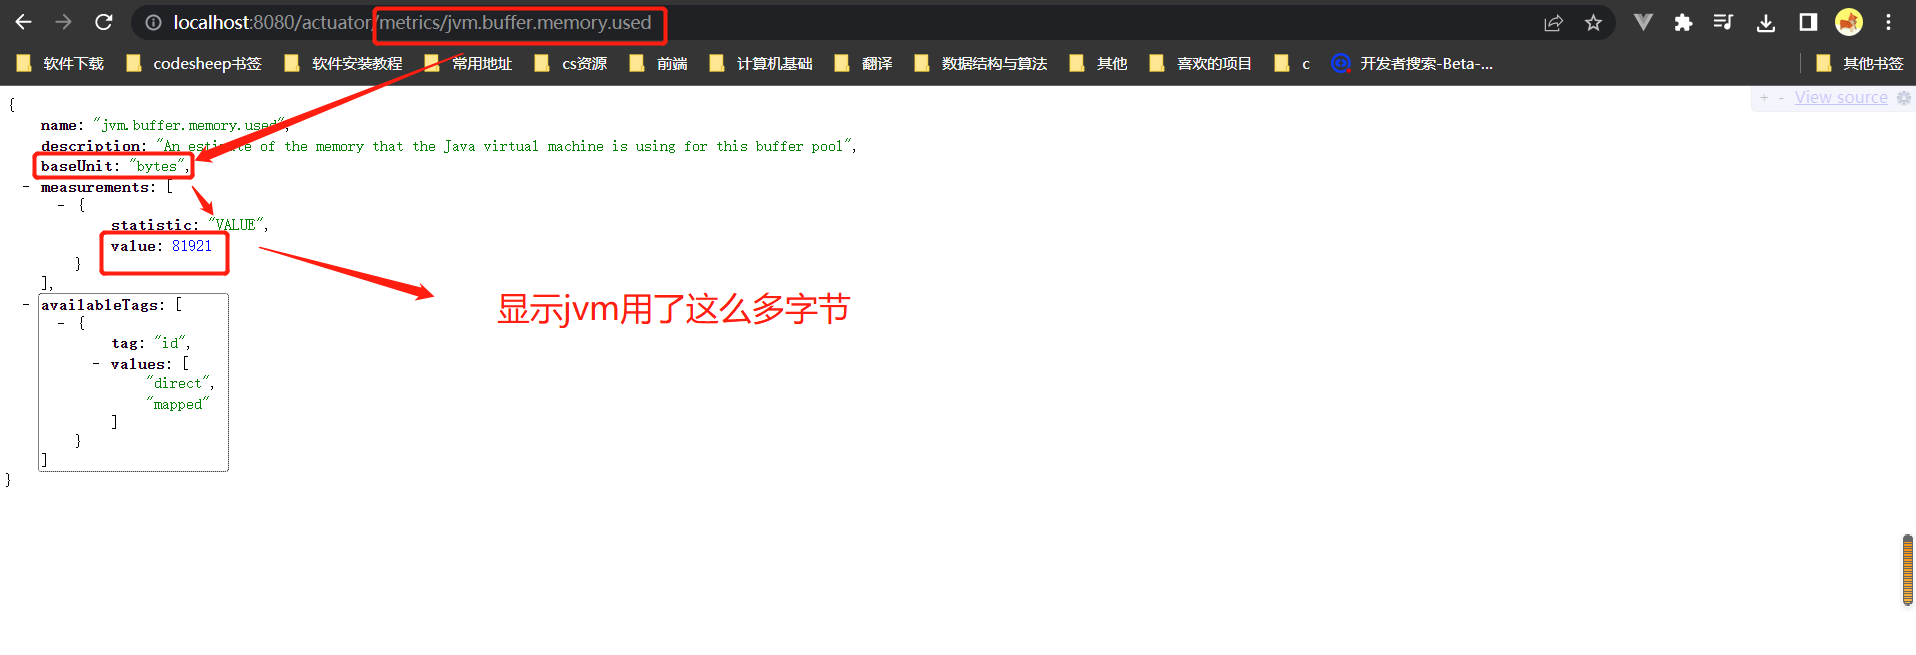
补充:也可以借用以下可视化平台将数据更好的显示出来
15-2 开启与禁用
常用的几个指标:
1.常用指标之health:
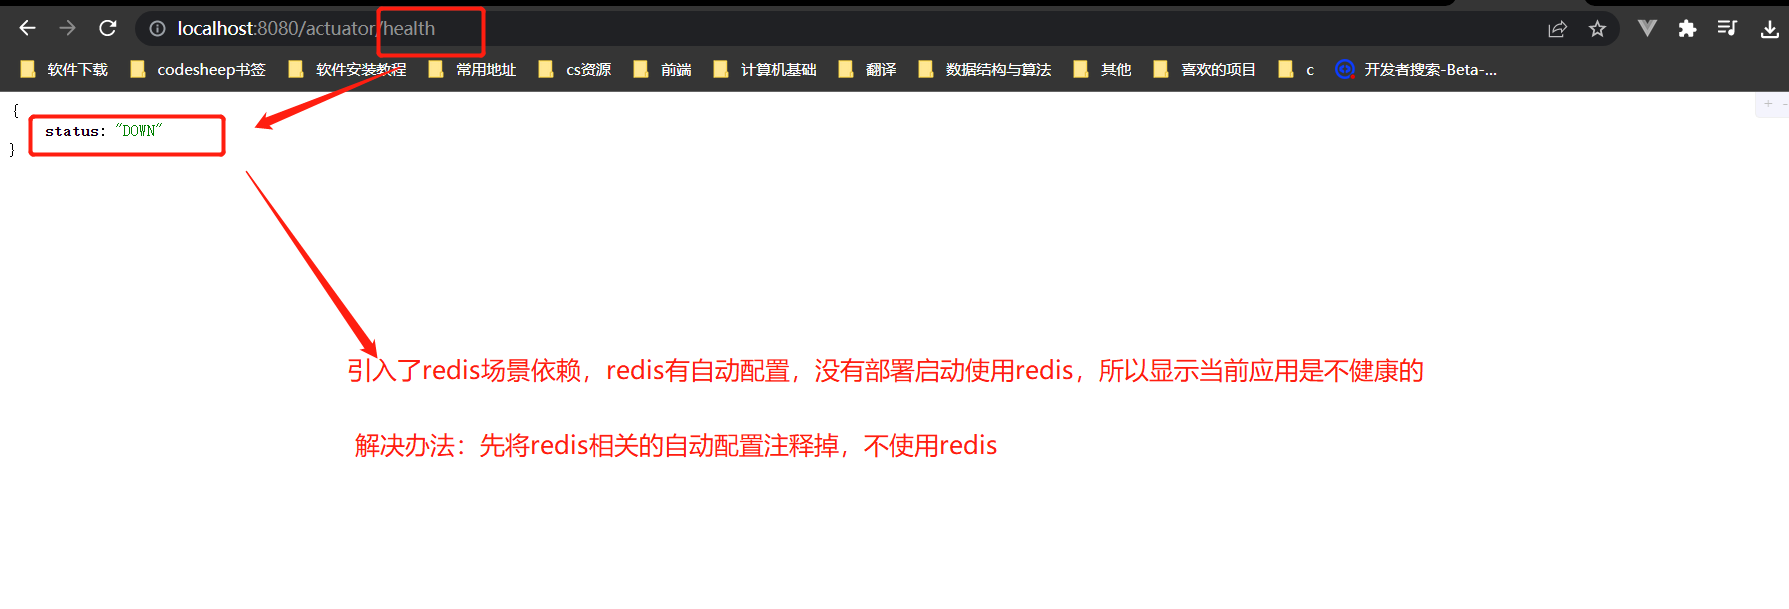
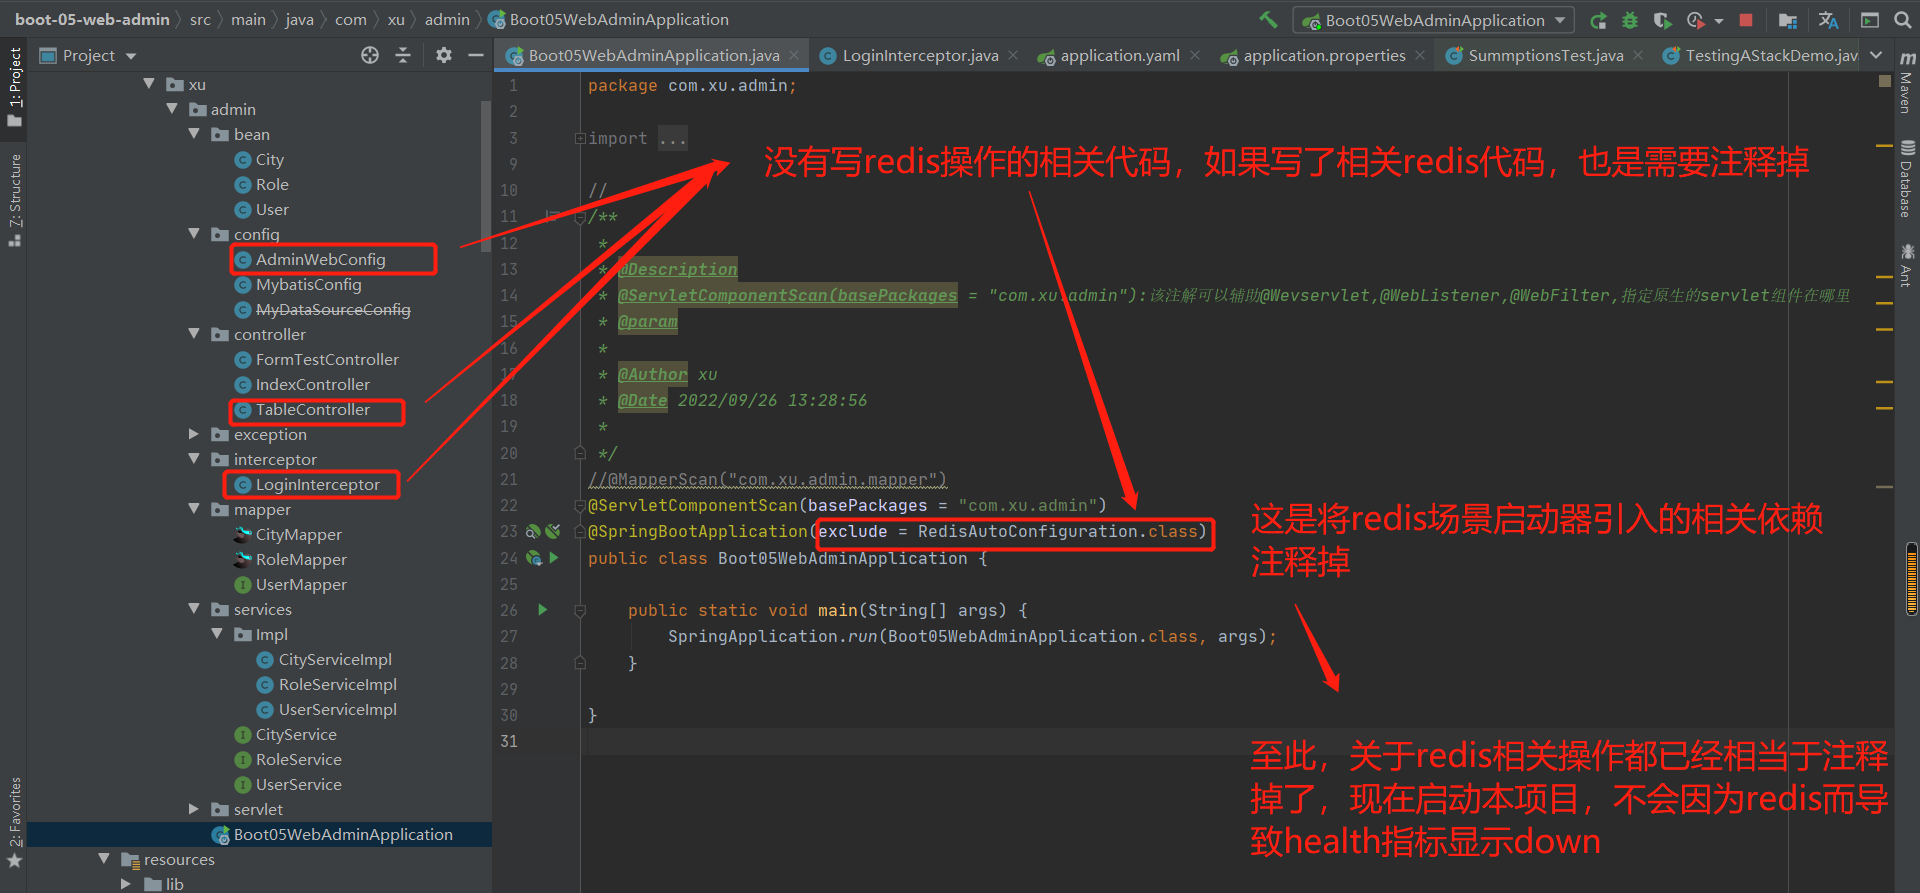
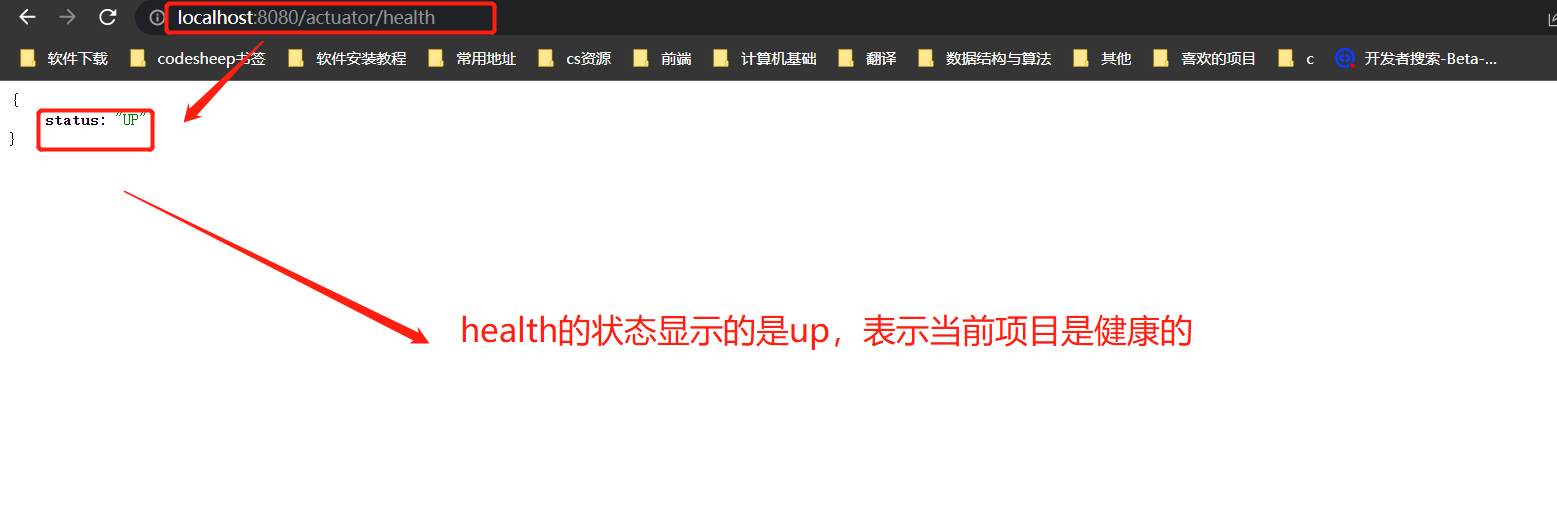
引出问题:以上只是显示该项目是健康的或者是不是健康的,我引入了很多依赖,就是可以具体显示是哪一个部分是健康的或不是健康的
解决:
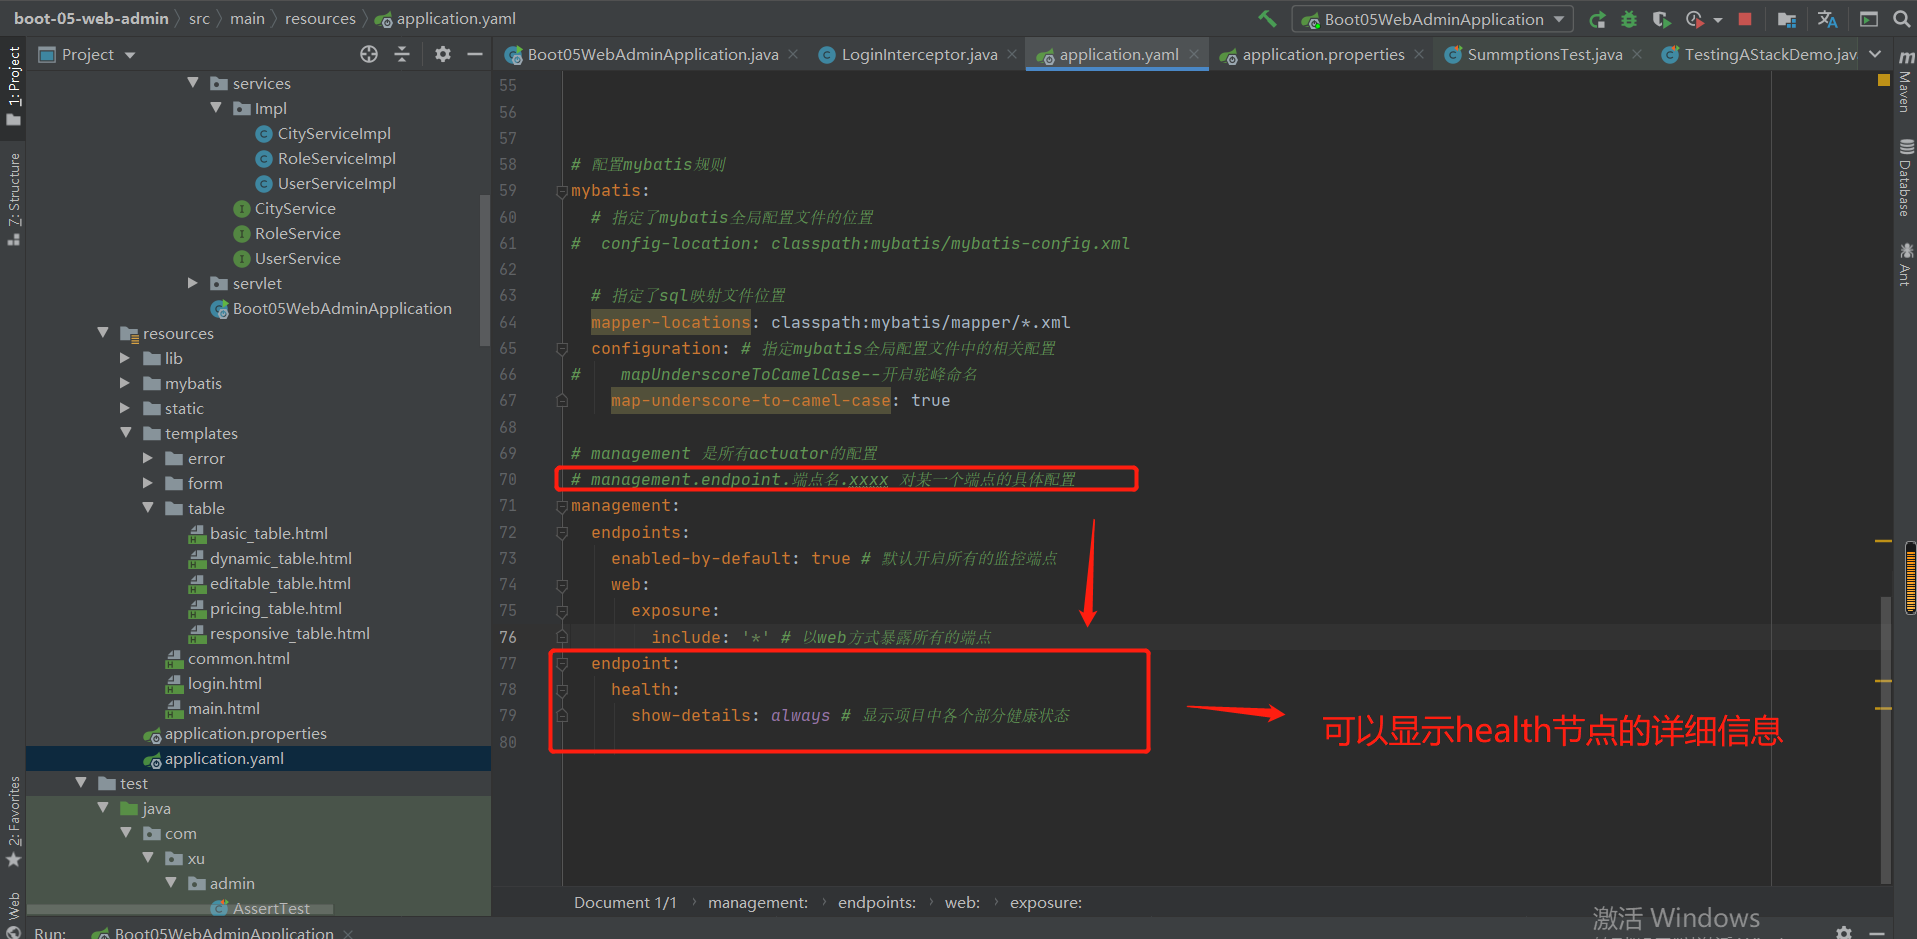
结果:
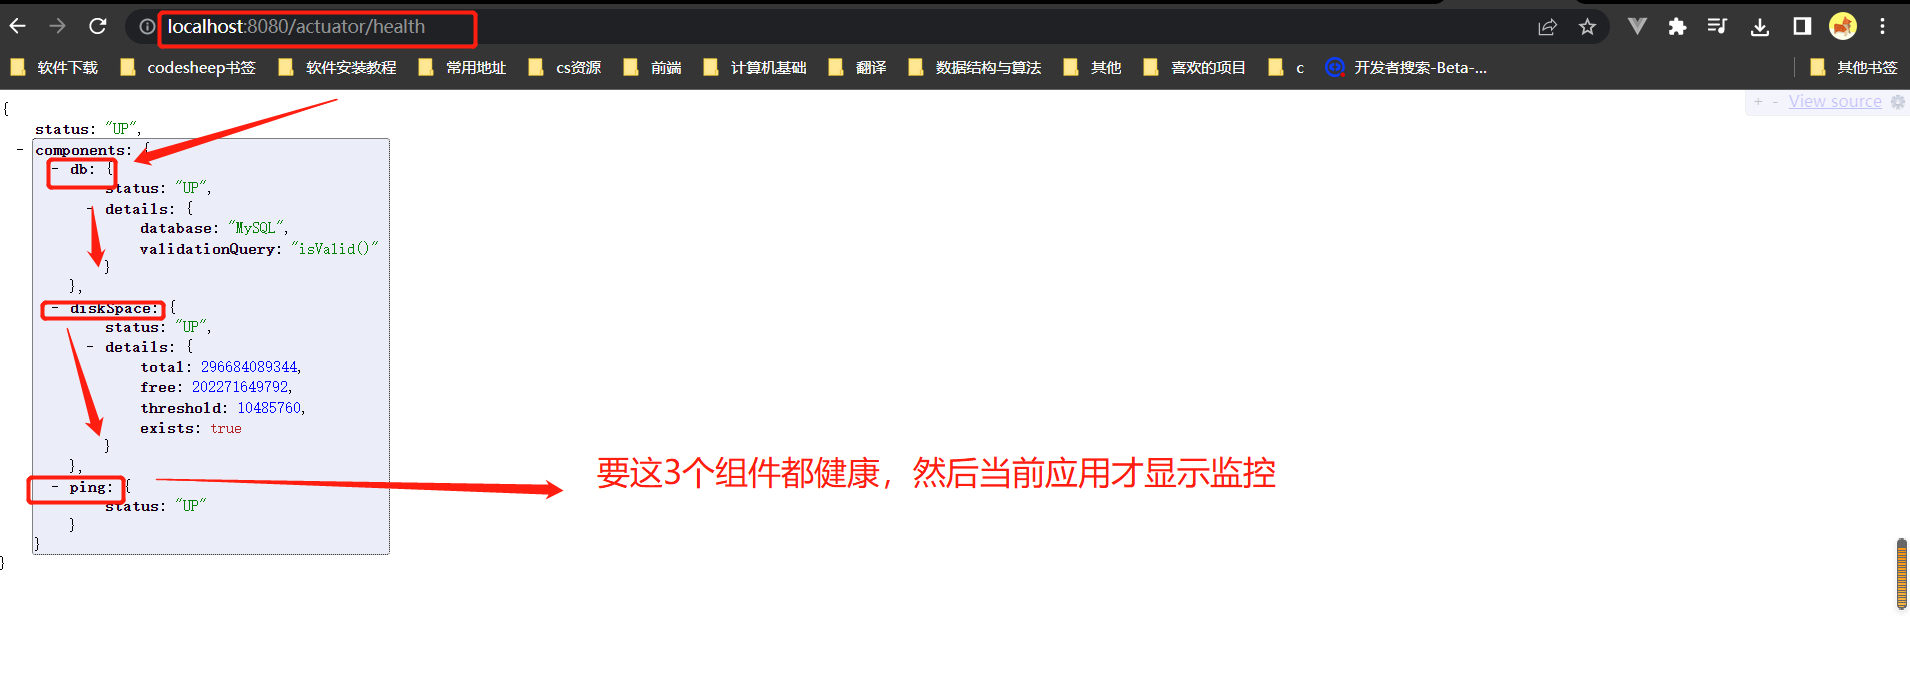
2.常用指标之metrics
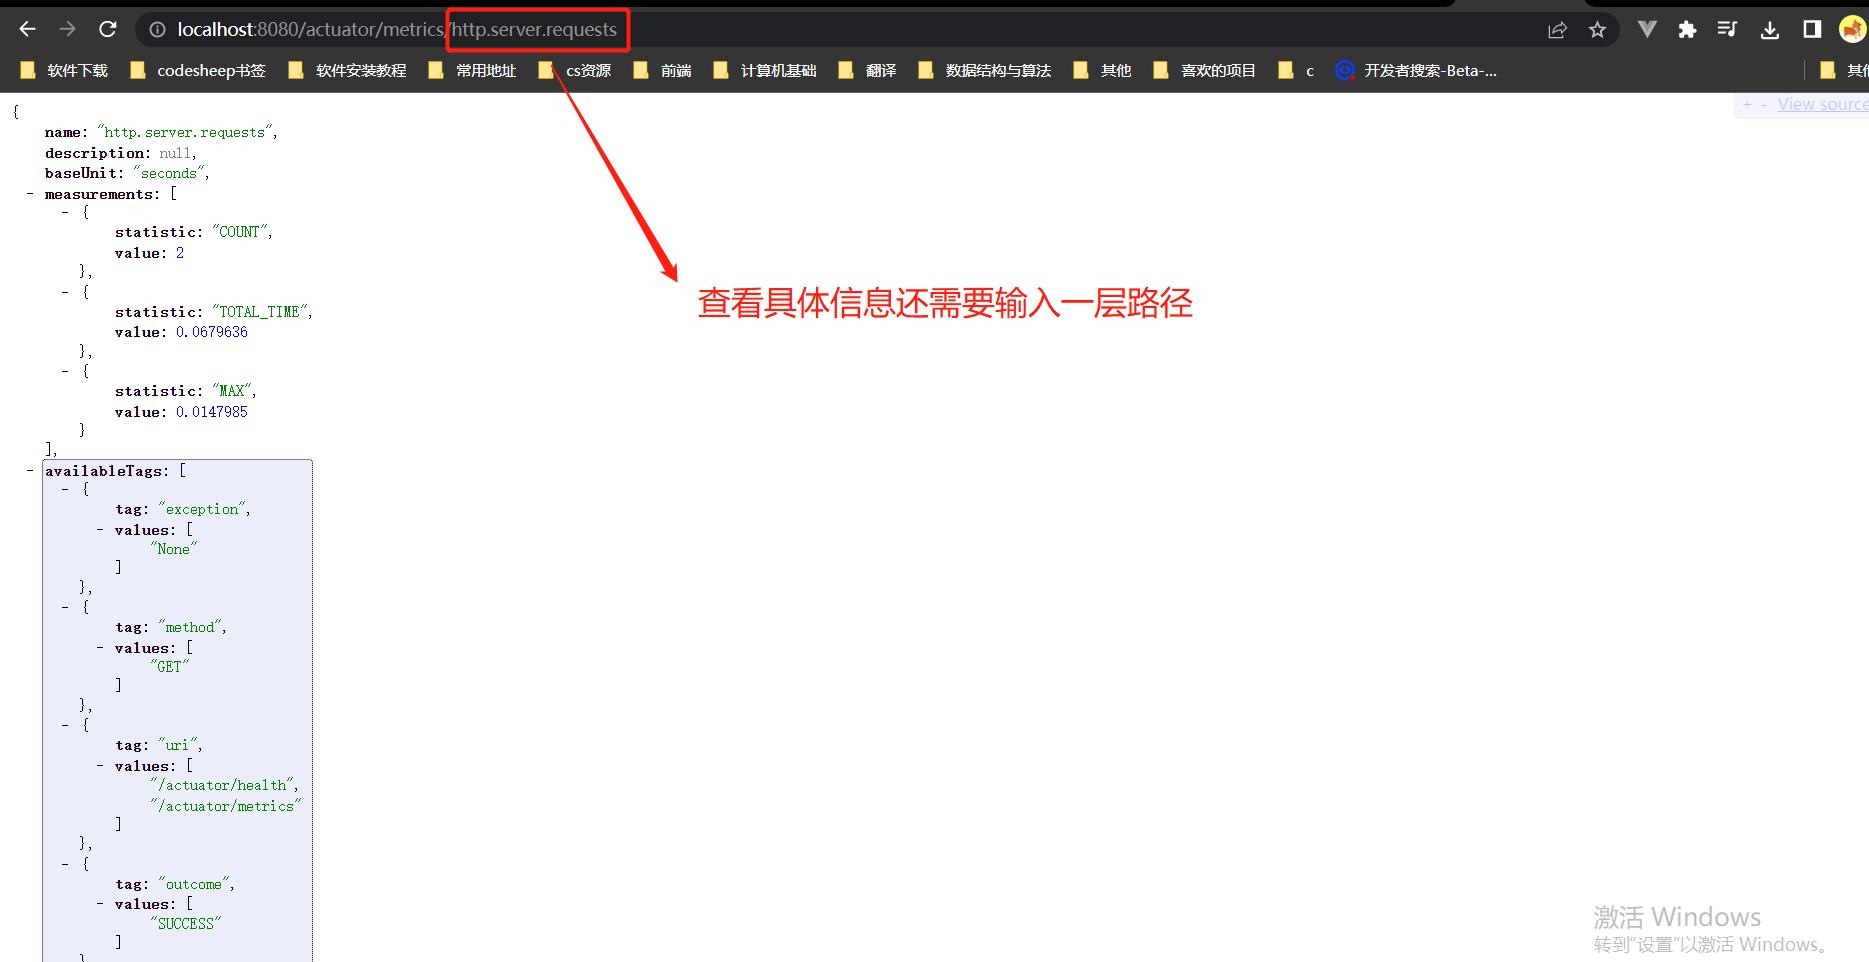
3.禁用掉部分指标,开启部分指标
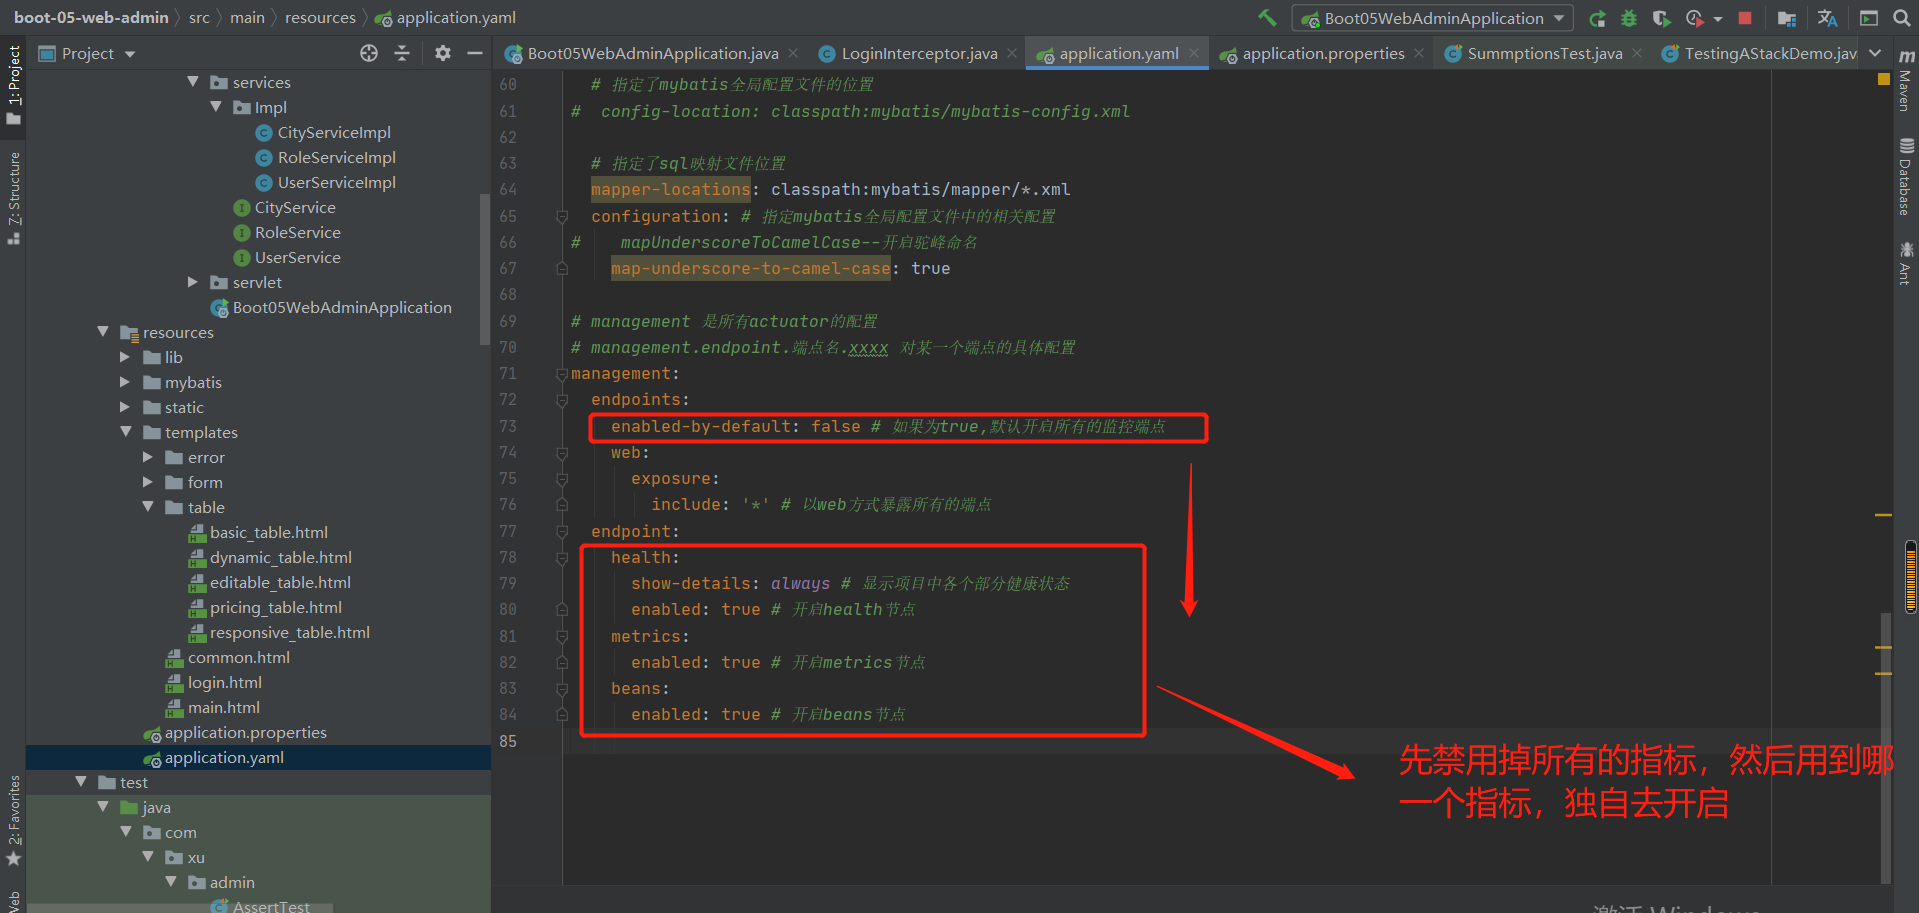
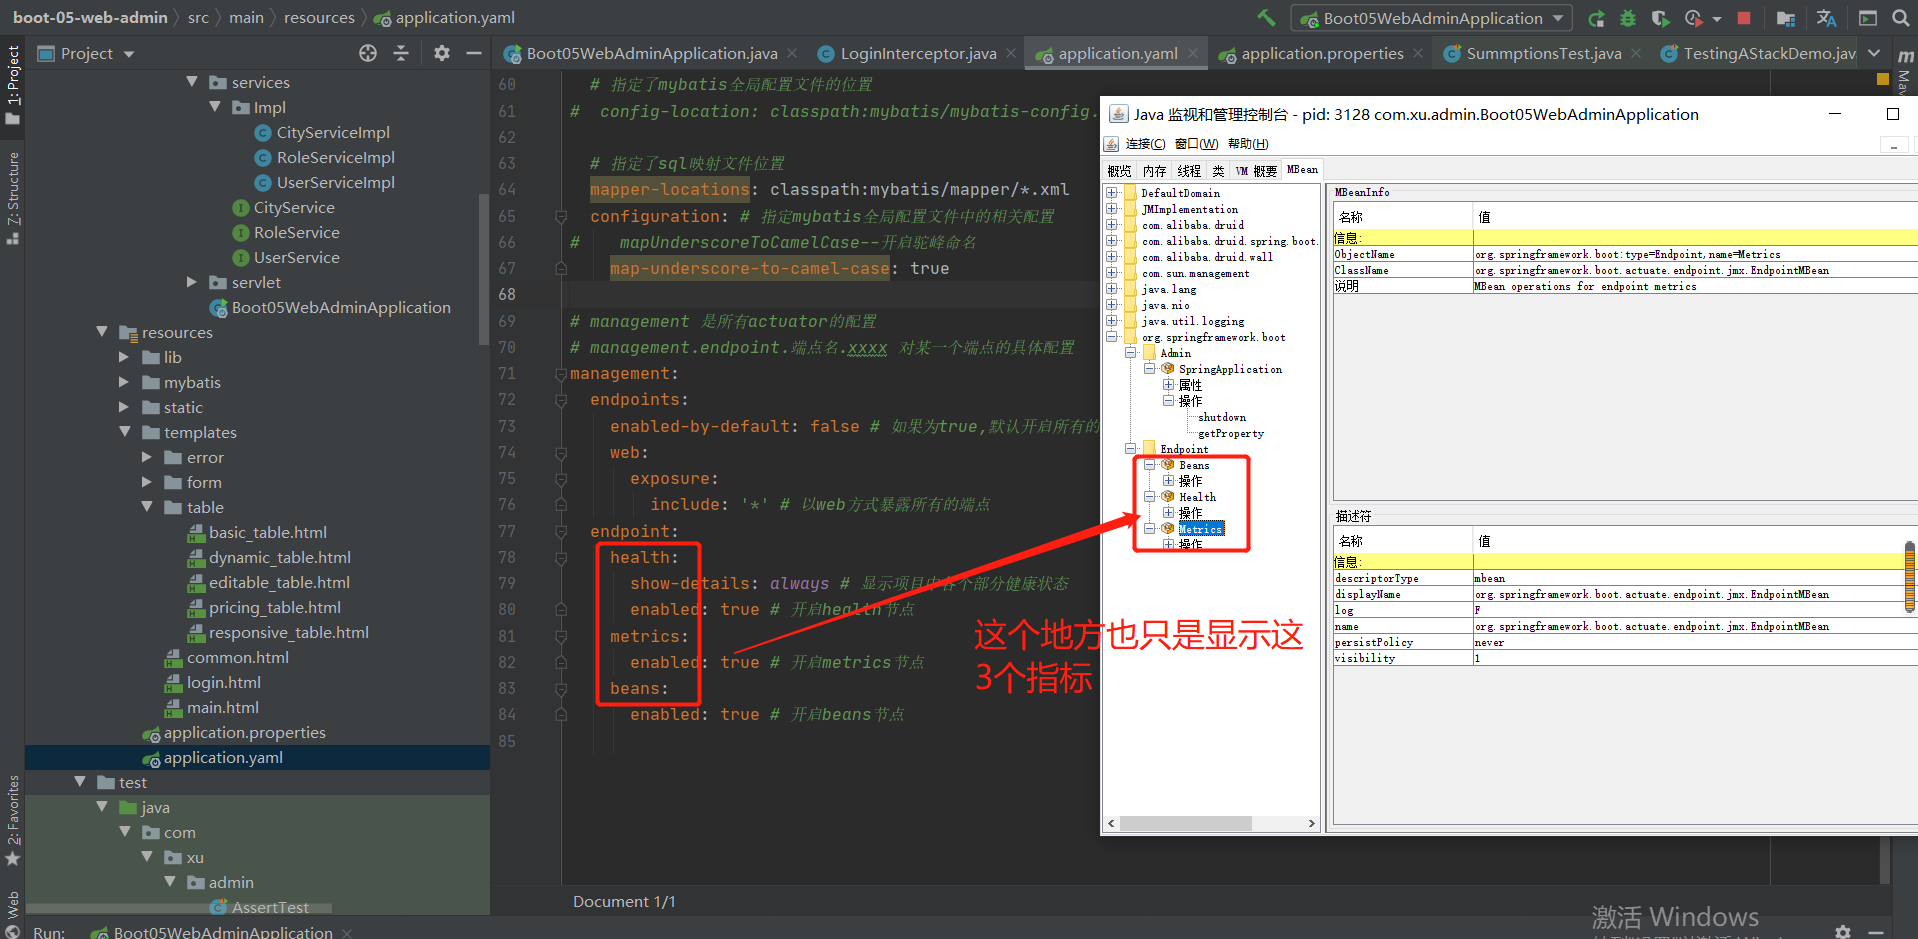
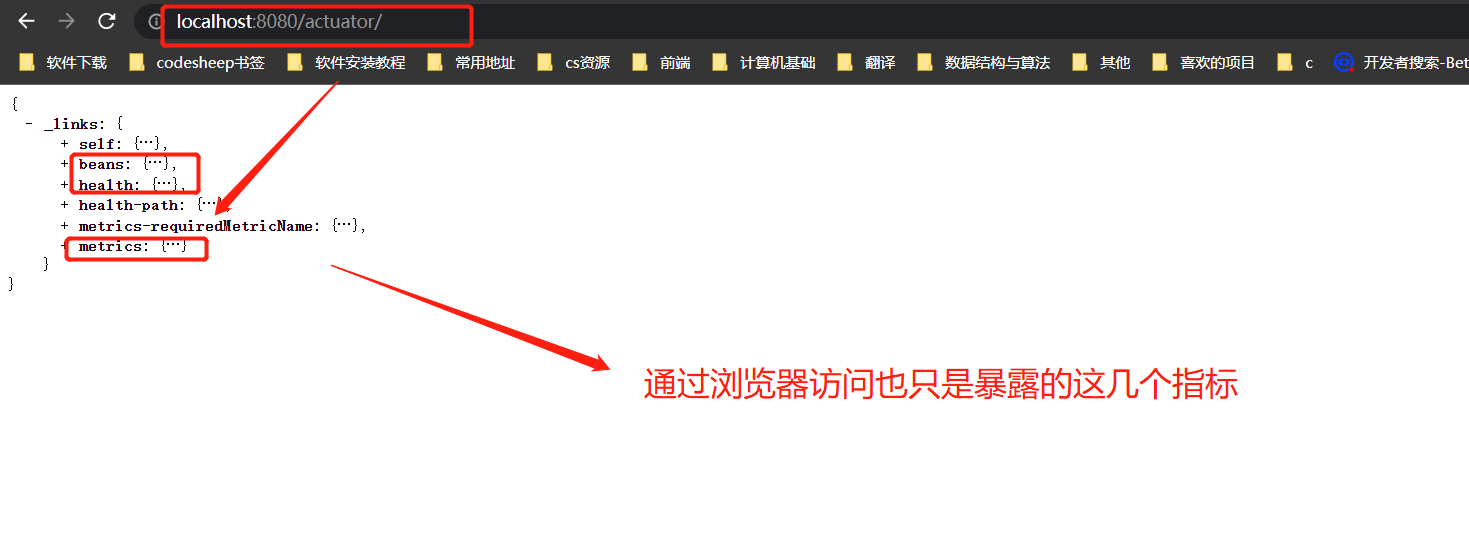
15-3 订制Endpoint
1.定义我自己的一个组件用于health指标监控
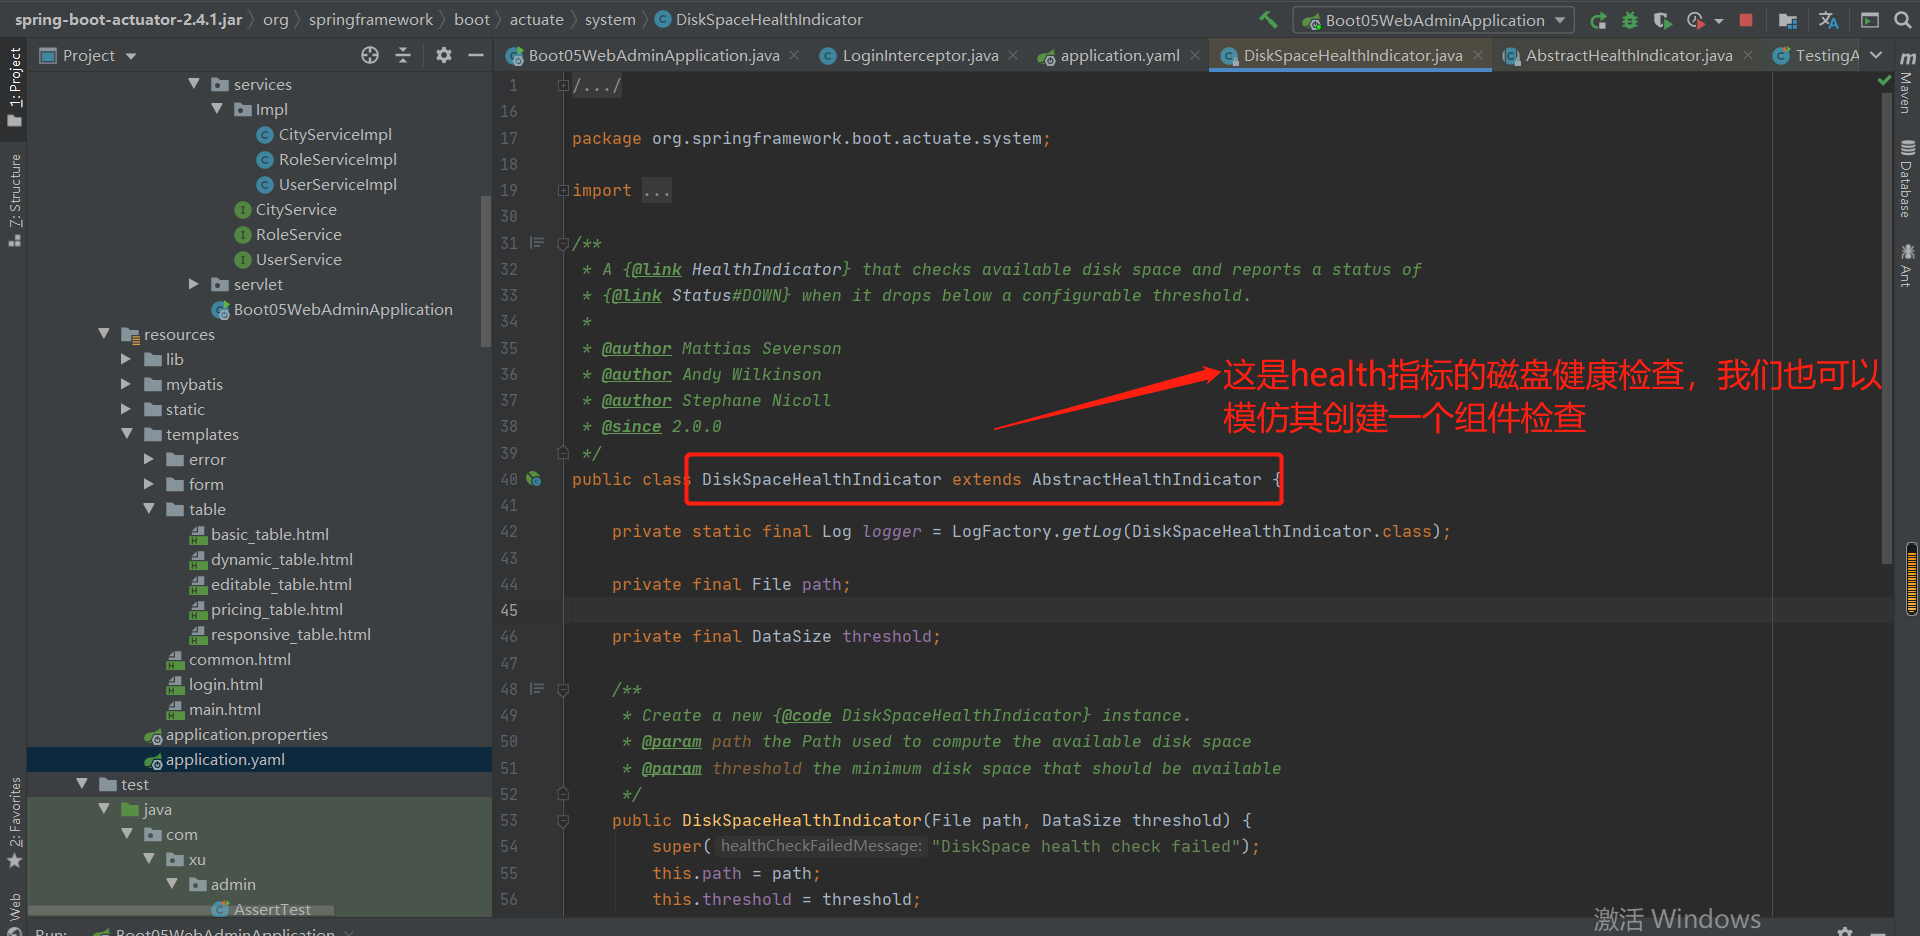
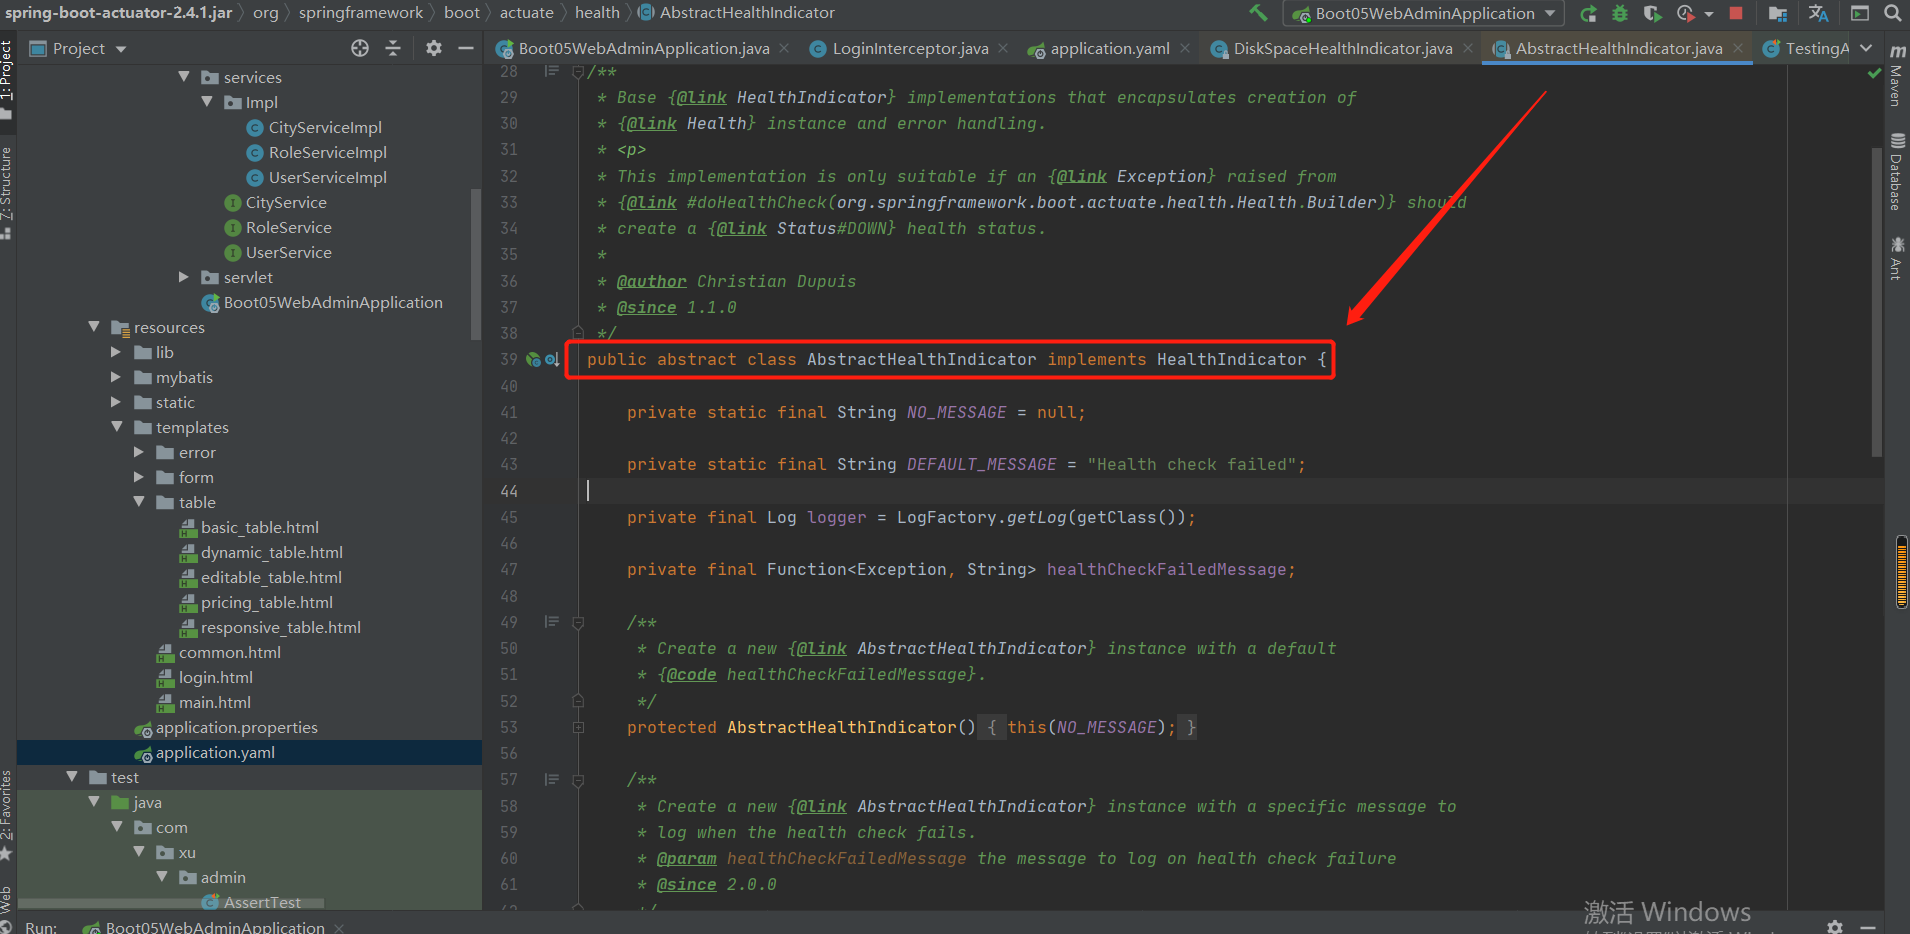
代码实现:
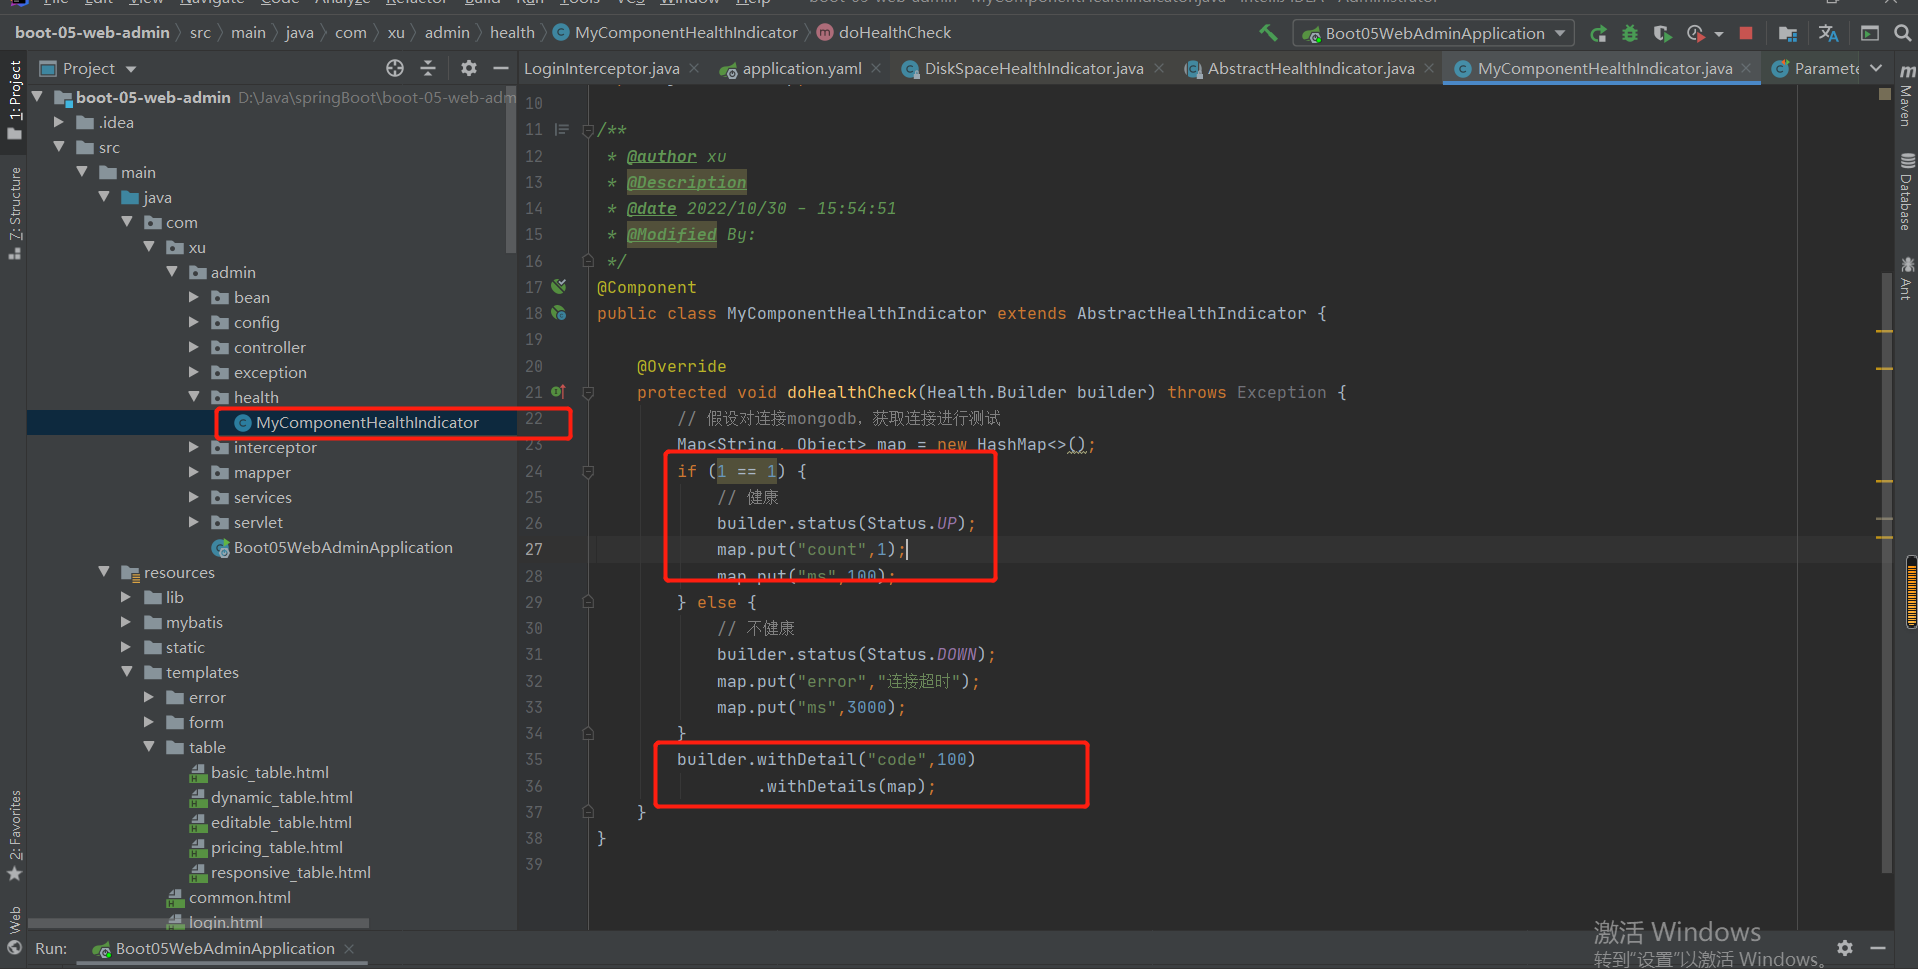
package com.xu.admin.health;

import org.springframework.boot.actuate.health.AbstractHealthIndicator;
import org.springframework.boot.actuate.health.Health;
import org.springframework.boot.actuate.health.Status;
import org.springframework.stereotype.Component;

import java.util.HashMap;
import java.util.Map;

/**
 * @author xu
 * @Description
 * @date 2022/10/30 - 15:54:51
 * @Modified By:
 */
@Component
public class MyComponentHealthIndicator extends AbstractHealthIndicator {

    @Override
    protected void doHealthCheck(Health.Builder builder) throws Exception {
        // 假设对连接mongodb,获取连接进行测试
        Map<String, Object> map = new HashMap<>();
        if (1 == 1) {
            // 健康
            builder.status(Status.UP);
            map.put("count",1);
            map.put("ms",100);
        } else {
            // 不健康
            builder.status(Status.DOWN);
            map.put("error","连接超时");
            map.put("ms",3000);
        }
        builder.withDetail("code",100)
                .withDetails(map);
    }
}
结果:
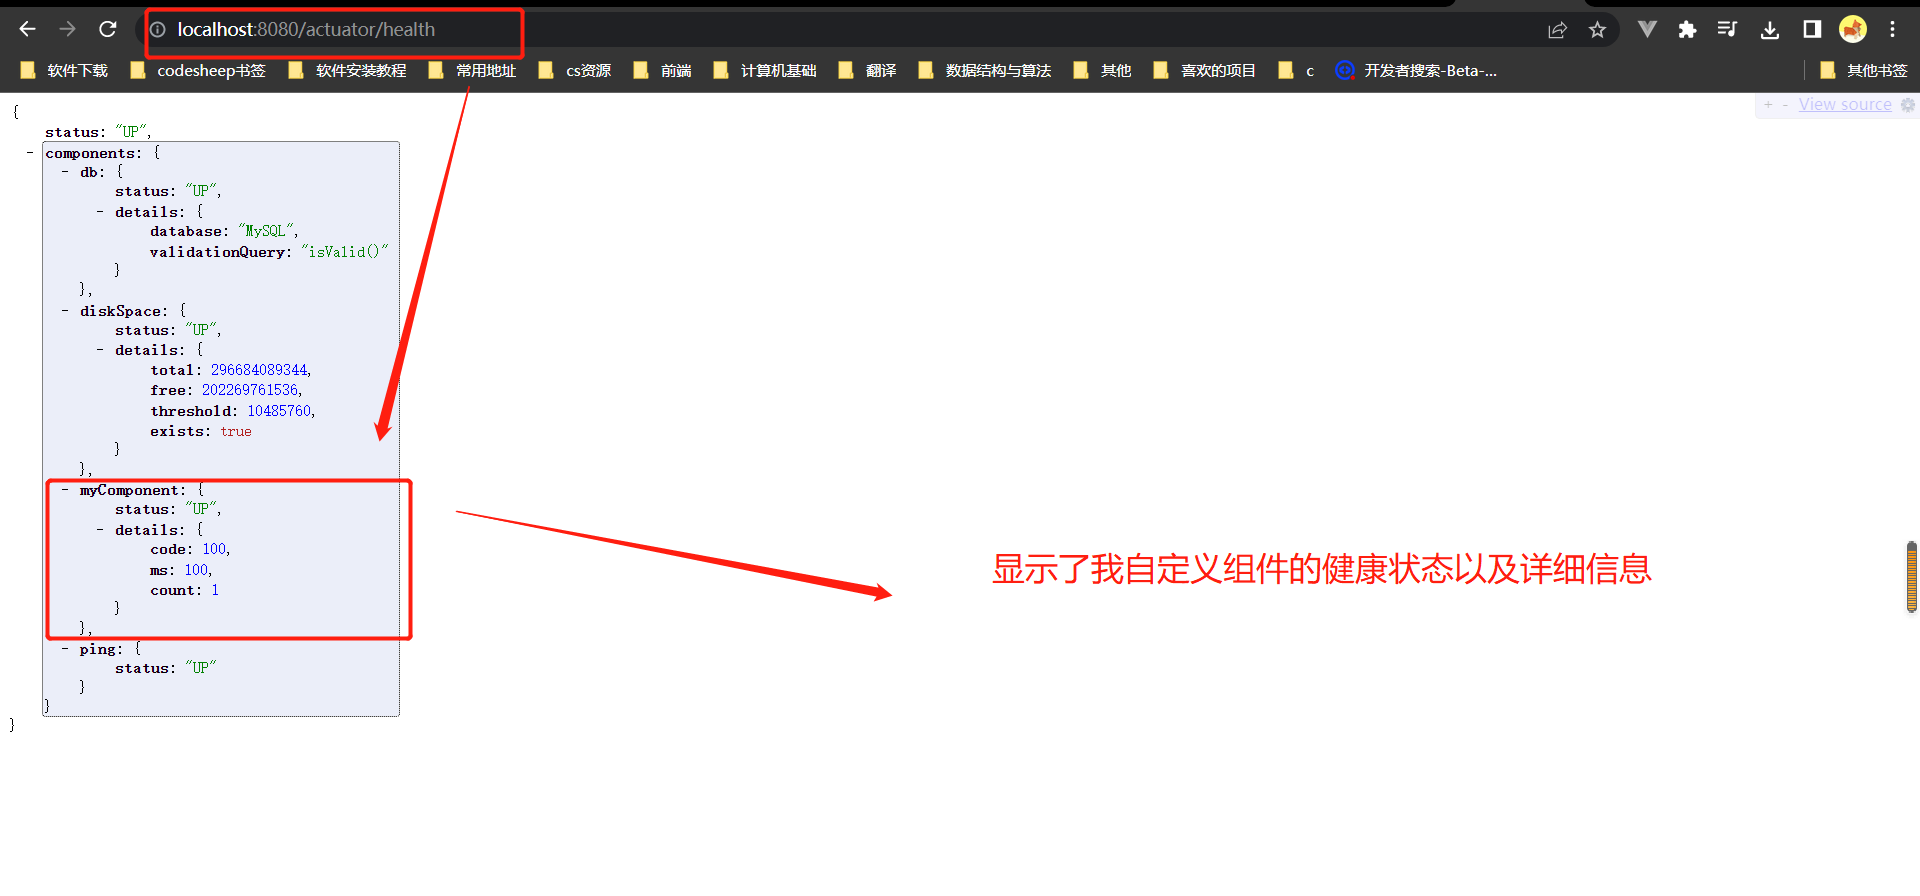
2.制定info信息以及获取本项目中pom.xml中的信息
方式1:
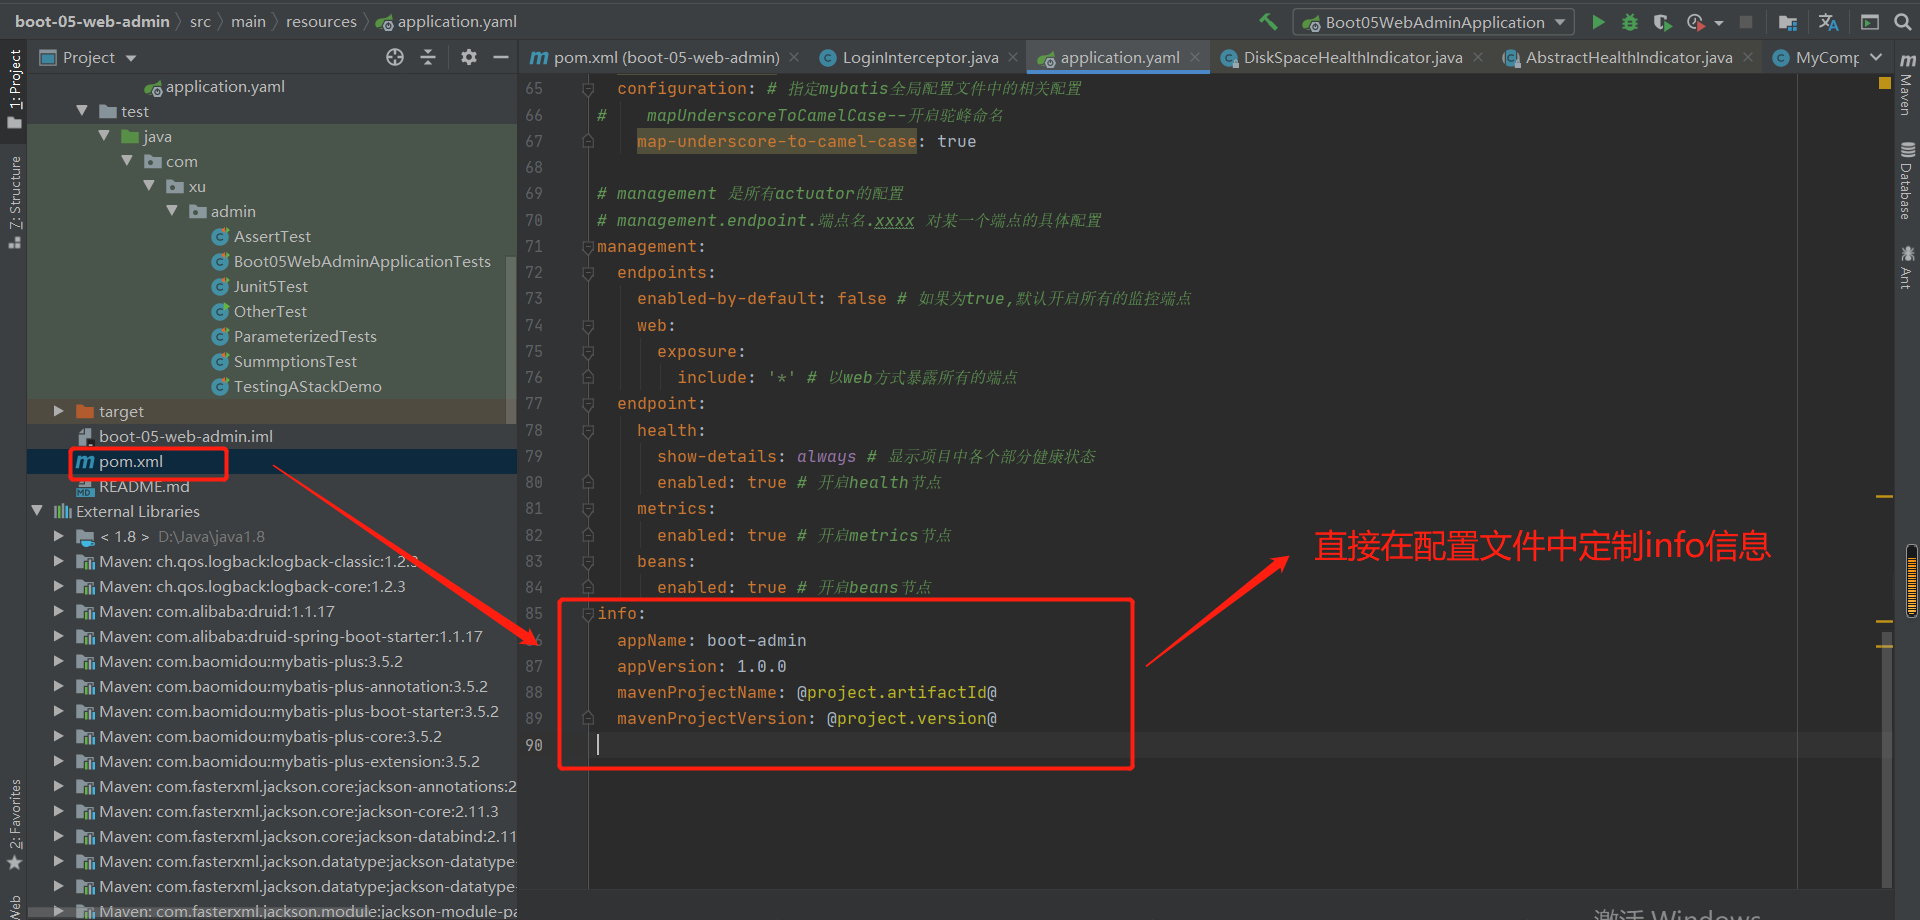
无法显示在浏览器中,需要在pom.xml文件中声明使用@@方式获取maven的取值,而不是${}:
结果:成功显示:

方式2:通过实体类为info增加信息
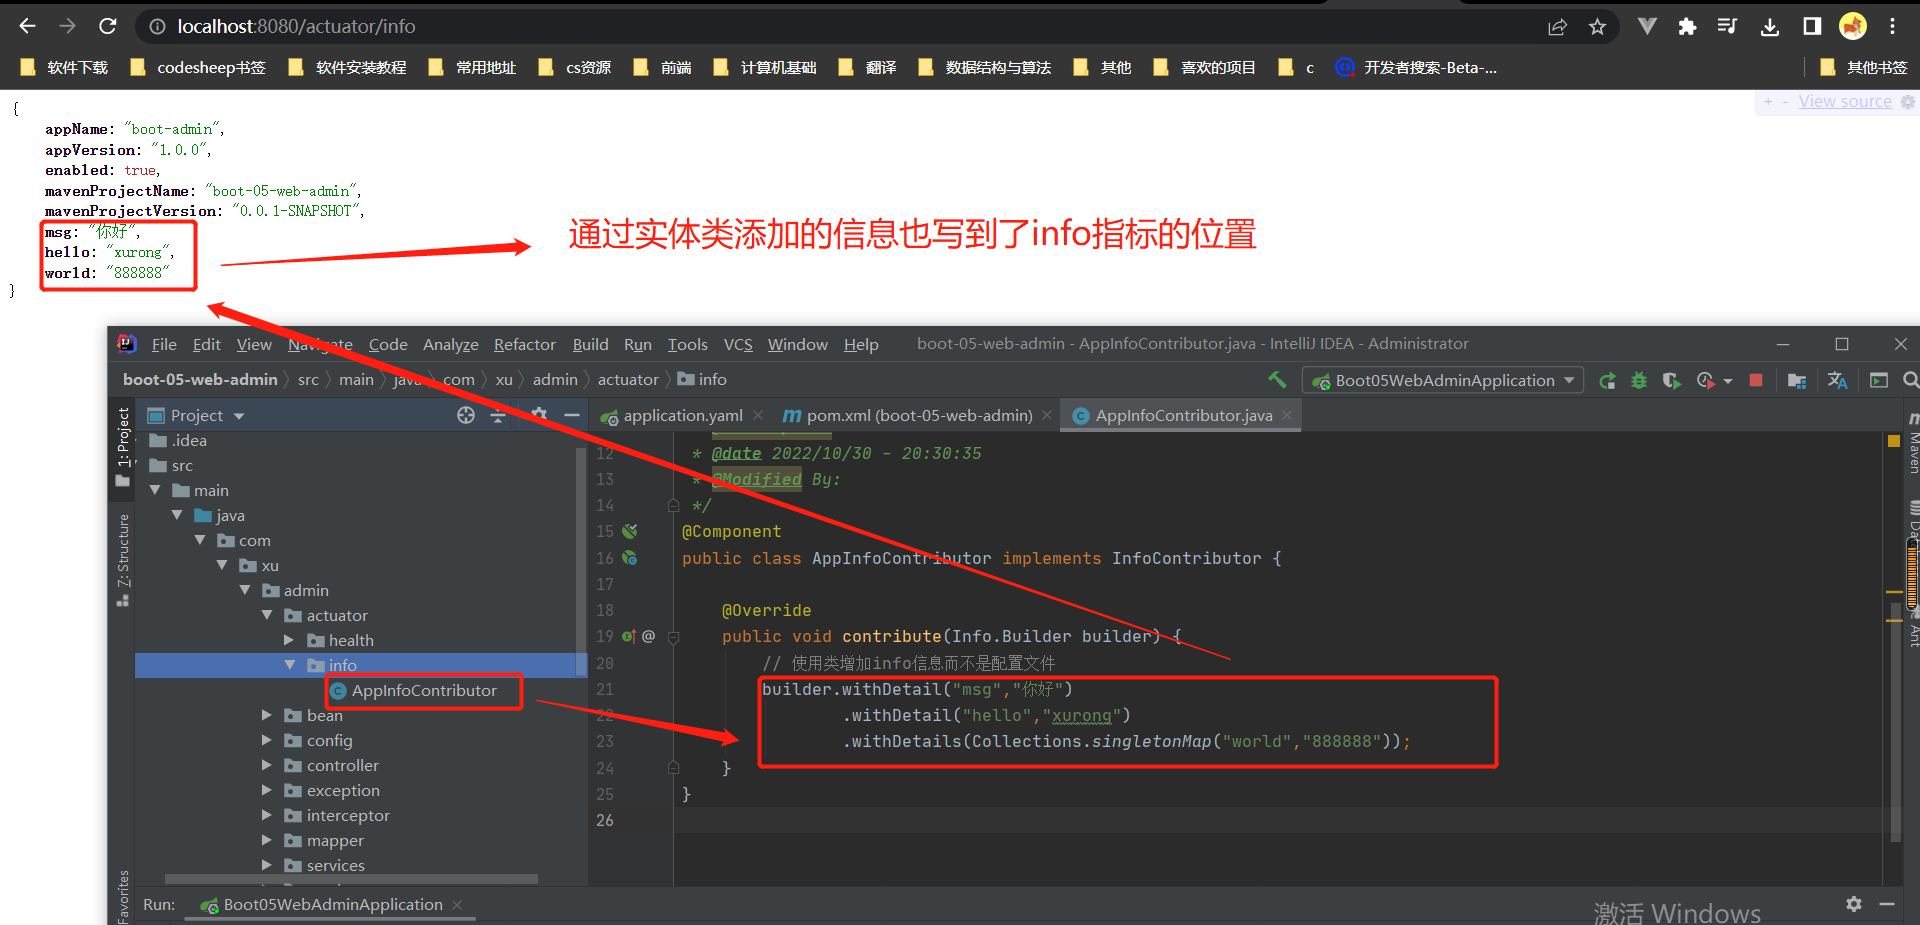
3.定制metrics中的指标
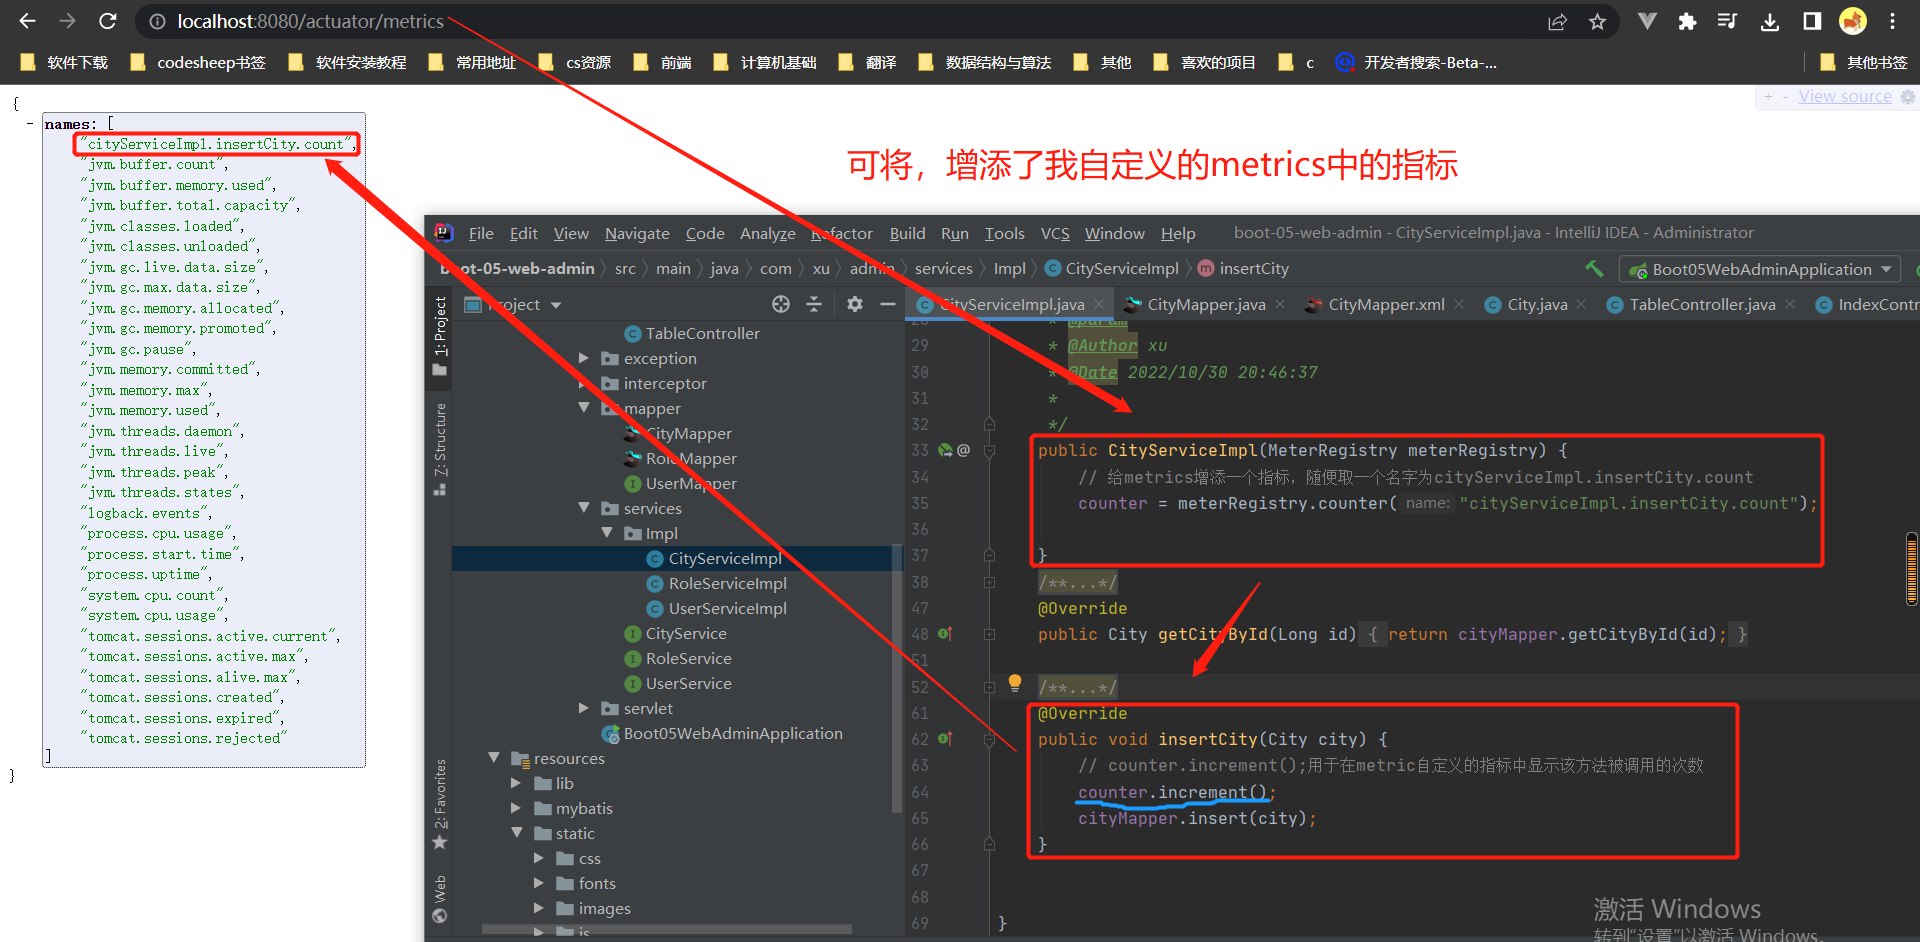
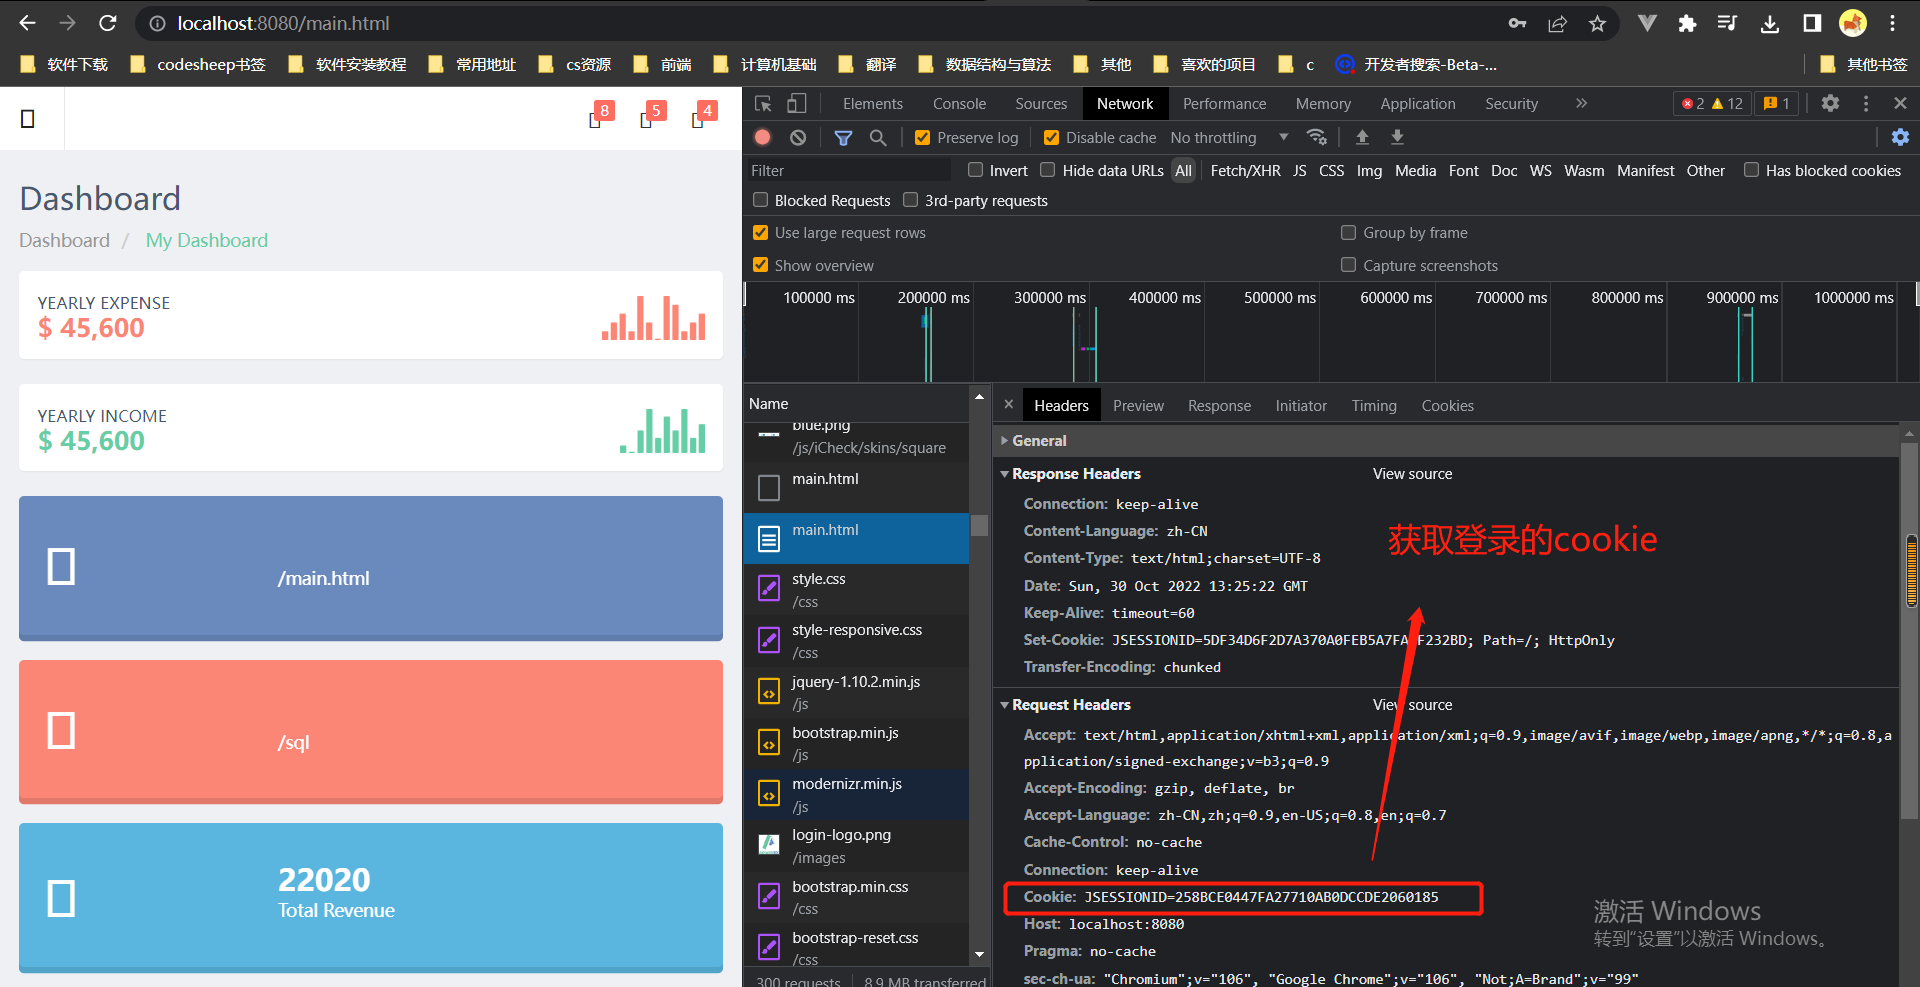
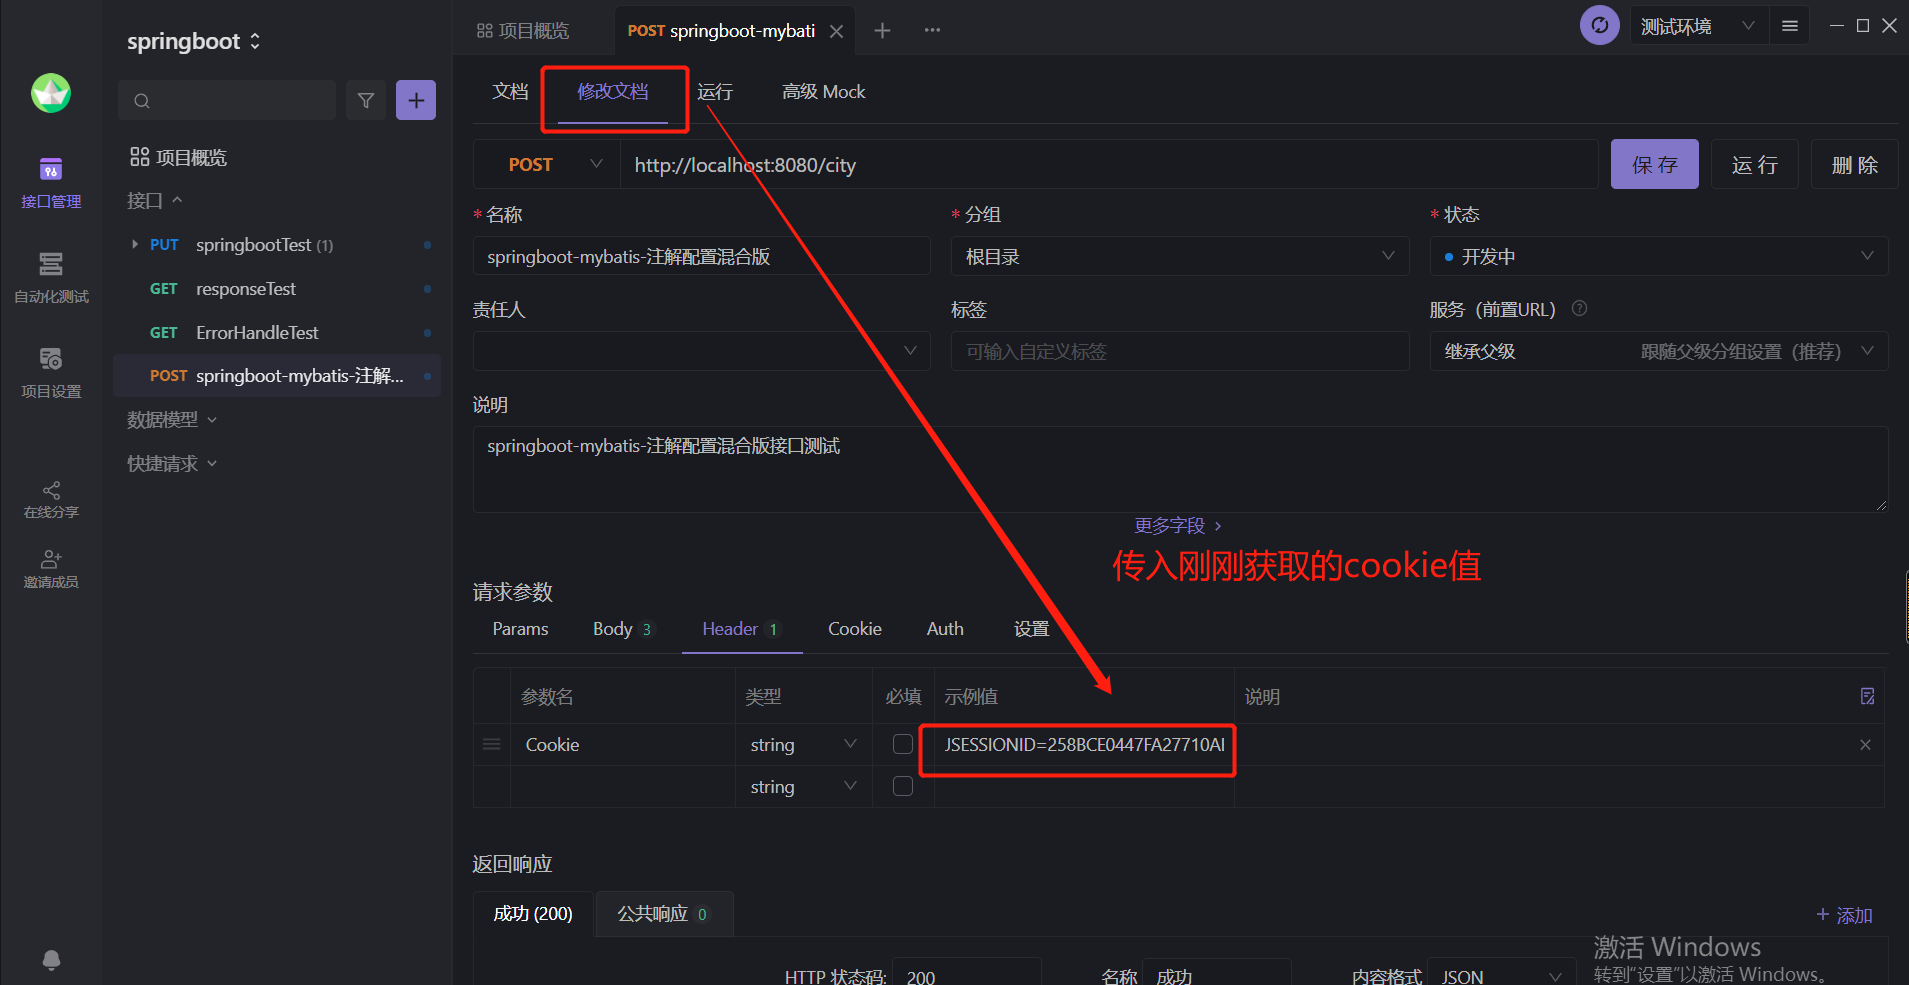
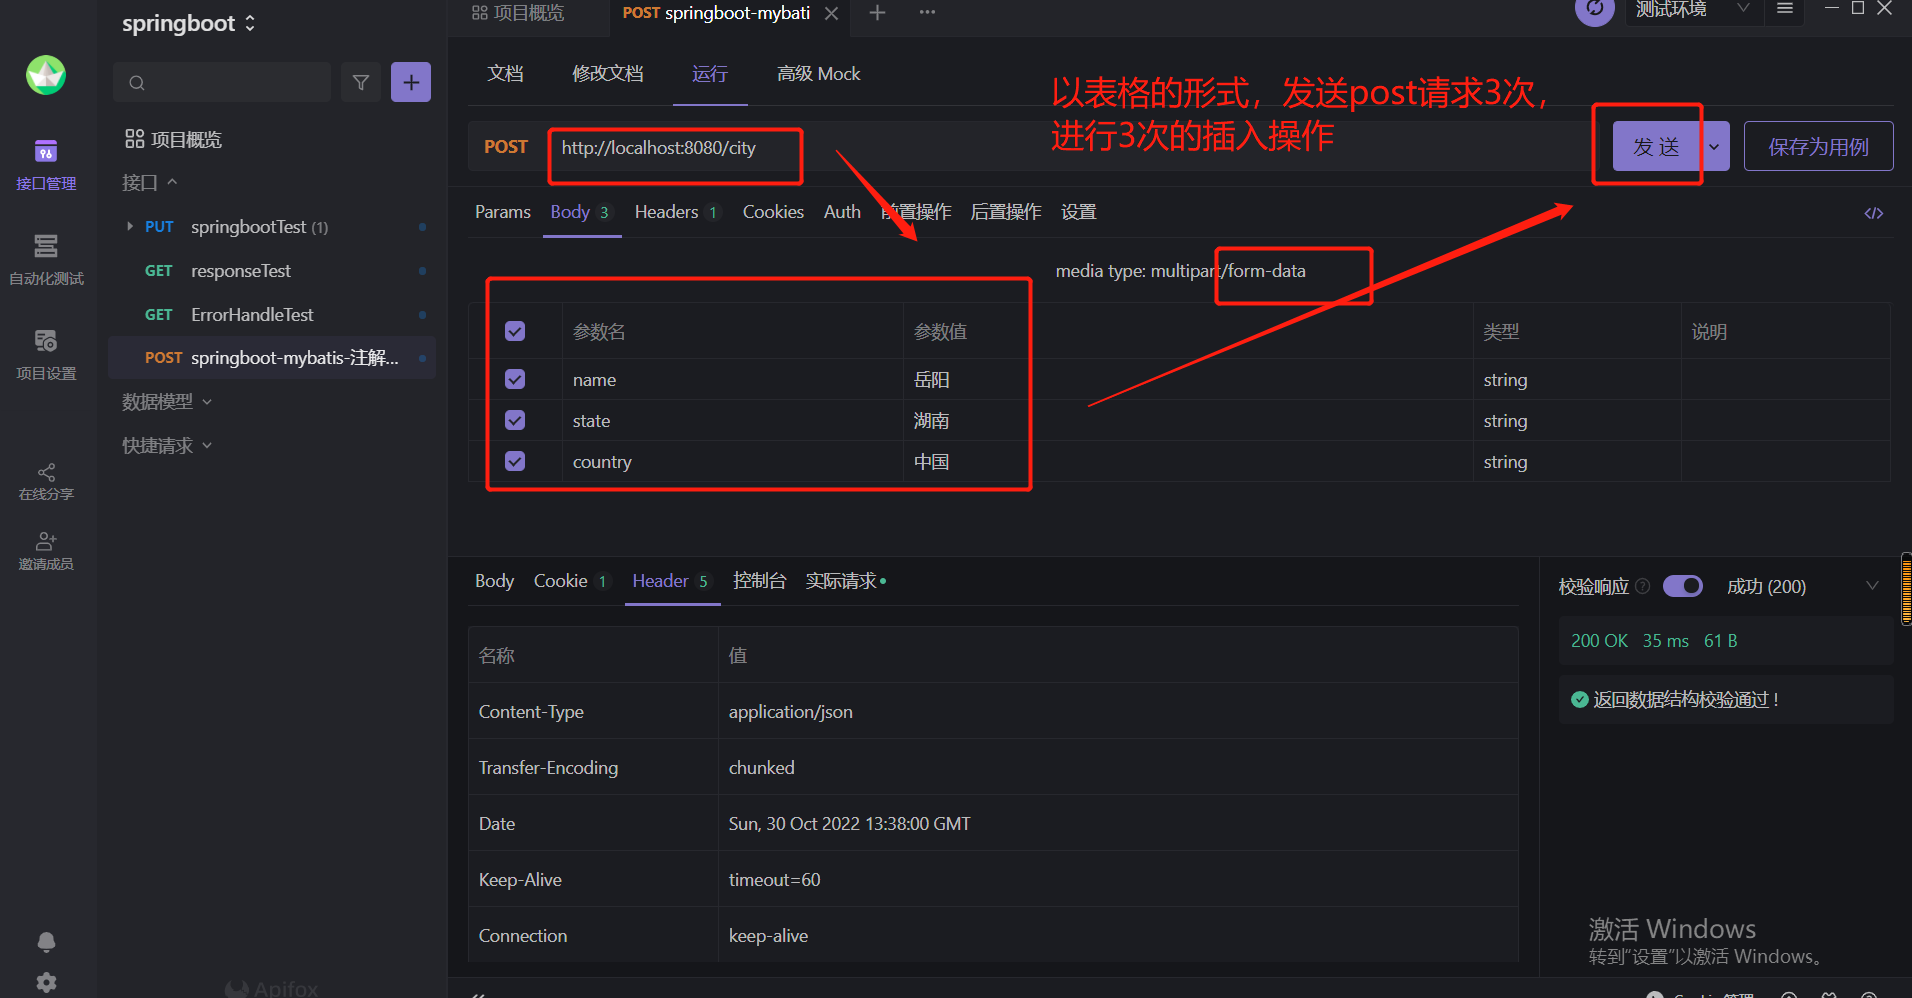
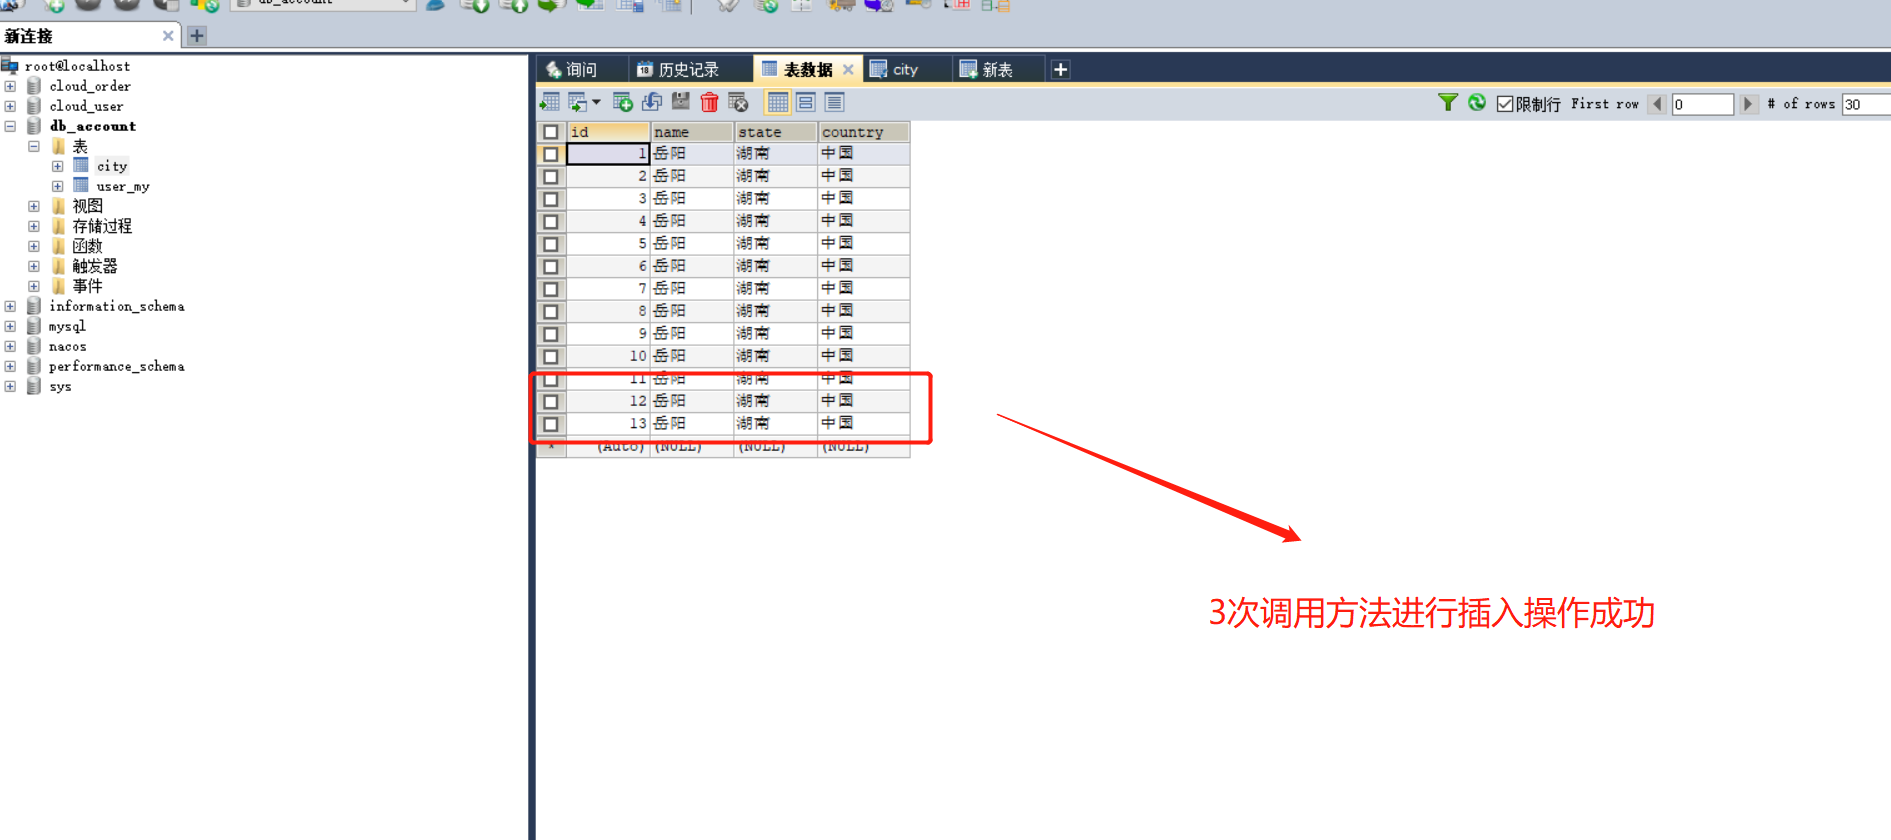
使用刚刚自定义的metrics指标,统计方法调用的次数结果:
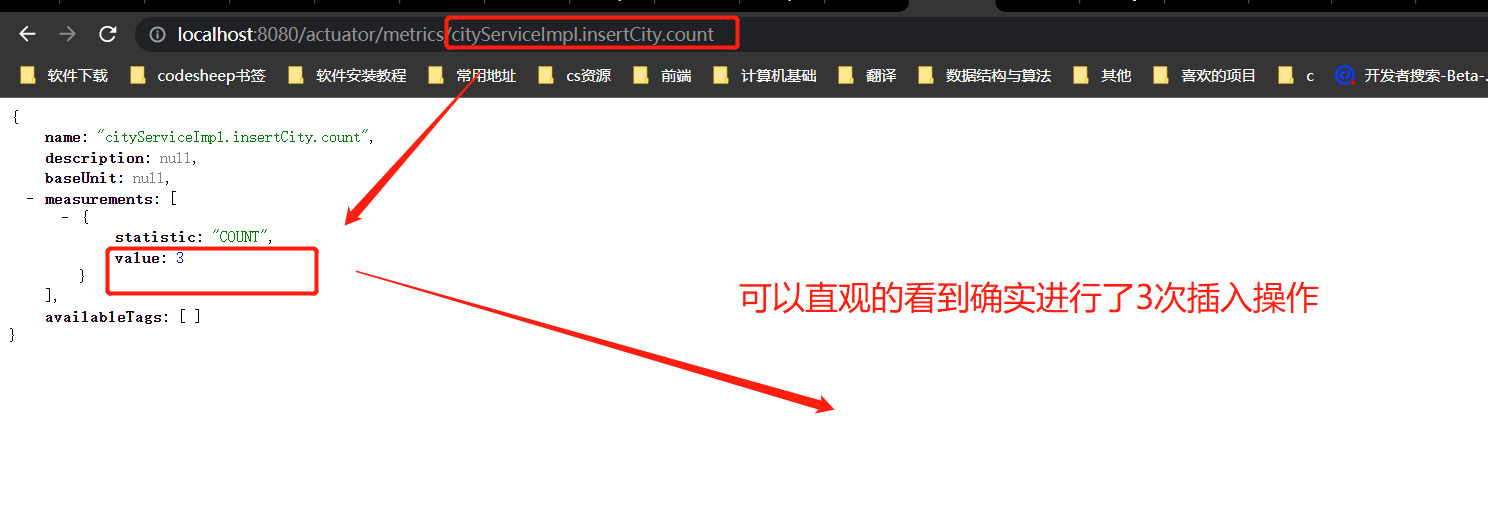
代码参考:
package com.xu.admin.services.Impl;

import com.xu.admin.bean.City;
import com.xu.admin.mapper.CityMapper;
import com.xu.admin.services.CityService;
import io.micrometer.core.instrument.Counter;
import io.micrometer.core.instrument.MeterRegistry;
import org.springframework.beans.factory.annotation.Autowired;
import org.springframework.stereotype.Service;

/**
 * @author xu
 * @Description
 * @date 2022/10/08 - 21:07:47
 * @Modified By:
 */
@Service
public class CityServiceImpl implements CityService {

    @Autowired
    CityMapper cityMapper;

    Counter counter;
    /**
     *
     * @Description
     * 该方法可以在actuator指标中直接查看insertCity方法调用的次数
     * @param
     * @Author xu
     * @Date 2022/10/30 20:46:37
     *
     */
    public CityServiceImpl(MeterRegistry meterRegistry) {
        // 给metrics增添一个指标,随便取一个名字为cityServiceImpl.insertCity.count
        counter = meterRegistry.counter("cityServiceImpl.insertCity.count");

    }
    /**
     *
     * @Description
     * 根据城市的id返回对应的城市数据
     * @param
     * @Author xu
     * @Date 2022/10/08 21:06:45
     *
     */
    @Override
    public City getCityById(Long id) {
        return cityMapper.getCityById(id);
    }

    /**
     *
     * @Description
     * 往表中插入数据
     * @param
     * @Author xu
     * @Date 2022/10/08 21:21:00
     *
     */
    @Override
    public void insertCity(City city) {
        // counter.increment();用于在metric自定义的指标中显示该方法被调用的次数
        counter.increment();
        cityMapper.insert(city);
    }


}
补充:
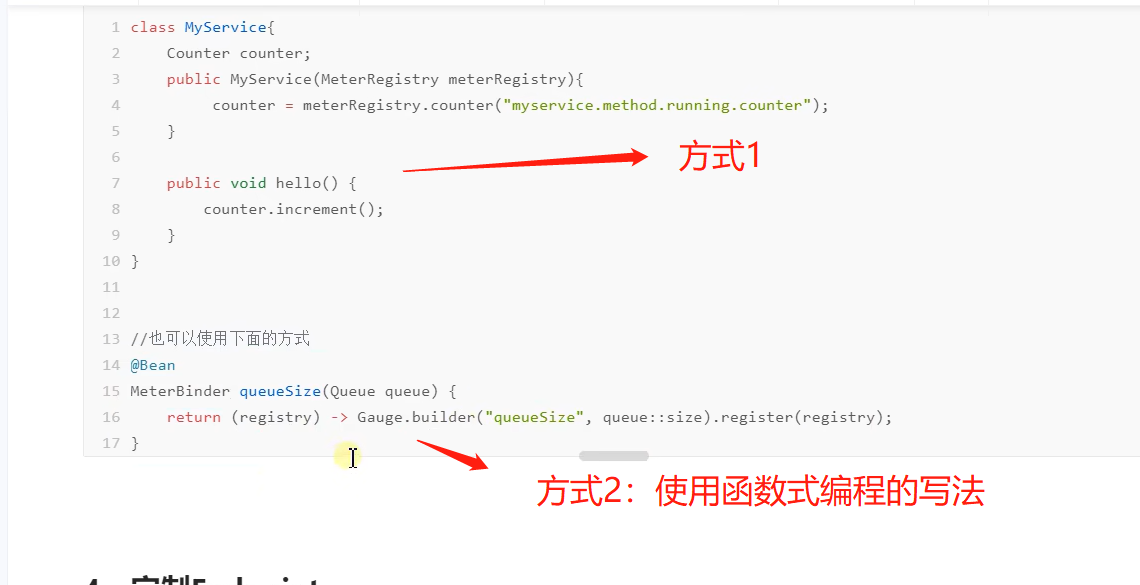
4.定制Endpoint
官网参考:官网参考
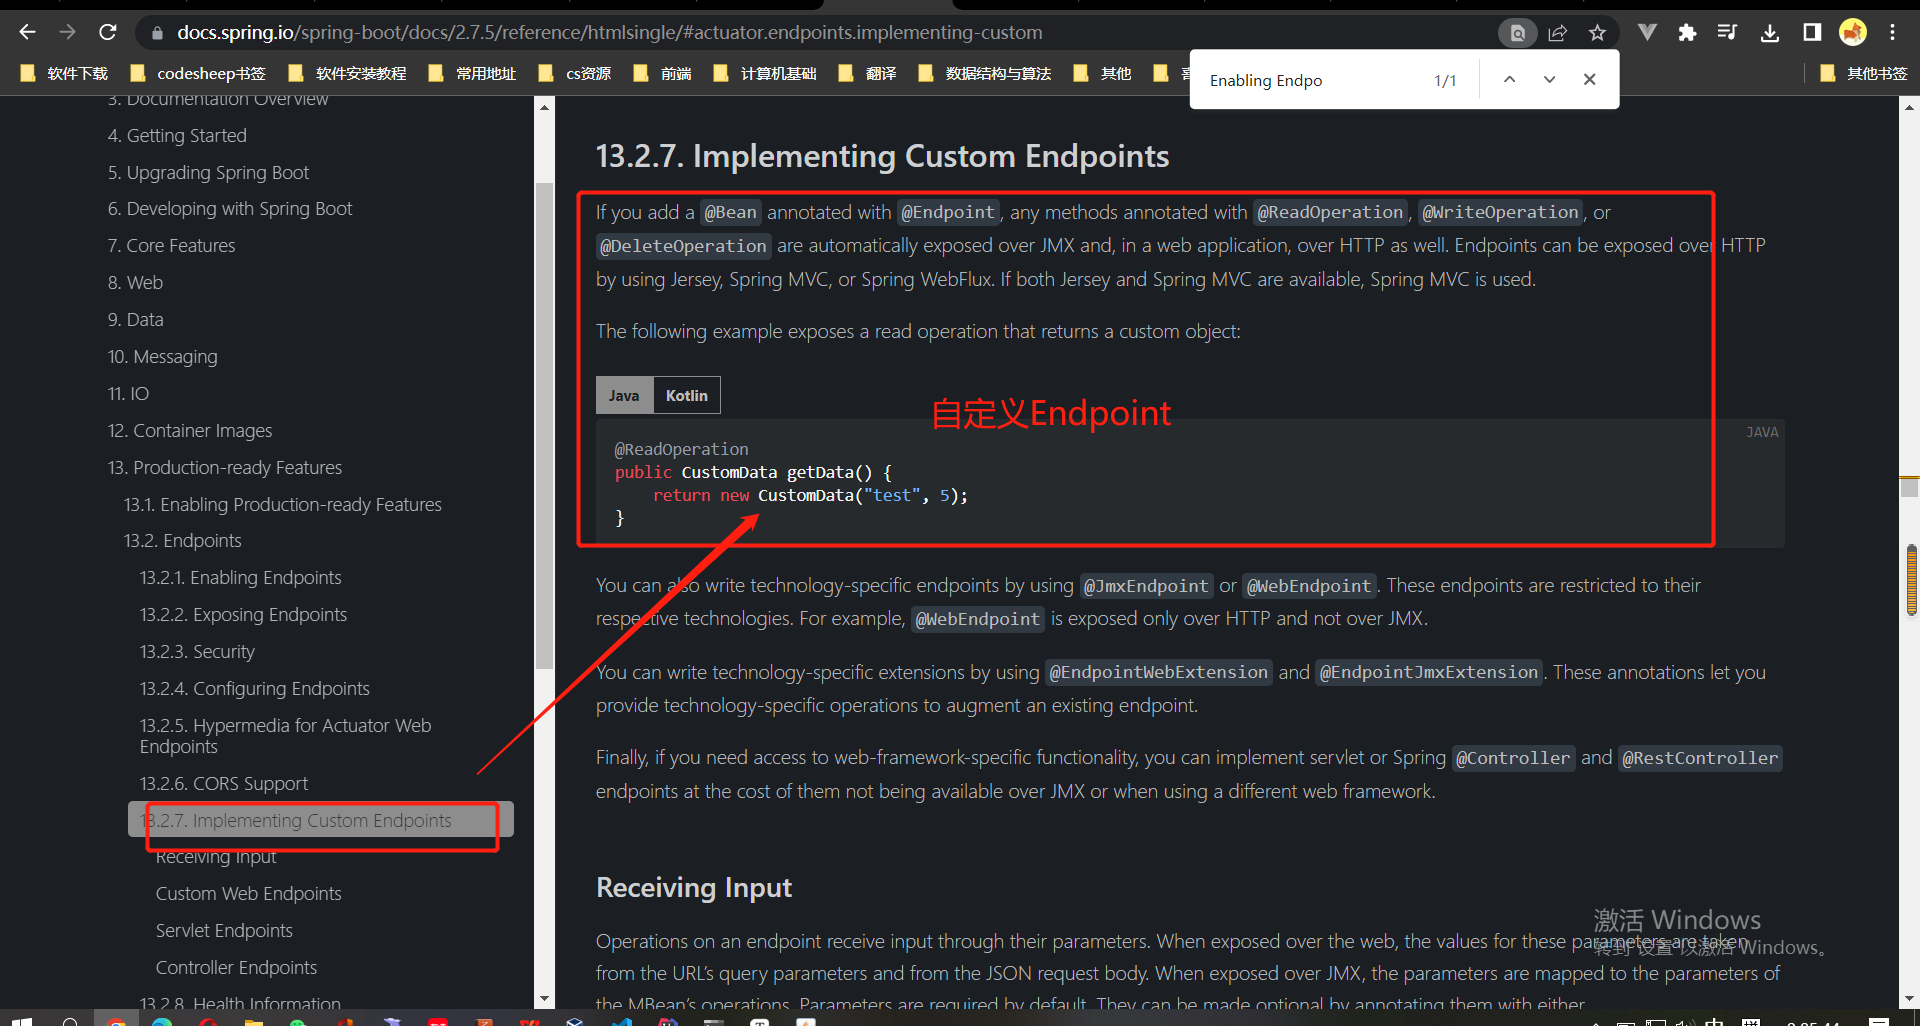
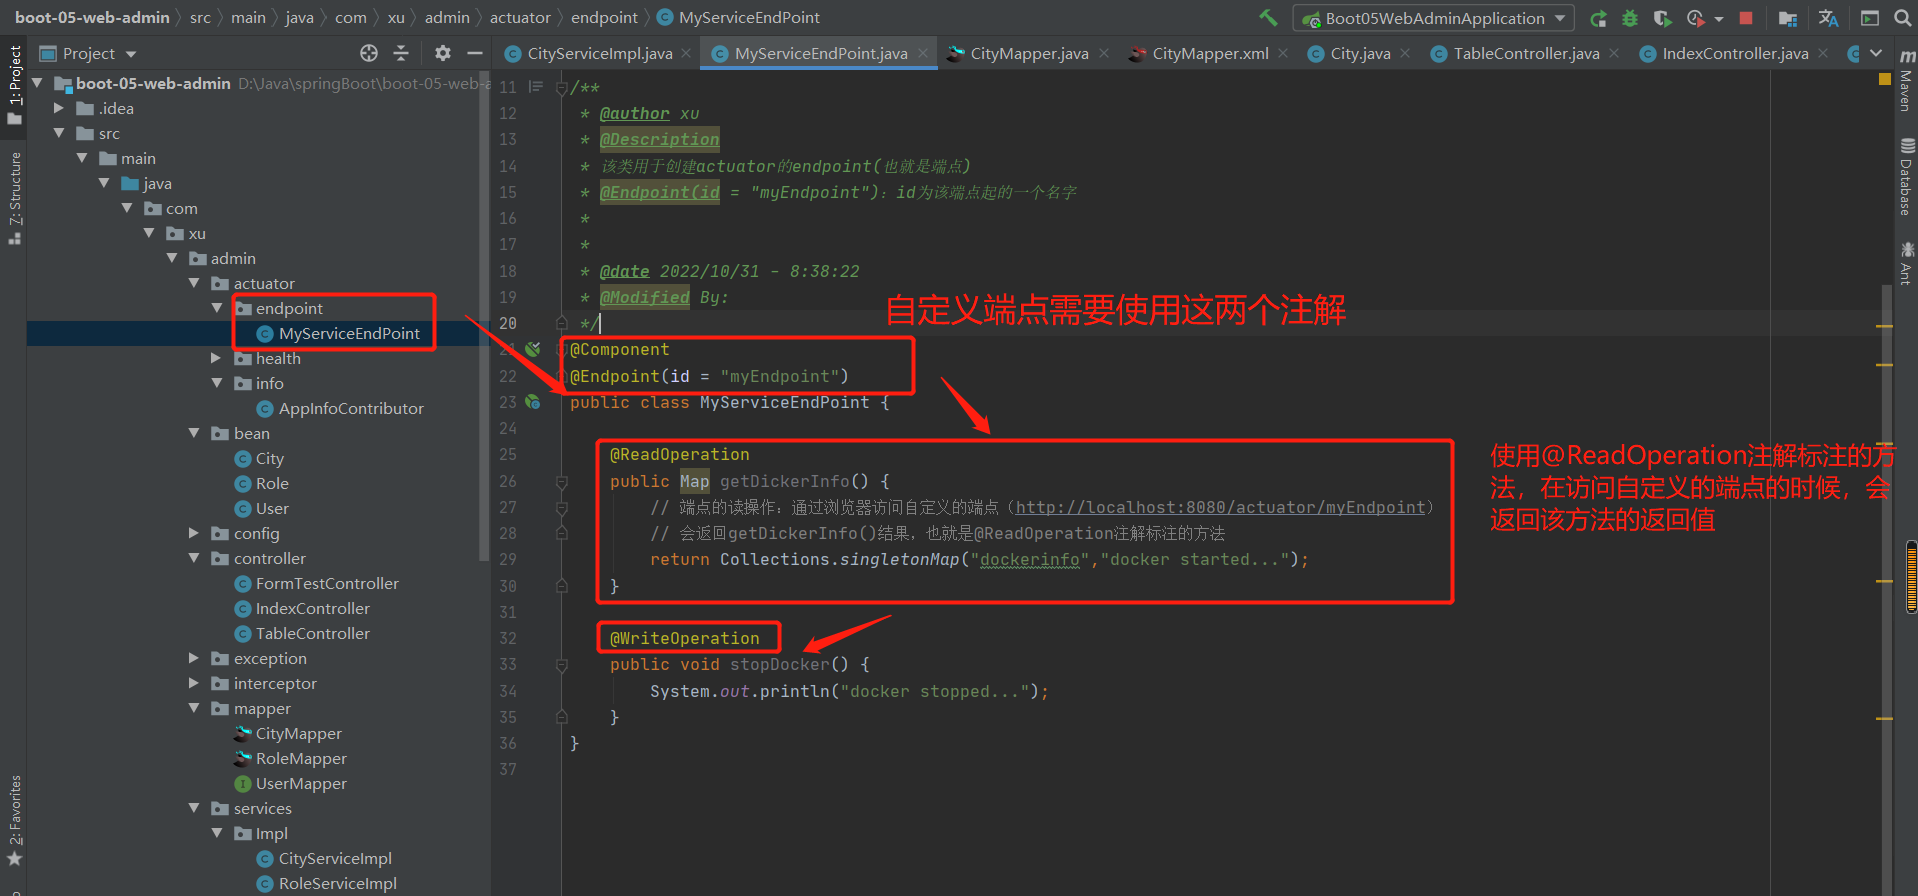
结果:
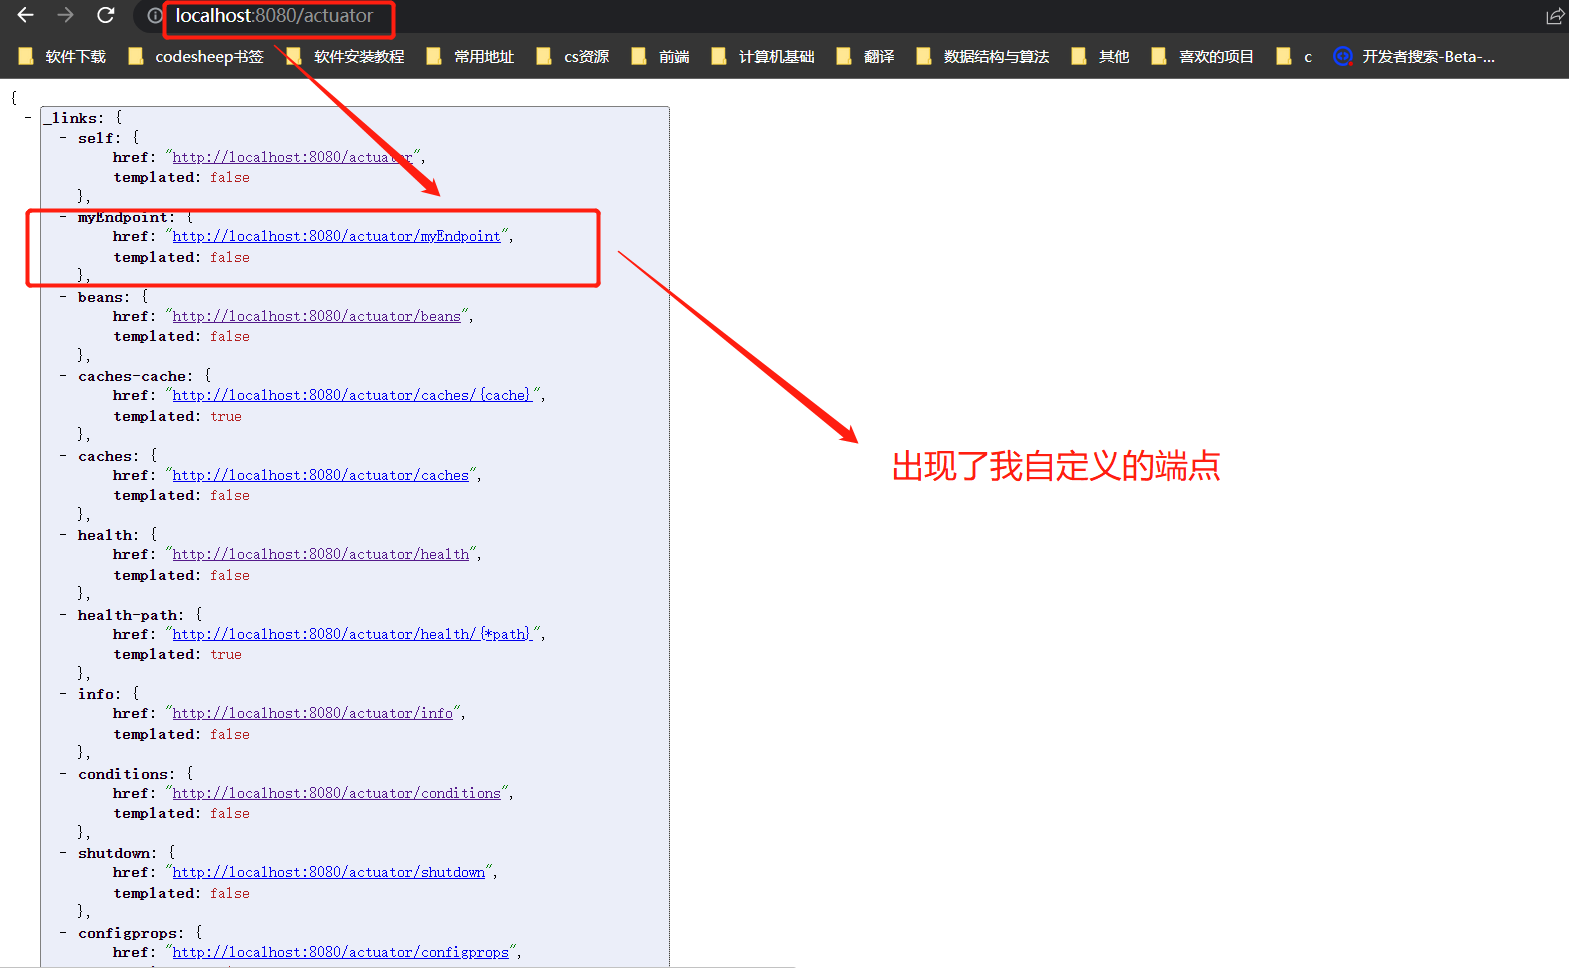
或者直接通过jconsole客户端进行自定义节点的访问:
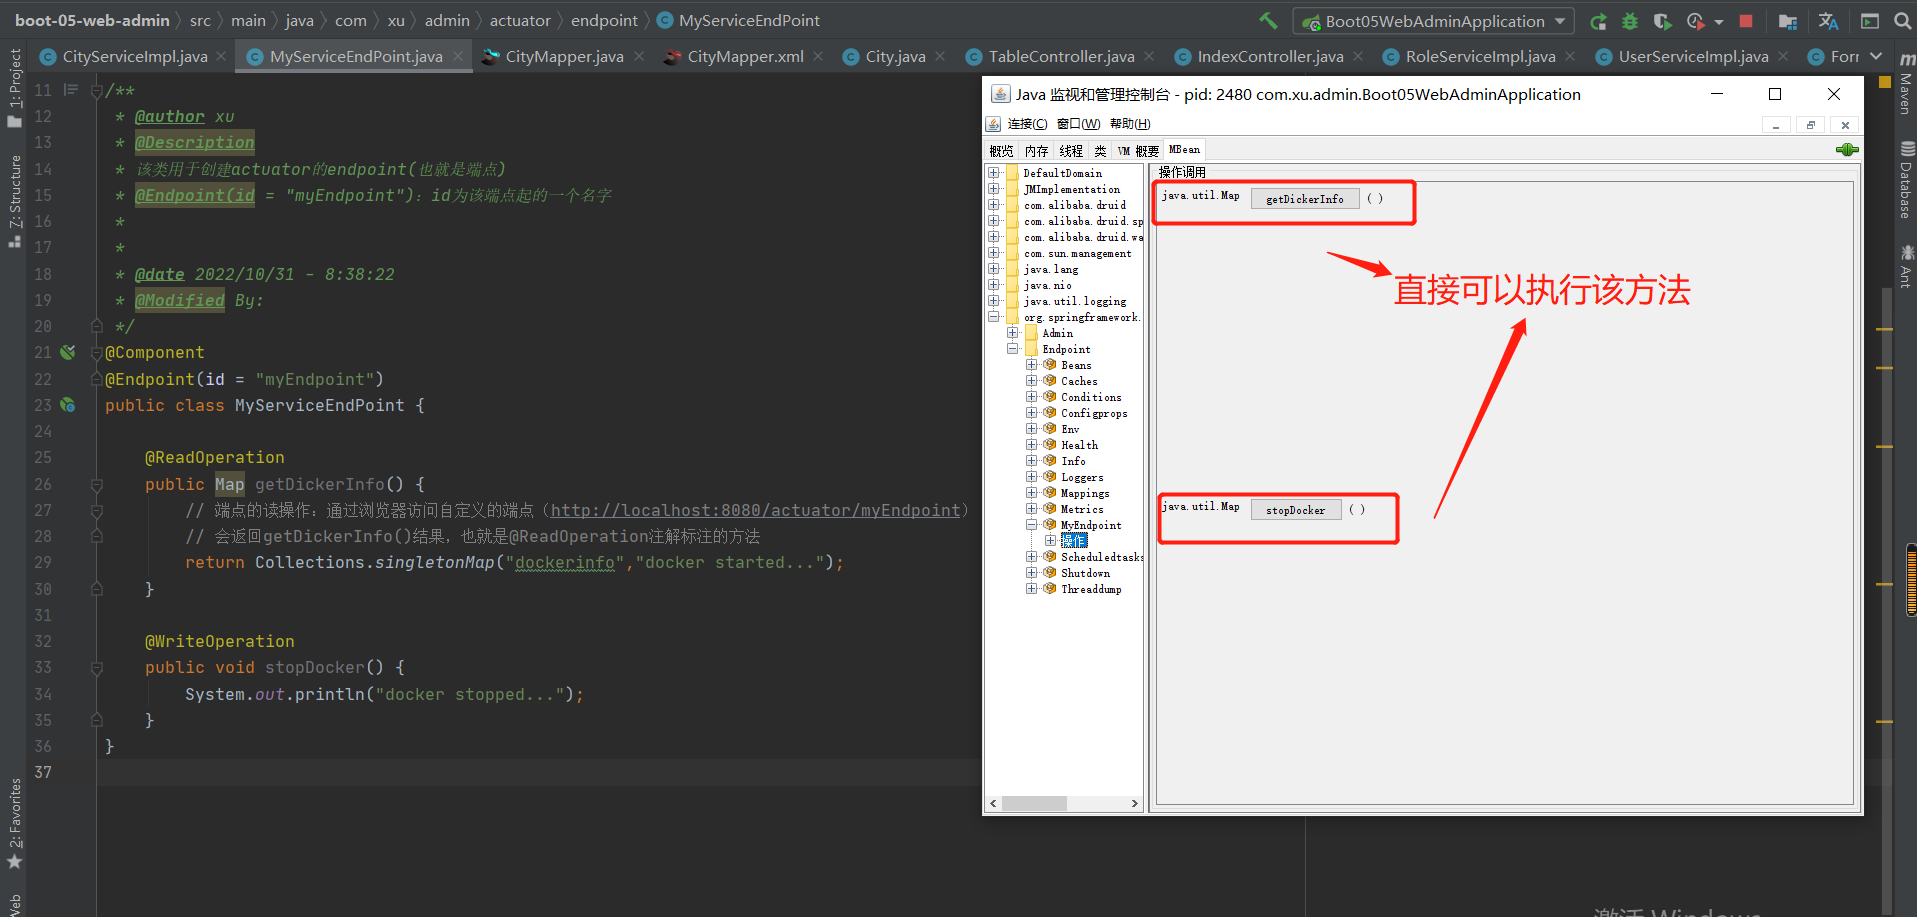
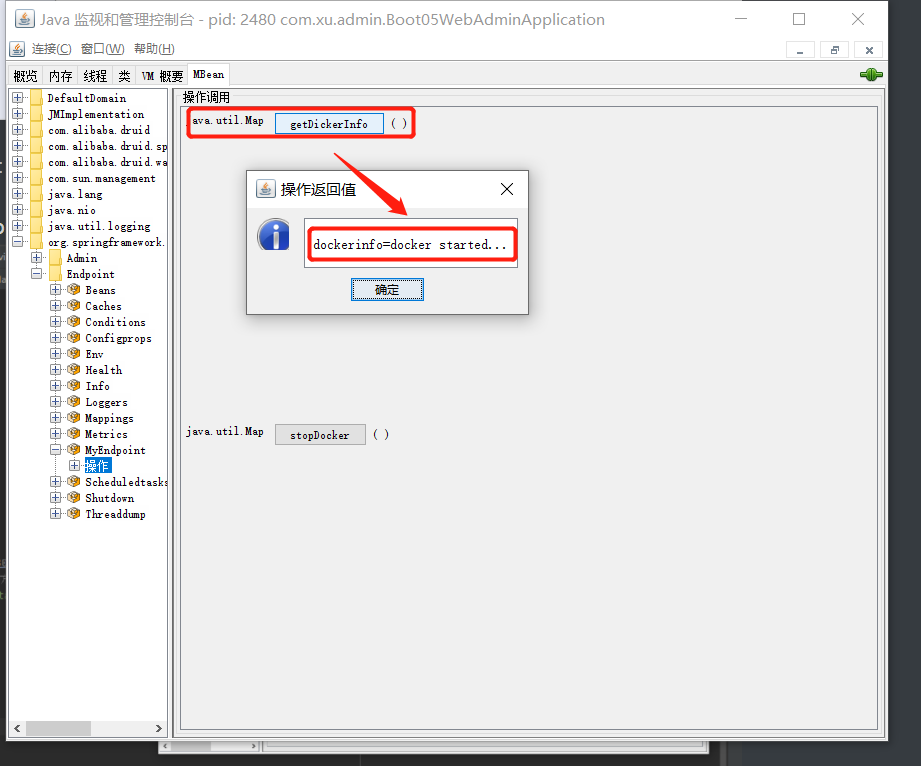
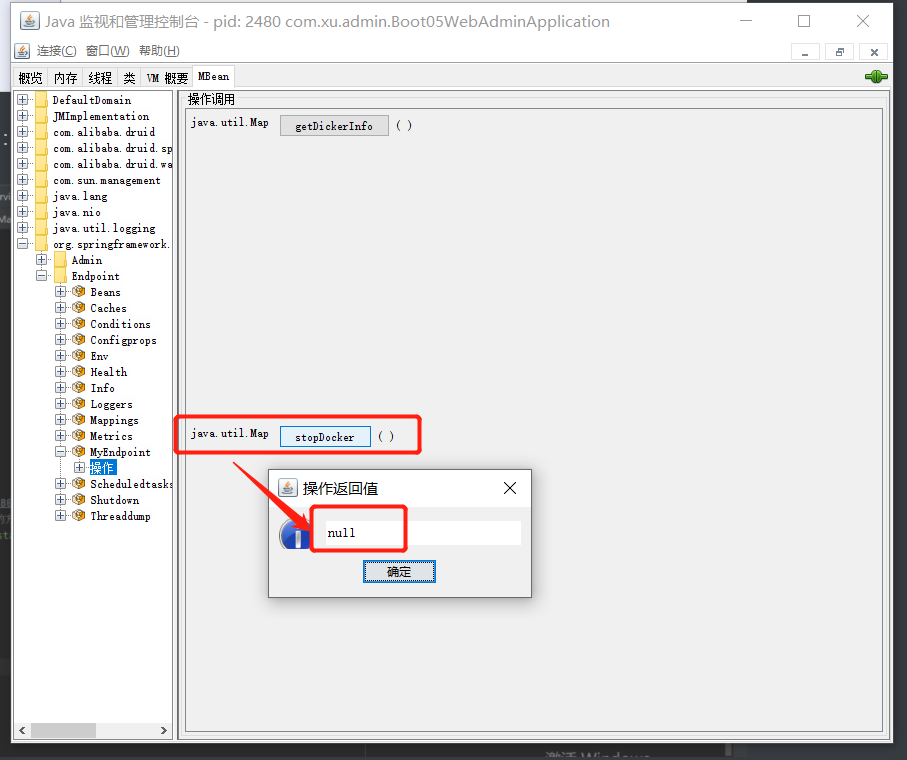
15-4 视图化actuator---boot admin server(一个开源项目)
引入依赖:
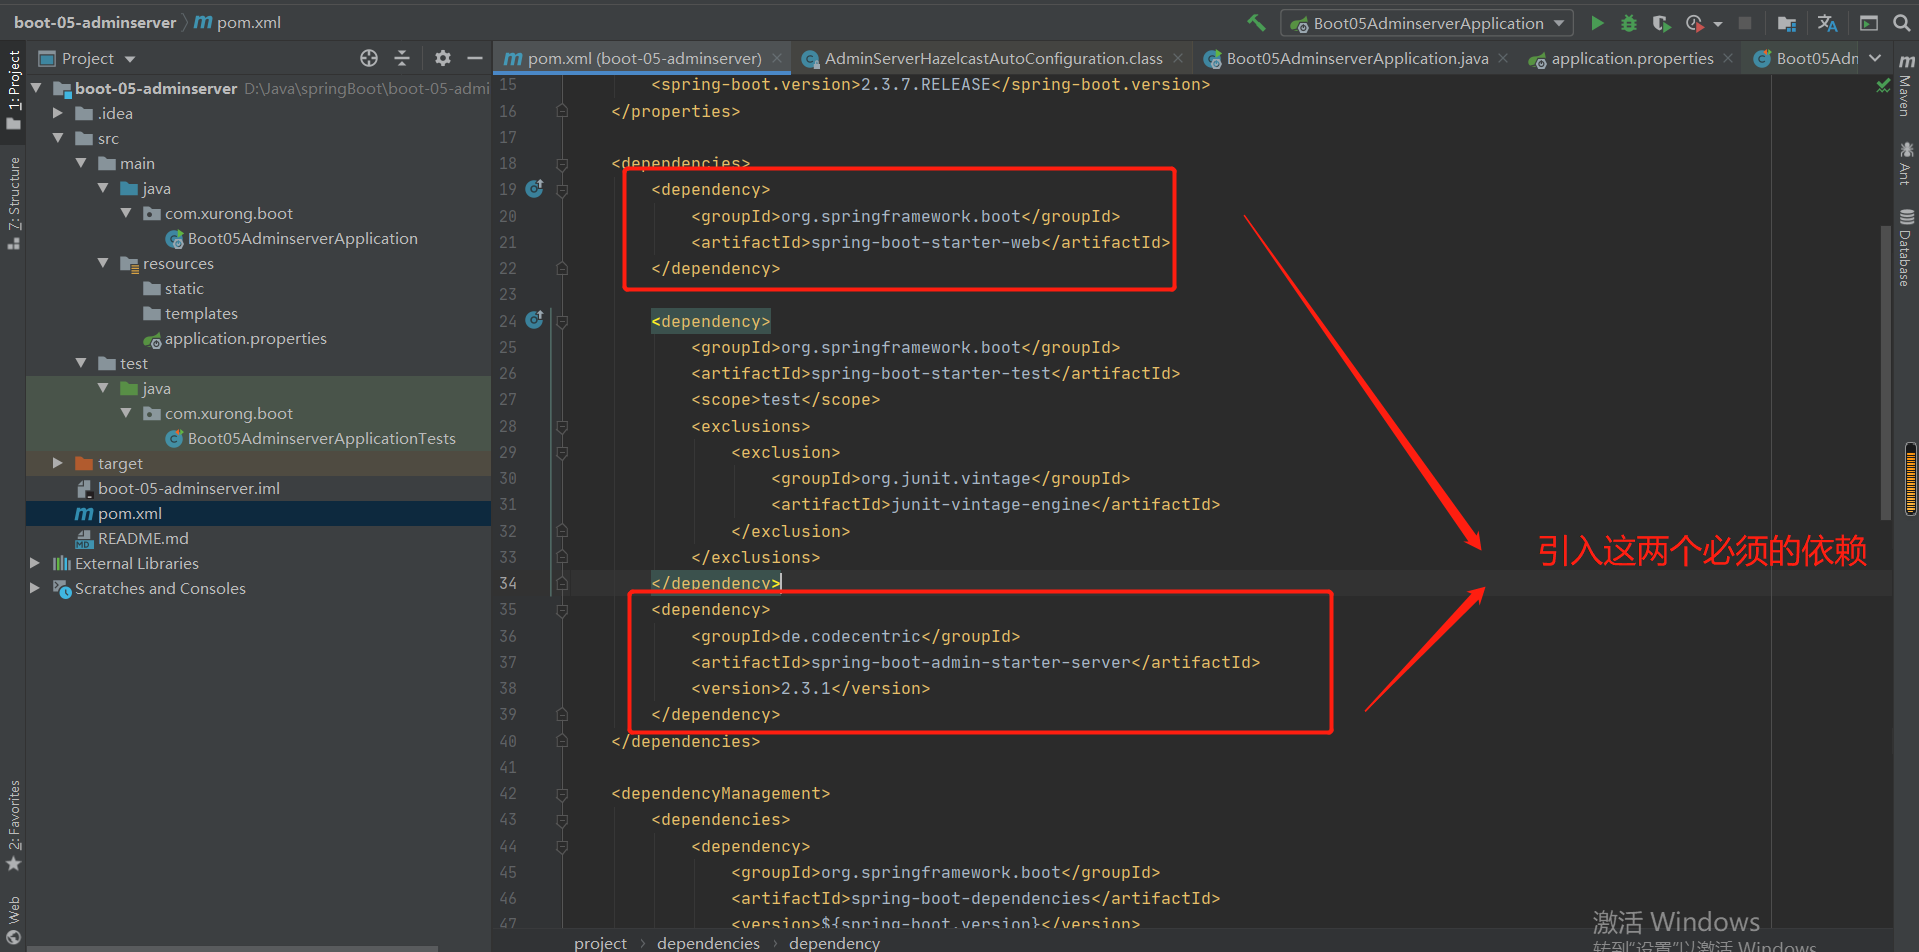
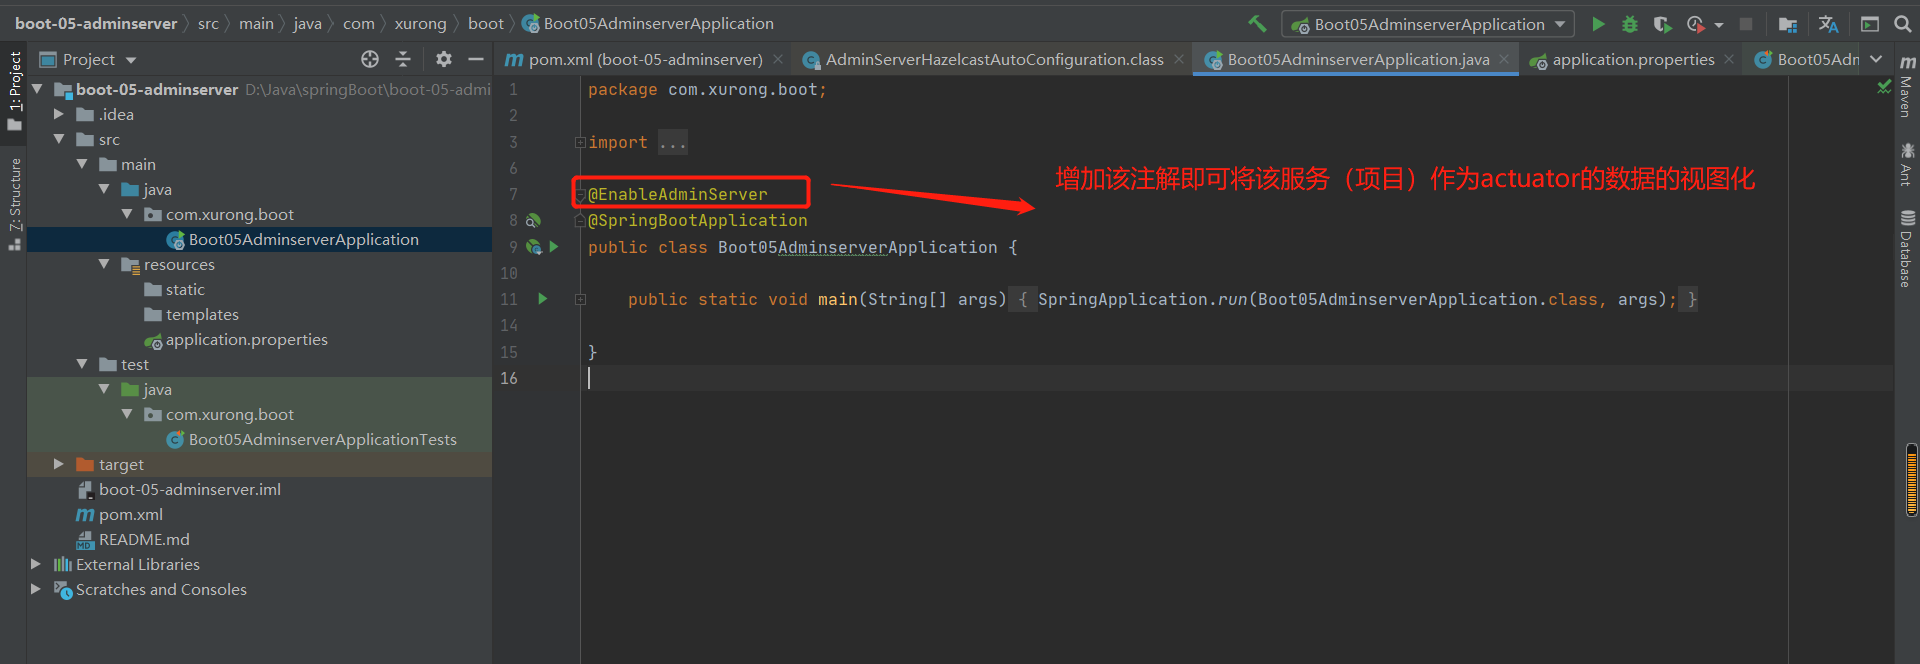

结果:
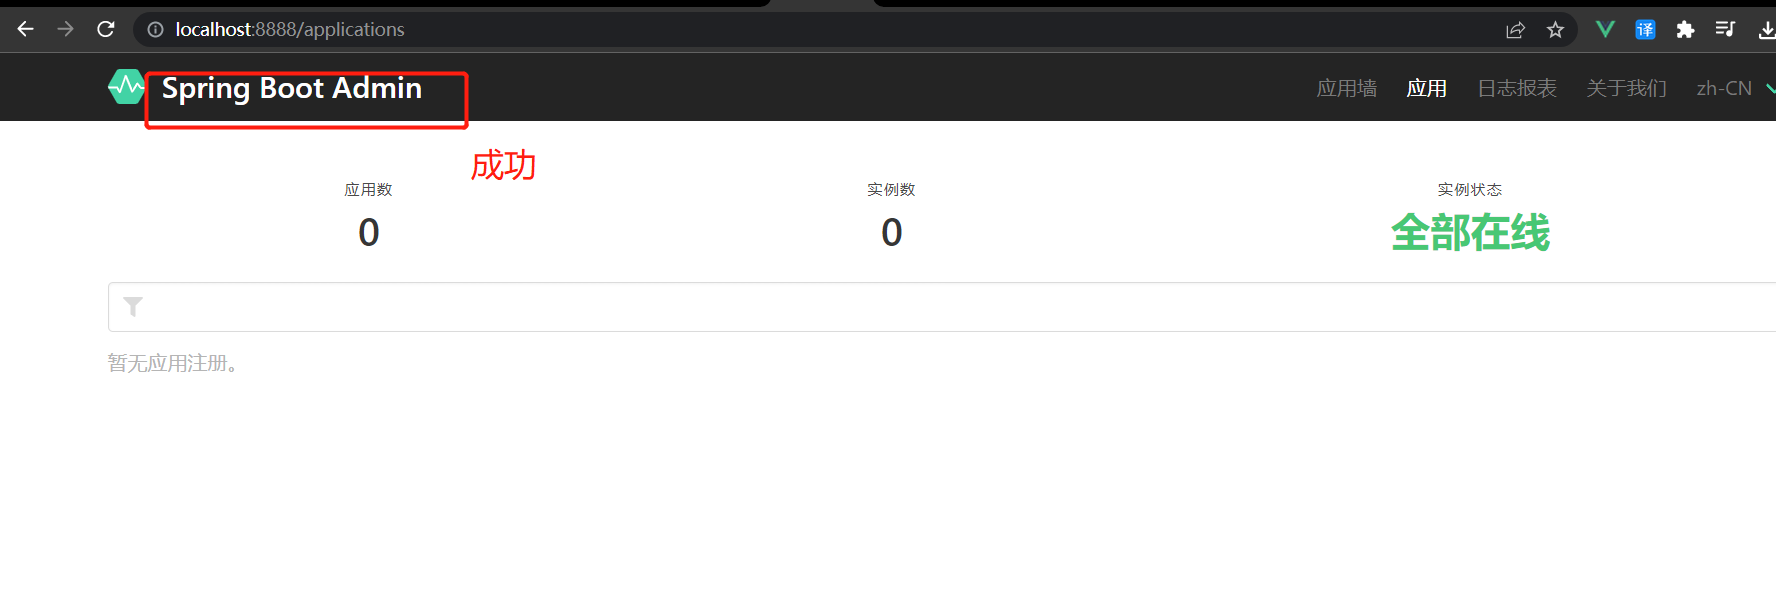
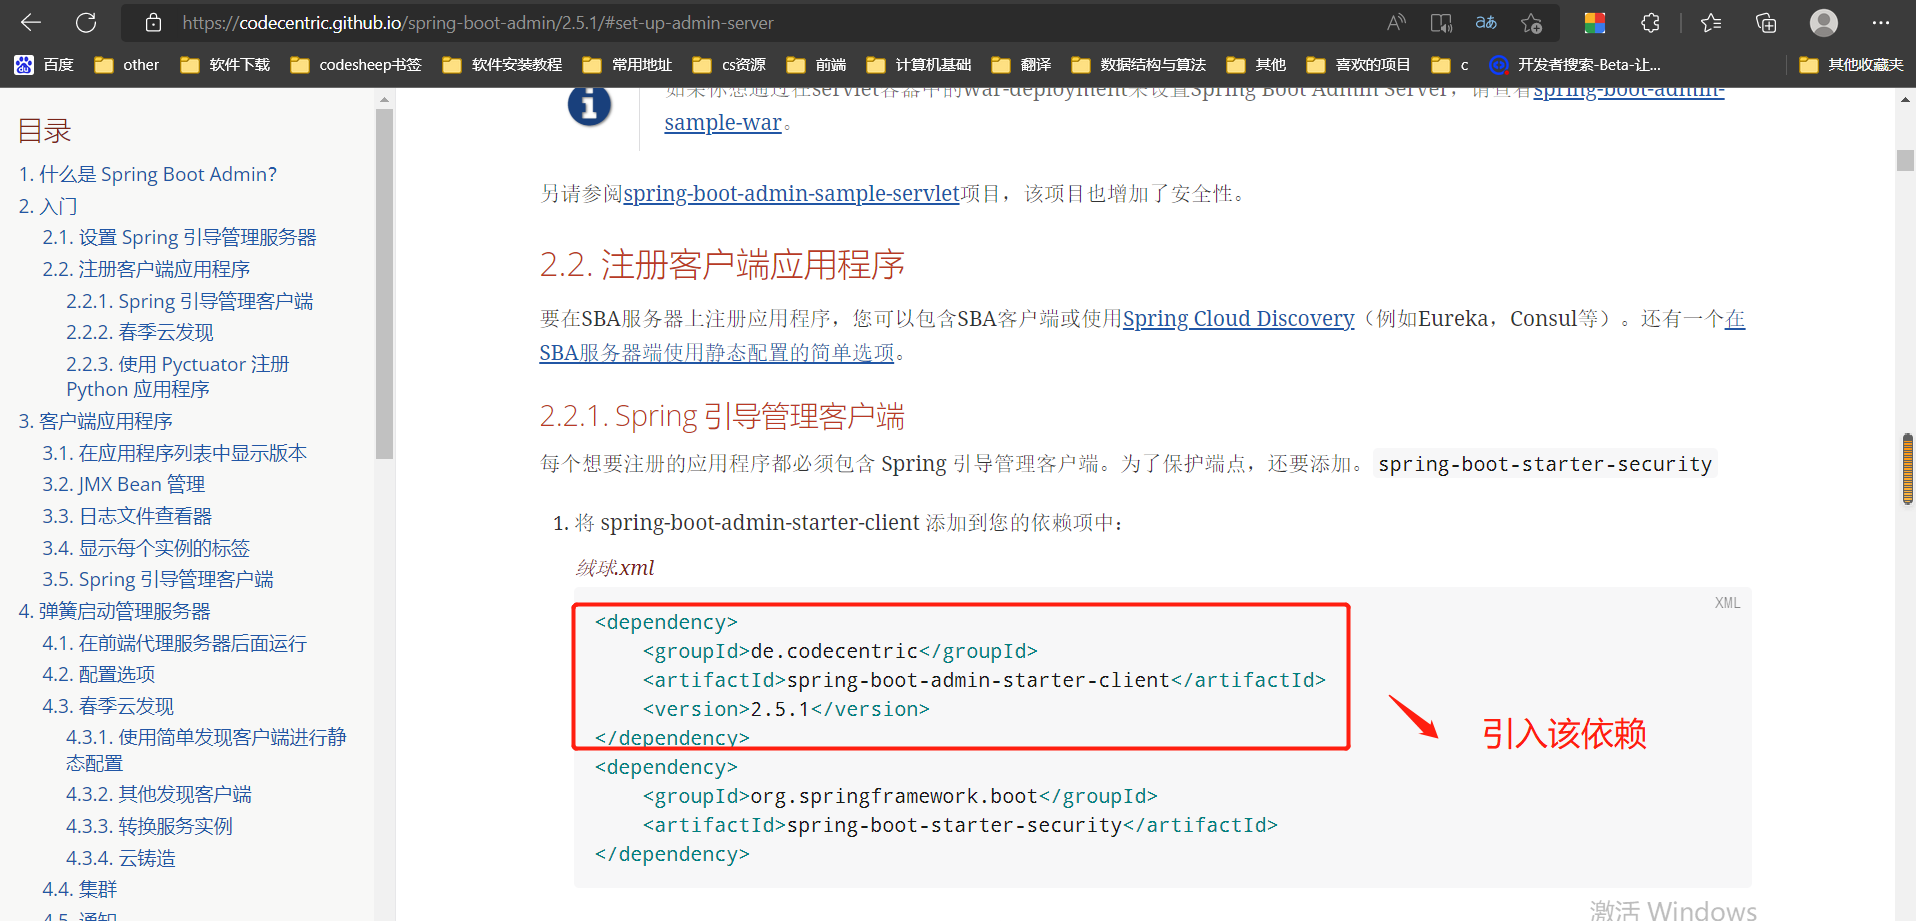
进行实验:
客户端进行配置:
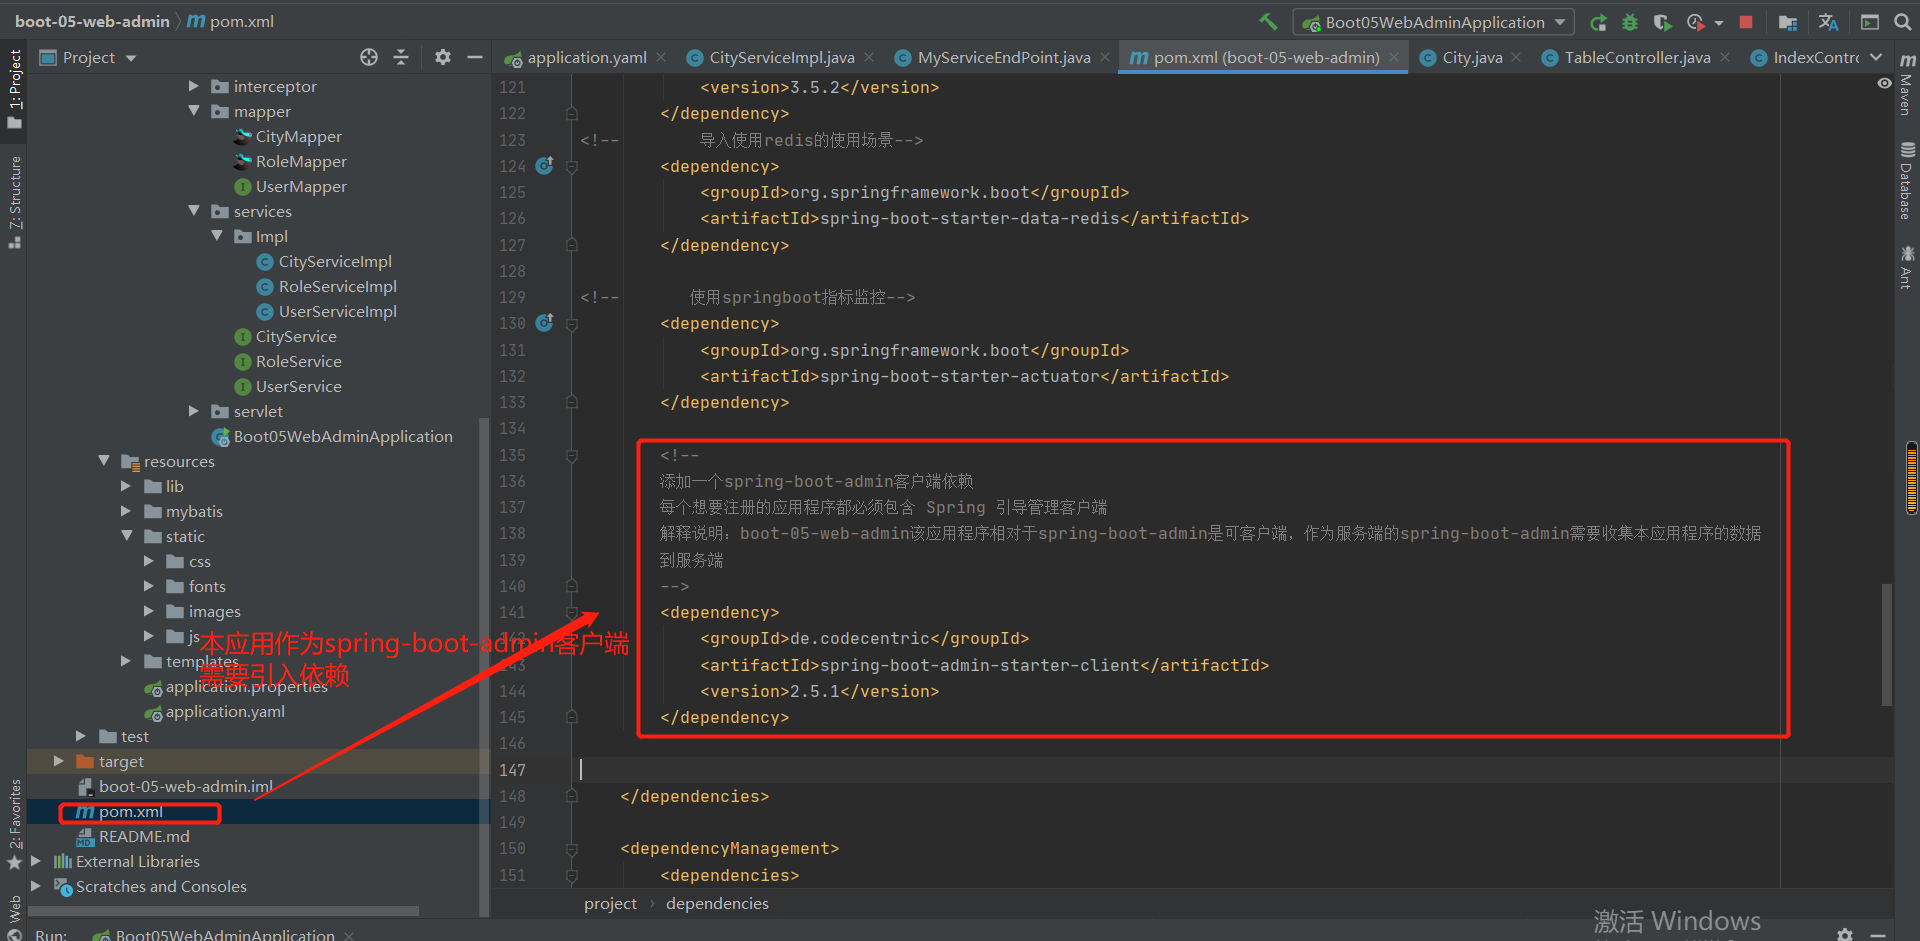
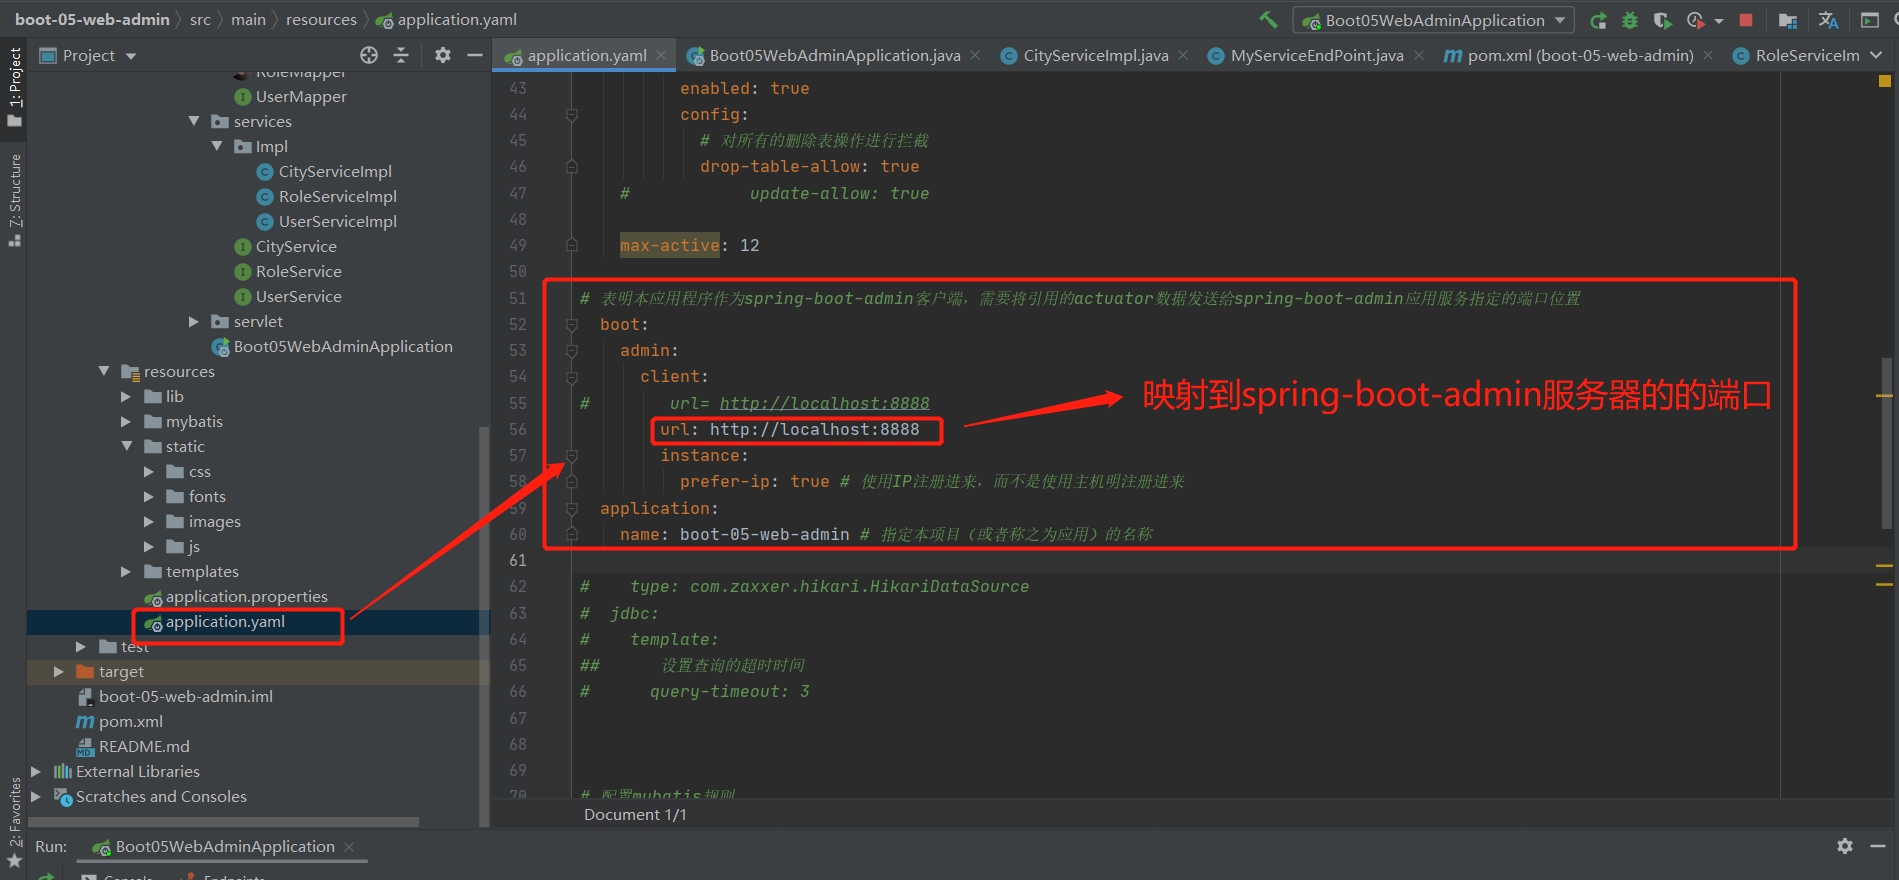
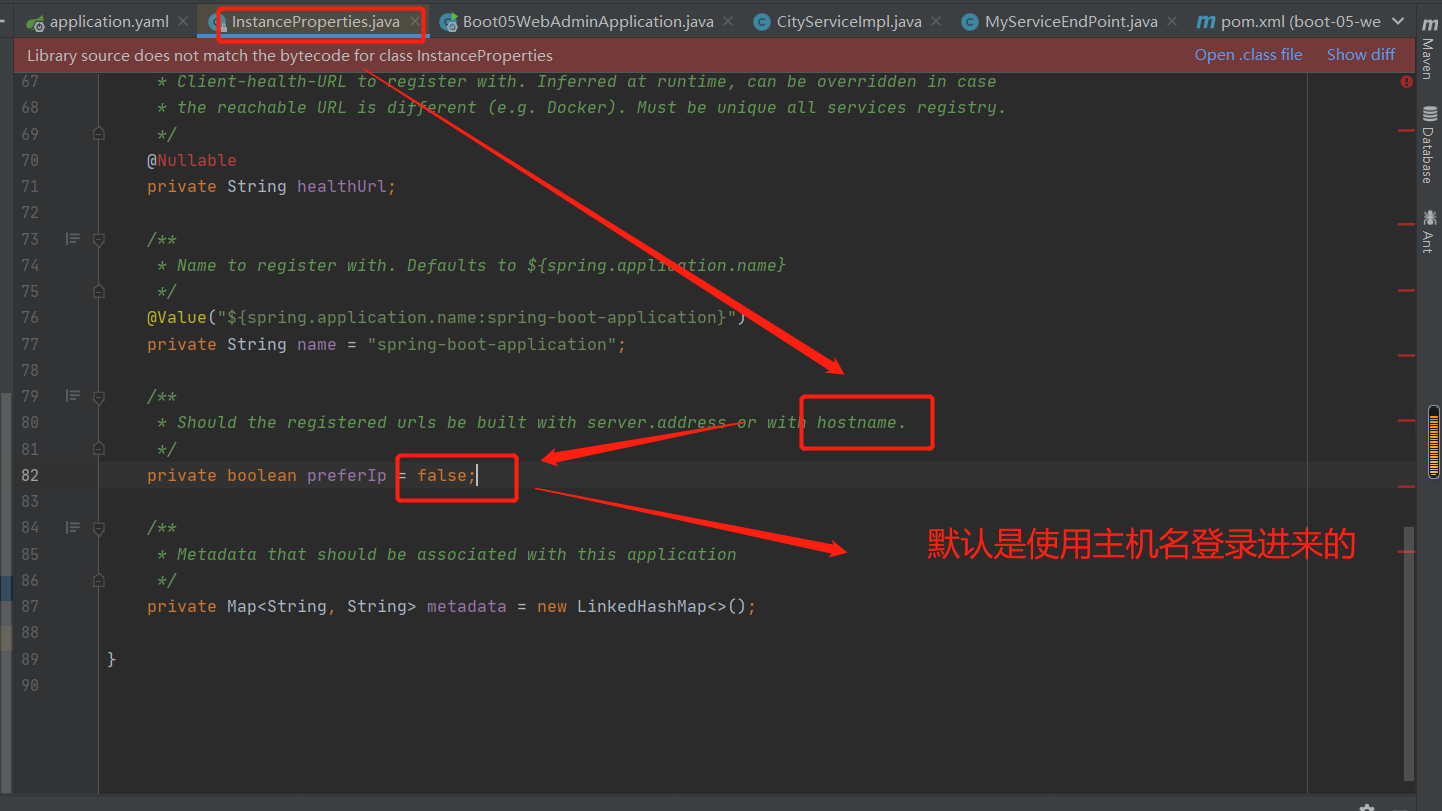
结果:

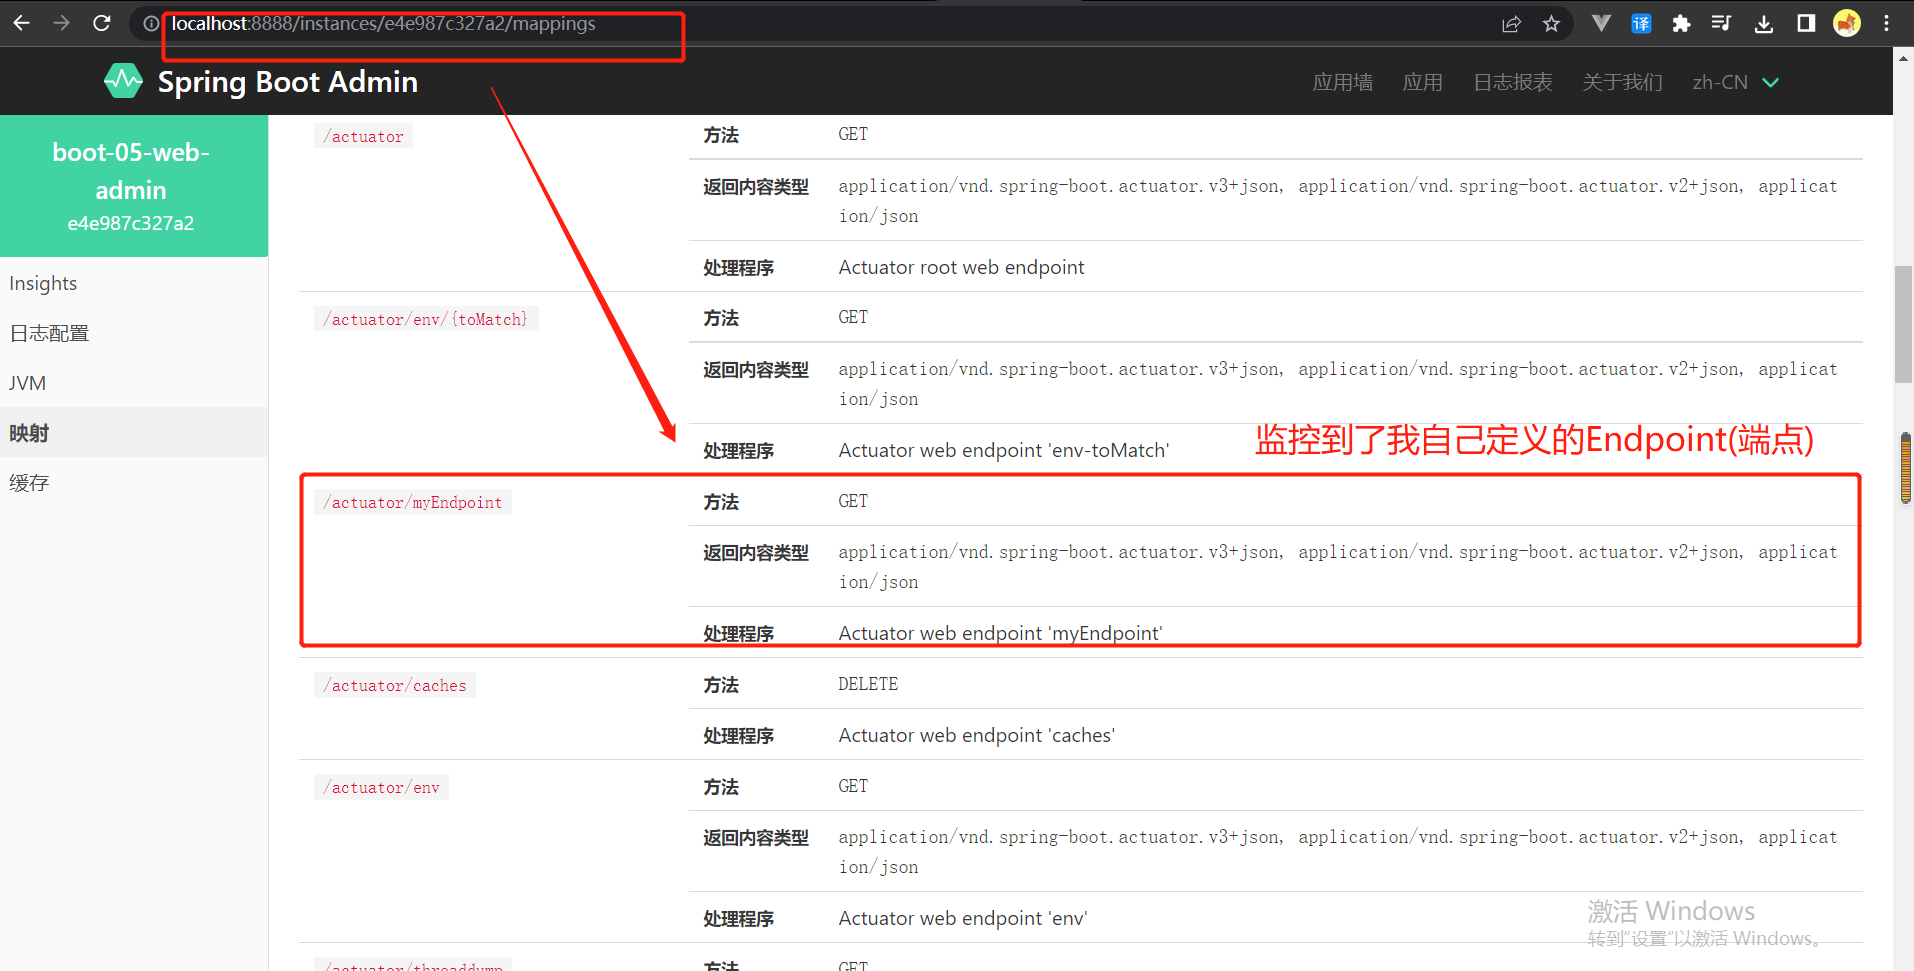
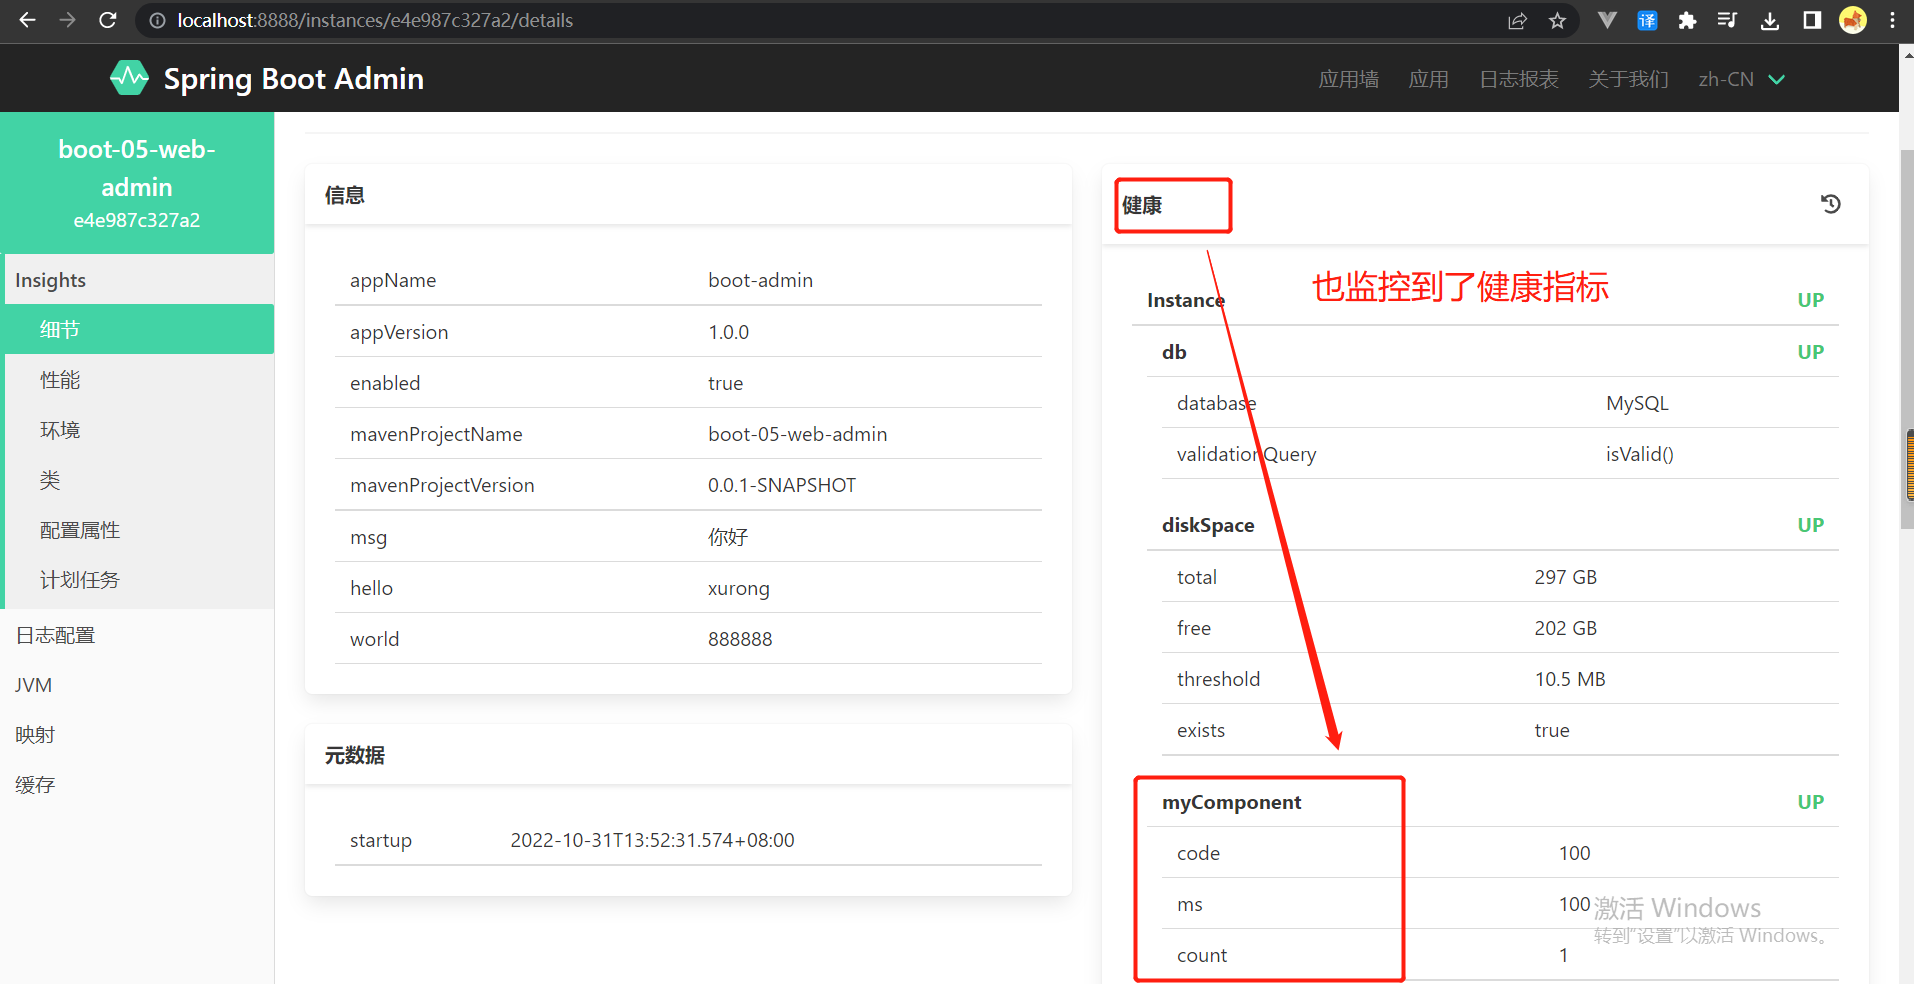
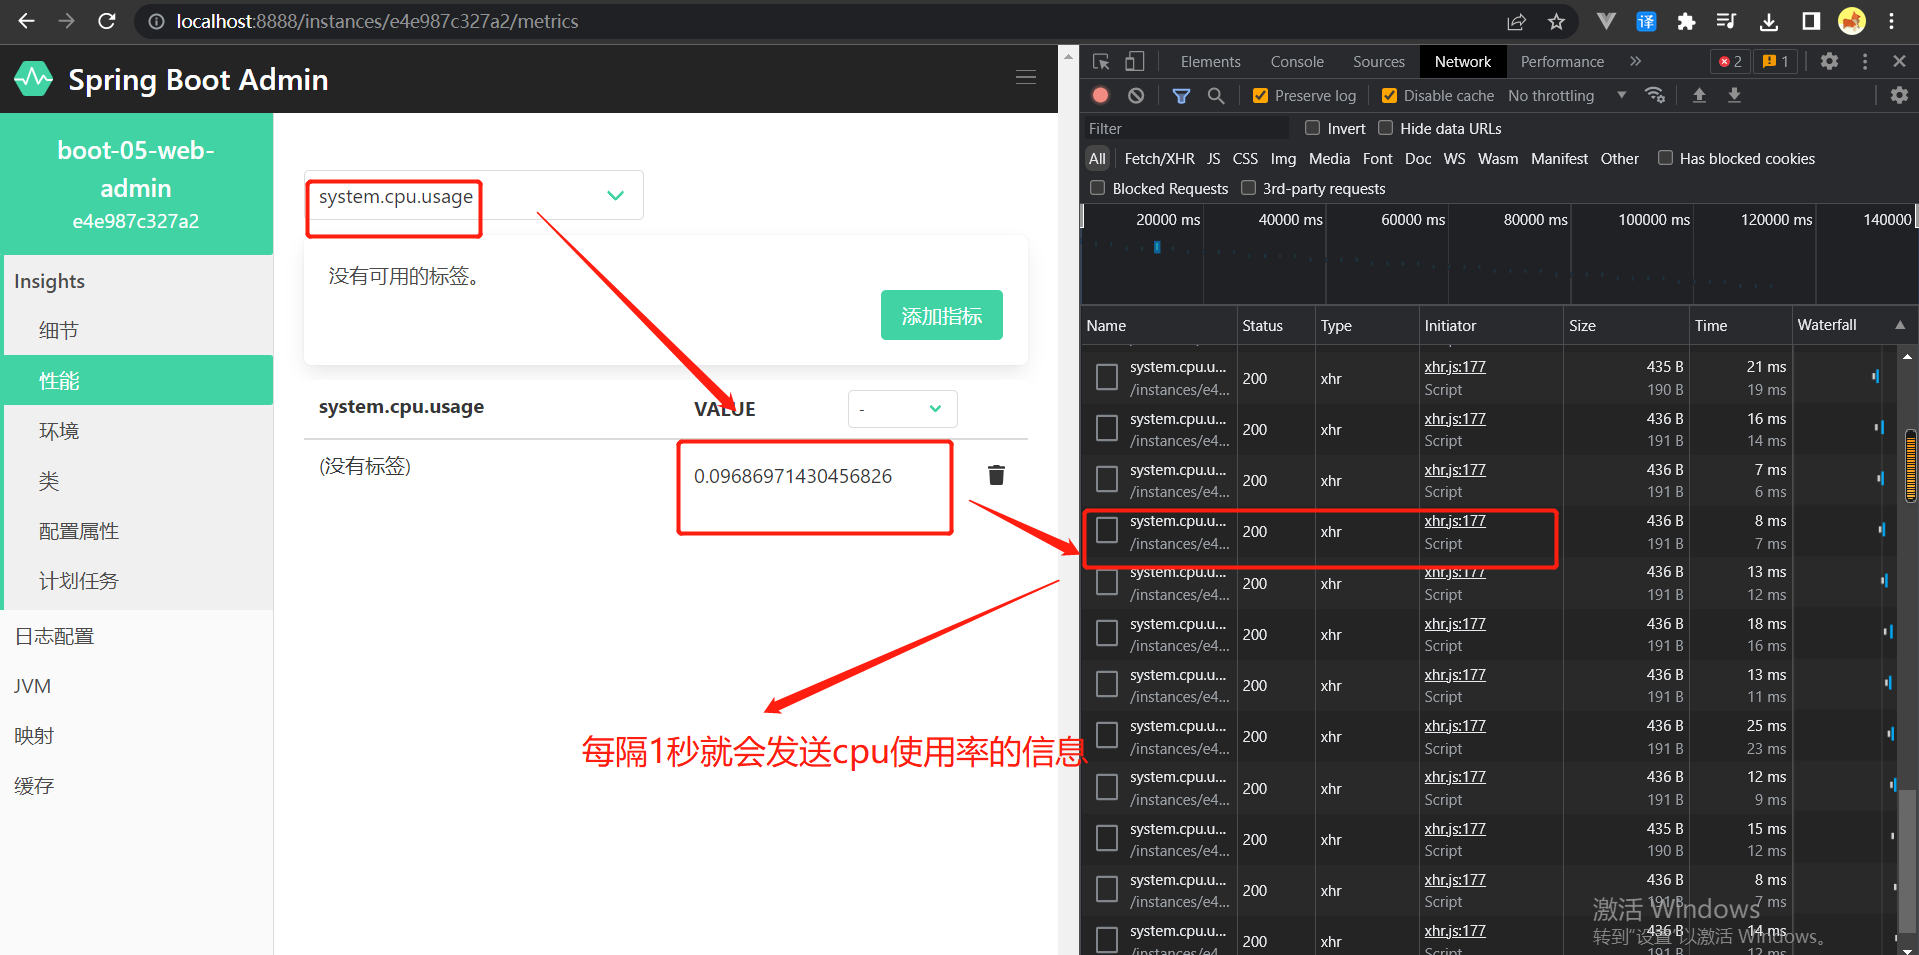
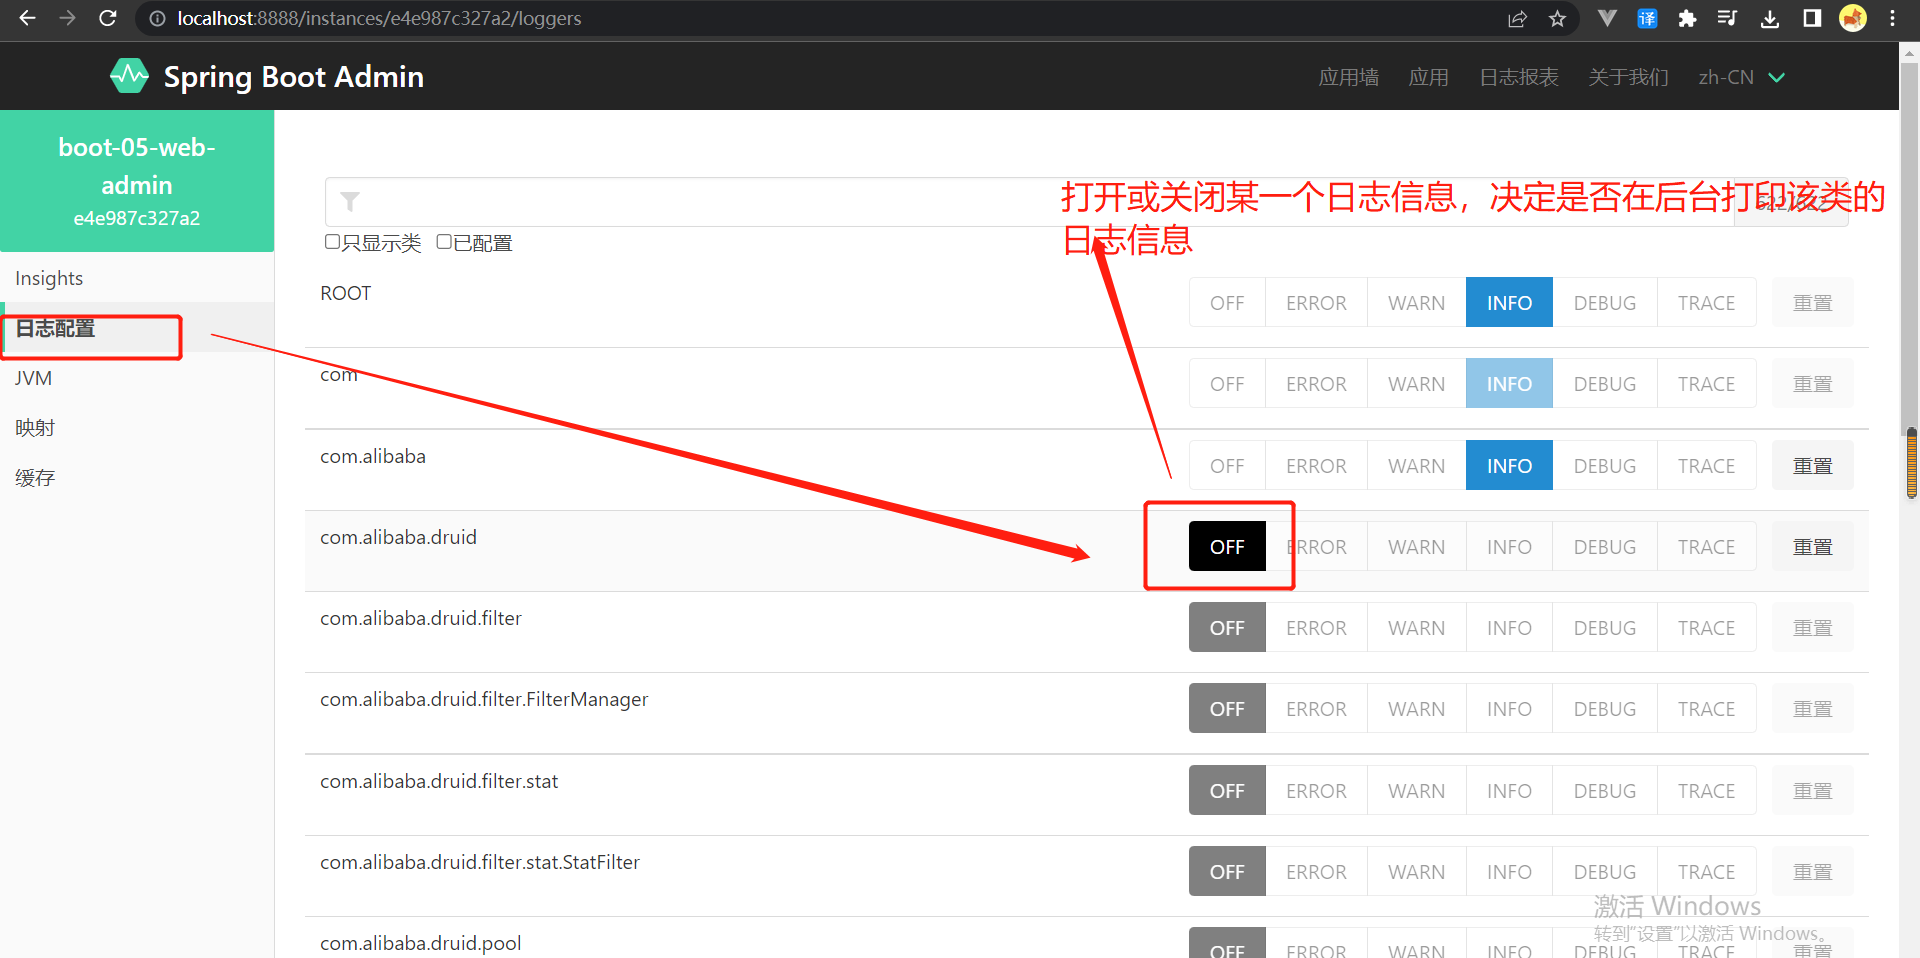
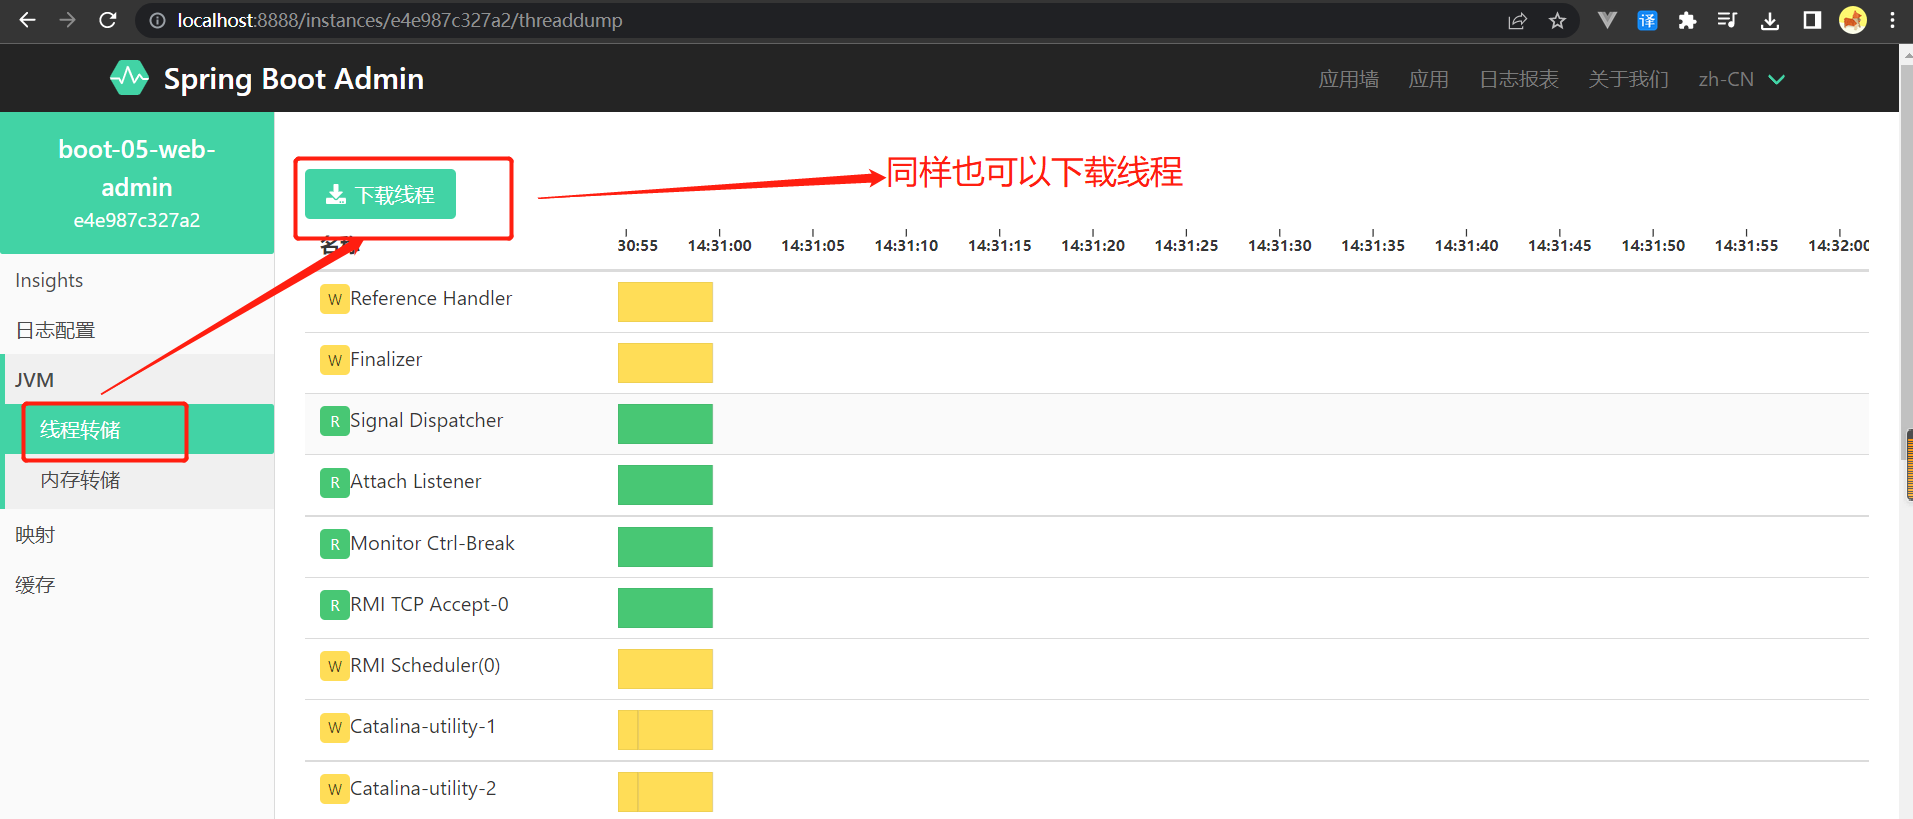
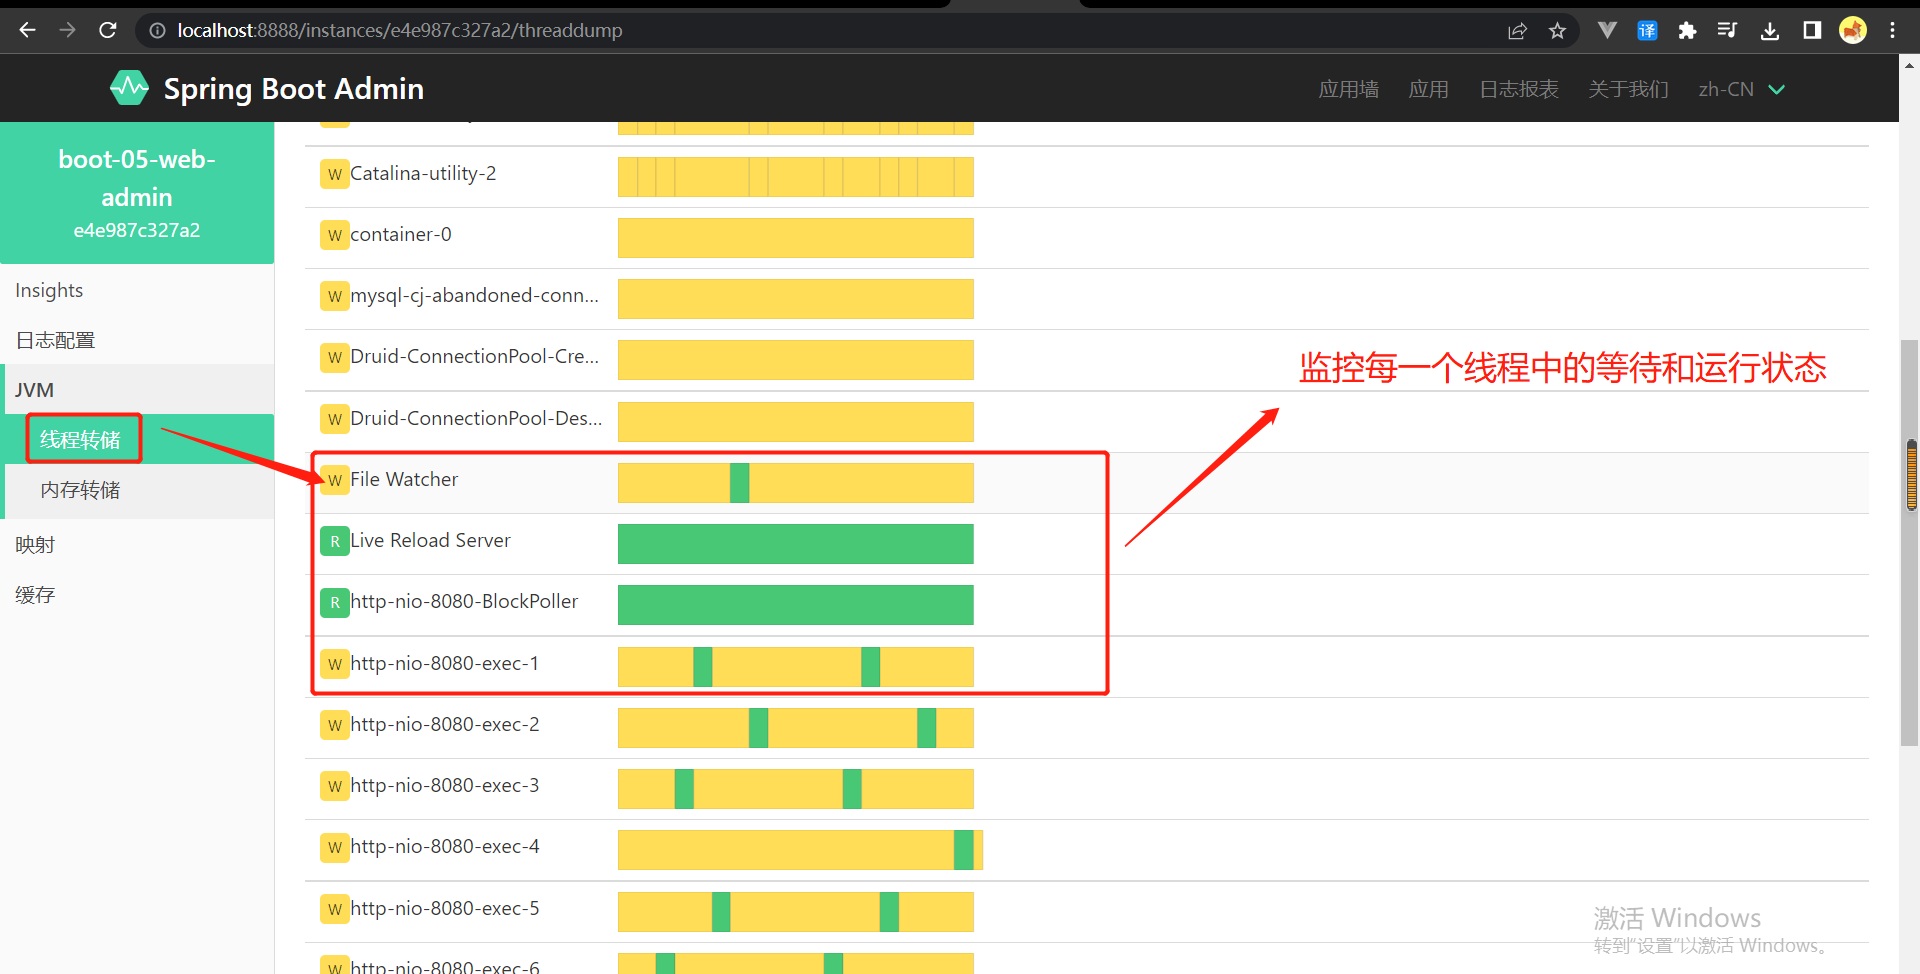
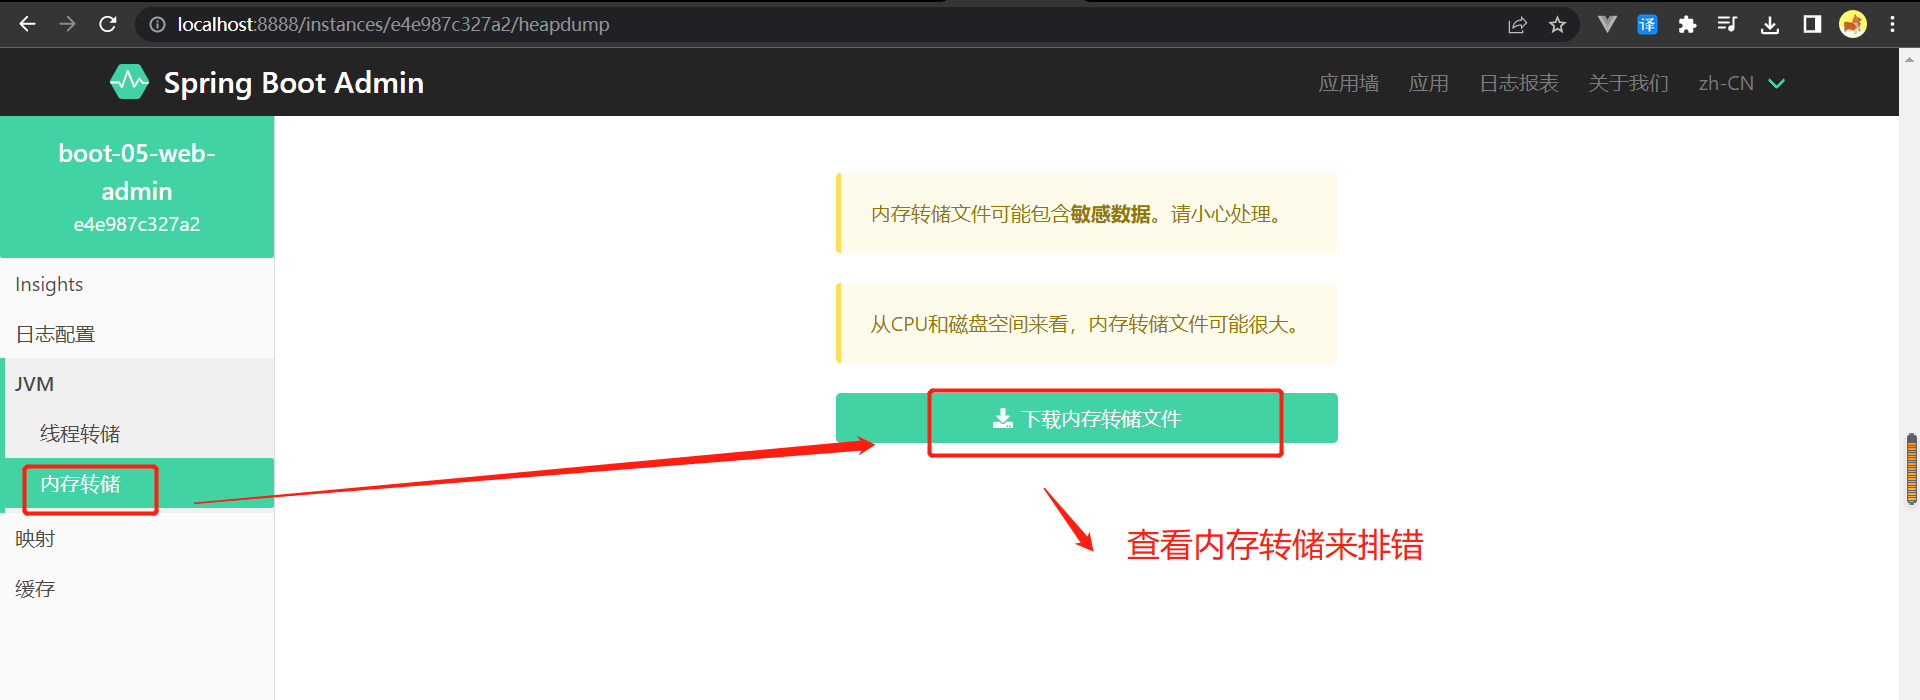
第16章 高级特性
16-1 profile环境切换:
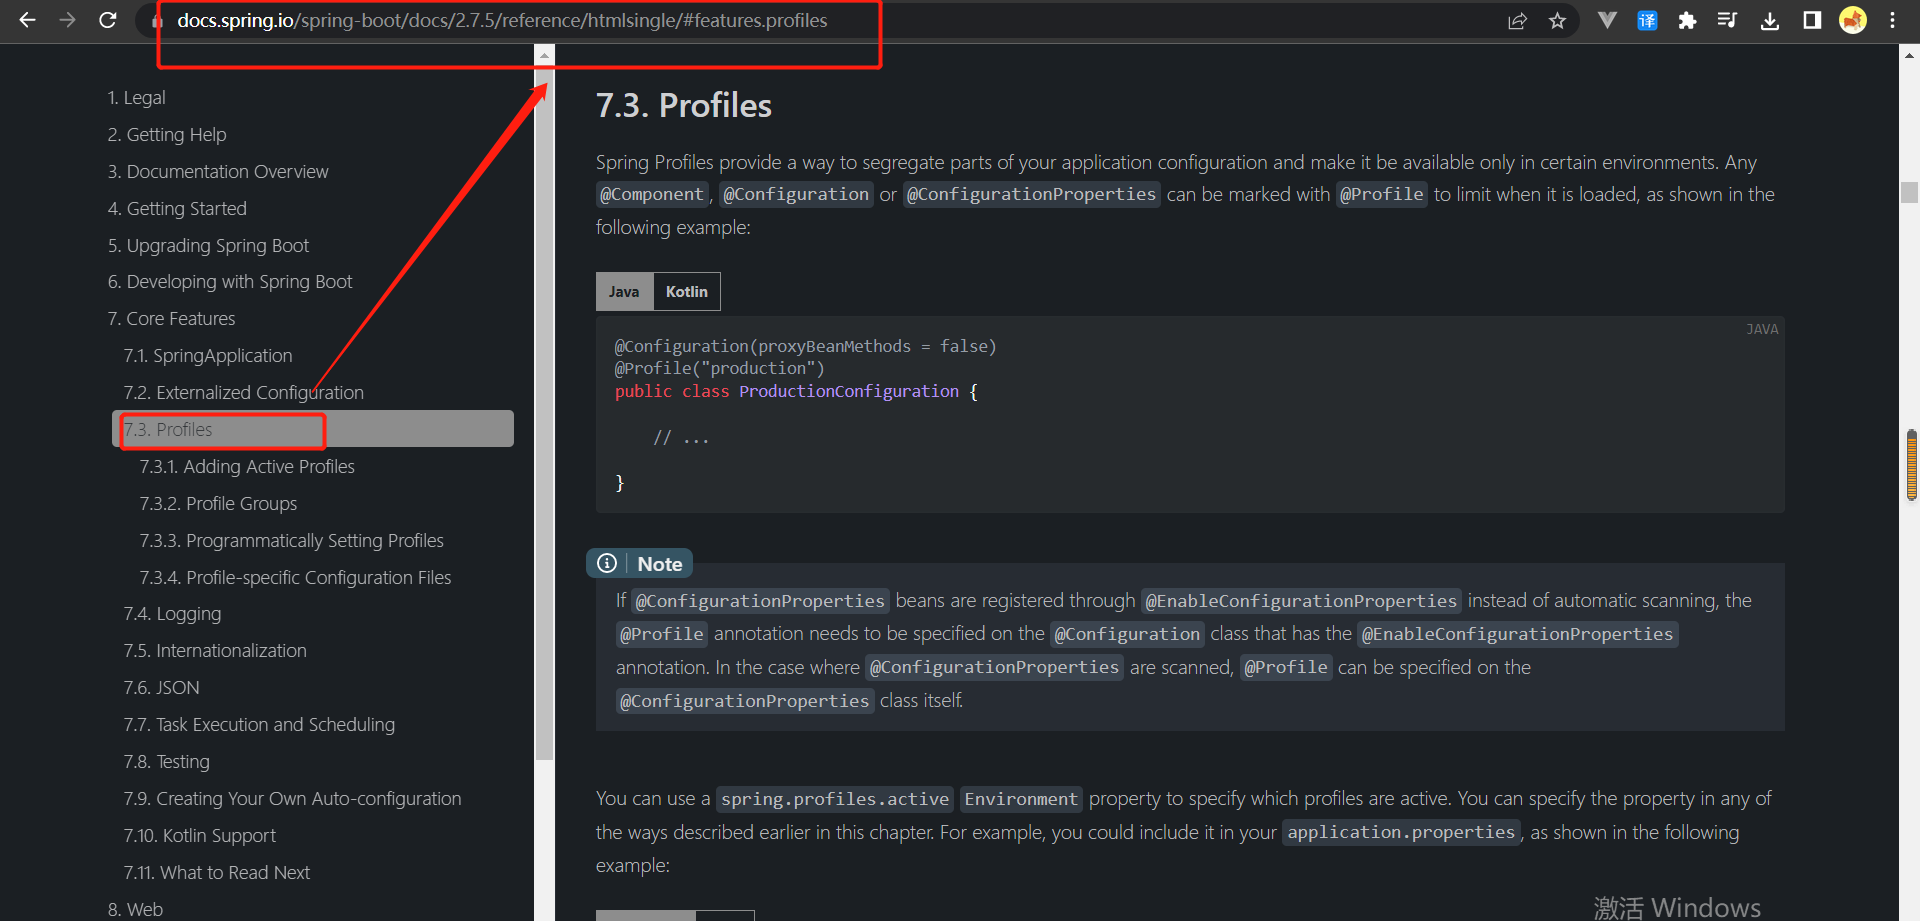
application-prod.yaml:该配置文件是用于上线的的环境配置
application-test.yaml:该配置文件是用于测试的环境配置
准备:
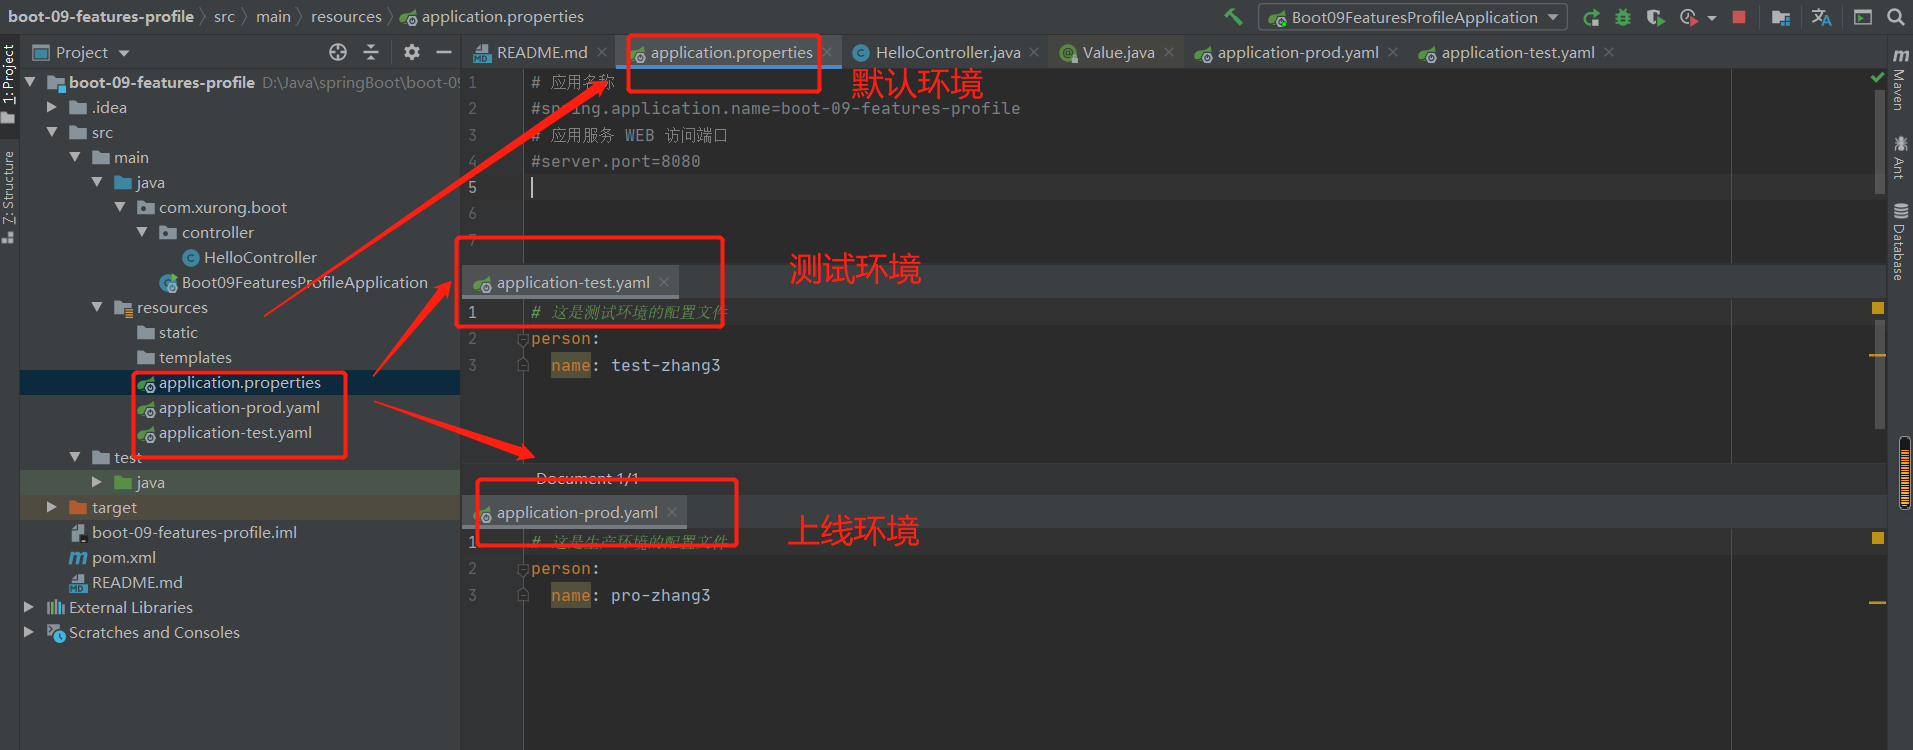
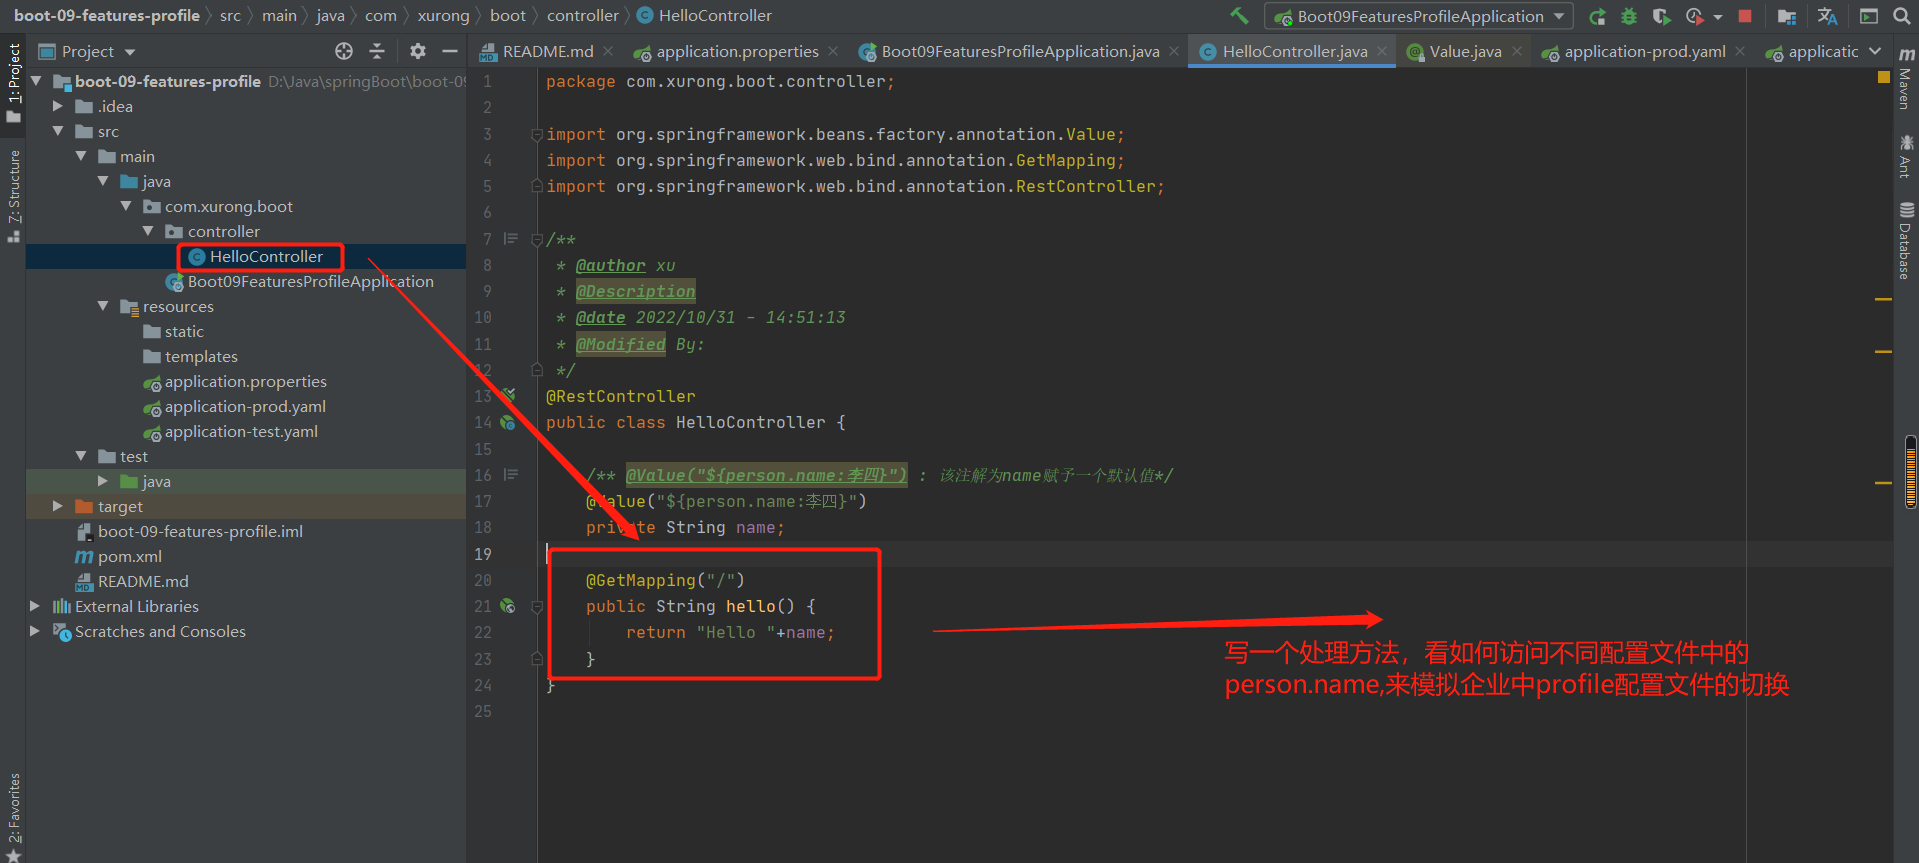
实验结果:
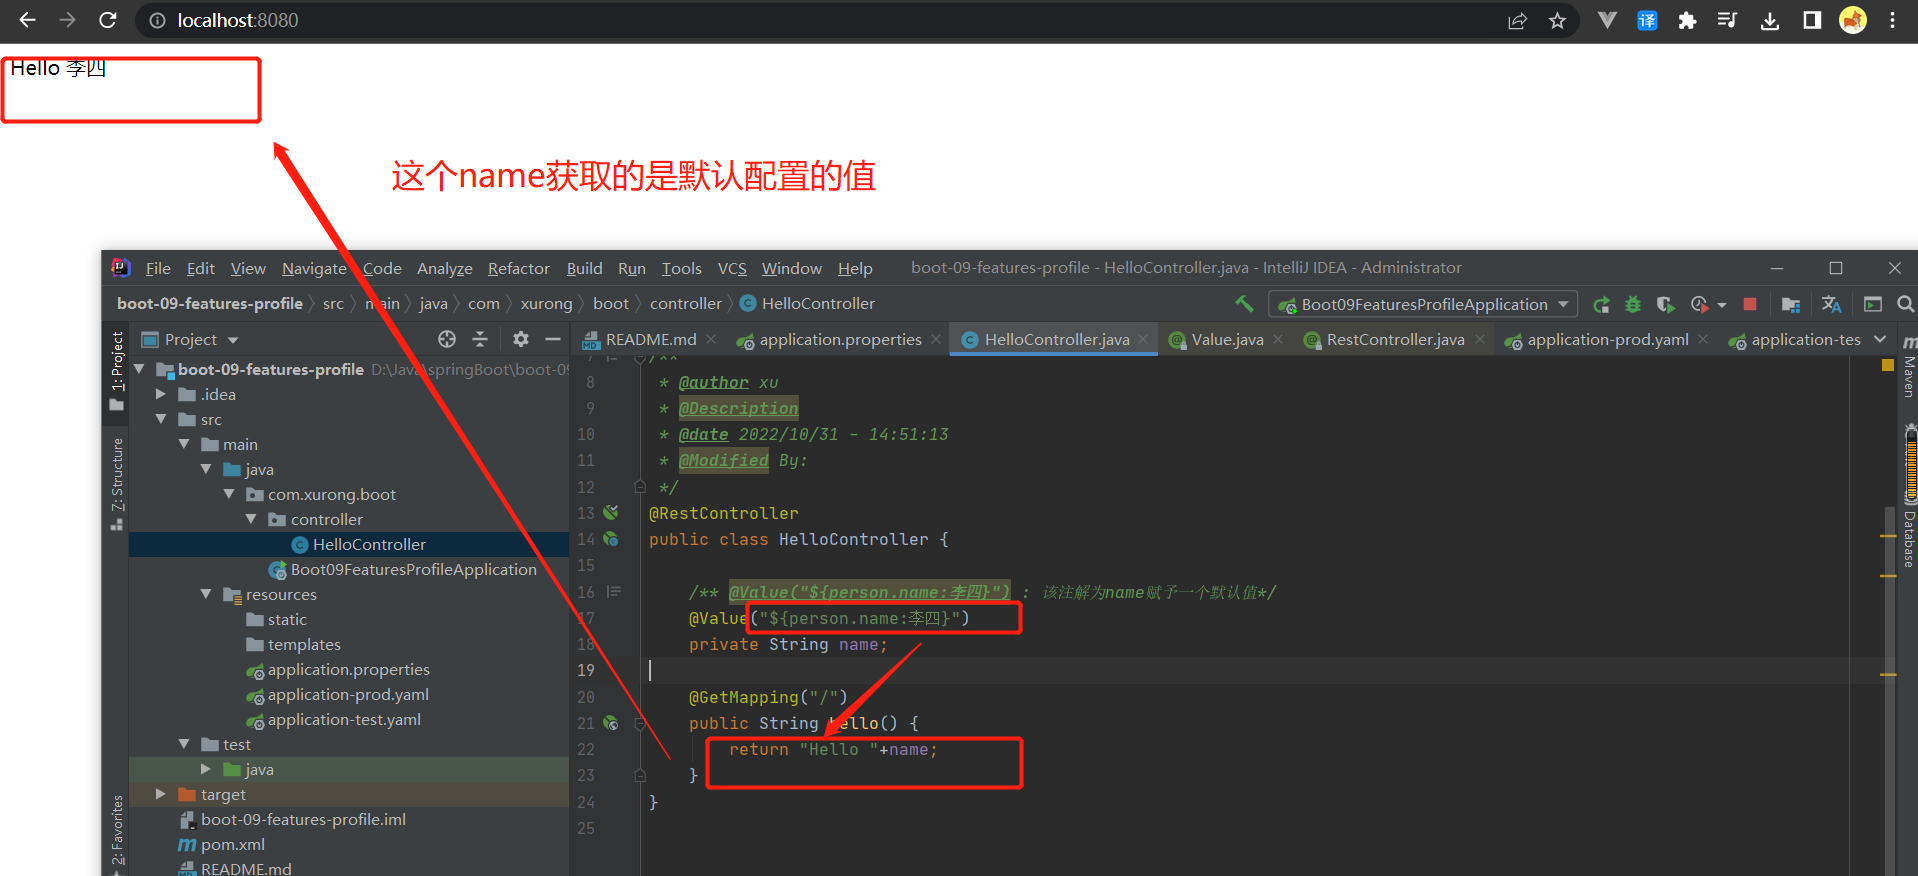
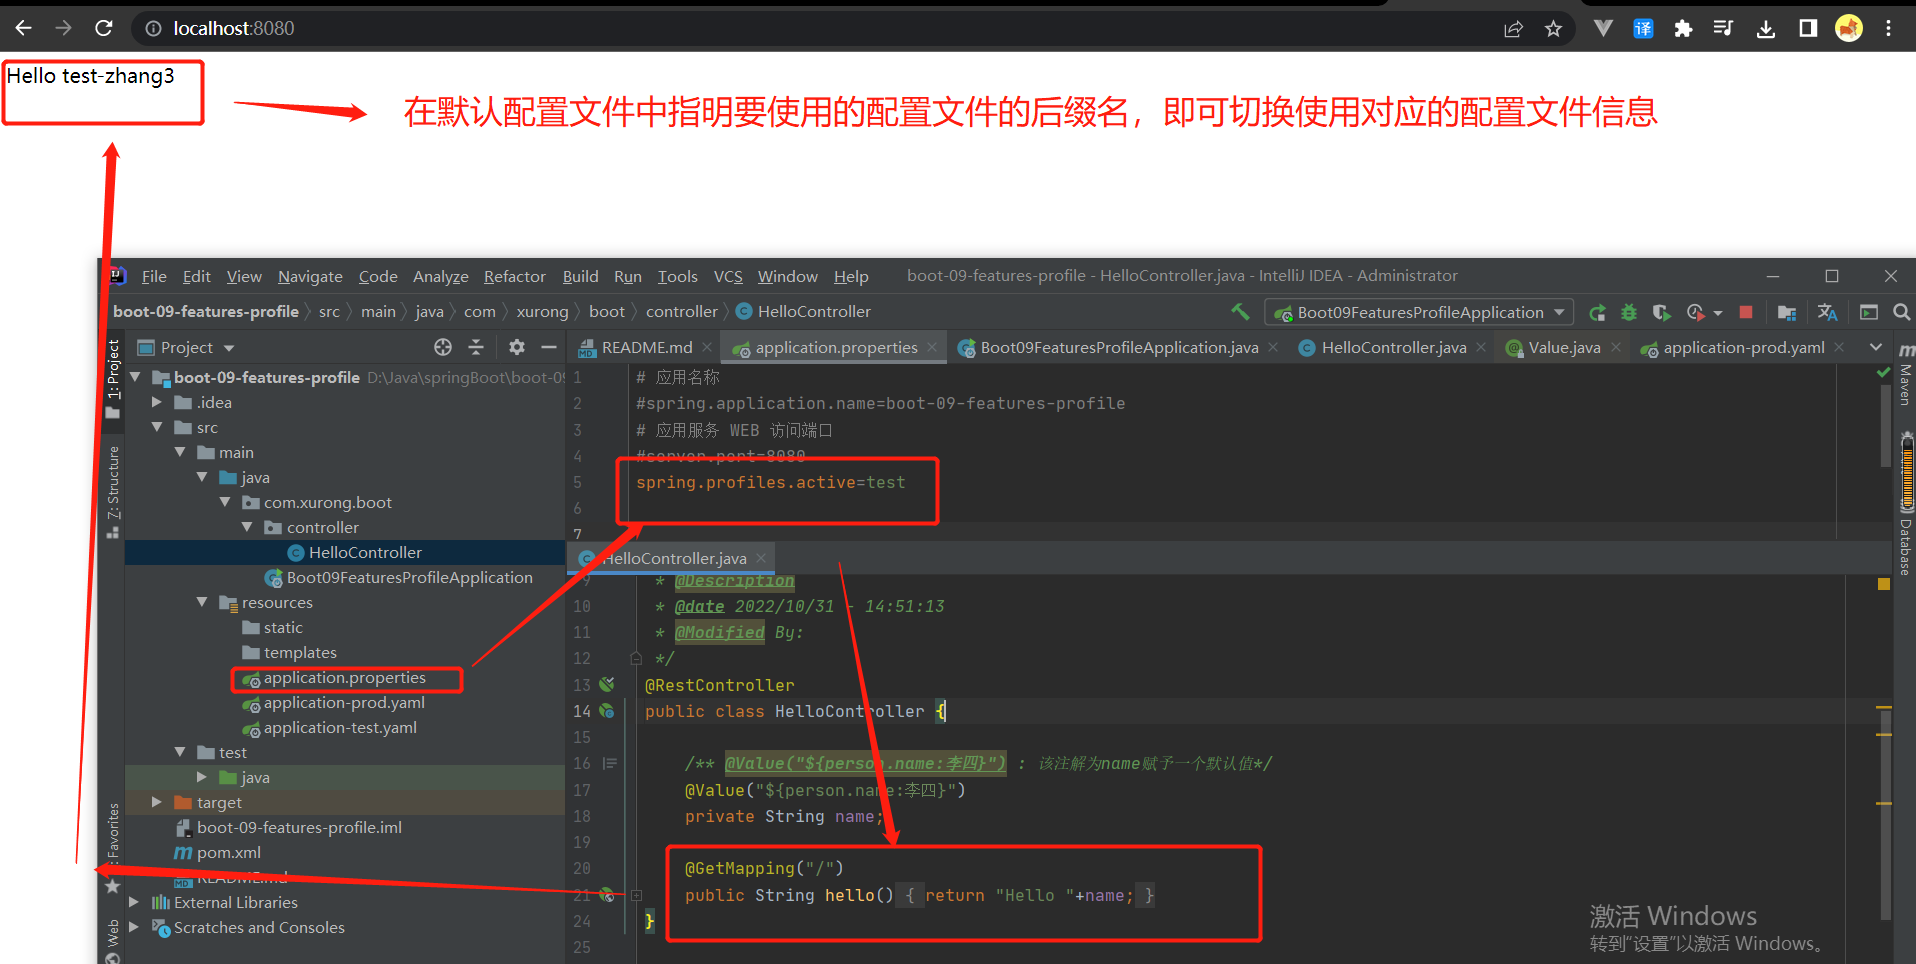
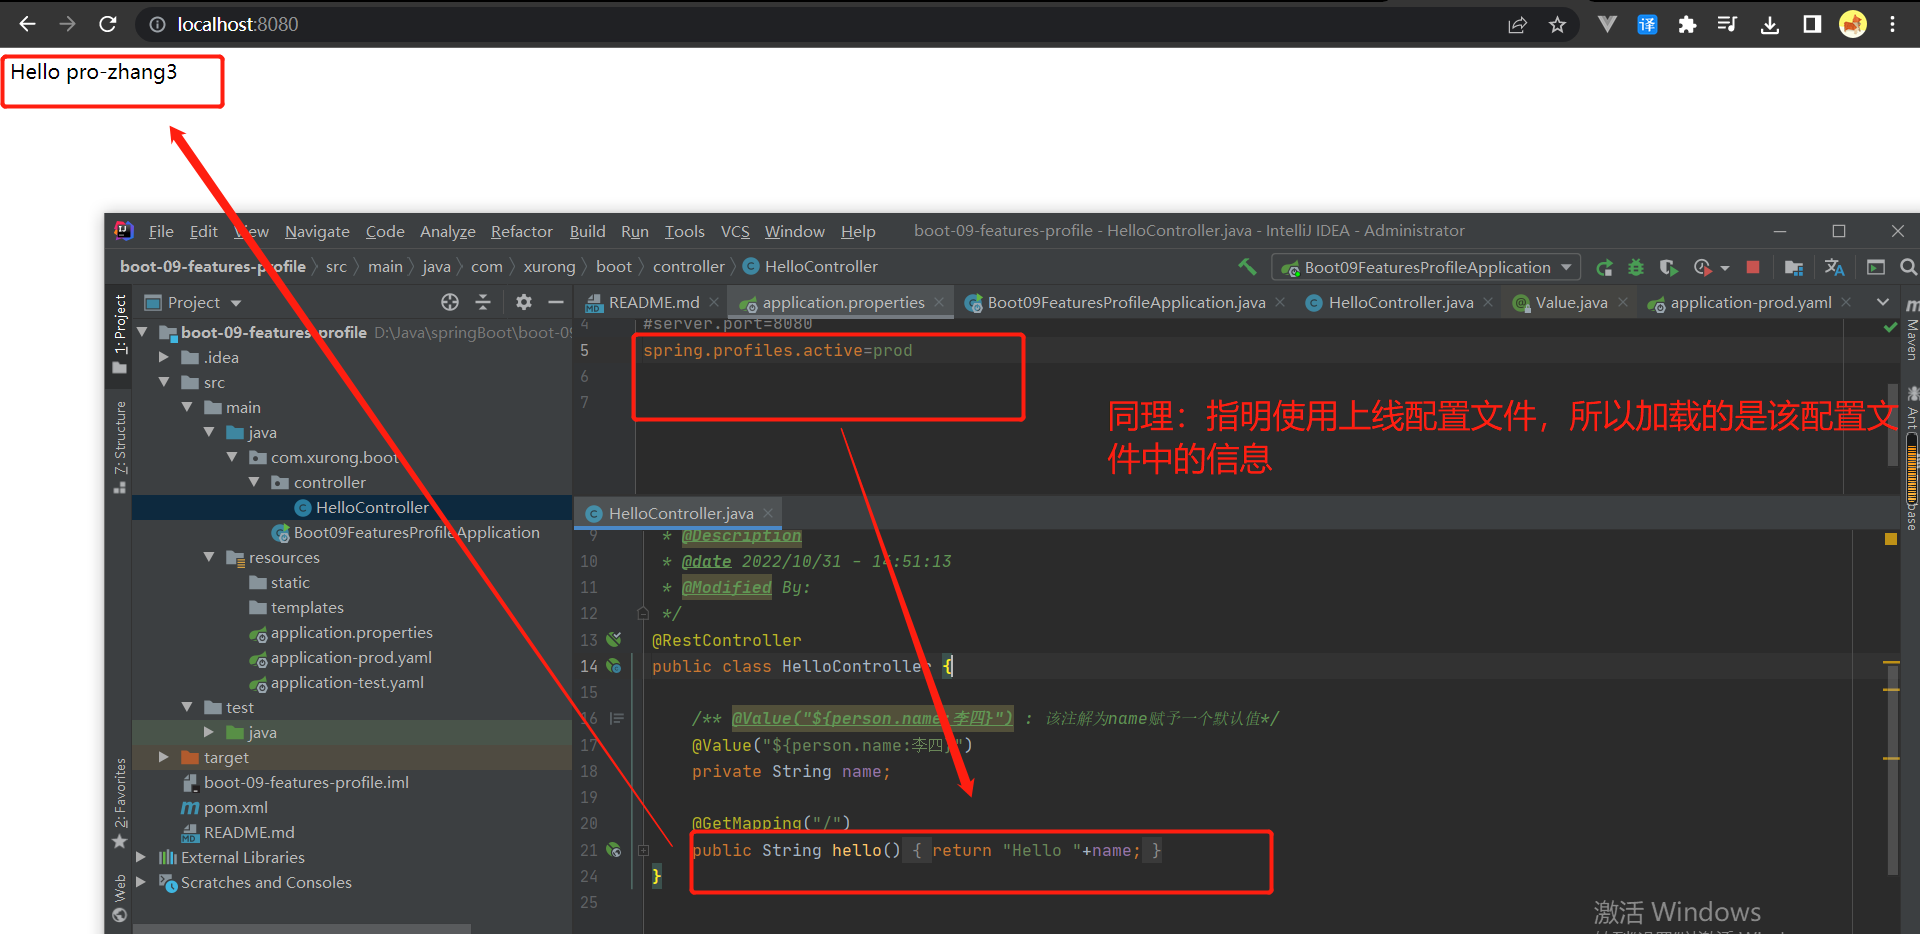
如果默认配置环境与application-prod.yaml配置文件中有相同的配置变量,有限使用精确的application-prod.yaml配置文件中的变量:
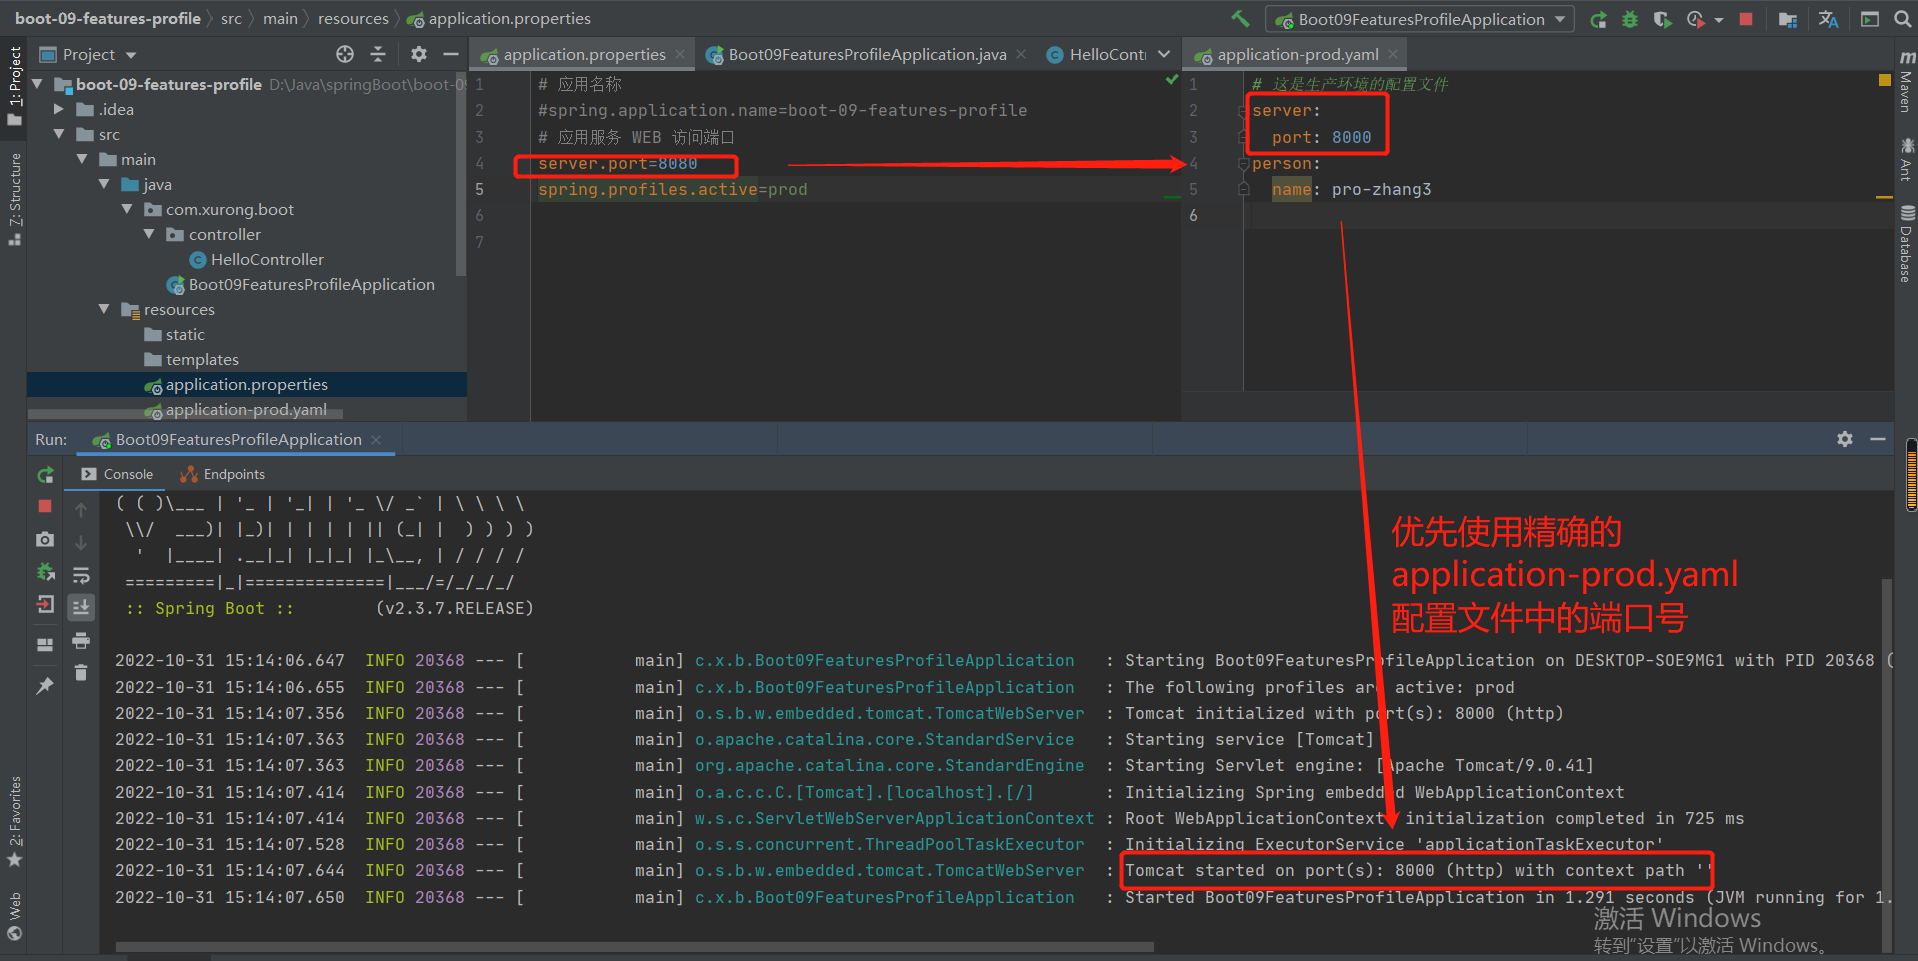
访问当然也只能通过8000了:

即使配置文件修改了,也可以通过命令行的方式改变:
只运行打包的jar包:
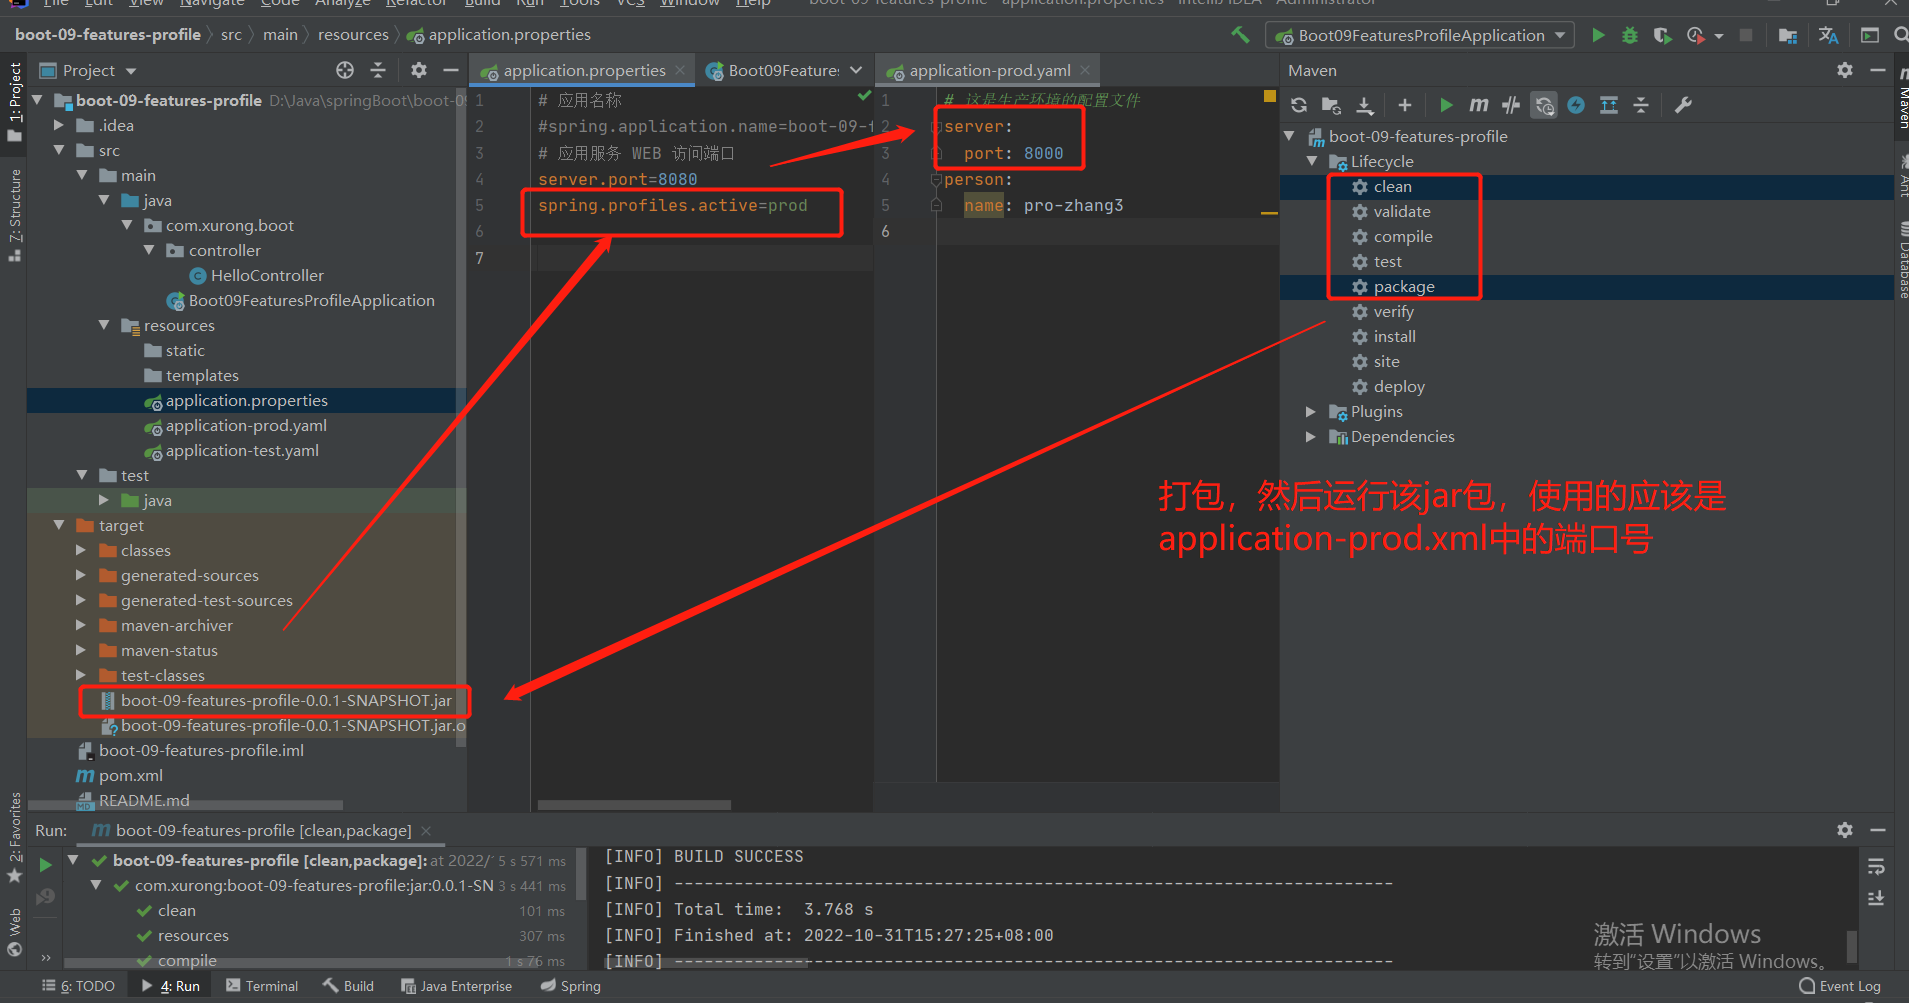
1.运行jar包时,切换配置环境
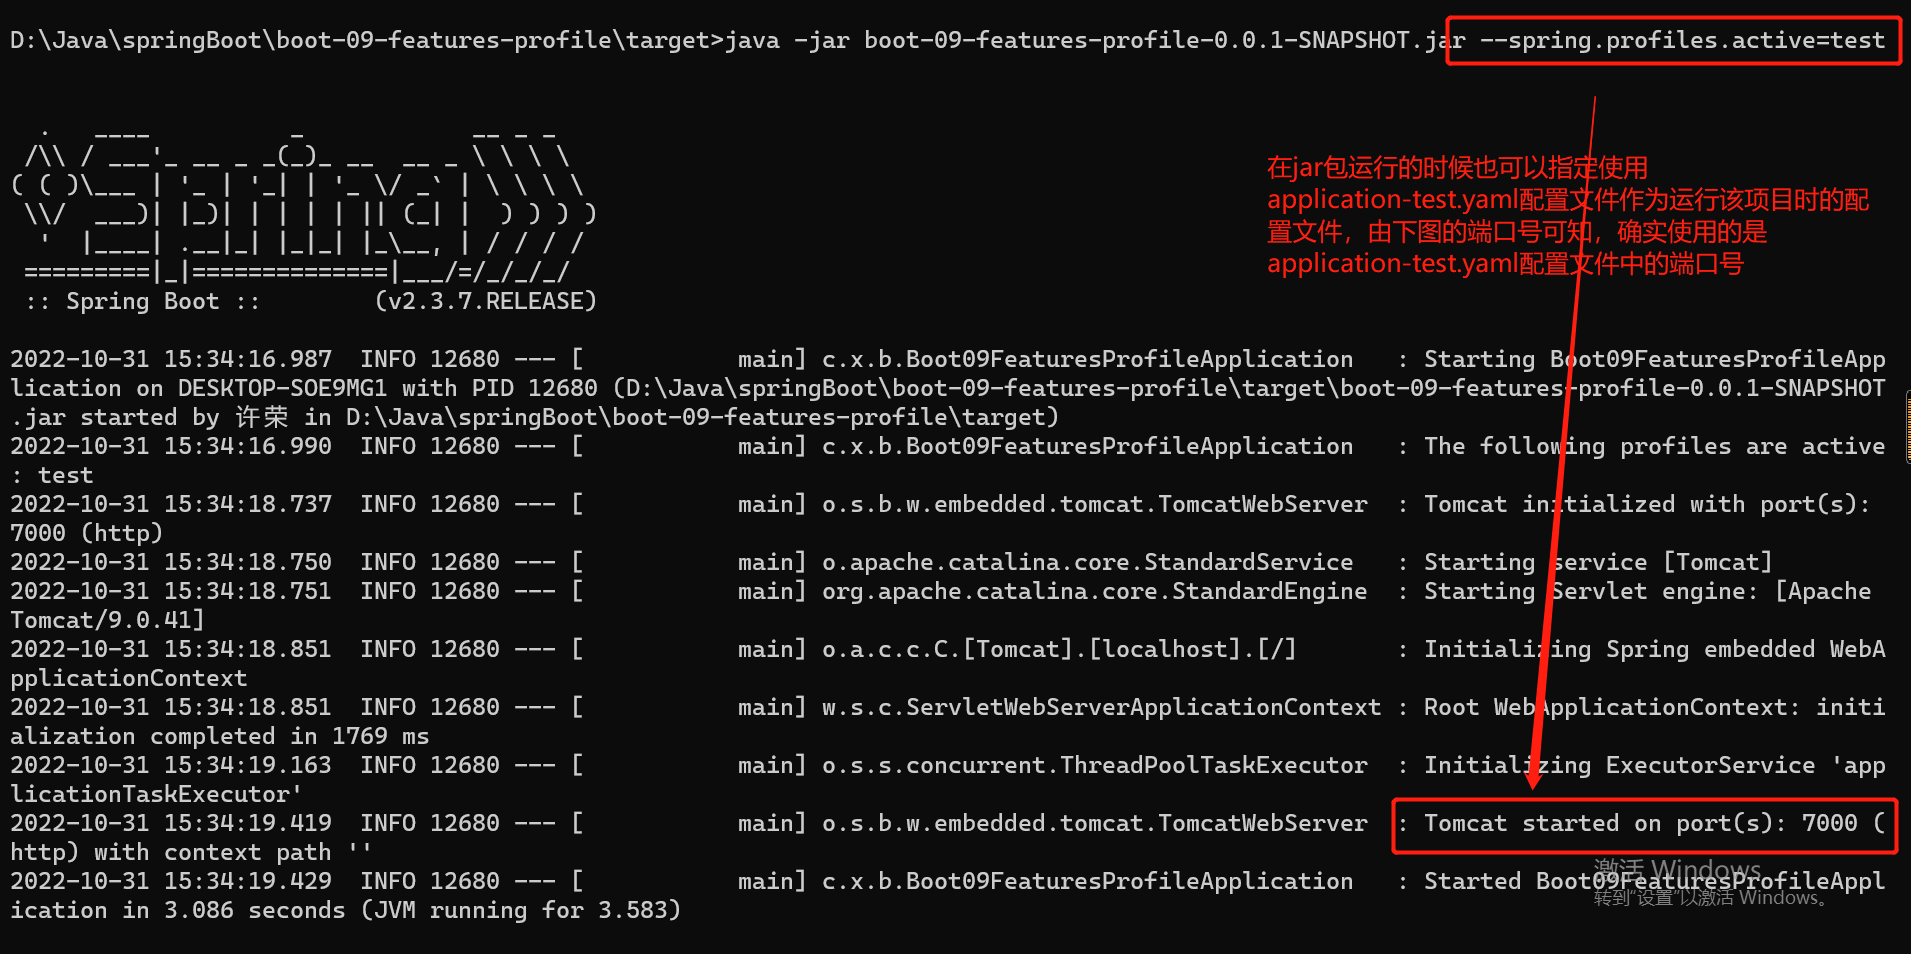
运行jar包时,不仅可以切换配置环境,还可以修改其中的配置变量的值:
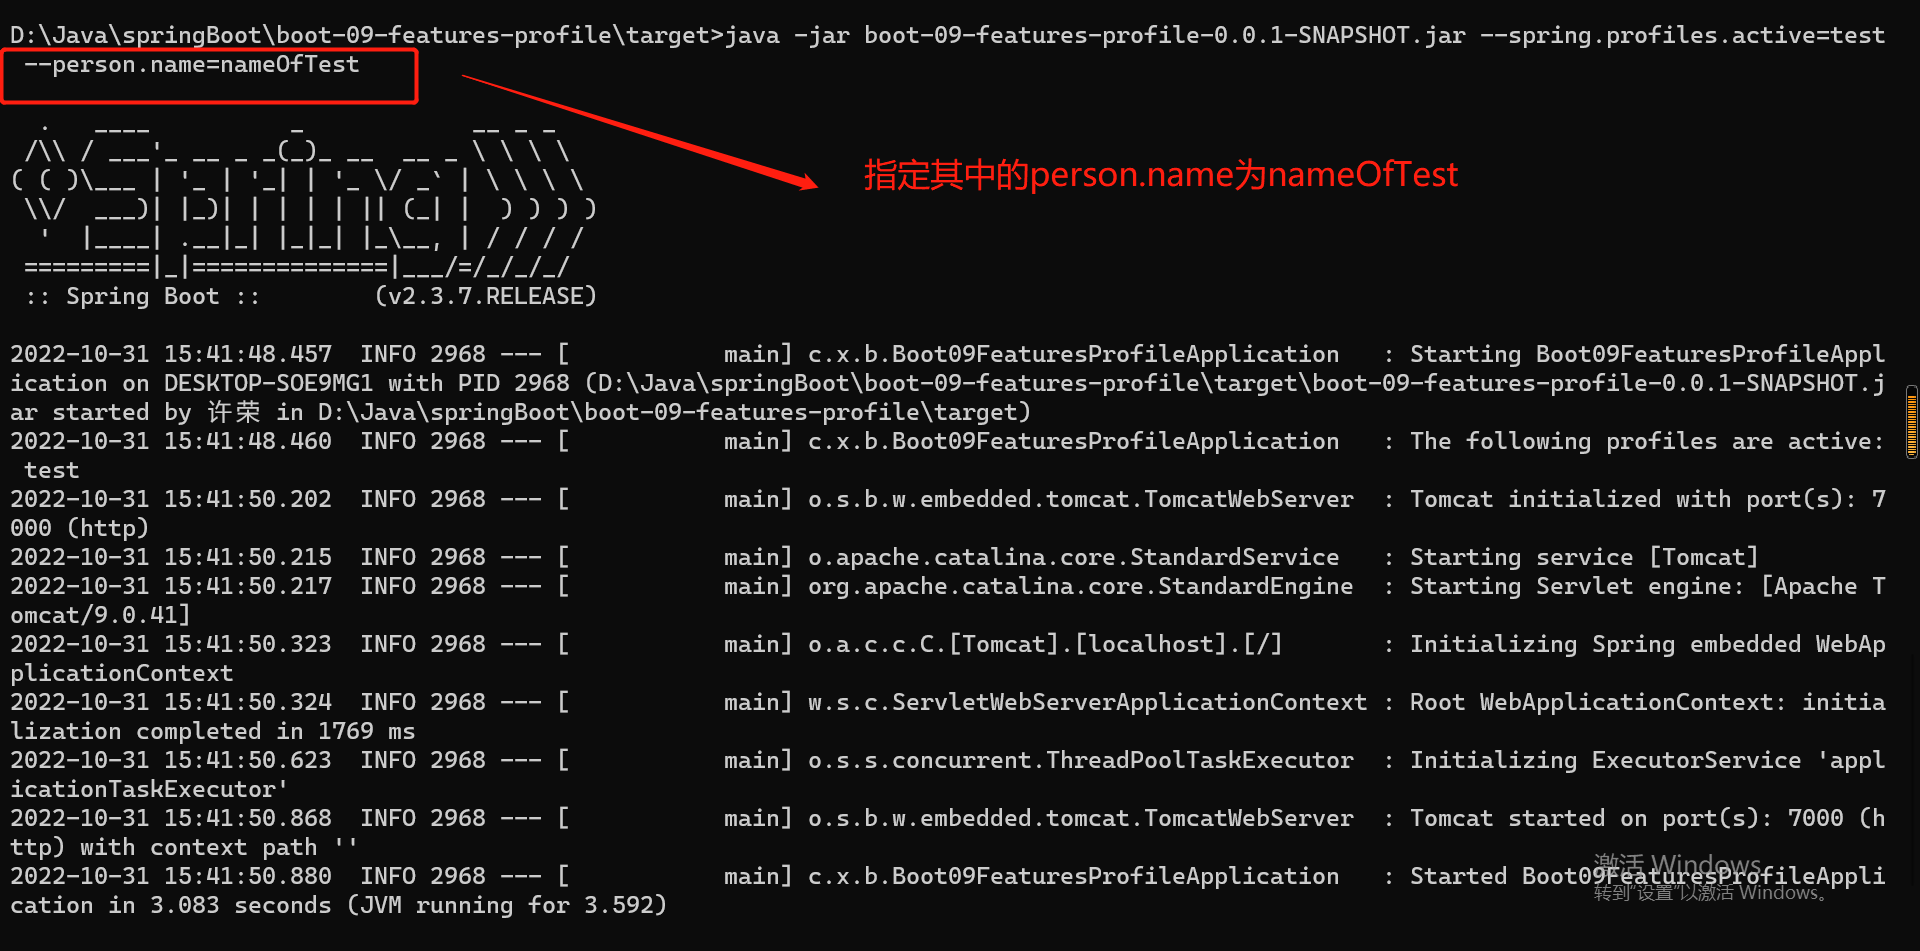
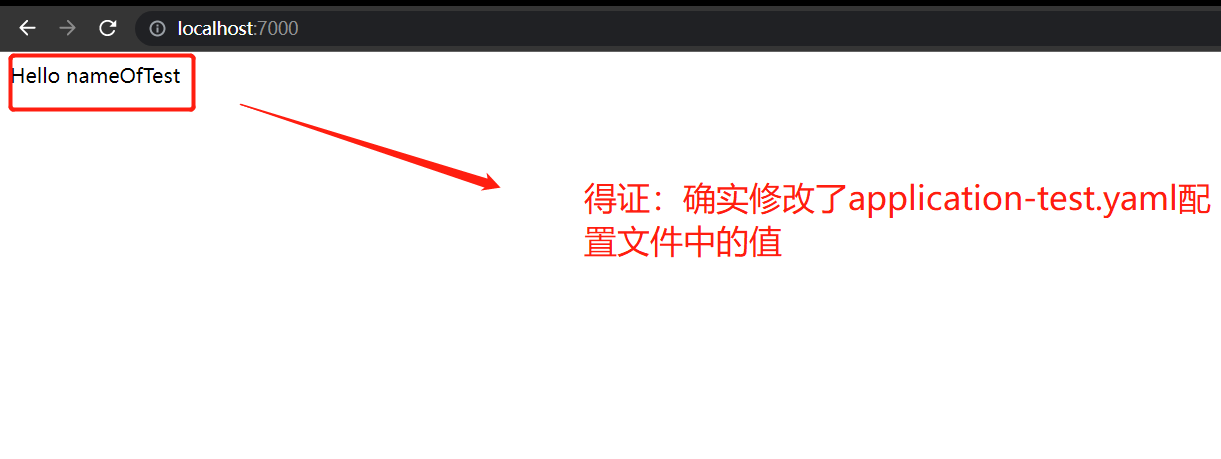
2.实验2:@Profile注解的使用
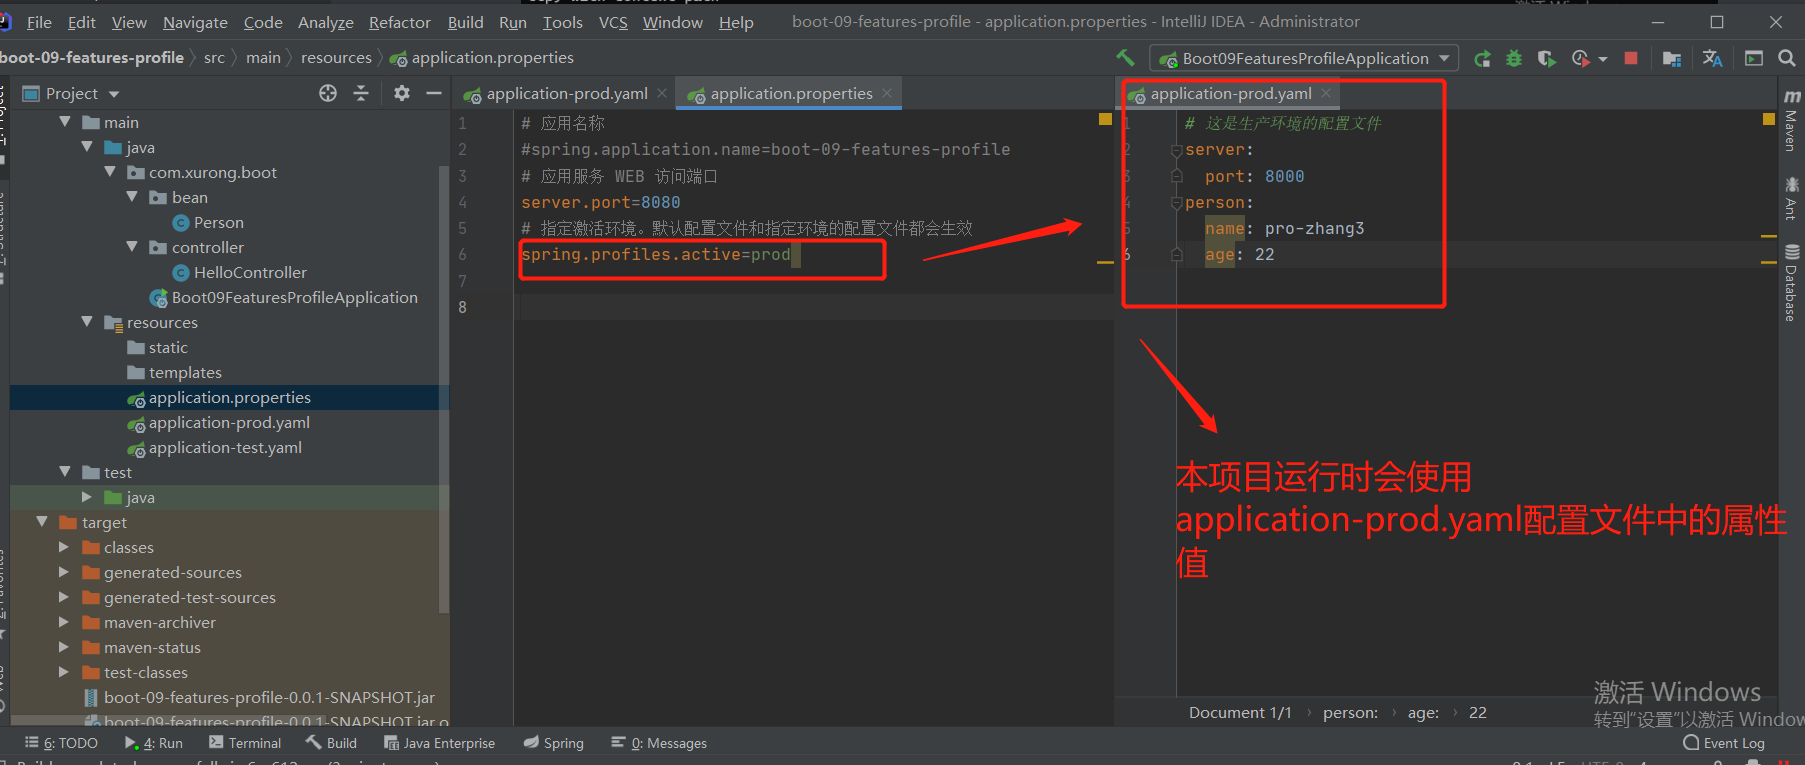
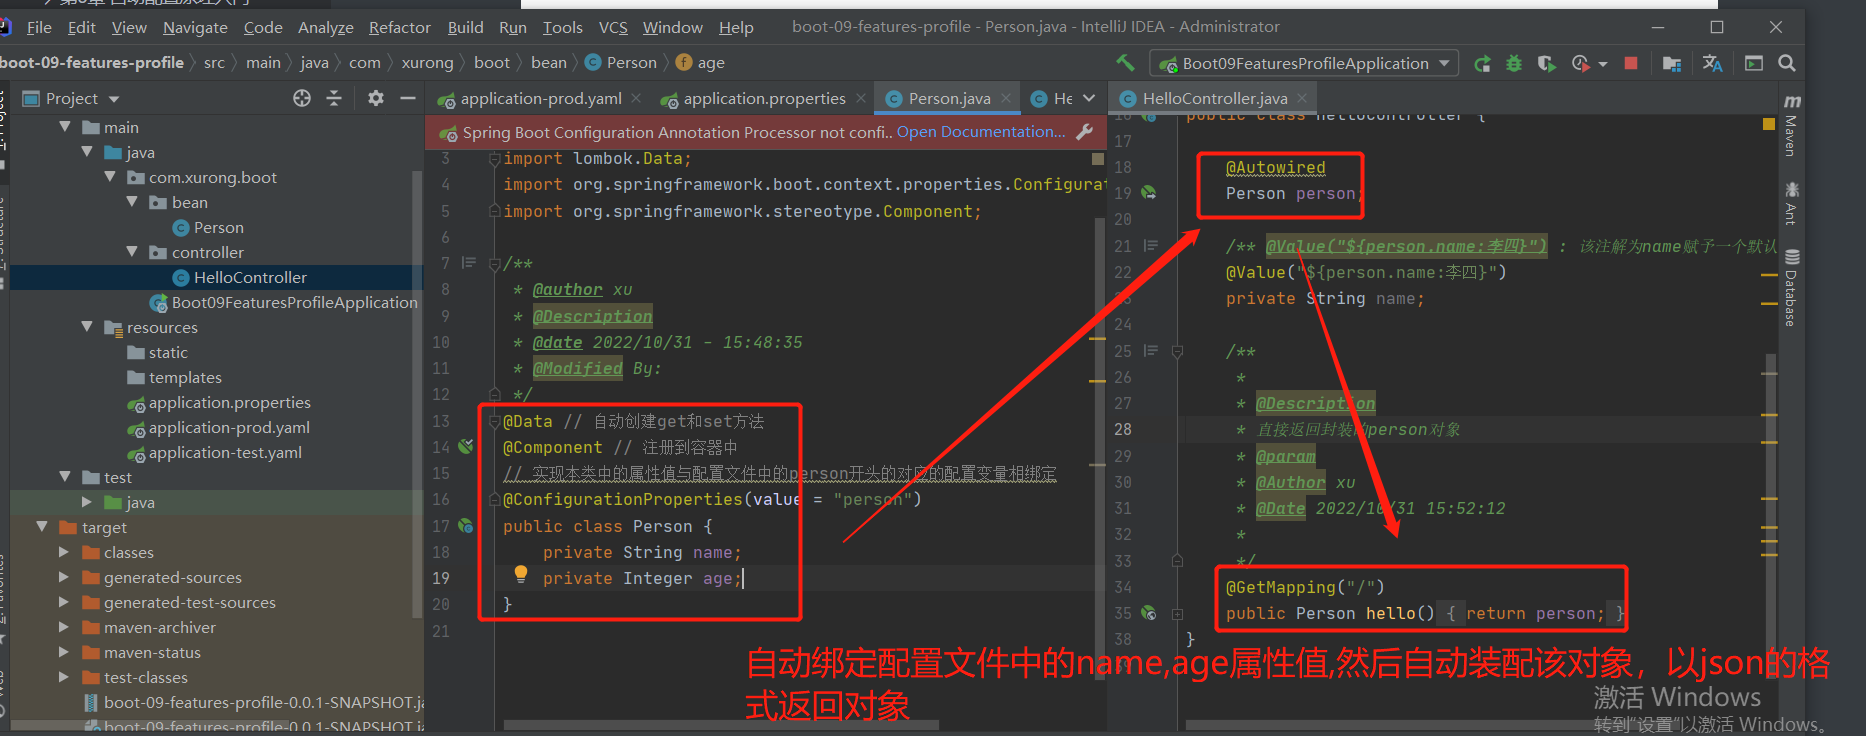
结果:
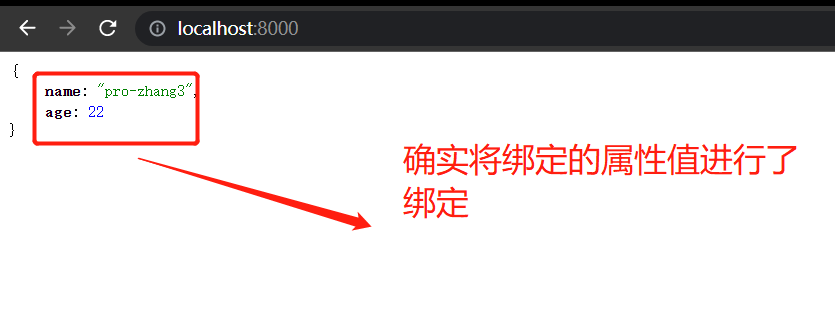
使用@Profile可以针对某一个类或者方法生效,只有绑定@Profile指定的配置文件,该类或者方法才可以生效:
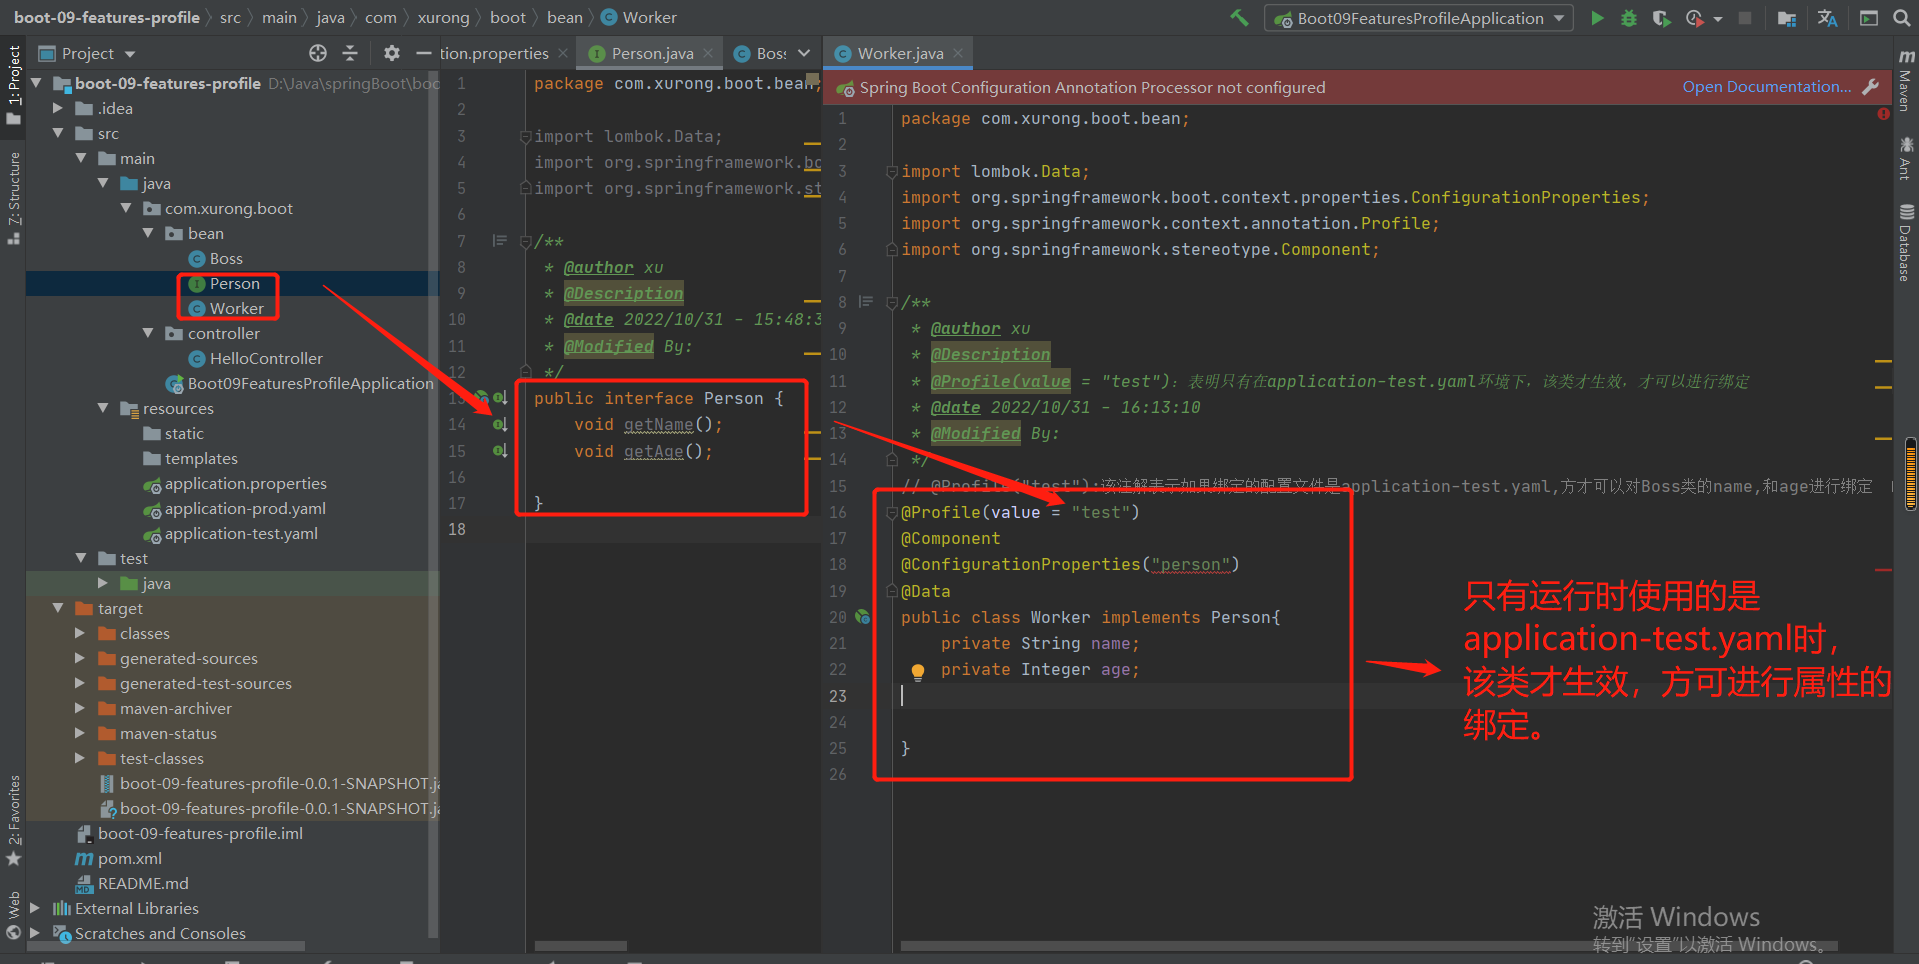
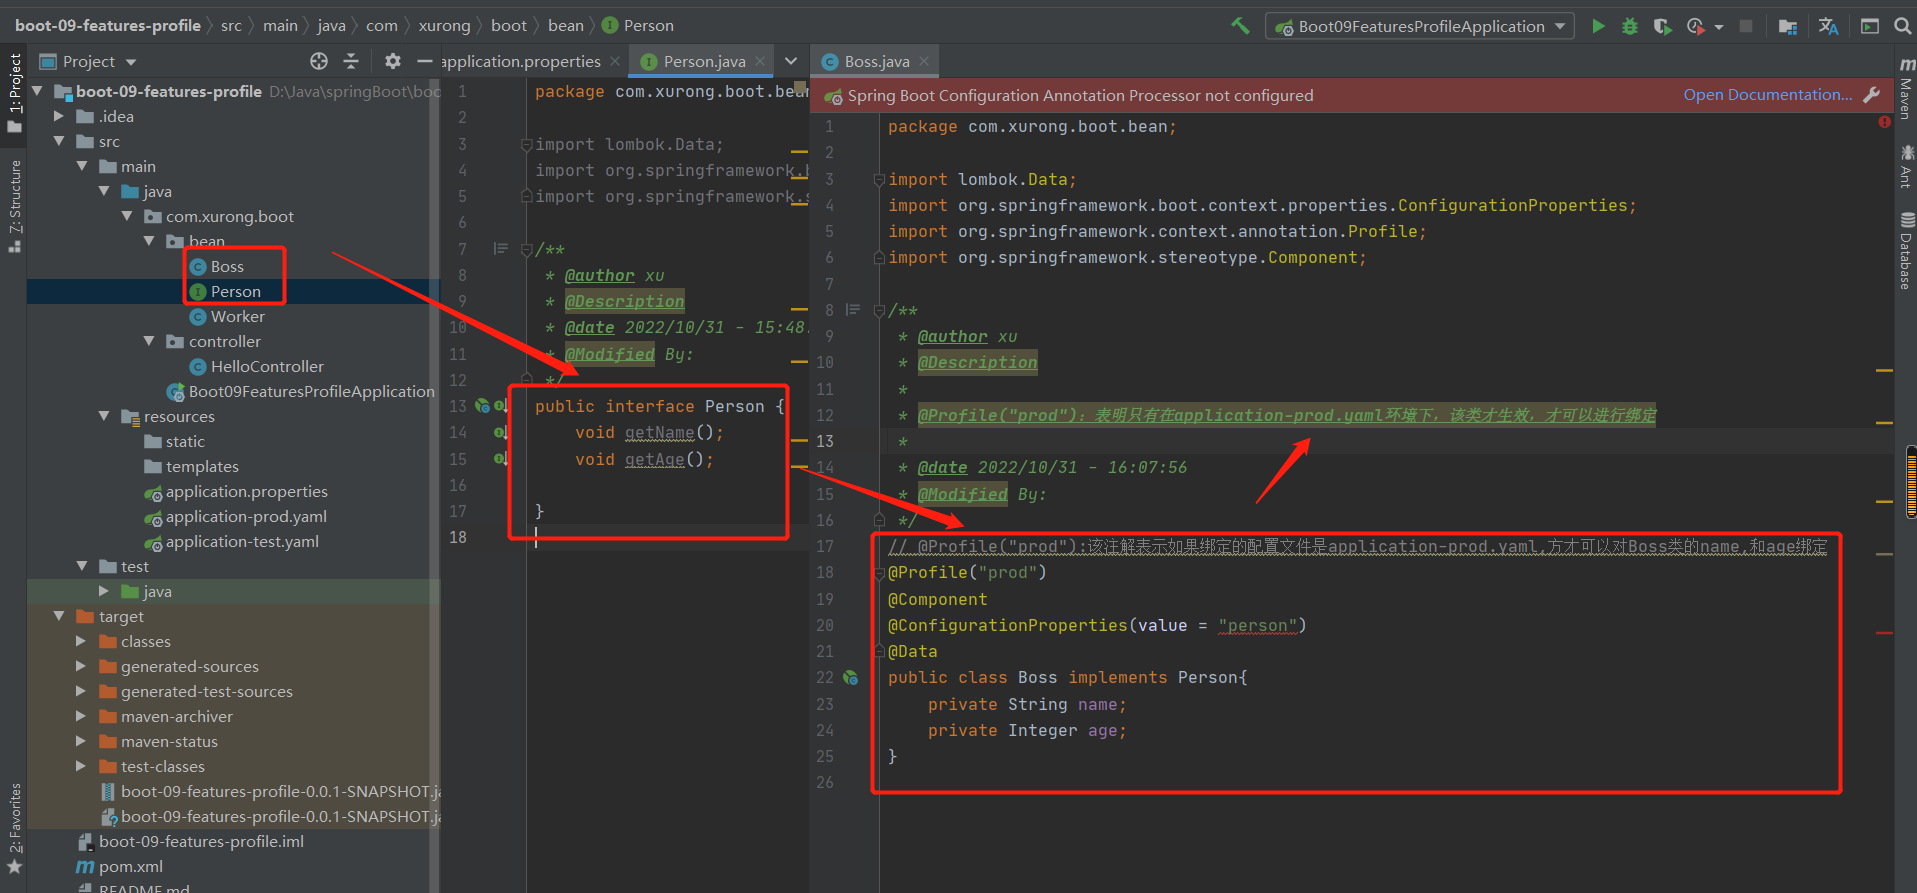
上图也是同样道理:只有在application-prod.yaml配置文件时,才将Boss类加载进容器中
对方法也是一样:
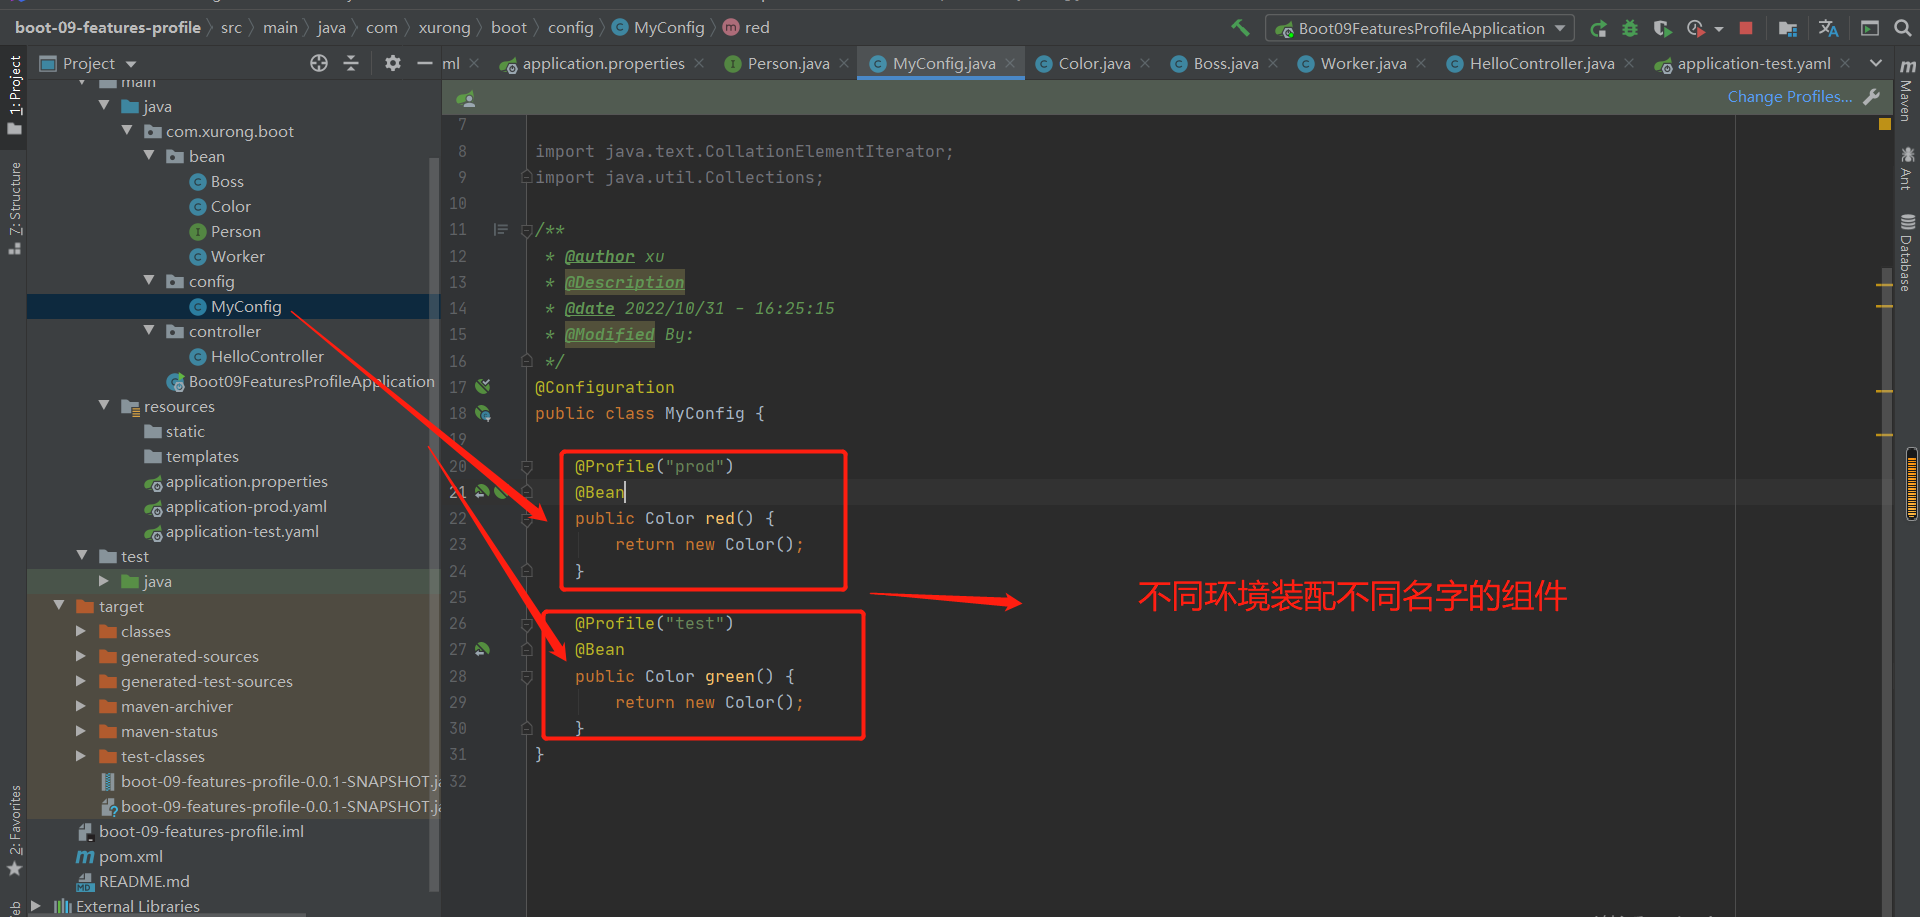
进行实验1:
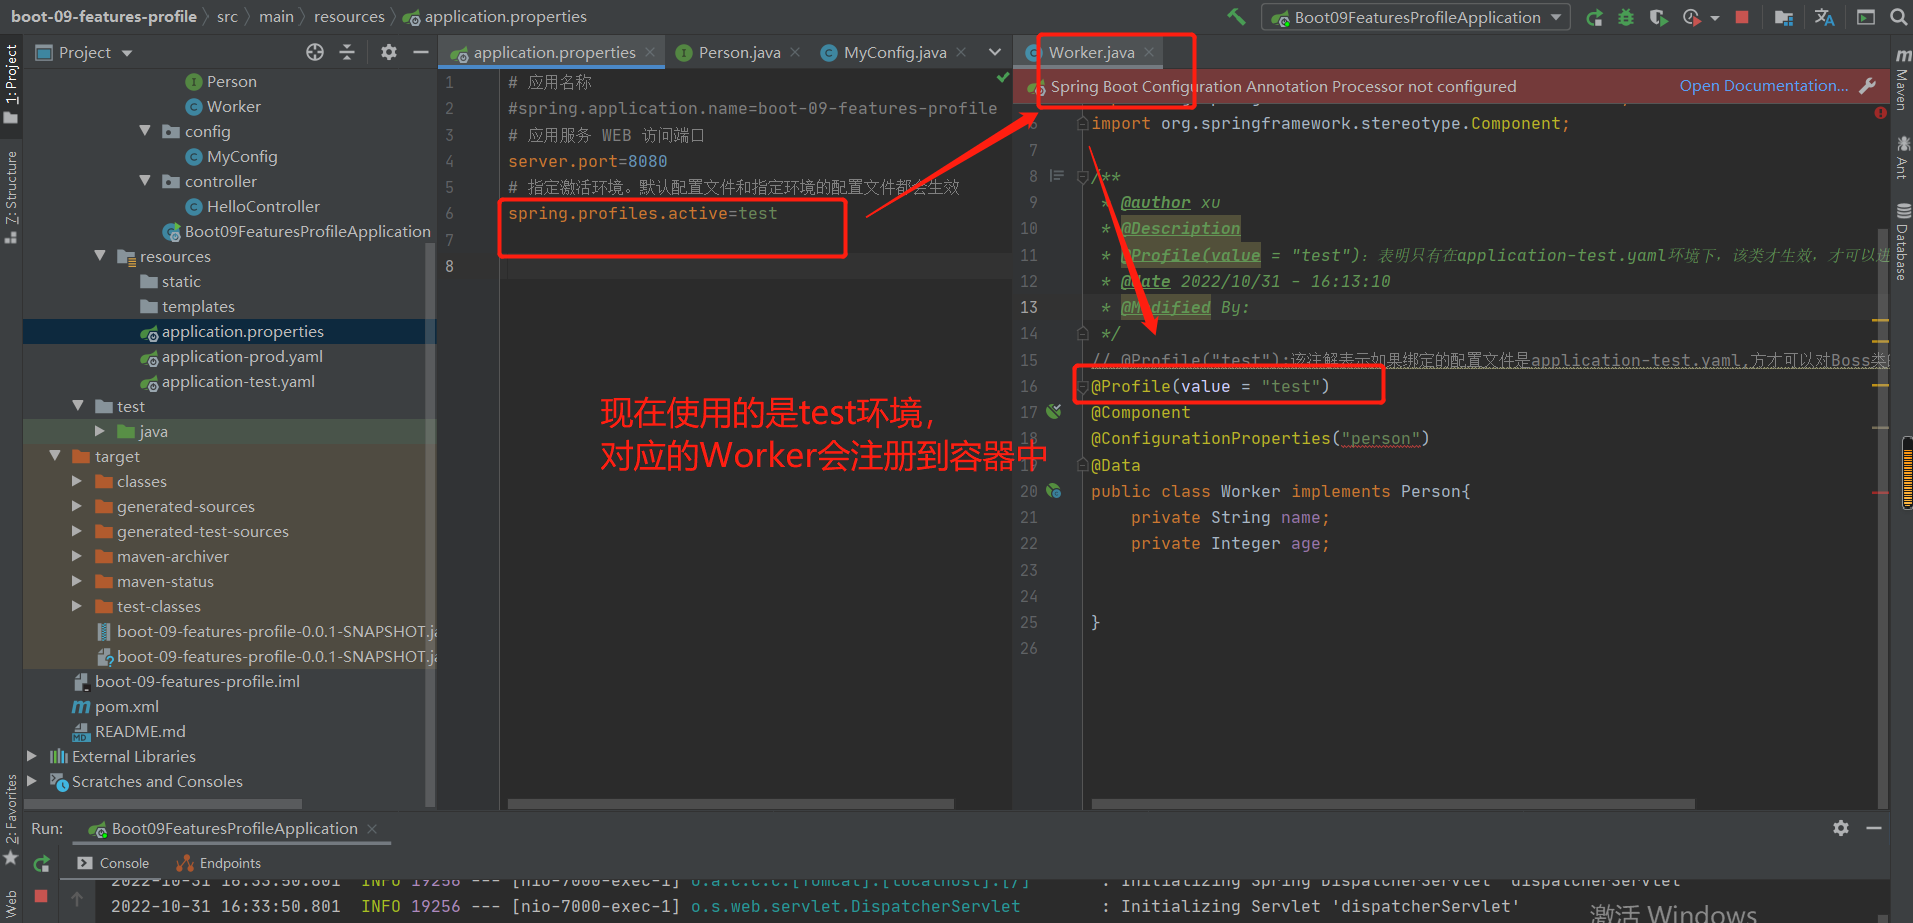
结果:
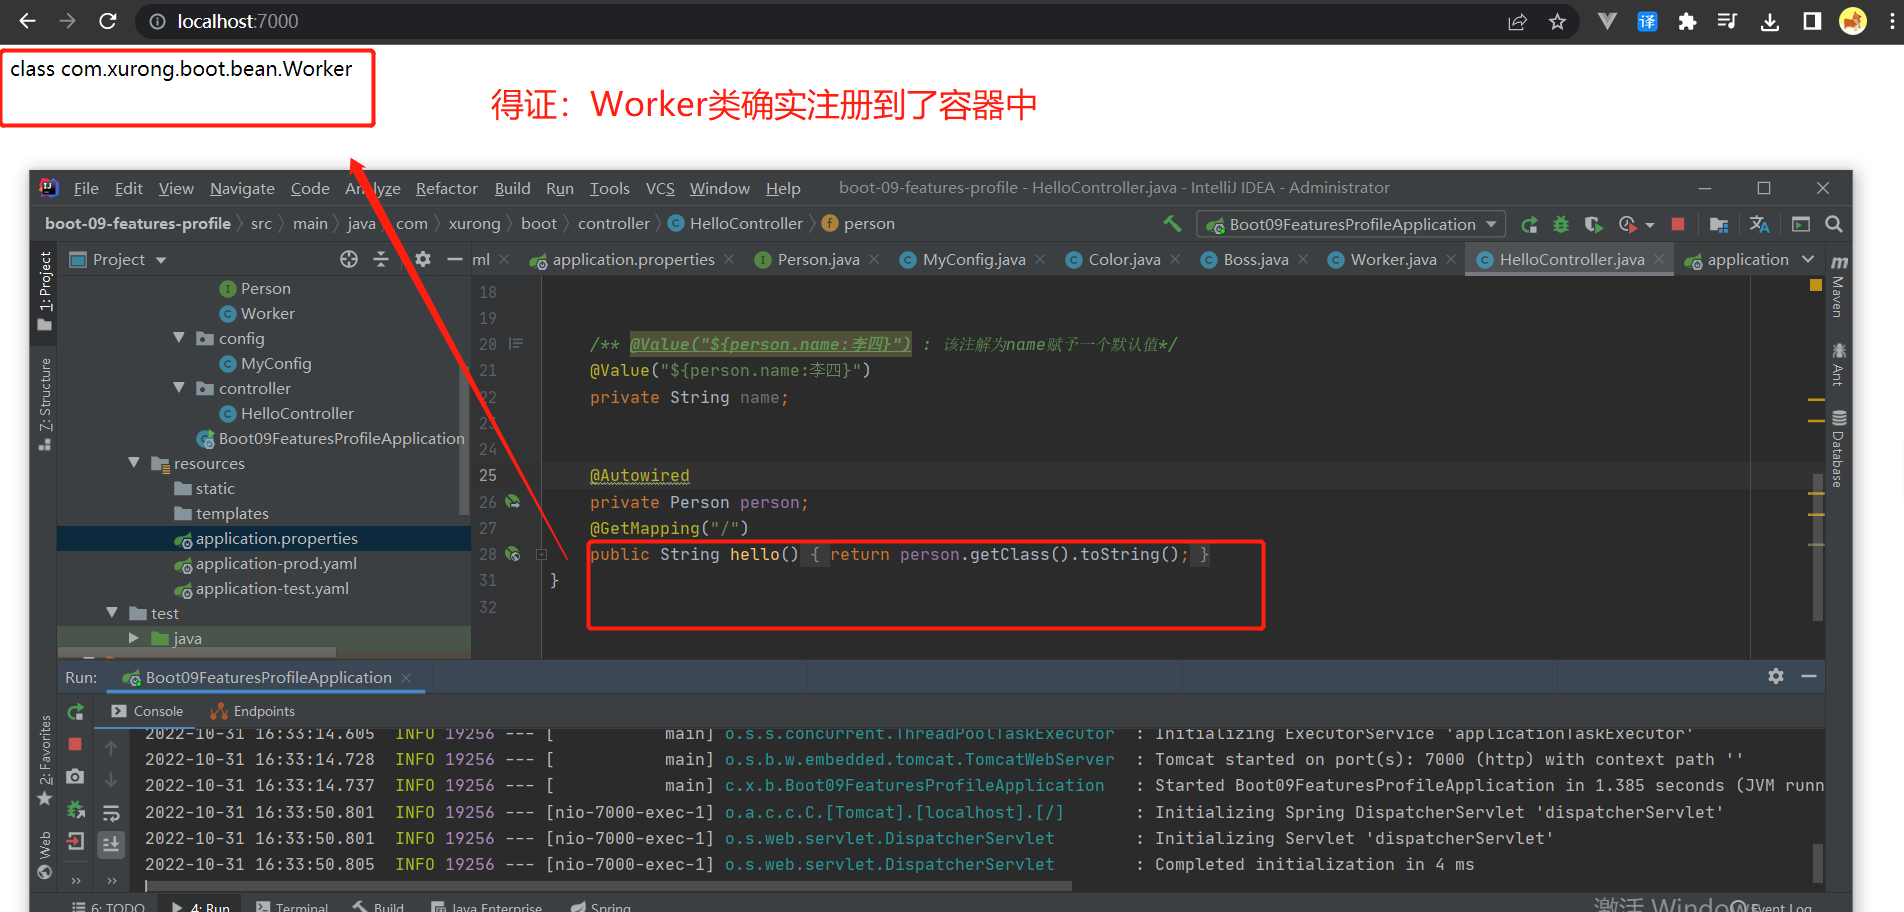
进行实验2:
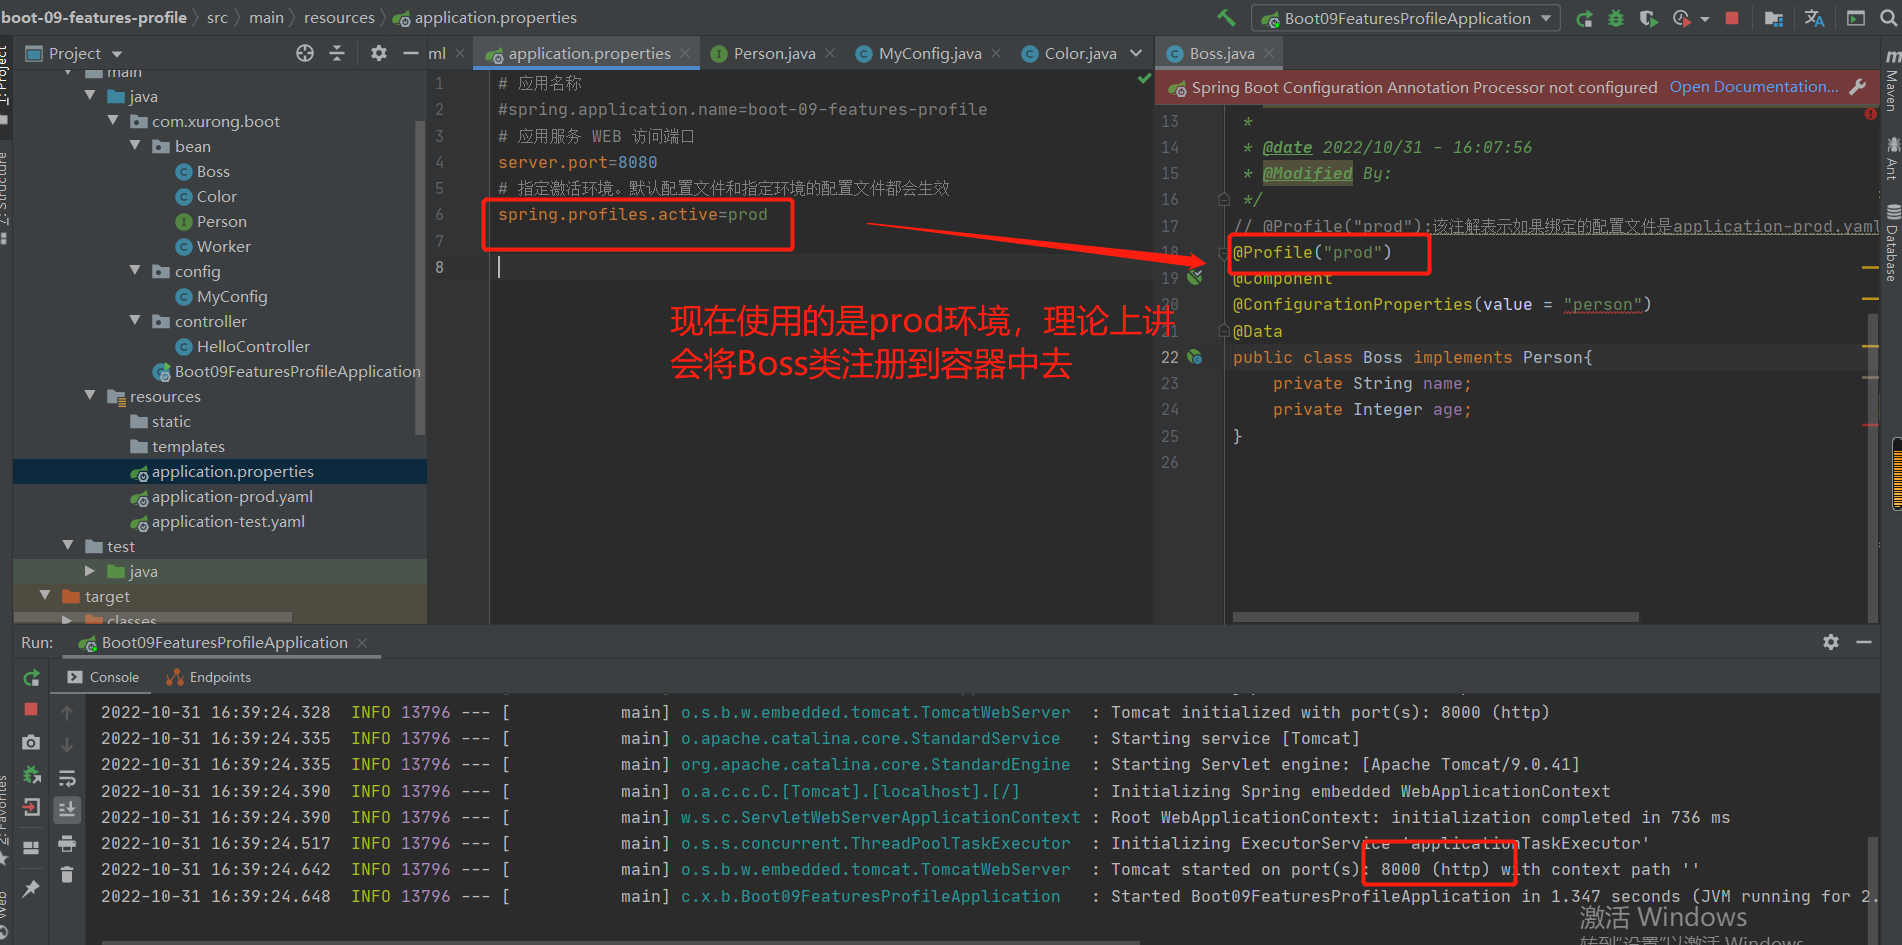
结果:
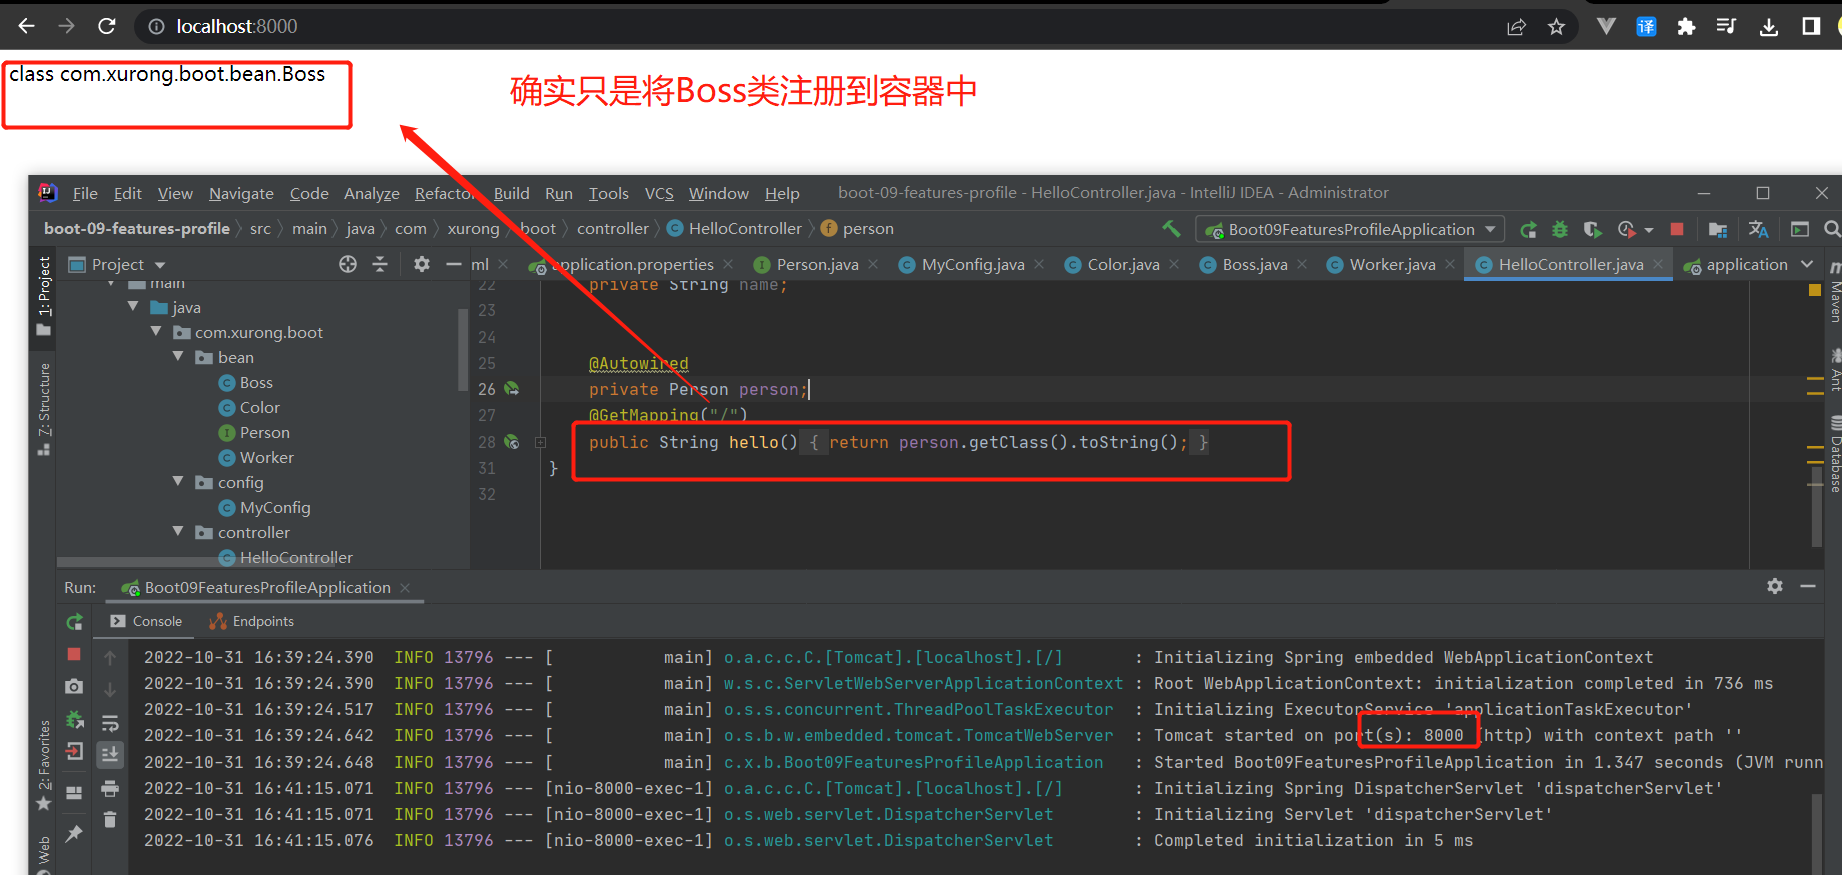
3.配置文件组
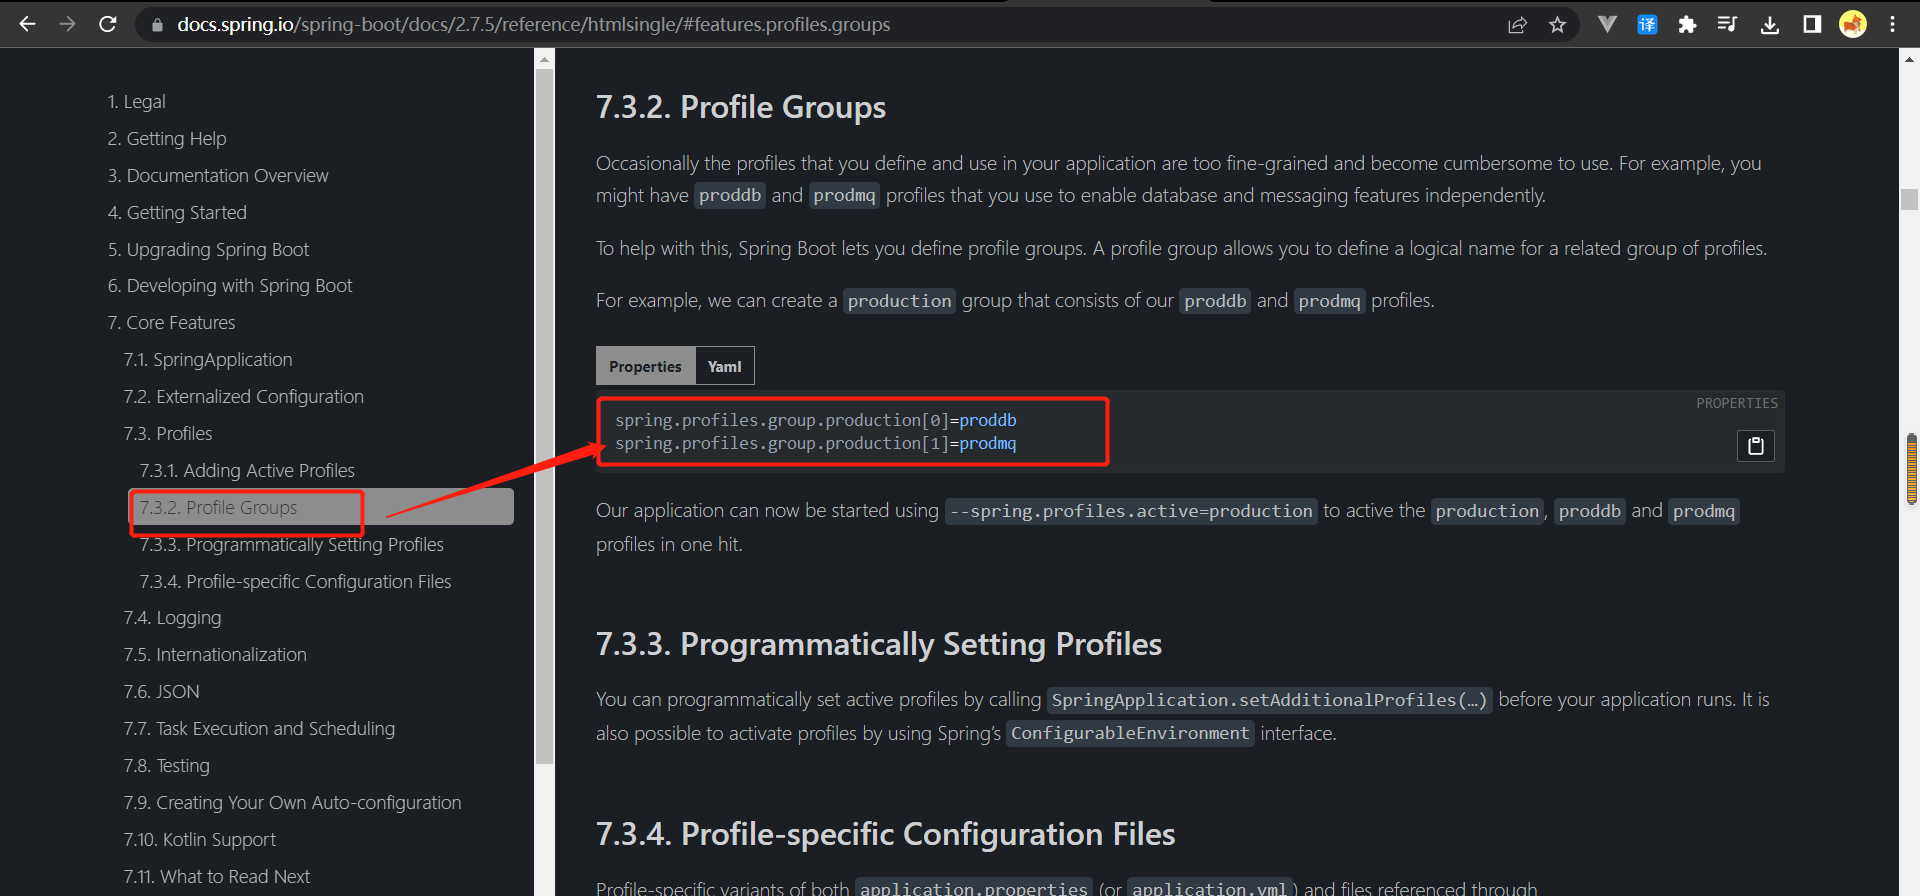
实验开始:
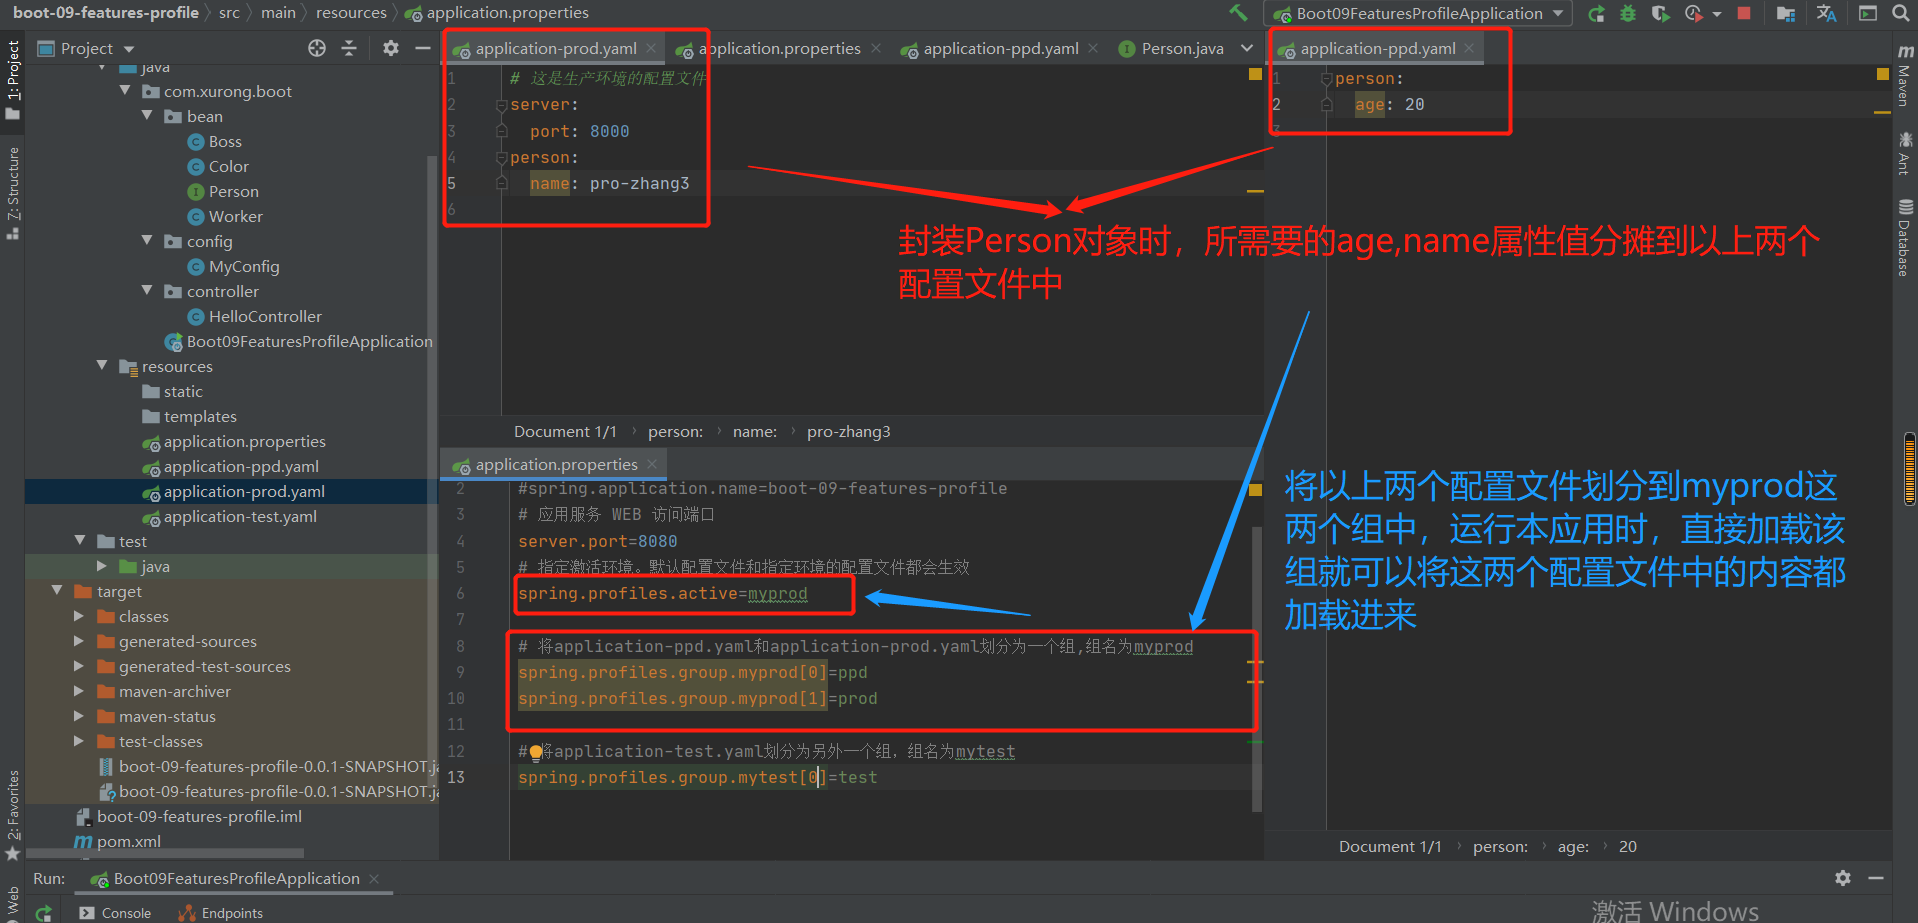
注意:直接加载的是命名的组名,并不是某一个配置文件
运行结果:
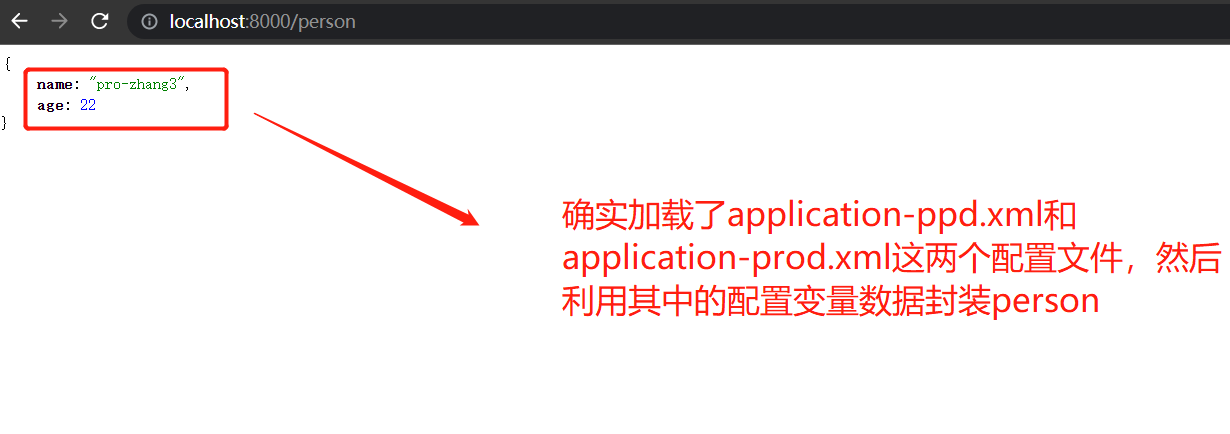
老师总结:
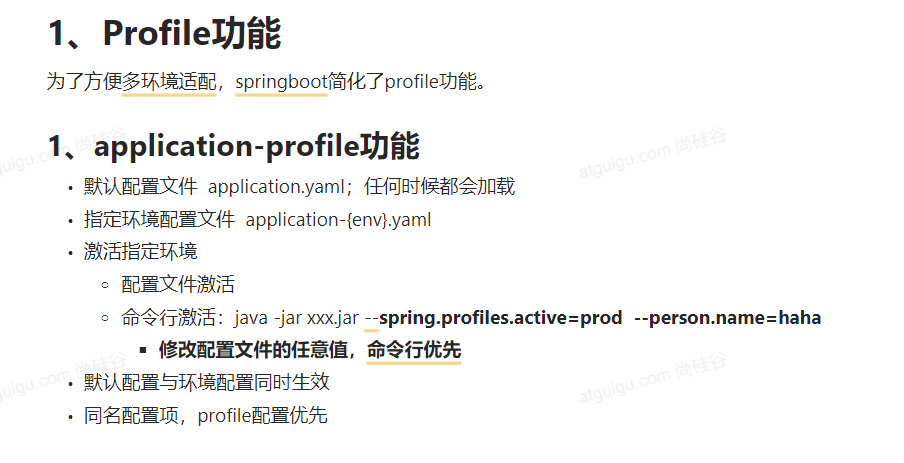
16-2 外部化配置
使用外部化配置好处举例:
连接数据库需要用户名和密码,如果改为使用另一个数据库,又需要到源码中重新设置一遍用户名和密码,过于麻烦,如果维护一个外部的配置文件用于维护连接数据库的用户名和密码,只需要改外部文件就可以实现对数据库的切换。这就是外部化配置。
实验1:
获取maven环境变量的值:
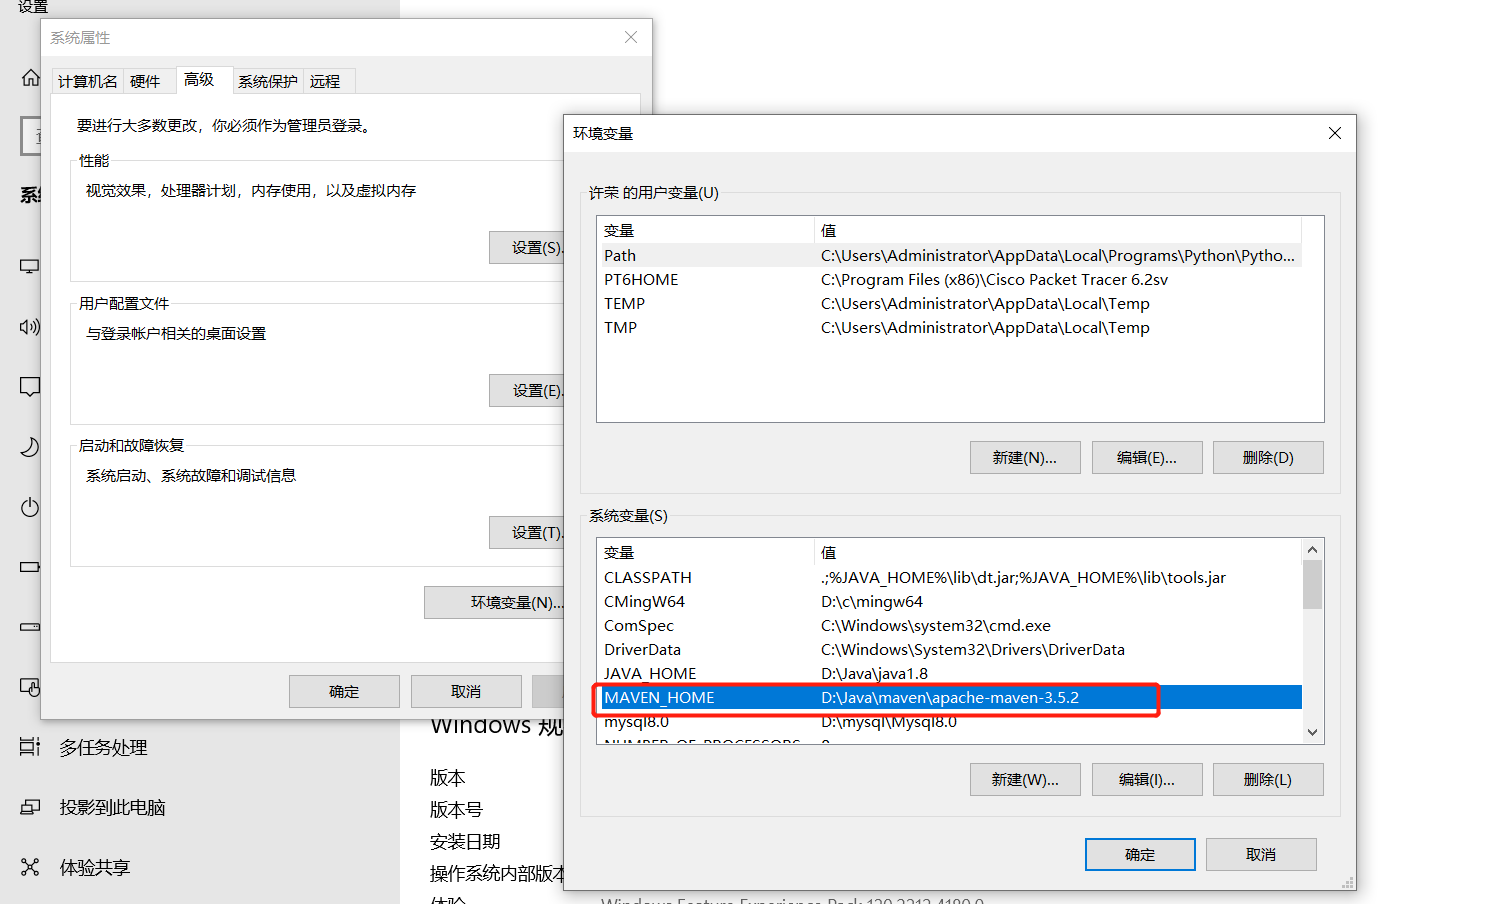
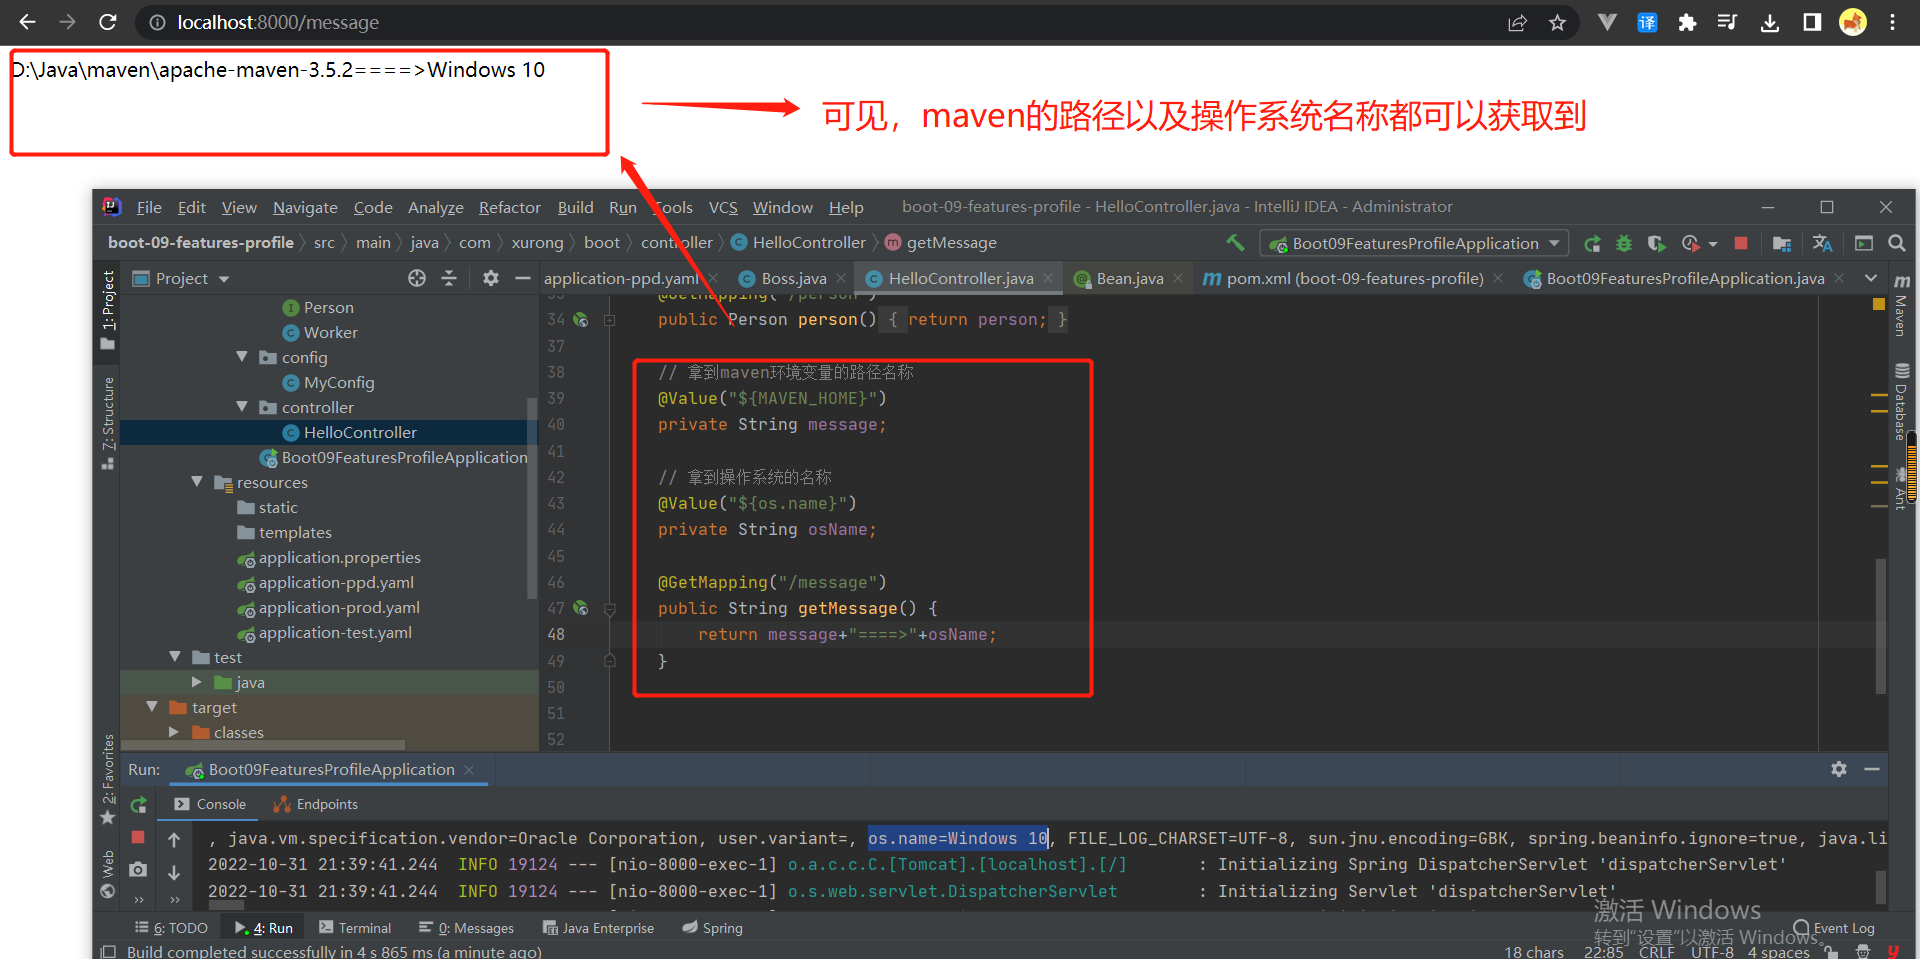
可见:windows也是用了外部化配置


