Android OpenGLES3绘图:球形视频播放器
https://github.com/android/media-samples
安卓官方的视频解码器示例
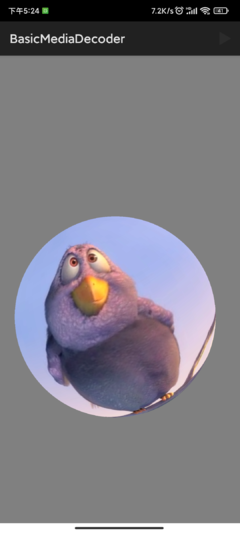
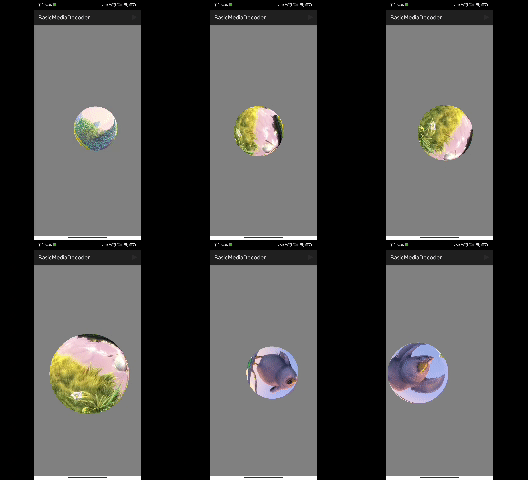
球形视频在全景视频、VR等领域有应用,原理是:解码视频获取每一帧图像,将图像用OpenGL渲染成球形展示出来。下面实现一个简单的Demo,分为三步:展示球体、解码视频、播放球形视频。


1 球体绘制
球体绘制比其他形状稍微麻烦一点点,但是原理是一样的,就是把球面分解成很多三角形。为了便于计算,将球体看作地球,自转轴与屏幕y轴重合。先将球体按经线切成很多层layers,每一层的y坐标根据经线与球心的夹角计算;然后将每一层按纬线切成很多块sections,每一块的x和z坐标根据纬线与自转轴的夹角计算。贴图的s和t坐标按1等分即可。
Sphere.kt
    var R = 0.5f
    var layers = 100
    var sectors = 360
    var alpha = (Math.PI / layers).toFloat()
    var beta = (Math.PI * 2 / sectors).toFloat()
    var sUnit = 1f / sectors
    var tUnit = 1f / layers

        var vertices = FloatArray((layers + 1) * (sectors + 1) * COMPONENT_COUNT)
        var index = -1
        for (i in 0 until layers + 1) {
            val r = (R * Math.sin((i * alpha).toDouble())).toFloat()
            val y = (R * Math.cos((i * alpha).toDouble())).toFloat()
            val t = i * tUnit
            for (j in 0 until sectors + 1) {
                val z = (r * Math.sin((j * beta).toDouble())).toFloat()
                val x = (r * Math.cos((j * beta).toDouble())).toFloat()
                val s = 1f - j * sUnit
                vertices[++index] = x
                vertices[++index] = y
                vertices[++index] = z
                vertices[++index] = s
                vertices[++index] = t
            }
        }
将平面点序号按三角形顺序排列,用ebo方式绘制。
        // 平面转化成GL_TRIANGLES,每个小方格两个三角形
        fun strip(w: Int, h: Int): IntArray {
            val list: MutableList<Int> = ArrayList()
            for (j in 0 until h - 1) {
                for (i in 0 until w - 1) {
                    val p = j * w + i
                    list.add(p)
                    list.add(p + 1)
                    list.add(p + w)
                    list.add(p + w)
                    list.add(p + 1)
                    list.add(p + w + 1)
                }
            }
            val a = IntArray(list.size)
            for (i in list.indices) {
                a[i] = list[i]
            }
            return a
        }

    init {
        //分配内存空间,每个浮点型占4字节空间
        vertexBuffer = ByteBuffer.allocateDirect(vertices.size * 4)
            .order(ByteOrder.nativeOrder())
            .asFloatBuffer()
        //传入指定的坐标数据
        vertexBuffer!!.put(vertices)
        vertexBuffer!!.position(0)
        vao = IntArray(1)
        GLES30.glGenVertexArrays(1, vao, 0)
        GLES30.glBindVertexArray(vao[0])
        val vbo = IntArray(1)
        GLES20.glGenBuffers(1, vbo, 0)
        GLES20.glBindBuffer(GLES20.GL_ARRAY_BUFFER, vbo[0])
        GLES20.glBufferData(
            GLES20.GL_ARRAY_BUFFER,
            vertices.size * 4,
            vertexBuffer,
            GLES20.GL_STATIC_DRAW
        )
        GLES20.glVertexAttribPointer(0, 3, GLES20.GL_FLOAT, false, 5 * 4, 0)
        GLES20.glEnableVertexAttribArray(0)
        GLES20.glVertexAttribPointer(1, 2, GLES20.GL_FLOAT, false, 5 * 4, 3 * 4)
        GLES20.glEnableVertexAttribArray(1)

        indices = strip(sectors + 1, layers + 1)
        val intBuffer = IntBuffer.allocate(indices.size * 4)
        intBuffer.put(indices)
        intBuffer.position(0)

        val ebo = IntArray(1)
        GLES20.glGenBuffers(1, ebo, 0)
        GLES20.glBindBuffer(GLES20.GL_ELEMENT_ARRAY_BUFFER, ebo[0])
        GLES20.glBufferData(
            GLES20.GL_ELEMENT_ARRAY_BUFFER,
            indices.size * 4,
            intBuffer,
            GLES20.GL_STATIC_DRAW
        )
    }

    fun draw() {
        GLES30.glBindVertexArray(vao[0])
        GLES20.glDrawElements(GLES20.GL_TRIANGLES, indices.size, GLES20.GL_UNSIGNED_INT, 0)
    }
#version 300 es
layout (location = 0) in vec3 vPosition;
layout (location = 1) in vec2 vTexCoord;
out vec2 aTexCoord;

uniform mat4 transform;

void main() {
     gl_Position = vec4(vPosition, 1.0f);
     aTexCoord = (transform * vec4(vTexCoord, 1.0f, 1.0f)).xy;
}
2 视频解码
视频解码分为硬解和软解:硬解是用机器上的专用芯片进行解码,不占用CPU,效率很高,缺点是支持格式有限;软解是用软件算法进行解码,支持的格式比较多,有ffmpeg等工具,缺点是CPU占用较高。
安卓平台的视频硬件编解码用MediaCodec,安卓提供了官方Demo,这个Demo里的BasicMediaDecoder
就是一个硬解mp4视频的示例,我们简单看一下代码。
解码主要在MediaCodecWrapper类里面,它初始化时传入了一个Surface用来初始化解码器MediaCodec,这个Surface很重要,解码后的视频能够直接展示到这个Surface上。
    public static MediaCodecWrapper fromVideoFormat(final MediaFormat trackFormat,
            Surface surface) throws IOException {
        MediaCodecWrapper result = null;
        MediaCodec videoCodec = null;

        // BEGIN_INCLUDE(create_codec)
        final String mimeType = trackFormat.getString(MediaFormat.KEY_MIME);

        // Check to see if this is actually a video mime type. If it is, then create
        // a codec that can decode this mime type.
        if (mimeType.contains("video/")) {
            videoCodec = MediaCodec.createDecoderByType(mimeType);
            videoCodec.configure(trackFormat, surface, null,  0);

        }

        // If codec creation was successful, then create a wrapper object around the
        // newly created codec.
        if (videoCodec != null) {
            result = new MediaCodecWrapper(videoCodec);
        }
        // END_INCLUDE(create_codec)

        return result;
    }
在MainActivity中用一个ValueAnimator进行循环解码,实际上这样不是很流畅,只是为了简单这么写。
            // By using a {@link TimeAnimator}, we can sync our media rendering commands with
            // the system display frame rendering. The animator ticks as the {@link Choreographer}
            // receives VSYNC events.
            mTimeAnimator.setTimeListener(new TimeAnimator.TimeListener() {
                @Override
                public void onTimeUpdate(final TimeAnimator animation,
                                         final long totalTime,
                                         final long deltaTime) {

                    boolean isEos = ((mExtractor.getSampleFlags() & MediaCodec
                            .BUFFER_FLAG_END_OF_STREAM) == MediaCodec.BUFFER_FLAG_END_OF_STREAM);

                    // BEGIN_INCLUDE(write_sample)
                    if (!isEos) {
                        // Try to submit the sample to the codec and if successful advance the
                        // extractor to the next available sample to read.
                        boolean result = mCodecWrapper.writeSample(mExtractor, false,
                                mExtractor.getSampleTime(), mExtractor.getSampleFlags());

                        if (result) {
                            // Advancing the extractor is a blocking operation and it MUST be
                            // executed outside the main thread in real applications.
                            mExtractor.advance();
                        }
                    }
                    // END_INCLUDE(write_sample)

                    // Examine the sample at the head of the queue to see if its ready to be
                    // rendered and is not zero sized End-of-Stream record.
                    MediaCodec.BufferInfo out_bufferInfo = new MediaCodec.BufferInfo();
                    mCodecWrapper.peekSample(out_bufferInfo);

                    // BEGIN_INCLUDE(render_sample)
                    if (out_bufferInfo.size <= 0 && isEos) {
                        mTimeAnimator.end();
                        mCodecWrapper.stopAndRelease();
                        mExtractor.release();
                    } else if (out_bufferInfo.presentationTimeUs / 1000 < totalTime) {
                        // Pop the sample off the queue and send it to {@link Surface}
                        mCodecWrapper.popSample(true);
                    }
                    // END_INCLUDE(render_sample)

                }
            });
3 播放球形视频
播放解码视频有两种方式:第一种是从解码出来的Buffer里面读取Image图像帧数据,传入OpenGL,将YUV格式的图像转换成RGB展示;第二种是利用前面提到的MediaCodec的Surface,我们先创建一个2D纹理Texture,用它创建SurfaceTexture和Surface,将这个Surface传给MediaCodec用来接收解码器的输出,再将这个Texture用OpenGL绘制。(由于传入OpenGL的顶点配置成球形了,绘制出来的就是球形视频。)
第二种方法跟之前用OpenGL预览CameraX相机画面几乎是一样的(同样创建OES纹理),在它的基础上稍微改改。由于球体Sphere里面封装了顶点和纹理坐标数据,所以GLVideoRender里的顶点和纹理等实际上是不用的,初始化Sphere,绘制时调用Sphere的draw()方法即可。
class GLVideoRender: GLSurfaceView.Renderer {

    var surfaceTexture: SurfaceTexture? = null

    private val executor = Executors.newSingleThreadExecutor()

    var vertices = floatArrayOf( //     ---- 位置 ----       ---- 颜色 ----     - 纹理坐标 -
        -1f, -1f, 0.0f, 0.0f, 0.0f, 1.0f, 0.0f, 0.0f,  // 左下
        1f, -1f, 0.0f, 0.0f, 1.0f, 0.0f, 1.0f, 0.0f,  // 右下
        -1f, 1f, 0.0f, 1.0f, 1.0f, 0.0f, 0.0f, 1.0f, // 左上
        1f, 1f, 0.0f, 1.0f, 0.0f, 0.0f, 1.0f, 1.0f  // 右上
    )

    val indices = intArrayOf( // 注意索引从0开始!
        0, 1, 2,  // 第一个三角形
        1, 2, 3 // 第二个三角形
    )

    var program = 0
    var vertexBuffer: FloatBuffer? = null
    var intBuffer: IntBuffer? = null
    var vao: IntArray = IntArray(1)
    var tex: IntArray = IntArray(1)

    var sphere: Sphere? = null

    var ourCamera: OurCamera = OurCamera(floatArrayOf(0.0f, 0.0f, 3.0f))

    var rx = 0f
    var ry = 0f

    fun rotModel(dx: Float, dy: Float) {
        rx += dx / 5f
        rx %= 360f
        ry += dy / 5f
        ry %= 360f
    }

    var modelMat = FloatArray(16)
    var viewMat = FloatArray(16)
    var projectionMat = FloatArray(16)

    override fun onSurfaceCreated(gl: GL10?, config: EGLConfig?) {

        sphere = Sphere()

        program = ShaderUtils.loadProgram()
        //分配内存空间,每个浮点型占4字节空间
        vertexBuffer = ByteBuffer.allocateDirect(vertices.size * 4)
            .order(ByteOrder.nativeOrder())
            .asFloatBuffer()
        //传入指定的坐标数据
        vertexBuffer!!.put(vertices)
        vertexBuffer!!.position(0)
        vao = IntArray(1)
        GLES30.glGenVertexArrays(1, vao, 0)
        GLES30.glBindVertexArray(vao[0])
        val vbo = IntArray(1)
        glGenBuffers(1, vbo, 0)
        glBindBuffer(GL_ARRAY_BUFFER, vbo[0])
        glBufferData(GL_ARRAY_BUFFER, vertices.size * 4, vertexBuffer, GL_STATIC_DRAW)

        intBuffer = IntBuffer.allocate(indices.size * 4)
        intBuffer!!.put(indices)
        intBuffer!!.position(0)
        val ebo = IntArray(1)
        glGenBuffers(1, ebo, 0)
        glBindBuffer(GL_ELEMENT_ARRAY_BUFFER, ebo[0])
        glBufferData(GL_ELEMENT_ARRAY_BUFFER, indices.size * 4, intBuffer, GL_STATIC_DRAW)

        tex = createOESTexture()
        surfaceTexture = SurfaceTexture(tex[0])
        surfaceTexture?.setOnFrameAvailableListener {
//            requestRender()
        }

        glUseProgram(program)
        val loc0 = glGetUniformLocation(program, "texture1")
        glUniform1i(loc0, 0)

        // Load the vertex data
        glVertexAttribPointer(0, 3, GL_FLOAT, false, 8 * 4, 0)
        glEnableVertexAttribArray(0)
        glVertexAttribPointer(1, 3, GL_FLOAT, false, 8 * 4, 3 * 4)
        glEnableVertexAttribArray(1)
        glVertexAttribPointer(2, 2, GL_FLOAT, false, 8 * 4, 6 * 4)
        glEnableVertexAttribArray(2)
        glBindBuffer(GL_ARRAY_BUFFER, 0)
        GLES30.glBindVertexArray(0)
        glClearColor(0.5f, 0.5f, 0.5f, 0.5f)
        glEnable(GL_DEPTH_TEST)
    }

    override fun onSurfaceChanged(gl: GL10?, width: Int, height: Int) {
        glViewport(0, 0, width, height)
        this.width = width.toFloat()
        this.height = height.toFloat()
    }

    var width: Float = 1f
    var height: Float = 1f

    var transform = FloatArray(16)

    override fun onDrawFrame(gl: GL10?) {
        // Clear the color buffer
        glClear(GL_COLOR_BUFFER_BIT or GL_DEPTH_BUFFER_BIT);

        surfaceTexture?.updateTexImage()
        surfaceTexture?.getTransformMatrix(transform)

        // Use the program object
        glUseProgram(program)
//        glBindTexture(GL_TEXTURE_2D, tex[0])
        glBindTexture(GLES11Ext.GL_TEXTURE_EXTERNAL_OES, tex[0])


        //        Matrix.setIdentityM(modelMat, 0);

//        Matrix.setIdentityM(modelMat, 0);
        Matrix.setIdentityM(viewMat, 0)
        Matrix.setIdentityM(projectionMat, 0)

        Matrix.perspectiveM(
            projectionMat,
            0,
            OurCamera.radians(ourCamera.Zoom),
            width / height,
            0.1f,
            100.0f
        )
        ourCamera.GetViewMatrix(viewMat)

        val loc1 = glGetUniformLocation(program, "view")
        glUniformMatrix4fv(loc1, 1, false, viewMat, 0)
        val loc2 = glGetUniformLocation(program, "projection")
        glUniformMatrix4fv(loc2, 1, false, projectionMat, 0)
        Matrix.setIdentityM(modelMat, 0)
        Matrix.translateM(modelMat, 0, 0f, 0f, 0f)
        Matrix.rotateM(modelMat, 0, rx, 0.0f, 1.0f, 0.0f)
        Matrix.rotateM(modelMat, 0, ry, 1.0f, 0.0f, 0.0f)
        val loc3 = glGetUniformLocation(program, "model")
        glUniformMatrix4fv(loc3, 1, false, modelMat, 0)

//        glDrawElements(GL_TRIANGLES, vertices.size, GL_UNSIGNED_INT, 0)
        sphere?.draw()
    }

    fun createOESTexture(): IntArray {
        val arr = IntArray(1)
        glGenTextures(1, arr, 0)
        glBindTexture(GLES11Ext.GL_TEXTURE_EXTERNAL_OES, arr[0])
        glTexParameterf(GLES11Ext.GL_TEXTURE_EXTERNAL_OES, GL_TEXTURE_MIN_FILTER, GL_LINEAR.toFloat())
        glTexParameterf(GLES11Ext.GL_TEXTURE_EXTERNAL_OES, GL_TEXTURE_MAG_FILTER, GL_LINEAR.toFloat())
        glTexParameterf(GLES11Ext.GL_TEXTURE_EXTERNAL_OES, GL_TEXTURE_WRAP_S, GL_CLAMP_TO_EDGE.toFloat())
        glTexParameterf(GLES11Ext.GL_TEXTURE_EXTERNAL_OES, GL_TEXTURE_WRAP_T, GL_CLAMP_TO_EDGE.toFloat())
        return arr
    }

}
顶点着色器
#version 300 es
layout (location = 0) in vec3 vPosition;
layout (location = 1) in vec2 vTexCoord;
out vec2 aTexCoord;

uniform mat4 model;
uniform mat4 view;
uniform mat4 projection;

void main() {
     gl_Position = projection * view * model * vec4(vPosition, 1.0f);
     aTexCoord = vec4(vTexCoord, 1.0f, 1.0f).xy;
}
片段着色器
#version 300 es
#extension GL_OES_EGL_image_external : require
#extension GL_OES_EGL_image_external_essl3 : require

precision mediump float;
in vec2 aTexCoord;
out vec4 fragColor;

uniform samplerExternalOES texture1;

void main() {
     fragColor = texture(texture1, aTexCoord);
}


【推荐】编程新体验,更懂你的AI,立即体验豆包MarsCode编程助手
【推荐】凌霞软件回馈社区,博客园 & 1Panel & Halo 联合会员上线
【推荐】抖音旗下AI助手豆包,你的智能百科全书,全免费不限次数
【推荐】博客园社区专享云产品让利特惠,阿里云新客6.5折上折
【推荐】轻量又高性能的 SSH 工具 IShell:AI 加持,快人一步
· PowerShell开发游戏 · 打蜜蜂
· 在鹅厂做java开发是什么体验
· 百万级群聊的设计实践
· WPF到Web的无缝过渡:英雄联盟客户端的OpenSilver迁移实战
· 永远不要相信用户的输入:从 SQL 注入攻防看输入验证的重要性