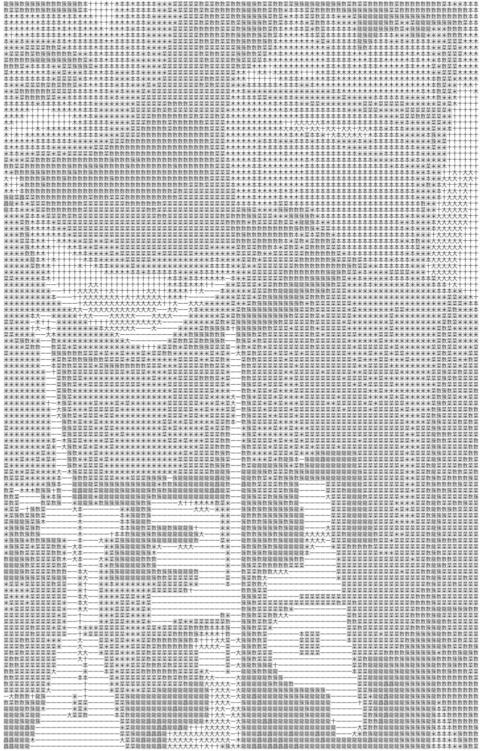
Android字符串相机

很早就看到过这种场景,用字符来展示图片甚至播放视频,可以说是黑客炫(zhuang)技(b)神器。当然有了一定的技术之后,就明白其实实现挺简单。
相机预览
首先是相机预览的实现,因为不是这里的重点,所以直接在Github上找到成熟的代码。Google官方的Demo当然是最好的:
https://github.com/googlesamples/android-Camera2Basic
这个项目演示了Camera2 API的基本使用,并在一个TextureView上展示了相机实时画面。
转换算法一(RGB转换)
有了TextureView,就能通过getBitmap()方法拿到bitmap,接下来就是把bitmap转换成字符串,相关算法这里有一份:
https://github.com/idevelop/ascii-camera/blob/master/script/ascii.js
虽然是JavaScript的,但是简单看一下就知道原理:
- 把bitmap中像素点的RGB值转换成灰度
- 用一个字符数组表示不同的灰度,如ascii字符串
" .,:;i1tfLCG08@",越往后表示灰度越高,也就是颜色越深。当然也可以中文" 一十大木本米菜数簇龍龘"。 - 采样像素点灰度转换成字符,每行成一个字符串,不同行用换行符连接成一个总的字符串,展示到TextView上。
算法 Utils.java
public class Utils {

    public static void startConvert(final TextureView textureView, final TextView textView) {
        Handler handler = new Handler(){
            @Override
            public void handleMessage(Message msg) {
                if(textureView != null) {
                    Bitmap bitmap = textureView.getBitmap();
                    if(bitmap != null) {
                        String s = Utils.bitmap2string(bitmap);
                        textView.setText(s);
                    }
                }
                sendEmptyMessageDelayed(0, 20);
            }
        };
        handler.sendEmptyMessage(0);
    }

    public static Bitmap imageReader2Bitmap(ImageReader imageReader) {
        Image image = null;
        ByteBuffer buffer = null;

        try {
            image = imageReader.acquireNextImage();
            buffer = image.getPlanes()[0].getBuffer();
            byte[] bytes = new byte[buffer.remaining()];
            buffer.get(bytes);
            return BitmapFactory.decodeByteArray(bytes, 0, bytes.length);
        } catch (Exception e) {
            e.printStackTrace();
        } finally {
            if(buffer != null) {
                buffer.clear();
            }
            if(image != null) {
                image.close();
            }
        }
        return null;
    }

    public static String bitmap2string(Bitmap bitmap) {
        StringBuilder sb = new StringBuilder();
        int w = bitmap.getWidth();
        int h = bitmap.getHeight();
        for(int j = 0; j < h; j+=20) {
            for(int i = 0; i < w; i+=15) {
                int pixel = bitmap.getPixel(i, j);
                sb.append(color2char(pixel));
            }
            sb.append("\r\n");
        }
        return sb.toString();
    }

//    private static char[] sChars = " .,:;i1tfLCG08@".toCharArray();
    private static char[] sChars = " 一十大木本米菜数簇龍龘".toCharArray();

    public static Character color2char(int color) {
        int red = Color.red(color);
        int green = Color.green(color);
        int blue = Color.blue(color);
        int brightness = Math.round(0.299f * red + 0.587f * green + 0.114f * blue);
        return sChars[brightness * (sChars.length - 1) / 255];
    }
}
在原项目的Camera2BasicFragment的onViewCreated()方法中添加一行代码启动即可
    @Override
    public void onViewCreated(final View view, Bundle savedInstanceState) {
        view.findViewById(R.id.picture).setOnClickListener(this);
        view.findViewById(R.id.info).setOnClickListener(this);
        mTextureView = (AutoFitTextureView) view.findViewById(R.id.texture);
        Utils.startConvert(mTextureView, (TextView) view.findViewById(R.id.text));
    }
转换算法二(YUV转换)
上面虽然实现了图像到字符串的转换, 但是有一些问题:
- TextureView上面还在显示视频画面, 而我们只需要TextView显示的字符串, 这是一种浪费, 可是TextureView不显示就拿不到Bitmap
- 很多视频播放器是SurfaceView的封装, 也是没法直接获取到Bitmap的
- 从Bitmap中取得像素的RGB值, 转换成灰度, 再转换成字符串, 需要一定的计算量, 是否有更简单的方式?
使用
ImageReader可以解决以上问题.ImageReader是Android API 19后提供的工具类, 它内部有一个Surface, 可以加载和读取图像, 但是不需要直接显示在界面上. 就相当于一个没有界面的后台播放器, 我们需要时可以从里面获取当前"播放"的图像数据.
ImageReader还能设置图像的格式, 除了RGB外, 另一种常用的格式是YUV. 它也是用像素点的分量来表示图像, 不同的是, 它的Y分量代表亮度, U和V两个分量代表颜色. 这样表示的好处是彩色与黑白画面的转换很方便, 去掉UV就是黑白的, 也就是灰度; 并且Y分量可以做一定的压缩, 比如每两个或四个像素点取一个Y分量, 以节省空间, 这就产生了不同格式的YUV, 如下图

YUV格式的详细介绍可以看这篇文章
http://www.cnblogs.com/azraelly/archive/2013/01/01/2841269.html
代码实现
之前初始化相机的时候传入一个TextureView显示预览, 现在传入一个ImageReader可以吗? 其实相机依赖的不是TextureView而是Surface, ImageReader.getSurface()方法可以获得它内部的Surface.
在ImageReader.OnImageAvailableListener回调中可以获取ImageReader中的图像.
我这里给ImageReader设置的格式是ImageFormat.YUV_420_888, 这种格式可以直接获得图像的Y分量也就是灰度.
    private ImageReader mImageReader = ImageReader.newInstance(MAX_PREVIEW_WIDTH, MAX_PREVIEW_HEIGHT,
                        ImageFormat.YUV_420_888, /*maxImages*/2);
    mImageReader.setOnImageAvailableListener(
                        mOnImageAvailableListener, mBackgroundHandler);

    private void createCameraPreviewSession() {
        try {

            // We set up a CaptureRequest.Builder with the output Surface.
            mPreviewRequestBuilder
                    = mCameraDevice.createCaptureRequest(CameraDevice.TEMPLATE_PREVIEW);
            mPreviewRequestBuilder.addTarget(mImageReader.getSurface());

            // Here, we create a CameraCaptureSession for camera preview.
            mCameraDevice.createCaptureSession(Arrays.asList(mImageReader.getSurface()),
转换算法如下, 从ImageReader中取得Image, Image中有几个平面Image.Plane[], 其中第一个平面就是Y分量数组. 它是一维数组, 通过逐行扫描将二维图像保存成一维, 我们获取图像宽度后进行相反的操作就能转换成二维. 数组中保存的灰度值范围是-128~127. 转换一下就能映射成字符串了.
public static String yuv2string(ImageReader imageReader) {
        Image image = null;
        ByteBuffer buffer = null;

        try {
            image = imageReader.acquireNextImage();
            Image.Plane[] planes = image.getPlanes();
            buffer = planes[0].getBuffer();
            byte[] bytes = new byte[buffer.remaining()];
            buffer.get(bytes);
            int w = image.getWidth();
            int h = image.getHeight();
//            Log.e("chao", "planes " + planes.length + " " + w + "," + h);
            StringBuilder sb = new StringBuilder();
            for(int j = 0; j < h; j+=6) {
                for (int i = 0; i < w; i+=6) {
//                    int y = bytes[i * w + j] + 128;
                    int y = bytes[j * w + i] + 128;
                    char c = sChars[y * (sChars.length - 1) / 255];
                    sb.append(c);
                }
                sb.append("\r\n");
            }
            return sb.toString();
        } catch (Exception e) {
            e.printStackTrace();
        } finally {
            if(buffer != null) {
                buffer.clear();
            }
            if(image != null) {
                image.close();
            }
        }
        return null;
    }
最终的展示效果与RGB转换后相似, 但是YUV转换通用性更好, 效率更高, 它也是图像处理中经常用到的格式.


【推荐】编程新体验,更懂你的AI,立即体验豆包MarsCode编程助手
【推荐】凌霞软件回馈社区,博客园 & 1Panel & Halo 联合会员上线
【推荐】抖音旗下AI助手豆包,你的智能百科全书,全免费不限次数
【推荐】博客园社区专享云产品让利特惠,阿里云新客6.5折上折
【推荐】轻量又高性能的 SSH 工具 IShell:AI 加持,快人一步
· PowerShell开发游戏 · 打蜜蜂
· 在鹅厂做java开发是什么体验
· 百万级群聊的设计实践
· WPF到Web的无缝过渡:英雄联盟客户端的OpenSilver迁移实战
· 永远不要相信用户的输入:从 SQL 注入攻防看输入验证的重要性