iOS更换默认的启动ViewController的几种方法总结
新建一个iOS工程,系统会自动创建ViewController,并在Main.storyboard中引用它作为主页面。这是一个基本的ViewController,如果要改成带导航栏的UINavigationController或者其他的,就得更换。网上搜了一下,资料很乱,改的地方很多,而且有的生效,有的不生效。
总结整理了一下有四种方法。
方法一:修改Main.Storyboard
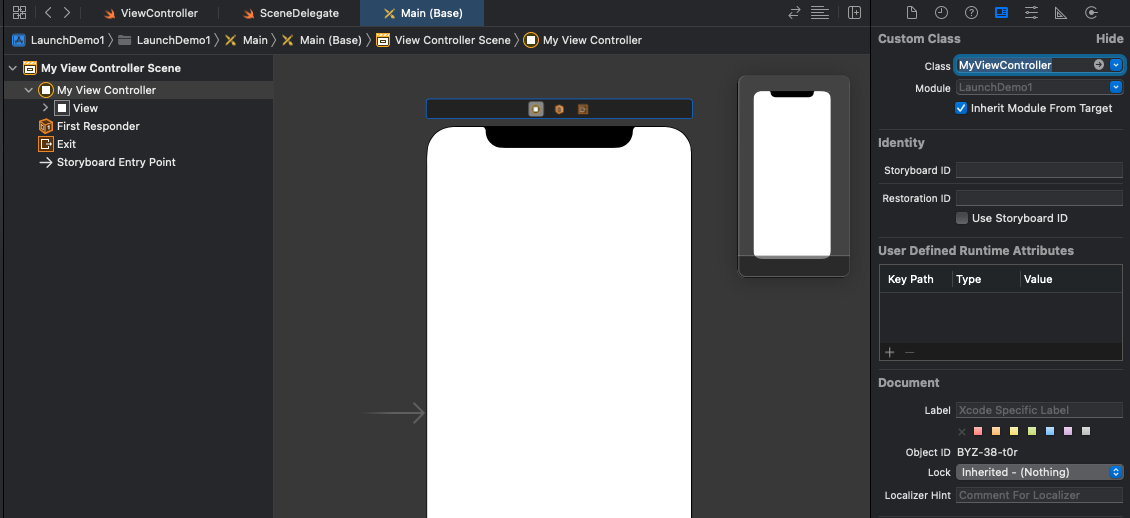
如图,选中Main.Storyboard - My View Controller,选择右边的蓝色标签,把Class类名改成你的类即可,当然这个类只能是ViewController类型的。

方法二:修改Main.Storyboard,更换其他类型的Controller
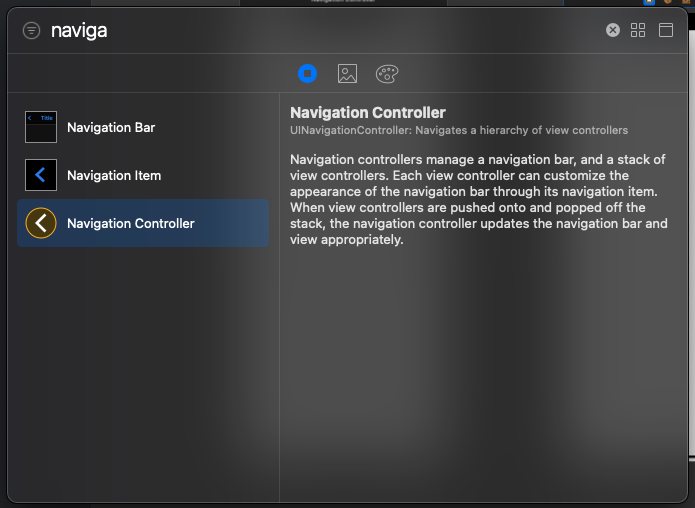
以UINavigationController为例,选中Main.Storyboard,点右上角加号,在如下弹窗中输入UINavigationController,选择它添加到Storyboard中。

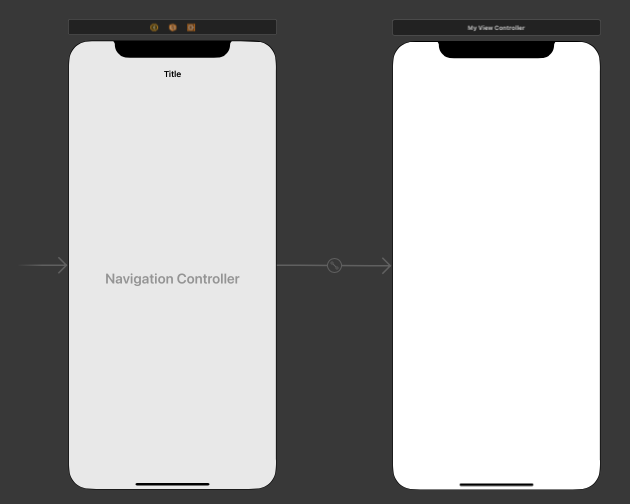
这时会出现三个Controller,一个系统创建的ViewController,还有就是刚添加的UINavigationController和它的rootViewController。把ViewController最左边的箭头也就是Entry Point拖动到UINavigationController左边,再点击ViewController按删除键删除。最后跟方法一一样,点击rootViewController,把Class类名改成你的类。

方法三:修改SceneDelegate
大部分网上教程都是修改AppDelegate,但是Xcode11以后会自动创建SceneDelegate文件,这时修改AppDelegate是无效的。需要修改SceneDelegate,在SceneDelegate的willConnectTo方法中设置window的rootViewController。
class SceneDelegate: UIResponder, UIWindowSceneDelegate {

    var window: UIWindow?

    func scene(_ scene: UIScene, willConnectTo session: UISceneSession, options connectionOptions: UIScene.ConnectionOptions) {
        // Use this method to optionally configure and attach the UIWindow `window` to the provided UIWindowScene `scene`.
        // If using a storyboard, the `window` property will automatically be initialized and attached to the scene.
        // This delegate does not imply the connecting scene or session are new (see `application:configurationForConnectingSceneSession` instead).
        guard let _ = (scene as? UIWindowScene) else { return }

        let vc = MyViewController()
        let nc = UINavigationController(rootViewController: vc)
        window?.rootViewController = nc
    }
方法四:修改AppDelegate,删除SceneDelegate
先删除SceneDelegate,全局搜索SceneDelegate,把Info文件中的Application Scene Manifest节点删掉

并且把AppDelegate中和Scene相关的两个方法:configurationForConnecting和didDiscardSceneSessions删掉。这样SceneDelegate就不起作用了,可以直接删除。
class AppDelegate: UIResponder, UIApplicationDelegate {

    // MARK: UISceneSession Lifecycle

    func application(_ application: UIApplication, configurationForConnecting connectingSceneSession: UISceneSession, options: UIScene.ConnectionOptions) -> UISceneConfiguration {
        // Called when a new scene session is being created.
        // Use this method to select a configuration to create the new scene with.
        return UISceneConfiguration(name: "Default Configuration", sessionRole: connectingSceneSession.role)
    }

    func application(_ application: UIApplication, didDiscardSceneSessions sceneSessions: Set<UISceneSession>) {
        // Called when the user discards a scene session.
        // If any sessions were discarded while the application was not running, this will be called shortly after application:didFinishLaunchingWithOptions.
        // Use this method to release any resources that were specific to the discarded scenes, as they will not return.
    }


}
最后在AppDelegate中的didFinishLaunchingWithOptions方法中设置window和rootViewController就可以生效了。
class AppDelegate: UIResponder, UIApplicationDelegate {

    var window: UIWindow?

    func application(_ application: UIApplication, didFinishLaunchingWithOptions launchOptions: [UIApplication.LaunchOptionsKey: Any]?) -> Bool {
        // Override point for customization after application launch.

        let window = UIWindow(frame: UIScreen.main.bounds)
        let vc = ViewController()
        let nc = UINavigationController(rootViewController: vc)
        window.rootViewController = nc
        self.window = window
        window.makeKeyAndVisible()

        return true
    }

}


【推荐】编程新体验,更懂你的AI,立即体验豆包MarsCode编程助手
【推荐】凌霞软件回馈社区,博客园 & 1Panel & Halo 联合会员上线
【推荐】抖音旗下AI助手豆包,你的智能百科全书,全免费不限次数
【推荐】博客园社区专享云产品让利特惠,阿里云新客6.5折上折
【推荐】轻量又高性能的 SSH 工具 IShell:AI 加持,快人一步
· PowerShell开发游戏 · 打蜜蜂
· 在鹅厂做java开发是什么体验
· 百万级群聊的设计实践
· WPF到Web的无缝过渡:英雄联盟客户端的OpenSilver迁移实战
· 永远不要相信用户的输入:从 SQL 注入攻防看输入验证的重要性