.Net Core微服务化ABP之五——IdentityServer4权限服务
架构图
设想中,客户端带有token的请求经由nginx,来到ocelot网关后,应先调用权限服务进行认证,认证成功后再往下游服务转发,所以本篇主要内容就是建立独立的权限服务,来完成认证以及授权的功能。
基于IdentityService4建立权限服务
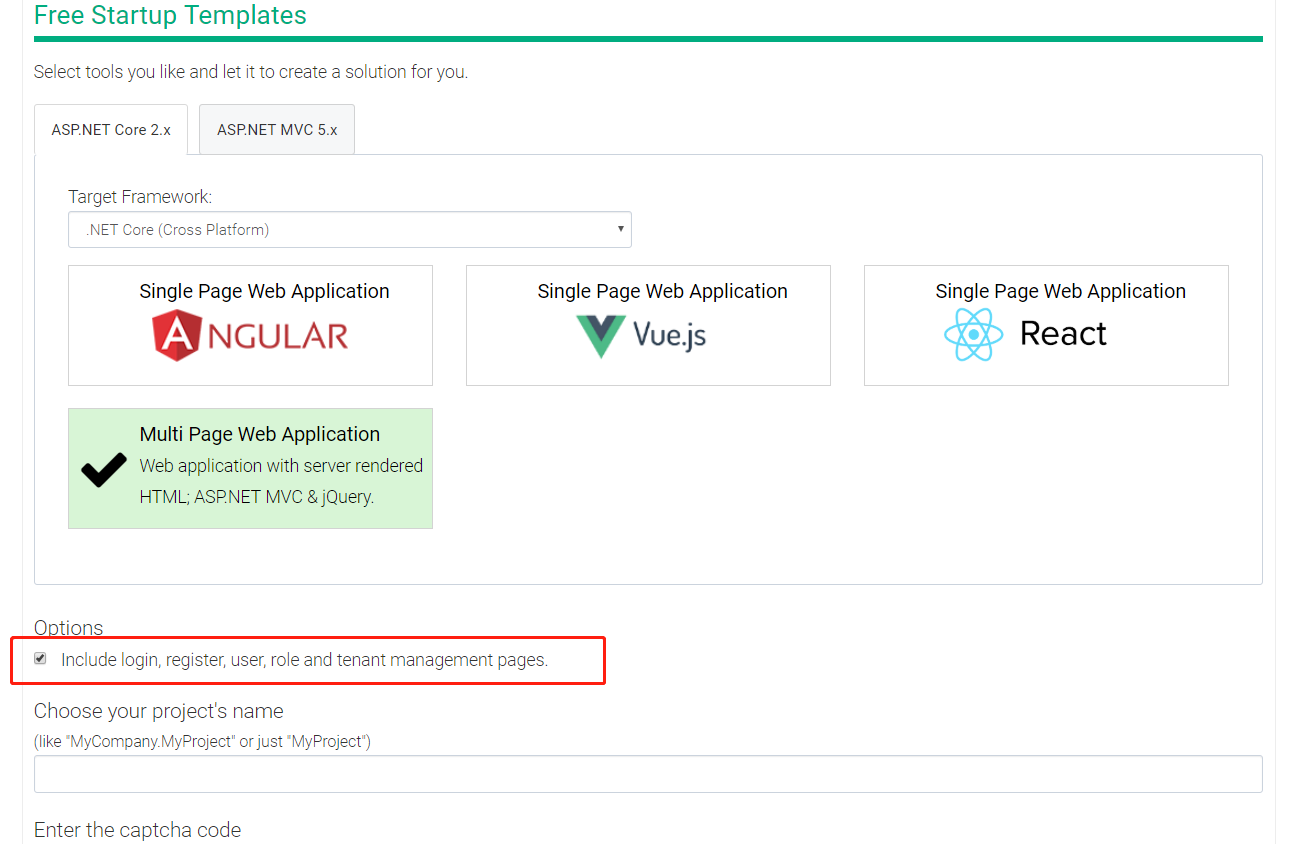
最开始看到了ABP官方给出的文章 Identity Server,考虑到权限服务需要与数据库有关系,所以选择基于abp模板开始
务必选择include login...,会包含部分必须的IdentityServer4依赖包
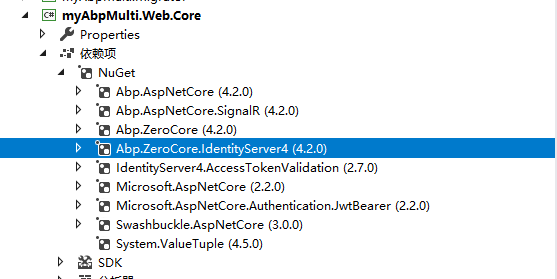
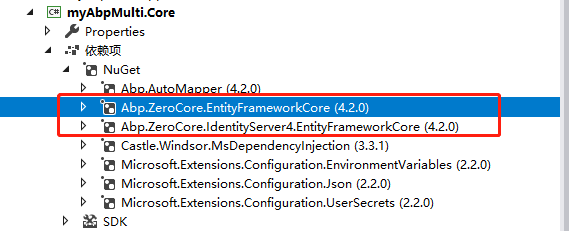
考虑到Mvc项目带有太多不相关的视图、静态资源,选择用Host项目,给Web.Core项目安装Abp.ZeroCore.IdentityServer4。因为EntityFrameworkCore项目依赖于Core项目,所以在Core项目安装Abp.ZeroCore.EntityFrameworkCore和Abp.ZeroCore.IdentityServer4.EntityFrameworkCore(仅用于演示功能实现,实际项目可能会有变化)
修改Core项目的myAbpMultiCoreModule
   [DependsOn(typeof(AbpZeroCoreModule), typeof(AbpZeroCoreIdentityServerEntityFrameworkCoreModule))]
    public class myAbpMultiCoreModule : AbpModule
    {
       //...
    }
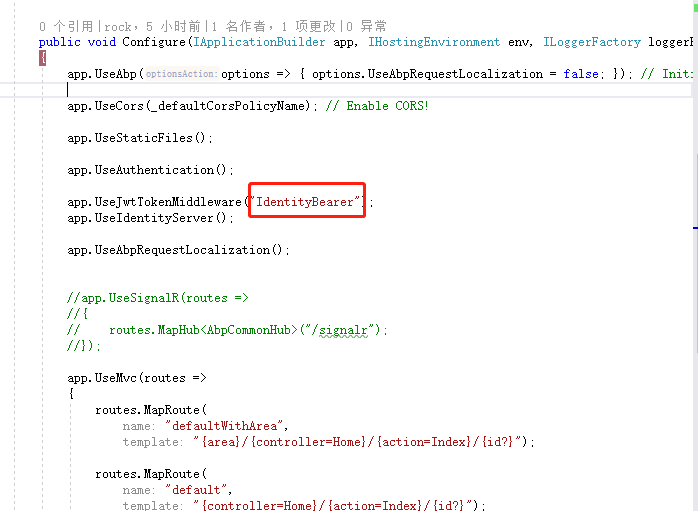
修改Starup.cs
using Abp.AspNetCore;
using Abp.Castle.Logging.Log4Net;
using Abp.Extensions;
using Abp.IdentityServer4;
using Castle.Facilities.Logging;
using Microsoft.AspNetCore.Builder;
using Microsoft.AspNetCore.Hosting;
using Microsoft.AspNetCore.Mvc.Cors.Internal;
using Microsoft.Extensions.Configuration;
using Microsoft.Extensions.DependencyInjection;
using Microsoft.Extensions.Logging;
using myAbpMulti.Authentication.JwtBearer;
using myAbpMulti.Authorization.Users;
using myAbpMulti.Configuration;
using myAbpMulti.Identity;
using Swashbuckle.AspNetCore.Swagger;
using System;
using System.Linq;
using System.Reflection;

namespace myAbpMulti.Web.Host.Startup
{
    public class Startup
    {
        private const string _defaultCorsPolicyName = "localhost";

        private readonly IConfigurationRoot _appConfiguration;

        public Startup(IHostingEnvironment env)
        {
            _appConfiguration = env.GetAppConfiguration();
        }

        public IServiceProvider ConfigureServices(IServiceCollection services)
        {
            // MVC
            services.AddMvc(
                options => options.Filters.Add(new CorsAuthorizationFilterFactory(_defaultCorsPolicyName))
            );

            IdentityRegistrar.Register(services);

            services.AddIdentityServer()
                .AddDeveloperSigningCredential()
                .AddInMemoryIdentityResources(IdentityServerConfig.GetIdentityResources())
                .AddInMemoryApiResources(IdentityServerConfig.GetApiResources())
                //.AddTestUsers(IdentityServerConfig.GetUsers().ToList())
                .AddInMemoryClients(IdentityServerConfig.GetClients())
                .AddAbpPersistedGrants<IAbpPersistedGrantDbContext>()
                .AddAbpIdentityServer<User>();


            AuthConfigurer.Configure(services, _appConfiguration);

            //services.AddSignalR();

            // Configure CORS for angular2 UI
            services.AddCors(
                options => options.AddPolicy(
                    _defaultCorsPolicyName,
                    builder => builder
                        .WithOrigins(
                            // App:CorsOrigins in appsettings.json can contain more than one address separated by comma.
                            _appConfiguration["App:CorsOrigins"]
                                .Split(",", StringSplitOptions.RemoveEmptyEntries)
                                .Select(o => o.RemovePostFix("/"))
                                .ToArray()
                        )
                        .AllowAnyHeader()
                        .AllowAnyMethod()
                        .AllowCredentials()
                )
            );

            // Swagger - Enable this line and the related lines in Configure method to enable swagger UI
            services.AddSwaggerGen(options =>
            {
                options.SwaggerDoc("v1", new Info { Title = "myAbpMulti API", Version = "v1" });
                options.DocInclusionPredicate((docName, description) => true);

               // Define the BearerAuth scheme that's in use
                options.AddSecurityDefinition("bearerAuth", new ApiKeyScheme()
                {
                    Description = "JWT Authorization header using the Bearer scheme. Example: \"Authorization: Bearer {token}\"",
                    Name = "Authorization",
                    In = "header",
                    Type = "apiKey"
                });
            });

            // Configure Abp and Dependency Injection
            return services.AddAbp<myAbpMultiWebHostModule>(
                // Configure Log4Net logging
                options => options.IocManager.IocContainer.AddFacility<LoggingFacility>(
                    f => f.UseAbpLog4Net().WithConfig("log4net.config")
                )
            );
        }

        public void Configure(IApplicationBuilder app, IHostingEnvironment env, ILoggerFactory loggerFactory)
        {
            app.UseAbp(options => { options.UseAbpRequestLocalization = false; }); // Initializes ABP framework.

            app.UseCors(_defaultCorsPolicyName); // Enable CORS!

            app.UseStaticFiles();

            app.UseAuthentication();

            app.UseJwtTokenMiddleware("IdentityBearer");
            app.UseIdentityServer();

            app.UseAbpRequestLocalization();


            //app.UseSignalR(routes =>
            //{
            //    routes.MapHub<AbpCommonHub>("/signalr");
            //});

            app.UseMvc(routes =>
            {
                routes.MapRoute(
                    name: "defaultWithArea",
                    template: "{area}/{controller=Home}/{action=Index}/{id?}");

                routes.MapRoute(
                    name: "default",
                    template: "{controller=Home}/{action=Index}/{id?}");
            });

            // Enable middleware to serve generated Swagger as a JSON endpoint
            app.UseSwagger();
            // Enable middleware to serve swagger-ui assets (HTML, JS, CSS etc.)
            app.UseSwaggerUI(options =>
            {
                options.SwaggerEndpoint(_appConfiguration["App:ServerRootAddress"].EnsureEndsWith('/') + "swagger/v1/swagger.json", "myAbpMulti API V1");
                options.IndexStream = () => Assembly.GetExecutingAssembly()
                    .GetManifestResourceStream("myAbpMulti.Web.Host.wwwroot.swagger.ui.index.html");
            }); // URL: /swagger
        }
    }
}
重点在于 IdentityRegistrar.Register(services) 之后的 services.AddIdentityServer(),以及app.UseAuthentication() 之后的两行。其中的IdentityServerConfig和IdentityRegistrar类放在了同一个文件,如下:
using System.Collections.Generic;
using System.Linq;
using Abp.IdentityServer4;
using IdentityServer4.Models;
using IdentityServer4.Test;
using Microsoft.AspNetCore.Identity;
using Microsoft.Extensions.DependencyInjection;
using myAbpMulti.Authorization;
using myAbpMulti.Authorization.Roles;
using myAbpMulti.Authorization.Users;
using myAbpMulti.Editions;
using myAbpMulti.MultiTenancy;

namespace myAbpMulti.Identity
{
    public static class IdentityRegistrar
    {
        public static IdentityBuilder Register(IServiceCollection services)
        {
            services.AddLogging();

            return services.AddAbpIdentity<Tenant, User, Role>()
                .AddAbpTenantManager<TenantManager>()
                .AddAbpUserManager<UserManager>()
                .AddAbpRoleManager<RoleManager>()
                .AddAbpEditionManager<EditionManager>()
                .AddAbpUserStore<UserStore>()
                .AddAbpRoleStore<RoleStore>()
                .AddAbpLogInManager<LogInManager>()
                .AddAbpSignInManager<SignInManager>()
                .AddAbpSecurityStampValidator<SecurityStampValidator>()
                .AddAbpUserClaimsPrincipalFactory<UserClaimsPrincipalFactory>()
                .AddPermissionChecker<PermissionChecker>()
                .AddDefaultTokenProviders();
        }
    }

    public static class IdentityServerConfig
    {
        public static IEnumerable<ApiResource> GetApiResources()
        {
            return new List<ApiResource>
            {
                new ApiResource("default-api", "Default (all) API")
            };
        }

        public static IEnumerable<IdentityResource> GetIdentityResources()
        {
            return new List<IdentityResource>
            {
                new IdentityResources.OpenId(),
                new IdentityResources.Profile(),
                new IdentityResources.Email(),
                new IdentityResources.Phone()
            };
        }

        public static IEnumerable<Client> GetClients()
        {
            return new List<Client>
            {
                new Client
                {
                    ClientId = "client",
                    AllowedGrantTypes = GrantTypes.ClientCredentials.Union(GrantTypes.ResourceOwnerPassword).ToList(),
                    AllowedScopes = {"default-api"},
                    ClientSecrets =
                    {
                        new Secret("secret".Sha256())
                    }
                }
            };
        }

    }
}
因为我们将用户信息放在数据库中,所以还要修改DbContext
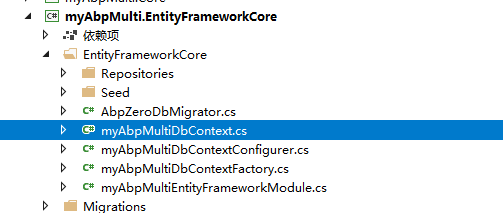
修改为:
using Abp.IdentityServer4;
using Microsoft.EntityFrameworkCore;
using Abp.Zero.EntityFrameworkCore;
using myAbpMulti.Authorization.Roles;
using myAbpMulti.Authorization.Users;
using myAbpMulti.MultiTenancy;

namespace myAbpMulti.EntityFrameworkCore
{
    public class myAbpMultiDbContext : AbpZeroDbContext<Tenant, Role, User, myAbpMultiDbContext>, IAbpPersistedGrantDbContext
    {
        /* Define a DbSet for each entity of the application */
        public DbSet<PersistedGrantEntity> PersistedGrants { get; set; }

        public myAbpMultiDbContext(DbContextOptions<myAbpMultiDbContext> options)
            : base(options)
        {
        }


        protected override void OnModelCreating(ModelBuilder modelBuilder)
        {
            base.OnModelCreating(modelBuilder);

            modelBuilder.ConfigurePersistedGrantEntity();
        }
    }
}
修改完成后需要更新数据库,执行Add-Migration "xxx" 和 Update-Database
至此IdentityServer的服务端配置完毕
根据IdentityServerConfig中填写的client_id,client_secret,grant_type 填写postman参数,username和password为数据表abpusers中存储的user信息
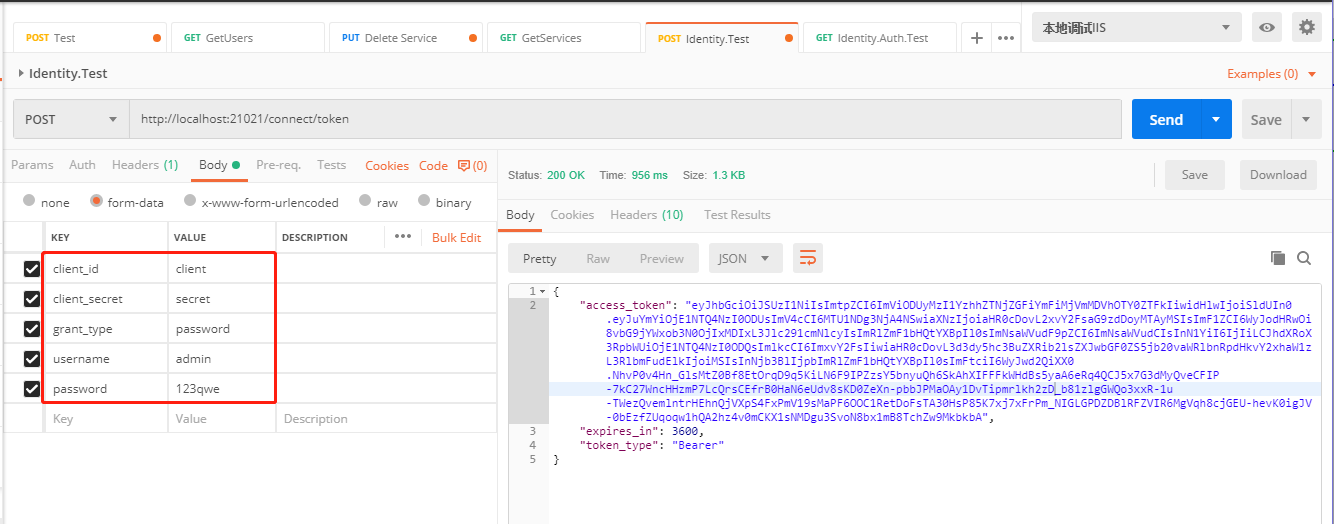
如果请求成功,可以在右侧获取到返回的token信息
向WebApi项目整合权限
在权限服务体系中,IdentityServer可以视作服务端,那其他所有需要权限验证的api服务,就全部属于客户端。
回到myAbpBasic.Web项目,在Core项目安装IdentityServer4.AccessTokenValidation
修改Startup.cs
        public IServiceProvider ConfigureServices(IServiceCollection services)
        {
            //Configure DbContext


            // Mvc

            // identity server
            services.AddMvcCore().AddAuthorization().AddJsonFormatters();
            services.AddAuthentication("IdentityBearer").AddIdentityServerAuthentication("IdentityBearer", options =>
            {
                options.Authority = "http://localhost:21021/";
                options.RequireHttpsMetadata = false;
                options.ApiName = "default-api"; // match with configuration in IdentityServer
            });

            // Swagger


        }
AddAuthentication后的参数,必须和权限服务中UseJwtTokenMiddleware名称一致。Authority自行改为权限服务地址。
在app.UseMvc之前调用app.UseAuthentication()
public void Configure(IApplicationBuilder app, IHostingEnvironment env)
    {
        if (env.IsDevelopment())
        {
            app.UseDeveloperExceptionPage();
        }

        // authentication
        app.UseAuthentication();

        app.UseMvc();

        // swagger
        .......
    }
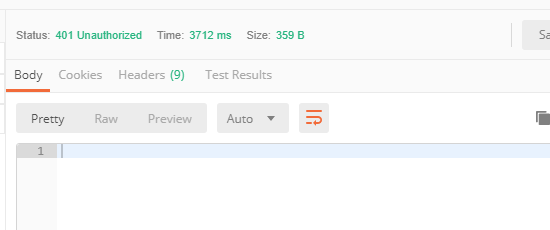
为了方便演示,给Default控制器Get方法增加Authorize特性,直接访问该api,会提示401
修改postman配置
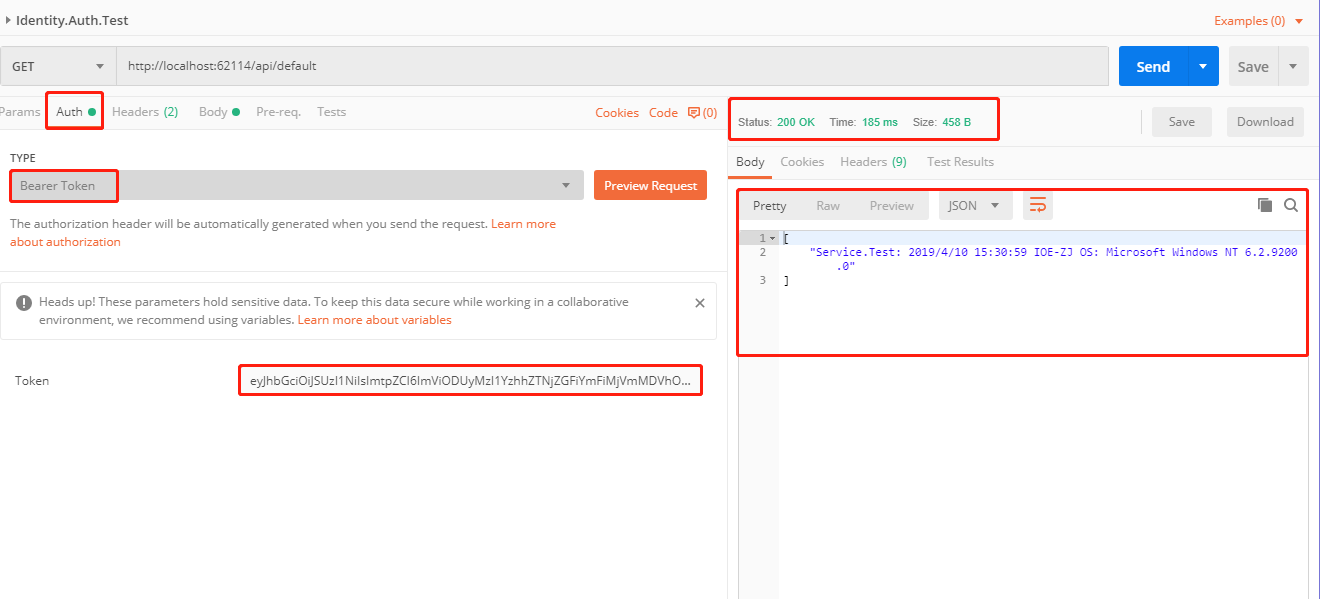
成功取得对应结果。
向MVC项目整合权限
暂缓,理论上mvc访问受权限保护的页面,会自动跳转到权限服务进行验证,成功后自动跳回原本页面,页面呈现后,左右的接口数据都需要直接从微服务获取了。不再经过mvc控制器。那么客户端需要拿到这个token才行。
权限角色区分
权限分为 系统角色权限和业务角色权限
系统角色是指整体平台的用户角色,大体上将app用户、网站用户、后台用户分开,分别拥有不同的接口权限。系统角色需要在每个api服务的每个接口进行标记。规划将系统角色分为以下几种
app_installer_user 师傅app
app_customer_user 商家app
web_customer_user 商家网站
web_admin_user 后台最高权限
web_manager_user 后台运维管理系统
web_business_user 后台业务配置系统
web_order_user 后台订单系统
业务角色是指业务子系统内部的权限划分。比如订单处理系统中就有订单查询、修改、派单、改派等权限,这个权限列表是固化在代码中的,业务系统中可以配置角色,以及每个角色拥有哪些权限。这部分权限不会出现在api服务中,而应该只在mvc客户端或api网关中出现,不涉及应用服务。mvc客户端可以轻松控制视图,但提交数据的接口应该是通过服务中心直接调用下游接口的,这部分就变得不可控。
本文涉及的是前者系统角色权限。用户登录验证后颁发token,同时该token也有对应的系统角色,一般而言,一个用户账号只对应一种客户端角色。基本上不存在一个账号既是商家,又是师傅的情况。
再次思考,identityserver中带的Claims-role控制不适合当前系统角色场景,因为它是用户-角色对应关系的,更像是业务角色。我们需要的是客户端-token-角色,也就是一类客户端同属一个角色,比如所有的商家版app客户端,都属于app_customer_user,那么显然可以简单地使用identityServer4自带的apiresource,clientid来控制。同时还允许一个账号(客户端)可能有多重权限的问题,admin_user有运维、业务、订单的所有权限。比如这样配置:
        /// <summary>
        /// 允许使用认证服务的api列表
        /// </summary>
        /// <returns></returns>
        public static IEnumerable<ApiResource> GetApiResources()
        {
            return new List<ApiResource>
            {
                new ApiResource("default-api", "Default (all) API"),
                new ApiResource("app_installer_user", "Default (all) API1"),
                new ApiResource("app_customer_user", "Default (all) API2"),
                new ApiResource("web_customer_user", "Default (all) API3"),
                new ApiResource("web_admin_user ", "Default (all) API4"),
                new ApiResource("web_manager_user ", "Default (all) API5"),
                new ApiResource("web_business_user ", "Default (all) API6"),
                new ApiResource("web_order_user ", "Default (all) API7")
            };
        }


 /// <summary>
        /// 允许使用认证服务的应用客户端
        /// </summary>
        /// <returns></returns>
        public static IEnumerable<Client> GetClients()
        {
            return new List<Client>
            {
                new Client
                {
                    ClientId = "client",
                    AllowedGrantTypes = GrantTypes.ResourceOwnerPassword,
                    AllowedScopes = {"default-api"},
                    ClientSecrets = new[]{ new Secret("secret".Sha256())}
                },
                new Client
                {
                    ClientId = "app_installer_client",
                    AllowedGrantTypes = GrantTypes.ResourceOwnerPassword,
                    AllowedScopes = {"app_installer_user"},
                    ClientSecrets = new[]{ new Secret("secret".Sha256())}
                },
                new Client
                {
                    ClientId = "web_admin_client",
                    AllowedGrantTypes = GrantTypes.ResourceOwnerPassword,
                    AllowedScopes =
                    {
                        "web_admin_user",
                        "web_manager_user",
                        "web_business_user",
                        "web_order_user",
                    },
                    ClientSecrets = new[]{ new Secret("secret".Sha256())}
                }
            };
        }
2019-4-11 10:15:57 之前的理解完全错误,ApiResource指的是提供api服务,比如serviceorder,servicepartner,对我们来说client只需要设置一个default即可,因为暂时没有需要限制某种类型客户端只能访问几个服务。
    public static class IdentityServerConfig
    {
        /// <summary>
        /// 允许使用认证服务的api列表
        /// </summary>
        /// <returns></returns>
        public static IEnumerable<ApiResource> GetApiResources()
        {
            return new List<ApiResource>
            {
                new ApiResource("serviceorder", "Default (all) API"),
                new ApiResource("servicepartner", "Default (all) API1"),
            };
        }

        /// <summary>
        ///
        /// </summary>
        /// <returns></returns>
        public static IEnumerable<IdentityResource> GetIdentityResources()
        {
            return new List<IdentityResource>
            {
                new IdentityResources.OpenId(),
                new IdentityResources.Profile(),
                new IdentityResources.Email(),
                new IdentityResources.Phone()
            };
        }

        /// <summary>
        /// 允许使用认证服务的应用客户端
        /// </summary>
        /// <returns></returns>
        public static IEnumerable<Client> GetClients()
        {
            return new List<Client>
            {
                new Client
                {
                    ClientId = "default_client",
                    AllowedGrantTypes = GrantTypes.ResourceOwnerPassword,
                    AllowedScopes =
                    {
                        "serviceorder",
                        "servicepartner",
                    },
                    ClientSecrets = new[]{ new Secret("secret".Sha256())}
                }
            };
        }

    }
继续说这个权限体系,系统角色的实现好像有点困难。其实本质上是要限制api网关可以访问的api范围,可能用swagger的分组,为每个api网关单独配置swagger.json可以解决。每个网关只能看到自己有权限的api文档(不知道能不能限制权限),或者是本身网关程序上写的api接口。这样完美解决系统角色的问题。
继续看业务角色问题,业务角色权限为了和api服务解耦,个人觉得应该放在上层api网关处理。目前打算是将各个子系统独立开来,这样每个子系统的MVC程序(对应mpa应用)(or api网关程序,对应spa应用)就需要数据库来存储这些权限规则,考虑到每个应用都需要这个数据库,而且数据库结构是类似的,所以建立一个后台权限服务,考虑和基础服务合并。这个数据库包含后台用户表,后台角色表,角色用户表,角色权限表,用户的注册添加是在这个服务进行的,只不过注册成功的同时需要向sso(identityserver)注册新用户。子系统mvc程序读取所有权限列表,赋权给对应用户,并将角色-权限对应关系(增加字段,api网关名称)保存在数据库中,这步再具体开发应用时再实现,现在只需要控制apigateway项目的权限即可。
参考文章:
https://aspnetboilerplate.com/Pages/Documents/Zero/Identity-Server
https://www.cnblogs.com/edisonchou/p/identityserver4_foundation_and_quickstart_01.html
https://aspnetboilerplate.com/Pages/Documents/Authorization

 浙公网安备 33010602011771号