Ubuntu16.04安装cuda8.0+cudnn6.0与tensorflow源代码安装
系统:Ubuntu16.04
一、安装Nvidia驱动
如果是笔记本的话,一般是有两块驱动,我们可以使用集成显卡用于显示,用Nvidia显卡计算(AMD目前不支持,可以跳过)
第1步:检查你的电脑有哪些显卡
打开终端,粘贴下面的命令
lspci -k | grep -A 2 -i "VGA"
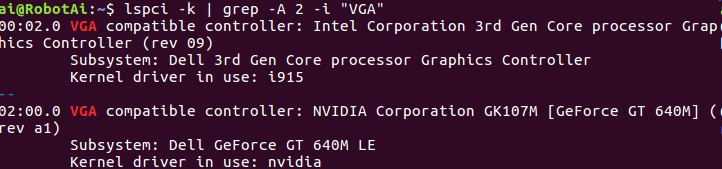
可以看见,我们笔记本有Intel显卡和Nvidia显卡,如果你的电脑也有这两种显卡,那么继续阅读。
第2步:检查你的电脑Nvidia显卡是否支持cuda以及你的显卡的计算能力
网址为
https://developer.nvidia.com/cuda-gpus
或者
http://blog.csdn.net/real_myth/article/details/44308169
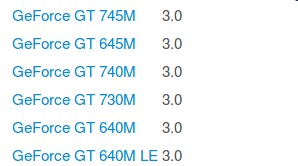
可以看见我们的显卡GT 640M LE的计算能力为3.0,满足要求
第3步:安装合适的Nvidia显卡
cuda自身是包含驱动的,但是它自带的显卡并不一定能够适合我们的笔记本(我的就是如此,显示分辨率始终有问题)
所以在终端里输入下面的命令来查看哪一个专有驱动是推荐安装的
sudo ubuntu-drivers devices
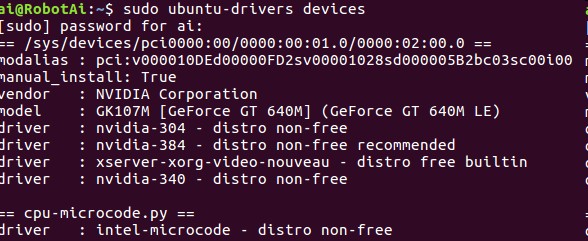
可以看到推荐我们安装的驱动为384,而cuda8.0要求我们的的显卡驱动版本>=375.26,所以我们安装推荐的驱动版本
在官网上下载该驱动,注意下载*.run文件,因为我们需要做一些配置,官网为
http://www.nvidia.cn/Download/index.aspx?lang=cn
下载完成后需要禁用nouveau(Ubuntu16.04系统自带的Nvidia驱动)
打开编辑配置文件
sudo vim /etc/modprobe.d/blacklist.conf
在最后一行添加
blacklist nouveau
保存退出后执行
sudo update-initramfs -u
重启后执行
lsmod | grep nouveau
没有输出即屏蔽好了,进入命令行界面
Ctrl-Alt+F1
禁用X服务
sudo service lightdm stop
切换到你下载驱动的目录执行
sudo ./NVIDIA-Linux-x86_64-384.22.run –no-opengl-files
–no-opengl-files 只安装驱动文件,不安装OpenGL文件,这个参数非常重要
安装完成后重新启动x服务
sudo service lightdm start
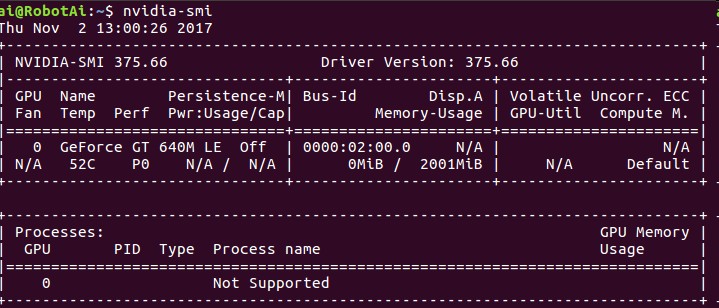
运行
nvidia-smi
出现以下类似内容就说明驱动安装完成了
二、安装cuda
和安装nvidia驱动一样,我们采用*.run文件安装cuda,文件下载网址为
https://developer.nvidia.com/cuda-downloads
第1步:安装依赖
sudo apt-get install freeglut3-dev build-essential libx11-dev libxmu-dev libxi-dev libgl1-mesa-glx libglu1-mesa libglu1-mesa-dev
第2步:安装cuda
在cuda文件目录下执行安装
sudo ./cuda_8.0.61_375.26_linux.run
除了驱动选择不安装,其他都选择yes
第3步:配置环境
编辑 /etc/profile,在末尾添加
export PATH=/usr/local/cuda-8.0/bin:$PATHexport LD_LIBRARY_PATH=/usr/local/cuda-8.0/lib64第4步:检测安装是否完成
在命令行输入
nvcc -V
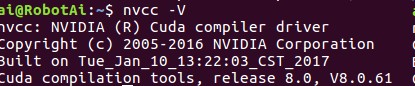
显示以上信息说明安装完成了,如果还不放心,切换到NVIDIA_CUDA-8.0_Samples/1_Utilities/deviceQuery目录下,执行make
运行产生的deviceQuery
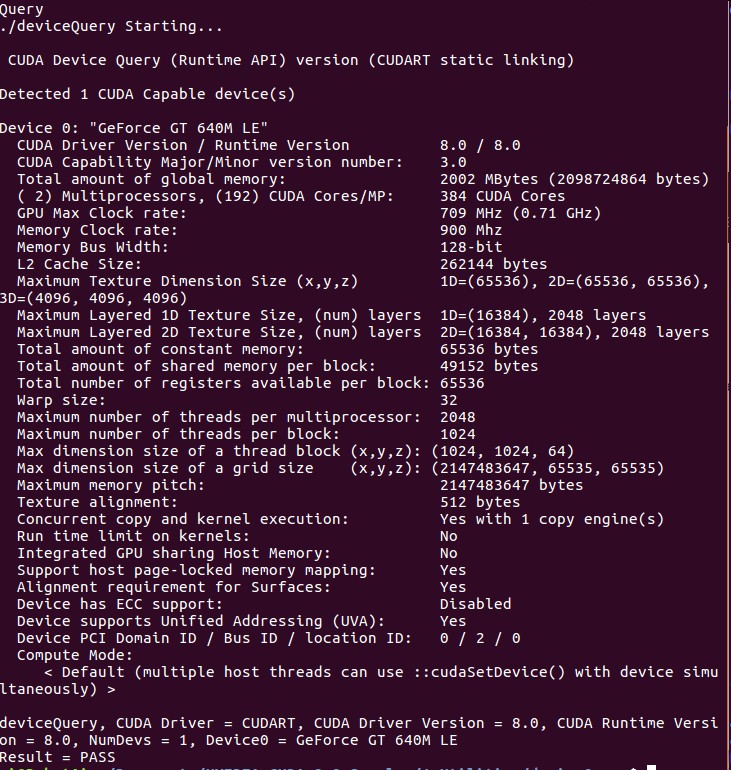
这样说明我们的安装真的已经完成了
三、导入cudnn
下载cudnn6.0,网址为
https://developer.nvidia.com/cudnn
将头文件.h导入/usr/local/cuda-8.0/include
将库文件.so和.a导入/usr/local/cuda-8.0/lib64
四、从源代码安装tensorflow
良心建议:最好参照官网教程https://www.tensorflow.org/install/install_sources
主要是因为软件一直在更新,本教程只适合版本tensorflow-1.4.0rc1,从源代码安装主要是因为我这里网络有问题,直接pip安装老是会中断
第1步:下载源代码
git clone https://github.com/tensorflow/tensorflow
cd tensorflow
git checkout r1.4
第2步:配置环境
安装Bazel(个人理解类似于cxx的make),官网网址https://docs.bazel.build/versions/master/install.html
bazel0.9.0会报错,安装0.8.1即可
安装python2.7相关依赖项
sudo apt-get install python-numpy python-dev python-pip python-wheel
最后安装libcupti-dev
sudo apt-get install libcupti-dev
第3步:配置TensorFlow依赖项所在路径
主要是cuda的环境,我们前面已经配置好了
cd tensorflow # cd to the top-level directory created
./configure
之后会弹出
You have bazel 0.7.0 installed.
Please specify the location of python. [Default is /usr/bin/python]:
直接回车
Found possible Python library paths:
/usr/local/lib/python2.7/dist-packages /usr/lib/python2.7/dist-packages Please input the desired Python library path to use. Default is [/usr/lib/python2.7/dist-packages]
输入/usr/local/lib/python2.7/dist-packages
Do you wish to build TensorFlow with jemalloc as malloc support? [Y/n]: n
No jemalloc as malloc support will be enabled for TensorFlow.
Do you wish to build TensorFlow with Google Cloud Platform support? [Y/n]: n
No Google Cloud Platform support will be enabled for TensorFlow.
Do you wish to build TensorFlow with Hadoop File System support? [Y/n]: n
No Hadoop File System support will be enabled for TensorFlow.
Do you wish to build TensorFlow with Amazon S3 File System support? [Y/n]: n
No Amazon S3 File System support will be enabled for TensorFlow.
Do you wish to build TensorFlow with XLA JIT support? [y/N]: n
No XLA JIT support will be enabled for TensorFlow.
Do you wish to build TensorFlow with GDR support? [y/N]: n
No GDR support will be enabled for TensorFlow.
Do you wish to build TensorFlow with VERBS support? [y/N]: n
No VERBS support will be enabled for TensorFlow.
Do you wish to build TensorFlow with OpenCL support? [y/N]: n
No OpenCL support will be enabled for TensorFlow.
这些都选择否,暂时用不上,之后配置cuda
Do you wish to build TensorFlow with CUDA support? [y/N]: y
CUDA support will be enabled for TensorFlow.
Please specify the CUDA SDK version you want to use, e.g. 7.0. [Leave empty to default to CUDA 8.0]:
Please specify the location where CUDA 8.0 toolkit is installed. Refer to README.md for more details. [Default is /usr/local/cuda]: /usr/local/cuda-8.0
Please specify the cuDNN version you want to use. [Leave empty to default to cuDNN 6.0]:
Please specify the location where cuDNN 6 library is installed. Refer to README.md for more details. [Default is /usr/local/cuda-8.0]:
Please specify a list of comma-separated Cuda compute capabilities you want to build with.
You can find the compute capability of your device at: https://developer.nvidia.com/cuda-gpus.
Please note that each additional compute capability significantly increases your build time and binary size. [Default is: 3.0]
后面的大同小异,如下:
Do you want to use clang as CUDA compiler? [y/N]: n
nvcc will be used as CUDA compiler.
Please specify which gcc should be used by nvcc as the host compiler. [Default is /usr/bin/gcc]:
Do you wish to build TensorFlow with MPI support? [y/N]: n
No MPI support will be enabled for TensorFlow.
Please specify optimization flags to use during compilation when bazel option "--config=opt" is specified [Default is -march=native]:
Add "--config=mkl" to your bazel command to build with MKL support.
Please note that MKL on MacOS or windows is still not supported.
If you would like to use a local MKL instead of downloading, please set the environment variable "TF_MKL_ROOT" every time before build.
Configuration finished
第4步:编译生成*.whl文件(pip package)
bazel build --config=opt --config=cuda //tensorflow/tools/pip_package:build_pip_package
bazel-bin/tensorflow/tools/pip_package/build_pip_package /tmp/tensorflow_pkg
第5步:安装编译生成*.whl文件
sudo pip install /tmp/tensorflow_pkg/tensorflow-1.4.0rc1-cp27-cp27mu-linux_x86_64.whl
第6步:做一个简单的测试
注意:在非Tensorflow文件目录下(比如/home下)打开python shell环境
python
然后输入:
import tensorflow as tf
hello = tf.constant('Hello, TensorFlow!')
sess = tf.Session()
print(sess.run(hello))
如果结果显示:
Hello, TensorFlow!
表示安装完成

截图纪念!!!
五、编译tensorflow的cxx api接口
由于后期程序采用的cxx编写的,所以这里顺便编译了cxx接口
第1步:编译接口
进入TensorFlow/tensorflow文件执行
bazel build :libtensorflow_cc.so
这样在bazel-bin/tensorflow/目录下会出现libtensorflow.so/libtensorflow_cc.so文件
第2步:配置其他依赖
在使用tensorflow c/c++接口时,会有很多头文件依赖、protobuf版本依赖等问题
tensorflow/contrib/makefile目录下,找到build_all_xxx.sh文件并执行,例如准备在linux上使用,就执行build_all_linux.sh文件
./tensorflow/contrib/makefile/build_all_linux.sh
成功后会在makefile目录下出现一个gen文件夹
在这一步我遇到一个问题
./autogen.sh: 48: ./autogen.sh: autoreconf: not found
原因是因为因为没有安装automake工具
执行sudo apt-get install autoconf automake libtool
然后再次执行build_all_linux.sh
第3步:简单测试
#include <iostream>
#include <tensorflow/core/platform/env.h>
#include <tensorflow/core/public/session.h>

using namespace std;
using namespace tensorflow;

int main(int argc, char **argv) {
  Session* session;
  Status status = NewSession(SessionOptions(), &session);
  if(!status.ok()){
    cout << status.ToString() << endl;
  }
  cout << "Session successfully created." << endl;

  return 0;
}
对应的CMakeLists.txt为
cmake_minimum_required(VERSION 2.6)
project(DeeperDepthPrediction)
set( CMAKE_CXX_FLAGS "-std=c++11" )

add_executable(FirstTry  FirstTry.cpp)

include_directories( /home/ai/Programs/TensorFlow
  /home/ai/Programs/TensorFlow/bazel-genfiles
  /home/ai/Programs/TensorFlow/tensorflow/contrib/makefile/gen/protobuf/include
  /home/ai/Programs/TensorFlow/tensorflow/contrib/makefile/downloads/nsync/public
  /home/ai/Programs/TensorFlow/tensorflow/contrib/makefile/downloads/eigen
)

target_link_libraries( FirstTry
  /home/ai/Programs/TensorFlow/bazel-bin/tensorflow/libtensorflow_cc.so
  /home/ai/Programs/TensorFlow/bazel-bin/tensorflow/libtensorflow_framework.so

)
对应的输出结果为
Starting: /home/ai/Projects/DeeperDepthPrediction/DeeperDepthPrediction/build/FirstTry
2017-11-04 19:09:06.960681: I tensorflow/core/platform/cpu_feature_guard.cc:137] Your CPU supports instructions that this TensorFlow binary was not compiled to use: SSE4.1 SSE4.2 AVX
2017-11-04 19:09:07.134301: I tensorflow/stream_executor/cuda/cuda_gpu_executor.cc:892] successful NUMA node read from SysFS had negative value (-1), but there must be at least one NUMA node, so returning NUMA node zero
2017-11-04 19:09:07.134625: I tensorflow/core/common_runtime/gpu/gpu_device.cc:1031] Found device 0 with properties:
name: GeForce GT 640M LE major: 3 minor: 0 memoryClockRate(GHz): 0.7085
pciBusID: 0000:02:00.0
totalMemory: 1.95GiB freeMemory: 1.94GiB
2017-11-04 19:09:07.134663: I tensorflow/core/common_runtime/gpu/gpu_device.cc:1121] Creating TensorFlow device (/device:GPU:0) -> (device: 0, name: GeForce GT 640M LE, pci bus id: 0000:02:00.0, compute capability: 3.0)
Session successfully created.
*** Exited normally ***


 浙公网安备 33010602011771号