css--一些基本属性
关于css各标签的属性: w3cschool一应俱全
设置固定的图片:
body
  {
  background-image: url(bgimage.gif);
  background-attachment: fixed;
  }
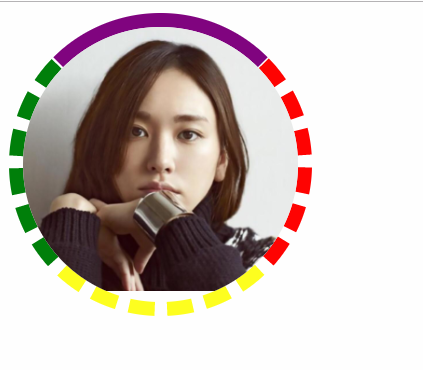
边框设置属性:
效果:

      .c1{
            /* 200*200是正方形 */
            width: 200px;
            height: 200px;
            /*height: 100px;*/
            /*border: 10px dashed blue;*/
            border-left:  10px dashed green;
            border-right:  10px dashed red;
            border-bottom: 10px dashed yellow;
            border-top: 10px solid purple;
            border-radius: 50%;
            /*background: url("xyjy.png") no-repeat;*/

            /*溢出的部分隐藏*/
            overflow: hidden;

        }
        .c1 img{
            /*按照父级标签的宽度来展示,并且进行等比缩放*/
            max-width: 100%;
        }

<div class="c1">
<img src="xyjy.png" alt="">
</div>
关于div浮动
效果:

div使用float进行浮动,浮动后产生异常需要处理一下,将浮动后外面加上一层
.clearfix:after{
            content: '';
            display: block;
            clear: both;
        }

<!DOCTYPE html>
<html lang="en">
<head>
    <meta charset="UTF-8">
    <title>Title</title>
    <!--<script src="https://cdn.bootcss.com/vue/2.5.17-beta.0/vue.js"></script>-->
    <!--<script src="https://cdn.bootcss.com/vue-router/3.0.1/vue-router.js"></script>-->
    <style>

        .c1{
            width: 200px;
            height: 100px;
            border: 1px solid black;

        }

        .c2{
            background-color: red;
            /*display: none;*/
            /*visibility: hidden;*/
        }


        .c3{
            background-color: blue;
        }
        .c3,.c4{
            display: inline-block;
        }


        /*.sp1{*/
            /*border: 1px solid red;*/
            /*display: block;*/
            /*width: 100px;*/
            /*height: 100px;*/
        /*}*/


    </style>

</head>
<body>


    <div class="c1">

    </div>
    <div class="c1 c2">

    </div>
    <div class="c1 c3">
        我是c3标签
    </div>
    <div class="c1 c4">
        我是c4标签
    </div>

    <!--<span class="sp1">-->
        <!--我是span1-->
    <!--</span>-->

    <!--<span class="sp1">-->
        <!--我是span2-->
    <!--</span>-->

</body>
</html>
定位:返回顶部按钮
效果:


<head>
    <meta charset="UTF-8">
    <title>Title</title>
    <!--<script src="https://cdn.bootcss.com/vue/2.5.17-beta.0/vue.js"></script>-->
    <!--<script src="https://cdn.bootcss.com/vue-router/3.0.1/vue-router.js"></script>-->

    <style>
        body{
            margin: 0;
            padding: 0;
        }

        .c1,.c2,.c3{
            width: 100px;
            height: 600px;
            background-color: red;
            border: 1px solid black ;
        }

        /*相对定位*/
        /*.c2{*/
            /*position: relative;*/
            /*left: 102px;*/
            /*!*top:-102px;*!*/
            /*bottom:102px;*/
            /*!*right: ;*!*/
        /*}*/
        /*绝对定位*/
        .c2{
            background-color: yellow;
            position: absolute;
            height: 100px;
            left: 60px;
            top:20px;

        }
        .c4{
            width: 200px;
            height: 200px;
            background-color: pink;
            position: relative;
            left: 100px;
            top:150px;

        }

        .back-top{
            position: fixed;
            bottom: 20px;
            right: 20px;
            width: 80px;
            height: 40px;
            background-color: rgba(255,165,0,0.5);

            text-align: center;
            line-height: 40px;
            border-radius: 5%;

        }
        .back-top:hover{
            background-color: rgba(255,165,0,1);
        }

        .back-top a{
            color: white;
            text-decoration: none;
        }


    </style>

</head>
<body>

<a name="top">顶部位置在这里</a>

<div class="c1">
    c1
</div>

<!--测试一下相对定位和绝对定位的组合使用-->
<div class="c4">
    <div class="c2">

    </div>


</div>

<!--简单测试相对定位和绝对定位的-->
<!--<div class="c2">-->
    <!--c2-->
<!--</div>-->
<div class="c3">
    c3
</div>


<span class="back-top">
    <a href="#top">返回顶部</a>
</span>

</body>
</html>
溢出:
当文字超过div的大小时,使用overflow:scroll
效果:


<!DOCTYPE html>
<html lang="en">
<head>
    <meta charset="UTF-8">
    <title>Title</title>
    <!--<script src="https://cdn.bootcss.com/vue/2.5.17-beta.0/vue.js"></script>-->
    <!--<script src="https://cdn.bootcss.com/vue-router/3.0.1/vue-router.js"></script>-->
    <style>

        div{
            width: 200px;
            height: 200px;
            border: 1px solid red;
            overflow: scroll;
        }

    </style>
</head>
<body>

<div>
    犀一点通.


</div>


</body>
</html>
z-index完成模拟注册对话框
效果


<html lang="en">
<head>
    <meta charset="UTF-8">
    <title>Title</title>
    <!--<script src="https://cdn.bootcss.com/vue/2.5.17-beta.0/vue.js"></script>-->
    <!--<script src="https://cdn.bootcss.com/vue-router/3.0.1/vue-router.js"></script>-->
    <style>
        body{
            margin: 0;
            padding: 0;
        }

        .content{
            height: 600px;
            width: 600px;
            border:1px solid blue;
            background-color: pink;
        }

        .shadow{
            background-color: black;
            /*整个标签内容的颜色的透明度*/
            opacity: 0.2;

            position: fixed;
            width: 100%;
            height: 900px;
            top:0;
            left: 0;
            color:red;
            z-index: 900;

        }

        .reg{
            width: 1000px;
            height: 360px;
            background-color: white;
            border-radius: 5%;
            position: fixed;
            top:50%;
            left: 50%;
            margin-left:-500px;
            margin-top: -180px;
            z-index: 1000;
        }
    </style>

</head>
<body>

<div class="content">

 文字
</div>

<div class="content">

    <a href="">金风玉露一相逢,便胜却人家无数</a>


</div>
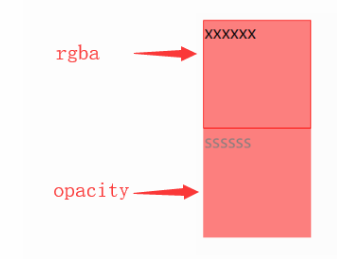
透明度属性:
rgba设置的是单独属性的透明度
opacity设置的是整个标签的透明度
效果:


<!DOCTYPE html>
<html lang="en">
<head>
    <meta charset="UTF-8">
    <title>Title</title>
    <!--<script src="https://cdn.bootcss.com/vue/2.5.17-beta.0/vue.js"></script>-->
    <!--<script src="https://cdn.bootcss.com/vue-router/3.0.1/vue-router.js"></script>-->

    <style>
        .c1,.c2{
            width: 100px;
            height: 100px;
            /*background-color: red;*/
            border: 1px solid red;
        }

        /*rgba设置的是单独属性的透明度*/
        .c1{
            background-color: rgba(255,0,0,0.5);
        }

        /*整个标签的透明度设置*/
        .c2{
            background-color: rgb(255,0,0);
            opacity: 0.5;
        }

    </style>

</head>
<body>

<div class="c1">
    xxxxxx

</div>
<div class="c2">
    ssssss

</div>

</body>
</html>


 浙公网安备 33010602011771号