14-Thymeleaf模板引擎
1、什么是模板引擎
当我们开发传统项目的时候,需要我们自己编写前端页面进行渲染结果,这时就需要模板引擎。在以前的开发中,前段交给我们的HTML页面,需要把这些页面转成jsp页面。使用jsp的好处就是可以在我们查出一些数据并转发到jsp页面后,可以用轻松实现对这些数据的显示以及交互。jsp的功能很强大,其中可以编写java代码,然而springboot的项目上衣jar包形式打包的,不是war包,而且使用的还是嵌入式的tomcat容器,所以不支持jsp。
在开发前后端不分离的springboot项目时,不能使用jsp,如果我们直接用纯静态页面的方式,会给我们的开发带来非常大的麻烦。所以springboot就会推荐我们使用模板引擎。
jsp也是一种模板引擎,springboot支持的模板引擎很多,包括freemarker、thymeleaf等等,springboot推荐我们使用thymeleaf模板引擎。其实大部分都模板引擎的思路都是一样的,如下图表示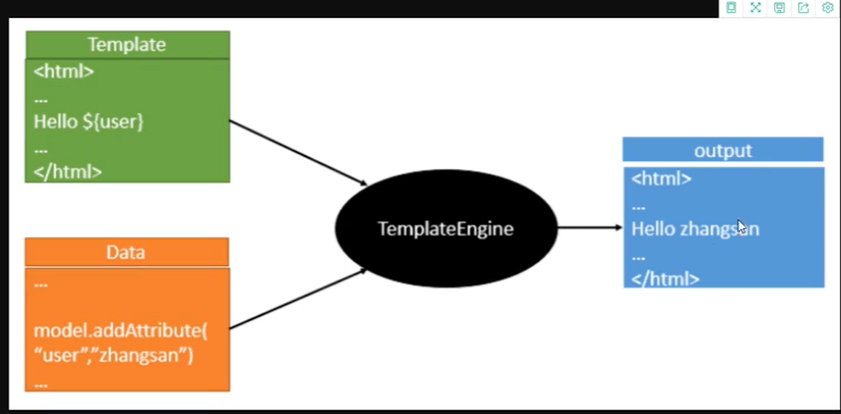
我们将后台数据放到model对象中,然后通过Template模板引擎中的具体语法获取数据,然后进行渲染,然后以静态页面的形式将数据在前端进行显示
模板引擎具体作用:我们写了一个页面模板,但是这个模板中的一些值是动态的,我们就在这些值得位置写一些表达式来获取数据。这些值去哪获取呢?我们可以将后台的数据进行组装,即组装到一个ModelAndView这个对象中,表达式就从这个对象中获取。然后我们将这个页面模板和这些数据交给模板引擎,模板引擎将其中的表达式进行解析,将获取的数据填充到我们指定的位置,然后将这些数据最终生成我们想要的内容输出。这就是大部分模板引擎的思想,不过不同的模板引擎的语法是不同的。
2、springboot中thymeleaf的用法
-
第一步:需要引入thymeleaf的依赖,我们可以到这下面网站获取thymeleaf的maven坐
1、Thymeleaf官网:https://www.thymeleaf.org/
2、thymeleaf在github的主页:https://github.com/thymeleaf/thymeleaf
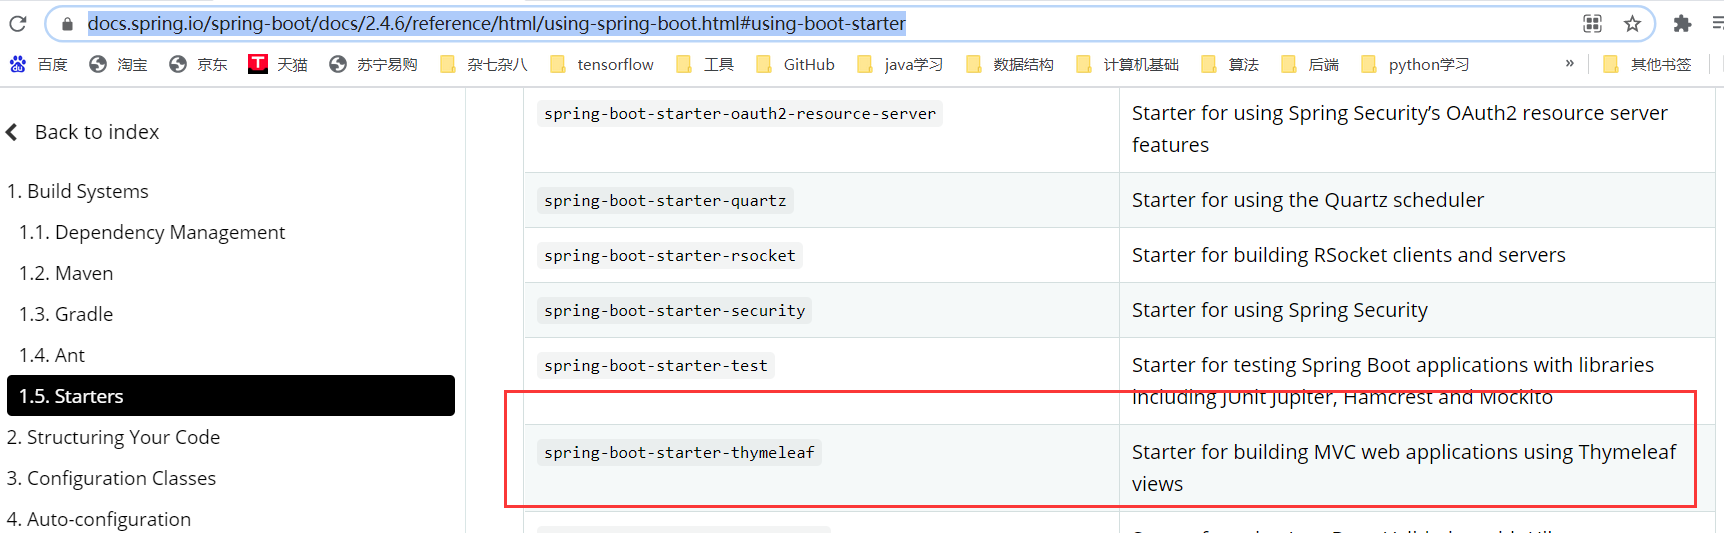
3、spring官方文档:https://docs.spring.io/spring-boot/docs/2.2.13.RELEASE/reference/html/using-spring-boot.html#using-boot-starter
从这三个网站获取我们对应的版本
这里我们直接到springboot官网文档中查看,但要注意的是不同版本的springboot的文档内容不一样,比如下面这个2.4.6版本的Starters中后面是没有pom选项的,所以我们找版本靠前的。
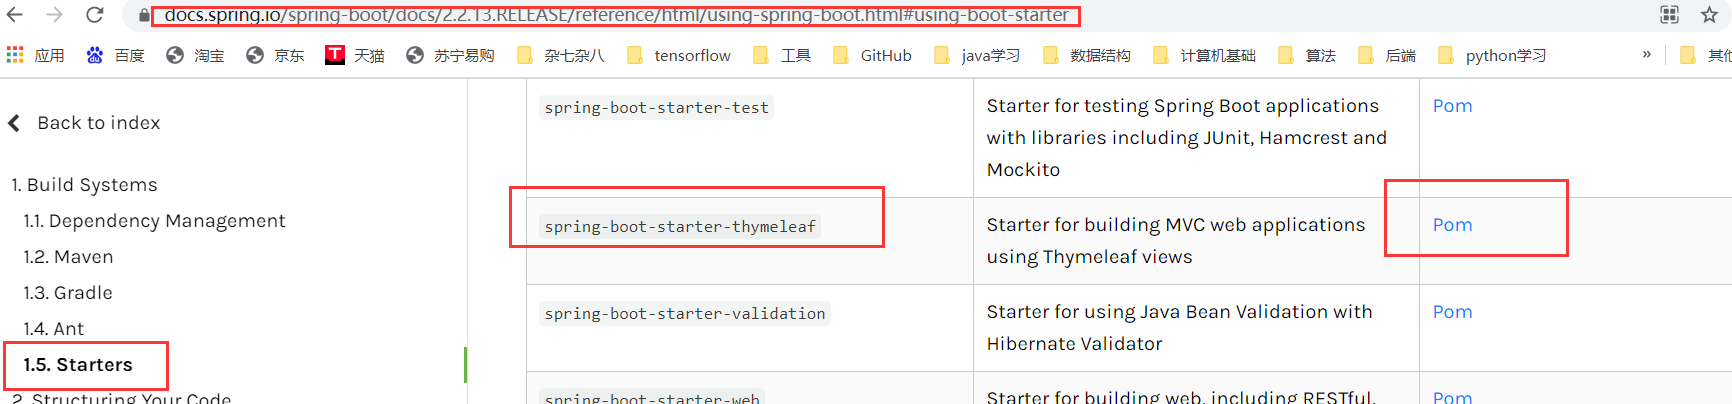
直接点pom
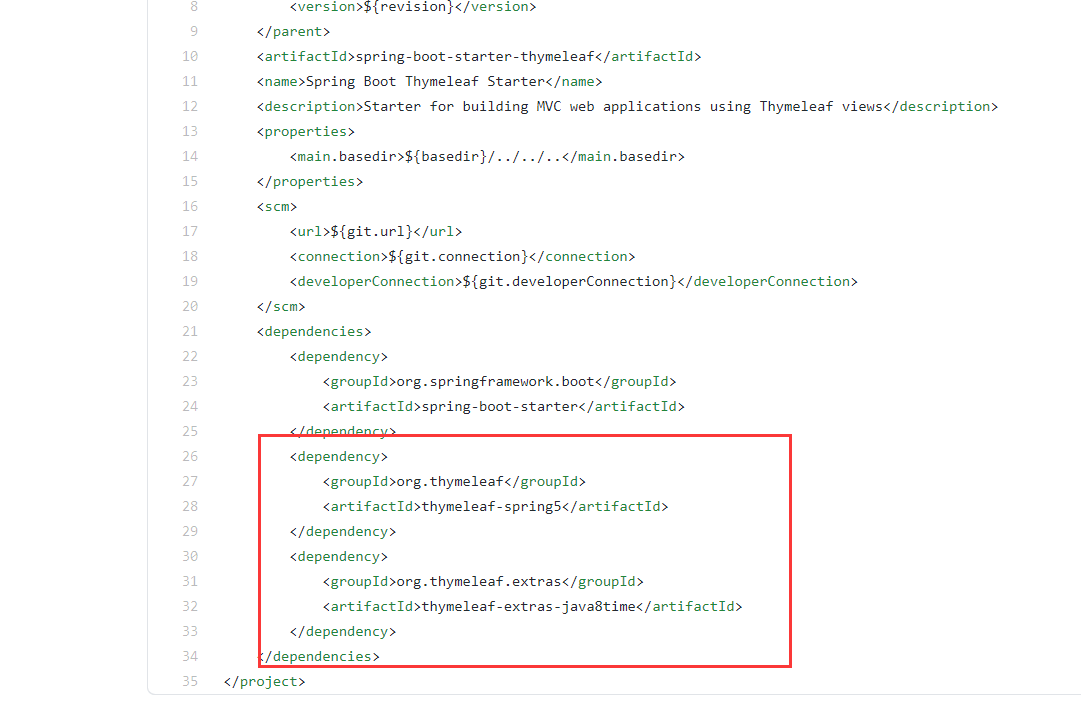
其中的两个依赖就是我们需要的
<!--thymeleaf依赖-->
<dependency>
	<groupId>org.thymeleaf</groupId>
	<artifactId>thymeleaf-spring5</artifactId>
</dependency>
<dependency>
	<groupId>org.thymeleaf.extras</groupId>
	<artifactId>thymeleaf-extras-java8time</artifactId>
</dependency>
其中使用的版本是3.x的,springboot2.x不能使用thymeleaf3.0以及之前的版本,不然包报错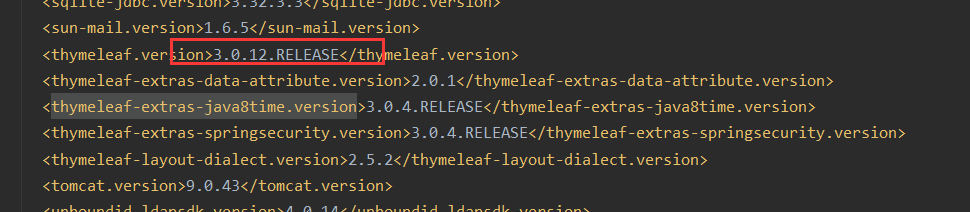
-
第二步:使用thymeleaf
首先我们找到关于thymeleaf的自动配置类ThymeleafAutoConfiguration,可以看到绑定了一个ThymeleafProperties类,该类的部分源码如下
@ConfigurationProperties(
    prefix = "spring.thymeleaf"
)
public class ThymeleafProperties {
    private static final Charset DEFAULT_ENCODING;
    public static final String DEFAULT_PREFIX = "classpath:/templates/";
    public static final String DEFAULT_SUFFIX = ".html";
    private boolean checkTemplate = true;
    private boolean checkTemplateLocation = true;
    private String prefix = "classpath:/templates/";
    private String suffix = ".html";
    private String mode = "HTML";
    private Charset encoding;
    private boolean cache;
    private Integer templateResolverOrder;
    private String[] viewNames;
    private String[] excludedViewNames;
    private boolean enableSpringElCompiler;
    private boolean renderHiddenMarkersBeforeCheckboxes;
    private boolean enabled;
    private final ThymeleafProperties.Servlet servlet;
    private final ThymeleafProperties.Reactive reactive;

    public ThymeleafProperties() {
        this.encoding = DEFAULT_ENCODING;
        this.cache = true;
        this.renderHiddenMarkersBeforeCheckboxes = false;
        this.enabled = true;
        this.servlet = new ThymeleafProperties.Servlet();
        this.reactive = new ThymeleafProperties.Reactive();
    }
从上面代码可以看到关于模板的解析属性配置,有默认前后缀,跟之前我们配置视图解析器配置的前后缀一样
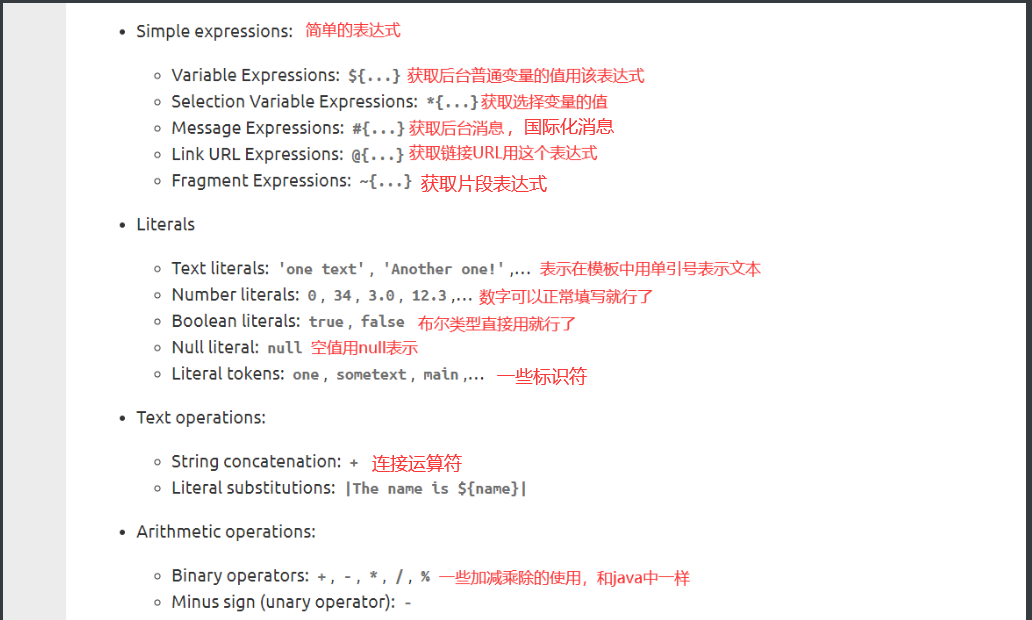
我们查看一下thymeleaf的帮助文档,如下
一些基本使用的表达式如下
(https://img2020.cnblogs.com/blog/2432278/202106/2432278-20210617142104924-654772761.png)
语法使用如下
测试各个语法
-
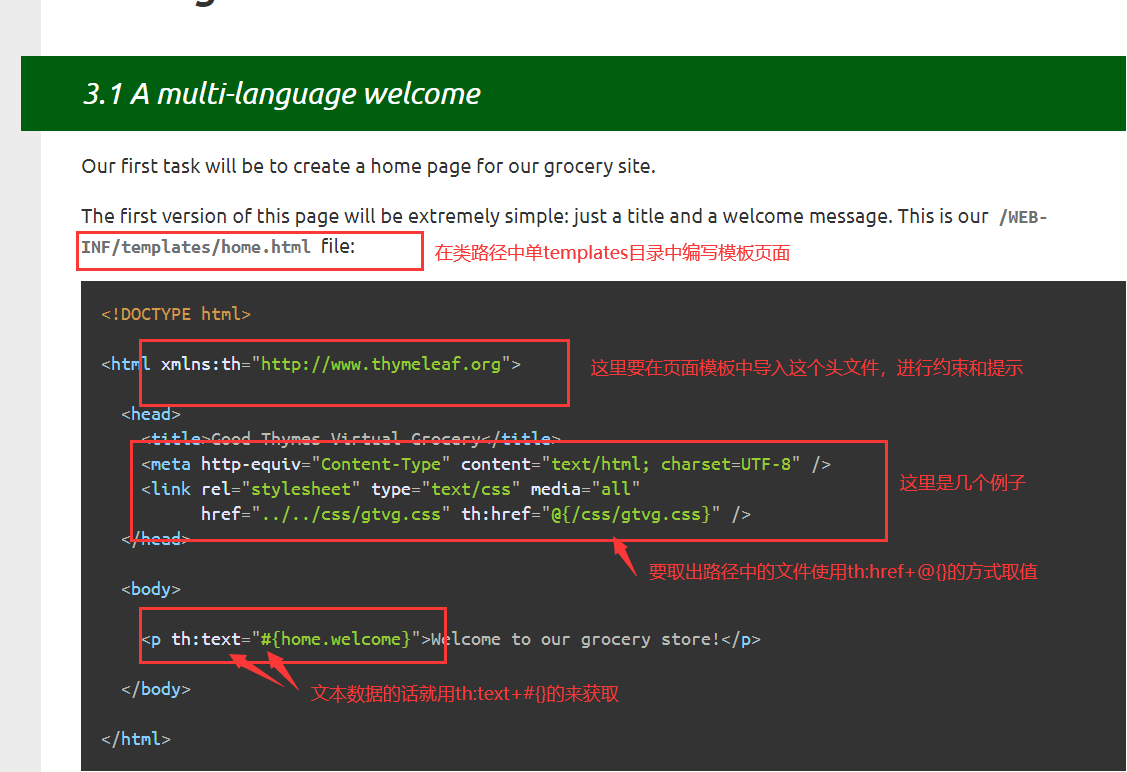
测试读取普通文本
首先我们在templates目录中创建一个模板页面text.html,然后导入头文件
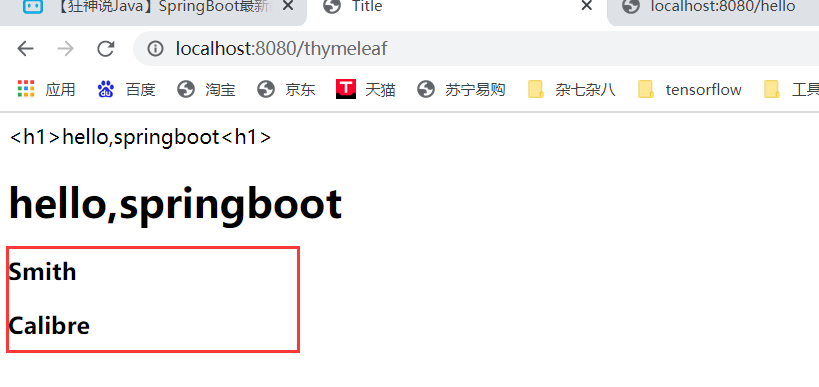
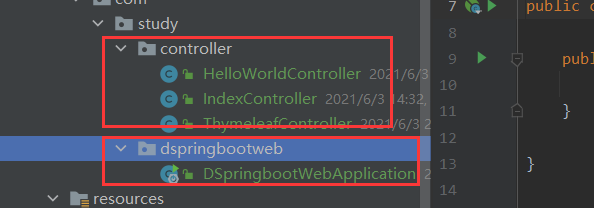
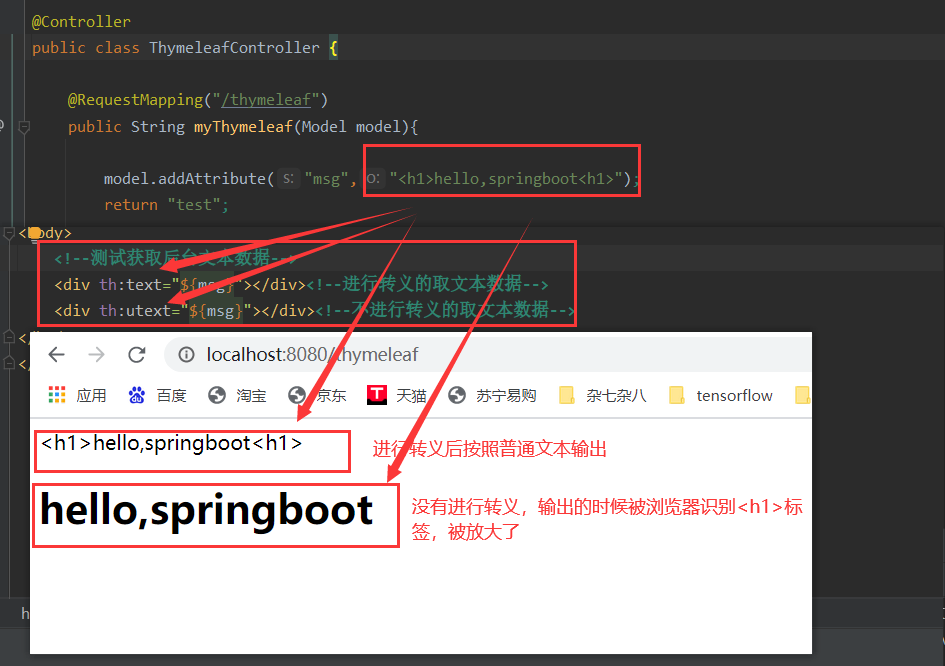
@Controller
public class ThymeleafController {

    @RequestMapping("/thymeleaf")
    public String myThymeleaf(Model model){

        model.addAttribute("msg","<h1>hello,springboot<h1>");
        return "test";

    }

}
<!DOCTYPE html> <html lang="en" xmlns:th="http://www.thymeleaf.org"> <head> <meta charset="UTF-8"> <title>Title</title> </head> <body> <!--测试获取后台文本数据--> <div th:text="${msg}"></div><!--进行转义的取文本数据--> <div th:utext="${msg}"></div><!--不进行转义的取文本数据--> </body> </html>再启动测试的时候出现了一个错误,由于主启动类被默认放进了一个自创建的包中,我们创建的controller包和这个包同级,所以没有扫描controller包中的类,容器中没有处理器类的组件。所以我们在进行访问的时候一直是404
我们把主配置类提出到study包下。运行项目,访问。结果如下
-
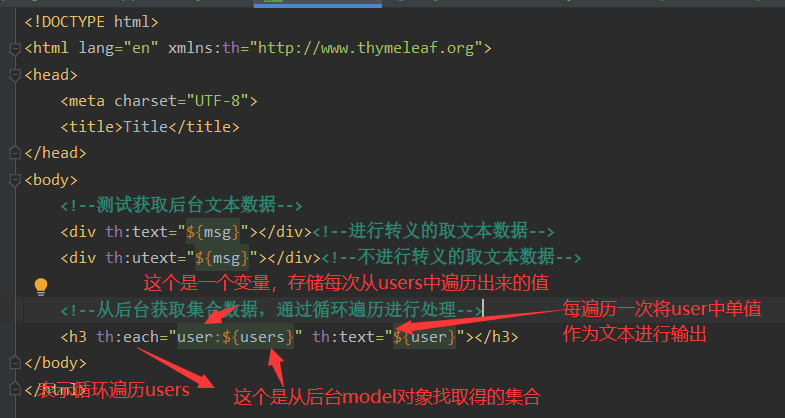
测试遍历数据的语法
<!DOCTYPE html>
<html lang="en" xmlns:th="http://www.thymeleaf.org">
<head>
    <meta charset="UTF-8">
    <title>Title</title>
</head>
<body>
    <!--测试获取后台文本数据-->
    <div th:text="${msg}"></div><!--进行转义的取文本数据-->
    <div th:utext="${msg}"></div><!--不进行转义的取文本数据-->

    <!--从后台获取集合数据,通过循环遍历进行处理-->
    <h3 th:each="user:${users}" th:text="${user}"></h3>
</body>
</html>
@Controller public class ThymeleafController { @RequestMapping("/thymeleaf") public String myThymeleaf(Model model){ model.addAttribute("msg","<h1>hello,springboot<h1>"); //创建一个数组 String[] arr = {"Smith","Calibre"}; model.addAttribute("users",Arrays.asList(arr));//将数组转换成集合,并且放到model对象中 return "test"; } }结果如下