UITableView 详解 教程
看TableView的资料其实已经蛮久了,一直想写点儿东西,却总是因为各种原因拖延,今天晚上有时间静下心来记录一些最近学习的TableView的知识。下面进入正题,UITableView堪称UIKit里面最复杂的一个控件了,使用起来不算难,但是要用好并不容易。当使用的时候我们必须要考虑到后台数据的设计,tableViewCell的设计和重用以及tableView的效率等问题。
下面分9个方面进行介绍:
一、UITableView概述
UITableView继承自UIScrollView,可以表现为Plain和Grouped两种风格,分别如下图所示:
其中左边的是Plain风格的,右边的是Grouped风格,这个区别还是很明显的。
查看UITableView的帮助文档我们会注意到UITableView有两个Delegate分别为:dataSource和delegate。
dataSource是UITableViewDataSource类型,主要为UITableView提供显示用的数据(UITableViewCell),指定UITableViewCell支持的编辑操作类型(insert,delete和reordering),并根据用户的操作进行相应的数据更新操作,如果数据没有更具操作进行正确的更新,可能会导致显示异常,甚至crush。
delegate是UITableViewDelegate类型,主要提供一些可选的方法,用来控制tableView的选择、指定section的头和尾的显示以及协助完成cell的删除和排序等功能。
提到UITableView,就必须的说一说NSIndexPath。UITableView声明了一个NSIndexPath的类别,主要用来标识当前cell的在tableView中的位置,该类别有section和row两个属性,前者标识当前cell处于第几个section中,后者代表在该section中的第几行。
UITableView只能有一列数据(cell),且只支持纵向滑动,当创建好的tablView第一次显示的时候,我们需要调用其reloadData方法,强制刷新一次,从而使tableView的数据更新到最新状态。
二、UITableViewController简介
UITableViewController是系统提供的一个便利类,主要是为了方便我们使用UITableView,该类生成的时候就将自身设置成了其包含的tableView的dataSource和delegate,并创建了很多代理函数的框架,为我们大大的节省了时间,我们可以通过其tableView属性获取该controller内部维护的tableView对象。默认情况下使用UITableViewController创建的tableView是充满全屏的,如果需要用到tableView是不充满全屏的话,我们应该使用UIViewController自己创建和维护tableView。
UITableViewController提供一个初始化函数initWithStyle:,根据需要我们可以创建Plain或者Grouped类型的tableView,当我们使用其从UIViewController继承来的init初始化函数的时候,默认将会我们创建一个Plain类型的tableView。
UITableViewController默认的会在viewWillAppear的时候,清空所有选中cell,我们可以通过设置self.clearsSelectionOnViewWillAppear = NO,来禁用该功能,并在viewDidAppear中调用UIScrollView的flashScrollIndicators方法让滚动条闪动一次,从而提示用户该控件是可以滑动的。
三、UITableViewCell介绍
UITableView中显示的每一个单元都是一个UITableViewCell对象,看文档的话我们会发现其初始化函数initWithStyle:reuseIdentifier:比较特别,跟我们平时看到的UIView的初始化函数不同。这个主要是为了效率考虑,因为在tableView快速滑动的滑动的过程中,频繁的alloc对象是比较费时的,于是引入了cell的重用机制,这个也是我们在dataSource中要重点注意的地方,用好重用机制会让我们的tableView滑动起来更加流畅。
我们可以通过cell的selectionStyle属性指定cell选中时的显示风格,以及通过accessoryType来指定cell右边的显示的内容,或者直接指定accessoryView来定制右边显示的view。
系统提供的UITableView也包含了四种风格的布局,分别是:
typedef enum {
    UITableViewCellStyleDefault,
    UITableViewCellStyleValue1,
    UITableViewCellStyleValue2,
    UITableViewCellStyleSubtitle
} UITableViewCellStyle;
这几种文档中都有详细描述,这儿就不在累赘。然而可以想象系统提供的只是最常用的几种类型,当系统提供的风格不符合我们需要的时候,我们就需要对cell进行定制了,有以下两种定制方式可选:
1、直接向cell的contentView上面添加subView
这是比较简单的一种的,根据布局需要我们可以在不同的位置添加subView。但是此处需要注意:所有添加的subView都最好设置为不透明的,因为如果subView是半透明的话,view图层的叠加将会花费一定的时间,这会严重影响到效率。同时如果每个cell上面添加的subView个数过多的话(通常超过3,4个),效率也会受到比较大的影响。
下面我们看一个例子:
- (UITableViewCell *)tableView:(UITableView *)tableView cellForRowAtIndexPath:(NSIndexPath *)indexPath
{
    NSArray *sections = [SvTableViewDataModal sections];
    SvSectionModal *sectionModal = [sections objectAtIndex:indexPath.section]; static NSString *reuseIdetify = @"SvTableViewCell";
    UITableViewCell *cell = [tableView dequeueReusableCellWithIdentifier:reuseIdetify]; if (!cell) {
        cell = [[UITableViewCell alloc] initWithStyle:UITableViewCellStyleDefault reuseIdentifier:reuseIdetify];
        cell.accessoryType = UITableViewCellAccessoryDisclosureIndicator;
        cell.showsReorderControl = YES; for (int i = 0; i < 6; ++i) {
            UILabel *label = [[UILabel alloc] initWithFrame:CGRectMake(100 + 15 * i, 0, 30, 20)];
            label.backgroundColor = [UIColor redColor];
            label.text = [NSString stringWithFormat:@"%d", i];
            [cell.contentView addSubview:label];
            [label release];
        }
    }

    cell.textLabel.backgroundColor = [UIColor clearColor];
    cell.textLabel.text = [sectionModal.cityNames objectAtIndex:indexPath.row]; return cell;
}
在上面这个例子中,我往每个cell中添加了6个subView,而且每个subView都是半透明(UIView默认是半透明的),这个时候滑动起来明显就可以感觉到有点颤抖,不是很流畅。当把每一个subView的opaque属性设置成YES的时候,滑动会比之前流畅一些,不过还是有点儿卡。
2、从UITableViewCell派生一个类
通过从UITableViewCell中派生一个类,可以更深度的定制一个cell,可以指定cell在进入edit模式的时候如何相应等等。最简单的实现方式就是将所有要绘制的内容放到一个定制的subView中,并且重载该subView的drawRect方法直接把要显示的内容绘制出来(这样可以避免subView过多导致的性能瓶颈),最后再将该subView添加到cell派生类中的contentView中即可。但是这样定制的cell需要注意在数据改变的时候,通过手动调用该subView的setNeedDisplay方法来刷新界面,这个例子可以在苹果的帮助文档中的TableViewSuite工程中找到,这儿就不举例了。
观看这两种定制cell的方法,我们会发现subView都是添加在cell的contentView上面的,而不是直接加到cell上面,这样写也是有原因的。下面我们看一下cell在正常状态下和编辑状态下的构成图:
cell在正常状态下的构成图如下:
进入编辑状态下cell的构成图如下:
通过观察上面两幅图片我们可以看出来,当cell在进入编辑状态的时候,contentView会自动的缩放来给Editing control腾出位置。这也就是说如果我们把subView添加到contentView上,如果设置autoresizingMask为更具父view自动缩放的话,cell默认的机制会帮我们处理进入编辑状态的情况。而且在tableView是Grouped样式的时候,会为cell设置一个背景色,如果我们直接添加在cell上面的话,就需要自己考虑到这个背景色的显示问题,如果添加到contentView上,则可以通过view的叠加帮助我们完成该任务。综上,subView最好还是添加到cell的contentView中。
四、Reordering
为了使UITableVeiew进入edit模式以后,如果该cell支持reordering的话,reordering控件就会临时的把accessaryView覆盖掉。为了显示reordering控件,我们必须将cell的showsReorderControl属性设置成YES,同时实现dataSource中的tableView:moveRowAtIndexPath:toIndexPath:方法。我们还可以同时通过实现dataSource中的tableView:canMoveRowAtIndexPath:返回NO,来禁用某一些cell的reordering功能。
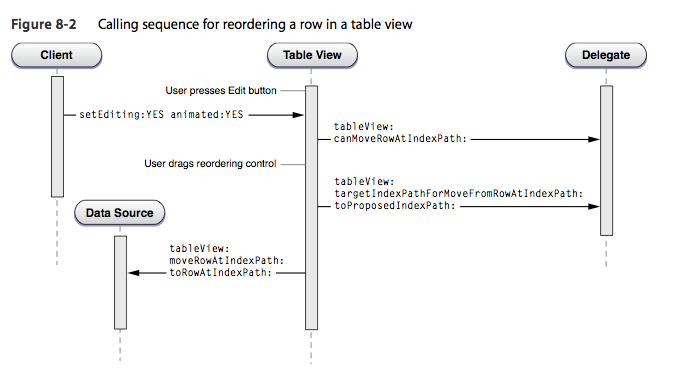
下面看苹果官方的一个reordering流程图:
上图中当tableView进入到edit模式的时候,tableView会去对当前可见的cell逐个调用dataSource的tableView:canMoveRowAtIndexPath:方法(此处官方给出的流程图有点儿问题),决定当前cell是否显示reoedering控件,当开始进入拖动cell进行拖动的时候,每滑动过一个cell的时候,会去掉用delegate的tableView:targetIndexPathForMoveFromRowAtIndexPath:toProposedIndexPath:方法,去判断当前划过的cell位置是否可以被替换,如果不行则给出建议的位置。当用户放手时本次reordering操作结束,调用dataSource中的tableView:moveRowAtIndexPath:toIndexPath:方法更新tableView对应的数据。
此处给个我写demo中的更新数据的小例子:
// if you want show reordering control, you must implement moveRowAtndexPath, or the reordering control will not show // when use reordering end, this method is invoke  - (void)tableView:(UITableView *)tableView moveRowAtIndexPath:(NSIndexPath *)sourceIndexPath toIndexPath:(NSIndexPath *)destinationIndexPath
{ // update DataModal  NSArray *sections = [SvTableViewDataModal sections];
    SvSectionModal *sourceSectionModal = [sections objectAtIndex:sourceIndexPath.section];
    NSString *city = [[sourceSectionModal.cityNames objectAtIndex:sourceIndexPath.row] retain];
    [sourceSectionModal.cityNames removeObject:city];
    [SvTableViewDataModal replaceSectionAtIndex:sourceIndexPath.section withSection:sourceSectionModal];

    SvSectionModal *desinationsSectionModal= [[SvTableViewDataModal sections] objectAtIndex:destinationIndexPath.section];
    [desinationsSectionModal.cityNames insertObject:city atIndex:destinationIndexPath.row];
    [SvTableViewDataModal replaceSectionAtIndex:destinationIndexPath.section withSection:desinationsSectionModal];

    [city release];
}
上面代码中首先拿到源cell所处的section,然后从该section对应的数据中移除,然后拿到目标section的数据,然后将源cell的数据添加到目标section中,并更新回数据模型,如果我们没有正确更新数据模型的话,显示的内容将会出现异常。
五、Delete & Insert
cell的delete和insert操作大部分流程都是一样的,当进入编辑模式的时候具体的显示是delete 还是insert
 取决与该cell的editingStyle的值,editStyle的定义如下:
typedef enum {
    UITableViewCellEditingStyleNone,
    UITableViewCellEditingStyleDelete,
    UITableViewCellEditingStyleInsert
} UITableViewCellEditingStyle;
当tableView进入编辑模式以后,cell上面显示的delete还是insert除了跟cell的editStyle有关,还与 tableView的delegate的tableView:editingStyleForRowAtIndexPath:方法的返回值有关(在这里唠叨一句,其实delegate提供了很多改变cell属性的机会,如非必要,还是不要去实现这些方法,因为执行这些方法也造成一定的开销)。
delete和insert的流程如下苹果官方文档中给出的图所示:
下面是我写的demo中删除和添加部分的代码:
#pragma mark -
- (void)tableView:(UITableView *)tableView commitEditingStyle:(UITableViewCellEditingStyle)editingStyle forRowAtIndexPath:(NSIndexPath *)indexPath
{
    NSLog(@"commit editStyle: %d", editingStyle); if (editingStyle == UITableViewCellEditingStyleDelete) {
        NSArray *sections = [SvTableViewDataModal sections];
        SvSectionModal *sourceSectionModal = [sections objectAtIndex:indexPath.section];
        [sourceSectionModal.cityNames removeObjectAtIndex:indexPath.row];

        [SvTableViewDataModal replaceSectionAtIndex:indexPath.section withSection:sourceSectionModal];
        [tableView deleteRowsAtIndexPaths:[NSArray arrayWithObject:indexPath] withRowAnimation:UITableViewRowAnimationRight];
    } else { // do something for add it NSArray *sections = [SvTableViewDataModal sections];
        SvSectionModal *sourceSectionModal = [sections objectAtIndex:indexPath.section];
        [sourceSectionModal.cityNames insertObject:@"new City" atIndex:indexPath.row];
        [SvTableViewDataModal replaceSectionAtIndex:indexPath.section withSection:sourceSectionModal];

        [tableView insertRowsAtIndexPaths:[NSArray arrayWithObject:indexPath] withRowAnimation:UITableViewRowAnimationRight];
    }
}
代码中首先判断当前操作是delete操作还是insert操作,相应的更新数据,最后根据情况调用tableView的insertRowsAtIndexPaths:withRowAnimation:或者deleteRowsAtIndexPaths:withRowAnimation:方法,对tableView的视图进行更新。cell的删除和添加操作相对还是比较简单的。
六、Cell的Select操作
当我们在tableView中点击一个cell的时候,将会调用tableView的delegate中的tableView:didSelectRowAtIndexPath:方法。
关于tableView的cell的选中,苹果官方有以下几个建议:
1、不要使用selection来表明cell的选择状态,而应该使用accessaryView中的checkMark或者自定义accessaryView来显示选中状态。
2、当选中一个cell的时候,你应该取消前一个cell的选中。
3、如果cell选中的时候,进入下一级viewCOntroller,你应该在该级菜单从navigationStack上弹出的时候,取消该cell的选中。
这块儿再提一点,当一个cell的accessaryType为UITableViewCellAccessoryDisclosureIndicator的时候,点击该accessary区域通常会将消息继续向下传递,即跟点击cell的其他区域一样,将会掉delegate的tableView:didSelectRowAtIndexPath:方法,当时如果accessaryView为 UITableViewCellAccessoryDetailDisclosureButton的时候,点击accessaryView将会调用delegate的 tableView:accessoryButtonTappedForRowWithIndexPath:方法。
七、批量插入,删除,部分更新操作
UITableView提供了一个批量操作的特性,这个功能在一次进行多个row或者scetion的删除,插入,获取更新多个cell内容的时候特别好用。所有的批量操作需要包含在beginUpdates和endUpdates块中,否则会出现异常。
下面请看我demo中的一个批量操作的例子:
- (void)groupEdit:(UIBarButtonItem*)sender
{
    [_tableView beginUpdates]; // first update the data modal [_tableView insertRowsAtIndexPaths:[NSArray arrayWithObject:[NSIndexPath indexPathForRow:0 inSection:0]] withRowAnimation:UITableViewRowAnimationTop];

    [_tableView deleteSections:[NSIndexSet indexSetWithIndex:0] withRowAnimation:UITableViewRowAnimationTop];

    [SvTableViewDataModal deleteSectionAtIndex:0];

    SvSectionModal *section = [[SvTableViewDataModal sections] objectAtIndex:0];
    [section.cityNames insertObject:@"帝都" atIndex:0];
    [SvTableViewDataModal replaceSectionAtIndex:0 withSection:section];

    [_tableView endUpdates];
}
上面的例子中我们可以看到先往tableView的第0个section的第0行添加一个cell,然后将第0个section删掉。按照我们程序中写的顺序,那么新添加进去的“帝都”,将不在会显示,因为包含它的整个section都已经被删除了。
执行程序前后结果如下图:
demo中第0个section是陕西省的城市,第1个section是北京。左边是执行前的截图,右边是执行后的截图,观察发现结果并不像我们前面推测的那样。那是因为在批量操作时,不管代码中先写的添加操作还是删除操作,添加操作都会被推出执行,直到这个块中所有的删除操作都执行完以后,才会执行添加操作,这也就是上面苹果官方图片上要表达的意思。
苹果官方文档有一副图可以帮助我们更好的理解这一点:
原图中操作是:首先删除section 0中的row 1,然后删除section 1,再向section 1中添加一行。执行完批量更新以后就得到右半边的结果。
八、IndexList
当我们tableView中section有很多,数据量比较大的时候我们可以引入indexList,来方便完成section的定位,例如系统的通讯录程序。我们可以通过设置tableView的sectionIndexMinimumDisplayRowCount属性来指定当tableView中多少行的时候开始显示IndexList,默认的设置是NSIntegerMax,即默认是不显示indexList的。
为了能够使用indexlist我们还需要实现dataSource中一下两个方法:
- (NSArray *)sectionIndexTitlesForTableView:(UITableView *)tableView; - (NSInteger)tableView:(UITableView *)tableView sectionForSectionIndexTitle:(NSString *)title atIndex:(NSInteger)index;
第一个方法返回用于显示在indexList中的内容的数组,通常为A,B,C...Z。第二个方法的主要作用是根据用户在indexList中点击的位置,返回相应的section的index值。这个例子可以在苹果官方给出的TableViewSuite中找到,实现起来还是很简单的。
九、其他
1、分割线
我们可以通过设置tableView的separatorStyle属性来设置有无分割线以及分割线的风格,其中style定义如下:
typedef enum {
    UITableViewCellSeparatorStyleNone,
    UITableViewCellSeparatorStyleSingleLine,
    UITableViewCellSeparatorStyleSingleLineEtched
} UITableViewCellSeparatorStyle;
同时还可以通过tableView的separatorColor属性来设置分割线的颜色。
2、如何提高tableView的性能
a、重用cell
我们都知道申请内存是需要时间,特别是在一段时间内频繁的申请内存将会造成很大的开销,而且上tebleView中cell大部分情况下布局都是一样的,这个时候我们可以通过回收重用机制来提高性能。
b、避免content的重新布局
尽量避免在重用cell时候,对cell的重新布局,一般情况在在创建cell的时候就将cell布局好。
c、使用不透明的subView
在定制cell的时候,将要添加的subView设置成不透明的会大大减少多个view层叠加时渲染所需要的时间。
d、如果方便,直接重载subView的drawRect方法
如果定制cell的过程中需要多个小的元素的话,最好直接对要显示的多个项目进行绘制,而不是采用添加多个subView。
e、tableView的delegate的方法如非必要,尽量不要实现
tableView的delegate中的很多函数提供了对cell属性的进一步控制,比如每个cell的高度,cell是否可以编辑,支持的edit风格等,如非必要最好不要实现这些方法因为快速的调用这些方法也会影响性能。


 浙公网安备 33010602011771号