Vue3.2 setup语法糖、Composition API归纳总结
起初 Vue3.0 暴露变量必须 return 出来,template中才能使用;
Vue3.2 中 只需要在 script 标签上加上 setup属性,组件在编译的过程中代码运行的上下文是在 setup() 函数中,无需return,template可直接使用。
⚠️Tips:配合➡️右侧目录树查看更清晰哦😁~
一、Vue文件结构
<template>
  // Vue2中,template标签中只能有一个根元素,在Vue3中没有此限制
  // ...
</template>

<script setup>
  // ...
</script>

<style lang="scss" scoped>
  // 支持CSS变量注入v-bind(color)
</style>
二、data
<script setup>
  import { reactive, ref } from 'vue'

  // ref声明响应式数据,用于声明基本数据类型
  const name = ref('Jerry')
  // 修改
  name.value = 'Tom'

  // reactive声明响应式数据,用于声明引用数据类型
  const state = reactive({
    name: 'Jerry',
    sex: '男'
  })
  // 修改
  state.name = 'Tom'
</script>
三、method
<template>
  // 调用方法
  <button @click='changeName'>按钮</button>
</template>

<script setup>
  import { reactive } from 'vue'

  const state = reactive({
    name: 'Jery'
  })

  // 声明method方法
  const changeName = () => {
    state.name = 'Tom'
  }
</script>
四、computed
<script setup>
  import { computed, ref } from 'vue'

  const count = ref(1)

  // 通过computed获得doubleCount
  const doubleCount = computed(() => {
    return count.value * 2
  })
</script>
五、watch 、watchEffect
1、watch监听器除了使用方式有区别之外,其他的与vue2.0没啥变化
<script setup>
  import { watch, reactive } from 'vue'

  const state = reactive({
    count: 1
  })

  // 声明方法
  const changeCount = () => {
    state.count = state.count * 2
  }

  // 监听count
  watch(
    () => state.count,
    (newVal, oldVal) => {
      console.log(state.count)
      console.log(`watch监听变化前的数据:${oldVal}`)
      console.log(`watch监听变化后的数据:${newVal}`)
    },
    {
      immediate: true, // 立即执行
      deep: true // 深度监听
    }
  )
</script>
2、watchEffect
watchEffect是Vue3.0新增的一个监听属性的方法,它与watch的区别在于watchEffect不需要指定监听对象,回调函数里可直接获取到修改后的属性的值
<script setup>
import { ref, reactive, watchEffect } from 'vue'

let count = ref(0)
const obj = reactive({
    count: 0
})
setTimeout(()=>{
    count.value++
    obj.count++
}, 1000)

watchEffect(()=> {
    console.log('修改后的count', count.value)
    console.log('修改前的obj', obj.value)
})
</script>
六、props父传子
子组件
<template>
  <span>{{props.name}}</span>
  // 可省略【props.】
  <span>{{name}}</span>
</template>

<script setup>
  // import { defineProps } from 'vue'
  // defineProps在<script setup>中自动可用,无需导入
  // 需在.eslintrc.js文件中【globals】下配置【defineProps: true】

  // 声明props
  const props = defineProps({
    name: {
      type: String,
      default: ''
    }
  })
</script>
父组件
<template>
  <child name='Jerry'/>
</template>

<script setup>
  // 引入子组件
  import child from './child.vue'
</script>
七、emit子传父
子组件
<template>
  <span>{{props.name}}</span>
  // 可省略【props.】
  <span>{{name}}</span>
  <button @click='changeName'>更名</button>
</template>

<script setup>
  // import { defineEmits, defineProps } from 'vue'
  // defineEmits和defineProps在<script setup>中自动可用,无需导入
  // 需在.eslintrc.js文件中【globals】下配置【defineEmits: true】、【defineProps: true】

  // 声明props
  const props = defineProps({
    name: {
      type: String,
      default: ''
    }
  })
  // 声明事件
  const emit = defineEmits(['updateName'])

  const changeName = () => {
    // 执行
    emit('updateName', 'Tom')
  }
</script>
父组件
<template>
  <child :name='state.name' @updateName='updateName'/>
</template>

<script setup>
  import { reactive } from 'vue'
  // 引入子组件
  import child from './child.vue'

  const state = reactive({
    name: 'Jerry'
  })

  // 接收子组件触发的方法
  const updateName = (name) => {
    state.name = name
  }
</script>
八、v-model
子组件
<template>
  <span @click="changeInfo">我叫{{ modelValue }},今年{{ age }}岁</span>
</template>

<script setup>
  // import { defineEmits, defineProps } from 'vue'
  // defineEmits和defineProps在<script setup>中自动可用,无需导入
  // 需在.eslintrc.js文件中【globals】下配置【defineEmits: true】、【defineProps: true】

  defineProps({
    modelValue: String,
    age: Number
  })

  const emit = defineEmits(['update:modelValue', 'update:age'])
  const changeInfo = () => {
    // 触发父组件值更新
    emit('update:modelValue', 'Tom')
    emit('update:age', 30)
  }
</script>
父组件
<template>
  // v-model:modelValue简写为v-model
  // 可绑定多个v-model
  <child
    v-model="state.name"
    v-model:age="state.age"
    />
</template>

<script setup>
  import { reactive } from 'vue'
  // 引入子组件
  import child from './child.vue'

  const state = reactive({
    name: 'Jerry',
    age: 20
  })
</script>
九、nextTick
<script setup>
  import { nextTick } from 'vue'

  nextTick(() => {
      // ...
  })
</script>
十、子组件ref变量和defineExpose,$el,$set
在标准组件写法里,子组件的数据都是默认隐式暴露给父组件的,但在 script-setup 模式下,所有数据只是默认 return 给template 使用,不会暴露到组件外,所以父组件是无法直接通过挂载 ref 变量获取子组件的数据。
如果要调用子组件的数据,需要先在子组件显示的暴露出来,才能够正确的拿到,这个操作,就是由 defineExpose 来完成。
子组件
<template>
  <span>{{state.name}}</span>
</template>

<script setup>
  import { defineExpose, reactive, toRefs } from 'vue'

  // 声明state
  const state = reactive({
    name: 'Jerry'
  })

  // 声明方法
  const changeName = () => {
      // 执行
      state.name = 'Tom'
  }

  // 将方法、变量暴露给父组件使用,父组见才可通过ref API拿到子组件暴露的数据
  defineExpose({
    // 解构state
    ...toRefs(state),
    changeName
  })
</script>
父组件
<template>
  <child ref='childRef'/>
</template>

<script setup>
  import { ref, nextTick } from 'vue'
  // 引入子组件
  import child from './child.vue'

  // 子组件ref
  const childRef = ref('childRef')

  // nextTick
  nextTick(() => {
      // 获取子组件name
      console.log(childRef.value.name)
    // 执行子组件方法
    childRef.value.changeName()
  })
</script>
上面的代码展示了使用ref获取dom的方式,还有另外一种方式:(vue2中可以使用 this.$el 获取dom)
import { getCurrentInstance, onMounted, reactive,  toRefs } from 'vue';
export default {
  setup() {
    const {ctx} = getCurrentInstance();

    onMounted(()=>{
        // 当前dom节点
        const _this = ctx.$el;
    })
}
$set
在vue2中我们常常会遇到明明已经改变了数据视图却没有实时更新这样的问题
比如:
<el-input v-model="input.text" placeholder="请输入内容"></el-input>
data() {
    return{
        input:{
            text:'1'
        }
    }
}
mounted () {
  this.input.text = '2';  // 视图层并没有改变
}
这时vue2就提供了一个方法就是$set
this.$set(this.input, 'text', '3');
原因就是 Vue2 中的数据响应式是利用 object.definedProperty()实现的,它是无法深层监听数据的变化的。
而Vue3中废弃了$set的概念,用的是ES6的proxy,对数据响应式进行一个数据的代理。如果想要让一个对象变为响应式数据,可以使用reactive或ref
setup() {
  const state =  reactive({
    input:{
        text:"1"
    }
  });
  return {
    state // 导出响应式数组
  }
},
mounted() {
  console.log(state); // 是一个proxy
  state.input.text = '2'; // 视图更新
}
十一、插槽slot
子组件
<template>
  <!-- 匿名插槽 -->
  <slot/>
  <!-- 具名插槽 -->
  <slot name='title'/>
  <!-- 作用域插槽 -->
  <slot name="footer" :scope="state" />
</template>

<script setup>
  import { useSlots, reactive } from 'vue'
  const state = reactive({
    name: '张三',
    age: '25岁'
  })

  const slots = useSlots()
  // 匿名插槽使用情况
  const defaultSlot = reactive(slots.default && slots.default().length)
  console.log(defaultSlot) // 1
  // 具名插槽使用情况
  const titleSlot = reactive(slots.title && slots.title().length)
  console.log(titleSlot) // 3
</script>
父组件
<template>
  <child>
    <!-- 匿名插槽 -->
    <span>我是默认插槽</span>
    <!-- 具名插槽 -->
    <template #title>
      <h1>我是具名插槽</h1>
      <h1>我是具名插槽</h1>
      <h1>我是具名插槽</h1>
    </template>
    <!-- 作用域插槽 -->
    <template #footer="{ scope }">
      <footer>作用域插槽——姓名:{{ scope.name }},年龄{{ scope.age }}</footer>
    </template>
  </child>
</template>

<script setup>
  // 引入子组件
  import child from './child.vue'
</script>
十二、路由useRoute和useRouter
<script setup>
  import { useRoute, useRouter } from 'vue-router'

  // 必须先声明调用
  const route = useRoute()
  const router = useRouter()

  // 路由信息
  console.log(route.query)

  // 路由跳转
  router.push('/newPage')
</script>
十三、路由导航守卫
<script setup>
  import { onBeforeRouteLeave, onBeforeRouteUpdate } from 'vue-router'

  // 添加一个导航守卫,在当前组件将要离开时触发。
  onBeforeRouteLeave((to, from, next) => {
      next()
  })

  // 添加一个导航守卫,在当前组件更新时触发。
  // 在当前路由改变,但是该组件被复用时调用。
  onBeforeRouteUpdate((to, from, next) => {
      next()
  })
</script>
十四、store
Vue3 中的Vuex不再提供辅助函数写法
<script setup>
  import { useStore } from 'vuex'
  import { key } from '../store/index'

  // 必须先声明调用
  const store = useStore(key)

  // 获取Vuex的state
  store.state.xxx

  // 触发mutations的方法
  store.commit('fnName')

  // 触发actions的方法
  store.dispatch('fnName')

  // 获取Getters
  store.getters.xxx
</script>
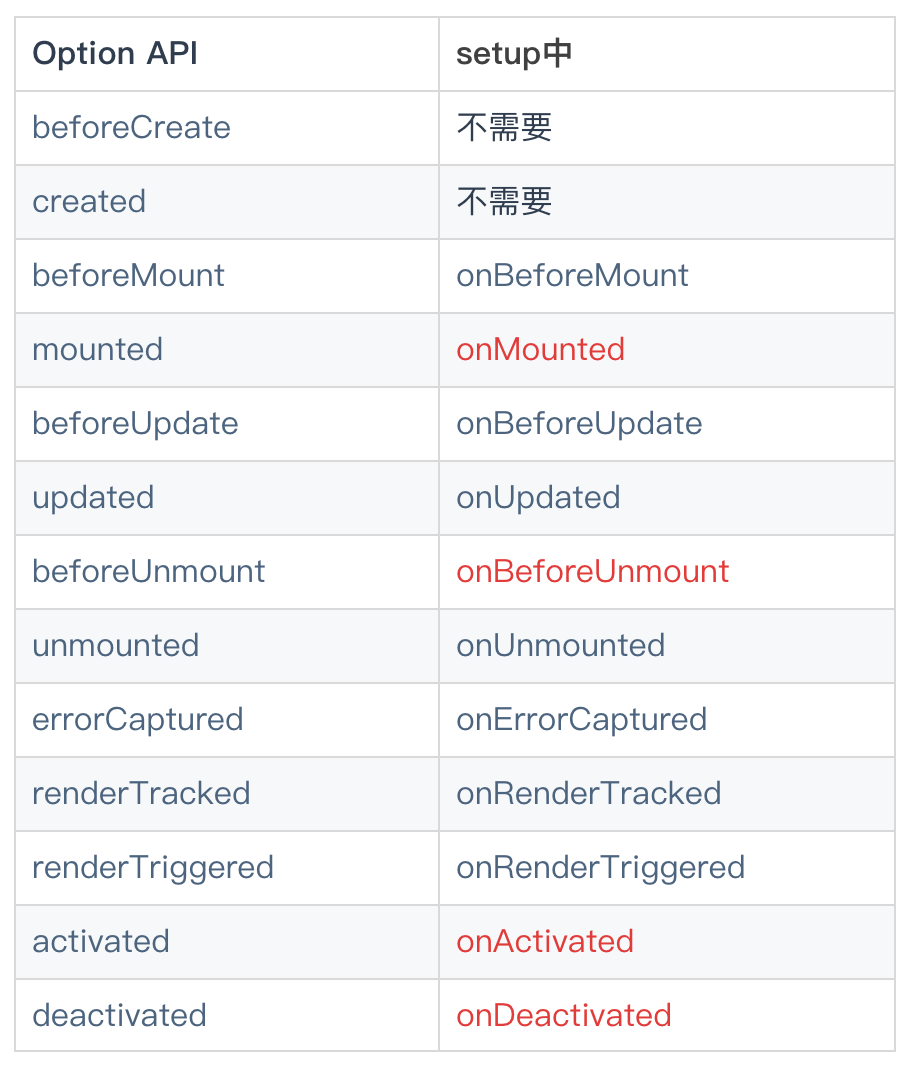
十五、生命周期
在vue3的生命周期中没有了销毁之前(beforeDestroy )以及销毁完毕(destroyed )这两个生命周期。
取而代之的是卸载,卸载之前(beforeUnmount )以及卸载完毕(unmounted )
通过在生命周期钩子前面加上 “on” 来访问组件的生命周期钩子。
下表包含如何在 Option API 和 setup() 内部调用生命周期钩子
十六、CSS变量注入
<template>
  <span>Jerry</span>
</template>

<script setup>
  import { reactive } from 'vue'

  const state = reactive({
      color: 'red'
  })
</script>

<style scoped>
  span {
    // 使用v-bind绑定state中的变量
      color: v-bind('state.red');
  }
</style>
十七、原型绑定与组件内使用
main.js
import { createApp } from 'vue'
import App from './App.vue'
const app = createApp(App)

// 获取原型
const prototype = app.config.globalProperties

// 绑定参数
prototype.name = 'Jerry'
组件内使用
<script setup>
  import { getCurrentInstance } from 'vue'

  // 获取原型
  const { proxy } = getCurrentInstance()

  // 输出
  console.log(proxy.name)
</script>
十八、对 await 的支持
不必再配合 async 就可以直接使用 await 了,这种情况下,组件的 setup 会自动变成 async setup 。
<script setup>
  const post = await fetch('/api').then(() => {})
</script>
十九、定义组件的name
用单独的<script></script>块来定义
<script>
  export default {
    name: 'ComponentName',
  }
</script>
二十、provide和inject
父组件
<template>
  <child/>
</template>

<script setup>
  import { provide } from 'vue'
  import { ref, watch } from 'vue'
  // 引入子组件
  import child from './child.vue'

  let name = ref('Jerry')
  // 声明provide
  provide('provideState', {
    name,
    changeName: () => {
      name.value = 'Tom'
    }
  })

  // 监听name改变
  watch(name, () => {
    console.log(`name变成了${name}`)
    setTimeout(() => {
      console.log(name.value) // Tom
    }, 1000)
  })
</script>
子组件
<script setup>
  import { inject } from 'vue'
  // 注入
  const provideState = inject('provideState')

  // 子组件触发name改变
  provideState.changeName()
</script>
二十一、Vue3中使用echarts
// 安装
cnpm i echarts --save

// 组件内引入
import * as echarts from 'echarts'
二十二、自定义指令directive
以 vNameOfDirective 的形式来命名本地自定义指令,可以直接在模板中使用
<script setup>
// 导入指令可重命名
// import { myDirective as vMyDirective } from './MyDirective.js'

// 自定义指令
const vMyDirective = {
  beforeMount: (el) => {
    // 在元素上做些操作
  }
}
</script>
<template>
  <h1 v-my-directive>This is a Heading</h1>
</template>
二十三、import导入的内容可直接使用
1、导入的模块内容,不需要通过 methods 来暴露它
// utils.js
export const onShow = function(name) {
    return 'my name is ' + name
}
// Show.vue
<script setup>
    import { onShow } from './utils.js'
</script>
<template>
    <div>{{ onShow('jack') }}</div>
</template>
2、导入外部组件,不需要通过components注册使用
// Child.vue
<template>
    <div>I am a child</div>
</template>
// Parent.vue
<script setup>
    import Child from './Child.vue'
</script>
<template>
    <child></child>
</template>
二十四、与普通的script标签一起使用
<script setup> 可以和普通的 <script> 一起使用。普通的 <script> 在有这些需要的情况下或许会被使用到:
- 无法在
<script setup>声明的选项,例如inheritAttrs或通过插件启用的自定义的选项; - 声明命名导出,
<script setup>定义的组件默认以组件文件的名称作为组件名; - 运行副作用或者创建只需要执行一次的对象。
<script>
// 普通 <script>, 在模块范围下执行(只执行一次)
runSideEffectOnce()

// 声明额外的选项
export default {
  name: 'ComponentName',    // 组件重命名
  inheritAttrs: false,
  customOptions: {}
}
</script>

<script setup>
// 在 setup() 作用域中执行 (对每个实例皆如此)
</script>
二十五、v-memo新指令
该指令与v-once类似,v-once是只渲染一次之后的更新不再渲染,而v-memo是根据条件来渲染。该指令接收一个固定长度的数组作为依赖值进行记忆比对,如果数组中的每个值都和上次渲染的时候相同,则该元素(含子元素)不刷新。
1、应用于普通元素或组件;
<template>
<-- 普通元素 -->
<div v-memo="[valueA, valueB]">
  ...
</div>

<-- 组件 -->
<component v-memo="[valueA, valueB]"></component>
</template>

<script setup>
import component from "../compoents/component.vue"
</script>
valueA 与 valueB 都维持不变,那么对这个 <div> 以及它的所有子节点的更新都将被跳过。2、结合v-for使用
v-memo 仅供性能敏感场景的针对性优化,会用到的场景应该很少。渲染 v-for 长列表 (长度大于 1000) 可能是它最有用的场景:
<template>
<div v-for="item in list" :key="item.id" v-memo="[item.id === selected]">
  <p>ID: {{ item.id }} - selected: {{ item.id === selected }}</p>
  <p>...more child nodes</p>
</div>
</template>
二十六、v-deep
在vue2中写法
  /deep/ .el-button{
              width:80%;
          }
vue3已改为:类名选择器:v-deep(.要修改的子类)
  :deep( .el-button){
              width:80%;
          }


#swiper >.swiperContext :deep(p) {
  width: 100vw;
  height:60vw;
  background: #000;
  border:5px solid;
  box-sizing: border-box;
  color: #fff;
  border-radius: 5%;
}
二十七、Proxy数据的取值
使用vue3.x时,因为底层是使用proxy进行代理的所以当我们打印一些值得时候是proxy代理之后的是Proxy对象,Proxy对象里边的[[Target]]才是真实的对象。

无论是Vuex还是使用的Composition API 的reactive(),vue中的响应式对象可使用toRaw()方法获取原始对象。
//第一种获取target值的方式,通过vue中的响应式对象可使用toRaw()方法获取原始对象
import { toRaw } from '@vue/reactivity'
var list = toRaw(store.state.menuList)
第二种获取target值的方式,通过json序列化之后可获取值
JSON.parse(JSON.stringify(store.getters.menuList))

 浙公网安备 33010602011771号