现在我们在应用程序中有了一个测试文件夹,我们可以开始增加我们的测试覆盖率。
实际上,到目前为止我们添加到应用程序中的每个特性都需要单独的测试用例。到目前为止,我们完全忽略了这一点,所以让我们为步骤23中的自定义格式化程序函数添加一个简单的单元测试。我们将通过与资源包中的文本进行比较来测试状态的长文本是否正确。
请注意:在本教程中,我们主要关注测试实现的一个简单用例。如果您想更多地了解QUnit测试,请参阅我们的测试教程Testing ,特别是步骤2:第一个单元测试 Step 2: A First Unit Test。
Preview

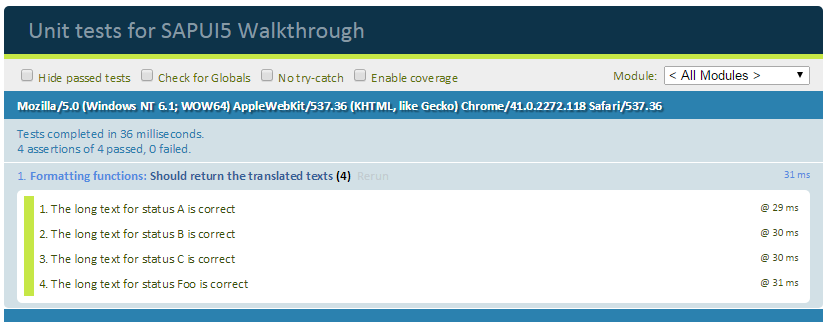
A unit test for our formatters is now available
Coding
You can view and download all files at Walkthrough - Step 28.

Folder Structure for this Step
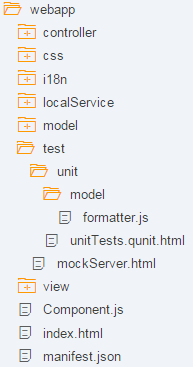
我们在测试文件夹下添加了一个新的文件夹单元和一个模型子文件夹,我们将在其中放置formatter单元测试。文件夹结构与app结构相匹配,便于找到对应的单元测试。
webapp/test/unit/model/formatter.js
/*global QUnit*/

sap.ui.define([
        "sap/ui/demo/walkthrough/model/formatter",
        "sap/ui/model/resource/ResourceModel",
        "sap/ui/thirdparty/sinon",
        "sap/ui/thirdparty/sinon-qunit"
],function(formatter,ResourceModel){
        "use strict";

        QUnit.module("Formatting functions",{
               beforeEach:function(){
                       this._oResourceModel =newResourceModel({
                               bundleUrl: sap.ui.require.toUrl("sap/ui/demo/walkthrough")+"/i18n/i18n.properties"
                       });
               },
               afterEach:function(){
                       this._oResourceModel.destroy();
               }
        });


        QUnit.test("Should return the translated texts",function(assert){

               // Arrange
               // this.stub() does not support chaining and always returns the right data
               // even if a wrong or empty parameter is passed.
               var oModel =this.stub();
                oModel.withArgs("i18n").returns(this._oResourceModel);
               var oViewStub ={
                       getModel: oModel
               };
               var oControllerStub ={
                       getView:this.stub().returns(oViewStub)
               };

               // System under test
               var fnIsolatedFormatter = formatter.statusText.bind(oControllerStub);

               // Assert
               assert.strictEqual(fnIsolatedFormatter("A"),"New","The long text for status A is correct");

               assert.strictEqual(fnIsolatedFormatter("B"),"In Progress","The long text for status B is correct");

               assert.strictEqual(fnIsolatedFormatter("C"),"Done","The long text for status C is correct");

               assert.strictEqual(fnIsolatedFormatter("Foo"),"Foo","The long text for status Foo is correct");
        });

});
我们创建一个新的格式化程序。在webapp/test/unit/model下实现自定义格式化程序的单元测试的js文件。我们要测试的格式化程序文件作为依赖项加载。我们还需要依赖于ResourceModel,因为我们希望检查翻译的文本是否正确。另外,我们需要加载SinonJS来为formatter函数中的依赖项创建存根。
格式化程序文件仅包含格式化程序函数的一个QUnit模块。它用beforeEach函数中的本地化文本实例化ResourceBundle,并在afterEach函数中再次销毁它。在执行每个测试之前和之后调用这些函数。
接下来是对formatter函数的单元测试。在我们在步骤23中创建的雕像stext函数的实现中,我们使用以下队列调用访问ResourceBundle: var ResourceBundle = this.getView(). getmodel ("i18n"). getresourcebundle ();;
由于我们不想测试控制器、视图或模型功能,我们首先通过使用SinonJS及其存根方法将这些调用替换为空外壳来删除依赖项。这发生在单元测试的arrangement部分。SinonJS为所有对象注入一个存根方法,因此我们可以简单地调用this.stub()来为需要模拟的任何行为创建一个新的存根。
测试存根是具有预编程行为的函数。它们支持完整的SinonJS test spy API,以及可以用来改变存根行为的方法。如果这部分有点混乱,请查看测试间谍的官方SinonJS文档,或者暂时忽略它,稍后就会清楚了。
然后通过调用JavaScript的绑定函数将存根绑定到lawstext格式化程序。当使用变量fnIsolatedFormatter调用函数时,这个指针现在绑定到我们的控制器存根上,我们仍然可以按照自己的意愿传入参数。这发生在测试的“系统测试”部分。
最后,我们执行断言。我们通过使用数据模型(A、B、C和其他所有内容)中预期的值调用隔离的formatter函数来检查格式化程序逻辑的每个分支。我们严格地将formatter函数的结果与我们期望从资源包中得到的硬编码字符串进行比较,并在测试失败时给出有意义的错误消息。我们在这里硬编码字符串以识别资源包属性的问题。如果缺少属性,那么如果我们检查资源包的实际值(两边都是空字符串),测试仍然会成功。
webapp/test/unit/unitTests.qunit.html (New)
<!DOCTYPE html>
<html>
<head>
        <title>Unit tests for SAPUI5 Walkthrough</title>
        <metahttp-equiv='X-UA-Compatible'content='IE=edge'>
        <metacharset="utf-8">

        <script
               id="sap-ui-bootstrap"
               src="https://openui5.hana.ondemand.com/resources/sap-ui-core.js"
               data-sap-ui-resourceroots='{
                       "sap.ui.demo.walkthrough": "../../"
               }'
               data-sap-ui-preload="async">
        </script>

        <scriptsrc="https://openui5.hana.ondemand.com/resources/sap/ui/qunit/qunit-2-css.js"></script>
        <scriptsrc="https://openui5.hana.ondemand.com/resources/sap/ui/thirdparty/qunit-2.js"></script>
        <scriptsrc="https://openui5.hana.ondemand.com/resources/sap/ui/qunit/qunit-junit.js"></script>
        <scriptsrc="https://openui5.hana.ondemand.com/resources/sap/ui/qunit/qunit-coverage.js"></script>

        <script>
               /* global QUnit */

               QUnit.config.autostart =false;

               sap.ui.getCore().attachInit(function(){
                       sap.ui.require([
                               "sap/ui/demo/walkthrough/test/unit/model/formatter"
                       ],function(){
                               QUnit.start();
                       });
               });
        </script>
</head>
<body>
        <divid="qunit"/>
        <divid="qunit-fixture"/>
</body>
</html>
所谓的QUnit测试套件是一个HTML页面,它触发应用程序的所有QUnit测试。其中大部分是生成结果页面的布局,您可以在预览中看到,我们不会进一步解释这些部分,而是将重点放在应用程序部分。
让我们从名称空间开始。由于我们现在在webapp/test/unit文件夹中,我们实际上需要向上两个级别才能再次获得src文件夹。可以在测试中使用此名称空间来加载和触发应用程序功能。
通过脚本标记加载一些基本的QUnit功能之后,我们加载并执行格式化程序。这里还可以添加其他QUnit测试。如果我们现在打开webapp/test/unit/unitTests.qunit。在浏览器中的html文件中,我们应该看到我们的测试正在运行并验证格式化程序逻辑。
Conventions
▪所有单元测试都放在app的webapp/test/unit文件夹中。
▪测试套件中的文件以*.qunit.html结尾。
▪unitTests.qunit。html文件触发应用程序的所有单元测试。
▪应该为格式化程序、控制器逻辑和其他独立功能编写单元测试。
▪所有依赖项都被存根替换,以便只测试作用域中的功能。
Parent topic: Walkthrough
Previous: Step 27: Mock Server Configuration
Next: Step 29: Integration Test with OPA
Related Information


