Netty 中的消息解析和编解码器
本篇内容主要梳理一下 Netty 中编解码器的逻辑和编解码器在 Netty 整个链路中的位置。
前面我们在分析 ChannelPipeline 的时候说到入站和出站事件的处理都在 pipeline 中维护着,通过list的形式将处理事件的 handler 按照先后关系保存为一个列表,有对应的事件过来就按照列表顺序取出 handler 来处理事件。
如果是入站事件按照 list 自然顺序调用 handler 来处理,如果是出站事件则反序调用 handler 来处理。所有的入站事件处理器都继承自 ChannelInboundHandler,出站事件处理器都继承自 ChannelOutboundHandler。channelPipeline 上的注释有说明 inbound 事件的传播顺序是:
* 入栈事件传播方法
*     <li>{@link ChannelHandlerContext#fireChannelRegistered()}</li>
*     <li>{@link ChannelHandlerContext#fireChannelActive()}</li>
*     <li>{@link ChannelHandlerContext#fireChannelRead(Object)}</li>
*     <li>{@link ChannelHandlerContext#fireChannelReadComplete()}</li>
*     <li>{@link ChannelHandlerContext#fireExceptionCaught(Throwable)}</li>
*     <li>{@link ChannelHandlerContext#fireUserEventTriggered(Object)}</li>
*     <li>{@link ChannelHandlerContext#fireChannelWritabilityChanged()}</li>
*     <li>{@link ChannelHandlerContext#fireChannelInactive()}</li>
*     <li>{@link ChannelHandlerContext#fireChannelUnregistered()}</li>
*     </ul>
* </li>
即 handler 中的方法调用顺序是如上所示,我们主要关注的点在 channelRead() 方法上。下面就由 channelRead() 出发,去看看编解码器的使用。
1. channelRead 解析
inbound 事件的入口在 NioEventLoop #run() 方法#processSelectedKeys()#processSelectedKeysPlain()#processSelectedKey()#unsafe.read()。
这里的 UnSafe 是定义在 Channel 接口中的子接口,并不是 JDK 的 UnSafe 类。UnSafe作为 channel 的内部类承担着 channel 网络读写相关的功能,这里可以抽出一节讨论,不是本篇的重点。我们继续看 UnSafe 的子类 NioByteUnsafe 重写的 read() 方法:
@Override
public final void read() {
  final ChannelConfig config = config();
  final ChannelPipeline pipeline = pipeline();
  //allocator负责建立缓冲区
  final ByteBufAllocator allocator = config.getAllocator();
  final RecvByteBufAllocator.Handle allocHandle = recvBufAllocHandle();
  allocHandle.reset(config);

  ByteBuf byteBuf = null;
  boolean close = false;
  try {
    do {
      //分配内存
      byteBuf = allocHandle.allocate(allocator);
      //读取socketChannel数据到分配的byteBuf,对写入的大小进行一个累计叠加
      allocHandle.lastBytesRead(doReadBytes(byteBuf));
      if (allocHandle.lastBytesRead() <= 0) {
        // nothing was read. release the buffer.
        byteBuf.release();
        byteBuf = null;
        close = allocHandle.lastBytesRead() < 0;
        break;
      }

      allocHandle.incMessagesRead(1);
      readPending = false;
      //触发pipeline的ChannelRead事件来对byteBuf进行后续处理
      pipeline.fireChannelRead(byteBuf);
      byteBuf = null;
    } while (allocHandle.continueReading());
		// 记录总共读取的大小
    allocHandle.readComplete();
    pipeline.fireChannelReadComplete();

    if (close) {
      closeOnRead(pipeline);
    }
  } catch (Throwable t) {
    handleReadException(pipeline, byteBuf, t, close, allocHandle);
  } finally {
    // Check if there is a readPending which was not processed yet.
    // This could be for two reasons:
    // * The user called Channel.read() or ChannelHandlerContext.read() in channelRead(...) method
    // * The user called Channel.read() or ChannelHandlerContext.read() in channelReadComplete(...) method
    //
    // See https://github.com/netty/netty/issues/2254
    if (!readPending && !config.isAutoRead()) {
      removeReadOp();
    }
  }
}
}
read()方法从内存读取数据给到 ByteBuf,上一节我们提到了ByteBuf,Netty 自己实现的 byte 字节累加器。下面有一个while循环,每次读取的 bytebuf 会给到 pipeline.fireChannelRead(byteBuf)方法去处理。继续看 ChannelPipeline 的默认实现类 DefaultChannelPipeline 中的实现:
@Override
public final ChannelPipeline fireChannelRead(Object msg) {
  AbstractChannelHandlerContext.invokeChannelRead(head, msg);
  return this;
}
调用了 AbstractChannelHandlerContext#invokeChannelRead()方法:
static void invokeChannelRead(final AbstractChannelHandlerContext next, Object msg) {
  final Object m = next.pipeline.touch(ObjectUtil.checkNotNull(msg, "msg"), next);
  EventExecutor executor = next.executor();
  if (executor.inEventLoop()) {
    next.invokeChannelRead(m);
  } else {
    executor.execute(new Runnable() {
      @Override
      public void run() {
        next.invokeChannelRead(m);
      }
    });
  }
}

private void invokeChannelRead(Object msg) {
  if (invokeHandler()) {
    try {
      ((ChannelInboundHandler) handler()).channelRead(this, msg);
    } catch (Throwable t) {
      notifyHandlerException(t);
    }
  } else {
    fireChannelRead(msg);
  }
}
重点就在 invokeChannelRead() 的这一句:
((ChannelInboundHandler) handler()).channelRead(this, msg);
最终触发了 ChannelInboundHandler#channelRead(ChannelHandlerContext ctx, Object msg) 方法。
所有的入站事件都实现了 ChannelInboundHandler 接口,不难理解我们的 handler 就是这样接收到 bytebuf 然后进行下一步处理的。
2. Read 事件一次可以读多少字节
说编解码器之前我们先解决一个问题,如果不使用任何的编解码器,默认的传输对象应该是 byteBuf,那么 Netty 默认一次是读取多少字节呢?前面在讲粘包的文章里我在 packageEvent1工程示例中演示了不使用任何编解码工具读取数据,默认一次会话会读取1024字节,大家有兴趣可以回到上一篇看看 Netty 中的粘包和拆包,在 handler 中打上断点就知道当前一次读取包的长度。既然知道是1024,就好奇到底是在哪里设置的,出发点肯定还是上面提到的 read() 方法:
byteBuf = allocHandle.allocate(allocator);
这一句就是从内存中拿出字节分配到 bytebuf,allocate() 是 RecvByteBufAllocator 接口中的方法,这个接口有很多实现类,那到底默认是哪个实现类生效呢?
我们再回到 NioSocetChannel ,看他的构造方法:
public NioSocketChannel(Channel parent, SocketChannel socket) {
  super(parent, socket);
  config = new NioSocketChannelConfig(this, socket.socket());
}

private final class NioSocketChannelConfig  extends DefaultSocketChannelConfig {
  private NioSocketChannelConfig(NioSocketChannel channel, Socket javaSocket) {
    super(channel, javaSocket);
  }

  @Override
  protected void autoReadCleared() {
    clearReadPending();
  }
}
这里会生成一些配置信息,主要是一些 socket 默认参数以供初始化连接使用。NioSocketChannelConfig 构造方法里面调用了父类 DefaultSocketChannelConfig 的构造方法:
public DefaultSocketChannelConfig(SocketChannel channel, Socket javaSocket) {
  super(channel);
  if (javaSocket == null) {
    throw new NullPointerException("javaSocket");
  }
  this.javaSocket = javaSocket;

  // Enable TCP_NODELAY by default if possible.
  if (PlatformDependent.canEnableTcpNoDelayByDefault()) {
    try {
      setTcpNoDelay(true);
    } catch (Exception e) {
      // Ignore.
    }
  }
}
同样这里又往上调用了父类 DefaultChannelConfig :
public DefaultChannelConfig(Channel channel) {
  this(channel, new AdaptiveRecvByteBufAllocator());
}

protected DefaultChannelConfig(Channel channel, RecvByteBufAllocator allocator) {
  setRecvByteBufAllocator(allocator, channel.metadata());
  this.channel = channel;
}
怎样,是不是看到了 AdaptiveRecvByteBufAllocator, 他就是 RecvByteBufAllocator 的实现类之一。所以我们只要看它是怎样设置默认值即可。
AdaptiveRecvByteBufAllocator 的默认构造方法:
public AdaptiveRecvByteBufAllocator() {
  this(DEFAULT_MINIMUM, DEFAULT_INITIAL, DEFAULT_MAXIMUM);
}
这3个参数的默认值为:
static final int DEFAULT_MINIMUM = 64;
static final int DEFAULT_INITIAL = 1024;
static final int DEFAULT_MAXIMUM = 65536;
DEFAULT_MINIMUM 是缓冲区最小值,DEFAULT_INITIAL 是缓冲区默认值,DEFAULT_MAXIMUM是缓冲区最大值,到这里我们就找到了默认值是从哪里来的了。
默认大小是1024,但是并不是固定不变,它会有一个动态调整的动作。除了这三个字段外,还定义了两个动态调整容量的步长索引参数:
private static final int INDEX_INCREMENT = 4;
private static final int INDEX_DECREMENT = 1;
扩张的步进索引为4,收缩的步进索引为1。
private static final int[] SIZE_TABLE;

static {
  List<Integer> sizeTable = new ArrayList<Integer>();
  for (int i = 16; i < 512; i += 16) {
    sizeTable.add(i);
  }

  for (int i = 512; i > 0; i <<= 1) {
    sizeTable.add(i);
  }

  SIZE_TABLE = new int[sizeTable.size()];
  for (int i = 0; i < SIZE_TABLE.length; i ++) {
    SIZE_TABLE[i] = sizeTable.get(i);
  }
}
SIZE_TABLE 为长度向量表,作用就是保存步长。上面的 static 修饰的代码块作用就是初始化长度向量表。从16开始,每次递增16,直到512,这里数组的下标为30。下标31的初始值为512, i递增的值为左移一位,左移一位相当于乘以2,所以每次递增是以当前值的倍数增加的,最终增加到的值直到 Integer 能达到的最大值。
长度向量表的值可以得出:
0-->16
1-->32
2-->48
3-->64
4-->80
5-->96
6-->112
7-->128
8-->144
9-->160
10-->176
11-->192
12-->208
13-->224
14-->240
15-->256
16-->272
17-->288
18-->304
19-->320
20-->336
21-->352
22-->368
23-->384
24-->400
25-->416
26-->432
27-->448
28-->464
29-->480
30-->496

31-->512
32-->1024
33-->2048
34-->4096
35-->8192
36-->16384
37-->32768
38-->65536
39-->131072
40-->262144
41-->524288
42-->1048576
43-->2097152
44-->4194304
45-->8388608
46-->16777216
47-->33554432
48-->67108864
49-->134217728
50-->268435456
51-->536870912
52-->1073741824
SIZE_TABLE 里面的值是干啥用的呢,刚才提到会将 byte 数据先预读到缓冲区,初始默认大小为1024,当目前没有这么多字节需要读的时候,会动态缩小缓冲区,而预判待读取的字节有很多的时候会扩大缓冲区。
动态预估下一次可能会有多少数据待读取的操作在哪里呢?还是回到 read()方法,while 循环完一轮之后,会执行一句:
allocHandle.readComplete();
对应到 AdaptiveRecvByteBufAllocator 中:
@Override
public void readComplete() {
  record(totalBytesRead());
}

//根据当前的actualReadBytes大小,对nextReceiveBufferSize进行更新
private void record(int actualReadBytes) {
  //如果actualReadBytes 小于 当前索引-INDEX_DECREMENT-1 的值,说明容量需要缩减
  if (actualReadBytes <= SIZE_TABLE[Math.max(0, index - INDEX_DECREMENT - 1)]) {
    if (decreaseNow) {
      //则取 当前索引-INDEX_DECREMENT 与 minIndex的最大值
      index = Math.max(index - INDEX_DECREMENT, minIndex);
      nextReceiveBufferSize = SIZE_TABLE[index];
      decreaseNow = false;
    } else {
      decreaseNow = true;
    }
    //读到的值大于缓冲大小
  } else if (actualReadBytes >= nextReceiveBufferSize) {
    // INDEX_INCREMENT=4 index前进4
    index = Math.min(index + INDEX_INCREMENT, maxIndex);
    nextReceiveBufferSize = SIZE_TABLE[index];
    decreaseNow = false;
  }
}
通过上一次的流大小来预测下一次的流大小,可针对不同的应用场景来进行缓冲区的分配。像IM消息可能是几K ,文件传输可能是几百M,不同的场景用到的内存缓冲大小不一样对性能的影响也不同。如果所有的场景都是同一种内存空间分配,客户端连接多的情况下,线程数过多可能导致内存溢出。
3. Netty 中的编解码器
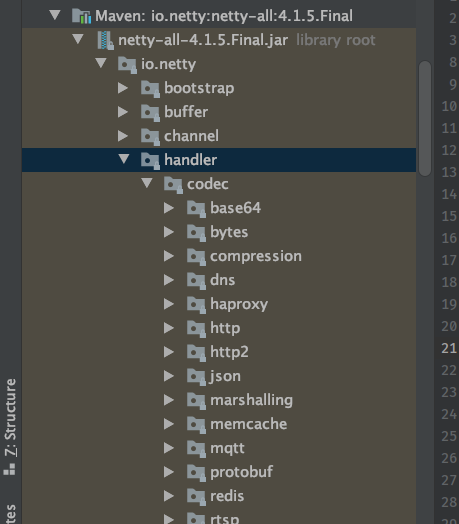
上面两小节聊到消息从哪里来,默认消息格式为 ByteBuf,缓冲区大小默认为1024,会动态预估下次缓冲区大小。下面我们就正式来说一下编解码相关的内容,编解码相关的源码都在 codec 包中:
因为编码器要实现的是对输出的内容编码,都是实现 ChannelOutboundHandler 接口,解码器对接收的内容解码,都是实现 ChannelInboundHandler 接口,所以可以完全适配 ChannelPipeline 将编解码器作为一种插件的形式做一些灵活的搭配。
3.1 decoder
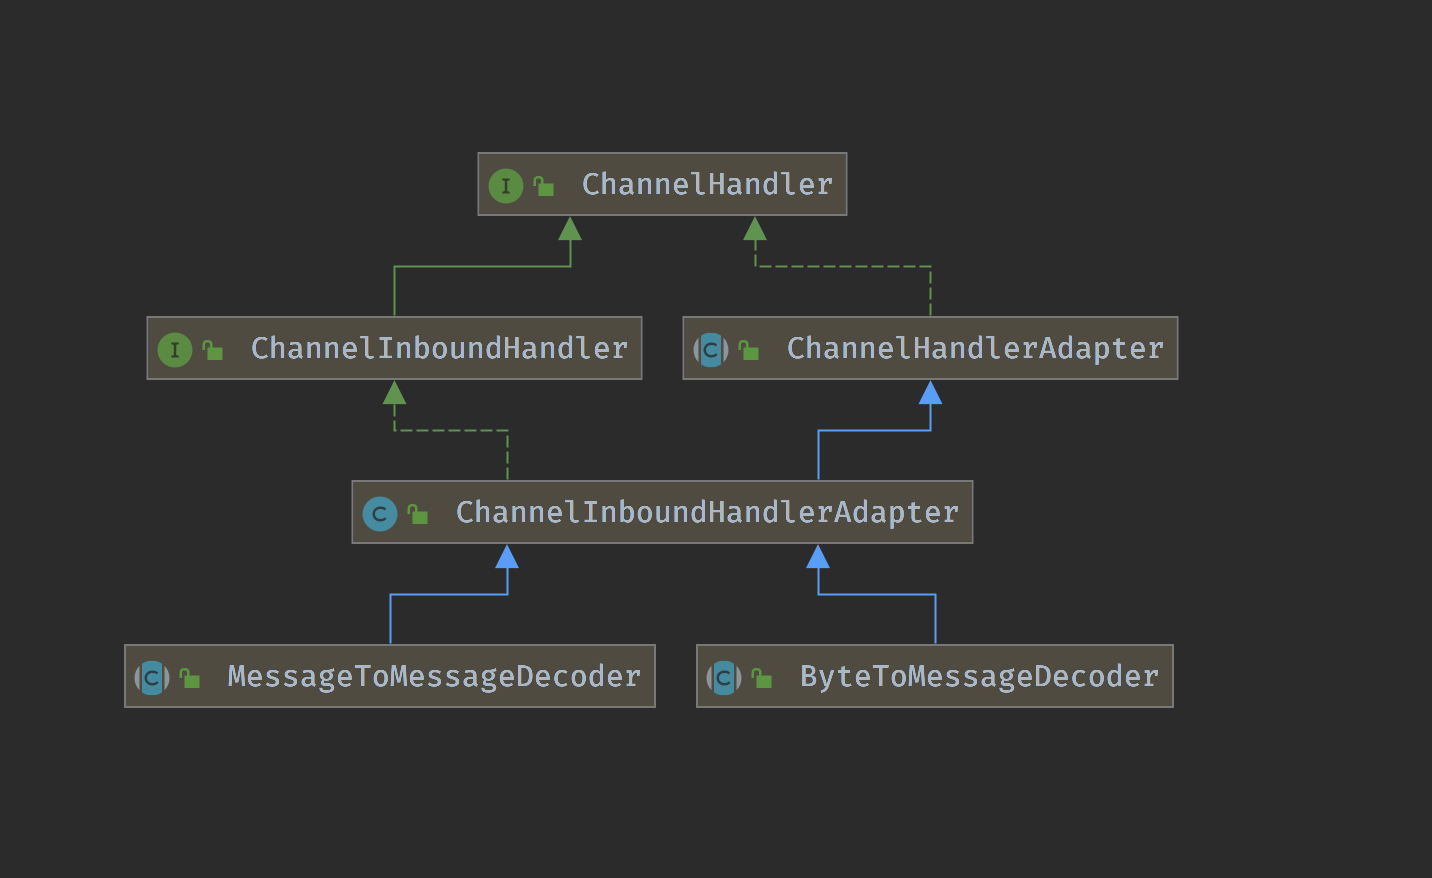
解码器负责将输入的消息解析为指定的格式。消息输入都来自inbound,即继承 ChannelInboundHandler 接口,顶级的解码器有两种类型:
- 将字节解码为消息:
ByteToMessageDecoder - 将一种消息类型解码为另一种 类型:
MessageToMessageDecoder。
字节码解析为消息这应该是最普通,最基本的使用方式,这里所谓的字节码就是上面我们讲到的 ByteBuf 序列,默认包含1024字节的字节数组。关于 ByteToMessageDecoder 的分析上一节在讲粘包的时候顺带提及,大家有兴趣可以回去看看:ByteToMessageDecoder 分析。
MessageToMessageDecoder 更好理解,比如消息的类型为Integer,需要将 Integer 转为 String。那么就可以继承 MessageToMessageDecoder 实现自己的转换方法。我们先简单看一下它的实现:
@Override
public void channelRead(ChannelHandlerContext ctx, Object msg) throws Exception {
  CodecOutputList out = CodecOutputList.newInstance();
  try {
    if (acceptInboundMessage(msg)) {
      @SuppressWarnings("unchecked")
      I cast = (I) msg;
      try {
        decode(ctx, cast, out);
      } finally {
        ReferenceCountUtil.release(cast);
      }
    } else {
      out.add(msg);
    }
  } catch (DecoderException e) {
    throw e;
  } catch (Exception e) {
    throw new DecoderException(e);
  } finally {
    int size = out.size();
    for (int i = 0; i < size; i ++) {
      ctx.fireChannelRead(out.getUnsafe(i));
    }
    out.recycle();
  }
}

protected abstract void decode(ChannelHandlerContext ctx, I msg, List<Object> out) throws Exception;
上面的 channelRead()方法中将 msg 转为消息原本的类型,然后进入 decode()方法。 decode() 是一个抽象方法,言意之下你想转为啥类型,你就实现该方法去转便是。
3.2 encoder
编码器主要的作用是将出站事件的消息按照指定格式编码输出。那么编码器应该是继承 outBound 事件,看一下主要的类图:
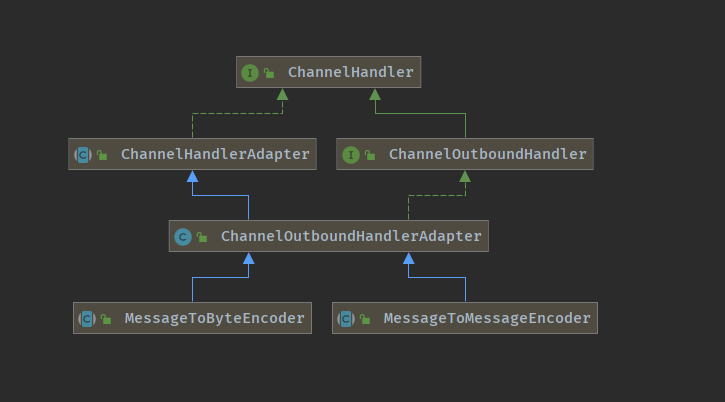
编码器的基本类型与解码器相反:将对象拆解为字节,将对象编码为另一种对象。
关于基本编解码器的使用和自定义编解码器上一节我们已经讲过,这里就不再复述。下一篇单独看看在 Netty 中使用protobuf编码格式进行数据传输。
