小谈DRF之认证相关
1. 认证相关
普通CBV的执行顺序:
请求来了 --> as_view方法 --> views方法 --> dispatch方法:通过反射对于不同的请求执行不同的方法
以下面代码为例
import json
from django.shortcuts import render, HttpResponse
from django.views import View
from rest_framework.views import APIView

# Create your views here.
class DogView(APIView):

    def get(self, request, *args, **kwargs):
        ret = {
            'code': 1000,
            'msg': 'xxx'
        }
        return HttpResponse(json.dumps(ret), status=201)

    def post(self, request, *args, **kwargs):
        return HttpResponse('创建Dog')

    def put(self, request, *args, **kwargs):
        return HttpResponse('更新Dog')

    def delete(self, request, *args, **kwargs):
        return HttpResponse('删除Dog')
1.1 认证源码流程分析
从1.3中了解的as_view()方法的源码我们可以知道:无论是View还是APIView,入口函数都是dispatch,所以在进行源码分析的时候都是先找dispatch方法。
-
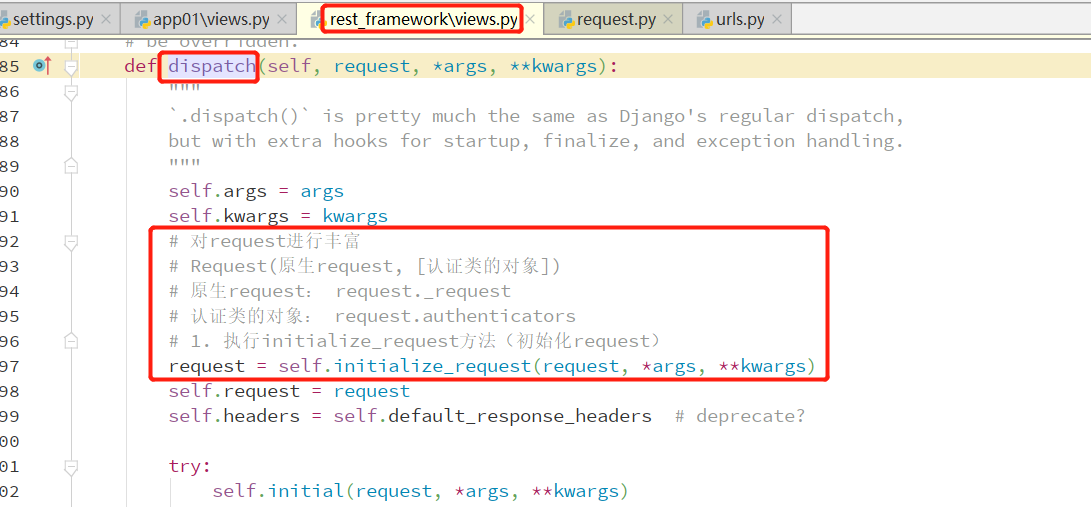
执行dispatch方法,DogView类中没有dispatch方法,就去父类(APIView)中找,查看APIView中的dispatch()方法的源码发现,比View中的dispatch()方法多了一些代码:对原始request进行丰富(这一过程中执行了self.initialize_request()方法)、并且执行了self.initial()方法;
-
如上图,在APIView中的dispatch方法中,对request进行了丰富,执行了initialize_request方法;
-
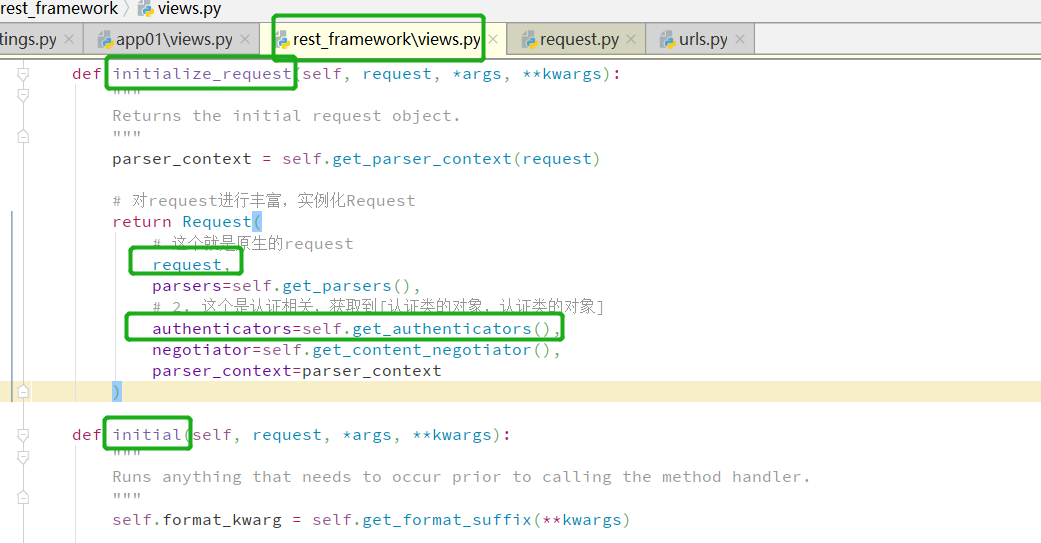
在initialize_request方法中可以看出:Request(原生request,[认证类的对象...]);

-
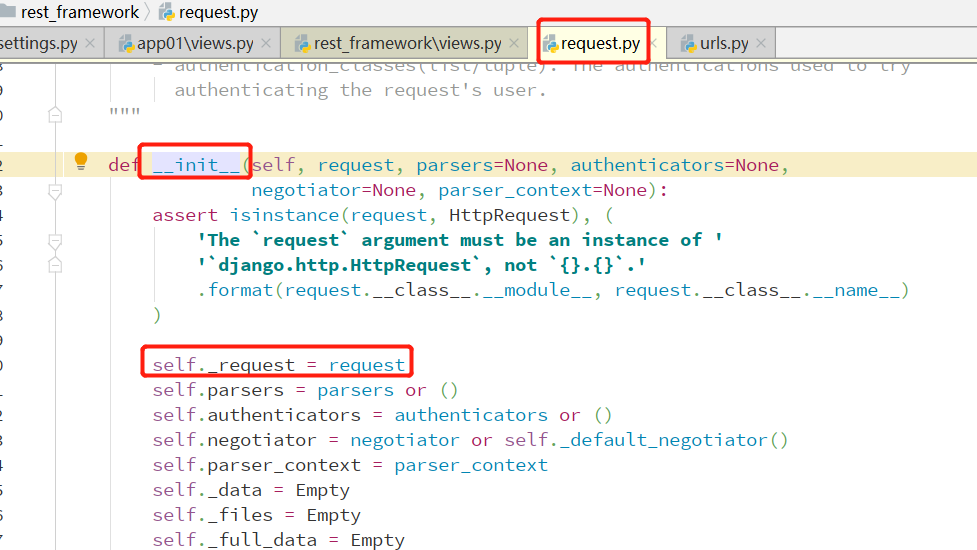
从上图可以看出,如果通过request想得到原生的request --> request._request;
-
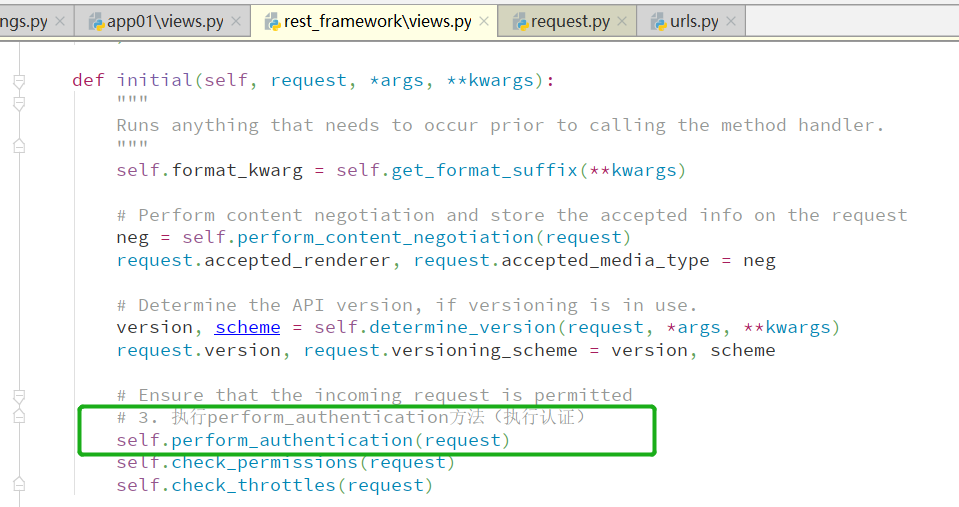
从第2点的图中可以看出,在initialize_request方法执行完毕后,会执行initial方法;
-
在perform_authentication方法中,只有一行:request.user 。而这里的user应该是Request的方法或者属性;

-
在Request类中找到了user,是property;并且执行了self._authencate()方法;
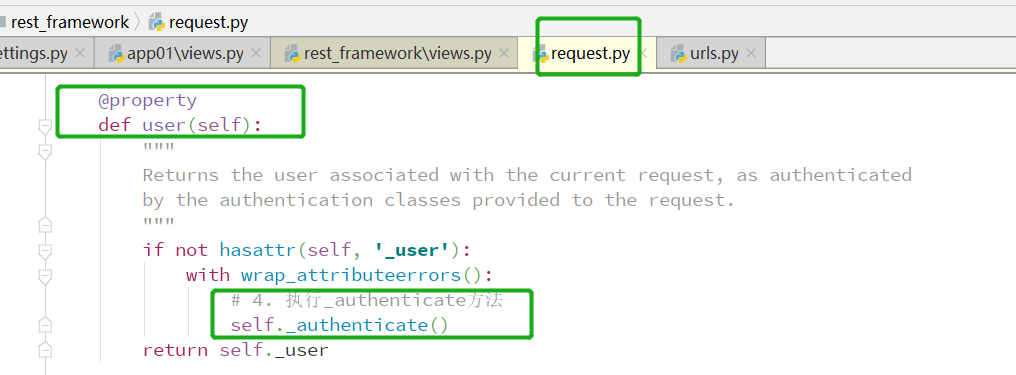
-
在_authencate方法中:循环第三步中的[认证对象...],并对列表中的每一个认证对象执行了authencate方法:
- 如果认证成功,则返回一个元祖;
- 如果认证失败,则抛出异常;

-
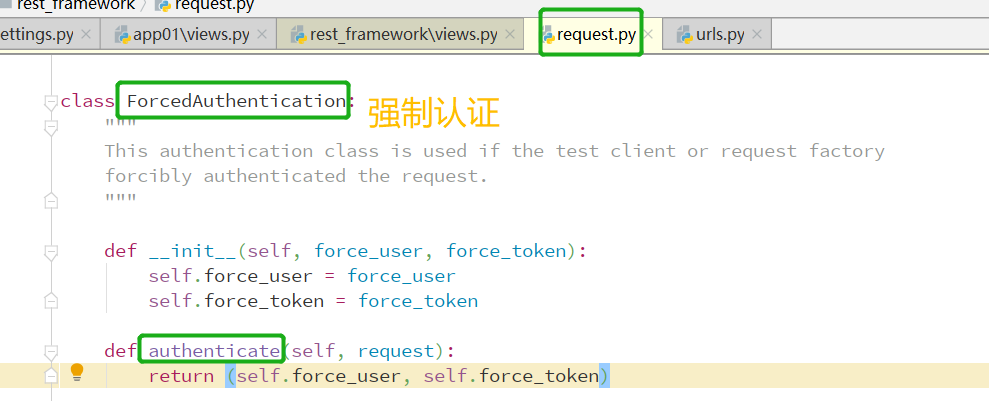
authencate方法属于强制认证类中的方法,执行完毕后会返回一个元祖;
1.2 认证源码流程总结
可以总结出,如果要自定义认证方法的话,我们需要做两个步骤:
- 在视图类中写出authencators=[认证类。。。];
- 在视图类外面要写一个认证类,而认证类中要实现authencate方法,并按要求返回;
- 认证成功 ——> 返回一个元祖;
- 认证失败 ——> 抛出异常;
1.3 认证的使用
对上面的总结进行一个示例演示:
import json
from django.shortcuts import HttpResponse
from rest_framework.views import APIView
from rest_framework.exceptions import AuthenticationFailed


class MyAuthentication(object):

    def authenticate(self, request):
        token = request._request.GET.get('token')
        if not token:
            raise AuthenticationFailed('认证失败!!!')
        return ('ooxx', 1)

    def authenticate_header(self, val):
        pass


class DogView(APIView):

    authentication_classes = [MyAuthentication, ]

    def get(self, request, *args, **kwargs):

        # 这里的request.user就是上面authenticate方法中返回的元祖的第一个元素
        print(request.user)

        ret = {
            'code': 1000,
            'msg': 'xxx'
        }
        return HttpResponse(json.dumps(ret), status=201)

    def post(self, request, *args, **kwargs):
        return HttpResponse('创建Dog')

    def put(self, request, *args, **kwargs):
        return HttpResponse('更新Dog')

    def delete(self, request, *args, **kwargs):
        return HttpResponse('删除Dog')
1.4 认证的简单实现
现实情况:有些API需要用户登录之后才能访问;有些无需登录就可以访问。
1.4.1 rest framework之用户登录
models.py代码如下:
from django.db import models


class UserInfo(models.Model):
    user_type_choices = (
        (1, "普通用户"),
        (2, "VIP"),
        (3, "SVIP")
    )
    user_type = models.IntegerField(choices=user_type_choices)
    username = models.CharField(max_length=32, unique=True)
    password = models.CharField(max_length=64)


class UserToken(models.Model):
    user = models.OneToOneField(to='UserInfo')
    token = models.CharField(max_length=64)
views.py代码如下:
from django.http import JsonResponse
from app01 import models
from rest_framework.views import APIView


def md5(user):
    """用于生成token"""
    import time
    import hashlib
    ctime = str(time.time())
    # m = hashlib.md5(bytes(user, encoding='utf-8'))
    m = hashlib.md5(user.encode('utf-8'))
    m.update(ctime.encode('utf-8'))
    return m.hexdigest()


class AuthView(APIView):
    """用于用户登录认证"""

    def post(self, request, *args, **kwargs):
        ret = {'code': 10000, 'msg': None}
        try:
            user = request._request.POST.get('username')
            pwd = request._request.POST.get('password')
            obj = models.UserInfo.objects.filter(username=user, password=pwd).first()
            if not obj:
                ret['code'] = 10001
                ret['msg'] = '用户名或密码错误!!!'
            # 为用户创建token
            token = md5(user)
            models.UserToken.objects.update_or_create(user=obj, defaults={'token': token})
            ret['token'] = token
        except Exception as e:
            ret['code'] = 10002
            ret['msg'] = '请求异常!!!'
        return JsonResponse(ret)
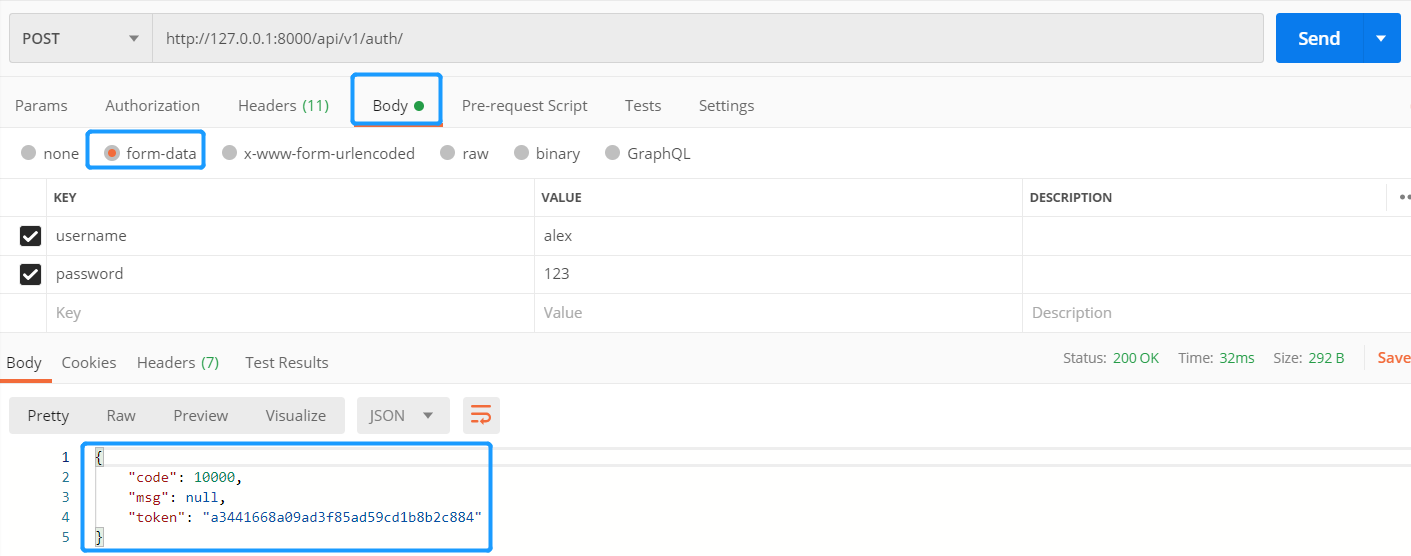
用postman测试后,结果如下:
1.4.2 rest framework之基于token实现基本用户认证
views.py代码如下:
ORDER_DICT = {
    1: {
        'name': '媳妇',
        'age': 18,
        'content': 'xxx'
    },
    2: {
        'name': '狗',
        'age': 2,
        'content': 'xxxxxxxx'
    }
}

from rest_framework import exceptions


class Authentication(object):

    def authenticate(self, request):
        token = request._request.GET.get('token')
        token_obj = models.UserToken.objects.filter(token=token).first()
        if not token_obj:
            raise exceptions.AuthenticationFailed('用户认证失败!!!')
        return (token_obj.user, token_obj)

    def authenticate_header(self, request):
        pass


class OrderView(APIView):
    """订单相关"""

    authentication_classes = [Authentication, ]

    def get(self, request, *args, **kwargs):
        ret = {'code': 10000, 'msg': None, 'data': None}
        try:
            ret['data'] = ORDER_DICT
        except Exception as e:
            pass
        return JsonResponse(ret)
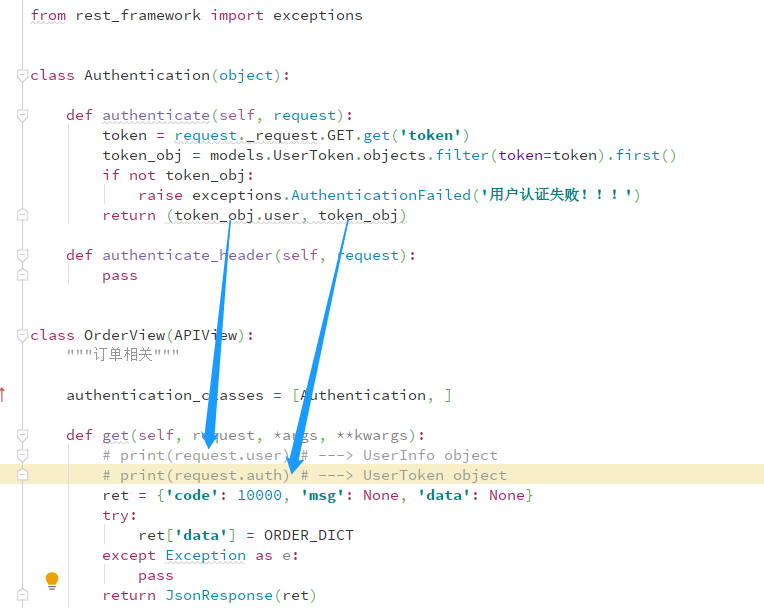
下图:在restframework内部会将token_obj.user和token_obj赋值给request,以供后续使用。比如:当用户类型不同时,可以让不同类型的用户看到不同的数据。
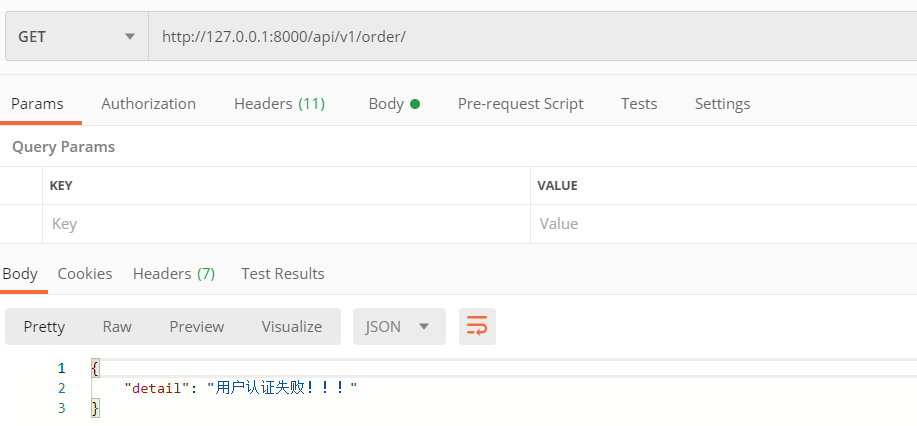
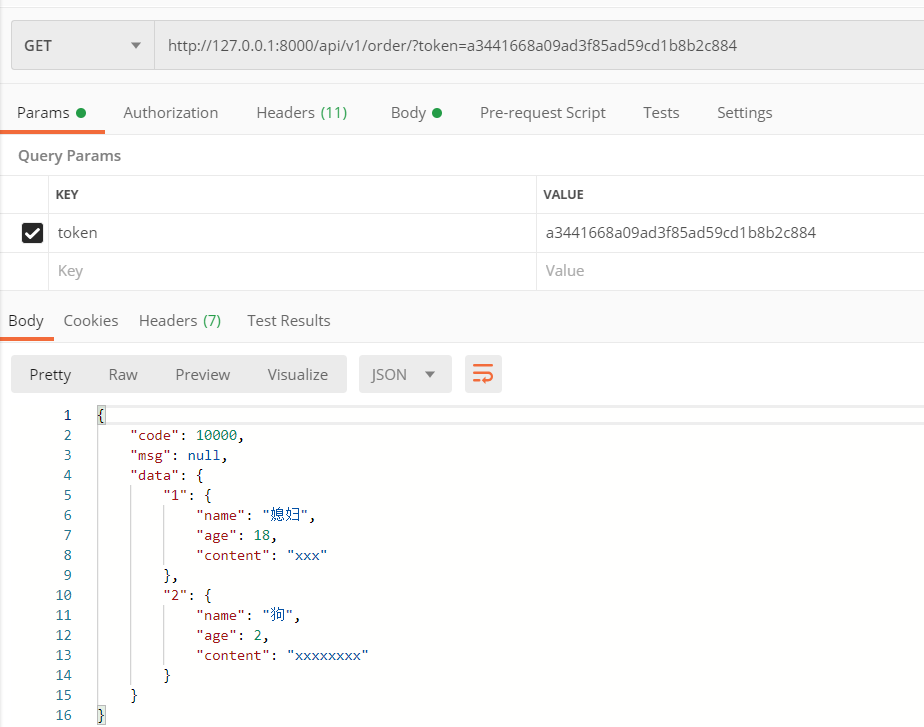
用postman测试后的结果如下:
url没有带token,认证失败;
url上带正确的token后,认证成功:
1.5 认证源码流程分析--再次
dispatch的部分源码:
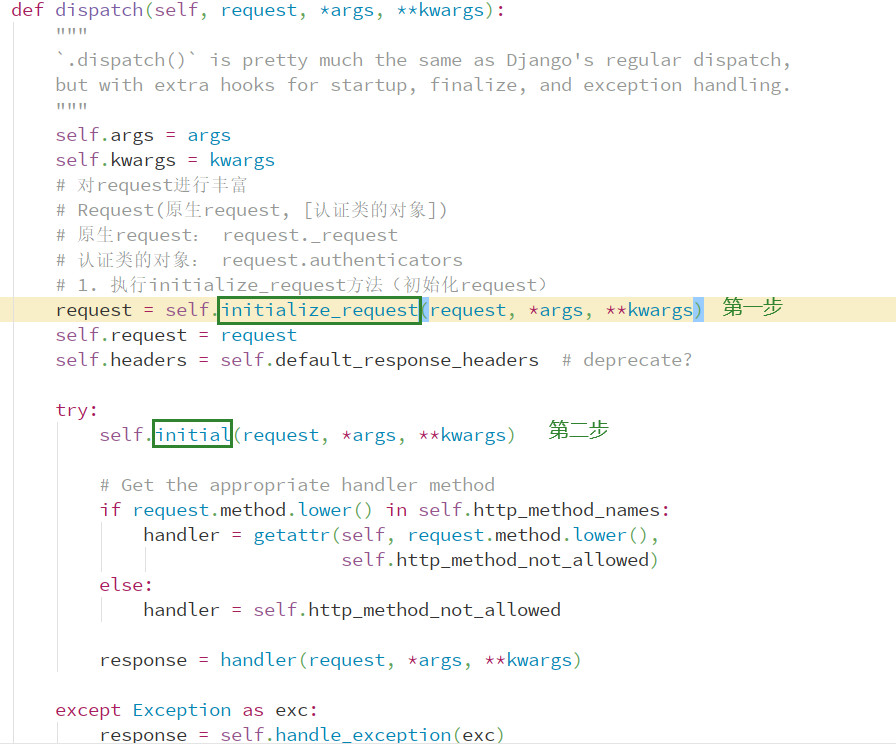
1.1 查看上图中第一步的self.initialize_request()方法(初始化request方法)的源码:
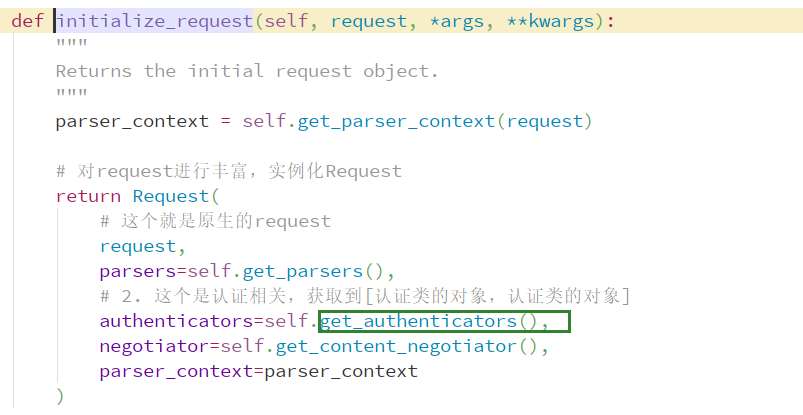
1.2 再次查看上图中的get_authenticator()方法的源码:

1.3 上面的dispatch()方法中的第一步总结:对request进行了丰富的同时获取到了认证类对象列表;
2.1 查看dispatch()方法源码中第二步self.initial()方法的源码:
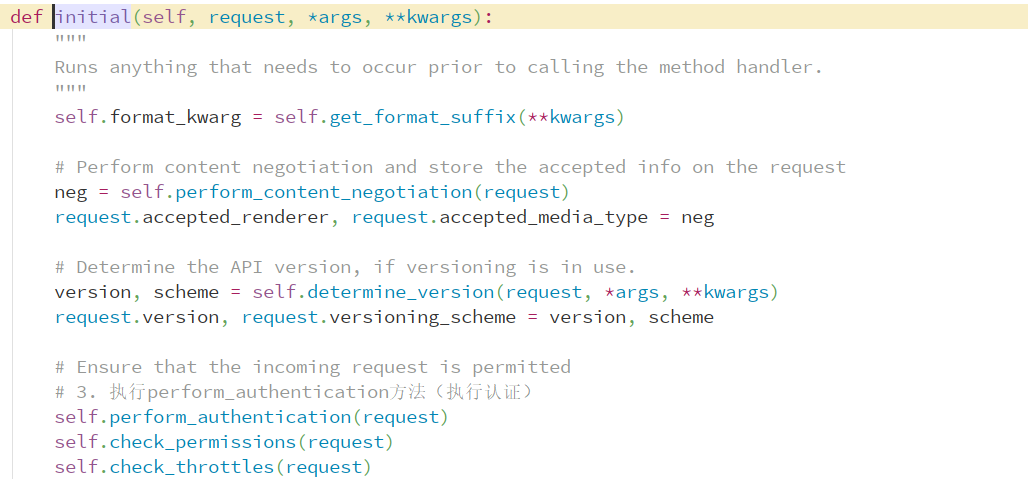
2.2 在initial()方法中执行了perform_authentication()方法,查看它的源码:

2.3 在perform_authentication()方法中,只有request.user这一行代码,我们需要在Request类(from restframework.request import Request)中找到user,并查看其源码:

2.4 在Request类中找到的user是property,而且执行了self._authenticate()方法,查看它的源码:
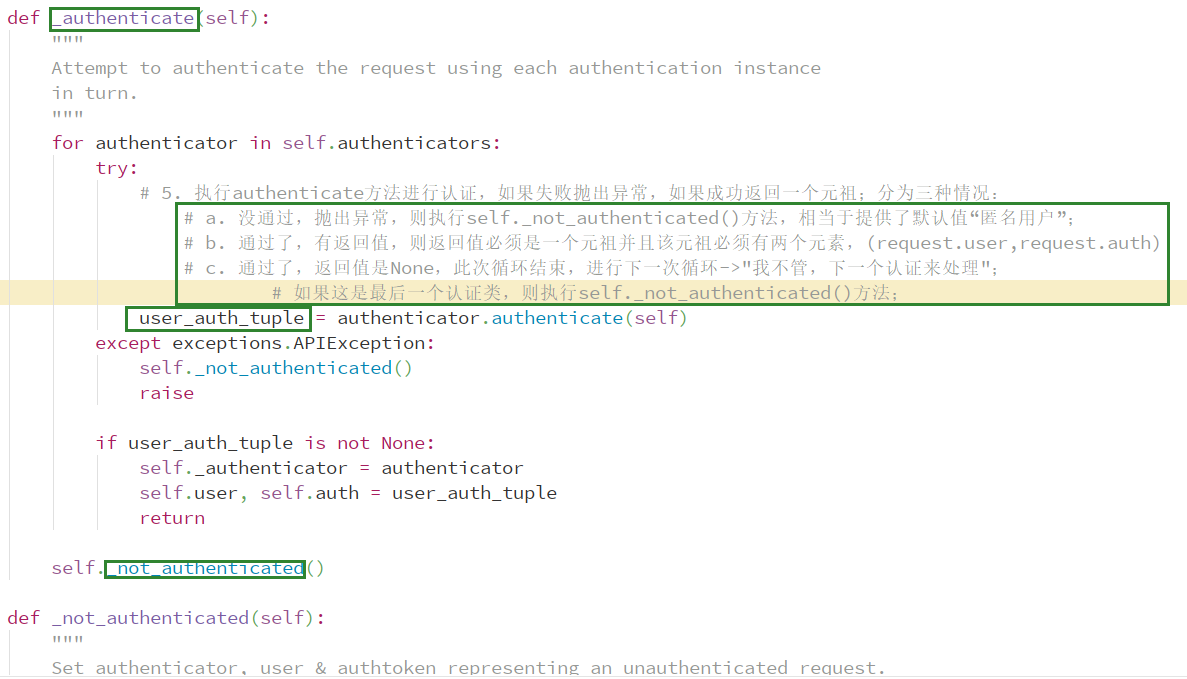
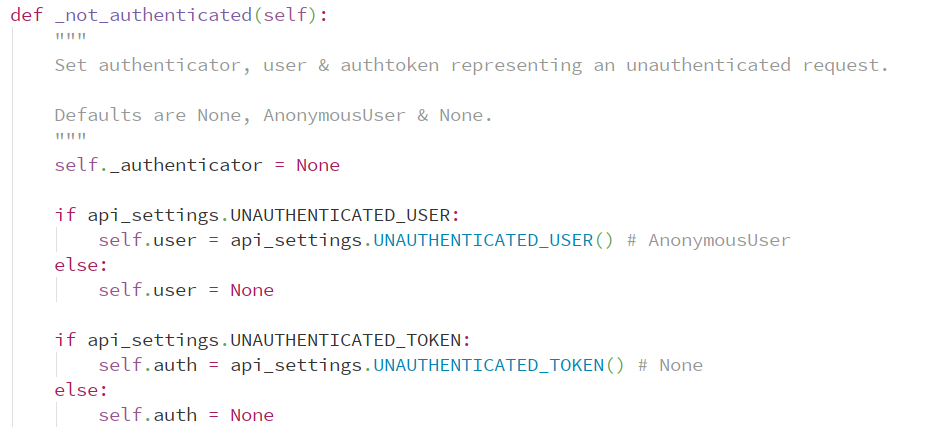
2.5 在_authenticate()方法中执行了authenticate()方法,查看它的源码:

1.6 认证源码流程总结--再次
由上面的源码流程分析可以得出结论:
- dispatch()方法执行过程中需要完成两个过程:
- 对request进行丰富(执行initialize_request()方法):
- 执行了self.get_authenticators()方法:这个方法就是获取认证类对象列表;
- 执行initial()方法:
- 执行了perform_authenticate()方法:
- 这个方法只有一行代码:request.user;
- 在Request类中找到user,是一个property,执行了_authenticate()方法;
- 在_authenticate()方法中,对认证类对象列表进行循环,然后分别执行authenticate()方法,并将authenticate()方法返回的元祖的两个元素分别赋值给request.user和request.auth方便后续使用;
- 在authenticate()方法中,最后返回一个元祖,元祖中有两个元素;
- 在_authenticate()方法中,对认证类对象列表进行循环,然后分别执行authenticate()方法,并将authenticate()方法返回的元祖的两个元素分别赋值给request.user和request.auth方便后续使用;
- 在Request类中找到user,是一个property,执行了_authenticate()方法;
- 这个方法只有一行代码:request.user;
- 执行了perform_authenticate()方法:
- 对request进行丰富(执行initialize_request()方法):
1.7 认证源码流程分析--配置文件
1.7.1 配置文件中的认证类列表

在2.5中的图1.2(上图)中可以点击查看self.authentication_classes(认证类)的源码:

点击api_settings,查看源码:

由上面两张图我们可以看出,认证类默认=api_settings.DEFAULT_AUTHENTICATION_CLASSES:
- 其中
api_settings是restframework的配置文件; - 其中
各种大写字母是配置文件中的一些类;
由此我们可以知道:对于我们自己写的认证类来说,可以局部设置也可以做到全局设置:
- 局部设置:还是像上面写的一样,在自定义的认证类中加入如下语句:
authentication_classes=[MyAuthentication01,MyAuthentication01...]
- 全局设置:可以在settings.py中增加配置项:
REST_FRAMWORK = {"DEFAULT_AUTHENTICATION_CLASSES":[utils.auth.MyAuthentication01...]}- 说明:
- 在settings.py增加的配置项中:认证类列表中的各个认证类要写明路径,上面的例子的意思是:在项目根目录下新建一个utils包,在utils包中新建一个auth.py的文件,在auth.py中写入所有的认证类;
- 全局设置后,视图中所有的类都会自动执行utils>auth.py中的所有认证类的认证;如果有的类不进行认证,则需要在该类中写入:
authentication_classes=[]
1.7.2 配置文件中的匿名用户
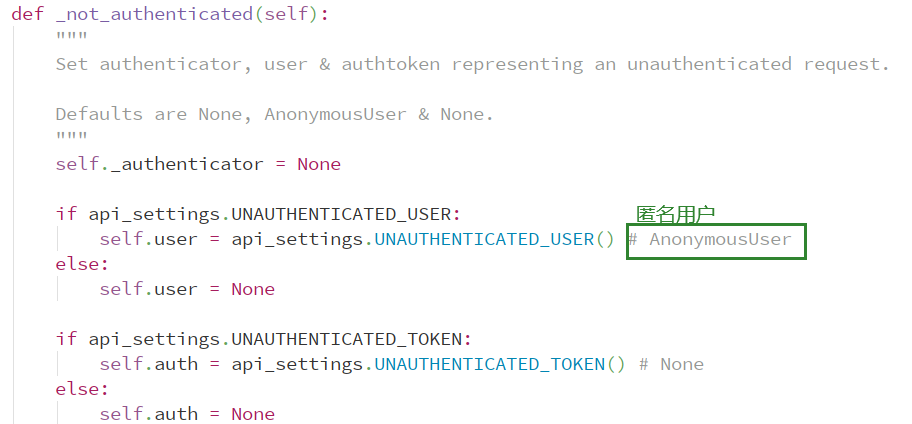
在2.5中的图2.4的第二张图(上图)可以看出,关于匿名用户的配置和上面的认证类的全局设置是在一起的,如果需要配置,需进行如下设置:在settings.py中增加如下配置项:REST_FRAMWORK={"UNAUTHENTICATED_USER":"匿名用户"}或者REST_FRAMWORK={"UNAUTHENTICATED_USER":None, "UNAUTHENTICATED_TOKEN":None}
DEFAULT_AUTHENTICATION_CLASSES = {
    "DEFAULT_AUTHENTICATION_CLASSES": ["utils.auth.MyAuthentication01", "utils.auth.MyAuthentication02"],
    # "UNAUTHENTICATED_USER": "匿名用户",
    "UNAUTHENTICATED_USER": None, # 匿名用户(未登录的)request.user=None
    "UNAUTHENTICATED_TOKEN": None # 匿名用户(未登录的)request.token=None
}

1.8 认证源码流程分析--内置认证类
或者叫 rest framework基于内置类实现的认证控制。
在查看dispatch()方法的源码时总是看到一些类似于api_settings.各种大写字母()的内容:
- 其中
api_settings是restframework的配置文件; - 其中
各种大写字母是配置文件中的一些类; - 其中
()是将配置文件中的一些类实例化;
下面简单看一些内置认证类的源码:

上面这些类都是rest framework配置文件中认证相关的类(内置认证类),我们先看第一个BaseAuthentication类:
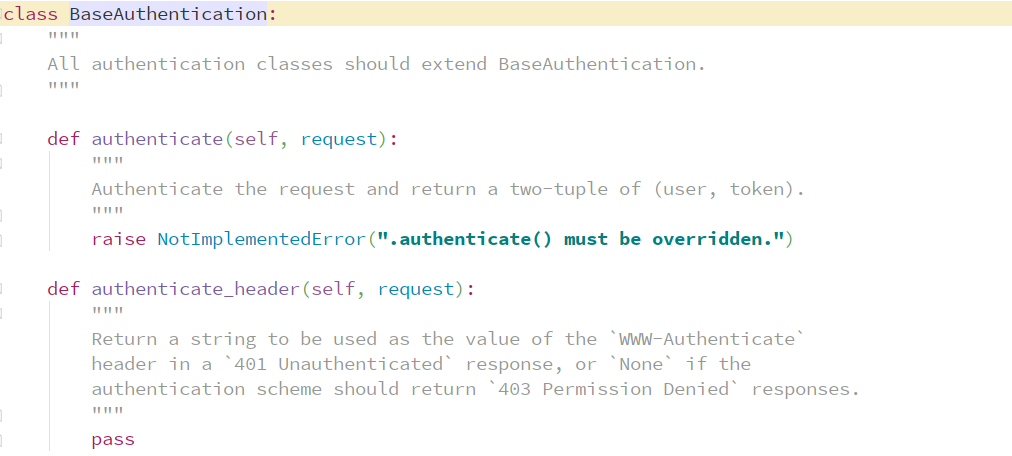
BaseAuthentication类是认证相关的基类,要求以后自己写认证类时必须要实现两个方法:authenticate()方法和authenticate_header()方法,所以上面我们自己写的认证类中都必须实现这两个方法,要不然就会报错。authenticate()方法中可以写具体认证细则,而authenticate_header()方法中只要传入两个参数,其他可以什么都不写,但是必须存在,导致我们写的所有认证类都必须加上这个看上去没什么用的方法,所以我们以后再写认证类时可以直接继承BaseAuthentication类,这样只需要自己重写authenticate()方法即可;
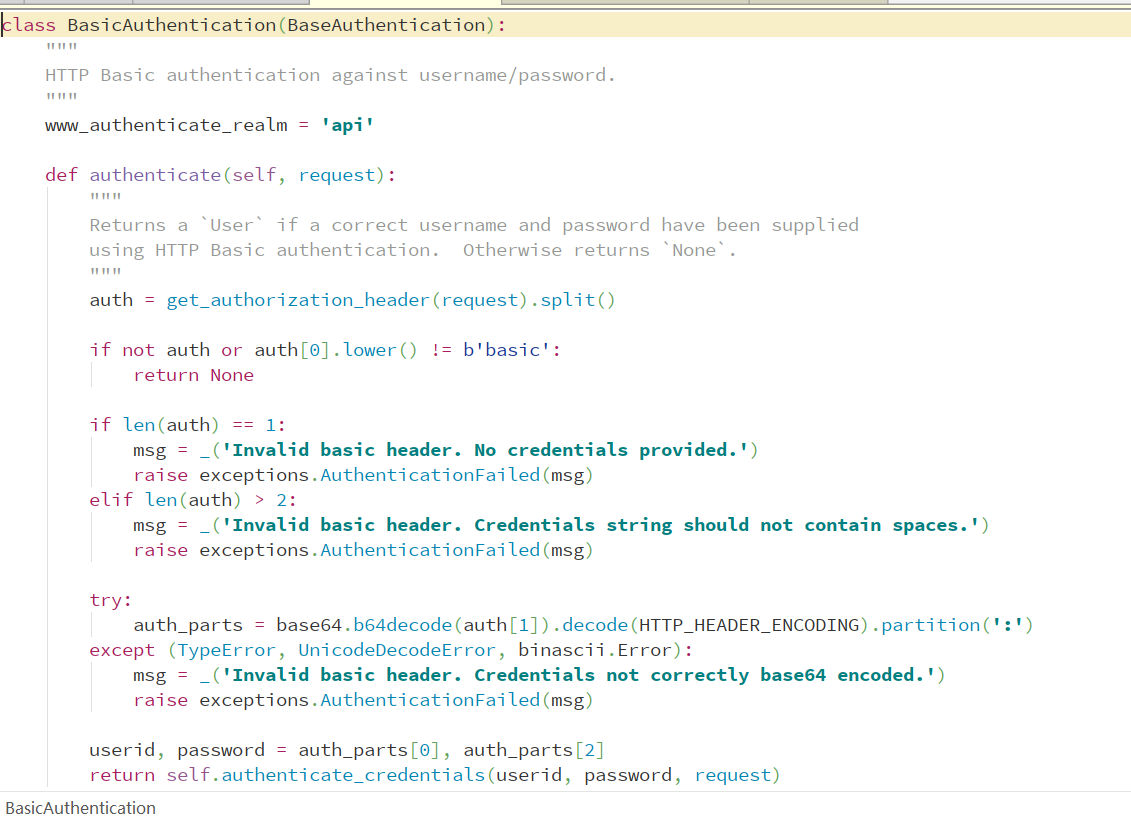
BasicAuthentication类的作用类似于:我们刚刚装上路由器时需要登录192.168.1.1对路由器进行设置时,浏览器会自动弹出一个框,要我们输入用户名和密码。


