Freescale Kibble test
Contents
2、Enable and disable peripherals 5
7、CAN configure1 & configure2 7
2、Fill memory to a big block 12
3、Write memory with high speed 12
1、Kibble_CRC_01 checkinvalid 15
2、Kibble_CRC_01 checkinactive 16
4、Kibble_CRC_02 CheckFailed 17
1、Blhost :
Blhost是PC跟板子进行通信的软件,查看RD提供的文件中是否有blhost ,路径\Kinetis_Bootloader_2_0_0_d1\bin
Blhost的使用手册路径
Desktop\Kinetis_Bootloader_2_0_0_d1\doc\Kinetis_blhost_User-s_Guide_review

1、Get-property
1、Get-property命令可以查看板子的属性值,属性值可以在datasheet中找到,查看是否跟datasheet中一样
2、set-property可以配置板子可写的属性值,命令格式如下
Blhost -p COM*/-u -- set-property 10/13/22 0/1
2、Excute
立即跳转到app
Demo写到指定 地址
blhost -u -- write-memory 0x8000 app_led_demo.bin
读取写入内容
blhost -u -- read-memory 0x8000 10
The first word is the address of <stackpointer>, but with Little endian ,The second word is the address of <addr>
例如读出来的前八byte值如下
0000a411 1fffe230
Stack pointer
地址单位是字,四个字节。(MCU是32位)
使用excute命令调到app
blhost -u -- execute sencond_word_address 0 first_word_address
使用错误的地址,看是否跳不到app。如上两个红色参数分别设置错误
PC错误,不可跳到app。Stack错误,能跳到
Blhost -p com43 -- excute 0x1fffe230 0 0x0000a411
Blhost -p com43 -- excute 0x1fffe230 0 错误stack
3、Exception
Blhost -p com43 -- flash-erase-region 0x0 100 // 返回kStatusMemoryRangeInvalid
Blhost -p com43 -- write-memory 0x0 100 //写值到reserved区域,kStatusMemoryRangeInvalid
Blhost -p com43 -- read-memory 0x0 1000000 //按住ctrl+c看是否中断读取
2、BCA
BCA (bootloade rconfiguration area)是可以配置bootloader的一段区域。它位于应用程序起始地址+0x3c0处。
Bootloader启动的时候会使用默认的配置,当启动完成后。可以在如上的地址处修改bootloader的配置
BCA开始四个字节称为tag,必须设置为'kcfg'。
详细描述请参考\Kinetis_Bootloader_2_0_0_d1\doc\reference_manual中chapter 2
Kcfg in hex are 6B 63 66 67
Flash –resident 中offset为0x3c0
ROM中offset 为0x3c0
A、在offset处写入tag为kcfg,同时关闭外设(置00),重启。发现UART 、I2C等外设都不能使用。
此时要想使外设能够使用,唯一的方法就是用j-link中的unlock kinetis命令擦除
Blhost -u -- write-memory $BCA_OFFSET "{{6B 63 66 67 FF FF FF FF FF FF FF FF FF FF FF FF 00}}"
B、在offset处写入错误的tag(kcxg),同时关闭外设,重启。发现所有外设还能正常工作
Blhost -u -- write-memory $BCA_OFFSET "{{6B 63 78 67 FF FF FF FF FF FF FF FF FF FF FF FF 00}}"
1、TAG
Blhost -p com43 -- write-memory 0x3c0 "{{6B 63 78 67 FF FF FF FF FF FF FF FF FF FF FF FF 00}}"
//all the peripherals can work
Blhost -p com43 -- write-memory 0x3c0 "{{6B 63 66 67 FF FF FF FF FF FF FF FF FF FF FF FF 00}}"
//correct TAG all the peripherals can not work ,need to use jlink unlock the device
2、Enable and disable peripherals
如下截图在用户手册中截取,bit位置1表示使能,置0表示禁用

Blhost -p com43 -- flash-erase-all
Blhost -p com43 -- write-memory 0x3c0 "{{6B 63 66 67 FF FF FF FF FF FF FF FF FF FF FF FF 01}}"
Blhost -p com43 -- reset
Disable uart only
Blhost -p com43 -- write-memory 0x3c0 "{{6B 63 66 67 FF FF FF FF FF FF FF FF FF FF FF FF FE}}"
I2C
Blhost -p com43 -- write-memory 0x3c0 "{{6B 63 66 67 FF FF FF FF FF FF FF FF FF FF FF FF 02}}"
Blhost -p com43 -- write-memory 0x3c0 "{{6B 63 66 67 FF FF FF FF FF FF FF FF FF FF FF FF FD}}"
SPI
Blhost -p com43 -- write-memory 0x3c0 "{{6B 63 66 67 FF FF FF FF FF FF FF FF FF FF FF FF 04}}"
Blhost -p com43 -- write-memory 0x3c0 "{{6B 63 66 67 FF FF FF FF FF FF FF FF FF FF FF FF FB}}"
USB
Blhost -p com43 -- write-memory 0x3c0 "{{6B 63 66 67 FF FF FF FF FF FF FF FF FF FF FF FF 10}}"
Blhost -p com43 -- write-memory 0x3c0 "{{6B 63 66 67 FF FF FF FF FF FF FF FF FF FF FF FF EF}}"
CAN
Blhost -p com43 -- write-memory 0x3c0 "{{6B 63 66 67 FF FF FF FF FF FF FF FF FF FF FF FF 08}}"
Blhost -p com43 -- write-memory 0x3c0 "{{6B 63 66 67 FF FF FF FF FF FF FF FF FF FF FF FF F7}}"
3、I2C slave address
Blhost -p com43 -- flash-erase-all
Blhost -p com43 -- write-memory 0x3c0 "{{6B 63 66 67 FF FF FF FF FF FF FF FF FF FF FF FF FF 35}}"
Blhost -p com43 -- reset
// it doesn't work
Blhost -p com42 -b i2c -- get-property 1
//it works normally
Blhost -p com42 -b i2c,0x35 -- get-property 1
4、USB pid&vid
Blhost -p com43 -- flash-erase-all
Blhost -p com43 -- write-memory 0x3c0 "{{6B 63 66 67 }}"
// {{usbVidLByte usbVidHByte usbPidLByte usbPidHByte}}"
Blhost -p com43 -- write-memory 0x10003d0 "{{ff ff ff ff a2 15 75 00 }}"
blhost -u usbVid,usbPid
Blhost -u 0x15a2,0x0075 -- get-property 1//it works normally
4.2、USB usbStringsPointer

Blhost -p com43 -- flash-erase-all
Blhost -p com43 -- write-memory 0x3c0 "{{6B 63 66 67 }}"
// stings pointer
Blhost -p com43 -- write-memory 0x10003d8 "{{65 66 67 68 }}"
Blhost -p com43 -- reset
Blhost -u -- get-property 1
5、Timeout
先下载led_demo到板子中,然后执行如下的命令,看灯是否10s后闪烁
Blhost -p com43 -- write-memory 0x3c0 "{{6b 63 66 67}}"
Blhost -p com43 -- write-memory 0x10003d0 "{{FF FF 10 27}}" //0x2710ms=10s
6、Directly jump to app
Blhost -p com43 -- write-memory 0x3c0 "{{6B 63 66 67}}"
Blhost -p com43 -- write-memory 0x10003d0 "{{FF FF 10 27}}" //设置app启动延时
Blhost -p com43 -- write-memory 0x10003d8 "{{ff ff ff ff ff ff 00 ff}}" //直接跳转flag
CAN
写死速率为0,若只是配置tag,则速率都可以使用,且不需要复位
125K 250K 500K 1M
0 1 2 4
3e9 :can-config1
3ea-3eb : can-config2
CAN RX/TX ID
Default :canTxId=0xffff ,txId=0x123;Else : txId= canTxId & 0x7ff.//cantxid 跟TXID不是一回事,blhost使用的是txid,同理rx也是这个情况
Default :canRxId=0xffff ,rxId=0x321;Else : rxId= canRxId & 0x7ff.
3ec-3ed canTxId
3ee-3ef canRxId
函数:flexcan_peripheral_init
Canconfig1 & 0x08,若为真,也就是canconfig1 bit[3] = 1的情况下,则根据canconfig2配置speed
若为假,则根据canconfig1 bit[0:2]的值计算速率
从下面的代码中可以看出,bit[0:2]的值>=3就默认使用default,也就是1M
计算方式如下:
switch (s_flexcanInfo.baudrate)
{
case 0:
config.baudRate = 125000;
break;
case 1:
config.baudRate = 256000;
break;
case 2:
config.baudRate = 500000;
break;
case 3:
case 4:
default:
config.baudRate = 1000000;
break;
}
7、CAN configure1 & configure2
1、配置BCAtag,不设置速率,则0,1,2,4速率都可以使用
Blhost -p com43 -- write-memory 0x3c0 "{{6B 63 66 67}}"
Blhost -p com13 -b can,1 -- get-property 1
2、配置3e9处速率,测试只能在该速率下通信
Blhost -p com43 -- write-memory 0xa3e0 "{{ ff ff ff ff ff ff ff ff ff f0 ff ff ff ff ff ff }}"
Blhost -p com13 -b can,0 -- get-property 1
3、配置config2内容
(Clock is based on 24Mhz.Baud rate 1M ,propseg = 4,pseg1 = 2, pseg2 = 2,pre_divider = 1,rjw = 2)
3e9 :can-config1
3ea-3eb : can-config2
Blhost -p com43 -- get-property 1
Blhost -p com43 -- flash-erase-all
Blhost -p com43 -- write-memory 0x3c0 "{{ 6b 63 66 67 }}"
Blhost -p com43 -- write-memory 0xa3e8 "{{ ff c8 4a 00 }}"
Blhost -p com13 -b can,4 -- get-property 1 //只用速率4pass
8、CAN TX/RX ID
1、测试默认状态rxid&txid
Blhost -p com13 -b can,4,0x321,0x123 -- get-property 1 //pass
Blhost -p com13 -b can,4,0x321,0x133 -- get-property 1
Blhost -p com13 -b can,4,0x123,0x321 -- get-property 1
2、不设置速率,设置id
Blhost -p com43 -- flash-erase-all
Blhost -p com43 -- write-memory 0x3c0 "{{6B 63 66 67}}"
Blhost -p com43 -- write-memory 0xa3e0 "{{ ff ff ff ff ff ff ff ff ff ff ff ff ff 03 6f 66 }}"//txid = 0x03ff&0x7fff = 0x03ff rxid = 0x666f&0x7fff = 0x6ff
Rx tx
Blhost -p com43 -- reset
Blhost -p com13 -b can,2,0x66f,0x3ff -- get-property 1 //pass
Blhost -p com13 -b can,2,0x66f,0x123 -- get-property 1
Blhost -p com13 -b can,2,0x321,0x3ff -- get-property 1
Blhost -p com13 -b can,2,0x321,0x123 -- get-property 1
3、配置速率跟ID
Blhost -p com43 -- flash-erase-all
Blhost -p com43 -- write-memory 0x3c0 "{{6B 63 66 67}}"
Blhost -p com43 -- write-memory 0xa3e0 "{{ ff ff ff ff ff ff ff ff ff f1 ff ff ff 03 6f 66 }}"
Blhost -p com43 -- reset
Blhost -p com13 -b can,1,0x66f,0x3ff -- get-property 1 //pass
Blhost -p com13 -b can,0,0x66f,0x3ff -- get-property 1
Blhost -p com13 -b can,4,0x66f,0x3ff -- get-property 1
Blhost -p com13 -b can,2,0x66f,0x3ff -- get-property 1
9、Clock
Configure BCA clockDivider, also disable the peripheral of USB and set in high-speed mode
然后查看bootloader是否能正常工作
简单来说就是usb使能的话就一定是工作在high speed mode,所以必须是48M,要想配置24M这种必须将usb关掉。
1、Configure core clock to 24MHz.
Blhost -p com43 -- flash-erase-all
Blhost -p com43 -- write-memory 0x3c0 "{{6b 63 66 67 ff ff ff ff ff ff ff ff ff ff ff ff 07 ff ff ff ff ff ff ff ff ff ff ff fe fe ff ff}}"
Blhost -p com43 -- get-property 1
2、Configure core clock to 8MHz.
Blhost -p com43 -- flash-erase-all
Blhost -p com43 -- write-memory 0x3c0 "{{6b 63 66 67 ff ff ff ff ff ff ff ff ff ff ff ff 07 ff ff ff ff ff ff ff ff ff ff ff fe fa ff ff}}"
3、Configure core clock to 4MHz.
Blhost -p com43 -- flash-erase-all
Blhost -p com43 -- write-memory 0x3c0 "{{6b 63 66 67 ff ff ff ff ff ff ff ff ff ff ff ff 07 ff ff ff ff ff ff ff ff ff ff ff fe f4 ff ff}}"
3、BUS
Bus就是总线,是连接各个部件的一组信号线。我们测试的总线有如下几种:UART、I2C、SPI、USB、CAN
测试不同速率下的总线是否能正常工作
1、Different band rate
UART:
Blhost -p com43 -- reset
Blhost -p com43,4800 -- get-property 1
Blhost -p com43,9600 -- get-property 1
Blhost -p com43,19200 -- get-property 1
Blhost -p com43,25600 -- get-property 1
Blhost -p com43,38400 -- get-property 1
Blhost -p com43,57600 -- get-property 1
Blhost -p com43,115200 -- get-property 1
USB:
blhost -u -- get-property 1
SPI:
Blhost -p com42 -b spi,5 -- get-property 1
Blhost -p com42 -b spi,10 -- get-property 1
Blhost -p com42 -b spi,20 -- get-property 1
Blhost -p com42 -b spi,50 -- get-property 1
Blhost -p com42 -b spi,100 -- get-property 1
Blhost -p com42 -b spi,200 -- get-property 1
Blhost -p com42 -b spi,500 -- get-property 1
Blhost -p com42 -b spi,1000 -- get-property 1
Blhost -p com42 -b spi,2000 -- get-property 1
I2C:
blhost -p com42 -b i2c -- get-property 1
blhost -p com42 -b i2c,0x10,5 -- get-property 1
blhost -p com42 -b i2c,0x10,50 -- get-property 1
blhost -p com42 -b i2c,0x10,100 -- get-property 1
blhost -p com42 -b i2c,0x10,400 -- get-property 1
CAN:
125K
Blhost -p com13 -b can -- flash-erase-all
Blhost -p com13 -b can -- write-memory 0x3c0 "{{ 6b 63 66 67 }}"
Blhost -p com13 -b can -- write-memory 0x3e0 "{{ ff ff ff ff ff ff ff ff ff f0 ff ff ff ff ff ff }}"
Blhost -p com13 -b can -- reset
Blhost -p com13 -b can,0 -- fill-memory 0x0 0x1000 0xfe byte
Blhost -p com13 -b can,0 -- read-memory 0x0 0x1000
250k:
Blhost -p com13 -b can -- flash-erase-all
Blhost -p com13 -b can -- write-memory 0x3c0 "{{ 6b 63 66 67 }}"
Blhost -p com13 -b can -- write-memory 0x3e0 "{{ ff ff ff ff ff ff ff ff ff f1 ff ff ff ff ff ff }}"
Blhost -p com13 -b can -- reset
Blhost -p com13 -b can,1 -- fill-memory 0x0 0x1000 0xfe byte
Blhost -p com13 -b can,1 -- read-memory 0x0 0x1000
500k:
Blhost -p com13 -b can -- flash-erase-all
Blhost -p com13 -b can -- write-memory 0x3c0 "{{ 6b 63 66 67 }}"
Blhost -p com13 -b can -- write-memory 0x3e0 "{{ ff ff ff ff ff ff ff ff ff f2 ff ff ff ff ff ff }}"
Blhost -p com13 -b can -- reset
Blhost -p com13 -b can,2 -- fill-memory 0x0 0x1000 0xfe byte
Blhost -p com13 -b can,2 -- read-memory 0x0 0x1000
1M:
Blhost -p com13 -b can -- flash-erase-all
Blhost -p com13 -b can -- write-memory 0x3c0 "{{ 6b 63 66 67 }}"
Blhost -p com13 -b can -- write-memory 0x3e0 "{{ ff ff ff ff ff ff ff ff ff f4 ff ff ff ff ff ff }}"
Blhost -p com13 -b can -- reset
Blhost -p com13 -b can,4 -- fill-memory 0x0 0x1000 0xfe byte
Blhost -p com13 -b can,4 -- read-memory 0x0 0x1000
2、Fill memory to a big block
To check all the bus driver
向内存写入大量数据后读出来比对是否正确,来判断驱动是否正常
UART:
Blhost -p com43 -- flash-erase-all
blhost -t 100000 -p com43,115200 -- fill-memory 0x0 20000 0x10
blhost -t 100000 -p com43,115200 -- read-memory 0x0 20000
SPI:
blhost -t 10000 -p com42 -b spi,2000,1,1,msb -- fill-memory 0xb000 0x10000 0xfe
blhost -t 10000 -p com42 -b spi,2000,1,1,msb -- read-memory 0xb000 0x10000
I2C:
blhost -t 10000 -p com42 -b i2c,0x10,400 -- fill-memory 0xb000 0x10000 0xfe
blhost -t 10000 -p com42 -b i2c,0x10,400 -- read-memory 0xb000 0x10000
CAN:
blhost -t 10000 -p com42 -b can -- fill-memory 0xb000 0x10000 0xfe
blhost -t 10000 -p com42 -b can -- read-memory 0xb000 0x10000
3、Write memory with high speed
配置peripheral高速模式下写入大量数据
UART:
blhost -t 10000 -p com43 -- flash-erase-all
blhost -t 10000 -p com43,115200 -- get-property 1
blhost -t 10000 -p com43,115200 -- write-memory 0x0 文件
blhost -t 10000 -p com43,115200 -- read-memory 0x0 0x10000
I2C:
blhost -t 10000 -p com42 -b i2c,0x10,400 -- flash-erase-all
blhost -t 10000 -p com42 -b i2c,0x10,400 -- write-memory 0xb000 0x10000
blhost -t 10000 -p com42 -b i2c,0x10,400 -- read-memory 0xb000 0x10000
SPI:
blhost -t 10000 -p com42 -b spi,2000,1,1,msb -- write-memory 0xb000 0x10000
blhost -t 10000 -p com42 -b spi,2000,1,1,msb -- read-memory 0xb000 0x10000
CAN :
blhost -t 10000 -p com13 - b can -- write-memory 0x3c0 "{{ 6b 63 66 67 }}"
blhost -t 10000 -p com13 - b can -- write-memory 0x3e0 "{{ ff ff ff ff ff ff ff ff ff f4 ff ff ff ff ff ff }}"
blhost -t 10000 -p com13 -b can,4 -- write-memory 0xb000 0x10000
blhost -t 10000 -p com13 -b can,4 -- read-memory 0xb000 0x10000
4、spurious data test
测试拔除通信线的情况下是否能通信或者不能通信的情况下占用通信通道
UART:
拔除uart RX线:
blhost -t 10000 -p com43 -- get-property 1 //fail
blhost -t 10000 -p com13 -b spi -- get-property 1 //pass
reset
blhost -t 10000 -p com43 -- get-property 1 //fail
插线
blhost -t 10000 -p com43 -- get-property 1 //pass
I2C:
拔除I2C SDA线
blhost -t 10000 -p com13 - b i2c -- get-property 1 //fail
blhost -t 10000 -p com13 - b spi -- get-property 1 //pass
reset
blhost -t 10000 -p com13 - b i2c -- get-property 1 //fail
插线
blhost -t 10000 -p com13 - b i2c -- get-property 1 //pass
SPI:
拔除SPI sin线
blhost -t 10000 -p com13 - b spi -- get-property 1 //fail
blhost -t 10000 -p com13 - b i2c -- get-property 1 //pass
reset
blhost -t 10000 -p com13 - b spi -- get-property 1 //fail
插线
blhost -t 10000 -p com13 - b spi -- get-property 1 //pass
CAN:
拔除CAN 任意一根线
blhost -t 10000 -p com13 - b can -- get-property 1 //fail
blhost -t 10000 -p com13 - b i2c -- get-property 1 //pass
reset
blhost -t 10000 -p com13 - b can -- get-property 1 //fail
插线
blhost -t 10000 -p com13 - b can -- get-property 1 //pass
4、CRC
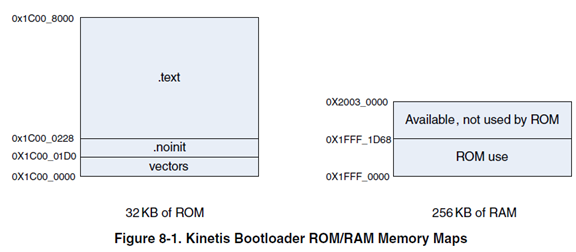
BCA起始地址0x0(start address of user application)+0x3c0(offset)

3c4-3c7 : crcStartaddress 都是4byte
3c8-3cb : crcByteCount
3cc-3cf : crcExpectedValue
1、Kibble_CRC_01 checkinvalid
-
直接使用command
Blhost -p com43 -- flash-erase-all
-
配置BCA,但是crc相关字节全部设置为ff
Blhost -p com43 -- flash-erase-all
Blhost -p com43 -- write-memory 0x3c0 "{{6b 63 66 67 ff ff ff ff ff ff ff ff ff ff ff ff }}"
Blhost -p com43 -- reset
Blhost -p com43 -- get-property 8
2、Kibble_CRC_01 checkinactive
设置tag,不设置PC值,但是非全部ff
Blhost -p com43 -- write-memory 0x3c0 "{{6B 63 66 67}}"
//BCA is valid and and crc parameters are set (not all 0xff bytes).
//开启Tag,但是其余值全部设为0
Blhost -p com43 -- flash-erase-all
Blhost -p com43 -- write-memory 0x3c0 "{{6b 63 66 67 00 00 00 00 00 00 00 00 00 00 00 00}}"
//BCA中CRC相关值写为0
Blhost -p com43 -- reset
Blhost -p com43 -- get-property 8 //返回值应该为kStatus_AppCrcCheckInactive
3、Kibble_CRC_02 OutOfRange
必须设置PC值
BCA is valid and and crc byte count is equal to zero.
A、
Blhost -p com43 -- flash-erase-all
Blhost -p com43 -- write-memory 0x3c0 "{{6b 63 66 67 00 00 00 00 00 00 00 00 ff ff ff ff}}"
Blhost -p com43 -- write-memory 0x0 "{{ff ff ff ff 01 00 00 00}}"
// set a PC pointer which is used for the bootloader check process。。a000处开始的四个字节是stack
Blhost -p com43 -- reset
Blhost -p com43 -- get-property 8
//except return value shoul be kStatus_AppCrcCheckOutOfRange
BCA is valid and and crc start address + count > END address
B、
Blhost -p com43 -- flash-erase-all
Blhost -p com43 -- write-memory 0x3c0 "{{ 6b 63 66 67 ff ff ff ff 00 00 00 02 ff ff ff ff}}"
//Blhost -p com43 -- write-memory 0x3c0 "{{ 6b 63 66 67 ff ff ff ff 00 00 00 00 00 00 00 00}}"
Blhost -p com43 -- write-memory 0x0 "{{ff ff ff ff 01 00 00 00}}"
// set a PC pointer which is used for the bootloader check process
Blhost -p com43 -- reset
Blhost -p com43 -- get-property 8
//except return value shoul be kStatus_AppCrcCheckOutOfRange
BCA is valid and and crc end address exceeds 4G address space
C、
Blhost -p com43 -- flash-erase-all
Blhost -p com43 -- write-memory 0x3c0 "{{ 6b 63 66 67 00 00 08 00 00 00 00 02 ff ff ff ff }}"
Blhost -p com43 -- write-memory 0x0 "{{ff ff ff ff 01 00 00 00}}"
// set a PC pointer which is used for the bootloader check process
Blhost -p com43 -- get-property 8
//except return value shoul be kStatus_AppCrcCheckOutOfRange
4、Kibble_CRC_02 CheckFailed
BCA is valid and everything is right but crc expect value is wrong
Blhost -p com43 -- flash-erase-all
Blhost -p com43 -- write-memory 0x3c0 "{{6b 63 66 67 00 a4 00 00 08 00 00 00 00 00 00 12}}"
//start 地址为0xa400 count为8 excepted value为0x12000000 错误值
Blhost -p com43 -- write-memory 0xa400 "{{11 22 33 44 55 66 77 88}}"
//检查的字节数目为8
Blhost -p com43 -- write-memory 0x0 "{{ff ff ff ff 0 a4 00 00}}"
// set a PC pointer which is used for the bootloader check process
Blhost -p com43 -- reset
Blhost -p com43 -- get-property 8
//except return value shoul be kStatus_AppCrcCheckFailed
5、Kibble_CRC_04 pass
Blhost -p com43 -- flash-erase-all
Blhost -p com43 -- write-memory 0x3c0 "{{6b 63 66 67 00 a4 00 00 01 00 00 00 8B 3E 83 E9}}"
//配置crc计算的起始地址为0x0000a400 ,从0xa400处取一个byte ,checksum为8B 3E 83 E9
Blhost -p com43 -- write-memory 0xa400 {{cd}}
//0xa400处写入一个byte,内容为0xcd
Blhost -p com43 -- write-memory 0x0 "{{ff ff ff ff 00 01 00 00}}"
// set a PC pointer which is used for the bootloader check process,PC 可以设置为除了0x0 0xffff reset——handle 的PC值外的任意值
设置PC的目的是,bootloader运行时,会检测app的PC is_application_ready_for_executing
Blhost -p com43 -- reset
Blhost -p com43 -- get-property 8
啸天上的case
- 打开led demo,打开startup_mkv46f16.s,对内内容处填写上如下值。(配置bca用)
DCD 0x6766636B ;240 /*0x3c0*/我们写的顺序是从高到低位,但是内存中读出来是是从低位开始的,看上去像是反过来, 小端模式
DCD 0x0000A000 ;241
DCD 0x0000084E ;242
DCD 0xFFFFFFFF ;243 /*with radom value at first*/
DCD 0xFFFFFFFF ;244
DCD 0xFFFFFFFF ;245
DCD 0xFFFFFFFF ;246
DCD 0xFFFFFFFF ;247
DCD 0xFFFFFFFF ;248
DCD 0xFFFFFFFF ;249
DCD 0xFFFFFFFF ;250
DCD 0xFFFFFFFF ;251 /*0x3fc*/
- 编译将生成的bin文件下载到板子上
- 使用get-property 8查看发现crc check fail
- 调试bootloader,src\bootloader\src中打开bl_app_crc_check.c,在calculate_application_crc32()处设置断点,同时view->watch中加入calculated_crc,按F10,调试知道calculated_crc出现值。将出来的值转化成16进制,填写到led demo如上243处。编译下载
-
Get-property 8发现测试pass。Reset后app正常运行
CRC的检测是在init函数中get_active_peripheral
static bool is_application_ready_for_executing(uint32_t applicationAddress)
#if BL_FEATURE_CRC_CHECK
// Validate application crc only if its location is valid
if (result)
{
result = is_application_crc_check_pass();
}
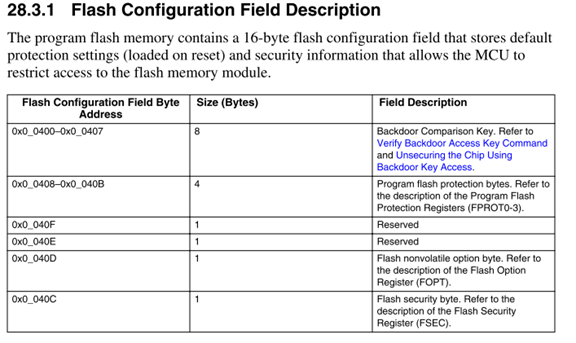
5、Flash
Flash configuration area 0x400-0x40f

1、Flash_Security_0001
0x400处是flash configuration area
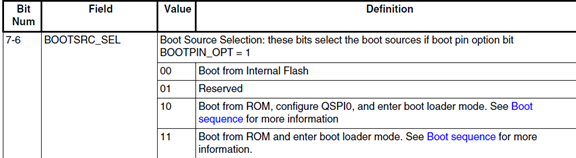
0x40D FOPT[BOOTSRC_SEL] bit[7:6] = 0b10表示ROM启动同时配置QSPI
0x400 – 0x40F这十六个字节的空间是flash configure区域。Reset后,flash secure寄存器FSEC,FOPT等会从这个地方加载相关的数据。从而实现flash secure状态的配置,boot的配置等等。
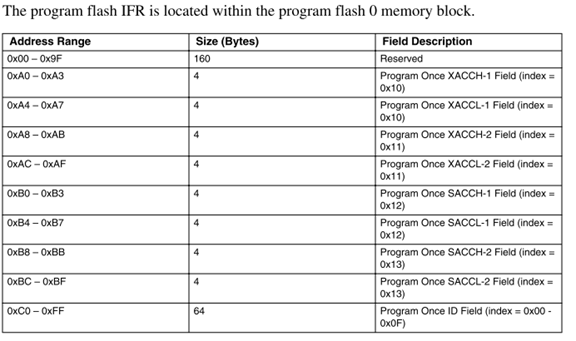
IFR是独立于program的一段空间。
Can't erase IFR
Program once ID field的index是:0x0-0x0f, 每个index 4bytes
Program once XACC & SACC 是:0x10-0x13,每个index 8 bytes
如上的96 bytes只可以program once但是不可擦
erase IFR
0x20-0x23可以写擦但是不可读
0x30-0x33 可以读写擦
每个index可以写4bytes
这个case设计的目的是为了测试backdoor key是否能工作。使用flash-erase-all之后0x40C就会变写成0xff 从而bit[1:0]变成11处于secure的状态
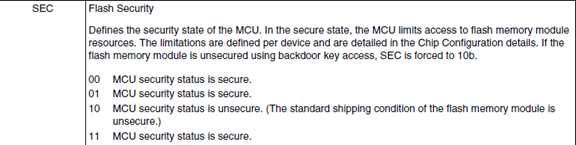
Flash configuration area中0X40C存放的是FSEC。
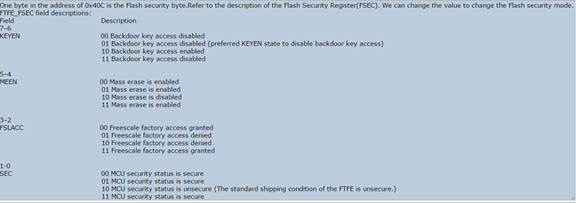
当板子reset后,FSEC的内容会拷贝到FTFA_FSEC寄存器中(0x4002_0002h),此寄存器可读不可写,reset状态其内容不可知.每个bit位的定义如上图所示。
bit[7:6] 代表是否enable backdoorkey (10代表enable,其余都是disable)
bit[1:0]代表MCU的状态是否为secure(10代表unsecure,其余都是secure)
backdoor key
blhost -p com43 -- get-property 17
Expected Result:Flash Security State=UNSECURE.
blhost -p com43 -- flash-erase-all
blhost -p com43 -- read-memory 0x400 16
Expected Result:For no flash reserved(K80) bootloader, all the bytes are 0xff.
//enable backdoorkey 0x40C bit[7:6] = 10 and set secure status 0x40C bit[1:0] = 11
blhost -p com43 -- write-memory 0x400 "{{ 01 02 03 04 05 06 07 08 ff ff ff ff bf ff ff ff}}"
blhost -p com43 -- reset
blhost -p com43 -- get-property 17
Expected Result: Flash Security State=SECURE.
blhost -p com43 -- flash-security-disable 0102030405060709 (Wrong Key)
Expected Result:kStatus_FlashAccessError
blhost -p com43 -- reset
blhost -p com43 -- flash-security-disable 0102030405060708 (Right Key)
Expected Result:Success
blhost -p com43 -- get-property 17
Expected Result: Flash Security State=UNSECURE
blhost -p com43 -- flash-erase-all
blhost -p com43 -- reset
blhost -p com43 -- get-property 17
Expected Result: Flash Security State=SECURE.
blhost -p com43 -- flash-erase-all-unsecure
blhost -p com43 -- get-property 17
Expected Result:Flash Security State=UNSECURE.
2、Flash_security status
这个case的目的是为了验证0x40c处的配置,看flash security是否能生效。
bit[1:0]代表MCU的状态是否为secure(10代表unsecure,其余都是secure)
仅当FSEC bit[1:0]为10时,unsecure。所以,如下只有case4会生效,其余都不可以读写擦
blhost -p com43 -- flash-erase-all-unsecure
case 1:
blhost -p com43 -- get-property 1
blhost -p com43 -- flash-erase-all
blhost -p com43 -- write-memory 0x400 "{{ff ff ff ff ff ff ff ff ff ff ff ff f0 ff ff ff}}"
blhost -p com43 -- reset
blhost -p com43 -- read-memory 0x0 1024
case 2:
blhost -p com43 -- get-property 1
blhost -p com43 -- flash-erase-all
blhost -p com43 -- write-memory 0x400 "{{ff ff ff ff ff ff ff ff ff ff ff ff f1 ff ff ff}}"
blhost -p com43 -- reset
blhost -p com43 -- read-memory 0x0 1024
case 3:
blhost -p com43 -- get-property 1
blhost -p com43 -- flash-erase-all
blhost -p com43 -- write-memory 0x400 "{{ff ff ff ff ff ff ff ff ff ff ff ff f3 ff ff ff}}"
blhost -p com43 -- reset
blhost -p com43 -- read-memory 0x0 1024
case 4:
blhost -p com43 -- get-property 1
blhost -p com43 -- flash-erase-all
blhost -p com43 -- write-memory 0x400 "{{ff ff ff ff ff ff ff ff ff ff ff ff fe ff ff ff}}"
blhost -p com43 -- reset
blhost -p com43 -- read-memory 0x0 1024
3、Flash_Fill_Memory_01
将写的flash区域全部写满,然后读取,查看写入值是否正确
3 è flash start address
4 è flash size
12 èreserved region
blhost -p com43 -- flash-erase-all
blhost -t 30000 -p com43 -- fill-memory 0x5000 0x3b000 0xfe byte
blhost -t 30000 -p com43 -- read-memory 0x5000 0x3b000 C:\Users\B57252\Desktop\1.txt
blhost -p com43 -- flash-erase-all
blhost -t 30000 -p com43 -- fill-memory 0x5000 0x3b000 0xfe short
blhost -t 30000 -p com43 -- read-memory 0x5000 0x3b000 C:\Users\B57252\Desktop\1.txt
blhost -p com43 -- flash-erase-all
blhost -t 30000 -p com43 -- fill-memory 0x5000 0x3b000 0xfe word
blhost -t 30000 -p com43 -- read-memory 0x5000 0x3b000 C:\Users\B57252\Desktop\1.txt
4、Flash_Write_Memory_01
使用fill-memory的方法将flash写满,然后读取到一个txt文档里面。再通过write-memory的方式将flash写满
blhost -p com43 -- flash-erase-all
blhost -t 30000 -p com43 -- fill-memory 0x5000 0x3b000 0xfe short
blhost -t 30000 -p com43 -- read-memory 0x5000 0x3b000 C:\Users\B57252\Desktop\1.txt
blhost -p com43 -- flash-erase-all
blhost -t 30000 -p com43 -- write-memory 0x5000 C:\Users\B57252\Desktop\1.txt
blhost -t 30000 -p com43 -- read-memory 0x5000 0x3b000
4、Flash_Read_01 IFR

Read once命令对应的读取96bit reserved区域。
读取的内容位于flash哪里?为何跟read-memory读取出来的值不一样?
能读取到IFR区域的值就ok
blhost -p com43 -- flash-read-once 0 4 //read the program once field
blhost -p com43 -- flash-read-resource 0x000000 256 0x00//read the IFR
blhost -p com43 -- flash-read-resource 0x000000 8 0x01 //read the Version ID

5、Flash_Read_02
Read and write invalid address of flash
1、Read/Write reserved regions
blhost -p com43 -- read-memory 0x0 10 //pass
blhost -p com43 -- write-memory 0x0 {{11111111}} //kStatusMemoryRangeInvalid.
2、 Read/Write address extend the whole flash
blhost -p com43 – get-property 4 //get-flash-size
blhost -p com43 -- read-memory 0x0 0x40004 //exceed flash size
blhost -p com43 -- write-memory 0x40000 {{111111}} //write value beyond the flash size
3、Read/Write address more than a sector
blhost -p com43 – get-property 5 //get-sector-size
blhost -p com43 -- read-memory 0x0 0x1004 //read more than a sector
blhost -p com43 -- fill-memory 0x0 0x1004 0xfe //fill than a sector size
4、Read/Write address not aligned, which include not aligned number and not aligned address
blhost -p com43 -- read-memory 0x0123,7 //success
blhost -p com43 -- write-memory 0xa123 "{{123}}"// kStatus_FlashAlignmentError
bit位00对齐,100 、1000 1100换成16进制末尾是4、8、0、12
关于对齐:
对齐有两种:1、数据对齐 2、地址对齐
Reference manual中找到Flash Memory Module ==》functional description==》flash command description ==》read 1s section command

如上表示4字节对齐(对内存的操作以字节为单位)
所以地址根数据必须是0x10的整数倍
为什么要对齐:
http://blog.163.com/crazy20070501@126/blog/static/12865946520112131313900/

6、FLash Call Command 01
执行call命令
创建IAR工程,生成bin文件的代码如下:
#include "stdint.h"
#define RAM_BASE (0x20002000ul)
int call_command()
{
volatile uint32_t *ram_reg = (volatile uint32_t*) RAM_BASE;
*ram_reg +=1;
return 0;
}
IAR环境 配置
1 select binary in "Output Converter" .
2 select " Cortex-M0+" in "General Option->Target->Core"
3 fill "call_command" in Linker->Library->Override default program entry
blhost -p com43 -- read-memory 0x20002000 1
blhost -p com43 -- write-memory 0x20000000 L5k_call.bin
blhost -p com43 -- call 0x20000001 0
blhost -p com43 -- read-memory 0x20002000 1
the value in 0x20002000 should plus 1
7、flash PFSize 01
PF size确定了flash的大小,计算后查表然后与get-property 4对比
"System Integration Module(SIM)" ->Memory map and register definition -> SIM -> SIM_FCFG1. Find the absolute address of SIM_FCFG1. [27-24]bits of SIM_FCFG1 stands for the PFSize.
例子:
blhost -p com# -- read-memory 0x4007504c 4 //读取四个字节
The blhost returns:00 00 00 0b . So the value of SIM_FCFG1 is 0x0b000000
step2: [27-24]bits of SIM_FCFG1 stands for the PFSize, so the PFSize of L5K is 1011
PFSize flash size
"0000 8K
"0001 16K
"0010 24K
"0011 32K
"0100 48K
"0101 64K
"0110 96K
"0111 128K
"1000
"1001 256K
"1010
"1011 512K
"1100
"1101 1M
"1110
"1111 2M
8、FAC
FAC(XACC)是用来控制flash某个segment访问权限的寄存器。
以K82为例:
Flash会分为64个相等的segment.
1. 40020018 开始的地址XACCH0-3,XACCL0-3 共8个寄存器控制64个segment = flash size/64,segment size也可以通过get-property 0x20得到。板子复位后,该地址处会自动加载IFR index 0x10跟0x11按位与的结果。
2. XACC由IFR 0x10跟0x11按位与得到结果
3. IFR 0xa0-0xaf(index 10对应A0-A7)可以通过read resource 0xa0 8 0得到,写入可以通过program once写入
4. IFR每四个字节小端存储
IFR 0x10 8个bytes
IFR 0x11 8个bytes
例子:
Flash-program-once 0x10 1122334455667788
Flash-program-once 0x10 1122334455667788
88与88按位与,得到的结果对应0-7 segment, 即flash 0地址开始的segment
77与77按位与,得到的结果对应8-15 segment
11与11按位与,得到结果对应56-63 segment
详细的对应关系如下:


如下表格是计算好的IFR:
For example (segment 0 – 7):
|
segment number |
XA[7:0] |
progam flash IFR address A |
program flash IFR address B |
|
0 |
11111110 |
ffff_ffff_ffff_fffe |
ffff_ffff_ffff_fffe |
|
ffff_ffff_ffff_fffe |
ffff_ffff_ffff_ffff |
||
|
ffff_ffff_ffff_ffff |
ffff_ffff_ffff_fffe |
||
|
1 |
11111101 |
ffff_ffff_ffff_fffd |
ffff_ffff_ffff_fffd |
|
ffff_ffff_ffff_ffff |
ffff_ffff_ffff_fffd |
||
|
ffff_ffff_ffff_fffd |
ffff_ffff_ffff_ffff |
||
|
2 |
11111011 |
ffff_ffff_ffff_fffb |
ffff_ffff_ffff_fffb |
|
ffff_ffff_ffff_fffb |
ffff_ffff_ffff_ffff |
||
|
ffff_ffff_ffff_ffff |
ffff_ffff_ffff_fffb |
||
|
3 |
11110111 |
ffff_ffff_ffff_fff7 |
ffff_ffff_ffff_fff7 |
|
ffff_ffff_ffff_fff7 |
ffff_ffff_ffff_ffff |
||
|
ffff_ffff_ffff_ffff |
ffff_ffff_ffff_fff7 |
||
|
4 |
11101111 |
ffff_ffff_ffff_ffef |
ffff_ffff_ffff_ffef |
|
ffff_ffff_ffff_ffff |
ffff_ffff_ffff_ffef |
||
|
ffff_ffff_ffff_ffef |
ffff_ffff_ffff_ffff |
||
|
5 |
11011111 |
ffff_ffff_ffff_ffdf |
ffff_ffff_ffff_ffdf |
|
ffff_ffff_ffff_ffdf |
ffff_ffff_ffff_ffff |
||
|
ffff_ffff_ffff_ffff |
ffff_ffff_ffff_ffdf |
||
|
6 |
10111111 |
ffff_ffff_ffff_ffbf |
ffff_ffff_ffff_ffbf |
|
ffff_ffff_ffff_ffff |
ffff_ffff_ffff_ffbf |
||
|
ffff_ffff_ffff_ffbf |
ffff_ffff_ffff_ffff |
||
|
7 |
01111111 |
ffff_ffff_ffff_ff7f |
ffff_ffff_ffff_ff7f |
|
ffff_ffff_ffff_ff7f |
ffff_ffff_ffff_ffff |
||
|
ffff_ffff_ffff_ffff |
ffff_ffff_ffff_ff7f |
Case:
blhost -p com# -- flash-erase-all-unsecure
blhost -p com# -- flash-program-once 0x10 8 fffffffffffffffe
Or blhost -p com# -- flash-program-once 0x08 8 fffffffffffffffe
blhost -p com# -- flash-program-once 0x11 8 fffffffffffffffe
Or blhost -p com# -- flash-program-once 0x09 8 fffffffffffffffe
blhost -p com# -- reset
the segment 0 is in execute-only mode, it can't be read and programmed.
blhost -p com# -- read-memory 0x00 16
expected result: kStatus_FlashRegionExecuteOnly
blhost -p com# -- write-memory 0x00 {{1122334455667788}}
expected result: kStatus_FlashRegionExecuteOnly
6、RAM
RAM测试跟flash的测试类似,将ram写满,然后读取,比较读取的内容跟写入的是否一致
1、RAM_Fill_Memory_01
blhost -u -- get-property 15 //get ram size
blhost -u -- get-property 14 //get ram start address
blhost -u -- get-property 12 //get ram reserved region
blhost -t 3000 -u -- fill-memory 0x1fff1298 126312 0xfe byte //fill the whole memory with 0xfe
blhost -t 3000 -u -- read-memory 0x1fff0000 131072 //read the whole memory
2、RAM_Write_Memory_01
blhost -u -- get-property 15 //RAM Size = 128 KB
blhost -u -- get-property 14 //RAM Start Address = 0x1FFF0000
blhost -u -- get-property 12 // RAM: 0x1FFF0000-0x1FFF1297
blhost -t 30000 -u -- fill-memory 0x1fff1298 126312 0xfe byte //fill the whole memory with 0xfe
blhost -t 30000 -u -- read-memory 0x1fff1298 131072 C:\Users\public.ZCHLABB46681-12\Desktop\Kinetis_Bootloader_2_0_0_d1\bin\Tools\blhost\win\test.txt //read memory to test_ram.txt
blhost -t 10000 -u -- write-memory 0x1fff1298 C:\Users\public.ZCHLABB46681-12\Desktop\Kinetis_Bootloader_2_0_0_d1\bin\Tools\blhost\win\test_ram.txt //write data to RAM
blhost -t 10000 -u -- read-memory 0x1fff1298 131072 //read the writed memory
3、RAM_abnormal_read_write
1 、read and write reserved region
blhost -p com43 -- read-memory 0x0 0x1004
blhost -u -- read-memory $RAM_Reserved_Start Reserved_Size, will read the value successfully.
blhost -u -- write-memory $RAM_Reserved_Start "{{1122}}", will return kStatusMemoryRangeInvalid.
2、read not aligned
blhost -u -- read-memory 0x1FFFE123 7,0x123 will read successfully
blhost -u -- write-memory 0x20001234 "{{123}}", will write successfully
3、read extend thewhole memory
blhost -u -t 100000 -- read-memory $RAM_Reserved_Start $RAM_Size+4
blhost -u -t 100000 -- read-memory $RAM_Reserved_End $RAM_Size
// kStatusMemoryRangeInvalid
7、QSPI
注意:给QSPI flash供电1.8V,J5
K80的启动:
Bootpin option bit: BOOTPIN_OPT = 1的前提下:
BOOTSREC_SEL(0x40D bit[7:6])决定启动源:
1、QSPI_without_config_01
Operate to QSPI, but without configure
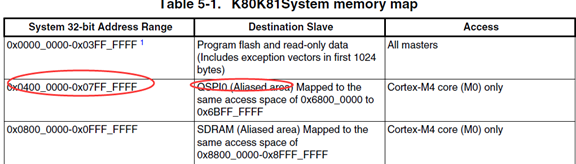
0x68000000是K80 QSPI的base address
blhost -u -- read-memory 0x68000000 8
blhost -u -- write-memory 0x68000000 "{{112233}}"
blhost -u -- fill-memory 0x68000000 10 0xfe byte
blhost -u -- flash-erase-region 0x68000000 1024
return value: QSPI not configured
2、QSPI_with_config_01
配置文件在release包中的apps\QCBGenerator\binaries内
blhost -p com43 -- write-memory 0x20000000qspi_cfg_block_quad.bin
blhost -p com43 -- configure-quadspi 1 0x20000000
blhost -p com43 -- read-memory 0x68000000 0x100
blhost -p com43 -- write-memory 0x68000000 "{{112233}}"
blhost -p com43 -- flash-erase-region 0x68000000 1024
all the commands should be executed successfully
3、QSPI_write_01
向QSPI flash不同地址写入不同长度字节的数据,然后读取出来看是否写成功
8bit对齐,0x100
Get-property 25 1可以查看qspi flash相关的信息,包括QSPI flash的大小,sector的大小等
blhost -u -- flash-erase-region 0x68000000 0x10000
blhost -t 100000 -u -- write-memory 0x68000000 {{00}}
blhost -t 100000 -u -- write-memory 0x68000100 {{0000}}
blhost -t 100000 -u -- write-memory 0x68000200 {{00000000}}
blhost -t 100000 -u -- write-memory 0x68000300 {{0000000000000000}}
blhost -t 100000 -u -- write-memory 0x687ff000 {{00}}
blhost -t 100000 -u -- write-memory 0x687ff100 {{0000}}
blhost -t 100000 -u -- write-memory 0x687ff200 {{00000000}}
blhost -t 100000 -u -- write-memory 0x687ff300 {{0000000000000000}}
blhost -t 100000 -u -- read-memory 0x687ff300 16
3、QSPI_write_sector
Xiaotian上面的case里面使用的.dat文件是定义一个sector为256KB(0x40000)
- 先从0x68000000处写入sector大小的文件,然后从0x68000000跟0x68003f00处(即写入空间的开头跟结尾处。因为QSPI flash是8bit对齐,就是0x100(八个bit都相同),所以极限是0x68003f00)开始读取16个byte,看是否写成功
- 跟A的思路一样,不同的就是在QSPI flash最后端的空间写数据
blhost -t 100000 -u -- write-memory 0x68000000 1_sector.dat
blhost -t 100000 -u -- read-memory 0x68000000 16
blhost -t 100000 - u -- read-memory 0x6803ff00 16
blhost -t 100000 - u -- write-memory 0x68040000 "qspi_two_sector.dat"
blhost -t 100000 - u -- read-memory 0x68040000 16
blhost -t 100000 - u -- read-memory 0x680bff00 16
blhost -t 100000 -u -- write-memory 0x68700000 "qspi_one_sector.dat"
blhost -t 100000 -u -- read-memory 0x68700000 16
blhost -t 100000 -u -- read-memory 0x687f3ff00 16
blhost -t 100000 -u -- write-memory 0x68740000 "qspi_two_sector.dat"
blhost -t 100000 -u -- read-memory 0x68740000 16
blhost -t 100000 -u -- read-memory 0x687bff00 16
4、QSPI_write_half
写满QSPI flash一半的空间\全部空间,然后分别在写入空间的前后处读取数据,看写入的内容是否正确
blhost -t 100000 -u -- write-memory 0x68000000 "qspi_one_half.dat"
blhost -t 100000 -u -- read-memory 0x68000000 16
blhost -t 100000 -u -- read-memory 0x683fff00 16
blhost -t 100000 -u -- write-memory 0x68000000 "qspi_full.dat"
blhost -t 100000 -u -- read-memory 0x68000000 16
blhost -t 100000 -u -- read-memory 0x687fff00 16
5、QSPI_write_alignment
Get-property 25 1查看QSPI信息
Page对齐
写对齐,分别使用不同长度的对齐来写数据,结果只有0x100长度对齐的能pass,其余的返回alignment error
blhost -t 100000 -u -- write-memory 0x68000004 "{{00}}"
blhost -t 100000 -u -- write-memory 0x68000008 "{{00}}"
blhost -t 100000 -u -- write-memory 0x68000010 "{{00}}"
blhost -t 100000 -u -- write-memory 0x68000040 "{{00}}"
blhost -t 100000 -u -- write-memory 0x68000080 "{{00}}"
blhost -t 100000 -u -- write-memory 0x68000100 "{{00}}"
6、QSPI_fill_01
Fill相关的操作参照如上write的思想,如下是fill不同字节长度的数据,分别在可以的QSPI flash的开头跟结尾
blhost -t 100000 -p COMx -- flash-erase-region 0x68000000 0x10000
blhost -t 100000 -p COMx -- flash-erase-region 0x68fe0000 0x10000
blhost -t 100000 -p COMx -- fill-memory 0x68000000 1 0x00 byte
blhost -t 100000 -p COMx -- read-memory 0x68000000 16
blhost -t 100000 -p COMx -- fill-memory 0x68000100 2 0x00 byte
blhost -t 100000 -p COMx -- read-memory 0x68000100 16
blhost -t 100000 -p COMx -- fill-memory 0x68000200 4 0x00 byte
blhost -t 100000 -p COMx -- read-memory 0x68000200 16
blhost -t 100000 -p COMx -- fill-memory 0x68000300 8 0x00 byte
blhost -t 100000 -p COMx -- read-memory 0x68000300 16
blhost -t 100000 -p COMx -- fill-memory 0x68fff100 1 0x00 byte
blhost -t 100000 -p COMx -- read-memory 0x68fff100 16
blhost -t 100000 -p COMx -- fill-memory 0x68fff200 2 0x00 byte
blhost -t 100000 -p COMx -- read-memory 0x68fff200 16
blhost -t 100000 -p COMx -- fill-memory 0x68fff300 4 0x00 byte
blhost -t 100000 -p COMx -- read-memory 0x68fff300 16
blhost -t 100000 -p COMx -- fill-memory 0x68fff400 8 0x00 byte
blhost -t 100000 -p COMx -- read-memory 0x68fff400 16
7、QSPI_ERASE
Erase不同大小的sector,erase全部\一半QSPI flash
8、boot with QSPI configured
启动的同时配置好QSPI
blhost -p com43 -- write-memory 0x20000000.bin
blhost -p com43 – configure-quadspi 0x20000000
blhost -p com43 -- write-memory 0x400 {{fffffffffffffffffffffffffe80}}
blhost -p com43 -- write-memory 0x68000000 qspi.bin
9、 boot from QSPI
Led 下载到QSPI中,然后从QSPI启动
此LED demo为特制,代码分布于flash跟QSPI flash中
使用receive-sbfile命令时,加长延时.
Blhost –t 500000
因为使用sbfile配置QCB的时候,如果有涉及到对QCB的操作的话,延时不够板子会无响应
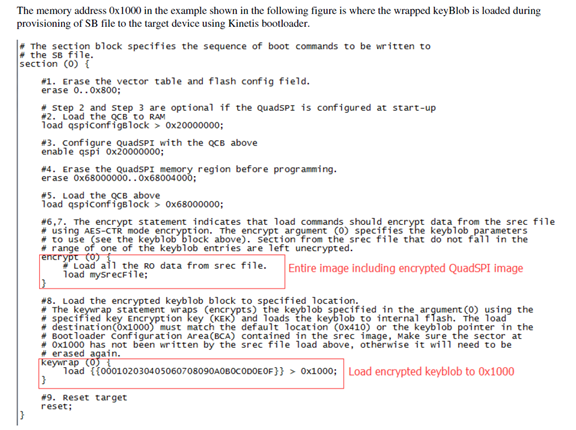
# The sources block assigns file names to identifiers
sources {
# SREC File path
mySrecFile = "led_demo_fpga_qspi.srec";
# QCB file path
qspiConfigBlock = "qcb_S25FL129P01.bin";
}
section (0) {
erase 0..0x4000;
load qspiConfigBlock >0x20000000;
enable qspi 0x20000000;
erase 0x68000000..0x68004000;
load qspiConfigBlock > 0x68000000;
load mySrecFile;
reset;
}
10 、boot from QSPI alias memory
代码分布于QSPI跟QSPI alias memory中
验证是否能够从alias memory中启动成功
sources {
# SREC File path
mySrecFile = "led_demo_fpga_alias_40001000.srec";
# QCB file path
qspiConfigBlock = "qcb_S25FL129P01.bin";
}
section (0) {
erase 0..0x4000;
load qspiConfigBlock >0x20000000;
enable qspi 0x20000000;
erase 0x4000000..0x4004000;
load qspiConfigBlock > 0x68000000;
load mySrecFile;
reset;
}
8、 SB FILE
1. Elftosb.exe
Elftosb实际上是一个加密工具,用elftosb.exe生成后缀名为.sb 的文件,然后在blhost工具中通过receive-sb-file command 下载到内存中生成.
2..bd文件
bd是"boot descriptor"缩写,该文件是一个command file,具有这种功能的文件我们以.bd作为其后缀名。
2.两者之间的关系
.bd文件作为一个command file来告诉elftosb工具如何将.bd文件中的内容转换成相应的sb file。
二. bd文件内容模块的介绍
我们将.bd文件中的内容分成以下几个大的模块:options ,constants ,sources and sections
这几个部分都可以按照一定的规则进行组合生成可执行的.bd文件。每个模块都以该模块的关键字来引入,并且其内容用{}来包含。如下面的option模块所示:
#define the options block
options{
#content goes here
}
1.options
该模块与产生ELF文件的工具有关系,工具箱有"GHS","GCC","GUN"和"ADS",我们一般在options模块中不添加任何内容而采用其默认的生成工具"GHS".
2.constants
该模块中可包含有0个或多个常量定义语句,每条语句都以分号结尾。假设有一个myBinFile 文件,我可以通过这个模块去获得该文件的大小:
constants{
bufsize = sizeof(myBinFile);
}
section (0)
{
if bufsize < 128
{
error"Buffer size is too small!";
}
else
{
info"Buffer size is acceptable";
}
}
3.sources
该模块是用来说明要加载的源文件的路径,对于led_demo_FRDM-KL25Z_8000.bin文件来说,有两种获取源文件的方法。
第一种方法:
Sources{
myBinFile = "led_demo_FRDM-KL25Z_8000.bin";
}
否则执行
Sources{
myBinFile = "../app_demo/led_demo_FRDM-KL25Z.bin";
}
第二种方法:
Sources{
demo =extern(0);
}
Cmd line:
elftosb.exe -V -c demo_L5K_flash_call.bd -o demo_L5K_flash_erase.sb led_demo_FRDM-KL25Z_8000.bin
4.sections
该模块可以说是四大模块中最重要的一个模块,整个源文件的加载也是在该模块中实现。在该模块中可以执行包括erase,load,from ,jump ,call等各种语句,在这里主要讲一下load语句。
load语句目前支持的文件格式有.bin 文件.out文件和.elf文件。
下面是针对于KL25Z4和L5K板子加载的两种文件的
加载.bin的文件
section (0) {
erase all;
load myBinFile > 0x8000;
jump 0x83e1;
}
9、 MMCAU
MMCAU或者LTC只会对SB file加密,即生成加密的SB file。。但是对SB内的内容不会加密。
比如在BD里面加入APP,APP还是明文APP附着在生成的SB file里面
但是OTFAD,里面会用到encrypt()这个段,这里面引入了APP。。此时的APP就是用blob生成的密文APP附着在SB file里面
AES几种加密模式:
http://www.cnblogs.com/starwolf/p/3365834.html
MMCAU是一个用于算法加速的模块。。
AES算法需要BCA指定一个地址存储。。
所以
- 使用elfrosb生成加密的sb,加密key 存放到0x30-0x33
- BCA指定MMCAU.bin,MMCAU.bin用来对SB进行解密
- Receive-sb ROM会自动解密
Memory-Mapped Cryptographic Acceleration Unit(内存映射加密加速单元)
MMCAU是对加密完成后的SB file进行解密。
通过CAU硬件加速模块,进行软件解密。
使用的算法是AES
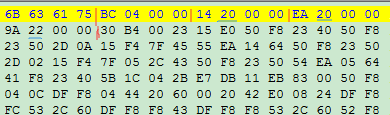
MMCAU算法在BCA中的配置:MMCAU算法可以被加载到any accessible RAM或flash中。不是每个MMCAU配置bin文件拿到手就能用的,我们需要在BCA里配置相应的位,即要告诉bootloader 有一个 pointer指向一个MMCAU设置结构。这边要谈到该bin文件头20个字节的数据,因为这20个字节数据有特殊的意义,不可缺少。
我们把这头20个字节数据分为5段。
- [Herschel]0-3字节为tag("6B 63 61 75")在ACSII码里对应为字符"kcau",类似于BCA的"kcfg"
- [Herschel]4-7 字节为length,其实这个length可以算出来,它就是从第21个字节开始算到函数代码最后的字节的总长度。
- [Herschel]8-11 字节为Init起始地址,这里它是绝对地址。
- [Herschel]12-15 字节为Encrypt起始地址,这里是绝对地址。
-
[Herschel]16-19 字节为Decrypt起始地址,这里也是绝对地址。
MMCAU的bin文件,有两种:cm0p Bin和cm4 Bin文件,区别MMCAU_OFFSET_cm0p_aes_init_start =0x14
MMCAU_OFFSET_cm0p_aes_encrypt_start =0xB8
MMCAU_OFFSET_cm0p_aes_decrypt_start =0x200
MMCAU_OFFSET_cm4_aes_init_start =0x14
MMCAU_OFFSET_cm4_aes_encrypt_start =0xEA
MMCAU_OFFSET_cm4_aes_decrypt_start =0x29A如上3-5填写的地址是需要加上BCA里面指定的地址。
步骤:
- 使用elftosb生成加密的sbfile
- BCA指定MMCAU的地址后reset
- IFR 0x30-0x33或者指定的flash 地址写入解密key
- 将MMCAU.bin写到指定的地址,MMCAU.bin就是操作CAU的算法,实现AES解密。
- Receive sbfile 接受加密后的文件
Test point:
-
MMCAU代码位于flash\ram中
- Zero key加密数据\app
- Non zero key加密数据\app
1 使用zerokey进行加密
1. Erase the whole flash
2. Update the BCA data. Make sure the tag is 'kcfg' and the mmcauConfigPointer is the located mmacu data address (0x1000).
3. Reset the target so that the BCA can be used.
4. Modify the MMCAU_DATA_cmXX.bin.
5. Set the mmcau data in flash and make sure the address is at least 4 bytes alignment.
6. Create simple.bd file, the contents are as follows.
options{}
section (0) {
load "hello sb loader world!"> 0x2000;
load {{ 05 20 00 bf 40 1e fc d1 70 47 }} > 0x3000;
}
Note: "05 20 00 bf 40 1e fc d1 70 47" is the opcodes of a tiny function.
7. Create generate_simple.bat file, the contents are as follows. (Please make sure the elftosb.exe exists in the current directory)
elftosb.exe -z -V -c simple.bd -o simple.sb
8. Double click generate_simple.bat file to generate simple.sb file.
9. Send the sb file to the target and it will return success.
10. Read data from memory address, and check if the simple string ("hello sb loader world!") is written in.
11. Call the loaded tiny function and blhost will return success.
blhost -u -t 50000 -- flash-erase-all-unsecure
blhost -u -t 50000 -- write-memory 0x3c0 "{{6B 63 66 67}}"
blhost -u -t 50000 -- write-memory 0x3E0 "{{00 10 00 00}}"
blhost -u -t 50000 -- reset
blhost -u -t 50000 -- write-memory 0x1000 XX.BIN
Note: choose the correct mmcau data file according to the architecture of the ARM core (CM0p, CM4, ...)
blhost -u -t 50000 -- receive-sb-file simple.sb
blhost -u -t 50000 -- read-memory 0x2000 22
blhost -u -t 50000 -- call 0x3001 0
2使用非zerokey进行加密
Sb file加密时使用的密文在receive-sb-file之前需要将密文写到Index 0x30处.
如果Index 0x30开始的地方没有写入key,receive-file将报错. kStatusRomLdrKeyNotFound

blhost -u -t 50000 -- flash-erase-all-unsecure
blhost -u -t 50000 -- write-memory 0x3c0 "{{6B 63 66 67}}"
blhost -u -t 50000 -- write-memory 0x3E0 "{{00 20 00 00}}"
blhost -u -t 50000 -- reset
blhost -u -t 50000 -- write-memory 0x2000 mmcau_cm4.bin
blhost -u -t 50000 -- write-memory 0x3c0 bca_mmcau_cm4.bin
//如果使用带BCA的bin文件,则上面bca的配置全部不需要,但是地址写到0x3c0处
elftosb.exe -k key.txt -V -c simple.bd -o simple.sb
blhost -u -t 50000 -- flash-program-once 0x30 4 11111111
blhost -u -t 50000 -- flash-program-once 0x31 4 11111111
blhost -u -t 50000 -- flash-program-once 0x32 4 11111111
blhost -u -t 50000 -- flash-program-once 0x33 4 11111111
blhost -u -t 50000 -- receive-sb-file case.sb
blhost -u -t 50000 -- read-memory 0x2000 22
blhost -u -t 50000 -- call 0x3001 0
2使用非zerokey加密led demo
如下图所示,红色分隔符里面的内容分别是:
typedef struct mmcau_function_info
{
uint32_t tag; // 'kcau' = 0x
uint32_t length; // number of bytes to copy, this number will be copied from the start of aes_init
uint32_t aes_init_start;
uint32_t aes_encrypt_start;
uint32_t aes_decrypt_start;
} mmcau_function_info_t;
当BCA里面的指定了MMCAU的pointer之后,对应的init_start、encrypt_start、decrypt_start需要加上BCA里面指定的地址
blhost -u -t 50000 -- flash-erase-all-unsecure
blhost -u -t 50000 -- write-memory 0x3c0 "{{6B 63 66 67}}"
blhost -u -t 50000 -- write-memory 0x3E0 "{{00 20 00 00}}"
blhost -u -t 50000 – reset
blhost -u -t 50000 -- write-memory 0x2000 mmcau_cm4.bin
blhost -u -t 50000 -- flash-program-once 0x30 4 11111111
blhost -u -t 50000 -- flash-program-once 0x31 4 11111111
blhost -u -t 50000 -- flash-program-once 0x32 4 11111111
blhost -u -t 50000 -- flash-program-once 0x33 4 11111111
blhost -u -t 50000 -- receive-sb-file case.sb
10、LTC
LTC是硬件解密。使用的也是AES解密,与MMCAU不同的是,他是通过硬件完成的。
所以不需要算法代码,也就是MMCAU.bin
测试步骤跟MMCAU一样。不需要配置BCA跟烧写MMCAU.bin
- 使用elftosb生成加密的SB
- Key烧写到0x30-0x33
- Receive SB后reset板子,LTC自动对SB进行解密
OTFAD:
使用SB file的方式进行image的烧写。。因为image的vector table出在internal flash中,boot data处于QSPI中。如果使用blhost的方式去烧写,不好做。
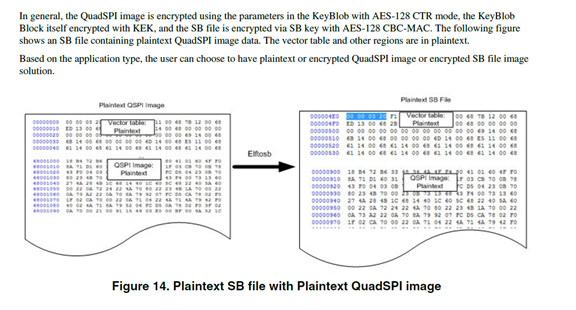
使用key blob对QSPI image加密后,SB file中image就被加密了。Elftosb这个工具是用来做加密的
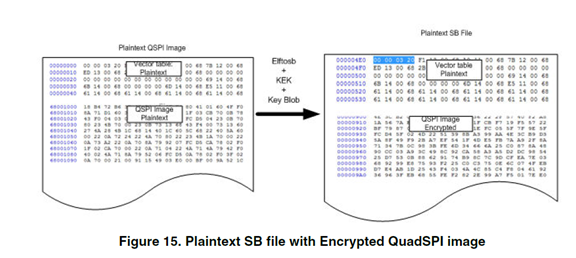
Kblob在SB中

0x20-0x23 处的kek对key blob加密。
如下的写法就是将加密的keyblob写到BCA中指定的key blob地址。
Encrypt(0)中就是将使用keyblob加密的QSPI image写到internalflash跟QSPI flash中
OTFAD是对QSPI进行解密的硬件,使用keyblob变运行边解密

- QSPI image使用key blob加密,加密的方式是AES-CTR mode
- 使用0x20 -0x23处key的值对keyblob加密,生成加密的key blob存放到BCA指定的keyblob地址
Keywrap (0) {
load {{000102030405060708090a0b0c0d0e0f}} > 0x1000;
}
SB中这段操作是使用kek对blob加密,然后加密后的blob写入0x1000.0x1000需要在BCA中指定
- 0x20-0x23处写入key
- Reset板子,ROM自动解密。0x20-0x23处的key解出blob,blob对加密的image解密。。image边解密边运行
如果需要对SB 加密的话,还可以对SB加密一次。。具体方式参照MMCAU或者LTC
11、reliable update
当更新firmware的时候,突然断电或者板子连线出了问题的时候。导致firmware的损坏或者设备没响应。reliable update的存在就是为了解决这个问题。
Reliable update将设备的memory分为两块:main application region & backup application region。只有备份应用区可以用来更新image。一旦备份应用区里面有image的更新,bootloader会检测image的有效性跟完整性,然后将image拷贝到主应用区。
Reliable update的触发有两种方式:
- backup application region里面有image,重启target
- 使用blhost命令reliable-update
Reliable update的实现有两种方式:
- 软件实现
- 硬件实现
两者很明显的区别就是
软件实现需要将backup application region里面的东西拷贝到main application region
硬件实现是将bootloader跟image分别在main跟backup region里面占用一部分,
[5/12/2016 2:39 PM] Jie Heng:
测试boot ROM并且是 HW reliable update话,image size要大于0x410,但是CRC计算长度是任意的
除了这种类型的测试外,其他测试 image size没有规定,不需要考虑flash config
[5/12/2016 2:43 PM] Jie Heng:
只要是测试 SW reliable update,CRC计算长度必须包含BCA
总结下来,
HW reliable:
1、ROM上面app size要大于0x410,其他类型app size 不管。
2、CRC计算的长度计算image前八个字节
SW reliable:
1、Image size没规定
2、CRC计算长度需要包含BCA
static uint32_t get_application_base(specified_application_type_t applicationType)
目的是得到app的存储地址
1、reset后init函数里面使用:
kReliableUpdateOption_Normal = 0
2、Blhost执行reliable update命令:
kSpecifiedApplicationType_Backup = 1
1、ROM: PFlash_size/2
2、FLASH: PFlash_size/2 + APP_VECTOR_TABLE_ADDRESS
3、ROM跟FLASH宏都没有打开:定义于bootloader_config.h中的BL_BACKUP_APP_START
PPT:
Reliable update
类型:硬件(需要硬件支持)/ 软件
媒介:flash/ROM
执行手段:重启/命令
可能的配对方式2*2*2 = 8种
Backup address of reliable update
HW
SW
Flash
ROM
Flash
ROM
Reset
Flash size/2 + app vector address
Flash size/2
BL_BACKUP_APP_START
Flash size/2
Command
Flash size/2 + app vector address
Flash size/2
Address by command
Address by command
命令方式执行reliable后面跟的地址
软件叫做:
Backup app address
硬件叫做
Indicator address
Reliable update代码详解:
Software update:
Test point:
1. Inactive
设置错误的BCA
2 invalid
CRC start address 全为FF
3 update success
正确的APP
4 reset method to execute reliable update
正确的BCA存放到代码里面指定的地址,然后reset
Backup address可以参考如上的表格
A、static bool is_reliable_update_active(uint32_t backupApplicationBase):
从app的存储地址得到APP的PC跟BCA的tag
满足如下条件则pass:
- BCA tag为kcfg
- APP 的PC值不是0x0,0xffffffff,不是reset_handler的地址
否则返回:
kStatus_ReliableUpdateInacive
B、static bool is_specified_application_valid(uint32_t applicationBase)
这个函数PASS的两个条件:
- BCA里面定义的CRC count不能大于reserved backup address
- APP通过CRC的校验
否则返回:
kStatus_ReliableUpdateBackupApplicationInvalid
C、status_t software_reliable_update(uint32_t backupApplicationBase)
get_result_after_copying_application(backupApplicationBase, mainApplicationBase, applicationSizeInByte);
1、擦除:起始地址为main flash app address,长度为:application count?
2、复制backup application到main flash中
kStatus_ReliableUpdateBackupBootloaderNotReady
CRC 起始地址修正为reliable update后面的地址,重载BCA,对app进行CRC校验
擦除:backup flash里面的app
return (updateResult) ? kStatus_ReliableUpdateSuccess : kStatus_ReliableUpdateFail;
Hardware update
Blhost -p com43 -- flash-erase-all-unsecure
Blhost -p com43 -- reset
Blhost -p com43 -- get-property 0x1a
Blhost -p com43 -- reliable-update 0xa000
Test point:
1. Swap system not ready
未进行过reliable update的情况下,在backup区放置一个符合要求的app,reset后使用get-property 0x1a,查看状态
2 still in main region
擦干净backup区,在app address处写入一个符合要求的app
3 inactive
错误的BCA,存放到backup区,进行reliable update
4 invalid
CRC起始地址配置为全ff
5 success
正确的APP放到backup区
6 indicator address invalid
成功进行过reliable update后,使用不一样的indicator address
7 reset method to execute reliable update
正确进行过reliable update后,将app address处的demo擦除,在backup区写入app,然后reset
A、reset方式
1、判断main flash中是否存在app,若存在app,则中断update,跳转到app
2、从IFR得到indicator address(第一次硬件reliable update必须使用命令的方式将值传送到IFR中)
然后执行后续操作
B、Blhost command方式
1、从blhost 命令得到indicator address
A、static bool is_reliable_update_active(uint32_t backupApplicationBase):
从app的存储地址得到APP的PC跟BCA的tag
满足如下条件则pass:
- BCA tag为kcfg
- APP 的PC值不是0x0,0xffffffff,不是reset_handler的地址
否则返回:
update_reliable_update_status(kStatus_ReliableUpdateInacive);
B、static bool is_specified_application_valid(uint32_t applicationBase)
这个函数PASS的两个条件:
- BCA里面定义的CRC count不能大于reserved backup address
- APP通过CRC的校验
否则返回:
update_reliable_update_status(kStatus_ReliableUpdateBackupApplicationInvalid);
C、status_t hardware_reliable_update(uint32_t swapIndicatorAddress)
static bool is_backup_bootloader_valid(void)
检查backup bootloader的CRC校验值跟main flash bootloader的CRC校验值是否相等
get_result_after_copying_application(mainBootloaderBase, backupBootloaderBase, bootloaderSizeInByte);
1、擦除:backup bootloader
2、复制main bootloader 到backup bootloader空间
3、重载BCA,对backup bootloader进行CRC校验
kStatus_ReliableUpdateBackupBootloaderNotReady
D、FLASH_Swap(&g_bootloaderContext.flashState, swapIndicatorAddress, kFLASH_SwapFunctionOptionEnable);
Swap the system
FLASH_SwapControl(config, address, kFLASH_SwapControlOptionReportStatus, &returnInfo);
1、0x10对齐
2、swap indicator在main flash区域,且不能位于flash 配置区,即0x400-0x40f
如果如上的两点不满足,返回:
kStatus_ReliableUpdateSwapIndicatorAddressInvalid
swap成功或者失败:
return (updateResult) ? kStatus_ReliableUpdateSuccess : kStatus_ReliableUpdateFail;
#if BL_TARGET_FLASH
status_t hardware_reliable_update(uint32_t swapIndicatorAddress)
is_backup_bootloader_valid()
CRC运算 得到从flash 0地址到app vector table处的校验值
CRC运算得到从flash size/2地址到flash size/2 + app vector table处的校验值。
两者若相等,则往下跑
几个关键的地址:
Back_up_app_address = get_application_base
Bl_main.c里,如果宏BL_FEATURE_RELIABLE_UPDATE = 1,则开启reliable_update功能
#if BL_FEATURE_RELIABLE_UPDATE
bootloader_reliable_update_as_requested(kReliableUpdateOption_Normal, 0);
#endif // BL_FEATURE_RELIABLE_UPDATE
接着往下看:如果这个宏打开,则执行硬件reliable update
#if BL_IS_HARDWARE_SWAP_ENABLED
#define BL_IS_HARDWARE_SWAP_ENABLED (BL_FEATURE_HARDWARE_SWAP_UPDATE && FSL_FEATURE_FLASH_HAS_PFLASH_BLOCK_SWAP)
接下来进行有效性的检测,所谓有效性,就是CRC校验的count不能大于flash_size/2 – app_vector_table_address。
函数如下:
static bool is_specified_application_valid(uint32_t applicationBase)
如上这些步骤pass后,会返回一个状态
1、Hardware reliable update
具体的测试case参照kibble自动化测试case,我已经写好测试脚本了。
Bootloader_config.h里面对应的宏打开:
#define BL_FEATURE_RELIABLE_UPDATE (1)
#define BL_FEATURE_HARDWARE_SWAP_UPDATE (1)
#define FSL_FEATURE_FLASH_HAS_PFLASH_BLOCK_SWAP (1)
使用flashtool工具配置app的bca的tag\crc
Step 2: Configure the BCA of backup application by KinetisFlash Tool:
2-1. Enable the tag of BCA
2-2. Enable Crc Check and set the Image Address 0x0
2-3. Save the BCA configuration to app demo.
将app下载到backup区域
Step 3: Load the saved demo to PFlash at 0x10a000.
Step 4: Run the new Blhost to reliable update
reliabe-update 0xffc00 (from 0xB000 to 0x100000 with 0x10 aligned)
