
.NET 微服务实践(3)-搭建平台服务
文章声明:本文系油管上的一个系列(.NET Microservices – Full Course)教程的学习记录的第二章。不涉及营销,有兴趣看可以原视频(链接在底部)。
本文分成三部分:脚手架(项目创建和包安装)、数据层(模型定义、读写以及转化)、控制器(服务外部调用)。目的是搭建平台服务,测试通过,为之后整体的微服务方案做铺垫。
脚手架
创建项目
ASP.NET Core Web API
添加安装包
- AutoMapper.Extensions.Microsoft.DependencyInject
- Microsoft.EntityFrameworkCore.5.0.8
- Microsoft.EntityFrameworkCore.Design.5.0.8
- Microsoft.EntityFrameworkCore.InMemory.5.0.8
数据层
创建Platform模型
using System.ComponentModel.DataAnnotations; namespace PlatformService.PlatformDomain { public class Platform { [Key] [Required] public int PlatformId { get; set; } [Required] public string Name { get; set; } [Required] public string Publisher { get; set; } [Required] public string Cost { get; set; } } }
除了定义模型属性外,这里做了两件事情:
- 定义了主键
- 要求属性必填
另外,我整体采用的是DDD的思路,具体实施的时候命名空间和视频里面不一样。
配置DbContext
using Microsoft.EntityFrameworkCore; using PlatformService.PlatformDomain; namespace PlatformService.Data { public class ApplicationDbContext: DbContext { public ApplicationDbContext(DbContextOptions<ApplicationDbContext> opt) :base(opt) { } public DbSet<Platform> Platforms { get; set; } } }
这里继承了DbContext,并且定义了DbSet Platform。
注册DbContext服务
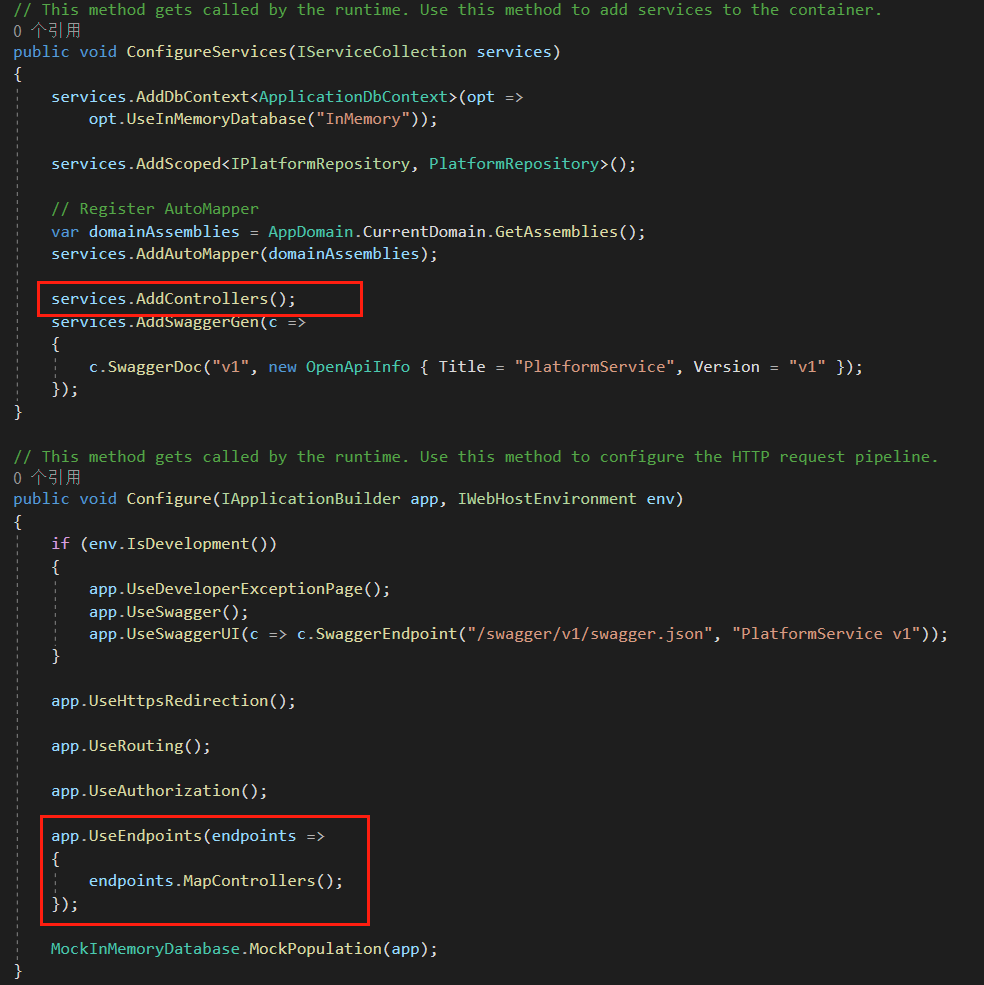
在Startup.cs文件中的ConfigureService方法里添加服务
using PlatformService.Data; using Microsoft.EntityFrameworkCore; ...... // This method gets called by the runtime. Use this method to add services to the container. public void ConfigureServices(IServiceCollection services) { services.AddDbContext<ApplicationDbContext>(opt => opt.UseInMemoryDatabase("InMemory")); services.AddControllers(); services.AddSwaggerGen(c => { c.SwaggerDoc("v1", new OpenApiInfo { Title = "PlatformService", Version = "v1" }); }); }
由于.NET Core自带依赖注入容器,这里就是先往容器中添加DbContext服务。注意,尽管最终平台服务的持久化是交给SQL Server来做,但是这里还是先用内存数据库来实现。
定义仓储层接口
using System.Collections.Generic; using System.Threading.Tasks; namespace PlatformService.PlatformDomain { public interface IPlatformRepository { public Task<int> CreatePlatform(Platform createdPlatform); public Task<IEnumerable<Platform>> GetAllPlatformsAsync(); public Task<Platform> GetPlatformById(int platformId); public Task<Platform> UpdatePlatform(Platform updatedPlatform); } }
这里和视频教程不一样。
- 把接口和模型放在了一起(作为Domain的组成部分)、而不是把接口及其实现放在一起。这样的好处在于,接口和实现可以分离,若是在实际项目中,接口可以根据环境已经需要调整不同的实现;同时(仓储层)实现应该和数据持久层保持紧密关联。
- 按照自己的习惯定义了CRU的接口,同时考虑并发。
实现仓储接口
using PlatformService.PlatformDomain; using System; using System.Collections.Generic; using System.Threading.Tasks; namespace PlatformService.Data { public class PlatformRepository : IPlatformRepository { private readonly ApplicationDbContext _context; public PlatformRepository(ApplicationDbContext context) { _context = context; } public Task<int> CreatePlatformAsync(Platform createdPlatform) { throw new NotImplementedException(); } public Task<IEnumerable<Platform>> GetAllPlatformsAsync() { throw new NotImplementedException(); } public Task<Platform> GetPlatformById(int platformId) { throw new NotImplementedException(); } public Task<Platform> UpdatePlatformAsync(Platform updatedPlatform) { throw new NotImplementedException(); } private async Task<bool> SaveChnagesAsync() { return await _context.SaveChangesAsync() >= 0; } } }
一般我会在Data文件夹下再加一个Repository的folder用于专门放仓储层的实现,考虑到只有一个Repo,所以没有这么操作。
这里有两点说明:
- PlatformRepository的构造中利用了依赖注入的方式调用了之前注册的ApplicationContext服务。
- 实现了一个私有方法用于EFCore整个事务的保存刷新。该方法后续可以用于Create以及Update。
具体实现对Platform对象的读写
public async Task<int> CreatePlatformAsync(Platform createdPlatform) { _context.Platforms.Add(createdPlatform); _ = await this.SaveChnagesAsync(); return createdPlatform.PlatformId; } public async Task<IEnumerable<Platform>> GetAllPlatformsAsync() { return await _context.Platforms.AsNoTracking().ToListAsync(); } public Task<Platform> GetPlatformById(int platformId) { return _context.Platforms .Where(platform => platform.PlatformId == platformId) .AsNoTracking().FirstOrDefaultAsync(); } public async Task<Platform> UpdatePlatformAsync(Platform updatedPlatform) { var currentPlatform = _context.Platforms .First(platform => platform.PlatformId == platform.PlatformId); if(currentPlatform is null) { throw new Exception($"Platform with Id {updatedPlatform.PlatformId} does not exist"); } _context.Platforms.Update(updatedPlatform); _ = await this.SaveChnagesAsync(); return updatedPlatform; }
这里和视频不一样的地方是:
- 对于数据的验证我会放在Controller层完成
- 读操作加了NoTracking
注册仓储层服务
类似之前ApplicationDBContext,对于仓储层的接口及其实现,也可以通过注册在依赖注入容器的方式进行调用。只需要在Startup中的ConfigureService中加入如下代码即可:
services.AddScoped<IPlatformRepository, PlatformRepository>();
在可以获取仓储层服务的基础上,可以尝试基于mock数据进行在内存数据库中的读写测试。
准备内存数据库以及Mock 数据
准备内存数据库
目前不使用SQL Server,所以要build一个内存数据库。
using Microsoft.AspNetCore.Builder; using Microsoft.Extensions.DependencyInjection; namespace PlatformService.Data { public class MockInMemoryDatabase { public static void MockPopulation(IApplicationBuilder app) { using (var serviceScope = app.ApplicationServices.CreateScope()) { SeedData(serviceScope.ServiceProvider.GetService<ApplicationDbContext>()); } } private static void SeedData(ApplicationDbContext context) { } } }
首先构造一个静态方法,能够调用ApplicationBuilder获取依赖注入容器,然后将容器中的ApplicationDbContext取出【在应用实例化时就有对应的DbContext,Scope型】。后期就可以用这个DbContext实现Mock数据的读写了。
然后要在Startup.cs的Configure中调用该静态方法。
// This method gets called by the runtime. Use this method to configure the HTTP request pipeline. public void Configure(IApplicationBuilder app, IWebHostEnvironment env) { if (env.IsDevelopment()) { app.UseDeveloperExceptionPage(); app.UseSwagger(); app.UseSwaggerUI(c => c.SwaggerEndpoint("/swagger/v1/swagger.json", "PlatformService v1")); } app.UseHttpsRedirection(); app.UseRouting(); app.UseAuthorization(); app.UseEndpoints(endpoints => { endpoints.MapControllers(); }); MockInMemoryDatabase.MockPopulation(app); }
Configure方法中各个同步操作,可以理解为HTTP请求的pipeline。相当于在最后一步中调用Mock数据进行操作测试。
准备Mock 数据
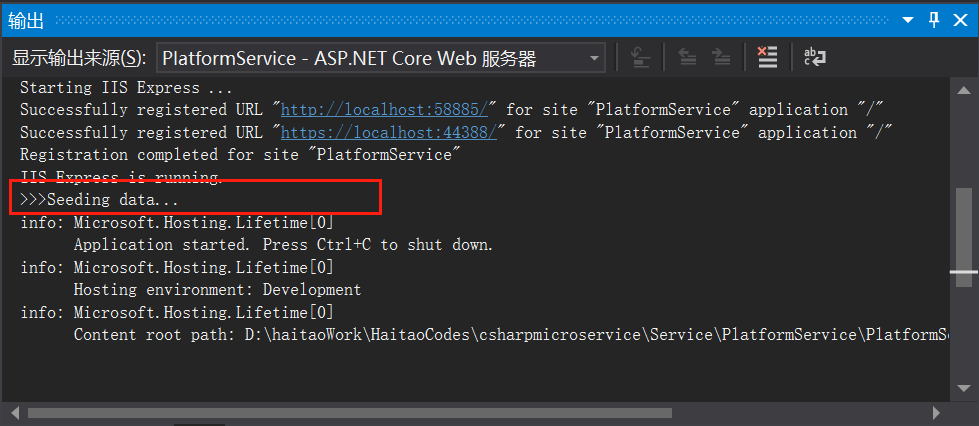
private static void SeedData(ApplicationDbContext context) { if(!context.Platforms.Any()) { Console.WriteLine(">>>Seeding data..."); context.Platforms.AddRange( new Platform() { Name = "Dot Net", Publisher = "Microsoft", Cost="Free"}, new Platform() { Name = "SQL Server Express", Publisher = "Microsoft", Cost = "Free" }, new Platform() { Name = "Kubernetes", Publisher = "Cloud Native Computing Foundation", Cost = "Free" } ); context.SaveChanges(); } else { Console.WriteLine(">>>Seed data exist..."); } }
编译后运行,可以在输出中看到结果
创建DTO
DTO全称Data Transfer Object。它的目的在于隐藏数据结构——通过从Model与DTO的转化,可以控制属性是否应该对调用者可见。保证了数据的隐私性。
相比于ViewModel,我的感觉是它的定位更加灵活,DTO可以分成读和写、ViewModel一般我会将其当做ReadDTO。
这里就创建读和写的DTO
Read DTO
namespace PlatformService.PlatformDomain { public class PlatformReadDto { public int PlatformId { get; set; } public string Name { get; set; } public string Publisher { get; set; } public string Cost { get; set; } } }
Write DTO
using System.ComponentModel.DataAnnotations; namespace PlatformService.PlatformDomain { public class PlatformWriteDto { [Key] [Required] public int PlatformId { get; set; } [Required] public string Name { get; set; } [Required] public string Publisher { get; set; } [Required] public string Cost { get; set; } } }
这里要解释一下,我整体采用DDD的思路,因此将DTO和Model放在一起。
对于读操作来说,不需要加注解来做模型的验证;对于写操作而言,主键由于是int类型可以在Mapping之后自动生成,因此也不需要Id。但是由于我还考虑了更新操作(也是写操作),所以需要主键来定位。
实现Model和DTO的双向Mapping
注册AutoMapper
在Startup.cs的ConfigureService中注册AutoMapper
// Register AutoMapper var domainAssemblies = AppDomain.CurrentDomain.GetAssemblies(); services.AddAutoMapper(domainAssemblies);
创建Mapping Profile
在Profile配置Model和DTO的Mapping
using AutoMapper; using PlatformService.PlatformDomain; namespace PlatformService.Utils { public class PlatformMappingProfile: Profile { public PlatformMappingProfile() { //Source -> Target CreateMap<Platform, PlatformReadDto>(); CreateMap<PlatformWriteDto, Platform>(); } } }
控制器
创建Controller
using AutoMapper; using Microsoft.AspNetCore.Mvc; using PlatformService.PlatformDomain; namespace PlatformService.Controllers { [Route("api/v1/[controller]s")] [ApiController] public class PlatformController : ControllerBase { private readonly IMapper _mapper; private readonly IPlatformRepository _platformRepository; public PlatformController( IPlatformRepository platformRepository, IMapper mapper) { _mapper = mapper; _platformRepository = platformRepository; } } }
类似IPlatformRepository的构造注入时从依赖注入容器中引入DbContext实例,PlatformController实例化也通过构造注入的方式调用IPlatformRepository和AutoMapper的实例。
路由的注解中,“[controller]”是默认读取类名中Controller之前的部分、也就是“Platform”。
构造Action
[HttpGet] public async Task<ActionResult<IEnumerable<PlatformReadDto>>> GetAllPlatformsAsync() { Console.WriteLine(">>>Getting Platforms..."); var platforms = await _platformRepository.GetAllPlatformsAsync(); return Ok(_mapper.Map<IEnumerable<PlatformReadDto>>(platforms)); }
这里以获取全部Platform,再通过AutoMapper转化Platform为PlatformReadDto。
测试Action
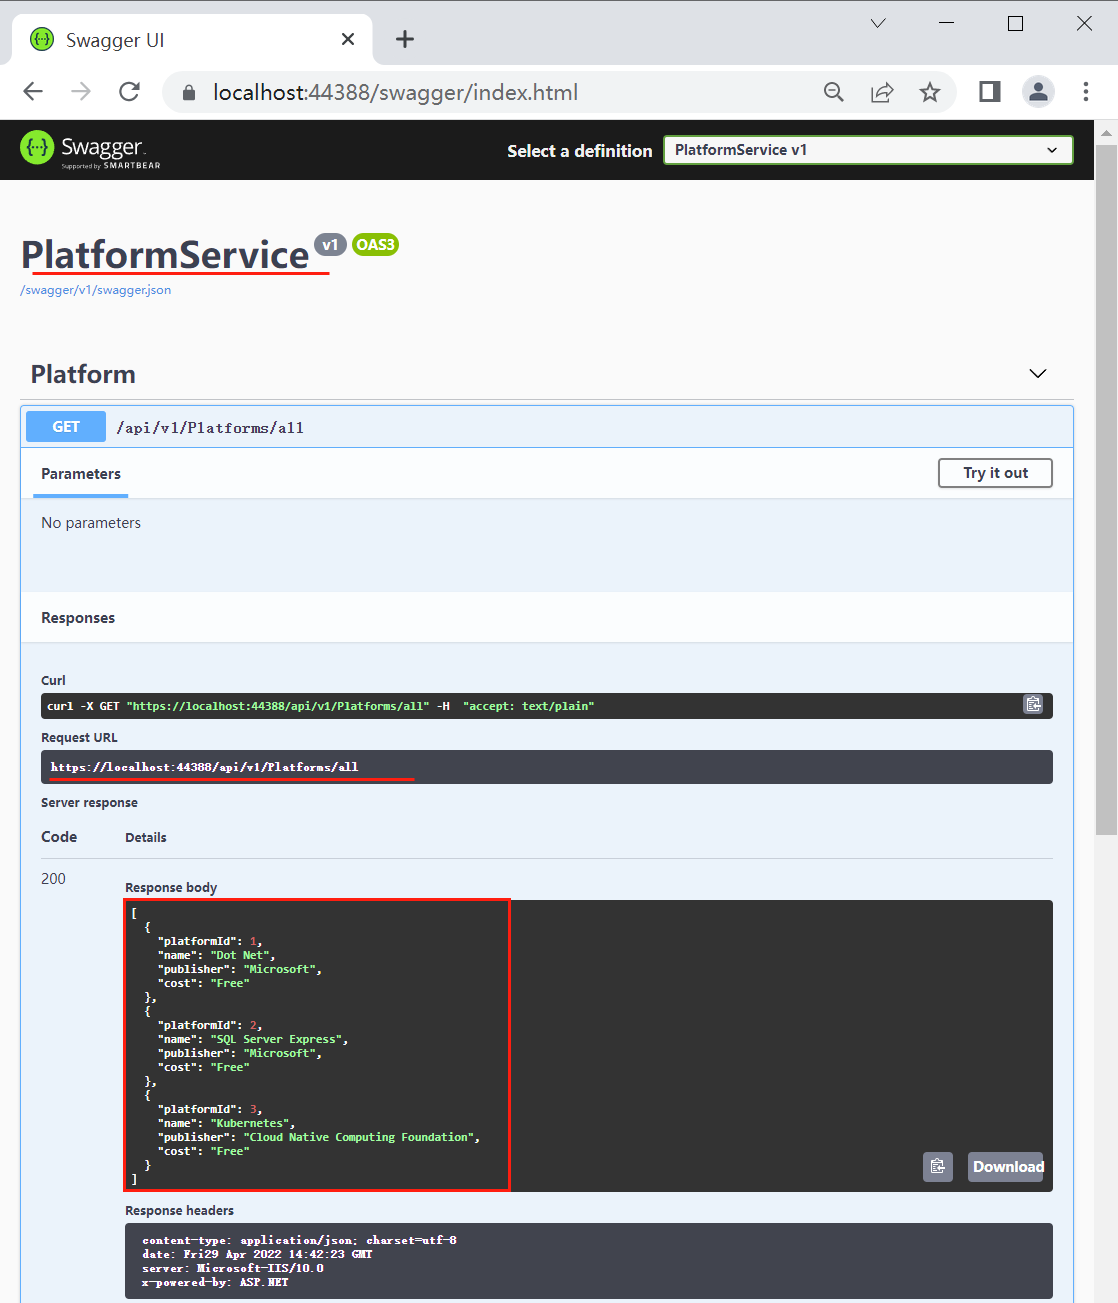
启动工程后,可以在浏览器中输入“http://localhost:58885/swagger/index.html”或者“https://localhost:44388/swagger/index.html”查看Swagger的API文档,进行接口调用测试。
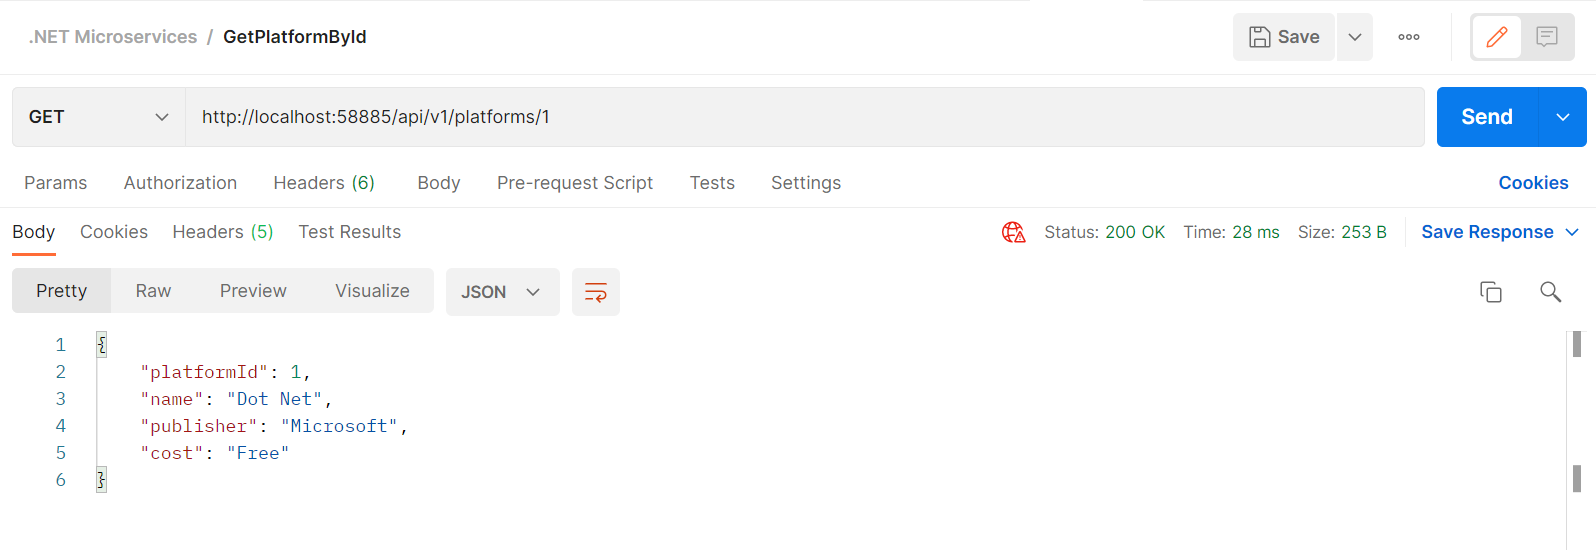
也可以使用Postman进行调用
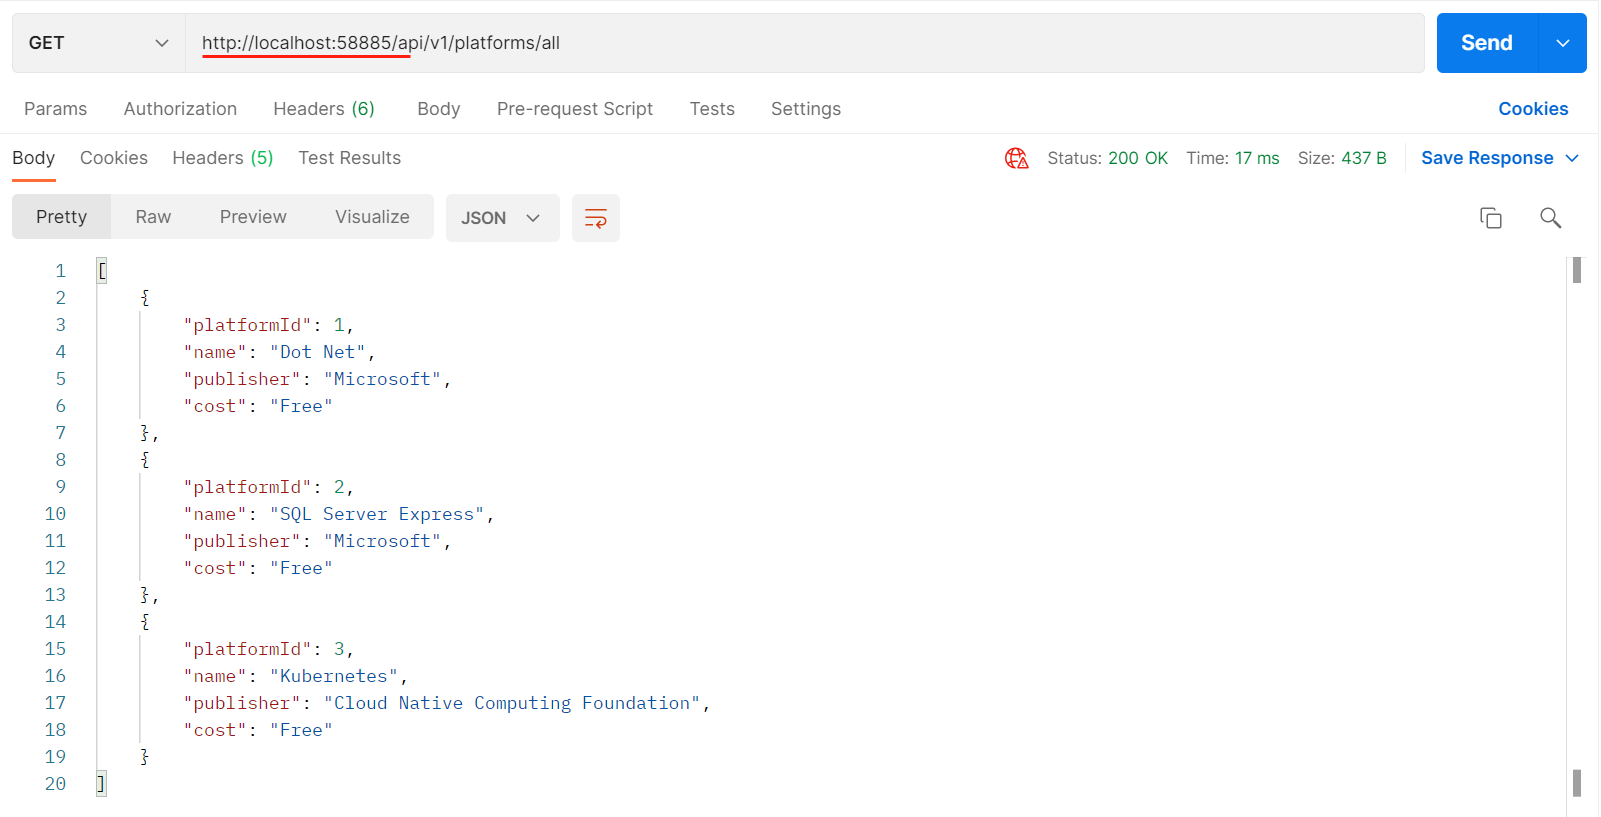
可以看到platformId是往内存数据库中添加mock数据时自动添加的。
这里面的Http的端口号以及Https的端口号是在launchSetting中配置的。返回值就是在内存数据库中的Mock数据。
{ "$schema": "http://json.schemastore.org/launchsettings.json", "iisSettings": { "windowsAuthentication": false, "anonymousAuthentication": true, "iisExpress": { "applicationUrl": "http://localhost:58885", "sslPort": 44388 } }, "profiles": { "IIS Express": { "commandName": "IISExpress", "launchBrowser": true, "launchUrl": "swagger", "environmentVariables": { "ASPNETCORE_ENVIRONMENT": "Development" } }, "PlatformService": { "commandName": "Project", "dotnetRunMessages": "true", "launchBrowser": true, "launchUrl": "swagger", "applicationUrl": "https://localhost:5001;http://localhost:5000", "environmentVariables": { "ASPNETCORE_ENVIRONMENT": "Development" } } } }
调用接口之前,实际上App是在依赖注入容器中添加了所有的Controller、并在Configure中实例化所有的Controller;这样外部应用才可以通过路由进行访问。
完成全部Action
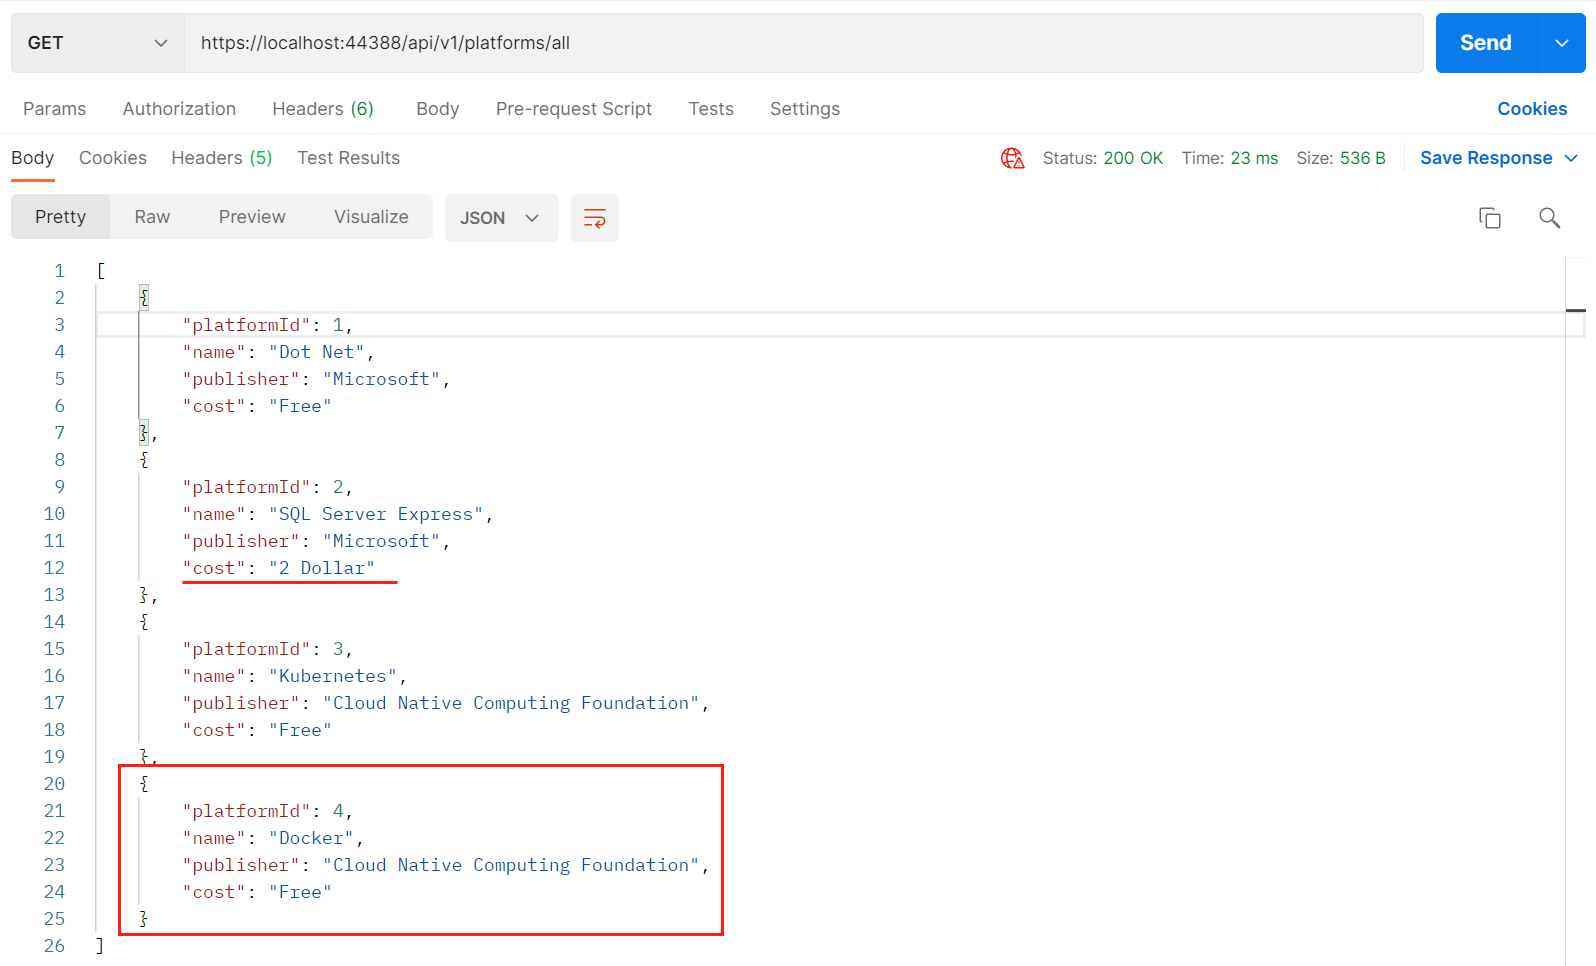
[HttpGet] [Route("all")] public async Task<ActionResult<IEnumerable<PlatformReadDto>>> GetAllPlatformsAsync() { Console.WriteLine(">>>Getting Platforms..."); var platforms = await _platformRepository.GetAllPlatformsAsync(); return Ok(_mapper.Map<IEnumerable<PlatformReadDto>>(platforms)); } [HttpGet("{platformId}", Name = "GetPlatformByIdAsync")] public async Task<ActionResult<PlatformReadDto>> GetPlatformByIdAsync([FromRoute] int platformId) { if(platformId <= 0) { return this.BadRequest(new { Message = "Platform Id should be greater than 0." }); } Console.WriteLine(">>>Getting target Platform..."); var platform = await _platformRepository.GetPlatformById(platformId); if(!(platform is null)) { return Ok(_mapper.Map<PlatformReadDto>(platform)); } return NotFound(); } [HttpPost] public async Task<ActionResult<PlatformReadDto>> CreatePlatformAsync( [FromBody] PlatformWriteDto platformWriteDto) { if(platformWriteDto is null) { return this.BadRequest(new { Message = "Platform data should not be bull." }); } Console.WriteLine(">>>Creating target Platform..."); var platform = _mapper.Map<Platform>(platformWriteDto); _ = await _platformRepository.CreatePlatformAsync(platform); var platformReadDto = _mapper.Map<PlatformReadDto>(platform); return CreatedAtRoute( nameof(GetPlatformByIdAsync), new { PlatformId = platform.PlatformId }, platformReadDto); } [HttpPut] public async Task<ActionResult<PlatformReadDto>> UpdatePlatformAsync( [FromBody] PlatformWriteDto platformWriteDto) { if (platformWriteDto is null) { return this.BadRequest(new { Message = "Platform data should not be bull." }); } if (platformWriteDto.PlatformId <= 0) { return this.BadRequest(new { Message = "Platform id should greater than 0." }); } Console.WriteLine(">>>Update target Platform..."); var platform = _mapper.Map<Platform>(platformWriteDto); _ = await _platformRepository.UpdatePlatformAsync(platform); return Ok(_mapper.Map<PlatformReadDto>(platform)); }
几点想法:
- 由于有多个HttpGet请求,所以需要通过路由对它们进行区分
- 应该对可预见的错误进行规避,即调用IPlatformRepository前进行类型检查、Mapping前进行检查等
- 实际上,还应该考虑错误处理、也可以考虑做一个全局错误处理
- 和视频里面的做法不同,这里还是倾向于在一个Create或者Update中完成SaveAsync,这让我感觉整个方法比较完整。
结果检查
Get Platform By Id
Create Platform

注意Response中有创建的Platform的GetById的路由地址
Update Platform

Get All Platforms


【推荐】国内首个AI IDE,深度理解中文开发场景,立即下载体验Trae
【推荐】编程新体验,更懂你的AI,立即体验豆包MarsCode编程助手
【推荐】抖音旗下AI助手豆包,你的智能百科全书,全免费不限次数
【推荐】轻量又高性能的 SSH 工具 IShell:AI 加持,快人一步
· 无需6万激活码!GitHub神秘组织3小时极速复刻Manus,手把手教你使用OpenManus搭建本
· C#/.NET/.NET Core优秀项目和框架2025年2月简报
· Manus爆火,是硬核还是营销?
· 一文读懂知识蒸馏
· 终于写完轮子一部分:tcp代理 了,记录一下