jQuery的属性,事件及操作
1.属性操作
1.1 基本属性操作
$("img").attr("src")				返回文档中所有图像的src属性值
$("img").attr("src","test.jpg")     设置文档中所有图像的src属性值
$("img").removeAttr("src")          将文档中图像的src属性删除

$("input[type='checkbox']").prop("checked",true)        选中复选框
$("input[type='checkbox']").prop("checked",false)       取消复选框
$("img").removeProp("src")				删除img的src属性值
attr与prop的区别:
attr可以找到自定义的属性,prop只能找到固有的属性
例子:
<!DOCTYPE html>
<html lang="en">
<head>
    <meta charset="UTF-8">
    <title>Title</title>
    <script src="../jquery-3.2.1.js"></script>
</head>
<body>
<button class="select_all">全选</button>
<button class="reverse">反选</button>
<button class="cancel">取消</button>
<hr>
<table border="1">
    <tr>
        <td><input type="checkbox"></td>
        <td>111</td>
        <td>222</td>
        <td>333</td>
    </tr>
    <tr>
        <td><input type="checkbox"></td>
        <td>111</td>
        <td>222</td>
        <td>333</td>
    </tr>
    <tr>
        <td><input type="checkbox"></td>
        <td>111</td>
        <td>222</td>
        <td>333</td>
    </tr>
    <tr>
        <td><input type="checkbox"></td>
        <td>111</td>
        <td>222</td>
        <td>333</td>
    </tr>
</table>
<script>
    //为"select_all"类绑定点击事件
    $(".select_all").click(function(){
        $(":checkbox").prop("checked",true);//选中所有的"checkbox"标签
    });

    //为"cancel"类绑定点击事件
    $(".cancel").click(function(){
        $(":checkbox").prop("checked",false);//取消选中的"checkbox"标签
    });

    //为"reverse"类绑定点击事件
    $(".reverse").click(function(){
        //循环每一个"checkbox"标签
        $(":checkbox").each(function(){
            $(this).prop("checked",!$(this).prop("checked"));//把所有的"checkbox"标签的属性取反
        })
    });
</script>
</body>
</html>
1.2 class属性操作
$("p").addClass("test")             为p元素加上"text"类
$("p").removeClass("test")          从p元素中删除"test"类
$("p").toggleClass("test")          如果存在就删除,否则就添加"test"类
$("p").hasClass("test")             判断有没有"test",返回一个布尔值
1.3 标签文本text/HTML的属性
$("p").html()                   返回p标签的html内容
$("p").html("hello world")      设置p标签的html内容
$("p").text()                   返回p标签的text内容
$("p").text("test")             设置p标签的text内容
$("input").val()				获取文本框中的值
$("input").val("test")          设置文本框中的内容
2.CSS操作
2.1 样式
$("p").css("color")             访问查看p元素的color属性
$("p").css("color","red")       设置p元素的color属性的"red"
$("p").css({"color":"red","bakcground-color":"yellow"})	设置p元素的color为"red",background属性为"yellow"(设置多个属性要用{}字典形式)
2.2 位置
$("p").offset()             元素在当前窗口的相对偏移,object{top:100,left:100}
$("p").offset().top         元素相对窗口顶部的偏移
$("p").offset().left        元素相对窗口左侧的偏移
$("p").position()           元素相对父元素的偏移,对可见元素有效,object{top:100,left:100}
例子:
<!DOCTYPE html>
<html lang="en">
<head>
    <meta charset="UTF-8">
    <title>Title</title>
    <script src="../jquery-3.2.1.js"></script>
    <style type="text/css">
        *{
            margin:0;
            padding:0;
        }
    </style>
</head>
<body>
<div class="div1" style="width:200px;height:200px;background-color:darkblue"></div>
<script>
    var val_x=0;//初始化标签到浏览器左边框的距离
    var val_y=0;//初始化标签到浏览器上边框的距离

    //定义当鼠标悬浮在标签上面的时候,鼠标的样式为移动
    $(".div1").mouseover(function(){
        $(this).css("cursor","move")
    });

    //为盒子绑定鼠标左键按下事件
    $(".div1").mousedown(function(e){
        val_x=e.clientX;//定义标签的初始x坐标
        val_y=e.clientY;//定义标签的初始y坐标

        var $box_x=$(".div1").offset().left;//获取盒子相对窗口左侧的偏移
        var $box_y=$(".div1").offset().top;//获取盒子相对窗口顶侧的偏移

        //定义鼠标移动的操作
        $(document).mousemove(function(e){
            var move_x=e.clientX;//获取鼠标的偏移量
            var move_y=e.clientY;

            //移动窗口到指定的偏移量
            $(".div1").offset({left:$box_x+move_x-val_x,top:$box_y+move_y-val_y})
        });

        //绑定鼠标左键松开事件
        $(document).mouseup(function(){
            $(document).off();//关闭事件
        })
    });
</script>
</body>
</html>
这样可以使div盒子跟随鼠标的移动而移动
$(window).scrollTop()           获取窗口滚动条的高度
$(window).scrollLeft()          获取窗口滚动条的宽度
$(window).scrollTop("100")      获取窗口滚动条的高度为100
例子:
<!DOCTYPE html>
<html lang="en">
<head>
    <meta charset="UTF-8">
    <title>Title</title>
    <script src="../jquery-3.2.1.js"></script>
</head>
<body>
<div class="box"></div>
<div id="returnTop">to top</div>
<script>
    //定义窗口的滚动条
    $(window).scroll(function(){
        console.log($(window).scrollTop());//打印滚动条的位置

        //当滚动条的位置大于200的时候
        if($(window).scrollTop()>200){
            $("#returnTop").show();//显示滚动条
        }
        else{
            $("#returnTop").hide();//隐藏滚动条
        }

        //为返回顶部按钮绑定点击事件
        $("#returnTop").click(function(){
            $(window).scrollTop(0);//使窗口返回顶部
        })
    })
</script>
</body>
</html>
2.3 尺寸
$("p").height()                     获取p元素的高度
$("p").width()                      获取p元素的宽度

$("p:first").innerHeight()          获取p元素的第一个元素的内部区域的高度(不包括边框)
$("p:first").innerWidth()           获取p元素的第一个元素的内部区域宽度(不包括边框)

$("p:first").outerHeight()          获取p元素的第一个元素的外部区域的高度(默认包括边框)
$("p:first").outerWidth()           获取p元素的第一个元素的外部区域的宽度(默认包括边框)
$("p:first").outerHeight(true)      为true时包括边框
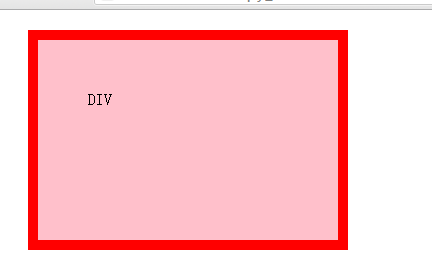
例子:
<!DOCTYPE html>
<html lang="en">
<head>
    <meta charset="UTF-8">
    <title>Title</title>
    <script src="../0814/jquery-3.2.1.js"></script>
    <style>
        .box{
            width:200px;
            height:100px;
            padding:50px;
            border:10px solid red;
            background-color:pink;
            margin:20px;
        }
    </style>
</head>
<body>
<div class="box">DIV</div>
<script>
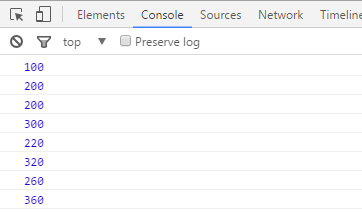
    console.log($(".box").height());//获取盒子的高度
    console.log($(".box").width());//获取盒子的宽度

    console.log($(".box").innerHeight());//获取盒子的内部区域的高度(包括填充)
    console.log($(".box").innerWidth());//获取盒子的内部区域的宽度(包括填充)

    console.log($(".box").outerHeight());//获取盒子的外部区域的高度(包括边框)
    console.log($(".box").outerWidth());//获取盒子的外部区域的宽度(包括边框)

    console.log($(".box").outerHeight(true));//获取盒子的外部区域的高度(示包括边距)
    console.log($(".box").outerWidth(true));//获取盒子的外部区域的宽度(不包括边距)
</script>
</body>
</html>
显示如下:
打印结果如下:
3. 文档处理
3.1 内部插入
$("p").append("<p>p1</p>")          在p标签后面追加标签"<p>p1</p>"
$("p").appendTo("<p>p1</p>")              把p标签追加到标签"<p>p1</p>"后面
$("p").prepend("<p>p1</p>")         在p标签前面追加标签"<p>p1</p>"
$("p").prependTo("<p>p1</p>")             把p标签追加到标签"<p>p1</p>"前面
3.2 外部插入
$("p").after("<p>p1</p>")           在p标签的同级标签后面插入标签"<p>p1</p>"
$("p").before("<p>p1</p>")          在p标签的同级标签前面插入标签"<p>p1</p>"
$("p").insertAfter("<p>p1</p>")     把p标签插入到标签"<p>p1</p>"后面
$("p").insertBefore("<p>p1</p>")    把p标签插入到标签"<p>p1</p>"前面
3.3 替换
$("p").replaceWith("<img src='a.jpg'>") 把p标签替换成图片
$(".div1").replaceAll("p")              把div类替换成文档中所有的p标签
例子一:
<!DOCTYPE html>
<html lang="en">
<head>
    <meta charset="UTF-8">
    <title>Title</title>
    <script src="../jquery-3.2.1.js"></script>
</head>
<body>
<p>p1</p>
<p>p2</p>
<p>p3</p>
<p>p4</p>
<div class="div1">div5</div>
<div class="div1">div6</div>
<div class="div1">div7</div>
<script>
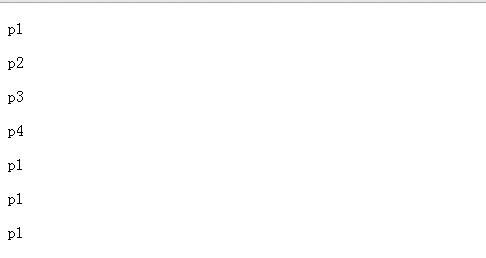
    $(".div1").replaceWith("<p>p1</p>");//把p标签替换成p标签
</script>
</body>
</html>
显示如下:
例子二:
<!DOCTYPE html>
<html lang="en">
<head>
    <meta charset="UTF-8">
    <title>Title</title>
    <script src="../jquery-3.2.1.js"></script>
</head>
<body>
<p>p1</p>
<p>p2</p>
<p>p3</p>
<p>p4</p>
<div class="div1">div5</div>
<div class="div1">div6</div>
<div class="div1">div7</div>
<script>
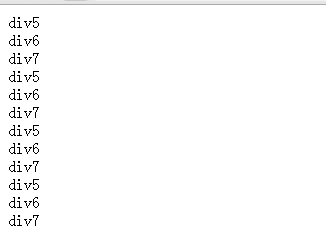
    $(".div1").replaceAll("p");//把div类替换成文档中所有的p标签
</script>
</body>
</html>
显示如下:
3.4 删除
$("p").empty()              删除所有的p标签中的所有的子标签
$("p").remove([expr])       删除所有的p标签以及p标签中的子标签
3.5 复制
$("p").clone()			克隆p标签
$("p").clone(true)		布尔值指定事件处理函数是否会被复制
3.6 循环
使用jQuery实现的集合循环
方式一:
$.each(Array,function(){
	function_suite
})
方式二:
$(element).each(function(){
	function_suite
})
例子:使用each循环进行判断
代码一:
<!DOCTYPE html>
<html lang="en">
<head>
    <meta charset="UTF-8">
    <title>Title</title>
    <script src="../jquery-3.2.1.js"></script>
</head>
<body>
<script>
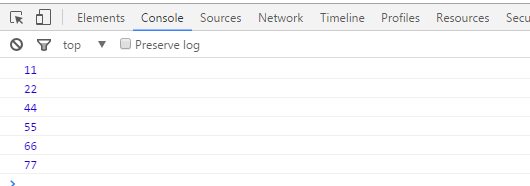
    li=[11,22,33,44,55,66,77];
    $.each(li,function(i,v){
       if(v==33){
           return;
       }
       console.log(v);
    });
</script>
</body>
</html>
打印如下:
代码二:
<!DOCTYPE html>
<html lang="en">
<head>
    <meta charset="UTF-8">
    <title>Title</title>
    <script src="../jquery-3.2.1.js"></script>
</head>
<body>
<script>
    li=[11,22,33,44,55,66,77];
    //定义循环,i为列表的索引,v为列表索引对应的值
    $.each(li,function(i,v){
        //当循环中的值为33时
        if (v==33){
            return false;
        }
        console.log(v);
    });
</script>
</body>
</html>
打印如下:

结论:
each的参数function内如果出现return,结束当次循环,类似于continue
each的参数function内如果出现return false,结束的是整个each循环,类似break
4. 事件
4.1 事件
$("p").click()                      单击事件
$("p").dbclick()                    双击事件

$("p").mouseover()                  当鼠标指针位于元素上方时触发事件
$("p").mousemove()                  当鼠标指针在指定的元素中移动时触发事件
$("p").mouseout()                   当鼠标指针从元素上移开时触发事件

$("input[type='text']").focus()     元素获得焦点时,触发focus事件
$("input[type='text']").blur()      元素失去焦点时,触发blur事件
$("input[type='text']").change()    当元素的值发生改变时触发事件

$("button").mousedown()             当按下鼠标时触发事件
$("button").mouseup()               元素上放开鼠标按键时触发事件

$(window).keydown()                 当键盘或按钮被按下时触发事件
$(window).keypress()                当键盘或按钮被按下时触发事件,每输入一个字符都触发一次事件

$(window).scroll()                  当用户滚动窗口的滚动条时触发事件
$(window).resize()                  当调整浏览器窗口的大小时触发事件
$(window).unload()                  用户离开页面时,触发事件

$("input").keyup()                  当按钮被松开时触发事件
$("input").select()                 当input元素中的文本被选择时触发事件
$("form").submit()                  当提交表单时触发事件
4.2 绑定方式
$(标签).事件(函数内容)
4.3 事件委托
通过其上级(可以是多层上级)事件委托,当点击这个标签时才会绑定事件
在页面不刷新的情况下添加一行数据,行数据有操作按钮,点击并无效果,就可以通过事件委托来解决
委托方式:
$("ul").on("click","li",function(){
	function_suite
})
例子:
<!DOCTYPE html>
<html lang="en">
<head>
    <meta charset="UTF-8">
    <title>Title</title>
    <script src="jquery-3.2.1.js"></script>
</head>
<body>
<div id="box">
    <div class="item">111</div>
    <div class="item">222</div>
    <div class="item">333</div>
    <div class="item">444</div>
    <div class="item">555</div>
    <div class="item">666</div>
</div>
<button>ADD</button>
<script>
    //为"button"按钮添加点击事件
    $("button").click(function(){
        $("#box").append("<div class='item'>777</div>");//在div标签后面添加一行
    });

    //为"box"下的"item"类添加点击事件
    $("#box").on("click",".item",function(){
        console.log($(".item").text());//打印"item"类的文本
    })
</script>
</body>
</html>
4.4 event object
所有的事件函数都可以传入event参数方便处理事件
方式:
$("p").click(function(event){
	function_suite
})
(event_object)的属性方法
event.pageX                     事件发生时,鼠标距离网页左上角的水平距离
event.pageY                     事件发生时,鼠标距离网页左上角的垂直距离
event.type                      事件的类型
event.which                     按下了哪一个键
event.data                      在事件对象在绑定数据,然后传入事件处理函数
event.target					事件针对的网页元素
event.preventDefault()          阻止事件的默认行为(比如点击链接,会自动打开新页面)
event.stopPropagation()         停止事件向上层元素冒泡
4.5 动画效果
基点
$("p").show()                   显示隐藏的匹配元素
$("p");show("slow")             参数表示速度,("slow","normal","fast"),也可以设置为毫秒
$("p").hide()                   隐藏显示的元素
$("p").toggle()                 切换显示/隐藏
例子:
<!DOCTYPE html>
<html lang="en">
<head>
    <meta charset="UTF-8">
    <title>Title</title>
    <script src="../0814/jquery-3.2.1.js"></script>
</head>
<body>
<img src="a.jpg">;//定义一张图片
<hr>
<button class="hide_element">hide</button>;//定义隐藏按钮
<button class="show_element">show</button>;//定义显示按钮
<button class="toggle_element">toggle</button>;//定义切换按钮
<script>
	//定义隐藏的点击事件
    $(".hide_element").click(function(){
        $("img").hide()
    });

    //定义显示的点击事件
    $(".show_element").click(function(){
        $("img").show()
    });

    //定义切换按钮的点击事件
    $(".toggle_element").click(function(){
        $("img").toggle()
    });
</script>
</body>
</html>
用浏览器打开的效果如下:
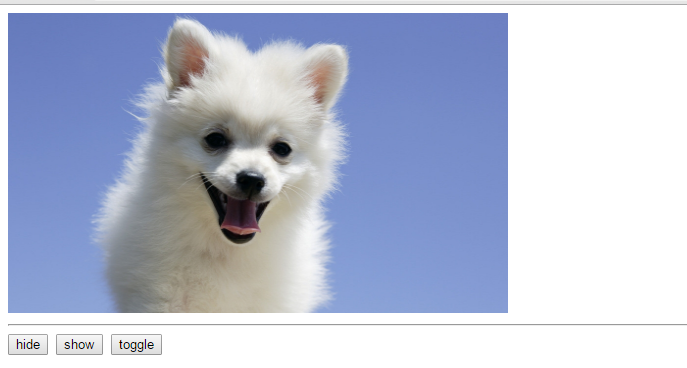
可以看到,图片是显示的,点击"hide"按钮,图片就被隐藏起来,然后再点击"show"按钮,图片就又会被显示出来了.
另外,当图片显示的时候,点击"toggle"按钮,图片就会隐藏,而当图片是隐藏的时候,点击"toggle"按钮,图片又会显示出来.
4.6 滑动操作
$("p").slideDown("1000")        用1000毫秒的时间将段落滑下
$("p").slideUp("1000")          用1000毫秒的时间将段落滑上
$("p").slideToggle("1000")      用1000毫秒的时间将段落滑上,滑下
例子:
<!DOCTYPE html>
<html lang="en">
<head>
    <meta charset="UTF-8">
    <title>Title</title>
    <script src="../0814/jquery-3.2.1.js"></script>
</head>
<body>
<img src="a.jpg" style="width:500px;height:300px">
<hr>
<button class="slide_up">slide_up</button>
<button class="slide_down">slide_down</button>
<button class="toggle">toggle</button>

<script>
    //对"slide_up"类绑定点击事件
    $(".slide_up").click(function(){
        $("img").slideUp(1000);//用1000毫秒的时间将段落收起
    });

    //对"slide_down"类绑定点击事件
    $(".slide_down").click(function(){
        $("img").slideDown(1000);//用1000毫秒的时间将段落滑下
    });

    //对"toggle"类绑定点击事件
    $(".toggle").click(function(){
        $("img").slideToggle(1000);//用1000毫秒的时间将段落滑下或者收起
    });
</script>
</body>
</html>
4.7 淡入淡出
$("p").fadeIn("1000")           用1000毫秒时间将段落淡入
$("p").fadeOut("1000")          用1000毫秒时间将段落淡出
$("p").fadeToggle("1000")       用1000毫秒时间将段落淡入,淡出
$("p").fadeTo("slow",0.6)       用慢速度将段落的透明度调整到0.6
例子:
<!DOCTYPE html>
<html lang="en">
<head>
    <meta charset="UTF-8">
    <title>Title</title>
    <script src="../jquery-3.2.1.js"></script>
</head>
<body>
<img src="a.jpg" style="width:500px;height:300px">
<hr>
<button class="fade_in">fadeIn</button>
<button class="fade_out">fadeOut</button>
<button class="fade_toggle">fadeToggle</button>
<button class="fade_to">fadeTo</button>
<script>
    //对"fade_in"类绑定点击事件
    $(".fade_in").click(function(){
        $("img").fadeIn(1000);//用1000毫秒时间将段落淡入
    });

    //对"fade_out"类绑定点击事件
    $(".fade_out").click(function(){
        $("img").fadeOut(1000);//用1000毫秒时间将段落淡出
    });

    //对"fade_toggle"类绑定点击事件
    $(".fade_toggle").click(function(){
        $("img").fadeToggle(1000);//用1000毫秒时间将段落淡入或淡出
    });

    //对"fade_to"类绑定点击事件
    $(".fade_to").click(function(){
        $("img").fadeTo("slow",0.6);//用慢速度将图片的透明度调整到0.6
    });
</script>
</body>
</html>
4.8 页面载入
页面载入,也就是当页面载入成功后立即运行的函数事件
$(document).ready(function(){
	function_suite
})
也可以简写为:
$(function(){
	function_suite
})


【推荐】编程新体验,更懂你的AI,立即体验豆包MarsCode编程助手
【推荐】凌霞软件回馈社区,博客园 & 1Panel & Halo 联合会员上线
【推荐】抖音旗下AI助手豆包,你的智能百科全书,全免费不限次数
【推荐】轻量又高性能的 SSH 工具 IShell:AI 加持,快人一步
· 深入理解 Mybatis 分库分表执行原理
· 如何打造一个高并发系统?
· .NET Core GC压缩(compact_phase)底层原理浅谈
· 现代计算机视觉入门之:什么是图片特征编码
· .NET 9 new features-C#13新的锁类型和语义
· Sdcb Chats 技术博客:数据库 ID 选型的曲折之路 - 从 Guid 到自增 ID,再到
· 语音处理 开源项目 EchoSharp
· 《HelloGitHub》第 106 期
· Spring AI + Ollama 实现 deepseek-r1 的API服务和调用
· 使用 Dify + LLM 构建精确任务处理应用