Android五种布局模式管理
学习了一段时间的android,结果发现对其布局还不是很了解,回头重新温习下,希望给和我一样困惑的朋友带来帮助,如有描述不对的地方,还请指正。
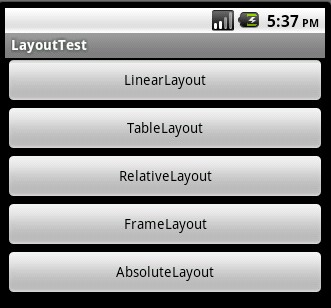
android分为5种布局模型:
1、 线性布局(LinearLayout)
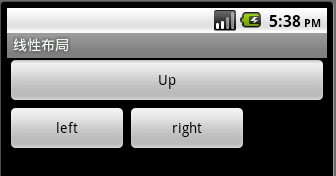
描述:最简单布局方式,依次向下进行排列。
<?xml version="1.0" encoding="utf-8"?>
<LinearLayout xmlns:android="http://schemas.android.com/apk/res/android"
android:orientation="vertical"
android:layout_width="fill_parent"
android:layout_height="fill_parent">
<Button android:text="Up"
android:id="@+id/Button03"
android:layout_width="fill_parent"
android:layout_height="wrap_content"></Button>
<LinearLayout xmlns:android="http://schemas.android.com/apk/res/android"
android:orientation="horizontal"
android:layout_width="fill_parent"
android:layout_height="fill_parent">
<Button android:text="left"
android:id="@+id/Button01"
android:width="120px"
android:layout_width="wrap_content"
android:layout_height="wrap_content"></Button>
<Button
android:text="right"
android:id="@+id/Button02"
android:width="120px"
android:layout_width="wrap_content"
android:layout_height="wrap_content"></Button>
</LinearLayout>
</LinearLayout>
<LinearLayout xmlns:android="http://schemas.android.com/apk/res/android"
android:orientation="vertical"
android:layout_width="fill_parent"
android:layout_height="fill_parent">
<Button android:text="Up"
android:id="@+id/Button03"
android:layout_width="fill_parent"
android:layout_height="wrap_content"></Button>
<LinearLayout xmlns:android="http://schemas.android.com/apk/res/android"
android:orientation="horizontal"
android:layout_width="fill_parent"
android:layout_height="fill_parent">
<Button android:text="left"
android:id="@+id/Button01"
android:width="120px"
android:layout_width="wrap_content"
android:layout_height="wrap_content"></Button>
<Button
android:text="right"
android:id="@+id/Button02"
android:width="120px"
android:layout_width="wrap_content"
android:layout_height="wrap_content"></Button>
</LinearLayout>
</LinearLayout>
2、 表格布局(TableLayout)
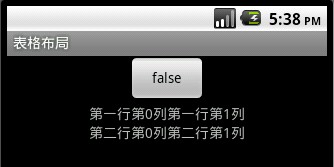
描述:类似于HTML table ,在其中间添加View 或是<TableRow></TableRow>控件。
<?xml version="1.0" encoding="utf-8"?>
<TableLayout
xmlns:android="http://schemas.android.com/apk/res/android"
android:id="@+id/TableLayout01"
android:layout_width="fill_parent" android:layout_height="fill_parent">
<TableRow android:gravity="center">
<Button
android:text="@+id/Button01"
android:id="@+id/Button01"
android:layout_width="wrap_content"
android:layout_height="wrap_content">
</Button>
</TableRow>
<TableRow android:gravity="center">
<TextView android:text="第一行第0列"
android:layout_width="wrap_content"
android:layout_height="wrap_content"></TextView>
<TextView android:text="第一行第1列"
android:layout_width="wrap_content"
android:layout_height="wrap_content"></TextView>
</TableRow>
<TableRow android:gravity="center">
<TextView android:text="第二行第0列"
android:layout_width="wrap_content"
android:layout_height="wrap_content"></TextView>
<TextView android:text="第二行第1列"
android:layout_width="wrap_content"
android:layout_height="wrap_content"></TextView>
</TableRow>
</TableLayout>
3、 单帧布局(FrameLayout)
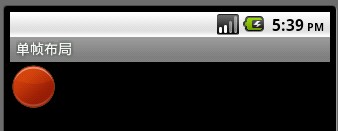
描述:没发现特别的,感觉和线性布局差不多,类似于HTML层叠
<?xml version="1.0" encoding="utf-8"?>
<FrameLayout
xmlns:android="http://schemas.android.com/apk/res/android"
android:layout_width="wrap_content"
android:layout_height="wrap_content">
<ImageView
android:id="@+id/ImageView01"
android:src="@drawable/circle_blue"
android:layout_width="wrap_content"
android:layout_height="wrap_content">
</ImageView>
<ImageView
android:id="@+id/ImageView02"
android:src="@drawable/circle_green"
android:layout_width="wrap_content"
android:layout_height="wrap_content">
</ImageView>
<ImageView
android:id="@+id/ImageView03"
android:src="@drawable/circle_red"
android:layout_width="wrap_content"
android:layout_height="wrap_content">
</ImageView>
</FrameLayout>
4、 相对布局(RelativeLayout)
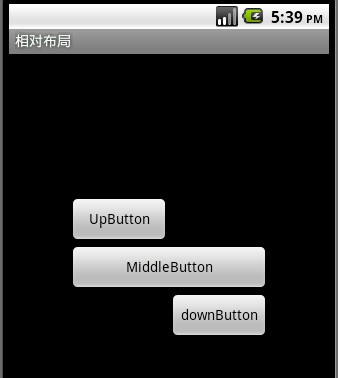
描述:取决于对参照控件进行布局,父控件和子控件均可
常用属性:android:layout_centerInParent=”true/false”
android:layout_above, android:layout_below
android:layout_alignleft, android:layout_alignright.
<?xml version="1.0" encoding="utf-8"?>
<RelativeLayout xmlns:android="http://schemas.android.com/apk/res/android"
android:layout_width="fill_parent" android:layout_height="fill_parent">
<Button
android:id="@+id/btnmiddle"
android:text="MiddleButton"
android:layout_width="200px"
android:layout_height="wrap_content"
android:layout_centerInParent="true">
</Button>
<Button
android:id="@+id/btnup"
android:text="UpButton"
android:layout_width="100px"
android:layout_height="wrap_content"
android:layout_above="@id/btnmiddle"
android:layout_alignLeft="@id/btnmiddle">
</Button>
<Button
android:id="@+id/btndown"
android:text="downButton"
android:layout_width="100px"
android:layout_height="wrap_content"
android:layout_below="@id/btnmiddle"
android:layout_alignRight="@id/btnmiddle">
</Button>
</RelativeLayout>
5、 坐标布局(AbsoluteLayout)

描述:对其控件进行直接定位,增加灵活性。
常用属性:android:layout_x,android:layout_y.
<?xml version="1.0" encoding="utf-8"?>
<AbsoluteLayout
xmlns:android="http://schemas.android.com/apk/res/android"
android:layout_width="wrap_content"
android:layout_height="wrap_content">
<TextView
android:layout_width="wrap_content"
android:text="UserName:"
android:layout_height="wrap_content"
android:id="@+id/tvName"
android:layout_y="20dip"
android:layout_x="50dip">
</TextView>
<TextView
android:layout_width="wrap_content"
android:text="Password:"
android:layout_height="wrap_content"
android:id="@+id/tvPassword"
android:layout_y="100dip"
android:layout_x="55dip">
</TextView>
<EditText
android:layout_width="150px"
android:layout_height="wrap_content"
android:id="@+id/tvPassword"
android:layout_y="10dip"
android:layout_x="120dip">
</EditText>
<EditText
android:layout_width="150px"
android:layout_height="wrap_content"
android:id="@+id/tvPassword"
android:layout_y="90dip"
android:layout_x="120dip">
</EditText>
</AbsoluteLayout>
MyLayout.java
package com.jay.Layout;
import android.app.Activity;
import android.os.Bundle;
import android.view.View;
import android.view.View.OnClickListener;
import android.widget.Button;
public class MyLayout extends Activity {
/** Called when the activity is first created. */
private Button btnLinearlayout;
private Button btnTablayout;
private Button btnRelativelayout;
private Button btnFramelayout;
private Button btnAbsolutelayout;
OnClickListener listener;
@Override
public void onCreate(Bundle savedInstanceState) {
super.onCreate(savedInstanceState);
setContentView(R.layout.main);
CreateControl();
listener = new OnClickListener() {
@Override
public void onClick(View v) {
// TODO Auto-generated method stub
switch (v.getId()) {
case R.id.btnlinearlayout:
setTitle("线性布局");
setContentView(R.layout.linearlayout);
break;
case R.id.btntableayout:
setTitle("表格布局");
setContentView(R.layout.tablelayout);
break;
case R.id.btnrelativelayout:
setTitle("相对布局");
setContentView(R.layout.relativelayout);
break;
case R.id.btnfreamelayout:
setTitle("单帧布局");
setContentView(R.layout.framelayout);
break;
case R.id.btnabsolutelayout:
setTitle("坐标布局");
setContentView(R.layout.absolutelayout);
break;
}
}
};
btnLinearlayout.setOnClickListener(listener);
btnTablayout.setOnClickListener(listener);
btnRelativelayout.setOnClickListener(listener);
btnFramelayout.setOnClickListener(listener);
btnAbsolutelayout.setOnClickListener(listener);
}
private void CreateControl() {
// TODO Auto-generated method stub
btnLinearlayout = (Button)findViewById(R.id.btnlinearlayout);
btnTablayout = (Button)findViewById(R.id.btntableayout);
btnRelativelayout = (Button)findViewById(R.id.btnrelativelayout);
btnFramelayout = (Button)findViewById(R.id.btnfreamelayout);
btnAbsolutelayout = (Button)findViewById(R.id.btnabsolutelayout);
}
}

