Go语言数据结构与算法-链表
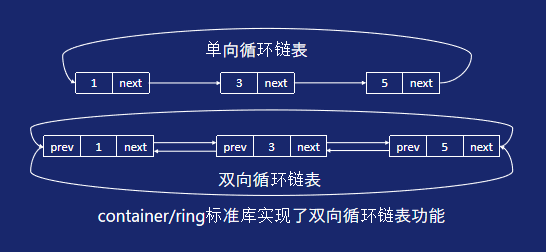
单双向链表

示例代码:
container/list标准库实现
package main

import (
	"container/list"
	"fmt"
)

func TraversList(lst *list.List) {
	head := lst.Front()
	for head.Next() != nil {
		fmt.Printf("%v ", head.Value)
		head = head.Next()
	}
	fmt.Println(head.Value)
}

func ReverseList(lst *list.List) {
	tail := lst.Back()
	for tail.Prev() != nil {
		fmt.Printf("%v ", tail.Value)
		tail = tail.Prev()
	}
	fmt.Println(tail.Value)
}

func main() {
	lst := list.New()
	lst.PushBack(1)
	lst.PushBack(2)
	lst.PushBack(3)
	lst.PushBack(4)
	lst.PushBack(5)
	TraversList(lst)
	ReverseList(lst)

	_ = lst.Remove(lst.Back())  //移除尾元素,同时返回元素的值,注意元素不能是nil
	_ = lst.Remove(lst.Front()) //移除首元素,Remove操作复杂度为O(1)
	fmt.Printf("length %d\n\n", lst.Len())
	TraversList(lst)
}

>>>>>>
1 2 3 4 5
5 4 3 2 1
length 3

2 3 4
自己动手实现
package main

import "fmt"

// ListNode 链表节点元素
type ListNode struct {
	Value int       //该节点数据
	Prev  *ListNode //上一个节点
	Next  *ListNode //下一个节点
}

// DoubleList 双向链表
type DoubleList struct {
	Head   *ListNode //头节点
	Tail   *ListNode //尾节点
	Length int       //节点数量
}

// NewDoubleList 初始化链表
func NewDoubleList() *DoubleList {
	return &DoubleList{}
}

// Append 追加到链表尾部
func (l *DoubleList) Append(i int) {
	n := &ListNode{Value: i}
	t := l.Tail
	if t == nil {
		l.Head = n
		l.Tail = n
	} else {
		t.Next = n
		n.Prev = t
		l.Tail = n
	}
	l.Length += 1
}

// Get 获取链表中id下标的节点
func (l *DoubleList) Get(index int) *ListNode {
	if l.Length <= index {
		return nil
	}
	pres := l.Head
	for i := 0; i < index; i++ {
		pres = pres.Next
	}
	return pres
}

// InsertAfter 链表插入节点
func (l *DoubleList) InsertAfter(i int, pNode *ListNode) {
	n := &ListNode{Value: i}
	if pNode.Next == nil {
		pNode.Next = n
		n.Prev = pNode
	} else {
		nNode := pNode.Next
		nNode.Prev = n
		n.Prev = pNode
		n.Next = nNode
		pNode.Next = n
	}
	l.Length += 1
}

// Traverse 链表正向值
func (l *DoubleList) Traverse() {
	pres := l.Head
	for pres != nil {
		fmt.Printf("%d ", pres.Value)
		pres = pres.Next
	}
	fmt.Println()
}

// Reverse 链表反向值
func (l *DoubleList) Reverse() {
	t := l.Get(l.Length-1)
	for t != nil {
		fmt.Printf("%d ", t.Value)
		t = t.Prev
	}
	fmt.Println()
}
func main() {
	l := NewDoubleList()
	l.Append(1)
	l.Append(2)
	l.Append(3)
	l.Append(4)
	l.Append(5)
	l.Traverse()
	gNode := l.Get(3)
	l.InsertAfter(9, gNode)
	l.Traverse()
	l.Reverse()
}


>>>>>>>
1 2 3 4 5
1 2 3 4 9 5
5 9 4 3 2 1
应用:
LRU缓存淘汰
- LUR(Least Recently Used)最近最少使用【冷数据】
- 思路:缓存的key放到链表中,头部的元素表示最近刚使用
- 如果命中缓存,从链表中找到对应的key,移到链表头部
- 如果没有命中缓存:
- 如果缓存容量没超,放入缓存,并把key放到链表头部
- 如果超出缓存容量,删除链表尾部元素,再把key放到链表头部
示例代码:
模拟LRU缓存淘汰机制:
package main

import (
	"container/list"
	"fmt"
)

var cache map[int]string
var lst *list.List

const CAP = 10 //缓存容量上限

func init() {
	cache = make(map[int]string, CAP)
	lst = list.New()
}

func readFromDisk(key int) string {
	return "china"
}

func read(key int) string {
	if v, exists := cache[key]; exists { //命中缓存
		head := lst.Front() //链表内第一个元素
		notFound := false
		for {
			if head == nil {
				notFound = true
				break
			}
			if head.Value.(int) == key { //从链表内找到对应的key
				lst.MoveToFront(head) //把key移到链表头部
				break
			} else {
				head = head.Next()
			}
		}
		if notFound { //正常情况下不会发生这种情况
			lst.PushFront(key)
		}
		return v
	} else { //没有命中缓存
		v = readFromDisk(key) //从磁盘中读取数据
		cache[key] = v        //放入缓存
		lst.PushFront(key)    //放入链表头部
		if len(cache) > CAP { //缓存已满
			tail := lst.Back()              //链表最后一个元素
			delete(cache, tail.Value.(int)) //从缓存中移除很久不使用的元素
			lst.Remove(tail)                //从链表中删除最后一个元素
			fmt.Printf("remove %d from cache\n", tail.Value.(int))
		}
		return v
	}
}
func TraversList(lst *list.List) {
	head := lst.Front()
	for head.Next() != nil {
		fmt.Printf("%v ", head.Value)
		head = head.Next()
	}
	fmt.Println(head.Value)
}

func main() {
	for i := 1; i <= 12; i++ {
		_ = read(i)
	}
	for k, v := range cache {
		fmt.Printf("%d:%s\n", k, v)
	}
	_ = read(1)
	_ = read(5)
	for k, v := range cache {
		fmt.Printf("%d:%s\n", k, v)
	}
	fmt.Println("-------")
	TraversList(lst)
}

>>>>>>
remove 1 from cache
remove 2 from cache
6:china
7:china
8:china
10:china
12:china
3:china
5:china
11:china
4:china
9:china
remove 3 from cache
6:china
7:china
8:china
10:china
12:china
1:china
5:china
11:china
4:china
9:china
-------
5 1 12 11 10 9 8 7 6 4
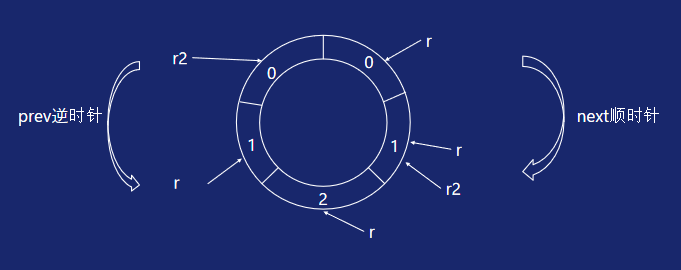
单双向循环链表

添加元素

package main

import (
	"container/ring"
	"fmt"
)

func TraverseRing(ring *ring.Ring) {
	//通过Do()来遍历ring,内部实际上调用了Next()而非Prev()
	ring.Do(func(i interface{}) {
		fmt.Printf("%v ", i)
	})
	fmt.Println()
}

func main() {
	//必须指定长度,各元素被初始化为nil
	r := ring.New(5)
	r2 := r.Prev()
	for i := 0; i < 3; i++ {
		r.Value = i
		r = r.Next()
	}
	for i := 0; i < 3; i++ {
		r2.Value = i
		r2 = r2.Prev()
	}

	// r和r2当前所在的指针位置不同,所以遍历出来的顺序也不同
	TraverseRing(r)
	TraverseRing(r2)
}

>>>>
1 0 0 1 2
1 2 1 0 0
应用:
基于滑动窗口的统计:
- 最近100次接口调用的平均耗时
- 最近10笔订单的平均值
- 最近30个交易日股票的最高点
ring的容量即为滑动窗口的大小、把待观察变量按时间顺序不停地写入ring即可


