

自己做个东西上外网
参考链接
https://www.digitalocean.com/community/tutorials/how-to-set-up-an-openvpn-server-on-ubuntu-16-04 --英文
http://blog.csdn.net/zstack_org/article/details/69228386 --中文
不知道为什么,之前这种方法现在不能用了,另外换一种方法,参考如下
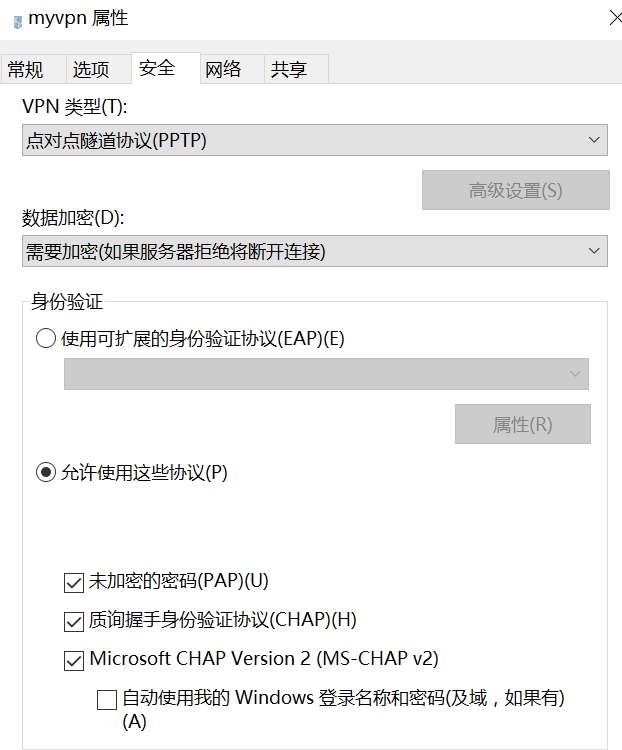
注意:需要修改安全选项中的VPN类型为PPTP,如下
下面这些不用看了,不好使了
Step 1: Install OpenVPN
apt-get update
apt-get install openvpn easy-rsa
Step 2: Set Up the CA Directory
make-cadir ~/openvpn-ca
cd ~/openvpn-ca
Step 3: Configure the CA Variables
在vars文件中自行修改如下参数,也可以不修改。保存退出后,执行source vars
export KEY_COUNTRY="US"
export KEY_PROVINCE="NY"
export KEY_CITY="New York City"
export KEY_ORG="DigitalOcean"
export KEY_EMAIL="admin@example.com"
export KEY_OU="Community"
export KEY_NAME="server", 这个修改后,下面命令中的server名也要改变
Step 4: Build the Certificate Authority
./clean-all
./build-ca,一路回车
Step 5: Create the Server Certificate, Key, and Encryption Files
./build-key-server server,一路回车,在最后2个输入y
./build-dh
openvpn --genkey --secret keys/ta.key
Step 6: Generate a Client Certificate and Key Pair
source vars
./build-key client1,一路回车,最后2个选y
Step 7: Configure the OpenVPN Service
cd ~/openvpn-ca/keys
sudo cp ca.crt server.crt server.key ta.key dh2048.pem /etc/openvpn
gunzip -c /usr/share/doc/openvpn/examples/sample-config-files/server.conf.gz | sudo tee /etc/openvpn/server.conf
Adjust the OpenVPN Configuration
vim /etc/openvpn/server.conf修改如下内容
tls-auth ta.key 0 # This file is secret,remove ";"
key-direction 0
cipher AES-128-CBC # AES
auth SHA256
user nobody
group nogroup
Step 8: Adjust the Server Networking Configuration
vim /etc/sysctl.conf
net.ipv4.ip_forward=1保存退出后,执行sysctl -p
Adjust the UFW Rules to Masquerade Client Connections
ip route | grep default:找到默认的接口,比如eth0
vim /etc/ufw/before.rules,在头部添加如下代码,然后保存退出
# START OPENVPN RULES
# NAT table rules
*nat
:POSTROUTING ACCEPT [0:0]
# Allow traffic from OpenVPN client to wlp11s0 (change to the interface you discovered!)
-A POSTROUTING -s 10.8.0.0/8 -o eth0 -j MASQUERADE
COMMIT
# END OPENVPN RULES
vim /etc/default/ufw,修改一行然后保存退出
DEFAULT_FORWARD_POLICY="ACCEPT"Open the OpenVPN Port and Enable the Changes
ufw allow 1194/udp
ufw allow OpenSSH
ufw disable && ufw enable
Step 9: Start and Enable the OpenVPN Service
systemctl start openvpn@server #这里的server不是上面定义的服务器的名字,固定为server
systemctl status openvpn@server
sudo systemctl enable openvpn@server
Step 10: Create Client Configuration Infrastructure
Creating the Client Config Directory Structure
mkdir -p ~/client-configs/files
chmod 700 ~/client-configs/files
Creating a Base Configuration
cp /usr/share/doc/openvpn/examples/sample-config-files/client.conf ~/client-configs/base.conf
vim ~/client-configs/base.conf,修改如下内容,然后保存退出
remote server_IP_address 1194 #设置openvpn端口, 这里的server_IP_address修改为自己服务器的外网地址
#确保端口对应的协议
proto udp
取消下面2行的注释
user nobody
group nogroup
把下面三行加上注释,
#ca ca.crt
#cert client.crt
#key client.key
接下来的三行要自己加上
cipher AES-128-CBC
auth SHA256
key-direction 1
Creating a Configuration Generation Script
vim ~/client-configs/make_config.sh,添加如下内容
#!/bin/bash

# First argument: Client identifier

KEY_DIR=~/openvpn-ca/keys
OUTPUT_DIR=~/client-configs/files
BASE_CONFIG=~/client-configs/base.conf

cat ${BASE_CONFIG} \
    <(echo -e '<ca>') \
    ${KEY_DIR}/ca.crt \
    <(echo -e '</ca>\n<cert>') \
    ${KEY_DIR}/${1}.crt \
    <(echo -e '</cert>\n<key>') \
    ${KEY_DIR}/${1}.key \
    <(echo -e '</key>\n<tls-auth>') \
    ${KEY_DIR}/ta.key \
    <(echo -e '</tls-auth>') \
    > ${OUTPUT_DIR}/${1}.ovpn
chmod 700 ~/client-configs/make_config.sh
Step 11: Generate Client Configurations
cd ~/client-configs
./make_config.sh client1
正常情况下执行ls ~/client-configs/files会有一个client1.ovpn,这个就是客户端配置文件,需要把他传到window上
最后就是在windows上安装客户端,然后把client1.ovpn复制到客户端的配置文件中,比如C:\Program Files\OpenVPN\config
注意事项
1. 在中文版第八步使用ufw allow 1194/udp时,记得用 ufw allow OpenSSH,否则你的阿里云服务器将不能进行远程连接
2.. 不管阿里云服务器内网IP是多少,在/etc/ufw/before.rules中都要设置ip为10.8.0.0/8,如下
-A POSTROUTING -s 10.8.0.0/8 -o wlp11s0 -j MASQUERADE
3. 参照中文版到第10步配置生成脚本时,脚本执行会出错,可以用英文版的脚本,其他应该都没错。中英文配置稍有区别,英文版的解释更详细,我是用中文版做的实验。
4. 按照英文版的第6,11步创建多个client之后,不能同时多用户登陆
5. 设置多客户端用一个证书,实现多用户同时登陆的方法,注意要同一个client才可以,我的实验中不同客户端用不同的client,会连不上VPN
