韩顺平Java35——线程基础
线程基础
1.相关概念
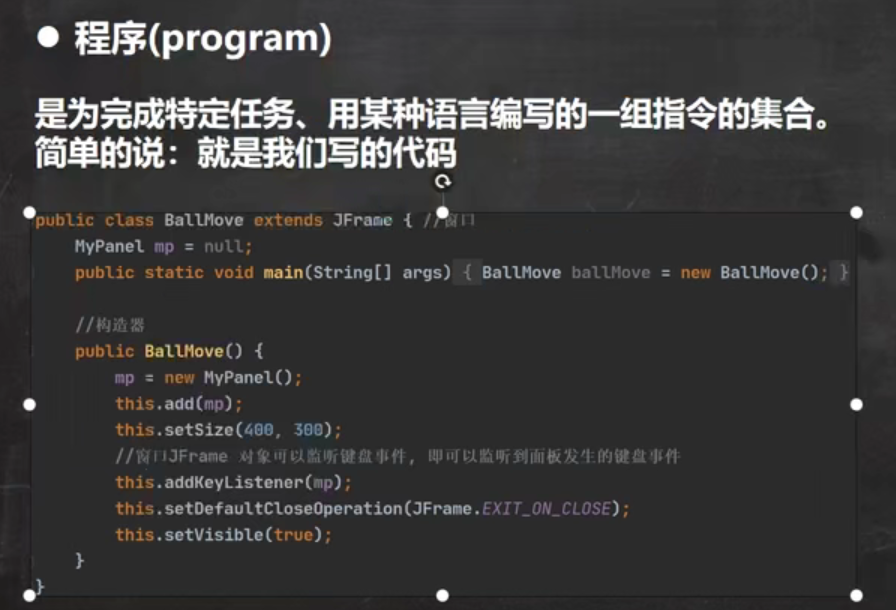
- 程序(Program)
- 进程

- 线程



并发:单个cpu同时执行多个任务,但某一时刻只执行一个,只是交替执行而且速度很快
并行:同一时刻,两个cpu分别执行两个任务。
并发和并行可以同时发生,比如两个cpu执行三个任务,一个cpu并发两个,另一个执行一个。宏观来看两个cpu是在并行工作,但是单看第一个就是并发。

2.创建线程
2.1通过继承Thread类

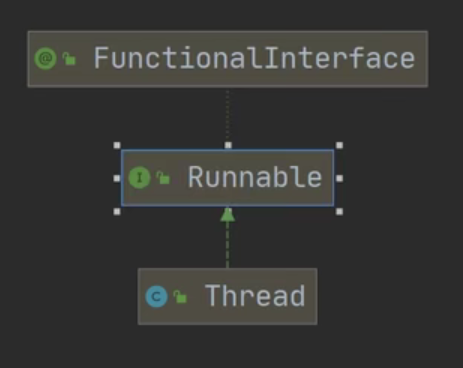
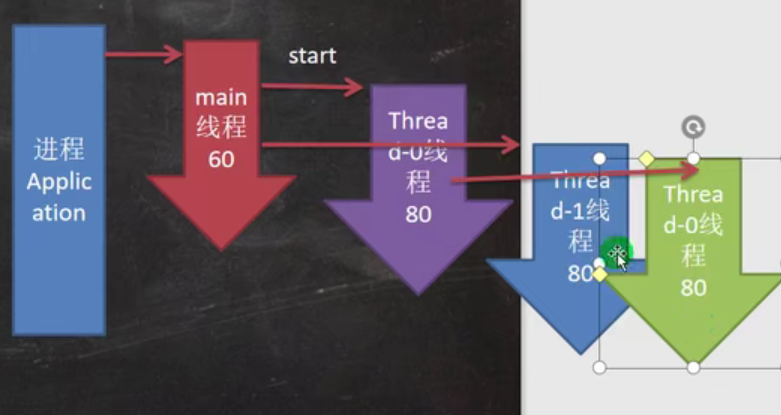
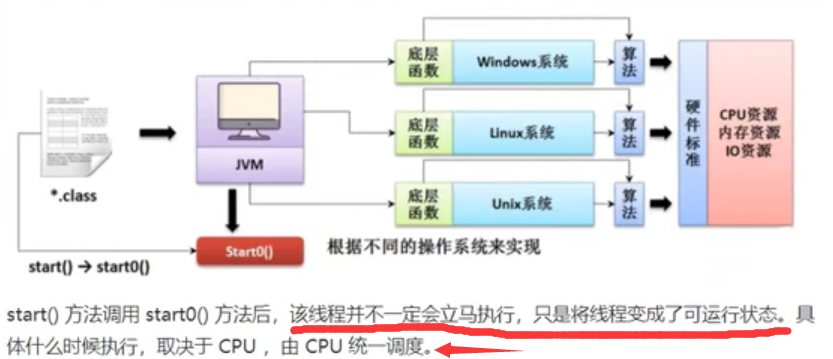
主线程的结束并不一定代表整个进程的结束,等所有线程都执行完毕才会退出程序
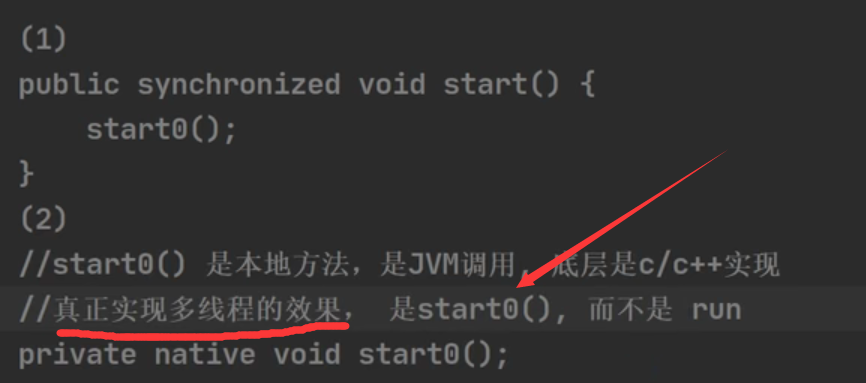
如果我们使用run()方法来执行会发现线程名是main,这时的run()方法只是一个普通方法,并没有真正启动新的线程,相当于串行化的执行,
会造成程序的阻塞,只有当run()方法执行完毕后才会继续执行下面的,而start()方法才是真正实现了多线程


2.2通过实现Runnable接口
因为Java是单继承机制,在已经有父类的情况下可以通过Runnable接口来实现多线程

public class Thread02 {
    public static void main(String[] args) {
        Dog dog = new Dog();
        Thread thread = new Thread(dog);
        thread.start();
    }
}

class Dog implements Runnable{
    int times = 0;

    @Override
    public void run() {
        while (true) {
            System.out.println("汪汪汪~");
            ++times;
            try {
                Thread.sleep(500);
            } catch (InterruptedException e) {
                e.printStackTrace();
            }
            if (times==10)break;
        }

    }
}
我们简单模拟一个静态代理模式:
package threadtest;

import sun.applet.Main;

/**
 * @author 紫英
 * @version 1.0
 * @discription 静态代理模拟
 */
public class Thread03 {
    public static void main(String[] args) {
        Tiger tiger = new Tiger();
        ThreadProxy threadProxy = new ThreadProxy(tiger);//把实现了Runnable接口的类的实例放入ThreadProxy
        threadProxy.start();
    }
}

class Animal {
}

class Tiger extends Animal implements Runnable {

    @Override
    public void run() {
        System.out.println("老虎嗷嗷嗷~");
    }
}

class ThreadProxy implements Runnable {//这里用ThreadProxy类来模拟Thread代理

    private Runnable target = null;//定义一个Runnable接口类型的变量

    public ThreadProxy(Runnable target) {
        this.target = target;
    }

    @Override
    public void run() {
        if (target != null) {
            target.run();//最后动态绑定到对应的target的run()方法
        }
    }

    void start() {
        start0();
    }

    void start0() {
        run(); //模拟Thread中的start0()
    }
}
- 使用jconsole命令来查看线程情况
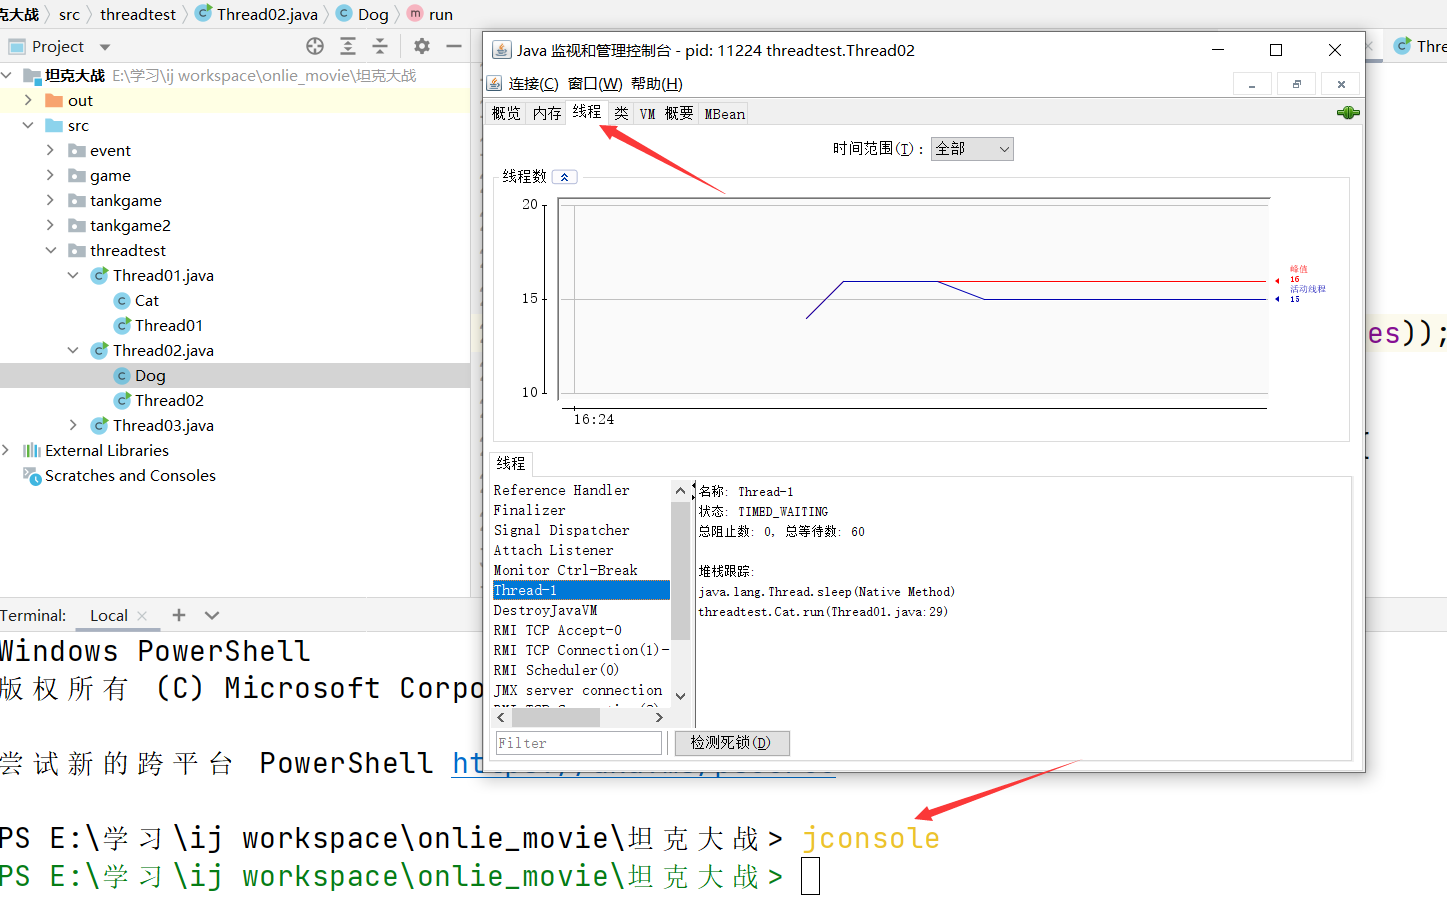
PID为进程号
- 继承Thread和实现Runnable接口的区别
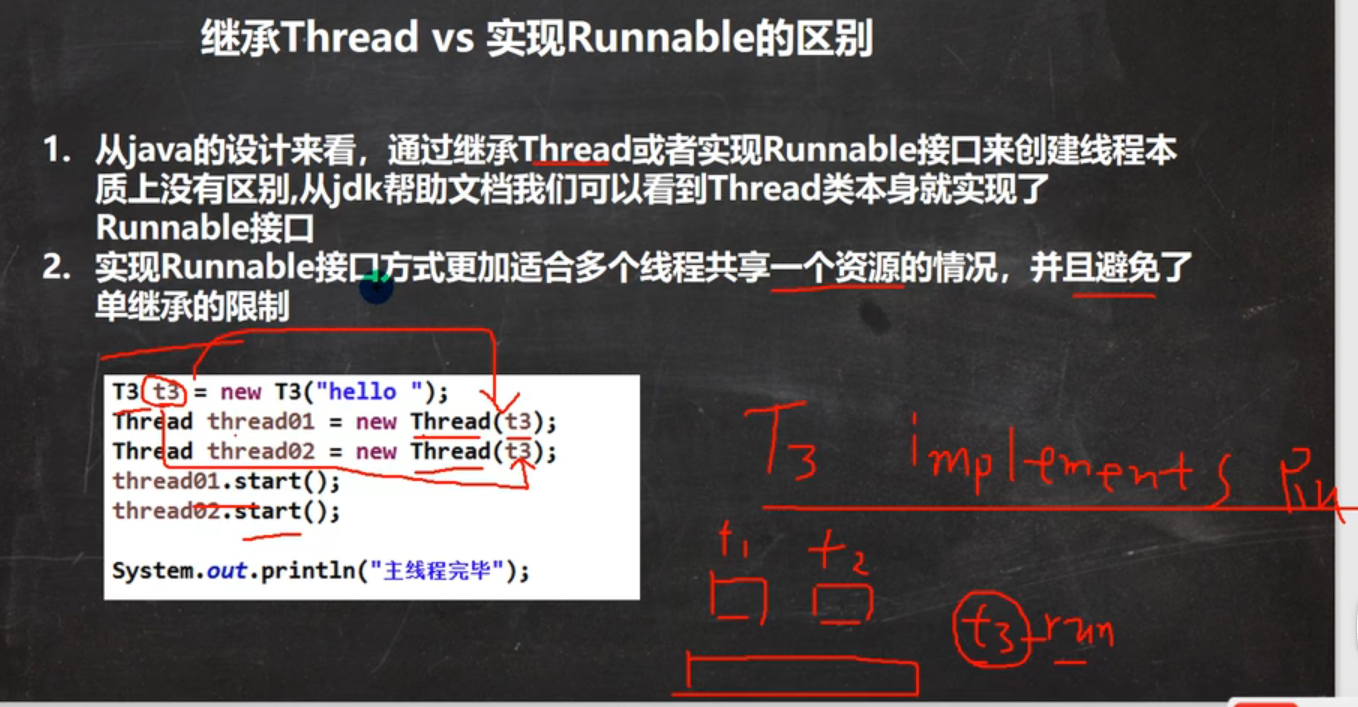
如图,假如T3继承了Runnable接口,那么线程thread01和thread02就都可以是用——多线程共享一个资源,
而继承Thread的话就指能自己用自己的,所以这边建议能用Runnable就用Runnable
售票问题

3.线程终止

![]()
package threadtest;

/**
 * @author 紫英
 * @version 1.0
 * @discription 主线程通知线程终止
 */
public class Stop01 {
    public static void main(String[] args) throws InterruptedException {
        T01 t01 = new T01();
        t01.start();//t01线程开始
        System.out.println("main休眠10s...");
        Thread.sleep(10000);
        t01.setLoop(false);//主线程通知关闭
    }
}

class T01 extends Thread {
    private int count;
    private boolean loop = true; //控制变量

    public boolean isLoop() {
        return loop;
    }

    public void setLoop(boolean loop) {
        this.loop = loop;
    }

    @Override
    public void run() {
        while (loop) { //使用loop来控制run()方法是否结束
            System.out.println("T01 running..." + (++count));
            try {
                Thread.sleep(50);
            } catch (InterruptedException e) {
                e.printStackTrace();
            }
        }
    }
}
4.线程方法
4.1 常用方法第一组
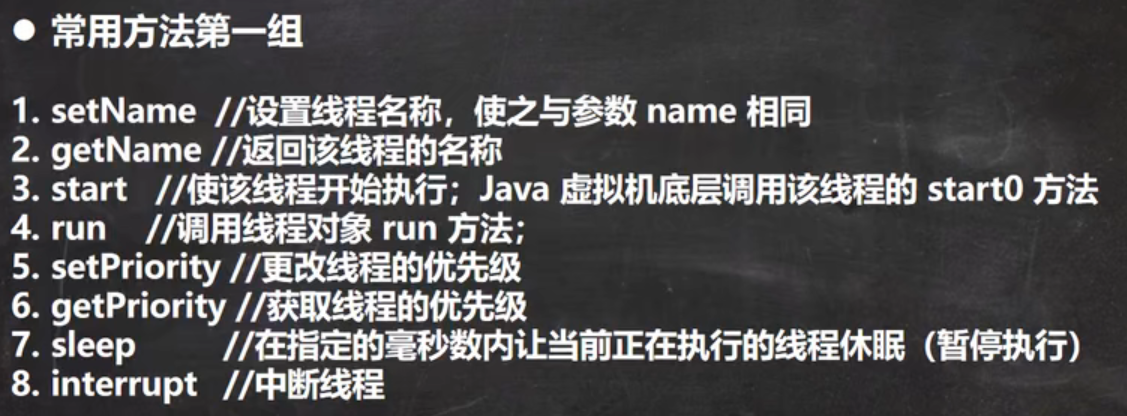
注意中断并不是中止
package threadtest;

/**
 * @author 紫英
 * @version 1.0
 * @discription 线程常用方法
 */
public class Thread04 {
    public static void main(String[] args) {
        T02 t02 = new T02();
        Thread thread = new Thread(t02);
        thread.setName("jack");
        thread.setPriority(Thread.MIN_PRIORITY);
        thread.start();
        for (int i = 0; i < 5; i++) {
            System.out.println("main "+i);
        }
        System.out.println("打断!");
        thread.interrupt(); //这里中断之后线程停止休息,继续呼呼呼

    }
}

class T02 implements Runnable{

    int times = 0;
    @Override

    public void run() {
        while (true) {
            for (int i = 0; i < 20; i++) {
                System.out.println((Thread.currentThread().getName()) + "呼呼呼~" + (++times));

            }
            try {
                System.out.println((Thread.currentThread().getName()) + "休息中(10s)...");
                Thread.sleep(10000);
            } catch (InterruptedException e) {
                System.out.println((Thread.currentThread().getName()) + "被中断了");
            }
        }
    }
}
4.2常用方法第二组

说明:注意两种方法的调用方式
1.yield是调用Thread自身的静态方法
2.join是调用要插队的线程的方法
演示:
package threadtest;

/**
 * @author 紫英
 * @version 1.0
 * @discription 演示yield(礼让)和join(插队)
 */
public class Thread05 {
    public static void main(String[] args) throws InterruptedException {
        Grandmother grandmother = new Grandmother();
        Thread thread = new Thread(grandmother);
        thread.start();
        for (int i = 0; i < 25; i++) {
            System.out.println("张三走了"+(i+1)+"步");
            Thread.sleep(1000);
            if (i==4){
                System.out.println("张三让老奶奶先走...");
                thread.join();//调用插入线程的join()
                //Thread.yield(); //调用Thread地静态方法
                System.out.println("张三继续走...");
            }
        }
    }
}
class Grandmother implements Runnable{
    private int step = 0;

    @Override
    public void run() {
        while (true){
        System.out.println("老奶奶走了"+(++step)+"步");
        try {
            Thread.sleep(1000);
        } catch (InterruptedException e) {
            e.printStackTrace();
        }
        if (step==20)break;
        }
    }
}


图一_join 图二_yield
如图一——可以看到使用join的时候确实让老奶奶插队成功了
图二——使用yield礼让的时候由于cpu资源充足并没有礼让成功。
- 小练习:
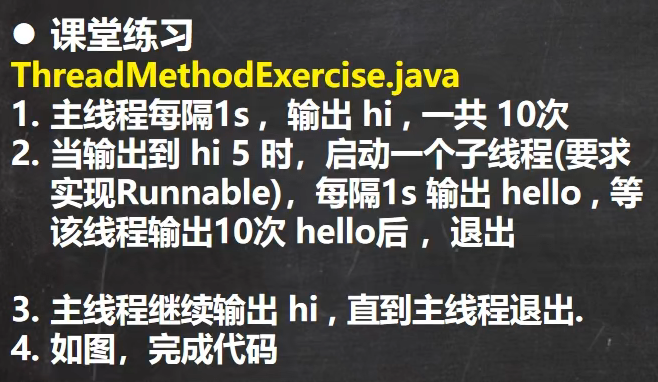
package threadtest;

/**
 * @author 紫英
 * @version 1.0
 * @discription 线程插队练习
 */
public class Exercise01 {
    public static void main(String[] args) throws InterruptedException {
        Hello hello = new Hello();
        Thread thread = new Thread(hello);

        System.out.println("主线程启动");
        for (int i = 0; i < 10; i++) {
            Thread.sleep(1000);
            System.out.println("hi"+(i+1));
            if (i==4) {
                System.out.println("子线程join");
                thread.start();
                thread.join();
                System.out.println("主线程继续");
            }
        }

    }
}
class Hello implements Runnable{

    @Override
    public void run() {
        System.out.println("子线程启动");
        for (int i = 0; i < 10; i++) {
            try {
                Thread.sleep(1000);
            } catch (InterruptedException e) {
                e.printStackTrace();
            }
            System.out.println("hello"+(i+1));
        }
    }
}
4.3用户线程和守护线程

将一个线程设置为守护线程(Daemon)——thread.setDaemon(true) [ˈdiːmən]
这样根据守护线程的特性,当所有的用户线程结束后守护线程也就会自动结束了,看一个简单的例子:
package threadtest;

/**
 * @author 紫英
 * @version 1.0
 * @discription
 */
public class Deamon {
    public static void main(String[] args) throws InterruptedException {
        Knight knight = new Knight();
        knight.setDaemon(true);//将骑士线程设置为守护线程
        knight.start();

        for (int i = 0; i < 10; i++) {
            System.out.println("公主蹦蹦蹦~~~");
            Thread.sleep(1000);
        }
    }

}

class Knight extends Thread {
    @Override
    public void run() {
        while (true) {//这里是一个死循环
            System.out.println("骑士守护公主...");
            try {
                Thread.sleep(1000);
            } catch (InterruptedException e) {
                e.printStackTrace();
            }
        }
    }
}
这里当主线程结束的时候守护线程也就自动停止了,不会继续死循环
5.线程的生命周期
- 可以使用 getState()来查看线程状态
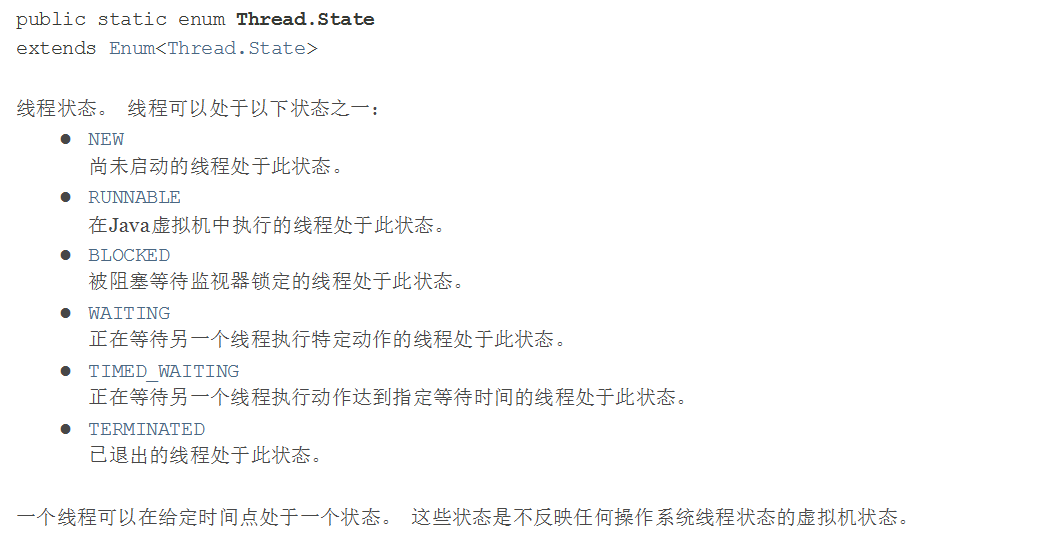
根据官方文档线程是有6种状态,也有7种的说法,我们看下面的图:
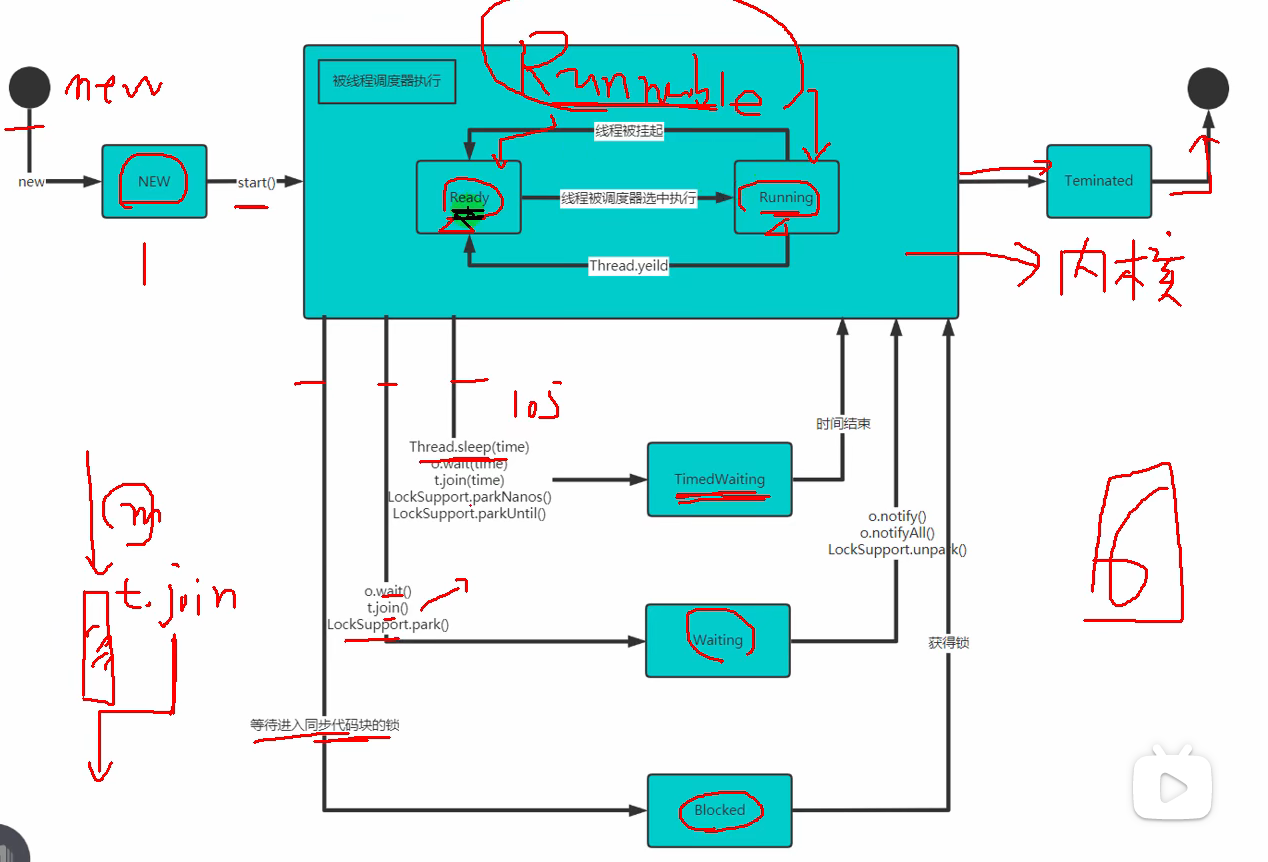
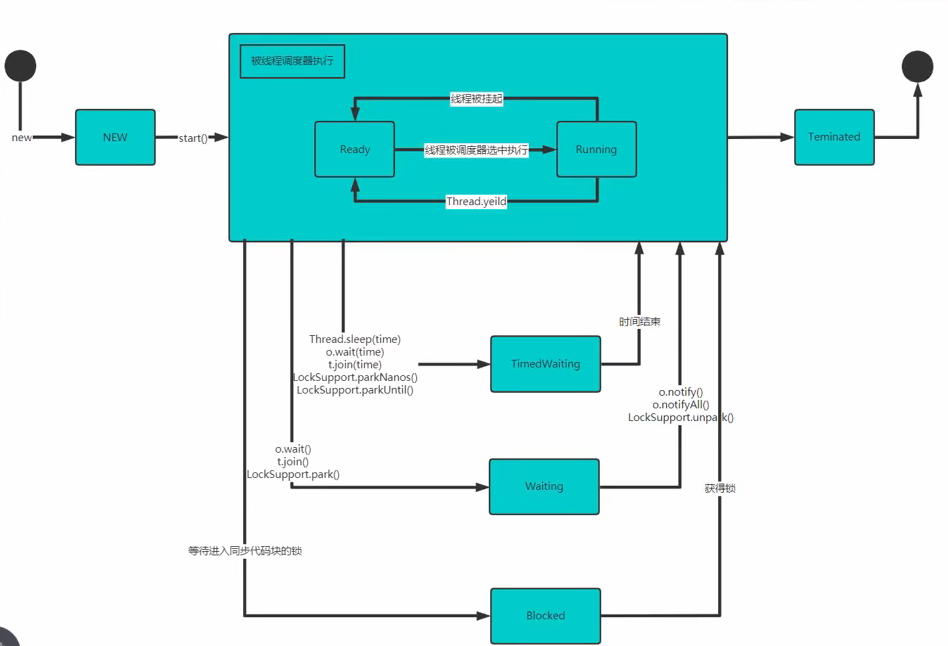
可以看到,这里是把Runnable状态细分成Ready(就绪)和Running(执行)两种状态,这两种状态的切换不是由程序决定的,而是由内核调度器来决定通过图片我们也可以看到join和yield的区别,前者直接进入waiting状态,而后者则是进入ready状态,宏观还是处于runnable状态的,所以可能礼让不成功。
纯享版:
6.线程同步机制

6.1线程同步实现方法——synchronized
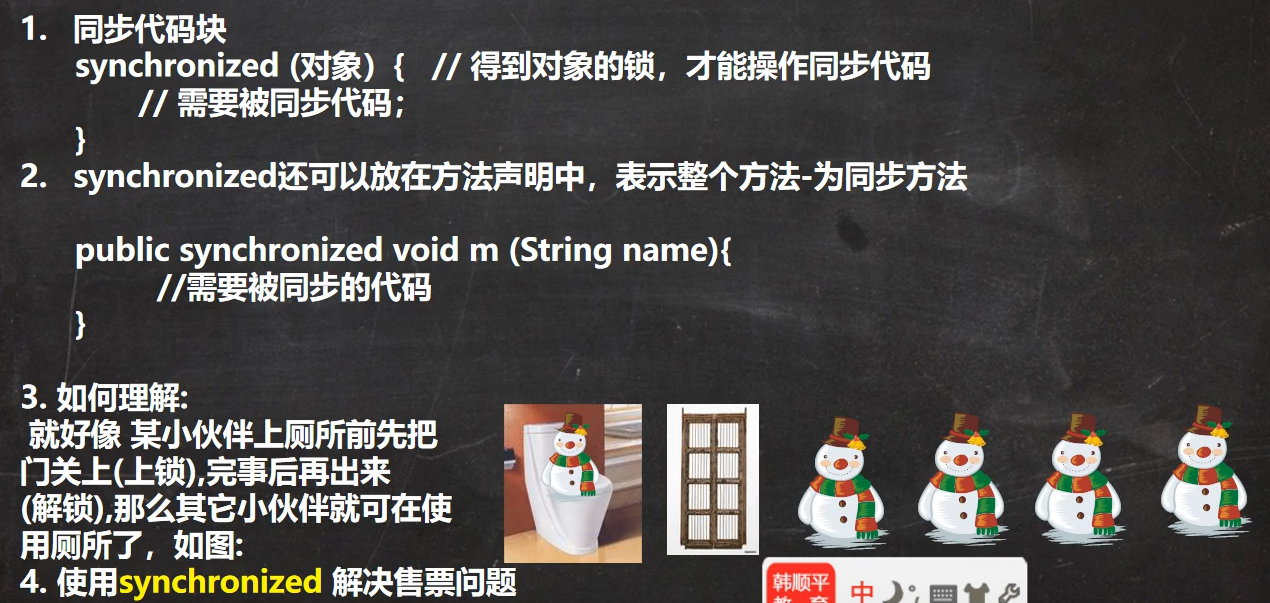
被同步代码块的意思就是——在同一时刻只能由一个线程来操作这个代码块。
第二个是在同一时刻只能由一个线程来操作这个方法
- 我们来使用synchronized解决一下售票问题:
package threadtest;

/**
 * @author 紫英
 * @version 1.0
 * @discription synchronized解决售票问题
 */
public class Sellticket {
    public static void main(String[] args) {
        SellWindows sellWindows = new SellWindows();
        Thread thread01 = new Thread(sellWindows);
        Thread thread03 = new Thread(sellWindows);
        Thread thread02 = new Thread(sellWindows);
        thread01.start();
        thread02.start();
        thread03.start();
    }
}

class SellWindows implements Runnable {
    int count = 100;    //100张票
    boolean loop = true;

    public synchronized void sell() {//同步方法
        if (count >= 1) {
            System.out.println((Thread.currentThread().getName()) + "卖出一张票,还有" + (--count) + "张票");
        } else {
            loop = false;
            return;
        }
    }

    @Override
    public void run() {
        while (loop) {
            sell();
            try {
                Thread.sleep(1000);//休息一会
            } catch (InterruptedException e) {
                e.printStackTrace();
            }
        }
        System.out.println("已售空!");
    }
}
6.2同步原理分析——互斥锁
- 基本介绍
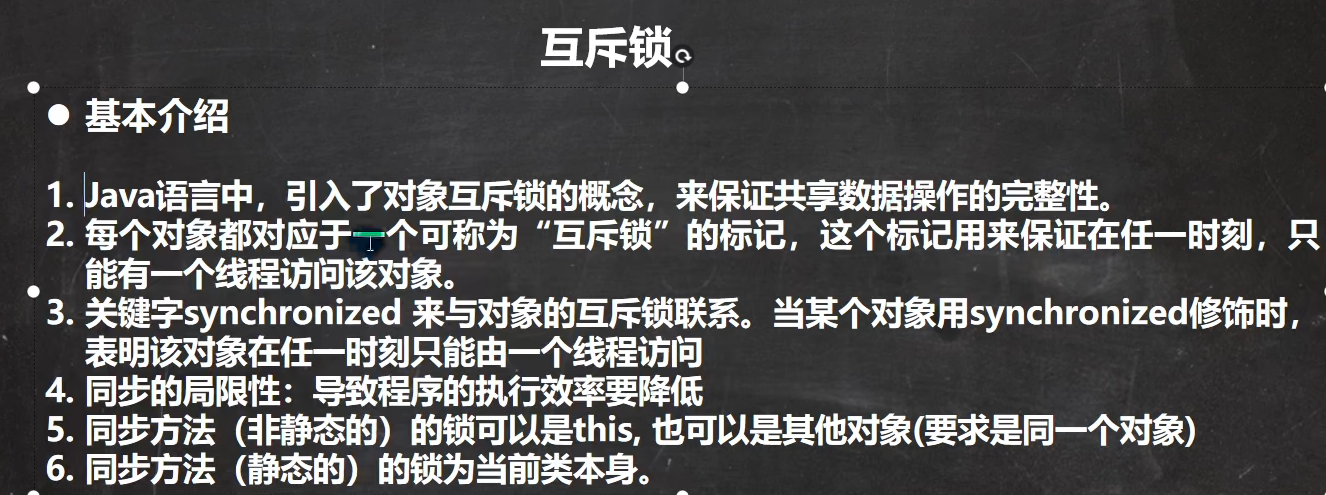
- 注意细节

能用同步代码块就用,因为范围越小效率越高
代码演示:
细节1.说明:也可以是其他对象但要求是同一个对象,如果用继承Thread的方式来创建线程那么this就不是同一个对象
Object o = new Object();
        public /*synchronized*/ void sell () {//同步方法
            synchronized (o) {
                //同步代码块,synchronized ()里面要求是同一对象,默认是this
                // 这里因为是使用的runnable接口所以三个线程调用的都是同一个对象
                // 如果改成 synchronized (new Object()) 锁就失效了
                if (count >= 1) {
                    System.out.println((Thread.currentThread().getName()) + "卖出一张票,还有" + (--count) + "张票");
                } else {
                    loop = false;
                    return;
                }
            }
        }
细节2.说明:static方法上synchronized加默认锁对象是当前类,所以下图中都不可以
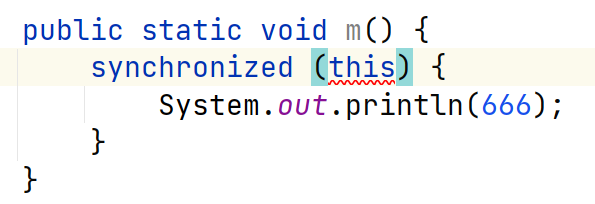
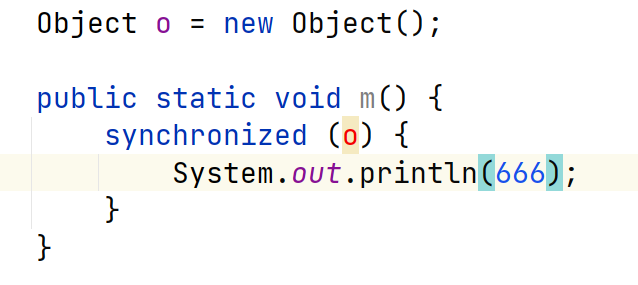
需要把对象改成当前类对象(类名+.class):

7.线程死锁

模拟死锁:
package threadtest.syn;

/**
 * @author 紫英
 * @version 1.0
 * @discription 线程死锁模拟
 */
public class DeadBlock {
    public static void main(String[] args) {
        Deadlock deadlock01 = new Deadlock(true);
        Deadlock deadlock02 = new Deadlock(false);
        deadlock01.start();//这里取得o1
        deadlock02.start();//这里取得o2
        //此时两个线程互相需要对方的资源(对象),但是因为无法满足条件都无法释放资源造成死锁
    }
}

class Deadlock extends Thread {
    static Object o1 = new Object(); //static保证多线程共享一个对象
    static Object o2 = new Object();
    boolean flag;

    Deadlock(boolean flag) {
        this.flag = flag;
    }

    @Override
    public void run() {
        //这里如果进入if先取得o1对象再向下走则需要取得o2对象
        if (flag) {
            synchronized (o1) {
                System.out.println("进入A-1");
                synchronized (o2) {
                    System.out.println("进入A-2");
                }
            }
        } else {
            //这里如果进入else先取得o2对象再向下走则需要取得o1对象
            synchronized (o2) {
                System.out.println("进入B-1");
                synchronized (o1) {
                    System.out.println("进入B-2");
                }
            }
        }
    }
}
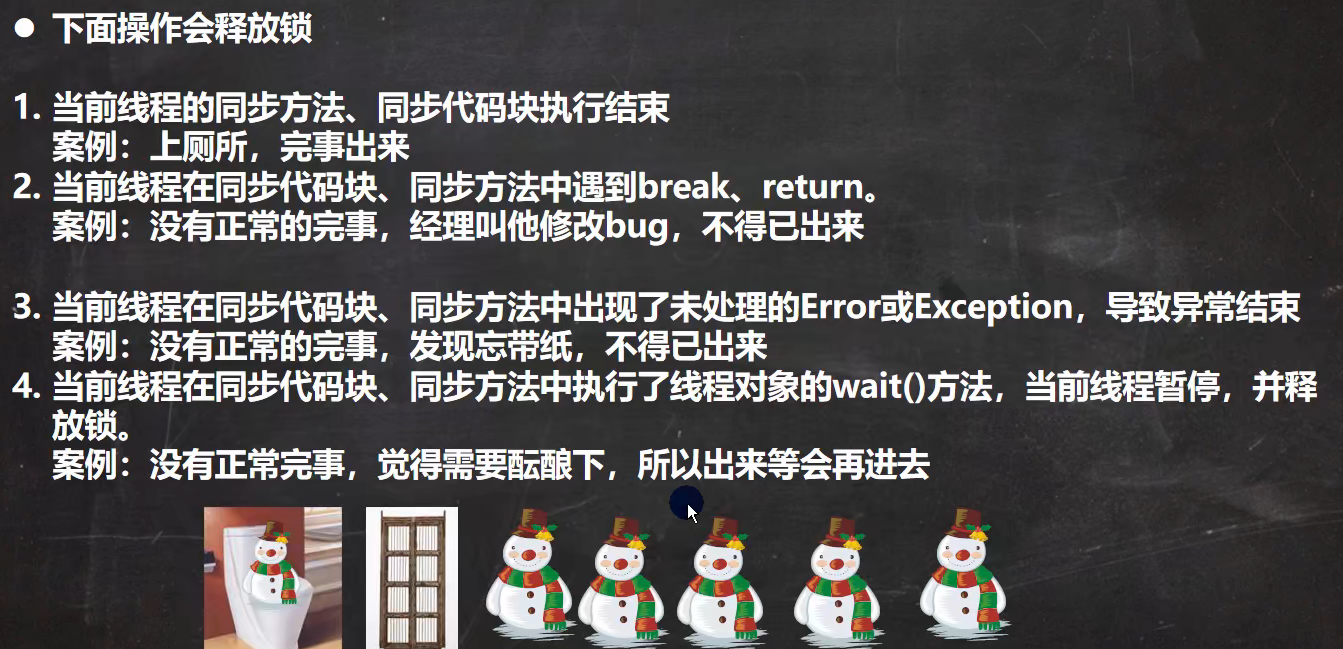
8.释放锁
8.1会释放锁的情况
8.2不会释放锁的情况

本文来自博客园,作者:紫英626,转载请注明原文链接:https://www.cnblogs.com/recorderM/p/15840192.html


【推荐】国内首个AI IDE,深度理解中文开发场景,立即下载体验Trae
【推荐】编程新体验,更懂你的AI,立即体验豆包MarsCode编程助手
【推荐】抖音旗下AI助手豆包,你的智能百科全书,全免费不限次数
【推荐】轻量又高性能的 SSH 工具 IShell:AI 加持,快人一步
· 从 HTTP 原因短语缺失研究 HTTP/2 和 HTTP/3 的设计差异
· AI与.NET技术实操系列:向量存储与相似性搜索在 .NET 中的实现
· 基于Microsoft.Extensions.AI核心库实现RAG应用
· Linux系列:如何用heaptrack跟踪.NET程序的非托管内存泄露
· 开发者必知的日志记录最佳实践
· TypeScript + Deepseek 打造卜卦网站:技术与玄学的结合
· Manus的开源复刻OpenManus初探
· 写一个简单的SQL生成工具
· AI 智能体引爆开源社区「GitHub 热点速览」
· C#/.NET/.NET Core技术前沿周刊 | 第 29 期(2025年3.1-3.9)