t113-c-lcd_lvgl篇
之所以用lvgl,是因为lvgl实在是太轻便了,只用库就能够做处图形管理页面,非常方便。当然,主要是我不想再下载qtcreate了,虽然qt被运用的很广泛,但是目前我对lvgl的掌握程度还是更深一点
1.从github下载

2.为下载的lvgl源码创建例程

需要注意的是lvgl所使用的不是makefile而是cmake,所以要用cmakelist
3.cmakelists
先来看一下lvgl里面的cmakelists
再.cmake中有:
# Option to define LV_LVGL_H_INCLUDE_SIMPLE, default: ON
option(LV_LVGL_H_INCLUDE_SIMPLE
"Use #include \"lvgl.h\" instead of #include \"../../lvgl.h\"" ON)
# Option to define LV_CONF_INCLUDE_SIMPLE, default: ON
option(LV_CONF_INCLUDE_SIMPLE
"Simple include of \"lv_conf.h\" and \"lv_drv_conf.h\"" ON)
# Option to set LV_CONF_PATH, if set parent path LV_CONF_DIR is added to
# includes
option(LV_CONF_PATH "Path defined for lv_conf.h")
get_filename_component(LV_CONF_DIR ${LV_CONF_PATH} DIRECTORY)
# Option to build shared libraries (as opposed to static), default: OFF
option(BUILD_SHARED_LIBS "Build shared libraries" OFF)
file(GLOB_RECURSE SOURCES ${LVGL_ROOT_DIR}/src/*.c)
file(GLOB_RECURSE EXAMPLE_SOURCES ${LVGL_ROOT_DIR}/examples/*.c)
file(GLOB_RECURSE DEMO_SOURCES ${LVGL_ROOT_DIR}/demos/*.c)
if (BUILD_SHARED_LIBS)
add_library(lvgl SHARED ${SOURCES})
else()
add_library(lvgl STATIC ${SOURCES})
endif()
add_library(lvgl::lvgl ALIAS lvgl)
add_library(lvgl_examples STATIC ${EXAMPLE_SOURCES})
add_library(lvgl::examples ALIAS lvgl_examples)
add_library(lvgl_demos STATIC ${DEMO_SOURCES})
add_library(lvgl::demos ALIAS lvgl_demos)
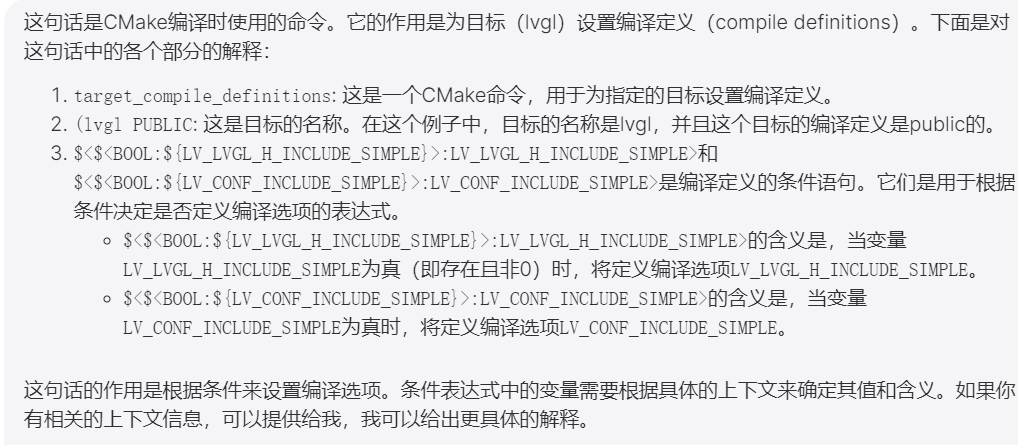
target_compile_definitions(
lvgl PUBLIC $<$<BOOL:${LV_LVGL_H_INCLUDE_SIMPLE}>:LV_LVGL_H_INCLUDE_SIMPLE>
$<$<BOOL:${LV_CONF_INCLUDE_SIMPLE}>:LV_CONF_INCLUDE_SIMPLE>)
# Include root and optional parent path of LV_CONF_PATH
target_include_directories(lvgl SYSTEM PUBLIC ${LVGL_ROOT_DIR} ${LV_CONF_DIR})
# Include /examples folder
target_include_directories(lvgl_examples SYSTEM
PUBLIC ${LVGL_ROOT_DIR}/examples)
target_include_directories(lvgl_demos SYSTEM
PUBLIC ${LVGL_ROOT_DIR}/demos)
target_link_libraries(lvgl_examples PUBLIC lvgl)
target_link_libraries(lvgl_demos PUBLIC lvgl)
# Lbrary and headers can be installed to system using make install
file(GLOB LVGL_PUBLIC_HEADERS "${CMAKE_SOURCE_DIR}/lv_conf.h"
"${CMAKE_SOURCE_DIR}/lvgl.h")
if("${LIB_INSTALL_DIR}" STREQUAL "")
set(LIB_INSTALL_DIR "lib")
endif()
if("${INC_INSTALL_DIR}" STREQUAL "")
set(INC_INSTALL_DIR "include/lvgl")
endif()
install(
DIRECTORY "${CMAKE_SOURCE_DIR}/src"
DESTINATION "${CMAKE_INSTALL_PREFIX}/${INC_INSTALL_DIR}/"
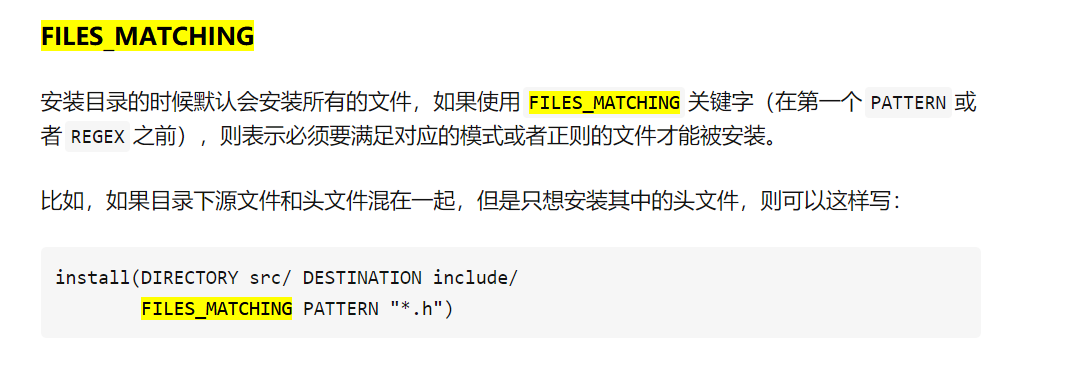
FILES_MATCHING
PATTERN "*.h")
set_target_properties(
lvgl
PROPERTIES OUTPUT_NAME lvgl
ARCHIVE_OUTPUT_DIRECTORY "${CMAKE_BINARY_DIR}/lib"
LIBRARY_OUTPUT_DIRECTORY "${CMAKE_BINARY_DIR}/lib"
RUNTIME_OUTPUT_DIRECTORY "${CMAKE_BINARY_DIR}/lib"
PUBLIC_HEADER "${LVGL_PUBLIC_HEADERS}")
install(
TARGETS lvgl
ARCHIVE DESTINATION "${LIB_INSTALL_DIR}"
LIBRARY DESTINATION "${LIB_INSTALL_DIR}"
RUNTIME DESTINATION "${LIB_INSTALL_DIR}"
PUBLIC_HEADER DESTINATION "${INC_INSTALL_DIR}")include
简单来说就是用来引用.cmake文件配置的
https://blog.csdn.net/qq_38410730/article/details/102677143
option
https://blog.csdn.net/lhl_blog/article/details/123553686
根据上面这篇文章我们可以知道option的作用相当于定义,遵守以下几点
- 1.第三格参数只要不是on都是off
- 2.可以再cmake的时候修改定义的值,例如用-d....=ON or OFF
- 3.子项目以父项目的定义为标准
get_filename_component
https://blog.csdn.net/wzj_110/article/details/116431616
寻找属性到var中:
很好理解
add_library
https://blog.csdn.net/mataojie/article/details/121466125
https://blog.csdn.net/LaineGates/article/details/108242803
这个指令时cmake常用的指令,用来添加静态库和动态库的,或者时模块库参数如下
- name 名字
- STATIC|SHARED|MOUDLE:库的类型
- EXCLUDE_FROM_ALL:加了EXCLUDE_FROM_ALL属性的target在默认编译的时候,不会被编译,如果要编译它们,需要手动编译
- source:构建库的文件
例如:add_library(hello_library STATIC src/Hello.cpp )
以上是添加库,还有一种是添加已经生成的库:
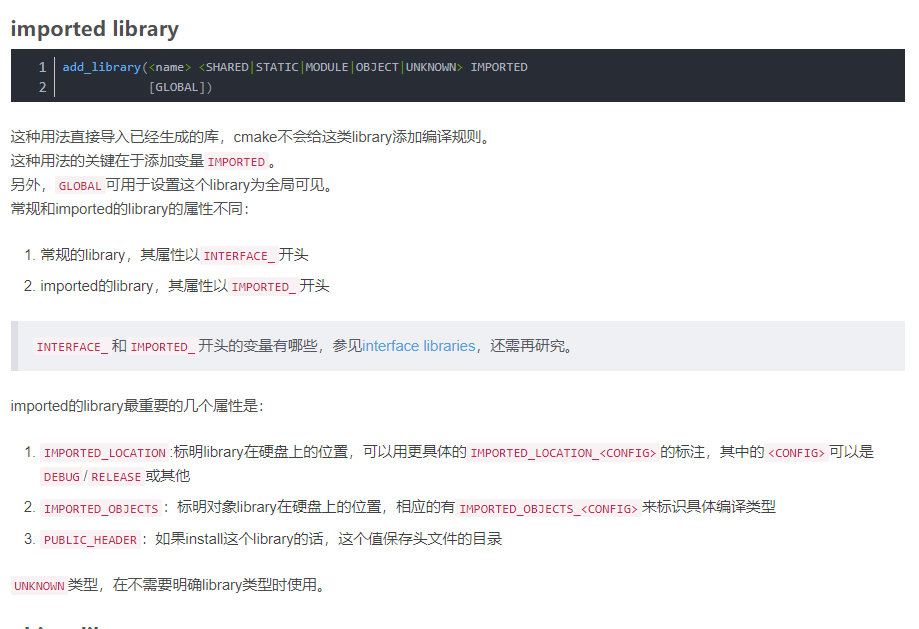
说实话没看懂
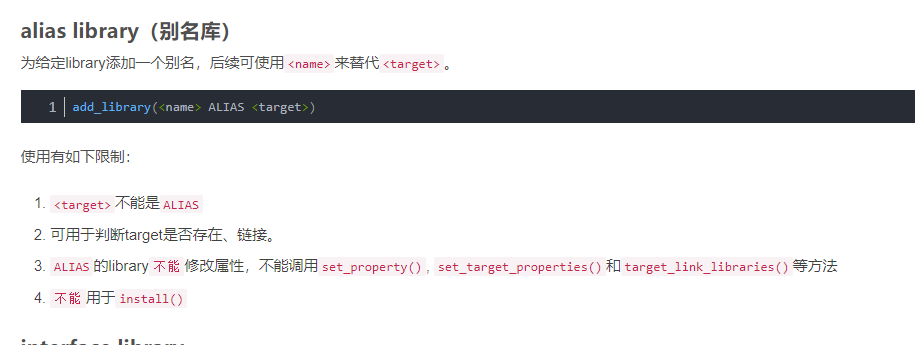
还有一个常用的作用就是别名:
target_compile_definitions
给目标添加定义?很奇怪什么东西,摸不着头脑,那定义如果是分对象的那么如何判断对象是否定义了某个宏呢?

这里的意思就i是判断这个宏是否定义了否则就给lvgl定义这个宏
后面大概懂了是再需要编译的目标中添加宏定义,并且traget必须不能是alias的重命名
target_include_directories
https://blog.csdn.net/sinat_31608641/article/details/121713191
该命令可以指定目标(exe或者so文件)需要包含的头文件路径。
对于public和接口等在下面文章中有讲解
https://zhuanlan.zhihu.com/p/82244559
在另外一篇文章中对头文件的包含也有更详细的解释:
https://juejin.cn/post/7127592962560622623
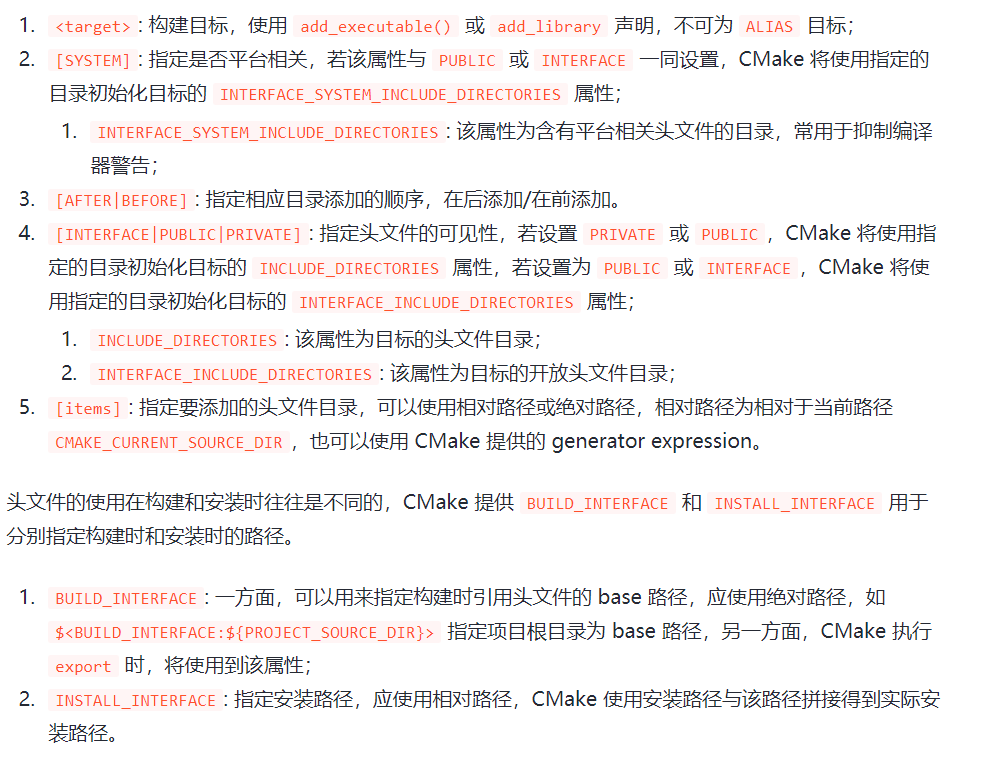
冒号的意思就是加单来说赋值给左边的变量
target_link_libraries
指定链接给定目标和/或其依赖项时要使用的库或标志。将传播链接库目标的使用要求。目标依赖项的使用要求会影响其自身源的编译。
详细的解析在以下链接:
https://blog.csdn.net/qq_26849933/article/details/127139052
install规则
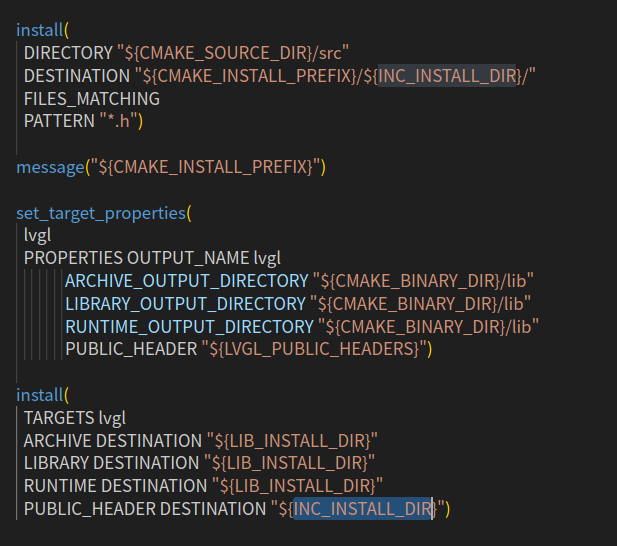
后面这一堆是设置安装路径规则的,应该有对应的表格说命各个参数是什么的。
那么我们就了解到了第一个install是为了把/src文件.h的内容安装到目的文件下
而set_target_properties
https://blog.csdn.net/challenglistic/article/details/130130789
是设置目标文件的属性,在文件里面设置的是输出静态和动态库的路径还有可执行文件的路径
最后一个PUBLIC_HEADER貌似是自己设置的,那么使用也是用install使用,目的是为了把所要用的头文件安装到目的路径中
最后cmake
通过cmake .
cmake --build .
cmake --install
就可以得到安装之后的一堆东西
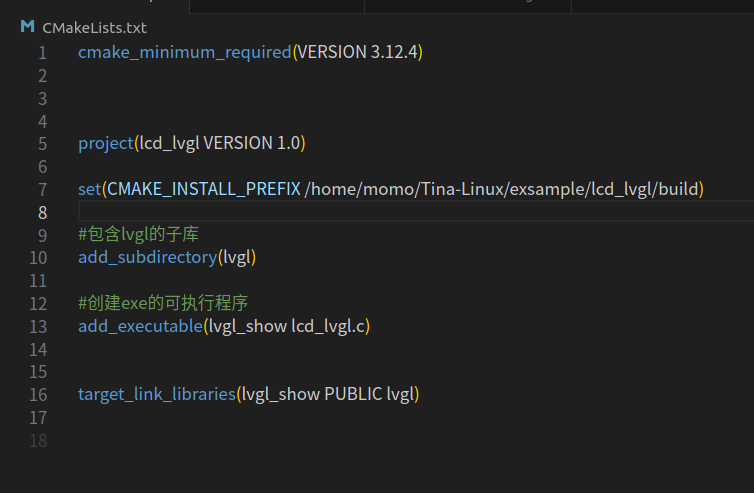
编写自己的cmakelists
lvgl的cmake已经是写好了的,到时候设置一下输出的库的位置然后在自己要调用的cmake中链接并调用所需要的库就可以了,按照这个思路:
简单地写了一下
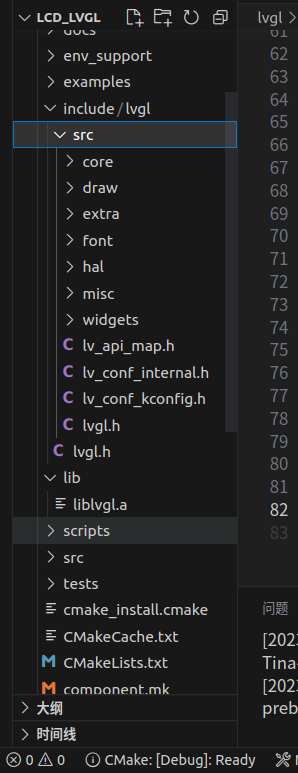
经过编译后的build下的文件分布是:
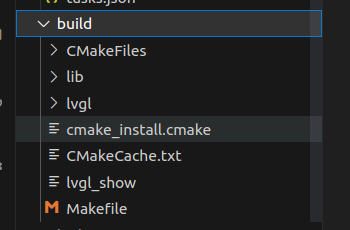
其中,build下面的是原本的cmake导出来的,lvgl和lib是在子cmake中导出的,而lvgl装的是原本的库文件等东西
lvgl-conf的使用
这个文件是用来定义各种宏的
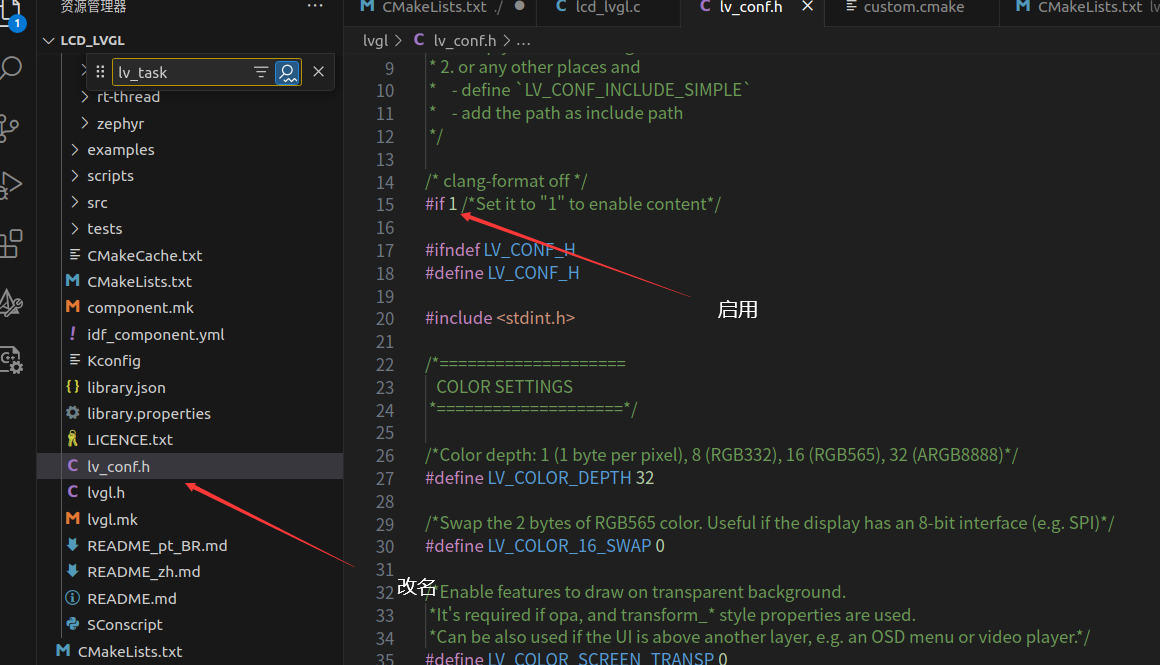
顺便把屏幕的参数标为32(argb888)
lvgl_disp_port的使用
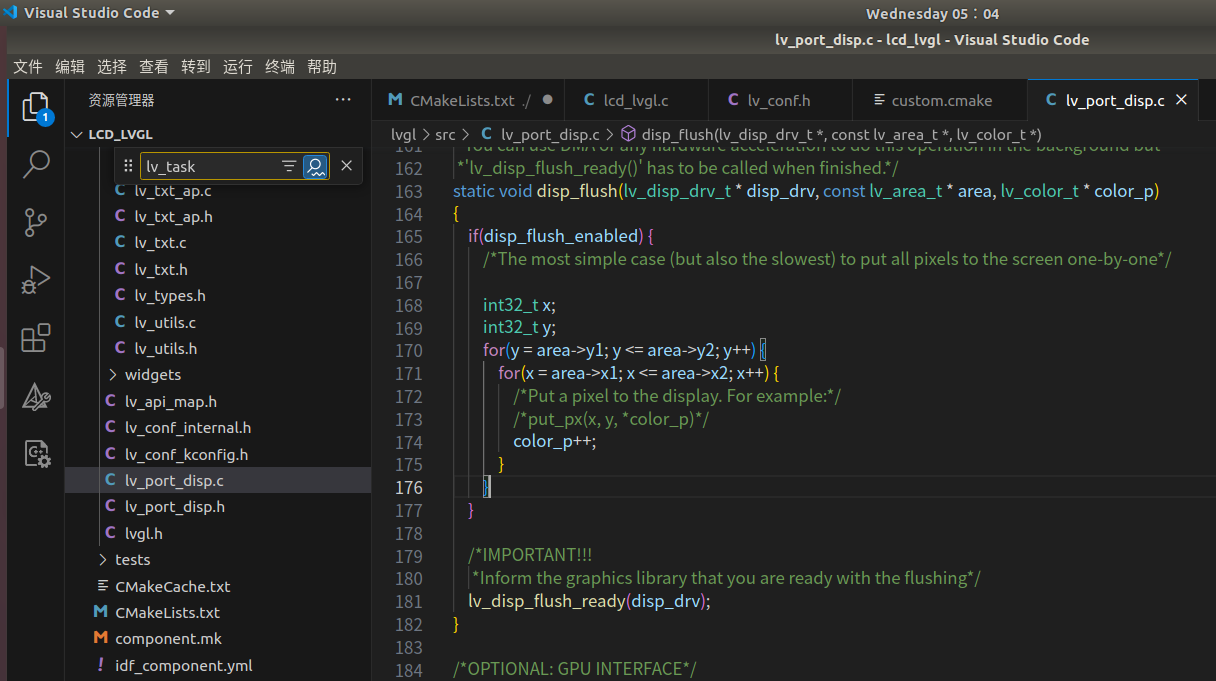
将port文件复制到src中,这样cmake就可以加载这些库,然后main就能调用了
再把之前所作的屏幕地址映射和函数什么的封装起来放上去,基本上就完成了
/**
 * @file lv_port_disp_templ.c
 *
 */

/*Copy this file as "lv_port_disp.c" and set this value to "1" to enable content*/
#if 1

/*********************
 *      INCLUDES
 *********************/
#include "lv_port_disp.h"
#include "linux/fb.h"
#include <sys/ioctl.h>
#include <fcntl.h>


#include <sys/mman.h>
#include <stdbool.h>

/*********************
 *      DEFINES
 *********************/
#ifndef MY_DISP_HOR_RES
    #warning Please define or replace the macro MY_DISP_HOR_RES with the actual screen width, default value 320 is used for now.
    #define MY_DISP_HOR_RES    480
#endif

#ifndef MY_DISP_VER_RES
    #warning Please define or replace the macro MY_DISP_HOR_RES with the actual screen height, default value 240 is used for now.
    #define MY_DISP_VER_RES    800
#endif

/**********************
 *      TYPEDEFS
 **********************/

/**********************
 *  STATIC PROTOTYPES
 **********************/
static void disp_init(void);

static void disp_flush(lv_disp_drv_t * disp_drv, const lv_area_t * area, lv_color_t * color_p);
//static void gpu_fill(lv_disp_drv_t * disp_drv, lv_color_t * dest_buf, lv_coord_t dest_width,
//        const lv_area_t * fill_area, lv_color_t color);

/**********************
 *  STATIC VARIABLES
 **********************/

/**********************
 *      MACROS
 **********************/

/**********************
 *   GLOBAL FUNCTIONS
 **********************/


void lv_port_disp_init(void)
{
    /*-------------------------
     * Initialize your display
     * -----------------------*/
    disp_init();

    /*-----------------------------
     * Create a buffer for drawing
     *----------------------------*/

    /**
     * LVGL requires a buffer where it internally draws the widgets.
     * Later this buffer will passed to your display driver's `flush_cb` to copy its content to your display.
     * The buffer has to be greater than 1 display row
     *
     * There are 3 buffering configurations:
     * 1. Create ONE buffer:
     *      LVGL will draw the display's content here and writes it to your display
     *
     * 2. Create TWO buffer:
     *      LVGL will draw the display's content to a buffer and writes it your display.
     *      You should use DMA to write the buffer's content to the display.
     *      It will enable LVGL to draw the next part of the screen to the other buffer while
     *      the data is being sent form the first buffer. It makes rendering and flushing parallel.
     *
     * 3. Double buffering
     *      Set 2 screens sized buffers and set disp_drv.full_refresh = 1.
     *      This way LVGL will always provide the whole rendered screen in `flush_cb`
     *      and you only need to change the frame buffer's address.
     */

    // /* Example for 1) */
    // static lv_disp_draw_buf_t draw_buf_dsc_1;
    // static lv_color_t buf_1[MY_DISP_HOR_RES * 10];                          /*A buffer for 10 rows*/
    // lv_disp_draw_buf_init(&draw_buf_dsc_1, buf_1, NULL, MY_DISP_HOR_RES * 10);   /*Initialize the display buffer*/

    // /* Example for 2) */
    // static lv_disp_draw_buf_t draw_buf_dsc_2;
    // static lv_color_t buf_2_1[MY_DISP_HOR_RES * 10];                        /*A buffer for 10 rows*/
    // static lv_color_t buf_2_2[MY_DISP_HOR_RES * 10];                        /*An other buffer for 10 rows*/
    // lv_disp_draw_buf_init(&draw_buf_dsc_2, buf_2_1, buf_2_2, MY_DISP_HOR_RES * 10);   /*Initialize the display buffer*/

    /* Example for 3) also set disp_drv.full_refresh = 1 below*/
    static lv_disp_draw_buf_t draw_buf_dsc_3;
    static lv_color_t buf_3_1[MY_DISP_HOR_RES * MY_DISP_VER_RES];            /*A screen sized buffer*/
    static lv_color_t buf_3_2[MY_DISP_HOR_RES * MY_DISP_VER_RES];            /*Another screen sized buffer*/
    lv_disp_draw_buf_init(&draw_buf_dsc_3, buf_3_1, buf_3_2,
                          MY_DISP_VER_RES * MY_DISP_HOR_RES/*LV_VER_RES_MAX*/);   /*Initialize the display buffer*/

    /*-----------------------------------
     * Register the display in LVGL
     *----------------------------------*/

    static lv_disp_drv_t disp_drv;                         /*Descriptor of a display driver*/
    lv_disp_drv_init(&disp_drv);                    /*Basic initialization*/

    /*Set up the functions to access to your display*/

    /*Set the resolution of the display*/
    disp_drv.hor_res = MY_DISP_HOR_RES;
    disp_drv.ver_res = MY_DISP_VER_RES;

    /*Used to copy the buffer's content to the display*/
    disp_drv.flush_cb = disp_flush;

    /*Set a display buffer*/
    disp_drv.draw_buf = &draw_buf_dsc_3;

    /*Required for Example 3)*/
    //disp_drv.full_refresh = 1;

    /* Fill a memory array with a color if you have GPU.
     * Note that, in lv_conf.h you can enable GPUs that has built-in support in LVGL.
     * But if you have a different GPU you can use with this callback.*/
    //disp_drv.gpu_fill_cb = gpu_fill;

    /*Finally register the driver*/
    lv_disp_drv_register(&disp_drv);
}

/**********************
 *   STATIC FUNCTIONS
 **********************/
uint32_t fb_line,fb_byte_per,fb_all_bit;
unsigned char *fb_base;
static struct fb_var_screeninfo var;
int fb_handle;
/*Initialize your display and the required peripherals.*/
static void disp_init(void)
{
    /*You code here*/
    //先初始化并且mmap

    fb_handle = open("/dev/fb0",O_RDWR);
    if(fb_handle < 0)
    {
        printf("failed to open");
        return;
    }
    if(ioctl(fb_handle,FBIOGET_VSCREENINFO,&var))//使用获取动态数据的标志符从驱动获取屏幕数据
    {
        printf("failed to ioctl");
        return;
    }
    ////////获取屏幕的数据
    fb_line = var.xres * var.bits_per_pixel / 8;//长度
    fb_byte_per = var.bits_per_pixel / 8;
    fb_all_bit = var.xres * var.yres * var.bits_per_pixel / 8;//总贞数
    ////////对文件进行映射
    fb_base = (unsigned char *)mmap(NULL , fb_all_bit, PROT_READ | PROT_WRITE, MAP_SHARED, fb_handle, 0);
    if(fb_base == (unsigned char *)-1)
    {
        printf("failed to mmap");
        return;
    }
}

static void disp_dinit(void)
{
    munmap(fb_base,fb_all_bit);
    close(fb_handle);
}

volatile bool disp_flush_enabled = true;

/* Enable updating the screen (the flushing process) when disp_flush() is called by LVGL
 */
void disp_enable_update(void)
{
    disp_flush_enabled = true;
}

/* Disable updating the screen (the flushing process) when disp_flush() is called by LVGL
 */
void disp_disable_update(void)
{
    disp_flush_enabled = false;
}

void lcd_flash(unsigned int  x,unsigned int y,unsigned int buffer)
{
    unsigned int *fb_test=(unsigned int *)fb_base;
    fb_test+=(unsigned int)(x+fb_line*y/4);//fb_line*0/4;//
    *fb_test = buffer;
}

/*Flush the content of the internal buffer the specific area on the display
 *You can use DMA or any hardware acceleration to do this operation in the background but
 *'lv_disp_flush_ready()' has to be called when finished.*/
static void disp_flush(lv_disp_drv_t * disp_drv, const lv_area_t * area, lv_color_t * color_p)
{
    if(disp_flush_enabled) {
        /*The most simple case (but also the slowest) to put all pixels to the screen one-by-one*/

        int32_t x;
        int32_t y;
        for(y = area->y1; y <= area->y2; y++) {
            for(x = area->x1; x <= area->x2; x++) {
                /*Put a pixel to the display. For example:*/
                /*put_px(x, y, *color_p)*/
                lcd_flash(x,y,(unsigned int)color_p);
                color_p++;
            }
        }
    }

    /*IMPORTANT!!!
     *Inform the graphics library that you are ready with the flushing*/
    lv_disp_flush_ready(disp_drv);
}

/*OPTIONAL: GPU INTERFACE*/

/*If your MCU has hardware accelerator (GPU) then you can use it to fill a memory with a color*/
//static void gpu_fill(lv_disp_drv_t * disp_drv, lv_color_t * dest_buf, lv_coord_t dest_width,
//                    const lv_area_t * fill_area, lv_color_t color)
//{
//    /*It's an example code which should be done by your GPU*/
//    int32_t x, y;
//    dest_buf += dest_width * fill_area->y1; /*Go to the first line*/
//
//    for(y = fill_area->y1; y <= fill_area->y2; y++) {
//        for(x = fill_area->x1; x <= fill_area->x2; x++) {
//            dest_buf[x] = color;
//        }
//        dest_buf+=dest_width;    /*Go to the next line*/
//    }
//}


#else /*Enable this file at the top*/

/*This dummy typedef exists purely to silence -Wpedantic.*/
typedef int keep_pedantic_happy;
#endif
定时器的制作:
那么接下来就是要给lvgl加上一颗”心脏“
定时器的制作应该是要用到timer和signal配合才能实现回调
https://www.cnblogs.com/chorm590/p/12158395.html
https://blog.csdn.net/oguro/article/details/53856947
根据这两篇文章我们就可以简单地做一个定时器回调函数
#include <stdio.h>
#include "linux/fb.h"
#include <sys/ioctl.h>
#include <sys/mman.h>
#include <string.h>
#include "lcd_lvgl.h"
#include "lvgl.h"
#include "sys/time.h"
#include <signal.h>


void sig_alm_handler(int sig_num)
{
    printf("%s, signal number:%d,\n", __FUNCTION__, sig_num);
    lv_tick_inc(10);//10ms
}

int main()
{
    signal(SIGALRM,sig_alm_handler);//信号捕获函数,当捕捉到了信号就回调函数,而我们知道timer第一种运行的时候会产生SIGALRM信号
    struct itimerval olditv;
    struct itimerval itv;
    itv.it_interval.tv_sec = 0; //定时周期为10毫秒钟。
    itv.it_interval.tv_usec = 10000;
    itv.it_value.tv_sec = 0; //立马启动//定时器启动以后将在3秒又500微秒以后正式开始计时。
    itv.it_value.tv_usec = 0;
    setitimer(ITIMER_REAL, &itv, &olditv);//第一种,真实的时间
    lv_port_disp_init();//调用的disp函数
    while (1)
    {
        lv_task_handler();
    }
    disp_dinit();
}
这样就差不多完成了,那么启动试一下
不出所料,失败了,失败的原因很有趣,说我语法错误,但是make都没错怎么运行就有错呢?
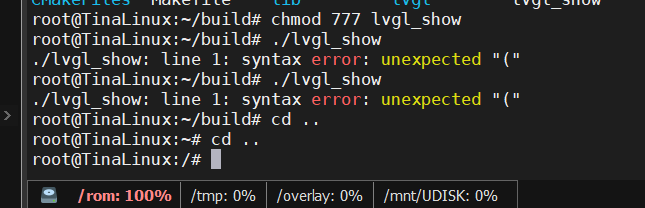
原来是编译器gcc用错了,一个是64位一个是32位的
任然是出错了,看来得找时间看看是什么错误了

 浙公网安备 33010602011771号