OpenStack实践系列⑨云硬盘服务Cinder
OpenStack实践系列⑨云硬盘服务Cinder
八、cinder
8.1存储的三大分类
块存储:硬盘,磁盘阵列DAS,SAN存储
文件存储:nfs,GluserFS,Ceph(PB级分布式文件系统),MooserFS(缺点Metadata数据丢失,虚拟机就毁了)
11.2网络类型选择
对象存储:swift,S3
8.2 cinder控制节点的部署
安装cinder
[root@node1 ~]# yum install openstack-cinder python-cinderclient -y
修改cinder配置文件
[default]
rpc_backend = rabbit
glance_host = 192.168.3.199
auth_strategy = keystone
[oslo_concurrency]
lock_path = /var/lib/cinder/tmp
[oslo_messaging_rabbit]
rabbit_host = 192.168.3.199 # rabbitmq的主机
rabbit_port = 5672 # rabbitmq的端口
rabbit_userid = openstack # rabbitmq的用户
rabbit_password = openstack # rabbitmq的密码
[database]
connection = mysql://cinder:cinder@192.168.3.199/cinder # 配置mysql地址
[keystone_authtoken]
auth_uri = http://192.168.3.199:5000
auth_url = http://192.168.3.199:35357
auth_plugin = password
project_domain_id = default
user_domain_id = default
project_name = service
username = cinder
password = cinder
修改后结果如下
[root@node1 cinder]# grep -n '^[a-Z]' /etc/cinder/cinder.conf
421:glance_host = 192.168.3.199
536:auth_strategy = keystone
2294:rpc_backend = rabbit
2516:connection = mysql://cinder:cinder@192.168.3.199/cinder
2641:auth_uri = http://192.168.3.199:5000
2642:auth_url = http://192.168.3.199:35357
2643:auth_plugin = password
2644:project_domain_id = default
2645:user_domain_id = default
2646:project_name = service
2647:username = cinder
2648:password = cinder
2874:lock_path = /var/lib/cinder/tmp
3173:rabbit_host = 192.168.3.199
3177:rabbit_port = 5672
3189:rabbit_userid = openstack
3193:rabbit_password = openstack
修改nova的配置文件
[root@node1 ~]# vim /etc/nova/nova.conf
os_region_name = RegionOne # 通知nova使用cinder [cinder]部分
执行同步数据库操作
[root@node1 ~]# su -s /bin/sh -c "cinder-manage db sync" cinder

检查导入数据库结果
MariaDB [(none)]> use cinder
Database changed
MariaDB [cinder]> show tables;
+----------------------------+
| Tables_in_cinder |
+----------------------------+
| backups |
| cgsnapshots |
| consistencygroups |
| driver_initiator_data |
| encryption |
| image_volume_cache_entries |
| iscsi_targets |
| migrate_version |
| quality_of_service_specs |
| quota_classes |
| quota_usages |
| quotas |
| reservations |
| services |
| snapshot_metadata |
| snapshots |
| transfers |
| volume_admin_metadata |
| volume_attachment |
| volume_glance_metadata |
| volume_metadata |
| volume_type_extra_specs |
| volume_type_projects |
| volume_types |
| volumes |
+----------------------------+
25 rows in set (0.00 sec)
创建一个cinder用户,加入service项目,给予admin角色
[root@node1 ~]# source admin-openrc.sh
[root@node1 ~]# openstack user create --domain default --password-prompt cinder
User Password:
Repeat User Password: # (密码需要配置成cinder就是/etc/cinder/cinder.conf配置文件中配置的2648行)
+-----------+----------------------------------+
| Field | Value |
+-----------+----------------------------------+
| domain_id | default |
| enabled | True |
| id | 420d7573e9fc43b3b263f31bb6dd76e2 |
| name | cinder |
+-----------+----------------------------------+
[root@node1 ~]# openstack role add --project service --user cinder admin
重启nova-api服务和启动cinder服务
[root@node1 ~]# systemctl restart openstack-nova-api.service
[root@node1 ~]# systemctl enable openstack-cinder-api.service openstack-cinder-scheduler.service

[root@node1 ~]# systemctl start openstack-cinder-api.service openstack-cinder-scheduler.service
创建服务(包含V1和V2)
[root@node1 ~]# openstack service create --name cinder --description "OpenStack Block Storage" volume
+-------------+----------------------------------+
| Field | Value |
+-------------+----------------------------------+
| description | OpenStack Block Storage |
| enabled | True |
| id | 6e3b2c3940d14300ab28aed272ade1d3 |
| name | cinder |
| type | volume |
+-------------+----------------------------------+

[root@node1 ~]# openstack service create --name cinderv2 --description "OpenStack Block Storage" volumev2
+-------------+----------------------------------+
| Field | Value |
+-------------+----------------------------------+
| description | OpenStack Block Storage |
| enabled | True |
| id | 2108489d055e4fcb8f9c88fa9d5e4e3d |
| name | cinderv2 |
| type | volumev2 |
+-------------+----------------------------------+
分别对V1和V2创建三个环境(admin,internal,public)的endpoint
[root@node1 ~]# openstack endpoint create --region RegionOne volume public http://192.168.3.199:8776/v1/%\(tenant_id\)s
+--------------+--------------------------------------------+
| Field | Value |
+--------------+--------------------------------------------+
| enabled | True |
| id | 007497468db7456d81157962f8740540 |
| interface | public |
| region | RegionOne |
| region_id | RegionOne |
| service_id | 6e3b2c3940d14300ab28aed272ade1d3 |
| service_name | cinder |
| service_type | volume |
| url | http://192.168.3.199:8776/v1/%(tenant_id)s |
+--------------+--------------------------------------------+

[root@node1 ~]# openstack endpoint create --region RegionOne volume internal http://192.168.3.199:8776/v1/%\(tenant_id\)s
+--------------+--------------------------------------------+
| Field | Value |
+--------------+--------------------------------------------+
| enabled | True |
| id | e7543b96b69342bcabead7ad8a583860 |
| interface | internal |
| region | RegionOne |
| region_id | RegionOne |
| service_id | 6e3b2c3940d14300ab28aed272ade1d3 |
| service_name | cinder |
| service_type | volume |
| url | http://192.168.3.199:8776/v1/%(tenant_id)s |
+--------------+--------------------------------------------+

[root@node1 ~]# openstack endpoint create --region RegionOne volume admin http://192.168.3.199:8776/v1/%\(tenant_id\)s
+--------------+--------------------------------------------+
| Field | Value |
+--------------+--------------------------------------------+
| enabled | True |
| id | 12e4bea586384d43b16e4de5a00afb1b |
| interface | admin |
| region | RegionOne |
| region_id | RegionOne |
| service_id | 6e3b2c3940d14300ab28aed272ade1d3 |
| service_name | cinder |
| service_type | volume |
| url | http://192.168.3.199:8776/v1/%(tenant_id)s |
+--------------+--------------------------------------------+

[root@node1 ~]# openstack endpoint create --region RegionOne volumev2 public http://192.168.3.199:8776/v2/%\(tenant_id\)s
+--------------+--------------------------------------------+
| Field | Value |
+--------------+--------------------------------------------+
| enabled | True |
| id | 07c56b0033454fbda201f3cc58ce0a1b |
| interface | public |
| region | RegionOne |
| region_id | RegionOne |
| service_id | 2108489d055e4fcb8f9c88fa9d5e4e3d |
| service_name | cinderv2 |
| service_type | volumev2 |
| url | http://192.168.3.199:8776/v2/%(tenant_id)s |
+--------------+--------------------------------------------+

[root@node1 ~]# openstack endpoint create --region RegionOne volumev2 internal http://192.168.3.199:8776/v2/%\(tenant_id\)s
+--------------+--------------------------------------------+
| Field | Value |
+--------------+--------------------------------------------+
| enabled | True |
| id | 66b34a18d4de456ab32ebba24831b959 |
| interface | internal |
| region | RegionOne |
| region_id | RegionOne |
| service_id | 2108489d055e4fcb8f9c88fa9d5e4e3d |
| service_name | cinderv2 |
| service_type | volumev2 |
| url | http://192.168.3.199:8776/v2/%(tenant_id)s |
+--------------+--------------------------------------------+

[root@node1 ~]# openstack endpoint create --region RegionOne volumev2 admin http://192.168.3.199:8776/v2/%\(tenant_id\)s
+--------------+--------------------------------------------+
| Field | Value |
+--------------+--------------------------------------------+
| enabled | True |
| id | fc0bed271a7048a5aff7e63aebd0199a |
| interface | admin |
| region | RegionOne |
| region_id | RegionOne |
| service_id | 2108489d055e4fcb8f9c88fa9d5e4e3d |
| service_name | cinderv2 |
| service_type | volumev2 |
| url | http://192.168.3.199:8776/v2/%(tenant_id)s |
+--------------+--------------------------------------------+
8.3 cinder存储节点的部署(此处使用nova的计算节点即node2.chinasoft.com)
本文中cinder后端存储使用ISCSI(类似于nova-computer使用的kvm),ISCSI使用LVM,在定义好的VG中,每创建一个云硬盘,就会增加一个LV,使用ISCSI发布。
在存储节点上加一个硬盘
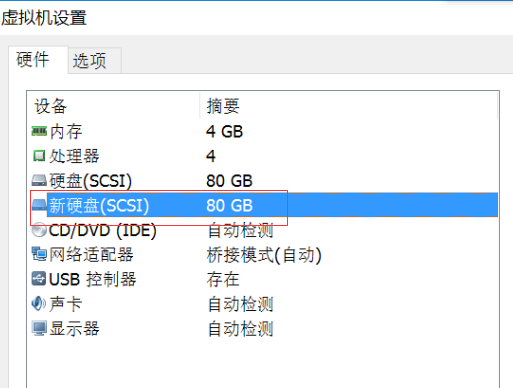
查看磁盘添加情况
[root@node2 ~]# fdisk -l

Disk /dev/sdb: 85.9 GB, 85899345920 bytes, 167772160 sectors
Units = sectors of 1 * 512 = 512 bytes
Sector size (logical/physical): 512 bytes / 512 bytes
I/O size (minimum/optimal): 512 bytes / 512 bytes


Disk /dev/sda: 128.8 GB, 128849018880 bytes, 251658240 sectors
Units = sectors of 1 * 512 = 512 bytes
Sector size (logical/physical): 512 bytes / 512 bytes
I/O size (minimum/optimal): 512 bytes / 512 bytes
Disk label type: dos
Disk identifier: 0x0004c2a9

Device Boot Start End Blocks Id System
/dev/sda1 * 2048 616447 307200 83 Linux
/dev/sda2 616448 155811839 77597696 8e Linux LVM

Disk /dev/mapper/centos-root: 32.2 GB, 32212254720 bytes, 62914560 sectors
Units = sectors of 1 * 512 = 512 bytes
Sector size (logical/physical): 512 bytes / 512 bytes
I/O size (minimum/optimal): 512 bytes / 512 bytes


Disk /dev/mapper/centos-swap: 4294 MB, 4294967296 bytes, 8388608 sectors
Units = sectors of 1 * 512 = 512 bytes
Sector size (logical/physical): 512 bytes / 512 bytes
I/O size (minimum/optimal): 512 bytes / 512 bytes


Disk /dev/mapper/centos-data: 42.9 GB, 42945478656 bytes, 83877888 sectors
Units = sectors of 1 * 512 = 512 bytes
Sector size (logical/physical): 512 bytes / 512 bytes
I/O size (minimum/optimal): 512 bytes / 512 bytes
创建一个pv和vg(名为cinder-volumes)
[root@node2 ~]# pvcreate /dev/sdb
Physical volume "/dev/sdb" successfully created
[root@node2 ~]# vgcreate cinder-volumes /dev/sdb
Volume group "cinder-volumes" successfully created
修改lvm的配置文件中添加filter,只有instance可以访问
[root@node2 ~]# vim /etc/lvm/lvm.conf
131 filter = [ "a/sdb/", "r/.*/"]
存储节点安装
[root@node2 ~]# yum install openstack-cinder targetcli python-oslo-policy -y
修改存储节点的配置文件,在这里直接拷贝控制节点的文件
[root@node1 ~]# scp /etc/cinder/cinder.conf 192.168.3.200:/etc/cinder/
修改存储(即计算节点node2.chinasoft.com)上的/etc/cinder/cinder.conf文件
添加如下配置:
默认没有[lvm]需要自己创建
[lvm]
volume_driver = cinder.volume.drivers.lvm.LVMVolumeDriver # 使用lvm后端存储
volume_group = cinder-volumes # vg的名称:刚才创建的
iscsi_protocol = iscsi # 使用iscsi协议
iscsi_helper = lioadm
[root@node2 cinder]# grep -n '^[a-Z]' /etc/cinder/cinder.conf
421:glance_host = 192.168.3.199
536:auth_strategy = keystone
540:enabled_backends = lvm # lvm 使用的后端是lvm,要对应添加的[lvm],自定义也可以
2294:rpc_backend = rabbit
2516:connection = mysql://cinder:cinder@192.168.3.199/cinder
2641:auth_uri = http://192.168.3.199:5000
2642:auth_url = http://192.168.3.199:35357
2643:auth_plugin = password
2644:project_domain_id = default
2645:user_domain_id = default
2646:project_name = service
2647:username = cinder
2648:password = cinder
2874:lock_path = /var/lib/cinder/tmp
3173:rabbit_host = 192.168.3.199
3177:rabbit_port = 5672
3189:rabbit_userid = openstack
3193:rabbit_password = openstack
[lvm] # 此行不是grep过滤出来的,因为是在配置文件最后添加上的,其对应的是540行的lvm
3416:volume_driver = cinder.volume.drivers.lvm.LVMVolumeDriver # 使用lvm后端存储
3417:volume_group = cinder-volumes # vg的名称:刚才创建的
3418:iscsi_protocol = iscsi # 使用iscsi协议
3419:iscsi_helper = lioadm
启动存储节点的cinder(这里是node2)
[root@node2 cinder]# systemctl enable openstack-cinder-volume.service target.service
Created symlink from /etc/systemd/system/multi-user.target.wants/openstack-cinder-volume.service to /usr/lib/systemd/system/openstack-cinder-volume.service.
Created symlink from /etc/systemd/system/multi-user.target.wants/target.service to /usr/lib/systemd/system/target.service.
[root@node2 cinder]# systemctl start openstack-cinder-volume.service target.service
查看云硬盘服务状态(如果是虚拟机作为宿主机,时间不同步,会产生问题)
[root@node1 ~]# source admin-openrc.sh
[root@node1 ~]# cinder service-list
+------------------+-------------------------+------+---------+-------+----------------------------+-----------------+
| Binary | Host | Zone | Status | State | Updated_at | Disabled Reason |
+------------------+-------------------------+------+---------+-------+----------------------------+-----------------+
| cinder-scheduler | node1.chinasoft.com | nova | enabled | up | 2017-04-28T09:59:54.000000 | - |
| cinder-volume | node2.chinasoft.com@lvm | nova | enabled | up | 2017-04-28T09:59:58.000000 | - |
+------------------+-------------------------+------+---------+-------+----------------------------+-----------------+
创建一个云硬盘,将云硬盘挂载到虚拟机上,启动在虚拟机实例详情可以查看到,云硬盘挂载的情况
具体步骤:
1.创建云硬盘


2.点击 动作选项下的 管理已连接云硬盘,选择需要的虚拟机 将云硬盘挂载到指定的虚拟机上

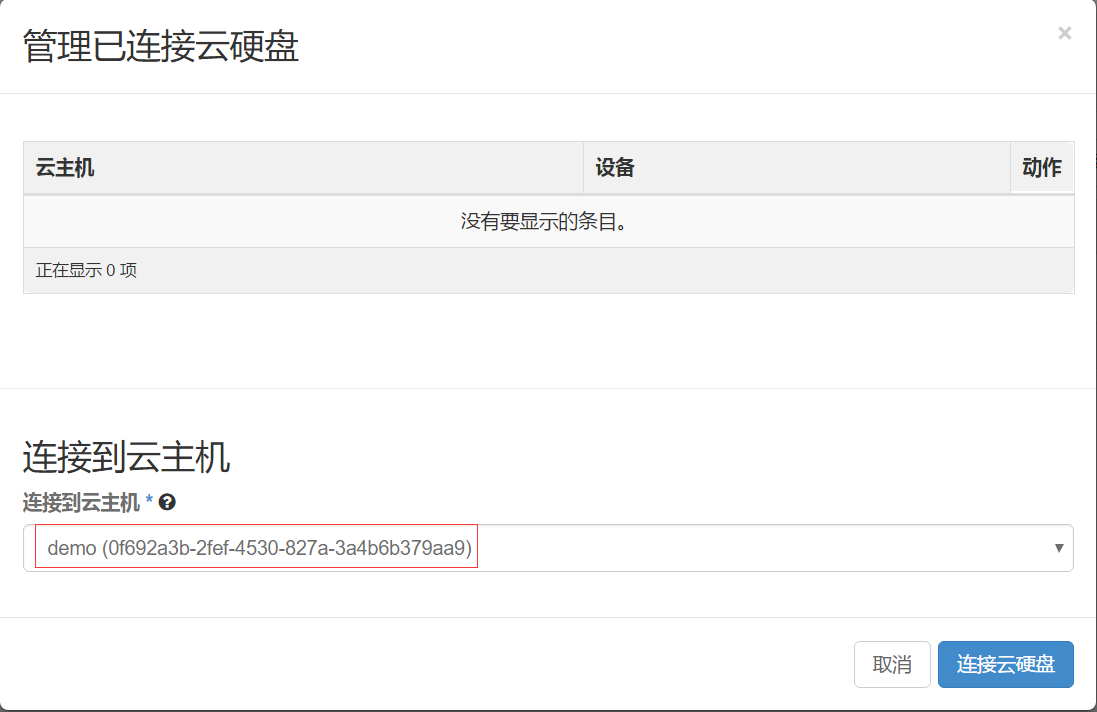

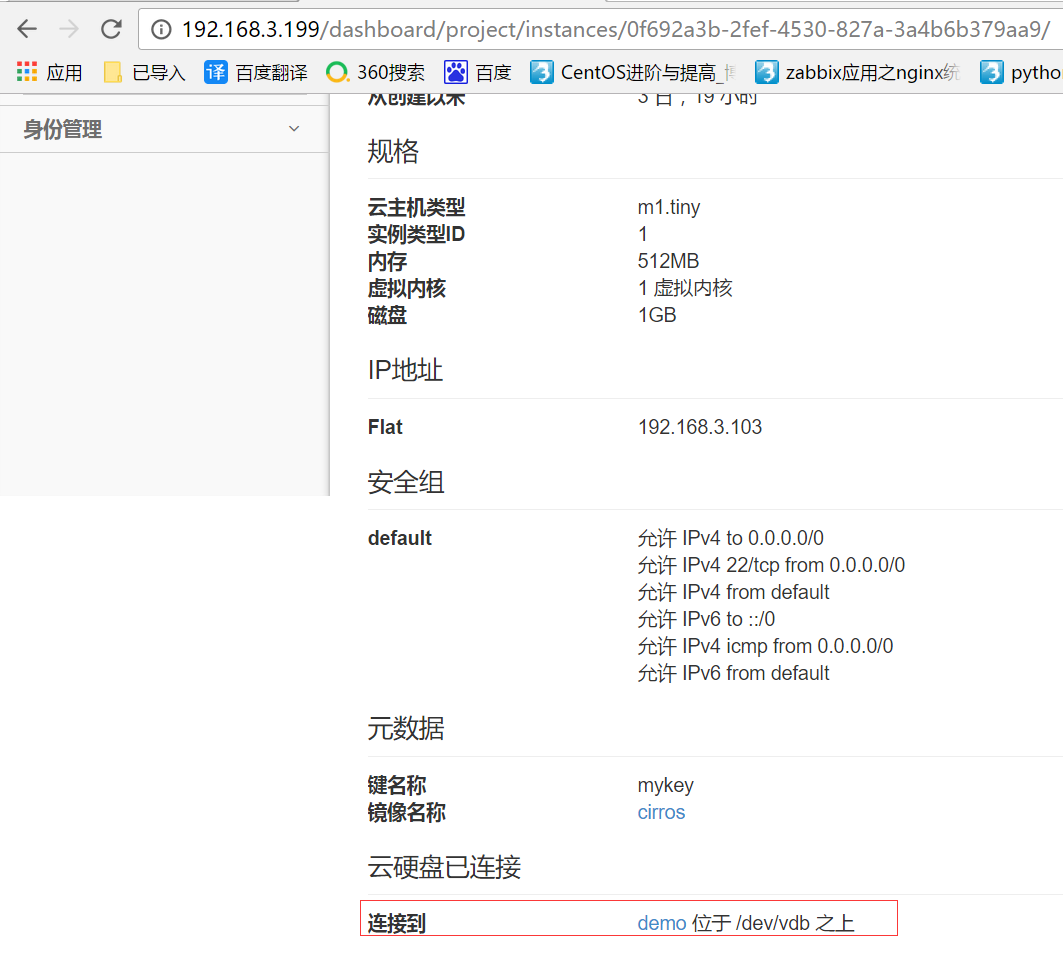
在虚拟机中对挂载的硬盘进行分区格式化,如果有时不想挂载这个云硬盘了,一定不要删掉,生产环境一定要注意,否则虚拟机会出现error,应该使用umont确定卸载了,再使用dashboard进行删除云硬盘
# ssh cirros@192.168.3.103

$ sudo fdisk -l

Disk /dev/vda: 1073 MB, 1073741824 bytes
255 heads, 63 sectors/track, 130 cylinders, total 2097152 sectors
Units = sectors of 1 * 512 = 512 bytes
Sector size (logical/physical): 512 bytes / 512 bytes
I/O size (minimum/optimal): 512 bytes / 512 bytes
Disk identifier: 0x00000000

Device Boot Start End Blocks Id System
/dev/vda1 * 16065 2088449 1036192+ 83 Linux

Disk /dev/vdb: 1073 MB, 1073741824 bytes
16 heads, 63 sectors/track, 2080 cylinders, total 2097152 sectors
Units = sectors of 1 * 512 = 512 bytes
Sector size (logical/physical): 512 bytes / 512 bytes
I/O size (minimum/optimal): 512 bytes / 512 bytes
Disk identifier: 0x00000000

Disk /dev/vdb doesn't contain a valid partition table

# 分区
$ sudo fdisk /dev/vdb
Device contains neither a valid DOS partition table, nor Sun, SGI or OSF disklabel
Building a new DOS disklabel with disk identifier 0x3fecc8a5.
Changes will remain in memory only, until you decide to write them.
After that, of course, the previous content won't be recoverable.

Warning: invalid flag 0x0000 of partition table 4 will be corrected by w(rite)

Command (m for help): n
Partition type:
p primary (0 primary, 0 extended, 4 free)
e extended
Select (default p): p
Partition number (1-4, default 1): 1
First sector (2048-2097151, default 2048):
Using default value 2048
Last sector, +sectors or +size{K,M,G} (2048-2097151, default 2097151):
Using default value 2097151

Command (m for help): w
The partition table has been altered!

Calling ioctl() to re-read partition table.
Syncing disks.

查看分区,已经生成了新的分区/dev/vdb
$ sudo fdisk -l

Disk /dev/vda: 1073 MB, 1073741824 bytes
255 heads, 63 sectors/track, 130 cylinders, total 2097152 sectors
Units = sectors of 1 * 512 = 512 bytes
Sector size (logical/physical): 512 bytes / 512 bytes
I/O size (minimum/optimal): 512 bytes / 512 bytes
Disk identifier: 0x00000000

Device Boot Start End Blocks Id System
/dev/vda1 * 16065 2088449 1036192+ 83 Linux

Disk /dev/vdb: 1073 MB, 1073741824 bytes
9 heads, 8 sectors/track, 29127 cylinders, total 2097152 sectors
Units = sectors of 1 * 512 = 512 bytes
Sector size (logical/physical): 512 bytes / 512 bytes
I/O size (minimum/optimal): 512 bytes / 512 bytes
Disk identifier: 0xfaacdc93

Device Boot Start End Blocks Id System
/dev/vdb1 2048 2097151 1047552 83 Linux


# 格式化
$ sudo mkfs.ext4 /dev/vdb1
mke2fs 1.42.2 (27-Mar-2012)
Filesystem label=
OS type: Linux
Block size=4096 (log=2)
Fragment size=4096 (log=2)
Stride=0 blocks, Stripe width=0 blocks
65536 inodes, 261888 blocks
13094 blocks (5.00%) reserved for the super user
First data block=0
Maximum filesystem blocks=268435456
8 block groups
32768 blocks per group, 32768 fragments per group
8192 inodes per group
Superblock backups stored on blocks:
32768, 98304, 163840, 229376

Allocating group tables: done
Writing inode tables: done
Creating journal (4096 blocks): done
Writing superblocks and filesystem accounting information: done

# 挂载
$ sudo mkdir /data
$ sudo mount /dev/vdb1 /data

$ df -h
Filesystem Size Used Available Use% Mounted on
/dev 242.3M 0 242.3M 0% /dev
/dev/vda1 23.2M 18.0M 4.0M 82% /
tmpfs 245.8M 0 245.8M 0% /dev/shm
tmpfs 200.0K 72.0K 128.0K 36% /run
/dev/vdb1 1006.9M 17.3M 938.5M 2% /data
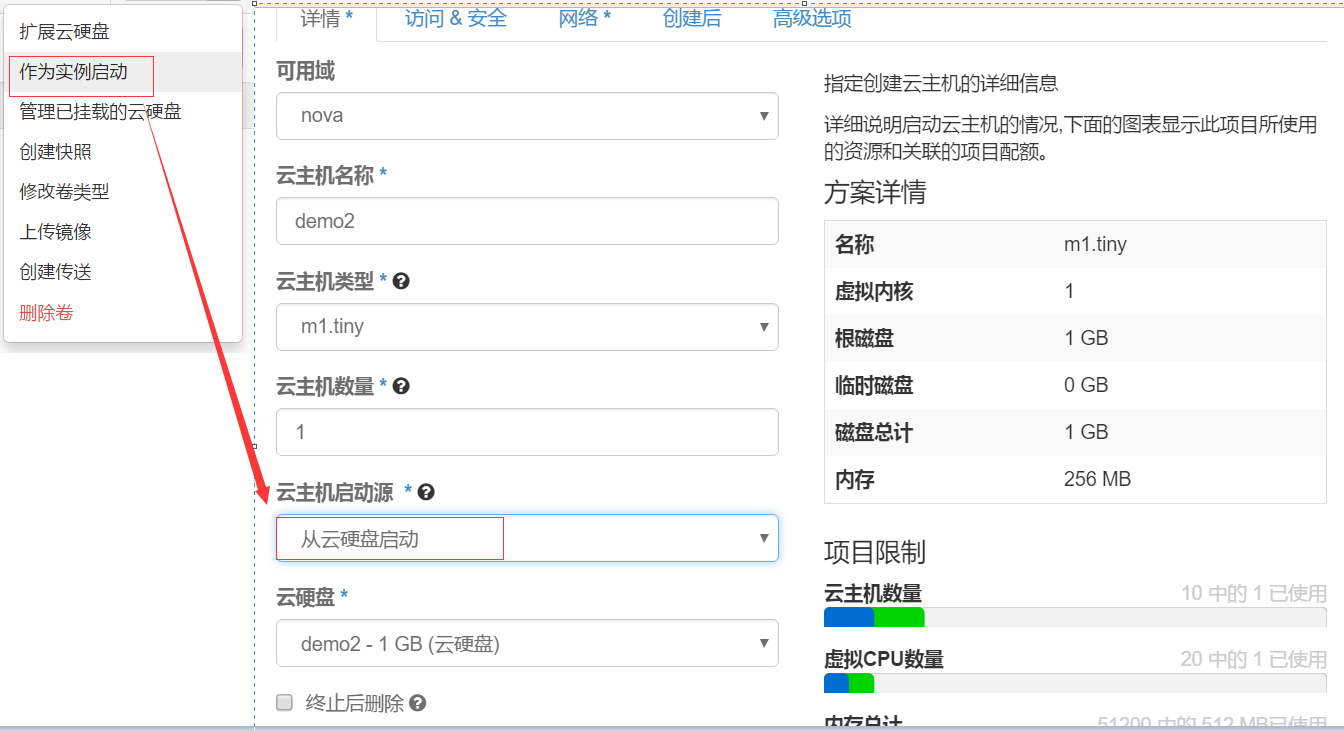
方法二:从云硬盘启动虚拟机
①先创建一个demo2的云硬盘

②动作-作为实例启动
九、虚拟机创建流程:
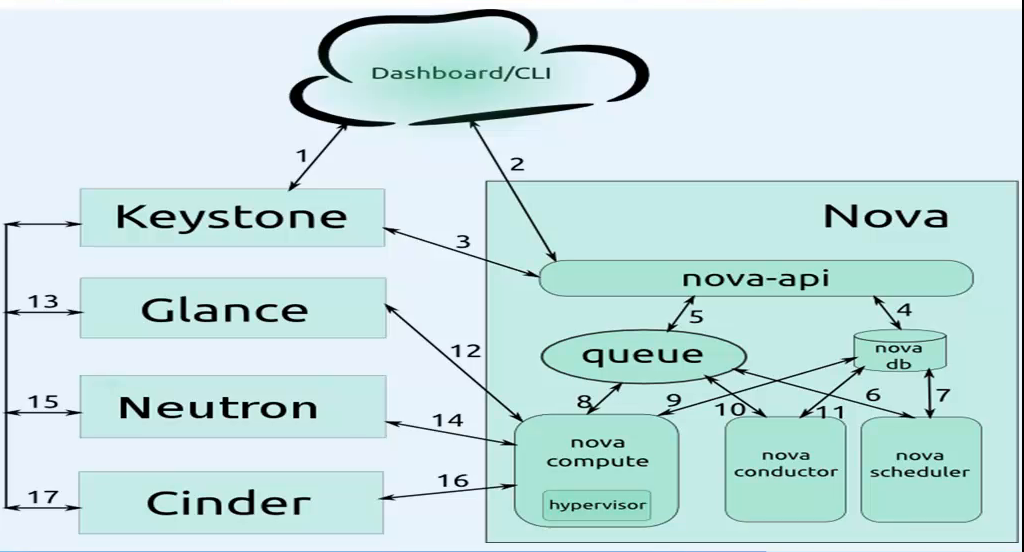
第一阶段:用户操作
1)用户使用Dashboard或者CLI连接keystone,发送用户名和密码,待keystone验证通过,keystone会返回给dashboard一个authtoken
2)Dashboard会带着上述的authtoken访问nova-api进行创建虚拟机请求
3)nova-api会通过keytoken确认dashboard的authtoken认证消息。
第二阶段:nova内组件交互阶段
4)nova-api把用户要创建的虚拟机的信息记录到数据库中.
5)nova-api使用rpc-call的方式发送请求给消息队列
6)nova-scheduler获取消息队列中的消息
7)nova-scheduler和查看数据库中要创建的虚拟机信息和计算节点的信息,进行调度
8)nova-scheduler把调度后的信息发送给消息队列
9)nova-computer获取nova-schedur发送给queue的消息
10)nova-computer通过消息队列发送消息给nova-conudctor,想要获取数据库中的要创建虚拟机信息
11)nova-conductor获取消息队列的消息
12)nova-conductor读取数据库中要创建虚拟机的信息
13)nova-conductor把从数据库获取的消息返回给消息队列
14)nova-computer获取nova-conducter返回给消息队列的信息
第三阶段:nova和其他组件进行交互
15)nova-computer通过authtoken和数据库返回的镜像id请求glance服务
16)glance会通过keystone进行认证
17)glance验证通过后把镜像返回给nova-computer
18)nova-computer通过authtoken和数据库返回的网络id请求neutron服务
19)neutron会通过keystone进行认证
20)neutron验证通过后把网络分配情况返回给nova-computer
21)nova-computer通过authtoken和数据库返回的云硬盘请求cinder服务
22)cinder会通过keystone进行认证
23)cinder验证通过后把云硬盘分配情况返回给nova-computer
第四阶段:nova创建虚拟机
24)nova-compute通过libvirt调用kvm根据已有的信息创建虚拟机,动态生成xml
25)nova-api会不断的在数据库中查询信息并在dashboard显示虚拟机的状态
生产场景注意事项:
1、新加的一个计算节点,创建虚拟机时间会很长,因为第一次使用计算节点,没有镜像,计算节点要把glance的镜像放在后端文件(/var/lib/nova/instance/_base)下,
镜像如果很大,自然会需要很长时间,然后才会在后端文件的基础上创建虚拟机(写时复制copy on write)。
2、创建虚拟机失败的原因之一:创建网桥失败。要保证eth0网卡配置文件的BOOTPROTE是static而不是dhcp状态。


【推荐】国内首个AI IDE,深度理解中文开发场景,立即下载体验Trae
【推荐】编程新体验,更懂你的AI,立即体验豆包MarsCode编程助手
【推荐】抖音旗下AI助手豆包,你的智能百科全书,全免费不限次数
【推荐】轻量又高性能的 SSH 工具 IShell:AI 加持,快人一步
· 基于Microsoft.Extensions.AI核心库实现RAG应用
· Linux系列:如何用heaptrack跟踪.NET程序的非托管内存泄露
· 开发者必知的日志记录最佳实践
· SQL Server 2025 AI相关能力初探
· Linux系列:如何用 C#调用 C方法造成内存泄露
· 震惊!C++程序真的从main开始吗?99%的程序员都答错了
· 【硬核科普】Trae如何「偷看」你的代码?零基础破解AI编程运行原理
· 单元测试从入门到精通
· 上周热点回顾(3.3-3.9)
· winform 绘制太阳,地球,月球 运作规律