centos7环境配置haproxy实现mysql数据库和redis代理服务器
centos7环境配置haproxy实现mysql数据库代理
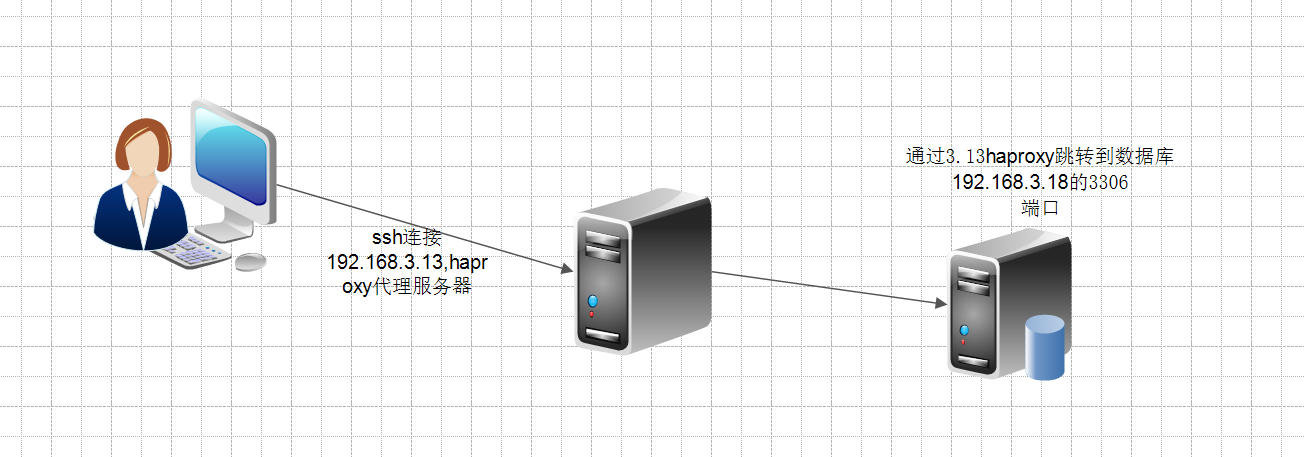
我们通常会碰到这样的业务场景:
b主机和c数据库在同一个内网,a主机不能直接访问c数据库,我们可以通过在b主机上搭建代理让a访问c数据库,我们使用haproxy来干这个事情
安装haproxy
yum install -y haproxy
配置haproxy:
vim /etc/haproxy/haproxy.cfg
global
log 127.0.0.1 local2
chroot /var/lib/haproxy
pidfile /var/run/haproxy.pid
maxconn 4000
user haproxy
group haproxy
daemon
stats socket /var/lib/haproxy/stats
defaults
log global
log 127.0.0.1 local3
mode http
option tcplog
option dontlognull
retries 10
option redispatch
maxconn 2000
timeout connect 5000
timeout client 50000
timeout server 50000
listen mysql
bind 0.0.0.0:7306
mode tcp
balance roundrobin
server mysql1 192.168.3.18:3306
CentOS 7上yum安装的Haproxy,默认没有记录日志。需要做一下配置才能记录日志。
1.创建日志文件/var/log/haproxy/haproxy.log
cd /var/log
mkdir haproxy
cd haproxy
touch haproxy.log
chmod a+w haproxy.log
2.开启rsyslog的haproxy日志记录功能
编辑vim /etc/rsyslog.conf文件,将
$ModLoad imudp
$UDPServerRun 514
local7.* /var/log/boot.log
之后添加
# Save haproxy log
local2.* /var/log/haproxy/haproxy.log
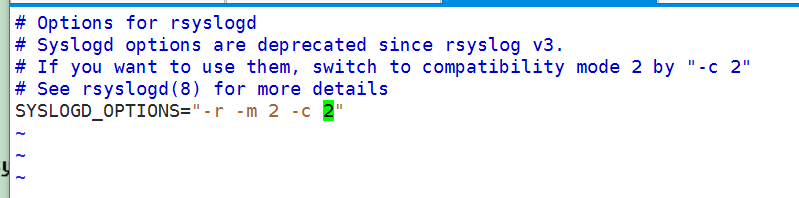
修改vim /etc/sysconfig/rsyslog 文件,将
SYSLOGD_OPTIONS=""
改为
SYSLOGD_OPTIONS="-r -m 2 -c 2"
3.配置haproxy
修改/etc/haproxy/haproxy.cfg文件,在global区段添加
log 127.0.0.1 local2
重启rsyslog和haproxy服务,haproxy就能记录日志了。
systemctl restart rsyslog
我们通常会碰到这样的业务场景:
b主机和c数据库在同一个内网,a主机不能直接访问c数据库,我们可以通过在b主机上搭建代理让a访问c数据库,我们使用haproxy来干这个事情
安装haproxy
yum install -y haproxy
配置haproxy:
vim /etc/haproxy/haproxy.cfg
global
log 127.0.0.1 local2
chroot /var/lib/haproxy
pidfile /var/run/haproxy.pid
maxconn 4000
user haproxy
group haproxy
daemon
stats socket /var/lib/haproxy/stats
defaults
log global
log 127.0.0.1 local3
mode http
option tcplog
option dontlognull
retries 10
option redispatch
maxconn 2000
timeout connect 5000
timeout client 50000
timeout server 50000
listen mysql
bind 0.0.0.0:7306
mode tcp
balance roundrobin
server mysql1 192.168.3.18:3306
CentOS 7上yum安装的Haproxy,默认没有记录日志。需要做一下配置才能记录日志。
1.创建日志文件/var/log/haproxy/haproxy.log
cd /var/log
mkdir haproxy
cd haproxy
touch haproxy.log
chmod a+w haproxy.log
2.开启rsyslog的haproxy日志记录功能
编辑vim /etc/rsyslog.conf文件,将
$ModLoad imudp
$UDPServerRun 514
两行前的#去掉。
local7.* /var/log/boot.log
之后添加
# Save haproxy log
local2.* /var/log/haproxy/haproxy.log
修改vim /etc/sysconfig/rsyslog 文件,将
SYSLOGD_OPTIONS=""
改为
SYSLOGD_OPTIONS="-r -m 2 -c 2"
3.配置haproxy
修改/etc/haproxy/haproxy.cfg文件,在global区段添加
log 127.0.0.1 local2
重启rsyslog和haproxy服务,haproxy就能记录日志了。
systemctl restart rsyslog
systemctl restart haproxy
测试
报错:
Stopping haproxy: [ OK ]
Starting haproxy: [WARNING] 313/111853 (29445) : parsing [/etc/haproxy/haproxy.cfg:17] : 'option httplog' not usable with proxy 'mysql' (needs 'mode http'). Falling back to 'option tcplog'.
将haproxy.cfg的httplog改为tcplog即可
可能报错:com.mysql.jdbc.exceptions.jdbc4.CommunicationsException: Communications link failure The last packet successfully received from the server was 50,158 milliseconds ago. The last packet sent successfully to the server was 50,157 milliseconds ago
参数可以适当调整:
timeout connect 500000
timeout client 500000
timeout server 500000
连接redis的配置,centos6.5
global
        maxconn 2
#       debug
        quiet
        user haproxy
        group haproxy
        nbproc 1
        log 127.0.0.1 local3
defaults
        timeout server  3s
        timeout connect 3s
        timeout client 60s
        timeout http-request 3s
        timeout queue 3s
frontend redis_read
        bind 0.0.0.0:7736
        default_backend cluster_redis
backend cluster_redis
        mode tcp
        option tcpka
        balance static-rr
        option httpchk
        server  redis_01        192.168.1.1:6379    weight 1
直接通过RedisDesktopManager工具连接redis即可
反向代理ssh 远程连接的配置
###########全局配置#########

global

daemon  #以后台形式运行harpoxy

nbproc 1  #设置进程数量

pidfile /usr/local/haproxy/conf/haproxy.pid  #进程PID文件


########默认配置############

defaults

    mode tcp   #设置HAProxy默认的工作模式,有tcp,http,health三种

    retries 2   #两次连接失败就认为是服务器不可用,也可以通过后面设置

    option redispatch #当serverId对应的服务器挂掉后,强制定向到其他健康的服务器,以后将不支持

    option abortonclose  #当服务器负载很高的时候,自动结束掉当前队列处理比较久的链接

    timeout connect 50000ms  #连接超时

    timeout client 300000ms   #客户端超时

    timeout server 300000ms  #服务器超时

    timeout check 5000      #心跳检测超时

    log 127.0.0.1 local0 err

listen http_front #haproxy的客户页面
  bind 0.0.0.0:1888
  mode http
  option httplog
  stats uri /haproxy
  stats auth admin:admin2022
  stats refresh 5s
  stats enable

########统计页面配置########

listen test1   #这里是配置负载均衡,test1是名字,可以任意
   option forwardfor
    bind 0.0.0.0:12348  #这里是监听的IP地址和端口,端口号可以在0-65535之间,要避免端口冲突
    mode tcp  #连接的协议,这里是tcp协议
    server s1  172.24.12.43:22

 浙公网安备 33010602011771号