sftp服务器高可用配置指引
目录
【3】配置keepalived + nginx 高可用和负载均衡
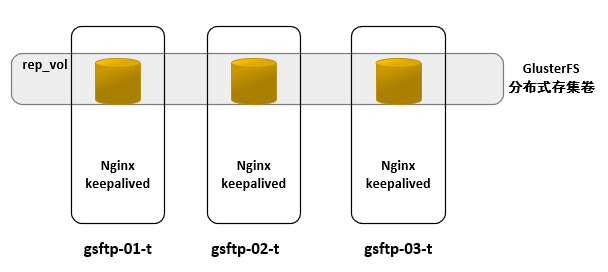
本配置指引,采用3节点,用到的软件有:glusterfs、nginx、keepalived 。
拓扑图如下:

gsftp-01-t    10.10.16.171
gsftp-02-t	10.10.16.172
gsftp-03-t	10.10.16.173

keepalived vip: 10.10.16.170
2.1 添加glusterfs yum源
#cat glusterfs.repo
[glusterfs]
name=glusterfs
baseurl = https://mirrors.tuna.tsinghua.edu.cn/centos/7/storage/x86_64/gluster-6/
enabled=1
gpgcheck=0
2.2 配置hosts解析
#cat /etc/hosts
10.10.16.171   gsftp-01-t
10.10.16.172   gsftp-02-t
10.10.16.173   gsftp-03-t
2.3 配置免密登陆
# ssh-keygen -t rsa				#一直3次回车就可以了
# ssh-copy-id root@gsftp-01-t
# ssh-copy-id root@gsftp-02-t
# ssh-copy-id root@gsftp-03-t
2个节点都要执行一下以上命令,再用ssh gsftp-01-t 和 ssh gsftp-02-t、ssh gsftp-03-t登陆测试,确保不要弹出密码就可以登陆。
2.4 安装glusterfs服务
# yum install glusterfs-server glusterfs-fuse
启动glusterd服务
# systemctl start glusterd
# systemctl enable glusterd
# systemctl status glusterd
2.5 配置glusterfs复制卷
#mkdir /data/brick/rep_vol -p #创建复制卷目录,3个节点都要执行
创建glusterfs群集
# gluster peer probe gsftp-02-t
peer probe: success.

# gluster peer status			#查看群集状态
Number of Peers: 1
Hostname: gsftp-02-t
Uuid: a4c6c741-950b-4408-8666-2ce6c4d3e820
State: Peer in Cluster (Connected)

# gluster volume help			#查看帮助

# gluster volume create rep_vol replica 3 transport tcp \
> gsftp-01-t:/data/brick/rep_vol \
> gsftp-02-t:/data/brick/rep_vol \
> gsftp-03-t:/data/brick/rep_vol \
> force
volume create: rep_vol: success: please start the volume to access data
默认情况下,需要3个条带,防止脑裂,测试环境,可以用到 2个条带,但后面要跟force参数;
#gluster volume set rep_vol network.ping-timeout 10      #默认是42秒,当某个节点出故障了,为了加快客户端切换到备用节点

#gluster volume start rep_vol		          #启动复制卷
#gluster volume info		               #查看卷的信息
Volume Name: rep_vol
Type: Replicate
Volume ID: 4872157a-cccf-47cc-b4db-dd8271851402
Status: Started
Snapshot Count: 0
Number of Bricks: 1 x 3 = 3
Transport-type: tcp
Bricks:
Brick1: gsftp-01-t:/data/brick/rep_vol
Brick2: gsftp-02-t:/data/brick/rep_vol
Brick3: gsftp-03-t:/data/brick/rep_vol
Options Reconfigured:
transport.address-family: inet
nfs.disable: on
performance.client-io-threads: off

#gluster volume status				#查看卷的状态
Status of volume: rep_vol
Gluster process                             TCP Port  RDMA Port  Online  Pid
------------------------------------------------------------------------------
Brick gsftp-01-t:/data/brick/rep_vol        49152     0          Y       10594
Brick gsftp-02-t:/data/brick/rep_vol        49152     0          Y       10548
Brick gsftp-03-t:/data/brick/rep_vol        49152     0          Y       10537
Self-heal Daemon on localhost               N/A       N/A        Y       10615
Self-heal Daemon on gsftp-02-t              N/A       N/A        Y       10569
Self-heal Daemon on gsftp-03-t              N/A       N/A        Y       10541

Task Status of Volume rep_vol
------------------------------------------------------------------------------
There are no active volume tasks
配置完了后,因为是3节点,每个节点自己挂载自己.
#mkdir /data/sftp
#mount -t glusterfs gsftp-01-t,gsftp-02-t,gsftp-03-t:rep_vol /data/sftp
#df -h
gsftp-01-t:rep_vol        200G  2.1G  198G   2% /data/sftp
节点1上的挂载配置,节点2就是:
#mount -t glusterfs gsftp-02-t,gsftp-03-t,gsftp-01-t:rep_vol /data/sftp
节点3就是:
#mount -t glusterfs gsftp-03-t,gsftp-02-t,gsftp-01-t:rep_vol /data/sftp
并把挂载配置写入:/etc/rc.local 文件开机自启动中。
#vim /etc/rc.local
/usr/bin/mount -t glusterfs gsftp-01-t,gsftp-02-t,gsftp-03-t:rep_vol /data/sftp
#chmod +x /etc/rc.local
以上glusterfs复制卷配置与挂载完毕!
【3】配置keepalived + nginx 高可用和负载均衡
首先需要配置CentOS 镜像源和epel源;
#yum install nginx nginx-mod-stream
#yum install keepalived
nginx 配置文件:
#cat nginx.conf           #3个节点的配置都一样
user nginx;
worker_processes auto;
error_log /var/log/nginx/error.log;
pid /run/nginx.pid;

include /usr/share/nginx/modules/*.conf;

events {
    worker_connections 1024;
}

stream {
  upstream sftpService {
    hash $remote_addr consistent;
    server gsftp-01-t:22 max_fails=3 fail_timeout=5;
    server gsftp-02-t:22 max_fails=3 fail_timeout=5;
	server gsftp-03-t:22 max_fails=3 fail_timeout=5;
  }
  server {
    listen 2211;
    proxy_pass sftpService;
  }
}
keepalived的配置文件(3个节点内容不一致):
#cat keepalived.conf
global_defs {
  router_id 10.10.16.171              #标识id,通常为 hostname,或者当前部署机器的IP,根据机器实际配置
}

vrrp_script chk_nginx {
  script "/etc/keepalived/nginx_check.sh"
  interval 3                            #(检测脚本执行的间隔/秒)
  weight 20                             #执行sh后,修改当前服务器权重
}

vrrp_instance VI_1 {
  state MASTER                        #设置为主服务器,备用服务器应设置为BACKUP
  interface ens192                      #定义虚拟ip绑定接口  ifconfig命令查询
  virtual_router_id 51                #VRRP组名,两个节点必须一样,指明各个节点属于同一VRRP组
  priority 100                        #优先级,主节点必须高于从节点,从节点可以配置为 90
  advert_int 1                        #组播信息发送间隔,检测nginx状态,两个节点设置必须一样
  authentication {                    #认证,默认即可。主从需一致。
	auth_type PASS
	auth_pass 1111
  }
  track_script {
    chk_nginx
  }
  virtual_ipaddress {
    10.10.16.170               		#绑定的虚拟ip,可以绑定多个,换行填写
  }
}
keepalived nginx_check.sh 文件(3个节点内容一致):
#cat nginx_check.sh
#!/bin/bash
res=`ps -C nginx --no-header |wc -l`
if [ $res -eq 0 -o $res -eq 1 ];then
    systemctl start nginx.service
    sleep 5
    res=`ps -C nginx --no-header |wc -l`
    if [ $res -eq 0 -o $res -eq 1 ];then
        systemctl stop keepalived.service
    fi
fi
sshd_config文件配置:
#cat /etc/ssh/sshd_config
#Subsystem	sftp	/usr/libexec/openssh/sftp-server   #注释掉这一行,增加以下6行至行尾,2个节点都要配置

Subsystem sftp internal-sftp
Match Group sftpgroup
ChrootDirectory /data/sftp/%u
ForceCommand internal-sftp
AllowTcpForwarding no
X11Forwarding no
以上sshd_config文件传给其它2个节点,并重启sshd服务:
#systemctl restart sshd
创建目录并授权:
#chown -R root:root /data/sftp  #用于存储sftp登陆用户的文件,保证/data 和 /data/sftp的属主和属组都是root
#groupadd sftpgroup 			#创建sftpgroup组
以下是创建sftp普通用户:
#useradd -g sftpgroup -d /data/sftp/momo -s /sbin/nologin momo
#echo '123456'|passwd --stdin momo

#chown root:sftpgroup /data/sftp/momo
#chmod 755 /data/sftp/momo

#mkdir /data/sftp/momo/upload
#chown momo /data/sftp/momo/upload
#chmod 7777 /data/sftp/momo/home
如果需要一个管理员账户,用于查看所有sftp用户的上传的资料,可以把管理员用户的家目录设置为:
#useradd -g sftpgroup -G root -s /sbin/nologin admin
#usermod -d /data/sftp/  admin
#echo '123456' |passwd --stdin admin
以后创建sftp普通用户就可以用bash脚本实现:
#cat sftpuseradd.sh
#!/bin/bash
if [ -z "$2" ];then
  pwd="test$890"
else
  pwd=$2
fi

useradd -g sftpgroup -d /data/sftp/$1 -s /sbin/nologin $1
echo $pwd | passwd --stdin $1

chown root:sftpgroup /data/sftp/$1
chmod 755 /data/sftp/$1
mkdir /data/sftp/$1/upload
chown $1 /data/sftp/$1/upload
chmod 777 /data/sftp/$1/upload

scp /etc/passwd /etc/group /etc/shadow gsftp-02-t:/etc
scp /etc/passwd /etc/group /etc/shadow gsftp-03-t:/etc


 浙公网安备 33010602011771号