

Swagger UI 与SpringMVC的整合
关于 Swagger
Swagger能成为最受欢迎的REST APIs文档生成工具之一,有以下几个原因:
- Swagger 可以生成一个具有互动性的API控制台,开发者可以用来快速学习和尝试API。
- Swagger 可以生成客户端SDK代码用于各种不同的平台上的实现。
- Swagger 文件可以在许多不同的平台上从代码注释中自动生成。
- Swagger 有一个强大的社区,里面有许多强悍的贡献者。
Swagger 文档提供了一个方法,使我们可以用指定的 JSON 或者 YAML 摘要来描述你的 API,包括了比如 names、order 等 API 信息。
你可以通过一个文本编辑器来编辑 Swagger 文件,或者你也可以从你的代码注释中自动生成。各种工具都可以使用 Swagger 文件来生成互动的 API 文档。
Swagger 、SwaggerUI与SpringMVC的整合
1.Maven引入
<dependency>
    <groupId>javax.servlet</groupId>
    <artifactId>javax.servlet-api</artifactId>
    <version>3.1.0</version>
    <scope>provided</scope>
</dependency>
<dependency>
    <groupId>io.springfox</groupId>
    <artifactId>springfox-swagger2</artifactId>
    <version>2.5.0</version>
</dependency>
<dependency>
    <groupId>io.springfox</groupId>
    <artifactId>springfox-swagger-ui</artifactId>
    <version>2.5.0</version>
</dependency>
<dependency>
    <groupId>io.springfox</groupId>
    <artifactId>springfox-staticdocs</artifactId>
    <version>2.5.0</version>
</dependency>
<dependency>
    <groupId>org.hibernate</groupId>
    <artifactId>hibernate-validator</artifactId>
    <version>5.2.4.Final</version>
</dependency>
2.配置webconfig.xml
将 DispatcherServlet 的 url-pattern 改为 /
<servlet>
    <servlet-name>springMvc</servlet-name>
    <servlet-class>org.springframework.web.servlet.DispatcherServlet</servlet-class>
    <init-param>
      <param-name>contextConfigLocation</param-name>
      <param-value>classpath:spring-mvc.xml</param-value>
    </init-param>
    <load-on-startup>1</load-on-startup>
  </servlet>
  <servlet-mapping>
    <servlet-name>springMvc</servlet-name>
    <url-pattern>/</url-pattern>
  </servlet-mapping>
3.在spring-mvc.xml中添加自动扫描
<mvc:annotation-driven  />

    <!-- 自动扫描(自动注入) -->
     <context:component-scan base-package="com.xhl.swagger.api"/>
     <mvc:default-servlet-handler/>
4.新建Swagger配置类
import org.springframework.context.annotation.Bean;
import org.springframework.context.annotation.Configuration;
import org.springframework.web.servlet.config.annotation.ResourceHandlerRegistry;
import org.springframework.web.servlet.config.annotation.WebMvcConfigurerAdapter;

import com.google.common.base.Predicates;

import springfox.documentation.builders.RequestHandlerSelectors;
import springfox.documentation.spi.DocumentationType;
import springfox.documentation.spring.web.plugins.Docket;
import springfox.documentation.swagger2.annotations.EnableSwagger2;

@Configuration
@EnableSwagger2
public class SwaggerConfig extends WebMvcConfigurerAdapter {

     @Bean
        public Docket api() {
            return new Docket(DocumentationType.SWAGGER_2).select()
                    .apis(Predicates.not(RequestHandlerSelectors.basePackage("org.springframework.boot")))
                    .build();
        }

        @Override
        public void addResourceHandlers(ResourceHandlerRegistry registry)
        {
            registry.addResourceHandler("swagger-ui.html").addResourceLocations("classpath:/META-INF/resources/");
            registry.addResourceHandler("/webjars/**").addResourceLocations("classpath:/META-INF/resources/webjars/");
        }
}
5.建测试的Controller和常量
public interface Constants {
    /****** 系统标识符 开始 *********/
    /**
    * 错误 描述
    */
    String MSG_ERROR = "error";
    /**
    * 成功 描述
    */
    String MSG_SUCCESS = "OK";

    /****** 系统状态码 开始 ******/
    /**
    * 请求失败
    */
    int ERROR = 100;
    /**
    * 请求成功
    */
    int SUCCESS = 200;
}
import java.io.Serializable;

import com.fasterxml.jackson.annotation.JsonInclude;

import io.swagger.annotations.ApiModel;
import io.swagger.annotations.ApiModelProperty;

@ApiModel
@JsonInclude(JsonInclude.Include.NON_NULL)
public class Result<T> implements Serializable {

    private static final long serialVersionUID = 1L;

    /** 正常状态为0或200 **/
    @ApiModelProperty(value = "状态代码", name = "状态代码")
    private int code;

    /** 是code异常时,返回的错误信息(app直接显示) **/
    @ApiModelProperty(value = "错误码描述", name = "错误码描述")
    private String message;

    /** 返回的数据对象 **/
    @ApiModelProperty(value = "数据对象", name = "数据对象")
    private T data;

    /** 是code正常时的提示(不为空,app直接展示) **/
    @ApiModelProperty(value = "code正常时的提示信息", name = "code正常时的提示信息")
    private String toast = "";

    /** response中允许 空值,不允许 NULL值出现 **/
    @ApiModelProperty(value = "响应流信息", name = "响应流信息")
    private String response = "";

    public Result() {
    }

    public Result(int code,String message) {
        this.code = code;
        this.message = message;
    }

    public Result(int code,String message,T data) {
        this.code = code;
        this.message = message;
        this.data = data;
    }

    public Result(int code,String message,T data,String toast,String response) {
        this.code = code;
        this.message = message;
        this.data = data;
        this.toast = toast;
        this.response = response;
    }

    public int getCode() {
        return code;
    }

    public void setCode(int code) {
        this.code = code;
    }

    public String getMessage() {
        return message;
    }

    public void setMessage(String message) {
        this.message = message;
    }

    public T getData() {
        return data;
    }

    public void setData(T data) {
        this.data = data;
    }

    public String getToast() {
        return toast;
    }

    public void setToast(String toast) {
        this.toast = toast;
    }

    public String getResponse() {
        return response;
    }

    public void setResponse(String response) {
        this.response = response;
    }
   @Override
    public String toString() {
        return "Result{" +
                "code=" + code +
                ", message='" + message + '\'' +
                ", data=" + data + '\'' +
                ", toast=" + toast + '\'' +
                ", response=" + response +
                '}';
    }
}
@ApiModel(value = "用户信息")
public class UserVo {
    @ApiModelProperty(value = "用户id", required = true)
    private String userId;
    @ApiModelProperty(value = "昵称", required = true)
    private String userName;
    public String getUserId() {
        return userId;
    }
    public void setUserId(String userId) {
        this.userId = userId;
    }
    public String getUserName() {
        return userName;
    }
    public void setUserName(String userName) {
        this.userName = userName;
    }
}
import org.springframework.web.bind.annotation.RequestMapping;
import org.springframework.web.bind.annotation.RequestMethod;
import org.springframework.web.bind.annotation.RequestParam;
import org.springframework.web.bind.annotation.RestController;

import com.qdingnet.pcloud.api.common.utils.StringUtils;
import com.qdingnet.pcloud.api.swagger.constants.Constants;
import com.qdingnet.pcloud.api.swagger.constants.Result;
import com.qdingnet.pcloud.api.swagger.vo.UserVo;

import io.swagger.annotations.ApiOperation;
import io.swagger.annotations.ApiParam;

@RestController
@RequestMapping("/api/json/user")
public class SwaggerController {


    @RequestMapping(value = "/add", method = RequestMethod.POST)
    @ApiOperation(value = "添加用户", notes = "增加用户")
    public Result<UserVo> add(@ApiParam(name = "token", value = "token",required = true) @RequestParam(name = "token", required = true) String token,
                              @ApiParam(name = "userName",value = "用户昵称",required = true)@RequestParam(name = "userName",required = true)String userName,
                              @ApiParam(name = "mobile",value = "手机",required = true)@RequestParam(name = "mobile",required = true)String mobile,
                              @ApiParam(required = true, name = "email", value = "邮箱") @RequestParam(name = "email", required = true) String email ) {
        UserVo userVo = new UserVo();
        userVo.setUserId(StringUtils.getUUID());
        userVo.setUserName(userName);
        return new Result<UserVo>(Constants.SUCCESS,Constants.MSG_SUCCESS,userVo);
    }

    @RequestMapping(value = "/getUser", method = RequestMethod.GET)
    @ApiOperation(value = "测试获取用户", notes = "测试获取用户")
    public Result<UserVo> getUser() {
        UserVo userVo = new UserVo();
        userVo.setUserId(StringUtils.getUUID());
        userVo.setUserName("测试获取用户");
        return new Result<UserVo>(Constants.SUCCESS,Constants.MSG_SUCCESS,userVo);
    }
}
6.测试运行
首先通过:http://localhost:8080/工程名/api/json/user/getUser.do 可以访问:
{"code":200,"message":"OK","data":{"userId":"d1239dc4e4164662af754c64e42762cd","userName":"测试获取用户"},"toast":"","response":""}
其次通过:http://localhost:8080/工程名/v2/api-docs 可以查看具体的接口描述信息:

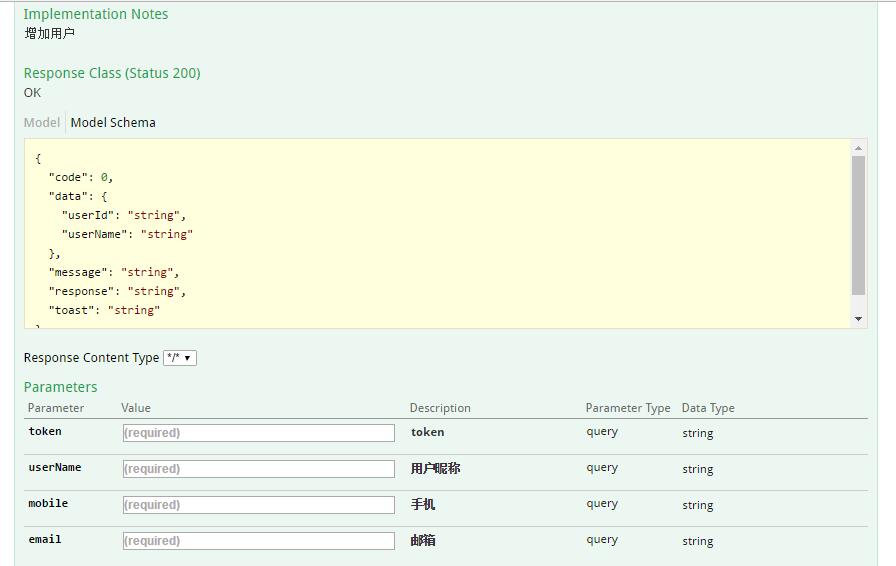
最后通过:http://localhost:8080/工程名/swagger-ui.html 进行访问和测试:

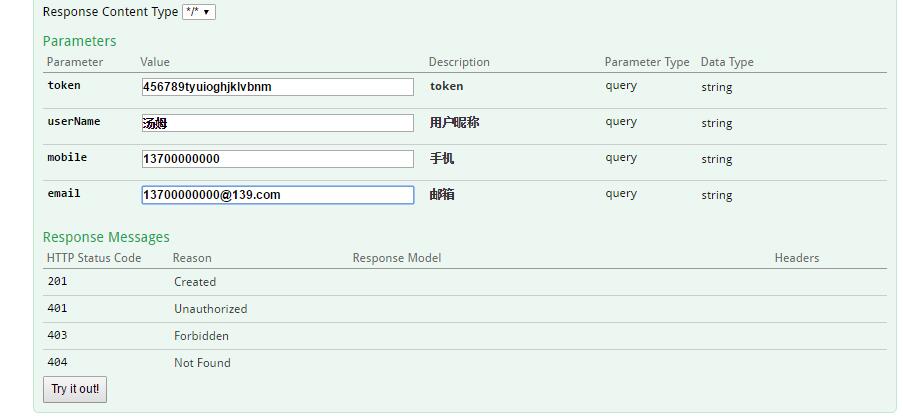
7.如果请求需要带参数的话,Swagger可以直接显示出可以输入请求参数的入口和描述:
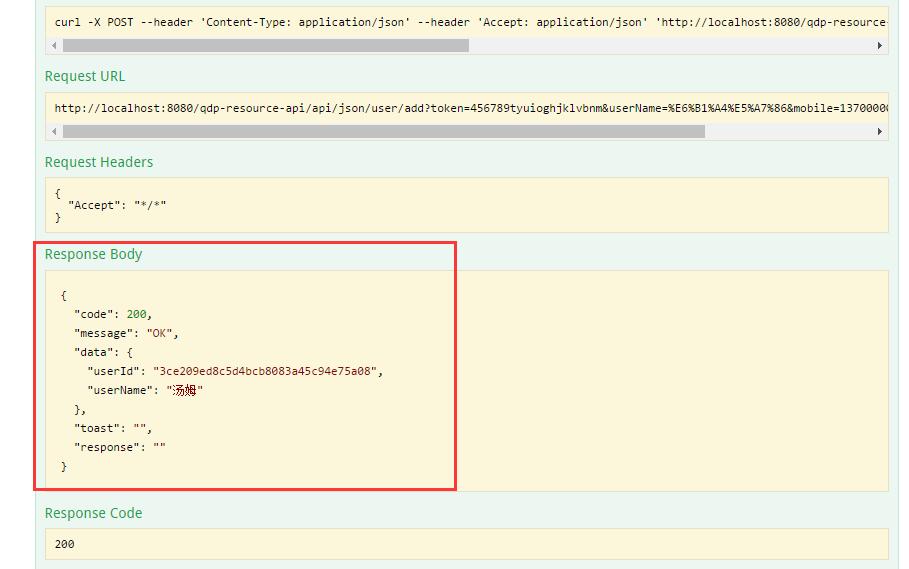
请求结果:
Try it out

 浙公网安备 33010602011771号