springboot+swagger2
一、在pom.xml引入相关jar
<!-- Swagger2 -->
<dependency>
	<groupId>io.springfox</groupId>
	<artifactId>springfox-swagger2</artifactId>
	<version>2.6.1</version>
</dependency>

<dependency>
	<groupId>io.springfox</groupId>
	<artifactId>springfox-swagger-ui</artifactId>
	<version>2.6.1</version>
</dependency>
二、Swagger配置类
import org.springframework.context.annotation.Bean;
import org.springframework.context.annotation.Configuration;
import springfox.documentation.builders.ApiInfoBuilder;
import springfox.documentation.builders.PathSelectors;
import springfox.documentation.builders.RequestHandlerSelectors;
import springfox.documentation.service.ApiInfo;
import springfox.documentation.spi.DocumentationType;
import springfox.documentation.spring.web.plugins.Docket;

/**
 * @author zh
 * @ClassName cn.saytime.Swgger2
 * @Description
 * @date 2017-07-10 22:12:31
 */
@Configuration
public class Swagger2 {

	@Bean
	public Docket createRestApi() {
		return new Docket(DocumentationType.SWAGGER_2)
				.apiInfo(apiInfo())
				.select()
				.apis(RequestHandlerSelectors.basePackage("cn.saytime.web"))
				.paths(PathSelectors.any())
				.build();
	}

	private ApiInfo apiInfo() {
		return new ApiInfoBuilder()
				.title("springboot利用swagger构建api文档")
				.description("简单优雅的restfun风格,http://blog.csdn.net/saytime")
				.termsOfServiceUrl("http://blog.csdn.net/saytime")
				.version("1.0")
				.build();
	}
}
用@Configuration注解该类,等价于XML中配置beans;用@Bean标注方法等价于XML中配置bean。
Application.class 加上注解@EnableSwagger2 表示开启Swagger
import org.springframework.boot.SpringApplication;
import org.springframework.boot.autoconfigure.SpringBootApplication;
import springfox.documentation.swagger2.annotations.EnableSwagger2;

@SpringBootApplication
@EnableSwagger2
public class SpringbootSwagger2Application {

    public static void main(String[] args) {
        SpringApplication.run(SpringbootSwagger2Application.class, args);
    }
}
三、控制层的配置
package com.raorao;

import java.io.IOException;

import javax.servlet.http.HttpServletRequest;
import javax.servlet.http.HttpServletResponse;

import org.springframework.stereotype.Controller;
import org.springframework.web.bind.annotation.PathVariable;
import org.springframework.web.bind.annotation.RequestMapping;
import org.springframework.web.bind.annotation.RequestParam;
import org.springframework.web.bind.annotation.ResponseBody;
import org.springframework.web.servlet.ModelAndView;

import com.raorao.model.person;

import io.swagger.annotations.Api;
import io.swagger.annotations.ApiOperation;
import io.swagger.annotations.ApiResponse;

//其他通用demo
@Api(value = "Api控制器")
@Controller
@RequestMapping("/index")
public class IndexController {
    String message="欢迎进入springmvc程序";

    @RequestMapping("/showMessage")
    public ModelAndView showMessage(@RequestParam(value="name",required=false,defaultValue="spring") String name)
    {
        ModelAndView mv=new ModelAndView("index");//指定试图
        //向视图中添加所要展示或使用的内容,将在页面中使用
        mv.addObject("message", message);
        mv.addObject("name", name);
        return mv;
    }

    @ResponseBody
    @RequestMapping("/hello")
    public String hello(HttpServletRequest request,HttpServletResponse response)throws IOException{
        //response.setContentType("application/json;charset=UTF-8");
        System.out.println("执行了");
        //response.getWriter().append("这里是hello");
        return "这里是hello";
    }

    //rest服务
    @ResponseBody
    @RequestMapping("/rest/{id}")
    public String rest(@PathVariable("id") Integer id){
        //response.setContentType("application/json;charset=UTF-8");
        System.out.println("执行了");
        //response.getWriter().append("这里是hello");
        return "id="+id.toString();
    }

    //rest服务返回json格式数据
    @ResponseBody
    @RequestMapping("/json")
    @ApiResponse(code = 200, message = "success", response = person.class)
    @ApiOperation(value = "返回json数据", response = String.class, notes = "返回json数据")
    public person json(){
        //response.setContentType("application/json;charset=UTF-8");
        System.out.println("执行了json");
        //response.getWriter().append("这里是hello");
        person p=new person();
        p.setName("王小二");
        p.setAge(123);
        return p;
    }
}
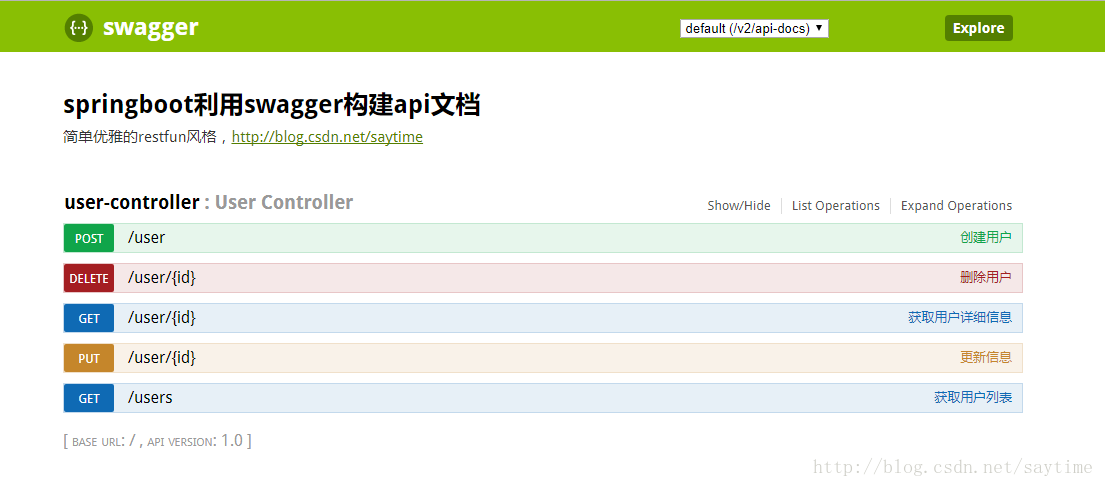
在浏览器中输入http://localhost:8080/swagger-ui.html,将会出现如下界面:

四、Swagger注解
swagger通过注解表明该接口会生成文档,包括接口名、请求方法、参数、返回信息的等等。

@Api:修饰整个类,描述Controller的作用
@ApiOperation:描述一个类的一个方法,或者说一个接口
@ApiParam:单个参数描述
@ApiModel:用对象来接收参数
@ApiProperty:用对象接收参数时,描述对象的一个字段
@ApiResponse:HTTP响应其中1个描述
@ApiResponses:HTTP响应整体描述
@ApiIgnore:使用该注解忽略这个API
@ApiError :发生错误返回的信息
@ApiImplicitParam:一个请求参数
@ApiImplicitParams:多个请求参数
【knife4j】
pom.xml
<!--        swagger-ui-->
        <dependency>
            <groupId>com.github.xiaoymin</groupId>
            <artifactId>knife4j-spring-boot-starter</artifactId>
            <version>3.0.1</version>
        </dependency>
Swagger2Config
/**
 * @Description : TODO
 * @Author : cxw
 * @Date : 2022/10/19 9:32
 * @Version : 1.0
 **/
@Configuration
@EnableSwagger2
@EnableKnife4j
@Import(BeanValidatorPluginsConfiguration.class)
public class Swagger2Config {
    @Bean
    public Docket createRestApi() {
        return new Docket(DocumentationType.SWAGGER_2)
                .apiInfo(apiInfo())
                .select()
                .apis(RequestHandlerSelectors.basePackage("com.example.kafka.controller"))
                .paths(PathSelectors.any())
                .build();
    }

    private ApiInfo apiInfo() {
        return new ApiInfoBuilder()
                .title("测试 - 接口文档")
                .description("测试服务。")
                .contact("test.com")
                .version("v1.0.0")
                .build();
    }
}
上传文件注释
    @ApiOperation(value = "导入")
    @PostMapping("/import")
    public void importFile(@RequestPart @RequestParam("file") MultipartFile file){

    }


