velocyto简单使用
软件介绍
软件安装
- R版本
library(devtools)
install_github("velocyto-team/velocyto.R")
需要安装hdf5,详细见hdf5的安装
然后报错,需要安装pcaMethods

BiocManager::install("pcaMethods")继续安装报错

yum install boost-devel安装完成

安装pagoda2
BiocManager::install(c("AnnotationDbi", "BiocGenerics", "GO.db", "pcaMethods"))
devtools::install_github("hms-dbmi/pagoda2")
安装依赖
yum install openssl-devel libcurl-devel- python版本
python 版本大于3.6
conda install numpy scipy cython numba matplotlib scikit-learn h5py click
pip install pysam
pip install velocyto
软件的使用
这里是python版本的使用方法
- 从cellranger得到loom文件,命令如下
velocyto run10x -m repeat_msk.gtf mypath/sample01 somepath/refdata-cellranger-mm10-1.2.0/genes/genes.gtf- note
- Repeat_msk.gft 需要从UCSA网站下载得到:hg38_rmsk.gtf
- samtools 需要是1.6版本
- genes.gtf是cellranger用的gtf文件
- mypath/sample01是10x输出的文件夹,是cellranger运行后得到的样品的文件夹,不是使filtered_gene_bc_matrices中的文件夹(只包含barcodes.tsv.gz, features.tsv.gz, matrix.mtx.gz)
这样就可以得到loom文件,loom文件被保存在cellranger的sample文件下velocyto文件夹
官网说这一步大约需要3个小时
合并多个样品的loom文件
files = ["file1.loom","file2.loom","file3.loom","file4.loom"]
# on the command line do: cp file1.loom merged.loom
ds = loompy.connect("merged.loom")
for fn in files[1:]:
    ds.add_loom(fn, batch_size=1000)
然后使用得到的loom文件进行下游分析
参考博客:http://pklab.med.harvard.edu/velocyto/notebooks/R/SCG71.nb.html
官网也推荐使用的流程
http://velocyto.org/

velocyto代码
#导入包
library(velocyto.R)

input_loom <- "SCG71.loom"
ldat <- read.loom.matrices(input_loom)

#使用剪切位点的表达量作为输入
emat <- ldat$spliced
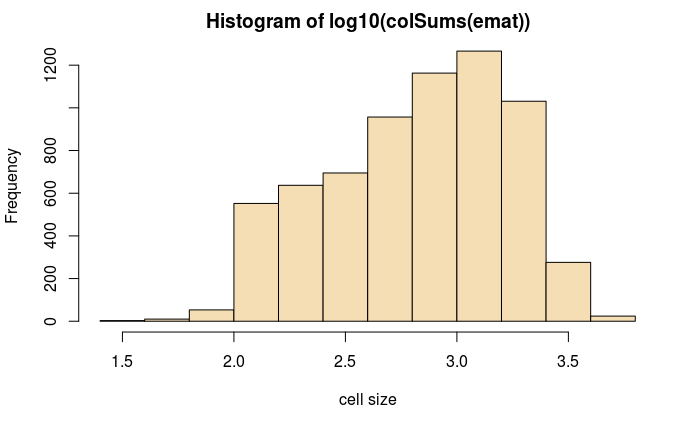
#做直方图查看数据分步
hist(log10(colSums(emat)),col='wheat',xlab='cell size')
#对数据进行过滤,如果过滤了可以不进行
emat <- emat[,colSums(emat)>=1e3]

# 使用Pagoda2 processing, 导入pagoda2包
# pagoda2用来生成细胞矩阵,对细胞聚类
library(pagoda2)
#读入数据进行标准化
r <- Pagoda2$new(emat,modelType='plain',trim=10,log.scale=T)
#查看作图结果
r$adjustVariance(plot=T,do.par=T,gam.k=10)
对细胞进行聚类和细胞嵌合分析
r$calculatePcaReduction(nPcs=100,n.odgenes=3e3,maxit=300)

r$makeKnnGraph(k=30,type='PCA',center=T,distance='cosine')

r$getKnnClusters(method=multilevel.community,type='PCA',name='multilevel')
r$getEmbedding(type='PCA',embeddingType='tSNE',perplexity=50,verbose=T)
作图展示聚类结果
par(mfrow=c(1,2))
r$plotEmbedding(type='PCA',embeddingType='tSNE',show.legend=F,mark.clusters=T,min.group.size=10,shuffle.colors=F,mark.cluster.cex=1,alpha=0.3,main='cell clusters')
r$plotEmbedding(type='PCA',embeddingType='tSNE',colors=r$depth,main='depth') 
准备矩阵和聚类结果
#忽略跨剪切位点的数据
emat <- ldat$spliced
nmat <- ldat$unspliced
#通过p2对细胞进行过滤
emat <- emat[,rownames(r$counts)]
nmat <- nmat[,rownames(r$counts)]
#对分类数据进行标记
cluster.label <- r$clusters$PCA$multilevel # take the cluster factor that was calculated by p2
cell.colors <- pagoda2:::fac2col(cluster.label)
# take embedding form p2
emb <- r$embeddings$PCA$tSNE
计算细胞间的距离
cell.dist <- as.dist(1-armaCor(t(r$reductions$PCA)))基于最小平均表达量筛选基因(至少在一个簇中),输出产生的有效基因数
emat <- filter.genes.by.cluster.expression(emat,cluster.label,min.max.cluster.average = 0.2)
nmat <- filter.genes.by.cluster.expression(nmat,cluster.label,min.max.cluster.average = 0.05)
length(intersect(rownames(emat),rownames(nmat)))
计算RNA速率
fit.quantile <- 0.02
rvel.cd <- gene.relative.velocity.estimates(emat,nmat,deltaT=1,kCells=25,cell.dist=cell.dist,fit.quantile=fit.quantile)
可视化RNA速率结果
show.velocity.on.embedding.cor(emb,rvel.cd,n=200,scale='sqrt',cell.colors=ac(cell.colors,alpha=0.5),cex=0.8,arrow.scale=3,show.grid.flow=TRUE,min.grid.cell.mass=0.5,grid.n=40,arrow.lwd=1,do.par=F,cell.border.alpha = 0.1)
可视化特定的基因
gene <- "Camp"
gene.relative.velocity.estimates(emat,nmat,deltaT=1,kCells = 25,kGenes=1,fit.quantile=fit.quantile,cell.emb=emb,cell.colors=cell.colors,cell.dist=cell.dist,show.gene=gene,old.fit=rvel.cd,do.par=T)

增加k的数目
gene <- "Camp"
gene.relative.velocity.estimates(emat,nmat,deltaT=1,kCells = 100,kGenes=1,fit.quantile=fit.quantile,cell.emb=emb,cell.colors=cell.colors,cell.dist=cell.dist,show.gene=gene,do.par=T)

