React笔记-首次渲染
渲染机制
渲染机制主要分为两部分: 首次渲染和更新渲染。
首次渲染
首先通过一个小例子,来讲解首次渲染过程。
<!DOCTYPE html>
<html lang="en">
  <head>
    <meta charset="utf-8">
    <title>React App</title>
  </head>
  <body>
    <div id="root"></div>
  </body>
</html>
import React from 'react';
import ReactDOM from 'react-dom';

class ClickCounter extends React.Component {
  constructor(props) {
    super(props);
    this.state = { count: 0 };
  }
  handleClick = () => {
    this.setState((state) => {
      return {count: state.count + 1};
    });
  }
  render() {
    return [
      <button key="1" onClick={this.handleClick}>Update counter</button>,
      <span key="2">{this.state.count}</span>,
    ]
  }
}
ReactDOM.hydrate(<ClickCounter />, document.getElementById('root'));
程序运行到ReactDOM.hydrate时,其中的<ClickCounter />已被babel转换为React.createElement(ClickCounter, null),生成的element如下:
{
    $$typeof: Symbol(react.element),
    key: null,
    props: {},
    ref: null,
    type: ClickCounter
}
接下来执行hydrate函数,生成root节点。首先了解下fiber的部分数据结构。
- alternate(对应的
workInProgress或fiber) - stateNode(关联的
fiber,组件实例或者DOM节点) - type(组件或
HTML tag,如div,span等) - tag(类型,详见workTags)
- effectTag(操作类型,详见sideEffectTag)
- updateQueue(更新队列)
- memoizedState(
state) - memoizedProps(
props) - pendingProps(
VDOM) - return(父
fiber) - sibling(兄弟
fiber) - child(孩子
fiber) - firstEffect(第一个待处理的
effect fiber) - lastEffect(最后一个待处理的
effect fiber)
首次渲染会以同步渲染的方式进行渲染,首先创建一个update,将element装载到其payload属性中,然后合并到root.current.updateQueue,如果没有updateQueue会创建一个。我们暂且将root.current看成HostRoot。
接着根据HostRoot克隆一棵workInProgress更新树。将HostRoot.alternate指向workInProgress,workInProgress.alternate指向HostRoot。然后进入workLoop进行更新树操作部分。workLoop的任务也很简单,就是将所有节点的更新挂载到更新树上。下面详细看看reconciliation阶段。
reconciliation阶段
reconciliation的核心在于workLoop。workLoop会以workInProgress为起点,即克隆的HostRoot,不断向下寻找。如果workInProgress.child不为空,会进行diff;如果为空会创建workInProgress.child`。
// 第一次循环nextUnitOfWork为workInProgress
function workLoop(isYieldy) {
  if (!isYieldy) {
    // Flush work without yielding
    while (nextUnitOfWork !== null) {
      nextUnitOfWork = performUnitOfWork(nextUnitOfWork);
    }
  } else {
    // Flush asynchronous work until there's a higher priority event
    while (nextUnitOfWork !== null && !shouldYieldToRenderer()) {
      nextUnitOfWork = performUnitOfWork(nextUnitOfWork);
    }
  }
}
因为只涉及首次渲染,所以这里将performUnitOfWork简单化。beginWork根据workInProgress.tag选择不同的处理方式。先暂且看看如何处理HostRoot。进入updateHostRoot方法,先进行workInProgress.updateQueue的更新,计算新的state,将update.baseState和workInProgress.memoizedState指向新的state。这里新的state装载的是element。
接下来调用createFiberFromElement创建fiber,将workInProgress.child指向该fiber,fiber.return指向workInProgress。
function performUnitOfWork(workInProgress) {
  let next = beginWork(workInProgress); // 创建workInProgress.child并返回
  if (next === null) { // 没有孩子,收集effect list,返回兄弟或者父fiber
      next = completeUnitOfWork(workInProgress);
  }
  return next;
}

function beginWork(workInProgress) {
  switch(workInProgress.tag) {
    case HostRoot:
      return updateHostRoot(current, workInProgress, renderExpirationTime);
    case ClassComponent:
      ...
  }
}
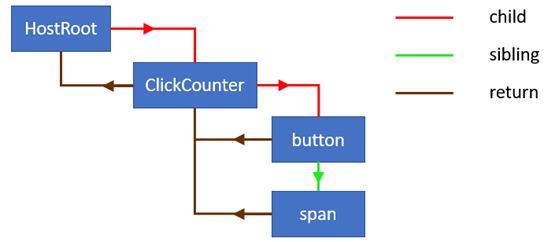
用一张图体现更新树创建完成后的样子:

当workInProgress没有孩子时,即创建的孩子为空。说明已经到达底部,开始收集effect。
function completeUnitOfWork(workInProgress) {
  while (true) {
    let returnFiber = workInProgress.return;
    let siblingFiber = workInProgress.sibling;
    nextUnitOfWork = completeWork(workInProgress);
   ...// 省略收集effect list过程
    if (siblingFiber !== null) {
      // If there is a sibling, return it
      // to perform work for this sibling
      return siblingFiber;
    } else if (returnFiber !== null) {
      // If there's no more work in this returnFiber,
      // continue the loop to complete the parent.
      workInProgress = returnFiber;
      continue;
    } else {
      // We've reached the root.
      return null;
    }
  }
}
function completeWork(workInProgress) {
  //根据workInProgress.tag创建、更新或删除dom
  switch(workInProgress.tag) {
    case HostComponent:
      ...
  }
  return null;
}
协调算法过程结束后,workInProgress更新树更新完毕,收集的effect list如下:

commit阶段
effect list(链表)是reconciliation阶段的结果,决定了哪些节点需要插入、更新和删除,以及哪些组件需要调用生命周期函数。firstEffect记录第一个更新操作,firstEffect.nextEffect(fiber)记录下一个,然后继续通过其nextEffect不断往下寻找直至为null。下面是commit阶段的主要流程:
// finishedWork为更新树
function commitRoot(root, finishedWork) {
    commitBeforeMutationLifecycles();
    commitAllHostEffects();
    root.current = finishedWork;
    commitAllLifeCycles();
}
变量nextEffect每次执行完上面一个函数会被重置为finishedWork。
commitBeforeMutationLifecycles
检查effect list中每个fiber是否有Snapshot effect,如果有则执行getSnapshotBeforeUpdate。
// 触发getSnapshotBeforeUpdate
function commitBeforeMutationLifecycles() {
  while (nextEffect !== null) {
    const effectTag = nextEffect.effectTag;
    if (effectTag & Snapshot) {
      const current = nextEffect.alternate;
      commitBeforeMutationLifeCycles(current, nextEffect);
    }
    nextEffect = nextEffect.nextEffect;
  }
}
commitAllHostEffects
提交所有effect,实现dom的替换、更新和删除。
function commitAllHostEffects() {
  while(nextEffect !== null) {
    var effectTag = nextEffect.effectTag;
    var primaryEffectTag = effectTag & (Placement | Update | Deletion);
    switch (primaryEffectTag) {
      case Placement: {
        commitPlacement(nextEffect);
        ...
      }
      case PlacementAndUpdate: {
        commitPlacement(nextEffect);
        var _current = nextEffect.alternate;
        commitWork(_current, nextEffect);
        ...
      }
      case Update: {
        var _current2 = nextEffect.alternate;
        commitWork(_current2, nextEffect);
        ...
      }
      case Deletion: {// 触发componentWillUnmout
        commitDeletion(nextEffect);
        ...
      }
    }
    nextEffect = nextEffect.nextEffect;
  }
}
commitAllLifeCycles
触发componentDidMount或componentDidUpdate
function commitAllLifeCycles(finishedRoot, committedExpirationTime) {
  while (nextEffect !== null) {
    var effectTag = nextEffect.effectTag;

    if (effectTag & (Update | Callback)) {
      var current$$1 = nextEffect.alternate;
      commitLifeCycles(finishedRoot, current$$1, nextEffect, committedExpirationTime);
    }
    if (effectTag & Ref) {
      commitAttachRef(nextEffect);
    }
    if (effectTag & Passive) {
      rootWithPendingPassiveEffects = finishedRoot;
    }

    nextEffect = nextEffect.nextEffect;
  }
}
总结
这里并未逐一细说,不想读起来直犯困,更多讲述了大概流程。如果觉得有疑惑的地方,也知道该在什么地方找到对应的源码,解答疑惑。
更好的阅读体验在我的github,欢迎👏提issue。


