【Android】5.3 单选和复选
分类:C#、Android、VS2015;
创建日期:2016-02-07
一、简介
1、CheckBox
复选
【Checked】属性:是否选中。
2、RadioButton
单选
【Checked】属性:是否选中。
【RadioGroup】属性:RadioButton的分组容器。注意必须将RadioButton包含在RadioGroup内。
二、示例4—Demo04CheckBoxRadioButton
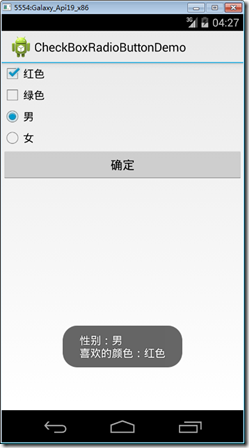
1、运行截图
2、添加demo04_CheckBoxRadioButton.axml文件
在layout文件夹下添加该文件。
从【工具箱】中向设计界面拖放2个【CheckBox】控件,1个【RadioGroup】控件,然后直接在【源】中将其修改为下面的内容:
<?xml version="1.0" encoding="utf-8"?>
<LinearLayout xmlns:android="http://schemas.android.com/apk/res/android"
    android:orientation="vertical"
    android:layout_width="match_parent"
    android:layout_height="match_parent">
    <CheckBox
        android:text="红色"
        android:layout_width="match_parent"
        android:layout_height="wrap_content"
        android:id="@+id/checkBoxRed" />
    <CheckBox
        android:text="绿色"
        android:layout_width="wrap_content"
        android:layout_height="wrap_content"
        android:id="@+id/checkBoxGreen" />
    <RadioGroup
        android:minWidth="25px"
        android:minHeight="25px"
        android:layout_width="match_parent"
        android:layout_height="wrap_content"
        android:id="@+id/radioGroupGander">
        <RadioButton
            android:layout_width="wrap_content"
            android:layout_height="wrap_content"
            android:checked="true"
            android:text="男"
            android:id="@+id/radioButtonMale" />
        <RadioButton
            android:layout_width="wrap_content"
            android:layout_height="wrap_content"
            android:text="女"
            android:id="@+id/radioButtonFamale" />
    </RadioGroup>
    <Button
        android:id="@+id/btnOK"
        android:layout_width="fill_parent"
        android:layout_height="wrap_content"
        android:text="确定" />
</LinearLayout>
3、添加Demo04CheckBoxRadioButton.cs文件
在SrcActivity文件夹下添加该文件。
using System;
using Android.App;
using Android.OS;
using Android.Widget;

namespace ch05demos.SrcActivity
{
    [Activity(Label = "CheckBoxRadioButtonDemo")]
    public class Demo04CheckBoxRadioButton : Activity
    {
        CheckBox red, green;
        RadioButton nan, nv;

        protected override void OnCreate(Bundle savedInstanceState)
        {
            base.OnCreate(savedInstanceState);
            SetContentView(Resource.Layout.demo04_CheckBoxRadioButton);

            red = FindViewById<CheckBox>(Resource.Id.checkBoxRed);
            green = FindViewById<CheckBox>(Resource.Id.checkBoxGreen);
            nan = FindViewById<RadioButton>(Resource.Id.radioButtonMale);
            nv = FindViewById<RadioButton>(Resource.Id.radioButtonFamale);

            var button = FindViewById<Button>(Resource.Id.btnOK);
            button.Click += Button_Click;
        }

        private void Button_Click(object sender, EventArgs e)
        {
            string s1 = "性别:" + (nan.Checked ? "男" : "女");
            string s2 = "喜欢的颜色:";
            if (red.Checked) s2 += red.Text;
            if (green.Checked) s2 += " " + green.Text;
            Toast.MakeText(this,
                string.Format("{0}\n{1}", s1, s2),
                ToastLength.Long).Show();
        }
    }
}
运行观察该例子的效果。
提示:通过【Checked】属性或Toggle()方法都可以改变RadioButton的状态。


