本章目的
在上一章中,我们利用Hibernate Tools完成了Android Model层的建立,依赖Hibernate Tools的强大功能,自动生成了Model层。在本章,我们将继续我们的项目,在Android端完成Http一个访问类,并完成整个请求、处理 Response、反序列化Json的工作。那么首先我们来看下Android的Http访问。
Http, POST or GET?
在 开始正式设计Http访问类之前,我们必须先了解一些关于Http协议的必要知识。在Http1.1规范中,一共定义了8种方法,在这里与我们有关的是 Get、post两种方法,对大多数程序员来说,大致的意思我们都明白,但能完整理解两种方法的区别和联系的,就不那么容易了。这里作者不去从协议本身去 探讨二者区别,只从应用层来讲:
GET:向服务器的特定资源发出请求,这种方法要求所有传递的参数只能通过URL的QueryString,由于URL长度大小最大有2KB限制,所以一般只能传递简单的参数。
POST:向服务器发送数据,这种方法可以将参数包含在请求体中,可以用来传输大量数据,如上传文件等。
如果你想了解HTTP协议的更多细节,这篇文章写的很详细,值得参考:http://www.cnblogs.com/skynet/archive/2010/05/18/1738301.html
Android的Http访问类
http访问类类的部分代码参考了开源的 https://github.com/yusuke
首先我们来看下Android中进行httprequest的全过程
1、根据URL生成成java.net.HttpURLConnection对象
2、设置HttpURLConnection允许返回值
3、设置HttpURLConnection的Header数据(Header数据保存在 Hashmap<String,String> requestHeaders中,从Configration静态类取得)
4、根据不同类型的httpMethod设置HttpURLConnection 的 RequestMethod
-----------至此HttpURLConnection生成完毕----------------
5、通过调用HttpURLConnection.getInputStream()方法实现Http连接
6、将服务器发回来的数据生成为Response对象(此对象由我们封装,表示服务器返回的数据)
7、通过HttpURLConnection.getResponseCode()的值判断此次Http请求是否成功
8、如果成功,HttpURLConnection.getInputStream()即为服务器返回的http流
-----------至此Request请求完毕----------
通过上面的流程,我们可以设计我们的http访问类,最核心的是下面几个类
HttpClientP:处理Http请求,包括重要的httprequest()方法以及设置header等方法
Response:HttpRequest的返回值,包括asDocument(), asJsonArray(), asString()等与取结果流有关方法,以及 getStatusCode()等与取连接状态、头变量相关的方法
Configuration:保存Properties的静态类,设置连接超时时间、重试次数等
下面给出http访问类的主要方法。
|
1
2
3
4
5
6
7
8
9
10
11
12
13
14
15
16
17
18
19
20
21
22
23
24
25
26
27
28
29
30
31
32
33
34
35
36
37
38
39
40
41
42
43
44
45
46
47
48
49
50
51
52
53
54
55
56
57
58
59
60
61
62
63
64
65
66
67
68
69
70
71
72
73
74
75
76
77
78
79
80
81
82
83
84
85
86
87
88
89
90
91
92
93
94
95
96
97
98
99
100
101
102
103
|
public class HttpClientP implements java.io.Serializable { private static final int OK = 200;// OK: Success! public Response httpRequest(String url, PostParameter[] postParams, boolean authenticated, String httpMethod) throws NException { int retriedCount; int retry = retryCount + 1; Response res = null; for (retriedCount = 0; retriedCount < retry; retriedCount++) { int responseCode = -1; try { HttpURLConnection con = null; OutputStream osw = null; try { con = getConnection(url); con.setDoInput(true); setHeaders(url, postParams, con, false, httpMethod); if (null != postParams || "POST".equals(httpMethod)) { con.setRequestMethod("POST"); con.setRequestProperty("Content-Type", "application/x-www-form-urlencoded"); con.setDoOutput(true); String postParam = ""; if (postParams != null) { postParam = encodeParameters(postParams); } log("Post Params: ", postParam); byte[] bytes = postParam.getBytes("UTF-8"); con.setRequestProperty("Content-Length", Integer.toString(bytes.length)); osw = con.getOutputStream(); osw.write(bytes); osw.flush(); osw.close(); } else if ("DELETE".equals(httpMethod)) { con.setRequestMethod("DELETE"); } else { con.setRequestMethod("GET"); } res = new Response(con); responseCode = con.getResponseCode(); if (DEBUG) { log("Response: "); Map<String, List<String>> responseHeaders = con .getHeaderFields(); for (String key : responseHeaders.keySet()) { List<String> values = responseHeaders.get(key); for (String value : values) { if (null != key) { log(key + ": " + value); } else { log(value); } } } } if (responseCode != OK) { if (responseCode < INTERNAL_SERVER_ERROR || retriedCount == retryCount) { throw new NException(getCause(responseCode) + "\n" + res.asString(), responseCode); } // will retry if the status code is // INTERNAL_SERVER_ERROR } else { break; } } finally { try { osw.close(); } catch (Exception ignore) { } } } catch (IOException ioe) { // connection timeout or read timeout if (retriedCount == retryCount) { throw new NException(ioe.getMessage(), ioe, responseCode); } } try { if (DEBUG && null != res) { res.asString(); } log("Sleeping " + retryIntervalMillis + " millisecs for next retry."); Thread.sleep(retryIntervalMillis); } catch (InterruptedException ignore) { // nothing to do } } return res; }} |
|
1
2
3
4
5
6
7
8
9
10
11
12
13
14
15
16
17
18
19
20
21
22
23
24
|
public class Response { private int statusCode; private Document responseAsDocument = null; private String responseAsString = null; private InputStream is; private HttpURLConnection con; private boolean streamConsumed = false; public Response() { } public Response(HttpURLConnection con) throws IOException { this.con = con; this.statusCode = con.getResponseCode(); if(null == (is = con.getErrorStream())){ is = con.getInputStream(); } if (null != is && "gzip".equals(con.getContentEncoding())) { // the response is gzipped is = new GZIPInputStream(is); } }} |
服务器端JSON序列化
前文已经说过,服务器采用Newtonsoft.JSON来序列化LINQ数据,这里,我们稍微将LinqToJson扩展一下,以适合Android端的GSON反序列化方法。先看代码:
|
1
2
3
4
5
6
7
8
9
10
11
12
13
14
15
16
17
18
19
|
public static string LinqToJson(object o) { string rtn = ""; //设置Json序列化格式 JsonSerializer js = new JsonSerializer(); //JSON中的Key名称采用驼峰命名法,且首字母小写 js.ContractResolver = new CamelCasePropertyNamesContractResolver(); //设置JSON Date类型转换格式 Newtonsoft.Json.Converters.IsoDateTimeConverter timeConverter = new Newtonsoft.Json.Converters.IsoDateTimeConverter(); timeConverter.DateTimeFormat = "yyyy'-'MM'-'dd' 'HH':'mm':'ss"; js.Converters.Add(timeConverter); //转换为为Json Array rtn = JArray.FromObject(o, js).ToString(); return rtn; }与 之前的版本相比,我们主要设置了JSON序列化格式,由于hibernate Tools生成的JavaBean类均采用驼峰命名,且首字母小写,所以要在Newtonsoft.json中设置一个JsonSerializer来实 现匹配。另外,Date类型是必须要重新处理的数据类型。 |
|
1
|
测试一下: |
|
1
2
3
4
5
6
7
8
9
|
public partial class Default : System.Web.UI.Page { protected void Page_Load(object sender, EventArgs e) { EmployeeEntity ee = new EmployeeEntity(1); lt_rtn.Text = ee.toJson(); } } |
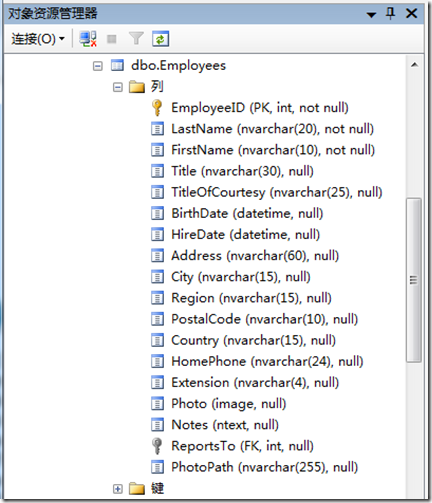
 数据库中的字段,可以看到已经转换字段名为首字母小写了:
客户端Android采用GSON反序列化
有了客户端的Http访问类,我们就可以来访问服务器了,我们采用下面的步骤来进行:
1、新建一个HashMap,包含发送到服务器的QueryString参数。在将来的使用中,通过向HashMap添加K-V对来实现添加QueryString参数
2、将此HashMap转换为一个加密的字符串
3、使用http.get()方法与服务器连接
4、如果出现Exception则进入全局Exception对象处理
5、连接正常的话,反序列化结果为对应对象
6、连接至此完成
现在我们暂时先使用一个Activity来测试这个连接过程,将所有流程都写入OnCreate()中,暂不考虑其他有更有逻辑的封装。
|
1
2
3
4
5
6
7
8
9
10
11
12
13
14
15
16
17
18
19
20
21
22
23
24
25
26
27
28
29
30
31
32
33
34
35
36
37
38
39
40
41
42
43
44
45
46
47
48
49
50
|
public class MainActivity extends Activity { /** Called when the activity is first created. */ private String baseURL = Configuration.getServer(); protected HttpClientP http = new HttpClientP(); @Override public void onCreate(Bundle savedInstanceState) { super.onCreate(savedInstanceState); setContentView(R.layout.main); TextView tvEmpName = (TextView) this.findViewById(R.id.empName); //设置QueryString参数的HashMap HashMap param = new HashMap(); param.put("cmd", "test"); //将此HashMap转换为加密字符串 String parmstr = URLParamUtils.toURLParam(param); String paramstrall = baseURL+ "default.aspx?a=" + parmstr; try { //使用Http.get()连接 返回JsonArray JSONArray json = get(paramstrall,null, true).asJSONArray(); String jsonfirst = json.get(0).toString(); //新建Gson对象并设置与服务器发来相同格式的Date类型 Gson gson = new GsonBuilder().setDateFormat("yyyy-MM-dd HH:mm:ss").create(); //反序列化Json数据为 Employees类型 Employees emp = gson.fromJson(jsonfirst, Employees.class); //测试Employees数据 tvEmpName.setText(emp.getFirstName()); } catch (NException e) { // TODO Auto-generated catch block e.printStackTrace(); } catch (JSONException e) { // TODO Auto-generated catch block e.printStackTrace(); } } protected Response get(String url, PostParameter[] params, boolean authenticate) throws NException { if (null != params && params.length > 0) { url += "&" + HttpClientP.encodeParameters(params); } return http.get(url, authenticate); }} |
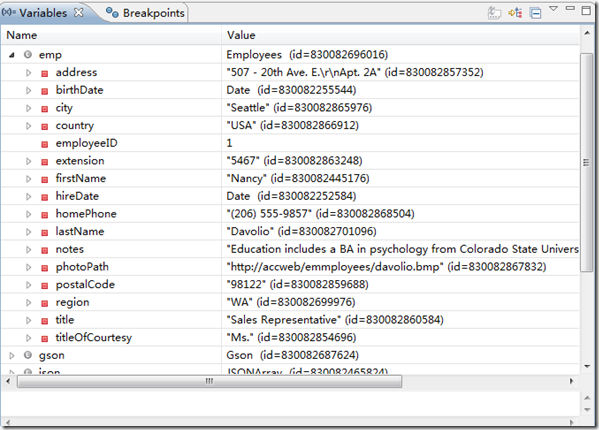
结果如下

小结与扩展
这一章我们主要解决了移动客户端与服务器使用HTTP访问的问题,我们了解了http访问的整个过程,完成了客户端的HTTP访问类,在最后的例子中我们使用了http.get()方法来与服务器交互,当然我们的访问类也支持post方法。
在接下来的一章,我们将继续扩展HTTP访问的客户端与服务器端,主要解决传输加密、参数等问题。


