Spring---IoC(控制反转)原理学习笔记【全】
1、IoC创建对象的方式
-
使用无参构造创建对象
-
假如要使用有参构造创建:
-
下标赋值constructor-arg
<!--有参--> <bean id="User" class="com.reliable.pojo.User" > <constructor-arg index="0" value="靠谱杨"></constructor-arg> </bean> public User(String name){ System.out.println("User的有参构造!"); this.name=name; } -
通过类型type="java.lang.String"
<bean id="User" class="com.reliable.pojo.User" > <constructor-arg type="java.lang.String" value="靠谱杨"></constructor-arg> </bean> - 通过参数名name="name" value="reliable"
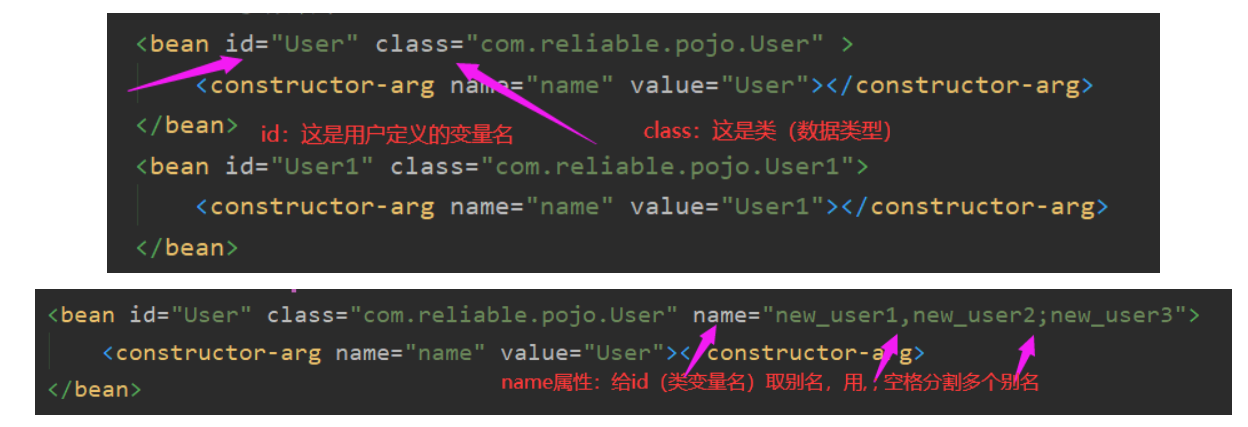
<bean id="User" class="com.reliable.pojo.User" > <constructor-arg name="name" value="reliable"></constructor-arg> </bean> 总结:在配置文件加载的时候,Spring容器中管理的对象就已经初始化成功了!
-
2、Spring的配置
2.1、别名
<!--别名--> <alias name="User" alias="new_user"></alias>
2.2、Bean的配置
<?xml version="1.0" encoding="UTF-8"?> <beans xmlns="http://www.springframework.org/schema/beans" xmlns:xsi="http://www.w3.org/2001/XMLSchema-instance" xsi:schemaLocation="http://www.springframework.org/schema/beans http://www.springframework.org/schema/beans/spring-beans.xsd"> <!-- 类型 变量名 = new 类型(); Hello hello = new Hello(); bean就是java对象 , 由Spring创建和管理 bean = 一个对象 其中 id = 变量名 class = new的对象类型 property相当于给对象里的属性设置一个值 --> <bean id="Hello" class="com.reliable.pojo.Hello"> <property name="name" value="Spring"/> </bean> <!-- 无参 --> <!--<bean id="User" class="com.reliable.pojo.User">--> <!--<property name="name" value="靠谱"></property>--> <!--</bean>--> <!--有参第一种,index--> <!--<bean id="User" class="com.reliable.pojo.User" > <constructor-arg index="0" value="靠谱杨"></constructor-arg> </bean>--> <!-- 2 类型--> <!-- <bean id="User" class="com.reliable.pojo.User" > <constructor-arg type="java.lang.String" value="靠谱杨"></constructor-arg> </bean>--> <!-- 3 参数名字 --> <bean id="User" class="com.reliable.pojo.User" > <constructor-arg name="name" value="User"></constructor-arg> </bean> <bean id="User1" class="com.reliable.pojo.User1"> <constructor-arg name="name" value="User1"></constructor-arg> </bean> <!--别名 如果添加的别名 都可以使用--> <alias name="User" alias="new_user"></alias> </beans>
2.3、import
一般用于团队开发使用,可以将多个配置文件导入合并为一个
<!--import --> <import resource="beans1.xml"></import>
3、依赖注入(DI)
3.1 构造器注入
- 依赖注入:Set注入
- 依赖:bean对象的创建依赖于容器
- 注入:bean对象中的所有属性,由容器来注入!
3.2、Set方式注入【重点】
- 复杂类型
public class Address { private String address; public String getAddress() { return address; } public void setAddress(String address) { this.address = address; } }
- 实体对象
import java.util.*; public class Student { public String getName() { return name; } public Address getAddress() { return address; } public String[] getBooks() { return books; } public List<String> getHobbies() { return hobbies; } public Map<String, String> getCard() { return card; } public Set<String> getGames() { return games; } public String getWife() { return wife; } public Properties getInfo() { return info; } private String name; private Address address; private String[] books; private List<String> hobbies; private Map<String,String> card; private Set<String> games; private String wife; private Properties info; public void setName(String name) { this.name = name; } public void setAddress(Address address) { this.address = address; } public void setBooks(String[] books) { this.books = books; } public void setHobbies(List<String> hobbies) { this.hobbies = hobbies; } public void setCard(Map<String, String> card) { this.card = card; } public void setGames(Set<String> games) { this.games = games; } public void setWife(String wife) { this.wife = wife; } public void setInfo(Properties info) { this.info = info; } @Override public String toString() { return "Student{" + "name='" + name + '\'' + ", address=" + address + ", books=" + Arrays.toString(books) + ", hobbies=" + hobbies + ", card=" + card + ", games=" + games + ", wife='" + wife + '\'' + ", info=" + info + '}'; } //show方法 public void show(){ System.out.println("name="+ name + ",address="+ address.getAddress() + ",books=" ); for (String book:books){ System.out.print("<<"+book+">>\t"); } System.out.println("\n爱好:"+ hobbies); System.out.println("card:"+card); System.out.println("games:"+games); System.out.println("wife:"+wife); System.out.println("info:"+info); } }
xml配置文件

<?xml version="1.0" encoding="UTF-8"?> <beans xmlns="http://www.springframework.org/schema/beans" xmlns:xsi="http://www.w3.org/2001/XMLSchema-instance" xsi:schemaLocation="http://www.springframework.org/schema/beans http://www.springframework.org/schema/beans/spring-beans.xsd"> <bean id="Address" class="com.kuang.pojo.Address"> <property name="address" value="石家庄"></property> </bean> <bean id="Student" class="com.kuang.pojo.Student"> <!-- 第一种:普通值注入 --> <property name="name" value="杨传伟"></property> <!-- 第二种:ref注入 --> <property name="address" ref="Address"></property> <!-- 第三种:数组注入 --> <property name="books"> <array> <value>《红楼梦》</value> <value>《西游记》</value> <value>《水浒传》</value> <value>《三国演义》</value> </array> </property> <!-- 第四种:List注入 --> <property name="hobbies"> <list> <value>听音乐</value> <value>看电影</value> <value>敲代码</value> <value>摄影</value> </list> </property> <!-- 第五种:Map注入 --> <property name="card"> <map> <entry key="IDcard" value="1234567"></entry> <entry key="STcard" value="7654321"></entry> </map> </property> <!-- 第六种:Set注入 --> <property name="games"> <set> <value>跑跑卡丁车官方竞速版</value> <value>王者荣耀</value> </set> </property> <!-- 第七种:设置空值 --> <property name="wife"> <null></null> </property> <!--properties--> <property name="info"> <props> <prop key="学号">20194074</prop> <prop key="性别">男</prop> <prop key="姓名">杨传伟</prop> <prop key="username">reliable</prop> <prop key="userpass">resetpass01</prop> </props> </property> </bean> </beans>
3.3、拓展方式注入---使用p命名空间和c命名空间
使用:
package com.kuang.pojo; public class User { private String name; private int age; public User(String name,int age) { this.name = name; this.age=age; } public User(){}; public String getName() { return name; } public void setName(String name) { this.name = name; } public int getAge() { return age; } public void setAge(int age) { this.age = age; } @Override public String toString() { return "User{" + "name='" + name + '\'' + ", age=" + age + '}'; } }
配置文件:
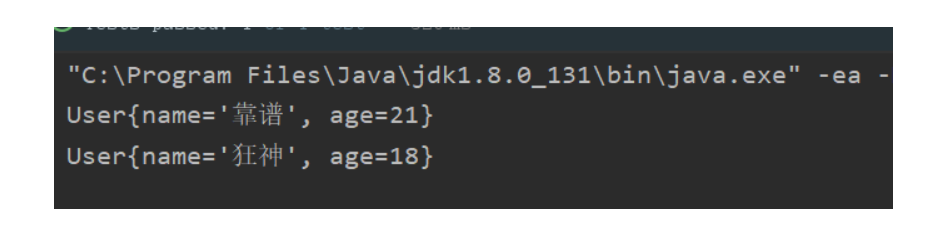
<?xml version="1.0" encoding="UTF-8"?> <beans xmlns="http://www.springframework.org/schema/beans" xmlns:xsi="http://www.w3.org/2001/XMLSchema-instance" xmlns:p="http://www.springframework.org/schema/p" xmlns:c="http://www.springframework.org/schema/c" xsi:schemaLocation="http://www.springframework.org/schema/beans http://www.springframework.org/schema/beans/spring-beans.xsd"> <!--P(属性: properties)命名空间 , 属性依然要设置set方法--> <bean id="user" class="com.kuang.pojo.User" p:name="靠谱" p:age="21"/> <!--C(构造: Constructor)命名空间 , 属性依然要设置set方法--> <bean id="user2" class="com.kuang.pojo.User" c:name="狂神" c:age="18"/> </beans>
测试:
public void test2(){ ApplicationContext context=new ClassPathXmlApplicationContext("beans03.xml"); User user = context.getBean("user", User.class); System.out.println(user); User user2 = context.getBean("user2", User.class); System.out.println(user2); }
注意
要引入c和p命名空间:
xmlns:p="http://www.springframework.org/schema/p"
xmlns:c="http://www.springframework.org/schema/c"
4、bean的作用域
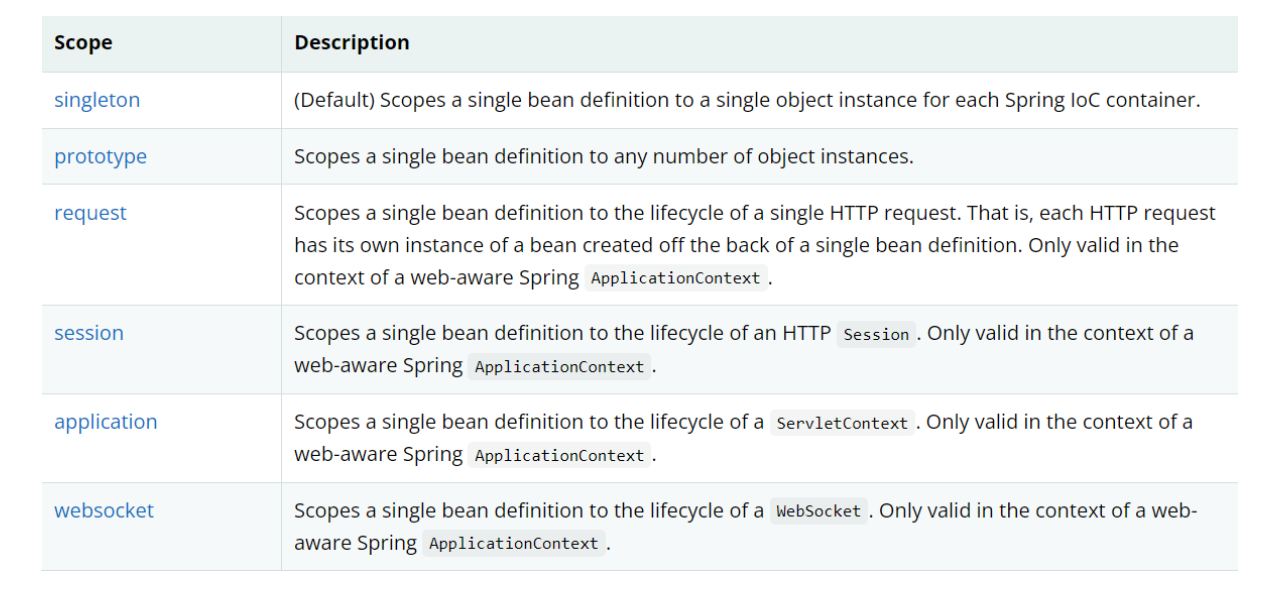
4.1、单例模式(default)
<bean id="accountService" class="com.something.DefaultAccountService"/> <!-- the following is equivalent, though redundant (singleton scope is the default) --> <bean id="accountService" class="com.something.DefaultAccountService" scope="singleton"/>
4.2、原型模式:每次都产生一个新对象
<bean id="accountService" class="com.something.DefaultAccountService" scope="prototype">
4.3、request、session、application,web开发中使用
5、bean的自动装配
- 自动装配是Spring满足Bean依赖的一种方式
- Spring自动在上下文寻找,装配bean属性
在Spring中有三种装配方式
- 在xml中配置
- 在Java中配置
- 隐式自动装配【重要】
5.1、自动装配属性
环境搭配:一个人有两个宠物,一只猫和一只狗
思路:
三个实体类,均实现getter和setter,toString( ) 方法,在bean中配置
People类和猫、狗类有关联关系,完成配置后实例化People类调用getDog( )方法调用Dog类的方法
<bean id="dog" class="com.kuang.pojo.Dog" p:dogname="狗"/> <bean id="cat" class="com.kuang.pojo.Cat" p:catname="猫"/> <bean id="people" class="com.kuang.pojo.People"> <property name="cat" ref="cat"/> <property name="dog" ref="dog"/> <property name="str" value="***"/>
5.2、byName:
- 在容器上下文寻找,id和对象set方法的参数值对应,id全局唯一
public void setCat(Cat cat) { this.cat = cat; }
<bean id="dog" class="com.kuang.pojo.Dog" p:dogname="狗"/> <bean id="cat" class="com.kuang.pojo.Cat" p:catname="猫"/> <bean id="people" class="com.kuang.pojo.People" autowire="byName"></bean>
5.3、byType:
- 必须保证类型全局唯一(class全局唯一)这个bean需要和自动注入的属性的类型一致
5.4、总结:
属性:
private Cat cat; private Dog dog1;
byName:类属性的名字和bean的id名字保持一致,且id全局唯一
byType:类属性的数据类型和bean的class名字保持一致,且全局唯一
6、注解实现自动装配
-
@Autowired public @interface Autowired { boolean required() default true; } Autowired()可以传一个参数,如果显式定义了Autowired的required属性为false,说明这个对象可以为NULL
直接在属性上使用即可,也可以在set方法上使用!
使用Autowired可以不用编写set方法,前提是这个自动装配的属性在IoC容器中存在,且id名字和属性名字一致!
(Autowired 是先根据类型寻找,如果在IoC容器中发现了多个类型,则按名字寻找!)
@Autowired private Cat cat; @Autowired private Dog dog; ***如果Autowired自动装配的环境比较复杂,无法通过一个注解实现的时候,可以使用【@Qualifier(“ ”)】的方式给容器指定一个要使用的bean
<bean id="dog2" class="com.kuang.pojo.Dog"></bean> <bean id="dog1" class="com.kuang.pojo.Dog"></bean> @Autowired @Qualifier("dog1") private Dog dog; 比如像上述这种情况:在bean中存在多个类型为Dog的对象,且找不到dog这个名字,这时候可以通过@Qualifier("dog1")制定使用容器中名字为dog1的那个bean来注入!
javax原生 @Resrouce(),首先寻找类型,再去寻找名字!
7、使用注解开发
在Spring4之后,要使用注解开发必须要导入AOP包

导入context约束,加入注解支持
<?xml version="1.0" encoding="UTF-8"?> <beans xmlns="http://www.springframework.org/schema/beans" xmlns:xsi="http://www.w3.org/2001/XMLSchema-instance" xmlns:context="http://www.springframework.org/schema/context" xsi:schemaLocation="http://www.springframework.org/schema/beans https://www.springframework.org/schema/beans/spring-beans.xsd http://www.springframework.org/schema/context https://www.springframework.org/schema/context/spring-context.xsd"> <context:annotation-config/> </beans>
7.1、bean
@Component
一般放在类上,说明这个类被Spring托管了
7.2、属性如何注入
package com.reliable.y; import org.springframework.beans.factory.annotation.Value; import org.springframework.stereotype.Component; //@Component 注解 这是一个组件 @Component public class User { public String name; @Value("靠谱杨") public void setName(String name) { this.name = name; } }
7.3、衍生的注解(放在类上)
@Component 有几个衍生注解,我们在web开发中会按照MVC三成架构分层!
-
dao【@Repository】
-
service【@Service】
-
controller (servlet)【@Controller】
这四个注解功能是一样的,都是代码把对应的类加载到容器中
7.4、自动装配属性(放在属性上)
@Autowired:自动装配通过类型名字,如果不能唯一装配,则需要通过@Qualifier(value=“ xxx ”)制定id!
@Nullable:说明这个字段可以为空!
@Resource:javax自动装配类型名字!
7.5、作用域
@Component @Scope("prototype") public class User { public String name; @Value("靠谱杨") public void setName(String name) { this.name = name; } }
7.6、小结
xml与注解:
- xml适用面广,维护简单方便
- 注解不是自己的类是用不了的,维护相对复杂
xml与注解的最佳实践:
-
xml管理bean,也就是xml文件下只有一个个bean
-
注解负责值的注入@Value(“ xxx ”)
-
注解生效:
<!--指定要扫描的包,这个包下面的注解就会生效--> <context:component-scan base-package="com.reliable"></context:component-scan> <context:annotation-config/>
8、使用Java的方式配置Spring
8.1、实体类:
package com.reliable.y; import org.springframework.beans.factory.annotation.Value; import org.springframework.stereotype.Component; //@Component 说明这个被被Spring接管,注册到了容器中 @Component public class User { private String name; @Override public String toString() { return "com.reliable.y.User{" + "name='" + name + '\'' + '}'; } public String getName() { return name; } @Value("靠谱杨") public void setName(String name) { this.name = name; } }
8.2、配置文件类:
package com.reliable.config; import com.reliable.y.User; import org.springframework.context.annotation.Bean; import org.springframework.context.annotation.ComponentScan; import org.springframework.context.annotation.Configuration; //YConfig 也会被Spring托管 @Configuration //@Configuration 代表这是一个配置类,就和之前看的beans.xml是一样的 @ComponentScan("com.reliable") public class YConfig { /* 1.这里注册了一个bean,相当于一组bean标签 2.方法的名字相当于之前bean标签里的id 3.方法的返回值相当于bean标签中的class */ @Bean public User getUser(){ return new User(); //要注入到bean的对象 } }
8.3、测试类:
import com.reliable.config.YConfig; import com.reliable.y.User; import org.springframework.context.annotation.AnnotationConfigApplicationContext; public class Test06 { public static void main(String[] args) { //如果完全使用配置类方法去做,就要使用AnnotationConfigApplicationContext去获取对象加载 AnnotationConfigApplicationContext context = new AnnotationConfigApplicationContext(YConfig.class); User user = (User) context.getBean("getUser"); System.out.println(user.toString()); } }
三句话总结IoC:
- 所有的类都要放到bean中
- 每一个bean都是一个实例化的对象
- 所有的bean(对象)都要通过容器(ApplicationContext)去取
9、代理模式
代理模式是SpringAOP的底层!【SpringAOP和SpringMVC】
9.1、代理模式分类:
- 静态代理
- 动态代理
9.2、角色分析
举例:房东、中介、客户、和租房这件事
- 抽象角色:一般会使用接口或者抽象类来实现(租房这件事就是一个抽象角色类或者接口)、
package com.reliable.y; //租房 public interface Rent { public void rent(); }
- 真实角色:被代理的角色(房东)
package com.reliable.y; public class Host implements Rent { public void rent() { System.out.println("房东要出租房子!"); } }
- 代理角色:代理真是角色处理一些事情的角色(中介)
package com.reliable.y; public class Proxy implements Rent { private Host host; public Proxy(Host host) { this.host = host; } public Proxy(){} public void rent() { host.rent(); } //看房 public void seeHouse(){ System.out.println("中介带客户看房子!"); } //收中介费 public void fare(){ System.out.println("收中介费!"); } //签合同 public void makeht(){ System.out.println("签合同!"); } }
- 客户:访问代理角色的角色
package com.reliable.y; public class Client { public static void main(String[] args) { Host host = new Host(); //代理角色一般会比真实角色多一些操作 Proxy proxy = new Proxy(host); proxy.rent(); proxy.seeHouse(); proxy.fare(); proxy.makeht(); } }
9.3、静态代理模式的好处:
- 可以使真实角色的操作更加纯粹,不需要去关注一些公共业务
- 公共业务交给了代理角色,实现了业务分工
- 公共业务发生扩展的时候,方便集中管理
静态代理缺点:
- 一个真实角色就要产生一个代理角色,代码量大,开发效率变低
9.4、动态代理
- 和静态代理角色一样
- 动态代理类动态生成
- 分为两类:基于接口的动态代理,基于类的动态代理
- 基于接口 --- JDK
- 基于类 --- cglib
- Java字节码 --- javasist
Rent接口
package com.reliable.demo1; //抽象角色:租房 public interface Rent { public void rent(); }
真实角色:Host
package com.reliable.demo1; //真实角色: 房东,房东要出租房子 public class Host implements Rent{ public void rent() { System.out.println("房屋出租"); } }
动态获取代理类:
package com.reliable.demo1; import java.lang.reflect.InvocationHandler; import java.lang.reflect.Method; import java.lang.reflect.Proxy; public class ProxyInvocationHandler implements InvocationHandler { private Rent rent; public void setRent(Rent rent) { this.rent = rent; } //生成代理类,重点是第二个参数,获取要代理的抽象角色!之前都是一个角色,现在可以代理一类角色 public Object getProxy(){ return Proxy.newProxyInstance(this.getClass().getClassLoader(), rent.getClass().getInterfaces(),this); } // proxy : 代理类 method : 代理类的调用处理程序的方法对象. // 处理代理实例上的方法调用并返回结果 @Override public Object invoke(Object proxy, Method method, Object[] args) throws Throwable { seeHouse(); //核心:本质利用反射实现! Object result = method.invoke(rent, args); fare(); return result; } //看房 public void seeHouse(){ System.out.println("带房客看房"); } //收中介费 public void fare(){ System.out.println("收中介费"); } }
测试调用类:
package com.reliable.demo1; //租客 public class Client { public static void main(String[] args) { //真实角色 Host host = new Host(); //代理实例的调用处理程序 ProxyInvocationHandler pih = new ProxyInvocationHandler(); pih.setRent(host); //将真实角色放置进去! Rent proxy = (Rent)pih.getProxy(); //动态生成对应的代理类! proxy.rent(); } }
好看请赞,养成习惯:) 本文来自博客园,作者:靠谱杨, 转载请注明原文链接:https://www.cnblogs.com/rainbow-1/p/15491614.html
欢迎来我的51CTO博客主页踩一踩 我的51CTO博客
文章中的公众号名称可能有误,请统一搜索:靠谱杨的秘密基地


【推荐】国内首个AI IDE,深度理解中文开发场景,立即下载体验Trae
【推荐】编程新体验,更懂你的AI,立即体验豆包MarsCode编程助手
【推荐】抖音旗下AI助手豆包,你的智能百科全书,全免费不限次数
【推荐】轻量又高性能的 SSH 工具 IShell:AI 加持,快人一步
· 开发者必知的日志记录最佳实践
· SQL Server 2025 AI相关能力初探
· Linux系列:如何用 C#调用 C方法造成内存泄露
· AI与.NET技术实操系列(二):开始使用ML.NET
· 记一次.NET内存居高不下排查解决与启示
· 被坑几百块钱后,我竟然真的恢复了删除的微信聊天记录!
· 没有Manus邀请码?试试免邀请码的MGX或者开源的OpenManus吧
· 【自荐】一款简洁、开源的在线白板工具 Drawnix
· 园子的第一款AI主题卫衣上架——"HELLO! HOW CAN I ASSIST YOU TODAY
· Docker 太简单,K8s 太复杂?w7panel 让容器管理更轻松!
2020-10-31 数据库主键的含义