Spring框架之IoC( Inversion of Control )基础知识入门
1、IoC创建对象的方式
-
使用无参构造创建对象
-
假如要使用有参构造创建:
-
下标赋值constructor-arg
<!--有参-->
<bean id="User" class="com.reliable.pojo.User" >
    <constructor-arg index="0" value="靠谱杨"></constructor-arg>
</bean>
public User(String name){ System.out.println("User的有参构造!"); this.name=name; } -
通过类型type="java.lang.String"
<bean id="User" class="com.reliable.pojo.User" > <constructor-arg type="java.lang.String" value="靠谱杨"></constructor-arg> </bean>- 通过参数名name="name" value="reliable"
    <bean id="User" class="com.reliable.pojo.User" >
        <constructor-arg name="name" value="reliable"></constructor-arg>
    </bean>
总结:在配置文件加载的时候,Spring容器中管理的对象就已经初始化成功了!
-
2、Spring的配置
2.1、别名
    <!--别名-->
    <alias name="User" alias="new_user"></alias>
2.2、Bean的配置
<?xml version="1.0" encoding="UTF-8"?>
<beans xmlns="http://www.springframework.org/schema/beans"
xmlns:xsi="http://www.w3.org/2001/XMLSchema-instance"
xsi:schemaLocation="http://www.springframework.org/schema/beans
http://www.springframework.org/schema/beans/spring-beans.xsd">
<!--
类型 变量名 = new 类型();
Hello hello = new Hello();
bean就是java对象 , 由Spring创建和管理
bean = 一个对象
其中
id = 变量名
class = new的对象类型
property相当于给对象里的属性设置一个值
-->
<bean id="Hello" class="com.reliable.pojo.Hello">
<property name="name" value="Spring"/>
</bean>
<!-- 无参 -->
<!--<bean id="User" class="com.reliable.pojo.User">-->
<!--<property name="name" value="靠谱"></property>-->
<!--</bean>-->
<!--有参第一种,index-->
<!--<bean id="User" class="com.reliable.pojo.User" >
<constructor-arg index="0" value="靠谱杨"></constructor-arg>
</bean>-->
<!-- 2 类型-->
<!-- <bean id="User" class="com.reliable.pojo.User" >
<constructor-arg type="java.lang.String" value="靠谱杨"></constructor-arg>
</bean>-->
<!-- 3 参数名字 -->
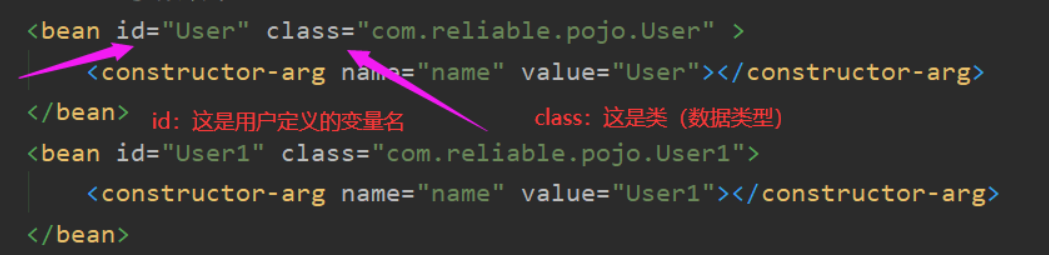
<bean id="User" class="com.reliable.pojo.User" >
<constructor-arg name="name" value="User"></constructor-arg>
</bean>
<bean id="User1" class="com.reliable.pojo.User1">
<constructor-arg name="name" value="User1"></constructor-arg>
</bean>
<!--别名 如果添加的别名 都可以使用-->
<alias name="User" alias="new_user"></alias>
</beans>

2.3、import
一般用于团队开发使用,可以将多个配置文件导入合并为一个
    <!--import -->
    <import resource="beans1.xml"></import>
3、依赖注入(DI)
3.1 构造器注入
- 依赖注入:Set注入
- 依赖:bean对象的创建依赖于容器
- 注入:bean对象中的所有属性,由容器来注入!
3.2、Set方式注入【重点】
- 复杂类型
public class Address {
	private String address;
	public String getAddress() {
		return address;
	}
	public void setAddress(String address) {
		this.address = address;
	}
}
- 实体对象
import java.util.*;

public class Student {
	public String getName() {
		return name;
	}

	public Address getAddress() {
		return address;
	}

	public String[] getBooks() {
		return books;
	}

	public List<String> getHobbies() {
		return hobbies;
	}

	public Map<String, String> getCard() {
		return card;
	}

	public Set<String> getGames() {
		return games;
	}

	public String getWife() {
		return wife;
	}

	public Properties getInfo() {
		return info;
	}
	private String name;
	private Address address;
	private String[] books;
	private List<String> hobbies;
	private Map<String,String> card;
	private Set<String> games;
	private String wife;
	private Properties info;
	public void setName(String name) {
		this.name = name;
	}
	public void setAddress(Address address) {
		this.address = address;
	}
	public void setBooks(String[] books) {
		this.books = books;
	}
	public void setHobbies(List<String> hobbies) {
		this.hobbies = hobbies;
	}
	public void setCard(Map<String, String> card) {
		this.card = card;
	}
	public void setGames(Set<String> games) {
		this.games = games;
	}
	public void setWife(String wife) {
		this.wife = wife;
	}
	public void setInfo(Properties info) {
		this.info = info;
	}

	@Override
	public String toString() {
		return "Student{" +
				"name='" + name + '\'' +
				", address=" + address +
				", books=" + Arrays.toString(books) +
				", hobbies=" + hobbies +
				", card=" + card +
				", games=" + games +
				", wife='" + wife + '\'' +
				", info=" + info +
				'}';
	}
	//show方法
	public void show(){
		System.out.println("name="+ name
				+ ",address="+ address.getAddress()
				+ ",books="
		);
		for (String book:books){
			System.out.print("<<"+book+">>\t");
		}
		System.out.println("\n爱好:"+ hobbies);
		System.out.println("card:"+card);
		System.out.println("games:"+games);
		System.out.println("wife:"+wife);
		System.out.println("info:"+info);
	}
}
xml配置文件

<?xml version="1.0" encoding="UTF-8"?>
<beans xmlns="http://www.springframework.org/schema/beans"
       xmlns:xsi="http://www.w3.org/2001/XMLSchema-instance"
       xsi:schemaLocation="http://www.springframework.org/schema/beans
        http://www.springframework.org/schema/beans/spring-beans.xsd">
    <bean id="Address" class="com.kuang.pojo.Address">
        <property name="address" value="石家庄"></property>
    </bean>
    <bean id="Student" class="com.kuang.pojo.Student">
        <!-- 第一种:普通值注入 -->
        <property name="name" value="杨传伟"></property>
        <!-- 第二种:ref注入 -->
        <property name="address" ref="Address"></property>
        <!-- 第三种:数组注入 -->
        <property name="books">
            <array>
                <value>《红楼梦》</value>
                <value>《西游记》</value>
                <value>《水浒传》</value>
                <value>《三国演义》</value>
            </array>
        </property>
        <!-- 第四种:List注入 -->
        <property name="hobbies">
            <list>
                <value>听音乐</value>
                <value>看电影</value>
                <value>敲代码</value>
                <value>摄影</value>
            </list>
        </property>

        <!-- 第五种:Map注入 -->

        <property name="card">
            <map>
                <entry key="IDcard" value="1234567"></entry>
                <entry key="STcard" value="7654321"></entry>
            </map>
        </property>
        <!-- 第六种:Set注入 -->
        <property name="games">
            <set>
                <value>跑跑卡丁车官方竞速版</value>
                <value>王者荣耀</value>
            </set>
        </property>

        <!-- 第七种:设置空值 -->
        <property name="wife">
            <null></null>
        </property>

        <!--properties-->
        <property name="info">
            <props>
                <prop key="学号">20194074</prop>
                <prop key="性别">男</prop>
                <prop key="姓名">杨传伟</prop>
                <prop key="username">reliable</prop>
                <prop key="userpass">resetpass01</prop>
            </props>
        </property>
    </bean>
</beans>
3.3、拓展方式注入
使用p命名空间和c命名空间
使用:
package com.kuang.pojo;

public class User {
	private String name;
	private int age;

	public User(String name,int age) {
		this.name = name;
		this.age=age;
	}
	public User(){};
	public String getName() {
		return name;
	}
	public void setName(String name) {
		this.name = name;
	}

	public int getAge() {
		return age;
	}

	public void setAge(int age) {
		this.age = age;
	}

	@Override
	public String toString() {
		return "User{" +
				"name='" + name + '\'' +
				", age=" + age +
				'}';
	}
}
配置文件:
<?xml version="1.0" encoding="UTF-8"?>
<beans xmlns="http://www.springframework.org/schema/beans"
       xmlns:xsi="http://www.w3.org/2001/XMLSchema-instance"
       xmlns:p="http://www.springframework.org/schema/p"
       xmlns:c="http://www.springframework.org/schema/c"
       xsi:schemaLocation="http://www.springframework.org/schema/beans
        http://www.springframework.org/schema/beans/spring-beans.xsd">
    <!--P(属性: properties)命名空间 , 属性依然要设置set方法-->
    <bean id="user" class="com.kuang.pojo.User" p:name="靠谱" p:age="21"/>
    <!--C(构造: Constructor)命名空间 , 属性依然要设置set方法-->
    <bean id="user2" class="com.kuang.pojo.User" c:name="狂神" c:age="18"/>
</beans>
测试:
	public void test2(){
		ApplicationContext context=new ClassPathXmlApplicationContext("beans03.xml");
		User user = context.getBean("user", User.class);
		System.out.println(user);
		User user2 = context.getBean("user2", User.class);
		System.out.println(user2);
	}

注意
要引入c和p命名空间:
xmlns:p="http://www.springframework.org/schema/p"
xmlns:c="http://www.springframework.org/schema/c"
好看请赞,养成习惯:) 本文来自博客园,作者:靠谱杨, 转载请注明原文链接:https://www.cnblogs.com/rainbow-1/p/15486641.html
欢迎来我的51CTO博客主页踩一踩 我的51CTO博客
文章中的公众号名称可能有误,请统一搜索:靠谱杨的秘密基地

 浙公网安备 33010602011771号