e3商城
项目架构
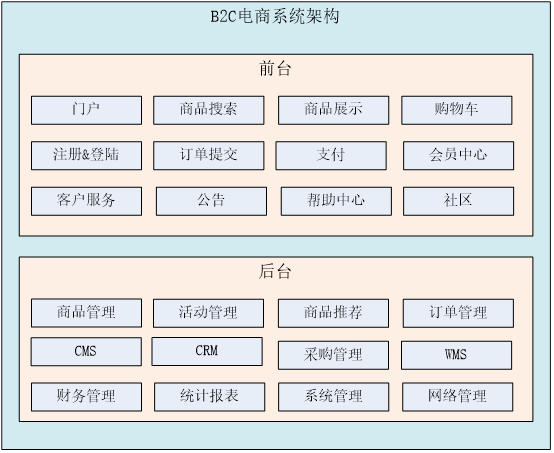
前后台功能列表
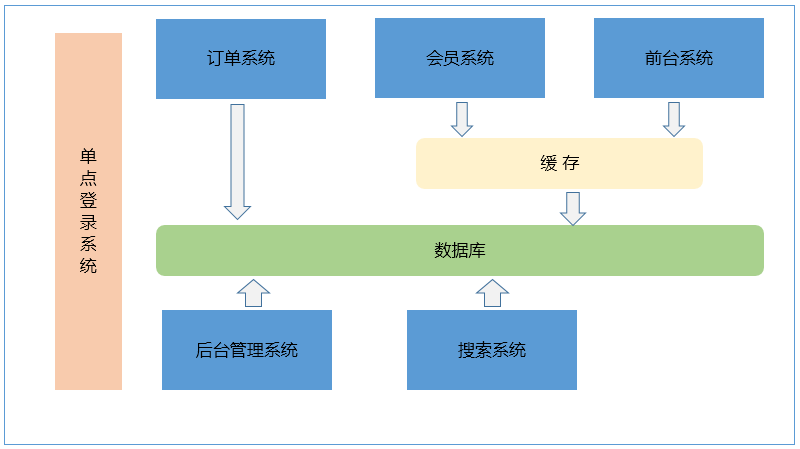
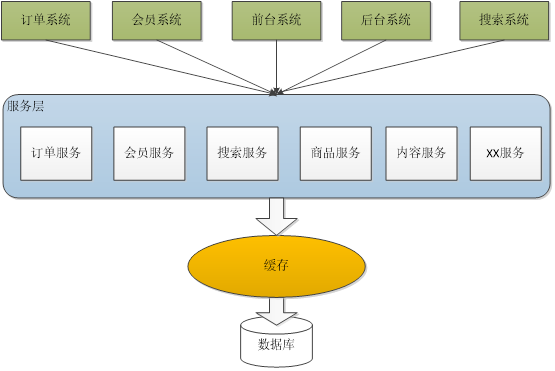
分布式架构以解决高并发,并发量高、需要快速响应的,就用缓存。也就是强行把系统分成多个子系统了,而处理业务时需要调相同的服务,于是需要SOA.
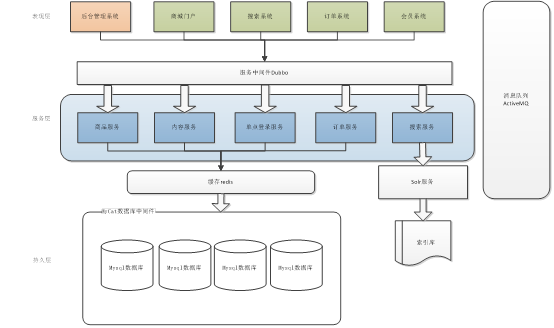
基于SOA的架构以解决各独立子系统调用相同的服务,dubbo因此而来(基于socket,效率高,仅支持Java),调友商的接口用webservice
最终架构
Maven工程结构
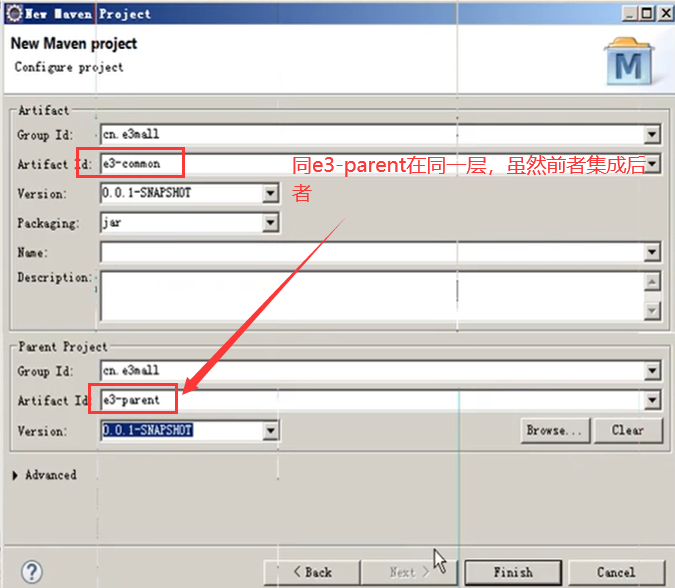
e3-parent:父工程,打包方式pom,管理jar包的版本号。
        |       项目中所有工程都应该继承父工程。
	|--e3-common:通用的工具类通用的pojo。打包方式jar
	|--e3-manager:服务层工程。聚合工程。Pom工程(注意,这个工程也是一个聚合工程)
		|--e3-manager-dao:打包方式jar
		|--e3-manager-pojo:打包方式jar
		|--e3-manager-interface:打包方式jar
		|--e3-manager-service:打包方式:jar
			|--e3-manager-web:表现层工程。打包方式war
e3-parent工程中的pom.xml中
<dependencyManagement>
    <dependencies>
        <dependency>
            <groupId>joda-time</groupId>
            <artifactId>joda-time</artifactId>
            <version>${joda-time.version}</version>
        </dependency>
        ……
        <dependency>
            <groupId>org.apache.commons</groupId>
            <artifactId>commons-lang3</artifactId>
            <version>${commons-lang3.version}</version>
        </dependency>
    </dependencies>
</dependencyManagement>
dependencyManagement标签中的内容仅仅是对jar包版本号进行管理,并非在此添加jar依赖
e3-common工程中的
<dependencies>
    <dependency>
        <groupId>joda-time</groupId>
        <artifactId>joda-time</artifactId>
    </dependency>
    ……
    <dependency>
        <groupId>org.slf4j</groupId>
        <artifactId>slf4j-log4j12</artifactId>
    </dependency>
</dependencies>
如上依赖,这些jar可以被传递到引用了此e3-common工程的其他工程中(另外,父工程的pom.xml中已经将版本号锁死了)
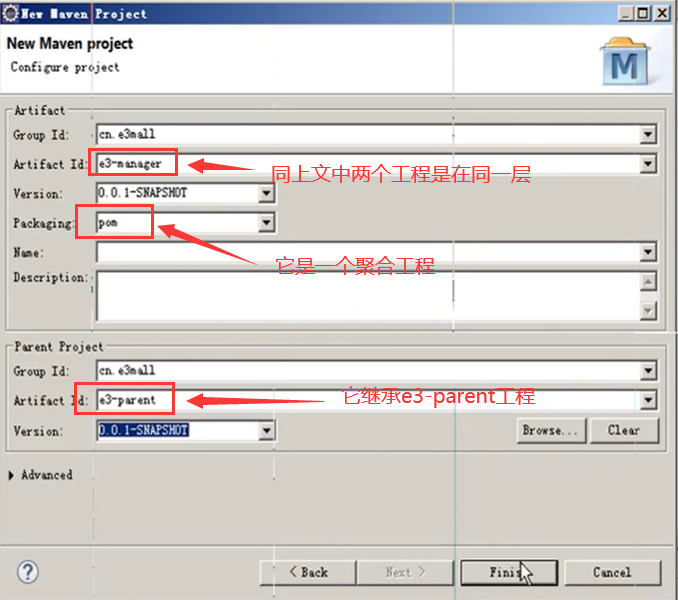
注意,这个e3-manager工程并没有继承e3-common工程,而是同样继承的e3-parent这个聚合工程,只不过,在e3-manager的pom.xml中,引用了e3-common工程,使得e3-manager的所有子工程也都依赖了e3-common。
<dependencies>
    <dependency>
        <groupId>cn.e3mall</groupId>
        <artifactId>e3-common</artifactId>
        <version>0.0.1-SNAPSHOT</version>
    </dependency>
</dependencies>
剩下的那一堆工程,就不过是e3-manager工程的module模块工程了
从底层的工程开始看(maven工程install就从被依赖的工程开始install),e3-manager-dao工程中需要


<dependencies>
    <dependency>
        <groupId>cn.e3mall</groupId>
        <artifactId>e3-manager-pojo</artifactId>
        <version>0.0.1-SNAPSHOT</version>
    </dependency>
    <!-- Mybatis -->
    <dependency>
        <groupId>org.mybatis</groupId>
        <artifactId>mybatis</artifactId>
    </dependency>
    <dependency>
        <groupId>org.mybatis</groupId>
        <artifactId>mybatis-spring</artifactId>
    </dependency>
    <dependency>
        <groupId>com.github.miemiedev</groupId>
        <artifactId>mybatis-paginator</artifactId>
    </dependency>
    <dependency>
        <groupId>com.github.pagehelper</groupId>
        <artifactId>pagehelper</artifactId>
    </dependency>
    <!-- MySql -->
    <dependency>
        <groupId>mysql</groupId>
        <artifactId>mysql-connector-java</artifactId>
    </dependency>
    <!-- 连接池 -->
    <dependency>
        <groupId>com.alibaba</groupId>
        <artifactId>druid</artifactId>
    </dependency>
</dependencies>
接口工程e3-manager-interface中需要依赖
<dependencies>
    <dependency>
        <groupId>cn.e3mall</groupId>
        <artifactId>e3-manager-pojo</artifactId>
        <version>0.0.1-SNAPSHOT</version>
    </dependency>
</dependencies>
服务层工程e3-manager-service依赖的包如下
<dependencies>
    <dependency>
        <groupId>cn.e3mall</groupId>
        <artifactId>e3-manager-dao</artifactId>
        <version>0.0.1-SNAPSHOT</version>
    </dependency>
    <dependency>
        <groupId>cn.e3mall</groupId>
        <artifactId>e3-manager-interface</artifactId>
        <version>0.0.1-SNAPSHOT</version>
    </dependency>
    <!-- Spring -->
    <dependency>
        <groupId>org.springframework</groupId>
        <artifactId>spring-context</artifactId>
    </dependency>
    <dependency>
        <groupId>org.springframework</groupId>
        <artifactId>spring-beans</artifactId>
    </dependency>
    <dependency>
        <groupId>org.springframework</groupId>
        <artifactId>spring-webmvc</artifactId>
    </dependency>
    <dependency>
        <groupId>org.springframework</groupId>
        <artifactId>spring-jdbc</artifactId>
    </dependency>
    <dependency>
        <groupId>org.springframework</groupId>
        <artifactId>spring-aspects</artifactId>
    </dependency>
    <dependency>
        <groupId>org.springframework</groupId>
        <artifactId>spring-jms</artifactId>
    </dependency>
    <dependency>
        <groupId>org.springframework</groupId>
        <artifactId>spring-context-support</artifactId>
    </dependency>
</dependencies>
(dao,interface,spring)
表现层工程e3-manager-web依赖
<dependencies>
    <dependency>
        <groupId>cn.e3mall</groupId>
        <artifactId>e3-manager-service</artifactId>
        <version>0.0.1-SNAPSHOT</version>
    </dependency>
    <!-- JSP相关 -->
    <dependency>
        <groupId>jstl</groupId>
        <artifactId>jstl</artifactId>
    </dependency>
    <dependency>
        <groupId>javax.servlet</groupId>
        <artifactId>servlet-api</artifactId>
        <scope>provided</scope>
    </dependency>
    <dependency>
        <groupId>javax.servlet</groupId>
        <artifactId>jsp-api</artifactId>
        <scope>provided</scope>
    </dependency>
</dependencies>
启动(运行e3-manager这个聚合工程,而不建议运行e3-manager-web这个子工程(这样不用每次install))
<!--e3-manager中需要配置tomcat插件 -->
<build>
    <plugins>
        <plugin>
            <groupId>org.apache.tomcat.maven</groupId>
            <artifactId>tomcat7-maven-plugin</artifactId>
            <configuration>
                <path>/</path>
                <port>8080</port>
            </configuration>
        </plugin>
    </plugins>
</build>
(E:\repository\com\github\pagehelper\pagehelper\3.4.2-fix中pagehelper-3.4.2-fix.jar见百度云)
(用aliyun中央仓库好使)
先install e3-parent,其次install e3-common,最后e3-manager-->run as-->maven build-->clean tomcat7:run
直到“信息: Starting ProtocolHandler ["http-bio-8080"]”
整合SSM
mybatis逆向工程(导入项目generatorSqlmapCustom,见GitHub)
准备好各配置文件,最好配置好约束,以免每次启动联网。
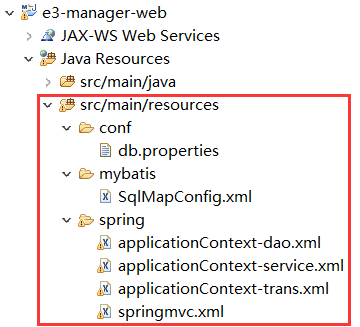
mybatis配置文件SqlMapConfig.xml:仅有头
spring配置文件applicationContext-dao.xml:加载db.properties,数据库连接池,让spring管理sqlsessionfactory;
applicationContext-service.xml:配置包扫描器
applicationContext-trans.xml:配置事务管理器,通知,切面
springmvc.xml:包扫描,注解驱动,视图解析器
web.xml:加载spring容器,post乱码过滤器,加载springmvc的前端控制器
Zookeeper注册中心
(redis其实也可以做)
最新版本安装失败
logs下.out文件显示
Error: Could not find or load main class org.apache.zookeeper.server.quorum.QuorumPeerMain
换到zookeeper-3.4.6.tar.gz老版本安装成功
安装
tar -zxvf zookeeper-3.4.6.tar.gz -C /usr/local
配置
cp zoo_sample.cfg zoo.cfg
mkdir data
修改配置文件内容/usr/local/zookeeper-3.4.6/data
开启端口(需重启)
2181
启动
启动命令:./bin/zkServer.sh start
停止命令:./bin/zkServer.sh stop
重启命令:./bin/zkServer.sh restart
查看状态:./bin/zkServer.sh status
如果启动不成功,删除data目录下的文件
44499端口应该是zk开启的(有一个伴随zk启动的端口号)
zookeeper集群,后面搭solr集群时搭建,主要信息:
https://www.bilibili.com/video/BV1Ms41137cQ?p=4

/usr/local/solr-cloud/zookeeper01/data
/usr/local/solr-cloud/zookeeper02/data
/usr/local/solr-cloud/zookeeper03/data

myid

2181-2183(其他端口不需要开启)

server.1=localhost:2881:3881(搞死人,单机伪集群必须填localhost)
server.2=localhost:2882:3882
server.3=localhost:2883:3883

cd zookeeper01/bin
./zkServer.sh start
cd ../../
cd zookeeper02/bin
./zkServer.sh start
cd ../../
cd zookeeper03/bin
./zkServer.sh start
cd ../../

chmod u+x start-all.sh
chmod u+x stop-all.sh

zookeeper02/bin/zkServer.sh status测试
出问题查看bin目录下的zookeeper.out
将工程改造为SOA架构
(基于服务,服务中间件为dubbo(直接传Java对象))
将e3-manager-web工程从e3-manager工程中提出来,单独作为一个工程(操作是
- 直接把工程拷出来与e3-manager同级,
- 再将pom.xml中的<module>e3-manager-web</module>移除(剩下的pojo,dao,interface,service聚合工程必须要有一个war包,于是将service改造成war(<packaging>war</packaging>,添加web.xml,将e3-manager-web中的配置文件拷来(springmvc不要))),
- e3-manager-web的pom.xml父工程改为e3-parent,依赖的e3-manager-service改为interface,把spring相关依赖拷过来,
具体见项目(最终目的就是将服务的提供与调用分离开,中间搞个dubbo))
pom.xml依赖(发布服务者与订阅服务者都要)
<!-- dubbo相关 -->
<dependency>
    <groupId>com.alibaba</groupId>
    <artifactId>dubbo</artifactId>
    <exclusions>
        <exclusion>
            <groupId>org.springframework</groupId>
            <artifactId>spring</artifactId>
        </exclusion>
        <exclusion>
            <groupId>org.jboss.netty</groupId>
            <artifactId>netty</artifactId>
        </exclusion>
    </exclusions>
</dependency>
<dependency>
    <groupId>org.apache.zookeeper</groupId>
    <artifactId>zookeeper</artifactId>
</dependency>
<dependency>
    <groupId>com.github.sgroschupf</groupId>
    <artifactId>zkclient</artifactId>
</dependency>
发布服务
<!-- 使用dubbo发布服务 -->
<!-- 提供方应用信息,用于计算依赖关系 -->
<dubbo:application name="e3-manager" />
<dubbo:registry protocol="zookeeper" address="xxx.xxx.xxx.xxx:2181" />
<!-- 用dubbo协议在20880端口暴露服务 -->
<dubbo:protocol name="dubbo" port="20880" />
<!-- 声明需要暴露的服务接口 -->
<dubbo:service interface="cn.e3mall.service.ItemService" ref="itemServiceImpl" timeout="600000"/>
订阅服务
<!-- 引用dubbo服务 -->
<dubbo:application name="e3-manager-web"/>
<dubbo:registry protocol="zookeeper" address="xxx.xxx.xxx.xxx:2181"/>
<dubbo:reference interface="cn.e3mall.service.ItemService" id="itemService" />
(并且需要添加约束)
逼良为娼,调云主机上注册中心不得行。本地的虚拟机安装centos7(root/root)
①virtualbox释放鼠标:右边的alt+ctrl
②ping baidu.com 报name or service not known(virtualbox太小众了,问题真烦)
解决方法
1、添加DNS服务器
vi /etc/resolv.conf
进入编辑模式,增加如下两行内容,分别是首选DNS服务器和备选DNS服务器。(可以自己选择DNS服务器,包括谷歌的8.8.8.8或者腾讯的119.29.29.29都是可以的)
nameserver 114.114.114.114
nameserver 114.114.114.115
保存退出。测试一下,如果还是报错,请继续下一步。
2、修改如下配置文件(这个文件名称不同的客户端可能会不同)
vi /etc/sysconfig/network-scprits/ifcfg-enp0s3
将ONBOOT=no 改成 ONBOOT=yes
保存退出,重启网络
service network restart
再进行测试,问题解决。
③ifconfig命令用不了,yum install net-tools解决
④virtualbox本地ping不通虚拟机IP:192.168.1.8(改成桥接模式得以解决)
⑤关闭防火墙
查看防火墙状态
firewall-cmd --state
停止firewall
systemctl stop firewalld.service
禁止firewall开机启动
systemctl disable firewalld.service
⑥继续报错(是因为没有装Java环境)
[root@192 zookeeper-3.4.6]# ./bin/zkServer.sh status
JMX enabled by default
Using config: /usr/local/zookeeper-3.4.6/bin/../conf/zoo.cfg
Error contacting service. It is probably not running.
⑦eclipse中项目还是启动不了(奇怪地址还是云主机的地址,都重新install一百遍了,解决方法如下图,重新配置(e3-manager-service或e3-manager)以及e3-manager-web)
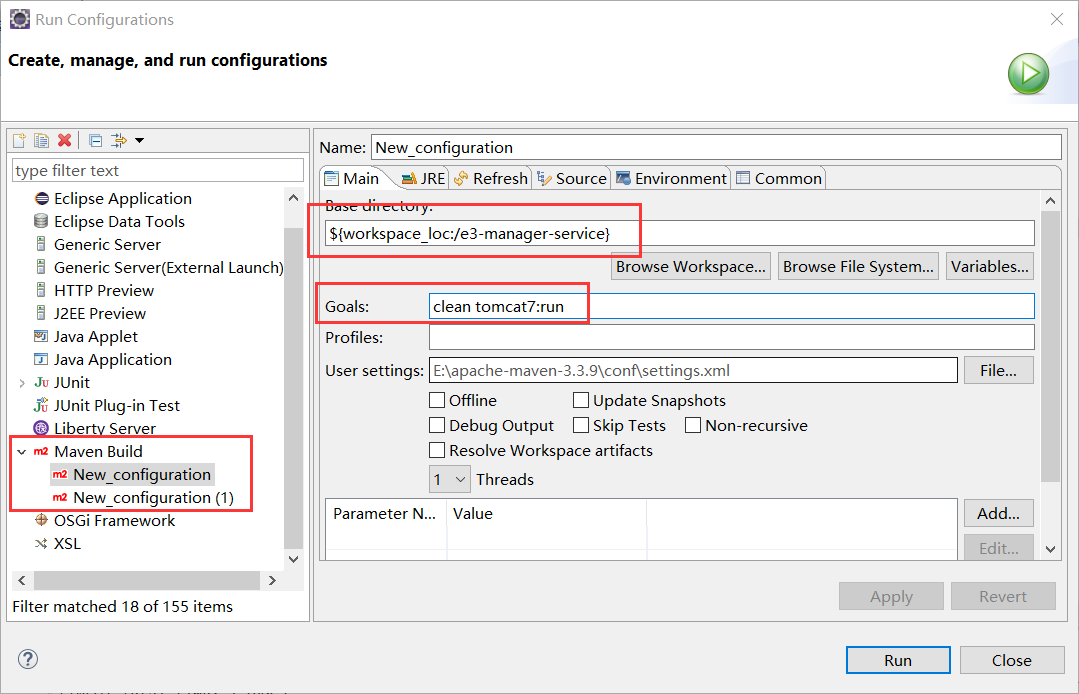
说明之前在云主机上配置的注册zookeeper的套路是没有问题的,就是上面⑦的问题!!
http://localhost:8081/item/679532
重新配置回到云主机,果然可以正常启动!!就是⑦!!冤枉啊!绕了一大圈!!
(不过有个问题,这个zk服务器在项目中又没有配置密码,怎么就能为项目服务)
监控中心
推荐将监控中心和注册中心安装在同一台服务器上,这样就不需要做任何配置
具体操作:
在安装zk的服务器上,装一个tomcat,将dubbo-admin-2.5.4.war部署启动
访问http://xxx.xxx.xxx.xxx:8080/dubbo-admin
root/root
就可以看到服务,提供者,消费者和应用了!
PageHelper分页插件
(如果用到了mybatis那就可以用这个插件实现分页,but不支持SQL server)
此项目中,该插件,被稍微做了一下改动,变为3.4.2-fix
https://github.com/ChenCurry/pagehelper.git
然后配置/e3-manager-service/src/main/resources/mybatis/SqlMapConfig.xml
测试类PageHelperTest
public class PageHelperTest {

    @Test
    public void testPageHelper() throws Exception {
        //初始化spring容器
        ApplicationContext applicationContext = new ClassPathXmlApplicationContext("classpath:spring/applicationContext-dao.xml");
        //从容器中获得Mapper代理对象
        TbItemMapper itemMapper = applicationContext.getBean(TbItemMapper.class);
        //执行sql语句之前设置分页信息使用PageHelper的startPage方法。
        PageHelper.startPage(1, 10);
        //执行查询
        TbItemExample example = new TbItemExample();
        List<TbItem> list = itemMapper.selectByExample(example);
        //取分页信息,PageInfo。1、总记录数2、总页数 。当前页码
        PageInfo<TbItem> pageInfo = new PageInfo<>(list);
        System.out.println(pageInfo.getTotal());
        System.out.println(pageInfo.getPages());
        System.out.println(list.size());
    }
}
(插曲:/e3-manager-service/src/main/resources目录下需要添加log4j.properties,进而发现是数据库连接字符串有误导致项目maven install报错,法克!)
Nginx
新一天的代码导进来,需要修改的地方:dubbo服务提供者与消费者注册配置。
安装Nginx,在如下默认配置的前提下启动,访问http://xxx.xxx.xxx.xxx/会进入欢迎页面
#默认配置
server {
	listen       80;
	server_name  localhost;

	location / {
		root   html;
		index  index.html index.htm;
	}

	error_page   500 502 503 504  /50x.html;
	location = /50x.html {
		root   html;
	}
}
nginx默认占用80端口
https://www.bilibili.com/video/BV1Ks41137CZ?p=12(配置规则讲的很详细!)
FastDFS图片服务器
https://www.bilibili.com/video/BV1Ks41137bX?p=2
需要fastdfs_client-1.25.jar这个jar包(中央仓库上没有)
主要是安装fastdfs,安装好后效果如下
应用见工具类FastDFSClient
Portal门户系统&Content内容管理
继续增加分布式的系统
(Controller指的是类,Handler指的是方法)
e3-portal-web实际就是从e3-manager-web工程就行拷贝,一样的套路
内容管理是e3-manager-web中调门户提供内容管理服务(e3-content聚合工程仅需要e3-content-interface和e3-content-service,dao和pojo可以引用e3-manager的即可)

需要注意,该工程dubbo的端口不一样
<!-- 用dubbo协议在20880端口暴露服务 -->
<dubbo:protocol name="dubbo" port="20881" />
e3-manager-dao工程下TbContentCategoryMapper.xml中有一波如下操作
<insert id="insert" parameterType="cn.e3mall.pojo.TbContentCategory" >
<selectKey keyProperty="id" resultType="long" order="AFTER">
    select last_insert_id()
</selectKey>
insert into tb_content_category (id, parent_id, name,
  status, sort_order, is_parent,
  created, updated)
values (#{id,jdbcType=BIGINT}, #{parentId,jdbcType=BIGINT}, #{name,jdbcType=VARCHAR},
  #{status,jdbcType=INTEGER}, #{sortOrder,jdbcType=INTEGER}, #{isParent,jdbcType=BIT},
  #{created,jdbcType=TIMESTAMP}, #{updated,jdbcType=TIMESTAMP})
</insert>
意味着在service中执行完了插入contentCategoryMapper.insert(contentCategory);,对象中就拥有了id属性
Redis
(单机安装,装了这玩意容易招挖矿病毒)
卸载
ps aux|grep redis
redis-cli shutdown
whereis redis
find / -name redis
rm -rf redis*
下载
-bash: wget: command not found
yum remove wget
yum install -y wget
wget http://download.redis.io/releases/redis-6.0.4.tar.gz
tar -zxvf redis-6.0.4.tar.gz
cd edis-6.0.4
准备编译环境
yum install gcc
gcc -v(版需要在5.3以上,解决方法:升级到5.3以上版本,依次执行命令)
yum -y install centos-release-scl
yum -y install devtoolset-9-gcc devtoolset-9-gcc-c++ devtoolset-9-binutils
scl enable devtoolset-9 bash
echo "source /opt/rh/devtoolset-9/enable" >>/etc/profile  --使永久生效
编译
make
make distclean(清理掉上一步编译产生的文件)
yum install tcl -y
make
安装(进入src目录安装)
make install PREFIX=/usr/local/redis
开启端口6379
cd /usr/local/redis/bin
./redis-server(前端启动,不推荐)
配置
复制源目录根目录下的redis.conf文件到生成的/usr/local/redis目录下
cp redis.conf /usr/local/redis
编辑redis.conf
bind 0.0.0.0  设置绑定的主机ip,0.0.0.0表示监听所有地址  后话 #注掉
protected-mode no  关闭安全模式,允许外网访问
daemonize yes  后台启动
启动/关闭
进入redis根目录,启动时指定配置文件
./bin/redis-server redis.conf
./bin/redis-cli -a root shutdown
./bin/redis-cli -a '' shutdown
./bin/redis-cli shutdown
./bin/redis-cli
auth ""
auth root
config get requirepass
config set requirepass root
config set requirepass ''
或修改配置文件设置密码requirepass root
使用redis工具或API远程访问
客户端一直连接不上 telnet xxx.x.xx.xx 6379
发现端口没有开启成功,搞死我了!
单机版搭建over!
https://www.cnblogs.com/liupenglong/p/13074209.html
基本操作
[root@10-9-48-229 bin]# ./redis-cli
127.0.0.1:6379> ping
PONG
127.0.0.1:6379> set str1 abc
OK
127.0.0.1:6379> get str1
"abc"
127.0.0.1:6379> keys*
(error) ERR unknown command `keys*`, with args beginning with:
127.0.0.1:6379> keys *
1) "str1"
127.0.0.1:6379> incr key1
(integer) 1
127.0.0.1:6379> keys *
1) "key1"
2) "str1"
127.0.0.1:6379> incr key1
(integer) 2
127.0.0.1:6379> incr key1
(integer) 3
127.0.0.1:6379> incr key1
(integer) 4
127.0.0.1:6379> decr key1
(integer) 3
127.0.0.1:6379> decr key1
(integer) 2
127.0.0.1:6379> decr key1
(integer) 1
127.0.0.1:6379> decr key1
(integer) 0
127.0.0.1:6379> decr key1
(integer) -1
127.0.0.1:6379> decr key1
(integer) -2
127.0.0.1:6379> get key1
"-2"
127.0.0.1:6379> set key2 abc
OK
127.0.0.1:6379> incr key2
(error) ERR value is not an integer or out of range
127.0.0.1:6379> del key2
(integer) 1
127.0.0.1:6379> keys *
1) "key1"
2) "str1"
127.0.0.1:6379> hset hash1 field1 1
(integer) 1
127.0.0.1:6379> hget hash1 field1
"1"
127.0.0.1:6379> hset hash1 field2
(error) ERR wrong number of arguments for 'hset' command
127.0.0.1:6379> hset hash1 field2 2
(integer) 1
127.0.0.1:6379> hset hash1 field3 a
(integer) 1
127.0.0.1:6379> keys *
1) "hash1"
2) "key1"
3) "str1"
127.0.0.1:6379> hkeys hash1
1) "field1"
2) "field2"
3) "field3"
127.0.0.1:6379> hvals hash1
1) "1"
2) "2"
3) "a"
127.0.0.1:6379> hgetall hash1
1) "field1"
2) "1"
3) "field2"
4) "2"
5) "field3"
6) "a"
127.0.0.1:6379> hdel hash1 field2
(integer) 1
127.0.0.1:6379> hgetall hash1
1) "field1"
2) "1"
3) "field3"
4) "a"
127.0.0.1:6379> lpush list1 1 2 3 4 5
(integer) 5
127.0.0.1:6379> rpush list1 a b c d e
(integer) 10
127.0.0.1:6379> lrange list1
(error) ERR wrong number of arguments for 'lrange' command
127.0.0.1:6379> lrange list1 0 -1
 1) "5"
 2) "4"
 3) "3"
 4) "2"
 5) "1"
 6) "a"
 7) "b"
 8) "c"
 9) "d"
10) "e"
127.0.0.1:6379> lpop list1
"5"
127.0.0.1:6379> lrange list1 0 -1
1) "4"
2) "3"
3) "2"
4) "1"
5) "a"
6) "b"
7) "c"
8) "d"
9) "e"
127.0.0.1:6379> rpop list1
"e"
127.0.0.1:6379> lrange list1 0 -1
1) "4"
2) "3"
3) "2"
4) "1"
5) "a"
6) "b"
7) "c"
8) "d"
127.0.0.1:6379> sadd set1 a b c d
(integer) 4
127.0.0.1:6379> sadd set1 a b c d a b
(integer) 0
127.0.0.1:6379> srem set1 a
(integer) 1
127.0.0.1:6379> smembers set1
1) "d"
2) "b"
3) "c"
127.0.0.1:6379> sadd seta a b c d e
(integer) 5
127.0.0.1:6379> sadd setb c d e f g
(integer) 5
127.0.0.1:6379> sdiff seta setb
1) "b"
2) "a"
127.0.0.1:6379> sdiff setb seta
1) "g"
2) "f"
127.0.0.1:6379> sinter seta setb
1) "d"
2) "e"
3) "c"
127.0.0.1:6379> sunion seta setb
1) "f"
2) "d"
3) "g"
4) "b"
5) "e"
6) "c"
7) "a"
127.0.0.1:6379> zadd zsert1 1 a 2 b 3 c 4 d 5 e
(integer) 5
127.0.0.1:6379> zrange zsert1 0 -1
1) "a"
2) "b"
3) "c"
4) "d"
5) "e"
127.0.0.1:6379> zrem zsert1 a
(integer) 1
127.0.0.1:6379> zrange zsert1 0 -1
1) "b"
2) "c"
3) "d"
4) "e"
127.0.0.1:6379> zrevrange zsert1 0 -1
1) "e"
2) "d"
3) "c"
4) "b"
127.0.0.1:6379> zrevrange zsert1 0 -1 withscores
1) "e"
2) "5"
3) "d"
4) "4"
5) "c"
6) "3"
7) "b"
8) "2"
127.0.0.1:6379> keys *
1) "list1"
2) "zsert1"
3) "hash1"
4) "setb"
5) "seta"
6) "str1"
7) "key1"
8) "set1"
127.0.0.1:6379> expire key1 100
(integer) 1
127.0.0.1:6379> ttl key1
(integer) 92
127.0.0.1:6379> ttl key1
(integer) 86
127.0.0.1:6379>
127.0.0.1:6379> ttl key1
(integer) 84
127.0.0.1:6379> ttl key1
(integer) 82
127.0.0.1:6379> ttl setb
(integer) -1
127.0.0.1:6379> ttl key1
(integer) 49
127.0.0.1:6379> ttl sdfs
(integer) -2
127.0.0.1:6379> ttl key1
(integer) 28
127.0.0.1:6379> ttl key1
(integer) 20
127.0.0.1:6379> keys *
1) "list1"
2) "zsert1"
3) "hash1"
4) "setb"
5) "seta"
6) "str1"
7) "key1"
8) "set1"
127.0.0.1:6379> ttl key1
(integer) 13
127.0.0.1:6379> keys *
1) "list1"
2) "zsert1"
3) "hash1"
4) "setb"
5) "seta"
6) "str1"
7) "key1"
8) "set1"
127.0.0.1:6379> ttl key1
(integer) 5
127.0.0.1:6379> ttl key1
(integer) 3
127.0.0.1:6379> ttl key1
(integer) 3
127.0.0.1:6379> ttl key1
(integer) 2
127.0.0.1:6379> ttl key1
(integer) 1
127.0.0.1:6379> ttl key1
(integer) 1
127.0.0.1:6379> ttl key1
(integer) -2
127.0.0.1:6379> ttl key1
(integer) -2
127.0.0.1:6379> ttl key1
(integer) -2
127.0.0.1:6379> keys *
1) "list1"
2) "zsert1"
3) "hash1"
4) "setb"
5) "seta"
6) "str1"
7) "set1"
127.0.0.1:6379> set key1 100
OK
127.0.0.1:6379> expire key1 60
(integer) 1
127.0.0.1:6379> ttl key1
(integer) 54
127.0.0.1:6379> persist key1
(integer) 1
127.0.0.1:6379> ttl key1
(integer) -1
127.0.0.1:6379>
Redis伪集群搭建
3个节点,3个备份节点
端口7001-7006
mkdir redis-cluster
将单机版/usr/local/redis中的bin拷到redis-cluster下redis01中
cp redis/bin redis-cluster/redis01 -r
cp redis.conf ../redis-cluster/redis01/
vi redis.conf
修改端口号
开启cluster-enable
cp -r redis01/ redis02
cp -r redis01/ redis03
cp -r redis01/ redis04
cp -r redis01/ redis05
cp -r redis01/ redis06
修改端口号
批处理进行启动vim start-all.sh
cd redis01
./redis-server redis.conf
cd ..
cd redis02
./redis-server redis.conf
cd ..
cd redis03
./redis-server redis.conf
cd ..
cd redis04
./redis-server redis.conf
cd ..
cd redis05
./redis-server redis.conf
cd ..
cd redis06
./redis-server redis.conf
cd ..
批处理进行关闭touch stop-all.sh
cd redis01
./redis-cli -p 7001 shutdown
echo "关闭redis01成功..."
cd ../redis02
./redis-cli -p 7002 shutdown
echo "关闭redis02成功..."
cd ../redis03
./redis-cli -p 7003 shutdown
echo "关闭redis03成功..."
cd ../redis04
./redis-cli -p 7004 shutdown
echo "关闭redis04成功..."
cd ../redis05
./redis-cli -p 7005 shutdown
echo "关闭redis05成功..."
cd ../redis06
./redis-cli -p 7006 shutdown
echo "关闭redis06成功..."
为当前用户赋权chmod u+x start-all.sh
./start-all.sh
./stop-all.sh
ps aux|grep redis
创建集群:进入到集群中某个实例下的bin目录
高版本执行
./redis-cli --cluster create --cluster-replicas 1 xxx.xxx.xxx.xxx:7001 xxx.xxx.xxx.xxx:7002 xxx.xxx.xxx.xxx:7003 xxx.xxx.xxx.xxx:7004 xxx.xxx.xxx.xxx:7005 xxx.xxx.xxx.xxx:7006
replicas参数表示一个master有接个slave
然后就会按照默认的方式进行分配matser,主从关系
(后话,netstat -ntlp发现需要开启17001-17006端口)
测试
使用命令连接上集群某个节点
./redis-cli -p 7001 -c
使用命令 cluster info 和 cluster nodes可查看集群信息。
-c表示连接上集群
项目中只需要修改配置文件即可在单机与集群两者之间进行切换
Solr
按照这个搭即可(较简单)
https://www.bilibili.com/video/BV1Ts411379J?p=3
启动solr
cd /usr/local/solr/apache-tomcat-7.0.105/bin
./startup.sh
成功的标志
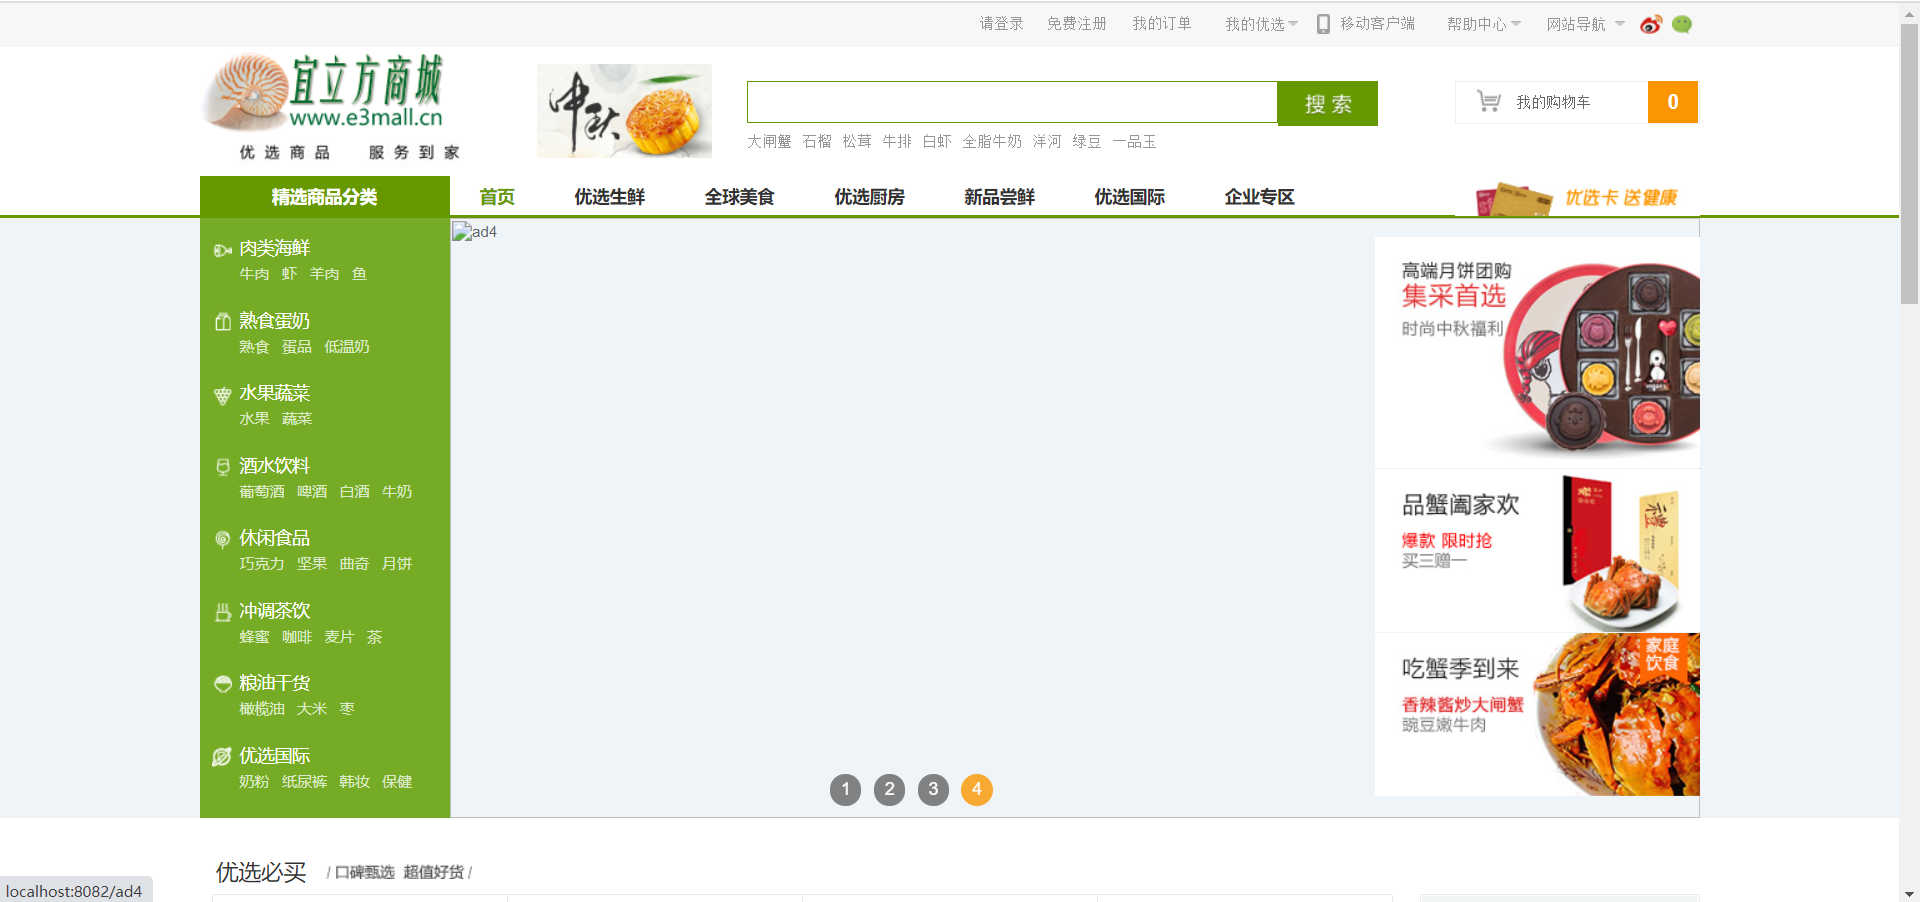
http://x.x.x.x:8082/solr/
将商品数据导入到solr中(数据库-->solr内存中的域)
新建工程e3-search(服务提供)e3-search-web(服务调用)
applicationContext-dao.xml需要多扫描一个包
<bean class="org.mybatis.spring.mapper.MapperScannerConfigurer">
    <property name="basePackage" value="cn.e3mall.mapper,cn.e3mall.search.mapper" />
</bean>
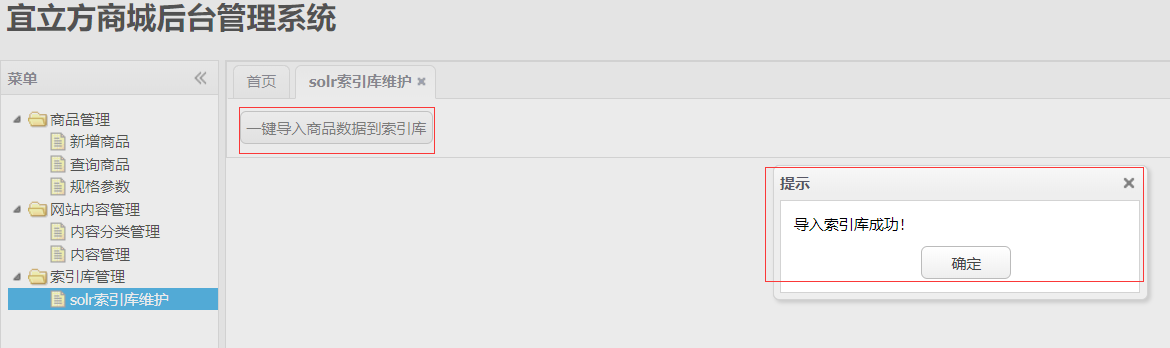
导入成功后,索引库中就有数据了

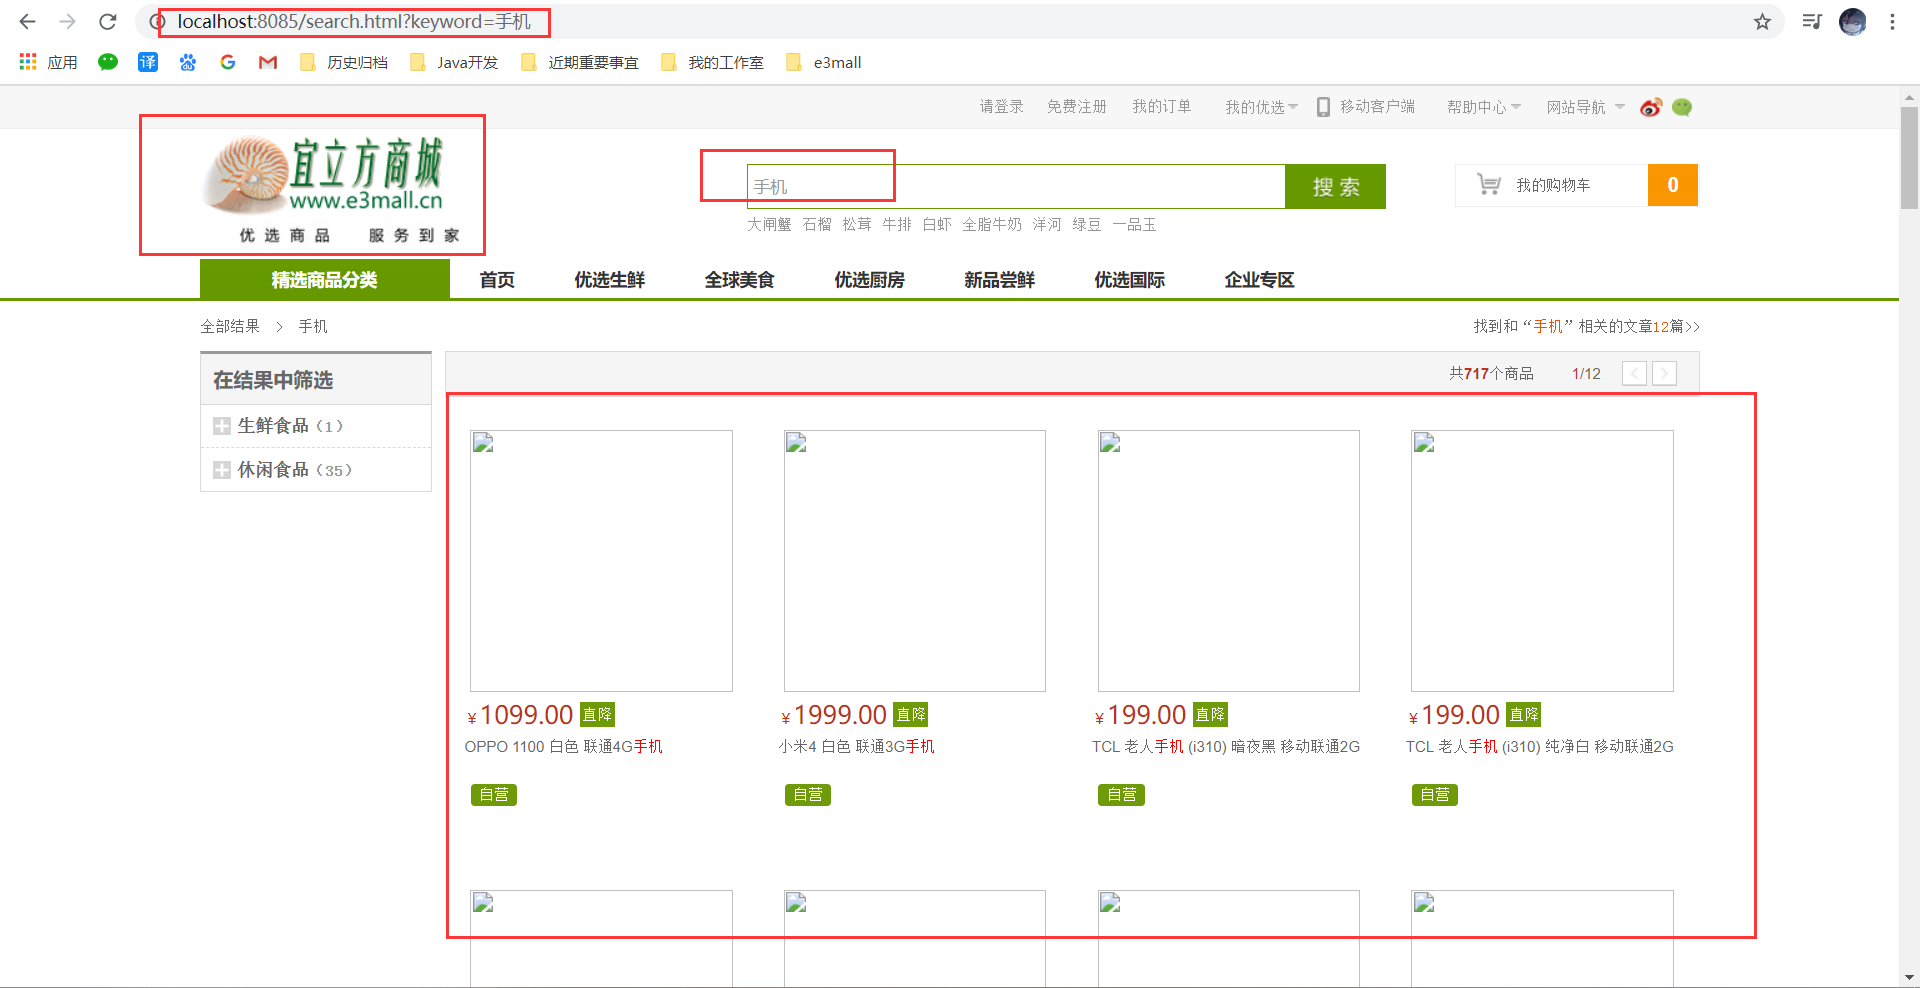
在商城首页搜索“手机”,可跳转到e3-search-web项目
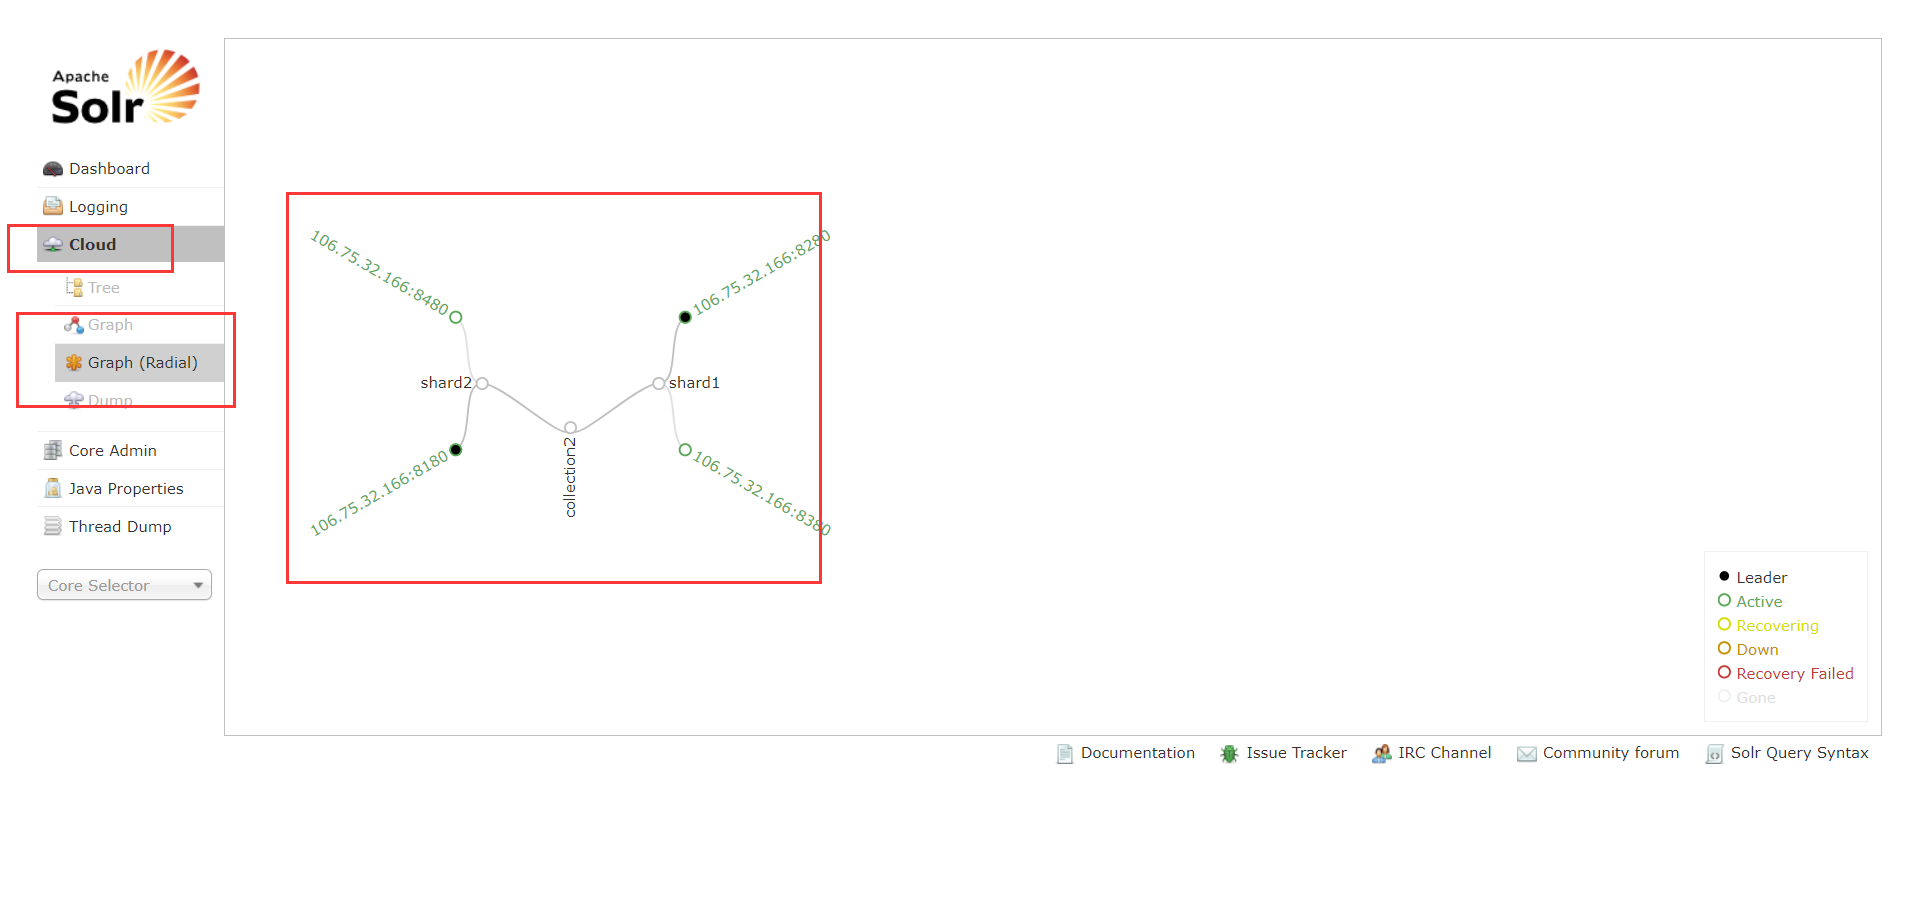
Solr集群(在Zookeeper集群的基础之上)
上当了,不该搞这个,配置太恶心了!配着配着走远了啊

https://www.bilibili.com/video/BV1Ms41137cQ?p=5

[root@10-9-48-229 ~]# cp -r apache-tomcat-7.0.105 /usr/local/solr-cloud/tomcat01
[root@10-9-48-229 ~]# cp -r apache-tomcat-7.0.105 /usr/local/solr-cloud/tomcat02
[root@10-9-48-229 ~]# cp -r apache-tomcat-7.0.105 /usr/local/solr-cloud/tomcat03
[root@10-9-48-229 ~]# cp -r apache-tomcat-7.0.105 /usr/local/solr-cloud/tomcat04

[root@10-9-48-229 solr-cloud]# cp -r /usr/local/solr/apache-tomcat-7.0.105/webapps/solr tomcat01/webapps/
[root@10-9-48-229 solr-cloud]# cp -r /usr/local/solr/apache-tomcat-7.0.105/webapps/solr tomcat02/webapps/
[root@10-9-48-229 solr-cloud]# cp -r /usr/local/solr/apache-tomcat-7.0.105/webapps/solr tomcat03/webapps/
[root@10-9-48-229 solr-cloud]# cp -r /usr/local/solr/apache-tomcat-7.0.105/webapps/solr tomcat04/webapps/

vi tomcat01/conf/server.xml
vi tomcat02/conf/server.xml
vi tomcat03/conf/server.xml
vi tomcat04/conf/server.xml
8180,8280,8380,8480(这4个要关闭)
8105,8205,8305,8405
8109,8209,8309,8409

[root@10-9-48-229 solr-cloud]# cp -r ../solr/solrhome/ solrhome01
[root@10-9-48-229 solr-cloud]# cp -r ../solr/solrhome/ solrhome02
[root@10-9-48-229 solr-cloud]# cp -r ../solr/solrhome/ solrhome03
[root@10-9-48-229 solr-cloud]# cp -r ../solr/solrhome/ solrhome04

vim tomcat01/webapps/solr/WEB-INF/web.xml
/usr/local/solr-cloud/solrhome01
vim tomcat02/webapps/solr/WEB-INF/web.xml
/usr/local/solr-cloud/solrhome02
vim tomcat03/webapps/solr/WEB-INF/web.xml
/usr/local/solr-cloud/solrhome03
vim tomcat04/webapps/solr/WEB-INF/web.xml
/usr/local/solr-cloud/solrhome04

vim solrhome01/solr.xml
<str name="host">x.x.x.x</str>
<int name="hostPort">8180</int>
vim solrhome02/solr.xml
vim solrhome03/solr.xml
vim solrhome04/solr.xml

vim tomcat01/bin/catalina.sh
搜JAVA_OPTS -Dorg.apache.catalina.security.SecurityListener.UMASK
JAVA_OPTS="-DzkHost=x.x.x.x:2181,x.x.x.x:2182,x.x.x.x:2183"
vim tomcat02/bin/catalina.sh
vim tomcat03/bin/catalina.sh
vim tomcat04/bin/catalina.sh

/usr/local/solr/solr-4.10.3/example/scripts/cloud-scripts
下执行
./zkcli.sh -zkhost x.x.x.x:2181,x.x.x.x:2182,x.x.x.x:2183 -cmd upconfig -confdir /usr/local/solr-cloud/solrhome01/collection1/conf -confname myconf

验证
/usr/local/solr-cloud/zookeeper01/bin
./zkCli.sh
quit
./zkCli.sh -server x.x.x.x:2182
ls /configs/myconf

vim start-tomcat-all.sh
/usr/local/solr-cloud/tomcat01/bin/startup.sh
/usr/local/solr-cloud/tomcat02/bin/startup.sh
/usr/local/solr-cloud/tomcat03/bin/startup.sh
/usr/local/solr-cloud/tomcat04/bin/startup.sh
chmod u+x start-tomcat-all.sh
./start-tomcat-all.sh
4个窗口
tail -f /usr/local/solr-cloud/tomcat01/logs/catalina.out
tail -f /usr/local/solr-cloud/tomcat02/logs/catalina.out
tail -f /usr/local/solr-cloud/tomcat03/logs/catalina.out
tail -f /usr/local/solr-cloud/tomcat04/logs/catalina.out

http://x.x.x.x:8180/solr/#/
(左侧多了个cloud!!!!)

创建新的collection
http://x.x.x.x:8180/solr/admin/collections?action=CREATE&name=collection2&numShards=2&replicationFactor=2
删除不用的Collection。
http://x.x.x.x:8180/solr/admin/collections?action=DELETE&name=collection1
ActiveMQ
添加商品的人不管添加索引,添加索引的人不管添加商品,ActiveMQ来实现丶
不同工程中的两个服务产生关系,又不耦合丶点对点queue(短信)||消息的发布与订阅topic丶
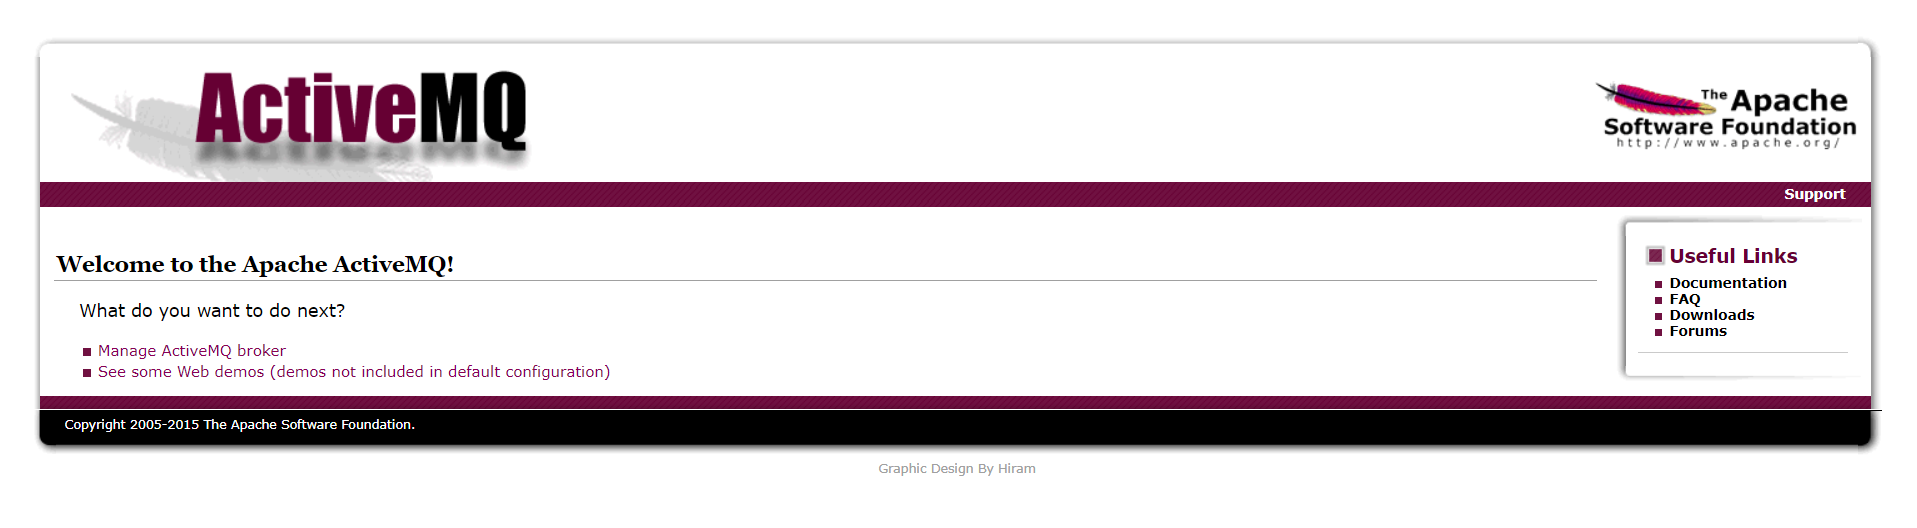
姑且同教程中一样版本apache-activemq-5.12.0-bin.tar.gz
解压即可用
端口号
8161
61616
bin/activemq start
bin/activemq stop
http://106.75.32.166:8161/
admin/admin
queue类型消息,消费了就没有了
topic类型消息,错过了就错过了(可以配置持久化)
添加商品(消息发布者e3-manager-service)-->activemq-->添加到索引(消息消费者)
将activemq与spring整合
引入jar包
<dependency>
    <groupId>org.springframework</groupId>
    <artifactId>spring-jms</artifactId>
</dependency>
<dependency>
    <groupId>org.springframework</groupId>
    <artifactId>spring-context-support</artifactId>
</dependency>
<dependency>
    <groupId>org.apache.activemq</groupId>
    <artifactId>activemq-all</artifactId>
</dependency>
消息生产者配置文件applicationContext-activemq.xml
<!-- 真正可以产生Connection的ConnectionFactory,由对应的 JMS服务厂商提供 -->
<bean id="targetConnectionFactory" class="org.apache.activemq.ActiveMQConnectionFactory">
    <property name="brokerURL" value="tcp://x.x.x.x:61616" />
</bean>
<!-- Spring用于管理真正的ConnectionFactory的ConnectionFactory -->
<bean id="connectionFactory"
    class="org.springframework.jms.connection.SingleConnectionFactory">
    <!-- 目标ConnectionFactory对应真实的可以产生JMS Connection的ConnectionFactory -->
    <property name="targetConnectionFactory" ref="targetConnectionFactory" />
</bean>
<!-- 配置生产者 -->
<!-- Spring提供的JMS工具类,它可以进行消息发送、接收等 -->
<bean id="jmsTemplate" class="org.springframework.jms.core.JmsTemplate">
    <!-- 这个connectionFactory对应的是我们定义的Spring提供的那个ConnectionFactory对象 -->
    <property name="connectionFactory" ref="connectionFactory" />
</bean>
<!--这个是队列目的地,点对点的 -->
<bean id="queueDestination" class="org.apache.activemq.command.ActiveMQQueue">
    <constructor-arg>
        <value>spring-queue</value>
    </constructor-arg>
</bean>
<!--这个是主题目的地,一对多的 -->
<bean id="topicDestination" class="org.apache.activemq.command.ActiveMQTopic">
    <constructor-arg value="itemAddTopic" />
</bean>
发布消息
@Test
public void sendMessage() throws Exception {
    //初始化spring容器
    ApplicationContext applicationContext = new ClassPathXmlApplicationContext("classpath:spring/applicationContext-activemq.xml");
    //从容器中获得JmsTemplate对象。
    JmsTemplate jmsTemplate = applicationContext.getBean(JmsTemplate.class);
    //从容器中获得一个Destination对象。
    Destination destination = (Destination) applicationContext.getBean("queueDestination");
    //发送消息  到时后直接注入jmsTemplate即可
    jmsTemplate.send(destination, new MessageCreator() {
        @Override
        public Message createMessage(Session session) throws JMSException {
            return session.createTextMessage("send activemq message");
        }
    });
}
消息消费者配置文件applicationContext-activemq.xml
<!-- 真正可以产生Connection的ConnectionFactory,由对应的 JMS服务厂商提供 -->
<bean id="targetConnectionFactory" class="org.apache.activemq.ActiveMQConnectionFactory">
    <property name="brokerURL" value="tcp://192.168.25.161:61616" />
</bean>
<!-- Spring用于管理真正的ConnectionFactory的ConnectionFactory -->
<bean id="connectionFactory"
    class="org.springframework.jms.connection.SingleConnectionFactory">
    <!-- 目标ConnectionFactory对应真实的可以产生JMS Connection的ConnectionFactory -->
    <property name="targetConnectionFactory" ref="targetConnectionFactory" />
</bean>
<!--这个是队列目的地,点对点的 -->
<bean id="queueDestination" class="org.apache.activemq.command.ActiveMQQueue">
    <constructor-arg>
        <value>spring-queue</value>
    </constructor-arg>
</bean>
<!--这个是主题目的地,一对多的 -->
<bean id="topicDestination" class="org.apache.activemq.command.ActiveMQTopic">
    <constructor-arg value="itemAddTopic" />
</bean>
<bean id="myMessageListener" class="cn.e3mall.search.message.MyMessageListener"/>
<!-- 消息监听容器 -->
<bean class="org.springframework.jms.listener.DefaultMessageListenerContainer">
    <property name="connectionFactory" ref="connectionFactory" />
    <property name="destination" ref="queueDestination" />
    <property name="messageListener" ref="myMessageListener" />
</bean>
<!-- 监听商品添加消息,同步索引库 -->
<bean id="itemAddMessageListener" class="cn.e3mall.search.message.ItemAddMessageListener"/>
<bean class="org.springframework.jms.listener.DefaultMessageListenerContainer">
    <property name="connectionFactory" ref="connectionFactory" />
    <property name="destination" ref="topicDestination" />
    <property name="messageListener" ref="itemAddMessageListener" />
</bean>
消费消息
public class MyMessageListener implements MessageListener {

    @Override
    public void onMessage(Message message) {
        //取消息内容
        TextMessage textMessage = (TextMessage) message;
        try {
            String text = textMessage.getText();
            System.out.println(text);
        } catch (JMSException e) {
            // TODO Auto-generated catch block
            e.printStackTrace();
        }
    }
}
创造测试条件(启动spring容器,加载配置文件中的资源)
public class MessageConsumer {
    @Test
    public void msgConsumer() throws Exception {
        //初始化spring容器
        ApplicationContext applicationContext =  new ClassPathXmlApplicationContext("classpath:spring/applicationContext-activemq.xml");
        //等待
        System.in.read();
    }
}
项目中的应用(消费者)
/**
 * 监听商品添加消息,接收消息后,将对应的商品信息同步到索引库
 */
public class ItemAddMessageListener implements MessageListener {

    @Autowired
    private ItemMapper itemMapper;
    @Autowired
    private SolrServer solrServer;

    @Override
    public void onMessage(Message message) {
        try {
            //从消息中取商品id
            TextMessage textMessage = (TextMessage) message;
            String text = textMessage.getText();
            Long itemId = new Long(text);
            //等待事务提交
            Thread.sleep(1000);
            //根据商品id查询商品信息
            SearchItem searchItem = itemMapper.getItemById(itemId);
            //创建一个文档对象
            SolrInputDocument document = new SolrInputDocument();
            //向文档对象中添加域
            document.addField("id", searchItem.getId());
            document.addField("item_title", searchItem.getTitle());
            document.addField("item_sell_point", searchItem.getSell_point());
            document.addField("item_price", searchItem.getPrice());
            document.addField("item_image", searchItem.getImage());
            document.addField("item_category_name", searchItem.getCategory_name());
            //把文档写入索引库
            solrServer.add(document);
            //提交
            solrServer.commit();
        } catch (Exception e) {
            e.printStackTrace();
        }

    }

}
项目中的应用(生产者)
/**
 * 商品管理Service
 */
@Service
public class ItemServiceImpl implements ItemService {

    @Autowired
    private TbItemMapper itemMapper;
    @Autowired
    private TbItemDescMapper itemDescMapper;
    @Autowired
    private JmsTemplate jmsTemplate;
    @Resource
    private Destination topicDestination;
    @Autowired
    private JedisClient jedisClient;

    @Value("${REDIS_ITEM_PRE}")
    private String REDIS_ITEM_PRE;
    @Value("${ITEM_CACHE_EXPIRE}")
    private Integer ITEM_CACHE_EXPIRE;


    @Override
    public TbItem getItemById(long itemId) {
        //查询缓存
        try {
            String json = jedisClient.get(REDIS_ITEM_PRE + ":" + itemId + ":BASE");
            if(StringUtils.isNotBlank(json)) {
                TbItem tbItem = JsonUtils.jsonToPojo(json, TbItem.class);
                return tbItem;
            }
        } catch (Exception e) {
            e.printStackTrace();
        }
        //缓存中没有,查询数据库
        //根据主键查询
        //TbItem tbItem = itemMapper.selectByPrimaryKey(itemId);
        TbItemExample example = new TbItemExample();
        Criteria criteria = example.createCriteria();
        //设置查询条件
        criteria.andIdEqualTo(itemId);
        //执行查询
        List<TbItem> list = itemMapper.selectByExample(example);
        if (list != null && list.size() > 0) {
            //把结果添加到缓存
            try {
                jedisClient.set(REDIS_ITEM_PRE + ":" + itemId + ":BASE", JsonUtils.objectToJson(list.get(0)));
                //设置过期时间
                jedisClient.expire(REDIS_ITEM_PRE + ":" + itemId + ":BASE", ITEM_CACHE_EXPIRE);
            } catch (Exception e) {
                e.printStackTrace();
            }
            return list.get(0);
        }
        return null;
    }

    @Override
    public EasyUIDataGridResult getItemList(int page, int rows) {
        //设置分页信息
        PageHelper.startPage(page, rows);
        //执行查询
        TbItemExample example = new TbItemExample();
        List<TbItem> list = itemMapper.selectByExample(example);
        //创建一个返回值对象
        EasyUIDataGridResult result = new EasyUIDataGridResult();
        result.setRows(list);
        //取分页结果
        PageInfo<TbItem> pageInfo = new PageInfo<>(list);
        //取总记录数
        long total = pageInfo.getTotal();
        result.setTotal(total);
        return result;
    }

    @Override
    public E3Result addItem(TbItem item, String desc) {
        //生成商品id
        final long itemId = IDUtils.genItemId();
        //补全item的属性
        item.setId(itemId);
        //1-正常,2-下架,3-删除
        item.setStatus((byte) 1);
        item.setCreated(new Date());
        item.setUpdated(new Date());
        //向商品表插入数据
        itemMapper.insert(item);
        //创建一个商品描述表对应的pojo对象。
        TbItemDesc itemDesc = new TbItemDesc();
        //补全属性
        itemDesc.setItemId(itemId);
        itemDesc.setItemDesc(desc);
        itemDesc.setCreated(new Date());
        itemDesc.setUpdated(new Date());
        //向商品描述表插入数据
        itemDescMapper.insert(itemDesc);
        //发送商品添加消息
        jmsTemplate.send(topicDestination, new MessageCreator() {

            @Override
            public Message createMessage(Session session) throws JMSException {
                TextMessage textMessage = session.createTextMessage(itemId + "");
                return textMessage;
            }
        });

        //返回成功
        return E3Result.ok();
    }

    @Override
    public TbItemDesc getItemDescById(long itemId) {
        //查询缓存
        try {
            String json = jedisClient.get(REDIS_ITEM_PRE + ":" + itemId + ":DESC");
            if(StringUtils.isNotBlank(json)) {
                TbItemDesc tbItemDesc = JsonUtils.jsonToPojo(json, TbItemDesc.class);
                return tbItemDesc;
            }
        } catch (Exception e) {
            e.printStackTrace();
        }
        TbItemDesc itemDesc = itemDescMapper.selectByPrimaryKey(itemId);
        //把结果添加到缓存
        try {
            jedisClient.set(REDIS_ITEM_PRE + ":" + itemId + ":DESC", JsonUtils.objectToJson(itemDesc));
            //设置过期时间
            jedisClient.expire(REDIS_ITEM_PRE + ":" + itemId + ":DESC", ITEM_CACHE_EXPIRE);
        } catch (Exception e) {
            e.printStackTrace();
        }
        return itemDesc;
    }

}
这样,添加完了商品即可即时更新索引库,不用手动去添加了,而且只需要添加新加入的即可
全局异常处理
在表现层捕获
package cn.e3mall.search.exception;

import javax.servlet.http.HttpServletRequest;
import javax.servlet.http.HttpServletResponse;
import org.slf4j.Logger;
import org.slf4j.LoggerFactory;
import org.springframework.web.servlet.HandlerExceptionResolver;
import org.springframework.web.servlet.ModelAndView;

/**
 * 全局异常处理器
 */
public class GlobalExceptionResolver implements HandlerExceptionResolver {

    private static final Logger logger = LoggerFactory.getLogger(GlobalExceptionResolver.class);

    @Override
    public ModelAndView resolveException(HttpServletRequest request, HttpServletResponse response, Object handler,
            Exception ex) {
        //打印控制台
        ex.printStackTrace();
        //写日志
        logger.debug("测试输出的日志。。。。。。。");
        logger.info("系统发生异常了。。。。。。。");
        logger.error("系统发生异常", ex);
        //发邮件、发短信
        //使用jmail工具包。发短信使用第三方的Webservice。
        //显示错误页面
        ModelAndView modelAndView = new ModelAndView();
        modelAndView.setViewName("error/exception");
        return modelAndView;
    }

}
<!-- 全局异常处理器 -->
<bean class="cn.e3mall.search.exception.GlobalExceptionResolver"/>
商品详情
e3-item-web
配置伪静态化(web.xml)
<servlet-mapping>
    <servlet-name>e3-item-web</servlet-name>
    <!-- 伪静态化 -->
    <url-pattern>*.html</url-pattern>
</servlet-mapping>
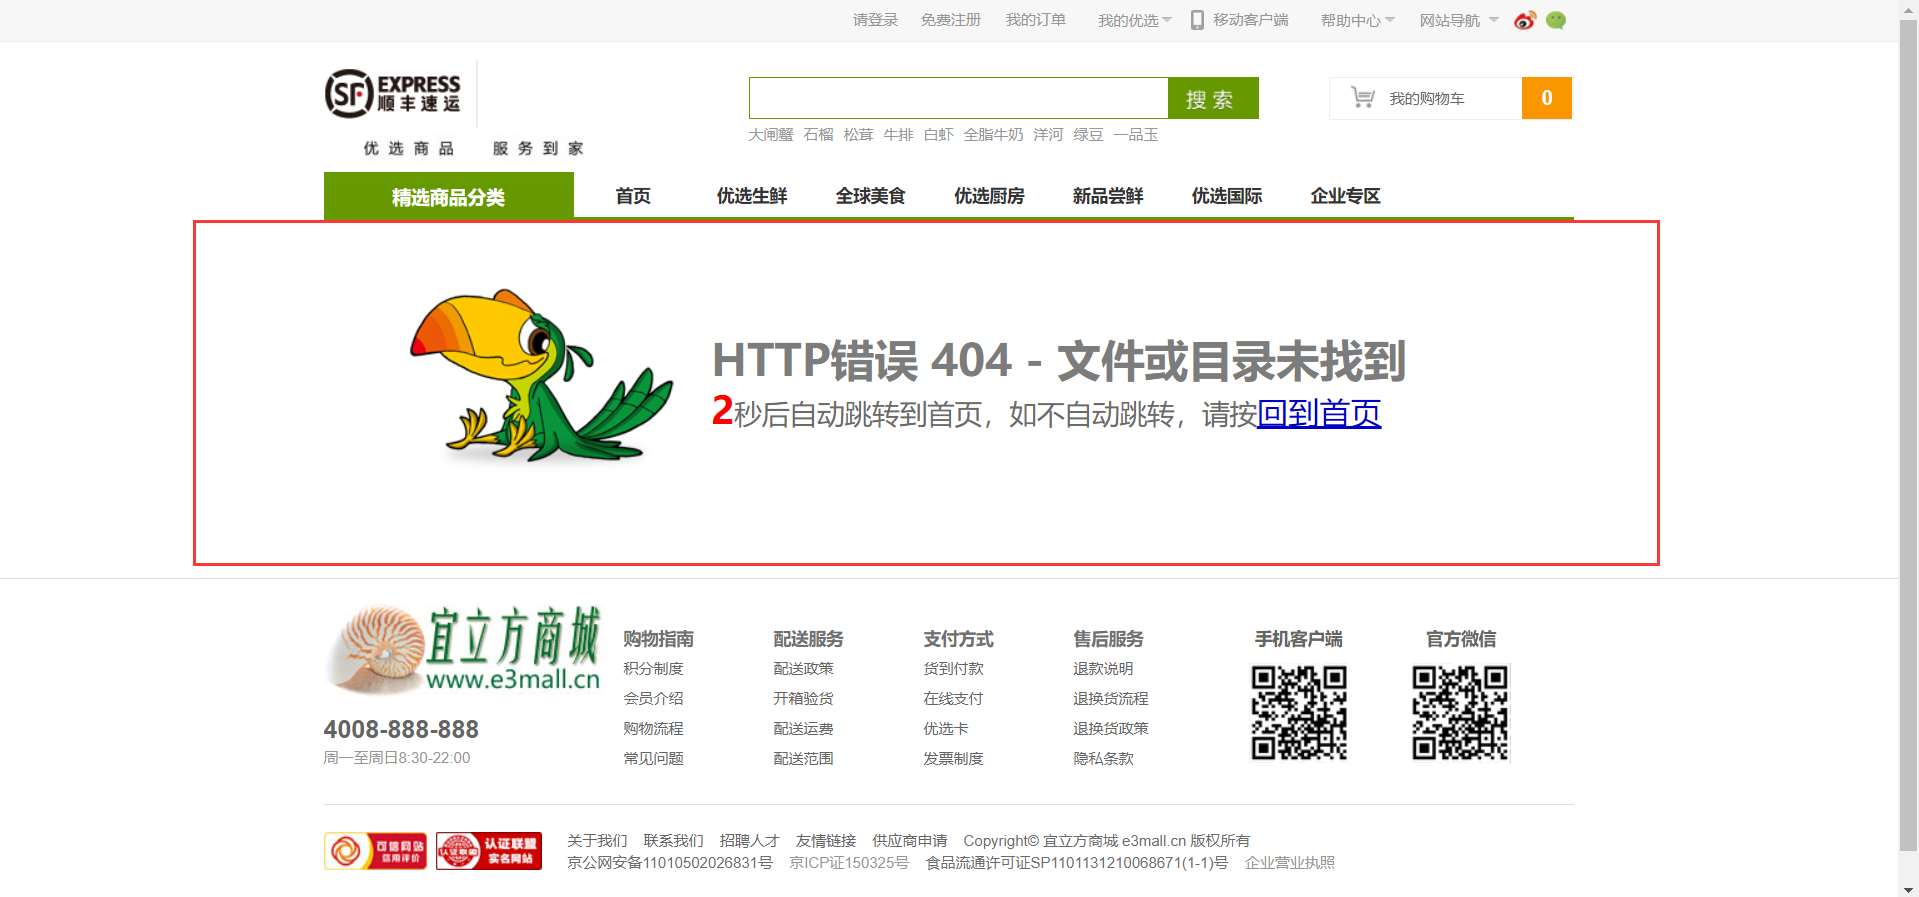
跳转http://localhost:8086/item/148006053890803.html时,加载该商品id对应的商品详情
/**
 * 商品详情页面展示Controller
 */
@Controller
public class ItemController {

    @Autowired
    private ItemService itemService;

    @RequestMapping("/item/{itemId}")
    public String showItemInfo(@PathVariable Long itemId, Model model) {
        //调用服务取商品基本信息
        TbItem tbItem = itemService.getItemById(itemId);
        Item item = new Item(tbItem);
        //取商品描述信息
        TbItemDesc itemDesc = itemService.getItemDescById(itemId);
        //把信息传递给页面
        model.addAttribute("item", item);
        model.addAttribute("itemDesc", itemDesc);
        //返回逻辑视图
        return "item";
    }
}
某用户查询详情后,需要添加缓存,避免每次都请求后台服务,直接从缓存中取才合适(设置缓存过期时间)
/**
 * 商品管理Service
 */
@Service
public class ItemServiceImpl implements ItemService {

    @Autowired
    private TbItemMapper itemMapper;
    @Autowired
    private TbItemDescMapper itemDescMapper;
    @Autowired
    private JmsTemplate jmsTemplate;
    @Resource
    private Destination topicDestination;
    @Autowired
    private JedisClient jedisClient;

    @Value("${REDIS_ITEM_PRE}")
    private String REDIS_ITEM_PRE;
    @Value("${ITEM_CACHE_EXPIRE}")
    private Integer ITEM_CACHE_EXPIRE;


    @Override
    public TbItem getItemById(long itemId) {
        //查询缓存
        try {
            String json = jedisClient.get(REDIS_ITEM_PRE + ":" + itemId + ":BASE");
            if(StringUtils.isNotBlank(json)) {
                TbItem tbItem = JsonUtils.jsonToPojo(json, TbItem.class);
                return tbItem;
            }
        } catch (Exception e) {
            e.printStackTrace();
        }
        //缓存中没有,查询数据库
        //根据主键查询
        //TbItem tbItem = itemMapper.selectByPrimaryKey(itemId);
        TbItemExample example = new TbItemExample();
        Criteria criteria = example.createCriteria();
        //设置查询条件
        criteria.andIdEqualTo(itemId);
        //执行查询
        List<TbItem> list = itemMapper.selectByExample(example);
        if (list != null && list.size() > 0) {
            //把结果添加到缓存
            try {
                jedisClient.set(REDIS_ITEM_PRE + ":" + itemId + ":BASE", JsonUtils.objectToJson(list.get(0)));
                //设置过期时间
                jedisClient.expire(REDIS_ITEM_PRE + ":" + itemId + ":BASE", ITEM_CACHE_EXPIRE);
            } catch (Exception e) {
                e.printStackTrace();
            }
            return list.get(0);
        }
        return null;
    }

    @Override
    public TbItemDesc getItemDescById(long itemId) {
        //查询缓存
        try {
            String json = jedisClient.get(REDIS_ITEM_PRE + ":" + itemId + ":DESC");
            if(StringUtils.isNotBlank(json)) {
                TbItemDesc tbItemDesc = JsonUtils.jsonToPojo(json, TbItemDesc.class);
                return tbItemDesc;
            }
        } catch (Exception e) {
            e.printStackTrace();
        }
        TbItemDesc itemDesc = itemDescMapper.selectByPrimaryKey(itemId);
        //把结果添加到缓存
        try {
            jedisClient.set(REDIS_ITEM_PRE + ":" + itemId + ":DESC", JsonUtils.objectToJson(itemDesc));
            //设置过期时间
            jedisClient.expire(REDIS_ITEM_PRE + ":" + itemId + ":DESC", ITEM_CACHE_EXPIRE);
        } catch (Exception e) {
            e.printStackTrace();
        }
        return itemDesc;
    }

}
用Freemaker工具生成静态化页面(缓存之外的另一种方案)
原理初窥
@Test
public void testFreeMarker() throws Exception {
    //1、创建一个模板文件
    //2、创建一个Configuration对象
    Configuration configuration = new Configuration(Configuration.getVersion());
    //3、设置模板文件保存的目录
    configuration.setDirectoryForTemplateLoading(new File("D:/workspaces-itcast/JavaEE32/e3-item-web/src/main/webapp/WEB-INF/ftl"));
    //4、模板文件的编码格式,一般就是utf-8
    configuration.setDefaultEncoding("utf-8");
    //5、加载一个模板文件,创建一个模板对象。
    Template template = configuration.getTemplate("hello.ftl");
    //6、创建一个数据集。可以是pojo也可以是map。推荐使用map
    Map data = new HashMap<>();
    data.put("hello", "hello freemarker!");
    //7、创建一个Writer对象,指定输出文件的路径及文件名。
    Writer out = new FileWriter(new File("D:/temp/JavaEE32/freemarker/hello.txt"));
    //8、生成静态页面
    template.process(data, out);
    //9、关闭流
    out.close();
}
项目中的应用
/**
 * 监听商品添加消息,生成对应的静态页面
 */
public class HtmlGenListener implements MessageListener {

    @Autowired
    private ItemService itemService;
    @Autowired
    private FreeMarkerConfigurer freeMarkerConfigurer;
    @Value("${HTML_GEN_PATH}")
    private String HTML_GEN_PATH;

    @Override
    public void onMessage(Message message) {
        try {
            //创建一个模板,参考jsp
            //从消息中取商品id
            TextMessage textMessage = (TextMessage) message;
            String text = textMessage.getText();
            Long itemId = new Long(text);
            //等待事务提交
            Thread.sleep(1000);
            //根据商品id查询商品信息,商品基本信息和商品描述。
            TbItem tbItem = itemService.getItemById(itemId);
            Item item = new Item(tbItem);
            //取商品描述
            TbItemDesc itemDesc = itemService.getItemDescById(itemId);
            //创建一个数据集,把商品数据封装
            Map data = new HashMap<>();
            data.put("item", item);
            data.put("itemDesc", itemDesc);
            //加载模板对象
            Configuration configuration = freeMarkerConfigurer.getConfiguration();
            Template template = configuration.getTemplate("item.ftl");
            //创建一个输出流,指定输出的目录及文件名。
            Writer out = new FileWriter(HTML_GEN_PATH + itemId + ".html");
            //生成静态页面。
            template.process(data, out);
            //关闭流
            out.close();

        } catch (Exception e) {
            // TODO: handle exception
        }

    }

}
<!-- 配置freemarker -->
<bean id="freemarkerConfig" class="org.springframework.web.servlet.view.freemarker.FreeMarkerConfigurer">
    <property name="templateLoaderPath" value="/WEB-INF/ftl/" />
    <property name="defaultEncoding" value="UTF-8" />
</bean>
使用户通过nginx能访问到访问静态页面即可
SSO单点登录
(解决 集群+分布式 登陆的问题,session共享)
登陆和注册放在这个模块来实现
http://localhost:8088/page/register
http://localhost:8088/page/login
登陆之后,系统生成token,并发送到cookie和redis,跳转http://localhost:8082
其他工程提供服务前,先对浏览器进行token校验
各工程网页顶部显示"欢迎xxx"的实现
1.使用js从cookie中取token
2.Ajax请求接口/user/token/{token}取redis中的token对应的用户信息
(这里,某工程某域名某端口的js,ajax请求不同来源的数据,服务端是响应了的,浏览器插手不给你结果,即json跨域问题)
3.得到json数据(用户信息)
4.从json中把用户名解析出来
来自8082的e3-portal-web工程的js去请求8088对应工程的服务,服务正常提供了,但是浏览器不让你取数据,json跨域
解决此问题的jsonp方案是利用的浏览器支持js跨域加载js文件的这个漏洞
利用<script/>标签src属性可以跨域加载8088的js,其返回的内容是js代码(方法名+参数,漏洞就藏在参数里边,瞒过浏览器,谎称"我就传了个js"),得到js后,就着这个js继续往下执行。
这一系列的动作,jQuery已经给你封装成一个常规操作了,你只需要在Ajax请求中多加一个dataType:"jsonp"即可;
当然,服务端还需要配合处理:如果是jsonp请求,返回的内容不一样
package cn.e3mall.sso.controller;

import org.apache.commons.lang3.StringUtils;
import org.springframework.beans.factory.annotation.Autowired;
import org.springframework.http.MediaType;
import org.springframework.http.converter.json.MappingJacksonValue;
import org.springframework.stereotype.Controller;
import org.springframework.web.bind.annotation.PathVariable;
import org.springframework.web.bind.annotation.RequestMapping;
import org.springframework.web.bind.annotation.ResponseBody;

import cn.e3mall.common.utils.E3Result;
import cn.e3mall.common.utils.JsonUtils;
import cn.e3mall.sso.service.TokenService;

/**
 * 根据token查询用户信息Controller
 */
@Controller
public class TokenController {

    @Autowired
    private TokenService tokenService;

    /*@RequestMapping(value="/user/token/{token}",
            produces=MediaType.APPLICATION_JSON_UTF8_VALUE"application/json;charset=utf-8")
    @ResponseBody
    public String getUserByToken(@PathVariable String token, String callback) {
        E3Result result = tokenService.getUserByToken(token);
        //响应结果之前,判断是否为jsonp请求
        if (StringUtils.isNotBlank(callback)) {
            //把结果封装成一个js语句响应
            return callback + "(" + JsonUtils.objectToJson(result)  + ");";
        }
        return JsonUtils.objectToJson(result);
    }*/
    @RequestMapping(value="/user/token/{token}")
    @ResponseBody
    public Object getUserByToken(@PathVariable String token, String callback) {
        E3Result result = tokenService.getUserByToken(token);
        //响应结果之前,判断是否为jsonp请求
        if (StringUtils.isNotBlank(callback)) {
            //把结果封装成一个js语句响应
            MappingJacksonValue mappingJacksonValue = new MappingJacksonValue(result);
            mappingJacksonValue.setJsonpFunction(callback);
            return mappingJacksonValue;
        }
        return result;
    }
}
购物车实现
未登陆也可以添加,关了浏览器再进来,购物车数据还在
从商品详情e3-item-web的item.jsp中添加购物车
function cartAdd(product_id,cart_type,opencity_id, flag,bs, obj, cfrom){
    //取购物车商品数量
    var num = $("#number_" + product_id).val();
    //拼装url参数,做跳转
    location.href="http://localhost:8090/cart/add/"+product_id+".html?num=" + num;
}
进而请求e3-cart-web进行业务处理
订单系统
e3-order&e3-order-web
页面http://localhost:8092/order/order-cart.html
e3-order-web实现拦截
<!-- 配置拦截器 -->
<mvc:interceptors>
    <mvc:interceptor>
        <mvc:mapping path="/**"/>
        <bean class="cn.e3mall.order.interceptor.LoginInterceptor"></bean>
    </mvc:interceptor>
</mvc:interceptors>
拦截逻辑
/**
 * 用户登录拦截器
 */
public class LoginInterceptor implements HandlerInterceptor {

    @Value("${SSO_URL}")
    private String SSO_URL;

    @Autowired
    private TokenService tokenService;
    @Autowired
    private CartService  cartService;

    @Override
    public boolean preHandle(HttpServletRequest request, HttpServletResponse response, Object handler) throws Exception {
        //从cookie中取token
        String token = CookieUtils.getCookieValue(request, "token");
        //判断token是否存在
        if (StringUtils.isBlank(token)) {
            //如果token不存在,未登录状态,跳转到sso系统的登录页面。用户登录成功后,跳转到当前请求的url
            response.sendRedirect(SSO_URL + "/page/login?redirect=" + request.getRequestURL());
            //拦截
            return false;
        }
        //如果token存在,需要调用sso系统的服务,根据token取用户信息
        E3Result e3Result = tokenService.getUserByToken(token);
        //如果取不到,用户登录已经过期,需要登录。
        if (e3Result.getStatus() != 200) {
            //如果token不存在,未登录状态,跳转到sso系统的登录页面。用户登录成功后,跳转到当前请求的url
            response.sendRedirect(SSO_URL + "/page/login?redirect=" + request.getRequestURL());
            //拦截
            return false;
        }
        //如果取到用户信息,是登录状态,需要把用户信息写入request。
        TbUser user = (TbUser) e3Result.getData();
        request.setAttribute("user", user);
        //判断cookie中是否有购物车数据,如果有就合并到服务端。
        String jsonCartList = CookieUtils.getCookieValue(request, "cart", true);
        if (StringUtils.isNoneBlank(jsonCartList)) {
            //合并购物车
            cartService.mergeCart(user.getId(), JsonUtils.jsonToList(jsonCartList, TbItem.class));
        }
        //放行
        return true;
    }

    @Override
    public void afterCompletion(HttpServletRequest arg0, HttpServletResponse arg1, Object arg2, Exception arg3)
            throws Exception {
        // TODO Auto-generated method stub

    }

    @Override
    public void postHandle(HttpServletRequest arg0, HttpServletResponse arg1, Object arg2, ModelAndView arg3)
            throws Exception {
        // TODO Auto-generated method stub

    }
}
拦截登陆完了需要回到当前位置
LoginController.java
@RequestMapping("/page/login")
public String showLogin(String redirect, Model model) {
    model.addAttribute("redirect", redirect);
    return "login";
}
login.jsp
$.post("/user/login", $("#formlogin").serialize(),function(data){
    if (data.status == 200) {
        jAlert('登录成功!',"提示", function(){
            if (redirectUrl == "") {
                location.href = "http://localhost:8082";
            } else {
                location.href = redirectUrl;
            }
        });

    } else {
        jAlert("登录失败,原因是:" + data.msg,"失败");
    }
});
完了创建订单,支付丶
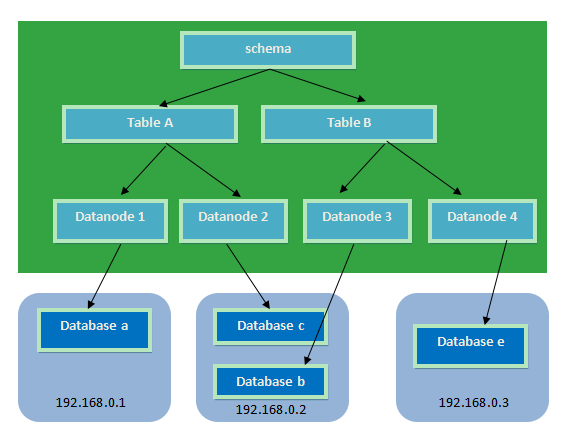
MyCat
逻辑库丶
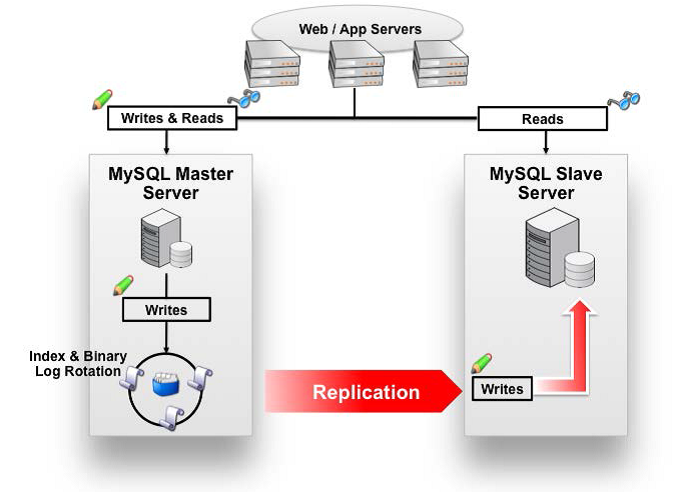
读写分离
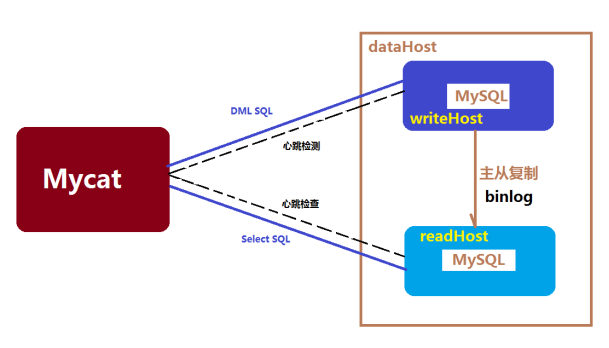
主从复制
解决的问题:
- 性能问题
- 数据库连接过多
- E-R分片难处理
- 可用性问题
- 成本和伸缩性问题
启动项目
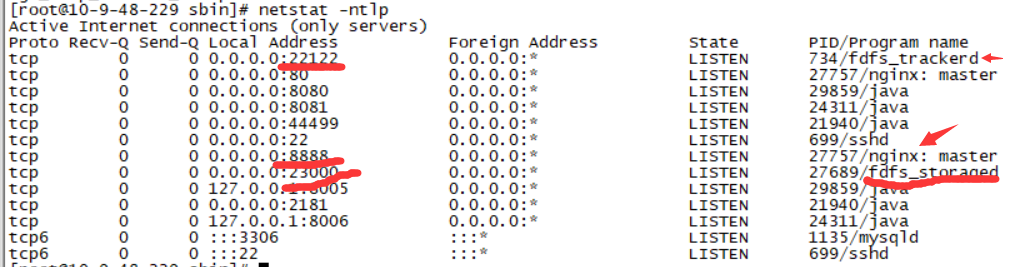
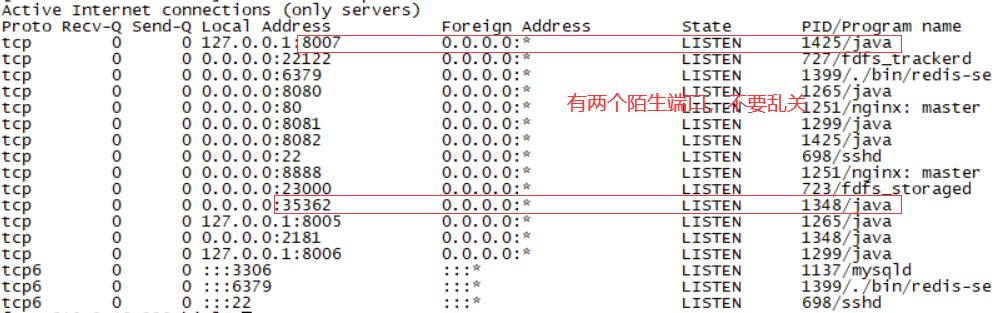
环境启动
netstat -ntlp
启动zookeeper
cd /usr/local/zookeeper-3.4.6
./bin/zkServer.sh start
启动redis
cd /usr/local/redis
./bin/redis-server redis.conf
启动nginx
cd /usr/local/nginx/sbin
./nginx
启动solr
cd /usr/local/solr/apache-tomcat-7.0.105/bin
./startup.sh
启动activemq
cd /usr/local/activemq-5.12.0
bin/activemq start
端口开启
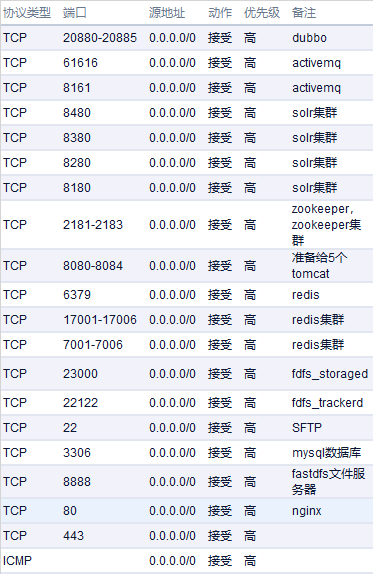
https://github.com/ChenCurry/e3-mall.git

 浙公网安备 33010602011771号