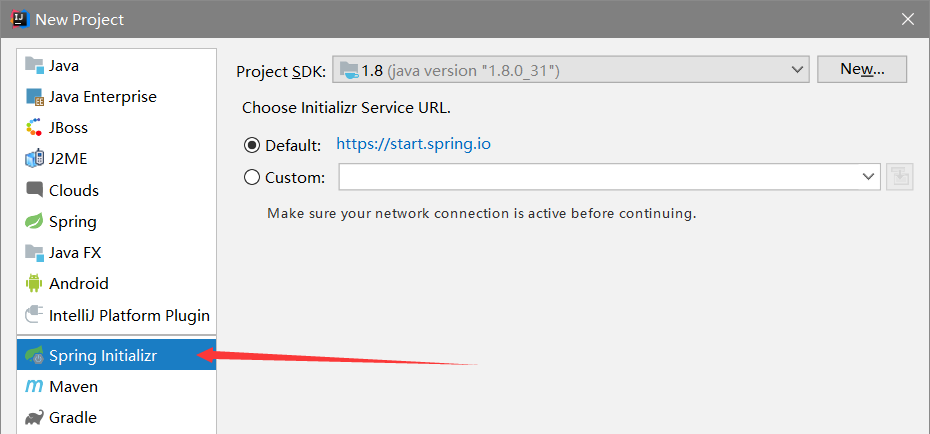
SpringBoot-01-启动第一个项目
通过官网quickstart快速生成一个项目
https://start.spring.io/
即可generate(生成)项目并下载到本地
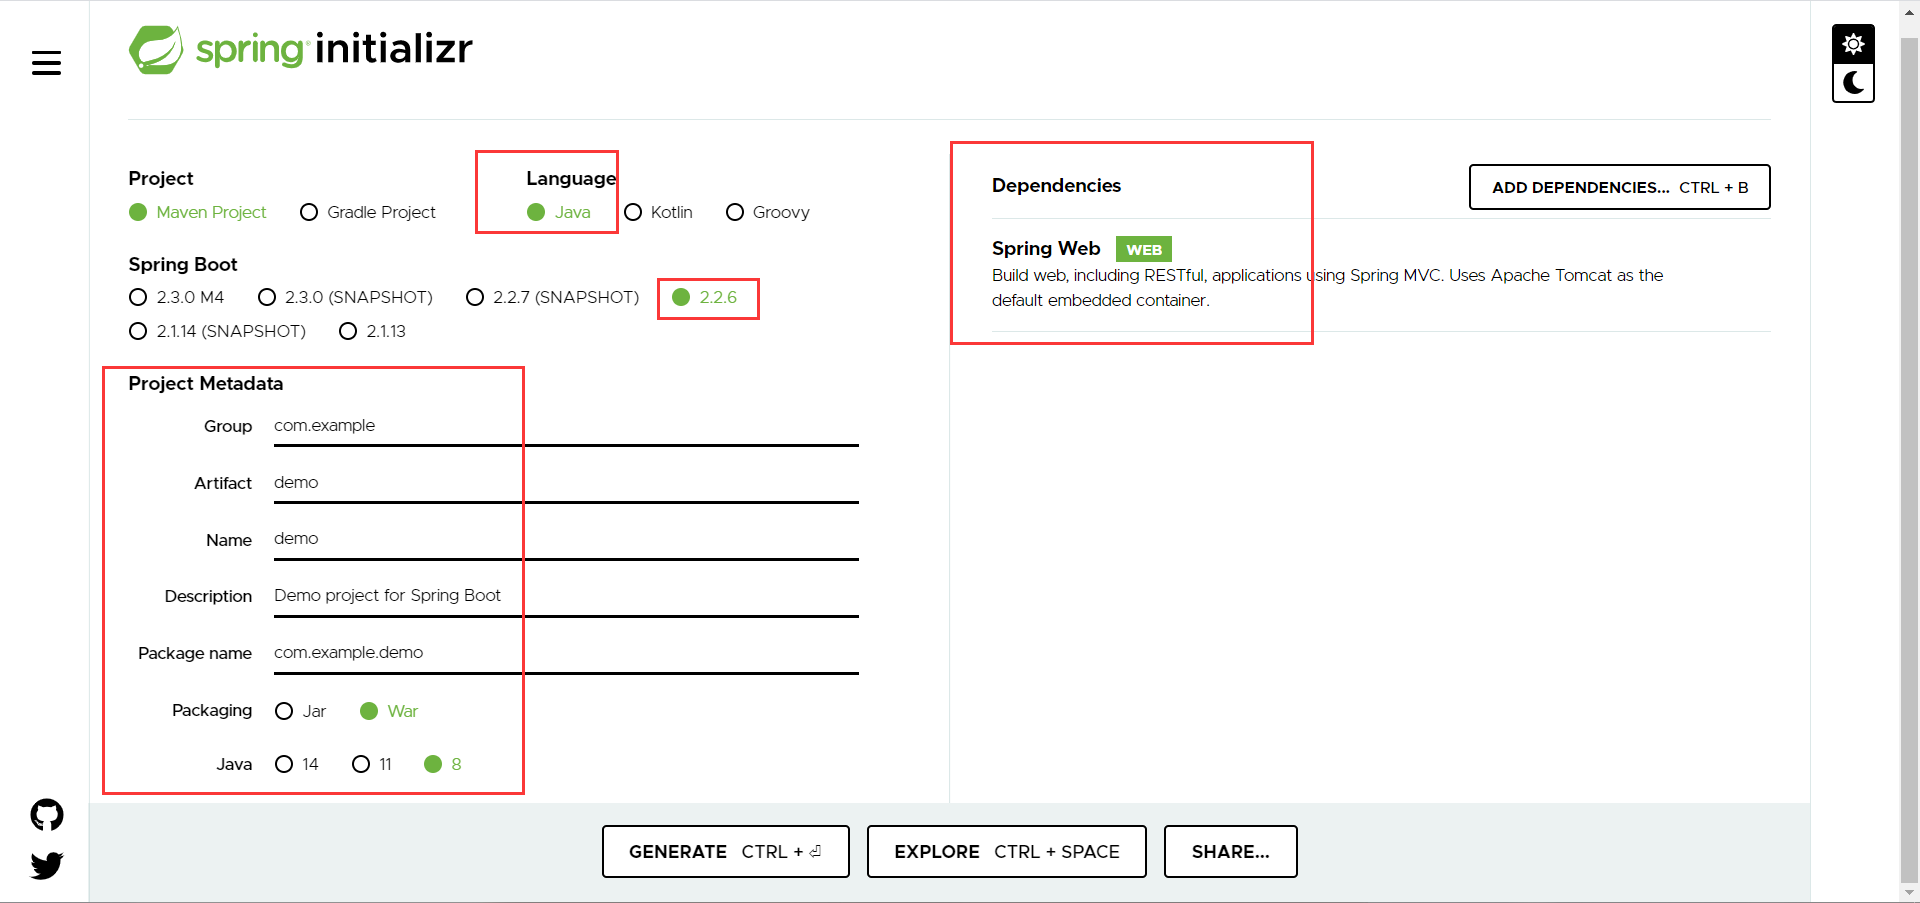
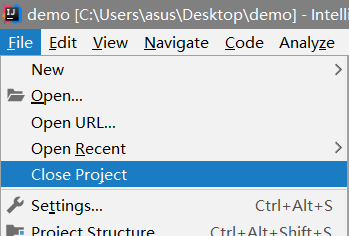
idea移除一个现有项目
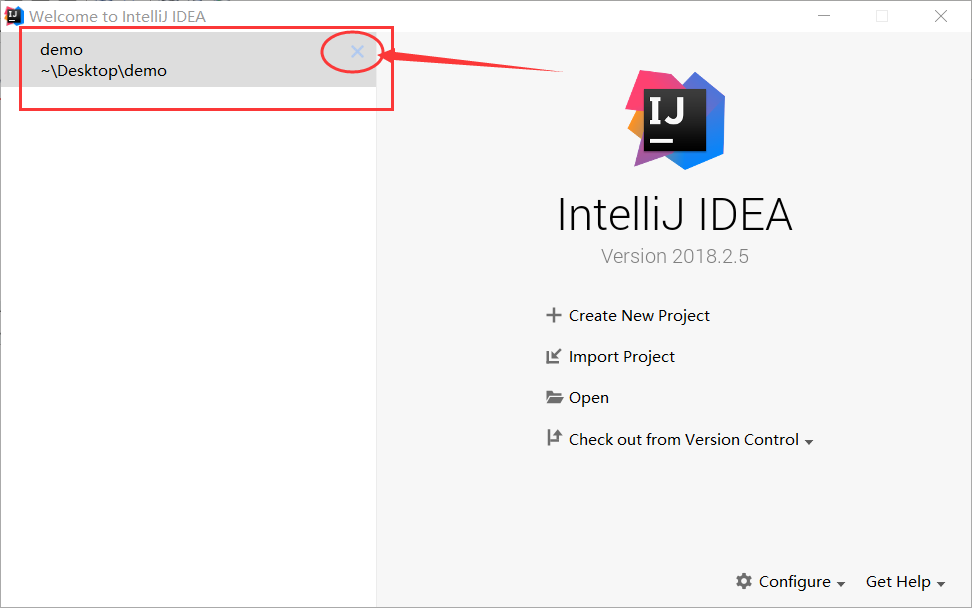
导入刚刚生成的项目
此时idea会去中央仓库下载jar包

(上面的操作是原始的做法,idea集成了这个网站)
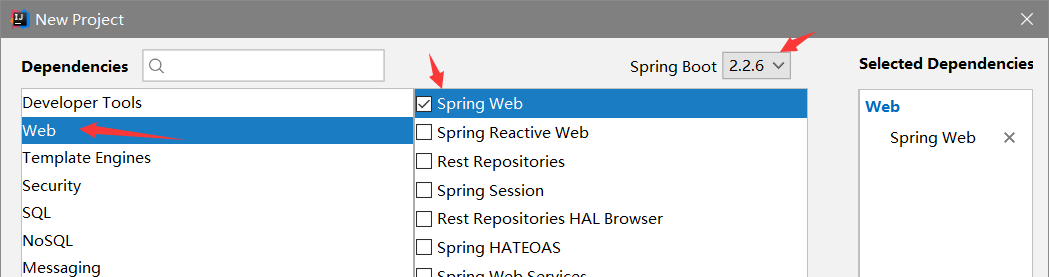
在Idea中新建一个项目
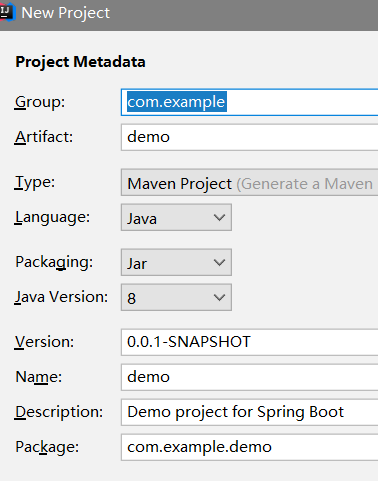
这种方式和官网上下载的方式配置是一样的

结果这种方式同样要去中央库下载jar包
去setting里边(检查maven配置)
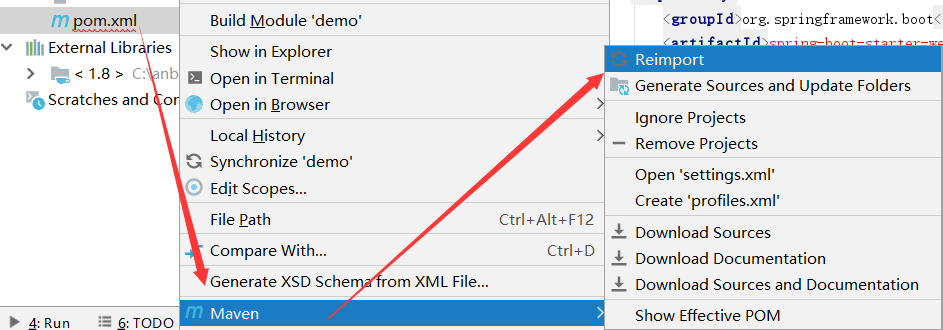
Reimport和Generate Sources and Update Folders
<!-- 连接阿里云中央仓库 -->
<mirror>
  <id>aliyun</id>
  <name>aliyun Maven</name>
  <mirrorOf>*</mirrorOf>
  <url>http://maven.aliyun.com/nexus/content/groups/public</url>
</mirror>
此时,N多的依赖jar包就开始下载了
完了执行contextLoads()空测试方法或者DemoSpplication的main方法,耐心等待几分钟

至此,这个spring boot程序就搭建完成了,现在开始解剖这家伙
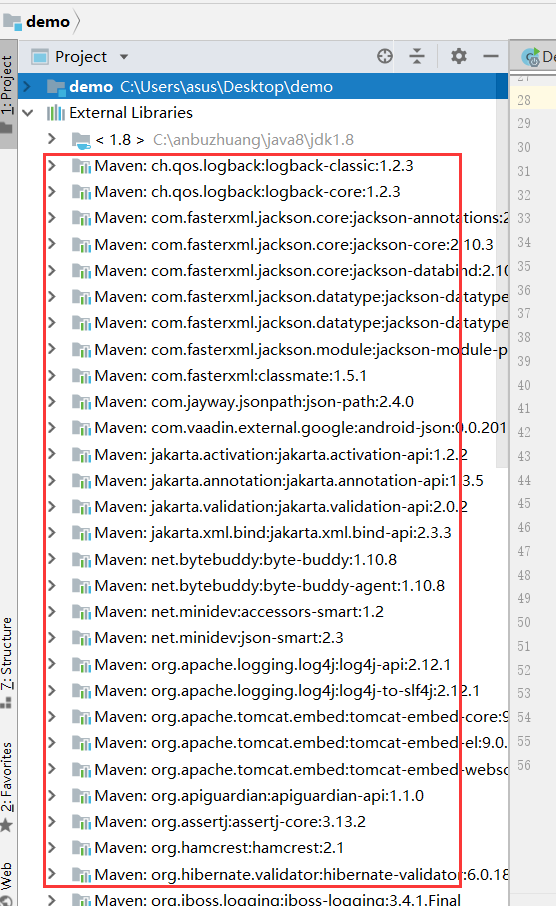
认识springboot工程
(首先从直观上看到这家伙依赖的jar包真不少,应该很健壮)
程序的入口,启动之后该web工程发布到tomcat8080端口(http://localhost:8080/error)
package com.example.demo;

import org.springframework.boot.SpringApplication;
import org.springframework.boot.autoconfigure.SpringBootApplication;

//本身就是spring的一个组件
//程序入口
@SpringBootApplication
public class DemoApplication {

    public static void main(String[] args) {
        SpringApplication.run(DemoApplication.class, args);
    }

}
核心配置文件application.properties
Java代码必须要放到与Application类同级的包的下面
Controller类
package com.example.demo.controller;

import org.springframework.web.bind.annotation.RequestMapping;
import org.springframework.web.bind.annotation.RestController;

//spring boot  自动装配
@RestController
public class HelloController {

    @RequestMapping("/hello")//这个接口的名字就叫做http://localhost:8080/hello
    //// 它就单纯的成了一个接口 不用再去管web.xml  前端  等等一系列东西了 它就和vue完全前后端分离了
    public String hello(){
        //接收前端的参数,调用业务
        return "hello world";
    }
}
pom.xml
<?xml version="1.0" encoding="UTF-8"?>
<project xmlns="http://maven.apache.org/POM/4.0.0" xmlns:xsi="http://www.w3.org/2001/XMLSchema-instance"
    xsi:schemaLocation="http://maven.apache.org/POM/4.0.0 https://maven.apache.org/xsd/maven-4.0.0.xsd">
    <modelVersion>4.0.0</modelVersion>
    <!-- 有一个父项目 -->
    <parent>
        <groupId>org.springframework.boot</groupId>
        <artifactId>spring-boot-starter-parent</artifactId>
        <version>2.2.6.RELEASE</version>
        <relativePath/> <!-- lookup parent from repository -->
    </parent>
    <groupId>com.example</groupId>
    <artifactId>demo</artifactId>
    <version>0.0.1-SNAPSHOT</version>
    <packaging>war</packaging>
    <name>demo</name>
    <description>Demo project for Spring Boot</description>

    <properties>
        <java.version>1.8</java.version>
    </properties>

    <dependencies>
        <!-- web依赖:tomcat,dispatcherServlet,xml等-->
        <dependency>
            <groupId>org.springframework.boot</groupId>
            <artifactId>spring-boot-starter-web</artifactId>
        </dependency>

        <dependency>
            <groupId>org.springframework.boot</groupId>
            <artifactId>spring-boot-starter-tomcat</artifactId>
            <scope>provided</scope>
        </dependency>
        <!--所有spring boot依赖都是使用spring-boot-starter开头的-->
        <!--单元测试-->
        <dependency>
            <groupId>org.springframework.boot</groupId>
            <artifactId>spring-boot-starter-test</artifactId>
            <scope>test</scope>
            <exclusions>
                <exclusion>
                    <groupId>org.junit.vintage</groupId>
                    <artifactId>junit-vintage-engine</artifactId>
                </exclusion>
            </exclusions>
        </dependency>
    </dependencies>

    <build>
        <!--打jar包插件-->
        <plugins>
            <plugin>
                <groupId>org.springframework.boot</groupId>
                <artifactId>spring-boot-maven-plugin</artifactId>
            </plugin>
        </plugins>
    </build>

</project>
这里可以下载依赖包的源码(方便在pom中直接ctrl点进去)

对该spring boot程序进行打包
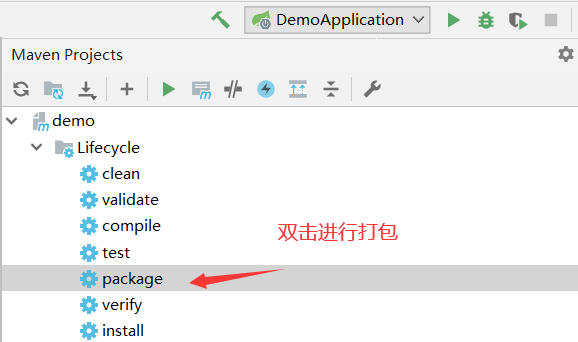
(打包成功之后target目录下生成jar包;install安装到本地仓库)
java -jar demo-0.0.1-SNAPSHOT.jar
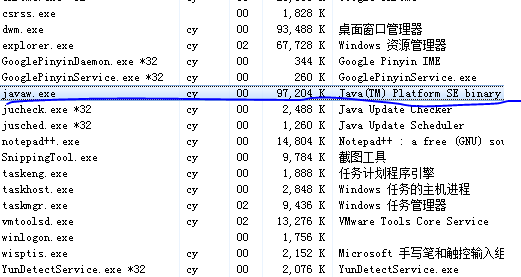
(内置tomcat,可直接在浏览器访问)
修改端口号
application.properties中配置
#更改项目的端口号
server.port=8081
修改springboot banner
https://www.bootschool.net/ascii-art
resource目录下新建文件banner.txt
主程序丶注解
pom.xml中有它的parent,其parent中还有parent(祖父母),其祖父母管理了各依赖版本号……约定大于配置(以往那种jar包冲突的问题就没了)
pom.xml中有很多启动器,各种场景的启动器,自动装配;要使用什么功能,只需要开启对应的启动器!
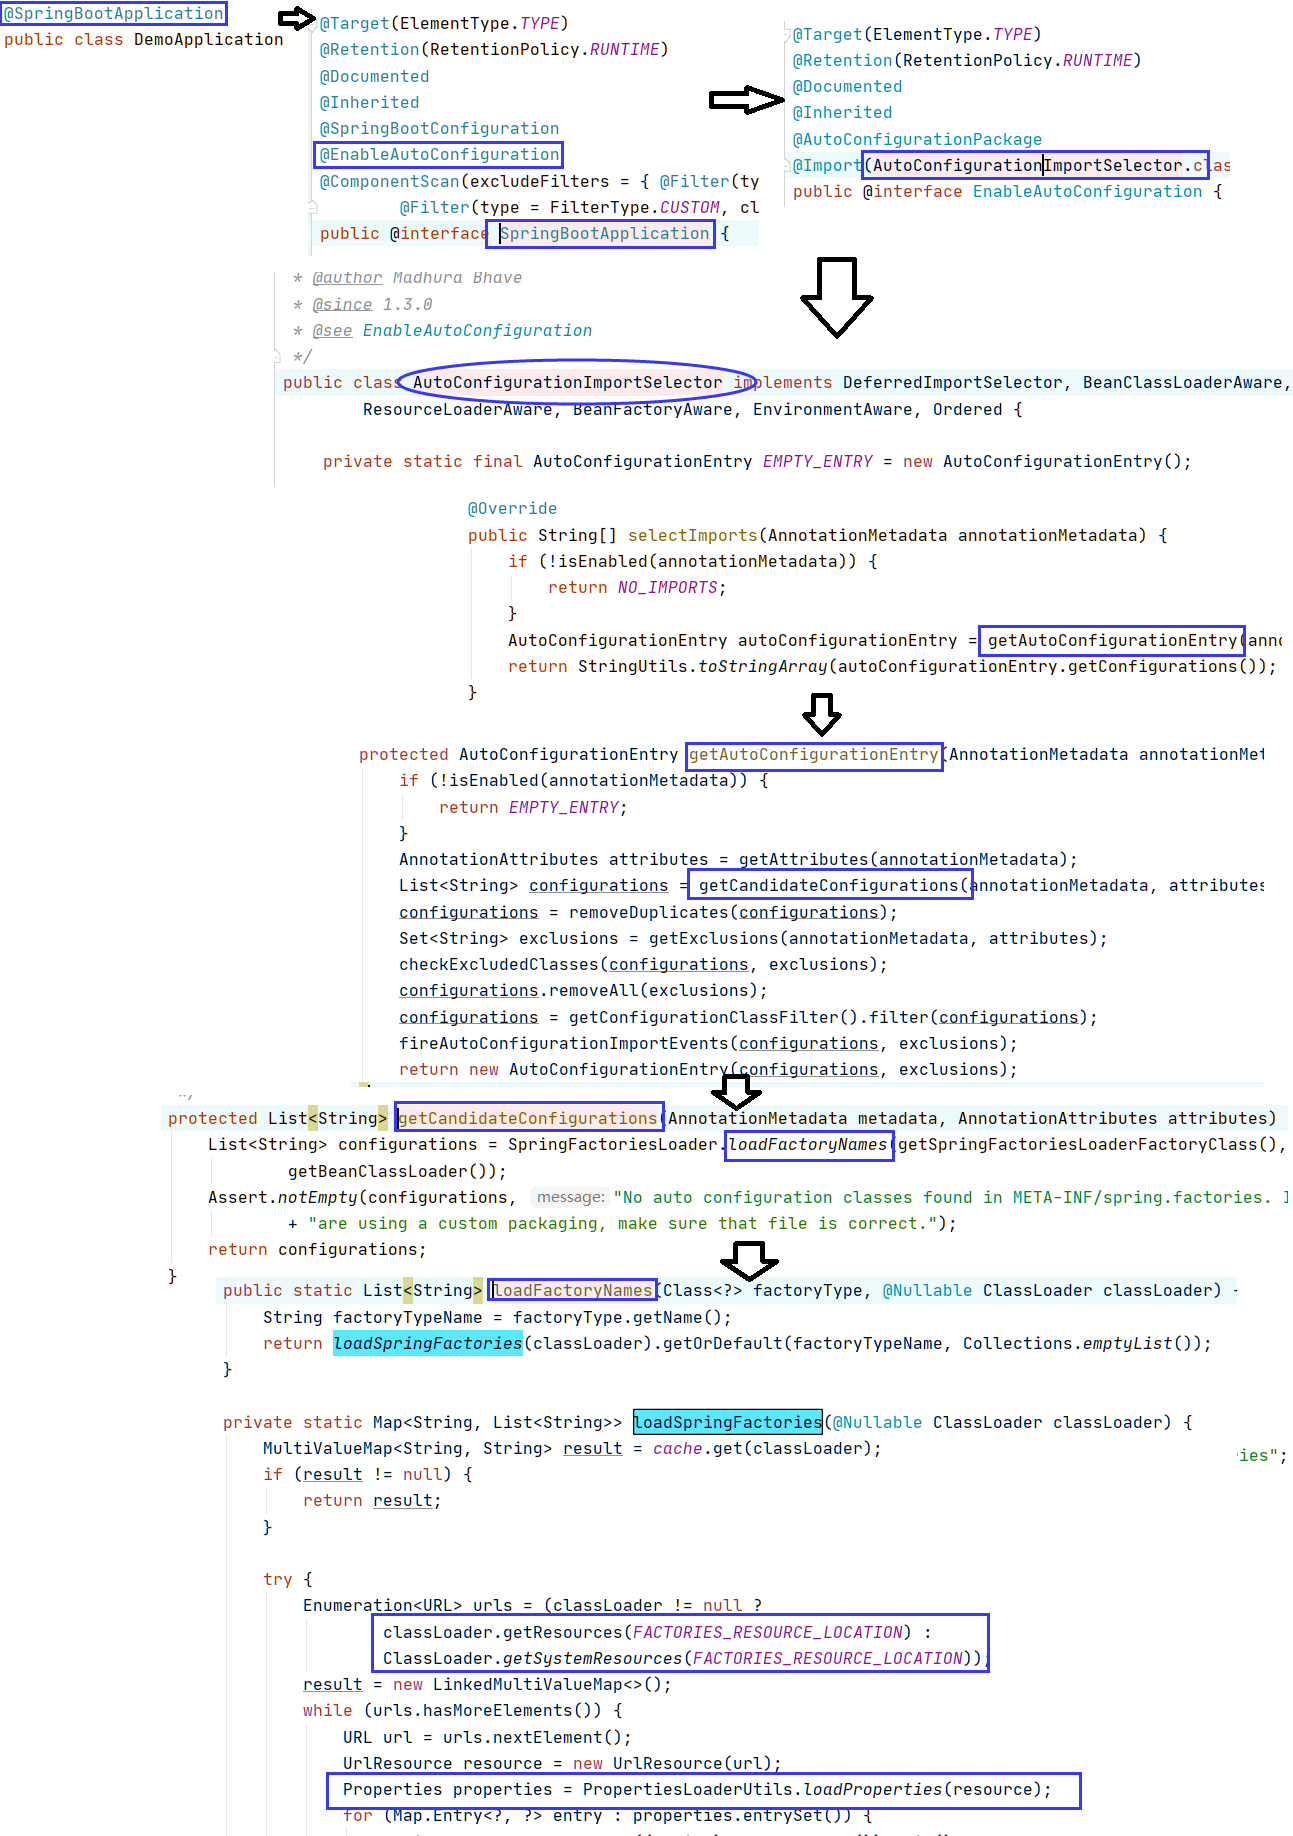
@SpringBootApplication表示这是一个springboot应用
@SpringBootConfiguration具备springboot配置
@Configuration具备spring配置
@Component表示其本质还是一个spring组件
@EnableAutoConfiguration自动配置
@AutoConfigurationPackage自动配置包
@Import(AutoConfigurationPackages.Registrar.class)自动配置“包注册”
@Import(AutoConfigurationImportSelector.class)自动配置导入选择
List<String> configurations = getCandidateConfigurations(annotationMetadata, attributes);
//META-INF/spring.factories(autoconfigure下的)
//List<String> configurations = SpringFactoriesLoader.loadFactoryNames(getSpringFactoriesLoaderFactoryClass(),getBeanClassLoader());
//private static Map<String, List<String>> loadSpringFactories(@Nullable ClassLoader classLoader)
//classLoader.getResources(FACTORIES_RESOURCE_LOCATION)
//Properties properties = PropertiesLoaderUtils.loadProperties(resource);//所有资源加载到配置类中
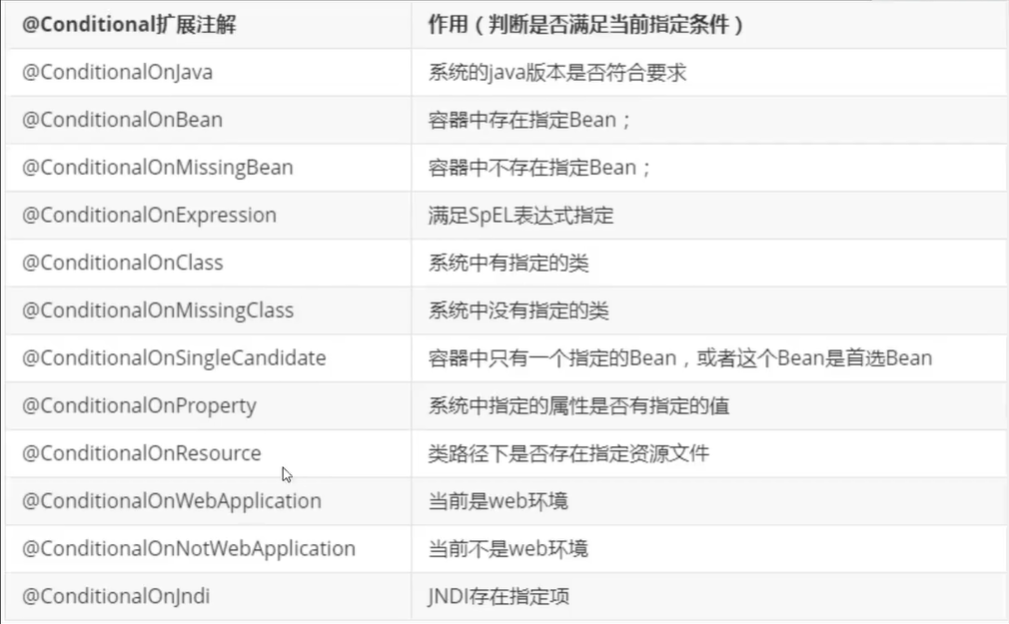
另:自动配置一核心注解@ConditionalOnXxx这里边的条件都满足才会生效!
结论
springboot的所有自动配置都在启动的时候被扫描并加载的;
spring.factories所有的自动配置都在这里边,但是不一定生效,要判断条件是否成立;
只要导入了对应的start,就有对应的启动器了,有了启动器,我们自动装配就会生效。
{从/META-INF/spring.factories获取指定的值,将这些自动配置类导入容器;
自动配置的东西都在spring-boot-autoconfigure-包下;
容器中存在非常多的xxxAutoConfigure类,给容器导入这个场景中的所有组件。}
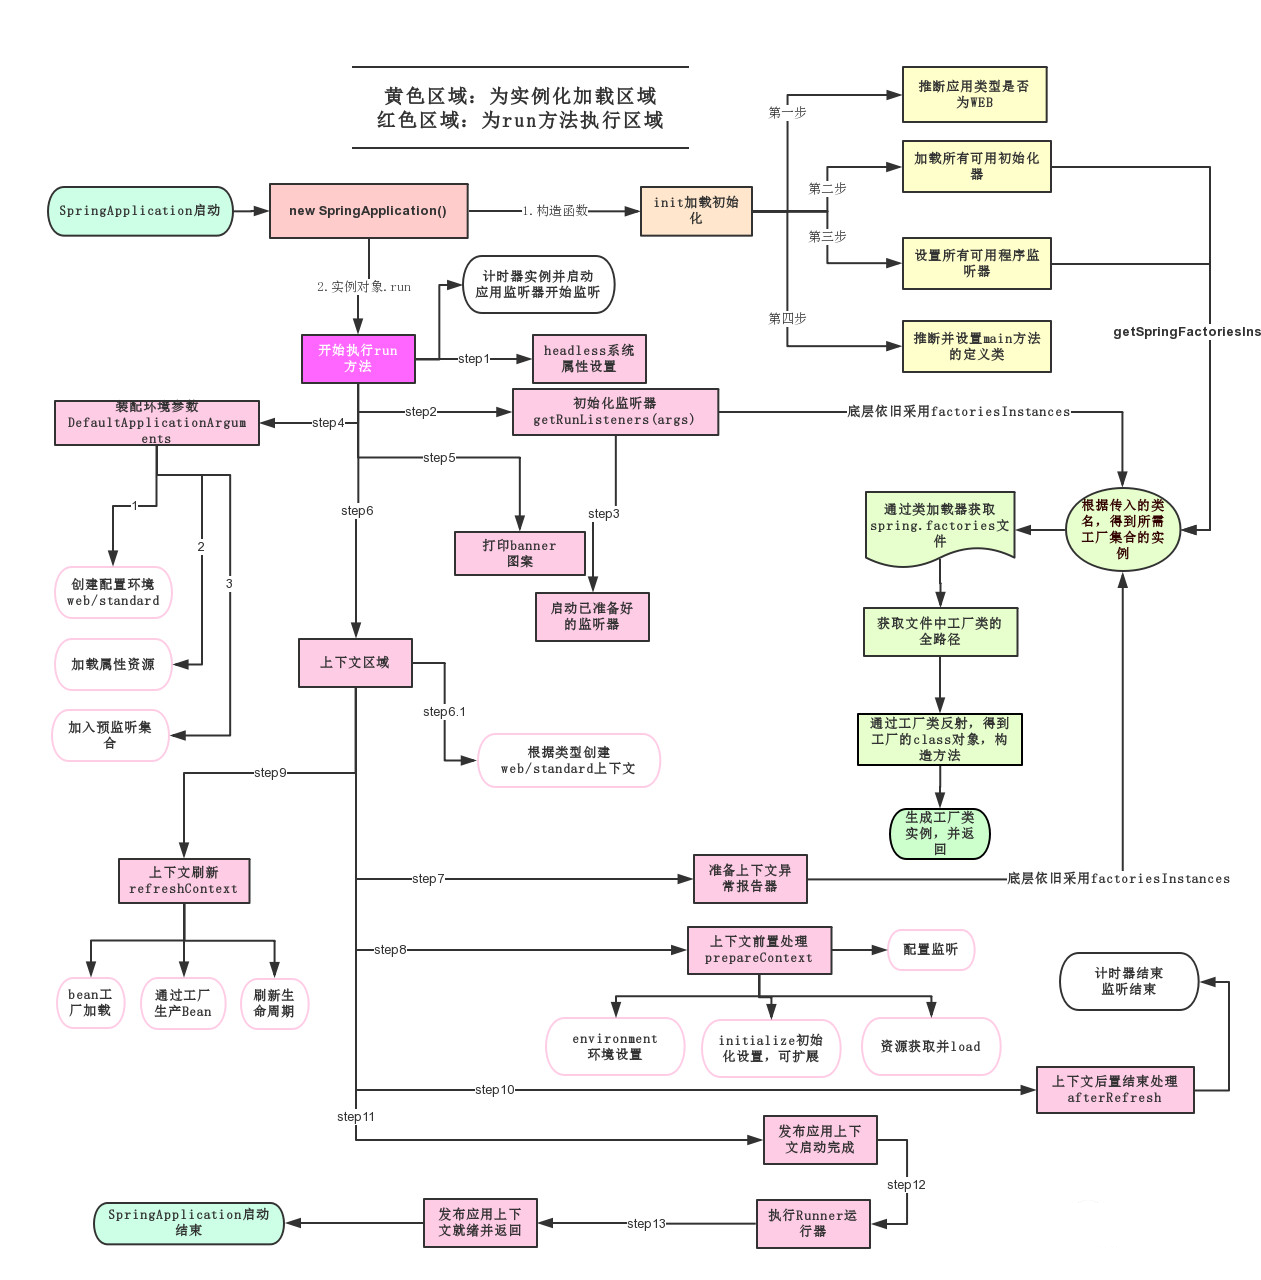
主程序丶启动
run();

配置文件
可以配置哪些东西?很多,官网上有。怎么记忆?一会说
application*.properties
语法结构 :key=value
application*.yml
语法结构 :key:空格 value
yaml用法(可以注入到配置类中)
对象
student:
    name: xiaoming
    age: 3
行内写法
student: {name: xiaoming,age: 3}

数组
pets:
 - cat
 - dog
 - pig
行内写法
pets: [cat,dog,pig]
给某一些配置类赋值(@ConfigurationProperties(prefix = "person"))


package com.example.demo.pojo;

import org.springframework.stereotype.Component;

@Component  //注册bean到容器中
public class Dog {
    private String name;
    private Integer age;

    public Dog() {
    }

    public Dog(String name, Integer age) {
        this.name = name;
        this.age = age;
    }

    public String getName() {
        return name;
    }

    public void setName(String name) {
        this.name = name;
    }

    public Integer getAge() {
        return age;
    }

    public void setAge(Integer age) {
        this.age = age;
    }

    @Override
    public String toString() {
        return "Dog{" +
                "name='" + name + '\'' +
                ", age=" + age +
                '}';
    }
}
package com.example.demo.pojo;

import org.springframework.boot.context.properties.ConfigurationProperties;
import org.springframework.stereotype.Component;

import java.util.Date;
import java.util.List;
import java.util.Map;

/*
@ConfigurationProperties作用:
将配置文件中配置的每一个属性的值,映射到这个组件中;
告诉SpringBoot将本类中的所有属性和配置文件中相关的配置进行绑定
参数 prefix = “person” : 将配置文件中的person下面的所有属性一一对应
*/
@Component //注册bean
@ConfigurationProperties(prefix = "person")
public class Person {
    private String name;
    private Integer age;
    private Boolean happy;
    private Date birth;
    private Map<String,Object> maps;
    private List<Object> lists;
    private Dog dog;

    public Person() {
    }

    public Person(String name, Integer age, Boolean happy, Date birth
            , Map<String, Object> maps, List<Object> lists, Dog dog) {
        this.name = name;
        this.age = age;
        this.happy = happy;
        this.birth = birth;
        this.maps = maps;
        this.lists = lists;
        this.dog = dog;
    }

    public String getName() {
        return name;
    }

    public void setName(String name) {
        this.name = name;
    }

    public Integer getAge() {
        return age;
    }

    public void setAge(Integer age) {
        this.age = age;
    }

    public Boolean getHappy() {
        return happy;
    }

    public void setHappy(Boolean happy) {
        this.happy = happy;
    }

    public Date getBirth() {
        return birth;
    }

    public void setBirth(Date birth) {
        this.birth = birth;
    }

    public Map<String, Object> getMaps() {
        return maps;
    }

    public void setMaps(Map<String, Object> maps) {
        this.maps = maps;
    }

    public List<Object> getLists() {
        return lists;
    }

    public void setLists(List<Object> lists) {
        this.lists = lists;
    }

    public Dog getDog() {
        return dog;
    }

    public void setDog(Dog dog) {
        this.dog = dog;
    }

    @Override
    public String toString() {
        return "Person{" +
                "name='" + name + '\'' +
                ", age=" + age +
                ", happy=" + happy +
                ", birth=" + birth +
                ", maps=" + maps +
                ", lists=" + lists +
                ", dog=" + dog +
                '}';
    }
}
person:
  name: xiaoming
  age: 3
  happy: false
  birth: 2000/01/01
  maps: {k1: v1,k2: v2}
  lists:
    - code
    - girl
    - music
  dog:
    name: 旺财
    age: 1
package com.example.demo;

import com.example.demo.pojo.Person;
import org.junit.jupiter.api.Test;
import org.springframework.beans.factory.annotation.Autowired;
import org.springframework.boot.test.context.SpringBootTest;

@SpringBootTest
class DemoApplicationTests {

    @Autowired //将狗狗自动注入进来
    Person p;

    @Test
    public void contextLoads() {
        System.out.println(p); //打印看下狗狗对象
    }
}
<!-- 导入配置文件处理器,配置文件进行绑定就会有提示,需要重启 -->
<dependency>
  <groupId>org.springframework.boot</groupId>
  <artifactId>spring-boot-configuration-processor</artifactId>
  <optional>true</optional>
</dependency>
选择@ConfigurationProperties还是@Value
1、@ConfigurationProperties只需要写一次即可,@Value则需要每个字段都添加
2、松散绑定:yml中写的last-name,这个和lastName是一样的
3、JSR303数据校验,这个就是我们可以在字段是增加一层过滤器验证,可以保证数据的合法性
4、复杂类型封装,yml中可以封装对象,使用value就不支持
配置文件放置的位置
-file:./config/
(项目根目录的config下)优先级最高
-file:./
(项目根目录)
-classpath:/config/
(类路径resource的config下)
-classpath:/
(类路径resource下)优先级最低
多环境配置
application.yml中配置如下
spring:
  profiles:
    active: test
application-test.yml中配置如下
server:
  port: 8082
application-dev.yml中配置如下
server:
  port: 8081
yml的多文档块还可以对上面的动作进一步简化
spring:
  profiles:
    active: test
---
server:
  port: 8082
spring:
  profiles: dev
---
server:
  port: 8083
spring:
  profiles: test
自动配置
得到如下spring.factories(里边包含很多自动配置类)
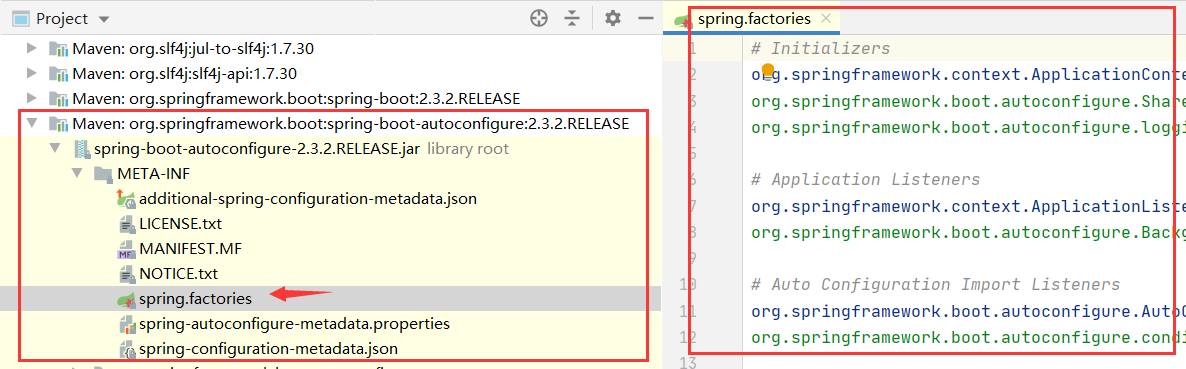
现在找application.yml中配置的内容与spring.factories的联系(spring.factories就像springboot的一个工具箱)
以HttpEncodingAutoConfiguration(Http编码自动配置)为例学习自动配置原理
//表示这个是一个配置类,被spring接管
@Configuration(proxyBeanMethods = false)
//ServerProperties中的内容和yml中提示的内容,显然配置文件中的配置项和该配置类
//进行了绑定(@ConfigurationProperties(prefix = "server", ignoreUnknownFields = true))
//从另一个角度说,yml中的每一个配置项,都有一个XxxProperties类与之对应
@EnableConfigurationProperties(ServerProperties.class)
//(ConditionalOnXxx)spring底层注解:根据条件判断当前配置类是否生效。更多同类注解见下图
@ConditionalOnWebApplication(type = ConditionalOnWebApplication.Type.SERVLET)
@ConditionalOnClass(CharacterEncodingFilter.class)
@ConditionalOnProperty(prefix = "server.servlet.encoding", value = "enabled", matchIfMissing = true)
public class HttpEncodingAutoConfiguration {

    private final Encoding properties;

    public HttpEncodingAutoConfiguration(ServerProperties properties) {
        this.properties = properties.getServlet().getEncoding();
    }

    @Bean
    @ConditionalOnMissingBean
    public CharacterEncodingFilter characterEncodingFilter() {
        CharacterEncodingFilter filter = new OrderedCharacterEncodingFilter();
        filter.setEncoding(this.properties.getCharset().name());
        filter.setForceRequestEncoding(this.properties.shouldForce(Encoding.Type.REQUEST));
        filter.setForceResponseEncoding(this.properties.shouldForce(Encoding.Type.RESPONSE));
        return filter;
    }

    @Bean
    public LocaleCharsetMappingsCustomizer localeCharsetMappingsCustomizer() {
        return new LocaleCharsetMappingsCustomizer(this.properties);
    }

    static class LocaleCharsetMappingsCustomizer
            implements WebServerFactoryCustomizer<ConfigurableServletWebServerFactory>, Ordered {

        private final Encoding properties;

        LocaleCharsetMappingsCustomizer(Encoding properties) {
            this.properties = properties;
        }

        @Override
        public void customize(ConfigurableServletWebServerFactory factory) {
            if (this.properties.getMapping() != null) {
                factory.setLocaleCharsetMappings(this.properties.getMapping());
            }
        }

        @Override
        public int getOrder() {
            return 0;
        }

    }

}
springboot装配各种XxxAutoConfiguration配置类,(配置类决定该类型工具是否加载, 工具类用自己的特长帮sping干事情)。工具加不加载,用不用yml配置,都在XxxAutoConfiguration中确定。
- 一但这个配置类生效;这个配置类就会给容器中添加组件;
- 这些组件的属性是从对应的XxxProperties类中获取的,XxxProperties类里面的每一个属性又是和yml配置文件绑定的;
- 配置文件能配置什么自然就可以参照某个功能对应的这个XxxProperties属性类
- 而至于加不加载这个工具,就看你的pom.xml里边有没有添加响应依赖丶
debug: true可查看哪些配置类生效了

 浙公网安备 33010602011771号