3.licheepi wifi
licheepi-wifi-RTL8723BS
gst-launch-1.0 filesrc location=deng2.mp4 ! qtdemux ! h264parse ! omxh264dec ! autovideoconvert ! fbdevsink
WiFi+BT模块:RTL8723bs
注意:如果使用了nfs根文件系统,使用命令ifconfig wlan0 up是会报错了,所以要修改uboot的bootargs命令,改为由TF卡中读出rootfs。
1.编译内核获取rtl8723bs.ko
首先配置内核:
make ARCH=arm menuconfig
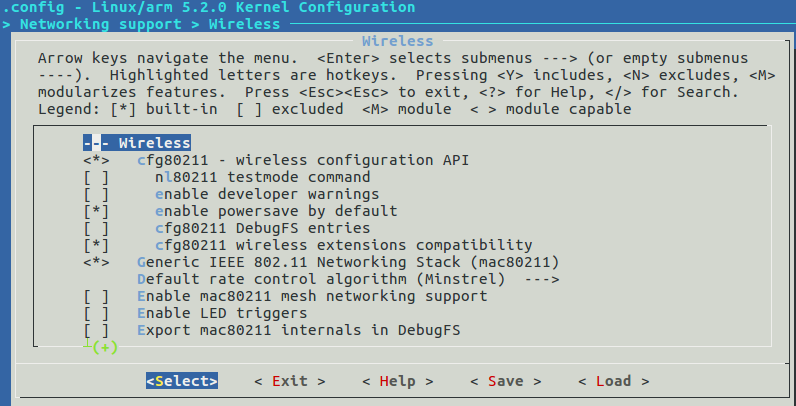
由于rtl8723bs依赖cfg80211,所以要选上:
Networking support ----->
Wireless---------> 
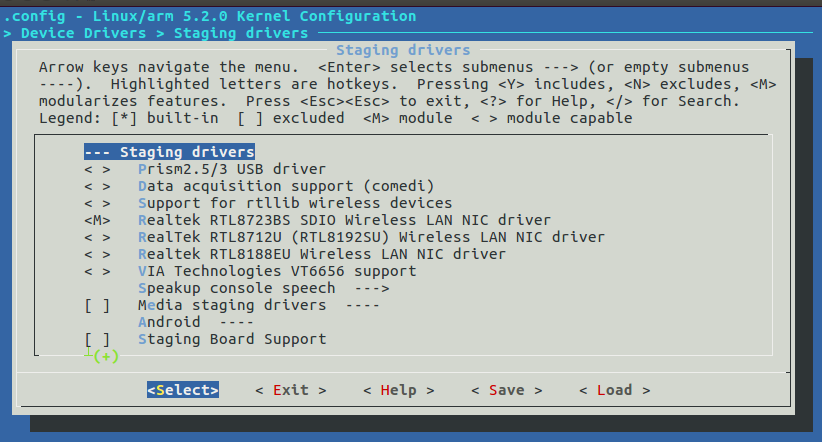
rtl8723bs:
Device Drivers ----->
staging drivers------>

然后保存退出,编译内核:
make ARCH=arm CROSS_COMPILE=arm-linux-gnueabihf- -j4
驱动程序在:drivers/staging/rtl8723bs/r8723bs.ko
然后把它拷贝到TF卡中的rootfs下的目录
2.下载rtl8723bs_nic.bin
加载r8723bs.ko之前,还需要一个文件:rtl8723bs_nic.bin
下载地址:https://github.com/ferbar/rtl8723bs/blob/master/rtl8723bs_nic.bin
下载后,把文件放进rootfs根目录下:/lib/firmware/rtlwifi
如果没有这个目录创建即可。
3.通过buildroot下载wpa_supplicant、libnl、openssl
首先配置buildroot:
make menuconfig
Targer packages --->
NetWorking applications----->

编译:
make
将/output/images/rootfs.tar 解压到TF卡中
4.加载驱动和连接wifi
加载驱动:
# insmod r8723bs.ko
[   12.994410] r8723bs: module is from the staging directory, the quality is unknown, you have been warned.
[   13.023178] RTL8723BS: module init start
[   13.027121] RTL8723BS: rtl8723bs v4.3.5.5_12290.20140916_BTCOEX20140507-4E40
[   13.034308] RTL8723BS: rtl8723bs BT-Coex version = BTCOEX20140507-4E40
[   13.042222] pnetdev = (ptrval)
[   13.078773] RTL8723BS: rtw_ndev_init(wlan0)
[   13.084590] RTL8723BS: module init ret =0
# ifconfig -a
eth0      Link encap:Ethernet  HWaddr 02:03:FA:73:60:D3
          BROADCAST MULTICAST  MTU:1500  Metric:1
          RX packets:0 errors:0 dropped:0 overruns:0 frame:0
          TX packets:0 errors:0 dropped:0 overruns:0 carrier:0
          collisions:0 txqueuelen:1000
          RX bytes:0 (0.0 B)  TX bytes:0 (0.0 B)
          Interrupt:38

lo        Link encap:Local Loopback
          inet addr:127.0.0.1  Mask:255.0.0.0
          UP LOOPBACK RUNNING  MTU:65536  Metric:1
          RX packets:0 errors:0 dropped:0 overruns:0 frame:0
          TX packets:0 errors:0 dropped:0 overruns:0 carrier:0
          collisions:0 txqueuelen:1000
          RX bytes:0 (0.0 B)  TX bytes:0 (0.0 B)

wlan0     Link encap:Ethernet  HWaddr 84:20:96:AB:34:8E
          BROADCAST MULTICAST  MTU:1500  Metric:1
          RX packets:0 errors:0 dropped:0 overruns:0 frame:0
          TX packets:0 errors:0 dropped:0 overruns:0 carrier:0
          collisions:0 txqueuelen:1000
          RX bytes:0 (0.0 B)  TX bytes:0 (0.0 B)
然后在添加要连接wifi的信息:
# vi /etc/wpa_supplicant.conf
network={
    ssid="R1CHIE_"
    scan_ssid=1
    key_mgmt=WPA-EAP WPA-PSK IEEE8021X NONE
    pairwise=TKIP CCMP
    group=CCMP TKIP WEP104 WEP40
    psk="a34032020"
    priority=5
}
搜索wifi:
wpa_supplicant -B -d -i wlan0 -c /etc/wpa_supplicant.conf
连接wifi:
# udhcpc -i wlan0
udhcpc: started, v1.27.2
udhcpc: sending discover
udhcpc: sending select for 192.168.1.104
udhcpc: lease of 192.168.1.104 obtained, lease time 86400
deleting routers
adding dns 192.168.1.1
参考:https://www.cnblogs.com/ZQQH/p/8366992.html
如果出现错误:
../src/common/sae.o:在函数‘sae_cn_confirm.isra.2’中:
sae.c:(.text+0x168):对‘crypto_bignum_to_bin’未定义的引用
sae.c:(.text+0x198):对‘crypto_bignum_to_bin’未定义的引用
../src/common/sae.o:在函数‘sae_cn_confirm_ffc’中:
sae.c:(.text+0x214):对‘crypto_bignum_to_bin’未定义的引用
sae.c:(.text+0x22c):对‘crypto_bignum_to_bin’未定义的引用
../src/common/sae.o:在函数‘sae_cn_confirm_ecc’中:
sae.c:(.text+0x2a4):对‘crypto_ec_point_to_bin’未定义的引用
sae.c:(.text+0x2c0):对‘crypto_ec_point_to_bin’未定义的引用
../src/common/sae.o:在函数‘sae_derive_pwe_ecc’中:
sae.c:(.text+0x370):对‘crypto_bignum_to_bin’未定义的引用
sae.c:(.text+0x388):对‘crypto_ec_prime_len_bits’未定义的引用
sae.c:(.text+0x40c):对‘crypto_bignum_init_set’未定义的引用
sae.c:(.text+0x420):对‘crypto_bignum_legendre’未定义的引用
sae.c:(.text+0x464):对‘crypto_bignum_deinit’未定义的引用
sae.c:(.text+0x528):对‘crypto_ec_prime_len_bits’未定义的引用
sae.c:(.text+0x5c0):对‘crypto_bignum_init_set’未定义的引用
sae.c:(.text+0x5d8):对‘crypto_ec_point_compute_y_sqr’未定义的引用
sae.c:(.text+0x5f0):对‘crypto_bignum_deinit’未定义的引用
sae.c:(.text+0x600):对‘crypto_bignum_deinit’未定义的引用
sae.c:(.text+0x60c):对‘crypto_bignum_deinit’未定义的引用
sae.c:(.text+0x670):对‘crypto_bignum_init_set’未定义的引用
sae.c:(.text+0x67c):对‘crypto_bignum_is_zero’未定义的引用
sae.c:(.text+0x690):对‘crypto_bignum_deinit’未定义的引用
sae.c:(.text+0x6a4):对‘crypto_bignum_init’未定义的引用
sae.c:(.text+0x6c0):对‘crypto_bignum_deinit’未定义的引用
sae.c:(.text+0x6cc):对‘crypto_bignum_deinit’未定义的引用
sae.c:(.text+0x6e0):对‘crypto_bignum_deinit’未定义的引用
sae.c:(.text+0x6f4):对‘crypto_bignum_deinit’未定义的引用
sae.c:(.text+0x758):对‘crypto_bignum_mulmod’未定义的引用
sae.c:(.text+0x778):对‘crypto_bignum_mulmod’未定义的引用
sae.c:(.text+0x7a0):对‘crypto_bignum_mulmod’未定义的引用
sae.c:(.text+0x7bc):对‘crypto_bignum_legendre’未定义的引用
sae.c:(.text+0x7e0):对‘crypto_bignum_mulmod’未定义的引用
sae.c:(.text+0x804):对‘crypto_bignum_deinit’未定义的引用
sae.c:(.text+0x828):对‘crypto_ec_point_init’未定义的引用
sae.c:(.text+0x850):对‘crypto_ec_point_solve_y_coord’未定义的引用
sae.c:(.text+0x860):对‘crypto_bignum_deinit’未定义的引用
../src/common/sae.o:在函数‘sae_derive_pwe_ffc’中:
sae.c:(.text+0x984):对‘crypto_bignum_init’未定义的引用
sae.c:(.text+0xa80):对‘crypto_bignum_init_set’未定义的引用
sae.c:(.text+0xaac):对‘crypto_bignum_init_set’未定义的引用
sae.c:(.text+0xad8):对‘crypto_bignum_exptmod’未定义的引用
解决:添加libnl和openssl,先把output/build/wpa_supplicant删除,再重新编译
如果出现错误:缺少:rtl8723bs_nic.bin
下载地址:https://github.com/ferbar/rtl8723bs/blob/master/rtl8723bs_nic.bin
其它错误信息参考:https://whycan.com/t_652.html


