AppRunner – Simple ‘desktop shortcut’ replacement
AppRunner – Simple ‘desktop shortcut’ replacement
Introduction
AppRunner is a simple tool, used as a Windows desktop shortcut replacement. Shortcuts are organized in tabs and their content is defined in a simple xml file.
The advantages of using AppRunner over desktop icons are:
- Icons can be organized via tabs
- Icon legends appear in full (no ellipsis!)
- Document, Folder and Application paths appear in full
Background
Part of our daily routine is to run multiple programs, open different directories and files, test multiple versions of applications, etc. My small team has to maintain many different versions of many different projects. Different versions of development tools (Visual Studio 10, 12, 13, Texas Instruments CCS 3.0, 5.0, 6.0) are used at different frequencies – daily, weekly, etc.
To keep up with all of this, we had been using desktop shortcuts to point to projects files, directories, test programs, etc. This approach was quite cumbersome, considering that we had to maintain this over multiple computers and multiple configurations. AppRunner was developed to make these operations easier.
A quick tour
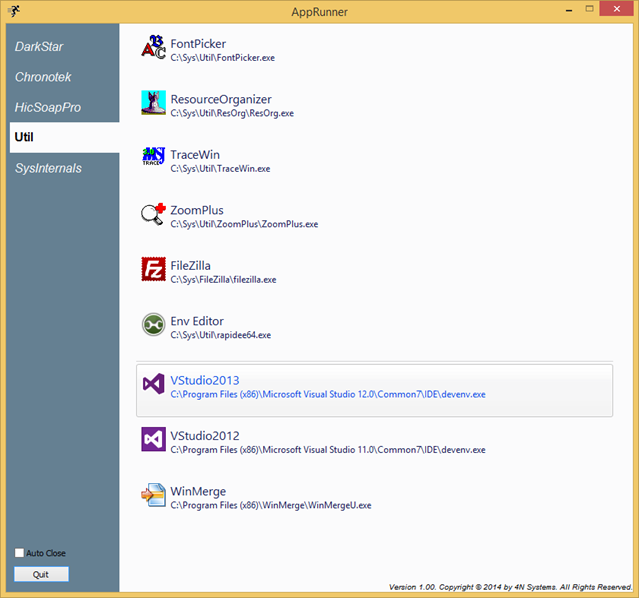
Here is a page of shortcuts:

... and another

The icons are grouped in tabs selected by the custom tab control on the left. Each tab contains multiple ‘shortcuts’ optionally separated by horizontal lines. Each shortcut represents a folder, file or an executable with optional command line arguments.
The icon for each shortcut is automatically retrieved, using the application specific icon. An invalid shortcut displays a red ‘X’ icon.
Configuring the tool
AppRunner is configured by an external .xml file, either supplied as a command line argument or named AppRunner.xml and located in the same directory as the AppRunner.exe. The xml file contains several sections as described below.
The sections are contained within the main root named AppRunner:
<AppRunner>
  ...
</AppRunner>
There are two different types of sections – CommandPage and Defines.
CommandPage: Each command page section contains information about the shortcuts in each tab page. Here is the CommandPage definition for the second page above:
   <CommandPage name="DarkStar">
      <Item name="Darkstar Folder->"                 cmd="%DarkStar%" />
      <Item name="Darsktar Solution"                 cmd="%VStudio2013% %DarkStar%\DarkStar.sln"/>

      <Separator name="TI Compilers"/>
      <Item name="TI CCS 6.0"                        cmd="C:\TI\ccsv6\eclipse\ccstudio.exe" />
      <Item name="TI CCS 3.0"                        cmd="C:\TI\CCS33\cc\bin\cc_app.exe" />
   </CommandPage>
The page contains 4 shortcuts and a separator line. The separator line has a single optional attribute (name) which specifies the title of the separator. If no name is specified, then a simple separator line is drawn.
The last two shortcuts are simple commands that point to the full path of an executable to run when the icon is hit. The first shortcut points to a folder specified by %DarkStar%. DarkStar is defined either as an environment variable or is defined in a Defines section as described below.
Defines: Here is a portion of the xml file that shows some defines:
   <Defines computer="Posidon">
      <Item name="Proj"               value="C:\_Proj" />
      <Item name="Data"               value="C:\Data" />
   </Defines>
   <Defines>
      <Item name="Program"            value="C:\Program Files (x86)" />

      <!-- Project Common -->
      <Item name="Proj"               value="D:\_Proj" />
      <Item name="Data"               value="D:\Data" />

      <!-- DarkStar -->
      <Item name="DarkStar"           value="%Proj%\_Active\Chronotek\Darkstar"/>
   </Defines>
Defines are grouped in one or more sections. An optional attribute (computer) is used to limit the definition to a specific computer.
Each section contains multiple variable definitions. The first definition encountered for a particular variable is the one used. As an example, the variable Proj will have the value C:\_Proj for the computer named Posidon and have the value D:\_Proj for all other computers.
The variable values may use variables defined previously. For example the variable DarkStar above will have the value D:\_Proj\_Active\Chronotek\Darkstar (for any computer not named Posidon).
Using the code
A Visual studio 2013 solution is included. The latest version is available at: https://github.com/tkontos/AppRunner
Recent versions of boost and WTL are the only external libraries required.
The most complicated part of setting up the Visual Studio project is the required external libraries configuration. This is a problem many developers face and we are no exception – our team's typical solution has more than 20 projects, most of them requiring boost, wtl, opencv, etc. The remainder of this section describes the approach we are using, which is based on importing solution and project level settings (Note: The project included with the source code has already been modified as described below).
Manually edit each project in the solution and add the following lines:
   <Import Condition="Exists('$(SolutionPath).props')" Project="$(SolutionPath).props" />
   <Import Condition="Exists('$(ProjectName).props')" Project="$(ProjectName).props" />
This will import, if they exist, the settings from a solution level file (named ‘AppRunner.sln.props’ located in the same directory as the as the solution) and then a project level file (named ‘AppRunner.props’ located in the same directory as the project). The easiest way to manually edit a project is to right-click the project in solution explorer and select Unload Project and then right click and select Edit.
These ‘props’ files specify additional include and library directories and any other settings (in this project the target directory is modified). For details, see the file AppRunnder.props included in the sources.
Another advantage of this approach is that multiple versions of external libraries may be used for different projects in the same solution. In one of our solutions, a project requires boost 1.36.0 and another boost 1.57.0.
If you make changes to the code, improve it, or have some better ideas, I would love to hear from you. Contact me at thanko [at] outlook [dot] com. Comments and suggestions are always welcome!
Points of Interest
The source code includes examples for the following:
- XML File processing
- Custom Tab Control
- Simple Windows Animation
- File icons
- Restore Window position


