canvas 学习笔记
1、canvas的默认样式的宽度和高度是 300px * 150px
2、直接在canvas里面写内容的话,当浏览器不支持canvas的时候,就会显示该内容
3、如果直接通过canvas的style去设置宽高的话,会导致内容被强行缩放,从而导致问题,所以要通过直接设置attr的width和 height去改变宽高
4、通过ctx = xx.getContext("2d")来获取绘制环境(xx是canvas该元素,并且2d必须是小写) ==》可看做画笔
5、canvas的坐标轴,x轴向右是正数,y轴向下是整数
6、绘制直线的条件
(1)起点 (2)终点 (3)颜色 (4)宽度
<1>ctx.beginPath() 开始定义路径
<2>ctx.closePath() 关闭前面定义的路径
<3>ctx.moveTo(x,y) 把canvas当前路径的结束点移动到x,y对应的点
<4>ctx.lineTo(x,y) 把canvas当前路径的结束点连接到x,y对应的点
<5>ctx.fill()填充当前的路径
<6>ctx.stroke()填充canvas当前路径绘制边框
<7>ctx.fillStyle = 符合颜色格式的字符串值,表示使用纯色填充/CanvasGradient,表明使用渐变填充/CanvasPattern,表明使用位图填充
设置填充canvas路径所使用的填充风格
<8>ctx.strokeStyle = 符合颜色格式的字符串值,表示使用纯色填充/CanvasGradient,表明使用渐变填充/CanvasPattern,表明使用位图填充
设置绘制canvas路径填充的风格
<9>ctx.lineWidth = 10设置笔触线条的宽度
<10>ctx.lineJoin = "bevel(斜角)|round(圆角)|miter(默认,尖角)";这个属性需要结合xx.lineWidth,用于线的交汇处
<11>ctx.lineCap = "butt(默认,平)/round(圆)/square(方)" ,用于线条的两端样式
PS:(1) fillStyle、strokeStyle、lineJoin 、lineWidth要放在fill()和stroke()前面
(2) canvas的绘图过程(即填充与描边)是非常消耗资源的,如果想节省系统资源提高效率,最好是绘制好所有路径,再一次性填充或描边图形。
(3)绘制图形的宽度为100的话,如果lineWidth=10的话,总宽度是100+(10/2)*2
7、绘制矩形
<1>ctx.strokeRect(float x,float y,float width,float height) 绘制一个矩形边框
<2>ctx.fillRect(float x,float y,float width,float height) 填充一个矩形边框
8、绘制字符串
<1>ctx.fillText(String Text, float x, float y, [float maxWidth]) 填充字符串
<2>ctx.strokeText(String Text, float x, float y, [float maxWidth]) 绘制字符串边框
<3>ctx.textAlign = start、end、left、right、center字符串水平对齐方式
<4>ctx.textBaseAlign = top、hanging、middle、alphabetic、idecgraphic、bottom 字符串垂直对齐方式
9、绘制阴影
<1>ctx.shadowBlur 设置阴影的模糊程度。该值是一个浮点数,该数值越大,阴影的模糊程度也就越大。
<2>ctx.shadowColor 设置阴影的颜色
<3>ctx.shadowOffsetX 设置阴影在X方向的偏移
<4>ctx.shadowOffsetY 设置阴影在 Y 方向的偏移
10、添加子路径的方法
<1>ctx.arc(float x, float y, float radius(半径), float startAngle, float endAngle, boolean counterclockwise(逆时针)) ===> Math.PI = 180°
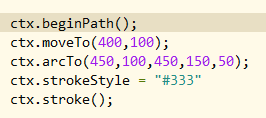
<2>ctx.arcTo(float x1, float y1, float x2, float y2, float radius)
eg:


<3>ctx.bezierCurveTo(float cpX1, float cpY1, float cpX2, float cpY2, float x, float y)
在当前路径上添加一段贝塞尔曲线
(cpX1 和 cpY1 则是控制第一个控制点的坐标,cpX2 和 cpY2 则是控制第二个控制点的坐标)
<4>ctx.quadraticCurveTo(float cpX, float cpY,float x,float y)
向 canvas 当前路径添加一段二次贝塞尔曲线
<5>rect(float x, float y,float width, float height)
向 canvas 的当前路径上添加一个矩形
11、绘制位图
<1>ctx.drawImage(image, x, y)
<2>ctx.drawImage(image, x, y, w, h)
<3>ctx.drawImage(image, sx, sy , sw, sh, dx, dy, dw, dh)
该方法将会从 image 上“挖出”一块绘制到画布上。其中 sx, sy 两个参数控制从原图片上的哪一个位置开始挖去, sw, sh 两个参数控制从原图片挖球的宽度和高度;dx, dy 两个参数控制把挖取的图片绘制到画布上的哪个位置,而 dw, dh 则控制对绘制图片进行缩放,绘制出来的宽度是 dw, 高度 dh
12、有时候1像素的线条不是1像素宽,好像要宽一些,模糊一些
这时候,在不很严谨的场合可以使用+0.5
13、线性渐变
<1>ctx.createLinearGradient(12,y1,x2,y2) 创建线性渐变
<2>ctx.addColorStop(位置,颜色) 往渐变里面添加颜色,位置是0-1之间的数字,也可以是两位小数
<3>最后把ctx.fillStyle = linear
14、圆形渐变
ctx.createRadialGradient(x1, y1, r1, x2, y2, r2)
15、曲线
ctx.arc(圆心x,圆心y,半径,开始的角度,结束的角度,是否逆时针)
16、transform实现位移、缩放、旋转
ctx.transform(水平)
100、在 Canvas 上使用路径,可按照下面的步骤进行。
- 调用 CanvasRenderingContext2D 对象的 beginPath()方法开始定义路径。
- 调用CanvasRenderingContext2D 的各种方法添加子路径。
- 调用CanvasRenderingContext2D 的 closePath 方法关闭路径。
- 调用CanvasRenderingContext2D 的fill()或 stroke()方法来填充路径或者绘制路径边框。


