Pytorch系列:(六)自然语言处理NLP
这篇文章主要介绍Pytorch中常用的几个循环神经网络模型,包括RNN,LSTM,GRU,以及其他相关知识点。
nn.Embedding
在使用各种NLP模型之前,需要将单词进行向量化,其中,pytorch自带一个Embedding层,用来实现单词的编码。Embedding层 随机初始化了一个查询表,他可以将一个词转换成一个词向量。需要注意的是,Embedding层输入的是一个tensor long 类型,表示读取第多少个tensor,等于token的数量。
import torch.nn as nn
embeds = nn.Embedding(2,5)

word_to_ix = {"one":0,"hot":1}
token_id = torch.tensor([word_to_ix["one"]],dtype=torch.long)

one_embed = embeds(token_id)
RNN
计算公式如下:
Pytorch中的RNN
nn.RNN(
  input_size,
  hidden_size,
  num_layers,
  nonlinearity,
  bias,
  batch_first,
  dropout,
  bidirectional
)
input_size: 输入维度
hidden_size:隐层维度,在RNN中也是输出的维度
num_layers :RNN的层数,默认为1
nonlinearity :非线性函数,默认为'tanh' , 也可以设置为'relu'
bias : 偏置参数,默认为True
batch_first : 输入向量第一维度是batch 还是 seq(序列长度), 默认为False
dropout :默认为0,设置是否在RNN层的末尾增加dropout操作
bidirectional : 是否为双向RNN,默认为False
RNN 中的输入与输出
out 等于所有step 中h 的输出的拼接
x : ( batch, seq , input_size) 当btach_first = True
h0 / ht : (num_layers, batch, hidden_size)
out : (batch, seq, hidden_size)
out , ht = RNN(x, h0)
举个例子,假设我们输入为 (3,10,100),表示3个batch,长度为10,每个单词表征为100维度。设置hidden_size 为20,这个时候,h的尺寸为[1,3,20]表示1层rnn,3个batch,20是隐层,然后out是[3,10,20].
rnn = nn.RNN(input_size =100,hidden_size = 20,batch_first=True)
x = torch.randn(3,10,100)

out, h = rnn(x,torch.zeros(1,3,20))
print(out.shape)
print(h.shape)

# [3,10,20]
# [1,3,20 ]
也可以直接查看RNN中的参数的尺寸
rnn = nn.RNN(100,20)
# rnn的参数名为:
# odict_keys(['weight_ih_l0','weight_hh_l0','bias_ih_l0','bias_hh_l0'])
print(rnn.weight_hh_l0.shape)
# [20,20]
多层RNN要注意的是要这是layer的双向设置,如何layer设置是双向的,那么 计算方式如下:
x : ( batch, seq , input_size) 当btach_first = True
h0 / ht : (num_layers2, batch, hidden_size) #只有这里有区别,num_layers2
out : (batch, seq, hidden_size)
RNNCell
RNNCell 计算公式和RNN一样,不过RNNCell每次运行只执行一步,因此,RNNCell的尺寸计算方式也会有所区别
RNNCell(
  input_size,
  hidden_size,
  bias=True,
  nonlinearity='tanh',
  device=None,
  dtype=None
)
输入输出尺寸:
xt : [batch, wordvec]
ht_1 / ht : [batch, hidden_size]
举个例子:
cell1 = nn.RNNCell(100,20)
xt = torch.randn(3,100)

h1 = cell1(xt, torch.randn(3,20))
print(h1.shape)
# [3,20]
LSTM
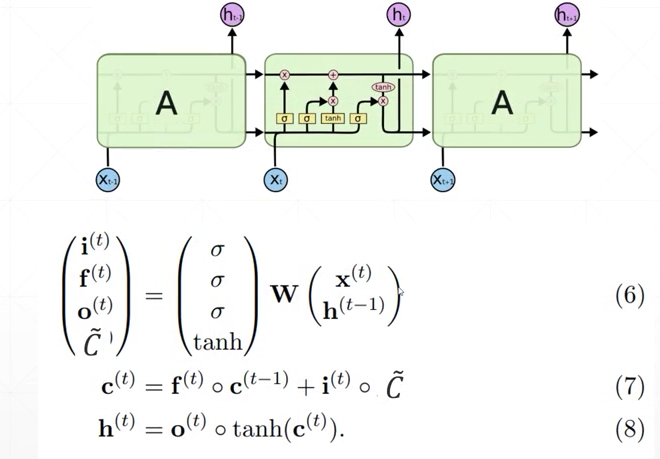
LSTM 的计算公式和结构图如下所示:包含四个门,输入门 i 控制多少信息可以输入,遗忘门f作用在先前的记忆c^{t-1} 上,作用是过滤一部分之前的记忆,输出门作用在新的记忆c^{t} 上,得到最终的输出h

Pytorch 中的LSTM
在Pytorch中LSTM的使用跟RNN一样,区别是LSTM中的output有两个,一个是c一个是h,这里的c和h的尺寸大小是一样的。
nn.LSTM(
  input_size,
  hidden_size,
  num_layers,
  bias,
  batch_first,
  dropout,
  bidirectional
)
input_size: 输入维度
hidden_size:隐层维度,在RNN中也是输出的维度
num_layers :RNN的层数,默认为1
nonlinearity :非线性函数,默认为'tanh' , 也可以设置为'relu'
bias : 偏置参数,默认为True
batch_first : 输入向量第一维度是batch 还是 seq(序列长度), 默认为False
dropout :默认为0,设置是否在RNN层的末尾增加dropout操作
bidirectional : 是否为双向RNN,默认为False
用法示例:
>>> rnn = nn.LSTM(10, 20, 2)
>>> input = torch.randn(5, 3, 10)
>>> h0 = torch.randn(2, 3, 20)
>>> c0 = torch.randn(2, 3, 20)
>>> output, (hn, cn) = rnn(input, (h0, c0))
LSTM 中的输入与输出
与RNN不一样的是,LSTM 中多了一个记忆参数c, 所以输入输出都多了c, 这里的c 和 h 的尺寸一模一样。
output, (hn, cn) = rnn(input, (h0, c0))
x : ( batch, seq , input_size) 当btach_first = True
h / c : (num_layers, batch, hidden_size)
output : (batch, seq, hidden_size) # h的拼接
一个例子:
lstm = nn.LSTM(input_size = 100,hidden_size=20,num_layer=4,batch_first=True)
x = torch.randn(3,10,100)
out, (h,c) = lstm(x)
print(out.shape,h.shape,c.shape)

# [3,10,20] [4,3,20]  [4,3,20]
LSTMCell
同样的LSTM也有Cell版本,和上述RNNCell原理一样,都是只执行一个时间步
nn.LSTMCell(
  input_size,
  hidden_size,
  bias=True,
  device=None,
  dtype=None
)
尺寸计算:
xt : [batch, wordvec]
h / c : [batch, hidden_size]
举个例子:
cell = nn.LSTMCell(100,20)
xt = torch.randn(3,100)
h = torch.zeros(3,20)
c = torch.zeros(3,20)

h_out, c_out = cell(xt, [h,c])
print(h_out.shape)
# [3,20]
通过LSTMCell 构建多层LSTM
cell1 = nn.LSTMCell(100,30)
cell2 = nn.LSTMCell(30,20)

h1 = torch.zeros(3,30)
c1 = torch.zeros(3,30)
h2 = torch.zeros(3,30)
c2 = torch.zeros(3,30)

for xt in x:
    h1,c1 = cell1(xt,[h1,c1])
    h2,c2 = cell2(h1,[h2,c2])
print(h2.shape,c2.shape)
# [3,20]  [3,20]
GRU
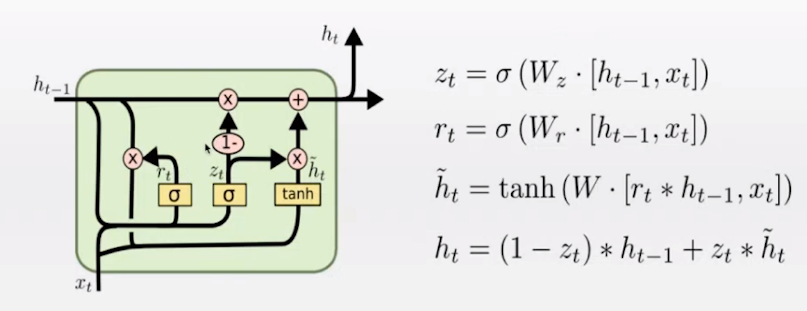
GRU的工作原理如下图所示,其中,重置门rt 用于过滤一部分过去的信息,更新门zt 用来控制多少保留多少旧信息和输出多少新信息

Pytorch 中的GRU
这里GRU的参数跟RNN的参数基本一样,区别是GRU中不能设置激活函数。
nn.GRU(
  input_size,
  hidden_size,
  num_layers,
  bias,
  batch_first,
  dropout,
  bidirectional
)
input_size: 输入维度
hidden_size:隐层维度,在RNN中也是输出的维度
num_layers :RNN的层数,默认为1
bias : 偏置参数,默认为True
batch_first : 输入向量第一维度是batch 还是 seq(序列长度), 默认为False
dropout :默认为0,设置是否在RNN层的末尾增加dropout操作
bidirectional : 是否为双向RNN,默认为False
序列模型采样方法
针对一段长文本,如果要使用循环神经网络去训练,必须要做采样,因为循环神经网络无法做长序列学习,这里常用的采样方式有两种。
- 随机采样
随机的选取一段样本用来训练,这个时候,每一个batch中的尾巴和下一个batch 的头部是没有任何关联的,所以需要训练的时候,每一个batch后,需要重新初始化一下隐层,此外还需要对隐层进行detach,中断计算图。
- 相邻采样
令相邻的两个随机小批量在原始序列上的位置相毗邻, 这样由于相邻的batch是连接起来的,所以这个时候,只需要在第一个batch前初始化一个隐藏状态,无需在每个batch结束后初始化。另外,由于模型串联使得梯度计算开销增大,所以在这里依然还是要在每个batch 结束后进行detach操作,中断计算图。
完整示例
一个lstm网络示例,注意这里使用Glove来初始化Embedding权重,然后取LSTM最后一层的输出,喂入到线性层中。
class BLSTM(nn.Module):
    def __init__(self,USE_GLOVE,pretrained_emb,token_size,batch_size,device):
        super(BLSTM, self).__init__()

        self.embedding = nn.Embedding(
            num_embeddings=token_size,
            embedding_dim=300
        )
        self.device = device
        # Loading the GloVe embedding weights
        if USE_GLOVE:
            self.embedding.weight.data.copy_(torch.from_numpy(pretrained_emb))


        self.text_lstm = nn.LSTM(300,150,num_layers=1,batch_first=True)  #b,n,150


        self.linear = nn.Sequential(
            nn.Linear(150,125),
            nn.ReLU(),
            nn.Dropout(0.2),
            nn.Linear(125,32),
            nn.ReLU(),
            nn.Dropout(0.4),
            nn.Linear(32,1)
        )

    def forward(self,text_feat):

        text_emb = self.embedding(text_feat)

        first_lstm_out = []

        init_h = torch.full((1,text_feat.shape[0],150),0).float().to(self.device)
        init_c = torch.full((1,text_feat.shape[0],150),0).float().to(self.device)

        out,_ = self.text_lstm(text_emb,[init_h,init_c])
        out_pre = out[:,-1,:]  # get last representation
        output = self.linear(out)
        return output


 浙公网安备 33010602011771号