docker学习
一、docker架构简述
docker是CS架构,docker体系结构
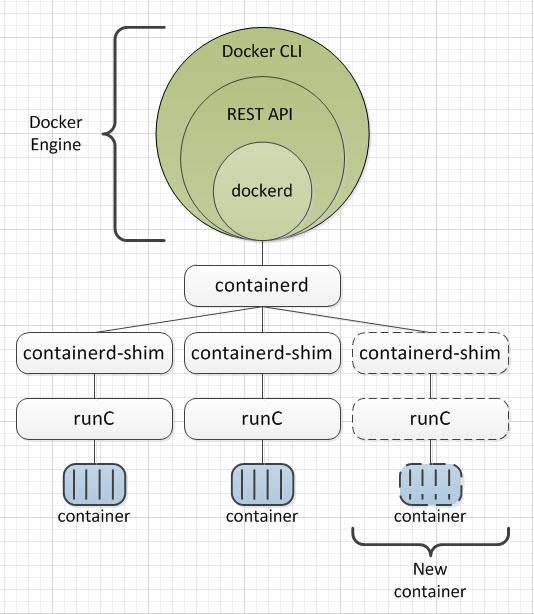
1、docker是一个客户端工具,作用是发送用户的请求给 dockerd。安装路径:/usr/docker/
dockerd也叫 docker daemon。安装路径:/usr/dockerd
一句话概括:docker和 dockerd 组成了 docker engine
2、Containerd:管理容器的生命周期(从创建容器到销毁容器)
拉取推送容器镜像
存储管理(管理镜像及容器数据的存储)
调用runC 运行容器 (与 runC 等容器运行时交互)
管理容器网络接口及网络
一句话概括:docker对容器的管理和操作基本都是通过 containerd 来完成的
3、Containerd-shim:它是containerd 的组件,是容器的运行时载体,我们在 docker 宿主机上看到的 shim 也正是代表着一个个通过调用 containerd 启动的 docker 容器。安装路径:/usr / docker containerd shim
4、RunC 是一个轻量级的工具,它是用来运行容器的,且只做这一件事。我们可以直接通过 runc ,可以不用通过 docker 引擎直接运行容器。(https:// github.com opencontainers runc)
二、docker使用镜像加速及代理
1、镜像加速
vim  /etc/docker/daemon.json


{
  "registry-mirrors": ["https://registry.docker-cn.com"]
}


systemctl daemon reload
systemctl restart docker
2、使用代理
# cat /etc/systemd/system/docker.service.d/http-proxy.conf
[Service]
Environment="HTTP_PROXY=http://127.0.0.1:8118" "NO_PROXY=localhost,127.0.0.1"
# cat /etc/systemd/system/docker.service.d/https- proxy.conf
[Service]
Environment="HTTPS _PROXY=http://127.0.0.1:8118" "NO_PROXY=localhost

#systemctl daemon reload
#systemctl restart docker
#systemctl show --property=Environment docker
三、docker images
docker search 搜索镜像
docker search nginx

docker pull NAME:<TAG> 下载镜像
docker pull nginx
docker images  查看镜像
docker images -q 只显示镜像id
docker images --digests 显示摘要信息
docker images相关子命令

Usage:  docker images [OPTIONS] [REPOSITORY[:TAG]]

List images

Options:
  -a, --all             Show all images (default hides intermediate images)
      --digests         Show digests
  -f, --filter filter   Filter output based on conditions provided
      --format string   Pretty-print images using a Go template
      --help            Print usage
      --no-trunc        Don't truncate output
  -q, --quiet           Only show numeric IDs
镜像导出
docker save -o nginx.tar nginx:latest #o是小写 nginx.tar导出文件名
或者
docker save > nginx.tar nginx:latest
镜像导入
docker load -i nginx.tar
或
docker load < nginx.tar

#其中-i和<表示从文件输入。会成功导入镜像及相关元数据,包括tag信息
修改tag
docker tag SOURCE_IMAGE[:TAG] TARGET_IMAGE[:TAG]

docker tag busybox  busybox:v1
删除镜像
docker rmi nginx
docker 镜像上传

首先在docker hub上创建一个自己id,然后在通过命令在本地登录
比如docker login

给已经存在的镜像打改成自己的仓库名称,比如
docker tag nginx my.registry:8080/nginx:v1
然后docker push

docker push my.registry:8080/nginx:v1
四、镜像构建
镜像构建主要有两种方式
1、docker commit
2、dockerfile
docker commit构建镜像
docker commit主要是在已经存在的镜像基础上做一些改动后,封装成新的镜像,对原有镜像无影响。docker commit 构建镜像主要有如下步骤:
1、运行已经存在的某个容器
2、进入容器,进行相关修改
3、将容器保存为新的镜像
默认centos镜像是没vim命令的,我们可以安装vim后构建为带vim命令的新镜像,具体步骤如下:
下载镜像
docker pull centos
启动镜像
docker run -it centos /bin/bash
安装vim
[root@4ce5779cc971 /]# yum install vim


[root@4ce5779cc971 /]# which vim
/usr/bin/vim

然后在容器外执行commit
[root@localhost ~]# docker commit 4ce5779cc971 centos-with-vim
sha256:d5a7683e6c475eb5e8e69edd0d9980bab61a4154a91ae1b4d4216e64c305a06b

查看镜像
[root@localhost ~]# docker images
REPOSITORY                                                          TAG                 IMAGE ID            CREATED             SIZE
centos-with-vim                                                     latest              d5a7683e6c47        3 minutes ago       272MB
centos                                                              latest              0d120b6ccaa8        3 months ago        215MB

启动新构建的镜像
[root@localhost ~]# docker run -it centos-with-vim /bin/bash
[root@23c309aa143e /]# which vim
/usr/bin/vim
dockerfile构建镜像
第一个简单的例子,基于centos镜像构建一个带vim指令的centos新镜像
1、编写dockerfile文件
[root@localhost dockerfile]# cat Dockerfile
FROM centos
RUN yum install vim -y


#说明FROM指定base镜像 RUN在容器中运行指定命令
2、通过build命令构建镜像
[root@localhost dockerfile]# docker build -t centos-vim-v1 .
查看构建后images
[root@localhost dockerfile]# docker images
REPOSITORY                                                          TAG                 IMAGE ID            CREATED             SIZE
centos-vim-v1                                                       latest              1f5ab78dabbc        5 minutes ago       272MB
构建详细过程如下


[root@localhost dockerfile]# docker build -t centos-vim-v1 .
Sending build context to Docker daemon  2.048kB
Step 1/2 : FROM centos
 ---> 0d120b6ccaa8
Step 2/2 : RUN yum install vim -y
 ---> Running in 5b6e8e271efa
CentOS-8 - AppStream                            244 kB/s | 5.8 MB     00:24
CentOS-8 - Base                                 530 kB/s | 2.2 MB     00:04
CentOS-8 - Extras                               9.0 kB/s | 8.6 kB     00:00
Dependencies resolved.
================================================================================
 Package             Arch        Version                   Repository      Size
================================================================================
Installing:
 vim-enhanced        x86_64      2:8.0.1763-13.el8         AppStream      1.4 M
Installing dependencies:
 gpm-libs            x86_64      1.20.7-15.el8             AppStream       39 k
 vim-common          x86_64      2:8.0.1763-13.el8         AppStream      6.3 M
 vim-filesystem      noarch      2:8.0.1763-13.el8         AppStream       48 k
 which               x86_64      2.21-12.el8               BaseOS          49 k

Transaction Summary
================================================================================
Install  5 Packages

Total download size: 7.8 M
Installed size: 31 M
Downloading Packages:
(1/5): gpm-libs-1.20.7-15.el8.x86_64.rpm        114 kB/s |  39 kB     00:00
(2/5): vim-filesystem-8.0.1763-13.el8.noarch.rp 151 kB/s |  48 kB     00:00
(3/5): which-2.21-12.el8.x86_64.rpm             204 kB/s |  49 kB     00:00
(4/5): vim-enhanced-8.0.1763-13.el8.x86_64.rpm  325 kB/s | 1.4 MB     00:04
[MIRROR] vim-common-8.0.1763-13.el8.x86_64.rpm: Status code: 504 for http://117.143.109.143/cache/mirror.centos.org/centos/8/AppStream/x86_64/os/Packages/vim-common-8.0.1763-13.el8.x86_64.rpm?ich_args2=39-25171905004885_b8f49e81e55cc4684a042b0f5435a1f4_10001002_9c8a642ad5caf4d8913a518939a83798_95b0f443f5745aa23c8b257c6cf6546e (IP: 117.143.109.143)
(5/5): vim-common-8.0.1763-13.el8.x86_64.rpm    227 kB/s | 6.3 MB     00:28
--------------------------------------------------------------------------------
Total                                           271 kB/s | 7.8 MB     00:29
warning: /var/cache/dnf/AppStream-02e86d1c976ab532/packages/gpm-libs-1.20.7-15.el8.x86_64.rpm: Header V3 RSA/SHA256 Signature, key ID 8483c65d: NOKEY
CentOS-8 - AppStream                            417 kB/s | 1.6 kB     00:00
Importing GPG key 0x8483C65D:
 Userid     : "CentOS (CentOS Official Signing Key) <security@centos.org>"
 Fingerprint: 99DB 70FA E1D7 CE22 7FB6 4882 05B5 55B3 8483 C65D
 From       : /etc/pki/rpm-gpg/RPM-GPG-KEY-centosofficial
Key imported successfully
Running transaction check
Transaction check succeeded.
Running transaction test
Transaction test succeeded.
Running transaction
  Preparing        :                                                        1/1
  Installing       : which-2.21-12.el8.x86_64                               1/5
  Installing       : vim-filesystem-2:8.0.1763-13.el8.noarch                2/5
  Installing       : vim-common-2:8.0.1763-13.el8.x86_64                    3/5
  Installing       : gpm-libs-1.20.7-15.el8.x86_64                          4/5
  Running scriptlet: gpm-libs-1.20.7-15.el8.x86_64                          4/5
  Installing       : vim-enhanced-2:8.0.1763-13.el8.x86_64                  5/5
  Running scriptlet: vim-enhanced-2:8.0.1763-13.el8.x86_64                  5/5
  Running scriptlet: vim-common-2:8.0.1763-13.el8.x86_64                    5/5
  Verifying        : gpm-libs-1.20.7-15.el8.x86_64                          1/5
  Verifying        : vim-common-2:8.0.1763-13.el8.x86_64                    2/5
  Verifying        : vim-enhanced-2:8.0.1763-13.el8.x86_64                  3/5
  Verifying        : vim-filesystem-2:8.0.1763-13.el8.noarch                4/5
  Verifying        : which-2.21-12.el8.x86_64                               5/5

Installed:
  gpm-libs-1.20.7-15.el8.x86_64         vim-common-2:8.0.1763-13.el8.x86_64
  vim-enhanced-2:8.0.1763-13.el8.x86_64 vim-filesystem-2:8.0.1763-13.el8.noarch
  which-2.21-12.el8.x86_64

Complete!
Removing intermediate container 5b6e8e271efa
 ---> 1f5ab78dabbc
Successfully built 1f5ab78dabbc
Successfully tagged centos-vim-v1:latest
构建过程分析
步骤1、运行docker build命令 -t 表示把新镜像命名为centos-vim-v1 命令最后的一个点 . 非常重要,指明build context为当前目录
步骤2、开始构建时通过上面过程可以看到“Sending build context to Docker daemon  2.048kB”,docker 会将 build context 中的所有文件发送给 Docker daemon,所以一般不要把/、/usr这些目录当做build context
步骤3、执行from 把centos当做base镜像
步骤4-6、启动容器,运行yum install vim -y 指令,执行成功后,删除临时启动容器
步骤7-8、Successfully built 1f5ab78dabbc build成功保存为新的镜像Successfully tagged centos-vim-v1:latest
镜像缓存
docker会缓存已有镜像的镜像层,构建新镜像时,如果某镜像层已经存在,就会直接使用,无需新创建。
例如下面的docekrfile就是在上一个dockerfile后面加了一条touch命令
[root@localhost dockerfile]# cat Dockerfile
FROM centos
RUN yum install vim -y
RUN touch /opt/cache.txt
build镜像
[root@localhost dockerfile]# docker build -t centos-vim-v2 .
Sending build context to Docker daemon  2.048kB
Step 1/3 : FROM centos
 ---> 0d120b6ccaa8
Step 2/3 : RUN yum install vim -y
 ---> Using cache
 ---> 1f5ab78dabbc
Step 3/3 : RUN touch /opt/cache.txt
 ---> Running in e8c582fd00c8
Removing intermediate container e8c582fd00c8
 ---> 70e98d404235
Successfully built 70e98d404235
Successfully tagged centos-vim-v2:latest

#说明:可以看到这次构建很快,"Using cache"用了已经存在的镜像层,当然也可以在执行docker build时加no cache 参数禁用缓存
dockerfile中的每一条指令都会创建一个镜像层,镜像的上层是会依赖于下层的,只要某一层发生变化,其上面层的缓存都会失效。如果我们更改dockerfile中指令的执行顺序或者修改添加指令,都会使缓存失效

 浙公网安备 33010602011771号