Vue

Author: Exchanges
Version: 9.0.1
一、Vue简介
1.1 简介
Vue (读音 /vjuː/,类似于 view) 是一套用于构建用户界面的渐进式的js框架,发布于 2014 年 2 月。与其它大型框架不同的是,Vue 被设计为可以自底向上逐层应用。Vue 的核心库只关注视图层,不仅易于上手,还便于与第三方库(如:vue-router,vue-resource,vuex)或既有项目整合。
1.2 MVVM 模式的实现者——双向数据绑定模式
- Model:模型层,在这里表示 JavaScript 对象
- View:视图层,在这里表示 DOM(HTML 操作的元素)
- ViewModel:连接视图和数据的中间件,Vue.js 就是 MVVM 中的 ViewModel 层的实现者
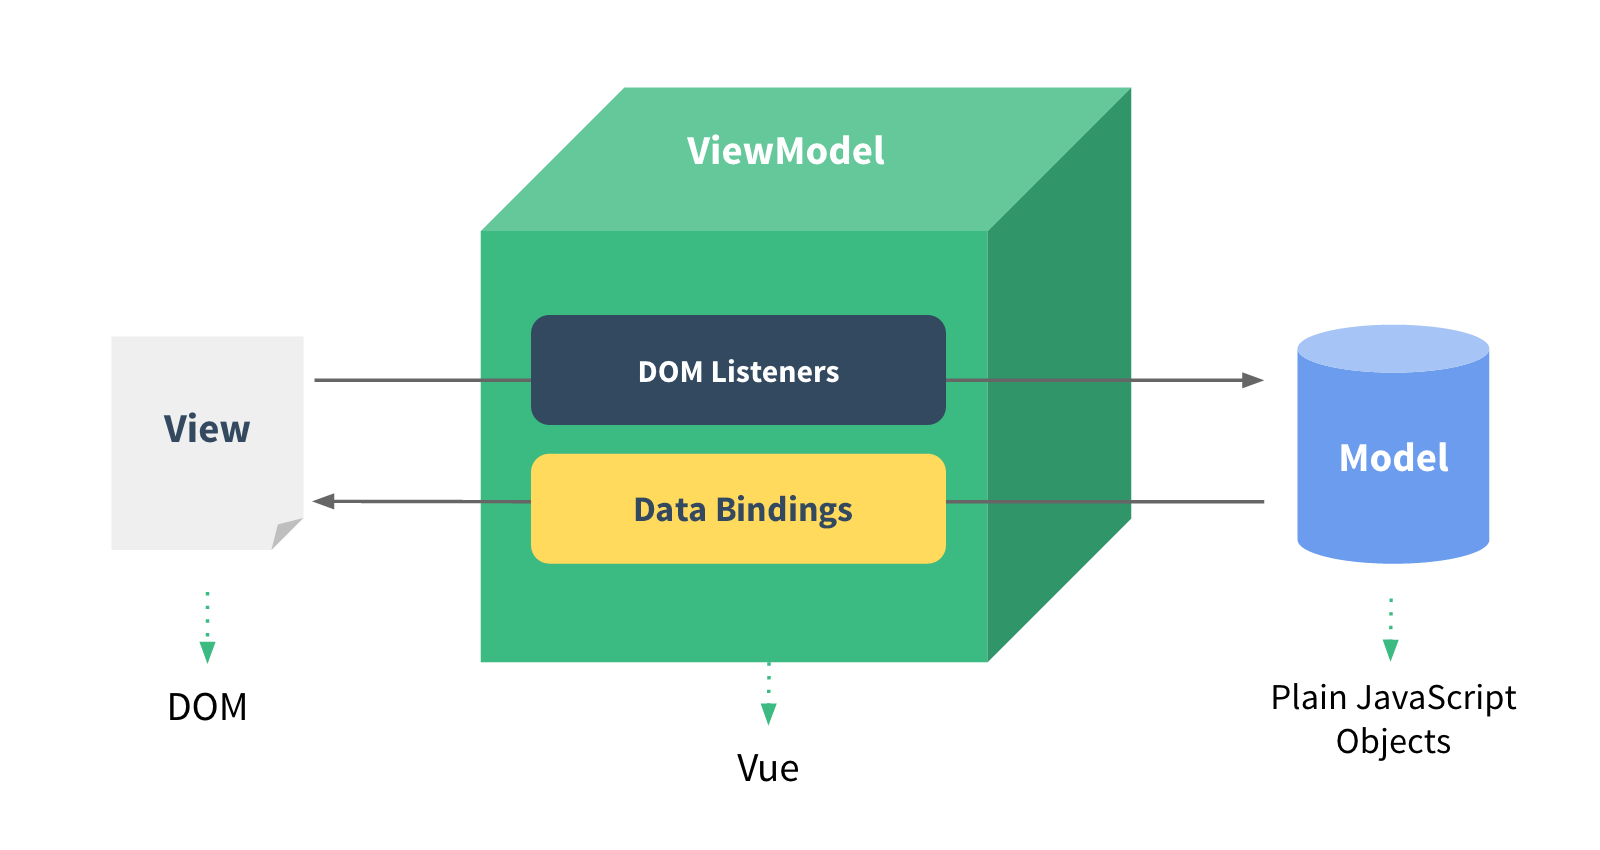
在 MVVM 架构中,是不允许 数据 和 视图 直接通信的,只能通过 ViewModel 来通信,而 ViewModel 就是定义了一个Observer` 观察者
- ViewModel 能够观察到数据的变化,并对视图下对应的内容进行更新
- ViewModel 能够监听到视图的变化,并能够通知数据发生改变
Vue.js 是目前最火的一个前端框架,和Angular.js、React.js 一起,并成为前端三大主流框架,框架的好处就是提高开发效率,原生JS -> Jquery之类的类库 -> 前端模板引擎 -> Angular.js / Vue.js,能够帮助我们减少不必要的DOM操作,提高渲染效率,双向数据绑定的概念一个核心的概念,就是让用户不再操作DOM元素,解放了用户的双手,让程序员可以更多的时间去关注业务逻辑。
Vue.js 是一个 MVVM 的实现者,核心就是实现了 DOM 监听 与 数据绑定
1.3 其它 MVVM 实现者
AngularJS
简单介绍一下,AngularJS诞生于2009年,由Misko Hevery 等人创建,后为Google所收购。是一款优秀的前端JS框架,已经被用于Google的多款产品当中。AngularJS有着诸多特性,最为核心的是:MVVM、模块化、自动化双向数据绑定、语义化标签、依赖注入等等。
ReactJS
React引入了虚拟DOM(Virtual DOM)的机制:在浏览器端用Javascript实现了一套DOM API。基于React进行开发时所有的DOM构造都是通过虚拟DOM进行,每当数据变化时,React都会重新构建整个DOM树,然后React将当前整个DOM树和上一次的DOM树进行对比,得到DOM结构的区别,然后仅仅将需要变化的部分进行实际的浏览器DOM更新。
微信小程序
微信小程序的视图层和数据层就是通过MVVM进行绑定的。
1.4 为什么要使用 Vue.js
- 轻量级,体积小是一个重要指标。Vue.js 压缩后有只有 20多kb (Angular 压缩后 56kb+,React 压缩后 44kb+)
- 移动优先。更适合移动端,比如移动端的 Touch 事件
- 易上手,学习曲线平稳,文档齐全
- 吸取了 Angular(模块化)和 React(虚拟 DOM)的长处,并拥有自己独特的功能,如:计算属性
- 开源,社区活跃度高
1.5 Vue.js 的两大核心要素
1.5.1 数据驱动
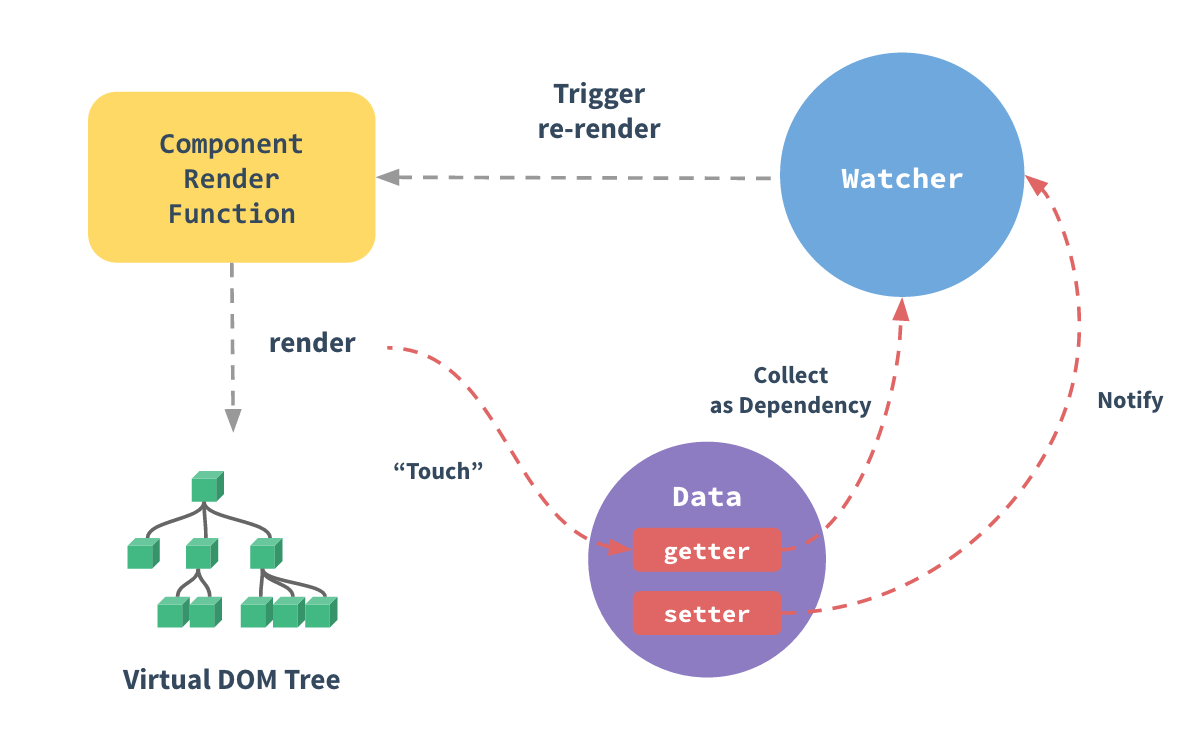
当你把一个普通的 JavaScript 对象传给 Vue 实例的 data 选项,Vue 将遍历此对象所有的属性,并使用 Object.defineProperty 把这些属性全部转为 getter/setter。Object.defineProperty 是 ES5 中一个无法 shim 的特性,这也就是为什么 Vue 不支持 IE8 以及更低版本浏览器。
这些 getter/setter 对用户来说是不可见的,但是在内部它们让 Vue 追踪依赖,在属性被访问和修改时通知变化。这里需要注意的问题是浏览器控制台在打印数据对象时 getter/setter 的格式化并不同,所以你可能需要安装 vue-devtools 来获取更加友好的检查接口。
每个组件实例都有相应的 watcher 实例对象,它会在组件渲染的过程中把属性记录为依赖,之后当依赖项的 setter 被调用时,会通知 watcher 重新计算,从而致使它关联的组件得以更新。
1.5.2 组件化
- 页面上每个独立的可交互的区域视为一个组件
- 每个组件对应一个工程目录,组件所需的各种资源在这个目录下就近维护
- 页面不过是组件的容器,组件可以嵌套自由组合(复用)形成完整的页面
二、Vue入门
2.1 vue 初体验
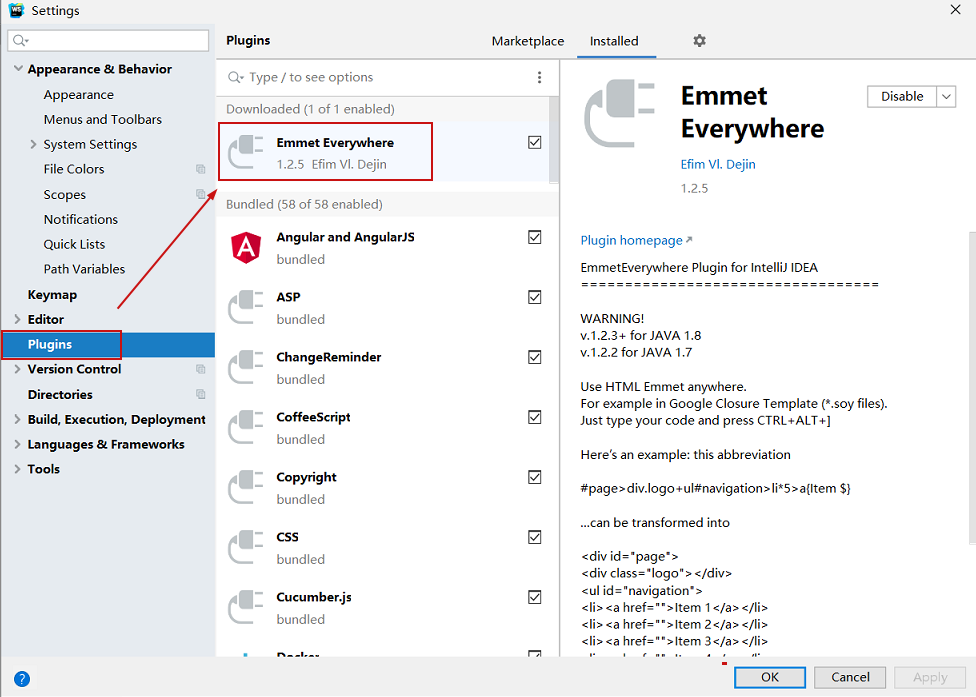
在webStorm中安装插件,安装成功后直接在页面输入:div#app>form>input*2 然后按 Tap 键即可
- vue 初体验
<!DOCTYPE html>
<html lang="en">
<head>
    <meta charset="UTF-8">
    <title>Title</title>
</head>
<!-- 导入vue.js -->
<script src="https://cdn.jsdelivr.net/npm/vue/dist/vue.js"></script>
<body>
    <div id="app">
        <!-- 插值表达式 -->
        {{ name }}
        <hr>
        <!-- v-model表示双向绑定 -->
        <input type="text" v-model="name">
    </div>
</body>
<script>
    new Vue({
        el: '#app',
        //组件化编程支持的data写法
        data(){
            return{
                name: 'jack'
            }
        }
    });
</script>
</html>
2.2 基本指令
v-text: v-text是用于操作纯文本,它会替代显示对应的数据对象上的值,可以简写为{{}}, 即插值表达式。
v-html: 将内容以html的形式呈现在页面
v-bind: 将值绑定到标签的自定义属性上,形式为 v-bind:title="mytitle",可以简写为 :属性名
v-model: 双向数据绑定
v-if: 值如果为true的情况下,显示标签,如果为false会移除标签
v-else-if: 与v-if配合使用
v-else: 与v-if配合使用
v-show: 如果为true,显示信息,如果为false则隐藏标签
v-for: 循环遍历。语法形式为 v-for=“item in list”
v-on:click: 点击事件,可以简写为@click
<!DOCTYPE html>
<html lang="en">
<head>
    <meta charset="UTF-8">
    <title>Title</title>
</head>
<!-- 导入vue.js -->
<script src="https://cdn.jsdelivr.net/npm/vue/dist/vue.js"></script>

<body>
<div id="app">
    <p v-text="name"></p>

    <p v-text="htmlText"></p>

    <p v-html="htmlText"></p>

    <!--<a v-bind:href="url">v-bind百度</a>-->
    <a :href="url">v-bind百度</a>

    <p v-if="score > 90">优秀</p>
    <p v-else-if="score > 60">及格</p>
    <p v-else>不及格</p>

    <ul>
        <li v-for="user in users">
            {{user.id}} -- {{user.username}}
        </li>
    </ul>
    <hr color="red">
    <!-- dom树中有该标签 -->
    <div v-show="score > 100">
        v-show成绩大于100
    </div>
    <!-- dom树中无该标签 -->
    <div v-if="score > 100">
        v-if成绩大于100
    </div>

    <button @click="show">点击</button>
</div>
</body>

<script>

    new Vue({
        el: '#app',

        data(){
            return{
                name:'张三',
                score:100,
                htmlText:'<a href="http://www.baidu.com">百度</a>',
                url:"http://www.baidu.com",
                users:[
                    {id:1001,username:'jack'},
                    {id:1002,username:'tom'},
                    {id:1003,username:'lucy'}
                ]
            }
        },
        methods:{
            show(){
                //如果method中要使用 vue data中的数据,都需要带上this
                alert(this.name);
                //对data中的数据重新赋值
                this.name = "李四";
            }
        }
    })
</script>
</html>
2.3 设置全名
<!DOCTYPE html>
<html lang="en">
<head>
    <meta charset="UTF-8">
    <title>Title</title>
</head>
<!--引入官方js文件 -->
<script src="https://cdn.jsdelivr.net/npm/vue/dist/vue.js"></script>
<body>

<div id="app">

    FirstName:<input type="text" v-model="firstName"><br>
    LastName:<input type="text" v-model="lastName"><br>
    FullName1(单向数据绑定):<input type="text" v-model="fullName1"><br>
    FullName2(单向数据绑定):<input type="text" v-model="fullName2"><br>
    FullName3(双向数据绑定):<input type="text" v-model="fullName3"><br>

</div>

</body>

<script>

    new Vue({

        el: "#app",

        data() {
            return {
                firstName: '',
                lastName: '',
                fullName2: '',
            }
        },
        //计算属性
        computed: {
            //定义了回调方法,没有显示调用,会触发
            //1.计算属性的值,不用再data中定义,直接用
            //2.计算属性对应一个回调方法
            //3.触发时机:只要牵扯到属性发生变化,该方法就会触发
            //4.在使用时,首先需要用到属性局部赋值

            // fullName1:function () {
            //
            //     let firstName = this.firstName;
            //     let lastName = this.lastName;
            //
            //     return firstName + "  " + lastName;
            // },

            fullName1: {
                get() {
                    let firstName = this.firstName;
                    let lastName = this.lastName;

                    return firstName + "  " + lastName;
                }
            },

            fullName3: {
                get() {
                    let firstName = this.firstName;
                    let lastName = this.lastName;

                    return firstName + "  " + lastName;
                },

                set(val) {
                    //alert(val);//拿到fullName3的值
                    let arr = val.split(/\s+/);//通过空格分离
                    var first = arr[0];
                    var last = arr[1];

                    this.firstName = first;
                    this.lastName = last;
                }

            }
        },

        watch: {
            firstName: function (newVal, oldVal) {
                this.fullName2 = newVal + " " + this.lastName;
            },
            lastName: function (newVal, oldVal) {
                this.fullName2 = this.firstName + " " + newVal;
            }
        }

    })

</script>
</html>
2.4 名字过滤以及年龄排序
<!DOCTYPE html>
<html lang="en">
<head>
    <meta charset="UTF-8">
    <title>Title</title>
    <script src="https://cdn.jsdelivr.net/npm/vue/dist/vue.js"></script>
    <style>

        #app {
            width: 400px;
            margin: 100px auto 0;
        }
    </style>
</head>

<body>

<div id="app">
    <input v-model="searchText">

    <table border="1" style="text-align: center;" cellspacing="0"
           cellpadding="0" width="100%">
        <tr>
            <th>ID</th>
            <th>姓名</th>
            <th>年龄</th>
        </tr>
        <tr v-for="user in filterUsers">
            <td>{{user.id}}</td>
            <td>{{user.name}}</td>
            <td>{{user.age}}</td>
        </tr>
    </table>

    <button @click="orderByAge(1)">升序</button>
    <button @click="orderByAge(2)">降序</button>
    <button @click="orderByAge(3)">不排序</button>

</div>

</body>

<script>
    new Vue({
        el: '#app',

        data() {

            return {

                users: [
                    {id: 1, name: 'zhangsan', age: 22},
                    {id: 2, name: 'lisi', age: 12},
                    {id: 3, name: 'wangwu', age: 42},
                    {id: 4, name: 'zhaoliu', age: 32},
                    {id: 5, name: 'tianqi', age: 28},
                ],

                searchText: '',
                order: 3

            }
        },
        computed: {

            filterUsers: function() {

                let searchText = this.searchText;
                let order = this.order;
                // 根据名字过滤
                let newUsers = this.users.filter(user => user.name.indexOf(searchText) > -1);

                // 排序
                if(order != 3) {

                    newUsers.sort((u1, u2) => {
                        if(order == 1) {
                            return u1.age - u2.age;
                        }else {
                            return u2.age - u1.age;
                        }
                    });
                }

                return newUsers;

                // String s = "helloworld";
                // s.indexOf('worlx'); // -1
            }
        },

        methods: {
            orderByAge(value) {

                this.order = value;

            }
        }
    })

</script>

</html>
2.5 事件修饰符
<!DOCTYPE html>
<html lang="en">
<head>
    <meta charset="UTF-8">
    <title>Title</title>
    <script src="https://cdn.jsdelivr.net/npm/vue/dist/vue.js"></script>
    <style>
        .box1 {
            background-color: red;
            height: 200px;
            width: 200px;
        }

        .box2 {
            background-color: #e3e3e3;
            height: 100px;
            width: 100px;
        }
    </style>

</head>
<body>
<div id="app">

    <!--@click.prevent 阻止事件传播 -->
    <a href="http://www.baidu.com" @click.prevent="show">百度</a>

    <hr>

    <div class="box1" @click="alertOuterBox">
        <!-- click.stop阻止冒泡事件 -->
        <div class="box2" @click.stop="alertInnerBox"></div>
    </div>

</div>
</body>
<script>
    new Vue({

        el: '#app',

        methods: {

            show() {
                alert("show")
            },
            alertOuterBox(){
                alert("alertOutterBox")
            },
            alertInnerBox(){
                alert("alertInnerBox")

            }
        }
    })
</script>

</html>
2.6 按键修饰符
<!DOCTYPE html>
<html lang="en">
<head>
    <meta charset="UTF-8">
    <title>Title</title>
    <script src="https://cdn.jsdelivr.net/npm/vue/dist/vue.js"></script>
</head>
<body>

<div id="app">

    <!-- keyup.enter 表示enter键弹起的时候,事件被触发 -->
    keyup:<input type="text" v-model="name" @keyup.enter="keyupTest()">
    <!-- keydown 表示按下某个键时触发 -->
    keydown:<input type="text" v-model="code" @keydown="keydownTest($event)">

</div>

</body>

<script>
    new Vue({
        el: '#app',

        data() {
            return {
                name: '',
                code: ''
            }
        },
        methods: {

            keyupTest() {
                alert(this.name)
            },

            keydownTest: function (event) {
                var keyCode = event.keyCode;
                alert(keyCode)
                // if (keyCode != 49) {
                //     event.preventDefault();//阻止按键输入
                // }
            }
        }

    })

</script>
</html>
2.7 生命周期
<!DOCTYPE html>
<html lang="en">
<head>
    <meta charset="UTF-8">
    <title>Title</title>
    <script src="https://cdn.jsdelivr.net/npm/vue/dist/vue.js"></script>
</head>
<body>

<div id="app">
    {{message}}
</div>

</body>

<script>
    var vm= new Vue({
        el: "#app",
        data(){
            return{
                message:"hello vue"
            }
        },
        methods:{
        },
        beforeCreate:function () {
            console.log("beforeCreate创建vue之前:",this.message);
            console.log("$el:"+this.$el);
            console.log("$data:"+this.$data);
            console.log("-------------")
        },
        created:function () {
            console.log("created创建vue:",this.message);
            console.log("$el:"+this.$el);
            console.log("$data:"+this.$data);
            console.log("-------------")
        },
        beforeMount:function () {
            console.log("beforeMount挂载之前:",this.message);
            console.log("$el:"+this.$el);
            console.log("$data:"+this.$data);
            console.log("-------------")
        },
        mounted:function () {
            console.log("mounted挂载:",this.message);
            console.log("$el:"+this.$el);
            console.log("$data:"+this.$data);
            console.log("-------------")
        },
        beforeUpdate:function () {
            console.log("beforeUpdate修改之前:",this.message);
            console.log("$el:"+this.$el);
            console.log("$data:"+this.$data);
            console.log("-------------")
        },
        updated:function () {
            console.log("updated修改:",this.message);
            console.log("$el:"+this.$el);
            console.log("$data:"+this.$data);
            console.log("-------------")
        },
        beforeDestroy:function () {
            console.log("beforeDestroy销毁之前:",this.message);
            console.log("$el:"+this.$el);
            console.log("$data:"+this.$data);
            console.log("-------------")
        },
        destroyed:function () {
            console.log("destroyed销毁:",this.message);
            console.log("$el:"+this.$el);
            console.log("$data:"+this.$data);
            console.log("-------------")
        }

    });
    vm.message="bye vue";
    vm.$destroy();
</script>
</html>

三、使用Vue-Cli搭建Vue项目
3.1 vue-cli 介绍
cli: Command Line 命令行工具,vue-cli就是vue的命令行工具,也称之为脚手架,使用vue-cli提供的各种命令可以拉取、创建、运行我们需要使用到的框架,比如webpack、Element UI、Element Admin等等。那么要想使用vue-cli命令,需要先安装node.js。
3.2 node.js 介绍及安装
node.js提供了前端程序的运行环境,可以把node.js理解成是运行前端程序的服务器。
从官网下载安装即可:http://nodejs.cn/download/
3.3 axios.js 介绍
Axios 是一个开源的可以用在浏览器端和 NodeJS 的异步通信框架,她的主要作用就是实现 AJAX 异步通信,其功能特点如下:
- 从浏览器中创建 XMLHttpRequest
- 从 node.js 创建 http 请求
- 支持 Promise API
- 拦截请求和响应
- 转换请求数据和响应数据
- 取消请求
- 自动转换 JSON 数据
- 客户端支持防御 XSRF(跨站请求伪造)
由于 Vue.js 是一个 视图层框架 并且作者(尤雨溪)严格准守 SoC (关注度分离原则),所以 Vue.js 并不包含 AJAX 的通信功能,为了解决通信问题,作者单独开发了一个名为 vue-resource 的插件,不过在进入 2.0 版本以后停止了对该插件的维护并推荐了 Axios 框架
3.4 Element-Ul 介绍
Element-Ul是
饿了么前端团队推出的一款基于Vue.js 2.0的桌面端UI框架,手机端有对应框架是Mint UI
官网地址:https://element.eleme.cn/#/zh-CN/component/installation
3.5 moment.js 介绍
moment.js是一个JavaScript的日期和时间处理工具类,提供了非常全面且强悍的日期处理功能
官网地址:http://momentjs.cn/
3.6 项目搭建流程
1.在 Terminal 下使用npm构建项目
1.首先安装Node.js(傻瓜式安装,安装之后可能需要重启)

2.npm install -g @vue/cli      #安装vue-cli,该步骤需要等一段时间,若无法安装可使用:npm install -g @vue/cli --force

3.vue -V                       #查看vue-cli的版本

4.vue create my-app            #创建名为my-app的项目(选择vue-cli2.0)

5.my-app>npm install axios vue-axios element-ui --save #安装axios,vue-axios和element-ui

6.my-app>npm install moment --save #安装格式化时间日期的moment.js

7.my-app>npm run serve  #启动项目 如果无法启动可以使用:npm run dev
2.访问http://localhost:8080/ 会显示 HelloWorld.vue 该组件的页面
vue-cli 项目启动时,默认端口为8080,可以在 node_modules@vue\cli-service\lib\commands 目录下,修改serve.js 文件,具体如下:
const defaults = {
  host: '0.0.0.0',
  port: 8080,
  https: false
}
3.7 在 main.js 中添加如下配置
main.js 是该程序的入口,引入以下内容( 注意:不要放在最后一行 )
// 如下两个是网络的请求组件
import VueAxios from "vue-axios";
import axios from 'axios'

// ElmentUI的组件
import ElementUI from 'element-ui'
// ElementUI的样式
import 'element-ui/lib/theme-chalk/index.css'

Vue.use(VueAxios, axios)
Vue.use(ElementUI)

// 设置默认访问后台url基础地址
axios.defaults.baseURL = 'http://localhost:8081'
3.8 修改 App.vue
注意:el-table-column 标签中的 prop属性 对应的是实体类的属性名
<template>
  <el-container>
    <el-header>管理系统</el-header>
    <el-container>
      <el-aside>系统列表</el-aside>
      <el-main>
        <el-table
                :data="musics"
                border
                style="width: 100%">
          <el-table-column
                  align="center"
                  prop="musicId"
                  label="编号">
          </el-table-column>
          <el-table-column
                  align="center"
                  prop="musicName"
                  label="歌曲名称"
                  width="180">
          </el-table-column>
          <el-table-column
                  align="center"
                  prop="musicAlbumName"
                  label="专辑名称"
                  width="180">
          </el-table-column>
          <el-table-column
                  align="center"
                  prop="musicArtistName"
                  label="歌手名称"
                  width="180">
          </el-table-column>
        </el-table>
      </el-main>
    </el-container>

  </el-container>
</template>

<script>

export default {
  name: 'App',
  components: {
    //HelloWorld
  },

  data(){
    return{
      musics:[]
    }
  },

  mounted() {

    // 第一种方式
    // let that = this;
    // this.axios.get('/music/findAll')
    //         .then(function (response) {
    //           that.musics = response.data;
    //         })
    //         .catch(function (error) {
    //           console.log(error);
    //         });

    // 第二种方式
    // this.axios.get('/music/findAll')
    //         .then(resp => {
    //           // resp.data才是实际的数据本身
    //           this.musics = resp.data;
    //           alert(this.musics)
    //         })

    // 第三种方式
    this.$http.get('/music/findAll').then((response) => {
      this.musics = response.data;
    })
  },
}
</script>

<style>
#app {
  font-family: Avenir, Helvetica, Arial, sans-serif;
  -webkit-font-smoothing: antialiased;
  -moz-osx-font-smoothing: grayscale;
  text-align: center;
  color: #2c3e50;
  margin-top: 60px;
}
</style>

<!-- 设置容器样式 -->
<style>
  .el-header {
    background-color: #409EFF;
    color: #ffffff;
    line-height: 60px;
    font-size: 28px;
  }

  .el-aside {
    background-color: #e3e3e3;
    width: 180px !important;
  }

  .el-pagination {
    text-align: center;
    margin-top: 10px;
  }

  .el-table {
    margin-top: 10px;
  }
</style>
分别启动前后端项目进行测试(注:设置后端项目与前端项目端口号对应,在后端Controller层配置跨域:@CrossOrigin(origins = "*")
3.9 moment.js 格式 Date 类型
1.在 main.js 引入 moment.js
import moment from 'moment'

Vue.use(moment)
2.在当前组件中(<script)>标签下引入moment.js(或者直接 import moment from 'moment' 导入也可以)
let moment = require("moment");
3.在日期列添加属性
<el-table-column
    align="center"
    prop="createTime"
    label="时间"
    :formatter="formatDate"
    width="180">
</el-table-column>
4.在methods中添加对应的的方法
methods:{
    formatDate(row, column, currValue) {
      return moment(currValue).format('YYYY-MM-DD');
    }
}
3.10 分页
1.修改 data
data(){
    return{
      musics:[],
      total:0,
      pageSize:0
    }
  },
2.添加分页标签
<el-pagination
    background
    layout="prev, pager, next"
    :total="total"
    :page-size="pageSize"
    @current-change="toPage">
</el-pagination>
3.修改 methods
methods:{
    formatDate(row,column,currVal){
      return moment(currVal).format("YYYY-MM-DD")
    },
    toPage(currPage){
      this.axios.get('/music/findByPage?pageNum='+currPage)
              .then(resp => {
                // resp.data才是实际的数据本身
                this.musics = resp.data.list;
                //alert(this.musics)
                this.total = resp.data.total
                this.pageSize = resp.data.pageSize
              })
    }
  },
4.修改 mounted
mounted() {

    this.axios.get('/music/findByPage')
            .then(resp => {
              // resp.data才是实际的数据本身
              this.musics = resp.data.list;
              //alert(this.musics)
              this.total = resp.data.total
              this.pageSize = resp.data.pageSize
            })
  },
3.11 删除
1.添加标签
<el-table-column label="操作">
  <template slot-scope="scope">
   <el-button
    size="mini" type="primary" icon="el-icon-edit"
    @click="updateById(scope.row.musicId)">编辑</el-button>
   <el-button
    size="mini" type="danger" icon="el-icon-delete"
    @click="deleteById(scope.row.musicId)">删除</el-button>
 </template>
</el-table-column>
2.修改 data 以及 methods
  data(){
    return{
      musics:[],
      total:0,
      pageSize:0,
      currentPage:1
    }
  },

  methods:{
    formatDate(row,column,currVal){
      return moment(currVal).format("YYYY-MM-DD")
    },
    toPage(currPage){
      this.axios.get('/music/findByPage?pageNum='+currPage)
              .then(resp => {
                // resp.data才是实际的数据本身
                this.musics = resp.data.list;
                //alert(this.musics)
                this.total = resp.data.total
                this.pageSize = resp.data.pageSize
                this.currentPage = resp.data.pageNum
              })
    },
    deleteById(musicId){

      this.$confirm('此操作将永久删除该文件, 是否继续?', '提示', {
        confirmButtonText: '确定',
        cancelButtonText: '取消',
        type: 'warning'
      }).then(() => {

        this.axios.get('/music/deleteById?musicId='+musicId)
                .then(resp => {
                  if(resp.data == 'success'){
                    this.toPage(this.currentPage);
                  }
                })

        this.$message({
          type: 'success',
          message: '删除成功!'
        });
      }).catch(() => {
        this.$message({
          type: 'info',
          message: '已取消删除'
        });
      });
    }
  },
3.如果删除成功,页面没有跳转,需要去后端配置 pagehelper
pagehelper.helper-dialect=mysql
pagehelper.reasonable=true
pagehelper.support-methods-arguments=true
3.12 添加
1.在 el-main 标签中增加添加按钮
<!-- 添加歌曲按钮 -->
<el-button type="success" @click="dialogVisible = true" >添加歌曲</el-button>
2.添加 add 的对话框
		<el-dialog
                title="添加歌曲"
                :visible.sync="dialogVisible"
                width="30%"
                :before-close="handleClose">

          <el-form :model="musicModel" :rules="musicRules" ref="musicForm">
            <el-form-item label="歌曲名称" prop="musicName">
              <el-input v-model="musicModel.musicName"></el-input>
            </el-form-item>
            <el-form-item label="专辑" prop="musicAlbumName">
              <el-input v-model="musicModel.musicAlbumName"></el-input>
            </el-form-item>
            <el-form-item label="歌手" prop="musicArtistName">
              <el-input v-model="musicModel.musicArtistName"></el-input>
            </el-form-item>
            <el-form-item label="时间" prop="createTime">
              <el-date-picker type="date" placeholder="选择日期" v-model="musicModel.createTime" style="width: 100%;"></el-date-picker>
            </el-form-item>

            <el-form-item>
              <el-button type="primary" @click="submitForm('musicForm')">立即创建</el-button>
              <el-button @click="resetForm('musicForm')">重置</el-button>
            </el-form-item>
          </el-form>

        </el-dialog>
3.修改 data
data(){
    return{
      musics:null,
      total:null,
      currentPage:null,

      //设置添加歌曲的对话框默认不显示
      dialogVisible: false,

      //添加歌曲的模型
      musicModel: {
        musicName: '',
        musicAlbumName: '',
        musicArtistName: '',
        createTime: ""
      },
      //添加歌曲的规则
      musicRules: {
        musicName: [
          {required: true, message: '请输入歌曲名称', trigger: 'blur'}
        ]
      }

    }
 }
4.在 method 中添加方法
//校验添加表单
submitForm(formName) {
    this.$refs[formName].validate((valid) => {
        if (valid) {
            //alert(this.musicModel);
            //添加歌曲,需要注意必须post方式提交,后台使用@RequestBody获取
            this.axios.post("/music/addMusic",this.musicModel).then((response) => {
                if(response.data == "success"){
                    //隐藏对话框(添加页面)
                    this.dialogVisible = false
                        //重置添加表单
                        this.$refs[formName].resetFields();
                    //添加完之后刷新页面
                    location.reload();
                }
            })

        } else {
            console.log('error submit!!');
            return false;
        }
    });
},
//重置添加表单
resetForm(formName) {
    this.$refs[formName].resetFields();
},
5.后端Controller方法实现( 切记:需要使用 @RequestBody 接收 )
//添加歌曲
@RequestMapping("addMusic")
public String addMusic(@RequestBody Music music){
    musicService.addMusic(music);
    return "success";
}
3.12 修改
1.创建修改对话框
        <!-- 修改的对话框 -->
        <el-dialog
                title="修改歌曲"
                :visible.sync="updatedialogVisible"
                width="30%"
                :before-close="handleClose">

          <el-form :model="updatemusicModel" :rules="updatemusicRules" ref="updatemusicForm">
            <el-form-item label="歌曲ID" prop="musicId">
              <el-input v-model="updatemusicModel.musicId" readonly="readonly"></el-input>
            </el-form-item>
            <el-form-item label="歌曲名称" prop="musicName">
              <el-input v-model="updatemusicModel.musicName"></el-input>
            </el-form-item>
            <el-form-item label="专辑" prop="musicAlbumName">
              <el-input v-model="updatemusicModel.musicAlbumName"></el-input>
            </el-form-item>
            <el-form-item label="歌手" prop="musicArtistName">
              <el-input v-model="updatemusicModel.musicArtistName"></el-input>
            </el-form-item>
            <el-form-item label="时间" prop="createTime">
              <el-date-picker type="date" placeholder="选择日期" v-model="updatemusicModel.createTime" style="width: 100%;"></el-date-picker>
            </el-form-item>

            <el-form-item>
              <el-button type="primary" @click="updatesubmitForm('updatemusicForm')">修改</el-button>
              <el-button @click="resetForm('updatemusicForm')">重置</el-button>
            </el-form-item>
          </el-form>

        </el-dialog>
2.在data中添加数据
//设置修改歌曲的对话框默认不显示
updatedialogVisible: false,

//修改歌曲的模型
updatemusicModel: {
    musicId:'',
    musicName: '',
    musicAlbumName: '',
    musicArtistName: '',
    createTime: ""
},

//修改歌曲的规则
updatemusicRules: {
    musicName: [
        {required: true, message: '请输入修改的歌曲名称', trigger: 'blur'},
        { min: 2, max: 10, message: '长度在 2 到 10 个字符', trigger: 'blur' }
    ]
}
3.修改methods中的方法
//修改之前先查询单个对象
handleEdit(musicId) {
    this.$http.get("/music/findByMusicId?musicId="+musicId).then((response) => {
        this.updatemusicModel = response.data;
        this.updatedialogVisible = true;
    })
},

//修改表单提交
//校验添加表单
updatesubmitForm(formName) {
    this.$refs[formName].validate((valid) => {
        if (valid) {
            //alert(this.musicModel);
            //修改歌曲,需要注意必须post方式提交,后台使用@RequestBody获取
            this.axios.post("/music/updateMusic",this.updatemusicModel).then((response) => {
                if(response.data == "success"){
                    //隐藏对话框(添加页面)
                    this.updatedialogVisible = false
                        //重置添加表单
                        this.$refs[formName].resetFields();
                    //添加完之后刷新页面
                    location.reload();
                }
            })

        } else {
            console.log('error submit!!');
            return false;
        }
    });
},

updateresetForm(formName) {
    this.$refs[formName].resetFields();
}
4.编写 Controller 中的方法( 切记:需要使用 @RequestBody 接收 )
//修改
@RequestMapping("updateMusic")
public String updateMusic(@RequestBody Music music){
    musicService.updateMusic(music);
    return "success";
}
四、Vue-router 路由
4.1 介绍
Vue Router 是 Vue.js 官方的路由管理器。它和 Vue.js 的核心深度集成,让构建单页面应用变得易如反掌。
4.2 准备工作
创建工程,并安装路由模块,然后去package.json修改版本为:"vue-router": "^3.5.3"
vue create router-app
router-app> npm install vue-router -s
或者指定版本安装
router-app> npm install vue-router@3.5.3 -s
4.3 Router 入门
1.在src下创建views文件夹,然后创建Home和About两个组件
<template>
    <div>
        <h1>Home</h1>
    </div>
</template>

<script>
    export default {
        name: "Home"
    }
</script>

<style scoped>

</style>
<template>
    <div>
        <h1>About</h1>
    </div>
</template>

<script>
    export default {
        name: "About"
    }
</script>

<style scoped>

</style>
2.在src下创建router文件夹,然后在里面定义一个index.js文件,在index.js文件中配置路由信息:
import Vue from 'vue'
import Router from 'vue-router'

import Home from "../views/Home";
import About from "../views/About";

Vue.use(Router)   //使用插件

export default new Router({

    routes: [
        {
            path: '/home',
            component: Home
        },
        {
            path: '/about',
            component: About
        }
    ]

})
3.修改main.js
import Vue from 'vue'
import App from './App.vue'

//默认指向router目录下的index.js
import router from './router'

Vue.config.productionTip = false

new Vue({
  router,//配置router
  render: h => h(App),
}).$mount('#app')
4.修改App.vue
<template>

  <div id="app">
    <ul>
      <li>
        <router-link to="/home">Home</router-link>
      </li>
      <li>
        <router-link to="/about">About</router-link>
      </li>
    </ul>

    <hr>

    <!-- 设置路由显示 -->
    <div>
      <router-view></router-view>
    </div>
  </div>

</template>

<script>

export default {
  name: 'App',
  components: {

  }
}
</script>

<style>
#app {
  font-family: Avenir, Helvetica, Arial, sans-serif;
  -webkit-font-smoothing: antialiased;
  -moz-osx-font-smoothing: grayscale;
  text-align: center;
  color: #2c3e50;
  margin-top: 60px;
}
</style>
5.修改vue.config.js,添加 lintOnSave: false ,然后启动测试
const { defineConfig } = require('@vue/cli-service')
module.exports = defineConfig({
  transpileDependencies: true,
  lintOnSave: false
})
6.设置默认访问Home页面,修改index.js
import Vue from 'vue'
import Router from 'vue-router'

import Home from "../views/Home";
import About from "../views/About";

Vue.use(Router)   //使用插件

export default new Router({

    routes: [
        {
            path: '/home',
            component: Home
        },
        {
            path: '/about',
            component: About
        },
        {
            path: '/',
            redirect: '/home'
        }
    ]

})
7.浏览器访问:localhost:8080,会显示Home页面,显示后路径会跳转为:localhost:8080/#/home,有#号
我们向router实例中添加mode属性:
- 值"hash": url带# 适用于调试模式
- 值"history": url不带#
import Vue from 'vue'
import Router from 'vue-router'

import Home from "../views/Home";
import About from "../views/About";

Vue.use(Router)   //使用插件

export default new Router({
    mode:'history',
    routes: [
        {
            path: '/home',
            component: Home,
        },
        {
            path: '/about',
            component: About
        },
        {
            path: '/',
            redirect: '/home'
        },
    ]

})
8.再次访问浏览器进行测试即可
4.4 子路由
1.在src/views目录下创建about目录,然后再创建Info.vue组件
<template>
    <div>
        <h1>Info</h1>
    </div>
</template>

<script>
    export default {
        name: "Info"
    }
</script>

<style scoped>

</style>
2.在index.js导入Info.vue组件并配置children子路由
import Vue from 'vue'
import Router from 'vue-router'

//导入组件,一次性全部加载
// import Home from "../views/Home";
// import About from "../views/About";
// import Info from "../views/about/Info";

//实际开发中,一般使用按需加载的方式
const Home = () => import('../views/Home');
const About = () => import('../views/About');
const Info = () => import('../views/about/Info');


Vue.use(Router)   //使用插件

export default new Router({
    mode:'history',
    routes: [
        {
            path: '/home',
            component: Home,
        },
        {
            path: '/about',
            component: About,
            children:[
                {
                    path:'/about/info',
                    component:Info
                }
            ]
        },
        {
            path: '/',
            redirect: '/home'
        },
    ]

})
3.修改About.vue组件
<template>
<!--    <div>-->
<!--        <h1>About</h1>-->
<!--    </div>-->

    <div>
        <center>
        <table border="1" cellpadding="0" cellspacing="0" width="200">
            <tr>
                <th>id</th>
                <th>name</th>
            </tr>
            <tr>
                <td>1</td>
                <td>
                    <router-link to="/about/info">jack</router-link>
                </td>
            </tr>
            <tr>
                <td>2</td>
                <td>
                    rose
                </td>
            </tr>
        </table>

        <router-view></router-view>
        </center>
    </div>

</template>

<script>
    export default {
        name: "About"
    }
</script>

<style scoped>

</style>
访问浏览测试即可
4.5 路由传参
1.修改index.js,在路径上配置 id和name 以及props
import Vue from 'vue'
import Router from 'vue-router'

//导入组件,一次性全部加载
// import Home from "../views/Home";
// import About from "../views/About";
// import Info from "../views/about/Info";

//实际开发中,一般使用按需加载的方式
const Home = () => import('../views/Home');
const About = () => import('../views/About');
const Info = () => import('../views/Info');


Vue.use(Router)   //使用插件

export default new Router({
    mode:'history',
    routes: [
        {
            path: '/home',
            component: Home,
        },
        {
            path: '/about',
            component: About,
            children:[
                {
                    path:'/about/info/:id/:name',
                    component:Info,
                    props:true
                }
            ]
        },
        {
            path: '/',
            redirect: '/home'
        },
    ]

})
2.修改Info.vue组件,设置id和name类型
<template>
    <div>
        <h1>Info</h1>
        <h1>{{ id }} -- {{ name }}</h1>
    </div>
</template>

<script>
    export default {
        name: "Info",
        props:{
            id:Number,
            name:String
        }
    }
</script>

<style scoped>

</style>
3.修改About.vue组件,设置参数值
<template>
<!--    <div>-->
<!--        <h1>About</h1>-->
<!--    </div>-->

    <div>
        <center>
        <table border="1" cellpadding="0" cellspacing="0" width="200">
            <tr>
                <th>id</th>
                <th>name</th>
            </tr>
            <tr v-for="(user,index) in users" :key="index">
                <td>{{ user.id }}</td>
                <td>
                    <router-link :to="'/about/info/' + user.id +'/' + user.name">{{ user.name }}</router-link>
                </td>
            </tr>
            <tr>
                <td>2</td>
                <td>
                    rose
                </td>
            </tr>
        </table>

        <router-view></router-view>
        </center>
    </div>

</template>

<script>
    export default {
        name: "About",
        data(){
            return{
                users:[
                    {id:1,name:'张三'},
                    {id:2,name:'李四'},
                    {id:3,name:'王五'},
                ]
            }
        }
    }
</script>

<style scoped>

</style>
4.访问浏览器测试即可
4.6 Element-ui 中的使用
1.切换到工程路径下,安装router
music-app> npm install --save vue-router@3.5.3
2.在src下创建views文件夹,然后创建Music和Sheet两个组件
<template>
    <div>

        <el-dialog
                title="提示"
                :visible.sync="updatedialogVisible"
                width="30%"
                :before-close="handleClose">

            <el-form :model="musicModel" :rules="musicRules" ref="updateForm">
                <el-form-item label="id" prop="musicId">
                    <el-input v-model="musicModel.musicId" readonly="readonly"></el-input>
                </el-form-item>
                <el-form-item label="歌曲" prop="musicName">
                    <el-input v-model="musicModel.musicName"></el-input>
                </el-form-item>
                <el-form-item label="专辑" prop="musicAlbumName">
                    <el-input v-model="musicModel.musicAlbumName"></el-input>
                </el-form-item>
                <el-form-item label="歌手" prop="musicArtistName">
                    <el-input v-model="musicModel.musicArtistName"></el-input>
                </el-form-item>
                <el-form-item label="时间" prop="createTime">
                    <el-date-picker type="date" placeholder="选择日期" v-model="musicModel.createTime" style="width: 100%;"></el-date-picker>
                </el-form-item>

                <el-form-item>
                    <el-button type="primary" @click="updateMusic('updateForm')">修改</el-button>
                    <el-button @click="resetForm('updateForm')">重置</el-button>
                </el-form-item>
            </el-form>

        </el-dialog>


        <el-dialog
                title="提示"
                :visible.sync="dialogVisible"
                width="30%"
                :before-close="handleClose">

            <el-form :model="musicModel" :rules="musicRules" ref="musicForm">
                <el-form-item label="id" prop="musicId">
                    <el-input v-model="musicModel.musicId"></el-input>
                </el-form-item>
                <el-form-item label="歌曲" prop="musicName">
                    <el-input v-model="musicModel.musicName"></el-input>
                </el-form-item>
                <el-form-item label="专辑" prop="musicAlbumName">
                    <el-input v-model="musicModel.musicAlbumName"></el-input>
                </el-form-item>
                <el-form-item label="歌手" prop="musicArtistName">
                    <el-input v-model="musicModel.musicArtistName"></el-input>
                </el-form-item>
                <el-form-item label="时间" prop="createTime">
                    <el-date-picker type="date" placeholder="选择日期" v-model="musicModel.createTime" style="width: 100%;"></el-date-picker>
                </el-form-item>

                <el-form-item>
                    <el-button type="primary" @click="submitForm('musicForm')">立即创建</el-button>
                    <el-button @click="resetForm('musicForm')">重置</el-button>
                </el-form-item>
            </el-form>

        </el-dialog>


        <el-button size="mini" type="success" @click="dialogVisible = true">添加</el-button>

        <el-table
                :data="musics"
                border
                style="width: 100%">
            <el-table-column
                    align="center"
                    prop="musicId"
                    label="编号">
            </el-table-column>
            <el-table-column
                    align="center"
                    prop="musicName"
                    label="歌曲名称"
                    width="180">
            </el-table-column>
            <el-table-column
                    align="center"
                    prop="musicAlbumName"
                    label="专辑名称"
                    width="180">
            </el-table-column>
            <el-table-column
                    align="center"
                    prop="musicArtistName"
                    label="歌手名称"
                    width="180">
            </el-table-column>
            <el-table-column
                    align="center"
                    prop="createTime"
                    label="时间"
                    :formatter="formatDate"
                    width="180">
            </el-table-column>

            <el-table-column label="操作">
                <template slot-scope="scope">
                    <el-button
                            size="mini"
                            type="primary"
                            icon="el-icon-edit"
                            @click="updateById(scope.row.musicId)">编辑</el-button>
                    <el-button
                            size="mini"
                            type="danger"
                            icon="el-icon-delete"
                            @click="deleteById(scope.row.musicId)">删除</el-button>
                </template>
            </el-table-column>

        </el-table>

        <el-pagination
                background
                layout="prev, pager, next"
                :total="total"
                :page-size="pageSize"
                @current-change="toPage">
        </el-pagination>

    </div>
</template>

<script>

    import moment from 'moment'

    export default {
        name: "Music",

        data(){
            return{

                musics:[],
                total:0,
                pageSize:0,
                currentPage:1,
                dialogVisible: false,
                updatedialogVisible:false,

                musicModel: {
                    musicId: '',
                    musicName: '',
                    musicAlbumName: '',
                    musicArtistName: '',
                    createTime: ""
                },
                musicRules: {
                    musicId: [
                        {required: true, message: '请输入id', trigger: 'blur'}
                    ]
                }
            }
        },
        methods:{

            formatDate(row,column,currDate){
                return moment(currDate).format("YYYY-MM-DD")
            },
            toPage(currPage){
                //alert(currPage)
                this.axios.get('/music/findByPage?pageNum='+currPage)
                    .then(resp => {
                        // resp.data才是实际的数据本身
                        this.musics = resp.data.list;
                        this.total = resp.data.total;
                        this.currentPage = resp.data.pageNum;
                    })
            },
            deleteById(musicId){

                this.$confirm('此操作将永久删除该文件, 是否继续?', '提示', {
                    confirmButtonText: '确定',
                    cancelButtonText: '取消',
                    type: 'warning'
                }).then(() => {

                    this.axios.get('/music/deleteById?musicId='+musicId)
                        .then(resp => {
                            if(resp.data == "success"){
                                this.toPage(this.currentPage);
                            }
                        })

                    this.$message({
                        type: 'success',
                        message: '删除成功!'
                    });
                }).catch(() => {
                    this.$message({
                        type: 'info',
                        message: '已取消删除'
                    });
                });
            },

            submitForm(formName) {
                this.$refs[formName].validate((valid) => {
                    if (valid) {
                        this.axios.post('/music/save',this.musicModel)
                            .then(resp => {
                                if(resp.data == "success"){
                                    this.$refs[formName].resetFields();//清空下一次添加表单中的数据
                                    this.dialogVisible = false //关闭添加的对话框
                                    this.toPage(this.currentPage);
                                }
                            })
                    } else {
                        console.log('error submit!!');
                        return false;
                    }
                });
            },
            resetForm(formName) {
                this.$refs[formName].resetFields();
            },

            updateById(musicId){

                this.updatedialogVisible =true;

                this.axios.get('/music/findById?musicId='+musicId)
                    .then(resp => {
                        this.musicModel = resp.data;
                    })
            },

            updateMusic(){
                this.axios.post('/music/updateMusic',this.musicModel)
                    .then(resp => {
                        if(resp.data == "success"){
                            this.updatedialogVisible = false //关闭添加的对话框
                            this.toPage(this.currentPage);
                        }
                    })
            }

        },
        mounted() {
            //第一种方式
            // let that = this;
            // this.axios.get('/music/findAll')
            //         .then(function (response) {
            //           that.musics = response.data;
            //         })
            //         .catch(function (error) {
            //           console.log(error);
            //         });

            //第二种方式
            // this.axios.get('/music/findAll')
            //         .then(resp => {
            //           // resp.data才是实际的数据本身
            //           this.musics = resp.data;
            //           alert(this.musics)
            //         })

            //第三种方式
            this.$http.get('/music/findByPage').then((response) => {
                this.musics = response.data.list;
                this.total = response.data.total;
                this.pageSize = response.data.pageSize;
                this.currentPage = response.data.pageNum;
            })

        }
    }
</script>

<style scoped>
    .el-pagination {
        text-align: center;
        margin-top: 10px;
    }

    .el-table {
        margin-top: 10px;
    }
</style>
<template>
    <div>
        <h1>歌单列表</h1>
    </div>
</template>

<script>
    export default {
        name: "Sheet"
    }
</script>

<style scoped>

</style>
3.在src下创建router目录,在router目录下创建index.js并编写index.js
import Vue from 'vue'
import Router from 'vue-router'

const Music = () => import("../views/Music")
const Sheet = () => import("../views/Sheet")

Vue.use(Router)   //使用插件

export default new Router({
    mode:'history',
    routes: [
        {
            path: '/music',
            component: Music,
        },
        {
            path: '/sheet',
            component: Sheet
        },
    ]

})
4.在main.js中导入router
import Vue from 'vue'
import App from './App.vue'

// 如下两个是网络的请求组件
import VueAxios from "vue-axios";
import axios from 'axios'

// ElmentUI的组件
import ElementUI from 'element-ui'
// ElementUI的样式
import 'element-ui/lib/theme-chalk/index.css'

Vue.use(VueAxios, axios)
Vue.use(ElementUI)

// 设置基础的url地址
axios.defaults.baseURL = 'http://localhost:8081'

Vue.config.productionTip = false

import router from './router'//找到router目录下的index.js

new Vue({
  router,//配置router
  render: h => h(App),
}).$mount('#app')
5.修改App.vue
<template>
  <el-container>

    <el-header>管理系统</el-header>
    <el-container>
      <el-aside>

        <!-- 添加 router ,否则页面无法显示-->
        <el-menu router>
          <!-- element-ui将vue中的router的to属性,使用index来替代了 -->
          <el-menu-item index="/music">
            <template slot="title"><i class="el-icon-setting"></i>歌曲列表</template>
          </el-menu-item>
          <el-menu-item  index="/sheet">
            <template slot="title"><i class="el-icon-menu"></i>歌单列表</template>
          </el-menu-item>
        </el-menu>
      </el-aside>

      <el-main>

        <!-- 显示内容 -->
        <router-view></router-view>

      </el-main>
    </el-container>

  </el-container>
</template>

<script>

export default {
  name: 'App',
  components: {

  },

}
</script>

<style>
#app {
  font-family: Avenir, Helvetica, Arial, sans-serif;
  -webkit-font-smoothing: antialiased;
  -moz-osx-font-smoothing: grayscale;
  text-align: center;
  color: #2c3e50;
  margin-top: 60px;
}
</style>

<!-- 设置容器样式 -->
<style>
  .el-header {
    background-color: #409EFF;
    color: #ffffff;
    line-height: 60px;
    font-size: 28px;
  }

  .el-aside {
    background-color: white;
    width: 180px !important;
  }

</style>
6.修改vue.config.js,添加 lintOnSave: false ,然后启动测试
const { defineConfig } = require('@vue/cli-service')
module.exports = defineConfig({
  transpileDependencies: true,
  lintOnSave: false
})
五、路由守卫
5.1 局部路由守卫
在某个页面中对其权限进行判断操作
1.在Music.vue中添加 beforeRouteEnter
export default {

    //to:要去哪里
    //from:从哪里来
    //next:继续向下执行
    beforeRouteEnter:function(to,from,next){
        // alert(to.path);
        // alert(from.path);
        // next();

        let meta = to.meta;
        let flag = false;

        meta.forEach(m =>{
            if(m.indexOf("music:list")>-1){
                flag = true;
            }
        })

            if(flag){
                next();
            }else {
                next({path:'/'});
            }
    }
}
2.在 index.js 中修改routes配置
import Vue from 'vue'
import Router from 'vue-router'

const Music = () => import("../views/Music")
const Sheet = () => import("../views/Sheet")

Vue.use(Router)   //使用插件

export default new Router({
    mode:'history',
    routes: [
        {
            path: '/music',
            component: Music,
            meta:["music:list"]
        },
        {
            path: '/sheet',
            component: Sheet
        },
        {
            path: '/',
            redirect: "/sheet"
        },
    ]

})
5.2 全局路由守卫
在所有页面中对其权限进行判断操作
1.安装vue-cookies
my-app>npm install vue-cookies --save
2.在views目录下创建Login.vue
<template>
    <el-container>
        <el-main>
            <el-row>
                <el-col :span="12" :offset="6">
                    <el-card class="box-card">
                        <div slot="header" class="clearfix">
                            <span>用户登录</span>
                        </div>
                        <div>
                            <el-form :model="loginInfo">
                                <el-form-item label="用户名">
                                    <el-input v-model="loginInfo.username"></el-input>
                                </el-form-item>
                                <el-form-item label="密码">
                                    <el-input v-model="loginInfo.password"></el-input>
                                </el-form-item>
                                <el-form-item>
                                    <el-button type="primary" @click.prevent="login">登录</el-button>
                                </el-form-item>
                            </el-form>
                        </div>
                    </el-card>
                </el-col>
            </el-row>
        </el-main>
    </el-container>

</template>

<script>

    //导入vue-cookies
    import VueCookies from 'vue-cookies'

    export default {
        name: "Login",
        data(){
            return{
                loginInfo:{
                    username:"",
                    password:""
                }
            }
        },
        methods:{
            login(){
                this.axios.post("/user/login",this.loginInfo)
                    .then(resp => {
                        //登录成功后,将token设置到cookie中,然后跳转页面
                        let token = resp.data;
                        alert(token)
                        VueCookies.set("token",token);

                        this.$router.push({path:'/index'})
                    })
            }
        }
    }
</script>

<style scoped>

</style>
3.在后端编写Controller
package com.qf.controller;

import com.qf.pojo.User;
import org.springframework.beans.factory.annotation.Autowired;
import org.springframework.data.redis.core.StringRedisTemplate;
import org.springframework.web.bind.annotation.RequestBody;
import org.springframework.web.bind.annotation.RequestMapping;
import org.springframework.web.bind.annotation.RestController;

import java.util.HashMap;
import java.util.Map;
import java.util.UUID;

@RestController
@RequestMapping("user")
public class UserController {

    @RequestMapping("login")
    public String login(@RequestBody User user){
        System.out.println(user);
        //模拟数据库查询
        //...
        if("jack".equals(user.getUsername()) && "123".equals(user.getPassword())){
            return "lingpai";
        }else{
            return "fail";
        }
    }


//    @Autowired
//    private StringRedisTemplate stringRedisTemplate;
//
//    @RequestMapping("login")
//    public String login(User user){
//        System.out.println(user);
//        //模拟数据库查询
//        //...
//        if("jack".equals(user.getUsername()) && "123".equals(user.getPassword())){
//            //表示登录成功
//            //stringRedisTemplate.opsForValue().set("token", UUID.randomUUID().toString());
//            stringRedisTemplate.opsForValue().set("token","lingpai");
//            return "登录成功";
//        }else{
//            return "登录失败";
//        }
//    }
//
//
//    @RequestMapping("findAll")
//    public Map findAll(){
//
//        HashMap<String, Object> map = new HashMap<>();
//
//        //访问时进行校验
//        String token = stringRedisTemplate.opsForValue().get("token");
//        //判断
//        if("lingpai".equals(token)){
//
//            map.put("code",200);
//            map.put("msg","success");
//            map.put("data","findAll查询的数据");
//
//            return map;
//        }else{
//            map.put("code",-1);
//            map.put("msg","fail");
//            map.put("data","暂无数据");
//
//            return map;
//        }
//    }
}
4.创建 Index.vue,将App.vue中的代码都拷贝到 Index.vue中
<template>
    <el-container>
        <el-header>管理系统</el-header>
        <el-container>
            <el-aside>
                <el-menu router>
                    <!-- element-ui将vue中的router的to属性,使用index来替代了 -->
                    <el-menu-item index="/music">
                        <i class="el-icon-setting"></i>歌曲管理
                    </el-menu-item>
                    <el-menu-item index="/sheet">
                        <i class="el-icon-menu"></i>歌单管理
                    </el-menu-item>
                </el-menu>
            </el-aside>
            <el-main>
                <!-- 编写 router-view -->
                <router-view></router-view>
            </el-main>
        </el-container>

    </el-container>
</template>

<script>

    export default {
        name: 'Index',
        components: {
            //HelloWorld
        },


    }
</script>

<style>
    #app {
        font-family: Avenir, Helvetica, Arial, sans-serif;
        -webkit-font-smoothing: antialiased;
        -moz-osx-font-smoothing: grayscale;
        text-align: center;
        color: #2c3e50;
        margin-top: 60px;
    }
</style>

<!-- 设置容器样式 -->
<style>
    .el-header {
        background-color: #409EFF;
        color: #ffffff;
        line-height: 60px;
        font-size: 28px;
    }

</style>
5.修改App.vue
<template>
    <router-view></router-view>
</template>

<script>

export default {
  name: 'App',
}
</script>

<style>
#app {
  font-family: Avenir, Helvetica, Arial, sans-serif;
  -webkit-font-smoothing: antialiased;
  -moz-osx-font-smoothing: grayscale;
  text-align: center;
  color: #2c3e50;
  margin-top: 60px;
}
</style>
6.修改router目录下的index.js
import Vue from 'vue'
import Router from 'vue-router'

import VueCookies from 'vue-cookies'

const Music = () => import("../views/Music")
const Sheet = () => import("../views/Sheet")
const Login = () => import("../views/Login")
const Index = () => import("../views/Index")

Vue.use(Router)   //使用插件
Vue.use(VueCookies)

const router = new Router({
    mode:'history',
    routes: [

        {
            path: '/',
            redirect: "/index"
        },
        {
            path: '/login',
            component: Login
        },
        {
            path: '/index',
            component: Index,
            children:[
                {
                    path: '/music',
                    component: Music,
                    meta:["music:list"]
                },
                {
                    path: '/sheet',
                    component: Sheet
                },
            ]
        },
    ]

})

export default router;

//全局路由守卫
router.beforeEach( (to,from,next) => {
    //1.如果用户访问的是登录页面,则不拦截
    //2.如果用户携带认证信息(token),也不拦截
    //判断
    if(to.path.indexOf("/login") > -1 || VueCookies.get("token")=="lingpai"){
        next();
    }else{
        next({path:"/login"})
    }

})
7.访问浏览器测试即可
六、 Vuex的应用
6.1 Vuex介绍
Vuex 是一个专为 Vue.js 应用程序开发的 状态管理模式。它采用集中式存储管理应用的所有组件的状态,并以相应的规则保证状态以一种可预测的方式发生变化。
6.2 准备工作
1.在项目根目录执行如下命令来安装 Vuex
my-app> npm install vuex@3.6.2 -s
2.在main.js 中导入 Vuex
import Vuex from 'vuex'
Vue.use(Vuex);
6.3 配置 vuex
1.在 src 目录下创建一个名为 store 的目录并新建一个名为 index.js 文件用来配置 Vuex
import Vue from 'vue'
import Vuex from 'vuex'
Vue.use(Vuex);

// 全局 state 对象,用于保存所有组件的公共数据
const state = {
  // 定义一个 user 对象
  // 在组件中是通过 this.$store.state.user 来获取
  user: {
    username: ''
  }
};

// 实时监听 state 值的最新状态,注意这里的 getters 可以理解为计算属性
const getters = {
  // 在组件中是通过 this.$store.getters.getUser 来获取
  getUser(state) {
    return state.user;
  }
};

// 定义改变 state 初始值的方法,这里是唯一可以改变 state 的地方,缺点是只能同步执行
const mutations = {
  // 在组件中是通过 this.$store.commit('updateUser', user); 方法来调用 mutations
  updateUser(state, user) {
    state.user = user;
  }
};

// 定义触发 mutations 里函数的方法,可以异步执行 mutations 里的函数
const actions = {
  // 在组件中是通过 this.$store.dispatch('asyncUpdateUser', user); 来调用 actions
  asyncUpdateUser(context, user) {
    context.commit('updateUser', user);
  }
};

export default new Vuex.Store({
  state,
  getters,
  mutations,
  actions
});
2.修改 main.js ,增加刚才配置的 store/index.js,关键代码如下:
import Vue from 'vue'
import Vuex from 'vuex'
import store from './store'

Vue.use(Vuex);

new Vue({
  el: '#app',
  store
});
3.修改后端UserController中的login方法
@RequestMapping("login")
public Map<String,Object> login(@RequestBody User user){
    System.out.println(user);
    //模拟数据库查询
    //...
    //伪代码演示
    //User db_user = userService.login(user);

    HashMap<String, Object> map = new HashMap<>();

    if("jack".equals(user.getUsername()) && "123".equals(user.getPassword())){

        //假设这是数据库查出来的User
        User db_user = new User();
        db_user.setUsername("jack");
        db_user.setPassword("123");

        map.put("token","lingpai");
        map.put("code",200);
        map.put("msg","success");
        map.put("data",db_user);

        return map;
    }else{

        map.put("code",-1);
        map.put("msg","fail");

        return map;
    }
}
4.修改Login.vue中的login方法
methods:{
    login(){
        this.axios.post("/user/login",this.loginInfo)
            .then(resp => {
                //登录成功后,将token设置到cookie中,然后跳转页面
                let lingpai = resp.data.token;
                alert(lingpai);//lingpai
                VueCookies.set("token",lingpai);

                //把后台User存储到vuex中的user变量中
                let user = resp.data.data;
                alert(user.username);
                this.$store.dispatch('asyncUpdateUser', user);//赋值

                //跳转到主页
                this.$router.push({path:'/index'})
            })
    }
}
5.修改Index.vue中的data以及el-header
<template>
    <el-container>
        <el-header>管理系统:{{ user.username }}</el-header>
        <el-container>
            <el-aside>
                <el-menu router>
                    <!-- element-ui将vue中的router的to属性,使用index来替代了 -->
                    <el-menu-item index="/music">
                        <i class="el-icon-setting"></i>歌曲管理
                    </el-menu-item>
                    <el-menu-item index="/sheet">
                        <i class="el-icon-menu"></i>歌单管理
                    </el-menu-item>
                </el-menu>
            </el-aside>
            <el-main>
                <!-- 编写 router-view -->
                <router-view></router-view>
            </el-main>
        </el-container>

    </el-container>
</template>

<script>

    export default {
        name: 'Index',
        components: {
            //HelloWorld
        },

        data(){
            return{
                //获取user
                user:this.$store.getters.getUser
            }
        }

    }
</script>

<style>
    #app {
        font-family: Avenir, Helvetica, Arial, sans-serif;
        -webkit-font-smoothing: antialiased;
        -moz-osx-font-smoothing: grayscale;
        text-align: center;
        color: #2c3e50;
        margin-top: 60px;
    }
</style>

<!-- 设置容器样式 -->
<style>
    .el-header {
        background-color: #409EFF;
        color: #ffffff;
        line-height: 60px;
        font-size: 28px;
    }

</style>
访问浏览器进行测试
6.4 解决浏览器刷新后 Vuex 数据消失问题
- 问题描述
Vuex 的状态存储是响应式的,当 Vue 组件从 store 中读取状态的时候,若 store 中的状态发生变化,那么相应的组件也会相应地得到高效更新。但是有一个问题就是:vuex 的存储的数据只是在页面的中,相当于我们定义的全局变量,刷新之后,里边的数据就会恢复到初始化状态。但是这个情况有时候并不是我们所希望的。
- 解决方案
监听页面是否刷新,如果页面刷新了,将 state 对象存入到 sessionStorage 中。页面打开之后,判断 sessionStorage 中是否存在 state 对象,如果存在,则说明页面是被刷新过的,将 sessionStorage 中存的数据取出来给 vuex 中的 state 赋值。如果不存在,说明是第一次打开,则取 vuex 中定义的 state 初始值。
- 修改代码
1.在 App.vue 中增加监听刷新事件
  export default {
    name: 'App',
    mounted() {
      window.addEventListener('unload', this.saveState);
    },
    methods: {
      saveState() {
        sessionStorage.setItem('state', JSON.stringify(this.$store.state));
      }
    }
  }
2.修改 store/index.js 中的 state
const state = sessionStorage.getItem('state') ? JSON.parse(sessionStorage.getItem('state')) : {
  user: {
    name: ''
  }
};

 浙公网安备 33010602011771号