
转载:Spring Bean的生命周期
一、生命周期流程图:
Spring Bean的完整生命周期从创建Spring容器开始,直到最终Spring容器销毁Bean,这其中包含了一系列关键点。
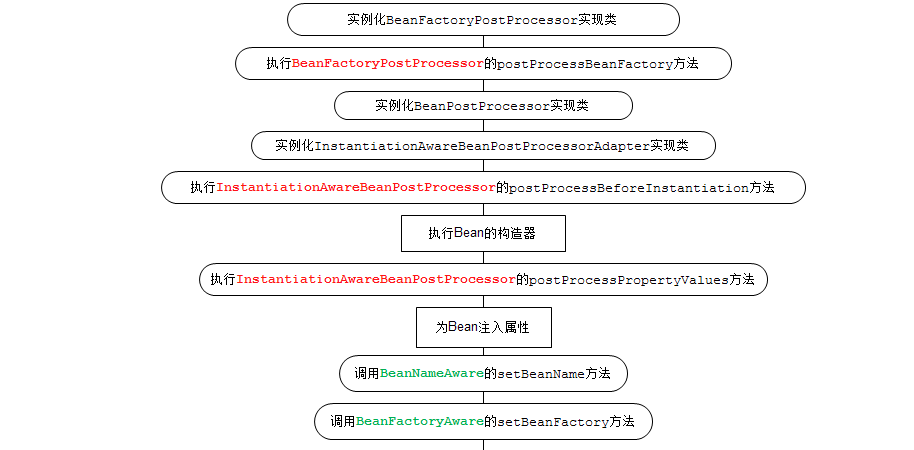
若容器注册了以上各种接口,程序那么将会按照以上的流程进行。下面将仔细讲解各接口作用。
二、各种接口方法分类
Bean的完整生命周期经历了各种方法调用,这些方法可以划分为以下几类:
1、Bean自身的方法 : 这个包括了Bean本身调用的方法和通过配置文件中<bean>的init-method和destroy-method指定的方法
2、Bean级生命周期接口方法 : 这个包括了BeanNameAware、BeanFactoryAware、InitializingBean和DiposableBean这些接口的方法
3、容器级生命周期接口方法 : 这个包括了InstantiationAwareBeanPostProcessor 和 BeanPostProcessor 这两个接口实现,一般称它们的实现类为“后处理器”。
4、工厂后处理器接口方法 : 这个包括了AspectJWeavingEnabler, ConfigurationClassPostProcessor, CustomAutowireConfigurer等等非常有用的工厂后处理器 接口的方法。工厂后处理器也是容器级的。在应用上下文装配配置文件之后立即调用。
三、演示
我们用一个简单的Spring Bean来演示一下Spring Bean的生命周期。
1、首先是一个简单的Spring Bean,调用Bean自身的方法和Bean级生命周期接口方法,为了方便演示,它实现了BeanNameAware、BeanFactoryAware、InitializingBean和DiposableBean这4个接口,同时有2个方法,对应配置文件中<bean>的init-method和destroy-method。如下:
1 2 3 4 5 6 7 8 9 10 11 12 13 14 15 16 17 18 19 20 21 22 23 24 25 26 27 28 29 30 31 32 33 34 35 36 37 38 39 40 41 42 43 44 45 46 47 48 49 50 51 52 53 54 55 56 57 58 59 60 61 62 63 64 65 66 67 68 69 70 71 72 73 74 75 76 77 78 79 80 81 82 83 84 85 86 87 88 89 90 91 92 93 94 95 96 97 | package springBeanTest;import org.springframework.beans.BeansException;import org.springframework.beans.factory.BeanFactory;import org.springframework.beans.factory.BeanFactoryAware;import org.springframework.beans.factory.BeanNameAware;import org.springframework.beans.factory.DisposableBean;import org.springframework.beans.factory.InitializingBean;/** * @author qsk */public class Person implements BeanFactoryAware, BeanNameAware, InitializingBean, DisposableBean { private String name; private String address; private int phone; private BeanFactory beanFactory; private String beanName; public Person() { System.out.println("【构造器】调用Person的构造器实例化"); } public String getName() { return name; } public void setName(String name) { System.out.println("【注入属性】注入属性name"); this.name = name; } public String getAddress() { return address; } public void setAddress(String address) { System.out.println("【注入属性】注入属性address"); this.address = address; } public int getPhone() { return phone; } public void setPhone(int phone) { System.out.println("【注入属性】注入属性phone"); this.phone = phone; } @Override public String toString() { return "Person [address=" + address + ", name=" + name + ", phone=" + phone + "]"; } // 这是BeanFactoryAware接口方法 @Override public void setBeanFactory(BeanFactory arg0) throws BeansException { System.out .println("【BeanFactoryAware接口】调用BeanFactoryAware.setBeanFactory()"); this.beanFactory = arg0; } // 这是BeanNameAware接口方法 @Override public void setBeanName(String arg0) { System.out.println("【BeanNameAware接口】调用BeanNameAware.setBeanName()"); this.beanName = arg0; } // 这是InitializingBean接口方法 @Override public void afterPropertiesSet() throws Exception { System.out .println("【InitializingBean接口】调用InitializingBean.afterPropertiesSet()"); } // 这是DiposibleBean接口方法 @Override public void destroy() throws Exception { System.out.println("【DiposibleBean接口】调用DiposibleBean.destory()"); } // 通过<bean>的init-method属性指定的初始化方法 public void myInit() { System.out.println("【init-method】调用<bean>的init-method属性指定的初始化方法"); } // 通过<bean>的destroy-method属性指定的初始化方法 public void myDestory() { System.out.println("【destroy-method】调用<bean>的destroy-method属性指定的初始化方法"); }} |
2、接下来是演示BeanPostProcessor接口的方法,如下:
1 2 3 4 5 6 7 8 9 10 11 12 13 14 15 16 17 18 19 20 21 22 23 24 25 26 27 28 29 | package springBeanTest;import org.springframework.beans.BeansException;import org.springframework.beans.factory.config.BeanPostProcessor;public class MyBeanPostProcessor implements BeanPostProcessor { public MyBeanPostProcessor() { super(); System.out.println("这是BeanPostProcessor实现类构造器!!"); // TODO Auto-generated constructor stub } @Override public Object postProcessAfterInitialization(Object arg0, String arg1) throws BeansException { System.out .println("BeanPostProcessor接口方法postProcessAfterInitialization对属性进行更改!"); return arg0; } @Override public Object postProcessBeforeInitialization(Object arg0, String arg1) throws BeansException { System.out .println("BeanPostProcessor接口方法postProcessBeforeInitialization对属性进行更改!"); return arg0; }} |
如上,BeanPostProcessor接口包括2个方法postProcessAfterInitialization和postProcessBeforeInitialization,这两个方法的第一个参数都是要处理的Bean对象,第二个参数都是Bean的name。返回值也都是要处理的Bean对象。这里要注意。
3、InstantiationAwareBeanPostProcessor 接口本质是BeanPostProcessor的子接口,一般我们继承Spring为其提供的适配器类InstantiationAwareBeanPostProcessor Adapter来使用它,如下:
1 2 3 4 5 6 7 8 9 10 11 12 13 14 15 16 17 18 19 20 21 22 23 24 25 26 27 28 29 30 31 32 33 34 35 36 37 38 39 40 41 42 43 44 45 | package springBeanTest;import java.beans.PropertyDescriptor;import org.springframework.beans.BeansException;import org.springframework.beans.PropertyValues;import org.springframework.beans.factory.config.InstantiationAwareBeanPostProcessorAdapter;public class MyInstantiationAwareBeanPostProcessor extends InstantiationAwareBeanPostProcessorAdapter { public MyInstantiationAwareBeanPostProcessor() { super(); System.out .println("这是InstantiationAwareBeanPostProcessorAdapter实现类构造器!!"); } // 接口方法、实例化Bean之前调用 @Override public Object postProcessBeforeInstantiation(Class beanClass, String beanName) throws BeansException { System.out .println("InstantiationAwareBeanPostProcessor调用postProcessBeforeInstantiation方法"); return null; } // 接口方法、实例化Bean之后调用 @Override public Object postProcessAfterInitialization(Object bean, String beanName) throws BeansException { System.out .println("InstantiationAwareBeanPostProcessor调用postProcessAfterInitialization方法"); return bean; } // 接口方法、设置某个属性时调用 @Override public PropertyValues postProcessPropertyValues(PropertyValues pvs, PropertyDescriptor[] pds, Object bean, String beanName) throws BeansException { System.out .println("InstantiationAwareBeanPostProcessor调用postProcessPropertyValues方法"); return pvs; }} |
这个有3个方法,其中第二个方法postProcessAfterInitialization就是重写了BeanPostProcessor的方法。第三个方法postProcessPropertyValues用来操作属性,返回值也应该是PropertyValues对象。
4、演示工厂后处理器接口方法,如下:
1 2 3 4 5 6 7 8 9 10 11 12 13 14 15 16 17 18 19 20 21 22 23 24 | package springBeanTest;import org.springframework.beans.BeansException;import org.springframework.beans.factory.config.BeanDefinition;import org.springframework.beans.factory.config.BeanFactoryPostProcessor;import org.springframework.beans.factory.config.ConfigurableListableBeanFactory;public class MyBeanFactoryPostProcessor implements BeanFactoryPostProcessor { public MyBeanFactoryPostProcessor() { super(); System.out.println("这是BeanFactoryPostProcessor实现类构造器!!"); } @Override public void postProcessBeanFactory(ConfigurableListableBeanFactory arg0) throws BeansException { System.out .println("BeanFactoryPostProcessor调用postProcessBeanFactory方法"); BeanDefinition bd = arg0.getBeanDefinition("person"); bd.getPropertyValues().addPropertyValue("phone", "110"); }} |
5、配置文件如下beans.xml,很简单,使用ApplicationContext,处理器不用手动注册:
1 2 3 4 5 6 7 8 9 10 11 12 13 14 15 16 17 18 19 20 21 22 23 | <?xml version="1.0" encoding="UTF-8"?><beans xmlns="http://www.springframework.org/schema/beans" xmlns:xsi="http://www.w3.org/2001/XMLSchema-instance" xmlns:p="http://www.springframework.org/schema/p" xmlns:aop="http://www.springframework.org/schema/aop" xmlns:tx="http://www.springframework.org/schema/tx" xsi:schemaLocation=" http://www.springframework.org/schema/beans http://www.springframework.org/schema/beans/spring-beans-3.2.xsd"> <bean id="beanPostProcessor" class="springBeanTest.MyBeanPostProcessor"> </bean> <bean id="instantiationAwareBeanPostProcessor" class="springBeanTest.MyInstantiationAwareBeanPostProcessor"> </bean> <bean id="beanFactoryPostProcessor" class="springBeanTest.MyBeanFactoryPostProcessor"> </bean> <bean id="person" class="springBeanTest.Person" init-method="myInit" destroy-method="myDestory" scope="singleton" p:name="张三" p:address="广州" p:phone="15900000000" /></beans> |
6、下面测试一下:
1 2 3 4 5 6 7 8 9 10 11 12 13 14 15 16 17 18 19 20 21 | package springBeanTest;import org.springframework.context.ApplicationContext;import org.springframework.context.support.ClassPathXmlApplicationContext;public class BeanLifeCycle { public static void main(String[] args) { System.out.println("现在开始初始化容器"); ApplicationContext factory = new ClassPathXmlApplicationContext("springBeanTest/beans.xml"); System.out.println("容器初始化成功"); //得到Preson,并使用 Person person = factory.getBean("person",Person.class); System.out.println(person); System.out.println("现在开始关闭容器!"); ((ClassPathXmlApplicationContext)factory).registerShutdownHook(); }} |
关闭容器使用的是实际是AbstractApplicationContext的钩子方法。
我们来看一下结果:
1 2 3 4 5 6 7 8 9 10 11 12 13 14 15 16 17 18 19 20 21 22 23 24 25 26 27 28 29 | 现在开始初始化容器2014-5-18 15:46:20 org.springframework.context.support.AbstractApplicationContext prepareRefresh信息: Refreshing org.springframework.context.support.ClassPathXmlApplicationContext@19a0c7c: startup date [Sun May 18 15:46:20 CST 2014]; root of context hierarchy2014-5-18 15:46:20 org.springframework.beans.factory.xml.XmlBeanDefinitionReader loadBeanDefinitions信息: Loading XML bean definitions from class path resource [springBeanTest/beans.xml]这是BeanFactoryPostProcessor实现类构造器!!BeanFactoryPostProcessor调用postProcessBeanFactory方法这是BeanPostProcessor实现类构造器!!这是InstantiationAwareBeanPostProcessorAdapter实现类构造器!!2014-5-18 15:46:20 org.springframework.beans.factory.support.DefaultListableBeanFactory preInstantiateSingletons信息: Pre-instantiating singletons in org.springframework.beans.factory.support.DefaultListableBeanFactory@9934d4: defining beans [beanPostProcessor,instantiationAwareBeanPostProcessor,beanFactoryPostProcessor,person]; root of factory hierarchyInstantiationAwareBeanPostProcessor调用postProcessBeforeInstantiation方法【构造器】调用Person的构造器实例化InstantiationAwareBeanPostProcessor调用postProcessPropertyValues方法【注入属性】注入属性address【注入属性】注入属性name【注入属性】注入属性phone【BeanNameAware接口】调用BeanNameAware.setBeanName()【BeanFactoryAware接口】调用BeanFactoryAware.setBeanFactory()BeanPostProcessor接口方法postProcessBeforeInitialization对属性进行更改!【InitializingBean接口】调用InitializingBean.afterPropertiesSet()【init-method】调用<bean>的init-method属性指定的初始化方法BeanPostProcessor接口方法postProcessAfterInitialization对属性进行更改!InstantiationAwareBeanPostProcessor调用postProcessAfterInitialization方法容器初始化成功Person [address=广州, name=张三, phone=110]现在开始关闭容器!【DiposibleBean接口】调用DiposibleBean.destory()【destroy-method】调用<bean>的destroy-method属性指定的初始化方法 |
转载自地址 http://www.cnblogs.com/zrtqsk/p/3735273.html


【推荐】国内首个AI IDE,深度理解中文开发场景,立即下载体验Trae
【推荐】编程新体验,更懂你的AI,立即体验豆包MarsCode编程助手
【推荐】抖音旗下AI助手豆包,你的智能百科全书,全免费不限次数
【推荐】轻量又高性能的 SSH 工具 IShell:AI 加持,快人一步
· AI与.NET技术实操系列:向量存储与相似性搜索在 .NET 中的实现
· 基于Microsoft.Extensions.AI核心库实现RAG应用
· Linux系列:如何用heaptrack跟踪.NET程序的非托管内存泄露
· 开发者必知的日志记录最佳实践
· SQL Server 2025 AI相关能力初探
· 震惊!C++程序真的从main开始吗?99%的程序员都答错了
· 【硬核科普】Trae如何「偷看」你的代码?零基础破解AI编程运行原理
· 单元测试从入门到精通
· 上周热点回顾(3.3-3.9)
· winform 绘制太阳,地球,月球 运作规律