vue-admin-elementui左侧栏根据 后台返回数据进行渲染
admin渲染左侧栏
最近在写后台管理系统的 时候左侧栏是根据 后台的数据进行生成的,本来对这个框架都不熟悉的我,各种百度搜索,结果没有我想要的结果。最后还是自己慢慢看代码解决的,首先是我走进了一个 盲区,总是想去通过路由来改变左侧栏,但是路由肯定不能动啊,不然怎么跳转,后来发现左侧栏是 获取路由列表来渲染的,那我改变这个列表不就行了,既然有了思路就只开始动手吧。
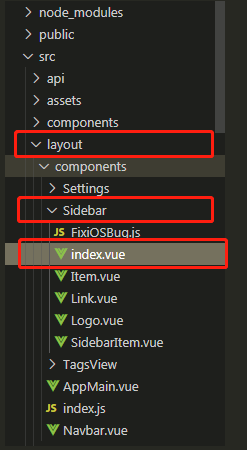
结构目录

找到红色框里面的 index.vue文件然后 你进去就会豁然开朗 原来左侧栏是这么生成的
<template>
  <div :class="{'has-logo':showLogo}">
    <!-- <logo v-if="showLogo" :collapse="isCollapse" /> -->
    <el-scrollbar wrap-class="scrollbar-wrapper">
      <el-menu
        :default-active="activeMenu"
        :collapse="isCollapse"
        :background-color="variables.menuBg"
        :text-color="variables.menuText"
        :unique-opened="$store.state.settings.uniqueOpened"
        :active-text-color="variables.menuActiveText"
        :collapse-transition="false"
        mode="vertical"
      >
      <!--改成aaa可以测试静态效果-->
        <sidebar-item v-for="route in all" :key="route.path" :item="route" :base-path="route.path" />
      </el-menu>
    </el-scrollbar>
  </div>
</template>

<script>
import { mapGetters ,mapState,mapActions} from 'vuex'
import Logo from './Logo'
import SidebarItem from './SidebarItem'
import variables from '@/assets/styles/variables.scss'

export default {
  components: { SidebarItem, Logo },
  data(){
    return{
      aaa:[//这个aaa是我测试的时候写的一个数组就是看看能不能改变 左侧栏答案是可以的 首先 path是必须的 路径你和你们的后台商量怎么写,
      //但是必须匹配你的组件名 meta必须的这是展示在左侧的标题  如果有下级就加上children
        {// 我的工作
          path: '/myworker',
          meta: { title: '我的工作', icon: 'work' },
          children: [
            {
              path: 'index',

              meta: { title: '待办任务', icon: '00', noCache: true }
            },
            {
              path: 'readytask',

              meta: { title: '已办任务', icon: '00', noCache: true }
            },
            {
              path: 'endtask',

              meta: { title: '办结任务', icon: '00', noCache: true }
            }
          ]
        }

      ],

      outList:JSON.parse(localStorage.getItem('sidebarList')).secondMenu,
      innerList:JSON.parse(JSON.parse(localStorage.getItem('sidebarList')).thirdMenu),
      all:[]
    }
  },
  mounted(){
    this.endList(this.outList,this.innerList)
  },
  methods:{
    endList(parents,childrens){ //因为后台返回了两个数组一个是 父级 一个是子级 然后根据pid 生成树形结构封装的方法
        let translator = (parents, children) => {
          //遍历父节点数据
          parents.unshift({
            path: 'dashboard',
            name: 'myhome',
            meta: { title: '首页', icon: 'home', breadcrumb: true },
            hidden: false, // 在侧边栏上显示  true为不显示  当父路由的字路由为1个时,不显示父路由,直接显示子路由
            alwaysShow: false// 默认是false   设置为true时会忽略设置的权限 一致显示在跟路由上
          })

          parents.forEach((parent,index) => {

            if(index!=0){
              console.log(8811,parent)
              parent['meta'] = { title: parent.sm_name, icon: parent.sm_cssstyle }
              parent['path'] = parent.sm_url
            }

            //遍历子节点数据
            childrens.forEach((current, index) => {

              //此时找到父节点对应的一个子节点
              if (current.pid === parent.sm_id) {
                //对子节点数据进行深复制,这里只支持部分类型的数据深复制,对深复制不了解的童靴可以先去了解下深复制
                current['meta'] = { title: current.text, icon: '00', noCache: true }
                current['path'] = current.attributes.url
                let temp = JSON.parse(JSON.stringify(childrens))
                //让当前子节点从temp中移除,temp作为新的子节点数据,这里是为了让递归时,子节点的遍历次数更少,如果父子关系的层级越多,越有利
                temp.splice(index, 1)
                //让当前子节点作为唯一的父节点,去递归查找其对应的子节点
                // translator([current], temp)
                //把找到子节点放入父节点的childrens属性中
                typeof parent['children'] !== 'undefined' ? parent['children'].push(current) : parent['children'] = [current]
              }
            })
          })
              }
        translator(parents,childrens)
       this.all =  parents
    }
  },
  computed: {
    ...mapGetters([
      'permission_routers',
      'sidebar'
    ]),
    activeMenu() {
      const route = this.$route
      const { meta, path } = route
      // if set path, the sidebar will highlight the path you set
      if (meta.activeMenu) {
        return meta.activeMenu
      }
      return path
    },
    showLogo() {
      return this.$store.state.settings.sidebarLogo
    },
    variables() {
      return variables
    },
    isCollapse() {
      return !this.sidebar.opened
    }
  }
}
</script>


