

linux实现人脸识别锁定解锁
环境
archlinux
桌面管理器i3wm
登录管理器 slim
python 3.10.4
dlib
pip install --user -i https://pypi.tuna.tsinghua.edu.cn/simple dlib
face_recognition 依赖dlib
pip install --user -i https://pypi.tuna.tsinghua.edu.cn/simple face_recognition
opency 读取摄像头
pip install --user -i https://pypi.tuna.tsinghua.edu.cn/simple opencv-python
笔记本内置摄像头
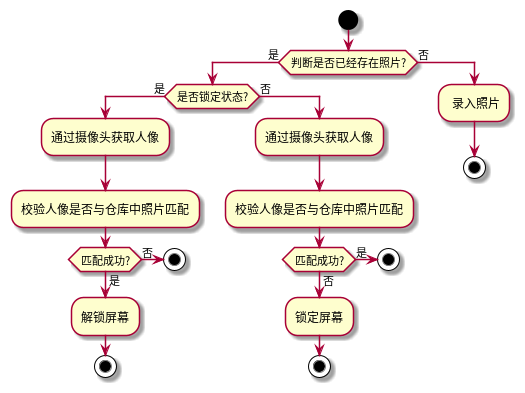
流程图
代码
"""
人脸识别认证

使用摄像头检验当前用户是否匹配
"""
# -*- coding: utf-8 -*-
import cv2
import os
import face_recognition
import pyautogui
import time


class AuthByFace:

    def __init__(self, clicked, clocked):
        self.clicked = clicked
        self.clocked = clocked
        # 设置图像保存目录
        self.SUCCESS_DIR = os.environ['HOME'] + "/Pictures/authFaces/success/"

    # 认证通过返回true
    def isAuthSuccess(self):

        # 获取摄像头中人脸
        cameraCapture = cv2.VideoCapture(0)
        result, image = cameraCapture.read()
        if result:
            # cameraImageRgb = image[:, :, ::-1]
            # 摄像头中的人脸位置, 可能出现多张脸
            cameraImageFaceLocations = face_recognition.face_locations(image)
            # 摄像头中人脸进行编码
            cameraImageEncodings = face_recognition.face_encodings(image, cameraImageFaceLocations)[0]

            # 使用仓库中文件 测试匹配
            # unknownImage = face_recognition.load_image_file(self.SUCCESS_DIR + "image_1.jpg")
            # cameraImageEncodings = face_recognition.face_encodings(unknownImage)[0]

            personNames = []
            knownImageEncodings = []
            # 跟所有保存的人脸比对
            files = os.listdir(self.SUCCESS_DIR)
            for file in files:
                if file.endswith("jpg") or file.endswith("png"):
                    name, _ = os.path.split(file)
                    personNames.append(name)
                    knowImagePath = self.SUCCESS_DIR + file
                    knownImage = face_recognition.load_image_file(knowImagePath)
                    # 将仓库中照片全部编码, 后续比对需要
                    knownImageEncodings.append(face_recognition.face_encodings(knownImage)[0])

            # 遍历locations,face_encodings,识别图片中的人脸
            matchs = face_recognition.compare_faces(knownImageEncodings, cameraImageEncodings)
            print("hhaha", matchs)
            for index, match in enumerate(matchs):
                if match:
                    # 有一个匹配就返回
                    print("图像: ", personNames[index], "匹配成功")
                    return True

    # 打开摄像头, 监听鼠标事件
    def onMouse(self, event, x, y, flags, param):
        # 点击左键, 重置click状态
        if event == cv2.EVENT_LBUTTONUP:
            self.clicked = True

    def savePicture(self):
        # 打开摄像头
        # VideoCapture()中参数是0,表示打开笔记本的内置摄像头,
        # 参数是视频文件路径则打开视频
        cameraCapture = cv2.VideoCapture(0)
        if not cameraCapture.isOpened():
            print("摄像头未打开~~")
            exit()
        cameraCapture.set(3, 100)
        # 帧宽度和帧高度都设置为100像素
        cameraCapture.set(4, 100)
        cv2.namedWindow('MyWindow')
        cv2.setMouseCallback('MyWindow', self.onMouse)
        # 点击左键保存
        print('showing camera feed. Click window or press and key to stop.')
        result, image = cameraCapture.read()
        # True/False 是否读取到照片
        print(result)

        # 点击鼠标左键后, 保存图片, 关闭窗口
        while result and cv2.waitKey(1) == -1 and not self.clicked:
            cv2.imshow('MyWindow', cv2.flip(image, 0))
            result, image = cameraCapture.read()
            name = self.SUCCESS_DIR + 'image_0.jpg'
            cv2.imwrite(name, image)
        cv2.destroyWindow('MyWindow')
        cameraCapture.release()


if __name__ == '__main__':
    authByFace = AuthByFace(False, False)

    # 仓库没有照片则先录入照片
    files = os.listdir(authByFace.SUCCESS_DIR)
    if len(files) < 1:
        authByFace.savePicture()
    else:
        # 锁定状态才会走这个认证逻辑
        # 每1分钟运行一次认证
        while True:
            time.sleep(10)
            try:
                isSuccess = authByFace.isAuthSuccess()
                if authByFace.clocked and isSuccess:
                    # 认证通过则解开锁屏
                    print("认证通过")
                    # 输入锁屏密码
                    pyautogui.typewrite("1")
                    pyautogui.press("enter")
                    pyautogui.press("Esc")
                    authByFace.clocked = False
                elif not isSuccess:
                    # 如果认证不通过, 调用系统快捷键, 锁定屏幕
                    pyautogui.hotkey('win', 'c')
                    pyautogui.press(['l'], interval=0.1)
                    # 对象设置为锁定状态
                    authByFace.clocked = True
            except Exception as exc:
                print(type(exc))
                if not authByFace.clocked:
                    pyautogui.hotkey('win', 'c')
                    pyautogui.press(['l'], interval=0.1)
                    # 对象设置为锁定状态
                    authByFace.clocked = True
开启启动
方式1 systemd (未通过)
经过测试,
无法将该程序放入到systemd单元,跟cv2等包有关系,引入就启动失败
方式2
直接加入到i3wm的开机启动即可,加载该文件时图形界面已经加载,正合适
exec --no-startup-id /usr/bin/python ~/workspace/python/demo/AuthByFace.py > /tmp/authByFace.log 2>&1
参考
https://www.cnblogs.com/sclu/p/12626553.html
问题列表
解决python安装opencv速度慢
使用清华镜像(速度快)
pip install --user -i https://pypi.tuna.tsinghua.edu.cn/simple
opencv-python


【推荐】国内首个AI IDE,深度理解中文开发场景,立即下载体验Trae
【推荐】编程新体验,更懂你的AI,立即体验豆包MarsCode编程助手
【推荐】抖音旗下AI助手豆包,你的智能百科全书,全免费不限次数
【推荐】轻量又高性能的 SSH 工具 IShell:AI 加持,快人一步
· 阿里最新开源QwQ-32B,效果媲美deepseek-r1满血版,部署成本又又又降低了!
· 开源Multi-agent AI智能体框架aevatar.ai,欢迎大家贡献代码
· Manus重磅发布:全球首款通用AI代理技术深度解析与实战指南
· 被坑几百块钱后,我竟然真的恢复了删除的微信聊天记录!
· AI技术革命,工作效率10个最佳AI工具