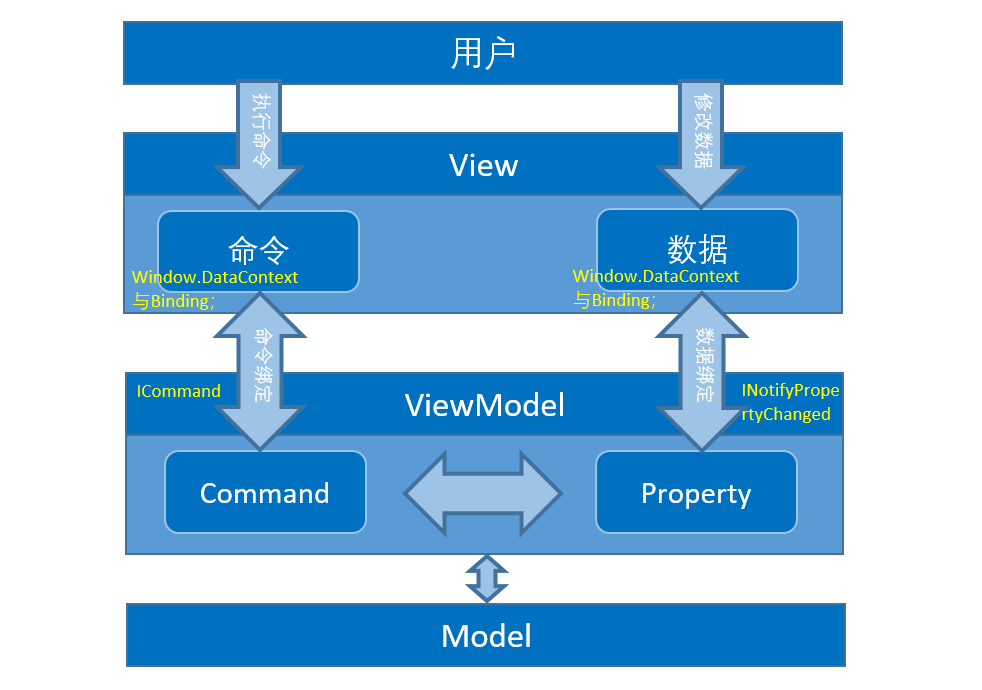
.Net-Avalonia学习笔记(四)-MVVM
Avalonia的MVVM实现方式与WPF一样,下面是一个简单示例;WPF的MVVM示例见:WPF-理解与使用MVVM,请勿滥用。
Avalonia与WPF不同的是,DataContext不一样。Avalonia不在后台绑定DataContext时按钮事件不可Binding(使用CommunityToolkit.MVVM的除外)
一、快速创建方式
1、使用模版进行创建
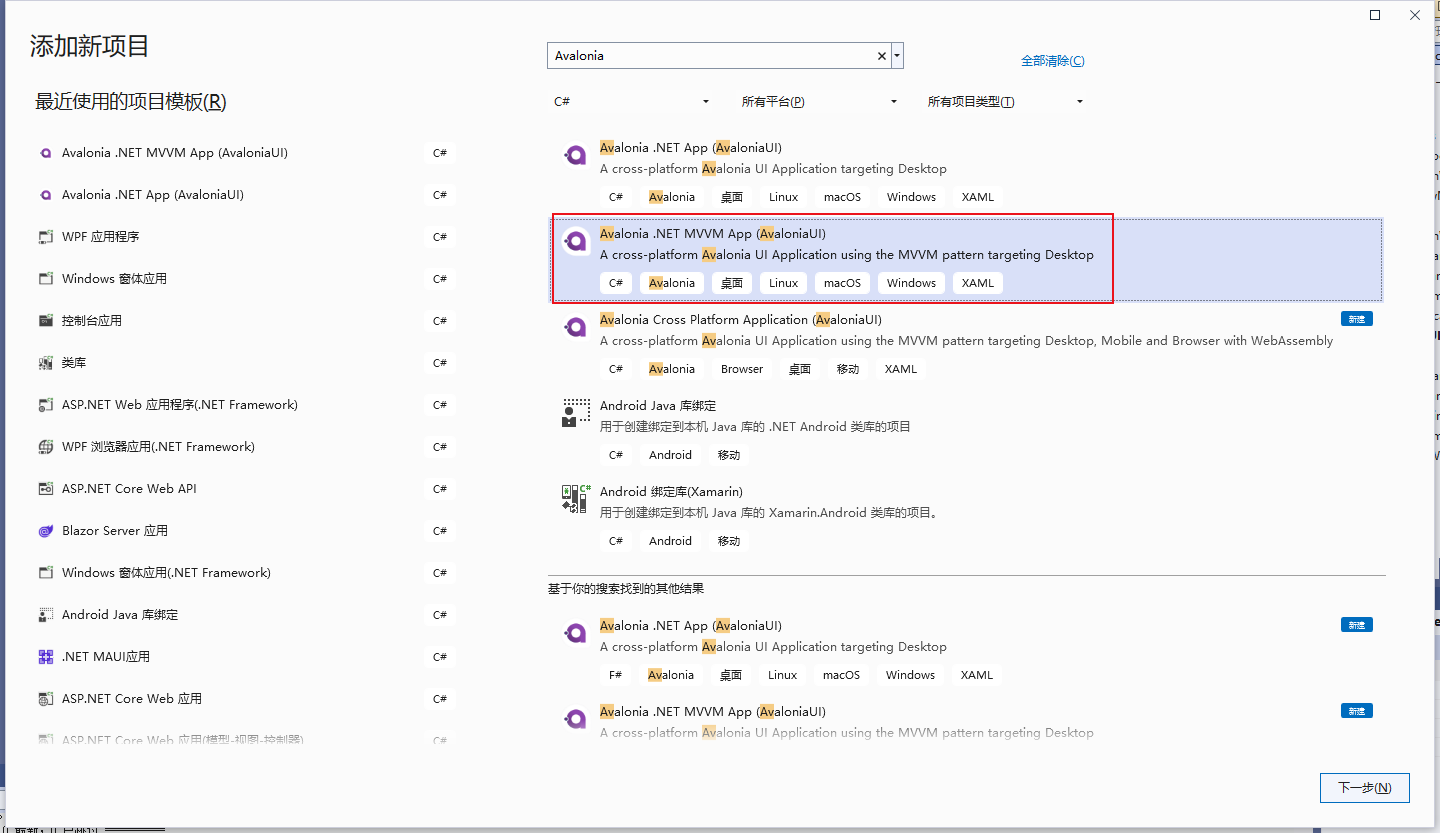
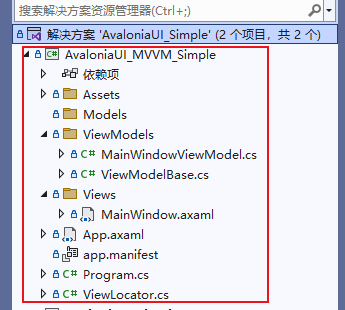
2、模版项目结构如下
3、Model示例
using System;
using System.Collections.Generic;
using System.Linq;
using System.Text;
using System.Threading.Tasks;

namespace AvaloniaUI_MVVM_Simple.Models
{
    /// <summary>
    /// 用户信息
    /// </summary>
    public class UserModel
    {
        /// <summary>
        /// 主键
        /// </summary>
        public string ID { get; set; } = string.Empty;

        /// <summary>
        /// 用户名
        /// </summary>
        public string Name { get; set; } = string.Empty;

        /// <summary>
        /// 用户邮箱
        /// </summary>
        public string Email { get; set; } = string.Empty;
    }
}
4、View示例
<Window xmlns="https://github.com/avaloniaui"
        xmlns:x="http://schemas.microsoft.com/winfx/2006/xaml"
        xmlns:vm="using:AvaloniaUI_MVVM_Simple.ViewModels"
        xmlns:d="http://schemas.microsoft.com/expression/blend/2008"
        xmlns:mc="http://schemas.openxmlformats.org/markup-compatibility/2006"
        mc:Ignorable="d" d:DesignWidth="800" d:DesignHeight="450"
        x:Class="AvaloniaUI_MVVM_Simple.Views.MainWindow"
        x:DataType="vm:MainWindowViewModel"
        Icon="/Assets/avalonia-logo.ico"
        Title="AvaloniaUI_MVVM_Simple">

    <Design.DataContext>
        <vm:MainWindowViewModel/>
    </Design.DataContext>
	<Grid>
        <TextBlock Text="{Binding Greeting}" HorizontalAlignment="Center" VerticalAlignment="Top"/>

		<Label Content="名字:" HorizontalAlignment="Left" Margin="10,10,0,0" VerticalAlignment="Top"/>
		<TextBox Text="{Binding Name, Mode=TwoWay}" HorizontalAlignment="Left" Margin="56,14,0,0" TextWrapping="Wrap" VerticalAlignment="Top" Width="139"/>
		<Label Content="邮箱:" HorizontalAlignment="Left" Margin="10,40,0,0" VerticalAlignment="Top"/>
		<TextBox Text="{Binding Email }" HorizontalAlignment="Left" Margin="56,44,0,0" TextWrapping="Wrap" VerticalAlignment="Top" Width="139"/>

		<!--Click="Button_Click"-->
		<Button Content="获取作者信息" Command="{Binding ButtonCommand}" HorizontalAlignment="Left" Margin="213,13,0,0" VerticalAlignment="Top" RenderTransformOrigin="0,-0.272" Width="110" />
		<!--Click="Button1_Click"-->
		<Button Content="和作者打招呼" Command="{Binding Button1Command}" HorizontalAlignment="Left" Margin="213,44,0,0" VerticalAlignment="Top" RenderTransformOrigin="0,-0.272" Width="110" />

		<Label Content="{Binding Log }" Margin="28,100,28,13" FontSize="72" Foreground="#FF00EDE8" HorizontalAlignment="Center" VerticalAlignment="Center"/>

	</Grid>
</Window>
5、ViewModel示例
MainWindowViewModel.cs
using CommunityToolkit.Mvvm.ComponentModel;
using CommunityToolkit.Mvvm.Input;
using System.Threading.Tasks;
using System;
using AvaloniaUI_MVVM_Simple.Models;

namespace AvaloniaUI_MVVM_Simple.ViewModels
{
    public partial class MainWindowViewModel : ViewModelBase
    {
        #region 控件 Binding
        // 写法一
#pragma warning disable CA1822 // Mark members as static
        public string Greeting => "Welcome to Avalonia!";
#pragma warning restore CA1822 // Mark members as static

        #region 写法二
        /// <summary>
        /// 名字
        /// </summary>
        [ObservableProperty]
        private string _name = string.Empty;

        /// <summary>
        /// 邮箱
        /// </summary>
        [ObservableProperty]
        private string _email = string.Empty;

        /// <summary>
        /// 打招呼的日志
        /// </summary>
        [ObservableProperty]
        private string _log = string.Empty;
        #endregion 写法二
        #endregion 控件 Binding

        #region
        /// <summary>
        /// 获取作者信息Command
        /// 数据流向:Model-> ViewModel-> View
        /// </summary>
        [RelayCommand]
        //public void ButtonFun(bool bool1)
        public void ButtonFun()
        {
            // Model ->ViewModel
            UserModel userModel = new UserModel()
            {
                ID = Guid.NewGuid().ToString("N"),
                Name = "Bili执笔小白",
                Email = "2806933146@qq.com"
            };

            #region 清空字符串(可省略)
            Name = string.Empty;
            Email = string.Empty;
            Log = string.Empty;
            #endregion 清空字符串(可省略)

            Name = userModel.Name;
            Email = userModel.Email;
        }

        //private RelayCommand<User>? buttonCommand;
        //public IRelayCommand<User> ButtonCommand => buttonCommand ??= new RelayCommand<bool>(ButtonFun);
        private RelayCommand? buttonCommand;  // 可省略
        public IRelayCommand ButtonCommand => buttonCommand ??= new RelayCommand(ButtonFun);  // 可省略


        /// <summary>
        /// 和作者打招呼Command - 异步
        /// 数据流向:ViewModel-> View
        /// </summary>
        [RelayCommand]
        public async Task Button1Fun()
        {
            await Task.Run(() =>
            {
                Log = "你好!" + Name;
            });
        }

        private AsyncRelayCommand? button1Command;  // 可省略
        public IRelayCommand Button1Command => button1Command ??= new AsyncRelayCommand(Button1Fun);  // 可省略
        #endregion
    }
}
ViewModelBase.cs代码
using CommunityToolkit.Mvvm.ComponentModel;

namespace AvaloniaUI_MVVM_Simple.ViewModels
{
    public class ViewModelBase : ObservableObject
    {
    }
}
二、原生MVVM方式
1、MVVM知识点
想要创建一个完整的MVVM,需要用到以下类型或修饰词:
- Window.DataContext:View Window强绑定ViewModel;
- Binding:View绑定ViewModel中的变量、事件;
- INotifyPropertyChanged:用于ViewModel通知View刷新;ViewModel继承该类,并实现PropertyChanged、OnPropertyChanged;
- ICommand:用于VIew通知ViewModel响应控件事件;创建ICommand的实现类RelayCommand,并实现CanExecuteChanged,CanExecute,Execute;
2、创建Model
using System;
using System.Collections.Generic;
using System.Linq;
using System.Text;
using System.Threading.Tasks;

namespace AvaloniaUI_Simple.Models
{
    /// <summary>
    /// 用户信息
    /// </summary>
    public class UserModel
    {
        /// <summary>
        /// 主键
        /// </summary>
        public string ID { get; set; } = string.Empty;

        /// <summary>
        /// 用户名
        /// </summary>
        public string Name { get; set; } = string.Empty;

        /// <summary>
        /// 用户邮箱
        /// </summary>
        public string Email { get; set; } = string.Empty;
    }
}
3、创建View
注意已下代码:
- Window.DataContext:View Window强绑定ViewModel;
- Binding:View绑定ViewModel中的变量、事件;
- Avalonia与WPF不同的是,DataContext不一样。Avalonia不在后台绑定DataContext时按钮事件不可Binding(使用CommunityToolkit.MVVM的除外)。
<Window xmlns="https://github.com/avaloniaui"
        xmlns:x="http://schemas.microsoft.com/winfx/2006/xaml"
        xmlns:d="http://schemas.microsoft.com/expression/blend/2008"
        xmlns:mc="http://schemas.openxmlformats.org/markup-compatibility/2006"
        mc:Ignorable="d" d:DesignWidth="800" d:DesignHeight="450"
		xmlns:vm="using:AvaloniaUI_Simple.ViewModels"
        x:Class="AvaloniaUI_Simple.MVVMView"
		x:DataType="vm:MVVMWindowViewModel"
        Title="MVVMView">
	<Design.DataContext>
		<vm:MVVMWindowViewModel/>
	</Design.DataContext>
	<Grid>
		<Label Content="名字:" HorizontalAlignment="Left" Margin="10,10,0,0" VerticalAlignment="Top"/>
		<TextBox Text="{Binding Name, Mode=TwoWay}" HorizontalAlignment="Left" Margin="56,14,0,0" TextWrapping="Wrap" VerticalAlignment="Top" Width="139"/>
		<Label Content="邮箱:" HorizontalAlignment="Left" Margin="10,40,0,0" VerticalAlignment="Top"/>
		<TextBox Text="{Binding Email }" HorizontalAlignment="Left" Margin="56,44,0,0" TextWrapping="Wrap" VerticalAlignment="Top" Width="139"/>

		<!--Click="Button_Click" Command="{Binding ButtonCommand}" -->
		<Button Content="获取作者信息" Command="{Binding ButtonCommand}" IsEnabled="True" HorizontalAlignment="Left" Margin="213,13,0,0" VerticalAlignment="Top" RenderTransformOrigin="0,-0.272" Width="110" />
		<!--Click="Button1_Click"-->
		<Button Content="和作者打招呼" Command="{Binding Button1Command}" IsEnabled="True" HorizontalAlignment="Left" Margin="213,44,0,0" VerticalAlignment="Top" RenderTransformOrigin="0,-0.272" Width="110" />

		<Label Content="{Binding Log }" Margin="28,100,28,13" FontSize="72" Foreground="#FF00EDE8" HorizontalAlignment="Center" VerticalAlignment="Center"/>

	</Grid>
</Window>
using Avalonia;
using Avalonia.Controls;
using Avalonia.Markup.Xaml;
using AvaloniaUI_Simple.ViewModels;
namespace AvaloniaUI_Simple;
public partial class MVVMView : Window
{
/// <summary>
/// 与WPF不一样的是无参时 事件不可用
/// </summary>
public MVVMView()
{
InitializeComponent();
}
//外部传值
public MVVMView(MVVMWindowViewModel mVVMWindowViewModel)
{
InitializeComponent();
if (mVVMWindowViewModel != null)
{
this.DataContext = mVVMWindowViewModel;
}
}
}4、创建ViewModel
- ViewModelBase为INotifyPropertyChanged的实现类;
- RelayCommand为ICommand的实现类;
using System.Threading.Tasks;
using System;
using AvaloniaUI_Simple.Models;
using AvaloniaUI_Simple.Commands;
using System.Windows.Input;

namespace AvaloniaUI_Simple.ViewModels
{
    /// <summary>
    /// ViewModel
    /// 集合 请使用 ObservableCollection<MainViewModel>
    /// </summary>
    public partial class MVVMWindowViewModel : ViewModelBase
    {
        #region 控件 Binding
        private string _name = string.Empty;
        /// <summary>
        /// 名字
        /// </summary>
        public string Name
        {
            get => _name;
            set
            {
                _name = value;
                OnPropertyChanged("Name");  // 通知UI
            }
        }

        private string _email = string.Empty;
        /// <summary>
        /// 邮箱
        /// </summary>
        public string Email
        {
            get => _email;
            set
            {
                _email = value;
                OnPropertyChanged("Email");  // 通知UI
            }
        }

        private string _log = string.Empty;
        /// <summary>
        /// 打招呼的日志
        /// </summary>
        public string Log
        {
            get => _log;
            set
            {
                _log = value;
                OnPropertyChanged("Log");  // 通知UI
            }
        }
        #endregion 控件 Binding

        #region 控件事件
        /// <summary>
        /// 获取作者信息Command
        /// 数据流向:Model-> ViewModel-> View
        /// </summary>
        public ICommand ButtonCommand => new RelayCommand(
                    excute =>
                    {
                        // Model ->ViewModel
                        UserModel userModel = new UserModel()
                        {
                            ID = Guid.NewGuid().ToString("N"),
                            Name = "Bili执笔小白",
                            Email = "2806933146@qq.com"
                        };

                        #region 清空字符串(可省略)
                        Name = string.Empty;
                        Email = string.Empty;
                        Log = string.Empty;
                        #endregion 清空字符串(可省略)

                        Name = userModel.Name;
                        Email = userModel.Email;
                    },
                    canExcute => { return true; }
                );

        /// <summary>
        /// 和作者打招呼Command
        /// 数据流向:ViewModel-> View
        /// </summary>
        public ICommand Button1Command => new RelayCommand(
                    excute =>
                    {
                        Log = "你好!" + Name;
                    },
                    canExcute => { return true; }
                );
        #endregion 控件事件
    }
}
5、实现INotifyPropertyChanged
INotifyPropertyChanged:用于ViewModel通知View刷新;ViewModel继承该类,并实现PropertyChanged、OnPropertyChanged;
using System.ComponentModel;

namespace AvaloniaUI_Simple.ViewModels
{
    /// <summary>
    /// ViewModel基类,主要为实现INotifyPropertyChanged接口
    /// </summary>
    public class ViewModelBase : INotifyPropertyChanged
    {
        /// <summary>
        /// MVVM 绑定事件
        /// </summary>
        public event PropertyChangedEventHandler? PropertyChanged;

        /// <summary>
        /// 数据变更时通知UI
        /// </summary>
        /// <param name="propName">绑定的值</param>
        protected virtual void OnPropertyChanged(string propName)
        {
            PropertyChanged?.Invoke(this, new PropertyChangedEventArgs(propName));
        }
    }
}
6、实现ICommand
ICommand:用于VIew通知ViewModel响应控件事件;创建ICommand的实现类RelayCommand,并实现CanExecuteChanged,CanExecute,Execute;
using System;
using System.Collections.Generic;
using System.Linq;
using System.Text;
using System.Threading.Tasks;
using System.Windows.Input;

namespace AvaloniaUI_Simple.Commands
{
    /// <summary>
    /// 用ICommand解耦‘用户界面’与‘事件’,即控件事件不写在页面的默认.cs代码中
    /// 这是实现MVVM(Model-View-ViewModel)设计模式的关键部分
    /// </summary>
    public class RelayCommand: ICommand
    {
        #region 变量
        /// <summary>
        /// 执行操作
        /// </summary>
        private Action<object?> _Excute;
        /// <summary>
        /// 如果可以执行Execute方法,则返回true;否则返回false
        /// </summary>
        private Func<object?, bool> _CanExcute;

        /// <summary>
        /// 当CanExecute的返回值可能发生更改时,会触发该事件
        /// </summary>
        public event EventHandler? CanExecuteChanged;
        #endregion 变量

        /// <summary>
        /// 如果可以执行Execute方法,则返回true;否则返回false
        /// </summary>
        /// <param name="parameter"></param>
        /// <returns></returns>
        public bool CanExecute(object? parameter)
        {
            return _CanExcute == null ? true : _CanExcute(parameter);
        }

        /// <summary>
        /// 执行操作
        /// </summary>
        /// <param name="parameter"></param>
        public void Execute(object? parameter)
        {
            if (_Excute != null)
                _Excute(parameter);
        }

        /// <summary>
        /// 构造函数
        /// </summary>
        /// <param name="ExcuteMethod"></param>
        /// <param name="CanExcuteMethod"></param>
        public RelayCommand(Action<object?> ExcuteMethod, Func<object?, bool> CanExcuteMethod)
        {
            _Excute = ExcuteMethod;
            _CanExcute = CanExcuteMethod;
        }
    }
}
7、外部调用
        /// <summary>
        /// 打开 MVVM页
        /// </summary>
        /// <param name="source"></param>
        /// <param name="args"></param>
        public void BtnMVVM_Click(object source, RoutedEventArgs args)
        {
            MVVMWindowViewModel mVVMWindowViewModel = new MVVMWindowViewModel();
            MVVMView mVVMWindow = new MVVMView(mVVMWindowViewModel);
            mVVMWindow.Show();
        }
8、效果
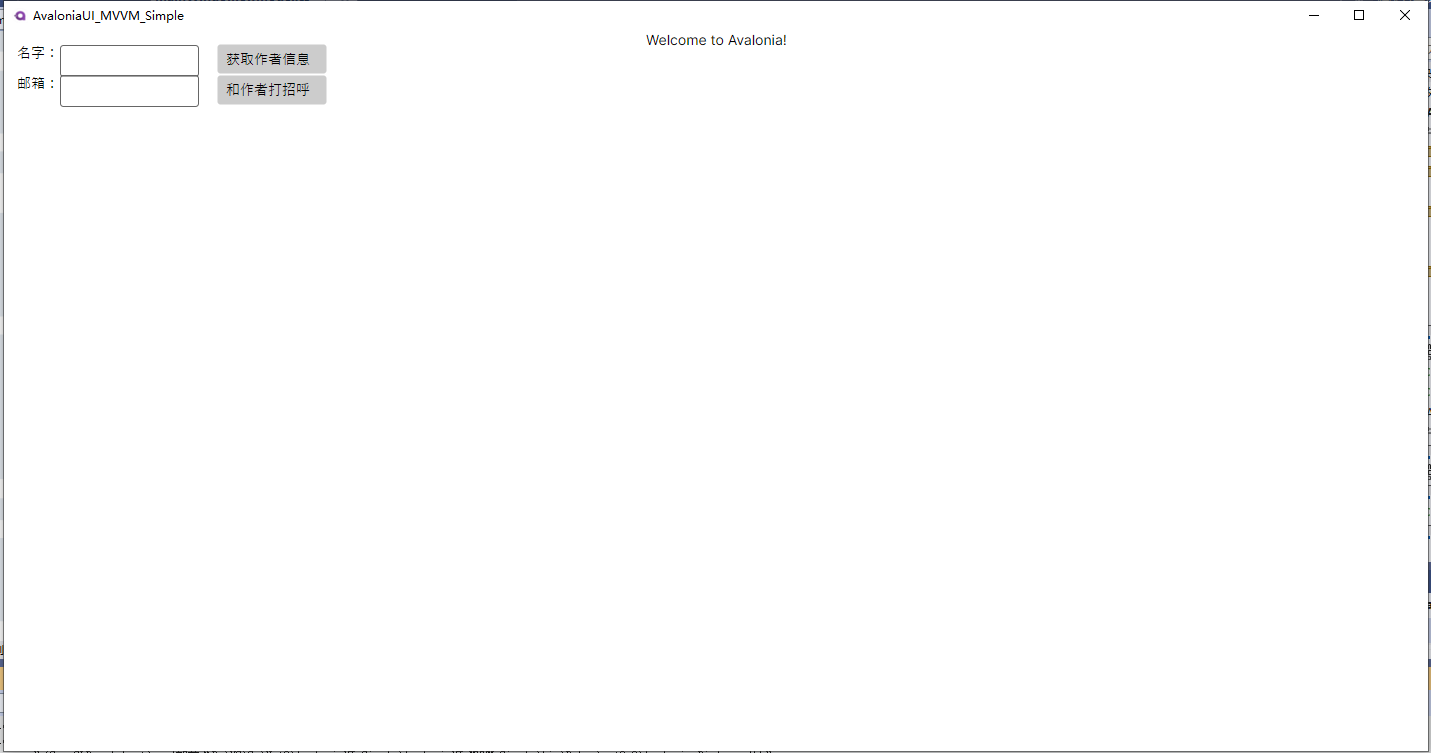
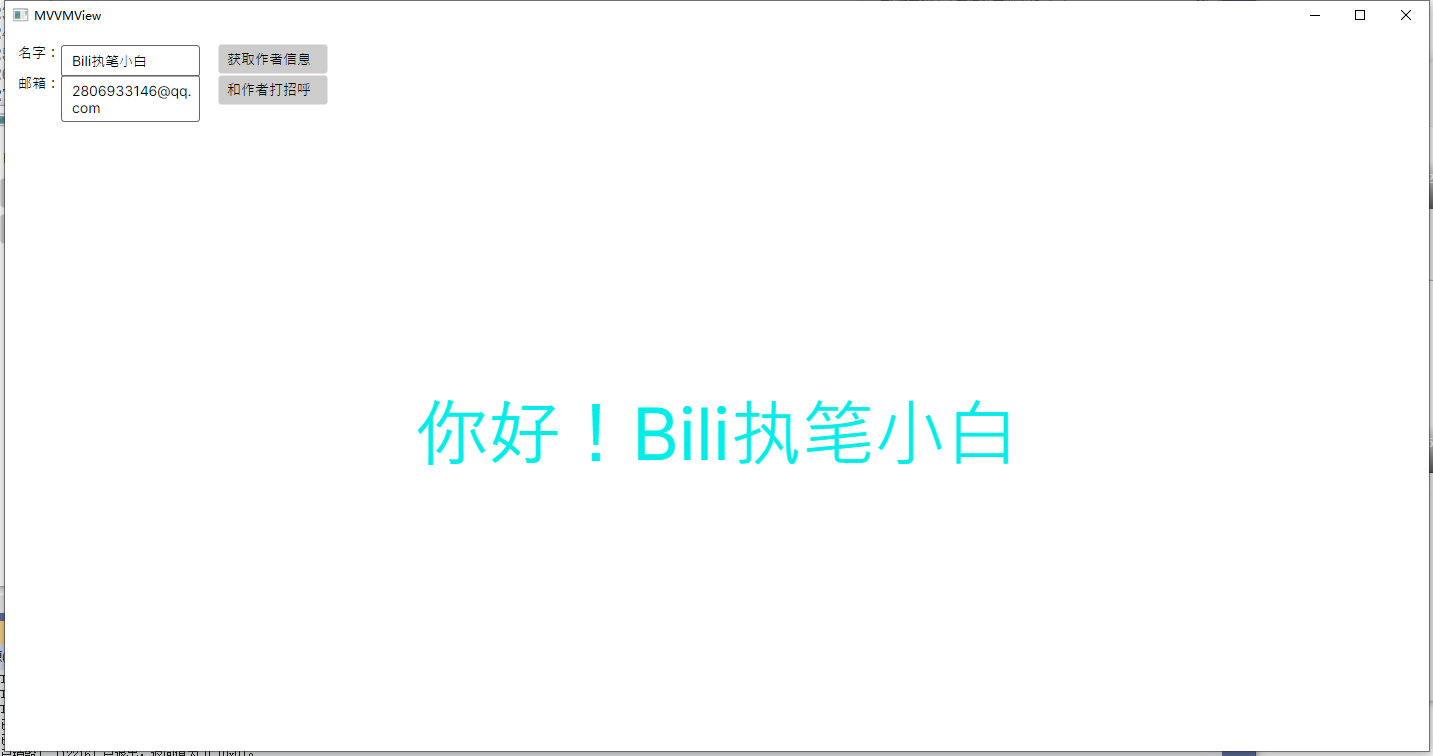
9、补充:
(1)若ViewModel中有List<>或Array[]类型的变量,请使用ObservableCollection<>代替;ObservableCollection知识见:WPF-双向绑定通知机制之ObservableCollection;
三、窗体事件如何使用MVVM
1、引言
当我们参考上面的代码对窗体的Loaded与Closed进行MVVM时会发现失效,失效代码如下:
(1)XAML文件
<Window xmlns="https://github.com/avaloniaui"
        xmlns:x="http://schemas.microsoft.com/winfx/2006/xaml"
        xmlns:vm="using:AvaloniaUI_MVVM_Simple"
        xmlns:d="http://schemas.microsoft.com/expression/blend/2008"
        xmlns:mc="http://schemas.openxmlformats.org/markup-compatibility/2006"
        mc:Ignorable="d" d:DesignWidth="800" d:DesignHeight="450"
        x:Class="AvaloniaUI_MVVM_Simple.Views.ToDoItemsWindow"
        x:DataType="vm:ToDoItemsViewModel"
        Title="待办事项应用" Loaded ="{Binding LoadedCommand}" Closed ="{Binding ClosedCommand}" >
    <!-- Closed="Window_Closed" -->
    <Design.DataContext>
        <vm:ToDoItemsViewModel />
    </Design.DataContext>
    <Grid>
    </Grid>
</Window>
(2).cs文件
    /// <summary>
    /// ViewModel
    /// </summary>
    public partial class ToDoItemsViewModel : ViewModelBase
    {
        #region 操作
        /// <summary>
        /// 加载
        /// </summary>
        //private void Window_Loaded(object sender, RoutedEventArgs e)
        [RelayCommand]
        //private void Loaded(RoutedEventArgs e)
        private void Loaded()
        {
            Debug.WriteLine("Loaded");
        }

        /// <summary>
        /// 关闭
        /// </summary>
        [RelayCommand]
        private void Closed()
        {
            Debug.WriteLine("Closed");
        }
        #endregion 操作
    }
2、进行MVVM的正确姿势:
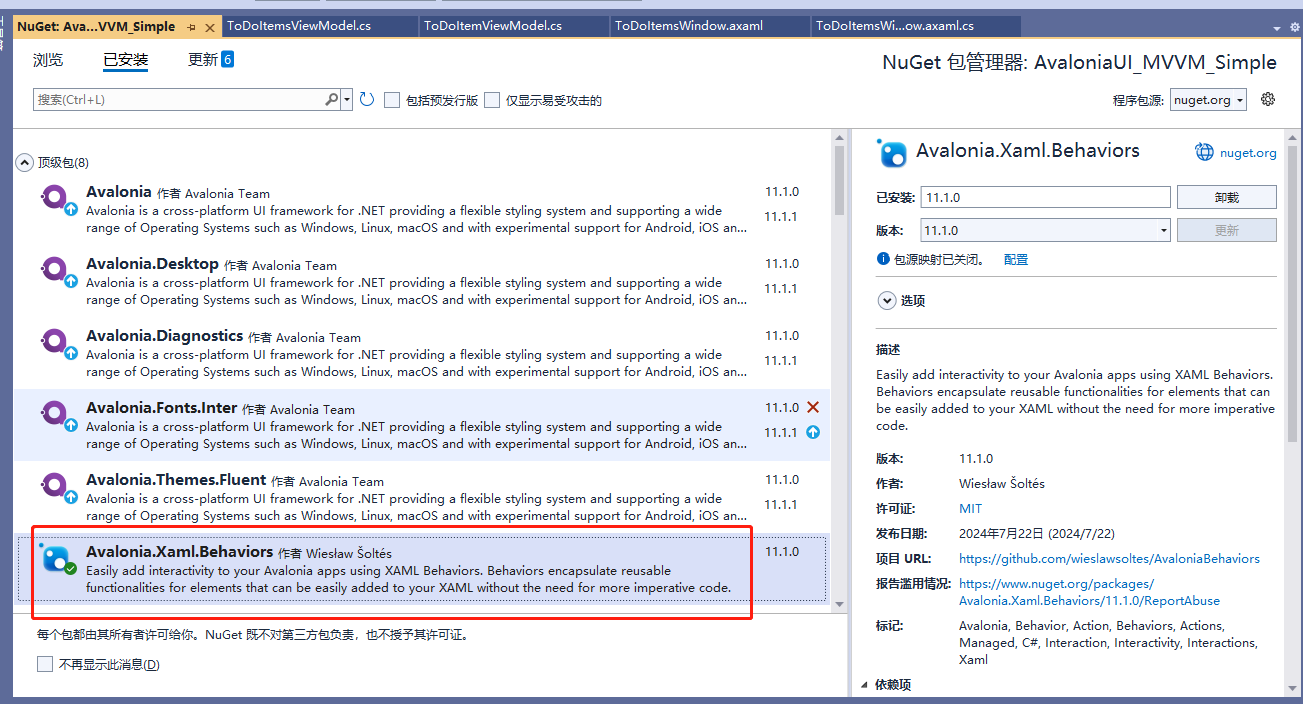
(1)引用Negut包 Avalonia.Xaml.Behaviors
(2)XAML添加引用
添加引用 xmlns:i="clr-namespace:Avalonia.Xaml.Interactivity;assembly=Avalonia.Xaml.Interactivity"
xmlns:iac="clr-namespace:Avalonia.Xaml.Interactions.Core;assembly=Avalonia.Xaml.Interactions"
(3)事件Binding写法如下
Behavior:行为,主要有鼠标、键盘、数据、位置等变化行为;
Triggers:触发器;可用来给事件绑定触发器;
<i:Interaction.Behaviors>
<iac:EventTriggerBehavior EventName="Loaded">
<iac:InvokeCommandAction Command="{Binding LoadedCommand}"/>
</iac:EventTriggerBehavior>
<iac:EventTriggerBehavior EventName="Closing">
<iac:InvokeCommandAction Command="{Binding ClosingCommand}"/>
</iac:EventTriggerBehavior>
<iac:EventTriggerBehavior EventName="Closed">
<iac:InvokeCommandAction Command="{Binding ClosedCommand}"/>
</iac:EventTriggerBehavior>
</i:Interaction.Behaviors>(4)完整代码如下:
<Window xmlns="https://github.com/avaloniaui"
xmlns:x="http://schemas.microsoft.com/winfx/2006/xaml"
xmlns:vm="using:AvaloniaUI_MVVM_Simple"
xmlns:d="http://schemas.microsoft.com/expression/blend/2008"
xmlns:mc="http://schemas.openxmlformats.org/markup-compatibility/2006"
 xmlns:i="clr-namespace:Avalonia.Xaml.Interactivity;assembly=Avalonia.Xaml.Interactivity"
 xmlns:iac="clr-namespace:Avalonia.Xaml.Interactions.Core;assembly=Avalonia.Xaml.Interactions"
mc:Ignorable="d" d:DesignWidth="800" d:DesignHeight="450"
x:Class="AvaloniaUI_MVVM_Simple.Views.ToDoItemsWindow"
x:DataType="vm:ToDoItemsViewModel"
Title="待办事项应用">
<!-- Loaded ="{Binding LoadedCommand}" Closed ="{Binding SaveCommand}" Closed="Window_Closed"-->
    <i:Interaction.Behaviors>
        <iac:EventTriggerBehavior EventName="Loaded">
            <iac:InvokeCommandAction Command="{Binding LoadedCommand}"/>
        </iac:EventTriggerBehavior>
        <iac:EventTriggerBehavior EventName="Closing">
            <iac:InvokeCommandAction Command="{Binding ClosingCommand}"/>
        </iac:EventTriggerBehavior>
        <iac:EventTriggerBehavior EventName="Closed">
            <iac:InvokeCommandAction Command="{Binding ClosedCommand}"/>
        </iac:EventTriggerBehavior>
    </i:Interaction.Behaviors>
<Design.DataContext>
<vm:ToDoItemsViewModel />
</Design.DataContext>
<Grid> </Grid>
</Window> /// <summary>
/// ViewModel
/// </summary>
public partial class ToDoItemsViewModel : ViewModelBase
{
#region 操作
/// <summary>
/// 加载
/// </summary>
//private void Window_Loaded(object sender, RoutedEventArgs e)
[RelayCommand]
//private void Loaded(RoutedEventArgs e)
private void Loaded()
{
Debug.WriteLine("Loaded");
}
/// <summary>
/// 关闭
/// </summary>
[RelayCommand]
private void Closed()
{
Debug.WriteLine("Closed");
}
#endregion 操作
}本文来自博客园,作者:꧁执笔小白꧂,转载请注明原文链接:https://www.cnblogs.com/qq2806933146xiaobai/p/18320856

