Linux安装FastDFS集群部署
过程问题:
make: gcc:命令未找到
1 | yum -y install gcc |
一、环境和版本:
Linux环境:CentOS 7.6
libfastcommon版本:1.0.39
FastDFS版本:V5.11
fastdfs-nginx-module版本:V1.2
nginx版本:1.12.2
1 2 3 4 5 | yum -y install pcre pcre-develyum install -y zlib-develmkdir -p /opt/fastdfs /data/fastdfs/tracker /data/fastdfs/storage /data/fastdfs/client /data/fastdfs/file |
为下一步下载源码做准备
1 | cd /opt/fastdfs |
(2)安装libfastcommon
1 2 3 4 5 6 7 8 9 | wget https://github.com/happyfish100/libfastcommon/archive/V1.0.39.tar.gztar -zxvf V1.0.39.tar.gzcd libfastcommon-1.0.39/./make.sh./make.sh install |
(3)安装FastDFS(在两台服务器上)
1 2 3 4 5 6 7 8 9 10 11 | cd /opt/fastdfswget https://github.com/happyfish100/fastdfs/archive/V5.11.tar.gztar -zxvf V5.11.tar.gz\cd fastdfs-5.11/./make.sh./make.sh install |
配置文件准备
1 2 3 4 5 6 7 8 9 | cp /etc/fdfs/tracker.conf.sample /etc/fdfs/tracker.conf #tracker节点cp /etc/fdfs/storage.conf.sample /etc/fdfs/storage.conf #storage节点cp /etc/fdfs/client.conf.sample /etc/fdfs/client.conf #客户端文件,测试用cp /opt/fastdfs/fastdfs-5.11/conf/http.conf /etc/fdfs/ #供nginx访问使用cp /opt/fastdfs/fastdfs-5.11/conf/mime.types /etc/fdfs/ #供nginx访问使用 |
(4)tracker server配置:
1 | vim /etc/fdfs/tracker.conf |
1 2 3 4 5 | 需要修改的内容如下port=22122 # tracker服务器端口(默认22122,一般不修改)base_path=/data/fastdfs/tracker # 存储日志和数据的根目录 |
启动服务
1 | service fdfs_trackerd start |
查看服务状态, 查看服务是否启动,端口是否打开
1 | netstat -tulnp |
(5)storage server配置:
1 | vim /etc/fdfs/storage.conf |
需要修改的内容如下
1 2 3 4 5 6 7 8 9 10 11 | port=23000 # storage服务端口(默认23000,一般不修改)base_path=/data/fastdfs/storage # 数据和日志文件存储根目录store_path0=/data/fastdfs/file # 第一个存储目录tracker_server=172.18.183.5:22122 # tracker服务器IP和端口tracker_server=172.18.183.8:22122 # tracker服务器IP和端口http.server_port=8888 # http访问文件的端口(默认8888,看情况修改,和nginx中保持一致) |
启动服务
1 | service fdfs_storaged start |
查看服务是否启动,端口是否打开
1 2 3 4 | netstat -tulnpfirewall-cmd --permanent --add-port=22122/tcpfirewall-cmd --permanent --add-port=23000/tcpfirewall-cmd --reload |
查看日志
1 | journalctl -xe |
查看集群状态
1 | fdfs_monitor /etc/fdfs/storage.conf list |
1 2 3 4 5 6 7 8 9 | storage server有7个状态,如下:FDFS_STORAGE_STATUS_INIT :初始化,尚未得到同步已有数据的源服务器FDFS_STORAGE_STATUS_WAIT_SYNC :等待同步,已得到同步已有数据的源服务器FDFS_STORAGE_STATUS_SYNCING :同步中FDFS_STORAGE_STATUS_DELETED :已删除,该服务器从本组中摘除(注:本状态的功能尚未实现)FDFS_STORAGE_STATUS_OFFLINE :离线FDFS_STORAGE_STATUS_ONLINE :在线,尚不能提供服务FDFS_STORAGE_STATUS_ACTIVE :在线,可以提供服务当storage server的状态为 FDFS_STORAGE_STATUS_ONLINE 时,当该storage server向tracker server发起一次heart beat时,tracker server将其状态更改为 FDFS_STORAGE_STATUS_ACTIVE |
(6)Client配置:
1 | vim /etc/fdfs/client.conf |
需要修改的内容如下
1 2 3 4 5 | base_path=/data/fastdfs/clienttracker_server=172.18.183.5:22122 # tracker服务器IP和端口tracker_server=172.18.183.8:22122 # tracker服务器IP和端口 |
保存后测试,随便上传一张图片到服务器,然后在该目录下执行以下命令返回ID表示成功
1 | fdfs_upload_file /etc/fdfs/client.conf halo.jpg |
返回值如下
group1/M00/00/00/rBK3BV58iTKABs-cABYoCsMn6JA740.jpg
1 2 3 4 5 6 7 | #下载nginx modulecd /opt/fastdfs/wget https://github.com/happyfish100/fastdfs-nginx-module/archive/V1.20.tar.gztar -zxvf V1.20.tar.gzcp /opt/fastdfs/fastdfs-nginx-module-1.20/src/mod_fastdfs.conf /etc/fdfs#编辑 fastdfs-n/ginx-module-1.20/src/config 文件vim /opt/fastdfs/fastdfs-nginx-module-1.20/src/config |
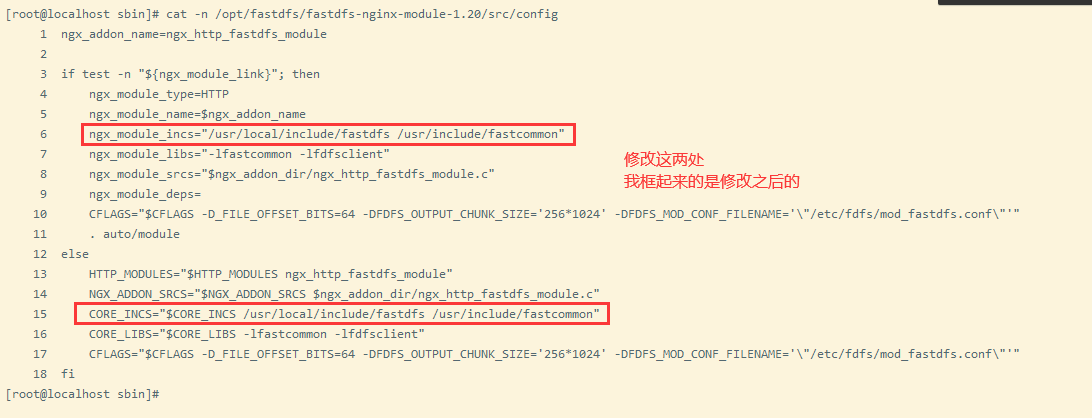
1 2 3 4 5 6 7 8 9 10 11 12 13 14 15 16 17 18 | ngx_addon_name=ngx_http_fastdfs_module if test -n "${ngx_module_link}"; then ngx_module_type=HTTP ngx_module_name=$ngx_addon_name ngx_module_incs="/usr/local/include/fastdfs /usr/include/fastcommon" ngx_module_libs="-lfastcommon -lfdfsclient" ngx_module_srcs="$ngx_addon_dir/ngx_http_fastdfs_module.c" ngx_module_deps= CFLAGS="$CFLAGS -D_FILE_OFFSET_BITS=64 -DFDFS_OUTPUT_CHUNK_SIZE='256*1024' - DFDFS_MOD_CONF_FILENAME='\"/etc/fdfs/mod_fastdfs.conf\"'" . auto/moduleelse HTTP_MODULES="$HTTP_MODULES ngx_http_fastdfs_module" NGX_ADDON_SRCS="$NGX_ADDON_SRCS $ngx_addon_dir/ngx_http_fastdfs_module.c" CORE_INCS="$CORE_INCS /usr/local/include/fastdfs /usr/include/fastcommon" CORE_LIBS="$CORE_LIBS -lfastcommon -lfdfsclient" CFLAGS="$CFLAGS -D_FILE_OFFSET_BITS=64 -DFDFS_OUTPUT_CHUNK_SIZE='256*1024' -DFDFS_MOD_CONF_FILENAME='\"/etc/fdfs/mod_fastdfs.conf\"'"fi |
安装nginx,并且添加nginx module
1 2 3 4 5 6 | cd /opt/fastdfs/wget http://nginx.org/download/nginx-1.12.2.tar.gztar -zxvf nginx-1.12.2.tar.gzcd nginx-1.12.2/./configure --prefix=/usr/local/nginx --add-module=/opt/fastdfs/fastdfs-nginx-module-1.20/srcmake && make install |
配置nginx访问
1 | vim /etc/fdfs/mod_fastdfs.conf |
1 2 3 4 5 6 7 8 9 10 11 12 13 | connect_timeout=10base_path=/data/fastdfs/filetracker_server=172.18.183.5:22122 # tracker服务器IP和端口tracker_server=172.18.183.8:22122 #tracker服务器IP2和端口group_name=group1 #当前服务器的group名url_have_group_name=true #url中包含group名称store_path0=/data/fastdfs/file #存储路径 |
配置nginx.config
1 | vim /usr/local/nginx/conf/nginx.conf |
1 2 3 4 5 6 7 8 9 10 11 12 13 14 15 16 17 18 19 20 21 22 23 24 25 26 27 28 29 30 31 32 33 34 | worker_processes 4;worker_cpu_affinity 1000 0100 0010 0001;error_log logs/error.log;events { worker_connections 1024;}http { include mime.types; default_type application/octet-stream; sendfile on; keepalive_timeout 65; server { listen 8888; server_name localhost; #charset koi8-r; #access_log logs/host.access.log main; location ~/group([0-9])/M00 { ngx_fastdfs_module; } error_page 500 502 503 504 /50x.html; location = /50x.html { root html; } }} |
测试下载,用外部浏览器访问刚才已传过的文件。
1 2 3 | http://172.18.183.5:8888/group1/M00/00/00/rBK3BV58iTKABs-cABYoCsMn6JA740.jpghttp://172.18.183.8:8888/group1/M00/00/00/rBK3BV58iTKABs-cABYoCsMn6JA740.jpg |


【推荐】国内首个AI IDE,深度理解中文开发场景,立即下载体验Trae
【推荐】编程新体验,更懂你的AI,立即体验豆包MarsCode编程助手
【推荐】抖音旗下AI助手豆包,你的智能百科全书,全免费不限次数
【推荐】轻量又高性能的 SSH 工具 IShell:AI 加持,快人一步
· 震惊!C++程序真的从main开始吗?99%的程序员都答错了
· 别再用vector<bool>了!Google高级工程师:这可能是STL最大的设计失误
· 单元测试从入门到精通
· 【硬核科普】Trae如何「偷看」你的代码?零基础破解AI编程运行原理
· 上周热点回顾(3.3-3.9)
2021-06-10 java 改变图片的DPI
2021-06-10 Java TIF、JPG、PNG等图片转换