

Atlas的搭建(集成CDH)
一、编译Atlas
1、源码包下载地址 https://archive.apache.org/dist/atlas/
2、将下载好的2.1.0源码包apache-atlas-2.1.0-sources.tar.gz上传至/opt/soft并解压 tar -zxvf apache-atlas-2.1.0-sources.tar.gz
3、进入解压目录,修改pom文件中的组件版本号以及Mavne版本号、JDK版本号
<hadoop.version>3.0.0-cdh6.1.1</hadoop.version>
<hbase.version>2.1.0-cdh6.1.1</hbase.version>
<solr.version>7.4.0</solr.version>
<hive.version>2.1.1-cdh6.1.1</hive.version>
<kafka.version>2.2.1</kafka.version>
<kafka.scala.binary.version>2.12</kafka.scala.binary.version>
<zookeeper.version>3.4.5-cdh6.1.1</zookeeper.version>
<repository>
   <id>aliyun</id>
   <name>aliyun</name>
    <url>https://maven.aliyun.com/repository/public</url>
</repository>
<repository>
  <id>cloudera</id>
  <url>https://repository.cloudera.com/artifactory/cloudera-repos</url>
   <releases>
      <enabled>true</enabled>
   </releases>
    <snapshots>
        <enabled>false</enabled>
    </snapshots>
</repository>
4、修改atlas源码以兼容hive2.1.1-cdh6.1.1
1)HiveMetaStoreBridge.java 577行
vim apache-atlas-sources-2.1.0/addons/hive-bridge/src/main/java/org/apache/atlas/hive/bridge/HiveMetaStoreBridge.java
String catalogName = hiveDB.getCatalogName() != null ? hiveDB.getCatalogName().toLowerCase() : null;
改为
String catalogName = null;
2)AtlasHiveHookContext.java 81行
vim apache-atlas-sources-2.1.0/addons/hive-bridge/src/main/java/org/apache/atlas/hive/hook/AtlasHiveHookContext.java
this.metastoreHandler = (listenerEvent != null) ? metastoreEvent.getIHMSHandler() : null;
改为
this.metastoreHandler = null;
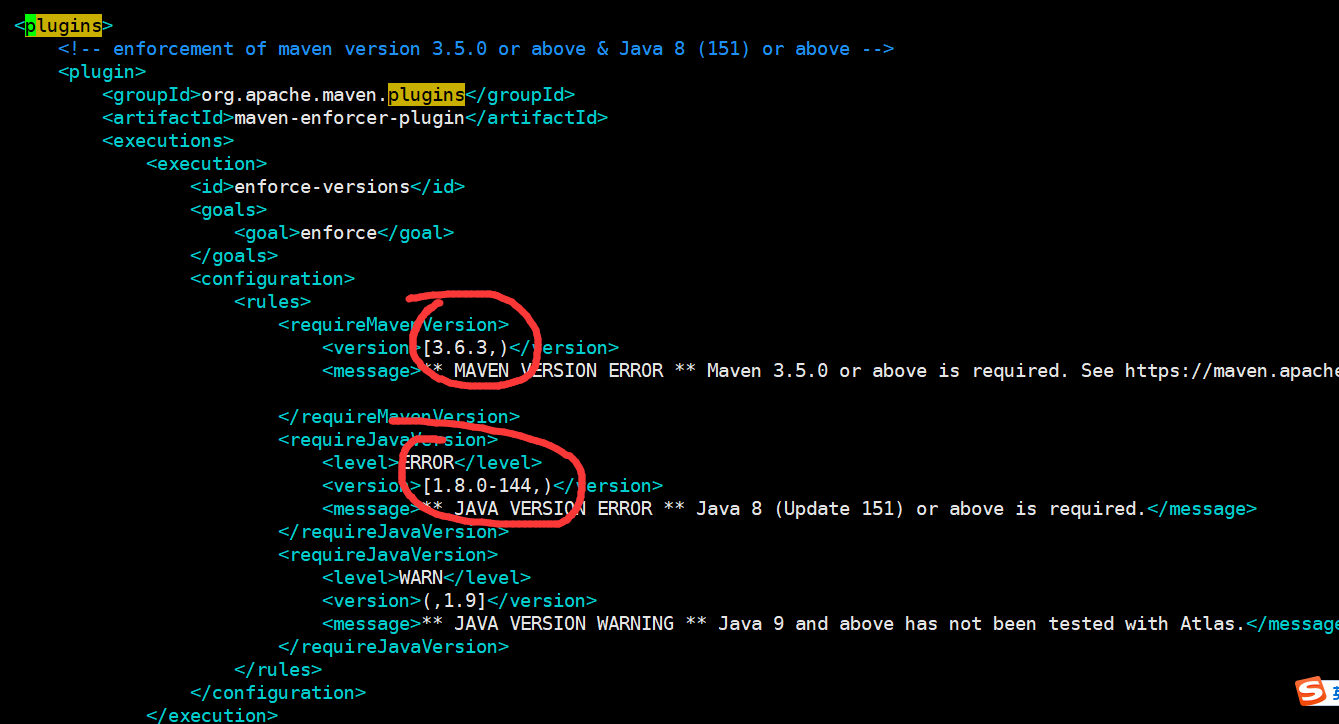
5、在解压目录执行编译命令(编译之前需要安装maven,我本地的maven版本是3.6.3)
export MAVEN_OPTS="-Xms2g -Xmx2g"
mvn clean -DskipTests package -Pdist
编译完成后进去distro/target/目录,即可查看编译好的安装包
6、上传安装包至CDH的Master节点,并解压
tar -zxvf /opt/module/apache-atlas-2.1.0-bin.tar.gz
mv apache-atlas-2.1.0/ atlas
二、安装
1、集成外部HBase(CDH版本)
vim conf/atlas-application.properties
#配置项如下:HBase的ZK地址
atlas.graph.storage.hostname=192.168.xxx.xxx:2181,192.168.xxx.xxx:2181,192.168.xxx.xxx:2181
最后将Hbase的配置文件软连接到Atlas的conf/hbase目录下
ln -s /etc/hbase/conf/ /opt/module/atlas/conf/hbase/
2、集成外部Solr(Apache版本)
1)修改solr配置文件
vim bin/solr.in.sh
#修改如下内容,配置Zookeeper集群
ZK_HOST="192.168.xxx.xxx:2181,192.168.xxx.xxx:2181,192.168.xxx.xxx:2181"
2)启动solr
bin/solr start -force
3)创建index(一个solr节点执行就好)
/opt/module/solr-7.4.0/bin/solr create -c vertex_index -d /opt/module/atlas/conf/solr -shards 3 -replicationFactor 2 -force

/opt/module/solr-7.4.0/bin/solr create -c edge_index -d /opt/module/atlas/conf/solr -shards 3 -replicationFactor 2 -force

/opt/module/solr-7.4.0/bin/solr create -c fulltext_index -d /opt/module/atlas/conf/solr -shards 3 -replicationFactor 2 -force
4)atlas集成solr
vim /opt/module/atlas/conf/atlas-application.properties

#atlas需要将graph的index存储到solr,指定solr的Zookeeper地址,所以我们修改它

atlas.graph.index.search.solr.zookeeper-url=192.168.xxx.xxx:2181,192.168.xxx.xxx:2181,192.168.xxx.xxx:2181

atlas.graph.index.search.solr.http-urls=http://192.168.xxx.xxx:8983/solr
3、集成外部Kafka(Apache版本)
vim /opt/module/atlas/conf/atlas-application.properties

#是否开启内置的通知机制
atlas.notification.embedded=false
#kafka中数据存放的目录
atlas.kafka.data=/data/kafka/logs
#kafka中Zookeeper的地址
atlas.kafka.zookeeper.connect=192.168.xxx.xxx:2181,192.168.xxx.xxx:2181,192.168.xxx.xxx:2181
#kafka中集群的地址
atlas.kafka.bootstrap.servers=192.168.xxx.xxx:9092,192.168.xxx.xxx:9092,192.168.xxx.xxx:9092
#Kafka验证
atlas.kafka.sasl.jaas.config=org.apache.kafka.common.security.scram.ScramLoginModule required username=用户名 password=密码;
#加密方式
atlas.kafka.sasl.mechanism=SCRAM-SHA-256
atlas.kafka.security.protocol=SASL_PLAINTEXT
4、集成外部Hive(CDH版本)
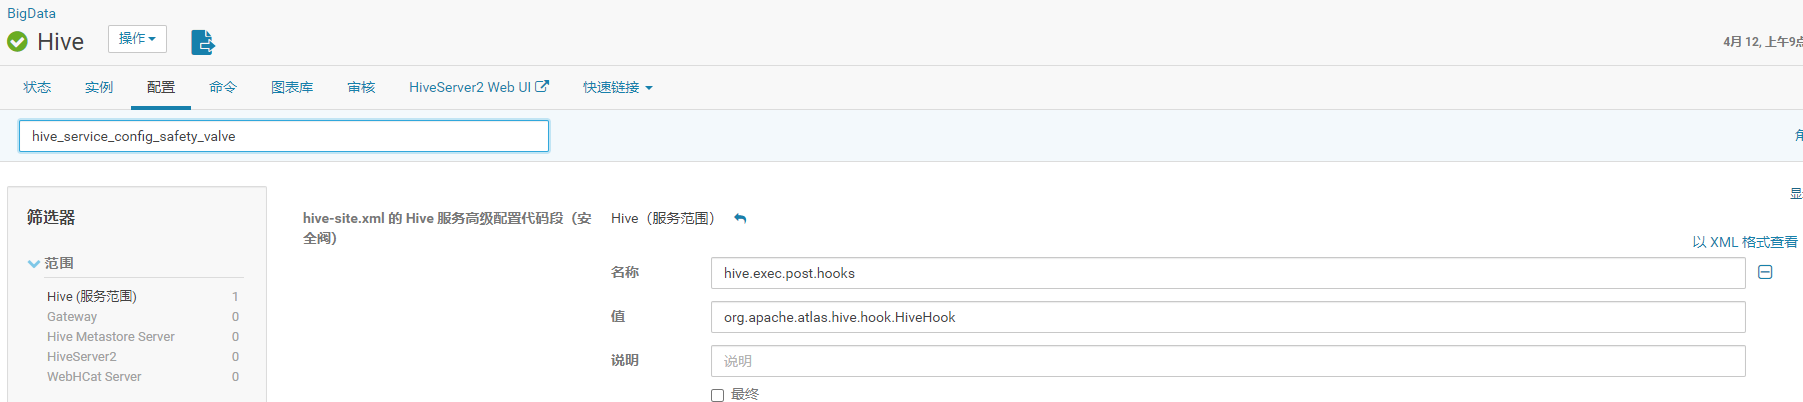
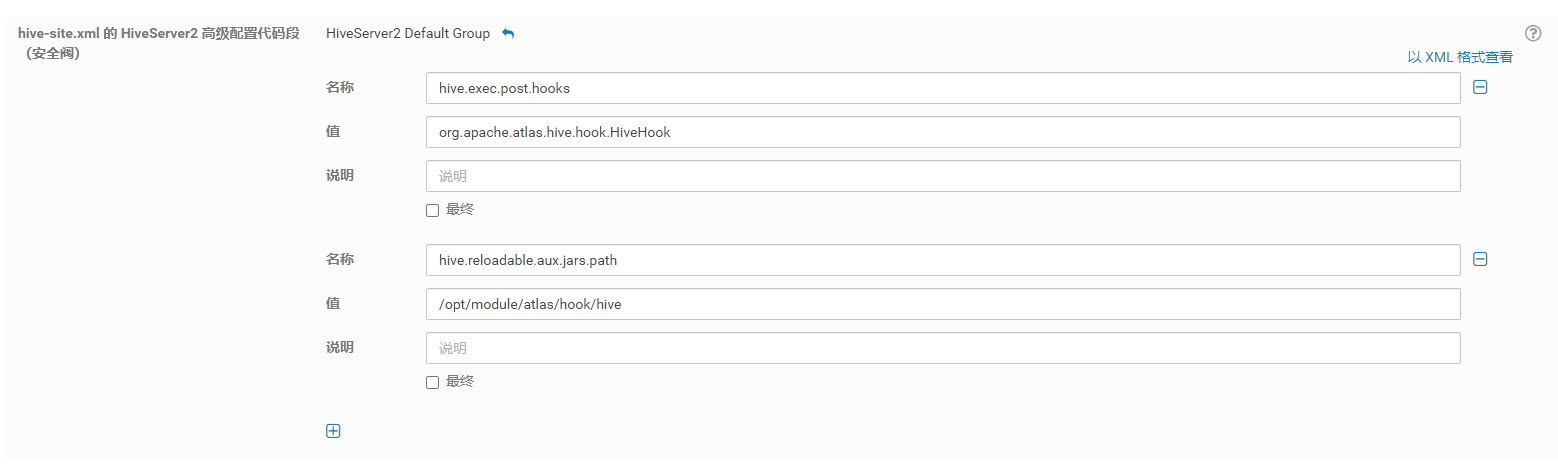
1)进入CM web控制台–> 进入hive的配置界面,搜索 hive-site.xml 配置如下参数:
<property>
     <name>hive.exec.post.hooks</name>
    <value>org.apache.atlas.hive.hook.HiveHook</value>
</property>
<property>
   <name>hive.reloadable.aux.jars.path</name>
   <value>/opt/module/atlas/hook/hive</value>
</property>


2)搜索 hive-env

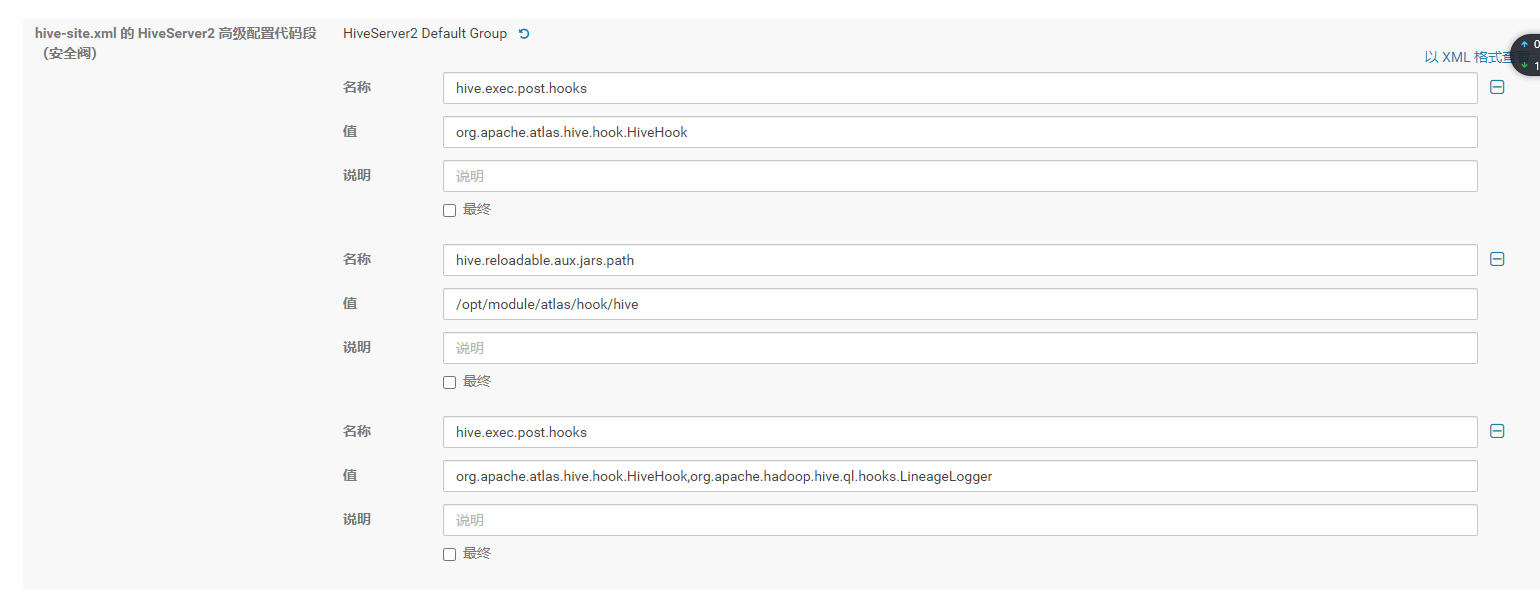
3)搜索 HiveServer2 环境高级配置代码段(安全阀)

4)搜索HiveServer2 高级配置代码段
5)安装Hive Hook
上传 apache-atlas-2.1.0-hive-hook.tar.gz 文件,解压Hive Hook 至 /opt/module
tar -zxvf apache-atlas-2.1.0-hive-hook.tar.gz -C /opt/module/
将Hive Hook依赖复制到Atlas安装路径
cp -r /opt/module/apache-atlas-hive-hook-2.1.0/* /opt/module/atlas/
6)配置HIVE_HOME
vim /etc/profile

#添加如下内容 HIVE_HOME
export HIVE_HOME=/opt/cloudera/parcels/CDH/lib/hive
export PATH=$PATH:$HIVE_HOME/bin
保存退出后source /etc/profile
7)读取不到atlas-application.properties配置文件,看了源码发现是在classpath读取的这个配置文件,所以将它压到jar里面(注意,若修改了atlas-application.properties配置文件,请重新压最新的文件至以下Jar包中,否则可能会出问题)
cd /opt/module/atlas/conf

zip -u /opt/module/atlas/hook/hive/atlas-hive-plugin-impl/atlas-intg-2.1.0.jar atlas-application.properties
8)拷贝jar包至hive的lib目录(所有安装了hive服务的机器都执行)(注意,若修改了atlas-application.properties配置文件,请重新压最新的文件至以下Jar包中,并重新拷贝atlas-intg-2.1.0.jar至Hive的lib目录,否则可能会出问题)
cp -r /opt/module/atlas/hook/hive/* /opt/cloudera/parcels/CDH/lib/hive/lib
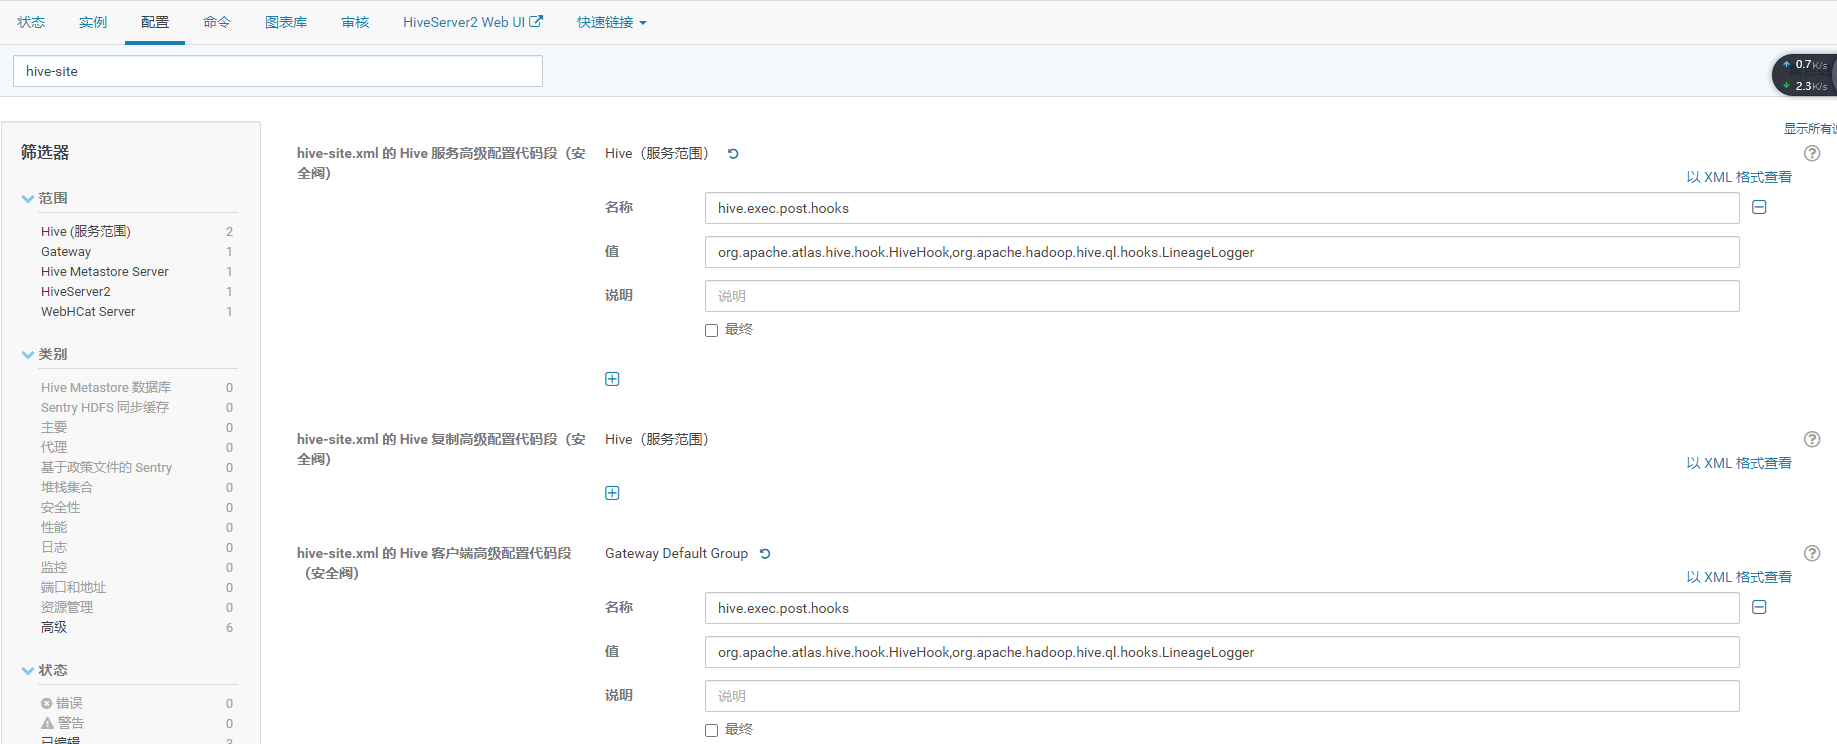
9)配置Hive列级别的血缘关系
在CDH的Web页面搜索hive-site,添加org.apache.hadoop.hive.ql.hooks.LineageLogger,以逗号分割
5、Atlas Server配置
1)修改一些常用配置
vim /opt/module/atlas/conf/atlas-application.properties

#发送reset请求的url路径
atlas.rest.address=http://192.168.xxx.xxx:21000
#是否自启,把注释打开即可
atlas.server.run.setup.on.start=false
#审计日志存储在hbase中,所以填写hbase的Zookeeper地址
atlas.audit.hbase.zookeeper.quorum=192.168.xxx.xxx:2181,192.168.xxx.xxx:2181,192.168.xxx.xxx:2181
2)修改常用日志配置
vim /opt/module/atlas/conf/atlas-log4j.xml
#去掉如下代码的注释
<appender name="perf_appender" class="org.apache.log4j.DailyRollingFileAppender">
     <param name="file" value="${atlas.log.dir}/atlas_perf.log" />
     <param name="datePattern" value="'.'yyyy-MM-dd" />
     <param name="append" value="true" />
     <layout class="org.apache.log4j.PatternLayout">
            <param name="ConversionPattern" value="%d|%t|%m%n" />
       </layout>
 </appender>
<logger name="org.apache.atlas.perf" additivity="false">
     <level value="debug" />
<appender-ref ref="perf_appender" />
</logger>
3)设置Hbase的环境变量
vim /opt/module/atlas/conf/atlas-env.sh

export HBASE_CONF_DIR=/etc/hbase/conf/
三、启动
1)输入启动/停止/查看状态命令
python2 /opt/module/atlas/bin/atlas_start.py
python2 /opt/module/atlas/bin/atlas_stop.py
python2 /opt/module/atlas/bin/atlas_admin.py -status
2)访问web端
http://192.168.xxx.xxx:21000
账号:admin,密码:admin
四、内存设置
如果计划存储数万个元数据对象,建议调整参数值获得最佳的JVM GC性能。以下是常见的服务器端选项,我们修改配置文件
vim /opt/module/atlas/conf/atlas-env.sh

#设置Atlas内存
export ATLAS_SERVER_OPTS="-server -XX:SoftRefLRUPolicyMSPerMB=0 -XX:+CMSClassUnloadingEnabled -XX:+UseConcMarkSweepGC -XX:+CMSParallelRemarkEnabled -XX:+PrintTenuringDistribution -XX:+HeapDumpOnOutOfMemoryError -XX:HeapDumpPath=dumps/atlas_server.hprof -Xloggc:logs/gc-worker.log -verbose:gc -XX:+UseGCLogFileRotation -XX:NumberOfGCLogFiles=10 -XX:GCLogFileSize=1m -XX:+PrintGCDetails -XX:+PrintHeapAtGC -XX:+PrintGCTimeStamps"
#建议JDK1.7使用以下配置
export ATLAS_SERVER_HEAP="-Xms15360m -Xmx15360m -XX:MaxNewSize=3072m -XX:PermSize=100M -XX:MaxPermSize=512m"
#建议JDK1.8使用以下配置
export ATLAS_SERVER_HEAP="-Xms15360m -Xmx15360m -XX:MaxNewSize=5120m -XX:MetaspaceSize=100M -XX:MaxMetaspaceSize=512m"
#如果是Mac OS用户需要配置
export ATLAS_SERVER_OPTS="-Djava.awt.headless=true -Djava.security.krb5.realm= -Djava.security.krb5.kdc="
五、参考博客
https://blog.csdn.net/huhaiyang9180/article/details/112603946
https://www.cnblogs.com/LzMingYueShanPao/p/14944867.html
https://zoyi14.smartapps.cn/pages/note/index?oauthType=search&slug=e32ade6e9f50&_swebfr=1
